
 Hi, another week's over and the new Weekday Escape here!
Amajeto's escape is a little bit different than usual and it's always good not to fall into stereotype and try new ways. Ninjadoodle's short game is a point'n'click one with an interesting setup, and tomoLaSiDo this time didn't prepare a side quest for you - picking up an aquarium can be hardly called a quest - it's all about the capsules. And then - huzzah! - we get a gift from our favourite Nicolet after three months - nice clever story starring a bunch of cute animals!
Have a good time and enjoy!
This time Amajeto wants you to find two tiles only - the game isn't simplier though. Moreover, you need to find five triangles and also figure out where to place them...nice variation on their usual theme. Can you escape?
The cursor isn't changing, no save button, one ending.
You don't need ultra-speed clicking in this Ninjadoodle's game, just your wits. Tiny ninjas made a fellowship in order to get nine pieces of PLAY button and succeeded. They hid after that in four scenes, and you need to catch all of them to complete the button. Entering respective game screens is easy - just click on them. Items you get in one scene can be used in another(s) and the same goes for clues. New stages are coming soon they say. Looking forward to them I say.
The cursor isn't changing, no save, one ending.
P.S. Looking for ninjas isn't what it used to be these days...only 9 ninjas!...there were times when 33 ninjas had hidden in a house! Here: Bustermcthundersticks.
The catepillar in tomoLaSiDo's room isn't hidden, it just sits in its small aquarium garden, chews juicy leaves and watches your clumsy attempts to open the cabinets. Although you get all hints you need it's not easy to see them from the right angle...or to realise that they are hints at all...
The cursor isn't changing, no save, one ending.
On one peaceful day, three mice were having a tea party when suddenly...boom! What was it? Didn't feel like an earthquake...short exploration follows...no it wasn't indeed. A bear passing by their house fall down right in front of it. Luckily, he isn't hurted, but can't stand up by himself and blocks the door. You need to help mice to leave the house in another way and once they are out, cope with the bear in a kind way.
The newest Nicolet's game is lovely in all aspects and cunning, too. Notice, that you can interact with some mice apart from fulfilling their wishes.
The cursor isn't changing, autosave, one ending.
P.S. The game is available for Android and iOS (as a part of a bundle). The tip button is here.
We love escape games, and our readers love talking about them and sharing hints! How about you? Let us know what you think, ask for clues, or help out other players in the comments below.


Click Play Go - Stage #1 Walkthrough
Introduction
This is my walkthrough for Click Play Go Stage #1. There is more than one way to complete this game, which is why I've structured the walkthrough the way I have. To begin the game, click any one of the pictures around the screen.
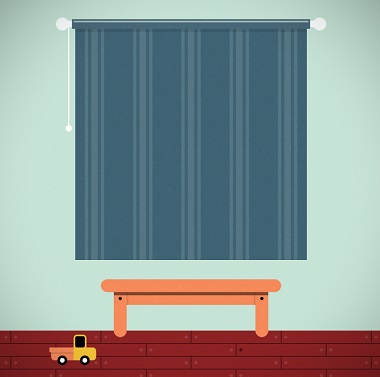
Scene 1 (Top): The Window
1. Click the white ball on the table to get Paper.
2. Click the car 3 times. It comes back after the third click with a ninja, which has Play Piece #3. Click on him to get it.
3. Under the right side of the table, one of the floor boards has a missing nail (looks like a black dot). Click it, and a ninja pops out! Click him to get Play Piece #2.
4. Click the curtain's drawstring (on the left) to pull up the curtain, where a ninja's hiding on the windowsill! The curtain drops back down after a few seconds, so it may take a few tries to get him. Click him to get Play Piece #1.
Scene 2 (Right): The Sleeping Man
1. Click the trash can next to the man. He doesn't wake up, but you can click the Matches that spill out.
2. Next to the man, leaning on the bench, is a black arrow. Click it to get Big Hand.
3. Put the Big Hand on the clock.
4. Next to the clock on the left, in the bushes, is a ninja! Click him to get Play Piece #4.
Scene 3 (Bottom): The Fireplace
1. Click on the white and black wheel next to the fireplace to get the Windwheel.
2. Under the fireplace is a floor board with a black dot again. Click on it. The ninja gives you Play Piece #7 when you click him.
3. Put the Paper in the fireplace.
Scene 4 (Right): The House
1. Click on the log next to the rock to get Firewood.
2. Click on the rock to find a ninja. Click on him to get Play Piece #9.
3. Click on the bush in front of the house to get a ninja to come out. Click on him to get Play Piece #8.
4. Put the Windwheel on the black pole on the roof of the house (opposite the chimney and the duck).
Going Back And Forth
This is back and forth between scenes, most of which are short, which is why I've nested it in its own spoiler.
Back to the Fireplace
1. Put the Firewood in the fireplace next to the Paper.
2. Use the Matches to light the fire. You'll hear the duck quacking.
Back to the House
1. Click the black arrow in the chimney to get Small Hand.
Back to the Sleeping Man
1. Put the Small Hand on the clock. The sky gets lighter.
Back to the House and the Window
1. Click the sun until the puddle dries up. A gray cloud will form and fly off to the right.
2. Click the van 1 time.
3. Go to the window and open it to see the first part of the numbers (which are in roman numerals). They're separated by color.
I, V, IV (green, blue, red)
4. Go back to the house and click the van again.
5. Go to the window and read the rest of the numbers.
VI (yellow)
Back to the Sleeping Man
1. Where the man once was is a ninja! Click him to get Play Piece #5.
Back to the Fireplace
1. The numbers on the van go in the four boxes above the fireplace. Put in the code.
V, I, IV, VI
5146
2. Click the lever. Then click the squares to put in the colors.
green (2 clicks), blue (3 clicks), red (1 click), yellow (4 clicks)
3. A ninja pops out of the top of the fireplace. Click him to get Play Piece #6... and win the game!
Thanks Hyaku. Good job.
Thanks Hyaku!
Navigation in the TomaLiSido game is difficult.
There is a hidden opening at floor level where the bathroom is. I found it long enough to try and get the key piece which rolled away. It looked like it rolled in the bathroom but it isn't there.
Now when I try to get back to the small opening, I can't find the right "pixel". I can only find the bathroom door.
hope more walkthroughs are coming.
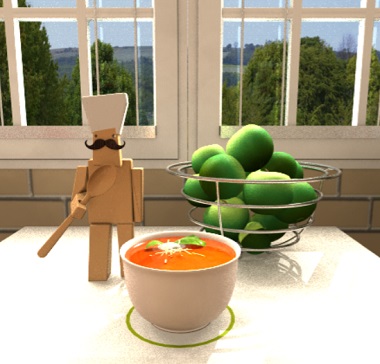
Summer Noon
Exploration
Let's focus on the colorful cups above the kitchen sink. The arrow points to a shelf compartment with red and yellow buttons on its lock.
The KITCHEN letters change a bit when you click them.
Under the sink, the left cabinet has five vertical bars next to an unusual shape, and the right cabinet has a grid of buttons that turn black. The fridge has four green magnets.
Turn right. A chef on the table twirls a spoon that's too large for him.
Turn right. The locked door on the right has a picture frame with three words. Above the couch, there's a picture frame missing only two tiles, and the spotlights on its left aren't on.
Turn right to face a television that's turned off. The compartments on the left have four colored buttons and four letter buttons, while those on the right have four digit buttons and four dials.
Right compartments under TV
You'll need the clues from
the text above the sink, and the small chef on the table.
For the four-digit compartment:
Clicking every letter gets you the code
4143
For the four-dial compartment:
The chef points his spoon at the
↗ ↑ ↙ ↖
(1 0 5 7 clicks)
Take a triangle tile, a square tile and a remote control.
Screen
Use the remote to turn on the TV, which shows a clue.
Use it on the TV again to change the clue.
Cupboards under sink
You'll need the clues from
the spotlights, the TV and the door.
For the four-bar lock:
The positions of the spotlights form a clue that you need to rotate counterclockwise to match the silhouette on the lock.
Since the spotlights (from top down) are 1st, 2nd, 4th, 3rd positions from the left edge, you'll need to click the bars (from left to right)
0 1 3 2 times.
For the button grid:
The TV clue tells you that every position with an S should be black. Referring to the door, that's every initial.
Click all buttons in the left column.
Take a square tile and a triangle tile.
Picture
That was quick! Place both square tiles into the picture, and then rotate its tiles until they align.
3 1 1 2
0 2 1 3
3 2 0 2
1 3 1 2
Take a green trapezoid tile.
Left compartments under TV
You'll need the clues from
the cups, the TV, and the door.
For the four-color lock:
The arrow under the cups tells you to read from right to left.
Green Red Yellow Blue
(7 2 0 6)
For the four-letter lock:
The second clue on TV tells you to read only four of the letters from the door.
The door clue reads
SUN SEA SKY, but if you only read the marked letters it'sEASYTake 2 triangle tiles.
Over the sink
Use the clue
under the TV
to unlock the two-button compartment:
Yellow Red Yellow Red Red
(RLRLL)
You find a triangle tile!
Diagram
Use all your green tiles on the fridge, which makes four numbers appear.
Use that clue to unlock the fridge itself:
Heart Hexagon Circle Star
(7 1 6 2 clicks)
Take a bowl of soup from it.
Escape
Place the soup on the table, then take the key that appears, then use it to unlock the door and leave!
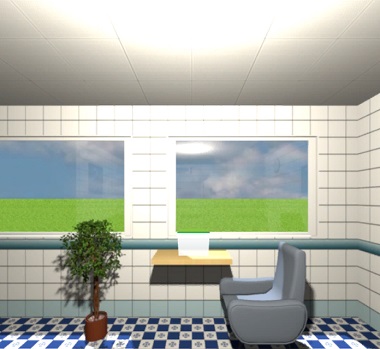
Escape Challenge 116: Room with Caterpillar
The Japanese title also references ageha, the swallowtail butterfly. But you probably don't have time to sit around and watch that happen!
Exploration
There are two windows here, and a chair that looks like it came from a train. The potted plant looks normal, and it's a safe distance away from the caterpillar in the glass box.
Turn right. There's a framed picture and a stopped wall clock, and a box with a yellow round thing and two buttons.
You can click the small corridor on the right, but there's just a small gap at the bottom of the wall through which you can see a capsule that rolls away when you try to pick it up. (There's more to do after that, but let's leave it for now.)
Turn right to face the locked door. The wall box has three digit buttons, while the drawers have three digit buttons in colored outlines, two pink buttons that flash white, and three shape buttons.
Turn left. Something weird is going on with the wall here, but let's just focus on the framed picture (showing Shinkansen 0 series), and the yellow cover that hides several things. The blue bin is empty.
Enter the corridor leading to the toilet, where you can admire the holes with painted outlines, as well as sit down, look right, look up and look left to find a drawing of trains/caterpillars.
On a roll
Let's chase down the runaway capsule! Click the hole at the bottom of that small wall to find a puzzle with a jumbled picture.
The buttons rotate the outer and middle rings.
Click the bottom button 4 times, and the top button 2 times.
The next puzzle has some numbers, and an instruction to get "10 on the 10th time".
The left number just counts from 1 to 10, and the right number needs to reach 10.
You'll notice that the right number is just the sum of the numbers for each of the bars that slide over. How do you control these?
In its default state, the 10th set pushes the bars for 2 and 5.
So all you need to do is move the 3 switch.
There's a puzzle with colored numbers! Make sure you pick up the capsule to get the key piece.
The framed pictures and wall clock now have colored numbers on them.
The yellow, blue, green numbers read
1 5 2
Alas, all you get for solving this last puzzle is a teasing face.
Yellow
The box under the wall clock asks you to thread a green line through the obstacles.
Push the LRLR buttons.
A number clue pops up, and the lights on each end flash.
Use the
number clue
to unlock the puzzle behind the yellow cover:
Reading the clue from left to right, you need to set the slider to certain numbers, and the lever to either horizontal or vertical.
Set the slider to 3, 1, 2, 1, 3, clicking the lever after each of these.
You get a key piece.
Drawers
You'll need clues
from the two-button box, the yellow cover, and the toilet walls
For the top drawer:
Each wall of the toilet has different-colored windows.
Looking at the red, yellow, blue walls, you find that they form the shapes of the digits
834
For the middle drawer:
The lights on the box flash in the sequence
RRLLRRLL
For the bottom drawer:
The back of the yellow cover has three circles.
Take 3 key pieces.
Wall box
Use the clues from
the wall clock and the framed picture near the toilet
to unlock the wall box:
Mentally rotate the clues to align the circle on the frame with the larger circle in 6 on the clock, you find that the arrows point to the numbers 1, 2, 3.
But the wall box has the circle on top, which means those numbers would be on the left, bottom, right, and therefore from left to right they would be:
2 1 3
Bonus
Pick up the glass box with the caterpillar before you leave!
Item list
6 key pieces:
Top left: in top drawer
Top middle: in middle drawer
Top right: in bottom drawer
Bottom left: in wall box
Bottom middle: behind yellow cover
Bottom right: under wall
1 caterpillar
in glass box
hope teatime is on it;s way with a walkthrough
Another escape game in point&click style...
I wondered if there was a first-person escape game?
Hope I'm not too late for teatime!
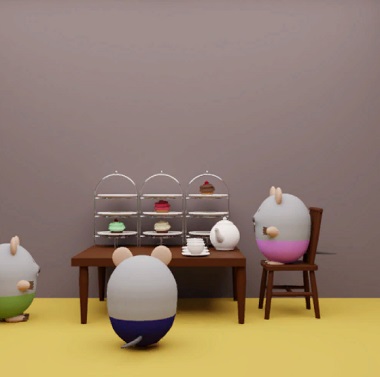
Teatime
Exploration
As you've seen from the intro, the door is blocked. There are bees on the windows. The device to the left has a button that doesn't work and a compartment missing gears. The chest of drawers on the right has four colored sliders, (a box with) three square buttons that cycle through different numbers of stripes, and four symbol buttons that spin when clicked.
Turn right to find only one mouse sitting at the table, asking for a jar of sugar cubes. The wall behind has some cupcakes.
Turn right to face a locked door. A very ornamental shelf on the left has a box with tree-shaped color buttons. On the right, another chest of drawers has three buttons (under six lights), a keyhole, and four square buttons around a yellow circle.
Turn right to find a mouse in an armchair, who needs a pair of scissors to open the gift on the floor. The tables on the sides have almost-identical flowers in pots, as well as locks with four symbol buttons and two buttons (under six lights).
Two drawers near the entrance
You'll need clues
from the cupcakes and the wall shelf.
For the top drawer under the right window,
The red, brown, green, white cupcakes are in the
Middle Top Bottom Bottom positions.
Take a key.
For the bottom drawer, a hint:
Each shape appears twice on the shelf, and each pair shares something in common about their positioning.
For example, you'll find that the triangles have their short sides touching the S shapes, and the circular quadrants have their curved sides touching the S shapes.
Since the black line appears under the buttons, you'll need to rotate the triangle button so its short side is at the bottom, the quadrant button so its curved side is at the bottom, and so on.
Click the buttons (from left to right)
3 3 2 1 times.
Take a cogwheel.
Sweet / 3 buttons
Use the key you got to unlock the middle drawer on the other side of the room.
Inside, you find a jar of sugar. Give it to the mouse at the table, who adds it to the tea.
Use that clue to unlock the top drawer.
The sugar cubes go into the
CCRLLR
Take another cogwheel.
Clockwork / 2 buttons
Place both cogwheels into the (bottom of the) device beside the door.
Then push the button at the top to release a chick waving flags.
Use that clue to unlock the right drawer beside the armchair:
RLLRRL
Take the key and use it to unlock the door.
Exploration 2
Two windows surround a fireplace under a potted flower and four framed pictures of fruity mouse detectives. Looking in the fireplace, you find the grate secured with screws.
Turn right. Under the pink balloon, a mouse is studying and you can click to get a glimpse of its thoughts.
Turn right to face the door back. This green cabinet has four colored bars, and the box on top contains a knife.
Turn right to face a locked door with four buttons involving squares in squares. There's a map beside with pins in it, and yet another chest of drawers, having five circular buttons that grow in size, a keyhole, and five line buttons that rotate the lines.
Mental picture
Use the clue from the
studying mouse
to unlock the left drawer beside the armchair mouse:
By position, the icons are
Mushroom(2) Fish(1)
Butterfly(0) Fern(3)
Take a yellow dart.
Use the dart to pop the balloon. This startles the mouse, who could really use a cup of tea right now.
Bees!
Use the clue from the
windows
to unlock the bottom drawer beside the door (from the first room to the second):
The yellow circle represents the positions of the bees on each window. For example, the window beside the device beside the door on the first screen has a bee on the top right of its frame, so its clue goes in the bottom left.
That gives you the code
        - =

        + |
which you can enter by clicking the buttons
2 1
0 3
times.
Take a pair of scissors.
Give the scissors to the mouse in the first room, who opens it to find a hat among some colorful styrofoam.
Now you can
click that mouse and it'll show you what's under the hat.
Rods / fruits
You just got two clues
from the gift box and the hat.
For the small green cabinet,
the pink foam bits are the longest, followed by yellow, light blue, dark blue.
Click the bars 3, 2, 1, 0 times.
Take a crowbar.
For the locked door in the second room,
(Pay attention to the red stitching.)
The grape, banana, pear, apple appear on the:
LR UR UL LL
Click the buttons
2 3 0 1 times.
Exploration 3
Two mice in suits of armor stand ahead. There's something tied near the left one's feet.
The left crate has a lemon and two pairs of shape buttons. The right crate is just nailed shut.
Unboxing
You'll need
the crowbar and a clue from this third room.
For the left crate,
The armor with a heart shape has squares over circles, while the armor with the star shape has circles over squares.
Click the top-left and bottom-right buttons.
Take the teacup (on a saucer) from inside.
For the right crate, use
the crowbar
to open it and find firewood.
Brewing
Give the teacup to the mouse with the teapot, who pours out some tea for you.
Also cut the lemon with the knife, and add it to the tea.
Give it to the studying mouse, who's all ready to start writing… but its pencil case only has different-sized erasers!
Sizes and clothes
Use the clue from
the erasers
to unlock the top drawer in the second room:
Big, Medium, Small, Big, Small
Take the clothes from inside, and give it to the armchair mouse.
Examine the mouse's shirt to find lines on the buttons.
Use that clue to unlock the box in the middle drawer on the first screen:
1, 3, 2 lines.
Take a matchbox.
Flammable
Place the firewood in the fireplace and use the matchbox to light it. The only thing this leaves behind is a clue on the bottom of the fireplace.
Use the clues
from the fireplace and framed map
to unlock the box on the wall shelf:
The trees indicated on the box appear on the
LR UL UR LL
of the fireplace map, and the colors of the matching pins are
Blue(3) Yellow(2) Red(1) Green(4)
Take the magnifying glass.
Detective
Give the magnifying glass to the armchair mouse, who pulls out a clue from its pocket to show you.
Use that clue to unlock the bottom drawer in the second room:
2, 0, 3, 0, 1 clicks
Take the wire cutters, and use them to get the bag in the third room.
Open the bag to find a lollipop, and give it to the armchair mouse.
Get a chewed lollipop key back from that mouse, and use it to unlock the middle drawer in the second room.
Take the screwdriver, and use it to unlock the fireplace grate!
Ascent
You can now access the ladder leading up, but first take a pencil from it.
At the top, you find a white gate with six shape buttons.
Give the pencil to the studying mouse, who draws a nice bouquet of flowers.
Use the clues from
that drawing and all the flower pots
to unlock the gate:
The flowers have
3 4 3
5 5 4
petals, matching the flower pots with the shapes
Triangle(1) Square(2) Triangle(1)
Circle(0) Circle(0) Square(2)
This ends the game!
kk, having problems with the
bottom drawer. I clicked the desired times (3,3,2,1) but it said it was wrong.
a snapshot might help. Thanks.
That code looks correct to me.
3 3 2 1 from the starting position.
Here's the screenshot.
Room with Caterpillar
The clues aren't easy to understand. I have difficulty on the first drawer and the wall box (even if I have looked at the spoilers, can't fully understand). The Yellow Cover clue is obvious but not easy to process in the clues, took some time to figure out. The combination of numbers and levels are confusing, maybe its' just me.
Summer Noon
It's easy, no sweat! Just the clues on the TV let me think for some time! No spoiler used at all, nice! :)
Teatime
What a cute game! Is there no music for the game? I think it should have. Some clues came in combination which I'm not aware of until I gave up and read the spoiler. It's tough at certain clues but not too hard for most clues.
Update