
 It's the middle of the week. We've climbed the hill and it's all downhill from here. Before we hit the slope to Friday, let's do some escaping!
This is a week of things going wrong. A supposedly safe fire exit turns out to be not so safe, and a skydiving trip turns sour when the plane door can't be opened. And then you can't microwave your meal. Oh, the humanity!!
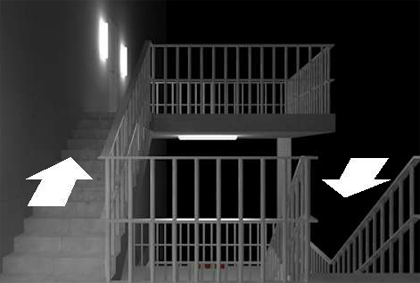 Mysterious Emergency Staircase
Emergency staircases are synonymous with escaping. Unfortunately, I don't think that this particular staircase is up to the fire code. Before you can unlock the door at the bottom, you'll need to unravel the codes and puzzles scattered around the various levels of this external staircase. Better get to it before the emergency catches up with you!

So you've finally plucked up the courage to go skydiving! Awesome! But you may have picked the wrong skydiving company - they've lost the door handle. You need to help them find it before you can leap into the unknown. Hurry up, skydiving is expensive and you don't want to miss your chance!
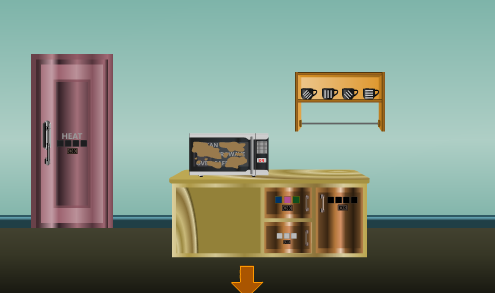 Safe Microwave Oven
Uh oh... you're hungry for an instant burrito but someone forgot to clean the microwave! Now where did you leave those cleaning supplies? Probably in one of those locked cupboards. And I bet it's the last one. Sigh. Better get unlocking!
We love escape games, and our readers love talking about them and sharing hints! How about you? Let us know what you think, ask for clues, or help out other players in the comments below.


Exploration
Exit and Cabinets
Arrows: nothing to do here yet.
Upper Left Cabinet: note the changing colors inside and along the edge of the circles
Upper Right Cabinet: IO II OI buttons. Wait for the sequence.
Lower Left Cabinet: 3x3 grid of colors. Wait for the clue.
Lower Right Cabinet: Three blue buttons. Wait for the sequence.
Arrow left
Main Cabin
Click on the open tray. Take the food. Take the cover off the jelly. Note the dotted lined rectangles above the trays.
Back out and click on the locked tray to the left. You need a key.
Back out and arrow left
Overhead Compartment
Note the closed windows.
The overhead compartment has three buttons with brown bars to choose from.
Return to the Exit door screen and the four cabinets.
Solving Puzzles
Upper Left Cabinet
Use the tray of food to select the right sequence of circles and edges
Left to right: dark brown circle with white edge; white circle with light brown edge; orange circle with light brown edge
Take the scissors
Seat back screens
Cut along the dotted lines. Back out and note the brown and yellow screens.
Overhead compartment
Match the buttons with the seat back screens:
B Y B
Y B B
Y Y Y
or
Left: 3 clicks
Middle: 2 clicks
Right: 5 clicks
Take the screwdriver.
Windows
Use the screwdriver to unlock one window and then open all three windows.
Note the sequence:
413
652
Lower Right Cabinet
Use the sequence above to open the cabinet: MRRLML
Take the key
Locked tray
Unlock the locked tray in the main cabin and take the passport.
Open the passport and note the red arrows on the left and the bolded IO OO OI numbers on the right.
Upper Right Cabinet
Select the buttons by sequence:
II IO OI II IO or MLRML
Take the towels
Lower Left Cabinet
Return to the main cabin and place the towels over the screens.
Back out and note the sequence of colors:
RBG
BYY
RGR
This is the sequence for the 3x3 grid on the Lower Left Cabinet.
Also by number of clicks:
103
022
131
Take the parachute pack.
Open the pack and take out the exit door handle
Time to jump
Affix the handle to the door and use the arrow from the passport.
Although it reads top to bottom:
U
R
D
R
L
U
You will want to read them left to right:
LURUDL
Select the arrows in this sequence and your door will open.
Hooray!
I assume the first walkthrough is for Emergency Staircase? just curious.
@Paul: By looks of it, that walkthrough would be for Touchdown!.
Yes. Sorry - hit submit before I added the puzzle name. Hoping a moderator will update it!
Mysterious Emergency Staircase
In this walkthrough, italicized phrases are hints from the game that don't require their own spoiler tag. Bold phrases are items, as usual. Don't forget that you can turn off the music or sound effects from the menu.
Exploration
This staircase goes down really low, try not to get lost.
You start off on the top landing, which I'll call floor 5 because there are five of them. The door here doesn't open, so look at the bright blue pail beside it... it's empty. Not to worry, you can turn to the right to find five plant pots, all empty except for the 4th (from the left). The first pot is white. Turn white to find a plain railing, facing away from the building into the darkest night. Turn right, and there are stairs down.
Go down the stairs. Floor 4. There's another row of five plant pots just like the previous, but both the 2nd and 4th have plants growing. Also on this screen, there's a blue bag perched precariously on a platform just out of reach. Turn right to find a pink box on the ground, locked with a three-digit code. The rectangular digits (and the dot on the upper left) glow a bright blue. Turn around to find a single white three-legged chair. You can lean over it for some reason, but you can't take it.
Turn left and go down the stairs again. Floor 3, another row of plant pots. This time, the 1st plant pot has a plant in it too. Turn right to find a white chair. You can't look over it this time, but you can click on the left to view the left side of the chair, completely painted green. Turn around to find a door. Try the handle, which slides off. Taking a closer look at the shaft, you find it plus-shaped and colored red.
Turn left and go down the stairs again. Floor 2, another row of plant pots. Now the 3rd plant pot also has a plant. Turn right to find a locker and the blue box. The locker has five buttons, one colored white and four colored brown, which light up with a green cross when clicked. There's a downward-pointing arrow next to those buttons. Something is peeking out from the left side of the locker, zoom in there to pick up a bottle of black liquid. Also zoom in on the blue box, which has a metal lid screwed down. Turn around to find black and blue four-legged chairs, which you can also lean over, and notice that the railing is broken in some places and thicker in others.
Turn left and go down the stairs again. Floor 1, finally. All the pots here have plants in them. Turn right to find another railing with nothing against it. Turn right again to find a table with two drawers. The right drawer is locked, and the left drawer is empty except for a clue on the bottom, a left-pointing arrow over two black silhouettes of chairs. Turn right to find a locked door.
Black
Go back up to floor 5 and use the bottle on the bucket.
The digits 597 appear out of the surface.
Digits
Go down one floor, and enter the digits 597 in the pink box.
Open it up and take a key with a red crescent on the handle.
Key
Go to the bottom floor and use the key on the right table drawer, and it opens up (but doesn't consume the key).
There's a green box inside with buttons labeled I, II and III (or rather, ⅠⅡⅢ).
Roman
Hint: look for those symbols and use the hint from the left drawer to unlock the green box.
From right to left, the symbols in the railing above the black and blue chairs are
II II I I III II.So click the MMLLRM buttons on the green box, opening a drawer in it. Take a screwdriver head.
Plants
Hint: Spot the differences in the plant pots at the landings, from top to bottom.
Go up to the locker on floor 2, and click on the buttons in the order that the plants appear.
Click on the 4th, 2nd, 1st, 3rd, 5th buttons, and open the locker to get a wooden stick.
Reach
Hint: You can reach something with the stick.
Go back up to floor 4 and use the stick to get the blue bag.
Check the bag to find a screwdriver body.
Unscrew
Assemble the screwdriver by using its parts together, then use the screwdriver on the blue box on floor 2.
Then remove the lid to find another safe, requiring you to color four outlines red, green, blue or white.
Colored
Hint: find objects matching those outlines.
Chair with back (floor 3): Green
Crescent (key in inventory): Red
Three-legged chair (floor 4): White
Plus handle (floor 3): Red
Click the buttons 2, 1, 4, 1 times, then open the box and take a plain key.
Escape
Use the plain key on the final door (on floor 1) to open it and escape!
Link to this game is currently on Weekday Escape N°144, but it's clear from the intro text that it belongs on this post.
Safe Microwave Oven
Don't worry, this game has many safes... I mean, the oven will be very safe.
Exploration 1
Look at the picture in the top-left, which has various card suits in red and black (but not the colors you expect). On the carpet, there are three safes: a three-color safe with oval buttons, a three-letter safe with red letters and a safe with four colored letters in a grid, which are either red or black CDHS letters. The safe on the right wall has eight buttons arranged in a circle around a ninth one, and the door to this room is also locked and requires a sequence of letter shapes, which seem to spell out "dear" with the ascender of the "d" missing.
Suits
Use the card suits from the picture to unlock the safe with colored letters on the right side of the carpet.
The suits are Red Spade, Black Heart, Black Club, Red Diamond.
So click the buttons
6 5

1 2
times, and open it to get a book.
The book has "read me" on the front page, but some parts of the letters are grayed out. On the next page, it has instructions for microwaving diluted lemon juice. That's all it says.
Readme
Unlock the door to the room using the letters from the book's front page.
Click the r,e,a,d,r,r,e buttons, then open the door and enter the next room.
Exploration 2
Gosh, that is a microwave so dirty you can't read the text on the door. It's sitting on a kitchen counter with three locked safes: one with red and yellow abstract shapes on blue, pink and green backgrounds, one which takes a simple three-digit code, and one which has either three or four lines on each of its four buttons, in either of the horizontal or diagonal directions. Above the counter, there's a shelf with four cups, decorated with different striped patterns. The door to this room is locked and requires a four-digit code. The letters HEAT appear above the four digits.
Stripes
Use the clues from the cups on the shelf to unlock the right cupboard door of the kitchen counter.
The stripes are
4/ 3| 3\ 4-.So click the buttons 3, 6, 4, 1 times, and open the cupboard to take a measuring bowl.
Calculative
Zoom in on the measuring bowl, and use the clue from its markings to unlock the three-digit cupboard safe.
Ignore the liter sign, and calculate -1 +750 -500 =249.
Enter 249 into the safe, open it and take a kitchen knife with bits of color on the handle.
Colors
Use the colors from the knife to unlock the left safe in the first room.
The bits are red, green, yellow.
So click the buttons 5, 2, 4 times, and open the safe to get a bottle of water with an interesting logo on the sticker.
Circular
Use the logo on the bottled water to unlock the safe on the right of the first screen.
Hint: you should press a total of 7 buttons.
The arrow on the logo passes through the top, middle, lower-right, bottom, lower-left, middle and left.
So press those buttons on the safe, and open it to get a sponge colored blue, pink and green with red and yellow shapes on it.
Sponge
Squeeze the sponge to put the red and yellow shapes together, then use the resulting clue to unlock the last safe in the second room.
Blue: Red circle + Yellow triangle
Pink: Yellow square + Red circle
Green: Red triangle + Yellow square
Click the buttons 4, 1, 2 times, then open the cupboard to get a piece of cloth.
Cleaning
Use the cloth on the door to wipe off the dirt, revealing the text on the door.
Open the door and- oh no, the inside looks even worse. We'll have to come back to this later.
Door
Use the text on the microwave door to open the second room door.
There are 2 H's, 6 E's, 4 A's and 1 T in the sentence.
So enter 2641 in the door, and open it to go to the next room.
Exploration 3
There's a large comfy sofa in this room, with two safes to the left of it. The top one needs a sequence of four buttons (arranged in a grid). The bottom one needs some of its sixteen buttons (in a grid) to be toggled, and the bottom row of buttons turns brown rather than gray like the otheres. The door is locked, and there's a light switch next to it.
Dark
Flip the light switch and back out to see some card suits drawn on the sofa.
(Turn the lights back on when you're done.)
More suits
Use the card suits with the picture in the first room to unlock the top safe in the third room.
HCDSD = UR LL LR UL LR
So click the ⌝ ⌞⌟ ⌜⌟ corners, and open the safe to take a lemon.
Microwave
Use the bottled water on the bowl, then the knife on the lemon, then squeeze the lemon halves and use them on the bowl.
Then open the microwave door, place the bowl inside, click the door again to close it, and turn on the microwave.
The letters I, R, W on the door light up in red.
Red
Use the red letters on the microwave door to unlock the last safe in the first room.
Enter IRW by clicking the buttons 3, 6, 8 times, then open the drawer and take the oven mitts.
More cleaning
Go back to the second room, open the microwave door and use the mitts to retrieve the bowl.
Use the sponge on the bowl, then retrieve it (somehow) and use it to loosen up the dirt in the oven.
Then use the cloth to clean it up, revealing some colored squares on the back.
Grid
Use the clue on the back of the microwave to unlock the bottom safe in the third room.
The brown squares go on the bottom, so turn the clue counterclockwise to enter it:
__G_

__GG

G_GG

BBBB
Click those buttons, and open the safe to take a gold key.
Use the key on the last door to escape!
Another announcement: I won't be available to post walkthroughs next week. If anyone wants to take over, please go ahead.
In case anyone didn't play Amajeto Hotel before, the walkthrough is on Weekday Escape 144.
So Weekday Escape 144 has the link to Safe Microwave Oven and the walkthrough for Amajeto Hotel, and Weekday Escape 146 (this one) has the link to Amajeto Hotel and the walkthrough for Safe Microwave Oven.
Safe Microwave Oven has now the good image and url.
Sorry for the confusion with a wrong copy/paste from weekday escape 144.
Update