
 It's halfway through the week! Wonderful! Wednesday means escaping, so let's get to it!
This week, Vitamin Hana has us stuck in the middle of nowhere at an abandoned gas station. Funkyland's excellent travel agency have taken us on a journey to the far north of the world, and MayMay is slightly overexcited about light bulbs (for reasons that escape me).

Vitamin Hana traditionally lock us inside for their escapes. This time, they are mixing it up and have dropped us at a creepy abandoned gas station in the middle of the night. You definitely don't want to be here for longer than you need to be... so get escaping!
 Escape a Nordic Cottage
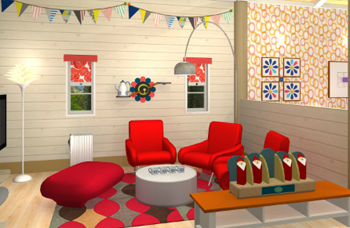
Where in the world is Funkyland? This week, we are in a lovely little cottage in northern Europe. The décor is oh so cute and the background music just makes you want to grab a partner and dance the day away. But there's no time for dancing - we have to escape!
 LIGHT BULBS!!!
MAYMAY IS SUPER EXCITED ABOUT LIGHT BULBS, YOU GUYS!!! THEY GAVE IT THREE EXCLAMATION POINTS AND EVERYTHING!!! DON'T WASTE TIME, GET TO IT!!! LIGHT BULBS!!! LIGHT BULBS!!!
We love escape games, and our readers love talking about them and sharing hints! How about you? Let us know what you think, ask for clues, or help out other players in the comments below.


It's as creepy as finding your computer password in a half-eaten sandwich from breakfast.
Gas Up!
You're stuck in a dimly lit gas station at night, and your only way out seems to be this locked red car. Don't ask how you got here, focus on getting that car fueled up!
Exploration
On the left of the first screen, there's a locked filing cabinet with two drawers. The top drawer needs a three-letter code to open, and the bottom drawer needs a three-digit code to open. Take the remote control hidden by the lower-left corner, which only has three buttons colored green, yellow and pink.
Zoom in on the gas pump, which asks for a four-digit "AMOUNT" before you can use the pump. Back up again and look at the car, which has both its front door and fuel tank locked. The front window is covered in dirt.
Turn right. There's a road here under a starry sky, and four directional road signs which you can't read. Or rather, there's nothing to read since all the road names have been replaced by four dots. Thankfully, the arrows on each sign are still large and clear.
Turn right. There's a trash can in the foreground, and two groups of buildings in the background. There's a compound of tall buildings with loads of windows and a radio tower on the roof, and there's a bunch of shorter houses on the right of that, with three small dots on the roof of the middle one.
One man's trash
Topple the trash can and search through the contents. There's a note which you can unroll and only has a grid of fifteen stars on it. There's also two locked boxes. The left one requires a three-letter code, but the letters are pink, green and yellow. The right one has three buttons, each of which cycles through pictures of hair? Or could those be bushy tails?
Beep!
Play around with the remote until you find out what it controls.
Each button of the remote lights up the windows on the buildings in a different pattern.
Colored
Use the patterns from the windows to unlock the left box in the trash.
(Hint: The middle building forms a + or - sign.)
Green: L
Yellow: T
Pink: H
Enter HLT on the left box from the trash. Open it and take a spray bottle, still full of water.
Starry
Hold the starry note up to the starry sky. The starlight shines through the paper, or at least some of the starlight shines through some of the star-shapes on the paper.
Those stars form constellations which look oddly familiar.
Numeric
Use the starry code to open the lower drawer in the filing cabinet.
Enter 719, open the cabinet, and take a piece of cloth.
Clean
Spray the front window of the car with the spray bottle, then wipe it with the cloth.
Look in the car. The glove compartment appears to be locked with another code, and oh no, Mom's calling the phone on the dashboard!
Is that your mom? Is that your car? Who knows.
Nominal
Enter MOM into the top drawer of the filing cabinet to open it. Take the binoculars from inside.
Distant
Use the binoculars on the small houses on the right screen. The three dots turn out to be three pairs of squirrels. The fourth squirrel from the left is smaller than the others.
Tails
Unlock the right box from the trash with the clue from the squirrel tails.
LL Rr RL
Press the buttons 2, 5, 1 times and open it to get the car keys!
Passenger
Open the car door with the keys. As you saw, the glove compartment is locked and needs a code with four silhouettes.
Take the phone from the dashboard and turn it on. You can't make or view calls with it, but you can view a screen showing a wheel with eight silhouettes around the outside.
Symbolic
Use the road signs to figure out which silhouettes unlock the glove compartment.
Up, right, down-left, up-right = star, heart, leaf, bear
Enter that into the glove compartment (5, 3, 4, 2 clicks) to open it. Take the coins from inside.
Monetary
Count up all the money and put it into the pump.
Two 500s, three 100s, one 50, two 1s = 1352.
Enter 1352 in the pump, then put the coins in, then unlock the fuel tank and click on the nozzle to fill the tank.
Escape
Turn away from the pump to the next screen (don't try this at home!), then turn back, remove the nozzle, and close the fuel tank.
And just like that, you're on your way towards the creepy deserted buildings. Have a good night!
Stuck at the end (I think) of Nordic Cottage, as
I don't read Japanese.
Does anyone know what
the tablet
says?
I assume you're at the part where
your only remaining item is a card with donuts and cake (and other clues) on it.
My save game was at that point, and the tablet says
Well, have you decided on your dessert yet?
and the text after you enter a code is
Delivering!
Dessert and Key Box have arrived.
Escape a Nordic Cottage
Once again, you've been tricked/convinced into getting yourself locked in a room in the middle of a pretty landscape. This time round, dinner will be covered by your Nordic acquaintances, and you'll just need to bring the dessert. Which sugary treat will you choose?
Exploration: Main room
I'll try not to describe too many objects, but Funkyland really decorates their houses too well.
Living room area
You can look over the partition at the ceiling of the bedroom, but let's focus on this side. On the right side, there's a locked box with four low-poly Santas on it, with room for a fifth in the center.
Next to that on the coffee table, there are four identical empty cups with blue flowers on them. Behind that, a fancy weighing balance is mounted on the wall, with a porcelain jug chained to one of its pans.
Turn left. There's nothing you can click on with the TV and speakers, so look at the main door (locked of course) and the red box next to it (also locked).
Turn left again. Zoom in on the red shelves along the right wall and take a jug with a blue flower on it. It may not be obvious from the examine screen, but the jug is full of hot tea.
Look at the doors of the walk-in wardrobe, which don't budge when you try to open them. Two of the handles on the right have been chained together with two brightly colored metal pieces screwed to each other.
Turn left.
Screen with two doors
On this screen, four colored stars and a box hang from the ceiling, way out of reach. Click on the right of the screen to look closer at the wall with two doors.
The door on the right doesn't open, since the handle is tied to the top of the door frame. (It seems like it'd be trivial to slide the knot off the handle, but apparently you can't.)
The left door opens into the dressing room, but let's not go there yet. Above the small shelf strewn with a variety of items, there's a small board on the wall with cartoony moose antlers on top, ten circular slots in three rows and two lights in the bottom, marked with bed and toilet pictographs. It's topped with cartoony moose antlers.
Back up and click on the left side of the screen this time. Other than the scenic Nordic view out the window, the only other point of interest on this screen is the orange lounge chair. So zoom in on it, pick up the cushion and take the metallic door handles.
Then back up once and click on the left side of the screen where the beds are.
Bedroom area
In between the two beds, there's a bedside table with two drawers. (That bowl of petals is quite unrealistic.) The top drawer has a fancy card with two horses facing each other on top, followed by a bunch of square tiles arranged to form digits, and triangles of various colors and sizes on the sides. The bottom drawer is locked and needs a key.
Above the left bed, a safe requires you to click four flower pictures until the light blue petals are in the correct positions. Above the right bed, a picture shows a rectangular diagram divided into ten parts, with the third compartment in the top row and the second in the second row colored orange and purple respectively.
Back out and go to the dressing room.
Exploration: Dressing room
Unlike the dressing room from the previous game, this one is much smaller and simpler.
There's two chairs in white and black, which are nice if you like rabbit-eared objects, but might be just a little uncomfortable to lean back in. Clicking on the chairs turns them around, revealing yellow stickers with the numbers 561 on the white (left) chair and 243 on the black (right) chair.
The door is locked, and you'll need to turn the handle left and right in the correct order to unlock it.
Binary lock
Use the clue from the dressing room chairs to open the door in the dressing room.
The numbers 1 to 6 appear in 561/243 on the left, right, right, right, left, left sides.
So click the LRRRLL sides of the handle to open the door.
Exploration: Bathroom
It's a cluttered bathroom without much to do. On the right, a locked box in the wall has a grid of eight panels on the front, with different trees marked on the lower-left and upper-right corners. The panels turn white when you click on them, and reset to light blue when you click on all eight in the wrong order.
The shower on the left has doors that don't open, until you attach the handles you got from the lounge chair outside. In the shower, there's a purple disk with a cute moose head on it. Take the purple moose token.
Pouring out
Use the jug (from the red shelves) on the four cups on the coffee table to pour out the tea.
On each cup, one of the petals turns light blue and another turns pink.
Balance
Now that the jug is empty, it exactly balances the one on the wall. Place it on the right pan of the balance, which makes a click sound.
It's not clear what changed unless you look carefully, or unless you accidentally click on the coin in the center of the balance, picking it up.
Petal puzzle
Use the clue from the cups to unlock the safe above the left bed.
pink Left = blue Right (Lower-right picture)
pink Down = blue Up (Upper-left picture)
pink Down-Right = blue Left (Lower-left picture)
pink Up-Right = blue Left (Upper-right picture)
So click the pictures until the light blue petal is on the:
Top(4) Left(5)
Left(3) Right(4)
and then open the safe. There's a flower key hidden behind the OK button.
Unlock
Use the key to open the bottom drawer of the bedside table. Take the scissors from inside.
Snip
Use the scissors to cut the cord on the right door. Open the door and enter the toilet.
Exploration: Toilet
Whew, you made it. Now you can finally let out some of that dinner- What? Escape? Oh right.
Look out the window on the left to see a garden with a grid of eight small trees. The lower-left and upper-right trees aren't real, but they look familiar.
Above the toilet bowl is a picture similar to that above the right bed, a diagram with a rectangle split into ten smaller ones. In addition to the purple and orange colors from the other picture, this one has two other rectangles colored green: the left one on the second row and the second one on the bottom row.
Back up, zoom in on the shelf on the right, and take an orange moose token.
Moose puzzle 1
Use the purple and orange moose tokens on the board outside, in the positions indicated by the picture above the right bed.
___O_P__
____
The bed pictograph lights up and has the word OPEN! next to it. Check it out.
The picture above the right bed has slid down. Take the sunglasses and two green moose tokens.
Moose puzzle 2
Use the two green moose tokens on the board in the positions indicated by the picture in the toilet.
___OGP__
_G__
The toilet pictograph lights up and gets an OPEN! too.
The picture above the toilet bowl has slid down. Take the Santa figure from it.
Planted
Look through the toilet window (again) and use your sunglasses to reveal a clue: a path that runs through the grid of plants and ends in the upper-right with a number 8 in a circle.
Garden pathed
Unlock the bathroom box with the garden glasses clue.
6857
43
12
Press the buttons in order to get the box for a screwdriver open.
Unscrew
Use the screwdriver to open the wardrobe door.
Exploration: Wardrobe
The box on the right is locked and takes a four-digit code. It's decorated with a horse facing to the left.
On the clothes rack, there's a long pole to pick up. It has a handle but's still missing something on the other end.
The tablet on the left requires a USB stick to use.
Four digits
Use the clue from the top bedside table drawer to open the box in the wardrobe.
The left-facing horse occurs on the right side of the card, over the digits 5638.
Open the box, with contains an envelope, which contains a card with musical notes. The notation seems a little off, with only four lines on the stave instead of five. On the other side of the card, pictures of a donut and a slice of cake appear next to silvered circles.
Ho ho ho
Use the Santa figure among the other Santas on top of the box in the first screen, then use the musical code from the card to unlock the box.
The notes occur in the bottom, middle, middle, top, bottom spaces.
Adjust the Santa figures accordingly (2, 1, 1, 0, 2 clicks), and open the box to get a hook.
From the top
Use the hook on the pole, and use the pole with hook to get the small box hanging from the ceiling.
Open up the box to get a USB stick.
Scratch it
Use your coin on the silvered surfaces of the card, scratching it off to reveal letter and number codes.
Technology
Use the USB stick on the bottom-left corner of the tablet, then back up to look at the tablet screen.
It's time to choose your dessert! Save the game.
Enter
15d72for the donuts orca9e4for the cake.After a short wait, it arrives.
Instant delivery
Take the cake box or donut box from the red box beside the main door, and then the key box from behind it. Open the key box to get the door key, which comes with a pink moose keychain.
Use the door key on the main door, and you're out!
thanks KK as always. Can't wait for Light Bulbs walkthrough :)
Don't waste time, get to it!!!
Light Bulbs!!!
MayMay may be excited about lightbulbs, but we need to find them first.
[Exploration] First room
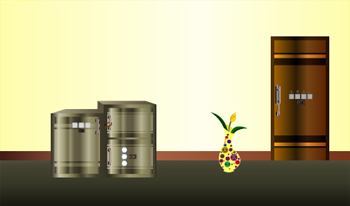
There are three safes on the left. The left one opens with a three-letter code, the top one seems to be tied shut and the bottom one needs a code with three colored face emoticons.
The vase next to it has a bunch of colorful dots on it, but three particularly large ones have those same emoticons. From top to bottom, they are brown, purple and green, and the emoticons are T_T, *_* and @_@.
The door of this room is locked and needs a four-digit code. Above the four digits, the word SEAL is written.
O_O
Use the dots on the vase to unlock the bottom safe.
Click the buttons 4, 3, 1 times.
Open the safe and take half a pair of scissors. It's not much, but at least it's
STAINLESS STEEL.Sense All Assets
Use the clue from the half scissors to unlock the door.
STAINLESS STEEL has 4 S's, 3 E's, 1 A and 2 L's.
Enter 4312, open the door and go to the next room.
[Exploration] Second Room
Is that a warning sign on the right? Let's start with that. The warning sign looks pretty warningy, with eight different warning symbols. Hopefully it's not for the machine next to it, which has three lightbulb holders on the top connected through frayed wires to a black switch on the wall, and a safe on the bottom that opens with a sequence of warning icons.
The cabinet on the left of that has two doors. The top one is already open and contains a stencil with WARNING!!! written across the top. Yep, three exclamation marks. The bottom door reads S0W00, where the 0s need to be changed to a three-digit code to unlock the door.
The door of this room is locked with a keypad, which has the digits 1 to 9 and no indication of how many digits are in the code.
Get your warnings together
Place the warning stencil over the warning icons, leaving just three of them: lightning strike to the body, hot fire, sparks through the fingers.
Use this code to open the safe on the bottom of the machine.
Click the buttons 4, 2, 7 times.
Open the safe and take a lightbulb marked SIV.
Three-letter safe
Unlock the left safe in the first room with the letters on the lightbulb.
Enter SIV in the safe, then open it and take the electrical tape, which has a bunch of colored numbers on it: 42135 in red, green, blue, brown, yellow.
Many digits
Unlock the door in the second room with the numbers on the tape.
Enter 42135, open the door and go to the next room.
[Exploration] Third Room
The cupboard on the left side of this room has two doors again. The top one needs a three-digit code, but there are colored hints on top of each digit: Green + Blue, Yellow + Red, Yellow - Blue. The bottom door is open and contains the other half of a pair of scissors.
The door to this room takes a three-color code. The safe to the right of the door doesn't need a code, but its door is screwed shut.
Sums
Add and subtract the colored numbers from the electrical tape to get the code for the top cupboard safe in the third room.
Red, Green, Blue, Yellow = 4, 2, 1, 5
G+B = 2+1 = 3
Y+R = 5+4 = 9
Y-B = 5-1 = 4
Enter 396 into the safe, and open it to take another lightbulb. This one has a nut which you can remove from the bottom.
Tooling
Combine the two half scissors, then use the nut from the lightbulb on the two halves to fasten the scissors together.
Snip!
Go back to the first room, and cut the cord from the top-right safe.
Open it and take another lightbulb, this one marked with V75.
Also use the scissors to cut the numbered end off the tape.
Words
Use the codes on the first and third lightbulbs to unlock the bottom cabinet door in the second room.
SIV+V75=SIW75, but the I is also a 1.
Enter 175, open the door, and take the screwdriver.
Power
Use the screwdriver to unscrew the last safe in the third room.
Open the door and flip the switch inside from OFF to ON.
Light bulbs (!!!)
Use the tape end on the frayed wires connected to the machine, then flip the switch to turn it on.
Use each lightbulb on the machine. Once all three bulbs are in, they glow yellow, green and red.
Enter those colors (3, 1, 6 clicks) in the last door. Open it and escape!!!
kk,you made a typo
under Sums you gave the answer as 3 9 4, but then said "type 3 9 6 as the answer"
Indeed!
I had typed both as 396, then went back to correct the top part but forgot about the bottom.
Hopefully it's still obvious which answer is the correct one.
I don't like the ending to "Gas Up!".
Drive away from the creepy buildings and the creepy squirrels, please.
Update