
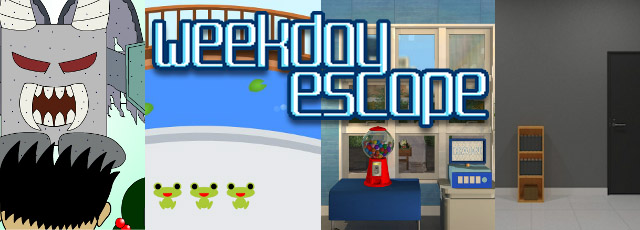
![]() If three's a crowd and four's a party, then why not? We'll have a party just for the sake of it this week, to celebrate hump day or to herald the end of July or for a happy birthday (early, late or on time) for all our Weekday Escape crowd. Not that a reason is needed to enjoy these four free online escape games, but each brings its own brand of fun to the party. FunkyLand provides the place: hip and happening and loaded with sweets. Wanpa's Quest delivers the quirky characters and oddball jokes. Hottategoya, while a bit of a wall flower, contributes to intellectual stimulation. Best of all, Yuri brought ten very cute chicks for you to pick up...
If three's a crowd and four's a party, then why not? We'll have a party just for the sake of it this week, to celebrate hump day or to herald the end of July or for a happy birthday (early, late or on time) for all our Weekday Escape crowd. Not that a reason is needed to enjoy these four free online escape games, but each brings its own brand of fun to the party. FunkyLand provides the place: hip and happening and loaded with sweets. Wanpa's Quest delivers the quirky characters and oddball jokes. Hottategoya, while a bit of a wall flower, contributes to intellectual stimulation. Best of all, Yuri brought ten very cute chicks for you to pick up...
 Candy Rooms No.14: Sky Blue Modern - in FunkyLand's world of chic whimsy, amusement resides solidly in the presentation as much as the satisfaction of solving a well-oiled puzzle. As usual, the end game revolves around acquiring five candy pieces which will automatically morph into your exit key. Some are in plain sight (although not easily spotted) and a few require gathering the tools to set devices in motion. There's nothing strenuous or obscure in this escape, yet the quiet ingenuity of the mechanisms can leave you feeling quite smart.
 Wanpa's Quest Another 9: Line Stamp - begins with a long series of narrative, giving the set-up for this hand-drawn mini point-and-click adventure. At the bequest of "Gas Body" (Gas Body??!), help Shiori Girl search the exhibition hall for the missing "Line Stamps" so the show can go on. Exuding a disarming personality and slightly odd, not quite in a Detarou way yet somehow reminiscent, it's hard to not be charmed by these characters. The puzzles are mostly logical, although, you might grapple to understand the intended meaning of the English translation. NOTE: scroll down the page to find the game window.
 Escape from the Similar Rooms 13 - As an apt alter ego to FunkyLand's quintessential whimsy, Hottategoya, with a sharply modern design and sparse interior decorating, is surprisingly adept at making the same ol' same ol' feel fresh and fun. If you avoid the more maze-like episodes, you will be glad to see, outside from the trouble of climbing up and down stairs, that it's not overly difficult to stay oriented in Similar Rooms 13. The key to escape depends mostly on your power of observation, as you explore your surroundings top to bottom and make note of the clues presented as part of the furnishings.
 Chick Hide and Seek 19 - Yuri's adorable brood of baby birds want to play another game of "I stand behind this object looking cute and you come find me." They're sweet as can be and the little chirp sound when you click on one is more addictive than popping bubble wrap, yet there is an evil amount of pixel hunting in this particular episode. Outside of the trouble of actually finding the necessary clues, solving the puzzles is a snap. Once you have all ten chicks, they'll point the way out. There are two endings, dependent on what you have in your hands as you escape and how you use it.
We love escape games, and our readers love talking about them and sharing hints! How about you? Let us know what you think, ask for clues, or help out other players in the comments below.


Walkthrough Guide
(Please allow page to fully load for spoiler tags to be functional.)
Quick walkthrough (my first!) for Funkyland's Candy Rooms 14: Sky Blue Modern:
Nice blue room! There are four views you can click on - let's take them one by one.
1) The table
- what can you pick up here?
- the lollipop in the flower vase, and the box of matches.
Back out and look at:
2) the left wall with the yellow balloon
There are three things here - a device on the left with letters and a picture, the balloon in the middle and a device with four pictures on the right.
Left device (letters)
Clicking on each letter reveals a number - make a note of these.
The balloon
Sadly you can't pop the balloon with the matches, as you could in reality!
Right device with four pictures
Clicking on each weather symbol changes it - but what is the code? We'll have to find out.
Back out and look at
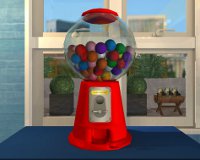
3) the right wall with the gumball machine.
What's that right in the middle of the window? Another sweetie!
There are two items here - the gumball machine and a box with a number code and the letters RAIN.
RAIN box
We saw some numbers on the other side of the room.
Which numbers corresponded to the letters R A I N?
R=4, A=9, I=5, N=2. Enter 4952 as the code.
You get a... strange lump of glass? It's a little oil lamp, actually. What are you going to do with that?
The gumball machine needs a coin, and we don't have one yet.
Back out and look at
4) the door
What's that on the top of the light fixture? Another sweetie!
There is a hot air balloon here.
Look closely and you'll see a round frame under the balloon itself. What might go in there?
How about your little oil lamp?
Put the oil lamp in the circular frame and use the matches on it to light it. Take a step back to see the effect.
The balloon rose up! Click to look at the pictures underneath.
We have seen these before, on the four-picture device on the left wall. How can you tell which picture goes where?
Each image on the strip has a square in one corner.
These squares indicate where the picture goes in the device puzzle. Make a note!
What else can you see?
There's a safety pin to take.
Back out and go back to the left wall.
What can you do with the pin?
Pop the balloon! Take the lollipop!
Now for the four picture puzzle.
Use the clue from the hot air balloon.
Top left - snowman
top right - sunshine
bottom left - cloud
bottom right - umbrella.
Push the button and you get a coin.
That will be for the gumball machine!
Head back there, put the coin in the slot, turn the handle, get the gumball - and that's the last sweetie!
The sweets magically become a key.
Take the key, use it on the door - and you're out.
Posted by: Lucy |
July 30, 2014 6:04 AM
|
July 30, 2014 6:04 AM
Similar Rooms 13 Walkthrough
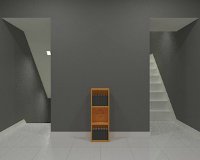
Starting room
Observe the shapes on the stools, including their orientation.
upside-down triangle, circle
Turn left and look closely at the bookcase.
Black at N, E, S, W; blue at NW, NE, SE, SW; red at NNW, ENE, SSE, WSW; green at NNE, ESE, SSW, WNW
Take the right-hand stairs up.
Top room
Turn right. Get the note from the stool, then observe the shapes.
diamond, pentagon kinda pointing NNW
Turn twice and look at the table. It looks like it's a star and moon left-right puzzle, but nothing happens when you try to push the buttons. Perhaps something is still missing?
Turn right so you're facing the bookcase and take the stairs down.
Door room
Take the box from the bottom of the bookcase.
Turn left and open the drawer of the table. Some sort of code?
KrPHIQeIdM in red, OgrQXeGFen in green
Turn left and look at the picture on the wall. Looks like you'll need a screwdriver.
Turn left and observe the shapes on the stools.
Triangle pointing right, hexagon with flat sides on top and bottom
Turn right and take the left-hand stairs down.
Bottom room
Turn right and open the drawer of the table. Get the note.
Turn right; the top of the bookcase needs a four-digit code. Look at the note you just got and decipher the code.
As the red & green code indicated, look at the lowercase letters only.
2834
Open the door with the code. Get the screwdriver.
Turn right and observe the shapes on the stools.
Circle, pentagon kinda pointing NNE
Look at the box in your inventory. Combine the shapes on the stools to solve the puzzle.
There are many ways to approach this; I started with the fact that both the diamond and the hexagon only occur once, so one of those needs to go on the top left. I tried it with the hexagon, and it didn't work out, so then I tried it with the diamond, and that worked.
Top left = diamond, middle row = pentagon, hexagon, bottom row = circle, triangle
Get the moon shape.
Turn left (you should be facing the bookcase) and go up the stairs.
Door room, take 2
Turn twice and look at the picture. Remove the screws with the screwdriver.
Look at the other note in your inventory and note the sequence of colors. Turn the picture on the wall to match those positions, using the diagram on the bookcase in the starting room.
The picture starts out in the "blue" orientation; if you turn it to the right (clockwise), it matches the "red" orientation, and so on. Colorblind hint: the sequence is blue, red, blue, green, black, red, black, green, blue. Solution:
right, left, left, left, left, right, right, right
Get the star shape.
Take the right-hand stairs up.
Top room, take 2
Turn right and put the shapes into the slots on the drawer. Press the middle button to open the drawer and get the key.
Turn right and take the stairs down, then use the key on the door to exit.
Posted by: Reka |
July 30, 2014 10:22 PM
|
July 30, 2014 10:22 PM
Walkthrough for the line stamp game:
You have a stamp album in your inventory. Page through it using the right and left yellow arrows in the inventory window. On the back cover is the Gas Body stamp. Leave the inventory and look at the first room.
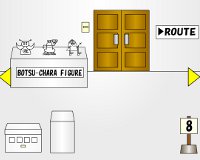
You start facing brown double doors, three figurines on a display, a small stand, a box with a number code, and a card with a number 8 on a stick. Take the central figure, a crab guy named Himajin, and put him on the little stand right in front of you. Go right.
You see two paintings and a card with the number 3 on a stick. Click on the right painting, the “Hell Stairs” one, until it falls off. Take the hand spade. Go right.
You see two toy houses on stands here, Makaimon’s and Wanpa Boy’s. You can zoom in on the door to Makaimon’s house, but it’s locked. There’s a number 9 on a card on a stick. Click on the base of the number-card stand to get a 100-yen coin. Back up to the room and go right again.
There’s a big stand with the sign “Line Stamp Exhibition” surrounded by a red ribbon and the number 4 on a card on a stick, plus stairs up marked “Staff Only.” For now, just go right.
You should be back at the starting view. According the signs on the walls, you’ve been following the display route. The numbers on the cards have been, starting from this first room, 8 3 9 4. Enter that on the number box in this room to get the stamp of Tencho’s baby. Back up and go left.
Go up the stairs marked “Staff Only.” Gas Body is there and he will tell you how many stamps you have left to get — right now, 9. Click on the seat of the chair to get Tencho’s stamp. The only other thing you can do now is get the scissors from the top drawer of the desk, as everything else is locked. Back up and click the yellow arrow to go back to the “Line Stamp Exhibition” stand room.
Use the scissors to cut the tape twice and take the segment of tape. Go either right twice or left twice to be back in the painting room
Tencho the scary guy is now there in the painting room. Talk to him, but he won’t help you yet. Left once so you’re facing the brown double doors.
Go through the double doors. Bunch of stuff here. Click at the base of the leftmost brown bench for the monster’s stamp. Back to the room and click on the plant to see its pot. Use the hand spade on the dirt to get a box. Examine the box in your inventory and use your coin to turn the lock on the box and get “the stamp of my brother.” Back up to the room. Click on the Wanpa drink machine, put the coin in the slot, hit the cream rectangle to the coin slot’s left (it’s a lever) and check the coin return to get Makaimon’s stamp and the coin. Back up to the room and go through the brown double doors to get back to the starting room.
Wanpa Boy is there. Click on him until he Wanpa-punches the figurine on the little stand. That gives you the Himajin stamp. Turn left twice or right twice so that you’re at the room with the little houses.
Makaimon the giant pink snail is there. Makaimon sympathizes with you and gives you a red key. Go right once and go upstairs to Gas Body’s office.
The red key opens the middle desk drawer. The drawer has a hammer in it. Back up to downstairs, then right to the starting room, then through the double doors.
This time, follow the yellow arrow down. You’ll see an outdoor area with a green sign in Japanese. Click on the small grey protrusion at the base of the divider with the sign. Take the rock, examine it in your inventory, crack it open with the hammer, and get the purple key. Back up to face the scene again.
You could go right and see an open area with a camera, but it doesn’t do anything yet. Instead, go through the grey double doors, which returns you to the lobby with the soda machine. Go through the brown double doors, then either right twice or left twice to the little-house and giant-snail room.
The purple key opens the door to Makaimon’s house. Get the stamp of Tencho’s wife and baby. Back up and go right or left twice so you’re facing the brown double doors, and go through those doors.
Here now are Tencho’s wife and baby. Click on them, and they’ll give you a red key. Back through the brown double doors, left once and up the stairs to Gas Body’s office.
The red key opens the bottommost desk drawer, which contains a scroll. It says someone can read it, but apparently not you. Back up and back down to the main floor.
Go left or right twice either one, so you’re in the room with Tencho and the paintings. Give the scroll to Tencho and he’ll read it. The leftmost painting will drop to the floor and you can get Pick’s stamp. Go left and through the brown double doors, and click the yellow arrow down to go outside.
Outside, Pick the fairy is floating there. She’ll give you a wand. Back through the grey double doors, then through the brown double doors to the starting room, then left and up the stairs to Gas Body’s office,
This time click on the desktop. You’ll see a circle. Use the red tape on it to make a magic circle with a pentagram. Use the wand on the magic circle and it will glow red. Back up and downstairs again, then right once to the starting view.
Hit the lights by the double doors. The letter “E” in “ROUTE” is now red. If you go right three times, you’ll see “H,” “A,” and “B.” Right once more to face the main doors, turn on the lights, turn left and go up the stairs.
Click on the box on the desk, which wants a letter code, which you just got: EHAB. Enter that to get “my stamp.” Back up so you’re looking at Gas Body.
Click on Gas Body to be told that there’s one stamp left and it’s incomplete. You’re going to make the last stamp with the camera outside. Click through his whole speech so that the screen goes temporarily black and you get the message “Gas Body ‘I go ahead. I ask you!’”
At this point, go downstairs and click through on everyone: Makaimon the pink snail, Tencho the scary guy, Wanpa Boy, Tencho’s wife and baby, and Pick the fairy. If you’ve not been to the camera room, follow the arrow right from the outdoor area with Pick and the green sign in Japanese.
There’s a camera and the whole gang’s there. Click through on them and the camera. Click through the successive screens to get the last stamp and see the exhibition go off successfully. You’re done!
Posted by: tullia |
July 31, 2014 12:16 AM
|
July 31, 2014 12:16 AM
Chick Hide and Seek 19 Walkthrough
Chicks
Frog taxi scene
Behind frog taxi sign
Give 3 coins to frog
Coins:
Behind frog taxi sign
Behind second ghost from the left
In the box
Three frogs scene
Under left-hand frog
Get goggles from frog under plant (gate scene); use it on bubbles in water in three frogs scene.
Ghosts scene
Underneath left-hand ghost
On the face of right-hand ghost
Gate scene
Behind base of plant
Under big leaf of plant
In the box
The clues are the three jumping frogs, and the numbers on the underside of the big leaf.
The left frog jumps twice, the middle frog jumps once, and the right frog jumps three times. Thus, the 132312 code can be translated to MRLRML.
In lid of box
Exiting
End 1
Just exit across the bridge the chicks have built for you.
End 2
Click the frog under the plant and get the frog key.
Exit across the bridge the chicks have built for you.
Once you see "end 1", click the green door.
Posted by: Reka |
July 31, 2014 1:30 AM
|
July 31, 2014 1:30 AM