
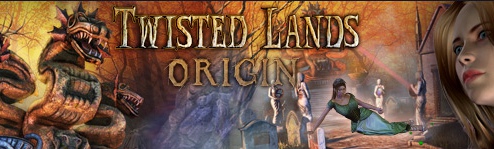
Twisted Lands: Origin
Platform: Mac, Windows
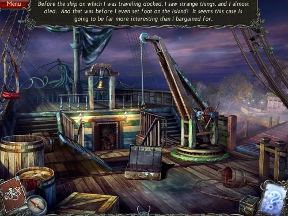
![]() Twisted Lands: Origin starts with a bang, and it never lets up. The third game in the Twisted Lands series, the story goes back to the beginning and tells the tale of the terror that stormed the island of Tormente. It's an intense casual adventure whose focus is strongly centered on story and hidden object scenes, creating an interesting sort of action/puzzle duality that keeps you moving along at a rapid pace.
Twisted Lands: Origin starts with a bang, and it never lets up. The third game in the Twisted Lands series, the story goes back to the beginning and tells the tale of the terror that stormed the island of Tormente. It's an intense casual adventure whose focus is strongly centered on story and hidden object scenes, creating an interesting sort of action/puzzle duality that keeps you moving along at a rapid pace.
 Things start off with a chase scene through the forest where a bunch of monster-looking things are after you. That's just great! Oh, and what? The crew of your ship is missing? Probably not a big deal. Boats pretty much operate themselves these days, right? Oh, well now there's something. A specter of a girl following the ship just under the water. And the entire port town is populated by ghosts? That's... that's just great! But that's not why you're here. Joaquin Huerta has asked you to search for her daughter, Teresa. So despite the ghosts, crazy storms, and evil guard dogs, you've got a job to do, detective.
Structured more like Twisted Lands: Insomniac, Origin sets you loose to explore small areas with new places blocked by puzzles you'll need to solve. Hidden object scenes are most often the manner in which you'll proceed, solving a few of them to gain key items necessary to remove obstacles in your path. The formula is very straightforward, with little room to get lost. And if you do, a friendly hint system is always ready to point you in the right direction.
 Analysis: It's always difficult to pull off a successful trilogy of games, but Alawar Stargaze knows how to keep your eyes glued to the screen. Through Twisted Lands: Origin's interesting mix of action storytelling and hidden object scenes, there's barely a moment to catch your breath. It's one of the more cinematic hidden object games out there, as even the music sounds like it was pulled from an action flick.
Twisted Lands 3 does suffer from some of the traps many hidden object games fall for, including subject puzzles that require just the right item to solve, even though half the items you just found would logically serve just as well. You'll never get stuck or be confused as to what to do, your mind will just wonder "Why can't I use the hammer I just saw?". The voice acting is also rather underwhelming, though it's passable for a casual adventure game.
Twisted Lands: Origin is a great exercise in exciting storytelling, something rarely seen in modern adventure/hidden object hybrids. Best of all, you don't need a thorough knowledge of the previous games to have a good time, just hop on board and get ready for a ride.
![]() Windows:
Windows:
Download the demo
Get the full version
![]() Mac OS X:
Mac OS X:
Download the demo
Get the full version


Walkthrough Guide
(Please allow page to fully load for spoiler tags to be functional.)
Twisted Lands: Origin Walkthrough
General Information
Main Menu
From the Main Menu, you can Play or Quit the game, choose your Options and your Profile.
Options include Music, Sound, and Voice volume, full screen or not, custom cursors or not, plus an aspect ratio adjustment for full screen.
If you play more than one profile, or choose to begin again with another profile, you will need to adjust your Options for that profile.
Game Modes include Regular, with interactive zones highlight and the Hint button quickly recharging.
In Expert mode, the Hint button recharges slowly, and interactive zones are not highlighted.
When you begin, you will be asked if you wish to learn how to play.
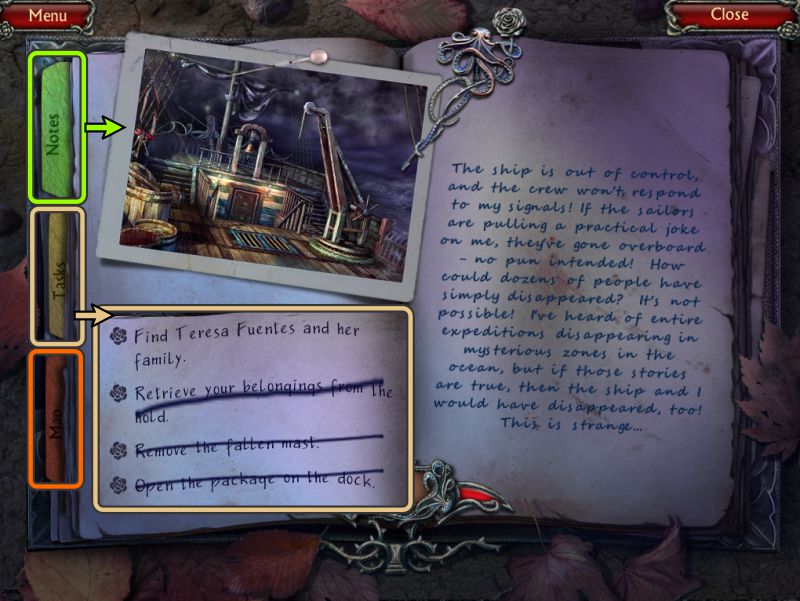
Journal
Your Journal will tell you what you need to do and provide hints to guide you on your way.
It is divided into 3 parts: Notes, Tasks, and a Map:
Notes record your journey.
Tasks is a to-do list that is crossed off as you complete each task.
Screenshot
The Map is not interactive, so you cannot use it to travel to a particular location, but it will show you locations you have visited so you know how to retrace your steps to return.
Make Your Choice
While you are being chased in the first cut scene, you will be asked how you wish to deal the wall in your path, so choose to Jump or Crawl.
Your adventure will then begin 3 days earlier aboard the Sea Lord.
Prologue
Deck
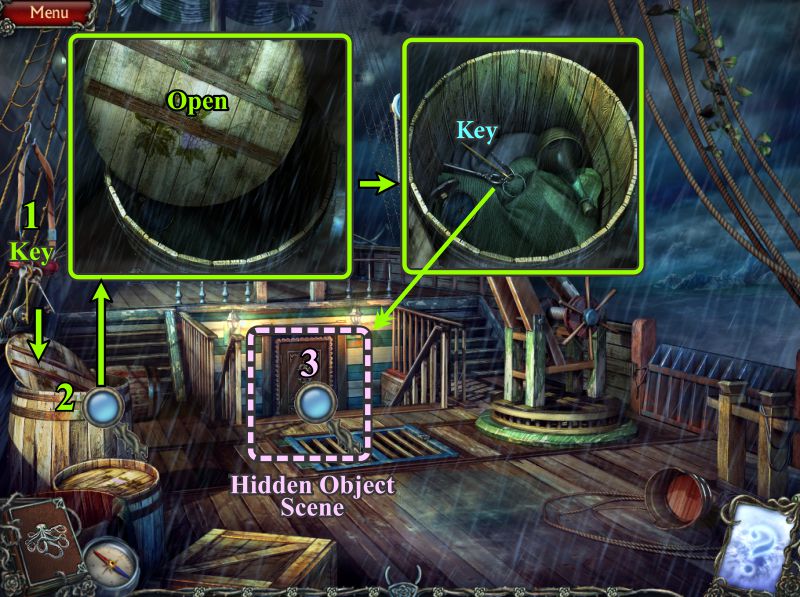
Try to pick up the key at the far left and it falls in the barrel below.
Zoom in on the barrel, open the lid, and take the Key.
The Detective will open the door to the cabin and trigger a Hidden Object Scene.
Screenshot
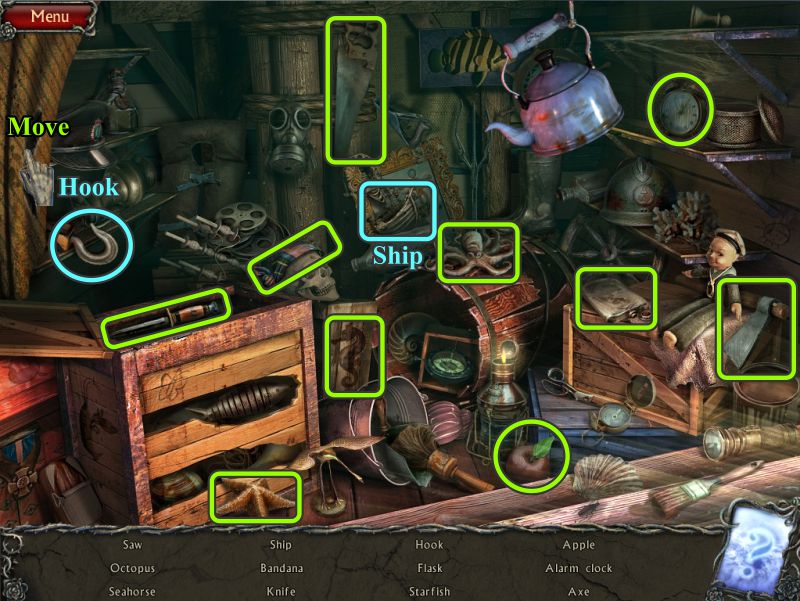
Cabin Hidden Object Scene
Your Inventory items will be a Hook and a Ship.
To find the Hook, move the curtain.
Screenshot
Deck
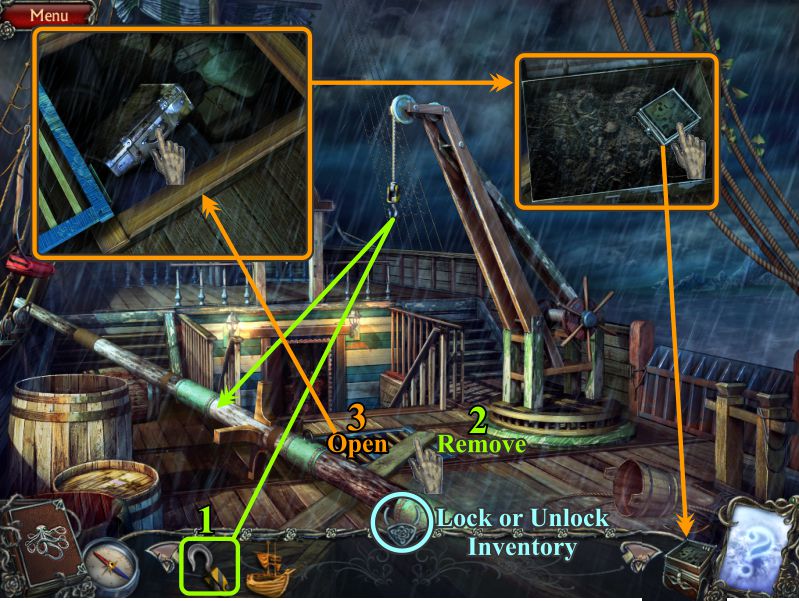
Now that you have items in your Inventory, note that you can lock your Inventory so it can always be seen, or just unlock it again when you don't need it.
Grab the Hook and place it on the crane wire to automatically move the beam out of the way.
You need to remove the plank so you can open the hatch.
When you touch the suitcase, the crane will bring it up. The Detective will open it, but then it will blow up.
Take the small chest that's left inside, and it will situate itself next to your Inventory.
Screenshot
Chest
The Chest opens to show a man, representing the Detective, on a path, so place the Ship from your Inventory on the image of the ship in the Chest. You move to the next step of the journey.
There are many blank spaces on the path that you will fill in along your journey as you find the various required objects.
When you find an object for the Chest, it will automatically open for you to place it.
Close the Chest to continue the game, and leave the ship.
Screenshot
Chapter 1: Arrival on the Island
Pier
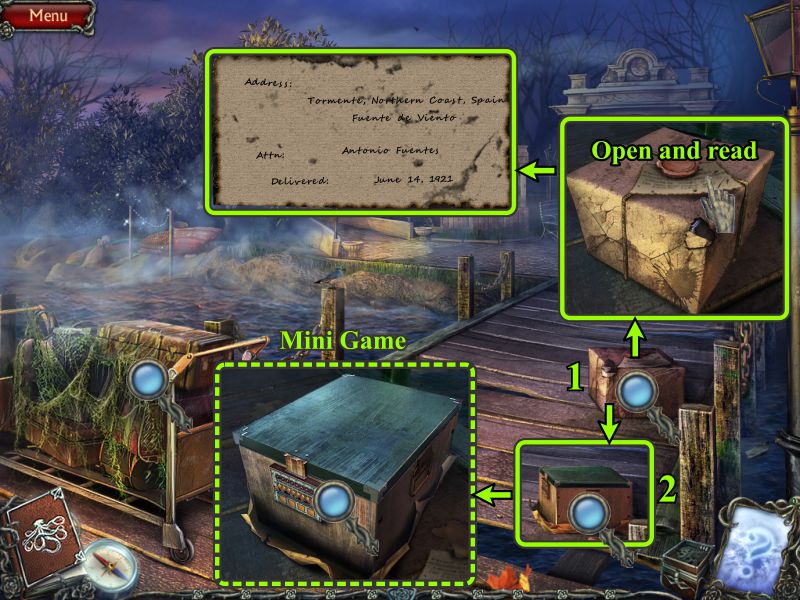
Zoom in on the wrapped package, open the note and read it.
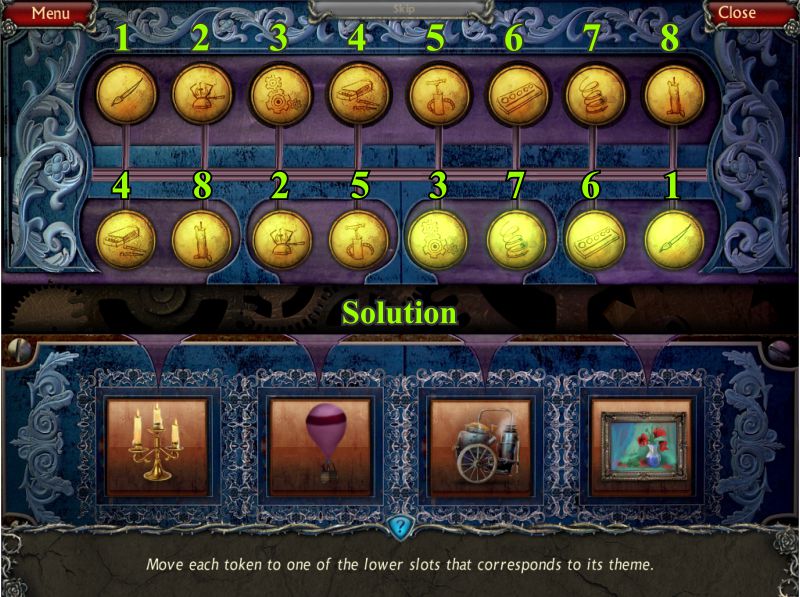
Examine the box for a Mini Game to open it.
Screenshot
Box Lock Mini Game
Move the tokens on the top row to correspond to the themes in the frames at the bottom.
Click the token you want to move, and then click where you want it to go.
See the screenshot for a numbered solution.
Screenshot
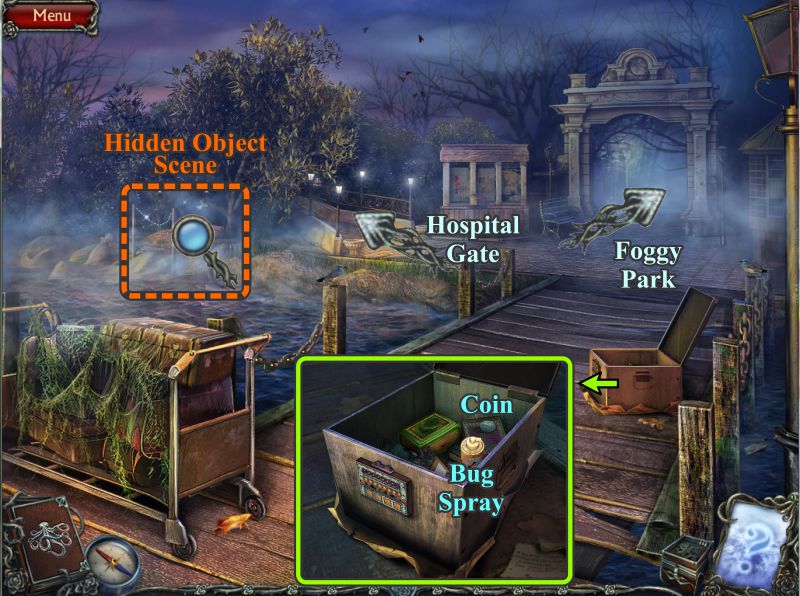
Pier
Take the Coin and Bug Spray from the open box.
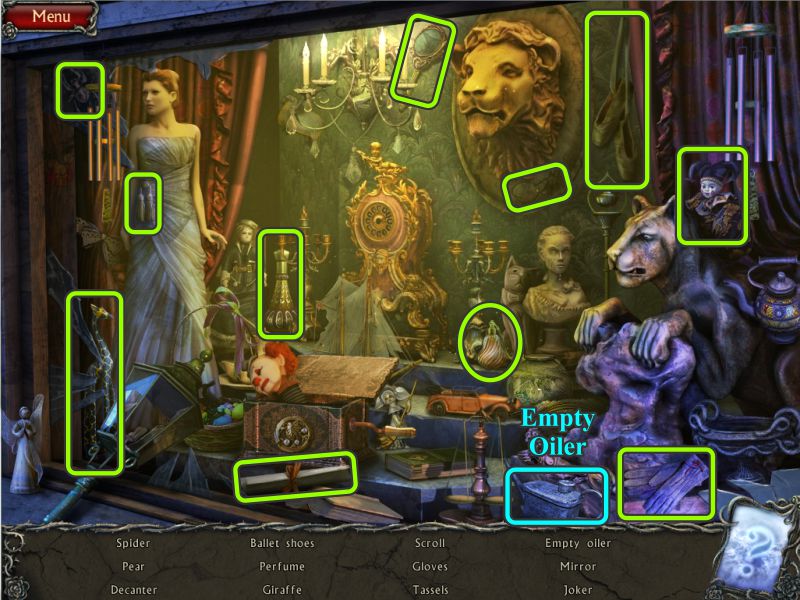
Play the Hidden Object Scene, then head to the Hospital Gate.
Screenshot
Shore Hidden Object Scene
You will get a Small Key for your Inventory.
Screenshot
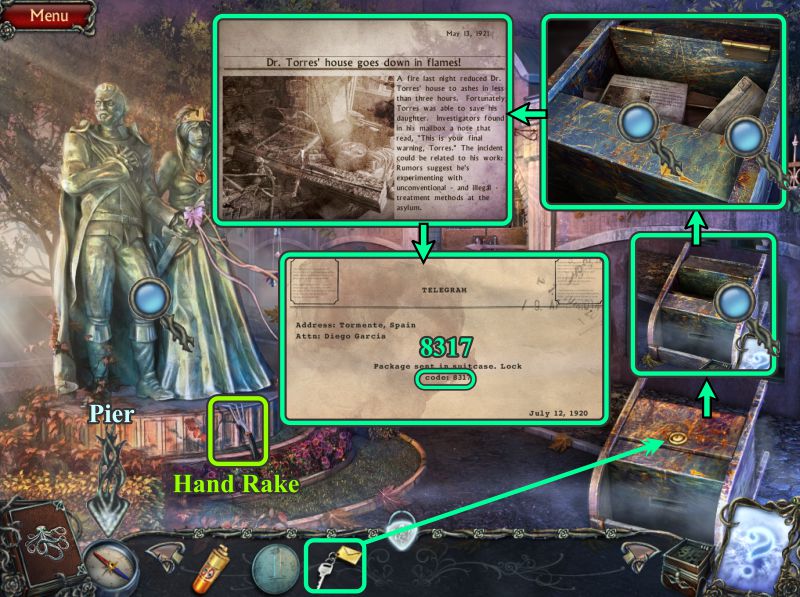
Hospital Gate
Take the Hand Rake and use your Small Key to open the postal box.
Read the newspaper and note the number 8317 on the telegram.
Return to the Pier.
Screenshot
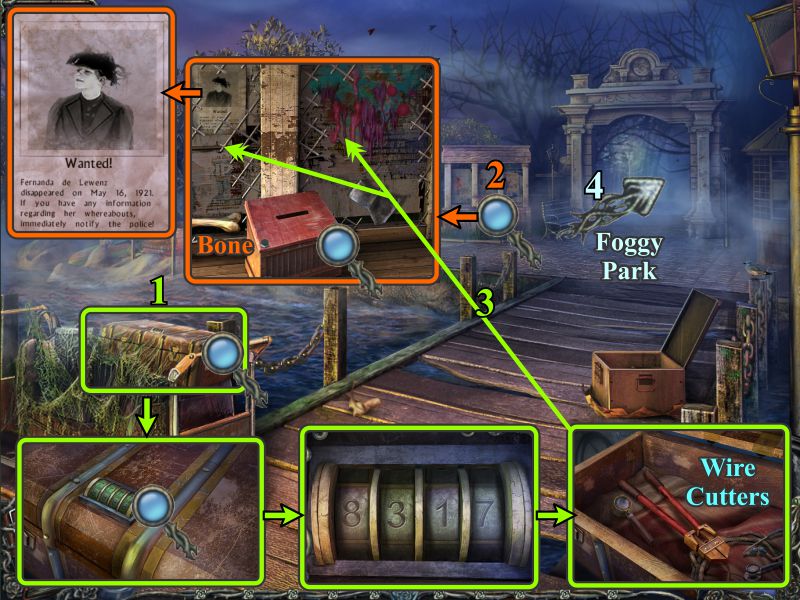
Pier
Open the chest using the combination 8317, and take the Wire Cutters.
Zoom in on the kiosk next to the archway and use your Wire Cutters to remove the wire so you can read the poster.
Take the Bone and go through the archway to the Foggy Park.
Screenshot
Foggy Park
Give the Bone to the dog to send him on his way.
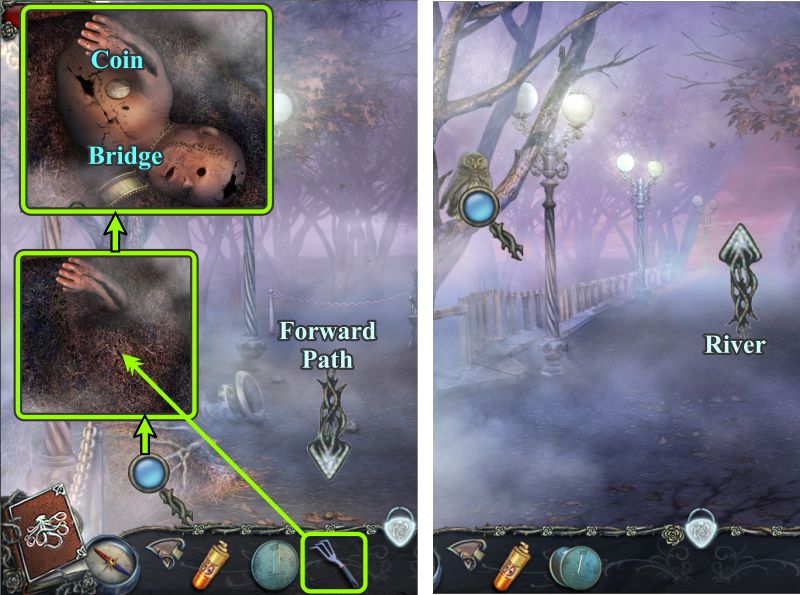
Take the Right Fork and then come back to reach the Forward Path.
Screenshot
Right Path
Zoom in on the area by the left bench and use your Hand Rake to uncover the doll.
Take the Coin and Bridge, then head back to the fork in the path.
Examine the owl and then head to the River.
Screenshot
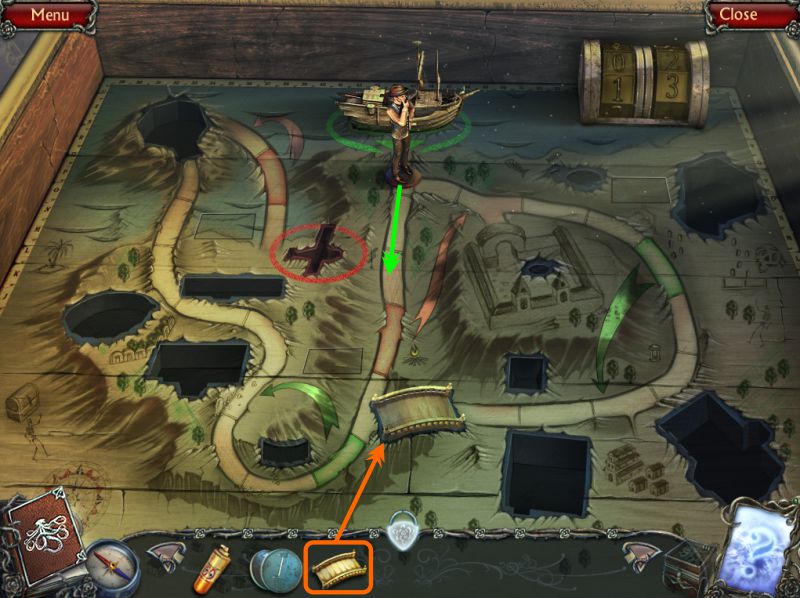
Chest
The Chest opens up for you to place the Bridge.
Your character will advance forward, so close the Chest to continue.
Screenshot
River
After the ghost leaves, there is a woman sitting on a chest with the dog you previously encountered, so ask her about Antonio Fuentes and how to get to Fuente de Viento.
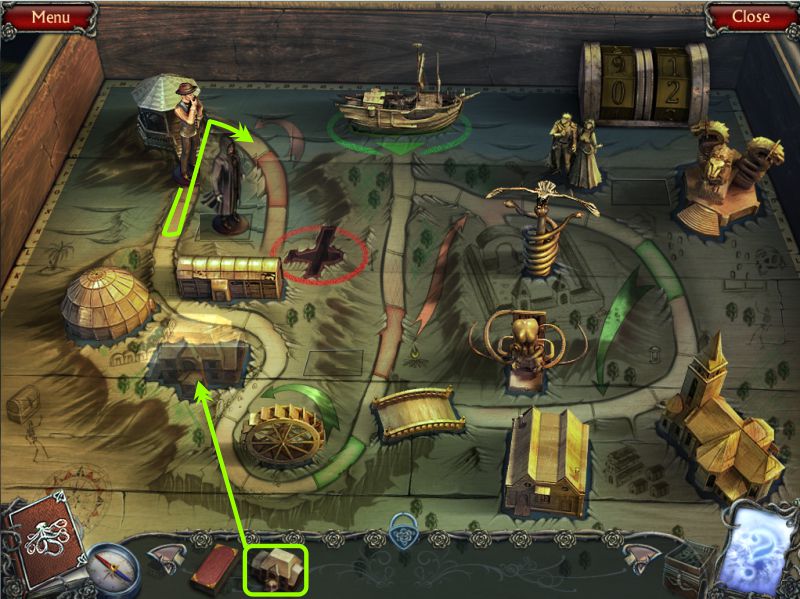
Go up the Mountain Path.
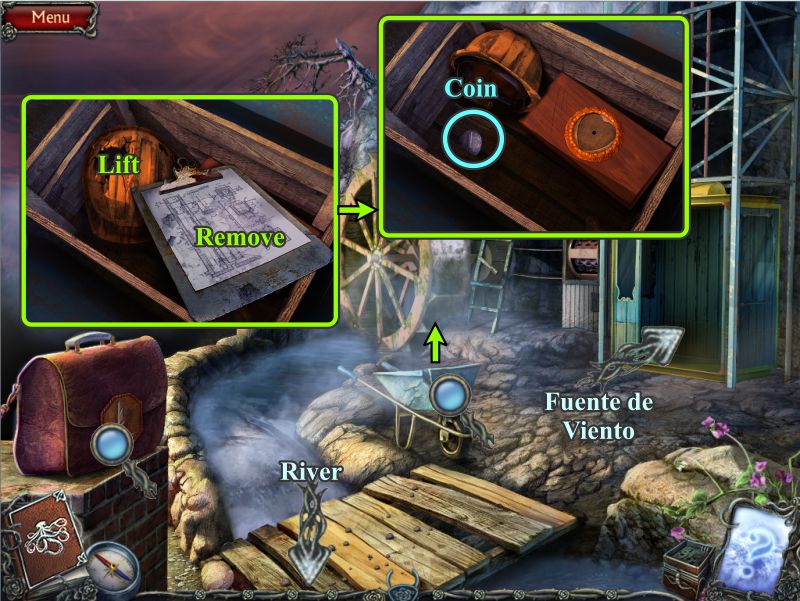
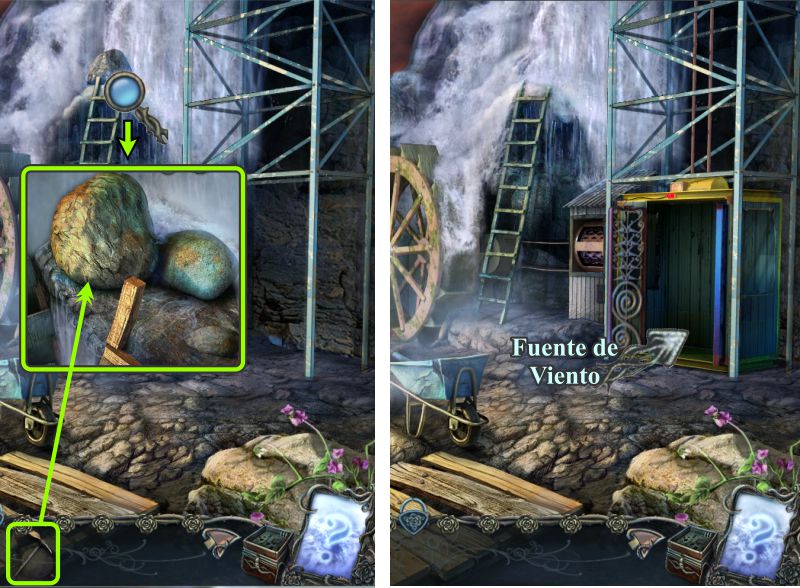
Mountain Path
After the rocks fall, note the Falling Rocks sign, and continue forward to the Lift.
Lift
Examine the wheelbarrow, then remove and lift the items shown the in screenshot to find the Coin.
Enter the Lift to continue to Fuente de Viento.
Screenshot
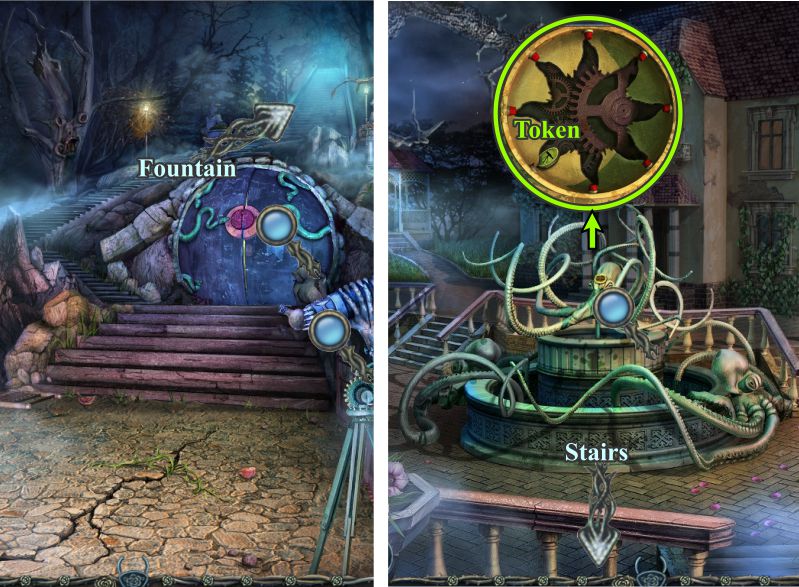
Stairs at the Top of the Lift and Fountain
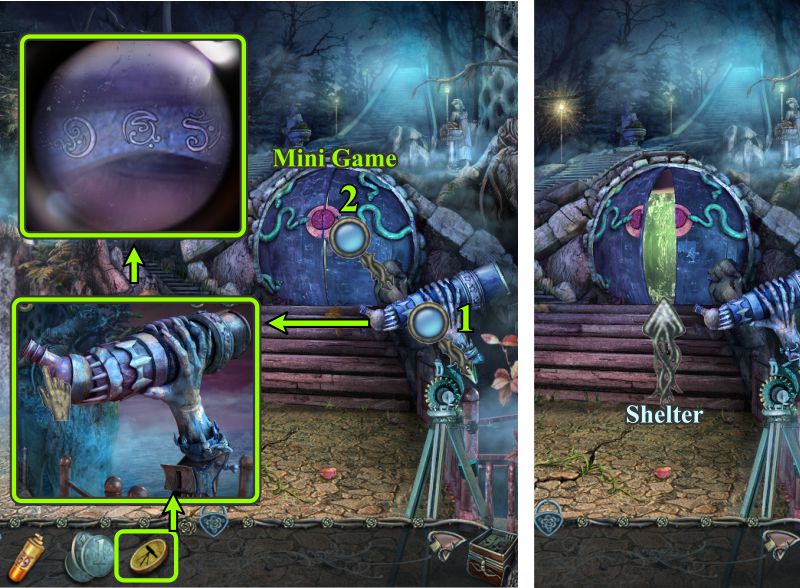
Examine the telescope and globe object before continuing upstairs to the Fountain.
Zoom in on the Fountain and take the Token.
Return down the stairs.
Screenshot
Telescope
Examine the telescope and place your token.
Zoom in on the lens and watch the telescope scan until it gives you a close up of the gazebo and the burning ship.
Note the image on the gazebo, back out, and zoom in on the sphere-shaped door for a Mini Game.
When the door opens, enter the Shelter.
Screenshot
Sphere Door Mini Game
Note the symbols on the paper and match them on the door to open it.
See the screenshot for the solution.
Screenshot
Shelter
Go forward to see what is there, note the snake, and come back to zoom in on the door at the left.
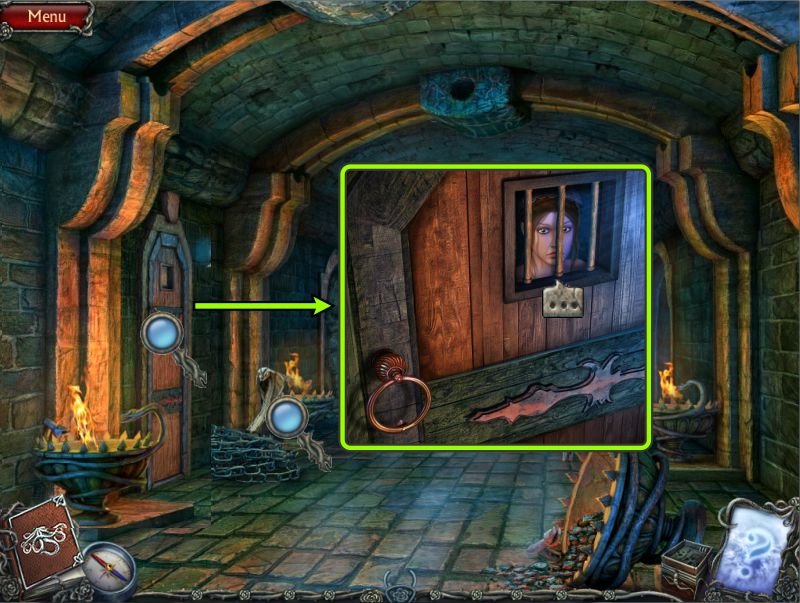
Knock on the door and talk to Teresa who will let you into the Lab.
Screenshot
Lab
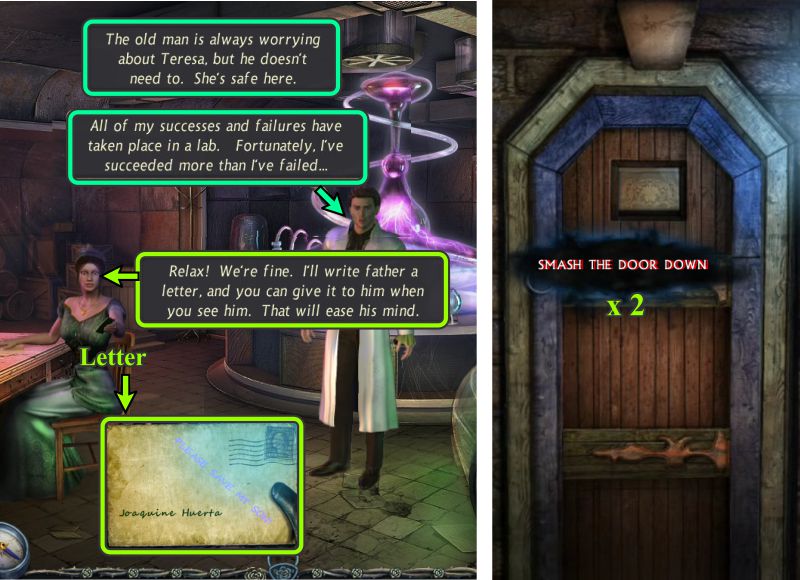
Talk to Teresa and listen to Antonio, then take the letter from Teresa.
Outside the door, you will be prompted to smash the door, so smash it twice and view the cut scene.
Screenshot
River
You end up back at the River. Listen to the woman.
Talk to her about getting a Hammer for 3 coins, then select the Hammer.
Once you make your selection, your money will automatically exchange for the item, so head off to the Lift.
Screenshot
Lift
Use the Hammer to repair the ladder.
Climb up the ladder and take the Lever.
Return to the River.
Screenshot
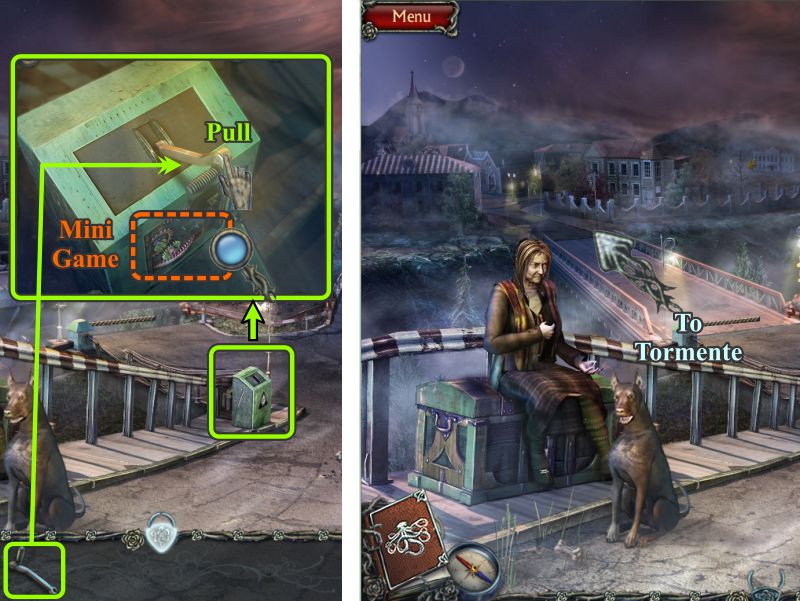
River
Zoom in on the bridge mechanism and place the Lever for a Mini Game.
After the game, the bridge swings around and again becomes available to cross over to go to Tormente.
Screenshot
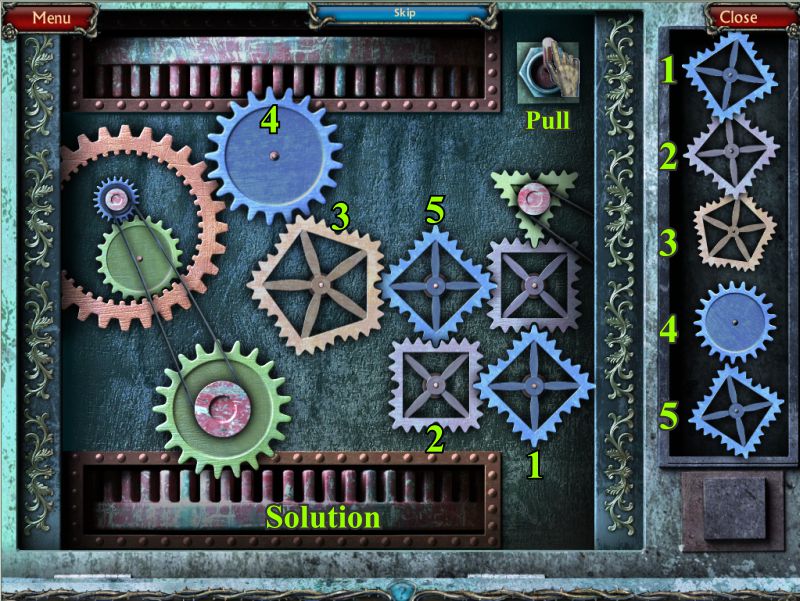
Bridge Gear Mini Game
Your goal is to place the properly shaped gears at the right into the mechanism to turn the bridge.
Select a gear at the right and then select its placement to the left.
See the screenshot for the numbered placement of the gears.
Screenshot
Chapter 2: Tormente
Across the Bridge
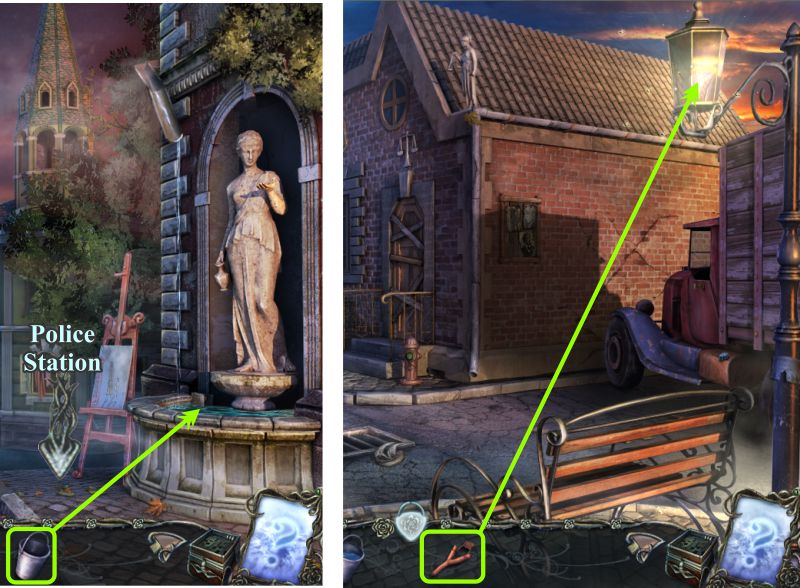
There doesn't seem to be anything to do here, so proceed to the Police Station.
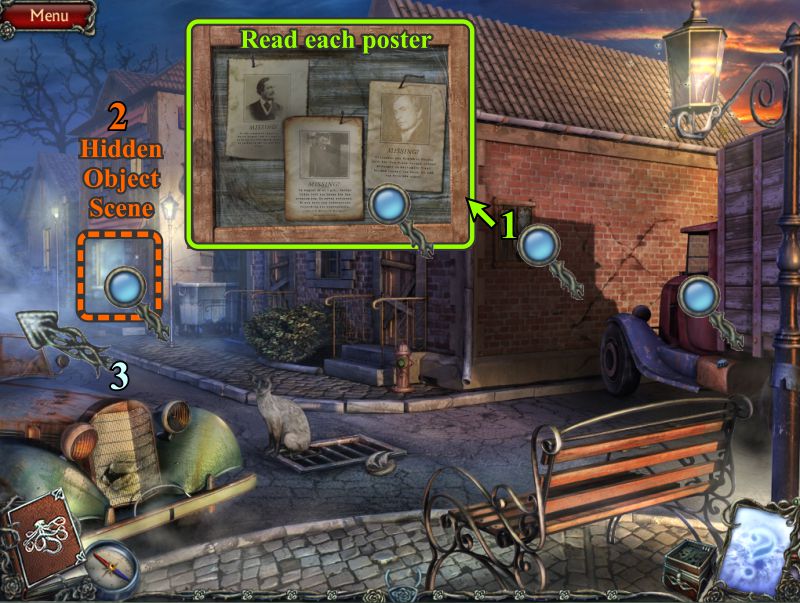
Police Station
Zoom in on the wall and read each poster.
Play the Hidden Object Scene.
Go forward on Main Street.
Screenshot
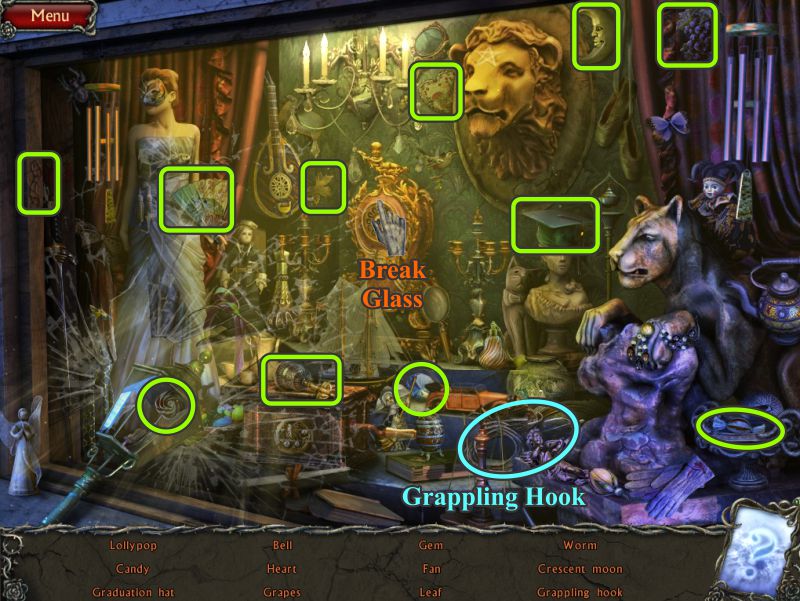
Store Window Hidden Object Scene
To find the hidden items, break the glass on the item shown in the screenshot, and also move the shown car.
You will get a Grappling Hook for your Inventory.
Screenshot
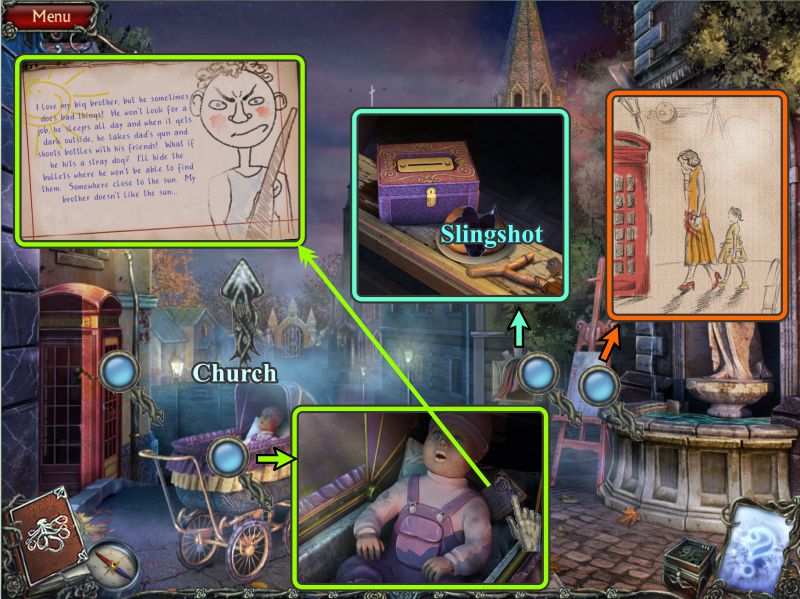
Phone Booth
Zoom in on all of the magnifying glasses, because there is a lot going on here.
The baby buggy will get you a note you need to read.
Zoom in on the areas shown in the screenshot to find a drawing and a Slingshot.
When you are done investigating here, go forward to the Church.
Screenshot
Outside Church
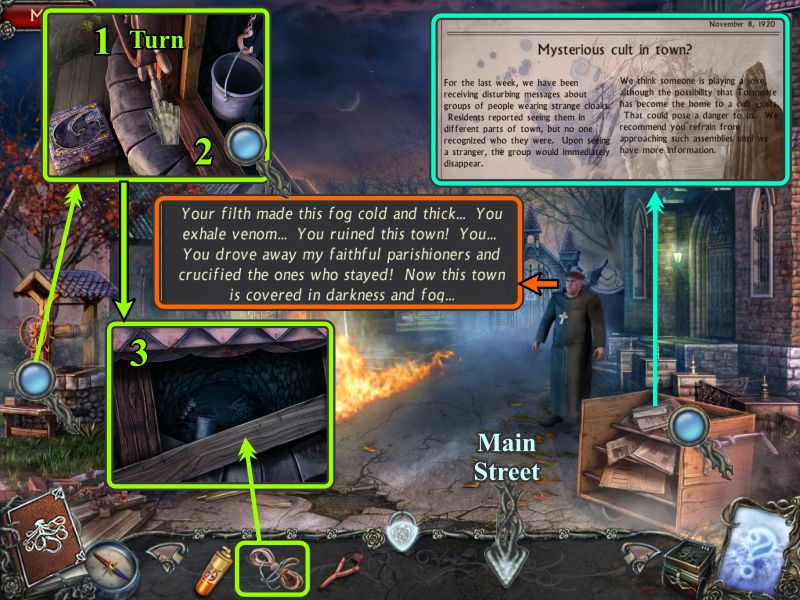
Talk to the Priest, examine the newspaper about the cult, and zoom in on the well.
Turn the handle.
Zoom in to see what happened to the bucket.
Use your Grappling Hook to retrieve the Bucket for your Inventory.
Return to Main Street.
Screenshot
Fountain and Police Station
Fill your Bucket in the fountain and go to the Police Station.
Use the Slingshot to put out the light to get rid of the bugs.
Screenshot
Police Station and Church
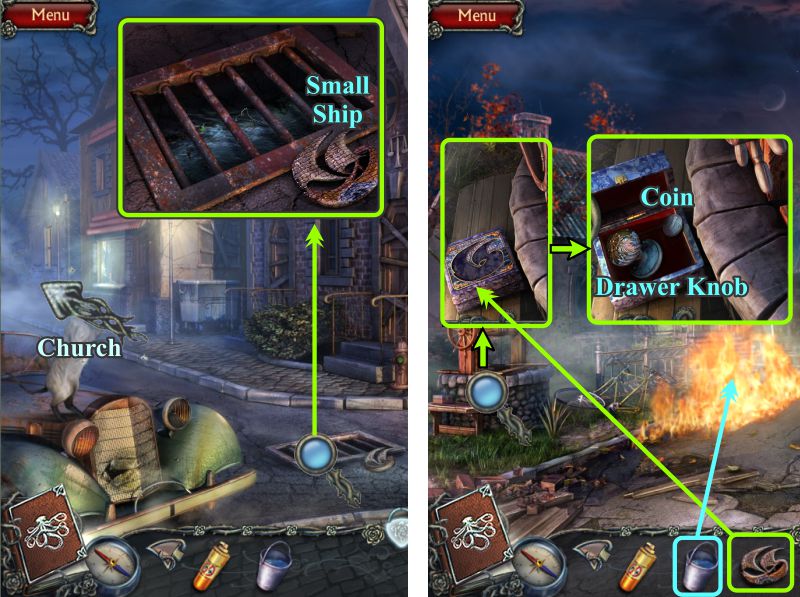
The cat has moved, so zoom in on the grate and pick up the Small Ship.
Go up the street to the Church and use the Bucket of Water to put out the Fire.
Zoom in on the Well and place the Small Ship on the box to open it.
Take the Coin and Drawer Knob.
Screenshot
Church and River
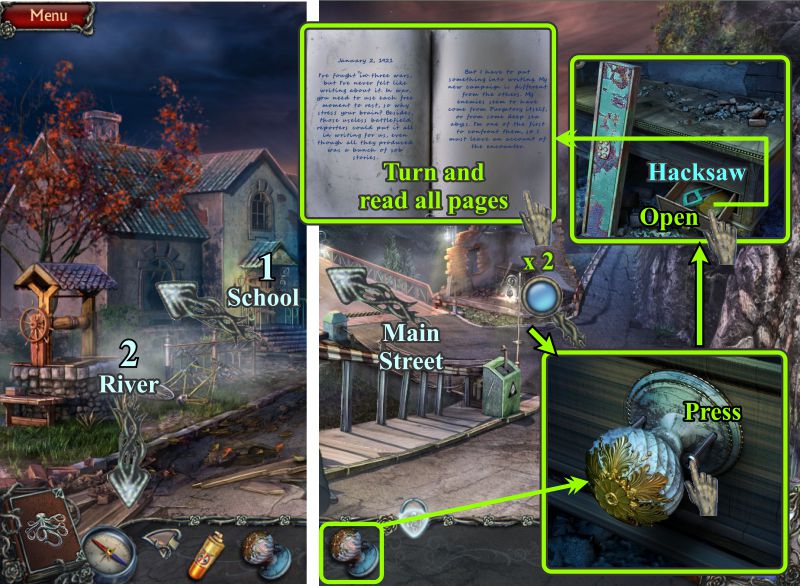
Now that the fire is out, go to the school in search of Ernesto.
It's too dark to see anything, so go to the River.
Zoom in twice on the desk by the bridge and place the Drawer Knob.
Press in the screws and open the drawer.
Take the Hacksaw and read all the pages of the diary.
Return to the city Main Street.
Screenshot
Phone Booth
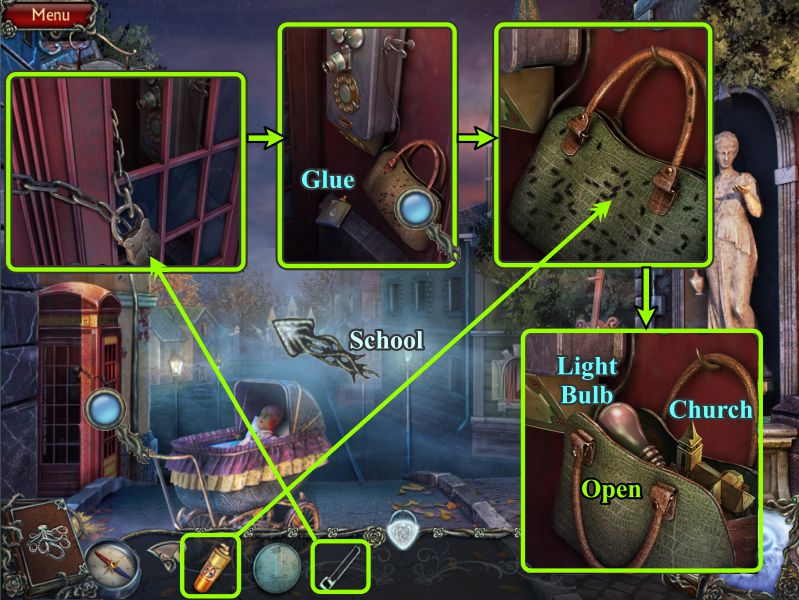
Zoom in and use the Hacksaw to remove the lock from the phone booth.
Pick up the Glue and use the Bug Spray to get rid of the bugs so you can open the purse.
Take the Light Bulb and Church.
Go to the School.
Screenshot
Chest and School
Place the Church, and you will move forward. A hooded figure appears, so you turn around and take the other path.
Go to the School and place the Light Bulb in the lamp.
Screenshot
School and Main Street
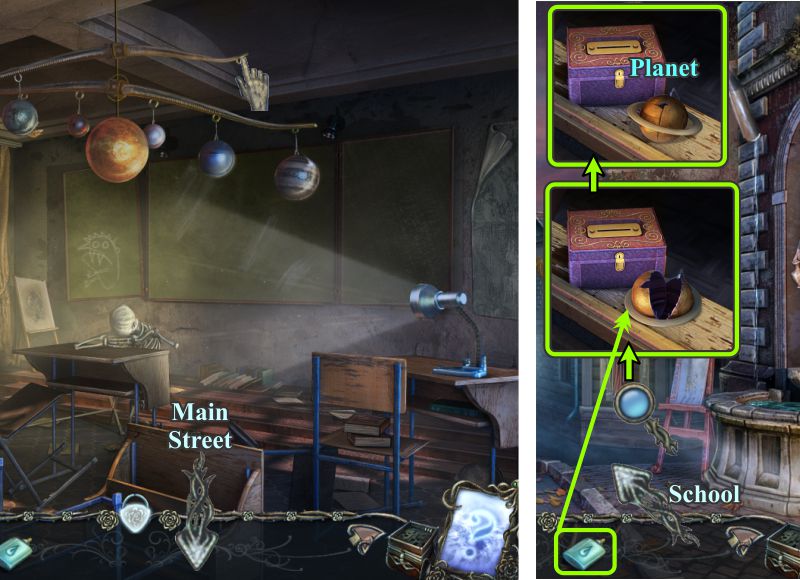
Look around and note the missing planets.
Return to Main Street where you saw a broken planet, zoom in on the niche, and glue it back together.
Return to the School.
Screenshot
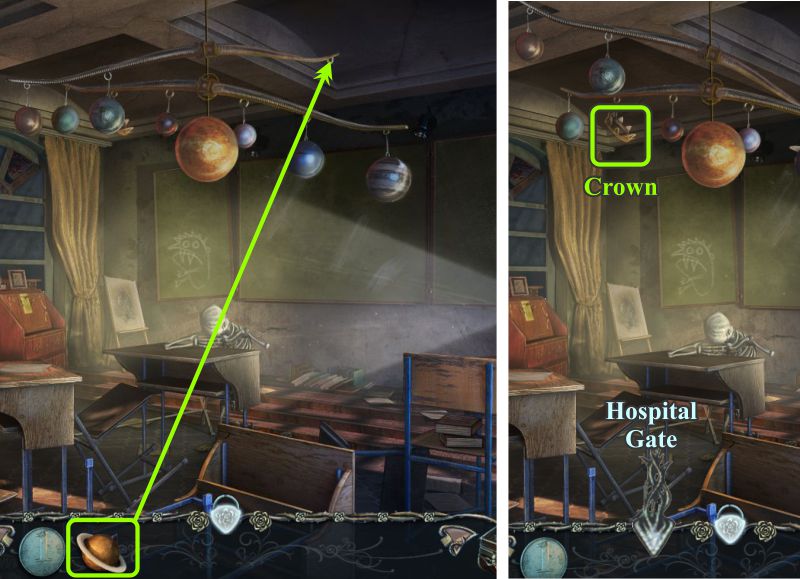
School
Place your Planet and the bar will tilt, revealing a Crown.
Take the Crown and go to the Hospital Gate.
Screenshot
Hospital Gate and Pier
Zoom in on the royal family and place the missing Crown.
When the statue moves his arm, take the Heart.
Go to the Pier and play the Hidden Object Scene before going to the Mountain Lift.
Screenshot
Shore Hidden Object Scene
Collect the Monk for your Inventory.
Screenshot
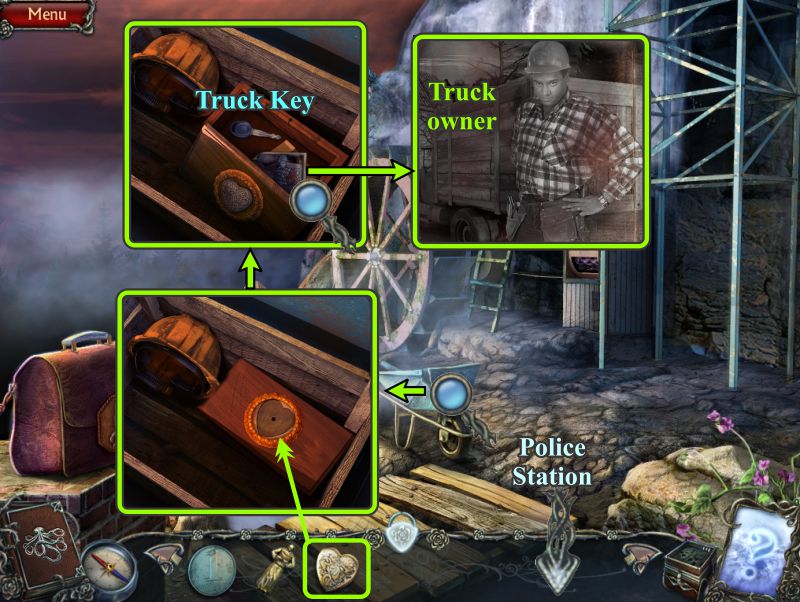
Lift
Zoom in on the wheelbarrow and place the Heart on the box.
Take the Truck Key and view the picture of the truck owner.
Go to the Police Station.
Screenshot
Police Station
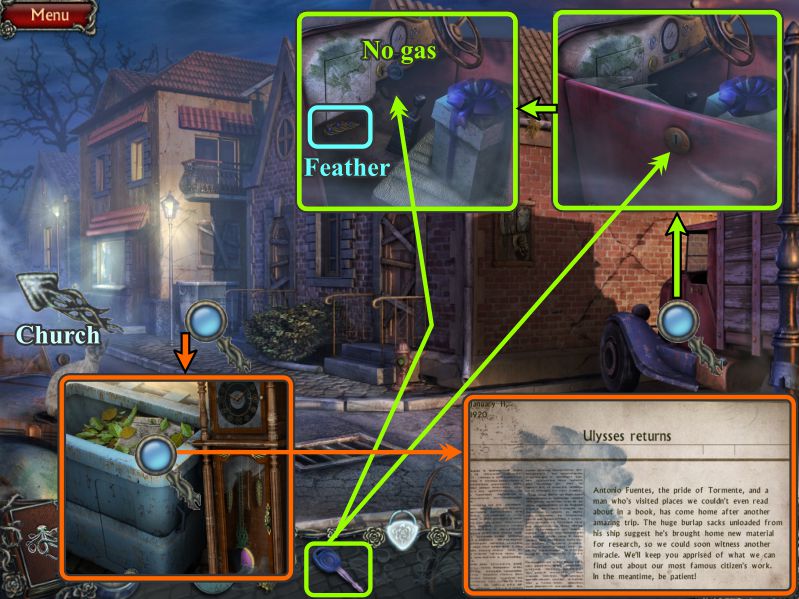
Zoom in on the truck and open the door with your Truck Key.
Take the Feather, and put the key in the ignition to find out there is no gas.
Leave the truck and zoom in on the dumpster.
Examine the clock and read the discarded newspaper article.
Head toward the Church.
Screenshot
Church
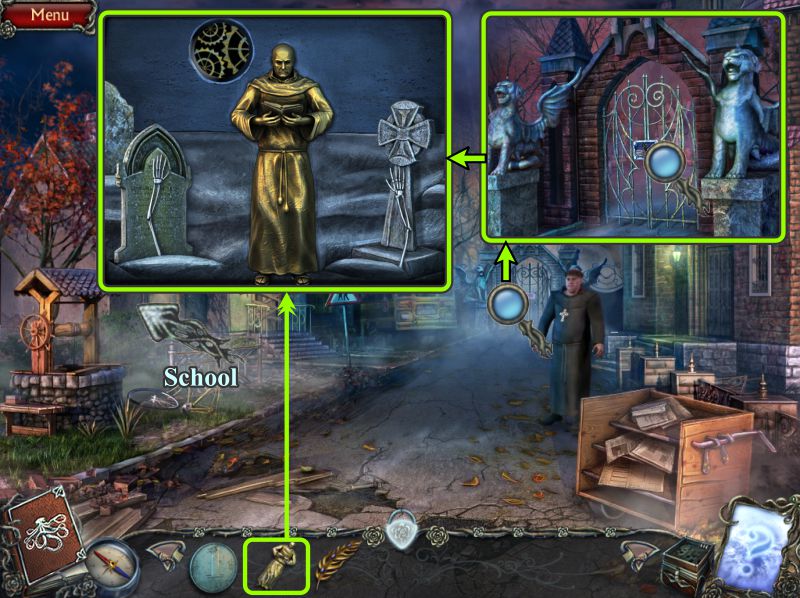
Zoom in twice on the Cemetery Gate and place the Monk.
Go into the School.
Screenshot
School
Zoom in on the locked desk and place the Feather to open it.
Take the Pacifier and Coin, and read the notes and book.
Go to Main Street.
Screenshot
Main Street and Police Station
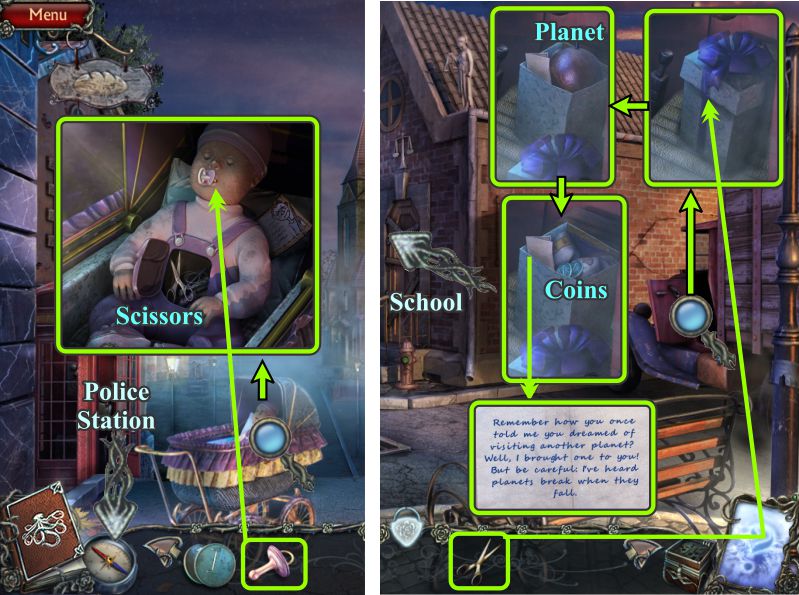
Zoom in on the buggy and place the Pacifier on the doll.
When the compartment opens, take the Scissors.
Head to the Police Station and zoom inside the truck.
Use the Scissors to cut the ribbon on the box.
Read the note, then take the Planet and Coins underneath it.
Go to the School.
Screenshot
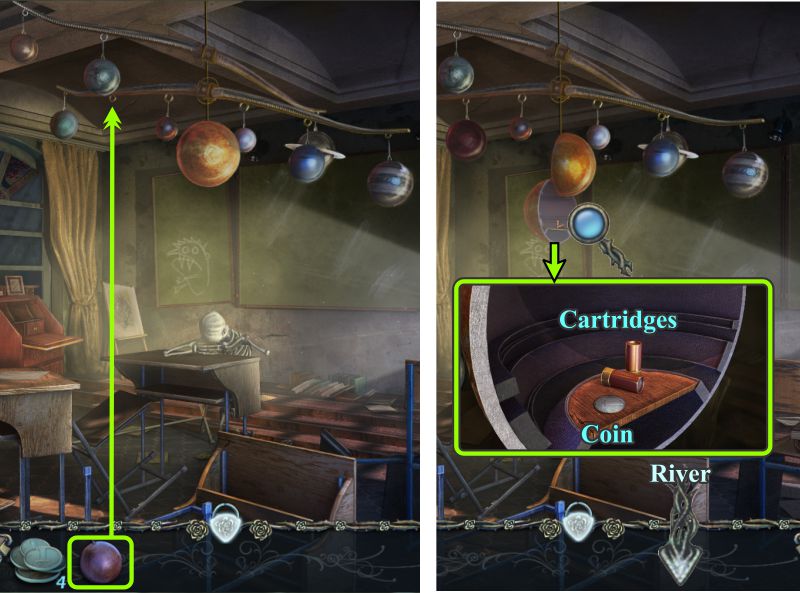
School
Place your new Planet, and a secret compartment will open.
Take the Cartridges and Coin.
Go see the woman at the River.
Screenshot
River and Police Station
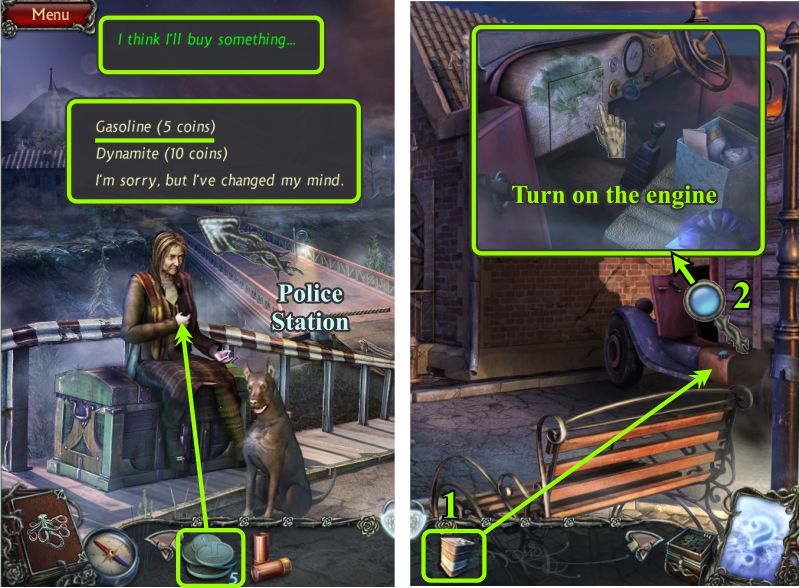
Time to buy something, but your only choice is Gasoline for your 5 Coins.
Go to the Police Station, pour the Gasoline in the tank, and turn on the engine.
Screenshot
Inside Police Station
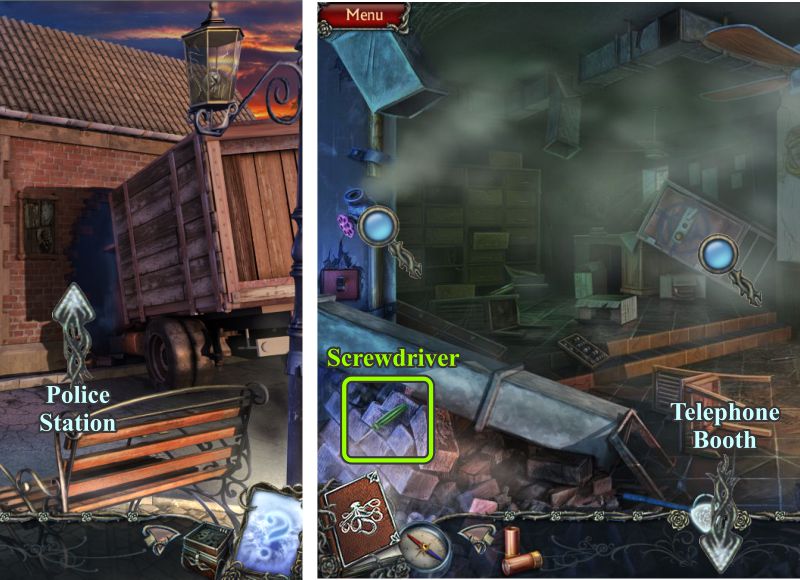
Go through the entry you made to the inside of the Police Station.
Gas is escaping, so grab the Screwdriver and go to the Telephone Booth on Main Street.
Screenshot
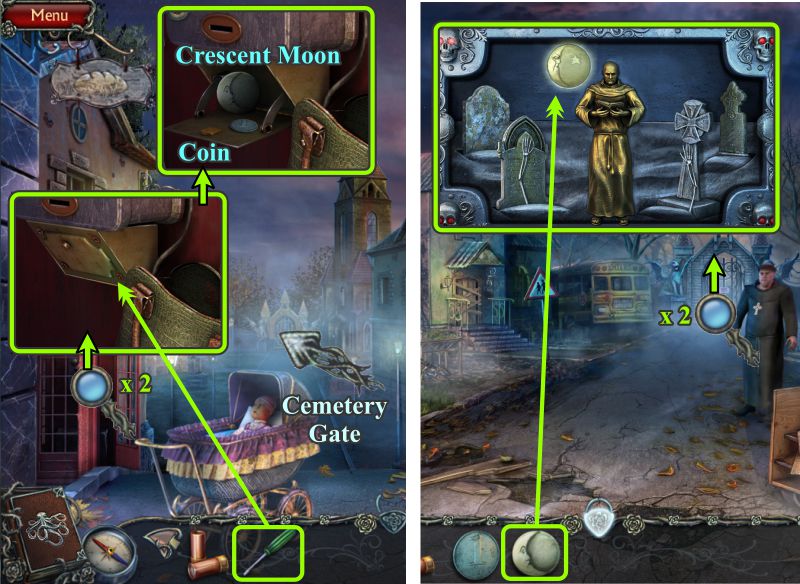
Phone Booth and Cemetery Gate
Zoom in under the phone and open the compartment with your Screwdriver.
Take the Crescent Moon and Coin, and go to the Cemetery Gate.
Zoom in twice on the gate and place the Crescent Moon.
Screenshot
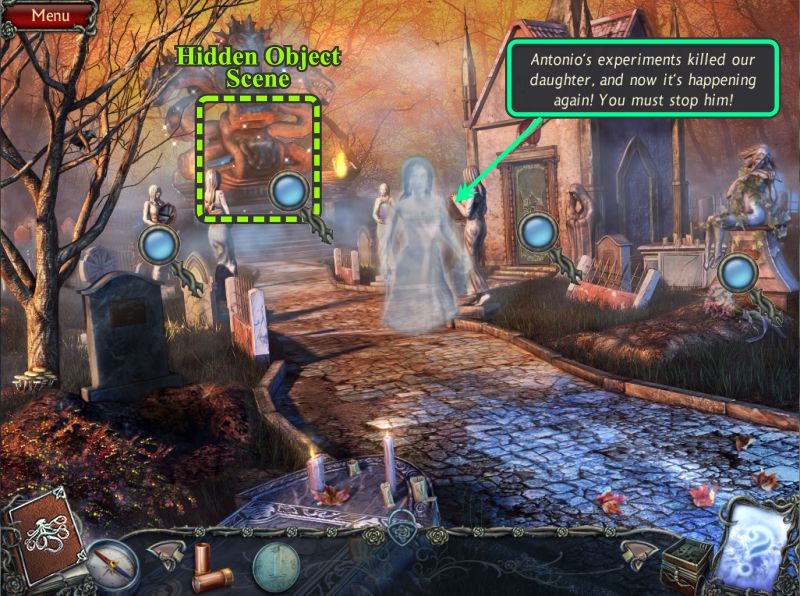
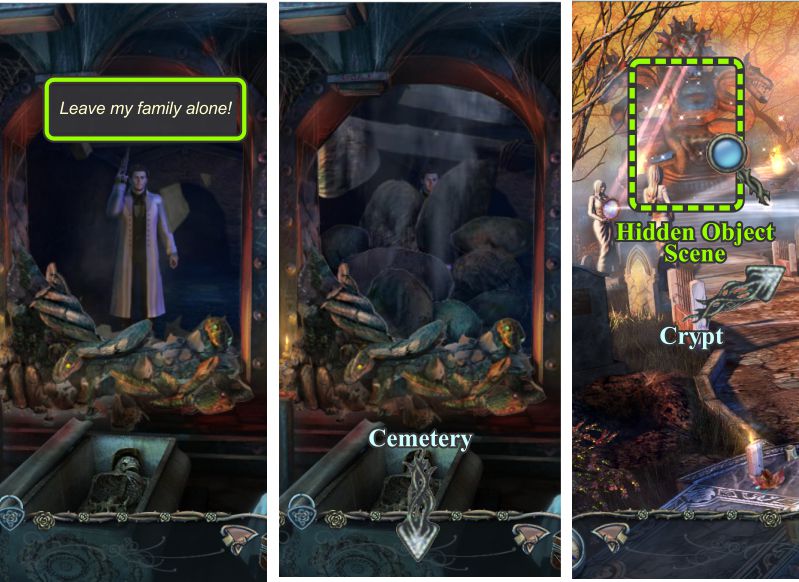
Cemetery
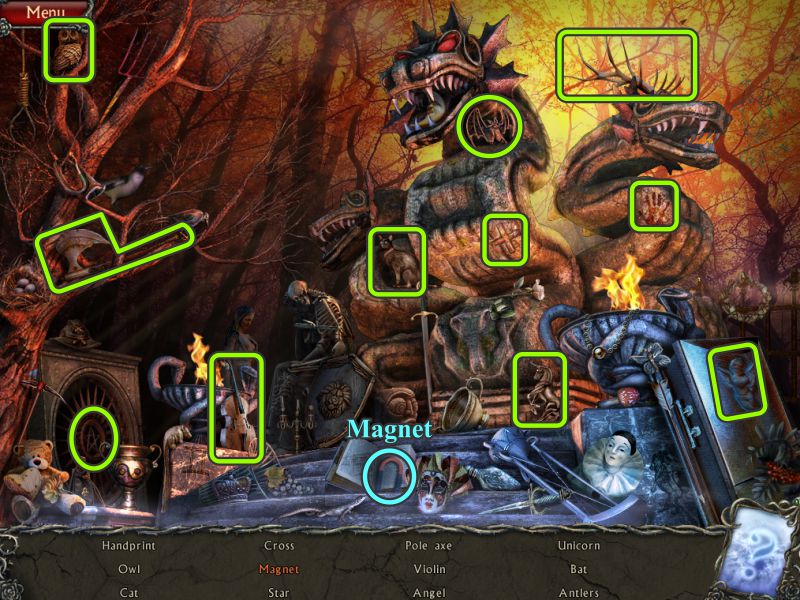
Listen to the musical ghost, then play the Hidden Object Scene.
Screenshot
Snake Statue Hidden Object Scene
You will get a Magnet for your Inventory.
Screenshot
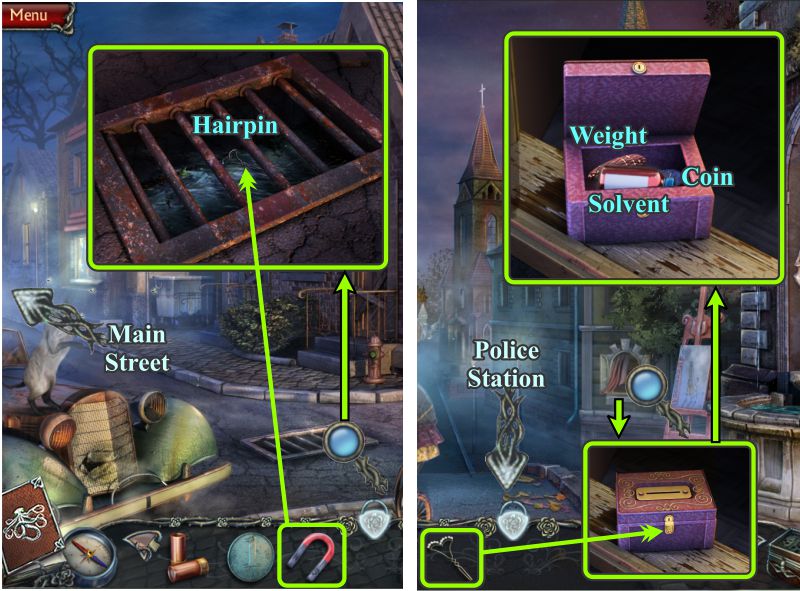
Police Station and Main Street
Zoom in on the grate and use the Magnet to retrieve a Hairpin.
Go to Main Street and zoom in on the niche.
Use the Hairpin to pick the lock on the small box.
Take the Weight, Coin, and Solvent.
Return to the Police Station.
Screenshot
Police Station
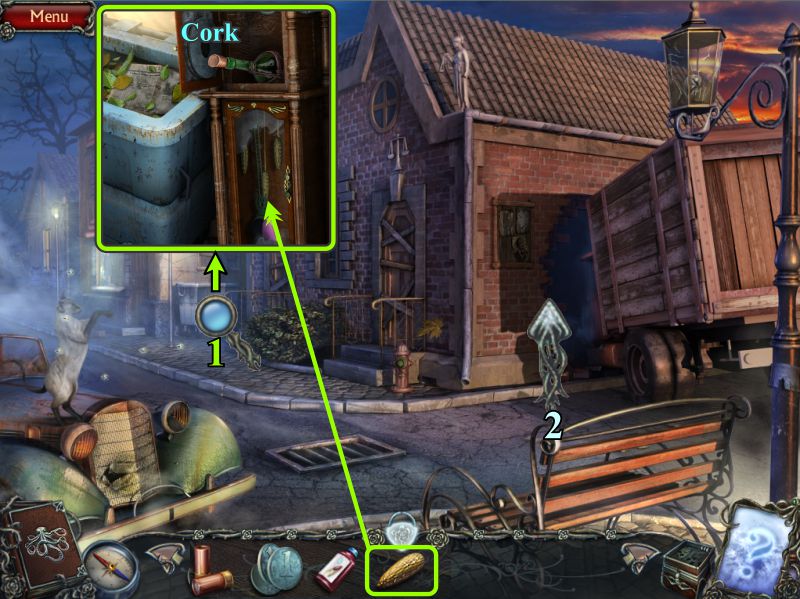
Zoom in on the clock by the dumpster and place the missing Weight.
Take the Cork, then go inside the station.
Screenshot
Police Station and Pier
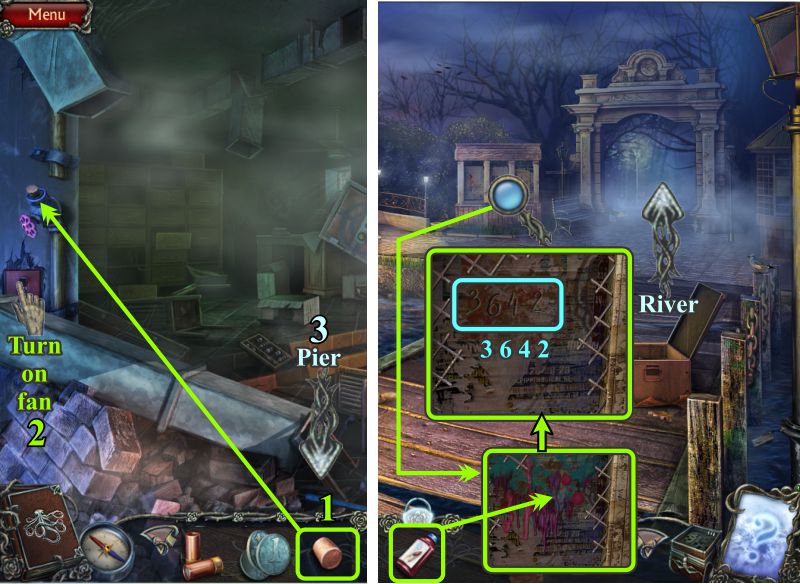
Use the Cork to trap the fumes in the pipe.
Switch on the fan.
Go to the Pier.
Zoom in on the kiosk and use the Solvent. It reveals the numbers 3642.
Go to the River.
Screenshot
River
Zoom in on the desk and enter 3642 on the safe.
Take the Gun and put the Cartridges in the barrel.
Head to the inside of the Police Station.
Screenshot
Police Station
Use the Gun to open the safe.
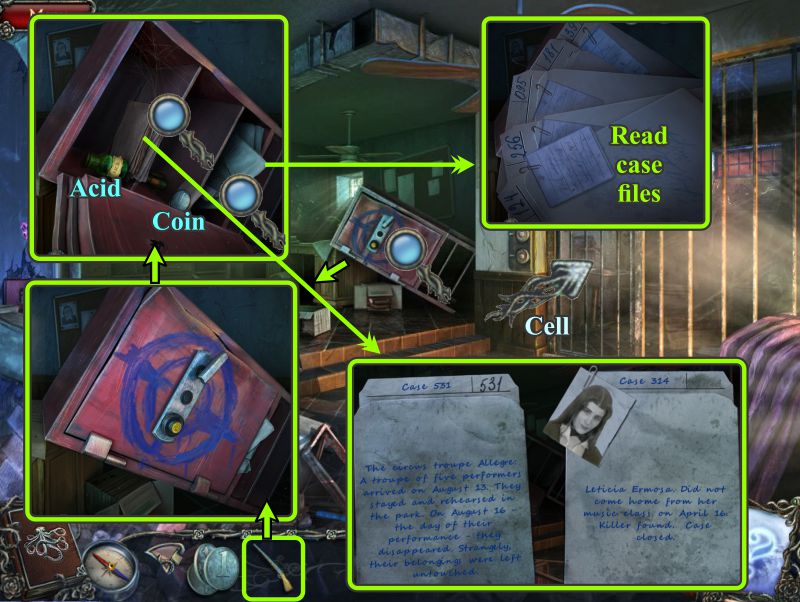
Take the Acid and Coin, and examine all the case files.
Push open and enter the Cell.
Screenshot
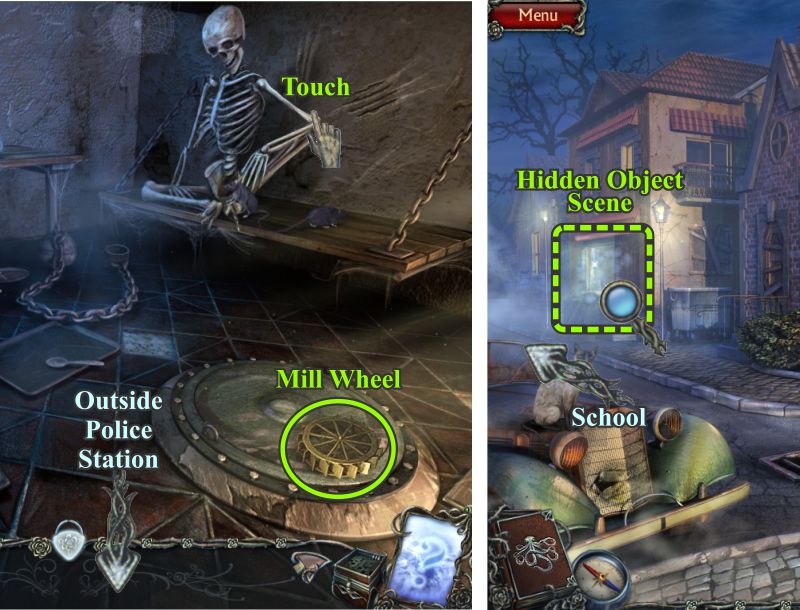
Cell and Outside Police Station
Touch the skeleton, and it will crumble.
Take the Mill Wheel from the hatch and go outside.
Play the Hidden Object Scene and go to the School.
Screenshot
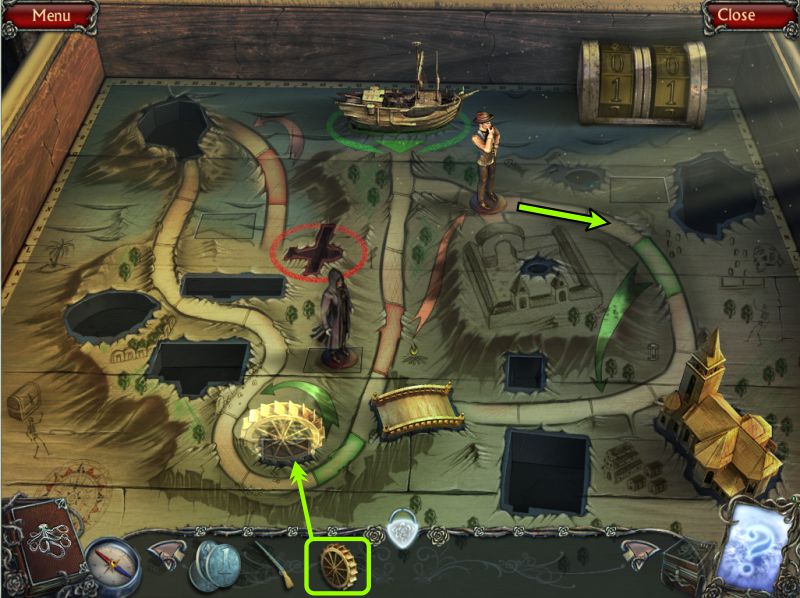
Chest
Place the Mill Wheel to advance forward.
Close the chest.
Screenshot
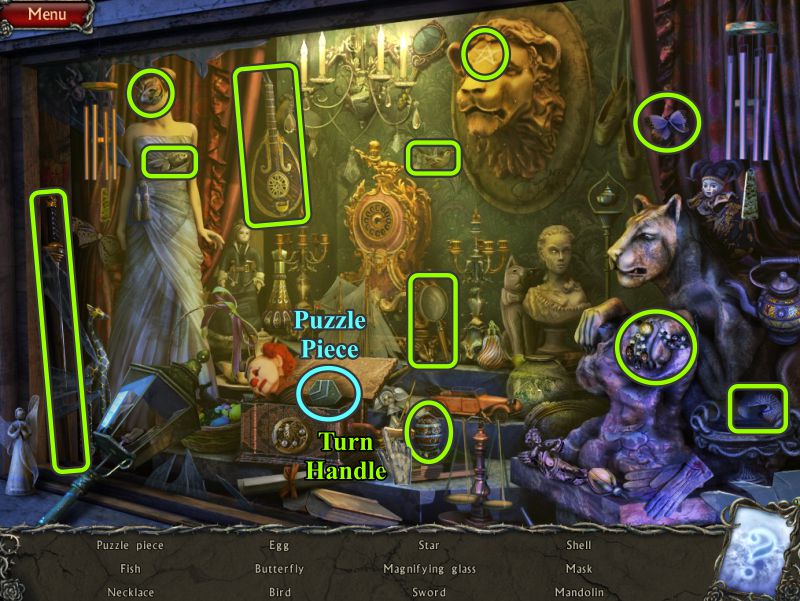
Store Window Hidden Object Scene
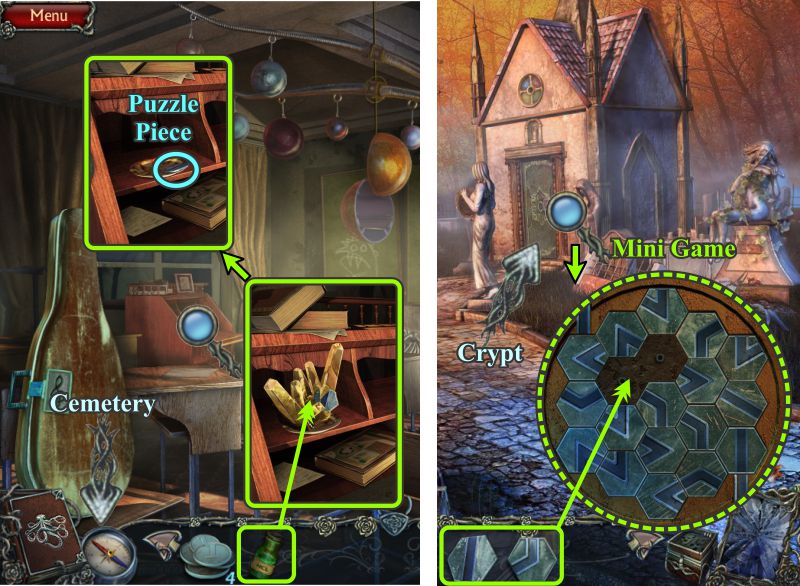
Turn the handle on the jack-in-the-box to get the Puzzle Piece for your Inventory.
Screenshot
School and Cemetery
Zoom in on the desk and use the Acid to melt the crystal.
Take the Puzzle Piece and go to the Cemetery.
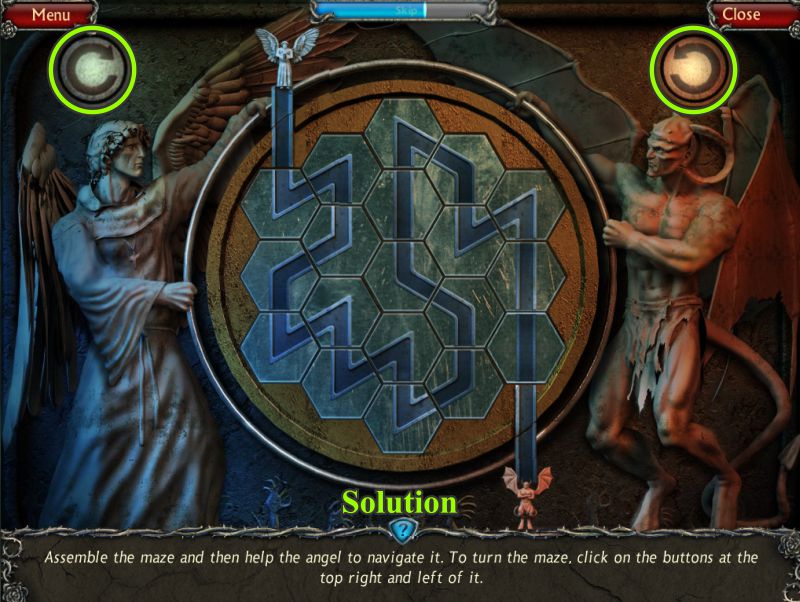
Zoom in on the Crypt door and place your two Puzzle Pieces for a Mini Game.
Screenshot
Crypt Door Mini Game
There are two parts to this game. See the screenshot for the solution to the maze.
Turn the Puzzle Pieces to make a path for the angel to reach the bottom.
Then, you must guide the angel through the maze by using the circled arrows.
Screenshot
Crypt
Enter the Crypt to find Ernesto standing in an archway that is soon closed by an altar of snakes.
Zoom in on the coffin, take the Wind-up Key and go outside.
Screenshot
Cemetery and Crypt
Zoom in on the grave shown in the screenshot, and use the Wind-up Key to open the box.
Take the Bat, read the note, and return to the Crypt.
Zoom in on the cell and place the Bat to open the door.
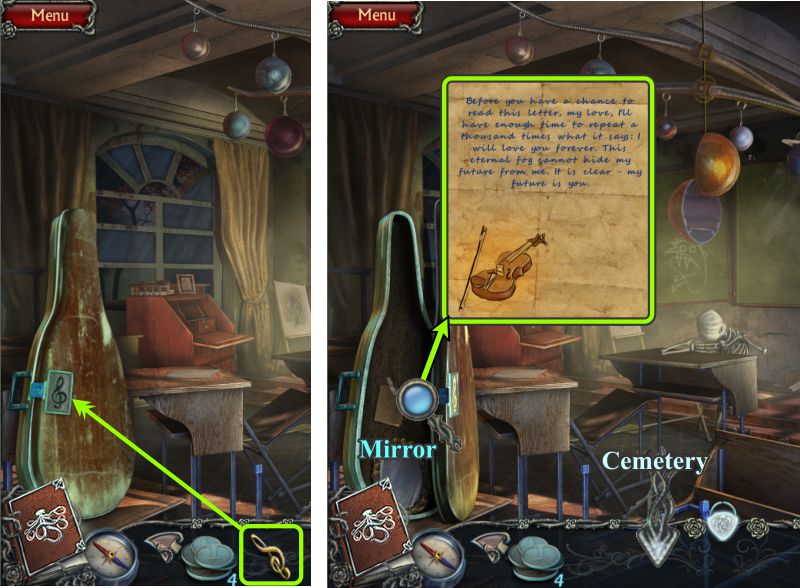
Take the Treble Clef from the skeleton, then go to the School.
Screenshot
School
Place the Treble Clef on the string instrument case to open it.
Take the Mirror, read the note, and return to the Cemetery.
Screenshot
Cemetery
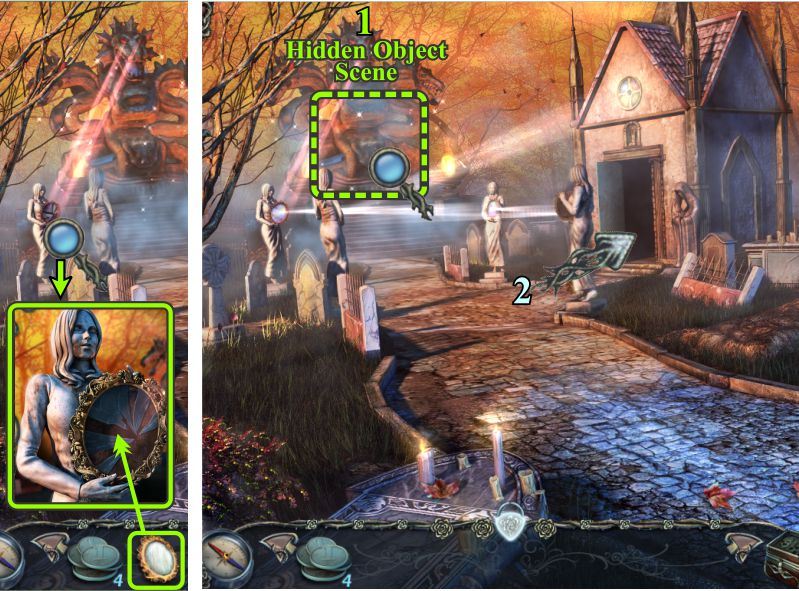
Replace the broken mirror with your new Mirror, and the light will reflect into the Crypt.
Play the Hidden Object Scene and then go inside the Crypt.
Screenshot
Snake Statue Hidden Object Scene
Collect everything to get the Skeleton.
Screenshot
Crypt
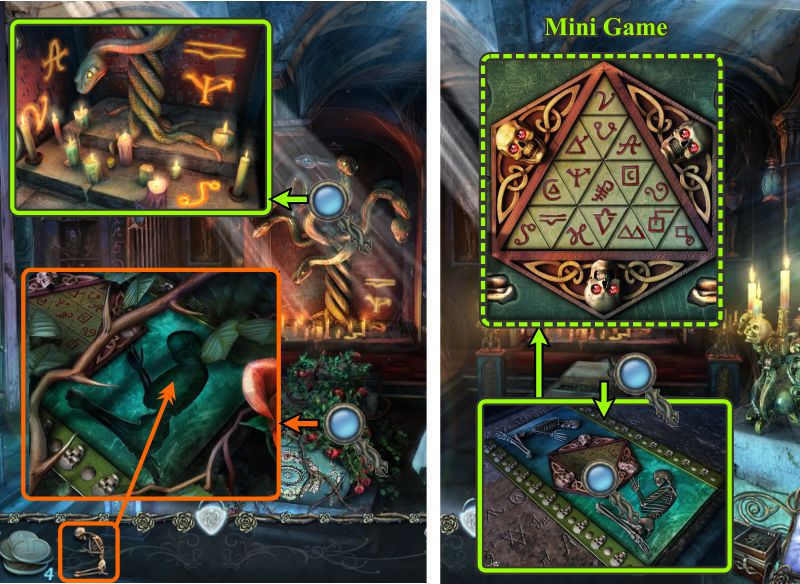
Zoom in on the altar and take note of the symbols.
Examine the coffin the place the Skeleton in the outline.
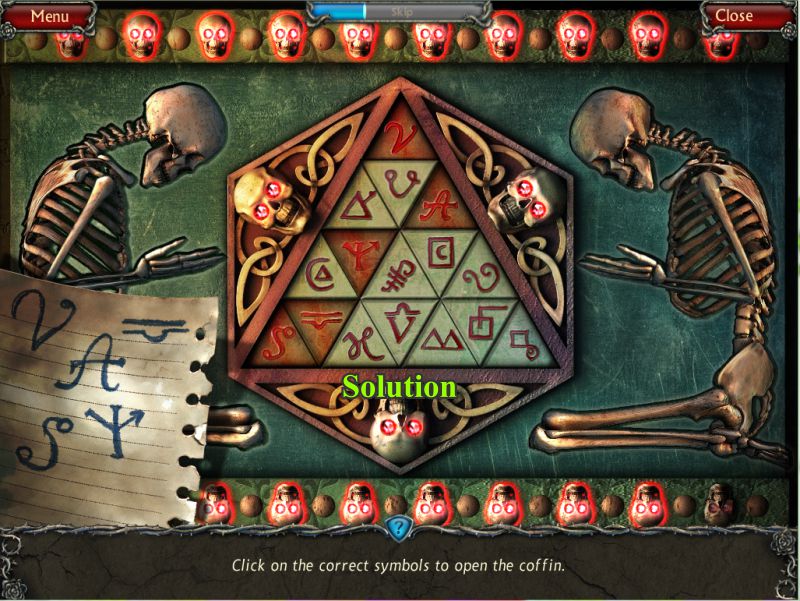
Zoom in on the center of the plaque for a Mini Game.
Screenshot
Coffin Mini Game
Press the symbols shown in the screenshot solution.
Screenshot
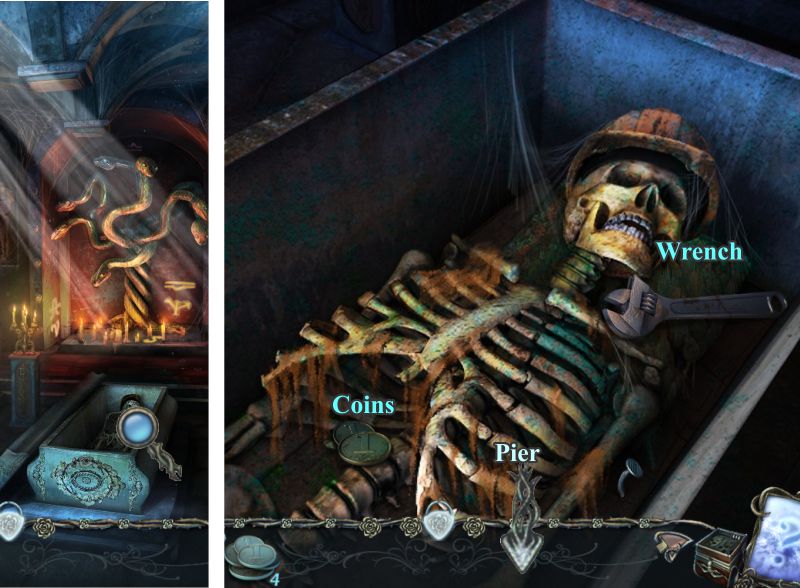
Coffin
Zoom in on the open coffin and take the Wrench and Coins.
Go to the Pier.
Screenshot
Pier
Zoom in on the kiosk and use the Wrench to open the box.
Collect the Coins and Lions.
Screenshot
Chest
Place the Lions to advance forward on the path.
Screenshot
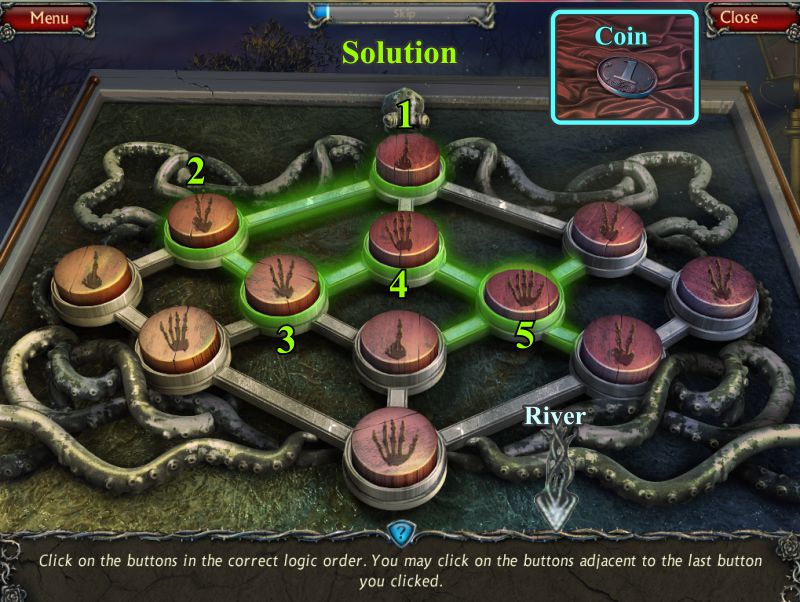
Chest Mini Game
Your goal is to click on the buttons in the correct logical order as shown in the screenshot.
Take the Coin and go to the River.
Screenshot
River and Crypt
You now have 10 coins, so negotiate with the woman to buy some Dynamite.
Go to the Crypt, zoom in on the altar, and place your self-igniting Dynamite.
Screenshot
Crypt and Cemetery
Antonio appears and says to leave his family alone.
He shoots off his gun, causing the doorway to be blocked by boulders.
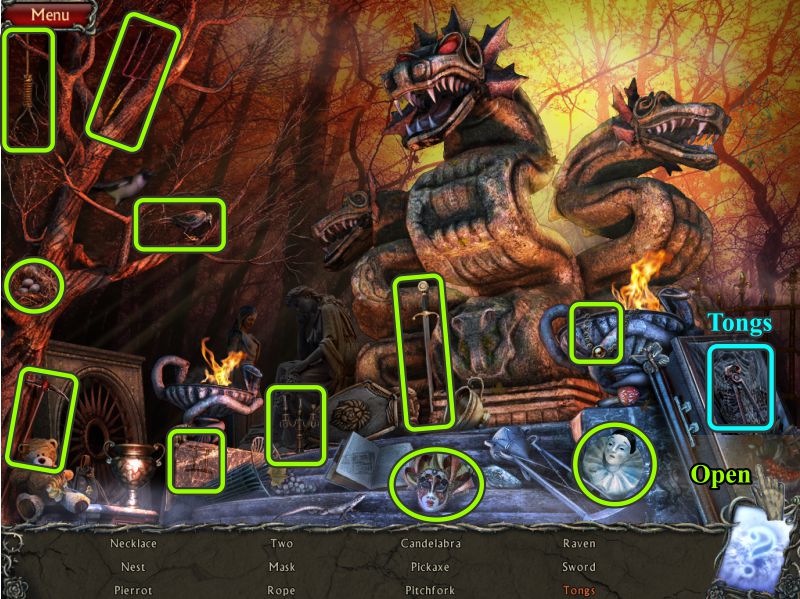
Go to the Cemetery, play the Hidden Object Scene, and return to the Crypt.
Screenshot
Snake Statue Hidden Object Scene
Open the coffin to get the Tongs for your Inventory.
Screenshot
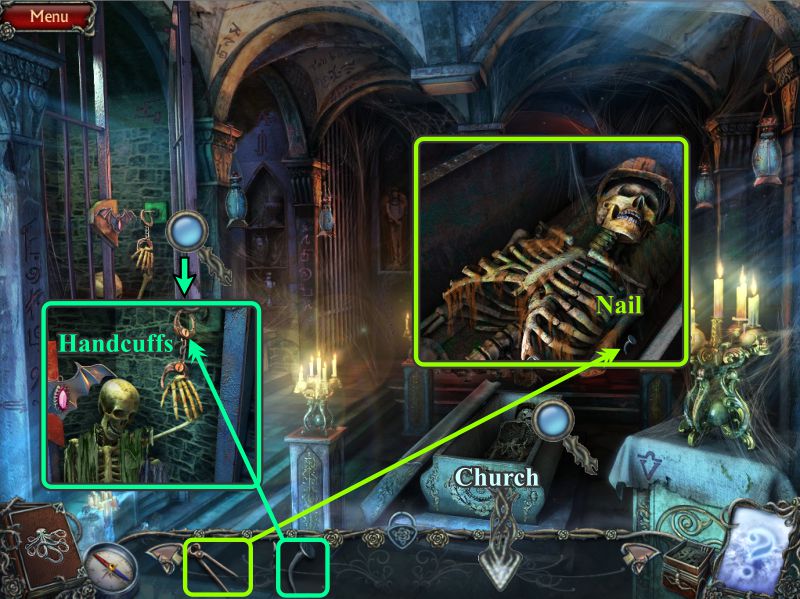
Crypt
Zoom in on the coffin, and use the Tongs to remove the Nail from the skeleton.
Use the Nail to remove the Handcuffs from the skeleton in the cell.
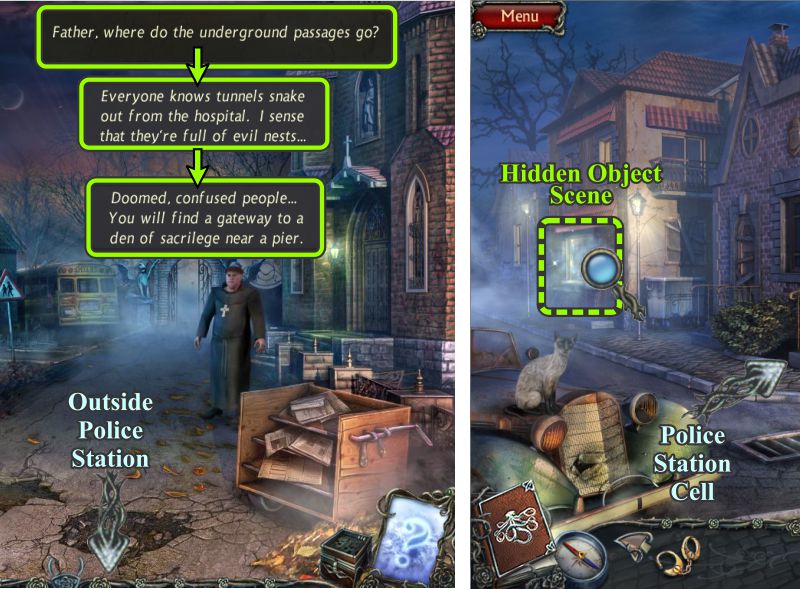
Head toward the Church.
Screenshot
Church and Police Station
Have a little chat with Father Sergio...see the screenshot in case you missed any of it.
Go to the Police Station, place the Hidden Object Scene, and go inside the station to the Cell.
Screenshot
Store Window Hidden Object Scene
You will get an Empty Oiler for your Inventory.
Screenshot
Cell and Mountain Lift
Use the Handcuffs to open the hatch.
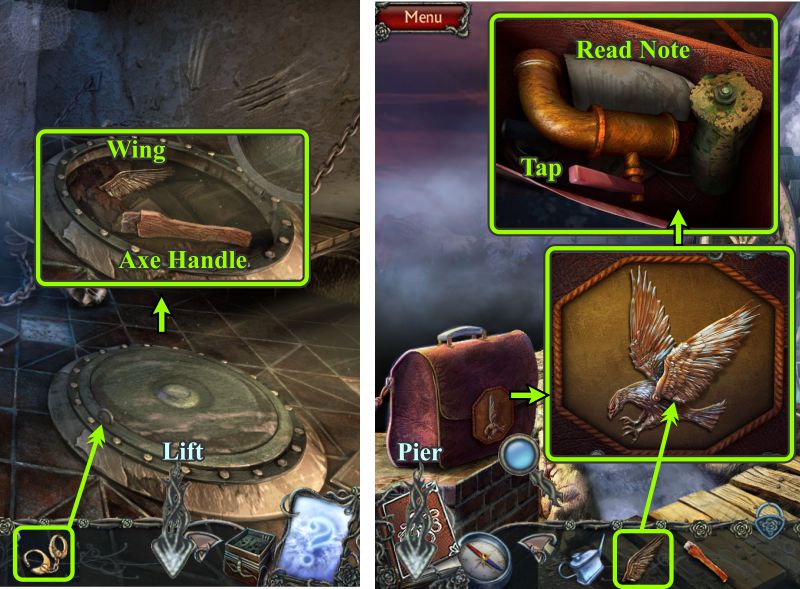
Take the Axe Handle and Wing, and go to the Lift.
Examine the briefcase and place the Wing on the eagle to open the case.
Read the Note and take the Tap.
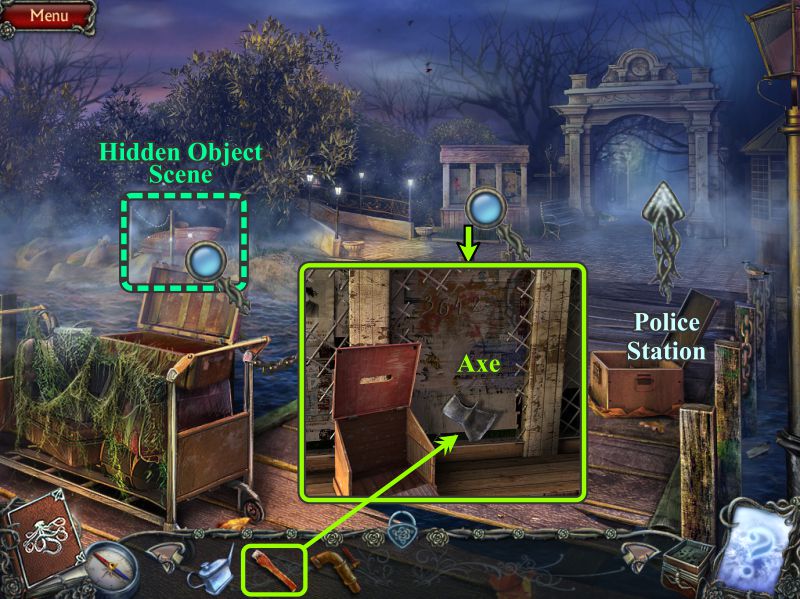
Go to the Pier.
Screenshot
Pier
Zoom in on the kiosk and place the Axe Handle on the Axe, and it will go into your Inventory.
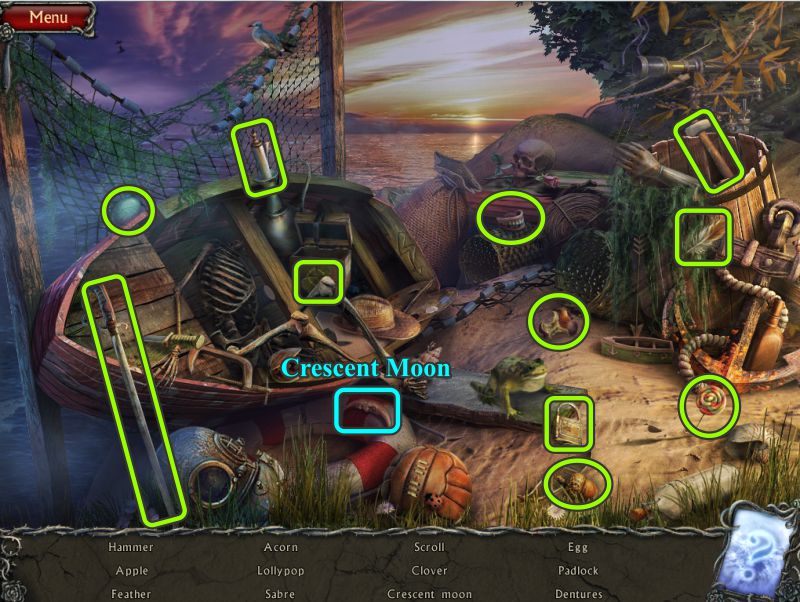
Play the Hidden Object Scene before returning to the Police Station.
Screenshot
Shore Hidden Object Scene
A Crescent Moon will go into your Inventory.
Screenshot
Police Station
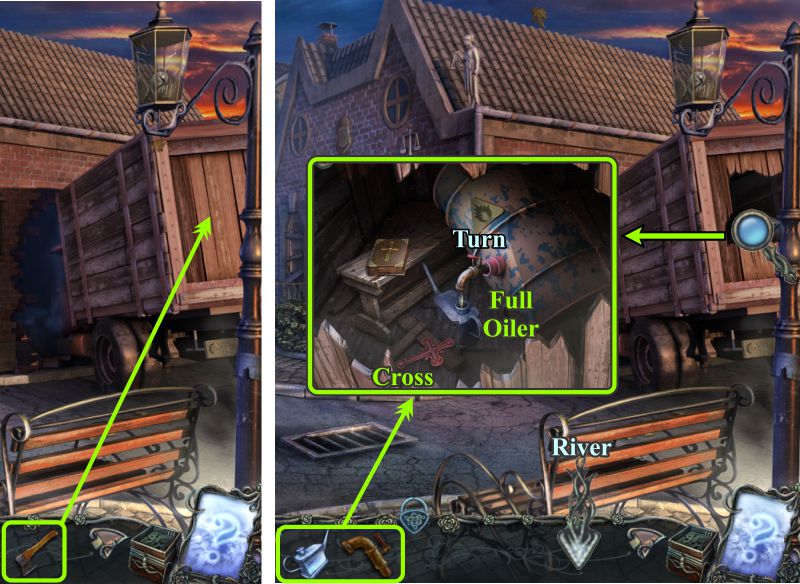
Use the Axe on the back of the truck and zoom inside.
Take the Cross, place the Tap and Oiler, and turn the handle on the tap to fill the oiler.
Collect the Full Oiler and head to the River.
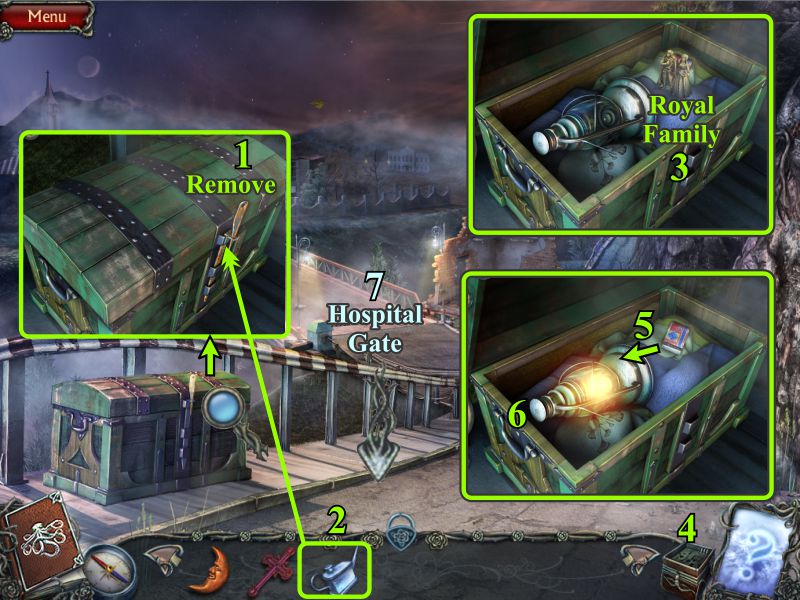
Screenshot
River
Remove the wedge.
Oil the lock to open the trunk.
Take the Royal Family.
Place it in the Chest.
Use the Matches to light the lantern.
Take the Lit Lantern.
Go to Hospital Gate.
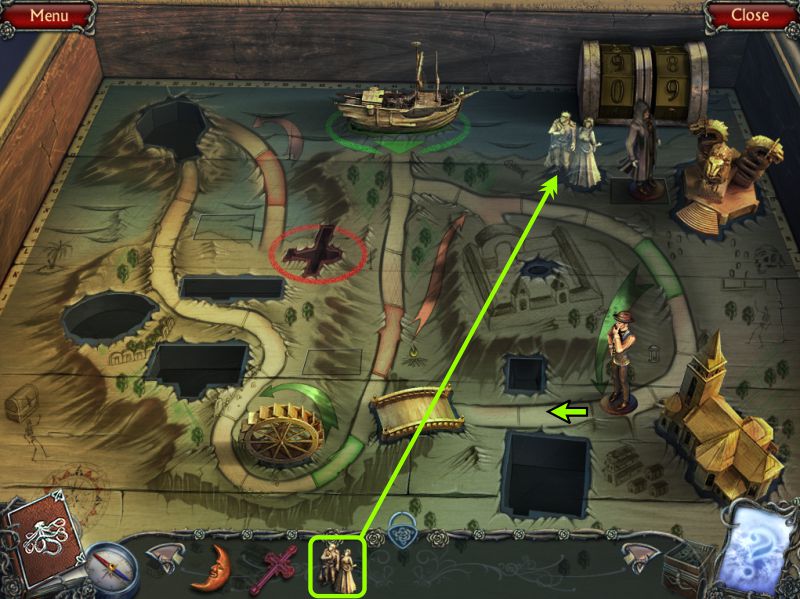
Screenshot
Deck
Place the Royal Family and advance forward.
Screenshot
Chapter 3: Finding the Hospital
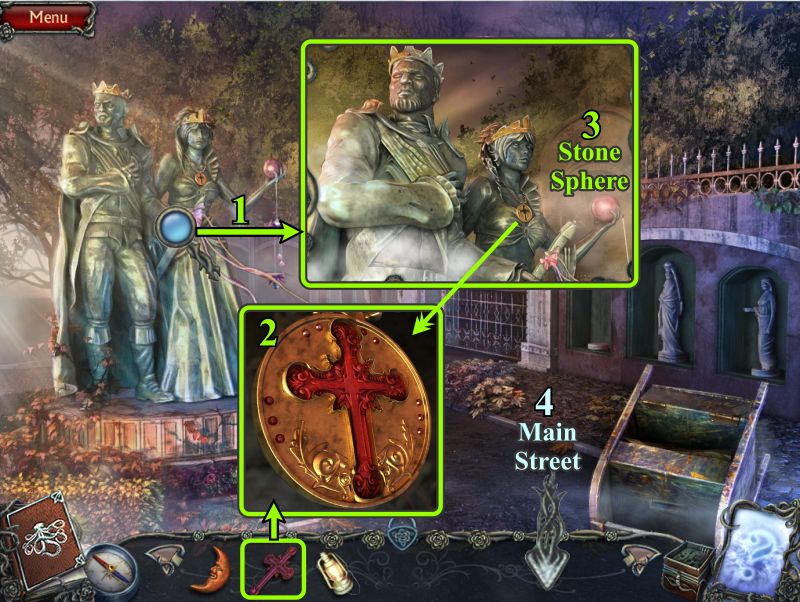
Hospital Gate
Zoom in on the statue and the pendant.
Place the Cross and take the Stone Sphere when she releases it.
Go to the Main Street.
Screenshot
Fountain
Place the Stone Sphere in the statue's hand.
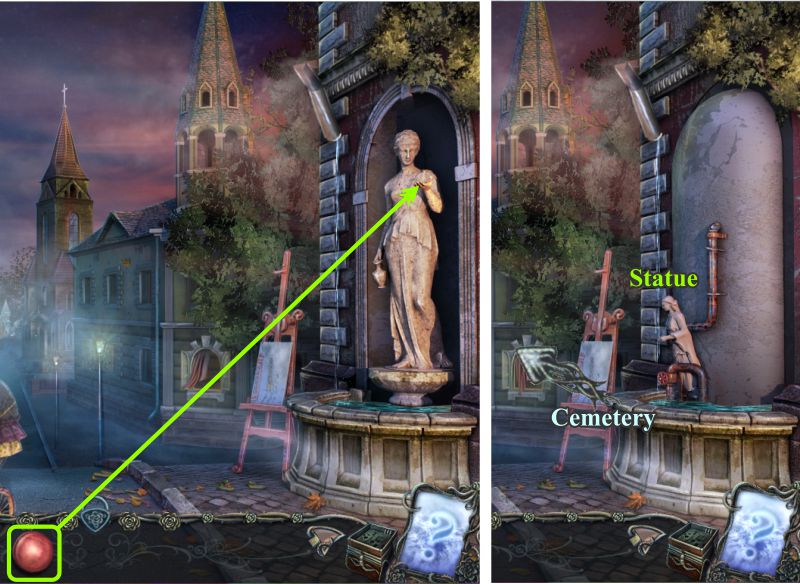
Take the small Statue and head to the Cemetery.
Screenshot
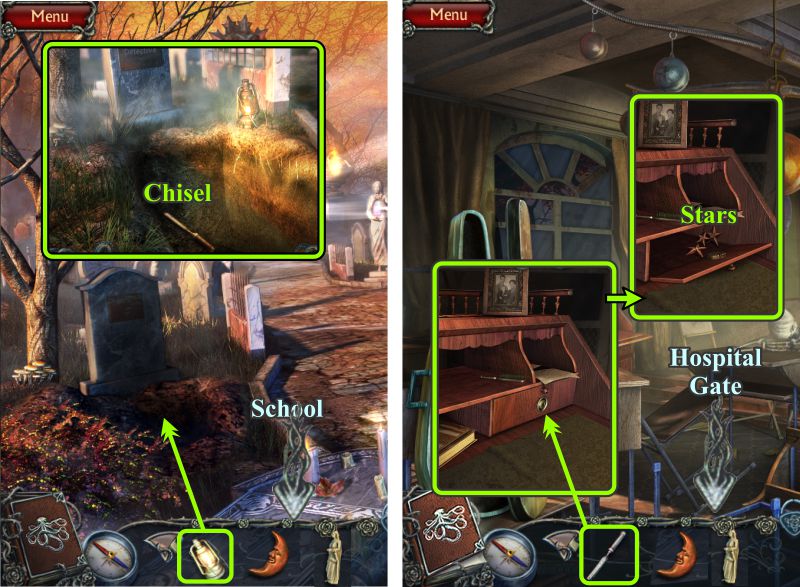
Cemetery and School
Place the Lantern by the open grave, and take the Chisel.
Go to the School and zoom in on the desk.
Use the Chisel to open the drawer.
Take the Stars and go to Hospital Gate.
Screenshot
Hospital Gate
Place your Statue in its niche as shown in the screenshot.
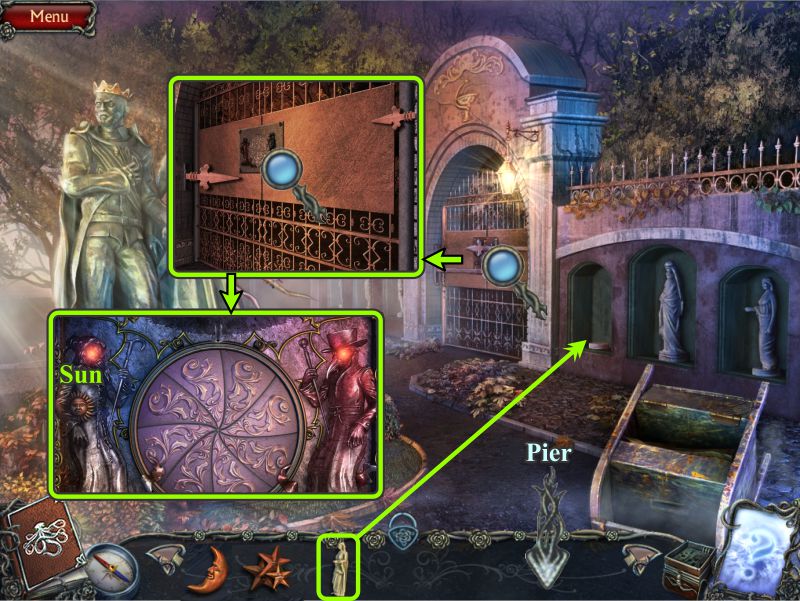
Zoom in on the gate and take the Sun.
Go to the Pier.
Screenshot
Pier
Zoom in on the box and place your Sun, Moon and Stars on the book.
Take the Caduceus from the open book and read the note.
Return to the Hospital Gate.
Screenshot
Hospital Gate
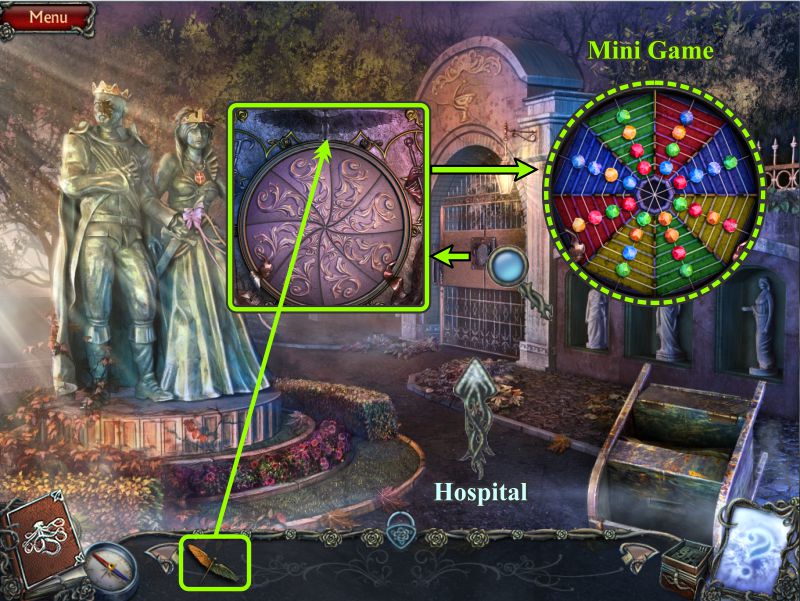
Zoom in on the gate and place the Caduceus to trigger a Mini Game.
When the gate opens, enter.
Screenshot
Hospital Gate Mini Game
Your goal is the move the gems into their corresponding color section.
Slide the gems into an empty space to move them, beginning with the center.
The original placement of the gems is random, so you are on your own to achieve the solution shown in the screenshot.
Screenshot
Doctor's House
You find yourself being chased by a group of monsters, so you need to make a run for it and take refuge in the Doctor's House.
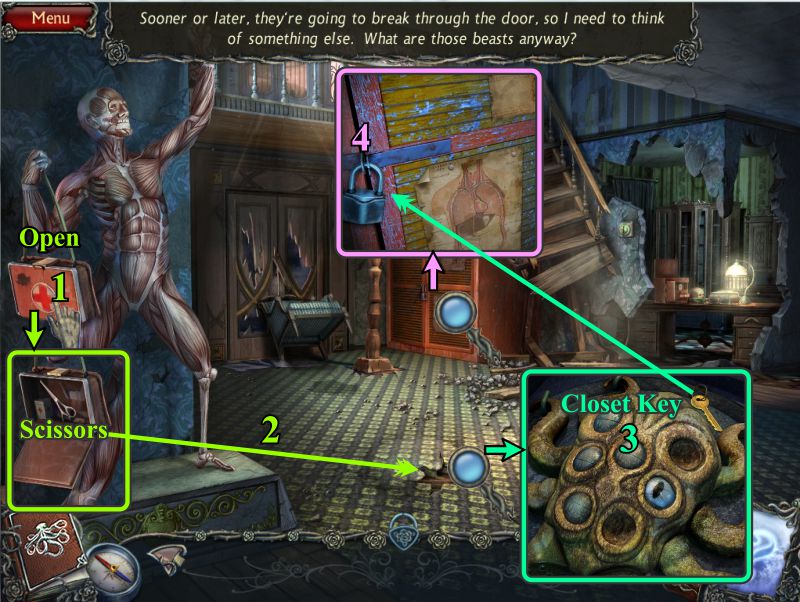
Open the first aid kit the statue is holding and take the Scissors.
Zoom in on the carpet and use the Scissors to find out what's underneath.
Take the Closet Key and note the missing eyes.
Zoom in on the closet and use the Closet Key on the lock.
Screenshot
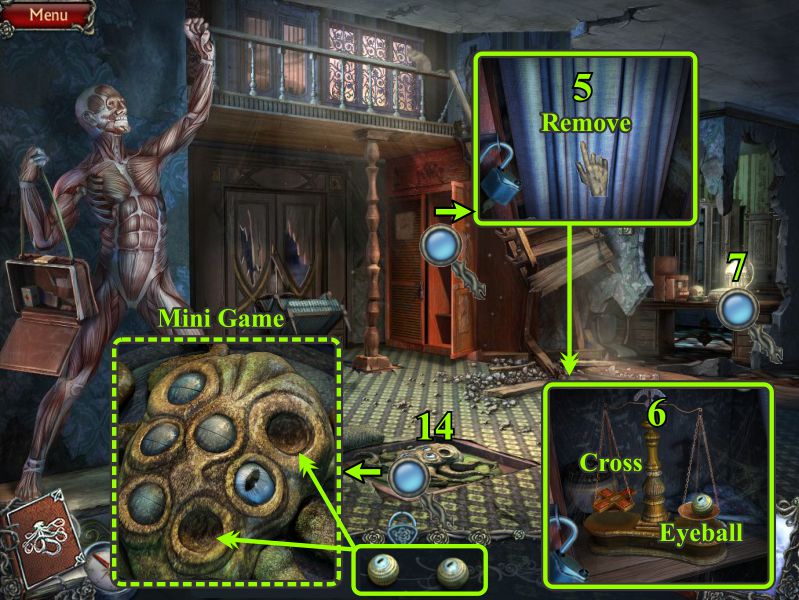
When the closet opens, remove the curtain.
Take the Cross and Eyeball.
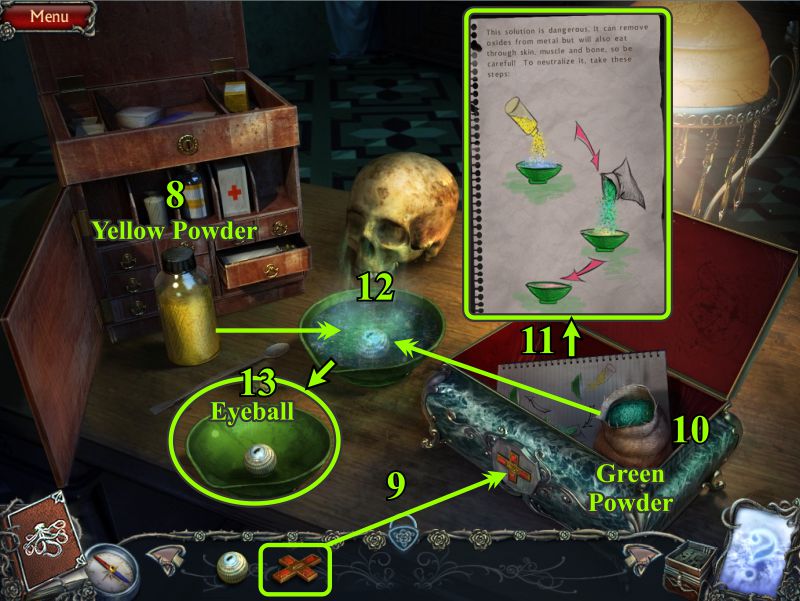
Zoom in on the table.
Screenshot
Take the Yellow Powder.
Place the Cross on the box to open it.
Take the Green Powder.
Read the instructions in the box.
Place the Yellow Powder and then the Green Powder in the bowl.
Take the Eyeball.
As shown in the previous screenshot, zoom in on the floor and place the 2 Eyeballs for a Mini Game.
Screenshot
Eyeball Hatch Mini Game
Your goal is to open all the eyes.
See the screenshot for a numbered solution.
When the hatch opens, go down to the Catacombs.
Screenshot
Catacombs
There are two corridors off the main part of the Catacomb, so first take the left one, and then you will come back to go right.
Continue down the left corridor to the Colonnade.
Colonnade
Zoom in on the fallen column and take the Knob.
Play the Hidden Object Scene before going to the Right Corridor.
Screenshot
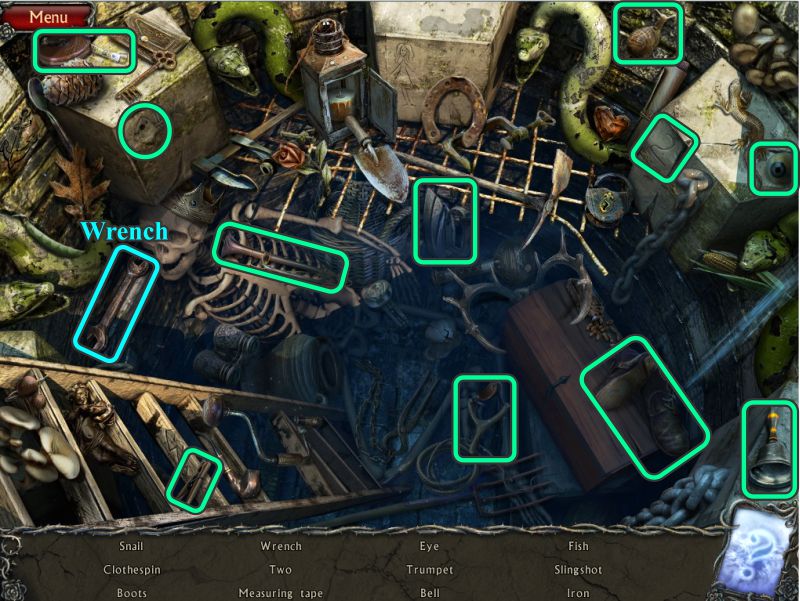
Colonnade Hidden Object Scene
Collect everything to get a Wrench.
Screenshot
Right Corridor
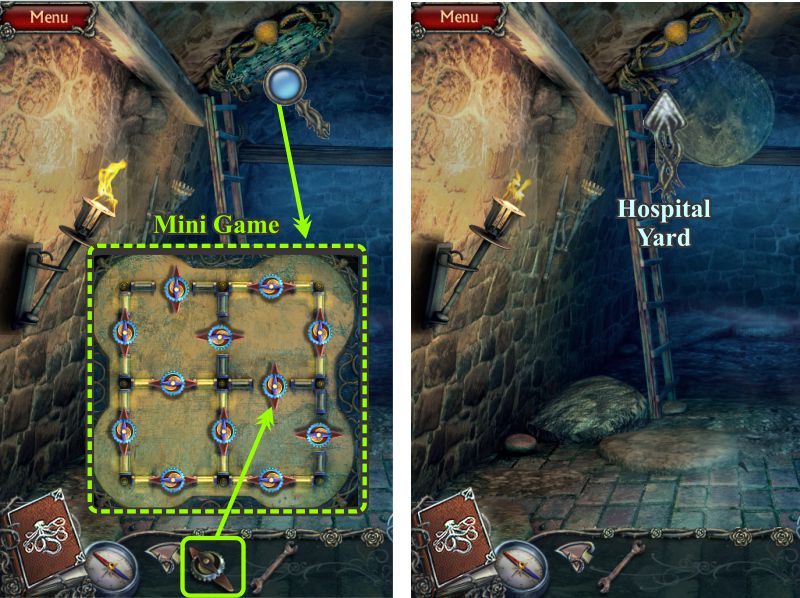
Zoom in on the hatch and place your Knob to trigger a Mini Game.
When the hatch opens, go up the ladder to the Hospital Yard.
Screenshot
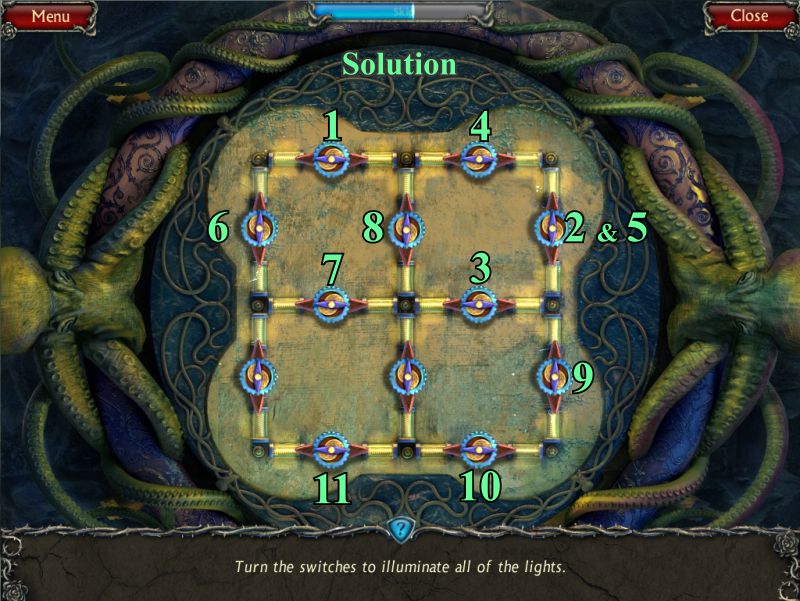
Hatch Mini Game
Your goal is to turn all the switches so all the lights are lit.
See the screenshot for a numbered solution.
Screenshot
Chapter 4: Hospital
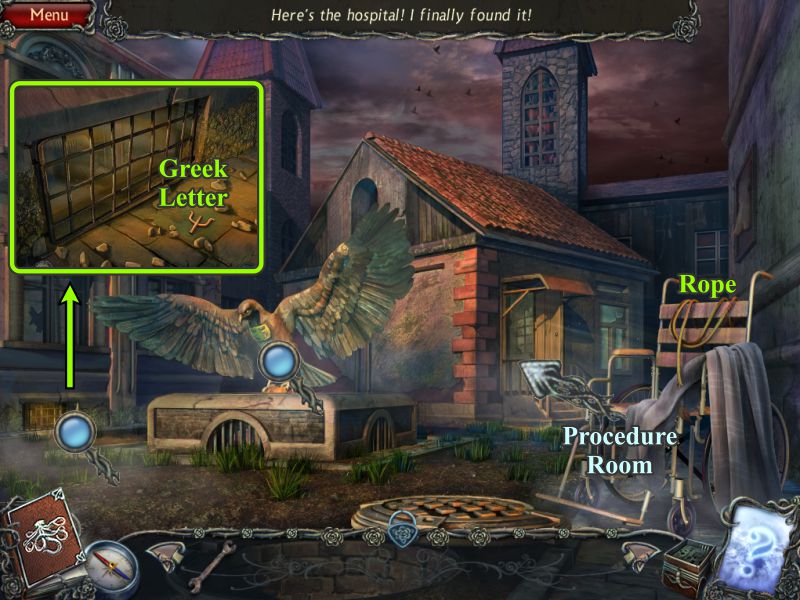
Hospital Yard
Take the Rope and zoom in on the grate at the left.
Take the Greek Letter and enter the Hospital.
Screenshot
Procedure Room
Examine the figure in the chair and use the Wrench to undo the helmet.
Remove the helmet and take the Valve Handle.
Zoom in on the table to the right and place the Greek Letter on the lock.
Take the Sulfuric Acid and Octopus.
Screenshot
Chest
Place the Octopus to move to the bridge.
Screenshot
Procedure Room
Zoom in on the book on the bed and turn all the pages to read everything.
Play the Hidden Object Scene, and then return to the Hospital Yard.
Screenshot
Procedure Room Hidden Object Scene
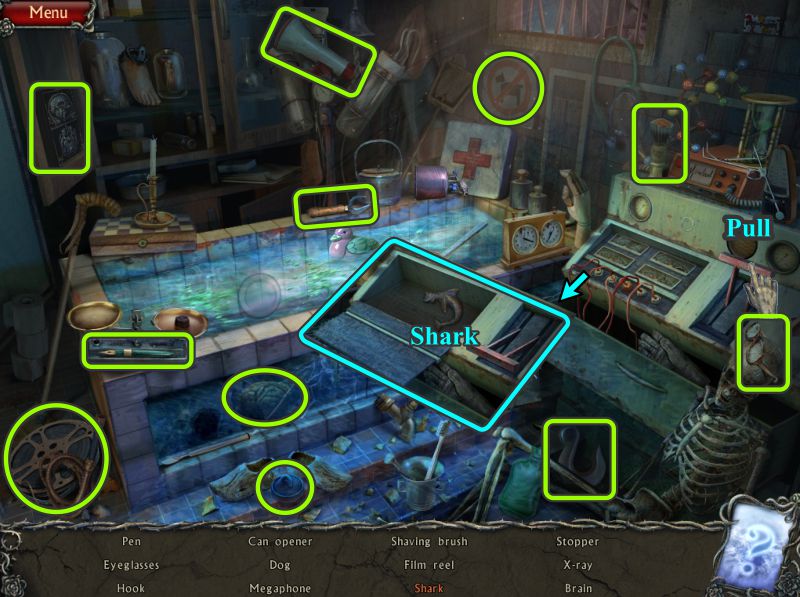
Pull the lever to open the machine at the right to find the Shark for your Inventory.
Screenshot
Hospital Yard
Zoom in on the grate and use the Sulfuric Acid to melt the bars.
Go through the grate to the Hospital Basement.
Screenshot
Basement
Examine the boiler and door.
Remove the opening from the tank and place your Valve.
Try to turn it and find out there is no pressure.
Go through the archway to the Rose Door.
Screenshot
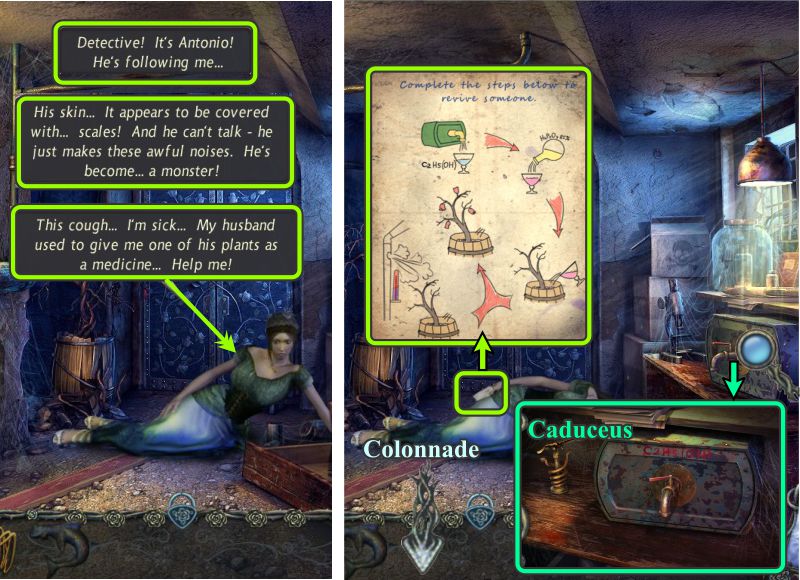
Rose Door
You've located Teresa, so talk to her before she collapses. See the screenshot if you missed the conversation.
Take the instructions from her about reviving the plant.
Zoom in on the table at the right and take the Caduceus before heading back to the Colonnade, in the Catacombs under the Doctor's House, via the hatch in the Hospital Yard.
Screenshot
Chest
Place the Caduceus in order to advance over the bridge.
Screenshot
Colonnade
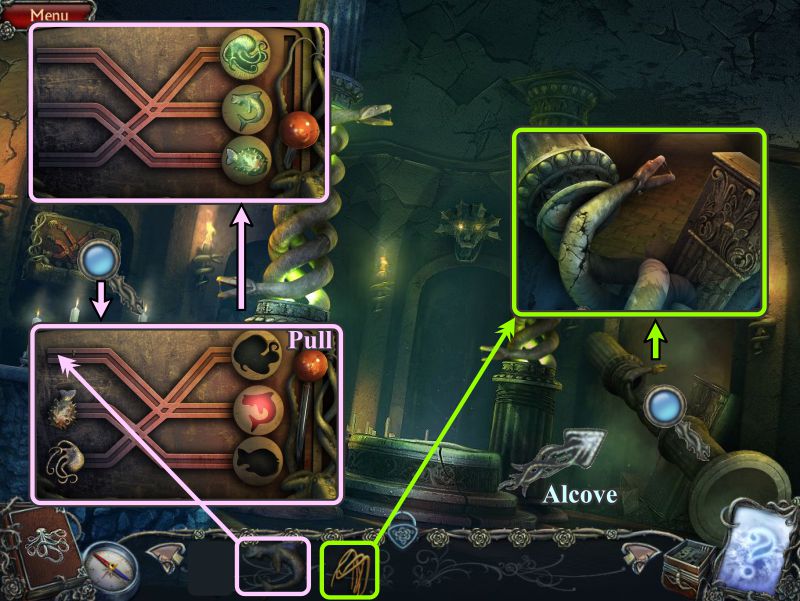
Zoom in on the mechanism on the wall and place the Shark.
Pull the handle, and the 3 elements will move along to their proper places.
The snake columns are now revolving, so zoom in on the fallen column and attach your Rope.
The Rope will be caught up by the nearest column, and the fallen column will rise so you can pass through the archway to the Alcove.
Screenshot
Alcove
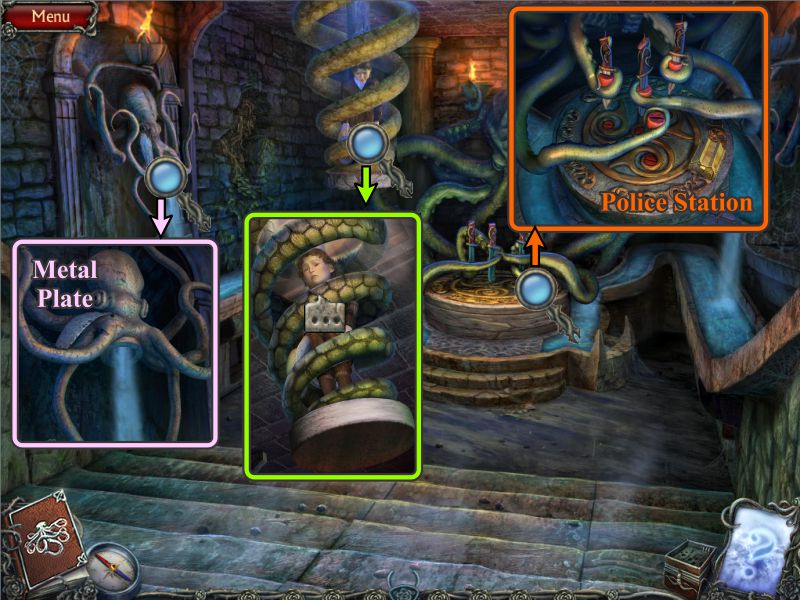
You've found Ernesto, so talk to him.
Zoom in on the octopus fountain and take the Metal Plate.
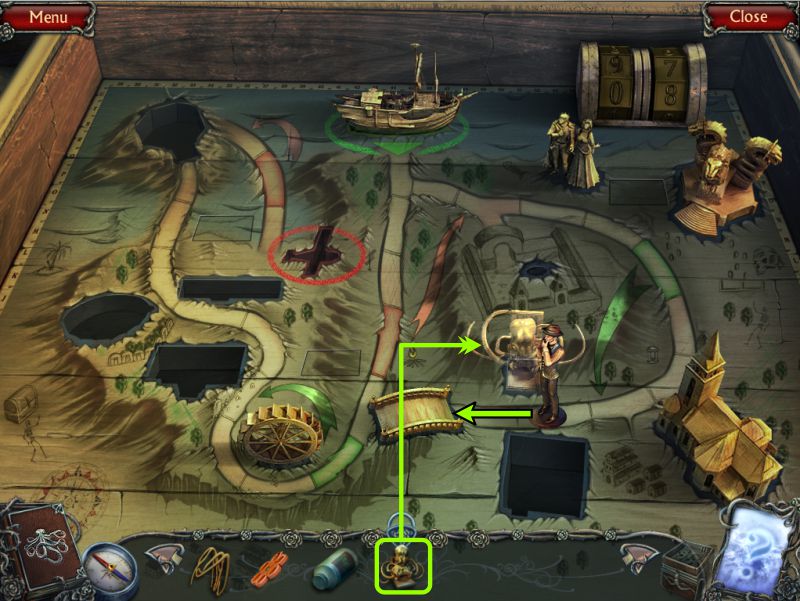
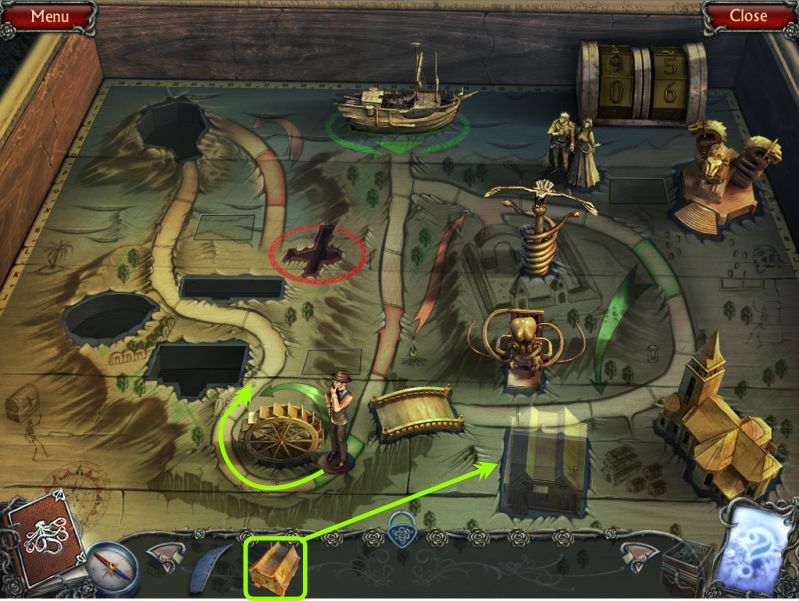
Examine the pedestal and take the Police Station.
Screenshot
Chest
Place the Police Station to advance around the Mill Wheel.
Screenshot
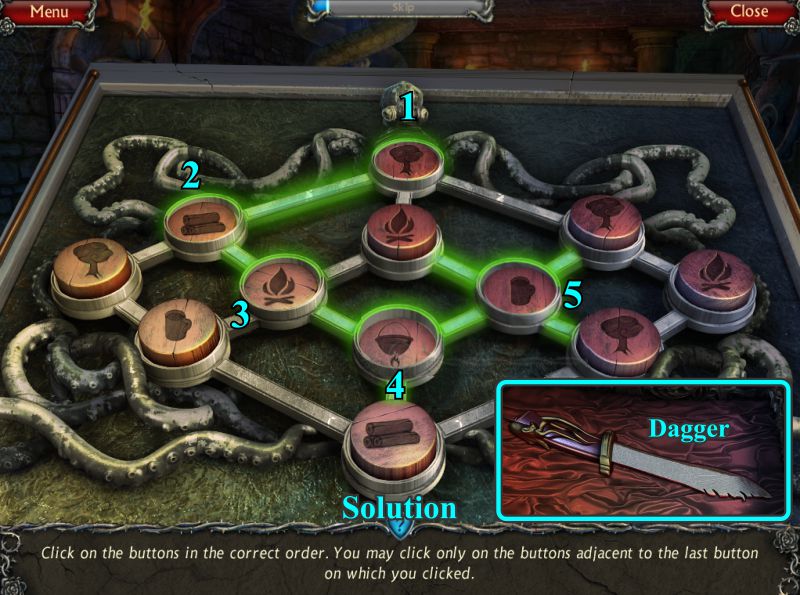
Chest Mini Game
Press the buttons in the correct order according to what comes first.
See the screenshot for the numbered solution.
Take the Dagger from the bottom of the Chest.
Screenshot
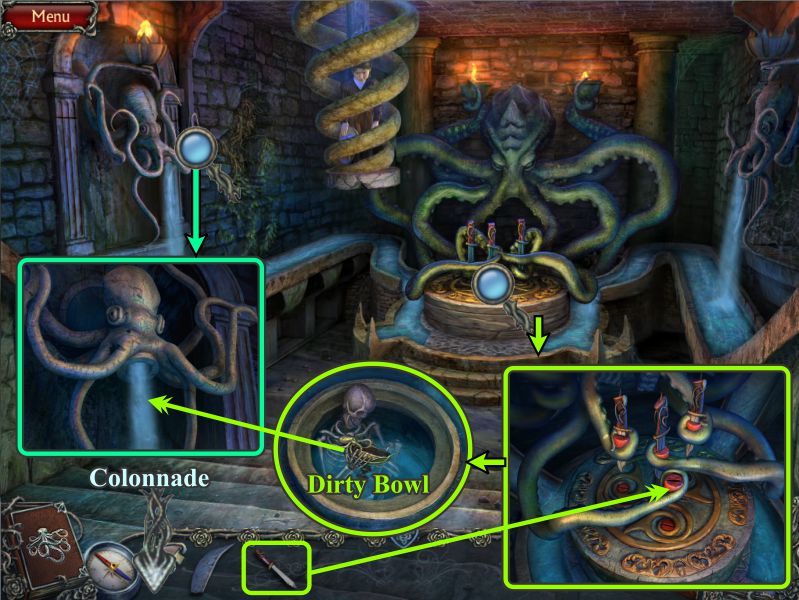
Alcove
You are back in the Alcove, so zoom in on the pedestal and place the Dagger.
When the container opens, take the Dirty Bowl and clean it up in the fountain.
Return to the Colonnade.
Screenshot
Colonnade and Hospital Basement
Play the Hidden Object Scene, and then go to the Hospital Basement.
Zoom in on the boiler and place the Metal Plate.
Examine the door.
Screenshot
Colonnade Hidden Object Scene
Open the drawer to get the Gear for your Inventory.
Screenshot
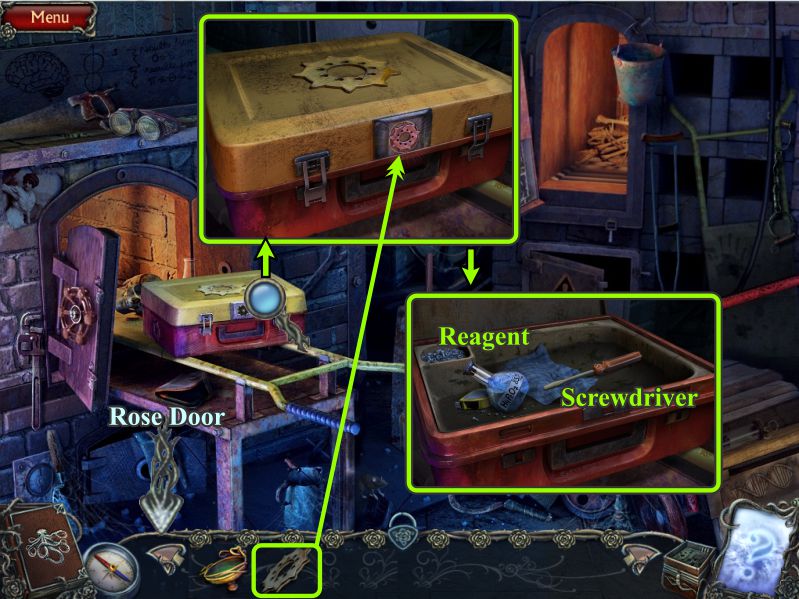
Door in Basement
Examine the box and place the Gear.
When the box opens, take the Reagent and Screwdriver.
Go to the Rose Door.
Screenshot
Rose Door
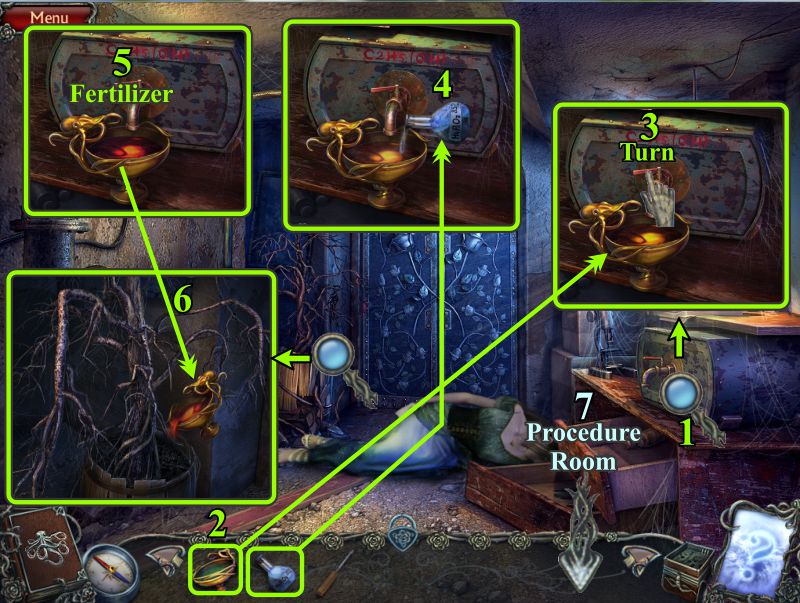
Zoom in on the table at the right.
Place your Clean Bowl.
Turn the handle to pour some alcohol into the bowl.
Pour the Reagent into the bowl.
Take the Fertilizer you have created.
Pour the Fertilizer onto the plant.
Go to the Hospital Procedure Room.
Screenshot
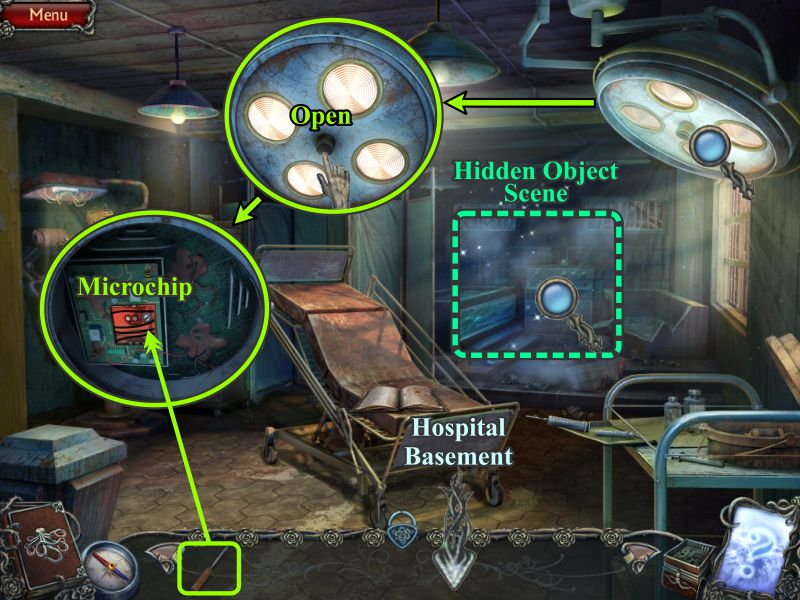
Procedure Room
Zoom in on the overhead lamp, open it, and use your Screwdriver to remove the Microchip.
Play the Hidden Object Scene and return to the Hospital Basement.
Screenshot
Procedure Room Hidden Object Scene
Collect everything to get the Blowtorch.
Screenshot
Basement and Rose Door
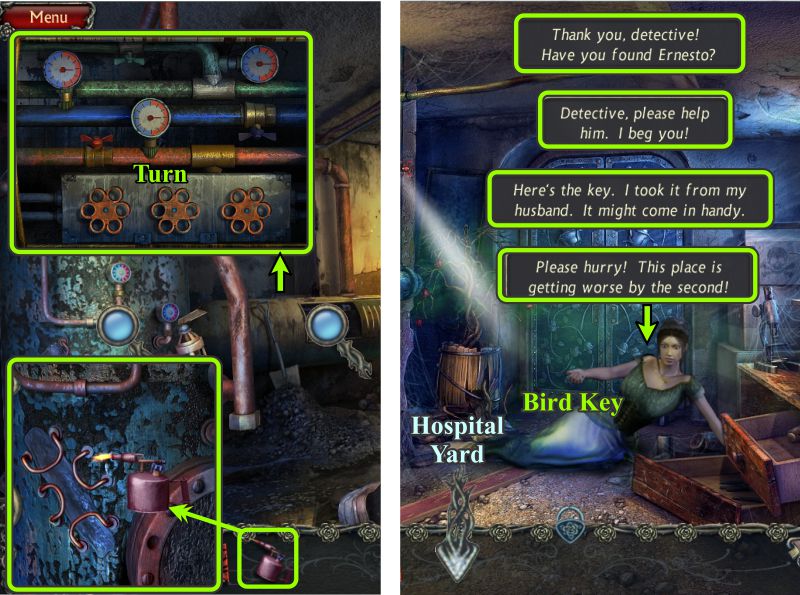
Use the Blowtorch to weld the Metal Plate to the boiler.
Zoom in on the valves and turn them to restore pressure.
Go to the Rose Door to talk to Teresa, who has now revived.
Take the Bird Key she offers you, then go to the Hospital Yard.
Screenshot
Hospital Yard
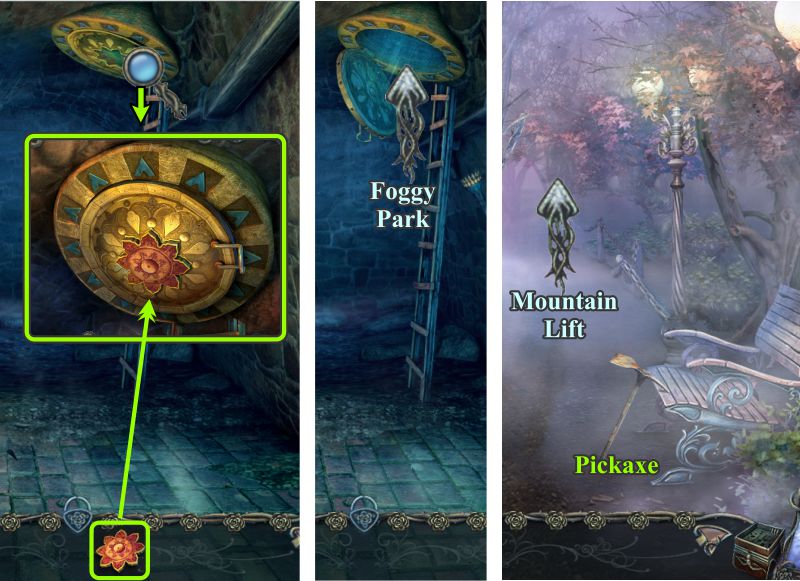
Zoom in on the bird, use the Bird Key to open the plate, and touch it for a closer look.
Place your Microchip, watch what happens next, and click the "Need to hurry" instructions to rapidly return to the Basement.
Screenshot
Basement
You've reunited Ernesto with his Mother, but you need to follow her instructions to go to the Hangar.
Go to the Rose Door that is now open to another set of Catacombs.
Enter and pick up the Sun-shaped Key.
Go through the archway to the right.
Screenshot
Hatch and Foggy Park
Zoom in on the hatch and place the Sun-shaped Key.
Go up the ladder to the Foggy Park.
Pick up the Pickaxe and head off through the park to the Mountain Lift.
Screenshot
Chapter 5: Mansion
Mountain Lift
Climb the ladder and use the Pickaxe on the boulders.
The Lift has returned, so enter it to go to return to Fuente de Viento.
Screenshot
Lift
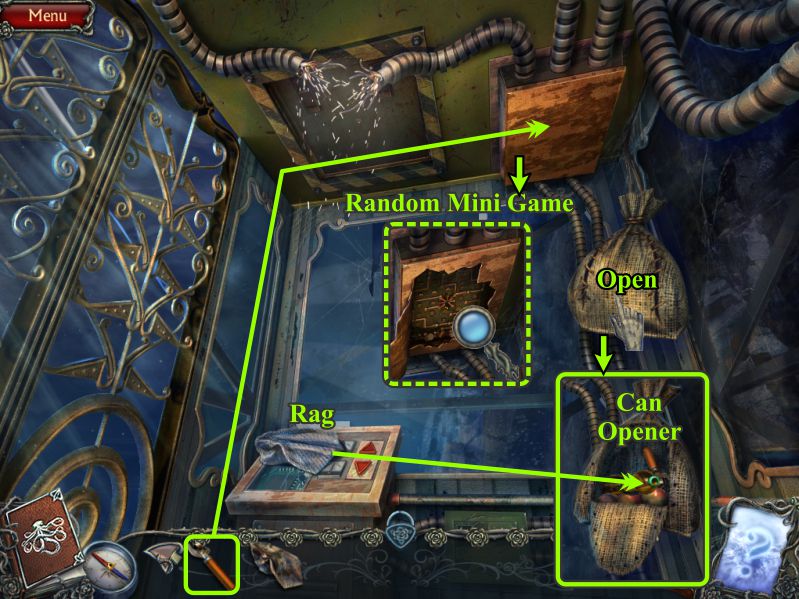
Open the sack and take the Can Opener.
Grab the Rag off the console and use it to sop up some oil from the sack to get an Oily Rag.
Use the Can Opener to open the fuse box for a Mini Game.
Screenshot
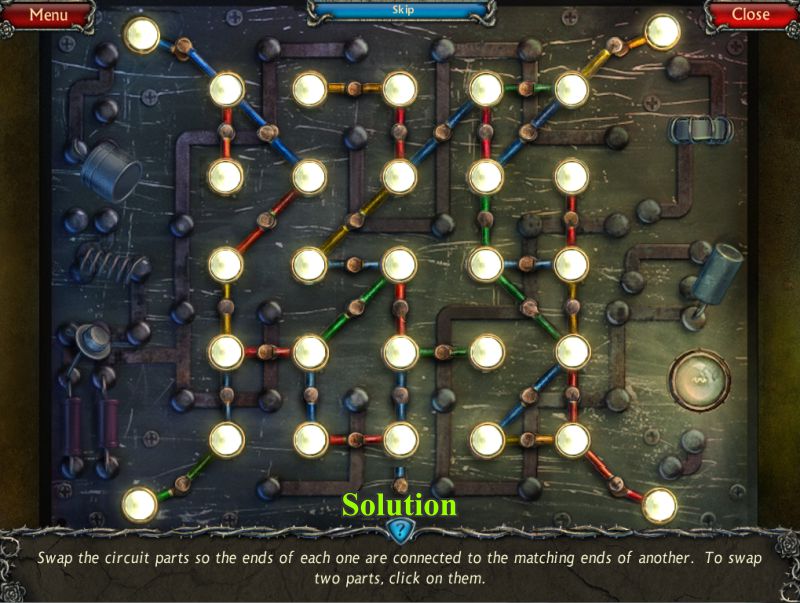
Fuse Box Mini Game
Your goal is to connect all of the circuits.
Swap out the various circuit parts to make matching ends without sparks.
See the screenshot for the solution.
Screenshot
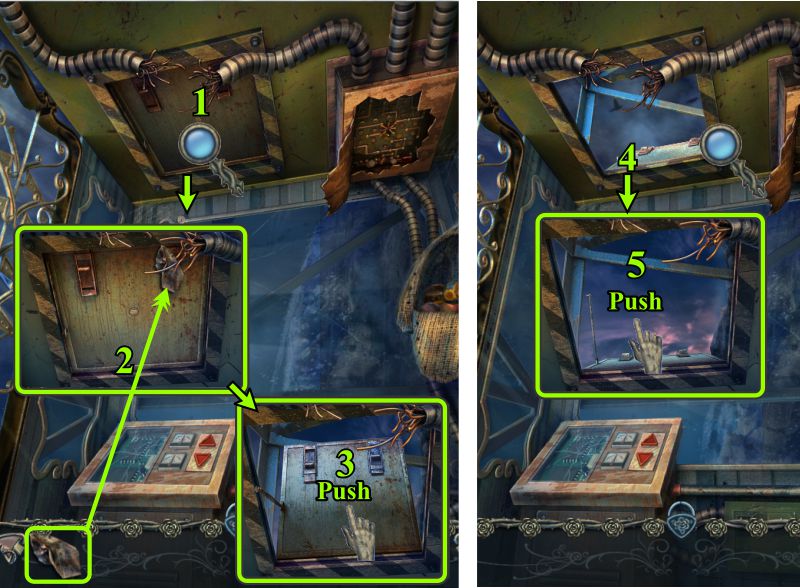
Lift
Zoom in on the hatch.
Use your Oily Rag on the hinges.
Push on the hatch to open it, and it will open part way.
Push again to be able to climb through and exit the lift.
Screenshot
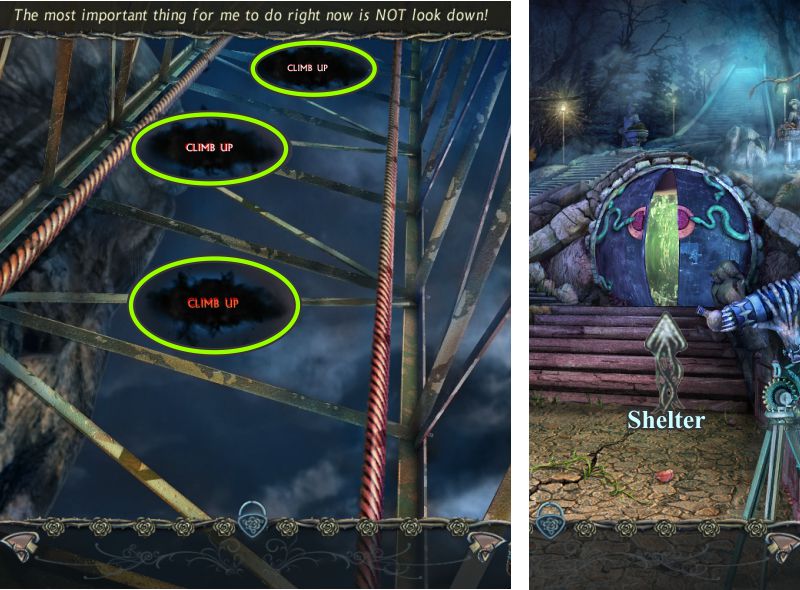
Climb the Tower and Catacomb Entrance
You are in a perilous position where the lift and tower are collapsing, so you need to click all of the "Climb Up" directions at each bar of the tower.
When you finally reach the top, enter the Catacombs to go to the Shelter.
Screenshot
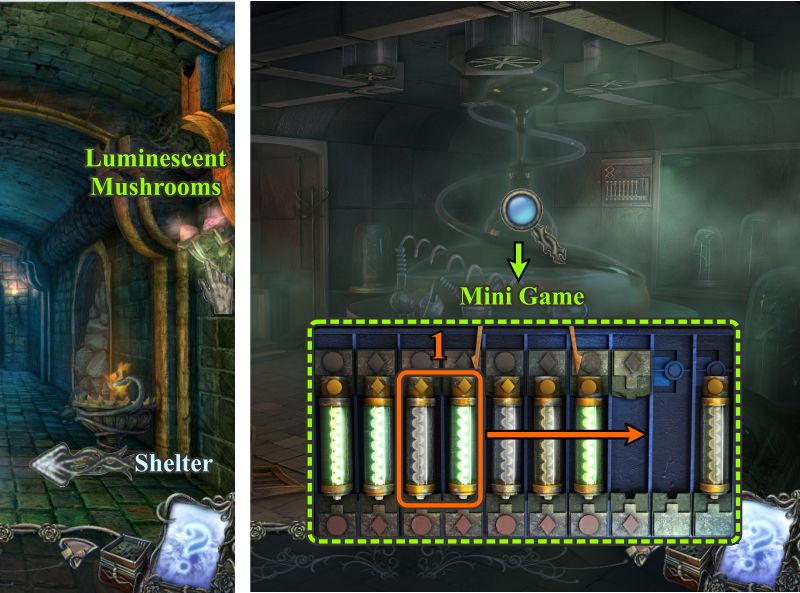
Catacombs and Shelter
Grab the Luminescent Mushrooms and go left to the Shelter.
There is too much plant gas, so click on the central machine for a Mini Game.
Your goal is to align the tubes to clear the air.
Each choice you make will move two tubes.
The left tube is dominant so is the one you need to click on to move what you want.
There will always be only one empty area for you to move your tubes, so click there to place them.
See the screenshot for the first move.
Screenshot
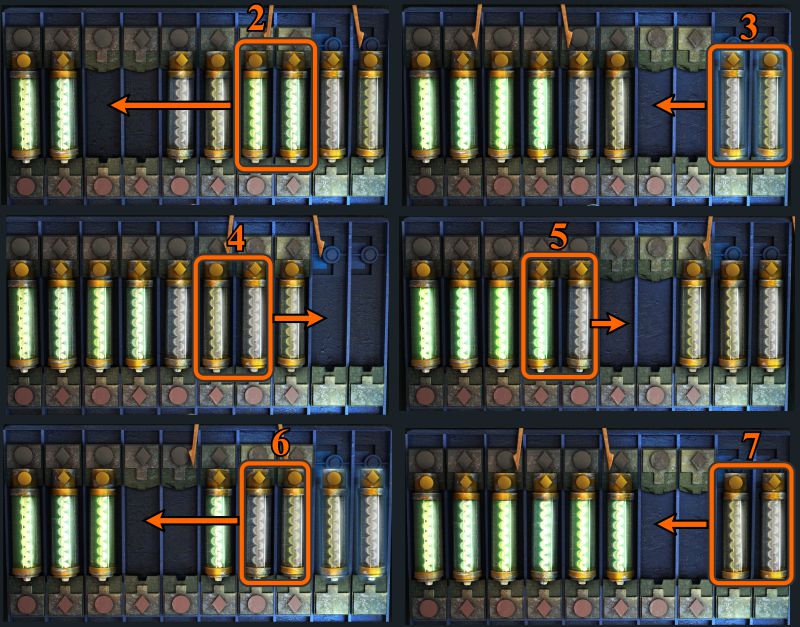
Clear the Air Mini Game
See the screenshot the moves necessary to complete the game.
Screenshot
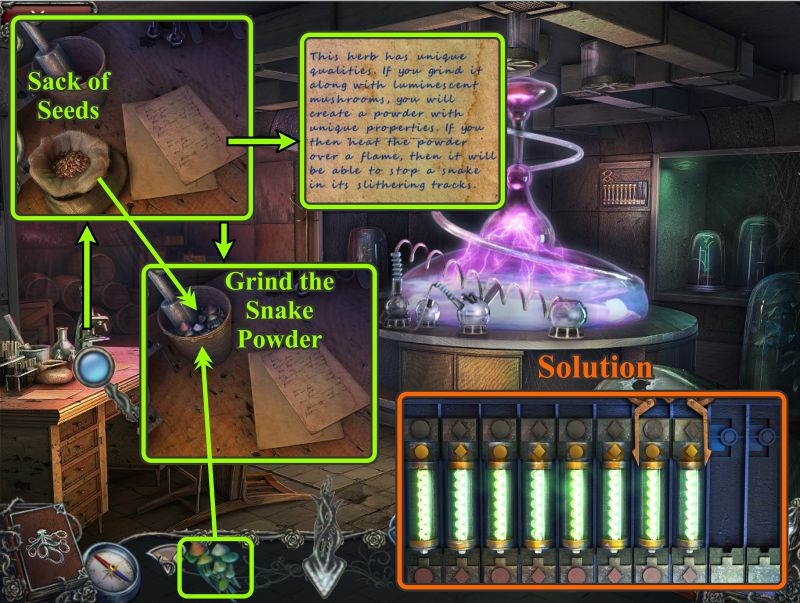
Shelter
The air is now cleared, so view the final solution to the Mini Game.
Zoom in on the desk and take the Sack of Seeds and read the instructions.
Place the Seeds and your Luminescent Mushrooms in the Mortar.
Use the pestle to grind the Snake Powder.
Take it and go to the Catacombs.
Screenshot
Catacombs
Go forward to where the snake is.
Place the Snake Powder in the fire and watch the snake disappear.
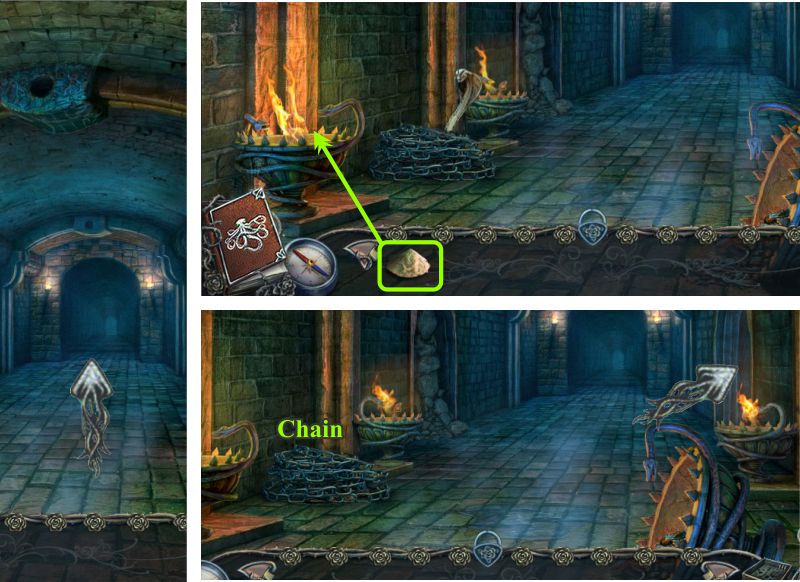
Once the snake is asleep, take the Chain and go through the right archway.
Screenshot
Catacombs
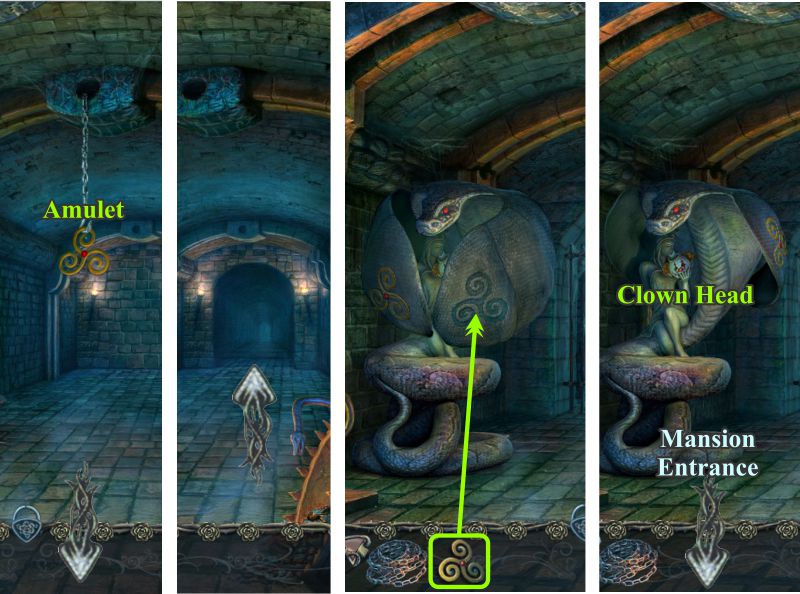
Take the Amulet hanging from the ceiling and back out to the central corridor.
Go forward and place the Amulet on the snake.
Take the Clown Head and leave the Catacombs.
Go up the stairs to the Mansion Entrance.
Screenshot
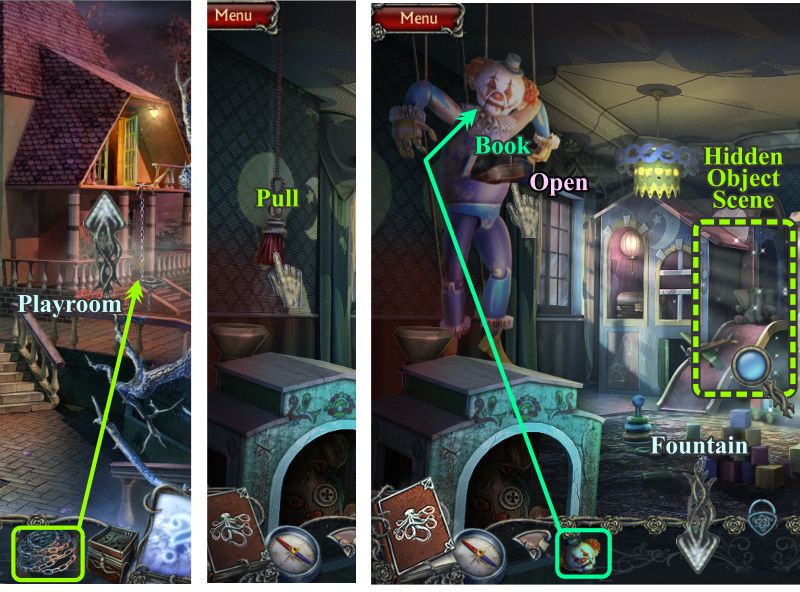
Mansion Entrance and Playroom
Place the Chain on the balcony and climb up to the Playroom.
Pull the tassel at the far left, and the clown's body appears.
Put the Clown Head on the body and open the compartment to find a Book.
Play the Hidden Object Scene and go outside to the Fountain.
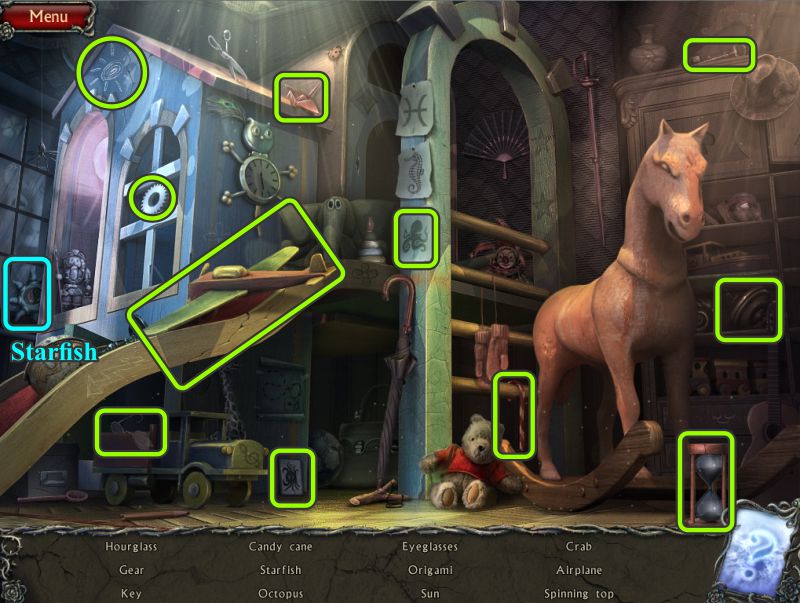
Screenshot
Playroom Hidden Object Scene
Collect everything to get the Starfish.
Screenshot
Fountain
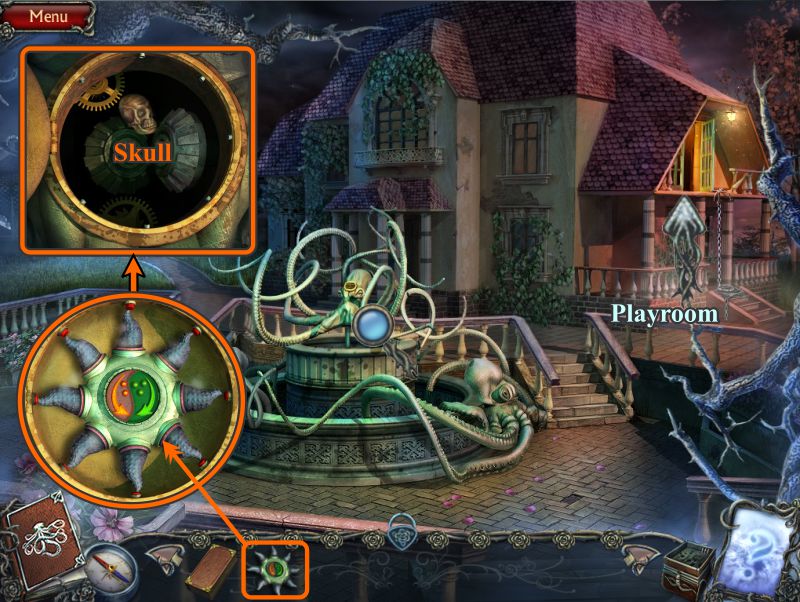
Zoom in on the Fountain and place the Starfish.
When the compartment opens, take the Skull.
Return to the Playroom.
Screenshot
Playroom
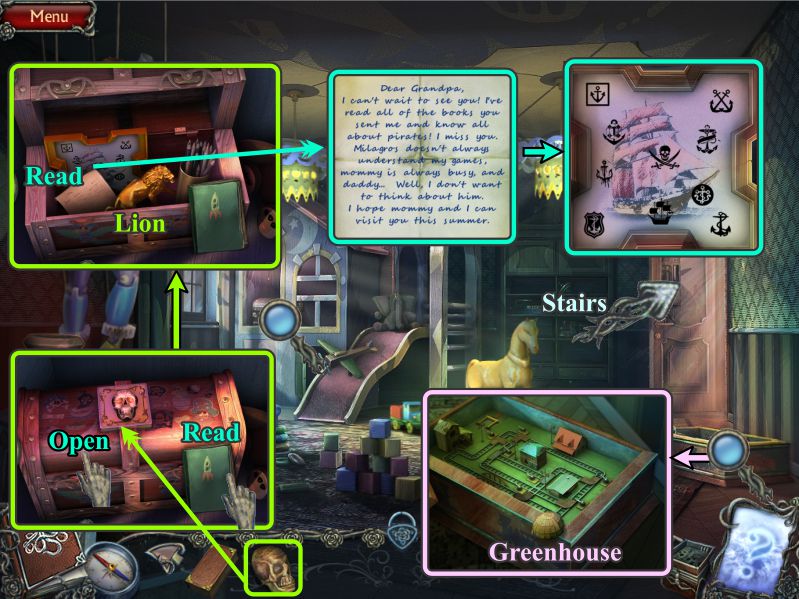
Zoom in on the chest in the playhouse and place the Skull to open it.
Read the book leaning against the chest.
Take the Lion from inside the chest, read the note, and examine the board with the symbols.
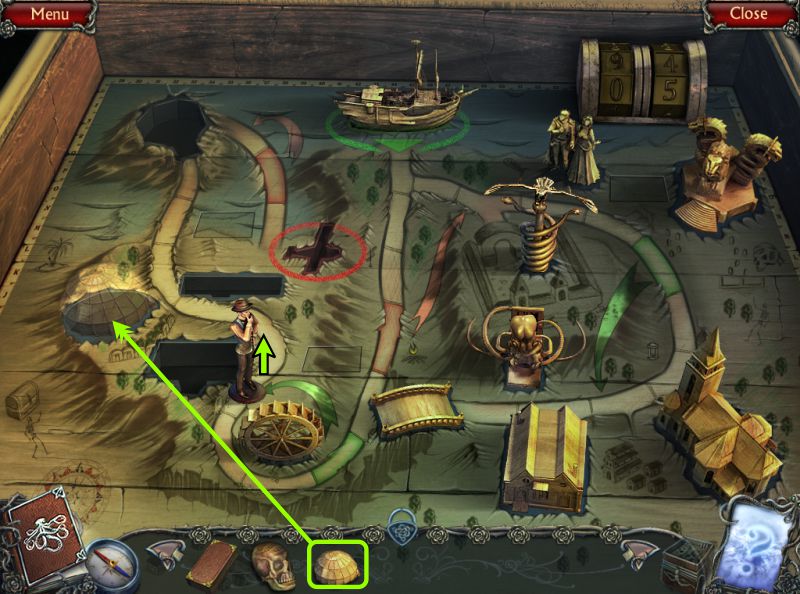
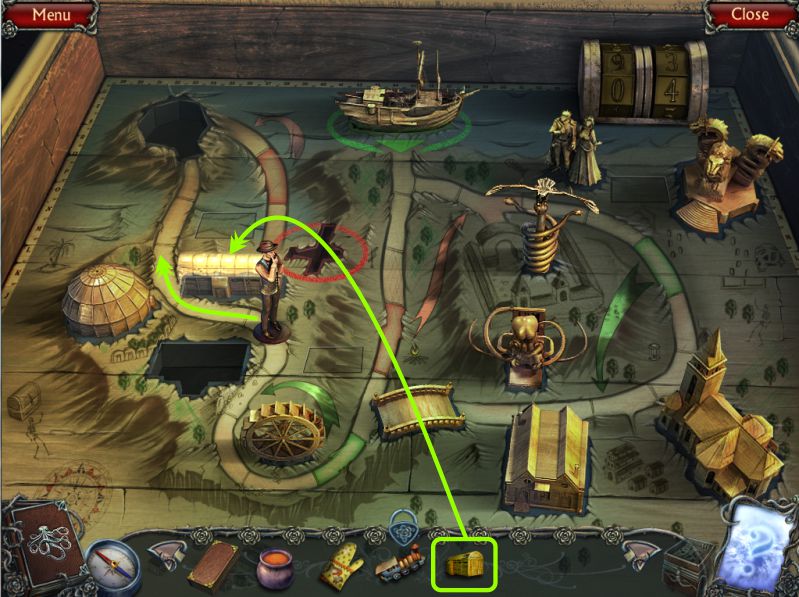
Zoom in on the train box at the right and take the Greenhouse.
Go through the door to the Stairs.
Screenshot
Chest
Place the Greenhouse and advance to your next stop.
Screenshot
Stairs
Place the Lion on the pedestal with the other lion to raise the chandelier from the floor to the ceiling.
Examine the magnifying glasses on your way downstairs, and go through the door to the Kitchen.
Screenshot
Kitchen
Zoom in and collect the Solidified Honey from the sink.
Press the red button to lower the tray.
Take the Train, Oven Mitt, and Shed.
Return to the Playroom after the Chest scene.
Screenshot
Chest
Place the Shed to move near it.
Screenshot
Playroom
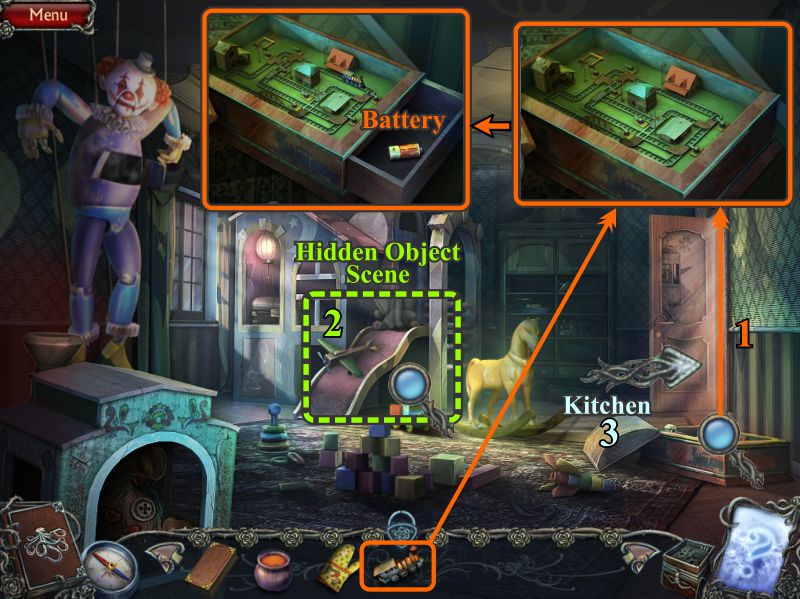
Zoom in on the train box and place the Train.
The Train will travel around the tracks to open a drawer with a Battery.
Play the Hidden Object Scene, and return to the Kitchen.
Screenshot
Playroom
Your Inventory item will be some Fishing Line.
Screenshot
Kitchen
Press the red button to raise the tray.
Zoom in on the boiler and replace the missing Battery.
Place the Solidified Honey on the stove and turn the heat on.
Use the Oven Mitt of pick up the hot honey pot.
Place the Honey in the sink.
Turn on the faucet to cool the pot.
Take the Key.
Zoom in on the door and place the Key.
Exit through the open door to the Porch.
Screenshot
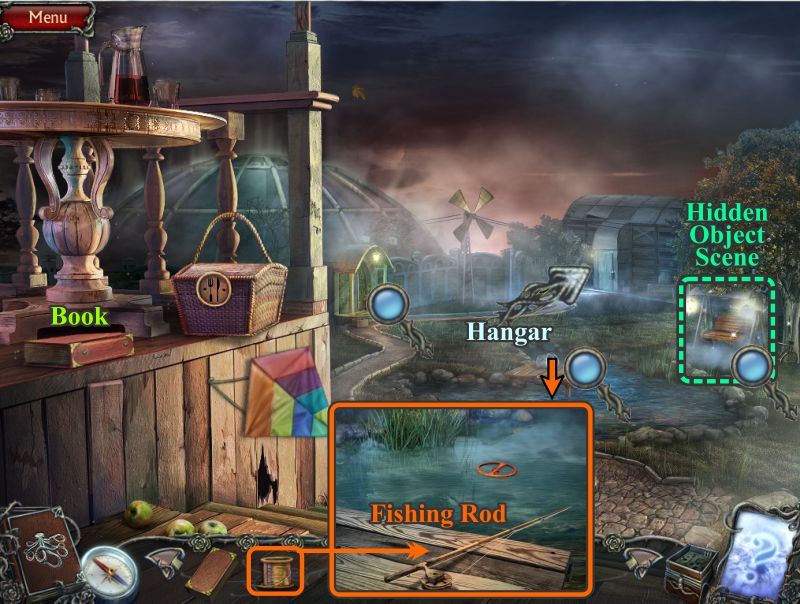
Porch
Take the Book from the counter at the left.
Zoom in on the pond and combine your Fishing Line with the pole to get a Fishing Rod.
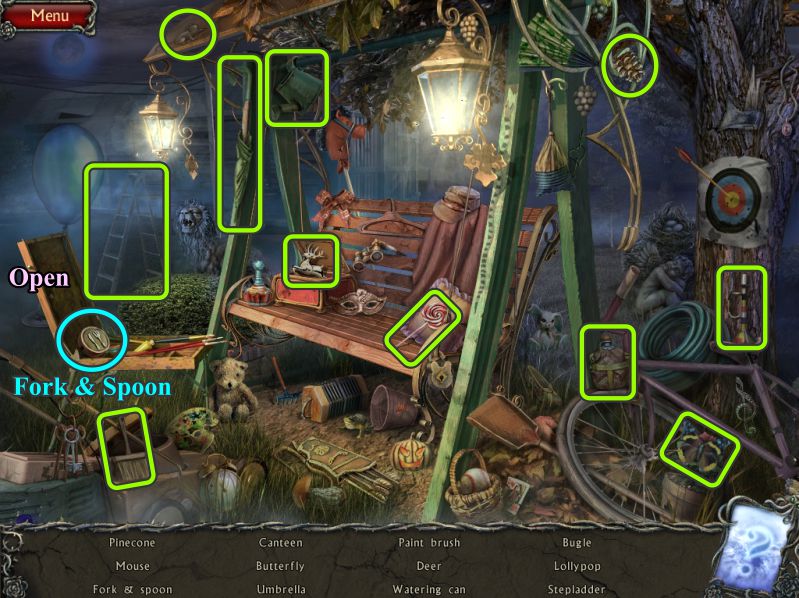
Play the Hidden Object Scene by the swing.
Screenshot
Swing Hidden Object Scene
Open the box to find the Fork and Spoon for your Inventory.
Screenshot
Porch and Hangar
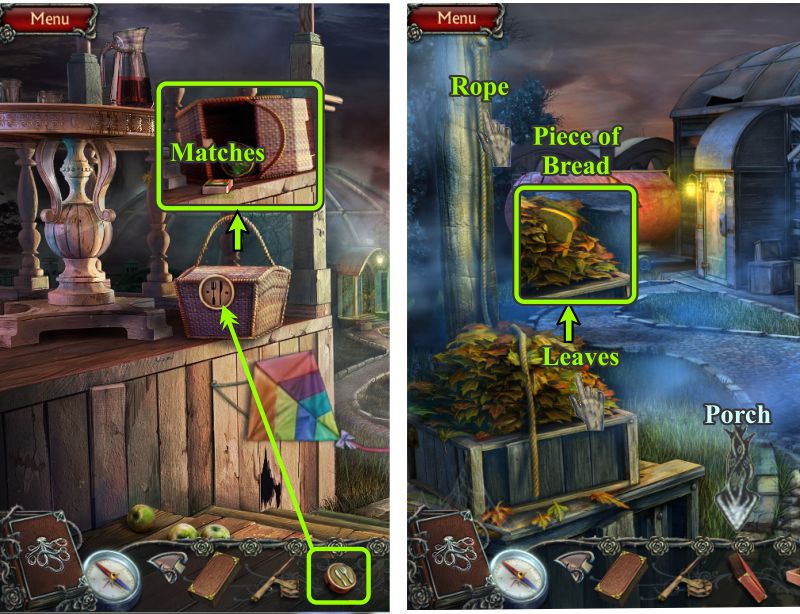
Zoom in on the basket and place the Fork and Spoon to open it.
Take the Matches and head to the Hangar.
Take the hanging Rope.
Removes some Leaves from the pile and pick up the Piece of Bread.
Return to the Porch.
Screenshot
Porch and Hangar
Zoom in on the pond and use the Piece of Bread as bait for the fish.
Use your Fishing Rod to catch a fish.
Take the Fish from the line and go to the Hangar.
Give the Fish to the seagull, and it will fly away.
Zoom in on the barrel and take the Grapes.
Open the Smoker and place the Leaves inside.
Light it with the Matches.
Take the Smoker and return to the Porch.
Screenshot
Chapter 6: Greenhouse
Greenhouse Entrance
Zoom in on the Greenhouse Entrance and use the Smoker to get rid of the wasps.
Go through the door to the Terrace.
Screenshot
Terrace
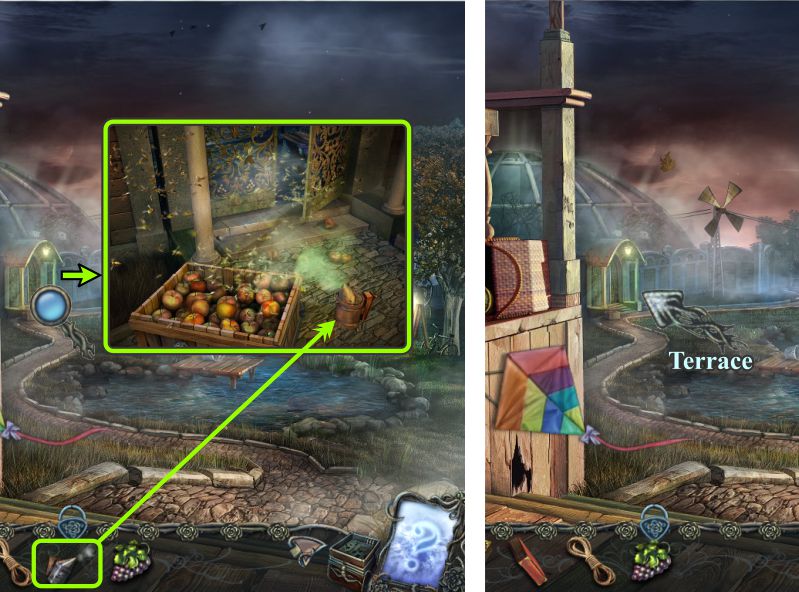
Zoom in on the planter and take the Grapes.
Go down the stairs to the Ferry.
Screenshot
Ferry Dock
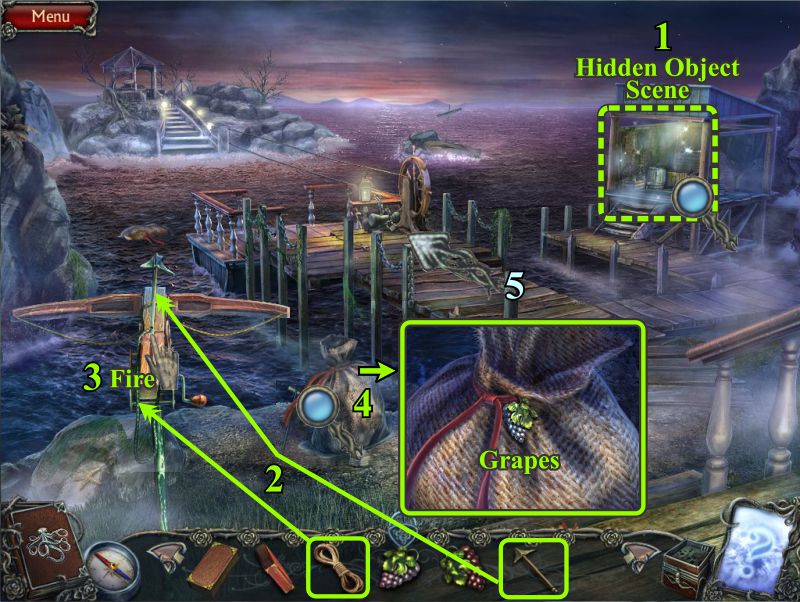
Play the Hidden Object Scene.
Place the Harpoon and Rope on the bow.
Fire the Harpoon to retrieve the bag.
Zoom in on the bag and take the Grapes.
Go forward to the Ferry.
Screenshot
Storage Shed Hidden Object Scene
Open the trunk to find the Service Cap.
Collect everything to get the Harpoon.
Screenshot
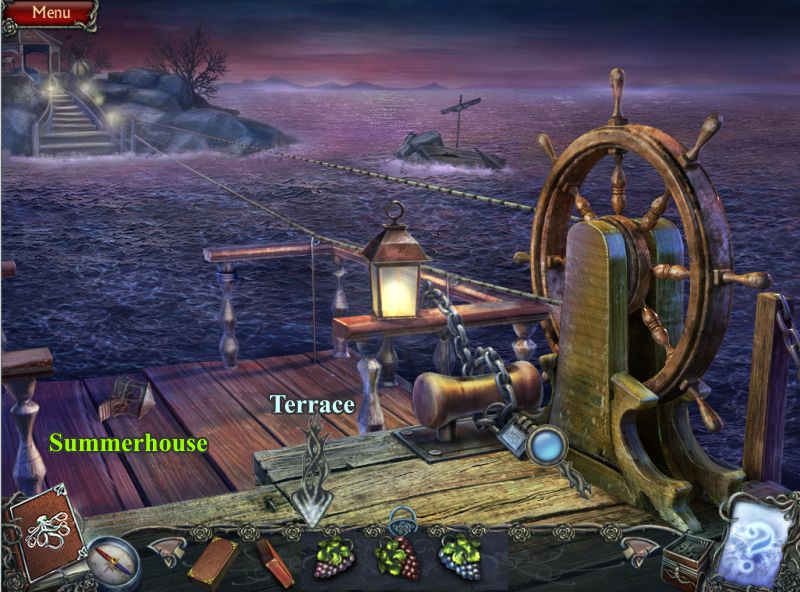
Ferry
Collect the Summerhouse, and return to the Terrace.
Screenshot
Chest
Place the Summerhouse Pavilion and move toward it.
Screenshot
Terrace
Zoom in on the Greenhouse door and place your Grapes to open it.
Enter the Greenhouse.
Screenshot
Greenhouse Garden
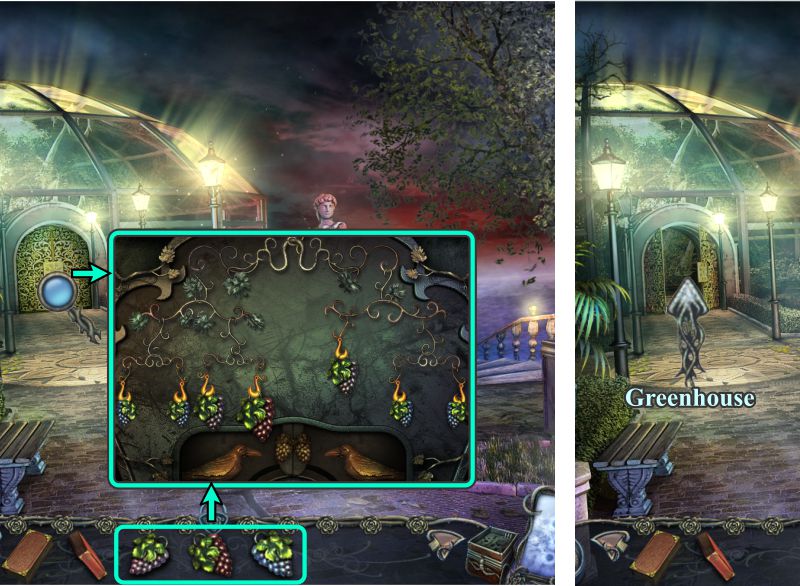
Zoom in on the bookcase, take the Flower and place your two books.
Move the plant to get to the chest.
Use the Flower on the lock to open the chest.
Take the Book and House.
Screenshot
Chest
Place the House and the cloaked figure will appear, so you do a turn-around to take the other path.
Screenshot
Chest Mini Game
Press the buttons in the correct sequence to show the advancement of transportation.
The solution is numbered in the screenshot.
Take the Bas-relief Fragment from the bottom of the Chest.
Screenshot
Greenhouse Garden
Zoom in on the bookcase and place your last Book.
The bookcase moves revealing an open hatch, so go down to the Study.
Screenshot
Study
Examine the magnifying glasses and take the Knife.
Read the book, turn the page to find the Snake Key, and ready the rest of the pages.
Return back up the hatch to the main part of the Greenhouse.
Screenshot
Greenhouse and Ferry
Use the knife to cut the pumpkin and take some Pumpkin Seeds.
Go to the Ferry and zoom in on the bag.
Use the Knife to cut the tie, take the Snake Key, and go to the Study.
Screenshot
Study and Porch
Zoom in on the cabinet and place your two Snake Keys.
Take the Corkscrew and go to the Porch.
Use the Corkscrew to open the bottle in the basket.
Read the note, play the Hidden Object Scene, and go to the Mansion Stairs.
Screenshot
Swing Hidden Object Scene
Collect everything to get a Jack o Lantern.
Screenshot
Mansion Stairs
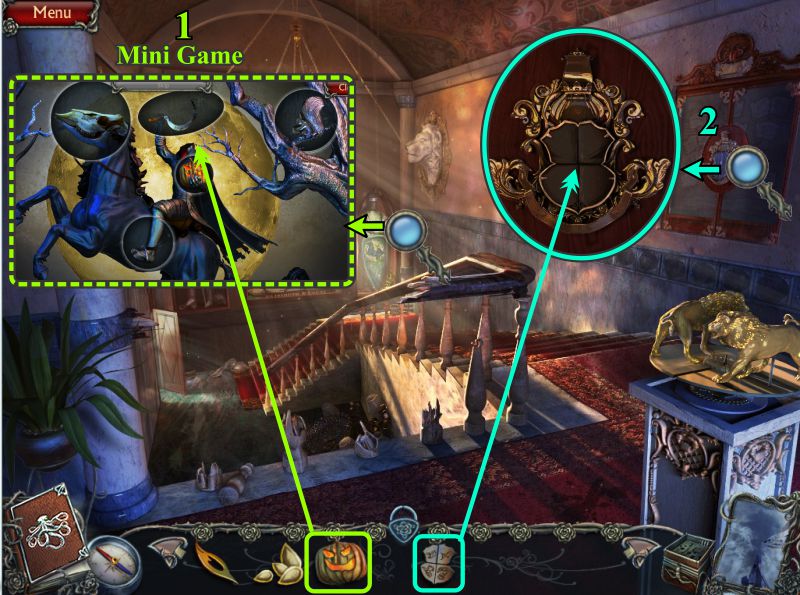
Zoom in to the right of the window and place the Jack o Lantern for a Mini Game.
Then, zoom in on the family cabinet and place the Coat of Arms.
Screenshot
Headless Horseman Mini Game
Click on the inserts to change them to the correct images.
See the screenshot for the solution.
Take the Coat of Arms.
Screenshot
Stairs and Playroom
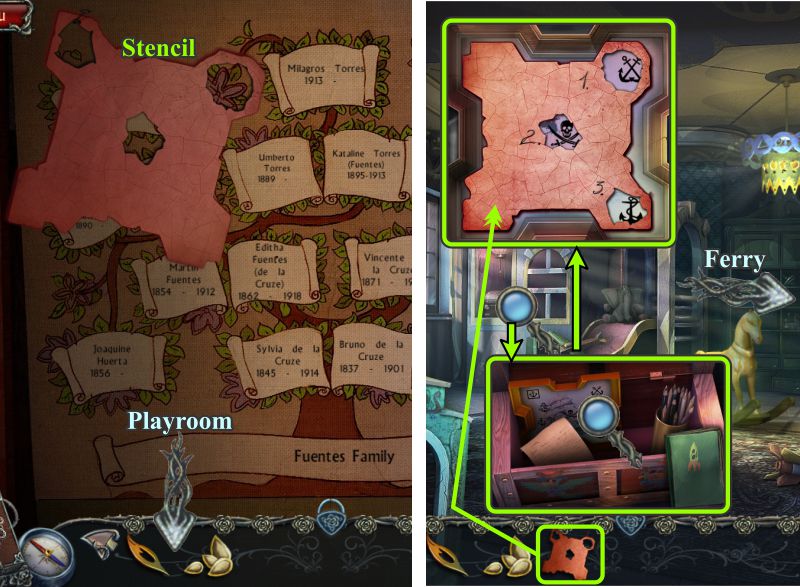
Take the Stencil that is attached to the family tree, and go to the Playroom.
Zoom in on the chest in the playhouse and zoom again on the board with the symbols.
Place the Stencil over the board to get the combination.
Go to the Ferry.
Screenshot
Chapter 7: Escaping the Island
Ferry Dock and Terrace
Play the Hidden Object Scene and then go to the Terrace.
Use the hand Shovel on the potted plant to dig up a Bas-relief Fragment.
Return to the Ferry.
Screenshot
Storage Shed Hidden Object Scene
You will get a hand Shovel for your Inventory.
Screenshot
Ferry
Zoom in on the lock and enter your pirate combination.
If you need a reminder, see the screenshot, or look at the notes portion of your Journal.
Once the chains are removed, turn the wheel to ferry across to the Pavilion.
Screenshot
Pavilion
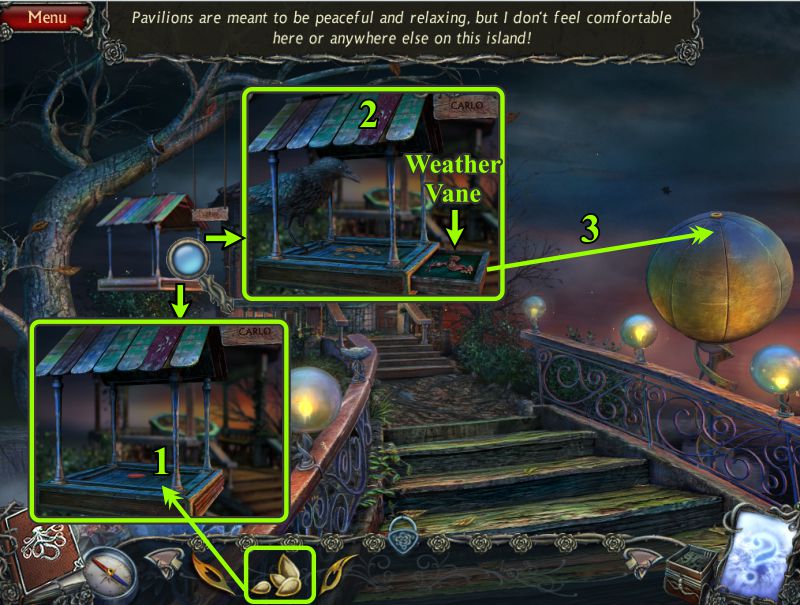
Zoom in on the bird feeder and place your Pumpkin Seeds.
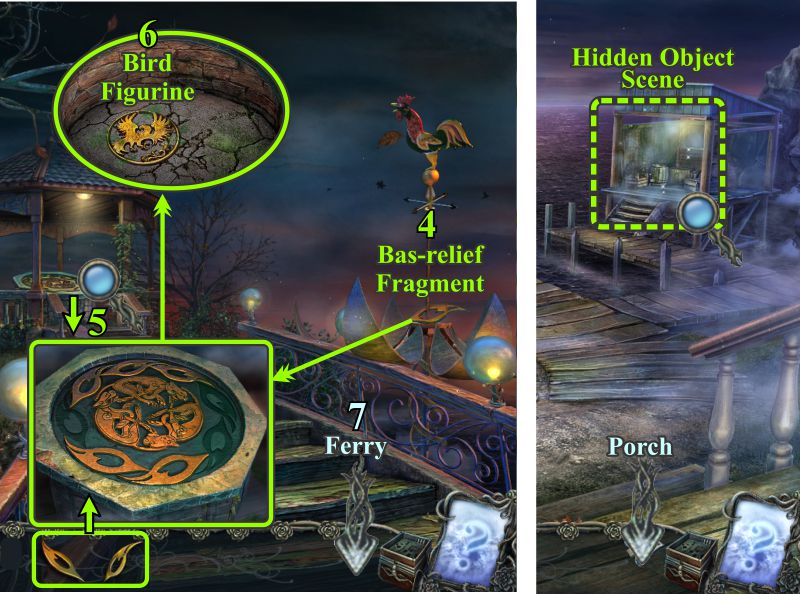
When Carlo comes to eat, a secret compartment opens to reveal a Weather Vane.
Place the Weather Vane on top of the globe to the right.
Screenshot
Take the Bas-relief Fragment.
Zoom in on the pedestal inside the Pavilion and place all three Bas-relief Fragments.
Take the Bird Figurine.
Take the Ferry back to shore and play the Hidden Object Scene.
Screenshot
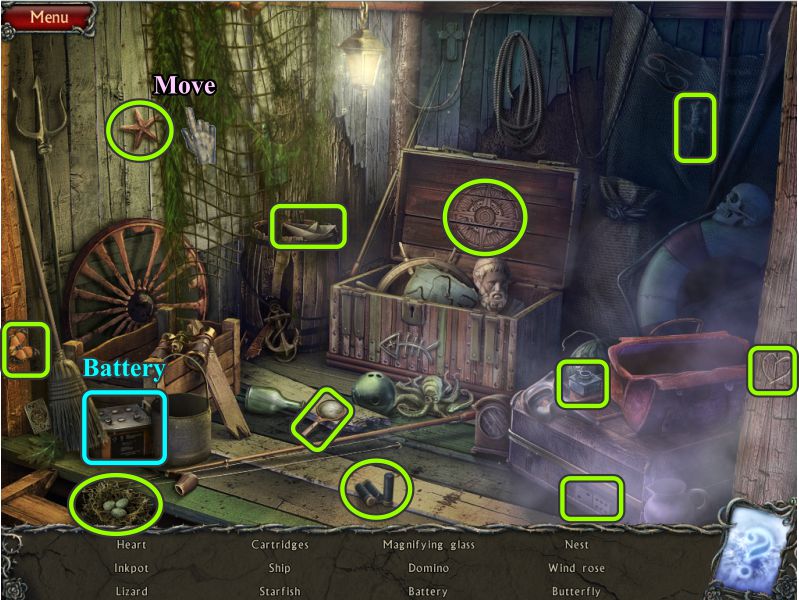
Storage Shed Hidden Object Scene
Move the fishing net to find the Starfish.
A Battery will go into your Inventory once you have all the items.
Go to the Porch.
Screenshot
Porch and Hangar
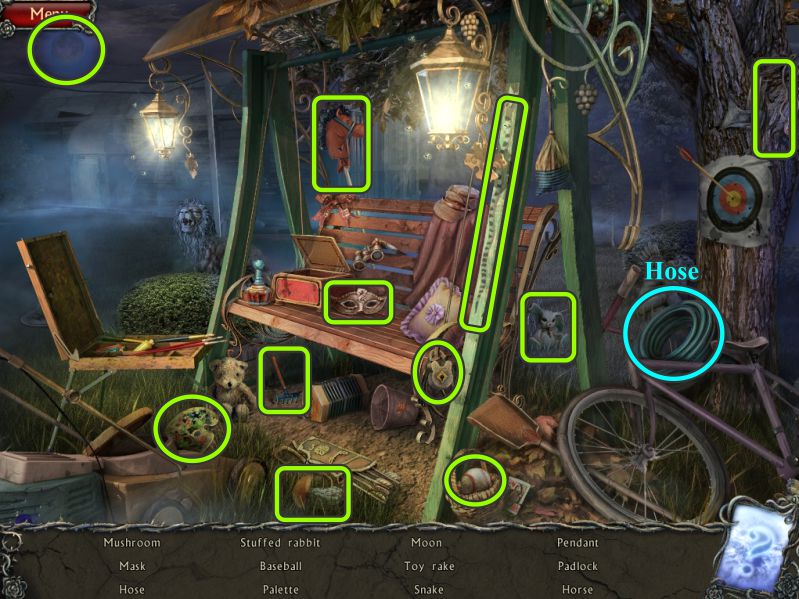
Play the Hidden Object Scene and go forward to the Hangar.
Zoom in on the door and place your Bird Figurine.
Once the door is open, you can attach your Hose to the fuel tank.
Enter the Hangar.
Screenshot
Swing Hidden Object Scene
Collect everything to get the Hose.
Screenshot
Inside Hangar
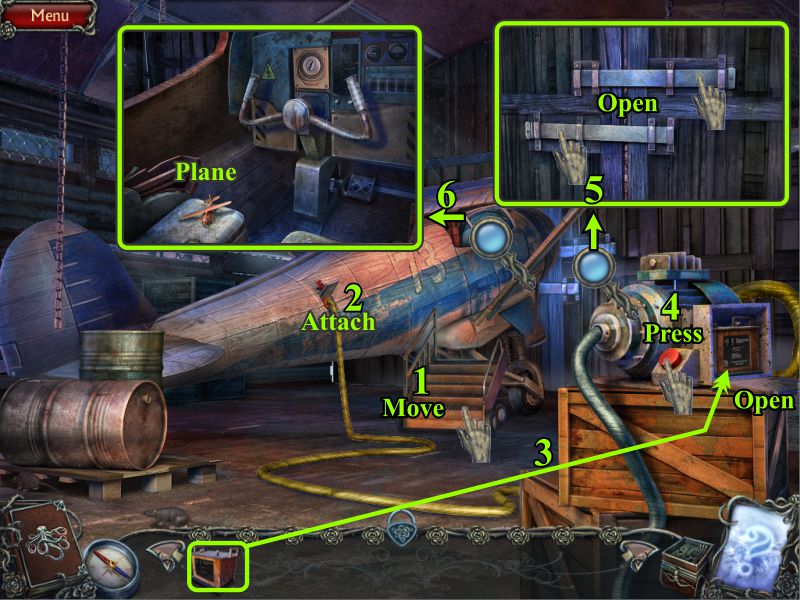
Move the steps to the plane door.
Attach the fuel hose to the plane.
Open the compressor compartment and connect your Battery.
Press the red button to fuel the plane.
Examine the door and open the latch bolts.
Zoom in on the cockpit and take the Plane.
Screenshot
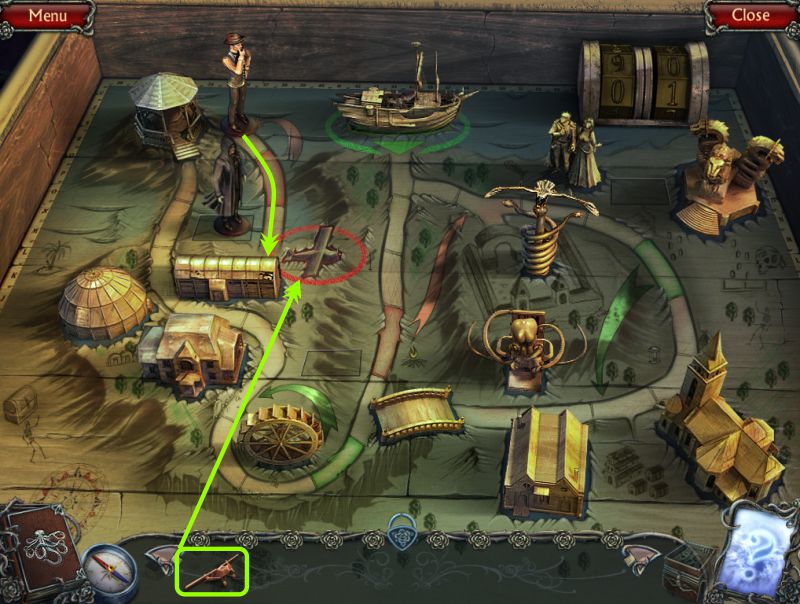
Chest
Place the Plane and walk forward to the end of your journey.
Screenshot
Chest Mini Game
Click on the astrological signs in the correct order beginning with Aries.
See the screenshot for the numbered solution.
Take the Plane Key from the compartment.
Screenshot
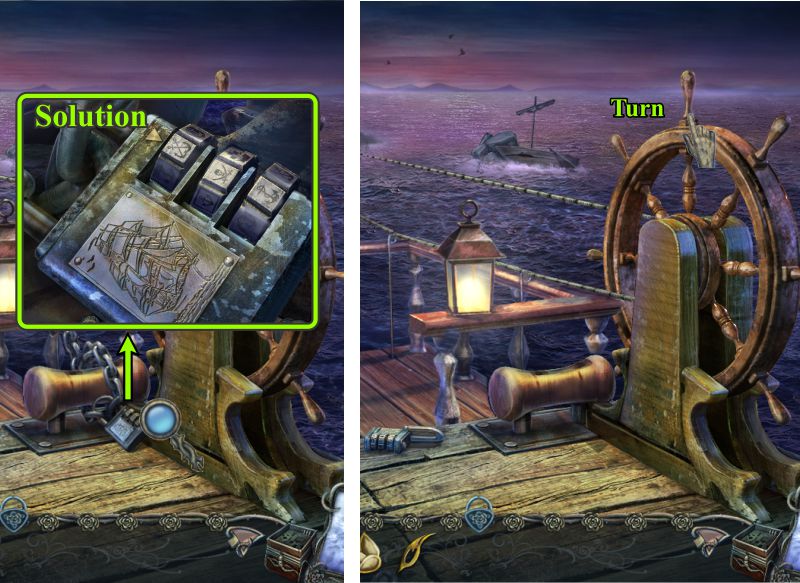
Plane
Zoom in on the cockpit and put the Plane Key in the ignition.
Turn the key to start the engine and begin the ending of your journey on the island.
Screenshot
Watch the epilogue to your stay in the Twisted Lands.
Posted by: Jazz |
August 21, 2012 8:22 PM
|
August 21, 2012 8:22 PM