
![]()
 So if you were stuck on a tropical island, what three things would you bring with you? Unless you answered, "TomaTea, an escape game, and puzzles", you're not going to be ready for Tropicool! You're stuck inside the world's mellowest beachside property this time, with only a cool pitcher of your favourite iced beverage, some wicker, and a sublimely laid-back guitar riff for company. Presumably you want to go outside, but I don't know why, since there's a giant flaming ball of fire in the sky, bugs in the sand, and other people out there. But if you must, you must, and to get out you'll need to solve a plethora of puzzles and use your noggin to find a way through the locked door. The cursor tip will glow when you're over an area you can click on, and the black bars that pop up at the edges of the screen when you mouse over them can be used to switch directions or perspectives.
With a larger emphasis on puzzle solving than MacGuyvering, Tropicool is the sort of game whose atmosphere and more cerebral challenges invite you to play it while sunk back low in your chair as a fan turns lazily overhead and the music washes over you. You really will need to look everywhere for clues to attempt the cabinet of curiosities, since the game will tell you that you have no idea how to solve something (which seems kind of presumptuous) unless you've viewed something that pertains to that particular puzzle. The many different angles you can view the environment at can mean hunting for a lot of little glowing cursor areas, but the little book of clues you'll pick up early on provides a clever source of hints on how to go about things. If you consult it frequently and pay attention to your environment, however, you'll quickly discover that this little escape gem isn't as baffling as it seems, and you'll be kicked back on the seaside in no time. The perfect puzzling getaway for your day, Tropicool doesn't break the mold or bring in any bells and whistles, but instead just serves up a beautifully designed little escape. And that's a-ok by us.
Thanks to Cyberjar88 for sending this one in!


Walkthrough Guide
(Please allow page to fully load for spoiler tags to be functional.)
Tropicool Walkthough
General Information
Try to pick up everything that isn't nailed down.
Examine everything you pick up, items may be hiding clues.
Some items may be combined together to make a new item.
In this walkthrough, every new inventory item is bolded on its first appearance.
There is only one ending to this escape.
Have fun~ :D
Exploration
You begin facing a seaside balcony.
Click on the open blinds to reveal that the locked balcony door, as well a closer look at a chair and patterned fence.
Back up and turn right.
Now you're facing two blue reclining chairs, a table, and a houseplant.
Zoom in on the table and note the blue screwdriver attempting to and failing to blend among the three flowers. Pick it up.
Note that you can zoom in on the lights above the table.
Zoom in on the plant and pick up the statue with pink label.
Back up and turn right.
There's a locked door (of course) and a nice bookshelf on this wall.
Zoom in on the bookshelf to discover that there are five locked cabinet puzzles here!
Pick up the tilted light blue notebook resting on the bottom shelf. Hey, there are many clues inside!
Back up and turn right.
Zoom in on the paintings for a closer look.
Note that there are two cabinet puzzles on this wall to the left and right of the long sofa.
Examine and top of the left cabinet puzzle and discover that you can place and remove the pink statue on each of the six grooves.
Back up and turn right and you're back to where you started.
Time to solve some puzzles!
Bookshelf - Bottom Left Cabinet
Hmmm, a 5x5 puzzle. Where have I seen such a pattern before?
On the balcony fence.
Copy the black-and-white pattern from the balcony fence onto this puzzle.
Inventory +1! There's a Statue with Brown Label inside this cabinet.
Bookshelf - Middle Cabinet
A left and right puzzle. Where do I find the necessary two clues?
One clue is in the fourth page of the notebook with the suns and moons.
The second clue is the on the leftside black-and-white painting above the long sofa.
Left-Right-Right-Left-Left-Right-Left.
Now that you've opened the cabinet, click once more to open the drawer.
Take the ice cubes from the left side and the gold key from the right side.
Bookshelf - Top Left Cabinet
A three letter word??? Where do I find the hint?
Inside the notebook on the last (5th) page.
Note the numbers, the letters, the symbols, and the orientation of each.
When you place 2 D's on top of one another, you get "B". When you place 2 V's next to each other, you get "W".
The three letter answer is "BOW".
Take the Statue with Green Label and the Screwdriver Handle
Cabinet Below the Paintings - Rightside Cabinet
Three symbols that turns when I click on them. Where have I seen this before?
On the 3rd page of the notebook where it says "X+XY+Y"
Note that the three symbols on this cabinet looks like "X" "Y" and "+". Click the symbols in the order of "X+XY+Y".
Yes! It's open! Take the Mysterious Grey Square Device.
Two Lights Above the Table
Where have I seen that symbol before?
In the first page of the Notebook.
What can I do with the symbol?
Are those... holes?
If you haven't already, combine together the two halves of the screwdriver from your inventory.
Click the screwdriver head until the blue half is sticking out.
Insert the screwdriver into the middle of the symbol.
Using the 1st page of the notebook as guide, insert the screwdriver in the holes in the following sequence, Middle-TopRight-BottomRight-BottomLeft-TopLeft-Middle.
The lights turned on!
Zoom out and click on the table to view the new clue.
Bookshelf - Bottom Right Cabinet
Where have I seen that symbol before?
On the table next to the three flowers, given that I've solved the "Two Lights Above the Table" puzzle.
"WholeFlower-LeftHalfofFlower-RightHalfofFlower-WholeFlower
Take the Statue with Yellow Label
Inventory - Mysterious Grey Square Device
Examine the device to learn that requires two button batteries.
Where are the two batteries?
One is inside the statue with yellow label
Examine the screwdriver and click the head until the silver screwdriver side is facing out. (You'll need to remove the screwdriver from the symbol below the lights if you haven't done so already.)
Remove the screws on the statue with the yellow label to obtain battery #1
One is inside the ice cubes in your inventory
Place the ice cubes on the table next to the chair on the balcony.
Zoom out and zoom back in to see the puddle left behind by the melted icecubes and retrieve battery #2
Insert the two batteries, close the battery compartment, flip the device over, and voila -- a tile puzzle!
Click two tiles to switch them and rearrange like so:
https://jayisgames.com/images/skylightica_tropicool_screen1.jpg
I did it! ...but nothing opened?
...Maybe it's a hint?
Bookshelf - Top Right Cabinet
Where to find the clue to a 4 digit number?
On the square grey electronic device after you solved its puzzle.
Read the letters vertically.
Two-One-Six-Two
Take the Statue with Blue Label, it's yours!
Cabinet Below the Paintings - Leftside Cabinet and ESCAPE!
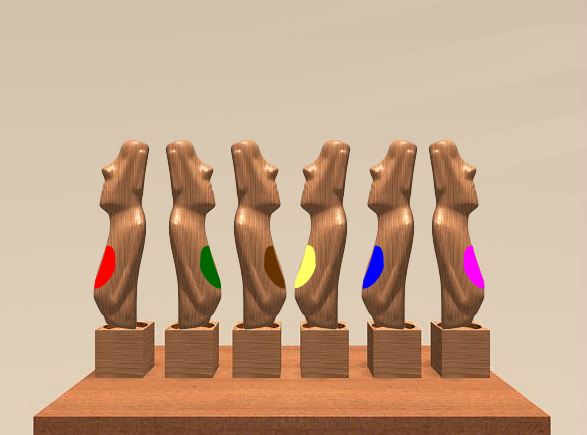
Counting the grooves, it looks like we'll need six statues.
Locations of all the statues
Pink - Behind the houseplant next to the blue sofa. Green - Inside the top left cabinet on the bookshelf. Brown - Inside the bottom left cabinet on the bookshelf. Red - Open the balcony door (with key) and look on the left side of the balcony. Yellow - Bottom right cabinet on the bookshelf. Blue - Top right cabinet.
Which order to place them in?
Check the second page of the notebook.
Mmmm, that's Red-Green-Brown-Yellow-Blue-Pink. Now what?
I can only rotate but not remove the statues now. Where is the clue that tells me how to rotate them?
On the righthand painting next to the long sofa.
Face the Red-Yellow-Blue statues to the left, and the rest to the right. Like so:
https://jayisgames.com/images/skylightica_tropicool_screen2.jpg
Take the key and escape!~
Congrats!~ *thumbs up* :)
Posted by: skylightica |
August 2, 2012 2:14 AM
|
August 2, 2012 2:14 AM
Tropicool Walkthrough
The Purple and Green Statuettes
Turn right and inspect the plant in the right corner.
Pick up the Purple Statuette behind the plant.
Move back and inspect the table with the drink and flowers.
Pick up the Screwdriver Tip from the flower vase.
Move back, turn right, and inspect the bookcase.
Pick up the Blue Book from the lowest shelf.
Check the fifth page of the Blue Book for a clue to the next puzzle.
Inspect the upper-right drawer of the bookcase, enter B O W and click on the square below.
Pick up the Green Statuette and the Screwdriver Handle from inside.
The Yellow Statuette
Inspect the Screwdriver Handle in your inventory, combine it with the Screwdriver Tip, and click on it to raise the insulator.
Check the first page of the Blue Book for a clue to the next puzzle.
Inspect the wall above the table with the drink and flowers.
Use the Screwdriver on the middle hole, then the upper-right, lower-right, lower-left, upper-left, and back to the middle.
Once the lights are fully on, inspect the table with the drink and flowers and note the shadows from the flowers.
Take the Screwdriver back out of the wall.
Inspect the lower-right drawer of the bookcase and use the shadows to enter the code.
Full flower, left half, right half, full flower.
Take the Yellow Statuette from the drawer.
Inspect the Screwdriver and move the insulator back down.
Inspect the Yellow Statuette and click on it to look at the bottom.
Use the Screwdriver to remove the screws and take the Battery.
Move back from the bookcase, turn right, and inspect the cabinet on the right.
Click on the top of the cabinet and enter the code.
From the third page of the Blue Book: X+XY+Y.
Click on X, +, X, Y, +, Y and then the square below.
Pick up the Electric Puzzle.
The Red Statuette
Check the fourth page of the Blue Book and the left painting on the wall above the couch for a clue to the next puzzle.
Use the painting to correspond the sun to "left" and the moon to "right."
The fourth page of the Blue Book gives a sequence of suns and moons.
It corresponds to Left, Right, Right, Left, Left, Right, Left.
Inspect the middle drawer of the bookcase, click on the buttons in the correct order and then the square below.
Take the Ice and the Clover Key from inside the drawer.
Move back from the bookcase, turn left twice, and inspect the door.
Use the Clover Key to open the door.
Inspect the table on the right and place the Ice on it.
Move back from the table and inspect the coconuts on the left.
Pick up the Red Statuette.
Go back to the table and pick up the Battery from the melted ice.
The Brown and Blue Statuettes
Inspect the Electric Puzzle, turn it over, and open the battery compartment.
Place the Batteries into place to turn the Electric Puzzle on.
Arrange the pieces to get a clue for the next puzzle.
The puzzle spells out the words "Two, One, Six, Two."
Inspect the upper-right drawer on the bookcase, enter the numbers, and click on the square below.
Take the Blue Statuette from the drawer.
Note the pattern on the railing outside for a clue to the next puzzle.
Inspect the lower-left drawer, enter the pattern, and click the square below.
Take the Brown Statuette from the drawer.
The Star Key
Move back from the bookcase, turn right, and inspect the cabinet on the left.
Check the second page of the Blue Book for a clue to the next puzzle.
Place the statuettes on the cabinet in the same order as the statues in the picture.
Red, green, brown, yellow, blue, purple.
Check the right painting above the couch for a clue to the next puzzle.
The painting shows red, yellow, and blue faces looking left and purple, green, and brown faces looking right.
Turn the red, yellow, and blue statuettes left.
Turn the purple, green, and brown statuettes right.
Open the cabinet and take the Star Key.
Use the Star Key to exit the door on the left.
Thanks to cheeko for the walkthrough!
Posted by: Mike |
August 2, 2012 2:54 AM
|
August 2, 2012 2:54 AM