

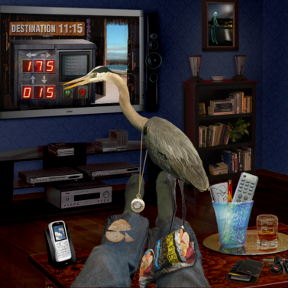
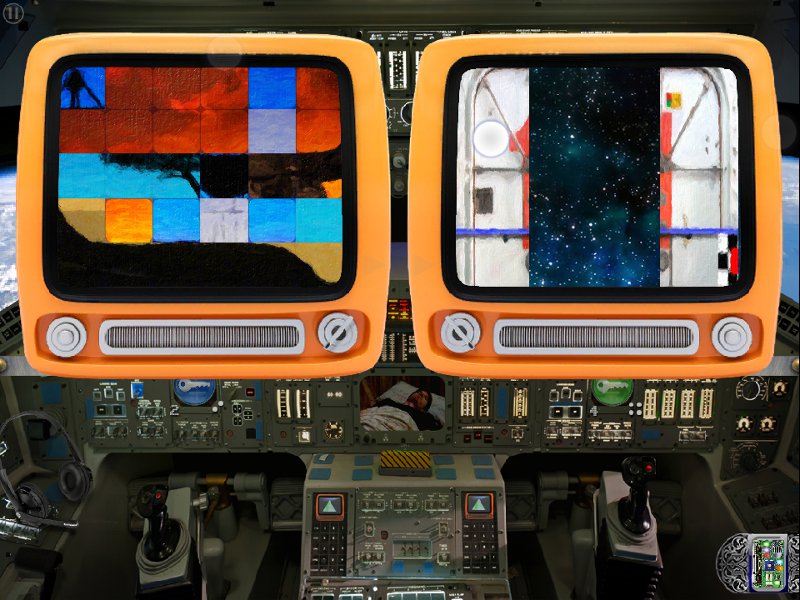
![]() Potato chips and a TV. What more could a human being possibly want? Apart from the fulfillment of hopes and dreams and all that stuff, of course. It's been several years since Dan Russell-Pinson's point-and-click adventure series Tipping Point has graced our screens. The iPad debut bundles together all four previously released chapters along with a brand new fifth chapter that resolves the little cliffhanger from chapter four. Tipping Point is some of the best point-and-click adventuring you'll come across, and the story and setting make the game something truly special.
Potato chips and a TV. What more could a human being possibly want? Apart from the fulfillment of hopes and dreams and all that stuff, of course. It's been several years since Dan Russell-Pinson's point-and-click adventure series Tipping Point has graced our screens. The iPad debut bundles together all four previously released chapters along with a brand new fifth chapter that resolves the little cliffhanger from chapter four. Tipping Point is some of the best point-and-click adventuring you'll come across, and the story and setting make the game something truly special.
 Tipping Point's interface is very easy to use; simply touch, tap or drag items you want to interact with. Remove close-up views of things by tapping the small X in the corner, just like closing a browser window. Tipping Point starts with an innocent evening of television and slowly moves into more and more surreal territory. The plot is a wild ride, and while the puzzles are a little on the unusual side, they're never obtuse or illogical. If you ever do get stuck, the in-game hint system is a marvelous piece of work. Instead of spoiling the solution outright, hints get progressively more specific until the answer finally clicks in your head. Best of all, hints aren't refilled by annoying in-app purchases or other modern gimmicks. Just wait a few seconds and more help will be available!
Check out the rest of the Tipping Point series right in your browser!
Tipping Point has not only withstood the test of time, but it actually seems more impressive on the iPad than in a browser. The touch interface is fantastic, the visuals have been improved and look lovely on a shiny iPad screen, and there's plenty of puzzles to keep you busy for hours. Whether you're an old fan or brand new to the series, the mobile version of Tipping Point is a fantastic place to jump in. And hooray for chapter five!!!
NOTE: This game was played and reviewed on the iPad 3. Game was available in the North American market at the time of publication, but may not be available in other territories. Please see individual app market pages for purchasing info.


Walkthrough Guide
(Please allow page to fully load for spoiler tags to be functional.)
Tipping Point Walkthrough
General Information
On the Main Screen, you can select your player, start or continue your game, choose a chapter and view the credits.
You can only access the chapters once you have completed each of them, but keep in mind that all your game progress will be lost if you choose to do so.
You do have the choice of creating 5 players, so if you wish to replay any particular chapter, you can use a different play to the beginning of that chapter and then be able to start it again.
To start the game, touch the door to open it and enter the house.
Use the button in the upper left corner if you need a hint or want to exit the game.
There can be multiple hints for a scene, but you will sometimes need to wait a few seconds to get to the next hint.
As you collect different objects during your adventure, your Inventory at the bottom of the screen will become available with these useful items.
When you are using items from your Inventory, you will notice a yellow glow when they have been properly placed.
Chapter 1: TV Room
Pick up the TV remote, press the red button on the top left corner to turn it on, and begin channel surfing until you get to Channel 8.
You doze off so once you wake up, click on the TV crane with something around his neck.
He will come out of the screen and stand on your remote.
Take a chip out of the bag and give it to him.
He drops it on you so stands on your leg while he attempts to eat it.
Grab the watch around his neck, open it, and examine it.
Tap on the picture of the boy and read the note on the back.
Exit from the watch via the red "X" on it, and grab the remote again.
Punch in Channel 804 as requested on the note.
You need to activate your subscription to The Travel Channel in order to see what's going on.
Exit out of the remote and pick up your cell phone.
Enter 555-3951 and press the green phone icon.
When asked to do so, press "1", and then press "2" to activate a new channel.
Enter 804#, and then press "1" to confirm the activation.
The TV says your destination is 11:15, so pick up the watch, move the hands to 11:15, and press the gold knob at the top of the watch.
Note the coordinates of 105 and 40 and close the watch.
Pick up the remote and use the arrows surrounding the "OK" button to enter the coordinates on the TV screen.
Keep tapping the right arrow to enter 105 on the top row, and use the top arrow to enter 40 on the bottom row.
Press "OK".
Chapter 2: The Beach
On the Beach
You have been transported to your travel destination, so tap on the right of the screen to leave the hut and find out where you are.
Select the left arrow to go to the ocean
Tap on the dry Palm Branch and it will drop so you can pick it up to add to your Inventory.
Exit down to return to the hut and go right to a beached ship.
Tap on the broken anchor to lower it, and enter the ship through the opening.
Grab the Green Lantern hanging to the right and it will go into your Inventory.
Enter the left door and pick up the Shovel for your Inventory.
Tap on the board just above your Inventory to uncover a box that needs a key to open it, so put it back until you find the key.
Exit down and enter the right door to find a Battery at the front of the pile to add to your Inventory.
Exit down twice and go left.
Enter the hut and pick up the device in the lower left corner, open the compartment, and install your Battery.
Tap the red button and it will combine with the rest of the Metal Detector so you can collect it for your Inventory.
Exit the hut, and tap on the arrow just to the right of the crane in the grass.
Pick up your Metal Detector, place it on the sand near the left path, and note when it glows yellow.
Use your shovel to dig in the area where it glows yellow.
Tap on the hole to collect a Key.
Ignore the cave for now because it is dark and you need to light your Lantern so you can look around.
Return to the inside of the ship, enter the left door and retrieve the box you found.
Insert the Key, open the lid, take the Magnifying Glass that says Tommy on the handle, and collect the Code.
Return to the area outside the cave and take the left path.
Place your Dry Palm Leaf in the fire circle, and use Tommy's Magnifying Glass to light it.
Use the fire while it is still burning to light your Lantern.
Exit to the right to the cave, note the Roman Numeral XI on the cave, and enter.
The Labyrinth
Pick up the Little Spy Decoder Tube at the right and it will go into your Inventory, so take it out and feed your Code into the top of it.
The Decoder will station itself at the top of your screen to show you which path to take.
If you make a mistake, you can always retreat and start over again.
Remember the number outside the cave, use the down arrow on the tube to move the Code to line 11.
The junction between the two entrances of your first choice looks like the second picture with a right arrow next to it, so go right.
This choice looks like the fourth picture, so go left.
Picture 3 is definitely this one, so go left.
Go right because this one looks like the first picture.
I voted for the last picture, so went left.
The fifth picture looks like the best choice, so go right.
You've found daylight, so go up the stairs past the Toucan and enter Chapter 3.
Chapter 3: The Jungle
Tommy
Go left and pick up the Ladder
We'll need to catch the beetle on the stump eventually, but we don't need it now.
Go right, place your Ladder against the tree house and enter it.
Tap on the wind chime to get a Glass Shard for your Inventory.
Open the curtain and talk to Tommy who will give you a Field Guide and a Start Button before falling asleep.
Grab the Pink Cassette Tape from the hanging basket and go to find a cure for Tommy.
The Cure
Zoom in on the table in front of you to see what's available there, and take the Black Cassette Tape.
Open the book to see what ingredients you need.
There is vinegar on the table, and we know where the Golden Tree Beetle is, so now you need to boil some water and find some Simarouba Fruit.
Pour some vinegar into the bowl.
Leave the tree house and go left to the macaw.
Since you can't climb up to that fruit, your goal is to get the macaw to drop some for you.
Use your Glass Shard to reflect light on the tree branch in hopes the macaw will follow it over to the fruit.
He will peck it down for you to pick up the Simarouba Fruit, so grab it.
Go left and zoom in on the stump.
We want to catch the Golden Tree Beetle, so play with the fern frond until he crawls up on it.
If necessary, you can also move him around to gain his attention.
When he crawls onto the spider web, pick him up, and return to the treehouse.
Zoom in on the front table and place the fruit and beetle in the bowl.
Flip the switch to turn on the burner and boil some water.
Pour the boiling water into the bowl and use the pestle to mash it all up.
Take the bowl of medicine to Tommy, talk some more, and let him rest while you go build the device.
Toucan
Zoom in on the workbench to the right only to find that Toucan on a branch outside the window.
Pick up the cassette player and place the Pink Cassette (from the hanging basket next to Tommy), entitled "2 Can Dance Till You Drop", and hold it in front of the player until it gets that yellow glow and installs itself.
Push the large play button on the right and watch the Toucan dance till he drops.
Use the left eject button to remove the cassette, and leave the tree house, exit left and down, to see what happened to the Toucan.
Tap on him and he will chomp on a fern frond to reveal something embedded in the tree, so zoom in to have a look.
The Lion
It's a lion, and since you have another tape to play, so return to the tree house and zoom in on the right workbench.
Select the cassette player and install the Black Cassette (from the mixing table), which is coincidentally titled, "Waking the Lion Twelve Squared Plus Twelve".
Press the play button and after it's played for a while, go check on the lion.
There are two eyes staring at you: According to the dots on the tape, the left should be blue and the right red, so tap on them until you get the correct color scheme because the original color is random.
Now, tap on his chin and a keypad will appear.
If you remember the name of the cassette, it gave you the code to enter: 12 squared is 144, plus 12 equals 156, so enter 156 on the keypad and press the green enter button.
The lion face falls apart leaving a niche of goodies: collect the Battery, Red Glasses, and Stop Button.
Circuit Board
Go left twice to the stump, put on the Red Glasses and note the word "Teleport" on the tree.
Put the glasses away via the "X" in the upper right corner, and return to the tree house equipment workbench.
Tap on the red Spoke and Spelled, turn it on via the top right button, enter the word teleport, and press the up arrow button to enter the word.
Everything falls apart and the LED Board says "Pick Me UP", so do so.
Tap the Circuit Board next to the cassette player and it will go into your Inventory, then tap it again to bring it up.
Install the Start and Stop Buttons, the 9-volt Battery, and the LED Board.
Now all you need to find is a key pad, so pick up the red Merman.
Turn it on with the tiny black button on the right side to trigger a Mini Game.
Forget those two top and bottom circle buttons, your goal is to turn on all the other circle buttons, except for the center one.
The solution seems to be random but I think pushing the center button last seems to be necessary.
Take the Key Pad, pull up the circuit board and install the Key Pad.
Plug the cord attachment into the circuit board, turn on the monitor, and everything goes fuzzy for a while.
Pick up the circuit board again, and install the cord to the LED Board.
Press the Start button and then press the start on the Atari board to activate a Mini Game.
Atari Mini Game
Your goal is to get your avatar to the castle with at least 1,000 gold coins.
In order to do this, you need to move him around the board and defeat the enemy in order to get to the castle.
Start by going left using the keypad, and when you encounter an enemy, tap the center button and then the direction you want to fire.
Once you wipe out the enemy, move over and collect the chest of gold.
Keep moving, destroying enemies, and picking up 1,000 gold until you get to the castle.
Go to the entrance of the castle, enter, go left, and connect with the avatar to upgrade your system, and get your device.
You need to get close enough to kill the enemy, but don't get too close because if he gets you first, the game is over.
To begin again, just press the start button and have another go at it.
Your path to take is left, up, right through the long path, down to the castle, right, and up to enter.
You can go through the greenery, but not the rocks, which can be a good shortcut, and make sure to collect 1,000 gold along the way so you don't need to start over.
Moving On
Go see Tommy for another chat, and then leave the tree house to go see the macaw.
Use the Glass Shard to direct him back to where he was originally, and he will hop down to another tree and part the way for you, so follow the path.
Chapter 4: Father's House
The Shack
Enter the shack and grab the red Fuse off the top of the machine next to the window.
Go outside, pick up the green Fuse in the lower left corner, and head left.
Zoom in, open the fuse box, place your two Fuses, and flip the switch.
The Green one goes on the left and the Red one on the right.
Close the lid and box, and return to the inside of the shack.
Turn on the light switch at the far right, and look at the board on the machine.
You need to find some sort of code, so exit the shack and go forward.
There is a fishing pole on the bridge, so touch the reel on it to see what it does.
You need to hook the pot below so move the pole to the left so it is slightly resting on the left rail, and touch the reel again.
You won't hook it on your first try because the hook is swinging from having moved the pole, but once you lower the hook and it comes back up, it will stop swinging.
Once you have hooked the Shrimp Pot, tap it and it will go into your Inventory.
Open the lid, take out the Code, close the lid to save the shrimp for later use, and exit the pot back into Inventory.
Return to the inside of the shack and bring up the board with the switches and post your Code.
Flip the following switches up so you can talk with Tommy: 6, 56, 7, 2, 36, 15, and 4.
Leave the shack, cross the bridge and take the path to the greenhouses.
Surrounding Area
Go left and zoom in on the face of the statue and note the white blotches, then examine the middle of the base of the statue and some sort of decoder will go into your Inventory.
Exit down to the greenhouses, zoom in on the panel between the two greenhouses, open the door, and take the goldenrod sheet.
Notice the diagram on the door and turn the valves to match the configuration.
When the water drains out of the trough above, take the Crowbar.
Go down, then right to the house, grab the signal light, and go to the front door.
Tap on the lantern, pick up the Key Keeper and return to the greenhouses.
There is an airplane circling around that seems to be signaling, so put up your Signal Light, and turn it on.
Respond to whatever his Morse Code signal is, using the Signal/Response table on the goldenrod Morse code sheet. Mine happened to be dash, dot, dot, but I expect it might be random.
If you tap the light switch, you get a dot, but if you hold it longer, you get a dash.
Tap down to see what he dropped out of the plane.
It's an upside down crate that has the numbers 247 and a picture of a satellite on the side, so use your Crowbar to open the crate.
Pick up the piece of equipment and then forage through the Styrofoam to find two Vacuum Tubes.
Return to the front door of the house and pull up your Key Keeper.
The code to open it was on the crate, but keep in mind that the crate was upside down, so enter 742, press down the button at the left, and take the Key.
Matter Encoder
Use the Key to open the door and enter.
Go left into what looks like a Library. Take the Music Box and Handkerchief off the table.
Return to the hall and go into the right room.
Tap on the button panel to the left of the door for a Mini Game.
Your goal is to press the buttons in a certain order, so you can experiment or trust me that you need to keep repeating the following sequence: red, green, blue, and white.
Once you have all the buttons lit, you can talk to Tommy again in order to find out that your goal is to get access to the computer system and install the Matter Encoder.
Turns out what you picked up from the crate is a Matter Encoder, and you now need to fix it up with 8 vacuum tubes before you can install it in the vacant space next to the machine that says "Tipping Point".
Exit the house and go left until you come to the statue.
Zoom in on her head and use the Handkerchief to remove the white spots in the order that the Handkerchief and the spot connects with the yellow glow, which is apparently random.
The last spot on her shoulder reveals a crescent moon, so back out, go to the house, and enter the Library on the left.
Pull up your round decoder and turn it so that the small dot shows a crescent moon.
Tap each of the books shown through the decoder until they have a yellow glow, close the decoder, move the chair to the right, and tap those books out of the bookcase.
Pick up the 4 vacuum tubes off the ground.
Go to the greenhouse on the right and enter it to find a sleeping flamingo.
Pull up the Music Box and start it with the handle so you can wake up the flamingo.
Pick up the Shrimp Pot and take a Shrimp out of it.
Your goal here is to tantalize the flamingo with the Shrimp once she is awake so that she will get off the nest and let you collect two more Vacuum Tubes.
You need to seriously use two hands to make this happen because you have to be quick.
No worries if you don't succeed the first time because you can grab another Shrimp from the pot, wake her up again and grab the other Vacuum Tube.
Once you have achieved your goal, close out the Music Box, and return to the computer room in the house.
You should now have all 8 of the Vacuum Tubes, so pull up the Matter Encoder, and start by inserting all the tubes into the encoder.
Next, you need to experiment and rearrange them so that they are in their correct positions.
The LED numbers on the left will tell you how many are correctly placed, so keep exchanging the tubes until the Matter Encoder is good to go.
Once you solve it, install the Matter Encoder and click on the Tipping Point game on the computer.
Personal Computer
Tap on the computer screen and notice that the directional arrows work the same as in the real game. Go to the stairs and then upstairs to the locked gate.
Go left and forward, and tap on the red door to find out it's locked. Back out and examine the candy wrappers at the bottom of the door.
Note the symbol at the base of the pole, then zoom in on the narrow window to the left of the pole.
Take the coin from the lower right corner of the monitor.
Back out 4 times and go left twice to the candy machine.
Use your coin to buy the Crack bar that is the second from the left on the top row.
Return to the turret door, zoom in on the candy wrappers, and place the candy bar which rapidly disappears and is replaced by a Key.
Take the Key, back out to the gate, zoom in, and use the Key to open the padlock.
Go through the gate and pick up the Hammer on the left with that same symbol on it as the base of the pole.
Return to the pole and use the Hammer on the brick with the symbol.
Take the Key, use it to open the lock on the red door, and enter.
Tap on the candy wrappers on the ground to gain access to the computer equipment.
Moving On Again
Talk to Tommy, who says your first destination is Paris, but you never get there because his father appears and you find yourself back inside the shack.
Go back to the computer room at the house to finish your conversation with Tommy.
He says his father attacked you and then teleported out, so you foolishly decide to follow him once Tommy provides the coordinates.
Chapter 5: Somewhere in Space
Match the Objects
We seem to have ended up somewhere in outer space with the task of matching the objects in the hand at the bottom of the screen to the animals floating around.
Move the object in the hand to the animal in order to match them up.
The objects in the hand are presented randomly, but the matches are as follows:
Watch = Crane
Music Box = Flamingo
Palm Leaf = Golden Tree Beetle.
Shrimp Pot = Shrimp.
Glass Shard = Macaw.
Pink Cassette = Toucan.
Black Cassette = Lion.
Shark's Tooth = Shark.
Aircraft
We definitely appear to still be in space but now on an aircraft rather than just floating around trying to recapture our objects.
Pick up the Microphone in the lower left corner, and the thing that looks like the top of a typewriter in the lower right corner.
Exit down and go right.
Pick up the Circuit Board, exit, and go forward to examine the airlock doors.
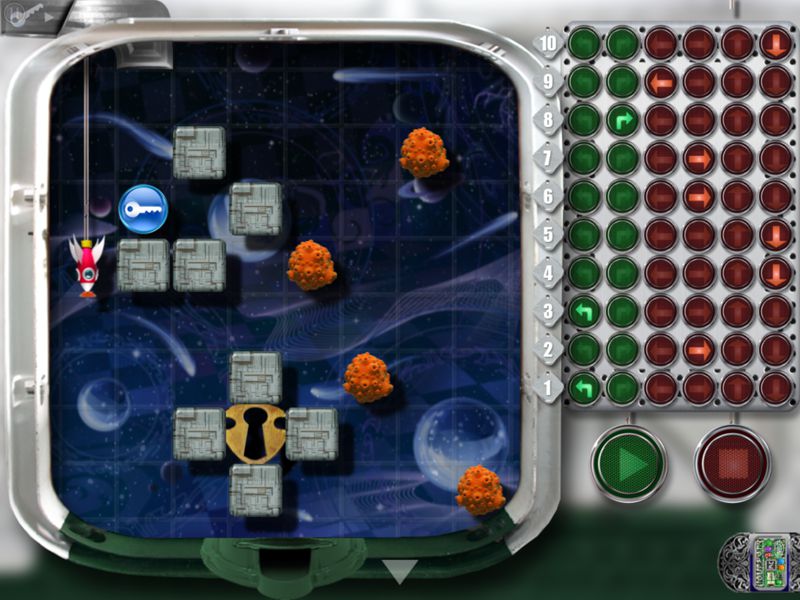
Airlock Doors Mini Games
Each of them has a mechanism that looks somewhat similar, but start with the door on the right.
The numbered rows of buttons on the board at the right control the movement of the rocket as to whether you want it to move left, right, up, down, or rotate.
Your goal is to get the key to the keyhole, using the rocket to guide it with its suction cup, so press the path of arrows you want it to taken and then the green play button.
The rocket can touch objects but the key cannot so see the screenshot for the solution.
Screenshot
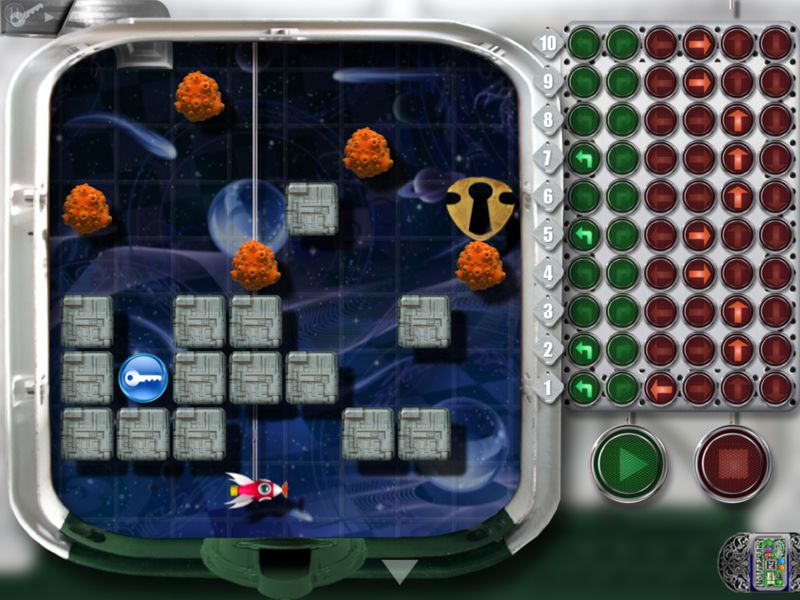
Back out, enter Door 2, and talk to Tommy's father who will give you the Key to Door 1.
Go to Door 1, zoom in on the lock, and drag the Key to the key image in the upper left corner of the screen.
Plot your path to the keyhole, and push the play button...see the screenshot for the solution.
When you have completed the Mini Game, the Key will fall to the trough at the bottom of the lock, so pick it up for your Inventory.
Screenshot
Light Person
Enter the door and try to talk to the "light person" you encounter.
Go to see Tommy's father, who will give you a Microchip.
Take the Circuit Board out of your Inventory and install the Microchip at MC, the Microphone where it says "Input", and the typewriter top at "Output".
Go to Airlock 1 and use your now completed Translator to see if you can have a conversation with the light person.
Turn on the Translator turn it on with the lower left green button, then flip on the other green button as well as the purple and blue buttons to get rid of the gibberish so you can understand him.
Close the Translator, and return to Airlock 2 to talk to Tommy's father.
Once you are back in Airlock 1 with Tommy's father, tap on him and he will want the Translator to make a few adjustments, so give it to him and leave him alone with the light person for a short while.
Go back inside for another conversation with Tommy's father, who asks you to help fix the corrupted sites, gives you the password, and returns your circuit board keypad.
Teleporter
Go to the control room, tap on the two arrows on the lower control panel to bring down two monitors.
Turn them both on and flip through the channels until you get a picture, and then tap on the screens.
The left one has pictures of Tommy and his father plus a pie with the Pi sign, and the right one finally produces a lock with an image of a key that looks like the one in your Inventory.
Drag the key to the monitor until you get that yellow glow on the area between the two knobs.
Close the right monitor and focus on the left one, and trace the numbers 3.14, the numerical equivalent of Pi, using the numbers on the screen.
You now have a screen that shows New York, London, Paris, and Munich has a checkmark.
Tommy appears on the center control panel screen, so close the left monitor and talk to Tommy to find out you need to fix corrupted sites in New York, London, and Paris.
At the end of your conversation, bring up the left monitor again, tap on the photo and then the right arrow to find a map of the United States, or tap right again for the map of Europe.
The red dots are the corrupted sites, so select whichever one you wish to fix first and tap on it.
The dot will turn into a button with two letter entered on the code line and three more for you to fill in.
Count how many letters the second letter is from the first and continue the pattern to complete the code by tapping on those letters in the name of the site.
London
Complete the code to be transported to London.
There are 3 scrambled pictures to complete in order to fix things up in London. See the following screenshots for the solutions.
Screenshot
Screenshot
Screenshot
Take the lime green Key that appears in a cache in the wall, and you will be transported back to the airship.
Control Room
Talk to Tommy and then bring up the right monitor.
Tap till you get the lock and install the lime green Key.
Close the right monitor and pull up the left monitor.
Find the map and select your next site.
Paris
Select the dot for Paris and complete the code.
There is a locked cabinet in front of you so you are going to use the keypad in your Inventory to open it by matching the pattern on your keypad to the lights on the cabinet. The directions below worked for me.
For the top row, tap the left button, middle button, middle button, and left button.
For the middle row, tap the middle button, right button, middle button, and right button.
For the bottom row, tap the middle button, right button, and left button.
Open the cabinet, pick up the control pad next to the center left monitor, and press the orange and blue buttons when the corresponding cartoon character is on the screen.
Repeat this same procedure until all 10 monitors on the right change to number screens as shown in the screenshot.
Screenshot
A green Key goes into your Inventory and you transport back to the airship.
Control Room
Talk to Tommy and then bring up the right monitor.
Tap till you get the lock and install the green Key.
Close the right monitor and pull up the left monitor.
Find the map and select your next site.
See New York and the conclusion from SonicLover below
Posted by: Jazz |
May 9, 2013 3:33 PM
|
May 9, 2013 3:33 PM
Tipping Point Chapter 5 Walkthrough (continued)
New York
You'll arrive looking at the side of a building. Bring out the device and light up the same buttons.
You'll begin a mini-game. Use the middle-left and middle-right buttons to move and the middle button to shoot. Word of warning: this mini-game was the reason our previous walkthrough-writer had to quit!
My recommendation: make avoiding your enemies' shots your first priority, and attack only when you're not in danger. Each of the three levels' gameplay is different. For level 3, you can move up, down, left, and right, and run into aliens and ships to destroy them; you might want to take out the ship at the bottom early, then take out the aliens from the top down.
Once that's done, you'll get a red key and return to the control room.
The Airlock Finale
Once you have all four keys, talk to Tommy again, then return to Airlock 1.
What happened here? Pick up the translator and take it out. Listen to what the light-person has to say.
Go back to the control room and speak to Tommy again.
Bring down the right monitor. Note the images; yellow is always 1, blue 2, and red 3.
Retract the monitor. Stick the yellow key in the socket marked 1, blue 2, red 3, and green 4.
Bring both monitors down again. Touch both screens to bring up the airlock puzzle.
Here's how it works: touching a square on the left will change it, and the silver key will interact with the environment, treating dark areas as solid. After the silver key comes to a rest, it will start its journey over. It needs to touch all four keys and then exit from the lower right.
Since the silver key can't go up, try to make a zigzagging path for it with ramps and platforms.
...That's the principle, anyways. I've found a glitch: sometimes if the key exits too high to the right, it can activate the airlock even if it didn't collect all the keys.
Once you've solved the puzzle, watch the cutscene, then tap the navigation arrow to return to the control room.
Talk to Tommy again. He'll send you home.
What the...? Whose legs are those beside you? Tap them.
Bring up the translator. Watch the ending and epilogue. Congratulations!
Silver Key Collection Drop
Solution (image)
Posted by: SonicLover |
May 13, 2013 9:32 PM
|
May 13, 2013 9:32 PM