
The Stormglass Protocol: Room Escape!
Platform: iPad, Android

![]() The Stormglass Protocol: Room Escape! is a first person room escape game created by the Stormglass team. It pulls the genre out of its stationary roots and offers a full 3D experience that lets you walk around and investigate each chamber as you please. The puzzles will be familiar, but the interface adds a nice level of realism to the normally static experience.
The Stormglass Protocol: Room Escape! is a first person room escape game created by the Stormglass team. It pulls the genre out of its stationary roots and offers a full 3D experience that lets you walk around and investigate each chamber as you please. The puzzles will be familiar, but the interface adds a nice level of realism to the normally static experience.
 There are 16 locked doors keeping you inside the Vindiqo Research Laboratory, each one leading to a room with more insidious puzzles to solve. Using the on-screen arrows you can walk around each area, tapping to pick up items and swiping the screen to look around. Inventory objects can be dragged out of place and dropped onto the screen. If you get stuck, a rudimentary hint system points you in the right direction. Apart from that, you're left to your own devices to figure out what needs to be solved and how to solve it!
The actual rooms in The Stormglass Protocol: Room Escape! aren't quite as interactive as you first expect. This is mostly a result of big budget 3D games giving us complete freedom to pick up any object we see, throw it across the room, then watch it shatter. With Stormglass, your interactions are streamlined to things directly involving each level's puzzle. It's slightly frustrating at first, but you'll thank the designers later on once things get more difficult.
The Stormglass Protocol: Room Escape! wins a lot of points for its 3D sci-fi setting as a unique approach to point-and-click escape gaming. Figuring out how to solve a puzzle is just as fun as actually solving it, and since your point of view isn't on rails, there's a much greater sense of discovery. The puzzles themselves are fairly standard, but that never detracts from the atmosphere set by the narration, artwork, and bountiful number of environments you'll get to walk through.
NOTE: This game was played and reviewed on the iPad 3. Game was available in the North American market at the time of publication, but may not be available in other territories. Please see individual app market pages for purchasing info.


Walkthrough Guide
(Please allow page to fully load for spoiler tags to be functional.)
The Stormglass Protocol: Room Escape Walkthrough
Room 01-16
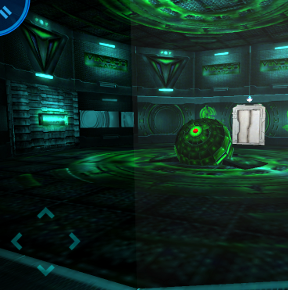
Walk to the green orb in the middle of the room.
Push the red button at the center of the green orb to open the exit door.
Go through the opened door and continue forward into Room 01-15.
Room 01-15
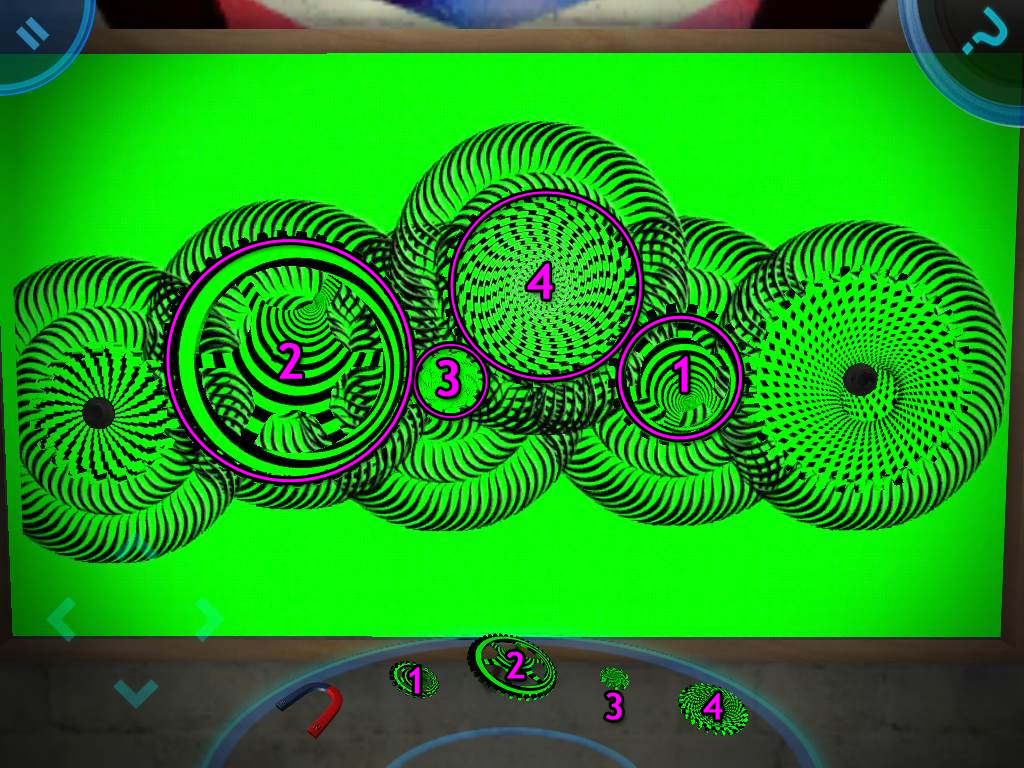
Collect the four gears placed around the room.
The first gear is on the round table at the center of the room.
The second gear is leaning against the wall near the rear right corner of the room. You'll find it just underneath the gas mask mounted on the wall.
The third gear is next to the globe on the cupboard near the entrance door.
The fourth and final gear is beside the gramophone on top of the cabinet that's between the two sofa chairs.
Face the machine beside the exit door. It looks incomplete, and there are four spaces that separate the spinning gear on the left with the unmoving gear on the right.
To fix the machine, you'll need to get all of the gears spinning by putting the right sized gear on each peg.
If the gear is in the right spot next to a spinning gear, it will start spinning too. It's easiest if you solve the puzzle from left to right.
Solution
Go through the opened door and continue forward into Room 01-14.
Room 01-14
Take a few steps into the room. The power will shut down due to an apparent "power failure."
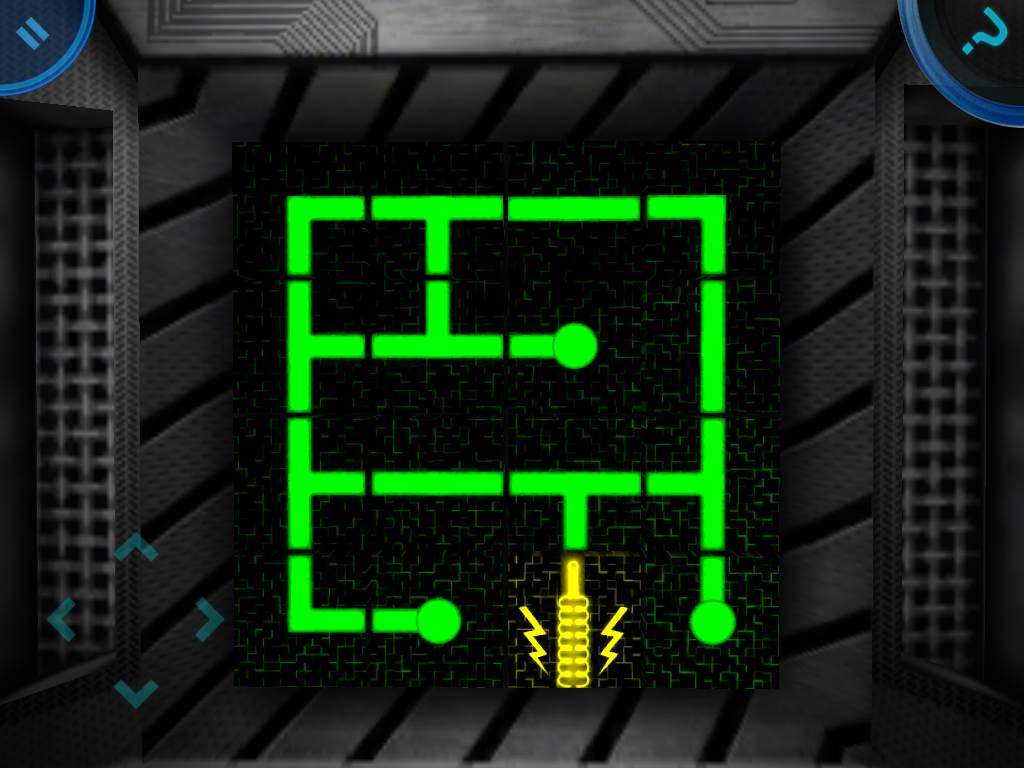
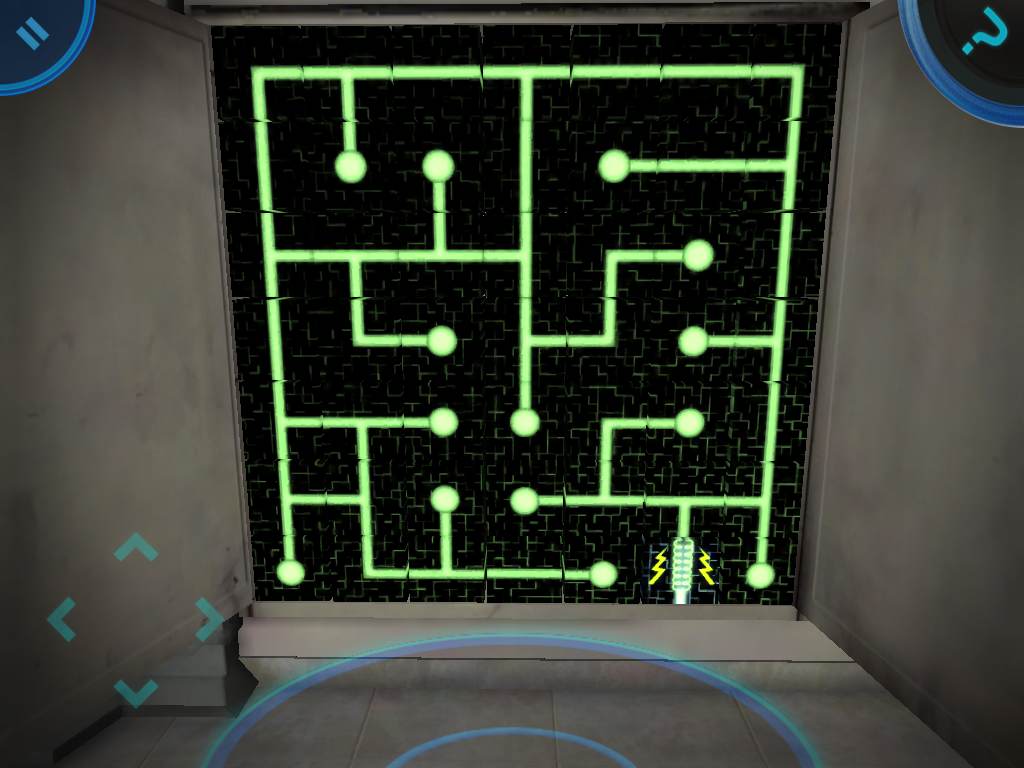
Go to the Electric Circuit at the left side of the room.
Rotate the circuit tiles on the board to make an uninterrupted path to the yellow power tile.
Tap a tile to turn it 90 degrees counter-clock wise.
When a circuit tile is connected to the power tile without any open ends, the color of the circuit will change from white to green.
It's easiest to solve if you at the power tile and work your way around.
Solution
The power should come back on after you solve the puzzle. Turn around and walk to the wall on the opposite side of the room.
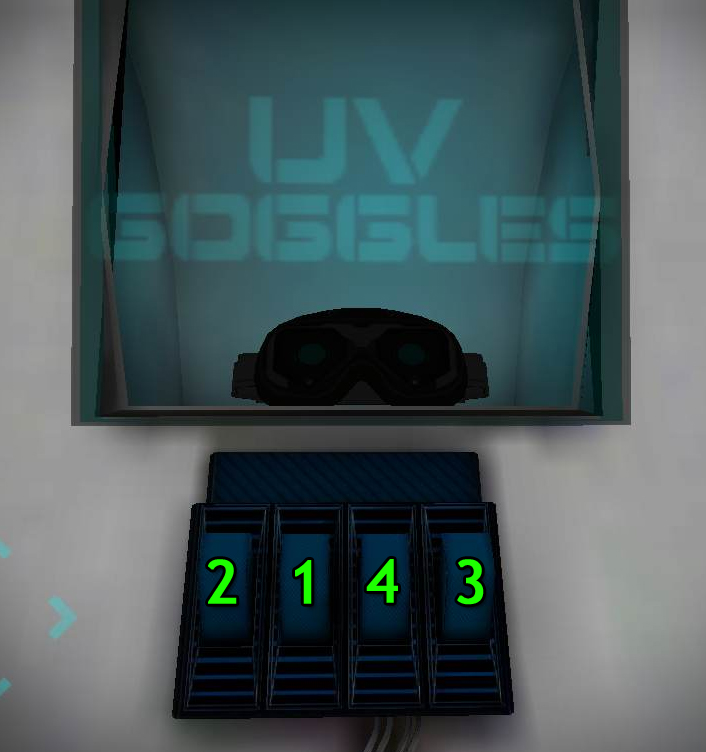
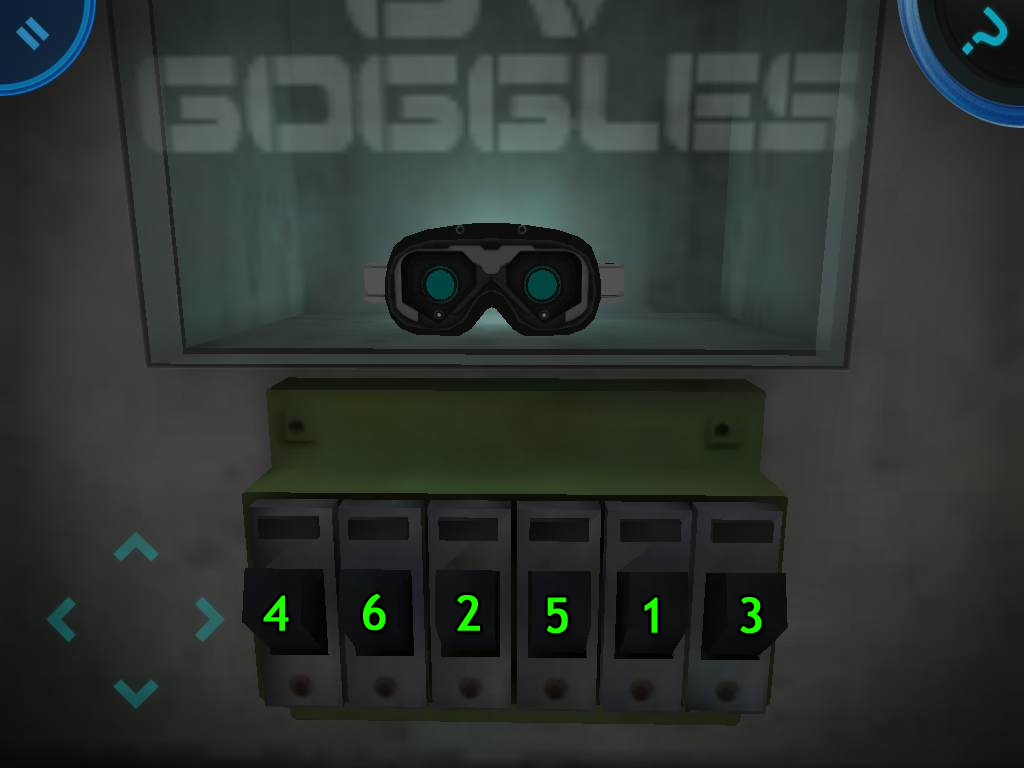
To open the case over the UV GOGGLES, you have to flip all of the switches down.
The switches need to be tapped in a specific order in order to unlock the case.
Use the process of elimination to solve this puzzle. A correctly hit switch will stay turned down, an incorrect switch will reset the puzzle.
Solution
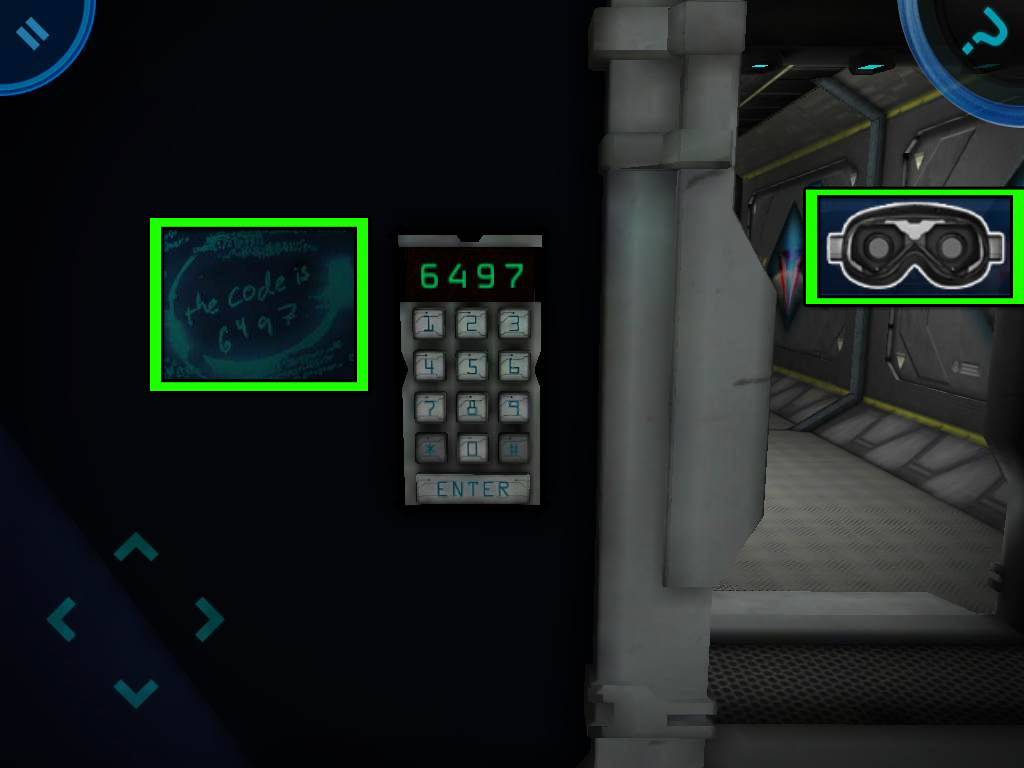
Take the UV GOGGLES. They'll now appear at the upper right side of the screen; tap the goggles to put them on.
Once the goggles are on, you'll see a whole bunch of hidden writing appear on the walls.
Walk to the exit door and turn left. Note the numeric code you see on the wall - 6497.
Punch the code into the numpad on the electric lock beside the door.
Screenshot
Go through the opened door and continue forward into Room 01-13.
Room 01-13
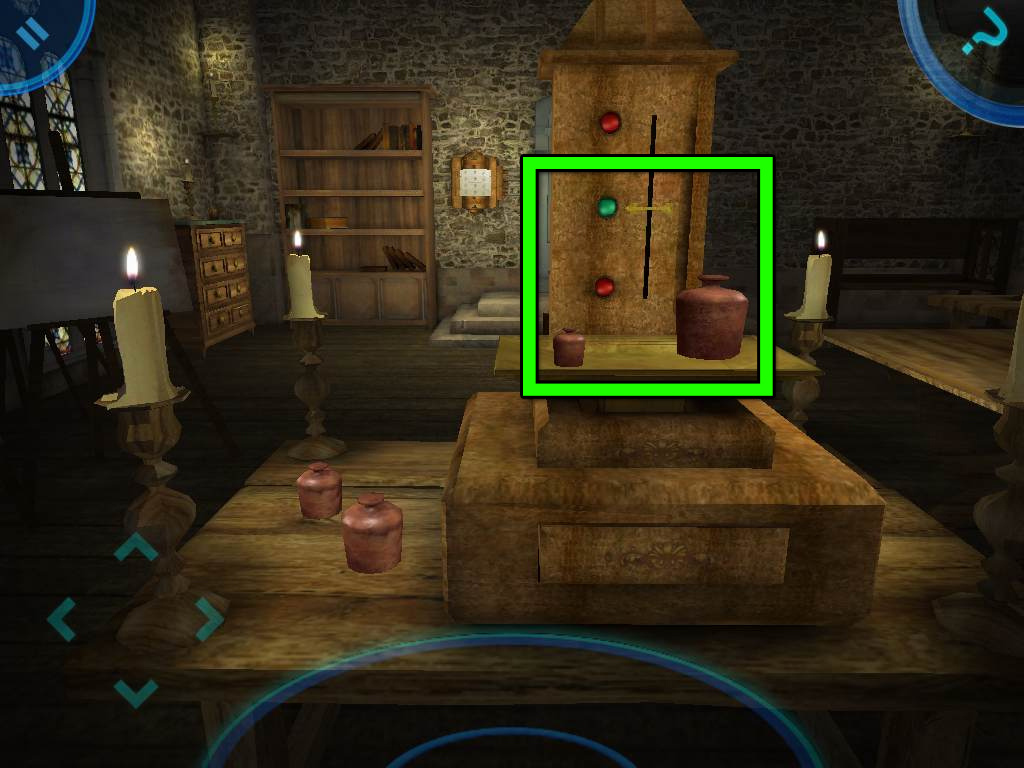
First go to the scale on the table. Find the correct weight to move the arrow to the green bulb.
Pick up the smallest weight and the largest weight, then put them both on the scale.
Leave the two medium weights untouched.
Solution
Read the note inside the drawer that opens underneath the scale. You'll find four clues to a lock combination:
"The first hides on a clock."
"The second in the sky."
"The third sits in a drawer."
"The last is marked by pi."
The first clue is fairly straightforward, so let's take a look at the clock on the wall first.
If you look closely, you'll see on the face of the clock: 12 at the top, "DIVIDED BY" in the middle, and 6 at the bottom.
12/6 = 2. So the first number is 2.
Screenshot
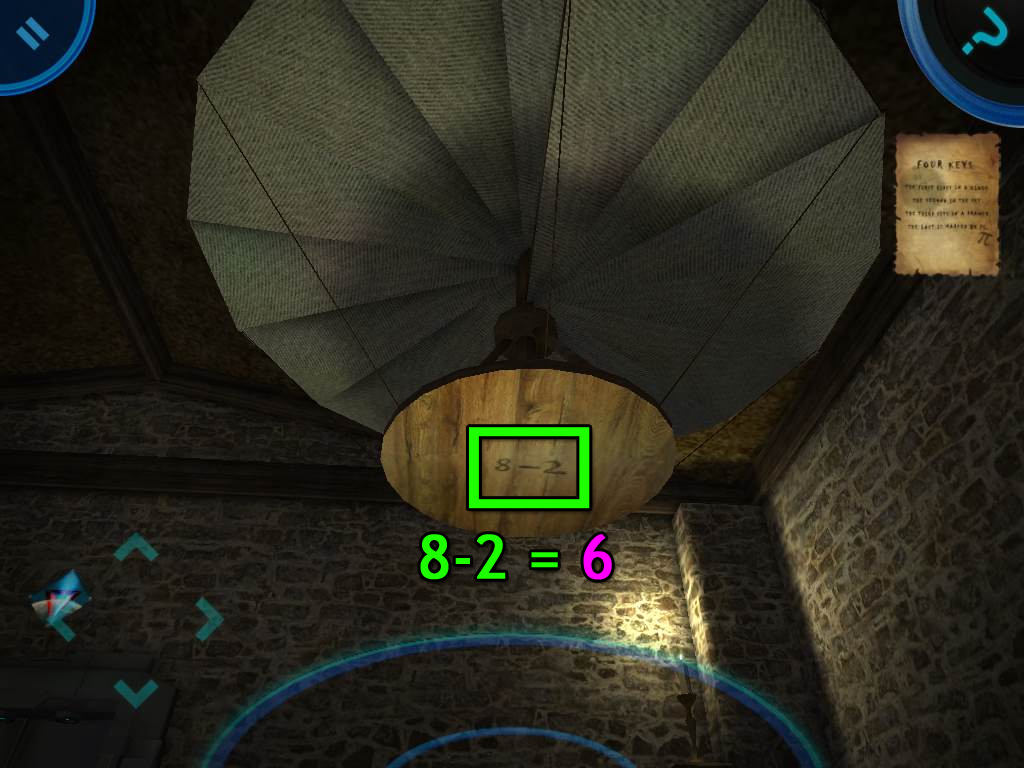
The next clue is found "in the sky." What object in this room can be found in the sky?
Inspect the model helicopter hanging from the ceiling.
Underneath the circular base of the model you'll see another equation: 8 - 2. Easy! the second number is 6.
Screenshot
The third clue "sits in a drawer." And no, it's not the drawer under the scale.
Open the second highest drawer in the cupboard beside the bookcase.
On the left side of the drawer are four red balls, in the middle is a plus sign, and on the right side are five red balls.
4 + 5 = 9, therefore the third number in the combination is 9.
Screenshot
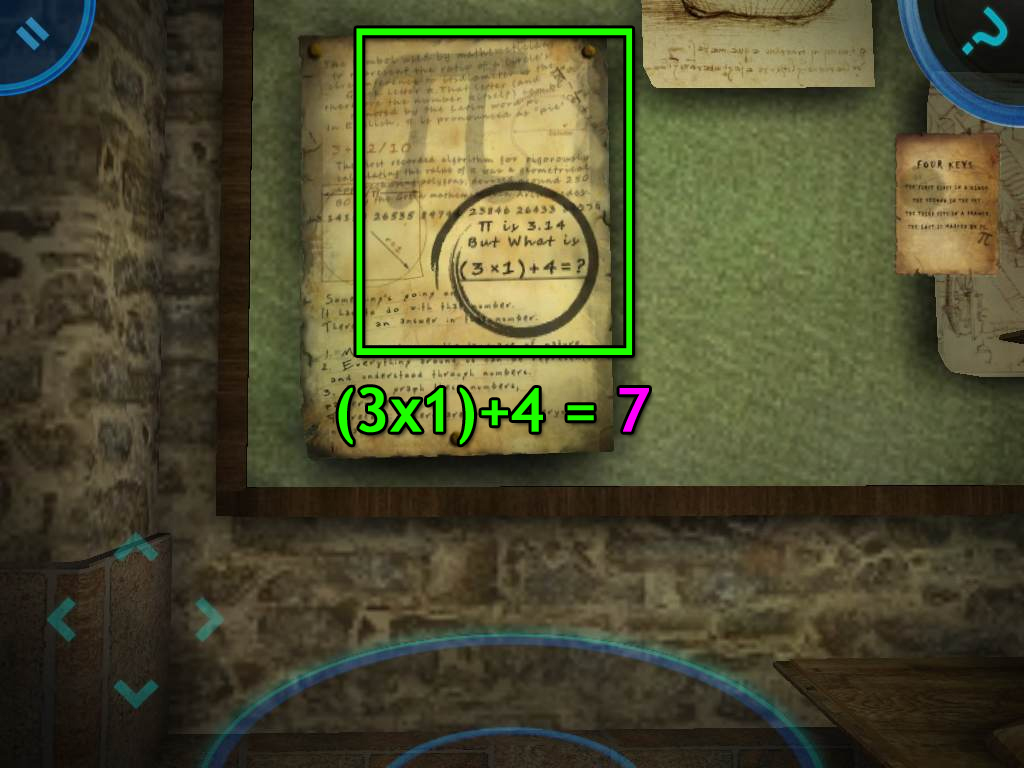
The fourth and final clue is "marked by pi." Just look for the pi symbol somewhere in the room, the fourth equation is not far away from it.
Examine the page pinned to the green board on the wall with a large faded pi symbol at the top of the paper.
Solve the equation underneath pi: (3 x 1) + 4 = 7.
Now we have all four numbers!
Screenshot
You're ready to go to the combination lock beside the door! Enter the four numbers in the order indicated by the poem.
Tap the dial to cycle through the numbers from 0 to 9. The number in the middle, under the red arrow, is the one currently selected.
The first number from the clock was 2, the second number from the helicopter was 6, the third number from the drawer was 9, and the fourth number from the paper was 7.
Set the combination 2697 into the lock.
Solution.
Go through the opened door and continue forward into Room 01-12.
Room 01-12
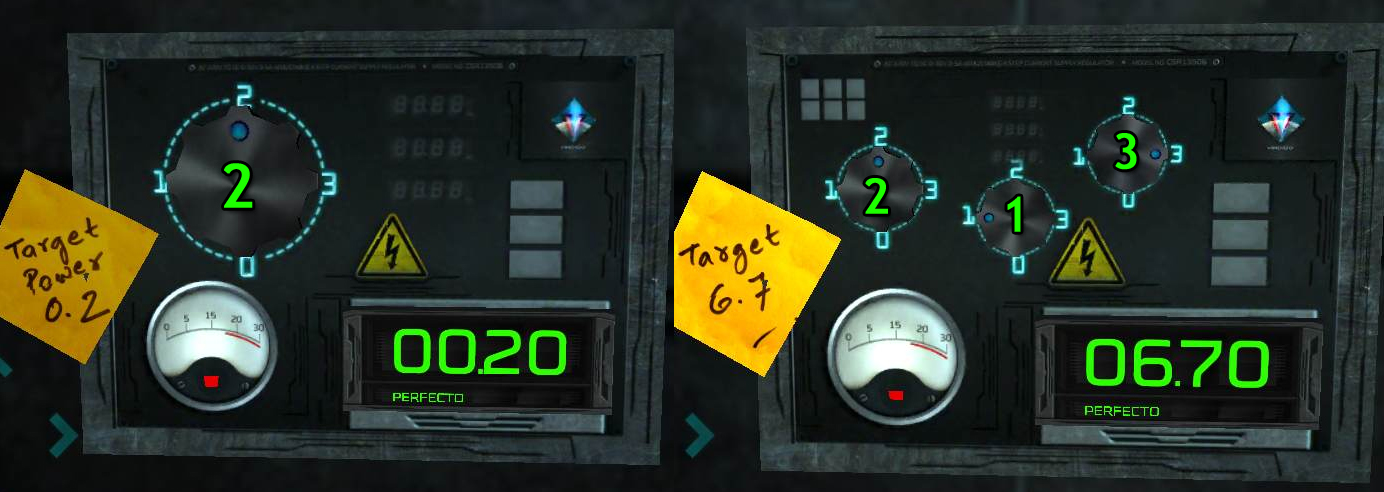
When you enter the room, turn towards the wall on your right to view the two power panels.
Turn the dial on each panel to set it to the target power amount.
On the left panel, rotate the dial to 2 so set the power at 00.20
On the right panel, rotate the left dial to 2, the middle dial to 1, and the right dial to 3 to set the power at 06.70
Solution.
With the power activated, you can now use the consoles at the center of the room.
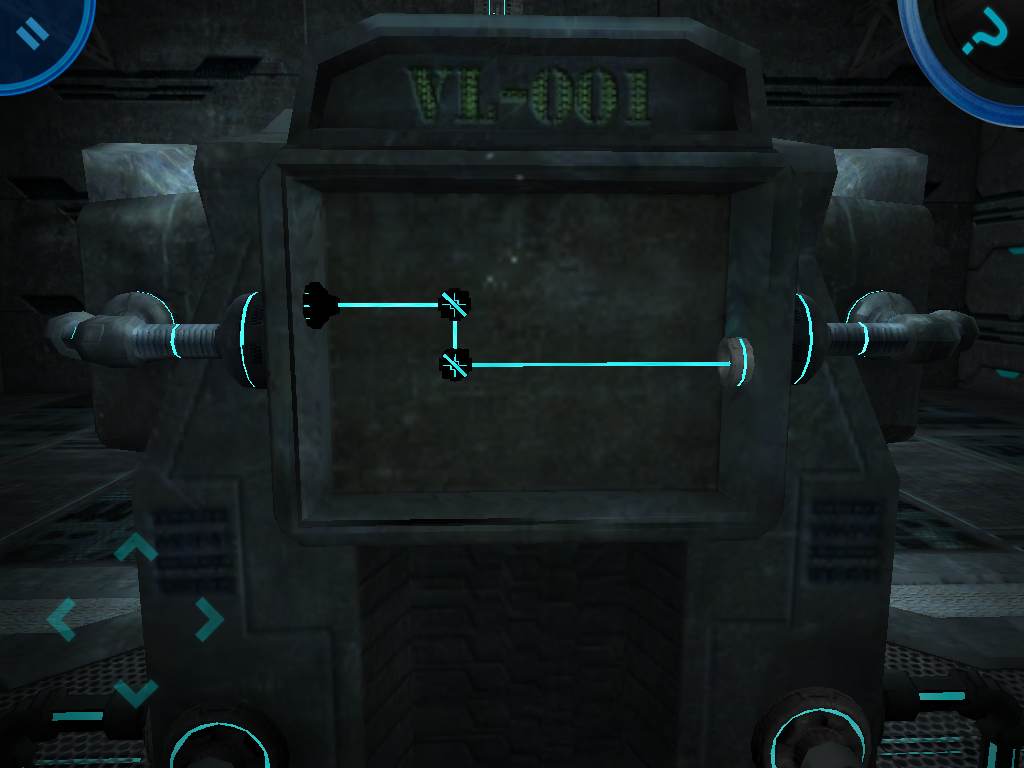
Each of the four consoles has a similar reflector puzzle. Let's start with the easiest one labelled VL-001.
Rotate the reflectors to shine the blue beam of light from the starting point on the left side into the socket on the right side.
Solution VL-001.
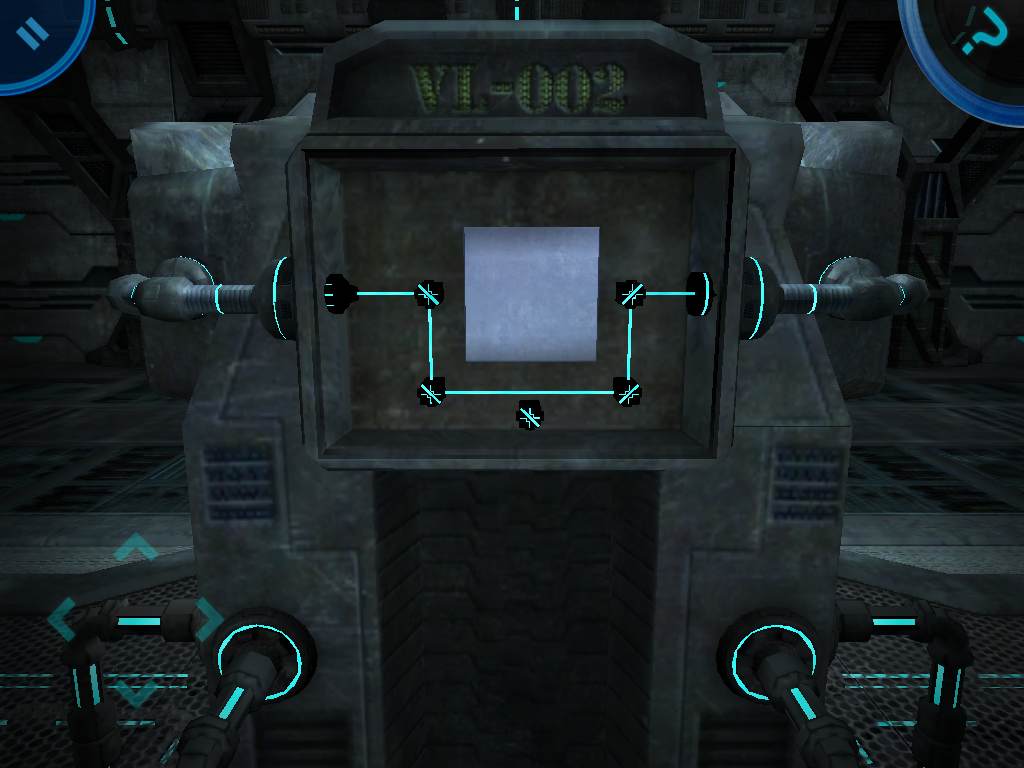
Move on to the next console, VL-002 on the right.
This puzzle is the same as the last one, but slightly more complicated. You have to aim the lasers around the bottom of the square metal sheet at the center of the puzzle.
You don't need to use all of the reflectors, just use as many as it takes so the laser reaches its end goal.
Solution VL-002.
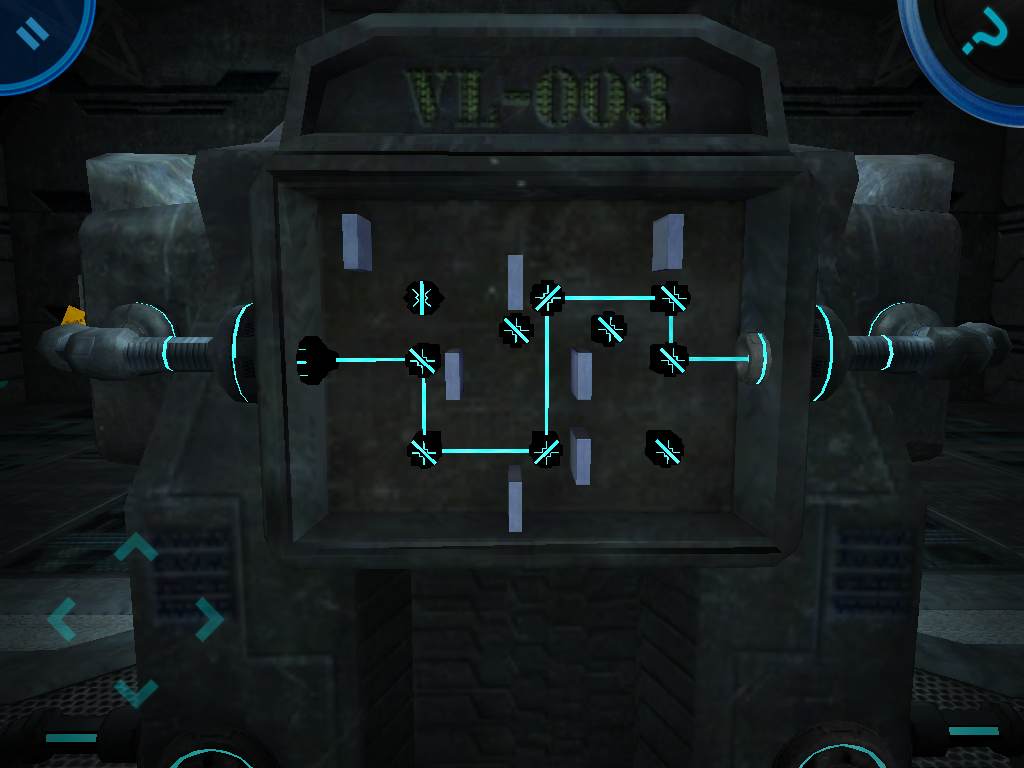
Continue to the next console on the right, VL-003.
Things are getting a bit trickier! This time there are multiple metal sheets blocking your path.
Also, there are four reflectors you don't need to use to solve this puzzle.
Solution VL-003.
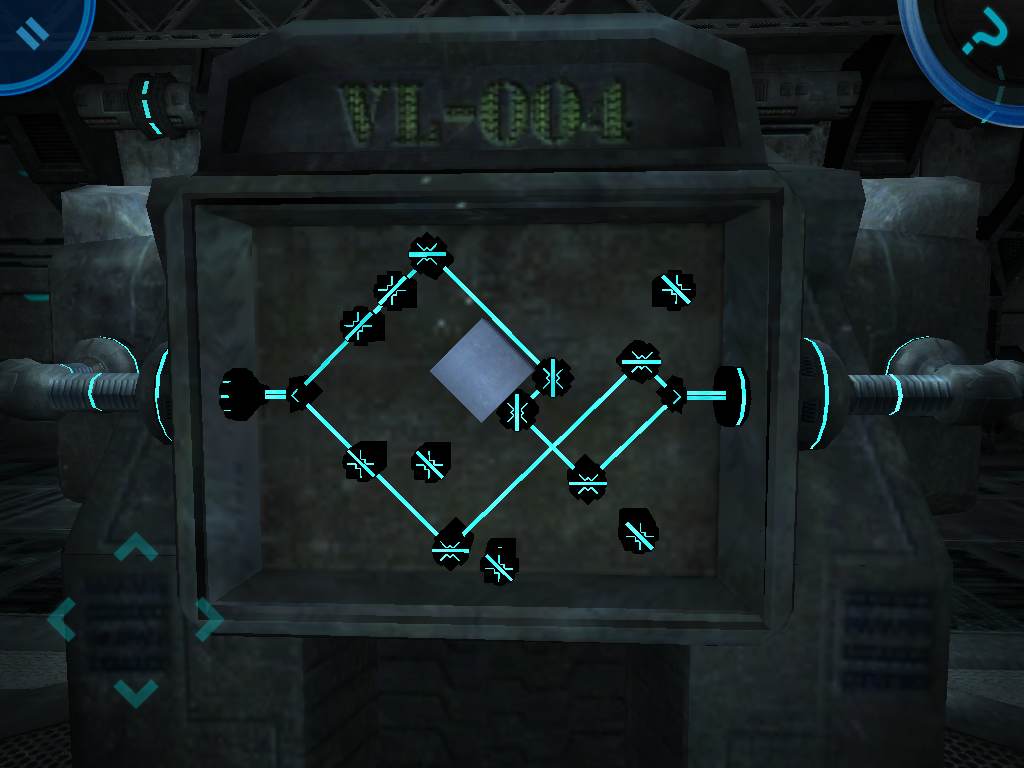
Go right once more solve the puzzle at the last console.
This time the laser has been forked into two paths. You must aim both paths into the socket on the right side of the console.
Solution VL-004.
Go through the opened door and continue forward into Room 01-11.
Room 01-11
In this level, you can choose to either take the long route or one of several possible short cuts.
The long route is pretty easy to follow. Just look for the V-shaped Vindiqo logos scattered around the area to take the designated tour.
Examine the stone slabs to view a map of the entire level. The stick figure indicates your current location. Your goal is to reach the arrow at the bottom right corner of the map.
Along the way you'll be stopped by a couple doors locked with a sliding block puzzle.
To solve the first sliding block puzzle in the Roman area, move the long horizontal block with the image of a centaur into the empty space at the left side of the board.
Solution Door 1.
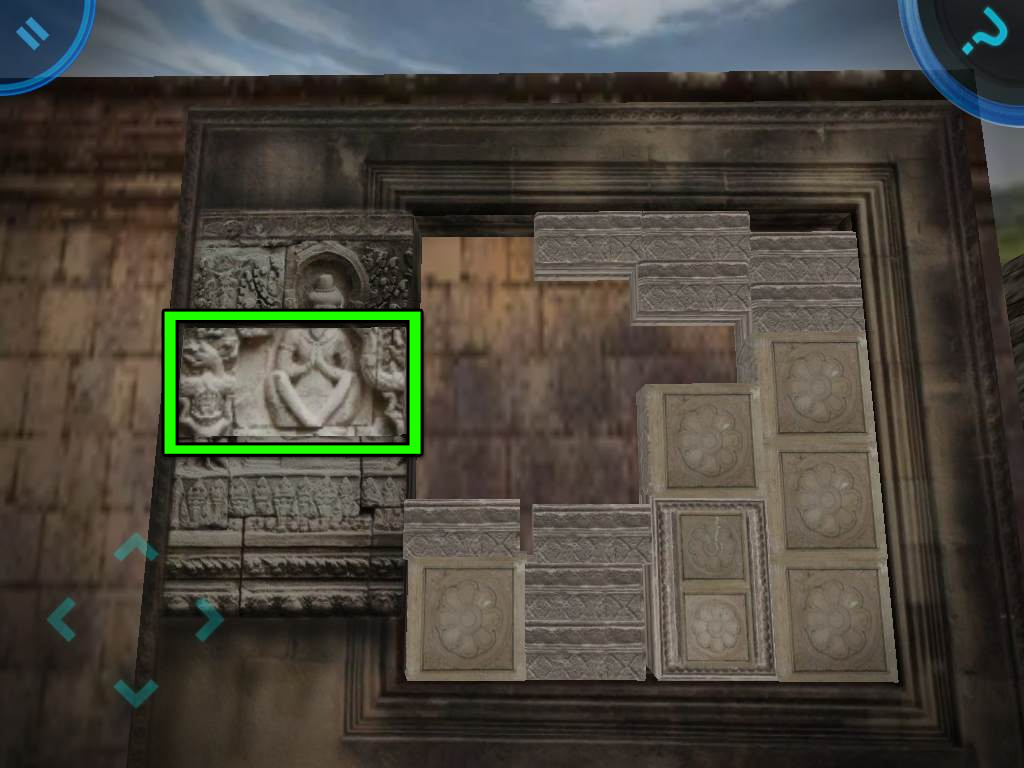
For the second sliding block puzzle at the door to the Cambodian area, move the horizontal block with the image of Buddha's body into the space at the left side of the board.
Solution Door 2.
To take the short cut that skips these two doors, walk to right roof at the back of the pyramid.
Stand on the corner of the roof, then carefully drop down onto the thin wall below the roof.
Walk along the top of the wall and follow it to the right until you reach the Vindiqo logo.
Drop off the left side of the wall to land inside the Cambodian area.
Check the map nearby if you need to reorient yourself. The exit is just a few feet away! Follow the road to the next Vindiqon logo, then round the corner to find the exit.
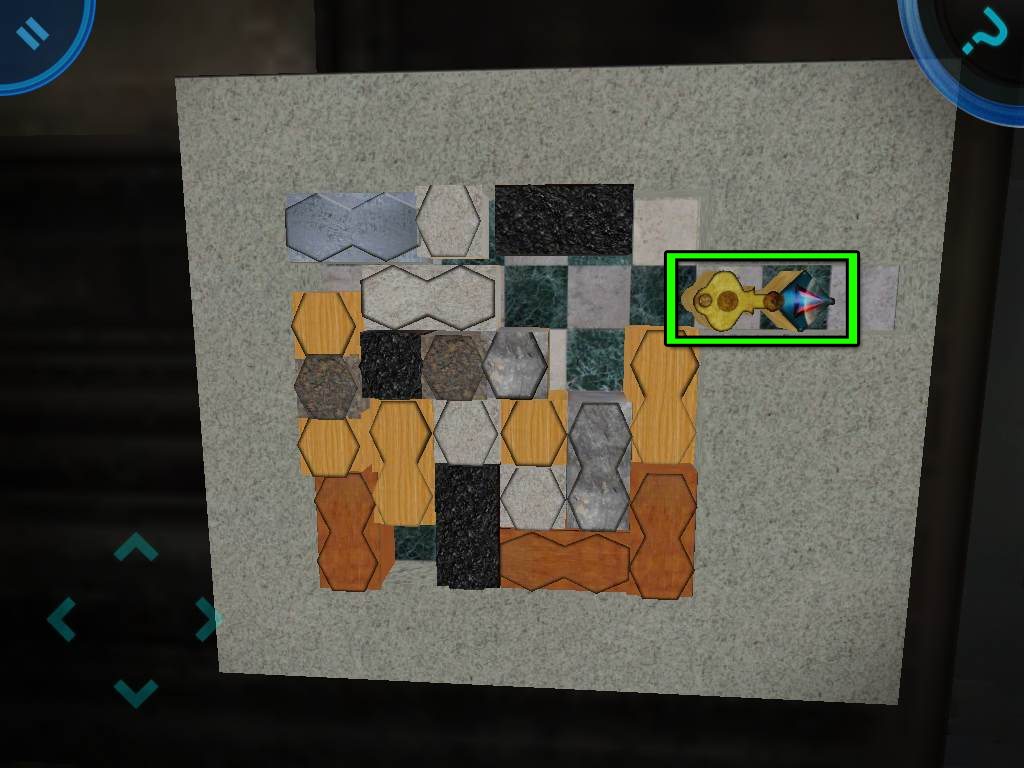
Here you'll encounter the third and final sliding block puzzle. Solve it to unlock the door
To complete the puzzle, move the key with the Vindiqon logo into the space at the upper right side of the board.
Solution Door 3.
Go through the opened door and continue forward into Room 01-10.
Room 01-10
In this room, you'll have to solve the puzzles found in four different paintings.
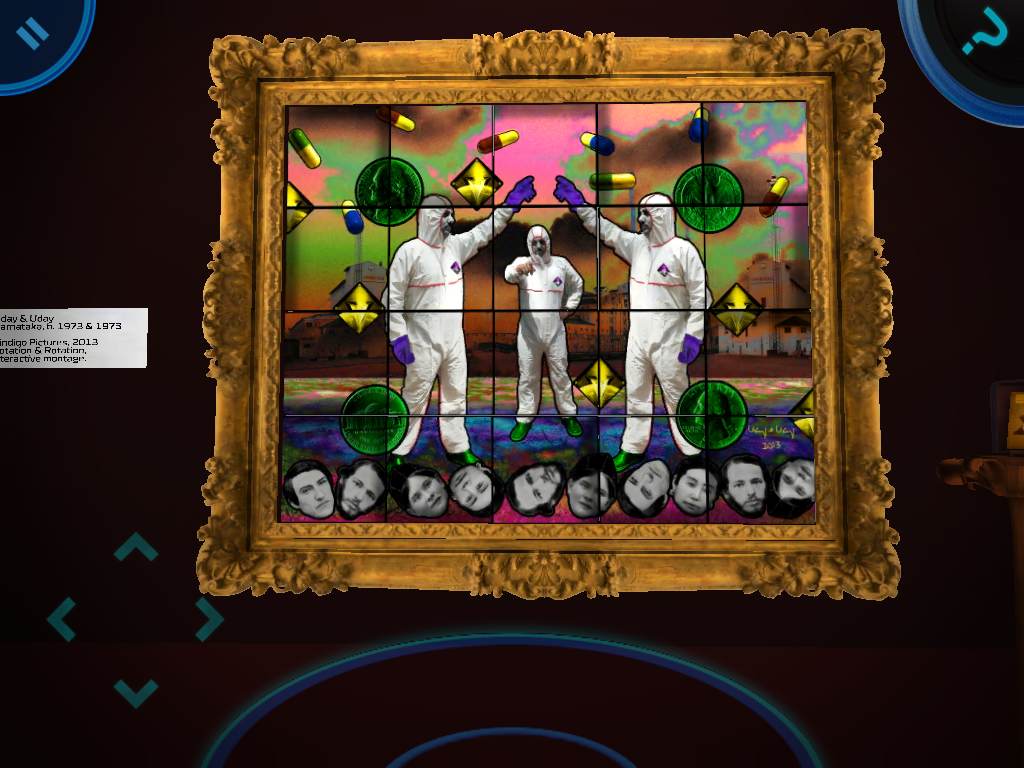
The first puzzle is at the side of the room in the painting Uday & Uday.
Rotate the tiles to align the picture inside the frame.
Uday & Uday Solution.
Take the KEY CARD 1/4 from the pedestal beside the completed puzzle.
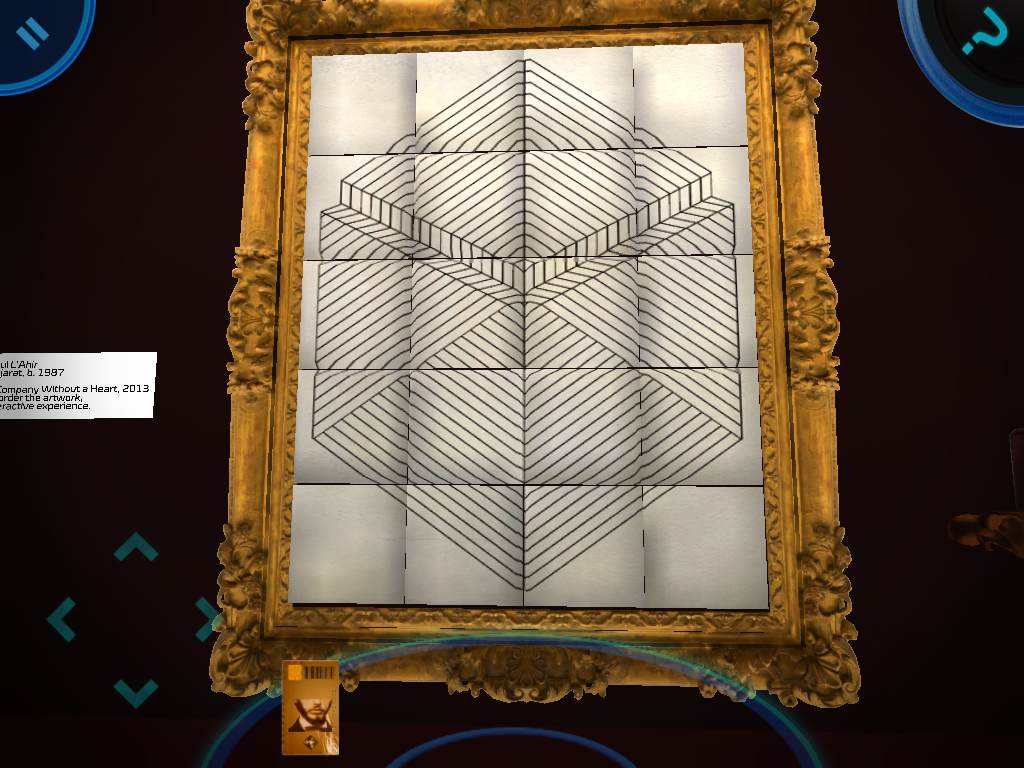
The second puzzle is at the complete opposite side of the room in the painting Soul L'Ahir.
It's another jumbled picture. This time, tap the tiles to swap their positions in the frame.
Arrange the tiles into a complete image. It's easiest to solve if you start with the corners, then solve the outer border tiles, and finally the pieces in the middle.
Soul L'Ahir Solution.
Take another KEY CARD 2/4 from the pedestal beside the second puzzle.
The third and fourth puzzles are inside walled section at the center of the room.
Clows Krishnaberg painting puzzle:
Find the find eight differences between the two nearly identical paintings.
Look for tiny details that have been changed in either painting, then tap the discrepancy to circle it.
The monitor in the middle of the wall counts down the number of differences left to find.
Clows Krishnaberg Solution.
Take the KEY CARD 3/4 on top of the pedestal beside the left painting.
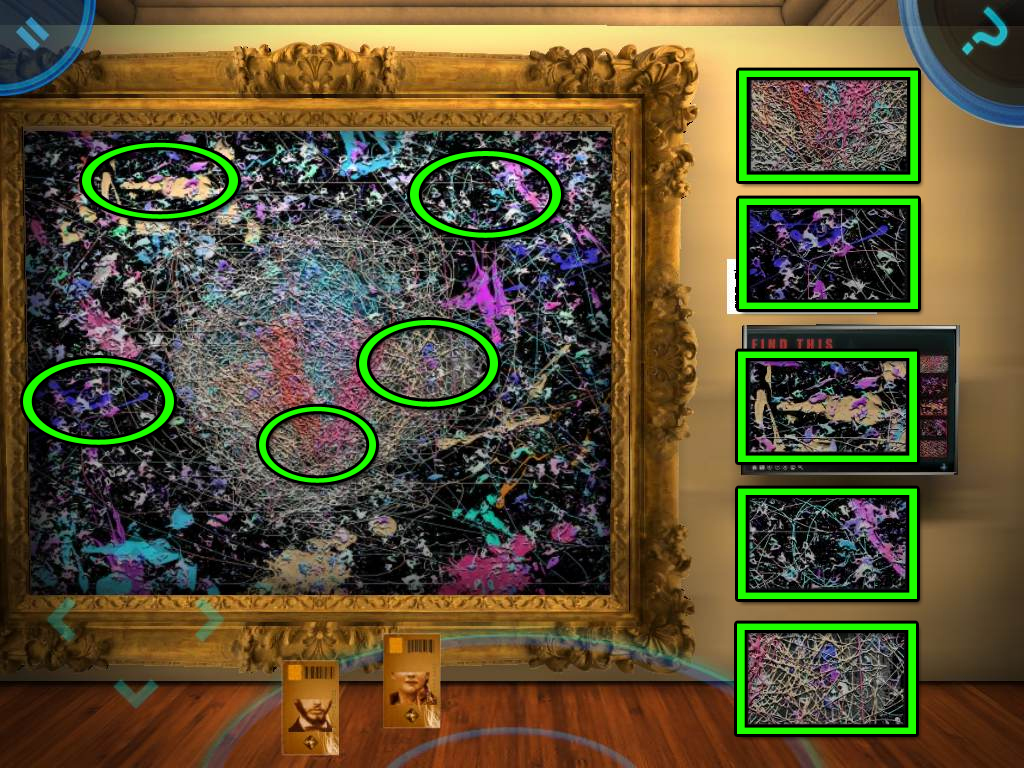
Jaxxon Joseph painting puzzle:
Locate the five sections of the painting that match the piece shown on the monitor under the words "FIND THIS".
After you tap to one found piece of the painting, the picture of a new piece will appear on the monitor.
Jaxxon Joseph Solution.
Once the puzzle is solved, take the last KEY CARD 4/4 to the left of the painting.
Go to the Smart Card Reader by the exit door at the back of the gallery.
At the top of each slot on the card reader you'll see the top half of a face. Similarly, on each of your key cards you'll see the bottom half of the face.
Pair the matching halves of the face by inserting the key cards into the correct card slots. If the inserted card is right, the green unlocked icon to the right of the card slot will light up.
If you need a clue, you can see a picture of each face at the bottom of the painting where you completed your first puzzle, Uday & Uday.
Screenshot.
Go through the opened door and continue forward into Room 01-09.
Room 01-09
Open the locker beside the exit door to reveal another circuit board puzzle.
Just like you did in Room 1-14, rotate the circuit tiles to create an interrupted path starting at the electric tile near the lower right corner of the board.
Tap a tile to rotate it. Tiles with a path connected to the electric starting tile will change color from blue to green.
Solution.
This will bring the power back on in the room, allowing you to use the vending machine. But wait! You're still missing some tokens to buy the items with.
Go to the keyboard on the table and tap the red button above "PRESS ME" (make sure you have the sound on.)
Listen to the randomly generated pattern of notes and memorize the song.
Tap the keys on the keyboard in the same order that you heard them to play the song yourself.
Just push the red button if you need to hear the song again to refresh your memory.
Once you've played the tune, take the two TOKENS 2/3 that spill out from the small hole at left side of the keyboard.
Press the red button again to play another song. This song will be slightly longer than the first one.
Play this song on the keyboard as well, then take another TOKEN 3/3 from the keyboard again.
Because the songs are randomized, you'll have to find this solution on your own.
Insert all three TOKENS into the coin slot in the middle of the vending machine.
Press the button with the picture of the VIDEO TAPE, then take it from the dispenser at the bottom of the machine.
Next, press the button for the GOLD KEY and take that from the dispenser as well.
Use the GOLD KEY to unlock the cupboard containing the television.
Open the cupboard and insert the VIDEO TAPE into the tape player underneath the TV.
Press the Power button on the TV to turn it on.
Memorize the four symbols that appear on the screen.
Now go to the button panel on the wall to the left of the exit door.
Push the buttons with the symbols that you just saw from the video on the television screen.
This pattern is also randomized each game, so please refer to the following screenshot as only an example of one possible solution. The correct solution in your game may be very different.
Screenshot.
Go through the opened door and continue forward into Room 01-08.
Room 01-08
When you enter the room, turn to the wall on your right and walk to the UV GOGGLES case.
This puzzle is identical to the one you solved in Room 1-14: flip all of the switches down in the correct order to open the case.
Tap a switch to flick it down. If the switch is right, it will stay down. However, if it's wrong, the puzzle will reset.
The solution to this puzzle is randomized. The screenshot below is only an example of one potential solution. The correct solution in your game may be very different.
Screenshot.
Take the UV GOGGLES from the opened case after the puzzle is complete.
The goggles will go on automatically, putting a blue filter on your screen. You can tap them at any time to turn them off or on.
Go to the tic-tac-toe robot, Chuckles - 05, in the middle of the room, then tap the screen to challenge it to a game.
With your UV GOGGLES on, you can read the boards to see Chuckles's tic-tac-toe cheat sheet. But you won't need to scour through all that, because you only need to know this winning strategy:
There are a few possible solutions, but this one has worked for me without fail every time I had the first turn.
First put an X in the square at the bottom right corner of the board.
Next, put an X in the opposite corner at the top left square on the board.
Now put an X at the bottom left corner of the board, which should also block Chuckles from making a diagonal win.
Lastly, put an X in either the middle space of the left column or the middle space of the bottom row, whichever of the two is empty will get you the winning move.
The elevators only become accessible once you win a game against Chuckles (a tie doesn't count).
Go back to the entrance door, then head up the ramp on your right. Press the call button on the right side of the tall, yellow structure to open the elevator.
Get inside and push the L6 button to go to the top floor.
Once the doors open, quickly drop down to the blue catwalk with the red guard rail.
From here, we're trying to make it to the second elevator.
Walk a few feet to the right until you reach a gap in the catwalk above the moving conveyor belt.
Step on to the belt and ride it just a little forward until you can step off to the wooden platform with the orange border.
Move forward until you're parallel with the second moving conveyor belt.
Step on to this belt, and ride it just long enough to positioned over the blue catwalk with the red guard rail just below you. Quickly drop down on to this cat walk.
Take a few steps forward and then turn left to find the call button for the second elevator.
Push the call button and step inside the elevator. Press L6 to ride this elevator to the top. Now we need to make it to the big green button panel on the wall.
When the elevator arrives, stand at the edge of the car. You should see a platform underneath you constantly shifting from left to right and a catwalk just above it.
Very carefully move towards the cat walk to drop down into it. Wait for the swinging platform to move underneath you and drop down on to that as well.
If you land the jump safely, you can just walk straight ahead to reach the button.
Press the button under the large sign to open the exit door. Now let's go to the exit!
Push the call button just to your right and step into elevator number three.
Press the L3 button to ride the elevator to level three. When the elevator reaches the third floor, step on to the large metal platform.
Go up the ramp to reach the exit door. Go through the opened door and continue forward into Room 01-07.
Room 01-07
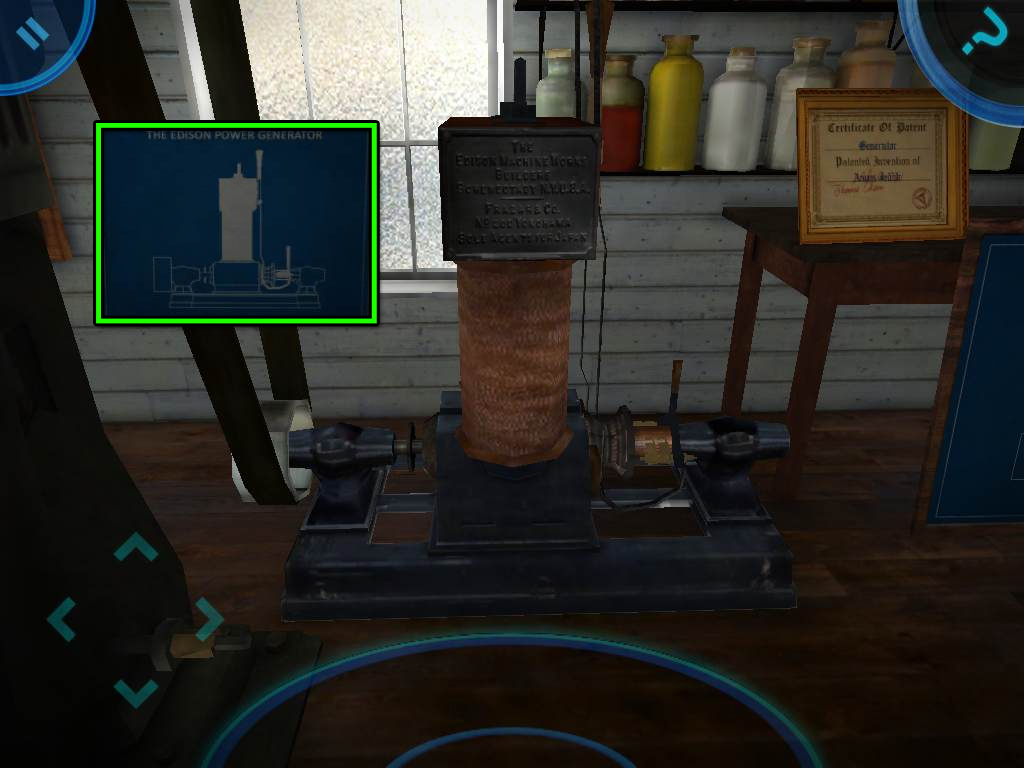
If you walk along the right side of the museum, you'll see a blueprint for the "Edison Power Generator" with an incomplete machine beside it.
You must collect the missing machine parts which are scattered throughout the museum.
The first part is MOTOR found on the surface of the counter just a few feet from the power generator.
Next is the COPPER CYLINDER 1/2 on the floor by the step ladder between the "Moving Pictures" exhibit and the "Phonograph" exhibit.
Third is the SWITCH which is on top of the long table beside the Tesla coil.
Last is the COPPER CYLINDER 2/2 also on the floor, this time to the right of the piano.
Once you have all the parts, attach it to the power generator as indicated by the blueprints.
The switch goes on top of the spinning part at the right side of the machine.
The two cylinders go atop the box-shaped center of the machine.
The motor goes on top of the cylinders.
Screenshot.
Eureka! You've brought power to the museum. Now take a look at the power relay just a little further down.
On the switch board of the Power Relay you'll see six colored dials, six switches, and six seemingly random numbers.
Your next task is to locate the number over each switch and the color that goes with that number.
Each of the numbers (and the color-indicating bar beneath it) can be found on or near an invention in the room.
The number 15,000 is found on the base of the Tesla coil with a RED line.
Go back to the Power Relay and turn the dial above 15,000 to RED and flip the switch UP to power the Tesla coil.
The number 120 is found at the bottom of the kinetoscope beside the moving pictures patent with an ORANGE line.
Go back to the Power Relay and turn the dial above 120 to ORANGE and flip the switch UP to power the kinetoscope.
The number 2640 is found on the seat of the electric chair with a BLUE line.
Go back to the Power Relay and turn the dial above 2640 to BLUE and flip the switch UP to power the electric chair.
The number 230 is found at the bottom of the wall of light bulbs with a YELLOW line beneath it.
Go back to the Power Relay and turn the dial above 230 to YELLOW and flip the switch UP to power the wall of lightbulbs.
The number 100 is found on the lower right side of the phonograph case with a GREEN line.
Go back to the Power Relay and turn the dial above 100 to GREEN and flip the switch UP to power the phonograph.
The number 6 is found on the lower right corner of the telegraph with a PURPLE line.
Go back to the Power Relay and turn the dial above 6 to PURPLE and flip the switch UP to power the telegraph.
All the machines in the room should now have power. If any of the dials are incorrectly set, the power relay board will spark and smoke.
Turn around and face the moving picture on the wall.
Memorize the four symbols on the backs of the two dancing men in the film.
Go to the strongbox and turn the dials to enter the four symbols you just saw.
The first symbol is set in the upper left dial, the second is set in the upper right, the third is set in the lower left, and the fourth is set in the lower right dial.
Solution.
Take the BLUE CYLINDER from the opened safe.
Walk to the Phonograph and insert the BLUE CYLINDER into the machine to play it.
Turn on the volume on your design to listen to the recorded message.
The voice will instruct you to use the telegraph to spell the word "Hello."
Check the Telegraph Morse Code Cheat Sheet on the wall beside the exit door to view the morse code alphabet.
A dot (.) indicates a short tone, a dash (-) indicates a long tone.
In morse code, "HELLO" is:
. . . . (H) . (E) . - . . (L) . - . . (L) - - - (O)
To write that on the telegraph, press the dot and dash buttons in the following order:
Left, left, left, left. Left. Left, right, left, left. Left, right, left, left. Right, right, right.
Go through the opened door and continue forward into Room 01-06.
Room 01-06
Walk to the active simulator panel, then turn right to face the Vindiqo gravity suit.
Follow the dark path on the right to find suit releaser monitor. Tap the screen to start the puzzle.
Rotate the image on the screen until it aligns into the picture of the Vindiqo gravity suit.
Make sure the suit is positioned perfectly upright, that you're facing the front of it, and that the text overlaps evenly to assure you have it positioned correctly.
Solution.
Go back out to the gravity suit chamber and tap the suit to put it on.
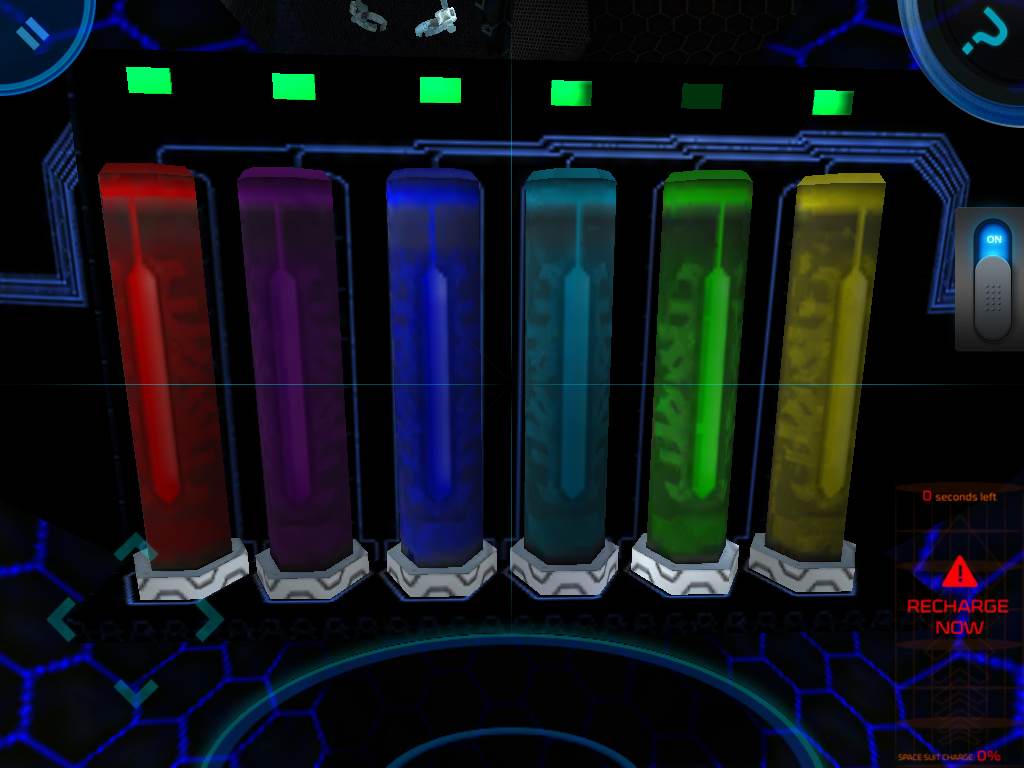
You can flip the switch at the right side of the screen to turn the gravity Off or On with your suit, but for that to work, we're going to have to charge the suit's battery.
Move to t he VGDAF suit charger station at the other side of the room.
Press the circular button at the center of the suitar charger to start the minigame.
Like a game of Simon says, push the triangular buttons in the correct order.
First watch to see which button segment lights up. Press that button, then wait a moment. Now that button will light up, and then a second button will light up.
Each time you successfully repeat the pattern, a new button will be added to the sequence.
Memorize the growing list of button pushes and recreate them without making a mistake. If you can successfully repeat the pattern 6 times, your suit will become fully charged.
Quickly turn the suit OFF, then move to the simulator control panel at the center of the room. Press the button to "Activate Simulator".
Now turn the suit back ON and look up to the ceiling. Move forward to fly up into the air and enter the planetarium.
You only have a few seconds before your suit will need to be charged again, so you have to move as quickly as possible.
Fly to the planets Uranus, Neptune, Jupiter, and Saturn which are revolving around the sun. Take the four COLOR CAPSULES you find at the center of each of those four planets.
When the suit runs out of power, drop down through the orange hole in the floor to return to the simulator control panel.
If you need to charge the suit again, you will have to replay the charging minigame.
When you have all four COLOR CAPSULES, go to the side of the room where you first found the gravity suit. This time, go through the dark hall on the left to reach the exit door.
Insert the COLOR CAPSULES into the control panel by the window.
From left to right, place the cells into the panel in the following order:
Purple, Dark Blue, Teal, Green.
Screenshot.
Go through the opened door and continue forward into Room 01-05.
Room 01-05
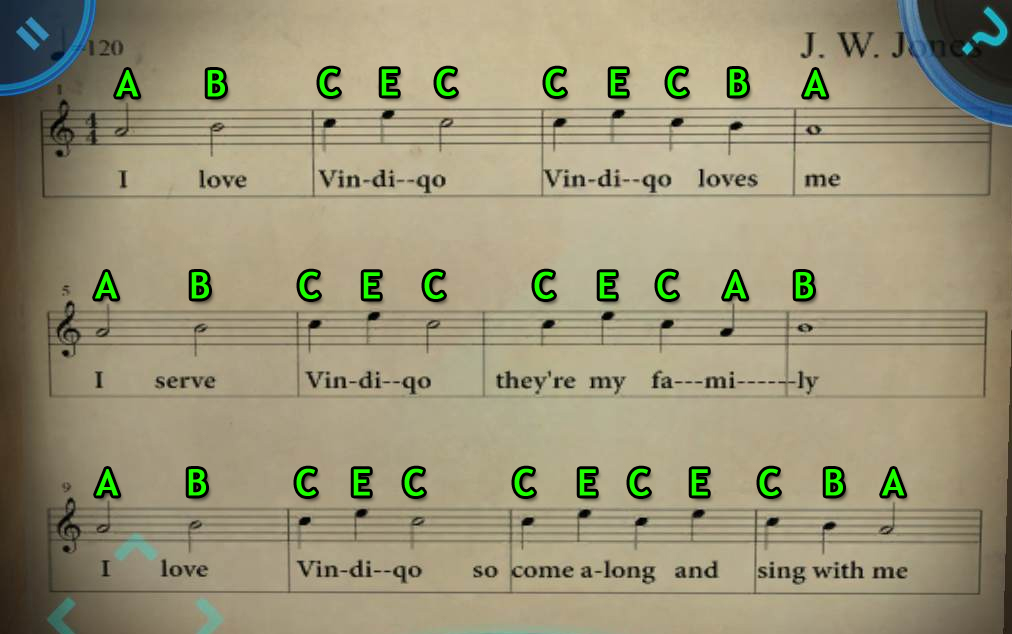
Walk around the triangular wall in the center of the room until you come to the side with the keyboard.
Read the music above the keyboard, then tap the keys to play the song.
If you don't know the notation, just the button above the words "PRESS ME" to hear the song Hail, Hail Vindiqo played on the keyboard.
Refer to the screenshot below for a guide to read each note in the music. It's easy! When the letter above the note is "A" just press the "A" key on the keyboard.
Solution.
After the puzzle is solved, collect the four TOKENS from the left side of the keyboard.
Go to the vending machine and insert all four TOKENS.
Press the buttons on the machine to take the MAGNET and the two GREEN GEARS 2/4, then take each item from the dispenser at the bottom of the machine.
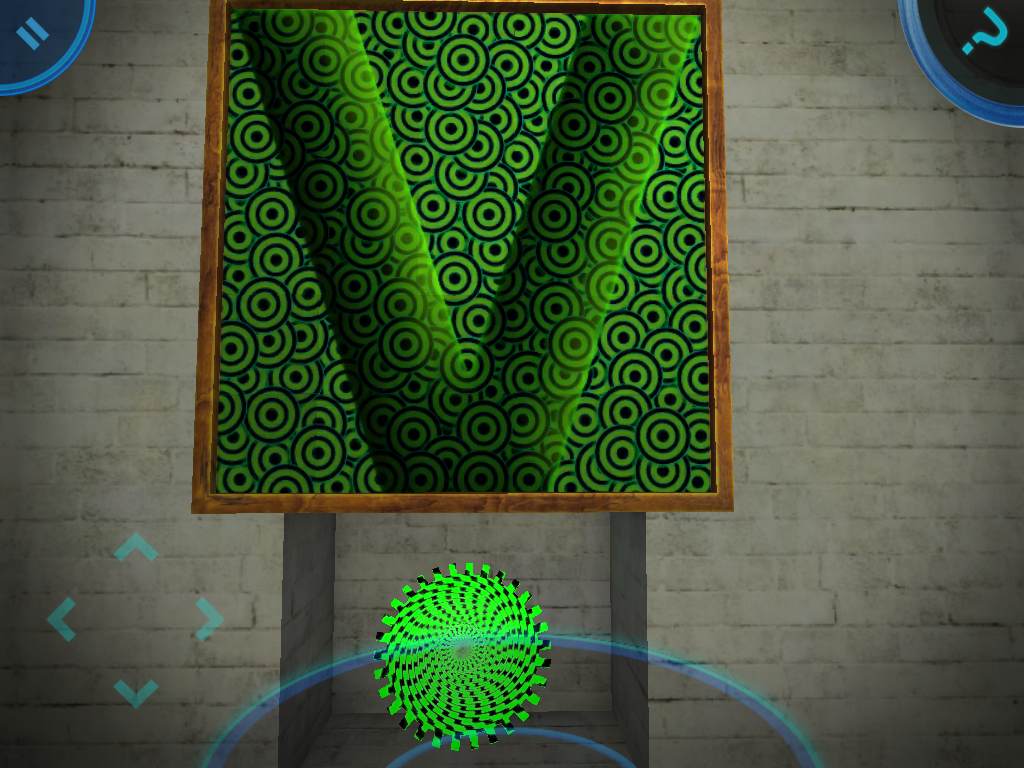
Move to the left side of the room where you'll find a mixed-up green painting and a sign that says "Hail Vindiqo!"
Tap the tiles in the painting to rotate them so that they are perfectly arranged into a V, for Vindiqo.
The target shaped circles at the center and sides of the painting need to be aligned correctly as well, don't forget to make sure they're right!
Solution.
Take the GREEN GEAR 3/4 that appears in the cache behind the lifted painting.
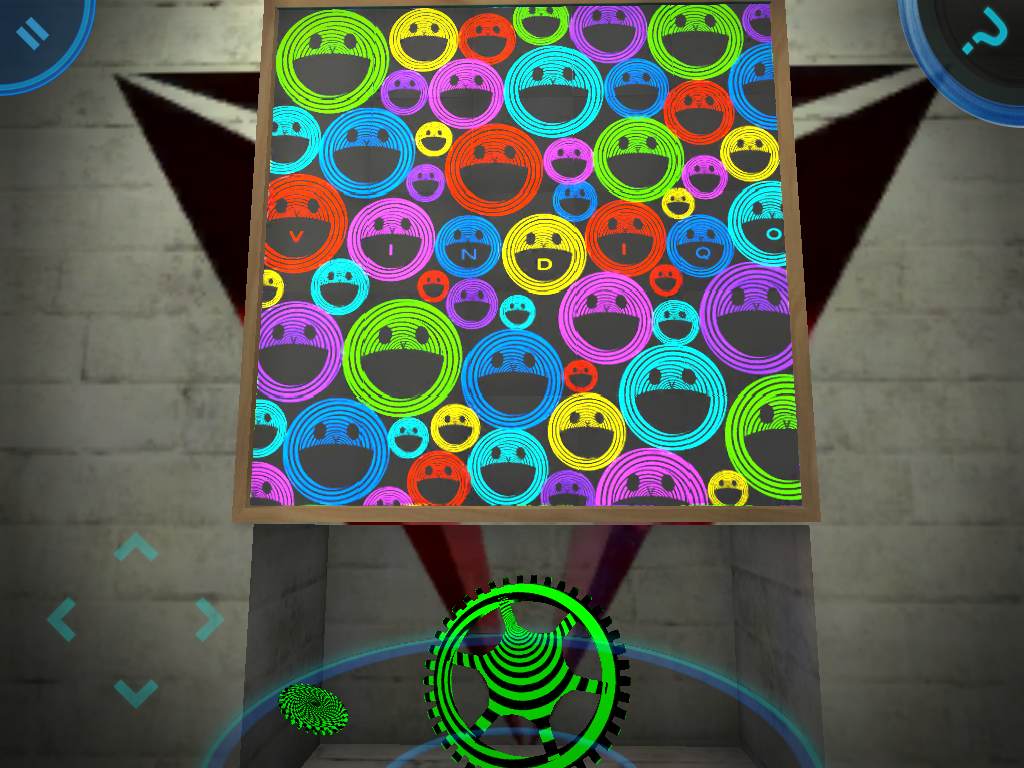
Turn around and walk to the painting covered in smiley faces on the opposite wall from where you're standing.
Instead of rotating the tiles to assemble the painting, you have to swap the tiles on the board.
Tap one tile to select it, then tap a different tile to switch their positions.
It's easiest if you start with the smiles that have the letters in the word "VINDIQO" in their mouths, which all belong in the center row of the puzzle, and build on from there.
Solution.
Pick up the GREEN GEAR 4/4 from behind the lifted painting once the puzzle is solved.
Go to the bright green section of the wall with the rotating gear.
Place the four GREEN GEARS from your inventory on to the pegs on the wall.
The gears must be arranged correctly so that all of them are spinning. Two adjacent gears have to be close enough to touch, but not overlap each other.
This puzzle is just like the one you completed in Room 1-15, just a little harder to see because of the bright color and bold patterns.
Solution.
Once the gears are in place, go to the malfunctioning exit door.
On the floor at the other side of the door you'll see an object.
Use the MAGNET from the vending machine to pull it towards you, then pick it up to add the SCREWDRIVER to your into your inventory.
Walk to the grate in the wall by the V puzzle you solved earlier.
Remove the four screws at the corner of the grate with the SCREWDRIVER.
Get into the vent and climb to the other side. Walk forward to push through the second grate and into the control room.
Press the big yellow button on the desk to activate the Manual Door-Opening Override.
While you're here, you can also push the button on the Brain Pills machine to take a brain pill or knock on the bathroom door to mess with one of the security guards.
Go back through the vent to return to the gallery. The door should now be wide open, allowing you to continue to room 1-04.
Room 01-04
Walk forward until you reach the studio. Step up to the terminal and answer all of the trivia questions.
Question 1: Is Vindiqo Good?
Answer 1: Good? We're grrrrreat!
Question 2: Do you love Vindiqo?
Answer 2: Oh, with all my heart!
Question 3: What year was Vindiqo officially founded?
To find this answer, step back out into the hall and take a look at the Vindiqo poster on the left wall when exiting the studio.
Answer 3: 1764.
Question 4: What's Vindiqo's budget airline called?
Go back out into the hall again and take a look at the airline poster near the entrance door.
Answer 4: VindiqAir
Question 5: What's Vindiqo's robotics division?
Let's take a peek at the robot right next to us for the answer.
Use the SCREWDRIVER to remove the small panel on the robot's back, then read the label above the uncovered battery.
Answer 5: Vindibot
Question 6: What's in the dots and dashes?
Think carefully - what have we done earlier in the game that used dots and dashes?
The repetition of "dots" in the narrators question is an additional clue; he's referring to morse code!
Go out to the hall and walk towards the Vindiqair poster. Turn up the volume and listen to the tones that seem to be coming from the wall.
You should hear: Long, long, short, long (aka dash, dash, dot, dash).
Now walk down the left hallway to the Telegraph Morse Code Cheat Sheet.
Look up the letter that is made with Dash, dash, dot, dash...
Answer 6: Q
Question 7: Where in North Korea does Vindiqo produce toys?
This one's a toughie, but luckily, we've got a cheat sheet nearby.
First you need to turn around and go up the stairs to the green button panel.
Press the buttons in the correct order so that all of them are simultaneously lit.
Tap a button to turn it on. A correctly selected button will stay lit while an incorrect button will reset the puzzle.
When all the buttons are illuminated, you should hear a ticking noise indicating a timer counting down.
Quickly run back down to the stage and face the audience to your left, where you should see a message in the crowd for a few seconds.
Answer 7: Nampo
Question 8: What is the Chariman of Vindiqo's last name?
Head back out to the hallway and walk right until you reach the grate in the wall.
Remove the screws at the corners of the grate with the SCREWDRIVER.
Enter the vent and crawl through to the security room on the other side.
Pick up some of the TOKENS on the table.
Turn left and examine the framed photographs on the wall.
The largest frame in the center of the photos shows the name and face of the Vindiqo chairman.
Before you leave the room, you can take one of the Brain Pills from the machine dispenser.
Answer 8: Kaufman
Question 9: What was Vindiqo's 1957 language?
Go back to the security room through the vent.
Beside the tokens on the you should also see a book.
If you read the cover, you'll find it's a special kind of dictionary.
Answer 9: Vindiqese
Question 10: What was the first name of Vindiqo's popular cartoon prune?
Leave the studio once again. Take just a couple steps to the left to find the vending machine.
Insert the TOKENS from the security room into the coin slot of the vending machine.
Push the dirty, faded button, then take the CAN OF PRUNES from the dispenser.
Examine the prune can to find your answer.
Answer 10: Petey
Question 11: How many billion cans of Splurge were sold yesterday?
Go up the stairs near the studio exit, then go up the ramp and on to the catwalk above the studio.
Look at the top of the light fixture straight ahead of you to see the answer.
Answer 11: 2.7 billion
Leave the studio and walk left down the hall to reach the exit. Continue forward into Room 01-03.
Room 01-03
Follow the red carpet to your cubicle.
Pick up the COMPUTER DRIVE 1/3 on top of your desk by the keyboard.
Leave your cubicle and walk to the large white building in the middle of the office.
The door is locked, but the key is in plain sight.
Lift the upper right corner of the unwelcoming welcome mat to find the GOLD KEY, then use it to unlock the door.
Take a look to your left when you enter the room. You can use the Brain Pills machine here if you want to take another brain pill.
Turn right and pick up the COMPUTER CHIP 2/3 leaning against the wall beside the door.
Walk behind the desk and pick up the COMPUTER FAN 3/3 next to the answering machine.
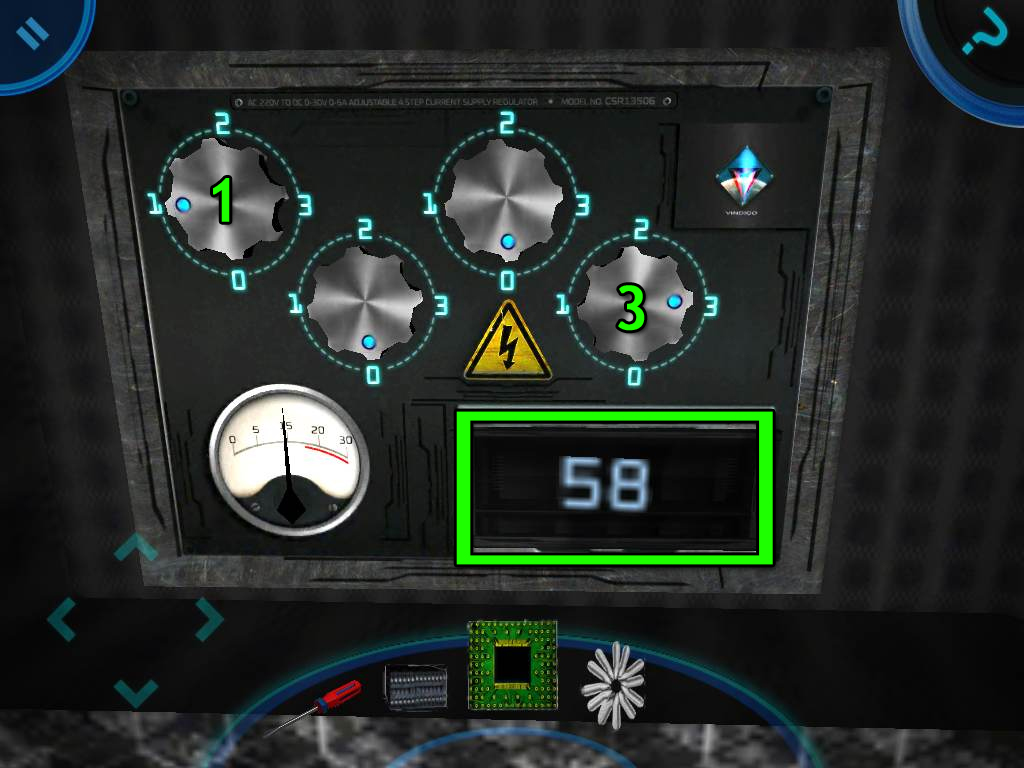
Read the post-it note stuck on the desk: "Target Power 58"
Also read the note attached to the corner of the monitor: "Password is in the safe!"
Face the back wall. Use the SCREWDRIVER to remove the screws along the bottom of the sheet metal covering the wall.
After the sheet metal disappears, examine the machinery at the right side of the wall.
Place the COMPUTER DRIVE into the space between the other drives at the right side of the wall.
Set the COMPUTER CHIP around the Vindicon logo at the center of the wall.
Put the COMPUTER FAN into the cylinder at the top left corner of the wall to complete your repairs.
Next, inspect the power panel on the left side of the wall.
Turn the dials to set the target power at 58, according to the note you found on the desk.
Move the left dial to 1 and the right dial to 3, leave the two middle dials at 0.
Solution.
Now that the room has power, check out the answering machine on the right end of the desk.
Press the right button on the answering machine to listen to the second message.
You can hear the maintenance guy reset the safe code. The buttons he pressed made very distinctive beeping sounds: one lower tone, one medium tone, and two higher tones.
Memorize the tone of the beeps, then move over to the safe.
The buttons that make the same sounds as the ones in the message are 9, 8, and 5, and the last note is played twice.
Therefore the combination to the safe is 9855.
Read the note inside the opened safe
You know 14 + 9 + 84 + 27 + 14 is the password to the computer, but entering 148 doesn't work. It's not a math problem, it's a code!
If you were being observant when you came in to the building, you may have noticed that there are robots patrolling the room with a number on their back and a letter on their front.
Find the robots numbered 14, 9, 84, and 27 and identify which letter each of them has on the front of their body.
Robot 14 has the letter A, Robot 9 has the letter L, Robot 84 has the Letter 0, and Robot 27 has the letter H.
Together, the letters for each robot mentioned in the safe code spells the word "ALOHA"
Enter ALOHA into the computer's password box to unlock the computer.
Press the button on the monitor labelled "Open Exit Doors" to complete the level.
Room 01-02
Walk down the corridor to the first set of doors.
First open the door on the left and enter the "Shoop Class Five" room.
Note the drawing on the chalk board - the upper left square and the lower right square are both marked.
Step out of the classroom and examine the vending machine by the open door.
Just like the squares on the chalk board, there are four square buttons at the center of the vending machine.
Tap the buttons on the vending machine to light them in the same pattern as the marked squares on the chalk board.
Check the boards in the three remaining classrooms and light the buttons on their vending machines as well.
On the vending machine by class five, light the upper left button and the lower right button.
On the machine by class three, light the lower left button and the upper right button.
On the machine by class seven, light the upper left, upper right, and lower right buttons.
On the machine by class four, light the upper left button and the lower left button.
The vending machines will each dispense an object once all the buttons on all four machines have been correctly set.
Take the DRINKING WATER NOTE from the vending machine dispenser by class three.
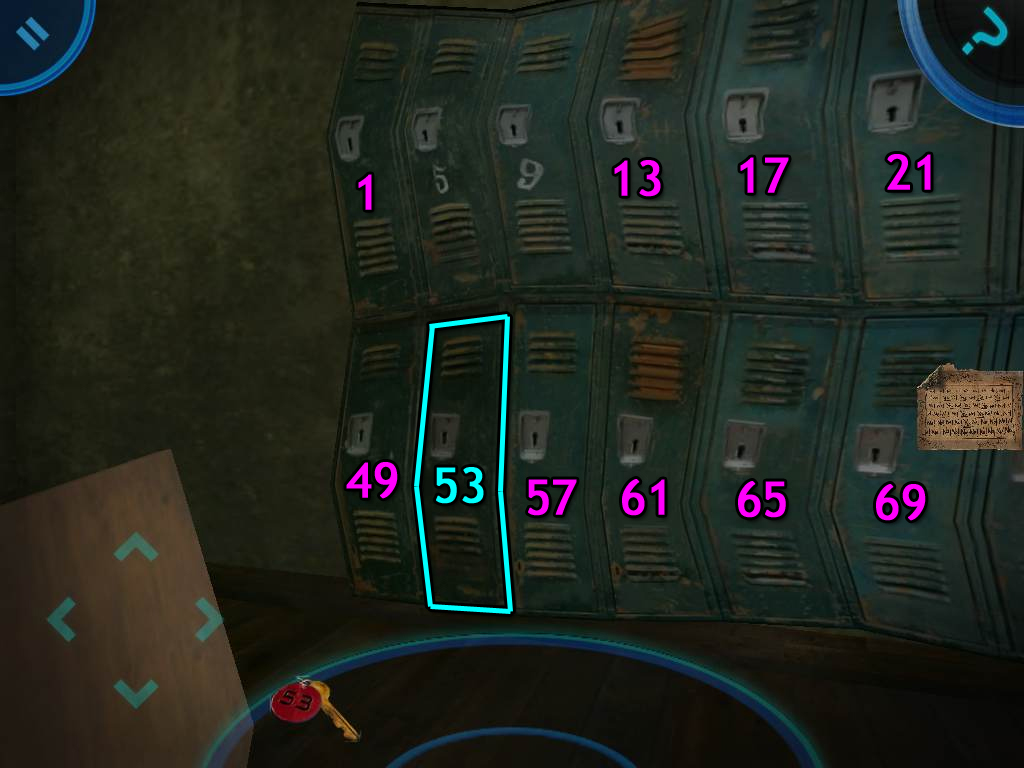
Also pick up the LOCKER KEY in the vending machine dispenser by class five.
If you examine the LOCKER KEY, you'll see a tag on it with the number 53. Unfortunately, there isn't any locker with that number on it!
But you can still find it in one of the classrooms.
Inspect the lockers in each class and you'll discover an important pattern: each locker starts at the number 1 at the upper left locker. From there, the locker number increases by the amount of the classroom number.
In room 7, for example, every locker number is 7 higher than the locker on its left and 7 lower than the locker on its right.
So if you subtract 1 (the starting locker number) from 53, you get 52. Out of all the classroom numbers (7, 5, 4, and 3) 52 is only divisible by 4. Into class room 4 we go!
From here, just count the lockers until you stop at number 52.
When you find the right locker (it's the second from the left on the bottom row), use the LOCKER KEY to open it.
Screenshot.
Take the ID PAPERS and the UV GOGGLES from the opened locker. Tap the UV GOGGLES to wear them.
Walk towards the drinking fountain, then go around to the back door behind the giant ramp.
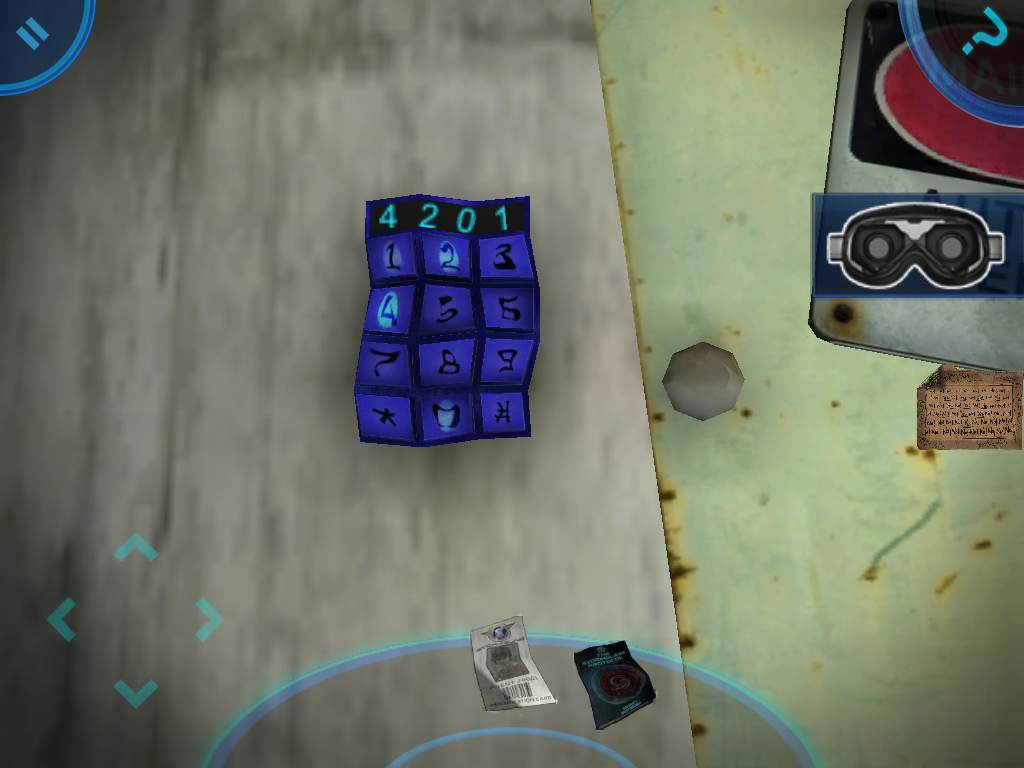
Examine the keybad by the locked door.
On four of the buttons you'll see a greasy fingerprint.
The fingerprint is brightest on the key that it touched first, because that's where it wiped off the most grease. The fainter the print, the later it was pressed.
With that in mind, you can determine that the keypad combination is 4201.
Solution.
Go through the opened door and into the cellar.
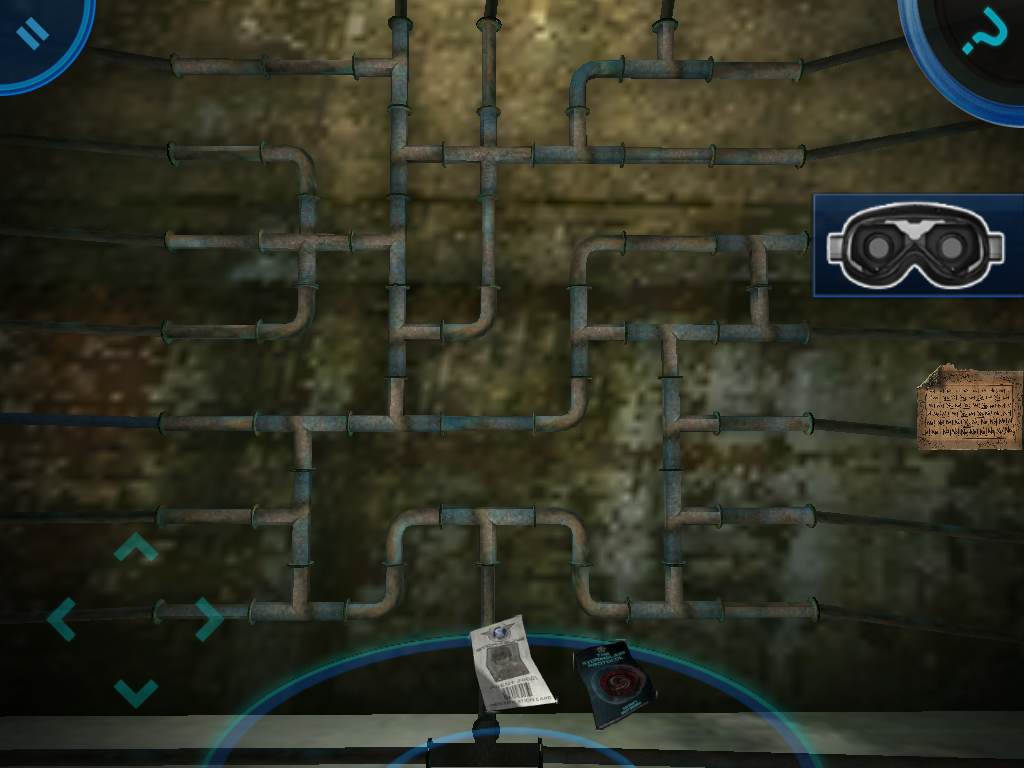
Walk towards the jumbled pipes on the right wall to start a puzzle.
Just like the rotating tiles in the circuit puzzles, in this minigame you must turn the pipes to create a path from the rows of pipes on the left to the rows of pipes on the right without any loose ends.
Simply tap a pipe to spin it in place, making sure that no end of the pipe is unconnected to the rest of the puzzle.
The easiest way to start the puzzle is to solve the long, straight bars at the side of the puzzle because they can only be pointing one way in order to connect with the rows of pipes.
Solution.
Follow the blue pipe labelled "Clean Drinking Water" to the left and eventually you'll hit a wonky brick wall.
This wall isn't as solid as it seems. If you tap the bricks, you can push them back slightly.
Now take a look at the DRINKING WATER NOTE you took from the vending machine earlier.
All of the words on the note are lined up just like the bricks on the wall.
A "No!" is a brick that stays up, and a "Yes!" is a brick that gets pushed in.
Solution.
After the brick wall falls to pieces, go through the tunnel and follow the glowing footprints around the maze.
Make sure your UV GOGGLES are on so you can see the prints on the ground!
Walk towards the water tank to meet the shadowy figure.
Room 01-01
Get out of bed and move to the bedroom door. You'll be dropped down into the button room below.
Pick up the green POSTCARD on the ground in the corner of the room.
Tap the postcard to examine it. This image looks really familiar...
Turn right towards the center of the wall where you'll see two screws between the rows of buttons.
Remove the screws with the SCREWDRIVER to reveal a hidden vent.
Crawl through the vent to reach the gallery.
Search the paintings on the walls. Eventually you'll happen upon one that's important.
One of the paintings is identical to your POSTCARD.
Walk through the frame to find a hidden room.
Pick up the BUTTON on the floor at the back of the room.
Go through the vent again to return to the button room.
Attach the BUTTON to the sparking pedestal in the circle at the middle of the room.
Push the button you just repaired, then quickly look at the floor.
Memorize the symbols that move across the ground. If you need to see them again, simply press the button again.
Next, push the button to its left to reveal a colorful tile puzzle on the wall behind it.
Arrange the tiles to complete the the image of two identical men in jump suits.
Tap one tile to select it, then tap another tile to swap their places on the board.
The entire picture is separated into three sections, and both men are split across these sections.
Look for large objects, such as the men, the coffee cups, the targets, and the V-shapes, and solve those pieces first.
After the puzzle is solved, the wall will flip back automatically and the robotic female voice will say a message on the intercom to indicate that the puzzle is complete.
Also, every time you complete the puzzle linked to one of the button pedestals, the blue light above it will shut off.
Step back and face the button you last pressed (it's the one at the end of the metal track which leads to the back wall where you just solved the tile puzzle).
Turn and push the next button on your left.
This button reveals another section on the back wall. You should see a large metal square with two very large, red buttons.
Pressing the left button makes a short beep and the right button makes a long beep.
We can't do anything with these things yet, so for now, go back to the ring of button pedestals.
Turn left and push the next button.
This button reveals a power panel on the left wall.
The note on the panel reads "Target Power 58"
Turn the four dials to set the correct power level.
Set the dial on the left to 0
Set the next dial to 1.
Set the third dial to 0.
Set the right dial to 3.
So from left to right, the dials should read 0, 1, 0, 3.
The green number at the bottom should now be 58, and the wall will flip back automatically.
Step back to the ring of pedestals. Turn left and press the next button.
When you push this button, a symbol should appear on top of every red button in the ring of pedestals (except the bright red glowing one you just pushed).
Four of these symbols should look very familiar to you. In fact, you saw them only a few moments ago.
When you repaired the sparking pedestal earlier and pushed the button, you saw four symbols move across the floor.
Find those four symbols on the buttons, and push those four buttons.
If the correct button is selected, it will glow red. When an incorrect button is pushed, the puzzle will reset.
When you've found all the right buttons, the robotic female voice will say another message on the intercom, indicating you've completed another puzzle.
Return to the ring of pedestals and go to the button you pressed to show all the symbols on the pedestals. The light above it should now be off. Turn left to the next pedestal with a glowing light, and press the next button.
When this button is pressed, it will light up bright red. Now if you try to press any other button in the ring, it will glow a dim red color.
Like the last puzzle, the buttons will only stay lit if you push them in the right order. If the order is wrong, the puzzle resets and all the lights go off.
Simply use trial and error to find the correct order to push the buttons.
Starting at the glowing red button:
Move right four times. Push the button.
From here, move right four times again. Push the button.
Move right once. Push the button. You should now be standing to the left of the brightly glowing red button.
Move right twice. Push the button. Now you should be standing to the right of the bright red button.
Move right four times. Push the button.
Move right twice. Push the button.
Move left once. Push the button.
Move left three times. Push the button.
Move left once. Push the button.
And now it should be solved! The voice on the intercom will say another message if you finished the puzzle.
Turn left to the next button pedestal with a glowing blue light and push the button.
When you press this one, a board should appear on the wall with a Morse Code Cheat Sheet.
Now we have a reference we can use later! But not yet.
Move left once and press the button on top of the glowing pedestal.
If you look to the next pedestal on your right, you'll see the button there has started flashing.
Push the blinking button. You'll hear a 4-note song.
Now if you push any of the other buttons on the ring, they'll play a note.
Find the four buttons that play the notes you heard in the song.
Push them in the right order to recreate the tune. The four notes in the puzzle are randomly generated each game
Listen for the voice on the intercom to indicate you've completed the song puzzle.
Move left twice to the next pedestal and push the button.
Turn around to face the wall behind you. You should now see a new section of the wall that has appeared with a glowing circuit puzzle on it.
Turn the tiles on the circuit board to create an uninterrupted path starting at the yellow electricity tile.
Tap a tile to rotate it. Arrange each of the circuits on the tile so that they connect either to another circuit in an adjacent tile, or to one of the round end points.
When a section of the puzzle is completely connected to the yellow electricity tile, it will change color from blue to green.
This solution will only work after you've solved the power panel puzzle explained earlier in this guide. Otherwise, the tiles will spark when you try to move them.
The wall flips back over when the puzzle is solved, and the voice on the intercom will say another slogan.
Step back and return to the button you just pressed to reveal the circuit puzzle. From here, move right once.
Quickly look at the floor again. You'll see three letters pass by on the ground: "B Y E"
Move right twice and push the button to view the Morse Code Cheat Sheet again.
Find the code for the word "BYE":
B = Dash, dot, dot, dot.
Y = Dash, dot, dash, dash.
E = Dot.
Now move right five times to the next pedestal and push the button here. This should flip the section of the back wall with the two large, red buttons.
You already found earlier that the left button played a short tone and the right button played a long tone. These are the buttons you use to enter the morse code message!
Remember that a short tone indicates a dot and a long tone indicates a dash. Therefore, you must press the buttons in the following order:
Right, left, left, left.
Right, left, right, right.
Left.
This solution will only work after you've solved the circuit board puzzle which powers the two large buttons.
Good work, you've solved all the button puzzles! Now a single blinking red button should be visible on the wall to your left. Push this button.
A giant red button will appear in the center of the floor. Press it to reveal an elevator door in the wall behind you.
Enter the elevator and push the button labeled "THE END"
But we're not done just yet!
When the elevator doors re-open, step outside and walk all the way to the giant statue in the distance.
In front of the statue is a giant stone head. Look on the ground to the left of the broken statue head and pick up the WALKIE-TALKIE.
Tap the WALKIE-TALKIE icon that appears at the right side of your screen to contact help.
Turn left and walk towards the helicopter that appears on the hill to complete the game.
Posted by: Trinn |
November 4, 2013 11:51 PM
|
November 4, 2013 11:51 PM