
![]() [1/12/2016: The Room Three is now available for Android!]
[1/12/2016: The Room Three is now available for Android!]
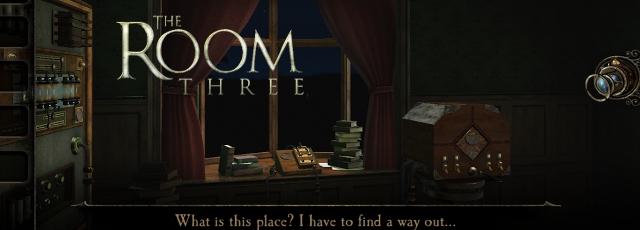
It starts with a box of a very ordinary sort, at least as ordinary as a box that appears out of nowhere on your train ride can be, but what's inside is, oh, so much more than that. In The Room Three, a stunning puzzle adventure from Fireproof Games for newer iPads and iPhones and Android, it seems you've attracted the attention of someone calling themselves The Craftsman, and they'd like your help unraveling the secrets of what lies between the cracks of the world... if you can prove yourself, of course. What follows is an immersive and atmospheric trip down the rabbit hole, as, challenge after challenge, you are drawn deeper and deeper into curious places filled with curiouser mechanisms. You'll need to think hard in order to overcome the obstacles in your way, exploring each new area with the sweep of a finger to look for clues as to how to solve every new puzzle you come across. With multiple endings and hours of gameplay, The Room Three is just begging for you to pick up and play, but be warned that if you do, you might not be able to put it down until you're finished.
 Playing The Room Three is a simple matter of dragging around the screen to turn around, double-tapping things to focus, and pinching to zoom in and out. Many of the things you'll encounter need movement to activate... swipe down on a switch to throw it, for example, or draw a circle on a key to turn it. Don't expect to be given any clear instructions whenever you come across one of the game's many puzzles! A large part of the game comes down to experimentation... figuring out how something works, how you can interact with it, and what might be required to make it work for you. In addition to using the items you gather, however, you also have your Eyepiece, which can allow you to see things unseen to the naked eye, as well as to literally get inside some objects and solve them from within. If you get stuck, provided you haven't disabled them, a series of progressively more direct hints will become accessible as question marks related to whatever you're currently dealing with... but don't assume they'll lead you by the hand.
It's all a surprisingly organic experience, with motions and actions that look and feel natural thanks to the game's touch-based movement. I've never played the original games (yet!), but I never once felt like a fish out of water as The Room Three drew me in. A large part of that is due to its stellar atmosphere, it's true, as Fireproof Games haven't slacked off on any aspect of the design. The soundtrack is at once both ominous and intriguing, and areas manage to be beautifully designed without cluttering things up with pointless decoration that might get in the way of your puzzle solving. Which, speaking of, is clearly the star of the show. The Room Three manages to make you feel like a real explorer, relying on your own wits as you go, and though there is a nice progressive difficulty curve, none of the puzzles feel like they're phoning it in. You may encounter a few that can be brute forced, but largely solving them comes down to fiddling with everything you can... hunting for secret mechanisms, twisting and poking, exactly as you would in real life. You will need to use more than one finger to activate some mechanics... using one hand to hold a spring-loaded latch open while the other presses a button, for example. It strikes a happy balance between simply pushing and pulling at your environment to find secrets, and needing to actively think your way through a puzzle each step of the way.
 And make no mistake, you will need to use the ol' gray matter, because some of the clues you'll find are very subtle indeed. While the game is good about nudging you where you need to focus your attention in a larger space, it's still possible to start spinning in circles if you missed something, be it a closer look at an item in your inventory, or maybe just the right way to interact with an object you assumed was locked. If you make use of it, the hint system is just about perfect, so don't be afraid to turn to it if you're really stuck. Though some puzzles are definitely more interesting than others, the game feels like it's really at its finest when you're peeling back multiple layers of a single mechanism, unlocking it bit by bit. As for the game's story, well, it exists, and it's even intriguing in a suspicious sort of "we have such sights to show you" way (I'm on to you, "Craftsman", Clive Barker prepared me for this!), but it's hardly the driving force. This is, however, a big game, with the sort of gameplay that invites your coziest chair and warmest lighting to get lost in for hours on end, and with multiple endings, you're got reason to come back to it even after you finish it for the first time. The Room Three is prime example of why Fireproof Games are masters of their craft, and will keep you captivated the whole way through.
![]() The Room Three (iPhone, iPad)
The Room Three (iPhone, iPad)
![]() The Room Three (Android, Android Tablet)
The Room Three (Android, Android Tablet)


Walkthrough Guide
(Please allow page to fully load for spoiler tags to be functional.)
Walkthrough
Chapter I
Getting out of the cell
Open the hatch on the door to take a look outside. Put on the eyepiece and take a look at the sides of the stone plinth. You'll find a riddle on each side with a small rotating box below. Each box contains six items, one of which is the answer to the riddle. The correct answers are:
The poor have me the rich need me - Nothing
My face is silent without my hands - A watch
The power of flight The power of knowledge - A feather
Grab the ornate box and rotate the small, round lock to open it.
Put on the eyepiece, take a look at the door lock and double tap to go inside. Rotate the pins until each one brightens and the door will open.
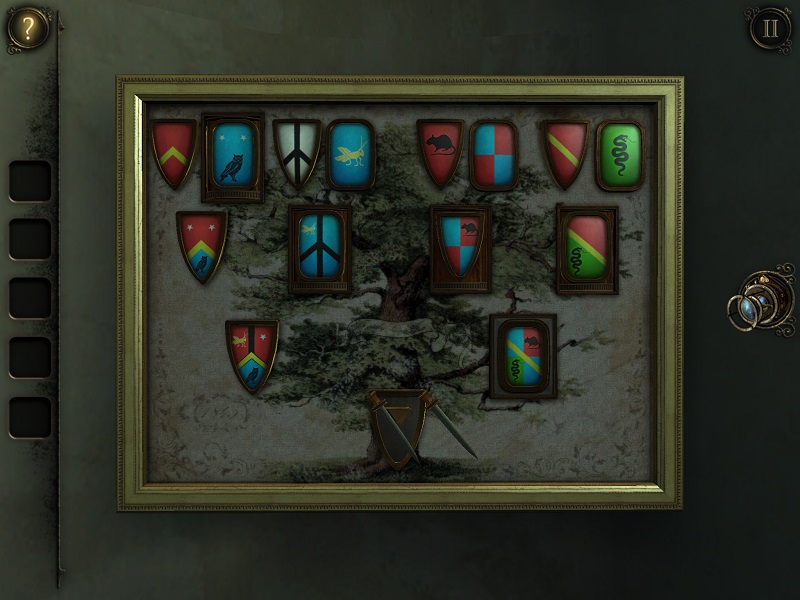
Emblem Puzzle
Go to the stone table and put the engraved pyramid in the empty slot.
Grab the emblem and go to the framed ones on the wall. Place it in the white slot on the right. Each emblem should be the result of the two above it combined.
The end result should look like this: https://jayisgames.com/images/the-room-3/Emblems.jpg
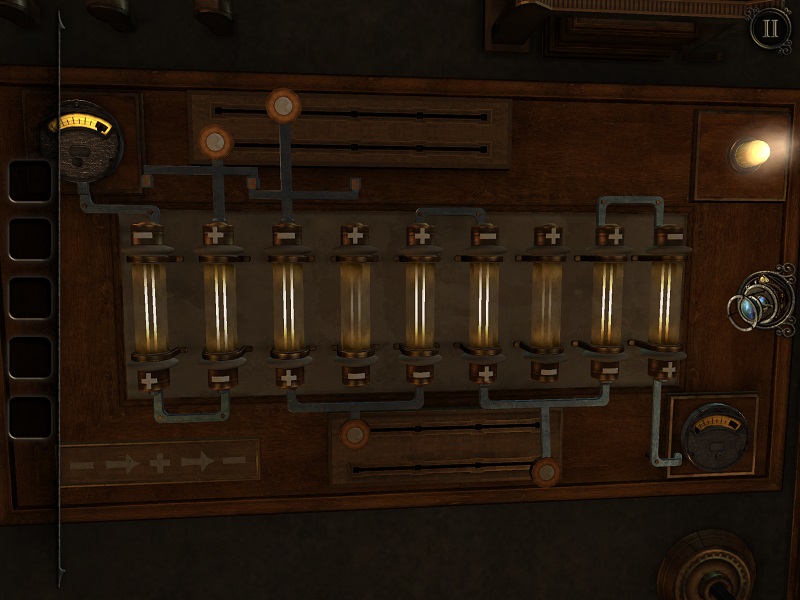
Power Generator
In order to get the power generator working, you'll have to get electricity from the left side to the right. Using the sliders, connect the positive terminals with the negative ones. Not all have to be connected to get the generator running.
The end result should look like this - https://jayisgames.com/images/the-room-3/generator1.jpg
Oscilloscope
Pull the lever at the window. Flip the small switches on the wooden box and head to the desk. Turn the dials until both waves are the same width and height at the center of the screen.
Table Room
1. On the side of the table you'll notice a metal panel. Hold it open and swing the clasp behind it to open the drawer and take the wooden gear. Place it on the small tower in the middle of the table and rotate it.
2. Device on the Bookshelf
If you take a closer look at the device, you'll notice a small note saying "The name of the tower will reveal the way." The name of he tower is, indeed, a four-letter word. You can find it on the floor, next to the table or in the scroll at the window. The name is
PYRE.
To write the word, use the buttons on the left side of the device. The letter Y for example can be typed in by having the top and bottom arrow pointing at it.
3. Standing Stones Model
Before going into the standing stones model, make sure you have two magnets in your invenory.
Magnets
1. Take a look at the workshop model on the table and rotate the water wheel. You'll find the magnet inside.
Pull the snake's tail. At the bottom layer of the snake you'll find a diamond marking. Rotate the other two layers so that the markings will align (black on one side, white on the other). Press the button on the snake's head and grab the magnet.
2. Under the plate on the ground that says "PYRE" you'll find a sphere. Turn it upside down and rotate it to find the second magnet inside.
Inside The Model
1. Place the wooden arch in the table's holes and rotate it. Put on the eyepiece and go inside.
2. On three of the standing stones you'll find two buttons. Press them simultaneously and you'll reveal the symbols that need to be drawn in the centre.
Magnets Puzzle
How it works: Both magnets go on the blue window inside the standing stones model. If you put on the eyepiece you'll see that they can be used to move the diamond shaped sliders.
At the other side of the box is a star chart with two sliders. Each one can be moved to one of 5 symbols. The two combinations can be found at the drawer and the pillar, on the right side of the star door.
1. Once you position the sliders on the star chart, focus on the looking glass. There should be 4 stars, one on each line. This is how the diamond shaped sliders need to be positioned, using the magnets.
2. Each magnet pushes the slider away, while having both magnets on the same slider will put it in the middle. The slider that needs to be in the middle should be the last one to modify (i.e if the top slider needs to be in the middle, start from the bottom one).
On the side of the box you'll find a drawer with a clock face inside.
4. Place the clock face on the empty spot on the tower, open it and go inside
5. Owl Figure
Push the owl's pecker up and rotate its head. Slide the button to the right and pull the wind out. Grab the model boat and head out.
6. Put the box in its respective place on the table and then the boat on the cradle. Slide the boat to its dock and go inside the house's window.
7. Mouse Figure
On the back of the mouse you'll find a yellow slider. Slide it down towards the tail and look at the head. Rotate the wheel inside and push the buttons (the eyes) on the mouse's head. Pull out the front half and grab the key.
8. Go back to the table and put the round wooden box in its respectful place. Use the key to open it and go inside.
7. Rotate the handle on the table until the body part aligns with the sculpture. Another window will open on the box. Enter and repeat until the statue is complete.
8. Diving Helmet 1
1. Rotate the wingnut at the bottom of the helmet so that the X and the square will match.
2. Grab the rivet, place it in the hole on the right side of the helmet and slide it down. Inside, you'll find a metal acorn and a switch behind it. Flip the switch and grab the wooden model piece.
3. On the right side of the plinth you'll find a drawer with and antler inside.
9. Place the wooden model piece in the last empty hole on the table. Use the gold band on top to rotate the ring and align it with the aperture, then go inside.
10. Grasshopper
Move the legs down and pull the slider on the back. Flip the newly discovered switch and pull the head out.
11. Diving Helmet 2
1. On the left side of the helmet, you'll find a weird mechanism with symbols on it. Put the pointer on it and rotate it to each of the three symbols displayed on the front of the helmet, using the handle below it.
2. On the right side of the helmet, you'll see a small triangle. Put the tap on and rotate it.
3. Rotate the metals on the helmet's face so that they'll both be standing vertically.
4. Once you open the helmet, grab the crystal phial and head to the standing stones model.
12. Take a closer look at the acorn and rotate the top to open it. Place it in the hole on the tree painting and rotate it. Place the antler on the skull and rotate each part so that the two will be identical.
13. Put the crystal in the square hole between the stones and grab the glowing gemstone.
14. Go to the tower on the table and put the gem in the lamp.
15. Elevator
Use the levers to hold the one half of the central cage and rotate it. Find the biggest opening and release the lever. Repeat the procedure with the other half and place the lamp inside.
Chapter II
Put the pyramid on the stone table in the main room.
1. Arch Puzzle
There is a broken arch on the wall behind the box. The bottom and the top of the box need to be rotated to the point where they align with the parts on the wall. If you it doesn't work, try looking at it from a different angle.
2. Generator
All generators follow the same principal. If you're having trouble, here's how it should look like:
https://jayisgames.com/images/the-room-3/generator2.jpg
3. Head upstairs and flip the switch at the window. This will give power to the box downstairs. Flip it's switches and go to the oscilloscope.
4. Using the buttons, match the length and width of the green wave with the black one.
5. The Clock Tower
1.Opening the Box
1. You'll find two square sliders on the box on the table. Slide them simultaneously to open it and grab the metal pillar.
2. Place the pillar in the small hall on the left side of the two locks and slide it.
3. Flip the handle on top of the box.
4. Slide the golden plate on top of the box and go inside the tower.
2. Golden Box Tower 1
1. Open the round door on the left side of the mechanism and grab the handle.
2. On the other side, you'll find a metal plate. Rotate it and take the metal ring. Place it on the gears and rotate so that the round hole and the square one inside will align.
3. Place the handle inside and rotate it to open the box.
4. Move the big metal plate so the panel will match the plate below. Once you position it, move the slider and flip the switch on the right.
3. Magnet Puzzle
Using the sliders move the magnetic tokens to the holes one by one. Here's how:
Token 1
Down, left, down, right, down, left.
Token 2
Down, left, down, right, down, left, down, right, down, left, up.
Token 3
Down, left, down, right, down, left, down, right, down, left, up, right, down, left, up, right.
Token 4
Down, left, down, right, down, left, down, right, down, left, up, right, down, right, up, left, down.
4. Go inside the window of the tower that popped up. Using the handle and the golden sliders, move the gear to the empty socket on the left side of the box.
5. Match the two patterns and take the gear from the side.
6. Put the gear in the rotating wheel at the clock tower, grab the wheel on top of the locked blue box and head upstairs.
7. Bell Tower
Put the wheel with a handle on the one with the sockets on the left side and rotate it.
Picture Puzzle
To complete the puzzle, move the red token through the white lines. Change the viewing angle to reveal new paths.
8.Head back and place the clock face in the golden box.
9. Chess Puzzle
The easiest way to complete the puzzle is to use the colors of each square. The horse can only move from white to black squares and vice versa.
10. Golden Box Tower 2
1. Rotate the golden plates on top of the mechanism so that the sliders can be moved towards the center. For the on at the top, rotate the three wheels until you make the path.
2. Once all three sliders are in position, pull them back and place the handle in the square socket. Open the device and rotate the plates to match the pattern. Grab the handle with a socket and go back.
11.Take the ballerina statue from the side of the golden box. Put the handle on the door on the left and open it.
12. The Locked Room
1. Ballerina Puzzle
1. Open the box and grab the winding key.
2. On the right side of the box, slide the square panel. Put on the eyepiece and complete the puzzle inside.
3. Place the winding key and rotate it to get the box working.
4. To complete the puzzle you need to get the ballerinas to the middle. Pressing the button will clear the golden lanes. The ballerina can cross one of those lanes, then you'll need to press it again.
2. Gems Puzzle
1. Grab the gem from the back of the ballerina. On the other side of the room you'll see a box with blue gems. One gem is missing at the bottom of it. This is where the red one should be placed.
2. To complete the puzzle change the colors of the gems as displayed on the two patterns below the box.
3. Use the buttons on the left of the box to rotate the golden pieces until they form the shadow of an eagle.
13. Go back to the main room and unlock the blue box using the key. Pull the lever and follow the bird upstairs.
14. Go back downstairs and complete the picture puzzle.
15.Put the clock hands in the golden box in the main room. Use the winding key in the newly opened socket and grab the pyramid.
Chapter III
1. Go to the main room, put the pyramid on the stone table and grab the optical device.
2. Place it it on the circular panel on the left. Rotate the mirrors so that light will reach the gem in the center.
3. Complete the generator puzzle ( https://jayisgames.com/images/the-room-3/generator3.jpg ), flip the switch by the window, flip the 4 switches on the box.
4.To complete the oscilloscope puzzle simply synchronise the movement of the bottom slider with the top one.
5. Main Room
First Key
1.Go to the plinths beside the wooden column and take the key. In the corner you'll find a trapdoor with a padlock. Use the key to open it, grab the metal rod and pull the lever inside.
2. Gems Puzzle
At the base of the iron box you'll find two latches. Slide them to open the box. Complete the puzzle by moving the blue gems to the left and the red ones to the right - https://jayisgames.com/images/the-room-3/gem_puzzle.jpg
3.Grab the metal casting and put it in the first empty spot in front of the box. Move the slider to the first bulb.
4. The Forge
1. Metal Bar
1. Put the metal rod in the plinths. Use the two rods to move the sack and activate the pressure plates on the ground. After triggering the first plate, go to the door and hold the top lock open.
2. Open the hatch in the woodworking room and Use the rods on the plinths to move the sack inside. Use the handle on the machine to cut it open.
2. Flint
On the front side of the metal box you'll find a button. Press it and grab the flint.
3. Firewood
Grab the leather case from the table and open it to find the firewood inside.
4. Working The Forge
1. Put the wood in the forge and the flint next to it. Rotate the wheel to start a fire.
2. Place the metal bar in. Look at the lowest key pattern on the box and rotate the tumblers at the forge to match the shape.
3. Pump the bellows on the right side of the forge until the temperature is high enough.
Have the key?
1. Use it to unlock the bottom part of the box.
2. Move the slider to the left and grab the small connector from the side of the box. Move the slider to the right and take the hollowed-out metal block.
3. Place the small connector on the two sliders above and rotate the wheel. Grab the mechanical disk. Move the tiles so the cross and the circle will be in their correct position.
4. Grab the metal casting, put it in its place, in front of the box and move the slider through.
Second Key
1. Rotate the center of the mechanical disk you took earlier to turn it into a gear.
2. Go to the woodworking room and look at the left corner.
3. Place the mechanical wheel on the bottom of the machine and grab the belt. Put it on the machine to the right and take the chess piece.
4. Grab the second chess piece from the metal plate on the right.
5. Watermill Puzzle
1. Place both chess pieces in the holes, on the side of the box. Put on the eyepiece to reveal the model of the watermill inside.
2. Rotate the waterwheel so it would connect with its missing piece inside and slide it to the right.
3. Move the right gear, open the roof and move the slider up.
6.A lens will appear on each edge of the box. The once on the front right has empty metal shapes on it. Rotate the other two lenses to match the shadows with the shapes.
7.Place the hollowed-out metal block at the bottom of the tumblers at the forge.
8. Use the old key to make a differently shaped one for the newly opened keyhole on the box.
Third Key
1. Open the second lock on the box and put on the eyepiece.
2. Rotate the box inside to match the holes with the gems (pushing them in 1 by 1) and grab the red gem.
3.Place the gem in the socket at the top side of the box and make the last key.
Already have the third key?
1. Once you've unlocked the top of the box, put on the eyepiece and go inside.
2. Move the gear using the arrows button. The sections which will rotate will be highlighted. To complete the puzzle all four gems need to go at the bottom of the wheel.
3. Grab the last metal casting, place it in the front of the box and move the slider
4. Making a New Handle
Go inside the newly opened room and take the piece of wood. Use it on both machines in the woodworking room to reshape it into a lathed piece.
5. Go back into the other room and replace the broken handle on the machine.
6. The Mechanical Arm
1. Use the machine to make a mechanical arm anatomy paper.
2. Put on the eyepiece and you'll see three wheels with symbols on them. The correct symbols can be found on the mechanical hand behind the forge.
3. Grab the camshaft and place it in the mechanical hand.
4. Use the slider and the wheel to move the different fingers of the arm and take the key.
The Strange Key
1. Take a closer look at the key and rotate its parts to put all holes on one side. Put it on the spikes at the side of the box and rotate it.
2. Rotate the tip of the key so its tip would face up. Place it on the other side and rotate.
3. Again, use the key to unlock the last side of the box and grab the pyramid.
Chapter IV
1.Place the pyramid on the stone table in the main room.
2. Grab the book, go to the library and place it on the lectern. Use the elevator to go upstairs.
3. Generator Puzzle - https://jayisgames.com/images/the-room-3/generator4.jpg
4. Flip the switch by the window and the ones on the wooden box.
5. The Oscilloscope
1. Grab the screwdriver by the oscilloscope and head back downstairs.
2. Go inside the study room, open the oscilloscope using the screwdriver and grab the electrical component.
3. Use it on the one upstairs and match the two waves.
6. Observatory
1. The Telescope
First Constellation
1. Rotate the big wheel on the wall to bring down the telescope.
2. Star Chart
1. Take a closer look at the device next to the star chart. Rotate the parts and position them on the red gems. Grab the etched glass disc.
2. Open the round capsule on the table and place the disc on it. Press the gray button on the side and rotate the two discs until their form and text align.
3. Place the crystal star from the capsule on the star chart.
4. Compare the star chart with the capsule on the table to see which gems should be turned red.
5. Grab the telescope lens and the scrap of parchment.
3. The Parchment and the Plinth
Place it on the plinth at the table and use the sliders to find a position which connects the figures on the parchment (circle with circle, square with square, etc.). This will display the symbols that need to be set on the telescope.
4. Replace the broken telescope lens with the one in your inventory.
5. Once you've set the telescope's wheels on the correct symbols, take a look through the lens. Use the sliders on the lens to make a constellation out of the stars.
Second Constellation
1. Grab the metal plate and put it on the parchment.
2. Put on the eyepiece and slide up and down to reveal another two symbols for the telescope.
2. Courtyard
1. Once you have the second constellation, grab the large iron handle and use it to open the door to the outside.
2. Pedestal
1. Rotate the two metal plates and grab the large gear. Slide open the metal panels at the bottom side and take the second gear.
2. Go into the newly opened room of the observatory. You'll find a model sundial on the table.
3. Place it on the pedestal in the courtyard and rotate it towards the numeral III. Go to the larger sundial and slide the part which holds it in place.
3. Gear Panel
1. Place the gear with the round hole at the bottom left corner and rotate the handle.
2. Place all three gears in their respective places on the right side. Slide the yellow gear to the right and rotate it using the handle.
3. Go back to the pedestal. You'll find a socket halfway down. Place the handle there and rotate it. Grab the intricate orb, open it, take the new handle and the orb with a socket.
4. Take a closer look at the brass handle. You'll see a small slider on it which should be moved up. Place the handle in the top left corner of the gear panel.
4. Rotate the wheel in the middle until the square is at the bottom.
5. Move the yellow gear to the middle using the slider and place the three gears in the their respective slots on the wheel in the center. Rotate everything using the handle.
4. Solar System Model
1. Look at the third planet from the sun (Earth). Rotate its segments to align the markings and press the button on the top.
2. Place the orb with a socket on the second planet to the sun and press the button on its top.
3. Look at the moon of the third planet on the Solar system model. Rotate its cage so that the two holes will match and grab the metal casting.
4. The planet nearest to the sun has two sliders. Move both of them down and take the lens cover from the pedestal.
5. Back to the Pedestal
1.Back at the pedestal, take a look at the top right corner with the eyepiece on.
2. Rotate the three parts of the door to match the metal casting and place it in there.
3. Put on the eyepiece again and go inside.
4. You'll find another pedestal with a ring on it. Rotate it and grab the stone craving.
3.Colored Tokens Puzzle
1. Go back to the observatory and enter the room which you previously opened.
2. Place the stone craving on the lectern and rotate it.
3. To complete the puzzle, arrange the tokens that appeared to match the symbols on the ground.
The easiest way to do this is to move all the misplaced symbols to the top or bottom (according to where they should be) and then put them in their exact spots.
4. Back to the Telescope
1. Put the lens cover on the telescope and set all three wheels to the signs displayed on the pedestal.
2. Align the squares on the lens with the structures seen through it.
5. Globe Radar
1. Take a look at the globe in the other room. Rotating it will set a red light below the crosshair. The higher the frequency the closer you are to your target.
2. Rotate towards the direction of the light until you find a pattern (3 total).
3. Draw each pattern on the machine to the left.
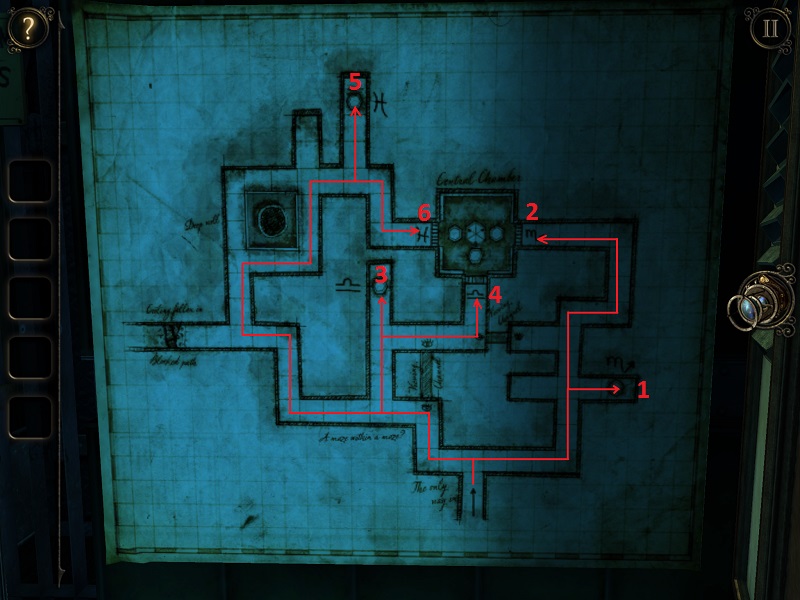
6. Maze
Use the map on the left of the machine to navigate through the maze easily.
You'll notice that on each side of the central chamber is an astrological sign. Before reaching them, you'll need to find their pressure plates (with the same markings).
The goal is to activate the pressure plates in the central chamber.
Fastest path - https://jayisgames.com/images/the-room-3/Maze.jpg
7. The last planet
1. Place the orb from the maze on the solar system model and go inside.
2. Column Puzzle
Rotate the mid part of the column by holding one of the bolts up or down respectively.
To rotate the top and bottom parts, pull one of the bolts, rotate and release. This will help rotate the top and bottom of the column without changing the middle part.
Once you've made a clear path for the switch, pull it down.
3. When you're done with the puzzle, press the button on top of the planet and grab the pyramid.
Endings
To avoid spoilers, the names of the endings will be hidden in spoiler tags.
Ending 1
IMPRISONED
1.Once you've put the pyramid on the stone table, grab the craftsman's key and go through the arch in the wall.
2.Place the craftsman's key in the socket, on top of the box.
3. Grab the metal ring from the table and place it on the small tower's aperture. Rotate and go inside.
4. Tumblers Puzzle
Use the lever and the dial to rotate the tumblers and position the sockets to the right side. Press the button to insert the pins.
5.Redirect the light beam by sliding the mirror in front of it.
6.Grab the second mirror from under the table and place it in front of the first one. Make way for the light beam and go inside the craftsman's key.
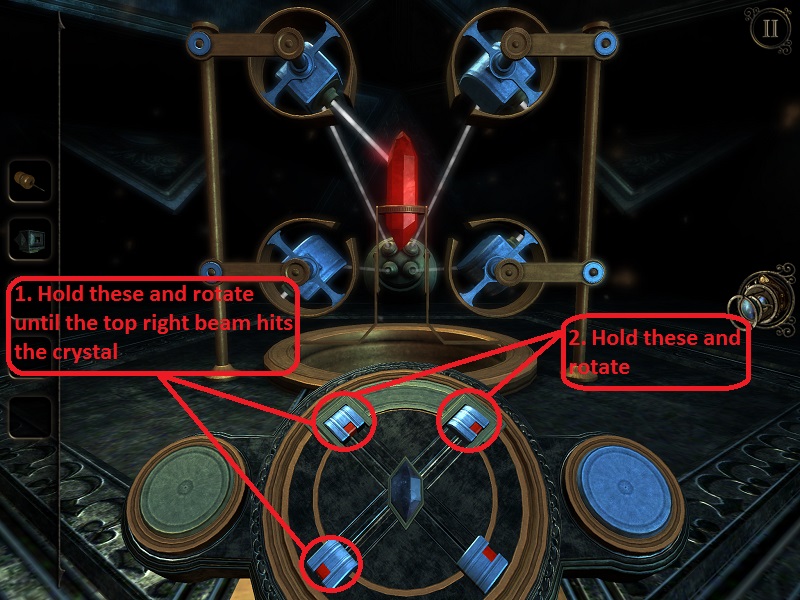
7. Light Beams Puzzle
This puzzle can get tricky and really annoying if you try solve it randomly.
The easiest way to complete it is to have two adjacent beams pointing at the crystal. Once you've achieved that, hold them in position and rotate the other two.
This will guide you through the puzzle from the starting position - https://jayisgames.com/images/the-room-3/beam_puzzle.jpg
8.Go through the door which appeared on the wall and read the note.
Ending 2
ESCAPE
To get this ending you'll first need to find 4 tokens for the Mystical Maggie machine in the library.
1. First Token
1.Go into the library and take a look at the "MYSTICAL MAGGIE" machine. Grab the small mechanism from the token slot and rotate it to turn it into a key.
2. Study
1. Go into the study room. Use the key to open the desk's right drawer. On the side of it, you'll find a small slider. Move it up to find a handle inside.
2. Use the handle to open the drawer on the left. Inside you'll find another slider. Pulling it will allow you to rotate the small circles at the middle of the desk.
3. Rotate the left circle and move the slider to unlock the small cabinet under the right drawer.
4. Move the mechanism inside to relocate the three sliders.
5. Rotate the circles at the front of the desk to find a token.
3. Go back to the "MYSTICAL MAGGIE" machine and insert the token to find a crank wheel.
2. Second Token
1. Go back to the cell, where the game started, and use the wheel to unlock the bars.
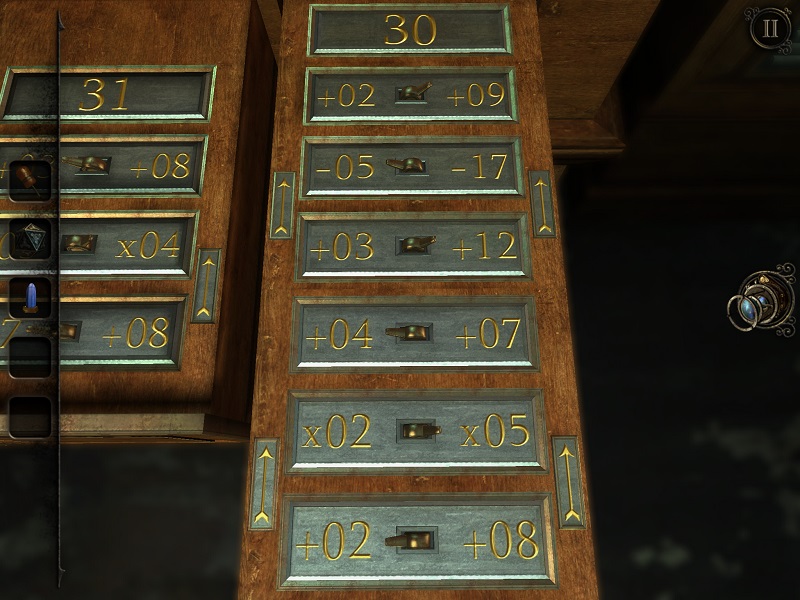
2. Math in the Drawers
Pull the three levers on the right side. In each drawer you'll find some equations with switches. Starting from the bottom side, the equation should be equal to the number at the top.
In case you get frustrated with the third one, here's how it should look - https://jayisgames.com/images/the-room-3/math.jpg
3. Move the three sliders on the machine to where the lights are.
4.Go to the library, answer the phone and grab the cross shaped key.
5. Go down to the basement again and put the key in the X hole above the drawers. Rotating the key will show the sequence in which the drawers need to be opened. Doing this correctly will grant you another token for the "MYSTICAL MAGGIE" machine.
3. Third Token
1. Once you've used the second token and grabbed the crank handle, head to the second floor of the library.
2. Pull up the plates that say "The Great Khan" and take the metal object.
3.Go to the room from Chapter III. On the left side, you'll find a table with a box on it. Place the metal cube there and activate the device on the right. Put on the eyepiece and use the arrows on the box to turn the cube into a sphere.
4. Go back to the second floor of the library. Put the sphere on the plates and pull them down.
5. Go inside the stage model and take the wax cylinder. Put it on the gramophone downstairs and remember the number on the telephone (1795).
6. Back in the Chapter III room, put the crank handle on the gramophone and rotate it until the music starts playing.
7. Call the number of the telephone in the library and head back. Answer the phone and take the wax cylinder.
8. Go back inside the stage model on the second floor. Put the cylinder on the gramophone and press the button. This will grant you yet another token for the Maggie machine.
4. Fourth Token
1. Take the metal device from the machine and use the elevator to go upstairs.
2. You'll see a banister on the handrail. Place the metal device on it and put on the eyepiece. Rotate the device and change the angle until a key is formed. Grab it and head downstairs into the room from Chapter III.
3.The Hole in the Wall
1. You'll find a few loose bricks on the wall, left of the door. Take them down, and go inside the hole. Rotate the three gears until a keyhole is formed on the wall behind them.
2. Go outside, put the key in (from the other side of the wall) and go back into the wall. Turn the handle at the base of the key.
3. Repeat the exact same thing to turn the handle at the other side of the key. The box on the wall will open and you'll find the fourth token.
5. Using the fourth token on the Mystic Maggie machine will grant you a mysterious artifact.
Go into the dark arch on the wall in the main room.
Out on the Tower
1.Place the craftsman's key in the socket, on top of the box.
2. Grab the metal ring from the table and place it on the small tower's aperture. Rotate and go inside.
3. Tumblers Puzzle
Use the lever and the dial to rotate the tumblers and position the sockets to the right side. Press the button to insert the pins.
4.Redirect the light beam by sliding the mirror in front of it.
5.Grab the second mirror from under the table and place it in front of the first one. Make way for the light beam and go inside the craftsman's key.
6. Light Beams Puzzle
This puzzle can get tricky and really annoying if you try solve it randomly.
The easiest way to complete it is to have two adjacent beams pointing at the crystal. Once you've achieved that, hold them in position and rotate the other two.
This will guide you through the puzzle from the starting position
https://jayisgames.com/images/the-room-3/beam_puzzle.jpg
7. Put the mysterious artifact on the left tower model and go inside. Use the slider to track the light beam and move the hole with it.
8. Press the button on top of the mysterious artifact and go through the wooden door.
Ending 3
RELEASE
1. Go into the library and use the elevator to go upstairs.
2. Opening the Safe
To open the safe go to the other side of the room. On the handrail you'll see a small ball which looks like a decoration. Rotating it will make the chandelier swing, eventually hitting the safe and causing it to fall down.
You'll find the broken safe in the main room downstairs, with a crystal inside.
3. Opening the Clock
1. Every 15 minutes (i.e 12:00, 12:15, 12:30, 12:45, etc.) a slider will appear under the clock's face. Move it to unlock the base of the clock. Inside you'll find three weights with numbers on the back.
2. Put on the eyepiece and you'll see the three numbers through the bob. The numbers are
left - 4; middle - 1; right - 2.
Note: The clock on the wall show the same time as your device. If you don't feel like waiting for 15 minutes, adjust the time through your device's settings.
4. Putting the Crystals to Use
1. Once you have the two crystals, head into the room from Chapter III.
2. You'll see a device with a wheel on the table. Place the two crystals on it and look through the maze screen.
3. To complete the maze simply follow the silver arrow until you find a pedestal with a mysterious artifact on it.
5. Go inside the dark ark on the wall in the main room.
6. Out on the Tower
1.Place the craftsman's key in the socket, on top of the box.
2. Grab the metal ring from the table and place it on the small tower's aperture. Rotate and go inside.
3. Tumblers Puzzle
Use the lever and the dial to rotate the tumblers and position the sockets to the right side. Press the button to insert the pins.
4.Redirect the light beam by sliding the mirror in front of it.
5.Grab the second mirror from under the table and place it in front of the first one. Make way for the light beam and go inside the craftsman's key.
6. Light Beams Puzzle
This puzzle can get tricky and really annoying if you try solve it randomly.
The easiest way to complete it is to have two adjacent beams pointing at the crystal. Once you've achieved that, hold them in position and rotate the other two.
This will guide you through the puzzle from the starting position https://jayisgames.com/images/the-room-3/beam_puzzle.jpg
7. Place the pyramid artifact you took earlier on the right tower model and go inside.
8. Artifact Light Beam Puzzle
1. To complete this puzzle look at the beams as 3 adjacent pairs.
2. Have all of them face the same direction, then point two at the crystal while the rest are facing the opposite direction.
3. Hold the ones in the correct position and rotate the others.
9.Press the button on top of the artifact and go into the wooden door.
Ending 4
LOST
If you don't have the two artifacts from endings 3 and 4, refer the guide to see how to obtain them.
1. Go into the dark arch on the wall in the main room.
2. Out on the Tower
1.Place the craftsman's key in the socket, on top of the box.
2. Grab the metal ring from the table and place it on the small tower's aperture. Rotate and go inside.
3. Tumblers Puzzle
Use the lever and the dial to rotate the tumblers and position the sockets to the right side. Press the button to insert the pins.
4.Redirect the light beam by sliding the mirror in front of it.
5.Grab the second mirror from under the table and place it in front of the first one. Make way for the light beam and go inside the craftsman's key.
6. Light Beams Puzzle
This puzzle can get tricky and really annoying if you try solve it randomly.
The easiest way to complete it is to have two adjacent beams pointing at the crystal. Once you've achieved that, hold them in position and rotate the other two.
This will guide you through the puzzle from the starting position https://jayisgames.com/images/the-room-3/beam_puzzle.jpg
7. Place the pyramid artifact you took earlier on the right tower model and go inside.
8. Artifact Light Beam Puzzle
1. To complete this puzzle look at the beams as 3 adjacent pairs.
2. Have all of them face the same direction, then point two at the crystal while the rest are facing the opposite direction.
3. Hold the ones in the correct position and rotate the others.
9. Go back outside and press the button on top of the artifact.
10. Put the second mysterious artifact on the left tower model and go inside. Use the slider to track the light beam and move the hole with it.
11.Press the button on top and go into the dark hole in the wall.
Posted by: Stinky |
November 25, 2015 12:40 PM
|
November 25, 2015 12:40 PM