

![]() Breath deep, the gathering gloom, watch lights fade from every room... Rooms look different in the night than they do in the day. Artificial lights highlight areas and cast shadows that can change perception as the darkness creeps in and evoke moods. Using the differences between day and night are what makes Switch, this week's room escape adventure by Robamimi such a joy and a challenge.
Breath deep, the gathering gloom, watch lights fade from every room... Rooms look different in the night than they do in the day. Artificial lights highlight areas and cast shadows that can change perception as the darkness creeps in and evoke moods. Using the differences between day and night are what makes Switch, this week's room escape adventure by Robamimi such a joy and a challenge.
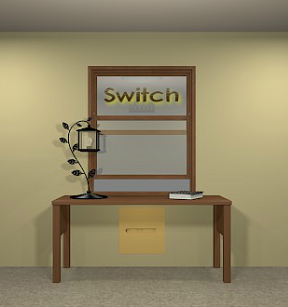 Switch takes place in a standard, stark four-walled room with very minimal furnishings. A table here, a cabinet there, a window, and a door, yet as you look closer you find much hidden in plain sight. Puzzles abound everywhere and the more you explore the more you find. Wander around using the left/right arrows and bars at the sides of the screen as well as the handy changing cursor to highlight areas that invite a closer look. Solving your way out involves a nicely balanced mix of use of found objects, logic, visual cues, and yes, some math. Although the "day" and "night" in the room are created artificially, the usual elegant solutions to Robamimi's puzzles involve both, once again taking the basic one room escape to a higher level.
Robamimi is one of the favorite room escape designers here at Weekday Escape and Switch once again shows why, with the simple, non-cluttered space, the elegant puzzles, the soft music, the wonderful built-in hint system, and all the other bells and whistles that any escaper could want in a game. What this charming room lacks in theme or decor it more than makes up for with engaging and amusing challenges, a perfect mid-week break.
Note: If you have trouble connecting to the game try Robamimi's alternate site.


Walkthrough Guide
(Please allow page to fully load for spoiler tags to be functional.)
Here's a quick little
Switch (Robamimi) Walkthrough
Lookin' around
We've got four areas here. Going clockwise from the start:
The Window
There's a window here, but we can't see out it. Everything is gray.
There's a lamp, unlit, with some leaves.
There's a book with six pages. This information may be useful later.
Under the desk, there's some sort of panel.
The Door
There's a door here, but it doesn't open.
There's a keypad with a switch and nine buttons.
There's a wall panel, but we can't interact with it.
The Vent
There's a vent way up on the wall. Something's sticking out of it, but we can't reach.
There's a picture of a gecko.
There's a cup of coffee.
There's a drawer with two leaf buttons.
There's another drawer with three digit buttons, and the word "COFFEE".
The Picture
There's a blank picture on the wall here. We can click its corners.
There's a cupboard with three digit buttons, and a star.
There's another cupboard with three digit buttons and some arithmetic clues.
Puzzles
The right cupboard
Let's do the right-hand cupboard, on the picture wall.
Looks like the third number should be two more than the second, and the second should be one more than the first.
Looks like the three numbers should add up to ten.
Enter "2 3 5" to get
the moon ball.
The left drawer
Let's do the left-hand drawer, on the vent wall.
The buttons have leaves. We've seen leaves before.
By the window wall, look at the lamp. It has left-pointing leaves and right-pointing leaves, too. How can we use that?
Look at page 1 of the book. It says "big leaf -> small leaf."
Enter "RLLRLLRL OK" to get
the cream.
COFFEE
First get the cream from the left drawer, in the vent view.
Use the cream in the coffee to get a code.
Enter the code in the right drawer to get
a part of something.
Under-desk panel
First get the part of something from the right drawer in the vent view.
Look at the panel under the desk in the window view.
Looks like we need to match a pattern here.
Raise the "1 34 7" notches on the part of something. Put the part in the panel to get
another panel. Oh well. Pressing on:
We have four numbers to find, and four clues on our note.
Do a little math here, or click onwards:
Enter "8 3 7 4" to get
access to the chalice. Hooray!
The chalice
You need the chalice from the under-desk panel by the window.
Page 2 of the book tells us what to do.
You also need the moon ball from the right cupboard on the picture wall.
Put the moon ball in the chalice.
Look out the window.
It's night!
The window (I)
After solving the chalice puzzle, look out the window.
There's a code with a star.
There's a gecko, but he flies away when we click him.
The lamp is lit now. You can see a code drawn on it.
The star code
After solving the chalice puzzle, look out the window.
There's a code with a star.
We've seen a star on a cupboard.
Enter "7 6 3" in the left cupboard on the picture wall to get
a flower. We've opened all the drawers and cupboards!
The door panel
After solving the chalice puzzle, look at the lamp by the window.
Copy that code. We've seen a 3x3 keypad somewhere.
By the door, there's a keypad where we can enter this code.
But what does the switch do?
Check out page 3 of the book.
Click five squares in an arch, with the switch to the right, to open the wall panel and get
the sun ball!
Click four squares in a Y, with the switch to the left, to open the door!
Beyond the door
After solving the door panel puzzle, go through the door.
We've got four more views here. Working clockwise again:
There's a box with a circle and some sort of green frowny heart.
There's an alcove with an asterisk and a pair of binoculars.
There's the door we just came through.
There's another door, with a peephole. But we can't look through it.
The flower
Get the flower, by using the code from the nighttime window.
Page 5 of the book tells us how to get it to bloom.
You'll need the sun ball, from the door panel.
Switch the sun ball for the moon ball. Oh! It's day now!
In the second room, there's a beam of light.
Put the flower on the asterisk, in the beam of light, to get
a clock hand.
The window (II)
Let's try switching the sun ball for the moon ball.
Oh! It's day now! Look out the window.
There's something on that star sign, but it's not quite readable from here.
If you've found some binoculars, use them.
Oh, it's some arrows on the points of the star. What do we know about star points?
Look up page 4 of the book. It'll put these in an order: top-right, bottom-left, bottom-left, top-left, bottom-right.
Click those corners of the painting, to get
the net.
The vent
Get the net, by using the code from the daytime window.
Change it back to night. Use the net to catch the gecko.
Use the gecko on the wall with the vent.
A clock hand falls down. Look down to retrieve it.
The clock
Go back to that funny circle box in the second room.
You'll need two clock hands. Click them anywhere on the clock _except_ the sad green heart.
Oh, now we need to know what times to set. Where have we seen something like the sad green heart?
It's a clover leaf!
By day and night, the blank painting becomes a painting of clovers.
Eight leaves by day, six by night. Set the clock to get
out!
Posted by: Ezra |
May 2, 2012 4:19 AM
|
May 2, 2012 4:19 AM
Switch Walkthrough
General Information
Make sure that the language you prefer is highlighted before you begin the game.
Be sure to examine everything you pick up, items may be hiding clues.
Many answers are a combination of more than one clue.
There is only one ending.
Good luck!
Exploration
You begin facing a wall with a table and a window. On the table is a lamp with leaf decorations.
Below the table is a panel in the wall. Click on the panel for a close up.
In the panel is a groove, and in the groove are some square shaped depressions. Back up.
Click on the table for a close up.
Click on the lamp for a close up.
Pretty lamp, but it doesn't appear to be on. Back up once.
On the table is a book, click on it for a close up.
Once the book is in close up click on it to open it.
Page one is a hint with leaves.
Page two is some sort of ball and a base.
Page three is shapes and the words door and wall.
Page four is a star with numbers at the points.
Page five appears to be a hint about a flower.
Page six shows a framed picture and symbols of the moon and sun.
Once you've finished reading the book back up twice.
Turn right.
This wall contains a door, which is locked.
To the right of the door is some sort of code panel, click on it for a close up.
This panel has an on/off switch, a 3 x 3 set of keys that turn on and off, and the word close. Back up.
To the right of the electronic panel is a wood panel. You can zoom in on it, but it is closed and there is no obvious means of opening it.
Back up.
Turn right.
On this wall is a low table with locked drawers. On the wall is the picture of a lizard, and high above the lizard is some sort of vent.
On top of the table is a cup of coffee.
Click on the left drawer and you will see that it is a code lock with pictures of leaves on the buttons.
Click on the right drawer and you will see a three digit code with the word coffee.
Back up twice.
If you click on the vent you can see that there is something up there, but you can't reach it.
Back up and turn right.
On this wall is a cabinet with two doors. There is also a picture on the wall.
Click on the picture for a close up. The picture appears blank, but you can click on the corners to make it wobble. Back up.
Click on the left door of the cabinet and you will see a three digit code key with a star underneath.
Click on the right door of the cabinet and you will see a three digit code that involves a math equation.
Back up and turn right.
At this point you should be back to the table and the window.
Time to solve some puzzles!
I Hate Math! (part 1)
From the window, turn left once to the taller cabinet.
Click on the right door twice for a close up of the code lock.
Notice the equations around the three digit code.
All three numbers of the code added together equal 10.
The first number plus 1 equals the second number.
The second number plus 2 equals the third number.
That is all the information you need to solve the code.
The three numbers added together equal 10.
None of the numbers are the same.
The first number is 2. 2 + 1 = 3, which is the second number, and 3 + 2 = 5, which is the third number.
2 + 3 + 5 = 10.
Therefore the code is 235.
Enter the code and click on the "ok" button.
The door will open and you will find a moon ball.
Take the moon ball and back up.
Would You Like a Little Coffee With Your Cream?
Turn left to face the low table, the one with the cup of coffee on it.
Click twice on the left drawer for a close up.
Note that there are two buttons with leaves on them, and an "ok" button.
Where have we seen leaves in the room?
There are leaves on the table lamp over by the window.
But how do those leaves translate into a code?
The second part of the puzzle is the first page of the gray book on the table.
The book indicated to go from the larger leaf to the smaller leaf.
Look closely at the lamp, the leaves are either on the left or the right side of the stem.
And the leaves go from large at the base to small near the light.
Note the pattern of leaves on the stem, this is the code for the buttons.
The code is: right, left, left, right, left, left, right, left.
Once you have the code, push the buttons in the correct order then click on the "ok" button.
The drawer will open, revealing a creamer package.
Take the creamer and click on the cup of coffee on the table for a close up.
Use the creamer on the coffee and a number will appear (888).
Back up once, then click on the right drawer for a close up.
This is a three digit code with the clue "coffee" above it, so it must be the number we just saw in the coffee.
Enter the code then click the "ok" button.
The drawer will open and you will get a piece of wood, some sort of part.
Take the part and back up.
The Hole(s) in the Wall
Pull up the wood piece you got from the drawer for a close up.
Notice the circular arrow in the upper left? Click on it to turn the piece over.
On the other side are square buttons which you can make go up and down.
Close down the piece and turn left (or right) twice to face the window.
Click on the panel below the table for a close up.
Notice the square indentations in the notch?
Perhaps we need to make the square buttons in our piece match the indentations?
Look closely at the square holes in the notch.
From left to right, there's a hole, then a blank space, then two holes, then a larger blank space, then another hole.
Pull up the piece of wood from your inventory.
Turn it over so that you can see the buttons.
Raise the buttons, from left to right: first button, third button, fourth button, seventh button.
Once you have the wood piece arranged correctly, place it in the notch in the panel below the table.
If the buttons were arranged correctly, the panel will slide open, revealing a note and another code lock.
Take the note.
I Hate Math! (part 2)
Click on the newly revealed code key for a close up.
This is a four digit code and each digit is related to a letter, A, B, C, and D.
Pull up the note from your inventory.
The note tells you a few things about the letters.
9 > A > C.
2 < B < D.
C - D = 3.
D < 5.
Goody, more math.
We know that 2 < B < D, and D < 5, so B and D must be 3 and 4 respectively.
Once we know that D = 4, then using the C - D = 3 equation we discover that C = 7.
Since 9 > A > C and C is 7, then A = 8.
This the code is A = 8, B = 3, C = 7, and D = 4.
Enter the code and click on the "ok" button.
The panel will open and there is a large cup or base inside.
Night
Using the clue on page 2 of the book, place the moon ball in the cup in the panel below the table.
Back up once and you will see that night has fallen and you can see through the window.
Click on the table for a close up.
Notice that there is a note on the window. Click on the window for a close up.
The note has three numbers: 763 and a star.
If you click on the lizard on the widow it will fly away. A flying lizard!
Back up once.
Click on the lamp for a close up and notice the pattern now visible on the lamp shade, a pattern of circles inside a 3 x 3 grid.
Back up twice.
Turn left to face the cabinet with the picture above it.
Notice that the picture is no longer blank. It has two clovers on it, each with three leaves.
Click on the left cabinet door twice for a close up, then enter the code from the window (763) and click the "ok" button.
Inside you will find a flower bud in a vase, take it.
Back up.
Switching On
Turn left (or right) twice to face the door.
Click on the electronic panel to the right of the door for a close up.
Flip the switch on top to the on position (click so that the circle side of the switch is down).
Now what?
The clue is in the lamp shade.
Click on the buttons in the 3 x 3 grid that correspond to the squares in the grid on the lamp shade that had circles in them.
That's the upper left and upper right buttons, the middle middle button, and the bottom middle button.
The indicator below the panel should now say open. Back up.
Click on the door to open it.
The Ante-Room
Click on the open door to go through.
In front of you is a wood panel, click on it to open it.
Looks like a clock face without hands or numbers.
Turn right.
Here's a little alcove with some binoculars, take them.
There is also a picture of a flower on the back of the alcove.
Turn right and you will see the open doorway to get back into the main room.
Turn right one more time and you will see the door out. Note the peep hole.
Turn left to face the open doorway, then go forward to the main room.
Switching Off
Turn left (or right) to face the door again.
Click on the electrical panel to the right of the door for a close up.
Now flip the switch off (the right side of the switch should be down).
Notice that the indicator at the bottom now says "close".
Now what?
When the switch was "on" (with the circle side down) we pushed the buttons that were circled in the 3 x 3 grid on the lamp.
Now that the switch is "off", we should push the buttons that were not circled in the grid.
Push the top middle, middle left, middle right, bottom left, and bottom right buttons.
If you pushed the correct buttons the indicator will go back to "open".
Back up.
Notice that the wood panel to the right of the electrical panel is now open.
Click on the open panel for a close up, and take the object inside (sun ball).
Back up.
The Shaky Picture Puzzle
Turn left to face the window.
Click on the open panel below the table for a close up.
Remove the moon ball and replace it with the sun ball.
Back up. Notice that you can now see outside the window into the daylight.
Click on the window twice for a close up.
There's a sign outside with a star on it, but it is hard to see.
Use the binoculars on the window and look at the star (you will have to move the cursor around).
Note that at each point of the star is an arrow pointing in a different direction.
Back up three times and turn left to the cabinet and the picture.
Click on the picture for a close up and notice that the picture has changed to two four-leaf clovers.
Now we just need to know how to remove the picture from the wall.
There are two clues for this puzzle, the star that we saw with the binoculars, and page 4 of the book.
The arrows at each point of the star point in either an upper left, upper right, lower left, or lower right position.
The star on page 4 of the book has a number at each point.
The numbers are the order, and the arrows are the directions.
To remove the picture you need to click: upper right, lower left, lower left, upper left, and lower right corners.
If you click on the corners in the correct order the picture will be removed, revealing an alcove.
Take the net from the alcove and back up.
When Lizards Fly
Turn right to face the window.
Click on the panel below the table for a close up.
Remove the sun ball and replace it with the moon ball.
Back up then click on the window twice for a close up.
Use the net to capture the lizard on the window.
Back up twice, then turn left (or right) twice to face the low table.
Click on the picture of the lizard on the wall for a close up.
Place the real lizard (gecko) on the picture and enjoy the cut scene. The lizard will knock down the object in the vent.
Back up and click below the table twice to get the object (clock hand). Take the object and back up twice.
Blooming
Turn right (or left) twice to face the window.
Click on the panel below the table and replace the moon ball with the sun ball.
Back up and turn right to face the door.
Click on the door to open it. Notice the shaft of light coming from the peephole in the locked door.
Go forward into the alcove then turn right.
Notice that the alcove with the picture of the flower now has sunlight streaming into it.
Remember the clue from page 5 of the book?
Place the vase with the flower bud in the alcove then turn right.
Keep turning right until you are back at the alcove. By this time the flower in the vase should have opened.
Click on the open flower to get the second clock hand.
Turn left to face the wood panel.
Getting Out
Click on the wood panel to open it.
Use the clock hands on the clock.
You will now see two circular arrows on the right, one to turn the sun hand and one to turn the moon hand.
But where should the hands be pointing?
The clue is in the book on page 6.
Remember, it showed a picture of the framed picture with both the sun and moon symbols.
If you were paying attention when the orbs were activated, the picture on the wall changed depending on whether the sun or the moon ball was in the cup.
When the moon ball was in the picture showed two 3-leaf clovers.
When the sun ball was in the picture showed two 4-leaf clovers.
The center of the clock seems to show a clover leaf, so that is also a clue.
The moon hand should be set to 6 (two 3-leaf clovers is six leaves).
The sun hand should be set to 8 (two 4-leaf clovers is eight leaves).
Once the clock is set click the "ok" button.
If you set the clock correctly the door will open and you will escape.
Congratulations!
Posted by: grinnyp |
May 2, 2012 4:40 AM
|
May 2, 2012 4:40 AM