
Spirits of Mystery: Song of the Phoenix
Platform: Mac, Windows
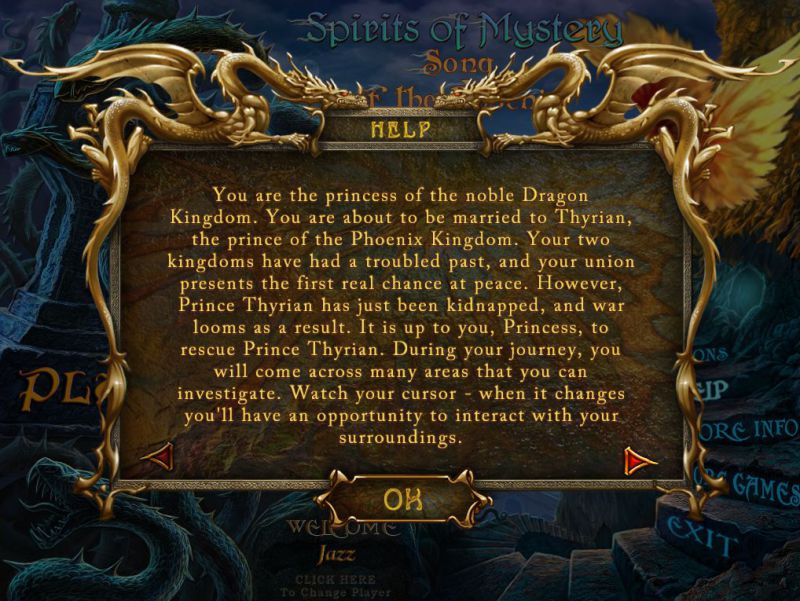
![]() ERS Game Studios has decided to add more to the fairy tale story of their Spirits of Mystery series in Spirits of Mystery: Song of the Phoenix. Again take the role of the princess of the Dragon Kingdom as you set out to save your groom-to-be of the Phoenix Kingdom. Take down the sinister wizard of dark magic who's trying to turn the wedding of your dreams into a nightmare. It's time to put on those hidden-object/adventuring boots and kick some evil butt!
ERS Game Studios has decided to add more to the fairy tale story of their Spirits of Mystery series in Spirits of Mystery: Song of the Phoenix. Again take the role of the princess of the Dragon Kingdom as you set out to save your groom-to-be of the Phoenix Kingdom. Take down the sinister wizard of dark magic who's trying to turn the wedding of your dreams into a nightmare. It's time to put on those hidden-object/adventuring boots and kick some evil butt!
 You saved the day, your family and kingdom in Amber Maiden, so now it's time for your happily ever after; you're set to marry the handsome Thyrian and unite your two kingdoms to create peace across the lands. Only there's one problem... another witch has conspired against your happiness, having your fiance kidnapped so that you can't marry, bring the kingdoms together and maybe live out a normal princess life. Maybe. You never quite know if another sequel's in your future, which usually just spells more trouble.
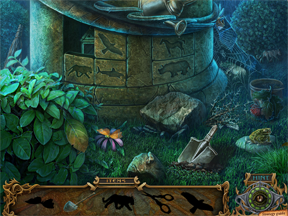
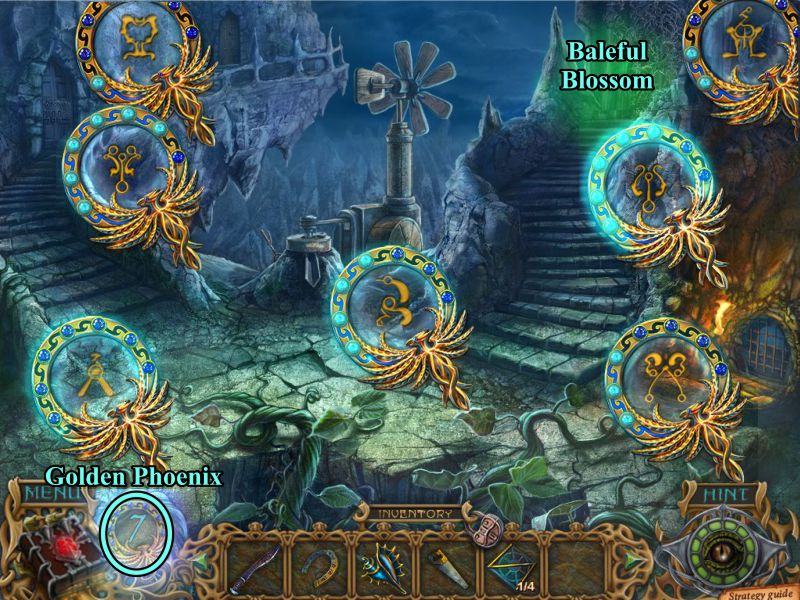
Song of the Phoenix offers the usual fare for a hidden-object/adventure hybrid as far as game mechanics. Use your mouse to navigate through each scene or to manipulate objects, as indicated by the changing cursor. In addition to the usual journal and hint meter, there's also a Golden Phoenix device that can be used in certain locations to hunt for magical symbols. Hidden-object scenes, on the other hand, come in two forms. There are the regular old scenes that we're all used to with the list of objects to find, but then there are the ultra cool silhouette scenes. These work differently in that you're tasked to find the objects that correspond to the silhouettes that you're given. But it's not just finding them, you then use those very objects back on the scene which leads you to find other objects until you arrive at the ultimate one that ends up in your inventory.
 Analysis: There's a lot going for Spirits of Mystery: Song of the Phoenix. It has amazing graphics, decent voice-overs and a wide range of difficulty in its puzzles. That's not even getting into the hidden-object scenes, which as previously mentioned, are not only interactive, but also have more of a sense of realism to them (at least as real as an adventure of a princess in a magical land can be). If hidden-object games are going toward scenes that aren't just a laundry list of items to find, then sign me up for more!
What's also great is that this game offers three levels of difficulty. There are the usual 'casual' and 'advanced' which differ in refilling time for the hint meter and also in whether interactive areas will glimmer, but then there's 'hardcore'. This insane difficulty not only has a slow filling hint meter and absense of glimmer, it also mostly gets rid of the hints that are usually given in areas you can click with the magnifier cursor to let you know what kind of object you need to use there. So just in case you thought these hybrid games were getting too easy, here's one that'll give you more of a challenge.
With all these great things going for it, the part of Song of the Phoenix that doesn't measure up to the rest is the storyline. It's nice to have the addition of the love interest in the mix, but the bad guy just seems like a rehash of the villian from the first game. There's just not as much excitement as you would expect from a great setup given the attention the develpers obviously gave to the other parts of the game.
All-in-all, ERS has created another enjoyable hidden-object/adventure title that shows them moving forward in the genre by adding new and interesting elements to the gameplay. Song of the Phoenix promises many, many hours of fun, and I'm sure I won't be the only one hoping for a third Spirits of Mystery.
A Collector's Edition is also available. It contains a bonus chapter, art gallery, strategy guide, and more. Remember that Big Fish Game Club Members pay only $13.99 for Collector's Editions (or 2 club credits), and collector's editions count 3 card punches of 6 total needed for a free game.
![]() Windows:
Windows:
Download the demo
Get the full version
Also available: Collector's Edition
![]() Mac OS X:
Mac OS X:
Download the demo
Get the full version
Also available: Collector's Edition


Walkthrough Guide
(Please allow page to fully load for spoiler tags to be functional.)
Spirits of Mystery: Song of the Phoenix Walkthrough
General Info, Chapters 1-4
General Information
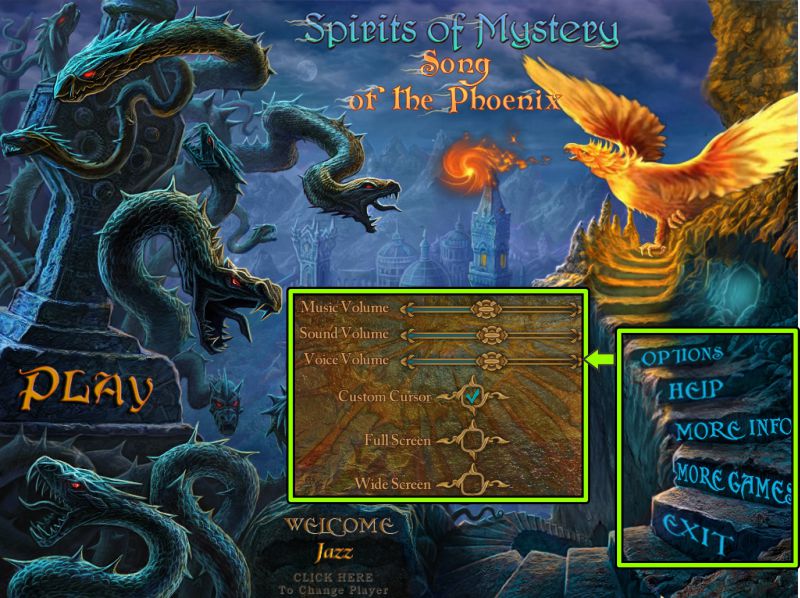
Main Menu
From the Main Menu, you can Play or Exit the game, choose your Options and Profile.
Options include Music, Sound, and Voice volume, Full or Windowed Screen, use of a Custom Cursor, and a Wide Screen in Full Screen mode.
If you purchased the Collector's Edition, there is a Strategy Guide under "More Info", and the "Extras" will become available when you have completed the basic adventure.
Extras include: Music, Concept Art, Wallpapers, Screensaver, and Bonus Play.
You can connect to More Games from ERS Game Studios, and view Help regarding game play.
Screenshot
Game Difficulty
Game difficulty choices are Casual, Advanced, or Hardcore Mode.
Casual Mode provides you with a more relaxed game-play with lots of sparkles, plus Hint and Skip buttons that recharge quickly.
If you choose Advanced Mode, the Hint and Skip buttons take longer to refill, and there are no sparkles.
Hardcore Mode is for those of you who really don't want much help. Hints and Skips are super slow, there are no sparkles, and the black bar tips are disabled.
Scene Navigation
As you begin play, you will get a choice of having Interactive Help.
Hints are unlimited once the Hint button in the lower right corner refills, and can be used in the main scenes as well as Hidden Object Scenes.
In the lower left corner is your Notebook.
Above the Notebook is the Menu where you can Continue the game, change your Options, view Help, or quit to the Main Menu.
In the lower center of your screen is your Inventory, and where Hidden Object Scene lists are shown.
If you need to identify an item in your Inventory, mouse over it for its name.
Some Hidden Object Scenes are variable and will always have an item for your Inventory. The Inventory item is marked in bright blue in those scenes.
Other Hidden Object Scenes are interactive, where you collect silhouetted items and use them in the scenes to obtain other items.
Mini Games have a Skip option, but the button takes 2 minutes to fill.
All Mini Games also have a Help section at the bottom with instruction as to how to complete the game.
Some Mini Games also have a Reset Button if you need to begin again.
Objects and locations with a Magnifying Glass need to be checked out for more information or to perform a task.
A Hand wants you to pick something up, move, or open an object.
Directional arrows show you other locations you can travel to.
Most times you will need to back out of a close-up scene by clicking on the main scene of using the red "X" in the upper right corner of the close-up.
Screenshot
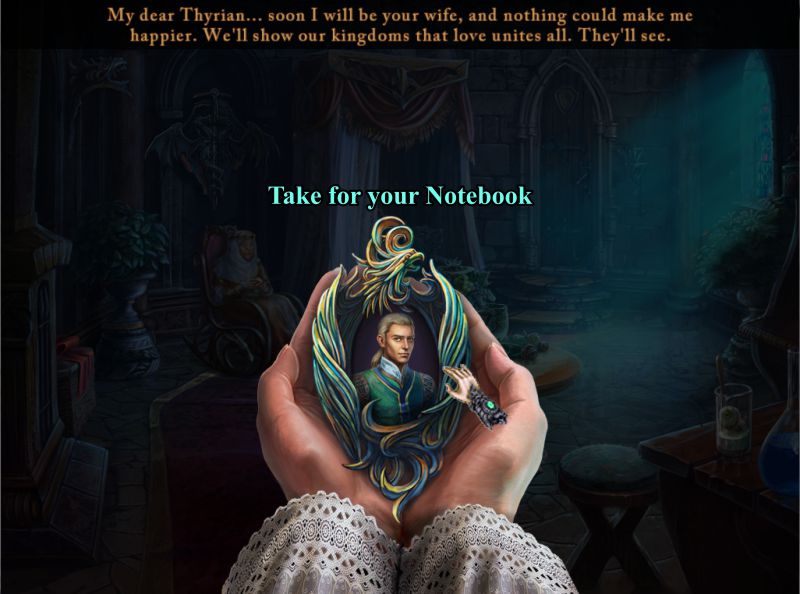
Notebook
The Dragon Kingdom is preparing for the wedding between their princess, and the prince from the Phoenix Kingdom.
Take the picture, and it will produce the first entry for your Notebook.
Screenshot
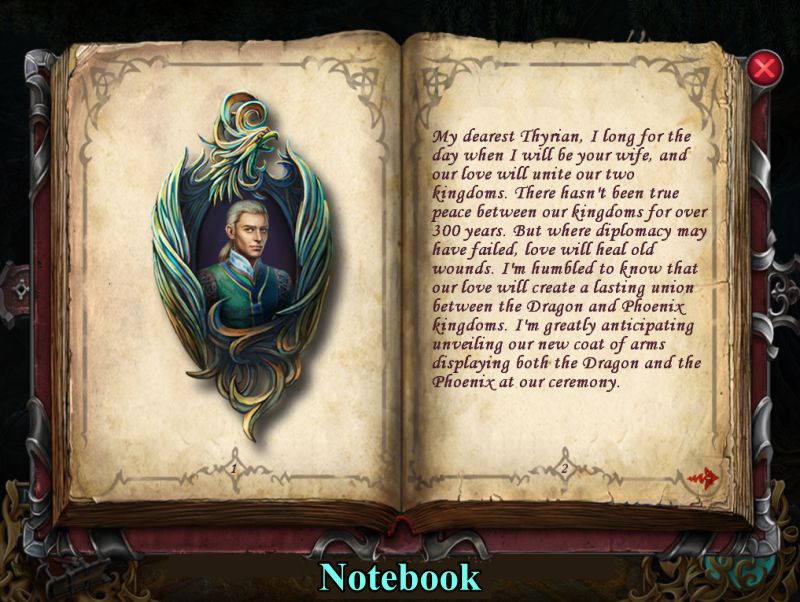
Your Notebook will record your journey and provide important information that you collect for future use so be sure to check it for new entries.
Screenshot
Chapter 1: Dragon Kingdom Palace
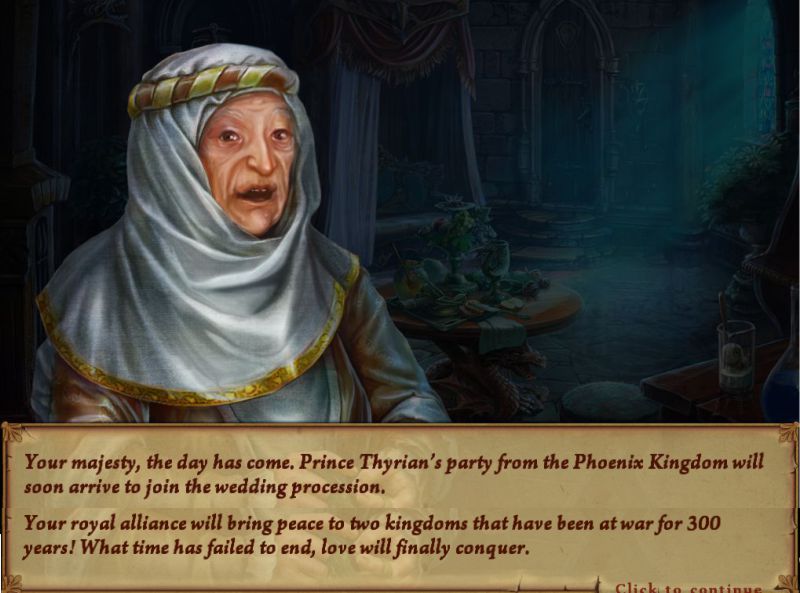
Nanny
Talk to your Nanny.
Screenshot
Chambers
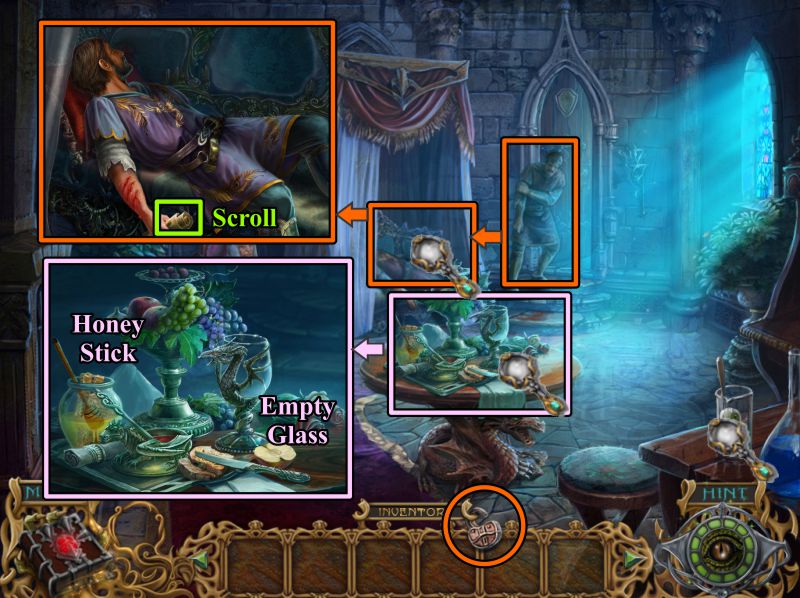
A wounded messenger from the Phoenix Kingdom staggers into your Chambers and fall on the bed.
Zoom in on him and take the Scroll he is holding.
Examine the table and collect the Honey Stick and Empty Glass.
Note that you can lock your Inventory bar to keep it visible at all times.
Screenshot
Scroll
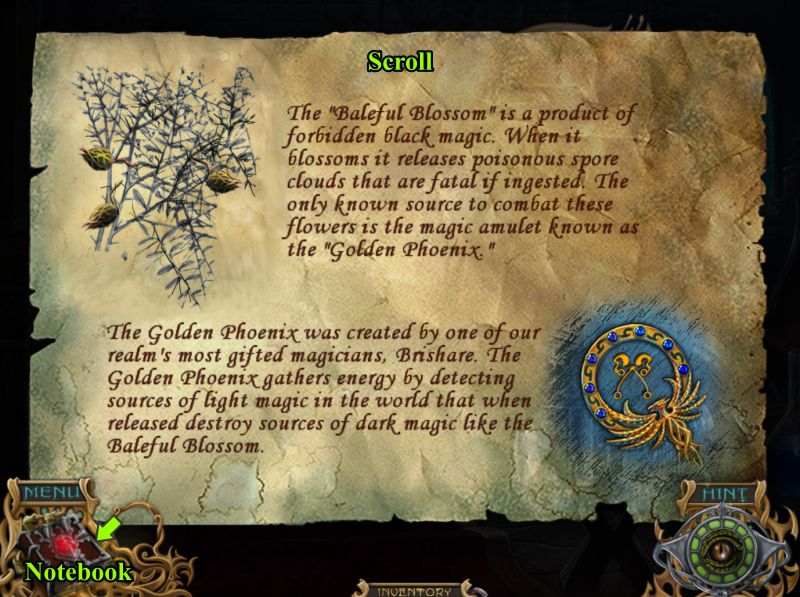
Read the Scroll with its important information.
Screenshot
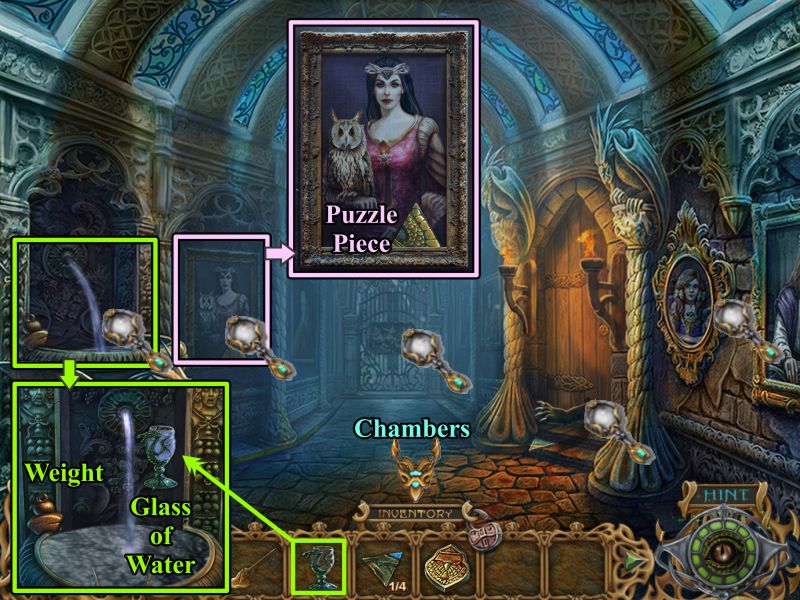
Chambers
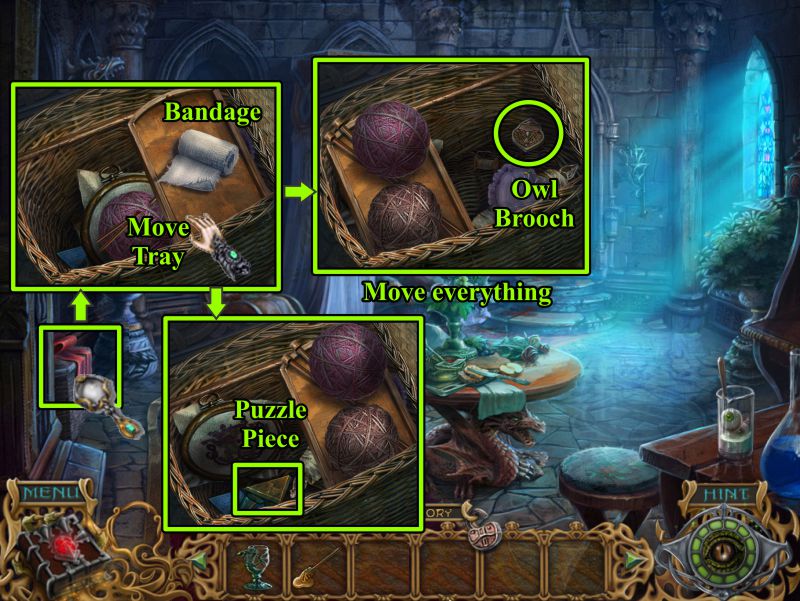
Zoom in on the basket at the left and collect the Bandage.
Move the tray back and forth and use it to help you move all the items in order to uncover the Owl Brooch and the Puzzle Piece.
Screenshot
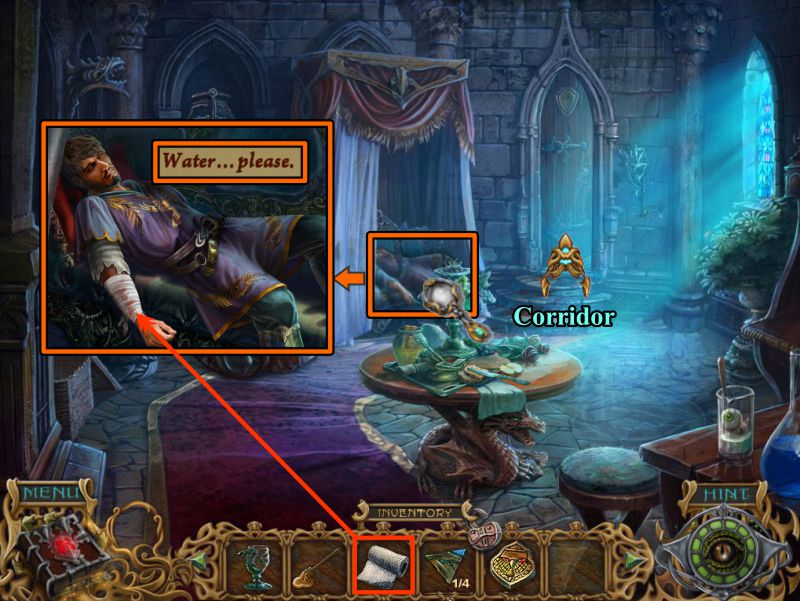
Zoom in on the messenger and bandage his arm.
He wants some water so go to the Corridor.
Screenshot
Corridor
Zoom in on the fountain and fill your Empty Glass with water.
Pick up the Weight, examine the portrait of your grandmother to collect a Puzzle Piece, and check out all the other magnifying glasses.
Return to the Chambers.
Screenshot
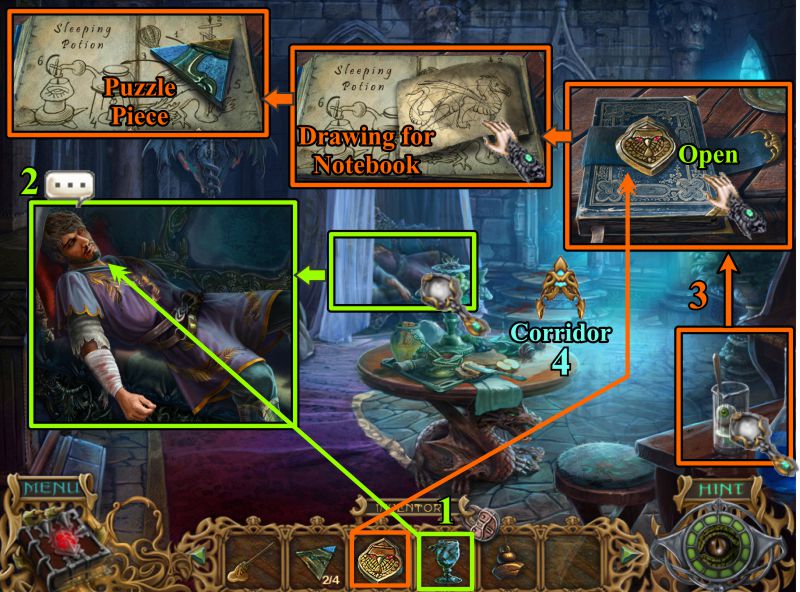
Chambers
Give the Glass of Water to the messenger, and he will speak.
Zoom in on the table at the right, place the Owl Brooch, and open the book.
Take the dragon drawing for your Notebook, and collect the Puzzle Piece beneath it.
Go to the Corridor.
Screenshot
Listen to what he has to say, then take the Golden Phoenix.
Screenshot
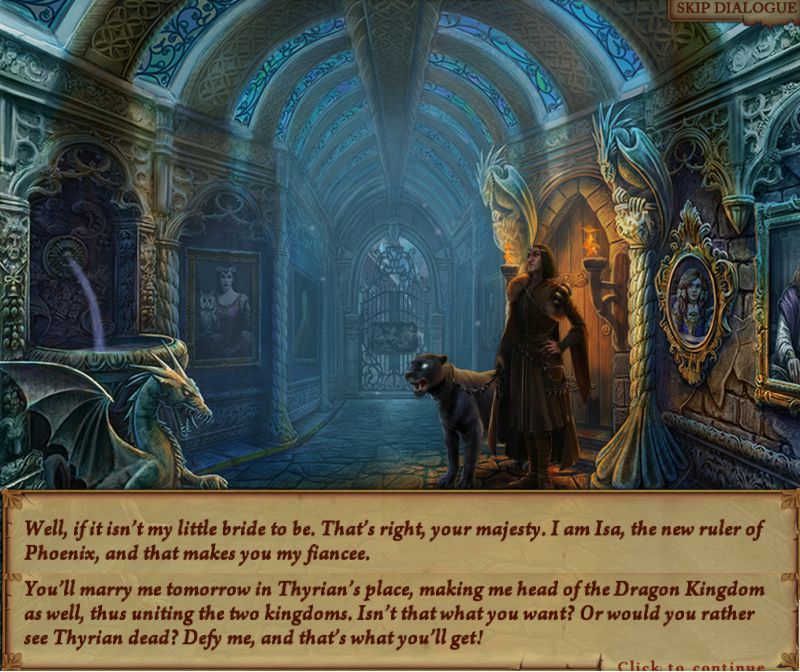
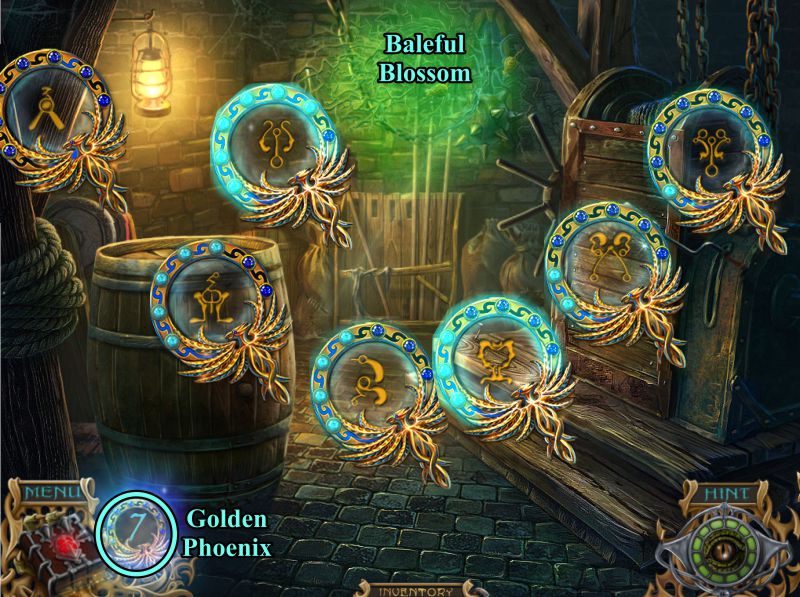
Corridor
Isa appears with his panther and has instructions for you regarding Thyrian.
Screenshot
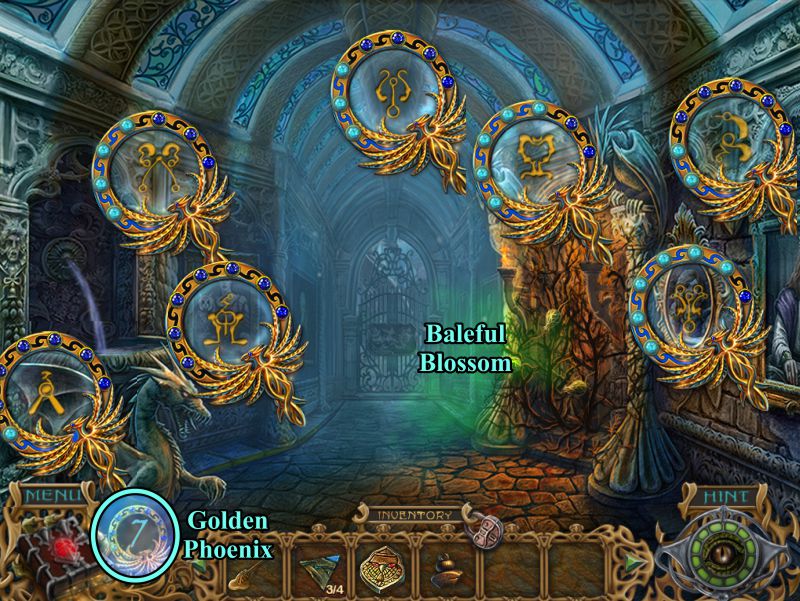
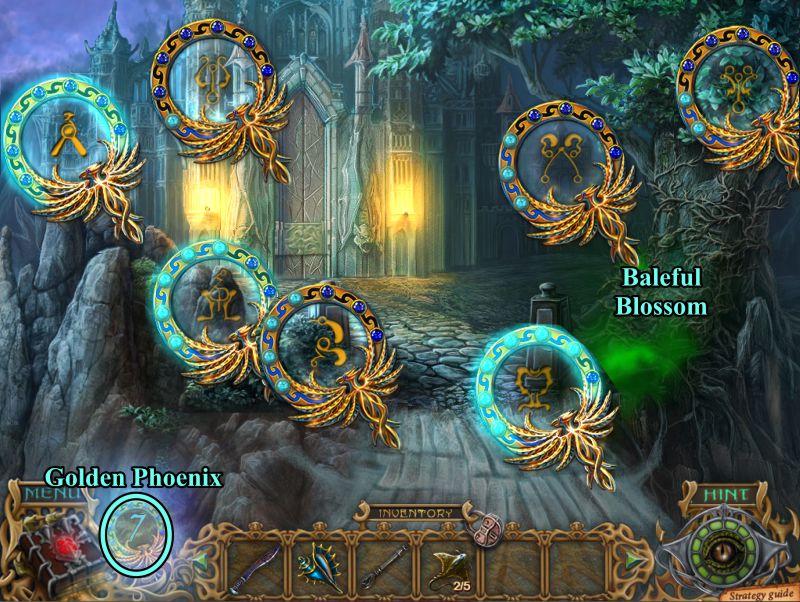
Isa disappears, leaving a Baleful Blossom behind.
Use your Golden Phoenix to collect the 7 symbols, shown in the screenshot, in order to remove the Baleful Blossom.
Screenshot
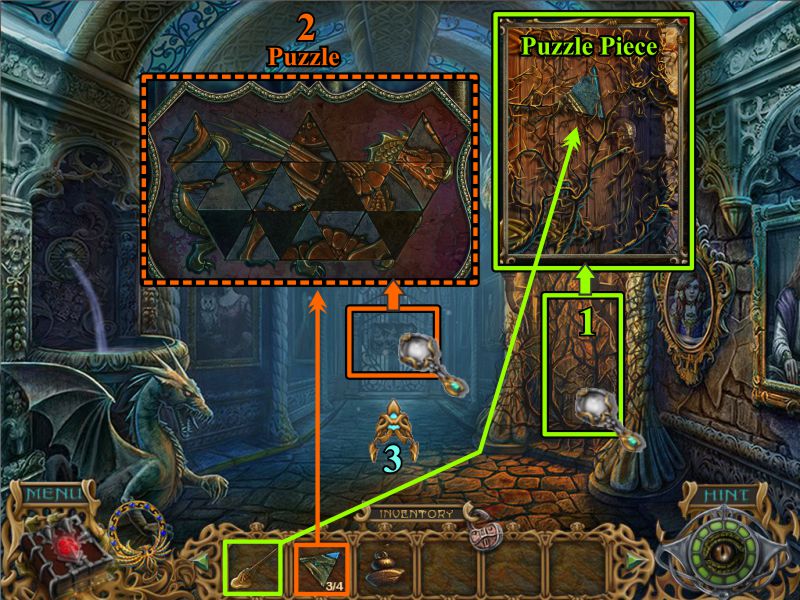
Zoom in on the door and use your Honey Stick to get the last Puzzle Piece.
Examine the gate and place your 4 Puzzle Pieces to trigger a Puzzle.
Screenshot
Dragon Puzzle
Swap the tiles by clicking between two of them so that the picture looks like the schematic.
See the screenshot for the solution.
Screenshot
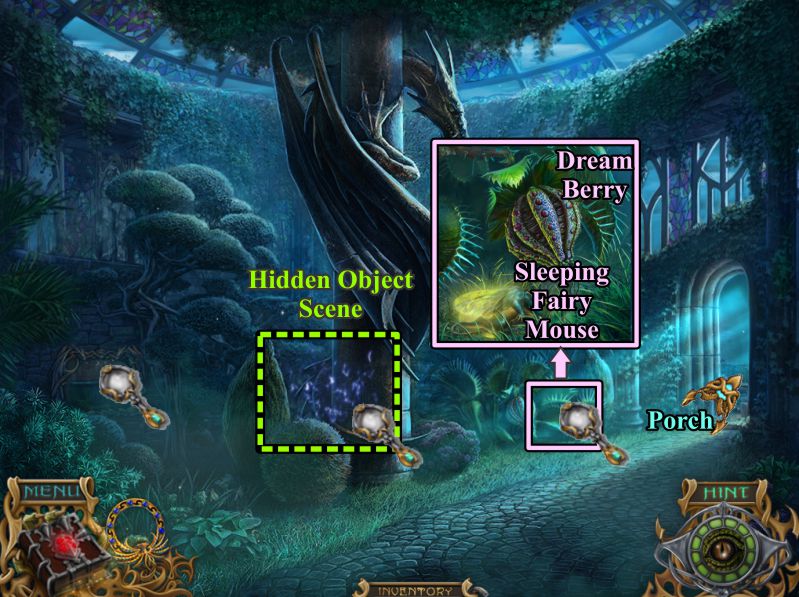
Winter Garden
Zoom in on the pink area in the screenshot and watch the Fairy Mouse munch on the Dream Berry.
When the Fairy Mouse falls asleep, pick him up and take the Dream Berry.
Play the Hidden Object Scene, and then go to the Porch.
Screenshot
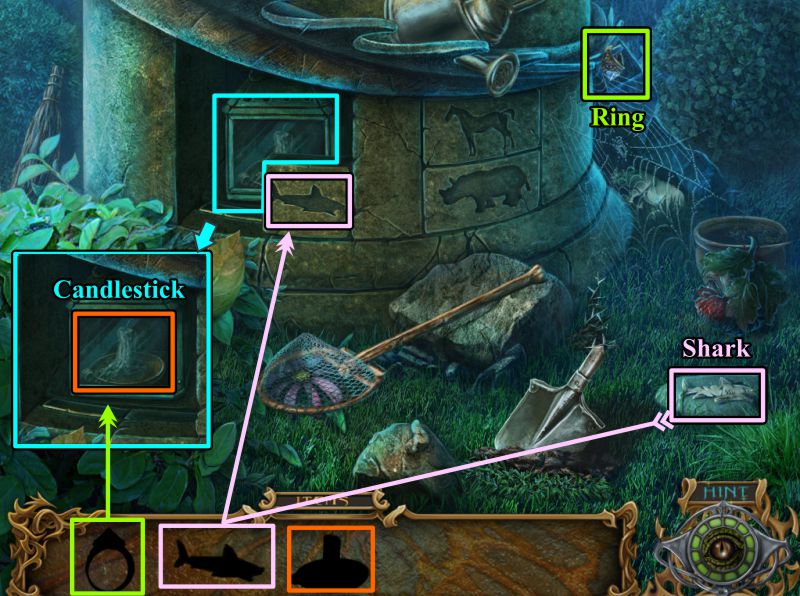
Garden Hidden Object Scene
Collect the silhouettes available.
Open the leaf to find the Scissors.
Screenshot
Use the Net to catch the Butterfly.
Use the Scissors to get the Eagle.
Place the Eagle, Cat, and Turtle in their silhouettes on the panel.
Feed the Butterfly to the frog.
Screenshot
Collect the Shark from where the frog left, then place it on the panel.
Pick up the Ring and use it to cut the glass to collect the Candlestick.
Screenshot
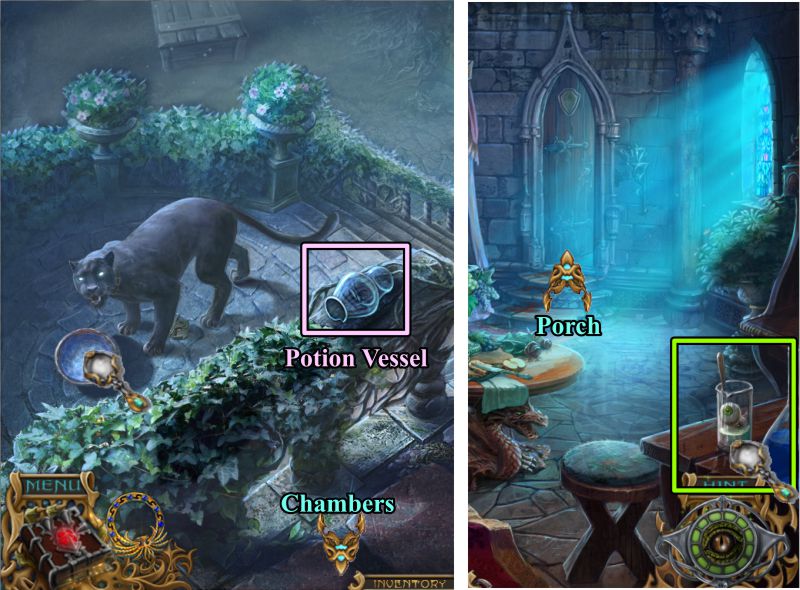
Porch
The panther is on the Porch. Collect the Potion Vessel and return to your Chambers.
Zoom in on the table at the right to mix the potion to take back to the Porch.
Screenshot
Potion Mixing
See the screenshot with the instruction in the book and begin mixing.
Place the Dream Berry in the press, then turn the press.
Place the squashed berry in the mixing vessel and the candle underneath.
Push on the dragon's tail to light the candle.
Put the Potion Vessel under the valve, then turn the valve when the potion is ready.
Take the Sleeping Potion and go to the Porch.
Screenshot
Porch
Pour the Sleeping Potion in the panther's bowl.
When he falls asleep, go to the Courtyard.
Screenshot
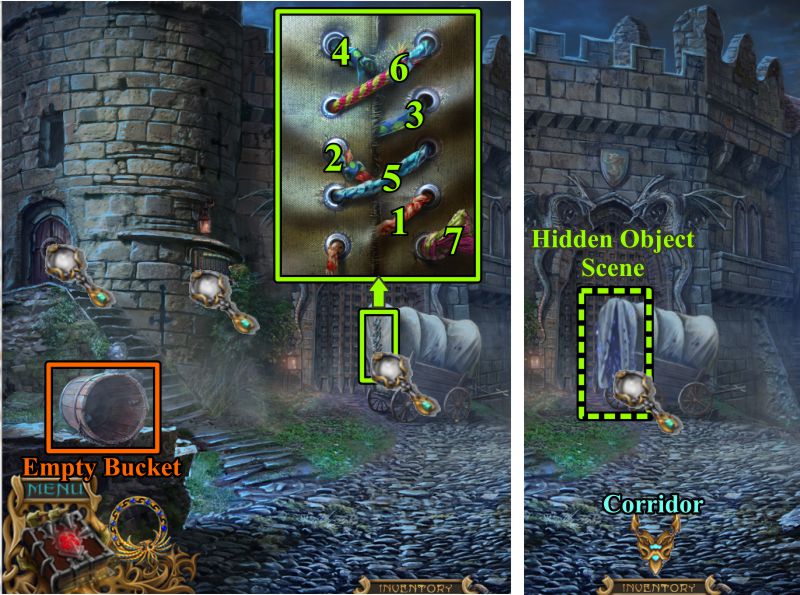
Courtyard
Pick up the Empty Bucket, check out the magnifying glasses, and zoom in on the covered wagon.
Undo the laces as numbered in the screenshot to trigger a Hidden Object Scene.
Screenshot
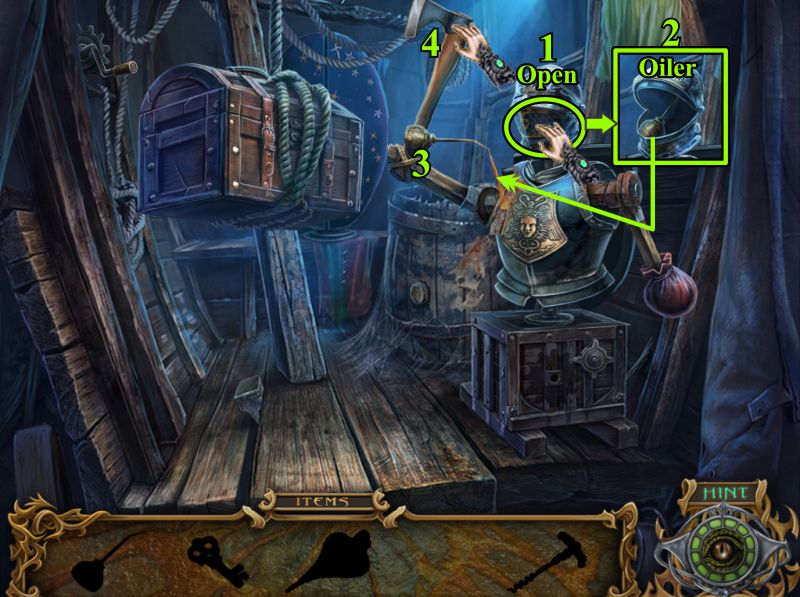
Wagon Hidden Object Scene
Pick up the Hammer and Wedge, then use them to get the Axe Head.
Place the Axe Head on the handle.
Screenshot
Open the helmet and take the Oiler.
Oil the arm and push the Axe to cut the rope and drop the chest.
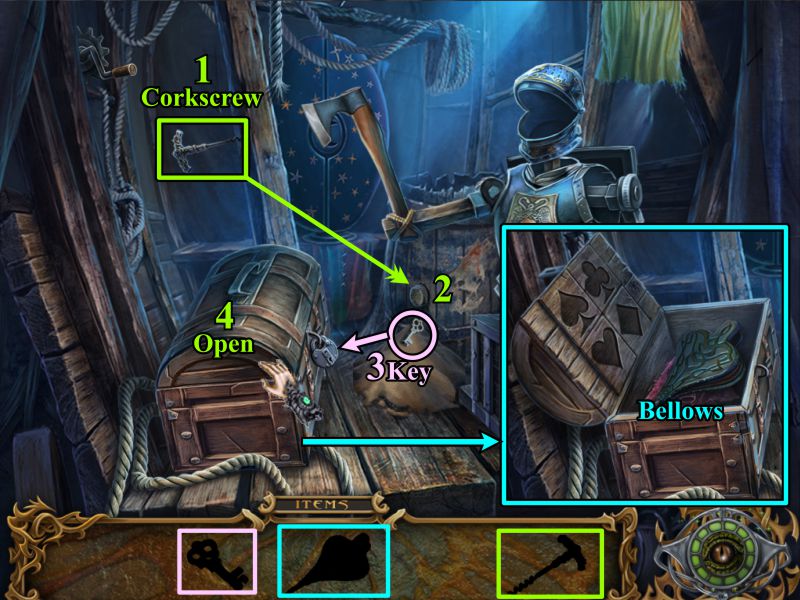
Screenshot
Take the Corkscrew and use it on the barrel.
Take the Key and use it on the lock on the chest.
Open the chest and take the Bellows.
Go to the Corridor to get some water.
Screenshot
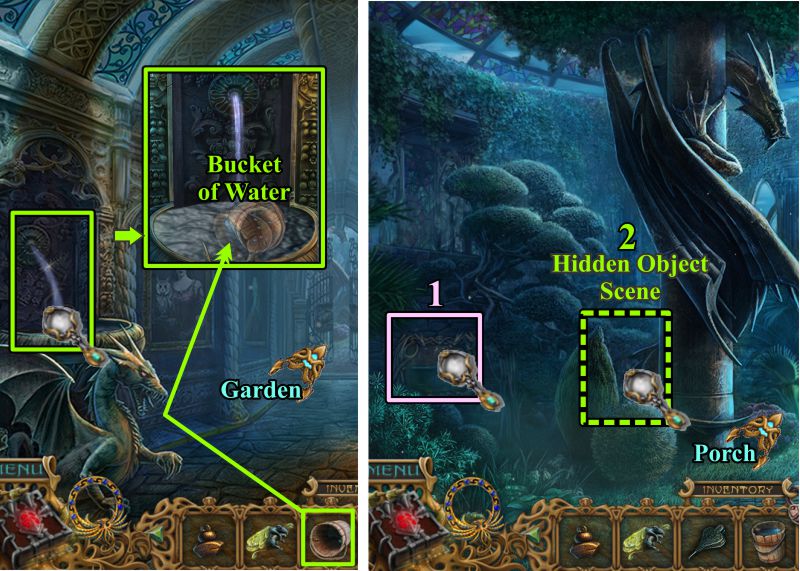
Corridor and Winter Garden
Zoom in on the fountain and use your Bucket to get some water.
Go to the Winter Garden and zoom in on the aquarium.
Play the Hidden Object Scene, then go to the Porch.
Screenshot
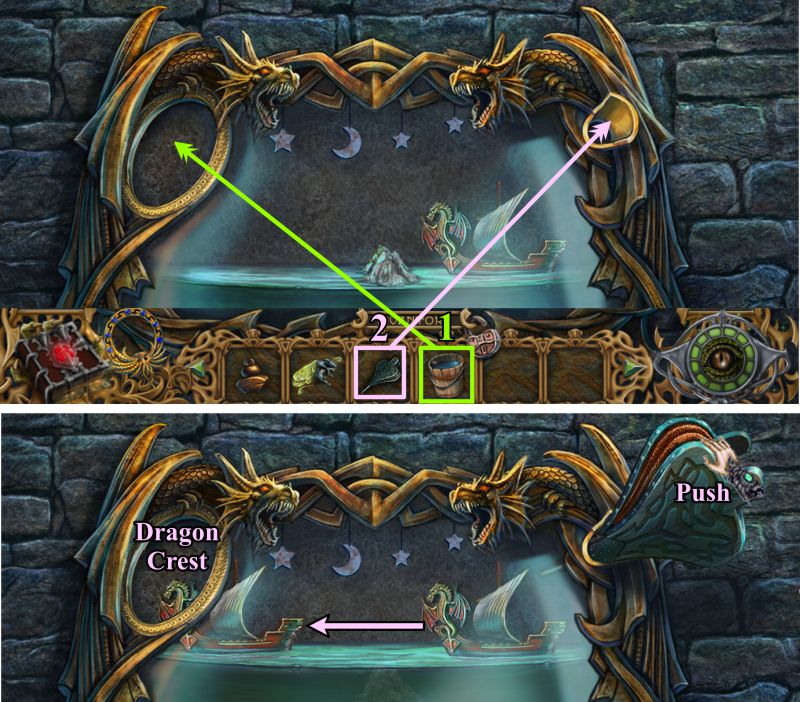
Aquarium
Pour the Bucket of Water in the left receptacle and place the Bellows at the right.
Push the Bellows until you can collect the Dragon Crest at the left.
Screenshot
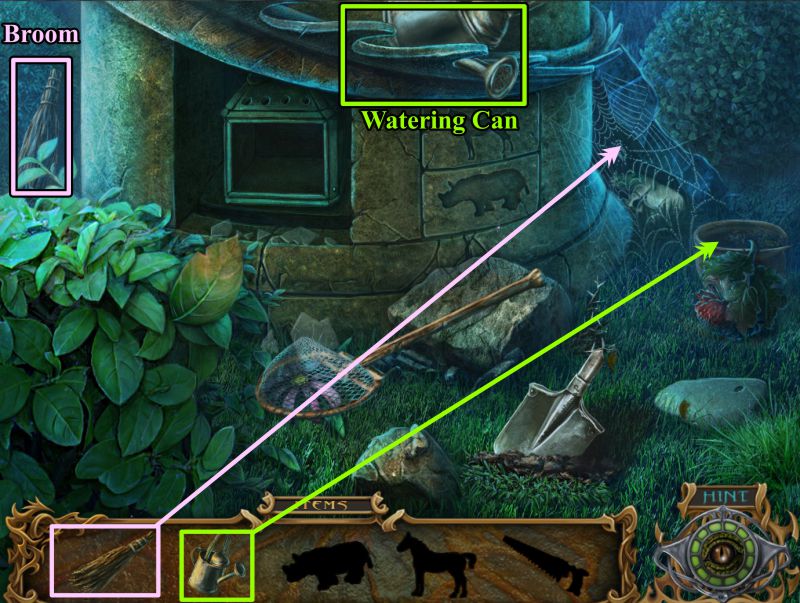
Garden Hidden Object Scene
Grab the Broom and use it to sweep away the cobwebs.
Use the Watering Can to revive the wilted flower.
Screenshot
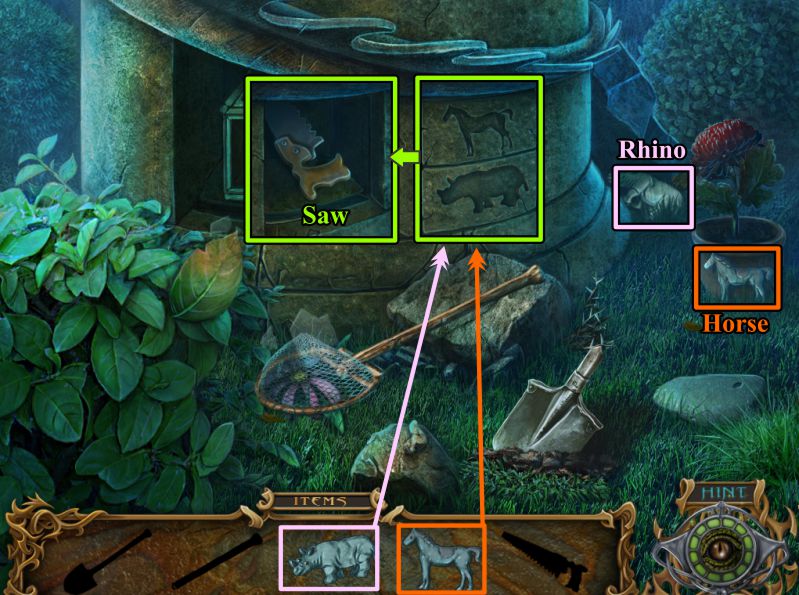
Collect the Rhino and Horse.
Place them on the right panel and take the Saw.
Screenshot
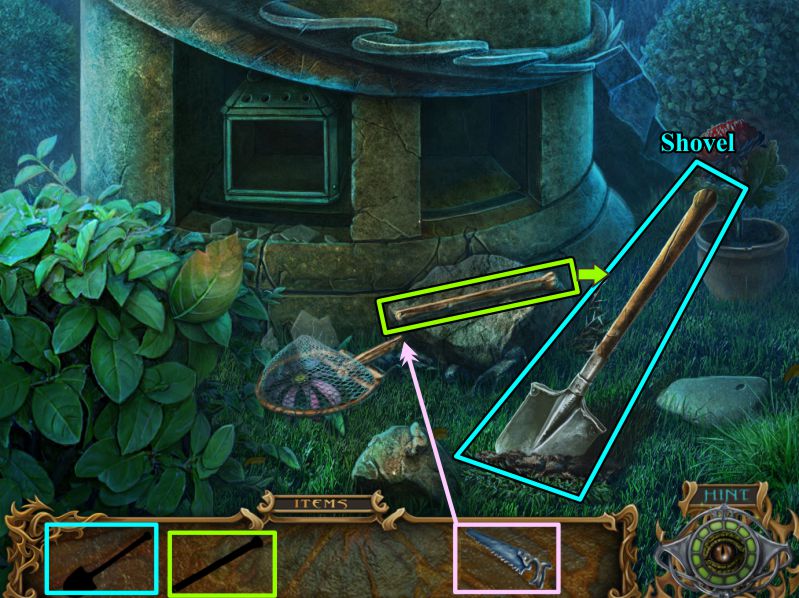
Use the Saw to remove a portion of the net handle, then place it on the shovel.
Collect the Shovel, then go to the Porch.
Screenshot
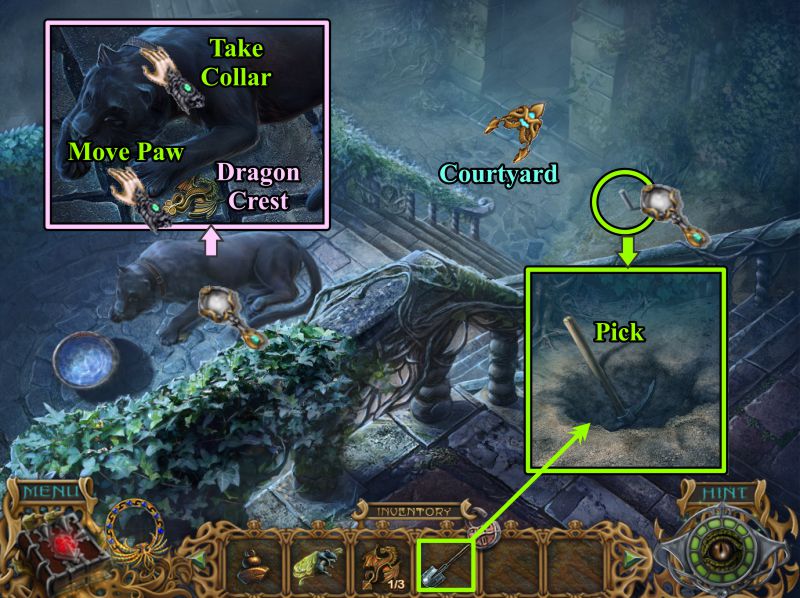
Porch
Zoom in on the panther, move his paw, and take the Dragon Crest.
Remove his Collar.
Examine the pile of sand and use your Shovel to dig out the Pick.
Go to the Courtyard.
Screenshot
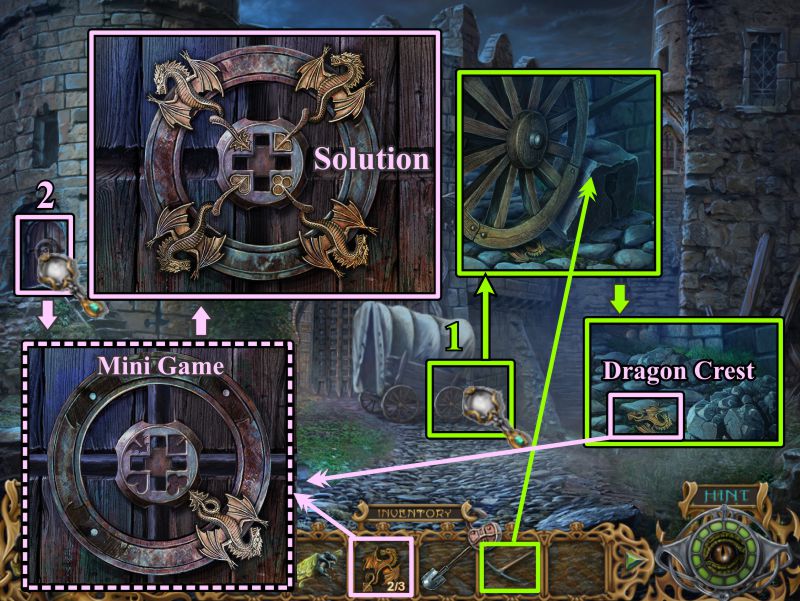
Courtyard
Zoom in on the wagon and use your Pick to break up the block so the wagon rolls away.
Take the Dragon Crest.
Zoom in on the Guard Tower door and place your Dragon Crests to trigger a Mini Game.
Turn the dragons to match the symbols and open the door.
Screenshot
Guard Tower
Another Baleful Blossom: Use the Golden Phoenix to find all 7 in order to get rid of it.
See the screenshot for the symbol locations.
Screenshot
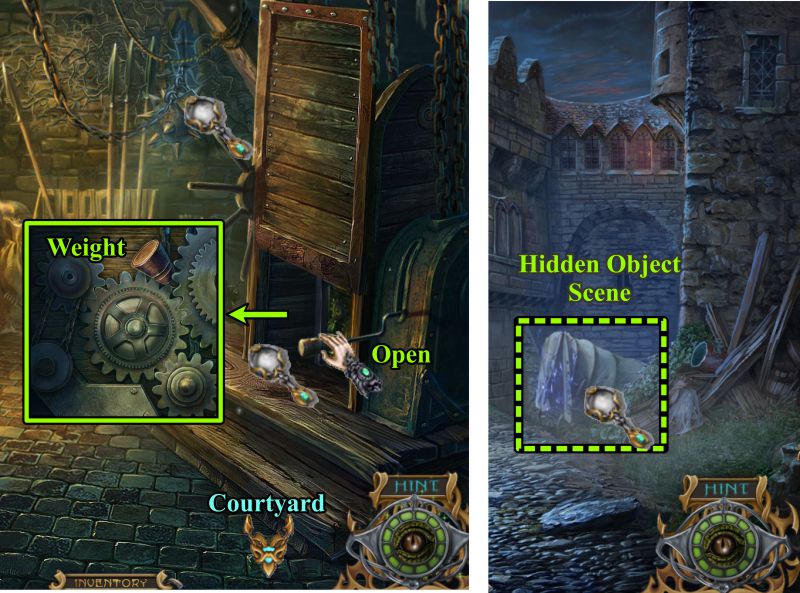
Guard Tower and Courtyard
Push down on the handle to open the mechanism to the right and collect the Weight wedged in the gears.
Go outside and play the Hidden Object Scene in the wagon.
Screenshot
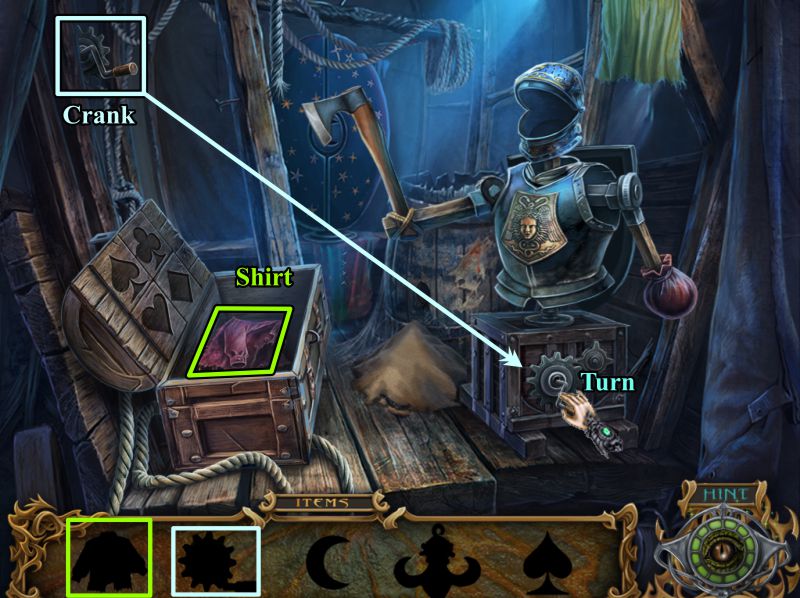
Wagon Hidden Object Scene
Take the Shirt from the chest.
Pick up the Crank and place it on the box.
Turn the Crank.
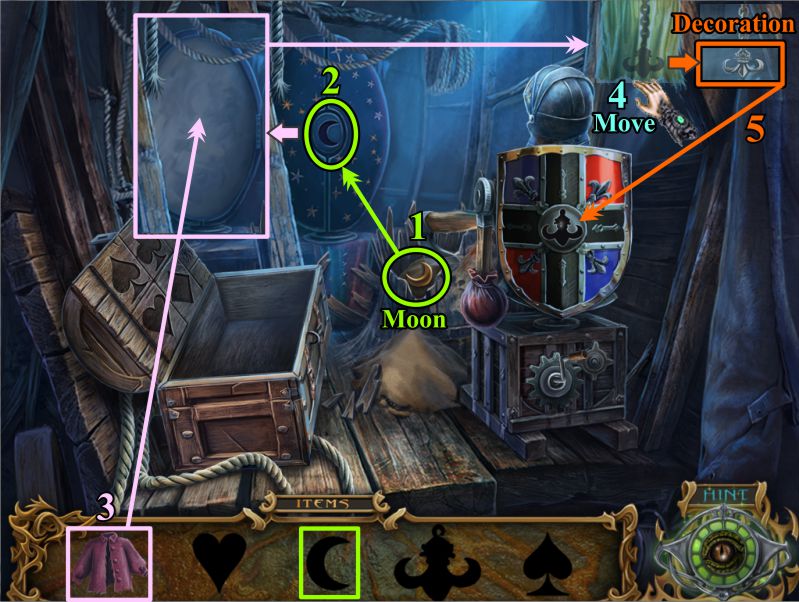
Screenshot
Pick up the Moon and place it to turn the mirror around.
The mirror is dirty, so use the Shirt to clean it.
Move the curtain and take the Decoration that appears when the mirror reflects.
Place the Decoration on the shield.
Screenshot
The shield opens to produce a square that is divided in 4 parts.
Your goal is to move the squares to form the shapes of a spade, club, diamond and heart; and to collect each shape as you create them.
See the screenshot for the solution.
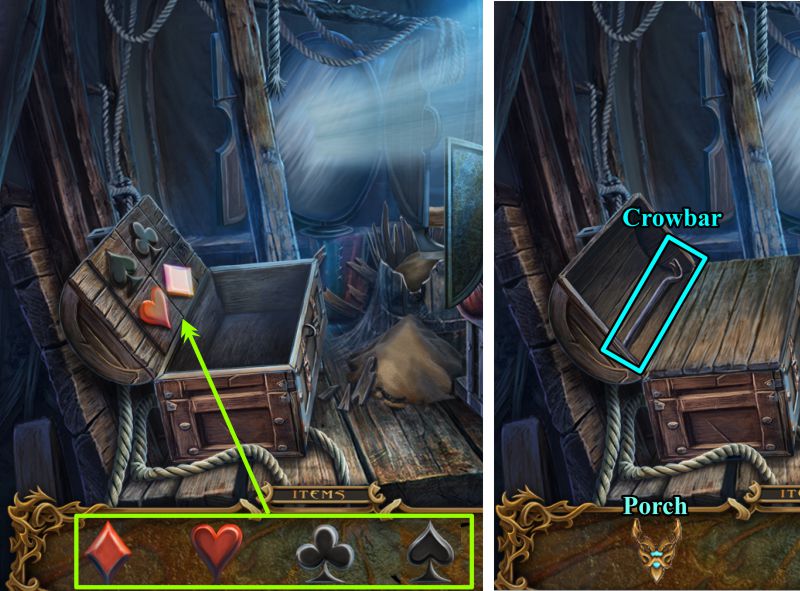
Screenshot
Place each of the card-deck symbols on the lid of the chest, then collect the Crowbar.
Go to the Porch.
Screenshot
Porch
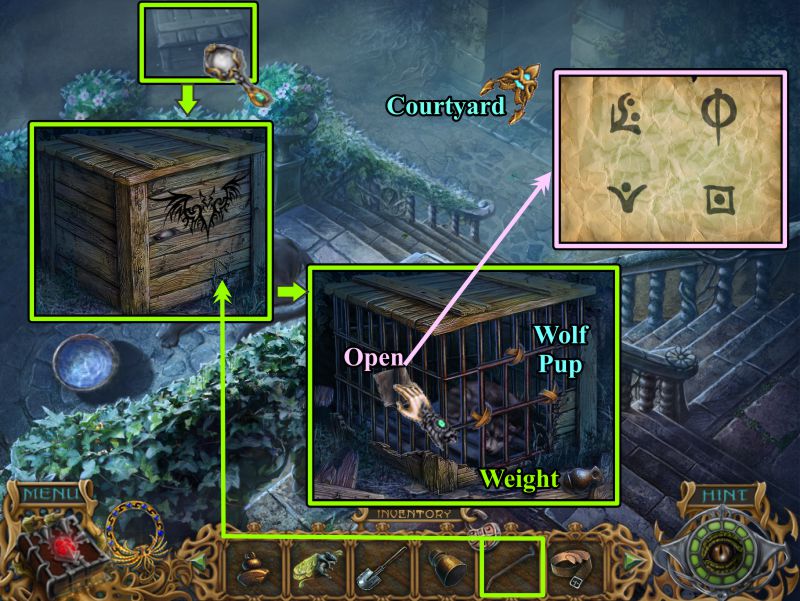
Zoom in on the crate and use the Crowbar to open it.
Take the paper and open it. Collect the Weight, and note the Wolf Pup you need to rescue.
Return to the Courtyard.
Screenshot
Courtyard
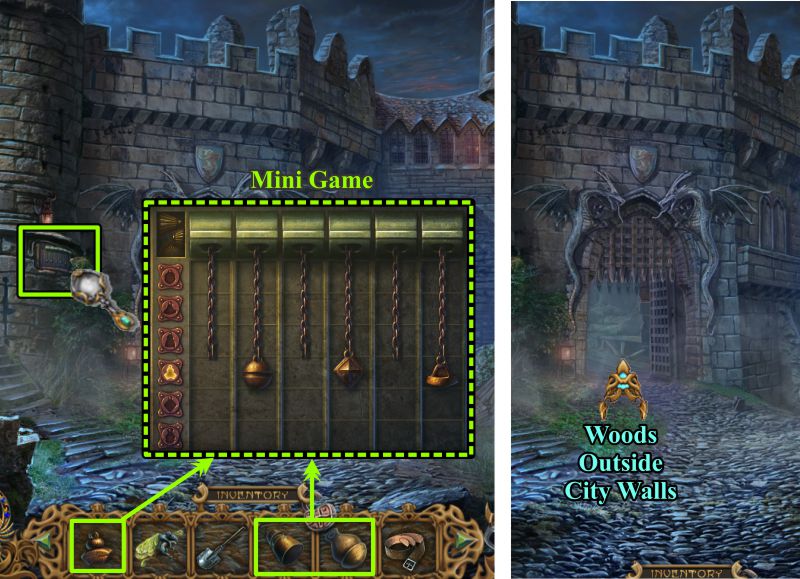
Zoom in on the mechanism on the tower at the left and place your Weights to trigger a Mini Game to open the gate to exit the city walls.
Screenshot
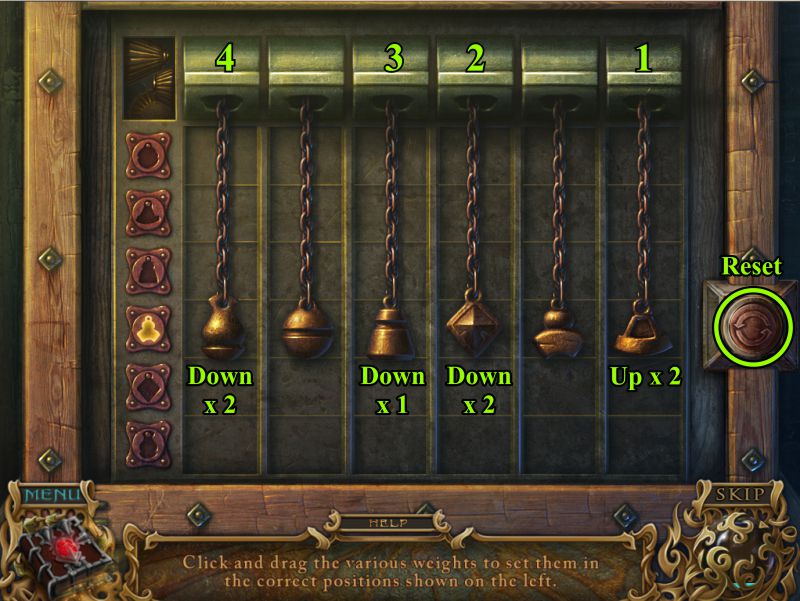
Weights Mini Game
See the next two screen shots for how to solve the Mini Game and what the solution should look like.
If you have a problem, you can use the Reset button to try again.
Screenshot
Screenshot
Chapter 2: Outside the City Gate
Woods
Isa is back, so hear what he has to say.
Zoom in on the coach to get the Note and the Whip.
Read the Note and move the rug.
Zoom in on the sign and take the Tassels.
Screenshot
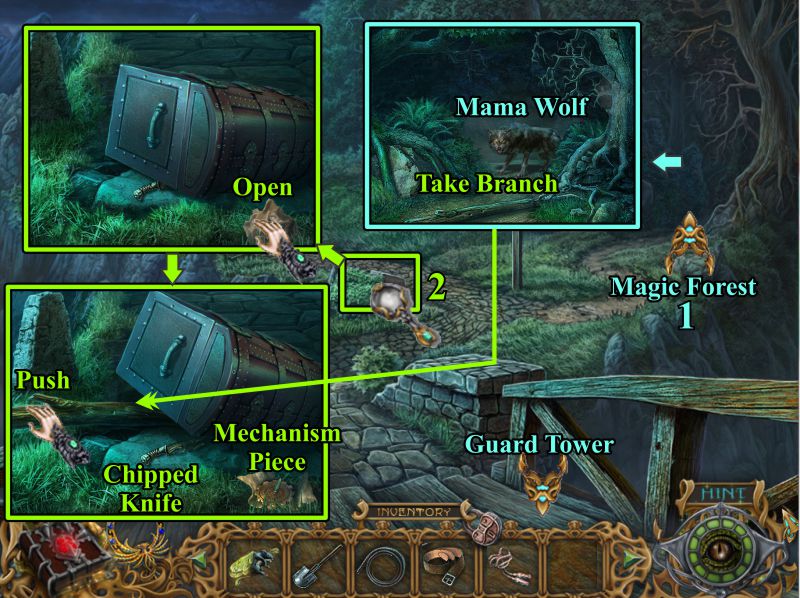
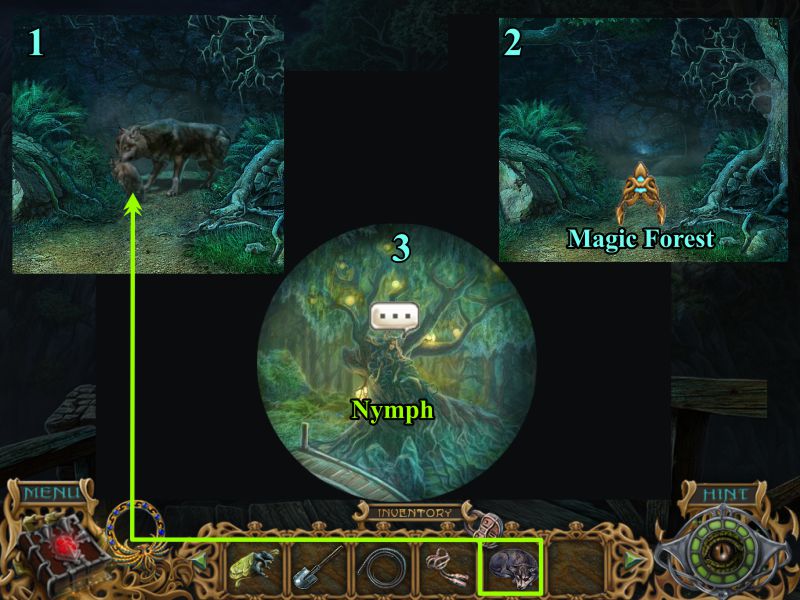
Go toward the Magic Forest where you encounter Mama Wolf.
Take the Branch and return to the Woods.
Zoom in on the area shown in the screenshot.
Open the paper and take the Mechanism Piece.
Jam the Branch under the chest and push on it to get the Chipped Knife.
Return to the Guard Tower.
Screenshot
Guard Tower
Zoom in on the far wall and place the Mechanism you just found.
Check your Notebook for the symbols you need and move the dial of the mechanism to those symbols.
See the screenshot for help.
Screenshot
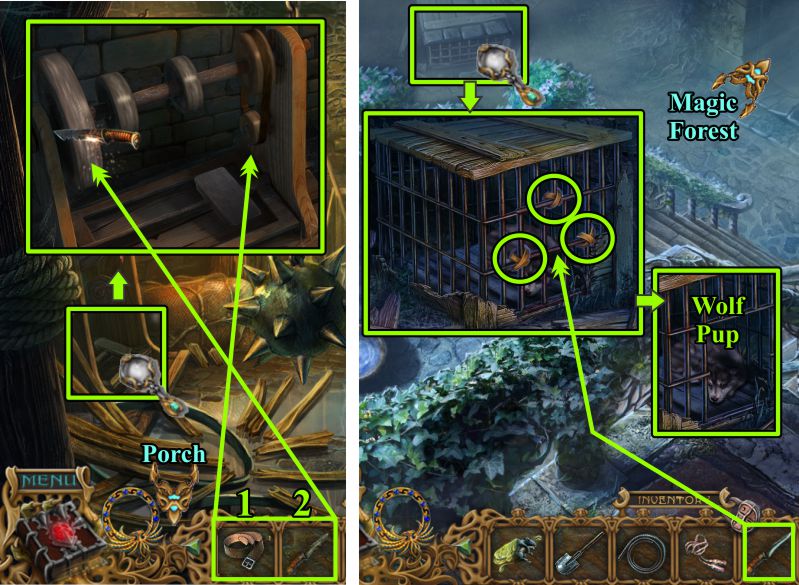
Guard Tower and Porch
The mace will come down and open up the grinder for you to sharpen your Knife.
Place the Belt as shown in the screenshot and sharpen your Knife.
Go to the Porch and cut the straps on the cage so you can get the Wolf Pup.
Head to the Magic Forest to find Mom.
Screenshot
Chapter 3: Magic Forest
Mama Wolf and Nymph
Give Mama Wolf her pup, enter the forest, and talk to the Nymph.
Screenshot
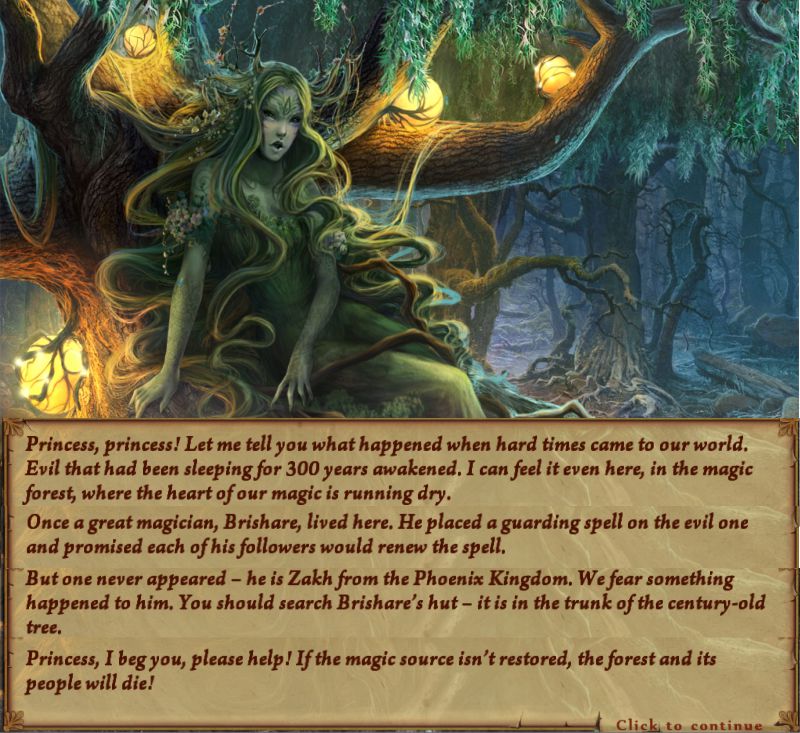
Nymph
Listen to her message for you.
Screenshot
Magic Forest
Once again you have a Baleful Blossom problem.
Pick up the Golden Phoenix and find the 7 symbols shown in the screenshot.
Screenshot
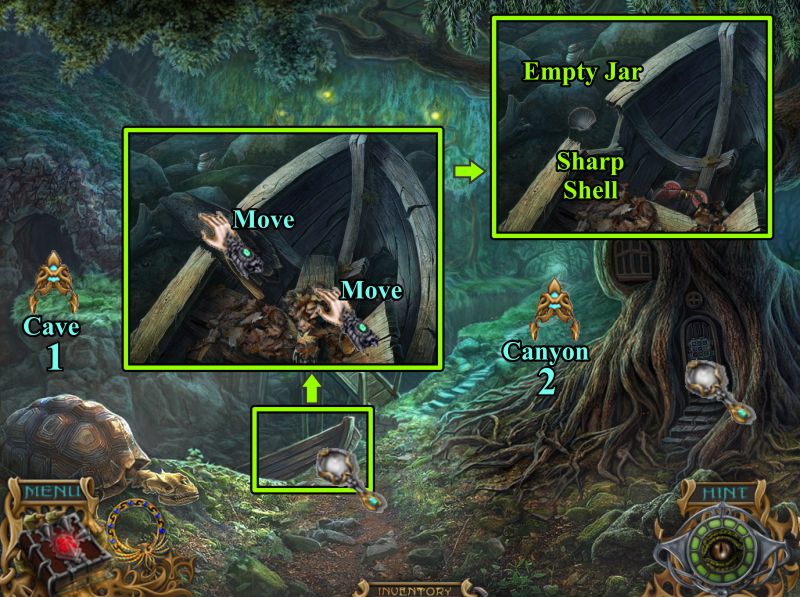
Zoom in on the rowboat and move the items shown in the screenshot.
Collect the Empty Jar and Sharp Shell.
The Baleful Blossom is gone, so you can check out the Cave before seeing what is in store for you at the Canyon.
Screenshot
Cave and Canyon
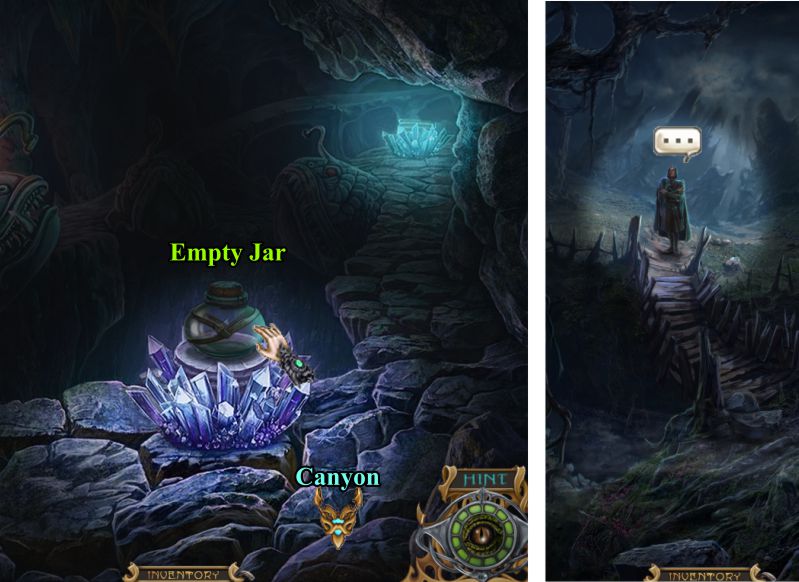
Collect the Empty Jar in the Cave and go to the Canyon.
Isa had once again appeared and has something to say.
Screenshot
Isa
You have a different agenda than Isa, so probably don't care about what he has to say.
The problem is that he destroyed the bridge so you cannot cross.
Screenshot
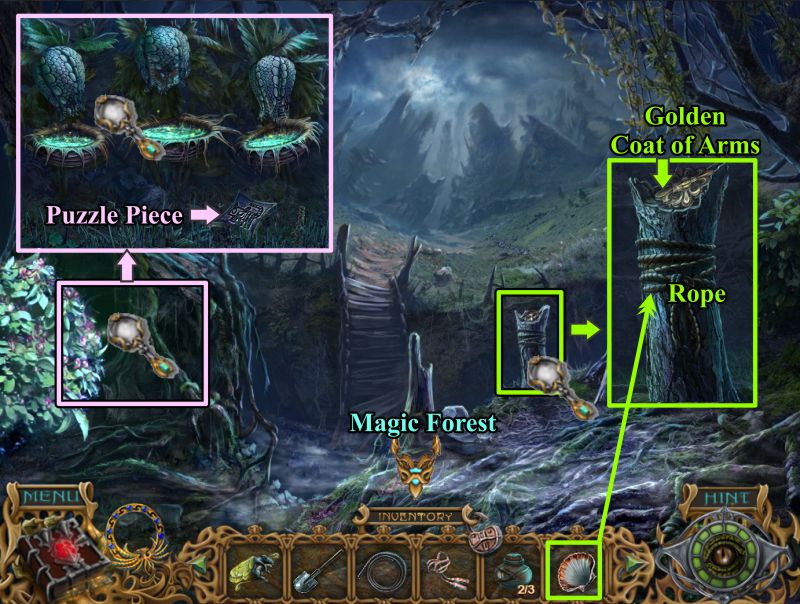
Canyon
Check out the plants at the left and grab the Puzzle Piece.
Zoom in on the pedestal with the Rope and take it, as well as the Golden Coat of Arms.
Return to the Magic Forest.
Screenshot
Magic Forest
Zoom in on the door of Brishare's Hut.
Place your Puzzle Piece to trigger a Mini Game.
Your goal is to turn all of the circles to match the solution shown in the screenshot.
Enter the hut.
Screenshot
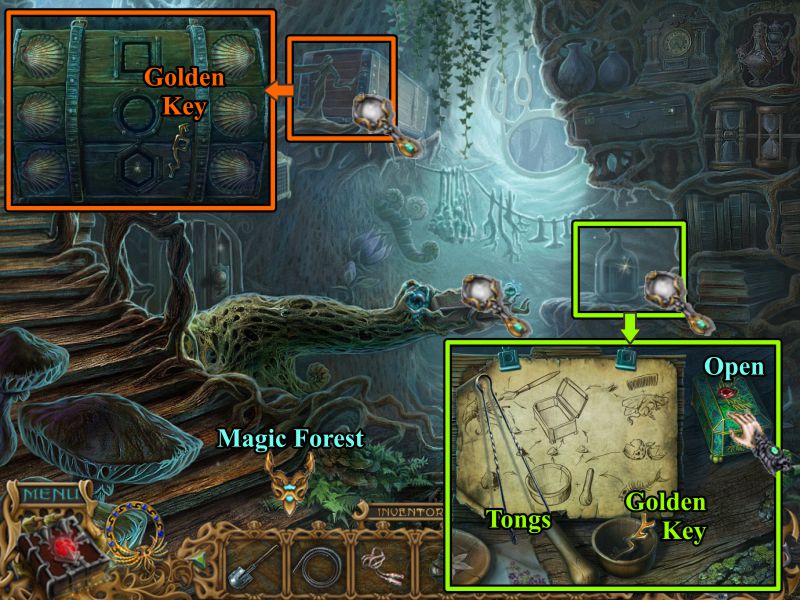
Brishare's Hut
Zoom in on the chest and take the Golden Key.
Examine the ledge at the right, open the box, and take the Tongs and Golden Key.
Return to the Magic Forest.
Screenshot
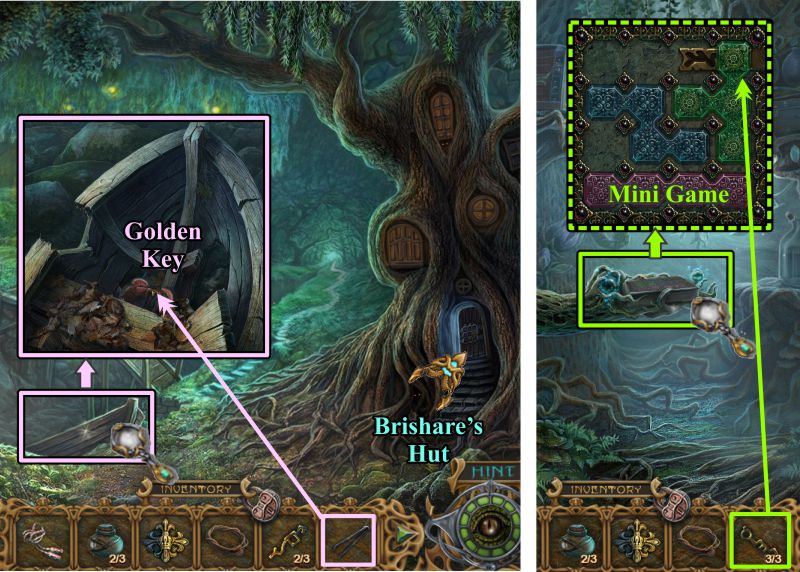
Magic Forest and Brishare's Hut
Zoom in on the boat and use the Tongs to get past the crab; then you can grab the Golden Key.
Return to the Hut and zoom in on the branch.
Place your 3 Golden Keys to trigger a Mini Game.
Screenshot
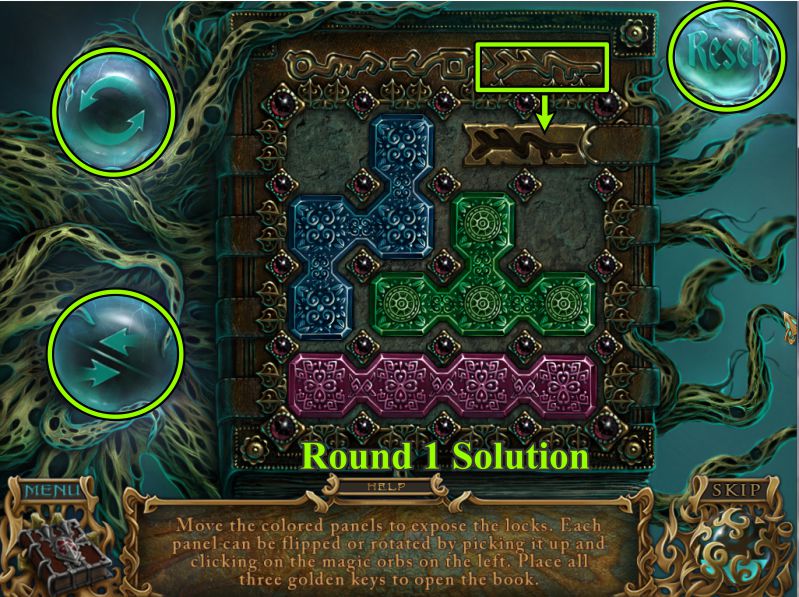
Golden Key Mini Game
Your goal is to use the blue bubbles to rotate and flip the 3 panels in order to clear the space to insert the keys.
If you need it, there is a reset button.
See the screenshot for the solution to Round 1.
Place the key when you have completed the round in order to continue.
Screenshot
The solution to Round 2 is shown in the screenshot.
Place that key to continue.
Screenshot
The Round 3 solution is shown.
Place the key and you have completed the Mini Game.
Screenshot
Brishare's Hut
Read the book until the end so you can collect the Phoenix.
Zoom in and place the Phoenix below the doorknob to trigger a Hidden Object Scene.
Screenshot
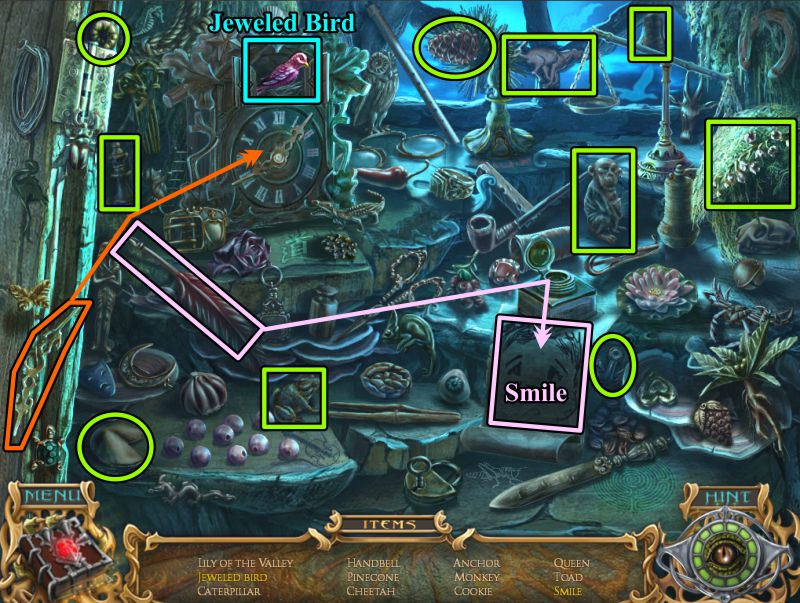
Hut Hidden Object Scene
Collect the items on your list to get the Jeweled Bird for your Inventory.
Place the clock hands on the clock to get the Jeweled Bird.
Use the feather, then draw the Smile so you can collect it.
Screenshot
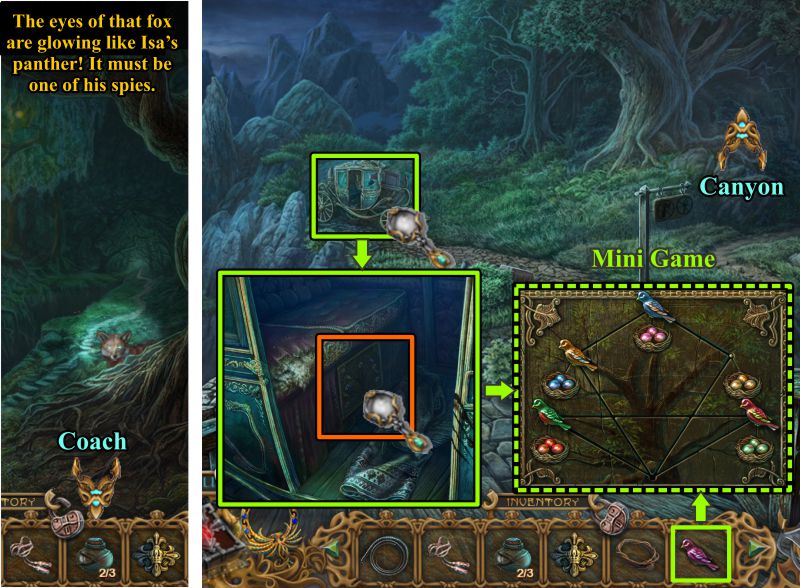
Magic Forest and Woods
A Fox, who is one of Isa's spies, is checking up on you; try to catch him, and he will disappear.
Go to the Coach in the Woods.
Zoom in on the panel under the seat and place the bird for a Mini Game.
Screenshot
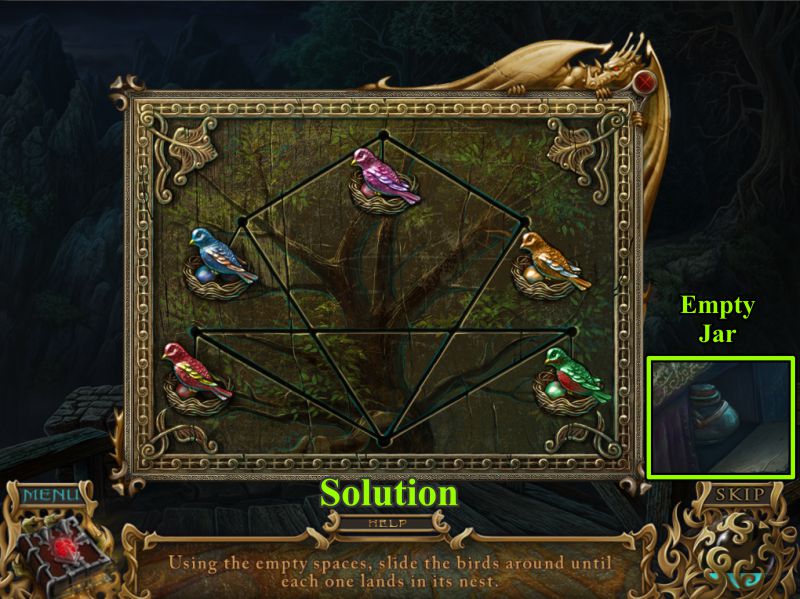
Bird Mini Game
Your goal is to rearrange the birds by color to match their nests.
Use the vacant space at the bottom to help you move them, and then take the Empty Jar.
See the screenshot for the solution.
Screenshot
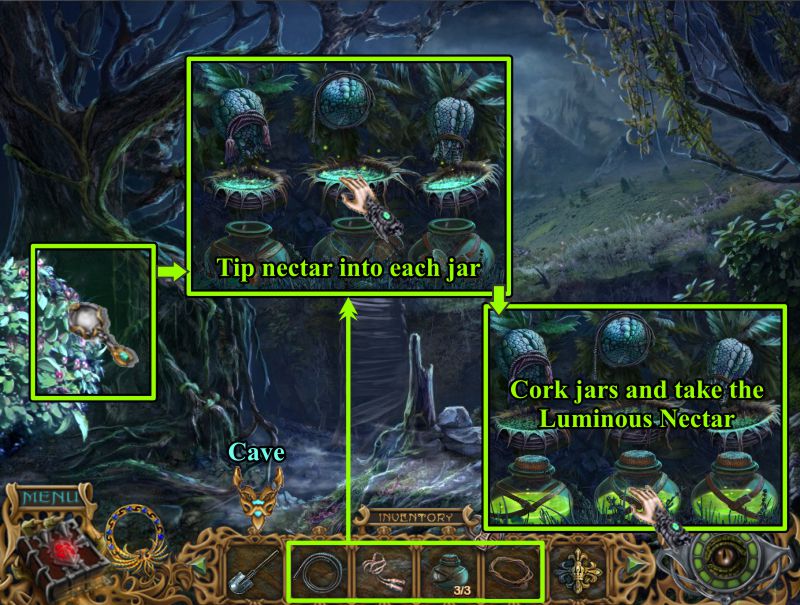
Canyon
Go to the Canyon and zoom in on the plants at the left.
Place your Rope, Whip, and Tassels on them to keep them from harming you.
Tip the nectar into each jar.
Cork each jar and collect the Luminous Nectar.
Go to the Cave.
Screenshot
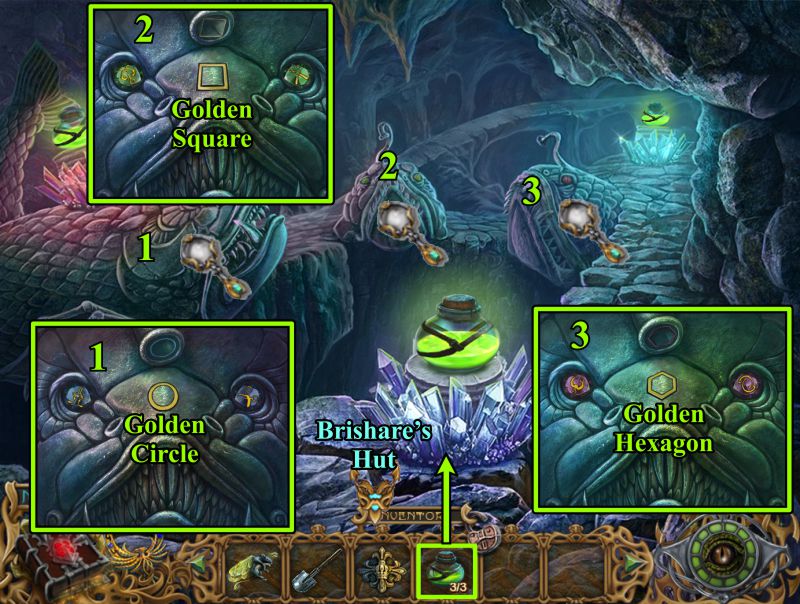
Cave
Place the Luminous Jars.
Zoom in on each of the fish and collect the Golden Circle, Square, and Hexagon.
Go to Brishare's Hut.
Screenshot
Brishare's Hut
Zoom in on the chest and place the 3 Golden shapes you just picked up from the Cave.
Rearrange the buttons as shown in the screenshot to collect the 3 Crystals.
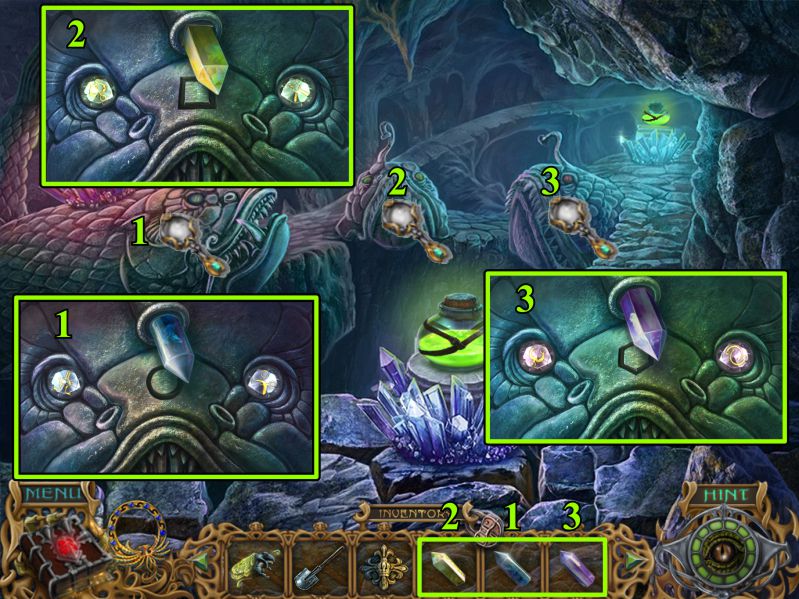
Screenshot
Zoom in on the first fish and place the Blue Crystal.
Zoom in on fish number 2 and give him the Yellow Crystal.
The third fish wants the Purple Crystal.
You are now ready for the Mini Games.
Screenshot
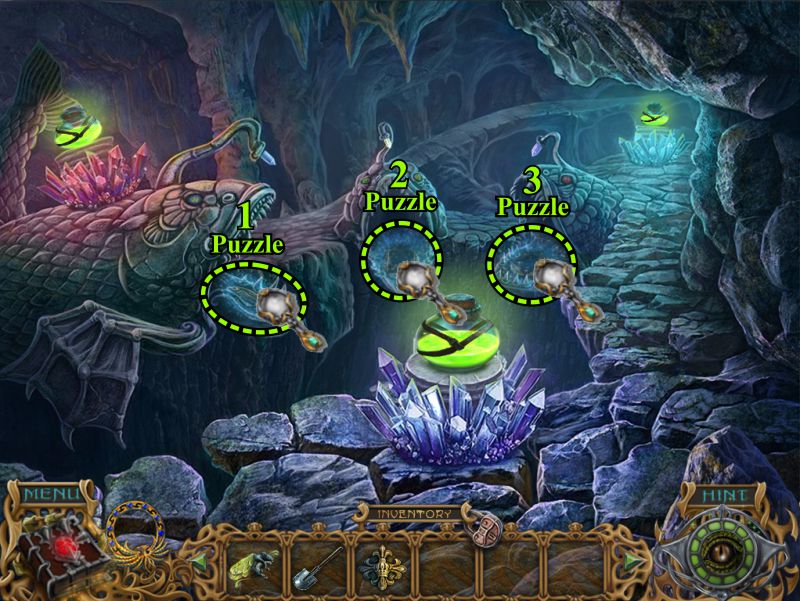
Fish Puzzles I
Zoom in on the mouth of each fish in the order of which I have numbered them to correspond to the solution of each puzzle.
Screenshot
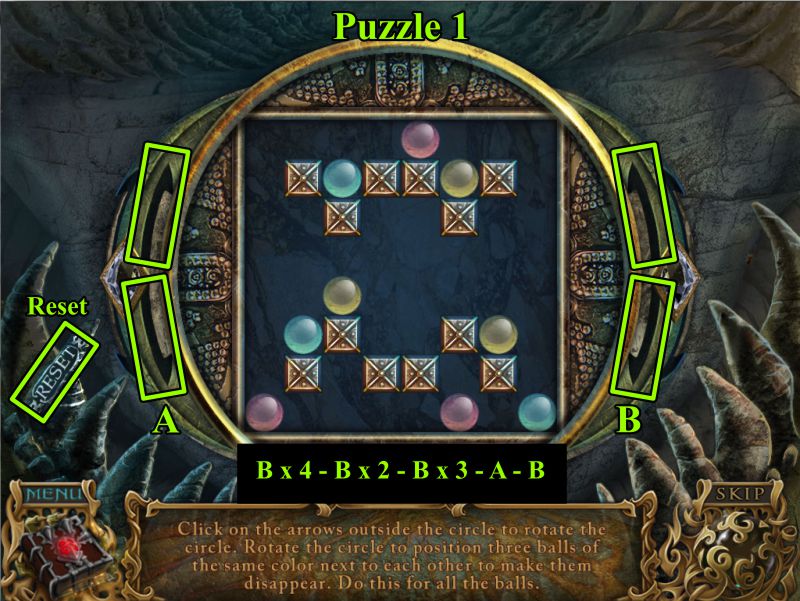
Fish Puzzles II
Your goal is to use the arrows outside the ring to turn the area in the middle.
Ignore the top two arrows: you can solve all of these puzzles just using the bottom ones.
There is a Reset button in case of need.
See the screenshot for the solution to Puzzle 1.
Screenshot
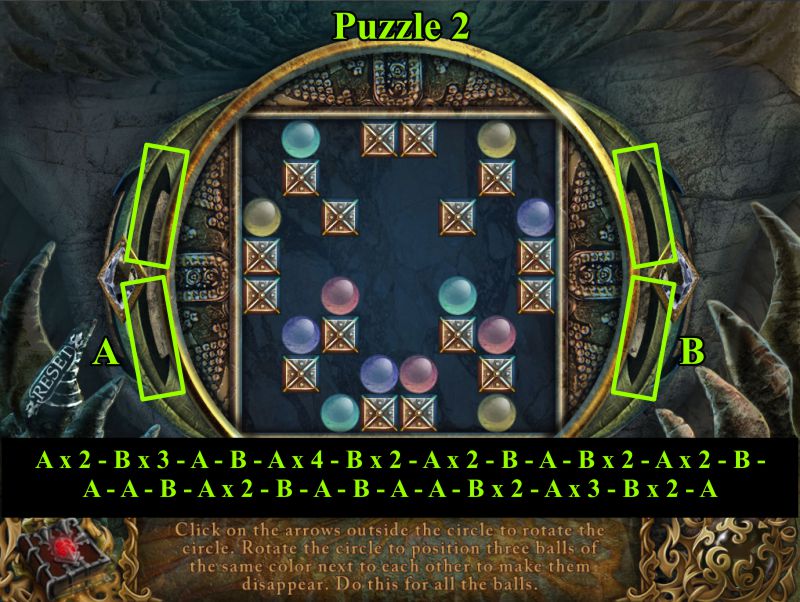
You are now on a roll, so see the screenshot for how to finish Puzzle 2.
Screenshot
You're on your way to the finish line; the screenshot will show you the solution to Puzzle 3.
Screenshot
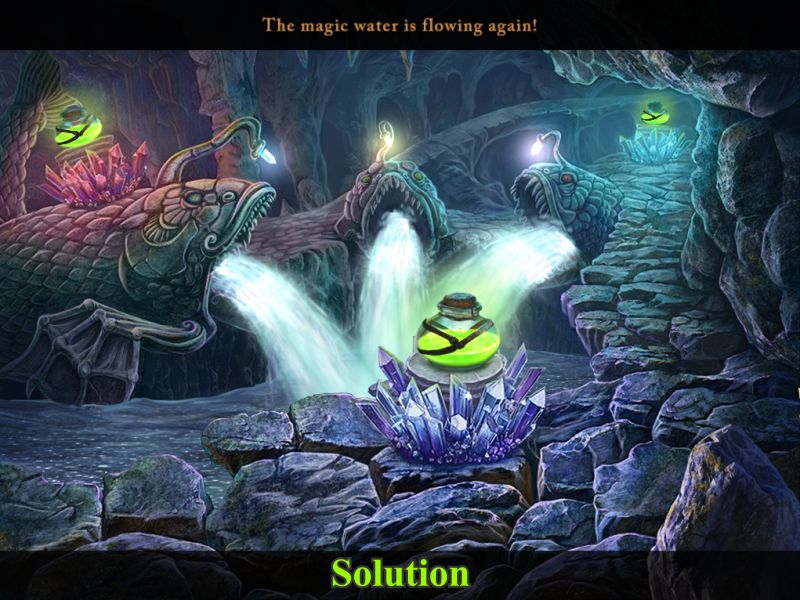
Cave
You've completed all the puzzles to make the waters flow again, so go talk to the Nymph.
Screenshot
Nymph
You are now on your way to go to the Phoenix Kingdom and find your love, so follow the Nymph's advice.
Screenshot
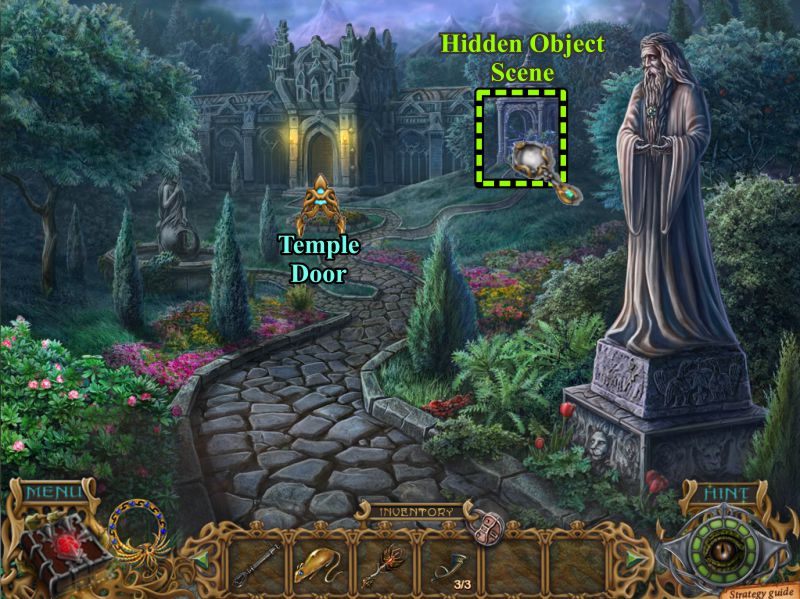
Path to the Phoenix Kingdom
The Nymph restores your path, so cross over.
Oops, you find another Fox spy, so try to catch him.
Screenshot
Chapter 4: Phoenix Kingdom
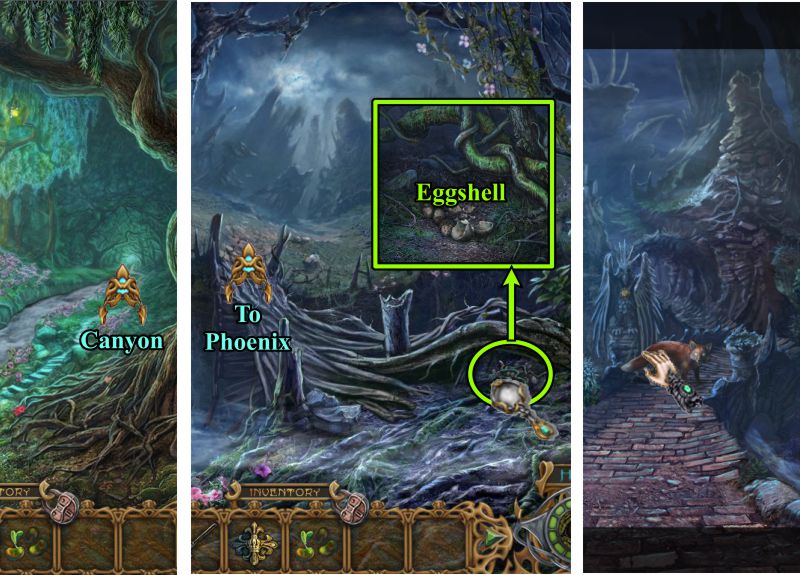
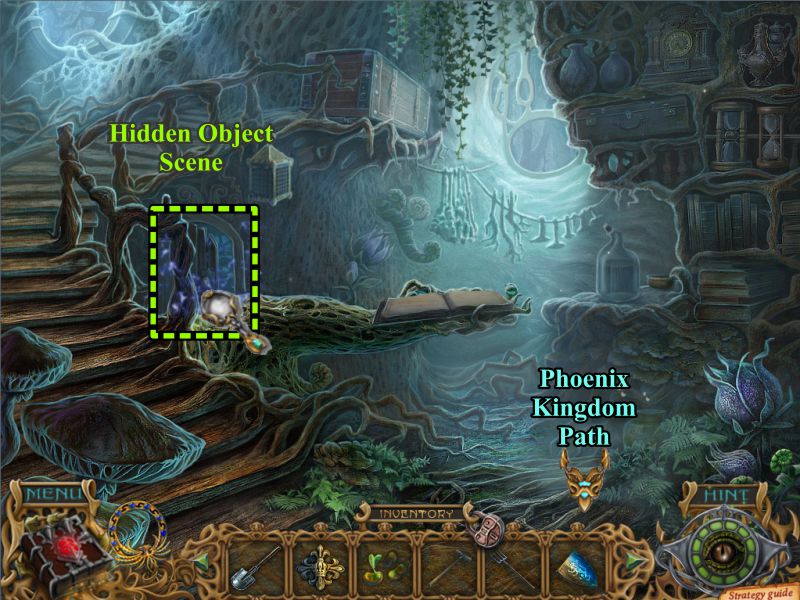
Path
When the fox runs away, the rocks fall and the path is blocked.
Zoom in on the statue to the left of the rock pile and take the Brush.
Zoom on the rock statue head, note something in his mouth, and take the Rake.
Go up the path on the left to the Pond.
Screenshot
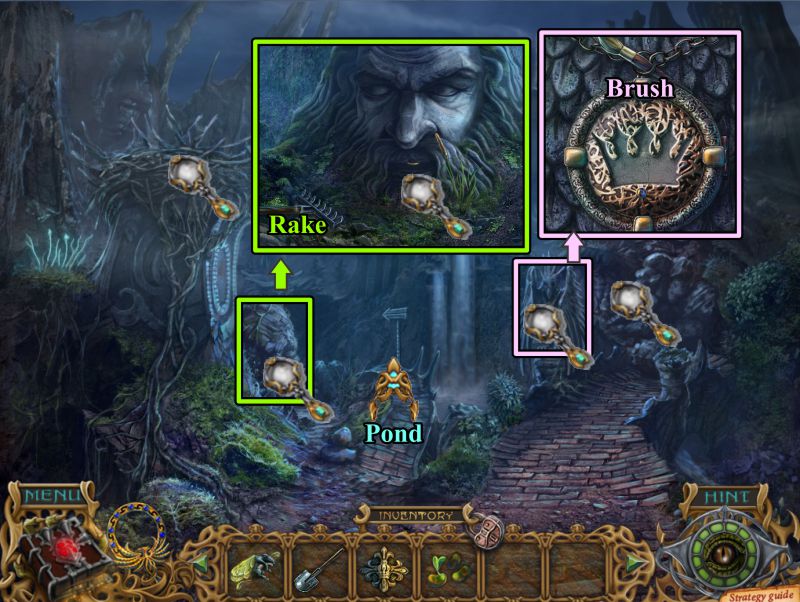
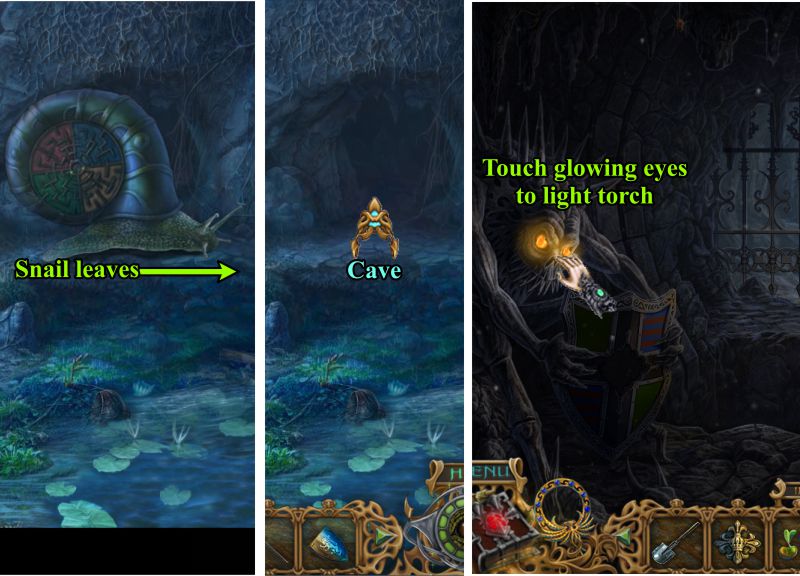
Cave
Zoom in to the left of the head and take the Fish Bones and Coal.
Zoom in on the pond and take the Lily.
Note the Baleful Blossom on the giant snail.
Screenshot
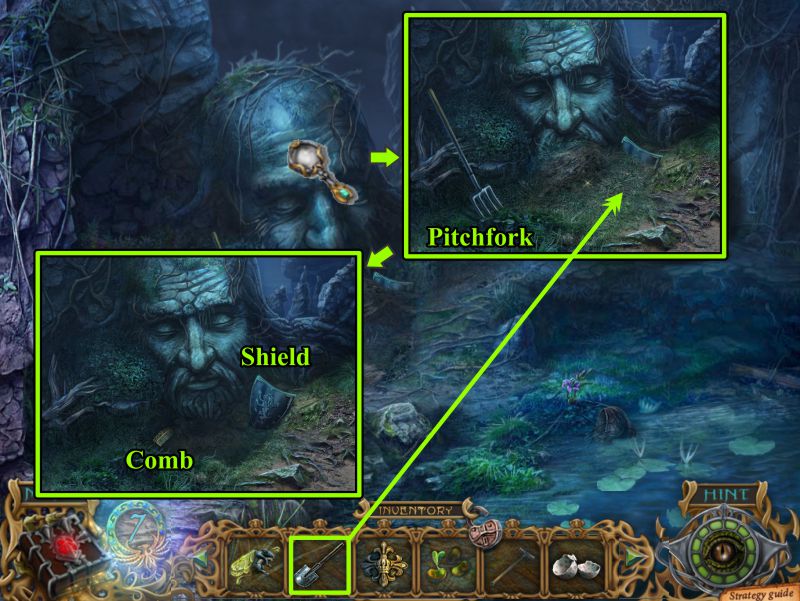
Zoom in on the stone head and take the Pitchfork.
Use your Shovel to dig in front of the statue.
Take the Shield and Comb.
Screenshot
In order to examine the snail, you need to use the Golden Phoenix to remove the poison. See the screenshot for the location of the 7 symbols.
Examine the snail to see the missing jewels.
Exit down 3 times and enter Brishare's Hut.
Screenshot
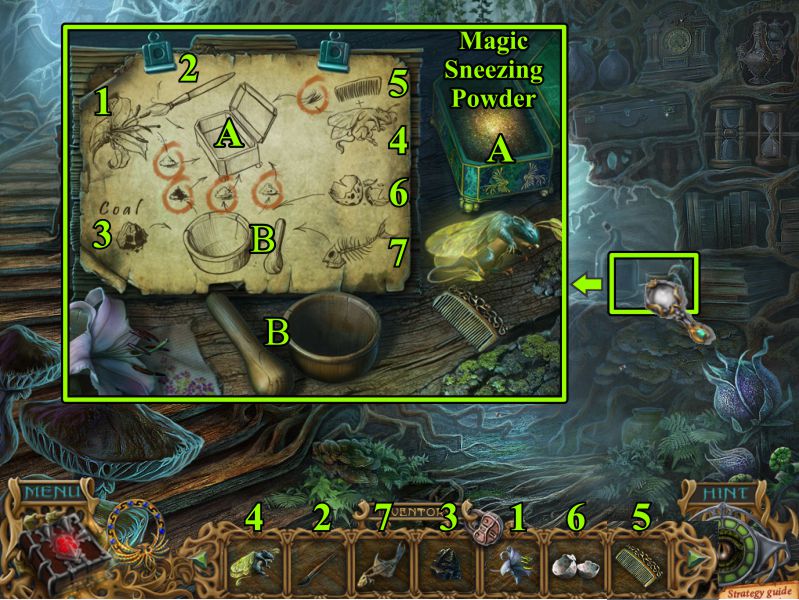
Brishare's Hut
Zoom in on the workbench.
Place the Lily (1) on the workbench, use the Brush (2) to remove the pollen from the Lily, and place the pollen in the box (A).
Place the Coal in the mortar (B), grind it with the pestle, and place the ground coal in the box.
Place the Sleeping Fairy Mouse (4) on the workbench, then use the Comb (5) to remove some fur to place it in the box.
Place the Eggshell (6) in the mortar, grind it, and place the powder in the box.
Place the Fish Bones (7) in the mortar, grind, and place in the box. The box will close and mix the powders together to form the Magic Sneezing Powder.
The Fairy Mouse wakes up and starts sneezing, so flies away. Take the box of powder.
Screenshot
Play the Hidden Object Scene, and then go to the Phoenix Kingdom Path.
Screenshot
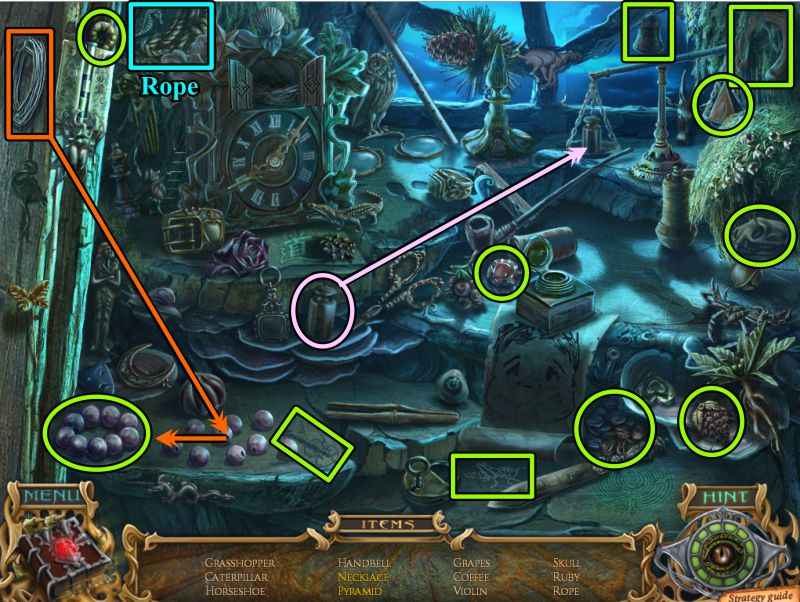
Brishare's Hut Hidden Object Scene
Use the string on the beads to get a Necklace.
Place the weight on the scale to find the Pyramid.
You will get a Rope for your Inventory.
Screenshot
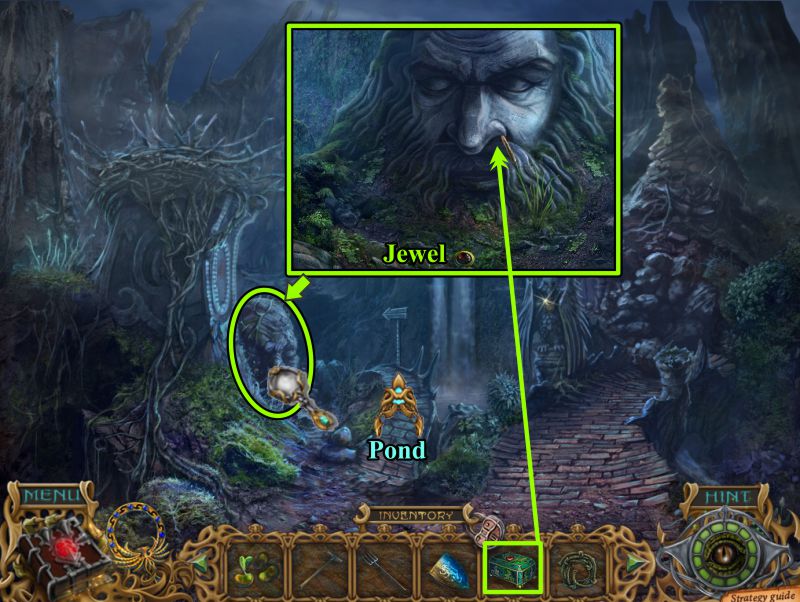
Path
Zoom in on the stone head at the left and place the Magic Sneezing Powder under his nose.
Pick up the Jewel and continue up the path to the Pond.
Screenshot
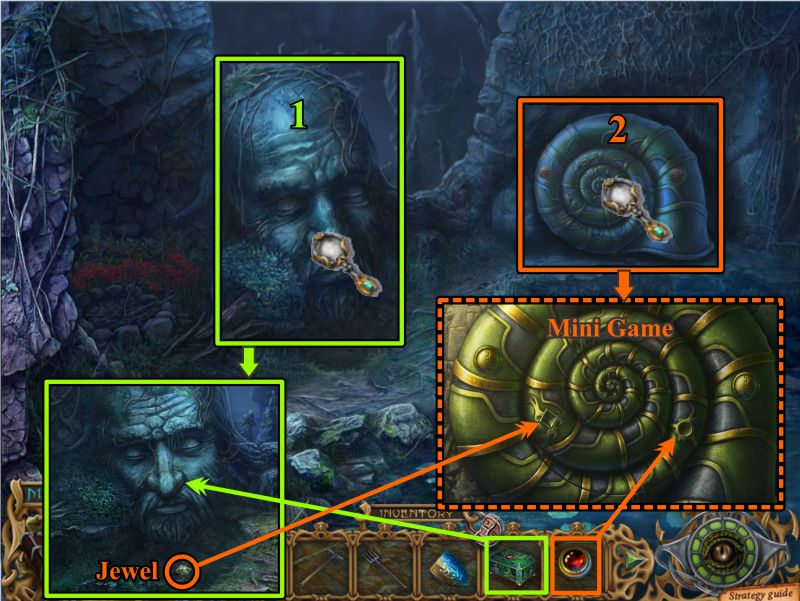
Pond
Zoom in on the stone head and use the Magic Sneezing Powder to get another Jewel.
Zoom in on the giant snail and place the two Jewels to trigger a Mini Game.
Screenshot
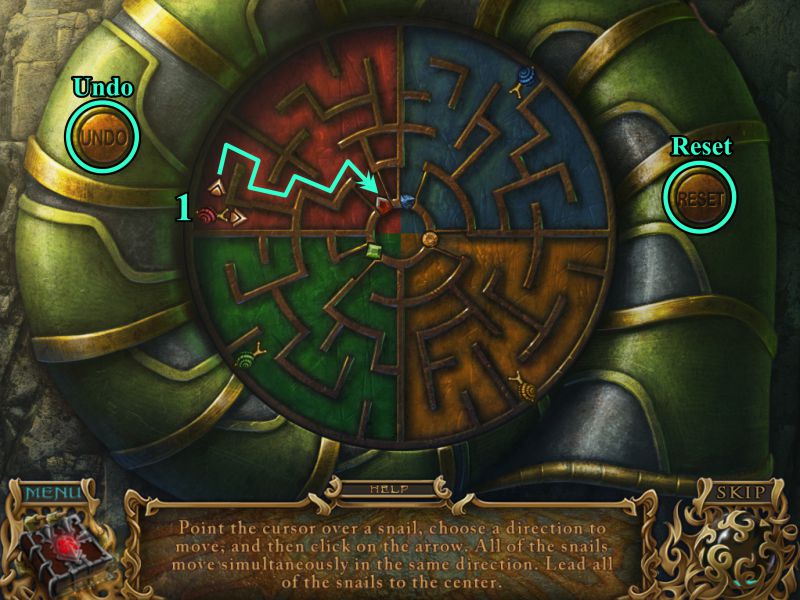
Giant Snail Mini Game
Your goal is to move the 4 snails to their places in the center ring.
One you move one snail, the other snails also move. See the screenshots for a solution to get them all where they belong.
There are Undo and Reset buttons to help you on your journey.
Move the red snail, using the arrows that attach to the snail, in the path shown in the first screenshot.
Screenshot
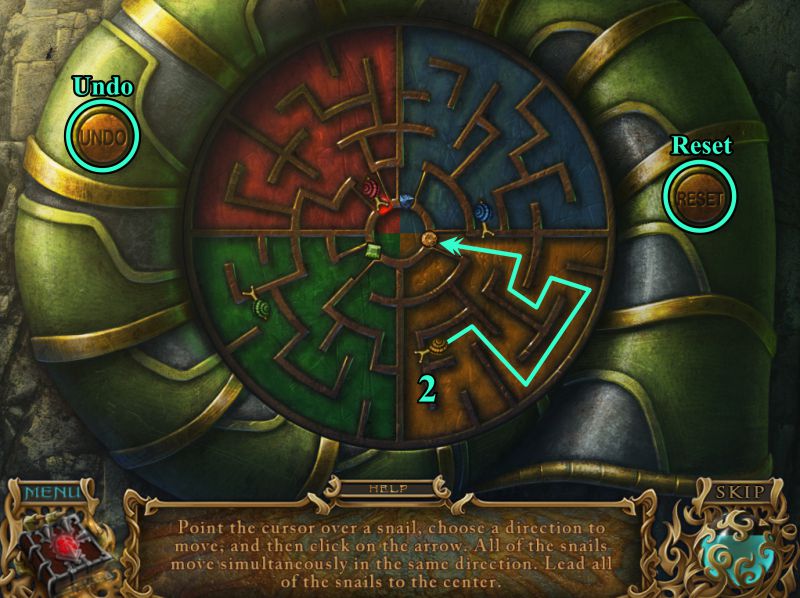
Next, move the gold snail in the path shown.
Screenshot
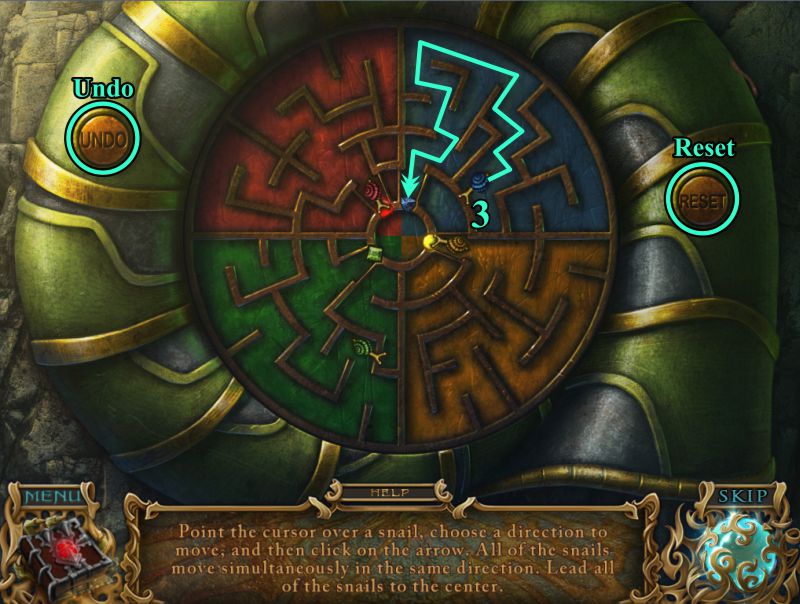
Now, move the blue snail.
Screenshot
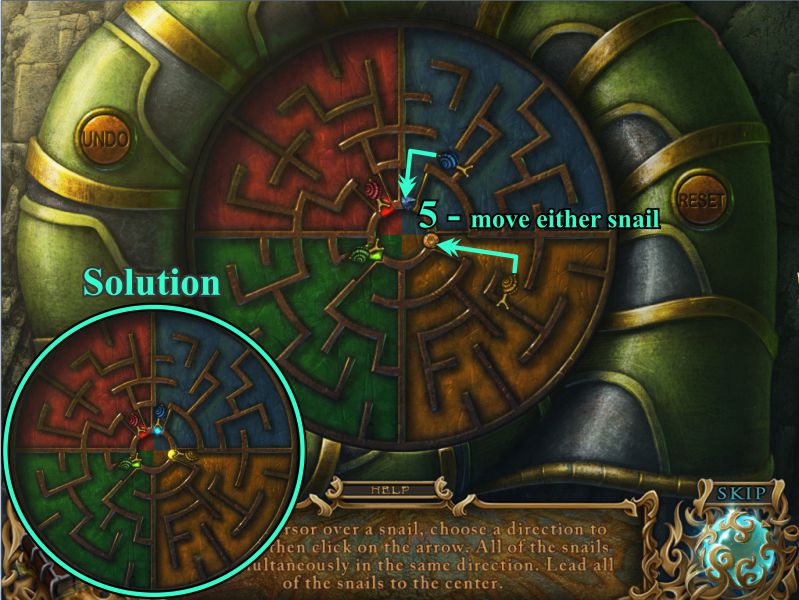
Lastly, move the green snail as shown.
Screenshot
The green snail caused both the gold and blue snails to move, so move either one of them to the center to finish the game.
The solution is shown in the screenshot.
Screenshot
Pond and Cave
Watch the giant snail leave the scene, revealing an opening to a Cave.
Enter the Cave and touch the glowing eyes at the left to light the torch.
Screenshot
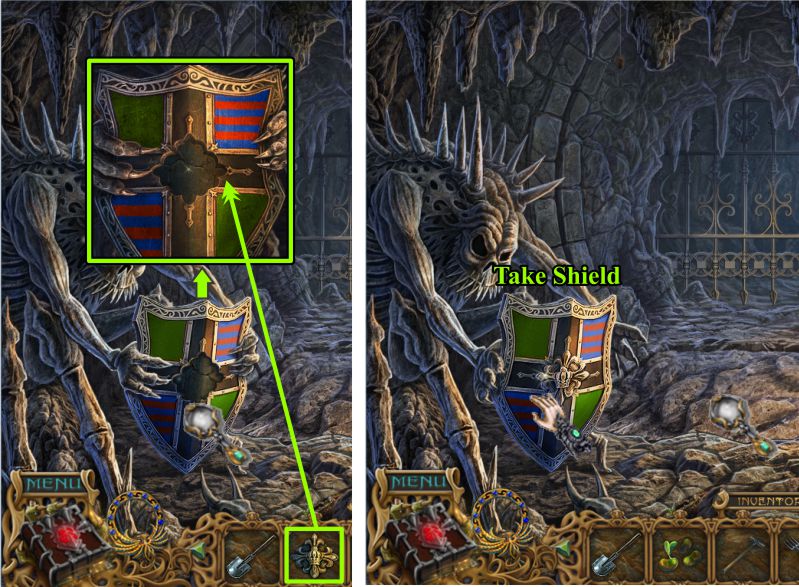
Cave
Zoom in on the shield the statue is holding and place the Golden Coat of Arms from your Inventory.
When he releases the Shield, collect it.
Screenshot
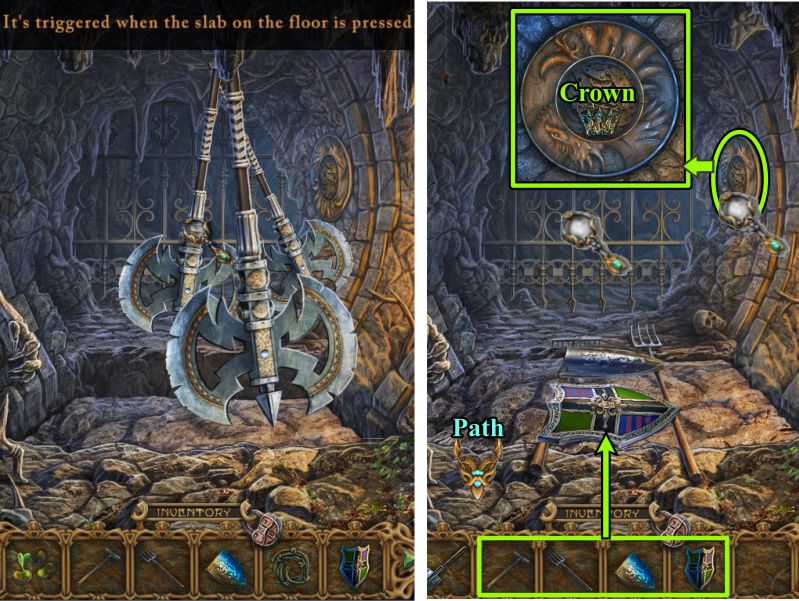
Examine the floor to find out it has a pressure booby trap.
Place the Rake and Pitch Fork across the slab and the two Shields on top so you can cross.
Zoom in on the wall and take the Crown.
Return to the Path.
Screenshot
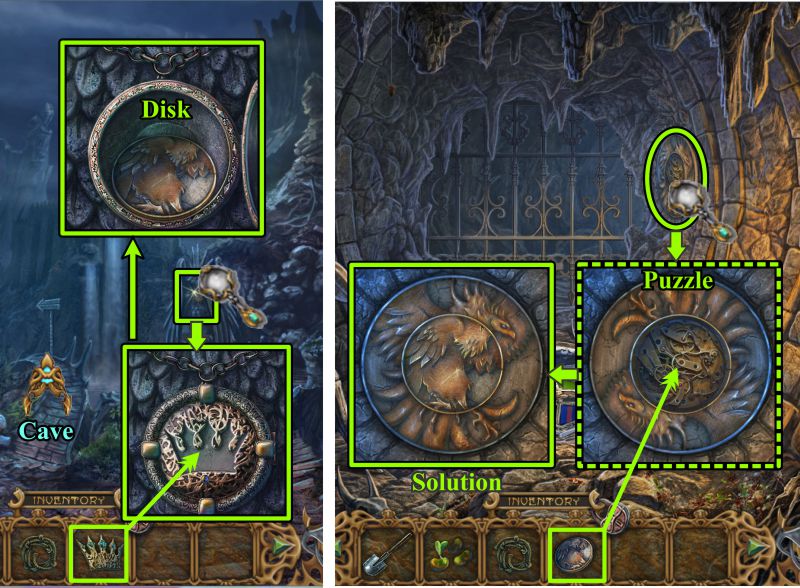
Path and Cave
Zoom in on the statue at the right and place the Crown.
Take the Disk when the compartment opens.
Return to the Cave, zoom in on the wall where you found the Crown, and place the Disk to trigger a puzzle.
Turn the outer ring to match the center Disk.
See the screenshot for the solution.
Screenshot
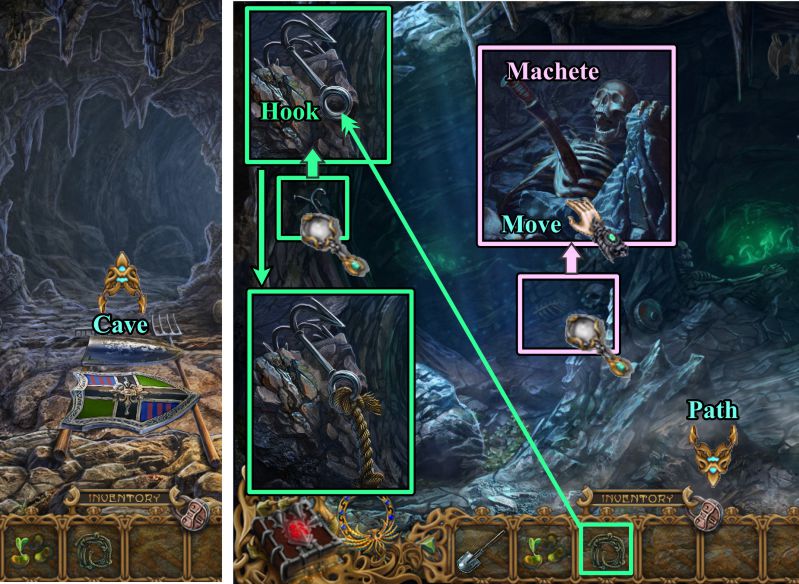
Deep Cave
You've opened the gate, so enter the Deep Cave.
Attach your Rope to the Hook on the left rocks to get a Rope and Hook.
Zoom in on the skeleton, move the stone and take the Machete.
Return to the Path.
Screenshot
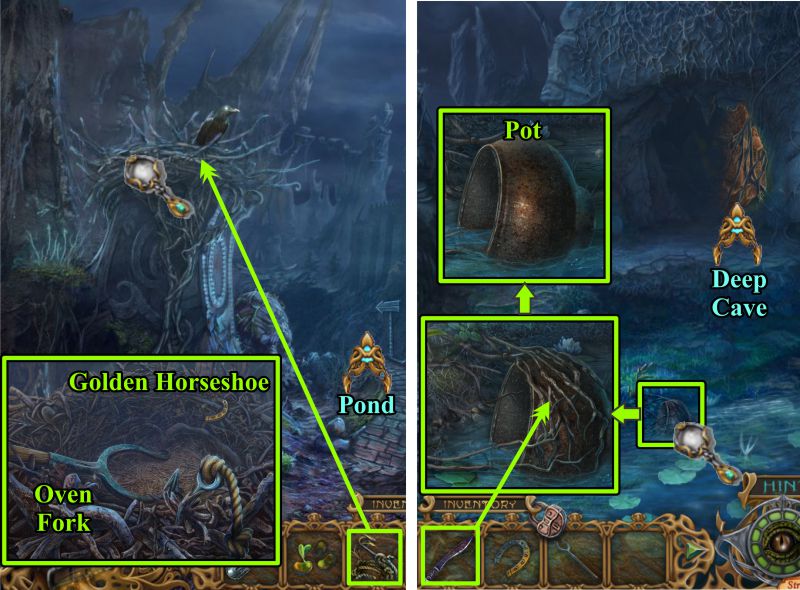
Path and Pond
There is a crow with glowing eyes sitting in nest. Throw your Hook and Rope up there, and he will leave.
Zoom in and pick up the Oven Fork and Golden Horseshoe.
Go to the Pond, zoom in on the Pot, and use the Machete to free it from the vines.
Return to the Deep Cave.
Screenshot
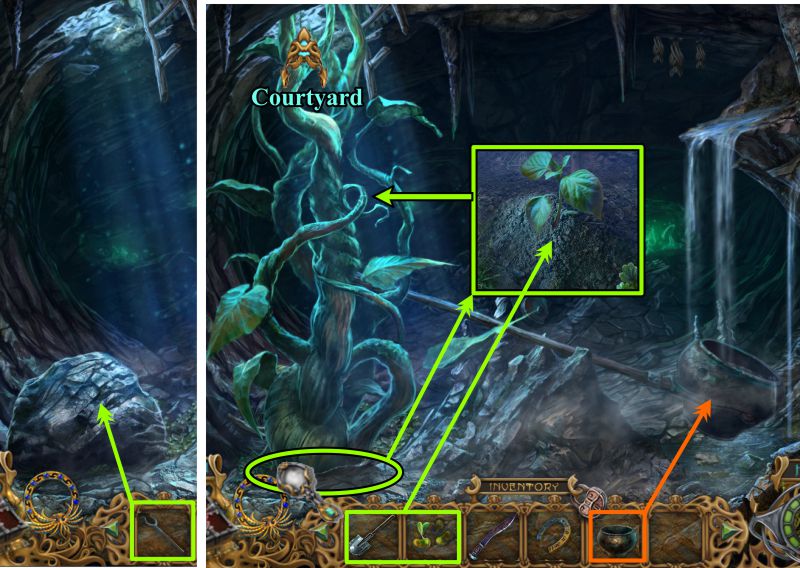
Deep Cave
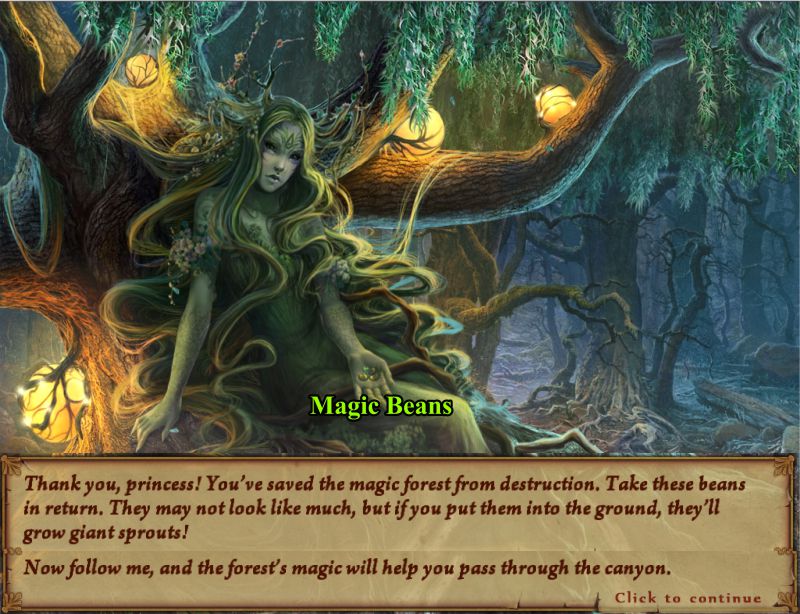
Use the Oven Fork on the large rock, and place the Pot at the end of it to move the rock.
Zoom in on the dirt, dig a hole with the Shovel, and plant the Magic Beans.
When the beanstalk becomes tall enough, climb it to get to the Courtyard.
Screenshot
Posted by: Jazz |
April 19, 2012 8:35 PM
|
April 19, 2012 8:35 PM
Spirits of Mystery: Song of the Phoenix Walkthrough
Chapters 5-9
Chapter 5: Castle on the Rock
Courtyard
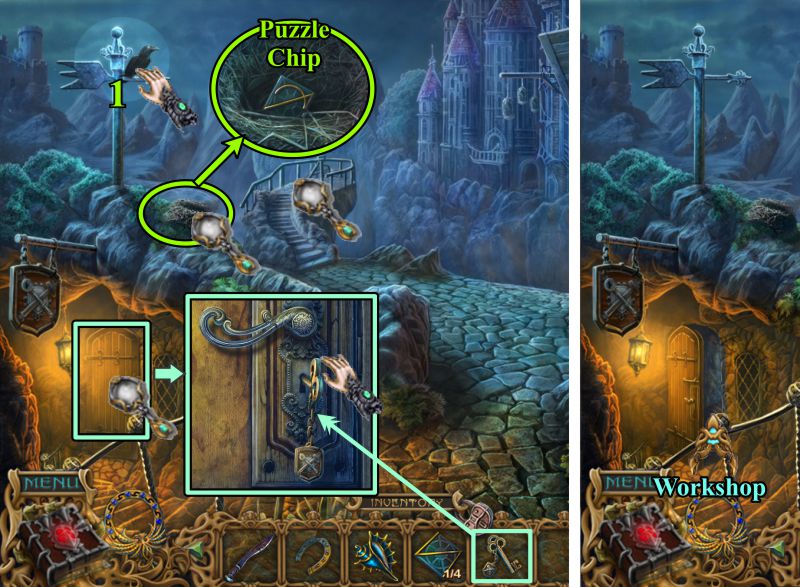
Examine the mill and take the Puzzle Chip.
Look at the grate at the right to find Zakh, the wizard the nymph told you about, imprisoned on the other side.
Pick up the Blue Shell and Saw.
Go up the stairs to the left and enter the Laundry.
Screenshot
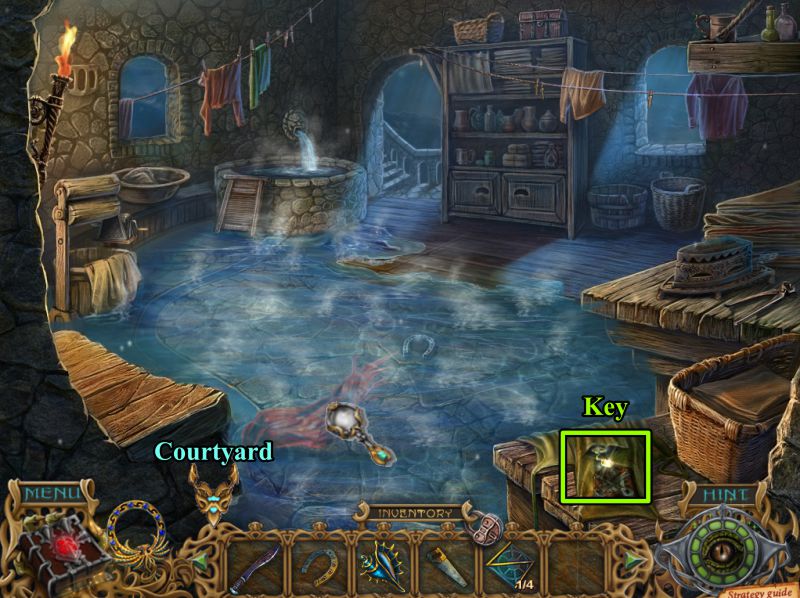
Laundry
The drain is plugged and you can't reach the fabric to unplug it.
Grab the Key at the right and return to the Courtyard.
Screenshot
Courtyard
Use your Golden Phoenix to remove the Baleful Blossom. See the screenshot for the location of the 7 symbols.
Screenshot
Examine the door once the poison is gone, then use the Machete to remove the vines.
Use the Saw to cut through the bolt, then go to the Drawbridge.
Screenshot
Drawbridge
The crow is watching for you; try to catch him, and he will fly away.
Zoom in on the nest and take the Puzzle Chip.
Go to the door at the left and use your Key to open it.
Enter the Workshop.
Screenshot
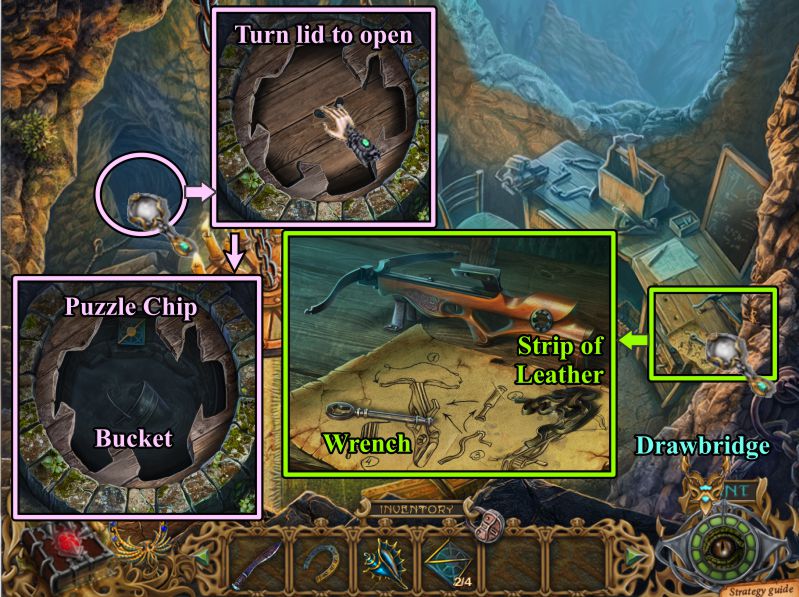
Workshop
Zoom in on the well at the left, turn to lid to match the cutouts, and open it.
Take the Puzzle Chip and Bucket.
Zoom in on the workbench to the right and pick up the Wrench and Strip of Leather.
Return to the Drawbridge.
Screenshot
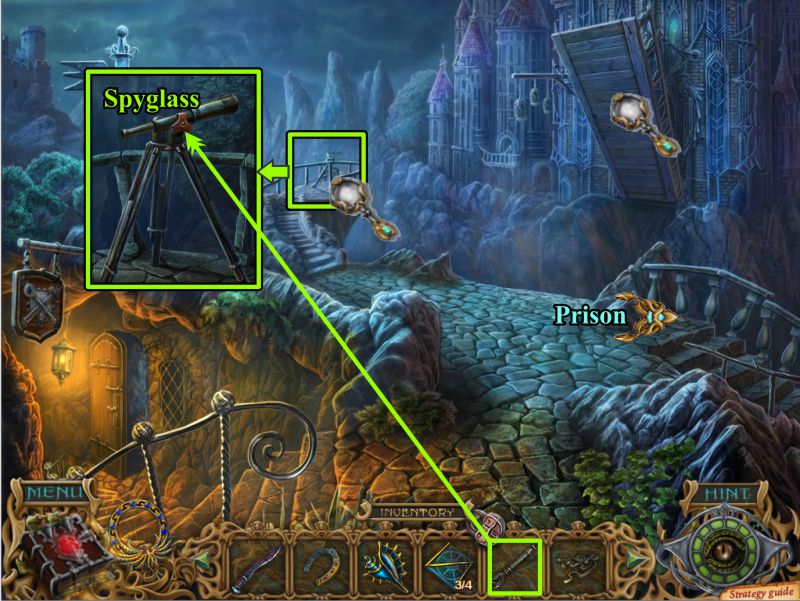
Drawbridge
Zoom in on the Spyglass and use your Wrench to remove it.
Go down the stairs to the right to find the Prison.
Screenshot
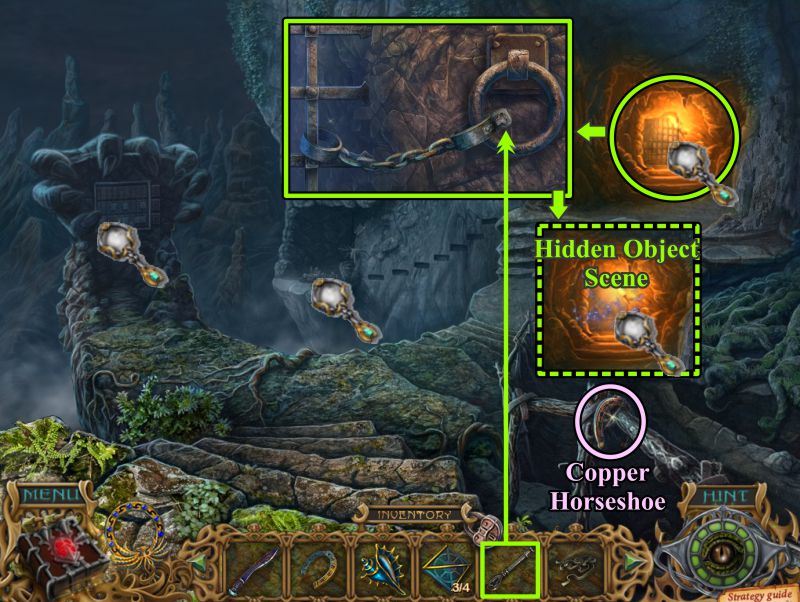
Prison in the Rock
Grab the Copper Horseshoe at the right and zoom in on the lighted area.
Use your Wrench to remove the chain and open it up for a Hidden Object Scene.
Screenshot
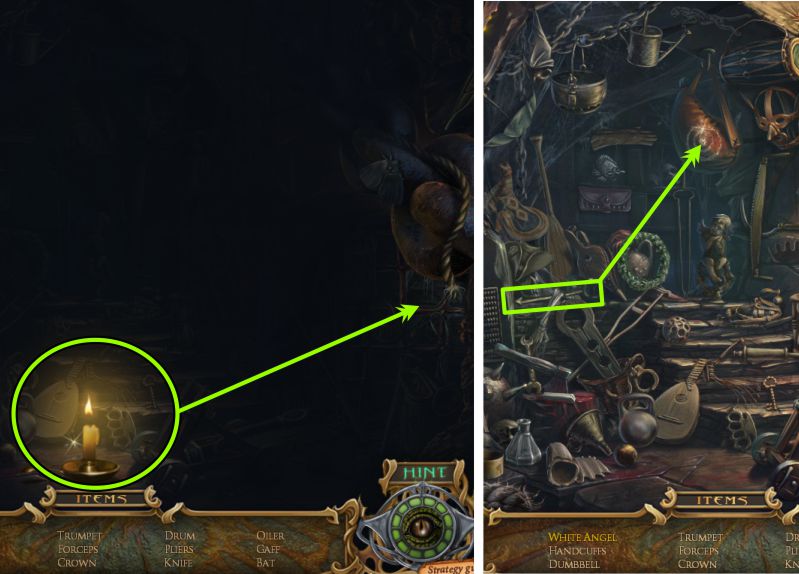
Prison Rock Hidden Object Scene
The scene is dark, so place the candle as shown in the screenshot.
Pick up the arrow and place it in the bullseye on the bag.
Screenshot
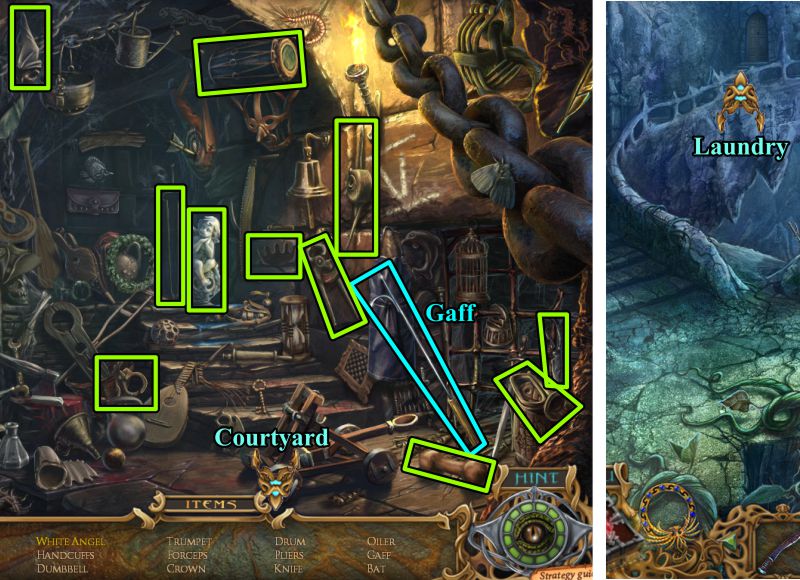
The angel is now white, so collect it and everything else on your list to get a Gaff for your Inventory.
Go to the Laundry.
Screenshot
Laundry
Use the Gaff to hook the fabric and unplug the drain.
Zoom in on the ringer at the left, use the Wrench to remove the bolts, and take the Mechanism.
Pick up the Silver Horseshow, zoom in on the table to the right to find a Pliers, and play the Hidden Object Scene.
Screenshot
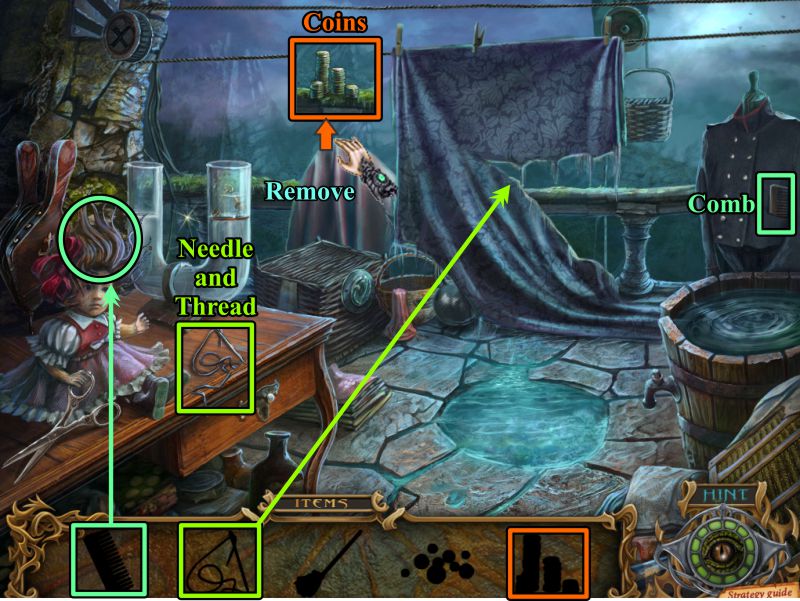
Laundry Hidden Object Scene
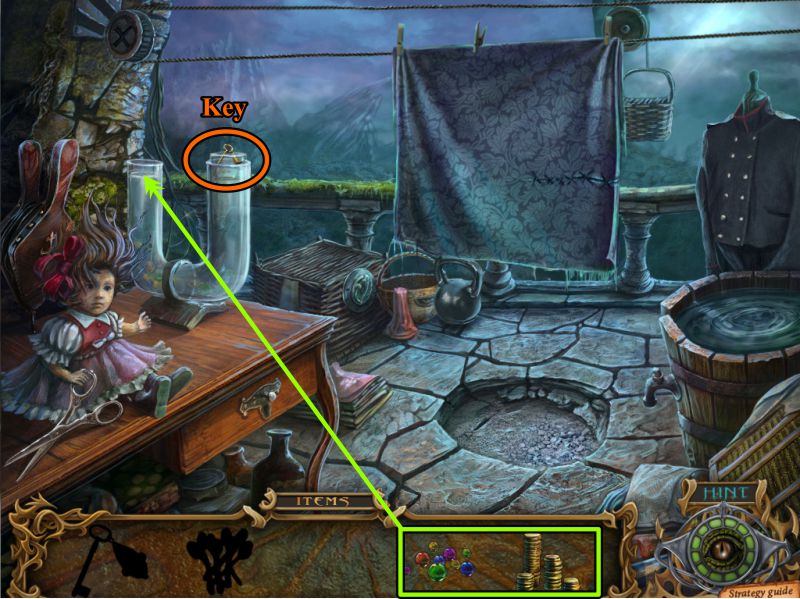
Take the Comb from the uniform and use it on the doll's hair.
Remove the pink fabric and take the Coins.
Use the Needle and Thread to sew up the torn blue fabric.
Screenshot
Collect the Mop and use it to soak up the water on the floor.
Collect the Glass Balls.
Screenshot
Place the Glass Balls and Coins in the left side of the tube to float the Key to the surface.
Screenshot
Use the Key to open the drawer to find the Tinware that will go into your Inventory.
Return to the Courtyard.
Courtyard
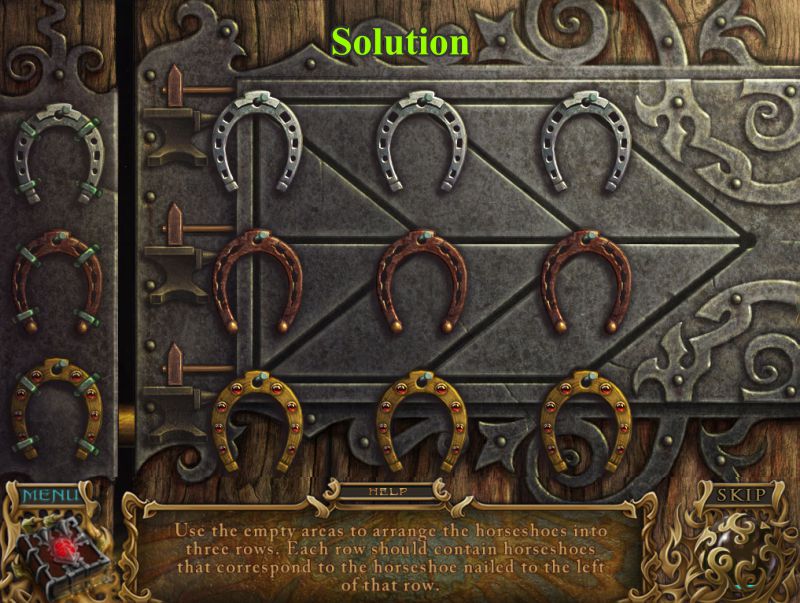
Zoom in on the wall at the left, just below the Laundry, and place the 3 Horseshoes to trigger a Mini Game.
Screenshot
Horseshoe Mini Game
Slide the horseshoes on the tracks, using the vacant areas.
Your goal is to line the horseshoes up in rows to match the column at the left.
See the screenshot for the solution.
Screenshot
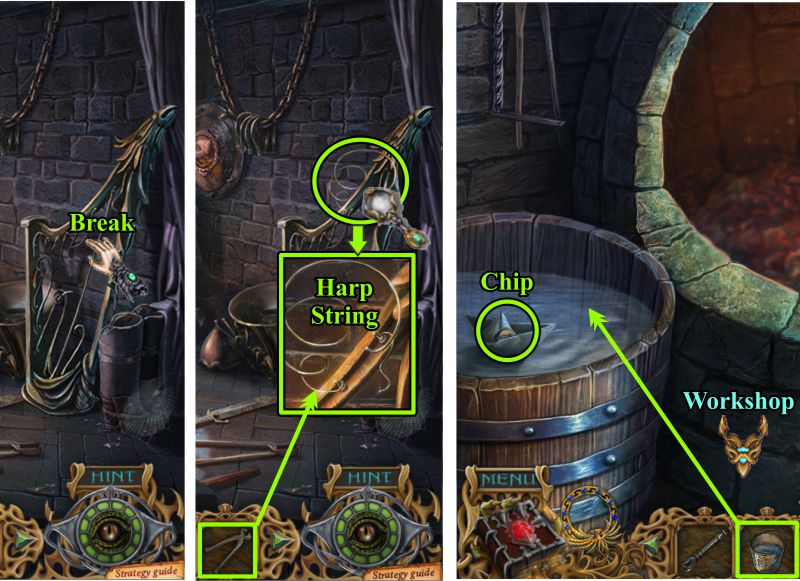
Smithy
Enter the Blacksmith Shop.
Break the Harp String and use the Pliers to snip it off.
Zoom in on the barrel and use your Bucket of water to fill it up so you can find the Chip.
Go to the Courtyard.
Screenshot
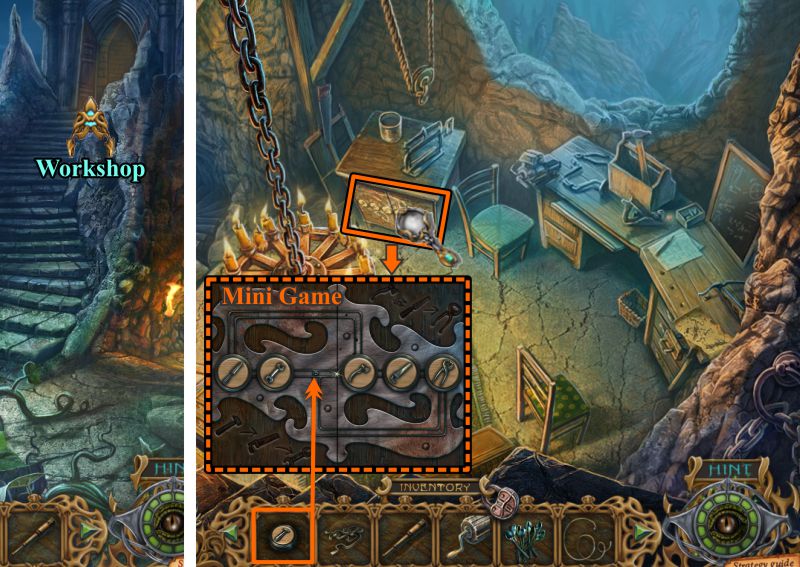
Workshop
Go through the door to the Drawbridge, then enter the Workshop.
Zoom in on the cabinet and place the Chip to trigger a Mini Game.
Screenshot
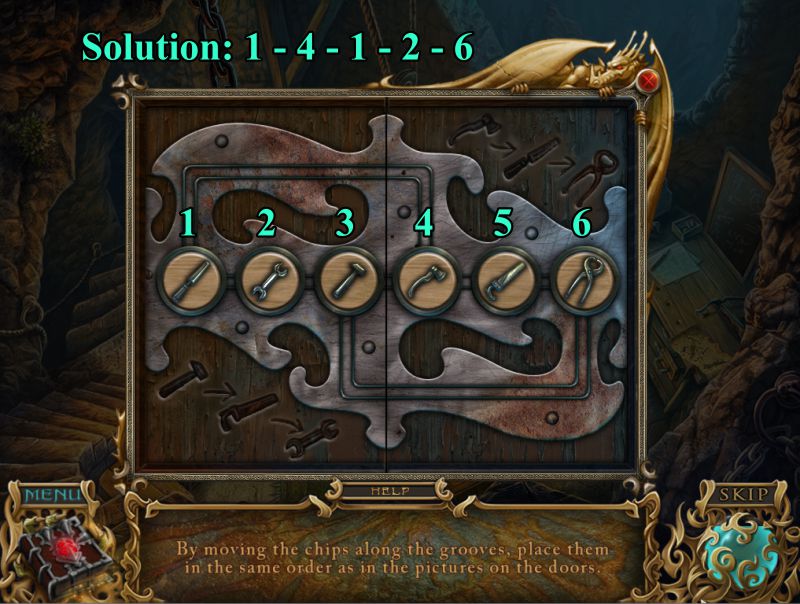
Cabinet Door Mini Game
Click on the Chips as numbered in the screenshot solution.
Screenshot
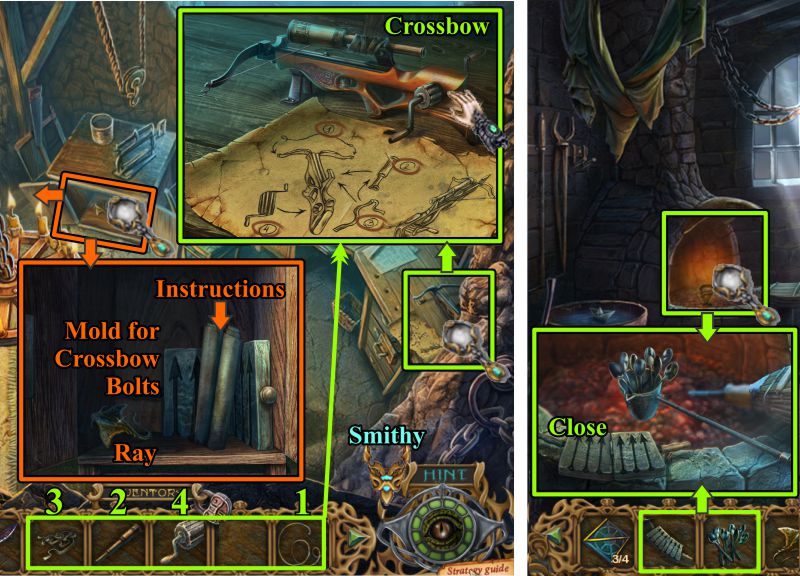
Workshop and Smithy
When the cabinet opens, take the Ray, Mold for Crossbow Bolts, and the Instruction sheet.
Zoom in on the workbench and add the parts to the Crossbow as shown in the instructions and numbered in the screenshot.
Take the Crossbow, then go to the Smithy.
Zoom in on the furnace, then place the Tinware in the crucible and the Mold on the bricks.
Close the Mold.
Screenshot
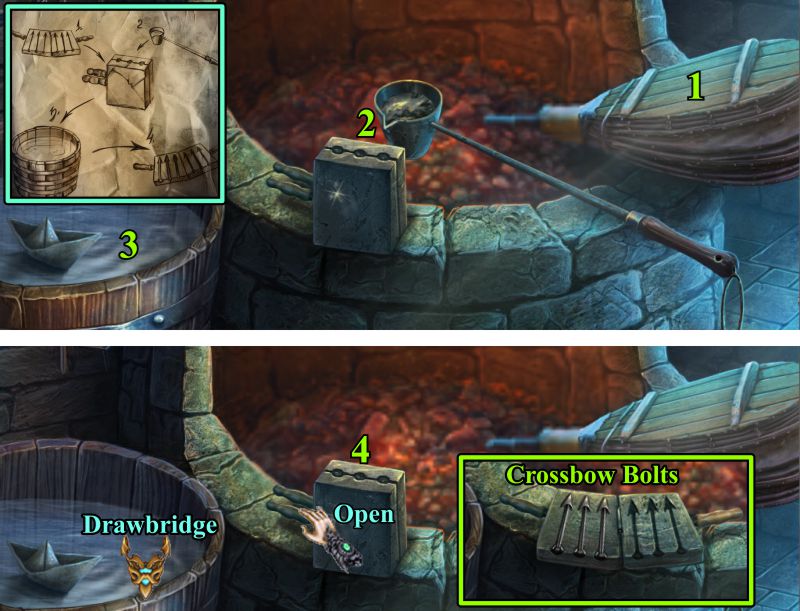
Smithy
Push on the bellows to make the fire hot enough to melt the tin.
Pour the melted tin in the Mold and dip the Mold in the water to cool it.
Open the Mold and take the Crossbow Bolts.
Go to the Drawbridge.
Screenshot
Drawbridge
Zoom in on the spyglass stand and place the Crossbow.
Place the Bolts in the Crossbow, then look through the spyglass at the sandbags.
Aim the Crossbow at each sandbag and break them.
When the Drawbridge lowers, go to the Castle Entrance.
Screenshot
Castle Entrance
Our friend the fox is back; try once again to catch him, and he disappears to the right over what seems to be an invisible bridge.
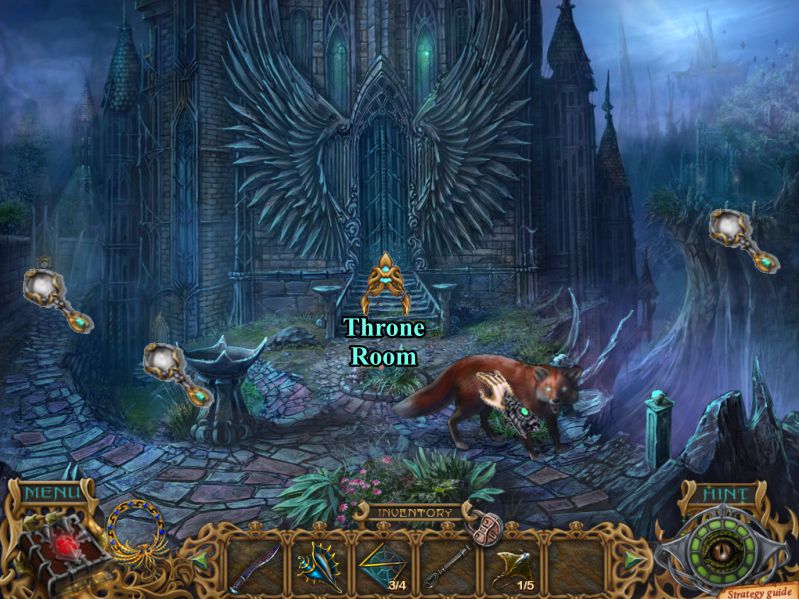
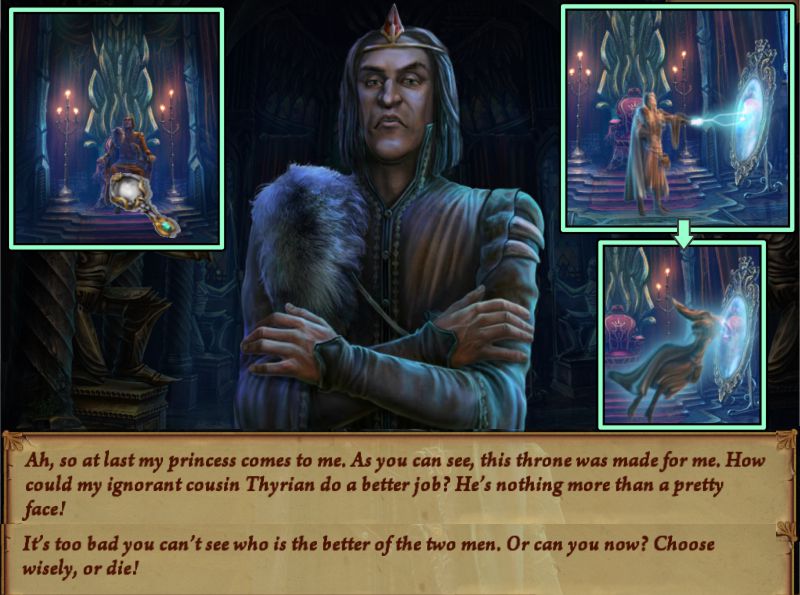
Examine all the magnifying glasses, then enter the Throne Room.
Screenshot
Throne Room
Isa is there, so zoom in and hear what he has to say. He then disappears through some sort of portal he creates in the mirror. The mirror melts after Isa's disappearance.
Screenshot
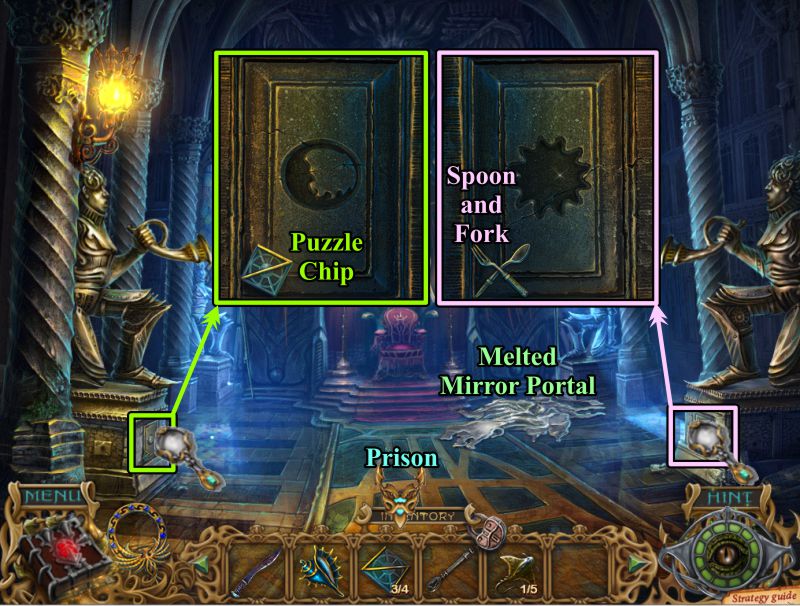
Zoom in on the statue at the left and take the Puzzle Chip.
Zoom in on the right statue and take the Spoon and Fork.
Go to the Prison.
Screenshot
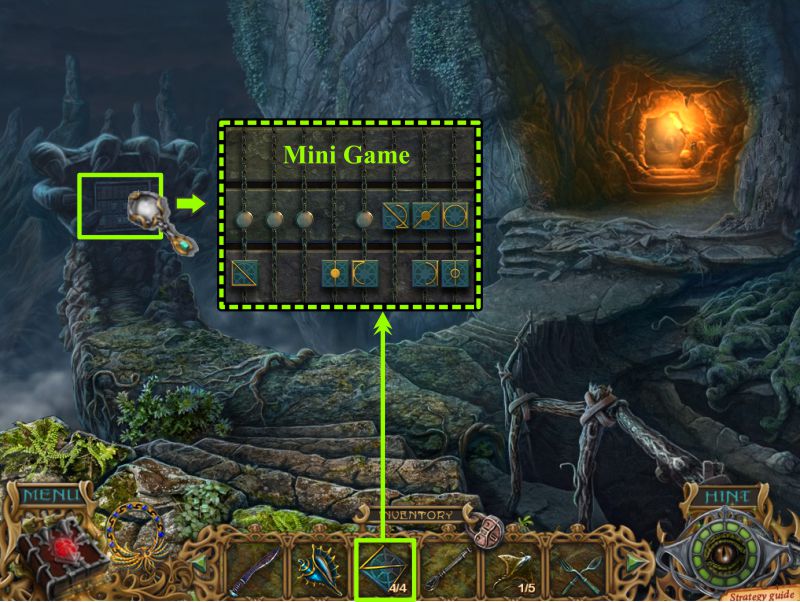
Prison in the Rock
Zoom in on the claw at the left and place your 4 Puzzle Chips to trigger a Mini Game.
Screenshot
Prison Mechanism Mini Game
Your goal is to move the tiles up and down the chains to create the images at the right.
A wrong tile in a position will show up as red.
See the screenshot for the solution.
Screenshot
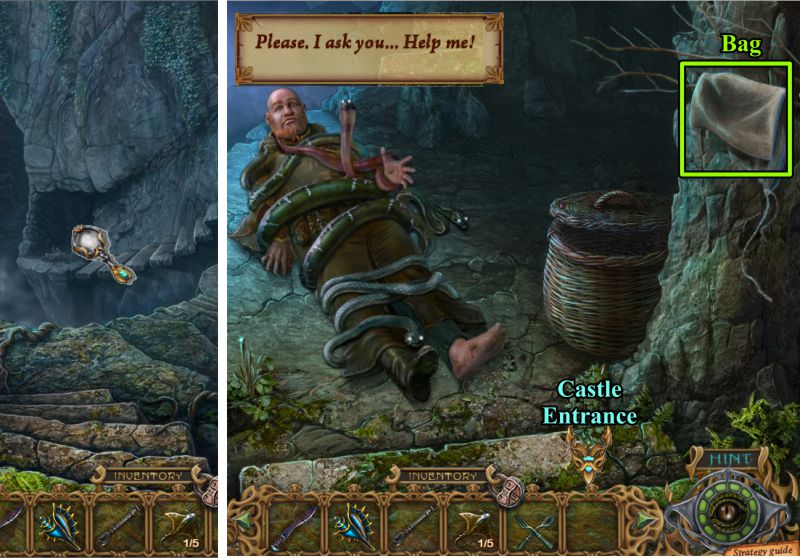
Zakh
Stairs now descend to the rock where Zakh is being held captive by snakes. He asks for your help, so grab the Bag and head to the Castle Entrance.
Screenshot
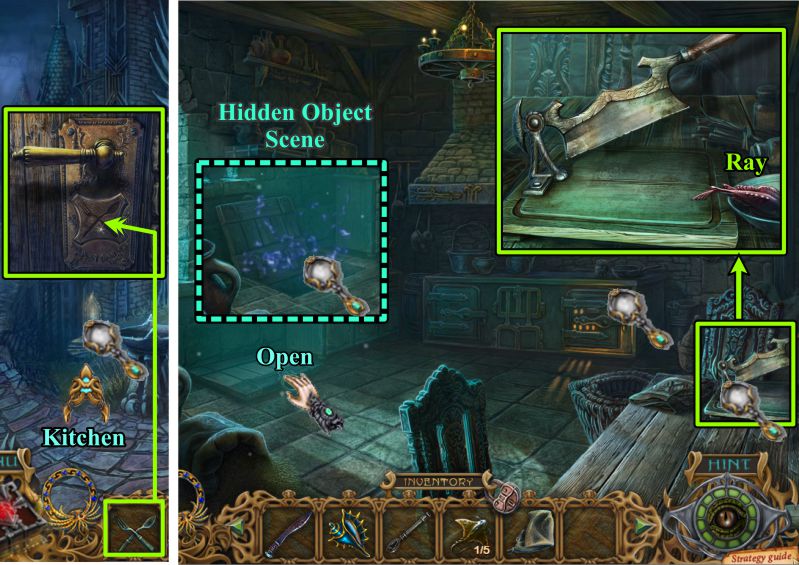
Kitchen
Zoom in on the door at the left and place the Spoon and Fork to open it.
Open the hatch to trigger a Hidden Object Scene.
Examine the stove and table to the right with the sharp knife.
Take the Ray and play the Hidden Object Scene.
Screenshot
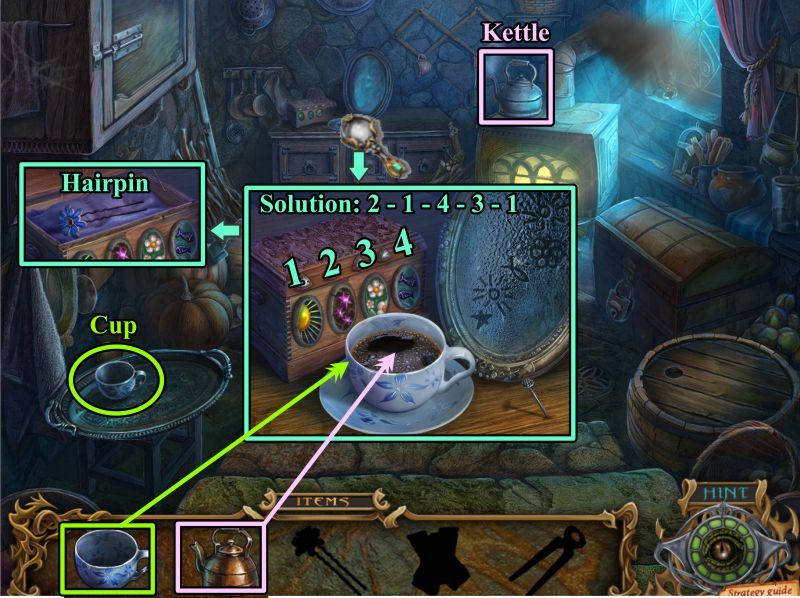
Kitchen Hidden Object Scene
Collect the Cup and Kettle, then zoom in on the cabinet at the back of the scene.
Place the Cup on the saucer and pour the Kettle into the Cup.
Note the symbols the steam created, then press the images on the box in that order. See the screenshot for the solution.
Take the Hairpin from the open box.
Screenshot
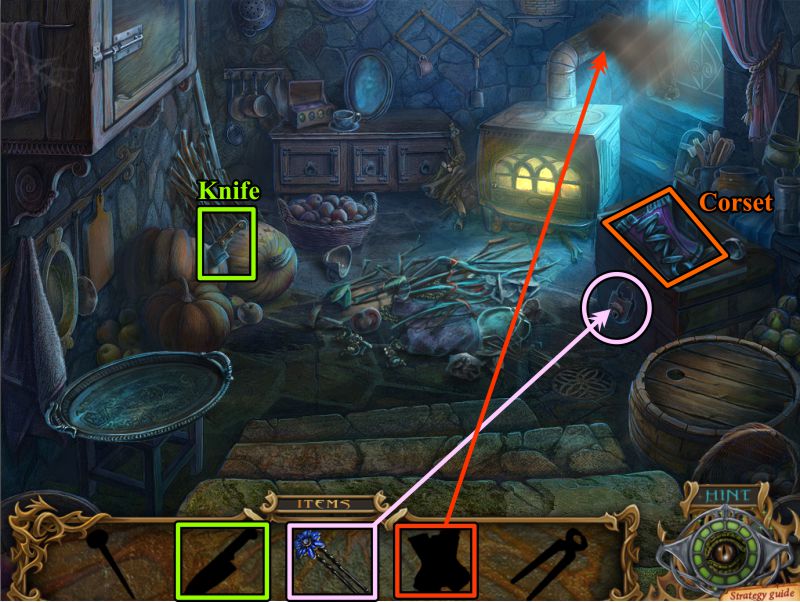
Pick up the Knife.
Use the Hairpin to pick the lock on the chest.
Take the Corset and put it on the pipe to stop the smoke.
Screenshot
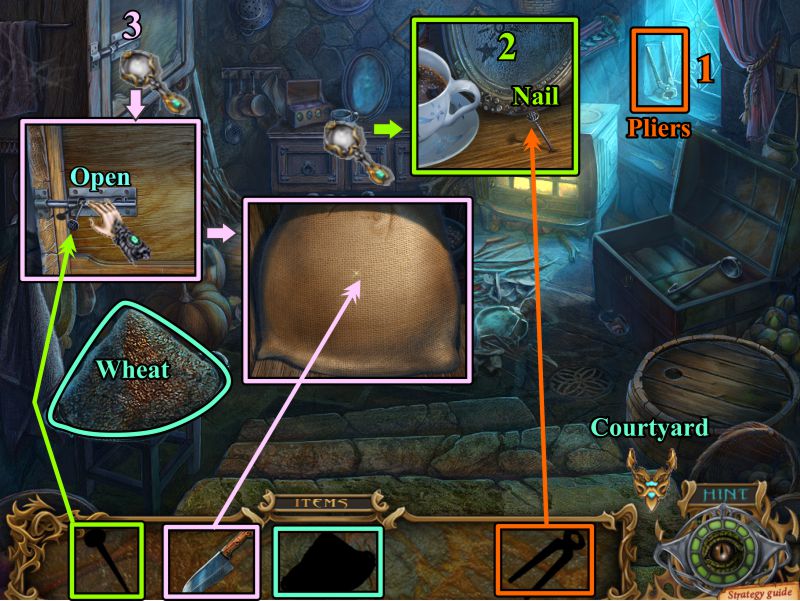
Collect the Pliers and use them to remove the Nail next to the cup and saucer.
Zoom in on the cabinet at the left and use the Nail to open the bolt.
Rip the bag with the Knife, then take the Wheat.
Go to the Courtyard.
Screenshot
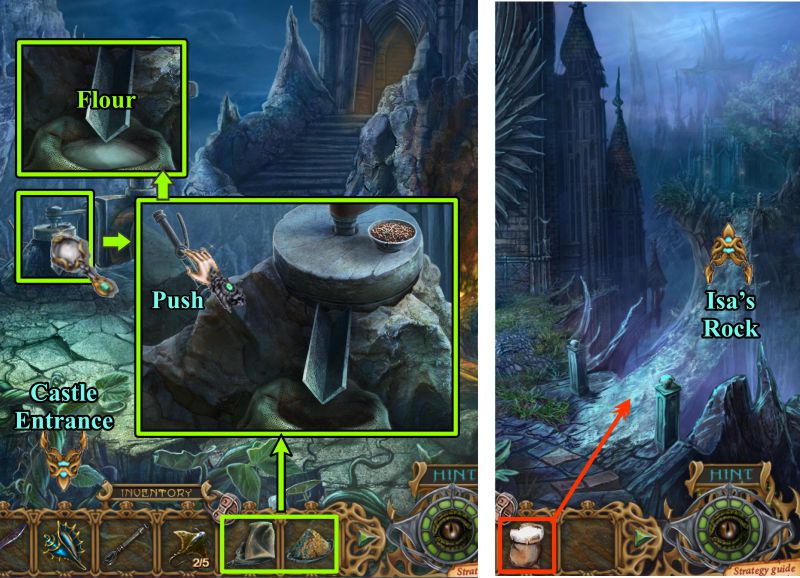
Courtyard
Zoom in on the mill, place the Bag and Wheat, and push the handle.
Take the Flour and scatter it on the invisible bridge so you can see it.
Go to Isa's Rock.
Screenshot
Chapter 6: Isa's Rock
Entrance
There is another Baleful Blossom to contend with, so use your Golden Phoenix to find the 7 symbols, as shown in the screenshot.
Screenshot
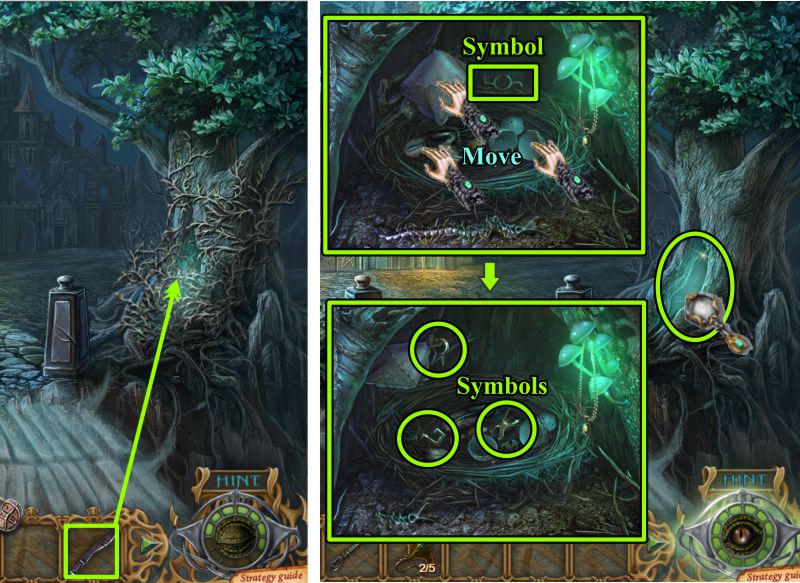
When the poison has been removed, zoom in on the tree with the hollow and use your Machete to remove the vines.
Look inside and move everything around until you have collected 4 Symbols.
Screenshot
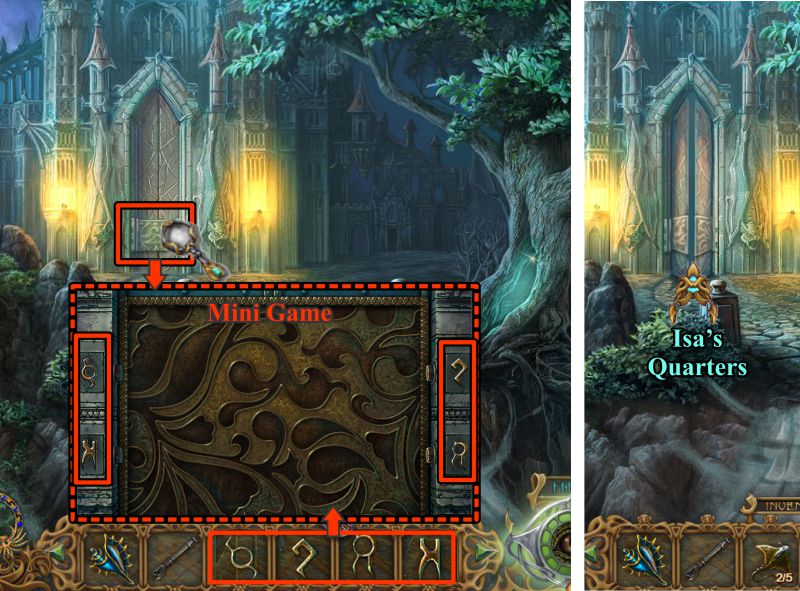
Zoom in on the door and place your 4 Symbols to trigger a Mini Game.
When the door opens, enter Isa's Quarters.
Screenshot
Door to Isa's Quarters Mini Game
Place the 4 chameleons as shown in the screenshot.
After you place them, move the blue parts until they turn brown and blend with the background.
Screenshot
Isa's Quarters
Touch the bones in the cage and they will crumble.
Examine the trap door and take the Feather.
Zoom in on the cage at the left and take the Note and Red Shell.
Enter Isa's Office.
Screenshot
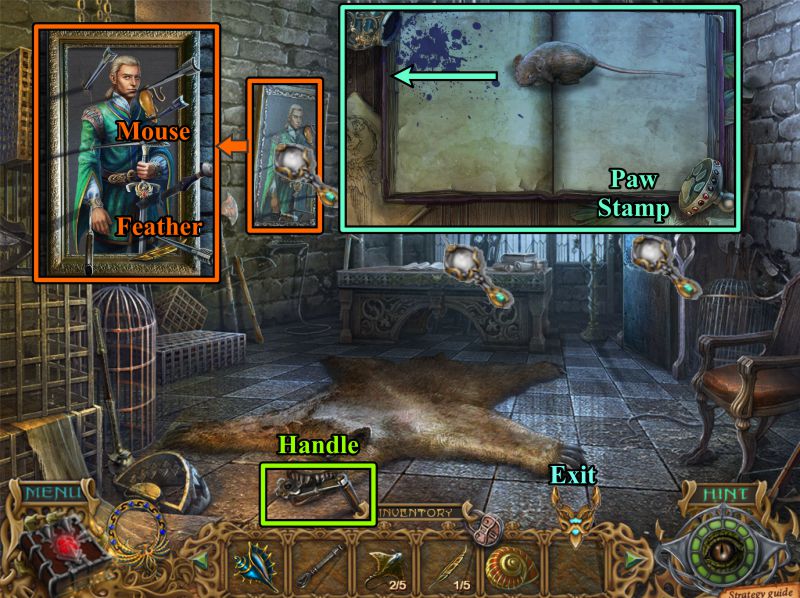
Isa's Office
Pry open the bear rug's mouth and take the Handle.
Zoom in on Thyrian's portrait and take the Mouse and Feather.
Examine Isa's desk to find a mouse with glowing eyes before he runs off, knocking over the ink container.
The ink disappears. Grab the Paw Stamp and exit the office.
Screenshot
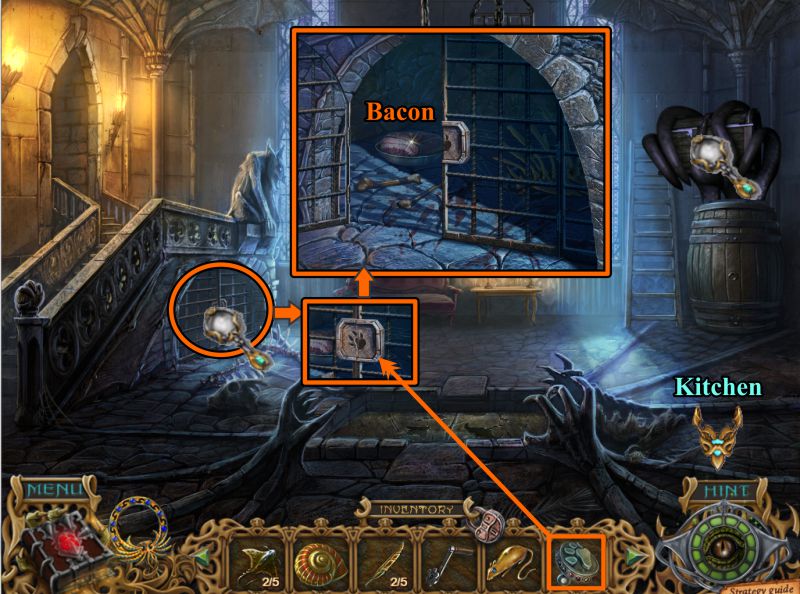
Isa's Quarters
Zoom in on the animal cage at the left and use the Paw Stamp to open it.
Take the Bacon and go to the Kitchen.
Screenshot
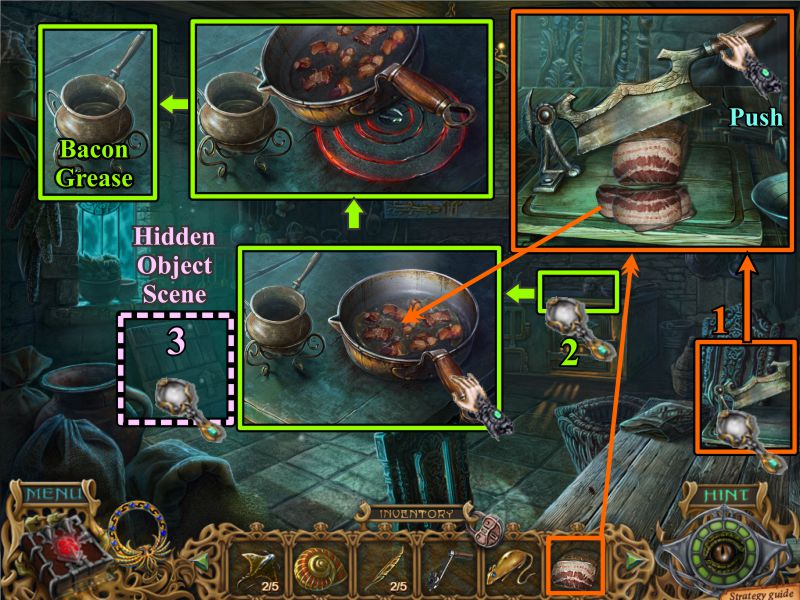
Kitchen
Zoom in on the table, place the Bacon, and push on the knife handle.
Take the sliced bacon, then zoom in on the stove.
Cook the bacon and pour the grease into the container.
Collect the Bacon Grease, then play the Hidden Object Scene in the hatch.
Screenshot
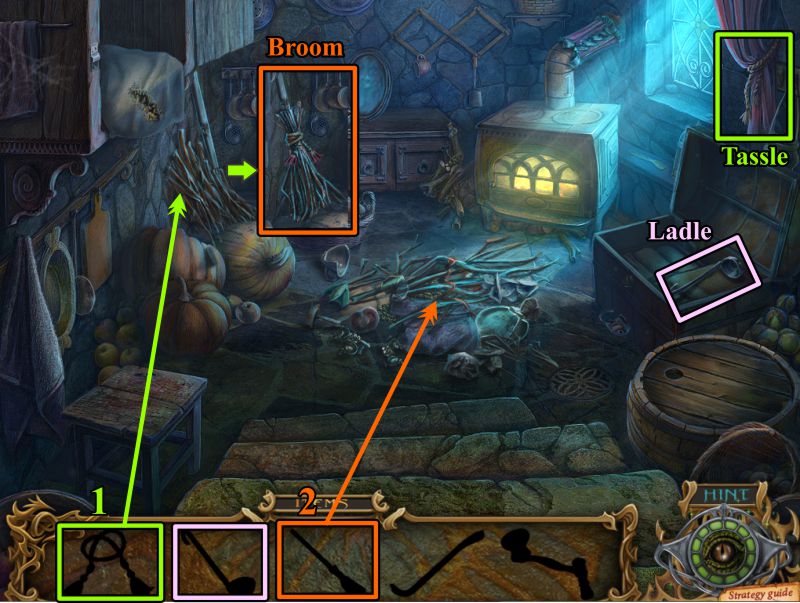
Kitchen Hidden Object Scene
Collect the Tassel and Ladle.
Use the Tassel to tie the twigs together to make a broom to sweep the pile on the floor.
Screenshot
Collect the Crowbar and use it to open the barrel.
Use the Ladle to remove the wine so you can find the Handle.
Zoom in on the cabinet at the left and place the Handle on the coffee grinder.
Turn the Handle and collect the Iron Icon.
Go to the Laundry.
Screenshot
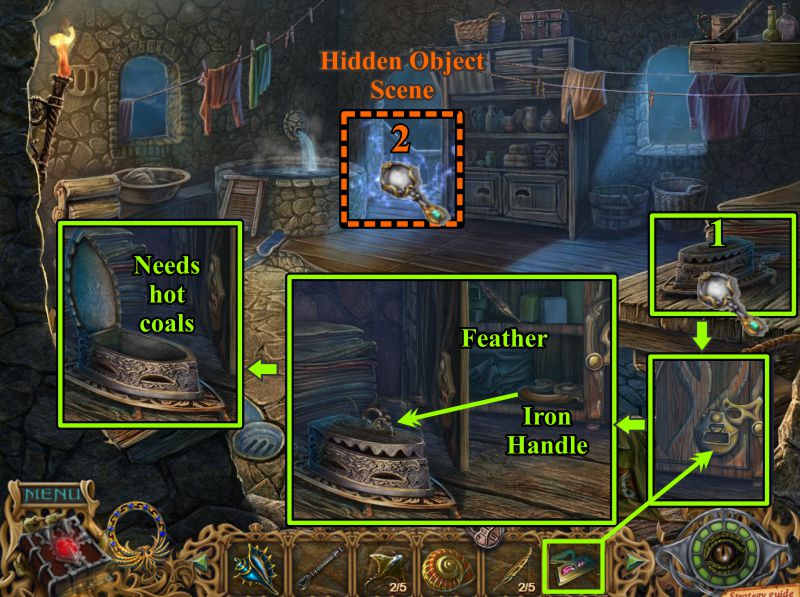
Laundry
Zoom in on the table and place the Iron Icon to open the lock.
Take the Feather and Iron Handle.
Place the Iron Handle on the Iron which opens for you to note it needs hot coals.
Play the Hidden Object Scene.
Screenshot
Laundry Hidden Object Scene
Collect the Scissors, Bellows, and Weight.
Put the Weight in the basket to bring up the Handle.
Place the Handle as show in the screen shot to move the objects on the line.
Screenshot
Use the Scissors to cut the pillowcase, and then the Bellows to blow away the feathers.
Take the Disk and zoom in on the chest.
Place the Disk on the lock and turn it so it looks like the screenshot.
Screenshot
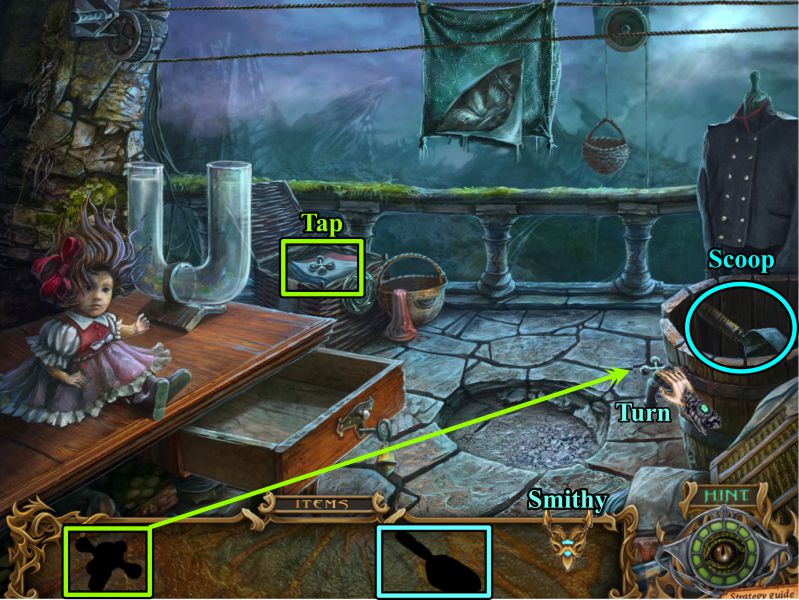
Take the Tap from the open chest and place it on the barrel.
Turn it to drain the barrel and find the Scoop for your Inventory.
Go to the Smithy.
Screenshot
Smithy
Zoom in and use your Scoop to get some Hot Coals to take back to the Laundry.
Screenshot
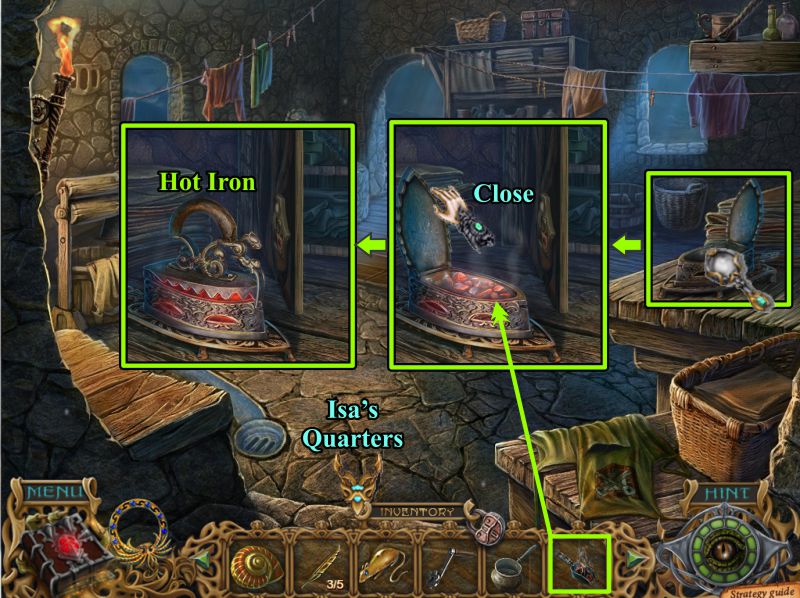
Laundry
Zoom in on the table with the iron and place the Hot Coals in the Iron.
Close the lid and take the Hot Iron to Isa's Quarters.
Screenshot
Isa's Quarters
Zoom in on the tentacles and pour your Bacon Grease to get it to release the chest.
Zoom in to find out it has a lock you still need to solve. Go to Isa's Office.
Screenshot
Isa's Office
Zoom in on Isa's desk and use the Hot Iron on his book to reveal all that was written in the invisible ink.
Keep turning the pages to read it all, and find the code at the end to open the cabinet.
Zoom in on the cabinet and enter the symbols you found in the book. See the screenshot for help.
Screenshot
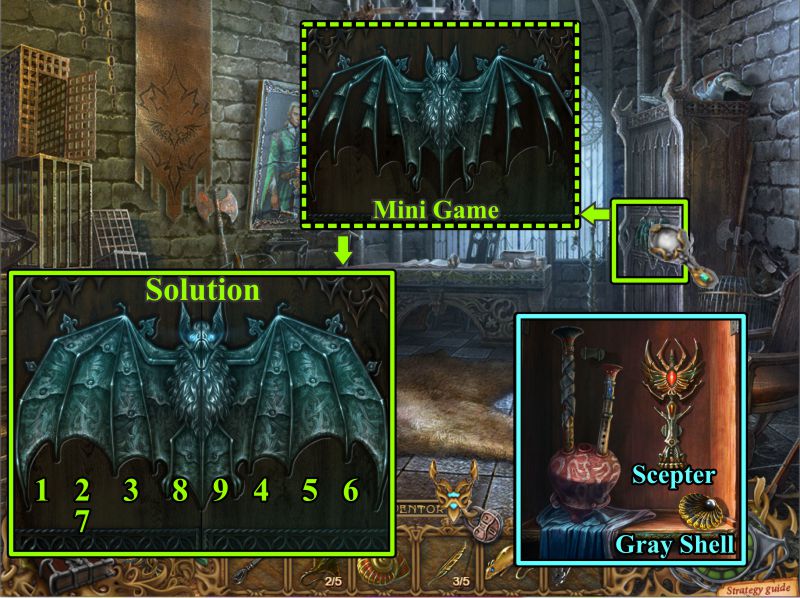
The symbols trigger a Mini Game to open the cabinet. Your goal is to inflate all of the bat wings. See the screenshot for the numbered solution.
When the cabinet opens, take the Scepter and Gray Shell.
You need another pipe for the flute, so go to the other room.
Screenshot
Isa's Quarters
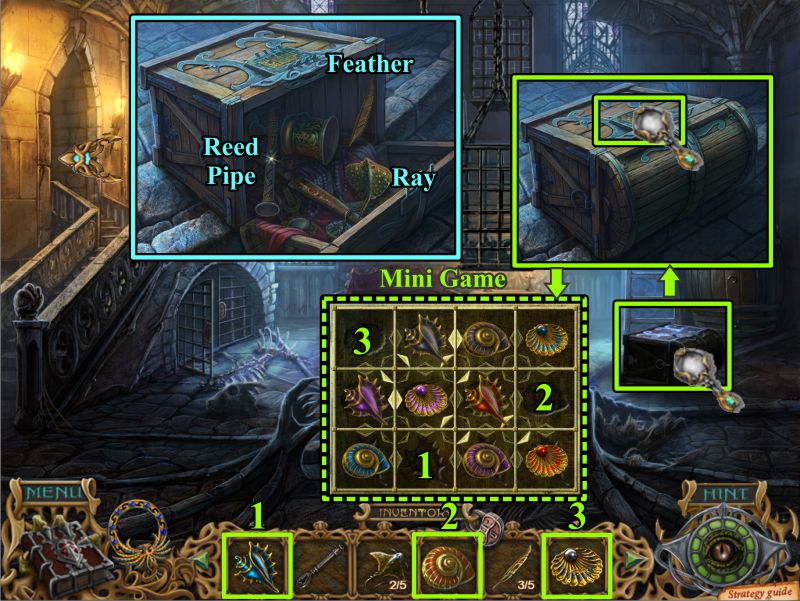
Zoom in on the chest and place all the Shells to trigger a Mini Game.
When the chest opens, take the Ray, Reed Pipe, and Feather.
Screenshot
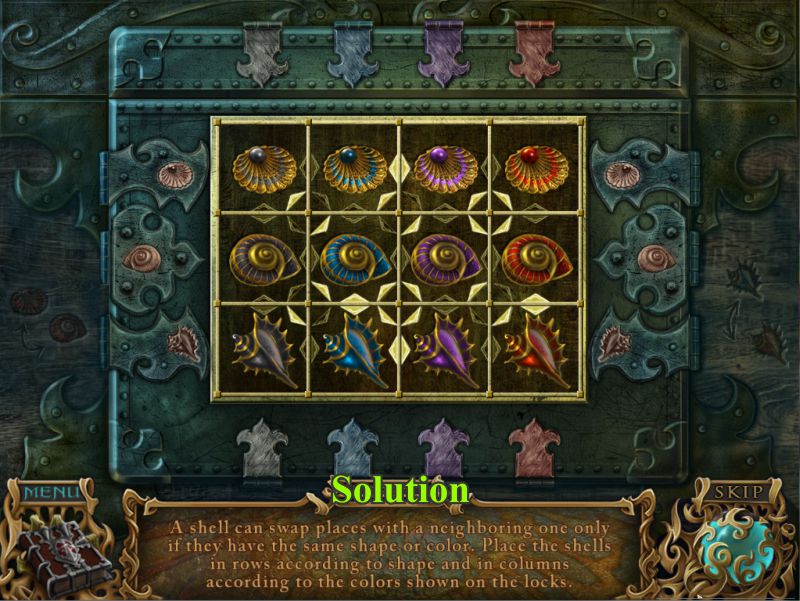
Shell Chest Mini Game
Your goal is to move the shell around as allowed by the arrow to form the solution shown in the screenshot.
Make sure to match the colors and types of shells as shown.
Screenshot
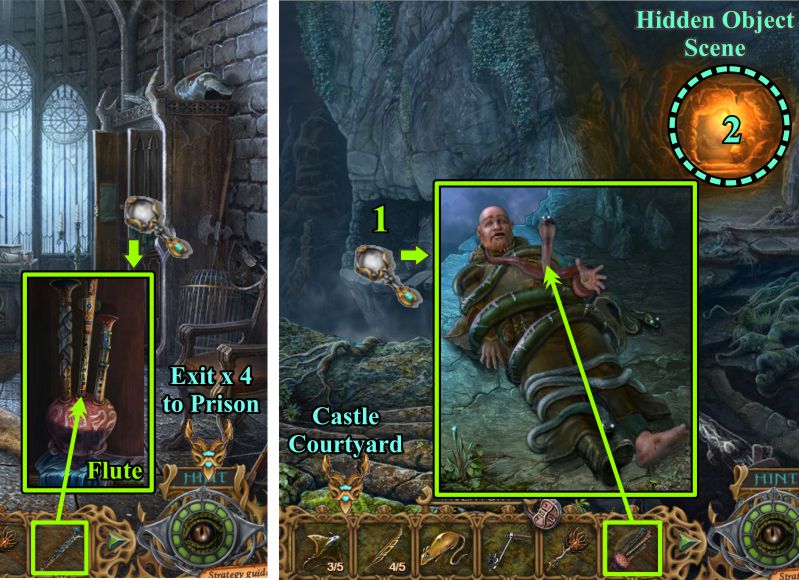
Isa's Office and Prison in the Rocks
Return to Isa's Office and zoom in on the cabinet.
Place the Reed Pipe to construct the Flute and take it.
Exit to the Prison, zoom in on Zakh, and play the Flute to remove the snakes.
After you talk to him, play the Hidden Object Scene, then go to the Castle Courtyard.
Screenshot
Zakh
Listen carefully to Zakh's advice, then take the Scroll to help with your journey.
Screenshot
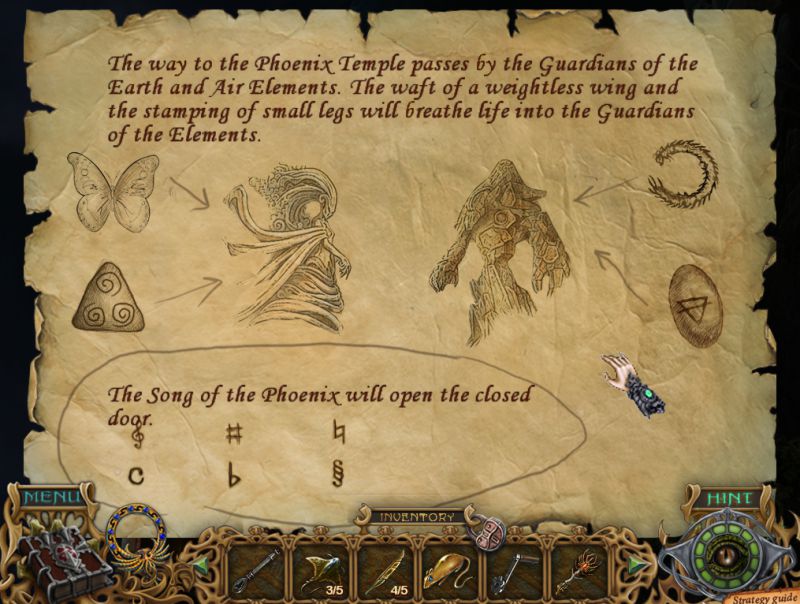
Scroll
The Scroll shows you how to make your way to the Phoenix Temple and explains the Song of the Phoenix to open its doors.
Screenshot
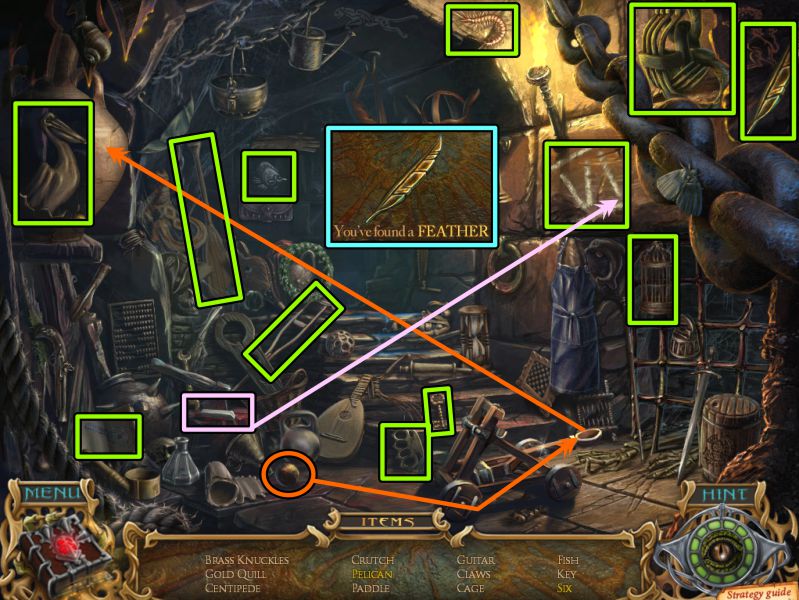
Prison Hidden Object Scene
Put the ball on the catapult to break the vase and get the Pelican.
Use the caulk on the "V" to turn it into "VI".
Although you don't collect it in the scene, you will be rewarded with a Feather.
Screenshot
Chapter 7: Brishare's Tomb
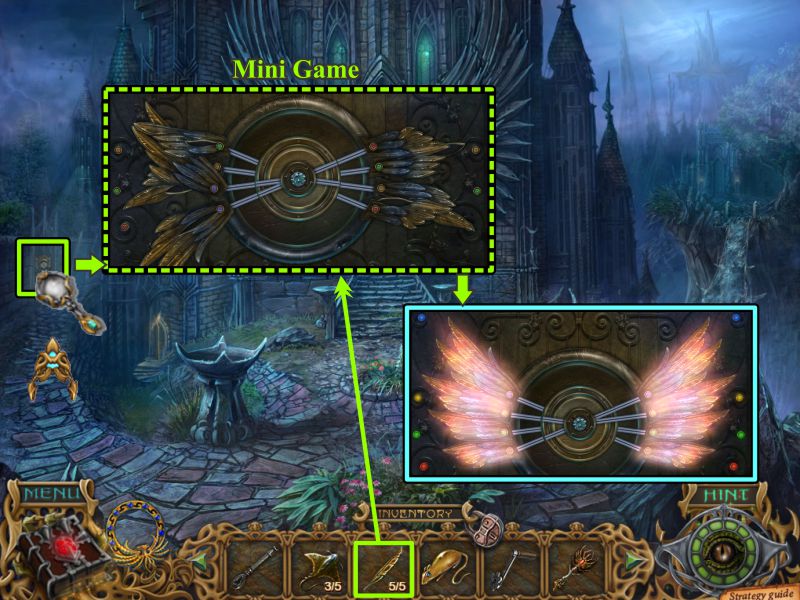
Temple Entrance
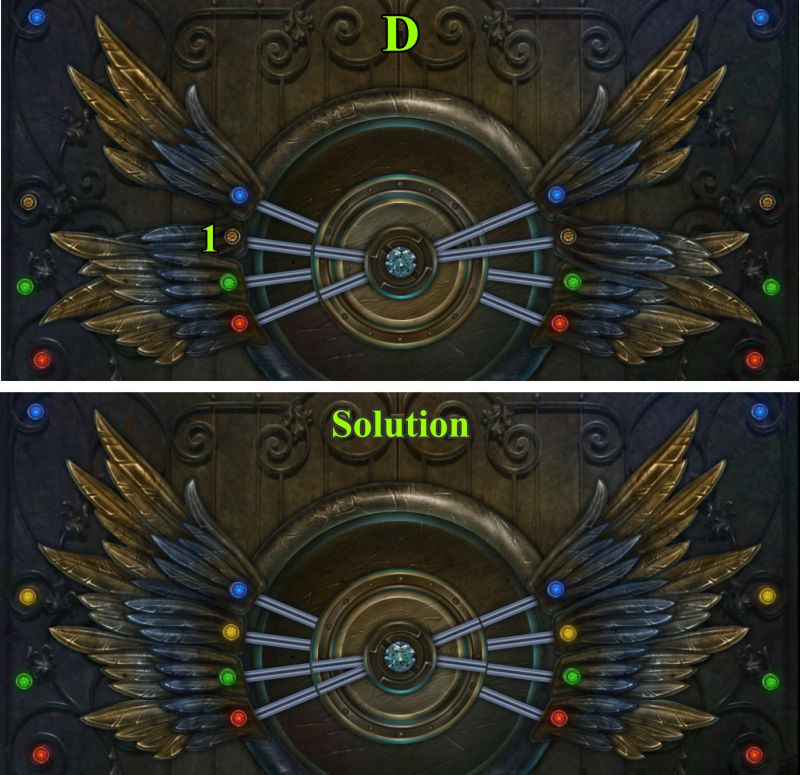
Zoom in on the gate and place the Feathers to trigger the Mini Game.
The final feathers are shown in this screenshot and the step-by-step solution follows.
When the game is finished, go through the gate.
Screenshot
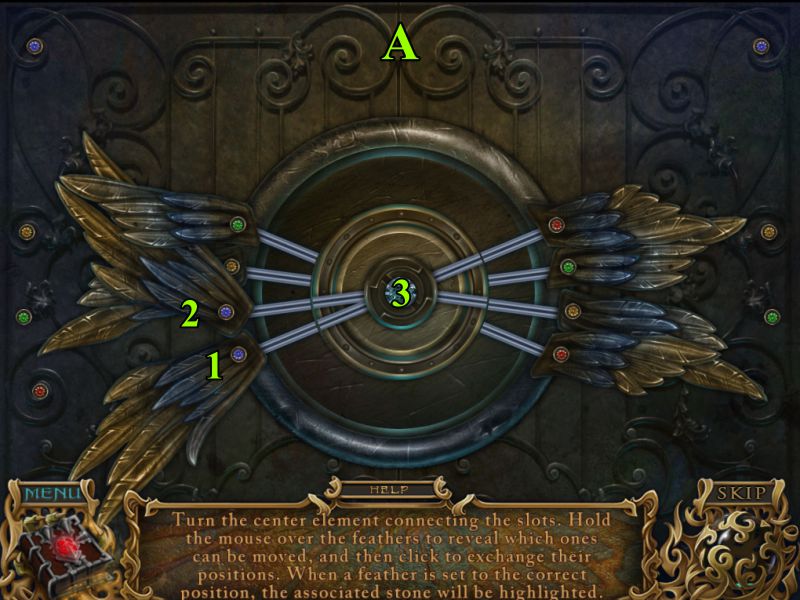
Temple Door Mini Game
Your goal is to turn all the feathers upward. Press on the feathers in this screenshot to start you on your way.
Then press on the inner circle to turn it like the view in the next screenshot.
Screenshot
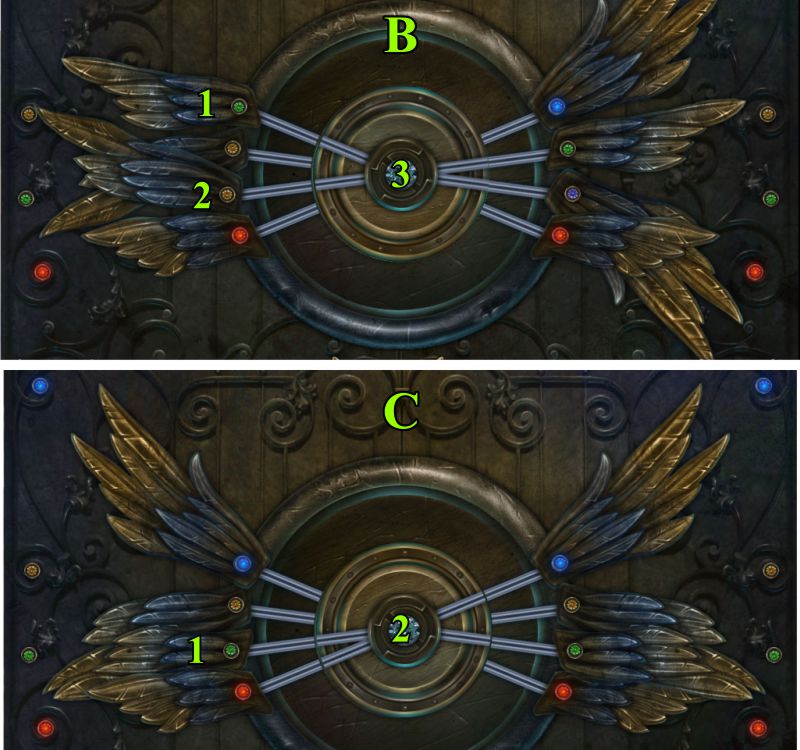
Having turned the inner circle, now press on the feathers shown in view B.
Turn the inner circle to look like view C and press the feather shown.
Once again, turn the inner circle to the view in the next screenshot.
Screenshot
When the inner circle is correct, click on the feather shown in D. The solution is shown below.
Screenshot
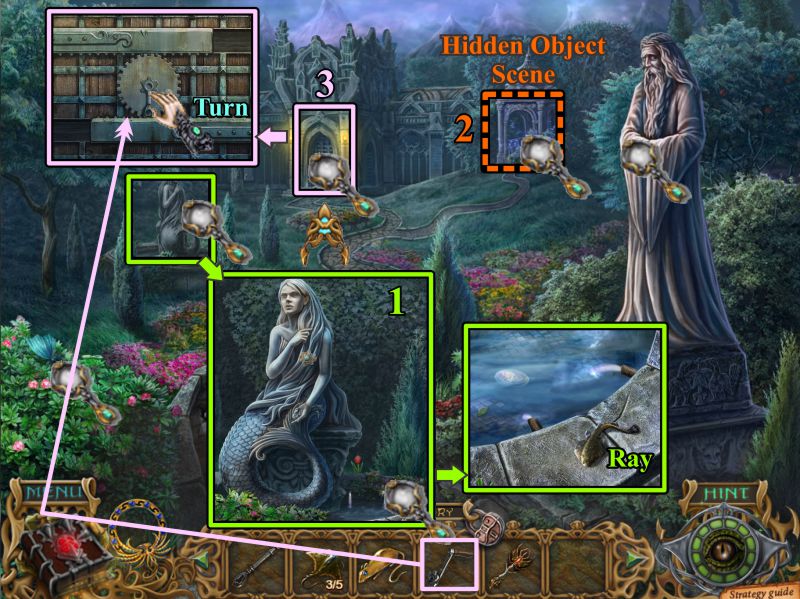
Temple Garden
Zoom in on the Mermaid and take the Ray.
Play the Hidden Object Scene.
Zoom in on the door, place the Handle, and turn it to open the door and enter.
Screenshot
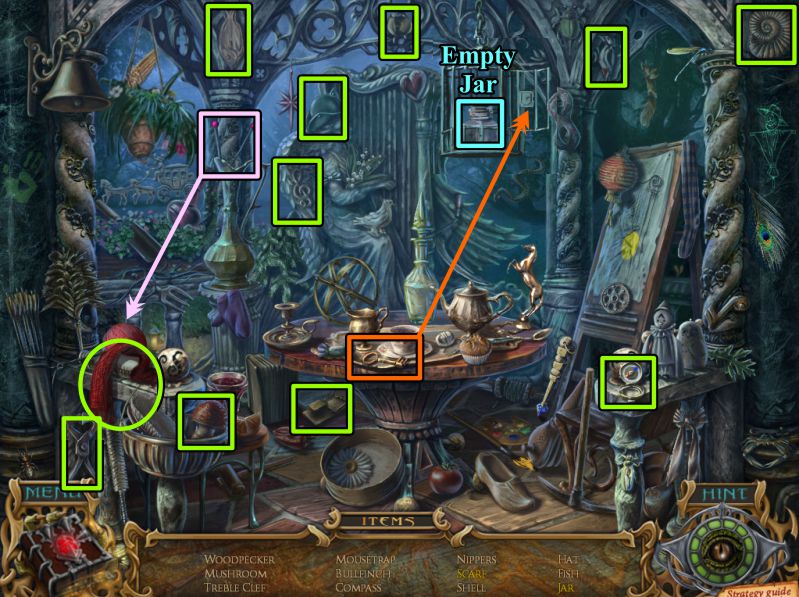
Temple Garden Hidden Object Scene
Grab the knitting needles and use the yarn to knit a Scarf.
Use the key to open the cage and take the Empty Jar that will end up in your Inventory.
Screenshot
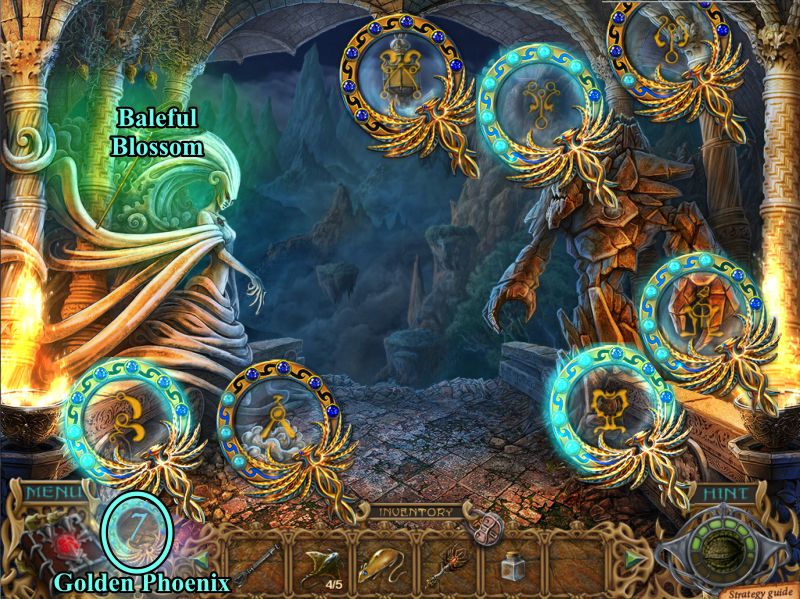
Temple Bridge
Use your Golden Phoenix to find the 7 symbols to destroy the Baleful Blossom. See the screenshot for the locations.
Screenshot
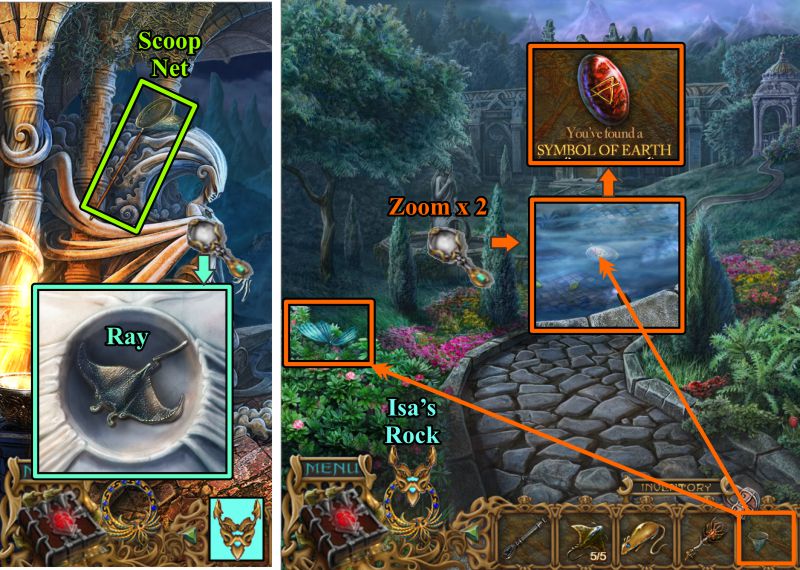
Bridge and Garden
Take the Scoop Net, zoom in on the air statue at the left, and take the Ray.
Return to the Garden and use your Scoop Net to catch the Butterfly.
Zoom in twice on the mermaid and use the Scoop Net to take the Symbol of Earth from the water.
Go to Isa's Rock.
Screenshot
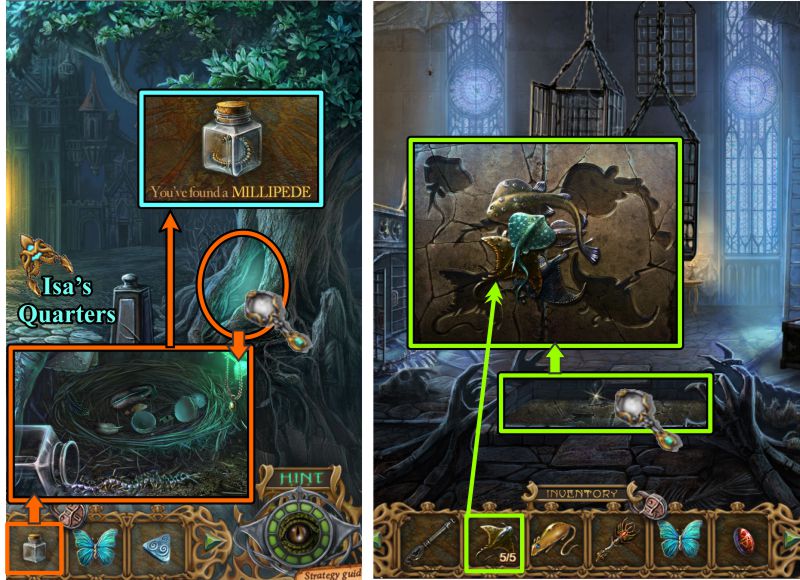
Outside and Inside Isa's Quarters
Zoom in on the hollow in the tree and use your Empty Jar to catch the Millipede.
Go inside, zoom in on the trap door, and place your Rays.
Screenshot
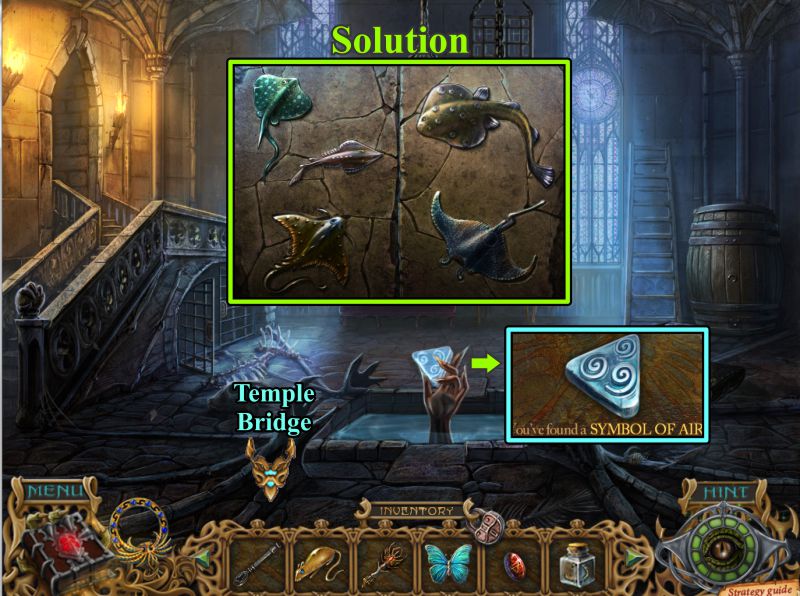
Arrange the Rays as shown in the screenshot solution.
The trap door will open and a hand will rise out of the water. Take the Symbol of Air, and return to the Temple Bridge.
Screenshot
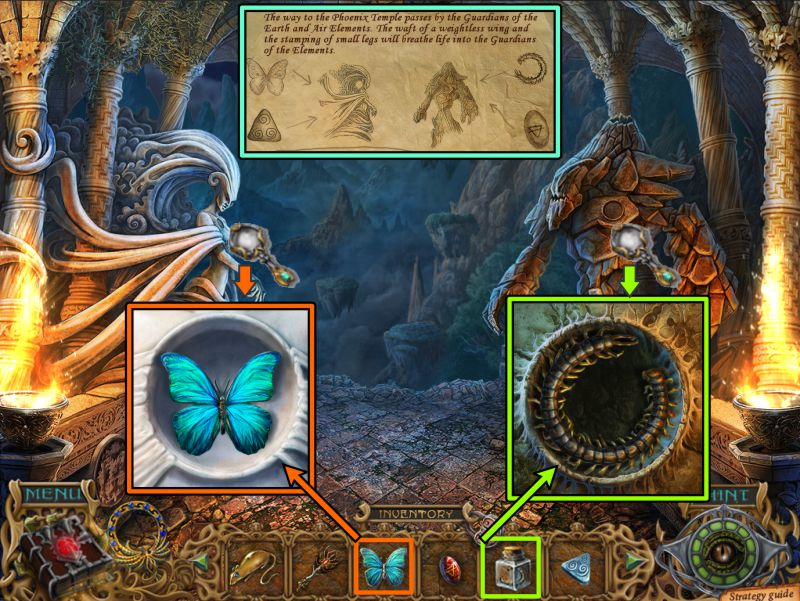
Temple Bridge
Time to follow the instructions regarding the guardians. Zoom in on the air statue and place the Butterfly.
Zoom in on the earth guardian and place the Millipede.
Screenshot
Zoom in on the guardian staffs that appear from the ground and place the Symbols of Air and Earth.
The floating rock will come together to form a path to the Temple Door.
Screenshot
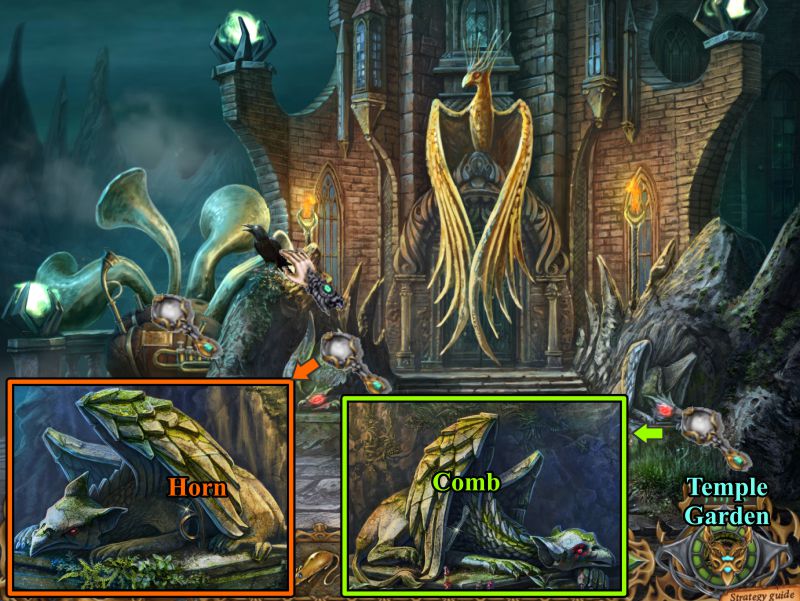
Temple Door
Zoom in on the two gargoyles to collect a Horn and a Comb.
Go to the Temple Garden.
Screenshot
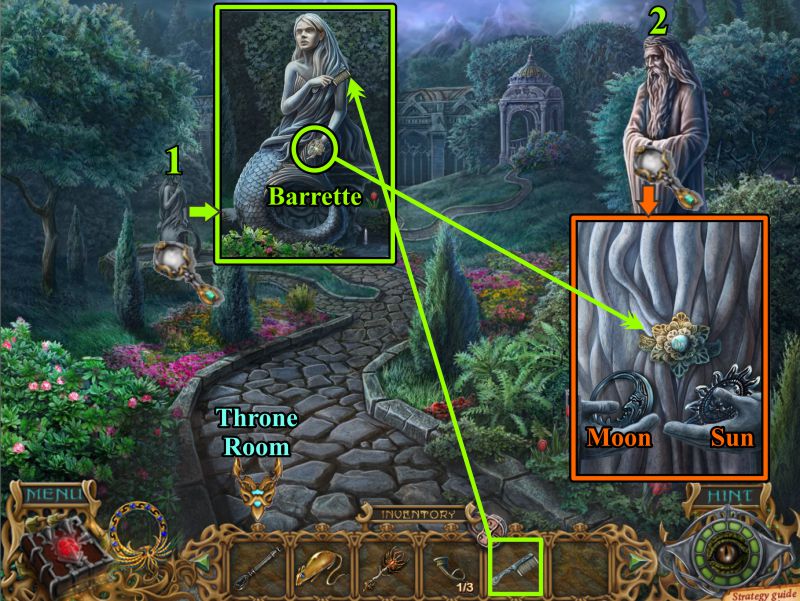
Temple Garden
Zoom in on the mermaid and give her the comb. You will receive a Barrette.
Zoom in on the statue at the right and use the Barrette on his beard.
Take the Moon and Sun, then go to the Throne Room.
Screenshot
Throne Room
Zoom in on each of the statues and place the Moon and Sun in their proper places to trigger 2 Mini Games.
Screenshot
Moon Square Mini Game
Your goal is to connect the circles of identical color.
There is a Reset button if you need it.
The Moon solution is shown in this screenshot.
Screenshot
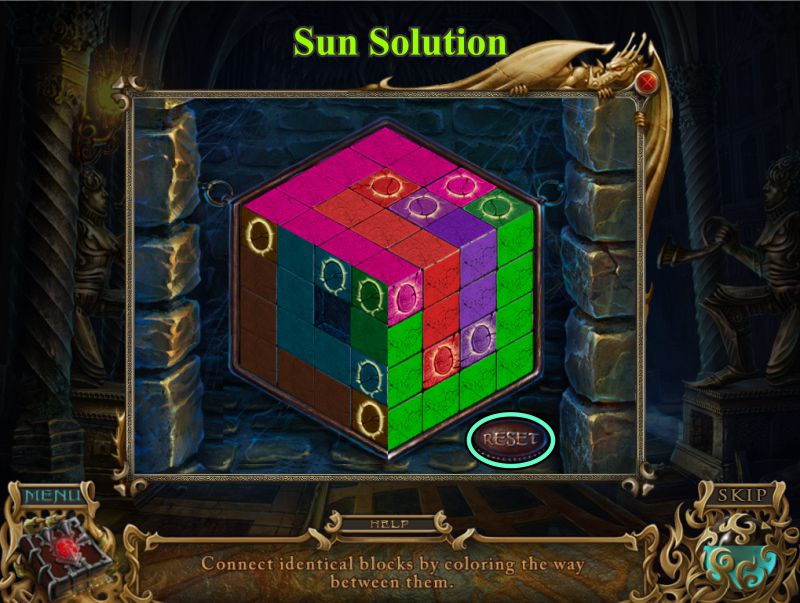
Sun Block Mini Game
See the screenshot for the solution.
Screenshot
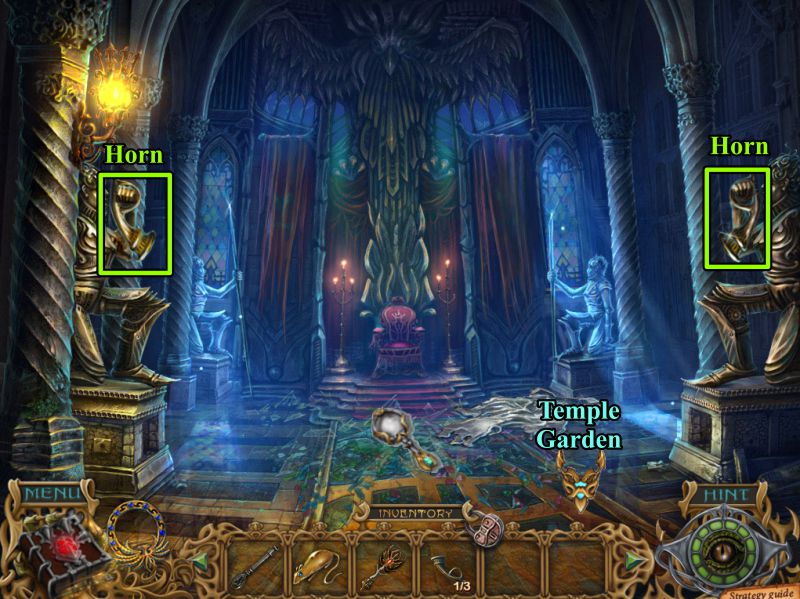
Throne Room
The statues blow their horns, breaking the stained glass window with the sound.
Collect both of the Horns and go to the Temple Garden.
Screenshot
Temple Garden
Play the Hidden Object Scene, and then go to the Temple Door.
Screenshot
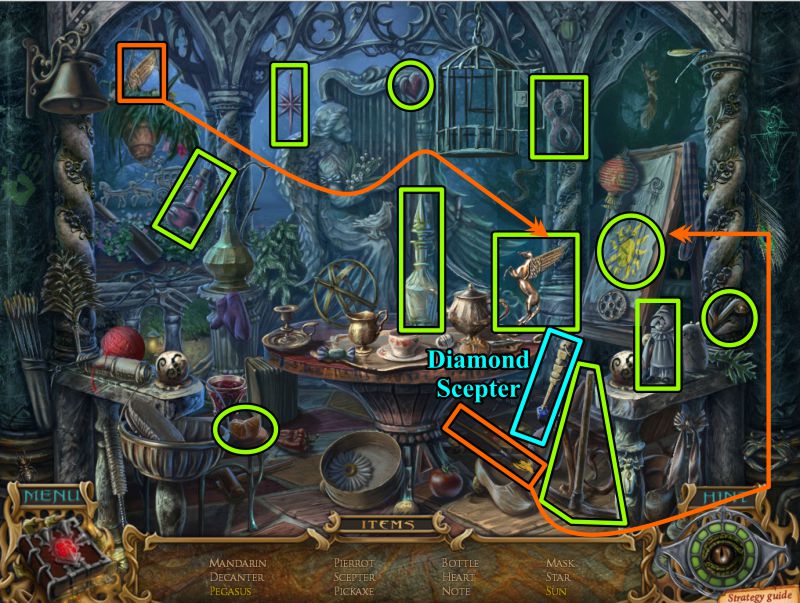
Temple Garden Hidden Object Scene
Place the wing on the horse to get Pegassus.
Use the yellow paintbrush to finish the Sun.
You will get a Diamond Scepter for your Inventory.
Screenshot
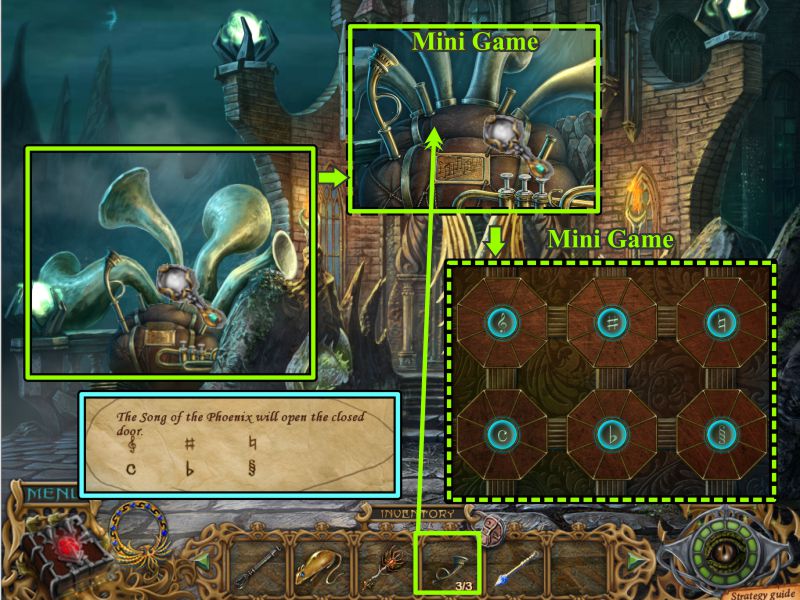
Temple Door
Zoom in on the horn mechanism and place your 3 Horns.
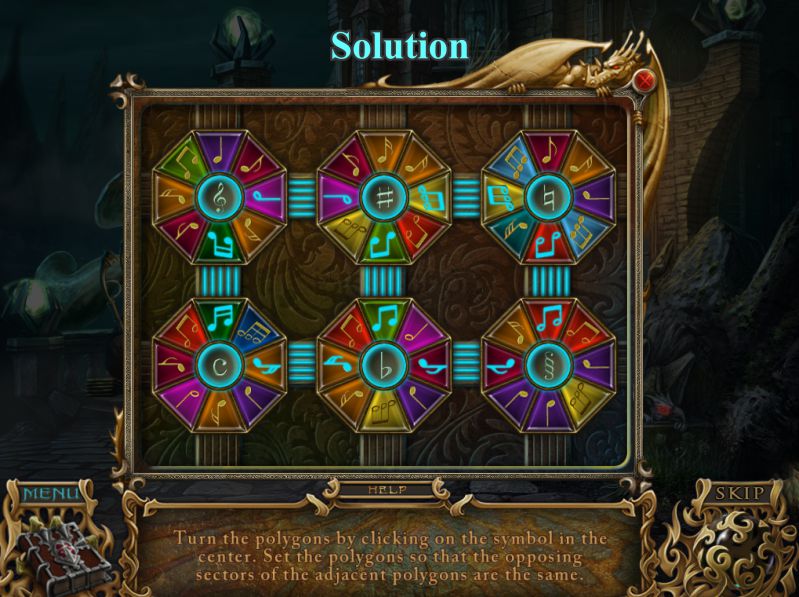
Using your Song of the Phoenix instructions, arrange the symbols as shown in the screenshot to trigger a Mini Game. Your goal is to set each disk so the adjoining disks match the touching segments.
Screenshot
Turn each disk once by clicking on the symbol in the center. See the screenshot for the solution.
Enter the Temple when the wings part and the door opens.
Screenshot
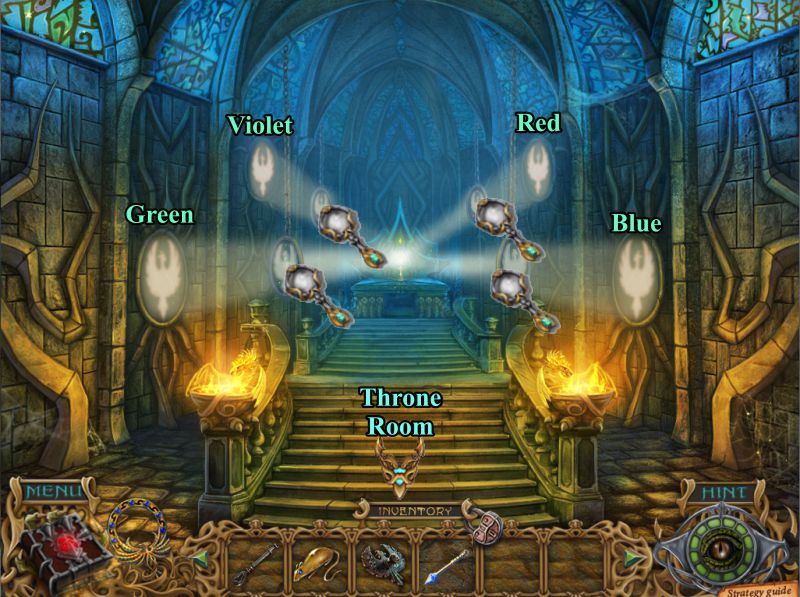
Temple of Phoenix
Zoom in on the altar and place the Scepter from your Inventory.
Take the Scroll and Pattern.
Screenshot
The Scepter radiates light to 4 reflectors that come down from the ceiling. Each reflector needs a phoenix pattern of a different color of glass, so go to the Throne Room to get them.
Screenshot
Throne Room
Zoom in on the broken stained glass pieces.
Place your Pattern on each of them and use the Diamond Scepter to trace the Pattern.
Collect the Blue, Red, Green, and Violet Glass Patterns.
Return to the Temple.
Screenshot
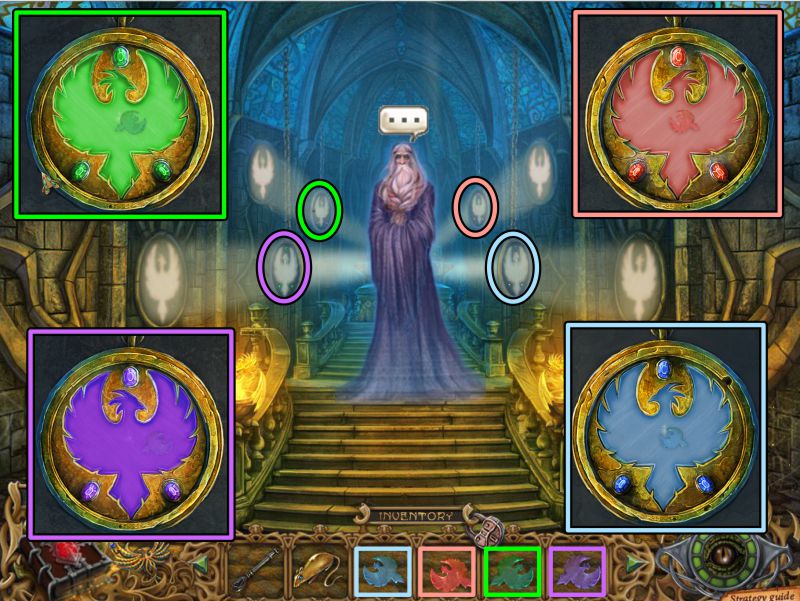
Temple of Phoenix
Zoom in on each reflector and place the appropriately colored glass phoenix.
Brishare's spirit will appear, so talk to him.
Screenshot
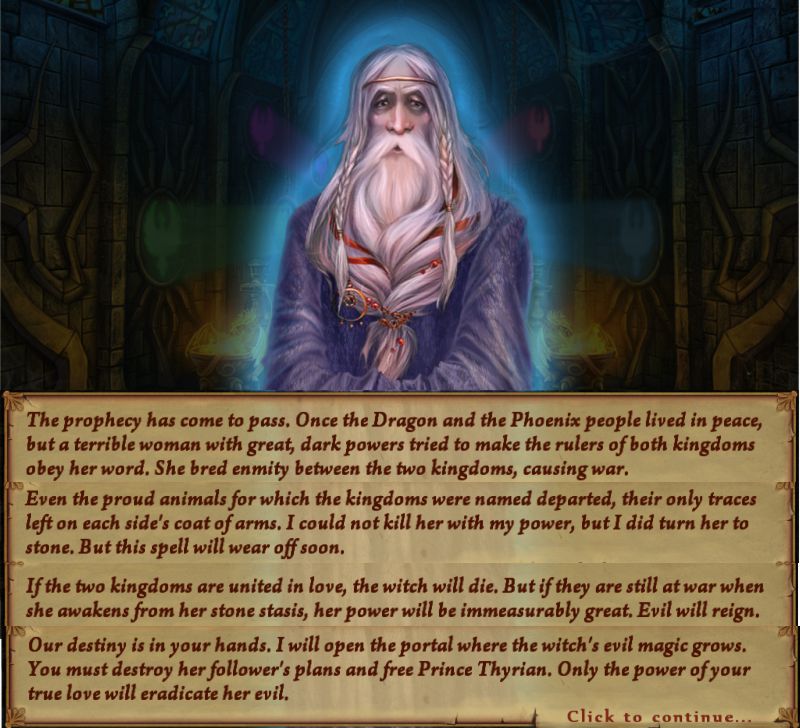
Chapter 8: The Witch's Realm
Brishare
Brishare explains about the witch and her evil magic. He offers to open the portal for you to enter her world.
Screenshot
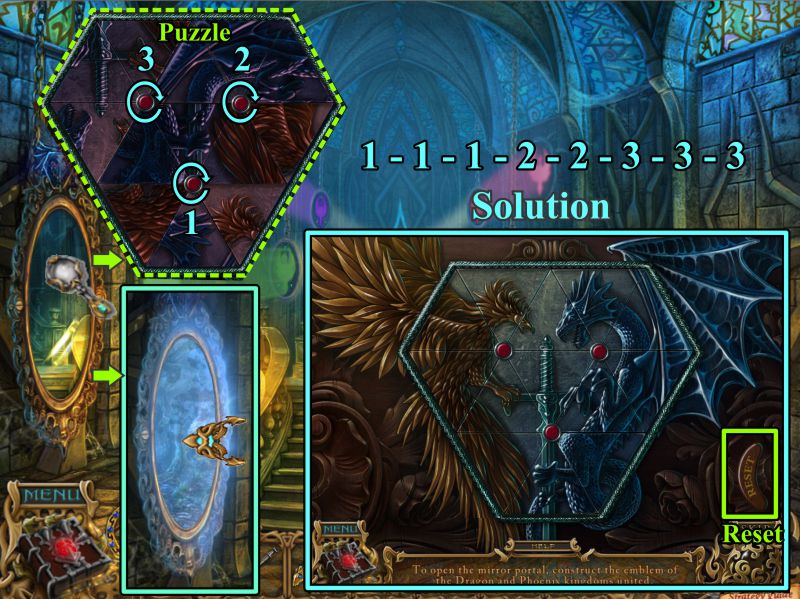
Portal Puzzle
To unlock the portal Brishare has created, you must solve a Puzzle.
There are 3 knobs to rotate to create the picture of the Phoenix and Dragon.
See the screenshot for the numbered solution.
Enter the now opened portal.
Screenshot
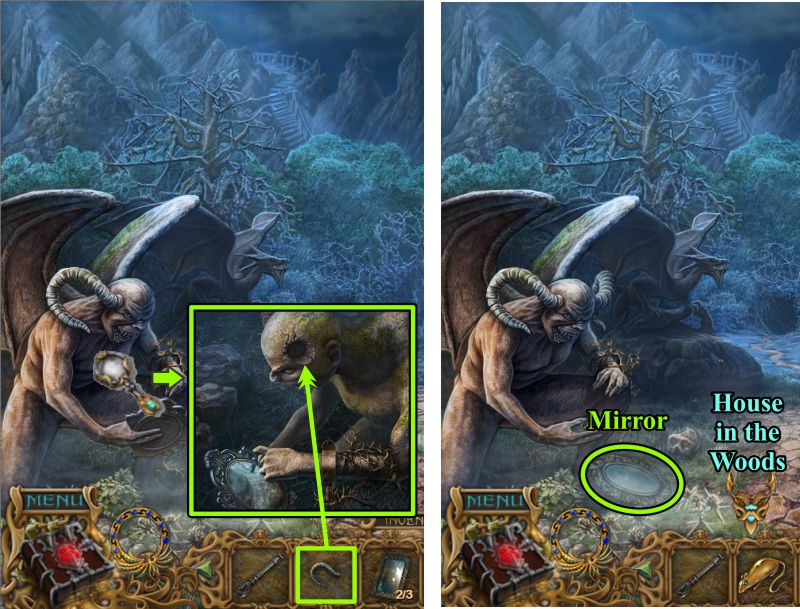
House in the Woods
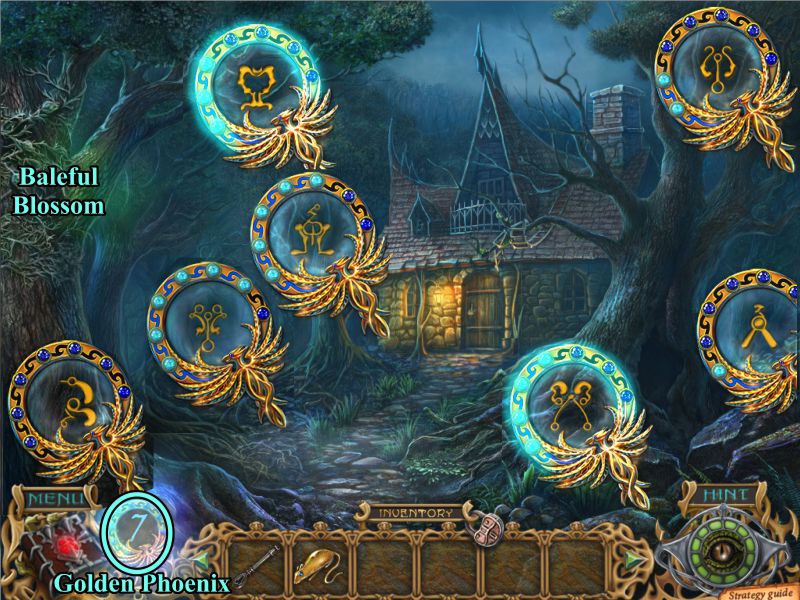
Get out your Golden Phoenix to destroy another Baleful Blossom. See the screenshot for the location of the 7 symbols.
Screenshot
Examine all of the magnifying glasses and proceed up the trail to Witch's Meadow.
Screenshot
Witch's Meadow
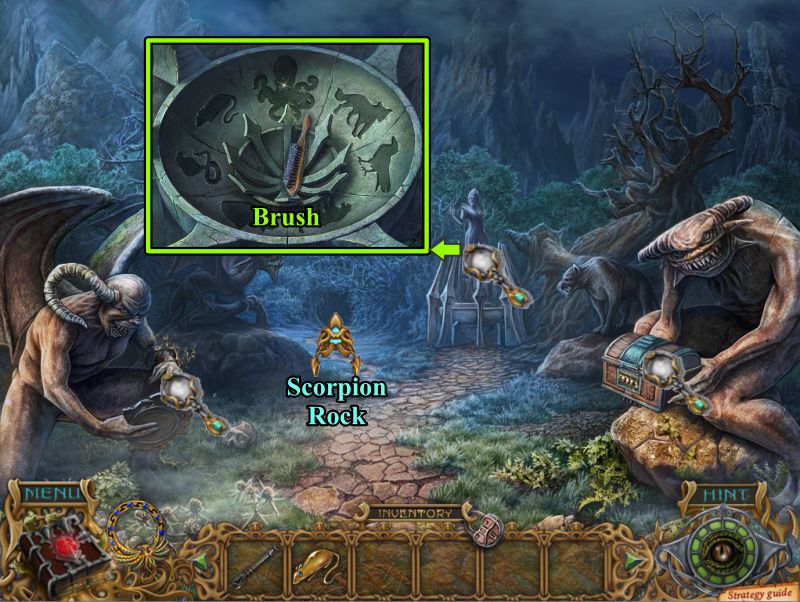
You don't have the items to deal with the two statues in front, so zoom in on the Witch and take the Brush.
Go through the hold at the back to find Scorpion Rock.
Screenshot
Scorpion Rock
Your friend the fox is there glaring at you and guarding a Ruby. Thyrian is in the distance chained up, but you can cross the chasm.
Zoom in on the scorpion head, take the Pruning Shears, and note his missing eyes.
Return to the Woods.
Screenshot
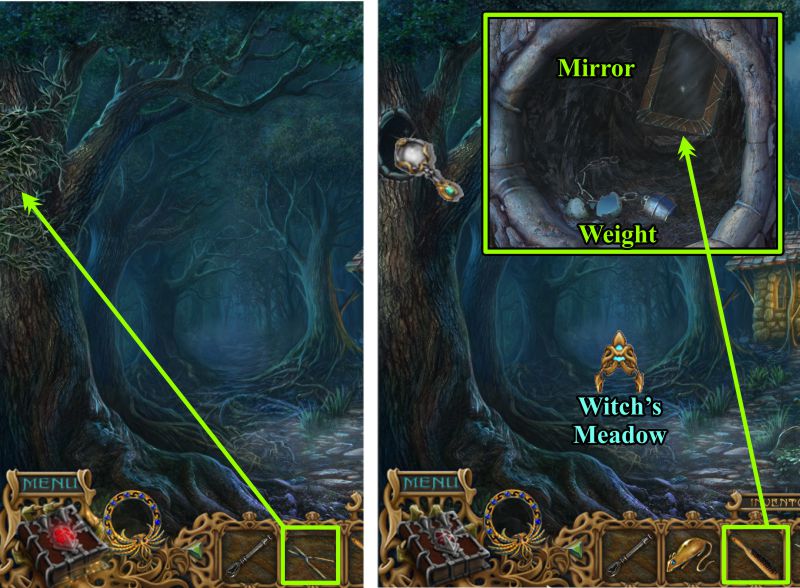
House in the Woods
Zoom in on the tree at the left and clear the vines with your Pruning Shears.
Clean the Mirror with the Brush, then collect the Mirror and the Weight.
Go to Witch's Meadow.
Screenshot
Witch's Meadow
Zoom in on the left statue, remove the vine on its arm, and use the Wrench to remove the Bolt from its wrist.
Continue to Scorpion Rock.
Screenshot
Scorpion Rock and House in the Woods
Zoom in on the tree limb, place your Bolt in the broken saw, and tighten it with the Wrench.
Take the Saw, pick up the Fox, and head off to the Woods.
Zoom in on the roof and cut the tree limb to lower the ladder.
Play the Hidden Object Scene.
Screenshot
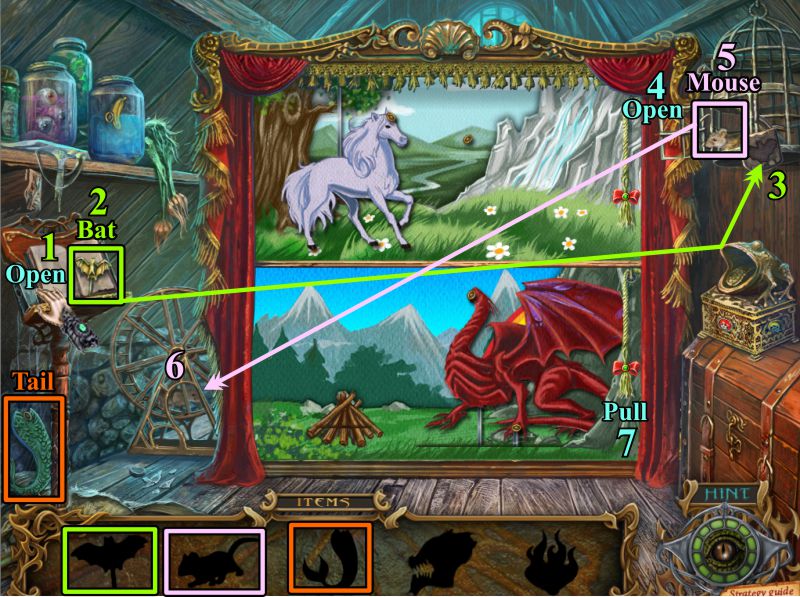
Roof Hidden Object Scene
Pick up the Tail, open the book, and take the Bat.
Place the Bat on the cage lock and open the door.
Take the Mouse and place him in the wheel to open the curtains.
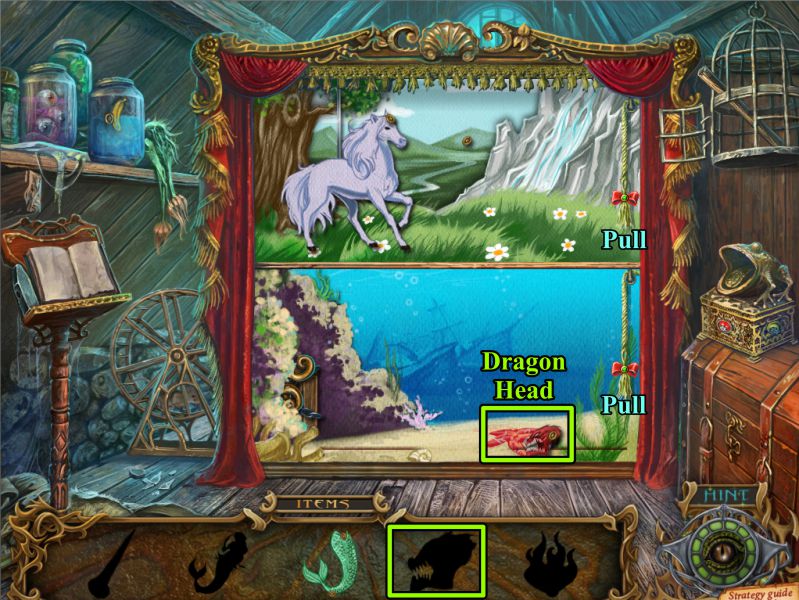
Pull the cord on the bottom picture.
Screenshot
Collect the Dragon Head, then pull the rope on both scenes to change them.
Screenshot
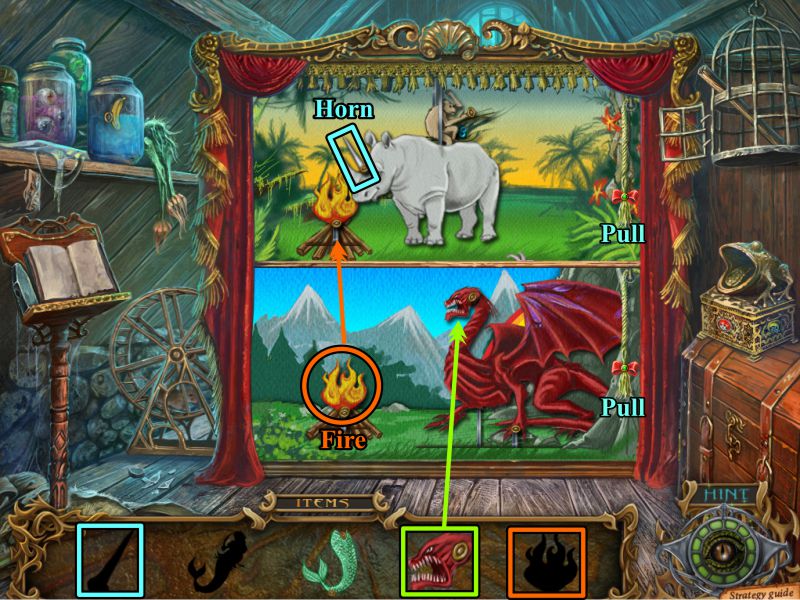
Put the head on the Dragon, and he will light the Fire.
Collect the Fire and place it on the scene above.
A rhino will come and put out the fire. Take the Horn from the rhino, then pull the cord in both scenes.
Screenshot
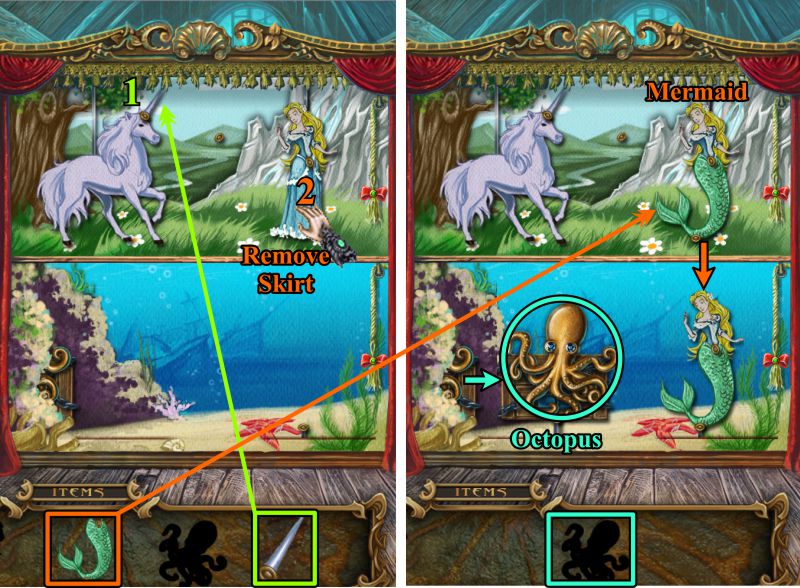
Place the Horn on the unicorn, and a maiden will appear.
Remove her skirt and replace it with the Tail.
Collect the Mermaid and place her in the bottom scene.
The Octopus will come out to see her, so grab him.
Screenshot
House in the Woods
Zoom in on the chimney and take the Bone.
Examine the door lock, give it the Bone, turn the Bone and enter the house.
Screenshot
Witch's House
Turns out it's the Witch's house.
Take the Mirror from the table.
Zoom in on the carpet and attach the Weight to get a Sweep Tool.
Go back outside, zoom in on the chimney and drop the Sweep Tool.
Return inside.
Screenshot
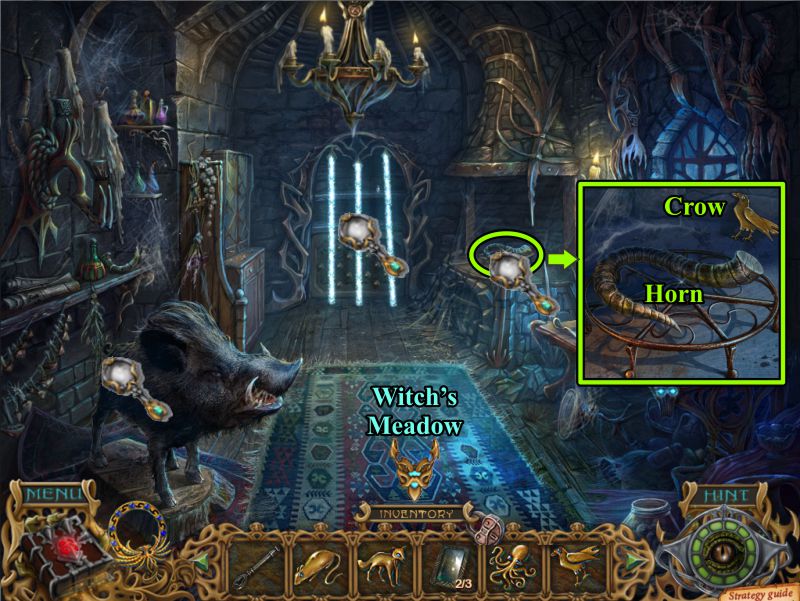
Zoom in on the fireplace, take the Crow and Horn, and go to Witch's Meadow.
Screenshot
Witch's Meadow
Zoom in on the left statue, place the Horn, and pick up the Mirror when it is released.
Go to the Woods.
Screenshot
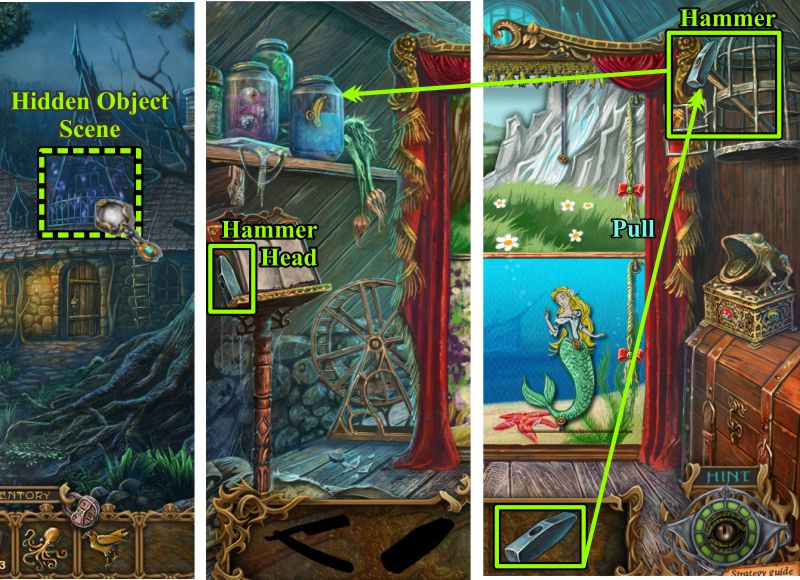
House in the Woods Hidden Object Scene
Zoom in on the roof and play the Hidden Object Scene.
Take the Hammer Head, place it on the stick in the cage, and take the Hammer.
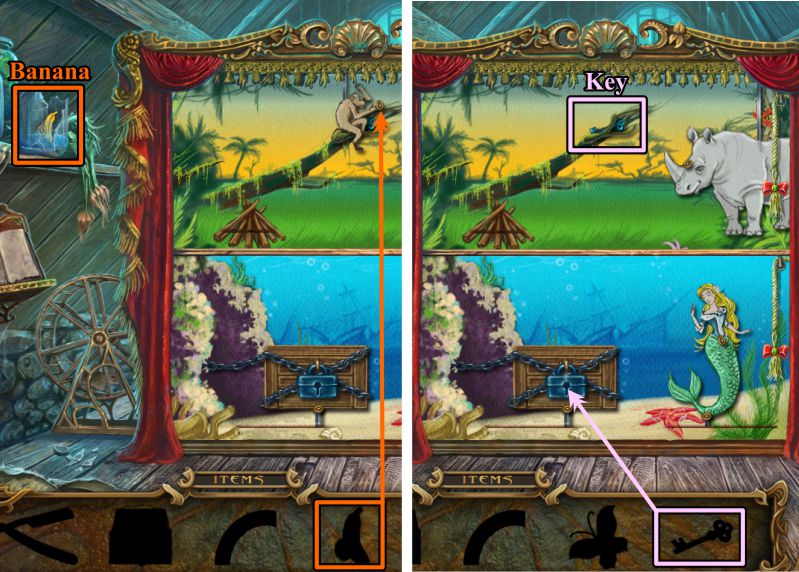
Use the hammer to break the jar on the shelf.
Screenshot
Take the Banana and give it to the monkey, who leaves you a Key.
Use the Key to open the chest in the lower scene.
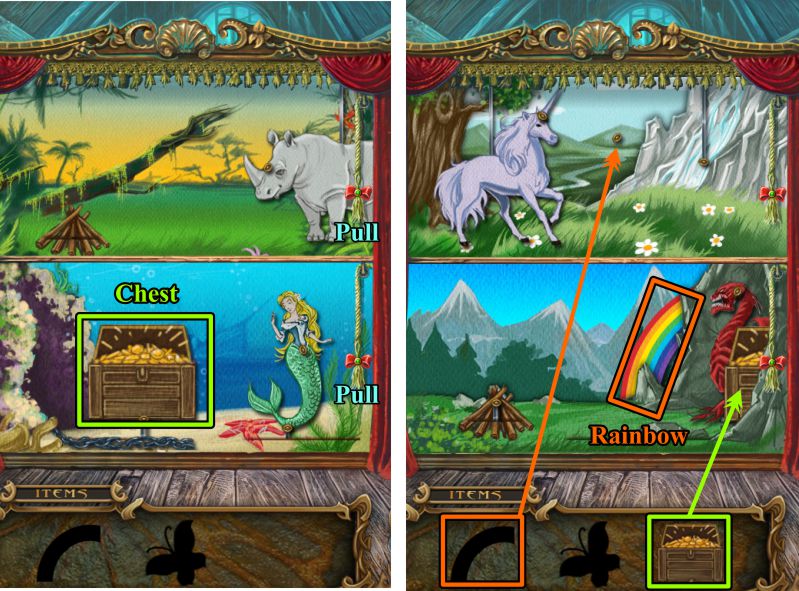
Screenshot
Take the Chest with its treasure and give it to the Dragon, who takes it to his cave.
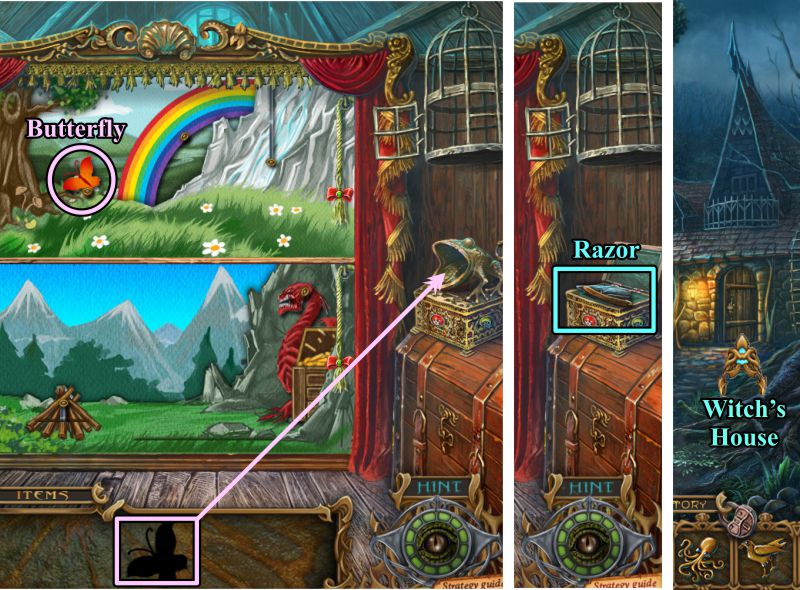
Gather the now-revealed Rainbow and place it in the top scene.
Screenshot
The unicorn leaves, revealing a Butterfly. Take the Butterfly and give it to the frog on the box.
When the box opens, take the Razor and enter the Witch's House.
Screenshot
Witch's House
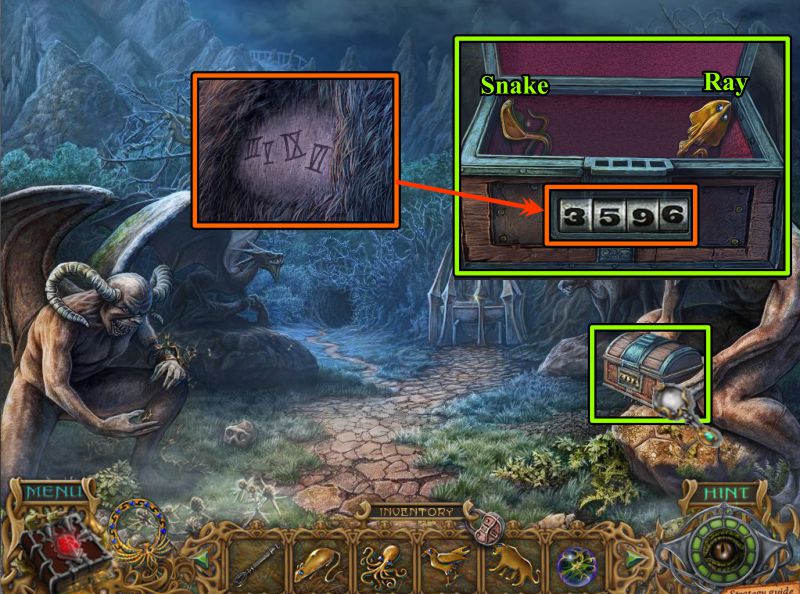
Zoom in on the boar and use the razor to shave his fur to show the numbers: III, V, IX, VI.
Examine the water falling at the rear and place your 3 Mirrors (from the Witch's House, Witch's Meadow, and House in the Woods).
Zoom in on the cabinet for a Mini Game.
Screenshot
Cabinet Mini Game
Turn the chips around for a match 2 game.
If the second chip you select isn't correct, the chips move, making it more difficult to remember what is where.
See the screenshot for the pairs you are looking for.
The remaining chip is a key, so the cabinet opens.
Screenshot
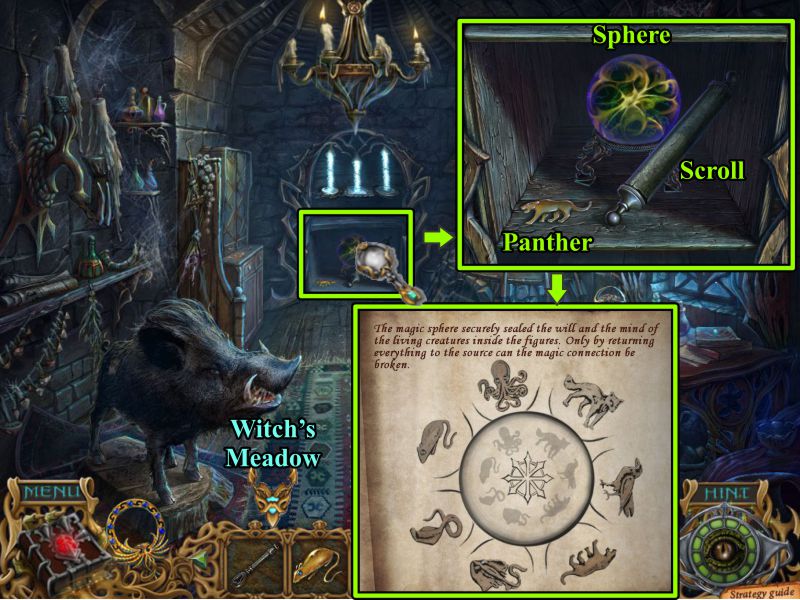
Take the Sphere, Panther, and Scroll. Read the Scroll, then head to Witch's Meadow.
Screenshot
Witch's Meadow
Zoom in on the right statue and open the box, using the code from the boar: 3596.
Collect the Snake and Ray from the open box.
Screenshot
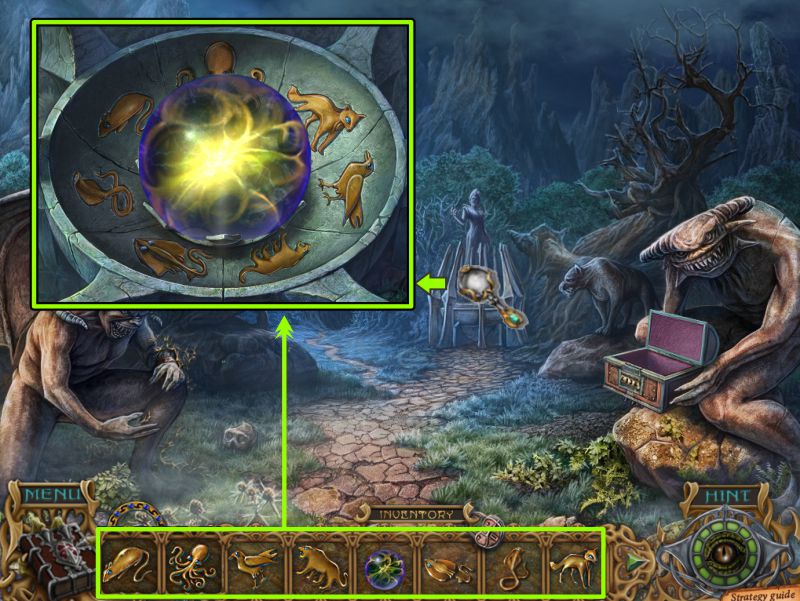
Zoom in on the Witch statue and place all the animals and the Sphere.
Screenshot
Chapter 9: Saving Thyrian
Isa
Isa appears to destroy you, but his power over the animals is gone, so the panther turns on him.
Screenshot
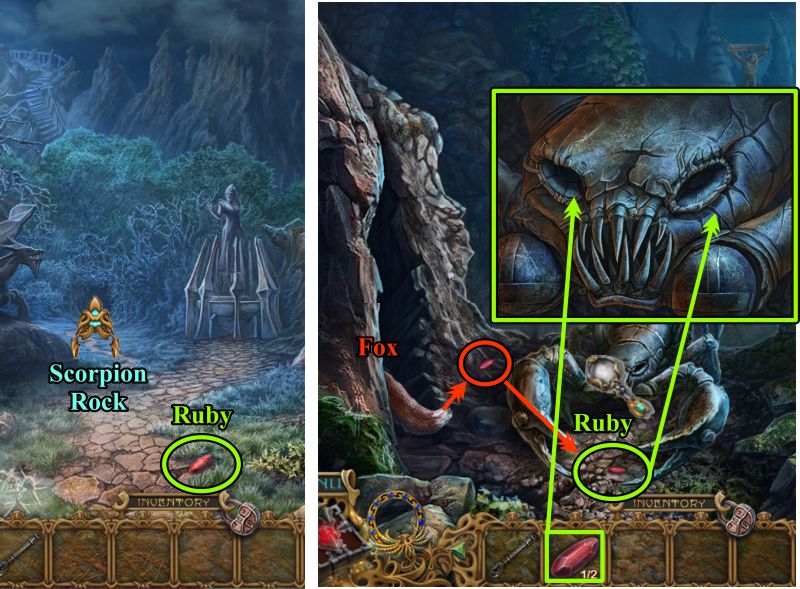
Witch's Meadow and Scorpion Rock
Pick up the Ruby and go to Scorpion Rock.
The fox is now powerless so tosses you the Ruby. Zoom in and place both Rubies in the scorpion's eyes.
Screenshot
Scorpion Rock
Zoom in on the mechanism on the scorpion's tail for a Puzzle.
Screenshot
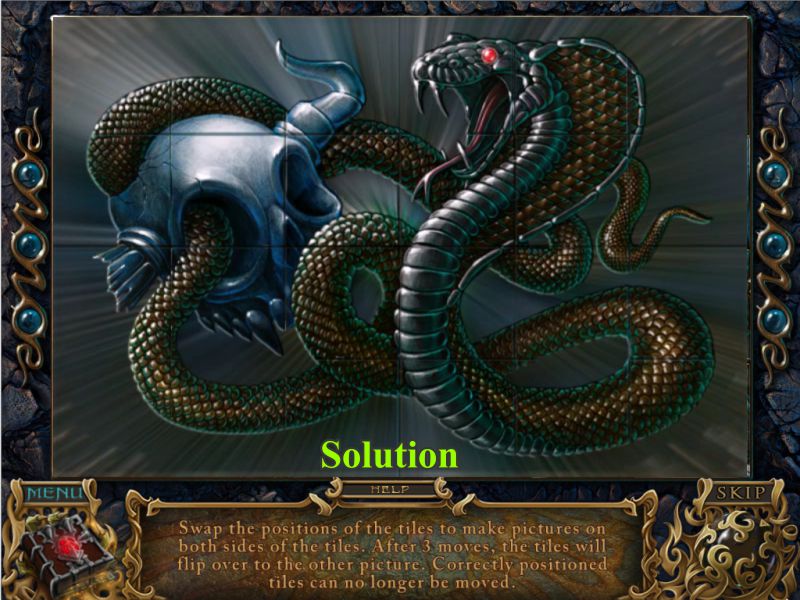
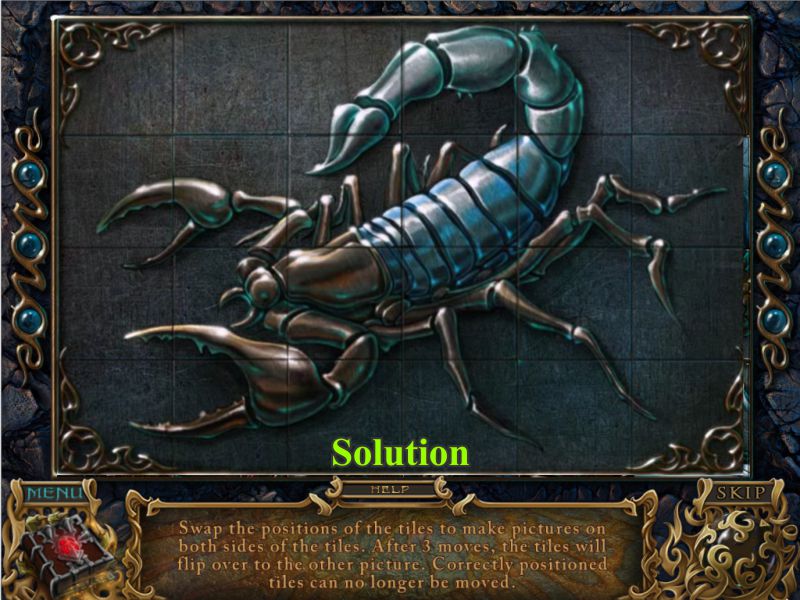
Scorpion Puzzle
This is a 2-part puzzle that you will play at the same time.
When you have swapped 3 pieces, it will turn to the other puzzle for you to swap pieces there.
See the next 2 screenshots for the solutions to both puzzles.
Screenshot
Screenshot
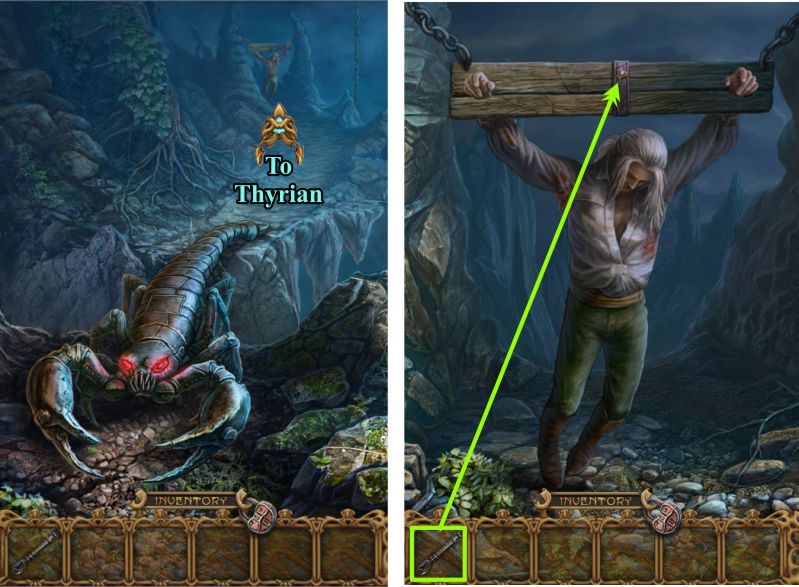
Thyrian
The scorpion's tail relaxes to form a bridge across the chasm. Go to Thyrian and use the Wrench to remove the bolt to free him.
Screenshot
Watch the cut scene.
Congratulations! You have completed the basic adventure of Spirits of Mystery: Song of the Phoenix.
Posted by: Jazz |
May 2, 2012 9:49 PM
|
May 2, 2012 9:49 PM