JayisGames.com is now available ad-free!
Jay is Games recommends Cheat Happens with 8,000+ games and 35,000+ trainers!

Sometimes Sunny Block


  • Currently 4.7/5
  • 1
  • 2
  • 3
  • 4
  • 5
Rating: 4.7/5 (167 votes)
Comments (49) | Views (9,019)

Weekday Escape

GrinnypHaretoki is back with another escaping gem that turns room escaping conventions on its head. Sometimes Sunny Block brings a refreshing charm and gameplay to the escape game genre.

Sometimes Sunny BlockSometimes Sunny Block appears at first glance to be (and actually is) a basic one-room escape. The furnishings are sparse and utilitarian as this room is definitely not a "living" space. There is the standard navigation bars and an easy to use inventory, although the game could also have benefitted from a save feature and perhaps a music clip. Unfortunately this is not the game for the color-blind, as nearly every puzzle features color in some way. Haretoki packs the room with some delightfully entertaining and original puzzles which we've come to expect since Sometimes Cloudy Challenge, the game that featured an escape from a rotating room.

One of the things that makes Sometimes Sunny Block stand out from the rest of the room escaping pack is the use of a found object in no less than four different puzzle solutions, bringing an elegance to the form that is rarely seen. Robamimi once used an abstract artwork as a dual solution, but how many escapes can claim four? While Sometimes Sunny Block is not terribly difficult, the charm of finding new and interesting ways to solve the puzzles within the strange room create an atmosphere that definitely can compete with the well-established designers of the field.

Play Sometimes Sunny Block

Walkthrough Guide


(Please allow page to fully load for spoiler tags to be functional.)

Sometimes Sunny Block Walkthrough

General Information

  • Try to pick up everything that isn't nailed down (and some things that might be).

  • Examine every item you pick up, they may be hiding a clue.

  • An item will disappear from your inventory when you no longer need it, so if an item is still there, it still can be used.

  • There is only one ending to this escape.

  • Good luck!

Exploration

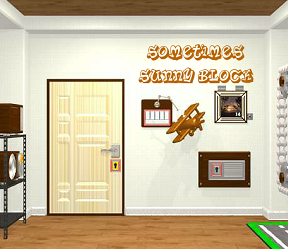
  • You begin facing a wall with two sets of shelves. The shelves on the left consist of 6 cubbyholes, the shelves on the right are open and three shelves.

  • If you click on the right set of shelves for a close up, you will find on the top a box that apparently needs a handle or lever, and on the middle shelf a box that looks like it needs a key.

  • Above the cubby shelves are two pictures on the wall, click on them for a close up.

  • Click on the right picture and it swings away, revealing a set of pliers. Take the pliers and back up.

  • The cubby shelves on the left are 3 cubbys across by 2 down.

  • The top left cubby has a picture of a blue box and the word "blue" inside.

  • The top middle cubby has a lock that has 5 buttons, one in the middle and four around the outside.

  • The top right cubby is empty.

  • The bottom left cubby has a picture of a red box and the word "red" on it.

  • It also has a door and a lock, with a key in the lock. Click on the keyhole for a close up and take the key (it does not open this lock).

  • The bottom middle cubby is empty.

  • The bottom right cubby contains a scroll, take it.

  • While the scroll is in close up click on it again to unroll it and read the clue.

  • The clue shows a 3 x 2 grid with a 6 in the lower left, a 3 in the upper middle, and a four in the lower right blocks.

  • It also shows a picture of a wind-up key.

  • Close down the scroll, back up from the cubby, and turn right.

  • You are now facing the wall with the exit door. Also on the wall are a panel with a wooden airplane, a picture, and a small cubby with a door.

  • Click on the plane for a close up and you will see that a 5 digit code is needed.

  • Click on the picture and you will see the number "14" in the picture, which has a thick frame and is screwed to the wall.

  • Click on the cubby door and you will see that it needs a key.

  • Back up and turn right.

  • On this wall is an elaborate set-up involving gears, chain, and a rug that looks like a road or a landing strip.

  • To the right of the device is a garbage can, but it is empty.

  • Turn right.

  • You are now facing a wall that has a safe, a shelf, a picture, and an odd table.

  • Click on the safe for a close up and you will see that there is a number keypad and two plug ports that are red and blue.

  • Click on the shelf above the safe and you will find a device that shows numbers and symbols every time you push a button.

  • To the right of the shelf is a picture, click on it for a close up.

  • Sitting in the picture is a blue cube, take it.

  • There is a button below the picture and pushing it opens the picture to reveal a yellow cube and a wind-up key, but it won't stay open.

  • Underneath the picture is the odd table. On the table is a metal plate, but there's nothing you can do with it at the moment.

  • Back up and turn right.

  • You should be back to where you began with the two sets of shelves.

  • Time to solve some puzzles!

Getting the Airplane

  • Turn right to face the exit door.

  • Click on the plane for a close up and examine the five digit code key.

  • These digits are either 8, 0, or a small circle at the top or the bottom.

  • Where have we seen symbols like that before?

  • Back up and turn left (or right) twice to face the wall with the safe.

  • Click on the shelf above the safe for a close up of the machine on the shelf.

  • Maybe this machine can help?

    • The machine shows 3 symbols, an 8, a 0, and a small circle in a bottom position.

    • Click on the button to the right of the three digits and the display changes.

    • Now you see a 0, a small circle in a bottom position, and an 8.

    • Click the button again to see small bottom circle, 8, and a small top circle.

    • Click again to see 8, small top circle, and a blank.

    • Basically you are seeing a five digit sequence three digits at a time.

    • The code is 8, 0, small bottom circle, 8, small top circle.

  • Once you figure out the code back up and turn left (or right) twice to face the exit door wall.

  • Click on the airplane for a close up and enter the five digit code.

  • Once the code is entered push the large button beneath the code. If you entered it correctly, the color will change to blue and it will say UnLocK.

  • Take the plane and back up.

Using the Key

  • Click on the metal panel in the wall to the right of the airplane for a close up.

  • Use the key you got from the cubby lock on the metal panel and the color changes from red to blue. An arrow also appears.

  • Click the arrow to slide the door to the left. Underneath the panel you will see a picture of a 3 x 2 grid, with a blue square in the bottom middle slot and a red square in the upper right slot.

  • Click the arrow on the metal panel again to open another compartment and get a red cube.

  • Back up.

Opening the 5 Button Box

  • You should still be facing the exit door.

  • Click on the picture to the right of the plane for a close up.

  • I wonder what the numbers 1 and 4 in the picture mean.

  • Hey, does that frame look a little...strange to you?

    • Look closely at the lines in the thick frame.

    • The lines actually form numbers. The top part of the frame is a 5, the right side of the frame is a 6, the bottom part of the frame is a 3, and the left side of the frame is a 2.

    • Together with the central numbers of 1 and 4 this creates a sequence of six moves.

  • Now we have a sequence, where have we seen something with five buttons?

  • Turn left to face the wall with the shelves.

  • Click on the top center cubby shelf for a close up.

  • The door on this cubby has five buttons, four outer and one inner.

  • Perhaps the sequence we just learned from the picture will help?

    • Push the buttons in this order: middle, left, bottom, middle, top, right.

  • If you enter the sequence correctly the panel goes blue. Click on the handle to open the door.

  • Inside the cubby is a strange machine, take it.

  • Note that with the door open, the configuration of the cubbys has the top left blue, the bottom left red, and the top right yellow.

  • Back up.

Using the Machine (Part 1)

  • Pull up the strange machine from your inventory.

  • Notice the 3 x 2 arrangement of slots in the machine.

  • Also notice that the two cubes, red and blue, are now with the machine.

  • We saw a hint for this under the panel that we opened with the key, didn't we?

  • That graphic showed a blue cube in the bottom middle slot, and a red cube in the top right slot.

  • Maybe if we recreate that, something will happen?

  • Place the cubes according to the graphic found underneath the metal panel.

  • Cool, a hand appears from inside the machine!

  • Close down the machine from your inventory then turn left to face the wall with the safe.

  • Click on that strange table for a close up, then place the machine on top of the table. Hey, that hand is very...handy!

  • Back up and you will notice that the hand is now pushing the button, so that the picture above the table is open.

  • Click on the open picture for a close up and take the yellow cube and the wind-up key.

  • Back up once, take the machine off of the table, and back up again.

Using the Machine (Part 2)

  • Turn right to face the wall with the two shelving units.

  • Click on the machine on the middle shelf of the right shelving unit.

  • Use the wind-up key on the machine.

  • Once the key is in place, click on it to wind it and watch what happens with the circular screen.

  • You should see a sequence of numbers and colored cubes. 1, 2, yellow, red, 5, and blue.

  • That would mean that the yellow cube would be 3 in that sequence, the red cube would be 4, and the blue cube would be 6.

  • How is that helpful?

    • Remember the note we found that had a picture of a wind-up key on it? The numbers 6, 3, and 4 were on a 3 x 2 grid on that note.

    • That would indicate a position of lower left slot for the blue cube, the upper middle slot should be yellow, and the lower right slot should be red.

  • Pull up the machine from your inventory.

  • Remove the red and blue cubes from the slots. Notice that you now have the three cubes, red, blue, and yellow.

  • Now place the three cubes in the machine as indicated by the note clue.

  • This time a gear pops out.

  • Close down the machine and turn left or right twice to face the wall with the gears and chain.

  • Click on that strange road/landing strip rug for a close up.

  • Notice the metal panel? Also notice the green thing on the chain?

  • Use the airplane on the green thing on the chain to attach.

  • Now place the machine on the metal panel and enjoy the cut scene as the plane knocks a green ball off of the top of the assembly.

  • Take back the machine from the metal panel.

  • Back up.

  • Don't bother looking in the trash can, the ball didn't fall in there.

Getting the Screwdriver

  • Turn left (or right) twice to face the wall with the two shelving units.

  • Notice that the ball has fallen in front of the left unit, take it.

  • While the ball is in close up, notice the wire holding it together.

  • Use the pliers to cut the wire.

  • Take the screwdriver from the open ball and turn right.

  • Click on the picture that had the number 14 for a close up.

  • Use the screwdriver to remove the picture and take the code panel.

The Red-Dotted Code Panel

  • While the panel is in close up, look closely at the numbers.

  • The first number is an 8, and it has a red dot in the lower left corner of the number.

  • What would happen if you removed that one red dot segment from the number? You'd get a 9.

  • Enter the number 9 in the second code slot.

  • Notice that the 9 also has a red dot in the upper left.

  • If you remove that segment you'd get a 3, so enter the number 3 in the third slot.

  • The number 3 has three segments with dots. Remove those and you get the number 1.

  • Enter the number one in the last code slot. It should now read 8931.

  • You now have a key. Close down the key and back up.

Opening the Locked Cubby

  • Turn left to face the wall with the two shelving units.

  • Click on the cubby shelving unit and use the new key on the lower left door (the one with the red cube).

  • When the door opens up, take the green cube.

  • Notice now that the shelving unit, also a 3 x 2 grid, is giving you another clue.

  • The upper left corner is blue, the lower left corner was red, and now with the doors open the upper right corner is yellow and the lower middle cubby is green.

  • Back up.

Using the Machine (Part 3)

  • Pull up the machine from your inventory.

  • Remove any cubes from the slots.

  • Now that you have 4 color cubes, you want to place them like the clues from the cubby shelves.

  • That would be upper left blue, lower left red, lower middle green, upper right yellow.

  • When you enter the cubes correctly two cables, a red and a blue, pop out this time.

  • Now what?

Opening the Safe

  • Turn left to face the wall with the safe.

  • Click on the safe for a close up.

  • Remember those two sockets for cables?

  • Use the machine on the safe to open it.

  • Take the machine back, then click on the safe handle to open the door.

  • Remove the red lever and back up.

Getting Out

  • Turn right to face the wall with the two shelving units.

  • This time click on the box on the upper shelf of the right shelving unit.

  • Use the red knob on the metallic part of the box and click it once.

  • Note that there are six colored blocks in a 3 x 2 pattern, some of them repeating. Also note that you can use arrows on either side of the rows of blocks to move them around.

  • Click on the lever again and you will find a black and a white block, take them.

  • Flip the lever two more times to get back to the six color blocks.

  • Move the rows left and right until you get all six colors (red, blue, green, yellow, black, and white) appearing only once.

  • Once you have the pattern set, it is the clue for the final use of the box.

    • The pattern for the top row is (from left to right) black, red, blue.

    • The pattern for the bottom row is (from left to right (yellow, green, white).

  • Pull up the box from your inventory.

  • Remove any cubes from the machine, then replace all of the cubes in the pattern from the wooden box.

  • If you do this correctly a hand in the shape of a fist will appear.

  • Click on the fist to open it and get a gold key.

  • Close down the key into your inventory and back up.

  • Turn right to face the exit door.

  • Click on the door for a close up, then use the gold key on the lock to escape.

  • Congratulations! Give yourself a big hand!

49 Comments

A bit tricky. I kept thinking I was stuck.

Reply
ThemePark July 25, 2012 1:00 AM

Well, I must admit defeat so far.

I can't find out how to get the plane moving, although I've noticed that the grey plate can be found elsewhere.

I've got the machine for which the cubes are needed but only have two cubes.

I have some pliers but I can't find a single place where they can be used.

And I've noticed the odd way that Unlock is written, and I think it's a clue but I can't see anywhere to input any letters.

Reply

I am stuck.

I have a red a blue square, a pair of pliers, and a picture with a rectangle and 6, 3, and 4 and a yellow handle drawn on it, and I can see another rectangle with red and blue squares drawn on it. Have taken and placed the aeroplane.

Have tried clicking all 3 objects on everything with no result, so I presume I'm meant to solve either the numeric keypad or the blue keypad puzzles, but I have no idea how.

Reply
ThemePark July 25, 2012 1:04 AM

Stephen:

Take a closer look at the photo, specifically the frame.

Reply

i'm stuck as well.

I've solved all the puzzles but the safe, the "red" cabinet door, and the exit door. I have the cube machine and the red, blue, and yellow cubes, and a card with four numbers on it.

Reply

power of the post.

Reply

@Thomas:

The "card" isn't a card at all. Pay attention to the red dots and the clue on top of the device, they tell you what to set the numbers to in order to unlock the device's true potential.

Reply

@ThemePark:

You need to get something out of the wall using the two cubes that you DO have before moving the plane.

Reply

Thanks ThemePark, that was all I needed - finished now. Very cute puzzles.

Reply
ThemePark July 25, 2012 1:25 AM

@Tenzhi:

You must be talking about the hole that instantly closes when the button is released.

However, the two cubes I have are in the inventory together with the grey machine with the 3 buttons, so I can't use them anywhere.

Reply

@Themepark:

You can use them on the machine in question's "About Item" screen. Indeed, that's key to a few puzzles.

Reply
ThemePark July 25, 2012 1:29 AM

Ha, POP!

I mistakenly thought that the different papers with cubes on them were clues for how to in the end place 6 different cubes. But it's actually only 2 cubes at a time.

Reply
Nebulesque July 25, 2012 1:39 AM

I know it's probably obvious, but can anyone help me find the red cube?

Reply

@Neb:

Certain sliding panels may need an extra push.

Reply
Nebulesque July 25, 2012 1:44 AM

@ Tenzhi You're a champion, Thanks

Reply
adrithesciencekid July 25, 2012 1:49 AM

just got my red and blue cube into the machine. Got a down finger. can't figure out the key pad!

Reply
adrithesciencekid July 25, 2012 1:51 AM

ah ha! The down finger is actually a helpful friend!

Reply

@adrithe...:

Fingers are handy for pushing buttons. And anyway, that device looks heavy, it couldn't hurt to set it down somewhere for a moment.

Reply
Nebulesque July 25, 2012 2:07 AM

Out... That felt really good :D

Reply
bearharry July 25, 2012 2:17 AM

I got a plate with numbers and red dots and the last three digit can be changed, also the machine and red,blue and yellow square, what should I do next??

Reply

@bear:

Change the numbers by paying attention to the red dots and the clue on the device itself.

Reply
bearharry July 25, 2012 2:24 AM

I still stuck with the red dots...

I really can't find any sequences between the dots and digits with any other things in the room even the 80o8^ devices...

Reply
vulpisfoxfire July 25, 2012 2:25 AM

Okay, I feel stupid..

I'm presuming the numbers from the paper and the wind-up box have something to do with the safe, but I'm not getting it. And where is this plate that people keep mentioning?

Reply

@bear:

The clue is on the device itself. There's a red line partially erased by an eraser. Sequentially erase the red.

Reply

@vulpis:

Note the wind up box gives a sequence 1-2-block-3-block-4-5-block. Note the missing numbers and look at the paper. Place face firmly in palm. ;)

Reply
https://www.google.com/accounts/o8/id?id=AItOawkTvbJsbfYY0k7TNFiWEyiFEq9sDGCTeDk July 25, 2012 2:29 AM

I'm still not getting the

red eraser thing. I see the clue, but it's not in a line or any other discernible pattern.


Reply

My memory miscounted on the last one, but the idea is sound. ;)

Reply

Alright, full disclosure on the device:

You take the first number and erase the lines that have red dots to get the second number. Then you erase the lines with red dots on that number to get the next. As I recall, the final sequence ends up being:

8931

Reply
vulpisfoxfire July 25, 2012 2:32 AM

@Tenzhi

Ah. Annnnd...looks like I hit a glitch or something. Plane goes around, knocks off green thing...but the wastebasket is still empty afterwards. :-(

Reply
https://www.google.com/accounts/o8/id?id=AItOawkTvbJsbfYY0k7TNFiWEyiFEq9sDGCTeDk July 25, 2012 2:33 AM

@Tenzhi
Thanks! I was really lost on that one.

Reply

@vulpis:

That's a red herring. Turn left. ;P

Reply
vulpisfoxfire July 25, 2012 2:39 AM

@Tenzhi POP. It bounced. Stumbled a bit on the card, but finally got the rest of the way out. Yeesh.

Reply
Chien D'Arren D'Or July 25, 2012 3:35 AM

Walkthrough

Initial Room Survey

Wall 1

  • two photographs

  • 3x2 shelf

    • upper center -- 5-button combination

    • lower left -- locked door

  • other shelf

    • wood box with missing lever

    • box with white circle

turn left to wall 2

  • wood stand

  • door with button ... opens door, but closes

  • box on shelf -- white button makes symbols appear in display

  • safe with combination

turn left to wall 3

  • gear and chain machine

  • empty trash can

turn left to wall 4

  • door

  • combo lock with wood airplane

  • screwed down painting

  • locked compartment with keyhole

Solving!

1. Getting the Box Machine

wall 4: look carefully at frame of screwed down painting

do you see numbers?

5
2 (14) 6
3

where have you seen an up/down/left/right/center pattern?

upper center door of wall 1, 3x2 shelf, upper center compartment

use the above code on combination lock, and get box machine

2. Get blue box

wall 2, lower corner of door

3. Get red box

wall 1, there's a key in the keyhole of the 3x2 shelf, lower left corner

wall 4, key unlocks locked compartment

press arrow to slide open compartment, and note pattern

- - R
- B -

press arrow again, and take red box

4. Get yellow box

play with box machine and boxes

set boxes to look like pattern in locked compartment

wall 2, place box machine on platform under door

get yellow box and gold key from behind door

retrieve box machine

5. Get airplane

wall 4, combo lock for airplane needs 5 symbols

where have you seen those symbols?

wall 2, symbol box on shelf

symbol box shows 3 symbols on each button press

but not all different

each time the button is pressed, the right two symbols
slide left, and a new symbol appears

one of the symbols is a blank space, and then the pattern repeats

repeating pattern is 5 symbols long!

pattern is 8Oo8�

wall 4, type pattern into combo lock, and get airplane!

6. Get green ball

wall 1, get paper out of lower right 3x2 shelf

gold key
- 3 -
6 - 4

wall 1, use gold key on box with white circle

turn key and see pattern: 1 2 Y R 5 B

compare paper and pattern

3 numbers on paper

the same three numbers missing from pattern!

3 = Y, 4 = R, 6 = B

- Y -
B - R
into box machine

wall 3, place box machine (with gear) into gear-and-chain machine

as per photograph on wall 1, place airplane onto green link of gear-and-chain machine

green ball rolls to corner of wall 4

retrieve box machine

7. get eraser box

wall 1, right hand photograph rotates, get cutters

cut ties holding green ball closed, and open ball to get screwdriver

wall 4, use screwdriver on screwed-down painting to get eraser box

8. unlock eraser box

as per clue, puzzle is about erasing

erasing red

from left to right

each number has one or more red-dotted segments

from each number, erase the red segments of the previous number

8 9 3 1

a key appears!

9. unlock safe

wall 1, use key on 3x2 shelf, lower left locked door

get green box

note colors on 3x2 shelf, now that all doors are unlocked

B - Y
R G -

set box machine to that pattern, red and blue leads appear

wall 2, plug leads of box machine into safe lock

get box handle

10. escape!

wall 1, attach handle to brown box

pull handle twice and get black and white boxes

pull handle on box twice more

obviously, this is a clue to placing boxes in box machine

we now have 1 each of 6 different colors

slide upper and lower rows left and right until a legal pattern appears

black red blue
yellow green white

input pattern into box machine

click hand to get key

wall 4, unlock door with key, and escape!

Reply

That was fun, I think I spent too long over thinking thinking the puzzles!

Especially the final one

Where I clicked everywhere trying to find something to punch through

Reply
Patreon Crew SonicLover July 25, 2012 8:59 AM

Oh wow. On a second play-through I discovered something clever.

The safe with the red and blue holes-- the one you "hack" with the block device-- will unlock if you enter its combination manually.

It's not that hard to remember since it's the first several digits of Pi.

Reply

That picture is brilliant.

Reply

I can't seem to use the wooden platform under the door. I have the item selected, I'm at the correct view, but nothing happens. Am I missing something?

Reply

Never mind, I got it. There *are* a couple of puzzles that have crossed up clues, in that other areas of the room have the exact same format, and they're active at the same time. I always feel like that goes from normal misdirection to outright misleading.

Otherwise, a very challenging bite.

Reply
nelliel123 July 25, 2012 12:42 PM

Am I missing something? All my efforts to enter the code for the top center cupboard fail.

Reply
inheritance.fan July 25, 2012 1:22 PM

The walkthrough is INCREDIBLY hard to comprehend.
"play with box machine and boxes
set boxes to look like pattern in locked compartment"
No. What happened to the usual style of walkthroughs?

Reply

ditto inheritance.fan

"play with box machine and boxes"

What box machine??? What boxes????

Sorry this game is too frustrating on an already too frustrating day. I like to "escape" frustration not embrace it.

Reply

Our own grinnyp is working on a walkthrough for this game, sorry for the delay.

Reply

i agree with the others. this walkthrough is hard to follow. i hope grinnyp will have this up soon.

Reply

My goodness, there's been a flood of complaints about walkthroughs lately. Maybe it's the heat, but 1) walkthroughs take a lot of time to write properly and most of us aren't paid to do them, 2) polite constructive criticism would be... a lot more polite, and a lot more constructive. Difficult games do invite a lot of teeth-gnashing, but after a while, repetition is just dogpiling.

Reply
awfulperson July 25, 2012 6:13 PM

That was a tough little puzzle! Very enjoyable. Five stars. :)

Reply
awfulperson July 25, 2012 6:31 PM

BTW, I wrote a walkthrough once, and I can certainly concur with Shudog that it is quite an undertaking, getting all those details painstakingly and logically in order.

I just poked my head into Chien's walkthrough--the language is a bit terse, but I think he did good work. Nice job, Chien! :)

Reply

(First off, yay for not having to log in prior to commenting! At last!)

Wow, that was crazy fun. The box-device was definitely an inventive touch, and everything else lived up to my expectations for a good mental workout that I love in a room-escape.

I think this one'll be sticking in my mind as well as Muselock has for the past few years. Kudos to Haretoki!

PS Huge thanks to grinnyp for the walkthrough; I take no shame in admitting this thing had me stumped in a few spots.

Reply

I came back today to try again and I am very glad that I did. Thank you grinnyp for writing your walk through. It's your "exploration" section that I find very helpful.

And to Chien - Thank you too for stepping up to the plate first. Forgive me for being harsh.

Thanks to Shudog and awfulperson for reminding me to be more patient and kind.

I used to write software manuals with step by step instructions. I should have been more understanding.

Nice lunch break and now time to get back to work. Have a wonderful day!

Reply

^ Scroll Up | Homepage >

Leave a comment [top of page]

Please consider creating a Casual Gameplay account if you're a regular visitor here, as it will allow us to create an even better experience for you. Sign-up here!
  • PLEASE UNDERSTAND SITE POLICIES BEFORE POSTING COMMENTS
  • You may use limited HTML tags for style:
    (a href, b, br/, strong, em, ul, ol, li, code, spoiler)
    HTML tags begin with a less-than sign: < and end with a greater-than sign: >. Always. No exceptions.
  • To post spoilers, please use spoiler tags: <spoiler> example </spoiler>
    If you need help understanding spoiler tags, read the spoiler help.
  • Please Preview your comment before posting, especially when using spoilers!
  • No link dropping, no domains as names; do not spam, and do not advertise! (rel="nofollow" in use)
chrpa Jayisgames needs your help to continue providing quality content. Click for details Welcome to the Roundup 66 - Retro with four games! After you find the ten monkeys in the chapter, look in the inventory. You will find a...  ...
chrpa Jayisgames needs your help to continue providing quality content. Click for details Welcome to the Roundup 65 with three games! As mentioned in the previous roundups, only odd-numbered episodes are featured since even-numbered are for Robin Vencel's patrons (the...  ...
chrpa Jayisgames needs your help to continue providing quality content. Click for details Hi! Weekday Escape and Weekday Puzzle are here! First we have two new cans from tomoLaSiDo and then two small rooms from isotronic. That's all for this...  ...
6,365 Views
0 Comments
chrpa Jayisgames needs your help to continue providing quality content. Click for details Welcome to Mobile Monday! We have another beautiful game from Nicolet and it's a winter game as it should be. Tasuku Yahiro have released another of their...  ...

HELP Jayisgames.com

Recent Comments


Display 5 more comments
Limit to the last 5 comments

Game of the week


Dark Romance: Vampire Origins Collector's Edition

Your Favorite Games edit

add
Save links to your favorite games here. Use the Favorites editor.

Monthly Archives