JayisGames.com is now available ad-free!
Jay is Games recommends Cheat Happens with 8,000+ games and 35,000+ trainers!

Rosetta Escape


  • Currently 4.7/5
  • 1
  • 2
  • 3
  • 4
  • 5
Rating: 4.7/5 (179 votes)
Comments (83) | Views (11,522)

Weekday Escape

GrinnypRoom escape games are some of the best things in the world, at least I think so. However, when you've played enough of them, things start to feel a bit...well, samey, don't they? After all, how many shaky pictures have we knocked off of walls? How many left/right directions for buttons (or cranks) have we deduced from pictures/dolls/figurines, whatever? How many times have we searched for keys, screwdrivers, wrenches, or other helpful bits of hardware? Wouldn't it be nice to have an escape game with some unique and original puzzles? Well, dear readers, we do now. Welcome to Rosetta Escape by Otousan.

Rosetta EscapeRosetta Escape, in fact, has many of the usual conventions. Screwdrivers? Check. Keys? Check. Finding objects? Check. But what lies at the heart of this amusing little game are a series of unique, original, heavily color-based puzzles that infuse a breath of fresh air into the stale, standard escape. Even better, many of the puzzles are randomly generated, so they change each time you play the game.

Rosetta Escape begins in a basic, four-walled room. There's no set up (and no musical accompaniment) to let you know what's going on. You're in a room, and of course you want to get out. Move around using the arrows at the sides (or bottom) of the screen, click on things for a close up or to pick them up, and bend your mind sideways to escape this amusing little puzzle. Finding things is pretty easy, due to the wonderful changing cursor that lets you know where the hot-spots are. Solving the puzzles? Well, that might take a while. Pull up a chair and prepare to spend some time solving your way out.

Although Rosetta Escape is a Japanese game, no knowledge of the language is needed. Any letter puzzles are in English, and everything else is a complicated code of colors, tiles, symbols, and funky drawings which, if interpreted correctly, will help you get out of the stark space. Otousan (which means "father" in Japanese) has created a fun, challenging little world in which to get lost for a few minutes (or hours, depending). The only complaint is that a save feature of some sort would have been nice, especially if you get hung up and want to walk away for a while.

The backgrounds are pretty basic and somewhat cartoony, but the heart of the game is in the puzzle solving. Original, enjoyable, and in some respects different from many of the room escape games out there, Rosetta Escape is a fantastic way to while away your time in the middle of the week. I only wish my dad made escape games this good.

Play Rosetta Escape

Walkthrough Guide


(Please allow page to fully load for spoiler tags to be functional.)

Archaeologist's Notes

The ancient race I am researching seems to use its own number system. I have obtained an object resembling a child's toy, with beads on a post. The egg at the very bottom represents the number 1, the leaf 2, and so on up the post.

I have also discovered a game of sorts the race played. They take a number of colored tiles with the corners painted in certain ways, and try to put them together so adjacent corners match. I have gotten very good at this game; the trick is to begin by isolating tiles that could only possibly begin in one location on the grid, or that must be adjacent to one another. I have installed a rudimentary security system in my office based on this game.

Another artifact of the race recently came into my possession: a finely crafted mask. The mask was found with some transparent colored beads that could be set into the mask's eyes, allowing the wearer to see everything in a certain color. It might have been used for seeing things through rose-colored glasses, or for decoding secret messages.

The race has its own symbols for addition and subtraction, too: a closed eye for the former, and an open eye for the latter. Their = sign appears to be an ear. I'm not entirely sure why they chose these body parts to represent those symbols, but they'd probably be just as mystified with our scheme. I also noted through those arithmetic tablets I found that their zero is represented by a cloud.

What a discovery I made today! It seems the race did not use base ten like we do; rather, they use base nine. Now that nine-by-nine grid I found the day before makes a lot more sense, and I know why there seemed to be one bead too few on that toy. Still, why? Did they only have five fingers on one hand and four on the other? No, that doesn't make sense. I must continue to research this.

I found another game the race plays to pass the time, using bird figurines. I have the fundamentals jotted down in my notebook: an equal number of each bird is set up on each end of a line, facing one another, with a single empty spot in between the two sets. One bird at a time is moved, one step forwards or jumping over a single bird in front of it, until the birds have swapped places. I've found the perfect strategy for winning this game: distribute the birds in such a way so that they alternate colors down the line. I am very good at the race's games; what I wouldn't give to go back in time and dazzle them with my skills!

Rozetusta Escape Walkthrough

General Information

  • Watch for the changing cursor, it indicates hot-spots.

  • Some items can be picked up again after being placed, you might need to use them again.

  • Many of the solutions change each time you play the game, so the walkthrough will give a general idea of how to solve a particular puzzle.

  • Hope you're good at math.

  • Good luck!

Exploration

  • You begin facing a couch (in a shade of orange that makes the eyes bleed). There are 3 pictures on the wall behind the couch. Click on the picture on the left for a close up.

  • This picture appears to be tiles behind a frame and glass. Notice on the right side of the frame there is a small 3 digit code box.

  • Click on the 3 digit code box for a close up and notice that it is framed in red, and that the digits are letters. Back up twice.

  • Click on the picture on the right. Again, tiles behind glass and a 3 digit code box. Click on the box to see that it is framed in green and that it is also letters. Back up twice.

  • Click on the central picture for a close up.

  • Okay, the first of several strange pictures. The dude in the picture appears to be pointing to two things: (1) a leaf, and (2) a large peg that looks like the old Towers of Hanoi game with two rings on it.

  • Click on the picture and you will notice that the frame and glass swing away, revealing 3 small blurry dots at the bottom of the picture. Click on those dots for a close up.

  • In close up you can see a picture of a leaf and the number 2. I'm sure that will make sense eventually. Back up twice.

  • Click beneath the couch for a close up and take the tile hidden there. Back up.

  • Turn left and you are facing the door that you will eventually escape from. To the right of the door is a panel in the wall, click on it for a close up.

  • Looks like we need a key. Back up.

  • Click on the orange carpet on the floor in front of the door for a close up. This will reveal another tile underneath the right corner of the rug. Take the tile and back up.

  • Turn left and you are facing a low cabinet with two doors, each needing a two digit code (this time numbers). Above the cabinet is a picture on the wall, and there are three items on top of the cabinet.

  • On the left is a yellow bird with a design similar to the one being worn by the dude in the central painting. In the middle is a gray grid that is empty.

  • Click on the item on the right and you will see two posts with rings, each ring having a symbol on it.

  • You can click on the posts again for a closer close up if need be, but you will see that, from top to bottom, you have the symbols for: a sun, a bird, a snake, a chick (baby bird), a fish, a flower, a leaf, and an egg (or just a circle).

  • Back up and turn left.

  • You are now facing a desk with two gray slabs (or papers) on the wall above it. Click on the gray slabs for a close up.

  • The slab on the left has a series of symbols, each line having 5 symbols. Most of these symbols are ones seen on the posts on the cabinet, but there are a few unfamiliar ones as well. The slab on the right is incomplete. Back up.

  • Click on the desk for a close up.

  • Open the bottom drawer and take the circle with what looks like eyeholes.

  • Open the middle drawer and take the tile (you should now have 3).

  • Notice the notebook on top of the desk? Click on the notebook to pick it up.

  • Click on the notebook again to open it. Notice on this page the red birds facing left and the green chicks facing right.

  • Click on the page to turn it and you will see some instructions. These are basically instructions for a jumping peg puzzle. Each character can move one move in the direction it is facing, or can jump over one other character to an empty space. Characters cannot move backwards or jump over 2 characters.

  • Click on the notebook again to turn the page and you will see a jumble of colors. Note the symbol in the lower right of the page, it looks like the circle (mask) that we just picked up in the desk drawer.

  • Back up twice and turn right to face the cabinets.

  • Puzzle solving time!

The 3 Tile Puzzle and the Left Cabinet

  • You should now be facing the low cabinet.

  • Click on the picture on the wall above the cabinet for a close up.

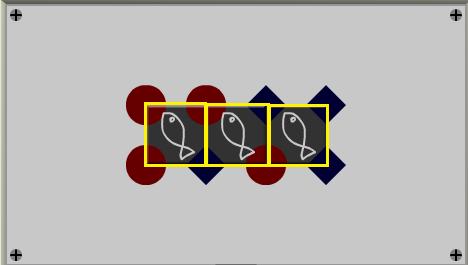
  • Notice that there are spaces for 3 tiles in the picture, and that there are red circles and blue bars around the outside, which are clues to the placement of the tiles.

    • I can't give you an exact solution for the symbols on the tiles, as they change from game to game. You need to solve for the colors in the corners of the tiles, those don't change.

    • From left to right, the tiles should be: (1) The tile with red in the upper right, upper left, and lower left, and blue in the lower right, (2) The tile with red in the upper left and lower right, and blue in the upper right and lower left, and (3) The tile with red in the lower left and blue in the other three corners.

    • Screenshot.

  • Once the tiles are properly placed you will be directed to the lower left cabinet. Note that the symbols on the tiles correlate directly to the 3 digit code on the cabinet.

  • Now you just need to figure out what numbers the tiles represent.

    • To solve the number values for the symbols, you need to combine the hint on the central picture (the guy pointing to a leaf and the second ring on the post), the leaf = 2 on the picture, and the posts sitting on top of the cabinet.

    • All indications point to the leaf being 2, and it is near the bottom of the column of rings.

    • This should tell you that the number values go from 1 - 8 (the number of rings) and from bottom to top.

    • Therefore, the symbols stand for: egg = 1, leaf = 2, flower = 3, fish = 4, chick (baby bird) = 5, snake = 6, bird = 7, and sun = 8.

    • The symbols on the tiles are usually different each time you play, but the numbers = symbols will stay the same. I.E. egg will always equal 1, leaf will always equal 2, etc.

    • Therefore, use the symbols on the tiles (and on the cabinet) to get the code. If you have fish, fish, fish, for instance, the code would be a simple 444.

  • Enter the 3 digit code into the door and back up once.

  • Click on the door handle to open it and take the item (phillip's head screwdriver).

  • Click on the picture above the cabinet again and notice that the background plate is being held down by phillip's head screws. Use the screwdriver to remove the screws and click on the plate to remove it.

  • There are now 9 slots in the background for tiles. Notice that the tiles you placed earlier are no longer in the correct places (they don't match the background).

  • Pick up the 3 tiles and also pick up the 2 red balls in the lower right corner of the picture.

  • Back up.

The Left Couch Picture

  • Turn left until you are facing the desk. You should have your 3 tiles back, as well as the mask and the red balls from the picture.

  • Click on the desk for a close up.

  • Pull up the mask from your inventory and use the red balls in the eyeholes.

  • Close down the mask and click on the notebook on top of the desk. Keep clicking until you are at the page with the multicolors and the little mask symbol.

  • Use the mask from your inventory over the colored mass and three letters will appear: E I A.

  • Put the mask back into your inventory, back up twice, and turn left to face the couch.

  • Click on the left picture for a close up and click on the 3 digit code on the right of the frame.

  • This is the code with the red border, and we just used the red balls (lenses) in the mask to get the code from the notebook.

  • Enter the code E I A and back up once.

  • Click on the picture to open the frame and take the six tiles.

  • You have now uncovered another picture, this one of the strange dude playing with the post and the symbol rings, with five symbols above him.

  • The symbols are: leaf, lips, egg, ear, and flower.

  • Notice the 3 fuzzy dots at the bottom of the picture? Click on them for a close up.

  • Now we have 2 + 1 = 3.

  • Could the symbols and the math equation be related?

    • We know that leaf is 2, egg is 1, and flower is 3.

    • Therefore, the lips symbol would stand for the plus sign, and the ear symbol would be an equal sign.

  • Back up twice and turn right once to face the desk.

  • Click on the gray slabs on the wall for a close up, then click on the left slab to look closer.

  • This slab is like the Rosetta Stone, it will help you decipher some simple symbols you haven't seen yet.

    • Notice the first line, leaf lips leaf ear fish, which using the symbols we know is 2 + 2 = 4.

    • The second line is egg lips flower ear fish, which is 1 + 3 = 4.

    • The third line introduces a symbol we've not seen before, a cloud.

    • The third line is cloud lips fish ear fish, which is ____ + 2 = 2. Therefore the cloud symbols stands for 0. (0 + 2 = 2)

    • The fourth line introduces another symbol we've not seen before, an eye.

    • The fourth line is fish eye leaf ear leaf, which is 4 ___ 2 = 2. Therefore, the eye stands for a minus sign (4 - 2 = 2).

  • Back up twice and turn right once to face the low cabinet.

The 9 Tile Puzzle and the Right Cabinet

  • You should now be facing the low cabinet and the picture on the wall behind it. Click on the picture for a close up.

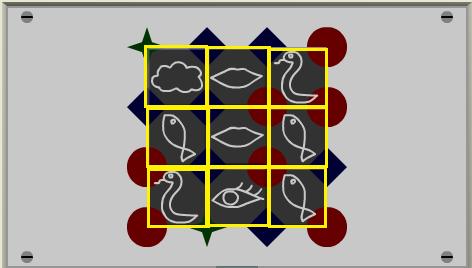
  • Now there are spaces for 9 tiles, and you should have 9 tiles in your inventory.

  • Again, you will be placing the tiles according to the colors in the corners. In the end, each corner should match the corner of the tile next to it (or the color on the background).

  • Notice that a new color has been added, green.

  • Solve for the green first, so the tile with the green in the upper left corner goes in the upper left corner of the picture, and the tiles with green in the lower right and lower left corners goes in the lower left of the picture.

  • After that, it's pretty easy to solve. The symbols change, but the colors in the corners do not.

  • Screenshot.

  • Once you solve the puzzle it will take you to the lower right cabinet door and the 3 digit code there.

  • Again, the symbols will be different each time. Simply substitute the numbers and math symbols as needed to get the solution. This time rather than single numbers you will be doing simple math problems with 1 digit numbers.

  • Once you have the numbers in, back up once and click on the door handle to open it.

  • Take the standard screwdriver from inside the open cabinet.

  • Click on the picture above the cabinet again for a close up.

  • Use the screwdriver on the screws holding down the background plate to reveal yet another plate beneath. Yep, the tiles are now in the wrong place so put them back in your inventory.

  • Also pick up the green balls (lenses) from the upper left corner of the puzzle and back up.

The Right Couch Picture

  • Turn left to face the desk and click on the desk for a close up.

  • Pull up the mask from your inventory and remove the red lenses from the eyeholes.

  • Now place the green lenses in the eyes and close down the mask into your inventory.

  • Click on the notebook to pick it up and click until you have reached the back page with the color jumble again.

  • Use the mask over the color jumble to find the letter code I B J.

  • Back up twice and turn left to face the couch.

  • Click on the right picture above the couch, then click on the 3 digit code boxes for a close up.

  • This is the code with a green frame, so use the letters you got from using the green lenses, I B J.

  • Back up once and click on the frame to open it.

  • Take the tiles.

  • You have now uncovered a picture showing the strange dude pointing to some kind of grid. There is the symbol for flower and snake in the upper left.

  • Notice the 3 fuzzy dots at the bottom, click on them for a close up.

  • Flower snake does not equal 36, according to this. Back up once.

  • Look again at the grid.

  • Note that the grid has 9 rows and 9 columns.

  • Back up and turn right twice to the low cabinet.

The 15 Tile Puzzle

  • Click on the picture on the wall above the cabinet for a close up.

  • You now have to place 15 tiles in the empty spaces. This one is a lot harder because the green is somewhere in the middle.

  • Remember to match all of the corners. Below is a screenshot of the finished puzzle so you can see where the colors go.

  • Screenshot.

  • Once the tiles are placed properly the plate will disappear, revealing a black safe door with more symbols. Now you're solving for 2 digit numbers.

  • On the left side of the safe is a piece of paper, pick it up.

  • On the paper is a yellow key, take it.

  • Notice that the paper is in 9 rows and 9 columns, with numbers in each cell.

  • Time to solve the math problems on the safe.

    • There are two ways to do this, one using the paper with the grid and one using math.

    • Basically you are looking at a base 9 math system.

    • In a base 9 system, the easiest way to get the correct number is to take the number given by the symbols and subtract the first digit from it.

    • For instance, if you have the egg leaf symbols (1 2), you would subtract the first digit (1) from it. In the base 9 system egg leaf would stand for 11 (12 - 1 = 11).

    • If you had the leaf sun symbols (2 8), subtract the first digit (2) and you would get 26 (28 - 2 = 26).

    • If, however, you don't want to do it this way, you can use the paper grid to the left of the safe.

    • Remember the picture of the dude pointing to the grid?

    • The symbols there were flower snake (3 6). However, as the dots at the bottom of the picture said, flower snake does not equal 36.

    • Since we are using a base nine system that runs from 0 (cloud) to 8 (sun), the rows in the grid should be numbered the same.

    • That would mean that the top (first) row is row zero, the 2nd row is row 1, the third row is row 2, etc.

    • The columns would be numbered normally from left to right, 1 through 9.

    • Look closely at the picture and the guy is pointing to row 3 (the 4th row down) and column 6, which corresponds to the flower snake symbols.

    • Now look at the paper to the left of the safe. Row 3 (4th row down), 6th column has the number 33 in it.

    • If you solved using the base 9 system, flower snake (3 6) minus the first digit (3) equals 33. In the base 9 system, either using the grid or the math, flower snake represents the number 33.

    • Look at the safe door. You should have two number symbols, then an math symbol (either the lips or the eye for plus or minus), then a second two digit symbol.

    • Using either the base 9 math method or the paper grid solve for the two digit numbers, then either add or subtract them to get the 2 digit numbers that go in the code boxes.

    • For instance, snake snake eye fish bird is a two digit number, a minus sign, and another two digit number.

    • First solve the two digit numbers. Snake snake (6 6) minus the first digit (6) is 60, so snake snake is 60.

    • Fish bird is 4 7, minus the first digit (4), gets you 43. So fish bird is 43.

    • 60 - 43 = 17. 17 would be the code to go in the box.

    • The symbols used changes each time you play, but the underlying math remains the same.

  • Once you've placed the numbers in the code boxes, click on the yellow handle on the right of the safe to open it.

  • Take the black key, back up, and turn left.

Getting Out

  • You should now be facing the desk. Use the yellow key you got from the number paper to open the top drawer of the desk.

  • When you open the drawer you will find the missing piece of the gray slab that goes above the desk. Back up.

  • Click on the gray slabs for a close up and use the missing piece on the right slab.

  • You will see that there are more equations here, 2 digit equations that further demonstrate how to add with the base 9 numbers.

  • Once you found the yellow key in the paper you could go to the desk, get the slab, attach it, and use that to help you solve the base 9 numbers. However, it is not necessary, and you can complete the game without ever having opened the desk drawer.

  • Back up and turn left twice.

  • Click on the panel to the right of the door for a close up and use the black key on it.

  • Click on the panel to open it and you are confronted with four symbols, 2 chicks facing right and 2 birds facing left.

  • Remember the drawings in the notebook?

    • This is a simple jumping peg puzzle.

    • First, pull up the mask from your inventory and remove the green lenses from the eyes.

    • Remember from the notebook that the chicks were green and the birds were red.

    • Add the green lenses to the chicks on the left, and the red lenses to the birds on the right.

    • Once both sets of lenses are added the symbols will color in and the puzzle will activate.

    • The object is to get the green chicks from the left side to the right side, and the red birds from the right to the left.

    • Click on the green chick on the right (the one nearest the birds) to move it one space forward (the green chick should now be right next to the red bird).

    • Now click on the leftmost red bird to make it jump over the green chick. You should now see (from the left) green chick, red bird, green chick, space, and red bird.

    • Move that red bird on the right forward to the empty space, so that now you have chick, bird, chick, bird, space.

    • Click on the rightmost green chick to jump it over the red bird to the far right space. Then click on the other green chick to jump it into the space vacated by the first green chick. You should now see space, bird, chick, bird, chick.

    • Move the left red bird forward one space to the far left space (bird, space, chick, bird, chick).

    • Now jump the right red bird forward to fill the empty space left by moving the other bird (bird, bird, chick, space, chick).

    • Move the left green chick forward once, and you have reversed the positions of the birds and the chicks. The button in the upper right should now read "open".

  • Once you solve the birds/chicks puzzle, back up once.

  • Click on the door to open it and click on the open doorway to escape.

  • You've now escaped to a barren desert! Good luck with that!

83 Comments

So I've unlocked-

the second set of symbols for the number combination lock and all of the picture frames. I'm trying to figure out what numbers the eye, lips, and cloud correlate to.

It seems like some hints around the room specifically do not apply to all of the symbols, according to other hints. I have a table set up that is suggested by one of the framed pictures. Any subtle hints from others would be welcome. :)

Reply

Trying to figure out what the "1" symbol is:

A hint says 1+2=3. 2 is a leaf and 3 is a flower. So, logically, 1 could either be the sun or the cloud... or possibly even the round symbol that could be a seed. Visually, the leaf plus the sun could form the flower.

Not sure where to take that.

Reply

At the risk of flooding the comments with only my posts...

I'm starting to think the hints in the 1+2=3 is just to get me the 3 for the flower. I'm still not sure what the 5 symbols at the top of that picture is supposed to mean.

Reply

I liked quite a bit of it (especially the changing cursor; yay!), except...

The way the base 9 puzzles were handled was kind of... iffy. Choosing to use base 9 to begin with seems a bit overboard, but having us get base 10 ("normal") answers out of base 9 equations just seems off.

Reply
The Logical Ghost September 29, 2010 1:29 AM

Actually managed to solve this without a walkthrough or any hints at all. Yay! I loved the use of different codes and a unique number system.

Reply

@escapist look at the full tablet on the wall. the fourth symbol in each is the same. it's an = sign.

the symbols are parts of an equation.

no more hints.

Reply

I just beat it, but never opened the locked desk drawer. Hmm. Anyways, here is a hint for the symbols:

They may not all be numbers.
More?

Think of the 1+2 hint literally
Give up?

The lip-like symbols is +, the eye is -, and the cloud is 0. The ear looking symbol i considered =. Treat them like equations to solve for an unknown.

Reply

Aha! I think I see what you're getting at. Good hint. Thanks, The Logical Ghost!

Reply

Err, I meant to thank GrinnyP. =)

Reply

@Escapist

The beads stacked on the table correspond to 1-8. So, 1 = egg, 2 = leaf, 3 = flower, 4 = fish, and so forth. Don't read the rest if you want to figure the rest out by yourself. ;)

Cloud = 0 while lips is a plus sign, and the eye is a minus sign. So something like would be 1 + 4 = 5 or . Then all of the more complicated math that it asks you to do later is done in base 9.

I hope that helps?

Reply

I enjoyed this.

I don't know if it's just me, but I found the number problems pretty easy. It seemed like the designer made sure to show you each concept two ways. I guess my advice would be, don't overthink it.

Reply

Forgot to say, I was a little puzzled by the ending. Is there more than one?

Reply

Ok.....what was with the locked drawer on the desk? Never got into it, though I got out.

Reply
infeliciter September 29, 2010 2:01 AM

First time i didn't need a walkthrough.
@Alkalannar

it has the 2nd half of the right tablet on the wall, there is a key and a number map (makes getting the number easier then counting) next to the BIG number puzzle

Reply

I really liked this escape!! I sure hope we see more from Otousan.

Reply
wildflower12 September 29, 2010 2:19 AM

Ooh, that made my brain hurt -

converting first to base 9 then back to base 10. That was mean!

Is there another ending? I feel like there should have been something more to the gray block in the middle of the table.

Reply

Finally got out. LOL Thanks for the hints. I agree that the only weird part was:

The use of a base-9 number system. Number systems outside of the decimal system always baffled me for some reason. I'm actually shocked at the number of people who were able to do this on their own. It makes me wonder how many programmers visit here. :)

Other than that, it was a pretty enjoyable experience. Thanks for humbling me, Otousan!

Reply

For the lips and eye symbols :

These symbols aren't numbers, 1+2=3 is correlated with another hint in the same place. For the numbers, see the thing with two columns of symbols on the staircase.

Maybe I will write a walkthrough soon (if nobody has done one yet), but I've never done any (and I don't speak english very well).

Reply

If you get stuck looking for green 'lenses' like I did:

Take the 3 tiles back out of the picture and then you will be able to fill it with what you have

To calculate easily in your head for base 9:

For every 10, subtract 1.
10=10-1 (9), 20=20-2 (18), 58=58-5 (53), etc...

Reply

Okay, something's wrong. Can someone check my math?

I'm at the two-digit puzzle. I've worked out that I'm supposed to use base-nine, and I know what the symbols mean. (At least I thought I did.) I have to solve duck-duck eye flower-bird and flower-fish lips fish-bird. My strategy is to multiply the "nines" digit by nine and then add the ones digit, which got me correct answers for the practice tablet. Therefore, the problems in base-ten are:
50-33=17
31+42=73
This doesn't get me an open door though. What am I doing wrong?

Reply

funnyguts, redo your flowerbird math

Reply

sry funnyguts, fishbird is incorrect as well. Your bird is wrong.

Reply

I wish I knew why

I thought the bird was worth 7 on the tablet but six on the cabinet.

Well, I almost beat this one without help...

Reply
crashlanding September 29, 2010 4:40 AM

Haven't started playing yet, but I thought I might let you know that the Japanese title spells out "Rosetta", not "Rosetsuta". the little tsu doubles the consonant sound of the following t :B.

Reply

That one was fun! Only question I have - did the two items on the display desk do anything? The little... chicken-ish thing and the blank stone board?

Reply

What I beautiful escape game! No ridiculous pixel hunting, very clever puzzles, a substantial amount of hints to get you through, but still challenge your mind! Not sure why the reviewer decided there were lots of colour based problems...

As far as I can tell, the only colour based problem for colour blindness comes at the very end with the birds?

Reply

Kadi: If you mean the chicken-esque thing next to the board under the puzzle space,

it's holding up nine fingers, in another hint to the base nine nature of everything.

Reply

Archaeologist's Notes

The ancient race I am researching seems to use its own number system. I have obtained an object resembling a child's toy, with beads on a post. The egg at the very bottom represents the number 1, the leaf 2, and so on up the post.

I have also discovered a game of sorts the race played. They take a number of colored tiles with the corners painted in certain ways, and try to put them together so adjacent corners match. I have gotten very good at this game; the trick is to begin by isolating tiles that could only possibly begin in one location on the grid, or that must be adjacent to one another. I have installed a rudimentary security system in my office based on this game.

Another artifact of the race recently came into my possession: a finely crafted mask. The mask was found with some transparent colored beads that could be set into the mask's eyes, allowing the wearer to see everything in a certain color. It might have been used for seeing things through rose-colored glasses, or for decoding secret messages.

The race has its own symbols for addition and subtraction, too: a closed eye for the former, and an open eye for the latter. Their = sign appears to be an ear. I'm not entirely sure why they chose these body parts to represent those symbols, but they'd probably be just as mystified with our scheme. I also noted through those arithmetic tablets I found that their zero is represented by a cloud.

What a discovery I made today! It seems the race did not use base ten like we do; rather, they use base nine. Now that nine-by-nine grid I found the day before makes a lot more sense, and I know why there seemed to be one bead too few on that toy. Still, why? Did they only have five fingers on one hand and four on the other? No, that doesn't make sense. I must continue to research this.

I found another game the race plays to pass the time, using bird figurines. I have the fundamentals jotted down in my notebook: an equal number of each bird is set up on each end of a line, facing one another, with a single empty spot in between the two sets. One bird at a time is moved, one step forwards or jumping over a single bird in front of it, until the birds have swapped places. I've found the perfect strategy for winning this game: distribute the birds in such a way so that they alternate colors down the line. I am very good at the race's games; what I wouldn't give to go back in time and dazzle them with my skills!

Reply

This is an excellent game; another great find by grinnyp. The game flows nicely, and the puzzles are logical. Although intimidating at first, the game progresses comfortably with challenging puzzles that can be solved by ingenuity or patient effort. The game does not need a walk through, but if a player should need some hints, SonicLover's Archaeologist's Notes post above is perfect.

Solo escapes are sweet.

Reply

Finished. The only bit I had trouble with was getting the whole base 9 thing. I've never been very good at maths. But other than that I thought it was a fairly easy game, and very nicely paced. Did anyone find a key to that top drawer? Is there more than one ending?

Reply
Patreon Contributor kingjulien86 September 29, 2010 10:22 AM

Can someone please explain the base nine system without giving too much away? GQWeasle's explanation is confusing me.

Reply
Paul Barratt September 29, 2010 10:42 AM

A very good game. Frustrating at the end though.

I had to construct a base 9 addition table in Excel to get my head around it.

Reply

I just really don't get this number puzzle.

I can't wrap my brain around base 9 and I'm a programmer. Or else I'm understanding base 9 just fine and the logic in these puzzles is incorrect.

For example, the first double digit equation on the right tablet shows egg-flower lips leaf-flower ear flower-snake.

Taking the clue that the first column of the toy goes bottom to top and the 2nd column goes top to bottom I see this as 16 + 26. No matter how you approach this, whether it's translated from base 10 to base 9 or vice versa there is no logical way to reach the answer they have of 33. Can someone explain this because I just don't get it.

Reply

Darn it. I don't even know what base 9 is, or how it works.
Can someone explain briefly how this puzzle works?

Reply

The answer you seek is easier than base nine

the key to the puzzle, and the key to the desk drawer, is in the cupboard

look for a sheet of paper

white bit to left of code board

Reply

It never crossed my mind that it was a base 9 system. Ignoring that part, you will get the answer if if you directly convert symbols to the numbers (in normal, everyday base 10)
and then subtract the first digit.

Reply

OK figured out the whole "base 9" thing...

It's not really base 9.

Think coordinates rather than trying to convert the numbers

Reply

I did NOT use base 9??? What for is base 9??
I solved the last puzzle sort of like this!

Turn over the paper with all the numbers on it. Note flower, bird = 33.. Turn the paper over and use it as a grid.. See 33 on the paper? I am not so good with math, but the x,y axis seemed reversed or something, but Flower is 3 and snake is 6, so using that logic, I solved the math. example, I had
fish fish eye egg penguin
4 4 + 1 7 40 + 16

Reply

To clarify my earlier comment, the

paper with the coordinate chart on it

is

to the left of the final code puzzle. you can see a white bit tucked in to the side, and the desk drawer key is folded up in it. A clue for how to use the coordinate system is on the reverse, and another is in the third picture frame where you get the last set of puzzle pieces

Reply

This is what a room escape should be like, no pixel hunting and puzzles that make sense. Great game.

Reply

To open the desk drawer:

There is a paper on the left of the tile puzzle with a key in it. I don't remember when you are first able to get it though. It might only be at the 15 tile board.

Reply

An easy way to do the base 9 puzzles...

Take the first symbol (on the left) and multiply by 9. Then add the second symbol.

(First Symbol X 9) + Second Symbol = Answer.

For example, flower-snake would be (3X9)+6. Flower-Snake is 33.

I also got out of the room without getting into the drawer. I'll have to go back and try again.

Reply

Great game - but it felt like there was more to do...

What was up with the little ghost man that had the star on his cape like the men in the hung paintings? I felt for sure we'd use him and the gray tablet, esp. since the note tucked into the side of the puzzle safe showed all the numbers on it. Was it a parallel to the third painting and just showing that flower snake was 33 and not 36?

I was so hesitant to open the door b/c I felt like I'd get the 'bad' ending. Did anyone use the little ghost or the tablet and get an ending other than walking out into the desert?

Reply

I'm having trouble with the second double-digit combination

I've got:

chick-chick-eye-flower-sun
flower-lips-cloud-lips-sun-11
flower-chick-lips-fish-sun

I'm also guessing that the sun means 9

It's really stumping me...

Reply

for those that need it,i think a walkthrough is overdue :)

Reply

Interesting and probably meaningless coincidence: In Swedish, my main language, "�...h tusan" (pronounced o-tusan) means "oh, damn". As in, for example, "Oh damn, I didn't think of looking in the paper bin!"

Reply

Amy --

I agree.

That last apparently empty inventory slot was begging for a Happy Coin or something.

Reply

GrinnyP, thank you for your VERY well done and detailed explanation of how to get the two digit numbers. That was the only section I was having trouble getting right, got the rest on my own. Fun little escape game.

Reply

I got a problem with the last puzzle
as first row I got

bird,fish eye chick,chick
which shoul mean (74-7) + (55-5) = 117 ?!?!?!
How can I imput this?
Or am I doing something wrong in the calculations?

Reply

Great Game. Figured out the

Last math puzzle before i unlocked the drawer with the tablet, which made it considerably harder...

Reply

Nafets,
You are doing it wrong!

eye is minus! and the two numbers together are coordinates on the grid of the sheet of paper to the left of the puzzle

Reply

Amy, etc.
Me too

maybe it has something to do with the green star in the symbol puzzle? dont have time to go back and try it...

Reply

Nice little puzzle escape game. Needed just one hint from the good folks here; I wasn't tuned in at first to the fact that

it was using a base-9 number system.

If it helps in accepting the desert ending as the single one, the message on that screen (in Japanese) says "escape success". I'd guess it's the Egyptian desert, since the game is titled "Rosetta" on the start screen.

BTW, the given "Rozetusta" is clearly a typo in the romanization; it should be "Rozetsuta", but even that is wrong because, as someone else noted above, the small "tsu" here should not be written out, but rather it is used to double the following consonant--thus giving "Rozetta".

Reply

Wow, I guess that says something about my brain type that I managed to figure this one out without help, whereas I almost always get stumped on more "standard" escape puzzles.
I agree with Freezair, though.

I automatically did base 10 addition / subtraction, but then second-guessed myself and tried base-9 to get the sums. But that didn't work, so I went back and added things the easy way and it worked.

Just a small, trivial quirk in an otherwise great game!

Reply

Puzzling but not impossible and with no real pixel hunting. I loved it!

Reply

My brain.... my poor brain... this one was HARD! Even with the walkthrough. Give me one of Tesshi-e's or Neutral's any day!

Reply

question regarding:

2nd block puzzle. On the first one all you did was look at the pictures and based on the chart Grinny made,you could easily solve it. however on the 2nd puzzle where you put all 9 blocks in,after it gives you the pictures,you get 2 or 3 pictures per line and none of these pictures match what's in the first one. i cannot figure out what the numbers should be or anything. Any advice or help? maybe a 2nd chart to follow,and if there are symbols for + and - please post that as well.

thanks.

Reply

Maybe this says something of my education, or that some programmers really enjoy math exercises, but I am curious how many people here actually studied base 9.

Consider me unaware of it's practicality in anything other than puzzlework. So, please tell me why base 9 comes up in this escape game when the rest of the puzzles were really straight-forward.

And if you do think that base 9 is basic, then that is probably why you recognized it being used at all in this game. I have this unfortunate liability of counting on my fingers and toes.

Reply
Procrastinateher September 30, 2010 8:09 AM

Finally finished thanks to a little help.

Confused on the Maths puzzle? Hint on how the base9/base10 thing works:


Convert your two digit numbers into base 9 numbers, then do the Maths and the answers in base 10.

For example, I had this problem: little bird leaf lips leaf big bird =

Little bird = 5, leaf = 2, big bird = 7 (from the columns)

52, which in base 9 becomes 47
27, which in base 9 becomes 25

47 + 25 = 72, so I would put 72 into the safe.

It really bugged me that there was a little statue on the table that didn't seem to be used for anything.

Reply

Oh, forgot to mention! The big clue offered here which really helped me get going (besides the number system's base) was the meaning of the non-number symbols on the wall tablet. Thanks!! I saw there was a pattern to them, but didn't catch on that they were

"+", "-", and "=".

Reply

@Paul,
If I understand your comment correctly, you need the same hint I did. The first clue is in the picture where you got the batch of six tiles.

The guy is showing you one bead and a pair of beads, and there's a line of symbols across the top of the picture related to that. You know that a leaf means '2' ....

The second clue is on the tablet of symbols on the wall which shows similar lines of symbols. If you now think you know what the symbols on the picture mean, you can confirm that by also figuring out what the symbols on the tablet mean. BTW, for the list of number symbols, that is helpfully provided by

the stack of beads on top of the cabinet.

Substitute the known numbers into the line of symbols on the picture and the tablet, and you'll shortly recognize what the other symbols mean.

Reply

Pay close attention at the statue, it is one more clue, one which actually explains the whole setup of the game.

The locked drawer is redundant, by the time you have the key you don't really need the clue it provides.

No one really studies base 9 per se, but if you have studied binary, octal or hex you know the drill about positional numbering systems, so managing another one is pretty straightforward no matter the base.

Reply

I did it! Without the walkthrough! YAY xD
And I nee ALWAYS help with room escapes.But this one I managed to do alone.
Love tese kind of puzzles!! No pixelhunting or weird combinations that you just figure out by accident, just poor logic - I hope there will be more games like this one :)

Reply
Ewan Whosarmy September 30, 2010 6:50 PM

@ Procrastinateher

Yeah i was wondering about that statue too. the only thing i can think, is that it was showing 5 fingers on one hand, and 4 on the other, totalling 9.. i.e. possibly a very obtuse clue that the maths was in base 9.

Reply

nope. if there was a chart that shows what each symbol means, i can do this. But there doesn't seem to be.

Reply

@Paul,
There is indeed a chart. It is

the pair of stacked beads on the cabinet. You know that 'leaf' means '2', and you see that the 2nd bead in the stack is 'leaf'. The rest are also in order from 1 to 8.

So on the left-hand picture, where you got the first set of six more tiles, the picture behind the tiles shows 2 beads and 1 bead for a total of 3 beads, and so the symbols on the top say

'2 mouth 1 ear 3'.

This should tell you what 'mouth' and 'ear' mean. Then look at the intact tablet on the other wall. You'll figure out from that what 'eye' means, and you'll also find a symbol for '0'.

Reply

Ok i need help on the last one

according to grinny's hint,if the clue was egg star eye etc. the clue is take the number on egg and subtract 1 from star to get the numbrt. mine ended up being 3 4 eye 1 7. i made it like 34-3 makes 31. 17-1 equals 16. but the one underneath says 3 1 lips 1 7. does that mean i have to Add 3 to 31 making it 34 and 1 to 17 making it 18? i tried that and the total was 52 but the door is still locked. Any ideas?

Reply

I have to agree with the others, here. The correct way to write the name of the game in English is Rosetta. I offer as additional evidence the name of the image at the top of the page.

That said, there's one thing that's confusing me about the big number puzzle:

I know how to convert a 2-digit number into base 9. But after I do the arithmetic, do I input the number I got, or should I convert it one way or the other first?

Reply

yay! I think this is the first room I escaped without hints! Very nice puzzles and no pixel hunting! I got outside without

Getting into the desk drawer

because it only

gives access to another clue which I didn't use

Very happy jayer here!

Reply

I need help with the last puzzle. the 9x9 one.

according to grinny's help,it says that if the clues has 2 objects, mine was 3 and 4,i say 34-3=31 i assume the same with the second which was 17 so 17-1=16. the one below had 3 1 lips 1 7. so does that mean i add 3 and 1 and 1 and 7? or do i add 3 to 31 making it 34? that part makes no sense because no matter what i did,the door is still locked. Please help.

Reply

Figured it out. the problem was here:

Grinny forgot to mention that you also subtract the numbers if it was 2 3 on the bottom line as well. as lips = +, i thought maybe it was the same idea as the first line only you added 2 to 23 to make 25. the only time you add on the bottom line is after you subtracted both numbers.

so if anyone needs additional help,that should work for you as well.

Reply

Ok, so this is really bugging me - I have

small bird fish eye flower small bird

fish lips cloud lips snake = 10 (it was filled in for me)

fish fish lips leaf sun

and I tried both ways, subtracty and whatnot

I get the same answer - but it doesn't work.

17 and 67, respectively

.

Glitch, or am I miscalculating?

Reply

Grr. *twitchtwitch*

Dear puzzle designers,

Base nine usually uses the numerals 1-8. Nine in base nine is written as 10. Please do not suggest that you are using base nine unless you actually are.

Sincerely,
Avetre

Reply

Oh, and jigger, your calculation was off by one.

It should be 17 and 66.

Reply

People, read my post. here it is again, if you are talking about the final 16x16 puzzle.

i thought originally going by Grinny's calculation that as you had 1 and 8, you subtracted 1 from 18 is 17, which is correct, but on the bottom, i assumed as the icon for Plus was there,i assumed you added instead of subtracted, but the only time you add is when after you subtract the numbers on the bottom first. like say it was 2 7 whatever plus sign is then 3 5. 2 from 27 is 25 3 from 35 is 32. now add 27 and 35, and get get 52.

use this as a guideline.

Reply

Loved it. One of the most innovative & original escape games in a long while. Did it on my own just fine, but it does require some thinking.

Kudos to the creators. It was a lot of fun.

Reply

Just want to add to the chorus of "I actually solved this without any hints!" And it's not because it was easy or that I'm particularly brilliant; it's simply a well-designed series of puzzles, always with just enough information to solve the next step if you persevere.

The only part where I thought there were perhaps too many hints was

the base-9 thing:

* Flower Snake ≠ 36 --> ok, so it's not simple two-digit numbers
* Flower Snake next to 9x9 board with 33 squares filled --> 33? eh? Oh, wait, there's three whole rows filled plus one row with six filled... something's glimmering... Oh! It's base 9!
* Flower Snake = 33 --> uh, I already got that.
* 9x9 multiplication grid --> really, I get the point already.

Reply

Reka has it exactly right. The puzzles are well designed, with just enough information (occasionally too much) revealed as one progresses. I like the use of

base 9

in the puzzles; the alien feel was consistent and logical.

Reply

^ Scroll Up | Homepage >

Leave a comment [top of page]

Please consider creating a Casual Gameplay account if you're a regular visitor here, as it will allow us to create an even better experience for you. Sign-up here!
  • PLEASE UNDERSTAND SITE POLICIES BEFORE POSTING COMMENTS
  • You may use limited HTML tags for style:
    (a href, b, br/, strong, em, ul, ol, li, code, spoiler)
    HTML tags begin with a less-than sign: < and end with a greater-than sign: >. Always. No exceptions.
  • To post spoilers, please use spoiler tags: <spoiler> example </spoiler>
    If you need help understanding spoiler tags, read the spoiler help.
  • Please Preview your comment before posting, especially when using spoilers!
  • No link dropping, no domains as names; do not spam, and do not advertise! (rel="nofollow" in use)
chrpa Jayisgames needs your help to continue providing quality content. Click for details Welcome to the Roundup 66 - Retro with four games! After you find the ten monkeys in the chapter, look in the inventory. You will find a...  ...
chrpa Jayisgames needs your help to continue providing quality content. Click for details Welcome to the Roundup 65 with three games! As mentioned in the previous roundups, only odd-numbered episodes are featured since even-numbered are for Robin Vencel's patrons (the...  ...
chrpa Jayisgames needs your help to continue providing quality content. Click for details Hi! Weekday Escape and Weekday Puzzle are here! First we have two new cans from tomoLaSiDo and then two small rooms from isotronic. That's all for this...  ...
6,365 Views
0 Comments
chrpa Jayisgames needs your help to continue providing quality content. Click for details Welcome to Mobile Monday! We have another beautiful game from Nicolet and it's a winter game as it should be. Tasuku Yahiro have released another of their...  ...

HELP Jayisgames.com

Recent Comments


Display 5 more comments
Limit to the last 5 comments

Game of the week


Dark Romance: Vampire Origins Collector's Edition

Your Favorite Games edit

add
Save links to your favorite games here. Use the Favorites editor.

Monthly Archives