
![]()
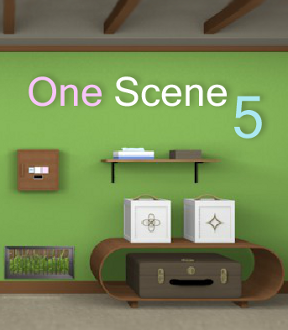 Although a bare, four-walled room may be appealing to minimalists who want to see every side of their entrapment while still sticking to the basics, the simplicity of Robamimi's series of single-walled escape-the-room games has an appeal all its own. This time, the warm colors and stylish furnishings in One Scene 5 welcome you into a cozy home and might even make you hesitant to leave. If only the pleasant view out the window and smartly-arranged puzzles weren't so hard to resist...
As with the other Robamimi single-scene escapades, navigation consists of following your changing cursor to find where you can zoom in and examine interactive areas, then taking the arrows at the bottom of the screen to back out. Rendering solutions less obvious and putting even more emphasis on your ability to make logical deductions, the "Hint" function is less helpful than normal—some hints with questionable wording can be like new riddles altogether. And, because Robamimi is being a bit more abstruse this time, you'll need to pay careful attention to even the tiniest of visual details if you want to garner all that's needed to progress.
In lesser hands, such a tactic feels unfair but when dropped into the beauty of Robamimi's design, it's actually enjoyable to have to stare harder and hunt around more diligently. Despite a slightly ramped up challenge, there are very few obstacles to overcome before you can make your exit. Reluctantly, perhaps, you step through the door, satisfied from the enjoyment of a well-tuned escape and looking over your shoulder to wonder: does Robamimi do home furnishing consultations?
Not loading? Try the alternative link: One Scene 5.


Walkthrough Guide
(Please allow page to fully load for spoiler tags to be functional.)
Thanks to elle for the Walkthrough!
One Scene 5 Walkthrough
Starting Out: Gathering Clues and Tools
You begin facing one wall. Zoom in on the "Slot" machine on the left side:
There appears to be something behind the slot machine...
A SCREWDRIVER. Get it.
While here, note that there's some paint on the side of the machine (but a tissue alone won't remove it).
Examine the front of the slot machine and note that it needs a "100" coin to operate.
Also make a note of the animals/pattern on the rollers.
Next to the slot machine is a box. Look closer at it:
It's very dark in there, so you can't see anything.
Perhaps later, when you have a light source, you can take a better look.
Zoom in on the door to look out its window:
There is a wooden caddy on the bench outside. Maybe you can find a way to fetch it and search inside it?
Back up and then take a look at the number pad above the door handle: looks like you'll need some sort of code to unlock the door and get outside.
Inspect the grate to the right of the door:
Using your SCREWDRIVER, remove the grate.
Reach outside and take the KEY with the open flower design.
Check out the box on the wall, just above the grate:
It has a white button on the left, a pink button on the right.
When you figure out the sequence for pushing these buttons, you can open the box to get what's inside.
There is tissue dispenser on the wall shelf, to the right of the two-button box:
Go ahead, take a TISSUE!
Hmmm. You can continue to take tissues...and they are different colors.
On the wall shelf, next to the tissue dispenser, is a small brown box:
There are five sliding buttons on this box.
Underneath the box is a piece of paper (a picture of a lion).
Below the wall shelf are two white boxes:
Each box needs a key to be opened.
Each box has a different design on its front.
Finally, under the white boxes is a little cubby for a large brown suitcase:
When you click it to examine the brown suitcase, it slides out of its cubby...
If you look carefully, you can see something in the cubby, along the top of the screen, behind the suitcase:
Click on it to look closer: get the HOOK!
The pattern on the suitcase matches the KEY in your inventory. So, use the KEY to unlock the suitcase:
Get the RADIO-CONTROLLED HELICOPTER.
The Helicopter
Examine the HELICOPTER in your inventory.
Click on the helicopter to turn it over.
Then, attach the HOOK to the bottom of the helicopter...
The HOOK is behind the suitcase (a.k.a. "bag") on the shelf where the suitcase was...you need to not open the suitcase to see it there on the top edge of the screen.
Go back to the opened grate to the right of the door:
Place the HELICOPTER on the ground outside the grate.
It will automatically fly over to the bench and fetch the wooden caddy.
Search inside the caddy that the helicopter brought over:
Get 2 BATTERIES.
The Small Brown Box, the Slot Machine and "500" Coin
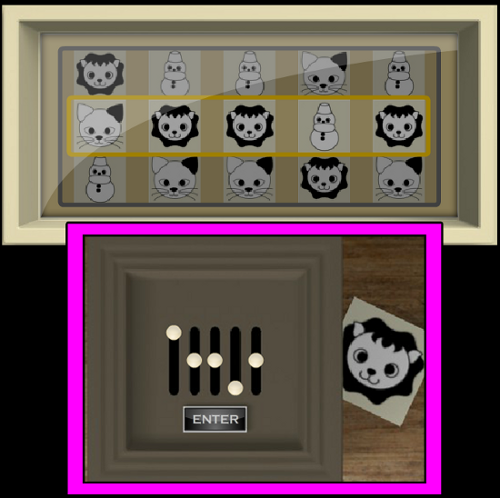
Examine the small brown box on the wall shelf:
The clues on the paper under the box and on the slot machine tell you how to arrange the sliding buttons:
If the lion is high on the slot machine, then slide the button up twice to the top position....middle lion means click once to slide the button to the middle...and a low lion means leave the button at the bottom.
SOLUTION:
x - - - -
- x x - x
- - - x -
See screenshot for more details:
Screenshot: Brown Box Solution
Click "ENTER" when you've arranged the buttons properly and the box will pop open:
Grab the 100 COIN.
Note that it appears there is another layer to the box although you can't open it further.
Back up from the shelf and go back to the slot machine:
Put the 100 COIN to activate the slot machine.
Push start and the rollers will spin around, eventually stopping in new positions.
Yay! You won something!
Back up and get the 500 COIN from the machine's slot.
Examine the 500 COIN in your inventory:
At its bottom is a little slash. Use your SCREWDRIVER to open it up.
Take the MICRO SD CHIP from inside the coin.
Two-Button Box and White Box 1
Go back to the box on the wall, to the right of the door:
Use the clue from the tissues dispenser to open this box.
As you take each tissue from the box, they change colors.
Note the pattern of colors after the blue tissue.
SOLUTION:
WHITE-WHITE-PINK-WHITE-PINK-WHITE-WHITE-WHITE
After pushing the buttons in the correct sequence, click "ENTER" and the box will open up.
Get the KEY with a four-petal flower design on it.
Back up and examine the white boxes below the wall shelf:
Use this new KEY with the four-petal flower design to open the box on the left:
Inside is a CAMERA. Take it out.
The Camera and Its Clue and White Box 2
Examine the remote control for the RADIO-CONTROLLED HELICOPTER.
Turn it over and take 2 BATTERIES out of the back of the controller.
Now you should have 4 BATTERIES (including the two from the basket outside).
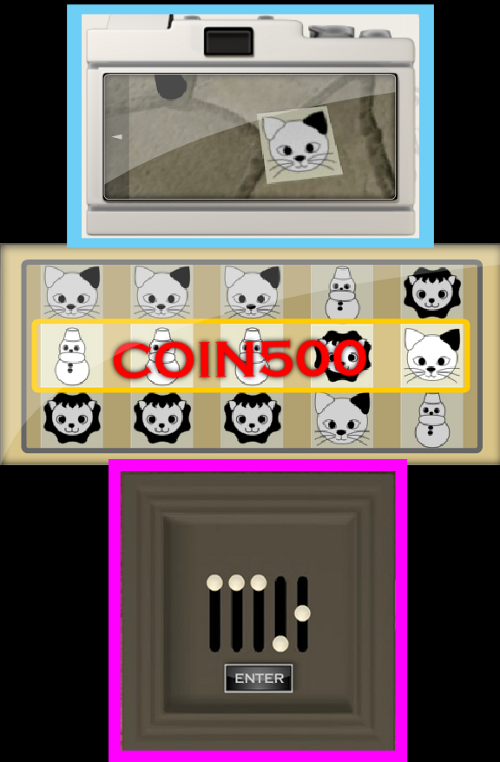
View the CAMERA in your inventory:
Click the bottom edge of the camera to look underneath it. There's a slot for batteries; click to open it.
Insert the 4 BATTERIES into the camera and close the slot again.
Now click up and then the left side of the camera to find the microSD slot:
Insert the MICRO SD CHIP into the slot.
With the camera loaded up, turn it over the click the "MICRO SD" icon:
Now you have another clue, the picture of a cat.
Return to the Brown Box on the wall shelf.
Use the clues from the camera's "Micro SD" image and the slot machine to arrange the sliding buttons into a new pattern.
SOLUTION:
x x x - -
- - - - x
- - - x -
See screenshot for more details:
Screenshot: Slider Box Solution 2
When the buttons are in the proper positions, click "ENTER" and the box will open to a deeper layer.
Take the KEY with an oblique diamond design on it.
Back up and zoom in on the white boxes again.
Use this new KEY with the oblique diamond design to unlock the white box on the right:
Get NAIL POLISH REMOVER from inside.
The Exit Code
Take another look at the side of the slot machine...
View the TISSUE in your inventory.
Pour the NAIL POLISH REMOVER on the tissue.
Use the wetted TISSUE on the smudge on the side of the slot machine:
Make a note of what is revealed under the paint.
Go over the "Dark Box" next to the slot machine....
Use your CAMERA to take a picture inside of the dark box.
Now, view your CAMERA, turn it around to its back and click the "PLAY" icon:
This picture gives you another clue.
Go over the door and zoom in on the number pad.
Use the information from the side of the slot machine, the picture from the dark box, and the keys in your inventory to come up with a code...
SOLUTION:
You have three keys in your inventory; each represents a number based on its pegs and where they're located (left or right side).
The picture of inside the dark box (press "play" on your camera after using it on the hole on top of the dark box) tells you how to multiply and count the pegs on each side of the keys.
The clue on the side of the slot machine tells you how to add the keys' numbers together for a total.
See this screenshot for more details:
Screenshot: Exit Code Solution
Correctly computing all these clues gives a 3-digit code:
1 5 4
Explanation: the first key shown adds up to 20 because there are 4 pegs on the left side and you need to multiply 4 x 5 as indicated by the picture from inside the dark box.
The second key is 7 because there is 1 peg on the left (1 x 5 = 5) and two on the right (5+2=7). The side of the slot machine tells you to multiply those two keys (20 x 7 = 140).
Then, add the last key: because 2 pegs on the left side mean 10 while two pegs on the right mean 4 and counted together that makes 14, you'll be adding 14 to 140 to get 154.
Enter the code into the number pad on the door and then click "E" to enter it.
If the code is correct, the message will say "OPEN".
Back up and click on the door to exit.
Congratulations on your escape!
Posted by: Dora Breckinridge |
December 2, 2012 9:02 AM
|
December 2, 2012 9:02 AM