
Midnight Mysteries 2:
Salem Witch Trials
Platform: Mac, Windows
![]() It starts out with Nathaniel Hawthorne asking for your help; after what you did for Edgar Allen Poe, it seems you've gotten yourself a bit of a reputation, and the departed author thinks you might be able to help him unravel the strange circumstances surrounding his death. But before you can uncover the truth, you'll have to take a trip to one of the darker chapters in human history. Namely, a little place called Salem, Massachusetts, when it was a bad time to be a woman with an enemy. Midnight Mysteries 2: Salem Witch Trials is a gorgeous and clever hidden-object/point-and-click hybrid that asks you to use your brain more than most games. Who killed Nathaniel Hawthorne? Was it simple human jealousy, or a curse that did him in? Of course it could be witches! Some evil witches!... Which is ridiculous 'cause witches they were persecuted and Wicca good and love the Earth and women power and I'll be over here...
It starts out with Nathaniel Hawthorne asking for your help; after what you did for Edgar Allen Poe, it seems you've gotten yourself a bit of a reputation, and the departed author thinks you might be able to help him unravel the strange circumstances surrounding his death. But before you can uncover the truth, you'll have to take a trip to one of the darker chapters in human history. Namely, a little place called Salem, Massachusetts, when it was a bad time to be a woman with an enemy. Midnight Mysteries 2: Salem Witch Trials is a gorgeous and clever hidden-object/point-and-click hybrid that asks you to use your brain more than most games. Who killed Nathaniel Hawthorne? Was it simple human jealousy, or a curse that did him in? Of course it could be witches! Some evil witches!... Which is ridiculous 'cause witches they were persecuted and Wicca good and love the Earth and women power and I'll be over here...
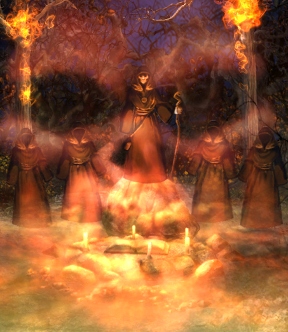
 Whatever your stance on witchcraft, Developers MumboJumbo have crafted a surprisingly grim little game that deals with human pettiness, jealousy, and greed. Using top-notch visuals and sound, they've managed to make a game heavy with atmosphere, and even a scare or two.
For a hidden-object title, typical object hunting actually takes up a surprisingly small amount of the gameplay. Most of your time is spent tracking down clues and items to appease restless spirits, and solving puzzles that stand in your way, occasionally achieved by combining objects in your inventory. (Apparently by magical glue that comes out of nowhere.) Puzzles can be skipped if you're stuck on them for long enough, but what's nice is that you probably won't be; Midnight Mysteries 2 has a nice variety of puzzles, and while some are more creative than others, none of them will hang you up for too long. Also keep an eye out for ravens; the hint system is very limited, and each bird you click on only gives you one hint to use, so use them sparingly or you could find yourself staring at a hidden-object scene for a long time.
Analysis: It's an unfortunate trend in casual adventure games where most of them tend to assume their players need to be taken by the hand and lead from place to place with lots of reassuring cuddles and not-so-gentle hints. Midnight Mysteries 2, by contrast, thinks you are a big kid now, and are perfectly capable of putting two-and-two together. The game is very good at dumping the tools you need into your lap, and then letting you move at your own pace and try to sort things out on your own. The downside, of course, is that unless you're in a hidden-object scene the hint system is exceptionally useless in helping direct you where to go next. This is compounded by the fact that click-detection isn't very sharp, and the interface can be a bit cumbersome, in particular manipulating your inventory or tracking down navigation hotspots on screen.
 But where Midnight Mysteries 2 is strongest is actually its story. (Which feels like it takes more than a few cues from Robert R McCammon's book duo, "Speaks the Nightbird".) The game puts a lot of effort into making you feel like you're actually trying to solve a mystery; clues and portents are everywhere, including on your items list in hidden object scenes, which helps the entire game feel more cohesive. This front-and-center approach to storytelling is a welcome change from other titles in the genre, but Midnight Mysteries 2 is pretty close to the edge of becoming overcomplicated in its plot. Ultimately, however, I was surprised by how neatly the game manages to tie everything together. It isn't the stuff of legends, but it's a very satisfying mystery, and for once in a hidden-object title you get to feel as though you've solved it yourself.
Despite its flaws, Midnight Mysteries 2: Salem Witch Trials is an exceptional example of the genre, with just enough challenge to elevate itself above most other titles, and definitely the production values and atmosphere to be a serious contender. An average play time might look like three hours, more or less depending on your point-and-click prowess, making this latest installment in the Midnight Mysteries series just the right size to spend your time on rather than the newest Adam Sandler movie nobody really wanted to see anyway. It does sort of make you wonder which famous dearly-departed author they'll choose next... maybe you should be sending your requests for a Lovecraft installment now. In the meantime, give the demo a try. You'll be glad you did.
![]() Windows:
Windows:
Download the demo
Get the full version
![]() Mac OS X:
Mac OS X:
Download the demo
Get the full version


Walkthrough Guide
(Please allow page to fully load for spoiler tags to be functional.)
MIDNIGHT MYSTERIES: THE SALEM WITCH TRIALS
General Tips:
There are 10 chapters with no auto pause feature and no timer so you will have plenty of time to interact with the characters and move between scenes at your own pace.
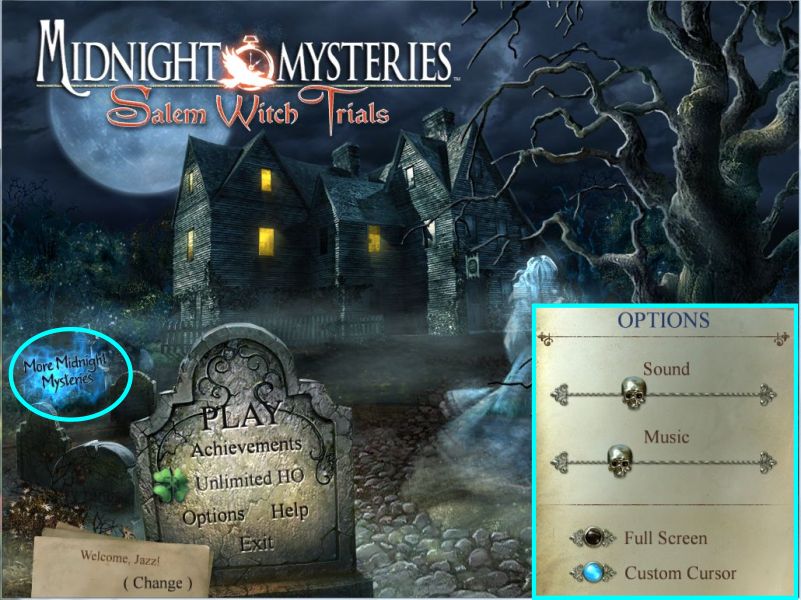
From the Main Menu you can choose your profile and Options which include music and sound volume; full screen versus window mode; and whether you wish a Custom Cursor or not.
You can also select to check out the previous edition of Midnight Mysteries which is The Edgar Allan Poe Conspiracy.
You can check up on your "Achievements" and access a "Help" file.
Once you have collected 50 Clovers you will get access to the Unlimited HO section which is on the selection tombstone.
Screenshot
When you click on close ups with a glowing foggy circle around it you will need to exit the close up somewhere near the edge of the circle.
You will also need to exit all other close up scenes as well as the hidden object scenes because it will not automatically happen.
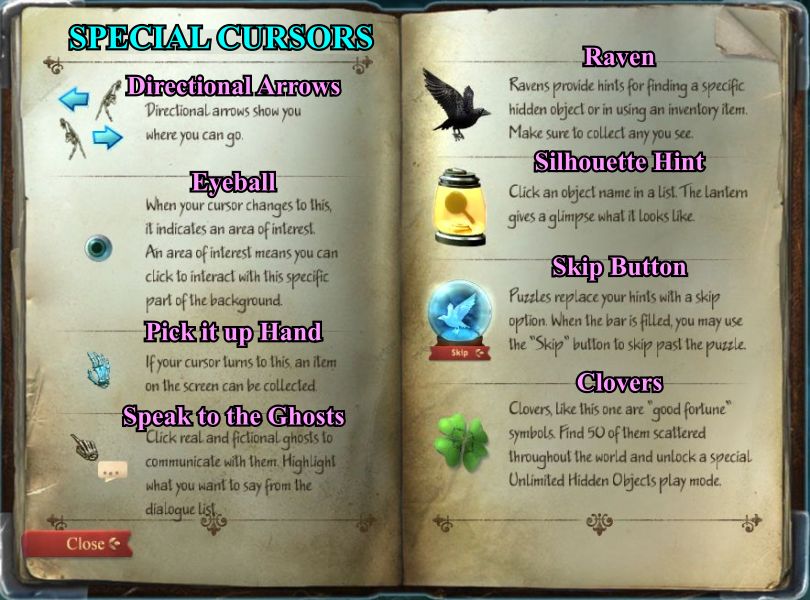
Special Cursors:
There are a number of Cursor Attachments that you will encounter during the game so check out the screen shot to see them all.
Screenshot
Achievements Room:
There are 16 Achievements for you to earn throughout the game.
Master Storyteller: Complete Story Mode.
Perfect: Complete Story Mode without using any hints.
Scaredy Cat: Complete Story Mode with no Black Cat Appearances.
Ornithologist: Collect all the Ravens in Story Mode.
Beady Eyes: Unlock Unlimited Hidden Object Mode.
HOG Wild: Complete a Hidden Object Scene in less than a minute.
Golden Greek: Solve all the puzzles in Story Mode.
HOG Baron: Find every object in all Unlimited Hidden Object Mode scenes.
Irish Rover: Collect all the hidden Clovers in Story Mode.
Thick Skull: Find Corwin.
Black Hole: Complete each Hidden Object Scene in Story Mode without using the lantern.
Worker's Comp: Construct the House of the Seven Gables.
Screenshot
Raven Hints and Clovers:
There are 28 Raven Helpers hidden throughout the game which are labeled and marked in bright pink.
Each Raven you collect will give you a Hint to use.
You can click on an item in your Hidden Object list for a view of it in the Raven Lantern.
You can also use the Raven to help you decide what to do with an item in your Inventory.
There are 63 Clovers in the Story Mode game and the tally will be in the lower left corner.
Don't try to tract what you should have by my screen shots because I play with multiple profiles to check for randomness and other things you need to know about so whatever you see in the screen shots will be seriously off for both the Clovers and Ravens. Just pay attention to the markings on the screen shots and you will get what you want and need.
The Journal:
When the Journal sparkles blue it wants you to check it out because there may be some important information.
You can also flip back through it if you forgot something that may be important for you to remember for your current scene.
Hidden Objects Scenes:
Hidden Object scenes are sufficiently random that the list will not be marked in screen shots.
Some items will automatically disappear from your list and others will be presented in the middle of the scene for you to take note and click to collect.
There will always be a final item which will go into your inventory to be used later.
Don't forget you need to exit out of the hidden object scenes.
Unlimited Hidden Objects:
Once you have 50 Clovers you will unlock the "Unlimited Hidden Objects" part of the game.
If you choose to play it, you will get an Achievement award for completing all of them and finding all the objects on the list.
They are random so will not be shown in any screen shots but enjoy.
Screenshot
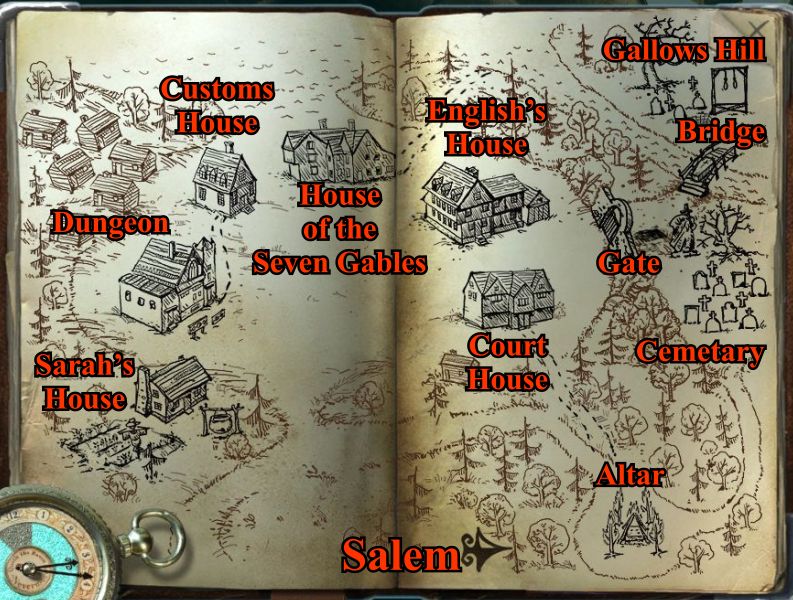
Map of Salem:
This is a map of Salem so if you get lost as to where you are going it is hoped that it will help you find your destination.
Screenshot
Map of Plymouth:
You enjoyed a stay in Plymouth so this will show you where you were and perhaps where you will again be when you are required to revisit the area.
Screenshot
Chapter 1: Meet Nathaniel Hawthorne
Your Inventory, List of Hidden Object to Find, and Dialogues with the various ghosts will be on the bar at the bottom of the scenes.
When your view of your inventory gets too full you will get arrows at either end to scroll for whatever items you need to find.
To the left is access to the Menu and a Journal where you can check your progress.
The Journal will get blue sparkles when there is a new entry for you to read.
Hawthorne appears and wants to feel a pen in his hand again so collect the empty pen and ink from the desk.
To fill the pen put it in the combining tray at the right side of the inventory and place the ink in the other slot.
Press the "
" button and they will combine to give you a full ink pen so give it to Hawthorne.
Collect your first Raven and Clover.
Screenshot
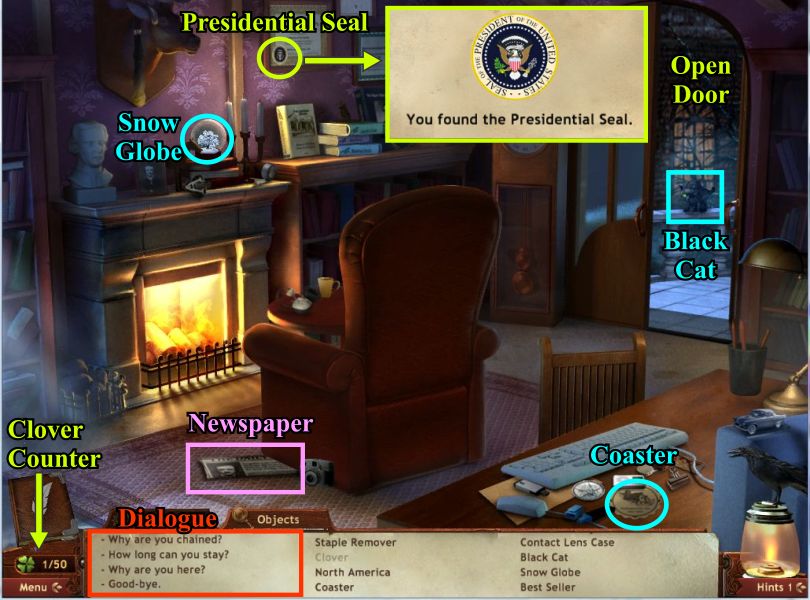
Hawthorne will provide you with a list of objects to find, including the coaster and Snow Globe which will be referenced in the Journal.
Your first Raven will situate himself on top of the lantern at the right bottom of the scene and give you your first Hint to use.
Open the door at the right and collect the Black Cat and let's hope this is the last time you see him because he will appear to disable your cursor for a short while if you click around too much and you won't get one of your Achievements.
You've collected Clover 1 which will show up in your Clover Counter under the Journal.
Collect all of the HO items on your list.
The last item to collect is the Presidential Seal.
You will have a dialogue with Hawthorne and he will ask you to take his hand to be transported to the graveyard.
Screenshot
Chapter 2: Find Hawthorne's Grave
Click on the two gravestones and collect the Clover from the one on the right and also get the Raven.
Check out the Puritan Statue and zoom in for a Hidden Object scene as shown.
Screenshot
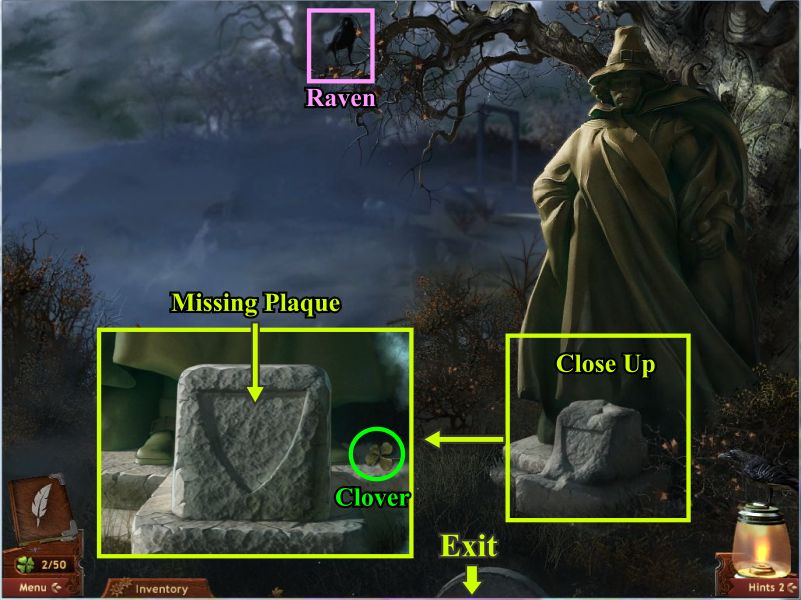
Collect the Raven and do a close up on the plaque in front of the statue.
Get the Clover and notice the plaque is missing who he is.
Exit at the bottom of the scene.
Screenshot
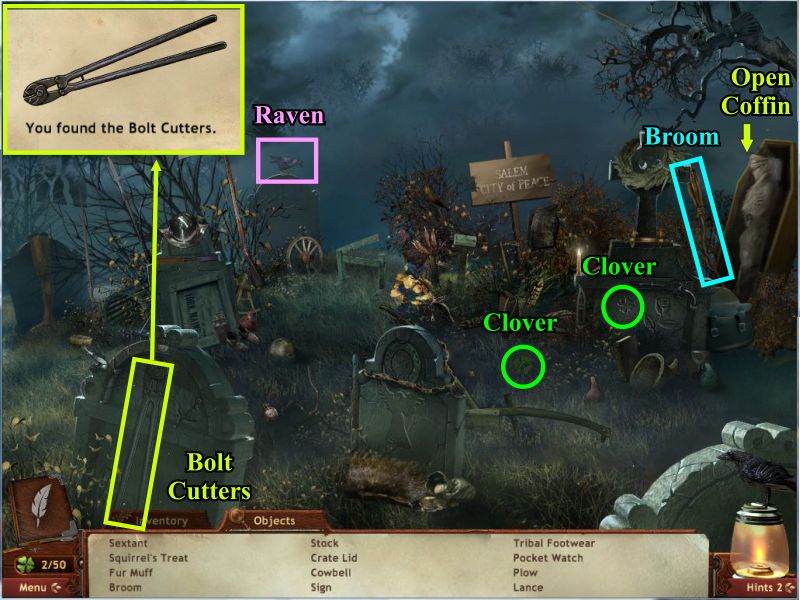
Zoom in on the Hidden Object scene and take the Raven and 2 Clovers and collect what is on your list.
Your last item is the bolt cutters.
Screenshot
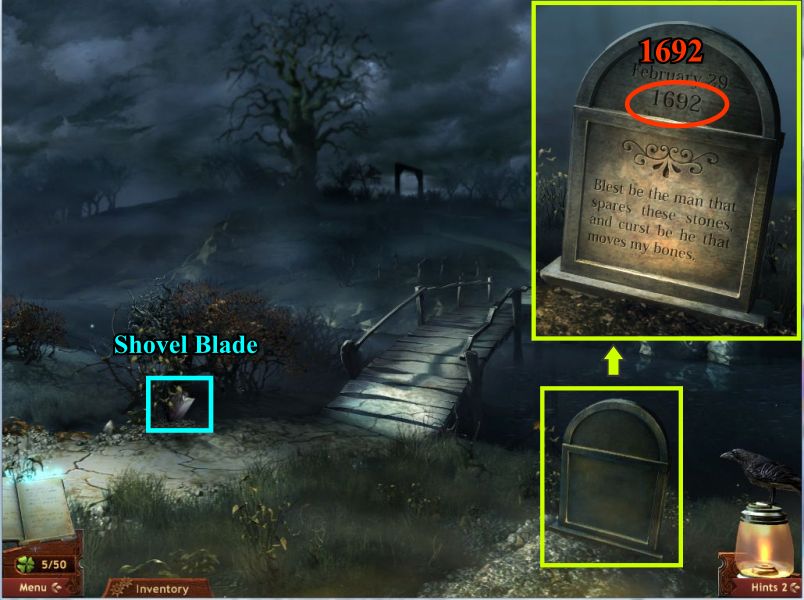
Make a right turn to the bridge area.
Pick up the blade for the shovel and click on the tombstone.
Note the date of 1692 because it will become important.
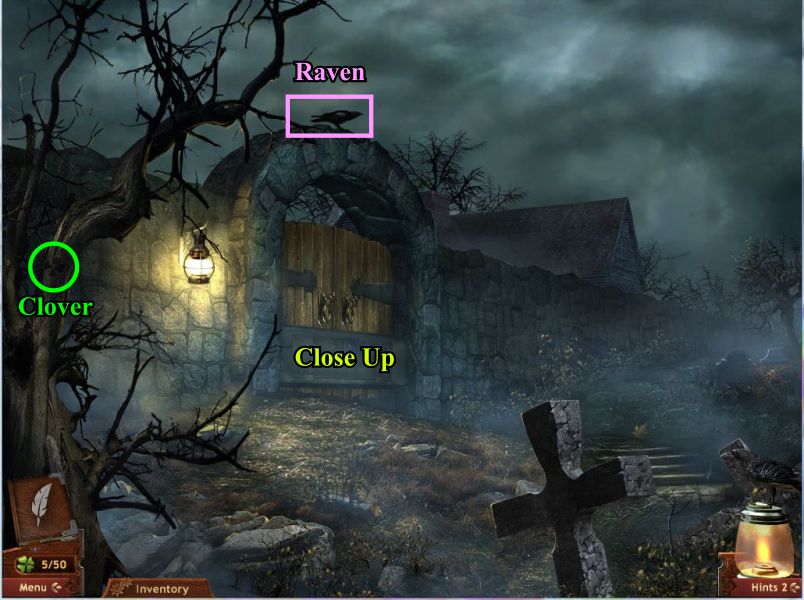
Exit back to the cemetery and go left to the Village Gate.
Screenshot
Collect the Raven and Clover and click on the gate for a close up and a mini game.
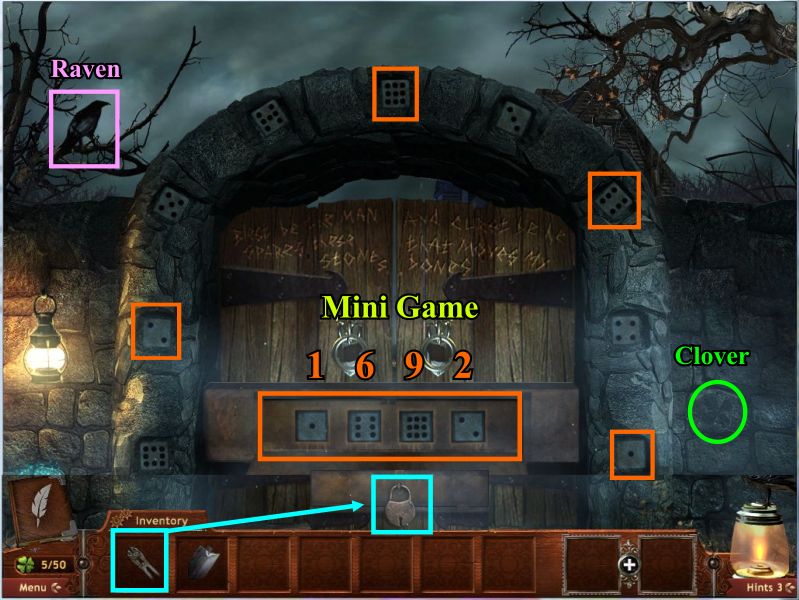
Screenshot
Get the Clover and Raven then click on the gate and use your bolt cutters.
You need to unlock the gate so place the marked dice from the gate using the 1692 date on the tombstone you just saw and you will be able to enter Salem.
Screenshot
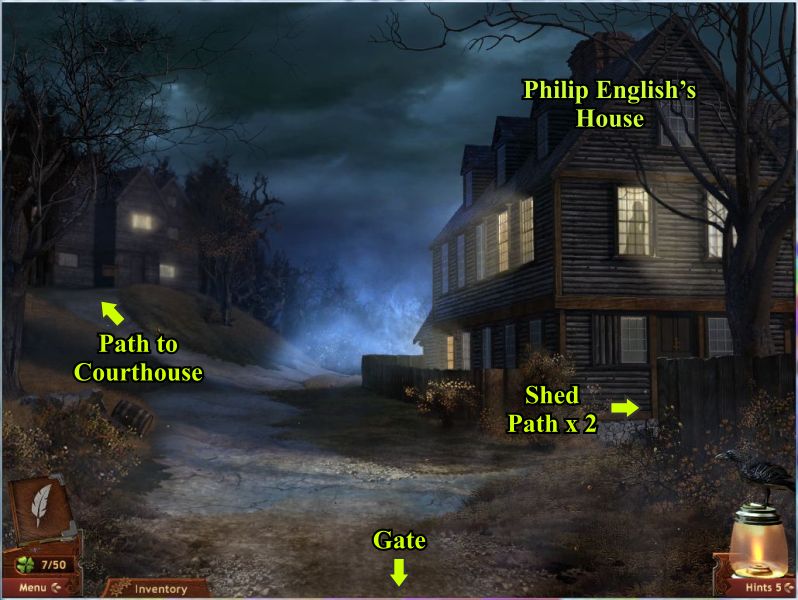
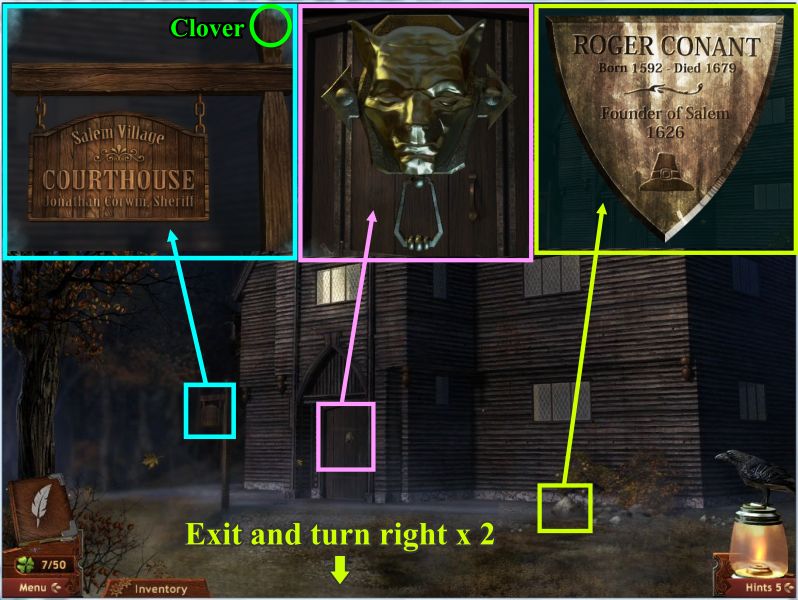
There are several paths to take once you are in the town so go left up the path to the Courthouse and see what's there.
Screenshot
Click on the Courthouse sign and grab the Clover.
Click on the door knob and watch it morph
Pick up the plaque for Conant's Grave.
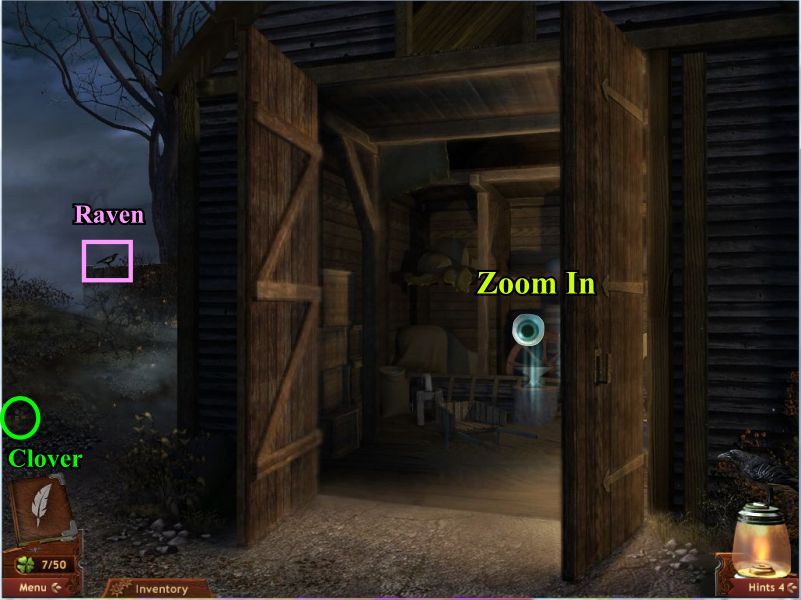
Exit down and go right twice to Philip English's Shed.
Screenshot
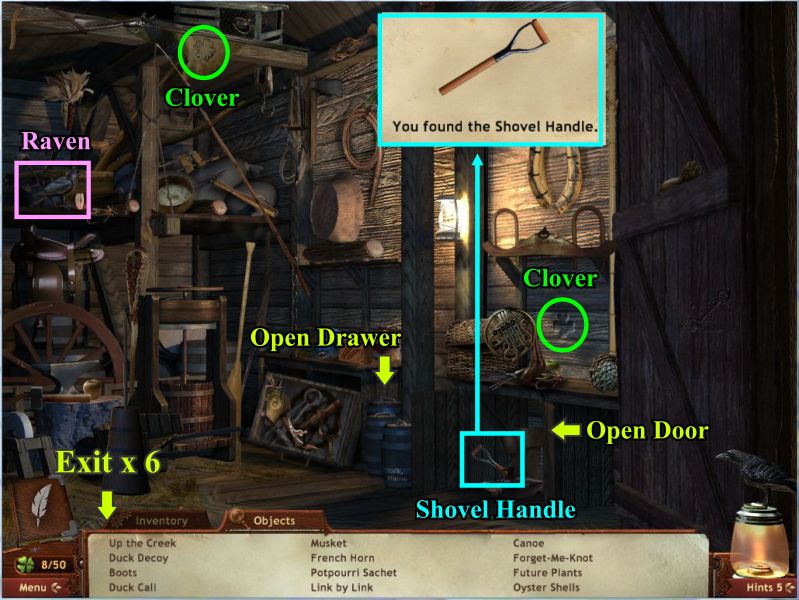
Get the Raven and Clover and zoom in for a Hidden Object scene.
Screenshot
Pick up the 2 Clovers and the Raven.
Don't forget to open what is indicated so you don't miss anything on your list.
Your final object will be the handle for the shovel.
Exit down 6 times to get back to the statue of Conant.
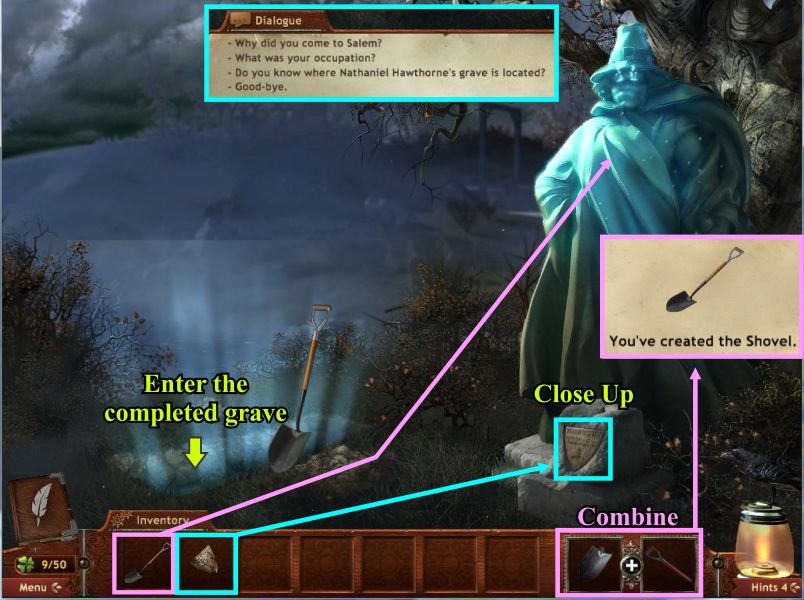
Screenshot
Click on the base of the statue for a close up to place his plaque.
Talk to him and give him the completed shovel so he can dig Hawthorne's grave.
Enter the grave to go to the next chapter.
Screenshot
Chapter 3: Rumors of His Death
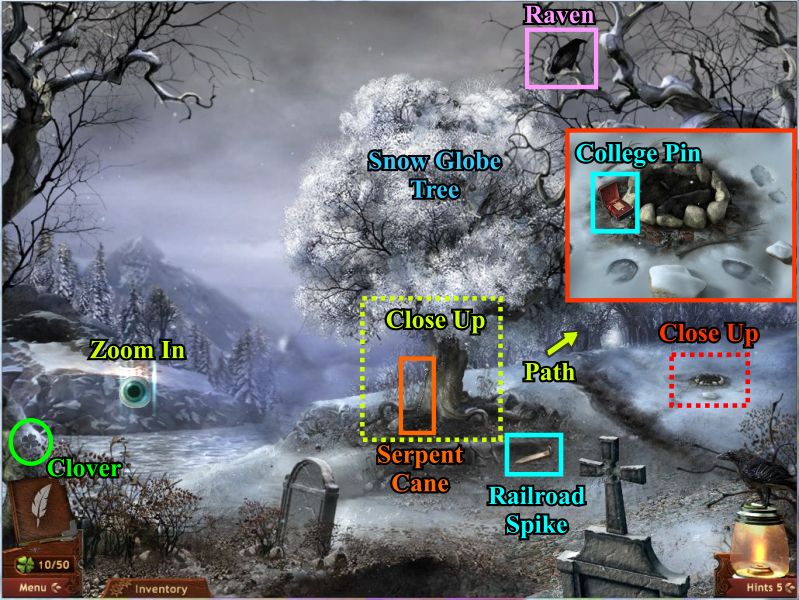
You are standing in front of the Snow Globe Tree so click on it for a close up to get the Serpent Cane.
Take the Raven and Clover.
Click on the close up fire ring on the right and pick up the College Pin.
Take the railroad spike for your inventory.
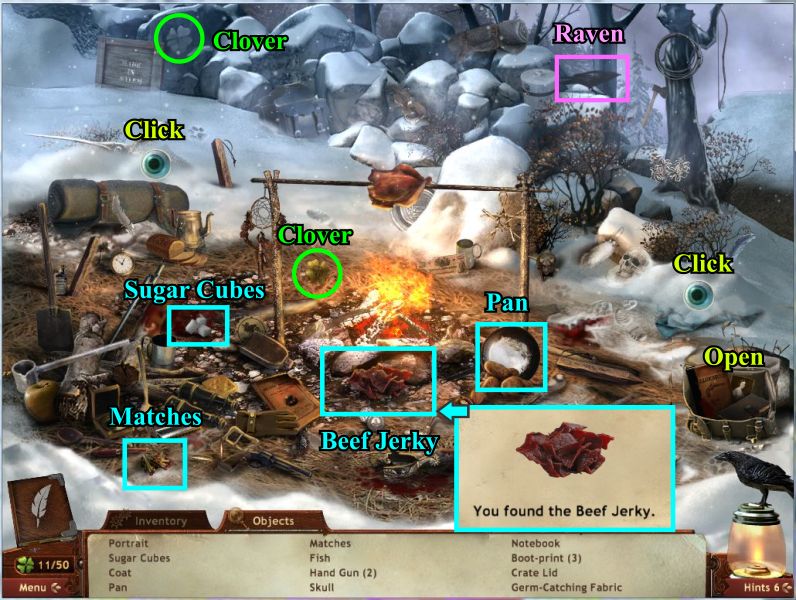
Zoom in to the campfire on the left for a Hidden Object scene.
Screenshot
Get the Raven and 2 Clovers and the rest of your list.
Move the snow off of a couple places to get what you need.
Items for your inventory include the sugar cubes, matches, pan and finally the beef jerky.
Screenshot
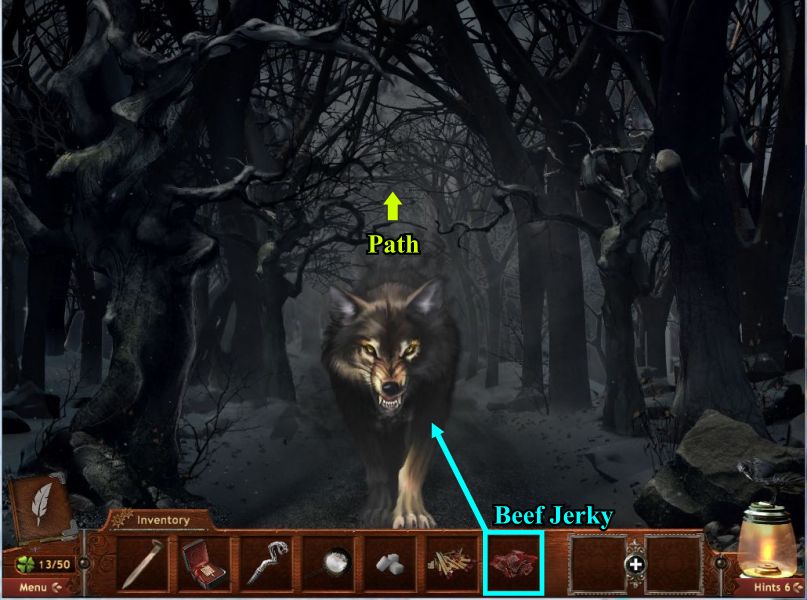
Return to the Snow Globe tree and take the right path.
There is a very unfriendly wolf in your way so give him the Beef Jerky you collected and go up the path.
Screenshot
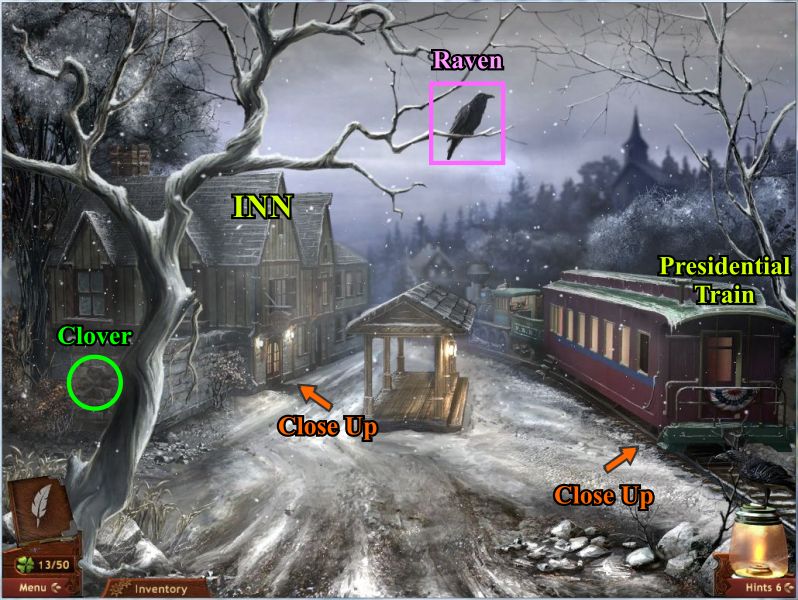
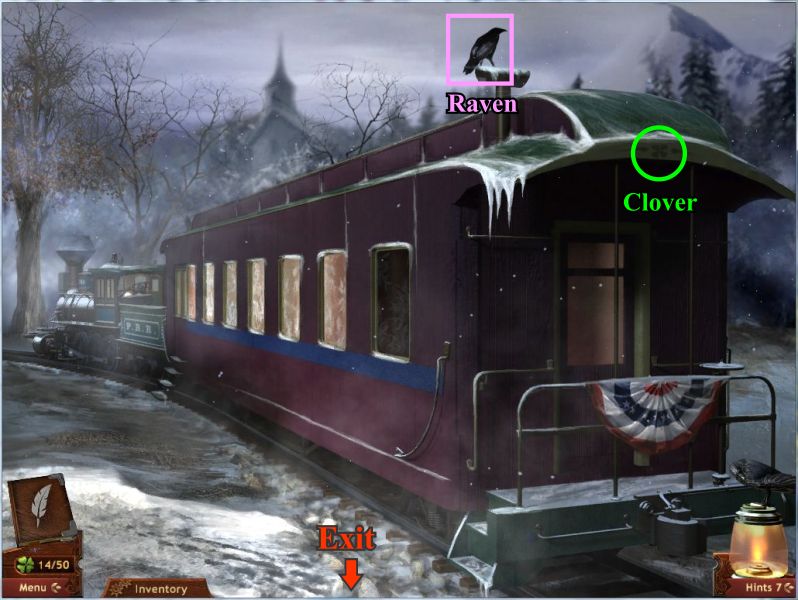
You have arrived at the Plymouth, New Hampshire Train Station.
Pick up the Raven and Clover.
Go right for a closer look at the Presidential Train.
Screenshot
Pick up the Raven and Clover and go have a closer look at the Inn.
Screenshot
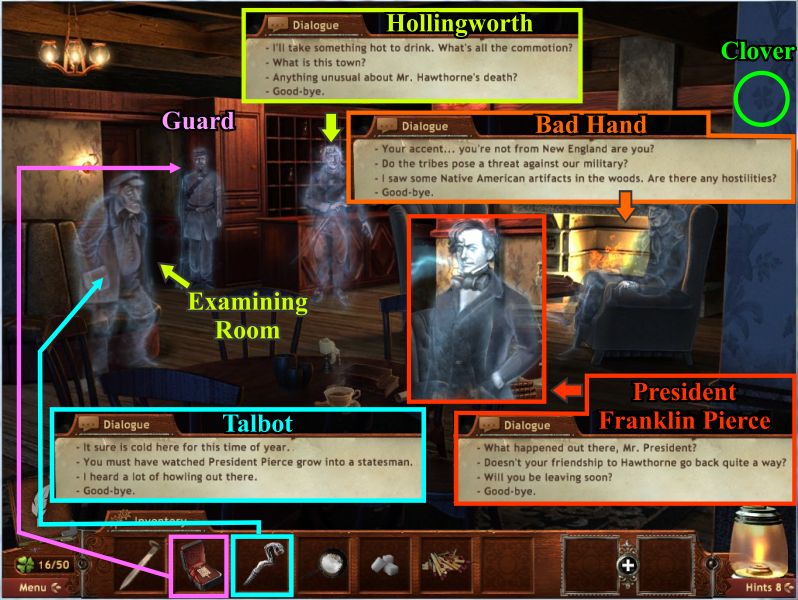
Pick up the Clover and enter the Inn.
Screenshot
Pick up the Clover and talk to all of the ghosts.
Give the Serpent Cane to the old man on the left.
Give the College Pin to the Guard and President Pierce appears.
After you talk to everybody and find out all the necessary information, enter the examining room.
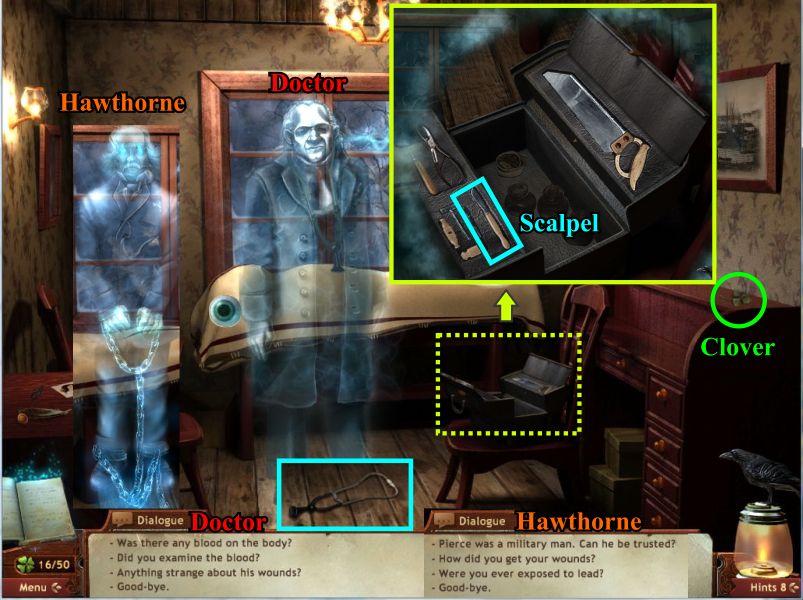
Screenshot
Talk to the doctor and take a closer look at the medical bag on the chair to collect the scalpel.
Collect the Clover and pick up the stethoscope after the doctor drops it.
Talk to Hawthorne when he arrives.
Screenshot
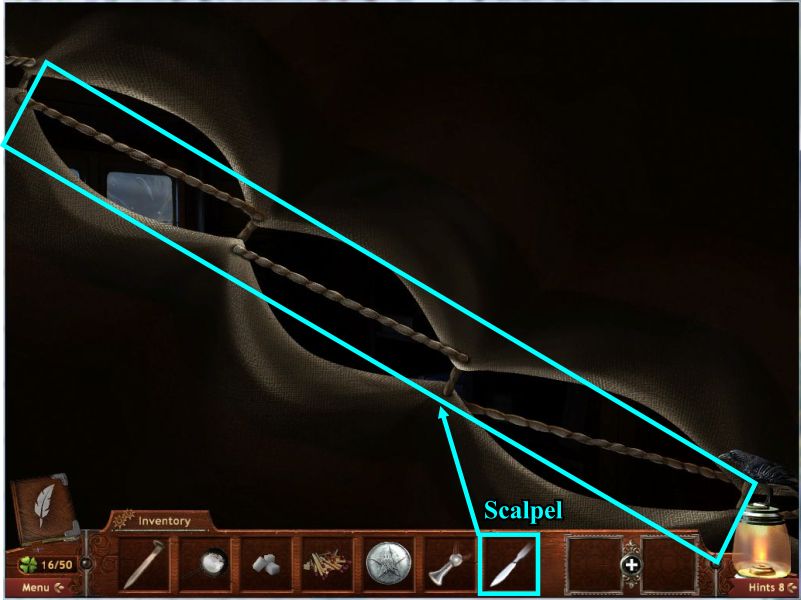
Click on the body bag to get inside it and the guard will carry you onto the train.
Use your scalpel to cut your way out of the body bag.
Screenshot
Use the matches from your inventory to light the lantern.
Grab the Clover and exit to the engine room.
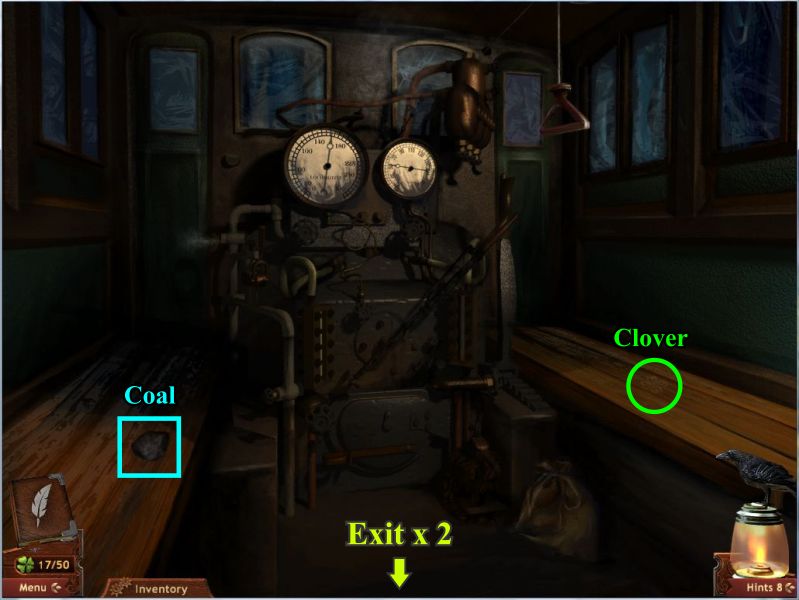
Screenshot
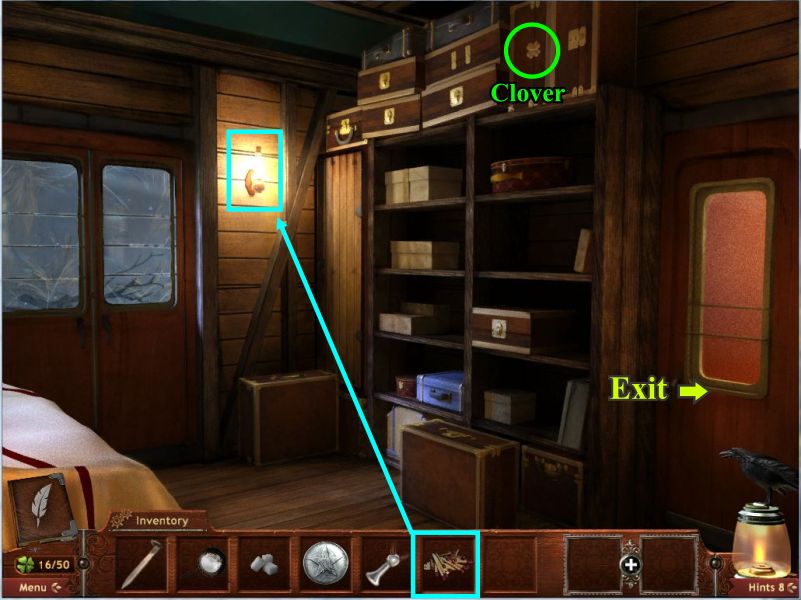
Pick up the coal on the left and the Clover before exiting to the Baggage Room and going to the Presidential Coach.
Screenshot
Pick up your Clover and the Morse Code Book.
Check out the picture on the table.
Move the bust on the left to reveal the safe.
Click on the right side of the desk for a Mini Game.
Screenshot
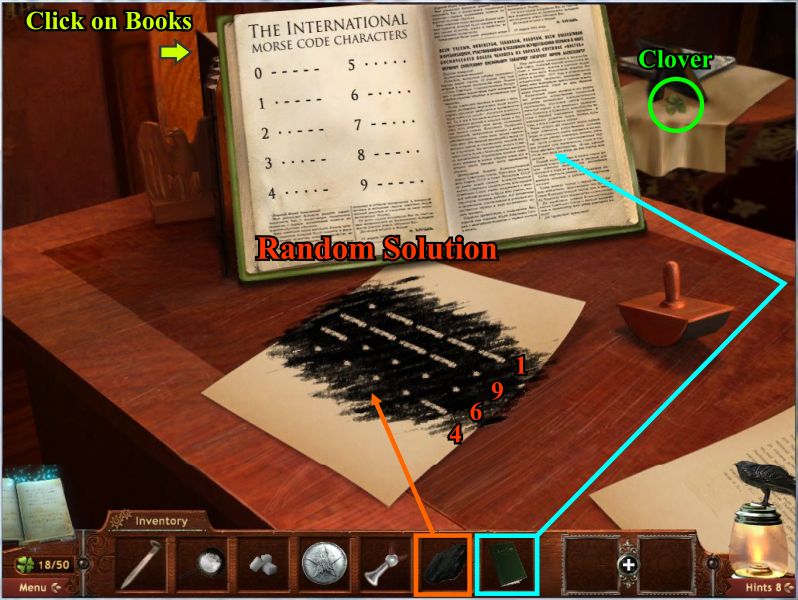
Morse Code Mini Game
Click on the books to bring up the game.
Place the Morse Code Book where it belongs.
Use the coal on the paper to show the marks.
The Morse Code markings are Random so you need to note what your solution turns out to be.
Screenshot
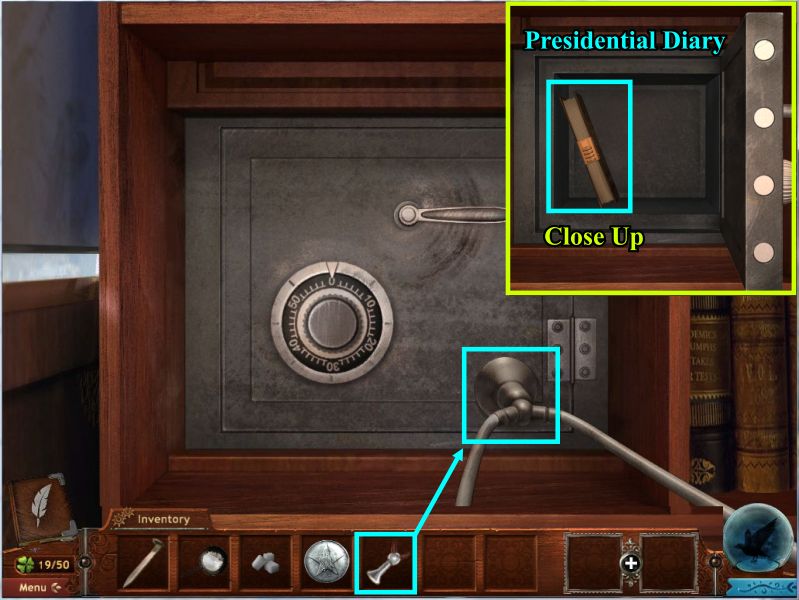
Safe Mini Game
Click on the safe for a Mini Game and place the stethoscope as shown.
Turn the dial until you hear a click or just watch the stethoscope expand when you have the correct number.
Turn it right, left and then right until the stethoscope goes away.
Click the handle to open the safe and take a closer look at the diary.
Screenshot
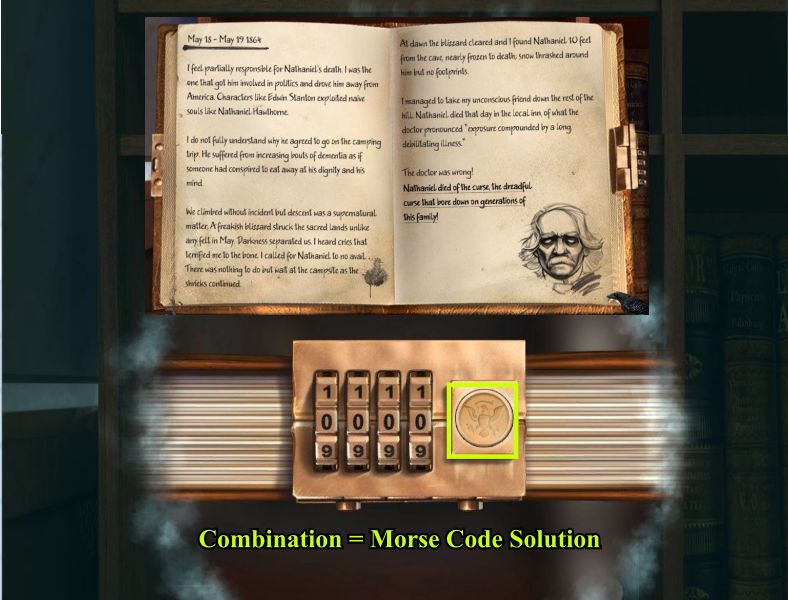
Diary Mini Game
The lock requires you to remember your Morse Code Solution because the combination is random.
Enter those numbers on the keypad and press the button.
Screenshot
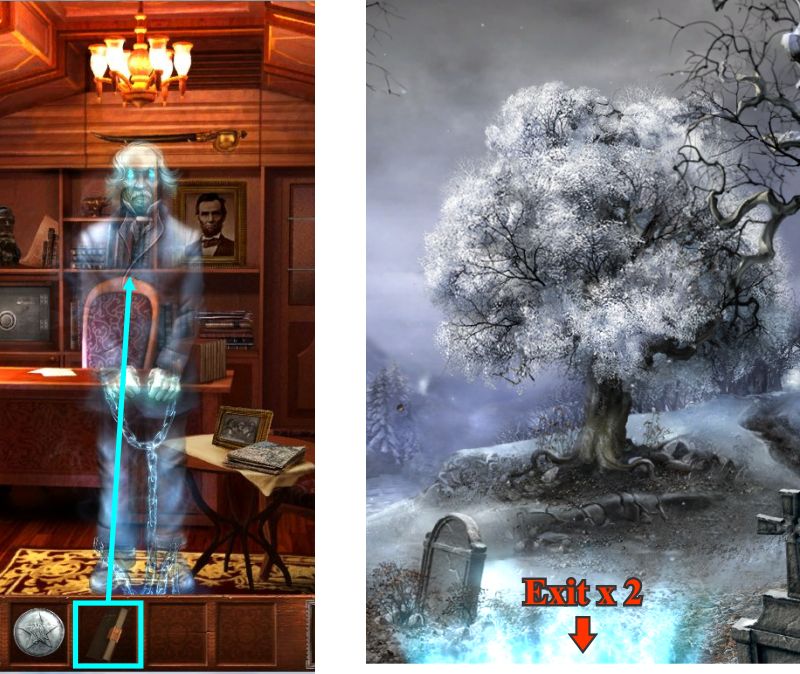
Give the Presidential Diary to Hawthorne and you will be transported to the Snow Globe Tree.
Step into the grave and go down to the cemetery, left to the gate, forward to the village and left to the Courthouse.
Screenshot
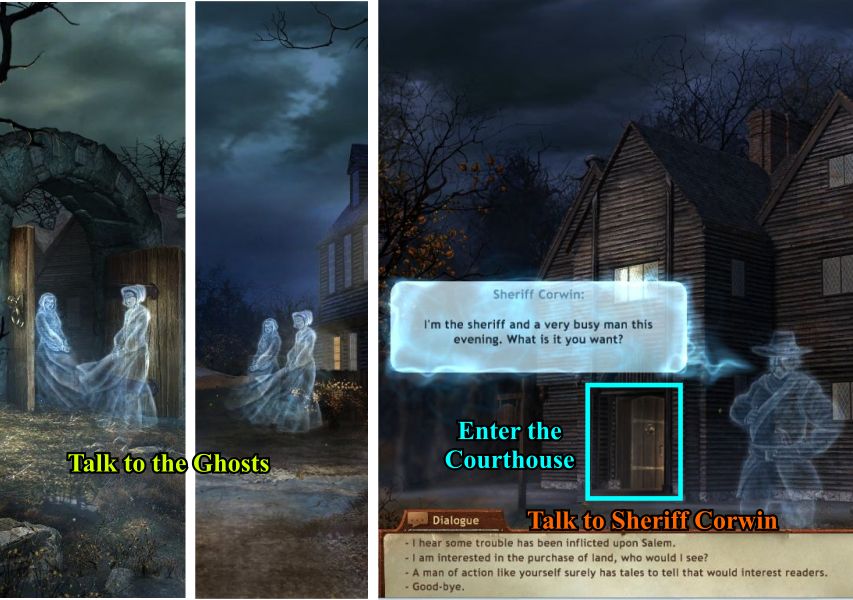
Chapter 4: Find the Warrant
Talk to the ghosts along the way and to the sheriff in front of the Courthouse until he opens the door for you to enter.
Screenshot
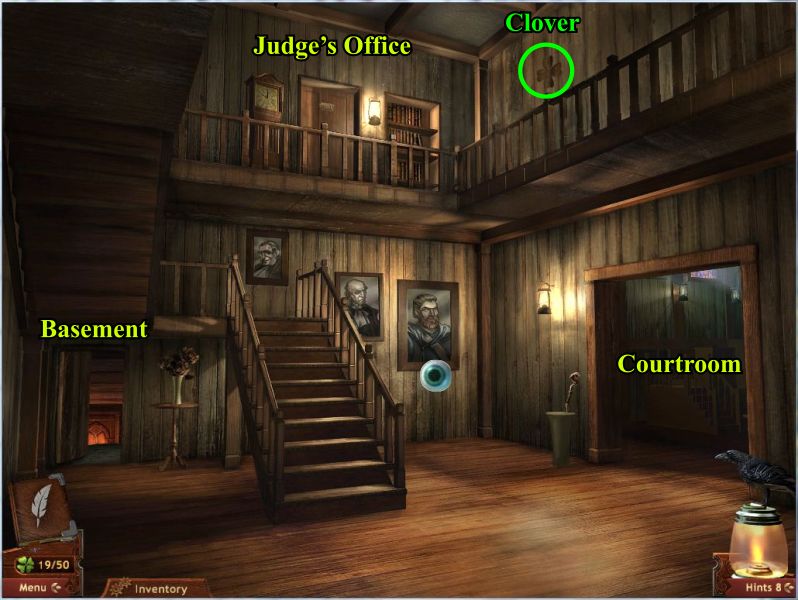
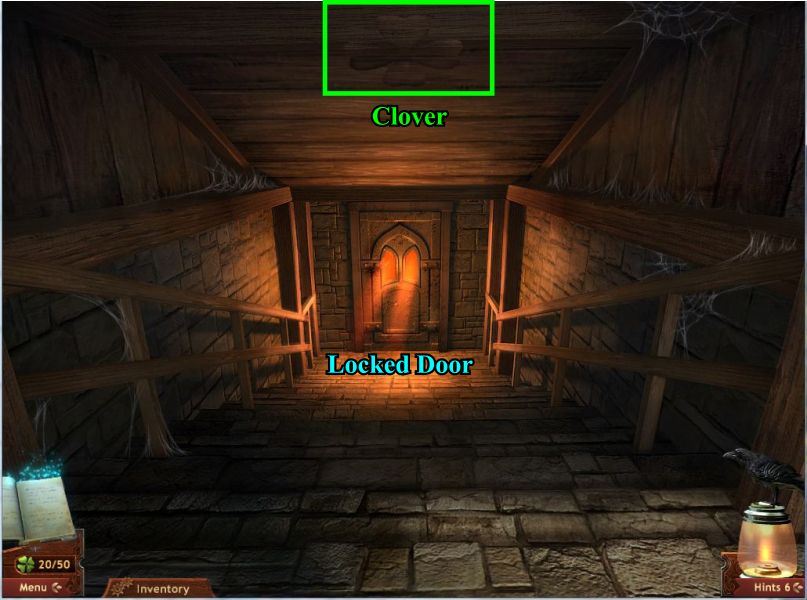
There are several areas of interest in the foyer.
Take the Clover a look at the basement stairs.
Screenshot
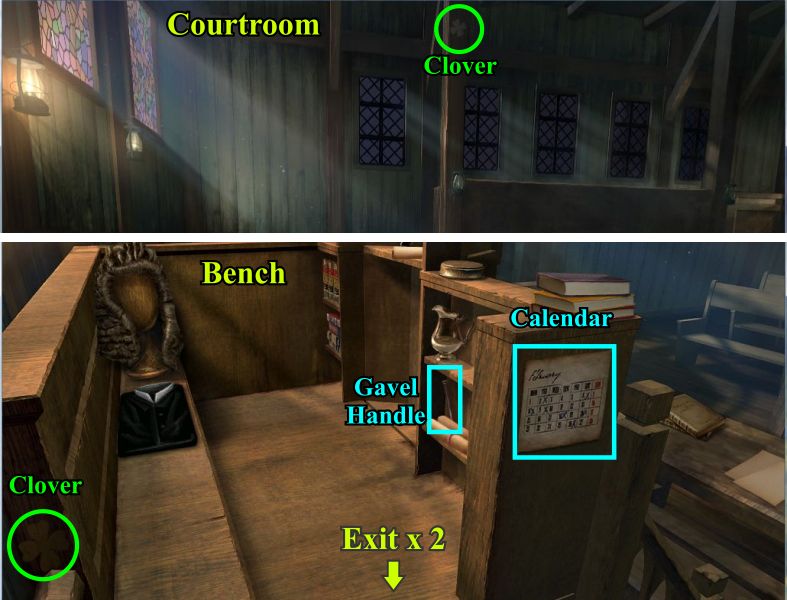
Take the Clover and note that the door is locked so go back to the foyer and enter the courtroom.
Screenshot
Take the Clover and click on the Bench for a closer look.
Pick up the Clover, gavel handle and February calendar.
Exit to the foyer and go upstairs.
Screenshot
Pick up the Clover, take a look and the books and click on the clock.
Take the door knob and put the 2 clock hands together somewhere on the clock in order to form a key.
Collect the key and click on the lock for a close up view so you can place the door knob and key.
Click on the knob to open the door and enter the Judge's Office.
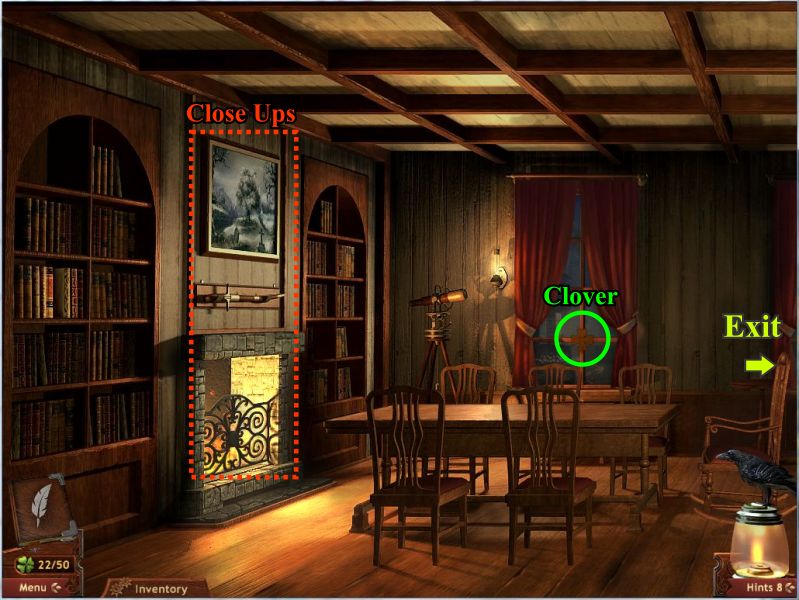
Screenshot
Take a look at the fireplace area, collect the Clover and go to the right side of the office.
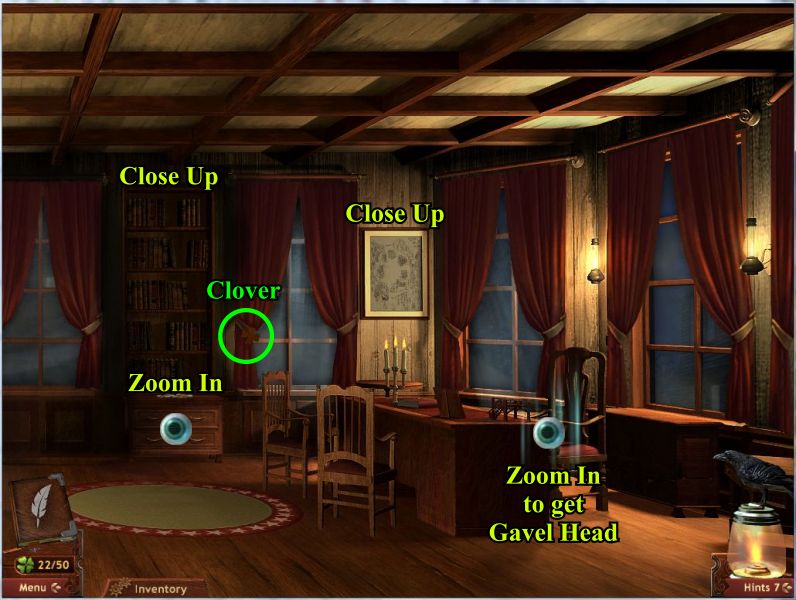
Screenshot
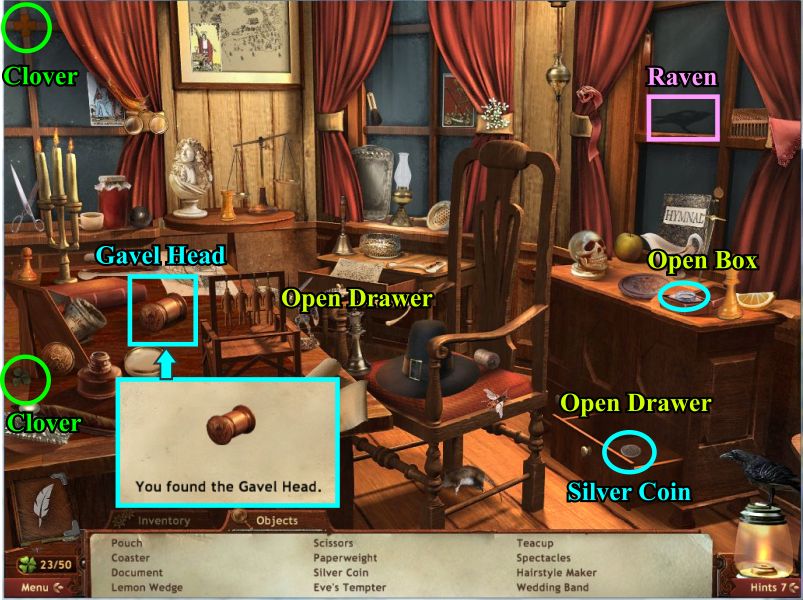
Pick up the Clover, check out the close ups and zoom in on the desk for a hidden object scene.
Screenshot
Open the drawers, collect and 2 Clovers and the Raven as well as the other items on your list.
Pick up the silver coin and collect the gavel head at the end of the scene.
Screenshot
Zoom in on the chest on the back wall.
Pick up the Clover and combine the gavel head and handle.
Use the completed gavel to unlock each of the drawers to get to the Mini Game.
Screenshot
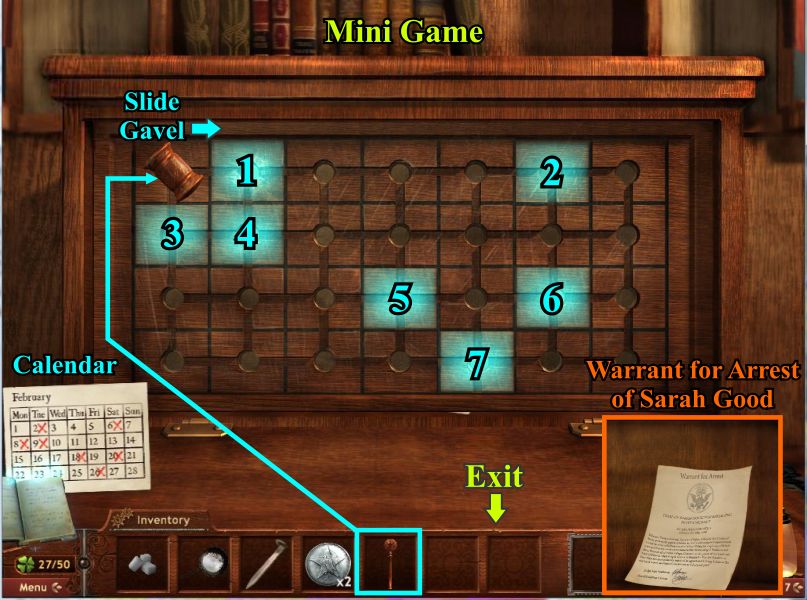
Gavel Mini Game
Place the gavel on the board and slide it through the board as marked with an X on the calendar in the left corner.
The positions are numbered on the screen shot and need to be done in order or you will have to start over.
You can go back through a marking you've already made to get to the next number.
Pick up Sarah's Arrest Warrant at the end of the game and go back to the Judge's Office.
Screenshot
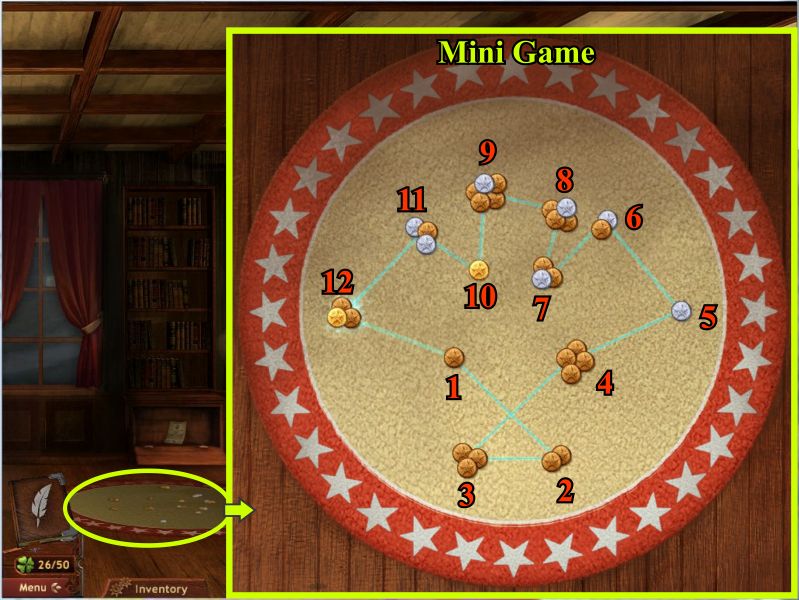
Coin Mini Game
Click on the rug on the floor where the coins have spilled out of the chest.
Your goal is to connect the coins in order of smallest to largest denomination with copper being the smallest and gold being the largest.
The screen shot is numbered to show the path from 1 to 12 but be sure to connect 12 back to 1 to finish the pattern.
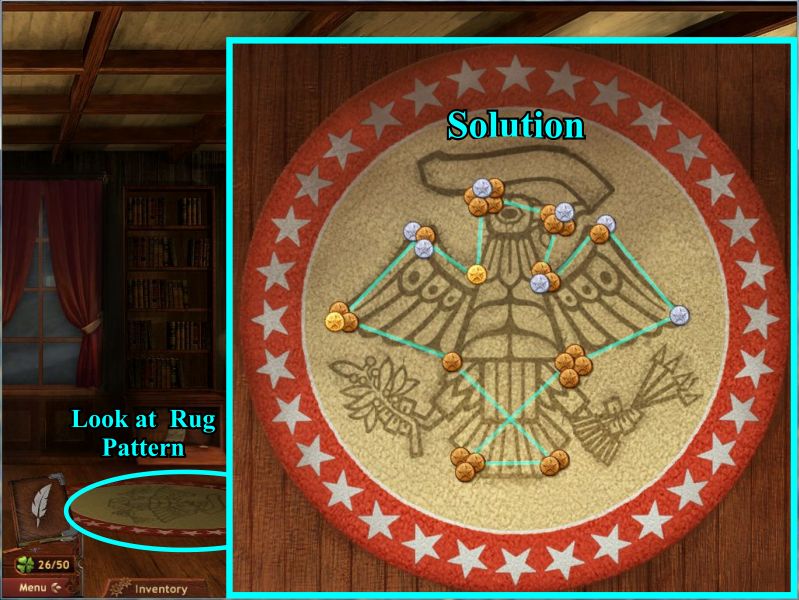
Screenshot
There is now a pattern on the rug formed by the connections you just made.
You get a bag of coins for having collected them.
Screenshot
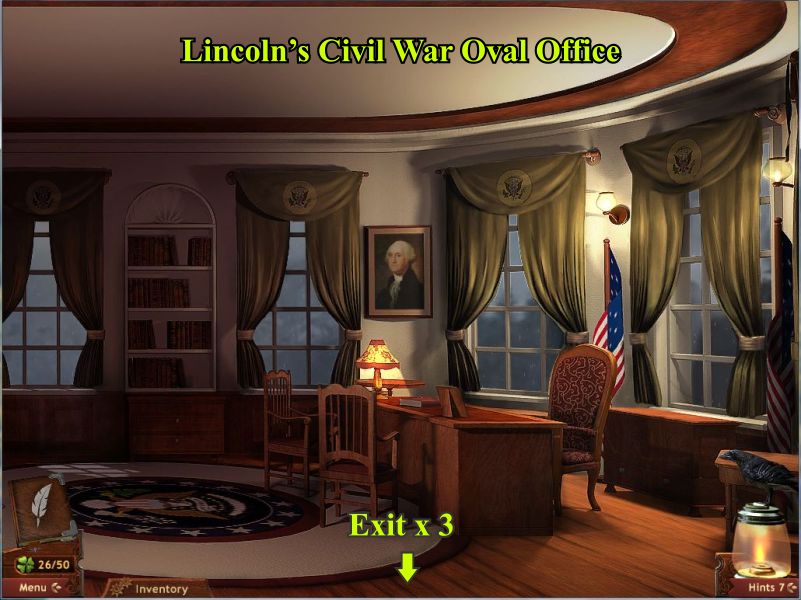
Click on the rug and Judge Hathorne's Office transforms into the President Lincoln's Oval Office.
Click anywhere to be transported back to Hathorne's office and exit down 3 times.
Screenshot
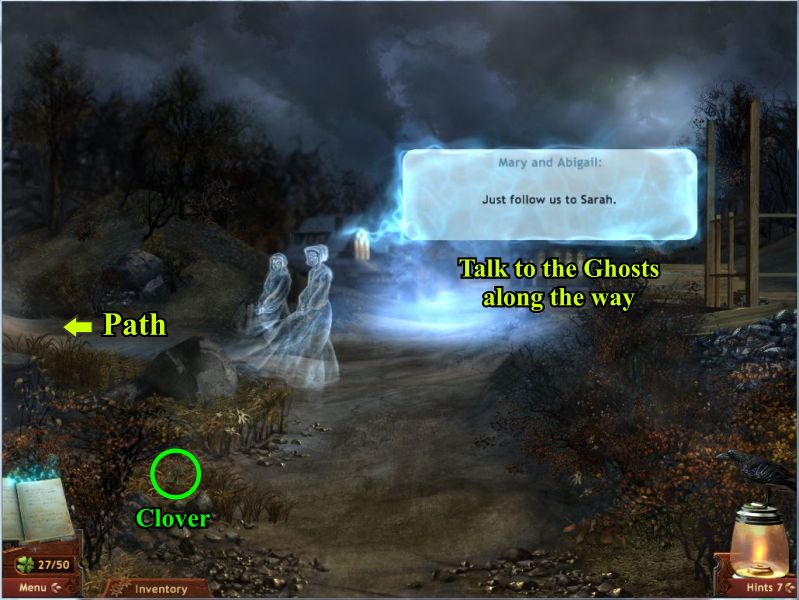
Chapter 5: The Love Potion
Pick up the Clover and talk to Mary and Abigail who will take you to Sarah's house to get a love potion.
Screenshot
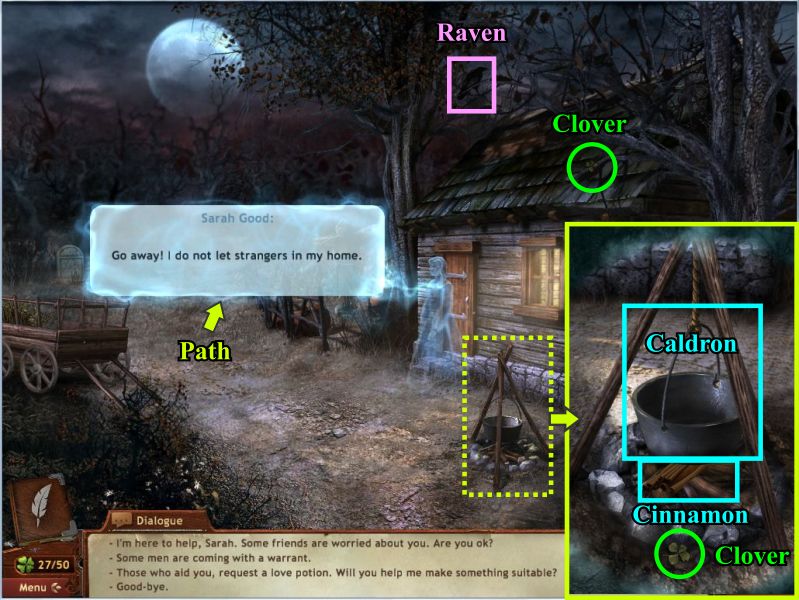
Collect the Raven and Clover and talk to Sarah.
Click on the caldron for a close up and collect the caldron and cinnamon and Clover.
Screenshot
Take the path to the Garden and collect the 2 Ravens and the Clover.
Pick up the barrel lid, corn, 4 moldy berries marked in orange, and 3 garlic marked in blue.
Return to the front of the house and enter.
Screenshot
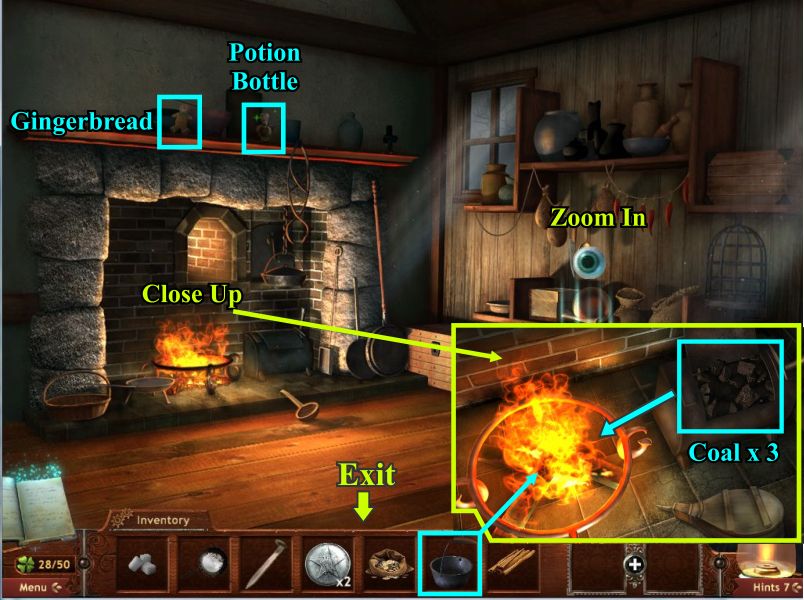
Take the gingerbread and potion bottle off the mantle and click on the fireplace for a close up.
Click on the coal 3 times to add to the fire and the bin will close.
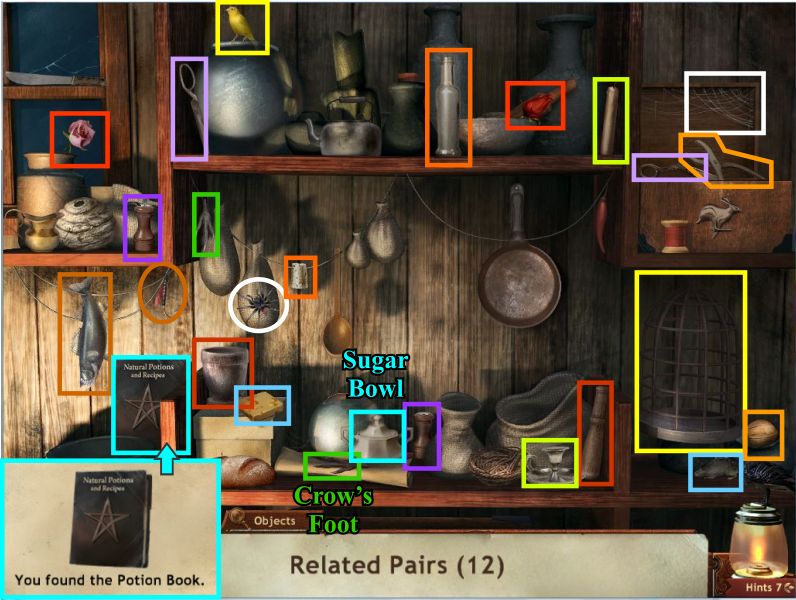
Place the caldron on the fire and zoom in on the hidden object scene.
Screenshot
Collect 12 related pairs such as the bird and cage.
All the pairs are color coded.
Pick up the sugar bowl and finally the Potion Book.
Screenshot
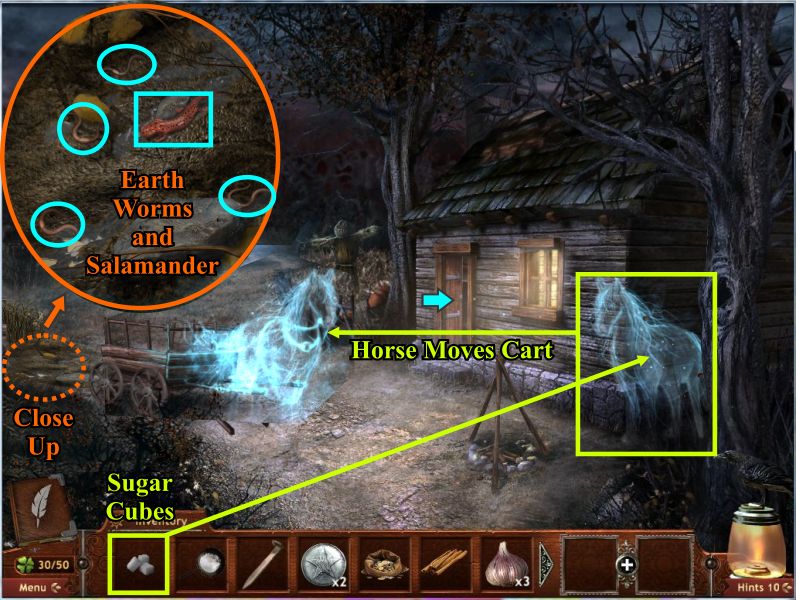
You don't have all the ingredients for the recipe so go outside and give the sugar cubes from your inventory to the horse who will pull the cart forward revealing the spot with the rest of the ingredients.
Click on the ground for a close up and collect the red salamander and 4 earthworms before returning to the house and clicking on the fireplace.
Screenshot
Love Potion Mini Game
Smoke circles will appear around the caldron representing the ingredients you have collected.
Place each ingredient in its proper circle.
When the caldron comes to a boil a smoky shape of an ingredient will appear so place that ingredient in the caldron.
The solution is random so watch the shapes.
Put the potion bottle into the caldron to create the "Love Potion" and exit to the Living Room.
Screenshot
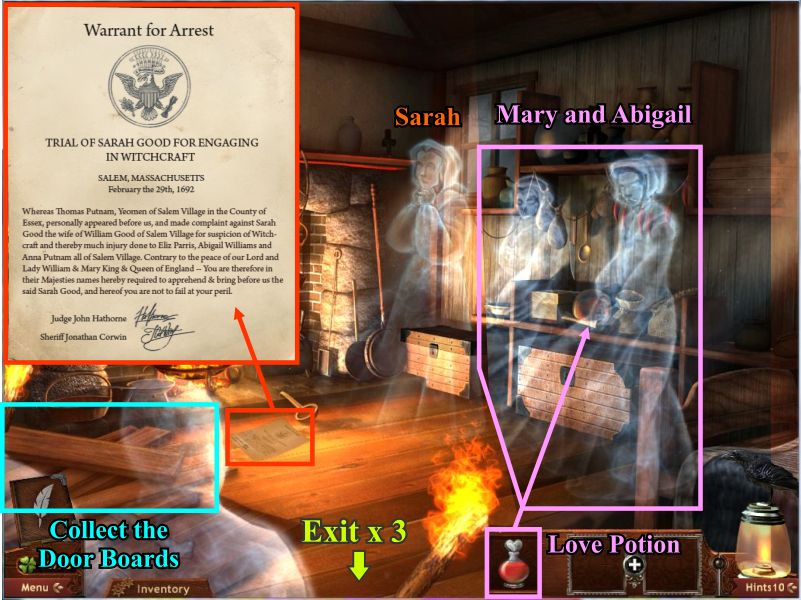
Abigail and Mary appear so give them the Love Potion.
Sarah's door is broken down by men with torches who have a warrant for her arrest.
Collect the waterproof boards from the door and go outside.
Talk to Sarah in the cart and the horse will come.
Follow the cart exiting down twice and left to the Courthouse and into the courtroom.
Screenshot
Click on the various ghosts to see what they have to say.
All the ghosts disappear except for Mary.
Pick up the Rag Doll on the bench where Dorothy sat and talk to Mary who will transport you to the House of the Seven Gables construction site.
Screenshot
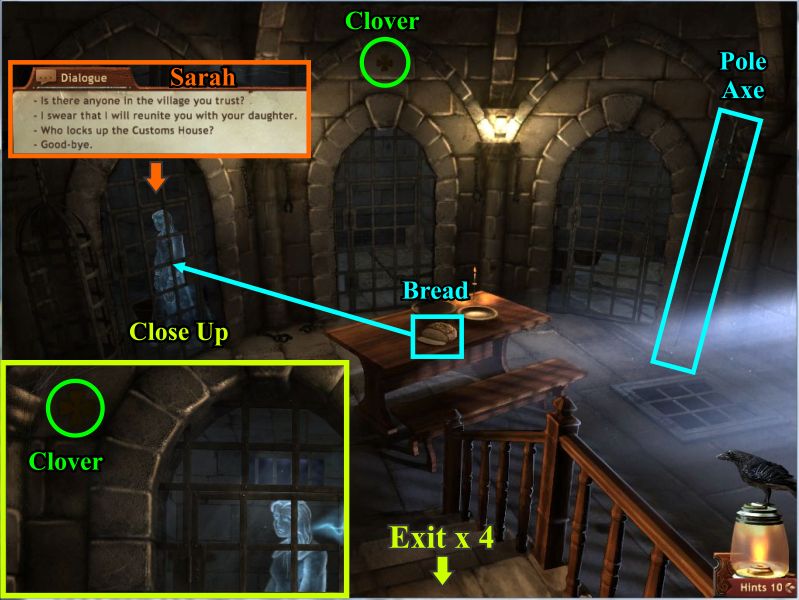
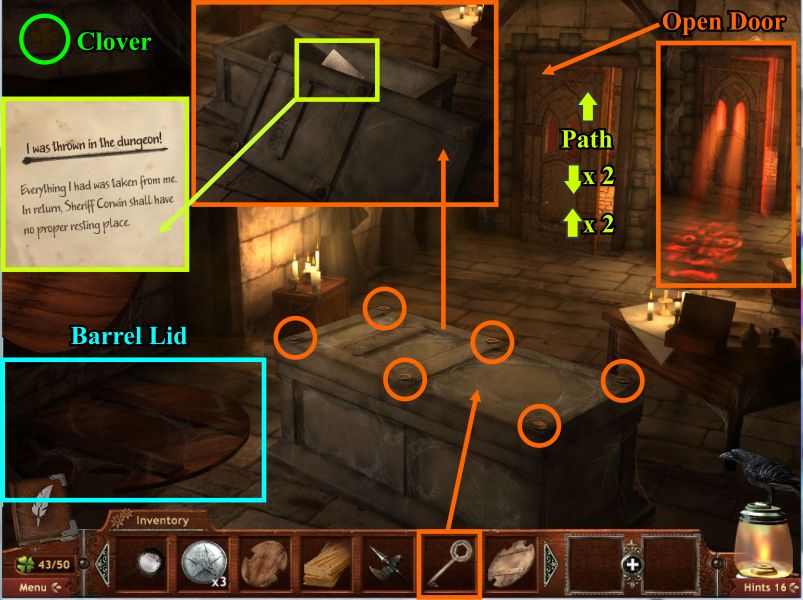
Chapter 6: The English Tale
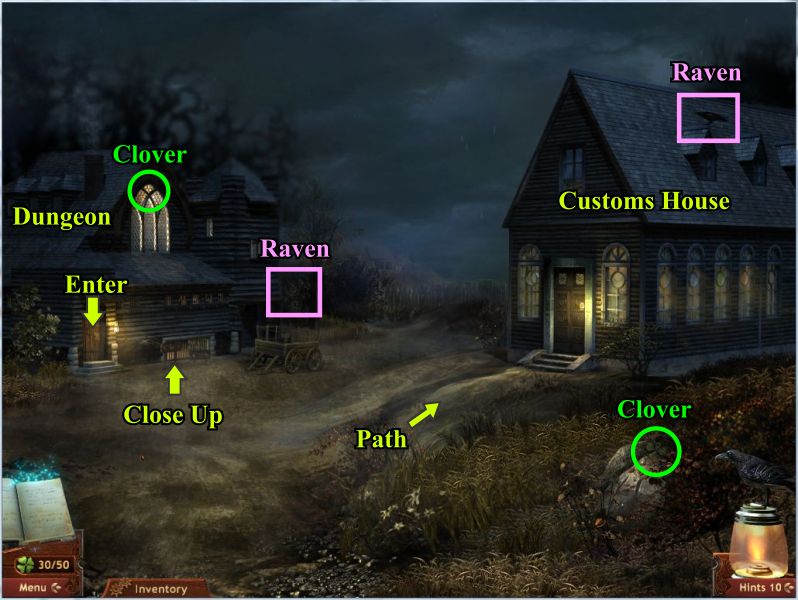
Exit down from the construction site and go forward.
Collect the Clover and Raven from the Customs House and go to the Dungeon.
Pick up the Clover and Raven and enter the Dungeon.
Screenshot
Pick up the Clover and Pole Axe and go talk to Sarah in her cell.
She is hungry so give her the bread and collect the Clover before exiting to Philip English's House.
Exit from the cell and then go down 4 times and turn right to English's front door.
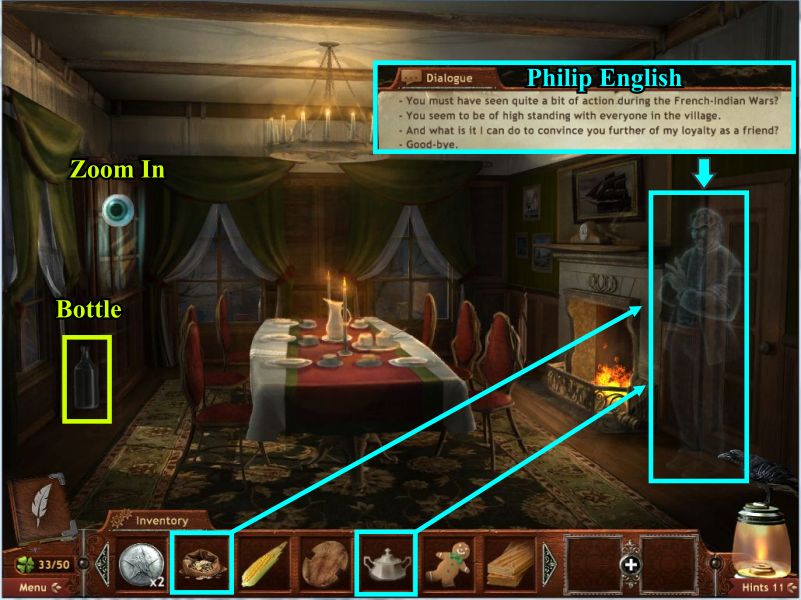
Screenshot
Mary is outside so click on her and then follow her into the house.
Give Philip the sugar bowl and speak with him before giving him the bag of coins.
Pick up the bottle and zoom in on the cabinet for a hidden object scene.
Screenshot
Open the items indicated and collect the 2 Clovers.
When you finish picking up everything on your list you need to collect the Ship for your inventory.
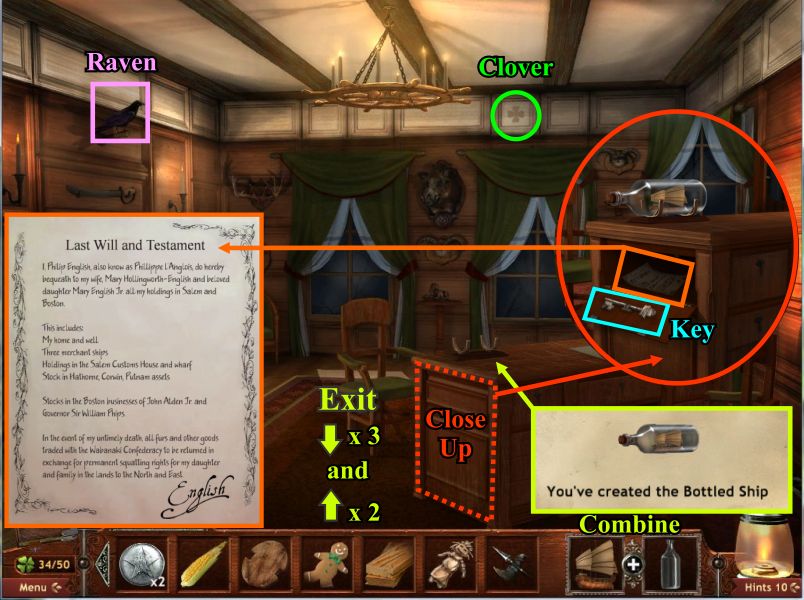
Screenshot
Return to the Dining Room and turn right to the Study.
Pick up the Raven and Clover.
There is something missing from the stand on the desk so combine the ship with the bottle in your inventory.
Place the ship in bottle on the desk and you get a close up of a secret compartment.
Read the Will and take the key.
Exit out of the close up and then down 3 times and go forward twice to the Customs House.
Screenshot
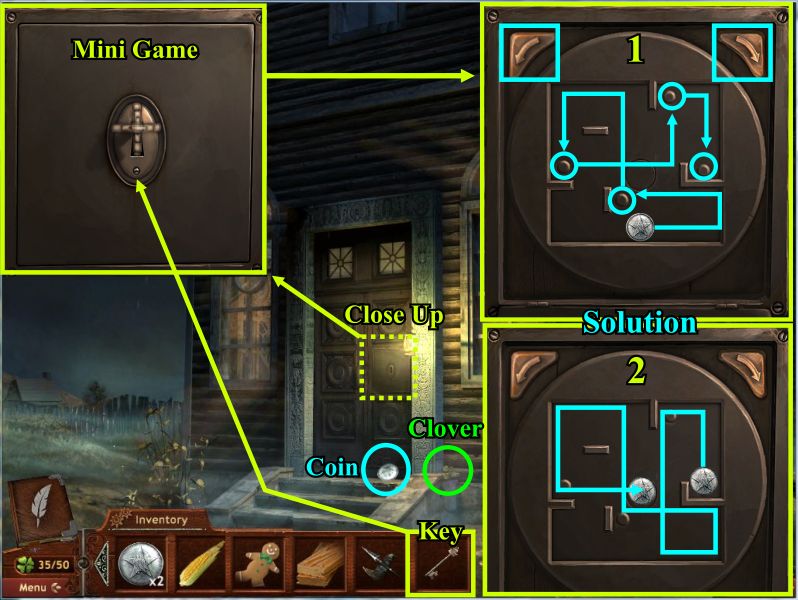
Go to the door and pick up the Clover.
Click on the door lock for a close up and put the key in the door to bring up the lock mini game.
Customs Lock Mini Game
Your goal is to depress all the buttons and get the coin in the hole that opens up in the center.
Use the 2 buttons in the top corners to rotate the lock 90 degrees in either direction.
One solution is shown in the screen shot.
Once the coin goes through the center hole it will end up on the ground and the left door will open so pick up the coin and enter.
Screenshot
Chapter 7: Salem Customs
There is a poltergeist in the lobby that looks like Dorothy wrecking the place.
Give the Rag Doll to the mirror frame and all the chairs get stacked up to the open attic hatch.
Collect the Clover, blue bowl and 7 pieces of the mirror that shattered and climb up to the attic.
Screenshot
Collect the Clover and the red float and zoom in for a hidden object scene.
Screenshot
Collect the Raven and 2 Clovers as well as everything on your list including the door handle.
Exit down and go forward to the back of the attic.
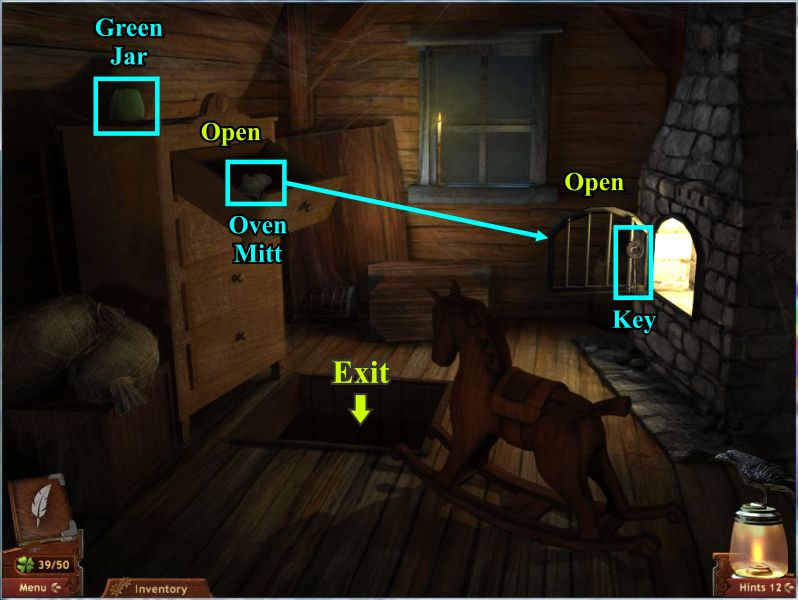
Screenshot
Open the drawer and take the oven mitt to open the hot grate at the right.
Take the key and get the green jar before exiting down the open hatch.
Screenshot
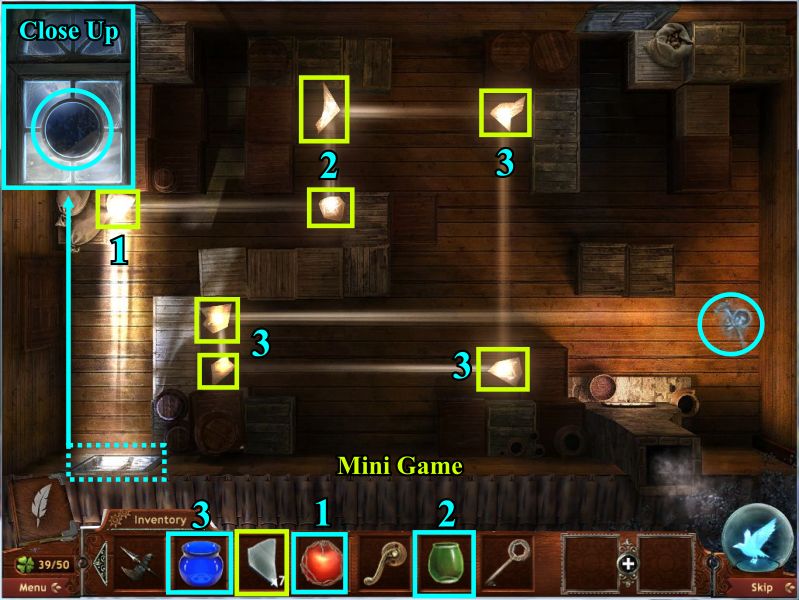
Warehouse Mini Game
Your goal is to direct the beam of light at Dorothy's ghost according to the color she is.
Click on the window for a close up and place the Red Float in the window opening and the first piece of mirror at the end of the light beam.
Dorothy will flit off and turn green so place the Green Bowl in the window opening and put two more mirror pieces in the beam so that it hits her.
She has now turned blue so place the Blue Bowl in the window opening and the remaining pieces of mirror at the end of the light beam and Dorothy will appear.
Screenshot
Pick up the barrel lid and the Clover and go forward to talk with Dorothy and she will open the secret compartment with a model house inside.
Zoom in on the model house and use your door handle in the hole to bring up a Mini Game.
Screenshot
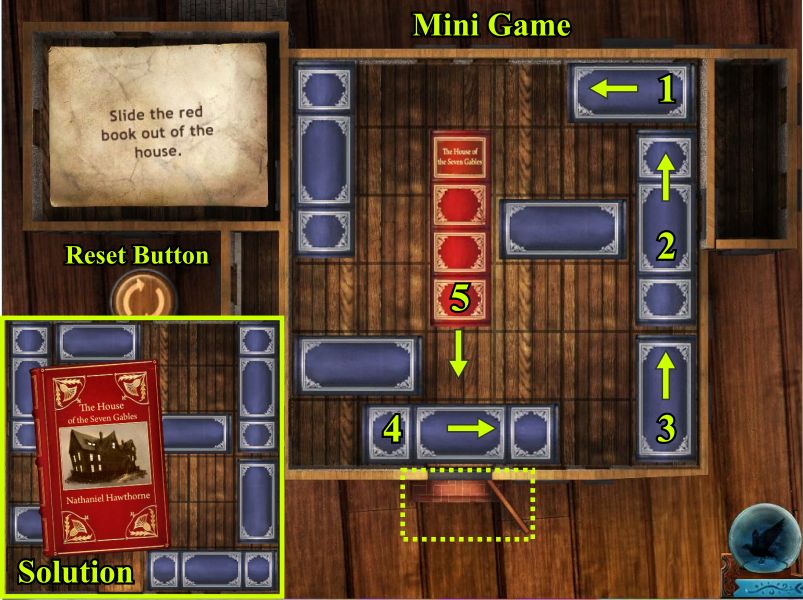
Red Book Mini Game
This is a slider game and this screen shot is the most popular configuration.
Your goal is to get the red book out the slot so follow the numbers for the solution and then take the book.
Screenshot
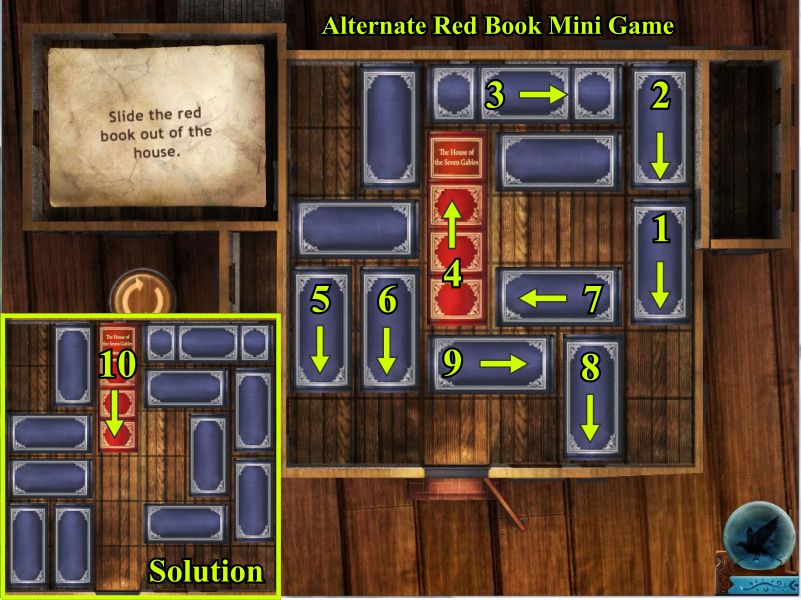
This is an alternate and more complicated configuration I encountered so if you get this one, just follow the numbers to get the solution.
Screenshot
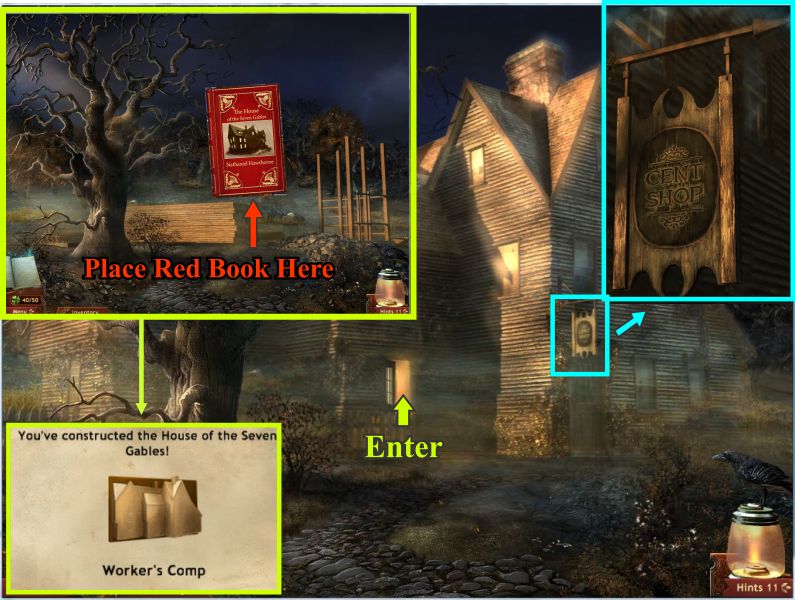
Exit the warehouse 5 times down to get to the House of the Seven Gables and turn right to the construction site.
Chapter 8: The House of the Seven Gables
Place the red book as shown and you will construct the house and get your Worker's Comp award.
Enter the house.
Screenshot
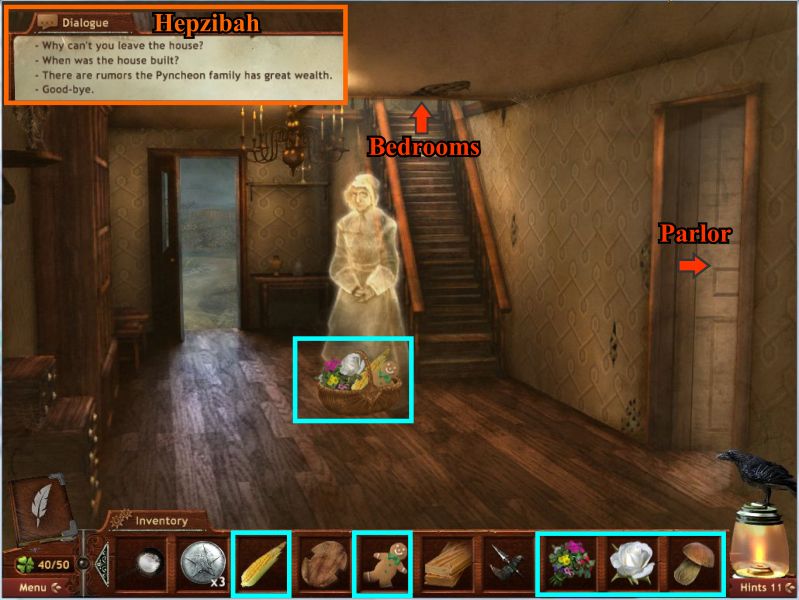
Talk to Hepzibah who says the Colonel won't let her leave the house so gives you a list of things to get for her.
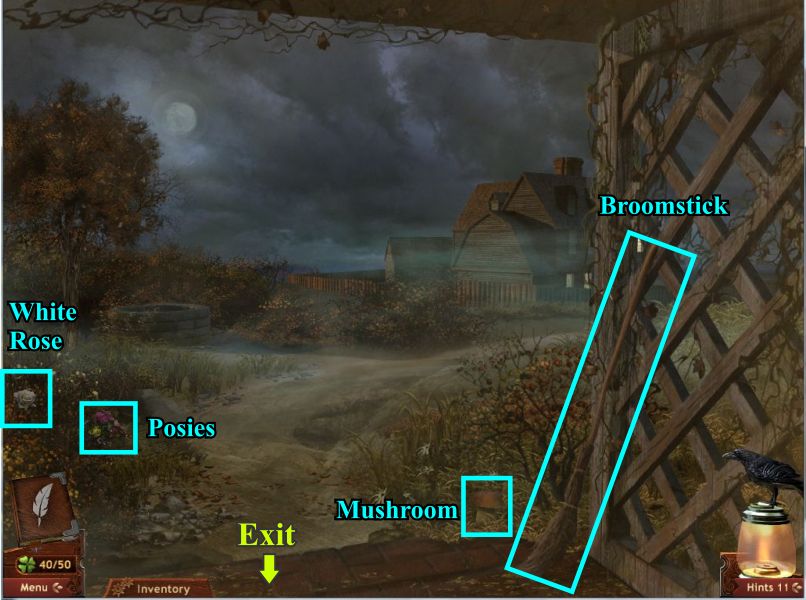
Pick up the piano key and go to the garden.
Screenshot
Collect the white rose, posies, mushroom and broomstick and go back inside the house.
Screenshot
Speak with Hepzibah and give her the items from her list.
You will get a key for upstairs but first go into the Parlor.
Screenshot
Speak with the Colonel then pick up the Raven, piano key and each of the 2 dice.
Go back to the hall and up the stairs.
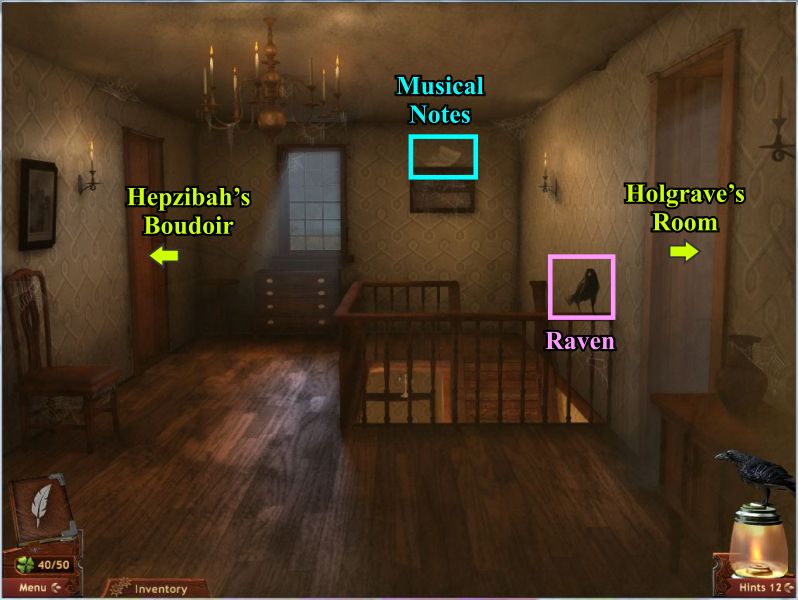
Screenshot
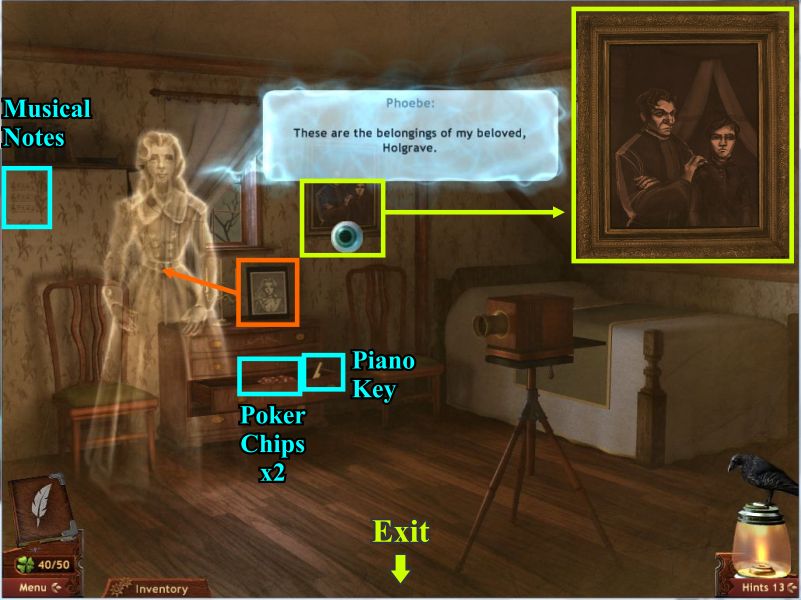
Pick up the Raven and musical notes and go into Holgrave's Room on the right.
Screenshot
Click on the picture on the chest and Phoebe will appear.
Open the third drawer to collect the 2 sets of poker chips and the piano key.
Take the musical notes off the wall and go across the hall to Hepzibah's Boudoir and enter.
Screenshot
Collect the Clover, Raven and piano key.
Combine the 2 halves of the musical notes to get sheet music.
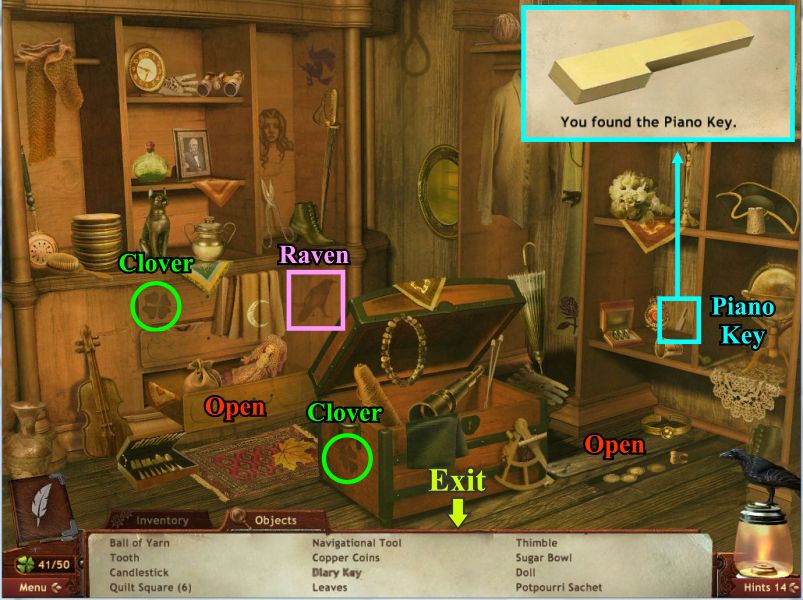
Use the key Hepzibah gave you to open the closet and zoom in for a hidden object scene.
Screenshot
Collect the Raven and 2 Clovers as well as everything on your list.
Be sure to open the drawer in the chest and the floor board to get what you need.
You will get another piano key so take it and go back to the Boudoir.
Screenshot
Harpsichord Mini Game
Take a closer look at the harpsichord to see it is in need of repair.
Individually place the 5 piano keys on the keyboard and put the sheet music in its place.
Swap the strings to arrange them from shortest to longest.
Screenshot
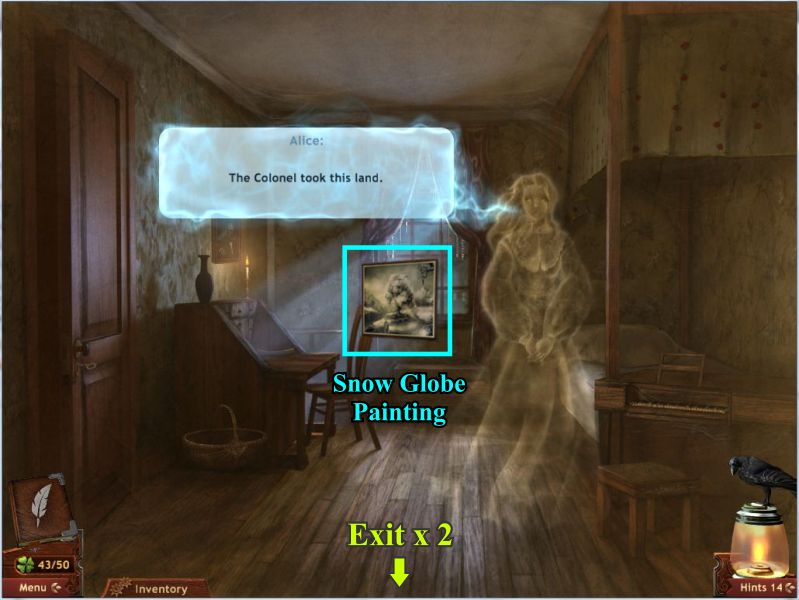
Alice appears to give you the Snow Globe painting.
Take it a go back downstairs to the Parlor.
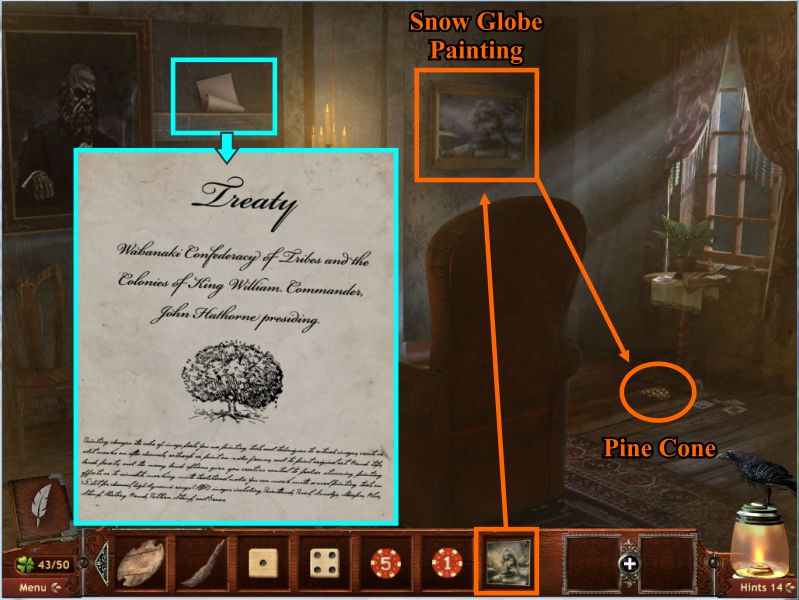
Screenshot
Place the painting on the wall and a secret compartment will be revealed above the fireplace.
Take the Treaty and the painting will start to shake and a pine cone will fall to the floor in front of the table by the window.
Click on the painting or the pine cone to be transported in front of Sarah's House.
Screenshot
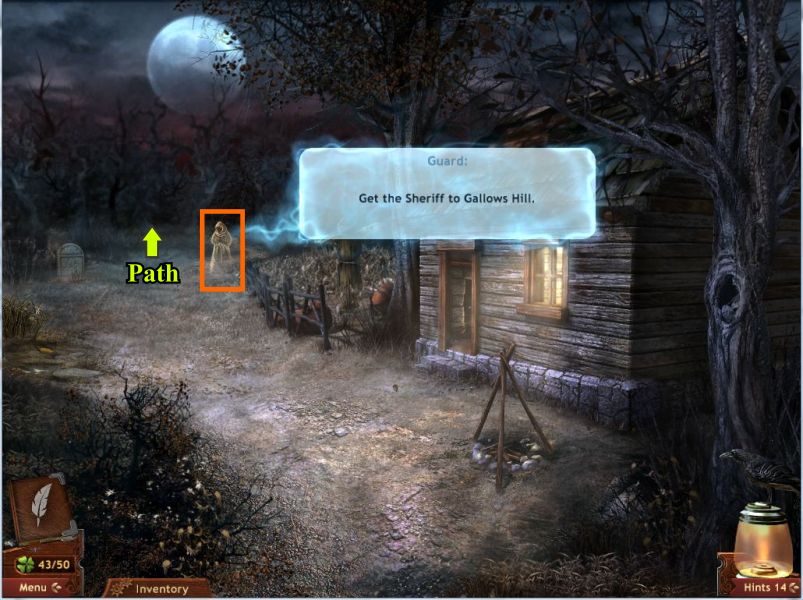
Chapter 9: Gallows Hill
Speak with the ghost and take the path to the woods.
Screenshot
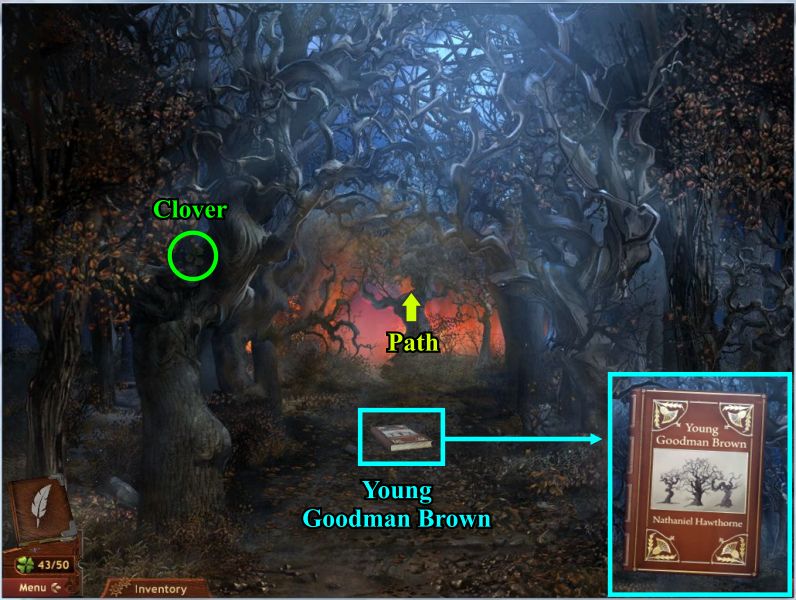
Pick up the Young Goodman Brown book and a Clover along the way and continue to the Altar.
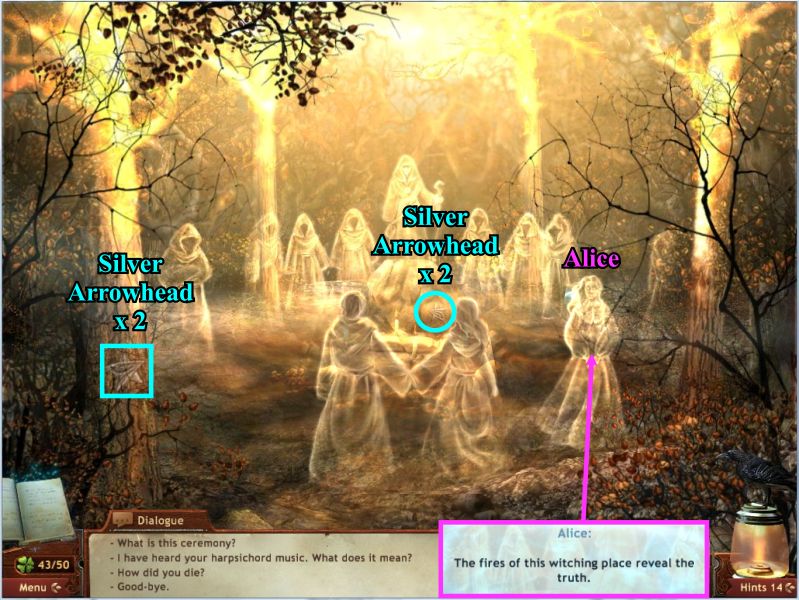
Screenshot
Collect the silver arrowheads and click on the couple holding hands.
Talk to Alice when she appears.
Screenshot
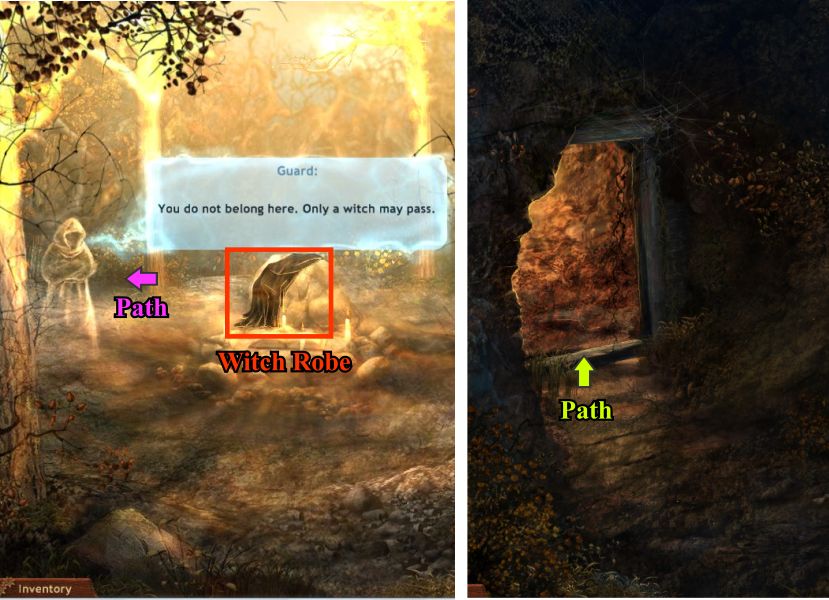
When the ceremony ends there will be a cloak on the altar.
Pick it up to wear it and proceed down the secret path to the left.
Screenshot
Collect the 2 Ravens along the way.
Click on the bottom of the barrel to open a bath into the basement of the Courthouse.
Screenshot
Pick up the barrel lid and Clover.
Use the hexagon key to undo the bolts on the coffin and read the note inside.
Open the door and go up the stairs to the Courthouse Foyer.
Exit the Courthouse and go to the Dungeon by going down twice and forward twice.
Screenshot
Go to Sarah's cell and collect the witch mark.
Exit the close up and speak with English in his cell.
Click on English again to bring up the Cell Mini Game.
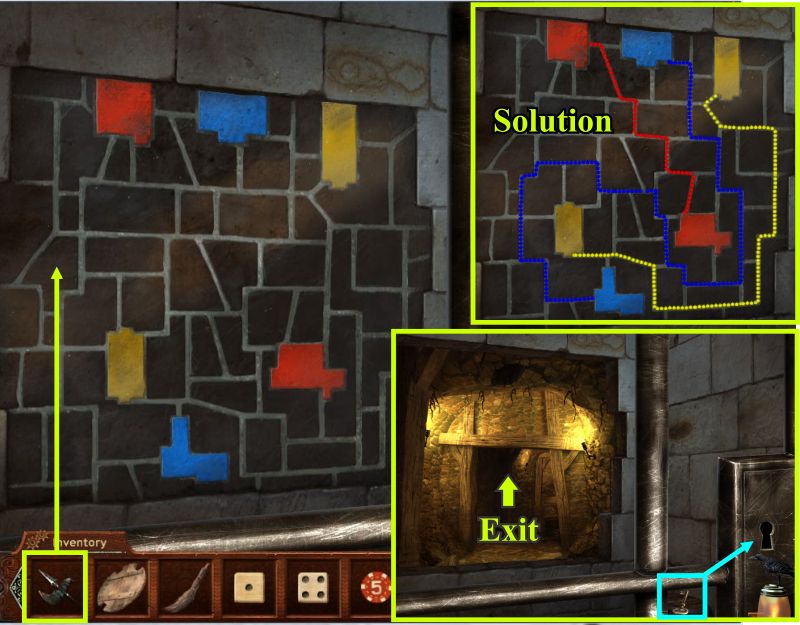
Screenshot
Cell Wall Mini Game
Place the pole axe from your inventory on the wall and trace a path on the mortar lines between the bricks of matching color.
Click and hold your mouse to drag the lines which cannot intersect each other.
There are slight deviations in the paths but the solution in the screen shot works.
Collect the cell key from the top of the barrel and open the lock.
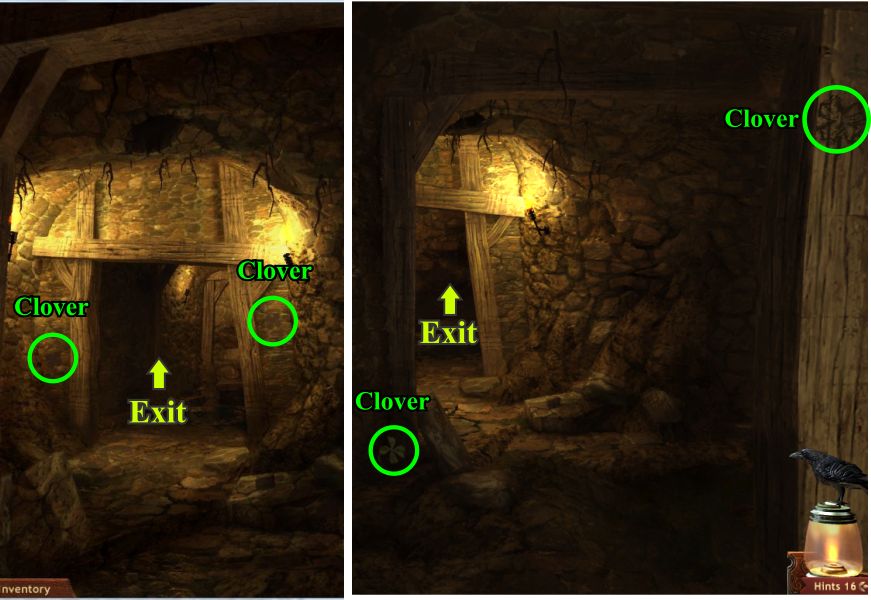
You can now exit the Dungeon through the escape tunnel you created.
Screenshot
Collect the 4 Clovers along the way.
Screenshot
You come to the end of the tunnel.
Collect the 2 Clovers and click on the rock to open the stairway to the Customs House and go through the hatch.
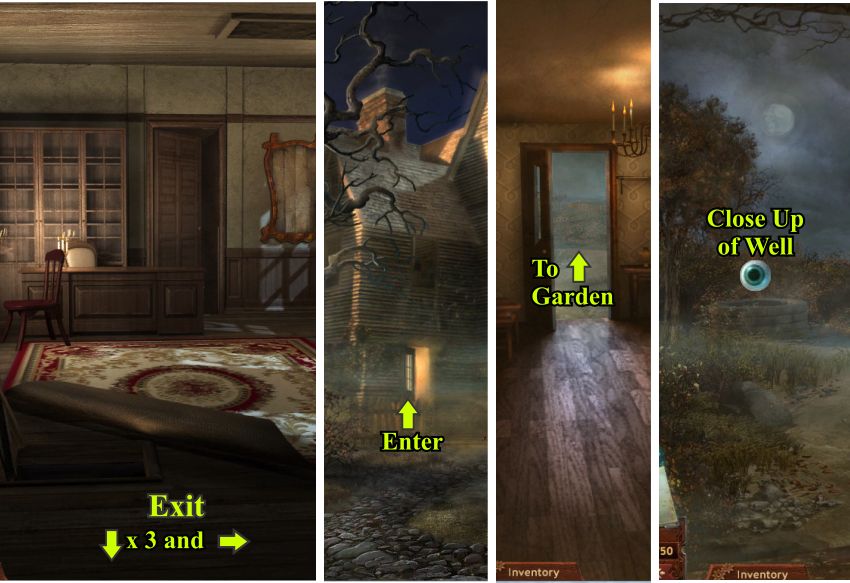
Screenshot
Exit down 3 times and go to the right to the House of the Seven Gables.
Enter the house and go out back to the garden and to the well..
Screenshot
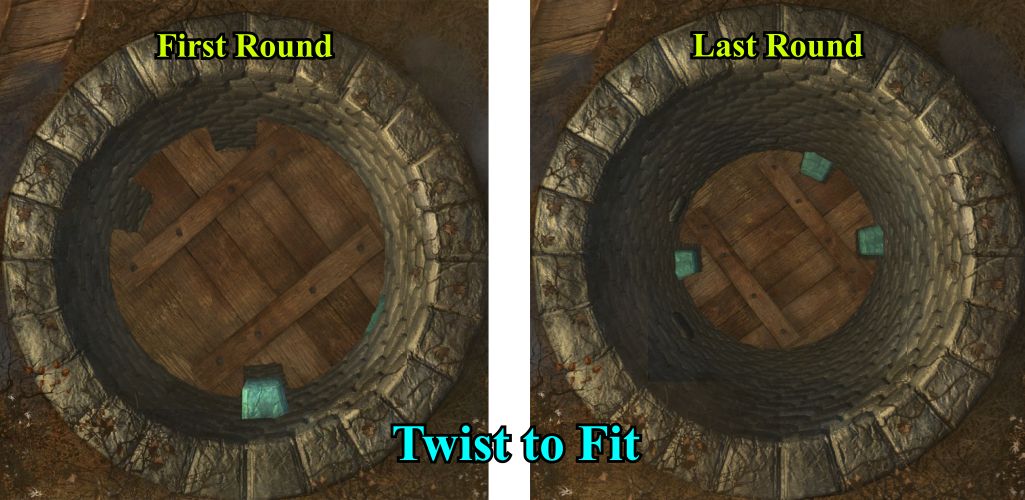
Well Mini Game
Pick up the tar bucket and the barrel lid.
You have several barrel lids in your inventory and if you don't collect the one in this scene, the one you need will be the only one with 3 notches but it is marked in inventory so place that one in the well.
Screenshot
Rotate the lid until one of the notches lines up with the blue stone sticking out of the wall and the lid will drop deeper into the well.
Repeat the same step for the next stone sticking out.
The next 2 rounds require you to line up notches for 2 stones.
The last round requires all 3 notches to be lined up with the stones in order to get to the bottom of the well.
Screenshot
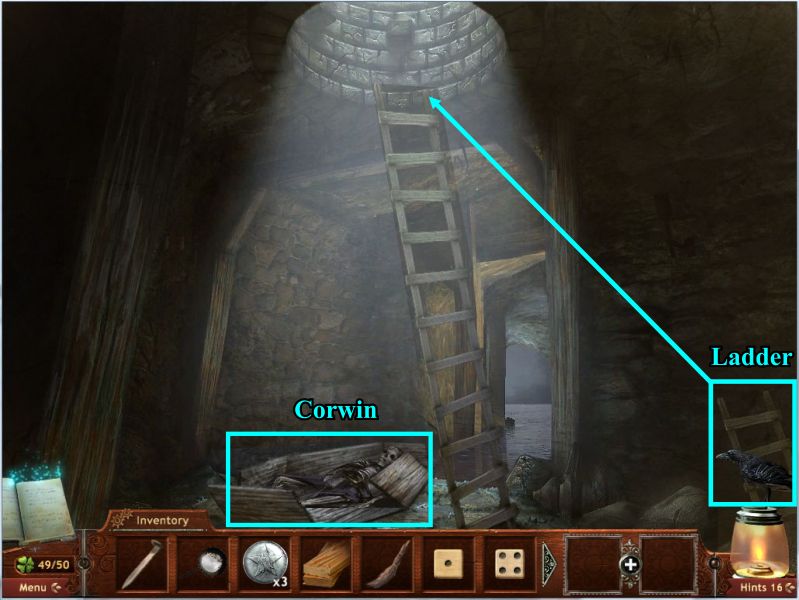
Pick up the skeleton and ladder and place the ladder where shown in case of need to get up out of the well.
Screenshot
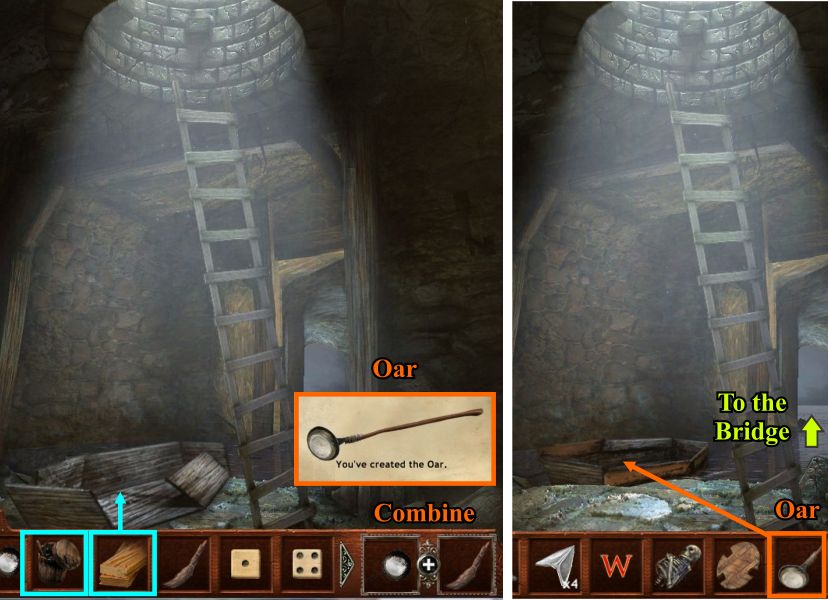
Put those waterproof door boards from Sarah's house on the broken up coffin and use the tar bucket to seal it up.
Combine the broomstick with the pan to get an ore to place on the coffin boat and take off to the bridge so you can get to Gallows Hill.
Screenshot
The boat puts itself on the broken bridge so follow the path to Gallows Hill.
Put Corwin's skeleton in the open grave to bury it.
Screenshot
The Sheriff is happy you buried his son.
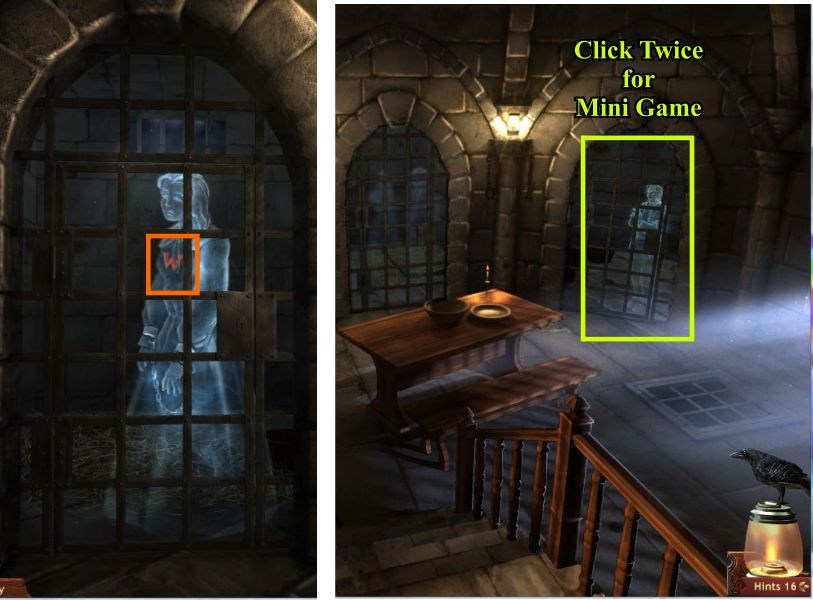
The Judge isn't happy anyway so you need to place the Witch Mark on him and watch him morph into Nathaniel Hawthorne.
Hawthorne explains his curse and about the "W" so click on him and Judge Hathorne will reappear along with a Raven Ghost so click on him and you will be transported to the Cave entrance near the Snow Globe Tree.
Screenshot
Chapter 10: Breaking the Curse
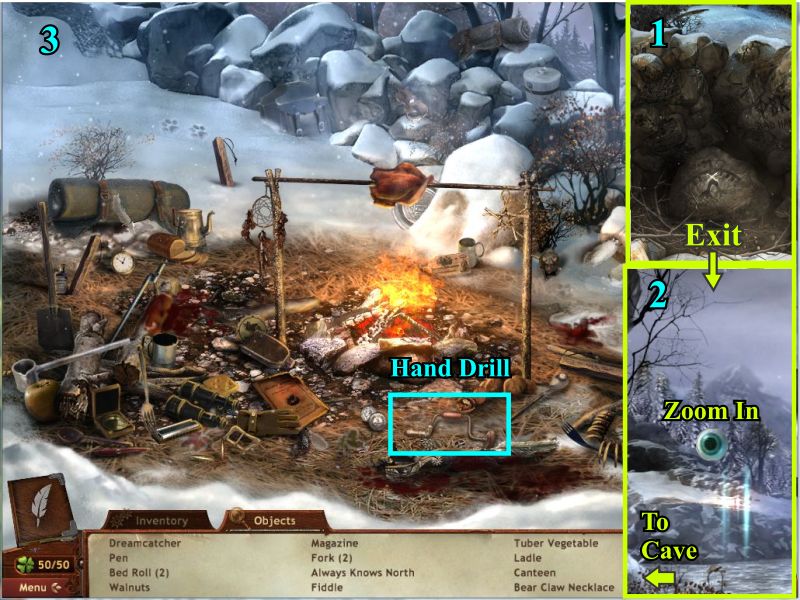
Exit the cave entrance down to the Snow Globe Tree so you can access the campfire and zoom in on a hidden object scene.
Collect everything on your list including the final item which is a hand drill.
Screenshot
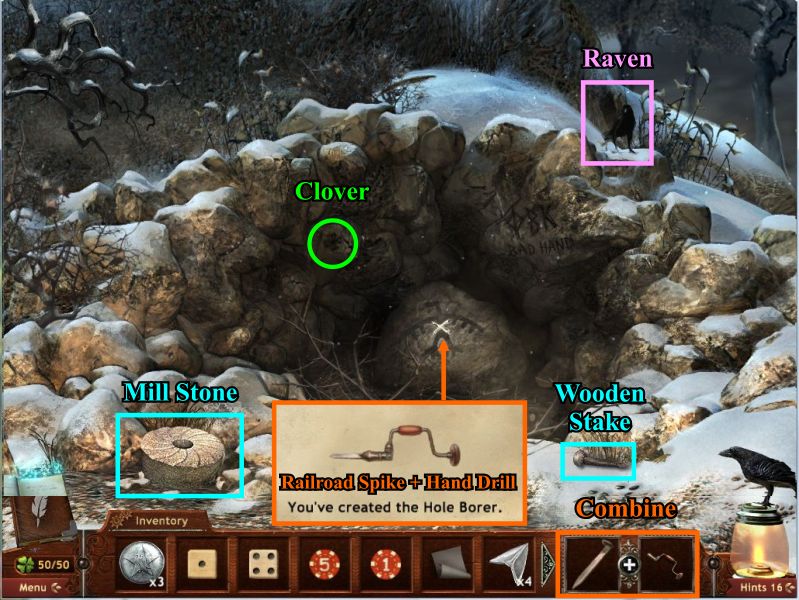
Exit back to the cave entrance.
Collect the Clover, Raven, mill stone and wooden stake.
Combine the Railroad Stake and Hand Drill from your inventory to form a Hand Borer and place it on the rock blocking the entrance to the cave.
Screenshot
Bore a hole in the large rock, place the wooden stake in the hole and use the mill stone to pound it in and break it so you can enter the cave.
Screenshot
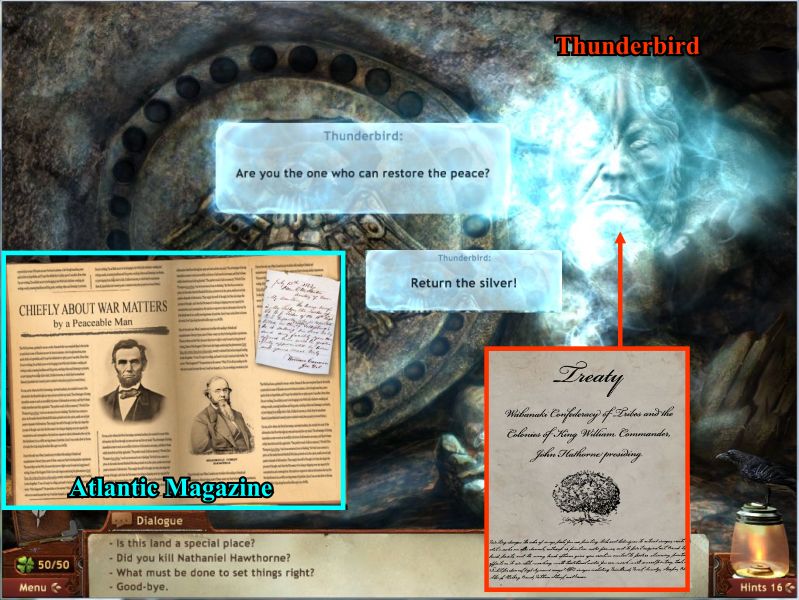
A Thunderbird spirit appears when you get into the cave so speak with him.
Give him the Treaty and he will give you a copy of Atlantic Magazine.
He wants his silver back so click on the magazine and you will be transported to Lincoln's Oval Office.
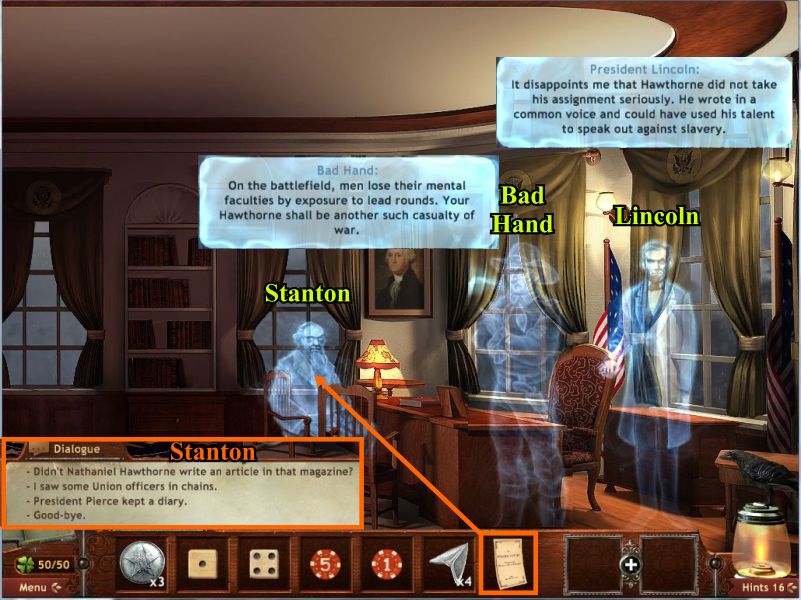
Screenshot
Talk to Stanton who wants his magazine so give it to him.
Click on Lincoln and Bad Hand to hear what they have to say.
Screenshot
Click on the rug and you will be transported back to Judge Hathorne's Office.
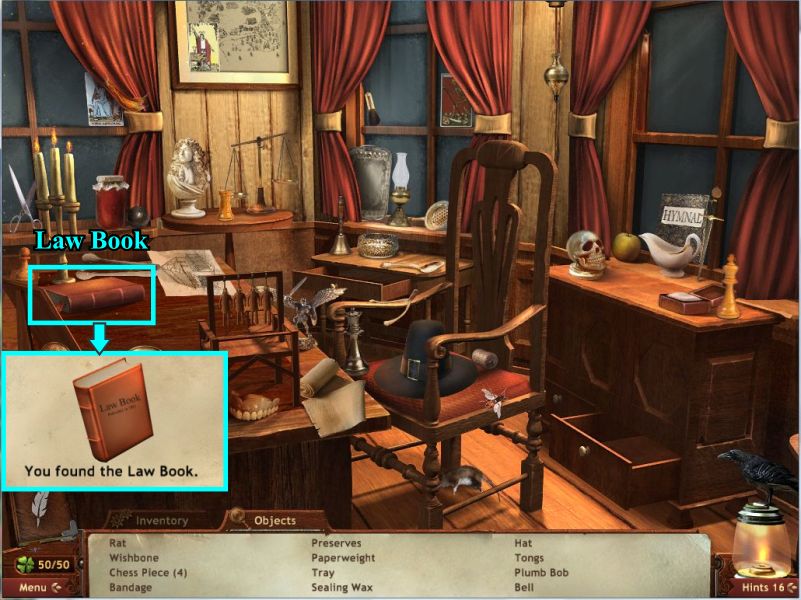
Zoom in on the desk for a hidden object scene.
Screenshot
Collect everything on your list including the Law Book.
Screenshot
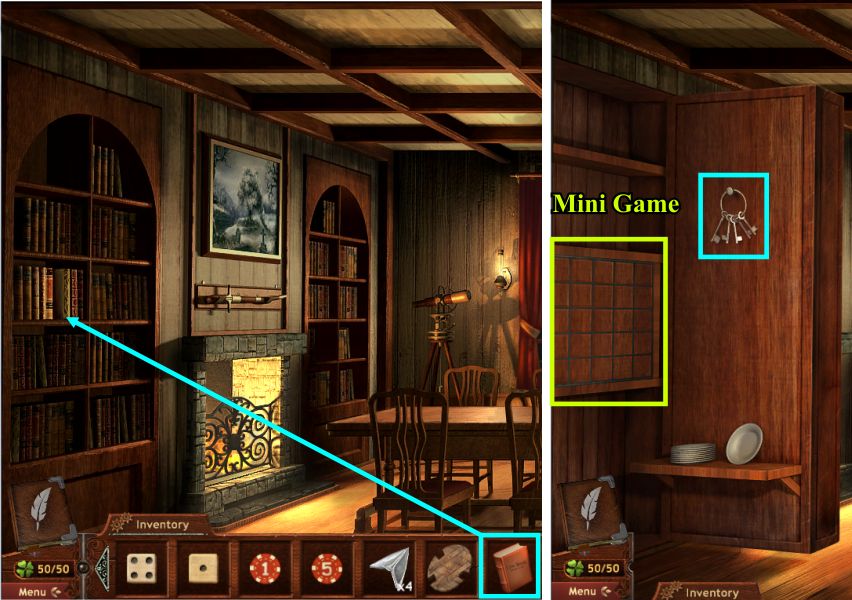
Exit back to the office and go left to the fireplace side of the room.
Place the Law Book on the shelf and a panel will open.
Pick up the Jailer Keys and click for the Mini Game.
Screenshot
Hathorne's Safe Mini Game
In order to open Judge Hathorne's safe you need to remember the chess comment about how the horse moves.
The "horse" is actually a chess knight which moves in an "L" pattern so that is how the numbers for the puzzle are going to progress.
Follow the numerical sequence from 1 though 25 for the solution and to collect the bag of silver coins from the safe.
To get to the dungeon which is your next stop, exit down 5 times, up twice, and left 3 times.
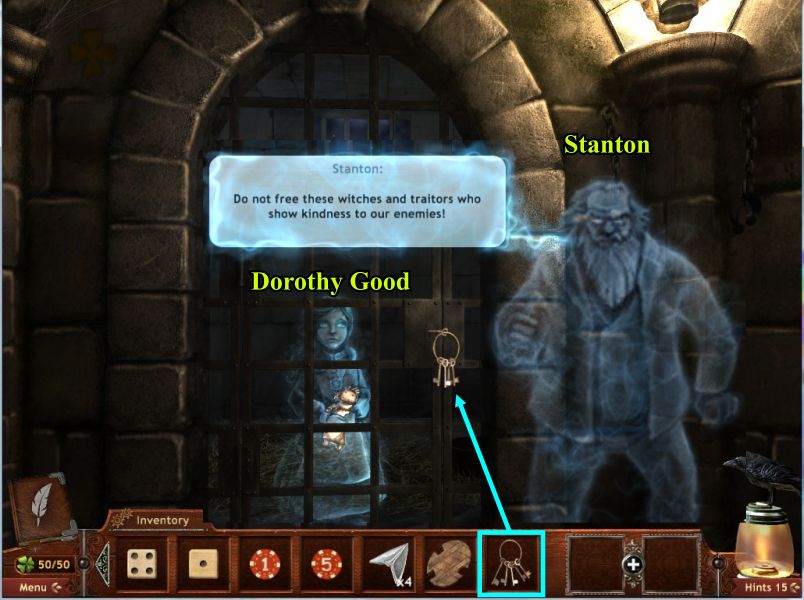
Screenshot
Dorothy's ghost is now inside Sarah's cell and a very angry Stanton appears.
Use the Jailer Keys to unlock Dorothy's cell and I'm guessing without other knowledge that what happens next is another Poltergeist tantrum.
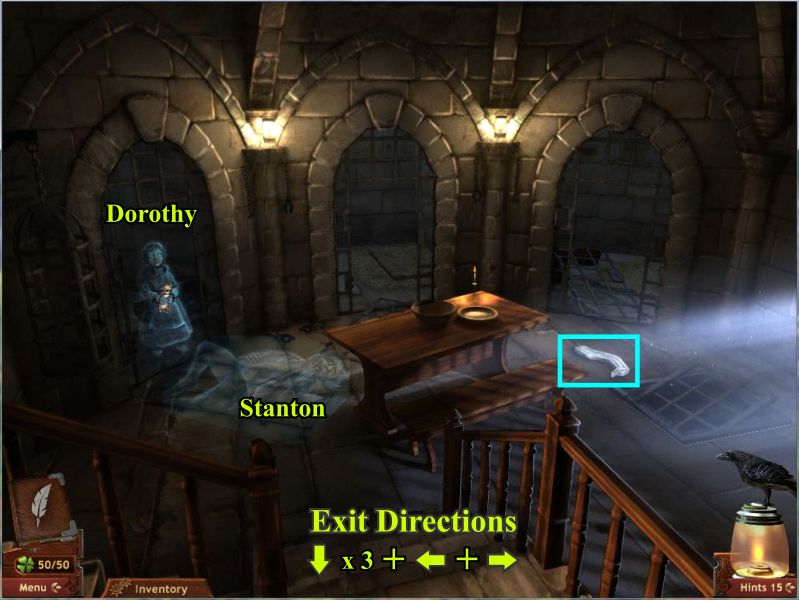
Screenshot
Back off and check out the scene and collect the silver ribbon.
Go back to Sarah's house by following the directions.
Screenshot
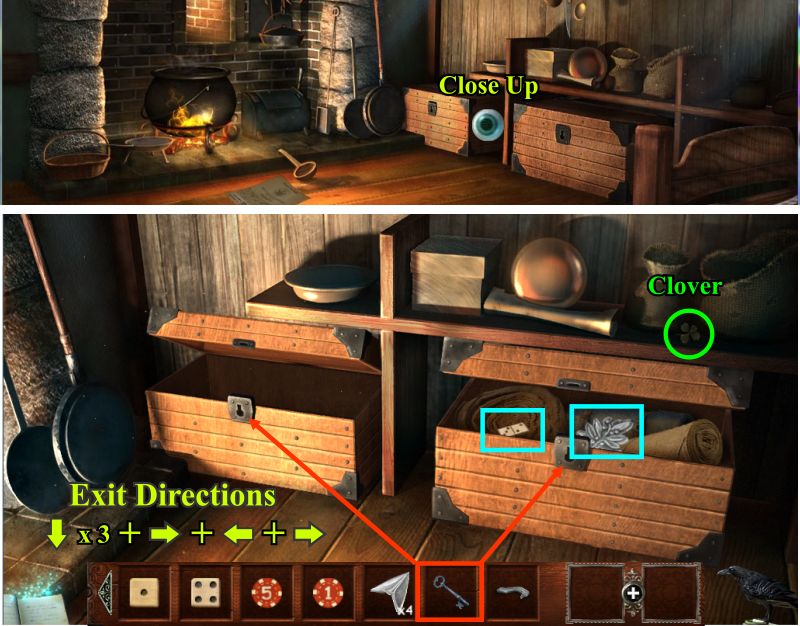
Dorothy gave you the key for the chests in her mother's house so use it on the 2 chests.
The left chest is empty but pick up the Clover in the scene and collect the domino and silver olive branch.
Follow the exit directions back to the Parlor in the House of the Seven Gables.
Screenshot
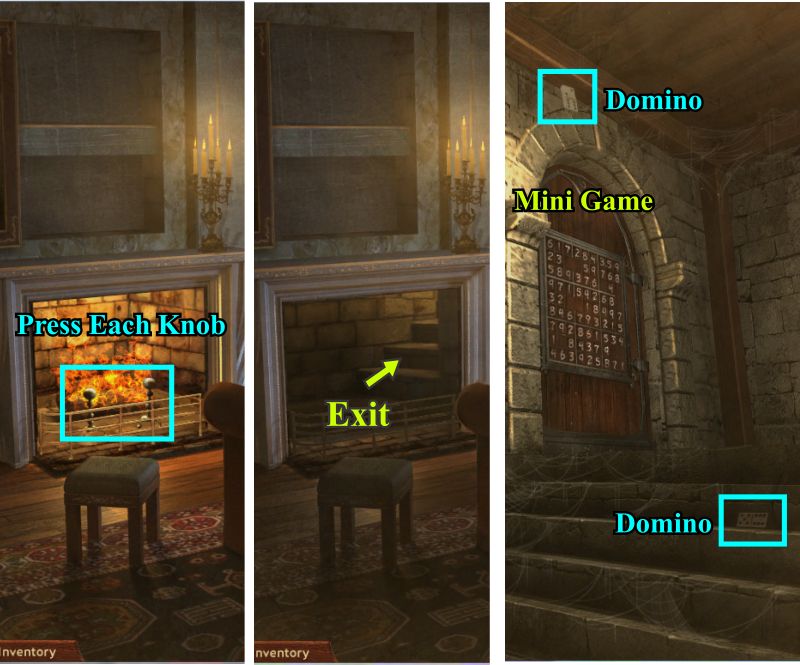
Press on the 2 fireplace andirons to reveal a secret stairway passage so take it.
At the top of the stairs is a Mini Game but first collect 2 domino pieces.
Screenshot
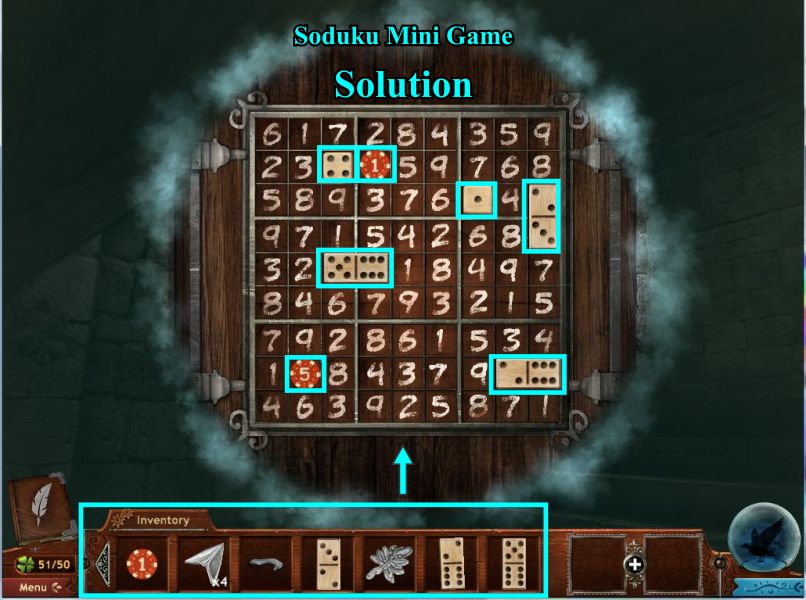
Sudoku Mini Game
This is a Sudoku sort of game with a difference because you are using the poker chips and dominos for the numbers.
Don't forget that no number can be repeated in a row or column.
Place the chips and dominos from your inventory as shown and you will solve the puzzle and be able to enter the secret room.
Screenshot
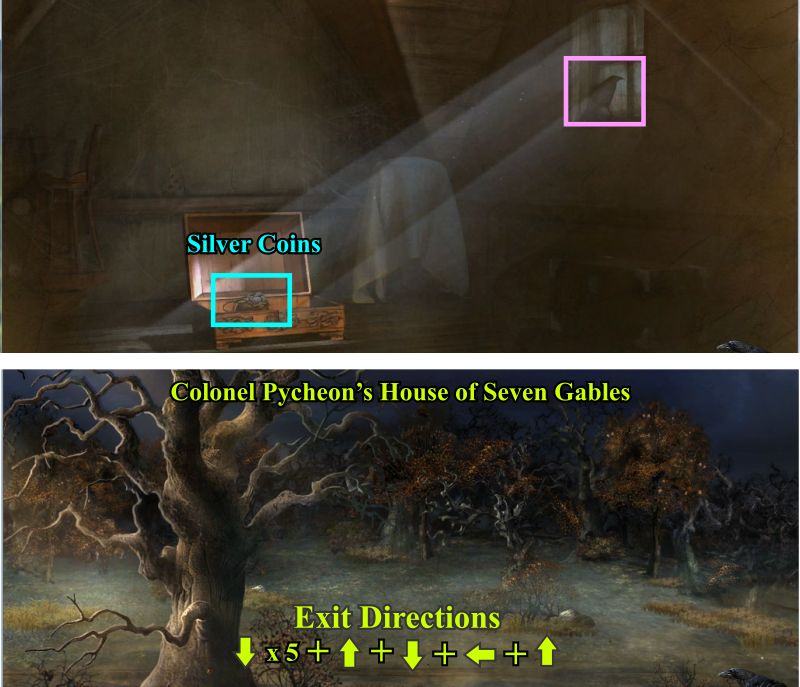
Collect the Raven and click on the chest to collect the silver coins.
Exit the House of the Seven Gables as shown and you will be transported back to the cemetery to go forward and enter the grave to get to the Snow Globe tree and finally to the cave to enter it.
Screenshot
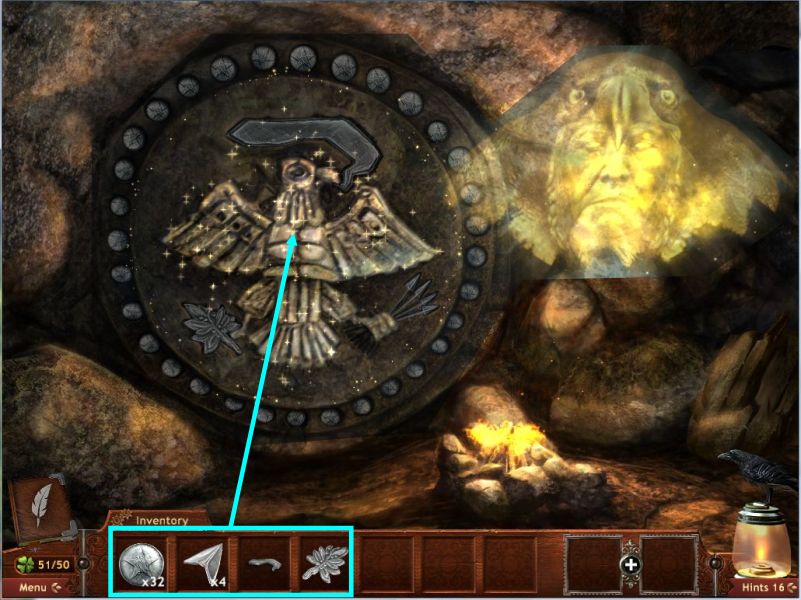
Place of the silver items from your inventory on the Thunderbird carving which includes the coins, arrowheads, olive branch and ribbon.
Screenshot
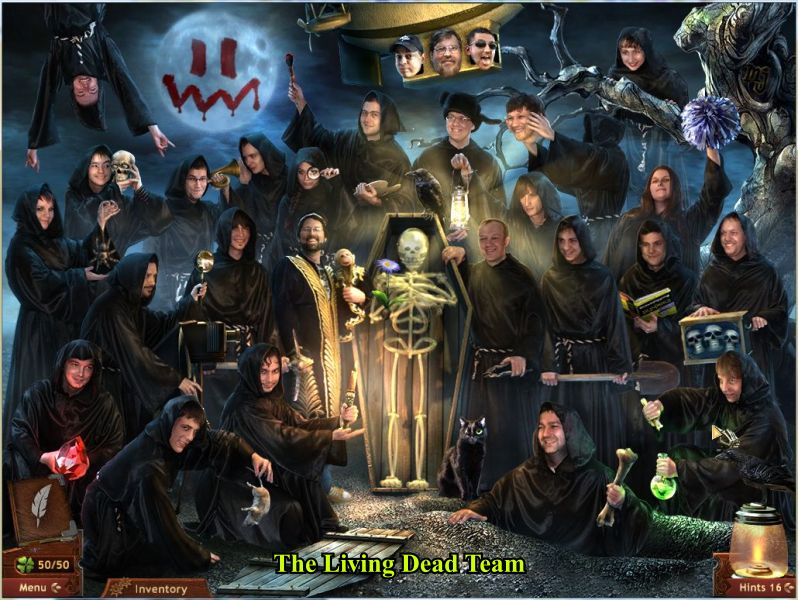
Watch the ending and enjoy the Easter Egg.
I know we don't always the credits but think about it so you can go back to Sarah's place and shift click on the tombstone outside her house.
Meet the Living Dead Team :).
Screenshot
Special thanks to Jazz for this kicking walkthrough!
Posted by: grinnyp |
July 5, 2010 5:21 AM
|
July 5, 2010 5:21 AM