
![]()
 See, this is why basements get such a bad reputation. Nobody ever wakes up in one to find a lovely surprise tea party with ponies and cookies. Nope. It's all red gunk and desperate messages scrawled on the walls and shackles and dead rats... and some guy in an exceptionally creepy mask who will be coming back really soon to get better acquainted with your vitals if you can't find a way to escape Psionic's grisly horror point-and-clicker, Killer Escape. Click when text pops up under your mouse to interact, and click the arrow at the top of the screen to drop down your inventory. The first order of business is finding a way out of your gruesome cell, and luckily for you it seems like the poor souls who came before you have left some things to help. Well... theoretically. Certainly didn't do them much good, did it? But maybe if you're clever, and daring, and don't mind fishing around inside dead rats, you might escape the same fate.
Psionic is sort of already established as the dastardly czar of make-you-jump horror games, but Killer Escape represents a significant increase in quality from his earlier efforts. It's not just the production values and visuals, though the overwhelming minute detail occasionally makes it hard to tell by sight alone what will be interactive and what isn't, but the gameplay as a whole. It's a very tightly paced and tense experience, and the notes you collect combined with the ending almost make it sound as though a sequel will be on the way. The downside is that the puzzles can be repetitive (you'll waggle your mouse over more valves than you ever dreamed), and you'll probably be left wanting more... providing one serious scare doesn't send you squealing. Killer Escape is begging for an expansion, but in the meantime, escapers who don't shrink from the grisly and the ghoulish will find this a welcome and gruesome experience.


Walkthrough Guide
(Please allow page to fully load for spoiler tags to be functional.)
Killer Escape Walkthrough
General Information
Click on the gray arrows at the top of the screen to pull up the inventory.
How to use an item: Click on an item, the inventory will close, then click where you want the item to be used.
Read the notes as you pick them up, they not only tell the story, they may be hiding clues.
Poke around into everything, even if it's disgusting. You might find something surprising.
Especially be on the lookout for spider webs.
The locations of certain items, like the fuses, are random.
Extra points are scored for how quickly you finish, and how many notes you find. There are 8 notes in the game, you can finish without finding them all.
Be careful and good luck!
The Cell
Enjoy the cut-scene when you start the game.
Once Jason, or Michael, or Jigsaw, or whatever that dude calls himself has left, you will find yourself in a cell.
Notice the bar at the top of the window that says "click here". Click there, it will show you the inventory and how to use it.
Once the bar is gone, your inventory is there in the form of a small gray arrow.
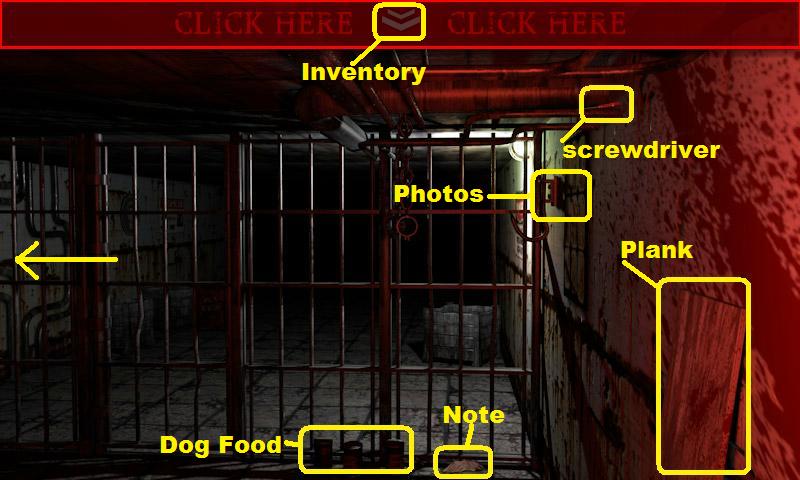
Look to the right, where the bars of the cell meet the right wall and the ceiling. There are some pipes there, and a screwdriver. Take the screwdriver.
On the right wall is a wooden plank, click on it to move it. Behind the plank is a loose brick.
Use the screwdriver on the loose brick to move it. Take the tape.
Just below where you found the screwdriver is a clickable area. Click on it to see the pictures. Notice that some of them have big red Xs on them.
Ignore the keyhole in the bars, you ain't gettin' out that way.
Look down, there is a small note on the ground to the right. Take the note (note 1).
Read the note in your inventory. Notice the small writing at the very top that says "inside the rat".
To the left of where you found the note are some cans, click on them for a close up.
There are three cans, click on each lid to open them. Inside one of the cans (it varies from game to game) you will find a locker key and an eyeball. Take the key. Feel free to poke the eyeball if you like. Back up.
Here's a screenshot of the area.
Click on the left side of the screen to turn left.
You are now facing the left side of the cell. On the floor to the right is a brick, click on it to move the brick.
Take the note revealed by moving the brick and read it (note 2).
To the left of the brick is a dead rat, click on it for a close up.
Remember the first note? It had a clue that said "inside the rat".
Click on the rat's internal organs, and keep clicking until they disappear and you see a key. Take the key. Back up. Yuck!
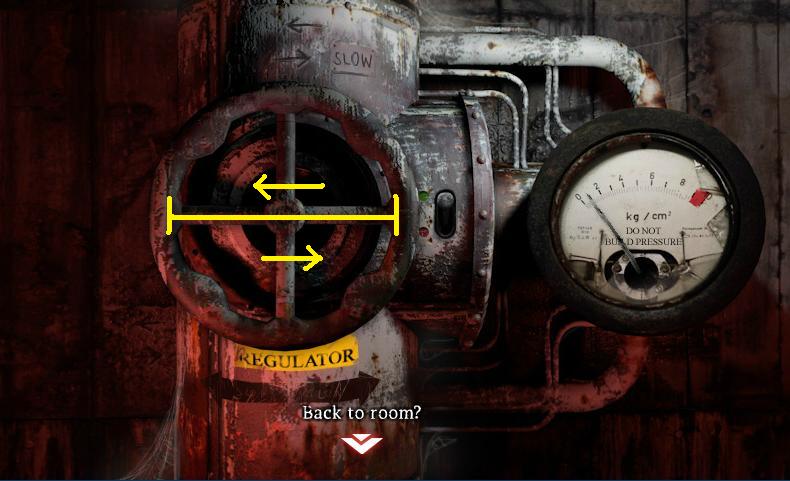
To the left of the rat, and halfway up the wall, there is a pressure valve. Click on the valve for a close up.
Notice that you can move the valve by clicking and holding, then moving the mouse to the left and right.
Here's a screenshot of the valve.
What you want to do is move the valve left and right until the gauge at the right goes to the red and the valve blows.
Grab the valve just inside the circle, and move left and right inside the circle. A few passes back and forth will do it for this first valve.
Once it blows, back up.
Above where the brick was, near the ceiling, is a failsafe relay switch, click on it for a close up.
Looks like you need the switch to stay off. Open your inventory and click on the tape.
Click on the switch when it is in the "down" position and the tape will hold it. Back up.
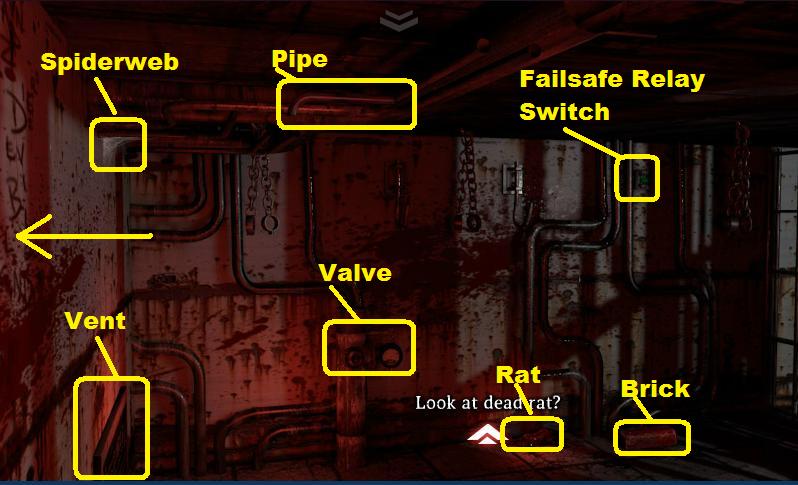
In the upper left corner of the room near the ceiling is a spiderweb. Click on it for a close up.
Once the spiderweb is in close up, click on it again to see what is inside. Three of the four fuses you need will be in spiderwebs, but which ones are random, so click on and open every spiderweb you find. If there is a fuse, take it and back up.
To the right of the spiderweb is a loose pipe. Open your inventory, take the screwdriver, then click on the pipe to get it.
Here's a screenshot of the scene.
Just above the floor on the left is a vent. Ignore it for now and turn left to see the writing on the wall.
There is some random writing on the wall, including a symbol that looks like a 0. There is a spiderweb in the upper left corner.
Click on the spiderweb for a close up and click again to open it. There may or may not be a fuse there. If there is, take it and back up.
Here's a screenshot of the area.
Turn right to face the wall with the pipes.
Notice the vent on the wall to the lower left? Click on it for a close up.
Open your inventory, click on the screwdriver, then use it to unscrew the vent.
When the vent is open, go forward.
The Boiler Room
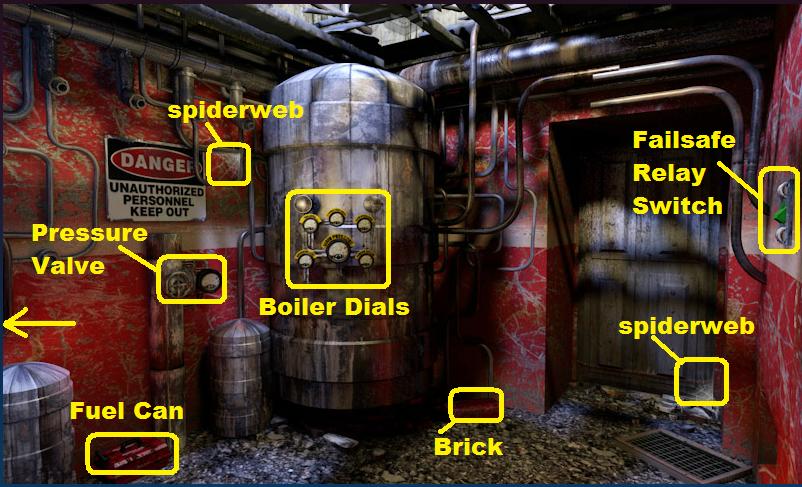
You are now facing the mail boiler for...whatever this place is. Click on the boiler dials for a close up.
Note the position of the dials. Most are to the far left except the failsafes and the valve regulators.
Looks like we need to redline all of these valves. Let's get cracking! Back up.
Before you do anything else find the two spiderwebs visible. One is in the doorway to the lower right, the other is just to the right of the Danger sign on the left wall. Click on each spiderweb and open them to see if you can find a fuse.
On the ground to the right of the boiler is a brick, click on it to move and take the note (note 3). Read the note once it is in your inventory.
On the ground to the left of the boiler is a red fuel can, take it.
On the left, underneath the Danger sign, is another pressure valve, click on it for a close up.
Like the other pressure valve, click, hold, and move left and right quickly to build up the pressure and blow this valve. This one will take more and quicker movement to complete. Back up once it is done.
On the right wall is another failsafe relay switch. Click on it for a close up, then get the tape from your inventory and click on the switch when it is in the down position. Once the switch is taped down, back up.
Here's a screenshot of the area.
Click on the left side of the screen to turn left.
You are now facing the back of the boiler room.
In the corner of the room, between a low table and some cylinders, is a spiderweb. Poke the spiderweb to see if it has a fuse.
On the wall to the right of the door is a diagram, click on it for a close up.
That looks like some important information, maybe we should memorize it. Back up.
In the corner, above where the spiderweb is, are some pipes and wheels. Click on them for a close up.
This is a puzzle involving yet more valves and pipes. In this puzzle, you will see steam escaping from one of the pipes. The object is to turn the wheel associated with that pipe.
When you turn the wheel, the leak will move to a new area. Again, you need to turn the valve associated with that particular pipe.
Keep watching for leaks and turning the appropriate valves until the pressure gauge goes into the red. When it does, back up.
Here's a color-coded screenshot showing which valve goes with which pipe.
Click on the table to the right of the door.
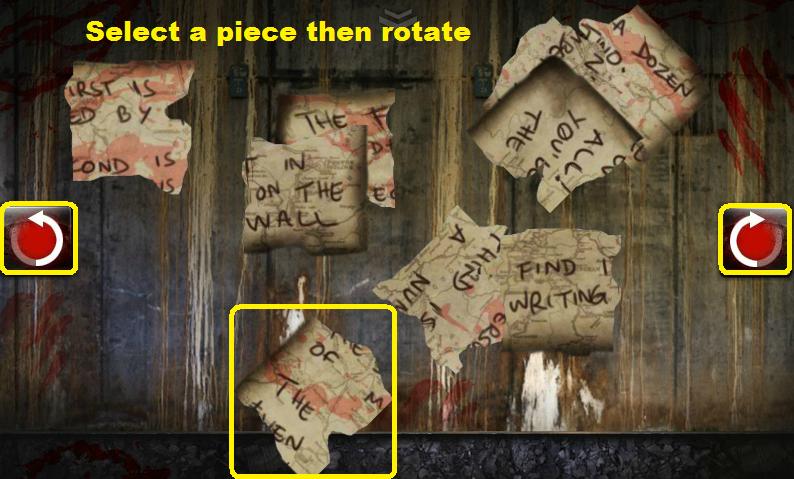
On the table is a puzzle which consists of pieces of paper. It's a jigsaw puzzle.
Click on a piece to select it, then click one of the arrow buttons on either side of the screen to rotate the piece (if necessary).
Here's a screenshot of the puzzle.
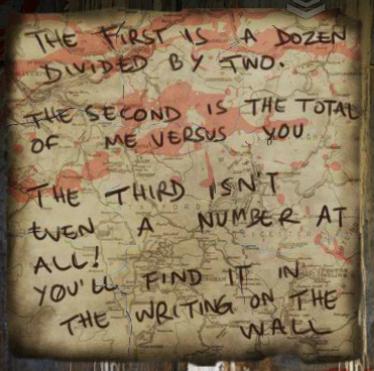
Once the pieces are rotated simply fit them together to form a clue. Here's a screenshot of the completed puzzle.
Once the puzzle is done and you have the clue, back up.
To the left of the door is a keypad, click on it for a close up.
The keypad is a 3 x 3 grid of buttons with no numbers.
We've seen that shape before, back in the cell. The photos on the wall near the bars are in a 3 x 3 grid pattern.
Do you remember which ones had red Xs on them?
Push the buttons that match the pattern seen on the photos: upper left, middle, lower right, lower left.
You will notice that the door has slid open. Back up.
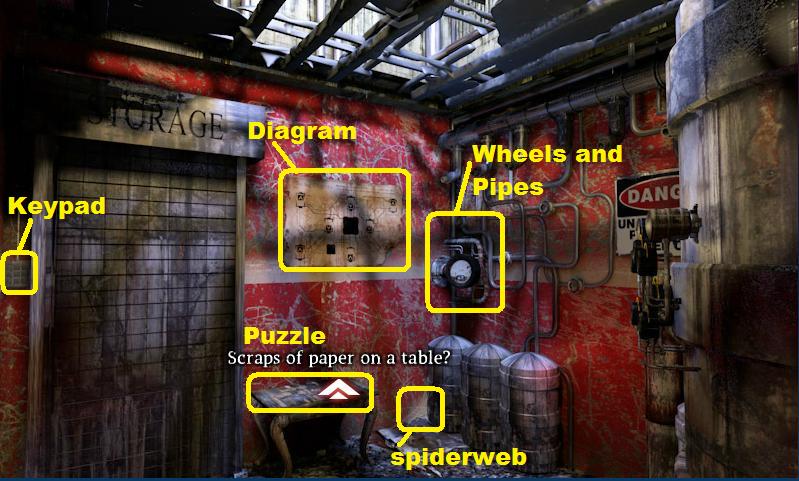
Here's a screenshot of the room for reference.
The Storage Room
You are now in the storage room.
Here's a screenshot of the view.
On the left is another failsafe relay switch, click on it, then tape it in the down position.
To the right is another pressure valve, click on it, then turn the wheel left and right until the gauge goes into the red.
There are two spiderwebs in the room, one to the right above the switches, the other to the left above the boxes. Check each web for fuses.
In front of you are two sections of boxes. Click on the left section for a close up.
Once in close up, hover the mouse cursor over the boxes until one says "a note?". When you see that, click to collect the note (note 4) then back up.
Repeat the actions with the boxes on the right: go for the close up and hover until you find and collect the note (note 5), then back up.
Read the new sections of the note to learn more. The positions of the notes in the boxes changes from game to game.
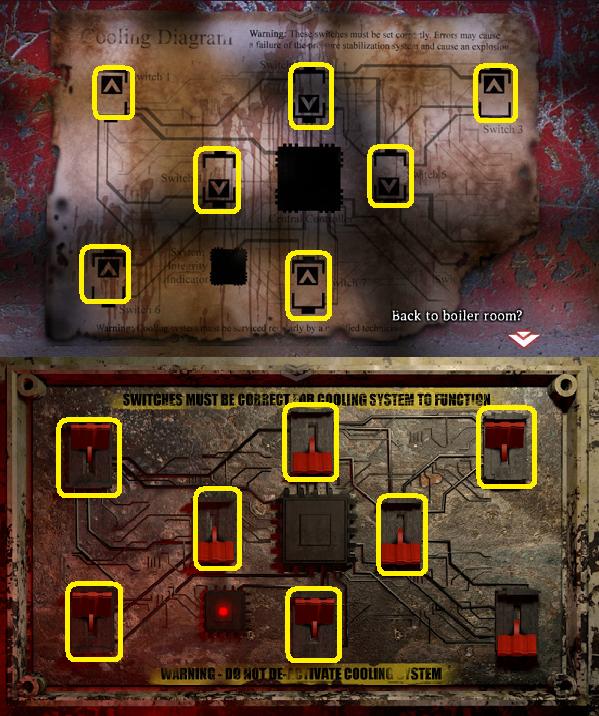
To the right is a panel of switches, click on them for a close up.
This diagram looks a lot like the one we saw in the boiler room.
So we should set the switches exactly like we saw in the diagram. Except the last switch in the lower right, that part of the diagram is missing.
Here's a screenshot of the diagram and the panel together.
Once the switches are set correctly the light will turn red, indicating that you've deactivated the cooling system. Back up.
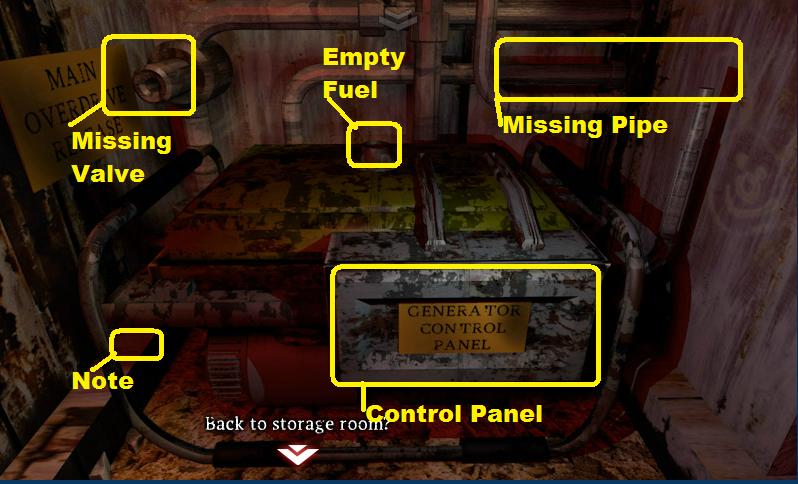
To the left is an overdrive generator, click on it for a close up.
Here's a screenshot of the generator.
There is another note to the left beneath the generator, take it (note 6) and read it.
If you hover your mouse above the machine from left to right, you will find that it is missing a valve, some fuel, and a pipe.
Click on the control panel for a close up.
Here you are missing four fuses and a key. Back up.
You have some of the needed stuff, but not others. Back up.
To the right is a hallway with a greenish glow. This is the way to the locker room.
Click on the hallway to the locker room.
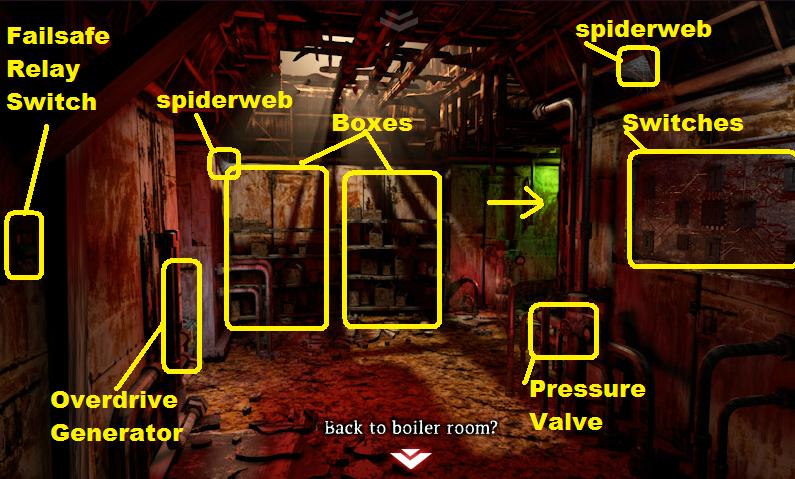
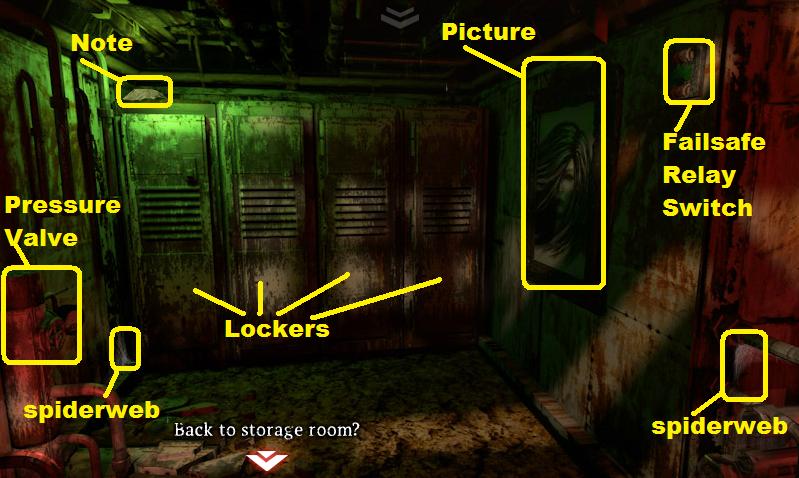
The Locker Room
You are now in the Locker Room. Here's a screenshot of the area.
Take the note that is on top of the left locker and read it (note 7).
Poke the two spiderwebs, the one in the lower right and the one in the lower left areas to check for fuses. Once you check these webs you should have three fuses. If you don't, go back and look for spiderwebs you haven't searched.
There's a pressure valve on the left and a failsafe relay switch on the right. As in the other rooms, turn the valve until it blows and tape down the relay switch.
In front of you are four lockers. Click on the lockers for a close up.
In your inventory find the locker key, then click on it. Use the locker key on all four lockers. Brace yourself for the jump-scare.
Once you've checked all the lockers (and had the life scared out of you) back up.
Click on the body that fell out of the locker. Note: the locker that has the body is random and changes from game to game.
Once the body is in close up click on the hand to open it. Take the yellow fuse (this should be the fourth and last fuse) and back up.
On the right wall is a picture, click on it and it will be removed.
Click on where the picture was to see a safe.
The safe shows numbers going from 0 to 9, constantly cycling.
The combination for the safe is given in clue form in the jigsaw puzzle done in the boiler room.
"The first is a dozen divided by two" means that the first number is 6 (one dozen, or 12, divided by 2).
"The second is the total of me versus you" means that the second number is 2 (total of me[1] and you [1]).
"The third isn't even a number at all! You'll find it on the writing on the wall" means that the third number is 0 (that big 0 on the wall in the cell).
To make the safe work: Watch the numbers as they go by. Put the cursor in the center of the ring on the safe that is rotating. When the 6 shows up, click and the top light will light up. Watch the numbers go by and as soon as you see the 2 click again and another light will light up. Click a third time when the counter hits 0 and the safe should open up.
Inside you will find the last piece of note (note 8) and a key wheel, take both and back up.
The Overdrive Generator
Back up to the storage room.
Click on the overdrive generator (on the left wall) for a close up.
Here's a screenshot of the generator.
Place the key wheel on the left, use the fuel, and place the pipe on the right.
Click on the control panel to open it.
Place the four fuses in the right of the panel (if a fuse won't go into one space, keep trying it in the others until it will stay).
Once all four fuses are in place use the key on the ignition on the left.
Back up once and hover the cursor over the key wheel. It tells you you need to check the valves on the main boiler.
Back up twice to the boiler room then turn right.
Click on the boiler dials for a close up.
All of the dials should be in the red.
Back up, turn left, then go forward to the storage room.
Click on the overdrive generator for a close up.
Click on the key wheel and enjoy the escape.
Posted by: grinnyp |
December 22, 2012 7:59 AM
|
December 22, 2012 7:59 AM