
Fabled Legends: The Dark Piper
Platform: Mac, Windows
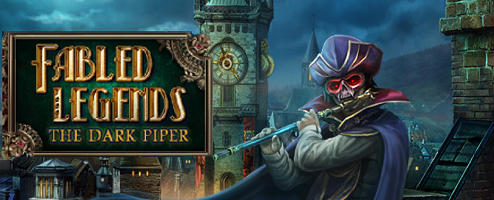
![]() Of all of the creepy fairy tales we tell our kids — and there are some supremely creepy ones indeed — one that stands out is the Pied Piper of Hamelin, in which a town that doesn't like to pay its debts ends up losing all of its children to a dude who charms rats with music. This haunting tale seems ready made to become both a childhood nightmare and a casual adventure hybrid, so it's just as well that Blue Tea Games has taken up the challenge with Fabled Legends: The Dark Piper, a hidden object finding adventure that features lots and lots of rats, both in vermin and human form. Rats, why'd it have to be rats?
Of all of the creepy fairy tales we tell our kids — and there are some supremely creepy ones indeed — one that stands out is the Pied Piper of Hamelin, in which a town that doesn't like to pay its debts ends up losing all of its children to a dude who charms rats with music. This haunting tale seems ready made to become both a childhood nightmare and a casual adventure hybrid, so it's just as well that Blue Tea Games has taken up the challenge with Fabled Legends: The Dark Piper, a hidden object finding adventure that features lots and lots of rats, both in vermin and human form. Rats, why'd it have to be rats?
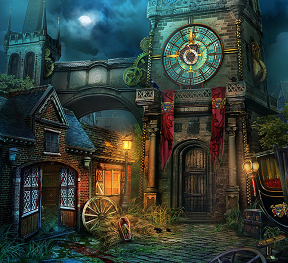 The action begins as you, an unnamed inspector, rush to a town that usually celebrates the story of the Pied Piper and how he saved the place from rodents. The Pied Piper appears to have come back for revenge, however, and rather than stealing the children he has simply brought the rats back with him. Dark, red-eyed, savage, plague-bearing rats, which have overrun the town and sent the population away screaming. The few town officials left have begged you to track down this mysterious man and help save the town before the plague can spread across Europe in a modern-day version of the Black Death. Solve the mystery using the clues that can be found around town, some help from the few characters left, and dodging a lot of animated rats..
Fabled Legends: The Dark Piper is classic hidden object finding fused with point and click adventure. The hidden object scenes are the standard "list" type, which feature one or more objects that must be manipulated before they can be found. There are also some mini-games and puzzles scattered about the place, along with the usual adventuring tropes involving gathering items from every locale.
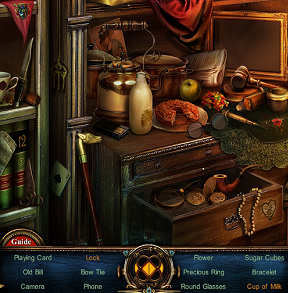 Gameplay features the standard controls seen in most hybrids these days with a changing cursor to indicate areas of interest and navigation, a bottom-loading inventory, and a journal to keep track of the story. The journal also helps you keep track of a list of running goals which lengthens as time goes on. A handy little map feature is also present, which allows you to keep track of areas and indicates whether or not there is still something of interest to be discovered. Unfortunately you can't use the map to instantly transport yourself from one location to another, which would have been helpful. There is a timed hint system personified with a beautiful animated cat who, while recharging, amusingly turns his back and ignores you with supreme disdain until the timer fills up again. A plethora of glints and sparkles indicate all sorts of interesting areas, at least in the easy mode.
Analysis: Blue Tea Games is one of the leaders in the hybrid field, and it's easy to see why with Fabled Legends: The Dark Piper. The designers who brought us the Dark Parables series and the joyful Enlightenus games have once again brought their A-game to the design of this dark little adventure, with an engrossing story, stunning graphics, and entertaining gameplay. This is an already dark fairy tale gone even darker and it makes for engrossing gameplay.
 The stunning visuals are expected as all Blue Tea Games are gorgeous. The animations are, well creepy since they are mostly of evil villains and lots and lots of rats. The presence of vermin runs so strongly throughout the game you might be tempted to shower afterwards to feel clean again. Background music, incidental sounds, and even the dialogue fuse the experience together into a delightful mélange. Fabled Legends: The Dark Piper is a pretty immersive experience from first to last. Puzzles and mini-games range from easy to difficult and the three modes of play (casual, normal, and hard) cover a wide variety of experience with adventure hybrids.
Fabled Legends: The Dark Piper is a stand-alone story which pulls together all of the elements needed to make a really entertaining adventure hybrid. Gorgeous on the eyes and ears, gameplay that is adjustable to a wide range of talent, and an engaging story guarantee that once again Blue Tea Games has a hit on their hands. If you can stand the creepy factor of thousands of rats then Fabled Legends is the game for you! Then, to cleanse your pallet, perhaps go watch something a little less rat-ridden, like "Willard".
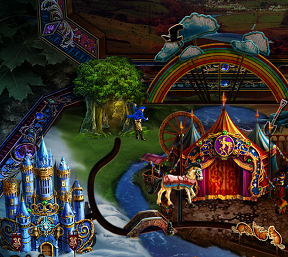
A Collector's Edition is also available. It includes concept art, an integrated strategy guide, and extra gameplay. Remember that Big Fish Game Club Members pay only $13.99 for Collector's Editions, and collector's editions count 3 card punches of 6 total needed for a free game.
![]() Windows:
Windows:
Download the demo
Get the full version
Also available: Collector's Edition
![]() Mac OS X:
Mac OS X:
Download the demo
Get the full version
Also available: Collector's Edition


Walkthrough Guide
(Please allow page to fully load for spoiler tags to be functional.)
Fabled Legends: The Dark Piper
Starting Screen
Upon starting the game you will enter in a name to use.
From the options tab you can change:
Music, ambience, and sound volume.
Cursor that is used (game cursor or normal arrow cursor).
Full screen or wide screen.
Difficulty.
There are three levels of difficulty.
Casual: The hint button recharges quickly, sparkles will appear to indicate hidden object scenes and active areas, and after a brief time you can skip puzzles.
Normal: The hint button recharges at a regular rate, sparkles will only occasionally appear to show active areas, and puzzles are skippable after a long waiting period.
Hard: Hint button is inactive, no sparkles exist, and you can not skip puzzles.
You can also access the credits to see who made the game.
The bonus game, The Midas Lair, is only available upon completion of the game and is available only in the collector's edition. The same is true for all bonus content.
Gameplay
On the bottom left of your screen is the hint button. You have unlimited hints, but the globe must recharge before use.
There is also your objective book. The objective book can be accessed at any time and lists the tasks you must be doing.
On the bottom middle of the screen is the tool bar which will hold any inventory items you obtain.
On the bottom right of the screen is a circle with four sections to it.
The top left section is for the map.
The red spot on the map is you in your current position.
A green star indicates an area of interest.
A blue exclamation point indicates an objective.
After you have explored an area on the map, you can hover over the box for it to see its title.
The top right section is where the ravenlore whistle goes. Use this whistle to summon a raven to help you complete tasks. It can only be summoned when outside.
The bottom left section is where the skeleton key will go. The key can open any lock.
The bottom right section is where the Pied Piper's flute will go. The flute can control rats.
The option tab is also on the bottom right.
The cursor will change to a magnifying glass if you hover over an area that can be investigated or a hidden object scene.
If you hover over an item that can be picked up, the cursor will change to a hand with the pinkie finger extended.
The cursor will change to an arrow when hovering over an area that leads to a new scene.
In a hidden object scene, any item written in orange requires an extra action to reveal it.
Throughout the game there are Fabled Objects that can be collected and help your hint button recharge faster. There are twenty Fabled Objects in all.
Fabled Objects are not always collectable during the first time in an area. Sometimes they appear at a later point in the game.
Hidden object scenes are randomized.
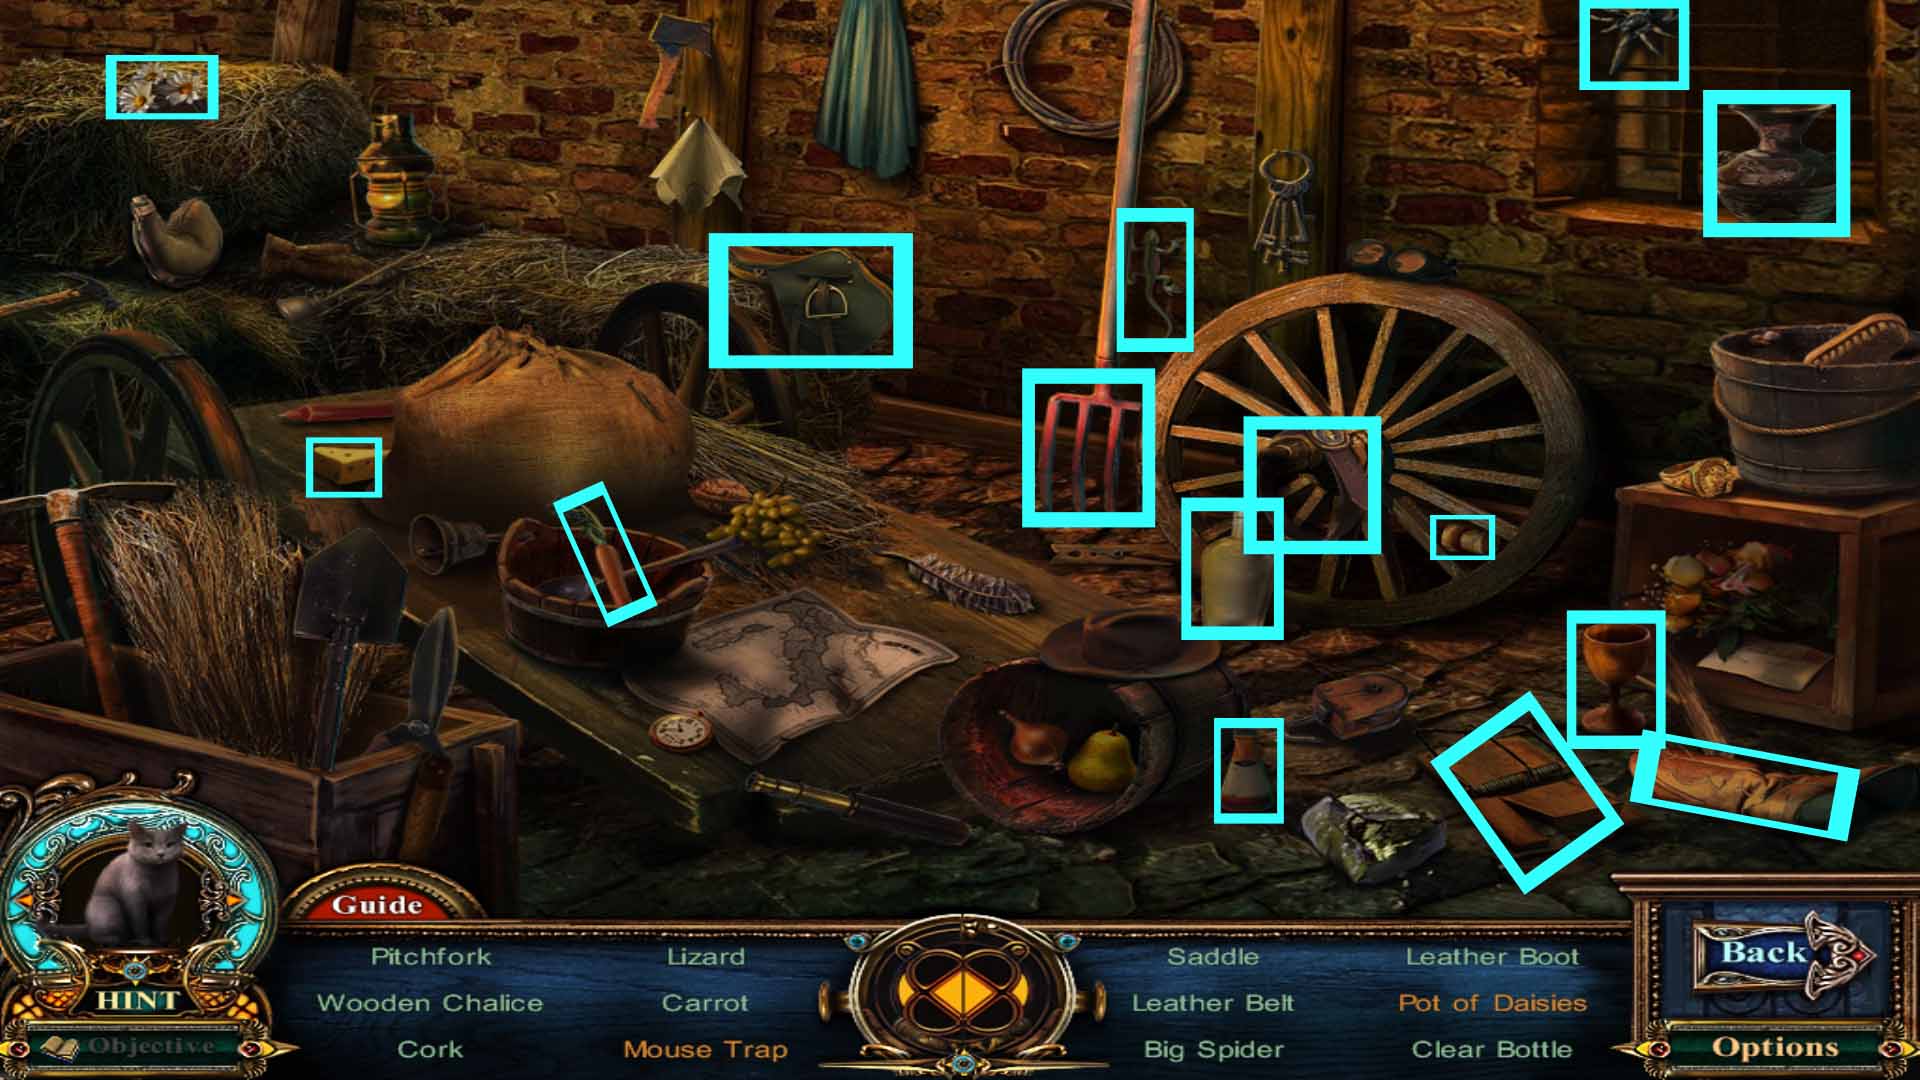
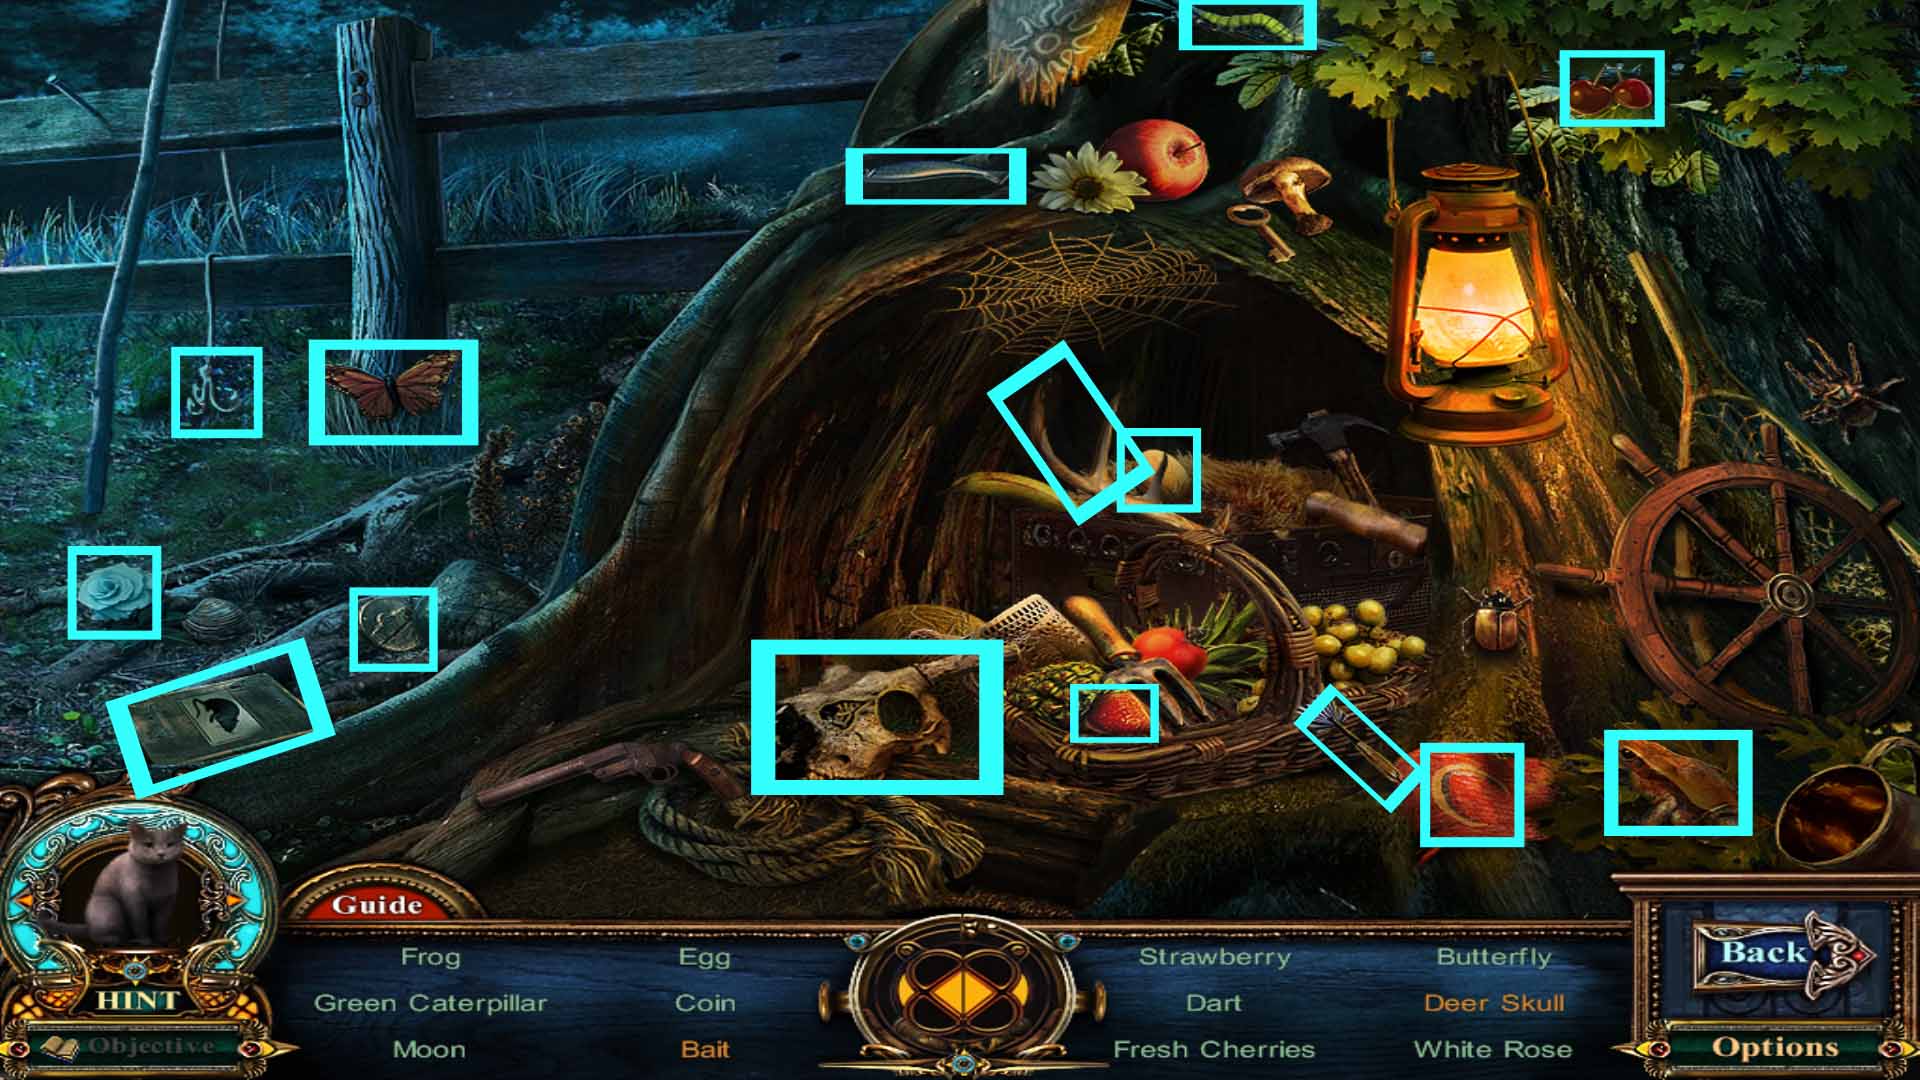
Chapter One: Summoned to Hamelin
Getting the Stable Key
Click on the cat to start with, and it will ask if you would like a tutorial.
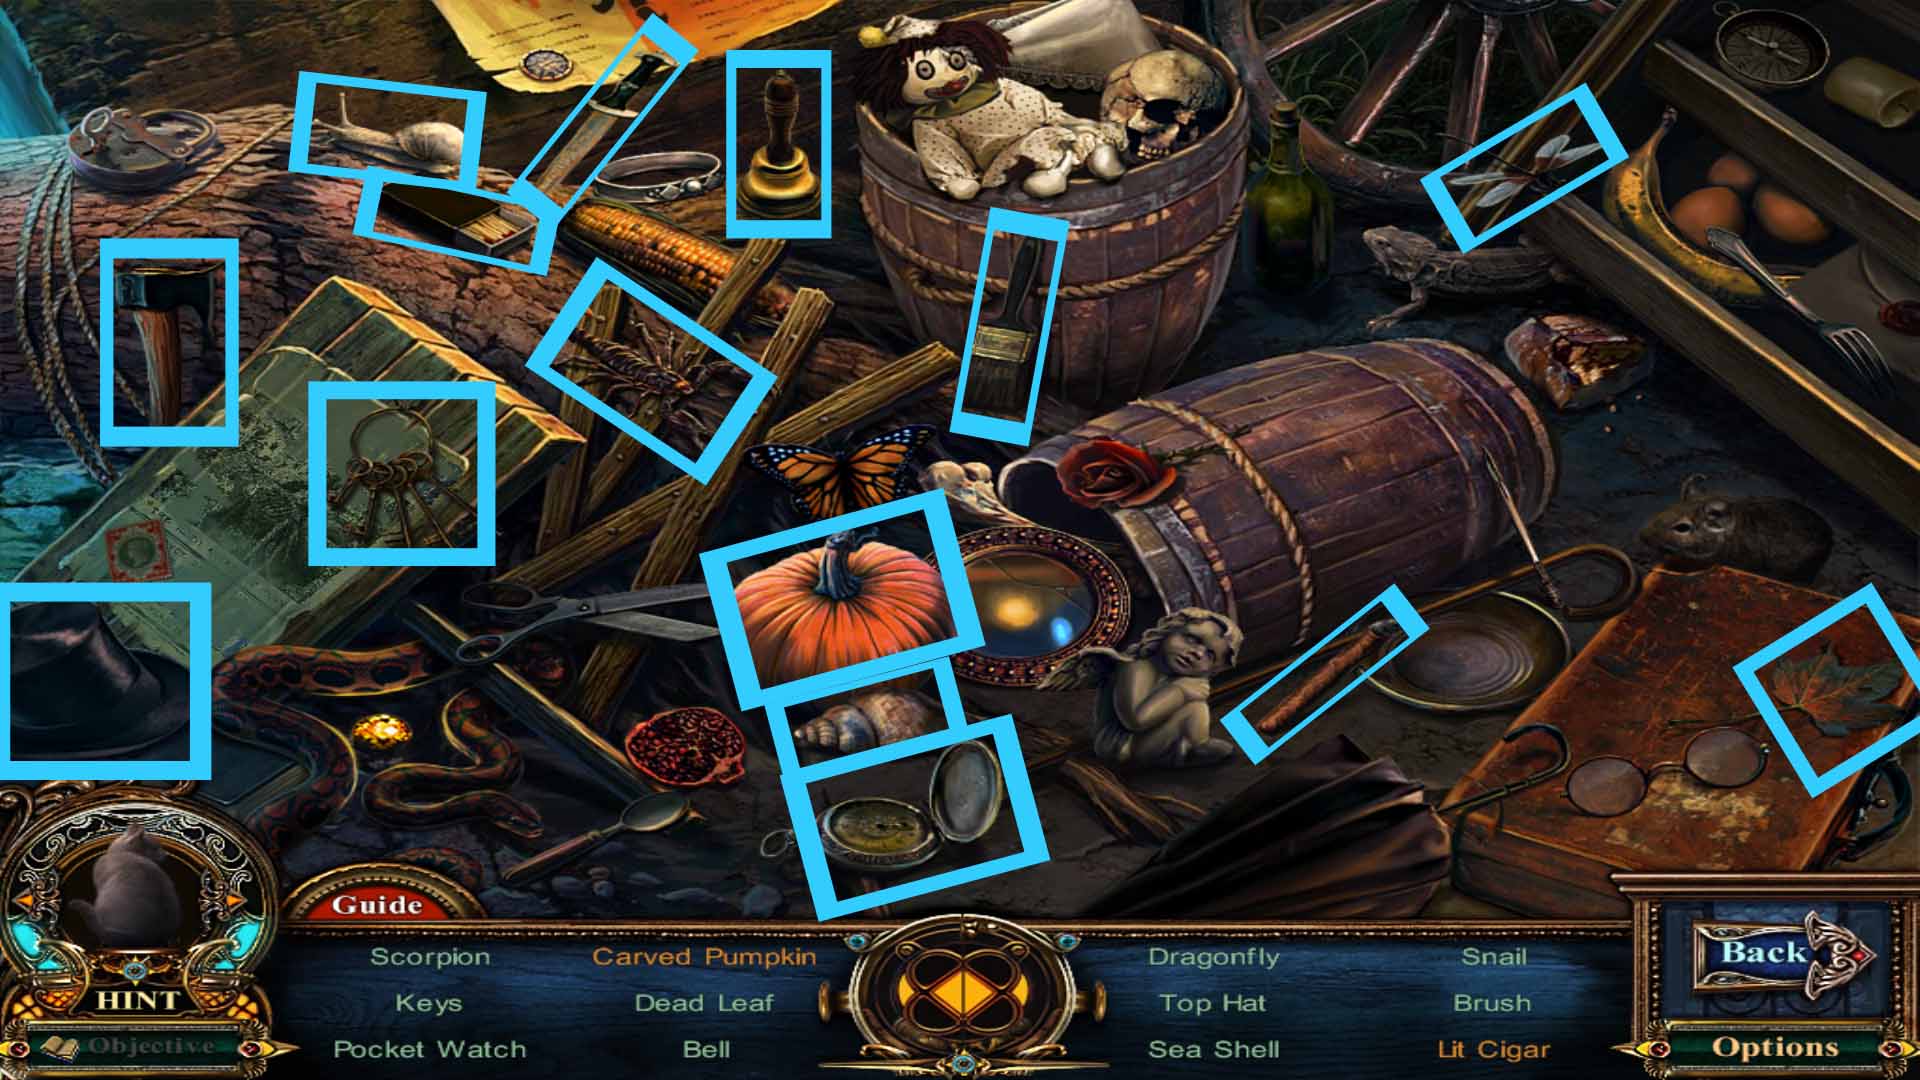
Start the hidden object scene.
Pick up the matches and use them on the cigar to light it.
Grab the knife and use it to carve the pumpkin.
Screenshot
You receive a wooden axe.
Zoom in on the fallen tree trunk and use the axe to chop it.
Go forward.
Click on the briefcase to open it, then pick up the rock.
Go left to enter the alley. Click on the Dark Piper standing on the bridge.
Inspect the flowers to the right. Pick up the hand shovel.
Pick up the bucket of water to the left of the flowers.
Go back once and use the bucket of water on the fire.
Move forward.
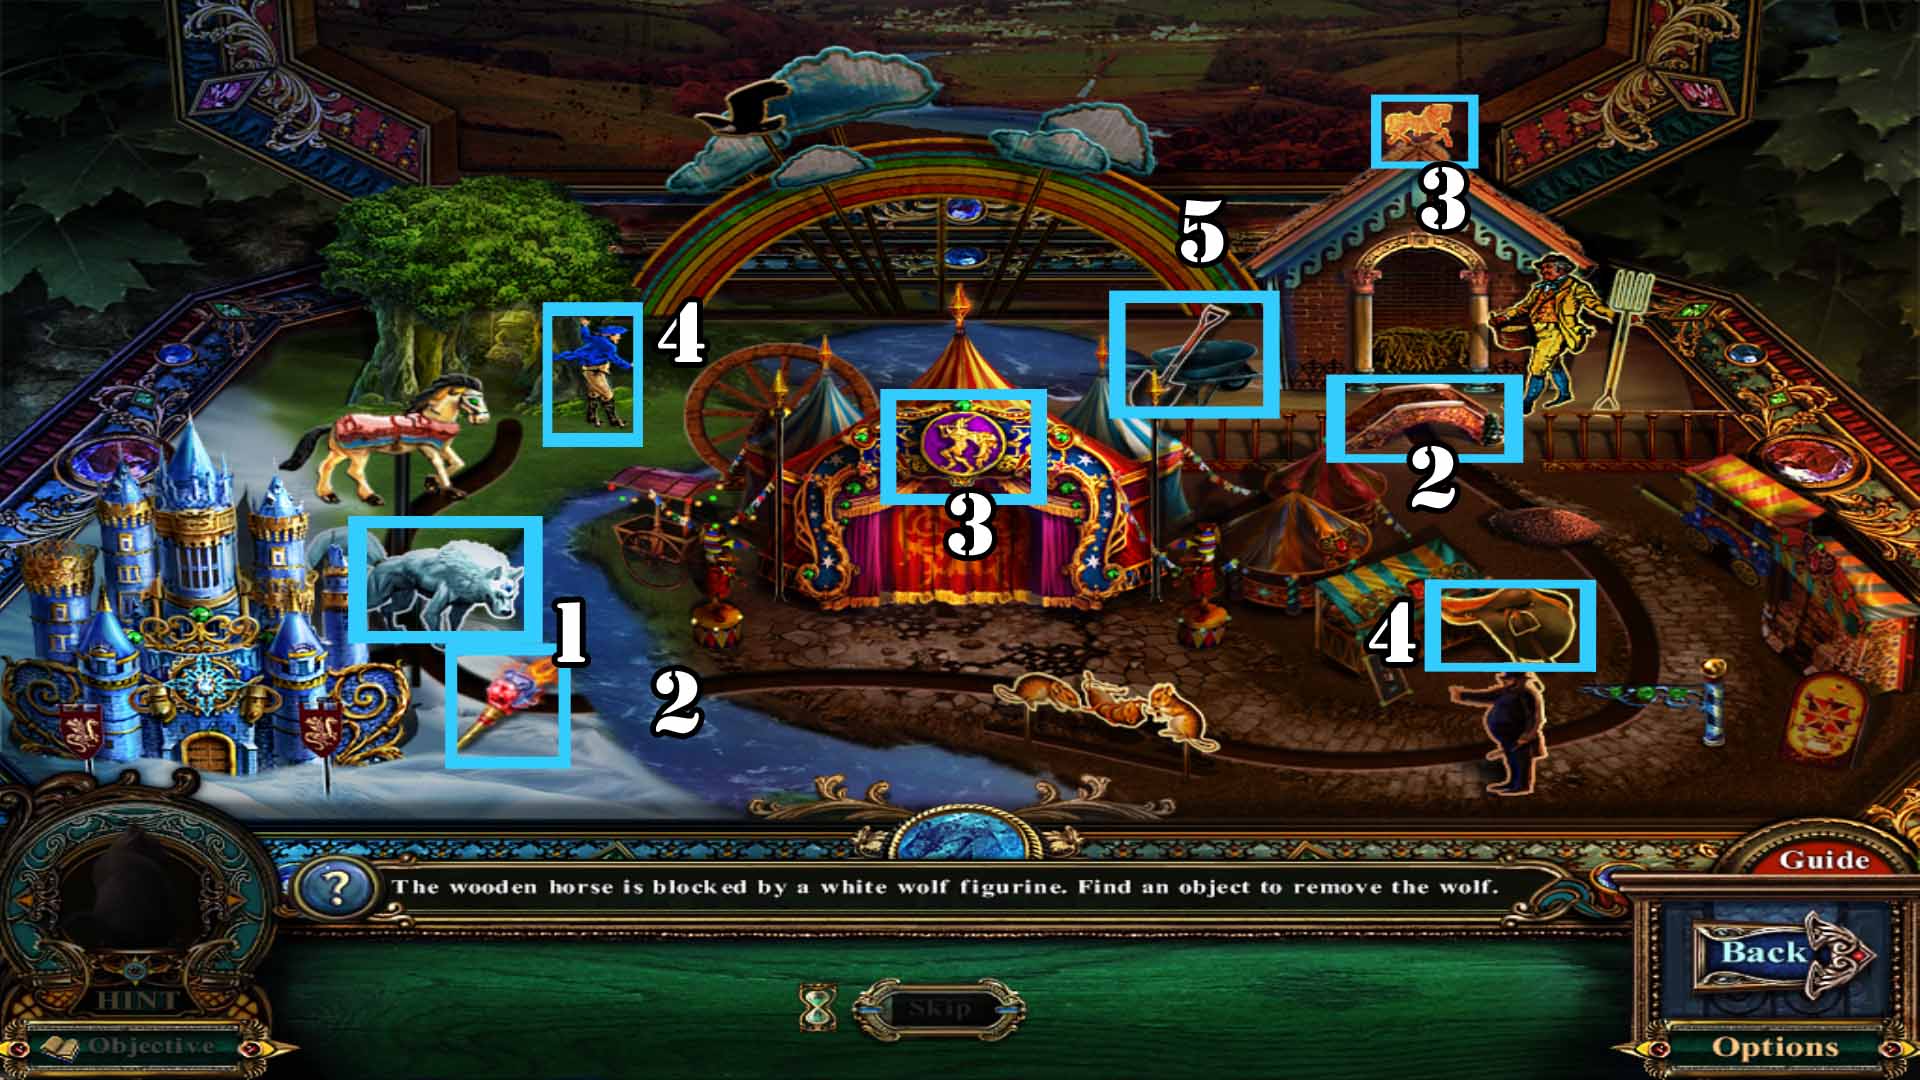
Click on the stables to the left to reveal a new objective.
Inspect the carriage and pick up the bolt cutters.
Use the hand shovel on the casket in the carriage.
A puzzle will start once you've cleared away the dirt.
The wooden horse is blocked by the wolf. Pick up the torch to make the wolf go away.
Place the bridge on the river so the horse can get past it.
Click on the rainbow in the background to switch it to night time. Press on the symbol of the piper on the tent to remove the rats.
Pick up the saddle and place the rider on the horse to prepare it for hurdle jumping.
Use the shovel and wheel barrow to clear away the mound of dirt.
Screenshot
Pick up the stable key.
Getting the Bronze Scepter
Pick up the gold bell.
Click on the Dark Piper.
Examine the stable door and use the stable key to open it. Go inside.
Click on the left stall where the black smoke is billowing to update your second objective.
Press on the red blanket hanging against the wall behind the left stall to reveal a ladder. Pick up the ladder.
Go back twice, then go left.
Zoom in on the figure in the window. Place the ladder against the wall, then use the rock to break the window.
Go forward through the window.
Click on the Butler to reveal a new objective.
Investigate the newspaper on the floor and pick up the chisel.
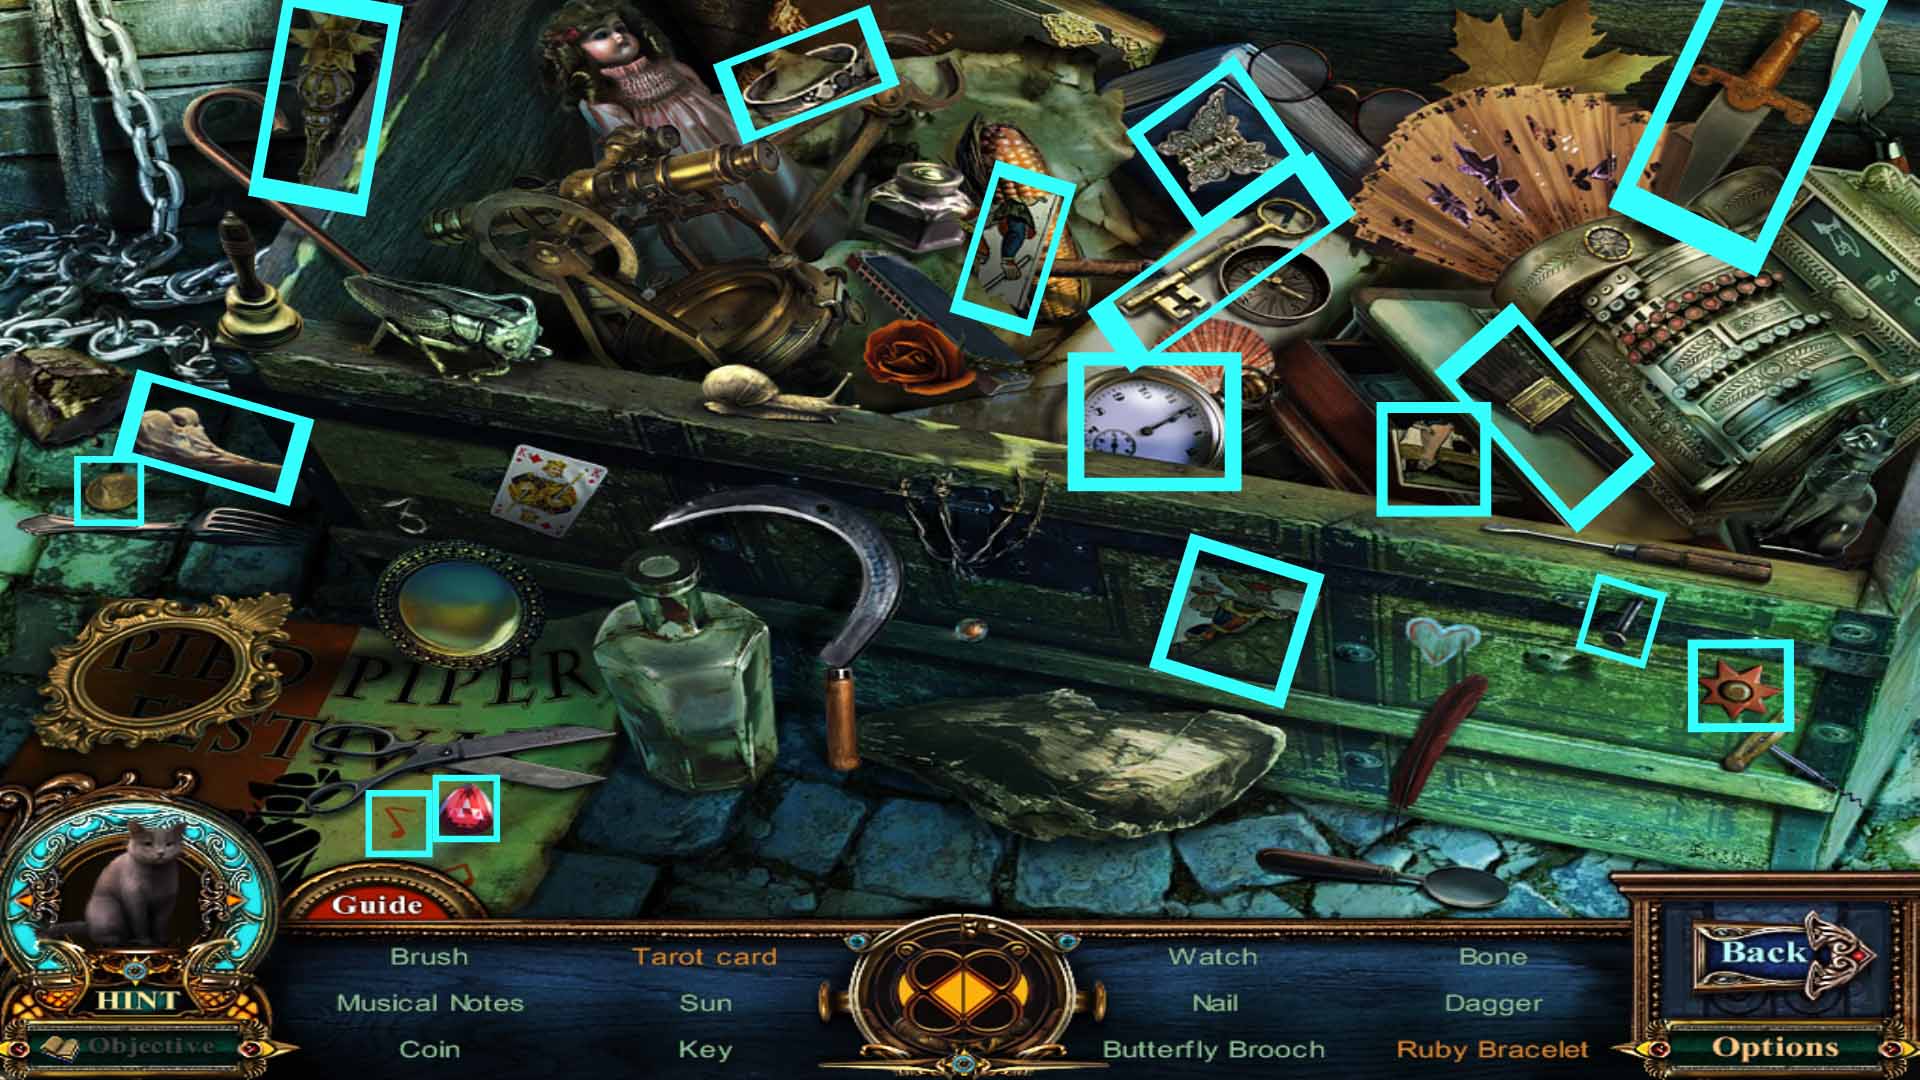
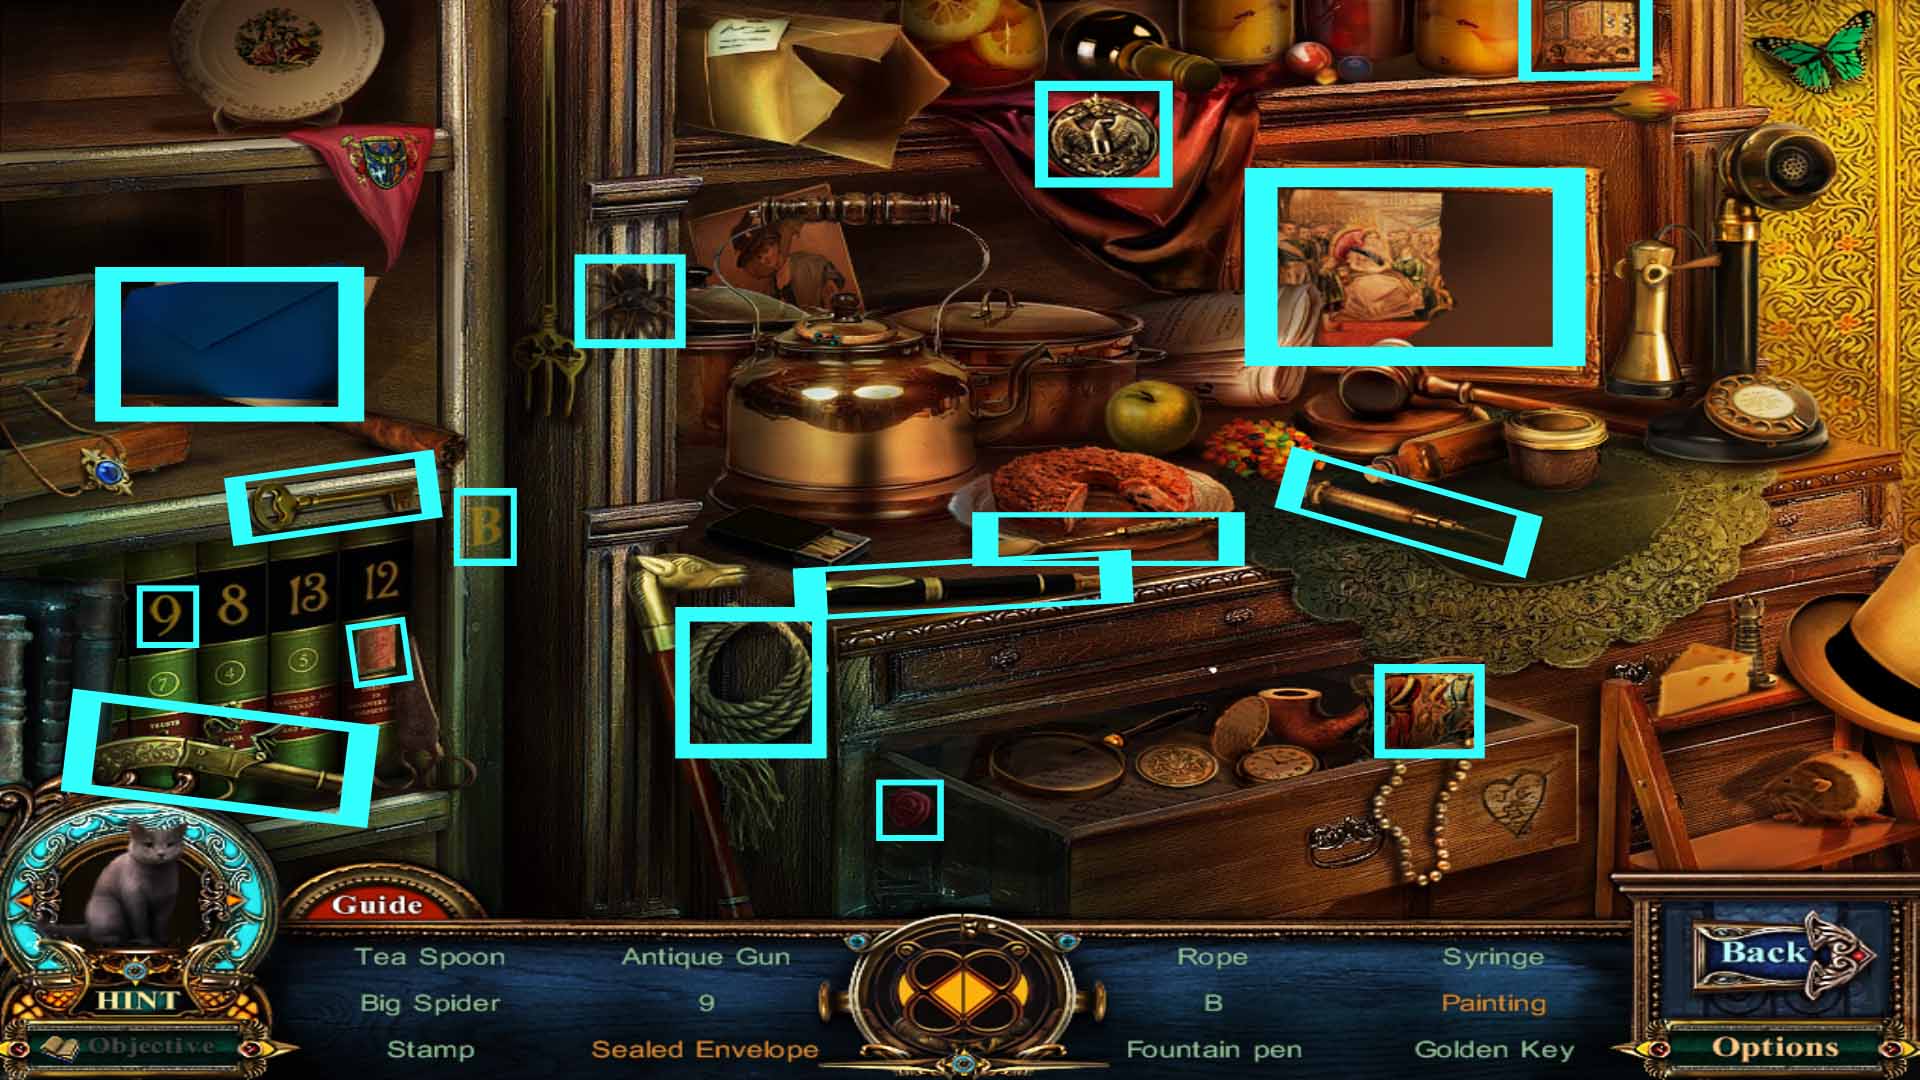
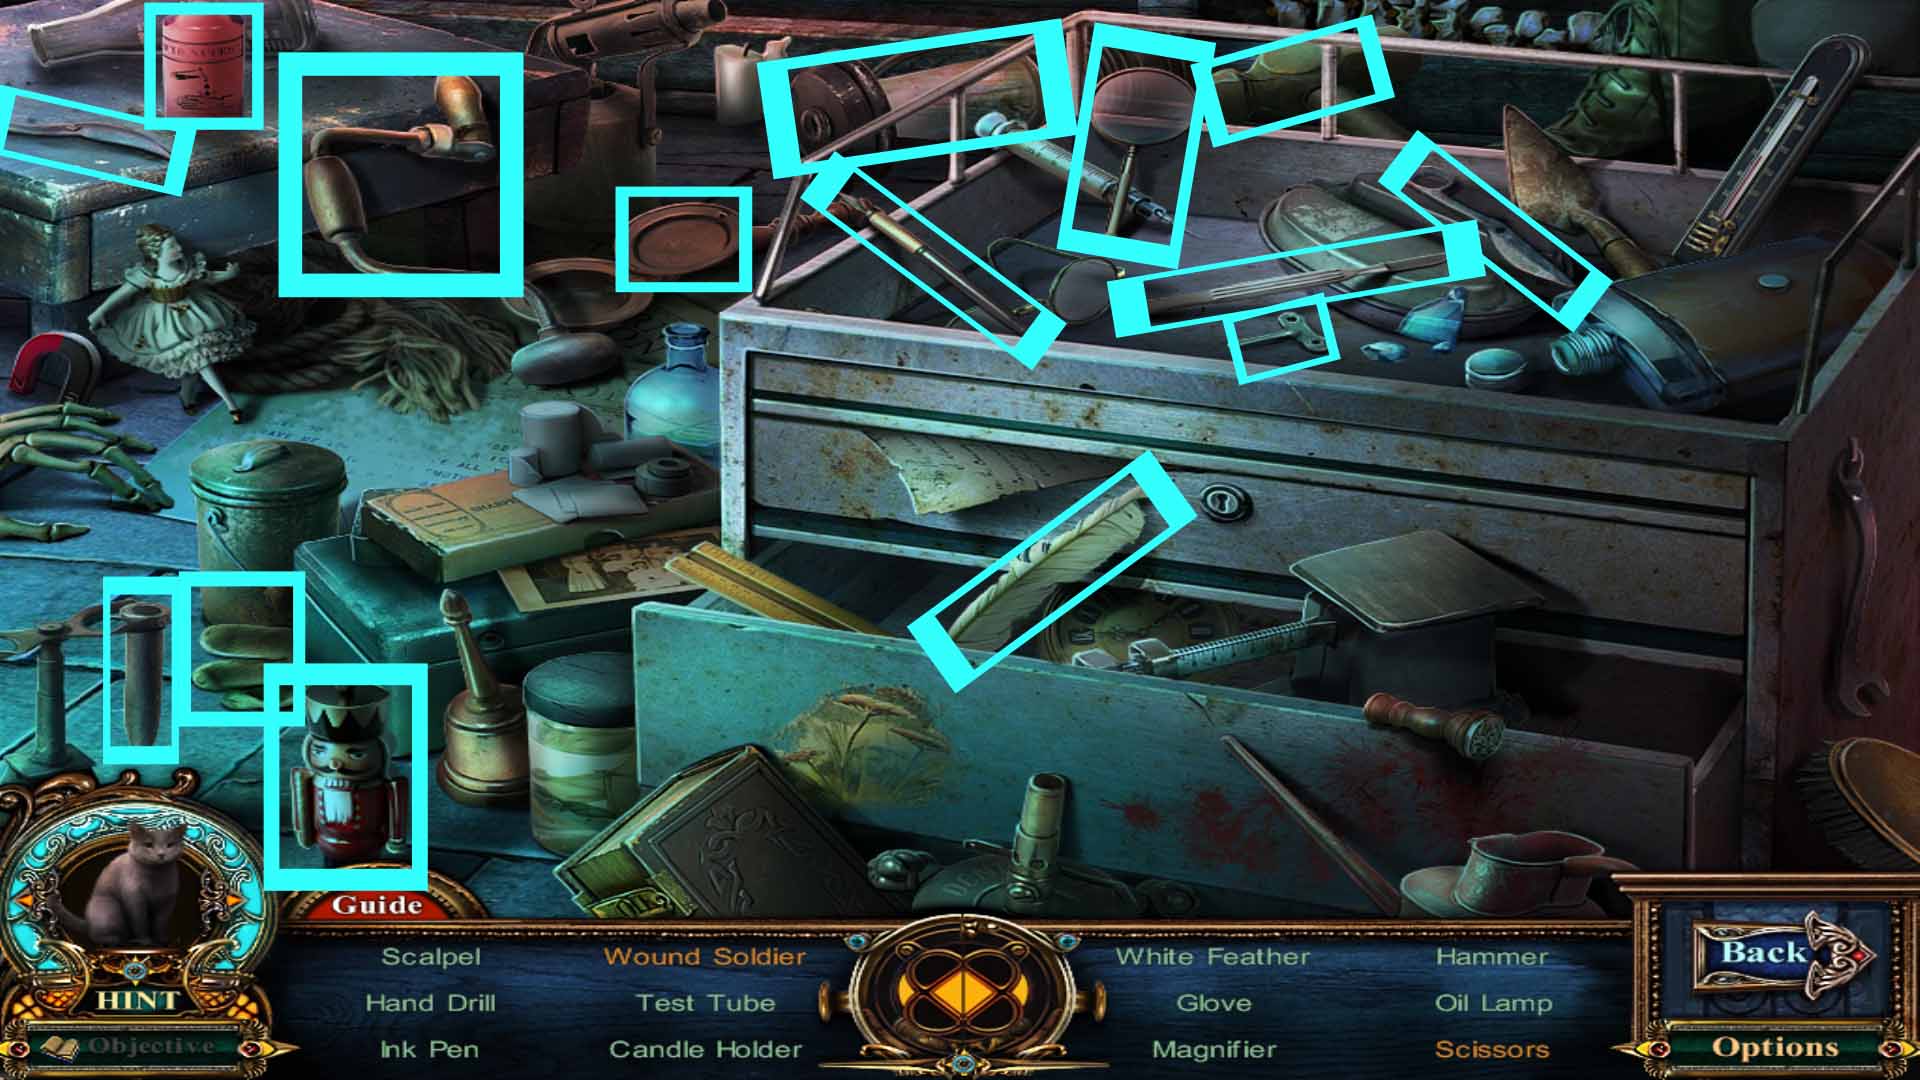
Start the hidden object scene located on the china dresser.
Pick up the milk bottle and pour it in the tea cup.
Grab the knife and use it on the package to reveal the lock.
Screenshot
You receive vermin repellant.
Go back once and zoom in on the chest on the ground to the left. Use the bolt cutters to cut the wire.
This reveals a hidden object scene to start.
Pick up the ruby and place it in the bracelet.
Grab the two torn pieces of the tarot card and reattach them to fix it.
Screenshot
You receive a bronze scepter.
Going to the Lake
Go back once and zoom in on the gargoyle statue. Use the chisel on the eye.
You receive the sapphire eye.
Go left and use the rat repellant on the horde of rats.
Move forward.
Click on the angel to the left to start a mini-game.
You must click on all flower buds to light them up.
You will have to make sure that every branch has been hit so you will click on flowers multiple times.
Pick up the ruby eye.
Click on the tomb stone to the right of the rabbit to collect a fabled object.
Click on the shadowed figure behind the left gate.
Go left.
Pick up the hayfork.
Inspect the door on the right (the morgue) and pick up the doll head.
Go back once and click on the gate to the right to open it. Go through to the lake.
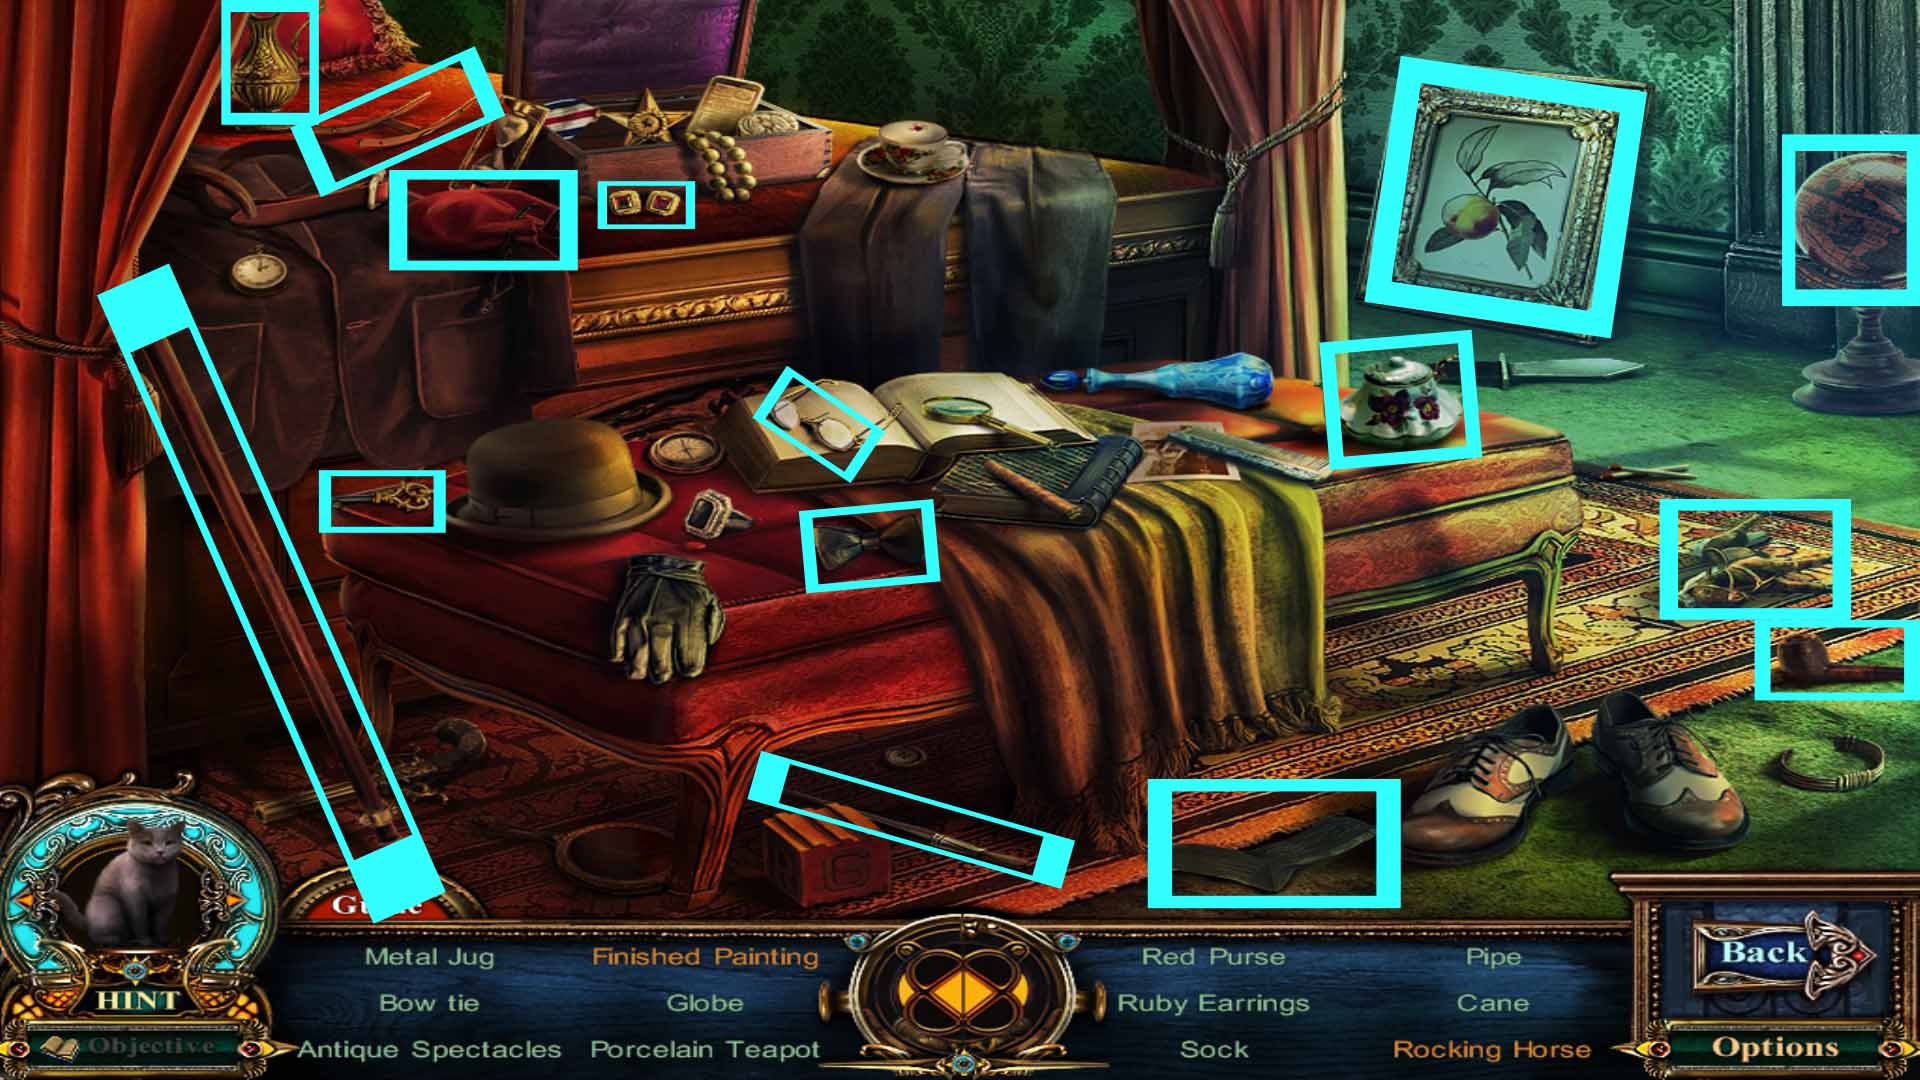
Chapter Two: The Piper's Partner
Getting the Raven Disk
Pick up the horse figurine.
Click on the men on horses in the distance.
Go back three times. Click on the window under the clock (on the left side) to gather a fabled object.
Go forward toward the stables.
Click on the doll in the miniature coffin and place the doll head on it.
Pick up the silver coin.
Go into the stables and zoom in on the back stall. Place the horse figurine in the indent for it.
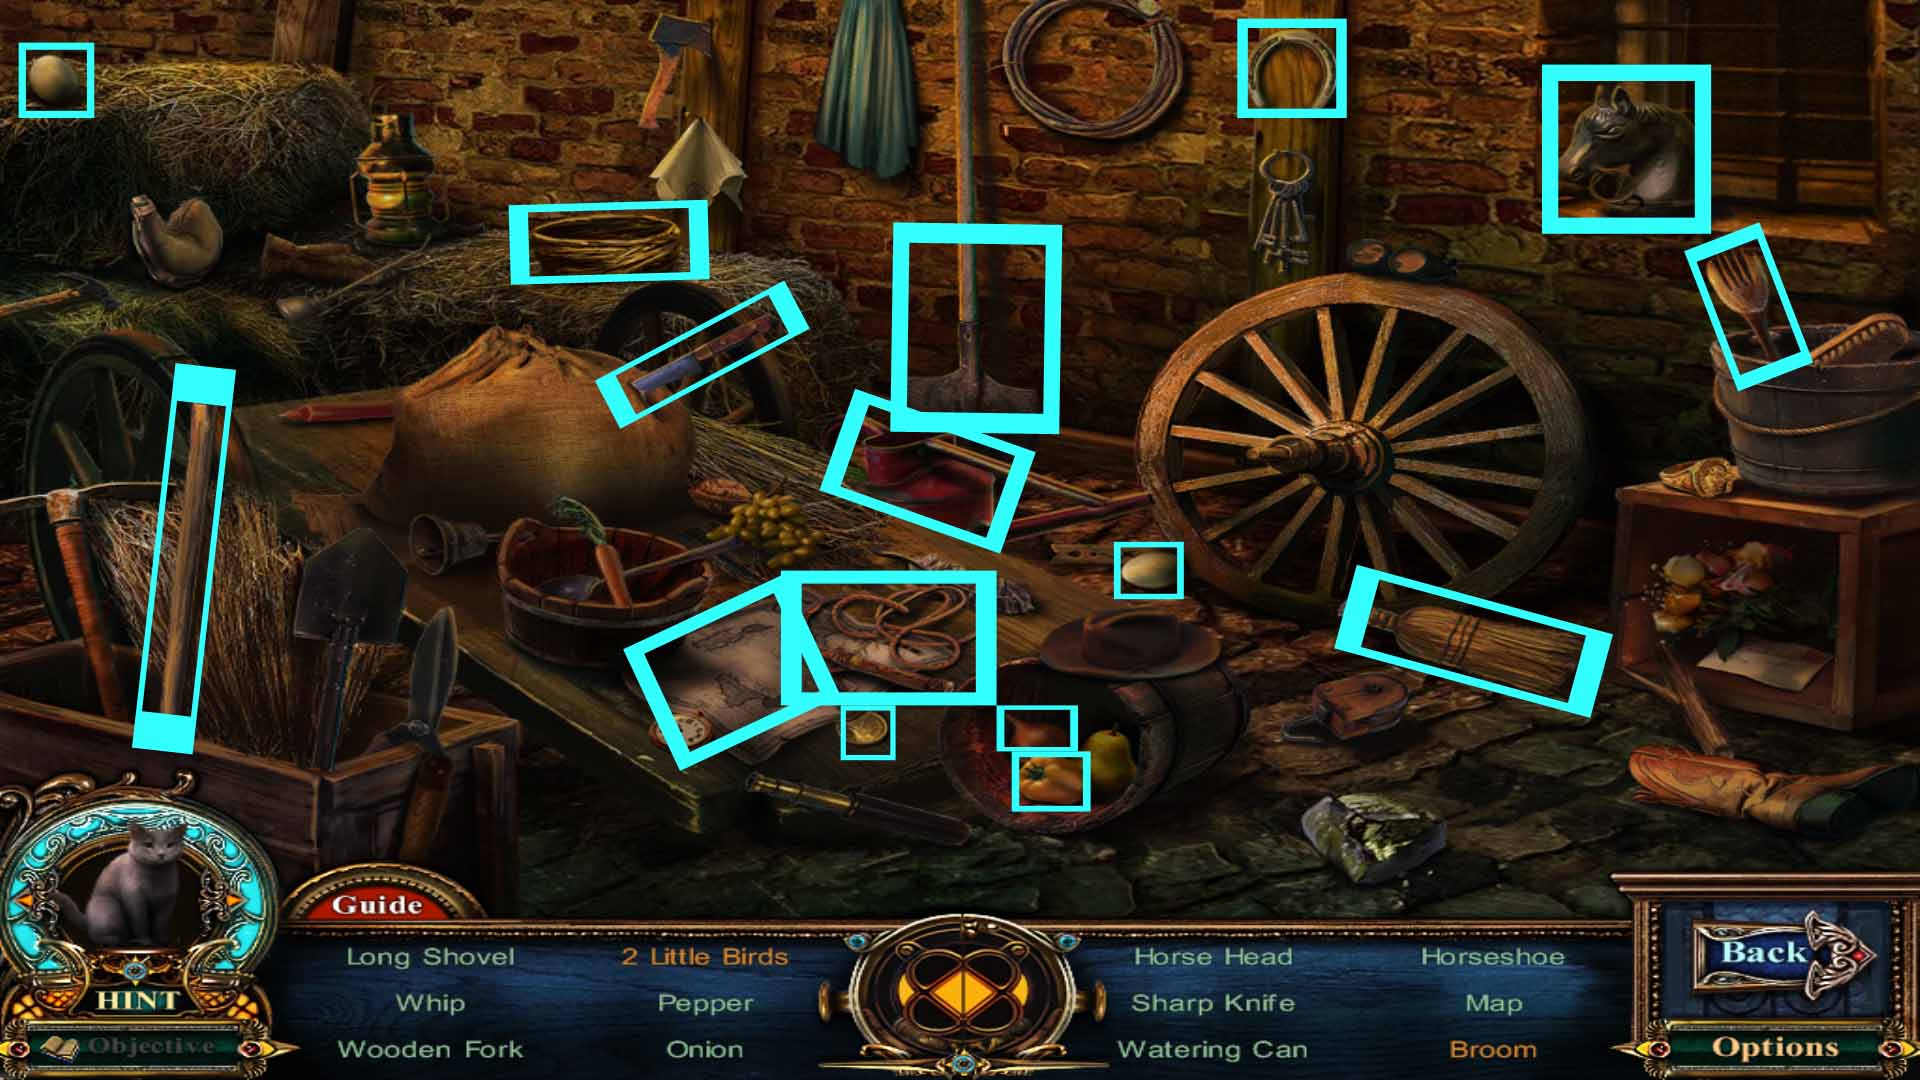
A hidden object scene is revealed once the stall is opened. Click to start.
Pick up the broom head and attach it to the broom stick to fix the broom.
Grab both eggs and place each in the nest to make them hatch.
Screenshot
You receive a gold coin.
Use the hay fork in the left stall where the smoke is coming from to remove the hay and reveal a trap door. The trap door needs a handle.
Return to the street where you first received the doll head.
Click on the machine towards the back and place the silver coin and the gold coin in their respective slots.
Press on the lever, then pick up the tonic water.
Go to the alley and go through the window.
Give the tonic water to the butler.
You receive a white swan emblem.
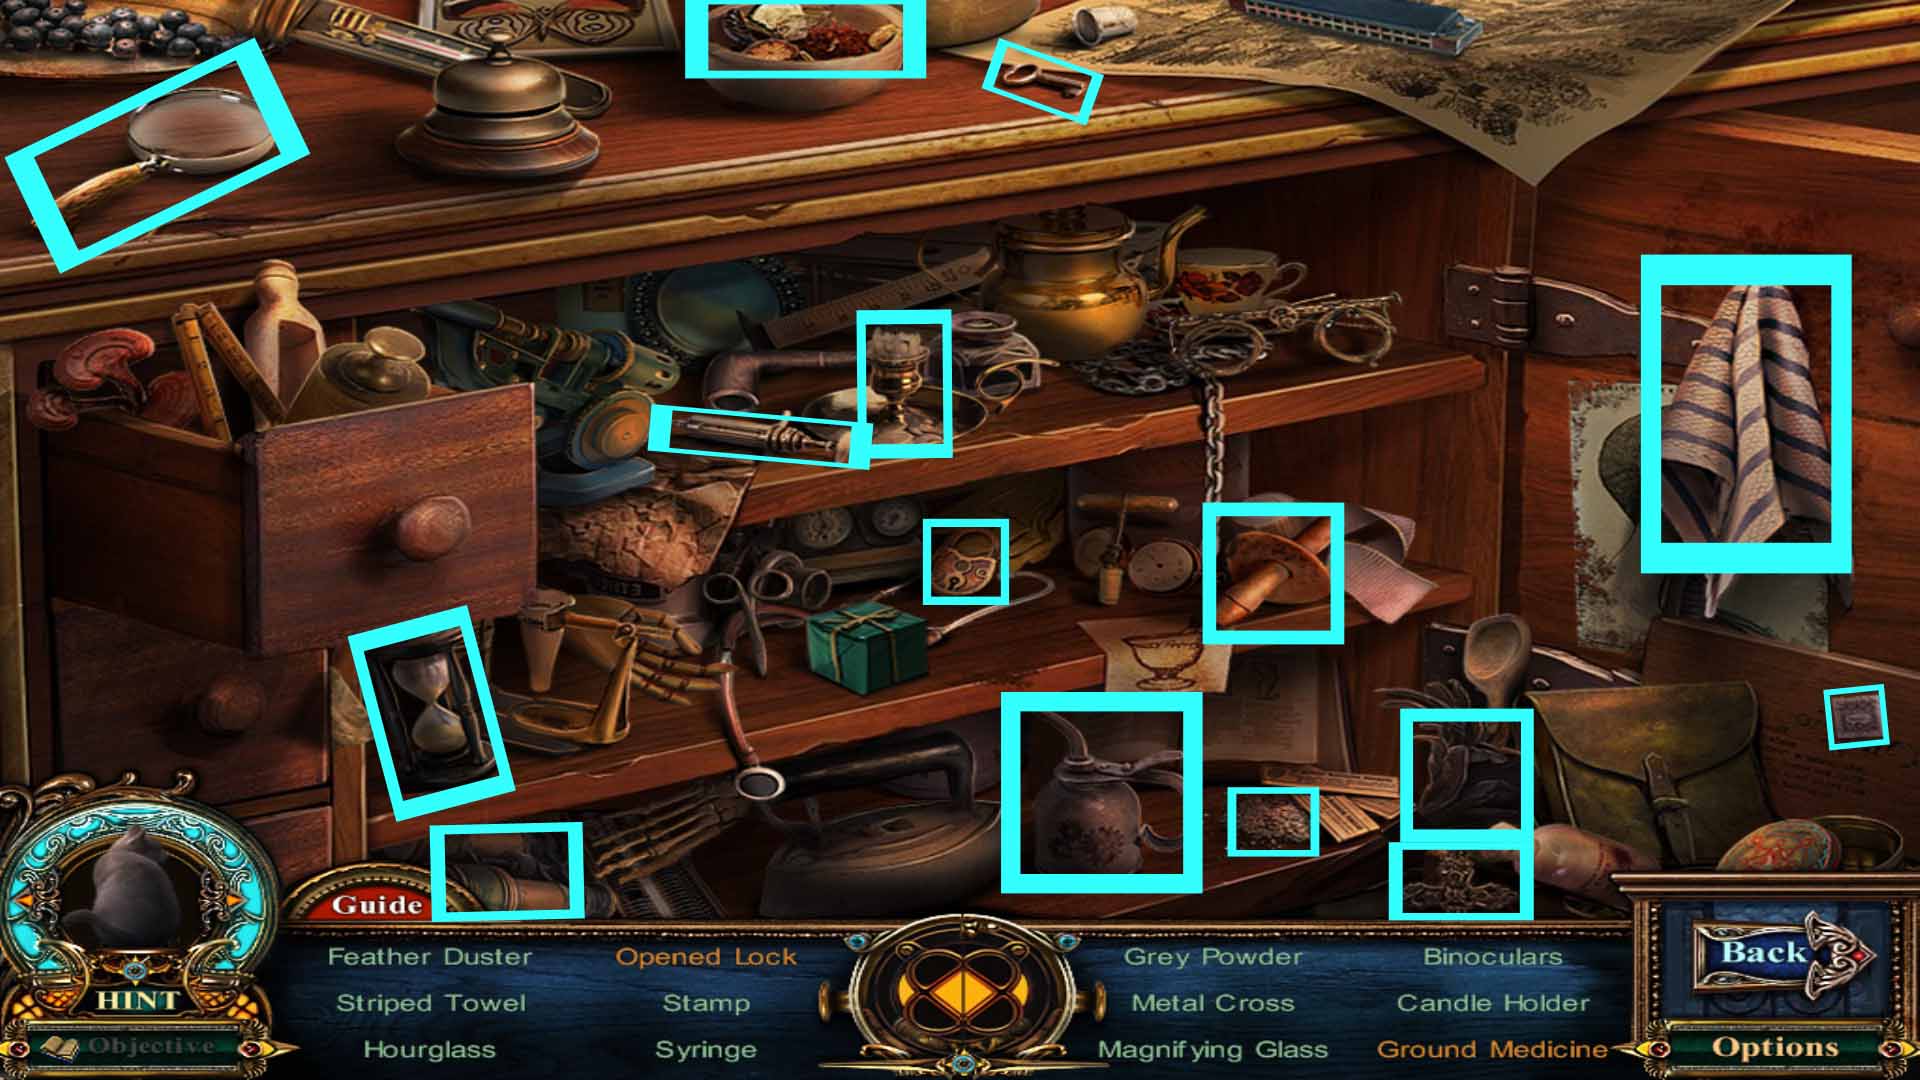
Start the hidden object scene on the china cabinet.
Pick up the wax seal and place it on the envelope.
Grab both pieces of the torn painting and put them back on the frame to fix the painting.
Screenshot
You receve a raven disk.
Getting the Jade Eye
Go down and then move forward into the front door that's now open.
Click the circular painting frame to the right of the eyeless doll: it is a fabled object.
Investigate the red book to the right of the grandfather clock. Click on the front cover to open it and pick up the button.
Inspect the open book on the far right of the room and pick up the long hook.
Go back once, then move forward to the gravesite.
Click on the hollow in the tree and use the long hook to obtain the police key.
Go back twice and zoom in on the police booth. Use the police key to open it.
Pick up the light bulb.
Go left and go through the door into the bottom of the house.
Inspect the far right wall and place the light bulb in the lantern.
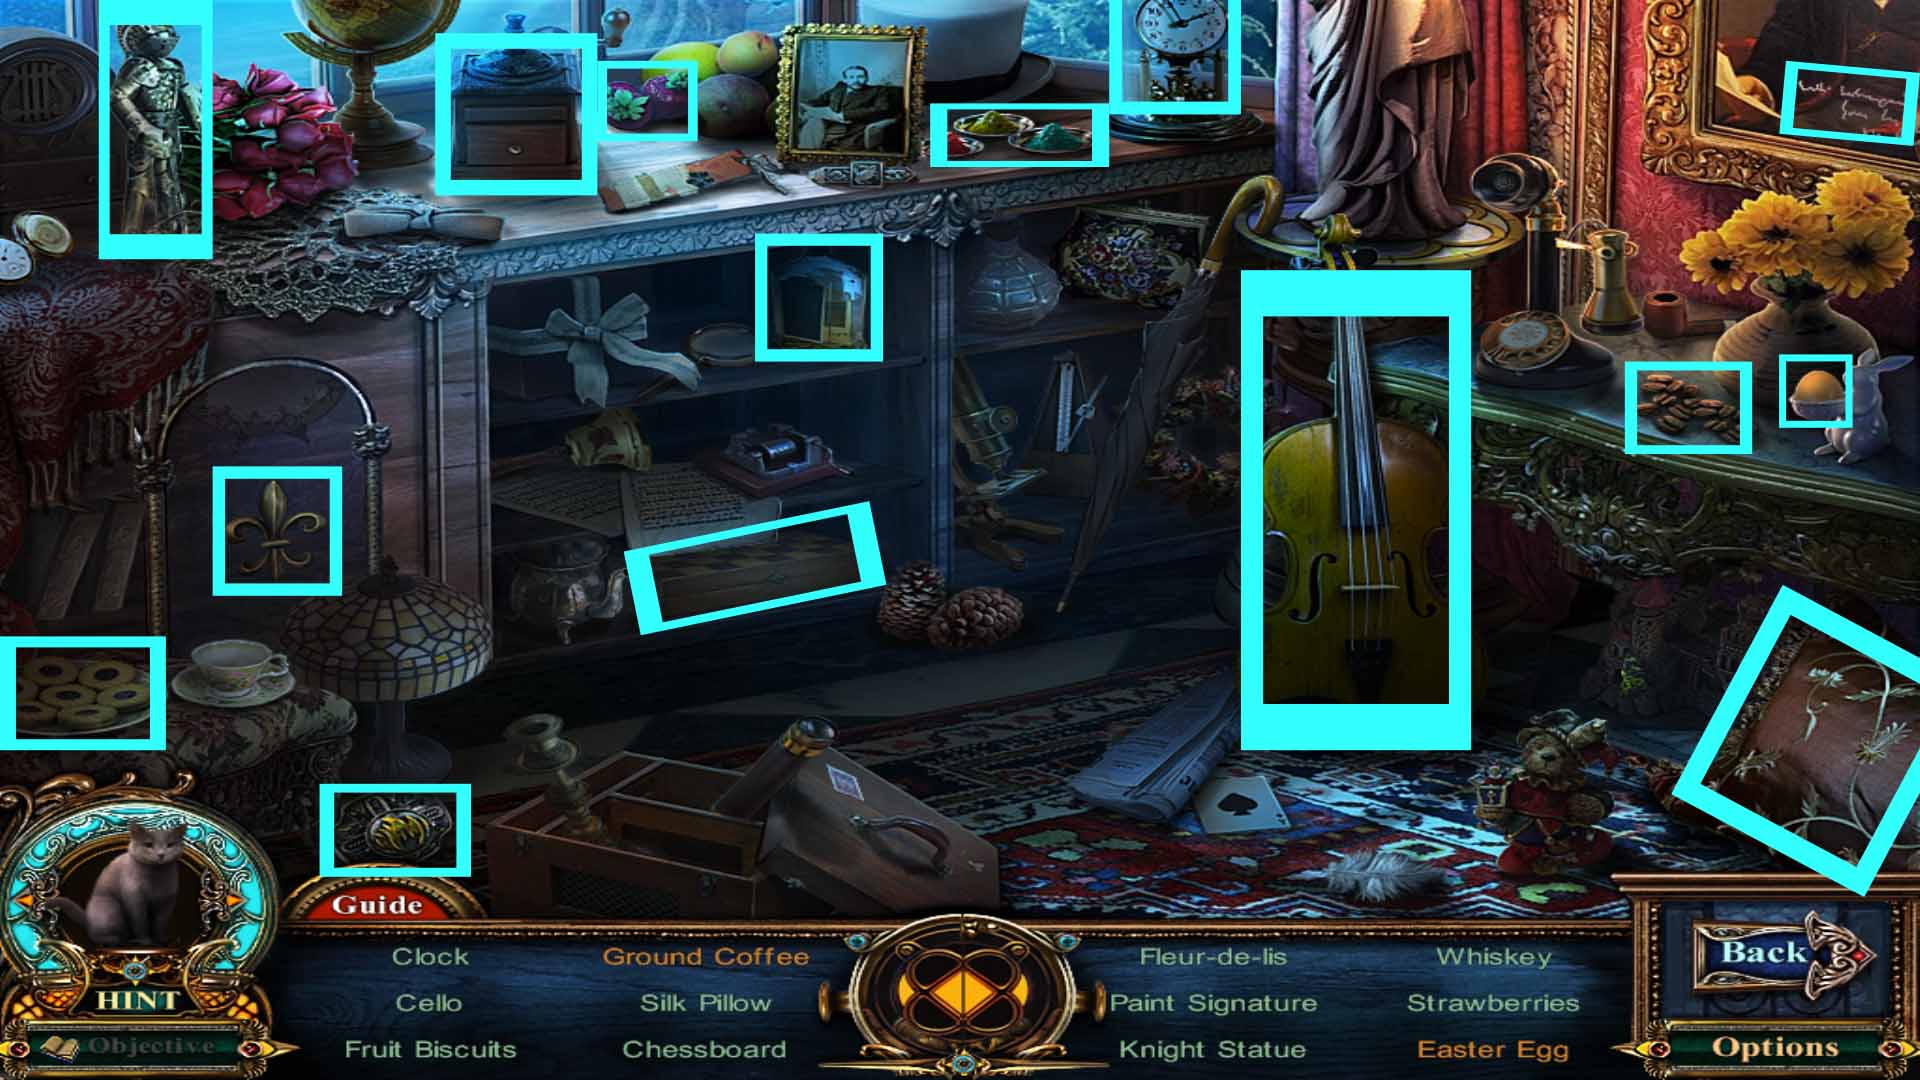
Start the hidden object scene that is on the desk near the staircase.
Pick up the light holder and place it on the lamp stand.
Grab the tea bag and place it in the kettle.
Screenshot
You receive a rat knob.
Go to the stables and zoom in on the trap door.
Place the rat knob on the trap door in order to open it.
Go down the trap door.
Click on the cover that's to the right of the wheel. Pick up the phoenix plate.
Start the mini-game located on the left table.
Rotate each disc until the liquid flows to the center. Each disc moves only itself, it doesn't not effect any other disc.
Start with the outermost disc, the blue one, and work your way in.
Screenshot
Pick up the jade eye.
Finding the Dark Piper
Go up, then move back three times.
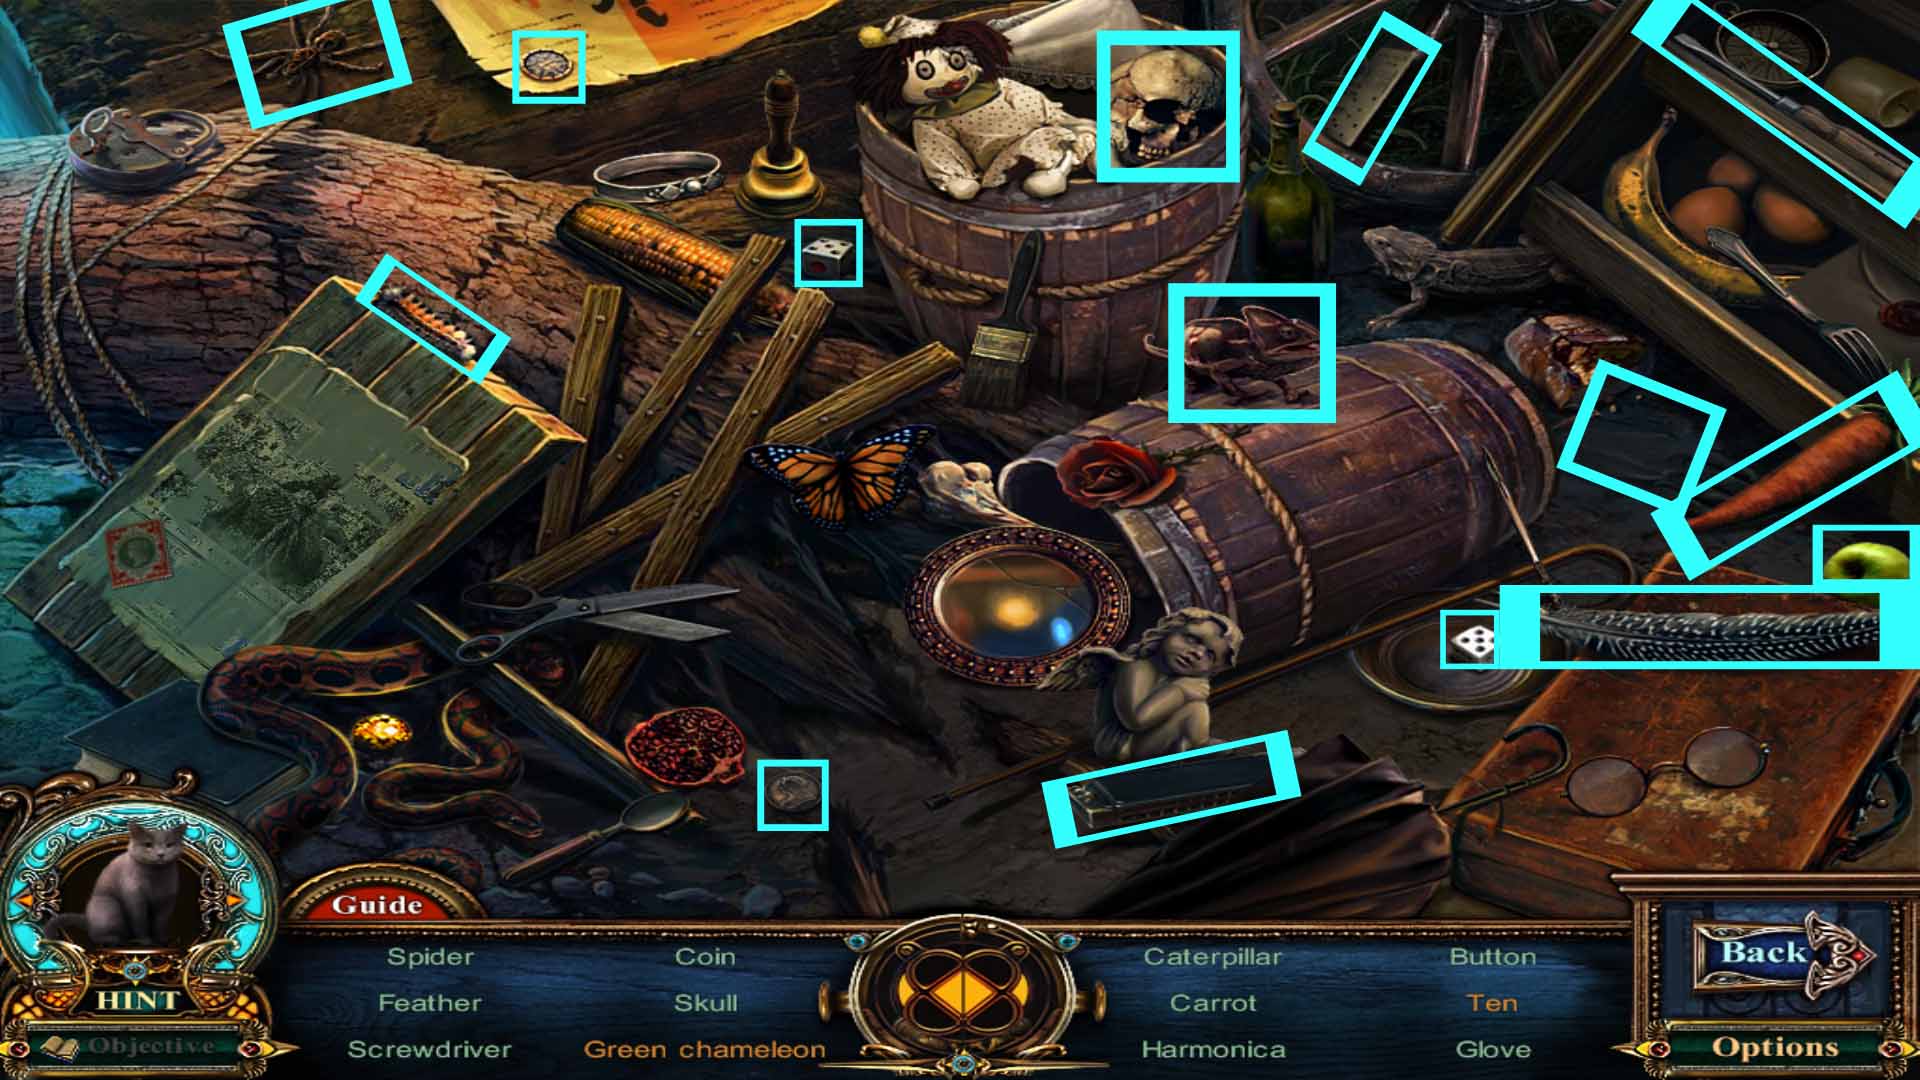
Start the hidden object scene on the barrels.
Pick up the die and place it with the other die to make ten.
Pick up the apple and place it next to the chameleon to turn it green.
Screenshot
You receive a decoder.
Go to the street where the toy shop is and zoom in on the nutcracker. Place the shiny button in the missing spot for it.
Pick up the crystal eye.
Go back twice, then enter the bottom of the house.
Inspect the giant raven statue.
Place the ruby eye, sapphire eye, jade eye, and crystal eye in the empty eye sockets of the correct raven.
Place the raven disc in the empty disc slot.
You receive the ravenlore whistle.
Leave the house. Click on the full poster on the right wall: it is a fabled object.
Go to the gravesite then go through the right gate to the lake.
Use the ravenlore whistle to retrieve the chest.
Inspect the chest and click the lid to open it. Pick up the gold chalice.
Go back three times.
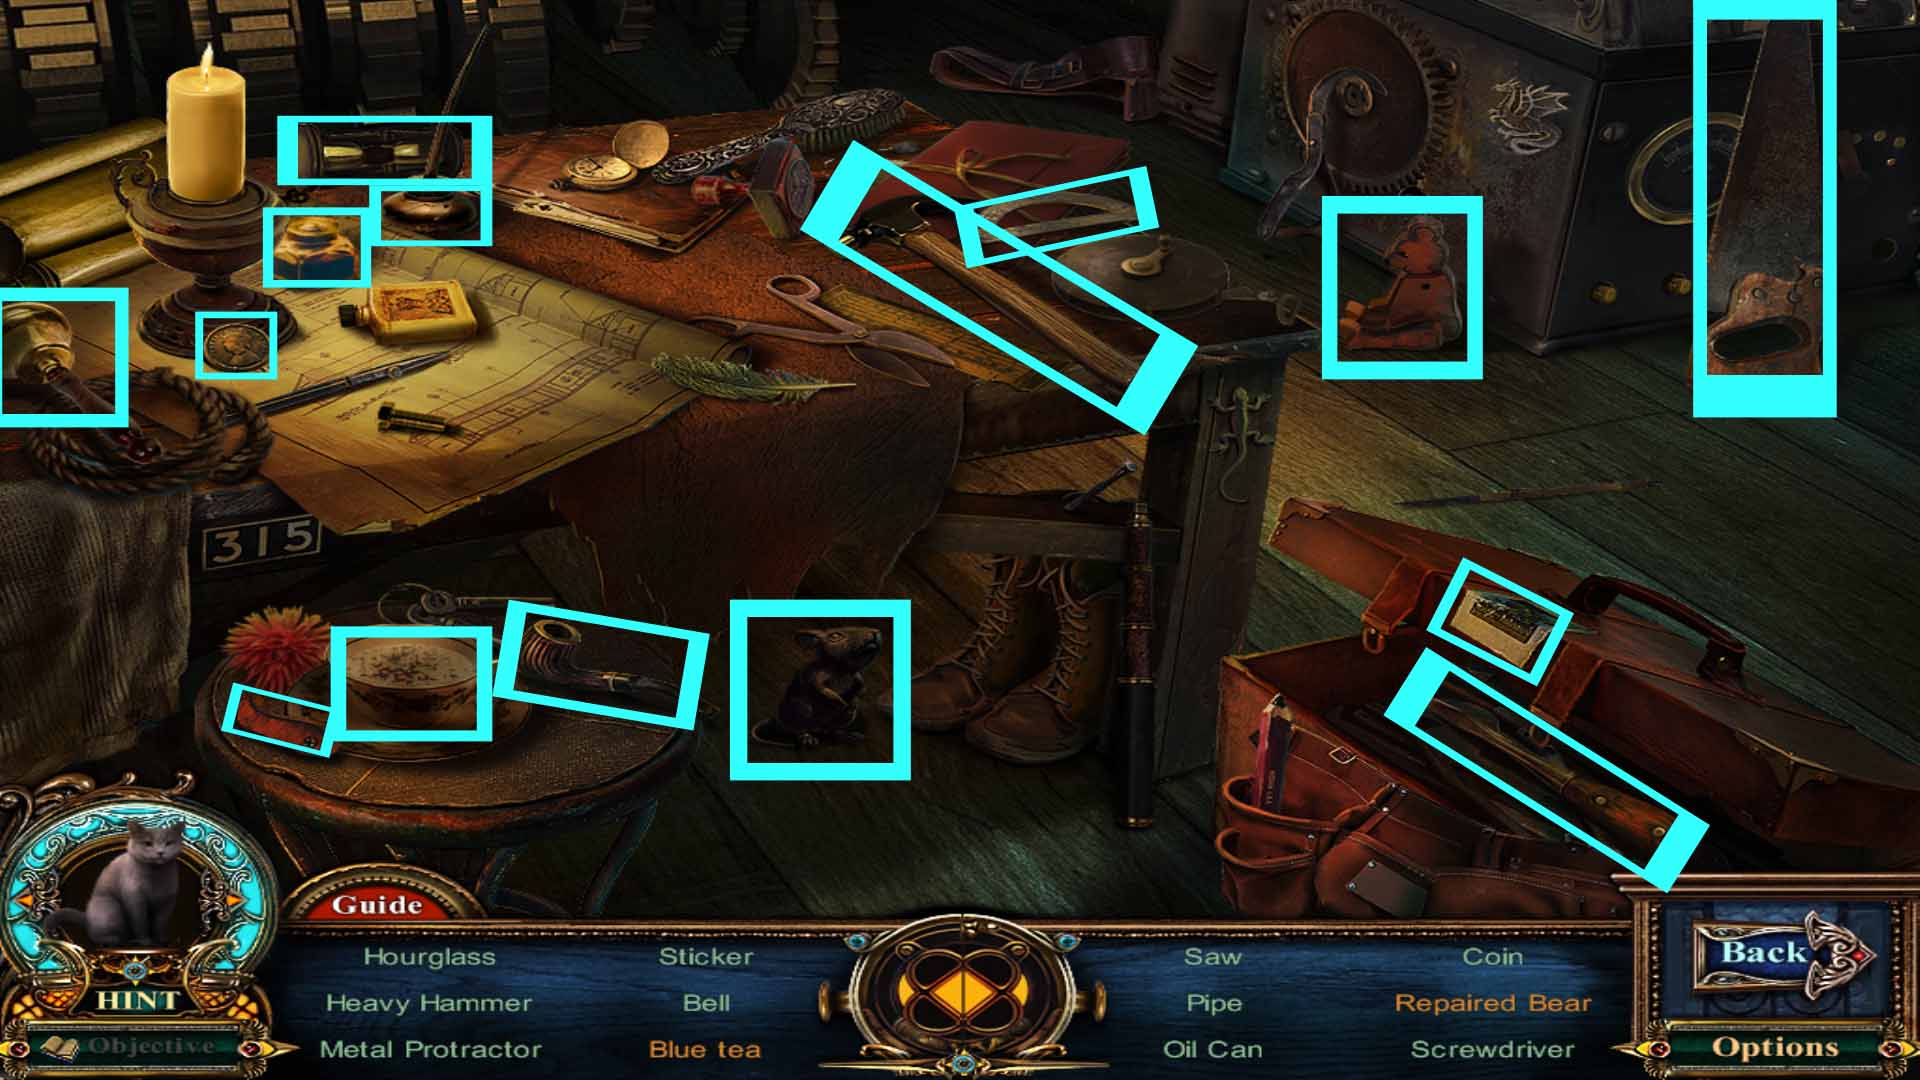
Chapter Three: The Underground
Getting the Rust Remover
Speak with the Dark Piper.
Pick up the scissors.
Click on the door to open it, then walk forward.
Pick up the pearl.
Investigate the left chest and pick up the flag.
Zoom in on the piper statue and pick up the rope with hook.
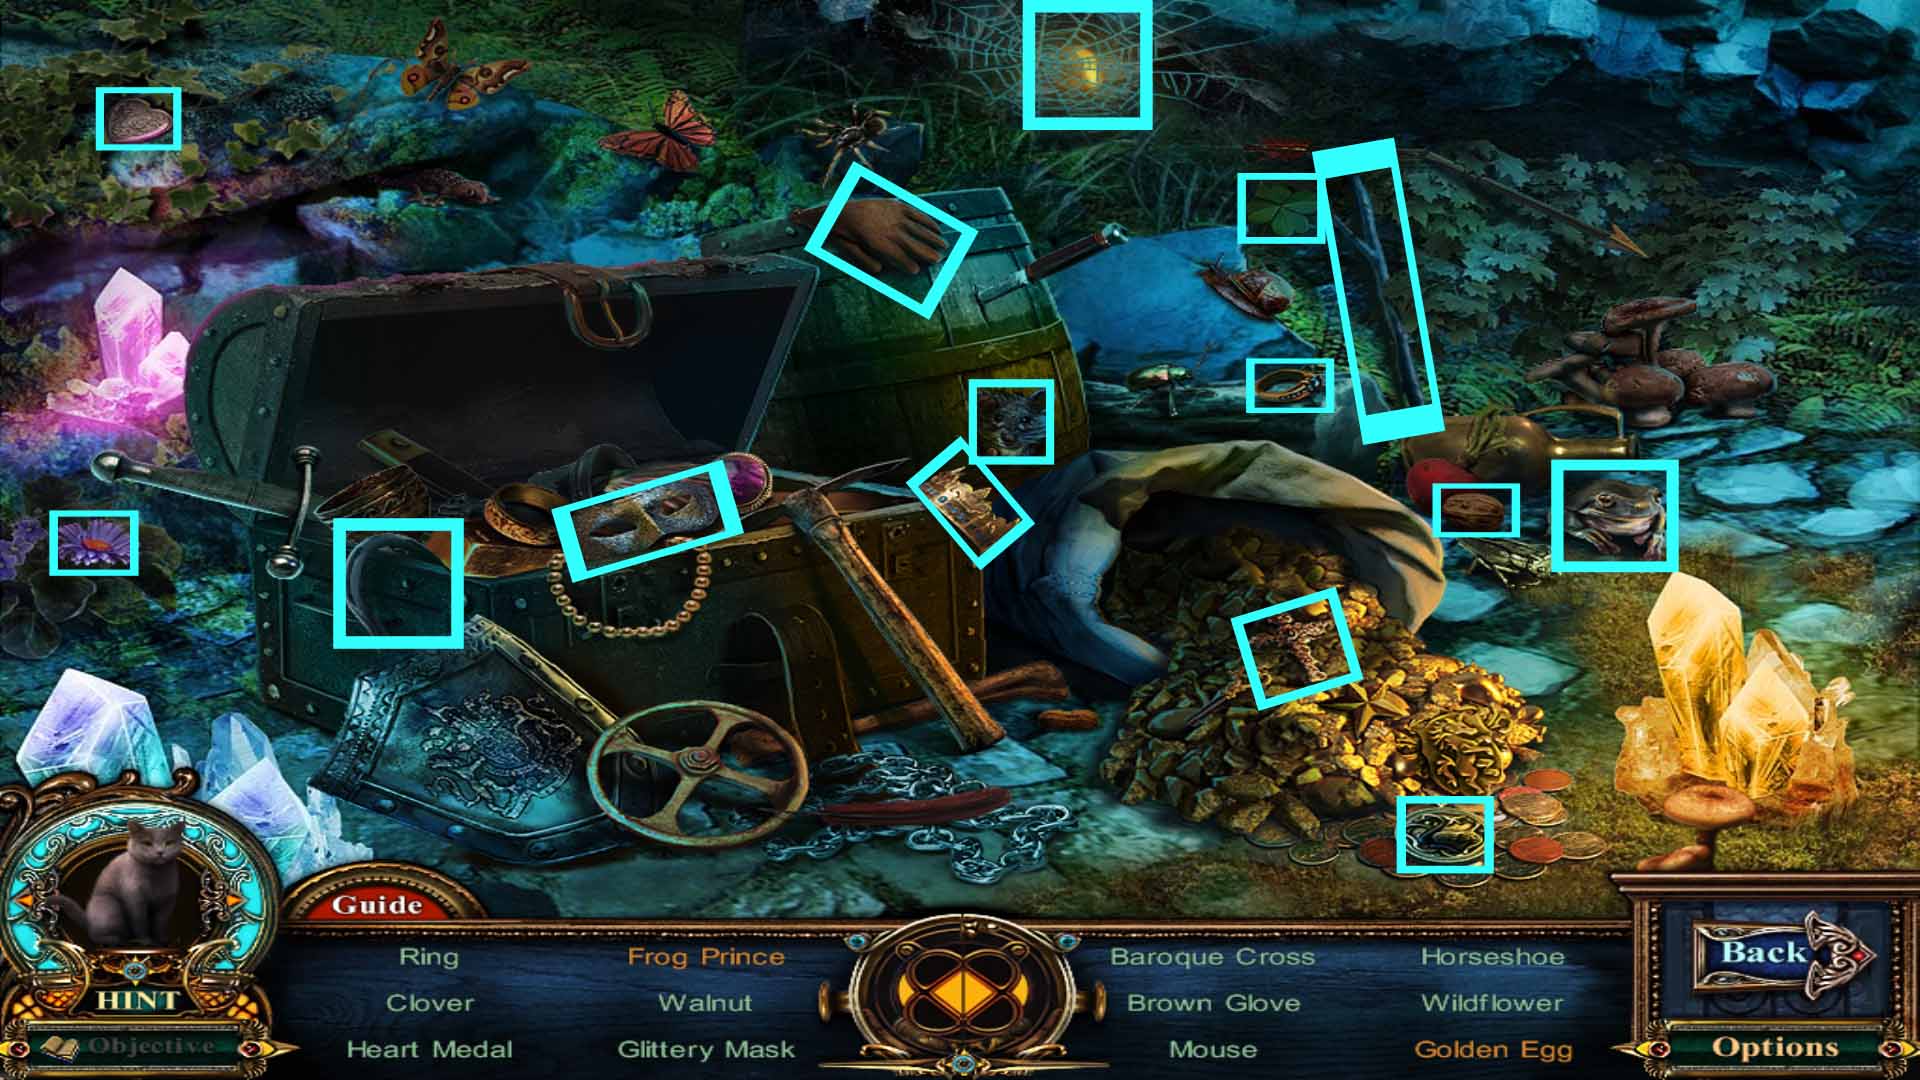
Go back once and click on the hidden object scene on the right mound of earth.
Pick up the crown and place it on the head of the frog.
Grab the twig and use it on the spider web to reveal the golden egg.
Screenshot
You receive the black swan emblem.
On the floor to the left next to the sword in the ground is a flower shifting to a gem. Pick this up: it's a fabled object.
Investigate the top of the hole you fell through and use the rope with hook on it.
Climb up the rope.
Go forward to the stables, then go left into the stable. Click on the hidden object scene at the back of the room.
Pick up the daisies and place them in the vase.
Grab the cheese and place it on the mouse trap.
Screenshot
You receive rust remover.
Obtaining the Encrypted Receipt
Go down through the trap door and zoom in on the statue of the woman.
Place the gold chalice in her hands.
Inspect the area under the statue and pick up the pharmacy key.
Go back up and go back once. Click on the lamp post on the left: it is a fabled object.
Go up the ladder and through the window.
Zoom in on the clam on the table and place the pearl inside it.
Pick up the clock tower key.
Leave and head to the grave site.
Zoom in on the gravestone to the right behind the tree. Click on the gravestone to move it.
Pick up the invisible ink.
Head to the street where the pharmacy is located.
Investigate the pharmacy door, place the pharmacy key in the lock and click to open the door.
Go through the door.
Inspect the display case that's on top of the counter. Pick up the small boat.
Zoom in on the displayed shelves and pick up the insecticide.
Pick up the stone carrot that's in front of the scales.
Go back twice to the gravesite and place the stone carrot in the rabbit paws.
Pick up the diary key and the cabinet key.
Go forward and go back into the pharmacy.
Zoom in on the book in the hands of the pharmacist and use the diary key on the indent to unlock it.
Use the invisible ink on the page to reveal writing. Pick up the encrypted receipt.
Getting the Rusty Pick Axe
Use the cabinet key on the cabinet to open it and reveal a hidden object scene.
Pick up the key and use it on the lock to open it.
Pick up the pestle and use it on the herbs in the mortar to grind them.
Screenshot
You receive oil.
Go back twice to the gravesite, then go through the gate on the right.
Zoom in on the spider on the book and use the insecticide on it.
Pick up the address book.
Go back twice to the bottom of the house and start the hidden object scene located on the right desk.
Pick up the torn piece to repair the map.
Pick up the jester hat and place it on top of the head of the teddy bear.
Screenshot
You receive a unicorn plate.
Go back once and click on the poster on the window of the pharmacy. It is a fabled object.
Return to the gravesite and inspect the gate on the left.
Place the white swan emblem and the black swan emblem in the two circular slots.
Go through the gate.
Inspect the empty bottle and place the small ship inside.
.
Pick up the golem plate.
Pick up the rusty pickaxe leaning against the lamp post.
The Right Door in the Clock Tower
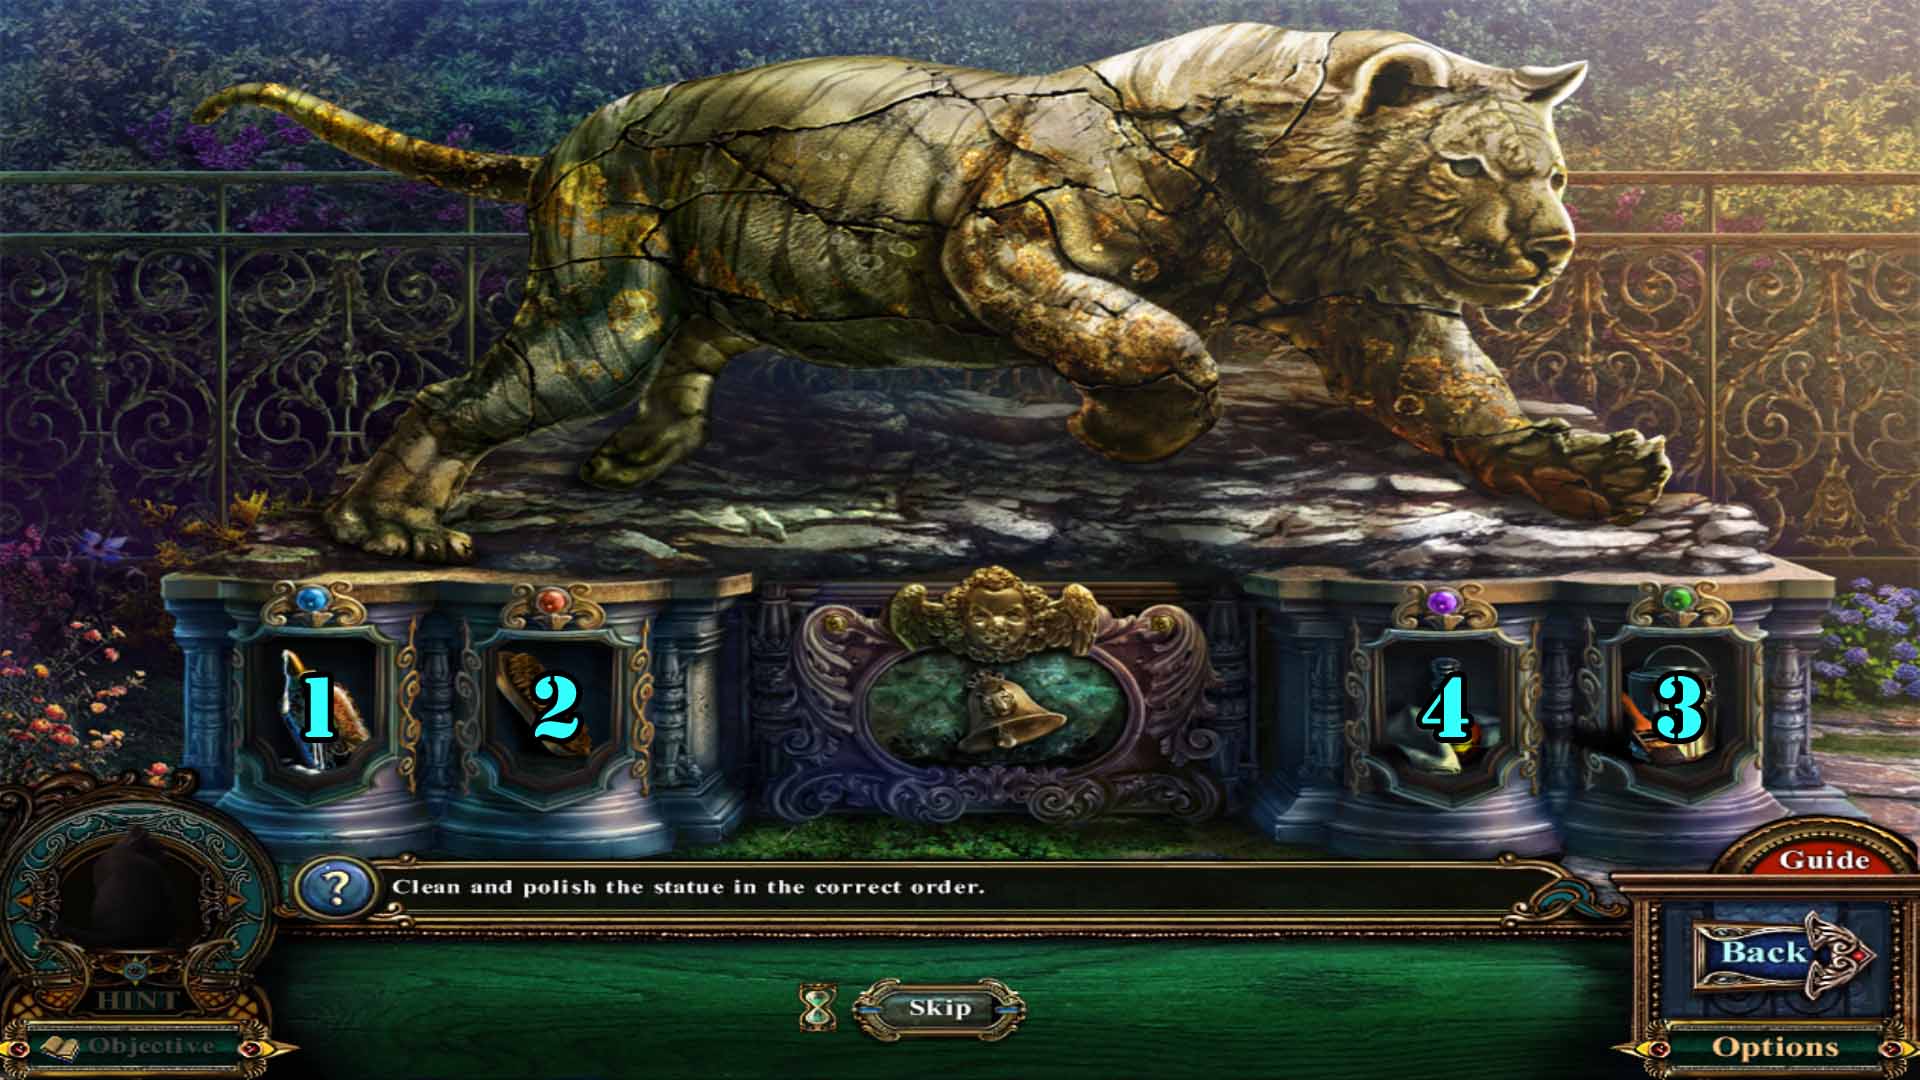
Inspect the tiger statue to start a mini-game.
Replace the pieces of the tiger on his body. Once all pieces are replaced, you must clean and polish the tiger in the correct order.
Use the bottle on the far left first.
Use the brush second.
Use the paint on the far right third.
Finish with the rag to the left of the paint.
Screenshot
Pick up the silver bell.
Go right towards the mansion and speak with the duke.
You receive the wolf emblem.
Leave the mansion grounds and go to the stable area with the clock tower.
On the right side of the carriage is an emblem changing to a face. Pick it up: it's a fabled object.
Zoom in on the clock tower door and use the rust remover to clear the lock.
Place the clock tower key in the lock. Click to turn and open the door.
Go through the door.
Pick up the skeletal half mask.
Place the gold bell in the hands of the gold statue.
Place the silver bell in the hands of the silver statue.
Start the hidden object scene that has appeared to the left on the work table.
Pick up the compass and use it on the blank piece of paper to make a circle.
Take the wrench and use it on the brass nut to make it wrench off.
Screenshot
You receive a lamp.
Inspect the door on the right and use the oil on the lock.
Go through the door.
Chapter Four: The Viceroy
Claiming the Embalming Acid
Inspect the table in the far right.
Place the encrypted receipt on the table followed by the decoder.
Put the address book on the table as well.
Once the poison purchaser has been revealed and the book turns to the proper page, pick up the morgue code.
Use the scissors on the curtain covering the cache.
Pick up the bottle of sour milk.
Go back four times and zoom in on the brick wall.
Use the rusty pickaxe to dislodge the brick.
Pick up the sea serpent plate.
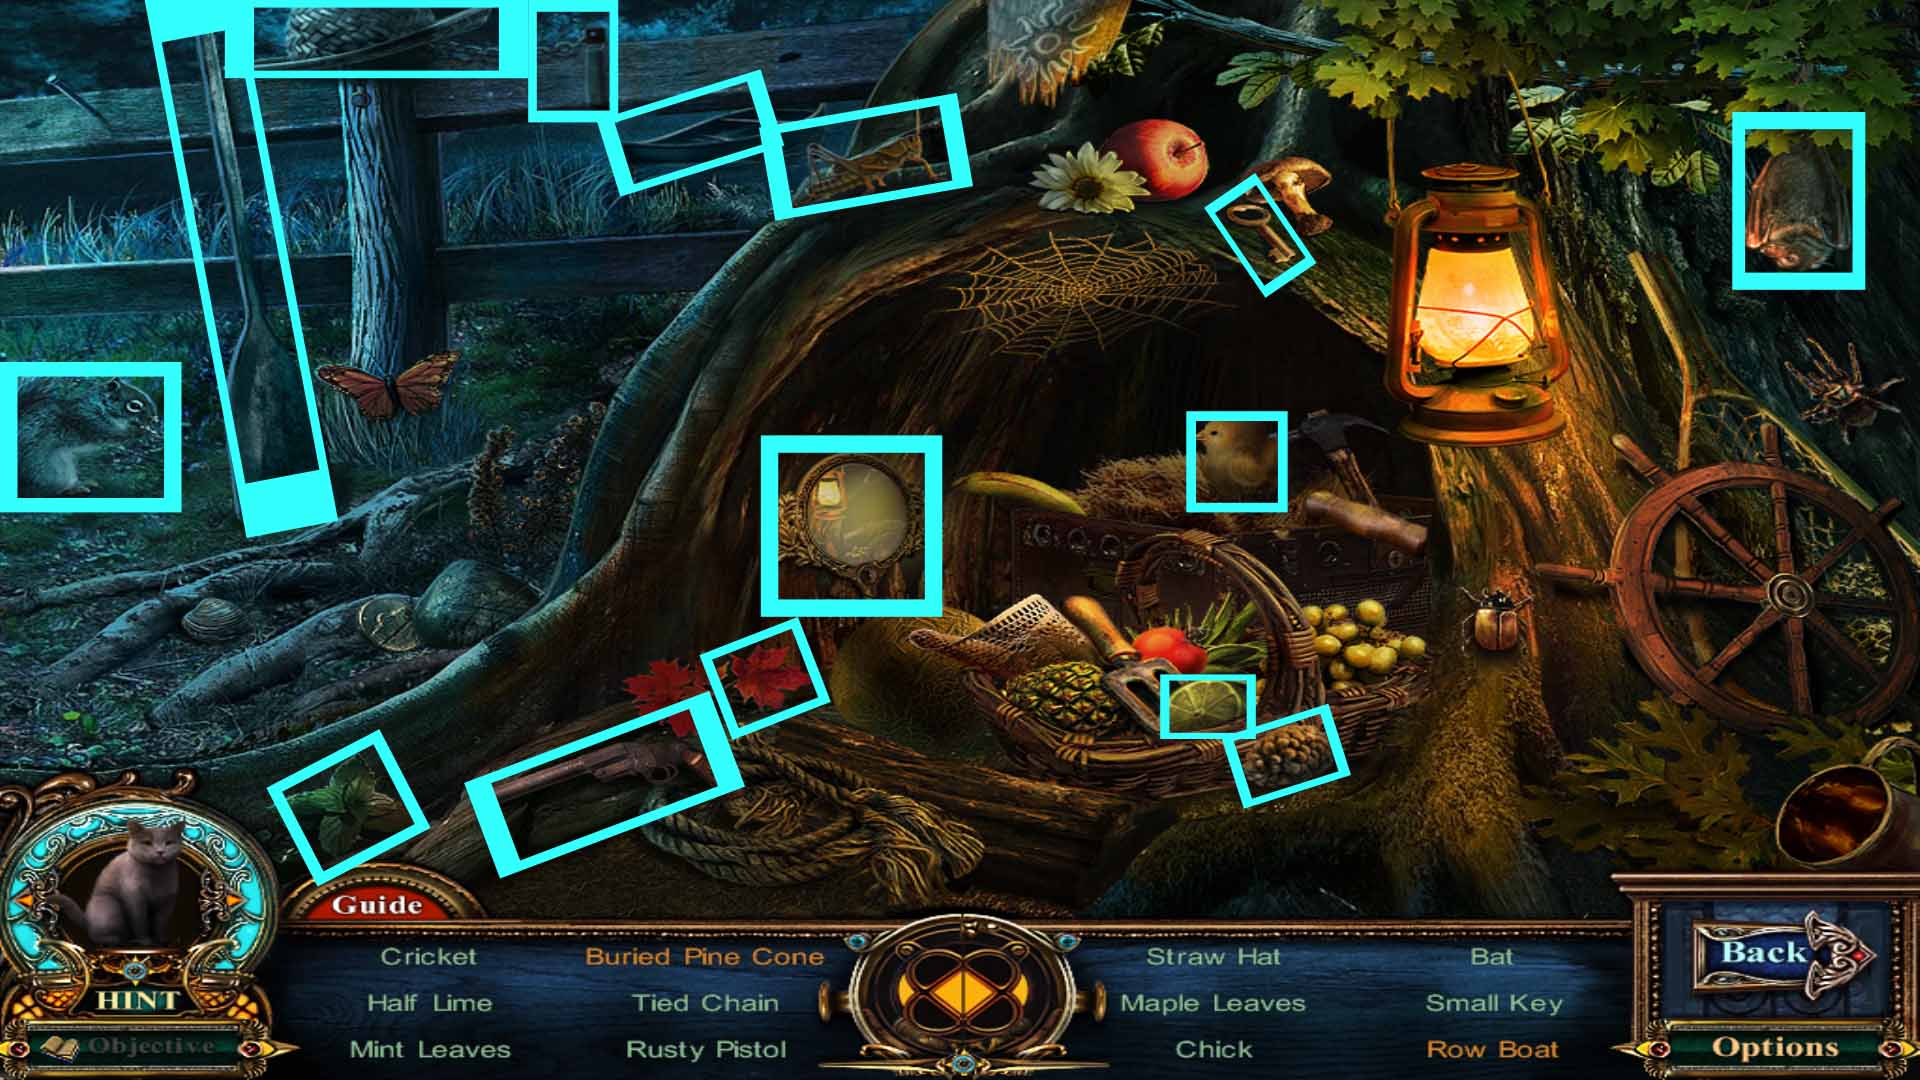
Go to the lake and use the lamp to light up the tree hollow. This reveals a hidden object scene.
Pick up the oar and place it on the boat.
Give the pinecone to the squirrel to have it buried.
Screenshot
You receive a hand mirror with moon engraving.
Go back once, then left to the street.
Zoom in on the morgue door and place the morgue code on the lock.
Go through the door.
To the left of the rat in the bottle is a fabled object.
Pick up the screwdriver.
Start the hidden object scene located on the box to the far right filled with bottles and junk.
Pick up the winder and place it on the nutcracker.
Attach the two scissor halves.
Screenshot
You receive embalming acid.
Getting a Skull
Go into the pharmacy and click on the poster on the right side of the shop to obtain a fabled object.
Go back three times, then go through the left gate. Go to the right towards the mansion.
Inspect the vase to the right of the Duke and pour the sour milk into it.
You receive the eagle plate.
Move back four times, then go down through the hole.
Zoom in on the bottom of the knight statue and place the hand mirror with moon engraving in the holder with the moon engraving.
Place the bronze scepter in the holder with the star on it.
Pick up blue crystal #1.
Move forward through the door.
Inspect the door on the left and place all the discs in the empty spots.
Go forward through the door.
Investigate the crack on the wall to the left of the door and use the embalming fluid on it.
Pick up the blue crystal #2.
Inspect the bottom of the knight statue on the right and place the blue crystal #1 and the blue crystal #2 in the empty spots.
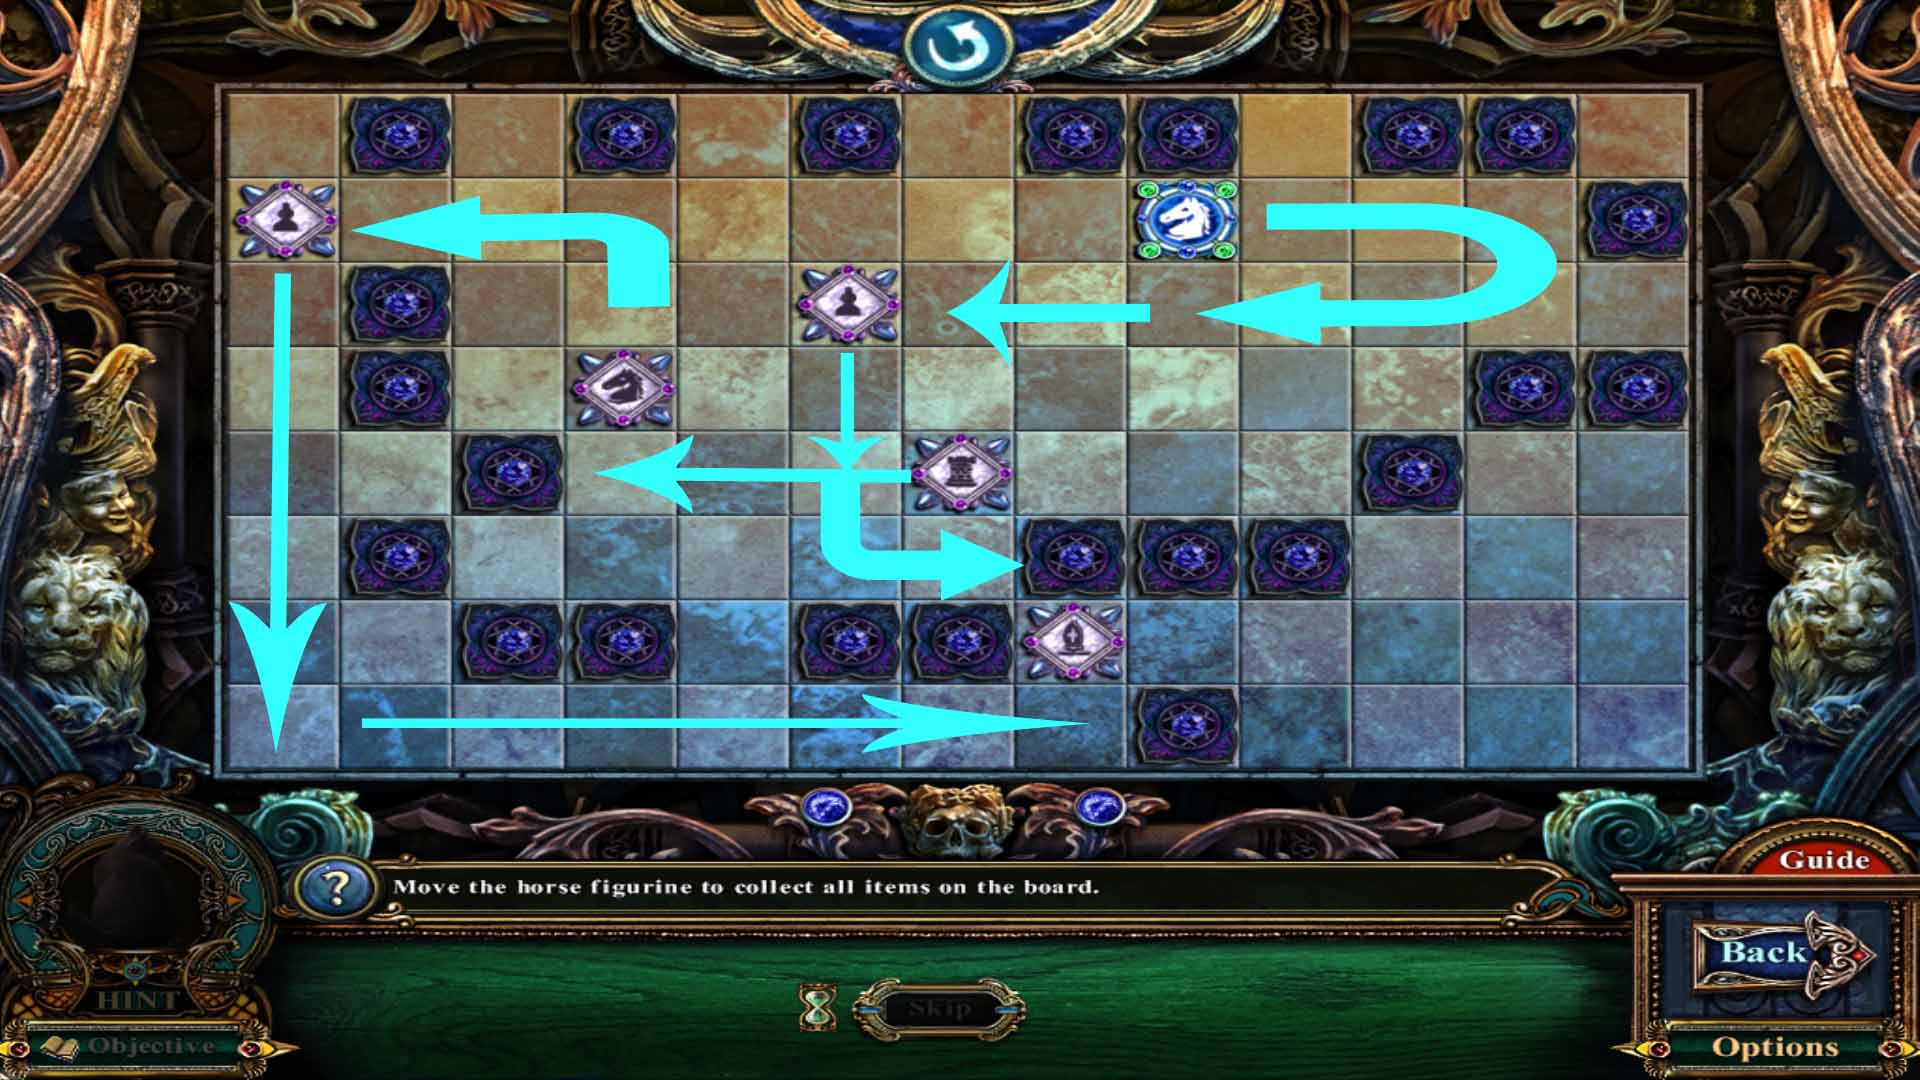
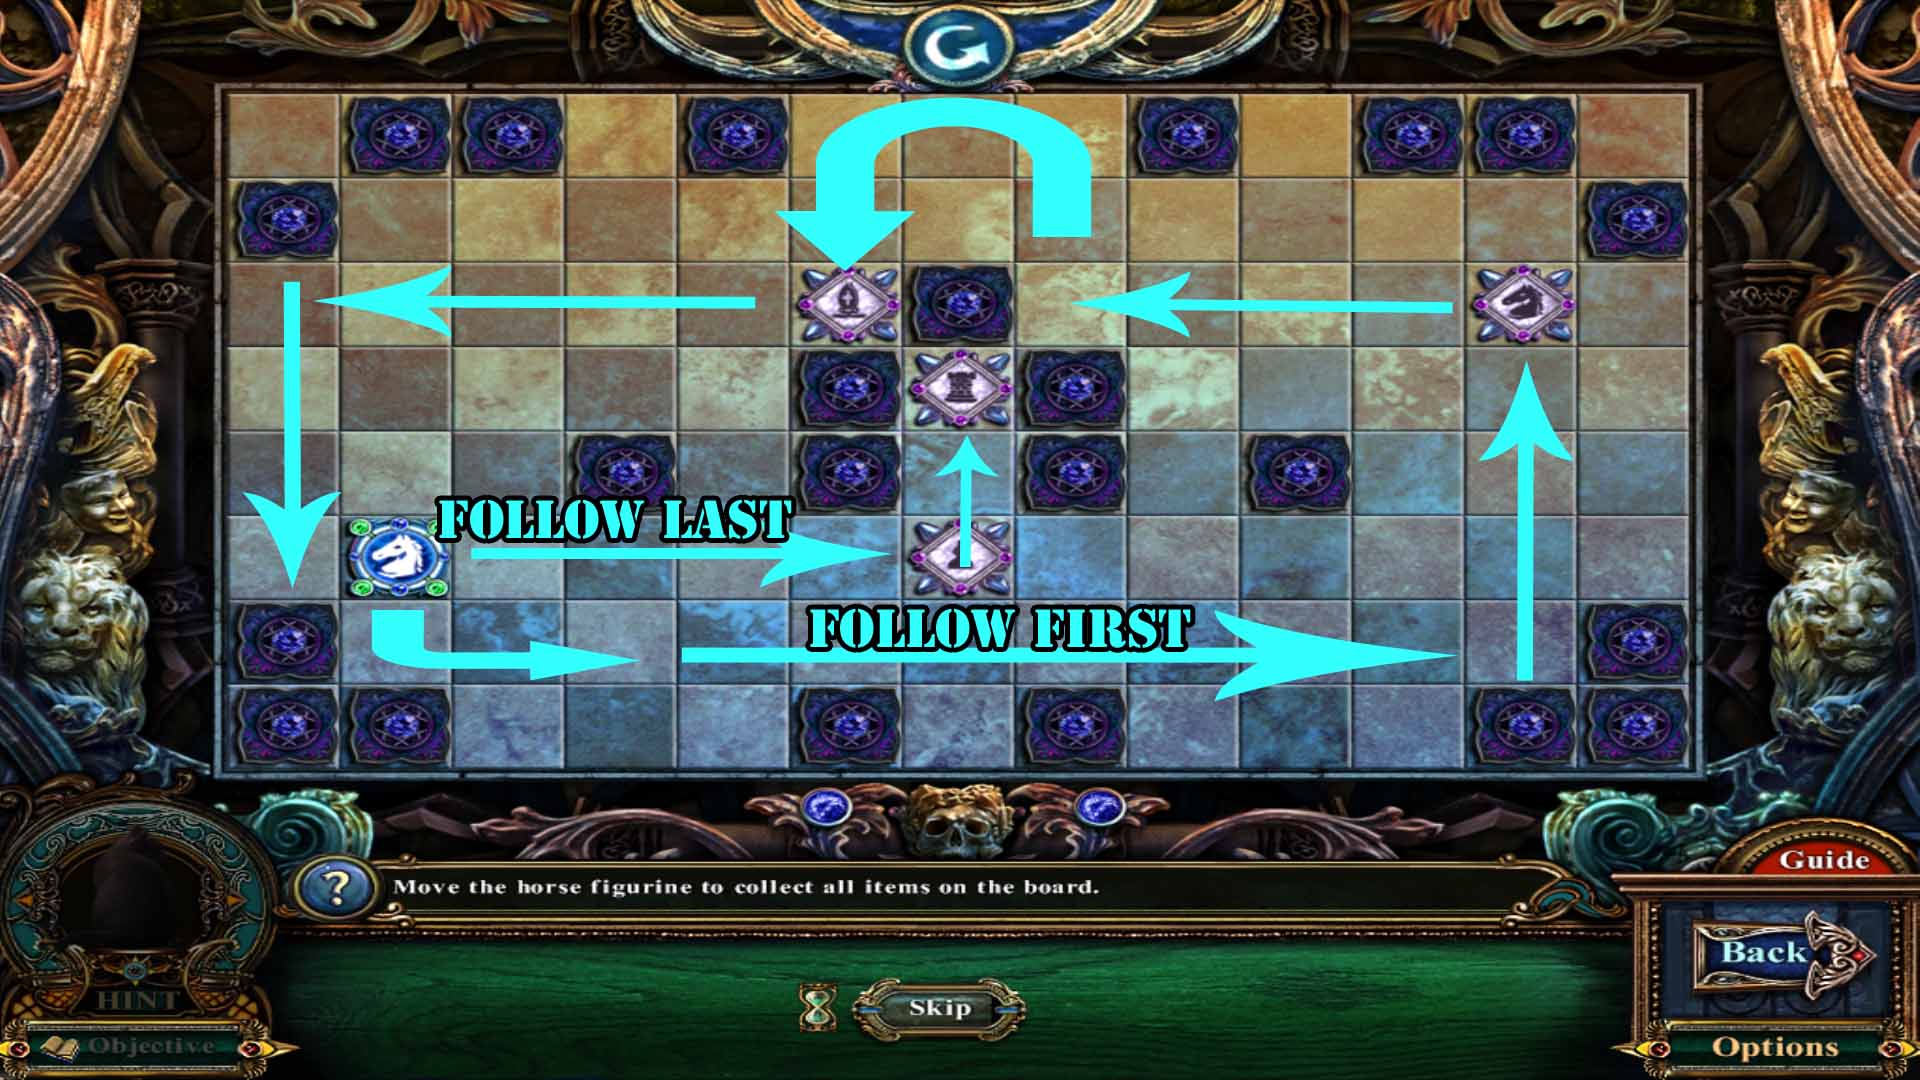
Click on the bottom part to start the mini-game.
You must click on the horse piece and move it across the board, collecting the purple colored pieces.
Screenshot
Pick up the vault key #1.
Return to the mansion.
Start the hidden object scene located to the left on the rock with the miniature knight figurine.
Pick up the clock hand and attach it to the clock.
Pick up both missing puzzle pieces and place them on the incomplete puzzle.
Screenshot
You receive a skull.
Receiving a Compass
Go back once and look at the ceiling to the left of the doorway. There is a fabled object looking like the sun.
Inspect the door on the right.
Place the skull in the indent.
Go through the door.
Pick up the book on the Pied Piper.
Pick up the wooden dragon>.
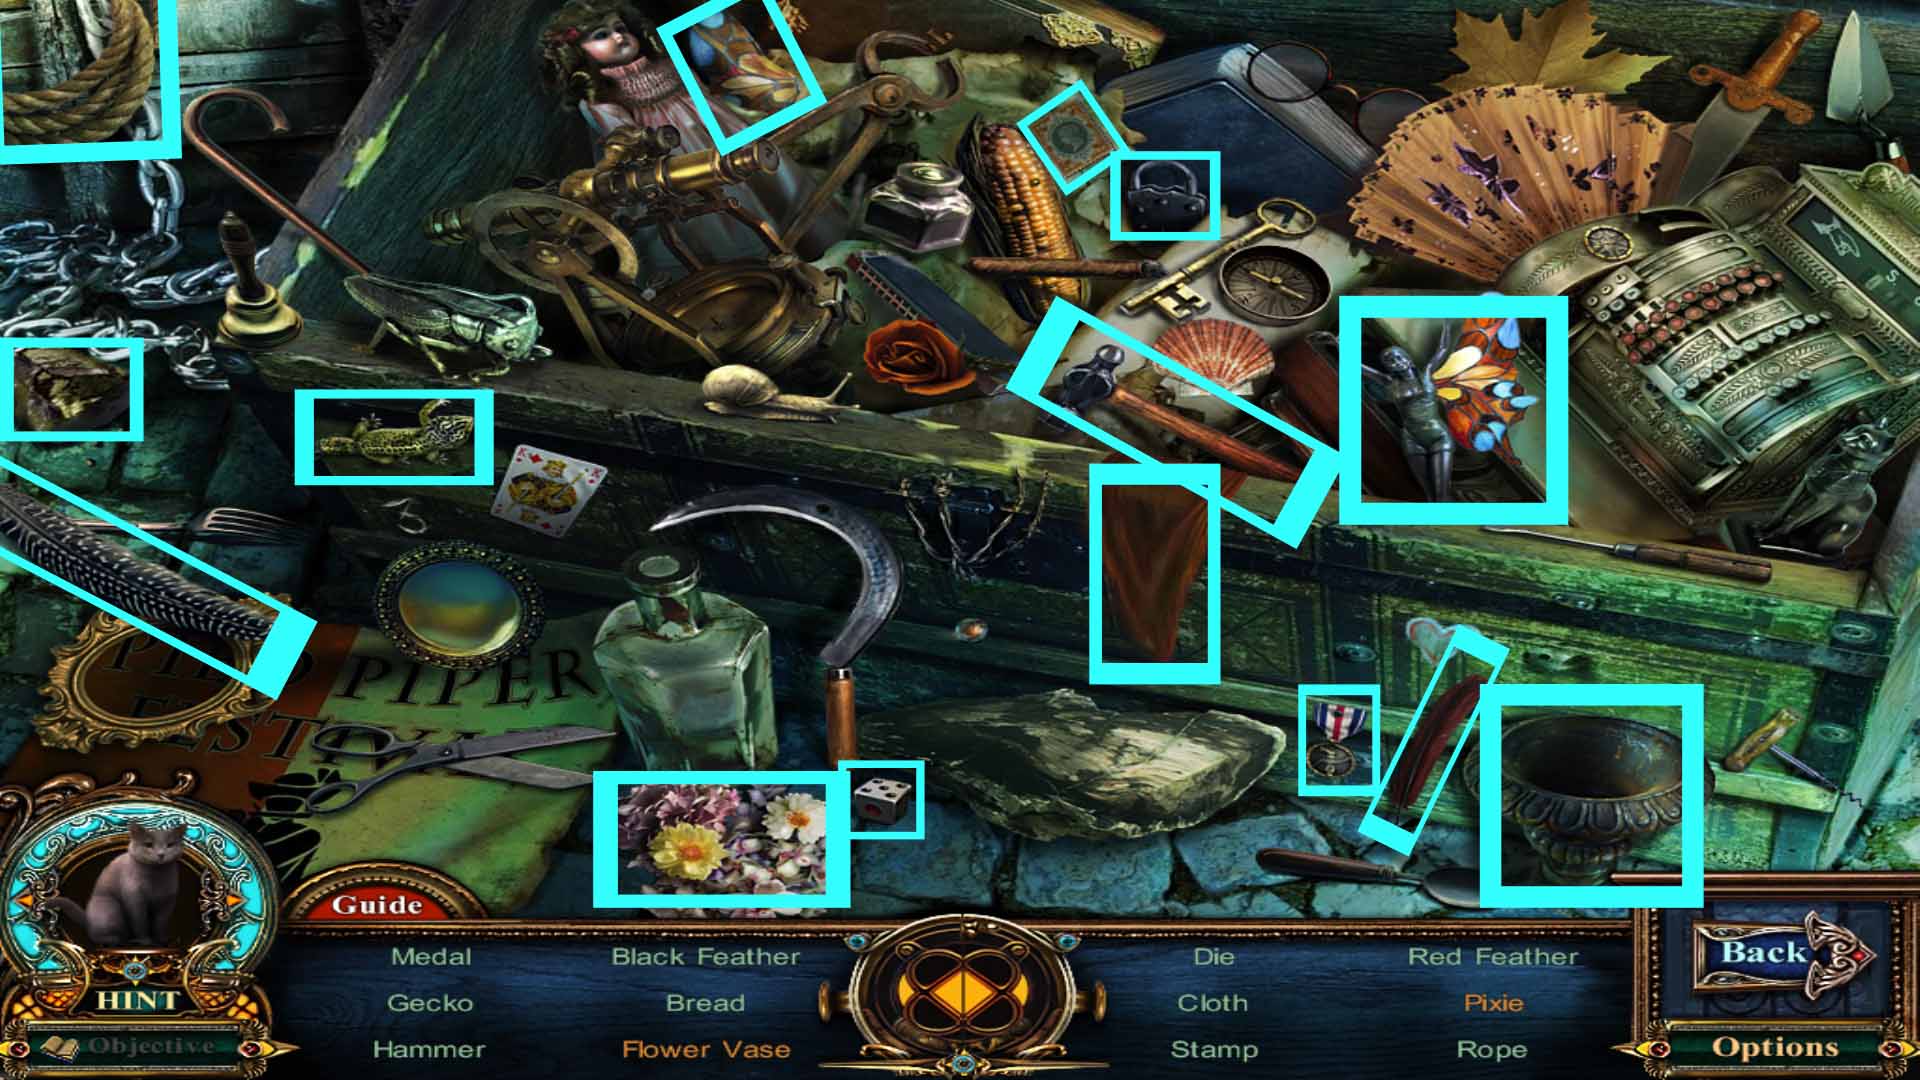
Start the hidden object scene located on the left side of the skeletons.
Pick up the paint brush and use it on the white mask.
Take the chisel and use them on the gold teeth.
Screenshot
You receive a sledgehammer.
Go back twice and zoom in on the crack in the wall to the left of the hulking guy. Use the sledgehammer.
Pick up red crystal #1.
Start the hidden object scene to the right on the mound of earth.
Pick up the broken flute piece and attach it the other half of the flute.
Pick up the bee and place it on the honeycomb to make honey.
Screenshot
You receive a compass.
Vault Key #2
Go forward twice to the vault and zoom in on the chest.
Place the compass in the empty spot for it.
Pick up the bones.
Go back once, then go right. Attach the bones to the skeleton on the right.
Pick up the red crystal #2.
Go back once and go into the vault. Inspect the statue to the left and place red crystal #1 and red crystal #2 in the two empty squares.
Start the mini-game.
Move the horse piece around the board and collect all the purple pieces.
Screenshot
Pick up vault key #2.
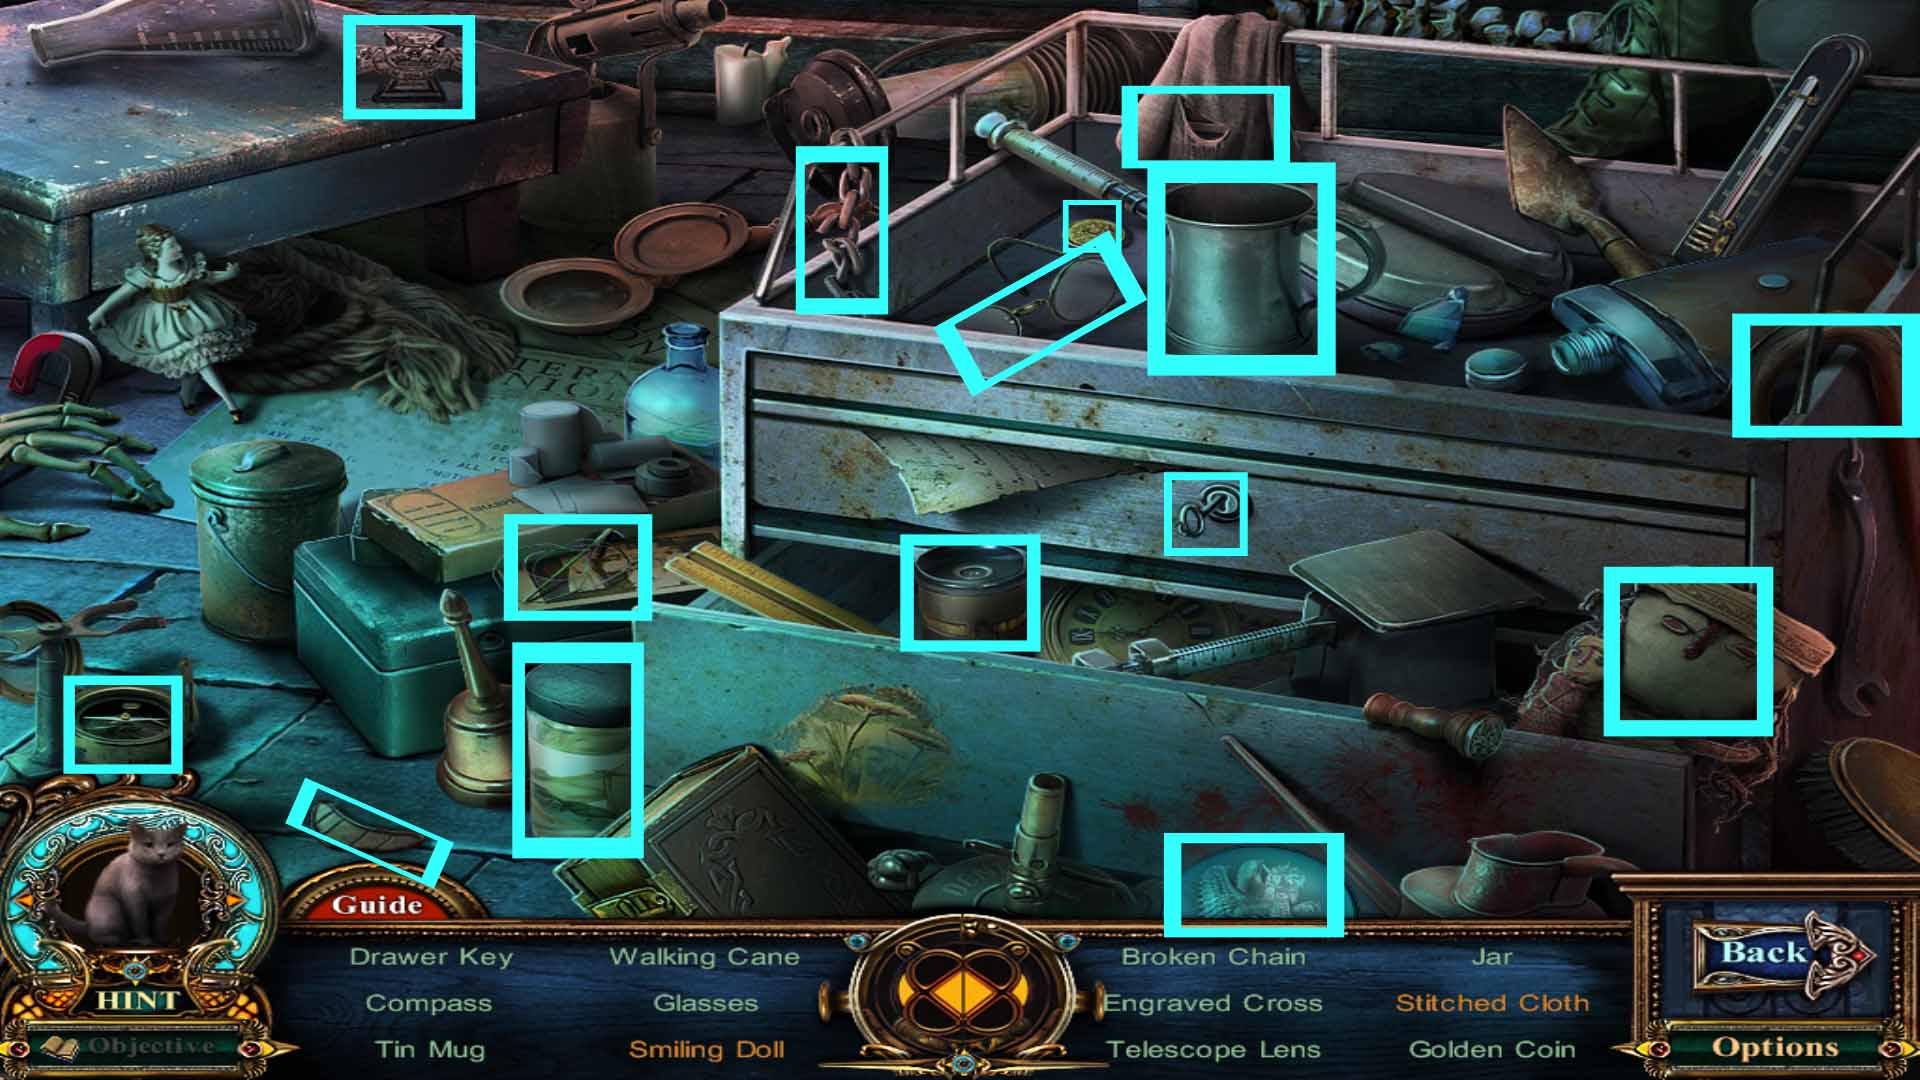
Chapter Five: The Double-Cross
Getting the Burnt Half Mask
Click on the vault key #2, then click on the Duke.
Inspect the body of the Duke and pick up the mansion key.
Go back once.
Click on the skull to the left on the stone coffin. It is a fabled object.
Go back once more and go up the rope.
Go to the left once and start the hidden object scene.
Pick up the flowers and place them in the vase.
Grab the wing and attach it to the pixie body.
Screenshot
You receive a silver lock.
Go to the gravesite and click on the angel on top of the tomb. It is a fabled object.
Go through the gate on the right to the lake and start the hidden object scene to the right on the hollow tree.
Pick up the antler and place it on the skull.
Grab the fish and place it on the hook.
Screenshot
You receive the book of rats.
Go back once, then go through the left gate. Go towards the mansion.
Use the mansion key on the front door of the mansion. Go through the door.
Pick up the blow dart.
Inspect the drawers to the right where you picked up the blow dart.
Use the screwdriver on the drawers to open them.
Pick up the burnt half mask.
Obtaining a Rat Carving
Go through the door on the left at the top of the stairs.
Click on the bed to start the hidden object scene.
Grab the paintbrush and use it on the painting.
Pick up the rocker and place it on the horse.
Screenshot
You receive the workshop key.
Go back four times, then go left. Zoom in on the workshop door.
Place the workshop key in the lock and click to open the door.
Go through the door.
Pick up the rake.
Read all the papers, then go back four times.
Use the ravenlore whistle.
Zoom in on the broken lamp and use the blow dart to knock down the item.
Pick up the white crystal #1.
Go forward twice and start the hidden object scene on the left side of the room.
Pick up the ink and pour it into the tea cup.
Grab the bear arm and attach it to the toy bear.
Screenshot
You receive a rat carving.
Receiving a Miniature Hat
Inspect the door at the top of the stairs on the left.
Place the flag in the empty flag holder.
Go through the door.
Inspect the jewelry box on the settee and click on the lid to remove it. Pick up the wooden knight.
Pick up the metal vase.
Pick up the blueprint.
Go to the gravesite, then go through the left gate.
Place the metal vase in the hands of the angel to reveal a hidden object scene. Start it.
Pick up the paintbrush and use it on the duck in the fountain.
Use the knife on the claim to reveal the pearl.
Screenshot
You receive tongs.
Go to the morgue.
Inspect the clear vase on the book case and use the tongs to retrieve the gold lock.
Go back, then go into the workshop.
Inspect the stand on the table and place the blueprint on it.
Pick up the diamond lock.
Walk back four times and go down through the hole.
Go forward, then go through the right door. Start the hidden object scene.
Pick up the crystal star and place it on the plate.
Take the knife and use it on the drawings in the dirt to finish.
Screenshot
You receive a miniature hat.
Chapter Six: The Skeleton Key and the Pied Piper's Flute
Getting the Book of Maps
Zoom in on the skeleton at the back and place the skeletal half mask and burnt half mask on the face.
On each of the metal rings, place the gold lock, silver lock, and diamond lock.
You receive the skeleton key.
Go to the stables, then go down through the trap door into the sewer.
Zoom in on the chest under the statue and use the skeleton key to open it.
Pick up the white crystal #2.
Return to the morgue and use the skeletal key to open the locked box.
You receive the book of poison.
Start the hidden object scene to the right.
Pick up the smiling mouth and place it on the doll face.
Grab the needle and thread and use it to mend the cloth.
Screenshot
You receive a glowing orb.
Head to the mansion and click on the left statue. It is a fabled object.
Inspect the patch of grass to the right of the vase and use the rake on it.
Use the skeleton key to open the door. Go down through the door.
Click on the keg to the right to move it, then pick up the painting piece 2.
Go back once, then go forward into the mansion.
Zoom in on the jewlery box on the floor and use the skeleton key to open it.
Pick up the book of maps.
Receiving Puzzle Piece #1
Go forward through the door on the left and start the hidden object scene by clicking on the bed.
Pick up the chimney and place it on the train.
Take the pickaxe and use it on the crack in the wall to reveal the magic orb.
Screenshot
You receive a star emblem.
Look at the wall to the left of the bed and click on the picture to the left of the portrait of the woman. It is a fabled object.
Go back six times, then go forward towards the clock tower.
Go into the clock tower, then go through the door on the left. Zoom in on the book stands.
Place the book of the Pied Piper, book of rats, book of poison, and book of maps on the stands.
Go through the open door.
Pick up the miniature wand.
Place the rat carving on the empty pedestal.
Look at the newspaper article on the bottom right and pick up white crystal 3.
Leave and go to the pharmacy.
Zoom in on the wooden lockbox and use the skeleton key.
Start the hidden object scene located on the left counter.
Pick up the blue and yellow vials and pour them into the beaker.
Pick up the pen and write on the notepad.
Screenshot
You receive painted piece #1.
Getting White Crystal #4
Leave and go to the gravesite, then move forward through the gate on the left.
Start the hidden object scene located on the angel fountain.
Take the cactus and place it in the pot of soil.
Grab the small shovel and dig in the patch of freshly dug dirt.
Screenshot
You receive miniature heels.
Go forward into the mansion, then go through the top left door.
Inspect the dolls on the right side and place the miniature hat, miniature wand, and miniature heels on the middle doll.
Pick up the painting piece 3.
Go to the clock tower, go through the left door, then go through the back door to the room with the dynamite.
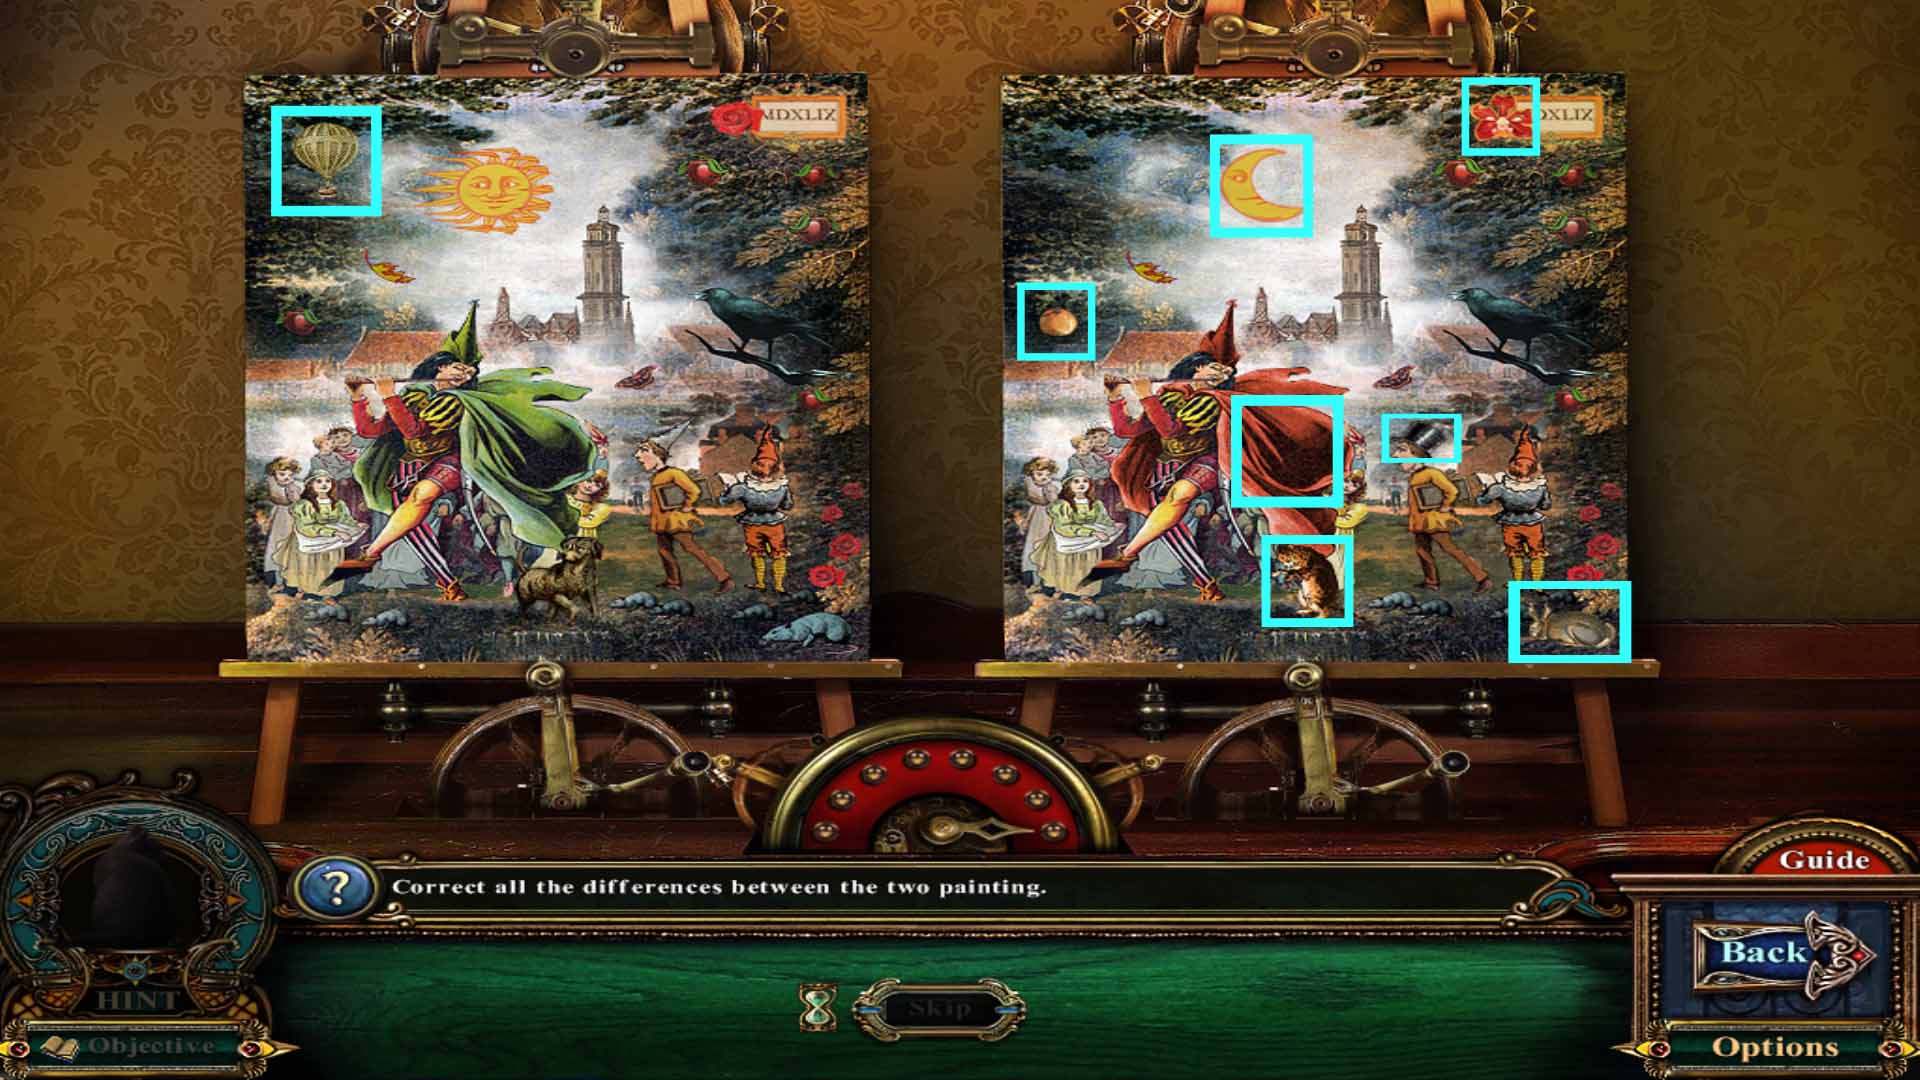
Zoom in on the painting on the right side and place all the painting pieces on the empty canvas to start a mini-game.
Spot the eight differences between the paintings.
Screenshot
Inspect the map on the wall and pick up the white crystal #4.
Obtaining the Handsaw
Go back four times, then go down the hole. Go forward twice. Inspect the door.
Place all four white crystals on the door.
Click on the door to start the mini-game.
Move the horse piece around the board to collect all the purple pieces.
Screenshot
Click on the center, then go through the door.
Click on the viceroy.
Pick up the wooden sun.
Inspect the burlap sack and click on the jewelry box. Pick up the flute gem.
Zoom in on the Pied Piper's flute and place the flute gem in the empty spot for it.
Pick up the Pied Piper's flute.
Use the Pied Piper's flute to clear away the rats.
To the left of the column on the left side of the lion at the top is a fabled object.
Leave and head to the workshop.
At the gravesite, use the Pied Piper's flute to clear away the rats.
Once in the workshop, zoom in on the door at the back of the room and place the wooden dragon, wooden knight, and wooden sun on the door.
To the right of the door is a fabled object, morphing between a pot and paint cans.
Go through the door.
Once inside the room, look on the shelving to the left of the wooden doll. There is a wooden box that is a fabled object.
Look at the pedestal to the left and place the glowing sphere in the bowl.
Pick up the handsaw.
Taking the Bucket of Alcohol
Go back once and zoom in on the box on the table.
Place the star emblem in the star shaped spot, then pick up the faucet tap.
Go back two times.
Zoom in on the left gate and use the handsaw to cut the chains. Go through the gate.
Use the ravenlore whistle to grab the vanishing cloak.
Use the Pied Piper's flute to summon the rats.
Investigate the body of the Viceroy.
Pick up the Duke's emblem.
Go to the mansion and head inside. Look at the door on the right and place the Duke's emblem in the indent.
Go through the door.
Start the hidden object scene located on the cabinet.
Pick up the color powders and place them on the egg.
Take the coffee beans and put them in the coffee grinder.
Screenshot
You receive the fire emblem.
Pick up the bucket.
Go back twice, then go into the cellar.
Once in the cellar, zoom in on the keg and place the bucket underneath it.
Place the faucet tap on the keg and click to release the wine.
Pick up the bucket of alcohol.
Taking on the Viceroy
Go to the clock tower and go through the door on the left.
Inspect the dresser in the left corner and place the fire emblem in the indentation for it.
Pick up the matches.
The gramophone on the table in front of the desk is a fabled object.
Go back to the mansion grounds where the carriage is. Use the bucket of alcohol on the crate with the flutes.
Use the matches on the flutes.
Return to the clock tower and use the Pied Piper's flute to clear away the rats. Go inside.
Go through the left door. In the distance where the astrological signs are, the archer between the two fish and capricorn is changing. It is a fabled object.
Use the Pied Piper's Flute to clear away the rats.
Click on the door to open it, then go through.
Click on the Viceroy.
Posted by: Meaghan |
May 23, 2012 4:50 PM
|
May 23, 2012 4:50 PM