
Escape from the Device-Filled Room

![]() Sometimes you just have to wonder about the goofy set-up scenarios in a Tesshi-e room escape game. This time around "he" has called and invited you to visit since "he" has developed a bunch of "interesting devices". You know, a person could take that the wrong way. However, we're going to take the high road and enjoy another great Weekday Escape with Escape from the Device-Filled Room. Now with 50% more whacky devices!
Sometimes you just have to wonder about the goofy set-up scenarios in a Tesshi-e room escape game. This time around "he" has called and invited you to visit since "he" has developed a bunch of "interesting devices". You know, a person could take that the wrong way. However, we're going to take the high road and enjoy another great Weekday Escape with Escape from the Device-Filled Room. Now with 50% more whacky devices!
 Point-and-click your way around the confined space, pick up objects, and solve puzzles along the way to get out of "his" house, preferably in time for dinner. Although most Tesshi-e escapes feature a strange device or two, "he" has certainly gone all out this time around, with a plethora of oddball mechanical things placed about the room.
Escape from the Device-Filled Room has everything you expect from a top-notch design, easy controls, a save feature, decent English translation, and the obligatory happy coin alternate escape. Rather unusual for this designer, though, is the absence of the goofy construction so prevalent in many of Tesshi-e's room escapes. With such fun puzzling to be had the construction is not really missed this time around. Get ready to challenge yourself with another of Tesshi-e's freaky friends and their habit of locking you into a strange house! You know, when we get out this time I think it's time we had a little chat with "him" about personal boundaries and certain laws about kidnapping and confinement.


Walkthrough Guide
(Please allow page to fully load for spoiler tags to be functional.)
Escape from the Device-Filled Room Walkthrough
General Information
There are two endings, regular and happy coin.
Remember to examine everything in your inventory, items may hide other important things.
There will be directions for the colorblind in this walkthrough.
Good luck!
Exploration
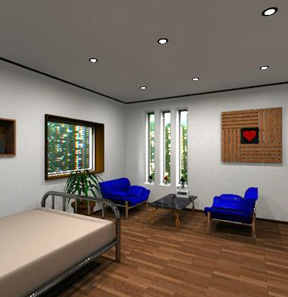
You begin facing the wall with the door out. To the left of the door is a light switch, to the right a panel.
There is also a picture on the wall and a bed.
Click on the door for a close up.
Click on the light switch to turn off the lights. Notice the pattern that appears on the door? (circle, square, up triangle, down triangle, square)
Turn the lights back on and click on the panel to the right of the door for a close up.
Hmmm, looks like we need a key card to activate. Back up twice.
Click on the bed for a close up.
Note the magazine rack next to the bed. It has an attached table with a coffee mug. There's a heart on the mug and a club on the wall near it.
Click on the pillows to lift them and you will see another heart.
Back up then click on the picture on the wall above the bed. Yep, there's the wobbly picture puzzle. Back up.
Turn right.
There is a window on this wall, as well as an alcove above the bed.
Click on the left side of the alcove for a close up.
Okay, on the books we have a club and a diamond. There's also a club key in a picture frame but it's screwed down. Back up.
Click on the right side of the alcove for a close up.
Here we find a picture of our old friend, Mr. Birdy. He's not usually upside down like the picture, though.
The picture of Mr. Birdy is sitting on a sound system of some kind. Click on the sound system's button and you will see some letters appear: IEOL. Back up.
Turn right.
There are three narrow windows on this wall, a large picture of a heart, two chairs, and a glass table. On the lower right of the wall you can also see an electrical outlet.
Click on the windows for a close up.
Each of the windows has a card suit figurine, spade, diamond, and club. Back up.
On the table is a device, click on it for a close up.
And here's Mr. Birdy again. Looks like he needs a four digit code. Back up.
Click on the electrical outlet for a close up and you will see more card suits, a diamond, heart, spade, and another diamond.
Back up and turn right.
Okay, lots to see on this wall. To the left is a shelving unit with different devices. In the middle is a low table with another device. On the right is a set of double doors.
Click on the doors twice for a close up and you will see that they have a padlock with a chain. Back up once.
To the left of the doors is a small panel. Click on it for a close up and you will see that it needs a key. Back up twice.
Click on the low table for a close up.
This odd device has a ball in a clear tube, a wooden hippo on top, and three sliding levers. Back up.
If you click on the bottom of the low table you will see two small doors. Looks like we need yet another key. Back up.
Click on the top shelf of the shelving unit for a close up.
Okay, there's a device here that says "water" on it, but we don't have any of that.
Notice that there's a club symbol on the flower vase to the right of the device.
Back up.
There are two items on the middle shelf. On the left is another ornament, this one with a heart.
On the right is an electronic picture frame. Looks like we need a battery.
Click on the bottom shelf for a close up.
Here's another device, this one has three wooden hippos. There's a keyhole on the right and a button on the left. Click on the button.
Okay, it was fun to watch the hippos open and close their mouths. Now what?
Back up and turn right. You should now be back facing the door out.
Time to solve some puzzles!
Hungry, Hungry Hippos
Turn left to face the wall with the shelving unit and the devices.
Click on the lower shelf for a close up.
Click on the button again and watch the hippos. Note that they open and close their mouths in a particular pattern.
Back up, then click on the device on the low table for a close up.
Note the hippo on the device, and the three sliders below?
Perhaps the other hippos were giving a clue?
The opening (and closing) of the hippos' mouths is a clue for manipulating the sliders.
Opening the mouth represents pushing the slider up, closing it represents pushing it down.
Push the levers in this order: middle lever up, right lever up, middle lever down, left lever up, middle lever up.
If you push the levers in the correct order, the light below them will glow red. Click on the panel below the light.
Two things will happen. First, the ball that was in the tube will go shooting up the tube. Second, the panel will open.
Click on the open panel and take the battery.
Back up.
The Wobbly Picture Puzzle
Click on the picture frame on the right of the middle shelf of the shelving unit.
Click on the panel at the bottom of the frame to open it, then place the battery inside.
Close the panel, then click on the button to the right of the panel. Watch the corners of the picture frame light up in sequence.
Back up and turn right to face the out door.
Click on the picture above the head of the bed for a close up.
You now have the sequence to push the corners of the wobbly picture puzzle.
The sequence is shown with the lights on the electronic picture frame.
The correct sequence is: upper right, lower left, upper left, lower left, lower right, upper left.
The picture will raise up, revealing a small cubby.
Inside the cubby is a lever and a triangle key. Take them both.
There is also a band of color at the back of the cubby, along with an arrow going from left to right.
For the colorblind: If you click on the color band it will tell you the order the colors are in.
They are: blue, green, red, green, yellow, red.
Back up.
Flipping Mr. Birdy
Turn right (or left) twice to face the blue chairs and the glass table.
Click on the table for a close up of the device with Mr. Birdy.
We need a four digit code here. Where could we find it?
The code is on the sound system, the one that had a picture of Mr. Birdy upside down.
When you pushed the button you saw the letters IEOL.
However, the fact that the picture of Mr. Birdy is upside down is a clue. Look at the letters upside down and you will see them as numbers.
Specifically you will see 7031.
Once you figure out the code, enter it into the code key below the Mr. Birdy figurine.
Click on Mr. Birdy and a small panel will open up below. Take the item from the panel (pliers) and back up.
Going Into the Closet
Turn right to face the wall of devices.
Click on the door twice for a close up of the padlock.
Use the pliers on the wire around the padlock.
Click on the doors to open them.
Inside the closet, to the lower left, is a small square hole in the wall, click on it.
Okay, there's an opening there. Now what?
Back up twice.
The Electronic Picture Frame
You can wander around the room and try the triangle key on every keyhole. It doesn't fit any of them.
Now what?
Make sure you are facing the wall with the shelving unit and the closet.
Click on the electronic picture frame on the right side of the middle shelf for a close up.
Notice the four small buttons at the top of the frame? They don't seem to do anything.
Look closely at the base of the frame. There's the panel where we put the battery, and the white button. To the right of the white button is a small hole.
If only we had something sharp to poke in there.
We do have this useless triangle key. Maybe we could do something with it?
Pull up the triangle key from your inventory.
Look closely at the teeth of the key, do they look right?
Click on the teeth to take them off.
You now have a long narrow object.
Use the modified triangle key on the small hole to the right of the white button.
Notice the four little buttons now light up.
Click the buttons and they will light up the corners of the picture frame in colors.
The first button turns the upper left corner yellow.
The second button turns the upper right corner green.
The third button turns the lower left corner blue.
The fourth button turns the lower right corner red.
We've seen a color clue somewhere, haven't we?
The clue for this puzzle is the color band in the cubby behind the wobbly picture puzzle.
The sequence of that band was blue, green, red, green, yellow, red.
So we should probably push the buttons in that sequence.
Number the buttons 1 through 4 from left to right.
The sequence is: 3, 2, 4, 2, 1, 4.
Push the buttons in the proper sequence and the center opens up, revealing a spade key. Take the spade key and back up.
Getting Some Leverage
Click on the closet doors once.
Once the doors are in close up, click on the panel to the left of the doors for a close up.
Use the spade key on the panel to open it.
Inside you will find a coin, take it.
While the coin is in close up, click on it to flip it over and see the heart on the back of the coin.
Close down the coin into your inventory.
Note the hole inside the open panel. Looks like it's just the right size for the lever we found earlier.
Use the lever on the hole.
Once the lever is in place, click on it once to turn it straight up.
You will get a little cut scene where the white ball goes through the tube.
Click on the lever again to turn it to the left.
There's another cut scene. Looks like a panel on the "water" device opened.
Back up twice.
Waterboarding (Part 1)
Click on the "water" device on the top shelf of the shelving unit.
Yes, a panel has been activated below the word water. Looks like a code involving two letters and a number.
Have we seen a clue for this?
The clue is right above the code key.
Water is the clue. What is the chemical composition of water?
The code is H2O.
Enter the code and press the white button to the right of the code key.
The button will drop down, revealing a circle key. Take the key and back up.
Waterboarding (Part 2)
Click on the three hippo device on the bottom shelf for a close up.
Use the circle key on the keyhole on the right of the base.
The central panel will open, revealing a screwdriver, take it.
Back up and turn left (or right) twice to face the alcove above the bed.
Click on the left side of the alcove, where the club key is in a picture frame.
Use the screwdriver on the frame and take the club key.
Turn right (or left) twice to face the closet wall again.
Click on the bottom of the low table to see the small doors beneath.
Use the club key on the doors to open them. Inside is a bottle of water, take it.
Back up.
Click on the top shelf where the "water" device is.
Use the water on the left tube of the device.
Notice that the water has forced the white ball to fall through a panel behind the machine.
Back up.
Having a Ball
Click on the closet doors twice to open them.
Notice the blue ball that is now in the closet. It must have been forced out of the hole by the white ball.
Take the blue ball.
While it is in close up, click on the button on the top of the ball.
Okay, there's a code key here, buttons that have shapes on them.
Where have we seen these shapes before?
We saw the clue for this on the door when the lights were turned off.
Remember the sequence? Circle, square, up triangle, down triangle, square.
Push the buttons in the correct order and a panel will lift up, revealing a code key. Take the code key.
There's a number on the key, better make a note of it.
Back up.
Getting Out (Regular End)
Turn right to face the out door.
Click on the door for a close up, then click on the panel to the right of the door for a close up.
Place the key card in the slot on the left.
Once the key is in place the lock activates.
And we have card suit symbols. But what is the code?
The code is a combination of two things, the number on the card (5643) and the card suits scattered around the room.
If you added them up as you went along, and included the keys (spade key and club key), there are 6 hearts, 3 spades, 5 clubs, and 4 diamonds.
Putting them in the order of the numbers on the card, the code is clubs, hearts, diamonds, spades.
Enter the code and back up. If you entered it correctly the light below the code will glow green.
Click on the door and you are out.
Now you just need to find your friend in the crowd and have a lovely dinner of "pasta-style bacon udon". Yum?
Getting Out (Happy Coin End)
Follow the regular end until you enter the code and the light is glowing green.
Back up twice and turn left to face the closet.
Click on the closet twice to open it.
Click on the little square hole in the lower left of the closet wall.
Inside you will see the white ball. Take it.
Once the ball is in close up, you will see the notch in the side. Pity all we have is a phillips head screwdriver.
We do have that coin we found earlier, maybe that would work?
Use the coin on the slot to open the white ball.
Inside the ball you will find the happy coin.
Back up twice and turn right.
Click on the door for a close up then click again to open it.
Enjoy the coffee and cake with your friend. Sounds loads better than "pasta-style bacon udon", doesn't it?
Happy Coin will bring happiness to you!!
Posted by: grinnyp |
December 21, 2011 3:40 AM
|
December 21, 2011 3:40 AM