
![]() Vampires are the new "it" thing, for reasons we shall not name, and recently they've become quite the item in casual games. Dracula: Love Kills goes back to the roots of the legends and casts you in the role of the non-sparkling Count Dracula, the original vampire that no teenage girl would ever want to date. It's a hidden object adventure from Waterlily Games that's heavy on story, atmosphere, and puzzles, and there are plenty of unlockables to get your cold, vampiric hands on, too!
Vampires are the new "it" thing, for reasons we shall not name, and recently they've become quite the item in casual games. Dracula: Love Kills goes back to the roots of the legends and casts you in the role of the non-sparkling Count Dracula, the original vampire that no teenage girl would ever want to date. It's a hidden object adventure from Waterlily Games that's heavy on story, atmosphere, and puzzles, and there are plenty of unlockables to get your cold, vampiric hands on, too!
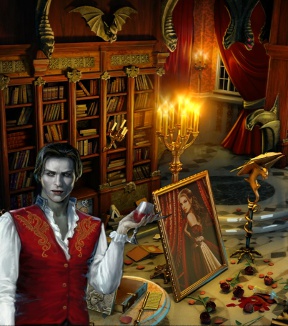
 Dracula: Love Kills starts with the Count waking from a long sleep to find his castle has been ransacked, his coffin destroyed, and crosses fill the path leading to the village. The vampire queen seeks to undermine Dracula's authority, and the Count is still weak from his previous battle with Van Helsing. Seeking to restore the fear inspired by his presence, he sets out to annihilate all who challenge his supremacy. It's time for Count Dracula to rule the night once again!
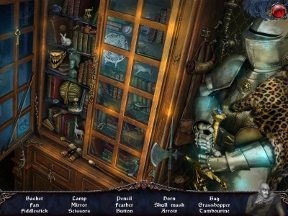
A puzzle-driven adventure game at its backbone, Dracula: Love Kills plays out in small areas of half a dozen screens or so, each featuring a number of items to find, puzzles to solve, and hidden object scenes to complete. You'll begin by poking around and clicking certain items that seem interesting or out of place, receiving a bit of information when necessary or even adding things to your inventory. Hidden object scenes also produce items which can be used to solve pressing puzzles in nearby locations. When you're done with a spot, a handy "location complete" sign appears, letting you know you can scour the pixels in another place with confidence!
Igor, Count Dracula's trusted servant, tags along in the adventure, providing hints and a bit of commentary from time to time. You also have to make the occasional choice whether or not to feed from certain citizens you find, an action that has real consequences in the game. Filling your blood meter to the left allows you to use special abilities such as Vampiric Vision, so to bite or not to bite becomes a bit of a quandary!
 Analysis: Not a standard hidden object or casual adventure game, Dracula: Love Kills builds a bridge between genres and provides a puzzle-centric experience that plays less like a hidden object game and more like a puzzle game with a narrative. The number of achievements you can unlock is also impressive, adding to the puzzle focus of the game and encouraging you to play through with gusto.
Storylines in vampire-centric games aren't known for being terribly interesting, but Dracula: Love Kills manages to weave a varied sort of tale that dips and bobs while you play, introducing new twists that keep you honestly interested in what happens. There's even backstory you can read from the book you pick up at the beginning of the game, which should delight anyone enjoying the story quite a bit! It may be a love story involving vampires, but Dracula: Love Kills manages to do it right.
A good length from start to finish, plenty of things to unlock/achieve, a story you actually want to take part in, and puzzles built around a hidden object/adventure core, Dracula: Love Kills is an excellent addition to any casual gamer's library.
A Collector's Edition is also available. It contains exclusive bonus content, an in-game strategy guide, and more. Remember that Big Fish Game Club Members pay only $13.99 for Collector's Editions (or 2 club credits), and collector's editions count 3 card punches of 6 total needed for a free game.
![]() Windows:
Windows:
Download the demo
Get the full version
Also available: Collector's Edition
![]() Mac OS X:
Mac OS X:
Not available.
Try Boot Camp or Parallels or CrossOver Games.


Walkthrough Guide
(Please allow page to fully load for spoiler tags to be functional.)
Dracula: Love Kills Walkthrough, part 1
General Info, Honors, Chapters 1-3
General Information
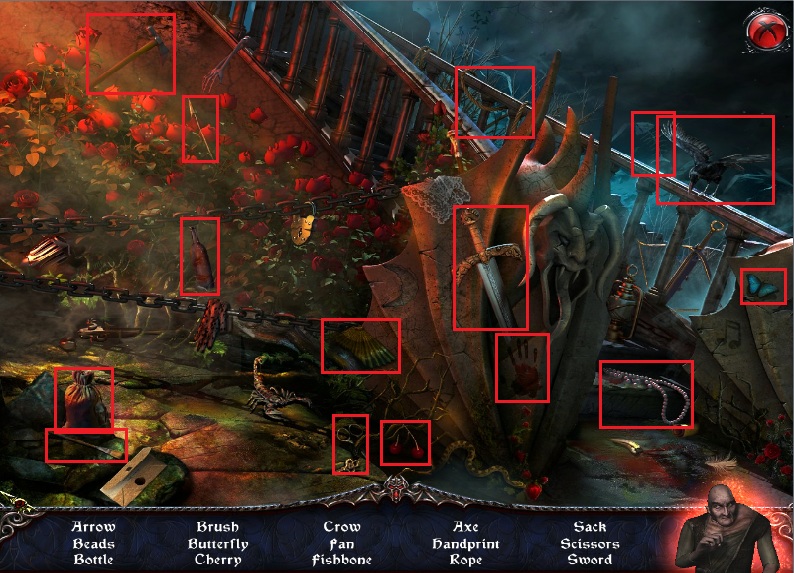
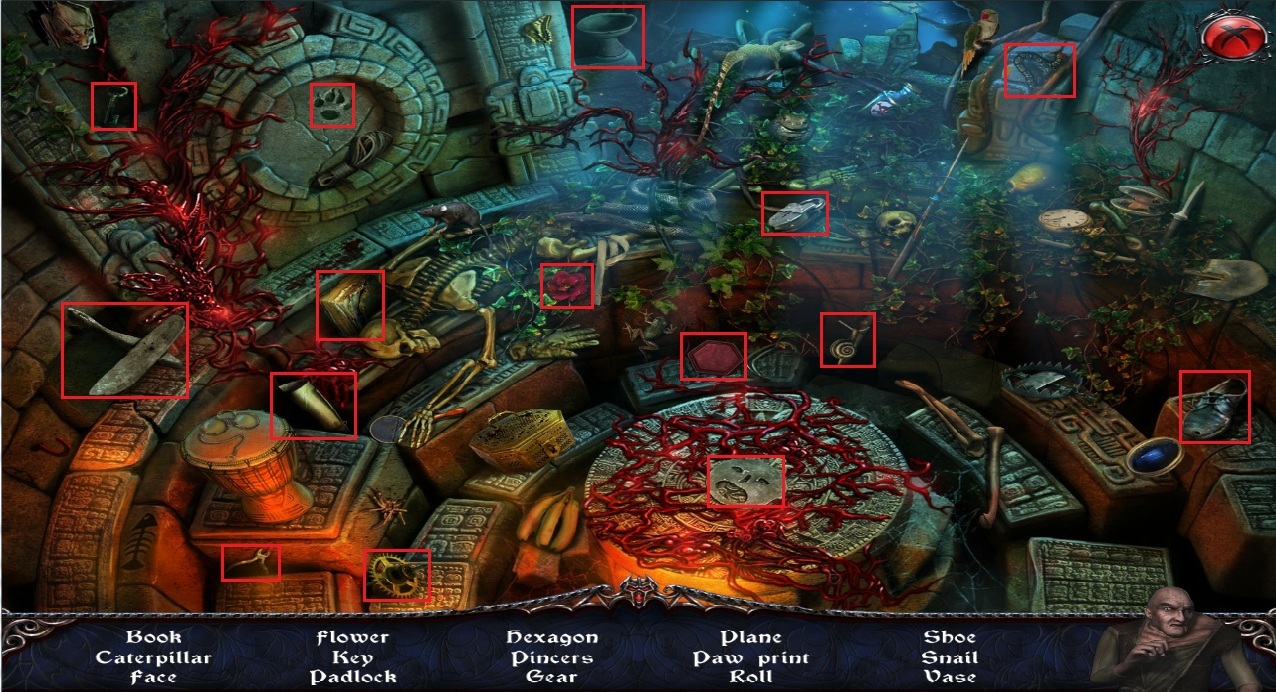
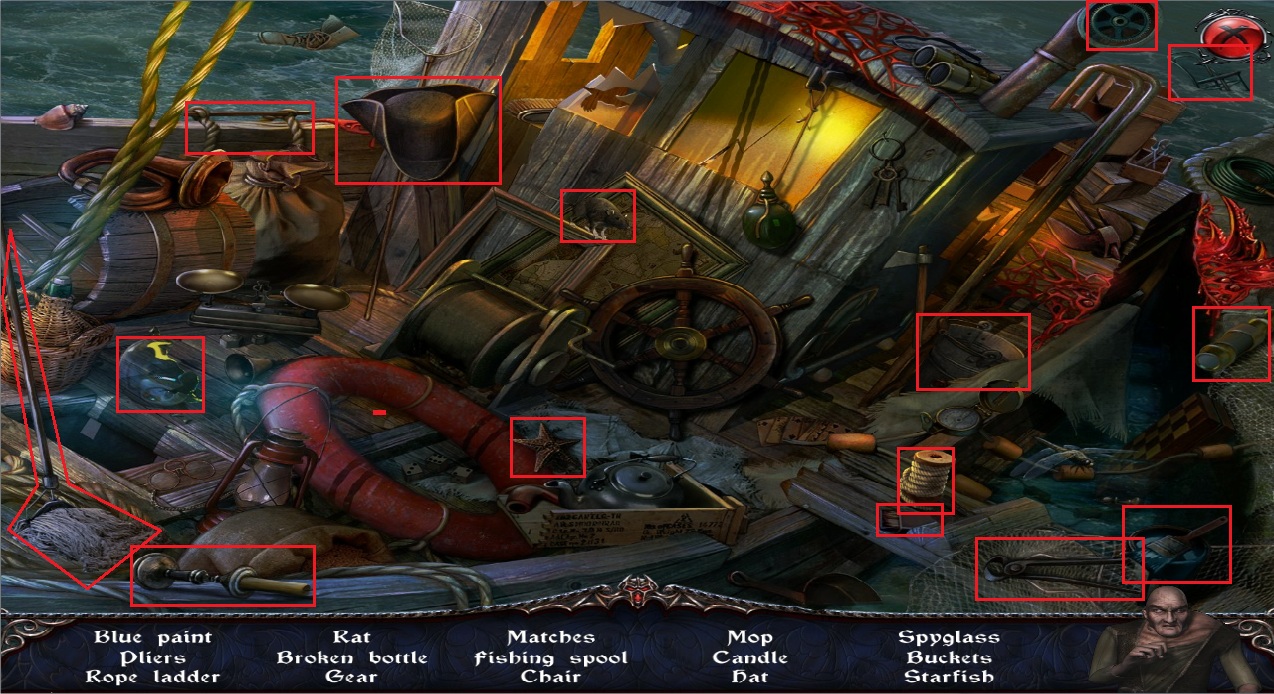
The lists of hidden object scenes change from game to game, so for the following walkthrough, the hidden object screenshots are a guide but not a definitive solution.
Likewise, the solutions to many of the puzzles differ between games. Puzzle screenshots can be used as a reference, but are not always the exact step-by-step solution you may have in your play-through.
When the cursor is over an area you can interact with, it will change to a gear shape.
When the cursor is over an area that can be further investigated, or leads to a hidden object scene, it will be in the shape of an eye.
When the cursor is over an object you can pick up or add to your inventory, it will change to a hand.
When the cursor is over an area where you can use a vampiric ability, it will change to the shape of a pentacle.
The Blood Meter on the left side of the screen tracks the amount of blood you have. Add to the blood meter by finding Vials of Blood.
The Book of the Order tracks your progress with the Knights of the Order, and shows the list of honors you currently have.
The Skull over the Menu tab takes you to the in-game menu, where you can return to the Main Menu or change the Options.
The space at the bottom of the screen is the Inventory. Items you collect along your journey will be placed in the Inventory area.
Many items are pieces or parts of a larger item or a puzzle. The number you possess and the number you need will be shown in parentheses beside the item: (1/6), (2/6), (3/6) etc.
The figure on the lower right is your Hint. Click it when you are stuck and need a helpful hint.
The coffin in the bottom right corner is the Map. Click any area on the map to automaticaly travel to that location.
A location that has unfinished tasks will have a drop of blood on its map icon.
Honors
Honors are awarded for accomplishing special tasks, completing puzzles, finding objects, and making certain in-game decisions.
Keeper of Secrets
Complete the beginning tutorial.
Black Cat's Omen
Complete a hidden object scene without misclicking.
Tendrils of Fate
Complete 10 hidden object scenes in a row without using any hints.
Dark Prize
Complete all hidden object scenes without using any hints.
Swift as Night
Find 3 hidden objects in 3 seconds.
Crown of Glory
Find 10 hidden objects in 10 seconds.
Riches of Eternity
Complete 10 consecutive hidden object scenes in under 3 minutes each.
Slave of Fate
Spend more than 10 minutes on a single hidden object scene.
Eternal Wanderer
Find 225 hidden objects.
The Devil's Own
Find 425 hidden objects.
Son of the Dragon
Find 625 hidden objects.
Heart Render
Spend more than 10 minutes on a single puzzle.
The Blade of Knowledge
Complete 5 consecutive puzzles without using the skip feature.
The Angel of Will
Complete all of the puzzles without using the skip feature.
Seer of the Unseen
Use the Vision vampiric ability at least 5 times.
Vessel of Force
Use the Telekinesis vampiric ability at least 5 times.
Hell's Soldier
Use the Strength vampiric ability at least 5 times.
Shapeshifter
Use the Animal Form vampiric ability at least 3 times.
Bloodletting
Find 10 bottles of blood.
The Hunger
Find 30 bottles of blood.
Sanguineous Lord
Find all bottles of blood.
Perfect Destroyer
For skillful TNT usage.
Veteran of the Dark
Find the Pluto temple.
Servant of Heaven
Destroy the Pluto artifact.
King of Hell
Collect the Pluto artifact.
Eye of the Wyrm
Assemble the fake artifact.
Tarnished Angel
Refuse to bite all of the girls.
Prince of Darkness
Bite all of the girls
Love Eternal
Do not skip the intro cinematic or any of the dialogue and cut scenes.
Undead Avenger
Complete the main story in easy mode.
Lord of the Night
Complete the main story in hard mode.
Watch Warden
Complete the game in less than 5 hours.
Destiny of the Damned
Collect all achievements.
Chapter 1
Dracula's Castle
Take the Book of the Order on the seat of the red chair.
The book will go to the lower left corner of the toolbar. You can use it to view your honors and your progress with the Order of the Dragon shield collection.
Take the Window Handle that was hidden beneath the book on the chair.
Take the Square Stone (1/2) from the surface of the round table.
Take the Oil Can at the foot of the stairs.
Use the Oil Can on the library mechanism at the bottom of the bookshelves.
Click the red Curtain to add it to your inventory.
Click the window to zoom in.
Use the Window Handle from your inventory on the frame of the window.
Go through the window to reach the castle courtyard.
Castle Courtyard
Take the Key and the Piece of Shield (1/6) on the right side of the crypt.
Click the highlighted area to begin the hidden object scene.
Screenshot.
Once the scene is complete, you will receive a piece of Rope (1/2)
Return to the room inside the castle.
Dracula's Castle
Click the chest in the compartment on the bookshelf to zoom in.
Use the Key from your inventory on the chest to begin the keys puzzle.
To solve this puzzle, select the three correct keys needed to open the three locks on the chest.
Click a key to pick it up and inspect the shape of its teeth (the serrated edges on the blade of a key).
Each of the keys has at least one of three distinctive teeth shapes: a small circular tooth, a large circular tooth, and a large square tooth
Compare the shape of the key to the shape of the lock to find a matching pair.
Click a lock to attempt to insert the key.
Screenshot.
Once the puzzle is solved, click the chest to open it.
Take the Axe and the Piece of Shield (2/6) from inside the chest.
Go back through the window to return to the courtyard.
Castle Courtyard.
Use the Axe from your inventory on the crossed boards blocking the tomb.
Take the Long Boards from the ground in front of the tomb.
Go into the tomb to find the crypt.
The Crypt
Take the Damaged Lid at the foot of the looted coffin.
Place the Damaged Lid on the broken space of the looted coffin.
Take the Skull Mask (1/2) that floats to the wall.
Take the piece of Rope (2/2) in a coil above the looted coffin.
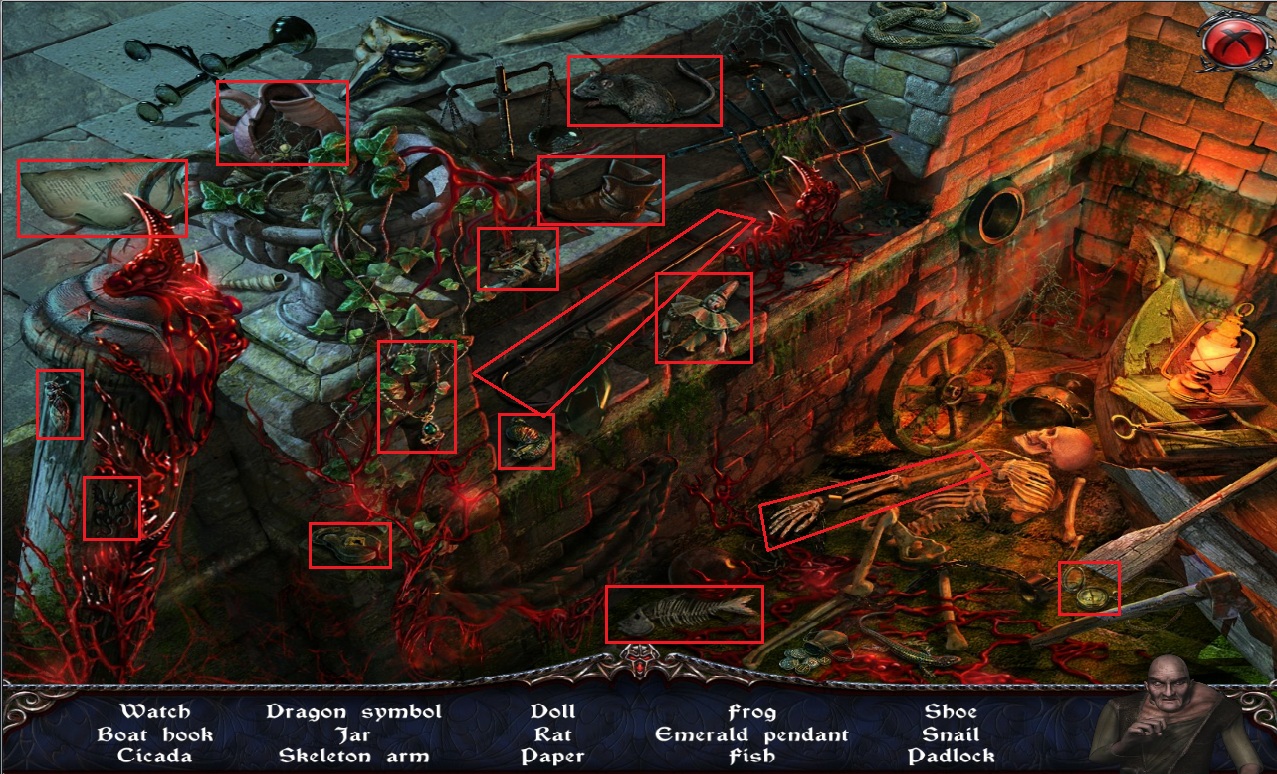
Click the pile of rubble in the rear of the crypt to begin the hidden object scene.
Screenshot.
Once the scene is complete, you will receive the Trowel.
Leave the crypt and return to the courtyard.
Castle Courtyard
Click the castle gates to zoom in.
Use the Rope from your inventory on the two crosses in front of the gates.
Go forward through the gates to reach the village.
The Village
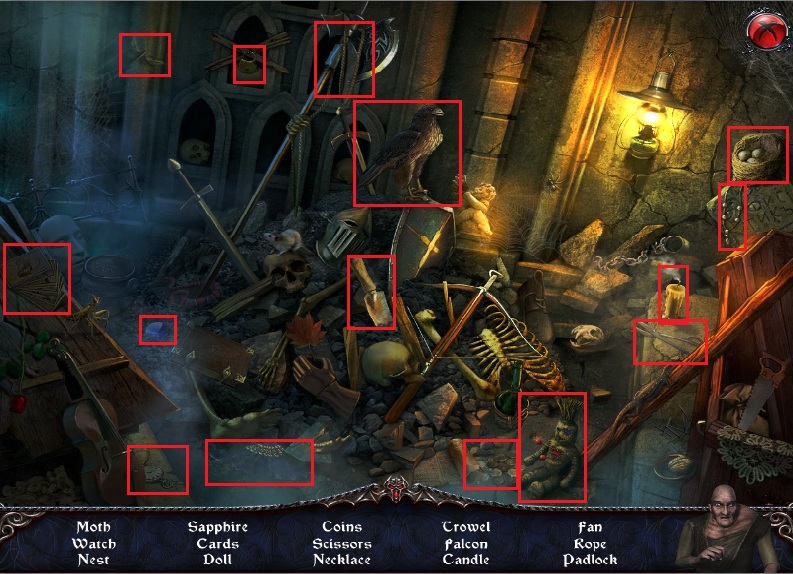
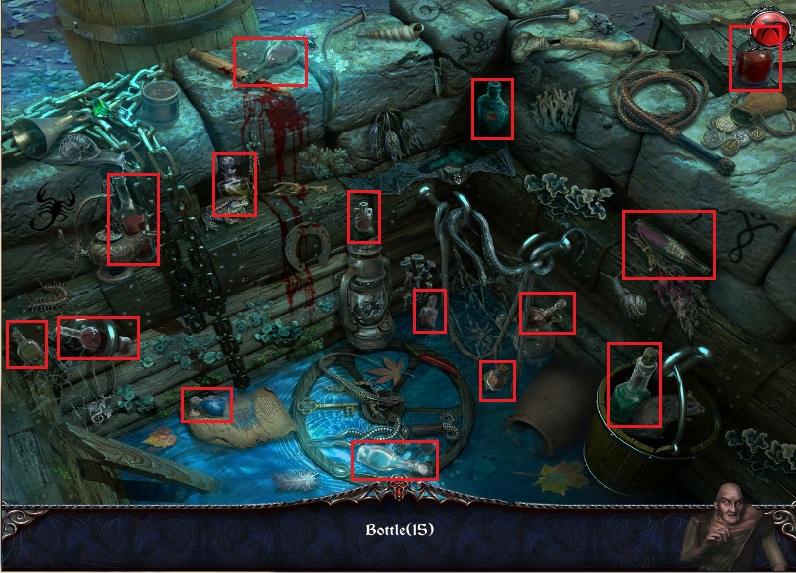
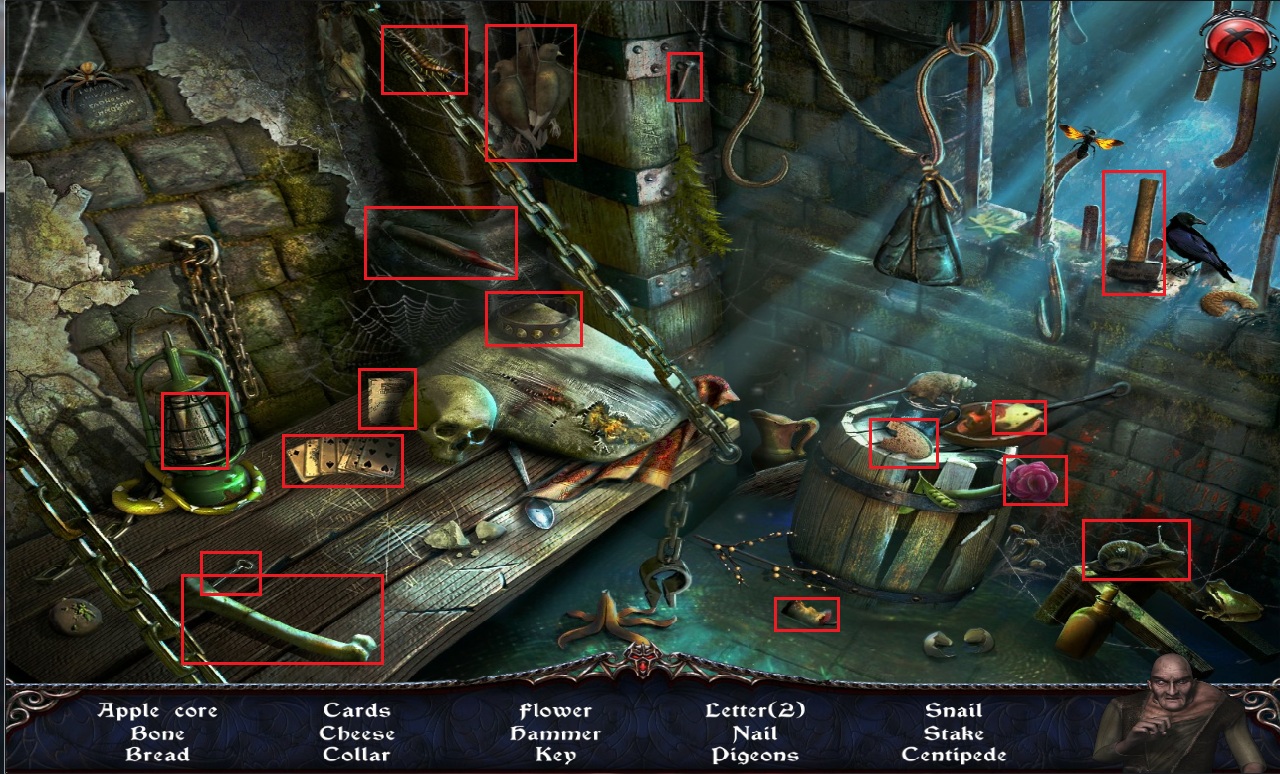
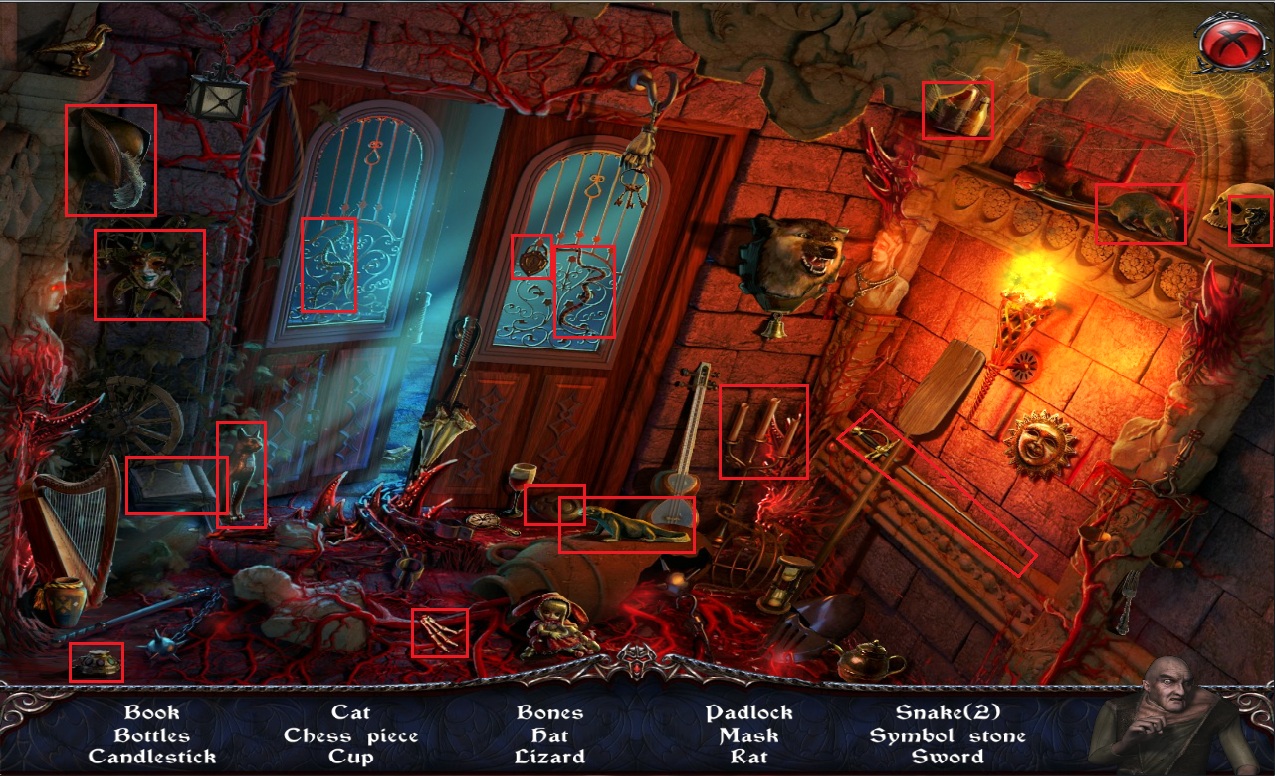
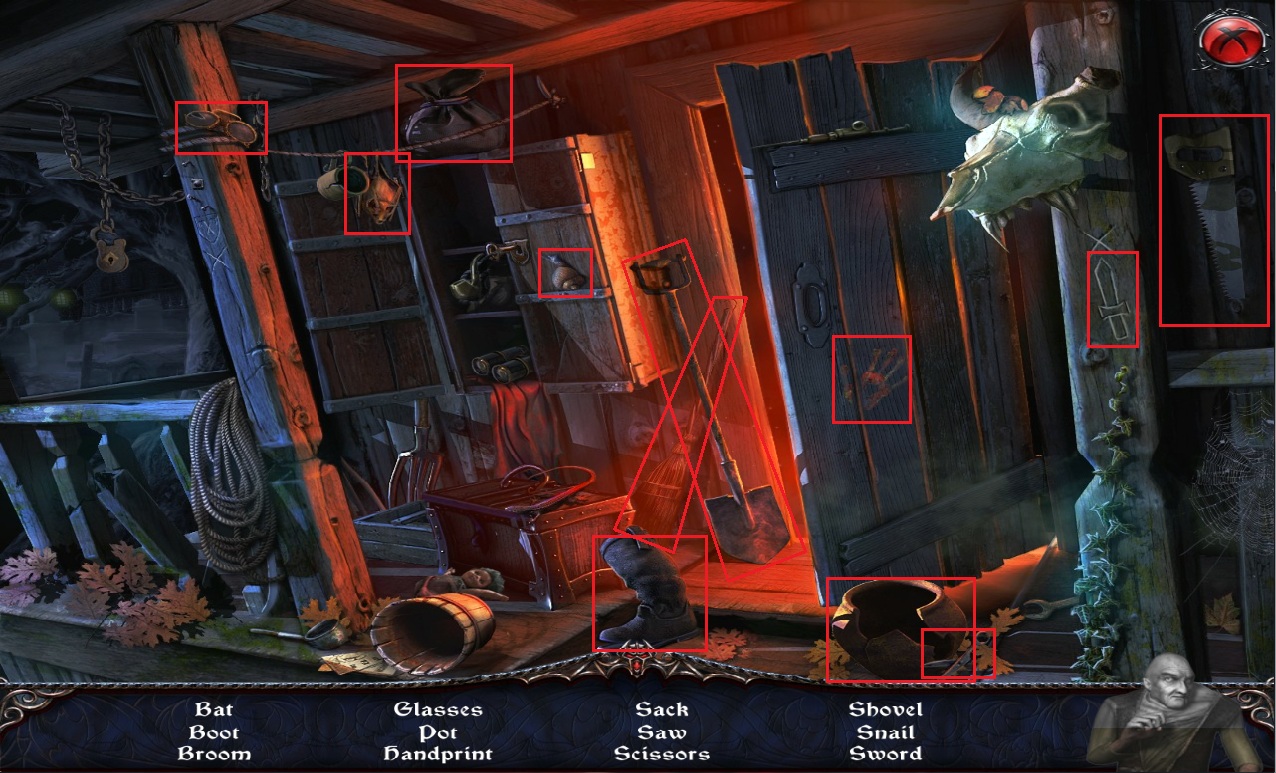
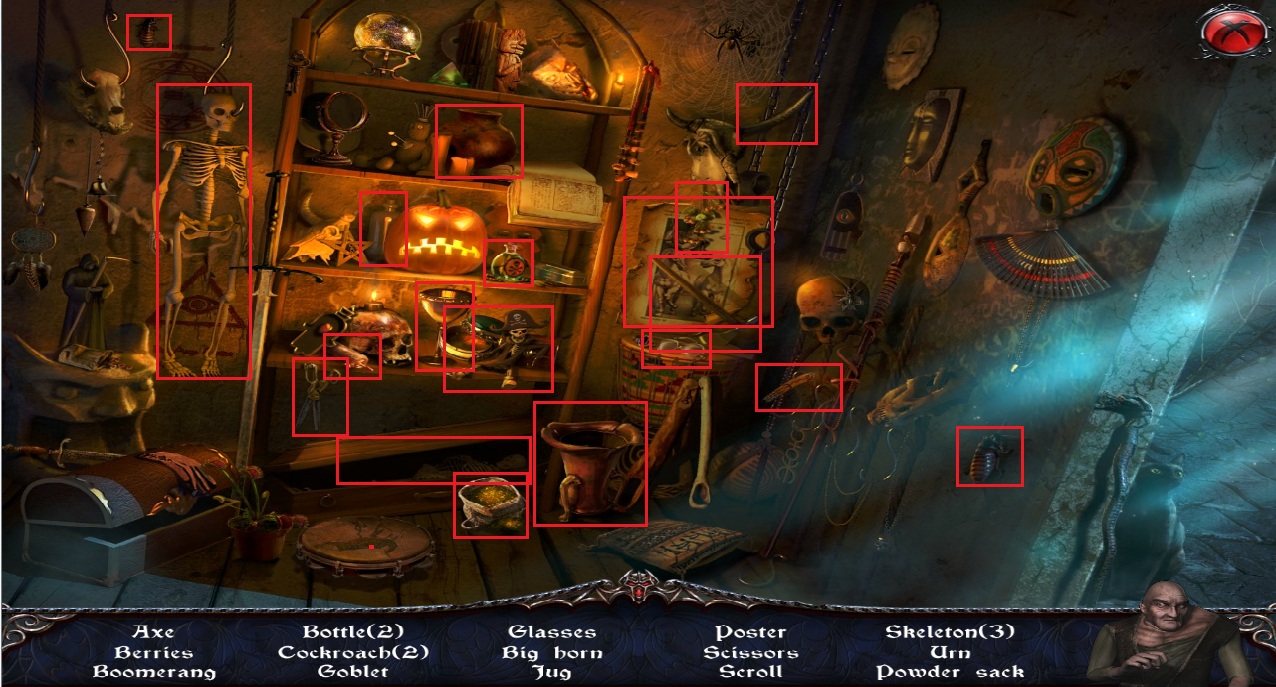
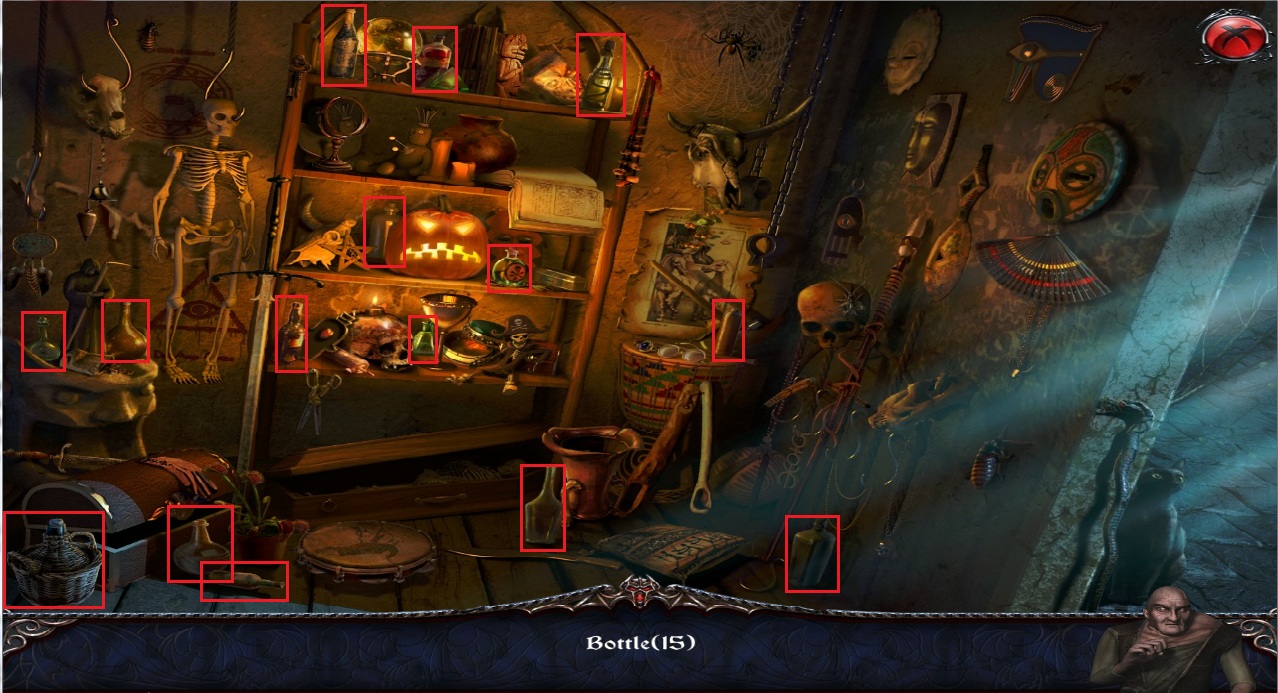
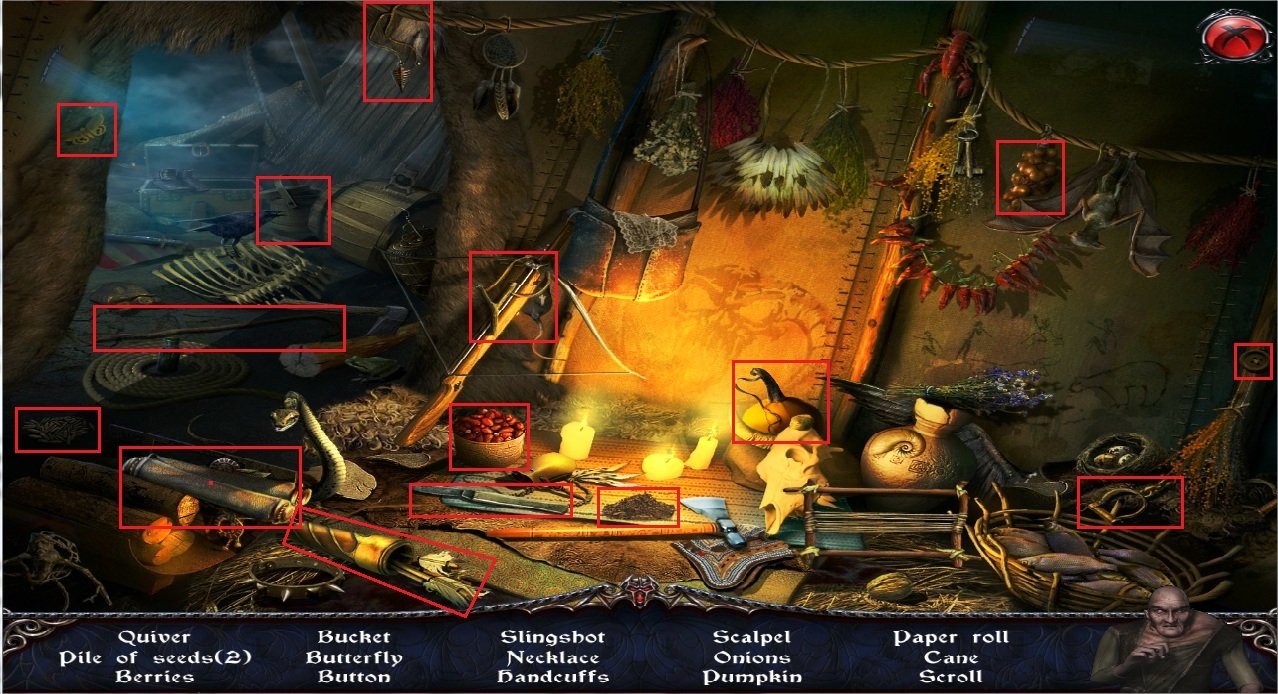
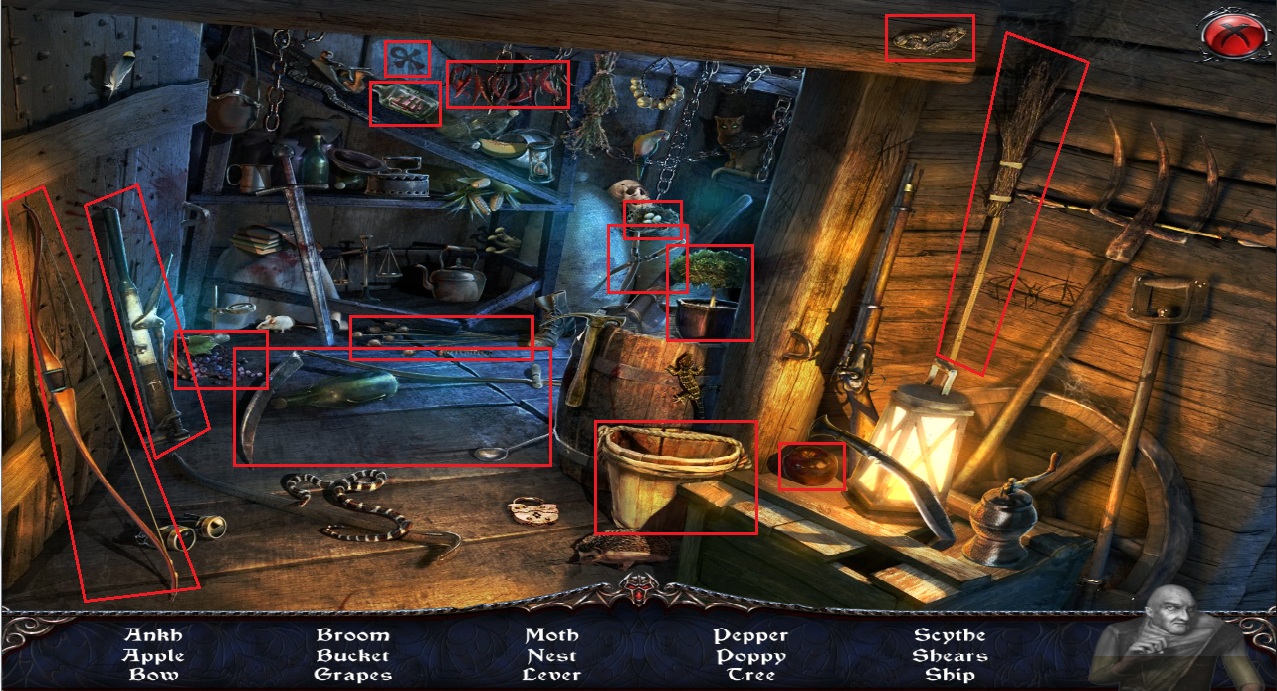
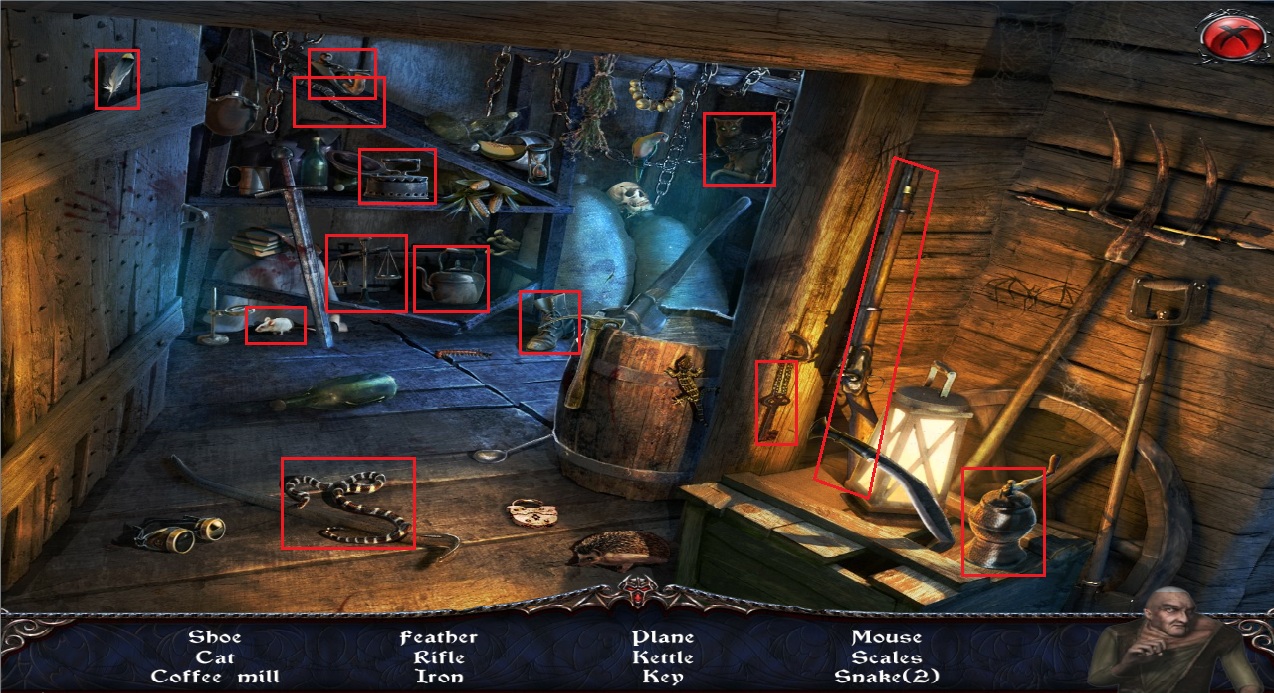
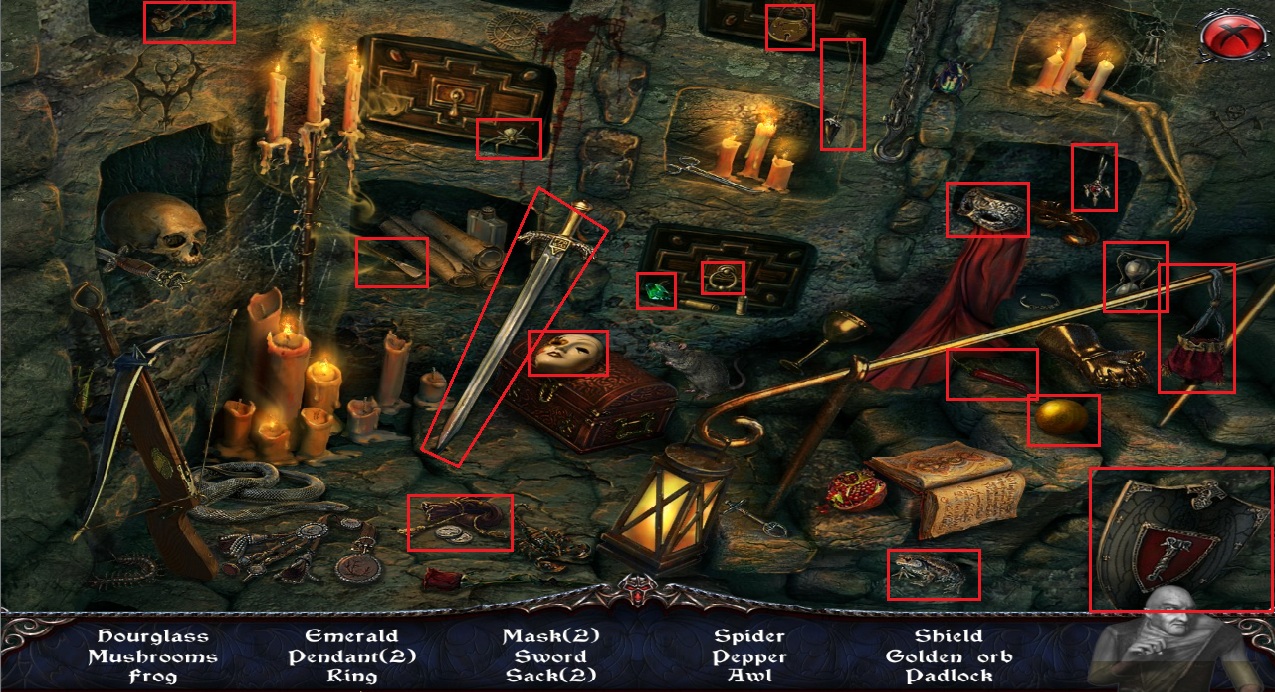
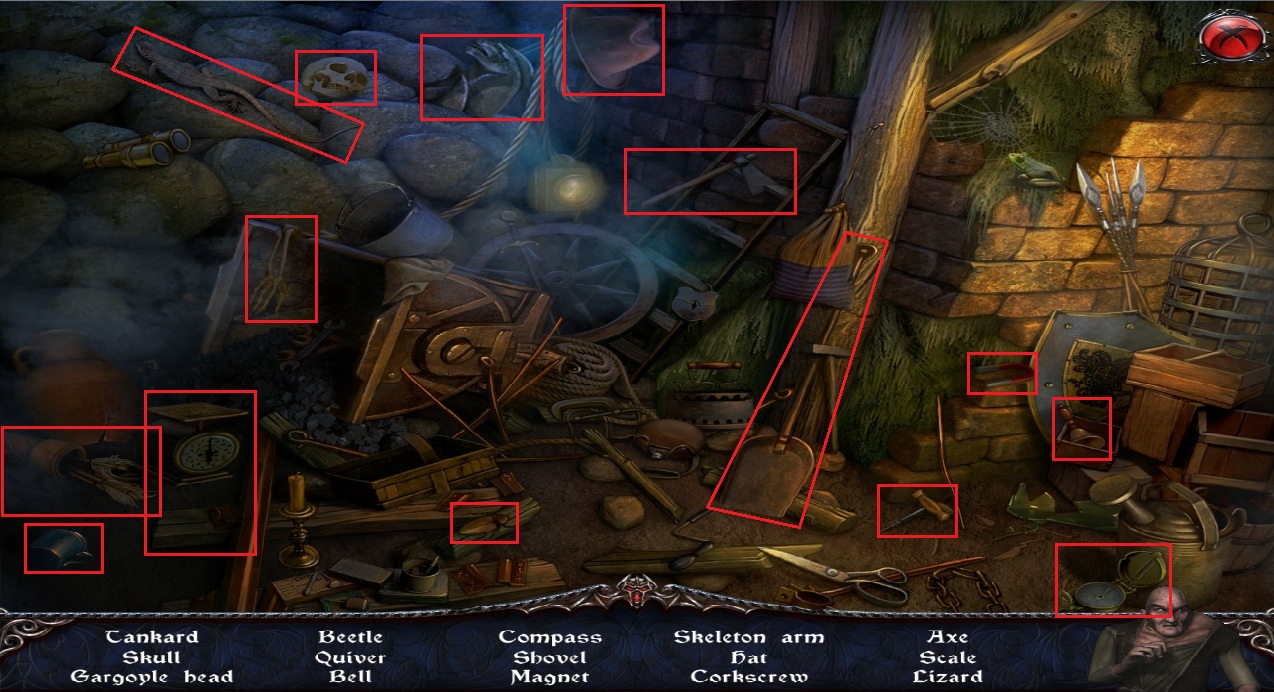
Click the well to begin the hidden object scene.
Screenshot.
Once the scene is complete, you will receive the Saw.
Take the Piece of Toolbox (1/2) in the barrel above the well.
Take the Piece of Shield (3/6) from the rooftop of the left building.
Use the Trowel from your inventory on the hole in the ground to the left of the coach to receive the Bone.
Use the Bone on the watchdog.
Take the Piece of Shield (4/6) the dog was guarding on the platform in front of the workshop.
Click the workshop door to look inside.
Take the Piece of Toolbox (2/2) from the table.
Use the Long Boards from your inventory on the table.
Use the Saw from your inventory on the boards.
Take the Short Boards from the table.
Close the workshop view and click the Toolbox left of the door to zoom in.
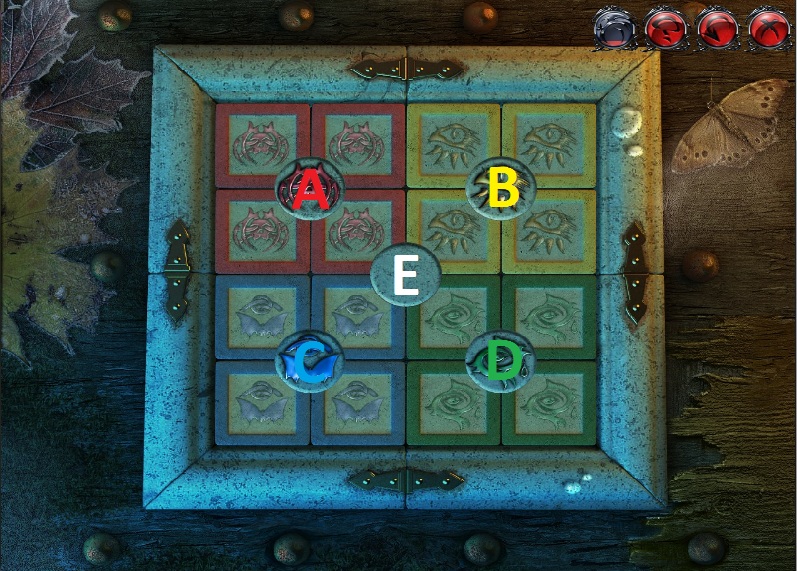
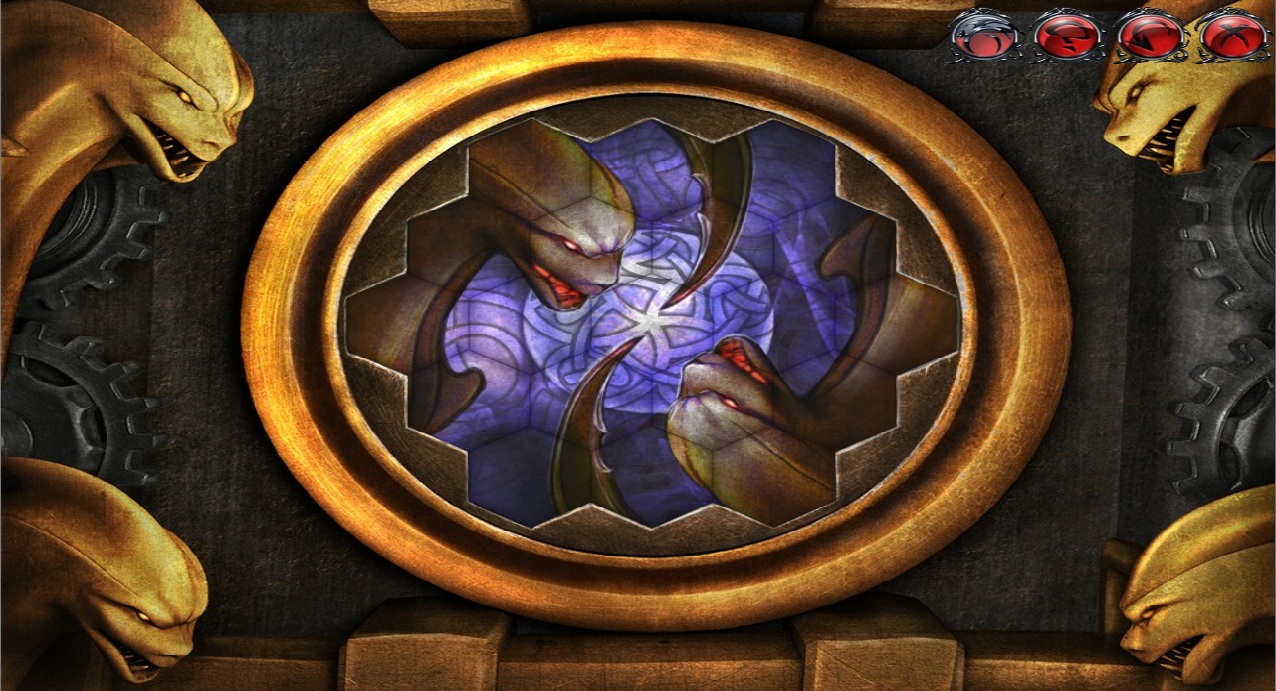
Use the Pieces of Toolbox from your inventory on the panel to begin the toolbox puzzle.
To solve this puzzle, assemble the colored tiles in a square around the matching colored symbol in the circular tile.
Click a circular tile (including the blank tile in the center) to rotate the four adjacent square tiles around it.
Screenshot.
Click the Blank tile (E).
Click the Red tile (A).
Click the Blue tile (C) 3 times.
Click the Blank tile (E).
Click the Yellow tile (B) 2 times.
Click the Green tile (D) 2 times.
Click the Blue tile (C) 2 times.
Click the Blank tile (E) 2 times.
Click the Yellow tile (B) 3 times.
Click the Blue tile (C).
Click the Green tile (D) 2 times.
Click the Blank tile (E).
Click the Yellow tile (B).
Click the Blank tile (E).
Click the Yellow tile (B) 3 times.
Click the Blank tile (E) 3 times.
Once the puzzle is solved, take the Hammer from the toolbox.
Click the bottom of the coach to zoom in.
Use the Saw from your inventory on the coach wheel.
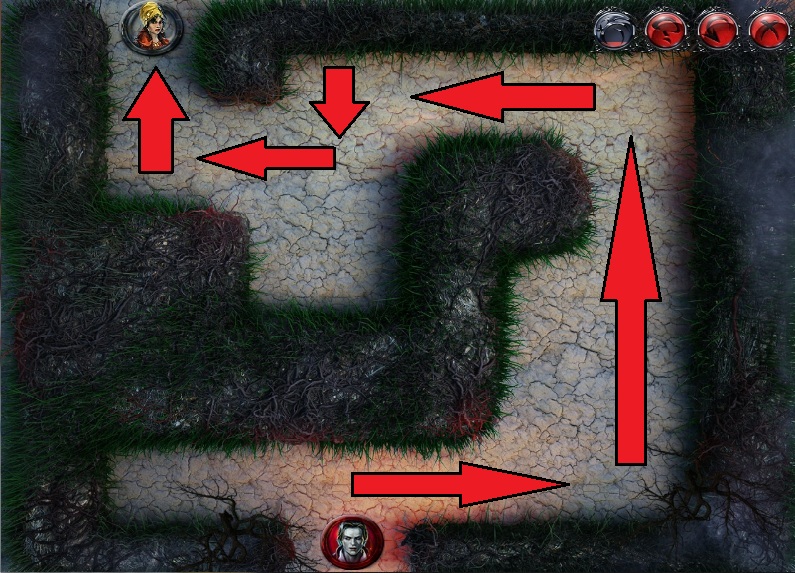
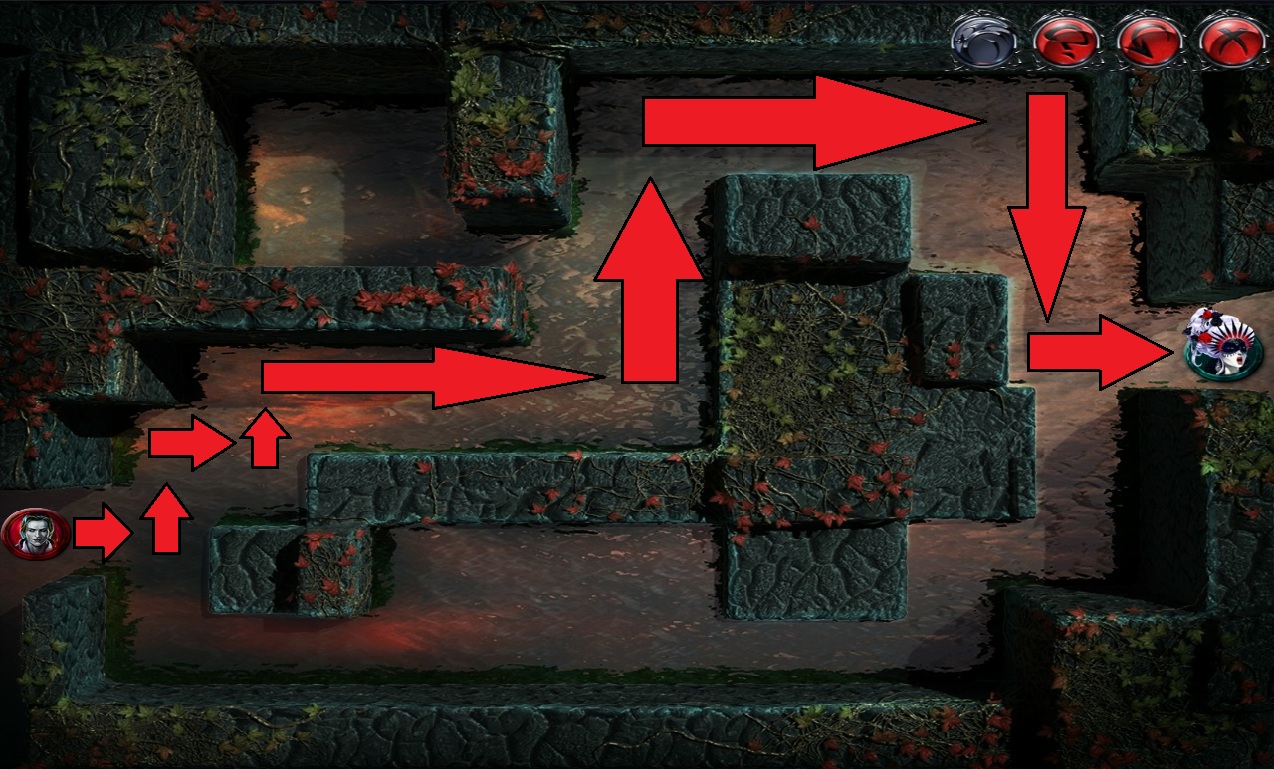
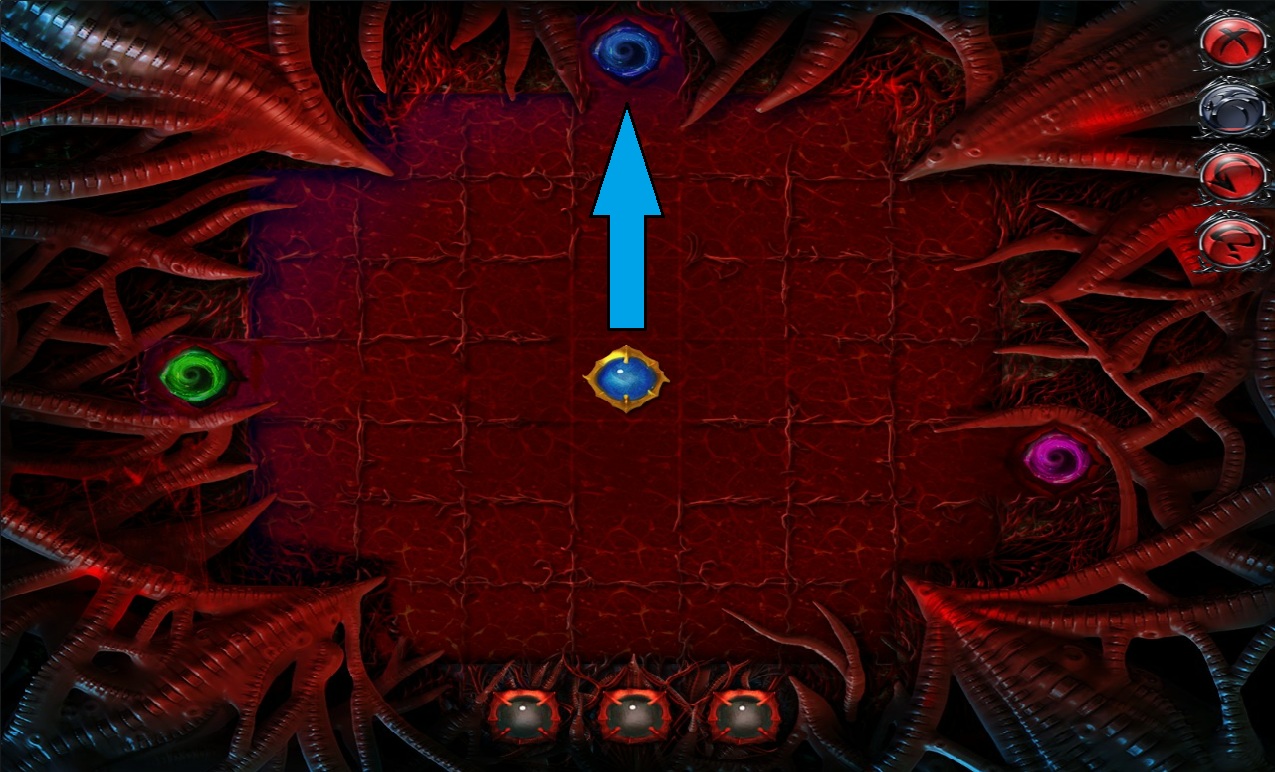
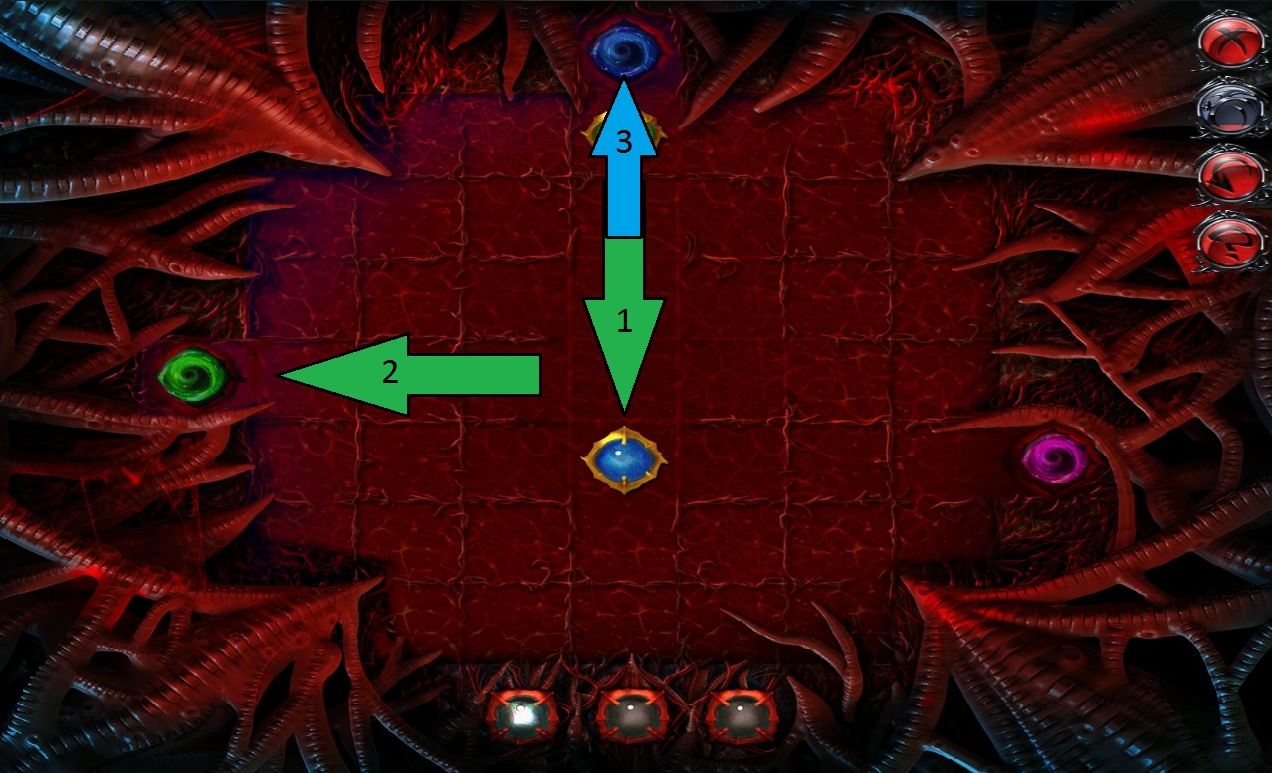
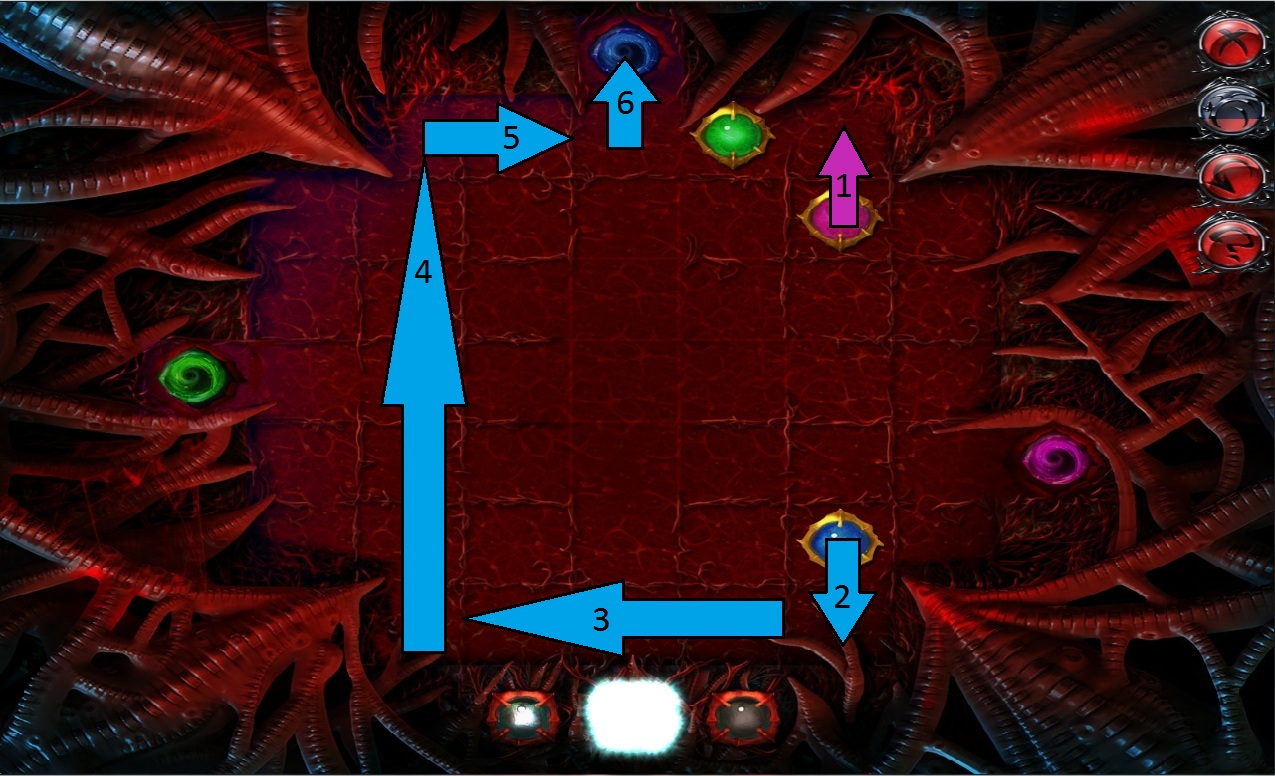
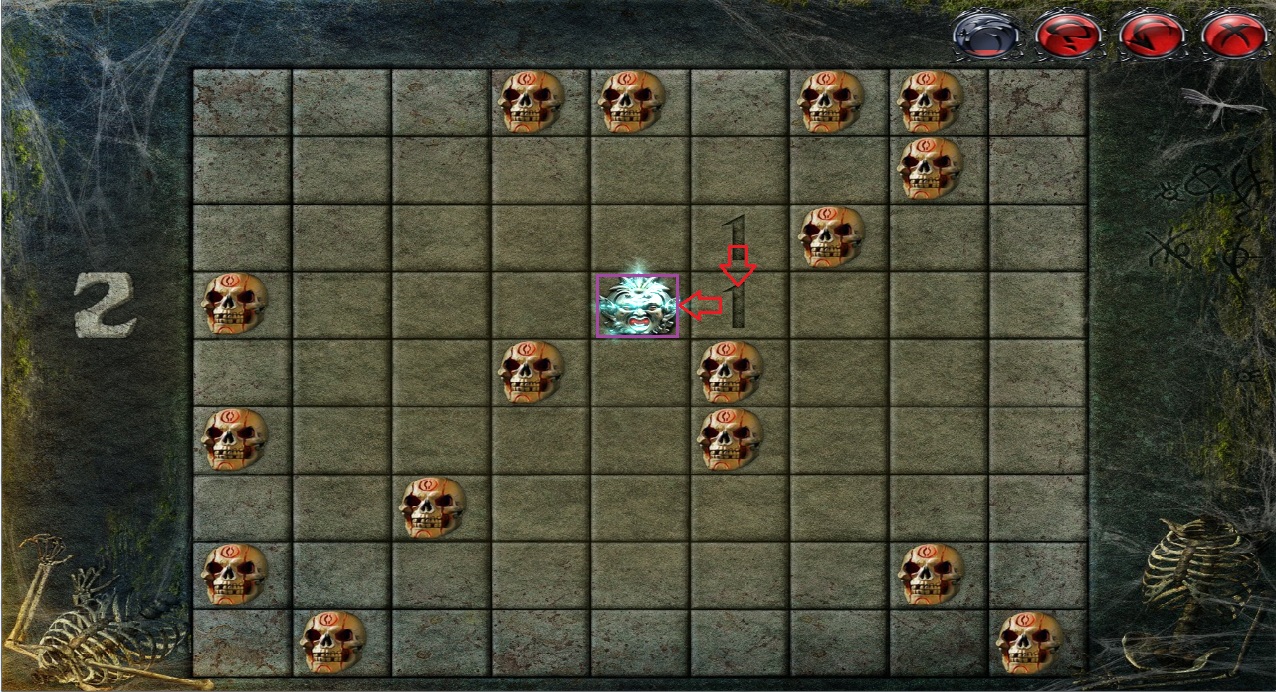
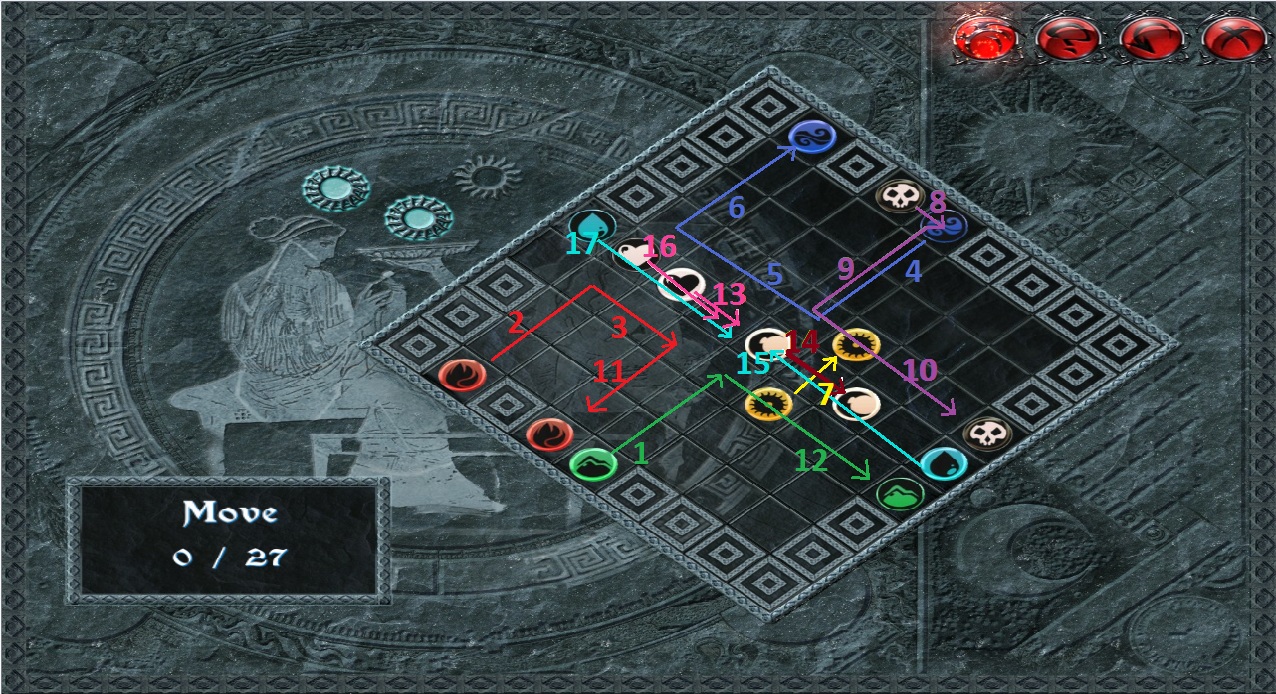
Click the Queen's Accomplice to begin the first vampire hunt puzzle.
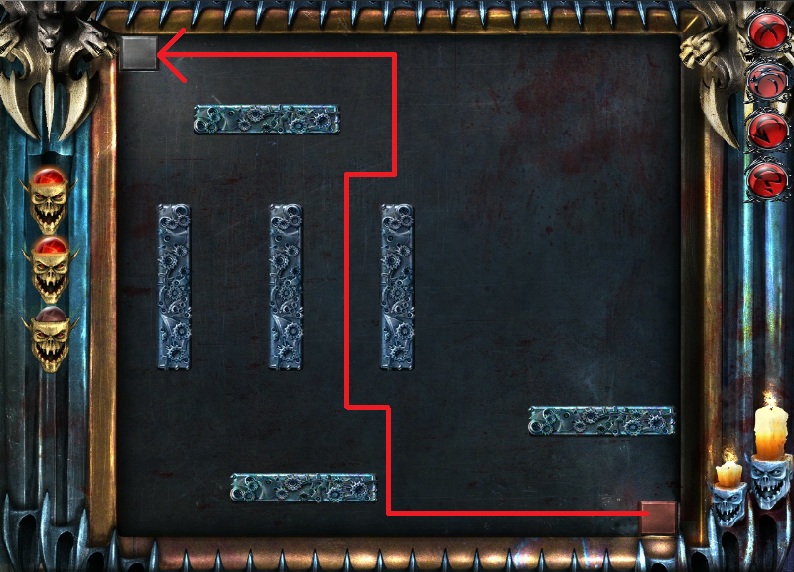
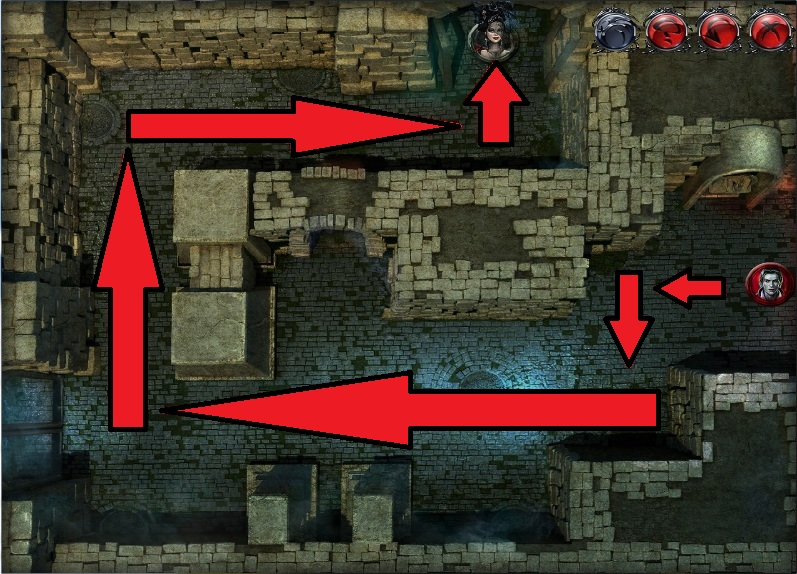
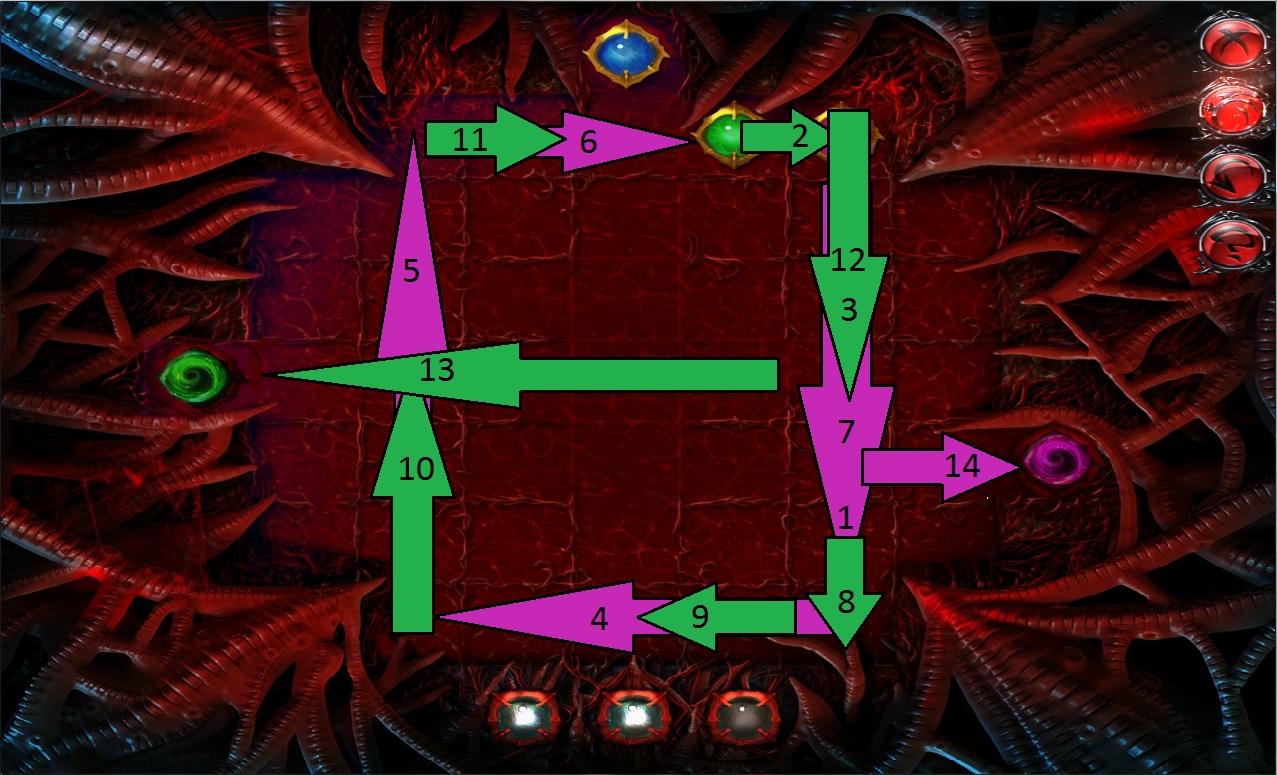
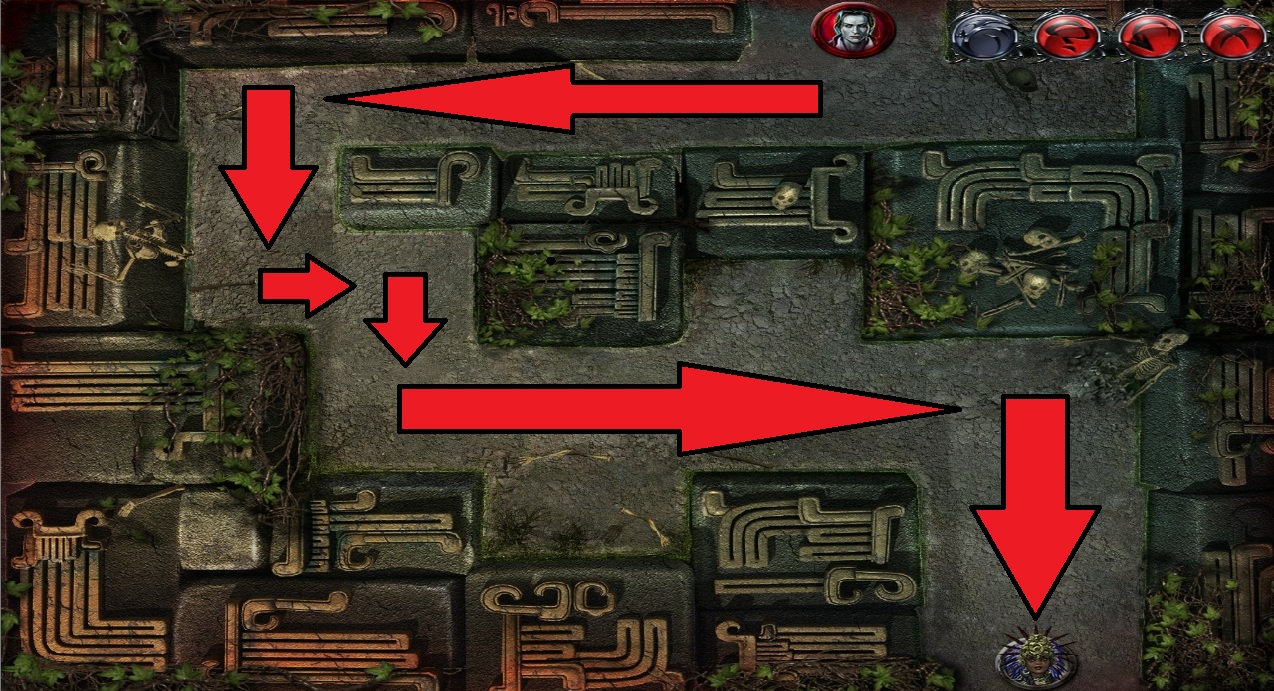
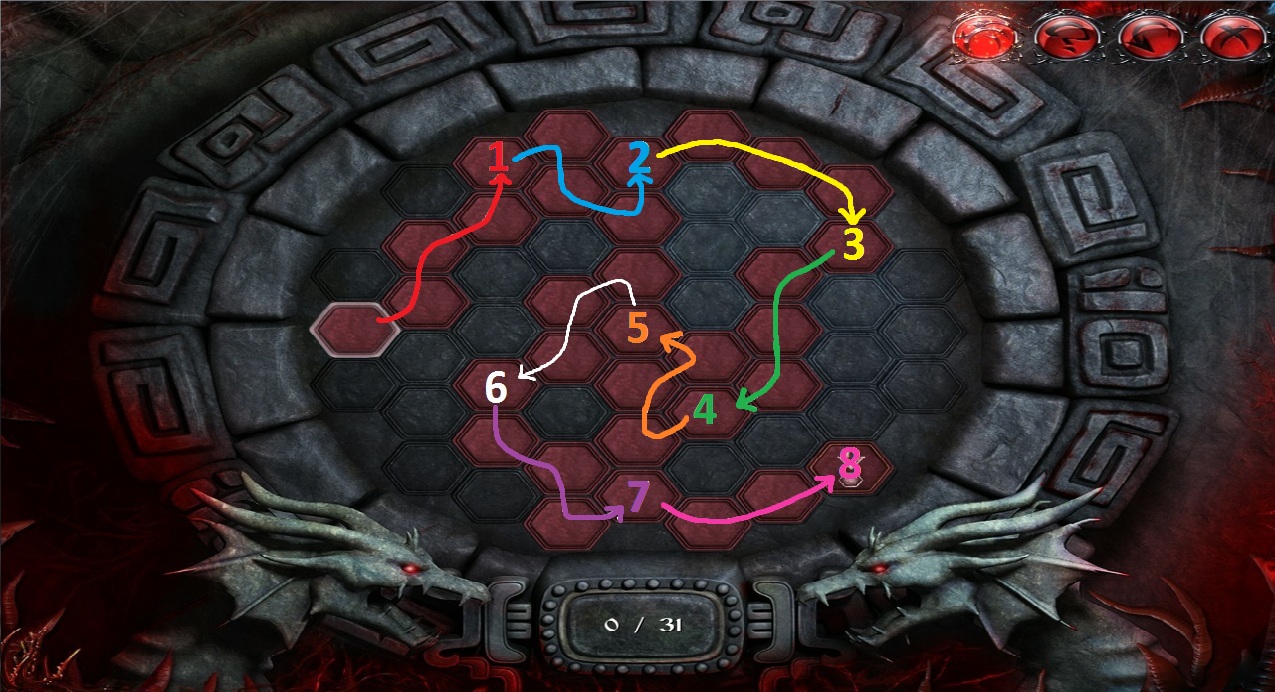
To solve a vampire hunt, click and hold the Dracula icon and drag it to the end of the maze to the victim's icon.
While dracula is moving, the screen will turn black.
Commit the maze to memory as best you can, then move dracula to the end without touching any of the walls or obstacles.
If you touch a wall, Dracula will stop moving, and his location will be revealed. Click and drag the icon again to continue.
Screenshot.
Once the puzzle is solved, you will be given the option whether or not you want to drink the victim's blood.
If you choose to drink, you will NOT be able to play the additional puzzles and hidden object scenes.
It is highly recommended for your first playthrough to refuse to drink the victim's blood.
After you've dealt with the Queen's accomplice, if you chose not to drink her blood, click the well to repeat the hidden object scene.
Screenshot.
Once the scene is complete, you will receive a bottle of blood which is added to your blood meter on the left side of the screen.
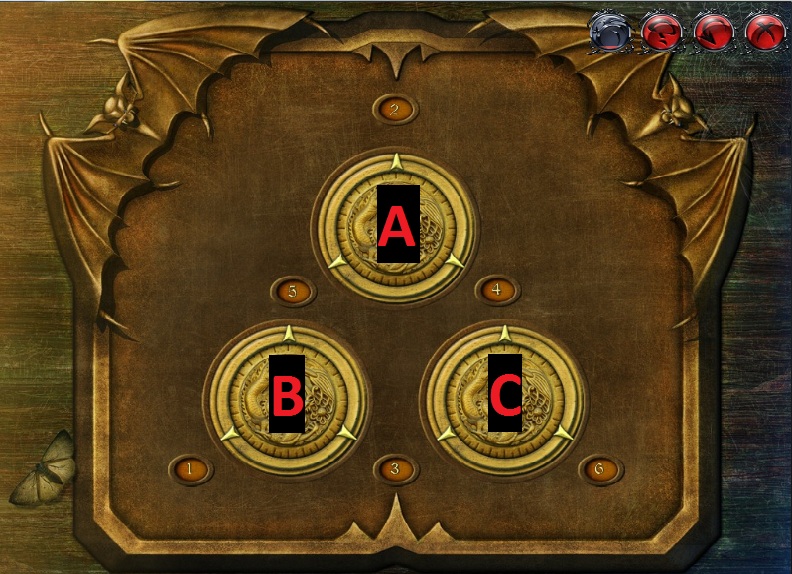
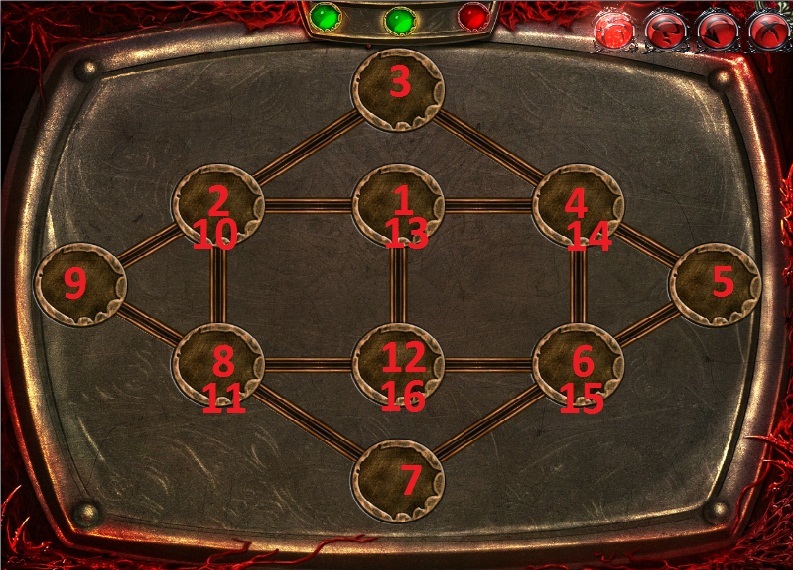
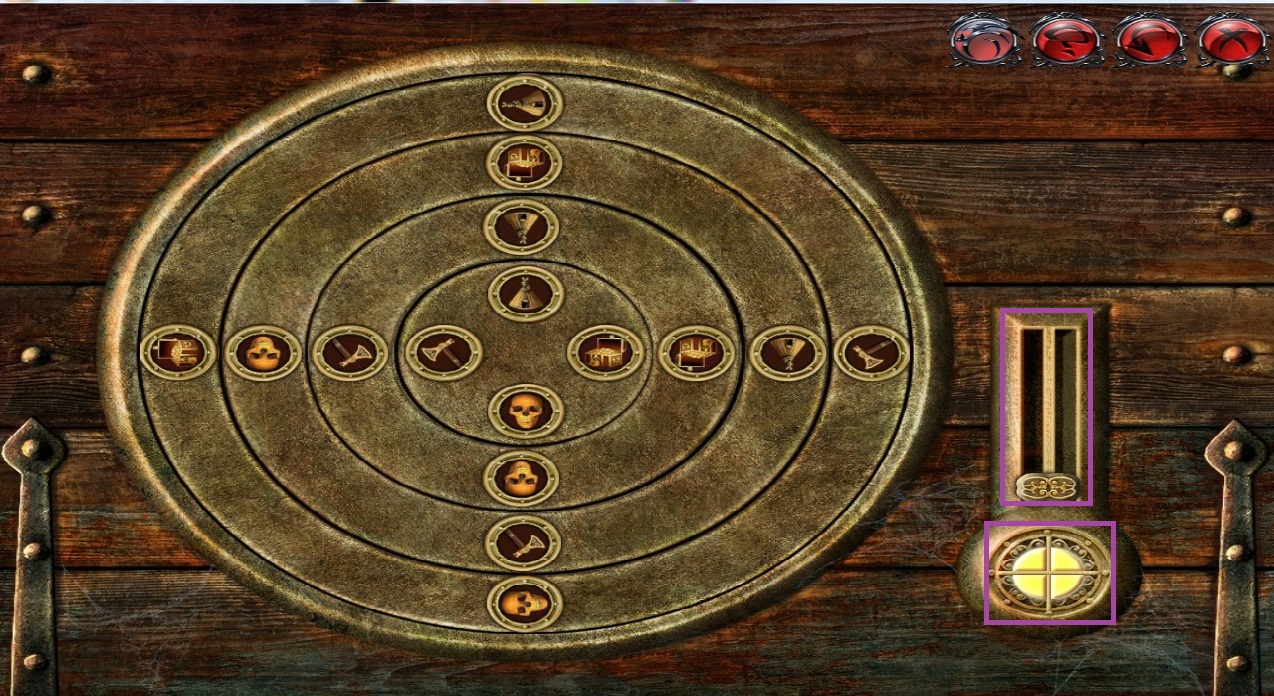
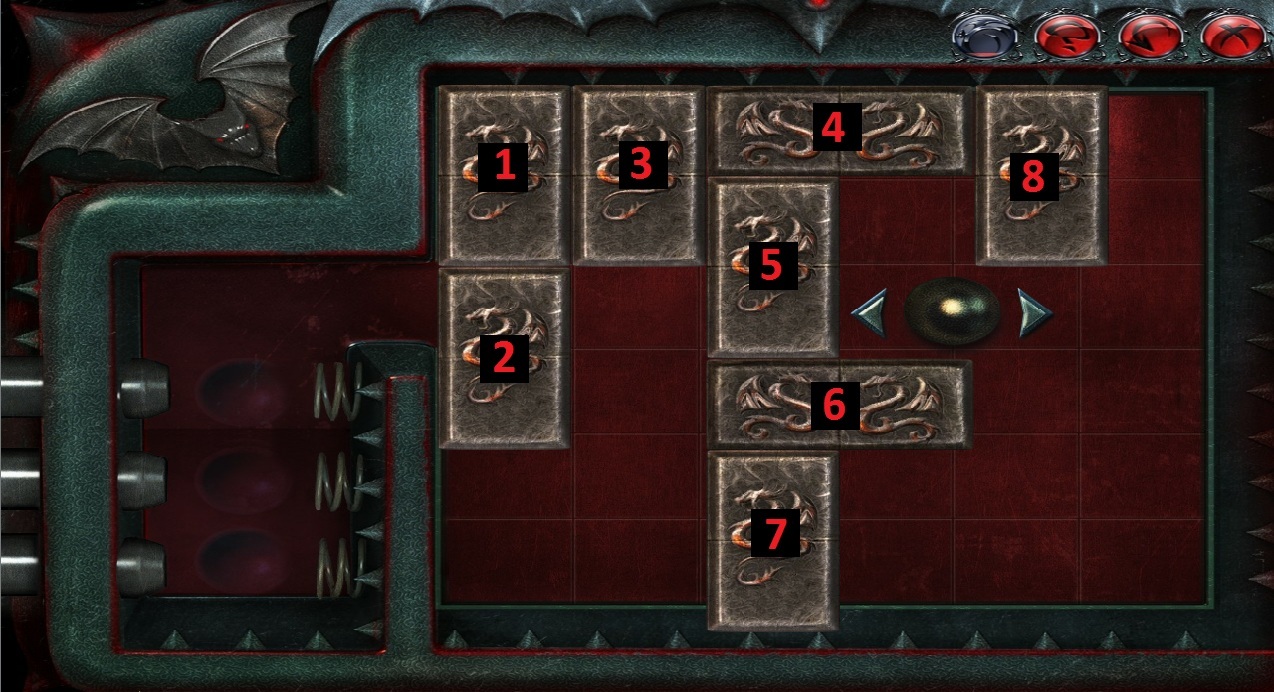
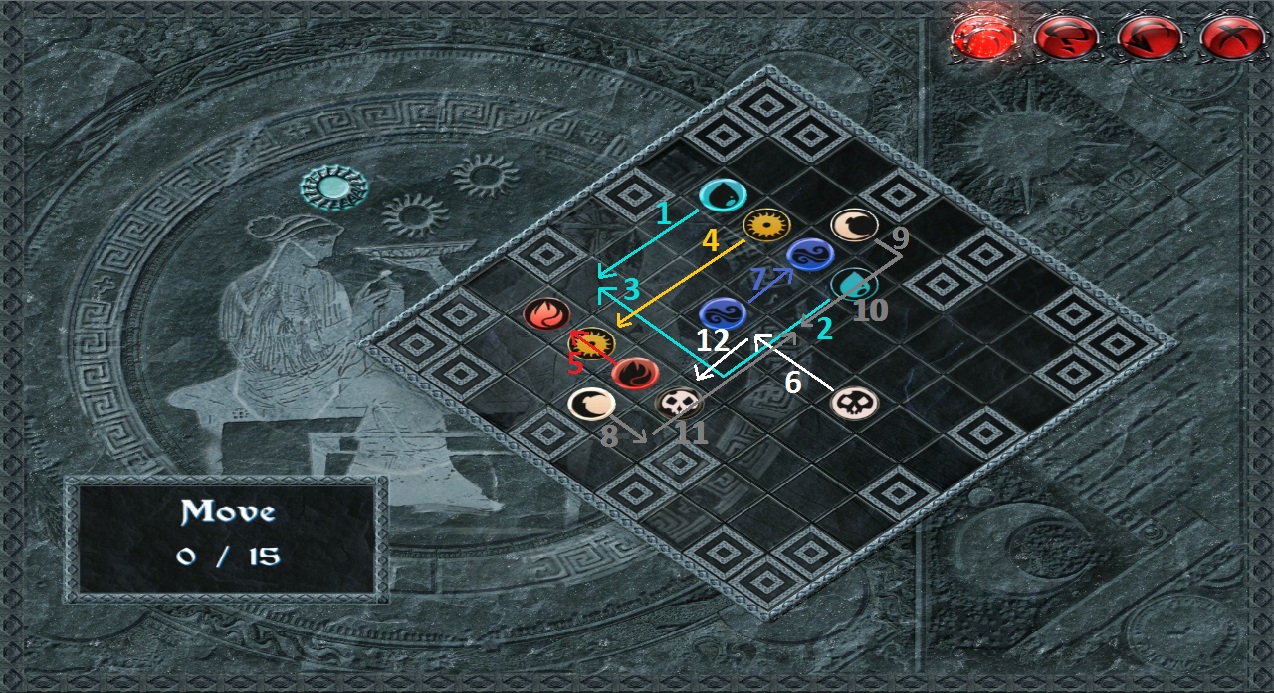
Click the travel chest in the back of the coach to begin the numbered dials puzzle.
To solve this puzzle, turn the dials so that the pyramid of numbers is in numerical order from 1 to 7.
Clicking a dial will turn the three numbers around it one rotation counterclockwise.
Screenshot.
Click dial B.
Click dial A 2 times.
Click dial B.
Click dial A 2 times.
Click dial B 2 times.
Once the puzzle is solved, take the Crowbar and Nails from the chest.
Return to the castle courtyard, then go down into the crypt.
The Crypt
Use the Crowbar from your inventory on the loose tile of the crypt floor.
Take the Earth from under the tile and put it into the open casket on the left pedestal.
Use the Crowbar from your inventory on the stone gargoyle to pry the Square Tile (2/2) from its mouth.
Click the fountain of blood from the gargoyle's mouth to raise your blood meter.
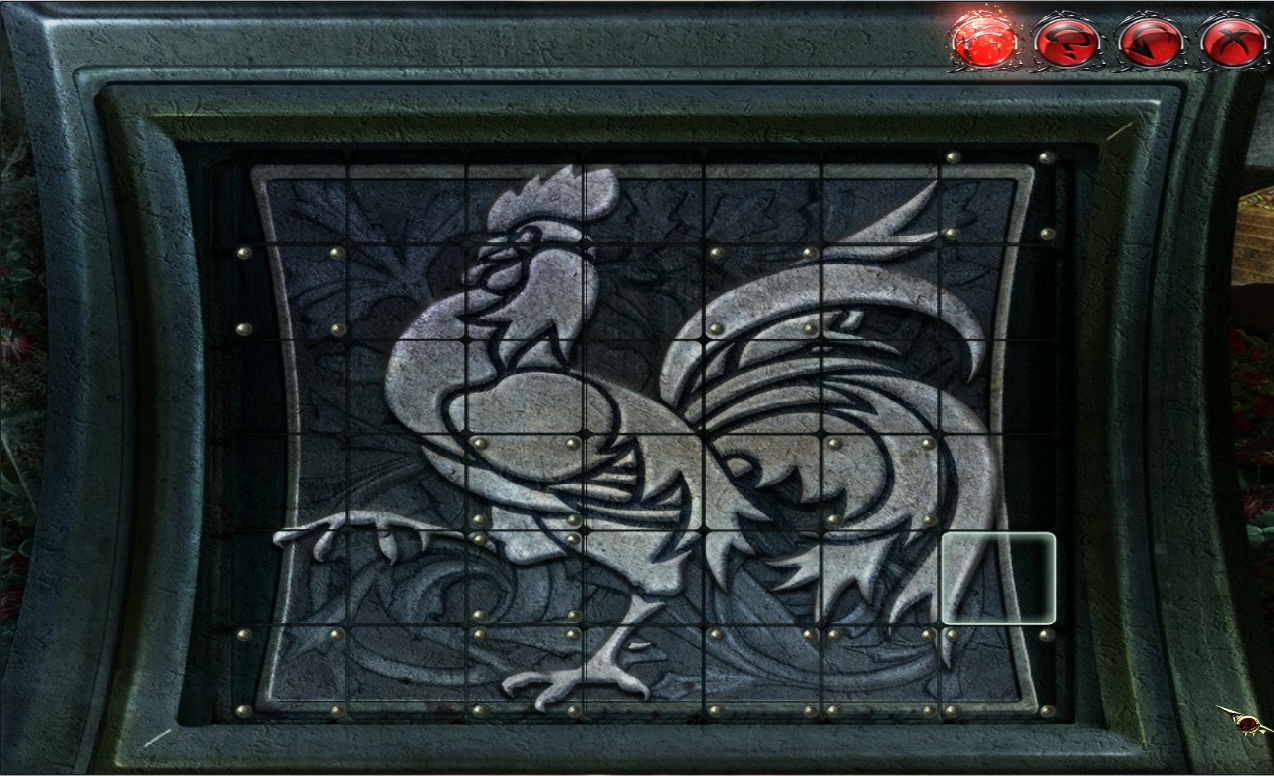
Click the fresco on the center casket to zoom in.
Add the two Square Stones from your inventory to begin the sliding tiles puzzle.
To solve this puzzle, swap adjacent tiles to complete the image.
Click a tile to select it, then click a second nearby tile to exchange positions.
Solution.
Once the puzzle is solved, take the Piece of Shield (5/6) from the bottom of the coffin.
Use the Short Boards from your inventory on the uncovered broken coffin.
Add the Nails to the makeshift coffin lid.
Use the hammer on the broken coffin to complete the construction.
Click the Traveling Coffin to add it to your toolbar.
Click the coffin to access the Map, then click London to travel to that location.
Van Helsing's Office
Use the Curtain from your inventory on the mirror in the corner by the open balcony.
Click the carpet to lift it up and pick up the Durable Thread from underneath.
Use the Durable Thread on the two arrows on the desk.
Add the Connected Arrows to the crossbow.
Use the Crossbow on the crucifix hanging from the bookcase.
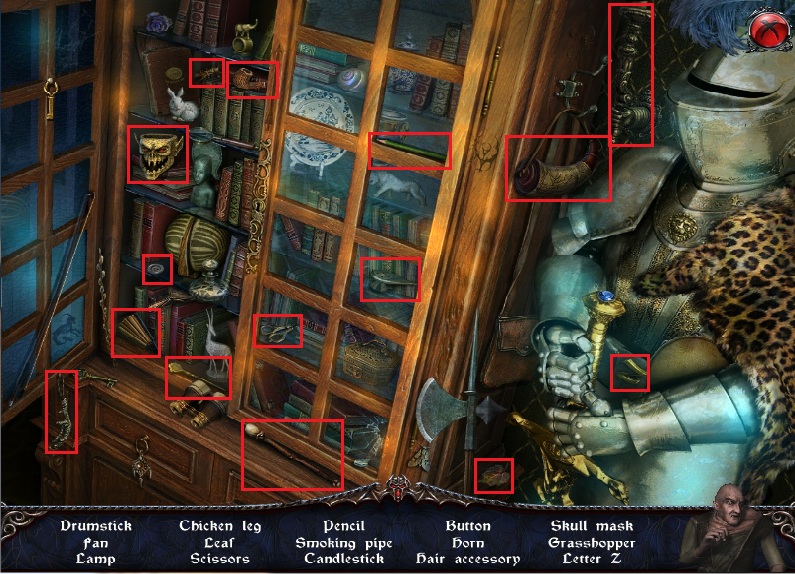
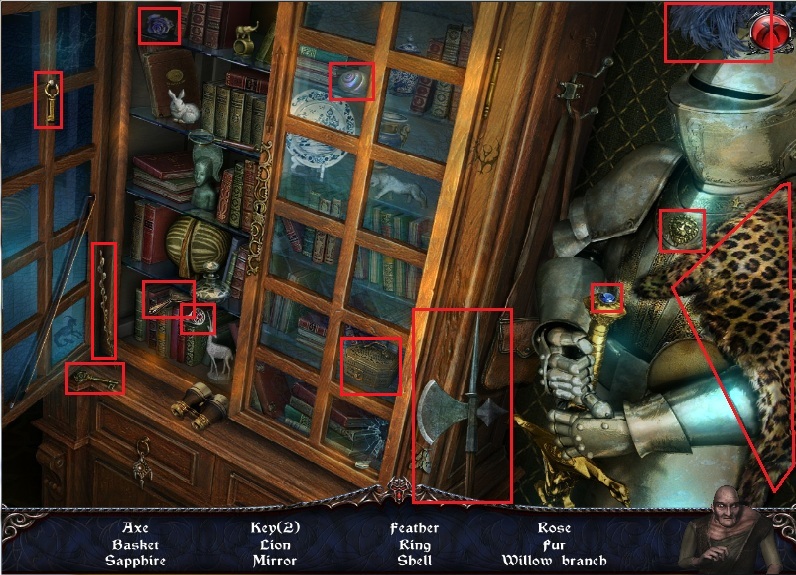
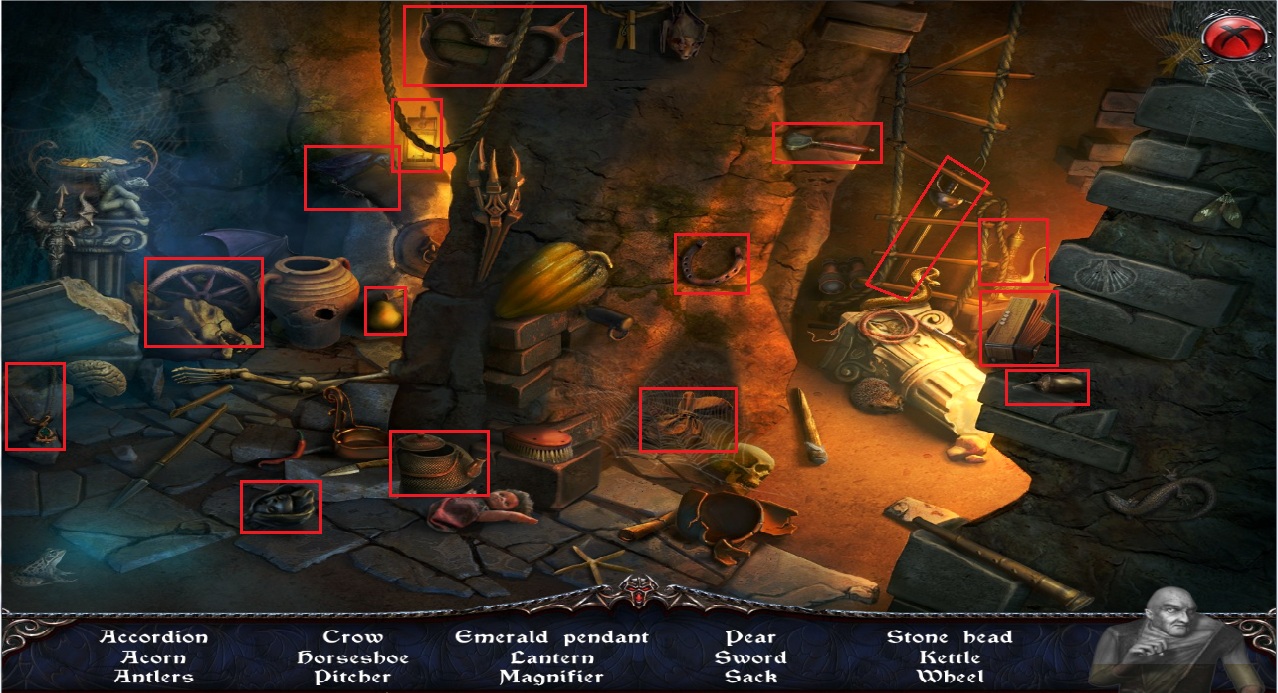
Click the bookcase to begin the hidden object scene.
Screenshot.
Once the hidden object scene is completed, the Skull Mask (2/2) will be added to your inventory.
You will be prompted to return to the crypt; click Yes.
The Crypt
Click the room of knights entrance to zoom in.
Add the 2 Skull Masks from your inventory to the missing pieces on the panel to begin the skull mask puzzle.
To solve this puzzle, move the grey boxes to the opposite corners of the square.
Click and hold one of the grey squares to drag it across the screen.
The second square will mirror the movements of the one you are controlling.
Both squares must avoid touching all obstacles before reaching the opposite corner.
Solution #1.
Solution #2.
Solution #3.
Go through the open doorway into the room of the knights.
The Room of the Knights
Take the Piece of Shield (6/6) at the top of the middle archway.
Use the Pieces of Shield on the shield of the left-most knight.
After the cinematic, you will be automatically transported to the cemetary in London.
Chapter 2
The Cemetary
Click the Vial of Blood at the bottom of the left lamppost to add it to your bloodmeter.
Use the Vampiric Vision ability on the middle of the pathway to the tomb to reveal the Piece of Shield (1/7).
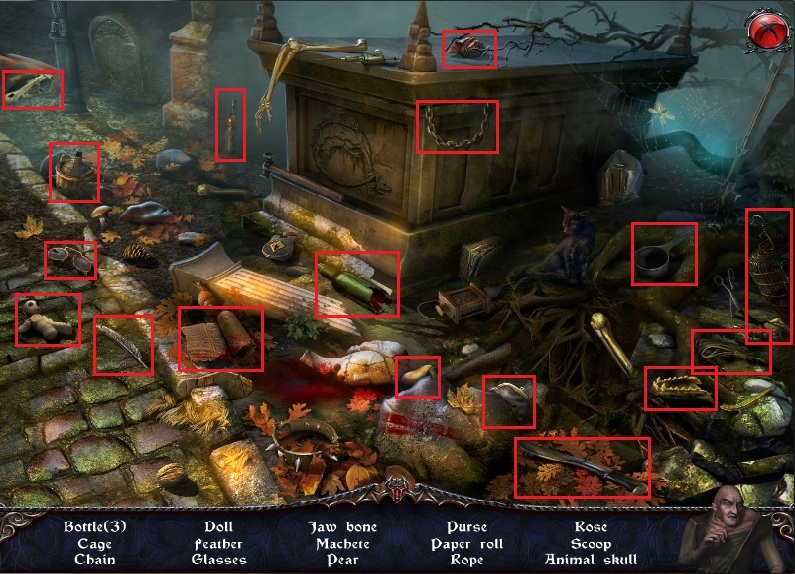
Click the tombstones on the right side of the path to begin the hidden object scene.
Screenshot.
Once the hidden object scene is completed, you will receive the Machete.
Use the Machete on the grave in the roots of the tree.
Take the Acorn (1/3) from the right treebranch.
Click the front lamppost to take the Candle (1/4).
Use the Map to travel to Van Helsing's office.
Van Helsing's Office
Click the bookcase to repeat the hidden object scene.
Screenshot.
Once the hidden object scene is complete, you will receive the Seal Ring.
Take the Vial of Blood on the right desk, next to the eagle statue, to add it to the blood meter.
Use the Vampiric Vision ability on the invisible sign on the floor tile at the bottom of the left curtain.
Take the Piece of Shield (2/7).
Take the Dagger stuck in the maps on the front desk.
Use the Dagger on the locked drawer of the right desk to pry it open.
Take the Key to the Shed from the opened desk drawer.
Click the cabinet at the bottom of the bookcase to open it and take the Seal Ring (2/4) inside.
Click the ink pot on the right desk to tip it over and take the Seal Ring (3/4) from inside the pot.
Return to the cemetary.
The Cemetary
Click the shed to zoom in.
Take the Acorn (2/3) on top of the cabinet.
Use the Key to the Shed from your inventory on the locked cabinet.
Take the Lamp and the Seal Ring (4/4) from the shelves.
Note the pattern carved into the wooden post to the left of the cabinet.
Use the Empty Lamp from your inventory on the open grave.
Click the lamp to add the Wisp to your inventory.
Click the tombstones behind the tree to repeat the hidden object scene.
Screenshot.
Once the hidden object scene is complete, you will receive an Acorn (3/3).
Use the Acorns from your inventory on the pile of leftover acorns on the cobblestone pathway to the left of the unlit lamppost.
Click the squirrel to receive the Piece of Shield (3/7).
Return to Van Helsing's office.
Van Helsing's Office
Click the seal ring collection on the table to the left of the balcony.
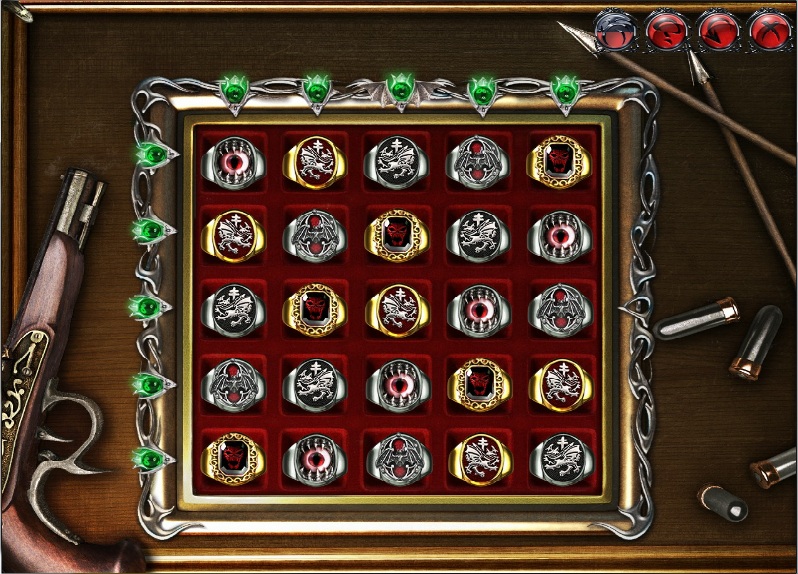
Add the four Seal Rings from your inventory to the collection to begin the rings puzzle.
To solve this puzzle, align the rings so that there is only one of each kind of ring in every row and column.
Click a ring to select it, click another ring to exchange positions.
If a row or column is correctly organized, the arrow pointing to that line of rings will glow green.
Solution
Once the puzzle is solved, take Harker's key from the case.
You will be prompted to travel to Mina's room; click Yes to go there now.
Mina's Room
Take the Piece of Letter (1/6) on the floor next to the bed.
Click the blood on the vase of roses to add it to the bloodmeter.
Take the Small Mina's Portrait on the vanity mirror on the nightstand.
Use the Vampiric Vision ability on the invisible sign area just below the chandelier.
Take the Piece of Letter (2/6).
Click the nightstand to zoom in.
Take the Small Diamond from the counter.
Click the left drawer to open it.
Take the Candle (2/4) and the Vial of Blood to add it to your blood meter.
Click the right drawer.
Take the Piece of Letter (3/6).
Click Harker's portrait on the back wall to draw out another one of the Queen's Accomplices.
Click the Queen's Accomplice to begin the second vampire hunt puzzle.
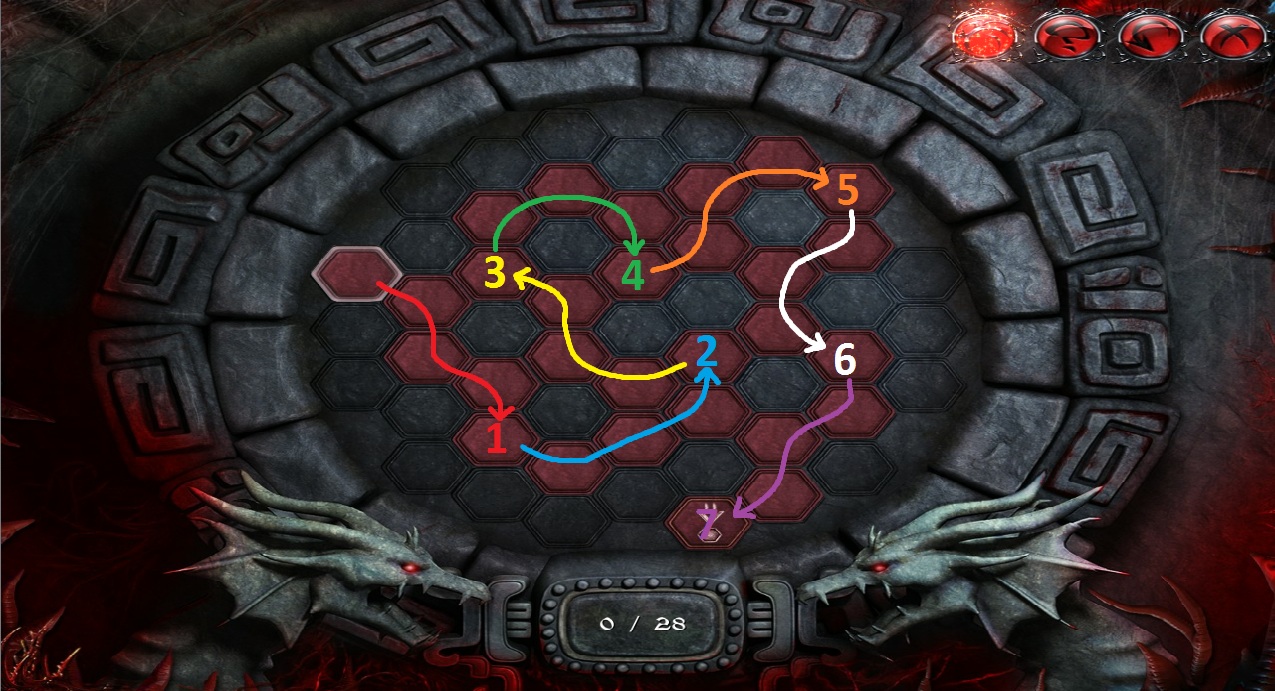
To solve the vampire hunt, click and drag the Dracula icon to the end of the maze to the victim's icon.
While dracula is moving, the screen will turn black.
Commit the maze to memory as best you can, then move dracula to the end without touching any of the walls or obstacles.
If you touch a wall, Dracula will stop moving, and his location will be revealed. Click and drag the icon again to continue.
Screenshot.
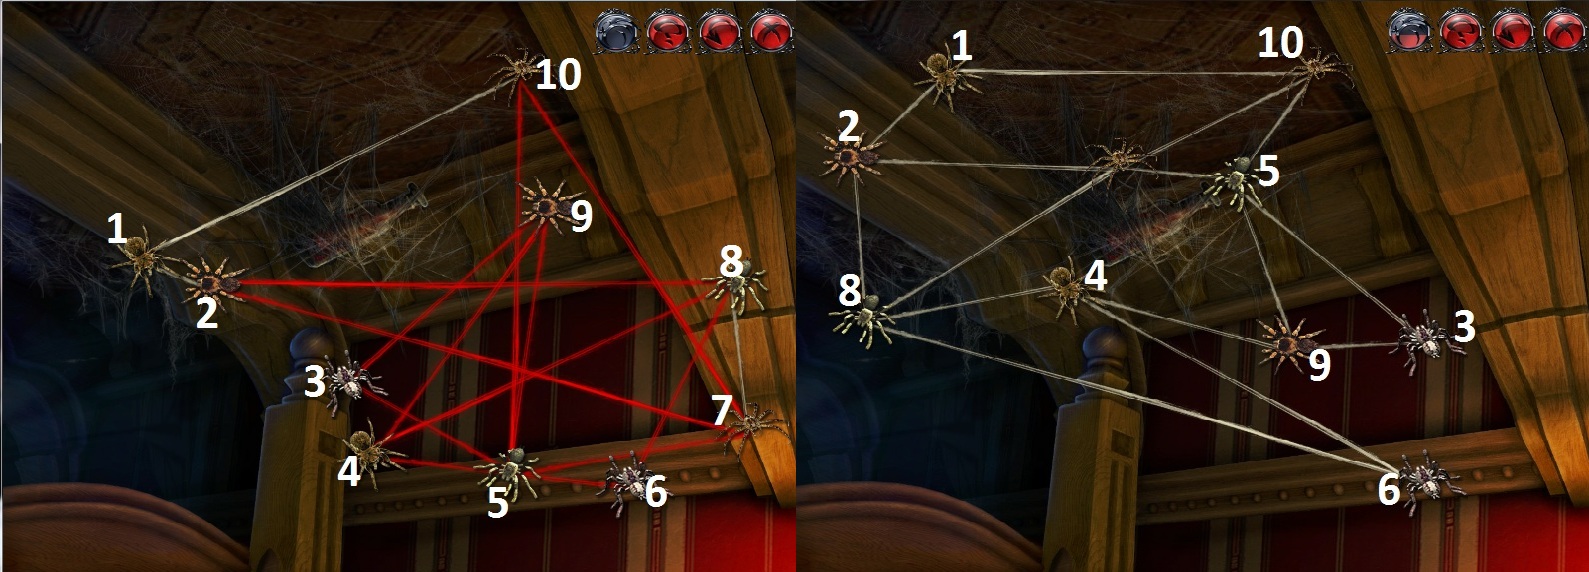
If you chose not to drink the accomplice's blood, click the ceiling between the bed and the nightstand to begin the spider's thread puzzle.
To solve this puzzle, move the spiders so that none of their threads are crossing.
Click a spider to pick it up, then click again to release the spider wherever you want to place it.
If spiders threads are crossing, they will be colored red. If the thread is uninterrupted, it will be white.
Screenshot.
Once the puzzle is solved, you will receive a Vial of Blood, which is added to your blood meter.
Click the secret compartment to zoom in.
Take the Metal Knob and the Vial of Blood, which is added to your blood meter.
Use the map to return to the cemetary.
The Cemetary
Click the tomb to zoom in.
Use the Vampiric Vision ability on the tomb door.
Place the wisp from your inventory at the top of the tomb entrance.
Go forward to step inside the tomb.
The Tomb
Take the green Small Diamond from the left stone coffin.
Take the Piece of Shield (4/7) from the right stone coffin.
Click the pile of stuck leaves at the center of the ceiling of the tomb.
Take the Piece of Shield (5/7), the Candle (3/4), and the Piece of Letter (4/6) that fall from the ceiling.
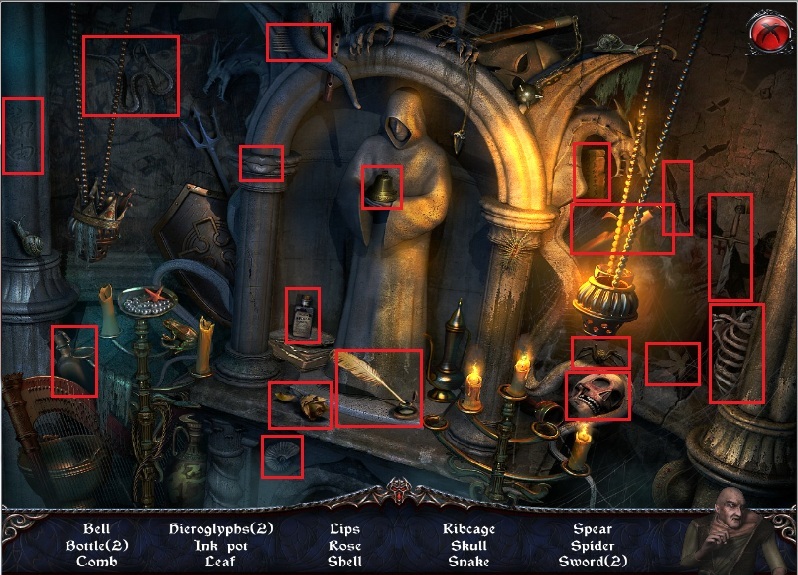
Click the back of the tomb to start the hidden object scene.
Screenshot.
Once the hidden object scene is complete, you will receive the Skull.
Use the Map to the village in Transylvania.
The Village
Use the Vampiric Vision ability on the hidden area below the toolbox.
Take the revealed Piece of Shield (6/7).
Take the Black Skull (1/3) on the signpost above the workshop.
Take the Black Skull (2/3) underneath the chest on the coach.
Use the Skull from your inventory on the corruption source in the well to turn it into the Black Skull (3/3).
Take the Piece of Letter (5/6) from the side of the well.
Click the door of the coach to zoom in.
Add the three Black Skulls from your inventory to the panel to start the puzzle.
To solve this puzzle, slide the round spider tile into the red circle on the board.
Move the cursor over the tile to point it up, down, left, or right.
Click the tile to move it in the direction the arrow is pointing.
The tile will slide continuously in that direction until it hits an obstacle.
Solution #1.
Solution #2.
Once the puzzle is complete, click the coach to begin the hidden object scene.
Screenshot.
Once the hidden object scene is complete, you will receive the Piece of Letter (6/6).
Take the Vial of Blood on the coach next to the chest.
Click the workshop to look inside.
Take the Piece of Picture (1/2) on the side of the work table.
Take the Metal Knob (2/5) on the left corner of the table.
Use the Pieces of Letter from your inventory on the missing piece of letter on the table.
Use the Vampiric Vision ability on the invisible sign on the letter.
Click the letter to read the location of your next destination.
When prompted, click Yes to travel to Venice.
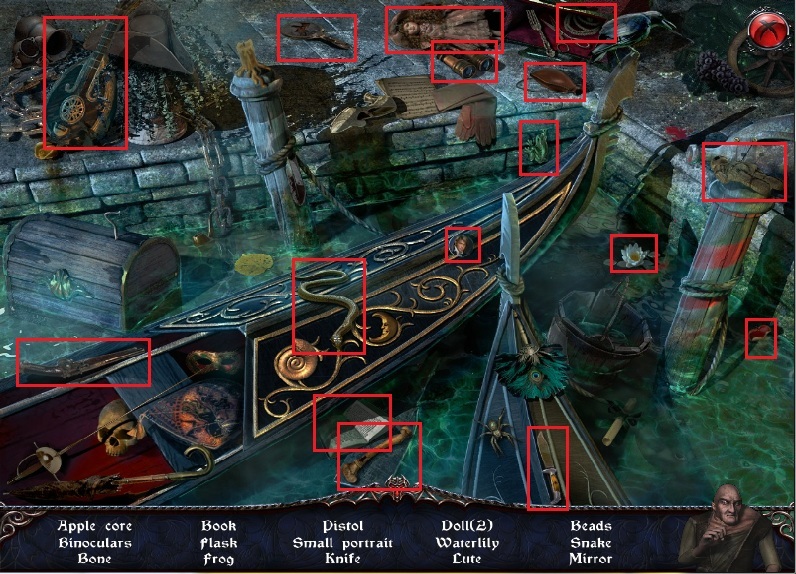
The Canal
Take the Metal Knob (3/5) from the inside of the gondola.
Click the Blood on the vines of the right banister to add it to your blood meter.
Use the Vampiric Vision ability on the stairs beside the water.
Take the revealed Piece of Picture (2/2).
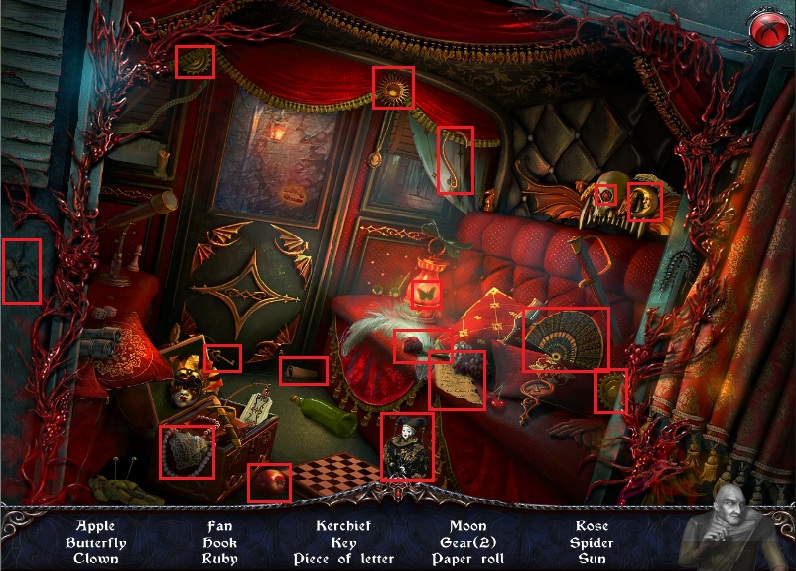
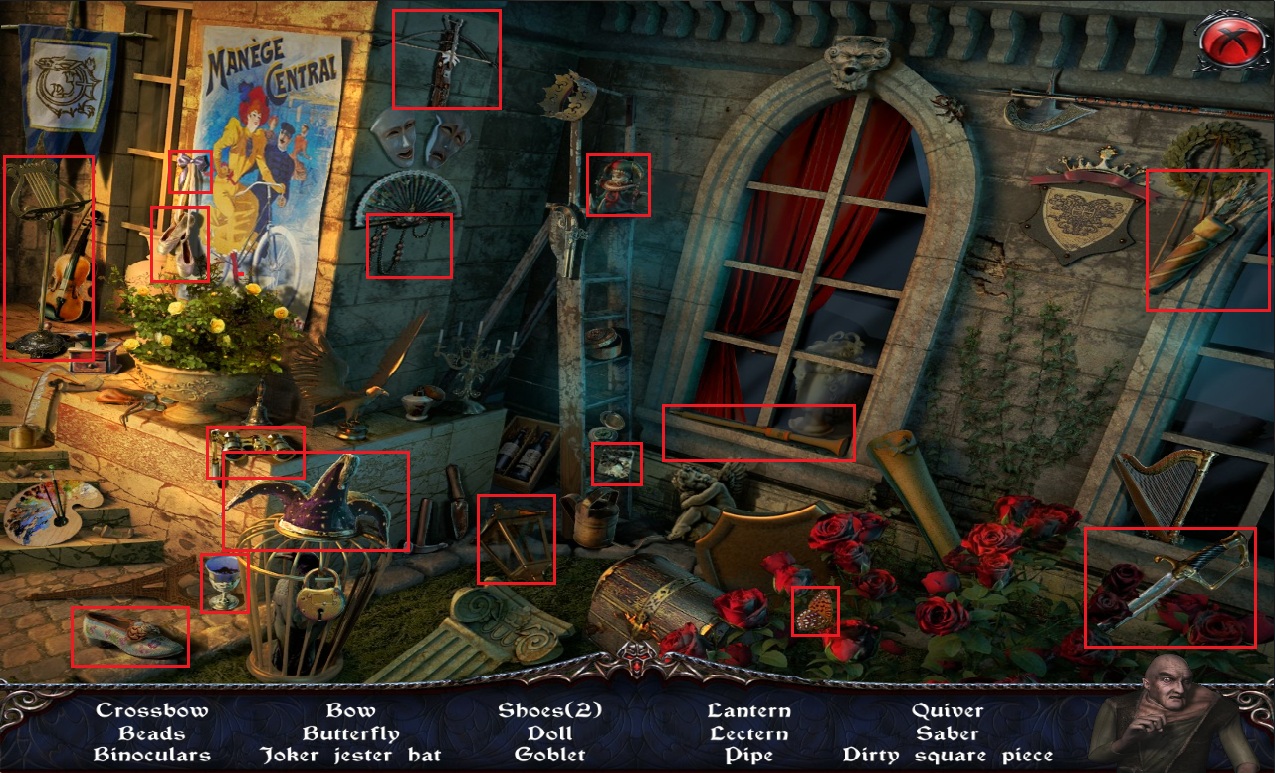
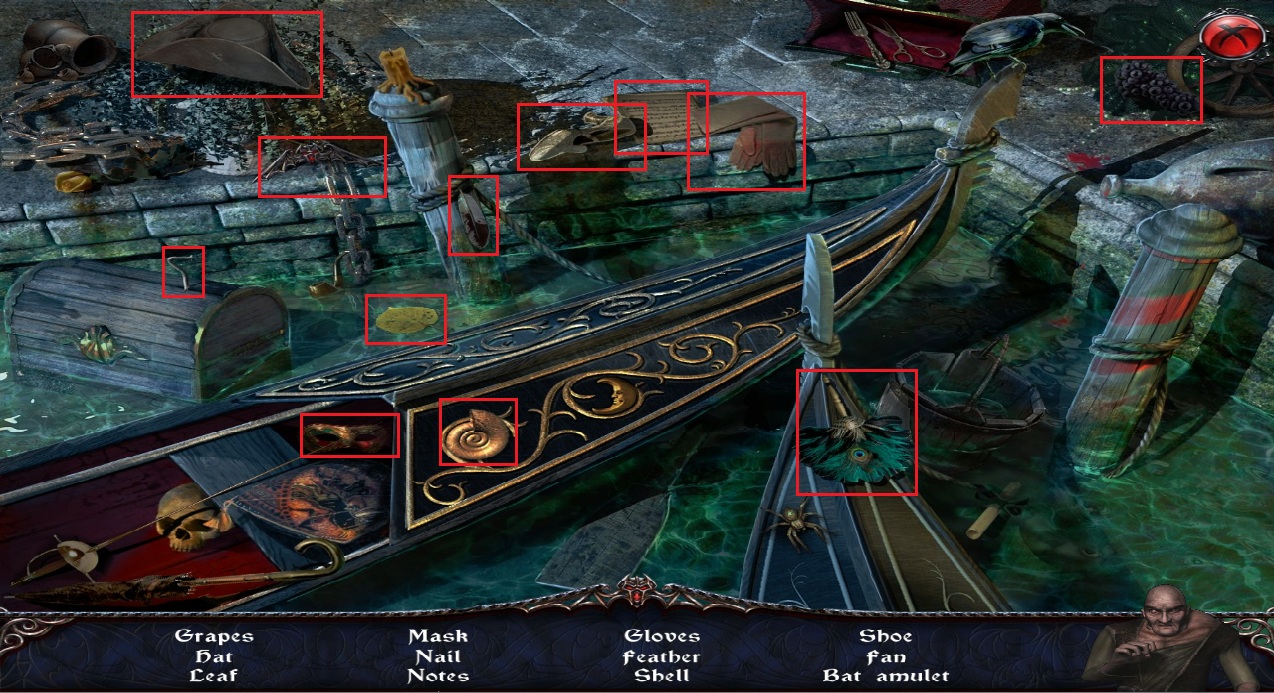
Click the left gondola to begin the hidden object scene.
Screenshot.
Once the hidden object scene is complete, you will receive the Small Harker Portrait.
Click the door up the stairs to zoom in.
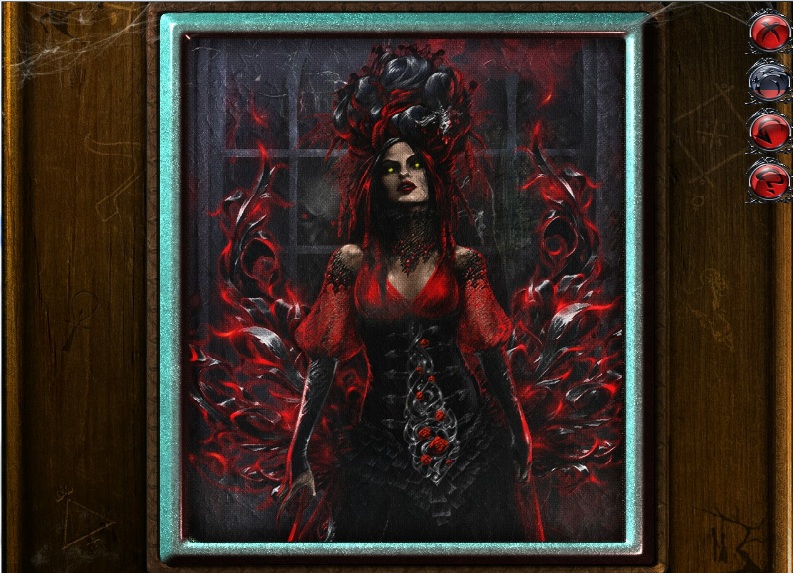
Add the 2 Pieces of Picture from your inventory to the frame on the wall to begin the portrait puzzle.
To solve this puzzle, slide and align the rectangular tiles to complete the picture of the Queen of Vampires.
Click and hold a tile to select it, drag and release the tile to place it.
Solution.
Once the puzzle is solved, go through the open door to the bridge.
The Bridge
Take the Vials of Blood on top of the barrel and next to the green locked box to the left to add them both to the blood meter.
Take the Small Diamond (3/3) on top of the green locked box.
Take the Metal Knob (4/5) on the front pillar of the right wall.
Use the Vampiric Vision ability on the invisible sign at the bottom of the crumbling right wall.
Take the revealed Metal Knob (5/5).
Click the chest to zoom in.
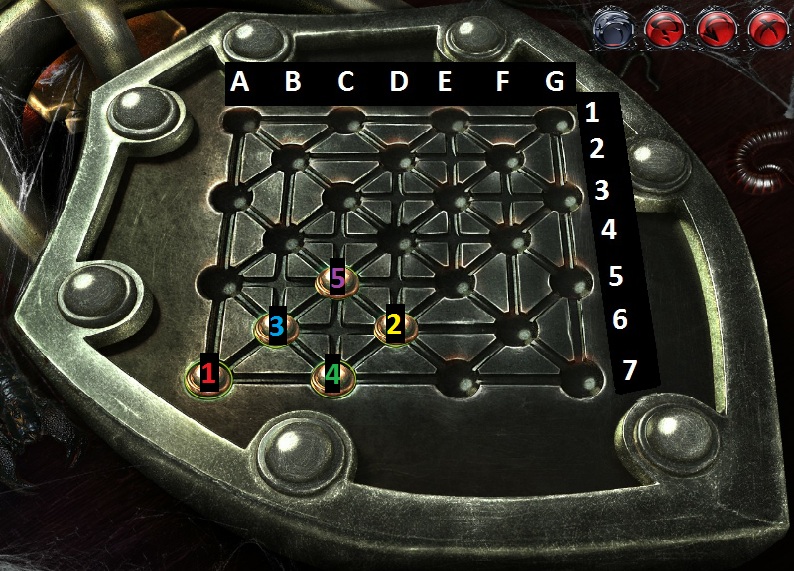
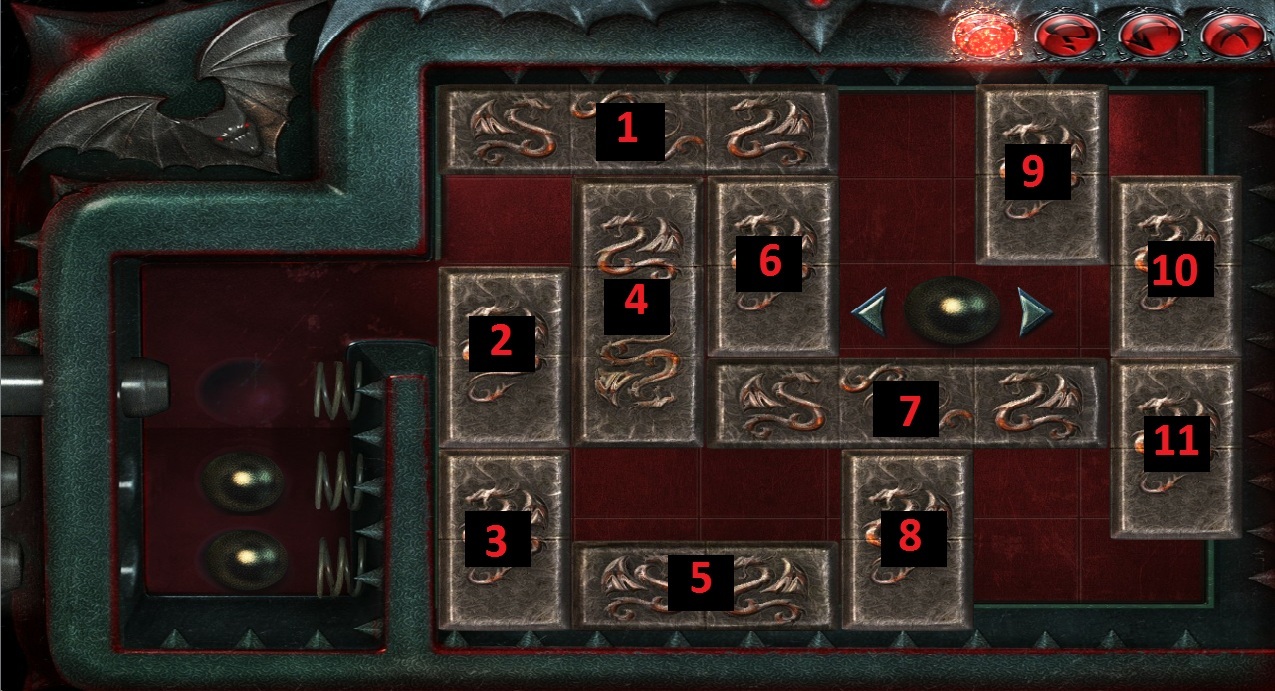
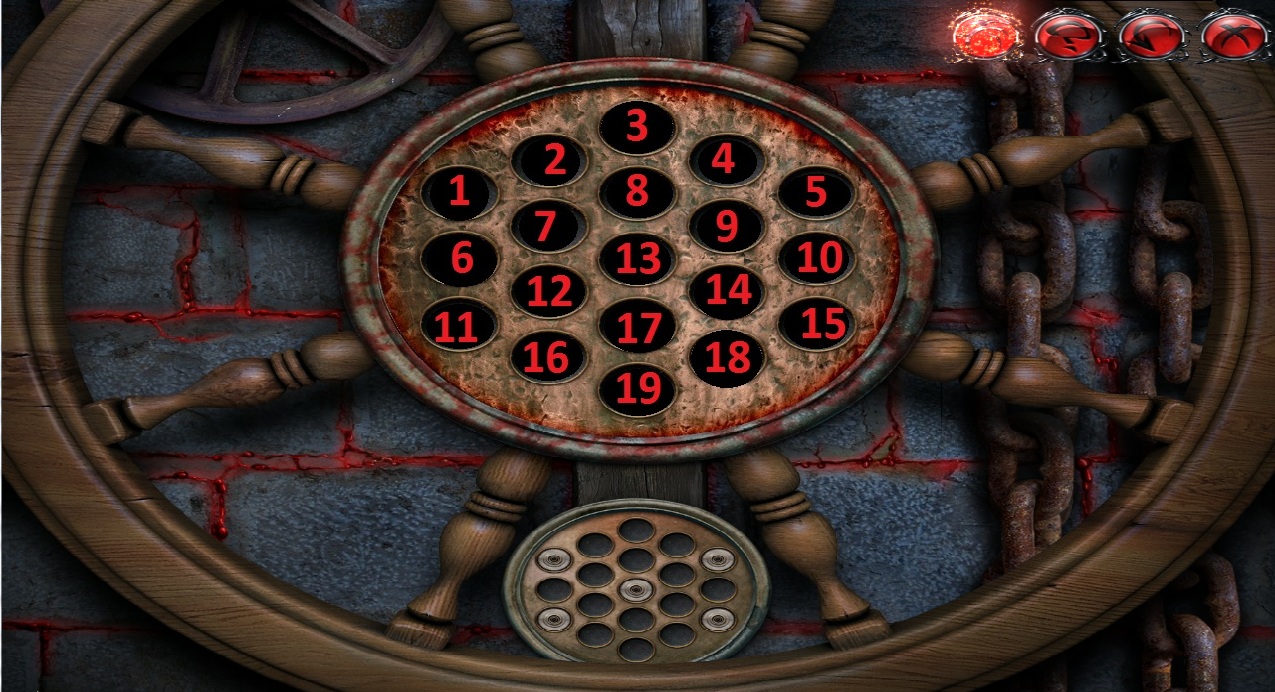
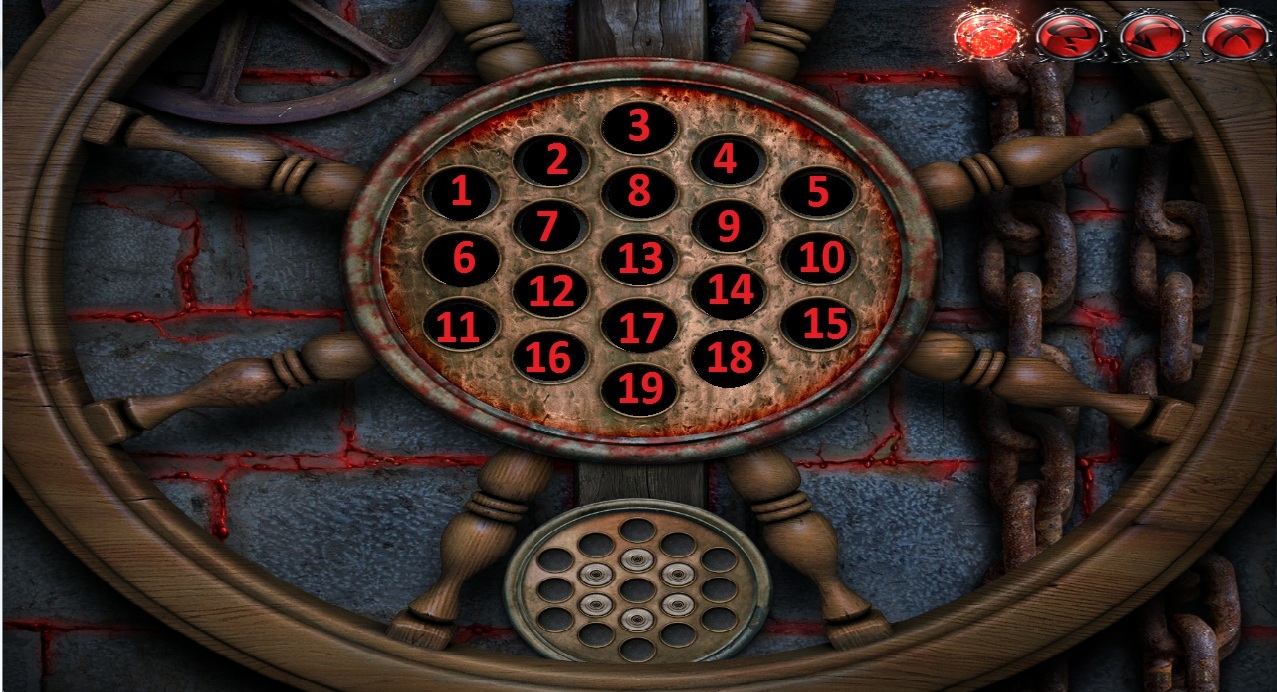
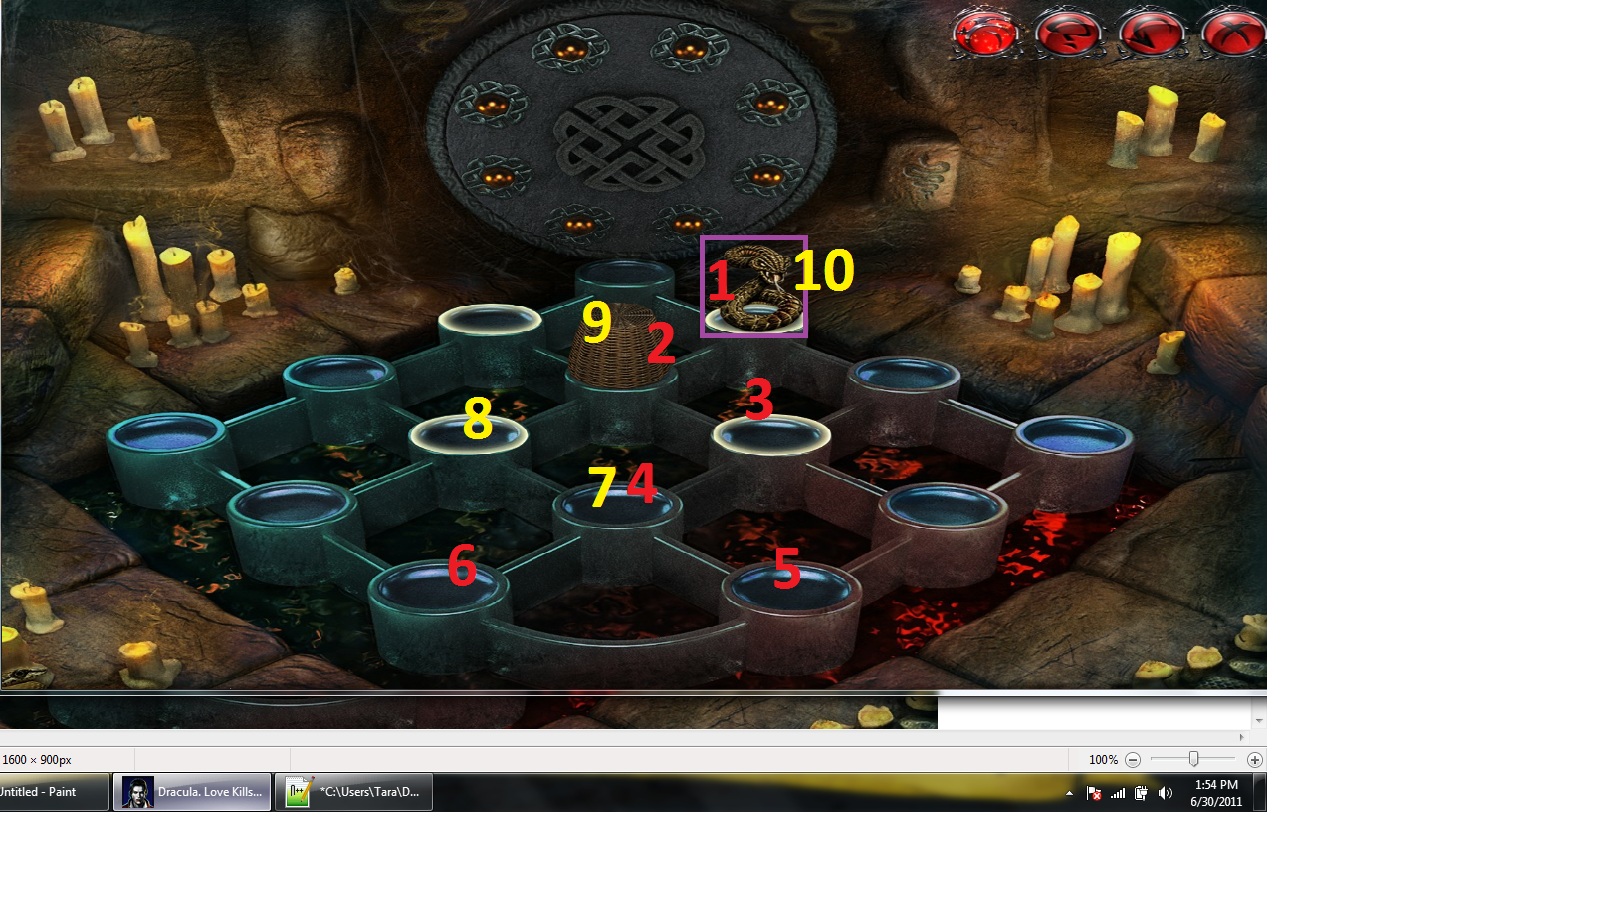
Add the 5 Metal Knobs from your inventory to the mechanism on top of the chest to begin the puzzle.
To solve this puzzle, move the metal knobs into the round spaces that are colored green.
Click and hold a metal knob to select it; drag and release the knob to place it in one of the spaces.
Metal knobs can only move forward into an empty space by hopping over another knob.
If you try to place a knob into a space where it cannot go, it will glow red.
Conversely, if you hold the knob over a space where it can be successfully placed, it will glow blue.
When a knob is placed in a green round space, it will glow gold.
Solution.
Move the Metal Knob #6 at G,1 to G,5.
Move the Metal Knob #3 at F,2 to D,4
Move the Metal Knob #4 at G,3 to E,5.
Move the Metal Knob #1 at E,3 to C,5.
Move the Metal Knob #2 at F,4 to D,6.
Move the Metal Knob #3 at D,4 to F,6.
Move the Metal Knob #6 at G,5 to E,7.
Move the Metal Knob #3 at F,6 to B,6.
Move the Metal Knob #1 at C,5 to A,7.
Move the Metal Knob #4 at E,5 to C,7.
Move the Metal Knob #6 at E,7 to C,5.
Solution.
Once the puzzle is solved, take the Vial of Blood to add it to the blood meter and the Candle (4/4) from the opened chest.
Use the Map to travel to Mina's bedroom in London.
Mina's Room
Click the secret compartment above the bookcase to zoom in.
Add the small portraits of Mina and Harker from your inventory to the Missing Portrait spaces of the Medallion.
Click the completed Medallion to add it to your inventory.
Click the headboard on the bed to zoom in.
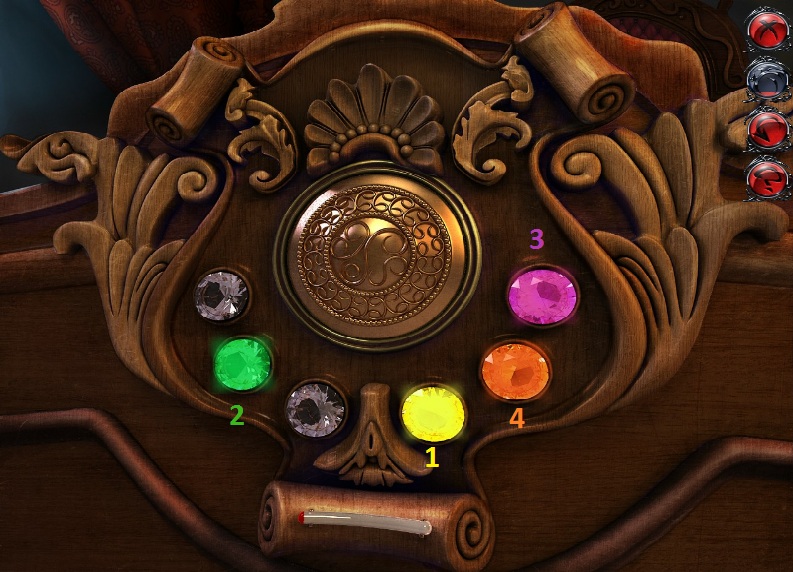
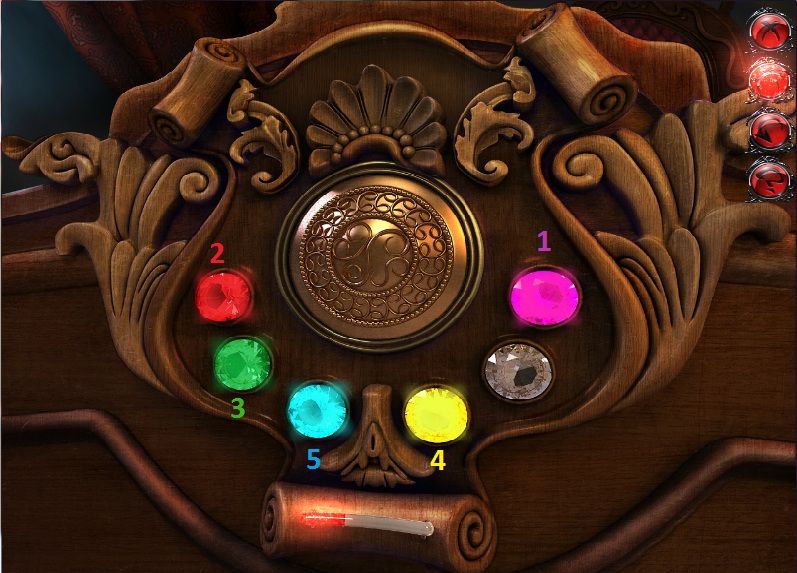
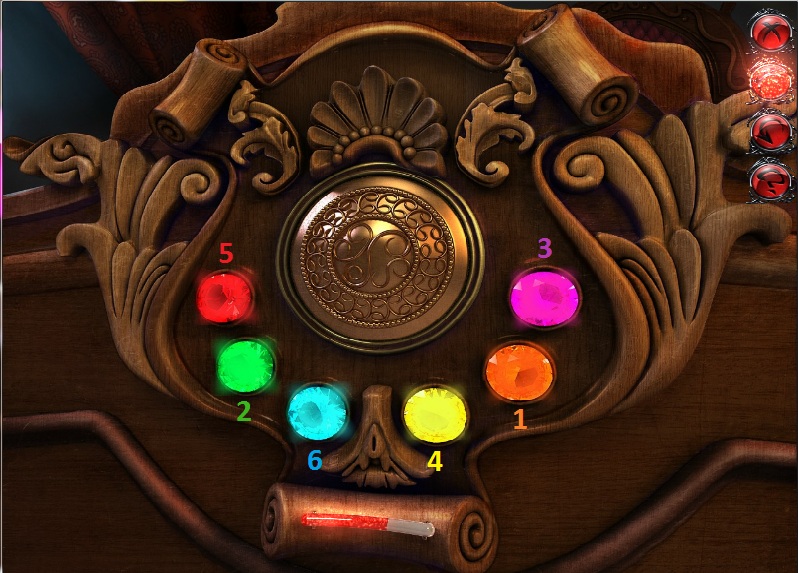
Add the three Small Diamonds and the Medallion from your inventory to the missing piece spaces of the headboard to start the simon-says puzzle.
To solve this puzzle, mimic the pattern of lighted colored gems.
First, watch to see the order of the gems, which will glow and play a tone one at a time.
Then click the gems in the exact order that they were played.
The game will repeat two more times, with increasing difficulty.
If you missed one of the play-through patterns click the "Reset" button to replay the order again.
The red bar at the bottom tracks your progress through the puzzle.
Solution #1.
Solution #2.
Solution #3.
Once the puzzle is solved, take the diamond inside the uncovered compartment in the headboard.
Use the Map to travel to the tomb.
The Tomb
Add the four Candles from your inventory and the large Diamond to the altar.
Use the Vampiric Vision ability on one of the highlighted spots on the wall.
Take the Piece of Shield (6/7) floating over Radomir's grave.
You will be prompted to return to the Room of Knights; click Yes to travel there.
Room of Knights
Use the 7 Pieces of Shield from your inventory on the second knight to the left to receive the Telekinesis vampiric ability.
Chapter 3
The Canal
Click the Vials of Blood at the bottom and middle of the right stairs and the Blood on the vines of the banister to add all three to the blood meter.
Take the Piece of Scissors (1/2) sticking out of the potted plant.
Take the Coin (1/5) on the ground next to the plant.
Take the Dynamite on the ground at the top of the stairs.
Click the left gondola to begin the hidden object scene.
Screenshot.
Once the hidden object scene is complete, a Vial of Blood will be added to your blood meter.
Use the Vampiric Vision ability on the invisible sign on the vines covering the right banister.
Take the revealed Piece of Shield (1/8).
Use the Telekinesis ability on the Coin (2/5) above the right archway to add it to your inventory.
Use the Telekinesis ability again on the left Lamppost to receive the Lighted Candle.
Go through the door to go forward to the bridge.
The Bridge
Take the Vials of Blood on the left wall and the right wall, between the arches to add them to the blood meter.
Use the Vampiric Vision ability on the invisible sign under the right arch.
Take the revealed Piece of Shield (2/8).
Use the Vampiric Vision ability again on the invisible sign in the middle of the ceiling.
Use the Telekinesis ability on the revealed Coin (3/5).
Take the Piece of Scissors (2/2) on top of the left crate.
Take the Hammer leaning against the right wall.
Use the Hammer on the crack in the wall to make a hole.
Put the Dynamite in the hole in the wall.
Use the Lighted Candle from your inventory on the Dynamite in the wall.
Take the Coin (4/5) and the Vial of Blood from the pile of rubble.
Take the Part of Skeleton (1/5) on the ground in the middle of the bridge.
Leave the bridge and return to the canal.
The Canal
Use the Scissors from your inventory on the back of the chair.
Take the revealed Coin (5/5) from underneath the fabric.
Click the base of the statue to zoom in.
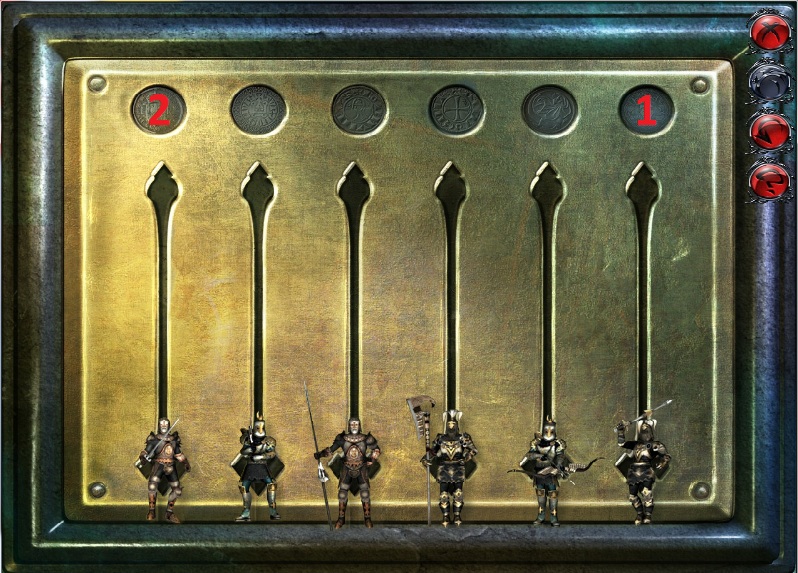
Add the 5 Coins from your inventory to the spaces in the base of the statue to begin the sliding knights puzzle.
To solve this puzzle, move all of the knights to the bottom of the panel.
Click a knight to pull it down to the bottom.
Moving one knight can affect the other knight pieces as well.
Solution.
Once the puzzle is solved, take the Dragon Stone (1/3) from behind the panel.
You will be prompted to travel to Van Helsing's office. Click Yes to go there now.
Van Helsing's Office
Take the Metal Rivet (1/3) and the Vial of Blood on the left desk to add it to the blood meter.
Click the Cleaning Drill in the middle of the bookcase to add it to your inventory.
Use the Vampiric Vision ability on the invisible sign at the top of the bookcase.
Take the revealed Dragon Stone (2/3).
Use the Telekinesis ability on the dragon head trophy to receive the Dragon Stone (3/3).
Click the Balcony to zoom in.
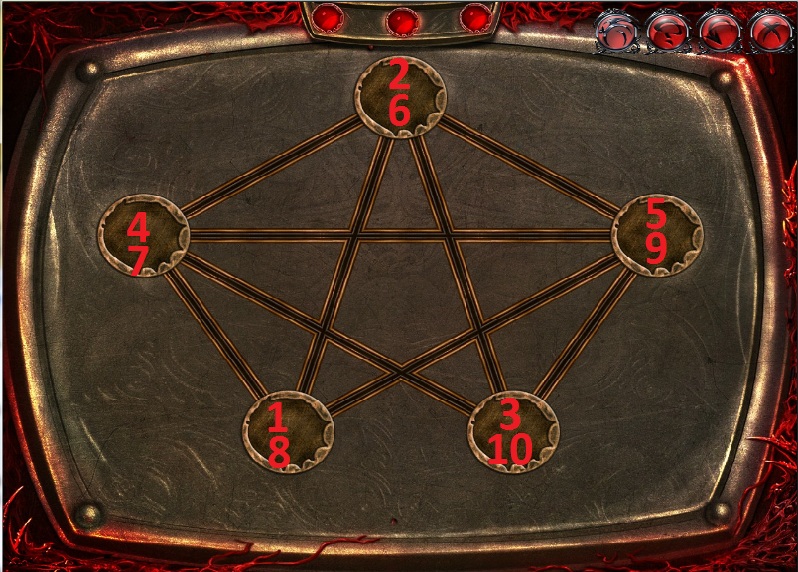
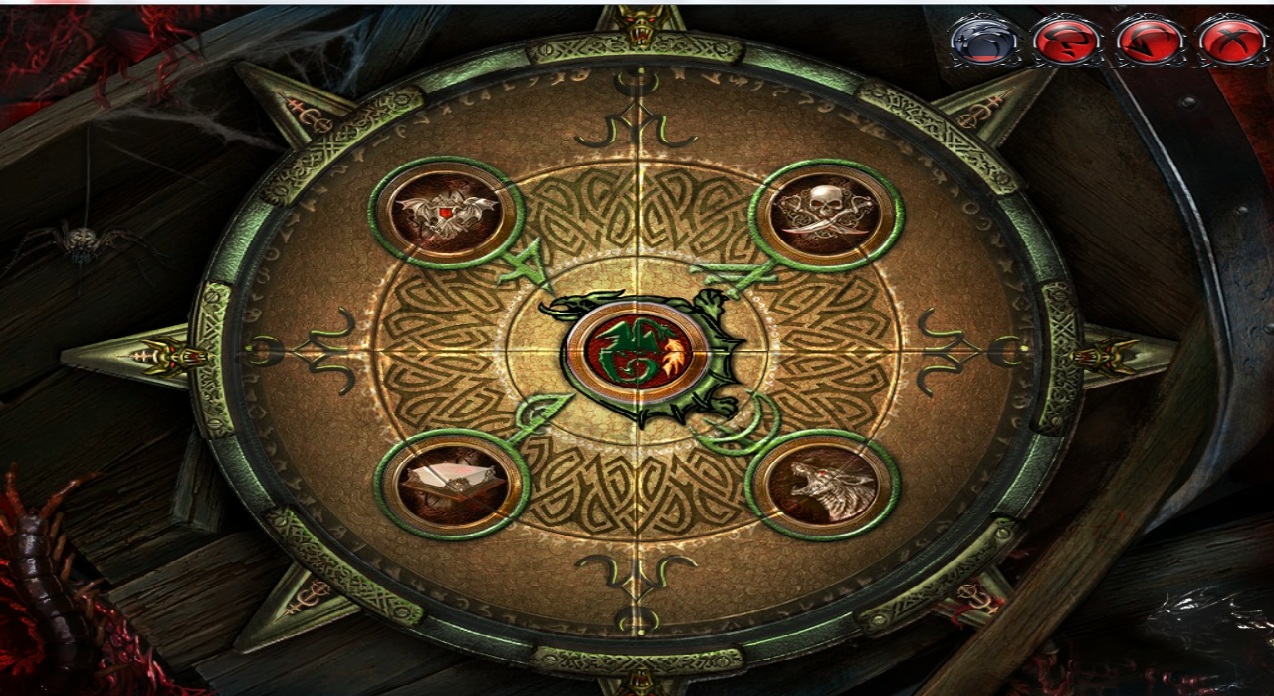
Add the three Dragon Stones from your inventory to the missing pieces to begin the pentagram puzzle.
To solve this puzzle, draw over all lines following the path of the pentagram.
You can only take each path one time, and if you double over one path the whole puzzle will reset.
When you draw over a line, it will glow white.
Solution #1.
Solution #2.
Solution #3.
Once the puzzle is solved, click the balcony to begin the hidden object scene.
Screenshot.
When the hidden object scene is completed, you will receive a Metal Rivet (2/3).
Use the Cleaning Drill from your inventory on the gun.
Take the revealed Metal Rivet (3/3).
Click the book at the base of the knight armor to zoom in.
Add the three Metal Rivets from your inventory to the missing spaces on the cover to start the rivet puzzle.
To solve this puzzle, move the symbol rivets into their respective colored spaces.
Click and hold a rivet to select it, then drag it over an empty space and release the mouse to set it down.
Rivets cannot pass over one another, only over empty spaces.
Solution.
Once the puzzle is solved, take the Sword on the ground beneath the case.
You will be prompted to travel to Venice. Click Yes to go there now.
The Canal
Use the Sword from your inventory on the statue of the queen of vampires.
You will be confronted by another of the Queen's accomplices; click her to begin the third vampire hunt puzzle.
To solve the vampire hunt, click and drag the Dracula icon to the end of the maze to the victim's icon.
While dracula is moving, the screen will turn black.
Commit the maze to memory as best you can, then move dracula to the end without touching any of the walls or obstacles.
If you touch a wall, Dracula will stop moving, and his location will be revealed. Click and drag the icon again to continue.
Screenshot.
If you chose not to drink the accomplice's blood, click the stairs on the left side of the canal to begin the hidden object scene.
Screenshot.
Once the hidden object scene is complete, you will receive a Vial of Blood which is added to the blood meter.
Take the Blue Rose and the Heavy Spike (1/3) on the stairs beside the shattered statue.
Use the Hammer from your inventory on the barrel above the left stairs to reveal the Heavy Spike (2/3).
Use the Telekinesis vampiric ability on the Piece of Shield (3/8) above the right archway.
Use the Hammer again on the jail bars beneath the right stairs to break through them.
Go forward through the bars into the jail cell.
Jail Cell
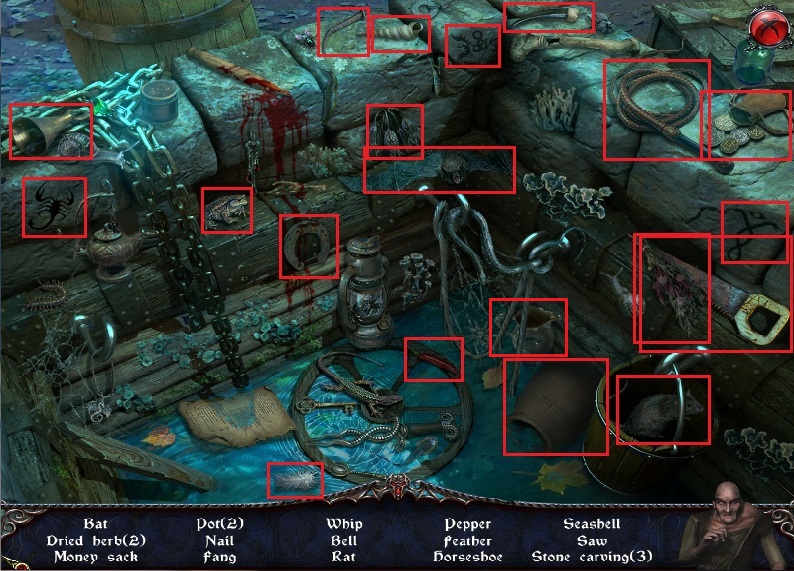
Click the water by the bars to begin the hidden object scene.
Screenshot.
Once the hidden object scene is complete, you will receive a Part of Skeleton (2/5).
Take the Piece of Shield (4/8) to the left of the wooden bench and the Piece of Shield (5/8) on the left column above the small steps.
Use the Vampiric Vision ability on the bottom step to reveal the Part of Skeleton (3/5)
Leave the jail cell and return to the canal.
The Canal
Click the left stairs to repeat the hidden object scene.
Screenshot.
Once the hidden object scene is complete, you will receive a Part of Skeleton (4/5)
Go forward through the doors to the bridge.
The Bridge
Take the Piece of Shield (6/8) next to the front row of spikes.
Take the Heavy Spike (3/3) on top of the left crate.
Add the Heavy Spikes from your inventory to the three chains hanging from the ceiling to retract the rows of spikes.
Click the doors at the end of the bridge to start a hidden object scene.
Screenshot.
Once the hidden object scene is complete, you will receive the Part of Skeleton (5/5).
Leave the bridge and return to the jail cell.
Jail Cell
Click the incomplete skeleton in the right corner of the cell to zoom in.
Add the five Parts of Skeleton from your inventory to the pile of bones to start the skeleton puzzle.
To solve this puzzle, assemble all the correct bones to complete the human skeleton.
Click a bone to select it and it will be automatically placed on the skeleton.
Each bone corresponds to a part of the skeleton, so selecting two bone parts of the same piece will replace the first bone with the second.
Solution.
Click the Complete Skeleton to add it to your inventory.
You will be prompted to return to the London cemetary. Click Yes to go there now.
The Cemetary
Take the Vial of Blood on the roots of the tree to the right to add it to the blood meter.
Click the shed to begin the hidden object scene.
Screenshot.
Once the hidden object scene is complete, you will receive a Runic Stone (1/3)
Leave the cemetary and return to Van Helsing's Office.
Van Helsing's Office
Place the Blue Rose from your inventory into the knight's hands.
Click the balcony to repeat the hidden object scene.
Screenshot.
Once the hidden object scene is complete, you will receive Leather Gloves.
Use the Leather Gloves on the knight's helm to receive the Blue Orb.
Leave Van Helsing's Office and return to the cemetary.
The Cemetary
Use the Blue Orb from your inventory on the front left altered grave to reveal the Runic Stone (2/3).
Use the Orb again on the rear left altered grave to reveal the Piece of Shield (7/8).
Use the Orb a third time on the rear right altered grave to reveal the Runic Stone (3/3).
Click the Pedestal of Corruption to zoom in.
Add the three Runic Stones from your inventory to the pedestal to begin the runic stone puzzle.
To solve this puzzle, move the balls to the points of their respective colors.
Click and drag ball to move it up, down, left, or right, following the arrow direction under your cursor.
A ball will continue to move until it hits an obstacle, such as a wall or another ball.
Solution #1.
Solution #2.
Solution #3 blue.
Solution #3 purple & green.
Click the shed to repeat the hidden object scene.
Screenshot.
When the hidden object scene is complete, you will receive a Shovel.
Use the Orb on the front right unaltered grave.
Use the Shovel on the earth inside the grave.
Place the Completed Skeleton from your inventory in the empty grave then take the Piece of Shield (8/8) hovering over the grave.
You will be prompted to return to the room of knights; click Yes to go there now.
Room of Knights
Add the eight Pieces of Shield from your inventory to the knight's shield in front of the left column to receive the Strength vampiric ability.
Posted by: Trinn |
July 2, 2011 2:59 PM
|
July 2, 2011 2:59 PM
Dracula: Love Kills Walkthrough part 2
Chapters 4-7
Chapter 4
Statue Plaza
Take the Vials of Blood in the flower bed by the front park bench and behind the easel to add both to the blood meter.
Take the Bottle of Solvent and Piece of Shield (1/9) on the seat of the front park bench.
Take the Scraper on the edge of the bench to the left of the easel.
Click the shrubbery in the back of the plaza to begin the hidden object scene.
Screenshot.
Once the hidden object scene is complete, you will receive a Dirty Piece (1/3).
Use the Strength vampiric ability on the sewer plate to reveal the Dirty Piece (2/3).
Click the base of the statue to zoom in.
Use the Scraper on the panel at the base of the statue.
Take the Caterpillar and the Piece of Shield (2/9), then close the statue view to zoom back out.
Use the Caterpillar from your inventory on the starling house at the top of the right tree to reveal the Dirty Piece.
Use the Telekinesis vampiric ability to add the Dirty Piece (3/3) to your inventory.
Click the water pump to zoom in.
Take the Vial of Blood to add it to the blood meter.
Place the three Dirty Pieces from your inventory on the grate below the pump.
Use the Bottle of Solvent on the dirty tiles, then use the Scraper to brush the tiles.
Click the water pump to rinse off the pieces, then click them to add them to your inventory.
Click the base of the statue again to zoom in.
Add the three Square Pieces from your inventory to the panel to begin the square tile puzzle.
To solve this puzzle, arrange the tiles to complete the picture.
Click a tile to rotate all of the adjacent squares around it.
Some tiles are bolted in place and will not move.
Solution.
Once the puzzle is solved, the panel will lift, revealing the Indian Scroll (1/4) Vial of Blood, and Louisiana Map.
You will be prompted to travel to Louisiana. Click yes to go there now.
The Bank
Take the rope on the bottom left corner of the dock.
Take the Vial of Blood at the top of the bell post to add it to the blood meter.
Use the Vampiric Vision ability on the invisible sign on top of the bell.
Take the revealed Angel (1/3).
Take the Part of Chest (1/3) below the bell.
Take the Fishing Net on the ground in the middle of the dock.
Use the Strength vampiric ability on the Part of Oar sticking up between the boards to add it to your inventory.
Use the Half Oar from your inventory to the part of oar handle lying on the ground.
Add the Rope from your inventory to the middle of the broken oar to repair it, then click the completed Oar to add it to your inventory.
Take the Knife sticking out of the barrel next to the magic shop.
Use the Strength vampiric ability on the overturned barrel.
Take the Vial of Blood and the Angel (2/3).
Take the Angel (3/3) on top of the doorway to the magic shop.
Use the Oar on the small boat next to the pier.
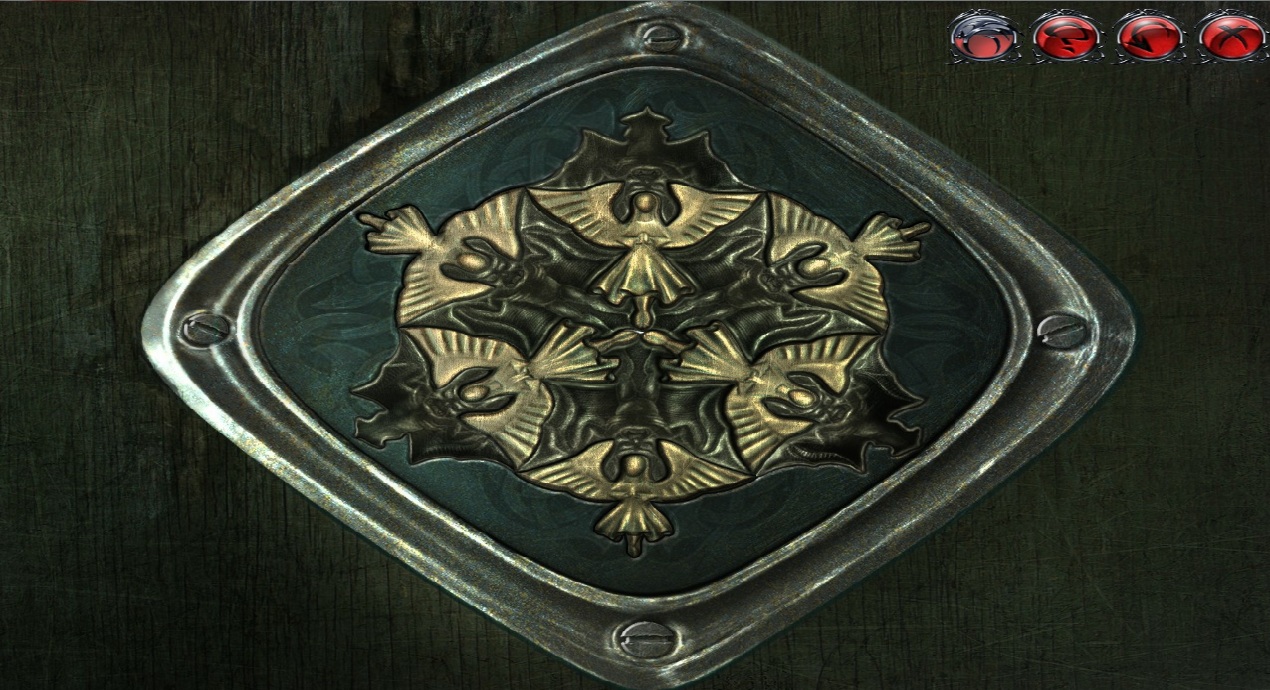
Click the shop door to zoom in.
Add the three Angels from your inventory to the mechanism on the door.
Take the revealed Piece of Shield (3/9) to start the angels and demons puzzle.
To solve this puzzle, place all the angel and demon figures into the lock mechanism.
Click a figure to pick it up, then click a space on the mechanism to set the figure in place.
Solution.
Click the unlocked doorway to begin the hidden object scene.
Screenshot.
Once the hidden object scene is complete, you will receive the Antialligator Powder.
Use the Antialligator Powder on the alligator lurking in the water by the boat.
Use the Telekinesis vampiric ability on the Isles Map floating in the water to add it to your inventory.
Click the left arrow above the boat to travel to the isle.
The Isle
Take the Part of Chest (2/3) hanging from the tree branch on the left.
Leave the isle for now and return to the bank.
The Bank
Click the door to the shop to repeat the hidden object scene.
Screenshot.
Once the hidden object scene is complete, you will receive a Vial of Blood, which is added to the blood meter.
Leave the Bank again and return to the isle.
The Isle
Use the Fishing Net from your inventory on the trout jumping in the water to the right of the island.
Give the Fishing Net with Trout to the grizzle bear.
Use the Knife to cut the Leather hide and add it to your inventory.
Use the knife again on the tipi to cut it open.
Click the inside of the tipi to start the hidden object scene.
Screenshot.
Once the hidden object scene is complete, you will receive an Indian Scroll (2/4).
Use the Vampiric Vision ability on the invisible object on the totem pole to reveal the Part of Chest (3/3).
Click the locked chest to the right of the shaman's tipi to zoom in.
Add the three Parts of Chest to the lock to begin the puzzle.
To solve this puzzle, rotate the circle to align them in the right combination.
Click a ring to rotate it once in a clockwise direction.
Click the checking lever to check the current combination.
If one of the rings is correctly positioned, one of the squares below the lever will change from red to yellow.
Solution.
Once the puzzle is solved, take the Blue Crystal from inside the chest.
You will be prompted to return to Venice. Click Yes to go there now.
The Canal
Use the Bison Skin from your inventory on the red crystal on top of the smashed statue.
Take the Wooden Board (1/2) at the bottom right corner of the middle stairway.
Take the Wooden Board (2/2) hanging from the banister of the right stairway, below the vines.
Use the Strength vampiric ability on the overturned barrel by the left stairs to smash it.
Click the broken barrel to zoom in.
Take the Piece of Shield (4/9).
Add the two Wooden Boards from your inventory to the missing pieces of the device to begin the puzzle.
To solve this puzzle, place sections of the circled pictures in the correct position to complete the image.
Click one tile to select it, then drag it over another tile to exchange places.
Start by aligning the center image of a dragon encircled by a griffin, then progress outwards.
Solution.
Once the puzzle is solved, take the Seal of the Queen in the smashed barrel to add it to your inventory.
Use the Seal of the Queen on the red crystal inside the flowerpot.
Use the Strength vampiric ability on the sealed red crystal.
You will be prompted to return to Louisiana. Click Yes to go there now.
The Bank
Take the Vials of Blood on the black crate inside the ship, on the ground beside the door to the magic shop, and between the black sheets and the barren to add all three to the blood meter.
Take the Pebble (1/4) on top of the left barrel and the Pebble (2/4) on the ground in front of the bank and the sea serpent.
Use the Vampiric Vision ability on the invisible sign on broken boards of the dock to reveal the Flask.
Take the Piece of Lock (1/3) on the dock in front of the crocodile and the Piece of Lock (2/3) on top of the right barrel.
Use the Vampiric Vision ability again on the invisible sign on the magic shop sign board to reveal the Piece of Shield (5/9).
Use the Strength vampiric ability on the sea serpent to pry the Piece of Shield (6/9) from its mouth.
Use the flask of Holy Water from your inventory on the crocodile to chase it away.
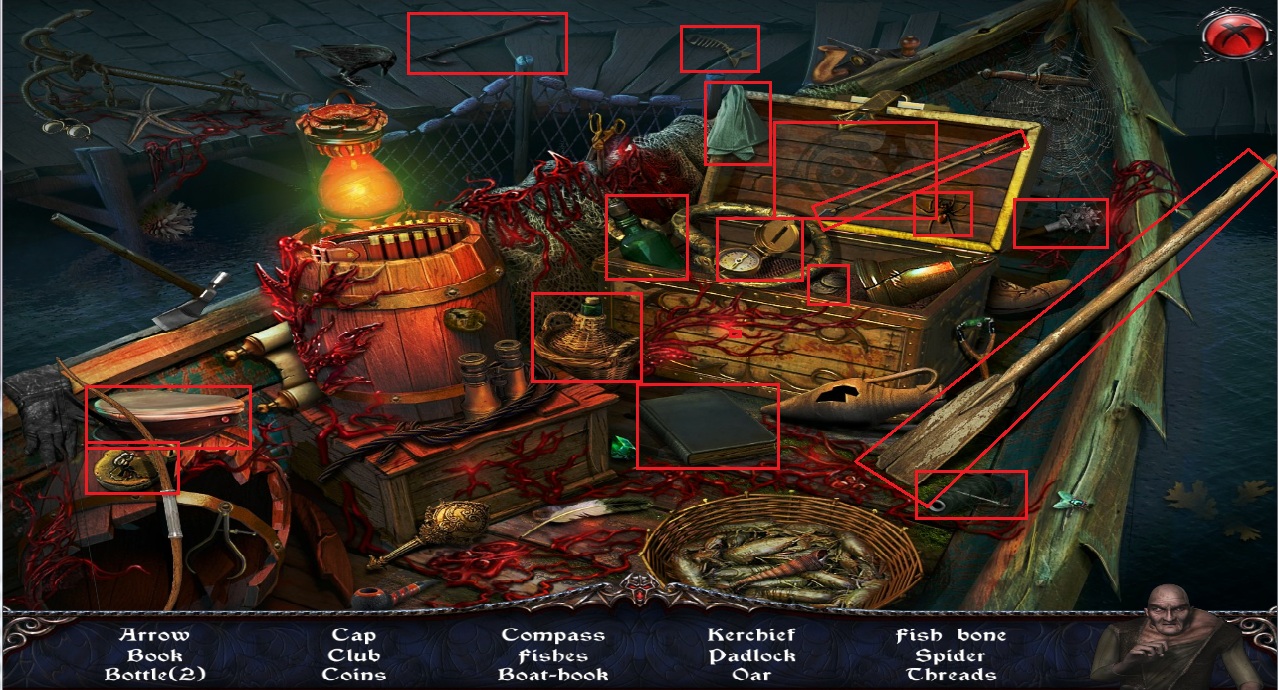
Click the black crate inside the ship to begin the hidden object scene.
Screenshot.
Once the hidden object scene is completed, you will receive the Threads.
Use the spool of Thread from your inventory on the black sheets to create a makeshift Black Sail.
Add the Black Sails to the mast of the ship.
Click the black crate inside the ship again to repeat the hidden object scene.
Screenshot.
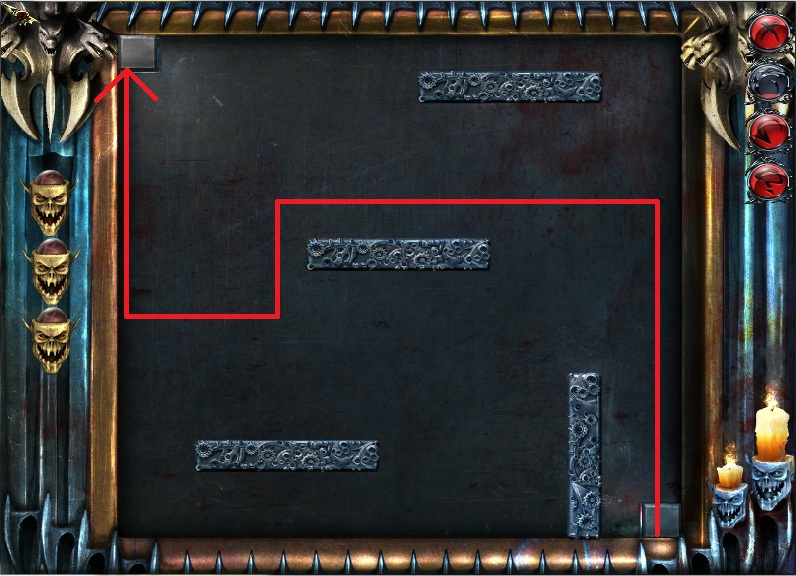
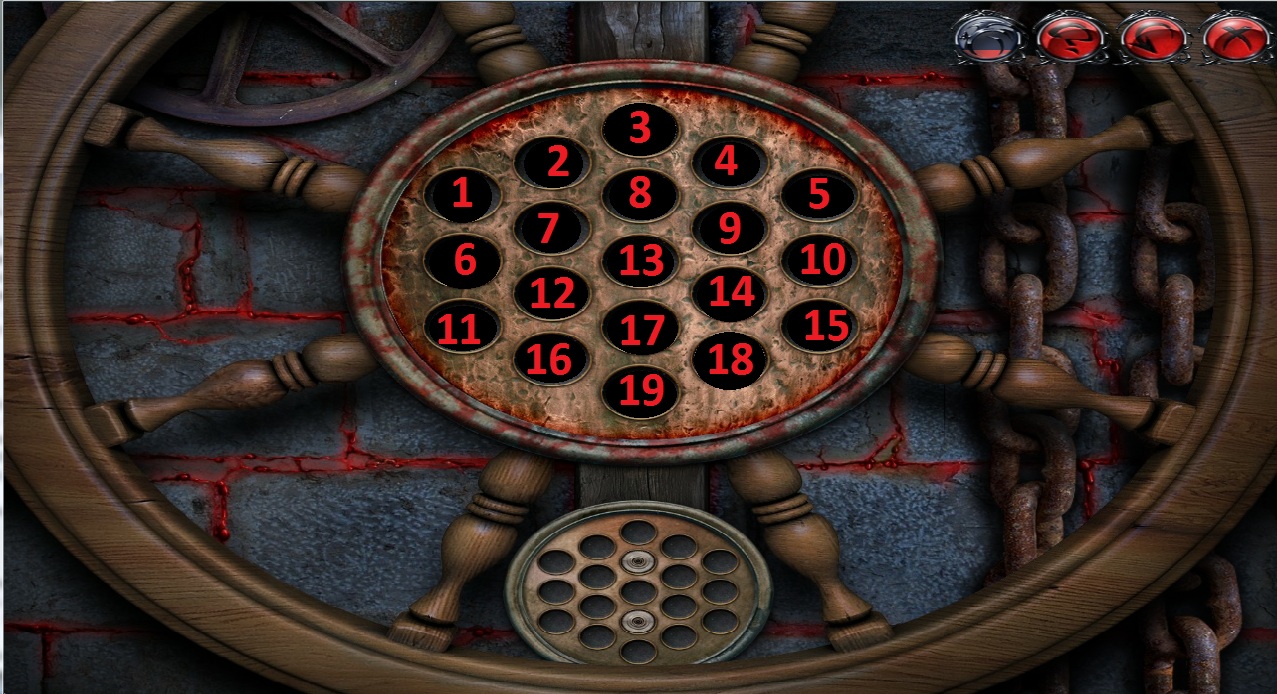
Click the docking system at the bow of the ship to zoom in.
Add the three Pieces of Lock from your inventory to the mechanism to begin the docking puzzle.
To solve this puzzle, drop the iron ball into the hole on the left side of the panel.
Click a tile or the ball to slide it up and down, or left and right.
Vertical blocks will only travel vertically, horizontal blocks will only travel horizontally.
Screenshot #1.
Click Tile 2.
Click Tile 3.
Click Tile 6.
Click Tile 1.
Click Tile 4.
Click Tile 5.
Click the iron ball.
Click Tile 8.
Click Tile 6.
Click the iron ball.
Click Tile 5.
Click Tile 4.
Click Tile 1.
Click Tile 5.
Click the iron ball.
Screenshot #2.
Click the iron ball.
Click Tile 11.
Click Tile 8.
Click Tile 7.
Click Tile 5.
Click Tile 2.
Click the iron ball.
Click Tile 10.
Click Tile 6.
Click Tile 1.
Click Tile 3.
Click the iron ball.
Screenshot #3.
Click Tile 11.
Click Tile 10.
Click Tile 7.
Click Tile 1.
Click Tile 2.
Click Tile 6.
Click the iron ball.
Click Tile 9.
Click Tile 10.
Click Tile 1.
Click Tile 3.
Click Tile 4.
Click Tile 5.
Click Tile 6.
Click Tile 7.
Click Tile 9.
Click Tile 7.
Click Tile 1.
Click Tile 10.
Click the Iron Ball.
Click Tile 6.
Click tile 5.
Click Tile 3.
Click Tile 7.
Click tile 8.
Click Tile 7.
Click Tile 5.
Click Tile 4.
Click Tile 6.
Click Tile 2.
Click Tile 1.
Click Tile 8.
Click the iron ball.
Click Tile 8.
Click Tile 1.
Click Tile 2.
Click the iron ball.
Once the puzzle is solved, the ship can travel to the isle.
The Isle
Take the Indian Scroll (3/4) on the ground near the front campfire.
Take the Pebble (3/4) on top of the half-submerged rock.
Take the Vials of Blood near the roots of the crooked tree, the Vial of Blood in the bow of the ship, and the Vial of Blood on the ground below the right campfire to add all three to the blood meter.
Take the Pebble (4/4) on the chest inside the ship.
Use the Telekinesis vampiric ability on the Piece of Shield (7/9) inside the chest floating in the water.
Use the Vampiric Vision ability on the invisible sign near the top of the left boulder to reveal the Piece of Shield (8/9).
Click the collapsed tipi to start the hidden object scene.
Screenshot.
Once the hidden object scene is complete, you will receive the Indian Scroll (4/4).
Add the four Pebbles from your inventory to the two left campires.
Place the Blue Crystal in the left hand of the totem and the Red Crystal in the right hand of the totem.
Click the middle of the totem to zoom in.
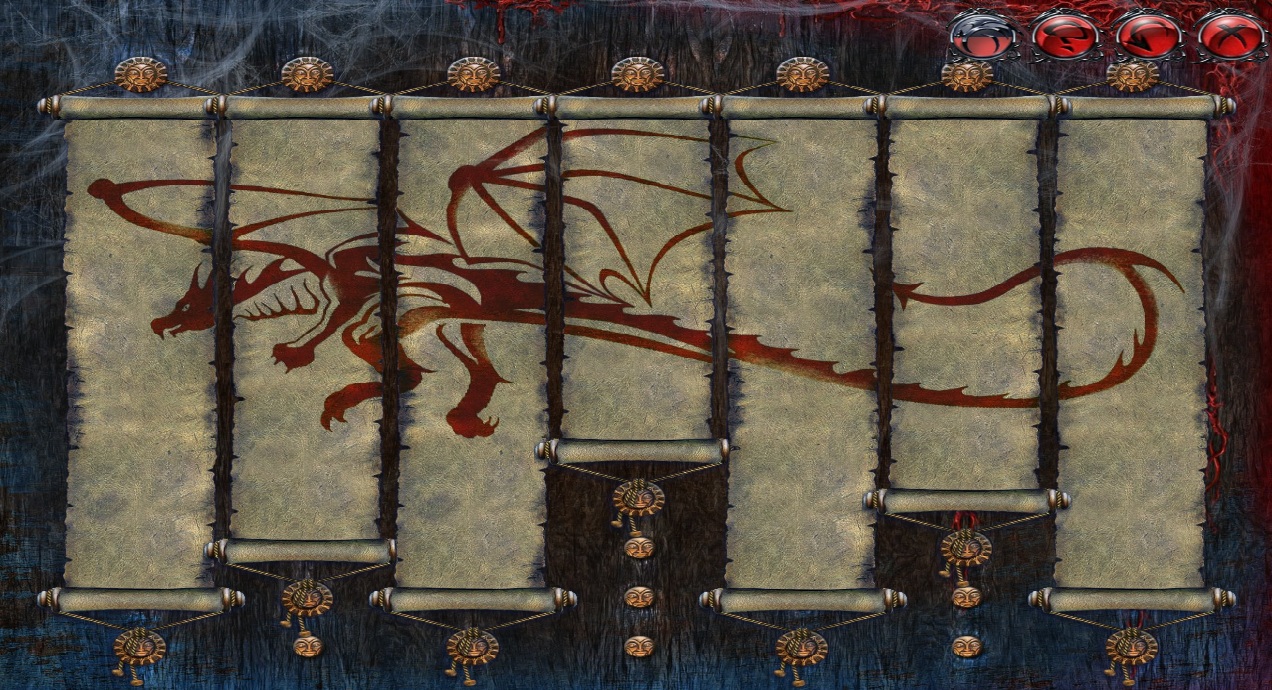
Place the four Indian Scrolls from your inventory onto the panel to begin the totem puzzle.
To solve this puzzle, place all the scrolls to complete the image of a dragon.
Click and drag a scroll to pull it downwards, then release the ring at one of the four knobs below each scroll to set it in place.
Solution.
Once the puzzle is solved, you will receive the Piece of Shield (9/9).
You will be prompted to travel to the room of knights. Click Yes to go there now.
Room of Knights
Add the nine Pieces of Shield from your inventory to the knight's shield in the back of the room.
You will receive the Animal Form vampiric ability.
Chapter 5
The Canal
Take the Vial of Blood on the leaning roof of the right building and on the porch of the left building to add both to the blood meter.
Take the Gear (1/3) on the ground next to the steam engine.
Take the Piece of Shield (1/10) on top of the crates.
Use the Vampiric Vision ability on the invisible sign on the roof of the right building to reveal the Gear (2/3).
Use the Strength vampiric ability on the crates.
to the left of the mining cart track to reveal the Gear (3/3).
Click the left building to begin the hidden obejct scene.
Screenshot.
Once the hidden object scene is complete, you will receive the Lever.
Click the steam engin to zoom in.
Take the Supervisor Key in the middle of the mechanism.
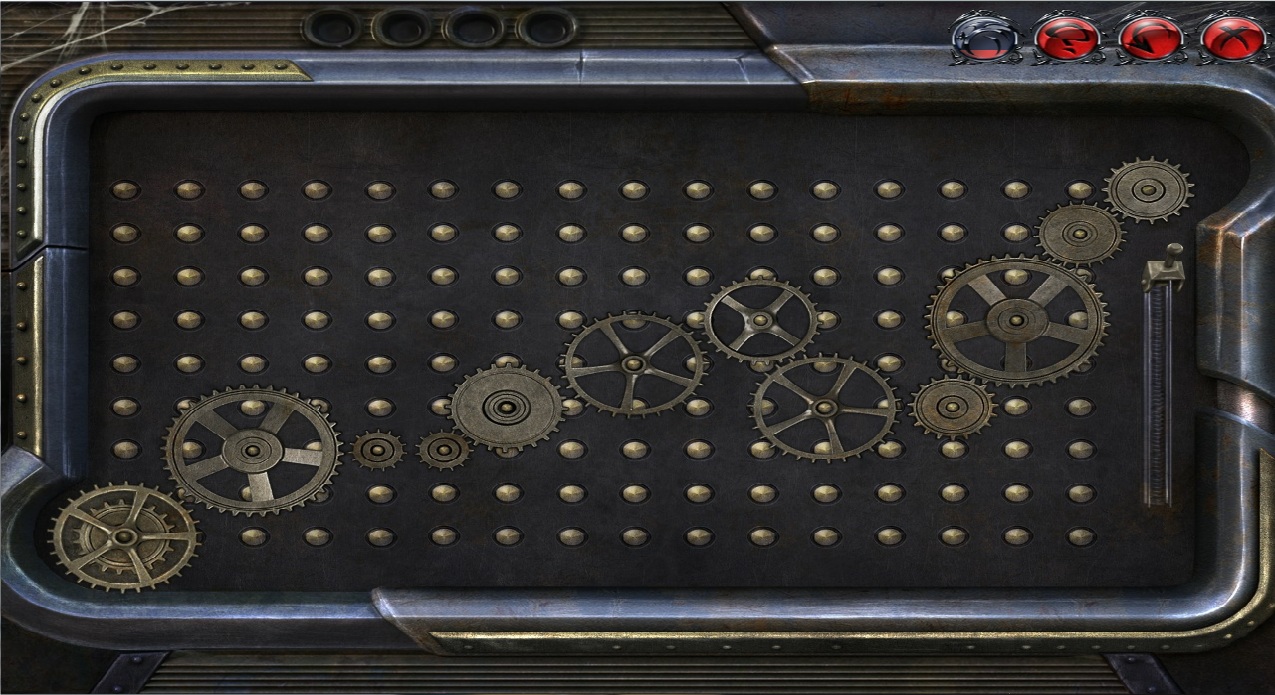
Add the three Gears from your inventory to the mechanism to begin the steam engine puzzle.
To solve this puzzle, connect a path from the gear in the bottm left corner to the gear in the upper right corner.
Click and drag a gear to select it, then release it on top of a peg to place it.
Gears cannot overlap, so if you attempt to place a gear on top of an area where another gear is touching, the first gear will revert to its original position.
Solution.
Use the Lever from your inventory on the switching system next to the steam engine.
Click the left building to repeat the hidden object scene.
Screenshot.
Once the hidden object scene is complete, you will receive a Key.
Click the shed to zoom in.
Use the Supervisor Key and the Engineer Key from your inventory on the padlock.
Take the Machete on the ground, the Vial of Blood hanging from the right door, the Square Piece (1/4) on the table, the Dried Meat on the hook, and the Part of Tomb Entrance (1/3) under the overturned stool all inside the shed.
Use the Machete from your inventory on the old road towards the Mayan temple.
Give the Dried Meat to the jaguar.
Go forward to the Mayan city.
Mayan City
Take the Piece of Shield (2/10) behind the skull of the right skeleton.
Take the Square Piece (2/4) between the left skeleton's legs.
Take the Piece of Animal Plate (1/3) at the top of the right stone tablet.
Take the Vials of Blood at the bottom of the right tablet and the top of the left tablet.
Use the Telekinesis vampiric ability on the Part of Tomb Entrance (2/3) in the branches of the left tree.
Use the Telekinesis ability again on the Part of Shield (3/10) at the top of the front pillar.
Use the Vampiric Vision ability on the invisible sign in the branches of the right tree to reveal the Square Piece (3/4).
Click the pit on the right side of the bridge to start the hidden object scene.
Screenshot.
Once the hidden object scene is complete, you will receive the blowpipe.
Use the Blowpipe on the anaconda on the stairs.
Take the revealed Part of Tomb Entrance (3/3).
Click the King's Tomb at the top of the ziggurat to zoom in.
Take the Vial of Blood inside the recess of the panel.
Add the three Parts of Tomb Entrance to the missing spaces to start the entrance puzzle.
To solve this puzzle, fit all of the pieces on to the grid.
Click a piece to select it, click an area on the grid to place it down.
Misplaced pieces that overlap or do not fit will revert to their original position around the grid.
Solution.
Go through the open door into the king's tomb.
King's Tomb
Take the Square Piece (4/4) on the ground to the right of the front brazier.
Take the Piece of Shield (4/10) in the unlit brazier at the back of the room.
Take the Vial of Blood inside the middle serpent head.
Click the mosaic to zoom in.
Add the four Square Pieces from your inventory to the mosaic to start the mosaic puzzle.
To solve this puzzle, arrange the tiles to match the image on the right.
Click a directional arrow under the cursor to move all attached tiles in that direction.
Tiles cannot be moved unless they are connected to another tile.
Screenshot
Move Tile 2 down four times.
Move Tile 4 down three times.
Move Tile 9 to the left.
Move Tile 7 to the right.
Move Tile 5 to the left.
Move Tile 10 to the left.
Move Tile 1 to the right.
Move Tile 6 to the right.
Move Tile 2 up.
Move Tile 17 up.
Move Tile 15 down.
Solution
Take the Piece of Animal Plate (2/3) at the bottom of the left grave.
Use the Vampiric Vision ability on the invisible sign in the top right corner of the recess to reveal the Piece of Shield (5/10).
Return to the Mayan city.
Mayan City
Use the Strength vampiric ability on the Sun Disk (1/2) by the roots of the right tree.
Leave the city and return to the king's tomb.
King's Tomb
Take the Piece of Animal Plate (3/3) in the corner of the sealed door.
Click the animal plate in the tomb recess to zoom in.
Add the three Animal Plates from your inventory to the missing spaces on the panel to start the animal plate puzzle.
To solve this puzzle, rotate the tiles to complete the picture of the animal.
Only one of the animals is a complete image.
Click a tile to shuffle through its four alternate pictures.
Solution
Go through the secret passage to return to the Mayan city.
Mayan City
Click the Queen's accomplice to begin the fourth vampire hunt puzzle.
To solve the vampire hunt, click and drag the Dracula icon to the end of the maze to the victim's icon.
While dracula is moving, the screen will turn black.
Commit the maze to memory as best you can, then move dracula to the end without touching any of the walls or obstacles.
If you touch a wall, Dracula will stop moving and his location will be revealed. Click and drag the icon again to continue.
Screenshot.
If you chose not to drink the accomplice's blood, click the Queen's accomplice puzzle on the stone slab on the left side of the stairs.
To solve this puzzle, match pairs of identical symbols.
Click one tile to reveal its symbol, then click another tile to attempt to match it.
If they are not a match, they will exchange places.
If the tiles do match, they will be removed from the board.
Once the puzzle is solved, you will receive a Vial of Blood, which is added to the blood meter.
Take the Hexagon (1/3) at the foot of the stairs.
Take the Vials of Blood on the right side of the stairs and in the pile of bones under the tree to add both to the blood meter.
Use the Strength vampiric ability on the Piece of Shield (6/10) stuck in the tree.
Click the right ziggurat to begin the hidden object scene.
Screenshot.
Once the hidden object scene is complete, you will receive a Hexagon (2/3).
Leave the city, and return to the canal.
The Canal
Take the Bag of Pepper hanging from the leaning roof of the right building.
Take the Vial of Blood on the ground by the rubble in front of the middle building and the Vial of Blood between the smashed crates to add both to the blood meter.
Use the Strength vampiric ability on the overturned mine cart to reveal the Hexagon (3/3).
Use the Vampiric Vision ability on the collapsed roof of the left building to reveal a Piece of Shield (7/10).
Use the Animal Form vampiric ability on the Cavern to zoom in.
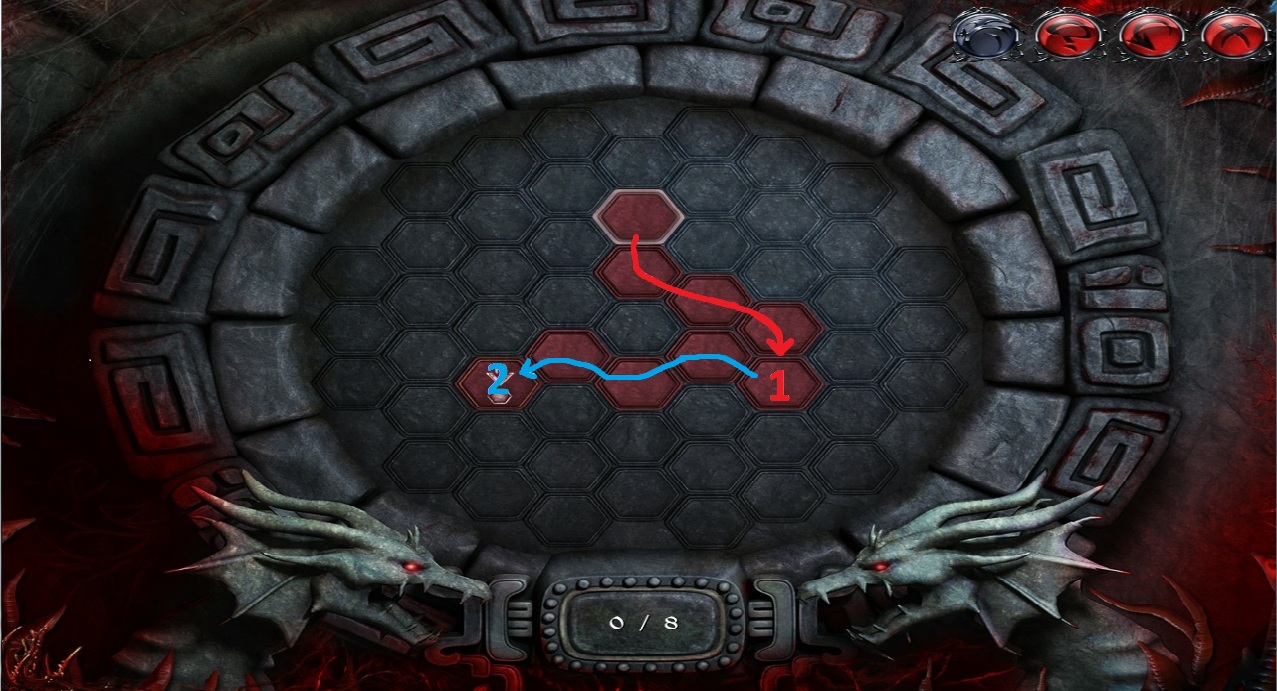
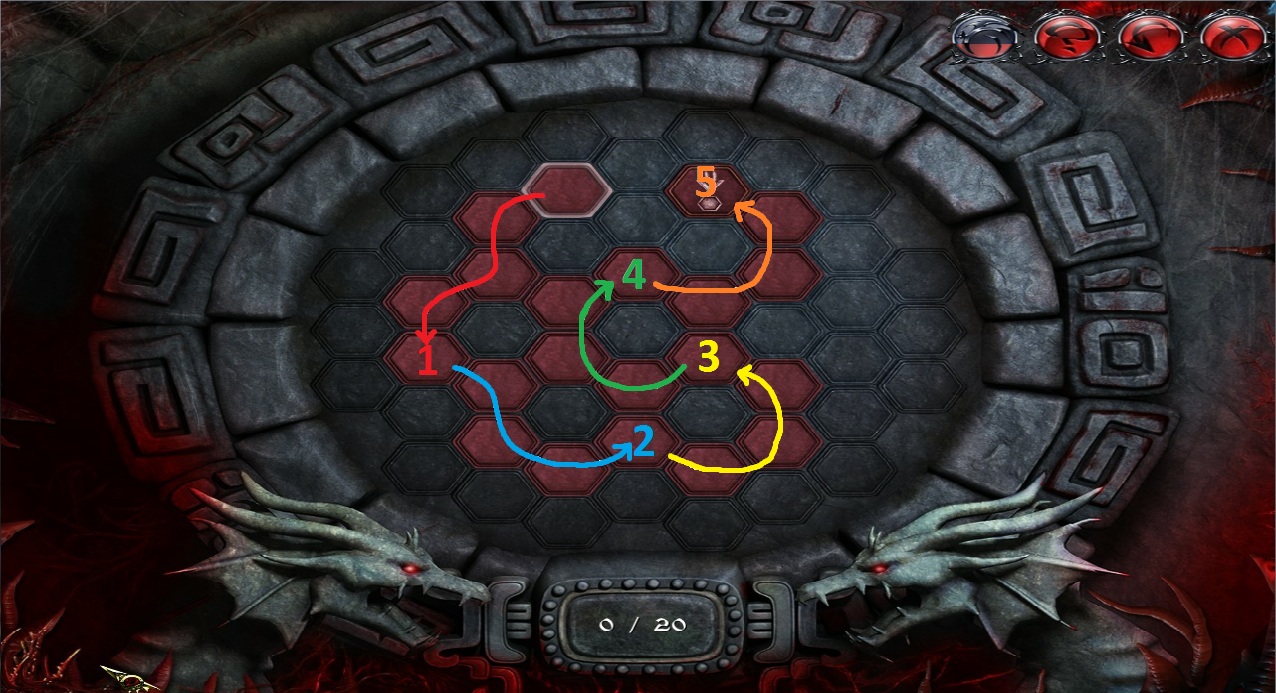
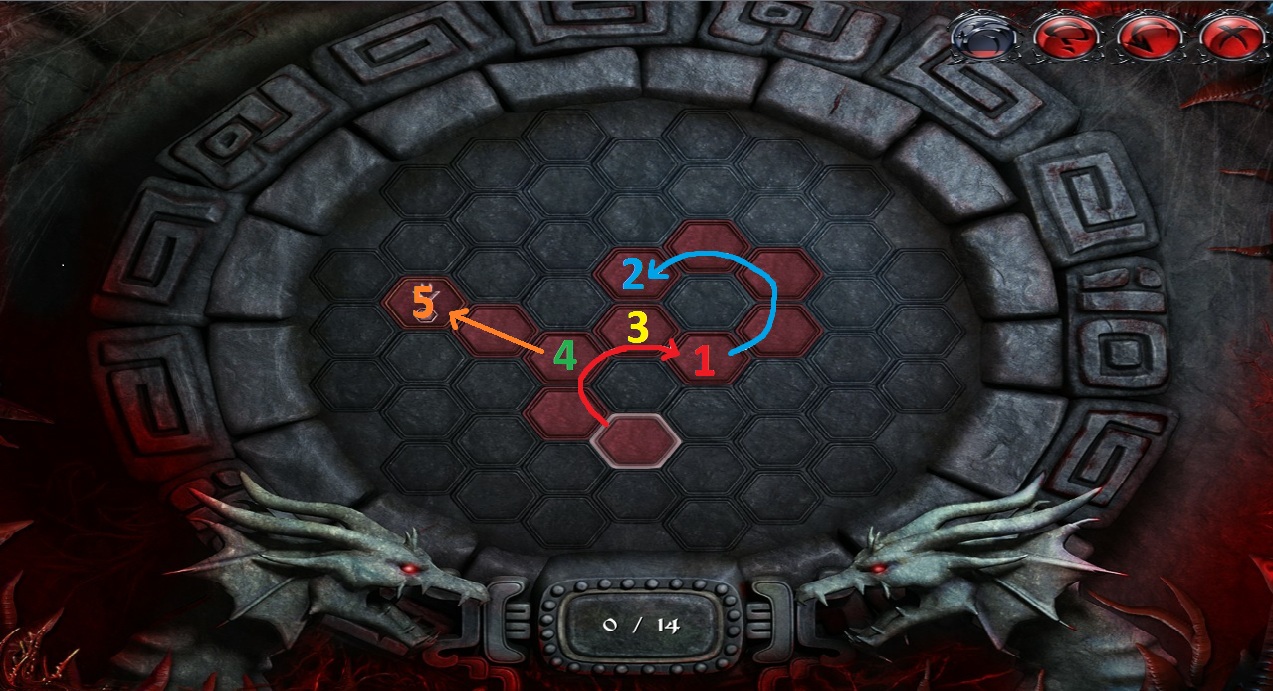
Add the three Hexagons from your inventory to the niche to begin the hex puzzle.
To solve this puzzle, follow the path of highlighted hexagons to reach the last one with the symbol.
There are a limited number of moves, shown at the bottom of the niche.
No boxes can be skipped before reaching the hexagon with the symbol.
Move your cursor across the boxes to highlight the hexagons, then click a hexagon to create a path.
You can highlight up to four hexagons at one time.
Solution #1.
Solution #2.
Solution #3.
Solution #4.
Solution #5.
Solution #6.
Once the puzzle is solved, take the Sun Disk (2/2) and the Piece of Shield (8/8).
Return to the Mayan city.
Mayan City
Use the Bag of Pepper from your inventory on the large snake to reveal the Piece of Shield (9/10).
Go forward into the king's tomb.
King's Tomb
Place the two Sun Disks from your inventory into the space at the bottom of each of the graves.
Take the floating Piece of Shield (10/10).
You will be prompted to return to the room of knights. Click Yes to go there now.
Room of Knights
Place the 10 pieces of shield from your inventory into the shield of the knight raising a sword.
Chapter 6
The Battlements
Take the Knife, Part of Bridge Mechanism (1/4), Adjustable Wrench, and the two Vials of Blood, all laying on the ground of the bridge.
Use the Knife on the seashell on the bridge to reveal the Part of Bridge Mechanism (2/4).
Use the Knife again on the seashell on top of the barrel to reveal the Part of Shield (1/6).
Click the deck of the boat to begin the hidden object scene.
Screenshot.
Once the hidden object scene is complete, you will receive a fishing spool.
Attach the fishing spool to the harpoon on top of the boat.
Use the Strength vampiric ability on the boat's mast to break it off.
Use the Boat's Mast on the barrel floating in the water to reveal the Piece of Shield (2/6), Maggots, and a Vial of Blood.
Drop the Maggots into the fishy spot in the water.
Use the Adjustable Wrench from your inventory on the ship's wheel.
Use the Animal Form ability on the left tower window to zoom in.
Take the Pulsing Red Sphere on top of the sofa.
Take the Part of Bridge Mechanism (3/4) at the bottom of the pedestal.
Use the Vampiric Vision ability on the invisible sign to the right of the pedestal to reveal the Piece of Shield (3/6).
Take the Golden Knob (1/4) from the corner of the window.
Take the Diamond on top of the pedestal.
You will be prompted to return to Radomir's tomb. Click Yes to go there now.
The Tomb
Add the Cut Diamond from your inventory to the altar.
Take the Vial of Blood in the hole beneath the monk statue.
Use the Vampiric Vision ability on one of the highlighted spots on the ceiling.
Take the Piece of Shield (4/6) floating above the altar and the Piece of Shield (5/6) beneath the letter "M" on the wall.
Take the Vial of Blood above the middle dragon's head on the right wall and the Vial of Blood at the bottom of the same column.
Use the map to travel to the Battlements.
The Battlements
Attach the Pulsing Red Sphere from your inventory to the harpoon on top of the boat.
Use the Sphere Attached with Harpoon on the corrupted drawbridge.
Use the Harpoon on the fishy spot to zoom in.
Take the Part of Bridge Mechanism (4/4) from the fishes mouth.
Take the Vial of Blood inside the barrel to add it to the blood meter.
Take the Piece of Shield (6/6).
You will be prompted to travel to the room of knights. Click Yes to go there now.
Room of Knights
Use the six Pieces of Shield from your inventory on the last knight's shield.
Take the Dagger of Order from the altar.
You will be prompted to travel to the battlements at Mont. St. Michel. Click Yes to go there now.
The Battlements
Use the Animal Form ability on the opening gates mechanism to the right of the drawbridge.
Add the four Parts of Bridge Mechanism and the Wheel from your inventory to the opening mechanism to start the gate puzzle.
To solve this puzzle, rotate the upper lock inside the wheel to match the example of the lower lock.
Click an area of the wheel to rotate all the pieces inside it clockwise.
Screenshot.
Click Circle 8 four times.
Click Circle 13.
Click Circle 14.
Screenshot.
Click Circle 9 twice.
Click Circle 14 four times.
Click Circle 12 four times.
Click Circle 7 twice.
Click Circle 8 three times.
Screenshot.
Click Circle 7.
Click Circle 14.
Click Circle 17 three times.
Go through the dropped bridge into the abbey.
The Abbey
Use the Animal Form vampiric ability on the left window of the abbey.
Click the window to begin the hidden object scene.
Screenshot.
Once the hidden object scene is complete, you will receive Holy Water.
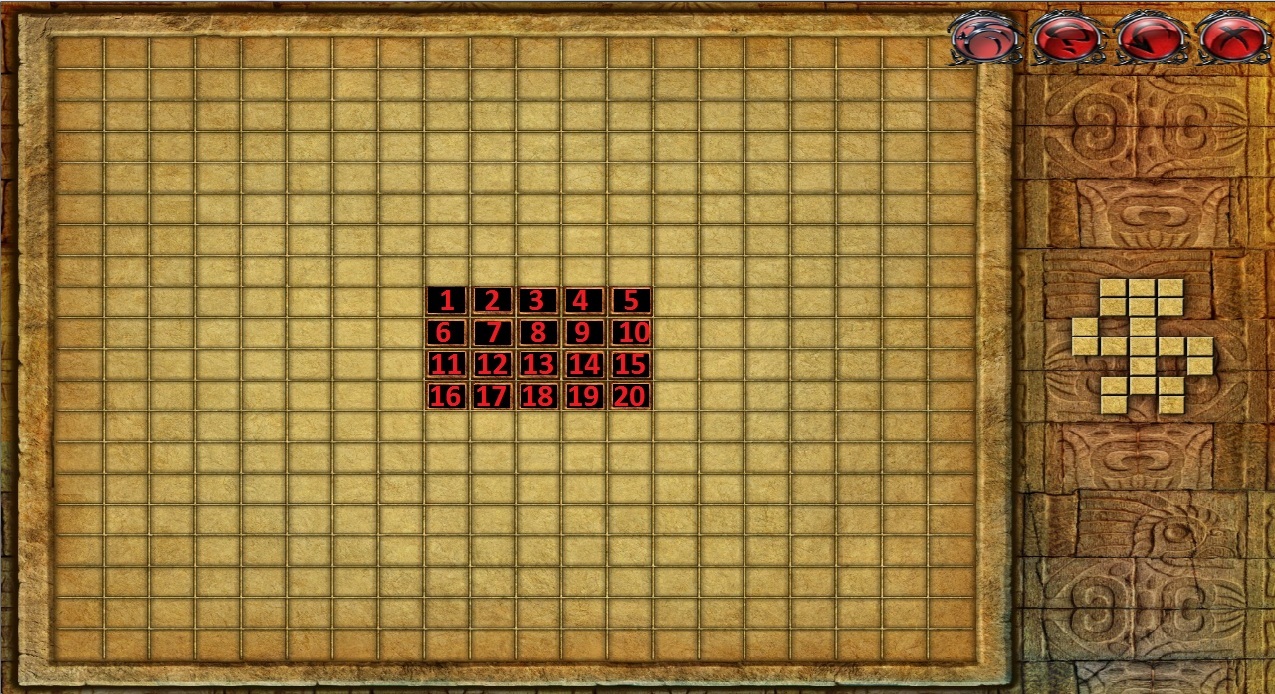
Use the Holy Water on the cerberus to start the cerberus puzzle.
To solve this puzzle, exchange the positions of the red tiles and green tiles.
Click a tile to select it, all available movements will flash across the screen.
Tiles can be moved into any open space, but cannot pass over other tiles.
Screenshot.
Move Puppy G to Space 5.
Move Cerberus C to Space 11.
Move Cerberus D to space 8.
Move Puppy G to Space 4.
Move Cerberus B to Space 5.
Move Ceberus A to Space 7.
Move Puppy G to Space 1.
Move Cerberus A to Space 4.
Move Cerberus D to Space 2.
Move Cerberus C to Space 3.
Move Puppy H to Space 6.
Move Cerberus B to Space 12.
Move Puppy F to Space 5.
Move Puppy E to Space 7.
Move Cerberus B to Space 9.
Move Puppy E to Space 12.
Move Puppy H to Space 10.
Move Cerberus C to Space 11.
Move Cerberus D to Space 8.
Move Puppy F to Space 2.
Move Cerberus D to Space 5.
Move Cerberus C to Space 3.
Move Puppy H to Space 6.
Move Cerberus D to Space 10.
Move Puppy H to Space 5.
Move Cebrerus C to Space 11.
Move Cerberus A to Sace 8.
Move Puppy H to Space 4.
Move Cerberus A to Space 5.
Move Cerberus C to Space 3.
Move Puppy E to Space 6.
Move Cerberus A to Space 12.
Move Puppy E to Space 5.
Move Cerberus C to Space 11.
Move Puppy E to Space 3.
Solution.
Use the Dagger of Order from your inventory on the Queen of Vampires.
Take the two Golden Knobs (2/4) and (3/4) on the ground next to the puppies.
Take the Golden Knob (4/4) at the foot of the red throne.
Take the Blue Crystal (1/3) on the ground to the left of Mina's prison.
Use the Telekinesis vampiric ability on the Blue Crystal (2/3) in the branches of the tree.
Click the abbey window to repeat the hidden object scene.
Screenshot.
Once the hidden object scene is complete, you will receive an Oil Can.
Click the Queen's Chest to zoom in.
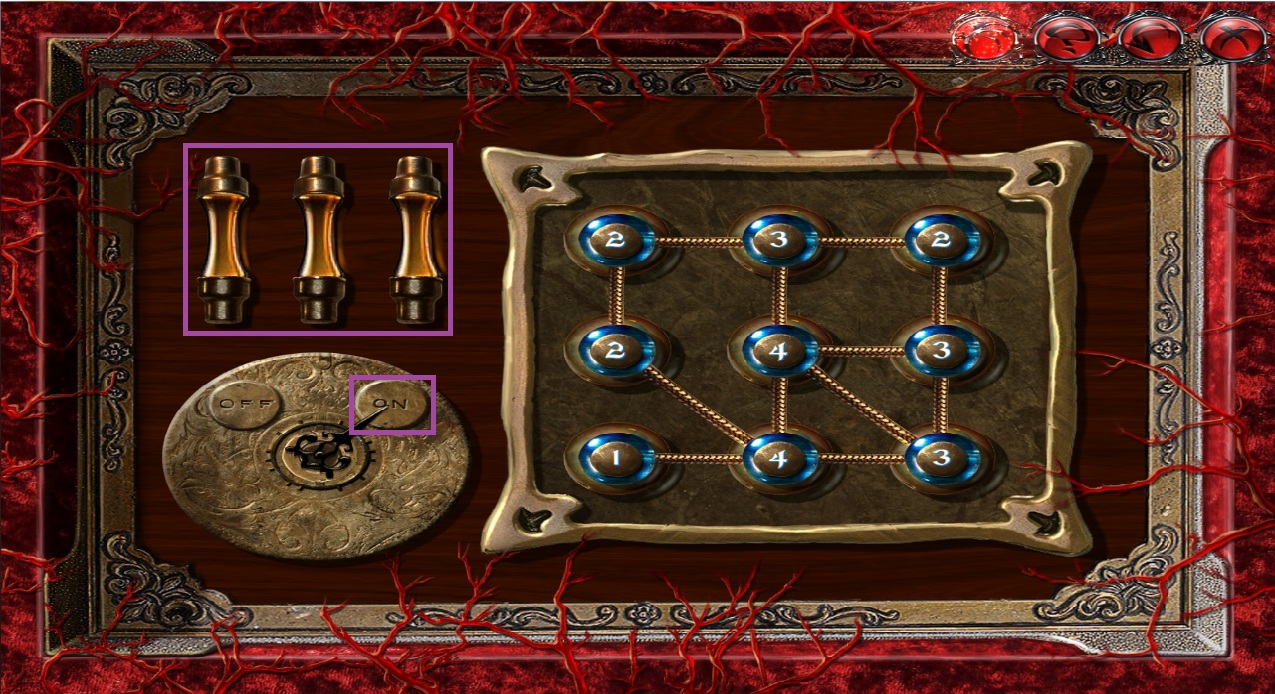
Add the four Golden Knobs from your inventory to the chest to start the queen's chest puzzle.
To solve this puzzle, connect the correct amount of lines to the numbered buttons on the device.
Click one button to select it, then click another button to attach a string between the two.
When you believe you have a correct solution, click the switch to push it to the ON position.
Buttons with the correct amount of attached links will glow blue.
Incorrectly connected buttons will glow red.
If any of the buttons are incorrect, one of the three fuses will blow.
If all three fuses go out, the puzzle will reset.
Solution.
Once the puzzle is solved, use the Oil Can from your inventory on the rusted lock.
Take the Vial of Blood and Blue Crystal (3/3) from inside the chest.
Click the Vortex surrounding Mina to zoom in.
Add the three Blue Crystals from your inventory to the missing pieces of the device.
Chapter 7
The Abbey
Use the map to travel to Radomir's tomb in London.
The Tomb
Click the area below the monk statue to repeat the hidden object scene.
Screenshot.
Once the hidden object scene is complete, you will receive a Bat Amulet (1/4).
Use the map to travel to the canal in Venice.
The Canal
Click the gondola by the left stairs to repeat the hidden object scene.
Screenshot.
Once the hidden object scene is complete, you will receive a Bat Amulet (2/4).
Take the Vial of Blood at the top of the right archway.
Use the Map to travel to the village in Transylvania.
The Village
Take the vial of blood on the porch near the toolbox.
Click the well to repeat the hidden object scene.
Screenshot.
Once the hidden object scene is complete, you will receive a Bat Amulet (3/4).
Use the map to travel to the Mayan city in Panama.
Mayan City
Take the Vial of Blood above the skull of the right skeleton.
Click the pit to the right of the bridge to repeat the hidden object scene.
Screenshot.
Once the hidden object scene is complete, you will receive a Bat Amulet (4/4).
You will be prompted to return to the abbey at Mont St. Michel. Click Yes to go there now.
The Abbey
Use the four Bat Amulets from your inventory on the bat outlines around the vortex.
Click the colonnade on the right to begin the hidden object scene.
Screenshot.
Once the hidden object scene is complete, you will receive a Shovel.
Leave the abbey and go back to the battlements.
The Battlements
Take the Crab (1/3) on the ground next to the lantern.
Take the Piece of Heraldry (1/4) leaning against the crate.
Take the Crab (2/3) inside the coil of rope on the ground.
Use the Shovel from your inventory on the mud to the left of the bridge.
Take the Piece of Heraldry (2/4) by the rope and the Crab (3/3) inside the life preserver.
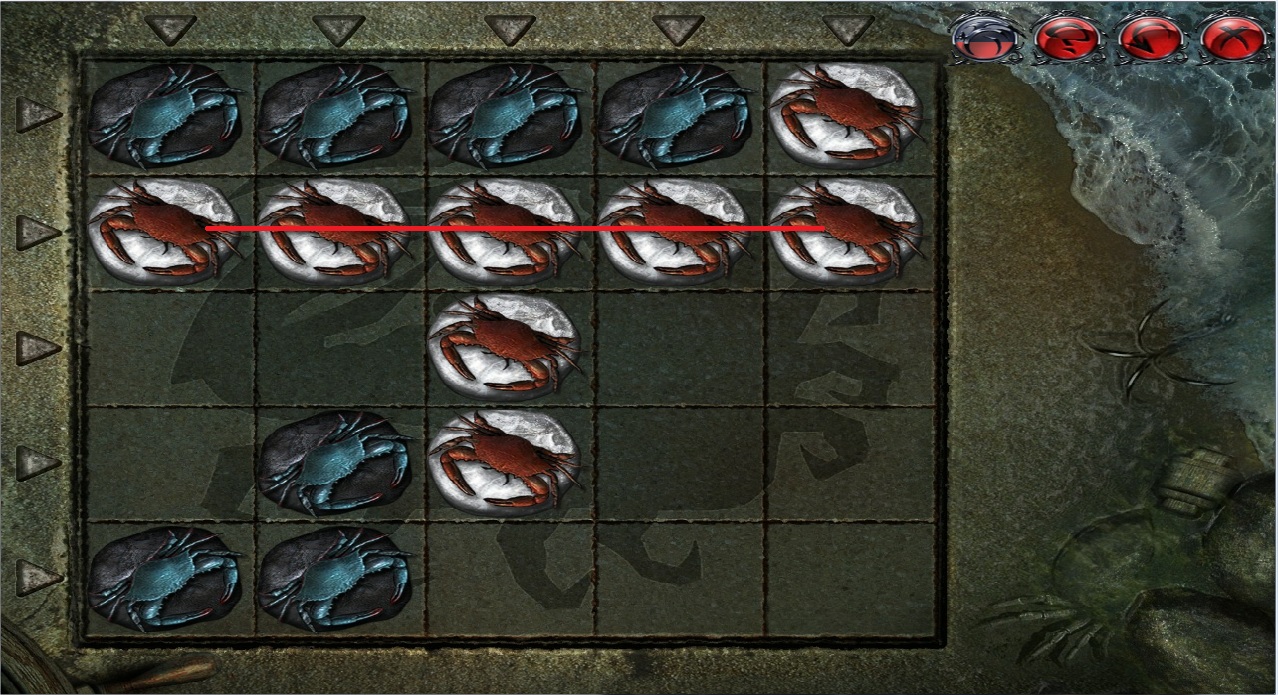
Click the crab hole on the right side of the bridge to zoom in.
Add the three Crabs from your inventory to the hole to begin the crab puzzle.
To solve this puzzle, create a horizontal, vertical or diagonal line of five crabs.
Place a crab on the grid by clicking one of the arrows on the top and left side of the board.
If the enemy AI makes a line of five crabs before you do, the puzzle will reset.
Opposing players can push away enemy tiles by moving one of their own tiles forward into the enemy's space.
Solution.
Once the puzzle is complete, take the Piece of Heraldry (3/4) inside the crab's claws.
Leave the battlements and return to the abbey.
The Abbey
Click the right colonnade to repeat the hidden object scene.
Screenshot.
Once the hidden object scene is complete, you will receive the Piece of Heraldry (4/4).
Return to the battlements.
The Battlements
Click the heraldry of the archangel at the top of the bridge to zoom in.
Add the four Pieces of Heraldry to the missing spaces of the heraldry on the wall.
Use the Strength vampiric ability to pull the completed Heraldry from the wall and add it to your inventory.
Return to the abbey.
The Abbey
Use the Animal Form ability on the base of the statue at the top of the abbey.
Add the Heraldry from your inventory to the missing heraldry on the wall to begin the heraldry puzzle.
To solve this puzzle, match all the pairs of identical shields.
Click a shield to select it, then click another shield to attempt to match the pair.
If two shields are correctly matched, they will disappear.
Solution.
The End
Posted by: Trinn |
July 2, 2011 3:00 PM
|
July 2, 2011 3:00 PM
Dracula: Love Kills Walkthrough, part 3
Extra Gameplay
Once the game has been beaten, click the Extra Gameplay tab in the middle of the Main Menu to continue the story.
The Theater
Take the Vials of Blood on the lower balcony above the seats and on the middle balcony above the stage.
Take the Metal Tablet (1/3) at the bottom of the stage curtain.
Take the Bat Token (1/2) from the left actor's hand.
Use the Telekinesis vampiric ability on the Mask (1/3) on top of the left balcony to add it to your inventory.
Click the seats in front of the stage to zoom in.
Use the Strength vampiric ability on the chairs to reveal the Piece of Fresco (1/3) and Piece of Chair.
Take the Vial of Blood on the undamaged chair to the right to add it to the blood meter.
Use the Telekinesis vampiric ability on the Piece of Clock (1/2) in the angel statue's hands.
Click the top of the balcony to start the hidden object scene.
Screenshot.
Once the hidden object scene is complete, you will receive a Mask (2/3).
Use the Piece of Chair from your inventory on the control mechanism on the column below the angel statue.
Take the revealed Piece of Fresco (2/3) on the stage.
Go forward to reach the backstage.
Backstage
Take the Vial of Blood above the statuette to add it to the blood meter.
Take the Metal Tablet (2/3) on top of the small stairs.
Take the Piece of Clock (2/2) in the corner of the womans' portrait.
Click the clock mechanism to zoom in.
Add the two Pieces of Clock from your inventory to the mechanism to begin the clock puzzle.
To solve this puzzle, assemble the tiles to complete the picture of the gear.
Click a tile to select it, then click a position on the grid to replace it.
Solution.
Take the revealed Mask (3/3) inside the clock.
Leave the backstage and return to the front of the theater.
The Theater
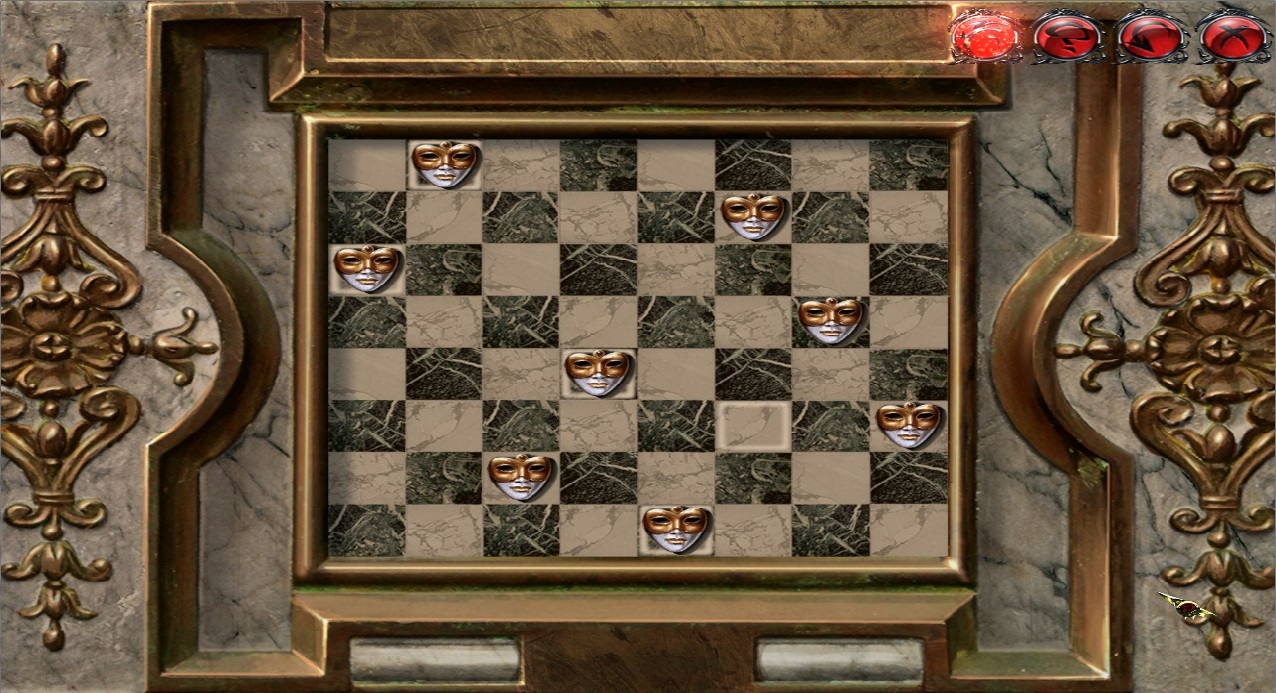
Click the cut curtain on the stage backdrop to zoom in.
Add the three Masks from your inventory to the missing mask spaces to begin the mask puzzle.
To solve this puzzle, place all the masks on the field.
Masks cannot be placed on the same vertical, horizontal, or diagonal line.
Click an area on the grid to place a mask.
If a placed mask shares any line with other masks on the board, any touching masks will be removed but the placed mask will remain.
Solution.
Click the hidden stage door to view the basement.
Take the Vial of Blood on the steps.
Use the Vampiric Vision ability on the corner under the stairs to reveal the Bat Token (2/2).
Close the basement view and return backstage.
Backstage
Click the chest to zoom in.
Add the two Bat Tokens from your inventory to begin the bat puzzle.
To solve this puzzle, place more red bats on the board than black bats.
Placing a red bat in an empty space over a black bat in a vertical, horizontal, or diagonal line will turn any black bats in that line into red bats.
Available moves will have a faded image of a bat when you move the cursor over the tile.
The AI will also try to turn your red bats to black.
The number of bats each player has is shown in the counters on the left and right sides of the board.
A good winning strategy is to play defensively and wait until the black bats have formed a row of five, so you can place the sixth bat and capture the whole row.
Try to take a side of the board early to prevent the AI from being able to capture any of the red bats against the wall.
Solution.
Take the Vial of Blood and Piece of Fresco (3/3) from inside the chest.
Leave the backstage area and return to the theater.
The Theater
Click the basement area to zoom in.
Add the three Fresco Pieces from your inventory to the missing spaces on the door to start the fresco puzzle.
To solve this puzle, all of the pieces of the fresco must be depressed.
When a tile is unlit, it is raised. Click that tile to press it down and it will brighten.
Clicking one tile will affect all adjacent tiles.
Solution.
Once the puzzle is solved, go through the open door into the catacombs.
Catacombs
Take the Metal Tablet (3/3) at the foot of the stairs.
Take the Vial of Blood on the ground next to the alcoves and the Vial of Blood inside the empty alcove above the stairs.
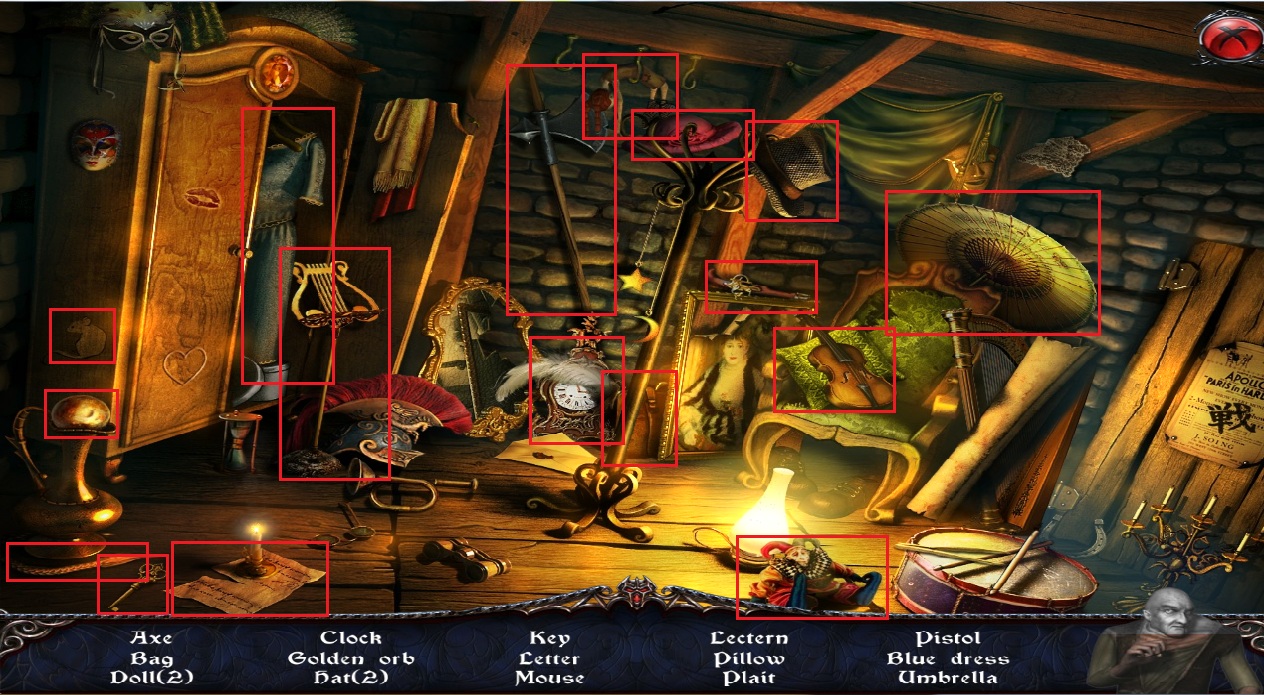
Click the candlelit alcoves to begin the hidden object scene.
Screenshot.
Once the hidden object scene is complete, you will receive a Golden Orb (1/3).
Click the Alcoves to zoom in.
Use the Vampiric Vision ability on the invisible signs on the alcoves.
Add the three Metal Tablets from your inventory to the plates marked with an X
Take the revealed Golden Orb (2/3), Lockpicks, and Engraved Skull (1/3)
Leave the catacombs and return backstage.
Backstage
Use the Lockpicks from your inventory on the small wooden locked door to start the lockpick puzzle.
To solve this puzzle, arrange all the tumblers numerically from 1 to 10.
Click and hold a tumbler to select it, then release the mouse to place it in one of the four grooves of the lock.
Exterior grooves (Grooves 1 and 5) can only hold one tumbler.
Interior grooves (Grooves 2, 3, and 4) can hold multiple tumblers, if the tumblers are ordered numerically.
Screenshot.
Place Tumbler 9 in Groove 5.
Place Tumbler 3 in Groove 2.
Place Tumbler 7 in Groove 4.
Place Tumbler 8 in Grove 4.
Place Tumbler 9 in Groove 4.
Place Tumbler 1 in Groove 1.
Place Tumbler 5 in Groove 5.
Place Tumbler 10 in Groove 4.
Place Tumbler 4 in Groove 2.
Place Tumbler 5 in Groove 2.
Place Tumbler 2 in Groove 5.
Place Tumbler 6 in Groove 2.
Place Tumbler 10 in Groove 3.
Place Tumbler 9 in Groove 3.
Place Tumbler 8 in Groove 3.
Place Tumbler 7 in Grove 3.
Place Tumbler 6,5,4,3,2 and 1 in Groove 4.
Place Tumbler 7 in Groove 1.
Place Tumbler 8 in Groove 2.
Place Tumbler 9 in Groove 2.
Place Tumbler 10 in Groove 5.
Place Tumblers 1,2,3,4,5, and 6 in Groove 3.
Place Tumbler 7 in Groove 3.
Place Tumbler 9 in Groove 4.
Place Tumblers 8,9, and 10 in Groove 3.
Solution.
Once the puzzle is solved, click the open door to start the hidden object scene.
Screenshot.
Once the hidden object scene is complete, you will receive the Golden Orb (3/3).
Leave the basement and return to the catacombs.
Catacombs
Click the alcoves base to zoom in.
Add the three Golden Orbs from your inventory to start the alcove puzzle.
To solve this puzzle, capture the snake by blocking the tubes with golden orbs.
Possible moves will be highlighted with a golden circle.
Click a circle to select it, and it will be covered with a basket, preventing the snake from moving there.
The snake will react to your movements to avoid you.
When the snake is standing on a highlighted circle that you can move to, click it to capture the snake.
Screenshot.
Go forward into the labyrinth.
The Labyrinth
Take the Vials of Blood in the hole of the wall and on the ground to the right of the altar to add both to the blood meter.
Click the candlelit altar to begin the hidden object scene.
Screenshot.
Once the hidden object scene is complete, you will receive a Round Amulet.
Click the stone Altar to zoom in.
Add the Round Amulet from your inventory to the closed altar to begin the altar puzzle.
To solve this puzzle, switch all the golden skulls from the left side with the silver skulls on the right side.
Click a skull to move it forward.
Skulls can move forward into an empty space, or jump over another skull into an empty space.
Screenshot.
Move Skull E to Space 6.
Move Skull F to Space 5
Move Skull G to Space 7.
Move Skull E to Space 8.
Move Skull D to Space 6.
Move Skull C to Space 4.
Move Skull F to Space 3.
Move Skull G to Space 5.
Move Skull H to Space 7.
Move Skull I to Space 9.
Move Skull E to Space 10.
Move Skull D to Space 8.
Move Skull C to Space 6.
Move Skull B to Space 4.
Move Skull A to Space 2.
Move Skull F to Space 1.
Move Skull G to Space 3.
Move Skull H to Space 5.
Move Skull I to Space 7.
Move Skull J to Space 9.
Move Skull E to Space 11.
Move Skull D to Space 10.
Move Skull C to Space 8.
Move Skull B to Space 6.
Move Skull A to Space 4.
Move Skull G to Space 2.
Move Skull H to Space 3.
Move Skull I to Space 5.
Move Skull J to Space 7.
Move Skull C to Space 9.
Move Skull B to Space 8.
Move Skull A to Space 6.
Move Skull I to Space 4.
Move Skull J to Space 5.
Move Skull A to Space 7.
Take the revealed Vial of Blood and Engraved Skull (2/3).
Use the Vampiric Vision ability on the invisible sign on the ground in front of the tunnels.
Go forward through the middle tunnel into the quarry.
The Quarry
Take the Vial of Blood and Engraved Skull (3/3) beside the central support beam.
Take the Vial of Blood next to the chest.
Use the Strength vampiric ability on the over turned mine cart to reveal the Lock Button (1/3).
Use the Telekinesis vampiric ability on the Lock Button (2/3) on top of the right wooden beam.
Use the Vampiric Vision ability on the invisible sign on the ground.
Click the wall the footsteps lead to.
Use the Strength vampiric ability on the fake wall.
Click the tunnel to begin the hidden object scene.
Screenshot.
Once the hidden object scene is complete, you will receive a Miner Pick.
Click the blocked wall to zoom in.
Use the Miner Pick on the stones of the blocked wall.
Return to the labyrinth.
The Labyrinth
Click the wall with skulls to zoom in.
Add the three Engraved Skulls from your inventory to the board to start the skull puzzle.
To solve this puzzle, find the hidden mask.
Click a Skull to make a guess.
If you chose incorrectly, the removed skull will reveal a number indicating how many tiles away you are from the mask.
Solution.
Take the uncovered Lock Button (3/3).
Return to the quarry.
The Quarry
Click the chest to zoom in.
Add the three Lock Buttons from your inventory to the missing spaces to begin the puzzle.
To solve this puzzle, connect four of the black pirate tokens in either a vertical, horizontal, or diagonal line.
The Red Skull AI player gets the first move.
Move your cursor over one of the rows and click to drop the black skull token.
Solution.
Take the revealed Dynamite.
Clicked the blocked wall to zoom in.
Add the Dynamite to the hole in the blocked wall.
Leave the quarry and return to the labyrinth.
The Labyrinth
Click the candlelit altar to repeat the hidden object scene.
Screenshot.
Once the hidden object scene is complete, you will receive a Box of Matches.
Return to the quarry.
The Quarry
Click the blocked wall to zoom in.
Use the Box of Matches from your inventory on the dynamite.
Go through the opened wall into the ruins.
The Ruins
Take the Torch on the wall to add it to your inventory.
Take the Vial of Blood inside the broken jar.
Click the sand to zoom in.
Take the Vial of Blood and the Gargoyle Head (1/4).
Take the Gargoyle Head (2/4) on the broken pillar to the left.
Use the Strength vampiric ability on the jar to reveal the Part of Statue (1/3)
Return to the quarry.
The Quarry
Take the Vial of Blood and the Kettle floating in the water.
Take the Part of Crystal Ball (1/2), Piece of Wood (1/3), and Candle (1/3) on the ground next to the water.
Use the Strength vampiric ability on the Piece of Wood (2/3) jutting out of the broken crates.
Use the Miner Pick from your inventory on the exposed rough tin inside the wall.
Click the overturned minecart to start the hidden object scene.
Screenshot.
Once the hidden object scene is complete, you will receive a Gargoyle Head (3/4).
Take the Piece of Statue (2/3) in the rubble in front of the passage to the ruins.
Go back to the labyrinth.
The Labyrinth
Take the Vial of Blood by the lit torch on the right.
Use the Strength ability on the heavy rock in the pile of boulders to reveal the Gargoyle head (4/4).
Take the Part of Crystal Ball (2/2) by the left lit torch.
Take the Piece of Wood (3/3) sticking out of the wall of skulls.
Take the Candle (2/3) on the right side of the wall of skulls.
Use the Animal Form ability on the crack in the wall.
Click the skull wall to start the hidden object scene.
Screenshot.
Once the hidden object scene is complete, you will receive Charcoal.
Return to the ruins.
The Ruins
Click the broken crystal ball inside the skeleton's hand to zoom in.
Add the two Parts of Crystal ball from your inventory to the broken ball.
Take the Candle (3/3) above the skeleton's elbow.
Return to the labyrinth.
The Labyrinth
Click the fireplace to zoom in.
Take the Vial of Blood inside the puddle.
Add the Charcoal, the three Pieces of Wood, the Kettle, the three Candles, and the Matches to the fireplace.
Take the Melted Wax above the fireplace to add it to the inventory.
Return to the ruins.
The Ruins
Click the door to zoom in.
Use the Melted Wax from your inventory on the seal to make an impression.
Add the four Gargoyle Heads from your inventory to the spaces on the sides of the door.
Return to the labyrinth.
The Labyrinth
Click the fireplace to zoom in.
Place the Kettle over the fire.
Add the Tin to the cauldron, then take the Kettle with Tin.
Return to the ruins
The Ruins
Click the sand to zoom in.
Place the Wax Seal from your inventory into the sand.
Pour the Kettle with Tin into the impression on the sand.
Return to the quarry.
The Quarry
Use the Kettle on the cold water.
Return to the ruins.
The Ruins
Click the sand to zoom in.
Pour the Kettle with Water from your inventory on to the seal to create the Seal Reproduction.
Click the door to zoom in.
Add the Seal Reproduction from your inventory to the middle of the door to start the puzzle.
To solve this puzzle, rotate the hexagons to create the image of the gargoyle heads.
Click a tile to pivot it clockwise.
Solution.
Go through the open door into the Pluto temple.
Pluto Temple
Put the Torch from your inventory into the torch place on the front left pillar.
Use the Matches to light the torch.
Take the two Vials of Blood by the far right torch and by the pile of stones to add both to the blood meter.
Click the columns to the left of the Pluto statue to begin the hidden object scene.
Screenshot.
Once the hidden object scene is complete, you will receive a Statue Part (3/3).
Add the three Parts of Statue from your inventory to the broken statue seated next to Pluto.
Take the Glue at the top of the stairs.
Leave the temple and return to the ruins.
The Ruins
Click the broken crystal ball to zoom in.
Use the Glue from your inventory on the broken ball.
Take the repaired Crystal Ball.
Return to Pluto's Temple.
Pluto Temple
Use the Crystal Ball from your inventory on the Orb of Pluto in the scepter.
Use the Orb of Pluto on the ceiling to start the puzzle.
To solve this puzzle, collide tiles of matching symbol and color.
Click and drag a tile to move it in the direction of the arrow under the cursor.
Tiles will continue to move until they hit an obstacle such as a wall or another tile.
Solution #1.
Solution #2.
Solution #3.
The End
Posted by: Trinn |
July 2, 2011 3:03 PM
|
July 2, 2011 3:03 PM