

![]() Ah, the title Ancient Scripts is a fantastic one for a room escape, isn't it? It conjures up visions of Indiana Jones and hunting through dark, mysterious ruins seeking a hidden treasure. So does Robamimi's latest escape actually take place in a tomb, or a cave, or a pyramid? Sadly, no, but don't let that put you off, no indeed. Ancient Scripts may take place in a sedately furnished modern room, but it is definitely worth checking out. And, hey, no snakes or spiders jumping out of dark corners, so that's a plus!
Ah, the title Ancient Scripts is a fantastic one for a room escape, isn't it? It conjures up visions of Indiana Jones and hunting through dark, mysterious ruins seeking a hidden treasure. So does Robamimi's latest escape actually take place in a tomb, or a cave, or a pyramid? Sadly, no, but don't let that put you off, no indeed. Ancient Scripts may take place in a sedately furnished modern room, but it is definitely worth checking out. And, hey, no snakes or spiders jumping out of dark corners, so that's a plus!
 While Ancient Scripts is sadly lacking in far away places, skeletons, or jump scares what it does supply is some fantastic room escaping. This is a standard one and a half room escape, but what it lacks in story or background it makes up for with tricky puzzles and easy on the eyes scenery. Navigation is the usual bars and arrows at the edges of the screens, and there's a lovely changing cursor to indicate areas of interest. As you explore you need to find a few objects, solve a few puzzles, and eventually you will make it out into the sunshine. And, hey, no strange giant rabbit to appease this time around.
Even better than the lovely backgrounds is the musical accompaniment which is...not music at all. Instead as you search frantically for a way out you will be serenaded with splendid recordings of wild birds which only add to the atmosphere of isolation in this sparsely furnished room. The birdsong is a nice change from room escape designers using the same music clip over and over and over again (I'm looking at you, Tesshi-e). For folks who are colorblind there is at least one color-based puzzle so be warned, escaping might be a bit difficult for you.
Analysis: There's a lot of debate about what makes a good escape game. Some folks prefer snazzy graphics, some folks prefer tough puzzles, and some folks prefer easy puzzles. I, myself, prefer a game where everything flows together logically from point A to point B and on and on until you reach point Z and hopefully escape. Robamimi has always done this, but they add a little something extra that elevates their games above much of the pack, elegance.
I can hear it right now. "Sure, the backgrounds are nice, but elegant?" That's not what we're talking about here. Elegance in both hints and puzzles is something hard to define, but it's the difference between staring at something for a while and having a light bulb go off above your head ("oh, that's what I'm supposed to do") or having a shiver run down your spine ("wow, so that's what that means!"). Robamimi tends to traffic in really elegant clues and solutions, and a perfect example of that can be found in the last Robamimi escape we featured, Hermit Rabi and Wonder Fountain. The wobbly picture puzzle has been done so many times before, but rarely has a clue for the solution been so...elegant, and what made it even better was that the clue itself was not just the solution to the picture puzzle (spoiler alert!), but also doubled as the first route in the maze. In Ancient Scripts, Robamimi has gone one better and produced two clues that serve double duty for two puzzles each, upping that "wow" factor even more.
The puzzles in Ancient Scripts are not the hardest we've ever seen, but if the only criteria for a good escape game was terribly difficult puzzles then Smile for Me would have a much better rating than it has. What Ancient Scripts has that many other games don't have though is that indefinable elegance of design, in the controls, in the backgrounds, and most especially in the puzzles. It's time for your mid-week break, and this one is a doozy! Just don't be expecting the title to have much to do with the game and you'll do just fine.


Walkthrough Guide
(Please allow page to fully load for spoiler tags to be functional.)
Hello there,
This room escape was so logical, I thought I'd practice my hint-through writing skills.
Robamimi - Ancient Scripts Hint Through
The room has 5 views:
clock wall
clock
The hands all point to 12 and can't be moved.
vase
You can't see into the opening.
There is left puzzle,
a middle puzzle,
There are roman numerals 1-5, each can have one of 4 squares switched on.
and a right puzzle.
[Hey, same roman numerals as the other puzzle!? Did they run out of ideas, or...]
Is there anything else on this wall?
What about the table?
Look at the left upright and note the 5 you see there
green cupboard wall
We can't look at the chair, so we can't check the cushions.
Do we stand on it later?
Or find a knife and cut the upholstery?
The cupboard is locked.
brown door view
Open the large panel on the wall there.
What do we do with these switches?
Look at the smaller, brown panel.
We need to enter 5 letters, but I don't know what they are.
The brown door doesn't open.
You can't see anything through the spyhole.
yellow door view
Oooh! that looks like a lift door!
The door doesn't open.
We can't press any buttons on the panel.
I suppose it needs a card to read.
And remember to...
check the mat!
See the pattern?
Checked underneath?
Under the right side you find...
A blue tile! Pick it up.
Look at the tile properly.
It has a number on the other side.
Notice anything else about the mat...
computer wall
Check the potplant.
Yay. Got a key.
Look at the computer desk.
The toy rabbit
has a 3 underneath, which we should note.
The medicine looks like antibiotics, or...
switches!
The computer needs power.
The book is full of clues!
Underneath the desk, a panel has electrical leads coming out of it,
but of course it's screwed shut.
the switches over near the brown door
match the pills.
down, up, up, down, down, up
Hey, the indicator on the spyhole changed to green.
Look at the spyhole.
A series of pictures?!? That's not a spyhole...
the key
It has a green tag on it,
like the green cupboard.
Books! Some volumes of a strange encyclopeadia, numbered I-V.
Where have we seen that subject matter before?
Note the picture sequence on the spyhole.
sunset, hydrangea, seating, a building, a man in simple surroundings
Where have we seen those numbers?
On some puzzles,
and a clue in a book.
I-V relate to position... The spyhole relates to order... and equals something on the book covers.
Two puzzle boxes are relavant, the small one relates to the order of the images in the spyhole, and the information on the book covers.
Match the spyhole and book information.
sunset, hydrangea, seating, a building, a man in simple surroundings equals
sky, flower, chair, architecture, prison equals
IV, I, V, II, III
Another tile, and a screwdriver.
the middle puzzle box
Roman numerals, different positions.
How many positions?
How many shelves were there?
Note the shelf each book is on.
Light up the 3rd down, top, bottom, 2nd down, and 3rd down squares on the puzzle box.
Pick up another tile, and a swipe card.
Since we have a screwdriver,
Use it on the panel beneath the computer.
Another tile.
Can you resist a switch?
the computer
Has an application for a clock, which we don't have a code for yet.
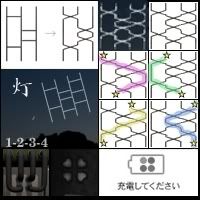
And a diagram for a "ghost leg" puzzle.
I don't think I really understand ghost leg, but go left and right along the bars, and come out at the right place at the bottom.
Let's start at the second upright for example. Follow it down, and go along the first bar you come to. Keep doing this, and see where you come out.
This example goes, right, right, right, left, left, and out at the second upright.
Which one comes out at the red arrow?
The fourth one along, so how does it relate to the buttons on the puzzle box?
Enter: right, right, left, left, left, right
yay! we have a torch
the card reader near the yellow door
Use the card we just found.
Now we can press the buttons. But which ones?
Remember the mat? How do we use it? What else was there?
Check the clue book.
The red stripe at the side of the mat is really the top.
So now we know what order to press the buttons in:
middle left, upper left, middle right, lower right, upper right, lower left
Aaah! a bathroom (sometimes more useful than a lift)
the bathroom
close the door and check behind it
note number seven
Look at the shelves
Take the watering can, because you can.
Another little puzzle box.
A safe.
Look at the basin.
Of course we can turn on the tap
Fill the watering can while you are here, you might as well.
Look at the big wall panel
Look inside, we can use our tiles here, somehow.
Pick up the cream coloured item.
It's a memo, so it must have codes written on it.
Oh...
the vase
Check the clue book again
Look, there's one about water
Pour the water into the vase,
with the watering can!
There's a code on the side,
and inside, another tile.
Now we have enough tiles for the vase clue...
because the tiles have numbers...
which are 7, 0, 4, 1, 2.
Was there another puzzle box?
In the bathroom, with a vase on the top.
Another tile,
and a picture clue,
table, rabbit, door.
the picture clue
The numbers which you have been keeping note of are:
5, 3, 7
They don't work on the safe, could they work on the clock?
The clock hands don't move.
Use the controller on the computer.
The clock has hands that...
match the colours on the safe dials. They are
red=4, yellow=2, green=9.
Another tile, and a spray bottle.
the memo
Let's check the clue book again.
We get a piece of paper, spray it, and shine a blue light on it.
That memo is a piece of paper that should have had a code on it.
Spray it.
Something happened...
Shine a blue light on it...
Batteries!
Do you have batteries? Where haven't you looked?
(Always try to take everything you find apart, including pens and screwdrivers.)
Put the batteries in the torch
and shine a light on the memo.
A code!
the last code
Those symbols look like our tiles.
And tiles are in the last clue in the book.
The alphabet goes in the blank spaces on the big panel in the bathroom,
and the tile symbols, added to the mathematical symbols on the panel, match the code on the memo.
Find each tile on the memo, and find the position for the matching letter on the panel
Put each tile above the position of the letter you found.
Use the hint button on the panel if you need to.
The order for the tiles is: circle, triangle, square, diamond, omega, drip, back-to-front "D",
and enter.
Now work out this code the same way.
Remember the symbols down the left have something to add.
The code is "WORLD"
Enter this in the small brown panel near the brown door,
And we can finally escape!
Posted by: ruufy |
July 13, 2011 3:14 AM
|
July 13, 2011 3:14 AM
Ancient Scripts Walkthrough
Exploring
Clock Wall
You start facing a wall with a clock and a shelving unit. The shelving unit contains three boxes and a large egg-shaped vase. There are several areas you can zoom in on.
Clock
You can zoom in on the clock (which is set at 12:00).
Left Box
You can zoom in on the left box, which has two buttons that light when you press them and a latch.
Middle Box
The middle box also has a latch, but is locked with a 4-row/5-column grid. Each column is labeled with a Roman numeral I through V. You can select (i.e., light up) one square in each column
Right Box
This box, also latched, has a five Roman-Numeral code; each digit can run from I through V.
Vase
You can zoom in on the vase, and the opening at the top is selectable, but you can't currently do anything with it.
But you can also click on...
... the left side of the shelving unit, to reveal the number 5.
That's all you can find on the clock wall, so turn right to the...
Desk Wall
You see a table/desk with a chair. On the desk is a rabbit and a computer monitor and keyboard. Wires from the computer components run to a panel on the wall under the desk. A plant sits to the right of the desk. There are several areas you can zoom in on.
Desktop
The desk contains a rabbit statue, a book, a package of capsules, a computer keyboard, and a computer monitor. You can further zoom in on several of these items.
Rabbit statue
Cute. Clicking on him reveals the number 3 inscribed on his base.
Book
The book can be opened to reveal ten pages. We will come back to these individually as they are needed.
Capsules
A package of six white/blue capsules in a push-through packet, each labeled "PILLS". They are arranged in different orientations: the white portion, reading from left to right, is up, down, down, up, up, down.
Computer Monitor
It is turned off.
Electrical panel
Secured with phillips-head screws.
Plant
Pretty. Can be shaken to make it drop a key on a keyring with some kind of green bar attached. Take it.
There's nothing else here, so turn to the right to the...
Keypad Door Wall
This corner of the room shows a door with a long window and a pull bar. Next to the door is a keypad of some sort, and a doormat is at the base of the door. To the right (around a corner) you can see another door, but that's not going to be accessible until we turn further to the right. The areas we can zoom in on are...
The Doormat
There is a faint code shown in white-on-off-white on the mat. Clicking the right-hand side of the mat curls it back to reveal something that resembles a greenish-grey scrabble piece. It has a backwards D on the front, and what appears to be a pipe junction, but is probably the numeral 1, on the back.
The Door
... is unsurprisingly locked. We can zoom further in on the keypad, which is revealed to be a card-reader with six buttons and two red lights, but we cannot do anything with it yet.
That's it for this view, so we turn further to the right to the...
Mini-hallway
Here you see a miniture hallway leading to what is presumably the way out. The door (with a short and long window, with a viewhole in the middle) is locked. There is an alphabetic code panel (five letters long) next to the door and a panel to the right that opens to reveal six blue switches, all in the up position.
Nothing else to see here, so turn to the right again to the...
Chair Wall
Despite being called the "Chair Wall," we can't seem to zoom in on the chair. We CAN, however, zoom in on the green cabinet, but we find that it is locked.
That's it, and further turn to the right takes us to our starting point.
Solving Puzzles
The Blue Switches
The shape and color of the switches on the wall in the mini-hallway reminds one of the capsules. Move down the
first, fourth, and fifth
switches, and the light next to the viewhole in the door will blink. Backing up and looking through the viewhole doesn't give us a view into the hallway, as one might expect, but instead gives us a short slideshow. The pictures are, in order,
A sunset/sunrise over a city with powerlines, a bunch of purple flowers, a set of bench-style seats against a chain-link fence, an exterior shot of a window on an octagonal building, and a man kneeling in a small room and taking a piece of paper out of a bowl with chopsticks.
The Green Cabinet
The key we got from the plant has a green fob, so maybe it will work here. Indeed it does, and we find four shelves and five books revealed. The books are:
Top shelf left: Architecture II
2nd shelf right: Sky IV
3rd shelf left: Flower I
3rd shelf right: Chair V
Bottom shelf right: Prison III
The Middle Box
We have a lot of information that seems to relate to each other, so let's start with the easiest: the location of the books on the shelves. Turn to the Clock Wall and zoom in on the middle box. The roman numberals match the numbers on the books, so select in each column which shelf the book was on.
From left to right and counting the shelves/buttons down from the top, the code is 3, 1, 4, 2, 3
You now have another scrabble tile (Omega on the front, o on the back) and a magnetic card labeled "MEMBER'S CARD CLUB ROBAMIMI".
The Right Box
It seems likely that the Roman Numerals from the books should go here as well. But what order to put them in? How about the order from the slideshow?
Sky, Flower, Chair, Architecture, Prison
IV I V II III
Success! And we now have a third scrabble tile (diamond on the front, 7 on the back) and a screwdriver. Looking closely at the screwdriver...
... we see we can open its back to reveal a battery. Take it.
The Electrical Panel
The electrical panel under the desk was secured with screws. So, using the screwdriver, remove the screws to reveal yet another tile. This one has a circle on the front and a 4 on the back. There is also a switch here. Flip it to turn on the computer. Moving up to the computer screen, we see two icons: Gost Leg and Clock. Clicking the Gost Leg icon shows a ladder-like diagram with a button on each side that look like the buttons from the left box. This type of puzzle usually connects the top entry points to bottom exit points by taking turns at every possible place when following a path from top to bottom.
If we label the entry/exit points from left to right, the mapping is 1 -> 6, 2 -> 2, 3 -> 3, 4 -> 4, 5 -> 5, and 6 -> 1. That is, 1 and 6 swap, but all of the other paths stay the same.
Clicking the Clock icon allows us to enter a three digit number, but we don't know which one to put in yet.
The Left Box
Having solved the mapping for the Gost Leg puzzle and having a hint that it relates to the left box, let's take a look at the left box. Let's try pressing the left button for the entry number and the right button for the exit number for all six. It's a long sequence, but it pays off with the box opening.
Left 1 time, right 6 times, left 2, right 2, left 3, right 3, left 4, right 4, left 5, right 5, left 6, right 1
You now have a flashlight. Open the flashlight and put the battery in it.
The Keypad Door
Unsurprisingly the Member's Card fits the card slot in the keypad, turning it on. Now, what code to enter? Remember the door mat? Count the dots and press the buttons in the order provided by the numbers (with the red stripe at the top). Congratulations, you have opened the door.
More Exploring
Entering the bathroom you have several areas to explore.
The Sink Wall
You can zoom in on the sink, but that's it. Once zoomed-in, you can turn on and off the water. Once that is done, the running water is selectable, but you can't do anything with it yet. Zoom out and turn right to find...
The Panel Wall
You can zoom in on and open the panel to reveal a complicated-looking display. Take the note in the bottom left-hand corner, and unfold it to read "CLUB ROBAMIMI." The scrabble-like pieces seem to fit into the holes at the top of the panel, but we don't know the order to put them in yet. Zoom out, turn around, and close the door to reveal...
The Shelf Wall
On the top shelf we see a box and a watering can (take the watering can). On the bottom shelf we see a safe. The box has an icon of a vase and requres a five digit code. The safe has three concentric tumblers, color coded (from inside to out) green, orange, and red. Pressing the adjacent button of the same color once will turn that tumbler one-twelfth of a turn clockwise.
The Back of the Door
Turning back to the way out of this smaller room we see that the door is labeled with a 7.
More Solving
The Egg-Vase
Go to the sink, turn on the water, and fill the watering can with water. Then go to the Clock Wall, zoom in on the vase, and fill it with the water from the watering can. Another tile floats to the surface, which you should take (Square on the front, 2 on the back). A series of symbols is also revealed on the side of the vase:
Diamond, Omega, Circle, Backwards-D, Square
Box on Shelf Wall
We have five tiles, each one has a symbol on the front and a number on the back. We have an order of the symbols from the Egg-Vase, so the resulting five-digit number should go somewhere. The box on the Shelf wall requires a five-digit code, so let's try it there.
70412
You now have a triangle tile (with nothing on the back), and see three symbols in the bottom of the box.
Shelf unit, Rabbit, Door
Clock Icon on Computer
We have three numbers from around the room, on the three locations from the symbols in the bottom of the box, and the clock icon on the computer requres a three-digit code, so let's try it.
537
Huzzah! Turning around to the clock now shows three hands.
The green hour hand points to the 9, the orange minute hand points to the 2, and the red second hand points to the 4.
I wonder where we could use that information?
The Safe
Entering the code from the clock into the safe does the trick.
Green (inner) at 9 o'clock, orange (middle) at 2 o'clock, and red (outer) at 4 o'clock
We now have a tile with a water-droplet symbol (nothing on the back) and a spray bottle. Our inventory is now full, so hopefully we are getting close to done.
The Club Robabmimi Note
Following the instructions from the book on the desk, spray the paper with the spray bottle and look at it under the flashlight. Each letter now has a symbol under it. Those symbols seem to be a combination of the symbols from the tiles and the symbols to the left of the panel on the panel wall.
C=Square Dot, L=Omega Vertical Line, U=Backwards D Horizontal Line, B=Triangle Dot, R=Diamond Horizontal Line, O=Circle Horizontal Line, A=Circle Dot, M=Droplet Vertical Line, and I=Triangle Vertical Line
The Symbol Panel
Put the tiles in the appropriate spots on the top of the panel to match the symbols from the note (remember the last pages of the book from the desk for the positions of the letters -- or simply count off the letters of the alphabet from left to right, top to bottom).
From left to right, circle, triangle, square, diamond, omega, droplet, backwards D
Press enter, the code squares will fill in, and a five-symbol message appears at the top. When translated, this message is...
WORLD
Getting Out
Enter the final code
WORLD
into the panel by the door, press enter, and you're out.
Posted by: kdausman |
July 13, 2011 1:08 PM
|
July 13, 2011 1:08 PM
Walkthrough
first scene - notice a vase and 3 boxes and a clock which doesn't work - but you cannot do anything here yet
turn right and zoom on desk lift up bunny and notice RED 3, also look through book and see lots of clues there also notice the colored ends of the pill packet - note the number 5 on side of desk PC not working yet
nice looking plant! shake it for KEY then turn right and look at the doormat and make a note of the position of those 6 "numbers". turn corner over for TILE 1 (an inverted D with no 1 on back) you cannot go into bathroom yet - you need a card!
turn to exit door - and open the white box - put the leves like the pillbox on desk and the spyhole is active - look through it and notice the way picture come up (Sky, flower, chair,house,chap with tea)
turn right and open green cubboard - notice the title and the number of the books and also the position i.e. which shelf is which book now you have the clue for box on the very right in opening sceene - the numbers correspond to the door
IV,I,V,II,III
take Screwdriver and TILE 2 (Diamond with No 7) also open the Screwdriver and take out the BATTERY
turn to desk and unscrew the the panel below desk - take TILE 3 (Circle with 4) and flip the switch to turn on computer. Look at first file and see the ghostleg - solve it and open left box.
Right,Right,Left,Left,Left,Right
take out FLASHLIGHT and put in battery and now you can also solve middle box with putting in the position of boos for DOOR CARD and TILE 4 (omega sign and 0.
fiest row: 3 second Row: 1 and 4 third row:2 and last row 3.
with card and carpet code you can enter bathroom (turn carpet 90° to the right)
middle left, upper left, middle right, lower right, upper right, lower left
turn left and take WATERING CAN - fill with water - close the door and note the number 7 on door
2 boxes which you cannot do yet - open box on right side of bathroom,and take the Club Robamimi paper and go back to room
pour water in vase and pick up TILE 5 (Square with No. 2) and note the hint on bottom of vase. Open the box in bathroom with clue and take TILE 6 (triangle)
70412 is the code for bathroom
also see another clue in safe (table,bunny,door) go to PC and put the corresponding numbers in file 2 to activate the clock.
the code is 537
look at the clock and notice it works now. go to bathroom to open the safe for TILE 7 (drop) and SPRAY.
click red button 4 times,green button 9 times,then yellow button 2 times
treat the paper with spray and Flashlight according the hint in deskbook and make a note of those blue signs go to bathroom and open the right box - place the tiles acc. hint on paper
in order, put them in like this: Circle, Triangle, Square, diamond, Omega (upside down U), drop of water, backwards D.
now you get 5 signs lit up - convert them to a word.
the answer is WORLD
put the word in box next to exit door and you are out.
Posted by: Paul | July 13, 2011 7:16 PM
Ancient Scripts Walkthrough
General Information
Remember to examine everything you pick up, it may be hiding something else.
There is a built-in hint feature in the game if you don't want to use the walkthrough.
You change the language at the start screen. If it says "Japanese" then you are set on English. If it says "English" then you are set on Japanese.
There will be directions for the colorblind in this walkthrough.
There is only one ending.
Good luck!
Exploration
You begin facing a low table. Underneath the table is a large vase. You can click on the vase, but you can't reach inside.
On top of the table are three boxes. The left box has two buttons, the middle box has a grid with Roman numerals, and the right box seems to need a five digit number also involving Roman numerals.
Above the table is a clock but the hands are stuck at 12:00.
If you click on the lower left side of the table you will notice the number 5. That may be important later.
Turn right.
You are now facing a desk with a computer on the right and a figurine on the left. Click on the figurine for a close up.
Hey, it's Hermit Rabi from Robamimi's last game! Click on the rabbit again for a close up.
Click on the rabbit one more time and voila, the number 3 is on the bottom of the base!
Back up once.
There is a brown book sitting on the desk in front of the rabbit figurine, click on it for a close up.
Once the book is in close up click on the right side to open it and start reading. There are pages and pages of clues in here, about books, boxes, what look like magnetic strip cards, water, the vase, spraying a note, and an alphabet grid.
Back up.
There appears to be a foil strip of pills above the keyboard of the computer, click on the pills.
The pills are pretty blue and white, but it looks like a manufacturer's defect, some have the blue going one way, some the other.
Back up.
You can click on the PC monitor, but it is dark.
Back up twice until you are at the full view of the table.
Hey, there's something underneath the table, a panel of some sorts. Click on it for a close up.
Hmmm, there are wires running into this panel from the PC, but it is screwed down. Perhaps we need to find a screwdriver?
Back up.
Click on the plant to the right of the desk for a close up.
Notice that you get a changing cursor when you hover over the top of the plant. Click on the top of the plant to shake it. A key! Take the key and back up.
Turn right.
You are now facing a yellow door. There is a small panel to the right of the door, click on it.
The panel is a card reader with six buttons. Looks like we need a key card and a code. Back up.
Click on the rug in front of the yellow door.
Now this is interesting! There is a small red strip running down the left side of the rug. If you look at the rug closely, it appears to be divided up into six cells, and each cell has a different number of light squares in them.
Click on the right side of the rug and it will lift up!
Underneath the rug is a tile that has something that looks like an upside down D. Take the tile.
While the tile is in close up click on it to turn it over. Is that a number 1 on the back?
Back up and turn right.
You are now looking at a dark brown door in a foyer. Notice that the door has a peephole in it, but you can't see anything through it.
On the wall to the right are two small panels. The one closest to the door appears to need a five letter code.
The white panel is closed. Click on it to open and notice that there are blue switches inside.
Back up and turn right.
Here we have a narrow green cabinet, but it's locked.
Turn right and you should be back facing the low table with the puzzle boxes.
Time to solve some puzzles!
The White Switch Box
Turn left twice to face the dark brown door.
Click on the white panel on the wall to the right for a close up.
Click on the panel to open it and reveal the switches.
Does the color of these switches look familiar to you?
Remember the strip of pills on the desk?
They are the same color as the switches, blue and white.
Use the position of the blue in the pills to determine the position of the switches.
From left to right: down, up, up, down, down, up.
When you get the switches in the correct order, the peephole in the door will activate.
Look through the peephole in the door and you will see some scenes: the sky, some flowers, some chairs, a building, and a dude in prison.
That was...helpful? I guess?
The Middle Puzzle Box
Let's turn our attention to the puzzle boxes on the low table.
First, if you are still looking at the brown door, turn right once to face the narrow green cabinet.
Notice that the key you picked up from the plant has a little green bob hanging from it. Maybe it's the key for this cabinet?
Click on the cabinet for a close up then use the key to unlock it.
Okay, we have four shelves inside, and each shelf has a book (or books).
The top shelf has a book on Architecture with the Roman numeral II on it.
The next shelf down has a book labeled "sky" with the Roman numeral IV.
On the third shelf down are two books, flower (I) and chair (V).
On the bottom shelf is a book called prison with the number III.
Hmmm, this seems like a clue for the middle puzzle box on the table.
Back up from the cabinet and turn right to face the table.
Click on the middle puzzle box for a close up.
We're looking at a 4 x 5 grid here, with Roman numerals across the bottom.
To solve this you need to combine the book clues with their positions on the bookshelves.
Notice that there are four rows in this grid, and there are four shelves in the cabinet.
There are five Roman numerals going across the bottom of the grid, and there are five books on the shelves, each with a Roman numeral from one to five.
The top row corresponds with the top shelf in the cabinet. The book on that shelf had the number II on it, so in the top row click on the column for the Roman numeral II to highlight it.
The next row down corresponds with the shelf that had the sky book, and the number on that one was IV, so click the IV column in the second row down.
The third shelf down on the cabinet had two books, the number I on the left and the number V on the right. Click both of those buttons in this row.
The bottom row had the prison book and the number III. Click the Roman numeral III in the bottom row.
Once you have the five buttons pushed, click on the black button at the base of the top to open it.
Inside you will find two things: another tile, this one with an omega type symbol on it (and the number 0 on the back) and a key card. Take both items and back up.
The Right Puzzle Box
Now click on the right puzzle box on the table for a close up.
This box appears to need five Roman numerals.
Well, we have Roman numerals from the books, but what order do they go in?
This time around let's think about the subject of the books, architecture, sky, flower, chair, and prison.
Where have we seen these before?
You saw them in the pictures that flash in the peephole in the brown door.
The order you put the Roman numerals is the order that the pictures flash.
So sky is first, and the sky book is IV, so the first number is IV.
The next picture was flowers (book I), so the next number is I.
The third picture was chairs, and the chair book was number V, so V is the third number.
The fourth picture was a building (architecture) so the fourth number is II (from the architecture book).
The fifth picture was a prisoner, so the fifth number is III.
Therefore the combination is IV, I, V, II, III.
Enter the correct combination into the code key and click the black button at the bottom to open the box.
This time you get another tile, this one with a diamond on the front and the number 7 on the back.
You also get a screwdriver, yay!
Take the items and back up.
The PC
Turn right to face the desk.
Click on the panel below the desk for a close up.
Use the screwdriver on the panel to open it.
Take the tile (circle on the front, 4 on the back).
Flip the revealed switch and back up.
Yay, the computer is on!
Click on the monitor twice for a close up.
There are two files here, "Ghost Leg" and "Clock".
If you click on the "clock" file you will see that you need a three digit number.
If you click on the "ghost leg" file you will see another of those Jacob's ladder puzzles. Yes, I grew up calling them Jacob's ladders. Sue me.
Notice the pink arrow at the bottom of the puzzle, and what looks like two gray buttons on either side of the puzzle.
That must surely mean something!
The clue here is the arrow.
Go to the top of the vertical line that the arrow is under.
From there, drop down the line until you hit the first intersection. This will force you to go right.
Go right until you hit the next intersection, which will drop you down. Keep dropping until you hit an intersection, and follow it.
Continue dropping and going right or left (depending on the intersection) until you reach the bottom. Notice that you will have ended up where the arrow is.
The clues are which direction you turned when you hit a horizontal intersection.
You turned a total of six times, right, right, left, left, left, and right.
The buttons on the puzzle are a clue to the fact that this is the hint for the left puzzle box on the table, the one with two buttons.
Back up twice from the computer and turn left.
Click on the left puzzle box on the table.
Click the buttons in the sequence you got from the Ghost Leg puzzle, then click the black button at the bottom to open the box.
Yay, we have a flashlight! Well, we have a flashlight that is missing a battery.
Back up.
The Yellow Door
Turn right twice to face the yellow door.
Click on the panel to the right of the door twice for a close up.
Well, we have a key card now, so use it on the slot.
Notice that one of the lights turned green. Now we just need the button code!
You know, this grid looks a little familiar, where have we seen this before?
The hint is in the book, on the pages with the key card.
The page next to the key card had something that looked like a key card, but with a red stripe at the top.
The rug in front of the door matches that pattern, although the red strip is on the left.
Turn the rug 90 degrees clockwise, and the stripe would be at the top, and the six "cells" in the rug look just like the keypad.
Note that each cell in the rug has a different number of squares, this is the clue to the order to push the buttons on the keypad.
The order: left middle button, left top button, right middle button, right bottom button, right top button, left bottom button.
Once you push the buttons in the correct order the door will open. Yay, a bathroom!
The Bathroom Exploration
Back up once from the keypad, then click on the yellow door to open it.
Go forward into the bathroom.
There's a sink here with a functioning faucet, but we have nothing to put the water in.
Turn right.
There's a large panel here, click on it to open it.
Inside you will find a note that says Club Robamimi.
Also notice the grid, doesn't it look like the alphabet grid in the book?
There are seven slots at the top of the grid, looks like we need seven tiles to fill in.
Back up and turn left to the sink, then left again.
The door is blocking your view, so click on it to close it.
Yay, shelves! Shelves with stuff!
On the top shelf is a watering can, take it.
Also on the top shelf is a box. Looks like it needs a five digit code. Notice the picture of the vase on it as well?
On the bottom shelf is a safe. It has a rotating dial with three colors: outer dial red, middle dial orange, and inner dial green.
Hmmm, we have some numbers from the room, a 3 from the rabbit statue that is red, and a 5 from the brown desk. Guess that's not a clue for that.
Back up and turn left.
Well! Another clue from the door, the number 7!
Click on the door to open it and go through.
The Vase
You should be back in the main room, facing the table with the three boxes and the vase.
Remember the clue from the book? The one that showed pouring water into the vase?
Now we have a source of water and something to carry it in.
Turn right twice to face the yellow door.
Click on the door for a close up, click on the door to open it, and go forward into the bathroom.
Click on the sink for a close up, then click on the faucet to turn it on.
Use the watering can on the running water to fill it up.
Back up, turn right (or left) twice to face the door, then go through.
Click on the vase for a close up, then use the full watering can on the vase.
Two things have now happened, first another tile floated to the surface of the vase, take it (square with a 2 on the back), and second a pattern has appeared on the vase.
Click on the bottom of the vase to look at the pattern. It appears to be a diamond, an omega symbol, a circle, an upside down D, and a square.
Five symbols, and each of those symbols is on a tile, and each of those tiles has a number on the back. Where did we need a five digit number?
Yup, the box in the bathroom, the one with a picture of the vase on it.
Back up and turn right twice to face the yellow door.
Open the door and go into the bathroom.
Turn left and close the door so you can see the shelves.
Click on the box on the top shelf for a close up.
The combination is the numbers on the backs of the tiles, and the order is given by the clue on the vase.
The diamond tile has a 7, the omega tile a 0, the circular tile a 4, the upside down D has a 1, and the square has a 2.
Therefore the code is 70412.
Enter the code into the box then press the black button to open it.
Take the tile (a triangle shape) and notice the clue underneath.
Hmmm, table, rabbit, door. A three digit code!
Back up, turn left, open the door, and go back into the main room.
The Clock and the Safe
Turn right to face the desk.
Click on the computer monitor for a close up (twice).
Click on the "clock" icon on the desktop.
Looks like we need a three digit code.
The clue for the code is in the box we just opened in the bathroom.
Each of the icons, the table, rabbit, and door, had a number on them.
The table had a 5, the rabbit had a 3, and the door had a 7.
The code is then 537.
Enter the three digit code and hit the enter button.
It should now say "ok".
Back up twice to the long view and turn left.
Click on the clock above the table, notice the hands have moved!
Each of the hands is a different color, and is pointing to a different number.
The orange hand is pointing to the 2, the red hand is pointing to the 4, and the green hand is pointing to the 9.
Aren't those the colors on the safe dial?
Back up and turn right twice to face the yellow door.
Go into the bathroom, turn left, and close the door.
Click on the safe for a close up.
Notice the buttons to the right of the dial. Each button controls a colored dial, so the top red button controls the outer red dial, the middle orange button controls the middle orange dial, and the bottom green button controls the inner green dial.
You should click each button the number of times indicated by the clock clue, so click the top (red) button 4 times, the middle (orange) button twice, and the bottom (green) button 9 times.
Click on the handle of the door to open it and take the tile (teardrop shape) and the bottle of luminol.
Back up.
The Note
Remember the clue in the book about the note? We need to spray it with luminol and shine the flashlight on it.
One problem, though, no batteries in the flashlight.
Let's examine what we have in our inventory.
Pull up the screwdriver, which should still be hanging around.
Click on the base of the screwdriver and you should see the hidden battery inside. Take the battery.
Now pull up the flashlight from your inventory.
Click on the base to rotate it and click again to remove the bottom.
Use the battery on the flashlight and replace the base.
Now pull up the Club Robamimi note and spray it with the luminol.
Use the now functioning flashlight on the note and, wow, a large clue!
Underneath the letters of Club Robamimi are some symbols. This is a simple substitution code, and each symbol stands for the letter above it.
Getting Out
If you are still in the bathroom, turn right twice to face that large panel.
Click on the panel for a close up then open it.
Time to place the tiles!
This "ancient script" is made up of combinations of four symbols added to the seven shapes on the tiles that you have picked up.
Note: if you don't remember the alphabet grid from the book, click on the black "hint" button on the wall panel, the alphabet will fill in.
Look at the note again and you will see that the letter "C" is made up of the square with a dot in it, so the square goes into the column that has the C in it (third from the left).
Using the note as a guide, continue to place the tiles until all seven are in place.
The order is, from left to right: circle, triangle, square, diamond, omega, teardrop, upside down D.
Once all of the tiles are in place click the enter button up top.
Notice that there is a five letter word (spelled out in symbols) at the top. Also notice that the alphabet has gone. Hope you remembered where the letters were.
Solve the five letter word using the grid. You should get the word "World".
Back up, turn right, open the yellow door, and go into the main room.
Turn left twice to face the brown door.
Click on the panel nearest the door, the one with the five letter code required.
Once the panel is in close up, fill in the word that you got from the grid in the bathroom (World).
Once the word has been placed click on the "enter" button. The light on the panel should turn green.
Back up, click on the door for a close up, then click again to escape.
Enjoy the lovely scenery!
Posted by: grinnyp |
July 13, 2011 8:14 PM
|
July 13, 2011 8:14 PM