
Dream Chronicles: The Book of Water Walkthrough
![]() We've just finished a complete walkthrough (with images) for Dream Chronicles: The Book of Water! Be warned: contains major spoilers, so proceed only as a last resort.
We've just finished a complete walkthrough (with images) for Dream Chronicles: The Book of Water! Be warned: contains major spoilers, so proceed only as a last resort.
-
Download Dream Chronicles: The Book of Water here:
-
Read our review of Dream Chronicles: The Book of Water here.
General Information
-
There is only one playing mode this time around. The find object hint timer refills slowly as does the skip puzzle option.
-
There are four Dream Jewels and 70 Dream Pieces to be found in the game, you only need about 40 of them to complete the game.
-
The screenshots will give the locations of items, but they sometimes change from game to game. If you have difficulty use the find object hint.
-
If you check the book in the lower right corner it will record any notes that you have found. You can also use it to check the map, which will tell you how many dream pieces you have found and how long you have been playing.
Chapter 1 - Wish
The Airship
-
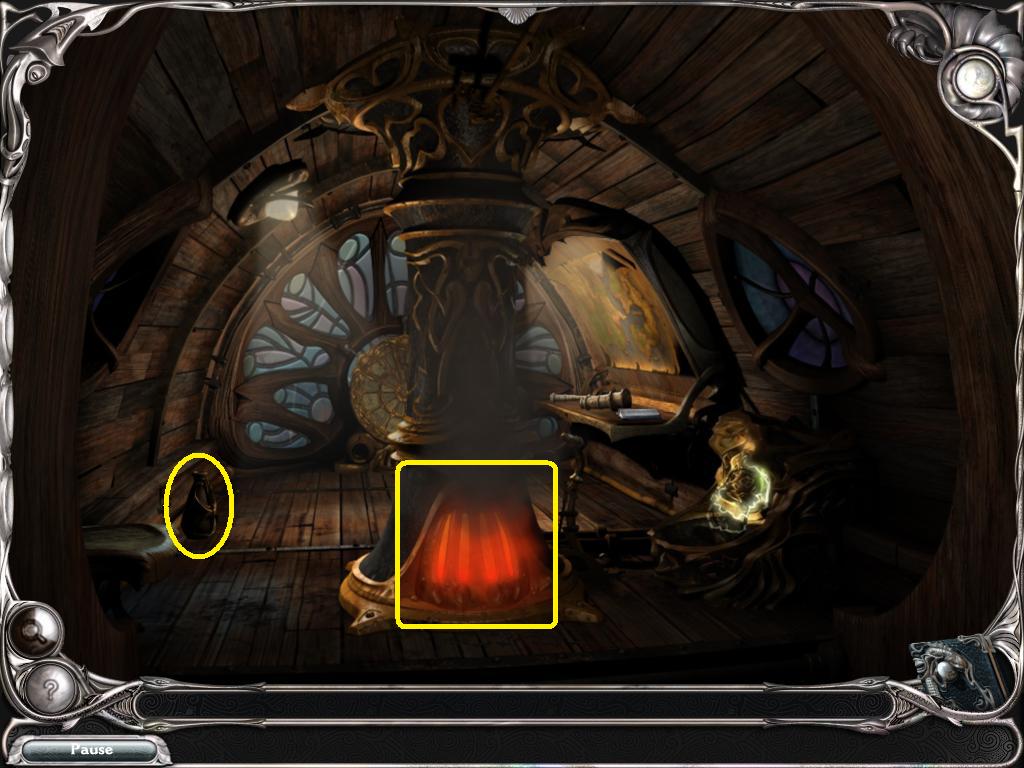
You are in the airship, flying towards Wish. Lightning strikes the ship, setting the engine on fire.
-
Find the flask of water. Take it, and use it on the burning engine.
-
Wait for the inevitable crash.
-
There are no dream pieces in this scene.
Outside the Gates
-
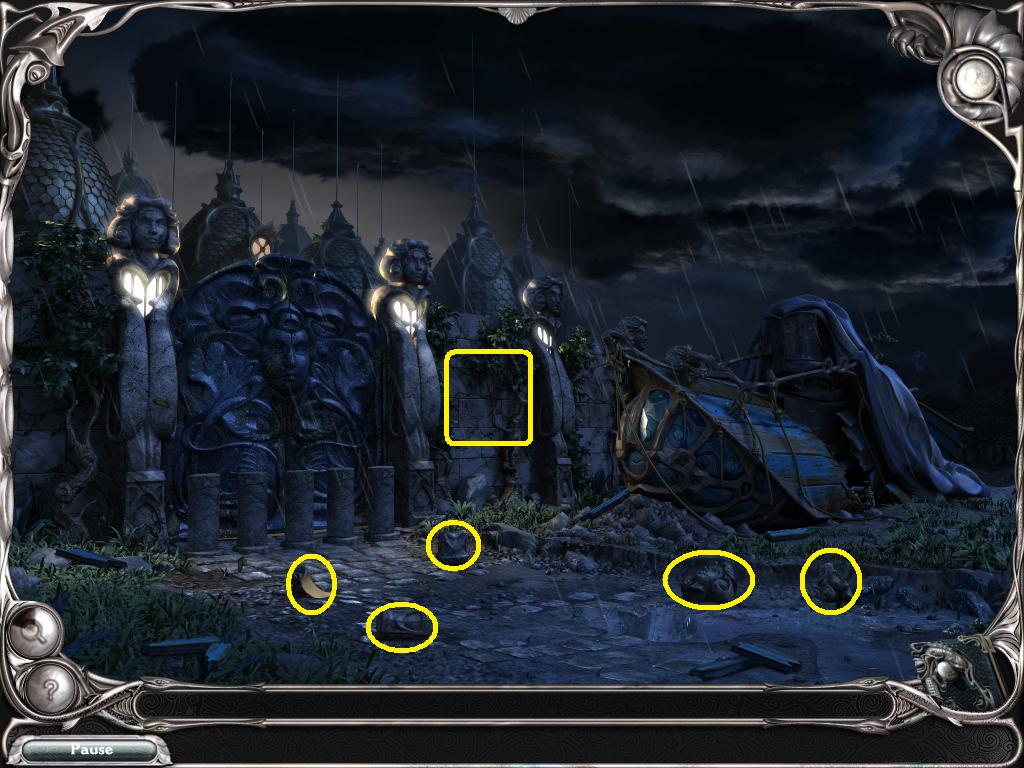
Read the note on the ground. The gates are locked.
-
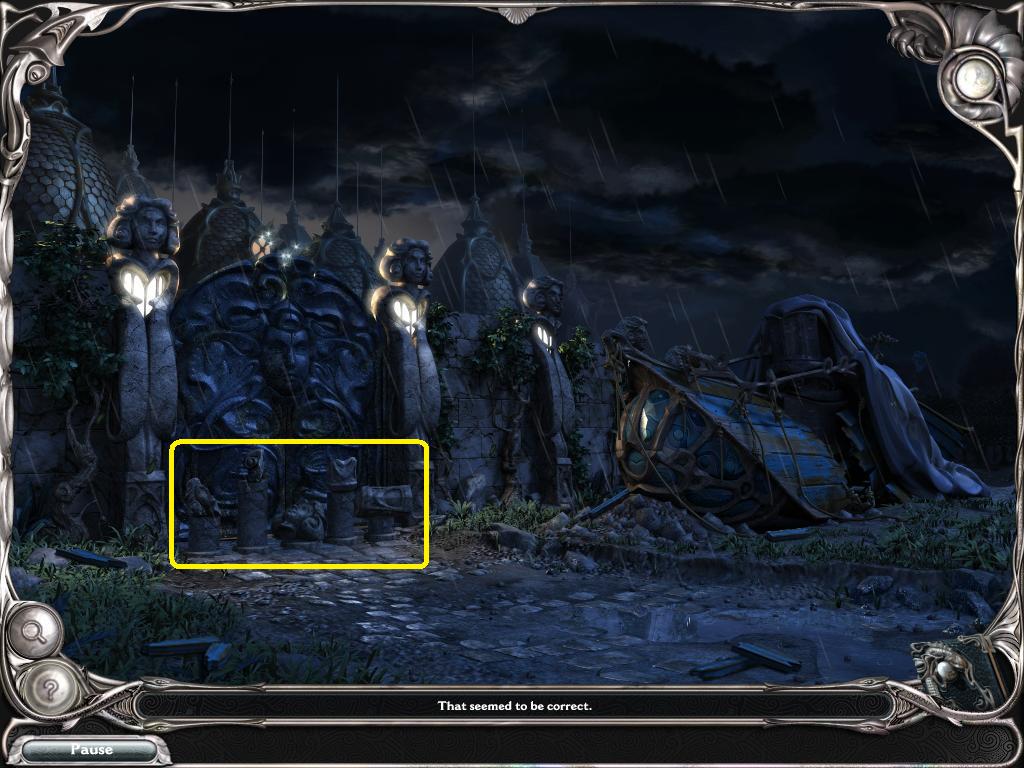
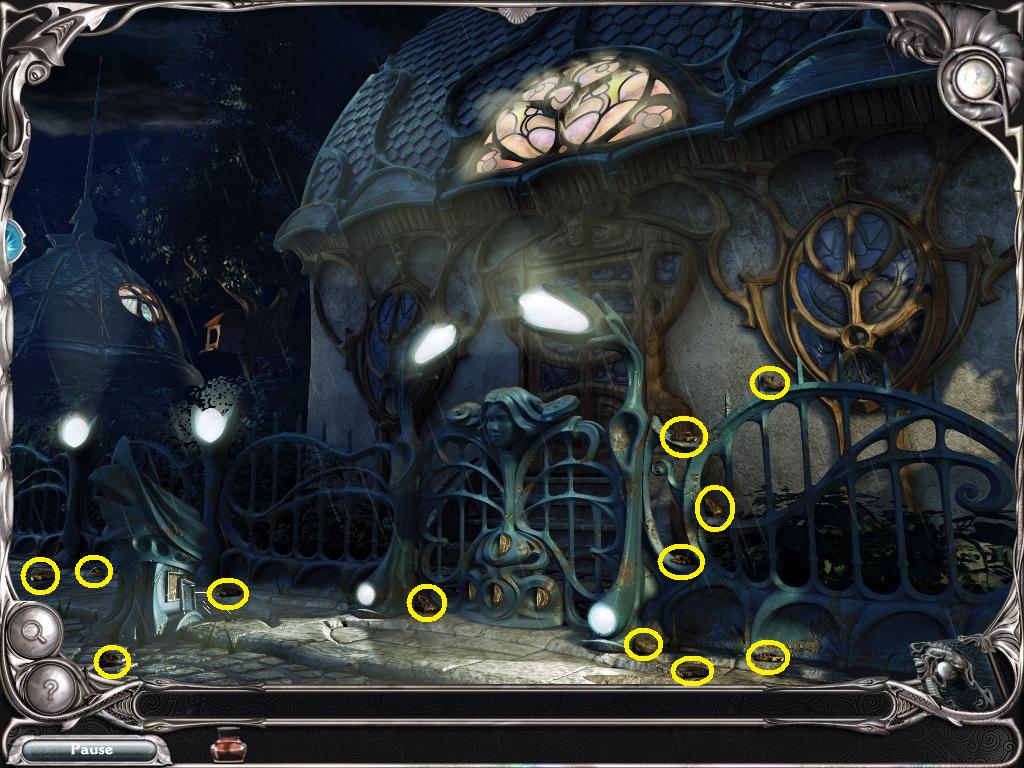
Pick up the five pieces of statue lying around on the ground.
-
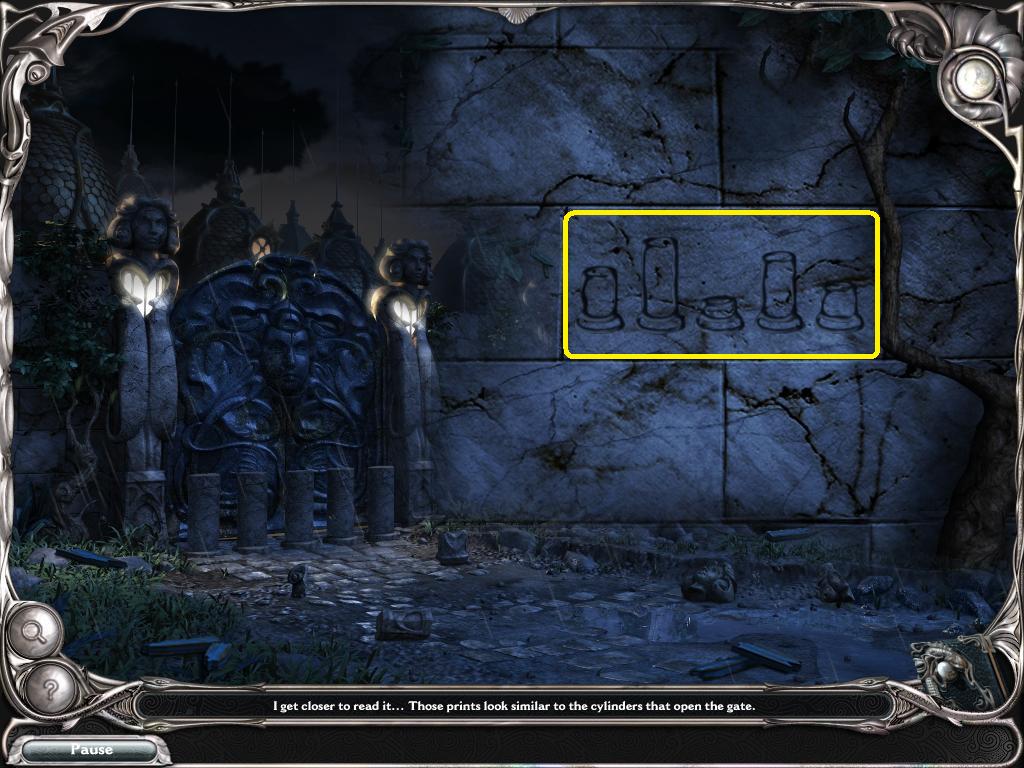
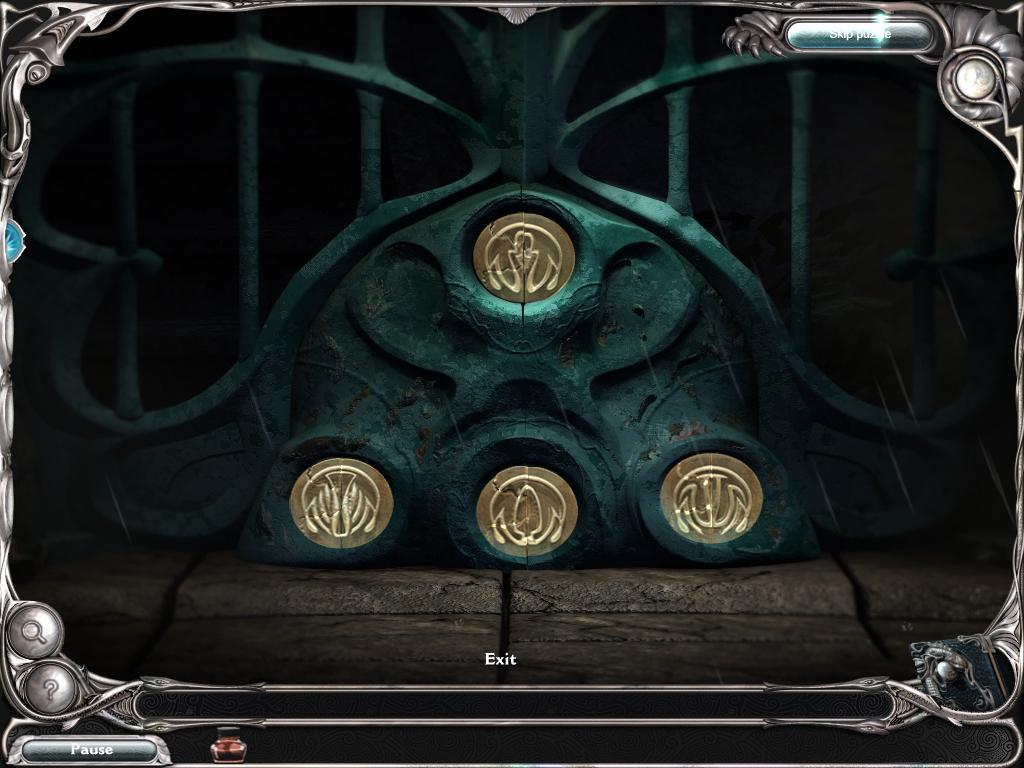
Click on the right side of the gate to see what the column positions should be.
-
Place the statues accordingly.
-
Enter the open gate.
-
There are no dream pieces to collect here.
The Main Street
-
The toy store is lit up.
-
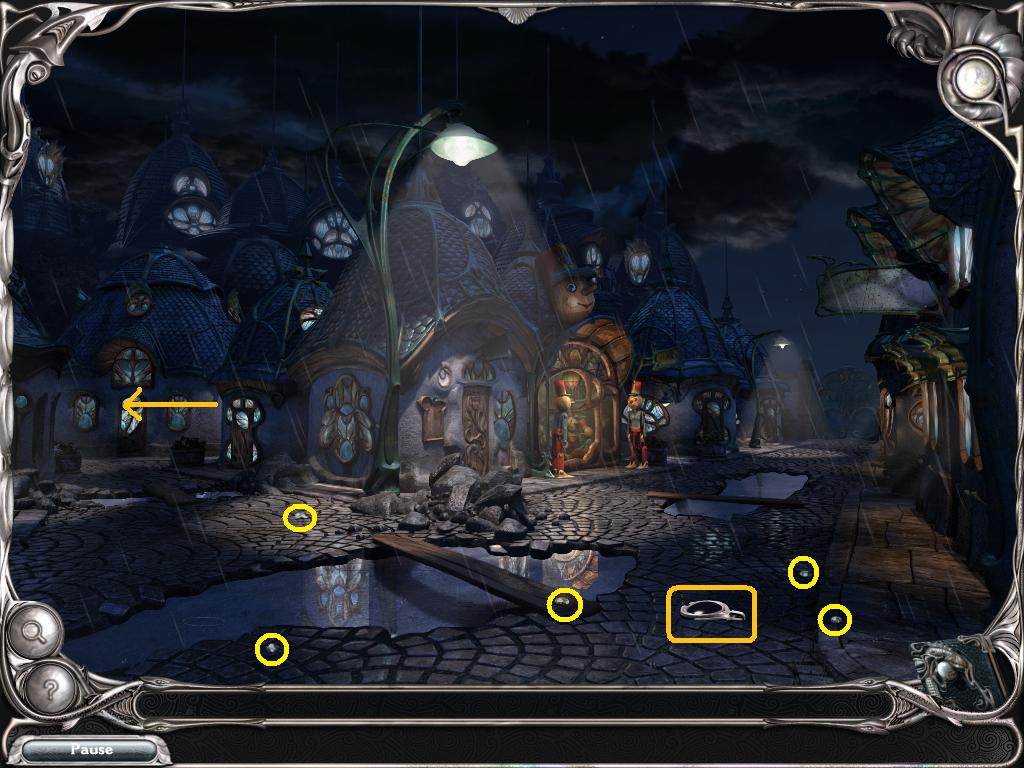
There is one Dream Jewel here to collect (Jewel of Illumination).
-
There are five dream pieces to collect. Collect all five to activate the jewel.
-
Go left towards the statue.
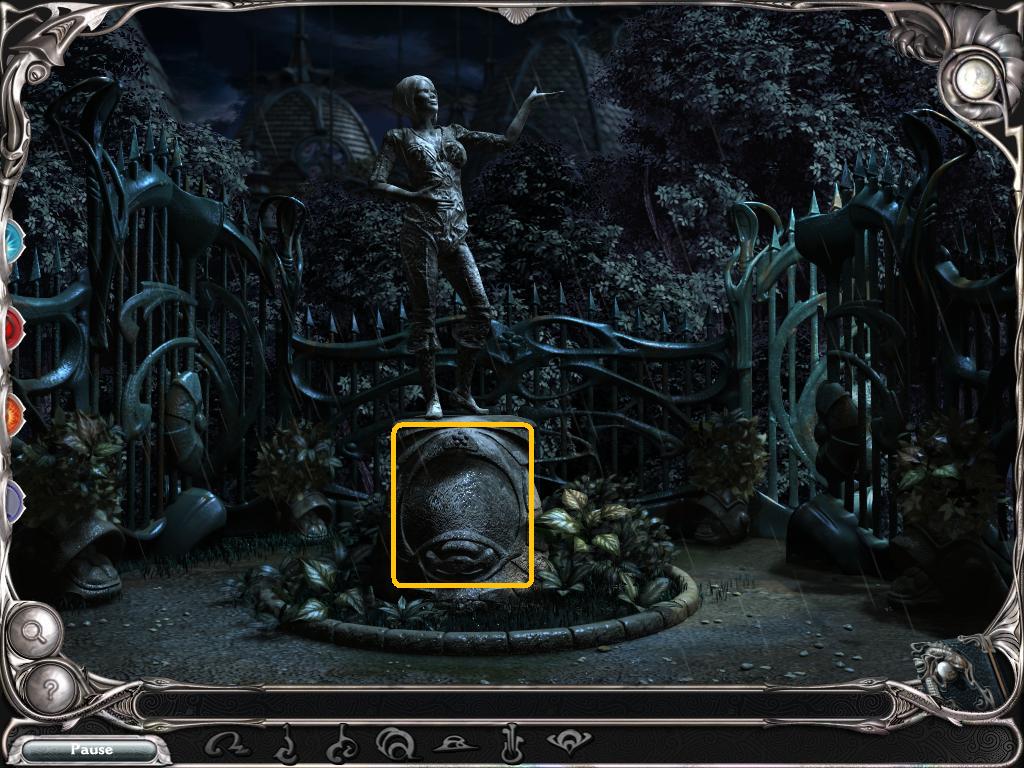
The Statue

-
Use the Illumination power of the jewel to light up the scene.
-
Lightning will strike the statue, changing its position.
-
Click on the statue to move the torso. It will tell you you need oil.
-
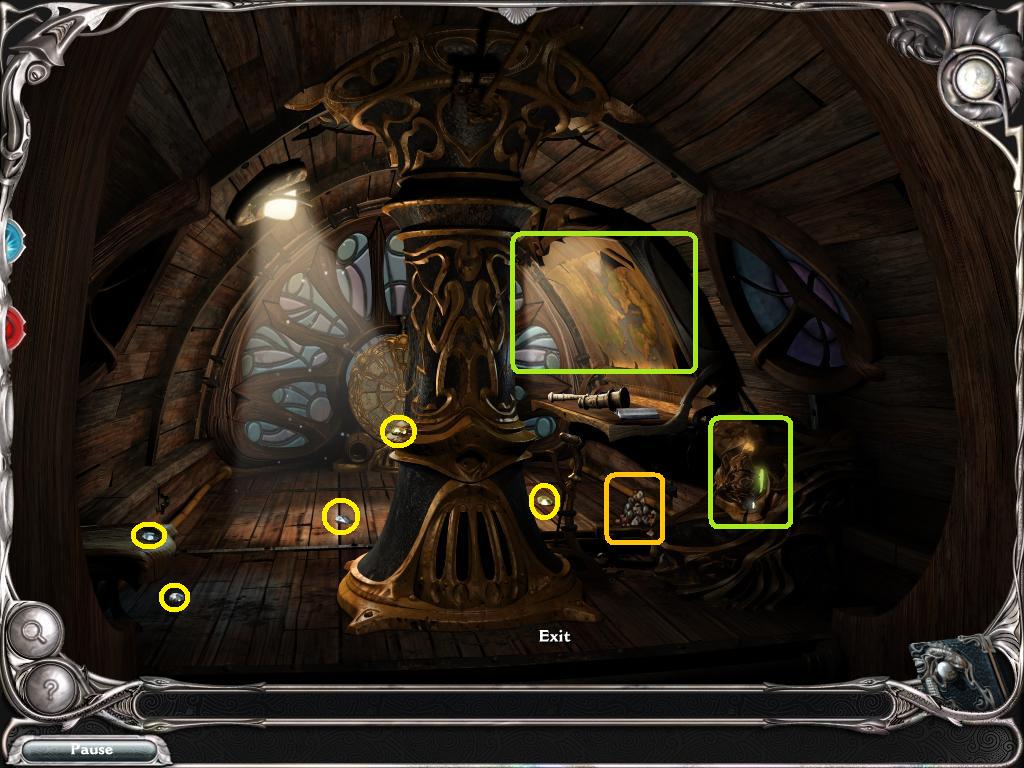
Collect the five dream pieces on the ground.
-
Go right through the gate back to the main street.
The Toy Store

-
On the ground in front of the toy store is a piece of paper. Click on the paper to read it.
-
The paper gives the order in which to click the toy soldiers to unlock the door. The order is left, right, right, left, right.
-
Once the door is unlocked click on it to enter the toy store.
-
Find the oil and click on it. After you get the oil you can click on the box on the floor and get the moonlight tint.
-
Collect the five dream pieces.
-
Go back to the street, then left to the statue.
The Statue
-
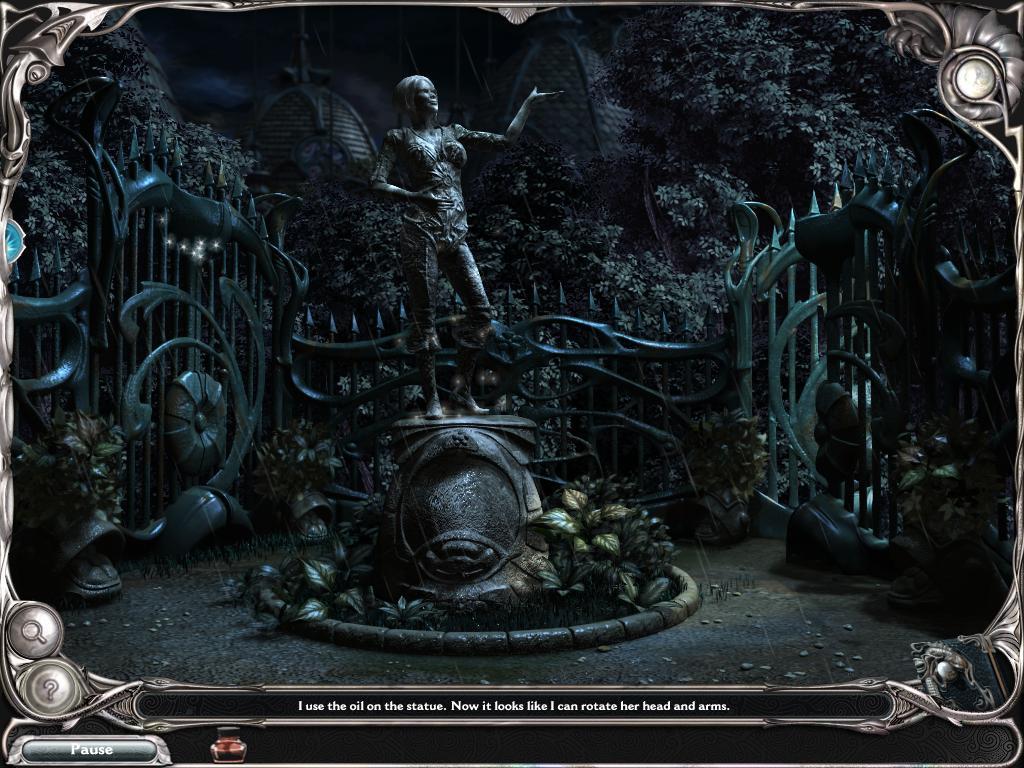
Use the oil on the statue.
-
Now click on the statue to move it to the proper position.
-
If you already clicked on the torso it is in the proper position.
-
Click on the left hand, the right hand, and the head.
-
The screenshot above shows the statue in the proper position.
-
Once the gate opens proceed to the left.
Outside the House
-
When you approach the house the gate will lock and lightning will strike the power pole.
-
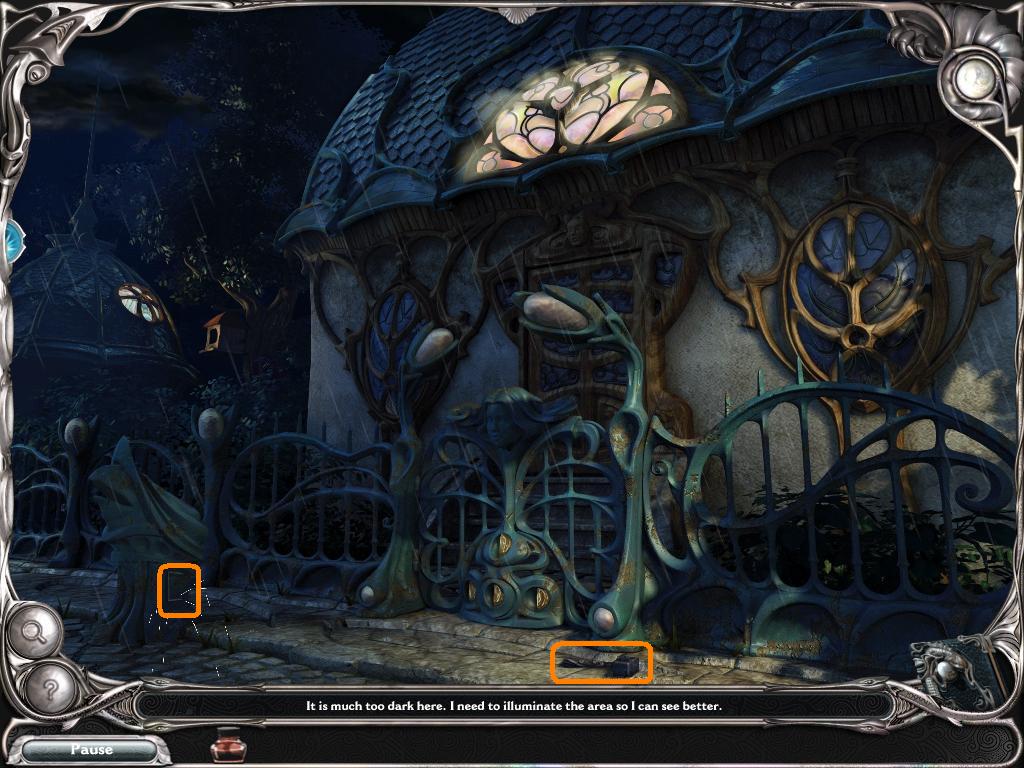
Use the illuminate power to light up the scene.
-
On the ground is a hammer. Take it and use it to hit the panel on the power pole.
-
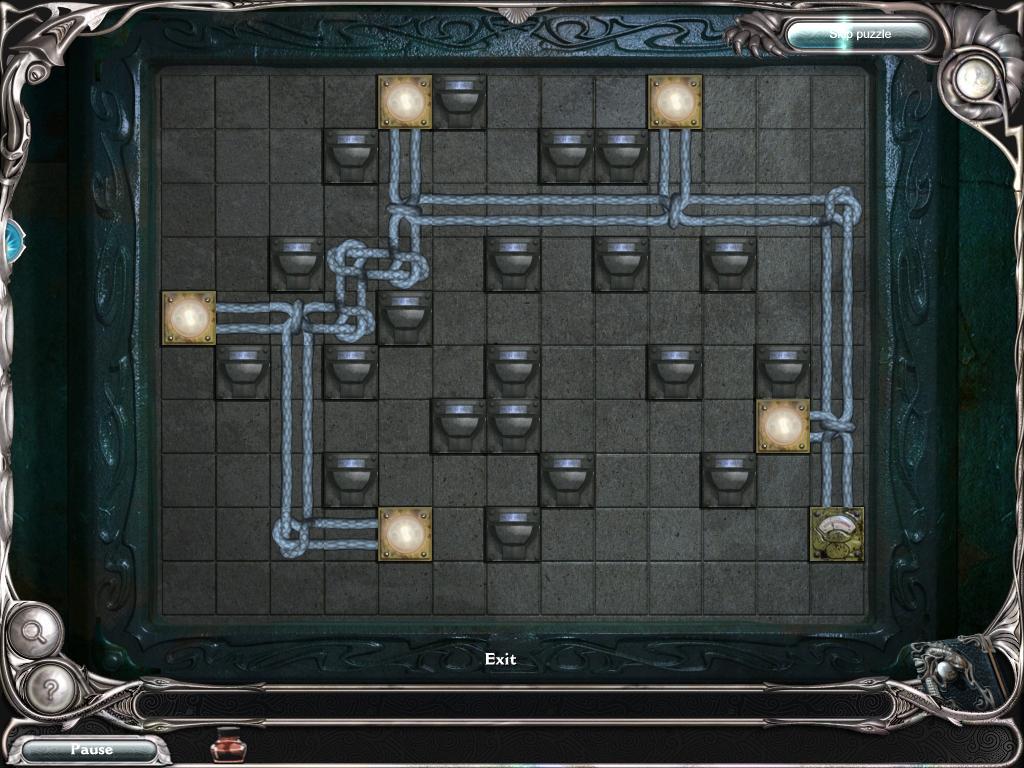
Click on the pole to activate the mini-game. Connect all of the power nodes to restore electricity.
-
There are no dream pieces to be found in this scene.
-
The solution is shown below.
The Gate
-
Once you restore power click on the gate. The gate locks will shatter and the pieces will scatter in the area.
-
Collect all 12 pieces of the gate locks.
-
Click on the gate to activate the lock mini-game.
-
When you have placed each piece properly that section of the lock will flash. When all pieces are placed the gate will open.
-
Solution to the puzzle is shown below.
-
Click on the open gate to enter the house.
The House
-
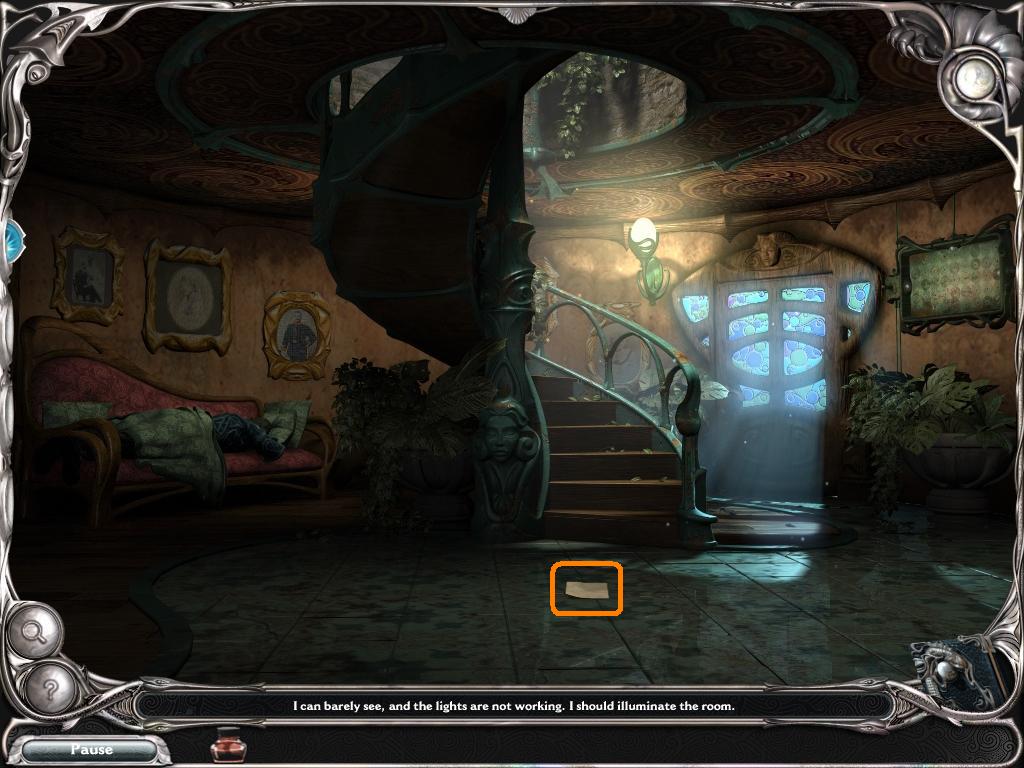
Once inside use the illuminate power to light up the space.
-
Read the note on the floor.
-
Click on the door to leave, then go back to the toy store.
The Toy Store
-
Enter the toy store.
-
When you enter the cabinet lock will break and two small triangular pieces will fall on the ground. Collect the pieces.
-
Replace the pieces and open the cabinet.
-
Click on the book and use the moonlight tint potion on it.
-
The engine for the toy train will be revealed, then it will break apart and the pieces will scatter.
-
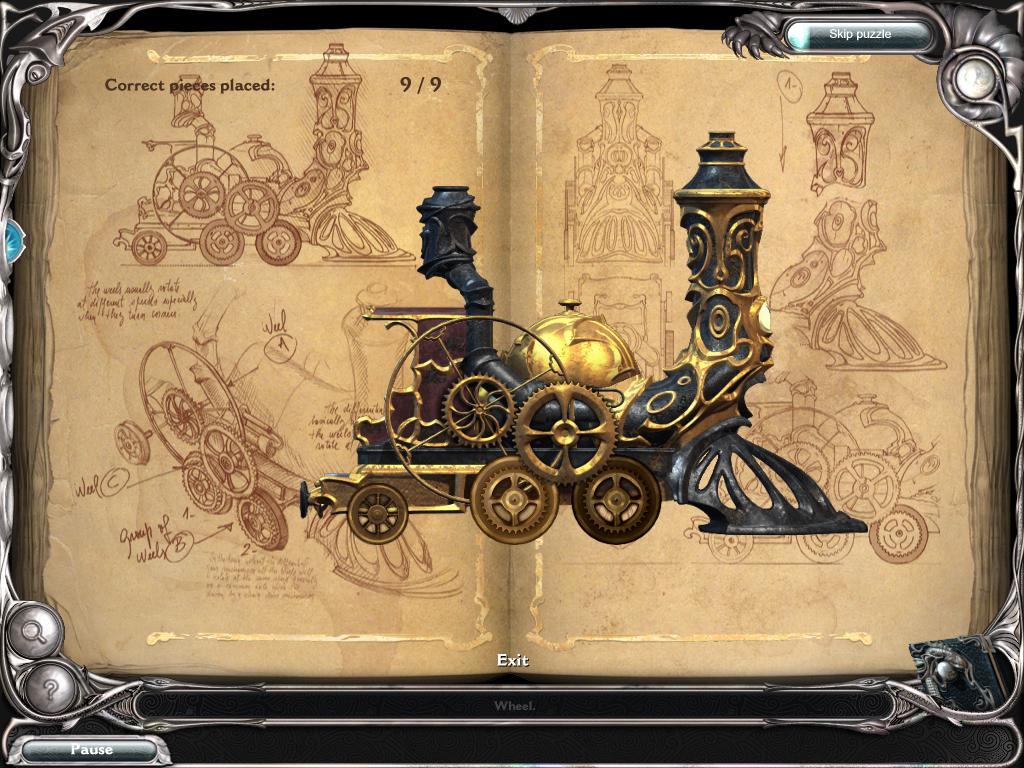
Back up to the toy store and collect the pieces of the engine (9 in all).
-
Once you have all 9 pieces click on the book again.
-
Assemble the engine (see screenshot below for picture).
-
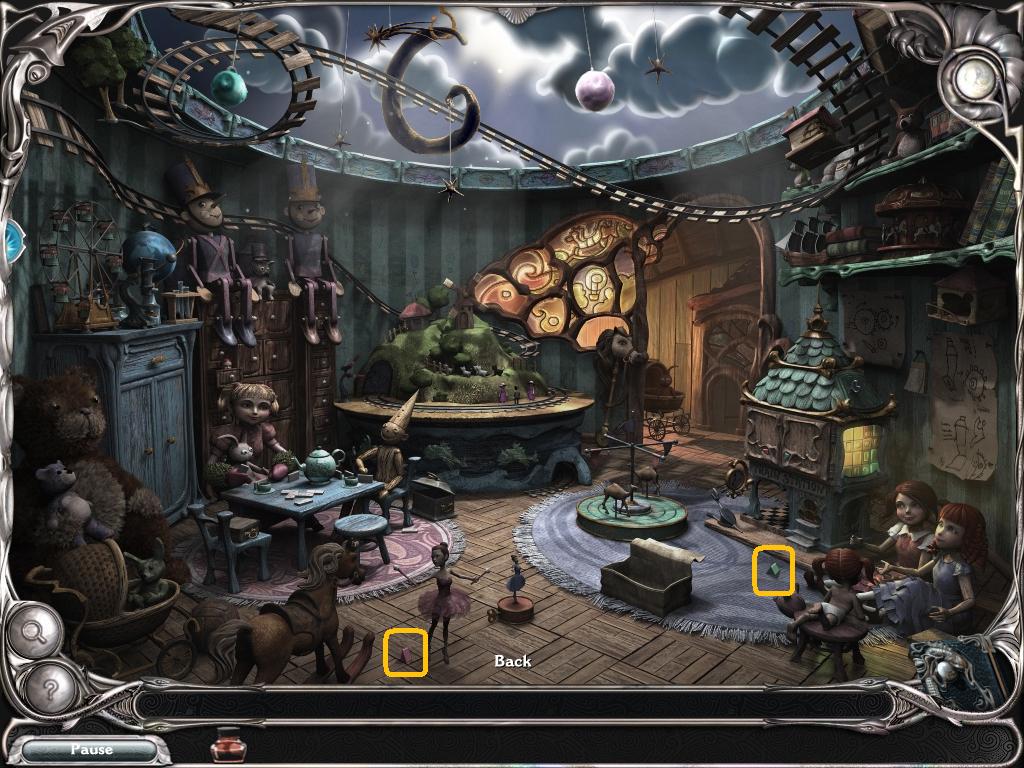
Once the train is in your inventory click on the model train set at the back of the room.
-
There are missing tracks. Read the note on the train set.
-
Back up and collect the tracks from the room, there are 8 in all.
-
Click on the train set again and place the tracks.
-
Place the train in the starting point at the lower right of the screen.
-
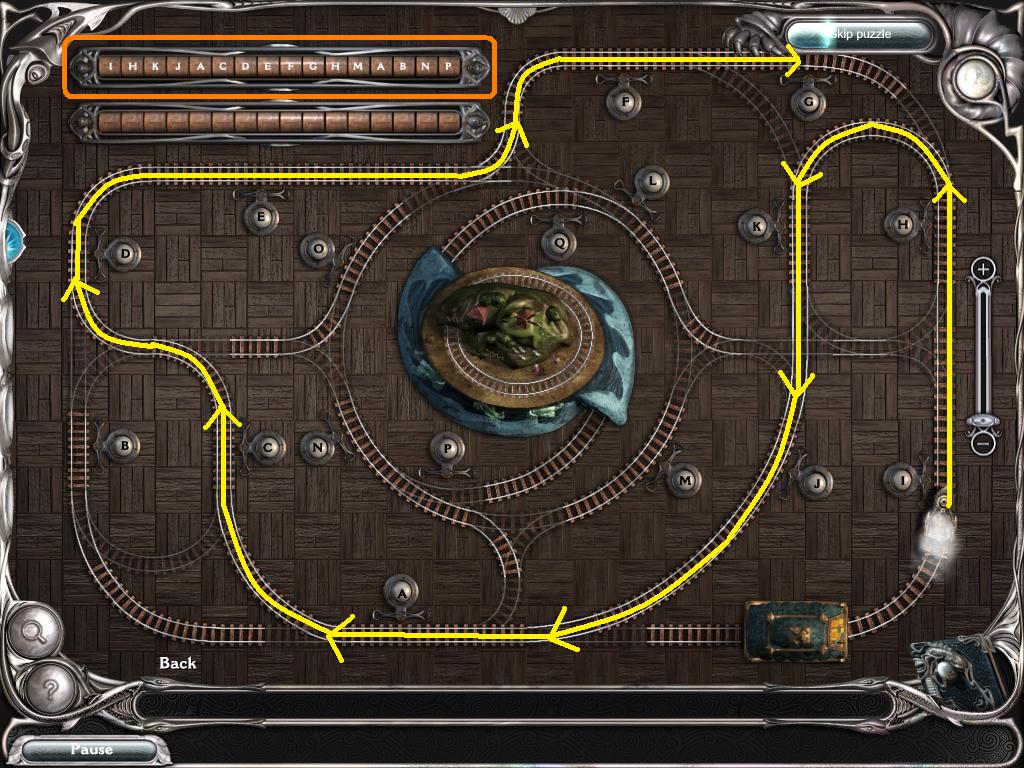
Notice the letters in the upper left of the screen, this is the order the train must pass these points.
-
Set the tracks up so that the train goes to "G", then click on the starting point to start the train.
-
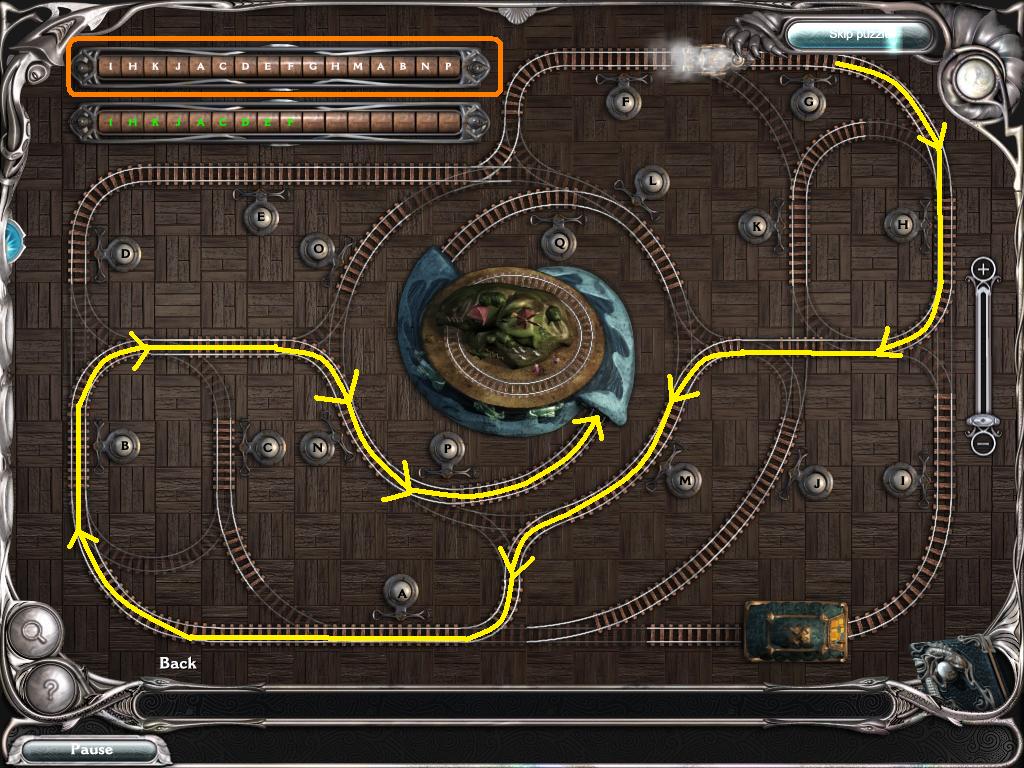
Wait until the train has reached the "A" point before you start switching the tracks for the letters after "G".
-
The two configurations are in screenshots below.
-
Once the train reaches the center wheelhouse you will get the next Dream Jewel. Note: if you have found all of the dream pieces the Jewel should activate.
The Airship

-
Leave the toy store and go back outside the gates to the airship.
-
Once at the airship find the five pieces of wood scattered around on the ground.
-
Once you have all five pieces click on the side of the airship to activate the puzzle.
-
Place all pieces of wood in the gaps, paying attention to the edges (this is a jigsaw puzzle). If a piece is in the correct place it will snap into place.
-
Once all of the pieces are in their proper place collect the two dream pieces, then use the power of Weld to fuse the repair.

-
Once the ship is repaired you will automatically enter it. There are five dream pieces and a pile of energy stones, collect them.
-
Use the weld power again to fix the fueling device.
-
Use the energy stones on the device and click on the map.
-
On the map click on "Herbalist" to go there.
-
End chapter 1.
Chapter 2 - The Herbalist
Outside the Herbalist's House
-
When you arrive the pumpkin in the door will disappear.
-
Click on the door lock and the numbers in the lock will also disappear.
-
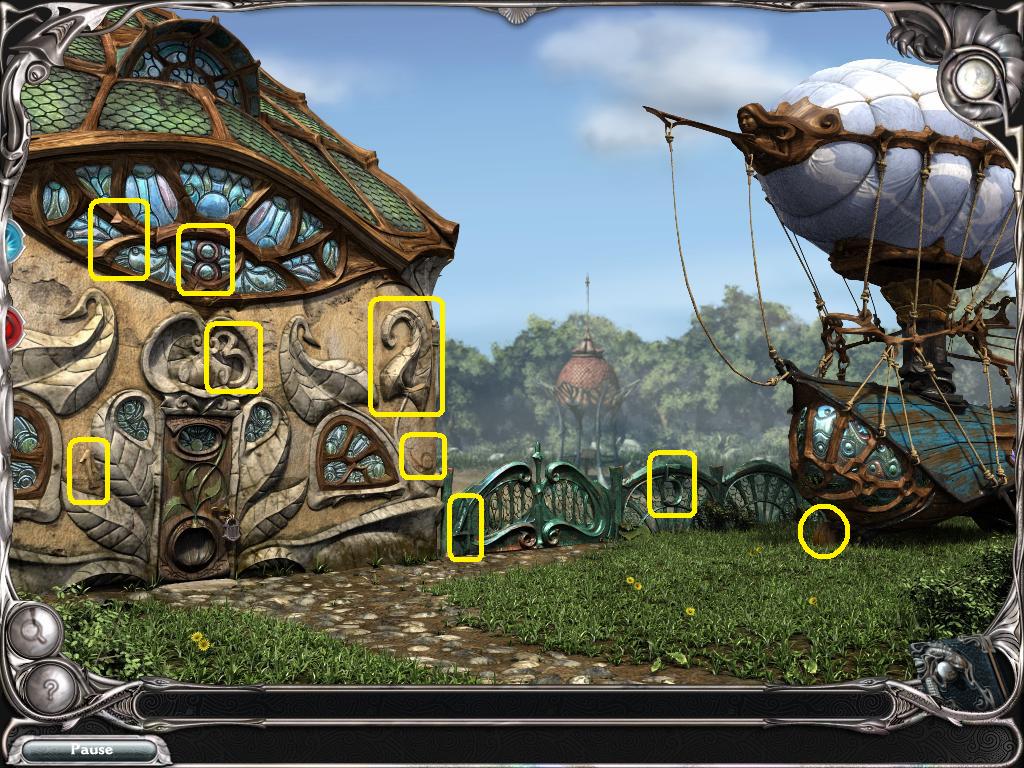
You must find the 8 numbers and the pumpkin in the scene.
-
Place the pumpkin in the door.
-
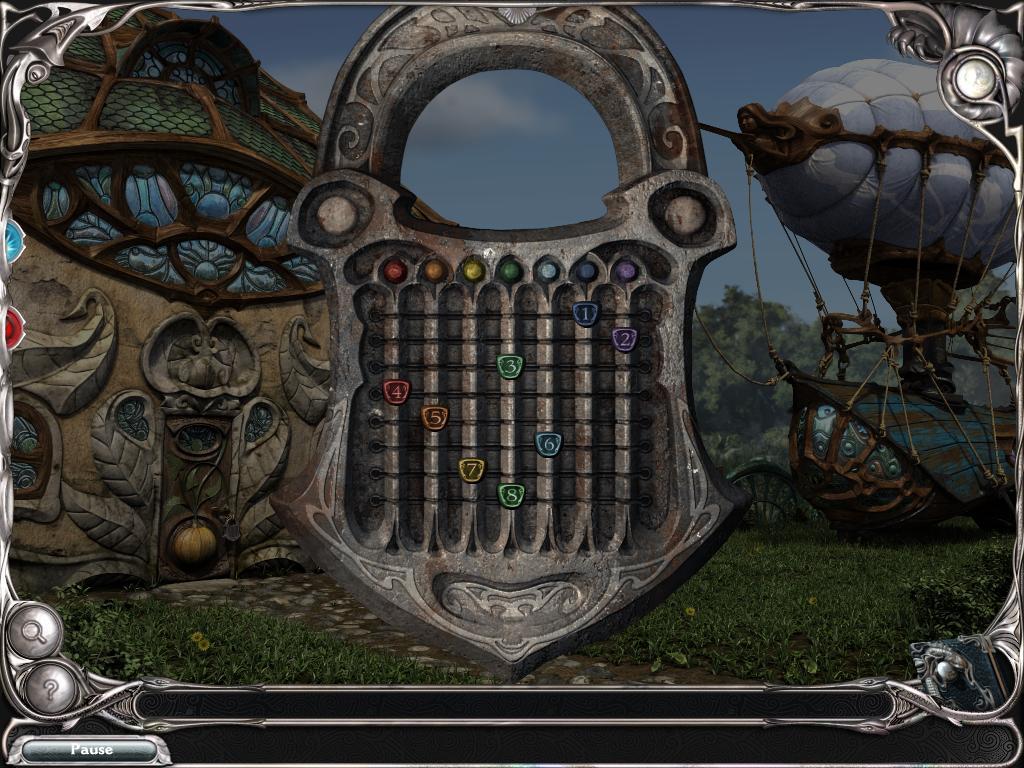
Click on the lock for a close up and place the numbers on the lock to activate the puzzle.
-
Simply move the number to the column with its corresponding color (see screenshot below).
-
When the lock is fixed the door will open.
-
There are no dream pieces in this scene.
-
Enter the house.
Inside the Herbalist's House
-
There is nothing to do in the first room, the living room, so click on the open doorway to the kitchen.
-
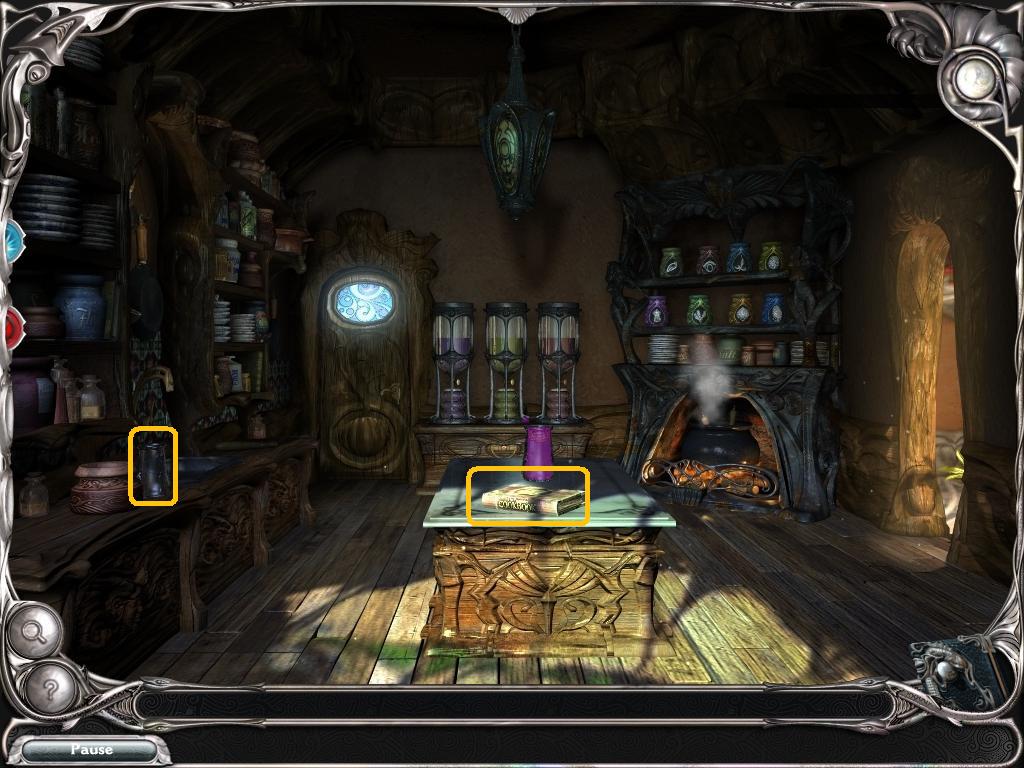
In the kitchen you will see a book on the table, read it.
-
Take the glass flask from the shelf on the left. It will break.
-
Pick up the pieces of glass from the floor (3) and use the weld power to repair the glass.
-
Use the glass on the purple potion on the table.
-
There are no dream pieces to collect.
-
Go back to the airship once you have the potion. Click on the map and click on Wish to travel back.
-
Once you are at Wish go through the gates and to the house.
-
Use the potion on Tangle (your father, lying on the couch).
-
Well, that just made things worse.
-
Go back to the airship and click on the map.
-
Click on Barge City.
-
End of chapter.
Chapter 3 - Barge City
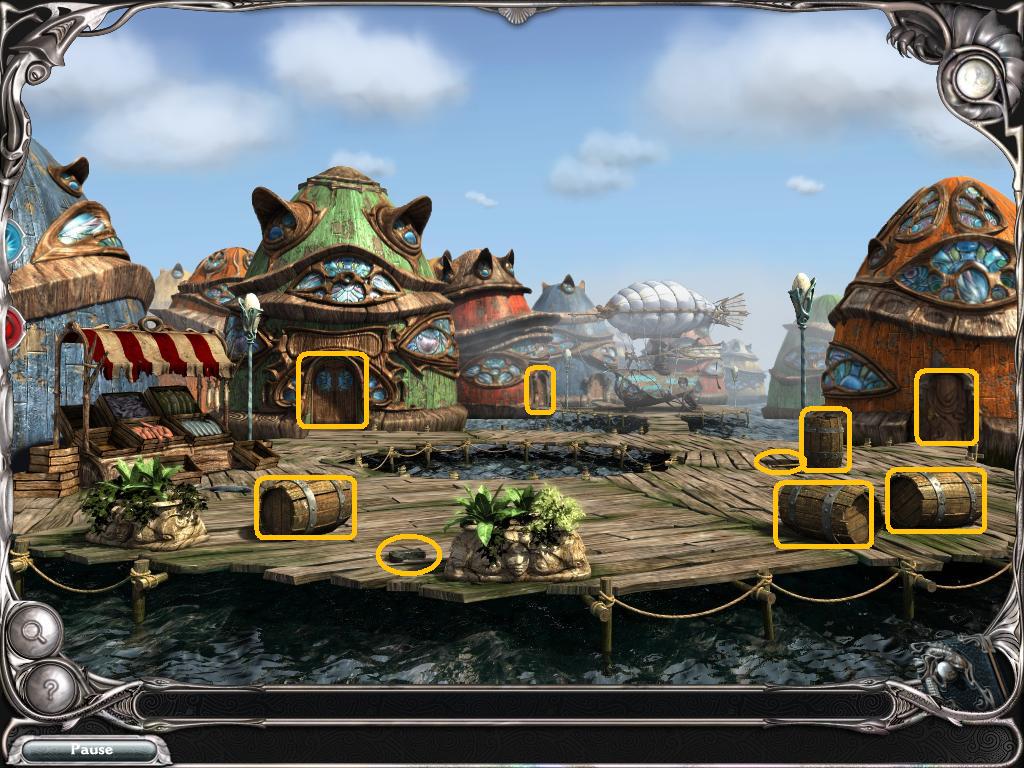
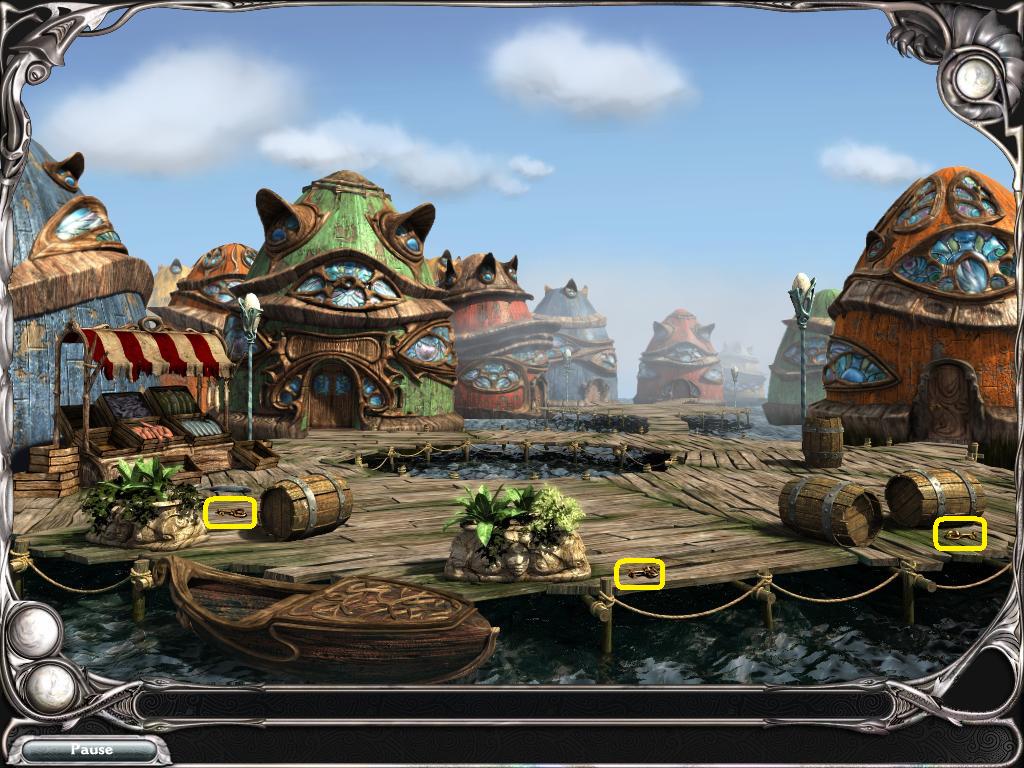
The Docks
-
On the docks are two pieces of a broken hammer, take them.
-
Once you have the pieces use the fuse power to repair the hammer.
-
Use the hammer on the 4 barrels on the dock. One of the barrels has a key (this changes from game to game).
-
When you find the key take it and use it on the door of the orange house on the right (the Port House).
The Port House

-
There are 10 dream pieces here to collect.
-
There is also a dream jewel (reveal).
-
Read the note on the desk.
-
Take the key from the right desk.
-
Click on the book to open it. Once the book is open, click on it to read.
-
Use the reveal power to read the book. Click on the "check" button at the bottom of the text.
-
Solve the puzzle that appears on the right page of the book.
-
This is a simple substitution cipher. The solution is "You must stop them".
-
Once you solve the puzzle you will get the locations of the four remaining figures.
-
Take the map from the wall on the right.
-
Leave the Port House.
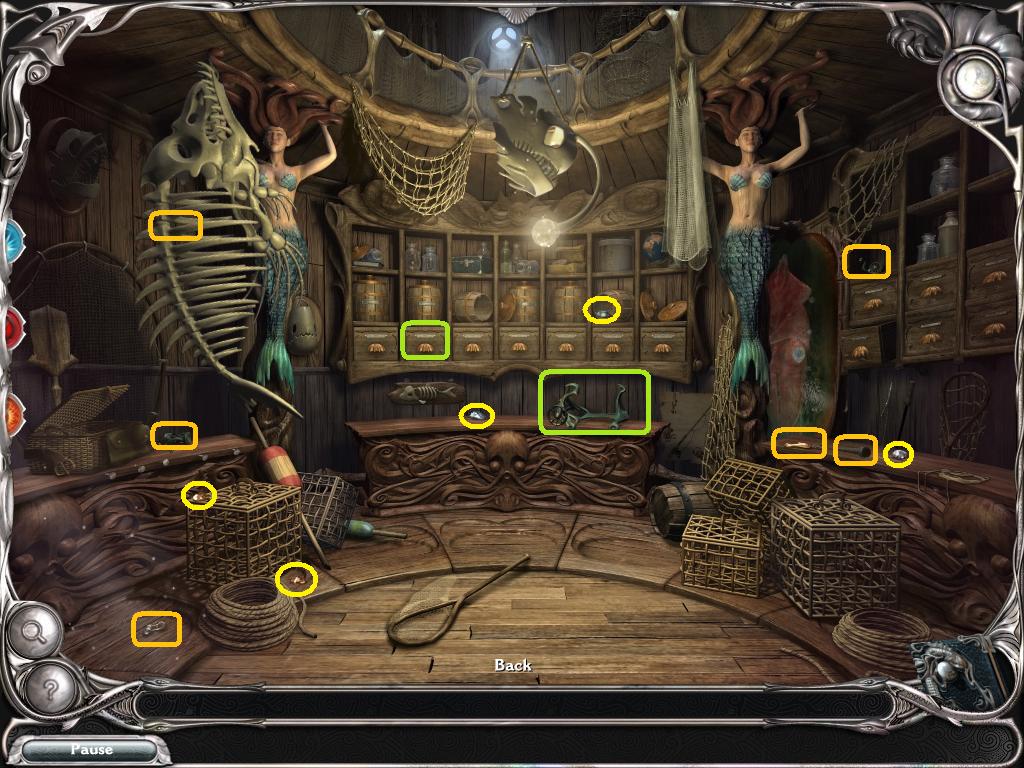
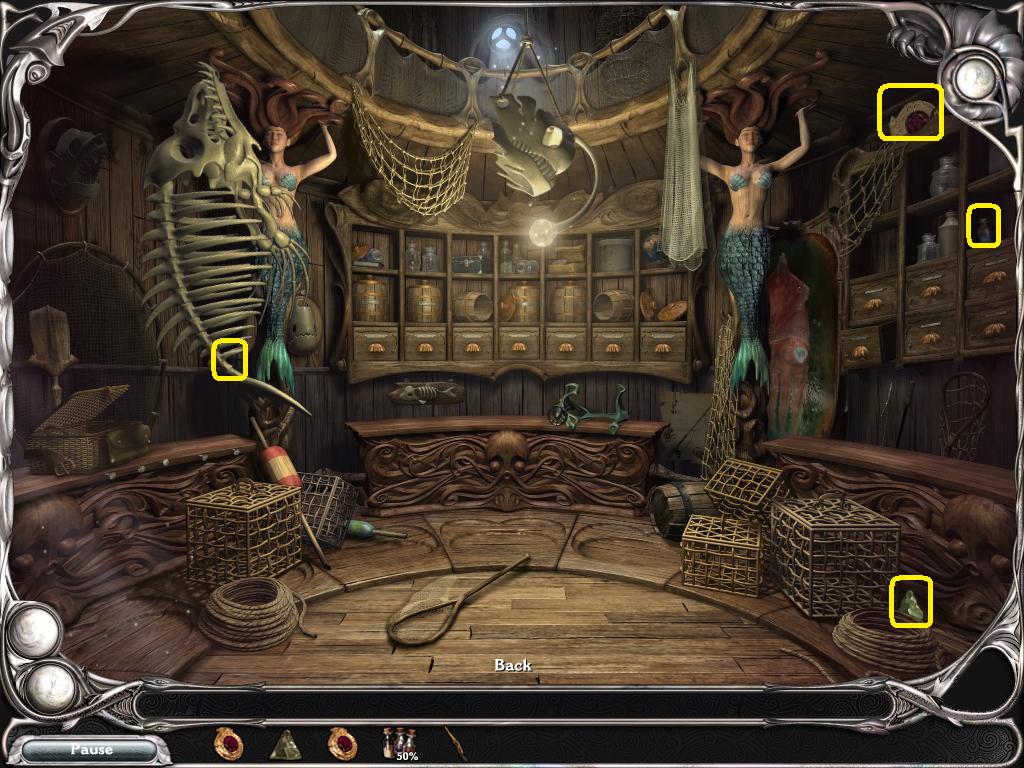
The Fishing Shop
-
Use the key on the orange house in the background, right next to the airship.
-
Once the door is open enter the Fishing Shop.
-
There are five dream pieces to collect here.
-
Pick up the hook, chisel, thread, and reel from the right side of the scene.
-
On the left pick up the ring, grip, and a rib from the fish skeleton.
-
Click on the vise in the center for a close up.
-
Once in close up read the instructions for making a fishing pole.
-
Place the rib in the clamp and use the chisel on it.
-
Place, in this order, the grip, reel, rings, line, then hook.
-
Back up from the close up and back up from the Fishing Shop.
-
Go back into the Port House and click on the open book below the map.
-
Read the instructions and take the paint sample.
-
Back up and go back to the Fishing Shop.
-
Once in the shop click on the second drawer from the left in the center and take the key.
-
Leave the Fishing Shop.
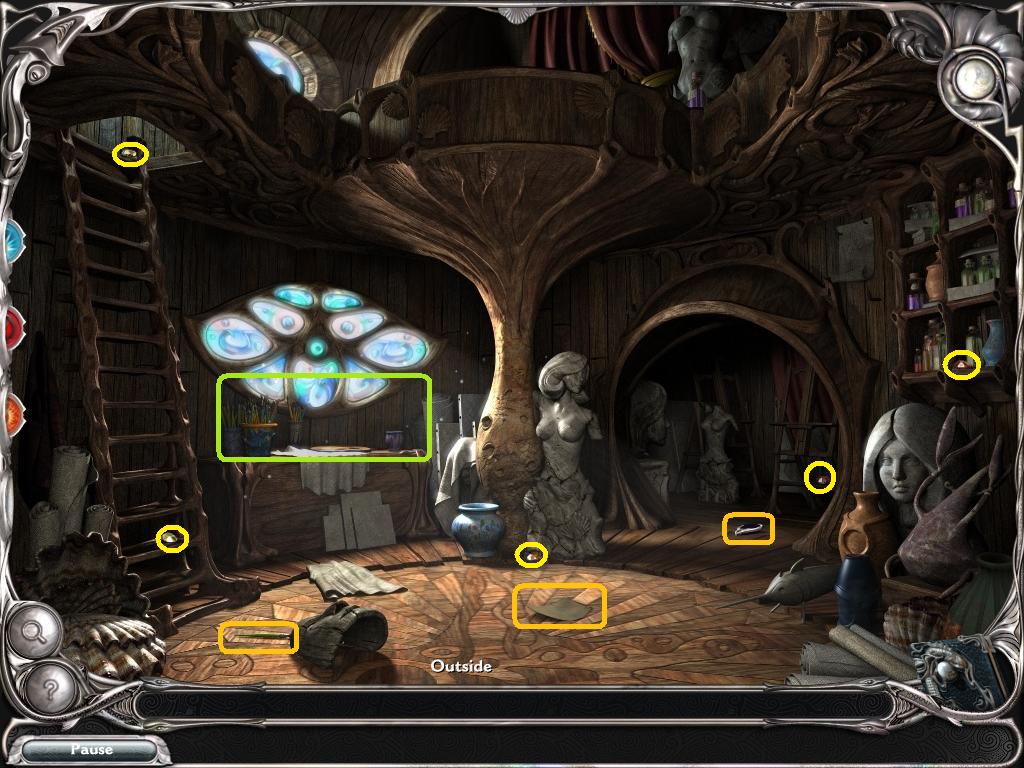
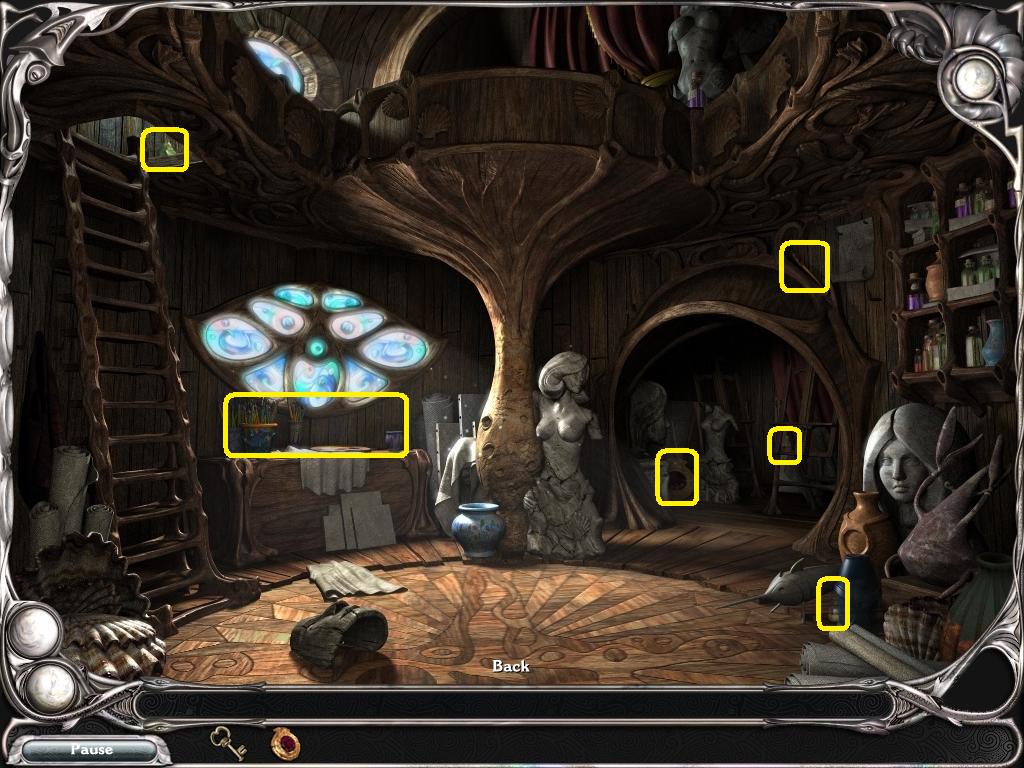
The Art Store
-
Use the key on the green house in the foreground on the left.
-
Enter the Art Store.
-
Collect the five dream pieces.
-
Collect the dream jewel (vision).
-
Read the note on the floor.
-
Pick up the brush.
-
Click on the desk underneath the window for a close up.
-
Place the brush on the palette.
-
Mix the color for the magic paint: 1 yellow, 2 red and 2 blue.
-
When you have the color in your inventory back up and go back to the Fishing Store.
-
Click on the clamp and use the magic color on the bait.
-
Back up until you are on the docks.
-
Use the fishing pole on the open center of the docks to get the dolphin figurine.
-
The Vision Dream Jewel should be pulsing, click on it.
-
Enter the airship and click on the map.
-
Click on The Obelisk to travel there.
-
End chapter.
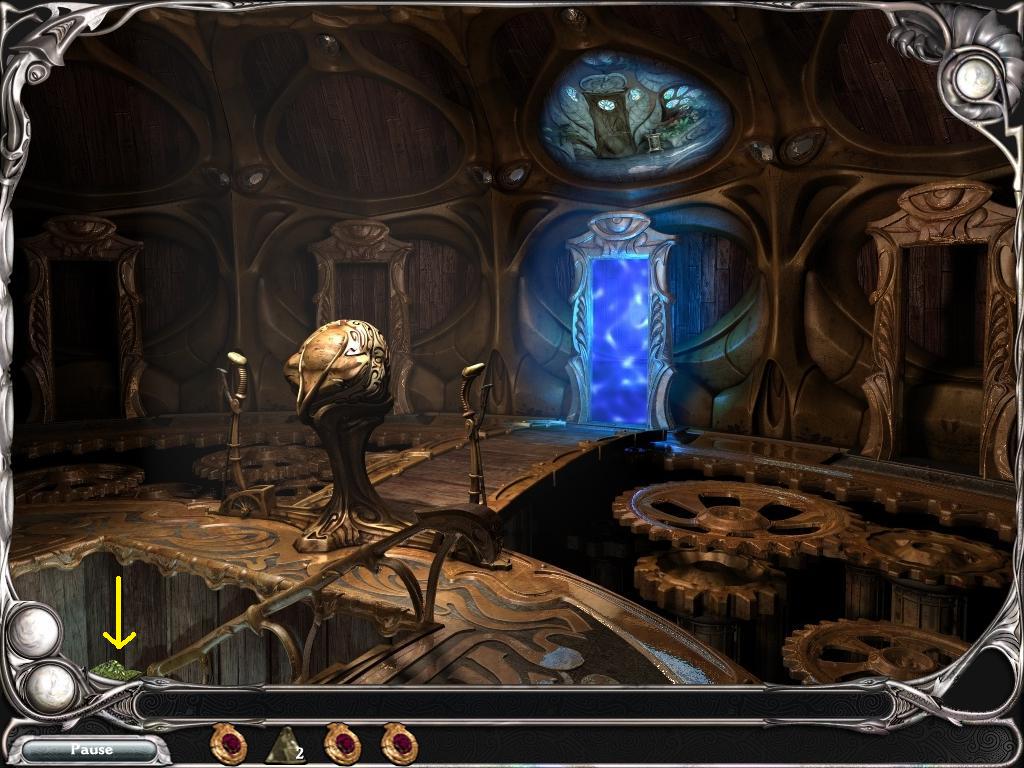
Chapter 4 - The Obelisk
Getting to the Obelisk

-
There is a mechanism on the left that is missing a handle. The handle is on the right in the distance, lying on the rocks.
-
Take the handle and place it on the mechanism. When it is in place a bridge will appear to the Obelisk.
-
Click on the Obelisk for a close up.
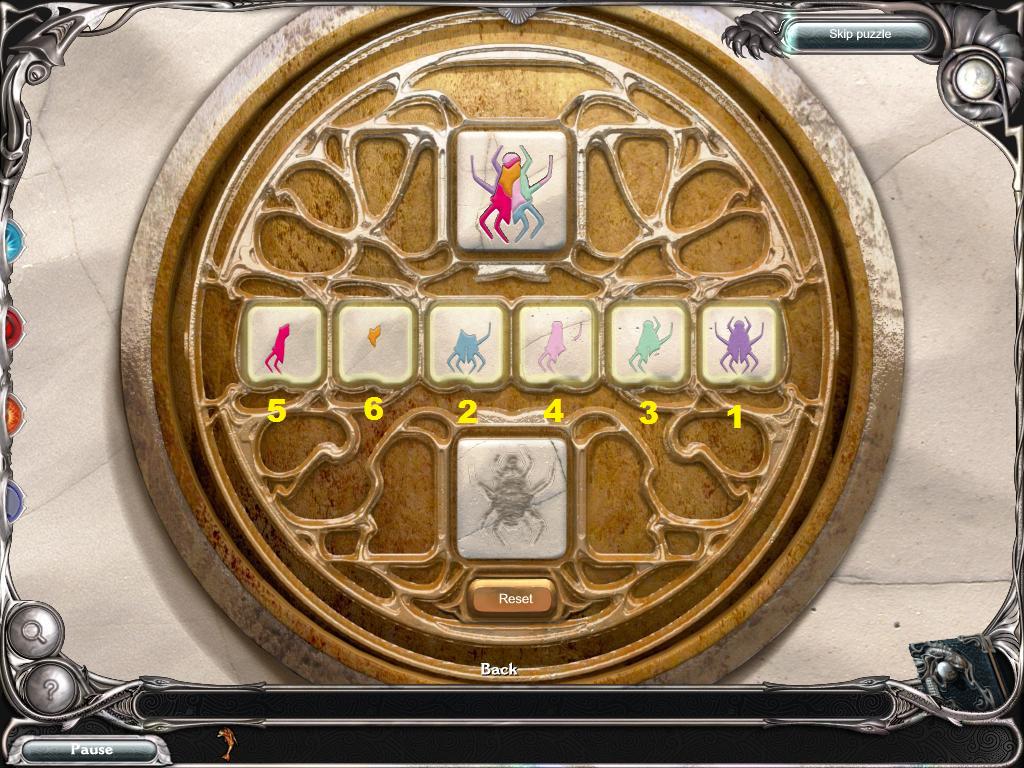
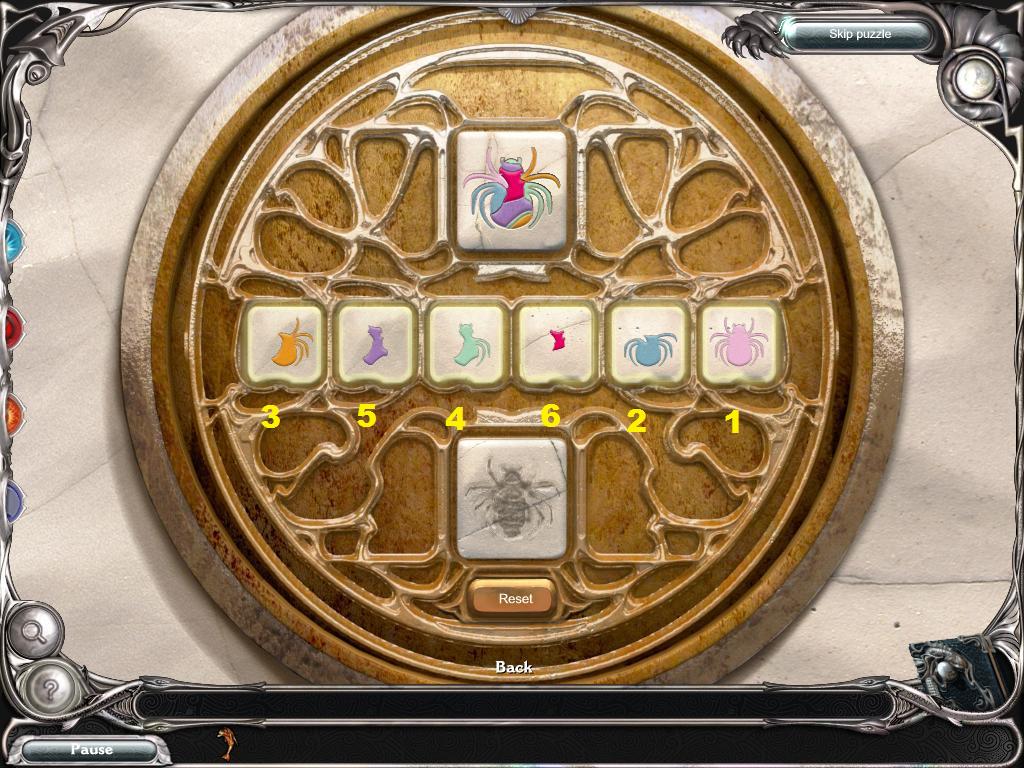
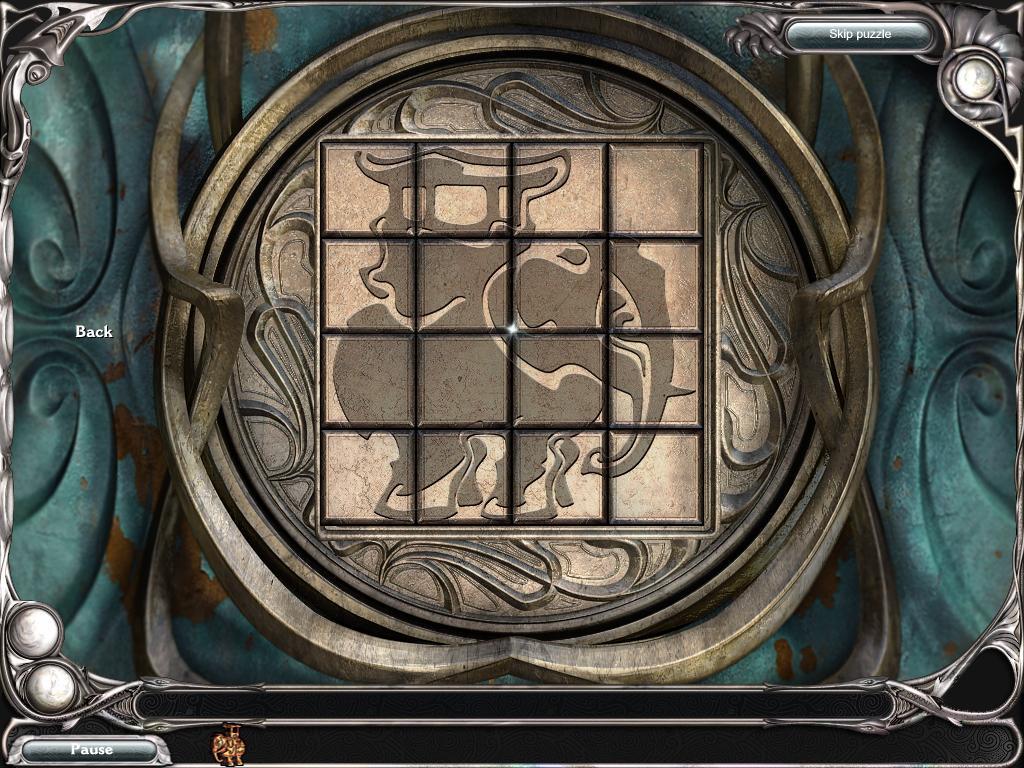
The Obelisk Puzzles
-
There are four puzzles on the obelisk. The challenge is to recreate the central animal figure using the colors in layers.
-
Here are the solutions:
-
When all puzzles are solved you will get the fairy figurine.
-
Click on the Vision power to get another vision of Faye.
-
There are no dream pieces to collect here.
-
Enter the airship and click on the map.
-
Click on Merrow's House to travel there.
-
End chapter.
-
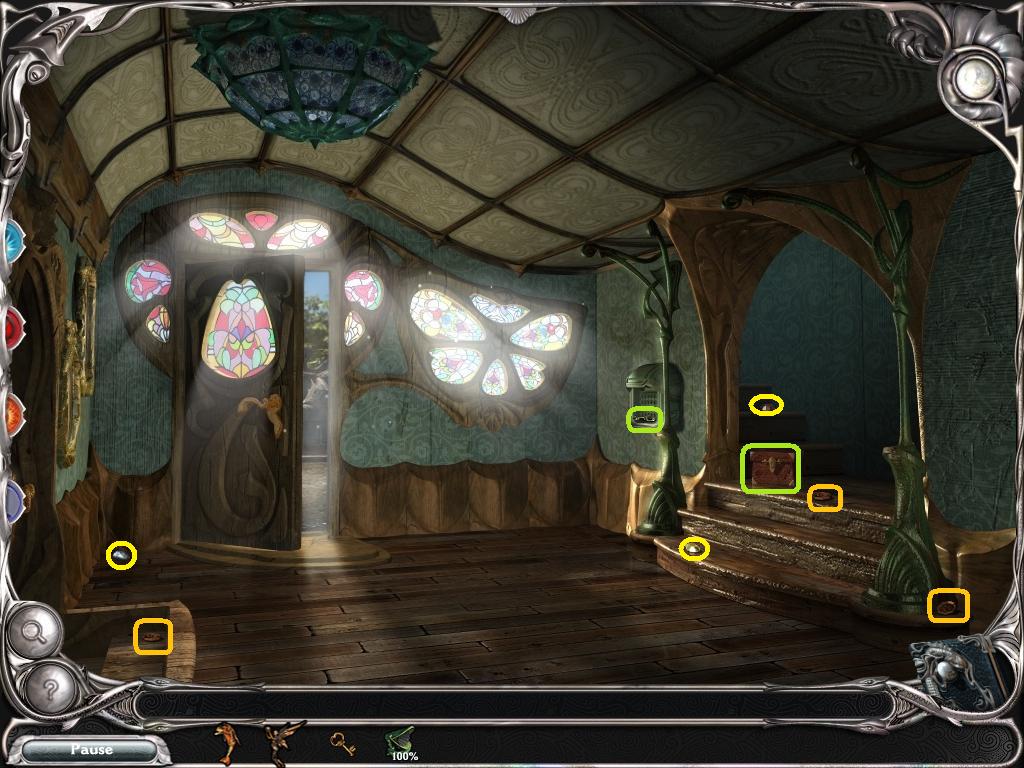
Your Vision jewel is flashing again, click on it for a vision of Faye.
-
Collect the five dream pieces in the scene.
-
Read the note on the door.
-
Pick up the key on the left side of the ground and unlock the house door on the right.
-
Go left into the Hangar.
-
When you enter the hangar the gramophone on the left will shatter.
-
Pick up the three dream pieces in the scene.
-
Pick up the three gramophone pieces in the scene.
-
Pick up the key on the ground on the left.
-
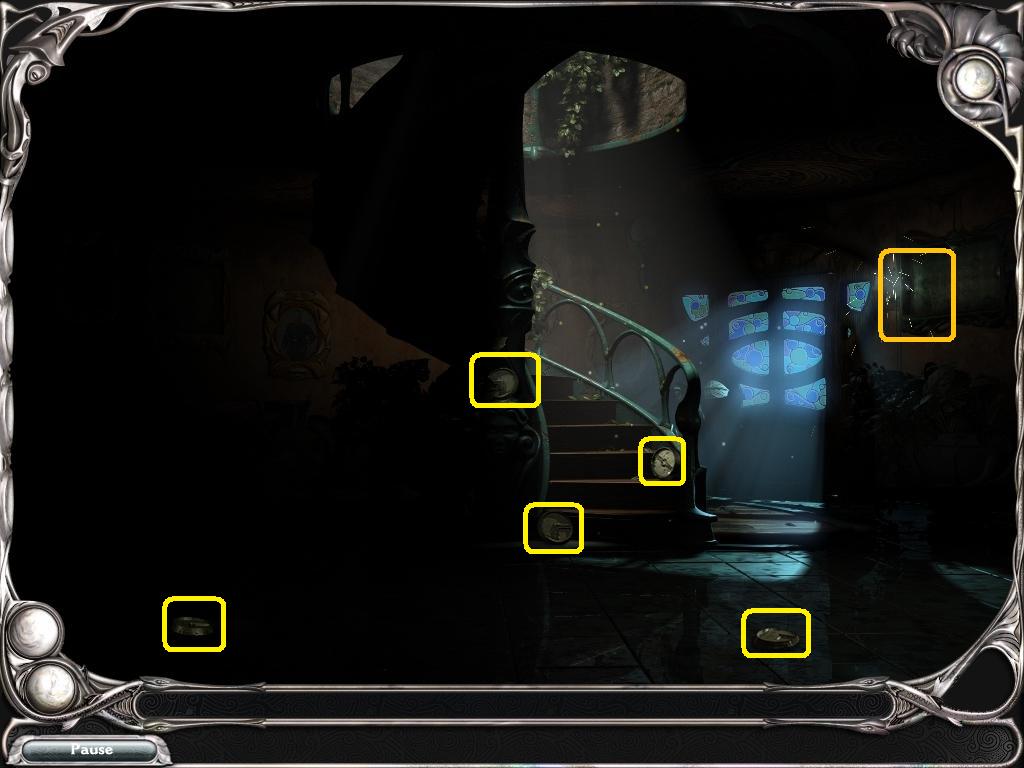
Go back outside, then into the House.
-
Pick up the three dream pieces.
-
Use the key on the locked box on the stairs.
-
Pick up the three wooden objects.
-
Take the key in the electrical box on the wall to the right of the door.
-
Go back outside and then left into the Hangar.
-
Use the key on the locked box next to the wheel to get a fifth wooden object.
-
Place the gramophone pieces on the table on the left.
-
Click on the gramophone for a close up./li>
-
Pick up the sixth and last wooden object underneath the gramophone.
-
Pick up the piece of record from the floor.
-
Read the note.
-
Click on the book on the top of the left stack and read it. You will find three more pieces of the record inside.
-
Use the weld power to repair the record, then place it on the gramophone.
-
Place the wooden pieces on the base of the gramophone.
-
Gramophone puzzle:
-
Click on the record and it will play a sound. Click on the wood tile that corresponds to that sound.
-
If you get it correct, the tile will light up yellow.
-
Click on the record again and listen to the next sound. Click on the wood tile that corresponds to that sound.
-
Continue until all six tiles are lit up.
-
If you click on an incorrect tile it will turn red and you will have to start over.
-
We cannot give a solution as the order in which the sounds play changes every game.
-
-
Once the puzzle is solved you will get the mermaid figurine.
-
Go back outside, then back to the airship.
-
Click on the map and click on The Clockmaker to go there.
-
End Chapter.
-
The vision jewel will be flashing again. Click on it for a vision of Faye.
-
Click on the large open door at the base of the tower to enter.
-
There are five dream pieces to collect here.
-
Click on the book to read it.
-
Click on the bell to summon the Clockmaker.
-
Enjoy the conversation.
-
Go back to the airship and click on the map.
-
Click on the Herbalist's House on the map to go there.
-
End Chapter.
-
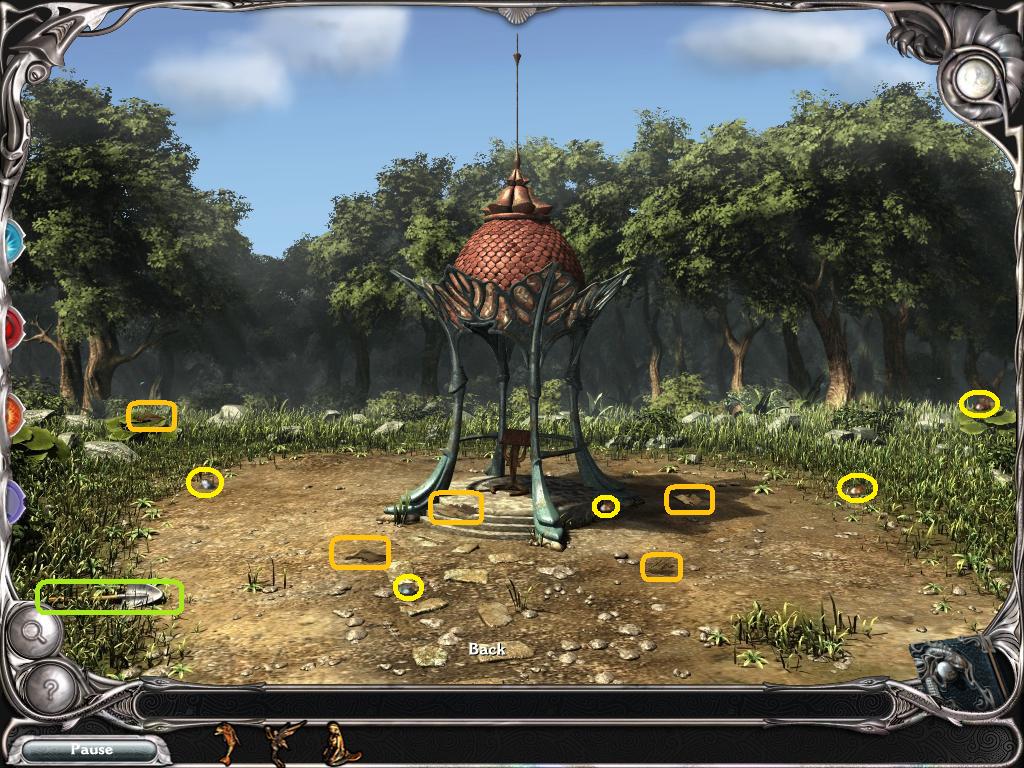
There are three pieces of a key scattered around the yard, find them.
-
Use the weld power to repair the key.
-
Use the key on the gate to enter the side yard.
-
There are no dream pieces to find in this scene.
-
Find the five dream pieces.
-
Find the five pieces of paper.
-
Pick up the shovel.
-
Your Vision jewel should be flashing. Click on it for a vision of Faye.
-
You need the book from the kitchen, so back up to the front yard and go through the door.
-
Go through the living room to the kitchen and take the book.
-
Go back to the side yard.
-
Use the shovel on the dirt areas until you dig up a box (the location changes).
-
Examine the box. You need a code.
-
Place the book on the stand underneath the pergola.
-
Click on the book for a close up.
-
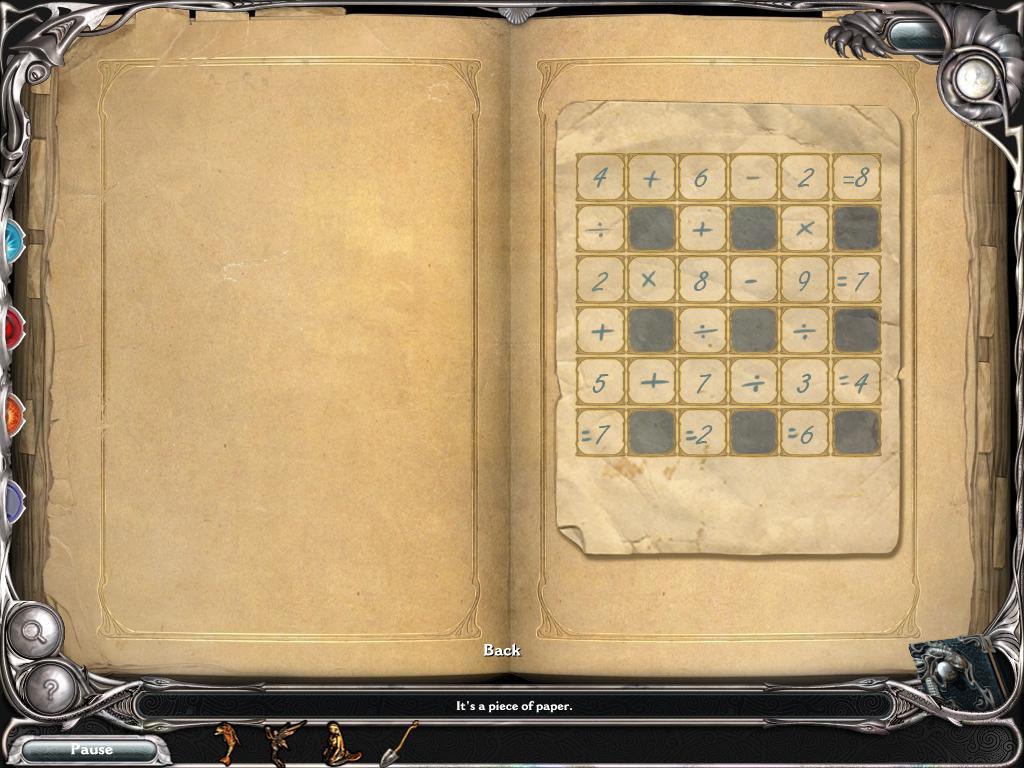
The Book Puzzle:
-
Once the book is in close up place the pieces of paper on it.
-
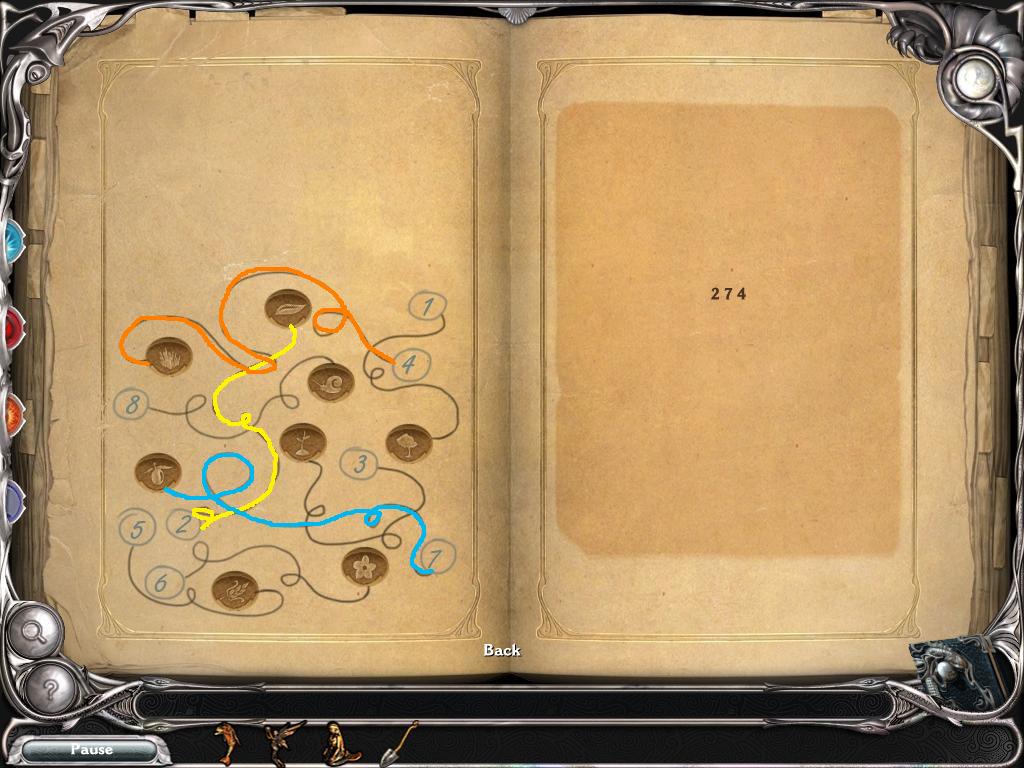
This will trigger a jigsaw puzzle. Piece together the puzzle and a three digit clue will appear.
-
A maze with numbers and symbols will appear on the left.
-
Use the numbers to find the symbols.
-
The Chest:
-
Click on the chest for a close up.
-
Click on each ring until the symbols for the numbers from the book code appear in the top center.
-
Once the chest is open you will get the final figurine, a unicorn.
-
Go back to the airship and go in.
-
Click on the map and click on the Crater of Time.
-
End Chapter.
-
Your Vision jewel should be flashing. Click on it for a vision of Faye.
-
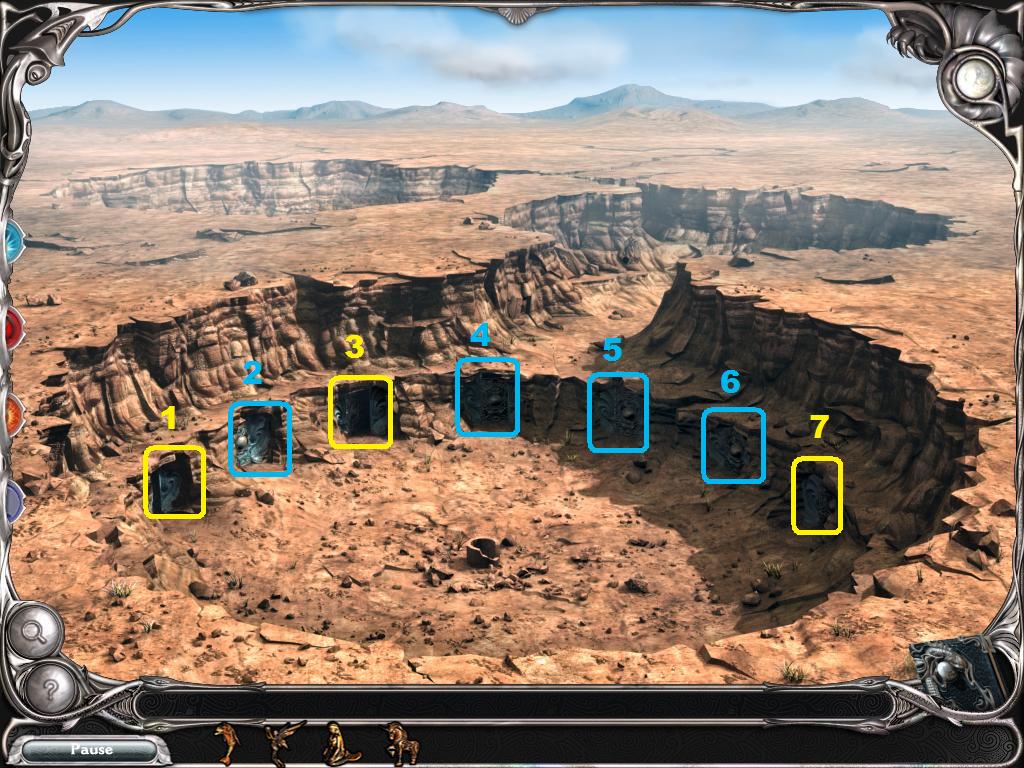
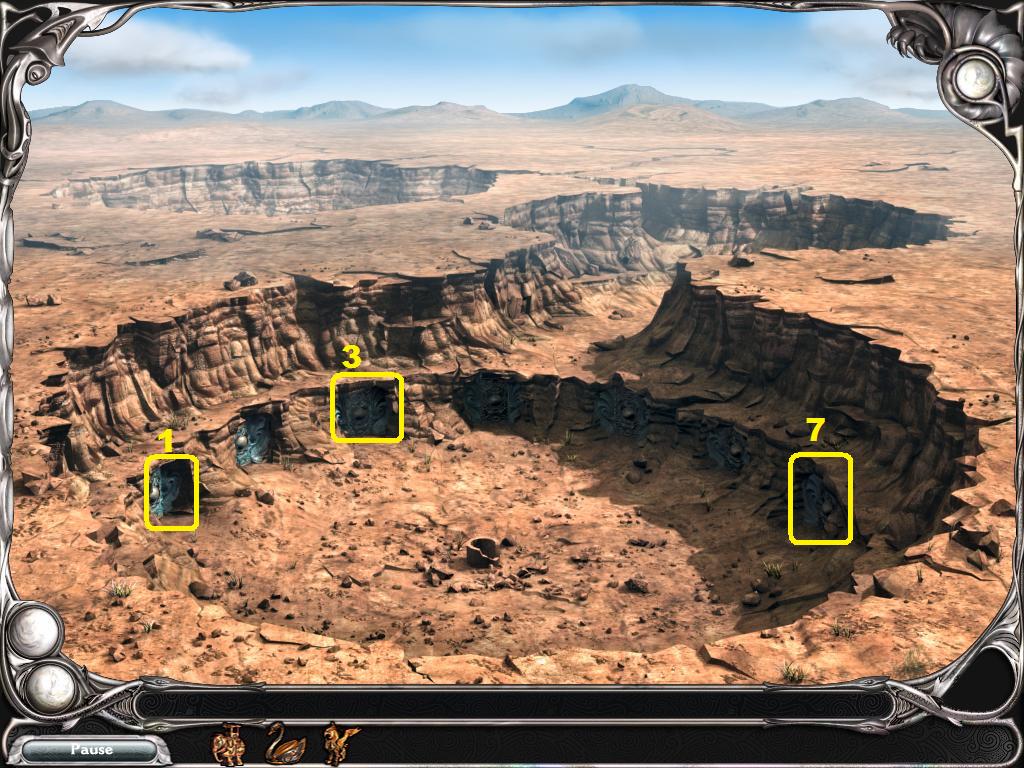
There are seven caves down below. Some have open doors, some have locked doors.
-
From left to right, they are unlocked, locked, unlocked, locked, locked, locked, unlocked.
-
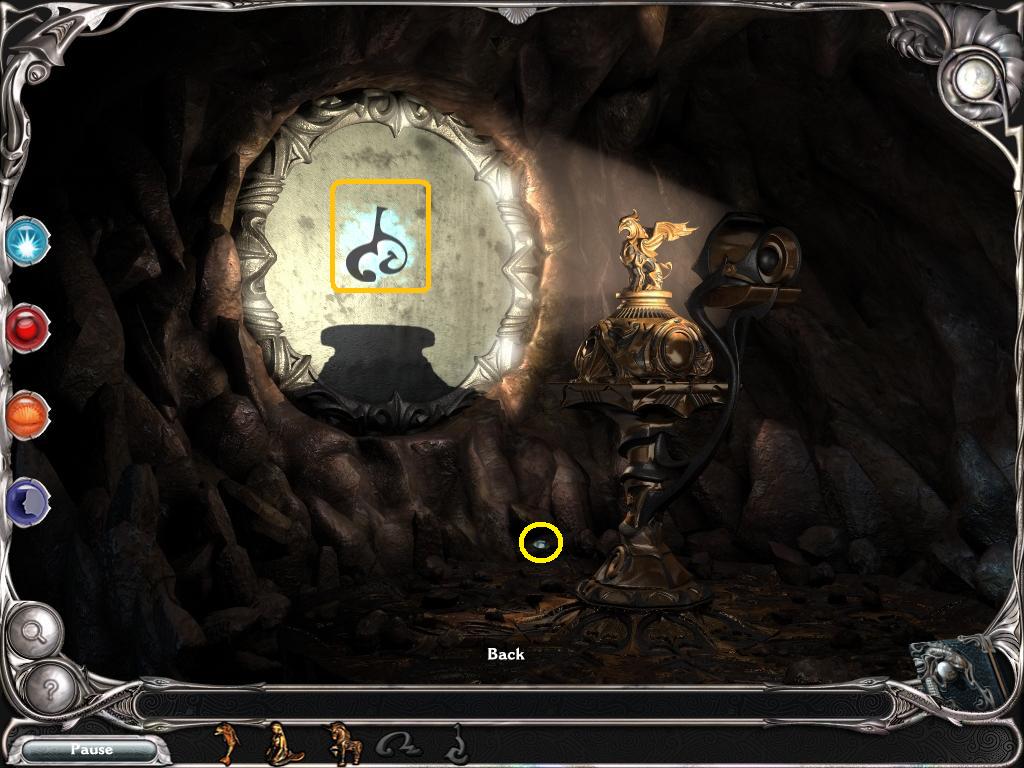
Click on the first door on the left, the unlocked door.
-
Collect the one dream piece.
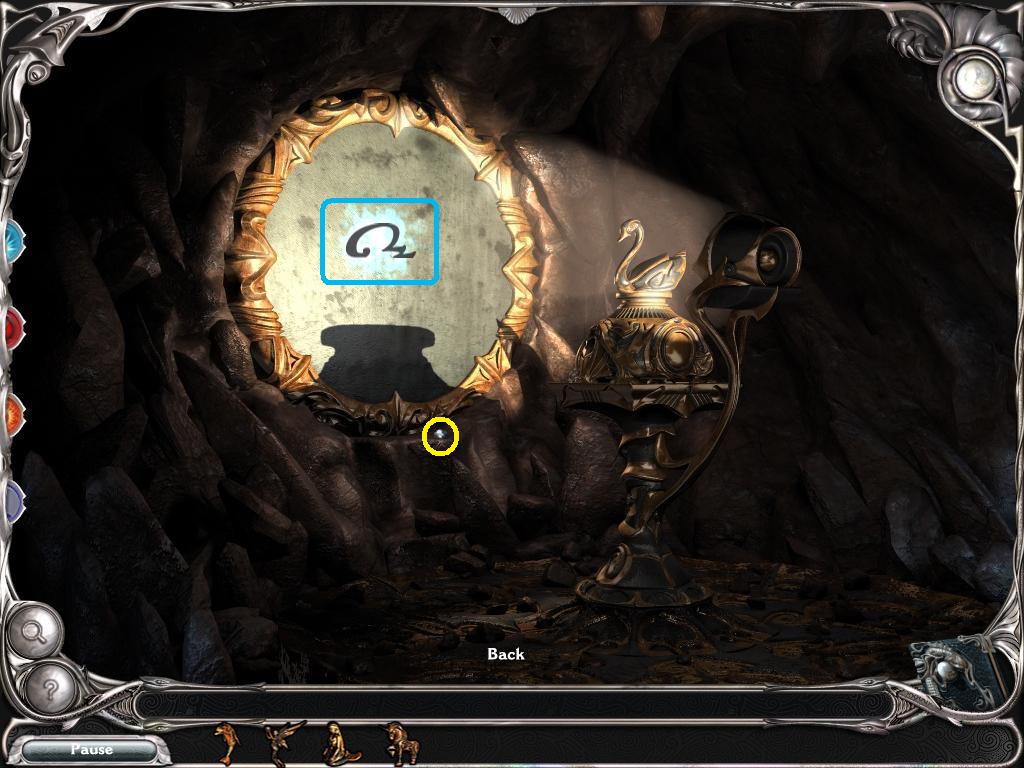
-
Use the Reveal power to show a symbol in the mirror. Take the symbol.
-
Go back to the edge of the crater.
-
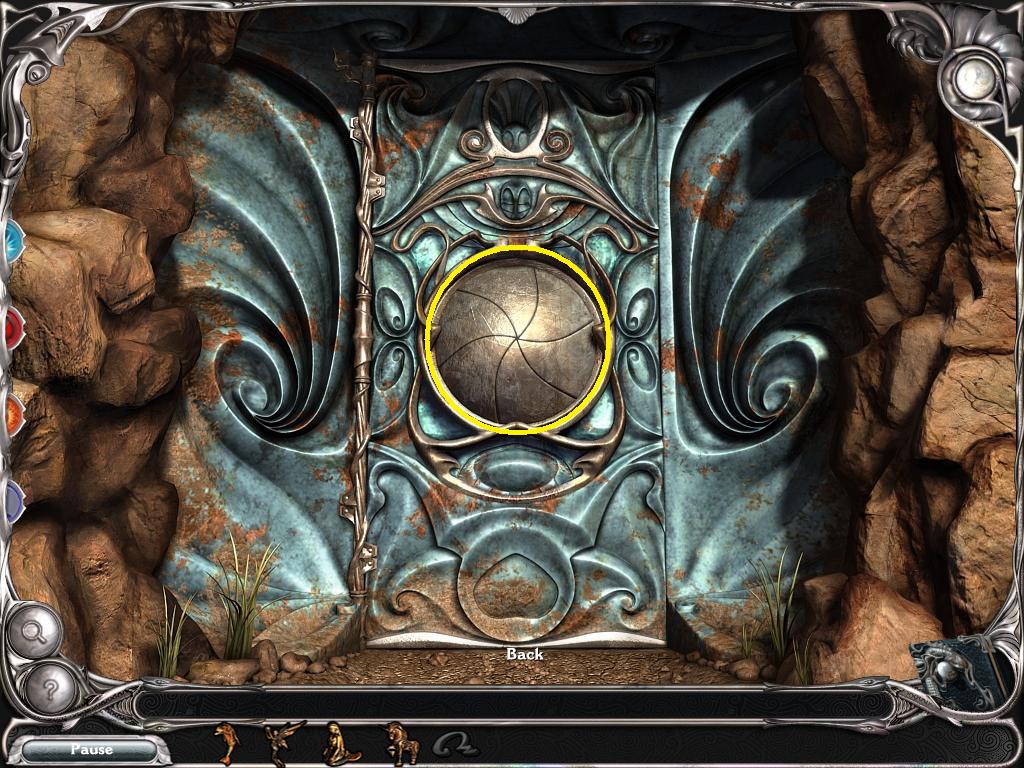
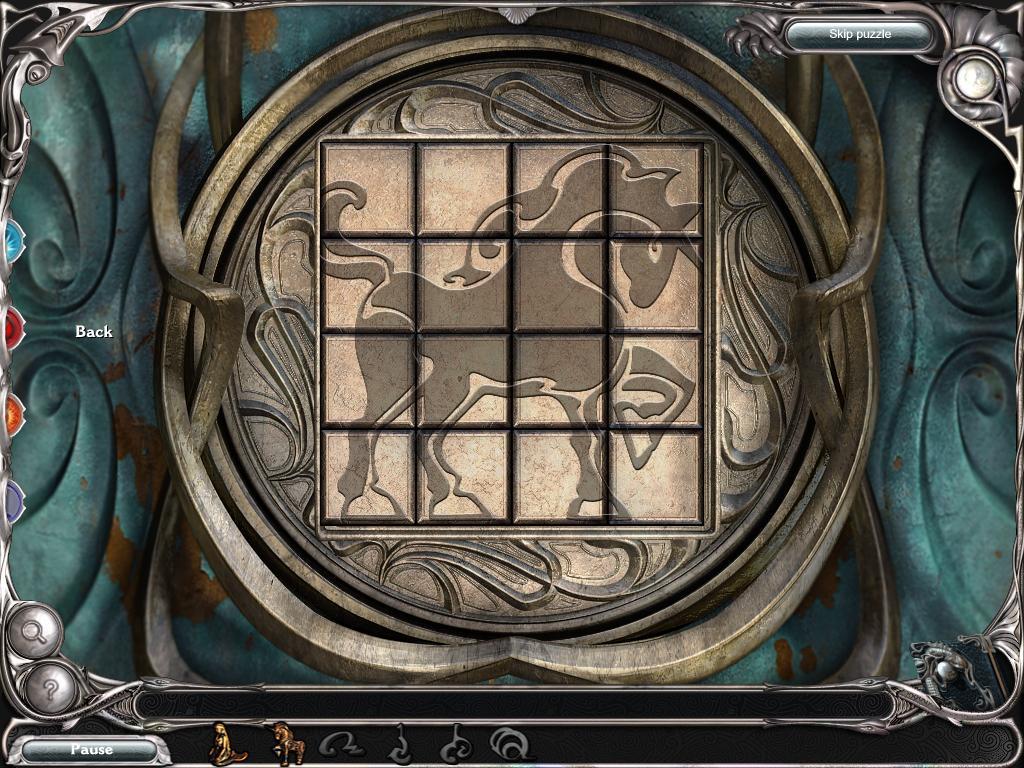
Click on the next cave in line, moving from left to right. This door should be locked.
-
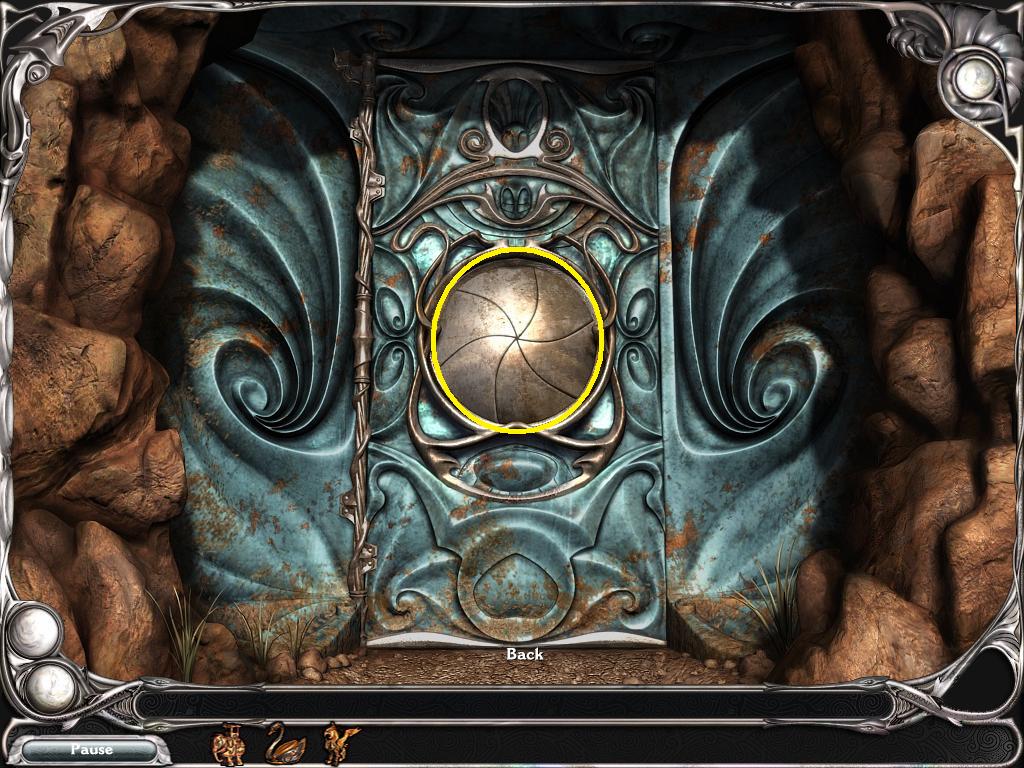
Click on the circle in the center of the door to reveal the puzzle.
-
Cave 2 Door Puzzle:
-
This is a basic swap 2 tiles jigsaw puzzle.
-
Once you recreate the picture of a stylized fairy the door will unlock.
-
Enter the cave.
-
Collect the dream piece.
-
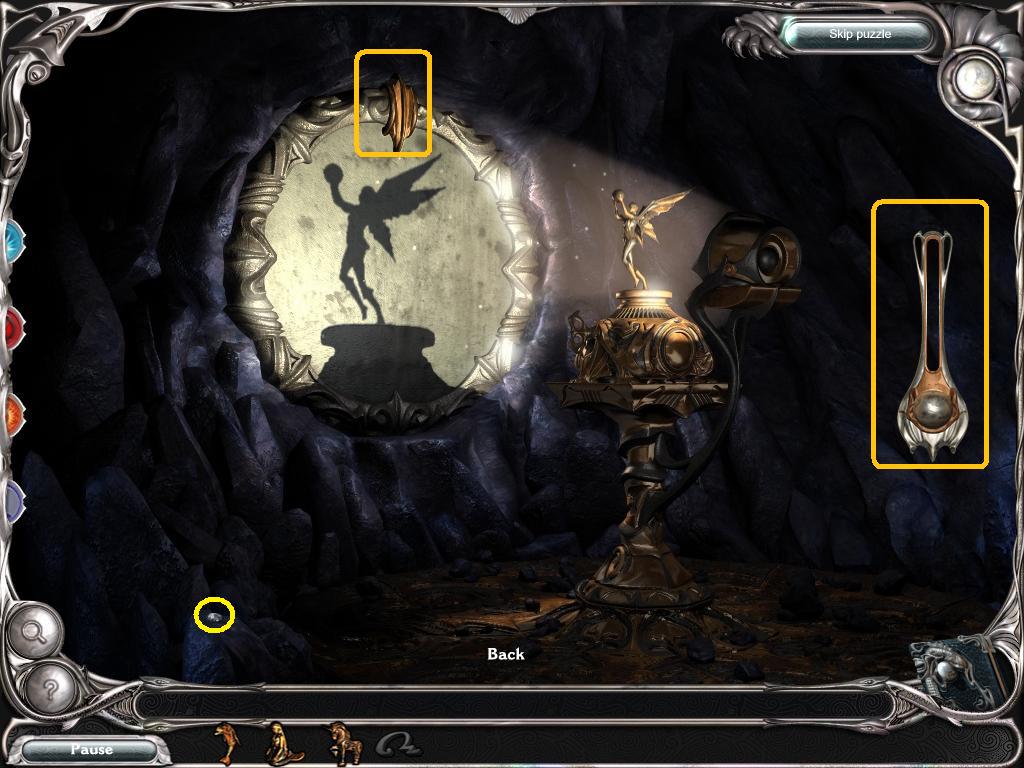
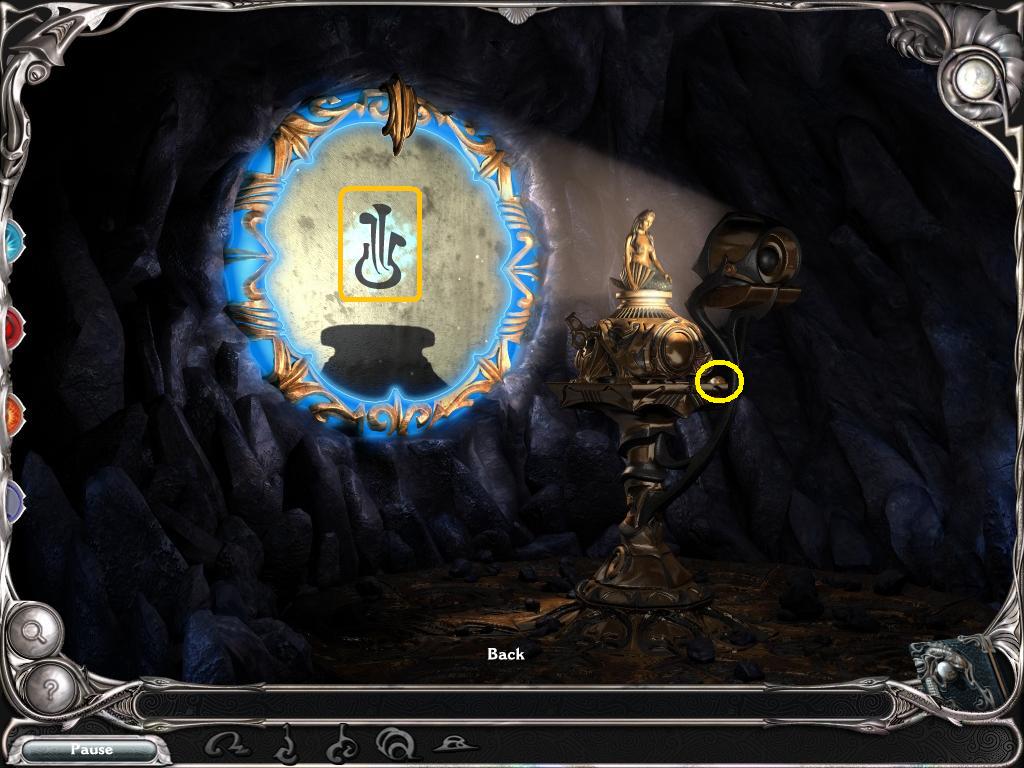
Place the fairy figurine on the pedestal.
-
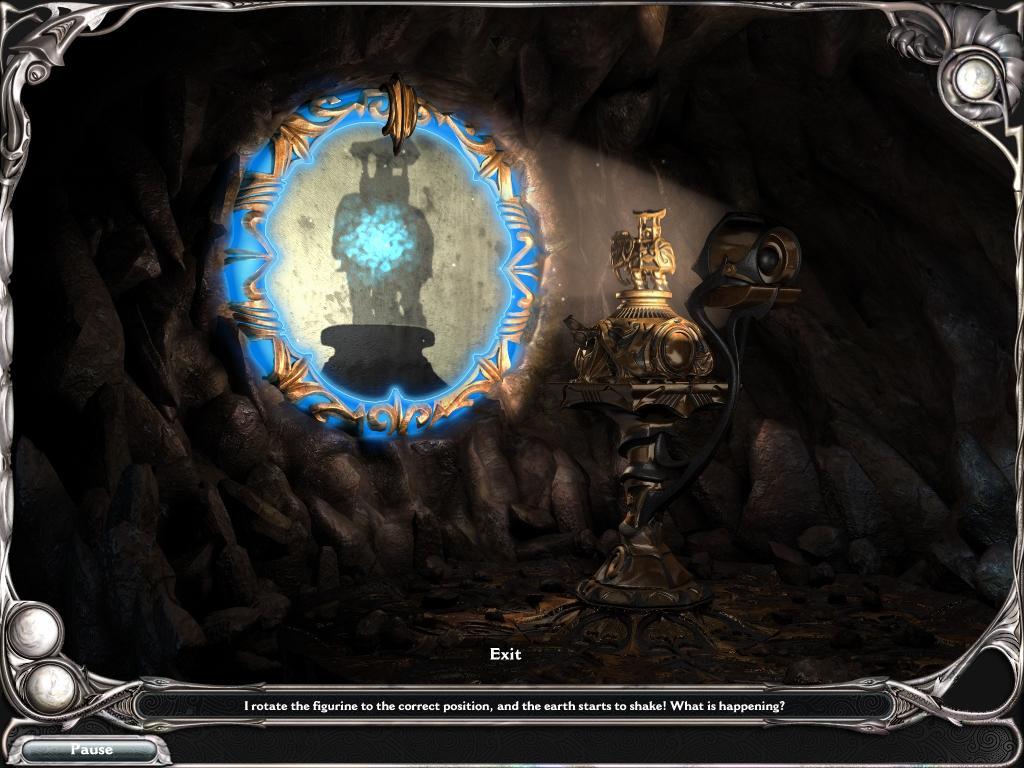
The Figurine Puzzle:
-
There is a bar at the top of the mirror, in the 12:00 position.
-
The objective is to move that bar around the mirror and get back to the 12:00 position.
-
The button on the right controls the strength of the music box, the longer you hold down on the button the more spaces the bar will move.
-
Experiment with the pressure on the button until you get the bar back in the 12:00 position.
-
When you succeed a symbol will appear in the mirror, take it.
-
Once you have the symbol go back to the edge of the crater.
-
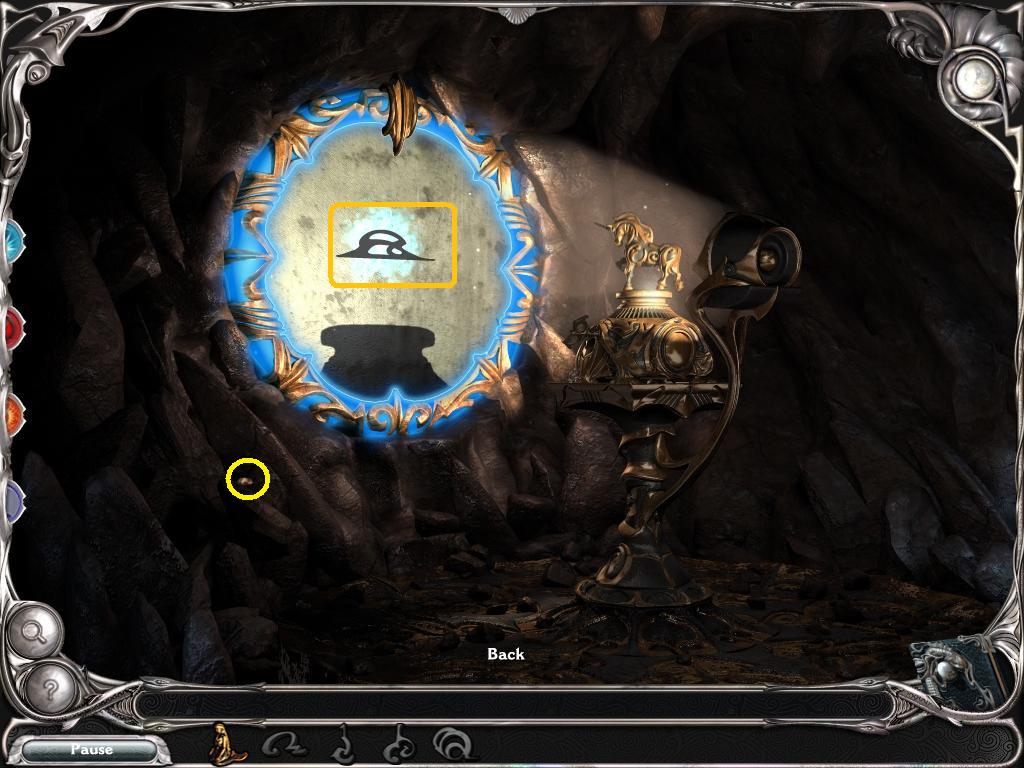
Click on the third cave, this one should be unlocked.
-
Collect the dream piece.
-
Use the Reveal power to show a symbol in the mirror. Take the symbol.
-
Go back to the edge of the crater.
-
This one is locked. Click on the circle in the door to reveal the puzzle.
-
Cave 4 Door Puzzle:
-
This is another swap 2 tiles jigsaw puzzle.
-
Recreate the picture of a dolphin to unlock the door.
-
Enter the cave.
-
Collect the dream piece.
-
Place the dolphin figurine on the pedestal.
-
Solve the Figurine puzzle as in cave 2.
-
Take the symbol.
-
Once you have the symbol go back to the edge of the crater.
-
Again, the cave is locked. Click on the circle in the door to reveal the puzzle.
-
Cave 5 Door Puzzle:
-
This is another swap 2 tiles jigsaw puzzle.
-
Recreate the picture of a unicorn to unlock the door.
-
Enter the cave.
-
Collect the dream piece.
-
Place the unicorn figurine on the pedestal.
-
Solve the Figurine puzzle as in cave 2.
-
Take the symbol.
-
Once you have the symbol go back to the edge of the crater.
-
Again, the cave is locked. Click on the circle in the door to reveal the puzzle.
-
Cave 6 Door Puzzle:
-
This is another swap 2 tiles jigsaw puzzle.
-
Recreate the picture of a mermaid to unlock the door.
-
Enter the cave.
-
Collect the dream piece.
-
Place the mermaid figurine on the pedestal.
-
Solve the Figurine puzzle as in cave 2.
-
Take the symbol.
-
Once you have the symbol go back to the edge of the crater.
-
Click on the last cave, this one should be unlocked.
-
Collect the dream piece (this should be the 70th and last dream piece).
-
Use the Reveal power to show a symbol in the mirror. Take the symbol.
-
Go back to the edge of the crater.
-
At the bottom of the screen you will see the words "back to Wish". Click on them.
-
In the airship, click on the map, then click on Wish.
-
You will appear at the statue of Lilith in Wish.
-
Place the seven symbols on the base of the statue.
-
Done!
-
The bonus content is available only in the Collector's Edition of the game.
-
The bonus content follows the adventures of Faye, glimpsed partially in Lyra's visions during the main game.
-
There are no dream pieces to collect in the bonus game.
-
The hint, object find, and dream jewels are also disabled in this section.
-
The room is dark, you need to fix the electrical panel.
-
Click on the panel to the right of the door.
-
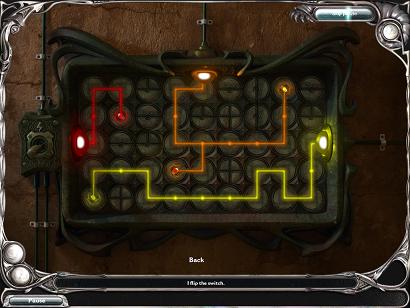
Electrical Panel Puzzle:
-
To solve the panel you need to find the missing connectors in the room. There are five connectors.
-
Place the connectors on the panel to trigger the puzzle.
-
If you pull the switch on the left you will see that there are four colored connectors inside the puzzle, two red and two yellow.
-
There are three colored domes at the edge of the panel. On the left is red, on the right is yellow, and on the top is orange.
-
You need to connect the red dome to one red connector, the yellow dome to one yellow connector, and the orange dome to both a red and yellow connector.
-
-
You need to click on the door to leave, then go towards the statue. From the statue go right and you will be outside the gates of town.
-
Once the gates close and lock you can head east to the Herbalist's house.
-
End Chapter.
-
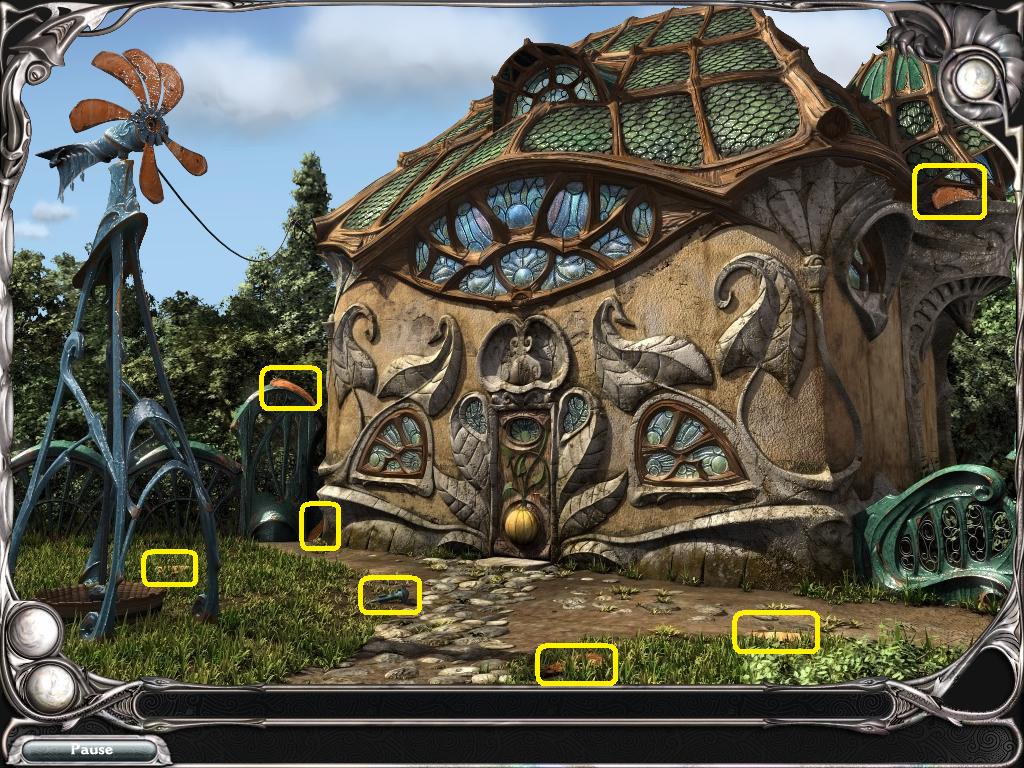
My, doesn't this look familiar.
-
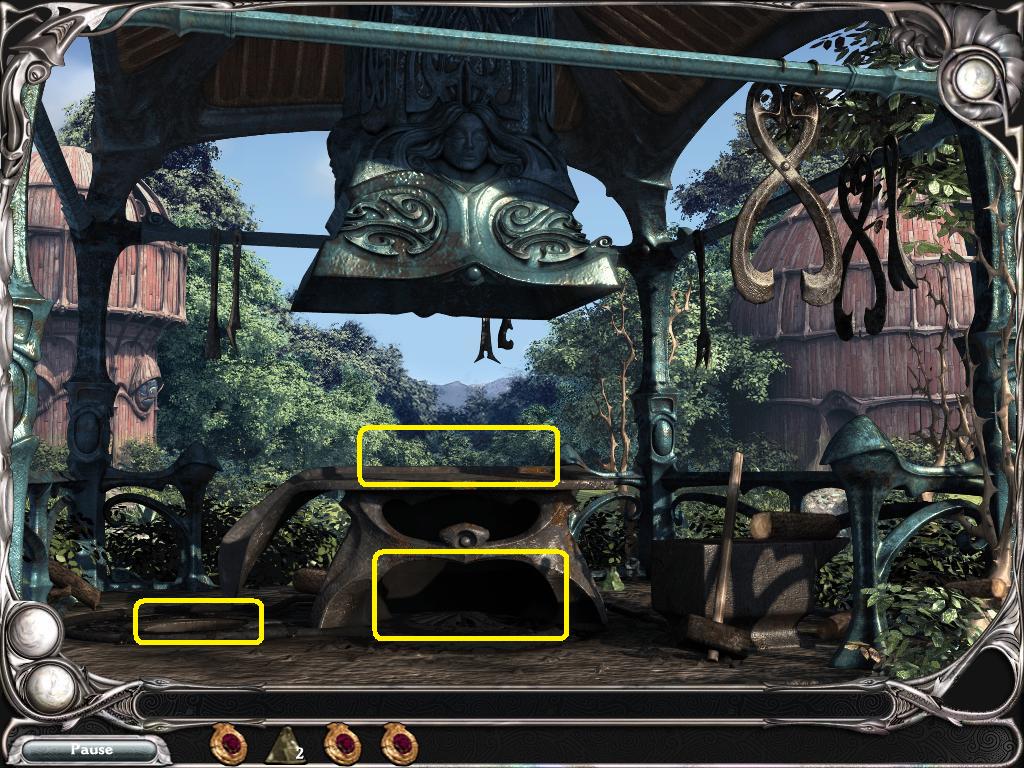
You need to find the bolt and the six missing blades for the windmill. Note: sometimes these are in different places.
-
When you have all of the items place first the blades then the bolt in the broken windmill.
-
When the windmill is fixed click on the door to open it and then click again to enter.
-
When you enter the living room you will see that the tree is dying.
-
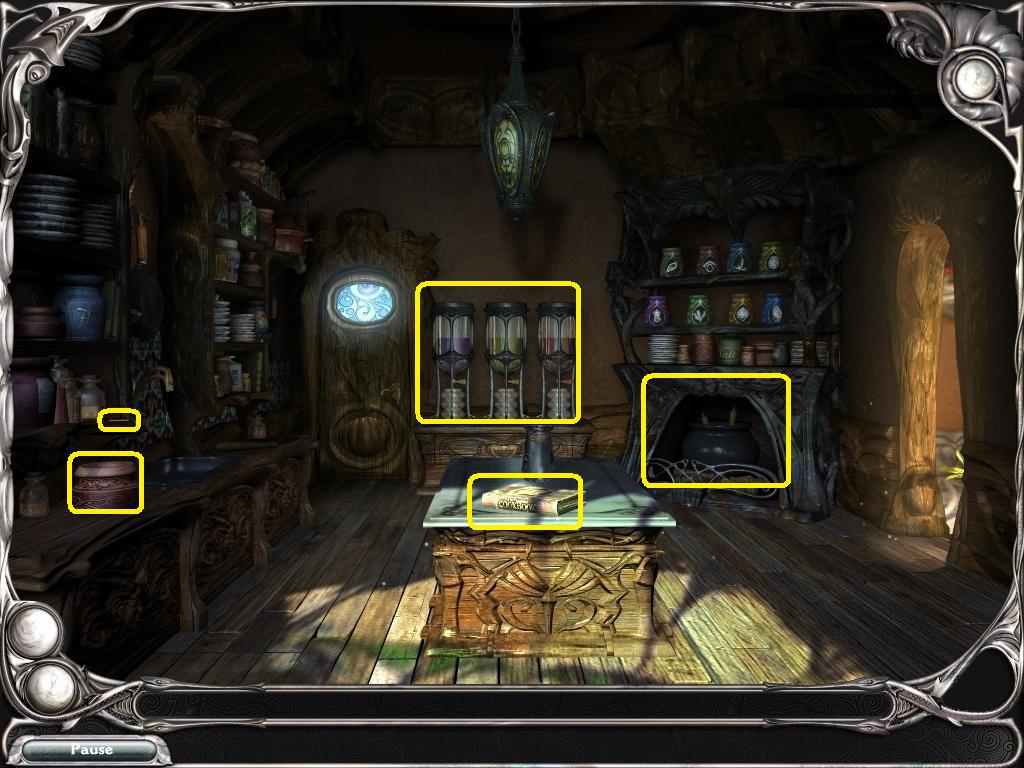
Go forward into the kitchen.
-
Click on the book on the table.
-
Click again to read the instructions for the potion.
-
The potion solution:
-
This puzzle will be familiar to anyone who has played the first trilogy.
-
First find the match on the left shelves, then use the match on the fireplace.
-
The liquids you need are in the three flasks on the table in the middle back. Click on each valve to fill the bottoms with liquid, then click each liquid and add it to the glass in the center of the table.
-
Find the orange peel in one of the containers on the shelves above the fireplace.
-
Place the orange peel in the mortar on the left shelf to crush it.
-
Place the orange peel in the cauldron on the fire to heat it.
-
Add the crushed, cooked peel to the glass on the table.
-
Go back to the living room then outside to the windmill.
-
When you go back out to the windmill Aeval will warn you against finishing the potion. Time to go to Barge City to find the Book of Water.
-
End Chapter.
-
On the docks you should see the three keys to the three buildings: the Port Office, the Fishing Shop, and the Art Shop.
-
Pick up the keys.
-
Unlock the door to the orange house on the right, the Port Office.
-
Above the bookshelves to the left is a gold lens, take it.
-
Read the note on the floor.
-
Examine the book on the couch, the Book of Water.
-
As Faye is human, she needs a magic color to see the contents of the book.
-
Go back to the docks.
-
Once out on the dock unlock the door of the green house to the left.
-
Enter the Art Shop.
-
On the shelves on the right is a paintbrush in a jar, take it.
-
There are two parts of the paints hidden here, one in the doorway in the back right, another in the lower right almost hidden by junk.
-
In the back doorway another gold lens is hidden, take it.
-
At the top of the ladder to the loft is a gold nugget, take it.
-
Leave the Art Shop.
-
Back on the docks, use the last key to unlock the orange house behind and to the right of the Art Shop.
-
Enter the Fishing Shop.
-
On the floor on the right is a gold nugget, take it.
-
There is another part of the paints on the right shelves.
-
Above the shelves is the third and last gold lens.
-
On the left, nearly hidden by the giant fish skeleton is the last part of paint.
-
Once you have all of the objects back up to the docks.
-
Once on the docks, go back into the green house on the left, the Art Shop.
-
Click on the table underneath the window for a close up.
-
The magic color puzzle:
-
Once you've clicked on the table place the brush and paints.
-
The note you picked up from the Port Office will appear, you need to replicate this color.
-
Add 2 yellow, 2 red, and one white to get the color.
-
Click on the color to take it.
-
Leave the Art Shop and go back to the Port Office.
-
Click on the Book of Water and add the magic color.
-
Time to forge some figurines!
-
Go back to the dock and you will automatically move to the next chapter.
-
End Chapter.
-
Enter the Herbalist's house.
-
In the living room you will find a note on the floor near the door to the nexus, read it.
-
Enter the kitchen.
-
You will find the tree healing potion on a shelf on the left, just above the mortar.
-
Go back to the living room and use the potion on the tree.
-
Once the tree is healed it will open the door to the Nexus.
-
In the nexus, go down the stairs behind the control panel.
-
At the forge there are five pieces of wood to collect.
-
There is also a gold nugget to find. When you pick up this one you should have three.
-
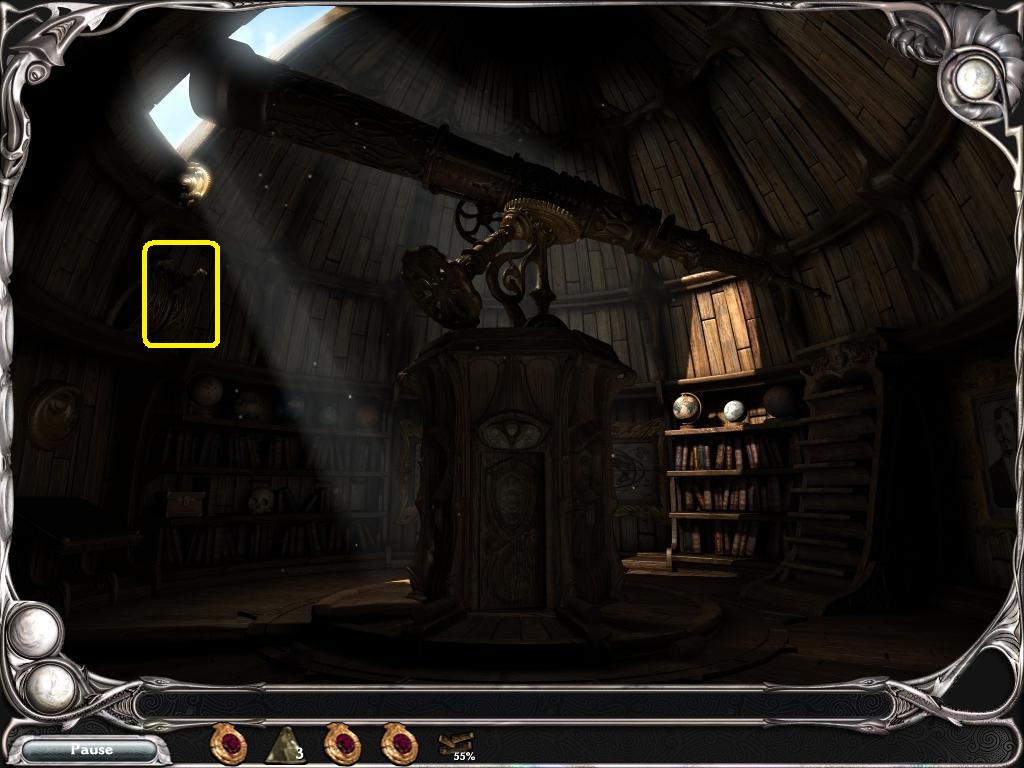
Go left to the Observatory.
-
It's dark inside the observatory. You need to find the handle to turn on the lights.
-
The handle is in the upper left of the scene, below the aperture where the telescope looks out.
-
Once the lights are on you need to find four pieces of wood on the floor.
-
On top of some shelves on the left is a magnifying glass, take it.
-
The telescope puzzle:
-
Again, this is a familiar puzzle to anyone who has played the first trilogy.
-
Take a lens and drop it into the slot on the right side of the telescope.
-
Wait until it gets dark.
-
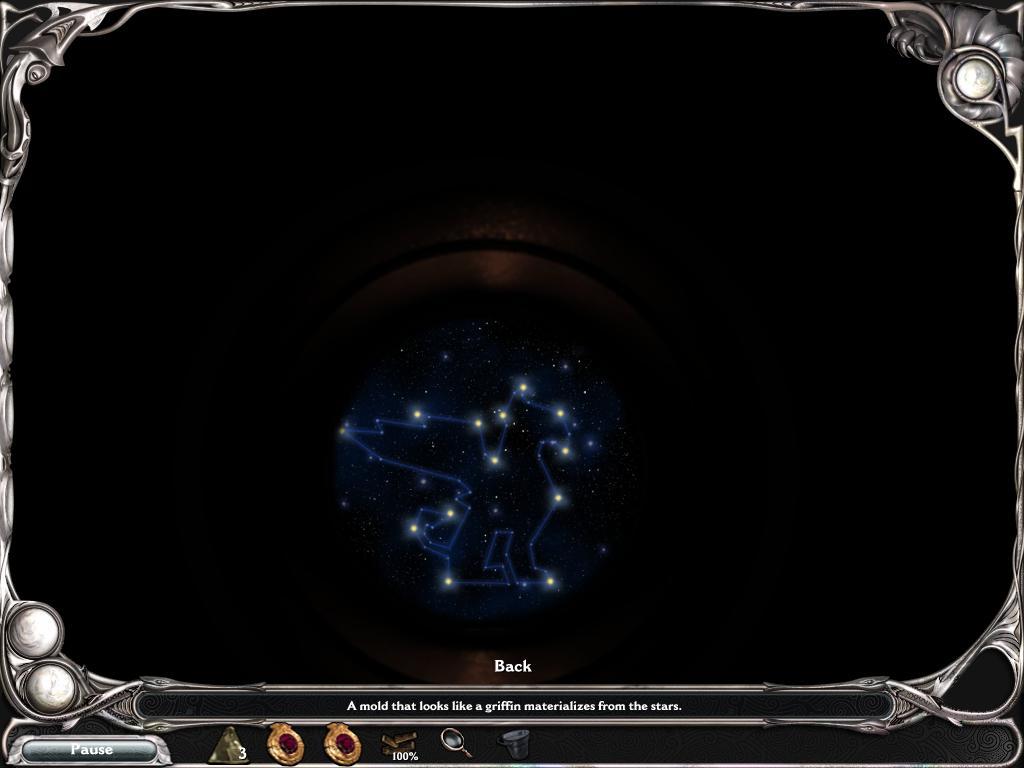
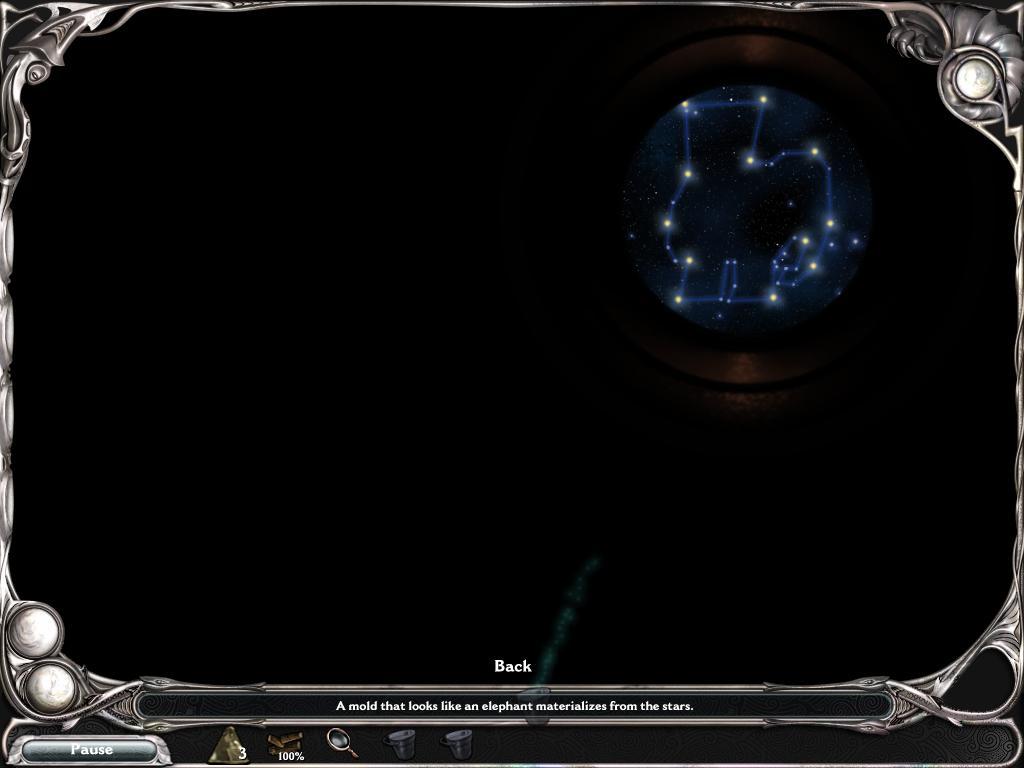
Click on the telescope to look into it. You will have a star pattern that you need to match against the background sky.
-
Once the star pattern matches a constellation appears and you will get a mold.
-
Repeat for the other two lenses until you have three molds.
-
Once you have the molds, click on the door in the center of the observatory to go back to the Forge.
-
Back at the forge, place the wood in the bottom of the forge.
-
Use the magnifying glass on the wood to light the fire.
-
Place a mold in the hole in the ground to the left of the forge.
-
Place a gold nugget on top of the forge, it will melt and create a figurine.
-
Repeat until you have three figurines.
-
Go right to the nexus, then click on the nexus portal.
-
End Chapter.
-
There are only three caves you can interact with here.
-
Numbering them from left to right, they are cave 1, cave 3, and cave 7.
-
Begin by clicking on the far left cave, cave 1.
-
Click on the door to cave 1. This door should be locked.
-
Click on the circle in the center of the door to reveal the puzzle.
-
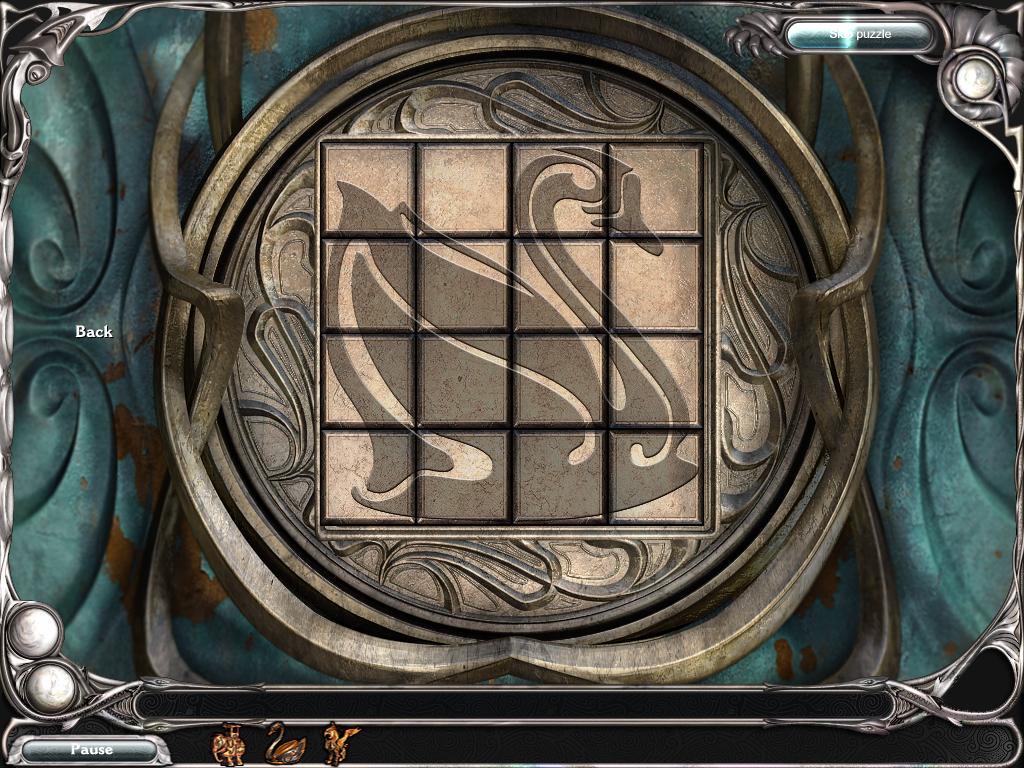
Cave 1 Door Puzzle:
-
This is a basic swap 2 tiles jigsaw puzzle.
-
Once you recreate the picture of a stylized swan the door will unlock.
-
Enter the cave.
-
Place the swan figurine on the pedestal.
-
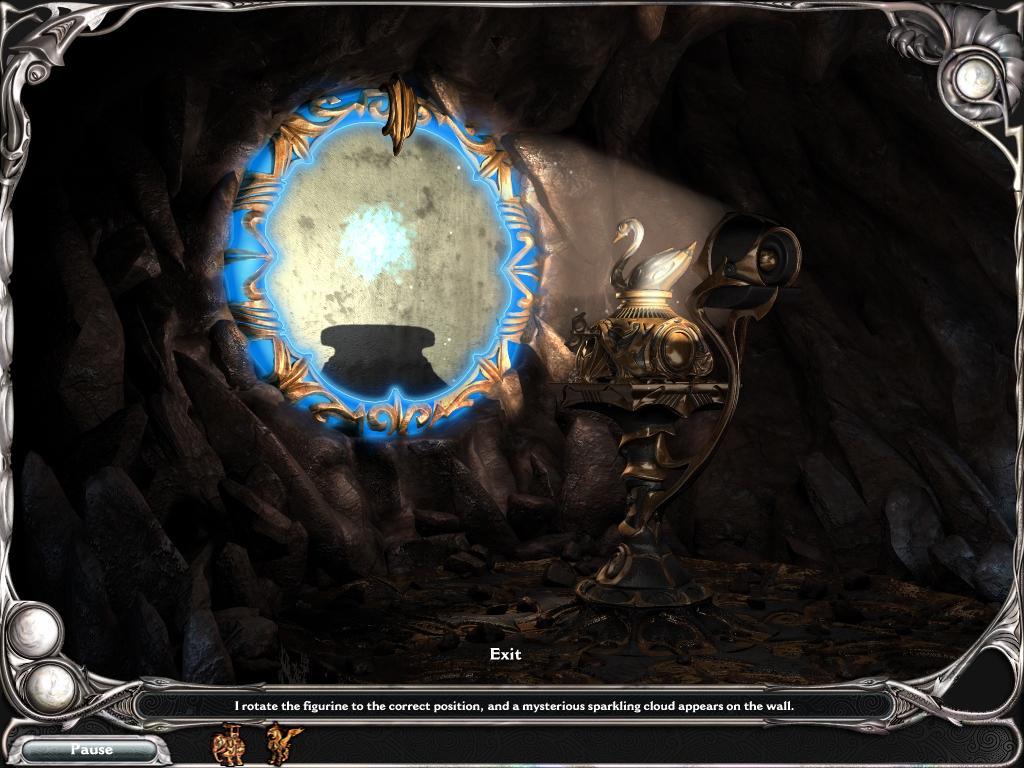
The Figurine Puzzle:
-
There is a bar at the top of the mirror, in the 12:00 position.
-
The objective is to move that bar around the mirror and get back to the 12:00 position.
-
The button on the right controls the strength of the music box, the longer you hold down on the button the more spaces the bar will move.
-
Experiment with the pressure on the button until you get the bar back in the 12:00 position.
-
When you succeed a glowing cloud will appear in the mirror.
-
Once the cloud appears go back to the edge of the crater.
-
Click on the door to cave 3. This door should be locked.
-
Click on the circle in the center of the door to reveal the puzzle.
-
Cave 3 Door Puzzle:
-
This is a basic swap 2 tiles jigsaw puzzle.
-
Once you recreate the picture of a stylized griffin the door will unlock.
-
Enter the cave.
-
Place the griffin figurine on the pedestal.
-
The Figurine Puzzle:
-
There is a bar at the top of the mirror, in the 12:00 position.
-
The objective is to move that bar around the mirror and get back to the 12:00 position.
-
The button on the right controls the strength of the music box, the longer you hold down on the button the more spaces the bar will move.
-
Experiment with the pressure on the button until you get the bar back in the 12:00 position.
-
When you succeed a glowing cloud will appear in the mirror.
-
Once the cloud appears go back to the edge of the crater.
-
Click on the door to cave 7. This door should be locked.
-
Click on the circle in the center of the door to reveal the puzzle.
-
Cave 7 Door Puzzle:
-
This is a basic swap 2 tiles jigsaw puzzle.
-
Once you recreate the picture of a stylized elephant the door will unlock.
-
Enter the cave.
-
Place the elephant figurine on the pedestal.
-
The Figurine Puzzle:
-
There is a bar at the top of the mirror, in the 12:00 position.
-
The objective is to move that bar around the mirror and get back to the 12:00 position.
-
The button on the right controls the strength of the music box, the longer you hold down on the button the more spaces the bar will move.
-
Experiment with the pressure on the button until you get the bar back in the 12:00 position.
-
When you succeed a glowing cloud will appear in the mirror.
-
Once the cloud appears the ending animation will begin.


Chapter 5 - Merrow's House
Outside the House
The Hangar
Merrow's House
The Hangar and the Gramophone

Chapter 6 - The Clockmaker
Outside the Tower

Inside the Tower

Chapter 7 - The Herbalist
Outside the House

The Side Yard

Chapter 8 - The Crater of Time
The Edge of the Crater
Cave 1
Cave 2

Cave 3
Cave 4


Cave 5
Cave 6

Cave 7

Chapter 9 - Wish
Endgame
Bonus Content
General Information
Chapter 1 - Wish
Waking Up

Chapter 2 - The Herbalist's House
Outside
Inside
Chapter 3 - Barge City
The Docks
The Port Office

The Art Shop
The Fishing Shop
Reading the Book
Chapter 4 - The Herbalist and the Nexus
The Herbalist (Again)

The Nexus
The Forge

The Observatory


The Forge Again
Chapter 5 - The Crater of Time
The Edge of the Crater
Cave 1
Cave 3


Cave 7


I looked EVERYWHERE but I cannot find the Magnifying Glass in the bonus walkthrough! Not even in the places where the guide says it would be... I think it's a glitch :(
I am at the Barge City Art Supply shop. I have followed your instructions...in desperation...to do the artist's palette. However, even with this, it just will not work. I don't what I am doing wrong. It keeps saying I need to bring the paint sample from the Portman's Office, which I already have!
Heaven's above, I am a mighty patient person, but this is just beyond me. HELP PLEASE!!!
I cannot skip it neither*
Featherfire -
The paint sample should appear in the close up view. If not, try going back to the Port Office and getting it again so it records in your Journal.
Thank you Jazz. I did as you said and it definitely IS recorded in my Diary/Journal.
But when I go to use the paint brush on the palette, I get nowhere. It justrefuses to mix the colours. I don't know if you have to put the brush in the middle, that's what I did, but still will not mix the colours no matter I do*
It just keeps making a thunking noise and doing nothing* I even had to follow your Spoiler instructions, much as I hate to, but it still will not even do anything with this either. The same happens*
I am not sure if it's a glitch in the game, I sure hope not. I fell asleep trying to work it out ok*
Still would appreciate ANY help Please! Thank you*
Thank you Very much. You were right, I had to go back to the Port House and a friend helped me realise, I had not clicked on the actual sample on the right side of the page to continue on. Then I went back to the Art Supply shop, and it all worked beautifully* Geeshh, talk about a wally. How simple little things like this can just be so easily overlooked hey*
I thank you for all your help very much. I am now up to the craters, if not for you, I wouldbe stuck back at the Docks in Barge City! Cheers*
So far it's a great game, challenging yes, but really great, and considering I am severely vision impaired*
Please help..
I just finish chapter3 and try travel to obelisk by clicking the map inside the airship. However, clicking on obelisk, it only show: I don't want to go there now!
I check the tips, it only shows go to airship and travel obelisk
I get stuck and can't travel anywhere. Please advice
Thanks
Kingsimonlittle -
Have a look at the walkthrough above the comments to see if you missed a task.
Thanks
I finally try the game 2more times, I believe it may be sequence problem!
I may tag the vision jewel first before fishing the dolphin...
But not sure 'coz I don't want try the 4th time!
hahaha..
Thanks again for the walkthrough and help..
I gonna back to chapter 4
I have retrieved the dolphin in Barge City, then clicked on the vision jewel and saw the message about her mother. I am told I need to go to the airship and travel to the obelisk but it keeps saying I don't want to go there right now. I have been trying everything, did everything the walkthrough specified and still can't leave Barge City! Saw a previous post about this too -is my only option to restart the game??? I really, really do not want to start over-please help! I love this game, up til now, and would so much like to play ASAP!
Thanks for any help!
I am stuck at the crater. I retrieved all of the symbols and now can't get back to the airship. Does anyone know how?
JIGuest -
Hover your cursor at the bottom of the screen. When it says "back to airship" click on it to go back.
Help! I am stuck at the figurine puzzle of cave2 at crater. I don't have a control button on either right or left of the screen, so I can't move the bar on the mirror. How do I get the control button? Is it a bug and do I have to start over again?
Hi Lunar,
Since you posted your comment on the walkthrough page for the game, I hope you've checked the very comprehensive walkthrough above the comments for some help.
I cannot get to the clockmaker it will not highlight it on the map
Can't go back to herbalist after clock thingie. HELP! Please.
Yael Shnider -
According to the walkthrough above the comments, you should be able to click on the map to go there. If not, you might want to have a look at the walkthrough to see if you missed something.
I recently purchase Dream Chronicles Book of Water. I successfully made it all the way to Barge City and I have completed all of the task that was required. After finding the book of water I was on my way to the next level when unfortunately my computer shut down on me while I was in the middle of the game to install some updates. When my computer rebooted I went back to the game to continue where I left off it took me back from when I first arrived at Barge City. I found the hammer it's broken into pieces and when I try to use the reconstruction jewel it's not responding, nothing is happening. So right now I'm currently stuck on that level and I don't want to restart the game from the beginning :( I hope someone can help me solve this dilemma so I can continue on my quest.
Stuck @ Merrel's in airship looking at map help tells me to go to airship travel to clockmaker, but when I click on clock maker " You don't want go there now".
Restarted changing name made it to unicorn chamber accidentally quit game now it's frozen.
Update