
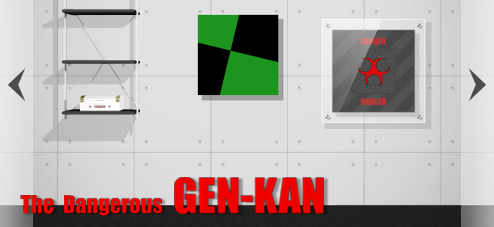
![]() Ah yeah, the thrill of living on the edge, that one wrong move that ends in eyes x'd out, toes up, kaput! There's nothing like knowing it can end any moment to really squeeze the best out of life. That's how it is in The Dangerous Gen Kan—thrills abound in a multiple of deadly triggers. There's really nowhere you can look in this room to avert your gaze from the face of danger. Can you escape alive and intact? Maybe...or maybe not. Meanwhile, make hay and enjoy discovering how often and in what ways you can, er, not survive. You know you can count on inventively creative Kotorinosu to have heaps of this said fun lined up for you.
Ah yeah, the thrill of living on the edge, that one wrong move that ends in eyes x'd out, toes up, kaput! There's nothing like knowing it can end any moment to really squeeze the best out of life. That's how it is in The Dangerous Gen Kan—thrills abound in a multiple of deadly triggers. There's really nowhere you can look in this room to avert your gaze from the face of danger. Can you escape alive and intact? Maybe...or maybe not. Meanwhile, make hay and enjoy discovering how often and in what ways you can, er, not survive. You know you can count on inventively creative Kotorinosu to have heaps of this said fun lined up for you.
 To join in the perilous festivities, all you really need to do is point and click. Stumble around enough and you're sure to light up the party with some explosive good times. But, when you tire of that, there is indeed a happy ending somewhere around here. To find it, gather clues, solve puzzles and be precise in your actions. When you come across a helpful object, it'll automatically join your inventory via a click; there, select the "?" symbol to examine each in more detail, working out if you can use, combine or otherwise manipulate these items for your benefit. The clean and simple design means no changing cursor is needed. There's no save option but no fear: you do get a here-let-me-put-you-back-where-you-were-all-new-and-safe retry after each "bad end." Still, the any wrong move can kill you gimmick means constant tension as you click everywhere. You must trial-and-error experiment if you want to discover a safe exit. I'd like to tell you just where that is, but then I'd have to kill you.
Play The Dangerous GEN-KAN


Walkthrough Guide
(Please allow page to fully load for spoiler tags to be functional.)
Odes to Death
There are ten ways to die in this game. Below are ten limericks dedicated to each one of them. For the best effect, read each limerick immediately after seeing the corresponding death.
1: Switch
You went for the button that's red,
Though "DANGER" and "DANGER" it said.
You may now be furious,
But hey-- you were curious,
And that is the reason you're dead.
2: Sensor
Those lasers are meant to detect
Attempts to reach in, I suspect.
You risked it and broke
The lasers-- no joke--
And now your whole body is wrecked.
3: Box
The opposite wall's now a mess.
Was that code the wrong one? Why, yes.
You've got to outfox
These codes and these locks;
The last thing you should do is guess!
4: Bottle
One jar on that shelf's safe to break.
Not that one-- you made a mistake.
Perhaps you should find
A clue of some kind
And use it, for everyone's sake.
5: Key
The safe said "DON'T OPEN", and yet
You opened it. What did you get?
You're now blown to bits.
Try using your wits;
You'll find a solution, I bet!
6: Weight
So now you're as dead as a nail.
That puzzle is deadly to fail.
What do the cubes weigh?
What does the scale say?
And who puts a bomb in a scale?
7: Lever
You jiggled the lever, and BOOM!
You're splattered all over the room.
The lever won't stick.
Perhaps there's a trick.
You surely were wrong to assume!
8: Wheel
Of life you're now no longer full.
But what just came down on your skull?
You've got to be faster
To avoid disaster;
So grab by the reins and then pull!
9: Bomb
Now what did you THINK would ensue?
That bomb just made ash out of you.
Don't let time expire,
And cut the right wire.
Keep at it; escape is in view!
10: Exit
So close! But how careless you are.
That blow's sure to leave quite a scar.
Don't rush; look around.
There's more to be found.
Despair not, you've come very far!
Posted by: SonicLover |
February 6, 2014 1:44 PM
|
February 6, 2014 1:44 PM
An Updated Walkthrough. Many thanks to bearharry and SonicLover for teaching me how to place the Cubes on the Scale.
The Dangerous GEN-KAN Walkthrough:
Getting the Red Cube
Click on the Potted Plant. Get the RED CUBE from the upper right corner of the Pot
Exploration 1
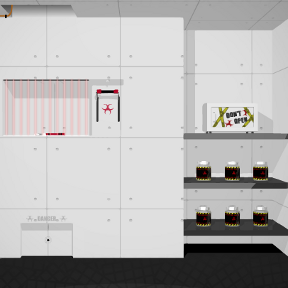
Back up. Click on the Shelf next to the Potted Plant. Examine the Picture on the top of the Shelf and the Scale beside it. While examining the scale, click on the bottom part to examine the Dial for weight measurement. After comparing the Picture to the Scale, notice that we are missing four elements: a Red Cube, a Green Cube, a Blue Cube, and a White Plate. Back up. DO NOT press the Red Button in the middle of the bars! Instead, click on the lower part of the metal bars. Notice the Note that, at the moment, is out of reach. Back up.
Getting the Green Cube
Turn to the left. Examine the Green and Black Wall Art in the middle of the wall. Get the GREEN CUBE from the top left corner.
Exploration 2
If you click on the Glass Plate to the right of the Wall Art, you will find a Wall Hanging behind it. It is, as of yet, inaccessible. If you click the Shelf to the left of the Wall Art, you will find a White Box. To open it, the input of a three digit code is required.
Exploration 3
Turn left. Examine the right corner and get the METAL ROD. Back up. Examine the Window. Note the roman numerals within the grid. Back up. Examine the Brown Box on the floor. Notice the top is secured by Hexagonal Bolts. Back up. Examine the Door. It is locked
Exploration 4
Turn left. Examine the White Safe on the top right shelf. Notice it needs a Key to open the front. Click on the top. There is another way to open it! Looks like a Screwdriver is needed. Back up. Examine the Bottles on the lower shelves. Each Top has the symbol of a circular puzzle piece. Back up. Examine the Lever on the wall. Notice that it is secured in the upright position with String. Back up. Examine the laser guarded section in the wall. DO NOT grab the Wrench! Back up. Examine the section in the ceiling. There is an unreachable Ladder. Back up. Examine the section at the bottom left of the wall. Notice the hole. What could go in it? Hmm, not the METAL ROD. We'll have to come back to this later.
Getting the Note
Turn left. Click on the lower section of the bars. Use the METAL ROD to get the NOTE. Back up.
Opening the 3 Digit White Box
Examine the note.
Where have we seen angles like this?
The grid on the Window!
Match the angles of the Note to their corresponding grid sections on the Window to find the numbers necessary for the code. The actual code changes each gameplay.
After inputting the code, open the White Box. Get the METAL HAMMER
Getting the Wall Hanging
Use the METAL HAMMER to break the Glass covering the WALL HANGING beside the Wall Art. Click on the WALL HANGING about three times to get it. Examine the Teal Box in the newly revealed section of the wall. Notice that something must be used to turn the Metal Screw to the right in order to open it
Getting the Silver Key
Examine the WALL HANGING. Notice the missing puzzle piece. Where have we seen this before?
On the tops of the Bottles!
After examining the tops of the Bottles, find the one whose symbol matches the missing puzzle piece of the WALL HANGING. The correct Bottle also changes each gameplay. Use the METAL HAMMER to break that Bottle open and to get the SILVER KEY. DO NOT use the METAL HAMMER on any of the other Botles!
Opening the Teal Box, Getting the Blue Cube, and Opening the White Safe
DO NOT use the SILVER KEY to open the White Safe! Instead, use it to unscrew the Screw of the Teal Box. Get the SCREWDRIVER and the BLUE CUBE from the top right corner of the box. Use the SCREWDRIVER to open the top of the White Safe. Get the WHITE PLATE.
Using the Scale
If you have followed the walkthrough verbatim, you should have in your inventory from top to bottom: the RED CUBE, the GREEN CUBE, the BLUE CUBE, and the WHITE PLATE. Take these items to the scale. First place the WHITE PLATE on the Scale. Now we need to place the cubes on the Scale, but IN THE RIGHT ORDER. To figure this out:
Place each cube individually on the scale and take note of their values in weight on the dial. The value to each Cube changes each gameplay, but the numbers remain the same:
1, 3, and 6
Notice on the dial that the values are in Gray and Red. In order to know the correct order in which to place the cubes on the scale:
Place them so that their added totals do not reach any of the red marks, which are 2, 5, 7, and 9. For example, the Cubes valued 6 and 3 should not be placed one after the other. Placing the Cubes in the order of 1, 3, then 6 is a viable solution.
Once all of the elements are placed correctly, a drawer will open from the Scale. Get the WIRE CUTTERS.
Getting the Wrench
Use the WIRE CUTTERS to cut the String holding the lever. Click on the Lever and KEEP IT PRESSED until the bar turns green. This will cause the laser beams to go away and you can then get the WRENCH.
Opening the Box and Bringing Down the Ladder
Use the WRENCH to open the Brown Box on the floor under the Window. Get the WHEEL. Attach the WHEEL to the Hole in the section of the wall that is under the area we found the WRENCH. Click on the WHEEL. AS SOON AS POSSIBLE, BACK UP! The Ladder is now down.
Defusing the Bomb
Go up the Ladder. The next steps must be done quickly in order to avoid one of the BAD ENDS. Click on the Metal Plate in front of you. At this point the timer for the bomb starts counting down from a minute. Notice there are five Wires. From top to bottom, they are: RED, YELLOW, GREEN, TEAL, and BLUE. There is also a Switch at the top right corner. Click the Switch. Quickly, go down the Ladder and examine the room to find the order in which the Wires of the bomb need to be cut.
The order and colors of the Wires that need to be cut changes each gameplay. The following are the places you can find the numbers for the order: RED at the Potted Plant; Teal at the Teal Box; GREEN on the Green and Black Wall Art; BLUE on the left bin in the right corner by the Door; YELLOW on the right bin beside that. Once you have the four colors and their order, quickly climb up the latter. Use the WIRE CUTTER to cut the Colored Wires in the correct order. For easier escape, keep the lights off.
Escaping
Go down the Ladder. Go to the metal bars and press the Red Button. Get the GOLD KEY. Use the GOLD KEY to unlock and open the Door. DO NOT GO OUT THE DOOR! Instead, back up. Notice the Shadow within the light of the Door. This can only be seen if the lights are off. Click on the Shadow. Click on the Panel in the floor. Press the Red Button. The metal bars have been raised and you can now escape down the dark hallway. Congratulations! You're on your way out! Or are you?
For fun, I have included a list of all the Bad Ends I could find. Enjoy! :)
BadEnd.1 SWITCH
Press the Red Button on the metal bars anytime before defusing the bomb.
BadEnd.2 SENSOR
Try to take the WRENCH while the laser field is still active.
BadEnd.3 BOX
Press enter on the White Box before entering the correct code
BadEnd.4 BOTTLE
Use the METAL HAMMER on any bottle other than the one with the Silver Key.
BadENd.5 KEY
Use the SILVER KEY to unlock and open the White Safe.
BadEnd.6 WEIGHT
Place the cubes in the wrong order on the scale.
BadEnd.7 LEVER
After cutting the Lever free of the String, click the lever and let go before the red bar fills and turns green.
BadEnd.8 WHEEL
After placing the WHEEL in the Hole in the wall and clicking it, do not back up.
BadEnd.9 BOMB
Wait for the timer on the bomb to run out or cut the wrong Wires.
BadEnd.10 EXIT
Go out the open Door.
Posted by: shjack180 |
February 6, 2014 5:22 PM
|
February 6, 2014 5:22 PM
The Dangerous GEN KAN Walkthrough / Tour
Deaths optional. With color help.
You're trapped! There's danger all around!
Danger All Around
Planter Wall I see a square red planter on the left, a black table, and a barred corridor. On the bars is a big red button!
Red Planter
I can look down into the planter. Get a RED CUBE. It's weighty!
Black Table
There's a photo of a scale with the cube weights on them: red, green, and cyan. Next to it is the Scale base with 5 holes to fit the top. Closer...
It seems like 100 units has a key symbol on it. Units 20, 50, 70, and 90 are red (this might be randomized – the red is the more saturated color). The others are grey.
Barred Corridor
Big red button! Danger danger danger! Red dot on the bottom right. Caution stripes! Reinforced circuit! ...push the button!
BadEnd.1 Switch
Wait, you can kind of see something.
Crouch down, and you can make out this white object in the distance. Your puny arms can't reach it!
Laser Wall Or the Recessed wall. The big red button's wires go along the ceiling. Your puny arms once more cannot reach it. There's a recess with lasers next to a huge lever. Below it is another recess. On the right are some shelves.
Lasers and Stuff
Check out the laser sensors. Looks like it's a WRENCH. ...grab it!
BadEnd.2 Sensor
To the right of the lasers, the giant lever is held up by thin wire.
In the recess below, there's a rhombus shaped hole with a gear-ish, maybe spoke-y circular symbol.
Look up. Where the red button's wire goes up is an opening, and there you can see the bottom rungs of a Ladder.
Lower Recess
Below it on the floor, you kneel down to check out another recess with a rhombus opening.
Black Shelves
A Safe that says Don't Open! And six fancy, fragile-looking jars.
Note the tops of all these objects.
Door Wall
A door!
It's locked.
A window!
No, it's a picture of a black grid with Roman numerals (Top: I, II, II; Middle: IV, V, VI; Bottom: VII, VIII, IX;)!
A Crate to use as a
... no, it doesn't move and it's bolted shut.
Barrels and rods! Blue barrel on the left, yellow barrel on the right.
Take a long ROD!
Gallery Wall Oooh fine art. Hanging shelves, then a green and black print, and then a grey installation. Lights are far above your... yeah, you can't reach them.
Hanging Shelves
A Code Box! It has 3 buttons with Roman numerals. Hmm! ...press enter!
BadEnd.3 Box
Green and Black Art
Check out the art. Check out the GREEN CUBE on the top left corner. Yoink! I guess that's what they call cubism.
Grey Art.
Looks like there's a plate of glass covering this art. The art itself is interesting, because it's all square except this triangle cut from the corner.
Note where all the DANGER signs are!
Code Box
You have:
RED CUBE, GREEN CUBE, and a ROD.
Turn to the metal bars.
Crouch down and check out that white item standing out in the darkness. Use the ROD to get yourself some digits, kinda. A code! Which you mysteriously know how to orient. Black perpendicular lines and shapes. These will be randomized every time you try this room, not that you would try to die over and over again.
Where have you seen those lines before?
Turn to the Door Wall. The numerals grid! This is a standard grid code. Look at the borders around each numeral. For example a U shape will be the top middle box.
Turn to the Gallery Wall.
Click the corresponding numerals on the Code Box on the hanging shelves. Open box!
Get HAMMER!
Let's Break It Down
You have:
a HAMMER with 2 CUBES.
What can you break?
...jars? You didn't get anything?
BadEnd.4 Bottle
(It's possible to guess correctly, in which case you won't receive the next clue.)
How about that glass-covered grey art? Break with the HAMMER! Jiggle it off the wall. It's another recess! A Cyan Box! However it's got this weird shallow slot, with arrows around it.
Time for pie.
If you don't have the Cyan Box's contents, check out the dark grey art. Click that corner. What's this on the back? It's a circle cut into six puzzle pie pieces. There's a black / missing piece. Six... what else has puzzle pieces?
Turn to the Laser Wall. There are. Six. Jars! With round jar lids! And darker toned symbols! Match the jar lid symbol to the missing puzzle piece; smash it with the HAMMER. ...or just break anything!
BadEnd.4 Bottle
Now you have a SILVER KEY. There's only one thing that seems like it has a keyhole. Check out the White Safe! ...let's open the Don't Open safe!
BadEnd.5 Key
Open...
All right, this SILVER KEY must have some other use.
Use its round side on that weird slot on the Cyan Box. Shimmy it back and forth. Open box!
Inside is a SCREWDRIVER!
Wait a sec, what else is cyan and is needed by you?
You squint and make out a CYAN CUBE in the far right corner of the Cyan Box.
Scale Up
You have:
3 CUBES and a SCREWDRIVER.
What's there to unfasten?
With your SCREWDRIVER... oh yeah!
Turn to the Laser Wall. The white Safe on the black shelves has a top panel. Unscrew the panel. Get a SQUARE PANEL! You've always wanted one! For what exactly?
5 pegs go with 5 holes. Aha!
Tared
Lining up the 5 pegs, place the SQUARE PANEL on top of the Scale. It magically tares itself! There's the photo with all the CUBES on the Scale. The key symbol on the dial clearly means you want to get to 100 units. ...put them all on the scale!
BadEnd.6 Weight
In inventory, from top to bottom, you'll see your latest cube on the bottom, and the first cube at the top. They have some weight to them.
Weigh them individually. The weights could be randomized too. To put the CUBES in order, make sure the dial doesn't hit the red areas as you add more weight.
A drawer pops out of the Scale! You get a WIRECUTTER!
Cut It Out
You have:
a WIRECUTTER.
You could try to cut everything before finding a wire.
Turn to the Laser Wall. The giant lever seems to be hanging by a wire! Cut the wire. The lever (switch) seems to stay up. Looks like it's recessed, right? Because there's a dark shadow above it? Well, lasers wait for no one! ...yank the lever!
BadEnd.7 Lever
Oh wait...
That dark shadow isn't what it seems! It's a black indicator bar. It slowly turns red as you pull down the lever.
Hold down the lever until the indicator bar fills and then turns green. Lasers off!
Retrieve thine WRENCH!
Oh, Nuts
You have:
WIRECUTTER and WRENCH.
Any nuts? All right, bolts.
Turn to the Door Wall. Check out the Crate. Take out its bolts with the WRENCH.
Get a WHEEL!
Where does this prize go?
The center has a square peg. Or a rhombus! Maybe that wasn't a gear, but a wheel. Go to the Laser Wall and kneel down. Stick your head in the recess, and stick the WHEEL in there. Turn it. ...watch it spin!
BadEnd.8 Wheel
Maybe you should:
Step back before the WHEEL is done spinning. The Ladder slides down to the floor. The heavy, metal ladder. Climb up the Ladder!
Electrical Panel
You have:
a WIRECUTTER.
Climb up and open this panel!
An ominous countdown! Quick! Panic! ...cut some wires!
BadEnd.9 Bomb
It's possible to guess correctly on this too. If you're McGyver.
The wires are from top to bottom: Red, Yellow, Green, Cyan, Blue. Notice above the wires
there's a set of 4 rhombuses... squares... or perhaps cubes in a line. There's also this green line in the top right. Wait! It's the highlight on a Switch! Toggle the Switch. The lights go out.
Back up?
...let's see what happens at the end of the countdown!
BadEnd.9 Bomb
Around the room, you'll see:
lit dots coming from the bank of gallery lights. No, wait! Come closer!
They're numbers! 1, 2, 3, 4.
Checklist of room
Blue: Left Barrel
Yellow: Right Barrel
Green: Art piece
Cyan: Box inside gallery recess
Red: Planter
Which wires?!
Cut the colored wires in the order of the lit numbers before time runs out.
Turn the lights back on.
Disarmed
The big red button is disarmed! Press it!
A GOLD KEY pops out of the side!
Turn to the Door Wall.
Unlock the door! Fling it open! The bright white light is blinding! No, it's kind of bluish with white whisps! You've never seen anything better! ...barge through the threshold!
BadEnd.10 Exit
Back Up.
With the door open, back up and go back up the Ladder. Switch the lights off again. Now hop down and look around the room. What's that in the bright light?
There's a thin shadow along the floor in front of the door. It originates in this bit of carpet riding up. Pull it open. It's another red button, though this time there's no danger sign.
Push the button.
Do you dare?
The darkness of the corridor stretches before you as the bars rise. There's nothing more frightening than the unknown darkness.
But you know what? The room has always warned you of danger. And there's no danger signs around. Go forth!
And meet the big red To Be Continued... sign.
Posted by: Shudog |
February 6, 2014 6:11 PM
|
February 6, 2014 6:11 PM