

![]() At first all you see are some square blotches of color. It's hard to make out what this is or where you are. Is that an ambiguously-shaped chair in the corner? Could this thing be a door? You stumble around as if in the dark or experiencing an episode of... some sort or other. But as you manage to collect together some unhelpful looking green pieces, clicking about in just the right places, the pixels start to take on form and function, and the details of Kotorinosu's Pixel Room come into being. To escape-the-room takes on a new meaning—visual clarity means progress. You're that much closer to success.
At first all you see are some square blotches of color. It's hard to make out what this is or where you are. Is that an ambiguously-shaped chair in the corner? Could this thing be a door? You stumble around as if in the dark or experiencing an episode of... some sort or other. But as you manage to collect together some unhelpful looking green pieces, clicking about in just the right places, the pixels start to take on form and function, and the details of Kotorinosu's Pixel Room come into being. To escape-the-room takes on a new meaning—visual clarity means progress. You're that much closer to success.
![]() The key feature of Pixel Room—its very vague, very 2-D nondescript graphics—combined with a static cursor is going to cause frustration for a lot of players. It's not that navigation is overly complicated; you can pick up "items" and examine them in your inventory, use the arrows on the sides of the screen to change views, or point and click on just about anything in the scene to interact with it. Many objects will respond to your manipulations but the trouble is figuring out just what response is being elicited. That results in puzzles that are initially extremely abtruse and, especially at first, a lot of random clicking around.
The key feature of Pixel Room—its very vague, very 2-D nondescript graphics—combined with a static cursor is going to cause frustration for a lot of players. It's not that navigation is overly complicated; you can pick up "items" and examine them in your inventory, use the arrows on the sides of the screen to change views, or point and click on just about anything in the scene to interact with it. Many objects will respond to your manipulations but the trouble is figuring out just what response is being elicited. That results in puzzles that are initially extremely abtruse and, especially at first, a lot of random clicking around.
To say there are pixel hunts in Pixel Room wouldn't be too pat, would it? Yet leave it to Kotorinosu to turn that into a good thing. Probably because you're not left in the dark overly long, and because it's rather fun to see your guesses turn into actualities, the concept works. It wouldn't have been unfair to give players a changing cursor to help us along, though, and that's my major quibble with the game as a whole: it's more pixel hunt-y than it ought to be. Even so, Kotorinosu's deft hand at puzzle design and a still rather intuitive interface creates substantive enjoyment and a very concrete feeling of satisfaction when the ending unfolds.
Thanks to Cyberjar88 and Corbin for sending this one in!


Walkthrough Guide
(Please allow page to fully load for spoiler tags to be functional.)
Pixel Room Walkthrough
NOTE: solutions will not work unless you have properly viewed all the clues involved.
Three Shapes Puzzle and a Ladder
When you begin, you see only some blocks of color on a black background.
Go right. Now you'll see an rectangular grey block in the center of the view.
To the right of this grey rectangle is a big white square:
Zoom in on the white square and you'll see an "x" pattern in its center.
Click it. Now the resolution of this room is a bit higher.
To the left of the grey rectangle is a yellow chair:
Zoom in on the chair and lift up the white seat to find a green object...
get the GREEN CIRCLE.
Back up from the chair and turn left.
Now you see a long white object, that looks like a sofa. On it is a yellow square (pillow):
Zoom in on the pillow and pick it up to see another green object...
Get the GREEN TRIANGLE.
Leave the sofa view, turning right two times until you see a tall red rectangle and a long green cabinet shape.
On the floor to the left of the green cabinet is a blue square:
Zoom in on the blue square to look inside and see a third green object...
Pick up the GREEN SQUARE.
Back out. Turn right. Here is what looks to be a fireplace with a potted tree next to it.
A red rectangle is hanging on the wall above the fireplace. Zoom in on it:
Insert the green CIRCLE, TRIANGLE and SQUARE in the appropriately-shaped slots.
Click the blue lever on the right side. You'll hear a clunk.
Back up then examine the inside of the fireplace:
Pick up the HAMMER.
Turn left to return to the view with the tall red door. Zoom in on the clear white strip in the bottom right corner of the red door:
Use the HAMMER to break this glass strip.
Back up and click the red door to slide it open:
Get the LADDER.
Go right. High in the upper right corner of the scene, to the left of the fireplace, you can see a faint grey rectangle...
Put the LADDER below it.
Climb up and press the second "x" button.
The Clocks and Scissors
Leave the fireplace view and turn left twice to face the grey door.
Under the "X" button, on the floor, you'll find...
A JAR with a battery in it. Pick it up.
Use your HAMMER on the jar to break it: get the BATTERY.
Turn right to face the long green cabinet.
Zoom in on the light blue object on top of the cabinet...it's a clock:
Click the top of the clock to turn it over, where you'll see a slot.
Click on the slot to open it: a battery is already inside.
Add the second BATTERY.
Now turn the clock to its front and press the button on the right:
You'll get a digital readout of the time in three different colors. Make a note of it.
Back up. Turn left twice to the white sofa view again.
Here's a red-framed white square above a purple desk. Zoom closer...
It's an analog clock. Using the red, green and blue buttons the right side, set the clock hands to the appropriate positions.
SOLUTION:
Blue at 11, Red at 15, and Green at 40.
When the time is correct, you'll here an unlocking sound.
Click on the bottom of the clock's red frame to lift it up...
get a pair of SCISSORS.
Back out.
Red and Yellow Robot Figurines
On a small table next to the white sofa is a red robot figurine. Zoom in on it:
Press the button on the top of the red robot and note the shape that you see.
Continue to press the button, cycling through a series of shapes, taking careful note of each.
Turn right twice. Here, on the long green cabinet, you'll see a yellow object. Zoom in on it to see it's a yellow robot figurine:
Using the clue from the red robot, press the buttons on the side of this yellow robot in the correct sequence.
SOLUTION:
RIGHT, TOP, TOP, LEFT, TOP, RIGHT, LEFT, TOP
When done correctly, the display will read O-P-E-N, indicating the door below.
Open the cabinet door and get WHITE BOX tied in red string.
Use your SCISSORS to open the box.
Take out the grey BIRD.
Box on the Mantel
From the green cabinet, turn right to view the fireplace.
Zoom in on the left side of the fireplace mantel.
Replace the tureen-like object with the grey BIRD.
Back up then focus on the blue box between the two birds on the mantel...
Open the box to find a third "X" button. Click it.
Now the resolution in the room is even better.
Desk Drawer and Cross Head Screwdriver
Turn to the sofa view.
On a high shelf above the sofa is a purple object. Zoom in on it:
It's a plush toy with a zipper mouth. Open the zipper and get a KEY.
Now examine the purple desk. The drawer on the left side of the desk is locked.
Use the KEY to unlock the desk drawer.
Open the drawer and get the red CROSSHEAD SCREWDRIVER.
Tablet Computer
Turn to the red door view and examine the orange-framed rectangle above the green cabinet:
Click on the four braces along the edges of the picture to move them out of the way.
Then remove the cover and the "P" will fall into place with the rest of the "letters". Make a note of what you see.
Turn to the white sofa view and zoom in on the purple desk.
On the desk top is a tablet computer...
Click the button on the upper left corner of the computer to turn it on.
Input the correct 4-digit key code.
SOLUTION:
The word "bIxEL" turned upside down is 73x19, which gives you the code:
1387
When you have entered the right key code, the computer screen will show a green and an orange icons.
Click on the green icon to see a picture. Note where the red "X" is indicating.
Turn around to the green cabinet view.
Click the corner of the rug just below the red door to zoom in on it. Click again to lift it up:
Get the ROUND CASE.
Use your SCREWDRIVER to pry the lid of the case and get a computer DISK.
Return to the desk and the tablet computer...
Insert the DISK into the slot on the right side of the computer.
Now turn on the computer again to see a new icon, a red X. Click it:
That opens fourth X button on the computer. Press it.
The room's graphical resolution is now even more detailed.
4-Letter Code, 2-Shapes and a Flat Head Screwdriver
On the desk, to the right of the computer tablet is a mat.M ove aside the mat to see a drawing of a cat...
The cat's eyes are screws. Use the SCREWDRIVER to remove the screws.
Open the right desk drawer:
Take out a GREEN HEXAGON
and get a PIECE OF PAPER. Open the piece of paper to see a 8x8 grid of letters.
Examine the mat on the desk. Compare the grid on the mat to the grid of letters on the paper you just found.
Turn around and zoom in on the left side of the green cabinet:
Enter the correct 4-Letter Code.
SOLUTION:
Match the letters on your paper clue to the black dots on the mat...
red D; green O; blue T; yellow S
When correct, you'll hear an unlocking sound.
Open the cabinet door:
get a GREEN STAR.
Turn to the fireplace and examine the 3 shapes picture above the mantel:
Use the SCREWDRIVER on the screw and then open the front cover.
Now you'll see a place for two more green shapes.
Insert the STAR and the HEXAGON.
Pull the blue lever.
Look inside the fireplace and get the FLATHEAD SCREWDRIVER.
Finding and Using the Door Code
Now that you have a FLATHEAD SCREWDRIVER, there are three places you can use it:
On the grey door, to remove the panel—here you'll find a 6x6 grid for the door code.
On the light blue III picture frame, above the sofa—a cryptic clue is found.
And, on the orange "bIXEL" picture above the green cabinet—here you find a red X RESET BUTTON. Don't press it yet!
Before pressing the reset button: go around the room and find the locations of four clues needed for the exit door...
There's one behind the blue III frame, another inside the left door of the green cabinet (marked with a II), as well as the orange IV icon on the computer.
The last clue is behind the red door. Zoom in on the blackness behind the red door and you'll see a little grey triangle. Click it to pull the paper off the wall. Here you'll see a square labeled "I".
But all these clues won't help you open the door: they're not in the correct resolution. Make a note of the roman numerals they're marked with, then turn back to the reset button.
Certain clues are only visible in certain resolutions. So, go ahead and press the red RESET BUTTON!
After pressing "RESET", you're back where you started—a bunch of ambiguous blocks. Turn to the grey door view and press the first X button:
While in "I" resolution, turn to the red door, slide it open and click on the black space for a closer view. That clue you couldn't read earlier makes more sense now.
Screenshot: pattern I (upper right)
Turn around, climb up the ladder, and click the second X button:
Go to the green cabinet, open the left side and read the clue.
Screenshot: pattern II (upper left)
Find the blue box on the fireplace mantel and press the third X button:
Look inside the blue-framed picture on the shelf above the sofa and find the next clue.
Screenshot: pattern III (lower left)
Lastly, go to the tablet computer on the desk, open the "x" icon and press the fourth X button:
Then, open the "IV" icon on the computer and view the final clue.
Screenshot: pattern IV (lower right)
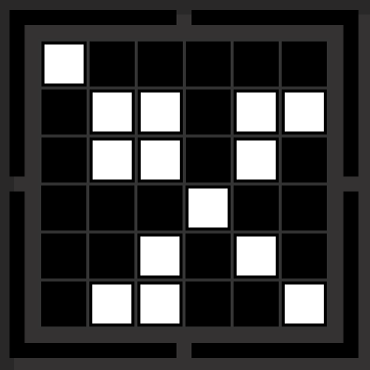
Armed with this information, go to the exit door, open its panel and examine the 6x6 grid:
Re-create the correct pattern on the grid to unlock the door.
SOLUTION:
The clues you found around the room, viewed in different pixel resolutions, each coordinate to one of the grid's four quadrants. Lines along the edges of the clue indicate which goes where.
W-b-b b-b-b
b-W-W b-W-W
b-W-W b-W-b
b-b-b W-b-b
b-b-W b-W-b
b-W-W b-W-b
("W" = white square, "b" = black)
Screenshot: Door Code Solution
(this only works after you've followed the steps for viewing the clues exactly)
When you've entered the correct pattern, the resolution improves even more and a thin chain becomes visible, hanging on the left side of the door:
Pull the chain, back up, and pick up the KEY from the floor.
Use the KEY to unlock the door, open it, and escape!
Congratulations!
EXTRA
After playing the main game, click the HOME button on the "Congratulations" screen; there, under NEW GAME and LOAD GAME, you'll see a new option: EXTRA. Click it to start the bonus game.
Bonus Walkthrough
When you begin the extra game, you're facing a white sofa. Zoom in on the purple plush toy on the high shelf:
Unzip its mouth and get the gold KEY.
Go to the desk and use the KEY to unlock the drawer:
Get the SCISSORS
Zoom in on the yellow pillow on the sofa...
Use the SCISSORS to cut open the pillow.
Get PIECE (1/10)
Lift up the yellow pillow and turn it over:
Note the green triangle and number 4.
Turn right to face the grey door. Examine the chair from this angle...
Look under the chair cushion to see a green circle, then look underneath the chair itself to see number 3.
Pull the chain by the door...
pick up the PIECE (2/10) that fell to the floor.
Turn right to face the green cabinet. Examine the blue wastebasket...
inside is a green square and under the wastebasket is the number 8.
Lift up the corner of the carpet nearest the red door:
Get another PIECE (3/10)
Turn right to face the fireplace. Look behind the potted tree:
Pick up a PIECE (4/10).
Examine the red-framed picture of 3 green shapes above the mantel:
Using the clues you found earlier, press each green shape to enter the correct 3-digit number.
SOLUTION:
3 4 8
When the number is correct, pull the blue lever and you'll hear a "clunk" sound.
Back up and look in the fireplace:
Get the FLATHEAD SCREWDRIVER.
Facing the red door view again, zoom in on the orange-framed picture above the green cabinet.
Use your FLAT SCREWDRIVER to remove the picture.
Get PIECE (5/10)
Turn right and zoom in on the blue-framed picture on the shelf above the sofa:
Use the FLAT SCREWDRIVER to remove the cover picture.
Get the SLIP OF PAPER and read it for a clue.
Go to the desk and examine the grid, noting where you see white and black dots in relation to the paper you just found.
Turn around and examine the left side of the green cabinet:
Using the two clues you just saw, enter the correct 4-Letter Code.
SOLUTION:
The colored squares on the paper relate to sections on the 8x8 grid on the desk. Note which white dots are visible in those sections:
red T, green H, blue X, yellow C
From inside the opened cupboard, get the WHITE BOX tied with red string.
Use your SCISSORS to open the box and get a TUREEN.
Go over to the fireplace and replace the bird on the right side of the mantel with your TUREEN.
Open the blue box on the mantel to get a BATTERY.
Return to the green cabinet and put the BATTERY inside the yellow robot...
Press the button on the top of the robot, then press the buttons on the sides to cycle through the symbols, making a note of what you see.
Remove the BATTERY from this robot when you're done.
Turn around and examine the red robot by the sofa...
Press the button the top of the red robot's head, then according to the clue from the yellow robot, act fast and press the button again at the right moments.
SOLUTION:
After pressing the button once, a series of images will flash on the red robot's screen. When you see the correct images, and in the proper sequence, press the top of the robot again to turn those images blue.
STAR, MUSICAL NOTE, HEART, CAT
When done correctly, the drawer below the robot will unlock.
Open the drawer and get the CROSSHEAD SCREWDRIVER.
Go back to the desk. Lift up the mat and look at the picture of the cat...
Use the CROSSHEAD SCREWDRIVER on the cat "eye" screws.
Open the drawer underneath and get the PIECE (6/10).
Turn to the grey door and pick up the JAR from the floor.
Use the FLAT SCREWDRIVER to open the jar and get another BATTERY.
Go back to the green cabinet and examine the blue digital clock...
Look at the back of the clock and use the CROSSHEAD SCREWDRIVER to open the battery compartment.
Put two BATTERIES into the back of the clock.
Turn the clock to its front and press the button its right side:
Very carefully note what you're seeing (and what you're not seeing).
Turn to the desk view and focus in on the red-framed clock on the wall:
Using the three colored buttons on the side, set the clock hands to the proper positions.
SOLUTION:
Read the empty space on the digital clock...04:35:15
blue 4, red 35, green 15
You'll hear an unlocking sound when the time is correct.
Click on the unlocked clock to lift it up:
Get the DISK
and, from just under the edge of the red frame, click the silver KEY.
Look behind the plant on the desk:
Pick up the KEY.
Examine the tablet computer on the desk...
Open the tray on the side of the computer and insert the disk.
Turn on the computer and open the orange "camera" icon. Make a note of what you see.
Leave the desk area and turn to the green cabinet; zoom in on the right side:
Use the silver KEY to open the cupboard.
Get the COFFEE POT.
Follow the arrow inside the cupboard and find another PIECE (7/10).
Return to the fireplace and examine the tureens on either side of the blue box:
Using the clue you found in the computer, put the correct colors into each tureen.
SOLUTION:
Turn the dial on the top of the coffee pot to change the colors...Mix colors to match the ones shown on the computer.
left side=RED and YELLOW
right side=YELLOW and GREEN
When both tureens are filled properly, open the blue box to get a new item:
a HAMMER.
Turn left from the fireplace to face the red door.
Zoom in on the glass strip in its lower right corner and use the HAMMER to break it.
Open the red door and take the LADDER.
Click the blank wall behind the red door to get closer.
Click to remove the panel then take PIECE (8/10)
Turn right. Prop up the LADDER along the wall next to the fireplace.
Climb the ladder to reach the high alcove.
Get PIECE (9/10).
Face the grey door. On the wall to the right of the grey door is a glass panel...
Use your HAMMER to break the glass.
Get the last PIECE (10/10).
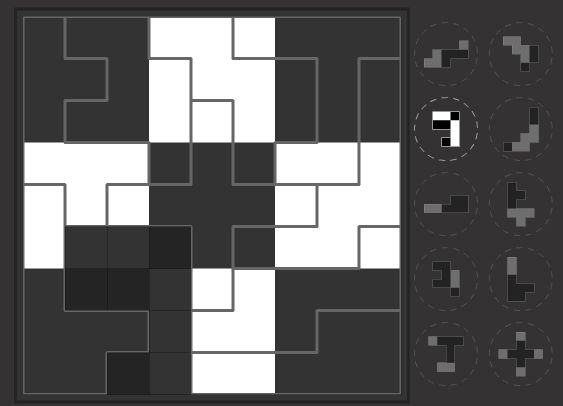
Finally, examine the door and use your PIECES to complete the puzzle.
Screenshot: Door Puzzle Pieces
Posted by: elle |
December 22, 2013 7:38 PM
|
December 22, 2013 7:38 PM
Pixel Room Walkthrough
Pixel Level 0
Go right one screen and click the big white square on the right to zoom in. Click the "pixel button" to increase the resolution.
Pixel LeveL 1
Click the grey square under the pixel button. Take the... thing. Back up.
Click on the chair to the left. Click on the cushion to lift it up. Take the green circle. Back up.
Go right one screen. Click the blue square on the bottom left to zoom in. Take the green square. Back up.
Go right two screens. Click on the big white couch, then click on the yellow cushion to lift it up. Take the green triangle. Back up.
Go left one screen. Click on the rectangle in the middle of the screen to zoom in. Place each shape in its hole, then pull the lever on the right. Back up.
Click on the fireplace under the rectangle to zoom in. Take the hammer. Back up.
Go left one screen. Click on the little glass rectangle on the bottom right of the door. Use the hammer to smash it. Back up and open the door. Take the ladder.
Go right one screen. Use the ladder under the grey square on the top left. Click the grey square to zoom in, then click the pixel button to increase the resolution.
Pixel Level 2
Go right one screen. Click on the reddish rectangle on the end table to zoom in on it. Press the button on its head to cycle through cycle through a set of cross-like shapes. Make a note of them and back up.
Go right two screens. Click on the green dresser to zoom in, then on the yellow robot-thing to zoom in on it.
This is similar to the other one, but it has buttons on the sides as well as the top of its head which go in or out when you click them. Perhaps the other one is related to it?
The symbols on the other one featured three small protrusions on a long stick. Kind of like the buttons on this one's head.
Press the buttons in the order that the protrusions disappeared/appeared on the other one.
Right, Top, Top, Left, Top, Right, Left, Top
Back up, then click on the now-open door beneath the yellow robot-thing. Take the package.
Click on the blue rectangle to zoom in on it. It's a clock, and if you click on it to turn it around and open the battery compartment, you'll notice it's missing a battery.
Do we have a battery? Examine that "thing" we picked up earlier. It's a jar, and it appears to have a battery in it. But how can we open it?
Use the hammer to break the jar and get the battery.
Put the battery in the clock, then close the battery compartment and turn it back around. Click the button on its right side to show the time in three sets colored numbers: a blue 11, a red 15, and a green 40. Make a note of them, then back up twice.
Go right two screens. Click to zoom in on what appears to be a picture frame above the desk, but is in fact a clock.
The clock has three colored buttons on the side; from top to bottom: red, green, and blue. If you click them, you'll find they control three different colored hands on the clock. We need to set them to the right time, but what is it?
We just saw a clock that gave us a time. And in the same three colors.
The blue hand is the hour hand. The red hand is the minute hand. The green hand is the second hand.
Set the red hand to the 3 position, the green hand to the 8 position, and the blue hand to the 11 position.
Click the clock to slide it up. Take the scissors from the niche and back up.
Go left one screen. Click on the top of the fireplace to zoom in.
You can click on the silver objects on the left and right of the mantle to zoom in on them. You may notice they look slightly different. The one on the right is a statue of a bird, but the one on the left is... a gravy boat?
Examine the package. It's bound with string, so use the scissors to cut it. Open the package and take the bird statue.
Zoom in on the gravy boat on the left. Use the bird statue on it to replace it. Back up.
Zoom in on the blue box in the middle of the mantle. Click it to open it, then click the pixel button inside to increase the resolution.
Pixel Level 3
Go left one screen. Click on the picture frame to zoom in. Click each of the latches on the sides to turn them, then remove the glass. The P will flip over, spelling "bIXEL". Make a note of this.
Go left two screens. Zoom in on the desk, then click on the rectangular object on the left (a tablet) to zoom in. Click on the little button on its left side to turn it on.
It's locked, and it needs a 4-digit password. We just saw something that may hold the answer.
How could "bIXEL" give us a 4-digit code?
Try rotating the word 180 degrees.
73X19
The code is 1387.
Now that we have access to the tablet, we can see two icons. Let's focus on the green one for now.
Click the green icon and you'll be shown an image with many colored squares/rectangles, and a red X on the corner of a large grey rectangle.
Does the image look familiar? It should: it's the floor layout of the room you're in. But what's the grey rectangle in the middle? Well, back up.
On the ground, there's a large grey rug. But if you try to click the corners nothing happens.
Go right two screens. Try the corner of the rug on the right. Flip the corner over and take the container.
Examine the container. You can't get the lid off, but maybe if you pried it?
Use the screwdriver on the container to open it. Take the disc from inside.
Go right two screens. Zoom in on the desk, and again on the tablet. Click on its right side to flip it over, then click on the little protrusion to open a disc drive. Put the disc in and back up.
Zoom back in on the tablet and turn it on. There's a new icon. Click it, then click on the pixel button to increase the resolution.
Pixel Level 4
Zoom in on the desk again. Zoom in on the grid on the right side. It's an 8x8 grid with 4 black dots. Make a note of it.
Click the grid to move it, then click on the picture of the cat underneath it to zoom in on it.
The cat's eyes are screws. Use your screwdriver to remove them, then back up twice.
Open the drawer on the right. Take the green hexagon and the folder paper. Back up.
Examine the paper. It's an 8x8 grid of letters in red, green, yellow, and blue. Make a note of this.
Go right two screens. Zoom in on the green dresser. Click on the door on the left to zoom in.
There are four letters, each a different color; from left to right: red, green, blue, and yellow.
Those are the same colors as the letters on the paper. But which letters are correct?
If you look at the letters in the same position as the black dots on the grid, you'll get: green O, red D, yellow S, and blue T.
The answer is DOTS.
Click to open the door and take the green star inside. Back up.
Go right one screen. Zoom in on the green shapes we placed earlier.
In this resolution, we can see there's a screw on the right side of the plaque. Use the screwdriver to remove it, then click it to open it.
There are spots for a star and a hexagon inside. We happen to have one of each, so put them in and pull the lever again. Back up.
Zoom in on the fireplace. Take the blue flathead screwdriver. Back up.
Go right one screen. Zoom in on the blue picture on the lower shelf. Remove the screws with the blue screwdriver. Back up.
Go right one screen. Click on the square on the door to zoom in, then use the blue screwdriver to remove the screws.
Under the cover is a grid of black squares which we can click to turn white. But we need to know which, so back up for now.
Go right one screen. Open the door on the right, then click inside to zoom in on a square cover. Click it to remove it. Ignore the picture behind it for now and back up.
Zoom in on the picture.
There are more screws here. Remove them with the blue screwdriver.
Under the picture is a cover, and under the cover is a red "RESET" pixel button. Push it, and return to Pixel Level 0.
Escaping
Go left one screen. Click on the big white square, then click on the pixel button to return to Pixel Level 1.
Go right one screen. Open the door and zoom in on the picture we uncovered. Make a note of the picture, then back up.
Go right one screen. Zoom in on the alcove above the ladder and click on the pixel button to return to Pixel Level 2.
Go left one screen. Zoom in on the green dresser, then open the door on the left and click inside to zoom in.
There's another picture in here. Make a note of it, then back up twice.
Go right one screen, then zoom in on the fireplace mantle, again on the blue box, then open it and click the pixel button to return to Pixel Level 3.
Go right one screen. Zoom in on the blue picture frame, and click on it to reveal another picture. Make a note of it, and back up.
Zoom in on the desk, then on the tablet. Turn it on, click on the red icon, and click on the pixel button to return to Pixel Level 4.
Go back to the tablet and turn it on again. Click on that orange "IV" icon and make a note of the picture. Back up twice.
We are now ready to escape. Go right one screen and zoom in on the grid on the door.
We should now know which squares to turn white.
We need to use each of the pictures we found.
Each picture showed one quarter of the grid, and could be identified by the black borders they and the grid share.
XOOOOO
OXXOXX
OXXOXO
OOOXOO
OOXOXO
OXXOOX
O=black, X=white
Click the chain to the left of the door to zoom in, and click it again to pull it. Back up.
Zoom in on the key that fell, under the chain. Pick it up, then zoom back out.
Click the door handle to zoom in on it. Use the key on the lock, then click the handle.
Click the open doorway.
Posted by: Night Stryke |
December 22, 2013 8:15 PM
|
December 22, 2013 8:15 PM
Hm, yeah, I could have sworn I wrote that part but it's not there. Sorry. It should read:
Pixel Level 2
Go right one screen. Zoom in on the grey blob on the top shelf. Click its mouth to unzip it and take the key inside. Back up.
Zoom in on the desk. Use the key on the left drawer and take the red screwdriver inside. Back up.
Click on the reddish rectangle on the end table to zoom in on it. Press the button on its head to cycle through cycle through a set of cross-like shapes. Make a note of them and back up.
Then the rest should be right.
Posted by: Night Stryke |
December 22, 2013 9:28 PM
|
December 22, 2013 9:28 PM
Extra Pixel Room Walkthrough
Be sure to select English in the top right corner when you start the game.
Starting Off
We can get two of the pieces off the bat.
Go right one screen. Zoom in on and pull the chain. Back up and grab the piece (1) off the floor.
Go right one screen. Zoom in on the right corner of the carpet. Flip it over and take the piece (2) underneath.
Go right one screen. Zoom in on the tree's pot. Take the piece (3) from behind it. Back up.
Go right one screen. Zoom in on the grey blob on the top shelf. Click its mouth to unzip it, and take the key inside. Back up.
Zoom in on the desk. Use the key on the left drawer and take the scissors inside. Back up.
Zoom in on the couch. Use the scissors on the pillow and take the piece (4) within. Back up.
Go right one screen. Zoom in on the jar on the ground and pick it up. Back up.
Shape Plaque
Go right two screens. Zoom in on the plaque above the fireplace. It already has the shapes in it, and now they have numbers under them. We need to find those numbers, so back up.
Go right one screen. Zoom in on the couch, then click the pillow to lift it and reveal a green triangle.
Click the pillow again to flip it over and reveal a 4. Back up.
Go right one screen. Zoom in on the chair, then click on the seat cushion to lift it up and reveal a green circle.
Click under the chair to look at the bottom and find a 3. Back up twice.
Go right one screen. Zoom in on the blue trashcan to find a green square.
Click the trashcan to move it and reveal an 8. Back up.
Go right one screen, and zoom back in on the shape plaque.
We now have the numbers that correspond to each shape.
Circle=3, Triangle=4, Square=8
Back up and zoom in on the fireplace. Take the blue screwdriver. Back up again.
Go left one screen. Zoom in on the picture above the dresser. Remove the screws with the blue screwdriver, then click the picture to remove it and the cover behind it to raise it. Take the piece (5) inside. Back up.
Green Dresser Door
Go left two screens. Zoom in on the blue picture on the lower shelf. Use the blue screwdriver to remove the screws, then remove the cover and take the paper taped to the inside. Back up.
Examine the paper. It's an 8x8 grid with four colored 3x3 grids on it: yellow, red, green, and blue. Make a note of it.
Zoom in on the desk, then again on the grid on the right side. Make a note of this and back up.
Go right two screens. Zoom in on the green dresser, then on the left door.
We need a 4-letter code, each letter corresponding to a different color.
The paper has an 8x8 grid with squares of the same colors on it.
The grid on the desk was also 8x8.
The white dots on the desk grid within the colored squares on the paper grid each make a letter.
The answer is THXC
Open the door and take the package. Back up.
The Red Doll
Go right one screen. Zoom in on the fireplace mantle.
Examine the package. Use the scissors to cut the string, then open it and take the gravy boat.
Zoom in on the bird statue on the right, then replace it with the gravy boat. Back up.
Zoom in on and open the blue box. Take the battery inside. Back up twice.
Go left on screen. Zoom in on the yellow doll. Click it to turn it around. Open the battery compartment and put the battery in, then close it and turn it back around.
Press the top button to turn it on and display a cyan star. Use the button on the right to cycle through more symbols, and the button on the left to cycle back. Make note of these symbols and back up twice.
Go right two screens. Zoom in on the red doll.
If you push the button on its head it will begin cycling through various symbols. If you push it again, the symbol it's on with turn cyan.
The yellow doll showed us what we need to do.
We need to turn certain ones cyan in a certain order.
Press the button on the star, then the musical note, then the heart, then the cat.
Back up, then zoom in on the end table the doll it on. Open the drawer and take the red screwdriver. Back up.
Zoom in on the desk. Zoom in on the grid, move it, then zoom in on the cat picture. Use the red screwdriver to remove the screws, then back up twice.
Open the right drawer and take the piece (6). Back up
Wall Clock
Go right two screens. Zoom in on the yellow doll on the green dresser. Turn it around and remove the battery. Back up.
Zoom in on the clock. Click it to turn it around, then use the red screwdriver to open the battery compartment. Put the battery inside.
Examine the jar in your inventory. Zoom in on the lid and use the blue screwdriver to remove the screws and open the jar. Take the battery, then place it in the clock. Turn it back around.
Press the button on the right side of the clock. Colored number fragments with appear. Make a note of them, then back up twice.
Go right two screens. Zoom in on the wall clock. There are three colored hands, and three corresponding colored buttons; from top to bottom: red, green, and blue. Now, which number to set each hand to?
It's related to the digital clock on the dresser.
Look at what's not there.
Invert the colored and blank spaces. So, make the blank spaces colored, and the colored spaces blank, and you'll have three sets of numbers: blue 04, red 35, and green 15.
Set the red hand to the 7 space, the green hand to the 3 space, and the blue hand to the 4 space.
Click the clock the move it. Take the disc in the niche. Also, click the key poking out of the bottom of the clock to make it fall. Back up.
Zoom in on the desk, then zoom in on the plant. Take the key and back up twice.
Gravy Boats
Zoom in on the desk, then on the tablet. Click the right side to flip it over, then click the protrusion to open the disc drive. Place the disc in it, then click the left side to flip it back over.
Click the button on the left to turn it on. Click the icon to show a picture of a blue rectangle with an orange circle to its left and a green circle to its right. Make a note of it and back up twice.
Go right two screen. Zoom in on the green dresser and use the key from the clock on the right door. Open it and take the pitcher.
While you're there, notice the arrow on the back? Click inside, and take the piece (7) from the top of the cubby. Back up twice.
Go right one screen. Zoom in on the fireplace mantle. If you zoom in on the box and open it you might notice the bottom looks like it could open. Back up.
Examine the pitcher and you'll find you can zoom in on the top and select between three colors: red, yellow, and blue.
Remember the picture on the tablet? Anything look familiar?
You need to fill the left gravy boat with orange liquid and the right gravy boat with green liquid, using the pitcher.
Set the pitcher to red and use it on the left gravy boat. Change it to yellow and use it on the left gravy boat again, then use it on the right gravy boat. Finally, change it to blue and use it on the right gravy boat.
Open the blue box and take the hammer from it. Back up twice.
Escaping
Go right two screens. Zoom in on the pane of glass on the right and use the hammer on it; take the piece (8) from behind it. Back up.
Go right one screen. Zoom in on the glass rectangle on the bottom right of the door. Use the hammer to break it. Back up.
Open the door and take the ladder.
Click inside the closet to zoom in. Click the peeling cover to remove it and take the piece (9) from the niche. Back up.
Go right one screen. Use the ladder on the space below the alcove on the upper-left of the wall. Zoom in on the alcove and take the piece (10). Back up.
We now have all the pieces, so go right two screens and zoom in on the door.
We need to fill in the puzzle with the pieces so that all of the light areas are covered by white tiles and all of the dark areas are covered by black tiles. If you place a piece in the wrong place you have to click its icon on the right to return it.
The position of each piece on the grid, with each piece represented by its number in the shape of the piece, and piece 10 represented by 0. (Using the icons on the right as a key, pieces 1-5 are in the first column, pieces 5-10 are in the second column.)
844665555
884466657
844406657
888406557
980000077
922207771
922201111
999211133
992233333
Exit the room.
Pieces
Piece 1:
In the screen with the black door, pull the chain then collect the piece from the floor.
Piece 2:
In the screen with the green dresser, zoom in on the right corner of the carpet and flip it over.
Piece 3:
In the screen with the fireplace, zoom in on the pot to look behind it.
Piece 4:
In the screen with the couch, use the scissors to cut the pillow open.
Piece 5:
In the screen with the green dresser, use the blue screwdriver to remove the screws on the picture and look behind it.
Piece 6:
In the screen with the couch, use the red screwdriver to remove the screws in the cat picture under the grid on the desk, then open the drawer on the right.
Piece 7:
In the screen with the green dresser, look inside the cubby on the right.
Piece 8:
In the screen with the black door, smash the glass pane with the hammer.
Piece 9:
In the screen with the green dresser, look inside the closet.
Piece 10:
In the screen with the fireplace, use the ladder to reach the alcove and look inside.
Posted by: Night Stryke |
December 23, 2013 2:33 AM
|
December 23, 2013 2:33 AM