
![]() In jo99's freaky yet stylish point-and-click adventure/escape game Humanoid 47, you're helping a human guinea pig escape from the mad scientist who has been experimenting on him and other poor saps for quite some time. Minus the top of your head, you seize the opportunity to run one day, but now find yourself trapped in a bizarre maze of labs and failed experiments. Click around to interact, and use the arrows at the bottom of the screen to back away from things or turn around. Like The Queen of Snakes, there's no changing cursor, so you'll have to search everywhere and everything, and keep an eye out for clues hidden around the labs that will help you solve puzzles.
In jo99's freaky yet stylish point-and-click adventure/escape game Humanoid 47, you're helping a human guinea pig escape from the mad scientist who has been experimenting on him and other poor saps for quite some time. Minus the top of your head, you seize the opportunity to run one day, but now find yourself trapped in a bizarre maze of labs and failed experiments. Click around to interact, and use the arrows at the bottom of the screen to back away from things or turn around. Like The Queen of Snakes, there's no changing cursor, so you'll have to search everywhere and everything, and keep an eye out for clues hidden around the labs that will help you solve puzzles.
SEE ALSO: The Queen of Snakes
 The biggest challenging in Humanoid 47 comes from figuring out what in the cluttered areas is actually useful or worth interacting with, so without a changing cursor for guidance you're unfortunately left to click your way around anything and everything to make sure you don't miss items or clues. To cut down on this, you'll probably want to explore everywhere you can first, since most required items and their uses tend to be abundantly clear when you see them, making it easier to go back and pick out what you need from the chaos of the labs. As in The Queen of Snakes, not only is the artwork beautiful and strikingly stylized, if potentially more disturbing this time around, the reliance on spotting puzzle-solving clues on bits of paper or scenery is back, forcing you to pay careful attention to your surroundings or anything that looks out of place. In a lot of ways, it feels like a cartoon from the late 70s, all creepy-freaky imagery and appealingly oddball design filled with colour. It's not particularly long, but it is particularly weird, and I mean that in the fondest way possible.


Walkthrough Guide
(Please allow page to fully load for spoiler tags to be functional.)
Humanoid 47 Walkthrough
(The screenshots in this walkthrough are currently not available but will be uploaded very soon! Thank you for your patience in the meantime.)
Supply Closet
Examine the small cabinet on the wall.
Open the glass door and take the green can of BUG SPRAY on the bottom shelf.
Also note the code taped to the inside of the door - 3416. Click the back arrow to return to the full view of the room.
Pick up the PIPE leaning against the block at the far right side of the room.
Move back once to enter the corridor. From there, go through the first door on the left into Room 432.
Room 432
First inspect the bright blue symbols on the board that's hanging on the left wall.
At the top, a circular symbol has an arrow pointing to a heart.
In the middle, a triangular symbol is pointing to a brain.
At the bottom, a diamond symbol is pointing to a battery.
Next, examine the robot on top of the left table, then take the detached METAL ARM beside it.
Back up and click the right table to zoom in.
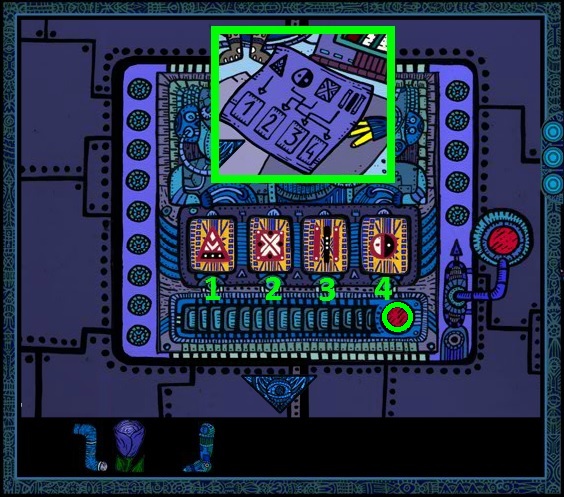
Study the symbols from the note on the table. Each symbol points to a specific number.
If you follow the arrows, you'll see the triangle points to 1, the yin-yang points to 4, the square points to 2, and the bars point to 3.
Open the door at the front of the canister to find a BLUE ROSE.
Click the back button to move away from the right table. Now click the small blue door in the middle of the metal tank for a close-up view.
Open the door then take the METAL LEG inside.
Examine the combination lock at the center of the back wall to start a puzzle.
First set the symbols in the same order as the note you read on the right table.
Enter the symbols 1 to 4 from left to right.
Triangle = 1, Square = 2, Bars = 3, Yin-Yang = 4.
Push the flashing button at the bottom of the panel to submit your solution.
Screenshot.
The wall will split open after the correct combination has been entered, allowing you to move into the back room.
Attach the METAL ARM and METAL LEG to the missing limbs of the sitting cyborg in the room.
The cyborg will first lift the cover on the left, revealing a CRESCENT SHAPE on the pedestal.
After you take that, he will then lift the cover on the right, allowing you to also grab an EYE SHAPE.
Select the two shapes in your inventory and combine them together to make a DISC SHAPE.
Move back twice to return to the corridor, then click the second door on the left to enter Room 437.
Room 437
Insert the DISC SHAPE (from the combined crescent and eye shapes) into the matching space in the center of the green panel at the front of the room.
Click the opened coffin to look at the sleeping robot inside.
Give the robot the BLUE ROSE, then take the HEART from the revealed compartment in the robot's chest.
Go back to the corridor and click the right door to enter Room 431.
Room 431
Click the machine up against the right wall to examine it.
At the top of the machine are four buttons which you can press to cycle through the numbers from 0 to 9.
Enter the 4 digit combination you saw inside the cabinet at the Supply Closet - 3416 - then push the flashing button.
Screenshot.
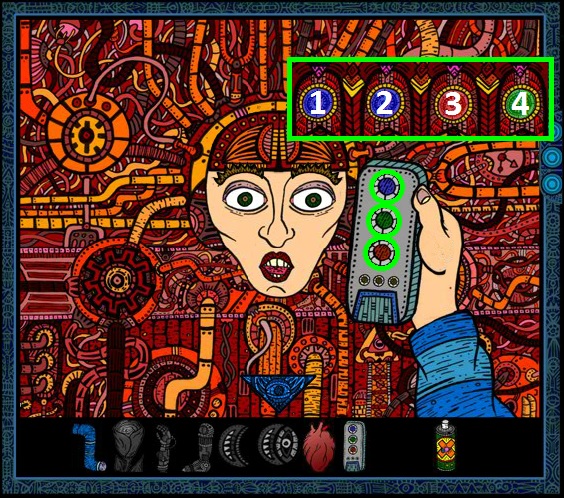
Once you've entered the correct combination you can take the REMOTE from the opened cache at the right side of the machine.
Also note the color pattern that appears in the circles above each number. From left to right it's: Blue, blue, red, green.
Move back, then click the face at the back of the room to zoom in.
Use the REMOTE on the face to start another puzzle.
Press the buttons in the same order as the circles on the machine - Blue, Blue, Red, Green.
Screenshot.
After the puzzle's solved, take the BRAIN that appears at the top of the face.
Go back out to the corridor, then walk forward to the end of the hall. From there, click the right door to enter the Spider's Lair.
Spider's Lair
Use the can of BUG SPRAY to kill the giant robotic spider, then click the spider to inspect it.
Open the flashing panel on the spider's back and take the BATTERY inside.
Go back out to the end of the corridor, then click the open doorway on the left to reach the Fluid Pipes Hallway. From there, walk forward into the pink Fluid Tank Room.
Fluid Tank Room
Pick up the VALVE on the floor leaning against the lower left pipes.
Attach the VALVE to the front of the tank, then click it to distribute the fluid through the pipes, which should change their color from blue to pink.
Walk back into the Fluid Pipes Hallway.
Fluid Pipes Hallway
Click to inspect the panel on the left wall.
Press the flashing button to open the panel cover.
Place the PIPE from your inventory into the gap between the two other pipes.
Click the small valve at the upper left corner of the panel to allow the pink fluid to flow through the pipes.
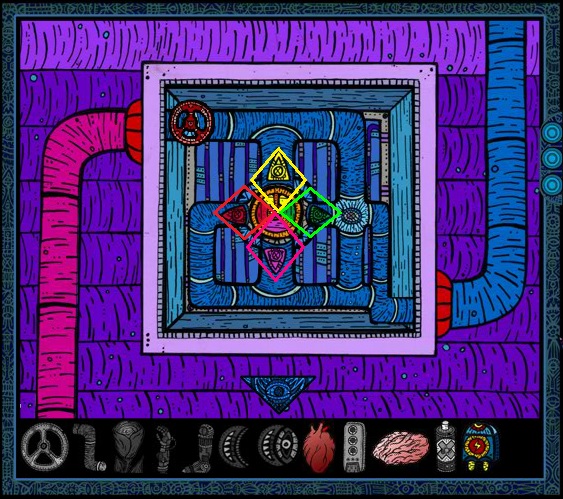
Click the back arrow to zoom out. Click the 123 sign at the middle of the right wall to move towards the small side area of the hallway, then click the second panel to zoom in.
Push the button at the bottom of this panel to remove the cover as well.
Rotate the valve so that each section of the square is next to its matching colored arrow.
Screenshot.
Click the valve to allow the pink fluid to flow through the pipes.
Move back three times to return to the end of the Corridor.
Corridor
If you've diverted the fluid from all of the pipes in the hallway, the tank in this area should have bubbling pink liquid inside it.
Click the valve at the front of the tank to open the middle door.
Move forward into Room 47.
Room 47
Remember the symbols on the board in room 432? A circle, triangle, and diamond eahc pointed to an item - a heart, a brain, and a battery, respectively - and it just so happens you have all three of those items in your inventory!.
First, click the small, circular window at the top of the tank on the left side of the room.
Open the window and put the HEART inside.
Next, examine the triangular window at the top of the taller tank on the right side of the room.
Click the window to open it and put the BRAIN inside.
Lastly, click the diamond-shaped window at the top of the short tank on the right side of the room.
Open the window and insert the BATTERY into the socket.
Zoom out, then walk towards the dome-shaped structure at the back of the room.
Click the door up the stairs on the right side of the dome to zoom in.
Press the flashing hand button to open the door.
Enter the room and then inspect the control panel below the large window.
Push the blinking button at the top of the panel to open the upper left compartment, revealing a GEAR.
Take the GEAR and insert it into the matching space at the right side of the panel.
Press the flashing button that is second from the left to reveal rows of multi-colored buttons behind the area where you placed the gear.
Note the red and white checkered pattern within the compartment where you found the gear.
Click to change the multi-colored buttons so that they match the red and white pattern.
Screenshot.
Push the flashing middle button at the top of the panel to submit your solution.
Posted by: Trinn |
September 5, 2013 8:17 PM
|
September 5, 2013 8:17 PM