
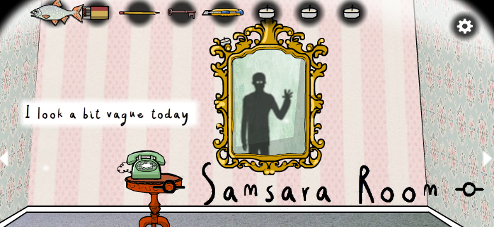
![]() Studio Maarten's Samsara Room is an escape game, but its surreal atmosphere and imagery make it feel a lot more like a dream... or maybe the sort of browser game they play every day in Twin Peaks. A mirror, a telephone, a chest of drawers, and a grandfather clock make up the room... but it's also missing a door, which is typically important to the whole "escape the room" formula as a general piece of design. But as you explore and begin gathering items, you'll quickly realise that this place is anything but typical, and Captain Reality is no longer steering this steamship.
Studio Maarten's Samsara Room is an escape game, but its surreal atmosphere and imagery make it feel a lot more like a dream... or maybe the sort of browser game they play every day in Twin Peaks. A mirror, a telephone, a chest of drawers, and a grandfather clock make up the room... but it's also missing a door, which is typically important to the whole "escape the room" formula as a general piece of design. But as you explore and begin gathering items, you'll quickly realise that this place is anything but typical, and Captain Reality is no longer steering this steamship.
Click around to navigate and interact with things, clicking an item in your inventory to highlight it for use the next time you click somewhere onscreen. While there are definitely instances of puzzle-solving where you have to do what would seem to be illogical, Samsara Room sort of functions on its own level of rules when it comes to reality, and once you've adjusted to those by experimenting a little, it makes figuring out what you need to do a lot simpler. It's the sort of escape game that's less cerebral and challenging and more, well, an experience, with its strange imagery and stranger atmosphere. In fact, players who prefer more intellectual, challenging game design might find the dreamlike setting and puzzles of this one a bit too weird... which is, of course, more a matter of personal taste than anything else. It's actually a bit on the short side, and its ending is a little unsatisfying after all the buildup, but sometimes it's more about the journey than the end destination, and Samsara Room's journey is a singularly unique, clever, and stylish one worth making.


Walkthrough Guide
(Please allow page to fully load for spoiler tags to be functional.)
Samsara Room Walkthrough
Normal Room
You start the game facing a grandfather clock.
Pick up the TEALIGHT (1/5) on the floor beside the base of the clock.
Click left to turn towards the cabinet.
Take the TEALIGHT (2/5) on the ground underneath the bottom drawer.
Click the drawers to take a closer look.
Open the top drawer to find a FISH.
Click the next drawer down to open it and take the box of MATCHES.
Next, open the lower drawer with double handles, then take the box KNIFE inside.
Lastly, open the left door at the bottom of the cabinet to find the PENCIL.
Use the PENCIL on the piece of paper at the top of the cabinet to draw a picture of a key.
Click the paper to crumple it up, then click it again to open it, revealing a SMALL KEY at the center of the paper.
Back away and turn left to face the mirror.
Grab the TEALIGHT (3/5) from the upper left side of the ornate mirror frame.
Pick up the telephone receiver to hear a cryptic message: "Search for enlightenment."
Also take the TEALIGHT (4/5) on the ground beside the left leg of the small table.
Move left once more to face the window.
Take the TEALIGHT (5/5) at the upper right corner of the window.
Go right to return to the view of the mirror.
Use the KNIFE on the corner of the carpet sticking up from the floor.
Click the sliced piece of carpet twice to roll it back and expose the bare floor underneath.
Click the exposed section of the floor to examine it more closely.
There are 5 points in the shape of a star that each give off energy when clicked and a space in the middle for placing an object.
Remember the clue from the telephone: "Search for enlightenment."
Place the 5 TEALIGHTS at each point of the star on the ground.
Light each of the candles with the box of MATCHES.
Put the FISH in the center of the makeshift altar.
Now that you've made all the necessary preparations, back up and turn left to face the window again.
Use the SMALL KEY on the padlock at the center of the window, then click the window to open it.
Click the landscape outside. "An invisible wall?" It seems you've been deceived...
Cut open the tableau in the window with the KNIFE. Peel back the canvas to uncover a round door.
Open the round door and step inside the black portal. Examine the cube floating in the center of space to travel to the other world.
Fish Room
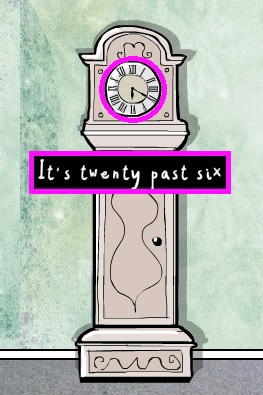
When you enter the Fish Room, you'll be facing the mirror again. Pick up the telephone to hear another clue: "It's twenty past six."
Click the table to move it aside, revealing a SHELL (1/5) behind it.
Turn left to face the window. Take the SHELL (2/5) floating in front of the portal door.
Move left again towards the grandfather clock. Grab the SHELL (3/5) beside to its left.
Click the clock to uncover yet another SHELL (4/5) on the wall behind it.
Turn left once more. Click the cabinet a few times to move it all the way to the left, then take the revealed SHELL (5/5) and the CUP against the wall.
Return to the side of the room with the mirror.
Cut open the carpet with the KNIFE, just like you did in the other room, and peel the carpet back to uncover the floor.
Zoom in on the exposed floor, then place each of the 5 SHELLS at the points of the star.
Back up and go left to view the window again.
Open the round door and travel through the portal to return to the normal world.
Normal Room
Turn left once to move towards the window.
Use the CUP to capture the gecko sitting on the wall to the right of the window, then click it to add the GECKO IN CUP to your inventory.
Move right to face the mirror again, then click the cut out section of the floor for a closer look.
Remove the FISH from the center of the altar and replace it with the GECKO IN CUP.
Return to the window, then go through the portal and click the cube to change worlds again.
Lizard Room
You'll be facing the mirror again as soon as you enter this new room. Take the CANDLE (1/3) sticking out of the lower left side of the upside-down mirror.
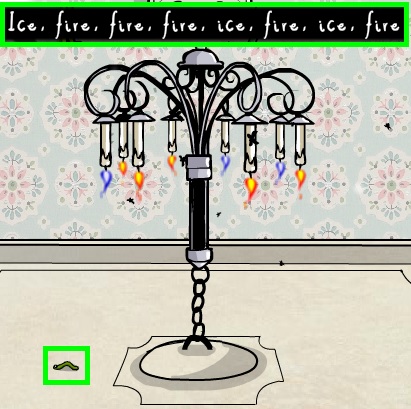
Pick up the telephone receiver again to hear a new clue: "Ice, fire, fire, fire, ice, fire, ice, fire."
Turn right to face the window.
Take another CANDLE (2/3) at the lower left side of the window and the third CANDLE (3/3) at the upper right corner of the window.
Move right twice to turn towards the chandelier.
Place the three CANDLES inside the three empty candlestick holders in the chandelier.
Light all of the candles with the MATCHES. If you click the flames, the color of the fire changes from red to blue, but "Nothing happens."
There must be a specific order! Use the clue from the telephone to determine the correct pattern.
Click the candles to change the flames to the correct color.
Ice and Fire from the telephone clue indicate the pattern of the colors - "Ice" refers to a blue flame and "Fire" is a red flame. The order from left to right is therefore:
Blue, red, red, red, blue, red, blue, red.
Solution
Once the puzzle is solved, the shaft of the chandelier will open.
Move left or right to a different scene, then return to the view of the chandelier.
A small WORM will appear crawling on the ceiling (which has now become the floor). Click it to add it to your inventory.
Turn around to face the window. Go through the portal and click the cube to return to the Normal Room.
Normal Room
Click the altar on the floor to zoom in.
Remove the GECKO IN CUP at the center of the star and replace it with the WORM from your inventory.
Back up and turn right twice towards the grandfather clock.
You can click the minute and hour hands of the clock to set the time, but do you know what time it should be?
The telephone clue from the Fish Room gives us the answer again: "It's twenty past 6."
Click the clock hands to set the time to 6:20, that's the short hand on VI and the long hand on IV.
Solution
After the puzzle is solved, click the small door to open the clock.
Click the dead man's body three times to drop it onto the floor.
Turn around to face the window, then go through the portal to enter the worm world.
Worm Room
Move left twice to turn towards the body in front of the clock.
Click the body twice to move towards the head.
Click the dead man's mouth to go inside his mouth, then click the glowing cube at the back of the throat to travel to the forest.
Forest
Click the two small, red flames in the first scene to release them.
Walk forward to move closer to the cube.
Click the three flames in this scene to send them to the cube as well.
Select the white cube to examine it more closely.
There should now be 5 red flames in a circle around the floating cube.
Click the cube to open it and take the EGG inside.
Move back six times to return to the center of the worm room. From there, turn left and go through the portal to return to the normal world.
Normal Room
Click the exposed section of the floor to examine the altar.
Take the WORM off the floor, then put the EGG in its place at the center of the star.
Back up and turn left to face the window. Enter the portal and click the cube to reach the Bird Room.
Bird Room
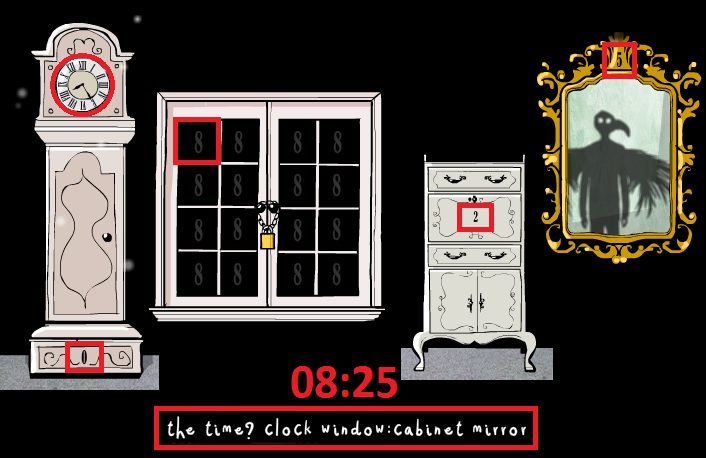
Pick up the telephone receiver to find another clue: "The time? Clock Window:Cabinet Mirror."
If you look at the top of the golden mirror frame, you'll find the number 5.
Turn left to face the cabinet.
Inspect the second drawer, at its center you'll see the number 2.
Move right tiwce to turn towards the window.
On each window pane is the number 8.
Continue right to face the grandfather clock.
At the bottom of the clock is the number 0.
Once again, you can click the hour and minute hands on the face of the clock to move them.
Combine all of the information from the clues around the room to discover the correct time.
The order of objects from the telephone clue is important - Clock Window: Cabinet Mirror
Plug in the number you found on each object within the code to find the time - 08:25
Solution
After the correct time is entered into the clock, click the clock door to open it and find a GOLDEN KEY.
Go left to turn to the window.
Unlock the padlock at the middle of the window with the GOLDEN KEY.
Open the window and climb outside. Click the room a few times until it disappears.
Thanks to Trinn for the walkthrough!
Posted by: Dora Breckinridge |
August 19, 2013 10:18 AM
|
August 19, 2013 10:18 AM