
Death Under Tuscan Skies:
A Dana Knightstone Novel
Platform: Mac, Windows

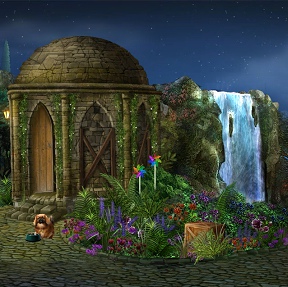
![]() You'd think that the life of a best-selling novelist would be pretty boring, just sitting at home and writing all day, plus occasional jaunts here and there for book signings for fans. Not so for Dana Kingstone. Death Under Tuscan Skies: A Dana Knightstone Novel, the latest hidden object adventure hybrid in the Dana Knightstone series from BoomZap, finds our author as a visiting lecturer in Tuscany. Once again she becomes embroiled in solving a murder mystery, so the life of a professional writer might not be too boring after all.
You'd think that the life of a best-selling novelist would be pretty boring, just sitting at home and writing all day, plus occasional jaunts here and there for book signings for fans. Not so for Dana Kingstone. Death Under Tuscan Skies: A Dana Knightstone Novel, the latest hidden object adventure hybrid in the Dana Knightstone series from BoomZap, finds our author as a visiting lecturer in Tuscany. Once again she becomes embroiled in solving a murder mystery, so the life of a professional writer might not be too boring after all.
 Dana has decided to take a break from writing and accepts a gig as a guest lecturer at a University in Tuscany. Yes, a free, all expenses paid trip to Tuscany. If you've played the previous game in the series, Death at Fairing Point: A Dana Knightstone Novel, then you can guess what happens the minute our heroine sets foot on the university campus: A handsome professor and a melancholy ghost make their appearances, and pretty soon Dana is blowing off research for the lecture to solve a mystery about Eva, a girl that died young of a mysterious disease and her missing love, Giovanni. First in and around the university, then later along the dreadfully picturesque Tuscan countryside the mystery takes the intrepid Dana as she rushes to discover why Eva died and what became of poor Giovanni whom her family disapproved of. If Dana can solve the mystery it looks like she might have another best-seller on her hands.
Although Death Under Tuscan Skies is classified as a hybrid, it's really a point-and-click adventure stuffed to the gills with tons of puzzles and mini-games, and a few hidden object elements occasionally thrown in. A changing cursor (and sparkles in easy mode) indicate places of interest or items that can be examined or picked up. There's also the usual notebook to keep track of clues (and notes for that later novel) and a bottom loading inventory to hold the various items picked up along the way. The refilling hint timer will give clues in the main adventure scenes as well as hints within the mini-games, puzzles, and hidden object scenes. Each of the six chapters of the story is pretty self-contained and wanders around the lavishly beautiful university, local town, and countryside of Tuscany, populated with interesting locals and ghosts alike.
 Analysis: Despite the spooky subject matter, Death Under Tuscan Skies: A Dana Knightstone Novel is not a jump-scare type of thriller. Rather, it is a gentle, somewhat romantic mystery that takes place in the ridiculously beautiful Tuscan locations. What makes it stand out is the fact that it is packed front to back with a wide variety of games and puzzles ranging from easy to head-bangingly difficult, with the hidden object scenes almost an afterthought.
Haunting, lyrical tunes accompany the player through unbelievably gorgeous scenery, from the dark and somewhat spooky university library to a sun-drenched Tuscan village and a remote and mysterious monastery. Each chapter is one location which cuts down on a lot of wandering back and forth, while presenting yet another picture-postcard locale to be enjoyed. The puzzles are a nice mix although they do tend to rely heavily on variations of slider puzzles, and they are skippable after a certain amount of time. The hidden object scenes are sharp and clear, and are also a nice mix of the standard list-type as well as "find 20 of a particular item" and others where you must find objects based on pictures or silhouettes. The mystery is...well, not very mysterious, although interesting enough to hold the gamers' attention while they puzzle their way through the scenic Italian countryside. Rather similar to the plots of novels these days by authors who got their start writing Harlequin and Silhouette romances (cough, cough, Nora Roberts, cough, cough).
 Death Under Tuscan Skies: A Dana Knightstone Novel has two modes of play, easy and advanced, and the length of gameplay depends on which mode is chosen, as well as how many puzzles and mini-games are skipped, but players can look forward to pretty hefty gameplay of several hours which is especially pleasing these days. Those looking for a relaxed, non-scary adventure that still features ghosts should give this amusing and entertaining hybrid a try.
A Collector's Edition is also available. It includes wallpapers, the soundtrack, cut-scenes, concept art, a built-in strategy guide, and an "epilogue" extra adventure. Remember that Big Fish Game Club Members pay only $13.99 for Collector's Editions (or 2 club credits), and collector's editions count 3 card punches of 6 total needed for a free game.
![]() Windows:
Windows:
Download the demo
Get the full version
Also available: Collector's Edition
![]() Mac OS X:
Mac OS X:
Download the demo
Get the full version
Also available: Collector's Edition


Walkthrough Guide
(Please allow page to fully load for spoiler tags to be functional.)
Death Under Tuscan Skies: A Dana Knightstone Novel
Chapters 1 - 4 Walkthrough
General Information
Main Menu
On the Main Menu you can choose your profile, Start or Quit the game, select your settings which include Language, Music and Sound volume, full screen or windowed, and difficulty level.
If you purchased the Collector's Edition, the Epilogue will be available once you have completed the novel.
When you Exit the game, your progress is automatically saved.
Screenshot
Bonus Content
Bonus Content includes Cutscenes, Concept Art, Soundtrack, Wallpaper, and the Strategy Guide.
Cutscenes become available to be viewed again once they have played within the game.
Screenshot
Scene Navigation
When you first begin the game, you will have a choice of playing the Tutorial.
You will also be asked again which Difficulty Level you wish to play: Casual or Advanced.
There is no click penalty in the main scenes, but there is a click penalty in the Hidden Object Scenes.
If you click too much, your cursor will turn into a puff of blue smoke.
Magnifying glasses mean you can zoom in on something for a closer look, get information for your notebook, or, in the case of the ghosts, cause them to disappear.
A hand means you can pick up, open or move an object.
Many Hidden Object Scenes are semi random, so they can have several different items than those marked in the screenshots.
An arrow with a blue circle means you can exit to another location.
A balloon with dots indicates the person has something to tell you.
The Notebook in the lower left corner contains important clues and story notes, so check it when it becomes animated.
The Notebook also contains biographies of the characters you meet, access to replay cutscenes, and the Strategy Guide for the Collector's Edition.
Menu will pause the game to give you the choices shown in the screenshot.
You can access your current Goals via the paper next to the Notebook.
Your Inventory or Taskbar for Hidden Object Scenes is in the bottom center of the scene.
Hints will find items for you in Hidden Object Scenes, or give you a clue as to your next task in the main scenes.
Mini Games and Puzzles have a Skip option once the bar is filled.
Sometimes you need to exit out of close up scenes.
Be sure to check the screenshots for additional information.
Screenshot
Achievements
Your Achievements can be accessed from the Main Menu and include the following list.
Dog Whisperer: Tame the fierce dog.
Darkroom Whiz: Find pictures from the past.
Adventurer: Discover the secret room.
Anatomy Master: Build the anatomy model.
Completato I: Finish Chapter 1 in less than an hour.
Completato II: Finish Chapter 2 in less than an hour.
Completato III: Finish Chapter 3 in less than an hour.
Completato IV: Finish Chapter 4 in less than an hour.
Completato V: Finish Chapter 5 in less than an hour.
Completato VI: Finish Chapter 6 in less than an hour.
The Tourist: Win the town's tourism contest.
Carrot Lover: Make a donkey contraption.
Non saltando: Finish 5 mini games without skipping.
Non saltando Bronze: Finish 10 mini games without skipping.
Non saltando Silver: Finish 25 mini games without skipping.
Non saltando Gold: Finish 50 mini games without skipping.
Non saltando Platinum: Finish all mini games without skipping.
Non saltando Storia: Watch all the cut scenes and credits.
Fast Gamer: Finish the game in less than 6 hours.
Completato Diamond: Get all achievements.
Chapter 1: The University in Lucca
Library Reception
Talk to Professor Romano.
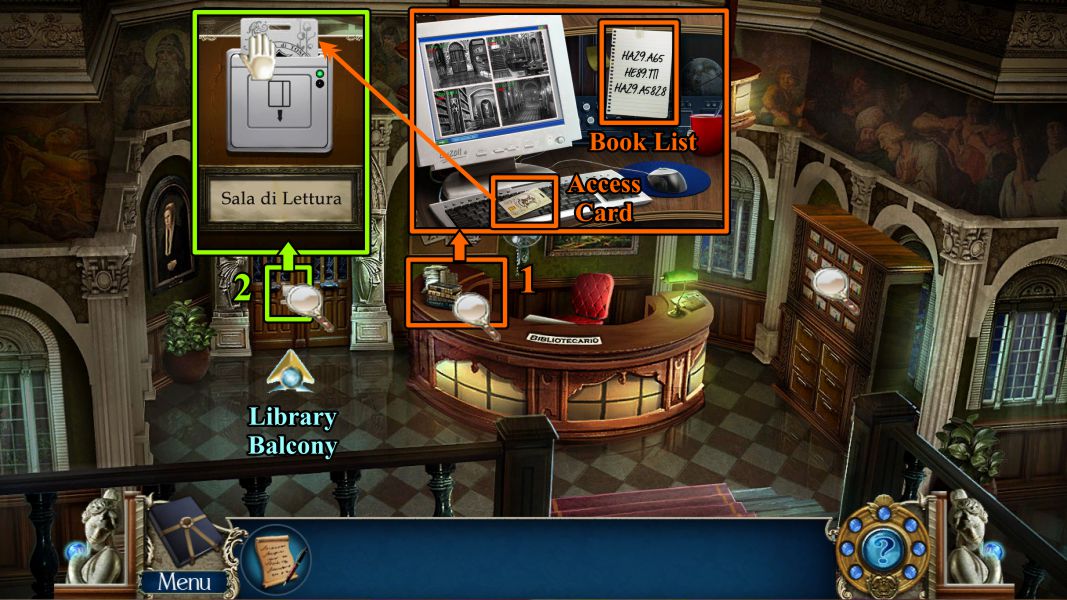
Zoom in on the reception desk.
Take the Book List and Access Card and watch the monitor.
Zoom in on the door, use your Access Card, and then collect it.
Go through the door to the Library Balcony.
Screenshot
Library Balcony
Zoom in on the Library Map and take the Figurine.
Zoom in on the pot of flowers on the right, then take the Ink and a Paperclip.
Zoom in on the door to the Literature Section, then zoom again on the figure: It will disappear, and the door will open for you to enter.
Screenshot
Literature Section
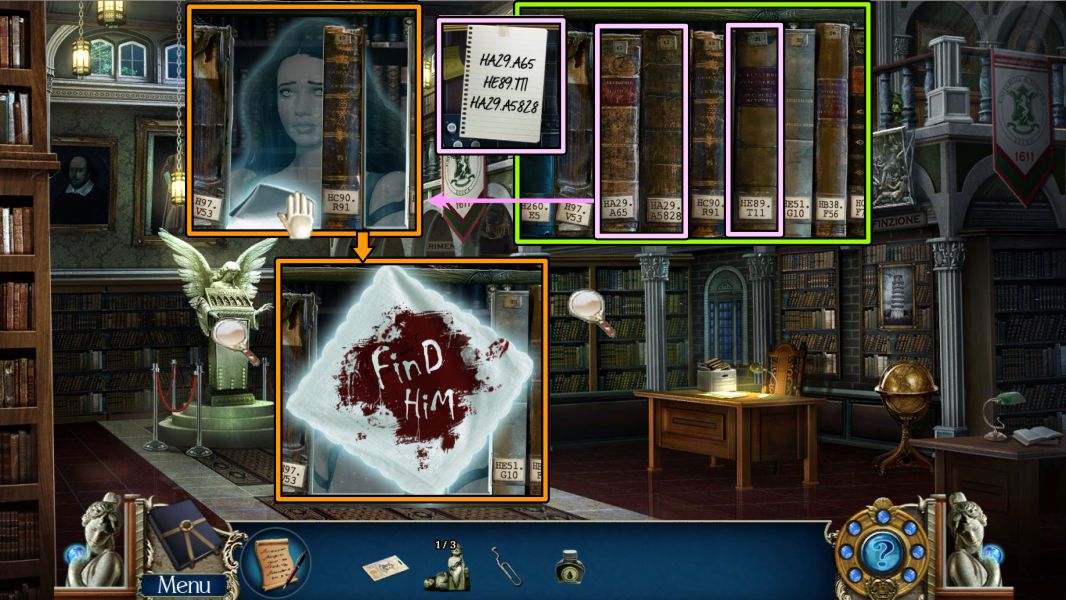
Zoom in on the stacks and select the 3 books from Professor Romano's list.
A ghost appears in the next aisle: Take the handkerchief that says "Find Him".
Screenshot
The ghost's spirit goes to the statue in the room, so we find out she must be Eva Leoni.
Zoom in on the desk and take the Figurine.
Zoom in on the globe, use your Paperclip to open it, and take the Figurine.
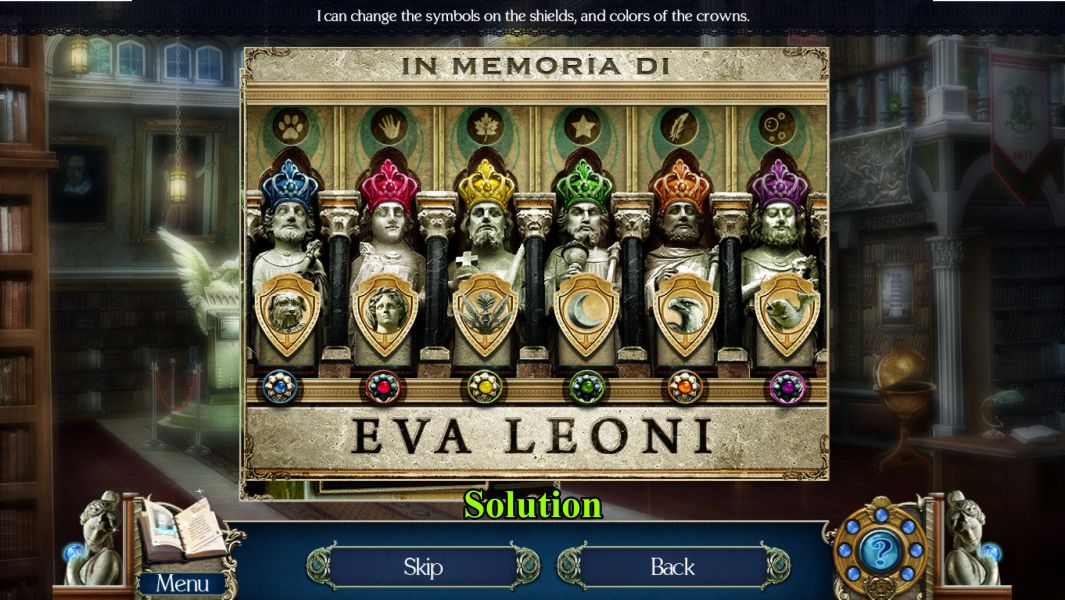
Zoom in on the statue and place you 3 Figurines to trigger a Mini Game.
Screenshot
Statue Mini Game
Change the color of each crown to match the color of the buttons below each figure.
Change the shields to relate to the symbols above the crowns.
See the screenshot for the solution.
Screenshot
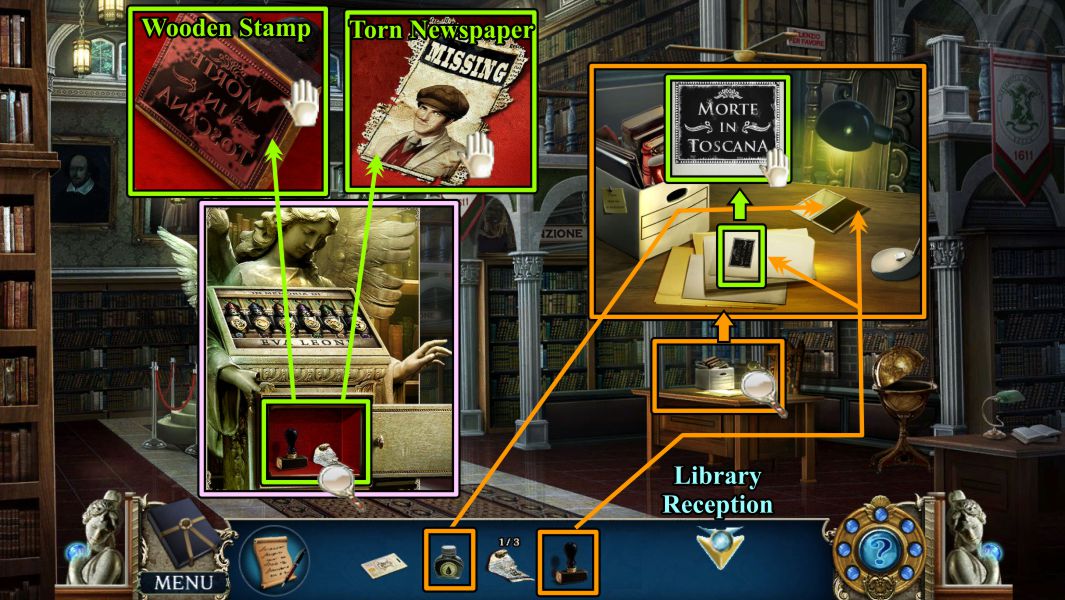
Literature Section
Take the Torn Newspaper and Wooden Stamp from the compartment.
Zoom in on the desk, place the Ink on the stamp pad, ink the Wooden Stamp, and stamp it on the paper.
Professor Romano appears and says you can find the location of the book in the card catalogue located in the Reception area, so go there.
Screenshot
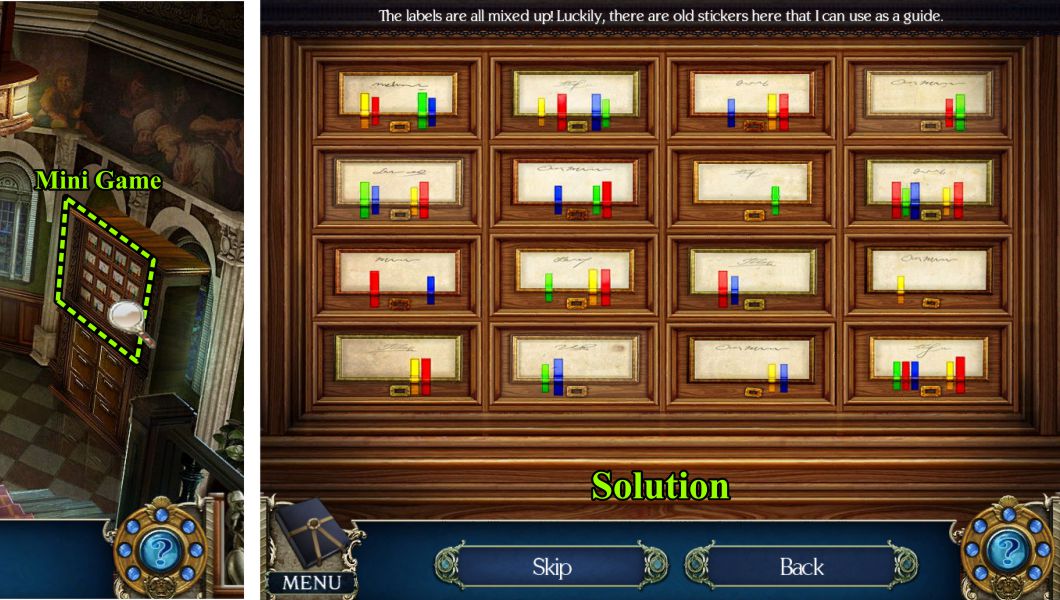
Card Catalogue Mini Game
Zoom in on the card catalogue for a Mini Game.
Your goal is to match the drawer labels with the color tabs underneath the drawer.
See the screenshot for the solution.
Screenshot
Library Reception
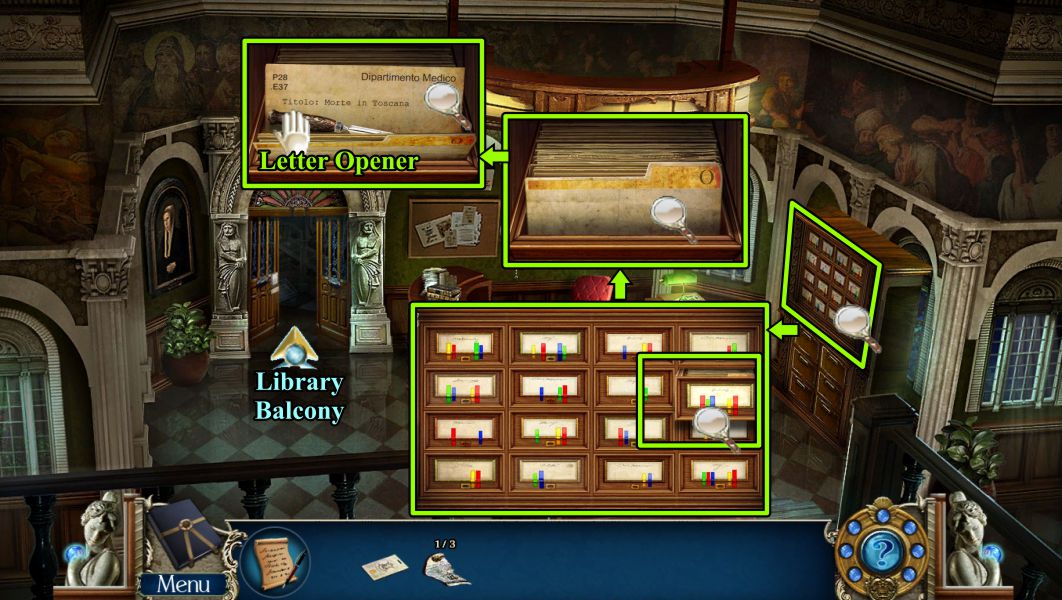
Zoom in on the open drawer, take the letter opener, and note the location of the book.
Go through the door to the Balcony.
Screenshot
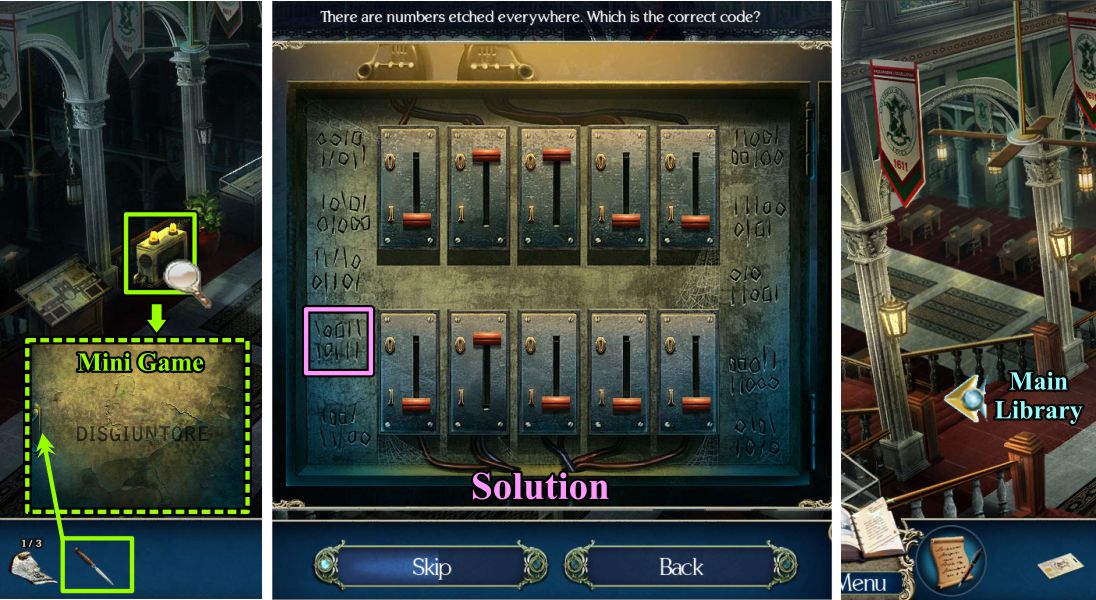
Library Balcony Circuit Breaker Mini Game
Zoom in on the circuit breaker door and open it with the Letter Opener to trigger a Mini Game.
Arrange the circuit breakers and shown in the screenshot solution.
When the lights come on, go to down the stairs to the Main Library.
Screenshot
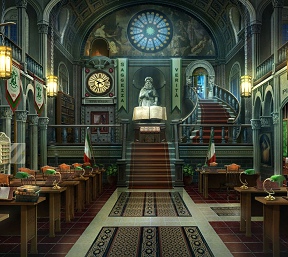
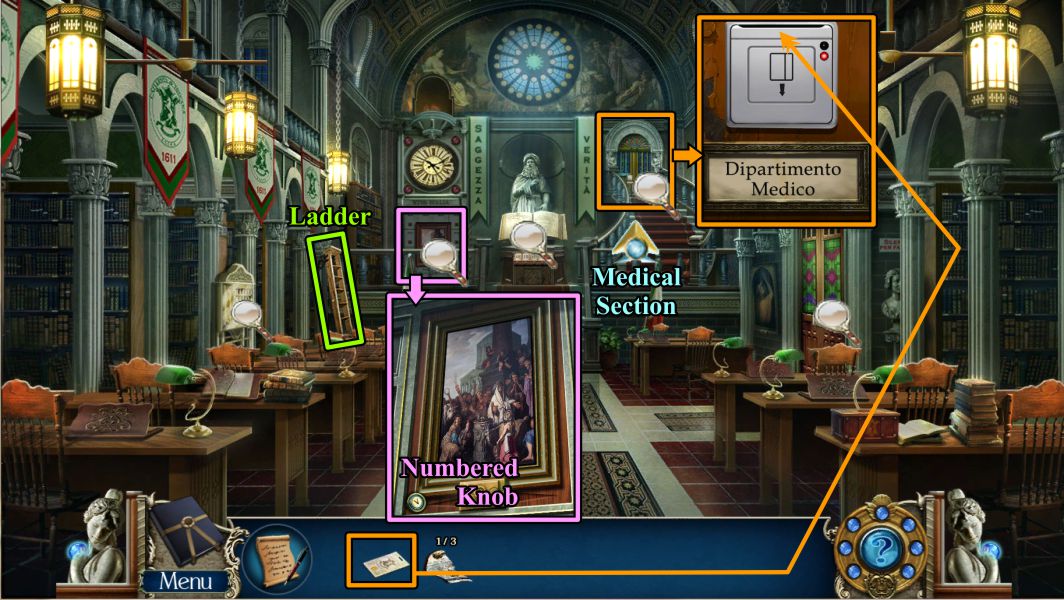
Main Library
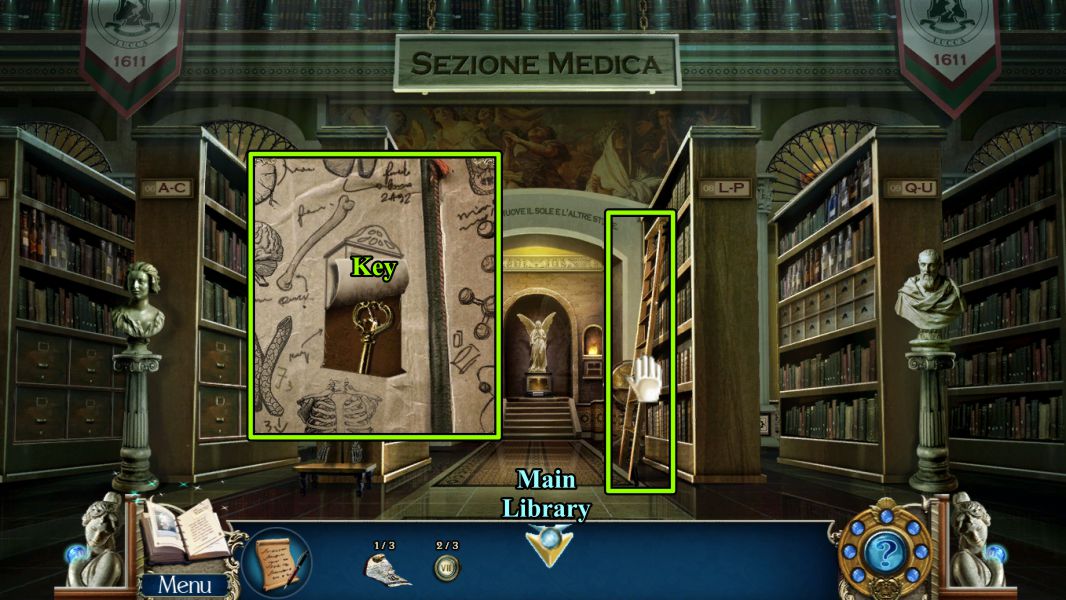
Grab the ladder, zoom in on the picture to take the Numbered Knob, and use your Access Card to enter the Medical Section.
Screenshot
Medical Section
Zoom in on the skeleton's head and take the Numbered Knob.
Place the ladder as shown in the screenshot and zoom in on the shelf.
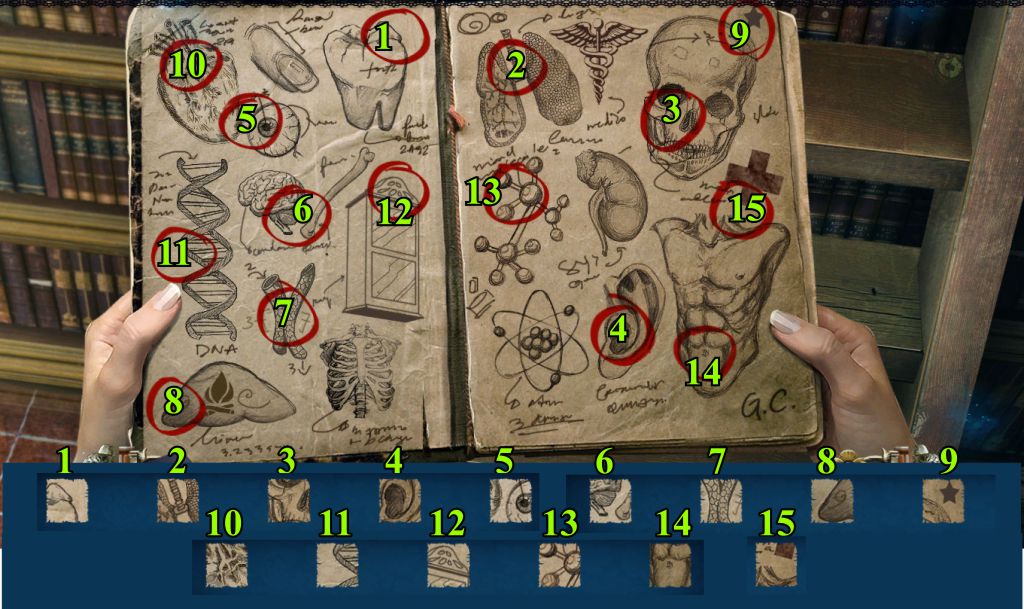
Take Morte in Toscana off the shelf and open it for a Mini Game.
Screenshot
Library Balcony
Match the parts of the page to the segments shown.
See the screenshot for a numbered solution.
Screenshot
Medical Section
Take the Key from the book, grab the ladder and return to the Main Library.
Screenshot
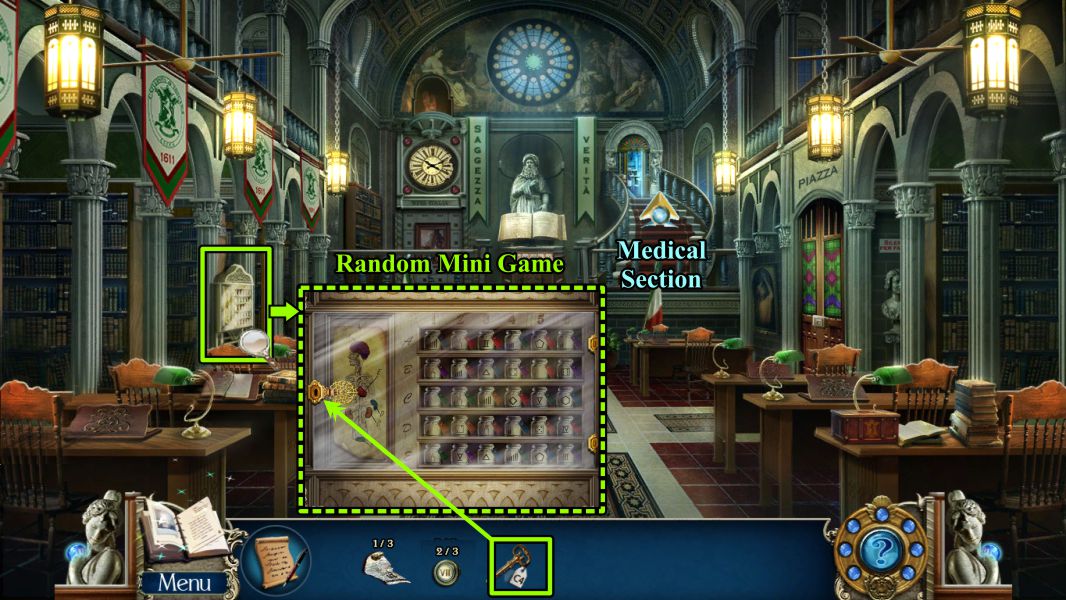
Main Library
Zoom in on the Medicine Cabinet at the left and use the Key you just found to open the cabinet for a Mini Game.
Screenshot
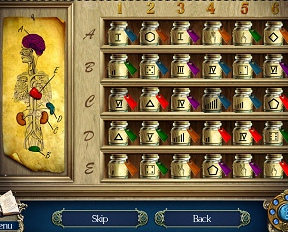
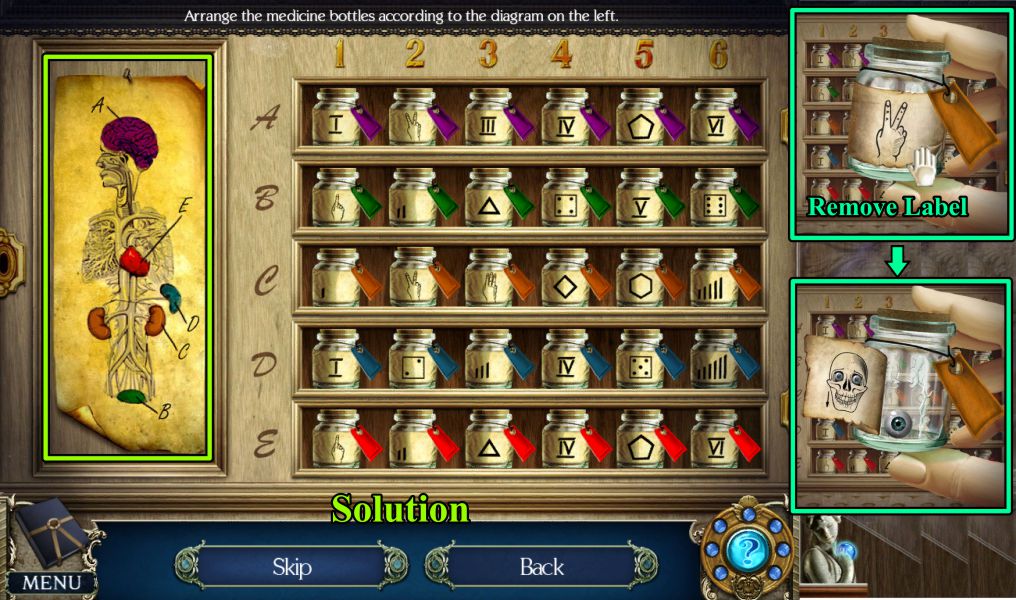
Medicine Cabinet Mini Game
Initial placement of the bottles is random.
Use the diagram at the left as a guide to the color of the tags for each shelf.
Arrange the bottles in each row so they are numbered 1 through 6 as shown in the screenshot.
Remove the label of the bottle you receive, and take the eyeball from the bottle.
Return to the Medical Section.
Screenshot
Medical Section
Zoom in on the skeleton's head and place the Eyeball.
When it opens its mouth, take the Scroll.
Go to the shelf marked in the screenshot to find the book.
Take the Screwdriver from the shelf above, slide down the plate on the book, and take the note.
Unfold the note twice and read it before returning to the Main Library.
Screenshot
Main Library
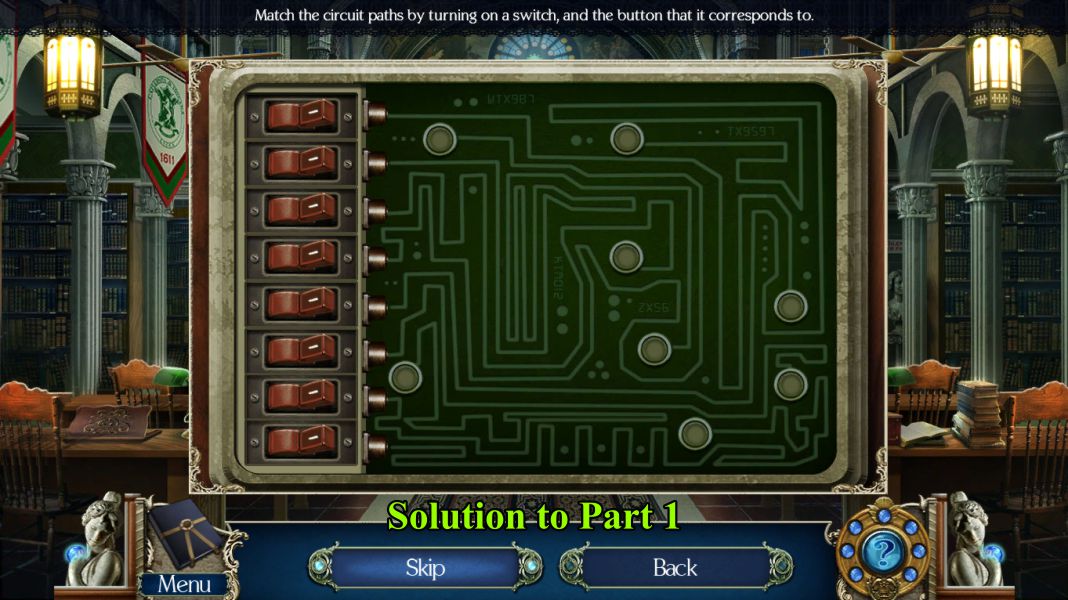
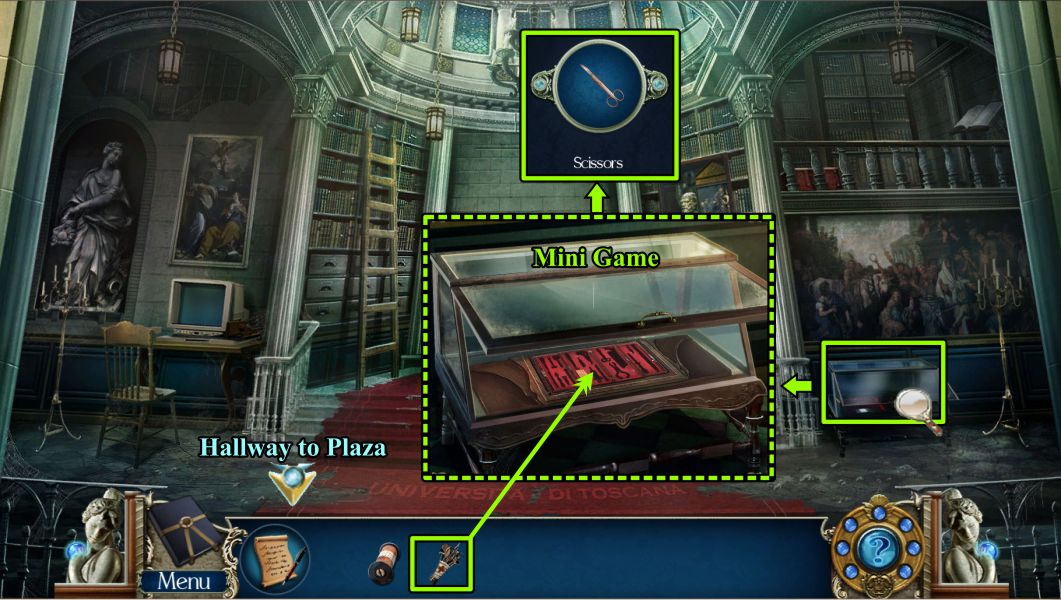
Zoom in on the door to the Plaza Hallway, unscrew the 4 screws holding the plate, and zoom in for a Mini Game.
Screenshot
Circuit Mini Game
There are two parts to this game: For Part 1, you need to rotate the parts of the board to create a completed path from the switches to the terminals.
See the screenshot for the solution.
Screenshot
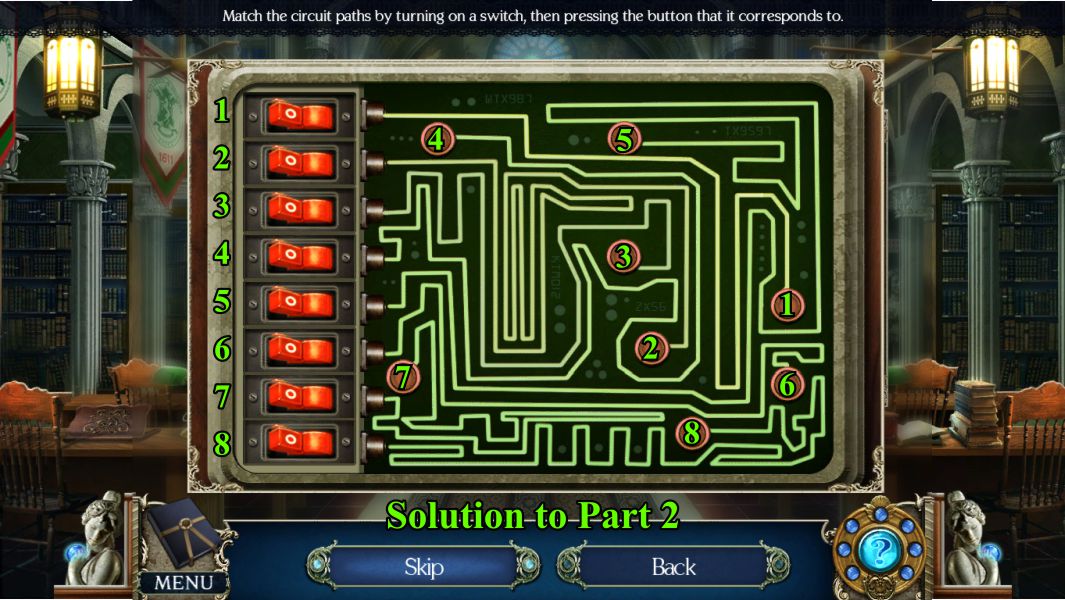
Your goal for Part 2 is to flip on a switch and trace the path of the circuit to its correct terminal.
See the screenshot for a numbered solution.
Go through the door to the Hallway.
Screenshot
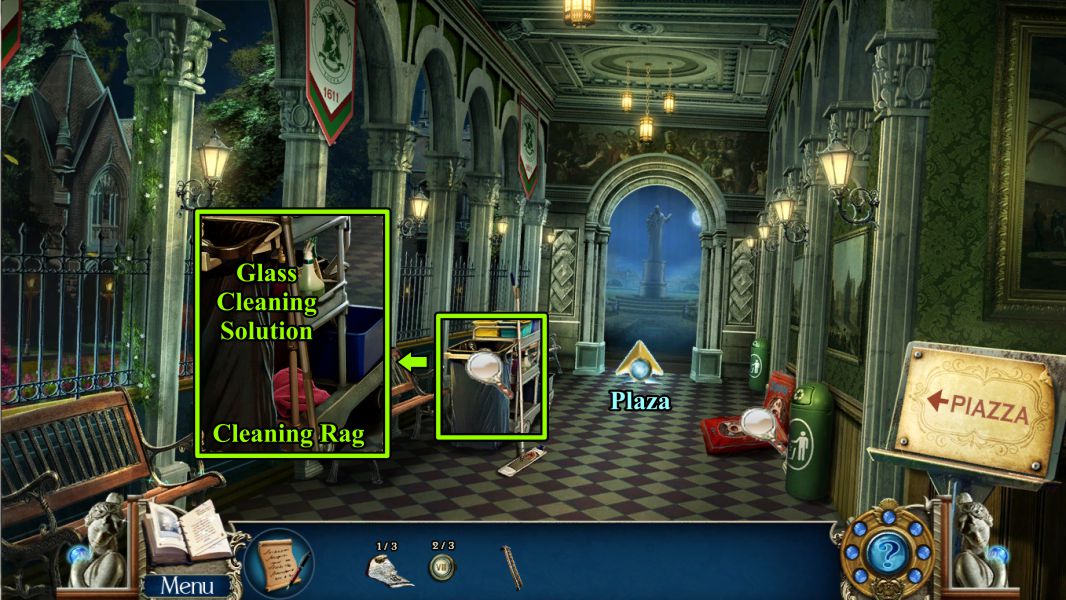
Hallway to Plaza
Zoom in on the cart at the left to take the Glass Cleaning Solution and the Cleaning Rag.
Note the dog biscuit bags that need a tool to open them, and continue out to the Plaza.
Screenshot
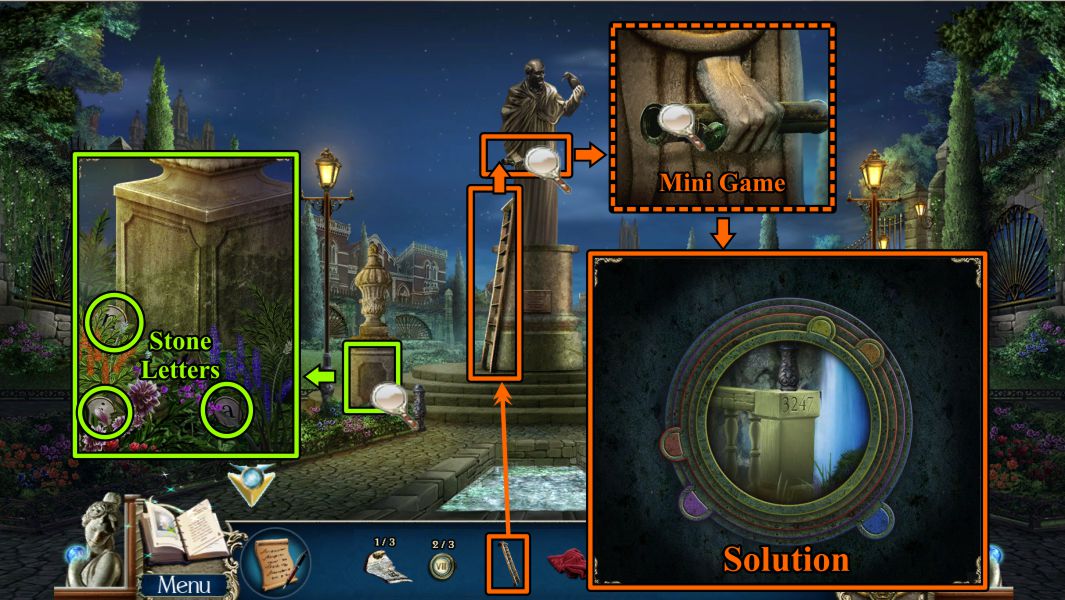
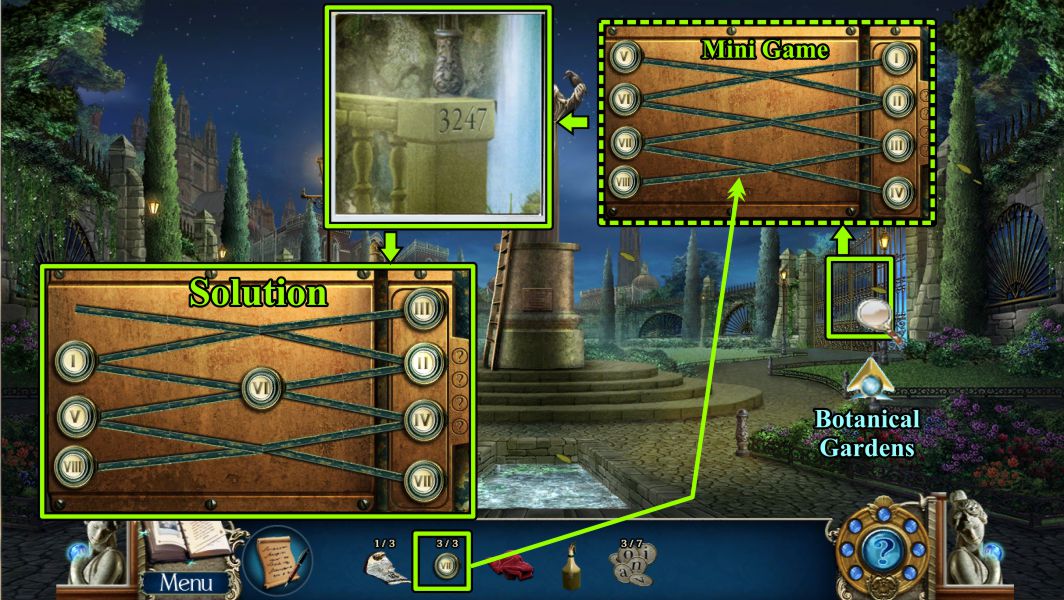
Plaza and Telescope Mini Game
Zoom in on the bushes at the left and collect the Stone Letters.
Place your ladder against the statue and zoom in on his hand.
Zoom in again for a Mini Game to focus the telescope.
See the screenshot for placement of the focus tabs to read the code number 3247 on the Bridge.
Return to the Main Library.
Screenshot
Main Library
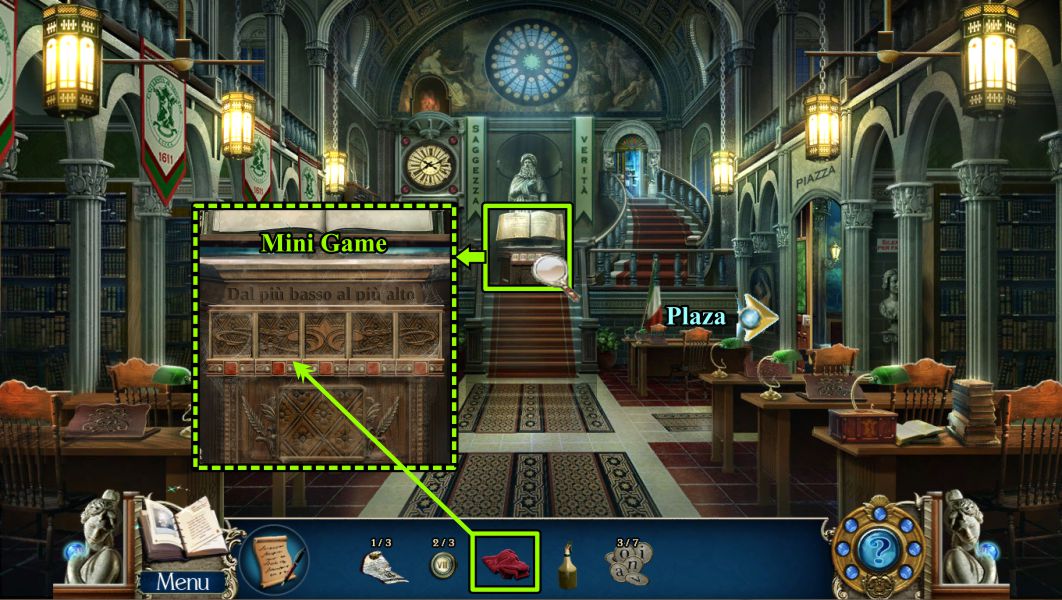
Zoom in on the area under the book, then use the Cleaning Rag to get rid of the cobwebs and trigger a Mini Game.
Screenshot
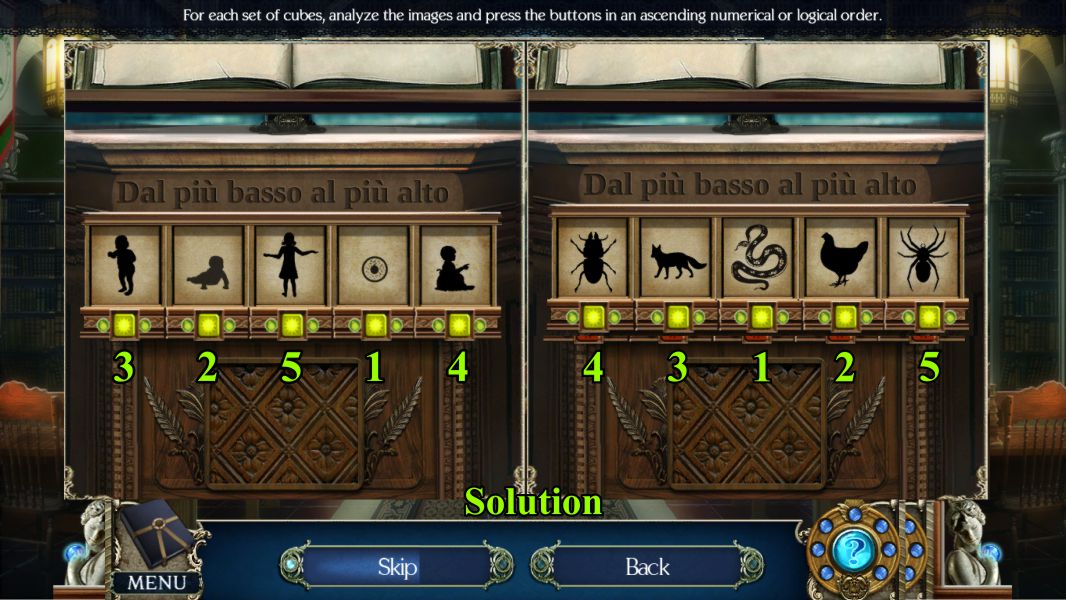
Progression Mini Game
For each set of cubes, you goal is to press the buttons underneath the image in a logical order of progression.
See the screenshot for the first two rounds.
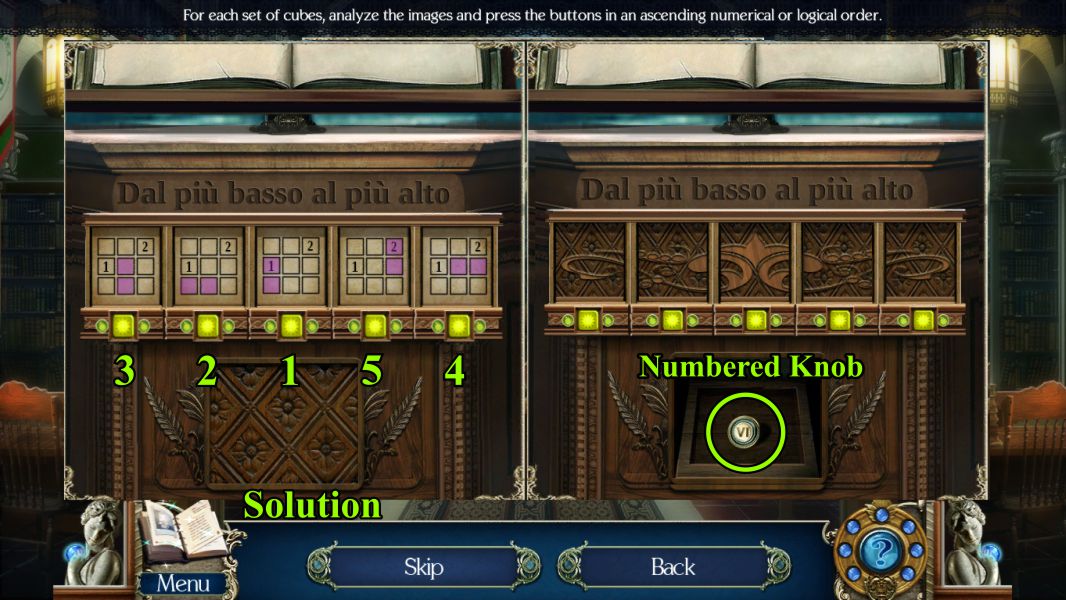
Screenshot
See the screenshot for the solution to the third round, and take the Numbered Knob before returning to the Plaza.
Screenshot
Plaza Gate Mini Game
Zoom in on the Gate and place your Numbered Knobs to trigger a Mini Game.
Your goal is to exchange the Numbered Knobs so that the right side reads 3247.
When the gate opens, enter the Botanical Gardens.
Screenshot
Botanical Gardens
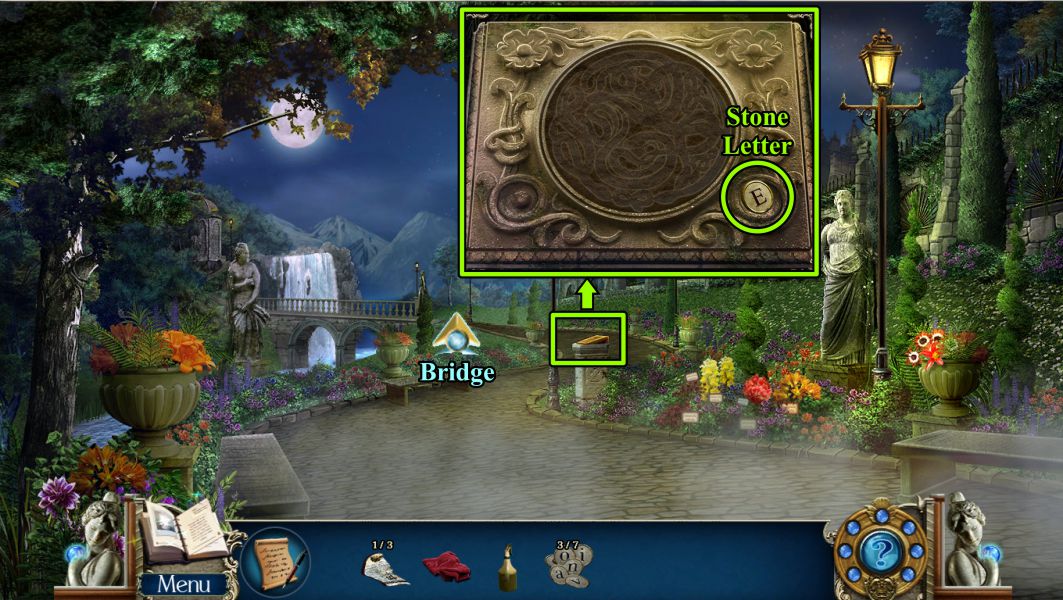
Zoom in on the plaque and take the Stone Letter.
Go to the Bridge.
Screenshot
Bridge
Note the statue of Eva, then zoom in on the statue at the left to collect 2 Stone Letters.
Head to the Domed Building.
Screenshot
Outside Domed Building
There is a dog guarding the building, so you can't get inside.
Click on him to find out why his name tag says "Il Terrible".
Zoom in on the box and take the Stone Letter.
Return to the Bridge.
Screenshot
Eva's Statue Mini Game
Zoom in on Eva's statue and place the Stone Letters to trigger a Mini Game.
Your goal for this game is to press each letter in the correct order to spell out her name.
Eva's complete name was on the angel statue in the Literature Section of the Library.
Take the letter from the cache and read it.
Screenshot
Bridge
Eva's ghost appears: click on her, and she directs you toward the motif on the Bridge.
Zoom in on it for a Hidden Object Scene.
Screenshot
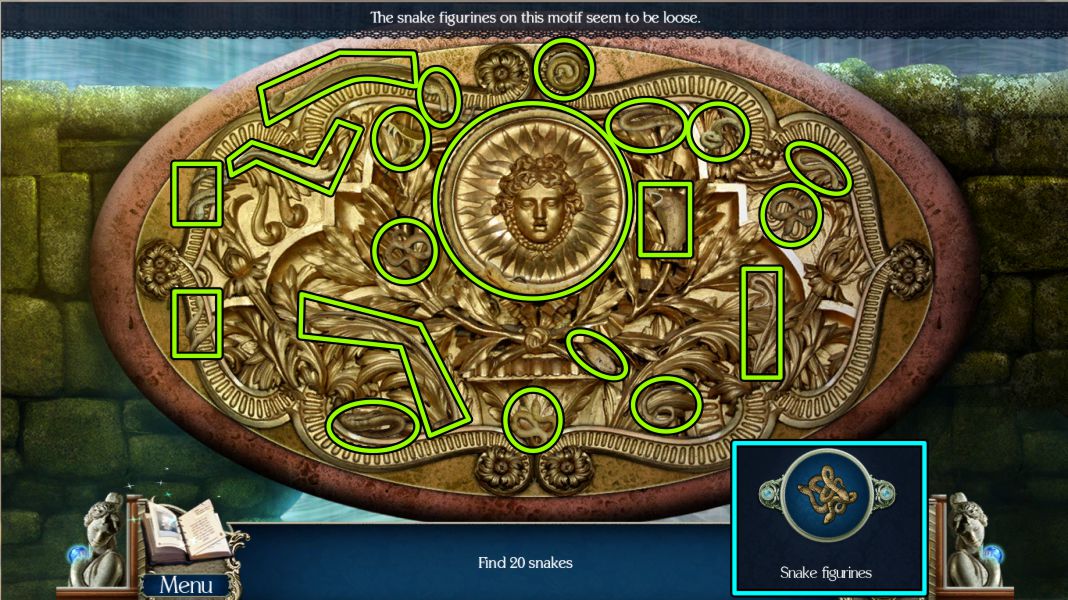
Snake Hidden Object Scene
Collect the 20 snakes marked in the screenshot, and you will be rewarded with some snake figurines.
Screenshot
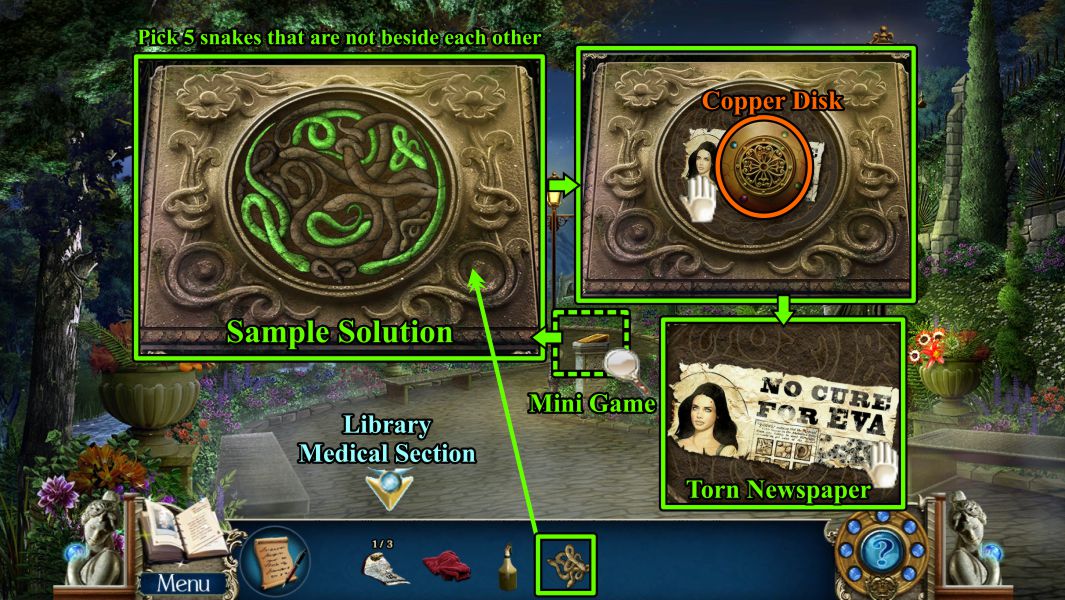
Botanical Gardens
Zoom in on the plaque and place your Snake Figurines.
Pick 5 snakes to mark that are not located side-by-side each other.
A sample solution is shown in the screenshot.
Take the Copper Disk and Torn Newspaper.
Return to the Medical Section of the Library.
Screenshot
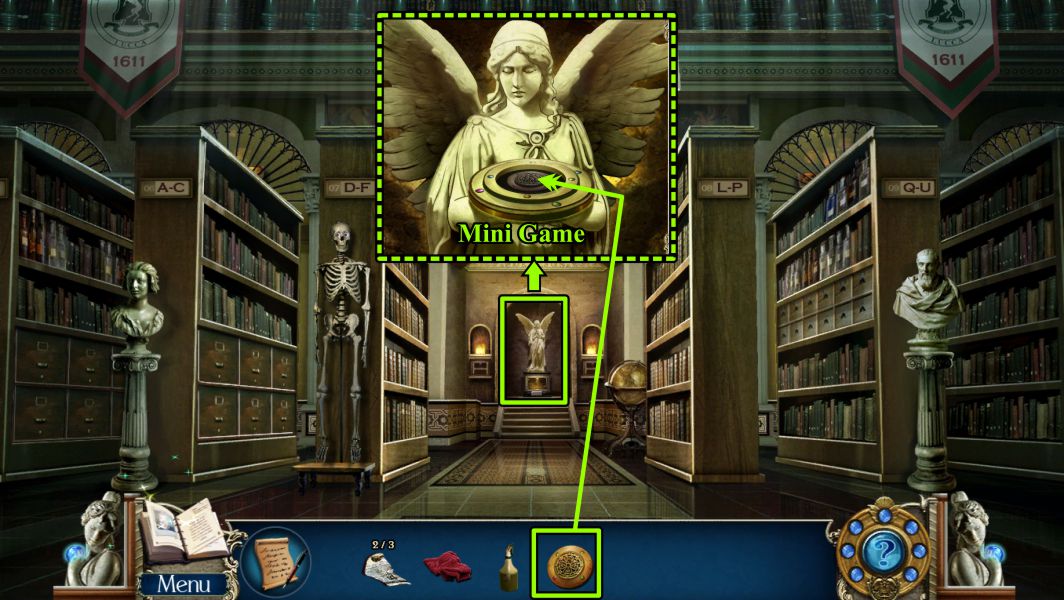
Medical Section
Zoom in on the angel statue and place the Copper Disk to trigger a Mini Game.
Screenshot
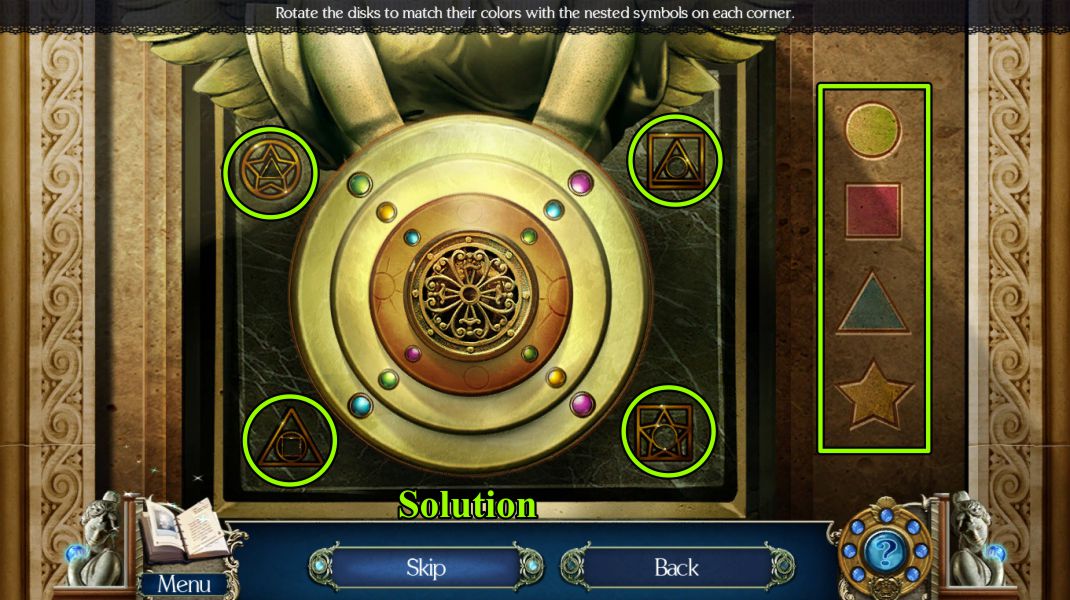
Copper Disk Mini Game
Your goal is to line up each ring so the buttons match the colors of the nested symbols in each corner.
For instance, the top right symbol is a circle within a triangle within a square.
According to the color chart at the right, the circle is green, the triangle is blue, and the square is red.
The button on the outer ring should be red, the inner ring blue, and the Copper Disk green.
See the screenshot for the complete solution.
Screenshot
Secret Chamber
The angel will move, revealing a door to a Secret Chamber, so enter.
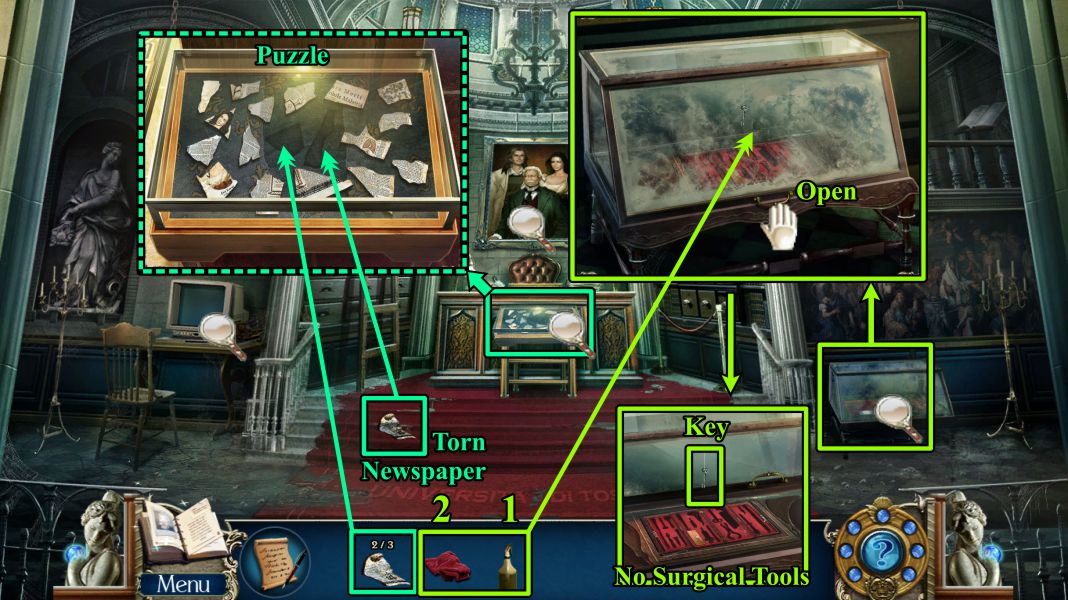
Zoom in on the display case at the right, then use your Glass Cleaner and Rag to clean it up.
Open it to see there are no surgical tools in the case. There is a Key, so take it.
Pick up the Torn Newspaper on the step, then zoom in on the display case in front of the desk.
Place your Torn Newspaper pieces in the case to trigger a Puzzle.
Screenshot
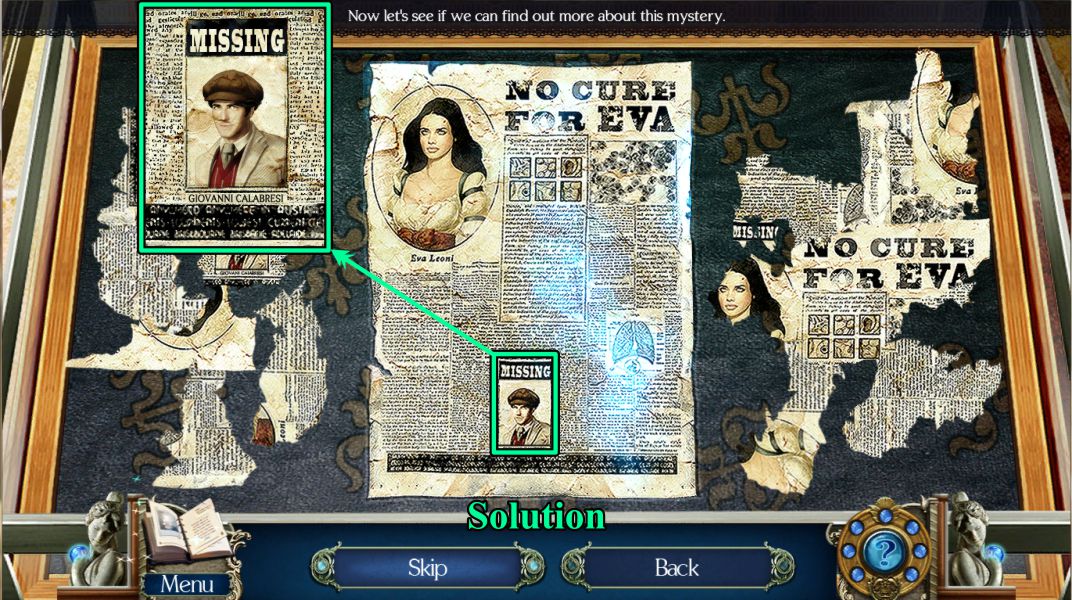
Library Balcony
Put the newspaper together, click to rotate the pieces as necessary, and note Giovanni was declared "Missing".
Screenshot
Secret Chamber
Antonio's ghost appears behind the desk, so click for a close up view.
When he disappears, zoom in on the painting on the wall and move it.
Take the note, read it, and take the roll of Undeveloped Film behind it.
Return to the Main Library.
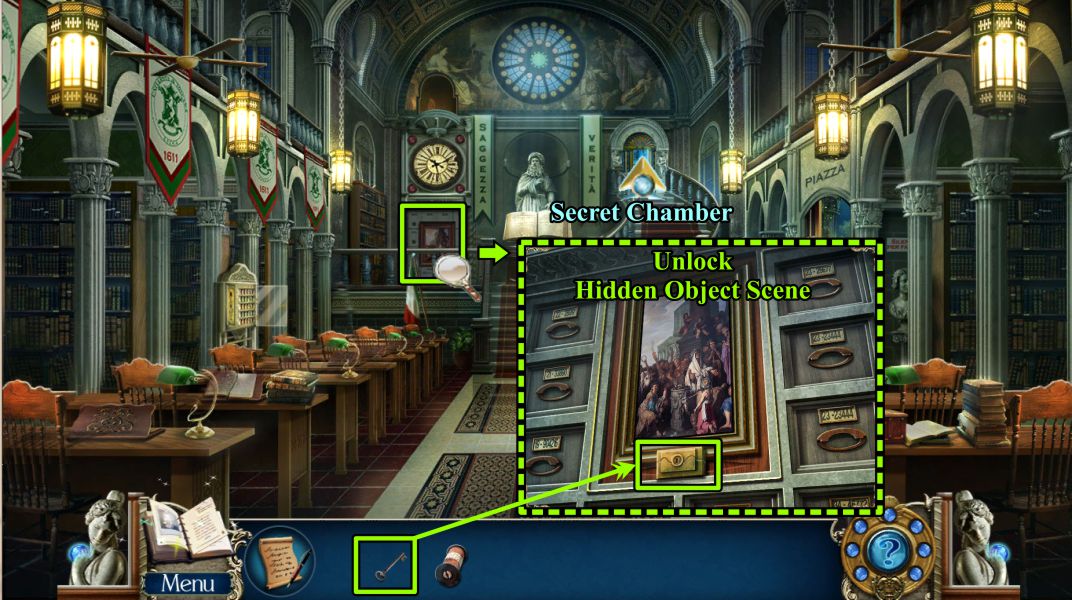
Screenshot
Main Library
Zoom in on the painting and surrounding boxes and use the Key you found to unlock a Hidden Object Scene.
Return to the Secret Chamber.
Screenshot
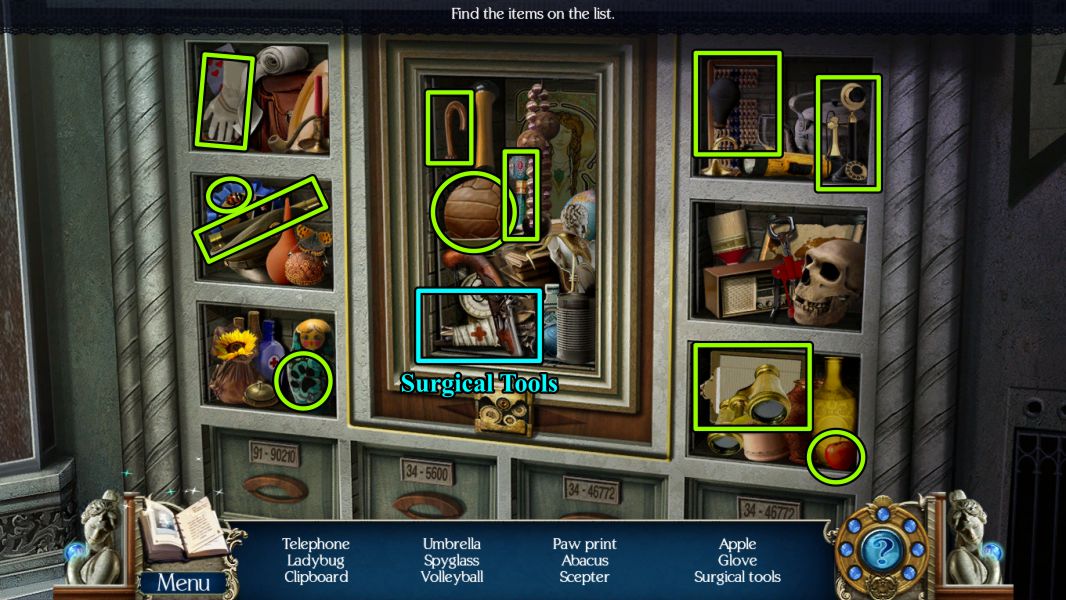
Painting Hidden Object Scene
Collect the items on your list to get the Surgical Tools.
Screenshot
Secret Chamber
Zoom in on the surgical display and place your tools for a Mini Game to get a pair of Scissors.
Go to the Hallway to Plaza.
Screenshot
Surgical Tool Mini Game
See the screenshot for a numbered solution.
Screenshot
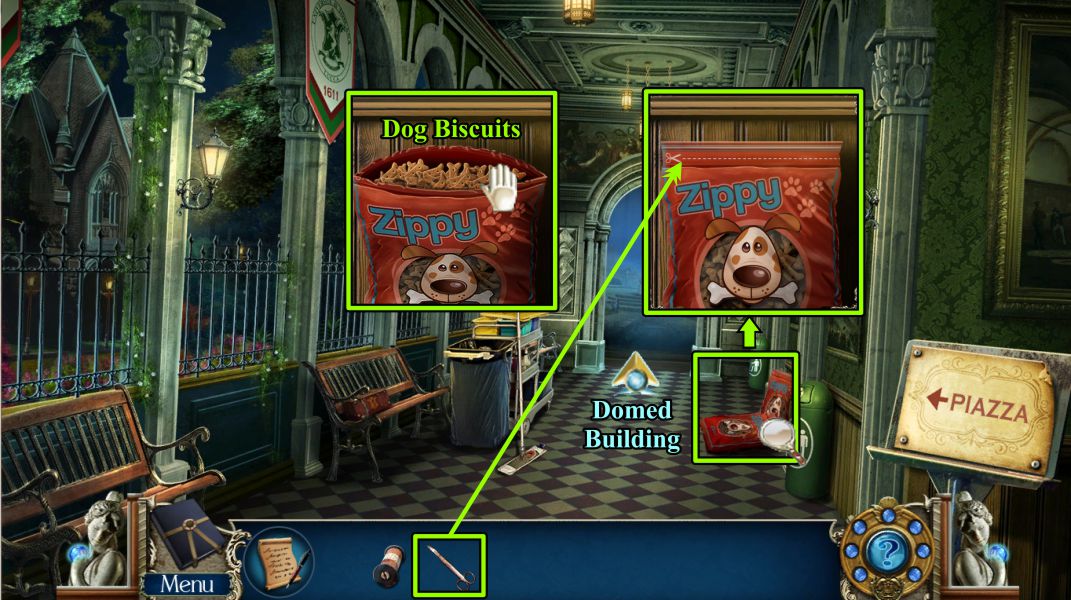
Hallway to Plaza
Zoom in on the Zippy bags and use the Scissors to make as straight a line as you can across the dotted line on the bag.
You may have to try more than once, and you can back trace your line if necessary to take out any wiggles.
Grab some Dog Biscuits and head off to the Domed Building.
Screenshot
Domed Building
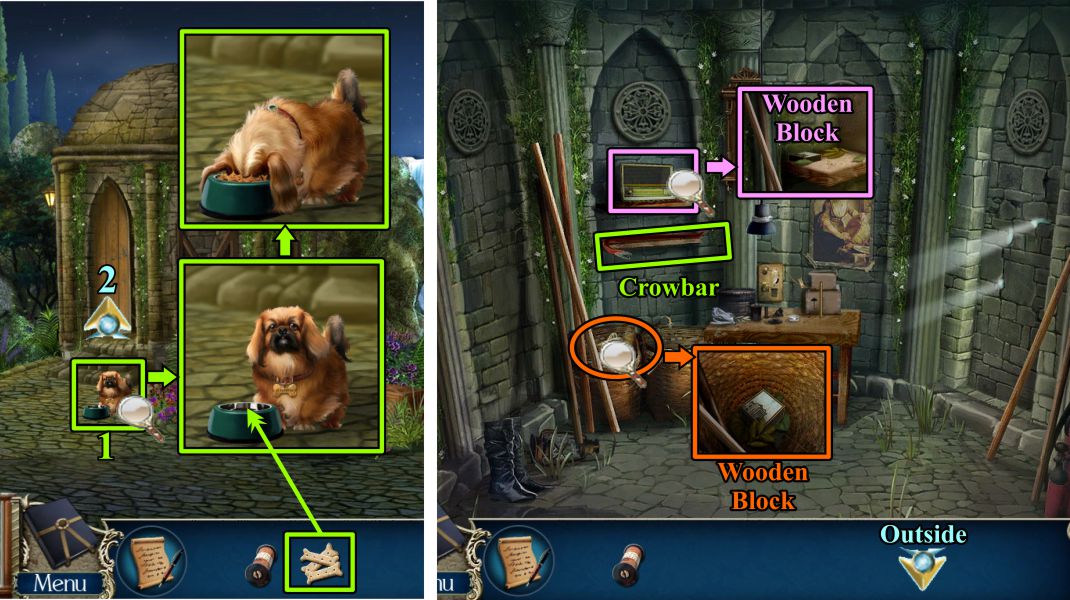
Zoom in on Il Terrible and give him the Dog biscuits.
While he's busy, enter the building.
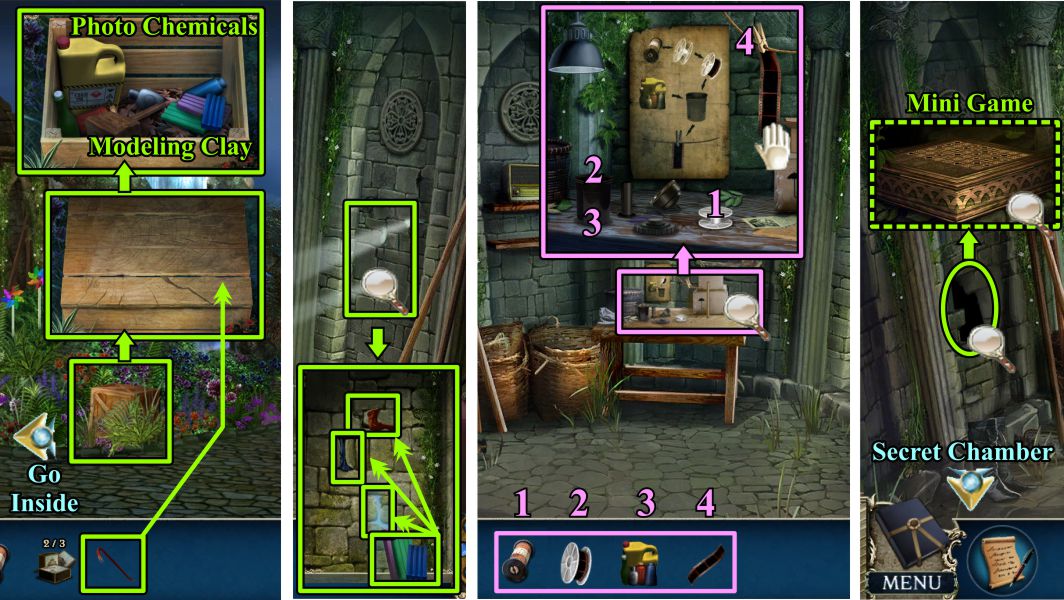
Take the Crowbar, then zoom in on the radio and basket to get the Wooden Blocks.
Go back Outside.
Screenshot
Zoom in on the box and use the Crowbar to open it.
Take the Photo Chemicals and Modeling Clay, then return inside.
Zoom in on the wall and use the Modeling Clay to block the light from coming in through the 3 holes.
Zoom in on the table and follow the film developing guide instructions as numbered in the screenshot.
Place the Film on the reel, place the reel in the container, and pour in the Photo Chemicals.
Place the wet film on the line to dry so you can collect it.
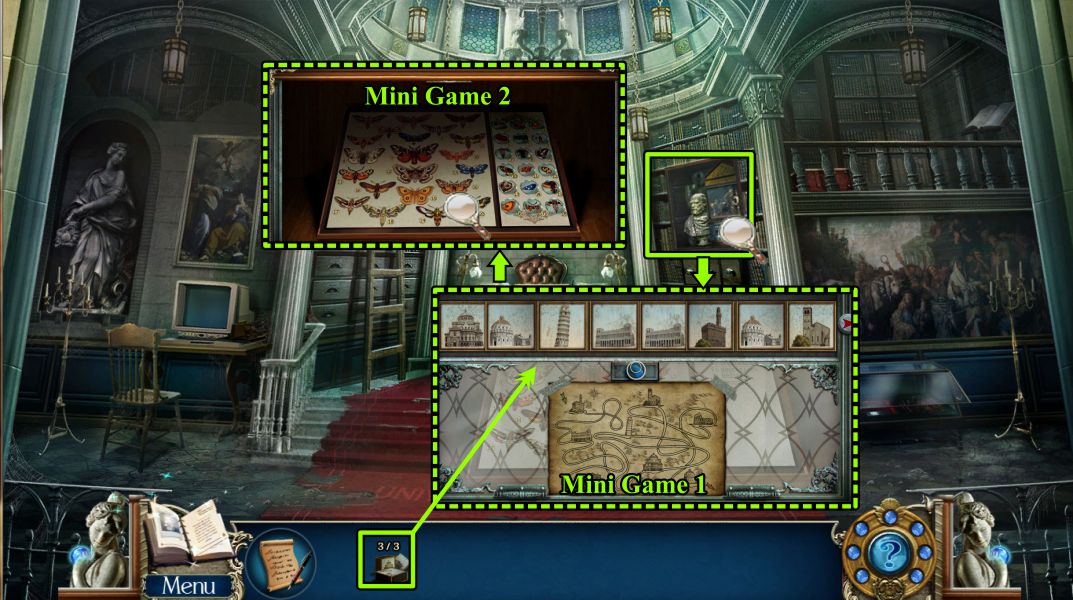
Eva's spirit flies across the room and makes a hole in the wall. Zoom in and zoom again on the box in the wall for a Mini Game.
Screenshot
Secret Box Mini Game
Your goal is to light up all the shapes on the board that are shown on the box.
See screenshot for the solution, and take the Wooden Block from inside.
Go to the Secret Chamber.
Screenshot
Secret Chamber
Zoom in on the area to the right of the desk and place your Wooden Blocks to trigger a Mini Game.
When you have completed the first game, there will be another Mini Game in the same place.
Screenshot
Wooden Block Mini Game
See the screenshot for a numbered solution.
Screenshot
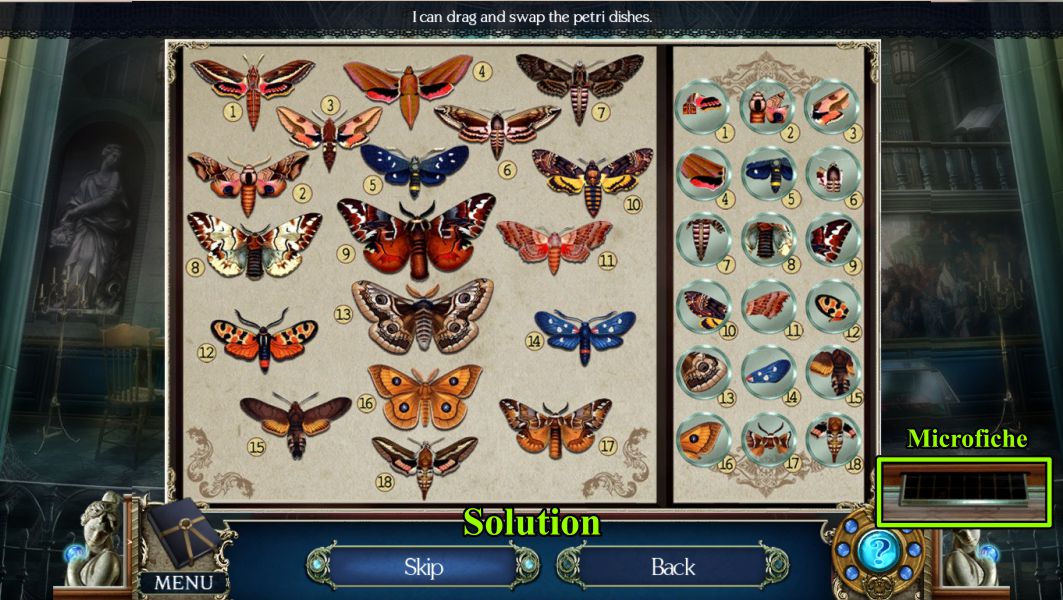
Moth Mini Game
Exchange the Petri dishes to make the moth parts match the numbers of the complete moths on the left.
See the screenshot solution.
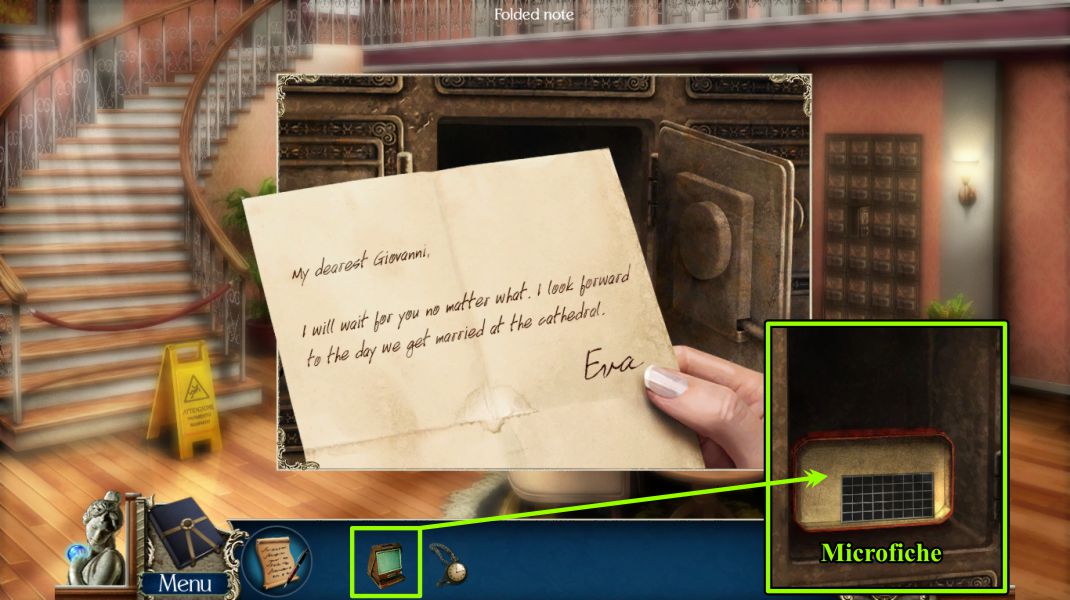
Take the Microfiche.
Screenshot
Secret Chamber
Zoom in on the microfiche scanner and place your Microfiche.
Watch the cutscene.
Screenshot
Chapter 2: The University Grounds
Records Office
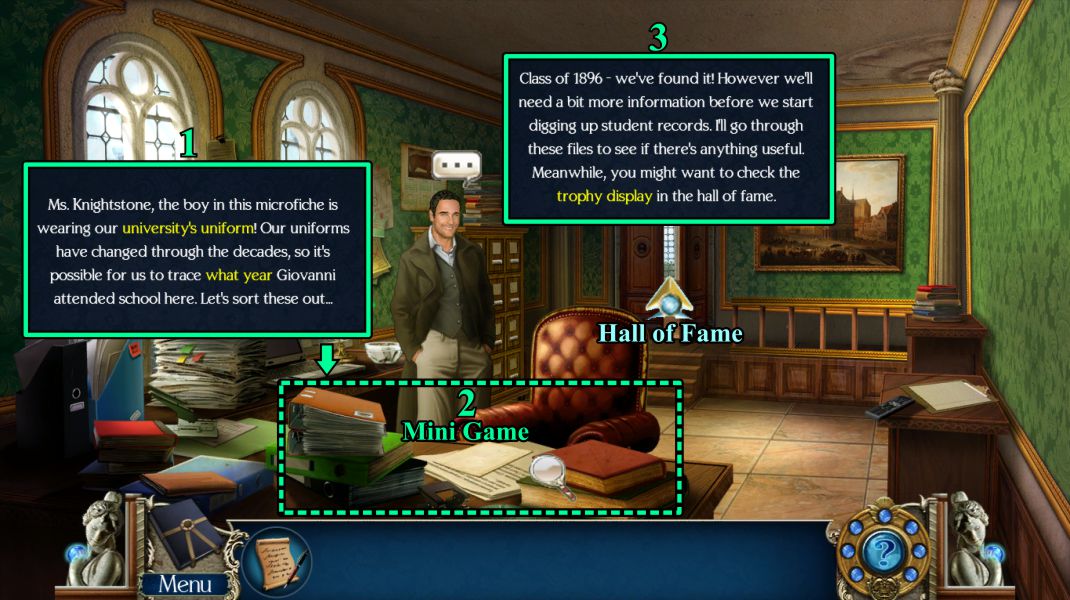
Talk to Professor Romano, who suggests you check the uniforms to determine what year Giovanna attended the university.
After you play the Mini Game, he suggests you check the trophy display in the next room.
Screenshot
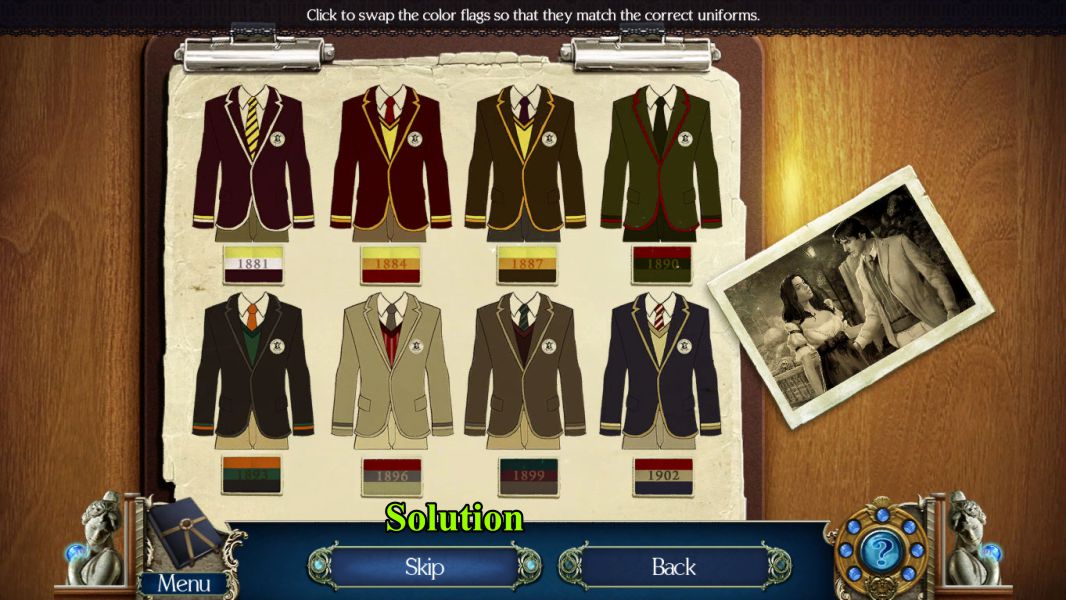
Uniform Mini Game
Arrange the years under the uniforms to match the colors on the uniform.
Screenshot
Hall of Fame
Zoom in on the far cabinet and take the Grappling Hook.
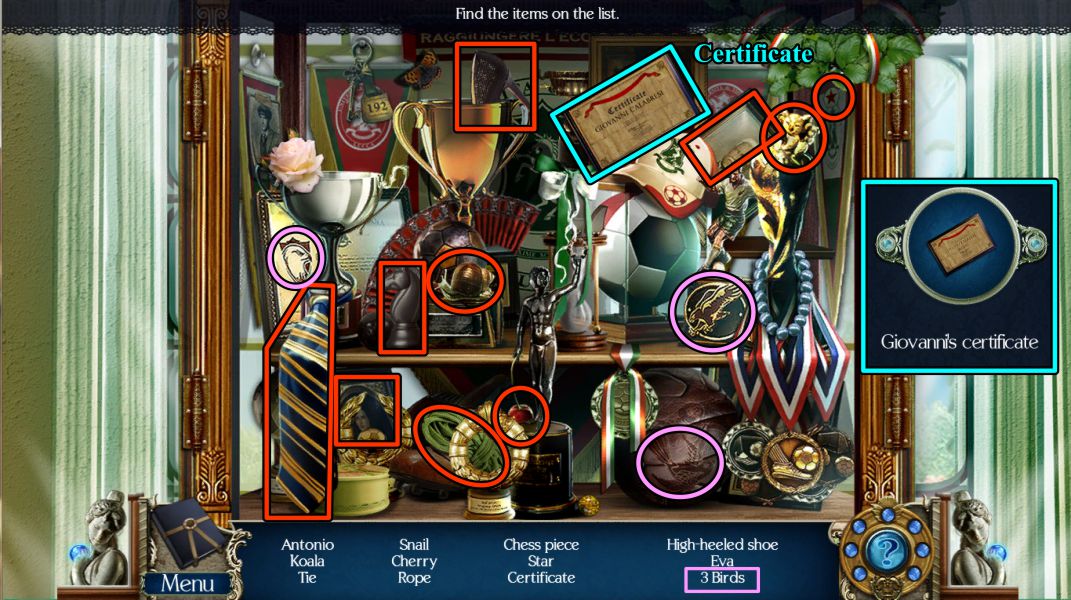
Play the Hidden Object Scene in the Trophy Case, then exit through the open door.
Screenshot
Trophy Case Hidden Object Scene
Collect everything on your list to get Giovanni's Certificate.
Screenshot
Outside the Administration Building
Zoom in on the bag, open it, and take the Wire Cutters and Tweezers.
Return to the Records Office.
Screenshot
Records Office
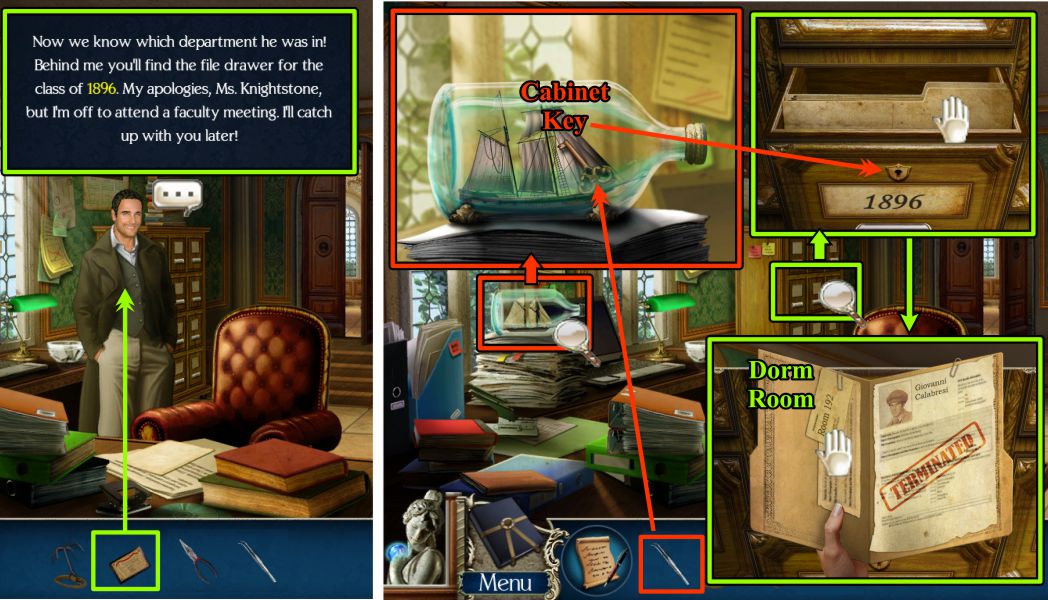
Give Professor Romano the Certificate, who suggests looking up 1896 in the Records Cabinet.
Zoom in on the bottle with the ship and use your Tweezers to get the Cabinet Key.
Unlock the 1896 drawer, locate Giovanni's folder, and take the card with his Dorm Room information.
Screenshot
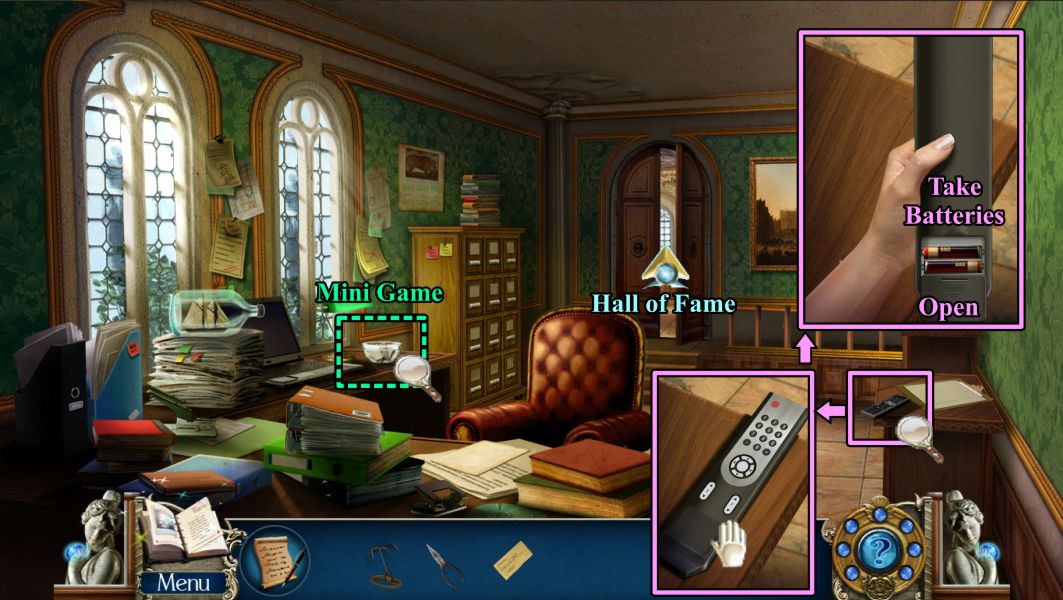
Zoom in on the remote at the right, turn it over, open it, and take the Batteries.
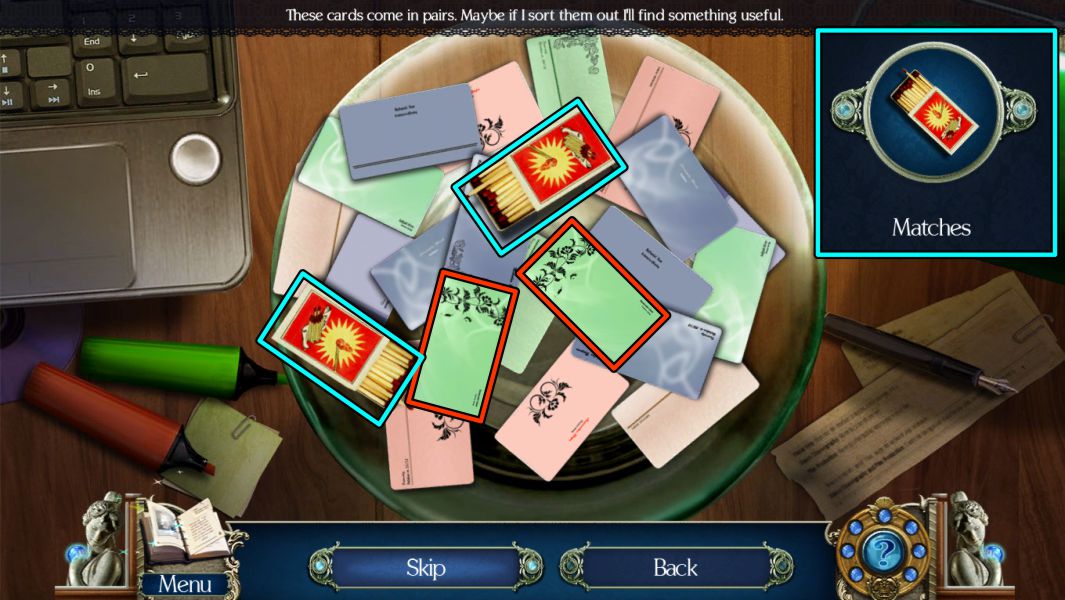
Zoom in on the bowl in the table to the left for a Mini Game.
Screenshot
Match the Cards Mini Game
Match two identical cards, as shown in the screenshot, until all the cards are gone from the bowl.
You will be rewarded with some Matches.
Go to the Hall of Fame.
Screenshot
Hall of Fame
Zoom in on the left display in the back.
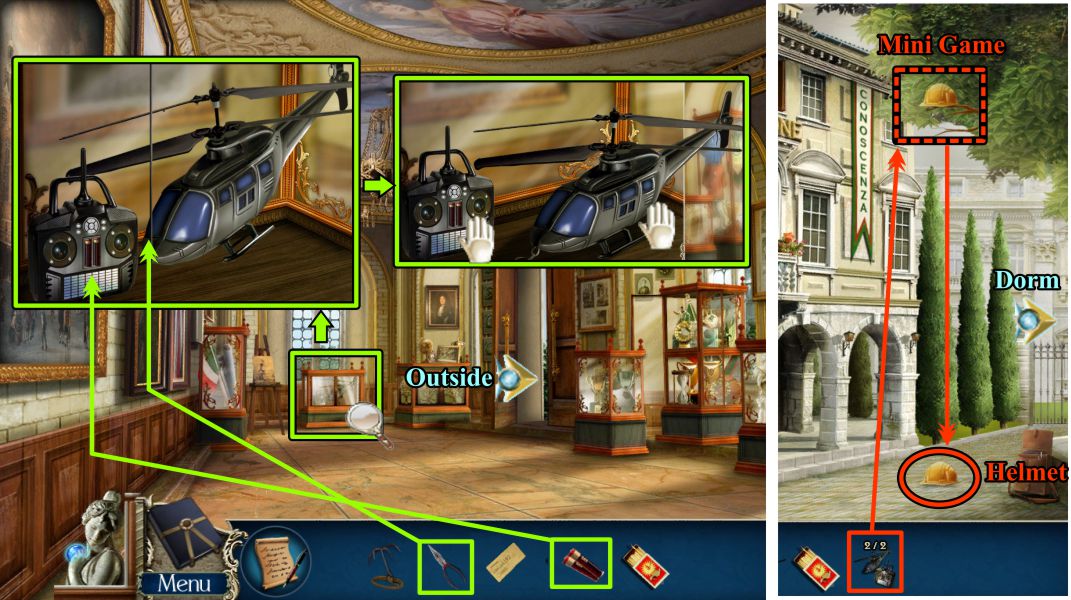
Put the Batteries in the remote, then clip the wire holding the helicopter with your Wire Cutters.
Collect both parts and go outside.
Your goal is to use the helicopter to get the Helmet out of the tree: Place the helicopter on the Helmet to trigger a Mini Game.
When you have completed the game, pick up the Helmet from the ground, and head off to the Dorm.
Screenshot
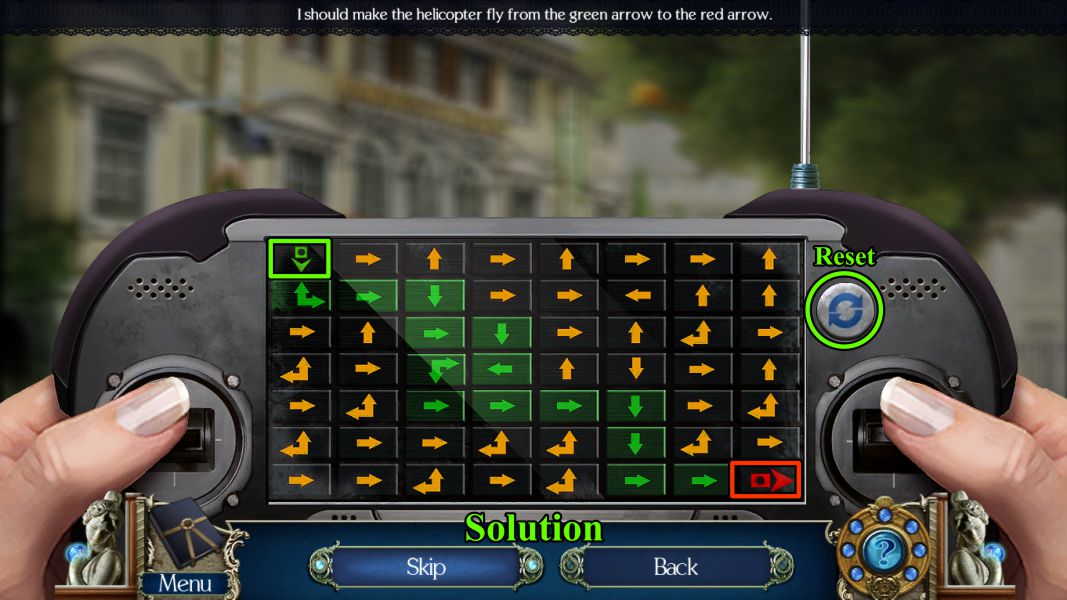
Helicopter Mini Game
Your goal is to make the helicopter fly from the green arrow to the red arrow.
If you make a mistake, there is a Reset Button at the right.
See the screenshot for the solution.
Screenshot
Outside Dorm
Show the construction worker the dorm information.
He says it is a safe area, but you will need a safety helmet before you can enter the building.
Show him your Helmet, and he will help you put it on.
Zoom in on the cement mixer and take the Hammer before going to the Dorm Lobby.
Screenshot
Dorm Lobby
Pick up the Broken Glass on top of the lockers.
Open the two lockers shown in the screenshot and take the two pieces Of Broken Glass from each locker.
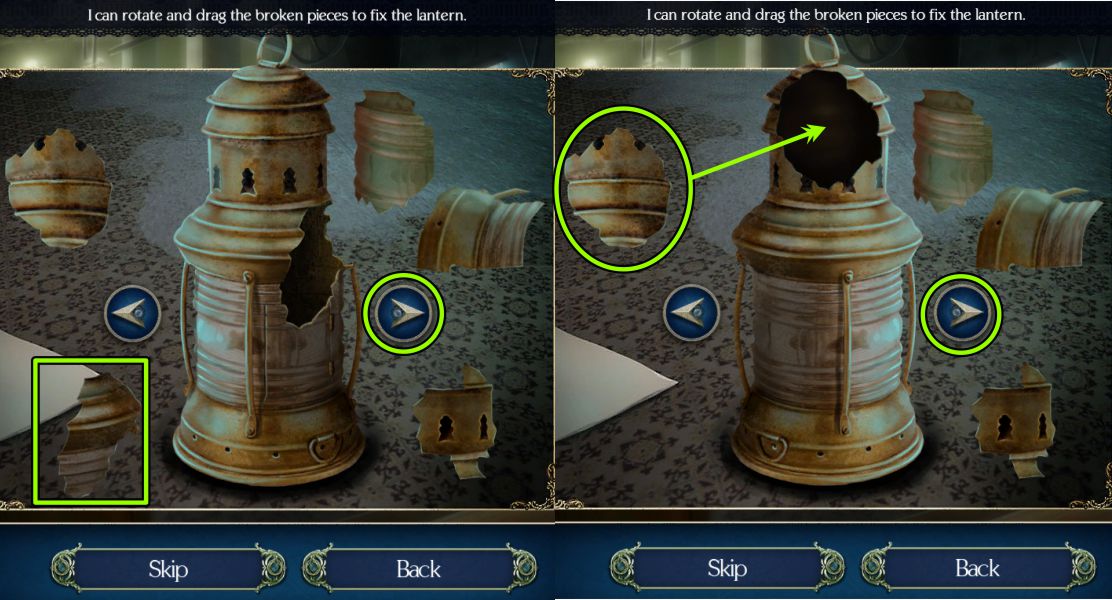
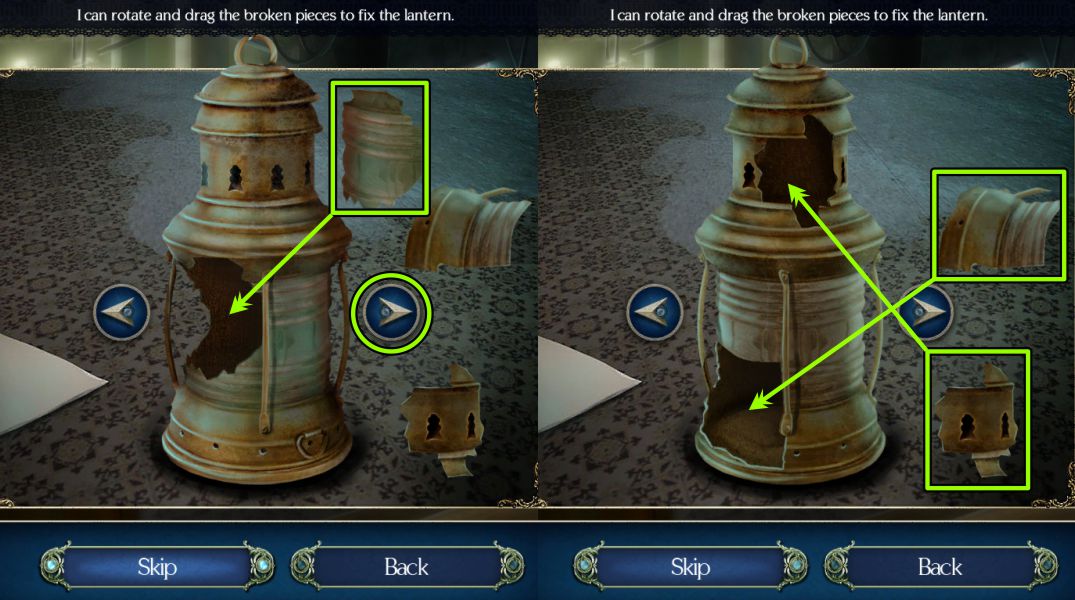
Zoom in on the lantern on the floor for a Puzzle.
Screenshot
Lantern Puzzle
Your goal is to repair the lantern by rotating it and putting the missing pieces where they belong.
Place you Broken Glass on the lantern to trigger the puzzle.
See the screenshot for the first two pieces.
Screenshot
See the screenshot for completing the puzzle.
Screenshot
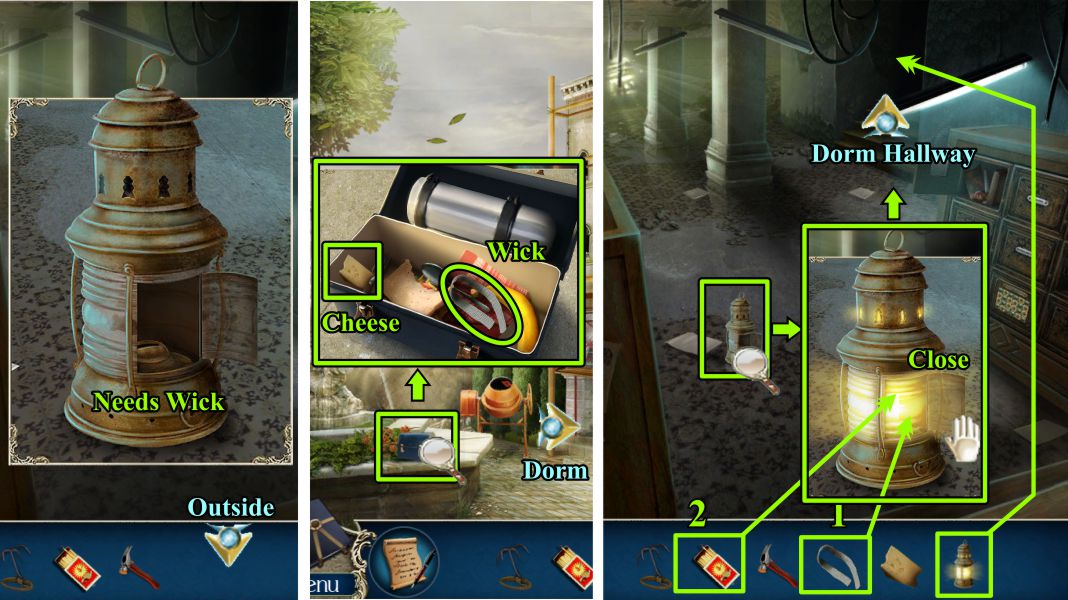
Dorm Lobby and Outside
The lantern needs a wick, so go outside and zoom in on the lunchbox.
Take the Cheese and Wick.
Return to the Lobby, zoom in on the lantern, place the Wick and light it with your Matches.
Shut the door, take the lantern and place it on the stairs to light up the Dorm Hallway.
Screenshot
Dorm Hallway
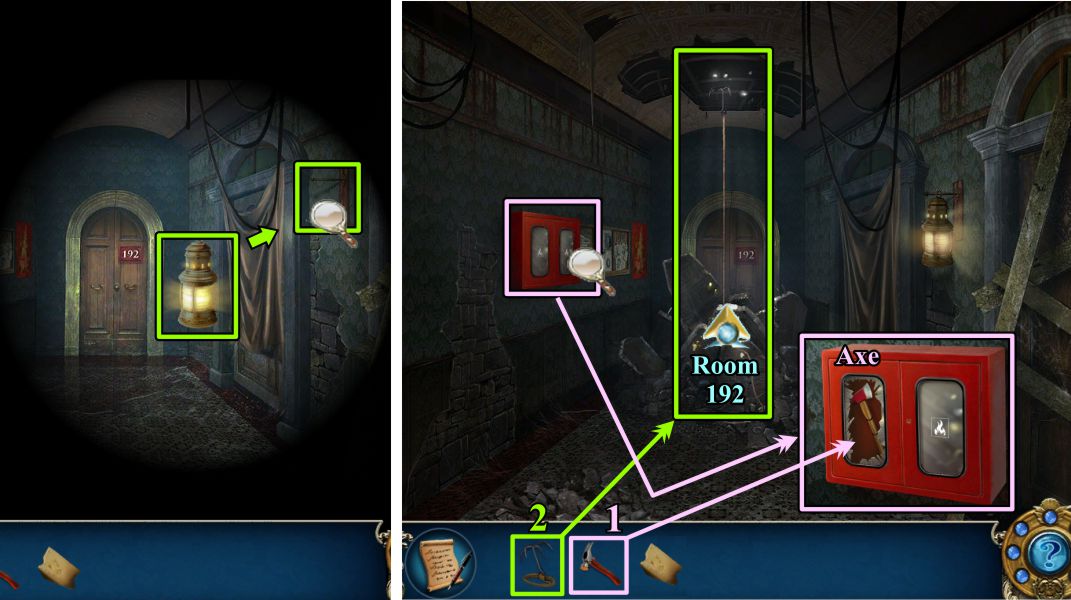
Zoom in on the right wall and hang the lantern on the nail.
Zoom in on the red emergency cabinet on the left and use the Hammer to get the Axe.
Place your Grappling Hook on the rafter that is exposed from the ceiling falling in.
Swing over to Room 192.
Screenshot
Dorm Hallway and Lobby
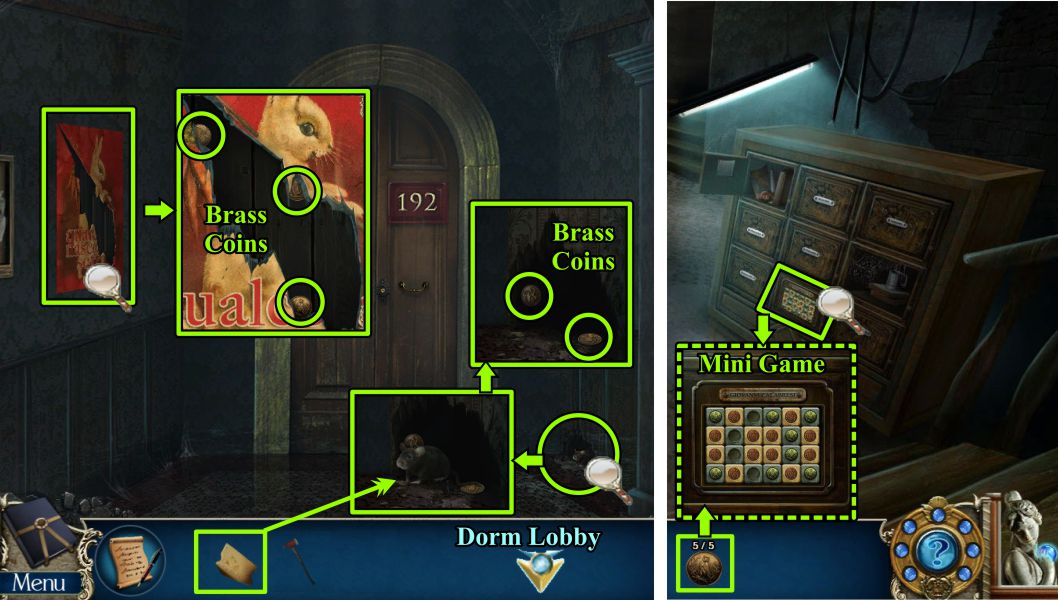
Zoom in on the picture to the left and take the 3 Brass Coins.
Zoom in and give the Cheese to the Rat so you can get the two Brass Coins.
Return to the Lobby.
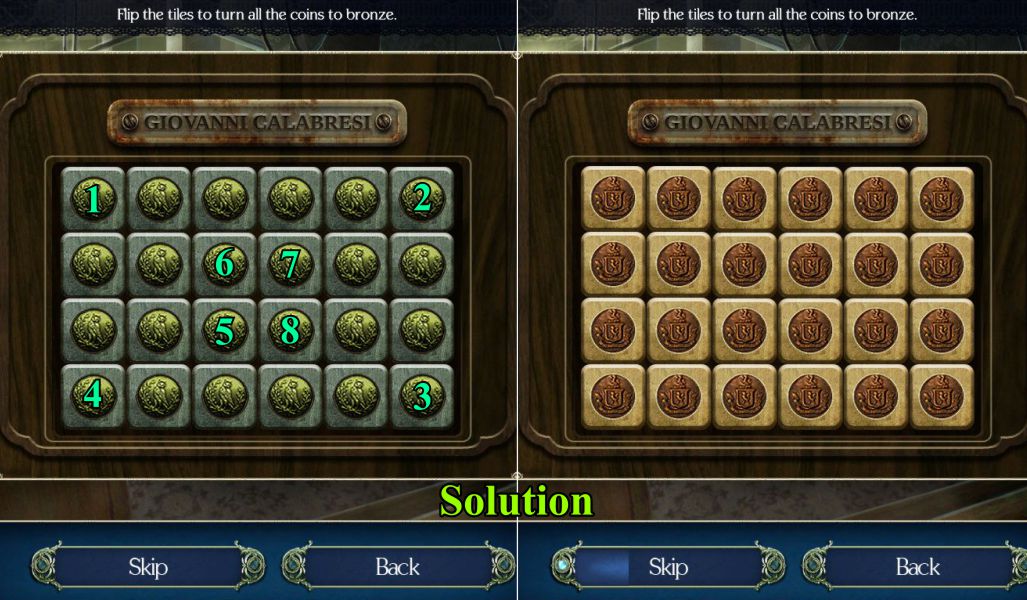
Zoom in on Giovanni's locker and place the 5 Brass Coins to trigger a Mini Game.
Screenshot
Giovanni's Locker Mini Game
See the screenshot as to which tiles to flip to arrive at the solution shown on the right.
Screenshot
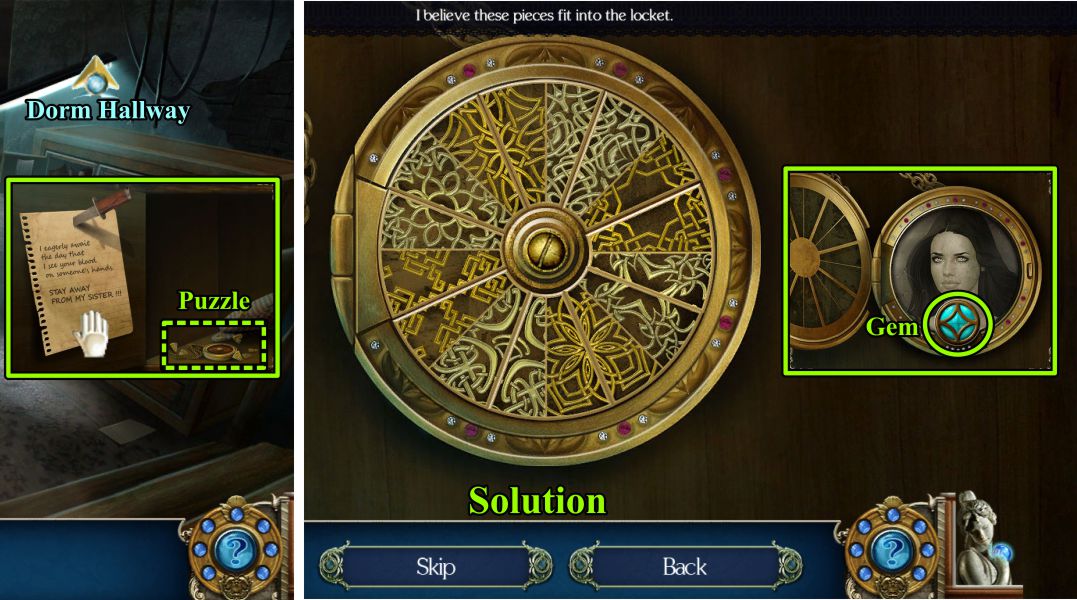
Giovanni's Locker and Locket Puzzle
Take the note and click on the locket for a Puzzle.
Place the Locket pieces as shown in the screenshot solution.
Some pieces will need to be clicked again to rotate.
Take the Gem from Eva's picture and go back upstairs.
Screenshot
Dorm Hallway
Swing over to Room 192, and use the Axe 3 times on the door to enter.
Screenshot
Room 192
Zoom in on the box on the desk and the basket in the rubble to pick up the Plastic Organs shown in the screenshot.
Zoom in on the hanging lamp and take the Light Bulb.
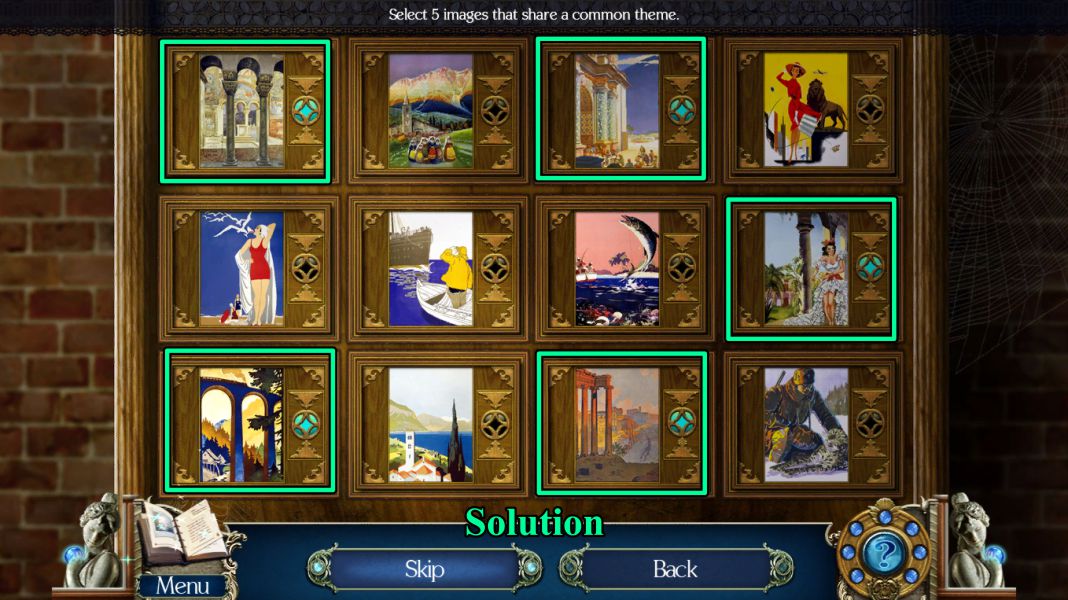
Zoom in on the area to the right of the window and place the Gem to trigger a Mini Game.
Screenshot
Image Mini Game
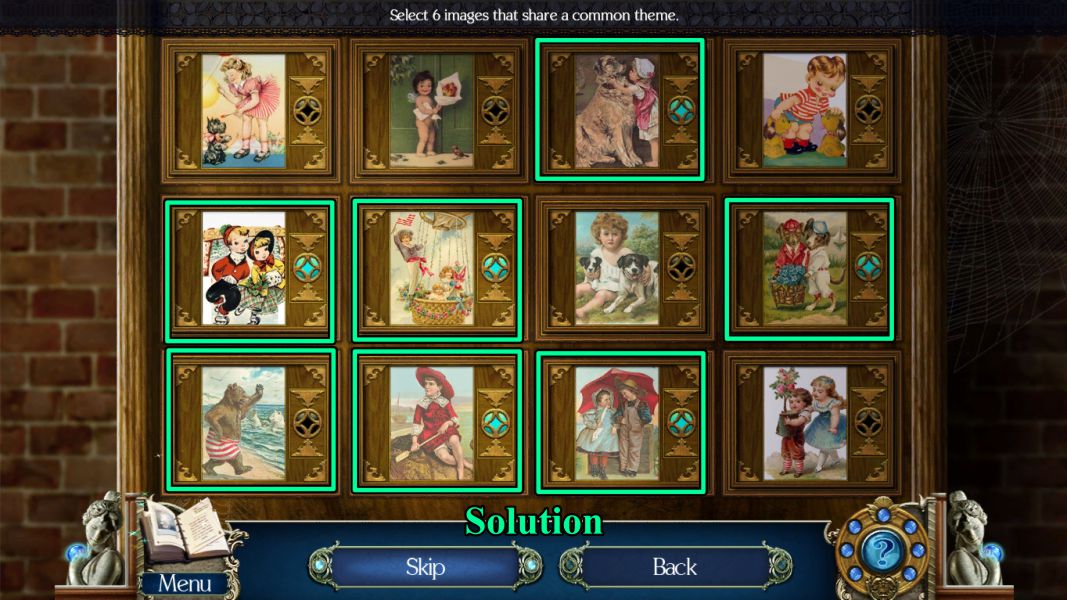
Your goal is to choose images that are similar so the gem buttons light up.
See the screenshot for the solution to Round 1 with 5 pictures showing arches.
Screenshot
See the screenshot for the 6 images in Round 2.
Screenshot
Room 192 and Secret Attic
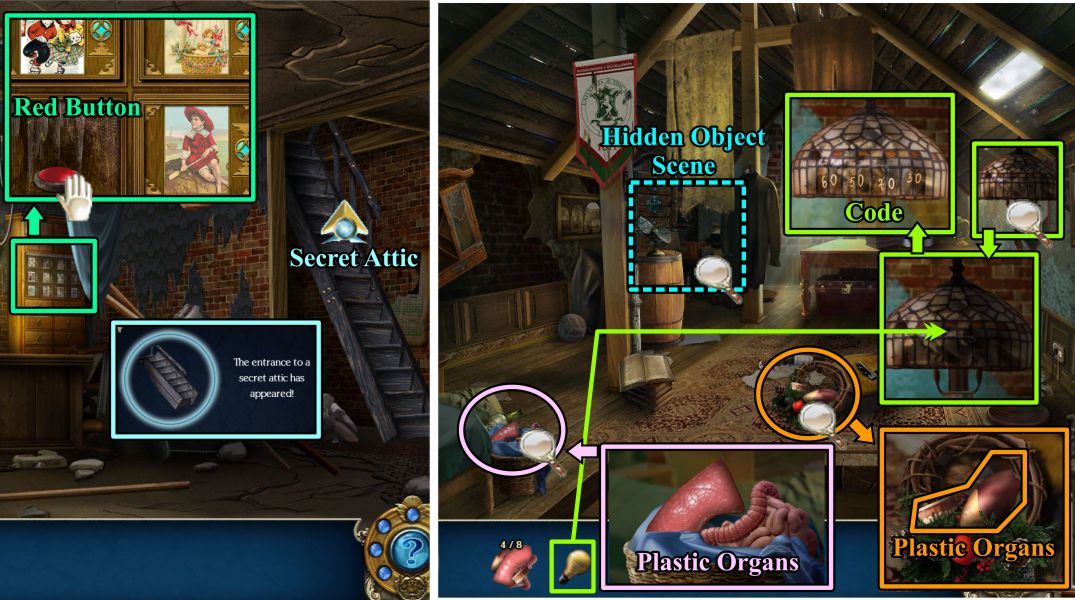
Press the Red Button that is revealed at the end of the game to release the ladder to enter the Secret Attic.
Zoom in on the wreath and basket shown in the screenshot to collect the Plastic Organs.
Zoom in on the stained glass lampshade, place your Light Bulb and note the code that appears.
Play the Hidden Object Scene at the back of the room.
Screenshot
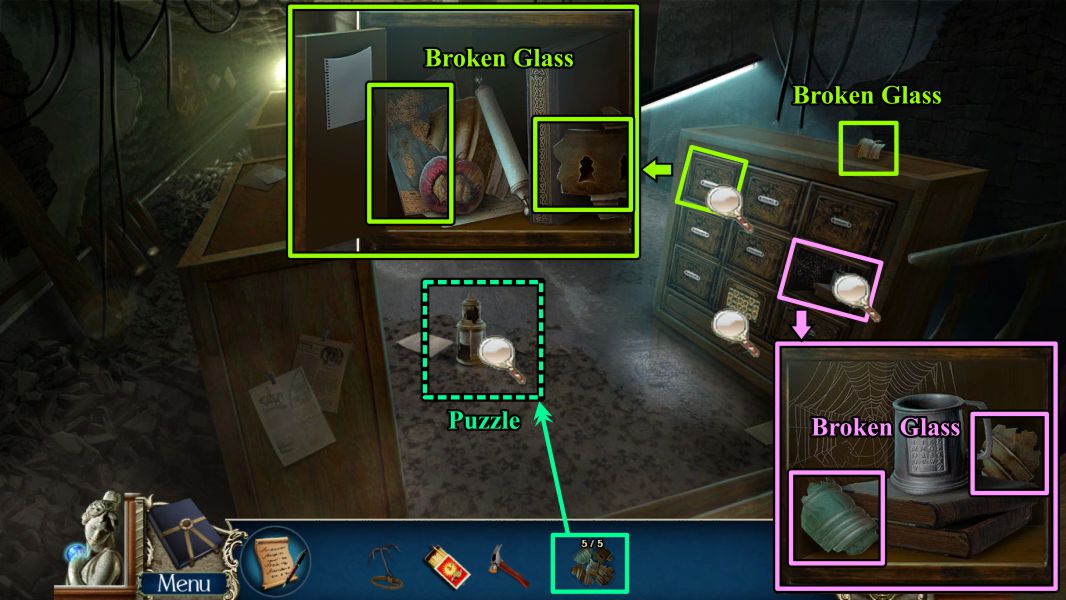
Secret Attic Hidden Object Scene
Collect everything on your list to get some Heavy Blocks.
Screenshot
Secret Attic
Zoom in on the falling cabinet at the left and place your Heavy Blocks for a Puzzle.
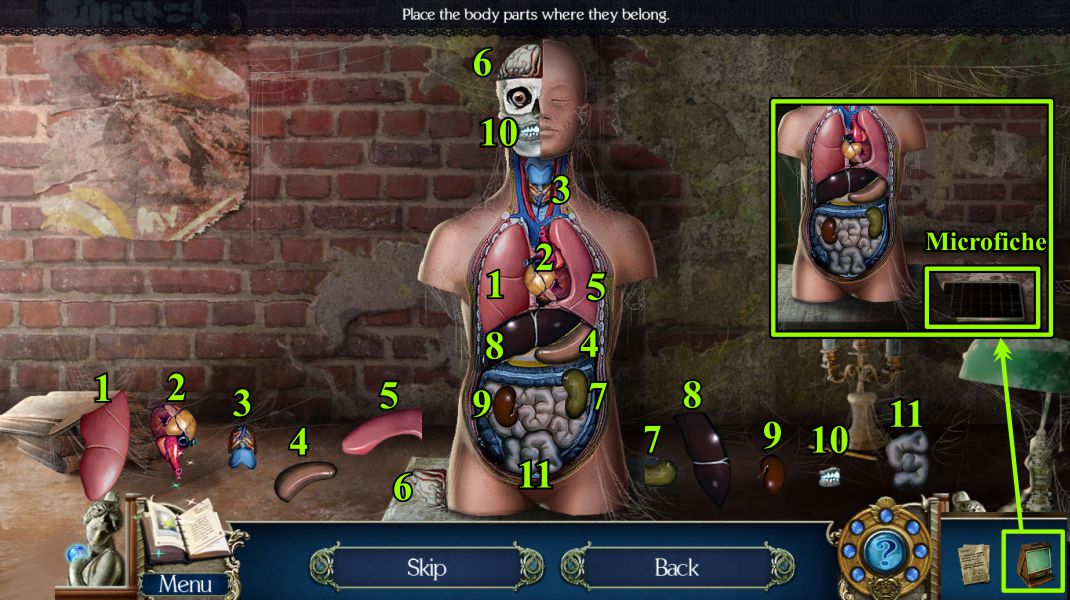
You also have another Puzzle to play by inserting all the Plastic Organs in the figure on the table.
Screenshot
Cabinet Puzzle
See the screenshot for the numbered solution.
Screenshot
Plastic Organs Puzzle
See the screenshot for a numbered solution.
Take the Microfiche when the game is completed.
Screenshot
Secret Attic
Zoom in on the safe behind the cabinet when you have completed that Puzzle.
Zoom again on the combination lock and enter the code from the lampshade.
See screenshot for solution.
Read the note in the safe and take the Portable Microfiche Viewer.
Screenshot
Chapter 3: Casentino
Town Center
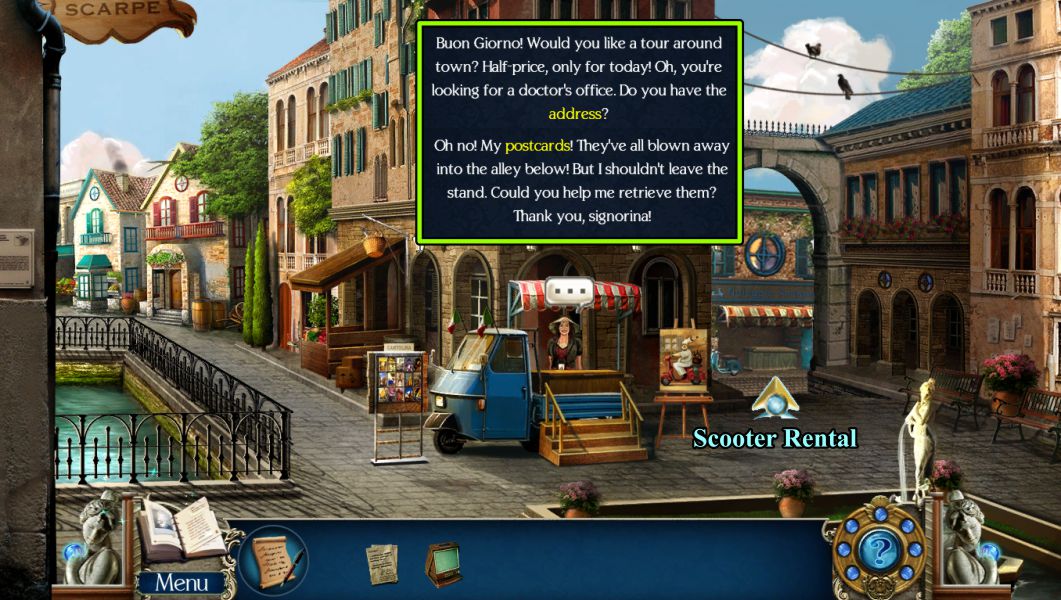
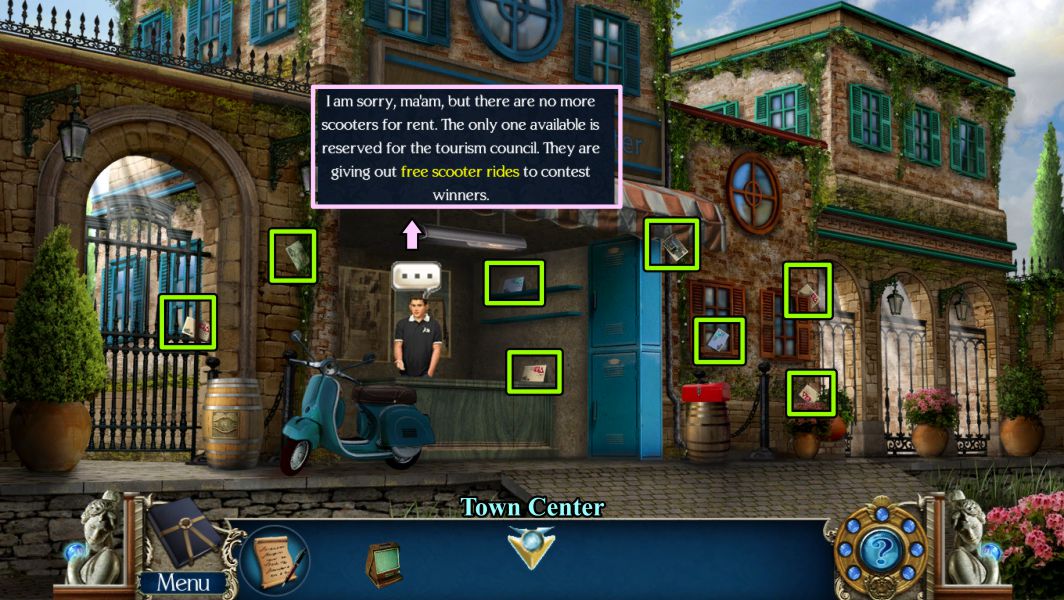
Talk to the Tour Guide, who loses her postcards and asks you to help retrieve them. Go to the Scooter Rental.
Screenshot
Scooter Rental
Talk to the Scooter Rental Owner and collect all the postcards before returning to the Town Center.
Screenshot
Scooter Rental
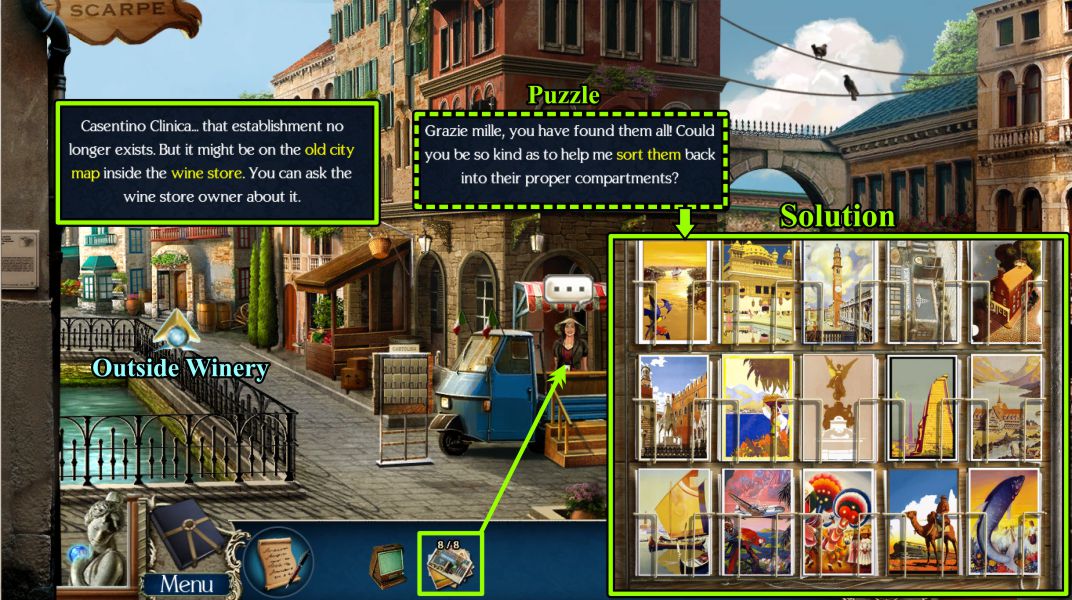
Give the Tour Guide the postcards.
She asks you to help replace them, so see the screenshot for the solution.
Screenshot
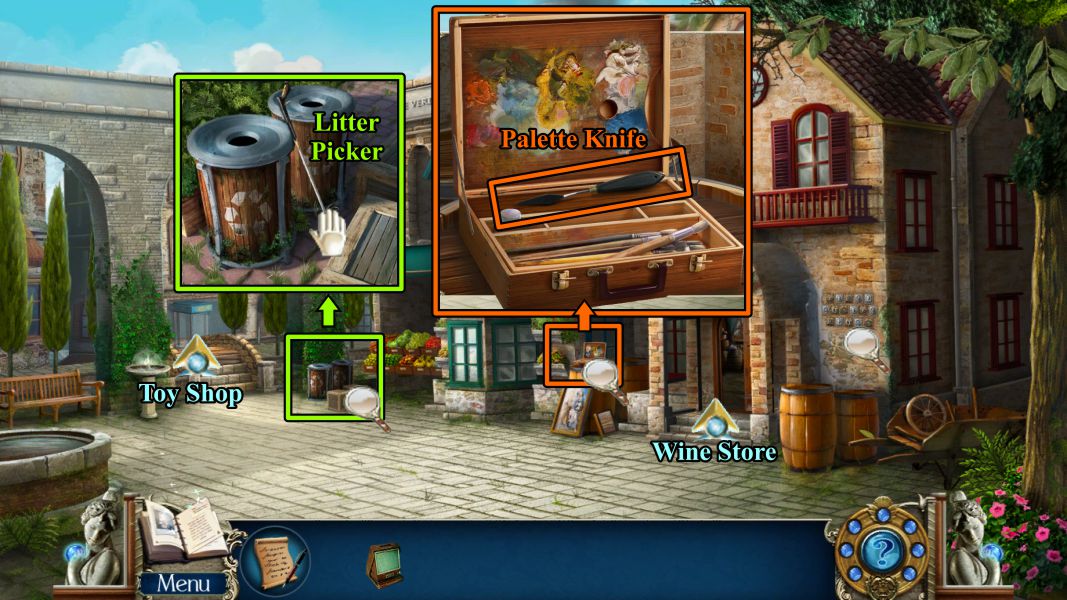
Outside Winery
Zoom in on the bins next to the steps to the Toy Shop, then take the Litter Picker.
Zoom in on the artist supply box and take the Palette Knife.
Enter the Wine Store.
Screenshot
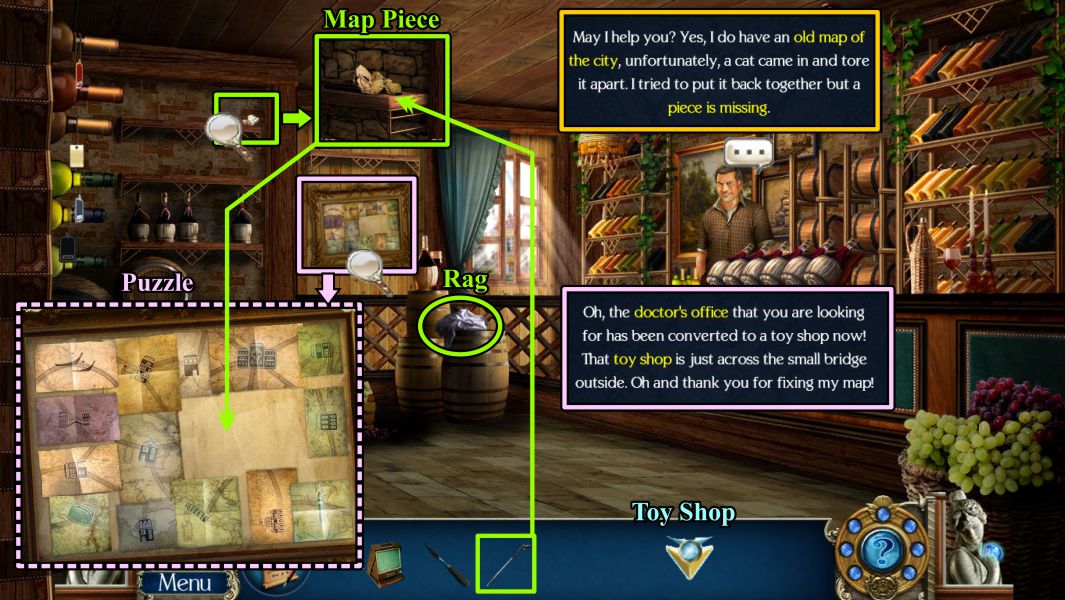
Wine Store
Talk to the owner, take the Rag, and zoom in on the shelf marked in the screenshot.
Use the Litter Picker to reach the Map Piece.
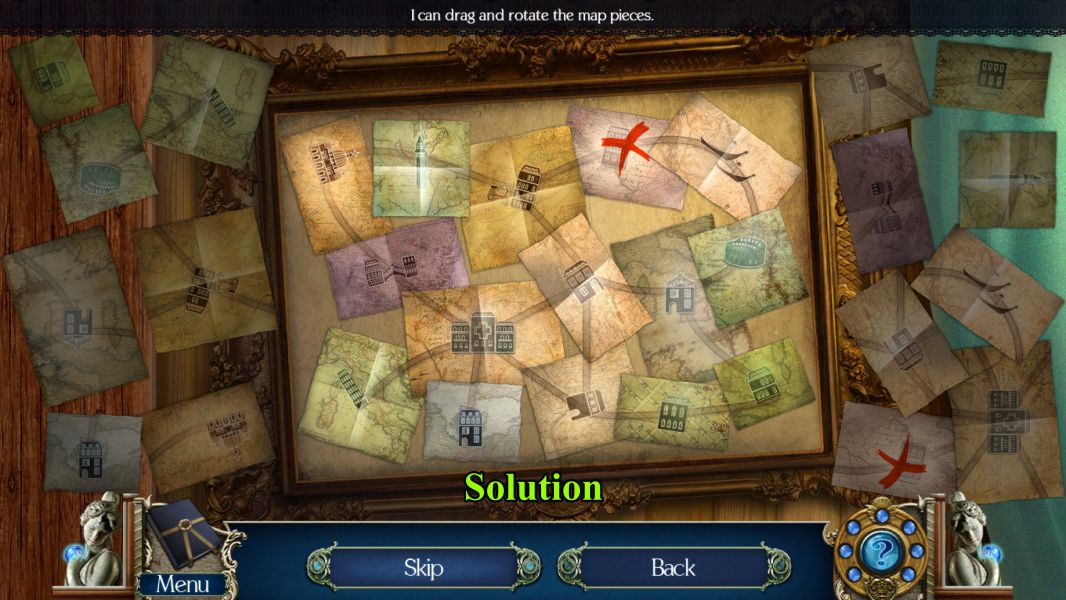
Zoom in on the Map and place the missing piece to trigger a Puzzle.
After you put the map together, the owner tells you the doctor's office is now the Toy Shop, so go there.
Screenshot
Map Puzzle
Drag and rotate the map pieces as necessary to create the solution shown in the screenshot.
Screenshot
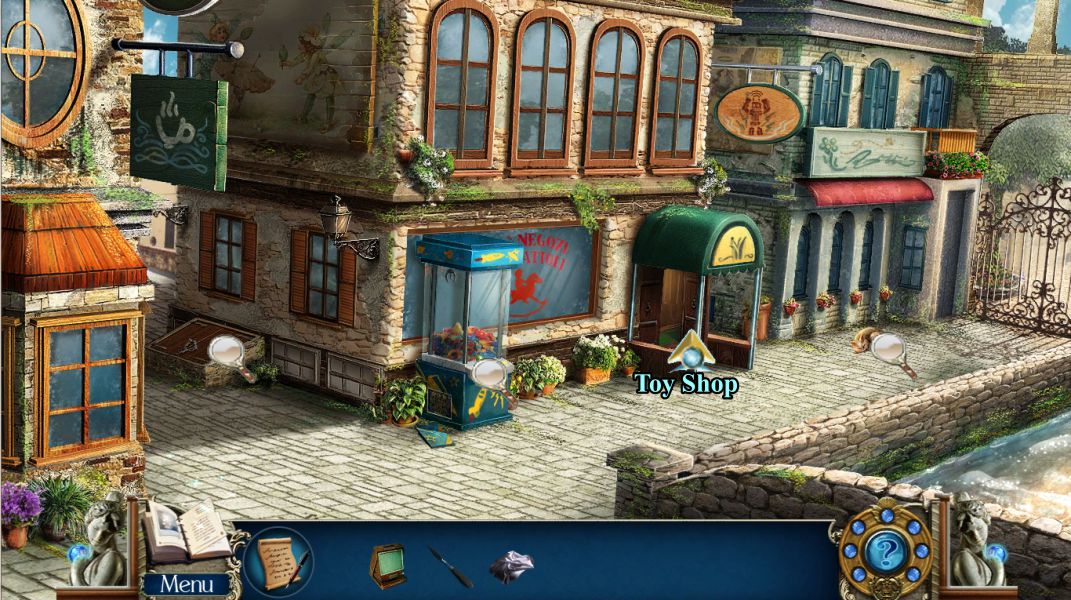
Outside Toy Shop
Note all the magnifying glasses in the screenshot before entering the Toy Shop.
Screenshot
Toy Shop
Talk to the owner, check out the Carrier Pigeon, and zoom in on the game machine for a Mini Game.
Screenshot
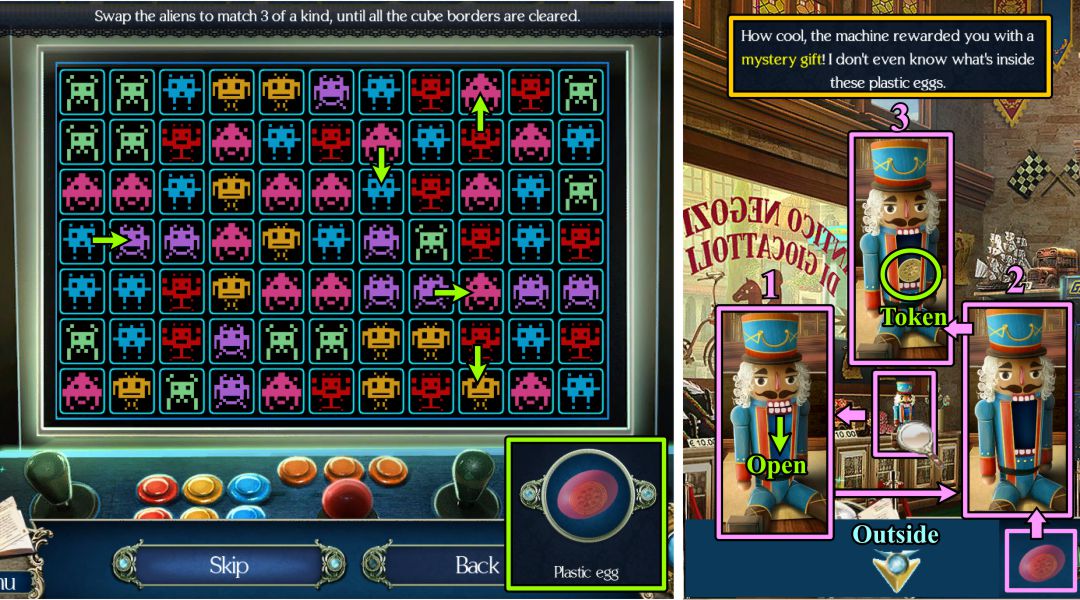
Toy Shop Match 3 Mini Game
Your goal is to match at least 3 of the same aliens until you have removed the outlines around all the aliens on the board.
Several moves are shown in the screenshot.
You will be rewarded with a Plastic Egg.
Zoom in on the nutcracker to the left, open its mouth, insert the Plastic Egg in its mouth, and take the Token.
Exit the Toy Shop.
Screenshot
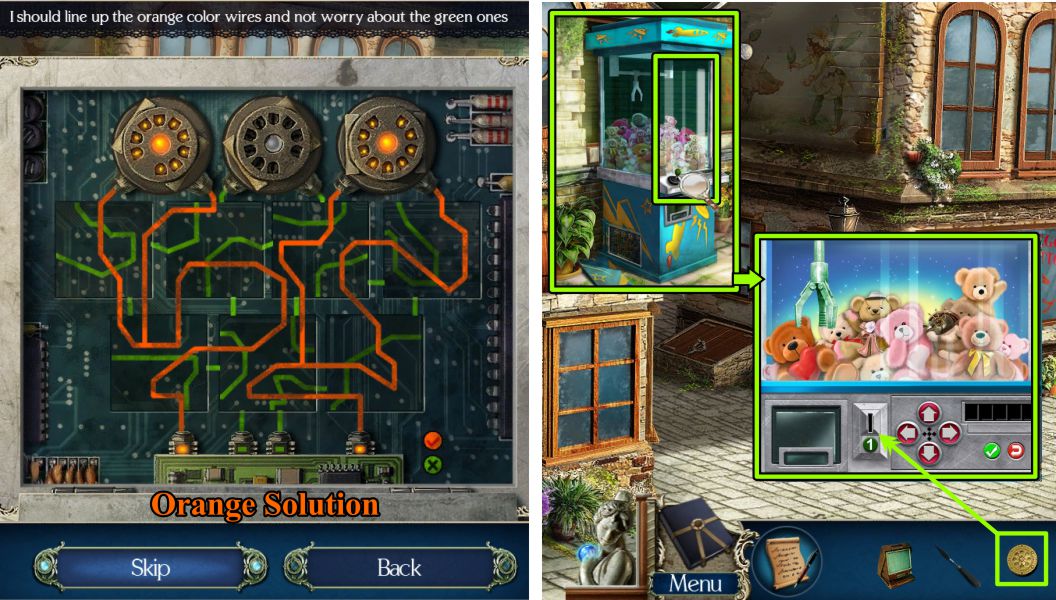
Toy Game Power Supply Mini Game
Zoom in on the Toy Game Machine's power supply for a 3-part Mini Game.
Rotate the circuit board pieces to connect the green wires at the top to the 2 terminals at the bottom.
See the screenshot for the green solution.
Screenshot
Ignoring the green wires, connect the orange wires at the top to their terminals at the bottom.
See the screenshot for orange solution.
Zoom in on the control panel and place your coin for the next part of the game.
Screenshot
Your goal is to use the arm to pick up the Mechanical Pigeon Part.
There are 5 direction panels. Use the 4 arrows to tell the arm what direction you want it to move.
Press the green Test Button to check your selection.
The Red Button will reset the arm.
See the screenshot for the solution.
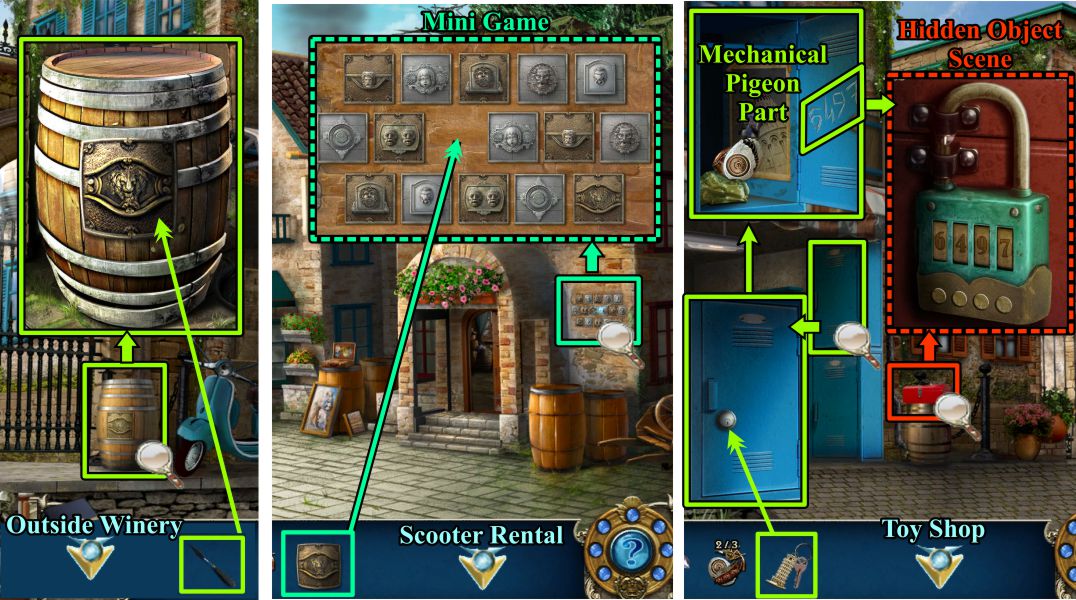
Pick up your prize and return to the Scooter Rental.
Screenshot
Scooter Rental and Outside Wine Store
Zoom in on the barrel and use your Palette Knife to remove the emblem.
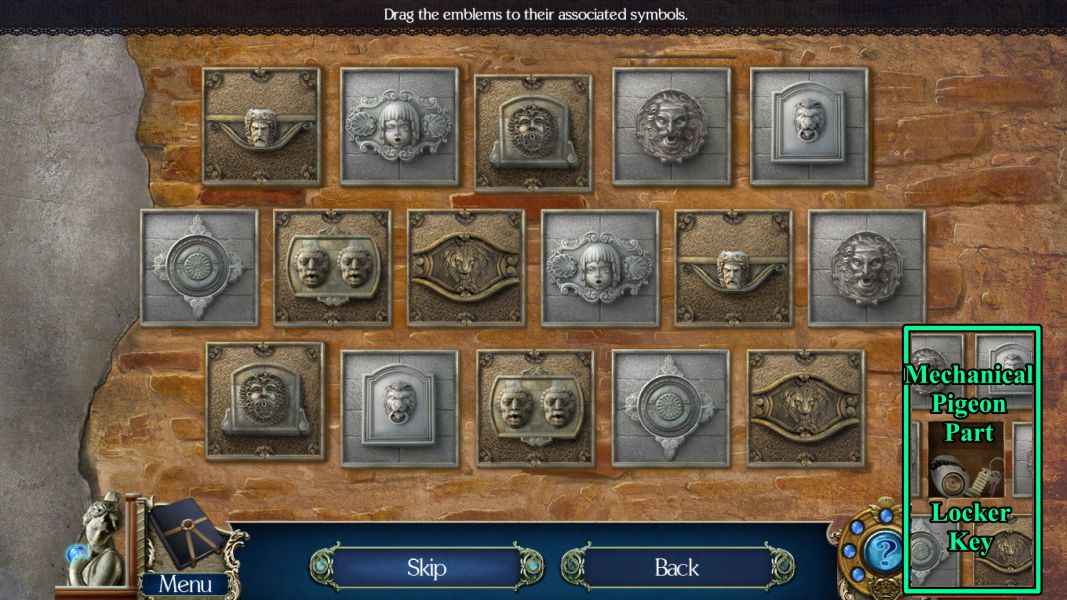
Go to the Outside of the Winery and zoom in on the wall of emblems.
Place your Emblem to trigger a Mini Game to get a Mechanical Pigeon Part and a Locker Key.
Return to the Scooter Rental and zoom in on the top locker.
Use the Key to open it and get the Mechanical Pigeon Part.
Note the numbers 6497 etched on the open door.
Zoom in on the Tool Box and enter the combination 6497, using the buttons at the bottom of the lock.
Play the Hidden Object Scene.
Screenshot
Emblem Mini Game
Screenshot
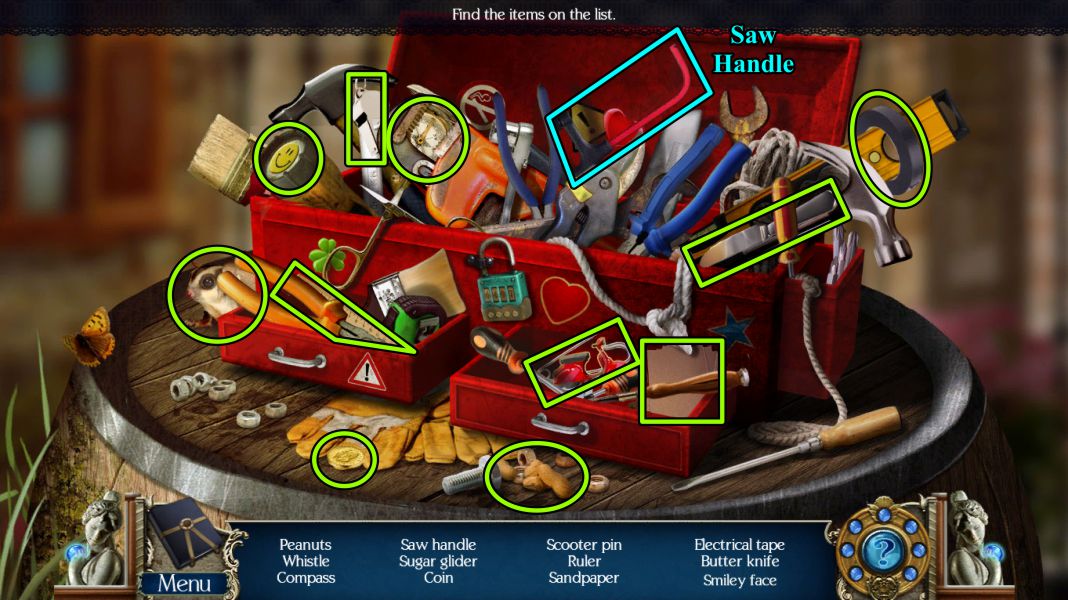
Tool Box Hidden Object Scene
Collect your list of items to get a Saw Handle.
Return to the Toy Shop.
Screenshot
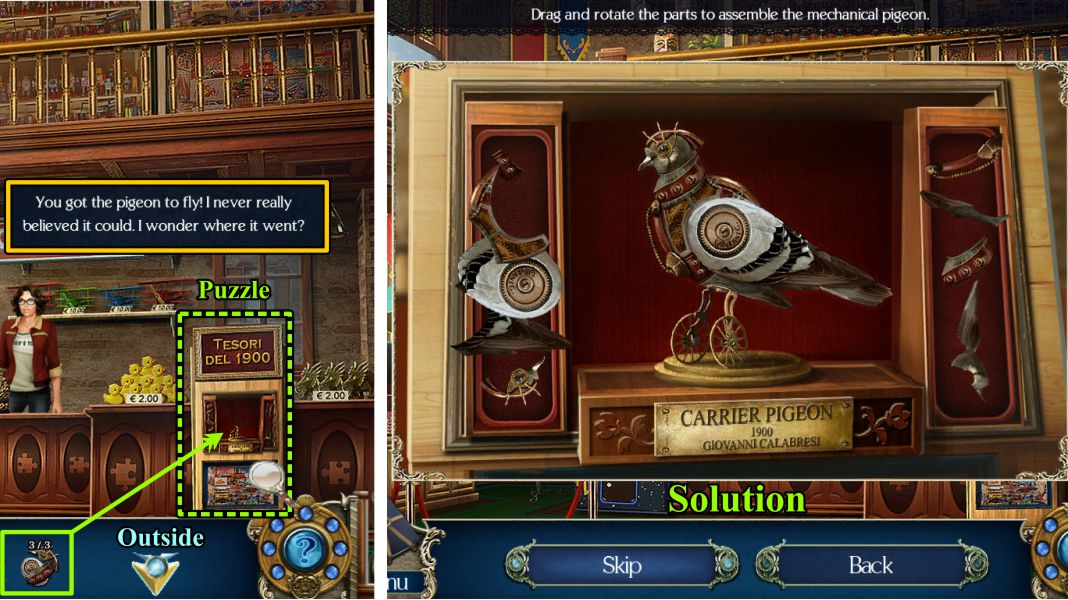
Carrier Pigeon Puzzle
Zoom in on the Carrier Pigeon and place your parts to trigger the Puzzle.
Assemble the pigeon as shown in the screenshot.
The pigeon takes off and the Toy Shop owner is amazed it could fly. Follow it outside to see where it went.
Screenshot
Outside Toy Shop and Town Center
Try to catch the pigeon, and it will fly into the basement window.
Use your Rag to grab a Glass Shard and head to Town Center.
Zoom in on the basket hanging on the pole and cut the rope with the Glass Shard.
Take a fish and return to the outside of the Toy Shop.
Give the fish to the cat to get him to release the box.
Open the box and place your Saw Handle on the blade to get a Hand Saw.
Go to the basement door, use the Saw to cut the chain and enter the basement.
Screenshot
Doctor's Office
Zoom in on the sink and take the Rings.
Play the Hidden Object Scene in the doctor's bag.
Use your rag to clean the wall shown in the screenshot, then zoom in for a Mini Game.
Screenshot
Doctor's Bag Hidden Object Scene
Find the silhouette objects in the doctor's bag, shown as silhouettes rather than a list.
See the screenshot for a numbered solution to get the Rings for your Inventory.
Screenshot
Family Tree Mini Game
Behind each portrait is a set of symbols that have number values as shown at the top of the family tree.
Spade = 1, Club = 2, Heart = 5, and Diamond = 6.
Match the numbered portraits to the total of the numbers represented under the portraits.
For instance, if there are 3 hearts under a portrait, then Portrait 15 belongs on that branch of the tree.
Note that Professor Romano is already placed as Portrait 10.
Screenshot
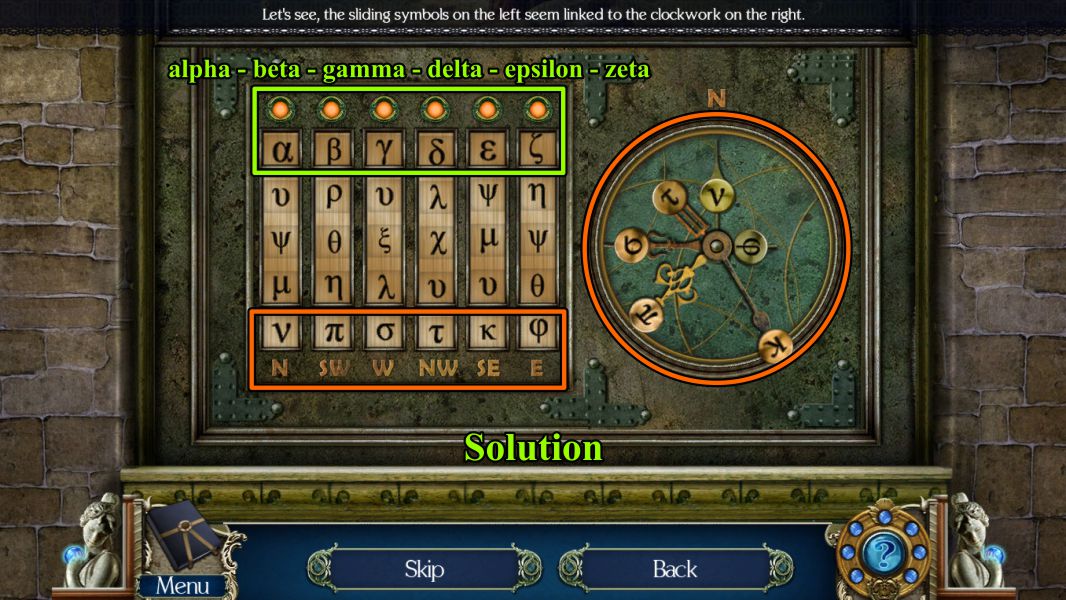
Clockworks Mini Game
The Family Tree opens up another Mini Game underneath.
The symbols on the left give a clue to how the directions need to be set for the clockworks on the right.
Set the top row to the beginning of the Greek alphabet as shown in the Screenshot.
The bottom set of symbols are above the compass directions to use for the position of the clockworks symbols as shown in the screenshot.
Screenshot
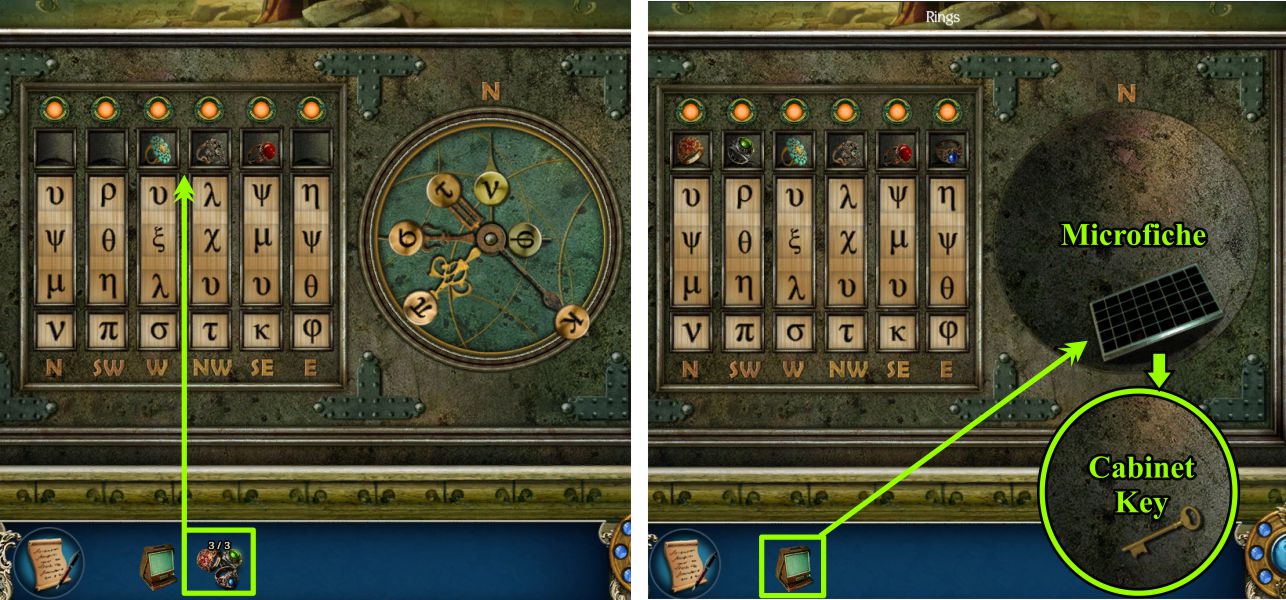
The top row will open for you to place your Rings there.
Use your Portable Microfiche Viewer on the Microfiche that appears, then take the Cabinet Key behind it.
Screenshot
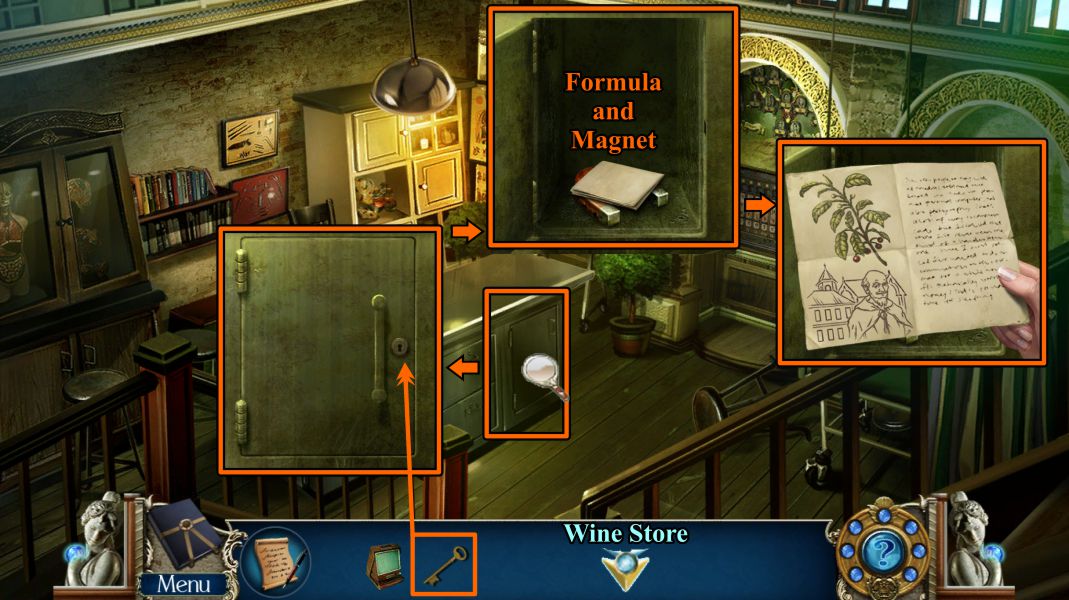
Doctor's Office
Open the cabinet with the key, then take the Formula and Magnet.
Go to the Wine Store.
Screenshot
Wine Store
Zoom in on the table to take the monthly challenge and win a bottle of wine.
Place the Magnet on the wine rack to trigger the Mini Game.
Screenshot
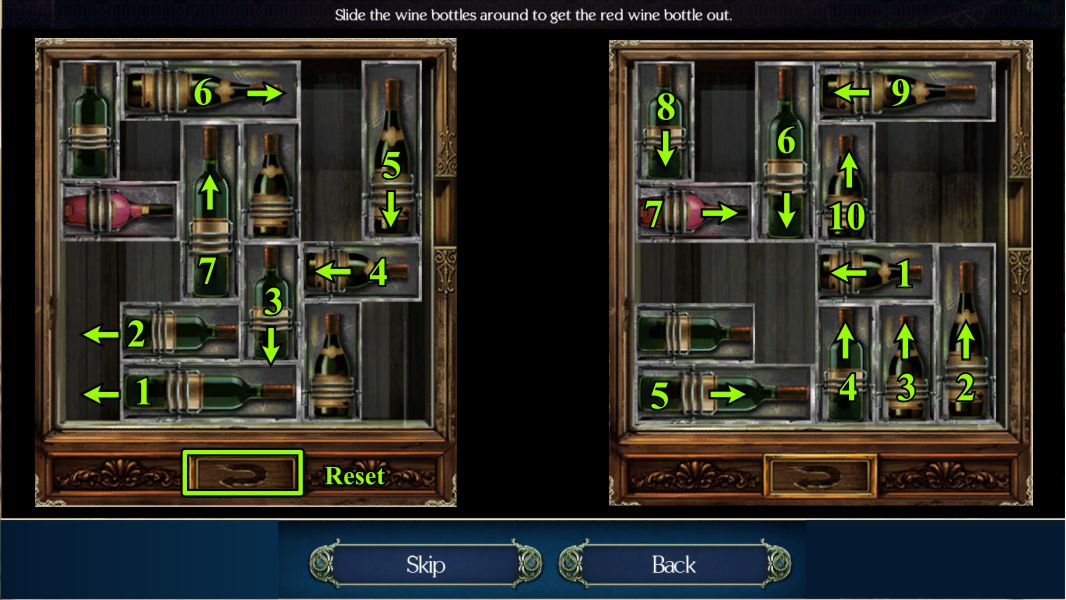
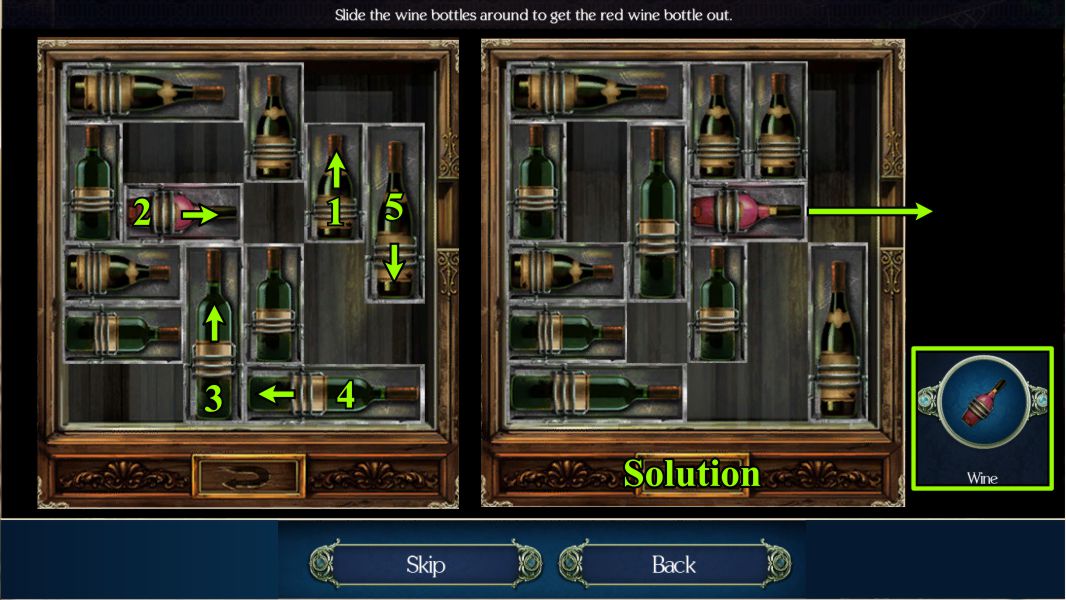
Wine Bottle Mini Game
Your goal is to get the red bottle out the exit at the right of the rack using the Magnet for help.
In case you need it, there is a Reset at the bottom of the rack.
See the screenshot for the start of the step-by-step solution.
Screenshot
The completion of the step-by-step solution and your bottle of Chianti are in the screenshot below.
Screenshot
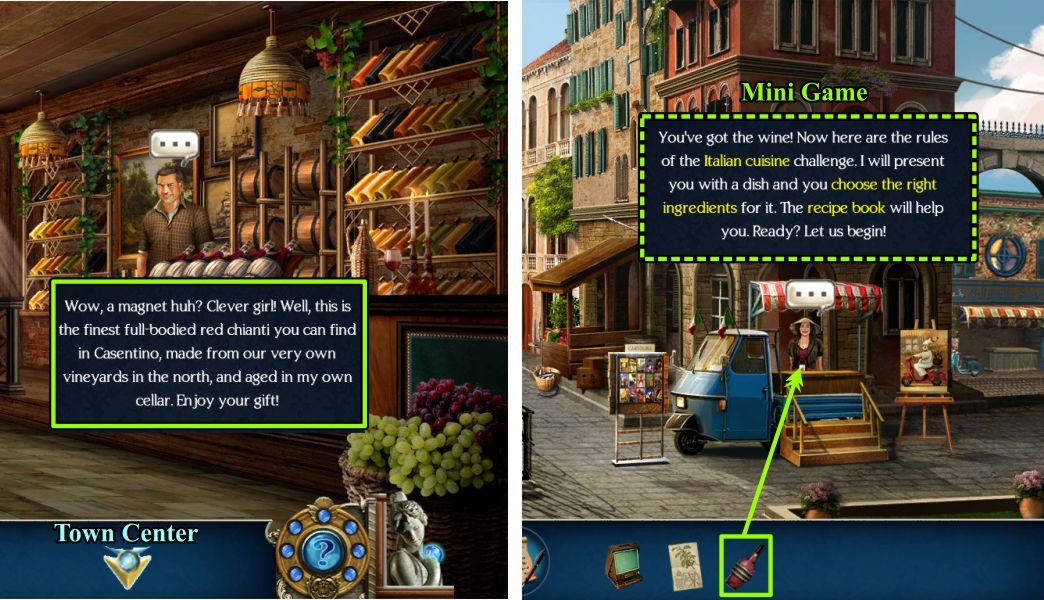
Wine Store and Town Center
Talk to the owner and head to Town Center.
Give the bottle of wine to the Tour Guide to trigger a Mini Game.
Screenshot
Recipe Mini Game
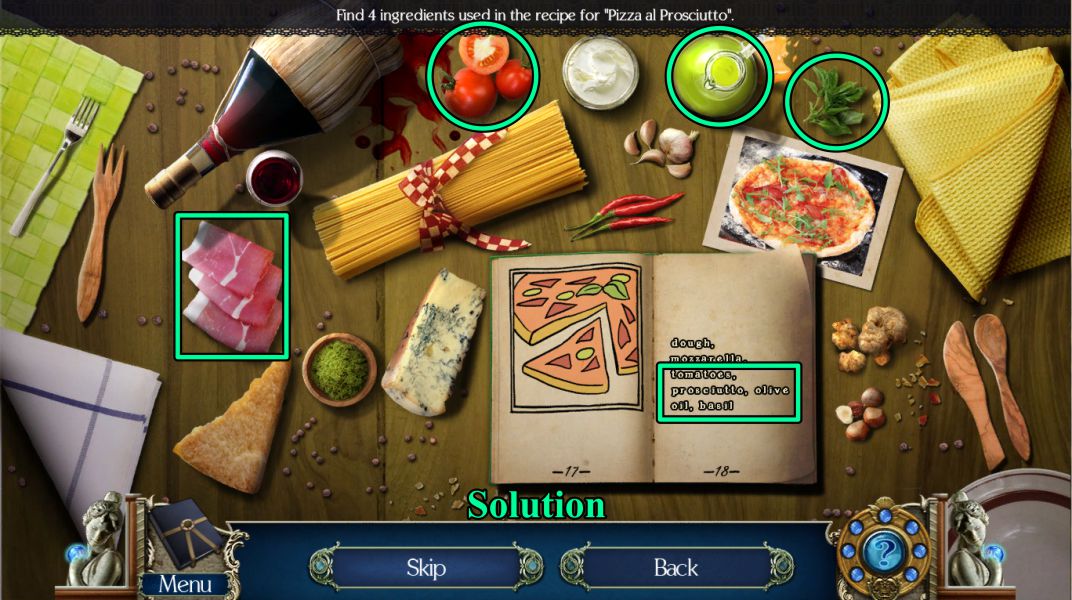
For the first part, go through the recipe book to find the ingredients for Pizza al Prosciuto.
Select 4 of the ingredients in the recipe that are shown on the table, as marked in the screenshot.
Screenshot
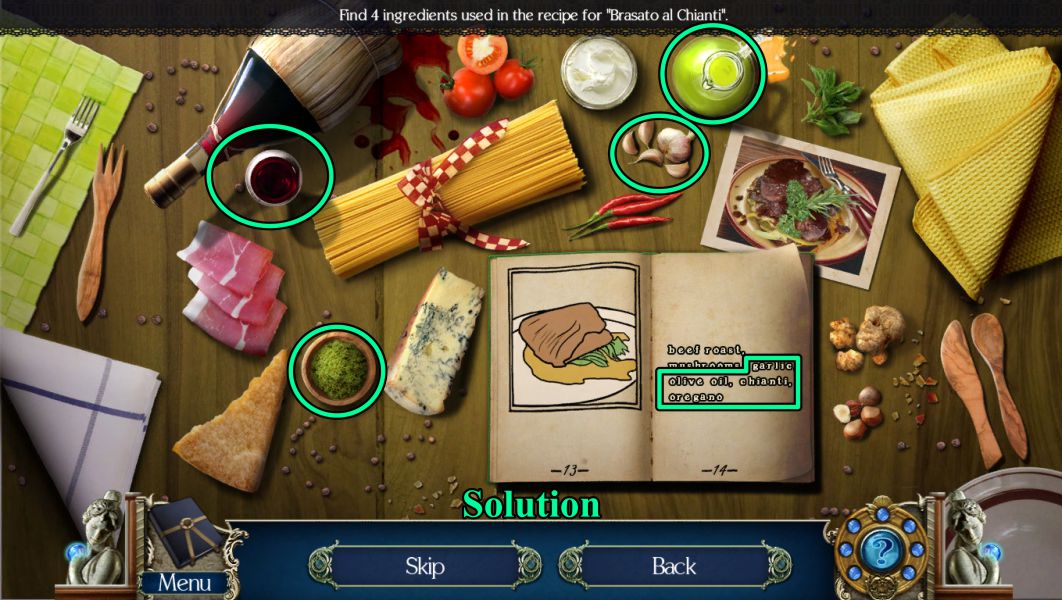
Find the recipe for Brasato al Chianti and choose the 4 ingredients shown in the screenshot.
Screenshot
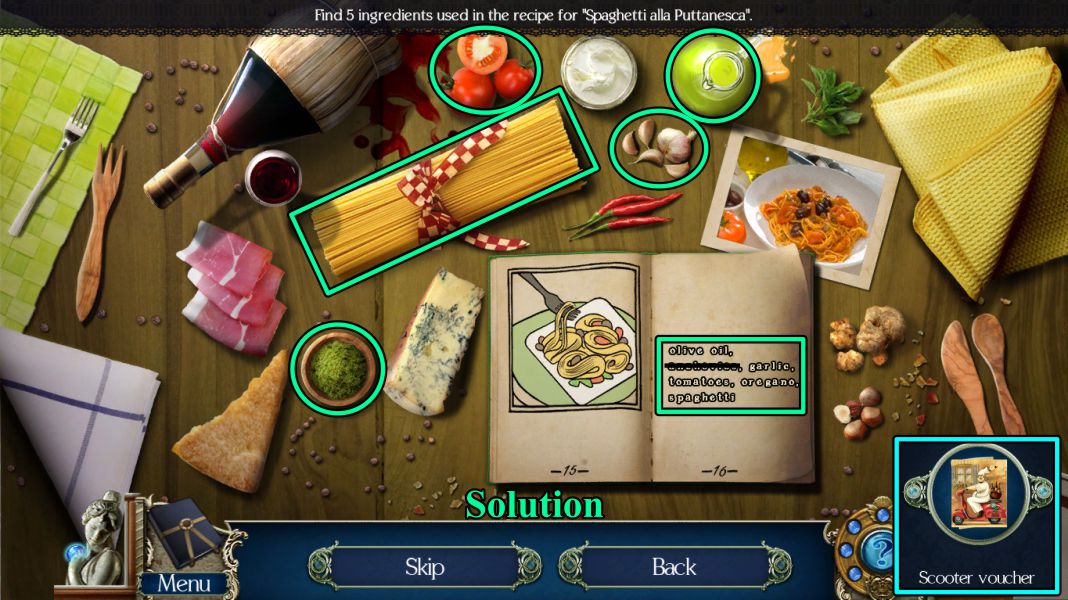
Your next recipe is Spaghetti alla Putanesca.
Choose the 5 ingredients marked in the screenshot.
You won the contest, and your prize is a Scooter Voucher.
Screenshot
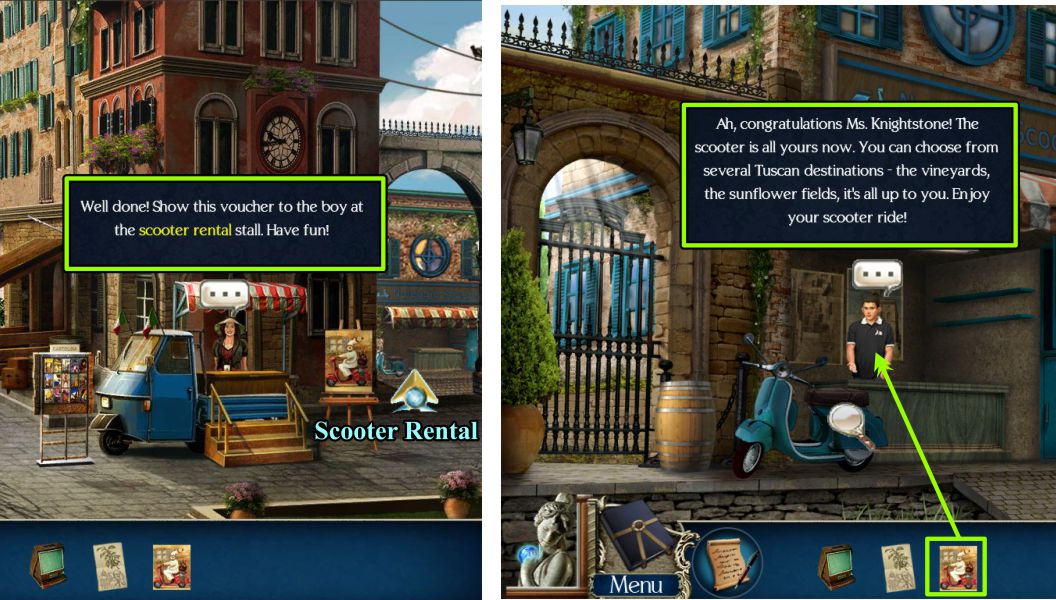
Town Center and Scooter Rental
Collect your prize and go to the Scooter Rental to claim your scooter ride.
Screenshot
Chapter 4: Monastery
Outside Monastery
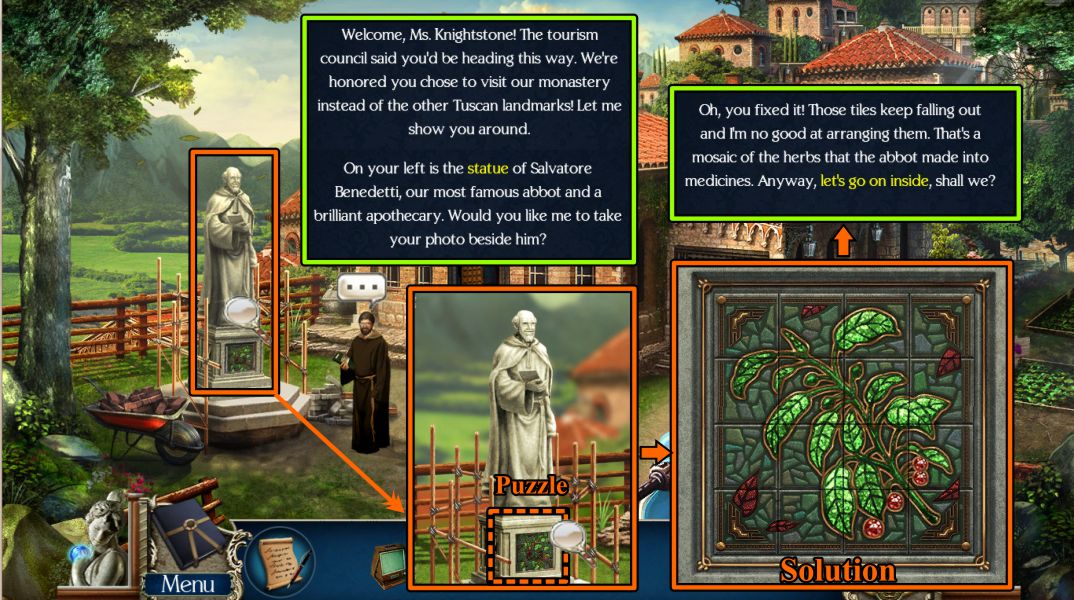
Talk to the Monk, then zoom in on the base of the statue, where he wants to take your picture, for a Puzzle.
See the screenshot for the solution.
He is happy you fixed it, so he will take you inside the Monastery.
Screenshot
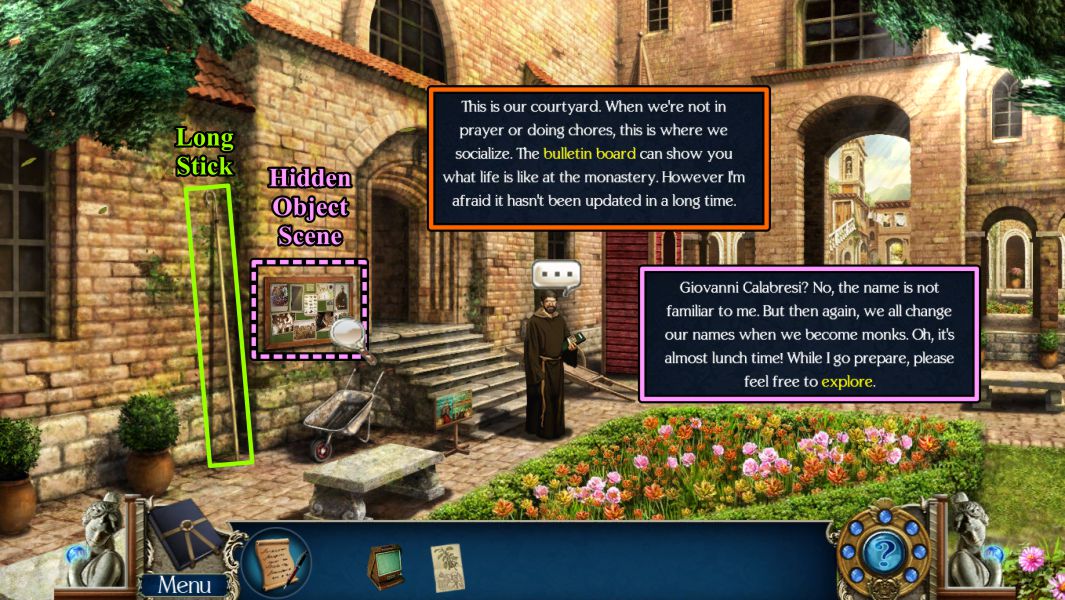
Courtyard
The Monk has more information to give you, so talk to him, pick up the Long Stick, play the Hidden Object Scene, and see what else the Monk has to say.
Screenshot
Bulletin Board Mini Game
Your goal is to determine if Giovanni has been to the Monastery: Select the objects to find out the answer.
Screenshot
Courtyard
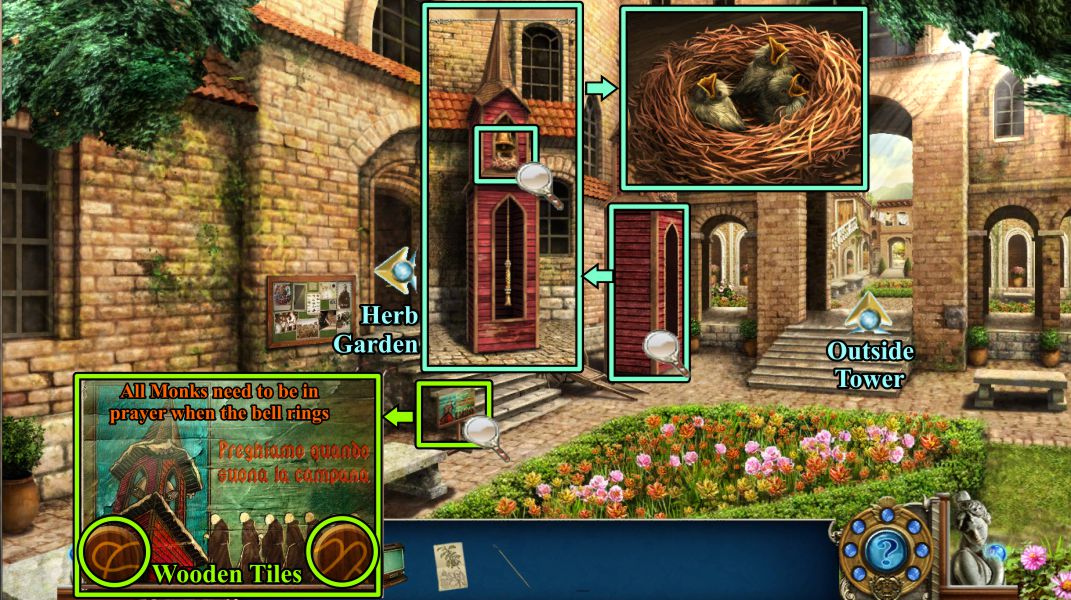
Since the Monk left, you have time to snoop around. Check out the Pray Meeting schedule and take the two Wooden Tiles.
Zoom in on the Bell Tower to find out there is a nest of baby birds: You need to find some way to save them if you are to ring the bell.
Go left to the Herb Garden.
Screenshot
Herb Garden and Outside Tower
Talk to the Gardener, then go back to the Courtyard and through the archway in the back to find yourself outside of the Tower.
You are not allowed to go upstairs according to the Monk on duty, so grab the basket, zoom in on the laundry, and use your Long Stick to grab the Blanket.
Go through the next archway to the Shady Grove.
Screenshot
Shady Grove and Courtyard
Check out all of the magnifying glasses shown in the screenshot to find the alcove is asking for your help.
First you need to get rid of the red ants to see what is going on there.
Return to the Courtyard and zoom in on the Bell Tower.
Place the Basket under it and the Blanket in the basket.
Ring the bell, and the birds will end up safely in the basket.
All the Monks are now going to prayer, so you are free to look around everywhere.
Start with the outside of the Monastery.
Screenshot
Outside of Monastery
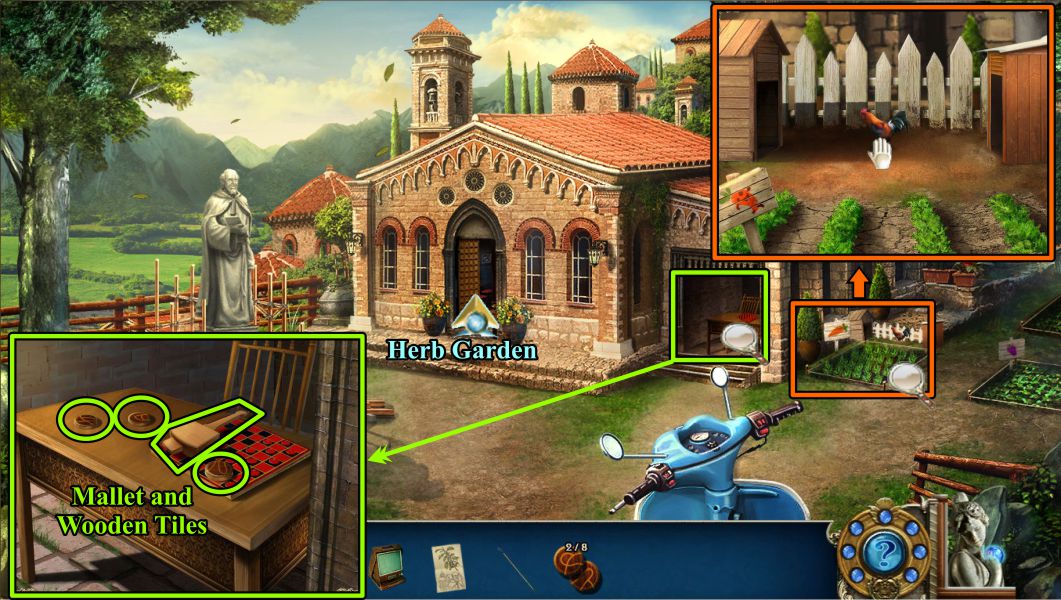
Zoom in on the alcove and take the Mallet and 3 Wooden Tiles.
Zoom in on the vegetable garden, try to catch the Rooster, and then go to the Herb Garden.
Screenshot
Herb Garden and Tower Door
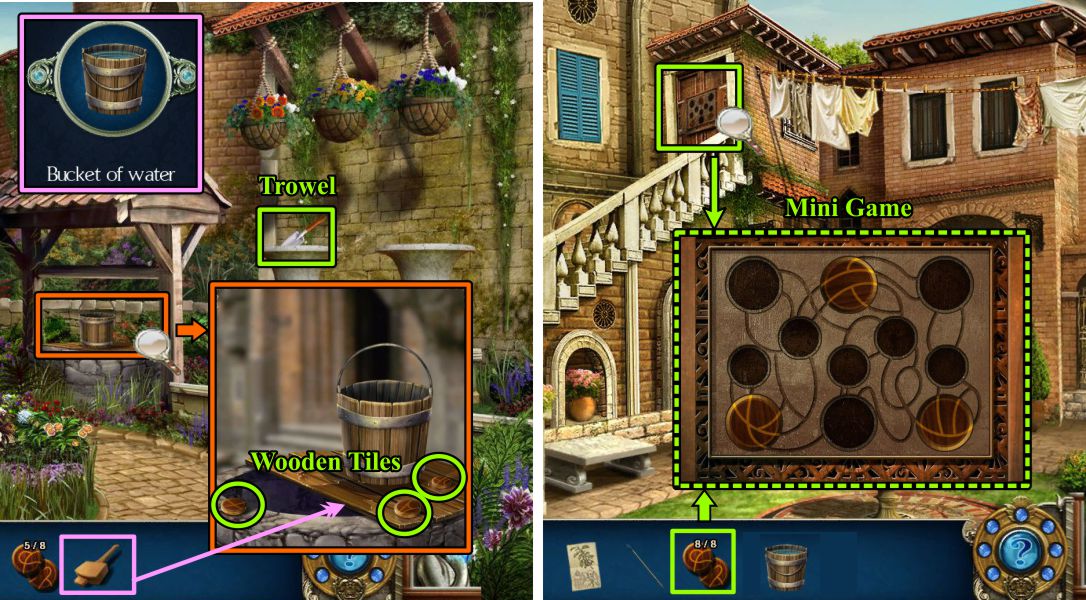
Pick up the Trowel and zoom in on the well.
Take the 3 Wooden Tiles, then use the Mallet to smash the boards under the bucket.
You will get a Bucket of Water for your Inventory.
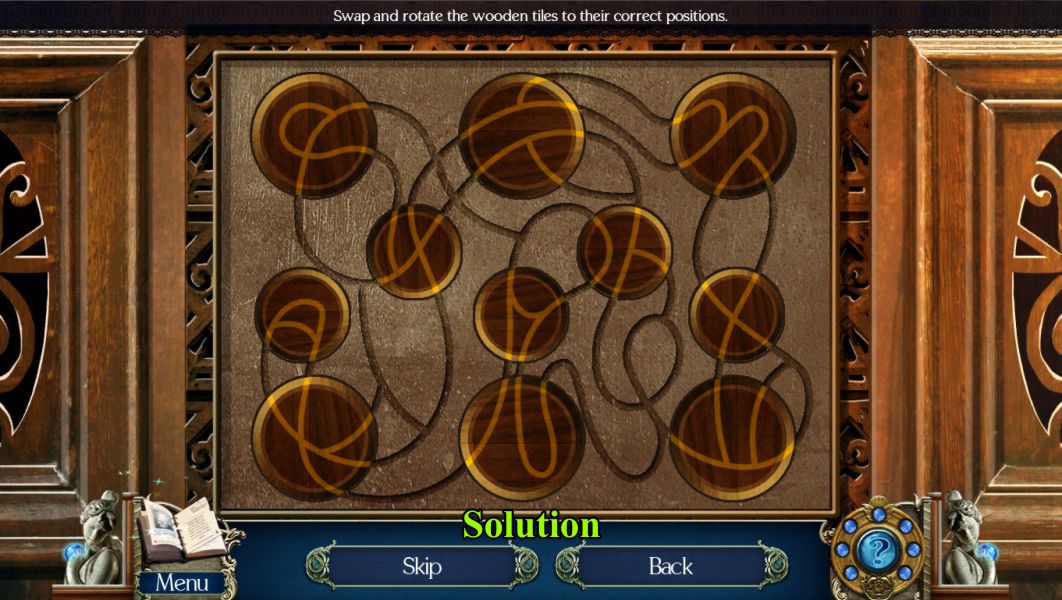
Go to the Tower and upstairs to the door.
Place your Wooden Tiles to trigger a Mini Game.
Screenshot
Tower Door Mini Game
Your goal is to swap and rotate the Wooden Blocks to connect the scheme, as shown in the screenshot.
The door will open, so enter.
Screenshot
Tower
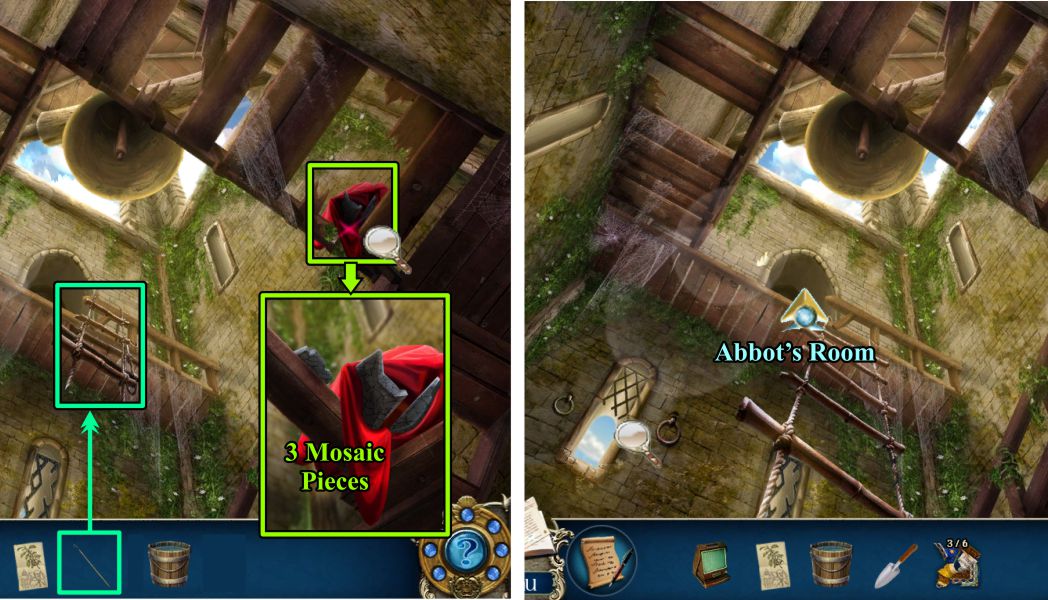
Zoom in and get the 3 Mosaic Pieces.
Place the Long Stick on the ladder to extend it so you can climb up to the Abbot's Room.
Screenshot
Abbot's Room and Outside Tower
The ghost of the Abbot appears and doesn't seem too happy about Dana's presence.
When he disappears, check out all the magnifying glasses in the screenshot, and pick up the Supply Cabinet Key from the table.
Go outside the Tower, then open the supply cabinet with the Key you found.
Take the Glue and Oil can, then go to the Herb Garden.
Screenshot
Herb Garden, Shady Grove, and Abbot's Room
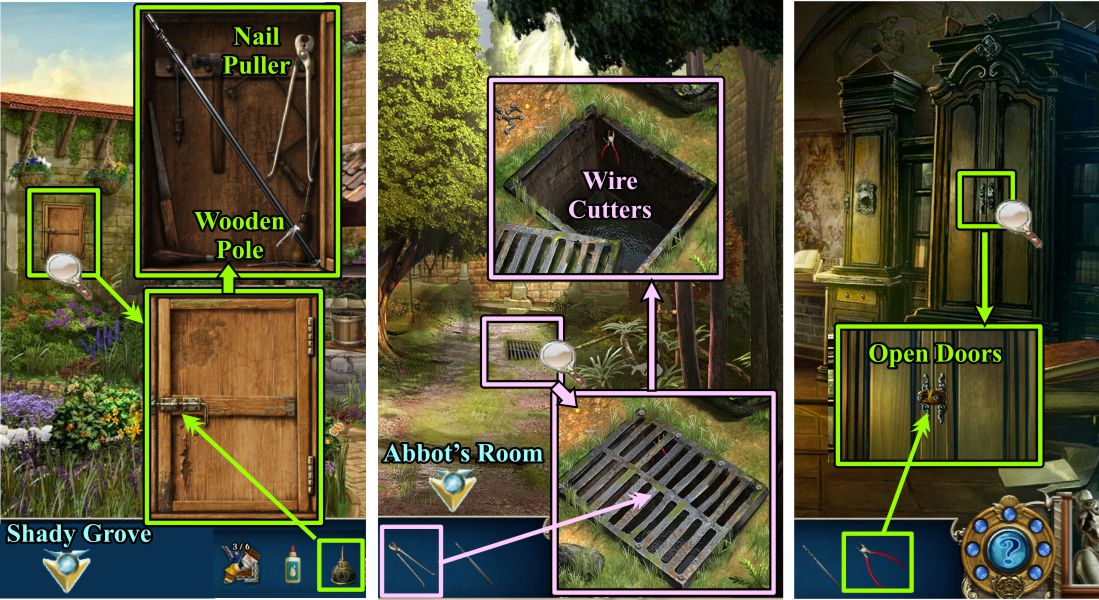
Zoom in on the Tool Cabinet and use some oil to remove the rust and open it.
Take the Nail Puller and Wooden Pole, then go to Shady Grove.
Zoom in on the grate and use the Nail Puller to open it and get the Wire Cutters.
Go to the Abbot's Room and zoom in on the cabinet.
Use the Wire Cutters to open it.
Screenshot
Abbot's Room
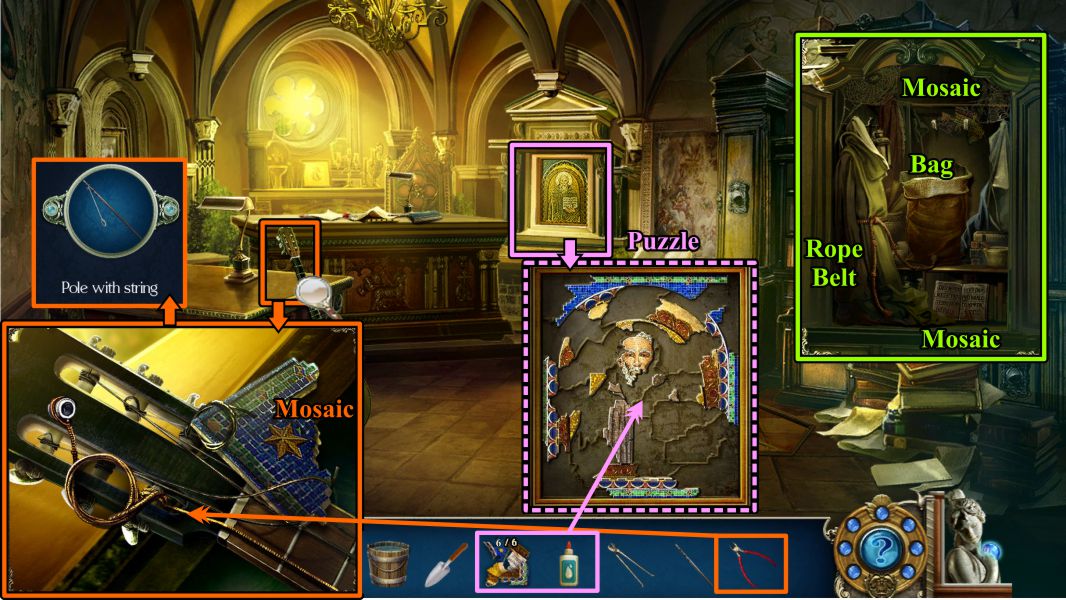
Take the 2 Mosaic pieces, Bag and Rope Belt from the opened cabinet.
Zoom in on the guitar, take the Mosaic, and use your Wire Cutters to clip the string.
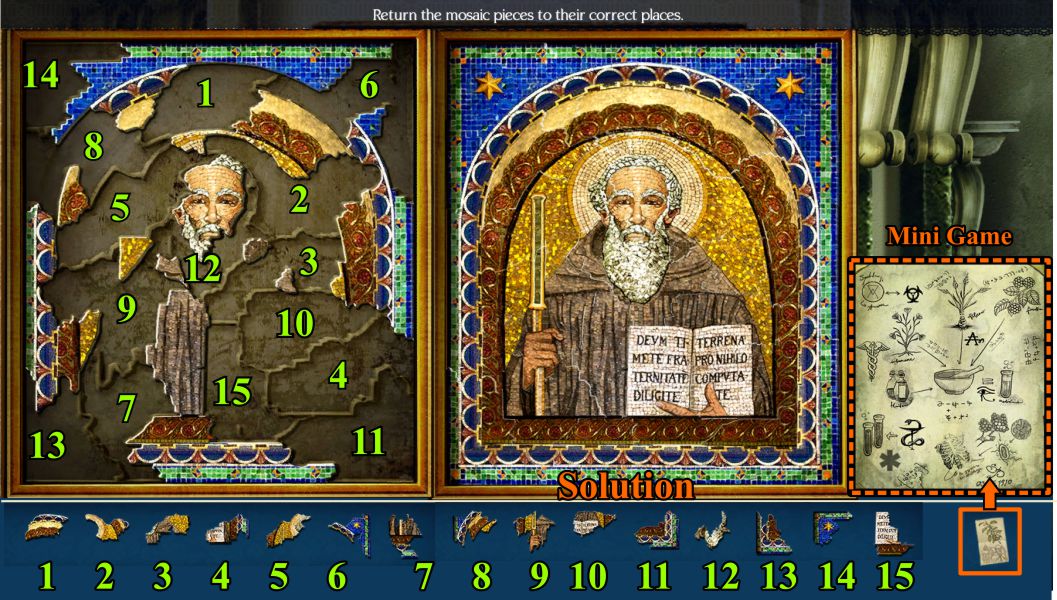
Now that you have all the Mosaic pieces, zoom in on the Mosaic and place the Glue and Mosaic pieces to trigger a Puzzle to put it back together.
Screenshot
Mosaic Puzzle
See the screenshot for a numbered solution.
Note that your pieces may not appear in the same order as mine, so match the shapes.
You will get a copy of the Cure Formula at the end of the game.
Screenshot
Formula Mini Game
Place your copy of the formula with the one you have from the Abbot and compare both formulas for differences.
Mark the left formula with the differences, as shown in the screenshot.
You have discovered a forged formula.
Screenshot
Abbot's Room
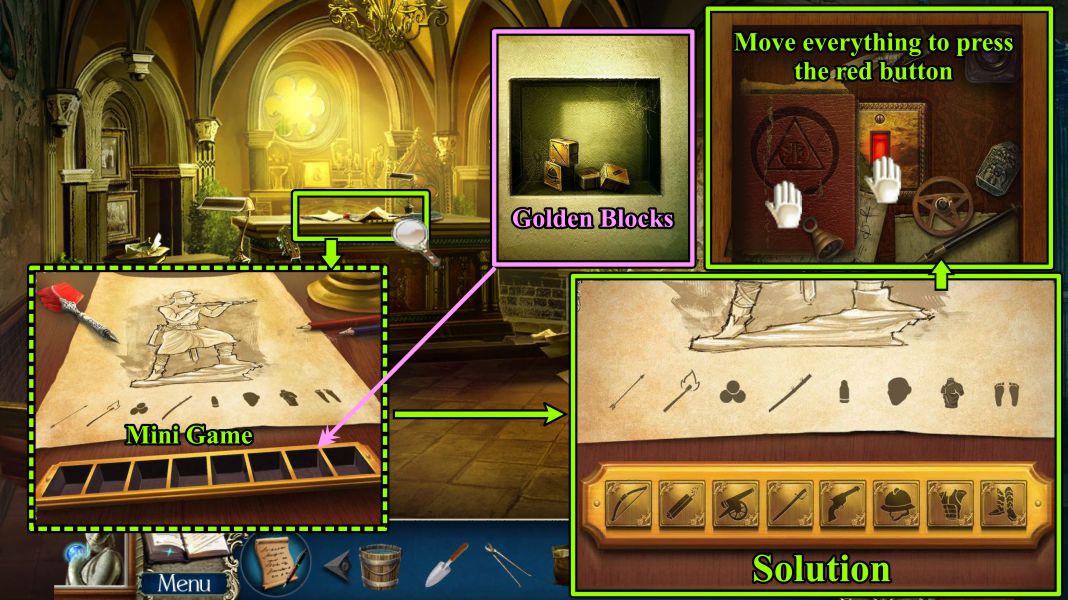
You will receive some Golden Blocks after the Mini Game: Zoom in on the desk and place them for another Mini Game.
Your goal is to match the blocks to their related items in the drawing: See the screenshot for the solution.
After the game, you will need to move everything in the way so you can get to the Red Button and press it.
Screenshot
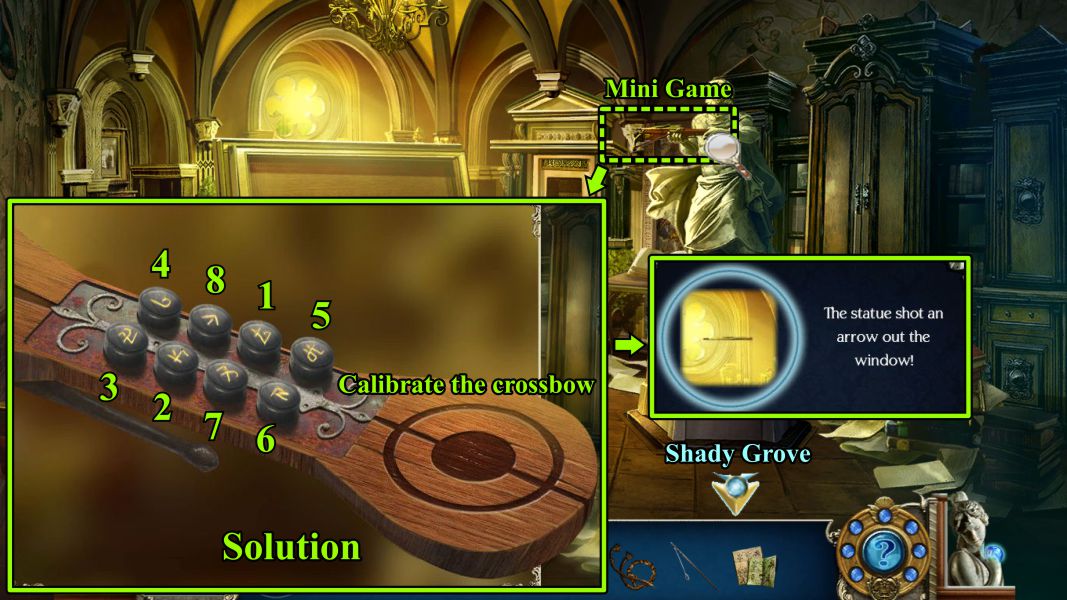
A statue of an archer will appear from the floor.
Zoom in on the Crossbow he is holding and play a Mini Game to calibrate the bow.
See the screenshot for the solution.
The statue shoots the arrow out the window, so go to Shady Grove to see where it lands.
Screenshot
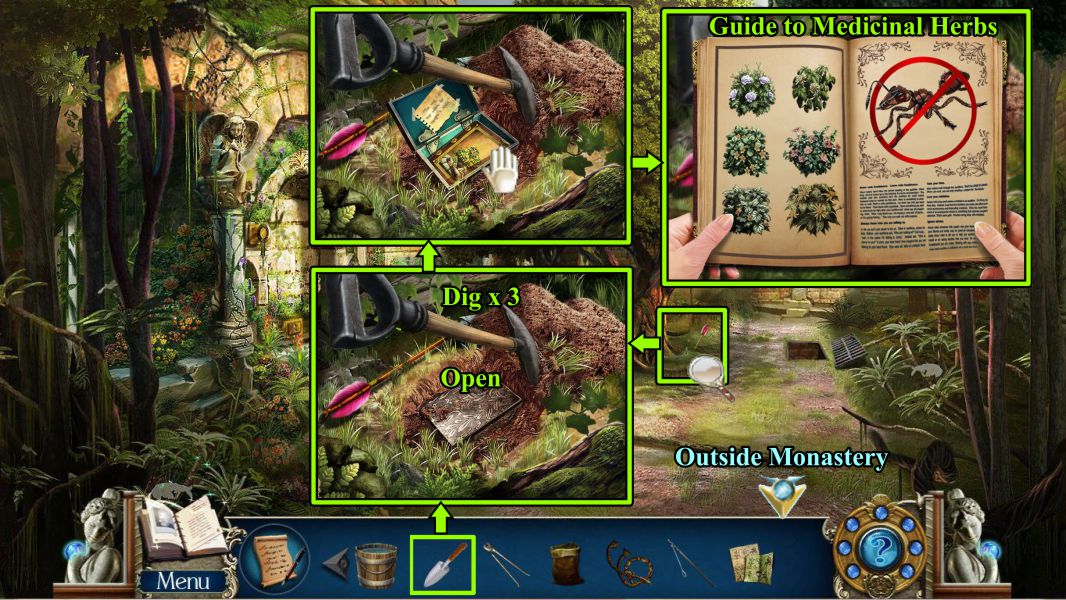
Shady Grove
Zoom in on the arrow and use your Trowel to dig up the dirt 3 times.
Open the box you find and take the Guide to Medicinal Herbs.
Go outside of the Monastery.
Screenshot
Outside Monastery and Herb Garden
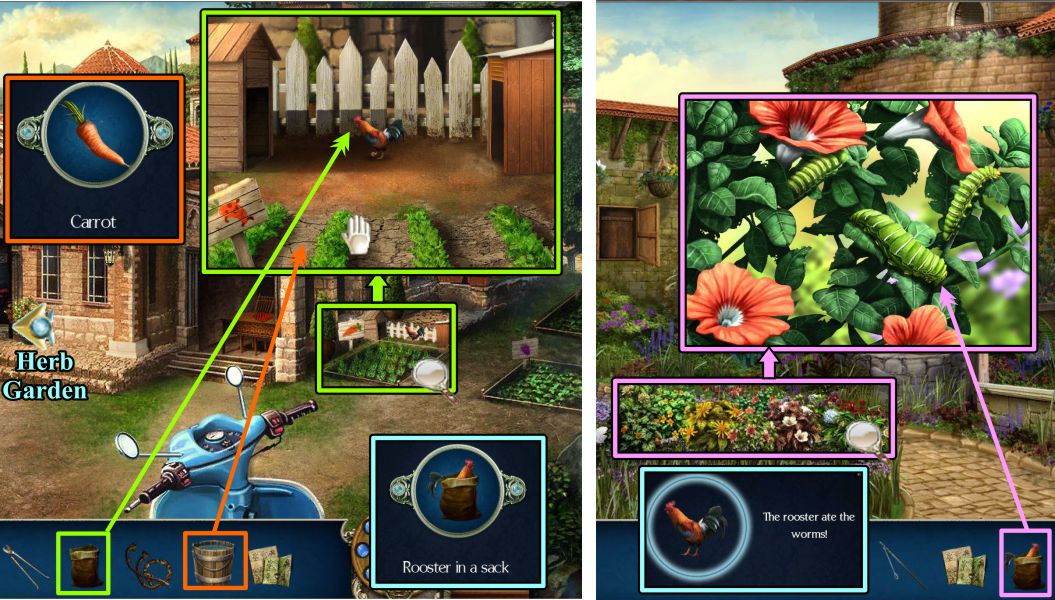
Zoom in on the vegetable garden and use your bag to catch the Rooster.
Water the carrots and pick one when the ground gets wet.
Go to the Herb Garden and zoom in on the herbs.
Place the Rooster to eat the worms.
Zoom in again on the garden for a Mini Game.
Screenshot
Herb Mini Game
Match the flowers in the herb garden to the pictures in your taskbar.
See the screenshot for the solution. You will be rewarded with a bouquet of natural ant killer.
Go to the Tower.
Screenshot
Tower and Shady Garden
Zoom in on the window with the rings, then use your Nail Puller to remove the Rings from the wall.
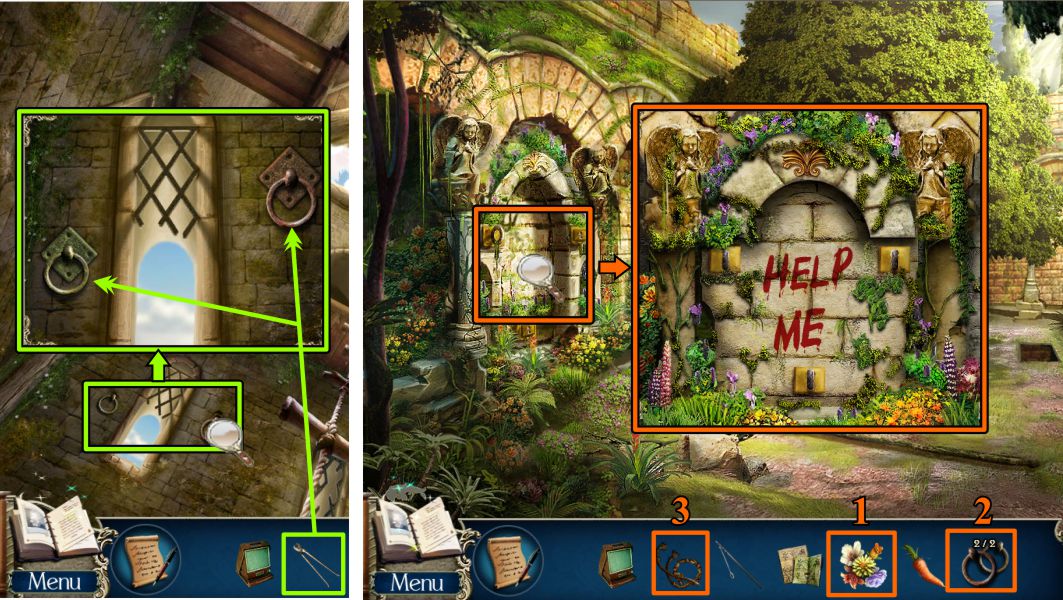
Continue on to the Shady Garden and zoom in on the wall with the "Help Me" written on it.
Place the herbal bouquet to get rid of the red ants.
Put the Ring in the place and attach the Rope Belt to the Rings.
Screenshot
Shady Grove Donkey
Zoom in on the Donkey who is not attached to the wall with the ropes.
Place the Pole with String on the Donkey and the carrot in the loop.
The Donkey will follow the carrot and rip an opening in the wall that appears to be a crypt.
Zoom in and play the Hidden Object Scene.
Screenshot
Crypt Hidden Object Scene
Dana thinks she has found Giovanni, so collect all the object shapes to get the Evidence.
See the screenshot for the location of the objects, and collect the Microfiche along with the Evidence.
Screenshot
Posted by: Jazz |
November 25, 2011 10:16 AM
|
November 25, 2011 10:16 AM
Death Under Tuscan Skies: A Dana Knightstone Novel
Chapters 5 and 6 Walkthrough
Chapter 5: The University Grounds
Outside University Buildings
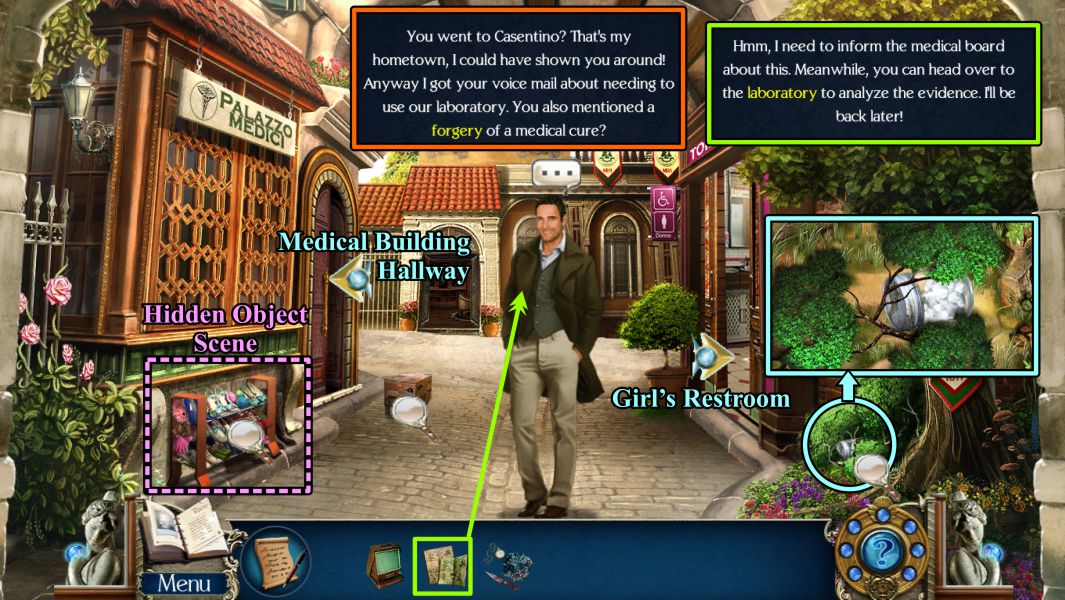
Professor Romano greets Dana upon her return and has a few things to talk about. Give him the Fake Formula, and he will be off to see about the forgery.
He will give you access to the Lab, but first, you need to check out some things in your current location.
Zoom in at the right and take the Cotton.
When Professor Romano leaves, zoom in on the shoes at the right for a Mini Game.
Also note the entrances to the Medical Building and the Girl's Restroom.
Screenshot
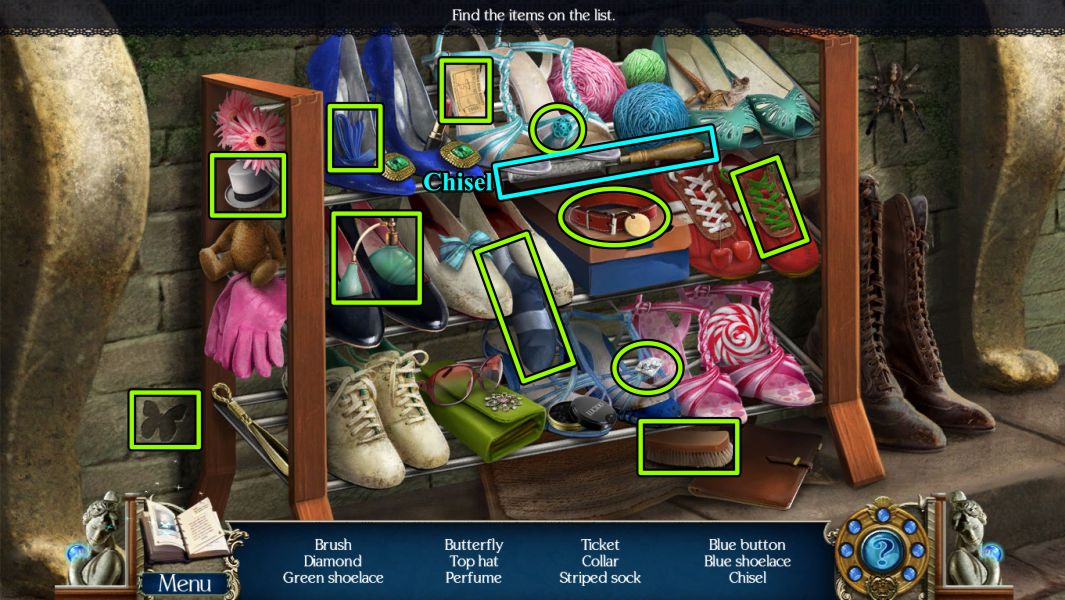
Shoes Mini Game
See the screenshot for the objects you need to find.
Screenshot
Medical Hallway
Check out the magnifying glasses in the screenshot, then go forward to the Laboratory.
Screenshot
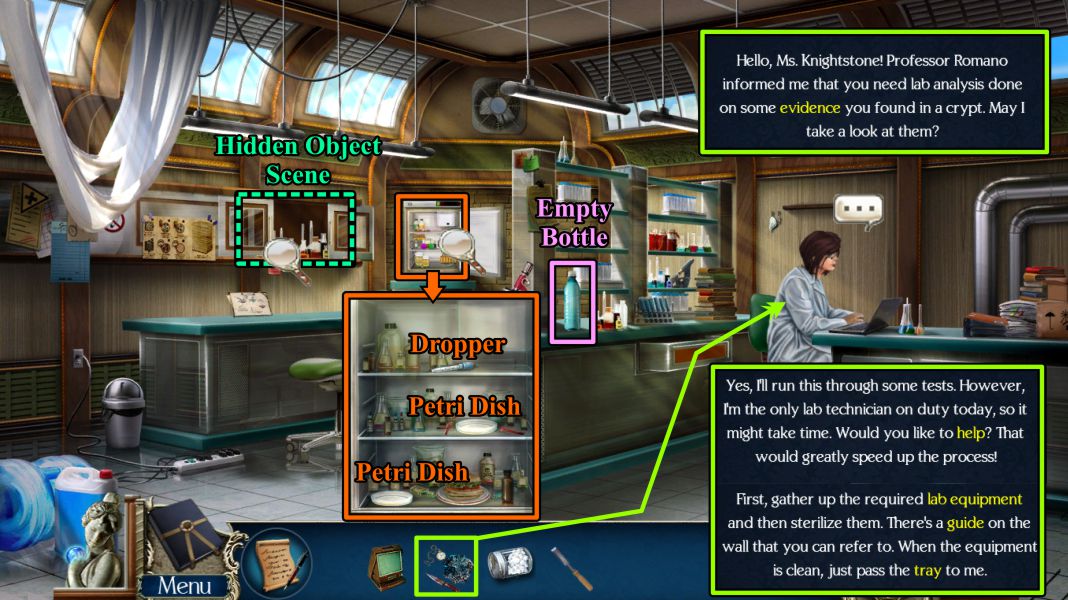
Laboratory
Talk to the Lab Assistant, who will tell you what is needed to help you with your search.
Collect the Empty Bottle, zoom in on the refrigerator and collect the Dropper, and two Petri Dishes.
Zoom in on the cabinet in the back for a Hidden Object Scene.
Screenshot
Cabinet Hidden Object Scene
You need to collect the items that will help you sterilize the items to give to the Lab Assistant.
Pick up the items that relate to the silhouettes.
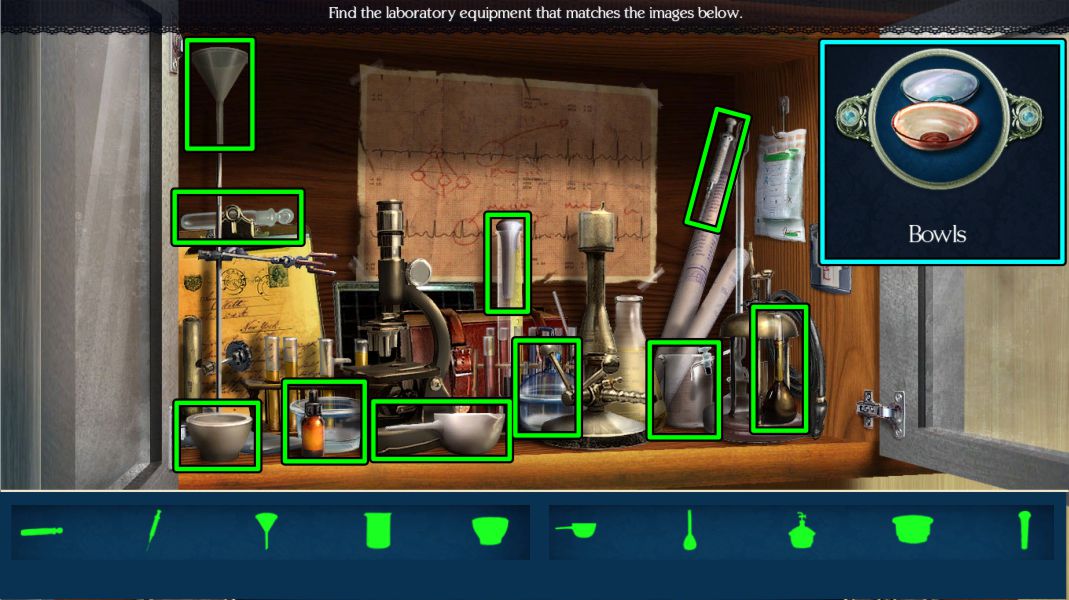
See the screenshot for the solution. When you complete the game, you will get two bowls.
Screenshot
Laboratory
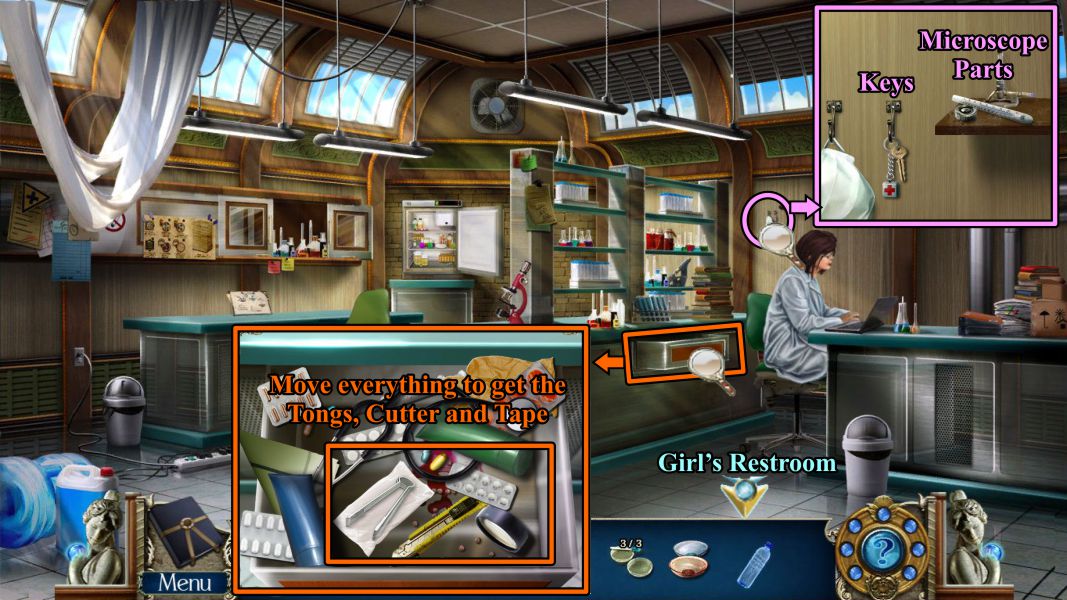
Zoom in on the wall next to the Lab Assistant and take the Keys and Microscope Parts.
Zoom in on the drawer just to the left of her and move everything around until you find the Tongs, Cutters, and Tape.
Go to the Girl's Restroom.
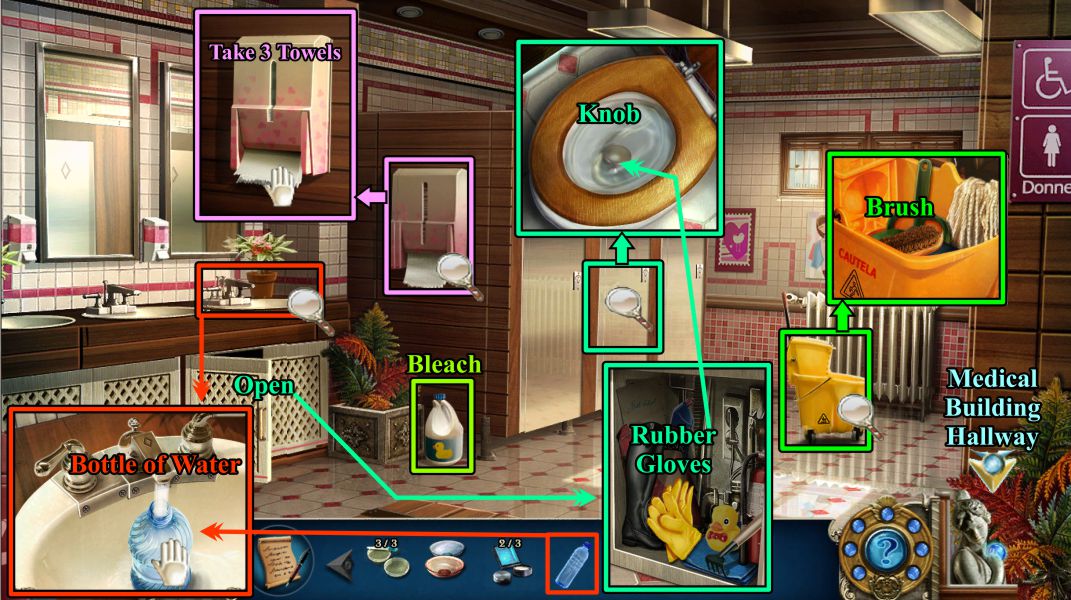
Screenshot
Girl's Restroom
Zoom in on the towel container and take 3 towels.
Zoom in on the cart and take the Brush.
Pick up the Bleach, then open the cabinet under the sink.
Take the Rubber Gloves, then zoom in on the toilet doors to use the rubber gloves to collect the Knob.
Zoom in on the sink and place the Empty Water Bottle to fill it.
Collect it and go to the outside of the Medical Building.
Screenshot
Outside Medical Building, Medical Hallway, and Laboratory
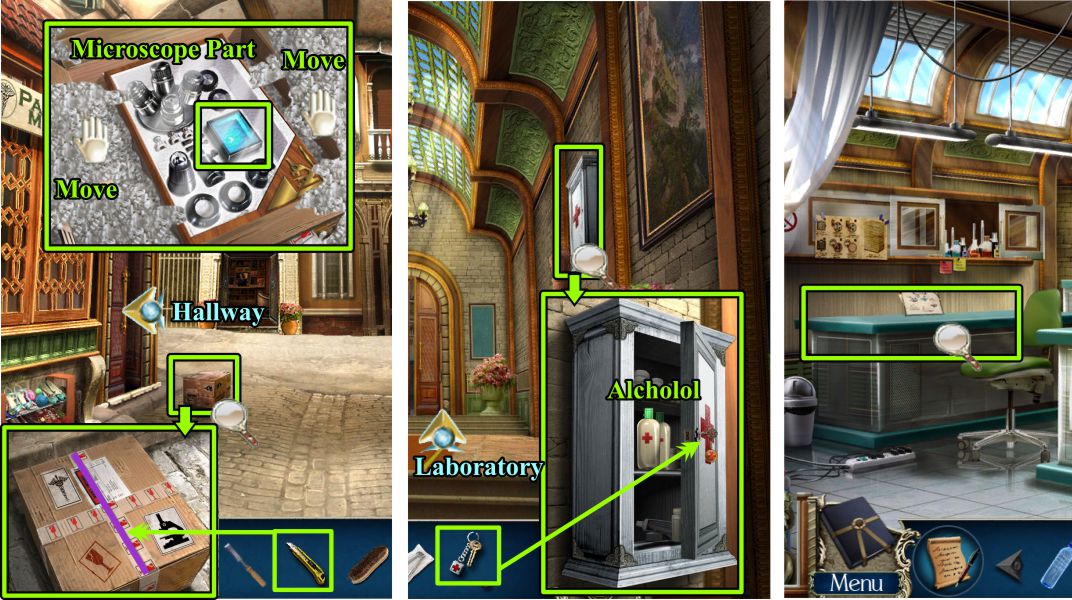
Zoom in on the box and use your Cutter to open it on the dotted line.
Move the bubble wrap to find the Microscope Part shown in the screenshot.
Go inside to the Hallway and zoom in on the Medical Cabinet.
Use the Key to open it and take the Alcohol.
Return to the Laboratory and zoom in on the table at the left.
Screenshot
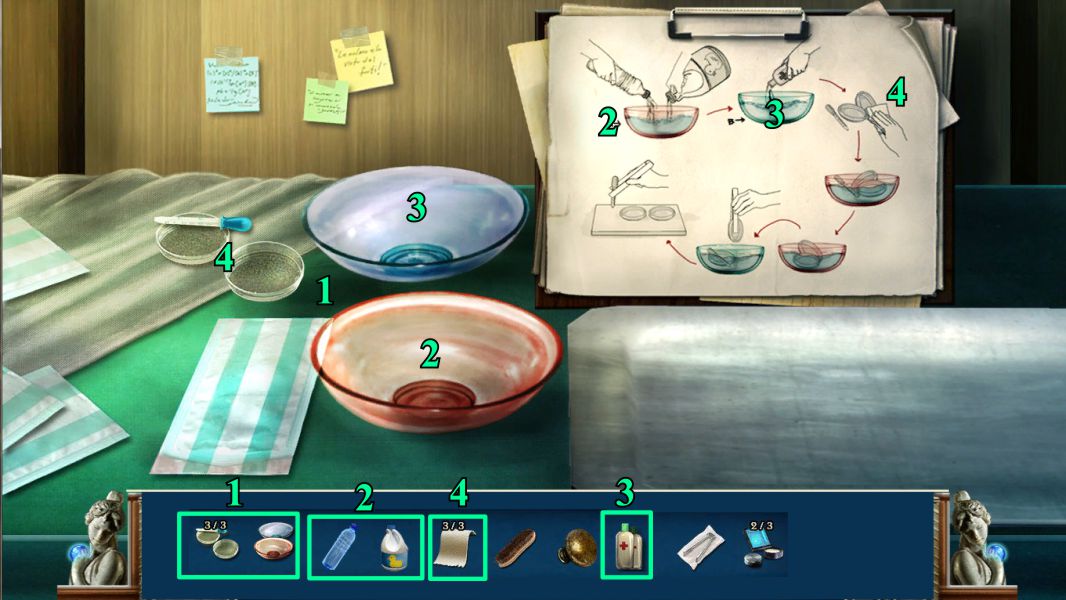
Sanitize the Equipment
Place the Bowls, Petri Dishes, and Dropper on the table.
Pour the Bleach and Bottle of Water into the red bowl.
Pour the Alcohol into the blue bowl.
Use the Towels to wipe off the Petri Dishes and Dropper.
Screenshot
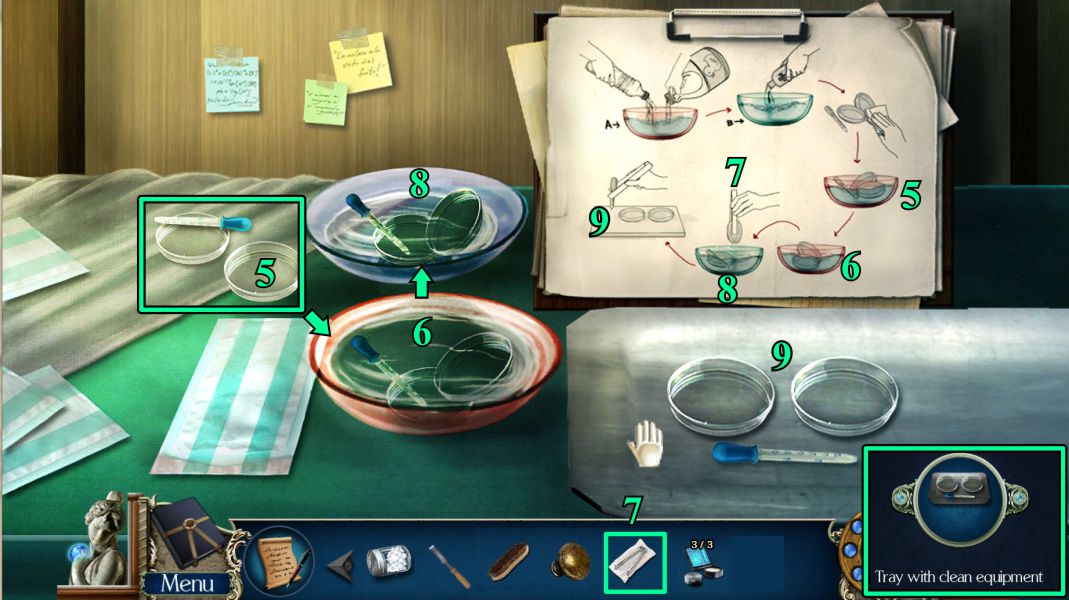
Place the equipment in the red bowl.
Use the Tongs to move the equipment to the blue bowl.
Use the Tongs to transfer the equipment to the tray.
Collect the Tray with clean equipment.
Screenshot
Laboratory and Microscope Mini Game
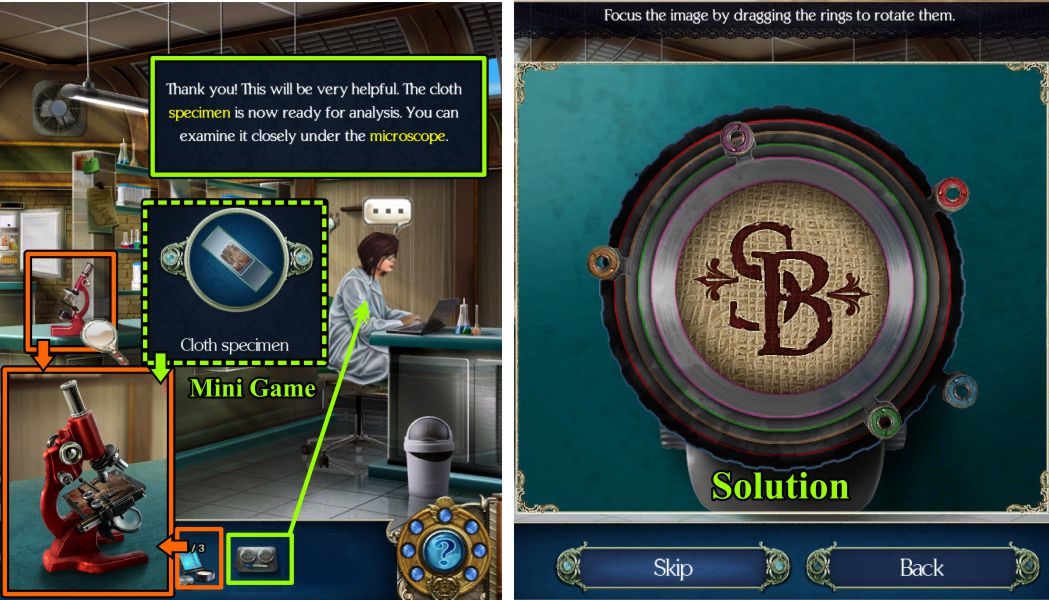
Give the Tray to the Lab Assistant, who will give you the cloth specimen.
Zoom in on the Microscope, repair it with the missing parts, and place the cloth specimen to trigger a Mini Game.
Your goal is to focus the Microscope by dragging the rings to rotate the parts of the image. See the screenshot for the solution.
Screenshot
Lab Assistant and Hallway
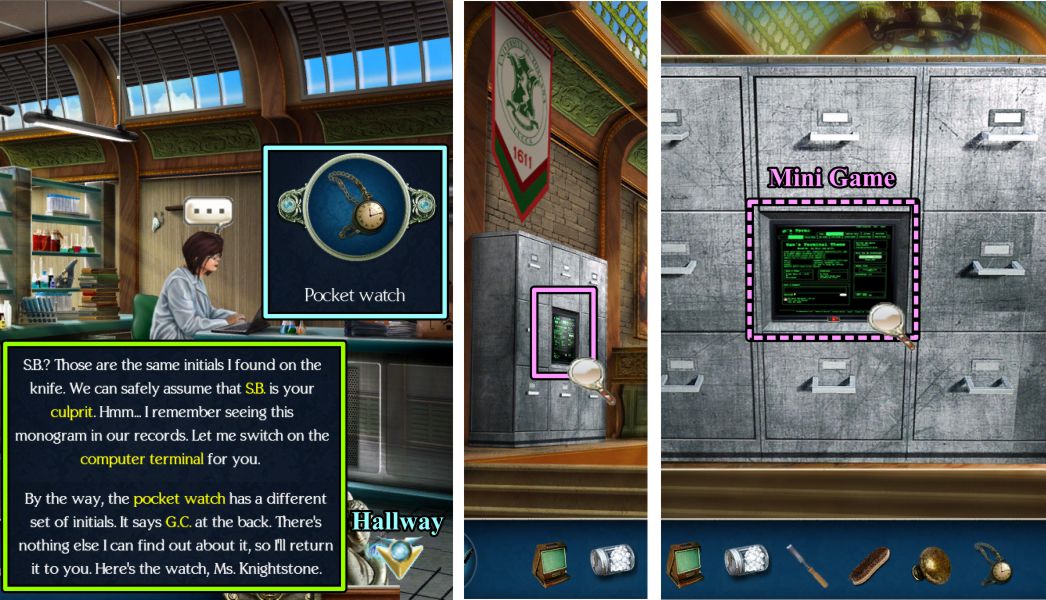
The Lab Assistant switches on the Computer Terminal for you so you can look up SB.
She also gives you the pocket watch with the initials GC on it.
Zoom in on the Records Cabinet, then on the Computer Terminal for a Mini Game.
Screenshot
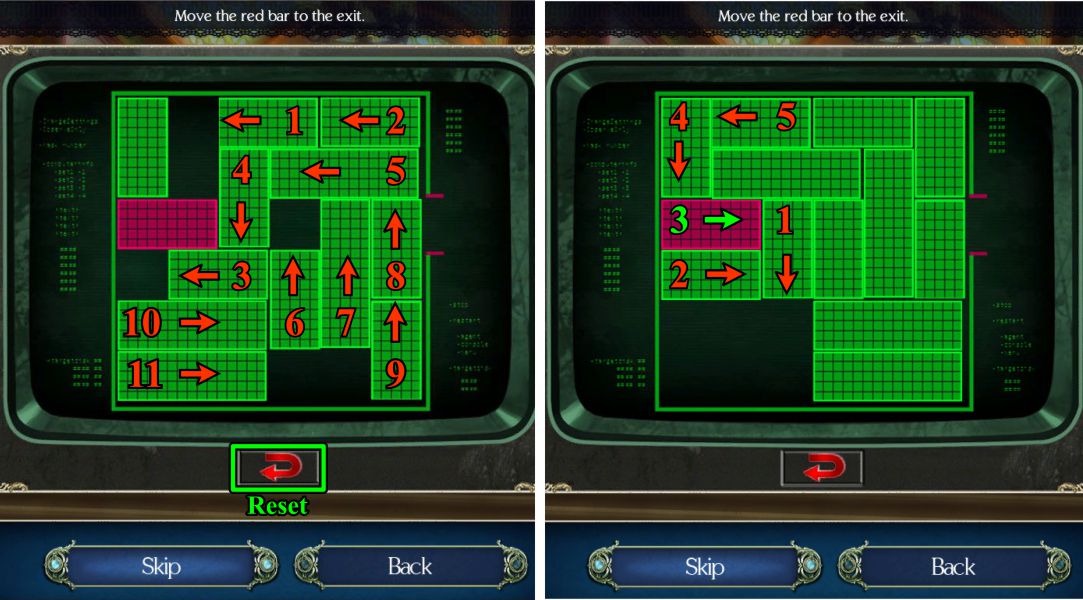
Computer Terminal Mini Game
Your goal it to move the red bar horizontally across the terminal to the exit.
There is a Reset button if you need to start over.
See the screenshot for the first part of a step-by-step solution.
Screenshot
The step-by-step solution continues in this screenshot.
Screenshot
See the screenshot for the completion of the step-by-step solution.
Screenshot
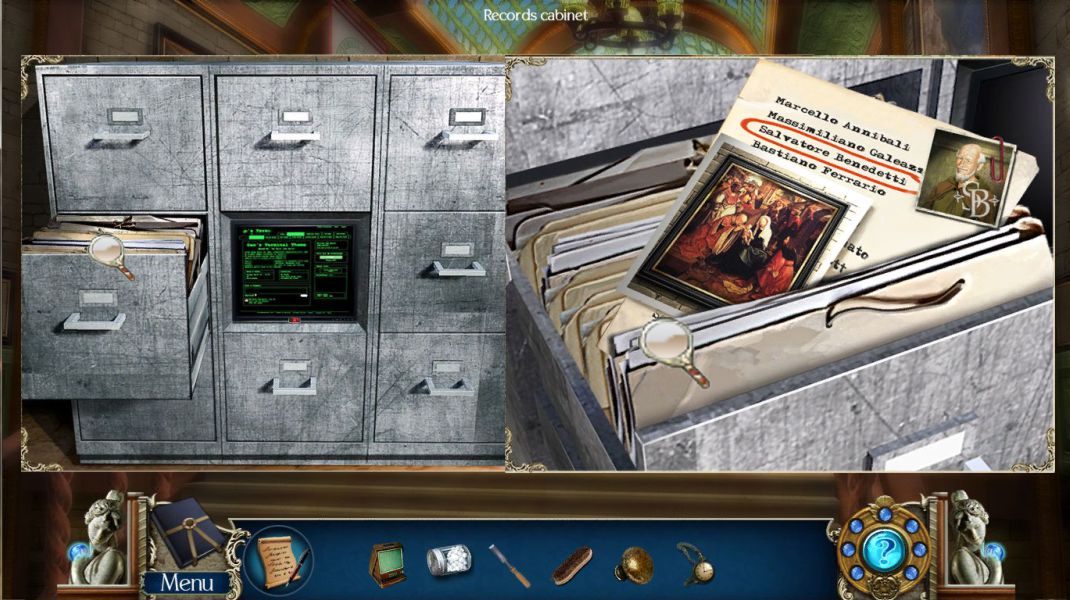
Records Cabinet
The file drawer at the left open, so zoom in to see that SB is Salvatore Benedetti, the Abbot.
Screenshot
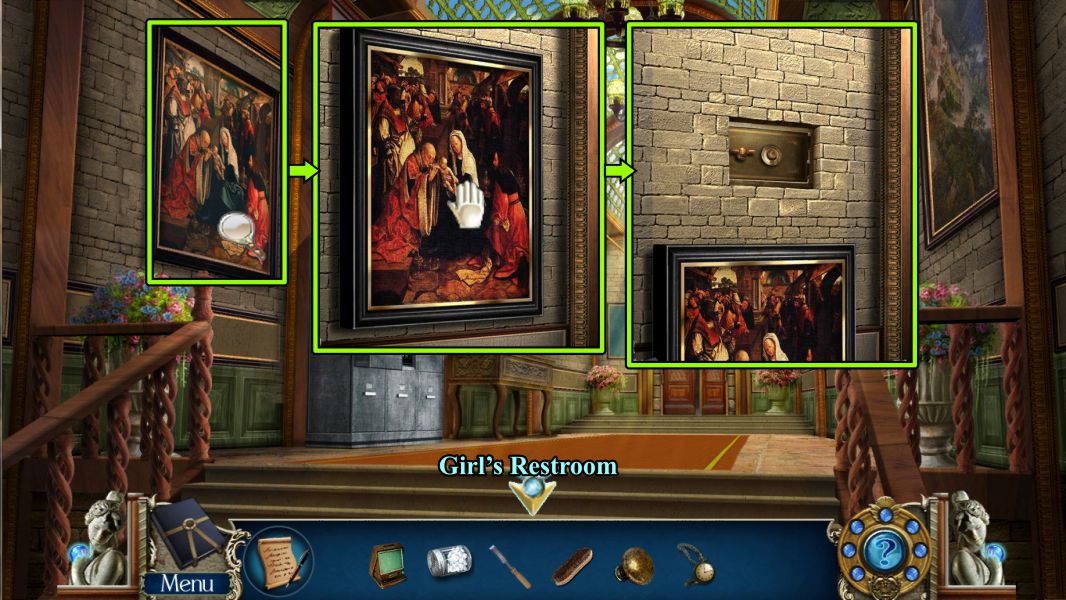
Painting
Zoom in on the painting to the left and move it to discover a safe.
Go to the Girl's Restroom.
Screenshot
Girl's Restroom and Medical Hallway
Zoom in on the basin, place your dirty knob, and take the Clean Knob.
Return to the Medical Hallway, zoom in on the table to the right of the cabinet, and open it with the Knob.
Take the Thinner, then zoom in on the painting and use the Thinner.
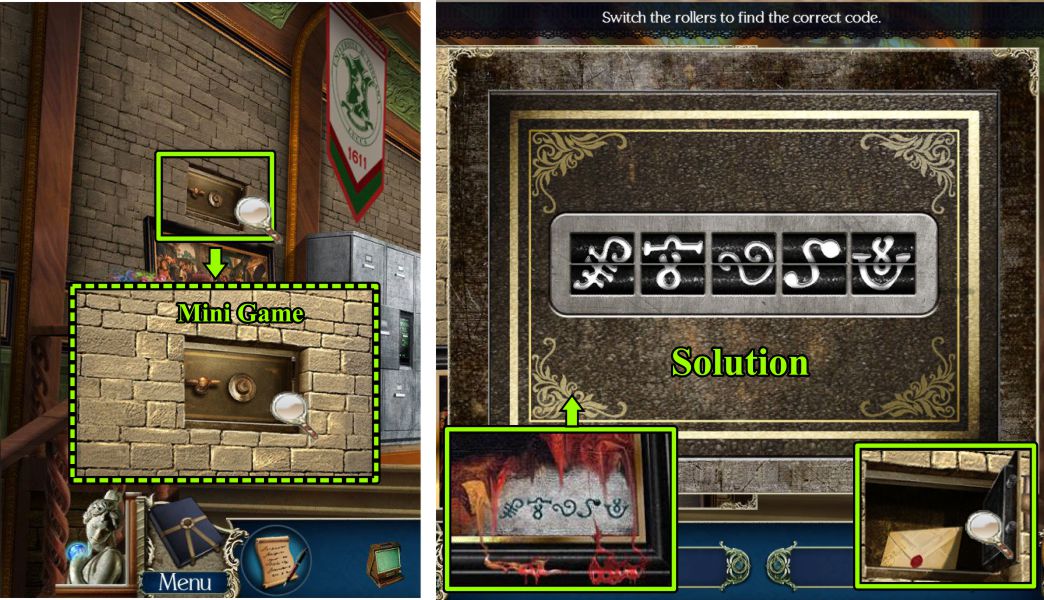
Use the Cotton after the Thinner to discover a code.
Screenshot
Safe Mini Game
Zoom in on the safe, then zoom in again for the Mini Game.
Move the top and bottom sections of the roller to match the code from the painting.
Take the envelope inside the open safe.
Screenshot
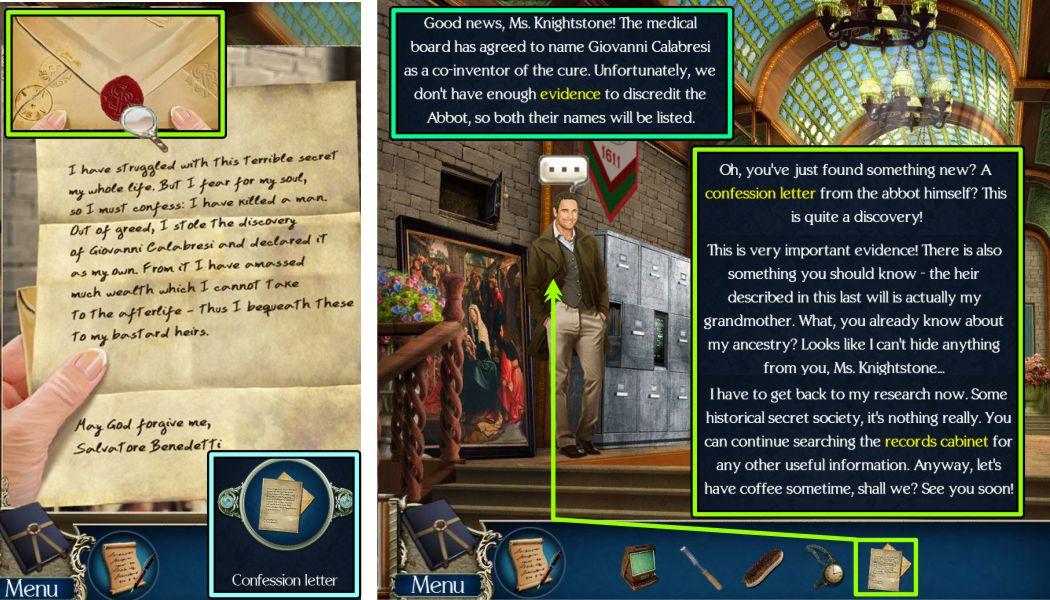
Confession
Open the envelope and read the Abbot's confession.
Professor Romano appears with news about the formula. Give him the Confession Letter, and he will suggest Dana continue her search for additional useful information.
Screenshot
Records Cabinet
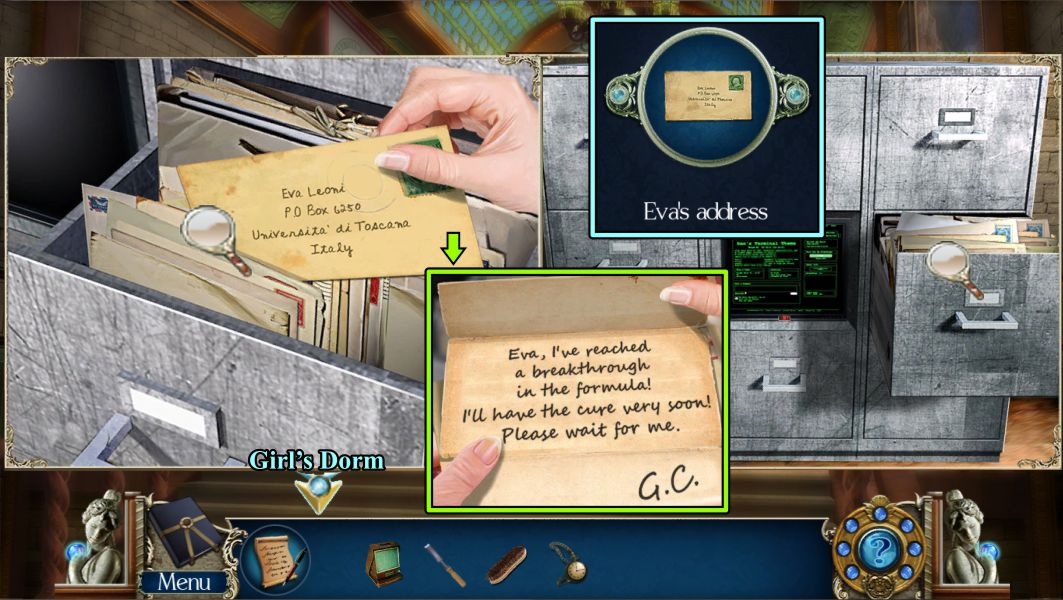
Zoom in twice on the right file drawer, take the letter to Eva and read it.
You now have Eva's address, so go to the Girl's Dorm.
Screenshot
Girl's Dorm and Outside
Talk to the Student Representative and give her Eva's Address.
Zoom in on the loose floorboard and use your Chisel to remove it. There is a bottle with a key in it.
Go outside and zoom in on the wall next to the Girl's Restroom.
Use the Chisel to remove the loose Brick.
Return to the Dorm.
Screenshot
Girl's Restroom
Zoom in on the bottle in the floor, use the Brick to smash it, and take the Key.
Zoom in on the Post Boxes and use the Key to open Box 6250.
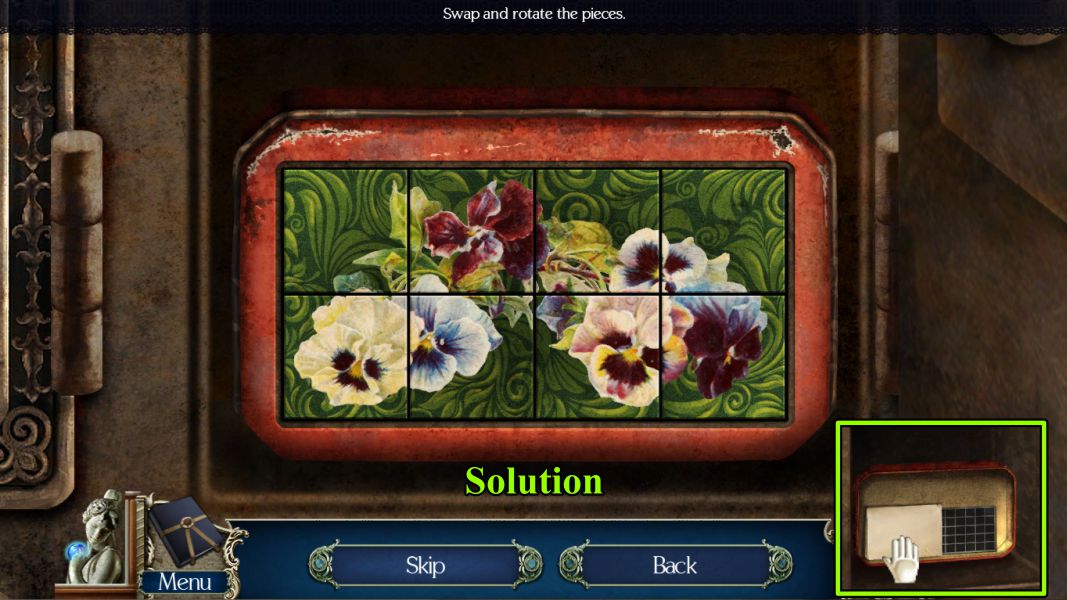
Use your Brush to clean off the dirty box inside, then zoom in for a Mini Game.
Screenshot
Eva's Box Mini Game
Exchange the tiles on the box, rotating when necessary, to look like the image in the screenshot.
Take the letter.
Screenshot
Box Contents
Read the letter and use your Portable Microfiche Reader on the Microfiche.
Screenshot
Chapter 6: Cathedral
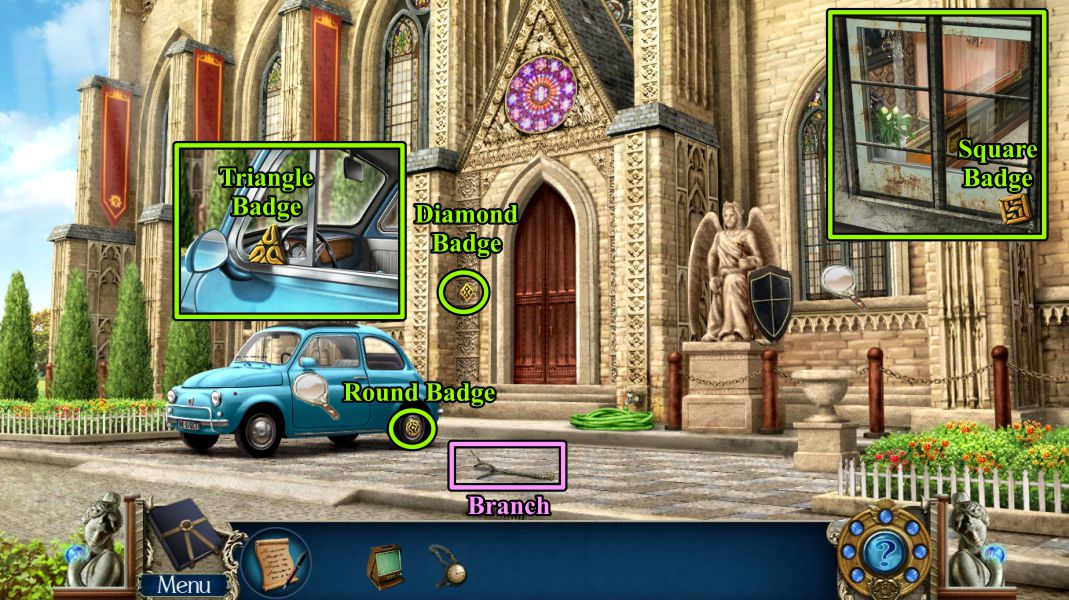
Outside Cathedral
Collect the Branch and all the Badges shown in the screenshot.
Screenshot
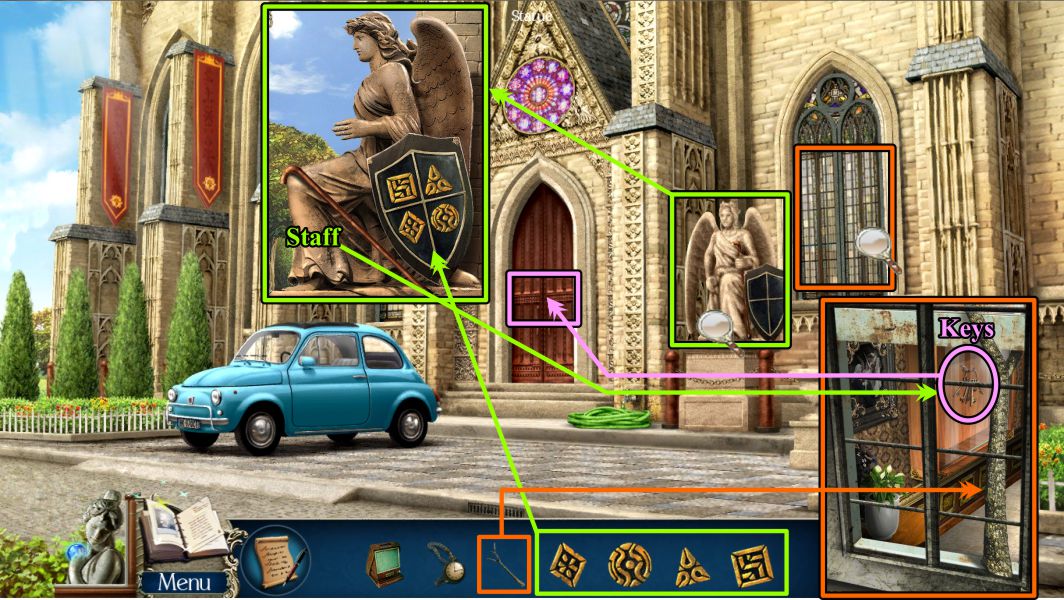
Zoom in on the statue and place the 4 Badges, as shown in the screenshot.
Take the Staff you loosen, then zoom in on the window.
Use the Branch to prop the window open and hook the Keys with the Staff.
Place the Keys on the Cathedral door to trigger a Mini Game.
Screenshot
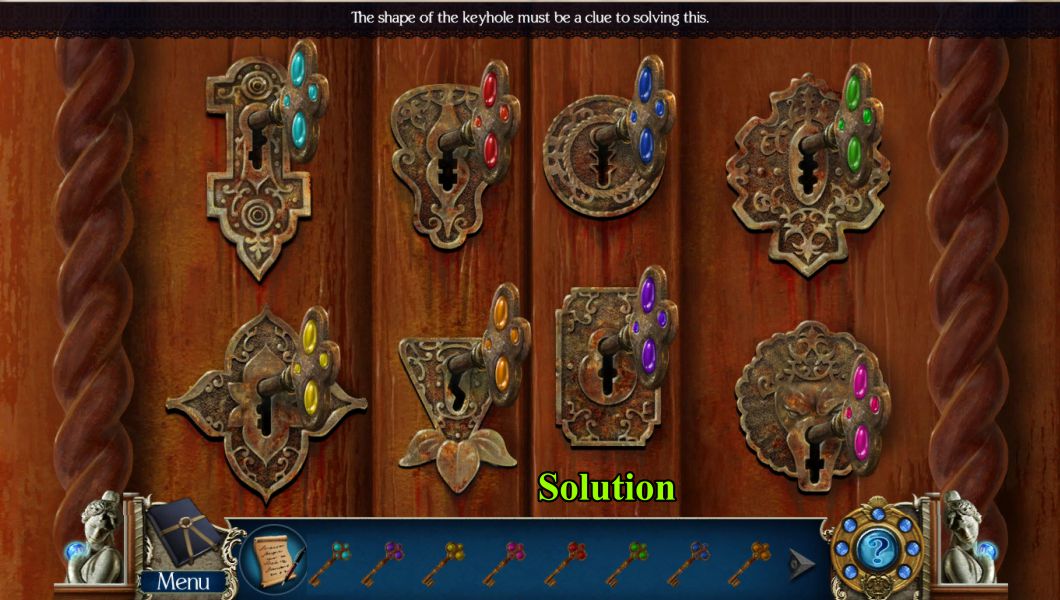
Cathedral Door Mini Game
Place the Keys in the keyholes, as shown in the screenshot.
Screenshot
Cathedral
Zoom in on the front pew and take the Car Keys.
Pick up the Vase, then zoom in on the organ to pick up a Cube and Code page.
Play the Hidden Object Scene, then go Outside.
Screenshot
Choir Area Hidden Object Scene
Collect 5 each of wind, string, and percussion instruments, as marked in the screenshot, to get a Trumpet for your Inventory.
Screenshot
Outside and Inside the Cathedral
Zoom in and use the Key to unlock the car.
Take the Spark Plug, Cube, and Harp.
Return to the Cathedral.
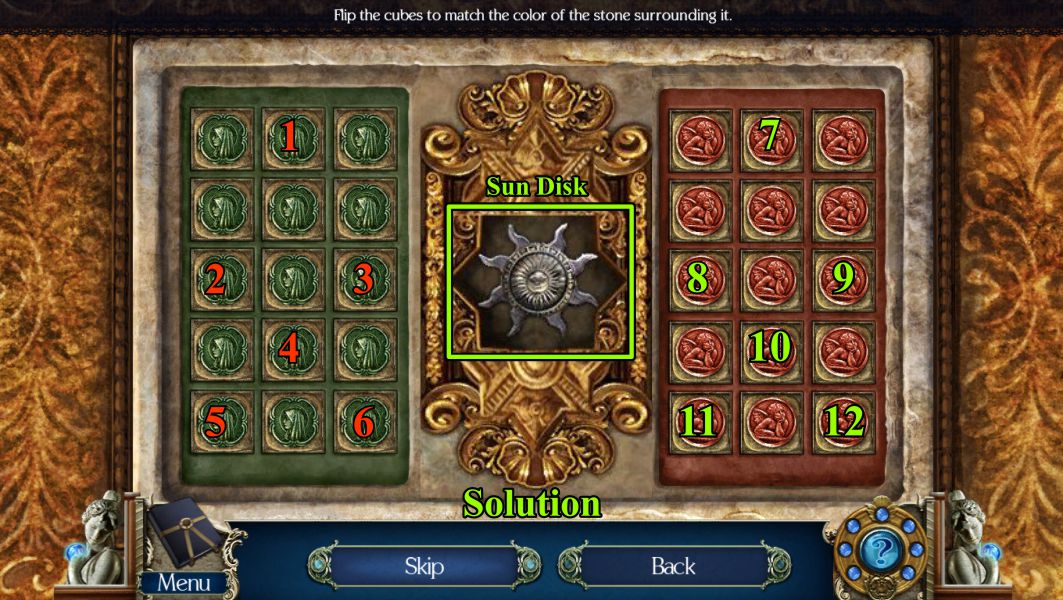
Zoom in on the Altar and place the two Cubes to trigger a Mini Game.
Screenshot
Altar Mini Game
Your goal is to turn the cubes so the green ones are on the left and the red ones on the right.
Each cube turns another cube. See the screenshot for which cubes to press.
Take the Sun Disk when the center opens.
Screenshot
Cathedral
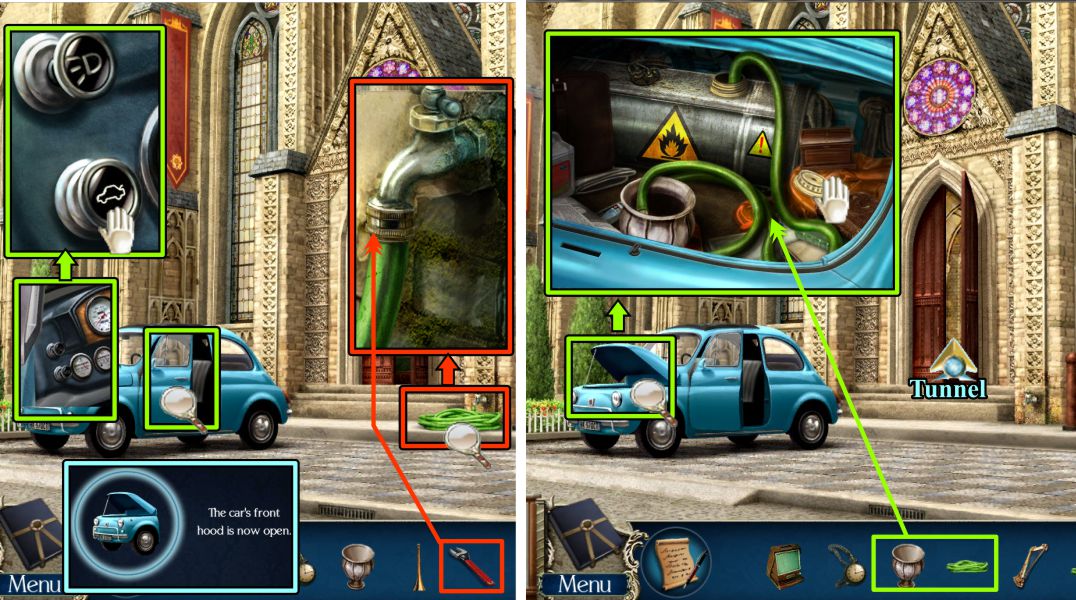
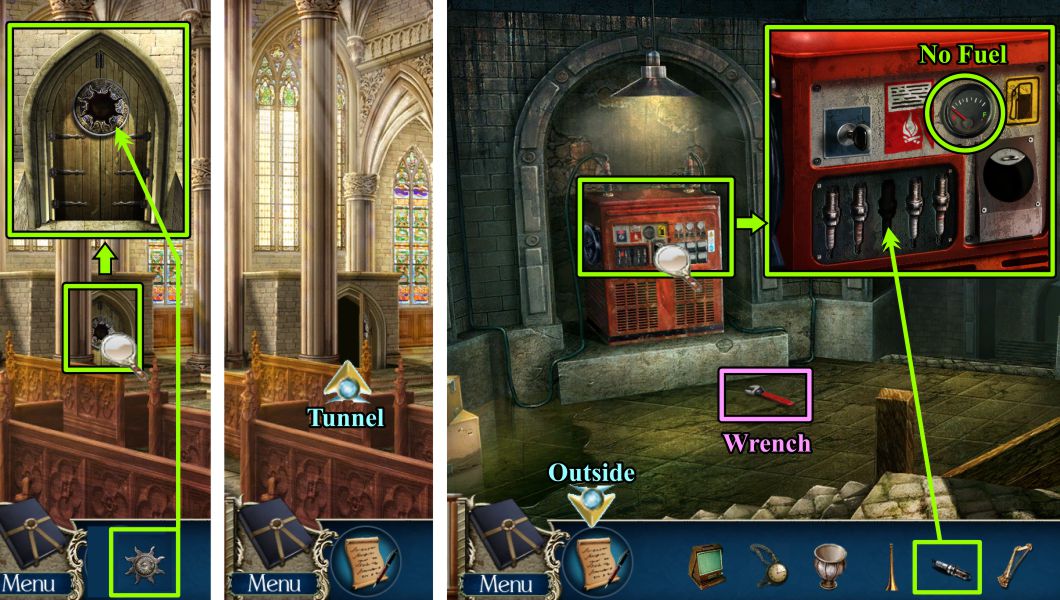
Zoom in on the door to the Tunnel and place the Sun Disk to enter.
Pick up the Wrench, zoom in on the Generator, place your Spark Plug, and note you need fuel.
Go outside the Cathedral.
Screenshot
Outside Cathedral
Zoom in on the hose and use the Wrench to remove it.
Zoom in on the inside of the car and pop the hood open.
Take the cap off the fuel tank, insert the Hose, and place the Vase to collect some fuel.
Return to the Tunnel.
Screenshot
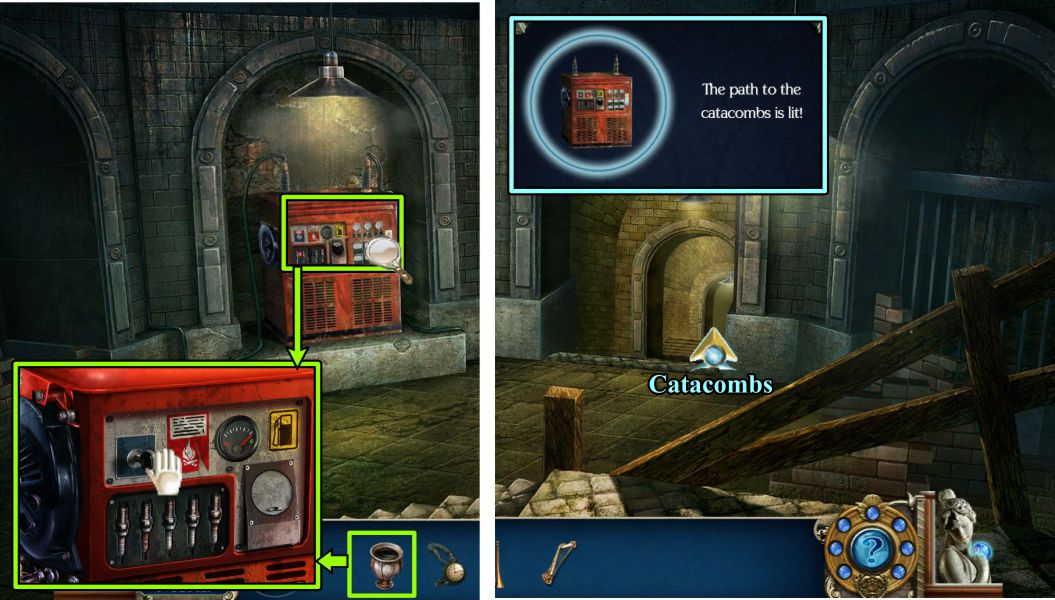
Cathedral
Zoom in on the Generator and pour your Vase of Fuel.
Flip the switch to turn on the lights to the Catacombs and enter.
Screenshot
Catacombs
Zoom in on the angel statue at the right and give her the Trumpet to get some Sheet Music.
Zoom in on the second angel from the left and give her the Harp to get some Sheet Music.
Return to the Cathedral.
Screenshot
Cathedral
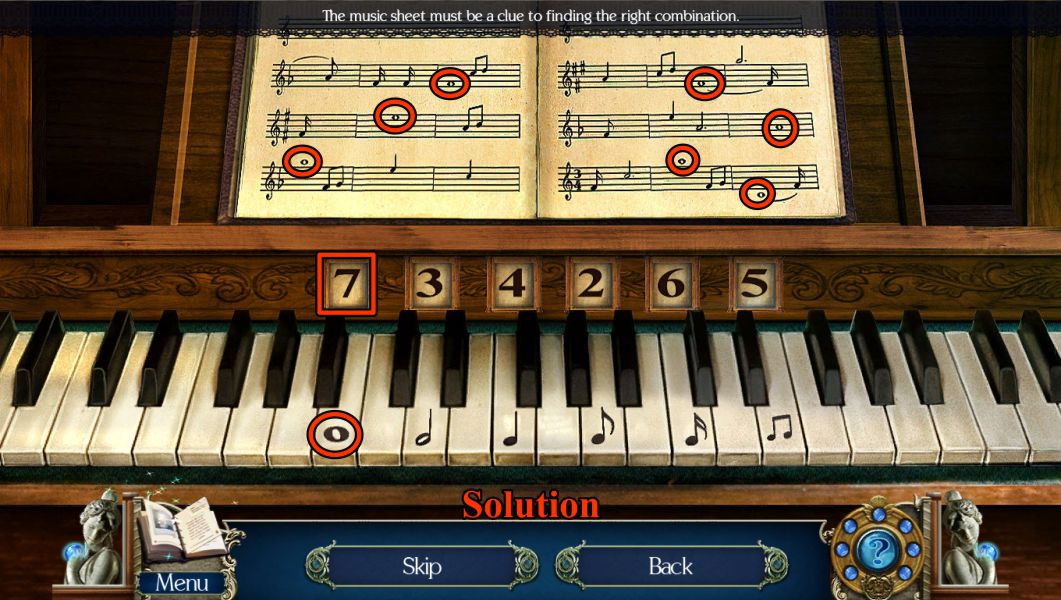
Zoom in on the Organ and place your Sheet Music to trigger a Mini Game.
Screenshot
Organ Mini Game
Compare the Sheet Music to the notes on the Organ keyboard.
There are 7 whole notes on the Sheet Music, so press the whole note on the keyboard until the number 7 shows up in the square above the key.
Count the rest of the notes and enter them the same way.
See the screenshot for the solution.
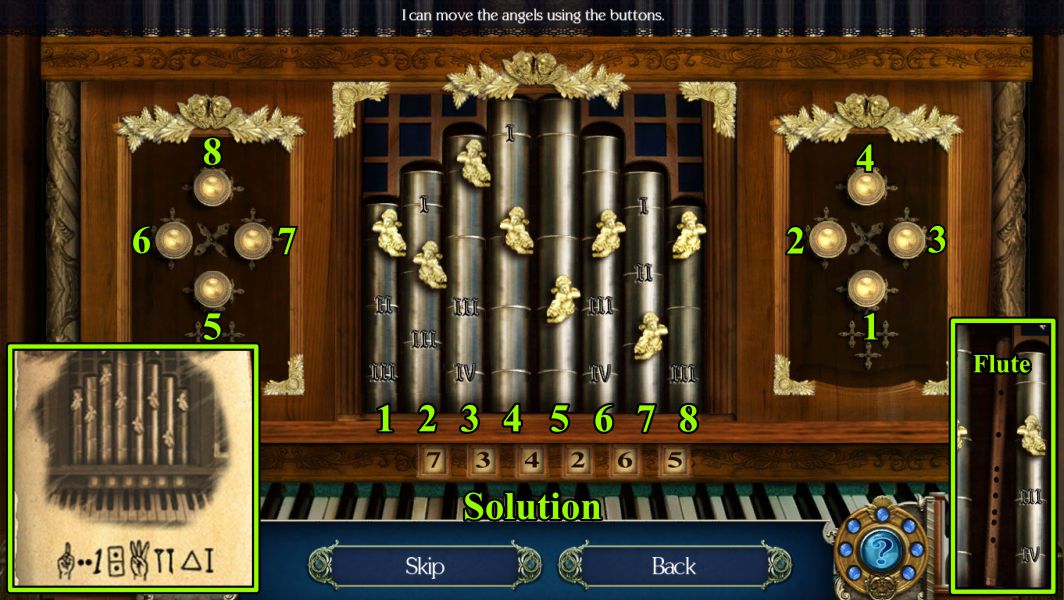
Screenshot
The Organ opens up to reveal the pipes with angels on each one.
Your goal is to move the angels to their proper place on the pipes, as shown in the Code you collected earlier from the organ.
To move the angels, you will use the buttons to either side of the pipes.
See the screenshot for a numbered solution to the collect placement of the angels.
Take the Flute when the pipes part, then return to the Catacombs.
Screenshot
Catacombs
Zoom in on the angel the second from the right and give her the Flute.
Press the red button underneath her to open Eva's tomb.
Place Giovanni's watch on Eva, and her ghost will rise and read Giovanni's note.
When she disappears, pick up the note and read it.
Go to the Cathedral.
Screenshot
Cathedral
Eva is by the Altar waiting for Giovanni, but the Cathedral clock is set for the wrong time, so zoom in for a Mini Game.
Set the clock to 7:15, and watch the cutscene.
Screenshot
Congratulations! You have helped to reunite Eva and Giovanni, and assisted Dana Kingstone to complete her latest novel, Death Under Tuscan Skies.
Posted by: Jazz |
November 25, 2011 10:29 AM
|
November 25, 2011 10:29 AM