
Azada: In Libro
Platform: Mac, Windows
![]() Remember Titus? Sure you do, he's that dummy who got himself trapped in a magic book his malevolent uncle left lying around. Then he called on you to help free a library from an evil genie who was ruining the classic stories contained within. It's been a few years, but Titus is back in the latest (and greatest) installment of the Azada series of adventure/hidden object hybrids, Azada: In Libro. That darned evil uncle is trying to take over the magical land of Azada once again, and this time it's personal!
Remember Titus? Sure you do, he's that dummy who got himself trapped in a magic book his malevolent uncle left lying around. Then he called on you to help free a library from an evil genie who was ruining the classic stories contained within. It's been a few years, but Titus is back in the latest (and greatest) installment of the Azada series of adventure/hidden object hybrids, Azada: In Libro. That darned evil uncle is trying to take over the magical land of Azada once again, and this time it's personal!
 While the original Azada was basically a ton of puzzles strung together with a bare-bones story, and Azada: Ancient Magic played like a series of small self-contained room escapes taking place within classic tales, Azada: In Libro is a fully realized point-and-click adventure within the land of Azada itself. Titus' evil uncle is once again attempting to take over Azada, attacking the three guardians of the land who hold the three keys which are, well, the key to getting in. What said uncle doesn't seem to realize is the fact that if Azada falls, so does the real world. Or, maybe he does know and just doesn't care in his bid for power. Titus has called upon you to enter the realm of Azada and rescue the three guardians before his uncle can get his grubby mitts on them.
 Azada: In Libro plays like a true adventure hybrid with a changing cursor, navigation arrows, a clue notebook, and the works. A bottom-loading inventory keeps track of the multiple items you will pick up along the way, most of them needed to activate the multitude of mini-games and puzzles hidden within the scenery. With few hidden object scenes and no lists, Azada: In Libro plays more like a classic point-and-click adventure than a hybrid. There are three modes of play included: Casual, which includes the usual refilling hint-timer, sparkles to indicate areas of interest, and the occasional text hint when an item is clicked on; Advanced, which keeps the refilling timer (it just refills slower) and the text hints, but loses the sparkles; and Hard, which has neither sparkles nor text hints, and the refilling timer is extremely slow to reactivate.
Analysis: It's been a long, long time (nearly 4 years) since Azada last enchanted us with its beautiful graphics and wicked puzzle-solving, and the time was very well spent indeed. Azada: In Libro has made the leap to full adventure story and wandering around the enchanted worlds of Azada is definitely time well spent. Lots of effort has gone into ramping up the gameplay, especially the adventure portion of the game.
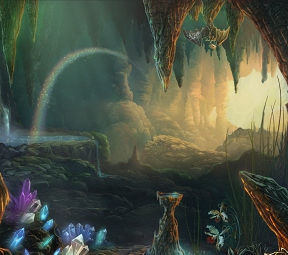
 Most of the focus in Azada: In Libro is still on the puzzle solving, with puzzles and mini-games popping up everywhere you turn. In addition to the usual suspects of jigsaws, sliders, and the like effort has been made to create original and challenging games as well. Everything, games, puzzles, the occasional hidden object elements, are wrapped up in the gorgeous graphics which change in tone as you move further and further into the fantasy world of Azada. The lovely music is the perfect accompaniment as you rush to keep Titus' uncle from destroying everything in his evil quest.
Although not as long as it could be, Azada: In Libro is still a pretty hefty adventure quest incorporating a lot of amusing brain-teasers along the way. The only thing missing is, perhaps, the wonder of wandering through so many different fantasy worlds as in Azada: Ancient Magic. Here you are confined to only three, which is tiny let-down after the vast variety available in Ancient Magic. This is a minor quibble, however, as the locations in Azada: In Libro are stunning in their own right. And despite being marketed as a hybrid, there are very few hidden object elements to be found in the three worlds, which might be disappointing those who really enjoy that sort of thing.
Try the rest of the Azada series:
For anyone who enjoys adventuring, though, Azada: In Libro is definitely a must have game. The three modes of play guarantee a gaming experience which can be enjoyed by a wide variety of skill levels, and the beauty and wonder of Azada itself is definitely worth the visit. Get ready to help Titus and defeat that evil uncle once again!
A Collector's Edition is also available. It includes concept art, wallpapers, the music, screensavers, and extra gameplay. Remember that Big Fish Game Club Members pay only $13.99 for Collector's Editions (or 2 club credits), and collector's editions count 3 card punches of 6 total needed for a free game.
![]() Windows:
Windows:
Download the demo
Get the full version
Also available: Collector's Edition
![]() Mac OS X:
Mac OS X:
Also available: Collector's Edition


Walkthrough Guide
(Please allow page to fully load for spoiler tags to be functional.)
Azada: In Libro - Walkthrough
Inventory List - The Adventure Begins/The First Key
The inventory list is sorted in chapters - for inventory objects for the other chapters please have a look at the associated spoilers for those chapters.
The first number shows the spoiler number where the objects can be found, the second number is the spoiler number where you will use this object.
Ankh - 9/9
Apple - 2/7
Bell cord - 1/1
Board (1/2)- 6/7
Board (2/2) - 7/7
Bracelet - 2/2
Brick - 2/8
Brush - 7/7/27
Bullet - 13/
Candle - 6/7
Carbon - 11/14
Cartridge - 14/18
Chain - 2/8
Chain link - 2/2
Chicken - 17
Clippers - 10/10
Coin (1/2) - 5/6
Coin (2/2) - 6/6
Crowbar - 6/6
Cuckoo - 13/
Duck - 11/
Faucet - 12/13
Fishing line - 7/8
Fishing rod 8/9
Gear - 7/8
Gun barrel 11/18
Gun cylinder 18/18
Hammer - 13/16
Hat - 9/9
Hook - 8/8
Horse shoe -
Knife - 10/
KNO3 - 13/14
Lantern - 7/7
Lantern - 7/16
Magnet - 13/15
Metal bug (blue) - 15/17
Metal bug (green) - 4/17
Metal bug (red) - 16/17
Metal sheet - 6/7
Milk - 1/1
Mop - 14/15
Mop, lathery - 15/18
Pestle - 11/14
Piano Scroll - 11/12
Pouch - 14/14
Powder - 14/14
Puzzle Part (1/3) - 11/17
Puzzle Part (2/3) - 13/17
Puzzle Part (3/3) - 14/17
Screwdriver - 6/7
Skirt - 5/9
Spring - 13/13
Soap - 11/11
Towel - 11/16
Sulfur - 10/14
Wing - 4/9
Inventory List - The Second Key
The inventory list is sorted in chapters - for inventory objects for the other chapters please have a look at the associated spoilers for those chapters.
The first number shows the spoiler number where the objects can be found, the second number is the spoiler number where you will use this object.
Amber - 25/25
Amulet - 29/29
Antidote - 30/31
Arrow - 20/27
Axe - 22/23
Bell - 26/29
Blue Flower - 19/25
Bottles - 21/25
Brush - 23/24
Cart handle (1/2) - 26/31
Cart handle (2/2) - 31/31
Cart with stones - 31/31
Caterpillar - 26/26
Dandelion - 24/25
Diamond, rough- 24/25
Diamond - 25/25
Feather - 19/25
Fire flies - 27/
Fin (1/3) - 26/28
Fin (2/3) - 27/28
Fin (2/3) - 27/28
Fruit - 21/23
Glass shard - 20/25
Glove - 20/20
Grain - 23/25
Grindstone - 24/25
Hammer - 27/30
Handle - 29/29
Horse shoe - 22/23
Ladder - 21/22/26
Match box - 27/27
Mosaic part (1/3) - 20/25
Mosaic part (2/3) - 23/25
Mosaic part (2/3) - 25/25
Mushroom - 23/25
Nail - 23/25
Net - 31/31
Pearl - 28/29
Pineapple - 26/27
Pipette - 21/21
Pipette with Acid - 21/
Ring - 20/23
Root - 22/25
Rope - 28/29
Shovel - 21/22
Splinter - 23/23
Stake - 29/30
Stone symbol - 29/29
Sword - 30/30
Watering can - 22/22/26
Wheel - 31/31
Inventory List - The Third Key
The inventory list is sorted in chapters - for inventory objects for the other chapters please have a look at the associated spoilers for those chapters.
The first number shows the spoiler number where the objects can be found, the second number is the spoiler number where you will use this object.
Ball of yarn - 37/45
Barrel with honey - 38/39
Bottle - 33/34
Broom - 34/35
Brush - 45/45
Bucket - 35/36
Bucket with water - 36/37
Bucket - 37/39
Cane - 36/36
Chain - 36/36
Clock heart - 43/43
Coal - 39/40
File - 39/39
Flute - 35/37
Gems, blue and red - 33/43
Glass of Lightning - 42/43
Ladder - 32/32
Lamp - (1/3) - 35/40
Lamp (2/3) - 37/40
Lamp 3/3) - 40/40
Lever - 39/40
Lock pick - 41/44
Map Piece - 35/35
Mirror (1/3) - 41/46
Mirror (2/3) - 42/46
Mirror (3/3) - 43/46
Mirror - 46/46
Needles - 37/41
Puzzle part - 34/38
Puzzle part (1/3) - 43/47
Puzzle part (2/3) - 45/47
Ribs - 33/33
Scissors - 33/41
Shell - 33/35
Shovel - 38/28
Skull - 32/35
Spell - 44/44
Sponge - 42/44
Spoon - 44/45
Sticky pollen - 45/46
Stone heart - 42/45
Termites - 34/36
Unicorn lock - 43/43
Wrench - 38/40/42
The Adventure Begins
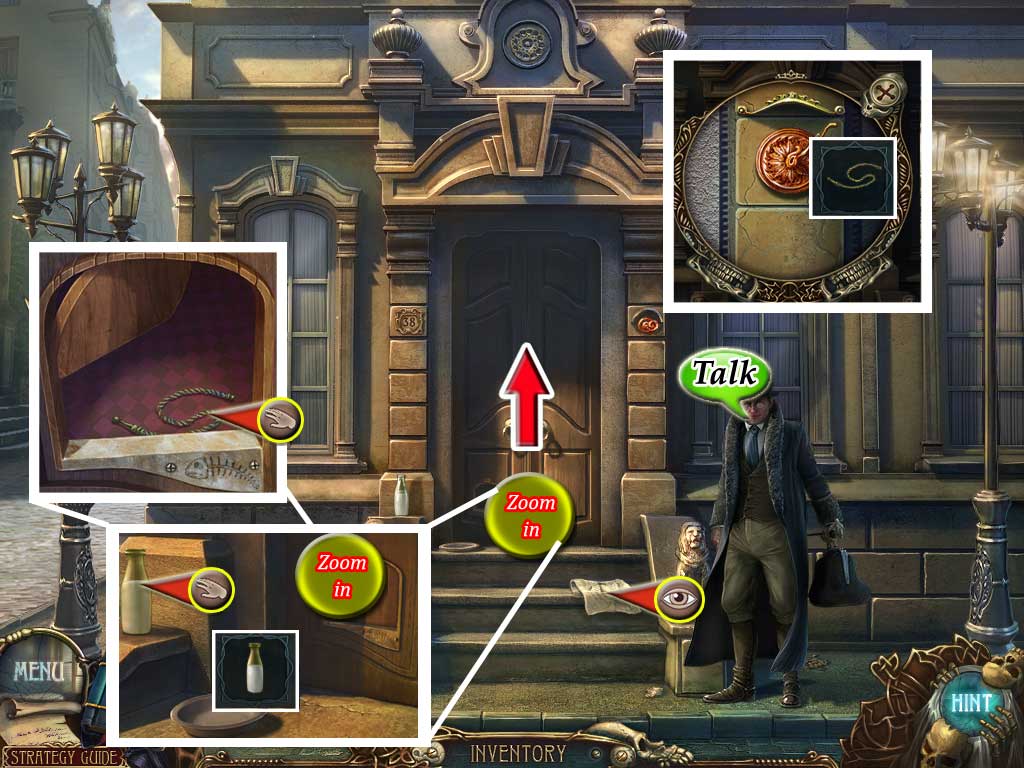
Prague - 1. Enter the house
Talk to the notary and click the newspaper clipping laying on the stairs.
It will be added to your diary.
Zoom into the bowl on the stairs, take the milk bottle, pour the milk in the bowl and wait for the cat.
After the cat went back into the house, zoom into the pet door and take the bell cord.
Exit the close ups and zoom into the bell right above the door.
Place the bell cord and use it.
The door opens, enter the house.
Screenshot
Click the cat on the stairs and talk with the butler
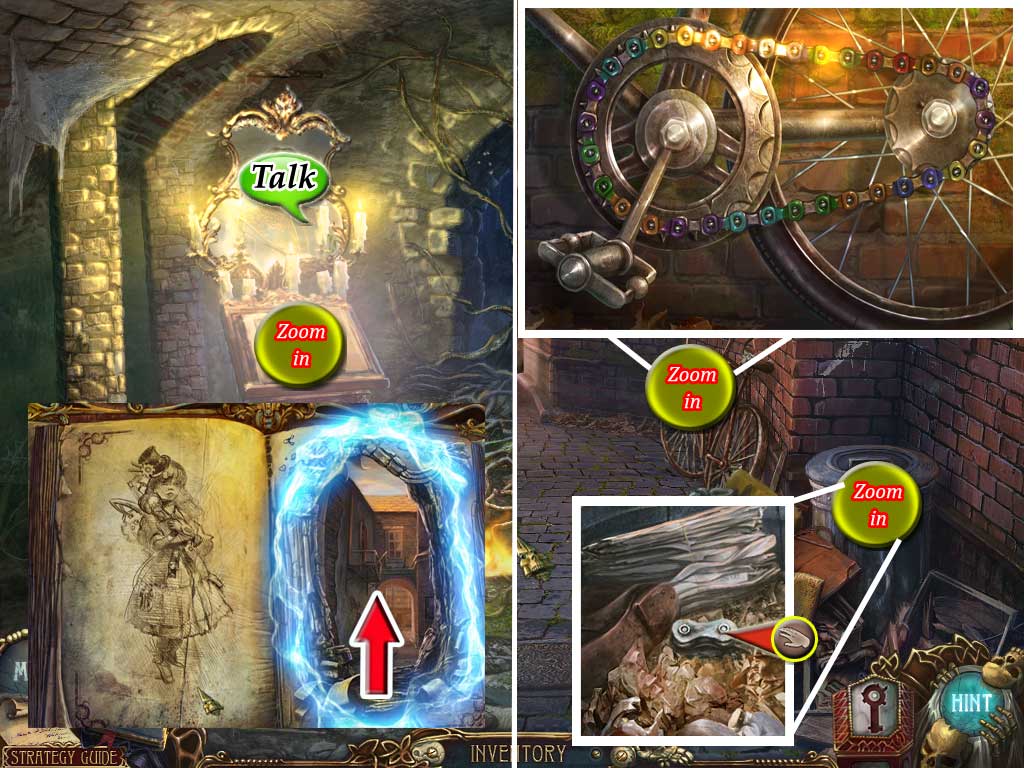
2. Meet Titus/Backyard
Click the mirror on the left to talk with Titus.
Click on the book below the mirror, click the right page to turn over and enter the back yard through the right page.
Talk with titus and take the key box - it will take place in the low right corner of your screen.
Zoom into the trash bin on the right side and click twice to find a chain link.
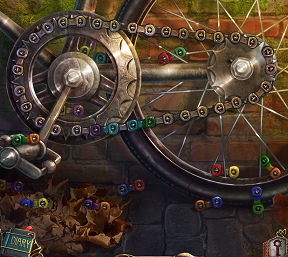
Zoom into the bicycle and place the chain link somewhere on the scene.
Your goal is to connect all links with the same color.
Click to pick up a link, click again to place it on the chain.
Click a link laying on the chain twice to turn it around.
When ready the chain will go into your inventory.
Screenshot
Zoom into the window on the far right side and take the apple.
Zoom into the white brick on the left wall.
Take the brick, zoom in again and take the bracelet from the compartment.
Have a look at the note hanging at the ladder.
Go straight ahead.
Screenshot
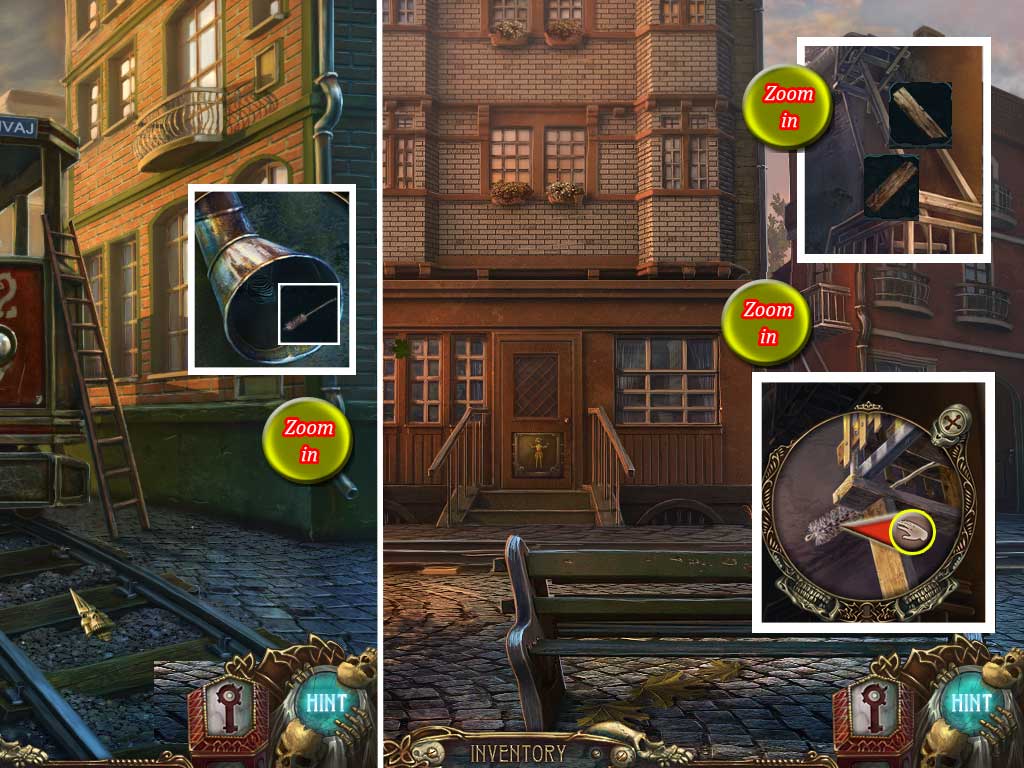
The First Key
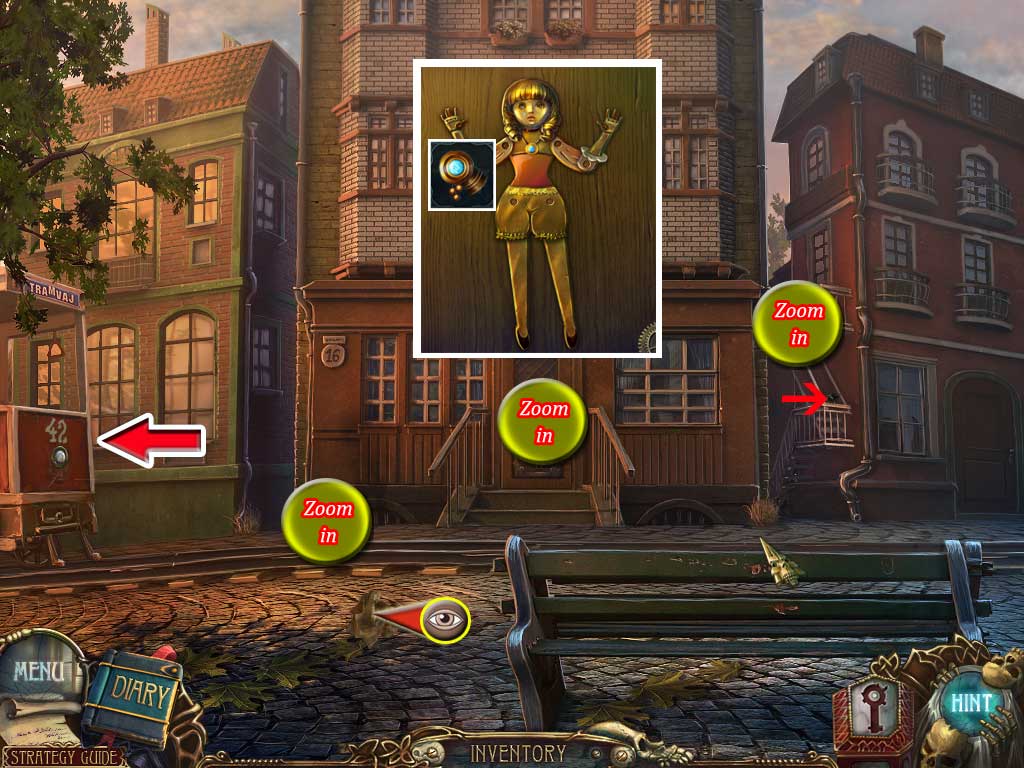
3. In front of the Guardian's house
Take the crumbled paper on the ground; the note will go into your inventory.
Zoom into the door of house 16 and place the bracelet (Spoiler 2) at the doll's left arm (seen from your position).
Learn that the doll is missing more clothes, exit the close up.
Zoom into the basement window on the left side; the one with the smoke; learn that you will need something to get that anklet out there; exit the close up.
Click on the raven at the ladder on the right side of the house and zoom into the ladder; learn that you will need something to get this object down.
Head to the left.
Screenshot
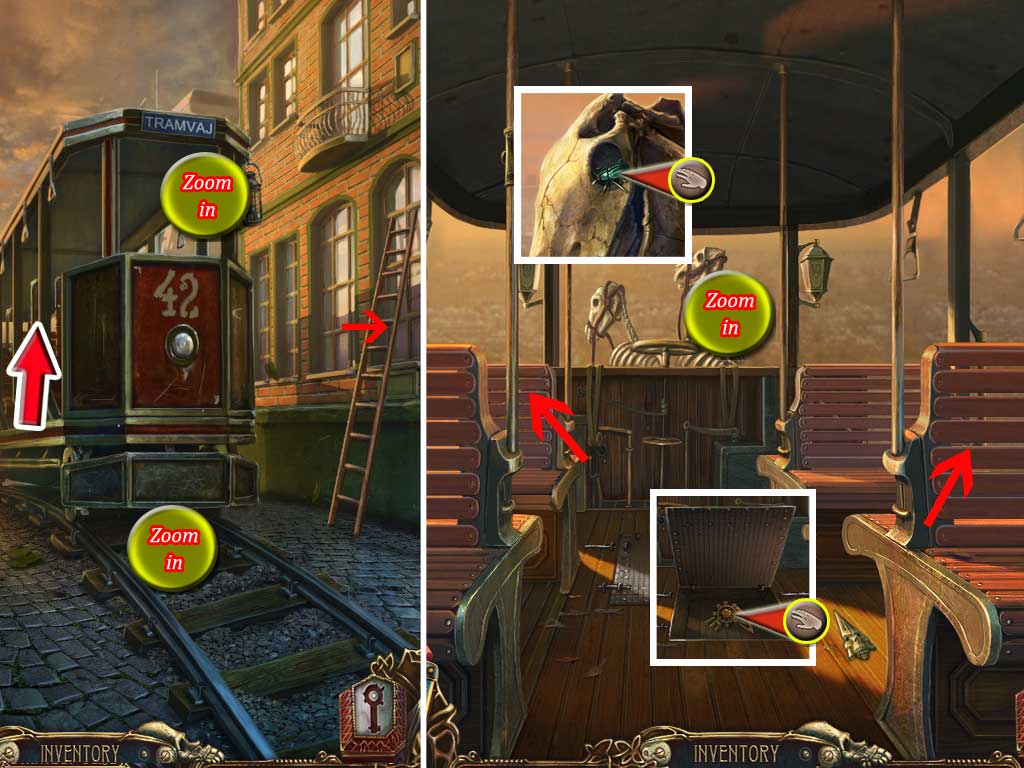
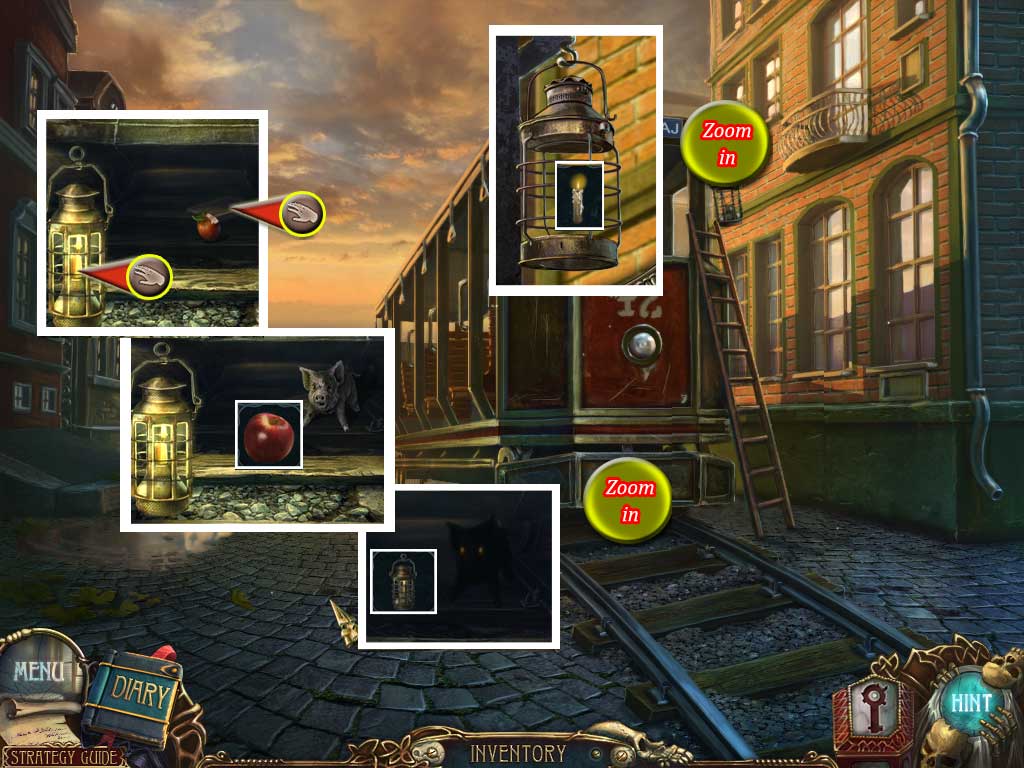
4. Tram - first time
Click the ladder on the right side, it will automatically go lean at the tram.
Zoom into the lantern to learn that you need some to light it.
Zoom under the front of the tram to learn that you will need light to see.
Enter the tram.
Click the left back seat and the right front seat to open the hatch.
Take the wing from the hatch.
Zoom into the right horse skeleton in the far middle and take the green metal bug.
Screenshot
Exit the tram, go back to the guardian's house and head right.
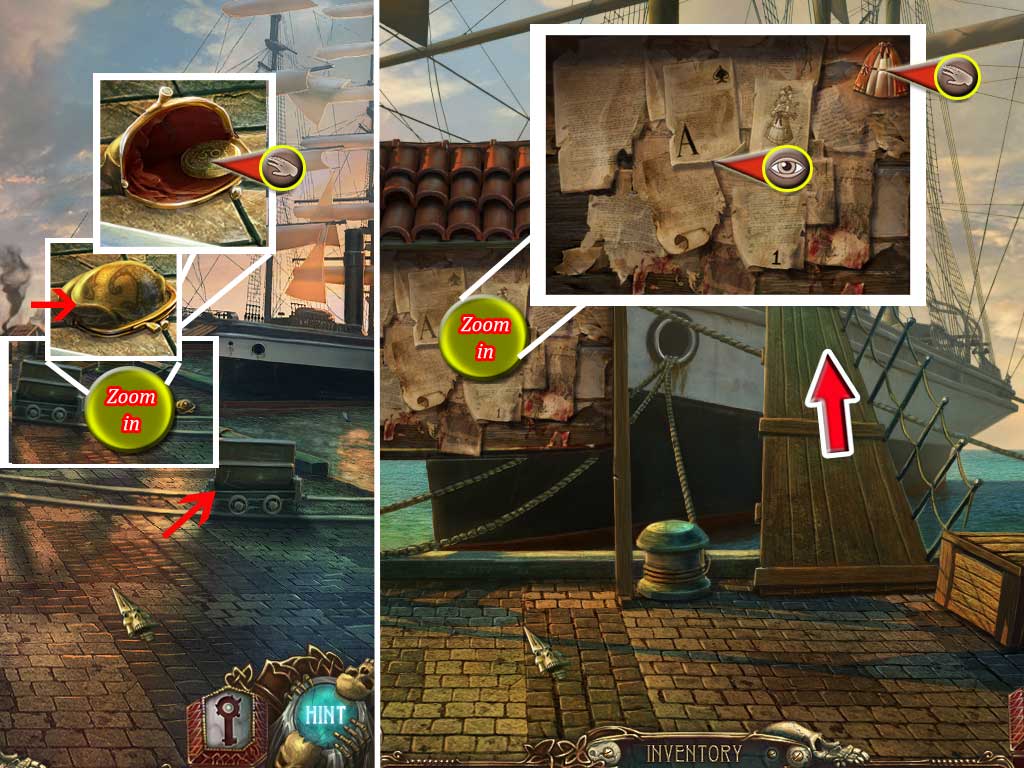
5. Enter the Ship
Click the little trolley on the trails - it will move.
Zoom in the coin purse that was laying behind the trolley.
Click the coin purse to open and take the coin (1/2).
Zoom into the message board and take the skirt.
Click the notes to get information into your diary.
Exit the close up and enter the ship.
Screenshot
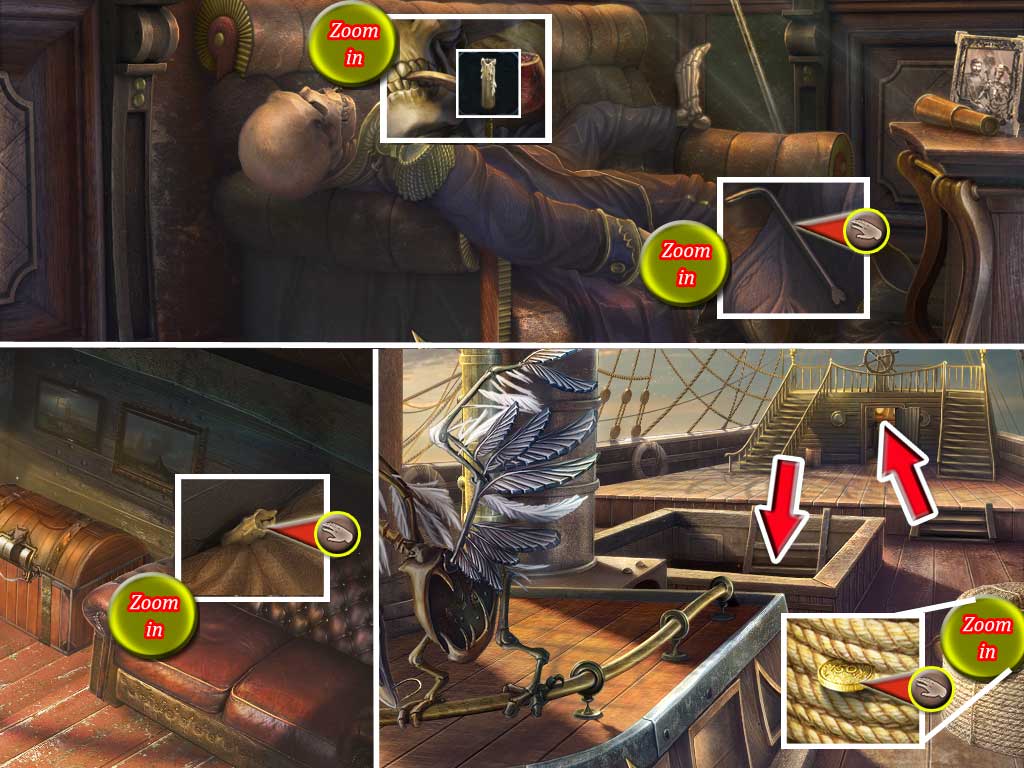
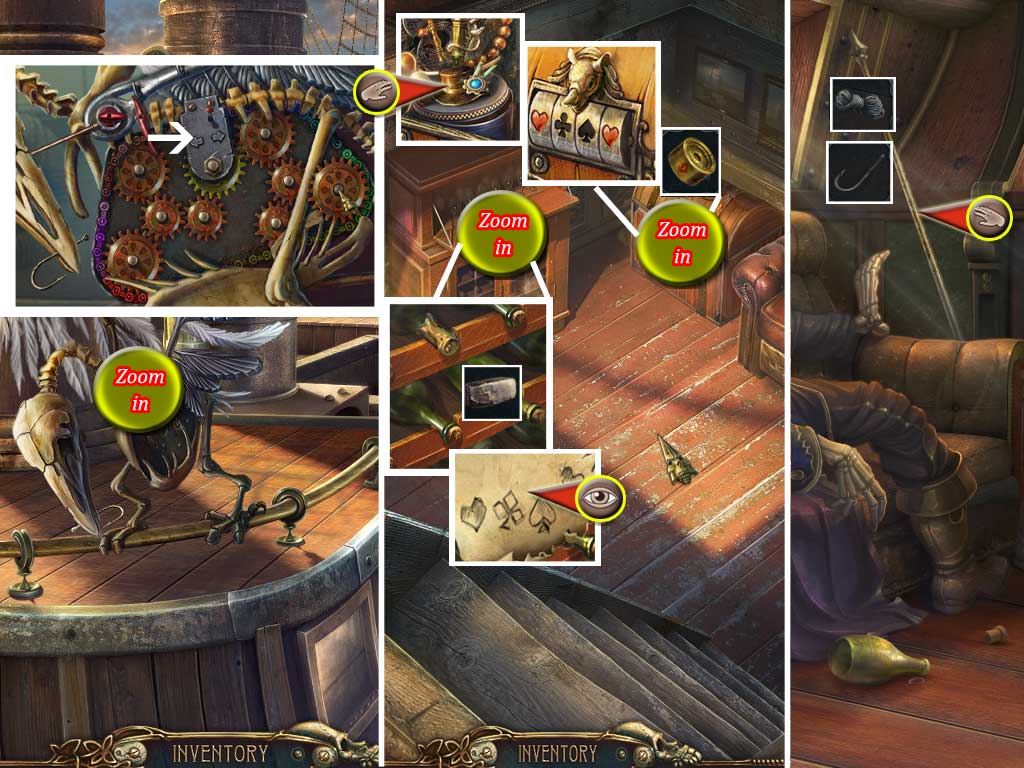
6. The Ship - first time
Zoom into the rope coil on the right side and take the coin (2/2).
Go down to the ship's hold and zoom into the couch; take the candle.
Exit and enter the captain's cabin in the far middle.
Zoom into the pipe and light the candle.
Zoom into the skeleton's hand and take the crowbar.
Screenshot
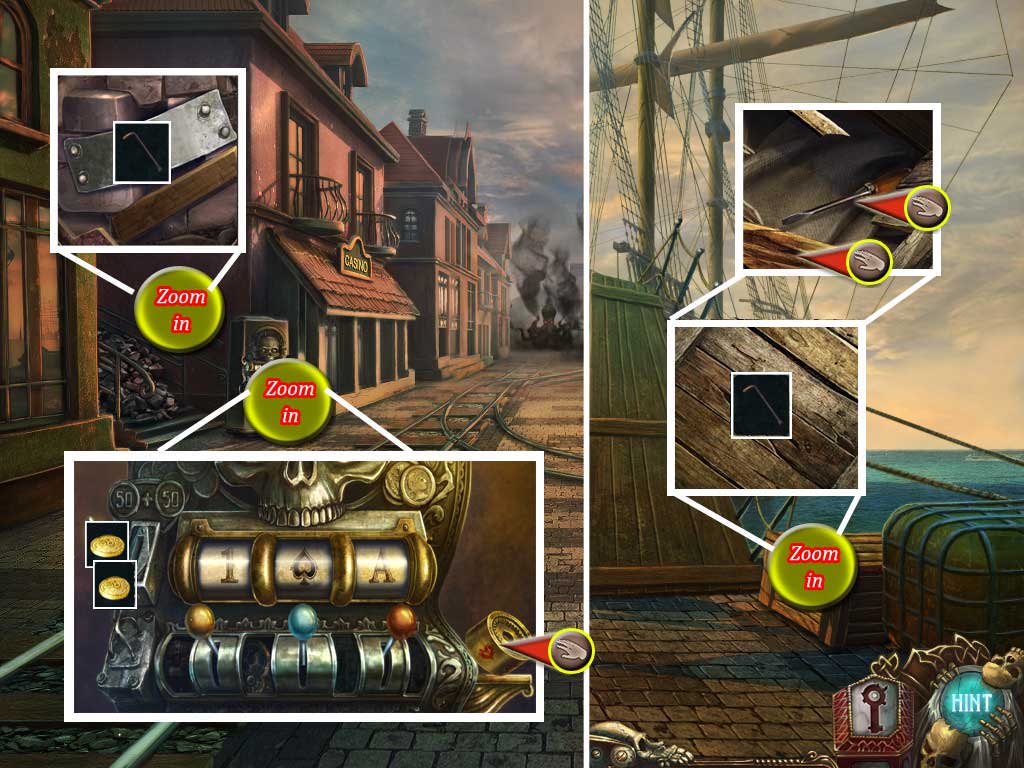
Exit the ship.
Zoom into the crate right in front of the ship und use the crowbar (Spoiler 6) to open it; take the screwdriver and the board (1/2).
Step one time back and zoom into the wall of the casino.
Use the crowbar to obtain a metal sheet.
Zoom into the slot machine and place both coins (Spoiler 5 and 6) into the coin slot.
You will need to click the levers and enter a code.
The code you saw on the message board; you may refer to your diary for the correct combination.
To put in the correct code click 2x the left lever and 3x the right lever.
Take the code wheel, appearing at the right side.
Screenshot
Head left twice.
7. Tram - second time
If you haven't already done, click the the ladder on the right side - it will automatically be place at the tram.
Zoom into the lantern at the right top of the tram.
Place the candle (Spoiler 6) into the lantern and take it.
Zoom under the front of the tram and place the lantern.
Place the lantern and give the apple (Spoiler 1) to the pig.
Wait till it runs away and grab the board and the lantern.
Exit the close up and enter the tram.
Zoom into the device at the left side and use the screwdriver (Spoiler 6) to loose the four screws.
Click the lever once to get a gear.
Return to the ship and enter it.
Screenshot
Go back once to the guardians's house.
Zoom into the ladder and place the two boards (Spoiler 6 and here) and the metal sheet (Spoiler 6) to fix the broken ladder.
Zoom into the object above and take the brush.
Return to the Tram.
Zoom into the pipe at the house on the right side.
Use the brush to obtain a fishing line.
Screenshot
Return to the ship.
8. Ship - second time
Zoom into the robot bird on the left.
Place the chain (Spoiler 2) and the gear (Spoiler 7).
Now place the gears so that they move counter clockwise, as this the red switch will be activated.
You may check your results with the two arrows.
As soon as the gears move in the right direction, the bird will let fall the hook; it goes into your inventory automatically.
Enter the ship's hold and zoom into the wine shelf.
Smash the wine bottle with the brick (Spoiler 2); click the paper and note the code.
Click the paper again; it will go into your diary.
Zoom into the chest and place the code wheel (Spoiler 6).
Click the elements till they show the same order as shown on the note.
The chest opens; take the hat.
Exit the ship's hold and enter the captain's cabin.
Place the fishing line (Spoiler 7) at the rod on the far left and place the hook at the fishing line.
Take the fishing rod.
Screenshot
Return to the guardian's house.
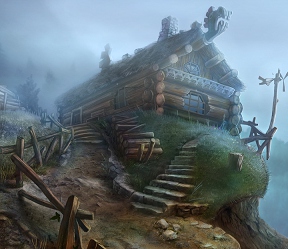
9. Enter the guardian's house
Zoom into the left basement window.
Use the fishing rod (Spoiler 8) to get the anklet.
Zoom into the door.
Dress up the doll with anklet, hat (Spoiler 7), wing (Spoiler 4) and skirt (Spoiler 5) and, if you did not do yet, the bracelet (Spoiler 2).
To open the slots on the left and right side click the doll's joints.
Finding the right position's will open the locks.
Hat and wing for the upper locks, arms for the middle locks, legs for the bottom locks.
When the locks are open enter the house.
Screenshot
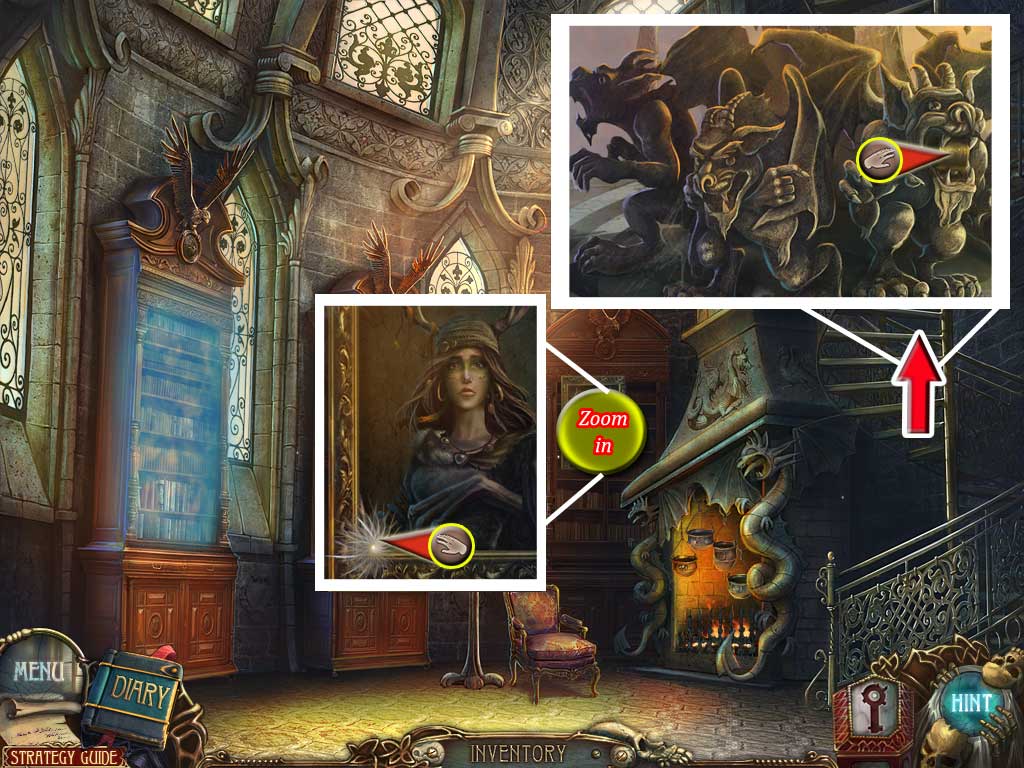
10. Guardian's house - Hall
Go forward and then to the right to access the skeleton at the desk.
Click the skeleton's arm and take the clippers.
Zoom into the upper drawer and take the knife.
Return to the main hall.
Zoom into the mail boxes on the right wall.
Click the top of the mail box to open it and take the sulfur.
Zoom into the door on the right side and cut the chain with the clippers.
Screenshot
Enter the right apartment.
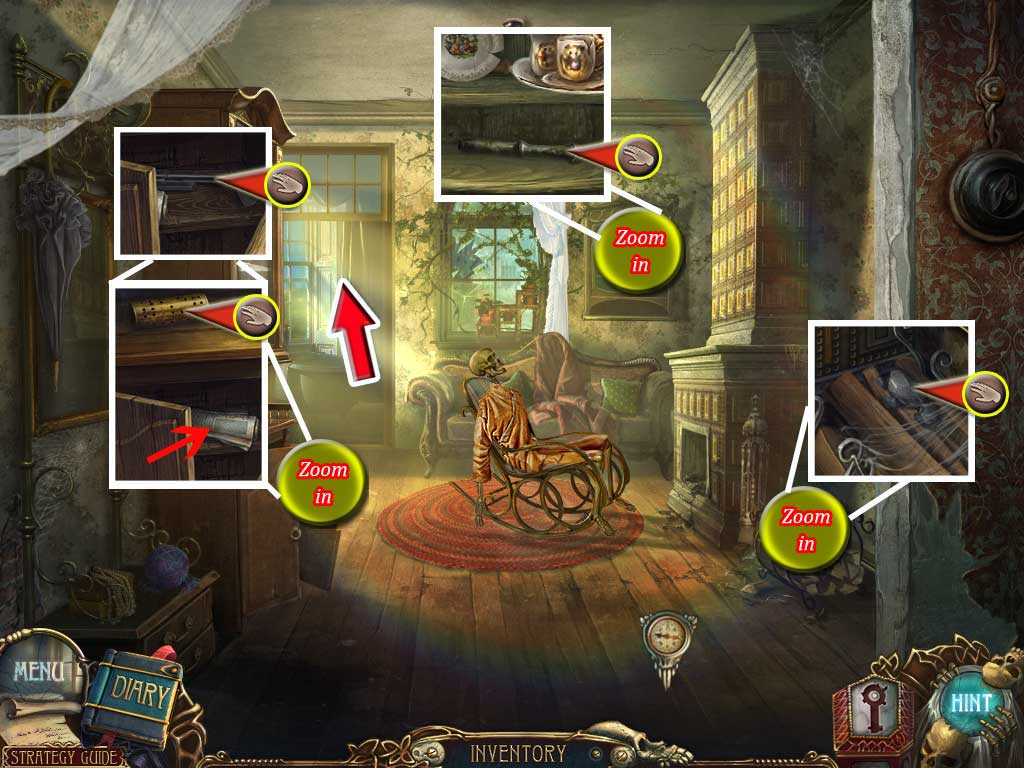
11. Right door - Living Room and bathroom
Zoom into the bottom cabinet on the left side.
Take the piano scroll from the upper shelf.
Click the newspaper roll and take the gun barrel.
Zoom into the fire wood on the right side and take the carbon.
Zoom into the hanging cabinet on the far right side and take the pestle from the bottom shelf.
Screenshot
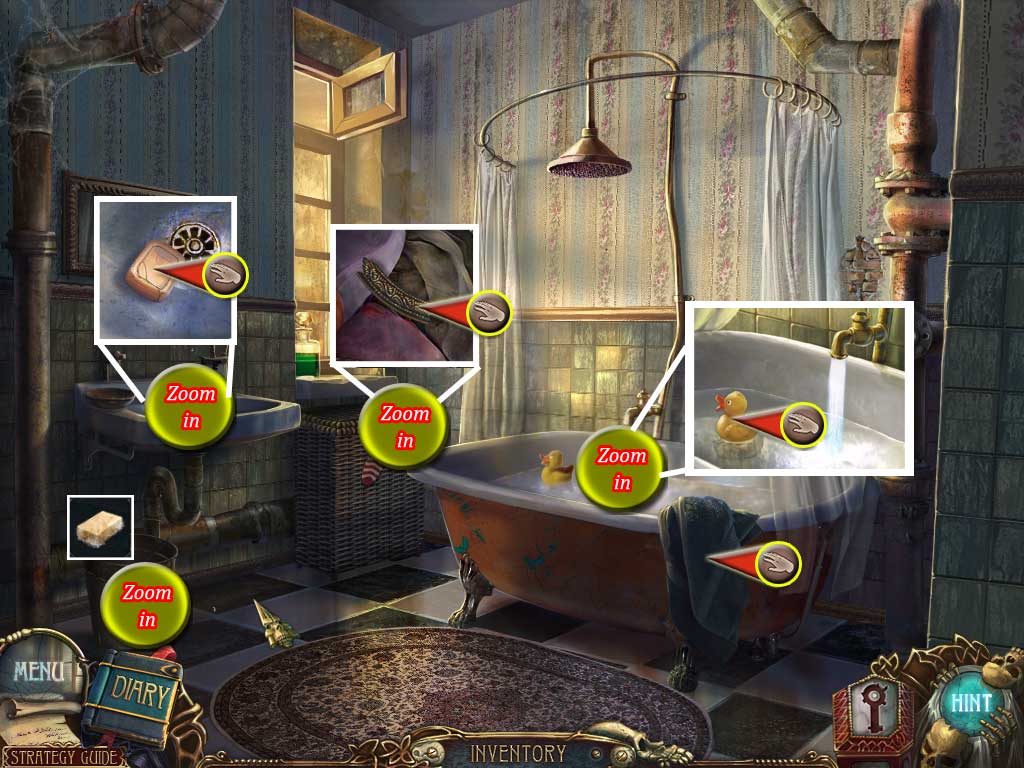
Go through the door on the far left side into the bathroom.
Take the towels on the right side of the tub.
Zoom into the tub and take the duck.
Zoom into the wash basket and click once to find the puzzle part (1/3).
Zoom into the sink and take the soap.
Zoom into the bucket and place the soap into the water.
Screenshot
Exit the right apartment and head over to the left one.
12. Left apartment - hall
Zoom into the painting on the wall right side beside the doors.
Click the painting to make it move.
Grab the faucet.
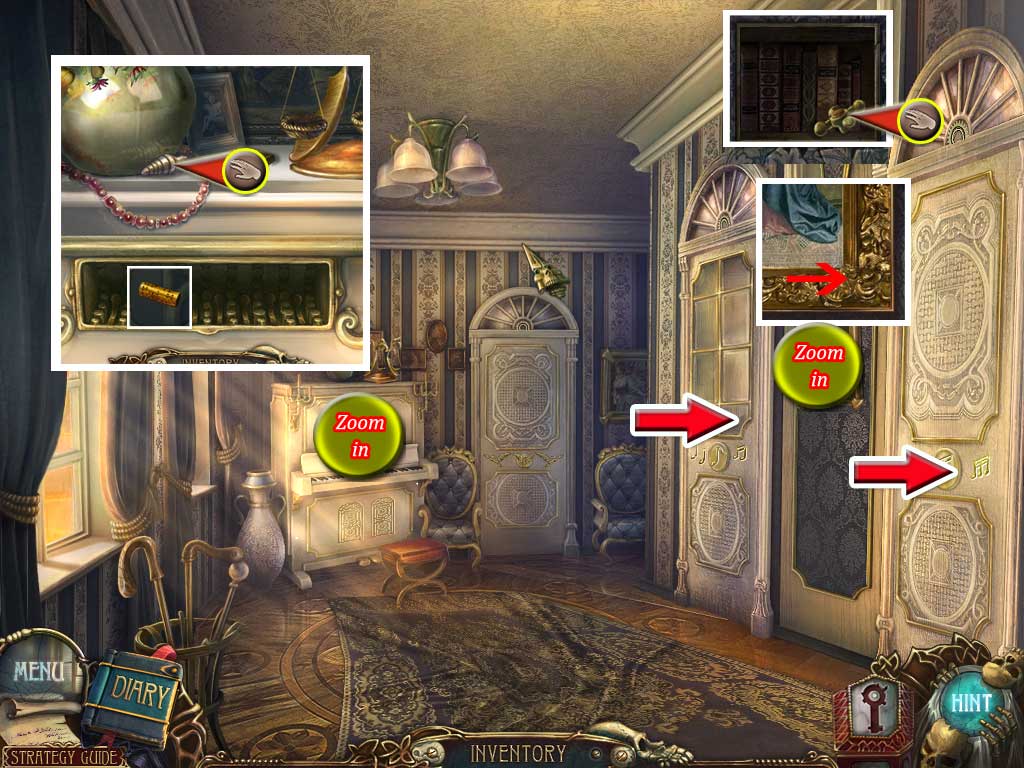
Zoom into the piano.
Place the piano scroll (Spoiler 11) and take the bullet.
The piano scroll opened the doors on the right side.
Enter the sleeping room on the far right side.
Screenshot
13. Left apartment - bedroom
Zoom into the wicker basket on the low right side.
Click to open it and click the clothes till you find a puzzle part (2/3).
Zoom into the dresser on the left and take the KNO3.
Click the armchair on the left to make it move and take the hammer from the floor.
Zoom into the bed and click the blanket to make it move.
Take the magnet and use the knife (Spoiler 10) to cut out the spiral.
Zoom into the grandfather clock on the far right and click again to access a puzzle.
Place the spiraled somewhere in the scene.
Your goal is it to place the two ends of the spiraled in the holes right and left next to the line of gears by using the colored arrows at the bottom.
Note that using the little walls or gears as obstacles you can stretch and move the spiraled
If you get stuck you may use the Reset button at the top.
Click the arrows in the following order: 2x green, 3x red, 5x yellows, 3x blue, 2x green, 1x red, 1x green.
The top of the clock opens, take the cuckoo.
Screenshot
Exit and enter the rightmost door to the study
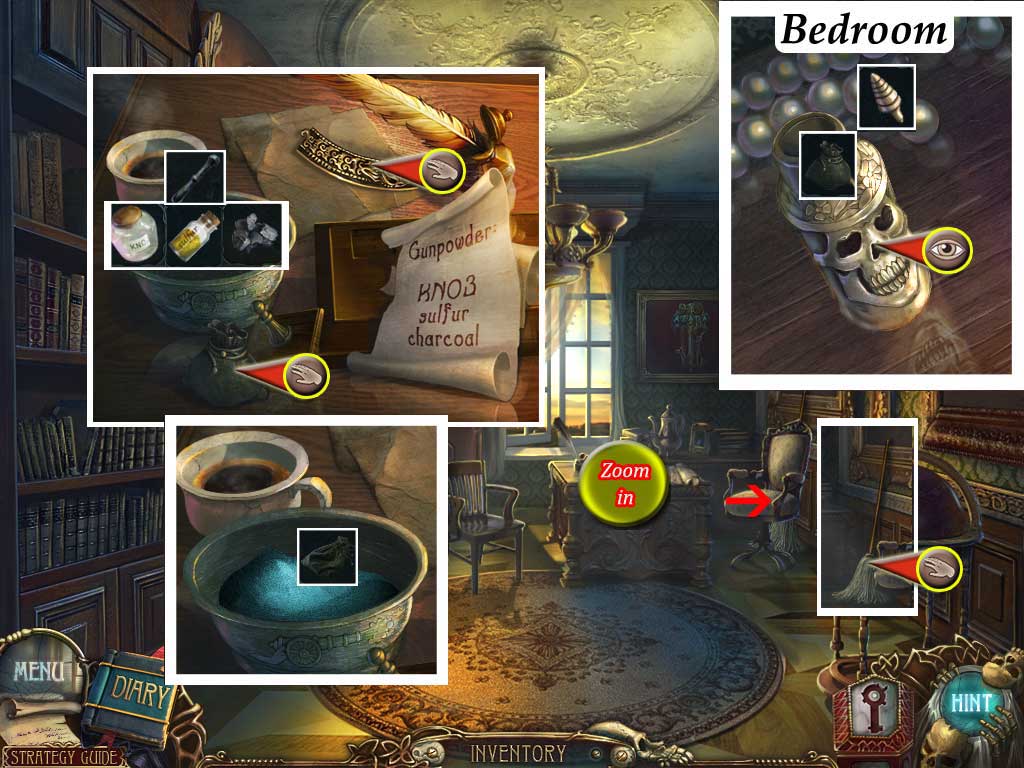
14. Left apartment - study/bedroom
Click the chair on the far right side and take the mop.
Zoom into the desk and take the puzzle piece (3/3) and the pouch.
Put sulfur (Spoiler 10), carbon (Spoiler 11) and KNO3 (Spoiler 13) in the mortar.
Use the pestle (Spoiler 11) to mix the ingredients.
Click the pouch on the mixture to get powder.
Return to the bedroom.
Zoom into the dresser.
Place the powder into the bullet bottom.
Place the bullet (Spoiler 12) and take the cartridge.
Screenshot
Exit the bedroom and the left apartment, head over to the bathroom in the right apartment
15. Right apartment - bathroom
Zoom into the bucket on floor, left side.
If you have not done yet, place the soap (Spoiler 11) into the water.
Now place the mop (Spoiler 14) into the bucket; it will go back into your inventory as lathery mop.
Zoom into the tub.
If you haven't done yet, take the duck.
Place the faucet (Spoiler 12) and wait till the water is gone.
Zoom into the empty tub.
Click again to activate a puzzle.
Place the magnet (Spoiler 13) at the top middle pipe.
Your goal is to get the metal bug from the bottom to the pipe top middle.
To do so, use the plus and minus parts of the magnet to move the bug through the pipes.
Imagine the magnets 1-5 seen from low left to to low right, click:
1x 3+, 2x 2+, 8x 1+, 1x 3+, 2x 2+, 4x 4+, 12x 1+, 5x 4-, 5x 3+, 4x 4+, 3x 2-, 6x 5+, 2x 4+, 3x 2+, 2x 4-, 6x 3+
The blue metal bug will be added to your inventory.
Screenshot
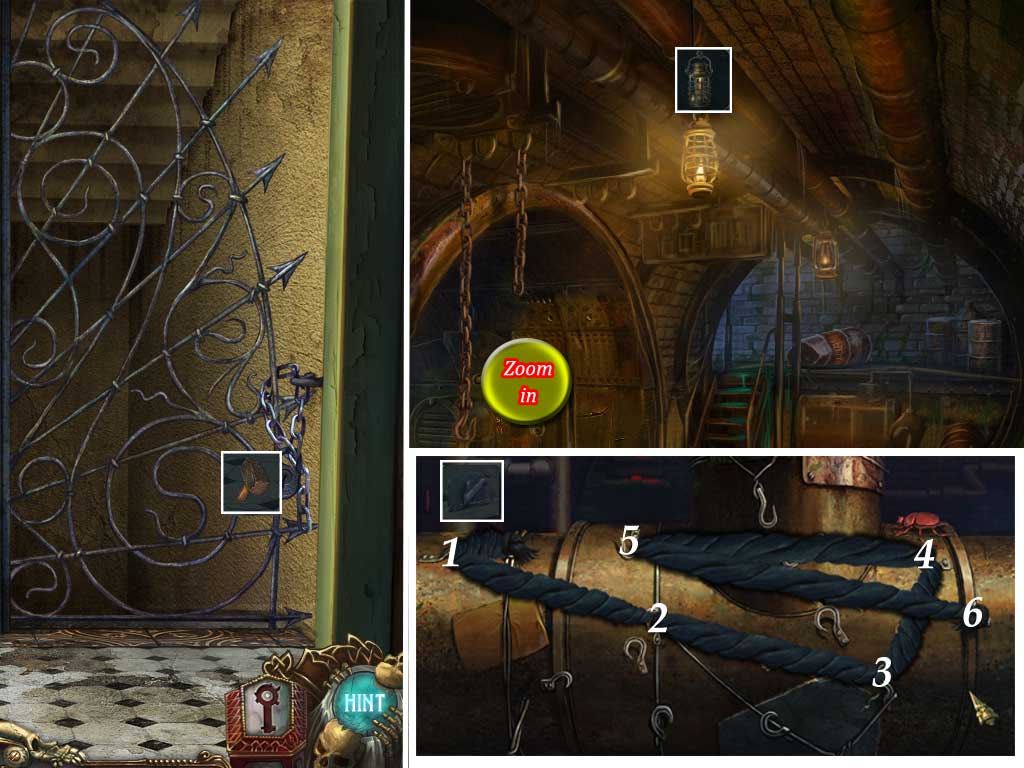
Exit the apartment and go straight forward to the elevator.
16. Hall/Basement
Use the hammer (Spoiler 13) to break the padlock on the right and go down to the basement.
Place the lantern (Spoiler 7) on the first hook at the ceiling to get light.
Zoom into the steaming pipe on the far left.
Place the towels (Spoiler 11) at the top left of the pipes.
Your goal is to close all the holes in the pipes by dragging the towels over the holes and fasten them at the hook.
You only have a maximum of six towels (moves).
If you run out of moves you will automatically start over and you may always use the Reset button if you feel, that your moves won't work.
There are several solutions possible, the screenshot shows one.
Screenshot
You will obtain the red metal bug.
Exit the basement and return to the left apartment and enter the study
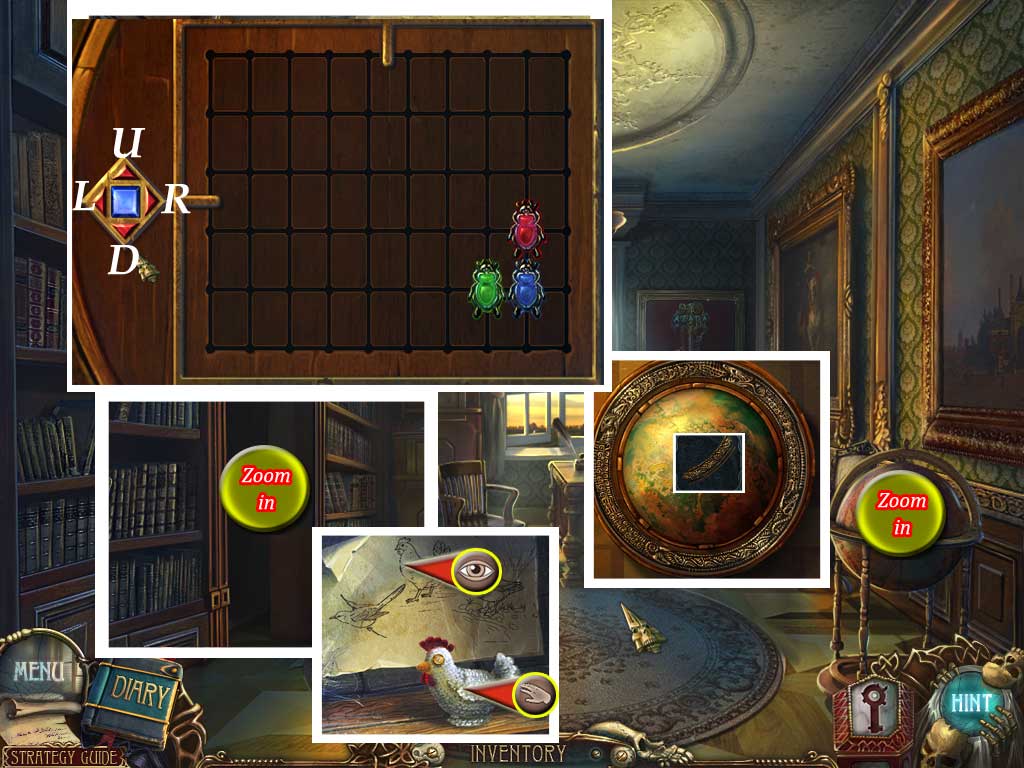
17. Left apartment - study (open the globe)
Zoom into the globe on the right side and click to open.
Place the three puzzle parts (Spoiler 11, 13, 14) and arrange them to show a complete image.
The globe will open further; place the three metal bugs (Spoiler 4, 15, 16).
Use the arrows on the left to place the bug in their matching slot in the lower right.
Using the arrows will make all three bugs move in the same direction till they are stopped by a wall or an obstacle.
All three bugs have to be placed at the same time into there slots.
You may use the Restart button if you get stuck.
Click the arrows in the following order (L=left, R=right, U=up, D=down):
2xL, 2xD, 1xL, 5xR, 2xU, 1xL, 2xU, 1xD, 1xR, 1xU, 1xL, 1xU, 2xD, 4xL, 1xD, 5xR, 2xU, 2xL
This will activate the mechanism for the bookshelf.
Zoom into the secret compartment and take the chicken.
Click the note; it will be copied into your diary.
Screenshot
Exit the study and zoom into the piano.
18. Get the first key
Zoom into the piano and place the three birds in the correct order in the nest (you may refer to the note in your diary).
The correct order would be cuckoo (Spoiler 13), chicken (Spoiler 16), duck Spoiler 11).
This will open the door right next to the piano.
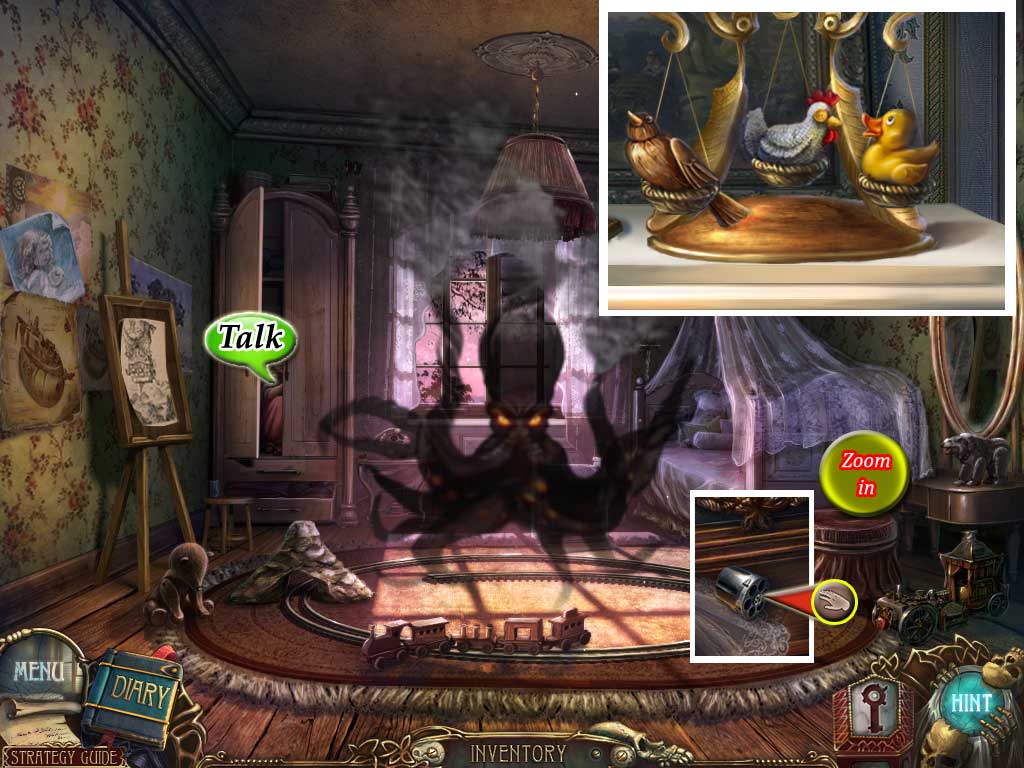
Enter the bedroom.
Talk to the guardian in the close on the far left.
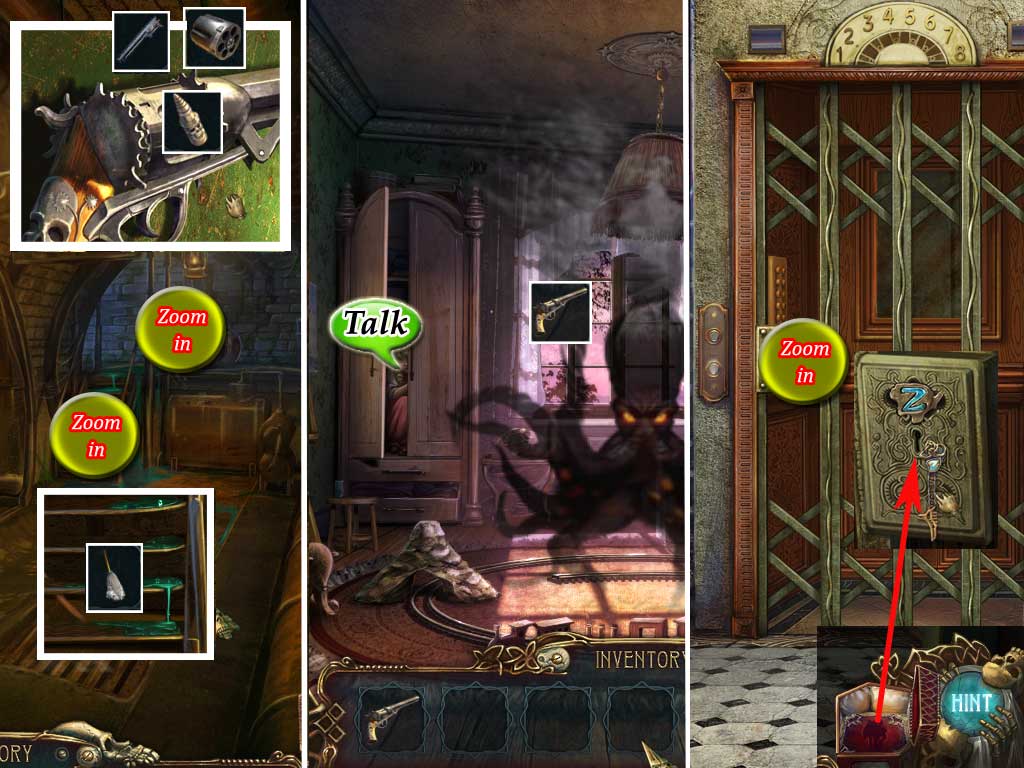
Zoom into the stool in front of the bed and take the gun cylinder.
Screenshot
Exit the apartment and go down in the basement.
Zoom in to the stairs in the far middle and use the lathery mop to remove the spill.
Zoom into the barrels and place the gun barrel (Spoiler 11) next to the rest of the revolver.
Now place the gun cylinder and in there the cartridge (Spoiler 14).
Take the revolver.
Return to the guardian's bedroom.
Use the revolver to shoot the window and the dark spirit will disappear.
Talk again with the guardian and take the key out of her hand.
Go back to the elevator area, zoom into the elevator lock.
Open your magic key box and place the key in the lock.
Screenshot
Enter the elevator and you will be brought back to the beginning.
Talk with Titus, zoom into the book, turn the page and enter the second world.
The Second Key
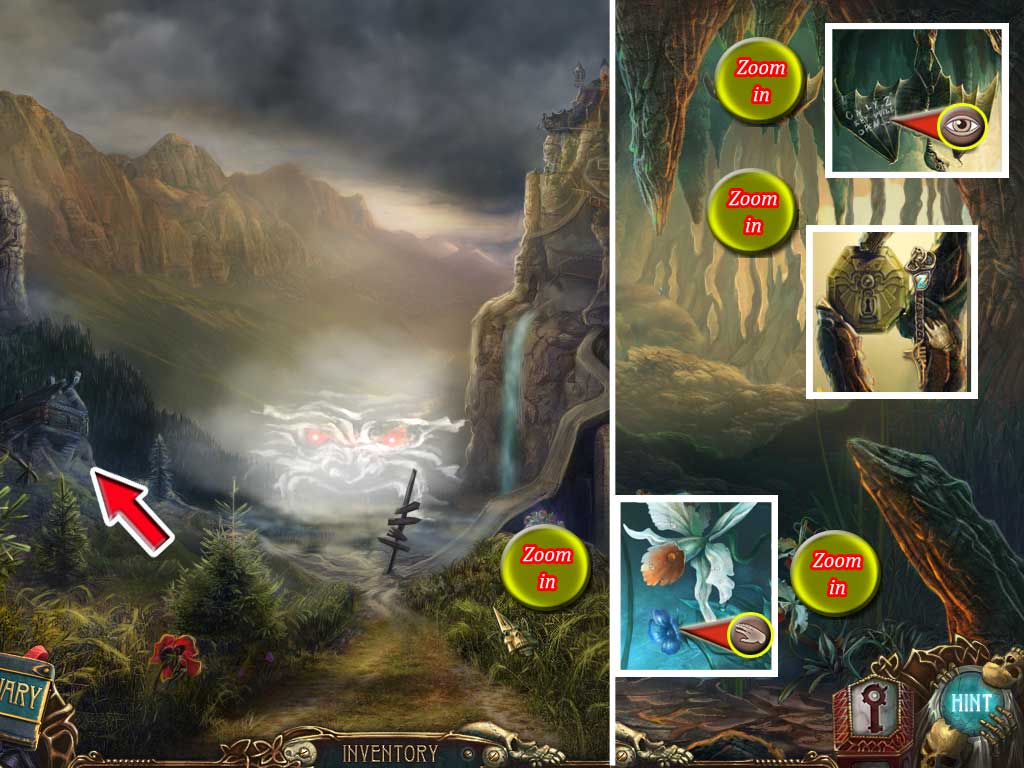
19. First Steps
Zoom into the flowers on the low right side and take the blue flower.
Zoom into the bat at the top of the cage and reach the note.
Zoom into the lock on the far right side, open you magic key box and use the key to open the lock.
Go forward.
Zoom into the grass heap on the right side and take the feather.
Screenshot
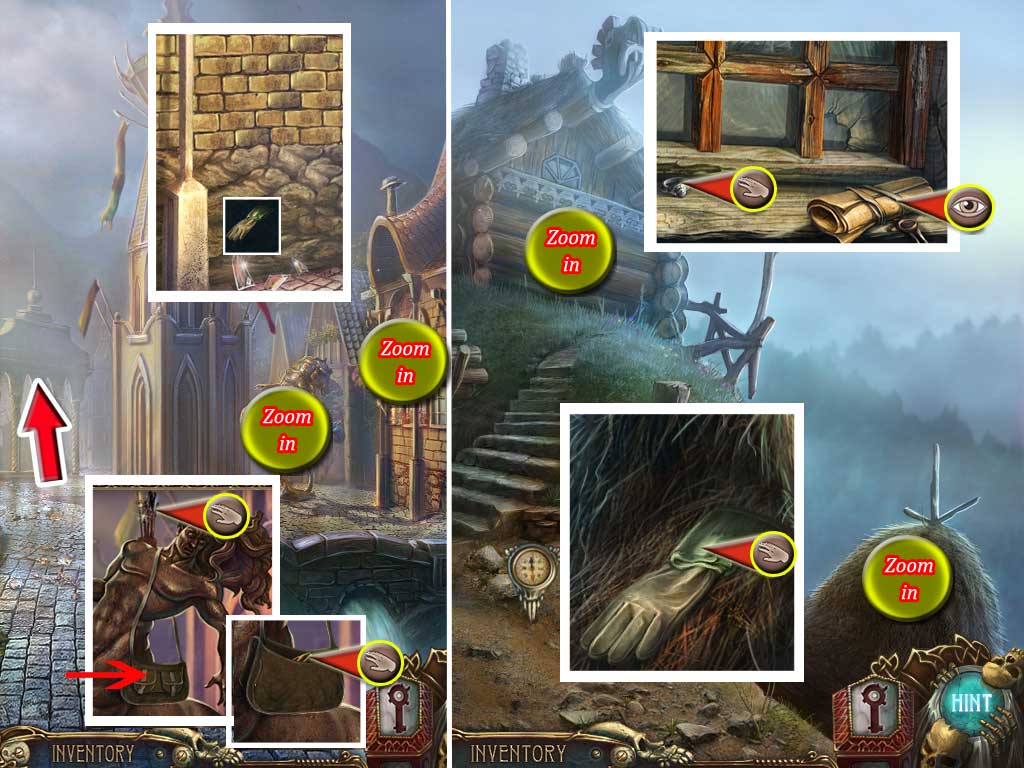
Head left.
20. House of the Garden Gnome/Town Square
Zoom into the hay stack on the right side.
Click twice to find a glove.
Zoom into the window and read the scroll.
Take the ring.
Go back and head right to the Town Square.
Zoom into the Centaur Statue on the right side.
Take the arrow; open the bag and take the puzzle part (1/3).
Zoom into the house on the right side and use the glove to pick up a glass shard from the ground.
Exit the close up and head towards the columns to get to the market.
Screenshot
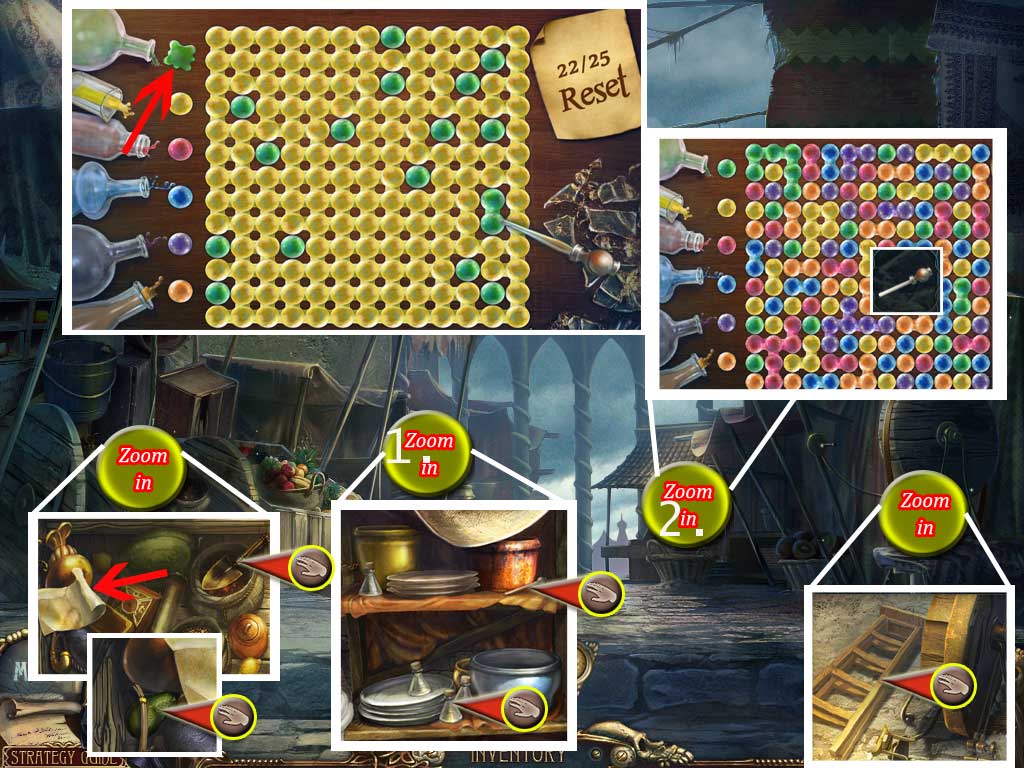
21. Market
Zoom into the far left stand and take the pipette and the bottles.
Zoom into the far right stand and click.
Wait till everything is destroyed and click again to activate a mini game.
Place the pipette on the board.
Your goal is to have all drops in the same color.
Starting with the drops upper left corner choose from the paint globs on the left one (click it) paint all connected drops the same color.
As example: there are a few connected green drops in the upper left corner. They are surrounded by different color drops.
Choose the color of the drop which does have the most connections with the green one - now all green ones turn into the chosen color.
Now choose the next color with has the most connected drops to the new color.
The little trick is to see, which color is less on the board. Try to do not use this one till the very last end in the low right corner.
You are only allowed to choose 25 drops or less.
When you finish successfully you obtain a pipette with acid.
Zoom into the grinding stone on the right side and take the ladder.
Zoom into the barrow on the low left side and take the shovel.
Click the paper on the right side and take the fruit.
Return to the Town Square.
Screenshot
22. The Centaur Shop
At the Town Square zoom into the house on the right side.
Place the ladder (Spoiler 21) under the window and take the empty watering can.
Take the ladder back into the inventory.
Go 1x back and zoom into the bushes on the left side, where you see the animal eyes glowing.
Use the shovel (Spoiler 21) to get the root.
Go 1x back and zoom into the water on the far left.
Click the image of the guardian away and use the watering can to get a filled watering can.
Screenshot
Return to the Town Square and zoom into the Centaur shop on the left.
Click to make the snail move away.
Used the filled watering can to remove the mucus.
Screenshot
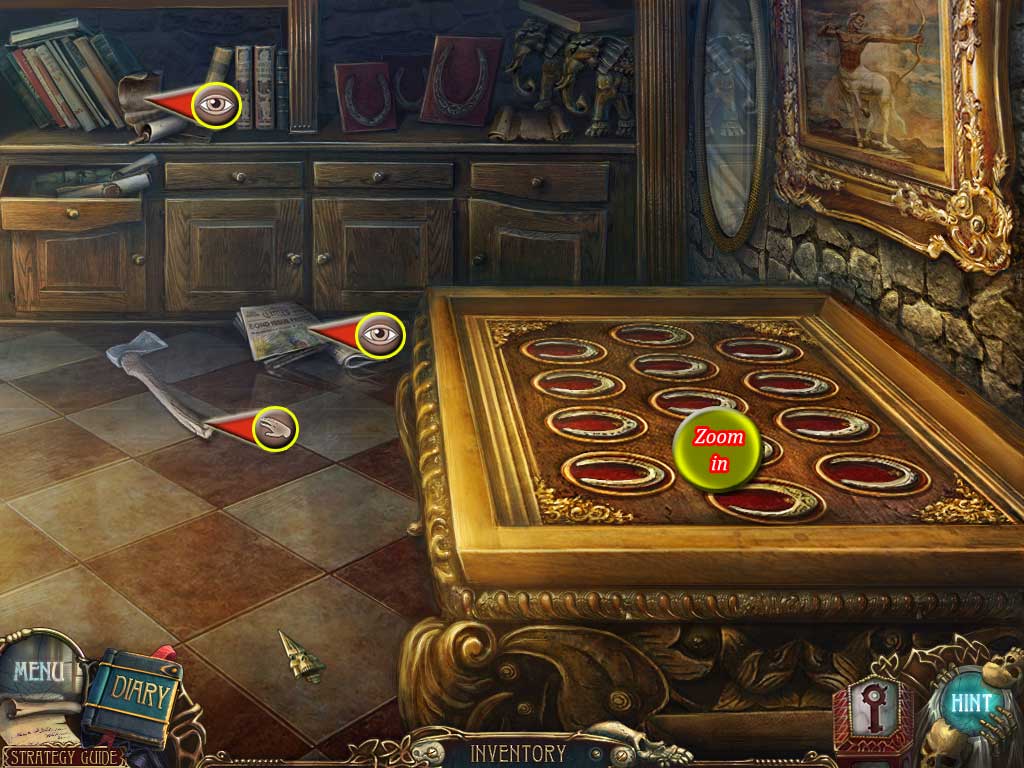
Click the door and enter the shop.
Pick up the axe.
Click the newspaper and read it.
Click the scroll in the lower left shelf and read it.
Click into the table with the horse shoes on the right to activate a mini game.
Each of the three boards shows one unique horse shoe; find it.
Having three wrong clicks on one board will restart this particular board.
You will get a horse shoe.
Screenshot
Exit, go 1x back and head left to the Gnome House.
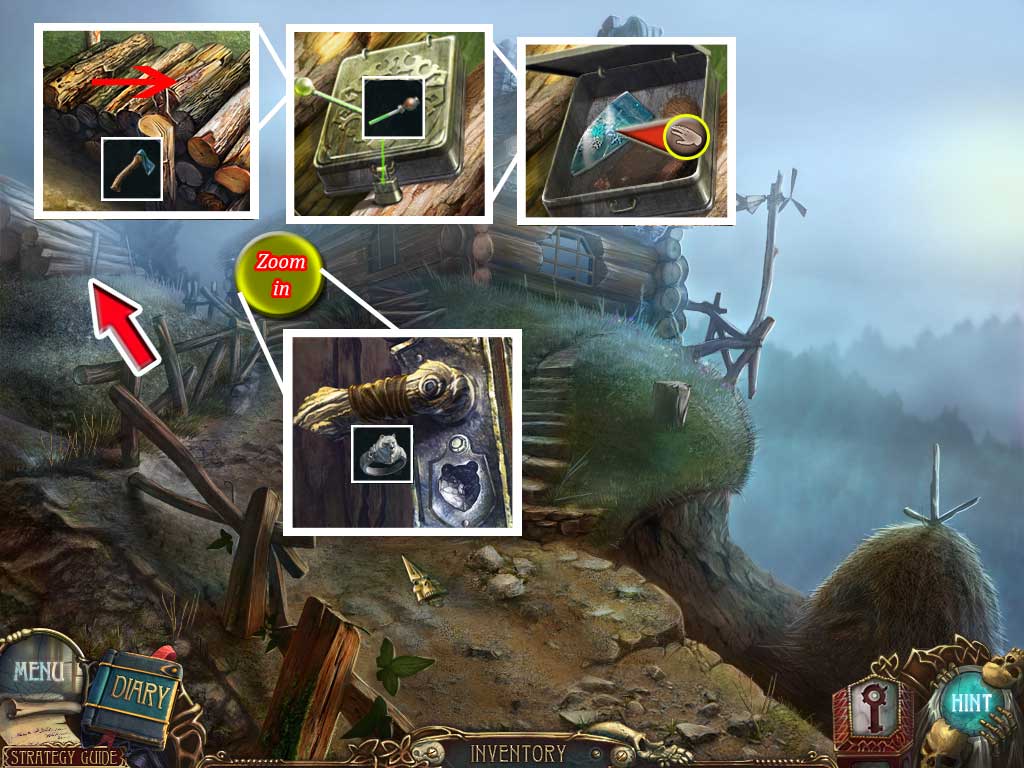
23. Gnome House
On the way to the gnome house go left.
Use the axe at the standing log to get a splinter.
Click the log heap.
Zoom into the box and use the pipette with acid to open the look.
Take the mosaic part (2/3).
Zoom into the gnome house's door.
Use the ring 23 at the lock.
Screenshot
Enter the house.
Zoom into the magic symbols top right side and place the horse shoe (Spoiler 22) at the nail.
Zoom into the bucket on the right side to activate a mini game.
Your goal is to remove all yellow and red mushrooms with the help of the stencils.
Click a stencil to pick up and click it on the mushrooms to remove them.
Use Restart button if you get stuck.
Take the green mushroom.
For solution please have a look at the screenshot.
Screenshot
Zoom into the fire place and use the splinter at the fire to get a burning splinter.
Look at the part of a recipe, it will be copied into your journal.
Zoom into the wooden log on the low right side.
Use the burning splinter to chase the spider away and take the brush.
Zoom into the table and read the newspaper clipping.
Take the nail.
Place the fruit (Spoiler 21) on the wooden board and use the knife to cut it.
A few seeds are automatically going onto the cotton on the low left side.
Click to close it and use the watering can (Spoiler 22) to grow grain.
Take the grain.
Screenshot
Exit the gnome's house and return to the cave, where you started.
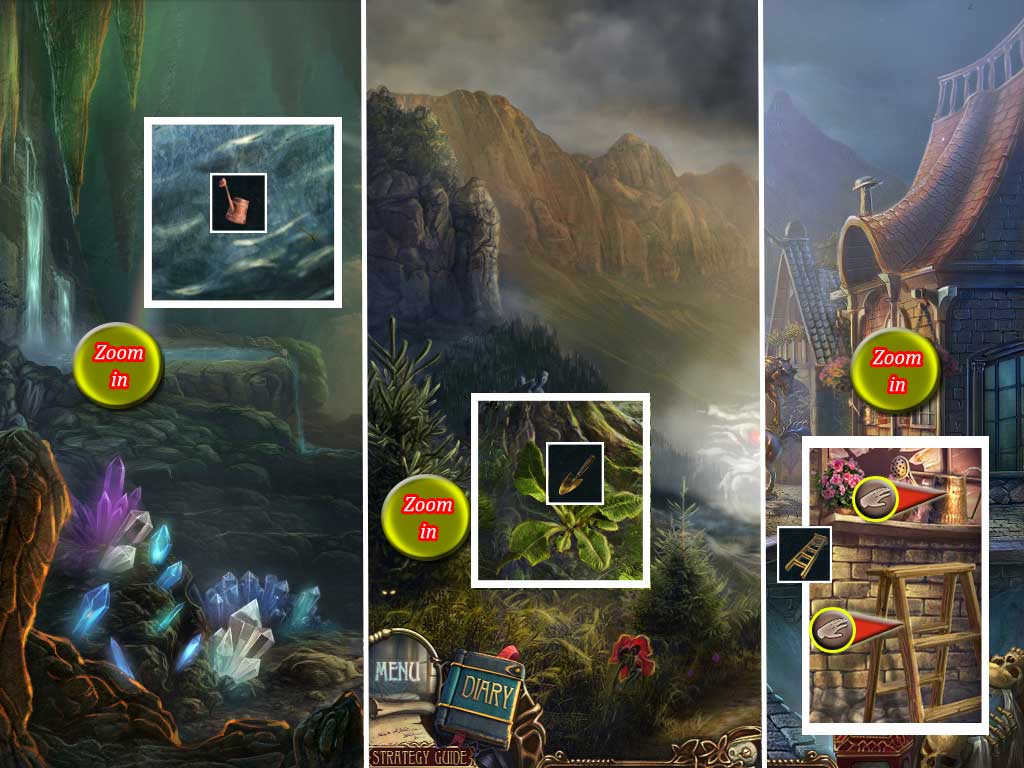
24. Cave/Tower
Zoom into the crystals on the low left side.
Clean the board with the brush (Spoiler 23) to activate a mini game.
Your goal is to bring all gems into the middle of the board, where they have to match the fields of the same color.
Move the gems by using the arrows.
By clicking the red, blue or green gem the board will turn.
Start with the pink gem and click 4x the right arrow.
Now red, 5x right.
Next one is blue: 3x right, 1x left.
Last one is blue: 2x right, 1x left, 3x right.
Screenshot
For finishing successfully you will receive a rough diamond.
Exit the cave, return to the town square and enter the Tower
Zoom into the painting at the far back wall and take the dandelion.
Go upstairs and take the grindstone from the third statue (seen from the left).
Exit the tower and head to the market.
Screenshot
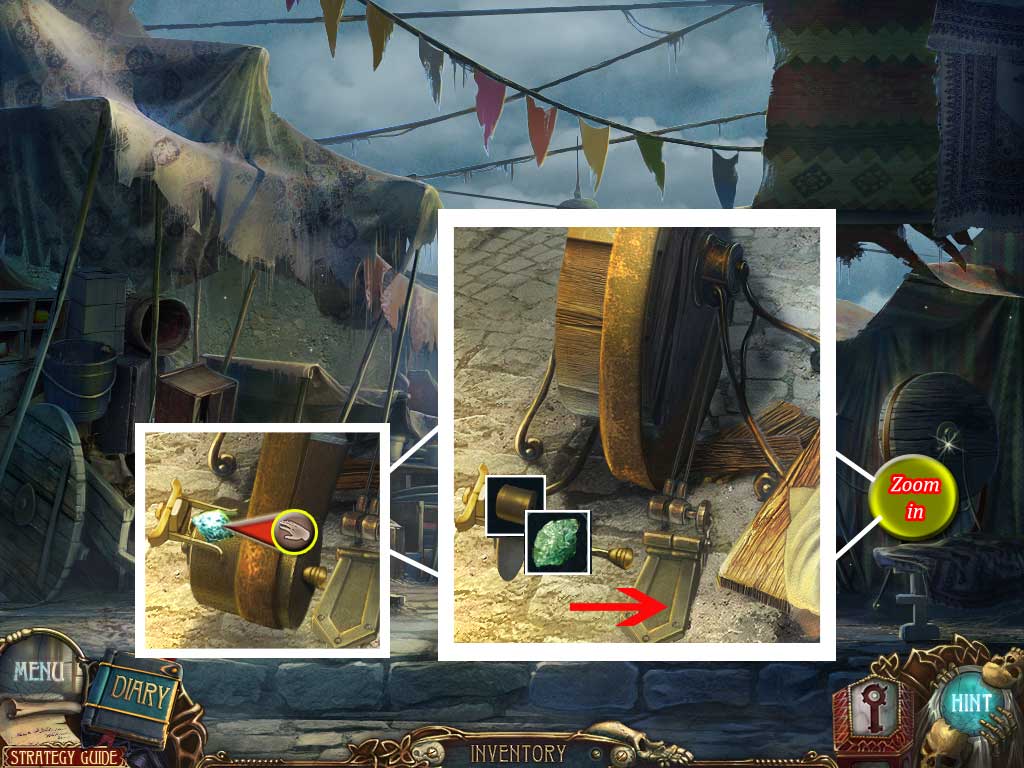
25. Market/Tower (The four Statues)
Zoom into the grinding machine on the left and place first the grindstone, then the rough diamond (both Spoiler 24).
Click the pedal and take the diamond after.
Screenshot
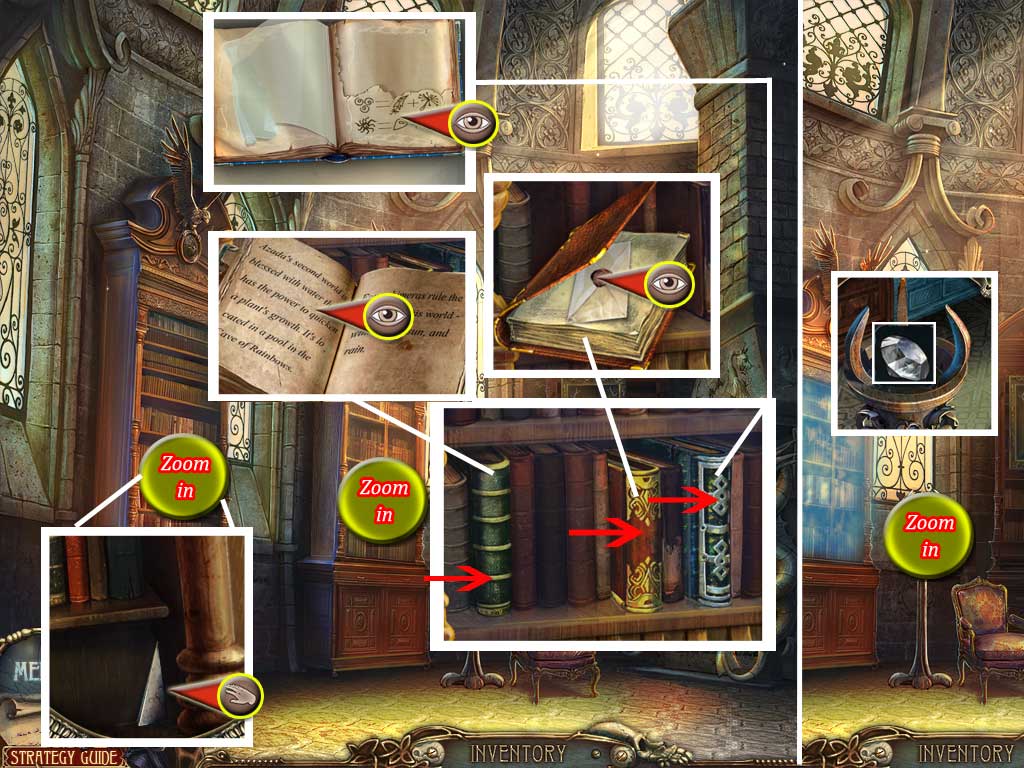
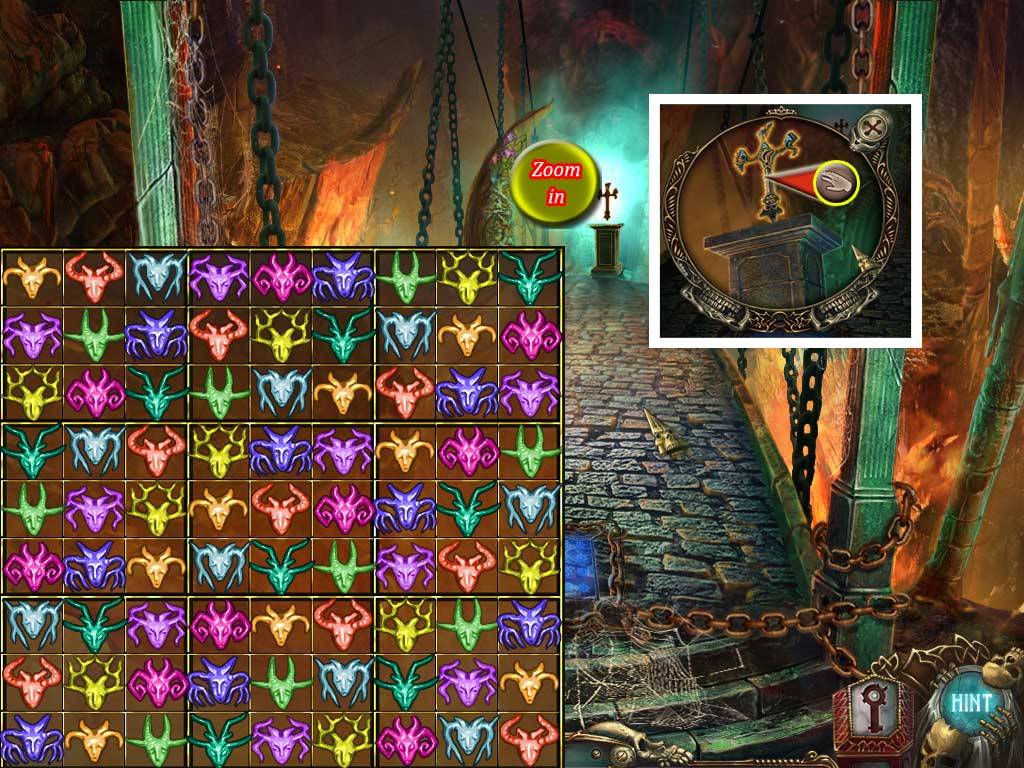
Return to the Tower.
Zoom into the pedestal and place the diamond.
The light beam will take away the magic on the book shelf.
Zoom into the left book shelf and take the mosaic part (3/3).
Zoom into the right book shelf.
Click on the green, the blue and the red book.
Notice the second half of a recipe going into your diary.
Read the texts.
Now zoom into the fire place.
Screenshot
Use the nail (Spoiler 23) to obtain the amber eye of the stone dragon on the left.
Your goal now is to make four potions; remember the two half of a recipe in your diary.
To do so put the right ingredient into every cauldron.
From left to right you will have to make a:
rain potion: mushroom + grain (both Spoiler 23)
wind potion: feather (Spoiler 19) + dandelion (Spoiler 24)
sun potion: amber + flower (Spoiler 19)
snow potion: glass shard (Spoiler 20) and root (Spoiler 22)
Click the bottles (Spoiler 21) at each cauldron to get the 4 potions into your inventory.
Screenshot
Go upstairs.
Click the puzzle in the middle of the column.
Click the mosaic parts (Spoiler 20, 23 and here) on the scene and assemble the picture.
Pick a part up with left click, turn it with right click; a part in the right position will be locked.
When done give each lion the potion corresponding to the symbol above its head.
You want to click the potion exactly into the mouth.
From left to right: green (wind), dark blue (frost), orange (sun), light blue (rain).
A portal appears; go through, you will on the street in front of the castle, which now is free to go.
Screenshot
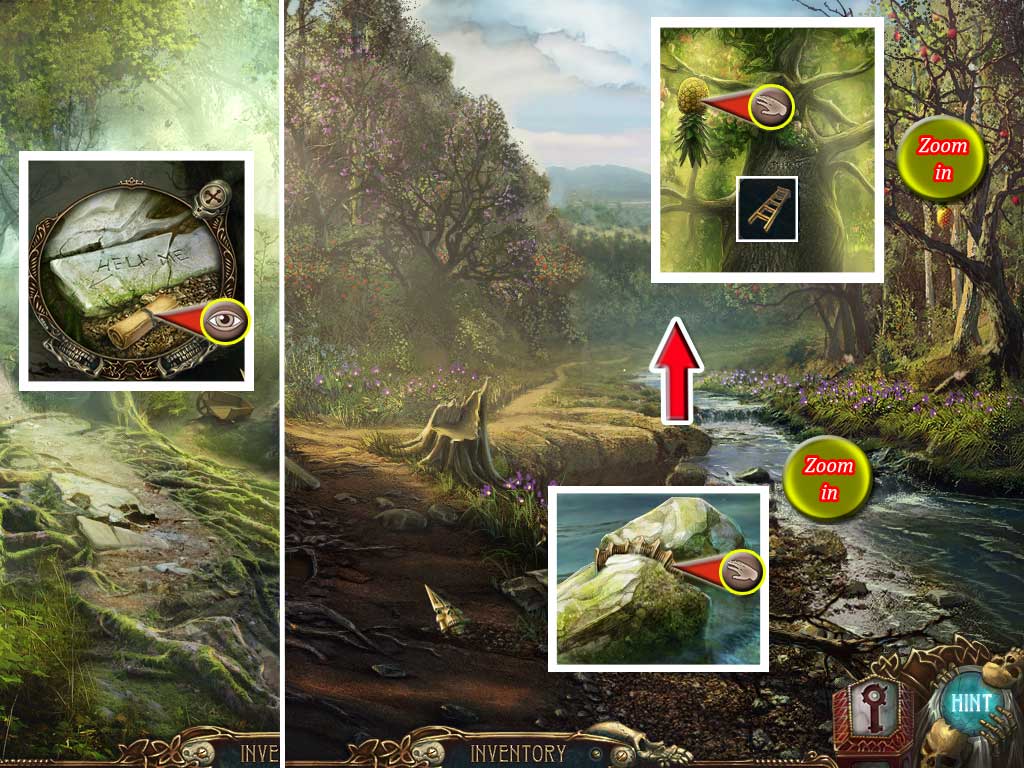
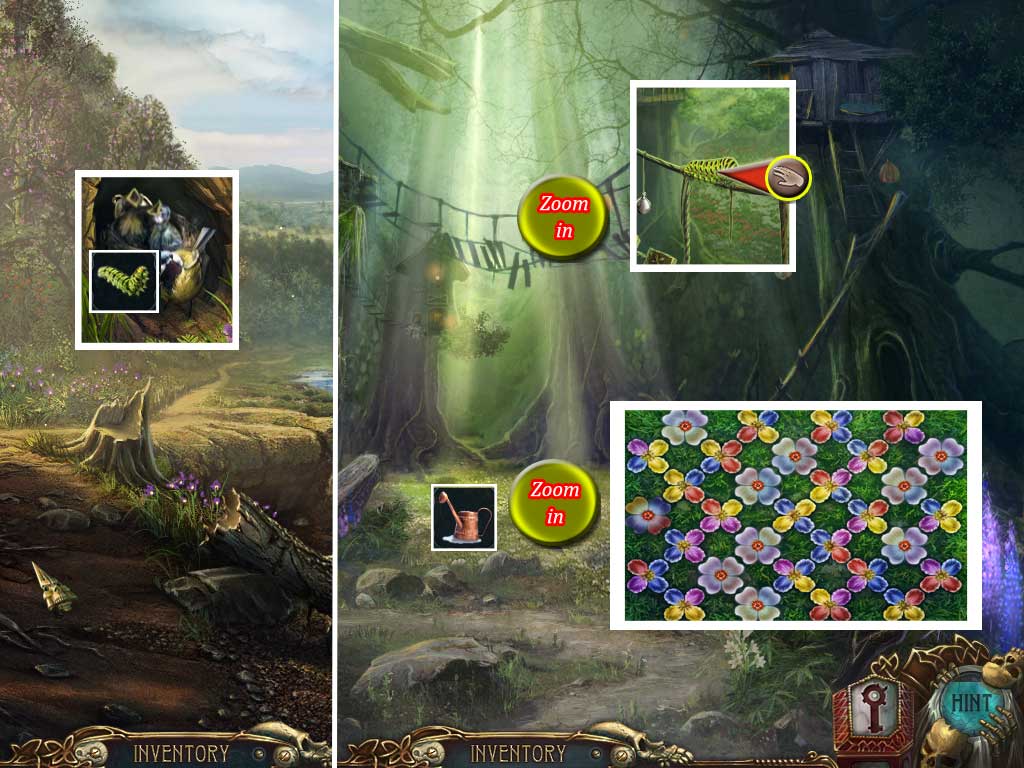
26. Forest - Start/Crossway/Fairy Village/Start
Zoom water where you see the stones lurking out of the water.
Take the fin.
Zoom into the pineapple at the apple tree on the far right and take the pineapple.
Go forward.
Zoom into the stones on the left way and click the scroll to read.
Screenshot
Head left.
Use your watering can on the grass in the middle and zoom in to activate a mini game.
Turn the bigger ones of the flowers to match the leaves of the touching flowers.
A flower that is in the right position can't be moved anymore.
A cart handle will go into your inventory.
Zoom into the hanging bridge and take the caterpillar.
Go back twice to the start and zoom into the stump on the right side.
Feed the bird with the caterpillar to obtain a bell.
Screenshot
Head right to the waterfall.
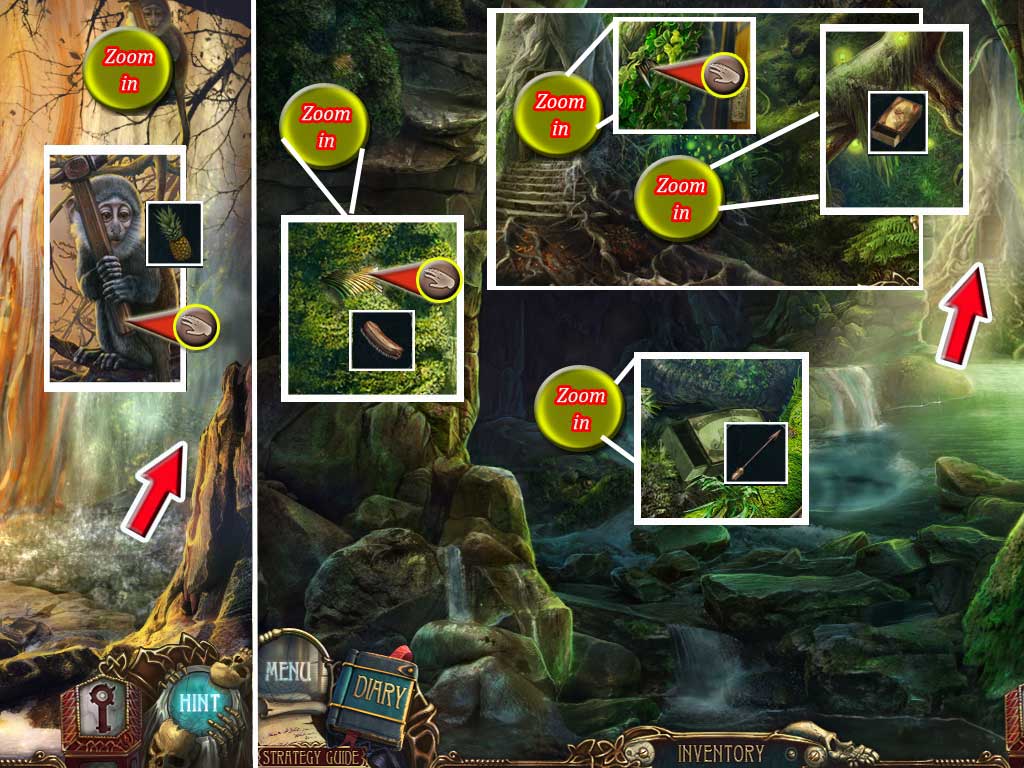
27. Waterfall/Cave
Zoom into the monkey on the top right side and give him the pineapple (Spoiler 26).
Take the hammer.
Go right to the cave.
Zoom into the moss on the left cave wall and use the brush (Spoiler 7) to remove it; take fin (2/3).
Zoom into the ground on the far left and use the arrow (Spoiler 20) to get the match box.
Go right.
Zoom into the door and take the fin (3/3) on the right side.
Zoom into the green shimmer on the right of the tree.
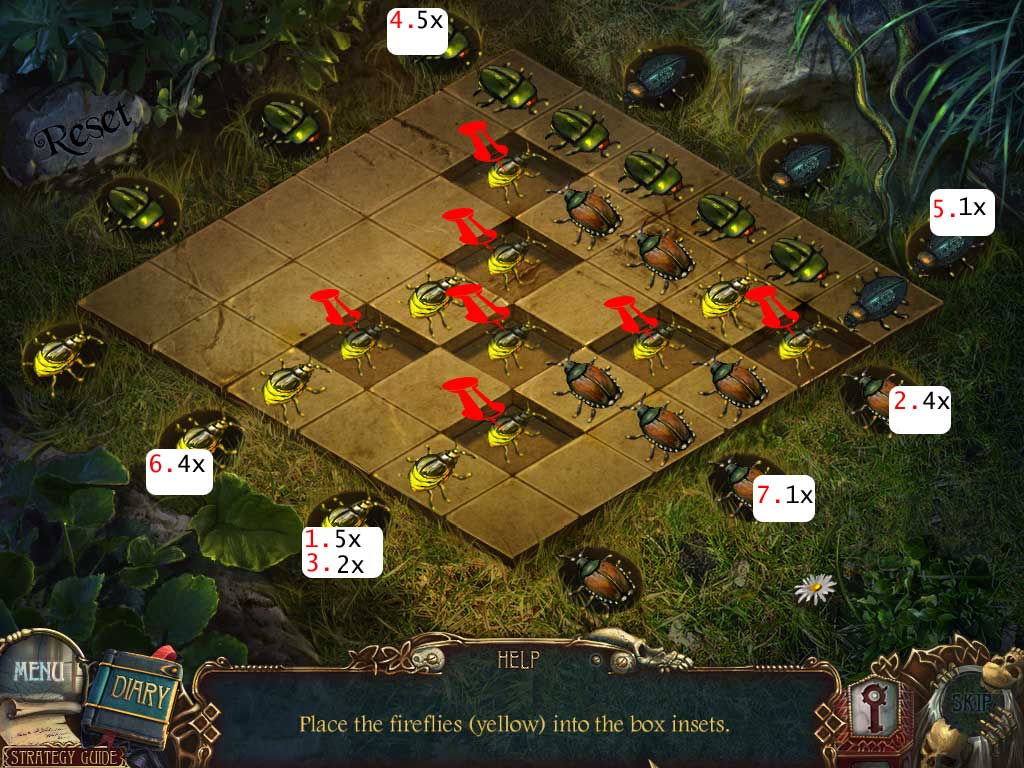
Click the match box at one of the fire flies to activate a mini game.
Screenshot
Your goal is to bring the yellow fire flies into the holes on the board.
When you click the fire flies at their exit holes they will be pushed forward in row, one after each other.
To get the yellow guys in the holes you will need the bugs at the other sides to push them in the right direction.
Bug moving works the same as fire fly moving.
There are a lot of solutions and you always may use reset, but in fact you will not need. There is not limit and bugs and fire flies will come as long as you click.
For one possible 7 step solution please have a look at the screenshot.
Screenshot
A box with fire flies will go into your inventory.
Go back to the waterfall.
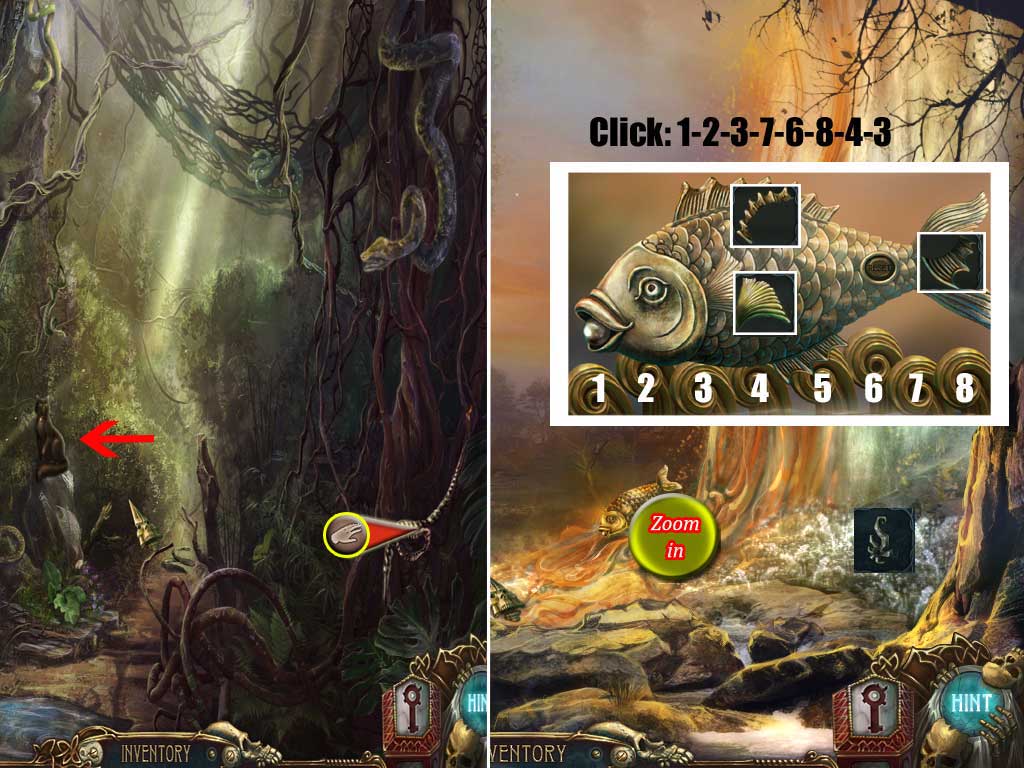
28. Waterfall/Snake Way
Zoom into the fish and place the three fins (Spoiler 26 u. 27).
In order to get the pearl from the fish you need to remove the waves below the fish by clicking on them.
One wave will effect one or more other waves.
Seen the waves from left to right 1-8 click: 1,2,3,7,6,8,4
You will obtain a pearl.
Head into the forest on the far right side.
Click the cat to make her run away.
Take the rope from the bark of the tree, low right side.
Screenshot
Return to the fairy village.
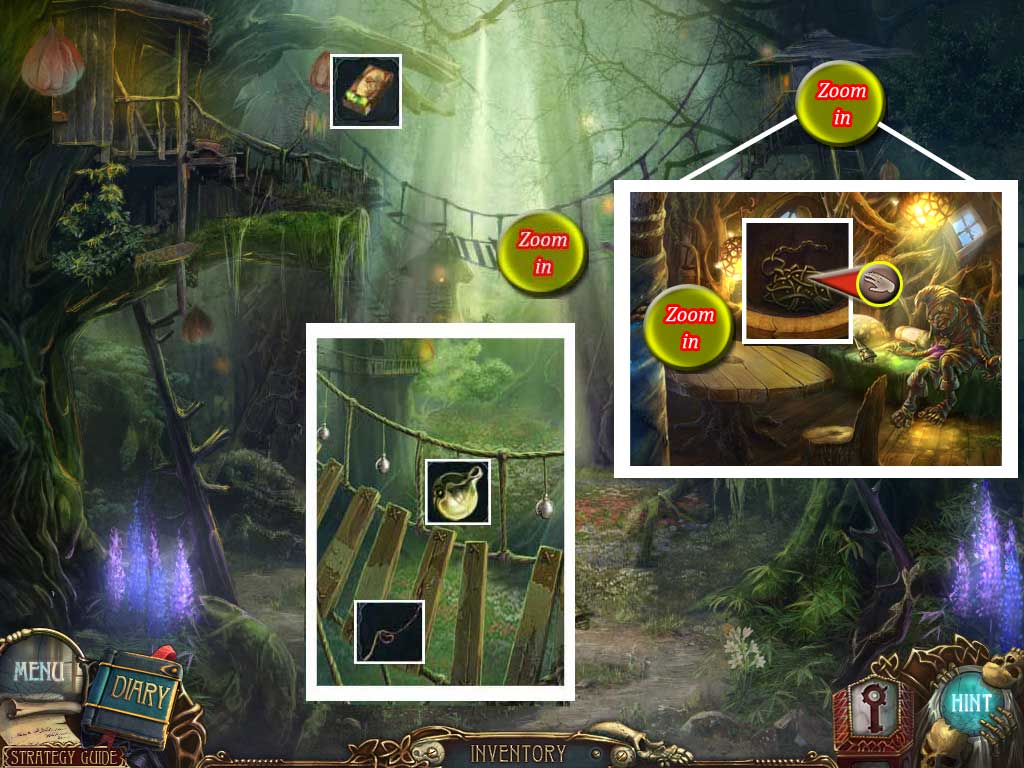
29. Fairy Village/Haunted Tree
Zoom into the hanging bridge and place first the rope (Spoiler 28) to repair it and then the bell (Spoiler 26) at the empty string.
Click the box with fire flies (Spoiler 27) at one of the lanterns.
The fairies will come and give you a stone symbol as gift.
Zoom into the right upper tree house.
Zoom into the vase on the far left side and take the amulet.
Screenshot
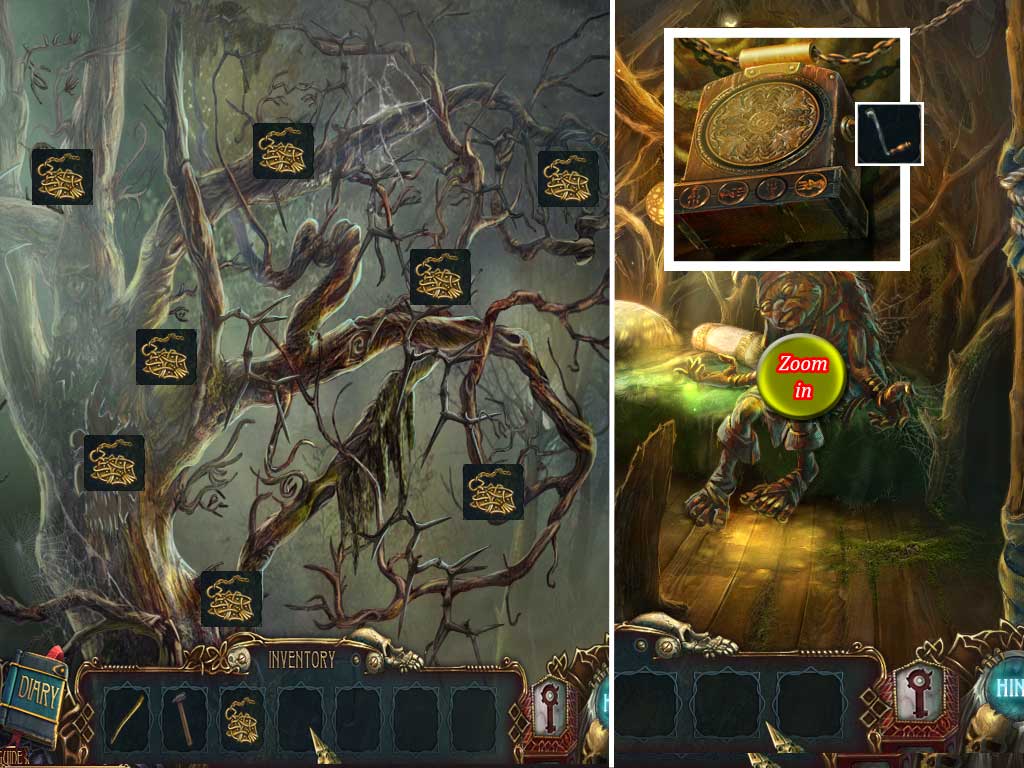
Exit the tree house and the fairy village.
Zoom into the haunted tree and remove the eight evil symbols by clicking them with the amulet.
When the tree is completely blooming exit the close up.
A handle will fall on the ground, pick it up.
Return to the tree house.
Zoom into the Gnome and place the handle at the right side of the box around his neck.
Click the handle and watch where the hurdy gurdy goes.
When it stops click the button representing the position of the figurine.
Win three rounds to obtain a stake.
Screenshot
Exit tree house and return to the waterfall.
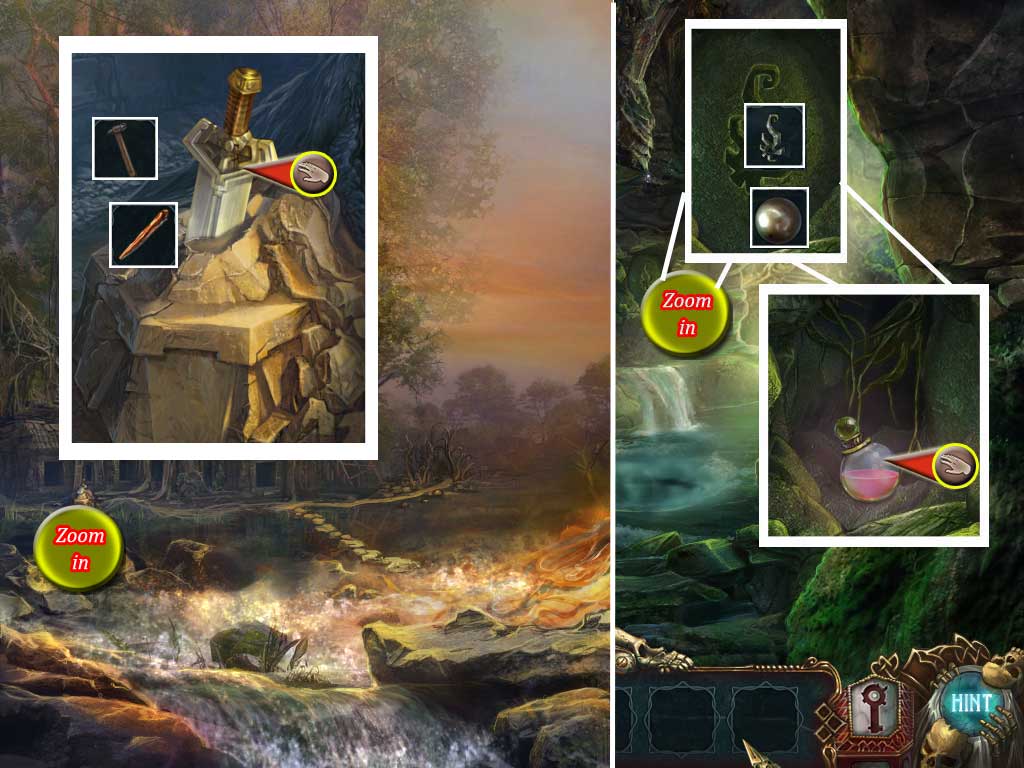
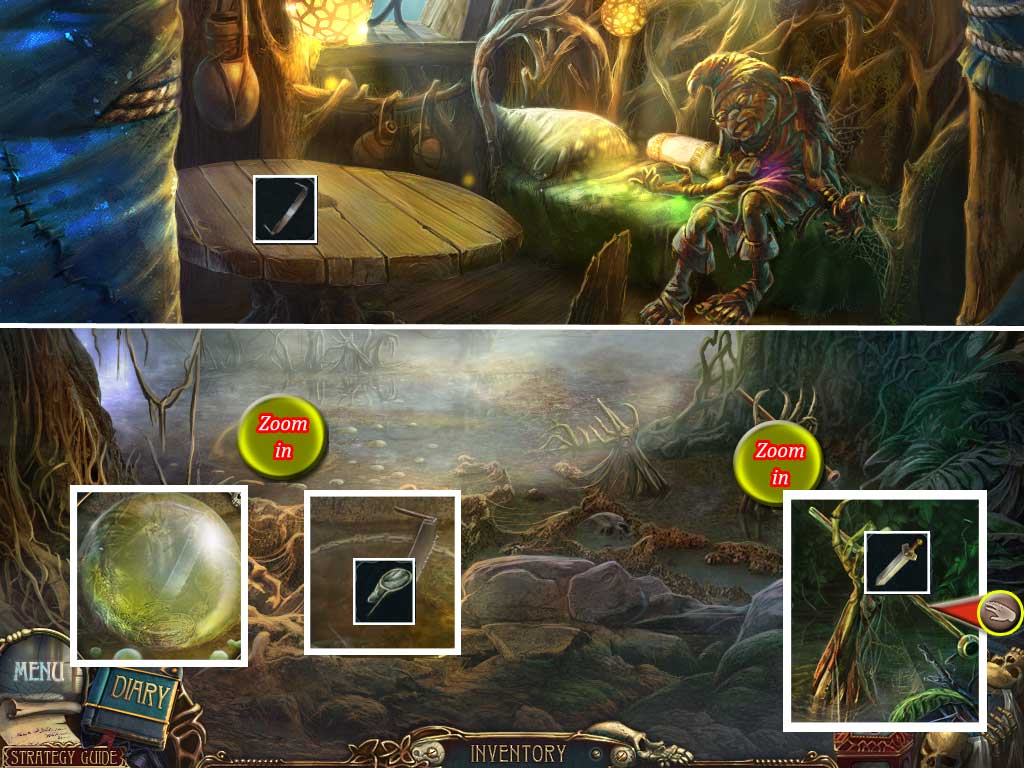
30. The Sword/Cave
Zoom into that small looking rock on the far left side.
Place the stake (Spoiler 30) and the hammer (Spoiler 27).
Take the sword.
Exit and go right to the cave.
Zoom into the far back wall and place the stone symbol into the slot.
Place the pearl (Spoiler 28) in the middle.
The stone moves, take the bottle with antidote.
Screenshot
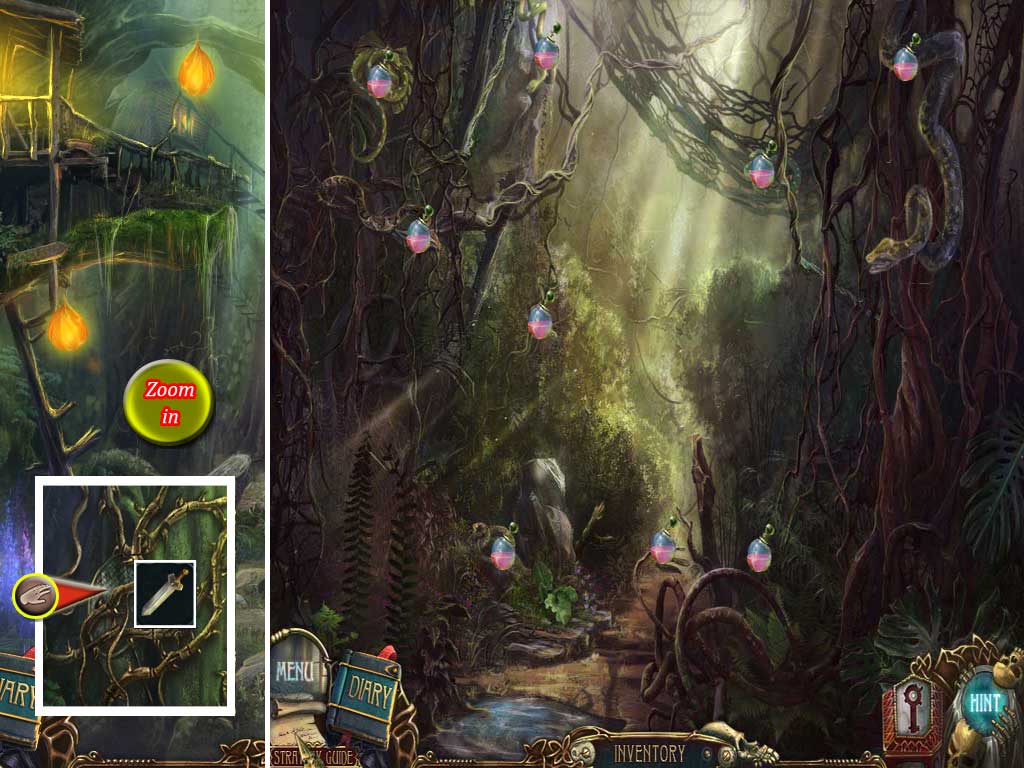
Return to the fairy village.
31. Get the Second Key
Zoom into the far left tree and use the sword to retrieve the net.
Return to the waterfall and head far right to the snake way.
Get the antidote out of the inventory and click it at nine snakes.
Screenshot
Go forward.
Zoom into the water and click the water bubble.
Use the net to get the saw.
Zoom into the cart handle on the right.
Use the sword to cut of the finger bones.
Take the cart handle.
Return a last time to the fairy village and zoom into the tree house.
Use the saw at the table on the left.
A wheel is going into your inventory.
Screenshot
Exit the fairy village and zoom into the broken cart left next to the now blooming tree.
Place the two cart handles (Spoiler 26 and here) and the wheel.
Take the cart with stones.
Screenshot
Return to the guardian.
Place the cart with stones at the swamp and zoom into the guardian.
Take the second key.
Screenshot
Return to the door behind the cave and use the key.
Talk to Titus, zoom into the book, go to the next page and enter the third world.
The Third Key
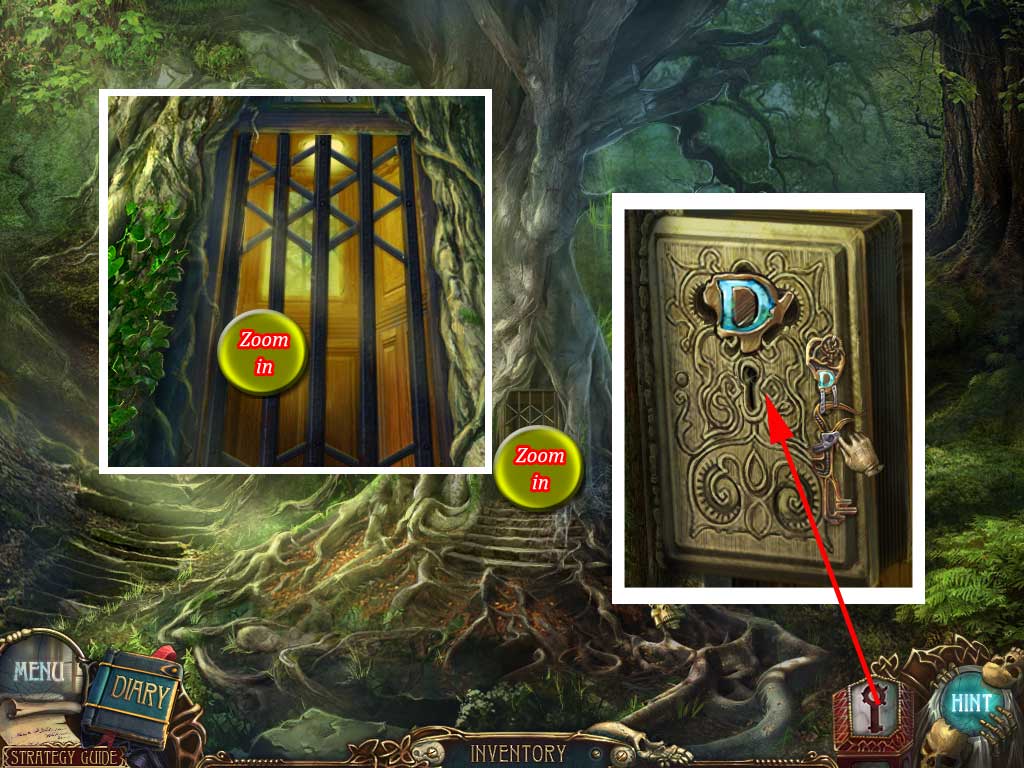
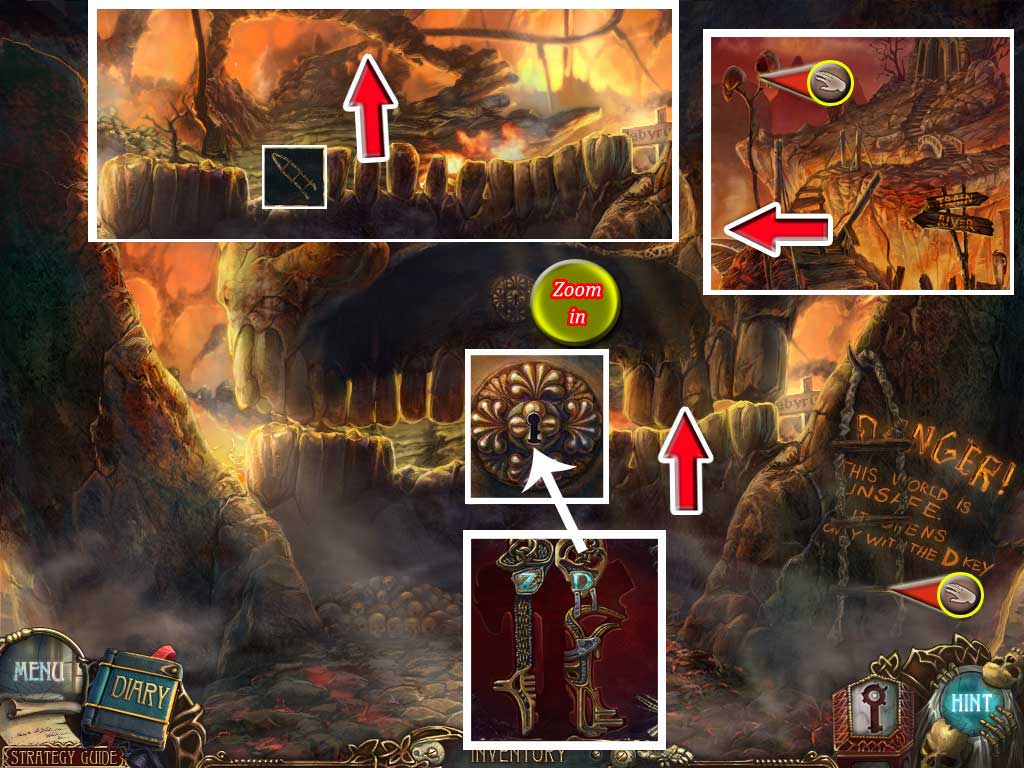
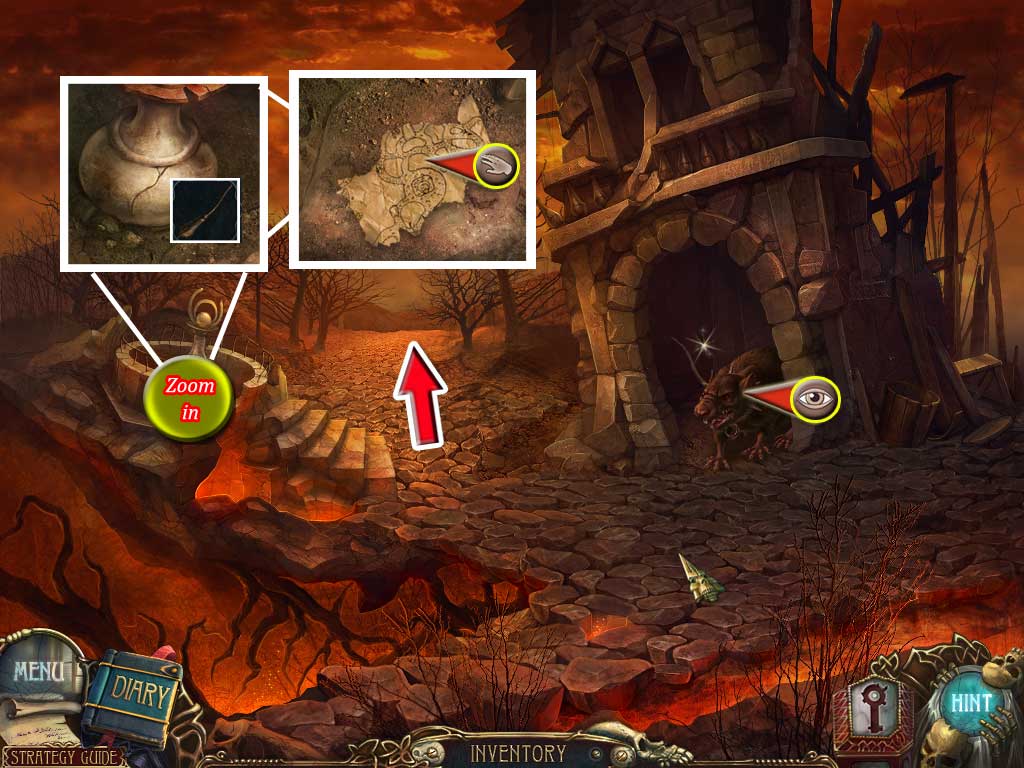
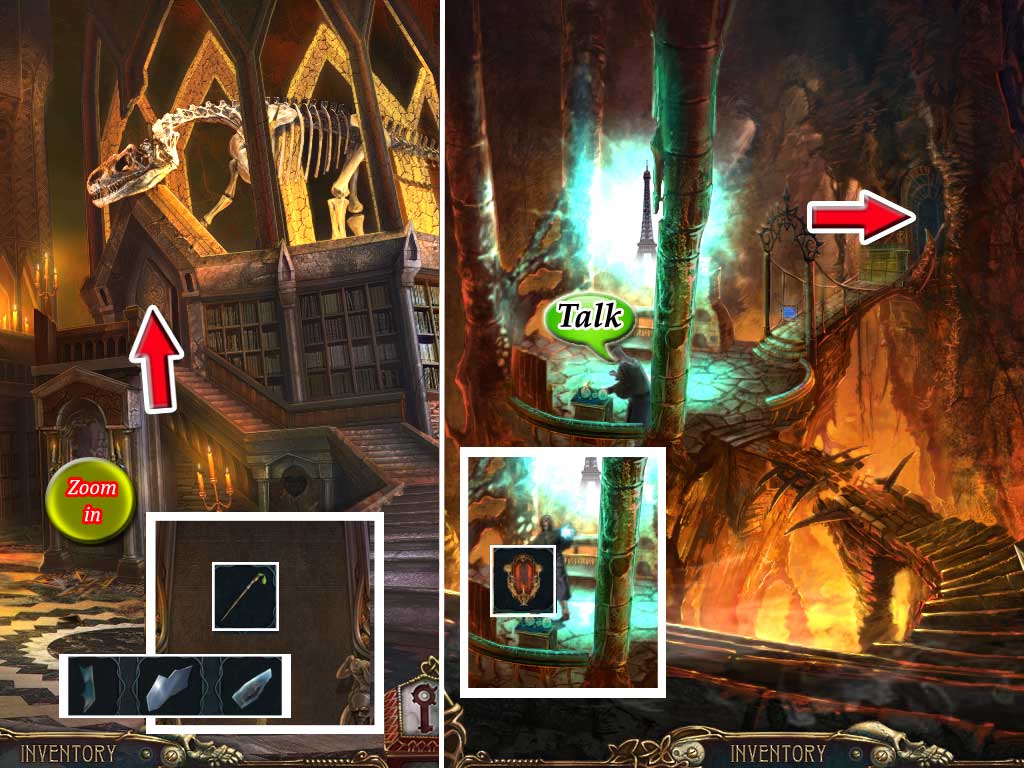
32. Entrance/Crossing Train-River
Take the ladder on the low right side.
Zoom into the lock.
Open your magic key box and use the D-key to open the lock.
Place the ladder between the teeth.
Go forward and click the demon.
Go forward, click the demon and take the right skull on the post left side.
Head left.
Screenshot
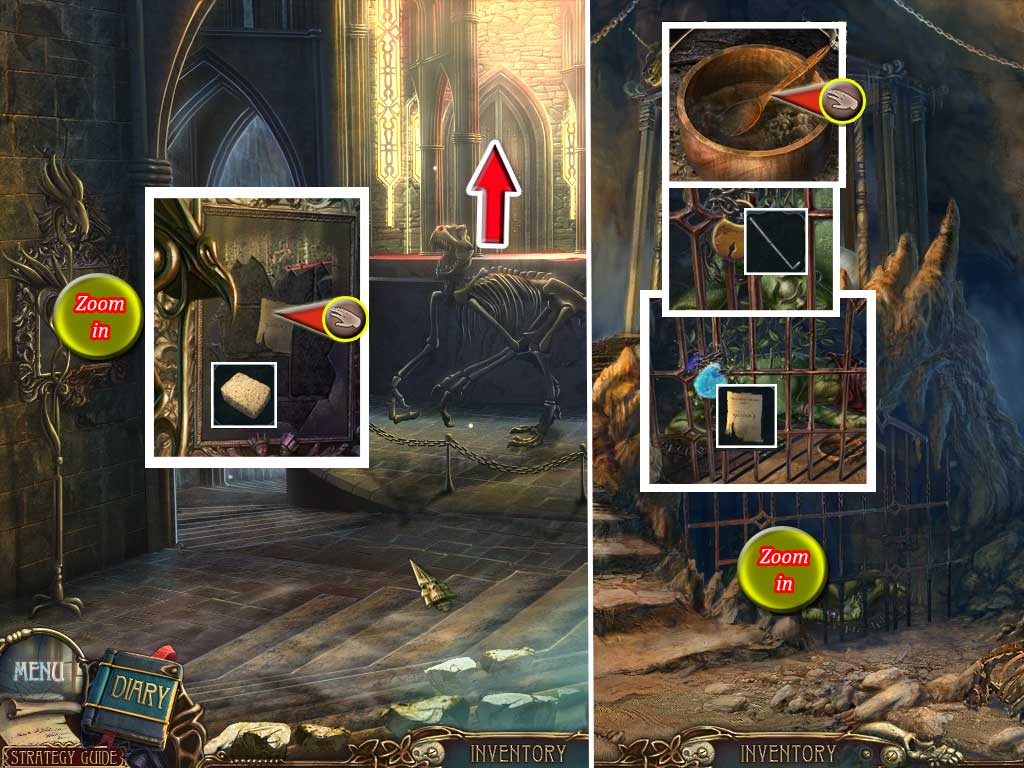
33. Dragon Skeleton/Train
Zoom into the middle of the scene and take the shell.
Go forward and take a few ribs from the left side of the dragon skeleton.
Go back 2x and head right to the train.
Click to open the hatch on the ground and zoom in.
Take the blue and red gem.
Zoom into the first aid box on the top right side and click to open it.
Take the scissors and a bottle.
Exit the train, go to the train-river crossing and zoom into the trails in front of you.
Place the ribs to repair the trails.
Screenshot
Go forward.
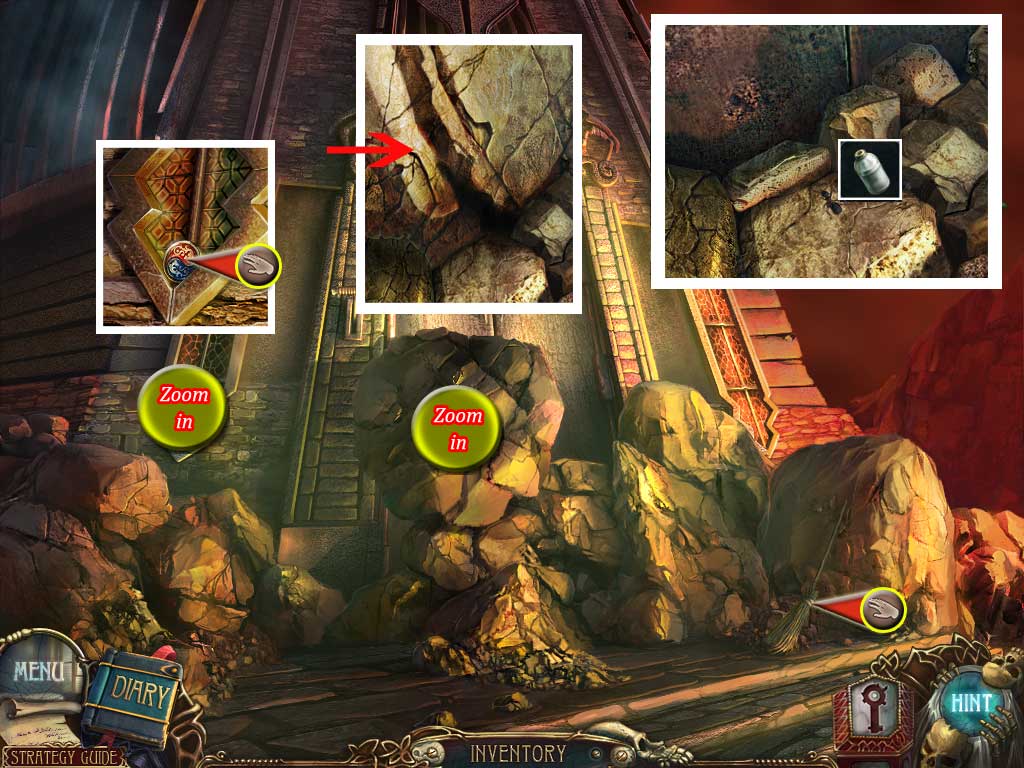
34. Tower Entrance
Take the broom on the right side.
Zoom into the stones in front of the door and remove the one on the top by clicking it.
Get the bottle (Spoiler 33) and collect the termites with it.
Zoom into the small glass stained window on the left side and take the puzzle part.
Screenshot
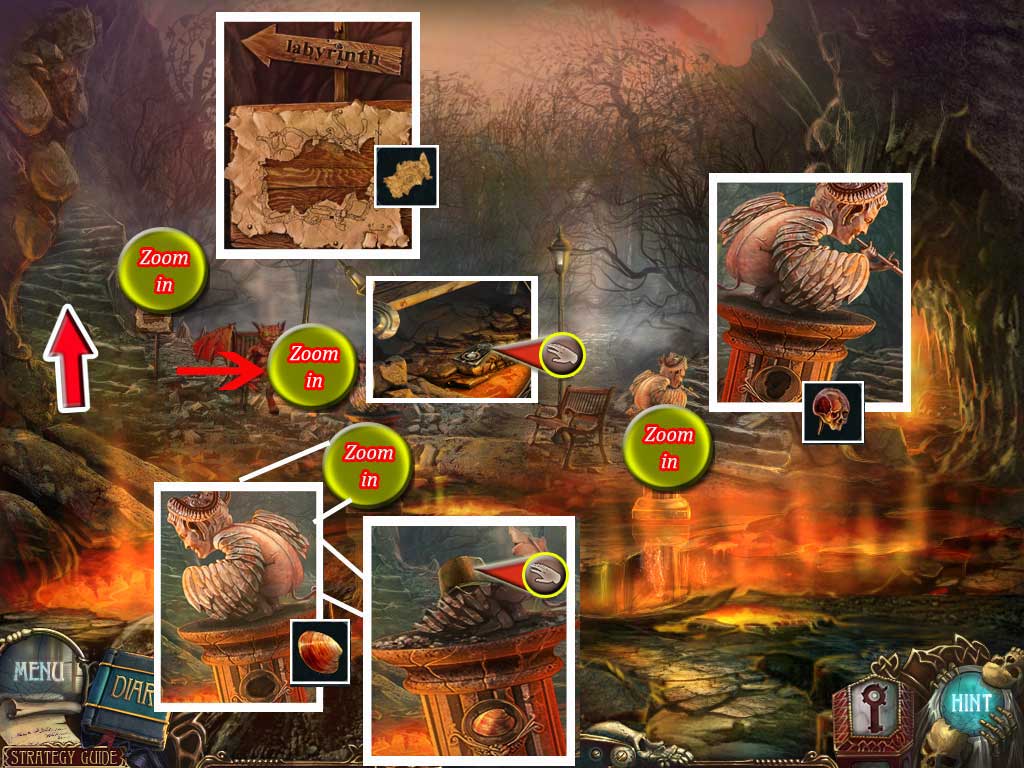
Go back twice and follow the sign "Labyrinth" to the right.
35. The two statues
Click the giant rat to learn that you will need to feed her.
Zoom into the dry fountain on the left side and use the broom (Spoiler 34) to clean the ground.
Take the map piece.
Screenshot
Go forward.
Click the demon away.
Zoom into the bench and take the lamp (1/3).
Zoom into the left statue and place the shell (Spoiler 33); the statue will break, take the bucket.
Zoom into the right statue and place the skull (Spoiler 32), you will obtain the flute.
Zoom into the wooden board on the far left and place the map piece.
Go forward.
Screenshot
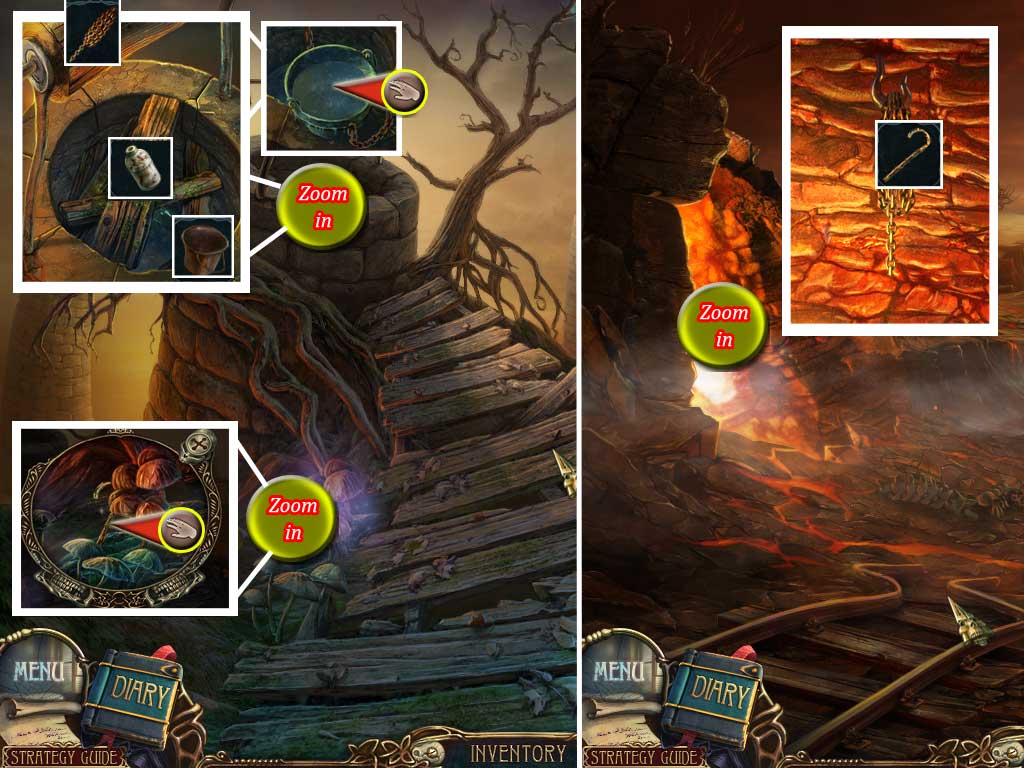
36. Well
Zoom into the glooming mushrooms on the left and take the cane.
Go back to the river-train crossing and head to the river.
Zoom into the huge cage on the left and use the cane to get the chain.
Return to the well.
Zoom into the well and use the termites (Spoiler 35) to get rid of the boards.
Place the bucket on the well and the chain at the winch.
Click to make the bucket go down.
It will come up filled, take the bucket with water.
Screenshot
Go back to the wooden "Labyrinth" sign.
37. Labyrinth Sign/Snake
Zoom into the burning bench behind the "Labyrinth" sign and the burning bush on the left side.
Use the bucket with water (Spoiler 36) to extinguish the fires and take the rod and the lamp (2/3)
The bucket will go back into your inventory.
Go forward to the river-train crossing and zoom into the snake.
Charm the snake with the flute (Spoiler 35).
Take the needles and the ball of yarn.
Head left to the river and go forward to the dragon skeleton.
Screenshot
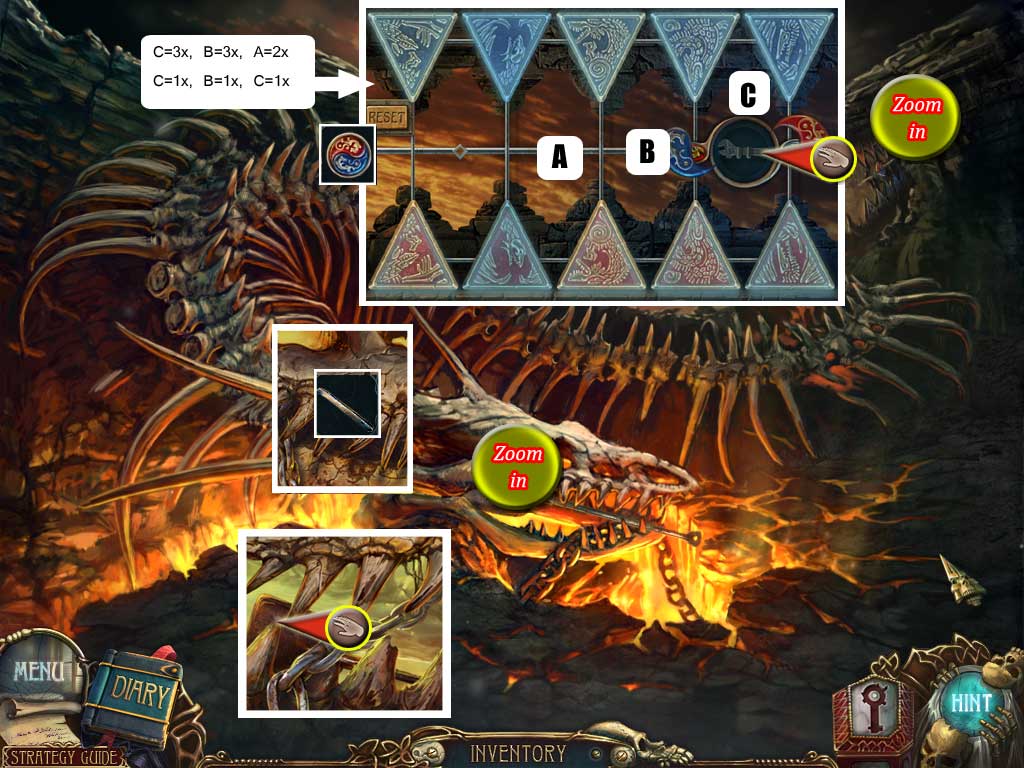
38. At the Dragon Skeleton/River
Zoom into the skeleton's head and use the rod (Spoiler 37) to open its mouth.
Take the shovel.
Zoom into the rock in the top right corner and place the puzzle part (Spoiler 34) in the middle of the board to activate a mini game.
Your goal is bring the matching tiles red and blue on top of each other, blue at the top and red at the bottom.
To do so, move the dial in the middle with the red and blue outside handles and click the ying-yang in the middle to flip the tiles.
If you get stuck you may use the Reset button.
There are several possible solutions, this is one:
Considering the last three spots for the dial A, B and C (seen from left to right) you will want to click in the following :
C=3x, B=3x, A=2x, C=1x, B=1x, C=1x
The ying-yang will open - take the wrench.
Screenshot
Go back once.
Zoom into the ground in the middle and use the shovel.
A barrel appears; click it to activate a mini game.
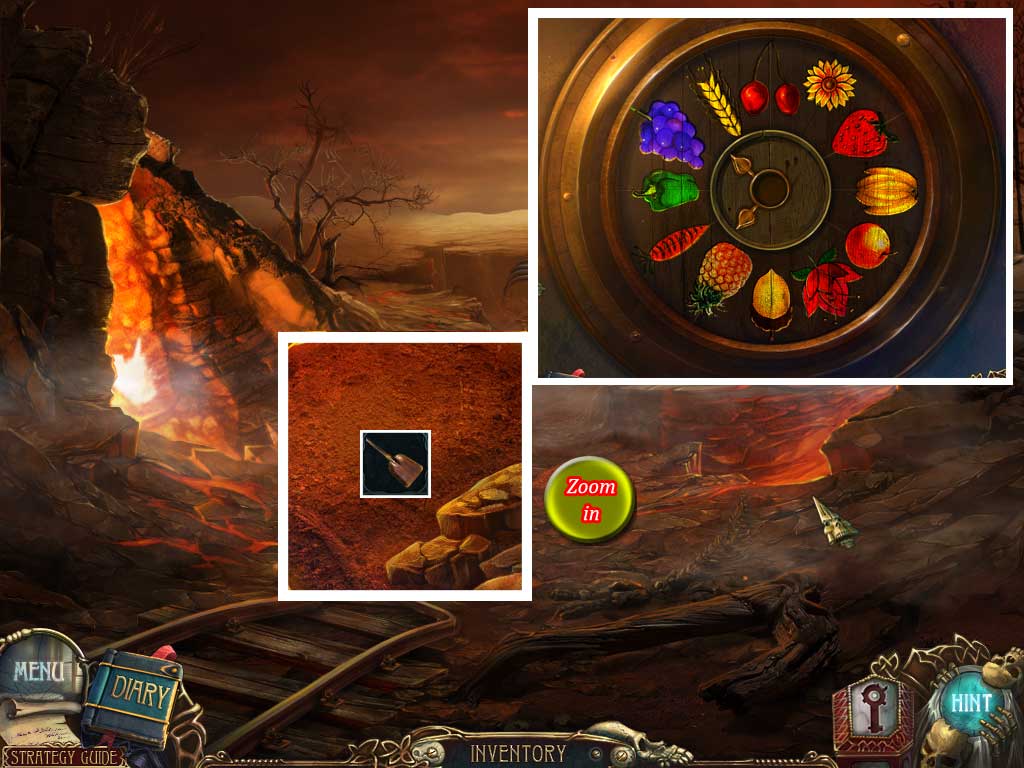
Your goal is to assemble the picture parts.
To move the parts place the two clock hands each on one picture part you want to change.
Click the red button in the middle to flip.
The cherries have to be on 12 o'clock.
You will obtain a bottle with honey.
Screenshot
Return to the giant rat.
39. Feed the Rat/Tower Entrance
Click the barrel at the rat and wait till it moves into the barrel.
Zoom into its hide out and use the bucket (37) to collect coal.
Take the file.
Return to the Tower Entrance.
Zoom into the lever left side of the door and use the file at it.
The lever will go into your inventory.
Screenshot
Return to the train.
40. Train
Zoom into the trails in the far back at the point where it looks like they are broken.
Use the needles (Spoiler 37) to remove the lamp (3/3) from the tracks.
Zoom into the trails left next to the train and place the lever (Spoiler 39).
Click the lever once.
Enter the train.
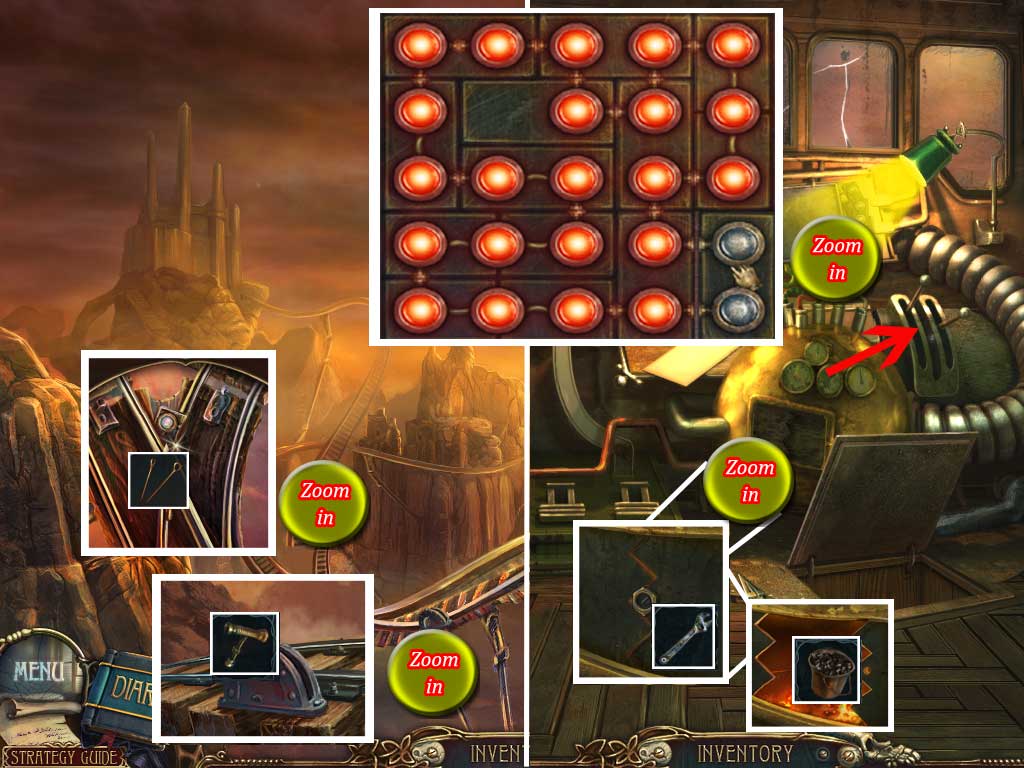
Zoom into the furnace door and use the wrench (Level 38) to remove the nut.
Click to open the door and place the coal (Level 39).
Zoom into the screen above the gauges.
Place the three lamps (Spoiler 35, 37 and here) on the board.
Your goal is to place all lamps on the board.
The lamps will light up, if they are connected in the right way.
Use right click to use the lamp.
When done on the right side the levers will appear.
Click them to start the train.
Screenshot
You will first see the train riding as if you are not in.
Click where the train stopped and you will be in it again.
Exit the train.
41. At the Train
If you find out that you forget some in the other part of this world you may always enter the train and go back and forth.
Click the demon to make him go away.
Zoom into the skeleton and use the scissors (Spoiler 33) to remove the web.
You will receive a lock pick.
Zoom into the window above the skeleton head and take the mirror (1/3).
Head left to the basement.
Screenshot
42. Basement
Zoom into the lower shelf on the right side and take the glass of lightning.
Take the sponge, low left side.
Zoom into the pile with the flower in the far back and take the mirror (2/3).
Zoom into the sailor on the far left and zoom into its chest.
Use the wrench (Spoiler 38) at the nut to open the chest.
Take the stone heart.
Head far right.
Screenshot
43. Unicorn/Sailor
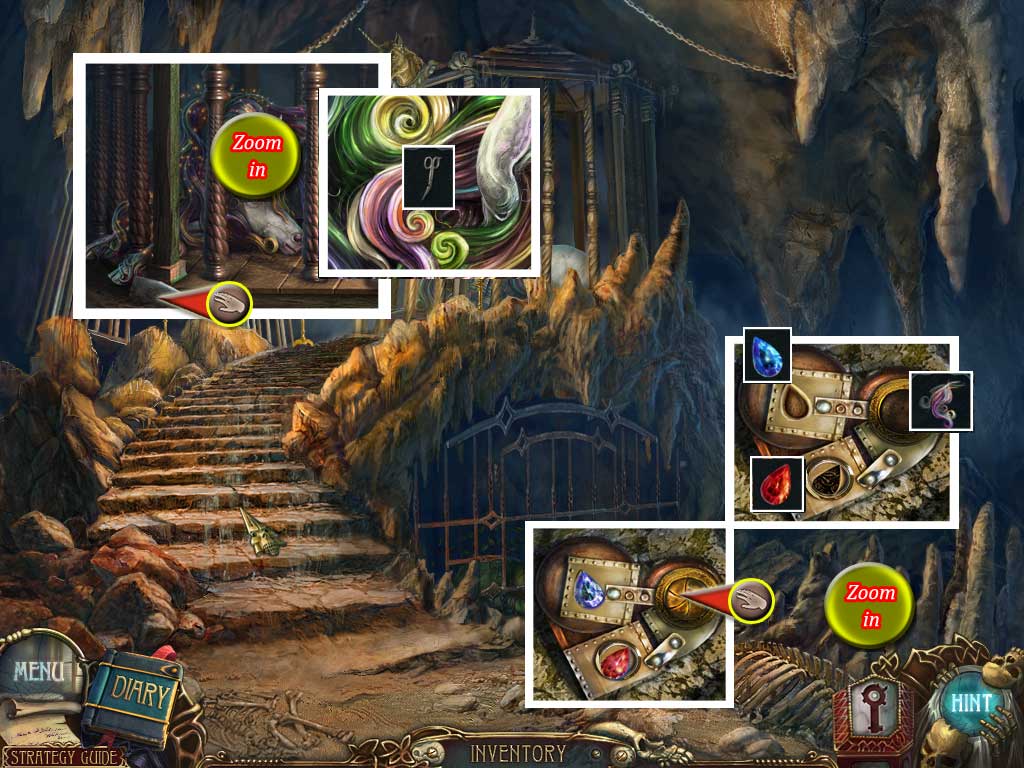
Zoom into the upper cage and take the mirror (3/3).
Zoom into the unicorn and use the scissor to get some unicorn hair.
Zoom into the lower right corner.
Place the blue and red gem ( Spoiler 33) in the left slots and the unicorn hair in the right slot.
Take the clock heart.
Screenshot
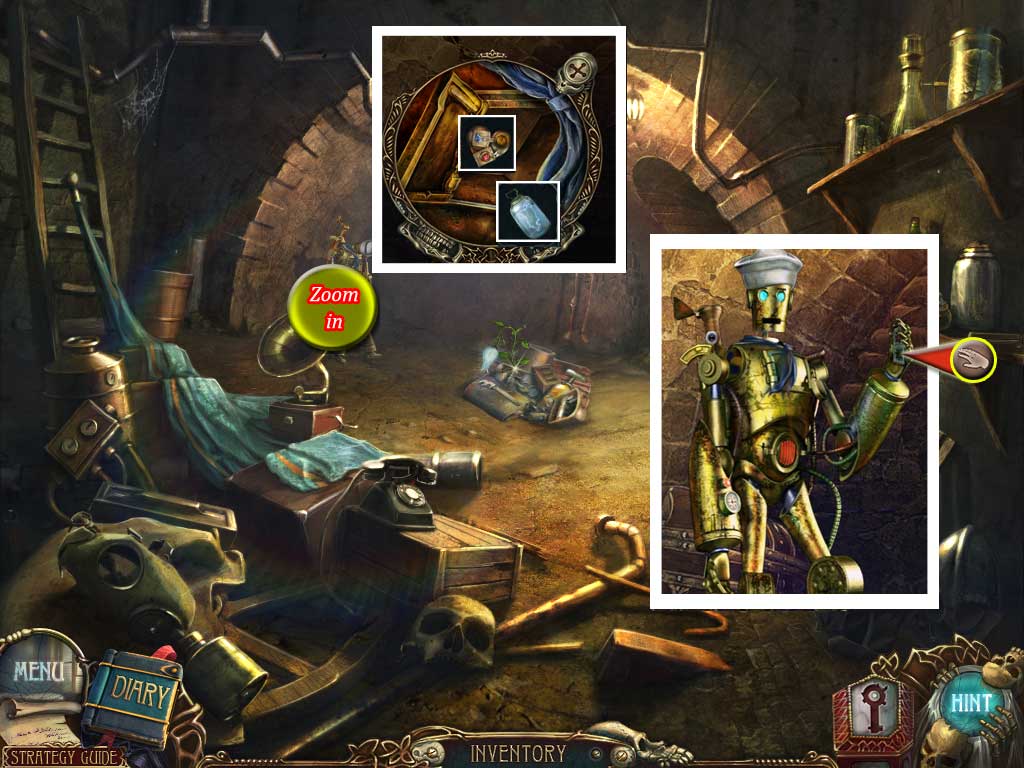
Return to the basement
Zoom into the sailor and his chest.
Place the clock heart and activate it with the glass of lightning (Spoiler 42).
Take the puzzle part (1/2) out of his hand.
Screenshot
Go upstairs.
44. At the train/Cyclops
Use the sponge at the mirror on the left side.
Take the spell.
Return to the basement and from there in the room with the cages.
Zoom into the lower cage and use the spell at the blue glooming.
Use the lock pick (Spoiler 41) to open the lock.
Zoom into the cage and take the spoon.
Screenshot
Return upstairs and go straight forward.
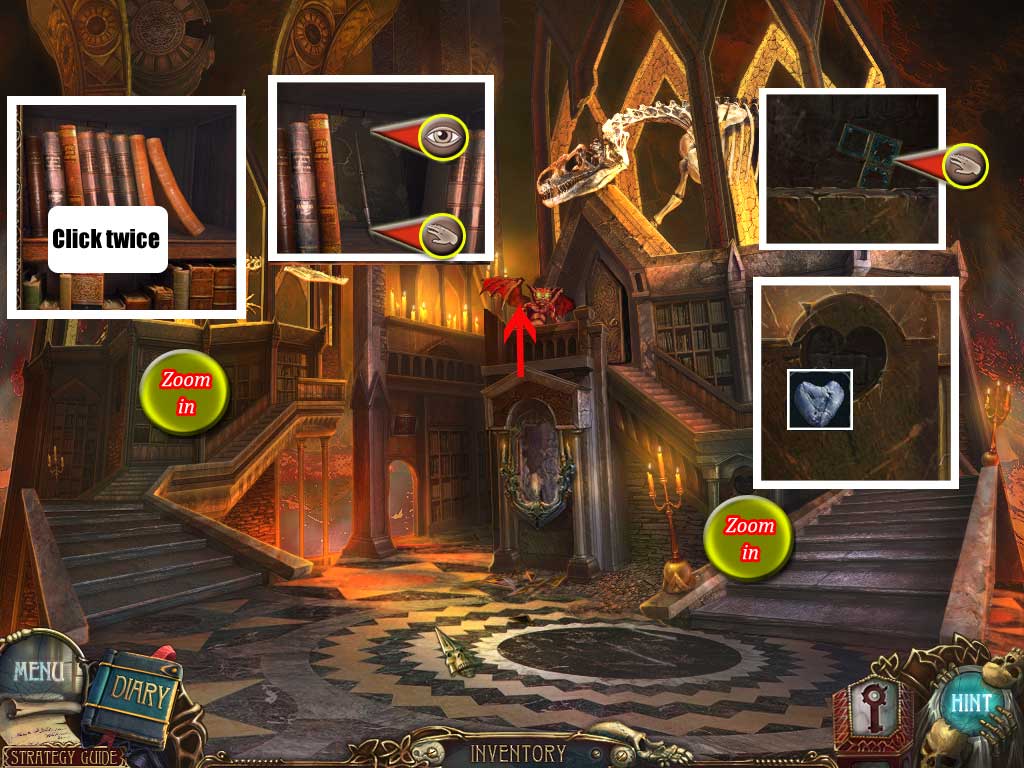
45. Library/Basement
Zoom into the book case on the far left.
Click the books 2x and take the brush.
Read the diary.
Zoom into the tomb left of the stairs.
Place the stone heart (Spoiler 42) and when the stone moved, take the puzzle part (2/2).
Screenshot
Return to the basement.
Zoom into the pile with the flower.
Use the spoon (Spoiler 44) and the ball of yarn (Spoiler 37) at the flower.
Use the brush to get sticky pollen.
Screenshot
Return to the Library
46. Library/Titus Uncle
Zoom into the mirror left next to the tomb.
Place the three mirror parts (Spoiler 41, 42, 43) and use the brush with sticky pollen (Spoiler 45) at the mirror back.
Reassemble the mirror; parts can't be turned and will lock when they are at the right place.
You will receive a mirror.
Go through the door above the mirror.
Zoom into the magician and talk to him.
Place the mirror in front of the glooming ball he wants to throw at you.
Go through the door far right.
Screenshot
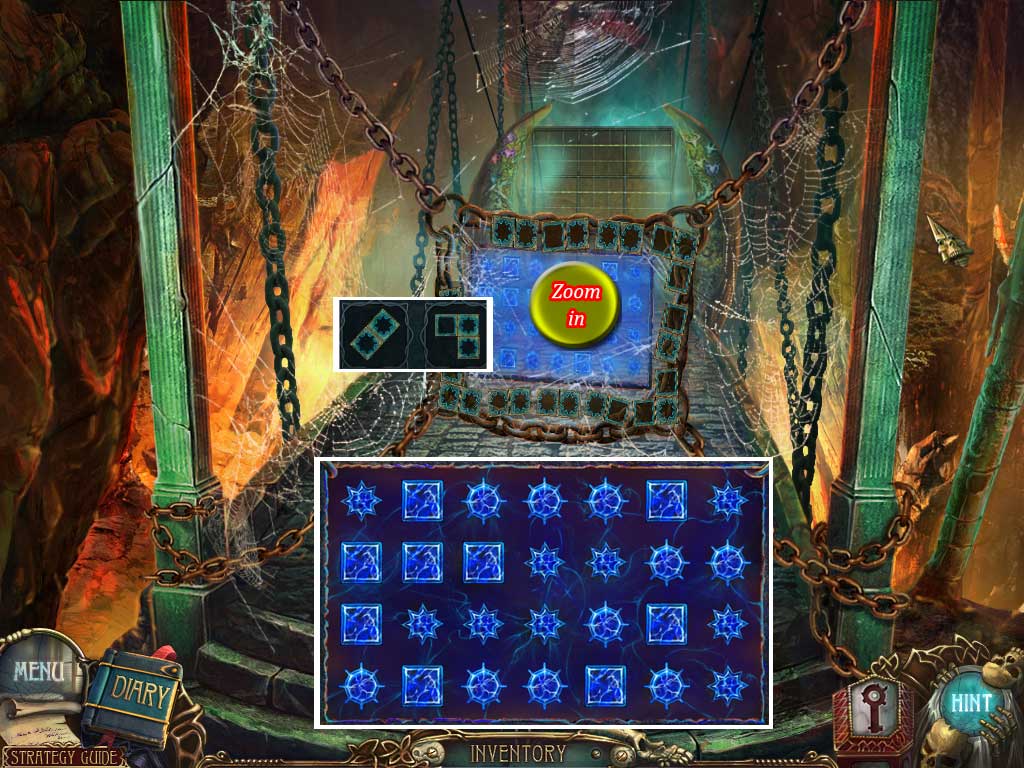
47. Get the third key
You are standing in front of a puzzle barrier.
Place the two puzzle parts (Spoiler 43/45).
Arrange the puzzle parts so that they match the symbols.
Turn parts with right click.
A part in the right place will be locked.
Screenshot
The barrier opens, go forward to the next puzzle.
Place the signs from the side so that no symbol the same vertically, horizontally or in the same square.
Zoom into the pedestal in the far back.
Take the key.
Screenshot
Click forward.
Congratulations! You finished Azada: In Libro!
Posted by: Kayleigh |
November 26, 2011 4:56 PM
|
November 26, 2011 4:56 PM