
Campfire Legends:
The Babysitter
Platform: Windows
![]() Ready for a creepy new adventure game? Then maybe you should point-and-click the lights out (ba-dum-tsh!) and give this a try. Campfire Legends: The Babysitter, a point-and-click horror adventure, is a new spin on the classic urban legend every teenage girl has probably heard at least once. Looking to pick up a bit of extra cash, as well as a recommendation from her Dean for medical school, Lisa agrees to babysit his twin daughters one night. Naturally the Laws of Scary Stories dictate this particular family must live in a suitably spooky old house frequently backlit by lightning flashes, but Lisa isn't afraid. Probably thinks her enormous purple plastic bracelets and high-tech portable cassette player will protect her. Ah, the 80's!
Ready for a creepy new adventure game? Then maybe you should point-and-click the lights out (ba-dum-tsh!) and give this a try. Campfire Legends: The Babysitter, a point-and-click horror adventure, is a new spin on the classic urban legend every teenage girl has probably heard at least once. Looking to pick up a bit of extra cash, as well as a recommendation from her Dean for medical school, Lisa agrees to babysit his twin daughters one night. Naturally the Laws of Scary Stories dictate this particular family must live in a suitably spooky old house frequently backlit by lightning flashes, but Lisa isn't afraid. Probably thinks her enormous purple plastic bracelets and high-tech portable cassette player will protect her. Ah, the 80's!
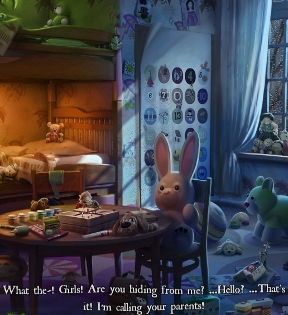 The twins don't seem to want her around. At least, Libby doesn't, whose rare skin condition has left her sullen and unfriendly. When strange things happening, Lisa starts to get impatient with the girls... even though Maggie insists everything is the work of Libby's imaginary friend, Nate, who lives in the closet. Kids today, amirite? As Lisa, you'll explore the old house, tracking down objects needed to complete puzzles, and doing important babysitter duties, like making hot chocolate for the twins, assuming the deep, angry male voice on the phone ordering you out of the house is a six-year-old girl playing a prank, and not informing the lady of the house about the figure you saw in the upstairs window before she leaves. Atta girl, Lisa. It's always important to provide a good role model for young girls who might someday want to be knocked unconscious by a madman.
Unlike most hidden-object games, the only items you'll ever be required to look for are items you actually need. The game will tell you what items you need for a specific task, and you'll have to track them down.The hint system comes in the form of fireflies that can be found scattered everywhere; each one is worth one hint, and since you need three of them to skip a puzzle, you'll want to keep your eyes peeled for them. (Up to five can be carried.) Their location in each room is random, so don't assume that just because one isn't in the last place you saw it doesn't mean it's missing.
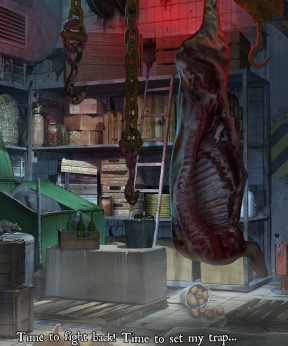
Analysis: Having been an enormous fan of The Hookman, the first game in the Campfire Legends series, I can't tell you how happy I was to discover that not only was the series being continued, it was being held to the same high standards. The game is visually impressive and generally very well acted, if it tends to rely a bit too much on excessively dramatic music. Playing The Babysitter is a lot like playing a 1980's B horror movie, minus a montage of the heroine trying on silly hats. It's fun, it's campy, and even scary. Of course, the potential problem with that is that there are quite a lot of jump scares in this game, particularly towards the end, so you might want to think twice about playing this one if you hate things being thrown at your face while the music goes REEEEEEE!
 The Babysitter doesn't just take a few steps to the left of its source material; it catches a plane to another part of the country and puts on a goofy disguise. The original story is probably a lot scarier, with its simple premise and ambiguity, but the game's plot is a lot more complex, and thus a lot more interesting. Things get weird very quickly, and finding out just what is going on is a great incentive to keep at it. Of course, the question remains whether you can forgive being forced to play a character who does all the stupid things you yell at people not to do in a movie. Don't go down the stairs, don't go down the stairs... "I think I'll go down the stairs!" YOU FOOL!
It's just unfortunate, then, that the latter half of the game winds up dragging its feet due to some tedious item collecting. You spend far too much time scouring the environment for tiny items, and more often than not, as soon as you finish with that one list, you're presented with another. Since items can be very small and very carefully hidden in dark areas, chances are you will wind up using hints. This wouldn't be that big of a deal, except the hint system isn't very helpful in tracking down those little items unless there's one in the room. Click on a firefly, and unless there's an object you need in your immediate vicinity, you'll probably waste a hint because the game will just vaguely point you towards another room, or just tell you that you should solve the puzzle.
While it lacks the tight gameplay design of its predecessor, The Hookman, Campfire Legends: The Babysitter, is still a beautifully made and highly enjoyable title that is well worth your time if you're looking for something fun and even a little scary as everyone's favourite BOOGA BOOGA holiday approaches. Which leaves us with only one thing left to say... THIS REVIEW IS COMING FROM INSIDE THE HOUSE!
![]() Windows:
Windows:
Download the demo
Get the full version
![]() Mac OS X:
Mac OS X:
Not available.
Try Boot Camp or Parallels or CrossOver Games.


Walkthrough Guide
(Please allow page to fully load for spoiler tags to be functional.)
Campfire Legends: The Babysitter - Walkthrough
General
You will need to find the trigger point in each scene to get a list of needed items.
The search list is located at the bottom. You will always see an image of the needed object(s).
Also read what Lisa does have to say. It can give you important hints.
Fireflies are your hint. You can hold a max of 5 fireflies at a time. At the beginning, they are marked on the screenshot, but after a while the firefly spots will be random depending on how much hints you need.
Fireflies can be find in nearly every scene. When you collect them, they might be appear at a different spot next time.
You can always walk around and collect fireflies before you start a task.
Puzzles can be skipped, but you will need to use 3 hints before you are allowed to skip the complete puzzle.
There are no explanations for puzzles - you will have to find out your self what to do.
Some scenes have arrows to the left or right - click them to reach different areas of a room or location.
Clicking the button "Goal", low right corner, will give you a list of your actual tasks.
The House
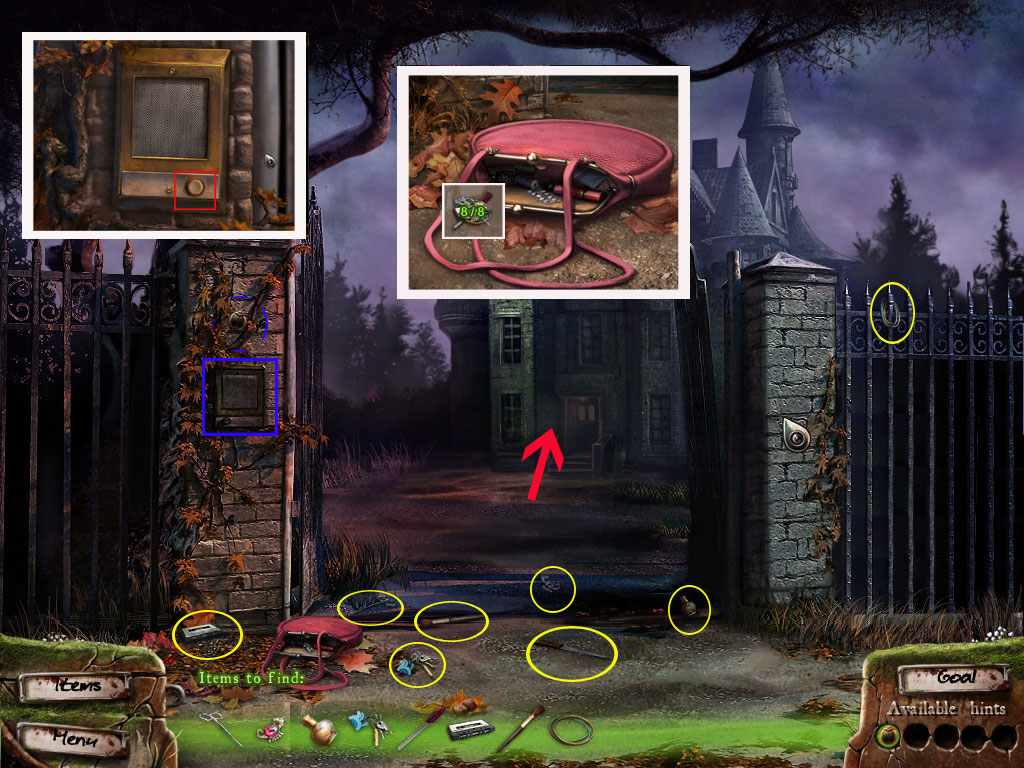
Entrance
There is an intercom at the right side of the entrance.
Click it to get a closer view and press the button.
Wait for what happens.
Find the things for the purse.
After finding everything, click the purse and drag the items from your inventory into the purse.
Enter the house.
Screenshot
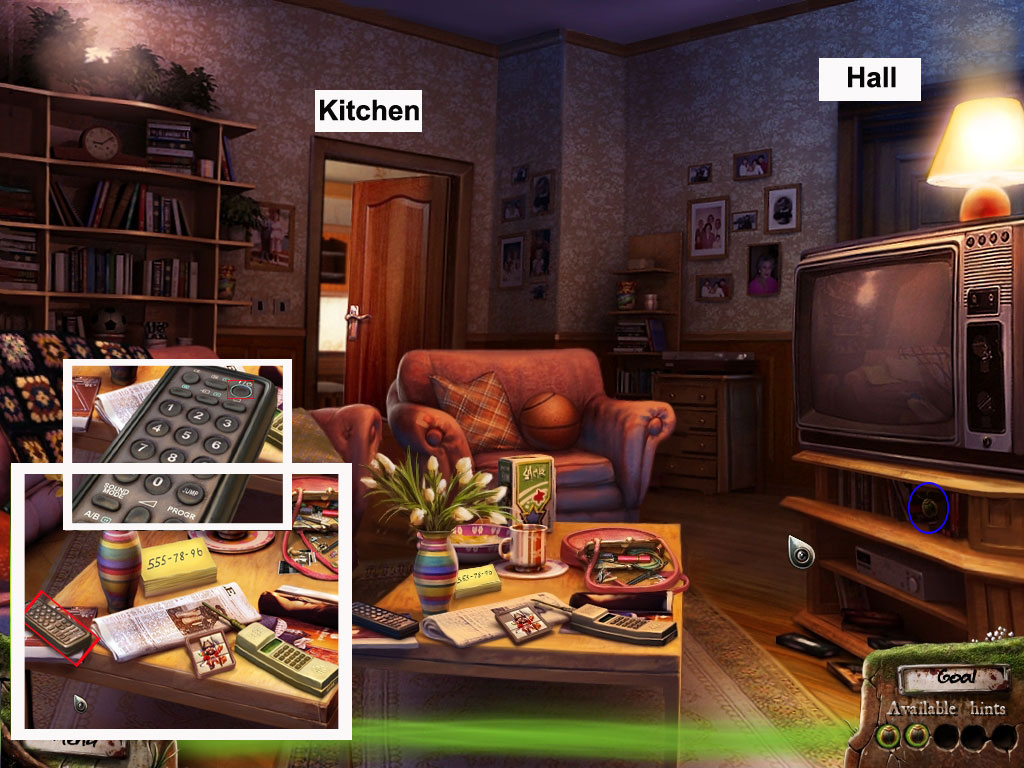
Living Room/Kitchen
Walk right into the Living Room after the cut scene.
Click the coffee table to find the remote.
On the remote first push the on/off button and then look for a working channel.
After the cut scene enter the Kitchen through the door to the left.
Screenshot
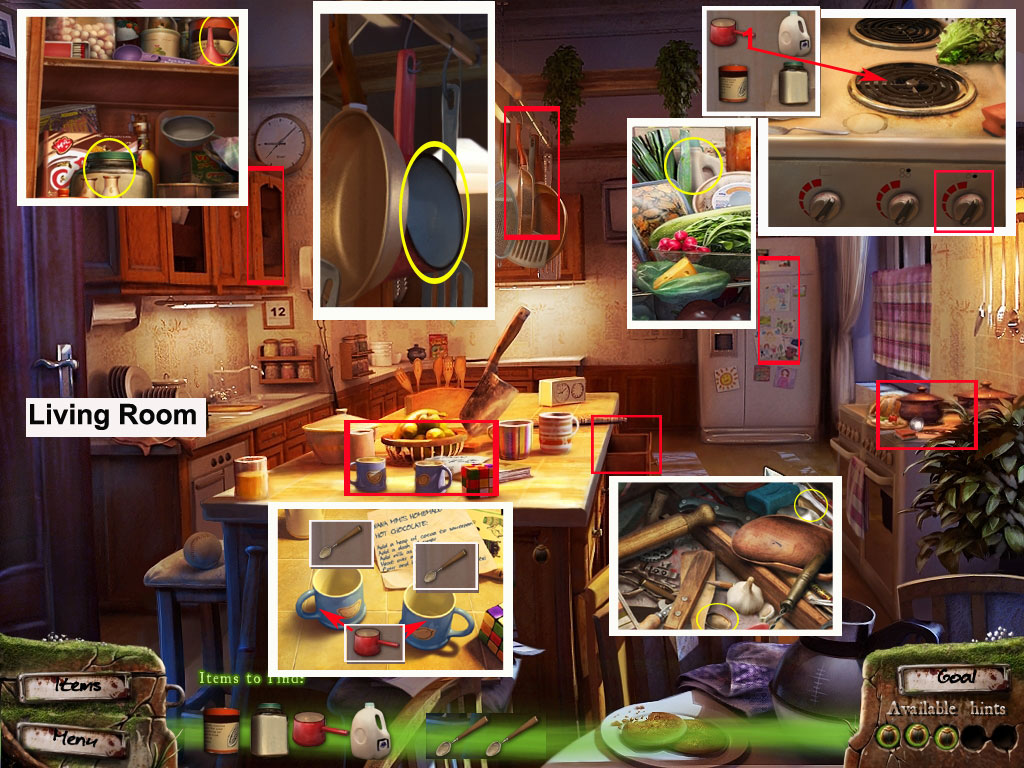
Click the table to find the recipe.
Click the recipe and the needed ingredients will be added to your search list at the bottom.
The milk you will find in the cooler at the far right.
Sugar and cacao you will find in the wall cupboard at the left and the pan above the table.
After finding all click the oven.
Place the pan on the low right hotplate and pour the milk in it first.
Now add the other ingredients and click the switch at the left.
Wait until it cooked and take then the pan back into your inventory.
Two spoons will be added to the search list.
You will find them in the table drawer at the right.
Click the table and pour the hot chocolate into the cups.
Add a spoon to each cup and you are done.
Screenshot
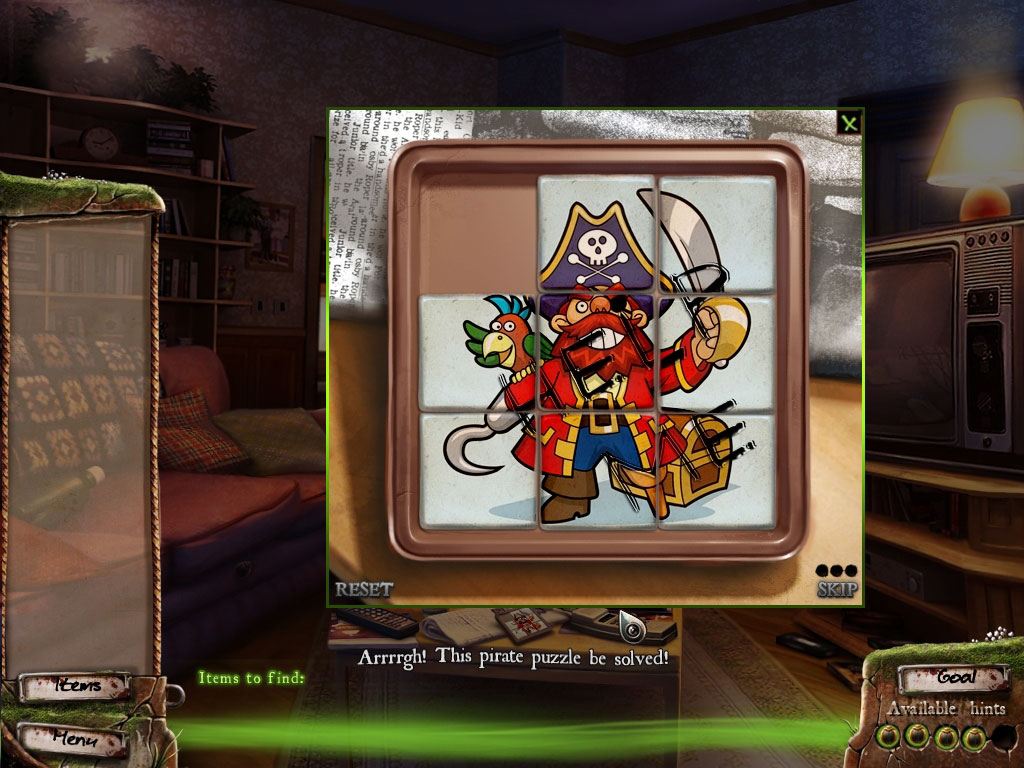
Head back to the Living Room and click the table. There is a slider puzzle.
Move the tiles to restore the picture - since at the end the free slot will be on the top left, you need to start with the bottom row.
Screenshot
Enter the Hall after the cut scene.
Hall/Get Key for Girls Room
Find all the marbles.
Click the table and place the marbles into the bowl.
Screenshot
Go upstairs and click the door straight ahead.
It is locked. You will have to find a way to get the key.
A newspaper and a file will be added to your search list.
Go downstairs and enter the Living Room.
Click the table and grab the newspaper.
Click the pink purse and get out the file.
Go upstairs and click the door.
The girls locked it from the inside.
Go down in the Living Room.
Click the table and pick up the newspaper.
Stay in this closer view and click the purse on the top right corner.
Find the file and go upstairs again.
Click the door and place the newspaper on the ground.
Use the file to poke in the keyhole.
The key falls on the newspaper and will be automatically thrown out to you.
Get the key and use it to open the door.
Screenshot
Cleaning the mirror
After the cut scene you will have to click one of the words on the mirror to get the items for your search list.
Click the arrow to the right and you will be brought to the other side of this Hall.
Open the left door to the Bathroom and enter.
Click the Closet under the sink. Get the rag from the upper shelf and the spray bottle from the lower shelf.
Go back and click the mirror.
Use the spray bottle and click until all letters are wet.
Use the rag to clean the mirror.
Screenshot
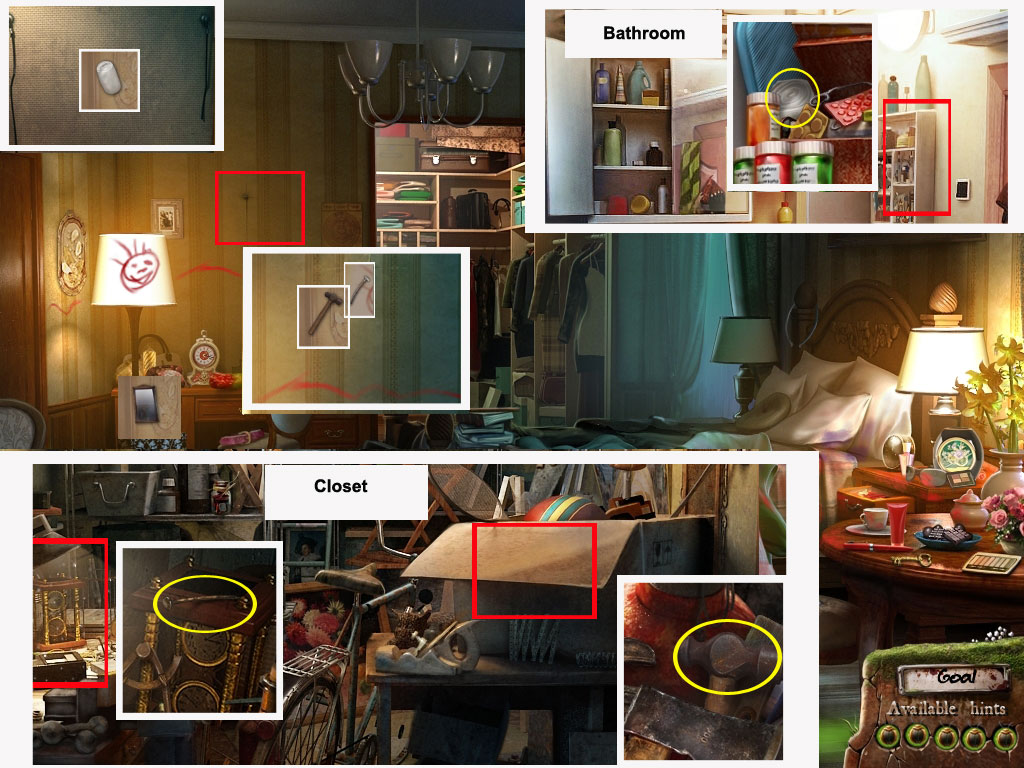
Hanging back the mirror/Cleaning Master Bedroom
Use the arrow to reach the other side of the upper Hall and enter the right door leading to the Master Bedroom.
Click the wall at the far left.
Click the hole where a nail is supposed to be. A hammer and a nail will be added to your search list.
Place the mirror against the desk, leave the room and go upstairs.
Enter the Closet.
Click the table at the left side and get the nail.
Click the box at the right side and get the hammer.
Go upstairs, click the wall, place the nail first and use the hammer after.
Click the mirror - you need something to fix the band at the back.
Leave the Master Bedroom again and enter the Bathroom.
Click the medical cabinet at the right wall and get out the bandage.
Go back and fix the mirror. Hang it up.
Screenshot
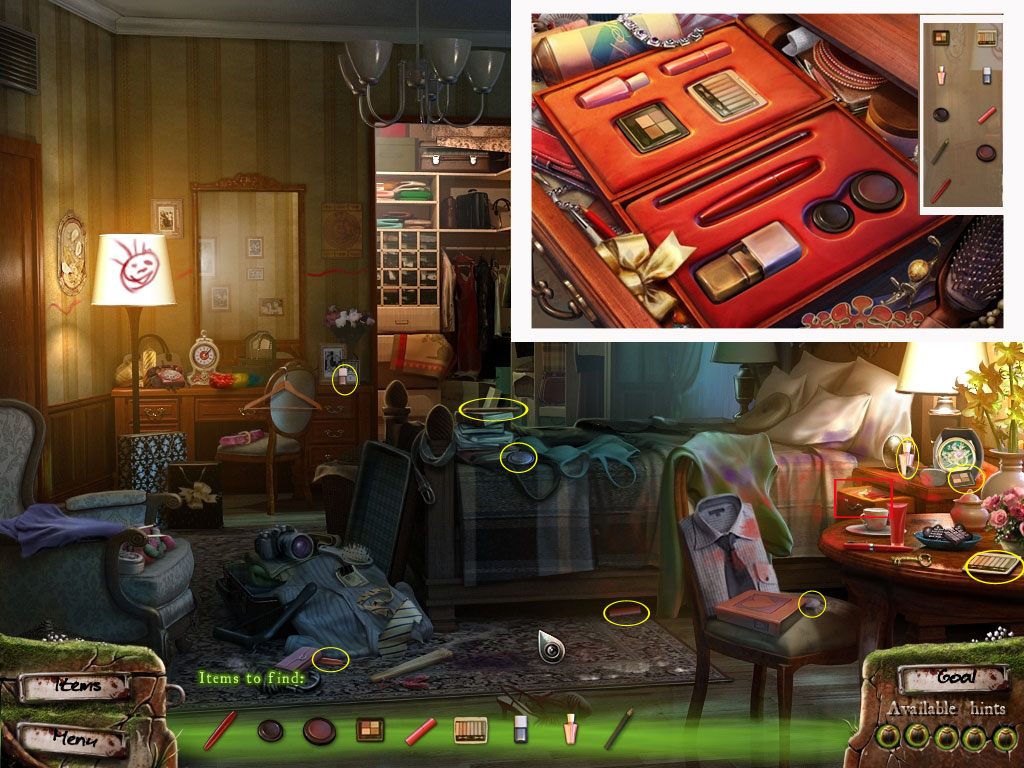
Click the nightstand on the right side of the bed.
Click the empty box and items will be added to your search list.
Find all objects.
Click the nightstand again and place each object into the appropriate spot.
Screenshot
Repairing the plate
Click the plate at the wall right next to the door to the Master Bedroom.
You will have to find the parts and glue.
Four parts you will find where you are, while four more parts are at the upper Hall on the right side.
The glue can be found in the Closet - click the table on the left.
Screenshot
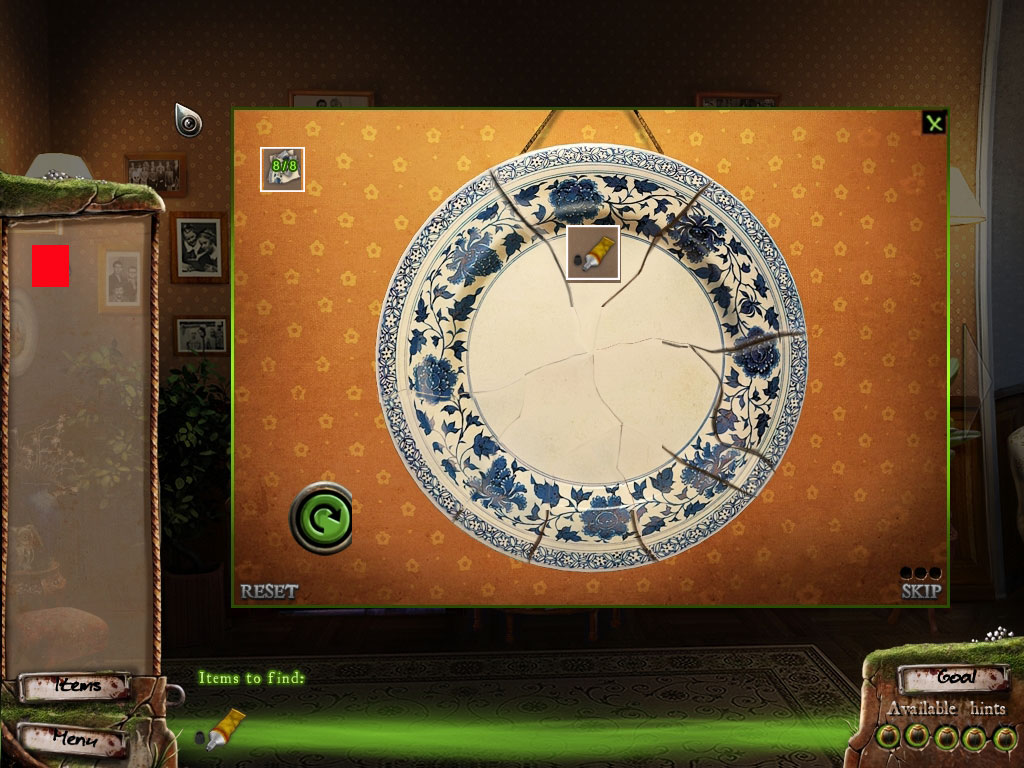
Go back and click the wall again.
You will have to restore the plate.
Place the broken parts next to the remaining part.
Grab a tile with a left mouse click, turn it (after using left mouse click) with a right mouse click.
A tile in the right place will lock.
Get the glue out of your inventory when all parts are together again.
Click and drag along the breaking lines with the left mouse button.
Stay as close at the breaking line as you can. The cracks will be glued.
Starting at the outside of the plate seems to be the easiest way.
Screenshot
Go right and open the twins' room.
Finding the lizards
Go left and enter the Bathroom after the cut scene.
Click the lizard on the stool in front of the bathtub to obtain other search items.
You will first have to make a net to catch the lizards.
Enter the Master Bedroom - you will find the hair band at the head of the bed on the left side.
Go downstairs, enter the Closet.
The rope is in the box right side.
Go to the Kitchen and click the table drawer to find the chop stick.
Head back to the Bathroom and click the stool.
Click first the hair band at the net, then the chop stick and at last the rope.
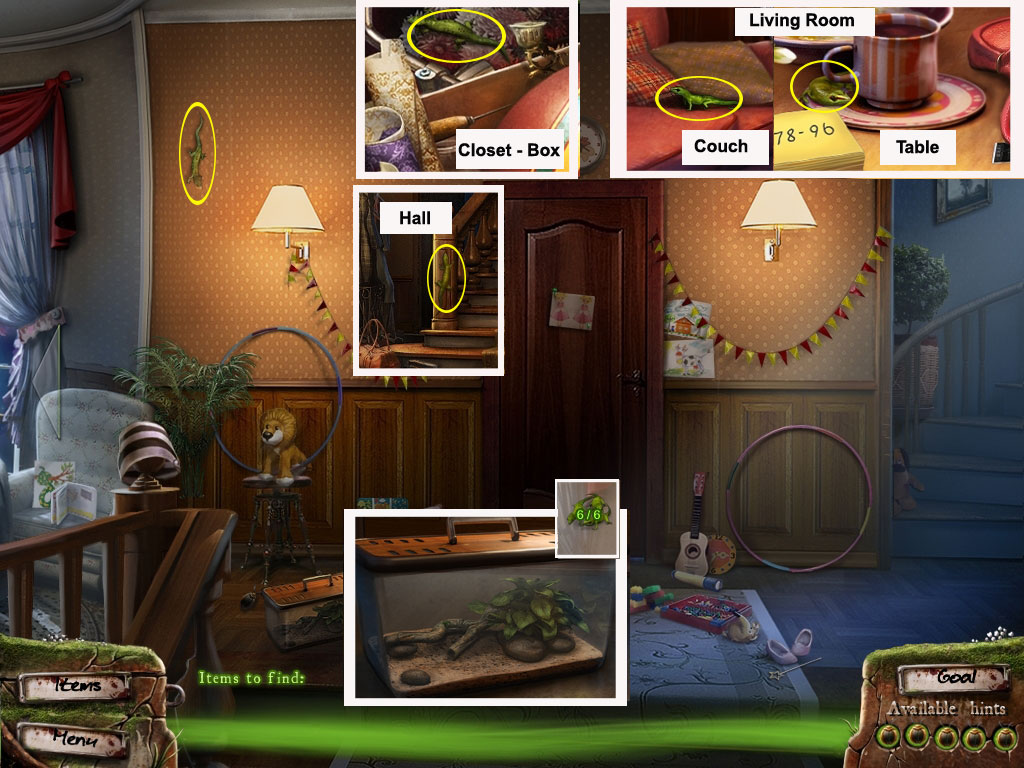
The net goes into your inventory - use it to catch the six lizards.
Screenshot
In the Bathroom - on the stool.
Wall left side of the twins' room.
Hall - right side of the stairs.
Closet - box right side
+ 6. Living room - on the couch and on the coffee table.
Go upstairs and click the terrarium.
Place the six lizards into it.
Click the girl's room door; enter it to learn that the girls are hiding.
Go to the Living Room.
Screenshot
Calling the parents
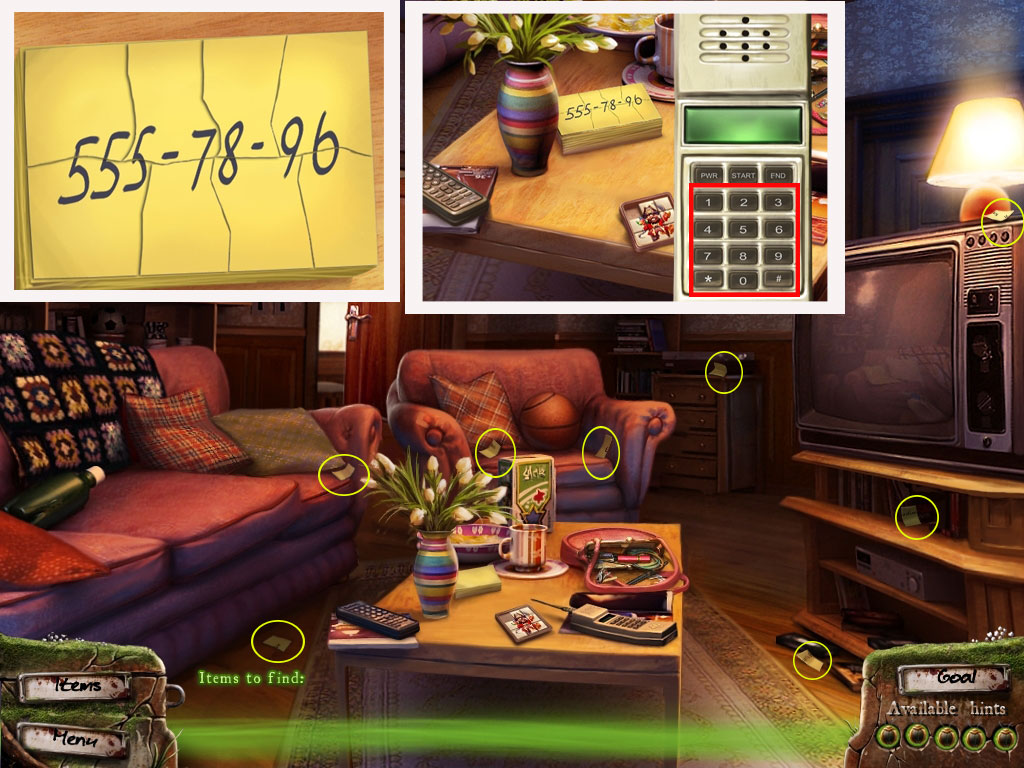
After the cut scene click the table where there the sticky notes to see. Notice that the note with the telephone number disappeared.
Find all parts in the Living Room.
Click the table again and the sticky notes to get a closer view.
Place the sticky note parts on the empty ones.
Use the left mouse button to grab a note part and the right mouse button to rotate them.
Restore the note - a part at the right place will lock.
Grab the telephone and dial the number from the note.
Screenshot
Leave the Living Room and enter the Library after the cut scene.
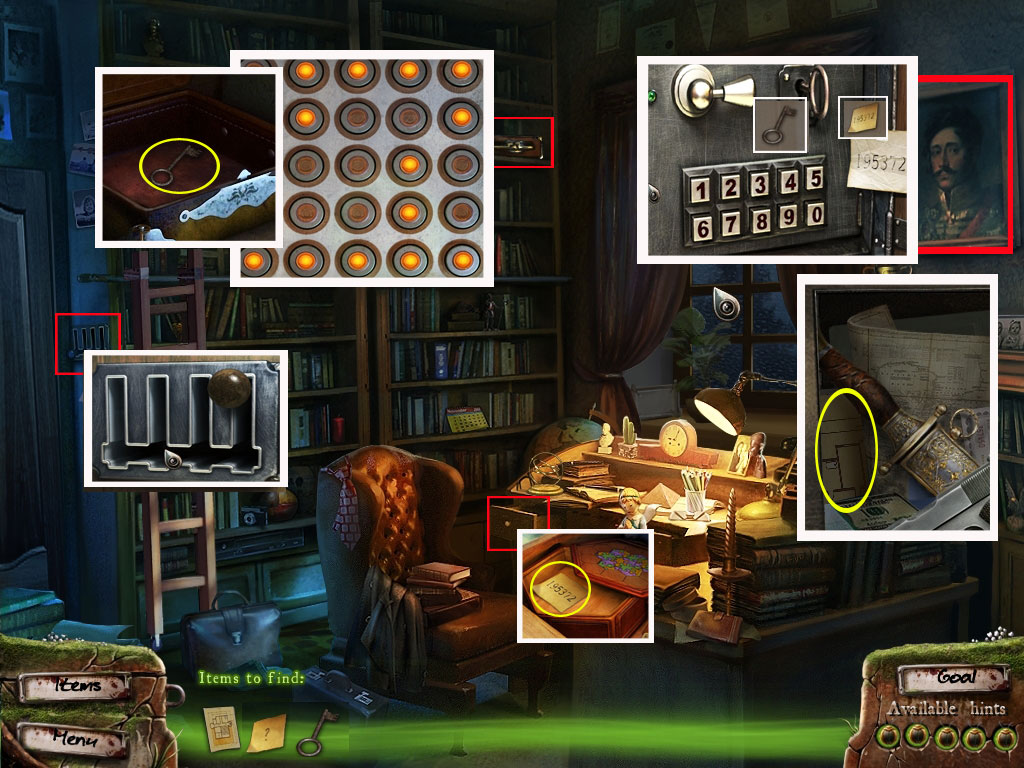
Finding blueprints
Click the painting above the desk to reveal a safe.
Click the safe to learn that you will need a key and a pass code note.
Click the open drawer - right side of the desk.
Click the puzzle box to activate a puzzle.
To unlock this box you need to reassemble the pieces of the box into their proper locations to complete the pattern.
Use the left mouse button to rotate clockwise and the right button to rotate counter-clockwise.
The solution is random so we can't provide a step by step solution.
With the reset button you can start over.
Screenshot
Grab the pass code note out of the box.
Look at the right side of the book shelf to find a box.
To reach it, you will need a ladder - click the ladder mechanism at the left side of the bookshelf.
Use the stick to move the ladder into the right position.
Click and drag the stick completely to the right and then completely up - you will need to click and drag for each step.
Now you can reach the box which is locked with another puzzle.
Click the buttons. Some of them will light up.
Your goal is to click all buttons which light up and avoid the buttons with no light. Clicking one of the latter will reset all buttons.
Also the puzzle is random and there is no logic behind the solution. There is easy way to solve it:
Click a complete row and write down which buttons light up and which not.
Do this with all rows and use your notes afterwords to click all the correct buttons once.
The box opens and you will find the key for the safe.
Click the safe.
First stick the note in the safe. Now place the key in the keyhole and then click the numbers according to the pass code note.
The safe opens.
Get out the blueprints.
Screenshot
After the cut scene go upstairs and enter the twins' room.
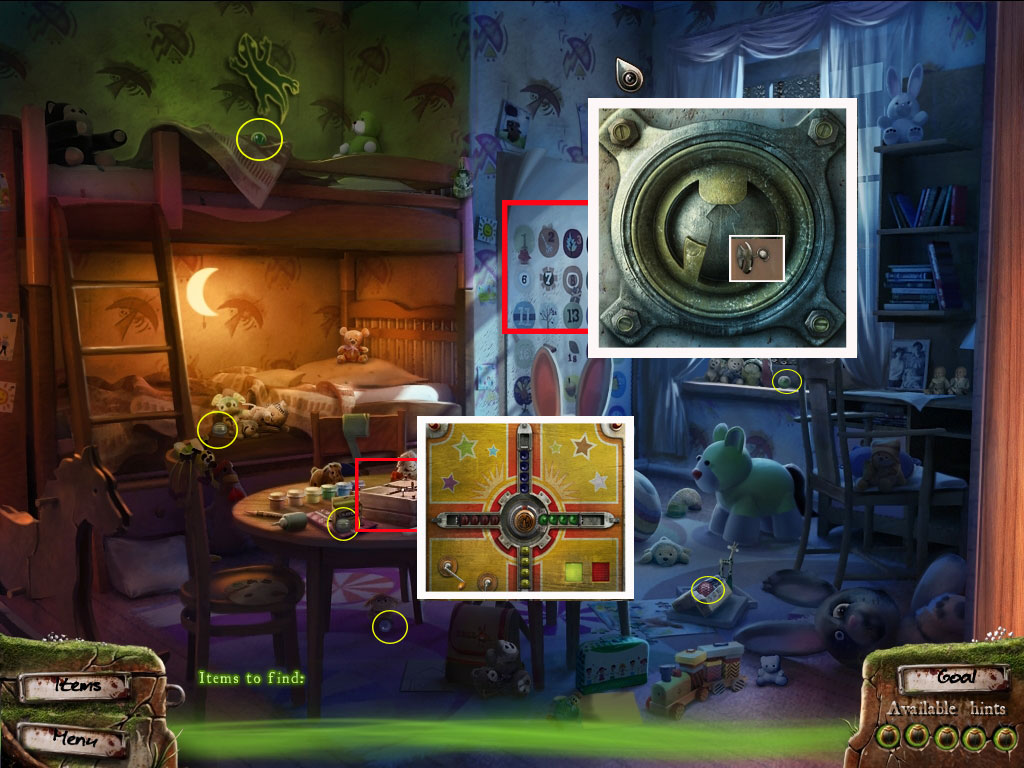
Finding and opening the Elevator
Click on the panel on the back wall, right next to the beds.
Click once more for a closer view and to discover that the Elevator key is missing.
There is a puzzle box on the table - click it for a closer view and click it again to learn that the marbles are missing.
Find the missing marbles.
Click the puzzle box on the table again and place the marbles on the board.
Your goal is it to fill all four bars with marbles in the same color, each bar with the color of the marble you see on the top.
To move the marbles use the slide in the middle.
It has a notch and when you click the lowest marble in a bar, it will go into this notch.
To remove the marble out of the notch, click it when the slide stands in front of a bar that can still hold one or more marbles.
Clicking the slide with the left mouse button will move it each time one step clockwise, right click will move it counter clockwise.
Each bar can contain a total of five marbles but only four marbles of one color are needed.
The solution is random.
After all four bars are filled correctly you will get the Elevator key.
Click the Elevator and place the key.
Screenshot
Secret Laboratory
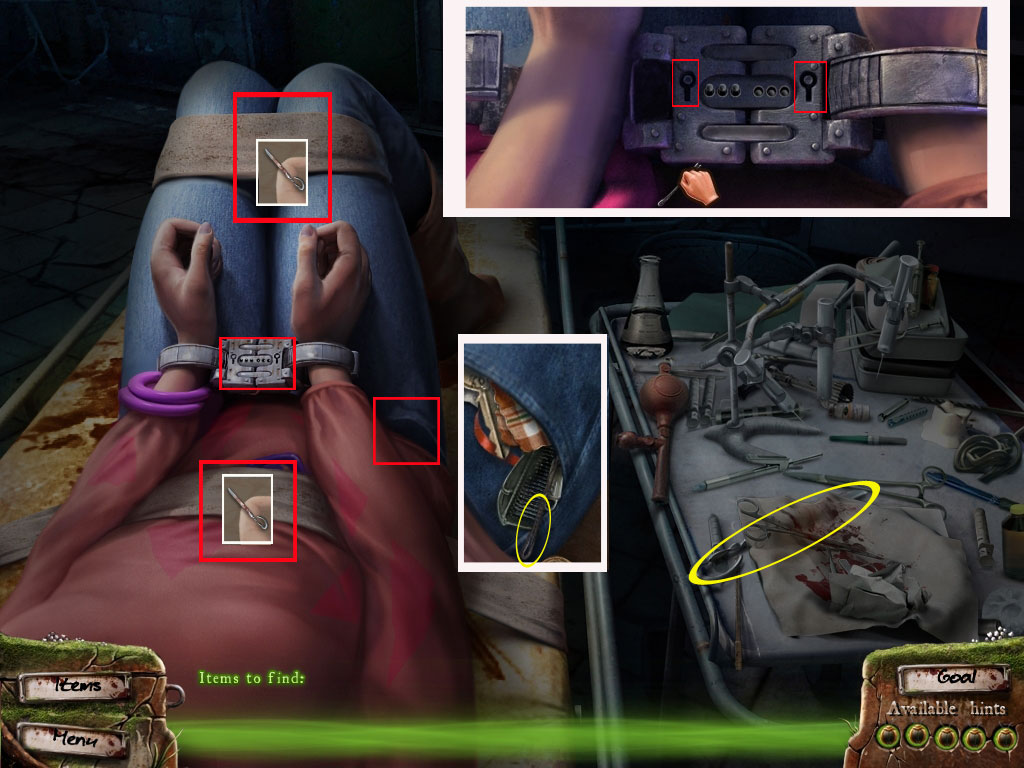
Opening handcuffs
Click the handcuffs to get a closer look.
Click them again to learn that you need a hair pin.
Click the right pocket of your jeans and grab the hairpin.
Click the handcuffs again and place the hairpin in one of the little keyholes.
Click and drag the hairpin until the first little pin next to the keyhole comes up. Release the mouse button.
Click and drag the hairpin into another direction and release it. If you found the right spot, the next pin will come up.
If it was the wrong spot, the other pin(s) will reset and you will have to start over.
When all three pins are up, the handcuff will open.
Do the same with the other side.
Click the bandage at your legs - you will need something sharp.
Get the half of a scissors from the tray next to you and use it to cut yourself free.
Screenshot
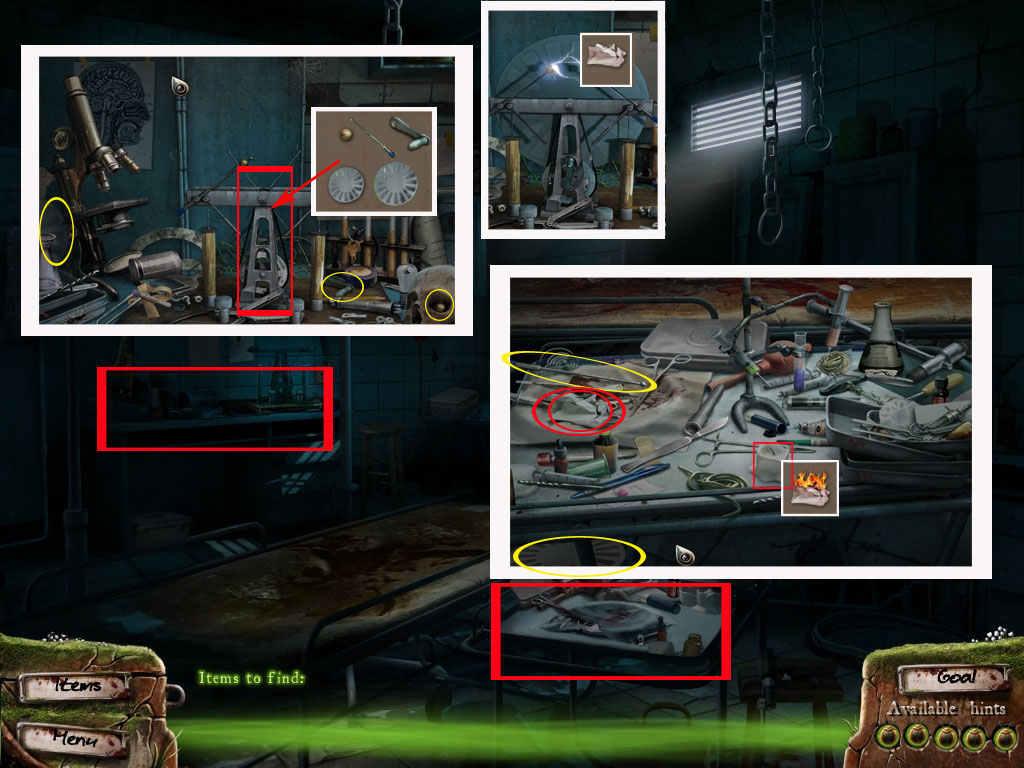
Making light
Click the desk on the left side. There the mechanism in the middle.
It is a generator, but it is missing some parts.
Three of the parts you can find in this closer view, two at the tray in the low right corner.
Place the parts at the generator and it will give sparks.
Click the tray again and pick up the crumbled paper on the right side.
Use the paper with the sparks to get burning paper. With this you can light the candle on the tray.
Screenshot
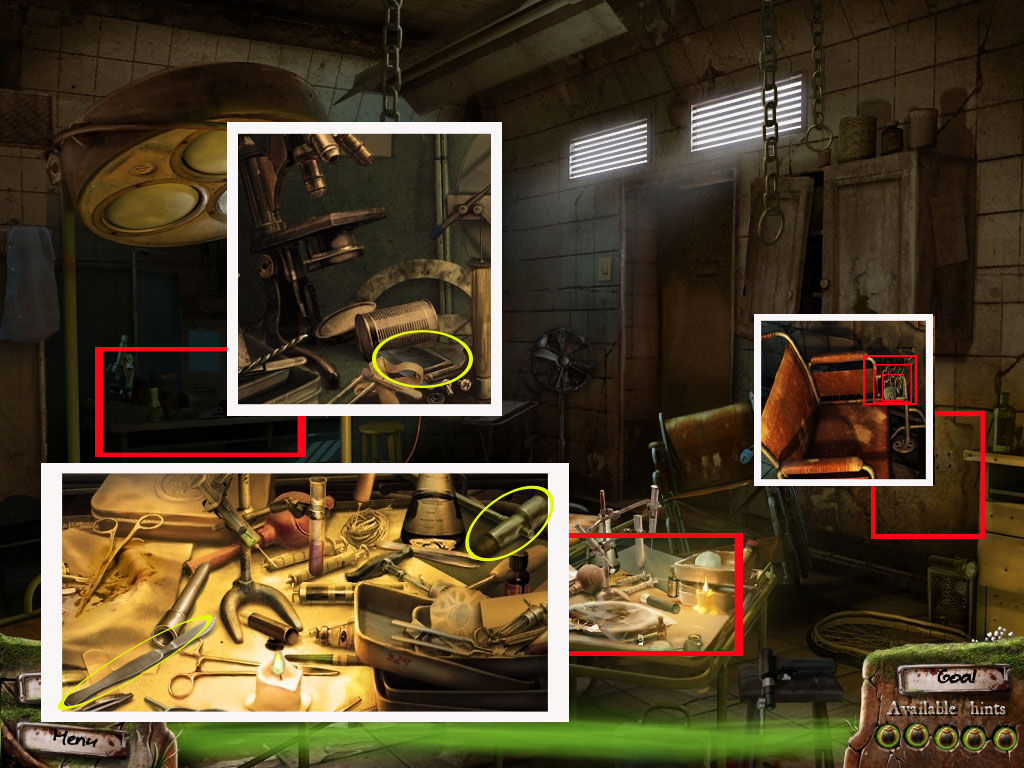
Leaving the Surgery
Take a closer look at the wall next to the wheelchair on the right.
Click the lock with the chain, holding the wheelchair to wall until the hinge falls off the wall.
Take a closer look at the wall and click it to obtain the search list of items you need to remove the bricks of this wall.
Two tools you will find on the tray, one part on the desk.
Screenshot
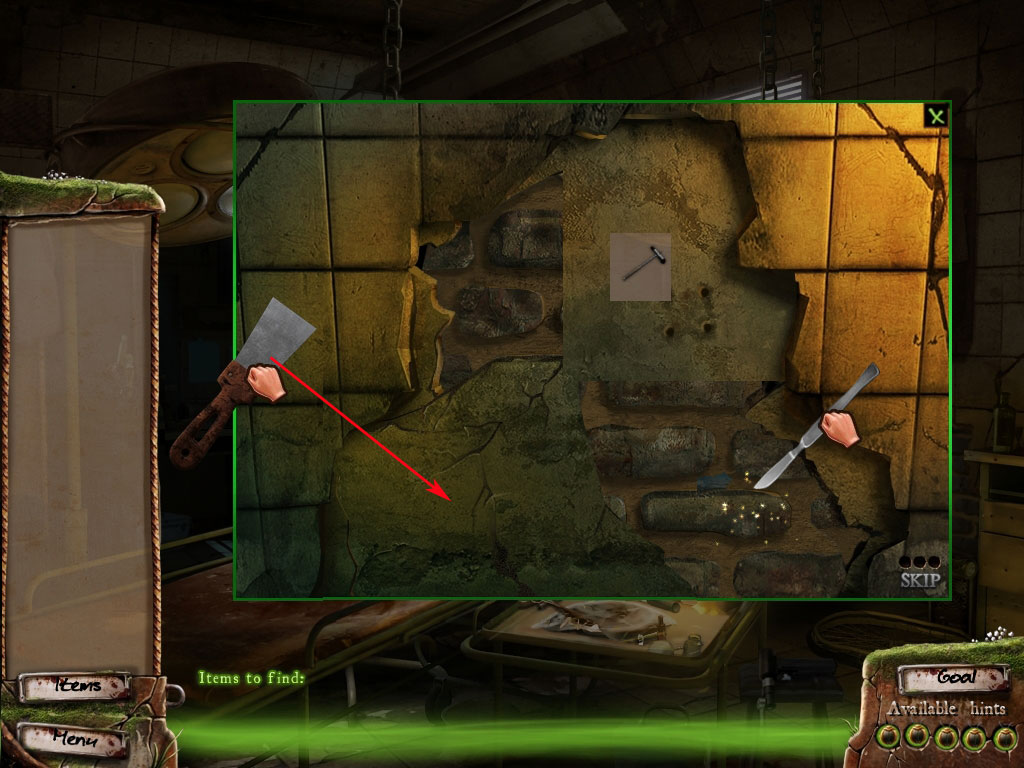
Click the wall again for a closer look.
First use the hammer to crack the wall.
Now use the trowel to remove the plaster and reveal the bricks.
Use the scalpel on the plaster between the bricks to remove them. Hold the left mouse button and drag the scalpel forwards and backwards. You will see some sparks.
When you do it long enough, some of the plaster will be removed.
Screenshot
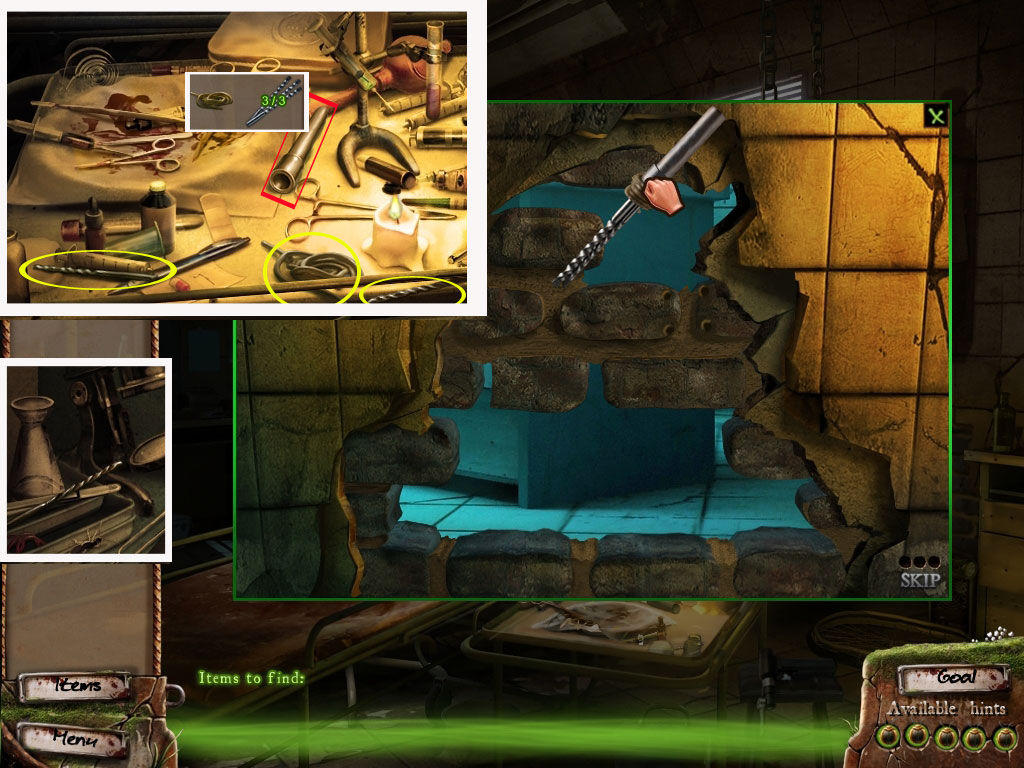
When the scalpel breaks click on the tray, then take a closer look at the tube lying in the middle.
Click it to discover which items you'll need to make it into a strong tool for removing plaster completely.
You will find 3 parts on the tray, one part on the desk.
Click first the drills at the tube and bind it with the rubber band.
Click the wall again and remove the leftover plaster.
Screenshot
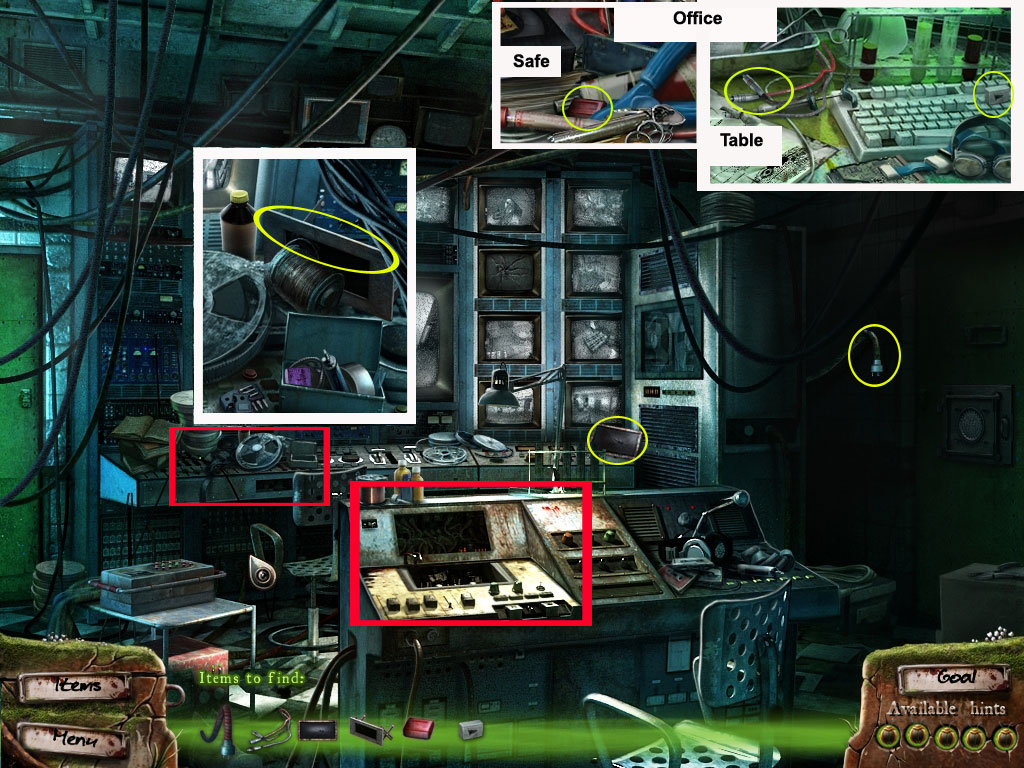
Click the hole to enter the Office.
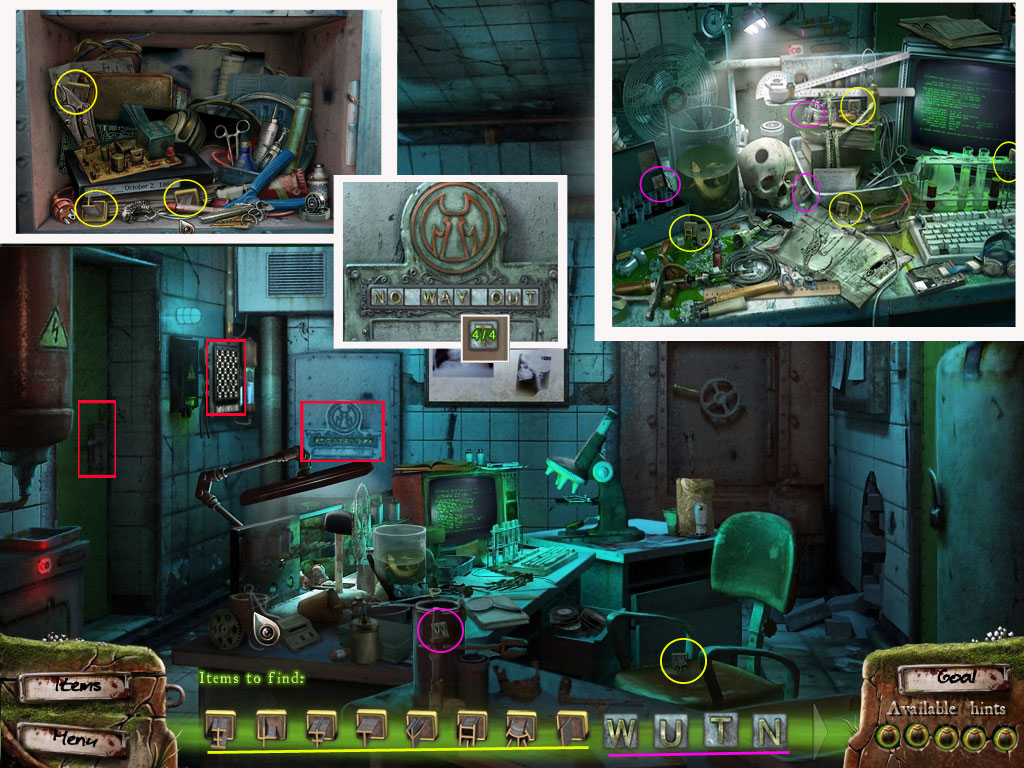
Opening the Office door
Click the green door to your left and click again in the closer view.
It is locked and a key will be added to your search list.
Click the checkered board on the left wall.
It appears to be a puzzle to get the needed key.
The puzzle parts will be added to your search list.
Click the safe cover on the wall at the far right - it appears to be another puzzle and letters will be added to your search list.
1 tile can be found on the chair, 1 letter at the middle bottom.
Click the desk to get a closer view.
You will find 4/8 tiles for the checkerboard and the remaining 3 letters.
Click the safe and place the letters in the lower bar.
Click and drag them into the upper bar to spell three words.
The tiles without letters are place holders between the words.
You will need to spell the words:
NO WAY OUT
Click the cover again and it will open.
Find the three remaining tiles.
Screenshot
Click the checkered board.
Place the tiles into their appropriate slots on the bar at the bottom.
Press the buttons at the bottom of the board to move the knight onto the red square. You will have to do this four times.
Each button provides you two possibilities to move the knight - when you hold your curser onto the mouse, you will see that one of the two squares on the button turns green. The green end of the tile will be the ending position of the knight when you click. In this way you can see in front where the knight would go to.
A reached red tile will highlight in green, and with every green highlight the key in the water tube on the right side will raise up. After the fourth green highlight you can grab the key.
Using the reset option will always reset the complete puzzle, not just the last steps.
The spoiler will provide you with a step by step solution for all four squares. This puzzle is not random but there are several solutions possible; this is only an example.
Seen from left to right the tiles are named A-H
2x F - lower green
2x G - lower green
1x C - lower green
1x E - upper green
1x G - upper green
2x H - upper green
1x E - lower green
1x D - upper green
1x E - lower green
1x H - lower green
4x D - lower green
1x H - upper green
Screenshot
Use the key to open the door.
You need to find the Video Room.
Go through the door into the Office corridor.
Use the arrow at the bottom to enter the Hall.
Use the left corridor to enter the Video Corridor.
Click the green door straight ahead to enter the Video Room.
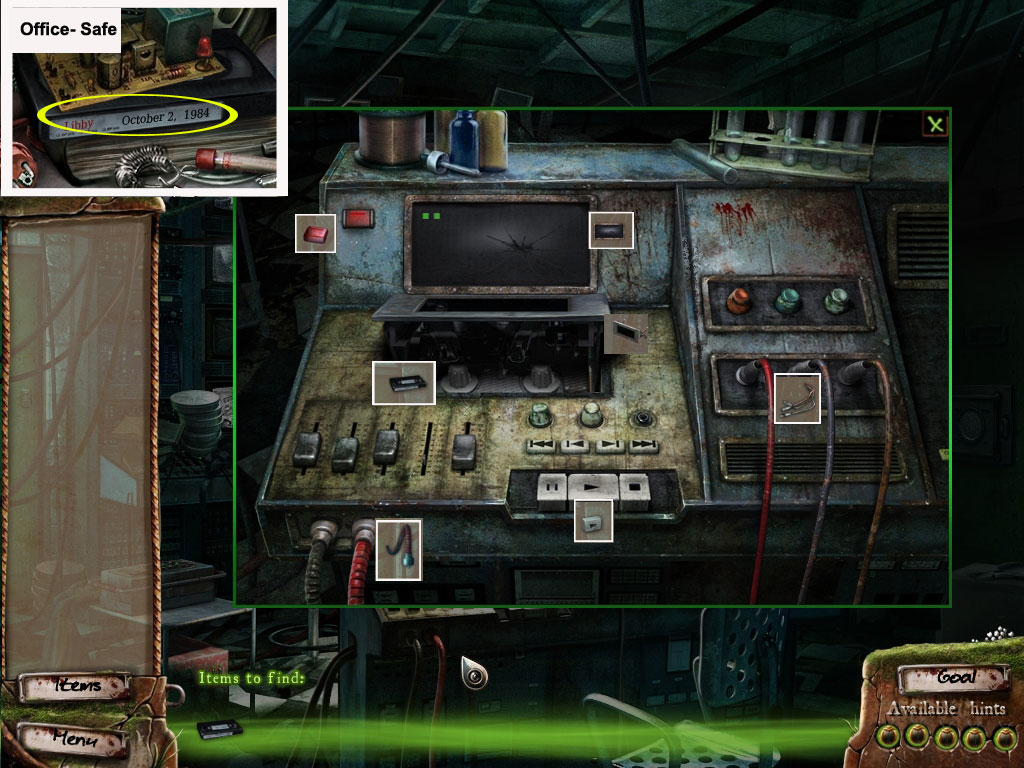
Repairing the VCR
Click the table with the VCR in the middle of the room.
In the closer view, click it again to learn that it is broken and get the parts to repair it for your search list.
In the room you will find two parts. Also click the table on the back to find another part in the closer view.
Return to the Office by using the bottom arrow two times and choosing the right corridor when you are in the Hall.
Click the save to find one part and the desk to find the remaining two parts.
Screenshot
Return to the Video Room.
Click the table with the VCR and place all parts in their appropriate spots.
You need to go back to the Office and grab the video with Libby from the safe.
Place it in the tape slot.
Screenshot
After the cut scene return to the Office.
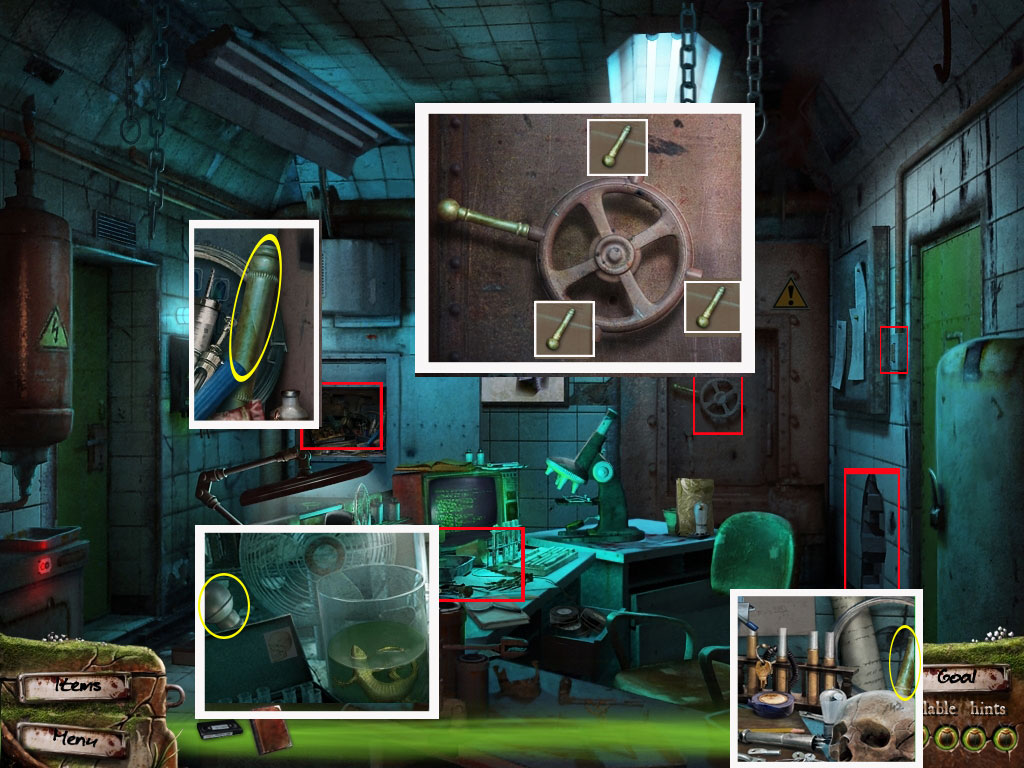
Opening door with the turn wheel
Click the door with the turn wheel on the far right.
Click it again in the closer view to receive the missing handles as search list objects.
Click the light right above the hole to the Surgery and enter the Surgery again.
Click the desk to find one handle.
Return to the Office.
One handle you will find in the safe, another on the table.
Click the door again to get a closer view and place the handles.
The door opens. Enter the Holding Cell.
Screenshot
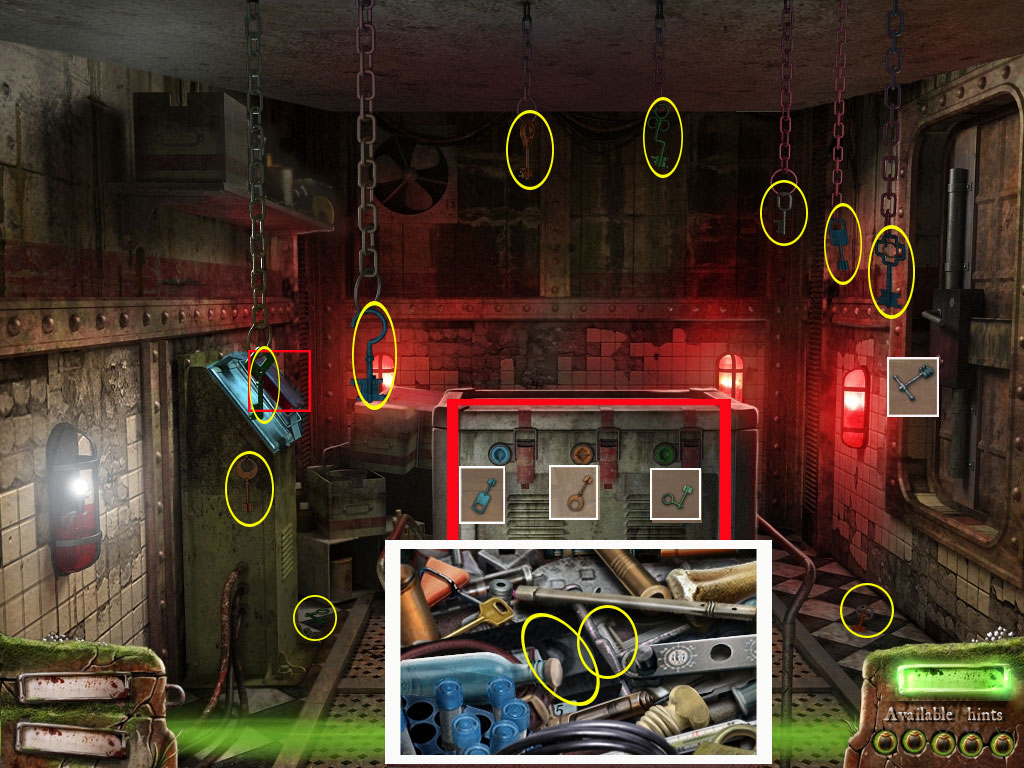
Finding 2nd video Tape
Click the book on the pedestal left side.
When you close the book, the ceiling will come down slowly.
Collect all keys, 10 in total.
Click the box in the middle and find the right key for each lock.
A fitting key will unlock the clasp. A non-fitting key will come out when you click again.
When the box is open, find the video tape.
Leave the closer view and click the door; it is locked.
Look into the box again and find the fitting key.
Screenshot
Unlock the door, leave the Holding Cell and head over to the Video Room.
Place the tape into the VCR.
After the cut scene leave the Video Room and return to the Hall.
Click on the arrow on the left to access the second part of the area. Choose the Workshop Corridor.
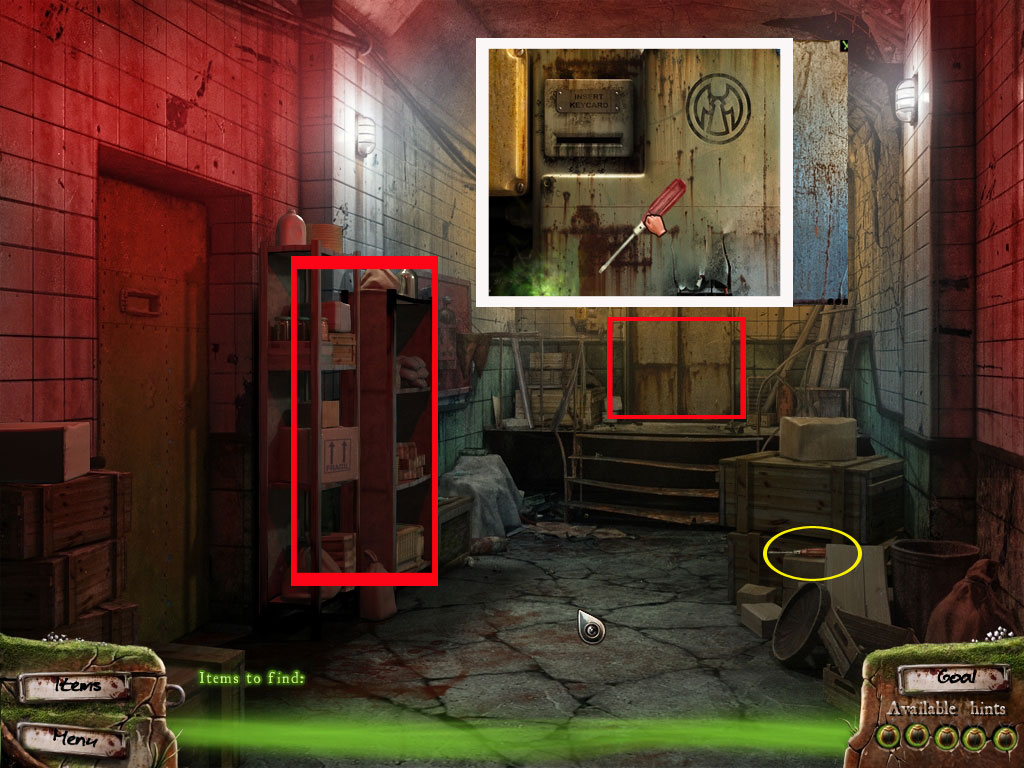
Opening the Workshop/3rd tape
Click the door to your left - you will need some tools to open it.
Return to the Office.
On the table you will find the dropper.
Enter the Holding Cell and click the box - find the empty jar.
Head back to the Main Hall, access the left side and choose the Food Storage Corridor.
Enter the Food Storage straight ahead.
Click the shelf to get a closer view and get the crowbar.
Return to the Workshop
Use the jar on the area below the dripping acid to collect it, then use the Dropper to acquire the acid and use it on the door hinges.
You will have to use the acid 3x on each hinge.
Now use the crowbar to open the door completely and enter the workshop.
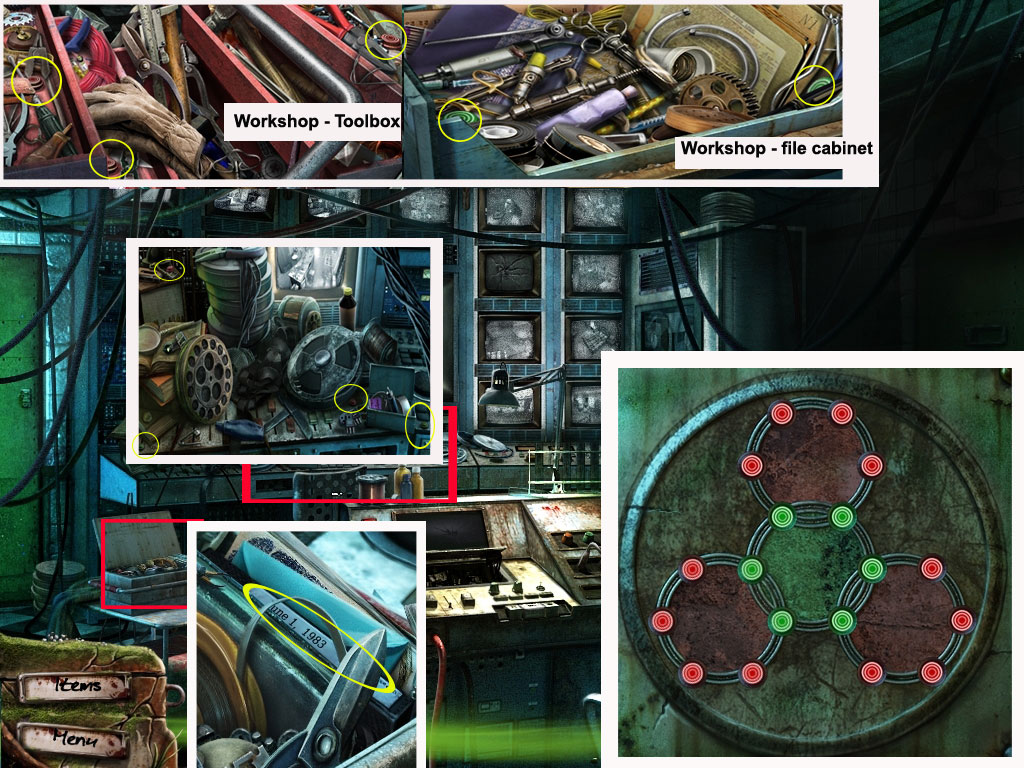
Click the file cabinet on the far right and get the video tape out when you are in the closer view.
Return to the Video Room and watch the tape.
Screenshot
After the cut scene look at the box on the left again for a closer view.
Finding Tape 4
You need to click the box in the closer view to obtain the play chips for your search list.
Leave the closer view and click the desk at the back - find 4 of the chips.
Head over to the Workshop.
Click the toolbox on the lower right and find 3 chips. The last two can be found in the file cabinet.
Return to the Video Room.
Drag the buttons from your inventory on the box.
Rotate the rings so that all the green buttons are in the center ring and all the red buttons are on the outer rings.
To rotate an outer ring click in the middle of this ring. To rotate the center ring click its middle.
A step by step solution is not possible as the beginning positions of the buttons are random.
Screenshot
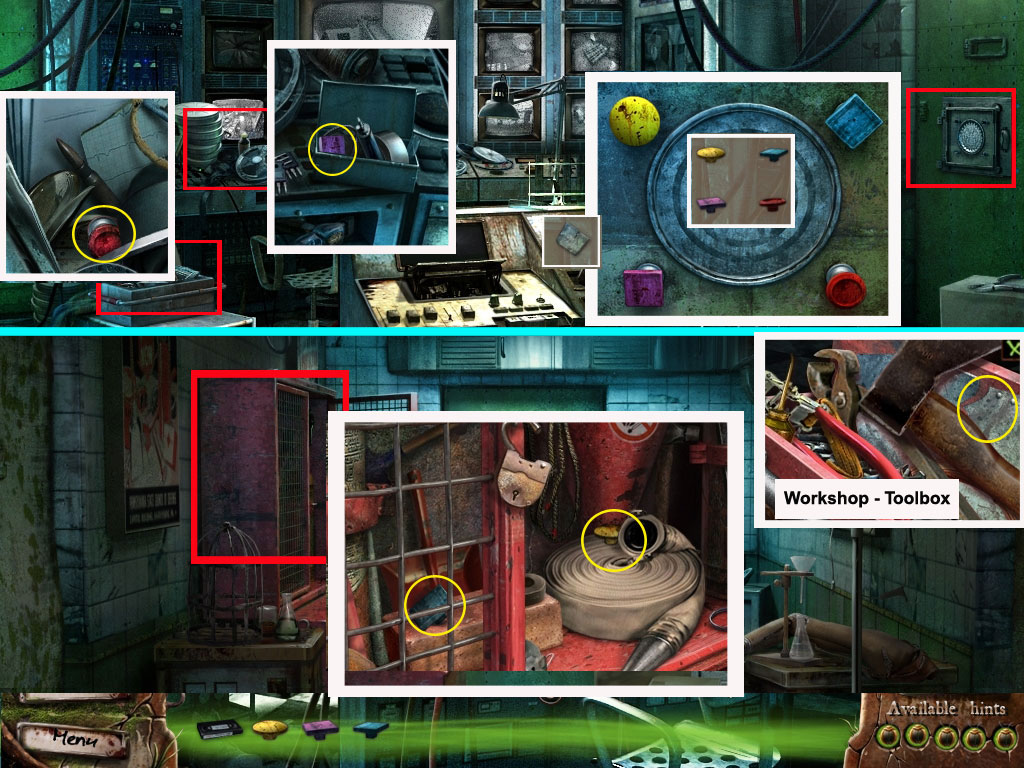
Take a closer look at the green door to the right.
Four buttons will be added to your search list.
Opening green door
Click the box on the right side and you will find one button.
The next button you will find on the desk in the Video Room.
Leave the Video Room and go to the Office Corridor.
Take a closer look at the Fire Emergency Closet at the left.
Find the remaining two buttons and return to the Video Room.
Click the door and place the buttons.
Each button will only lock into its right place. You need to try them out.
Click one of the buttons to find out that you need a metal plate to push all buttons at the same time.
Go to the Workshop.
Take a closer look at the toolbox and grab the metal plate.
Return to the Video Room.
Click the door and place the metal plate onto the buttons. Click the plate once.
The door will open.
Screenshot
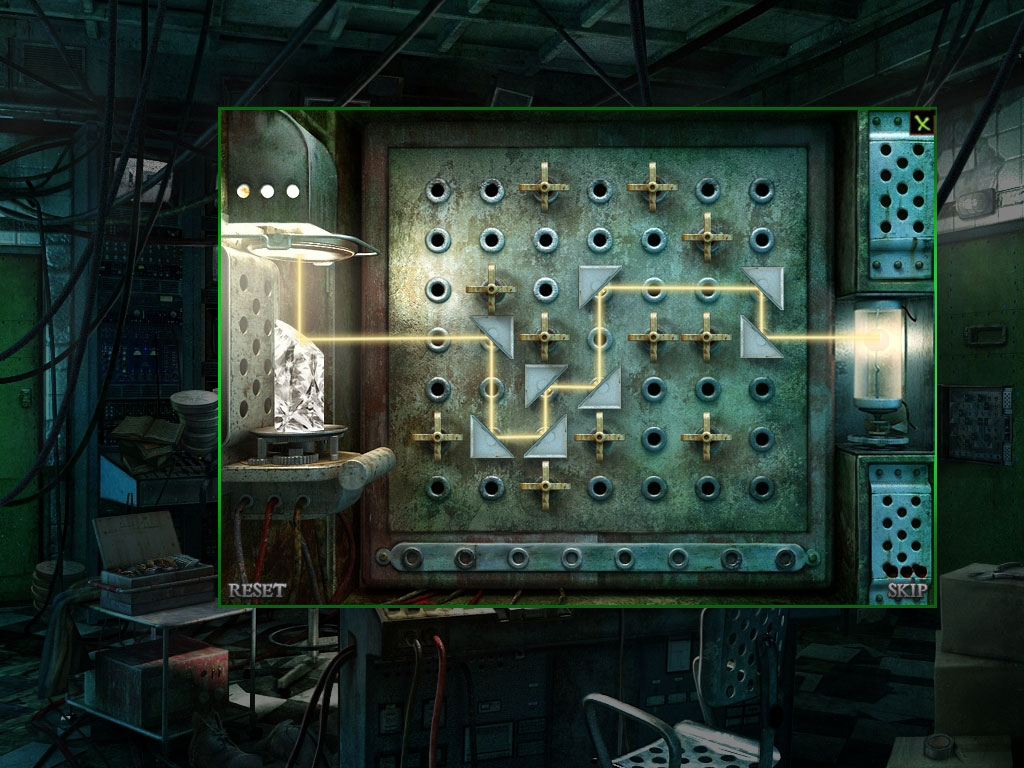
Another puzzle appears.
Prism Puzzle
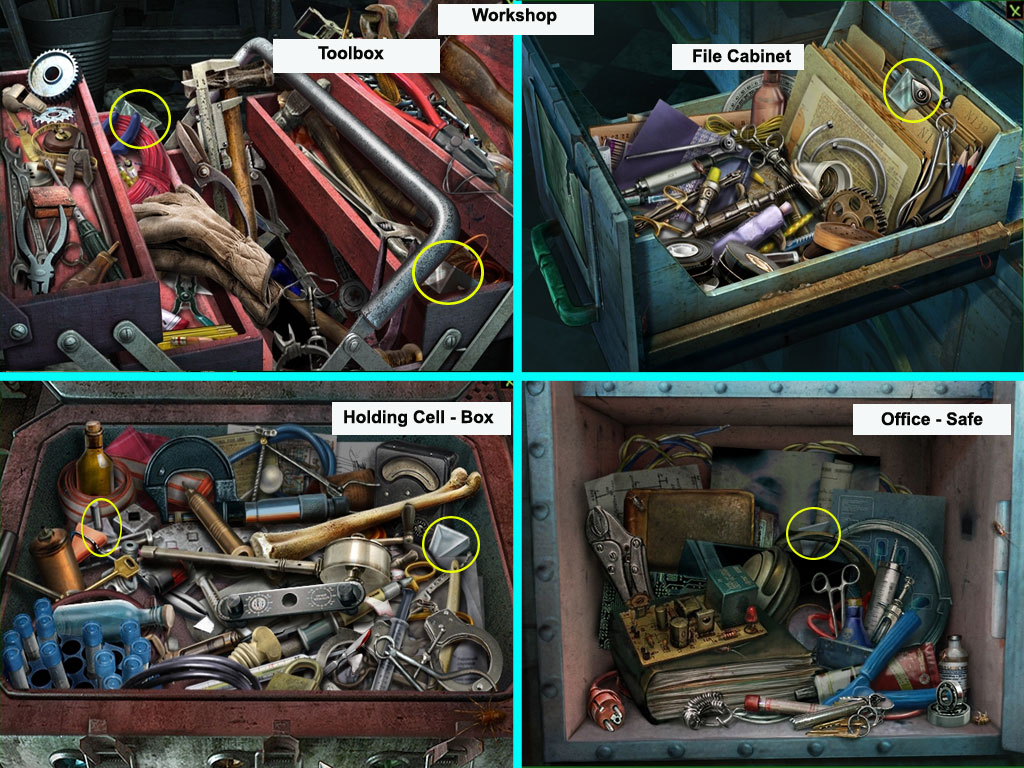
You will need to find the missing prism.
Start with the Workshop: Two prism can be found in the toolbox, one in the file cabinet.
Head back to the office - there is one prism in the safe.
Enter the Holding Cell and find the last two prisms in the box.
Screenshot
Return to the Video Room.
Click the green door and place the prism on the bottom bar.
Use the prism now to lead the light beam to the ball on the right side.
Screenshot
The door opens. Enter the Lobby.
Use the door far right - the Animal Test Room.
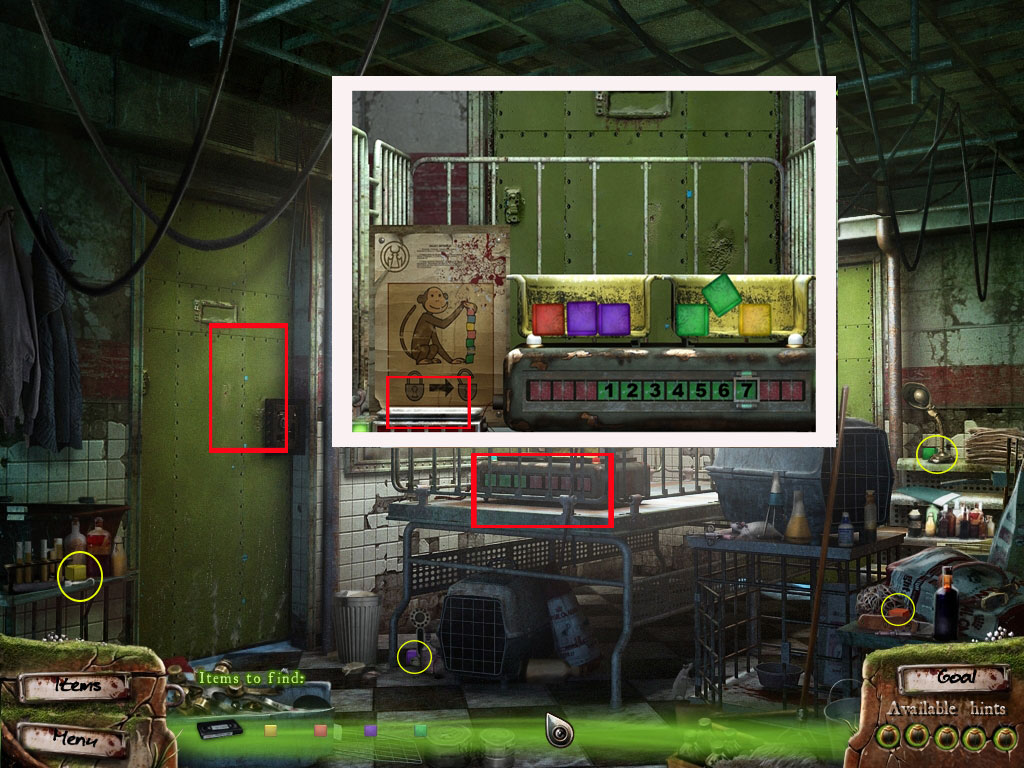
Escaping the Animal Test Room
After entering the Animal Test Room, the door will close and you are trapped.
Take a closer look at the crib and the device inside.
Four blocks are missing - find them and return to the device.
Place the blocks at the left side, next to the two others.
Your goal is to place the six blocks in the two containers in such a way that the display below the device shows the number 1-7 in green.
Place red, purple and purple in the left container and green, green, yellow in the right container.
The door to the left will open, enter the Laboratory.
Screenshot
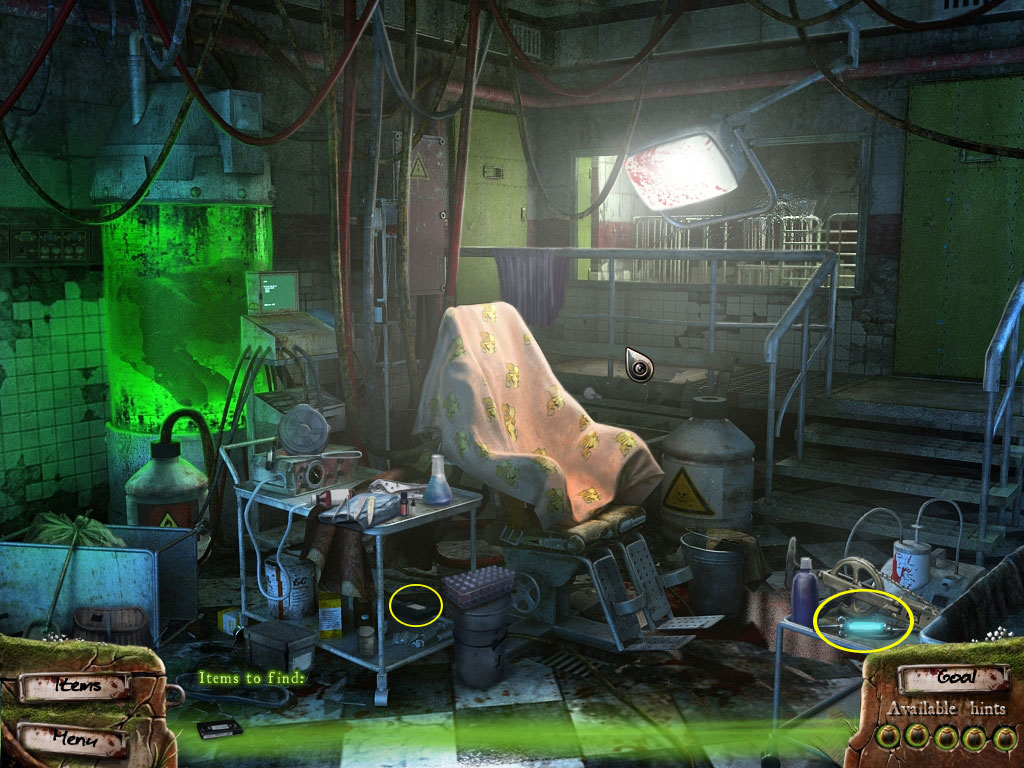
Finding tape 5/Finding Serum
Get the tape from the trolley in the Laboratory and leave the room through the door on the far right.
Enter the Video Room and watch the tape.
A syringe with serum will be added to your search list.
Go back to the Laboratory and find it.
Screenshot
Head back to the Foot Storage.
The Escape
Foot Storage
Click the electrical device on the floor in front of the door.
Click it once or twice until you recognize a puddle below the device.
A few tools are added to your search list.
Click the shelf and find your objects.
Take a closer look at the device again.
Click the cover to open it.
Place the red and green wires into the device.
Use the knife on both wire ends.
Use the electrical tool on the wires, then the pliers on the wire holding the lever.
Click the lever into its down position.
Click the ventilators on the left side of the room - you will need a screwdriver.
Click the shelf to find it.
Return to the ventilators; click to get a closer view and remove the four screws with the screwdrivers.
Screenshot
Enter the ventilator.
You will need to find your way out, but for "horror reasons" you will have to look everywhere.
Go: Forward, right, back, forward, forward, forward, back, left, forward, down.
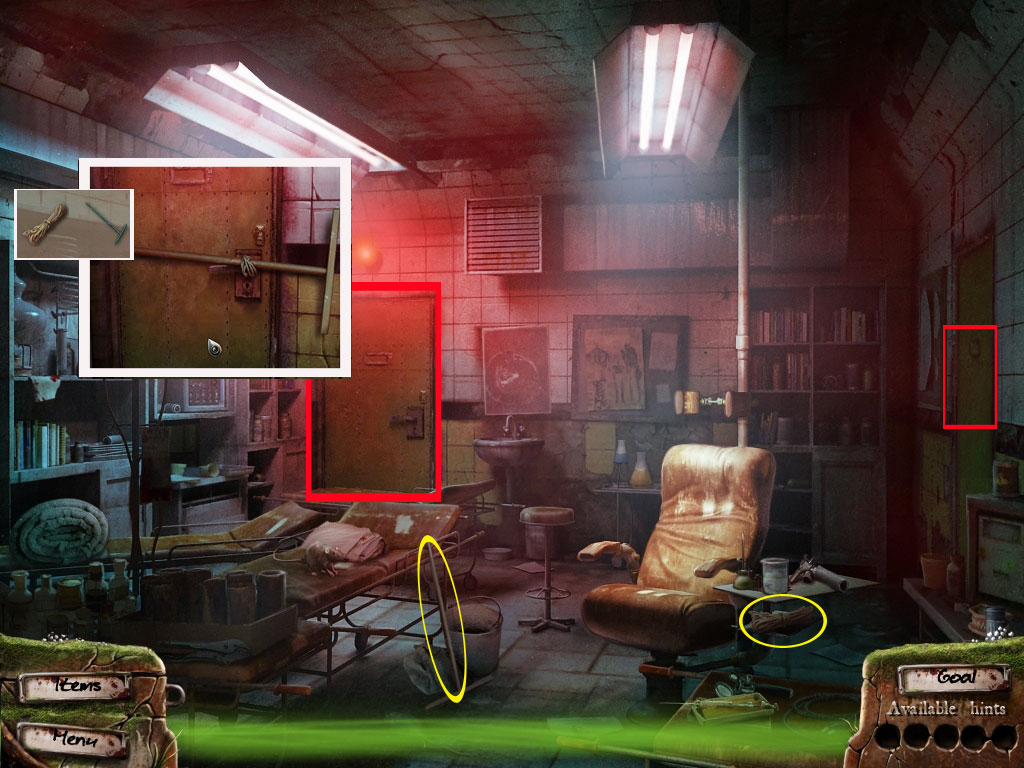
Test Room
Click the green door on the far end of the room.
Click again to get a mop and a rope into your search list.
Find the objects in the room.
Take a closer look at the door again and place both items at the door.
Leave the room through the door on the right.
Screenshot
The Elevator
Click the two shelf on the left side.
They will fall in front of the door.
Click the elevator device on the far end to the left, next to the elevator.
You will need a screwdriver - find it and remove the screws.
Screenshot
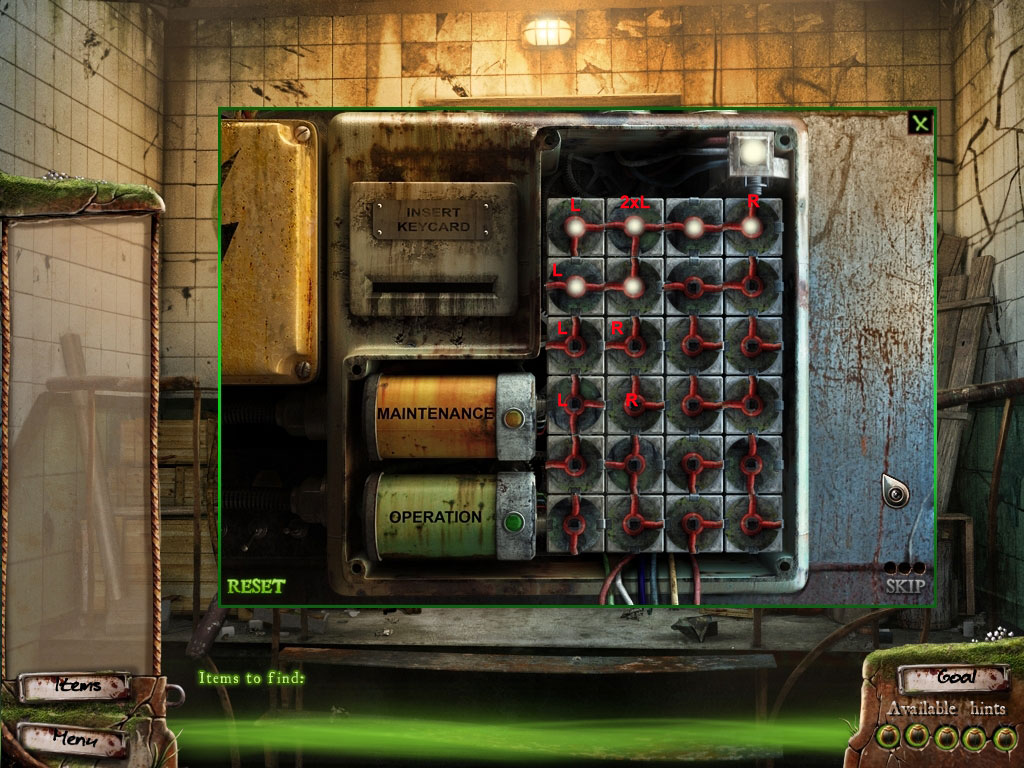
Your goal now is to connect the wires with the "Maintenance" battery. To do so, you will need to rotate the cables.
A wire can only be rotated when power is supplied to it - with a right mouse click it will rotate counter clockwise, left click will let it rotate clockwise.
The chance that you will have to reset the puzzle a couple of times is big.
Start with the powered wire on the top right and rotate it counter clockwise.
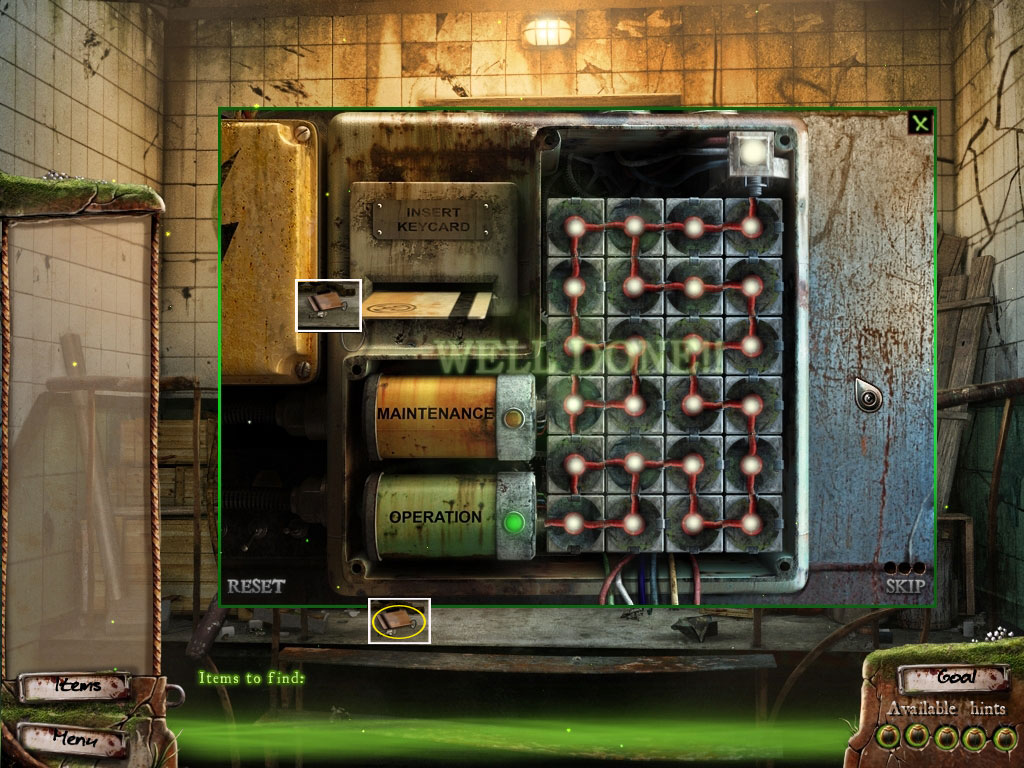
The first screenshot shows the solution, the second screenshot shows a step by step solution:
Screenshot
Screenshot
Watch the cut scene.
Pick up the key card, take a closer look at the panel again and enter the key card.
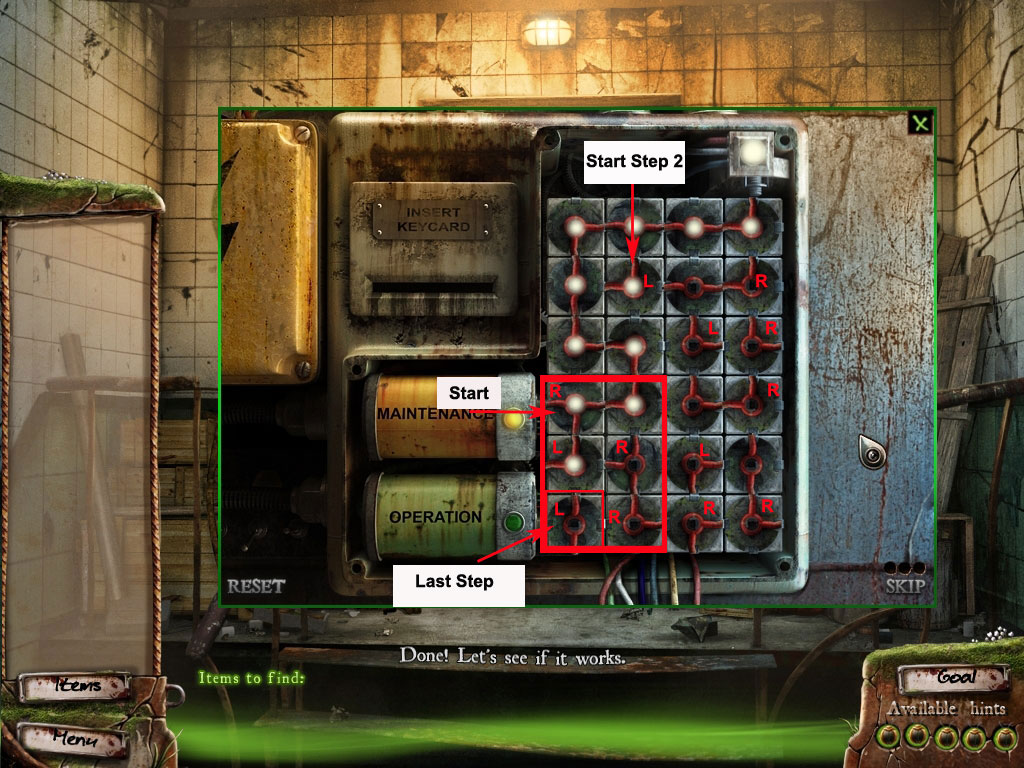
Your goal now is to connect the cables with the "Operation" battery.
You do not need to reset; just use the already powered wires.
The first screenshot shows the solution, the second screenshot shows a step by step solution:
Screenshot
Screenshot
You will be brought to the twins' room.
Go upstairs and watch .......... THE END
Thanks to Kayleigh for the walkthrough!
Posted by: Mike |
October 26, 2010 2:57 PM
|
October 26, 2010 2:57 PM