


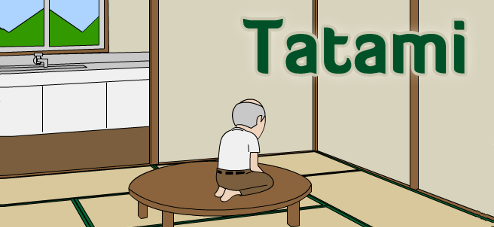
![]() The randomness, the weirdness, the incomparable chutzpah of Detarou—before we could shut the door in the face of its crudeness, it tilts us with a guileless smile and once again we're welcoming it in. This time it's Tatami that's baffling us with an irreverent mix of strange characters and pop culture cameos for a surreal escape game experience to tease the brain. Everywhere you look is something or someone suspicious but no obvious exit so the only way out is by collecting items, gathering clues and solving puzzles until that golden door key is yours.
The randomness, the weirdness, the incomparable chutzpah of Detarou—before we could shut the door in the face of its crudeness, it tilts us with a guileless smile and once again we're welcoming it in. This time it's Tatami that's baffling us with an irreverent mix of strange characters and pop culture cameos for a surreal escape game experience to tease the brain. Everywhere you look is something or someone suspicious but no obvious exit so the only way out is by collecting items, gathering clues and solving puzzles until that golden door key is yours.
 While there's been a slight redesign to the user interface, the controls and gameplay are still the usual Detarou: point and click to move around, interact with objects, and manage your inventory. Remember that you can click once to use an inventory item or double-click to examine it in detail and, when possible, combine items to make a new fun gadget. Likewise, make use of the "save" slots as there are three endings to Tatami but not all are winners. Quite a bit easier than most Detarou offerings and only a teensy bit less offensive, the only real hang up might be keeping your bearings in a few convoluted navigational steps. That said, the layers of clues means you'll have to sort out which work together and how to apply them for a solution. So why rack your brain wondering why Detarou is so so strange when you can spend that precious brain power figuring out the abundance of puzzles in store for you in Tatami.
Game not loading? Try this alternative link.


Walkthrough Guide
(Please allow page to fully load for spoiler tags to be functional.)
Tatami Walkthrough
Starting Out: Room 1 Exploration and Clue Gathering
After pressing start, you're face-to-face with a poster...
The bottom corners of the poster are not taped down, so lift up the poster to look underneath:
Make a note of the clue you see here.
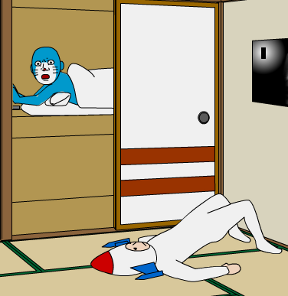
Back up. Ignoring the rocketman doing core exercises on the floor, and staying far from the blue character on the left side of the closet, open the RIGHT SIDE of the closet doors.
Zoom in on the blue feet and click on the blanket to find...
a PYRAMID. Take it.
Leave the rocketman/poster/closet area and turn left. Here you see a desk. Let's give it a go over.
The first drawer is locked and the other drawers are empty, but there is an interesting device on top of the desk:
A triangle-shaped indentation in the surface of this device invites you to put your PYRAMID on it.
Click on each of the four buttons, from left to right, and mark down the colors you see: green, yellow, blue, red.
Now take the PYRAMID back; it belongs to you!
Back away from the desk and turn left twice, past the windows, to a view of a cupboard and small bookcase.
Open the bottommost drawer of the cupboard and you'll find another clue. Note what you see.
Since the other doors in this view are locked, back up, remembering to be on the lookout for a 4-digit number.
Turn left from the cupboard to find a locked set of tatami sliding doors.Notice that there's a panel near the floor in the wall to the left of the tatami doors but it's inaccessible unless you happen to have a screwdriver handy. So... Ready to solve your first puzzle?
Tatami Sliding Doors: Color Code
While the doors by the poster just open to a closet, the doors to the left of the cupboard/bookcase open up to the hallway.
Zoom in twice on the doors to find a puzzle:
Color the four buttons correctly to solve the puzzle and unlock the doors.
Use three different clues from around this room to determine the colors and their order.
SOLUTION:
Combine the image under the poster, the one in the bottom cupboard drawer and the colors from the pyramid platform...
BLUE, GREEN, GREEN, RED
Press the rectangle button when you have the proper color sequence and the tatami sliding doors will unlock.
Click the left door panel to open it and walk into the hallway.
The Hallway, Toilet and Washrooms
As you step out of the first room and into the hallway, you're staring at a blank wall but to your left and to your right are arrows indicating your two directional choices (you can also back up to return to room 1).
Go right by clicking the right arrow. Open the door to find the toilet.
On top of the toilet is another one of those devices/platforms. This one is for a cube.
Lift the lid of the toilet and the seat cushion: you'll see a sphere stuck in the toilet but you can't quite get a gripe on it.
Back up three times and turn left. The tatami doors here are locked by a 5x5 grid panel. Down the hall on the right is the exit door. Directly in front of you, though, is an unlocked door. So go in.
Here is a laundry room. Turn left to face the sink and laundry basket.
On the wall, note the number 1 in a circle.
In the sink, pay attention to the color and order of the three rings around the drain.
Under the laundry basket... take note of the pattern you see there.
Turn away from the sink area and step through the far door to the bathing room. Not much can be interacted with here but give yourself a reminder to come back later with a screwdriver.
Tatami Doors to Room 2: the 5x5 Grid
Back out of the bathing area and laundry area until you're at the new set of sliding doors, the ones locked by a 5x5 grid.
Zoom in on the puzzle on the middle of these doors.
Click the buttons on this grid to change their color from black to white and back again. In this way, you can create a pattern on the grid.
Input the correct pattern then push the rectangular button to unlock the doors.
SOLUTION:
Use the pattern under the laundry basket, orienting it to the rectangle button. "X" = black button; "o" = white button
XXoXX
oXXXo
ooooo
oXXXX
XXoXo
When you've entered the correct pattern and pressed the button, the doors unlock.
Open the doors and step through to the second room.
Room 2: Exploring and Clue Gathering
Upon first entering the second room, you'll see an elderly man kneeling on a round table.
Make a note of the shape and number on the wall here.
Move past the old man and go into the kitchen...
On the counter by the sink is another platform device; this one seems to take a sphere shape.
Turn right to see the rest of the kitchen: a fridge, cabinets, rice cooker, microwave...and someone hiding in the corner.
Open the cabinet:
Take the grey PLUNGER SUCTION cup.
Move aside the bowls on the top shelf to find a code. Make note of it and leave the cupboard.
The guy in the corner's glasses can be clicked and moved around. Apparently a certain pattern of clicks might do something, but you don't know the sequence yet.
There is a 3-ring dial on the fridge, but you don't have enough clues to open it yet.
Now you have enough information for another puzzle. Leave the kitchen, leave the second room, and continue backing up into the center of the first room.
Room 1 Cupboard: 4-Digit Code
After returning to the first room from the kitchen area, turn right to view the cupboard next to the window.
Zoom in on the cupboard doors:
You need a 4-digit code to unlock and open this cupboard.
The answer is in the cabinet in the kitchen.
SOLUTION:
9265
When you input the correct code, click the rectangular button to enter it and unlock the doors.
Open the cupboard:
Take the PLUNGER STICK from the blue jacket guy.
Make note of the images inside the left cupboard door.
Corner Guy's Glasses
After opening the cupboard in the first room, turn left, go through the doors, go into the second room, go into the kitchen and turn right to visit the guy standing in the corner again.
Zoom in on his face:
Click either the left, right or middle of the glasses in the correct order.
SOLUTION:
A square with line to the right refers to the right side of the glasses. Line on the left? Left side. See that little hump in the forth row? That's the bridge of the glasses (middle).
RIGHT, LEFT, RIGHT, MIDDLE, LEFT, RIGHT
When his glasses are adjusted properly, the corner guy will hand you an item:
a SCREWDRIVER
Back up all the way into the first room again.
Unscrewing and Plunging
In the first room, to the left of the tatami sliding doors is a grey panel near the floor. Zoom in on it:
Use the SCREWDRIVER to remove the panel.
In your inventory, combine the suction and the stick to make a whole PLUNGER.
Use the PLUNGER to get the STRONGMAN from inside the wall panel!
Go out of the first room, turn right, and go to the toilet:
Use the PLUNGER to get the SPHERE from inside the toilet bowl.
Back up until you can turn left, then go through the other tatami doors to the second room, where the old man is kneeling on the table.
Use the STRONGMAN to overturn the table, sending the old guy into a hand-stand.
Move aside the table and zoom in on the old guy's belly; make a note of the numbers you see there.
Back out of the second room then through the brown door to the laundry room. Continue forward into the bathing room.
Zoom in on the panel on the side of the bath tub:
Use your SCREWDRIVER to remove the panel.
Now enter the correct 5-digit number.
SOLUTION:
The number is on the handstand guy (remember, he's upside down)...
51592
After you input the correct 5 numbers and hit the "ENTER" key on the panel, a whole new area opens up.
Two Bad Pandas
After using the bathtub code, go into the white door on the left.
-This is a good time to save your game!-
You have two choices in this room, both are worth seeing: Mess with the Bad Pandas -or- Press the red button. Just as long as you SAVE your game, you can restart and go again
If you want to press the red button, do it first:
Press it. Gawk. Then back up.
You'll be given the option to replay from your saved game.
If you want to mess with the pandas:
Use the PLUNGER. Enjoy.
3 Ring Dial on the Fridge
After acquiring a working plunger and using it, you will be able to gather the rest of the clues for the fridge dials.
Go into the kitchen and, on the counter by the sink, is a device platform with a round indentation on its surface:
Put the SPHERE on the platform then takes notes on what you see.
Take the SPHERE back when you're done.
Go right to the corner guy view of the room and zoom in on the refrigerator door:
Set each of the 3 dials to the correct positions.
SOLUTION:
The colors and arrows on the sphere, along with the rings around the sink drain in the laundry room, indicate the arrows on each dial should point...
Outer=NorthWest
Middle=East
Inner=NorthEast
When you get the dials set properly, push the blue button in the middle to unlock the fridge doors.
Open the fridge:
Take the CUBE from the hippie.
Note the number and shape inside the door.
The Clue on the Cube (and what to do with it)
After getting the CUBE from the hippie in the fridge, back out of the kitchen and turn right to go into the toilet.
Put the CUBE on the device on top of the toilet; notice the three different patterns it shows you.
Once you've noted that information, get the CUBE again.
Back up until you can turn left, turn left and go back into the second room.
Lift up the floor mat by the handstand guy and zoom in...
Using the information you saw on the cube, adjust the bars on the three sides of this lock then press the yellow button to open the floor safe.
SOLUTION:
Screenshot: Floor Safe Pins Solution
When you get the floor safe open, take the black KEY.
Rope, Shapes and Exit Key
Take KEY you got from the floor safe (under the tatami mat in the second room) and back up all the way into the first room.
Turn right three times past the gecko man in the window and zoom in on the desk drawers:
Use the black KEY to unlock the top drawer and get a ROPE.
Turn right twice, leave the first room, turn left, and go through the bathroom to the two white doors.
Click on the door on the right and another puzzle will come up:
Place the SHAPES in the correct spots.
SOLUTION:
Each shape, and its number, is found on the walls in various rooms...
SQUARE-CIRCLE-TRIANGLE
When they're in the proper order, you'll hear the door unlock.
Go through the right door and you'll see a well in the floor.
Looking deep inside the well, you see the glint of something shiny and gold.
Since you can't reach that far, you'll need to rig up the mechanism next to the well...
SOLUTION:
Put the plunger on the strongman's head, then attach the rope to it, then put Strongman Plungerhead on the pully mechanism next to the well.
Press the DOWN arrow on the machine to lower your helper into the well. Then, press UP to bring him back up.
Take the GOLDEN KEY that he hands you.
Back all the way out, turn right down the hallway to the exit door...
Use the GOLD KEY to unlock the door and open it.
Save your game!
Whenever you're ready to return to sanity, go through the door and escape.
Red Stamp Hint and Solution
What else is down there?
This only works after you unlock the exit door...Go back into the well room and use the pully mechanism to pull up the RED STAMP. Take it, go out the exit door, and enjoy the extra feeling of specialness on your escape!
Posted by: elle |
October 11, 2013 10:01 AM
|
October 11, 2013 10:01 AM