


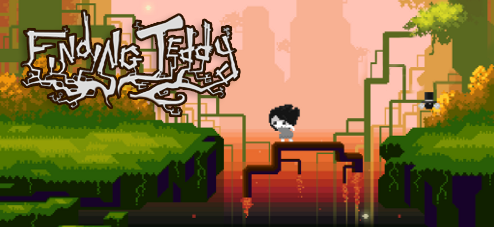
![]() A little girl is tucked in bed and sleeping peacefully, her teddy bear cuddled under her arm, when... something intrudes her urban surroundings and snatches away her beloved plush pal. Investigating his disappearance, the little girl encounters a fantastical world inhabited by strange creatures and other oddities. Join her Finding Teddy quest, discovering and deciphering the secrets of a magical realm, in this thoroughly enchanting point-and-click adventure from Storybird Games.
A little girl is tucked in bed and sleeping peacefully, her teddy bear cuddled under her arm, when... something intrudes her urban surroundings and snatches away her beloved plush pal. Investigating his disappearance, the little girl encounters a fantastical world inhabited by strange creatures and other oddities. Join her Finding Teddy quest, discovering and deciphering the secrets of a magical realm, in this thoroughly enchanting point-and-click adventure from Storybird Games.
 Using traditional point-and-click mechanics, tap the edges of the screen to move off stage as well as tapping to interact with characters or pick up items where possible. Once you've acquired some objects, tap the girl to open your circlet of inventory, tap the item you want to use, then tap the area where you want to try it. Later, you can touch the top of the screen to access your array of musical notes, useful in solving tone-based puzzles, a necessary part of advancing successfully in the rescue teddy endeavor. As you play through this surreal environment built with gorgeous artwork, there's much to discover, including some deadly dangers, but the game saves automatically as you progress so you're always regenerated back were you left off.
Finding Teddy is as much about entertaining your aesthetic sensibilities with remarkable artistry as challenging your logic with both conventional adventure game puzzles and auditory riddles. You'll complete a number of tasks in each of the three chapters; some will earn you new friends and a couple of traveling companions who assist in your missions. Your rewards include not only the success of overcoming obstacles, you can also unlock entries in a gallery of truly frame-worthy pictures by making it to the next stage or solving a particular puzzle, or by uncovering special orbs hidden within various scenes. The mystery of the orbs is a puzzle in and of itself, but being observant with both ears and eyes, along with a bit of thinking, you'll likely figure it out before too long. If not, at the end of the game, you can go back and try again, keeping the orbs you gathered the first time.
 Analysis: Finding Teddy is an incredibly unique and thoroughly engaging creation, the result of collaboration between the talents of French developer, Storybird, and Indie game publisher, LookAtMyGame. While there is no narration—nor dialogue in the typical sense—Finding Teddy communicates its story extremely effectively through detailed imagery, animations and music. The surreal beauty coming alive so vividly and magically on your mobile device is reason alone to experience this game. While Finding Teddy is quite playable on the smaller screen, the remarkable visuals are even more lovely played on a tablet.
Since some riddles rely on sound to complete, the challenges can be difficult until you figure out the reason behind the music. There are enough logical and visual hints provided that talent in music is not requisite, but it can feel frustrating if you're hard of hearing or just not used to such riddles. Fortunately, it gets more doable as you go along and get into the rhythm and particular logic of this enchanted world. A couple rare quirks might leave you wondering if they're hiccups in the story design or some enigmatic optional puzzle. It's hard to tell but it's easy to imagine that, in building such a detail-oriented creation, the designers could overlook an edit here or there. On the other hand, in beholding such talent, it's also easy to envision the creators sneaking in an easter egg or two. Either way, extra exploration is always enjoyable.
If you love playing traditional adventure-based games or are a lover of brilliant artistic talents, this story of a little girl braving the unknown to rescue her teddy is a tremendous find. Utterly charming and replete with replay value, Finding Teddy might just cuddle up to your gamer heart and make you its everlasting friend.
NOTE: This game was played and reviewed on the iPad 2 and iPhone 4S. Game was available in the North American market at the time of publication, but may not be available in other territories. Please see individual app market pages for purchasing info.


Walkthrough Guide
(Please allow page to fully load for spoiler tags to be functional.)
Finding Teddy Walkthrough
Hidden Orb Locations
In all three chapters of the game, there are collectible orbs that unlock a drawing from the Gallery when discovered.
These orbs are invisible and hard to find, but you do have one clue to finding them. When you enter a room that contains an orb, you will hear a light pinging sound whenever you tap on the screen.
The closer you are to the orb's location, the louder this pinging sound will be.
After the orb is revealed, tap it while it bounces around in mid-air to capture it.
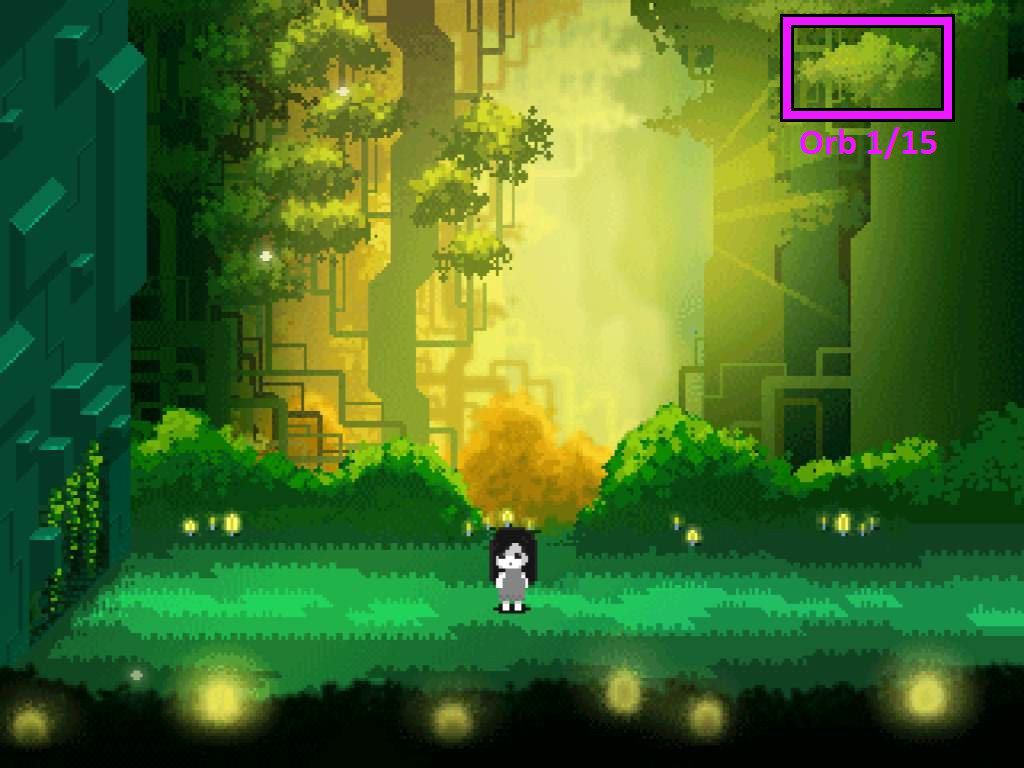
The number at the upper left corner of the screen indicates how many of the 15 Hidden Orbs you have located.
Locate Hidden Orb 1/15 in Chapter 1. Go to the area with the blob monsters, then walk down one screen.
You will find the orb near the leafy tree branch at the upper right corner of the screen.
Screenshot.
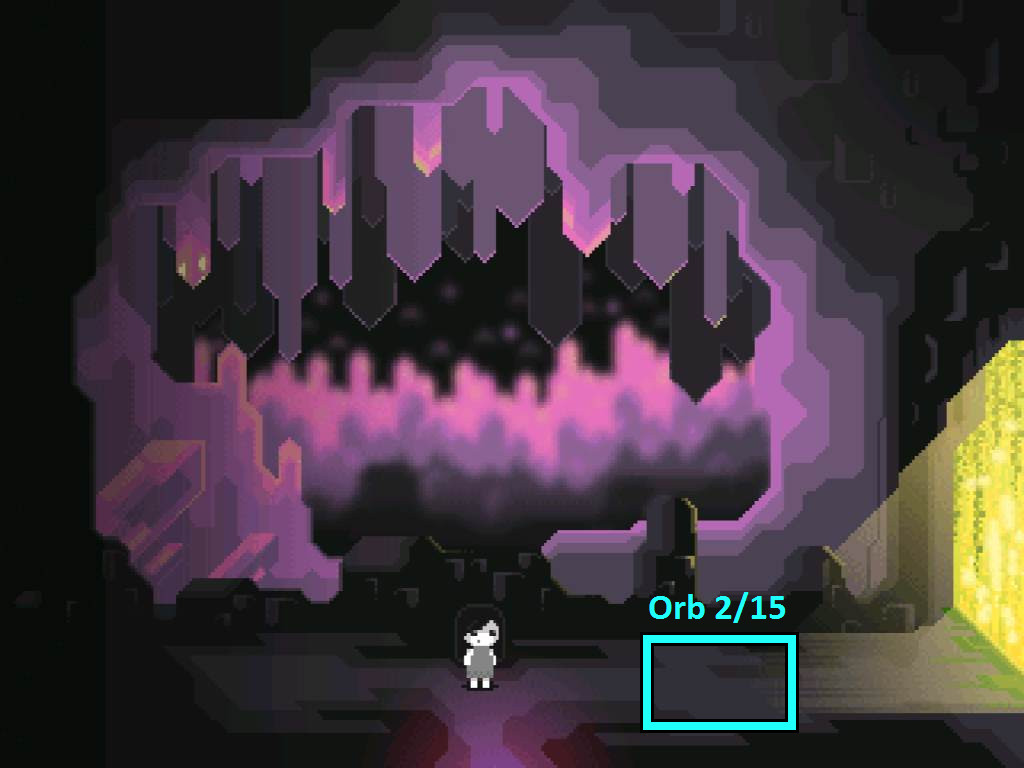
Locate Hidden Orb 2/15 in Chapter 1, at the entrance room inside the cave.
You will find the orb on the section of the floor just to the left of where the yellow light from the cave entrance ends.
Screenshot.
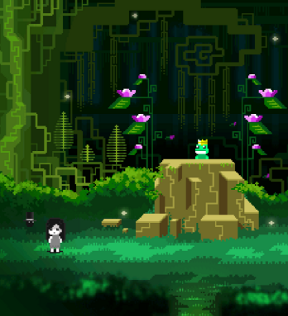
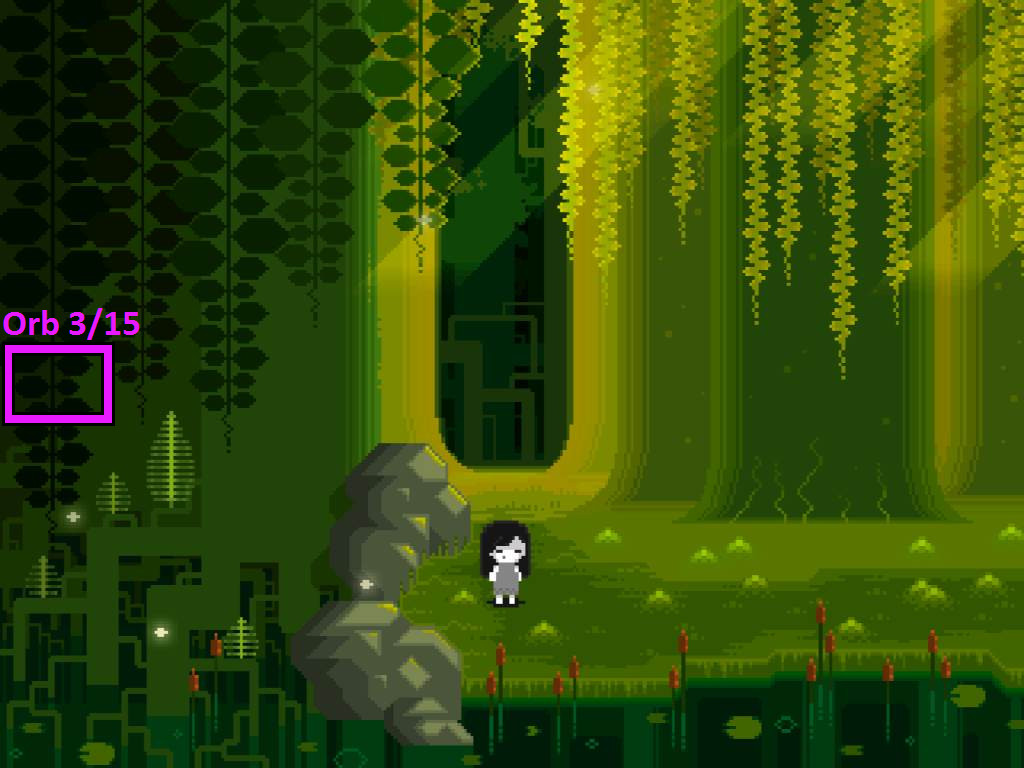
Locate Hidden Orb 3/15 in Chapter 1. Go to the singing frog king sitting on a rock, then move one screen downard.
You will find the orb above the bottom of the farthest left hanging ivy.
Screenshot.
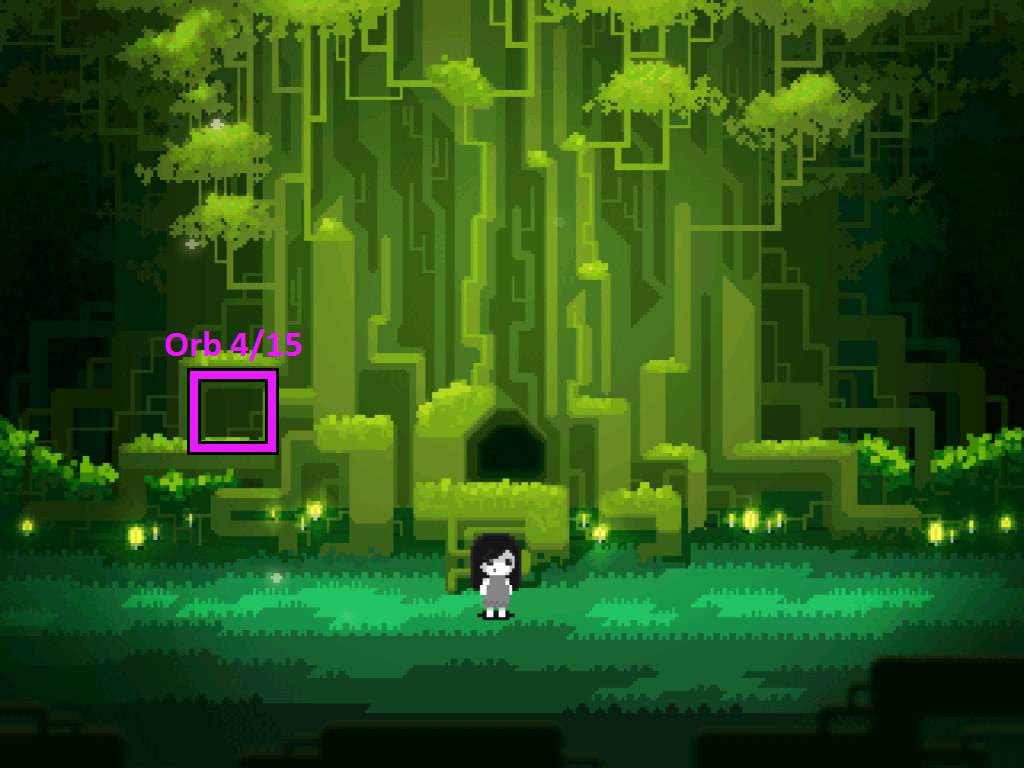
Locate Hidden Orb 4/15 in Chapter 1. Go to the outside entrance of the giant tree.
You will find the orb inside the square space between the roots on the left side of the tree.
Screenshot.
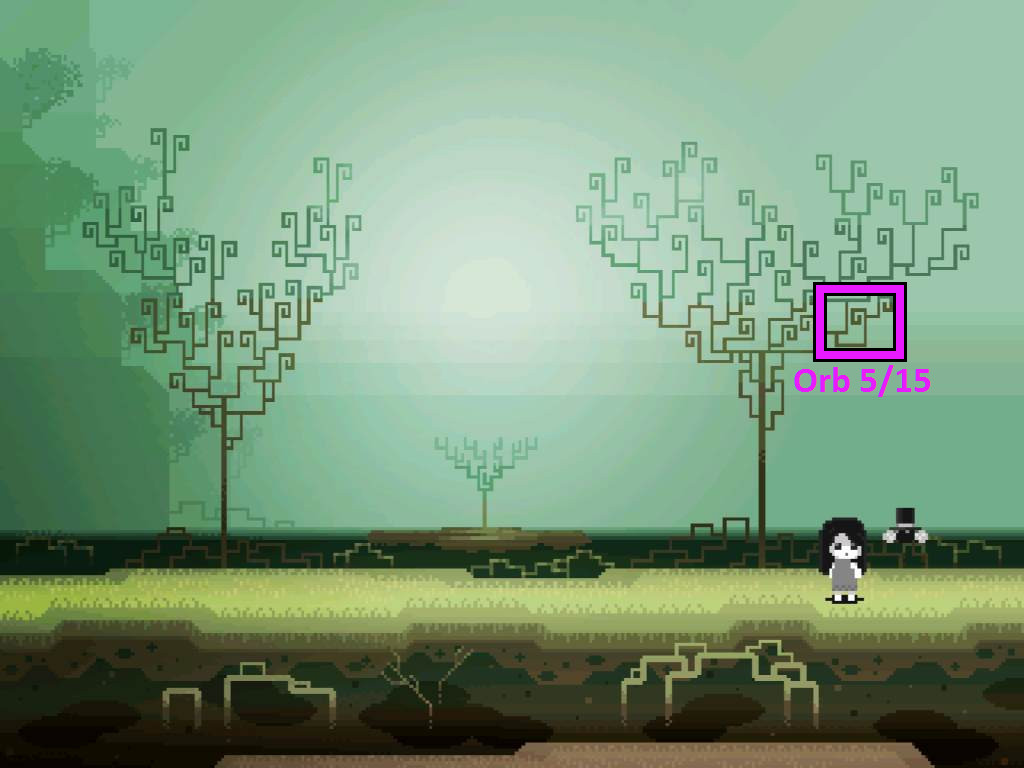
Locate Hidden Orb 5/15 in Chapter 2. Walk one screen to the left from where you enter the chapter, the same area where you can take the STAR-SHAPED ROOT from the ground.
You will find the orb near the lower right branches of the farthest right tree.
Screenshot.
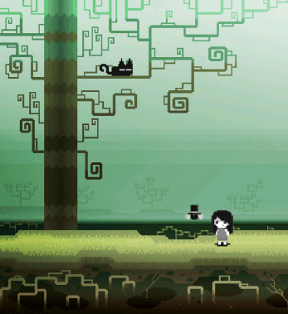
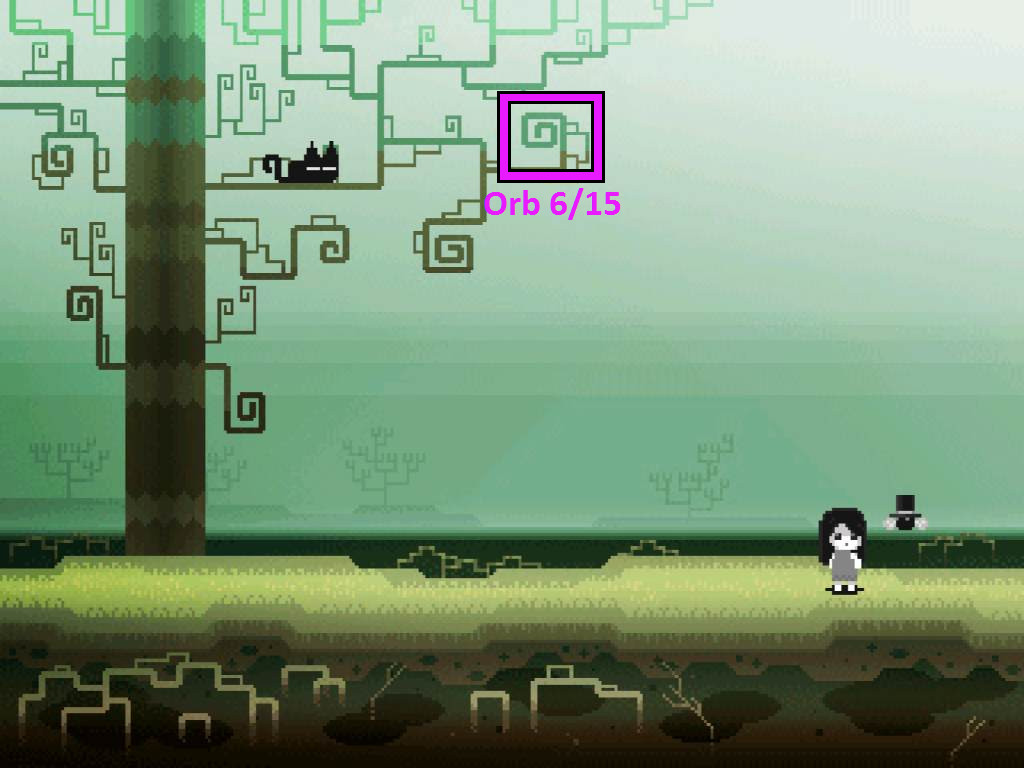
Locate Hidden Orb 6/15 in Chapter 2. Go to the cat sitting at the top of the tree.
You will find the orb at the farthest right swirling branch in the cat's tree.
Screenshot.
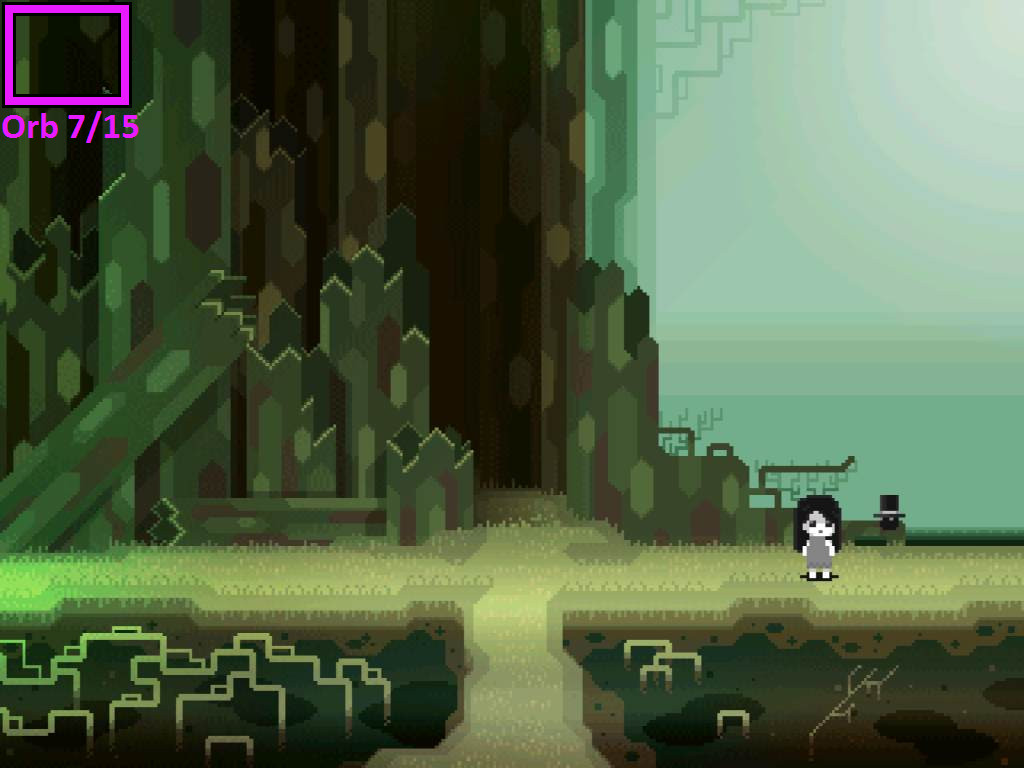
Locate Hidden Orb 7/15 in Chapter 2 at the crossroads, in the same area where you take the PLASTIC BAG.
You will find the orb at the top left corner of the screen.
Screenshot.
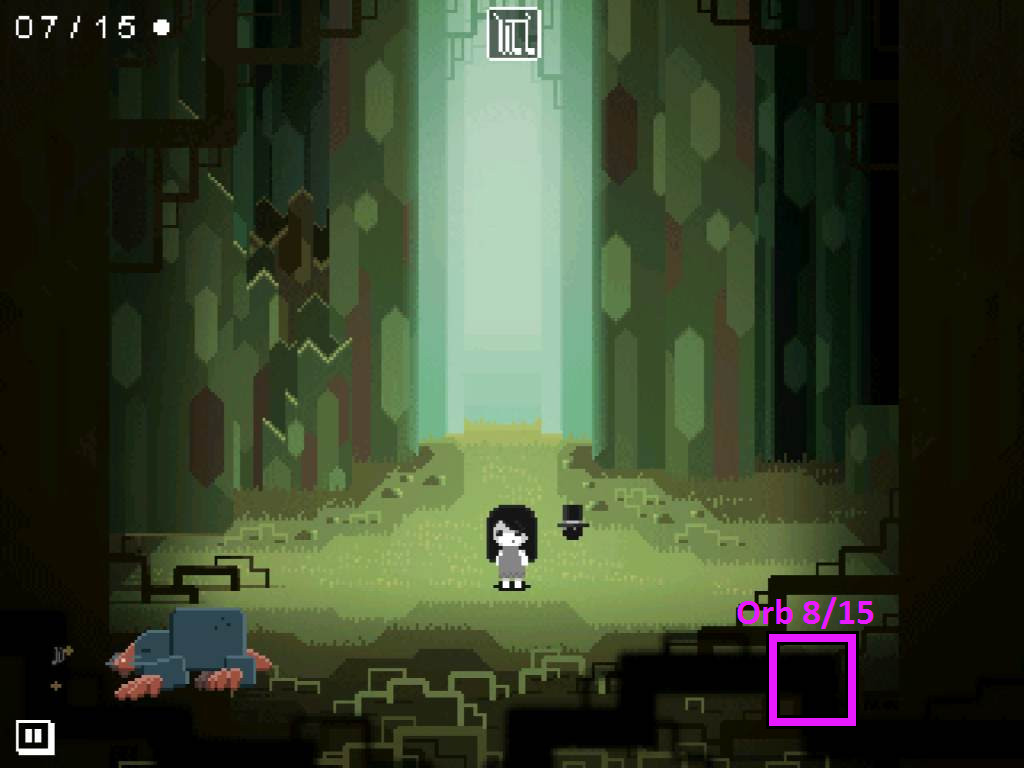
Locate Hidden Orb 8/15 in Chapter 2 at the working mole.
You will find the orb at the right edge of the large black root in the foreground, near the lower right corner of the area.
Screenshot.
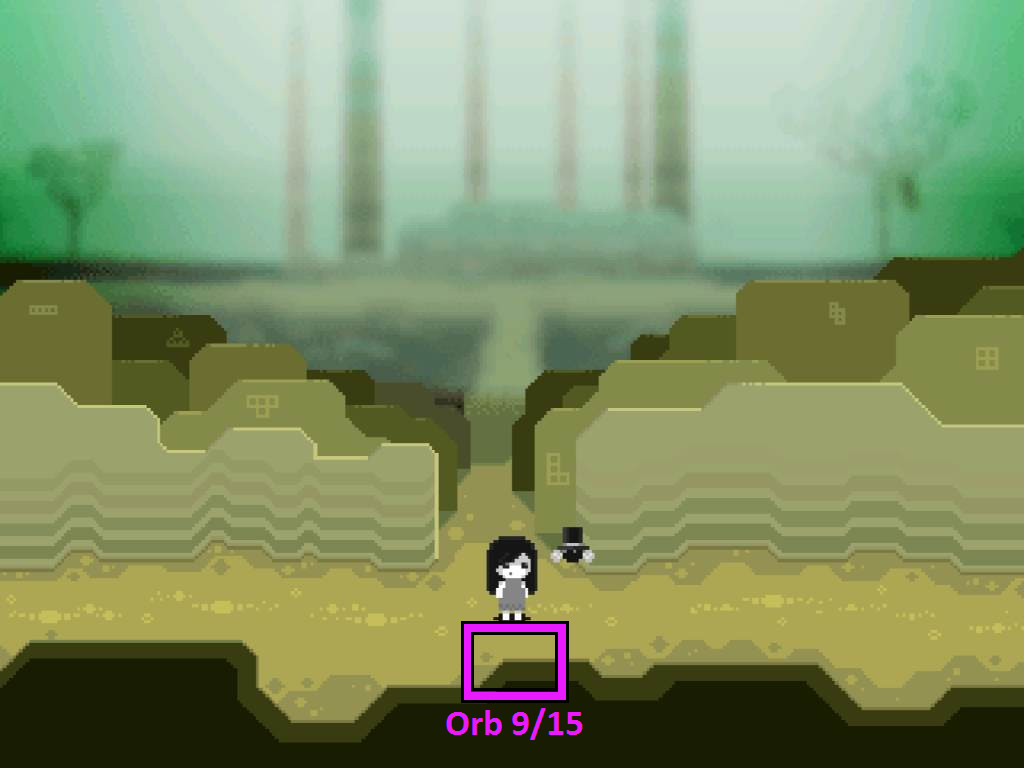
Locate Hidden Orb 9/15 in Chapter 2. Walk to the sleeping mole, then move one screen to the right.
You wll find the orb at the middle of the ground, directly under the girl's feet if she were to enter the area from the upper path.
Screenshot.
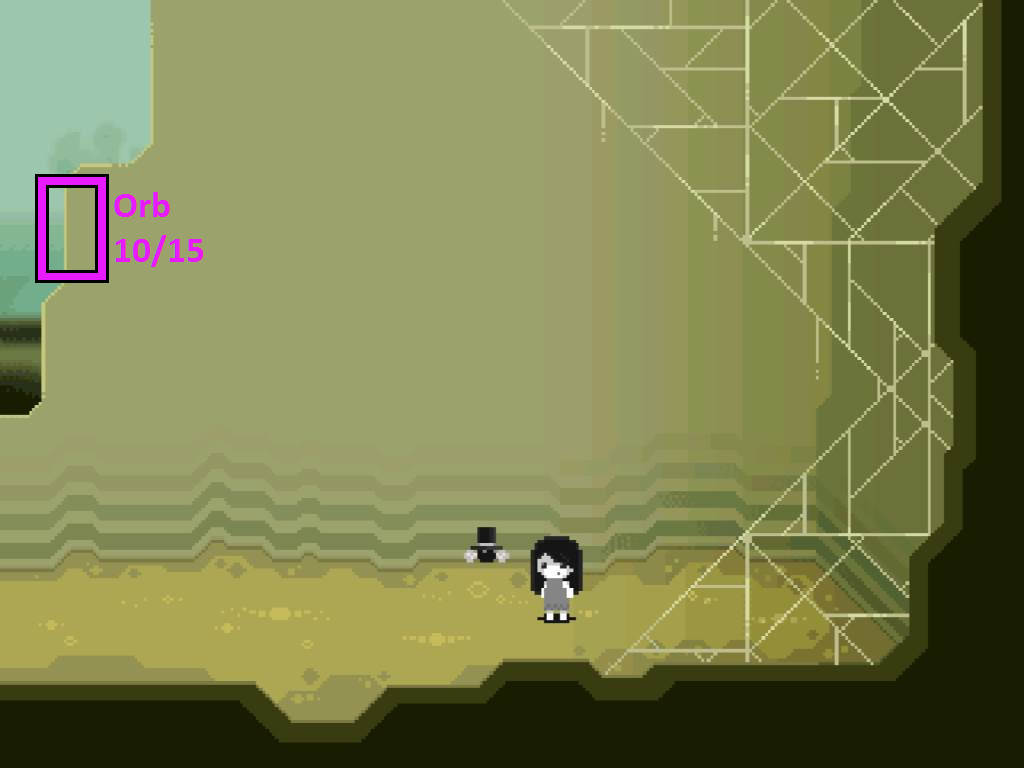
Locate Hidden Orb 10/15 in Chapter 2, at the hungry spider's area.
You will find the orb at the edge of the highest bump on the left side of the brown wall.
Screenshot.
Locate Hidden Orb 11/15 in Chapter 2. Go down the rope in the cave and walk right to the room with the words "TARANT IS OUR MASTER" written on the wall.
You will find the orb in the black area at the upper right corner of the screen.
Screenshot.
Locate Hidden Orb 12/15 in Chapter 3. Walk to the room with the letters "TAR" written on the wall, then continue to the dead end one screen to the right.
You will find the orb at the far left side of the tunnel, near the shape on the wall that looks like a bubble.
Screenshot.
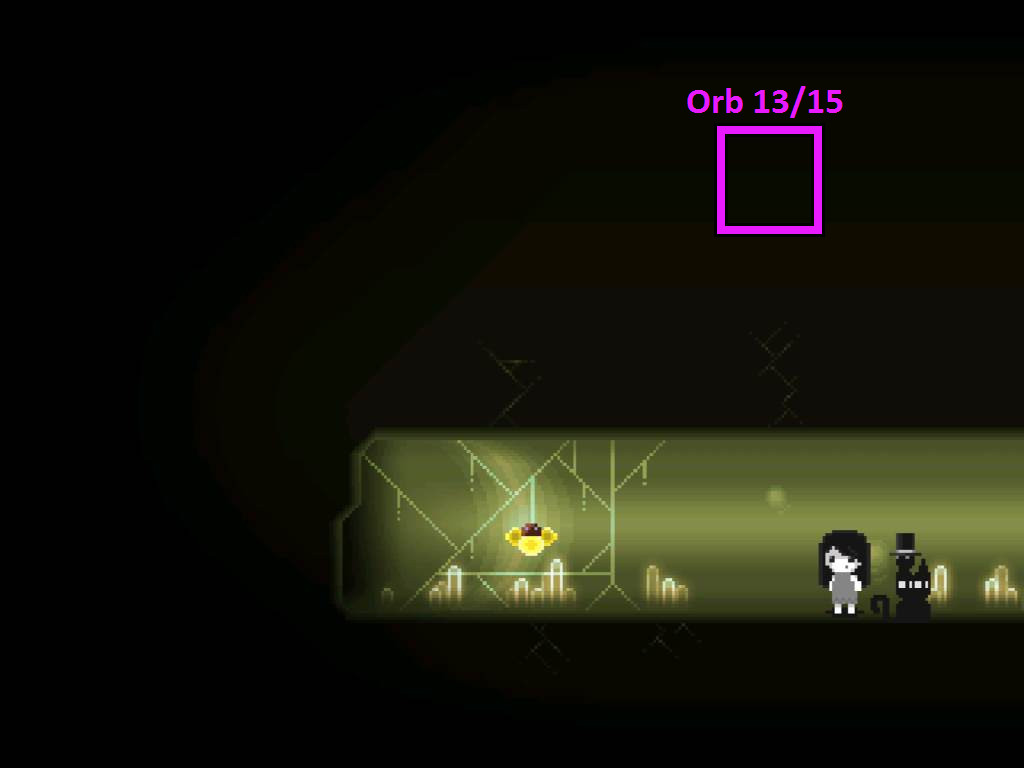
Locate Hidden Orb 13/15 in Chapter 3, at the dead end where you take the FIREFLY.
You will find the orb in the black space at the top of the screen, above the right crack in the ceiling.
Screenshot.
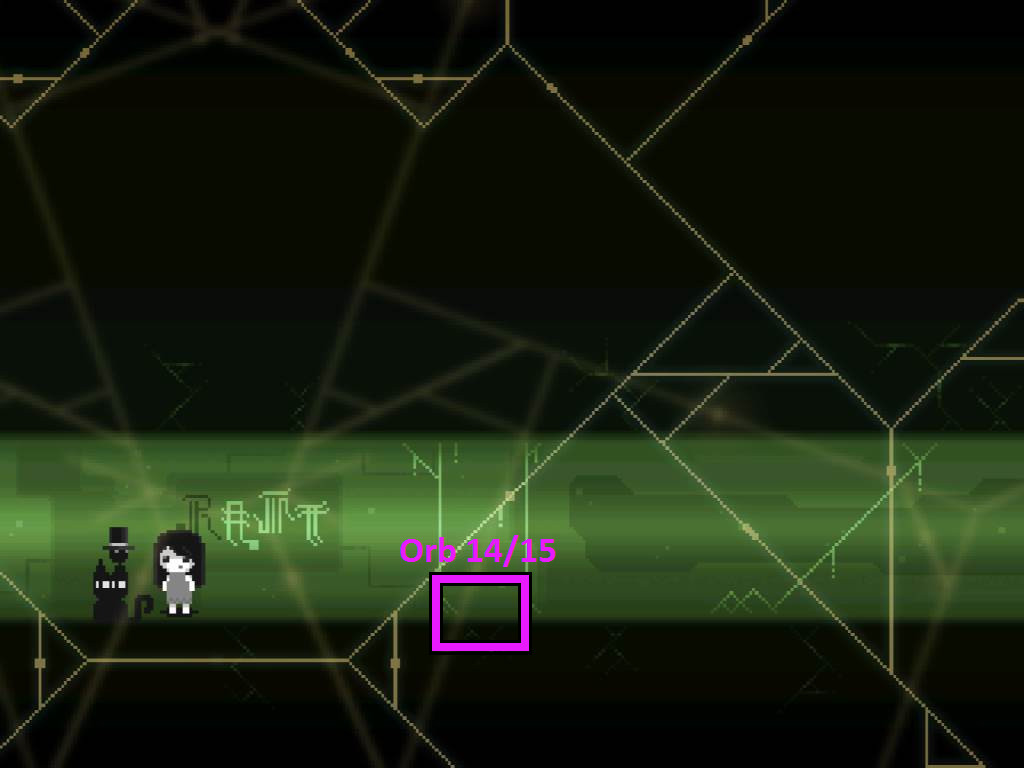
Locate Hidden Orb 14/15 in Chapter 3. Go to the room with the letters "RANT" written on the wall.
You will find the orb on the floor between the two vertical strips of light green webbing on the wall.
Screenshot.
Locate Hidden Orb 15/15 in Chapter 3. Enter the room indicated by the sign with a picture of an egg.
You will find the orb in the space near the upper left corner of the screen, just an inch or so to the right and down.
Screenshot.
Prologue
After the cinematic, you start the game inside the bedroom. Tap the wardrobe to leave the room and travel to the other world.
In the future, you can double tap an area to move there more quickly.
Chapter 1 - The Forest
When your character appears on the pedestal in the forest, tap the right arrow to move to the right.
Pick up the GOLDEN APPLE on the ground to add it to your inventory.
You can tap your character at any time to view all of the items currently in your inventory.
You can attempt to use an item by tapping to select it and then tapping an object or area in the game.
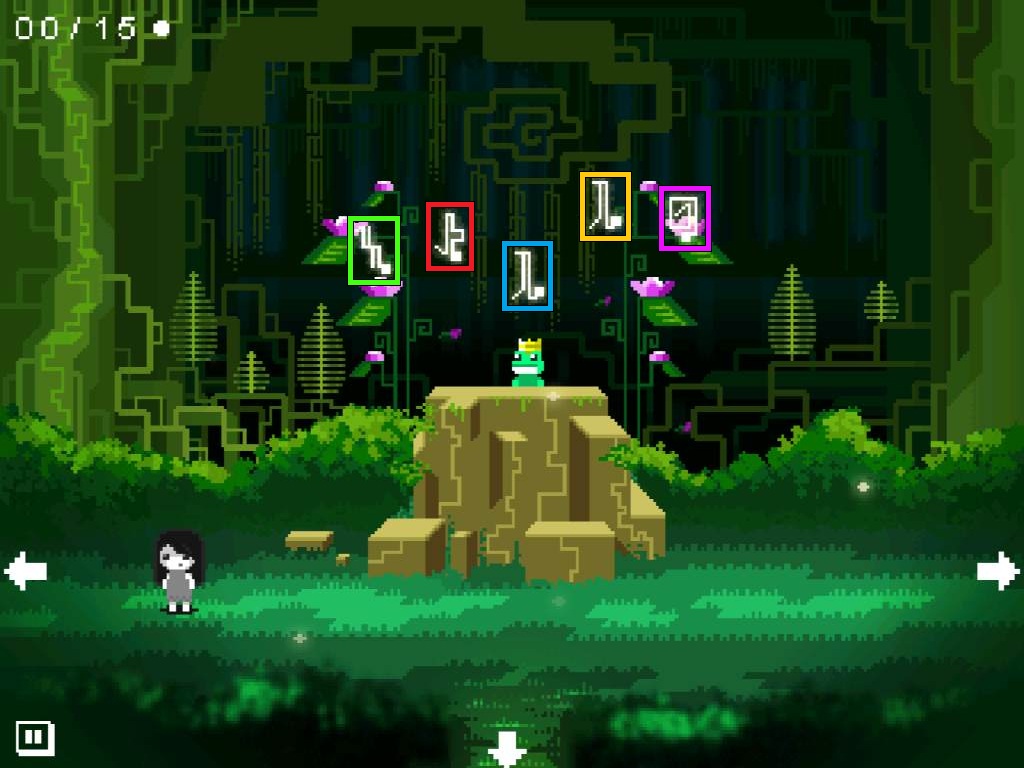
Move right again to reach the colorful frogs.
If you tap the frogs sitting above the river, you'll find that each frog sings a specific note that appears at a range of heights.
Note that for later, then return to where you began at the pedestal in the forest.
Continue left to the blob monster.
Do not try to talk to the blob or it will eat you.
Instead, give it the GOLDEN APPLE from your inventory.
Walk downwards to go further into the forest.
You can find a Hidden Orb in this location.
Locate Hidden Orb 1/15 near the leafy tree branch at the upper right corner of the screen.
After the orb is revealed, tap it while it bounces around in mid-air to capture it, which will unlock a drawing in the Gallery.
Screenshot.
Move left to enter the cave.
You can find another Hidden Orb in this location.
Locate Hidden Orb 2/15 on the section of the floor just to the left of where the yellow light from the cave entrance ends.
Screenshot.
Walk down once and right twice to find a stone room with some furniture.
Take the EMPTY JAR on top of the table.
Return to the outside of the cave and move right once to reach the frog king.
Memorize the pattern of symbols that appear in the air after the frog king sings a series of 5 notes.
Take a good look at the five symbols and you might notice something interesting.
Each symbol looks like a letter in the alphabet! When put together, they spell "HELLO".
Screenshot.
Go down the bottom path.
You can find another Hidden Orb in this location.
Locate Hidden Orb 3/15 near the bottom of the farthest left hanging ivy.
Screenshot.
Walk right to find the waterfall.
Use the EMPTY JAR on the waterfall to fill it. Now you have a JAR OF WATER.
Return to the frog king, then walk one screen to the right.
You can find another Hidden Orb in this location.
Locate Hidden Orb 4/15 inside the square space between the roots on the left side of the tree.
Screenshot.
Move right twice to reach the queen bee.
Do not directly touch the plant on the ground in front of the queen or she will kill you.
Pour the JAR OF WATER on the plant to bloom the flower (after its use, the item reverts back to an EMPTY JAR).
In exchange, the queen bee will give you a SAW.
Walk left twice, then go forward through the hole to enter the giant tree.
Use the SAW on the small plant at the right side of the room to cut off the SHOOT.
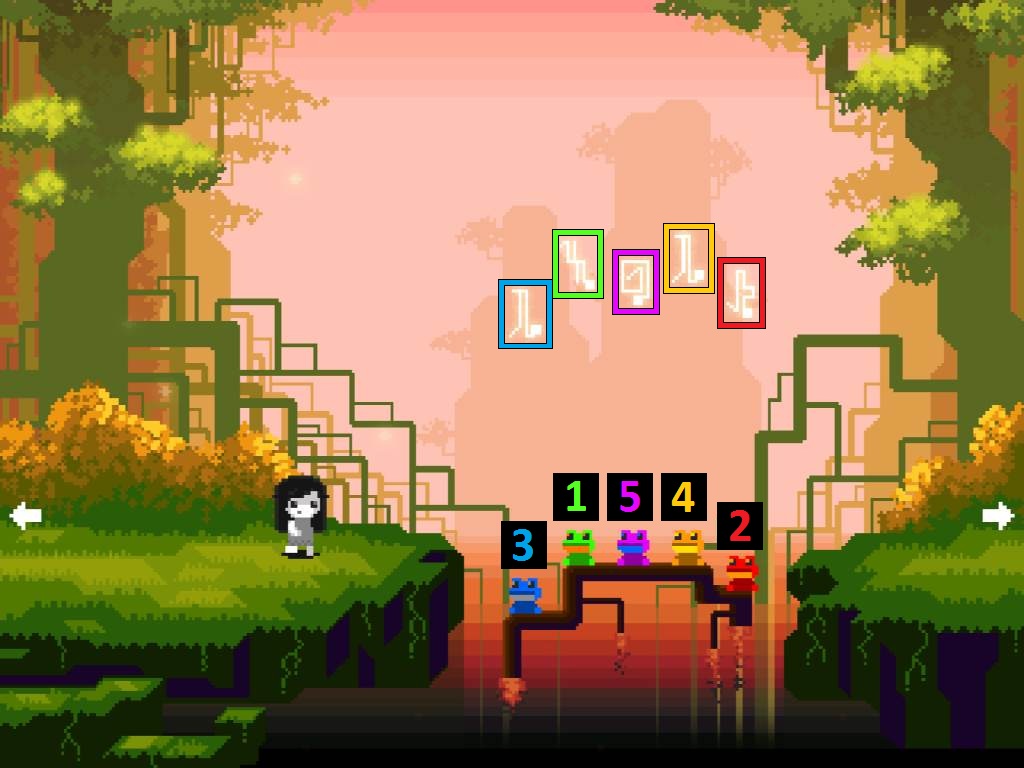
Go back to the colorful frogs by the river.
Now that you know the order of the notes by memorizing the pattern from the frog king, tap the colored frogs on the log to recreate the song.
The blue and orange frogs sing the same note, but you can see that the blue frog's note is always lower than the orange frog's note.
Since the frog king sang the lower note of that symbol first, you can infer that the blue frog must be tapped first.
Make the frogs sing "HELLO" by tapping them in the following order: Green -> Red -> Blue -> Orange -> Purple.
Solution.
After the frogs hop out of the way following the correct solution, the letters "E", "H", "L", and "O" will be added to your list of music notes.
Go right to cross the river to the cliff.
Stick the SHOOT inside the small hole at the bottom of the cliff to meet your new companion, the fly.
Return to the giant tree (past the frog king), then walk right once.
Tap the fly to select it, then tap the feather stuck to the tree branch at the top of the screen.
The fly will retrieve the FEATHER and add it to your inventory.
Go back inside the cave to the stone room with furniture where you found the jar. Continue downwards to reach the totem pole.
Add the FEATHER to the top of the totem pole to make the eagle statue sing.
Memorize the 5 note tune that the eagle sings; you'll need to use it very soon.
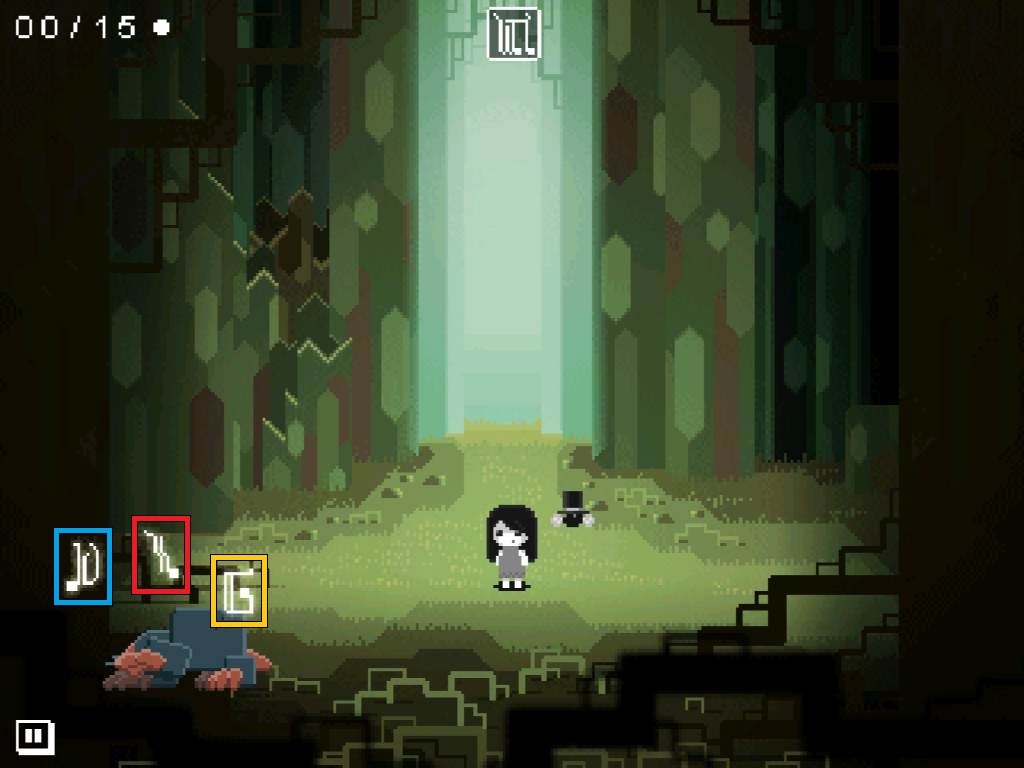
Walk up once and left three times to find the crying monster.
Do not approach the creature or it will kill you like the others.
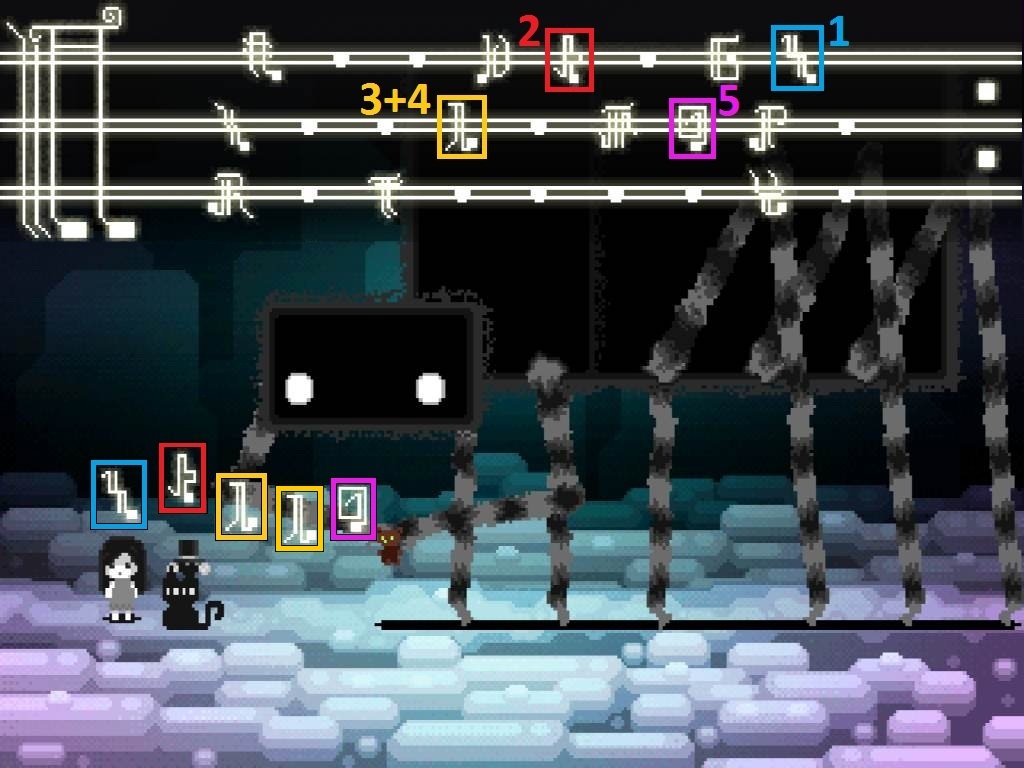
Tap the symbol at the top of your screen to view a drop-down window with a list of music notes.
Here, you'll see the letters representing the notes you discovered from the frog puzzle as well as some blank dots representing notes that you have yet to discover.
The letters are organizes alphabetically with A-H on the top line, I-Q on the middle line, and R-Z on the bottom line.
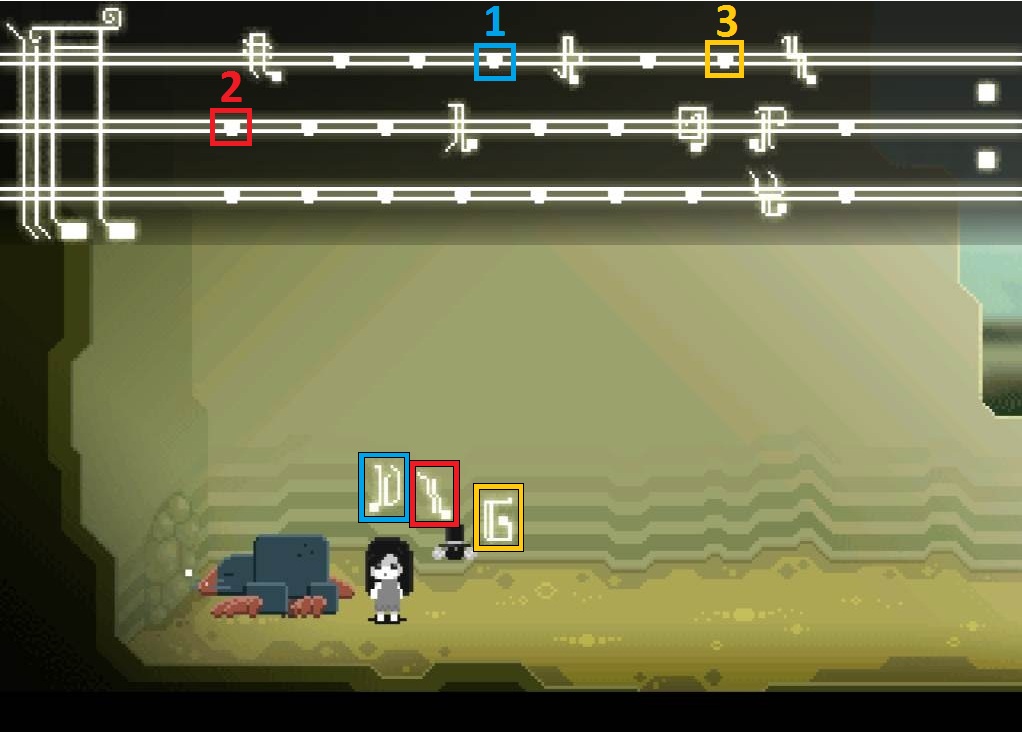
Tap the notes to sing the notes to the crying monster in the same order as the eagle's song.
First, sing the far right note on the top line (H).
Next, sing the far left note on the top line (A).
Then, sing the second note from the right on the middle line two times (P, P).
Lastly, sing the second note form the right on the bottom line (Y).
Solution.
After the puzzle is solved, the letters "A", "P", and "Y" will be added to your music list.
The crying monster will cheer up and give you a GOLDEN KEY.
Return to the eagle totem, then walk left to the cave exit.
Use the GOLDEN KEY to open the padlock blocking the door.
Chapter 2 - The Swamp
Move one screen to the left.
You can find another Hidden Orb in this location.
Locate Hidden Orb 5/15 near the lower right branches of the farthest right tree.
Screenshot.
Tap the leafy plant on the ground to pull out the STAR-SHAPED ROOT.
Go left twice to find the bouncing ant.
Use the EMPTY JAR to capture the ANT.
Walk one screen to the left.
You can find another Hidden Orb in this location.
Locate Hidden Orb 6/15 at the farthest right swirling branch in the cat's tree.
Screenshot.
Continue one more screen to the left.
You can find another Hidden Orb in this location.
Locate Hidden Orb 7/15 at the top left corner of the screen.
Screenshot.
Take the white PLASTIC BAG hanging from the stick above the white road.
Take the downward path to the working mole.
You can find another Hidden Orb in this location.
Locate Hidden Orb 8/15 at the right edge of the large black root in the foreground, near the lower right corner of the area.
Screenshot.
Memorize the mole's song, and determine its corresponding letters in the music list.
You'll find that notes spell the word "DIG" when put together.
Screenshot.
Go up, right three times, and then down.
You can find another Hidden Orb in this location.
Locate Hidden Orb 9/15 at the middle of the ground, directly under the girl's feet when she enters the area from the upper path.
Screenshot.
Walk right to reach the spider web.
Be careful not to touch the web yourself to avoid being eaten by the spider.
Place the ANT caught in the jar on to the web.
In exchange, you will receive a BALL OF SPIDER THREAD.
You can find another Hidden Orb in this location.
Locate Hidden Orb 10/15 at the edge of the highest bump on the left side of the brown wall.
Screenshot.
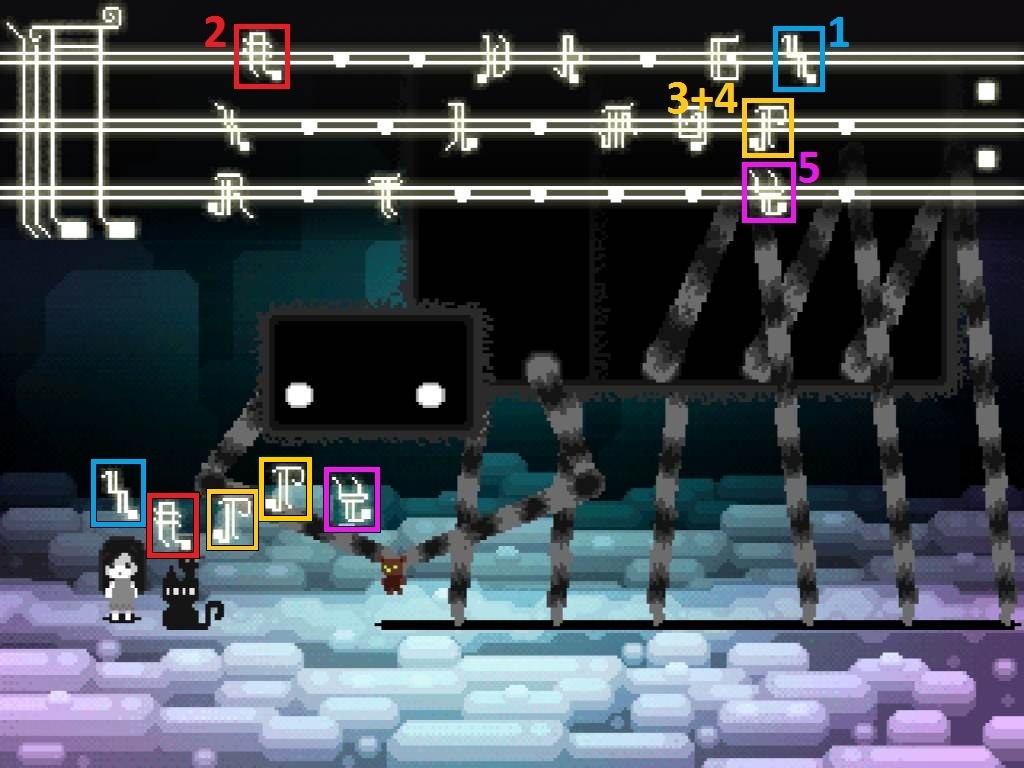
Walk left twice to find the sleeping mole.
Sing the other mole's song to wake up the mole.
Tap the notes where the letters "D", "I", and "G" would be found to play the song.
First, tap the fourth note from the left on the top line (D).
Second, tap the far left note on the middle line (I).
Last, tap the second note from the right on the top line (G).
Solution.
The three letters from "DIG" will be added to your music list.
The mole will wake up to your song and dig a tunnel into the rock wall.
Enter the tunnel through the hole, then climb down the rope.
Tap your fly companion to select him.
Use the fly to collect the FUZZY PLANT from the left wall.
Climb back up the rope and move right twice, up once, and left twice to reach the large tree with the swirly branches.
Give the BALL OF SPIDER THREAD to the black cat in the tree.
The cat will join your small team as your second companion.
Walk left, up, and right to the lurking alligator.
The alligator will attack you if you stand on the rock in the middle of the water, so stay back at a safe distance.
Place the STAR-SHAPED ROOT on top of the rock.
Add the PLASTIC BAG and the FUZZY PLANT to the root to create a dummy.
The alligator will take the dummy and swim away, allowing you to cross safely.
Walk right twice to the middle of the stone wall.
Tap both the fly and cat companions to select them.
Tap the green, leafy plant at the top of the hill to send your companions to fetch the TURKEY.
Go left three times to find the vulture.
Feed the TURKEY to the vulture.
After being fed, the vulture will start to sing a 5 note song.
Memorize the notes and find them on your music list; you'll need them soon.
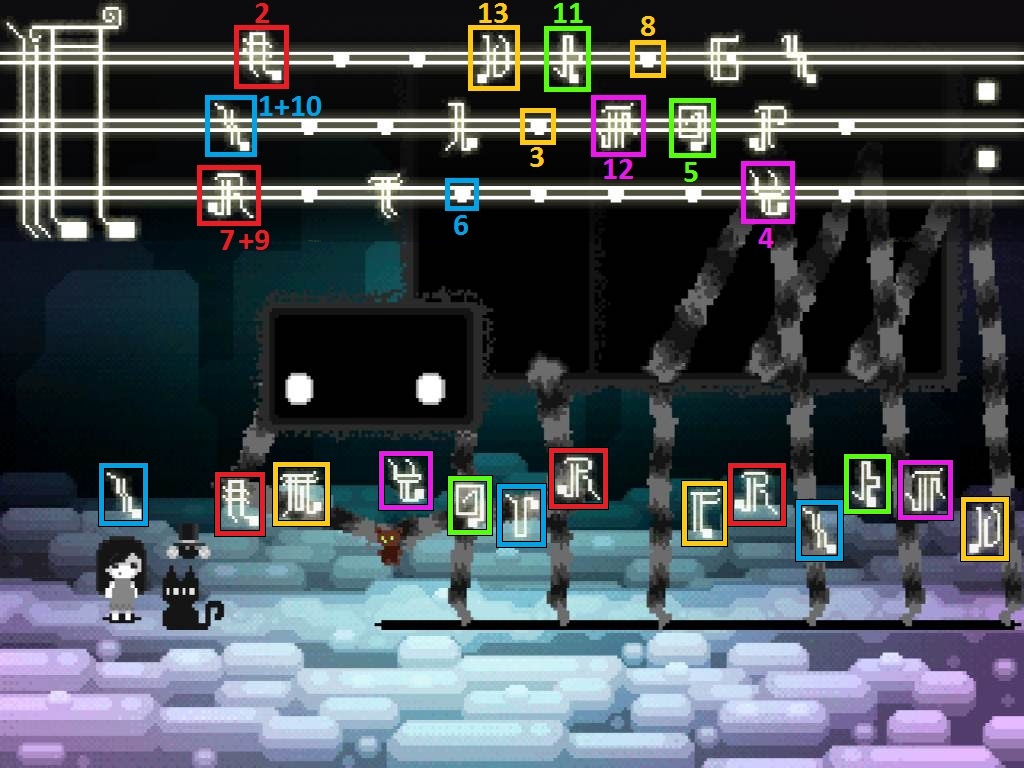
Move right three times to enter the graveyard.
Open your music list and tap the notes to sing the vulture's song.
First, sing the fourth note from the left on the top row (D).
Second, sing the fifth note from the left on the top row (E).
Next, sing the far left note on the top row (A).
Then, sing the third note from the left on the bottom row (T).
Lastly, sing the far right note on the top row (H).
Solution.
After the puzzle is solved, the letter "T" will be added to your music list.
A skeleton will appear from the lit grave to give you a LANTERN.
Return to the underground tunnel that was dug by the sleepy mole. Climb down the rope and continue one screen to the right, where "TARANT IS OUR MASTER" is written on the wall.
You can find another Hidden Orb in this location.
Locate Hidden Orb 11/15 in the black area at the upper right corner of the screen.
Screenshot.
Move right three times to enter the dark chamber.
With the LANTERN in your inventory, your character will automatically light the room.
Pick up the RED GEM on the floor at the right end of the tunnel.
Go back to the 4-way crossroads. From there, head left to find robotic snake.
Do not approach the snake or it will kill you.
Instead, give it the RED GEM from your inventory.
Chapter 3 - Tarant's Lair
Walk all the way left past Tarant's mailbox and into the first room of the cave.
Note the three letters "GRE" on the wall.
Ignore the web-wrapped insect for now. You can't remove it yet, so you'll have to come back later.
Go left once and down once.
You'll see another three letters on the right side of the doorway: "EAT."
Walk one screen to the right.
There are three more letters on the wall here, "TAR."
Go one screen to the right again to come to a dead end.
You can find another Hidden Orb in this location.
Locate Hidden Orb 12/15 at the far left side of the tunnel, near the shape on the wall that looks like a bubble.
Screenshot.
Move left four times times to reach another dead end.
Take the FIREFLY hanging from the spiderweb at the end of the passage.
You can find another Hidden Orb in this location.
Locate Hidden Orb 13/15 in the black space at the top of the screen, above the right crack in the ceiling.
Screenshot.
Go right once, down once, and then right again.
Note the last four letters written on the wall: "RANT"
You can find another Hidden Orb in this location.
Locate Hidden Orb 14/15 on the floor between the two vertical strips of light green webbing on the wall.
Screenshot.
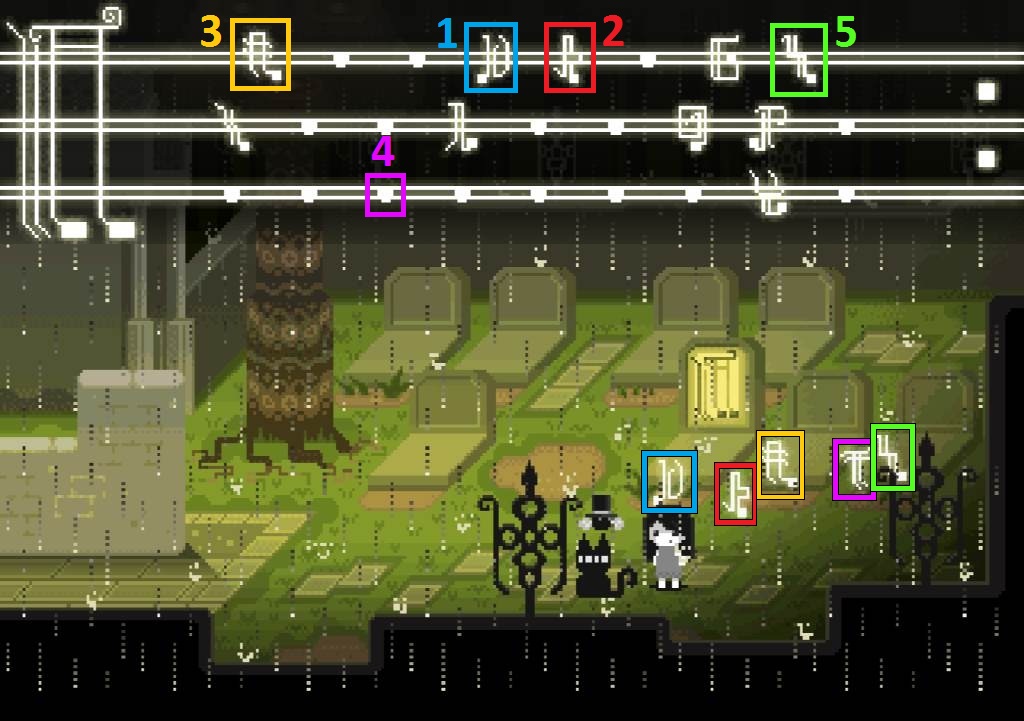
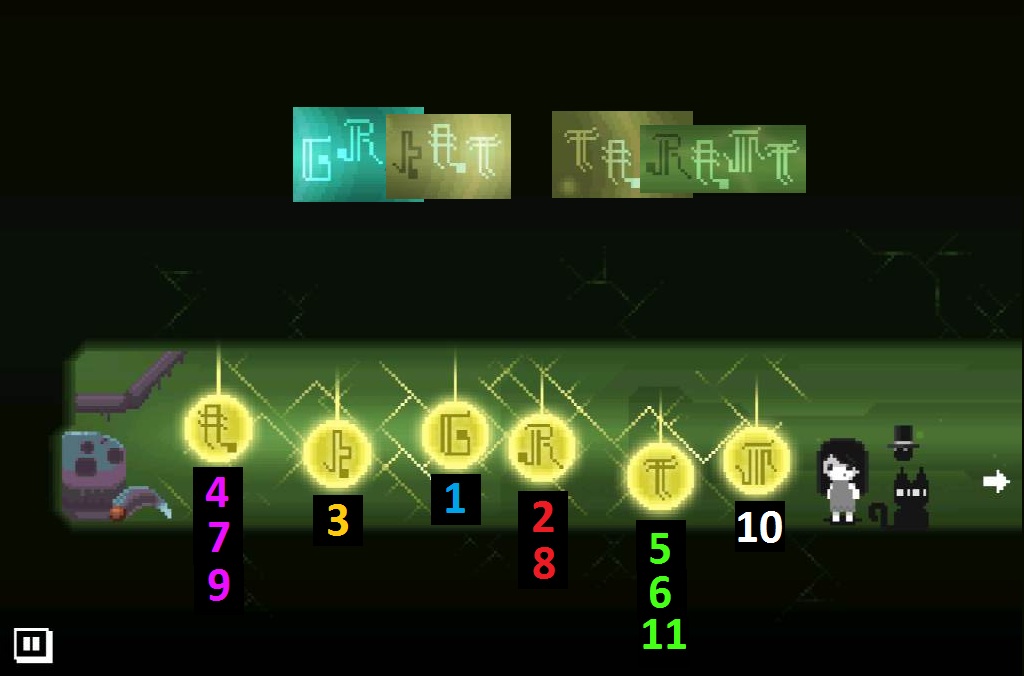
Walk one screen to the left to reach the glowing lettered lanterns.
Combine all the letters you found from the clues on the wall to discover the secret message.
Tap the lanterns in the correct order to enter that message.
Each first half of one word has the same last letter as the first letter in the second half of the word.
GRE+EAT = GREAT (minus the duplicate "E").
TAR+RANT = TARANT (minus the duplicate "R").
Next, tap the lanterns to spell "GREAT TARANT".
Solution.
After the puzzle is solved, the letters "R" and "N" will be added to your music list.
Take the FANG from the side of the creature at the end of the tunnel.
Return to the entrance room of the cave, then continue one screen to the left to find the beetle.
If you translate the beetle's song, he's asking for "HELP."
Use the FIREFLY to burn up the spiderweb he's stuck in.
Follow the beetle one screen to the right.
Ask the beetle for "HELP" by spelling out the word with letters.
Solution.
The beetle will cut the BABY SPIDER down from the web, allowing you to pick it up.
Go back down to the tunnel where you solved the lantern puzzle and found the FANG, then move to the right three times.
Give the BABY SPIDER to the mother spider.
She will teach you a new song, "I AM YOUR FRIEND."
Return to the area where you first freed the beetle. From there, move left once to find another spider.
Be careful here: the spider will kill you if you approach its web.
Tap your fly companion to select it.
Use the fly to lure the spider, which will clear the path for you.
Walk left and then continue through the doorway to reach a tunnel blocked by a spider web.
Cut away the web with the FANG from your inventory.
Walk right past the giant web to the doorway with an egg sign. Go through the door to enter the room.
Take the EGG underneath the green light.
You can find another Hidden Orb in this location.
Locate Hidden Orb 15/15 in the space near the upper left corner of the screen, just an inch or so to the right and down.
Screenshot.
Exit the room and walk right four times and then up once to find the nest.
Place the EGG inside the bird's nest.
In exchange, the bird will give you the SILVER KEY.
Go down, right, up, and then right again to reach the chest.
Unlock the chest with the SILVER KEY.
You'll receive the SPIDER DOOR KEY from the opened chest.
Go back to the door with the egg sign, then continue right once to find the spider door.
Unlock the giant gate with the SPIDER DOOR KEY.
Walk right to meet Tarant.
The last puzzle requires you have a conversation with Tarant by reusing a few of the messages you've picked up throughout the game.
Speak quickly and try not to make a mistake, or Tarant will get impatient and kill you.
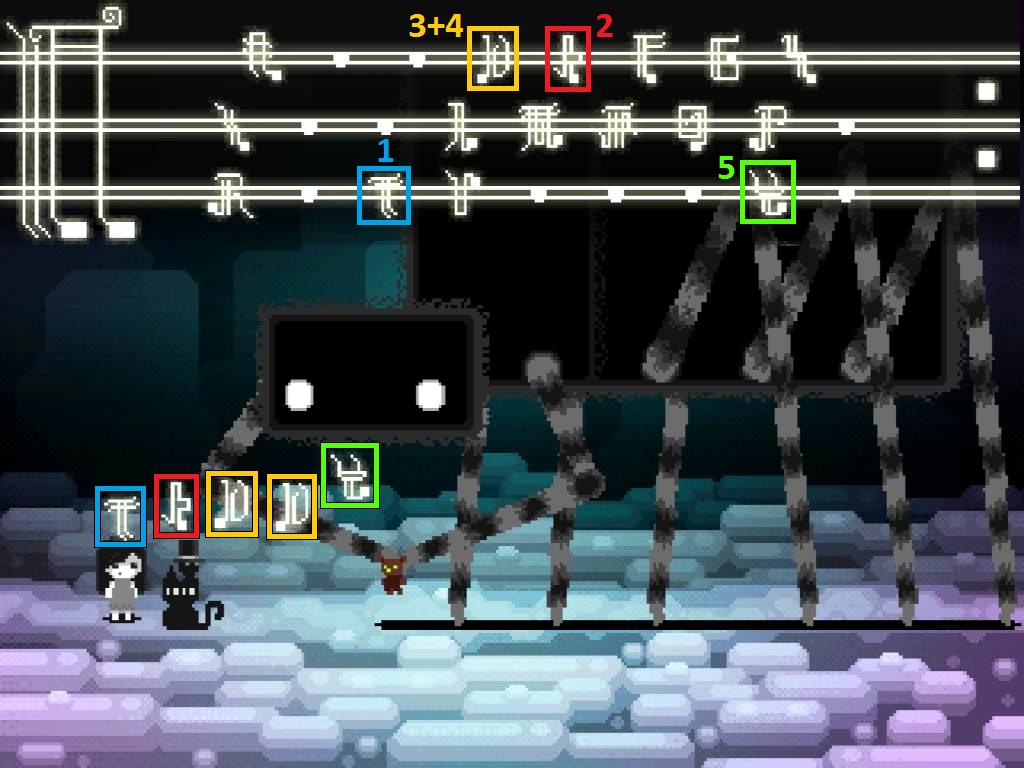
First, Tarant will introduce itself by saying "HELLO."
Respond to Tarant by repeating the notes to sing "HELLO."
Screenshot.
Next, Tarant will tell you "I AM SAD."
Tell Tarant to be "HAPPY."
Screenshot.
Then, Tarant explains that "I HAVE NO FRIEND."
Say that "I AM YOUR FRIEND."
Screenshot.
Lastly, Tarant will ask "WHAT DO YOU WANT?"
Ask him for your TEDDY.
Screenshot.
Epilogue
After the credits, your character will reappear inside her old bedroom.
Tap the wardrobe at the right side of the room to open it.
"HELLO." :)
Posted by: Trinn |
February 14, 2013 4:06 PM
|
February 14, 2013 4:06 PM