
Spirit Soup:
The Queensbury Curse
Platform: Windows
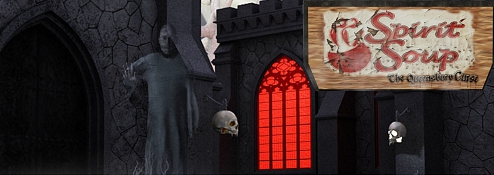
![]() It's been a long, strange year, hasn't it? First your great uncle passed away, then you had to move to the odd little town of Queensbury to help your grandmother run the family soup stall, then a curse hits the town and suddenly the only thing standing between the townsfolk and complete chaos is your great-uncle's magical spirit soup recipe. Wait, wha? Seriously, that's the premise behind newcomer Twilight Games' fabulously goofy new adventure, Spirit Soup: The Queensbury Curse. Yes, seriously.
It's been a long, strange year, hasn't it? First your great uncle passed away, then you had to move to the odd little town of Queensbury to help your grandmother run the family soup stall, then a curse hits the town and suddenly the only thing standing between the townsfolk and complete chaos is your great-uncle's magical spirit soup recipe. Wait, wha? Seriously, that's the premise behind newcomer Twilight Games' fabulously goofy new adventure, Spirit Soup: The Queensbury Curse. Yes, seriously.
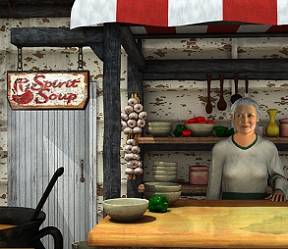 One morning on your way to help grandma at ye olde soupe stalle, the curse begins to manifest itself with strange formations opening in the earth and even stranger spiked trees popping up out of nowhere, slowly strangling the sunny medieval village of Queensbury and it is up to you (and grandma) to find the recipe, suss out the ingredients, solve a few puzzles, maybe get arrested, and (hopefully) eventually save the town from the malificence that is overwhelming it. You know, the basic adventure staples that include an ungrateful dude whose cart keeps breaking down, a slimy merchant who pays non-union wage, an absentee Queen, and her efficient (and officious) guards. As you do.
Spirit Soup: The Queensbury Curse may be billed as a hidden object hybrid but it really isn't. What it is, fantastically so, is a pure point-and-click adventure game with maybe three tiny hidden object elements in the entire story. Spirit Soup hearkens back to the classic adventure days of yore and involves a lot of wandering around using only the click of a mouse to navigate, pick up objects, and solve puzzles and problems along the way. Included within this wacky story are the usual suspects: a changing cursor to indicate areas of interest, a map to keep track of where you've been, a journal to keep track of your keen observations, a scrolling inventory of odd items to be used at a later point, and a rapidly refilling hint timer to help you along the way. All you have to do is solve a lot of puzzles and problems to help this poor town in distress. Or, you know, leave them to their fate.
 Analysis: Spirit Soup: The Queensbury Curse is over-the-top, goofy, cheesy, adventurey fun of a type not seen for many, many years, hearkening back to the days of such amusements as Monkey Island and the like, a breath of fresh air in a market increasingly crowded by dark, dank, angsty adventure hybrids. You've gotta love a game where despite the curse the townsfolk go about their everyday business, gouging you for free labor, free repairs, and tossing you in the can for picking berries where you shouldn't.
The graphics are sharp, clear, cartoony 3D of the Pixar school, with appropriate, vaguely Elizabethan era music to back up the adventure. The atmosphere is relentlessly bright and sunny despite the urgency of the curse, and the characters you meet along the way are all amusing and so self-absorbed that most don't even seem to know that a deadly curse is destroying the town around them. The puzzles are a bit of a mixed bag, ranging from amazingly simple to complex, and most of them variations on the standards like pipe puzzles and the like. The few (very few) hidden object elements are so fleeting you might almost miss them in the rush to rescue the townsfolk from a doom that doesn't seem to bother them overtly, which is just part of the fun.
 Amazing fun though it is, Spirit Soup: The Queensbury Curse contains a few flaws. Some of the puzzles are almost excruciatingly easy, the hint timer, despite its quick filling time, is of very limited help in some areas, there are a few minor glitches with clickable areas, and the gameplay is rather...well, short, especially if you are not a novice to adventuring. For those who've got more than one quest under their belts we're talking maybe two to three hours playing time, which is pretty short even for these days of incredibly shrinking gameplay.
On the plus side the wacky characters and situations are quite fun, along with the whole premise of the story. How often do you get a chance to play a game where a tasty soup saves the day? Not too often, these days. There are also some extra puzzles of certain varieties that unlock after you've passed a similar type in the game, giving a little extra bang for the buck when the adventure is over. Frankly it's worth it just for the joy of playing a game that doesn't take itself too seriously, opening the way for the amusements of the town of Queensbury and its strange, strange inhabitants.
Can you make a delicious batch of soup to soothe the tortured souls of the curse? Will that dude with the broken down cart (that keeps breaking down) ever get out of your way? Does the Queen really give life sentences for picking berries? Will the stall-holder ever pay minimum wage? Oh, yeah, and will the curse get lifted in time to save the town? Spirit Soup: The Queensbury Curse is worth playing just to find out.
![]() Windows:
Windows:
Download the demo
Get the full version
![]() Mac OS X:
Mac OS X:
Not available.
Try Boot Camp or Parallels or CrossOver Games.


Walkthrough Guide
(Please allow page to fully load for spoiler tags to be functional.)
Spirit Soup: The Queensbury Curse Walkthrough
Chapter 1 - Home
Bedroom
Take the Jewelry Box Key on the ground in front of the bed.
Click the jewelry box on top of the small table to zoom in.
Use the Jewelry Box Key from your inventory on the keyhole of the box and take the Gear inside.
Click the bottom of the trunk to zoom in and take Fly (1/3).
Go downstairs to the foyer.
Foyer
Take the Wizardwerks Matches on the table between the candles.
Click the note on the table to add it to your Journal.
Click the bottom of the stairs to zoom in and take the Fly (2/3) and the Nail (1/3).
Go through the left doorway to the storeoom.
Storeroom
Use the Wizardwerks Matches from your inventory on the candle on top of the cupboard to light the room.
Take the Knob on top of the picture frame.
Take the Hammer on the right side of the lower shelf on the wall.
Click the top of the pumpkin to zoom in and take the Fly (3/3).
Use the Hammer to remove the Nail (2/3) from the barrel next to the pumpkin.
Go back to the bedroom.
Bedroom
Use the knob on the hole in the cupboard to the right of the bed.
Click the drawer to look inside and take the Hammer and the Screwdriver.
Click the carnivorous plant above the cupboard for a closer look./li>
Give the Flies to the mercury flysnapper, then take the Magic Revealing Ink.
Return to the storeroom.
Storeroom
Click the handle of the cupboard to zoom in.
Use the Screwdriver from your inventory to remove the two screws from the top and bottom of the handle.
Click the plate to remove it.
Place the Gear inside the mechanism, then click the handle to open the door.
Take the Pruning Shears from the bottom shelf of the cupboard.
Go back to the foyer, then out the front door to the home outside.
Home Outside
Use the Pruning Shears from your inventory on the vines growing over the fence.
Click the fence post to zoom in and click the paper stuck to the post to add the note to your Journal.
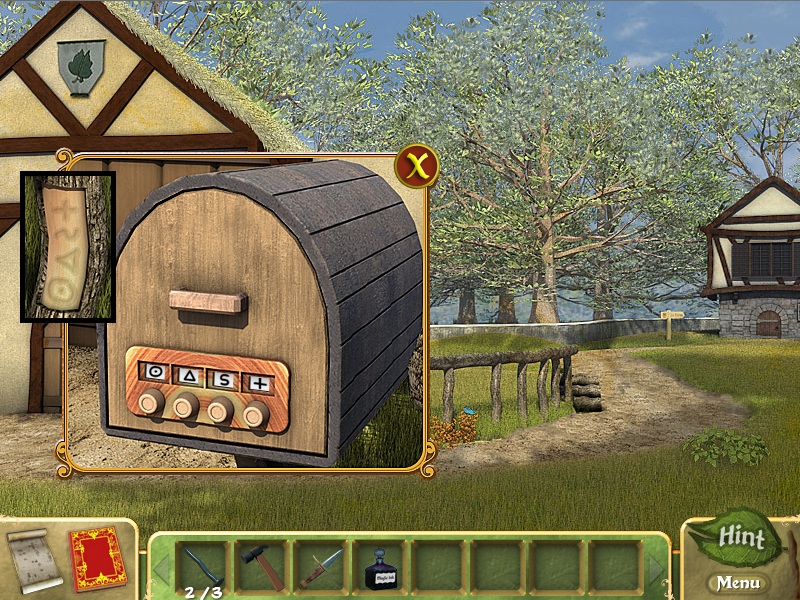
Click the mailbox to zoom in.
Enter in the symbols found on the fence post to open the mailbox.
Screenshot.
Once the lock is opened, click the mailbox door to open.
Use the Hammer on the Nail (3/3) inside the mailbox.
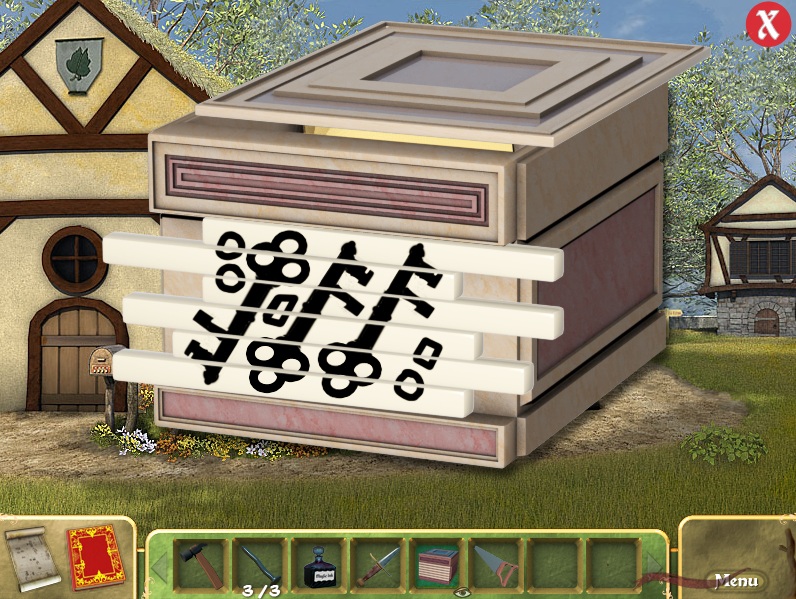
Click the rolled up note to add it to the Journal and take the Puzzle Box.
Click the Puzzle Box in your inventory to start the puzzle.
To solve this puzzle, align the tiles to complete the images of the keys.
Click and hold a tile to select it, then drag it left and right to slide it horizontally.
Starting from the top, moving Tile 1 also moves Tile 5.
Moving Tile 2 also moves Tile 1.
Moving Tile 3 also moves Tile 6.
Moving Tile 4 also moves Tile 2.
Moving Tile 5 also moves Tile 6.
Moving Tile 6 also moves Tile 2.
Solution.
Once the puzzle is solved, click the top of the box to open it and take the Letter for Temple inside.
Click the Letter for Temple in your inventory for a closer look.
Use the Magic Revealing Ink on the paper to start the puzzle.
To solve this puzzle, arrange the squares to complete the image.
Click one square to select it, then click a different square to switch their positions.
Click one square twice to rotate the image in the square.
Solution.
Once the puzzle is solved, you will reveal the message on the Letter for Temple.
Click the pile of logs at the right end of the fence to zoom in and take the Saw.
Go down the right path to the town.
Chapter 2 - In Town
Town
Click the man behind the broken cart to speak with him.
Give the man the Nails, Hammer, and Saw from your inventory.
Take the right path to the temple field, then go forward to the Temple of Light.
Temple of Light
Click the pile of rocks and bones on the ground.
Speak with Father Merhiew, then give him the Letter for Temple from your inventory.
Talk to Father Merhiew again to receive the Dog Cookie.
Go back to the temple field.
Temple Field
Give the Dog Cookie from your inventory to the black dog in front of the tree.
Go right to the market street and then forward to the soup stand.
Soup Stand
Speak with Grandma to receive the Soup Stand Key and the List of Items for Shop.
Use the Soup Stand Key from your inventory on the locked grey door behind the stand.
Go through the open door to the back room.
Back Room
Take the Oil Can on the top shelf between the candles.
Take the Broom leaning against the counter.
Click the cork at the bottom of the right drum to take the Stopper and release the water.
Take the Water Pail on the ground beside the torn sack of grain.
Use the Broom on the pile of grain on the floor to reveal the Smooth Cube (1/6).
Use the Oil Can on the rusted water pump.
Use the Water Pail on the oiled water pump to receive a Full Water Pail.
Use the Stopper on the hole at the bottom of the left drum.
Pour the Full Water Pail into the left drum.
Fill the Water Pail with water again from the pump, then pour it again into the left drum.
Take the Smooth Cube (2/6) that floats to the top of the drum.
Use the Dagger on the stained part of the wallpaper on the left wall to reveal the Smooth Cube (3/6).
Use the Hammer on the blue crock pot on the right side of the bottom shelf to reveal the Smooth Cube (4/6).
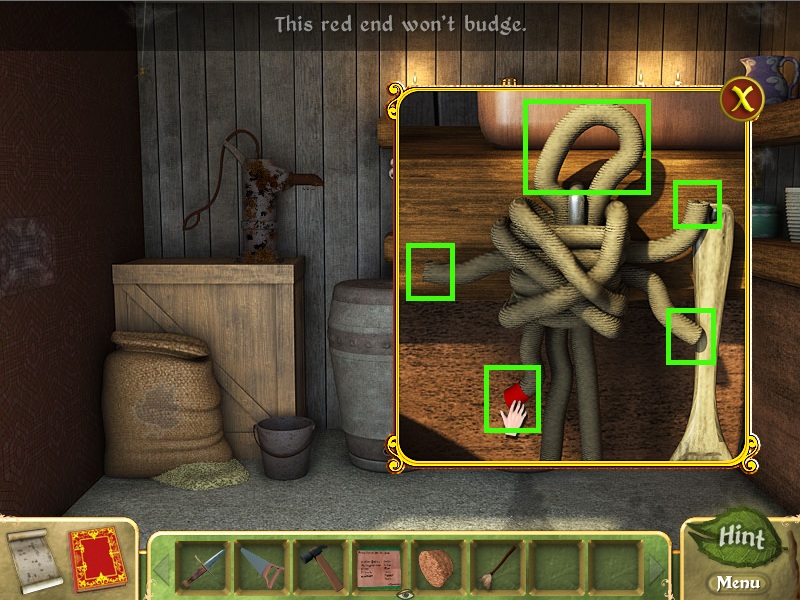
Click the knotted rope under the puzzle box to zoom in.
Click the loose ends of the rope sticking out of the knot and then the loop on the top to release the knot.
Screenshot.
Take the Skeleton Key that falls to the ground by the right drum.
Go back to the foyer in the home.
Foyer
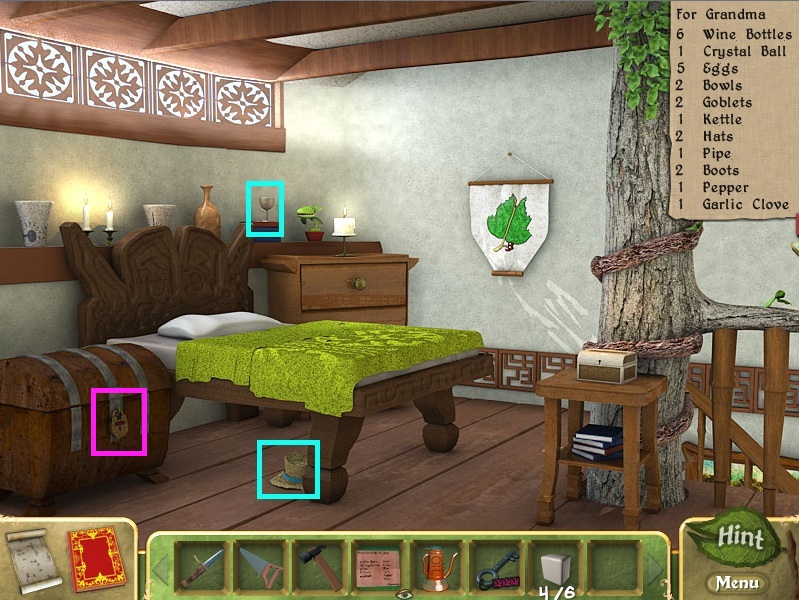
Take the Bowl (1/2) list item on the table.
Go up the stairs to the bedroom.
Bedroom
Take the Goblet (1/2) list item on the stack of books to the left of the carnivorous plant.
Take the Hat (1/2) list item underneath the bed.
Screenshot.
Click the large chest to zoom in.
Use the Skeleton Key from your inventory on the padlock.
Click the opened chest to zoom in and take the Wine Bottle (1/6) list item.
Use the Knife on the carved panel at the back of the chest to reveal the secret compartment with the Smooth Cube (5/6) and the note from Ezekiel Spirit.
Return to the storeroom.
Storeroom
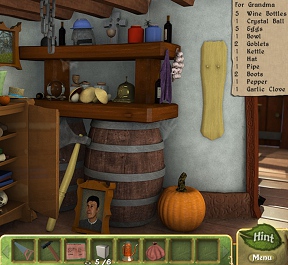
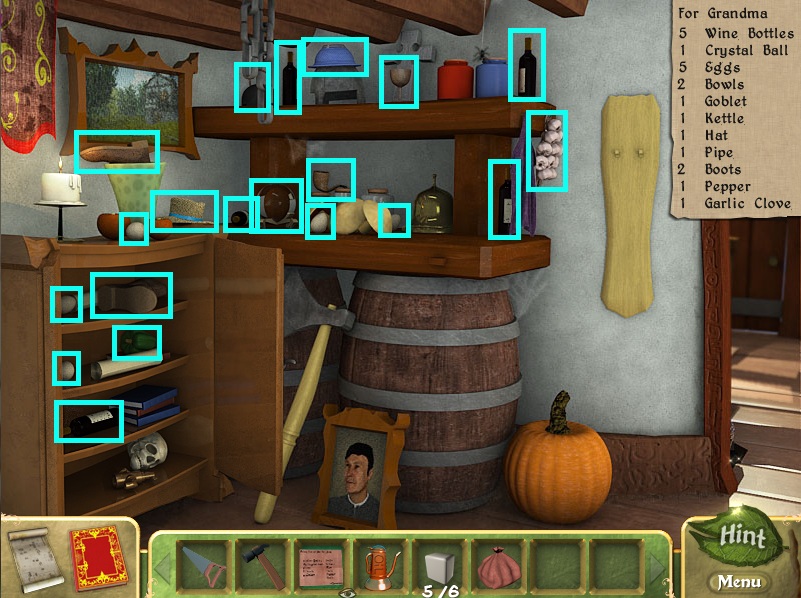
Take the Wine Bottles (2/6) and (3/6), the Goblet (2/2), the Bowl (2/2), the Garlic Clove, and the Kettle on the top shelf.
Take the Wine Bottles (4/6) and (5/6), the Egg (1/5), the Pipe, and the Crystal Ball on the lower shelf.
Take the Hat (2/2), the Eggs (2/5) and (3/5), and the Boot (1/2) on top of the cupboard.
Take the Eggs (4/5) and (5/5), the Boot (2/2), and the Pepper inside the cupboard.
Screenshot.
Return to the soup stand.
Soup Stand
Give the Items for Grandma to Grandma, then speak with her to receive the Smooth Cube (6/6).
Go into the back room.
Back Room
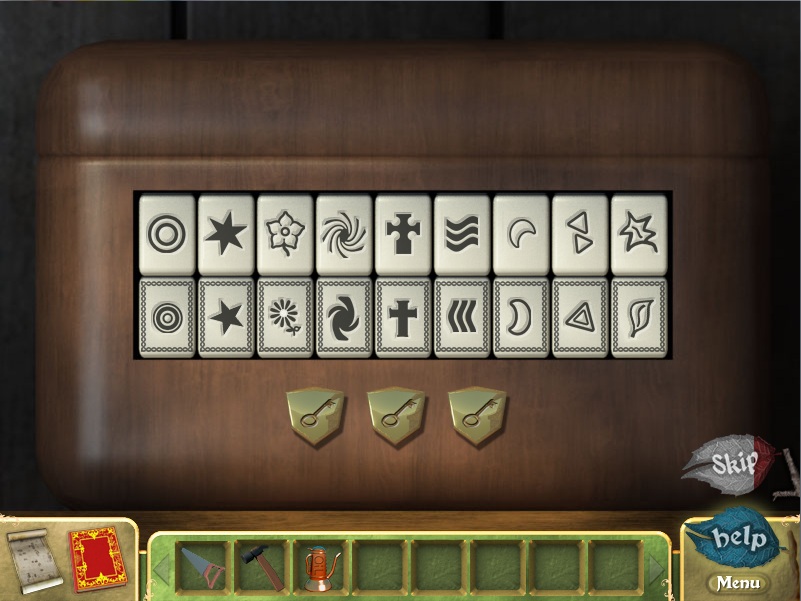
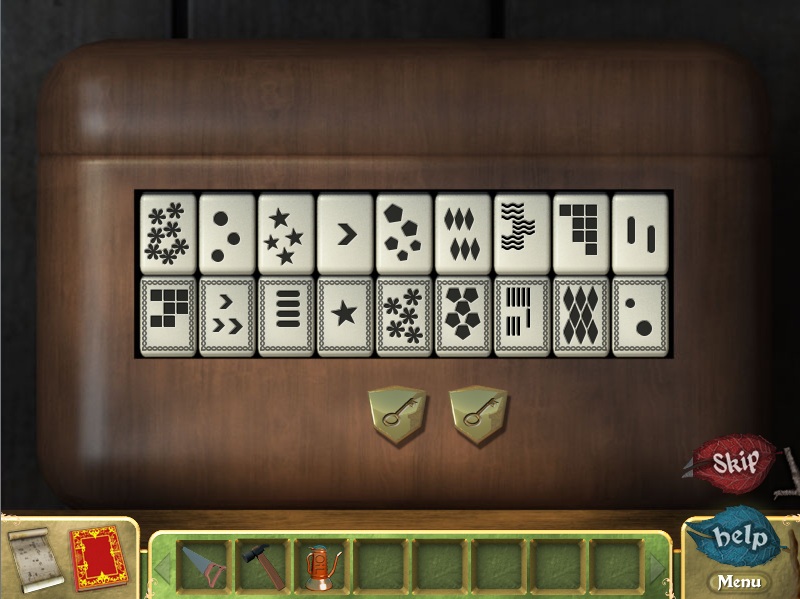
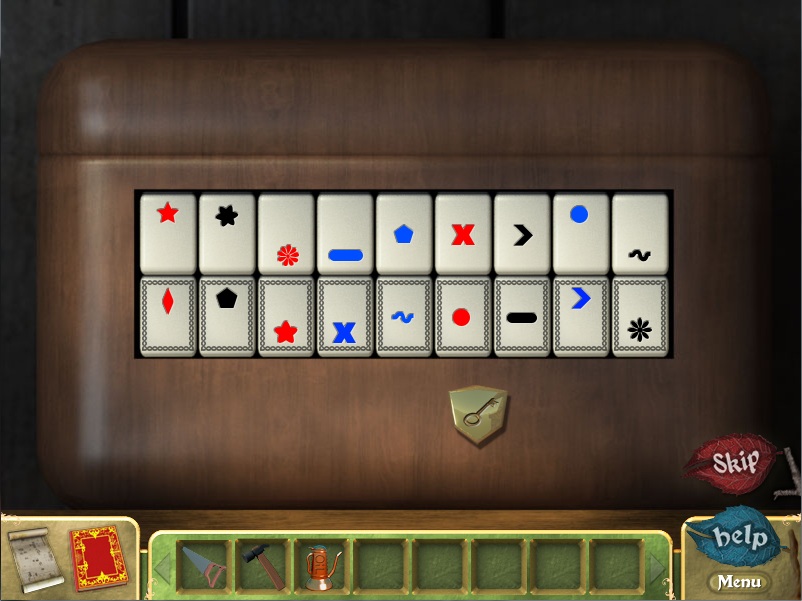
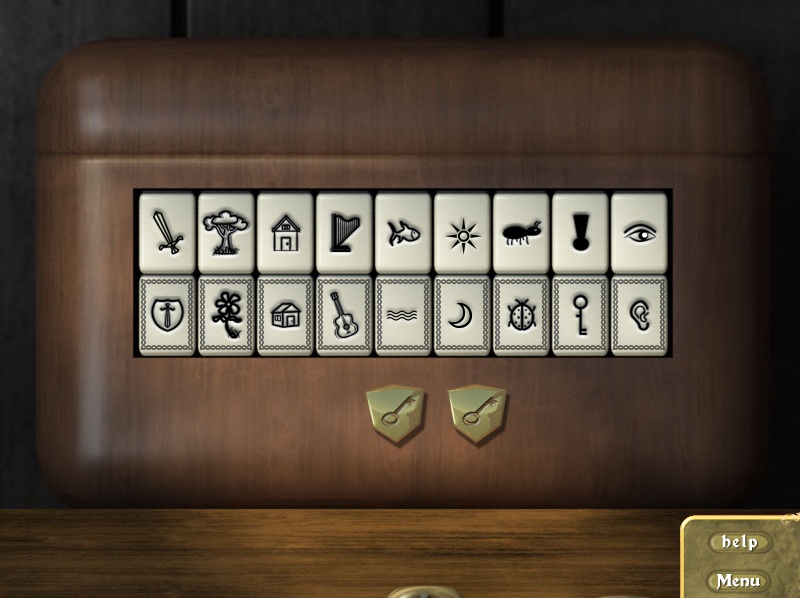
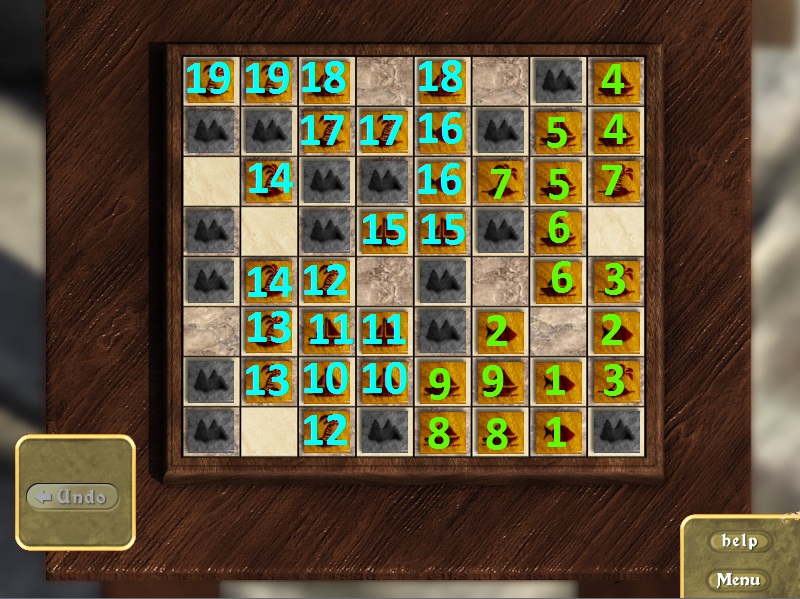
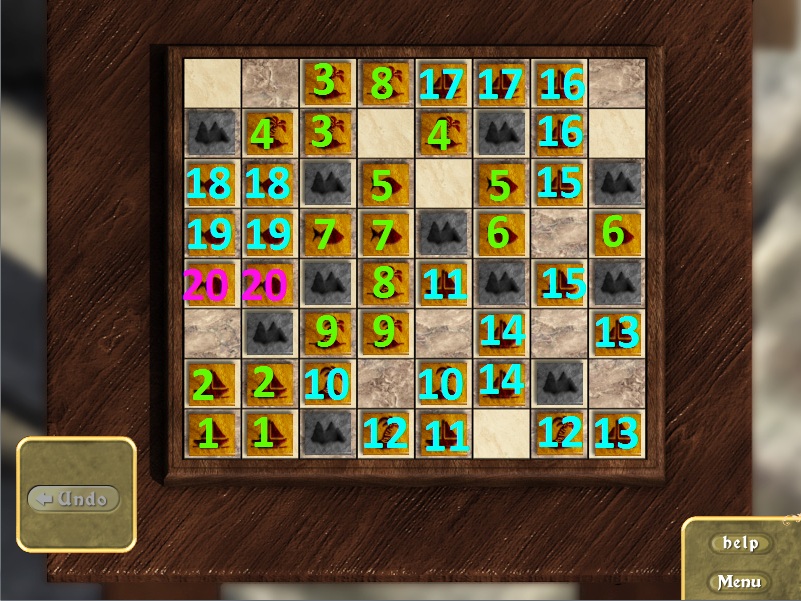
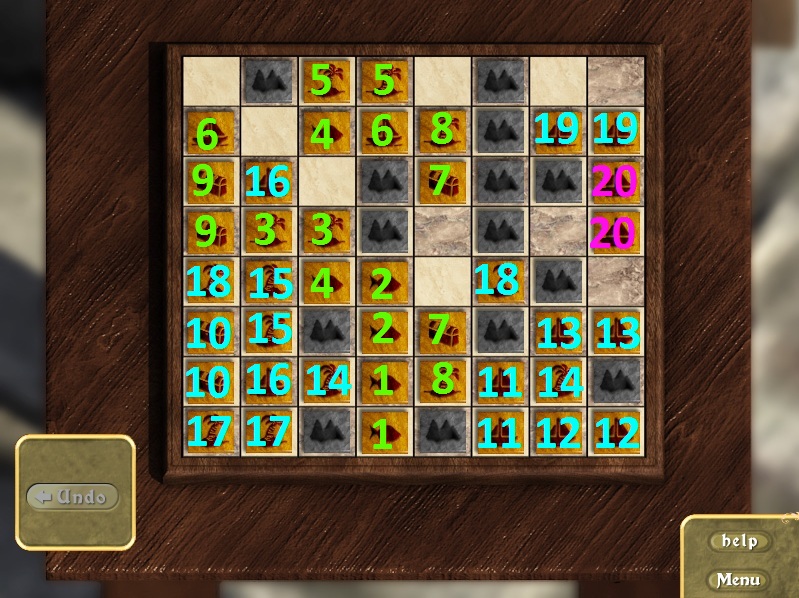
Use the Smooth Cubes from your inventory on the locked box at the lower shelf.
Click the box to start the puzzle.
To solve this puzzle, swap the tiles at the top to match the tiles at the bottom.
Click a tile to select it, then click a different tile to swap their positions.
After the tiles at the top row have been moved, the tiles at the bottom row will be briefly revealed.
If a tile's position in the top row is a match to the bottom tile, both will stay revealed.
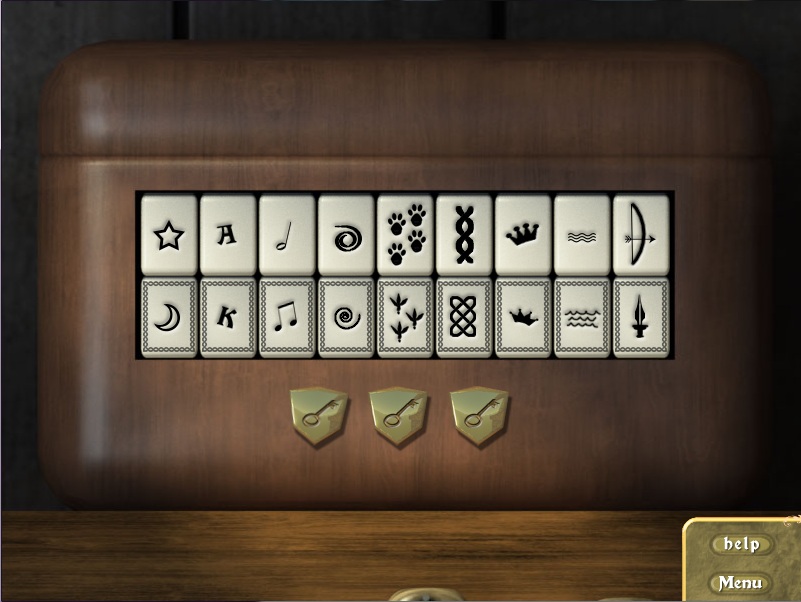
Once all of the tiles at the top row have been matched with their similar tiles at the bottom row, one of the three keys at the bottom will be removed.
Solution #1.
Solution #2.
Solution #3.
Once the puzzle is solved, the box will open, revealing the Recipe for Spirit Soup.
Go back outside to the soup stand.
Soup Stand
Give the Recipe for Spirit Soup from your inventory to Grandma.
Go back to the Marketplace, take the right road to Sunnyvale Street, then head north past the gate field to the town gate.
Town Gate
Click the small tree next to the cart on the right to zoom in.
Click the berries and then click the snake wrapped around the tree.
Go back to the marketplace and then left to Hassim's shop.
Hassim's Shop
Click Hassim to speak with him.
Go through the door behind the counter into Hassim's back room.
Hassim's Back Room
Click the window on the right wall to light up the room.
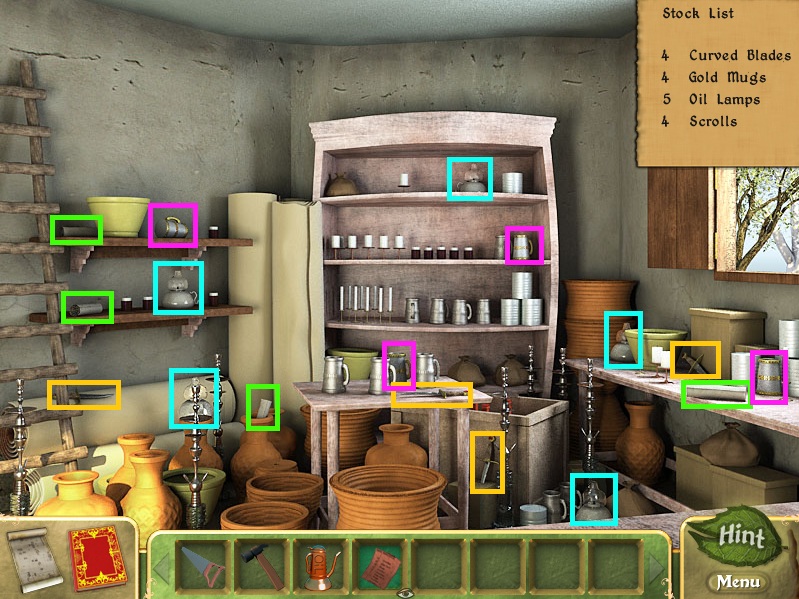
Take the labelled Stock List on top of the table in the center of the room.
Collect all the items around the room named on the stock list.
Screenshot.
Once you have completed the task, you will receive a bag of Hassim's Items.
Exit the room to return to Hassim's shop.
Hassim's Shop
Give Hassim's Items from your inventory to Hassim.
Speak with him to receive Queensbury Copper (1/2).
Go all the way back to town, then take the left road to the town fountain.
Town Fountain
Use the Oil Can from your inventory on the rusty hatch at the base of the fountain.
Click the hatch to open it, then click it again to start the puzzle.
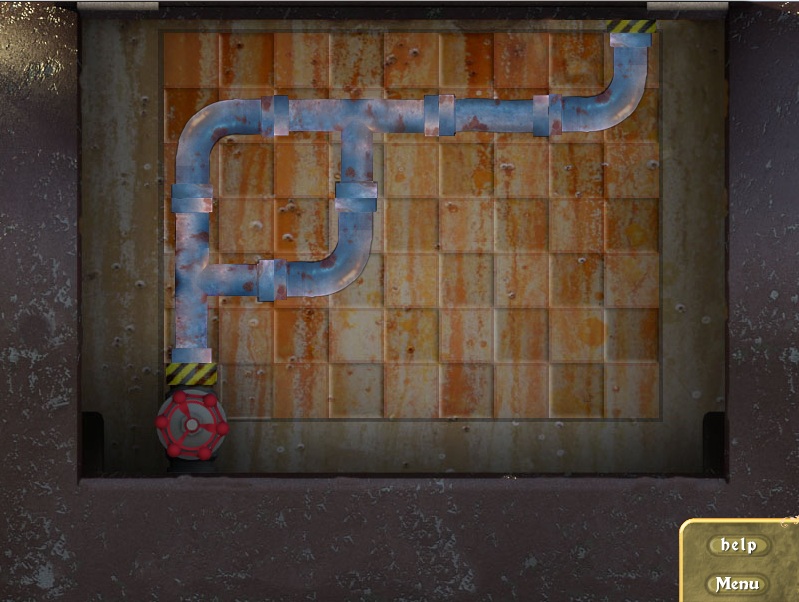
To solve this puzzle, connect the steam valve with the black and yellow stripes to the square tile at the top with black and yellow stripes, using all of the pipes on the board.
Click a pipe to select it, then click a position on the board to place it.
Pipes cannot intersect objects such as walls or other pipes.
There must be an uninterrupted flow through all the pipes, with no steam escaping, to complete the puzzle.
Solution.
Once the puzzle is solved, the fountain will be repaired.
Click the plaque on the fountain to zoom in and take the Queensbury Copper (2/2).
Go back to Hassim's Shop.
Hassim's Shop
Give the Queensbury Coppers from your inventory to Hassim.
Speak with Hassim to receive the Snake B' Gone.
Return to the town gate.
Town Gate
Click the small tree to zoom in.
Use the Snake B Gone from your inventory on the snake coiled around the branch.
Take the Queensberries from the tree.
Click the back arrow to attempt to leave, then speak with the guard.
Chapter 3 - Castle Dungeon
Jail Cell
Take the Old Drinking Cup on the ground beside the bucket.
Use the Old Drinking Cup on the bars of the prison cell door.
Speak with the guard to receive Moldy Bread.
Use the Moldy Bread on the rat hole at the bottom of the right wall.
Take the Piece of Metal that falls to the ground in front of the hole.
Click the front leg of the bed to zoom in.
Use the Piece of Metal on the screws at the base of the leg.
Click the bed to push it aside, then click it again for a closer look.
Use the Piece of Metal on the mortar surrounding the left brick to remove the three pieces of mortar: two on the left side, and one at the top.
Click the brick, then go through the revealed escape tunnel.
Tunnel
Use the Piece of Metal to remove the large spider web.
Go forward twice to the end of the tunnel.
Click the grate to remove it, then go forward to the corner of the corridor.
Corridor
Use the Old Drinking Cup from your inventory on the open doorway at the right wall to distract the guard.
Go left to the middle of the hallway.
Hallway
Take the Guard Key hanging from the wooden shelves on the left.
Go back to the corner of the corridor.
Corridor
Use the Guard Key from your inventory on the locked iron door to the left of the column.
Go through the open door to the evidence locker room.
Evidence Locker Room
Click the button device on the locker to start the puzzle.
To solve this puzzle, press the buttons in the correct order to open the lock.
Click a button to push it down; if pushed in the correct sequence, it will stay pressed.
If a button is pressed incorrectly, it will raise back up and all other buttons will also revert upright.
Solution.
Once the puzzle is solved, the locker will open.
Take the Handsaw, Hinge and Clasp Bracelet, Queensberries, and Hammer from the shelves.
Use the Hammer from your inventory on the loose nail at the left side of the board blocking the stacked crates to receive the Nail.
Click the top crate to move it aside.
Use the Hammer on the lid of the bottom crate.
Take the Watchman's Whiskey from inside the opened crate.
Click the tin on top of the desk to open it.
Use the Watchman's Whiskey on the tin of crackers.
Click the tin to receive a Whiskey Soaked Cracker, then give it to the bird.
Take the Dungeon Key hanging from the wall next to the bird.
Return to the hallway.
Hallway
Go down to the door in the center of the room for a closer look.
Use the Dungeon Key from your inventory on the iron door to unlock it.
Click the door to open it, then go forward to the gate.
Gate
Click the wheel to the right of the door to zoom in.
Turn the wheel until an additional loop on the chain is revealed.
Use the Hinge and Clasp Bracelet from your inventory on the very bottom loop of the hanging chain above the wheel.
Click the wheel to open the gate.
Go through the gate to the outer wall.
Wall
Click the vines on the wall to climb to the top.
Go forward on the left side of the screen to return to the gate field, then go all the way back to the soup stand.
Soup Stand
Give the Queensberries from your inventory to Grandma.
Go back to the Temple of Light.
Chapter 4 - Collecting Ingredients
Temple of Light
Speak with Father Merhiew to receive the Wizardwerks Matches.
Go back to the temple field.
Temple Field
Click the sword in the stone to the left of the road to zoom in.
Use the Watchman's Whiskey from your inventory on the small hole beside the sword.
Light the whiskey with the Wizardwerks Matches.
Click the Sword to add it to your inventory.
Note the three symbols engraved on the stone.
Go back to the storeroom inside the house.
Storeroom
Place the Sword from your inventory on the display plaque hanging on the wall.
Take the 2 Pronged Custom Tool from the secret compartment.
Read the notes at the top and bottom of the compartment, then to the town.
Town
Click the roadsign to zoom in.
Use the 2 Pronged Custom Tool from your inventory on the two tiny rectangular holes attached to the castle sign to receive the Triangular Piece of Wood.
Go to the market.
Market
Click the roadsign to zoom in.
Use the 2 Pronged Custom Tool from your inventory on the two tiny rectangular holes attached to the castle sign to receive the Rectangular Piece of Wood.
Go to Sunnyvale Street.
Sunnyvale Street
Click the roadsign to zoom in.
Use the 2 Pronged Custom Tool from your inventory on the two tiny rectangular holes attached to the castle sign to receive the Moon Shaped Piece of Wood.
Go back to the temple field.
Temple Field
Click the large stone in the field to zoom in.
Place the three Pieces of Wood from your inventory into their similarly shaped carvings on the stone.
Take the Broken Stone Bits from the revealed secret compartment.
Return to the Temple of Light.
Chapter 5 - Temple of Light
Temple of Light
Give the Broken Stone Bits from your inventory to Father Merhiew.
Speak with Father Merhiew to add the Traditional Candle Display note to your Journal.
Go through the temple door to the nave.
Nave
Take the Blue Church Candle (1/5) by the stack of books on the right tale.
Take the Blue Church Candle (2/5) by the stack of books on the left table.
Go forward to the altar.
Altar
Take the Blue Church Candle (3/5) and the Padded Cloth on top of the altar.
Go back to the town fountain.
Town Fountain
Use the Padded Cloth from your inventory on the water of the fountain to receive a Wet Cloth.
Go back to the temple nave, then go left to the west room.
West Room
Take the Blue Church Candle (4/5) in front of the vase on the front left stand.
Click the stained glass window on the right wall to zoom in.
Use the Wet Cloth from your inventory on the window to remove the grime.
Take the Blue Church Candle (5/5) on the bottom right corner of the window.
Click the top of the stone slab to zoom in.
Take the Small Blue Octagonal Stone from the red circle.
Click the drain of the structure for a closer look.
Use the Blue Octagonal Stone on the socket of the drain.
Go back to the nave, then right to the east room.
East Room
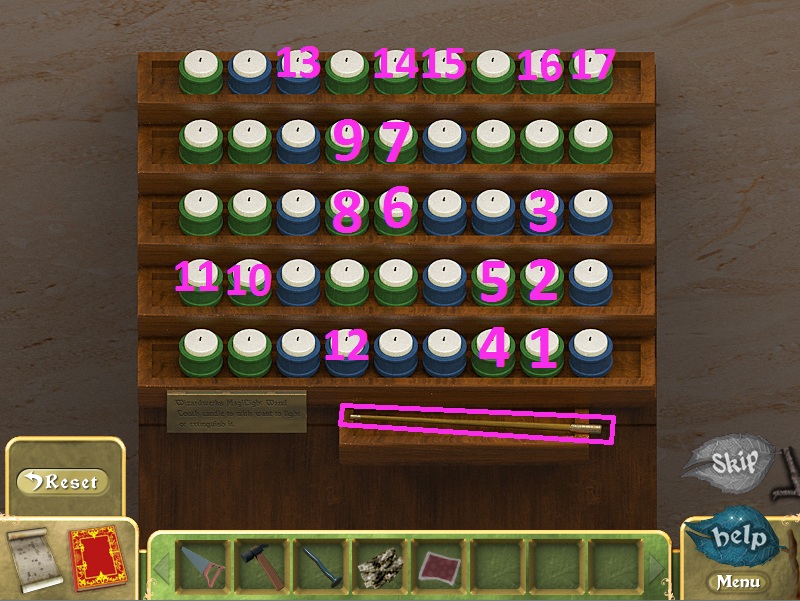
Click the candle stand on the left side of the room to zoom in.
Add the 5 Blue Church Candles from your inventory to the stand to start the puzzle.
To solve this puzzle, light all of the blue candles and none of the green candles.
Click the wand to pick it up, then click a candle to light it.
Lighting one candle will also light both adjacent candles on the left and right side.
Solution.
Once the puzzle is solved, the spirit will be banished.
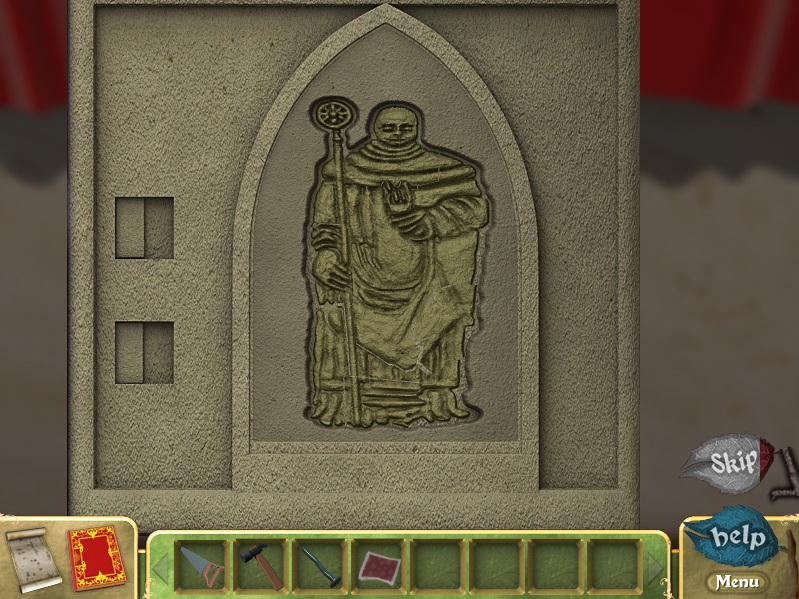
Click the pedestal in front of the red curtain to zoom in.
Add the Broken Stone Bits from your inventory to the carving on the pedestal to start the puzzle.
To solve the first part of this puzzle, arrange all the stone bits to complete the image of the relief.
Click a piece to select it, then drag it to a position on the relief to set it in place.
If a piece is correctly positioned, it will lock in place.
Use the stained glass image noted in your Journal as a reference for the complete image.
Solution Part 1.
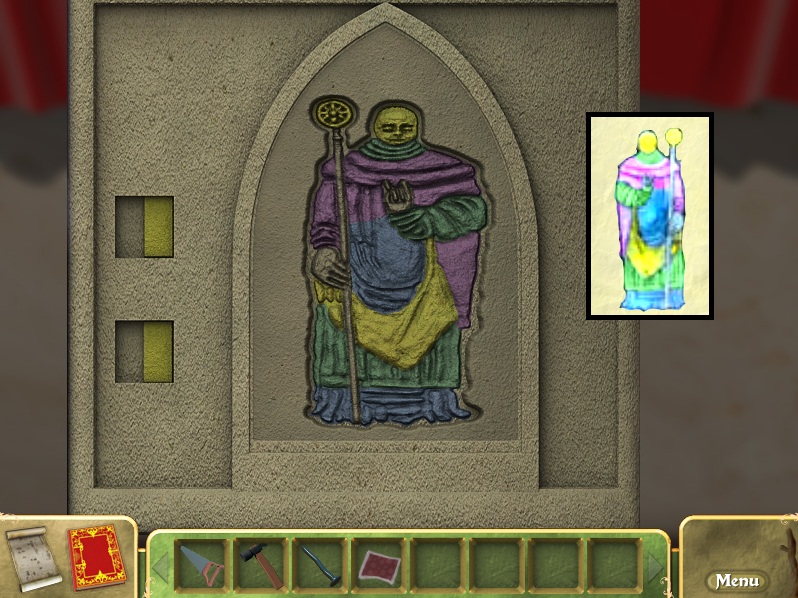
To solve the next part, color the relief to match the color order of the image on the stained glass window.
Click a section to cycle through the colors of that section.
Solution Part 2.
Click the revealed cache at the bottom of the pedestal to zoom in and take the Magic Soup Ingredient (1/2) and the Small Red Octagonal Jewel.
Go back to the west room.
West Room
Click the top of the stone slab to zoom in.
Add the Small Red Octagonal Jewel from your inventory to the red circle at the top.
Press the button at the top left side of the slab to reveal the Magic Soup Ingredient (2/2) inside the opened secret compartment.
Go back to the soup stand.
Soup Stand
Give the two Magic Soup Ingredients from your inventory to Grandma.
Go to Sunnyvale Street, then go through the window of the building on the right to enter town hall.
Chapter 6 - The Final Ingredients
Town Hall
Take the Fancy Gear (1/4) under the rear left leg of the chair.
Click the desk to zooom in and take the Knob next to the stamp.
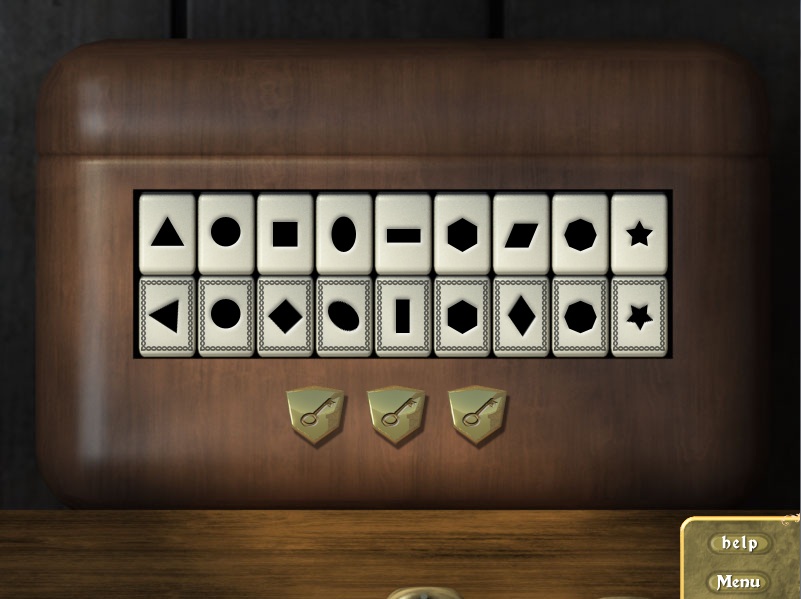
Click the right bookcase for a closer look.
Click the books on the top shelf to push them over, revealing the Fancy Gear (2/4).
Click the skull display case to zoom in and take the Fancy Gear (3/4) from the statue hand to the left of the case.
Click the Queensbury Royal Jewel display case on the left side of the room to zoom in.
Add the Knob from your inventory to the hole on the right side of the case.
Place the Nail in the center hole of the right knob.
Click both knobs to raise their latches, then click the golden center button to open the case.
Take the revealed Fancy Gear (4/4) inside the display case.
Click the wooden panel in the back of the desk to zoom in.
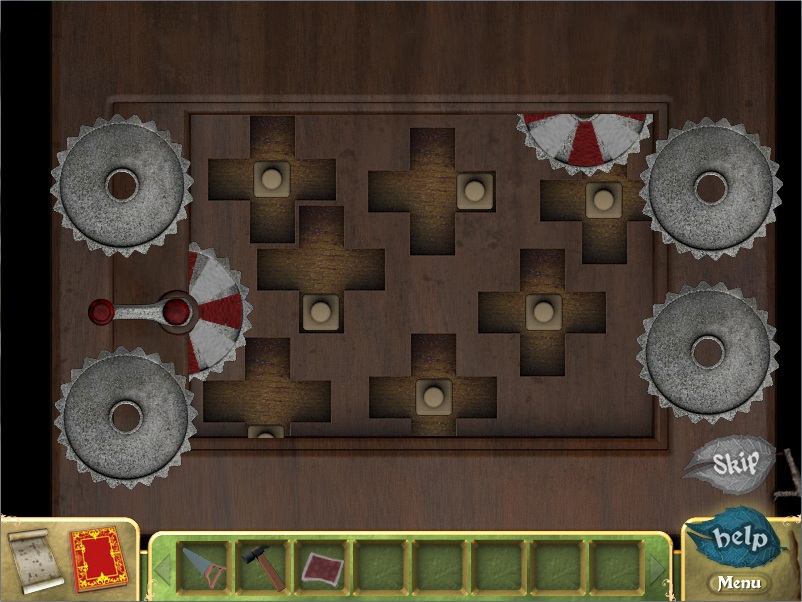
Place the four Fancy Gears from your inventory onto the board to start the puzzle.
To solve this puzzle, arrange the knobs in the crosses and the gears to connect a path between the two red striped gears.
Click a knob to select it, then drag it up, left, down, right, or center to set its position.
Place a gear on a knob to place it.
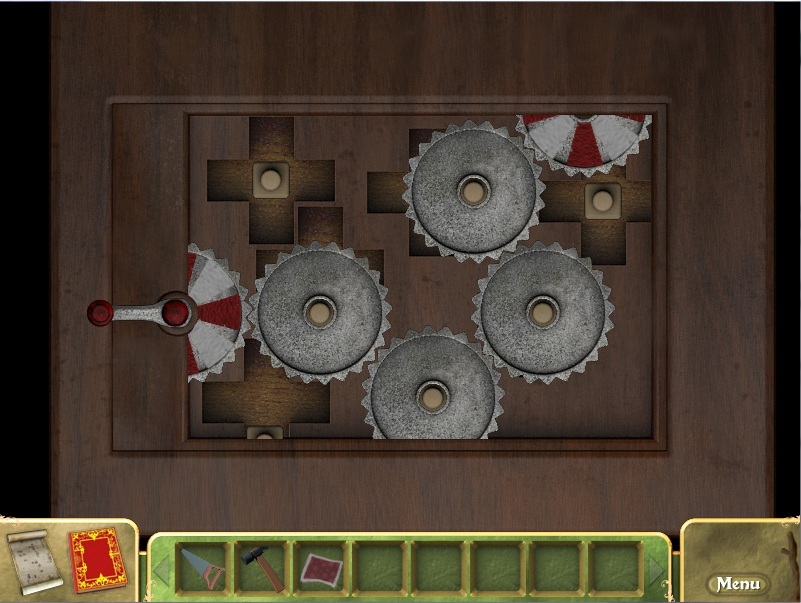
Solution Part 1.
Solution Part 2.
Once the puzzle is solved, the skull display case will open.
Click the display case to zoom in and take the Vampire Fang from the skull.
Go back to the soup stand.
Soup Stand
Give the Vampire Fang to Grandma.
Speak with her to get your new instructions, then go to Sunnyvale Street and take the right road to the castle gate.
Castle Gate
Speak with the man next to the broken cart.
Go back to Hassim's Shop.
Hassim's Shop
Click Hassim to speak with him.
Go into Hassim's back room.
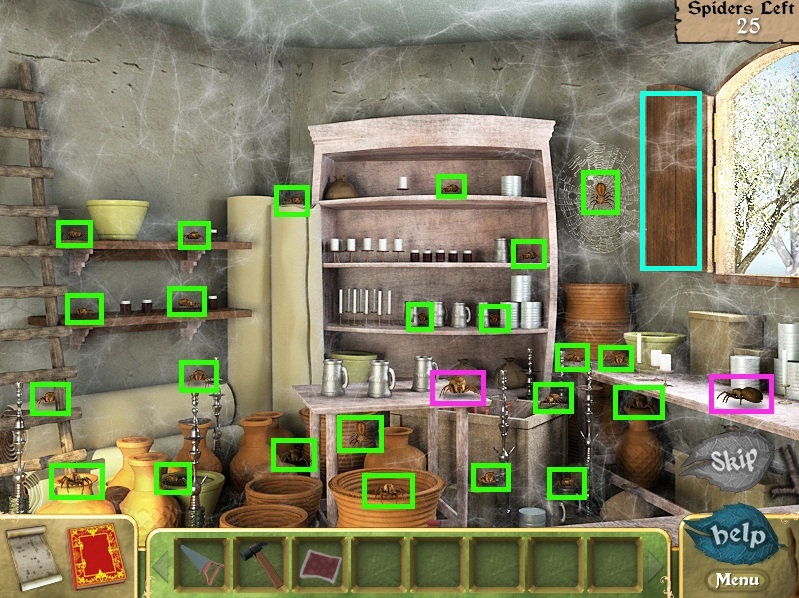
Hassim's Back Room
Use the Spider B Gone potion to spray all of the spiders around the room.
The two large spiders on the tables cannot be sprayed directly. To remove them, first click the next spot where they will move to spray the area for a couple seconds, then click the large spider to make them run into the cloud of spray.
Once all the spiders have been sprayed, click the window shutter to close it.
Screenshot.
Go back to Hassim's shop.
Hassim's Shop
Speak with Hassim to receive the MagiGlue.
Go back to the Castle Gate.
Castle Gate
Give the MagiGlue from your inventory to the man by the cart.
Go right to Lookout Hill and then down the road to the docks.
Docks
Click the man sitting at the table to speak with him.
Click the log to zoom in and take the Slimy Oyster Shell.
Put the Slimy Oyster Shell on top of the log, then place the Cloth from your inventory on top of the shell.
Smash the cloth-covered shell with the Hammer.
Click the smashed oyster to reveal the Pearl.
Give the Pearl to the man at the table.
Speak with the sailor to start the puzzle.
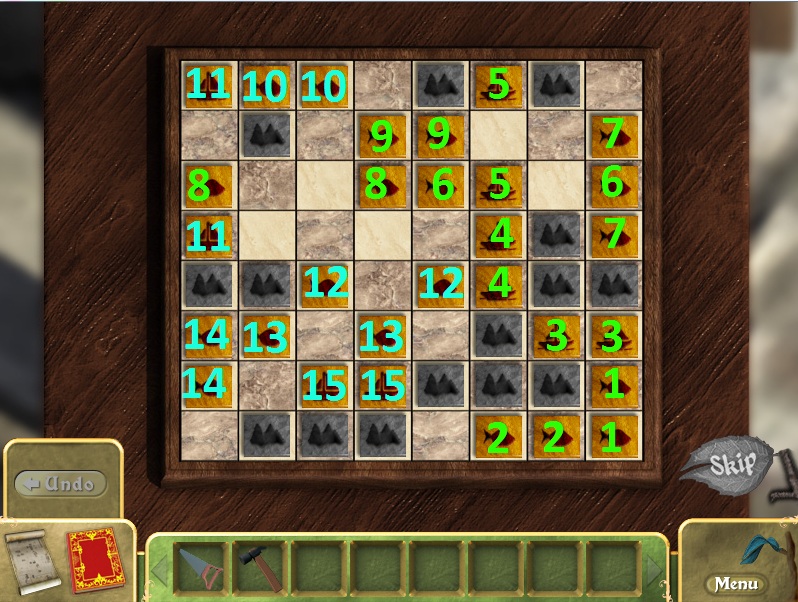
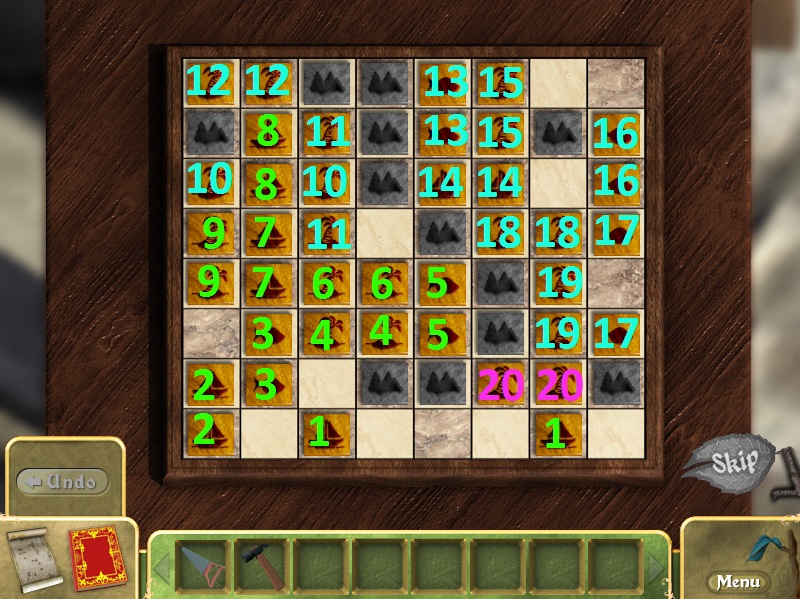
To solve this puzzle, remove all the tiles from the board except the grey tiles with the reef symbol.
Click a tile to select it, then click a matching tile to remove it from the board.
Tiles can only be paired if they are in the same row or column, and there are no tiles in between them.
Solution #1.
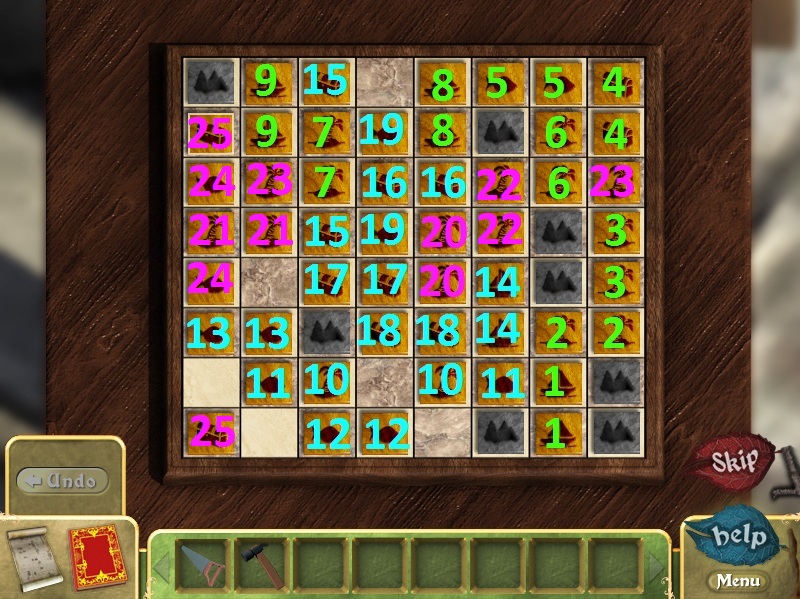
Speak with the sailor to repeat the puzzle at a higher difficulty.
As before, remove all the tiles from the board except the grey reef tiles.
Solution #2.
Speak witht he sailor again to repeat the puzzle for the third and final time.
As before, remove all the tiles from the board except the grey reef tiles.
Solution #3.
Speak witht he sailor for the final time to receive the Kraken Skin Amulet.
Go back to the soup stand.
Soup Stand
Give the Kraken Skin Amulet from your inventory to Grandma.
Speak with her to receive the Dead Flower Seeds.
Take the Queensbury Copper from the tip jar on the counter.
Go back to Hassim's shop.
Hassim's Shop
Click Hassim to speak with him.
Give Hassim the Queensbury Copper from your inventory to receive the MagiGrow Pellets.
Return to the gate field.
Gate Field
Use the Dead Flower Seeds from your inventory on guard Mike's grave to the right of the road.
Add the MagiGrow Pellets to the seeds in the grave.
Take the Levinsoma Flower that grows from the grave.
Go back to the soup stand.
Soup Stand
Give the Levinsoma Flower from your inventory to Grandma.
Place the Levinsoma Flower inside the large bowl of green liquid.
Take the Flask of Spirit Soup from the counter top.
Go back to the Temple of Light.
Chapter 7 - Breaking the Curse
Temple of Light
Click the Flask of Spirit Soup from your inventory for a closer look.
Click the flask again to drink.
Click the dead vines to the right of the door to zoom in.
Use the Saw to cut through the vines, revealing the Small Disc (1/2).
Click the unlit skull on the left wall to zoom in.
Break the skull with the hammer to reveal the Small Disc (2/2).
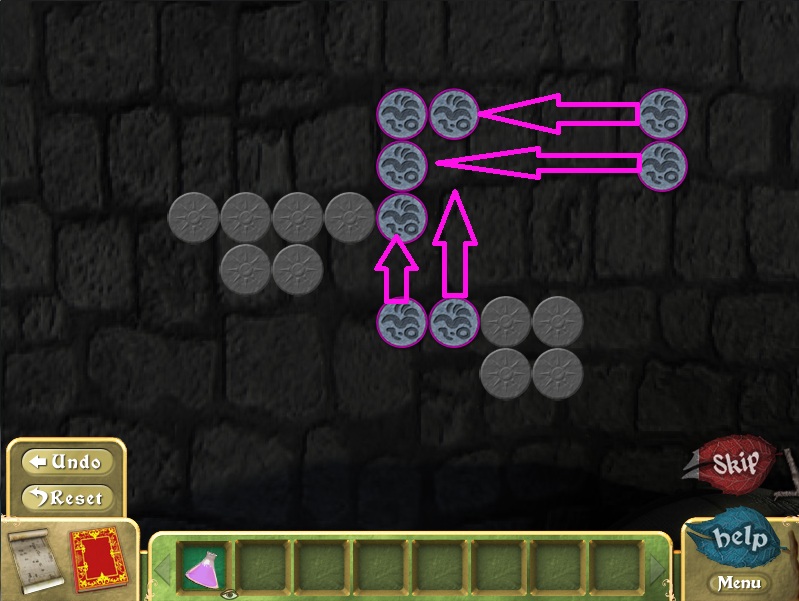
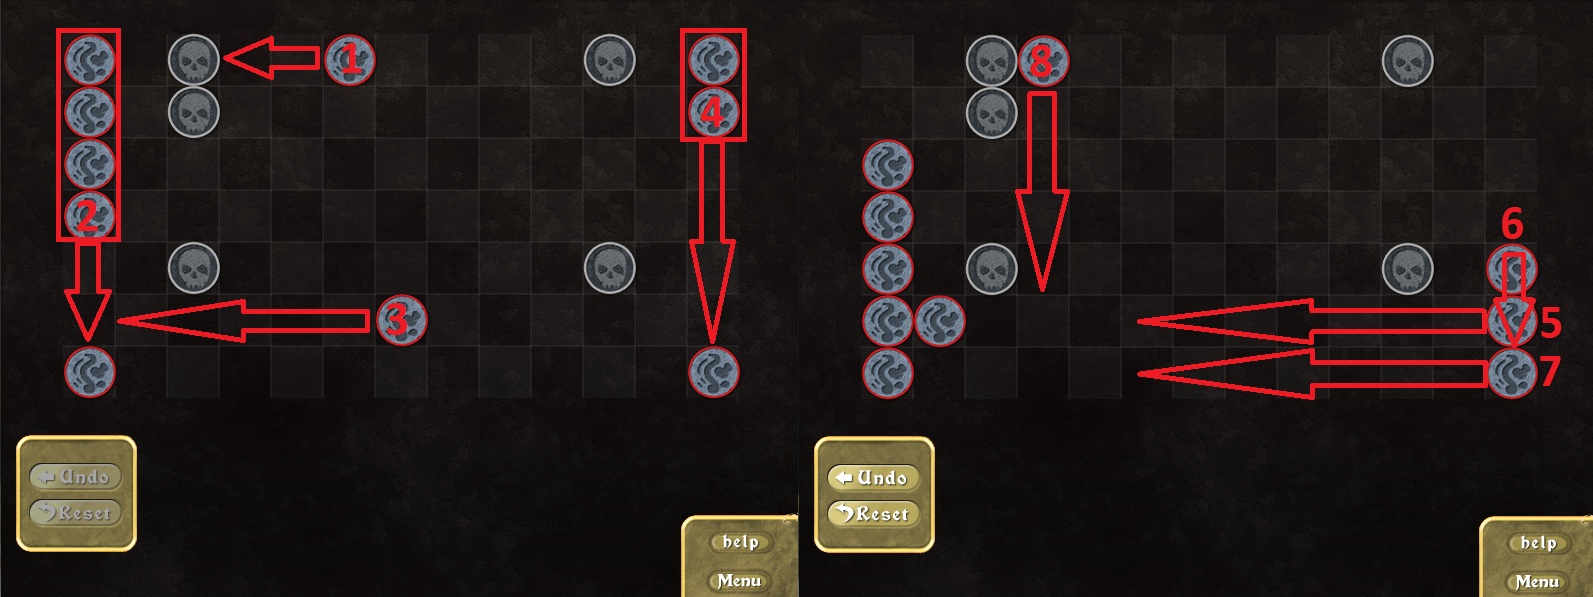
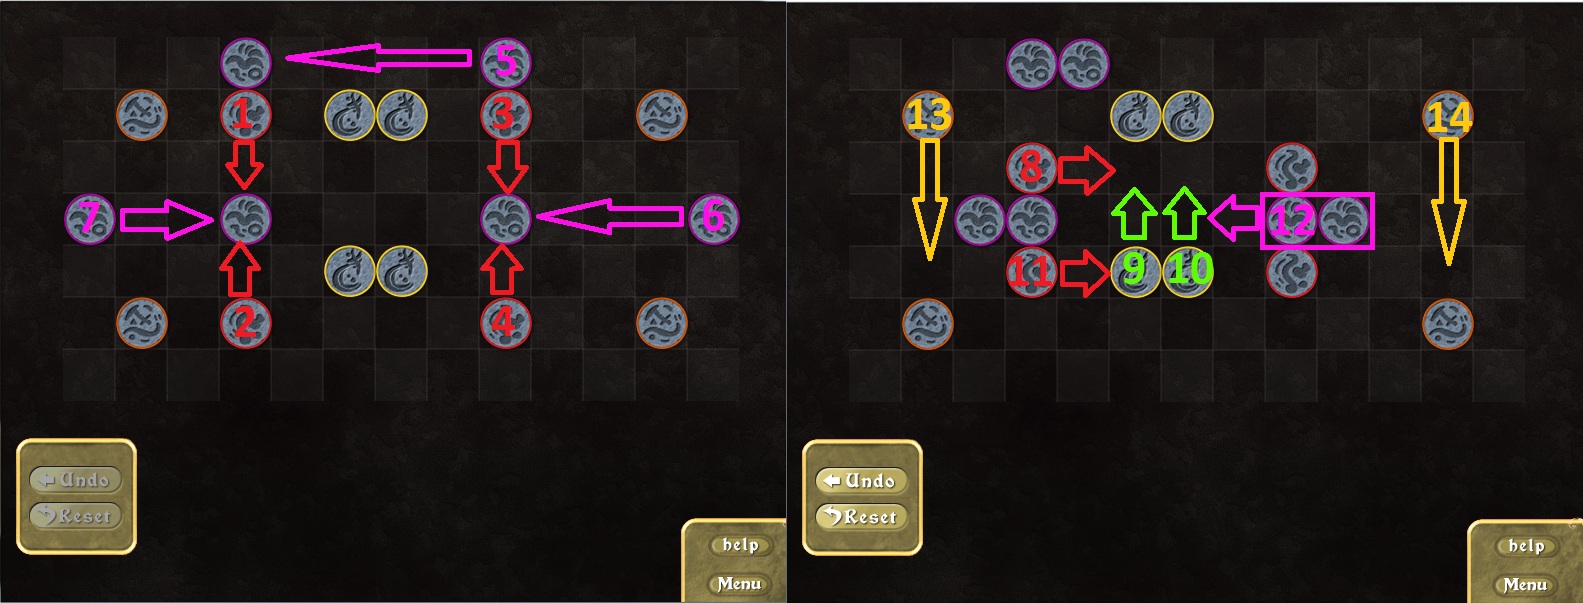
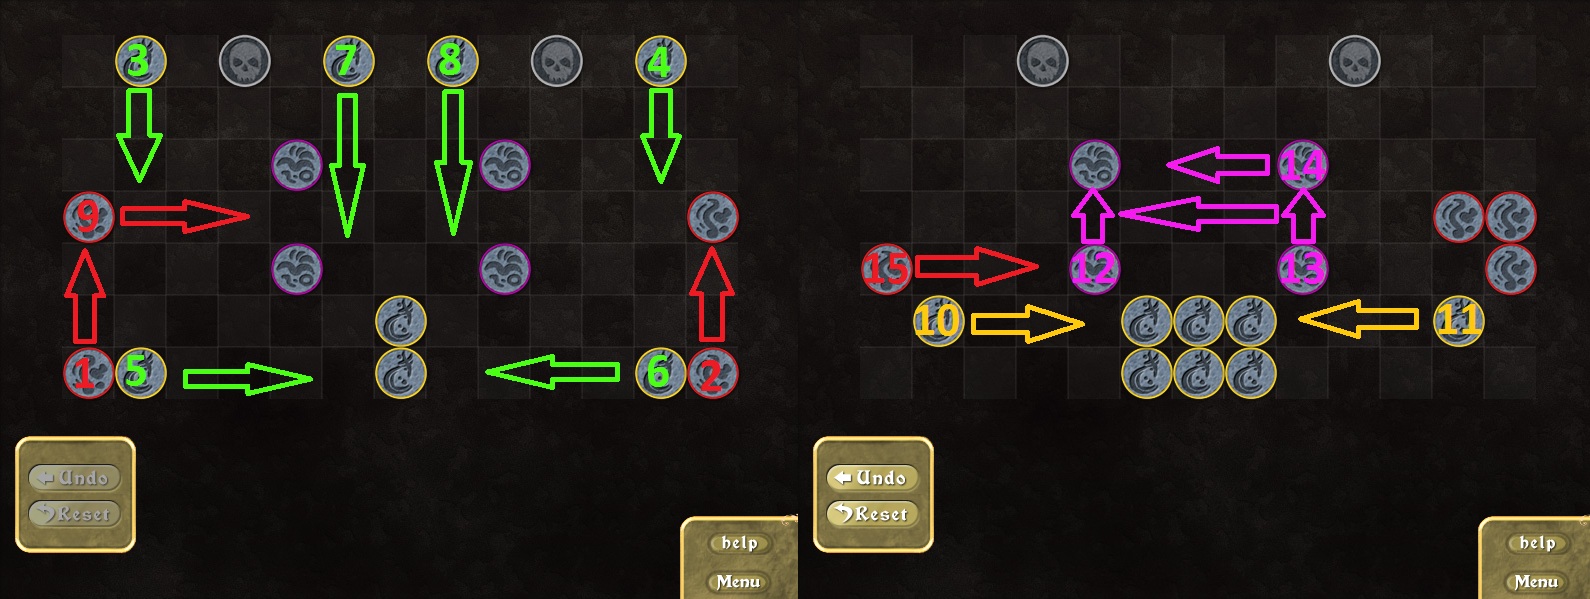
Click the summoning circle on the ground for a closer look.
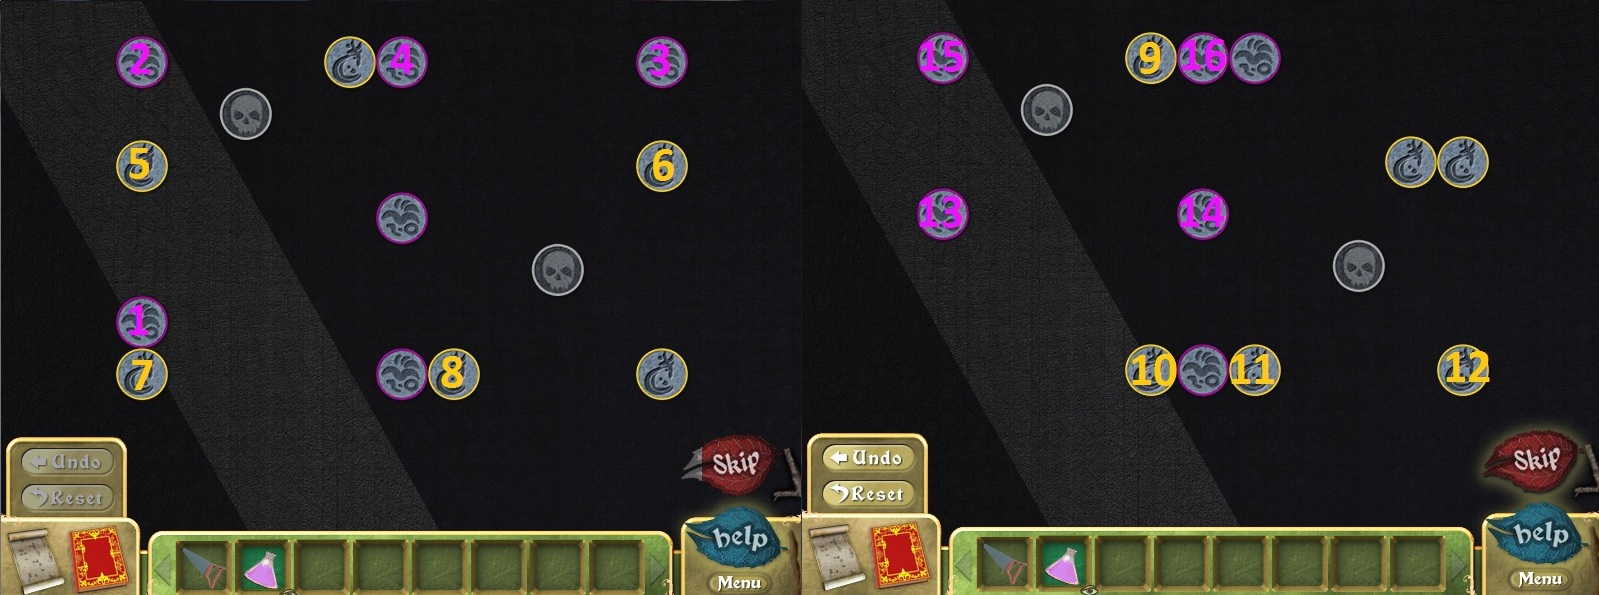
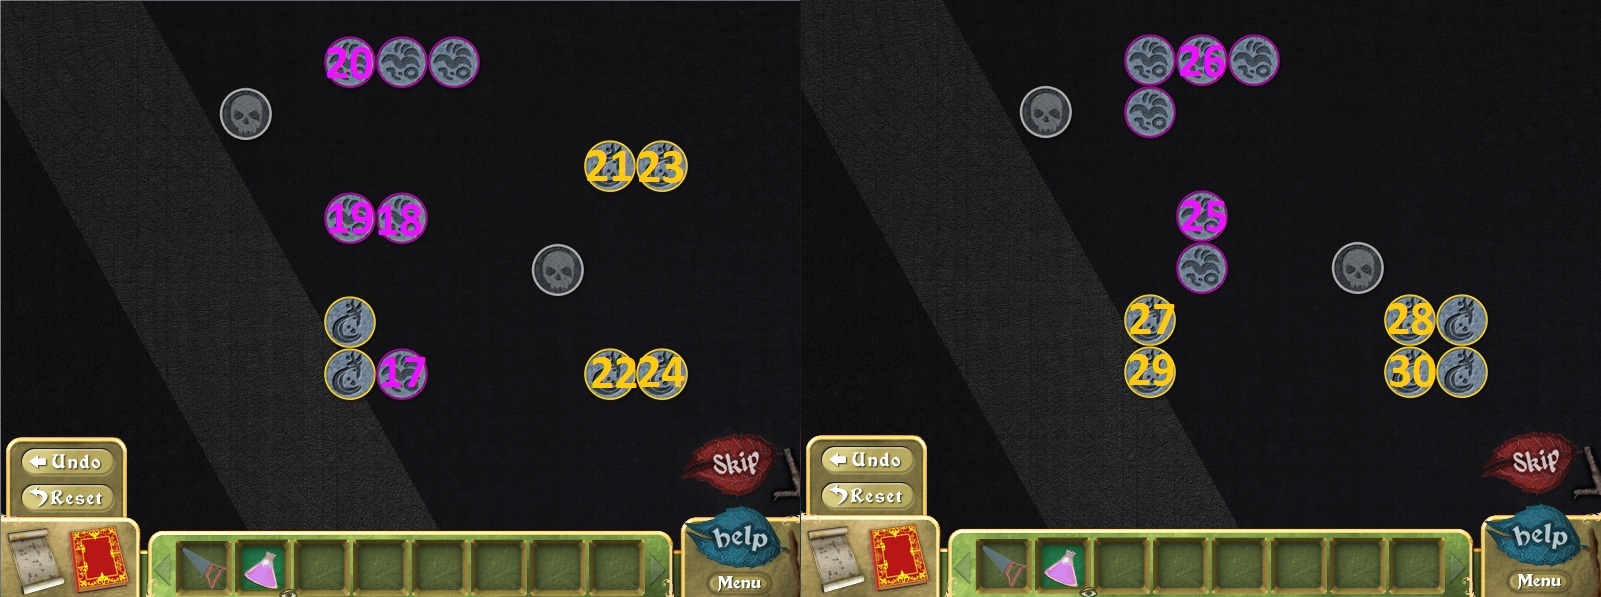
Add the 2 Small Discs from your inventory to the circle to start the puzzle.
To solve this puzzle, group all the similarly colored/shaped discs together by connecting lines between them.
Click a disc to select it, then click a matching disc to draw a line between them, pulling the first disc next to the second.
You can pull two tiles towards each other even if a different colored disc is in the middle; however, they cannot pass through or over the different disc.
Skull tiles cannot be moved.
Click the undo button to undo your last move.
Click the reset button or right click the board to reset the puzzle.
Solution Part 1.
Solution Part 2.
Click the Flask of Spirit Soup in your inventory twice to return to the real world.
Go to Sunnyvale Street.
Sunnyvale Street
Click the Flask of Spirit Soup in your inventory twice to travel to the spirit world.
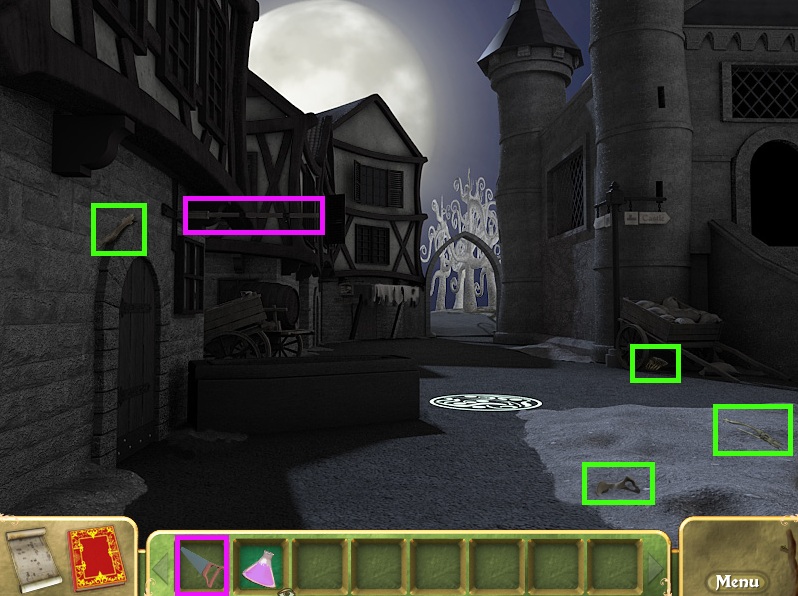
Collect all the bones scattered around the area.
Screenshot.
Use the Saw from your inventory on the pole sign sticking out of the left building.
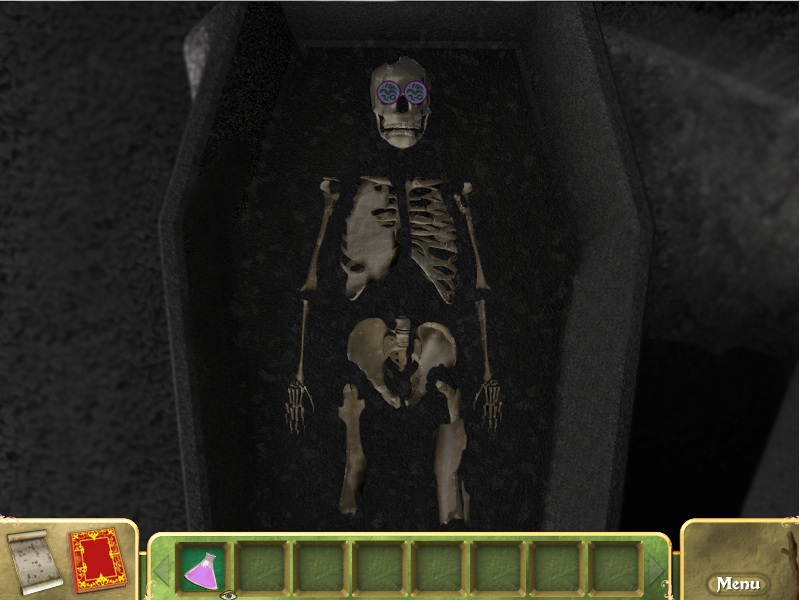
Click the coffin next to the door to zoom in.
Use the Sawed Off Sign Pole on the space at the top left side of the coffin lid.
Click the makeshift lever to open the coffin, then click it to look inside.
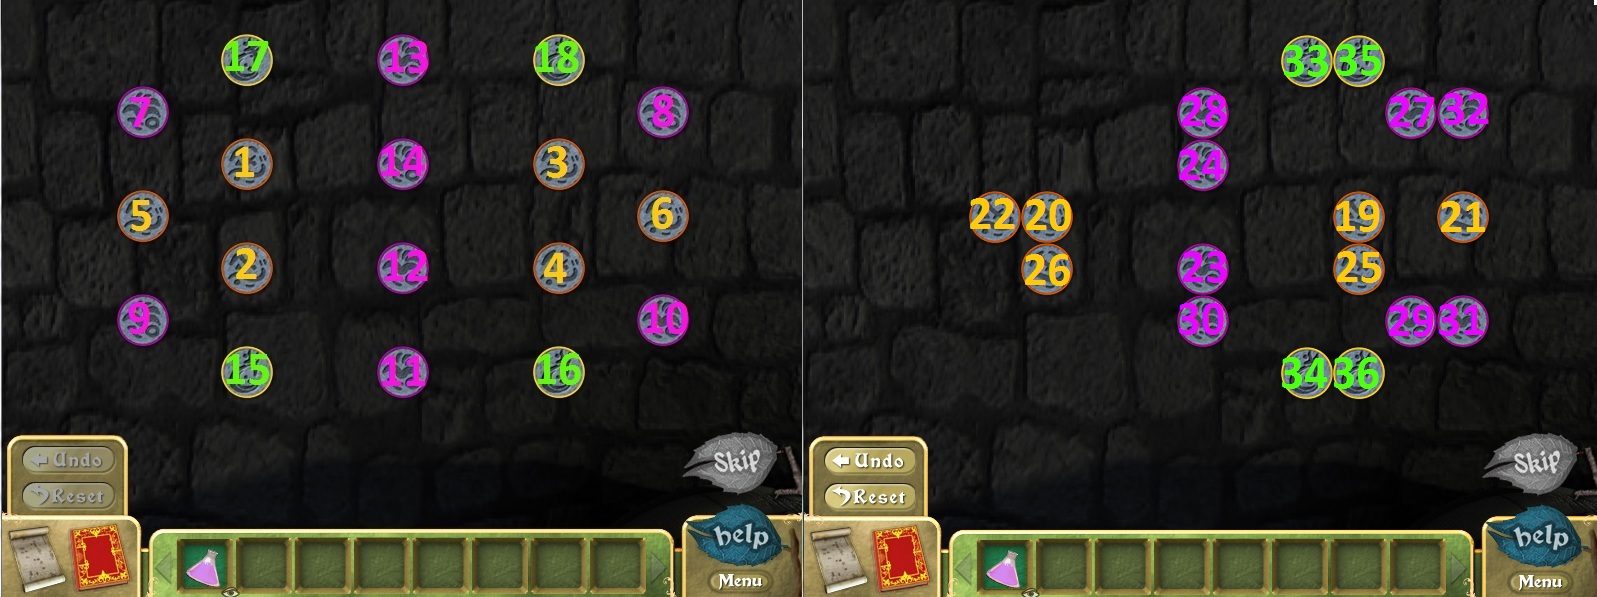
Add the four Bones from your inventory to the skeleton in the closet to start the puzzle.
To solve this puzzle, arrange the bones to complete the skeleton.
Click a bone to select it, then click a different bone to swap their positions.
Solution.
Once the puzzle is solved, the skull will appear with two Small Discs in the eye sockets.
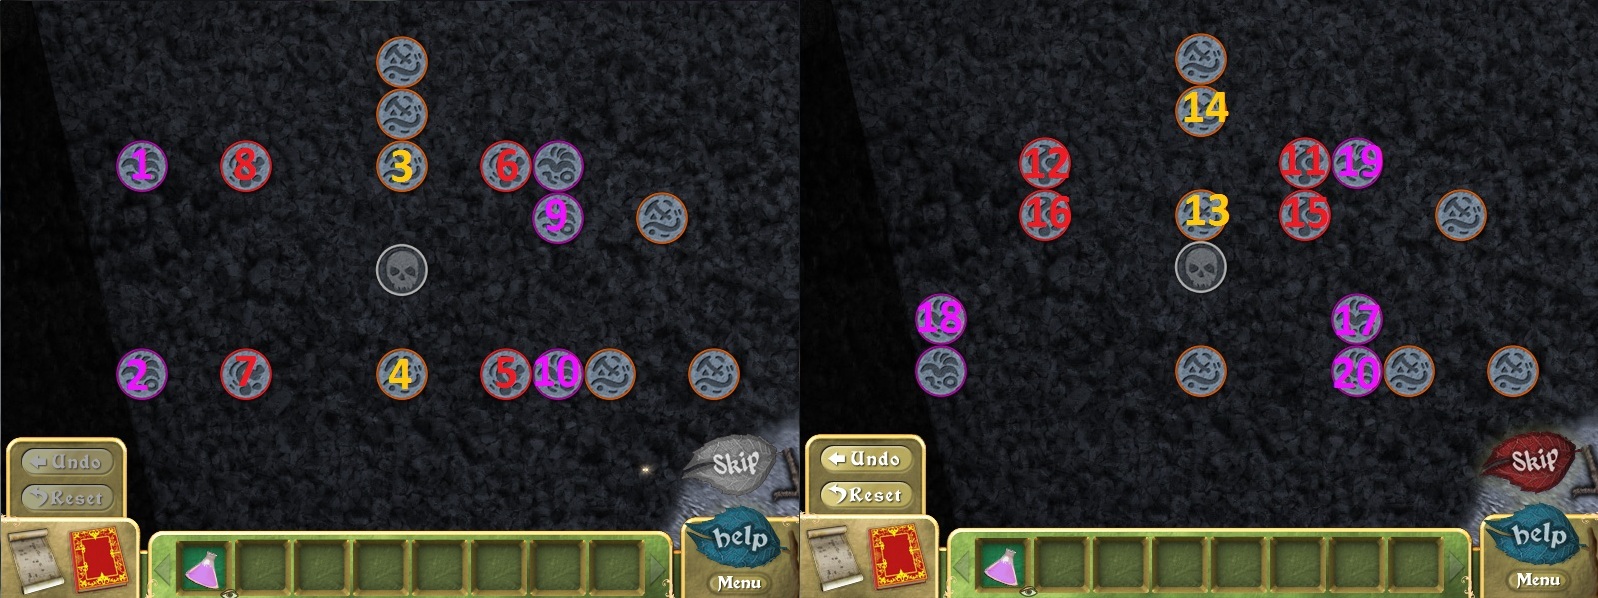
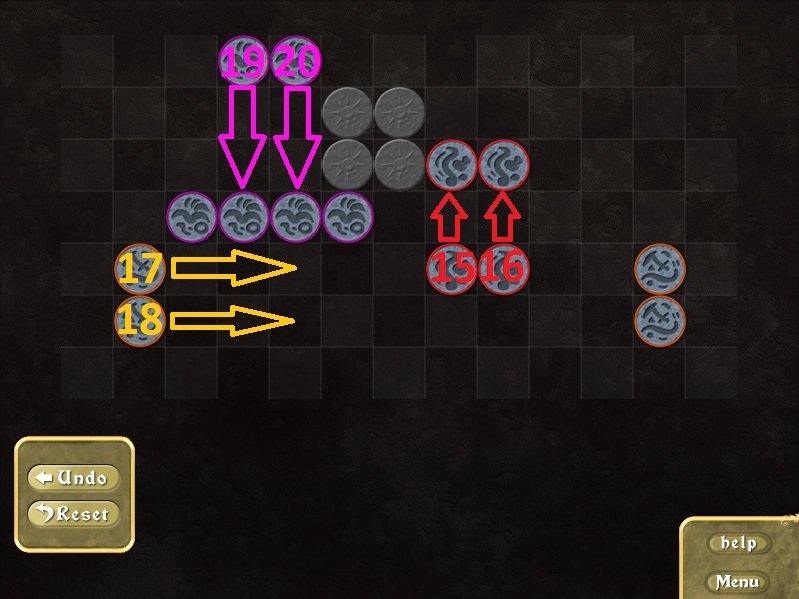
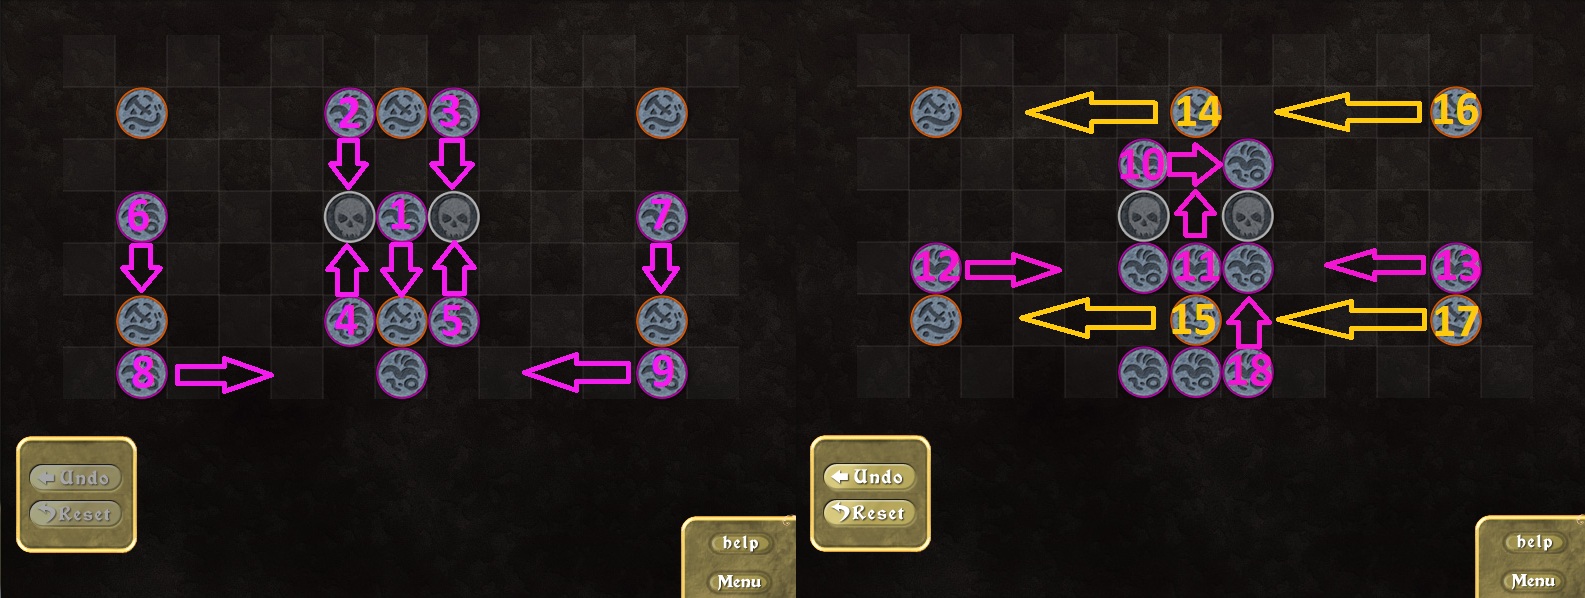
Click the circle on the ground beside the coffin to zoom in.
Add the two Small Discs from your inventory to the ground to start the puzzle.
As before, group all the similarly colored/shaped discs together by connecting lines between them.
Click a disc to select it, then click a matching disc to draw a line between them, pulling the first disc next to the second.
You can pull two tiles towards each other even if a different colored disc is in the middle; however, they cannot pass through or over the different disc.
Skull tiles cannot be moved.
Click the undo button to undo your last move.
Click the reset button or right click the board to reset the puzzle.
Solution Part 1.
Solution Part 2.
Repeat Steps 32-33 with each of the three discs in a vertical row above the skull.
Solution Part 3.
Click the Flask of Spirit Soup in your inventory twice to return to the real world.
Go to the Queensbury Docks.
Queensbury Docks
Click the Flask of Spirit Soup in your inventory twice to travel to the spirit world.
Click the barrel next to the crab to get a Fish.
Put the Fish on top of the pile of bones on the ground to lure away the crab.
Click the tarp hanging on the rafters above the crab to trap it.
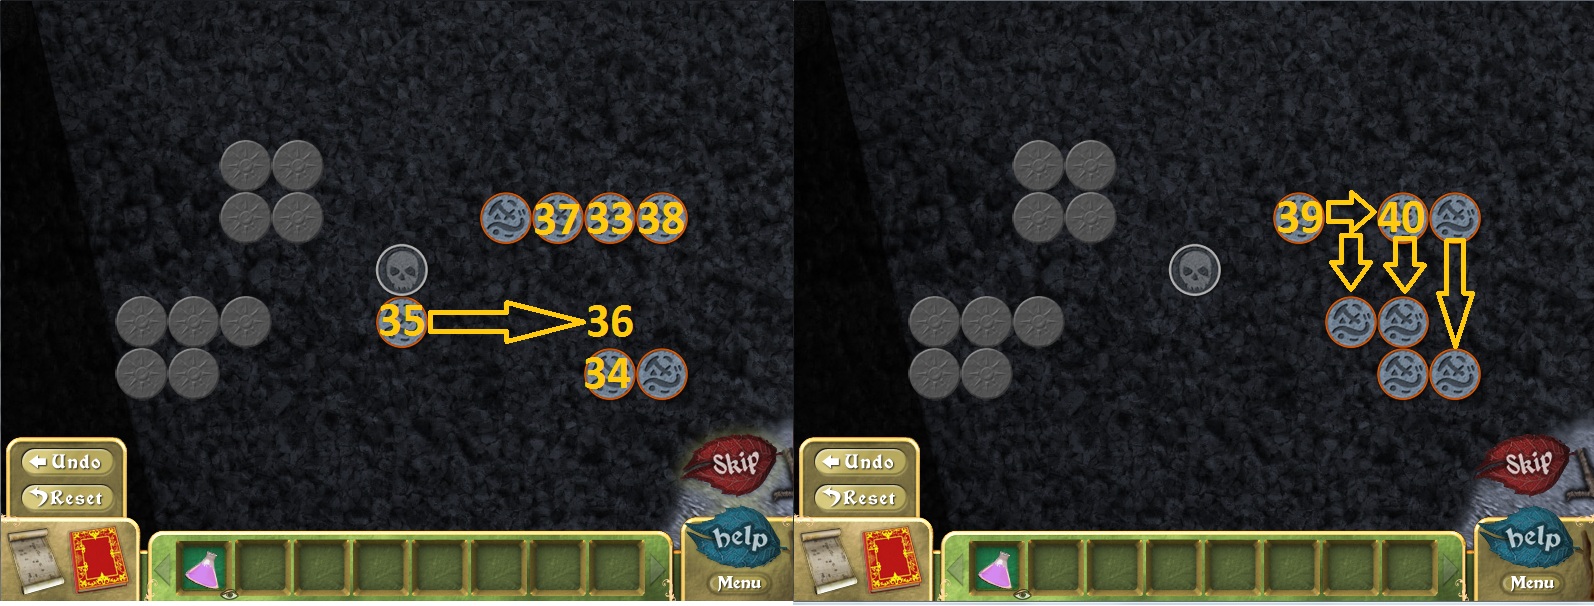
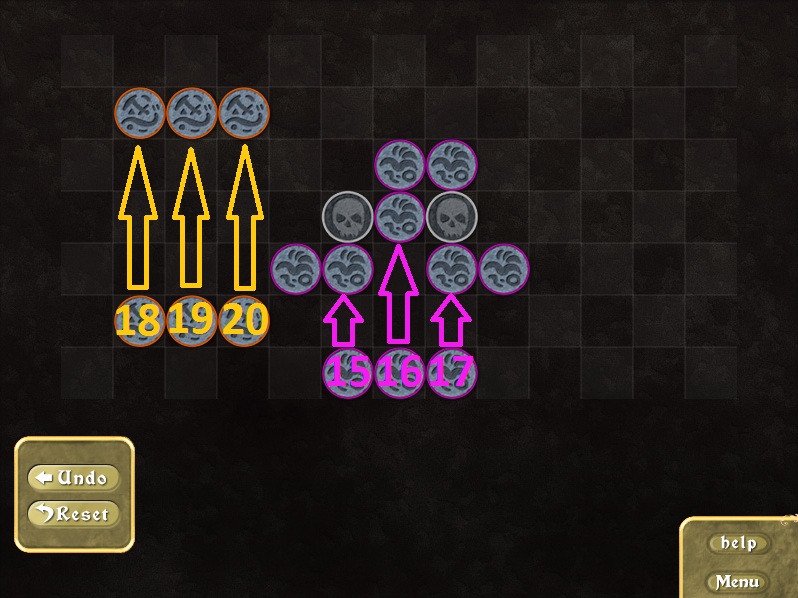
Click the glowing circle on the ground to start the puzzle.
As before, group all the similarly colored/shaped discs together by connecting lines between them.
Click a disc to select it, then click a matching disc to draw a line between them, pulling the first disc next to the second.
You can pull two tiles towards each other even if a different colored disc is in the middle; however, they cannot pass through or over the different disc.
Skull tiles cannot be moved.
Click the undo button to undo your last move.
Solution Part 1.
Solution Part 2.
Click the Flask of Spirit Soup in your inventory twice to return to the real world.
The End
Posted by: Trinn |
August 26, 2011 1:01 PM
|
August 26, 2011 1:01 PM
Spirit Soup: The Queensbury Curse Walkthrough - Bonus Puzzles
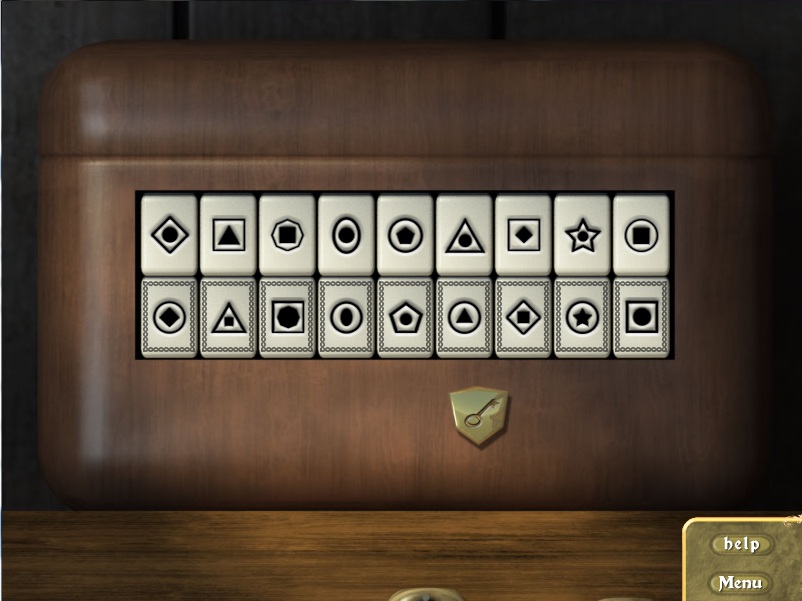
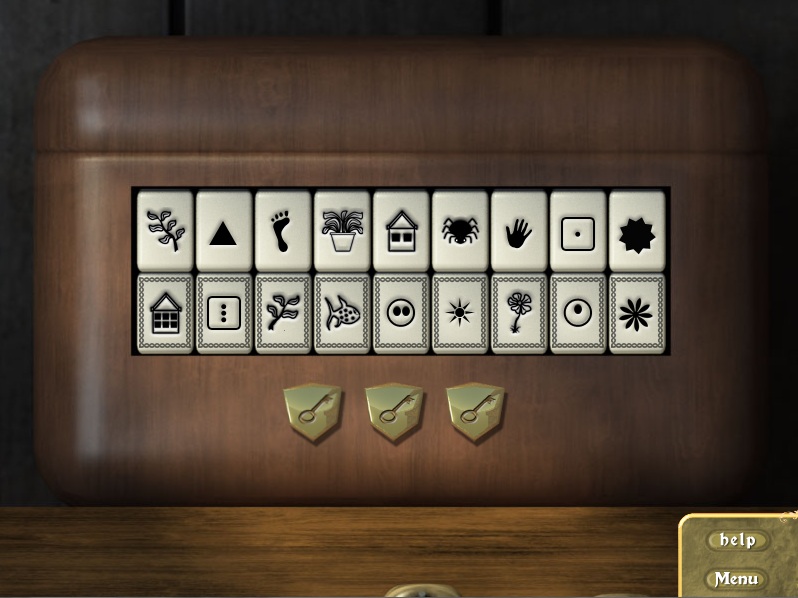
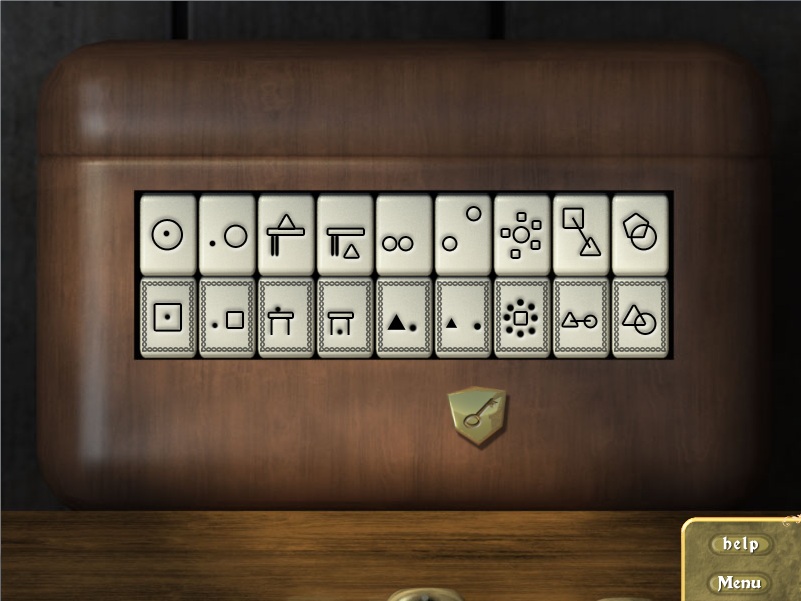
After you've beaten the game, click the Bonus Puzzles button in the main menu to access new versions of the puzzles you've played in the main game.
Match Lockbox
Puzzle #1
Solution #1.
Solution #2.
Solution #3.
Puzzle #2
Solution #1.
Solution #2.
Solution #3.
Puzzle #3
Solution #1.
Solution #2.
Solution #3.
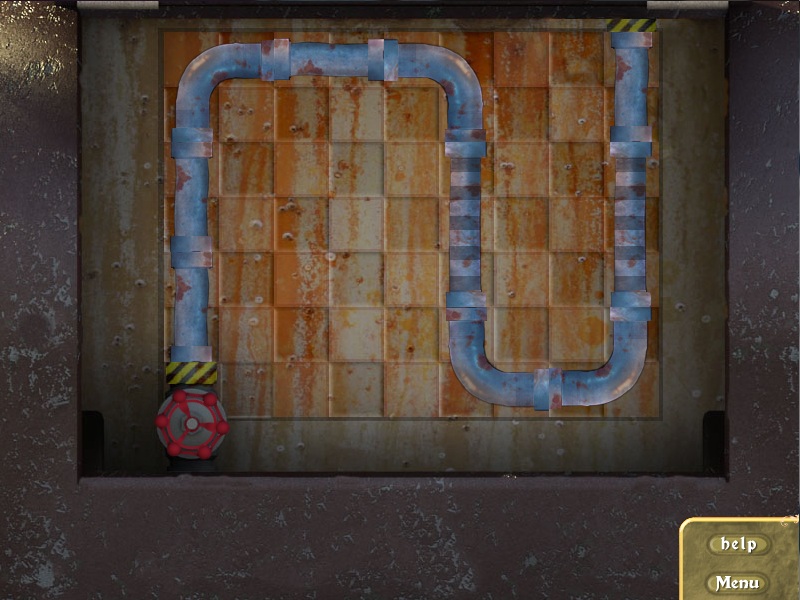
Pipe Fitting
Puzzle #1
Solution.
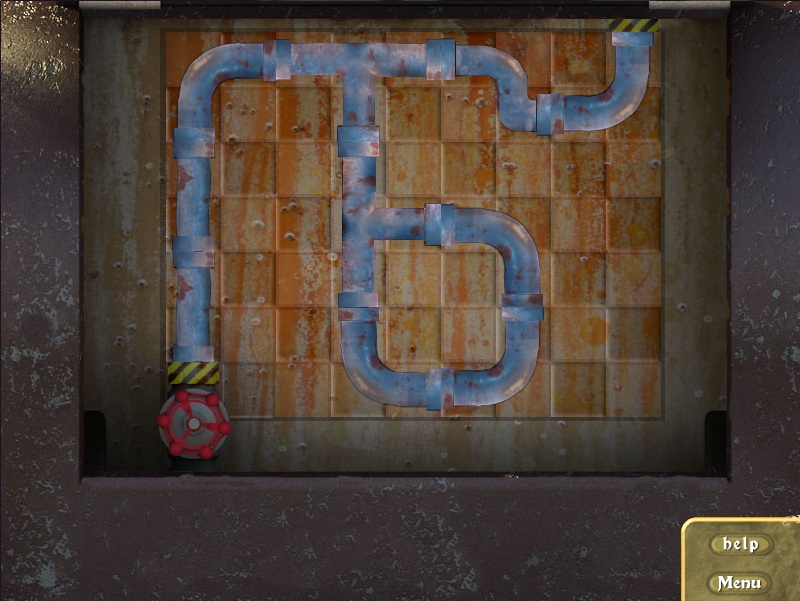
Puzzle #2
Solution.
Puzzle #3
Solution.
Sailor's Challenge
Puzzle #1
Solution.
Puzzle #2
Solution.
Puzzle #3
Solution.
Puzzle #4
Solution.
Puzzle #5
Solution.
Spirit Symbols
Puzzle #1
Solution.
Puzzle #2
Solution Part 1.
Solution Part 2.
Puzzle #3
Solution Part 1.
Solution Part 2.
Puzzle #4
Solution.
Puzzle #5
Solution Part 1.
Solution Part 2.
Posted by: Trinn |
August 26, 2011 1:03 PM
|
August 26, 2011 1:03 PM