


![]() You work fast, don't you detective? Little Suzy hasn't been missing for more than a few hours when you show up in town. But this isn't your normal missing child case; Suzy was kidnapped by a mechanical monstrosity unearthed in the newly excavated series of caves on the outskirts of town, and if you go poking around in them, you might find there are more secrets hidden beyond the rubble than anyone expects. Puppet Show: Lost Town is easily the best title in the popular hidden-object adventure series yet, combining clever puzzles, bizarre environments, and a fantastically creepy vibe for one top-notch experience.
You work fast, don't you detective? Little Suzy hasn't been missing for more than a few hours when you show up in town. But this isn't your normal missing child case; Suzy was kidnapped by a mechanical monstrosity unearthed in the newly excavated series of caves on the outskirts of town, and if you go poking around in them, you might find there are more secrets hidden beyond the rubble than anyone expects. Puppet Show: Lost Town is easily the best title in the popular hidden-object adventure series yet, combining clever puzzles, bizarre environments, and a fantastically creepy vibe for one top-notch experience.
 Lost Town comes with two difficulty modes, the primary differences between the two being whether or not interactive areas are highlighted and how long your hint/skip button takes to recharge. Gameplay is fairly typical, and handled entirely with the mouse, clicking to pick up or use items, and otherwise interact with the screen. Items you've gathered will be kept in your inventory, which you can access by clicking on the "tools" button on the left side of the screen, and scrolling through any objects you have available. Lost Town strikes an easy balance between hidden-object hunting and standard adventure gameplay, with a healthy dose of puzzle solving to fill things out.
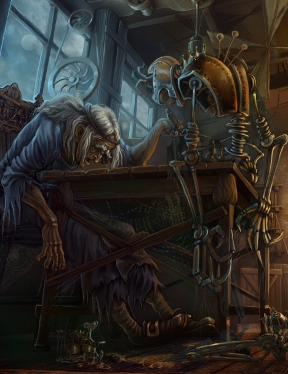
Analysis: The story is, as you've probably come to expect, a little silly, but pleasingly so; the whole series has always been sort of over the top, and if you've played any of the previous titles you know you don't come expecting anything serious. There are trap doors, spider dolls, neme... uh... nemesy... nemeses, and unorthodox puppets galore. There's also a ton of animation this time around, and watching the strange puppet designs lurch to life in cutscenes is as impressive as it is nightmare fuel. If you've played the other games in the series you might be disappointed to hear the same soundtrack recycled here again, but overall you'll be able to see how far the series has come.
There are times when it feels like the game's big environments work against it somewhat. After you pass the first few areas which act as a tutorial of sorts, the number of places you're able to go greatly increases, as does the amount of items you'll have filling your inventory. Keeping track of what item might work where and any unsolved puzzles or things you need to come back to "unlock" can mean a lot of back tracking, especially once hidden-object scenes start repeating themselves. It really is sorely in need of a Sherlock Holmes: Hound of the Baskervilles-style map (I'll stop harping about it when more casual games start doing it.). As anyone who has ever spent a vacation running around Disney World will tell you, even the most interesting places start losing some of their appeal after you've gone back and forth through them six times in one day.
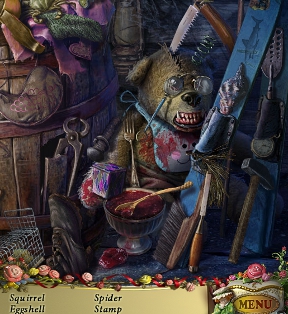 The puzzles are, even if not particularly difficult, wonderfully creative and a welcome departure from the samey variations plaguing most other games in the hidden-object genre. The game does wind up feeling a little predictable; most of the gameplay revolves around encountering a puzzle that's missing a piece, tracking down that missing component, and then doing it all over again a few steps later. This might be a bit more annoying if not for the fact that all of the environments look fantastic, with a surreal, morbid vibe that makes them wonderful to explore. Everything is packed full of unusual detail, from the areas you'll walk through to the hidden-object scenes themselves; it really feels like the designers just cut loose. If you didn't think puppets were unsettling before with their judgemental, unblinking eyes and rigid limbs, you definitely will after an encounter outside the barbershop in the Lost Town.
The overall length of the game is obviously going to vary, but a ballpark figure for standard mode is probably five to six hours, including the bonus chapter. Whether that merits the purchase is between you and your wallet. For me, at least, I can say that despite a few flaws, I feel that PuppetShow: Lost Town delivers on all fronts. The series as a whole has always reached high for quality, and Lost Town sets the bar even higher on almost all fronts. Does it leave the door open for another installment? You betcha. But for fans of the series, this is hardly bad news, and if you enjoy the genre but have never given the PuppetShow titles a spin, there's no time like the present to check out the demo.
A Collector's Edition is also available. It contains a bonus chapter to play, wallpapers, strategy guide, and more. Remember that Big Fish Game Club Members pay only $13.99 for Collector's Editions, and collector's editions count 3 card punches of 6 total needed for a free game.
![]() Windows:
Windows:
Download the demo
Get the full version
Also available: Collector's Edition
![]() Mac OS X:
Mac OS X:
Download the demo
Get the full version
Also available: Collector's Edition


Walkthrough Guide
(Please allow page to fully load for spoiler tags to be functional.)
PuppetShow: Lost Town - Walkthrough
General
You may choose between "Casual" and "Expert" modes. As usual the difference is in the time hint and skip function recharge, and whether you will see sparkling areas of interest or not.
A magnifying glass on your cursor indicates a scene of interest; this can either be for information or a zoom-in scene for finding inventory objects or solving puzzle.
Clicking the "Tool" button in the low left corner will open a fan with your tools.
There is no journal; you might want to write down important information.
In search scenes you will find names of objects written in pink. These objects either can only be taken by performing an action (as peeling an apple for "peeled apple") or opening/moving things to find objects that are not visible at first.
List of inventory items
This is a list of all inventory items in the order that I found them.
The first number indicates the spoiler where the item is found, the second one where it is used.
Inside the spoiler all inventory objects are written strong when you are able to take them.
Chapter 1
Crowbar - Spoiler 1 - item will be used several times
Box of Matches - Spoiler 1 - item will be used several times
Pickaxe - Spoiler 1/1
Grappling Hook - Spoiler 1/2
Piece of Paper - Spoiler 2/2
Flower disk (1/3) - Spoiler 1/6
Cage - Spoiler 2/3
Knife - Spoiler 2/2
2 wooden beams - Spoiler 2/2
Chapter 2
Shovel - Spoiler 3/4
Mouse - Spoiler 3/5
Puppet - Spoiler 3/5
Flower disc (2/3) - Spoiler 4/6
Copper coin - Spoiler 4/6
Hook - Spoiler 5/6
Flower disc (3/3) - Spoiler 6/6
Oil can - Spoiler 6/ used several times
Ladder - Spoiler 6/7
Well ring - Spoiler 6/7
Chapter 3
Spike - Spoiler 7/22
Battery - Spoiler 7/7
Magnet - Spoiler 7/7
Piece of armor - Spoiler 7/7
Metal statue - Spoiler 8/29
Letters - Spoiler 8/9
Butterfly ring - Spoiler 9/9
Silver coin - Spoiler 9/9
Weed killer - Spoiler 9/10
Pesticide - Spoiler 9/16
Bulb - Spoiler 10/11
Chapter 4
Lever (for robot) - Spoiler 11/12
Piano piece - Spoiler 11/13
Handcuff key - Spoiler 12/15
Heart - Spoiler 13/13
Lever (for slot machine) - Spoiler 13/14
Head - Spoiler 13/16
Bullet - Spoiler 14/15
Revolver - Spoiler 15/17
Chisel - Spoiler 15/21
Chapter 5
Pendant - Spoiler 16/16
Mirror - Spoiler 16/16
Lens - Spoiler 16/16
Gears - Spoiler 16/18
Puppet Wheel - Spoiler 17/17
Cat head - Spoiler 17/17
Cat puppet - Spoiler 17/17
Wrench - Spoiler 17/19
Chapter 6
Empty sack - Spoiler 19/21
Fuel can - Spoiler 19/22
Valve - Spoiler 20/21
Train wheel (broken) - Spoiler 20/21
Sledge Hammer - Spoiler 20/22
Hammer - Spoiler 21/21
Golden Tooth - Spoiler 21/21
Sack with sand - Spoiler 21/21
Train wheel (repaired) - Spoiler 21/22
Gold coin - Spoiler 21/21
Winding gear - Spoiler 21/26
Clock weight - Spoiler 21/24
Chapter 7
Sleep Gas - Spoiler 23/28
Grasshopper tile - Spoiler 23/
Barber button - Spoiler 23/23
Screwdriver - Spoiler 24/24
Clock hands - Spoiler 24/24
Scissors - Spoiler 24/26
Ivory Statue - Spoiler 24/29
Triangle (1/2) - Spoiler 25/26
Wooden statue - Spoiler 25/29
Triangle (2/2) - Spoiler 26/26
Key - Spoiler 26/27
Key - Spoiler 27/27
Chapter 8
Felicia's brooch - Spoiler 28/29
Crystal Shard - Spoiler 29/29
Chapter 1 - Path to Town
1. Cave
Talk with Suzy's Mom and zoom in on the stairs of the box office on the right side.
Grab the crowbar.
Click the leaves to move the leaves; you will find a head of a pick axe, but you can't take it yet.
Zoom in on the information board on the left side behind the house.
Click the paper in the low right corner and use the crowbar to remove the nailed board.
Take the box of matches.
Screenshot
Go forward.
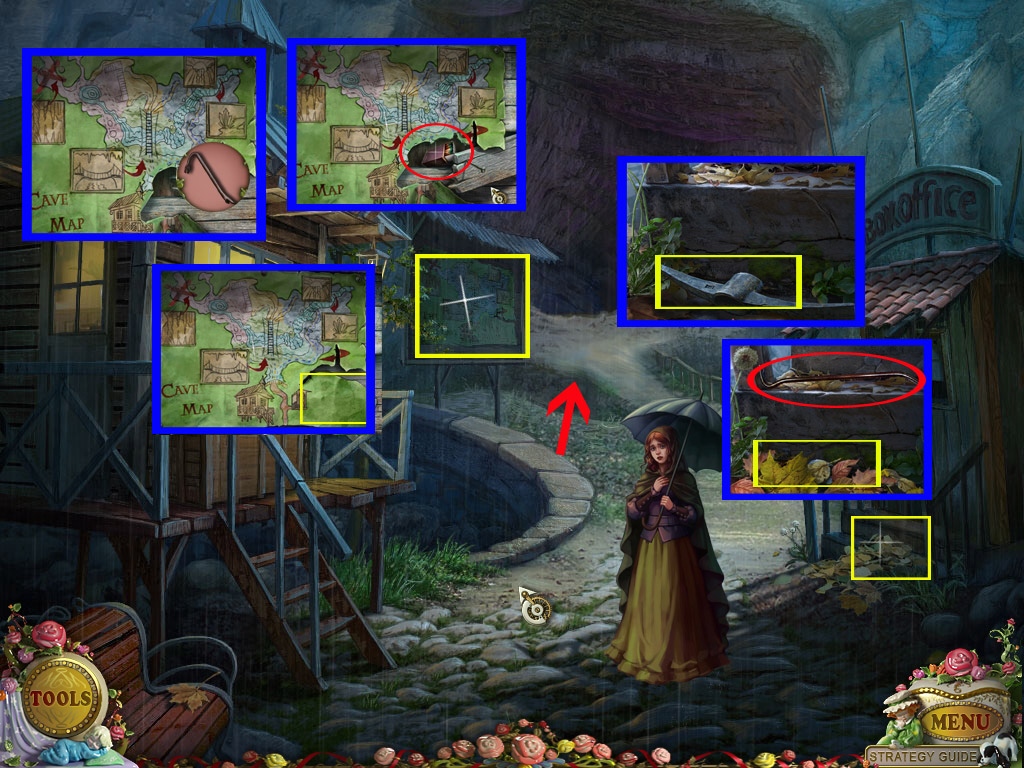
Zoom in on the wooden arrow on the right cave wall.
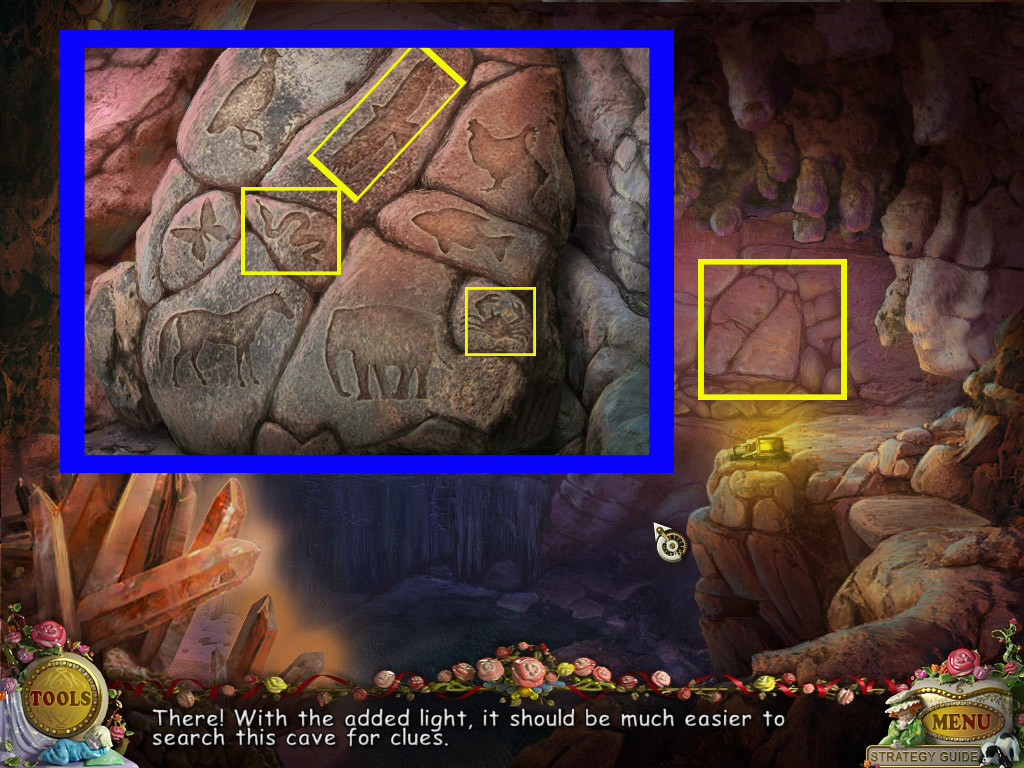
Remove the latches by clicking. Note the carving of a crab, a snake and a eagle.
Go over the bridge.
Zoom in on the lamp laying on the ground.
Click to open the lamp and use the matches to light up.
Zoom in on the stone heap on the far right.
You will find carved stones. Click the three with the same carving as you saw at wall before.
Screenshot
The stones will move and you stand in front of a stone wall.
Grab the pickaxe handle.
Go back three times and zoom in on the stairs of the box office.
Place the pickaxe handle at the pickaxe head. A pickaxe goes into your inventory.
Play the search scene on the left side to obtain a grappling hook.
Return to the stone wall and use the pickaxe. Click several times to get a hole big enough to slip through.
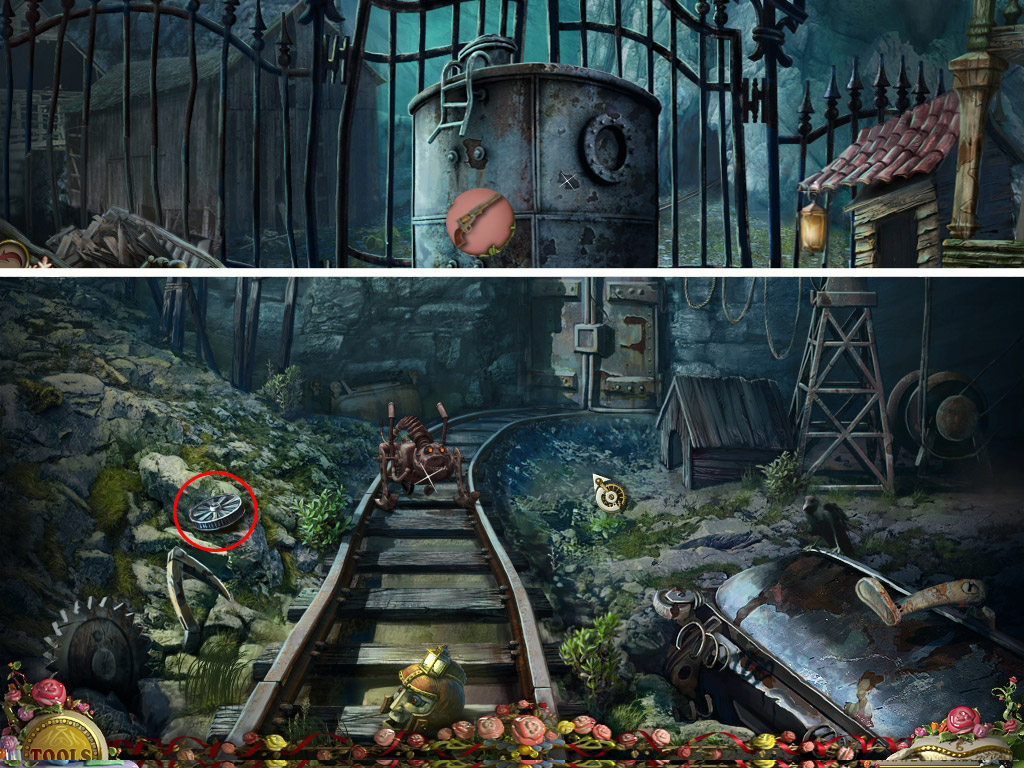
2. Over the Abyss
Click the mechanical beast on the bridge.
Zoom in on the mechanical puppet and click to open its hand.
Click the note saying "save us," then click the piece of paper.
Zoom in on the door on the left and put the piece of paper on the top left to the other half.
Your goal is to reproduce the facial impression of the paper in the middle of the device. To do so, use the arrows left and right.
Screenshot
Enter the Jail.
Zoom in on the book on the table and grab the flower disc (1/3).
Click the green curtain on the right, next to the cannon, to activate a search scene.
Click the box on the left, next to the barrel, to find "Jack in the Box".
The cage will go into your inventory.
Zoom in on the cannon and place the grappling hook (Spoiler 1) at the top of the cannon.
Use the matches (Spoiler 1) to light the fuse.
Leave the close up and click the winch in the middle of the room to raise the bridge.
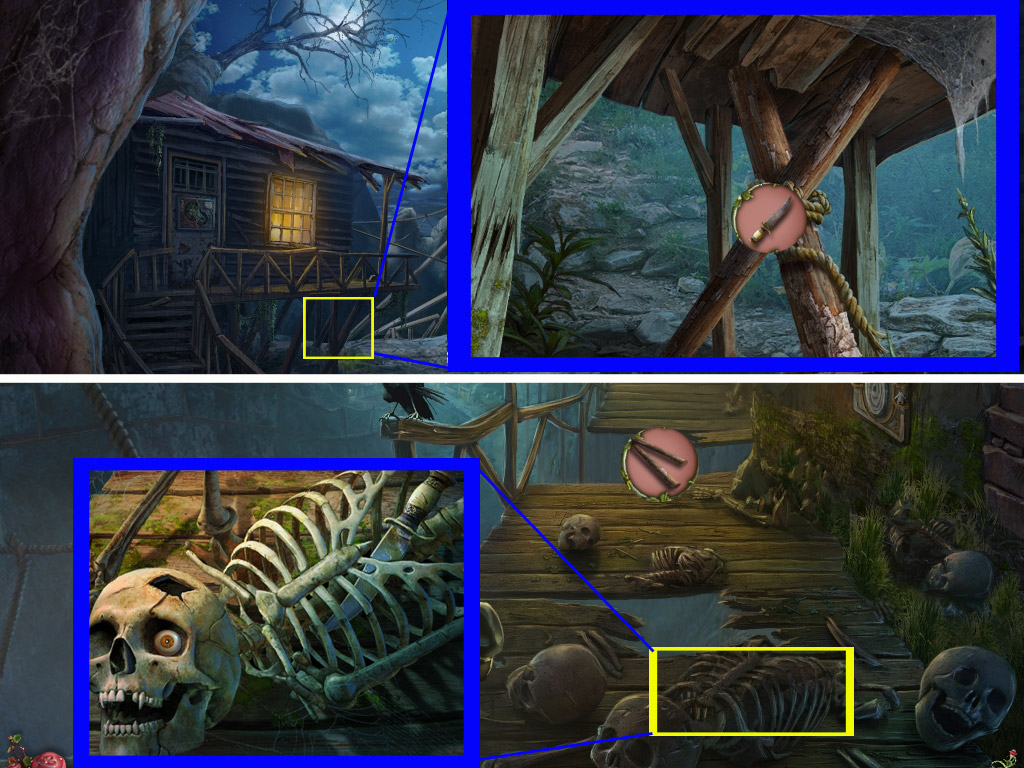
Exit the jail and walk over the bridge.
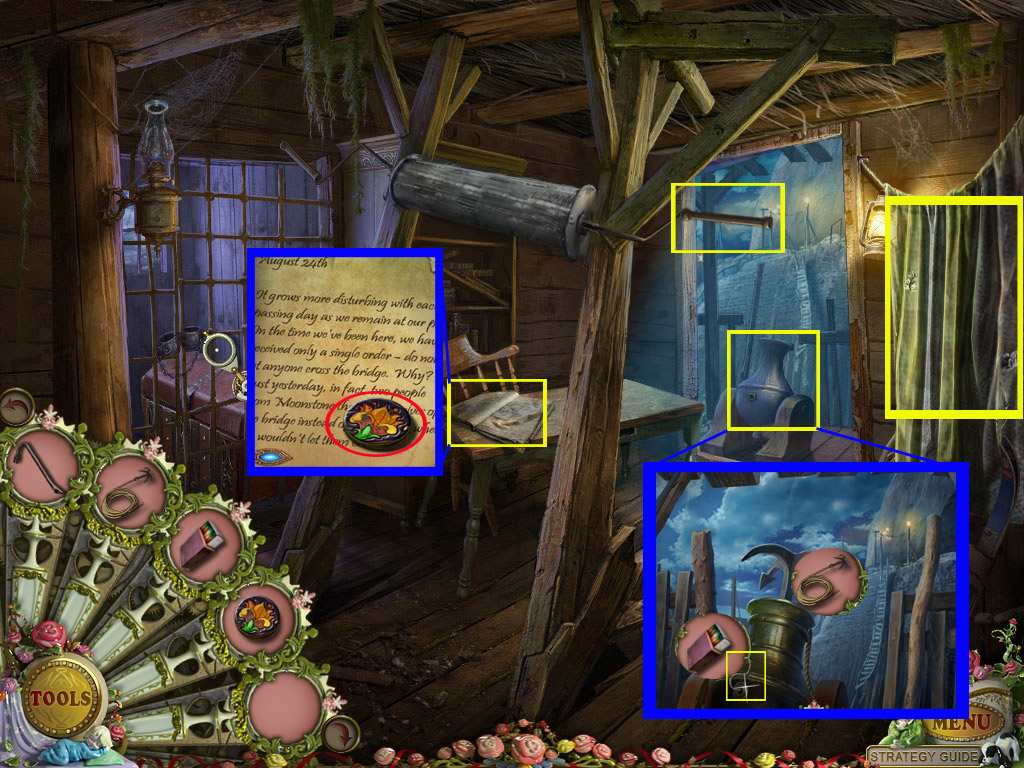
Zoom in on the skeleton on the ground and grab the knife.
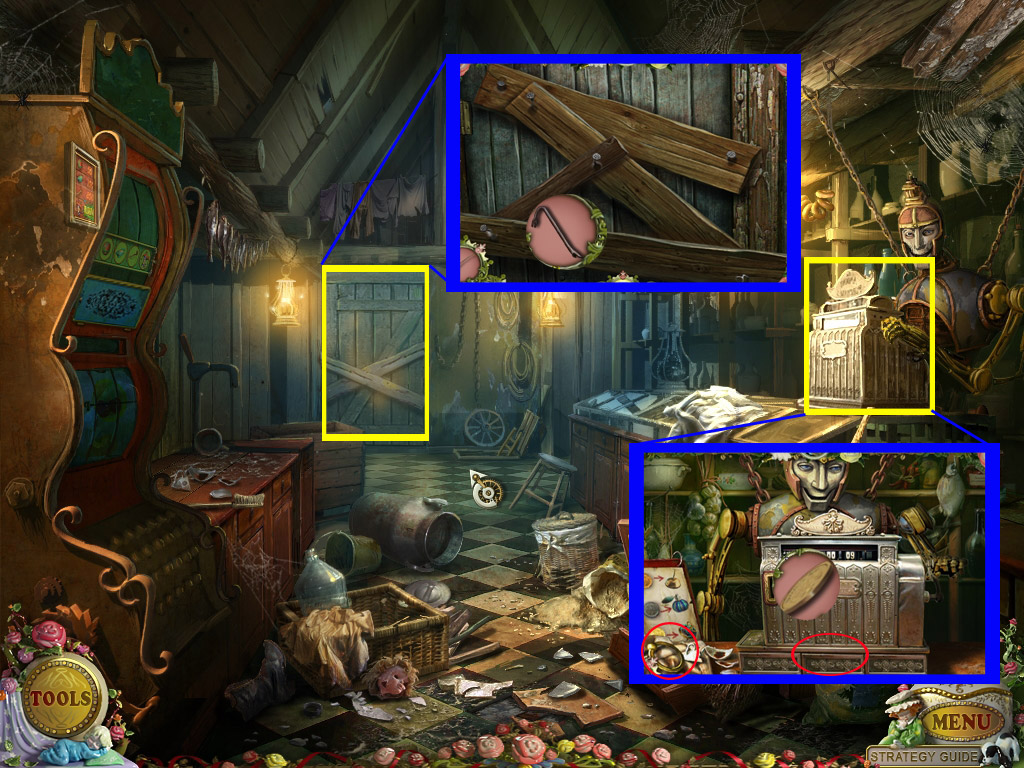
Go back twice and zoom in on the beams on the left side under the jail.
Use the knife (click 3 times) to cut the rope around the beams.
Two wooden beams will go into your inventory.
Return on the bridge and use the wooden boards to close the gaps.
Screenshot
Go forward 2x.
Chapter 2: Town Arrival
3. Blacksmith/Toymaker
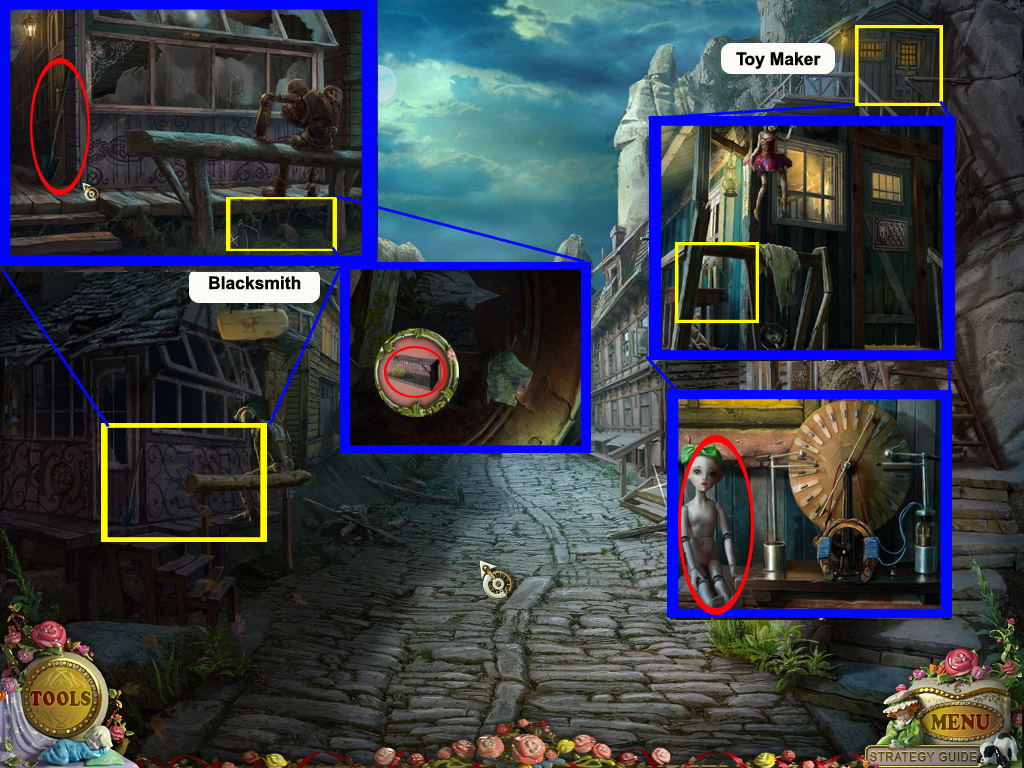
Enter the Blacksmith's on the left and take the shovel.
Zoom in on the porch and place the cage (Spoiler 2).
The mouse will go into it and the cage with mouse will go into your inventory.
Zoom in on the robot to learn that a lever is missing.
Return to the street and go upstairs to the Toymaker's house.
Zoom in on the small table on the left side of the porch and take the puppet.
Screenshot
Go back 1x and right to the church.
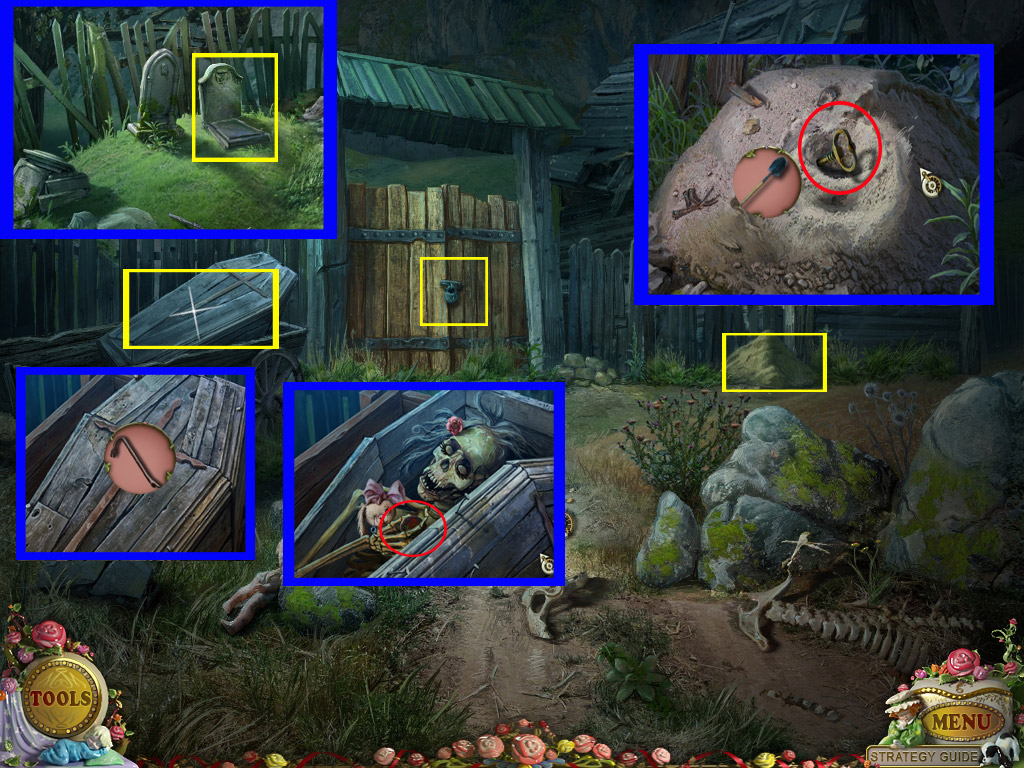
4. Church/Cemetery
Zoom in on the coffin on the left side and remove the four nails with the crowbar (Spoiler 1). You want to click once for each nail.
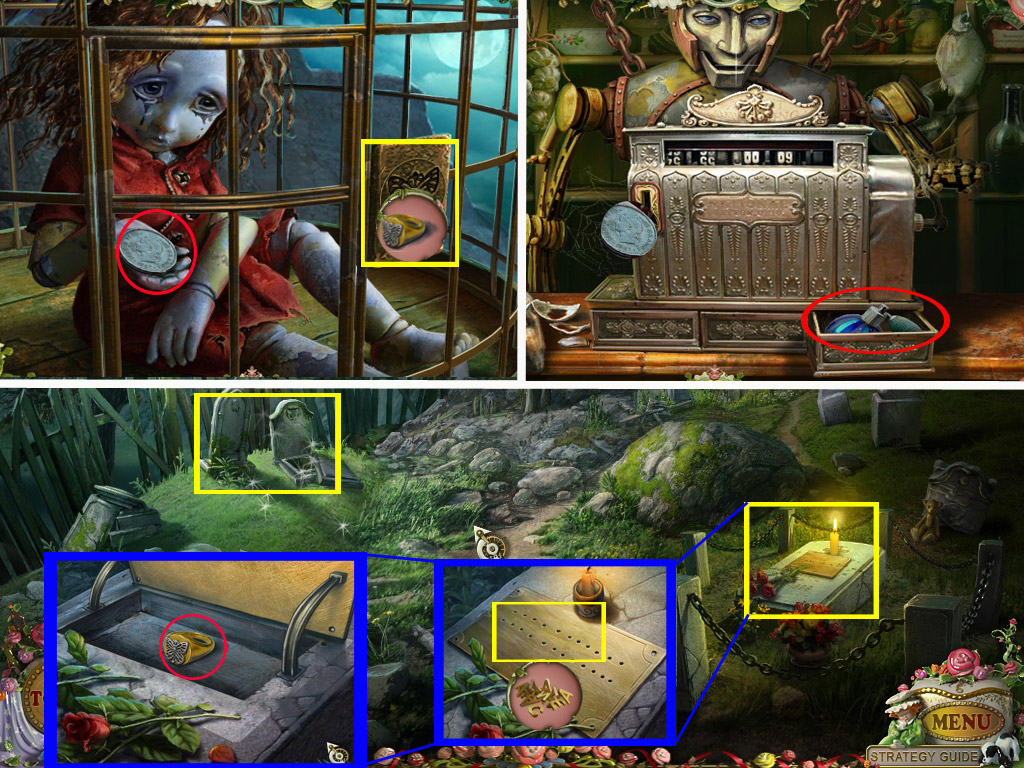
Grab the flower disc (2/3) out of of the skeleton's hand.
Zoom in on the sand heap in the back and use the shovel (Spoiler 1) to dig.
Take the cemetery key and use it to open the gate to the cemetery.
Click the gravestone on the far left to activate a search scene.
Use the hammer on the left to smash the piggy bank and find the copper coin. The copper coin will go into your inventory.
Screenshot
Go back and zoom in on the Theater on the left side of the main road.
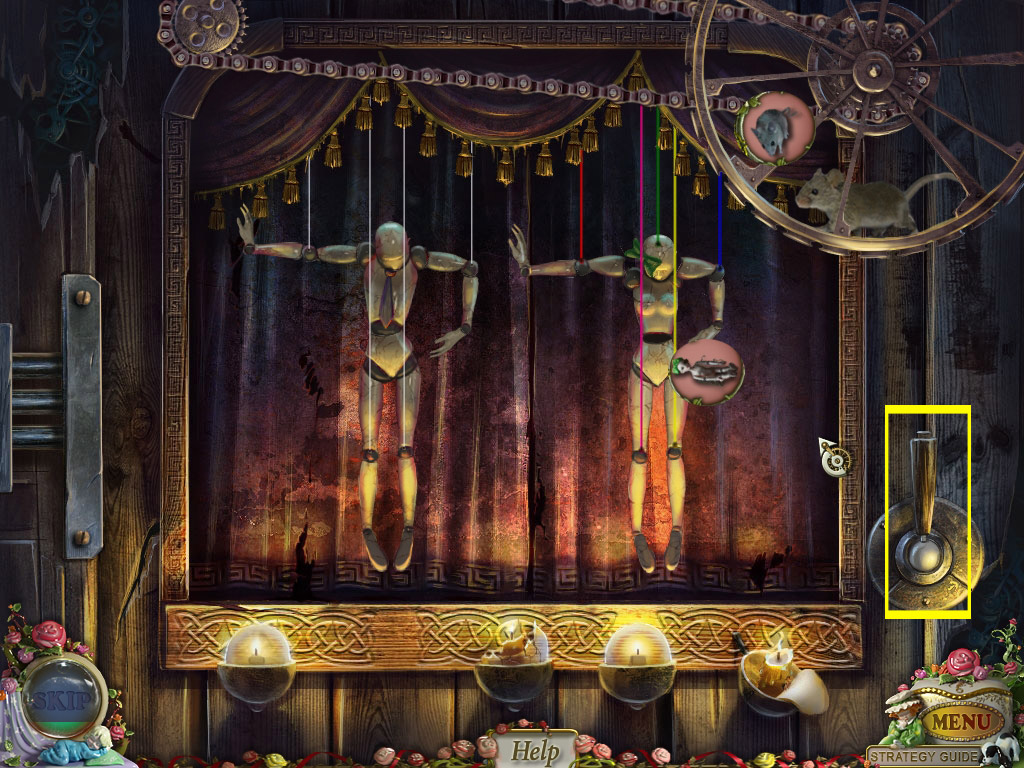
5. Theater
Zoom in on the theater and place the mouse the puppet (Spoiler 3) in the wheel on the top right.
Get the puppet (Spoiler 3) out of your inventory and place it at loose hanging strings.
Click the lever on the right to activate the puzzle and watch the puppets movements. Your goal is to let the puppets move unisonous.
To do so swap any two strings of the right puppet and click the lever again to see the result. Do so, until the movements are equal.
From left to right you need the following string order:
Red, pink, green, yellow, blue.
Screenshot
The door to the Theater opens - enter.
Play the search scene on the left to obtain a hook.
To find the moth click the hat and click the moth soon as she stops flying.
Zoom in on the letter on the table in the low left corner and open it.
Screenshot
Exit the theater and go forward 1x.
6. General Store
Zoom in on the crack in the stairs on the right side in front of the general store.
Use the hook and get a flower disc (3/3).
Zoom in on the door.
Place all three flower discs (Spoilers 1, 4, 6) into the empty slots.
Swap any 2 discs to assemble the picture in the right way.
Screenshot
The door will open; enter the General Store.
Zoom in on the cash register on the right and put the coin in the slot.
The middle drawer will open; take the oil can.
Grab the well ring in the low left corner.
Zoom in on the boarded door in the back and use the crowbar to remove the boards. This will activate a search scene.
Click the suitcase to open for the "ball of yarn" and the arm of the teddy bear for the "key".
Find all objects to obtain a ladder.
Screenshot
Exit the General Store and go 1x forward.
Zoom in on the guard puppet and oil the gears.
The barrier will open - enter the center of the town.
Screenshot
Chapter 3 - Center of the Town
7. Enter the Residence
Click the barber puppet to make it go away.
Go 1x forward in direction the rail tracks go.
Play the search scene on the left.
To find the flute, click the knife on the right side above the bamboo. The spike will go into your inventory.
Zoom in on the tracks and grab the battery.
Screenshot
Go back twice and go upstairs to the Toymaker's house on the right side.
Zoom in on the table on the left and place the battery on the left slot.
Take the magnet.
Go back once and on the main street 1x forward.
Now head left between the pink and the green house.
Zoom in on the well and place the well ring (Spoiler 6)
Click to open the well and use the magnet to get the piece of armor.
Place the ladder (Spoiler 6) at the lighted window on the right and zoom in on the window to learn that it is covered with poison ivy.
Screenshot
Go 1x back and zoom in on the door of the Residence (pink house).
Place the piece of armor and enter.
8. The Residence
Zoom in on the chairs on the right side.
Click twice to remove the strings and take the metal statue.
Click the stairs in the far back to see them fall and activate a search scene.
You will find the ship wheel when opening the chest on the right side, the letters by clicking the green pouch on the left side.
The letters will go into your inventory.
Screenshot
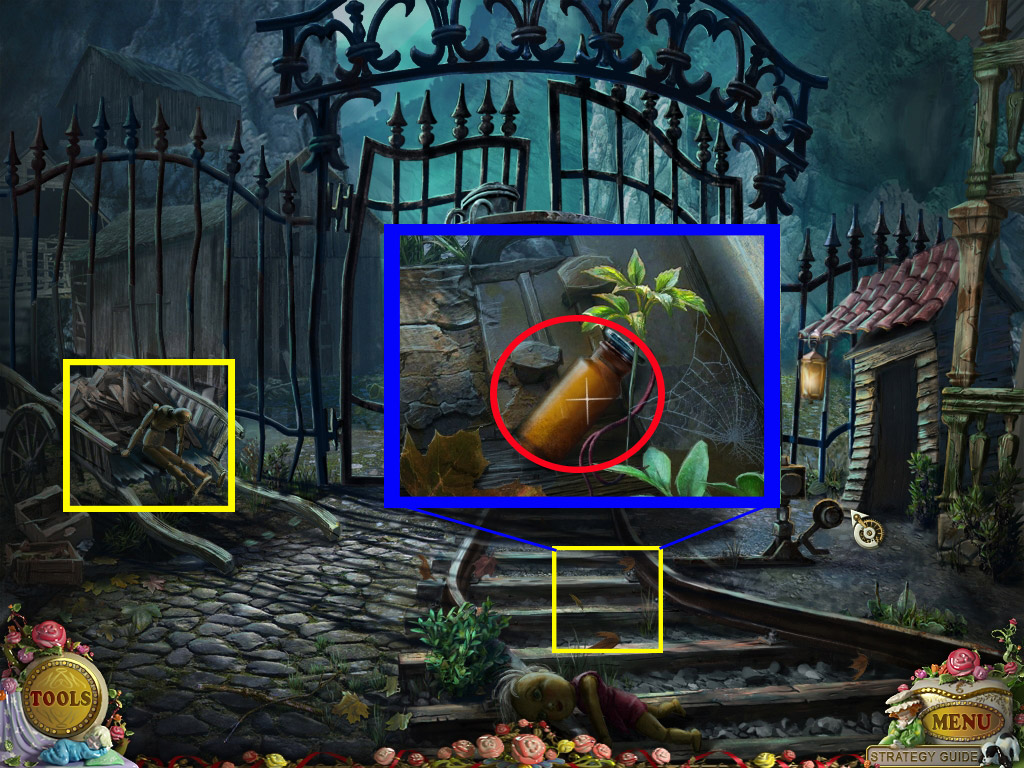
Go 5x back, left to the church and through the gate to the cemetery.
9. Cemetery/Cage/General Store
Zoom in on the grave on the right side and place the letters (Spoiler 8) on the plate.
Click to move the plate and take the butterfly ring.
Play the search scene on the far left to obtain weed killer.
Go back 2x on the Main Street and zoom in on the cage on the left.
Use the butterfly ring as a key and click once to open the cage.
Take the silver coin.
Go forward 1x to the General store and zoom in on the cash register.
Put the silver coin into the coin slot and take the pesticide.
Screenshot
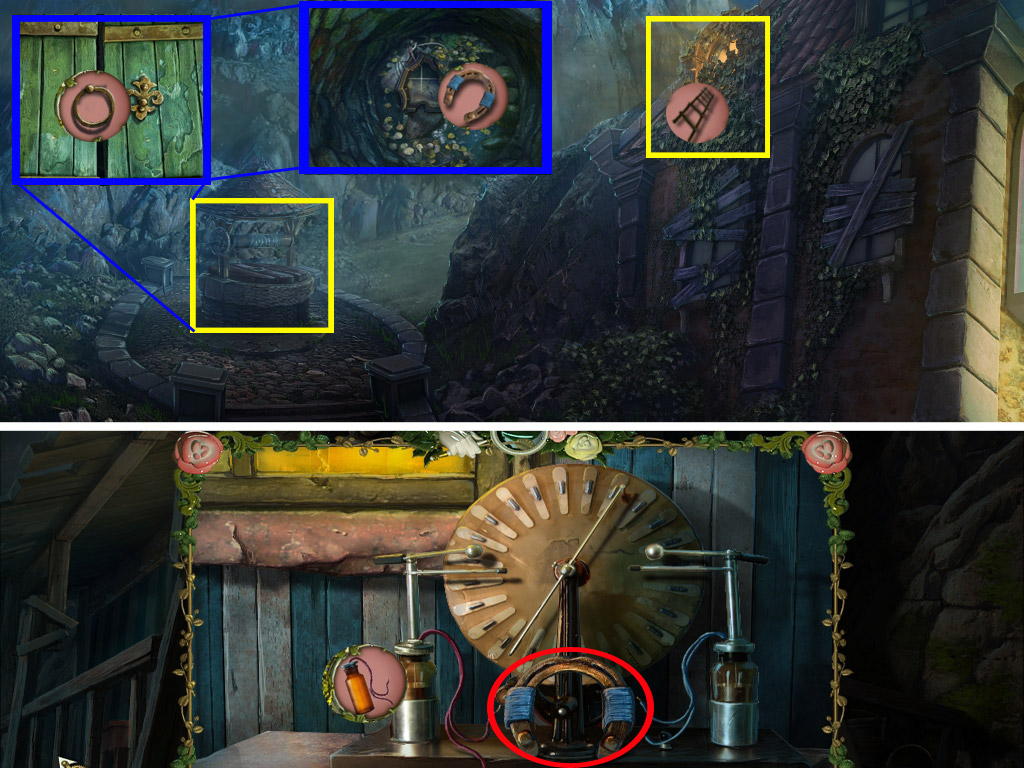
Go 1x forward and left to the well.
10. Meet Felicia
Climb up the ladder and put the weed killer (spoiler 9) on the poison ivy.
Click the window and enter.
Click Felicia to hear what she has to say.
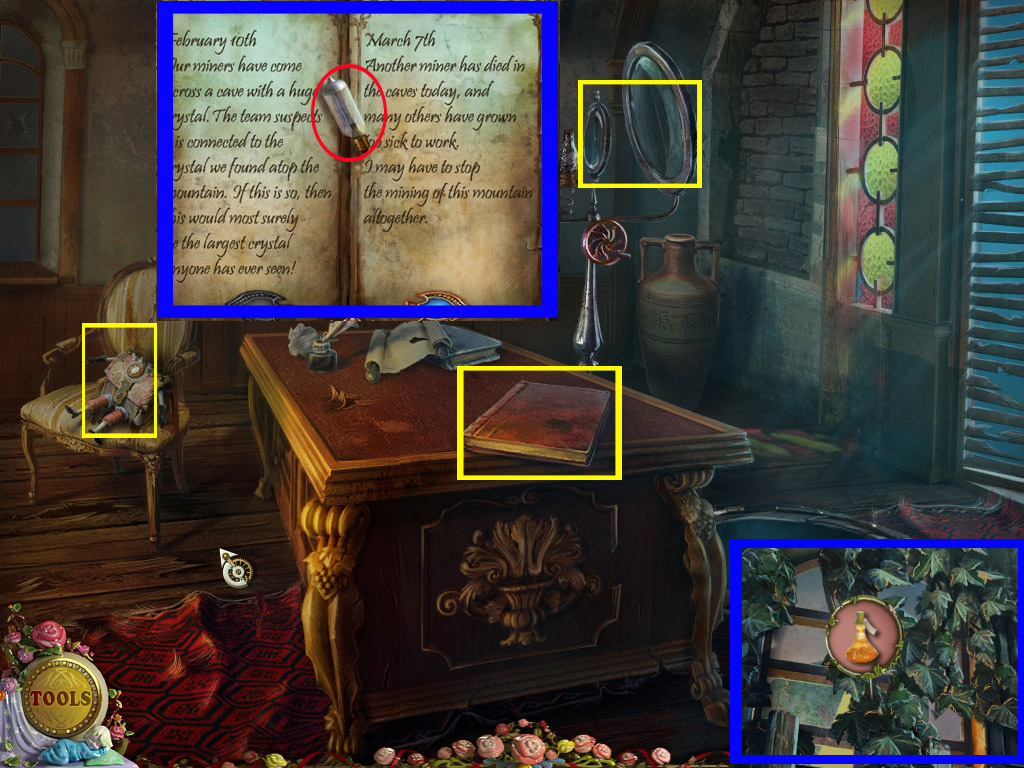
When she is gone, zoom in on the book on the table and click to turn the pages.
Grab the bulb.
Zoom in on the puppet box on the chair to learn that it needs a head.
Zoom in on the lens device to learn that one lens is missing.
Screenshot
Go back 3x times and go upstairs to the Toymaker's House.
Chapter 4: Town Business
11. The Toymaker's House
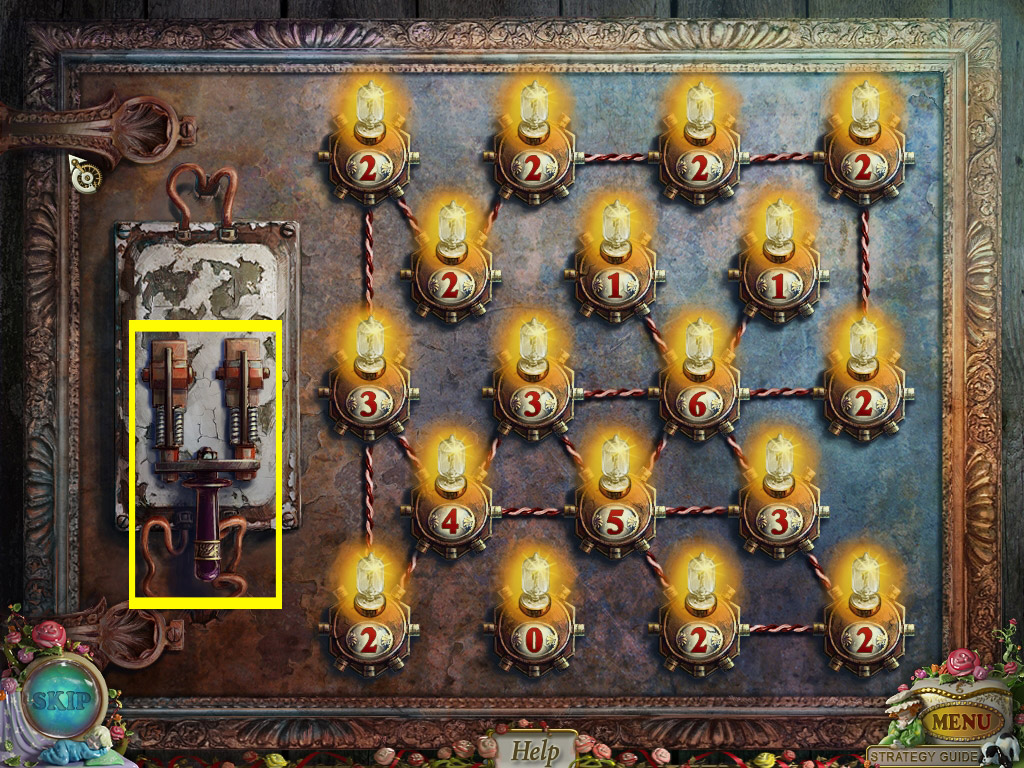
Zoom in on the door and replace the broken bulb with the one from your inventory (Spoiler 10).
Your goal is to connect each bulb with the amount of bulbs the number on the plate is showing. To connect two bulbs, click between them - a cable will appear.
When you are ready, click the lever on the left. The door will open when all bulbs are working.
Screenshot
Enter the house.
Zoom in on the Toymaker and take the lever from the robot.
Play the search scene. The piano piece can be found in the lower drawer on the left.
Click the red blanket on the right to find all other pink-written objects. The piano piece will go into your inventory.
Leave the Toymaker's house.
12. Blacksmith's House
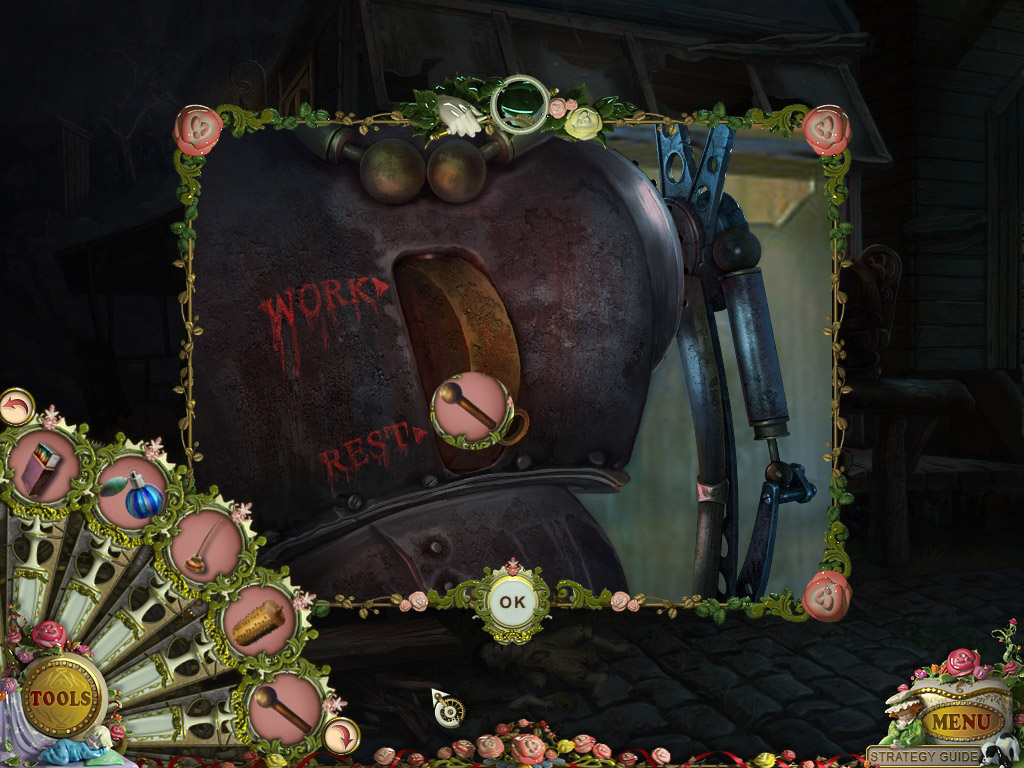
Zoom in on the robot in front of the Blacksmith's house and place the lever (Spoiler 11).
Screenshot
Click the lever once and follow the robot into the house after the cut scene.
Zoom in on the pile of junk on the bottom of the scene and take the hand cuff key.
Go back 3x and enter the Theater.
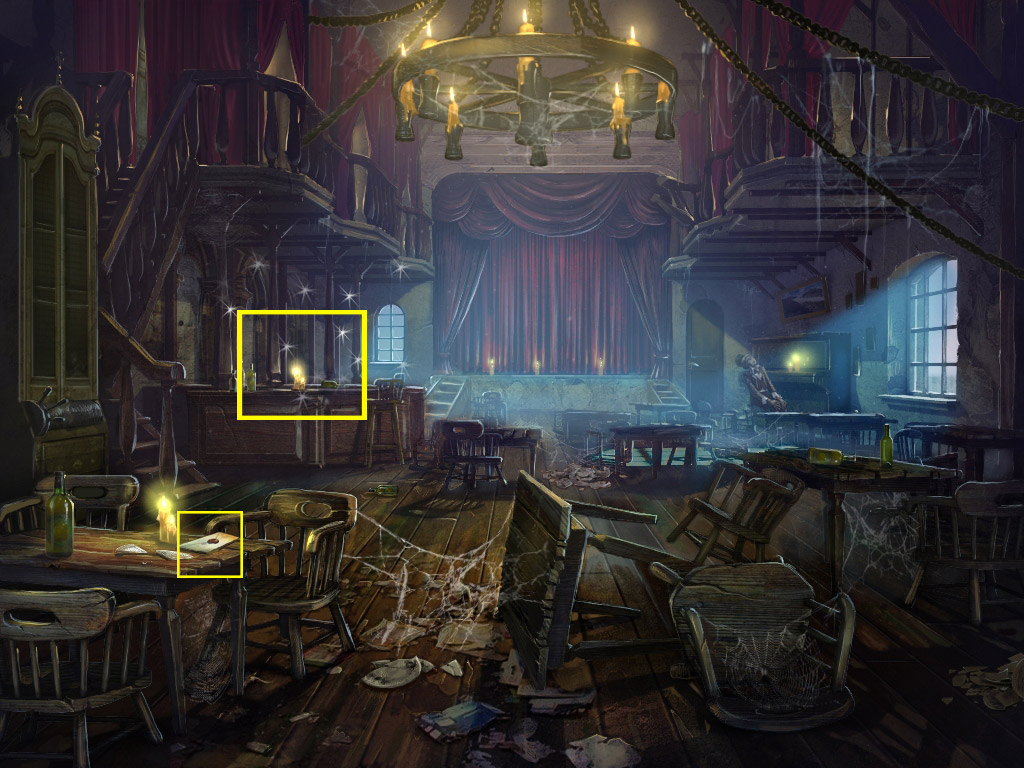
13. Theater
Play the search scene at the bar and click the blue fabric on the left to find the bow.
Find all objects to obtain a lever.
Zoom in on the piano player on the far right and place the piano piece (Spoiler 11) into the slot of the piano.
Watch the cut scene and zoom in on the last dancer.
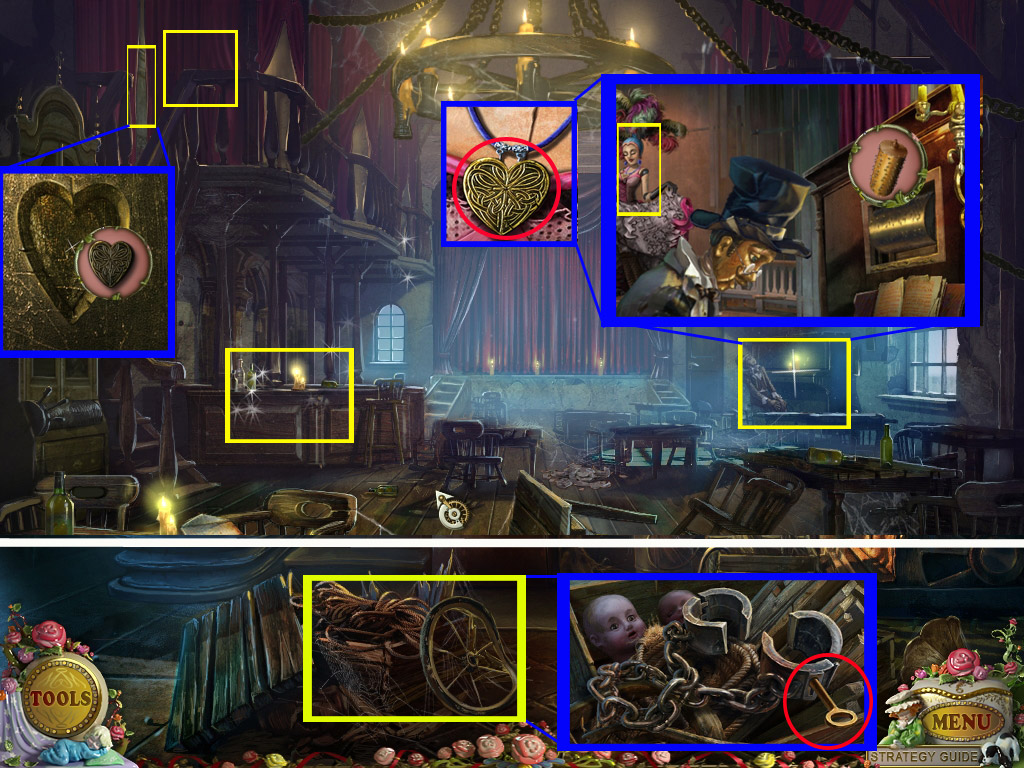
Grab the heart from her necklace.
Click the curtain top right to reveal a door.
Zoom in on that door and place the heart in the empty spot to activate a mini game.
Screenshot
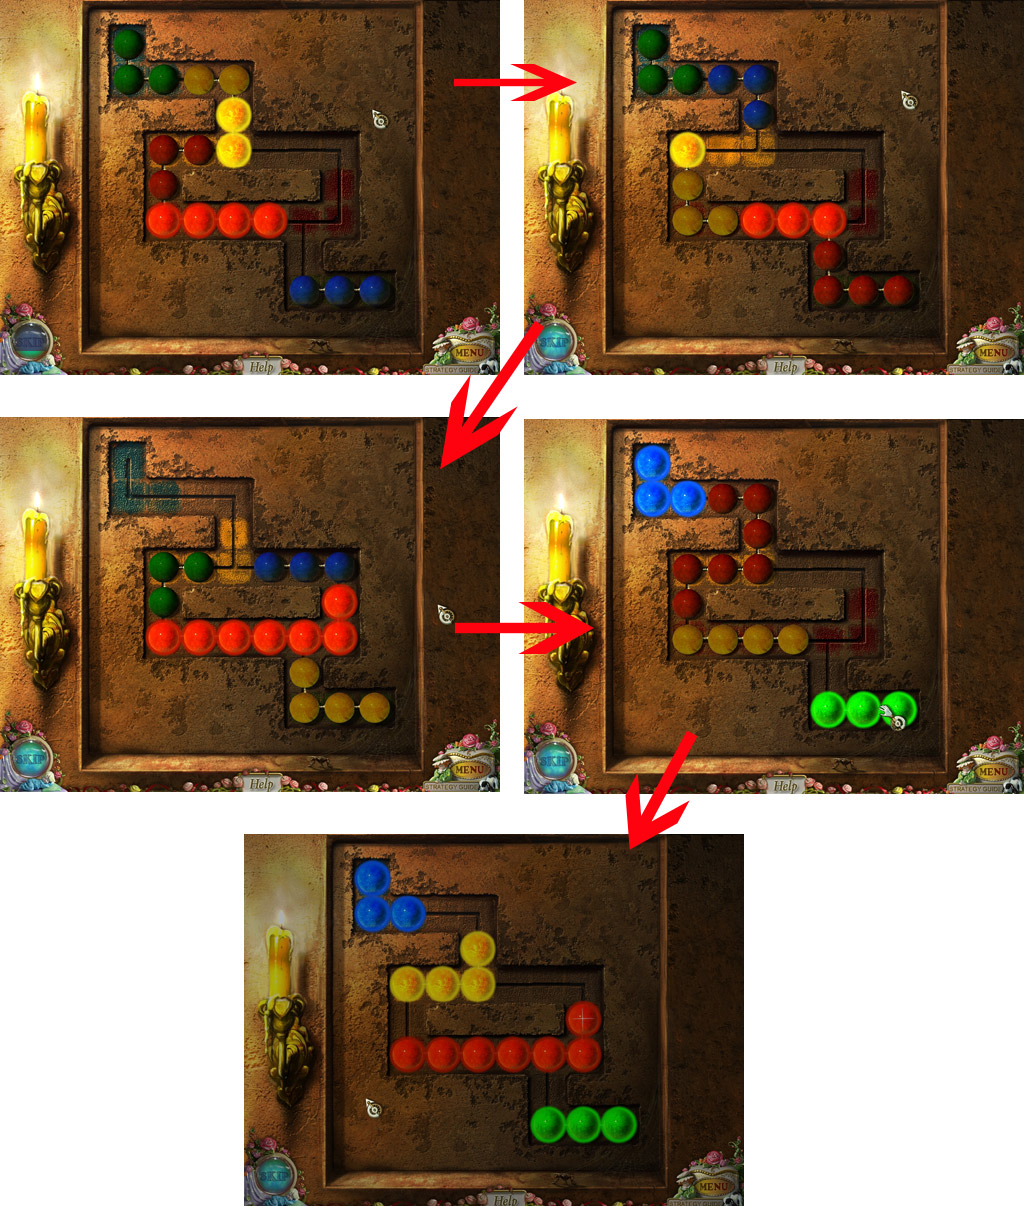
Your goal is it to place all balls in the spots with the matching color.
Drag the balls to move them. The first or last ball in the chain has to lay free.
A ball in the right spot will light up.
You first want to move the green balls completely up; now drag the red ones down but do not block the exit for the blue balls. Drag the yellow balls up to the green balls.
Drag the blue balls next to the yellow ones and the red ones down as far as possible; drag the blue balls to the green now.
Drag the yellow balls to the right so you can move out the red to the to the right and now the yellow balls down; drag the red ones in their spot, the blue to the right and the green balls to the red ones.
Place blue in its place, the green balls to the right and the red to the blue; drag the yellow balls to the red and the green in its spot.
Finally move the red and yellow balls around until they are in their spots.
Please see screenshot for the steps 1-5.
Screenshot
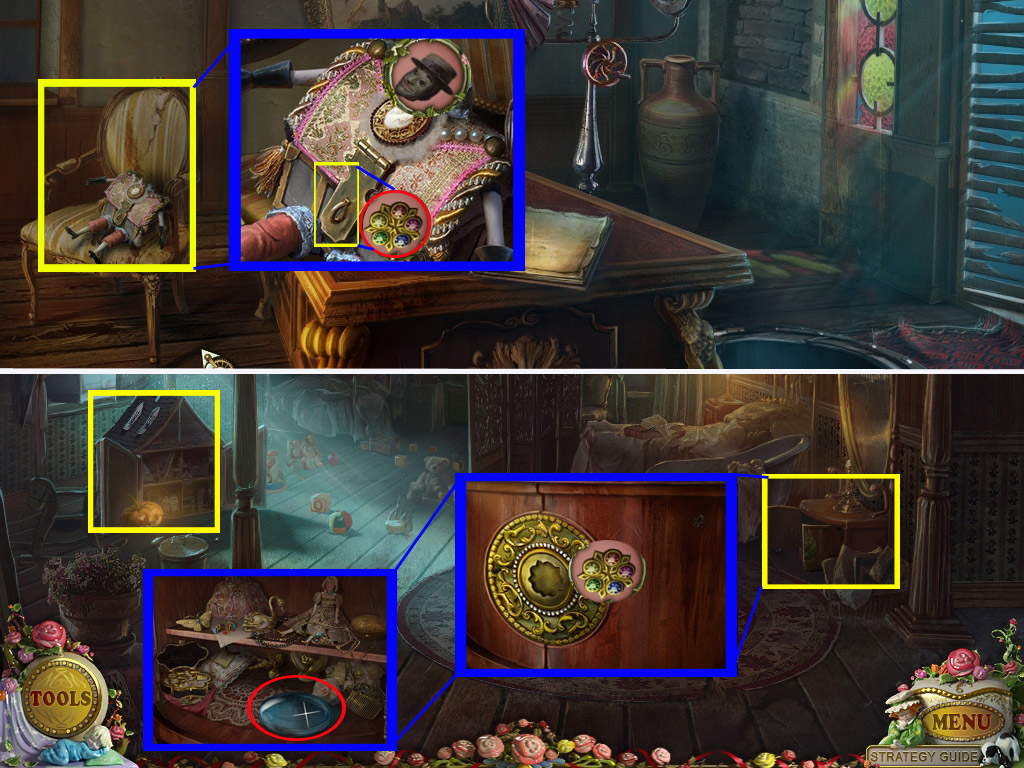
The door opens; enter the room.
Play the search scene on the left side.
Open the doors to find the pink-written objects.
Click inside the curtains on the left to find the head and the ring.
Close the doors to find all other objects and obtain the head.
Leave the Theater, go 1x forward, enter the General Store.
14. General Store
Enter the General Store on the right.
Zoom in on the slot machine on the left side and place the lever (Spoiler 13).
Click the lever once to reveal four buttons.
Your goal is to press the buttons in the right order so that 4 jokers show up in line. Seen from left to right (A-D), press these buttons:
A D C C A A.
Take the bullet that appears at the bottom of the slot machine.
Leave the General Store, go back 3x and enter the Jail.
15. Jail
Play the search scene on the green curtain right next to the canon.
Click the crab on the barrel to make it open the tin can - as this you will find the cake.
Click the spoon on the low right side to find the chess figure.
Find all other objects to obtain the chisel.
Zoom in on the cell door on the left and open the hand cuffs with the key (Spoiler 12).
Zoom in on the chest to activate a mini game. Your goal is to reassemble the picture by using the wheels on top (1 and 2), left (3) and right (4).
Please press in the following order:
1, 2, 2, 3, 3, 3, 4, 3, 4, 3, 1, 1, 3, 1, 1, 1
The chest will open.
Use the bullet (Spoiler 14) at the revolver - the loaded revolver will go into your inventory.
Screenshot
Go back 1x, 4x forward, left to the well and climb up the ladder.
Chapter 5: The Mines
16. Residence/Theater
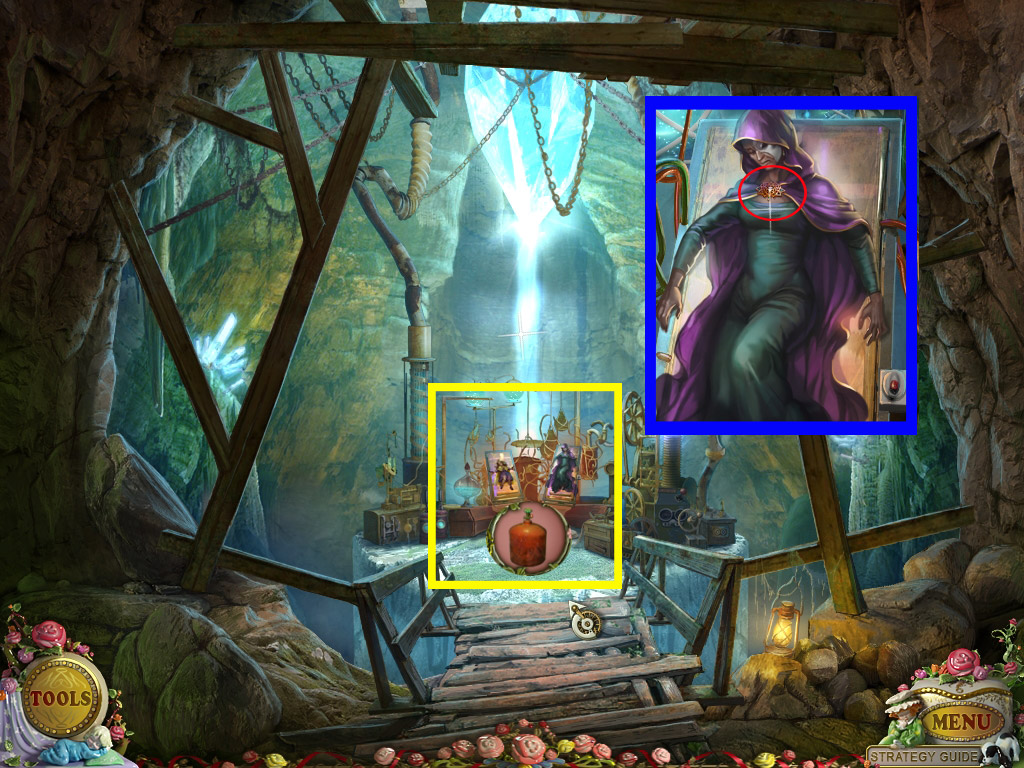
Zoom in on the puppet box on the chair and place the head (Spoiler 13.
Now click the box and you can grab a pendant.
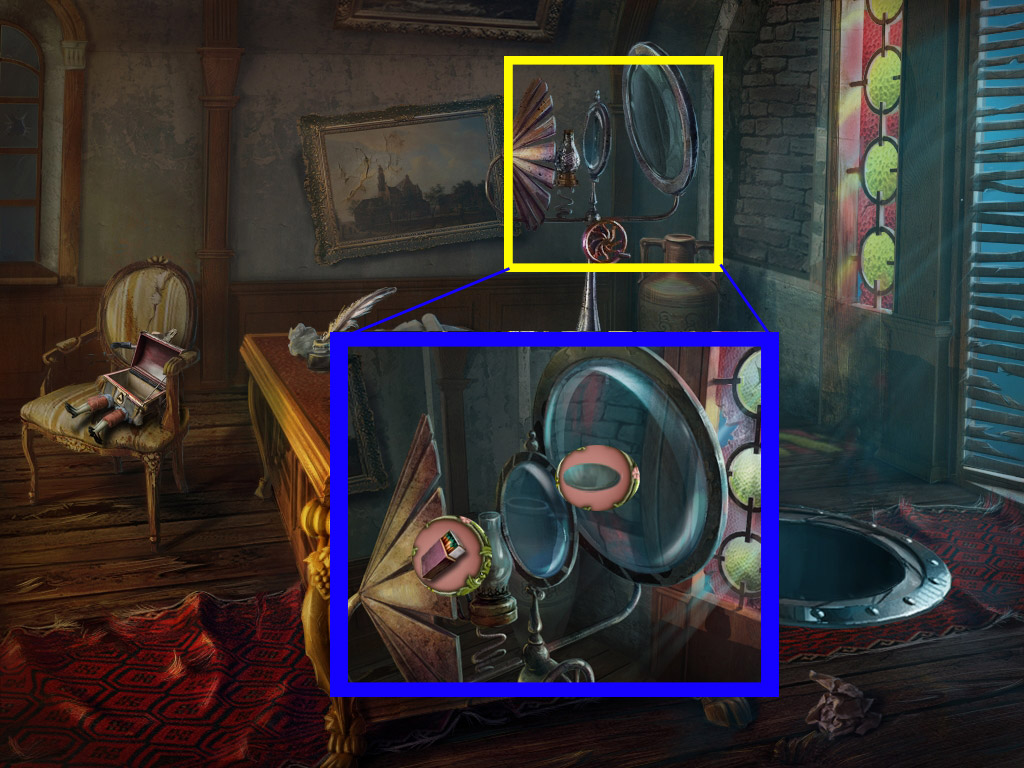
Return to the Theater.
Play the search scene on the left.
Click the paper in the low right to create "origami crane".
Open the door and the curtain inside to find all pink written objects.
Find all items of your list to obtain a mirror.
Zoom in on the armoire on the right side and use the pesticide (Spoiler 9) to get rid of the bugs.
Place the pendant in the slot and click the doors to open and take the lens.
Screenshot
Return to the Residence.
Zoom in on the device and place the lens.
Use the matches to light the lamp.
Screenshot
Exit the Residence and go 1x back on the main street.
Replace the broken mirror on the top of the green house with the one from your inventory.
The lens device sent a light beam out and your goal is to move all mirrors, until the beam will point on the street.
Zoom in on the area the beam points to and click the stone.
Take the gears.
Screenshot
Go one step forward.
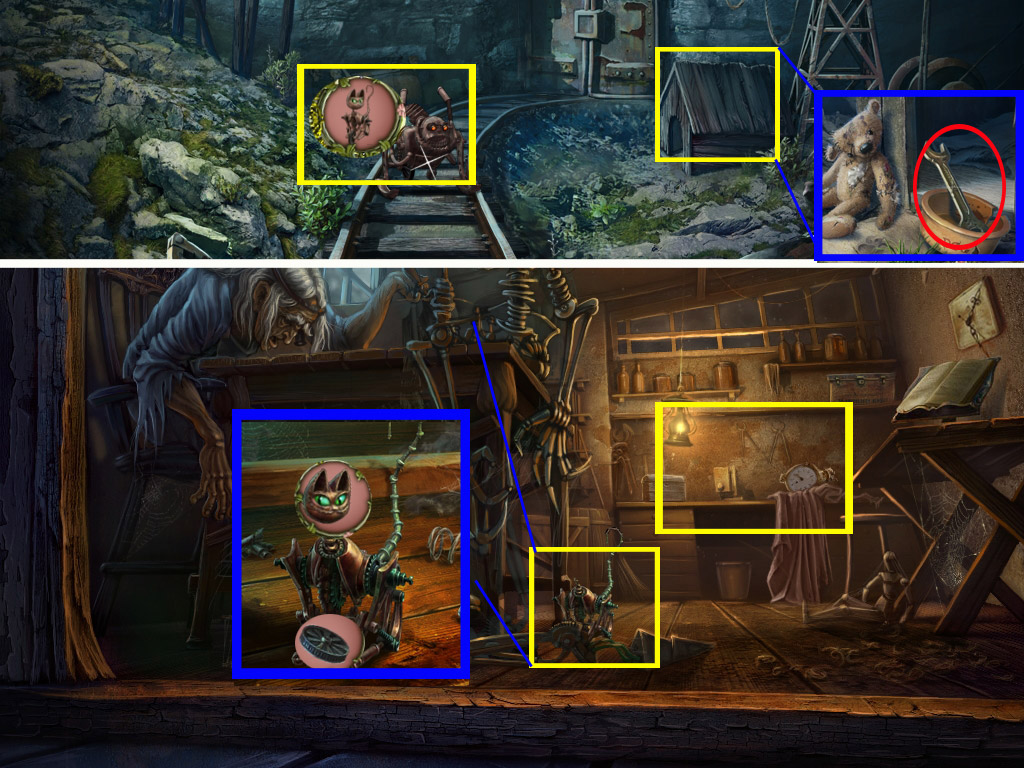
17. Mines/Toymaker
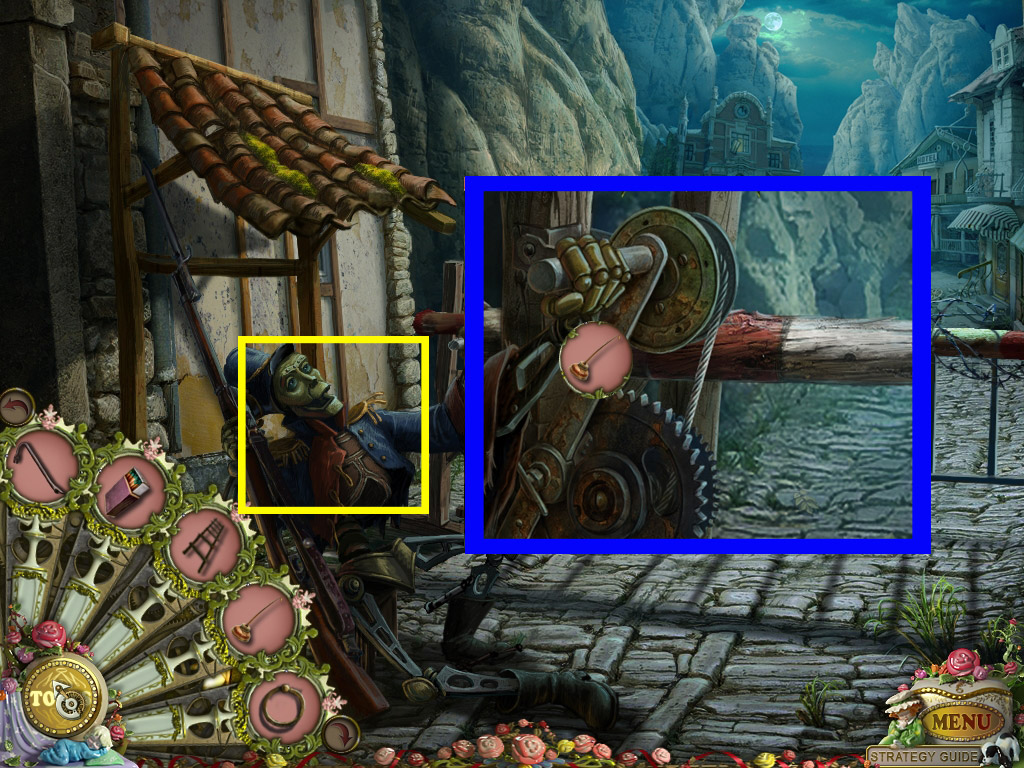
Use the revolver (Spoiler 15) to shoot a hole in the water tank in front of you.
Wait until the water stops floating and click to move it.
Click the gates to open and go one step forward.
Grab the puppet wheel on the right side.
Screenshot
Go back twice and enter the Toymaker's house.
Play the search scene - the crowbar can be found in the bottom drawer, the rest of the pink written objects you will find behind the red curtains.
Find all objects to obtain a cat head.
Zoom in on the broken device on the ground in front of the table and place the puppet wheel and the cat head.
Take the cat puppet.
Return to the Mine Entrance and use the cat puppet with the dog puppet.
Zoom in on the dog house on the right and grab the wrench.
Screenshot
Zoom in on the door.
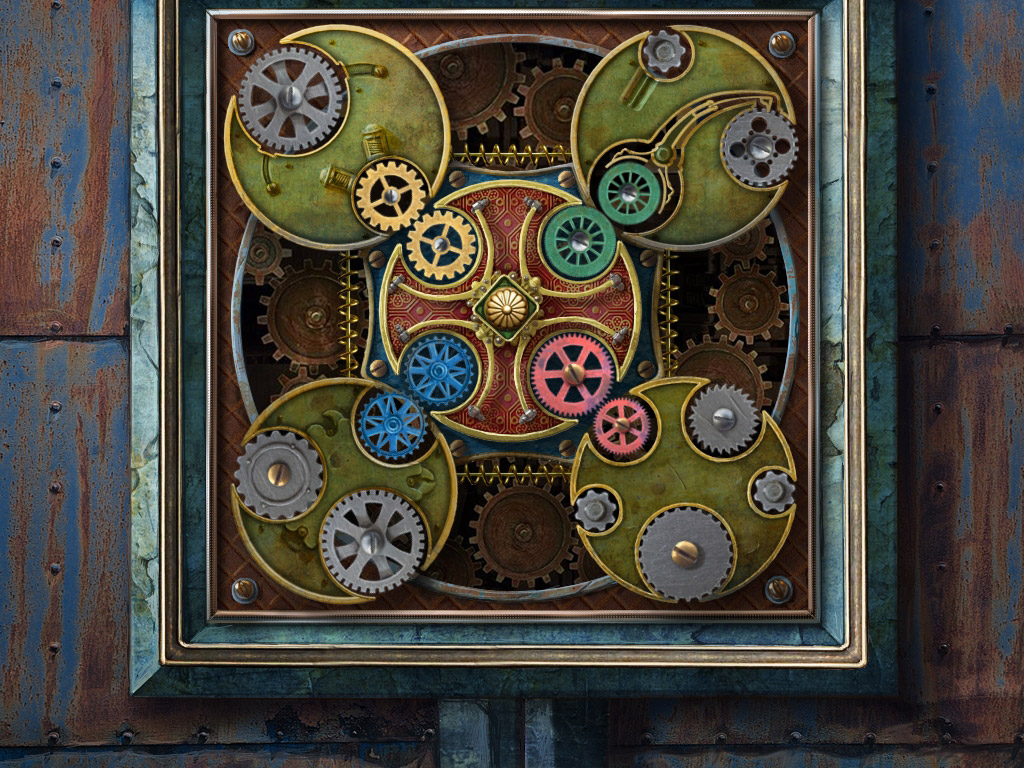
18. Enter the Mines
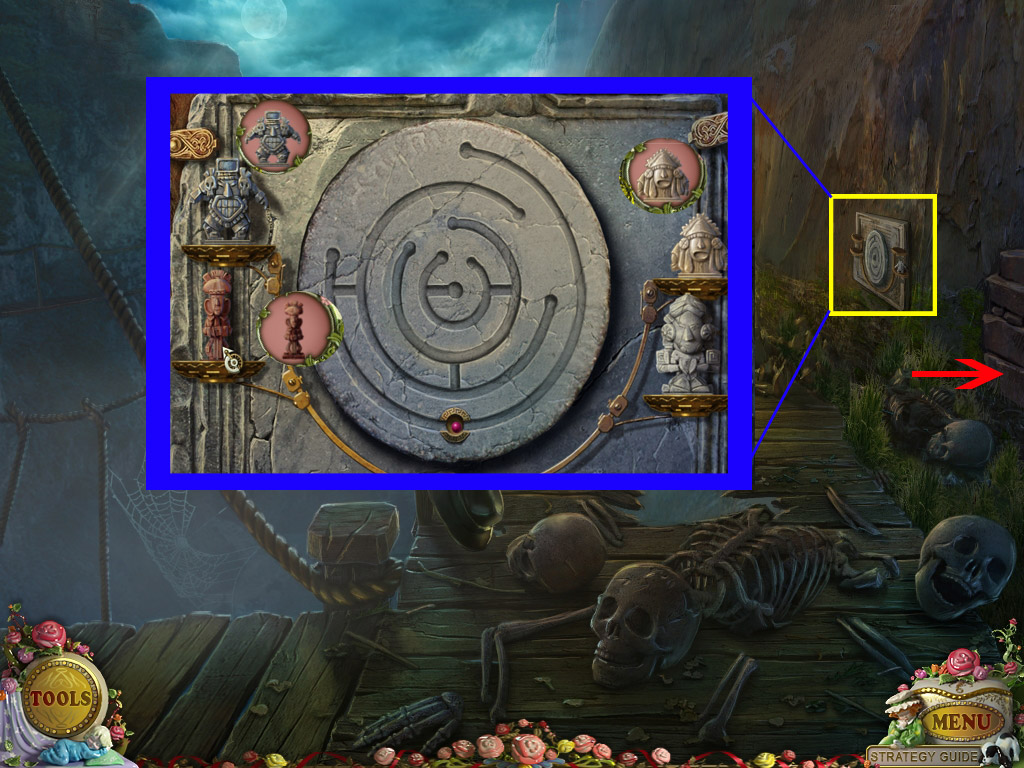
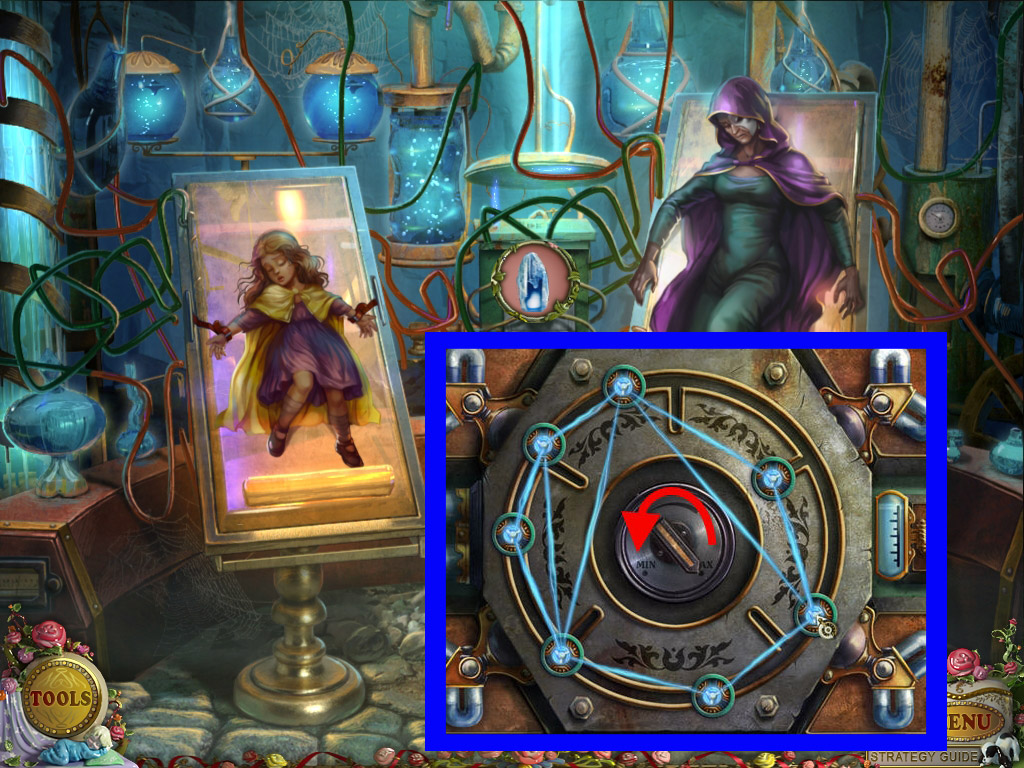
Place the gears (Spoiler 16) on the puzzle.
Your goal is to move the outer circles to match the colored gear with the gear in the inner circle. The puzzle is randomized, so it is not possible to post a solution.
Screenshot
When done, enter the Mine through the door.
Chapter 6: The Train
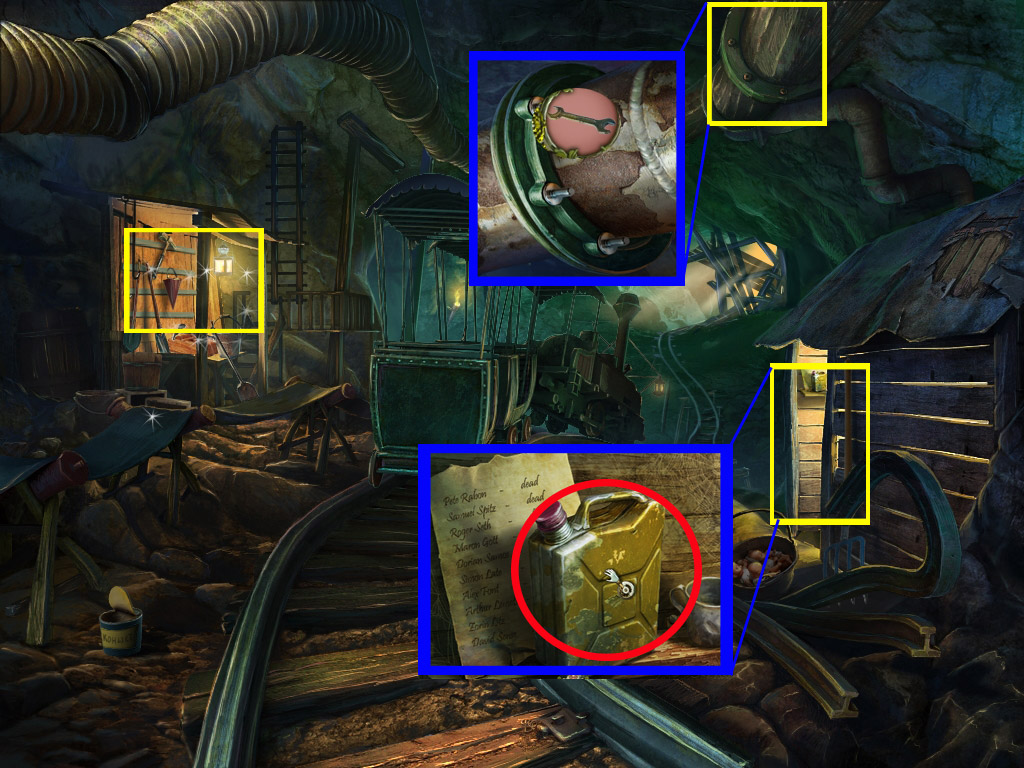
19. Train Area
Zoom in on the pipe top right and use the wrench (Spoiler 11) to fasten all screws.
Play the search scene at the work bench on the left side.
The bearing can be found in the chest on the table, the spring in the crate under the table.
Find all objects to obtain an empty sack.
Zoom in on the shed on the right side and grab the fuel can.
Screenshot
Go forward 1x.
20. Train
Play the search scene on the left side.
The photo can be found in the suitcase and the pearl inside the oyster.
Find all objects from your list to obtain the valve.
Grab the broken train wheel from the ground.
Go 1x back and play the search scene at the work bench.
The pipe joint can be found in the chest, for the number 28 click the vise lever.
Find all other objects to obtain a sledge hammer.
Screenshot
Go 1x step back.
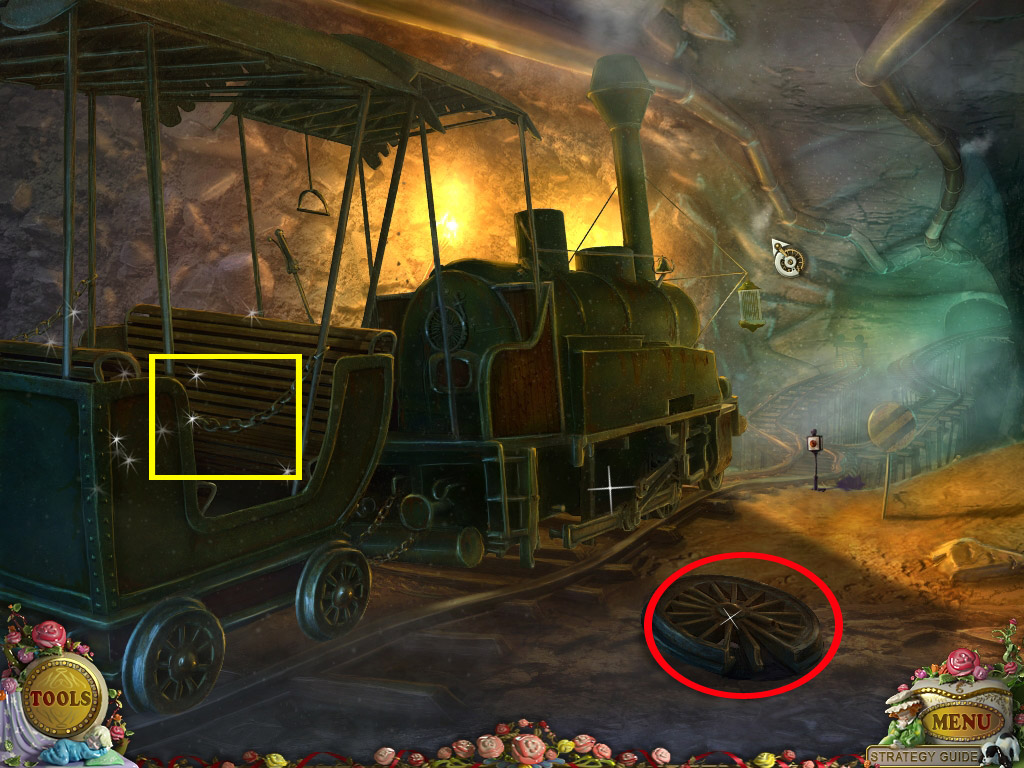
21. Repair the broken train wheel
Play the search scene to the left, next to the water tank.
Click the yarn to get the sock; find all objects to obtain a hammer.
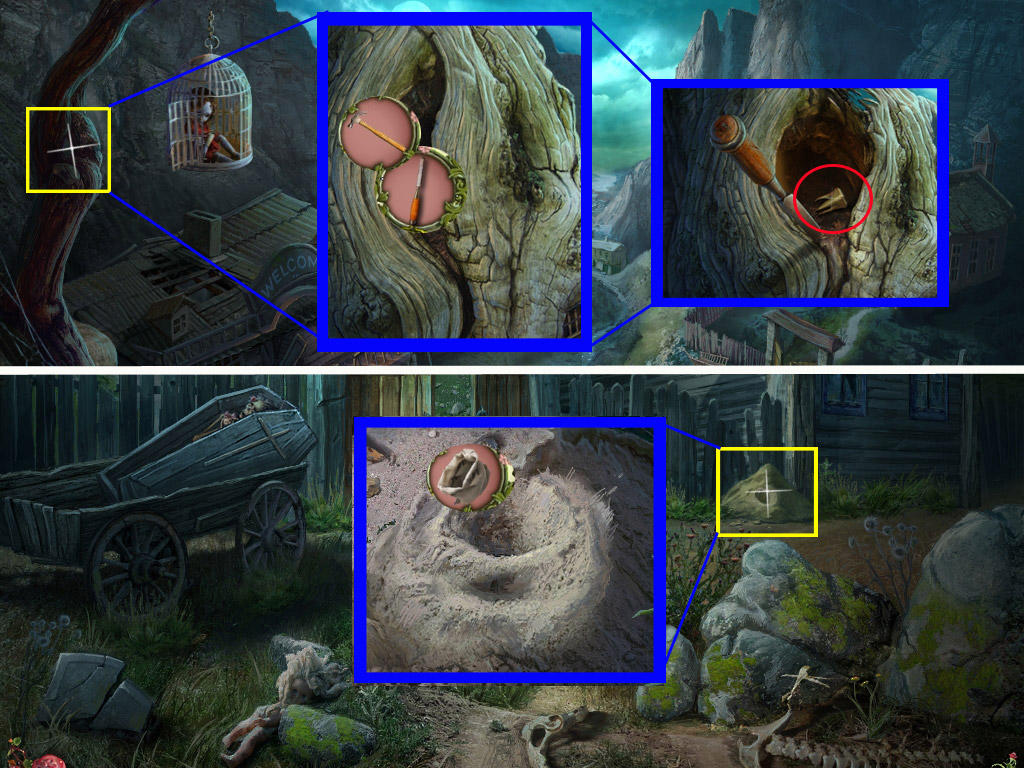
Go back 3x time and zoom in on the hole in the tree on the left side.
Use first the chisel, then the hammer to open the hole further (click 2x)
Take the golden tooth.
Go to the left and zoom in on the sand heap at the right side of the fence.
Use the empty sack (Spoiler 19) at the sand heap.
A bag with sand will go into your inventory.
Screenshot
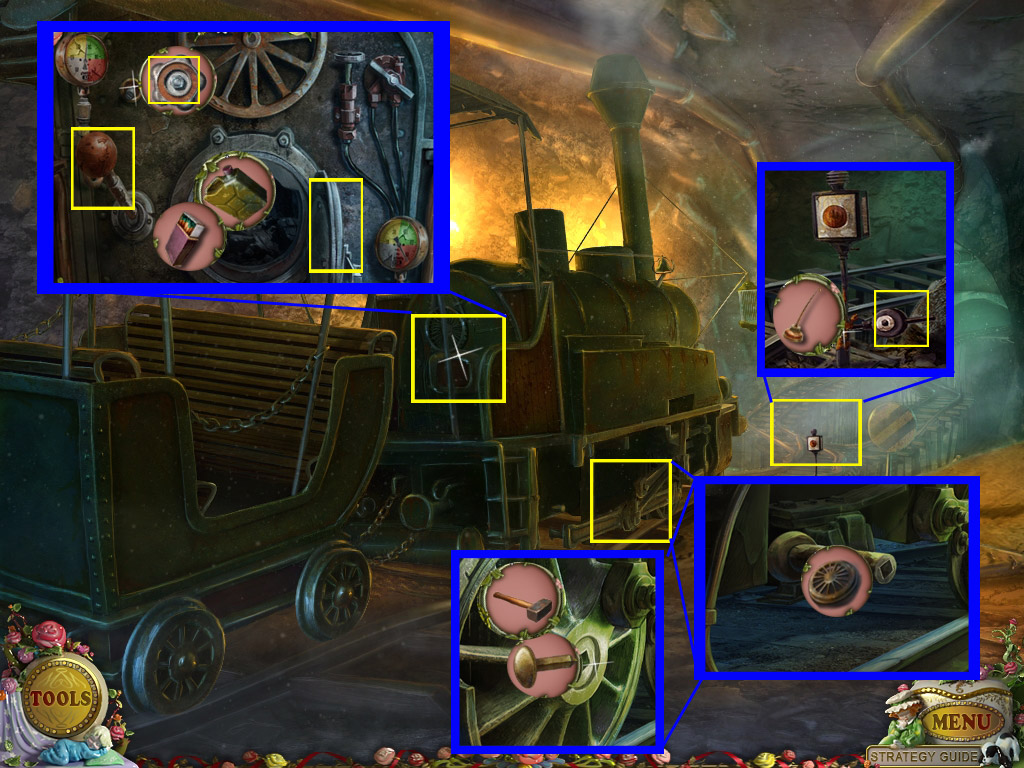
Go back to main street, 1x forward and enter the Blacksmith on the left side.
Zoom in on the hook on the left side and place the bag with sand.
Zoom in on the anvil and place the broken train wheel (Spoiler 20) on it.
Wait until the robot stops working, then zoom in again and take the repaired train wheel.
Screenshot
Zoom in again and place the golden tooth.
Wait until the robot is done and take the gold coin.
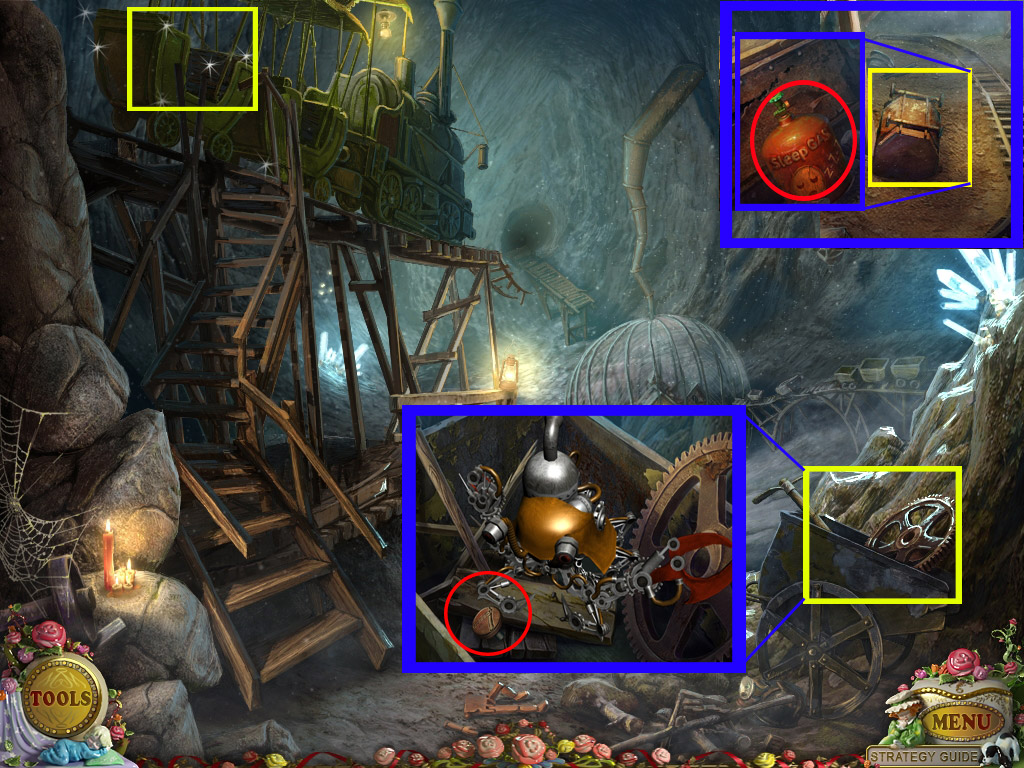
Exit the Blacksmith and enter the General Store on the other side of the road.
Zoom in on the cash register, place the coin in the coin slot and take the winding gear out of the first drawer.
Play the search scene at the back.
The french curve can be found in the chest. The ant will be seen when the bear's arm is down.
Find all objects to obtain a clock weight.
Return to the Train.
22. Start the Train
Zoom in on the bottom of the train and place the repaired train wheel (Spoiler 21).
Place the spike (Spoiler 7) in its hole and use the sledge hammer (Spoiler 20) to fasten the wheel.
Click the tracks in front of the train and oil (Spoiler 8) the lever; click the lever to divert the tracks.
Zoom in on the motor of the train.
Use the fuel can (Spoiler 19), then the matches (Spoiler 1), with the coal.
Close the door to the coal oven.
Place the valve (Spoiler 20) at the bolt right next to the lever and click the valve once.
Click the lever.
Screenshot
The train will open up a new way for you to go further.
Go 1x forward.
Chapter 7: Finding Suzy
23. Enter the Barber Shop
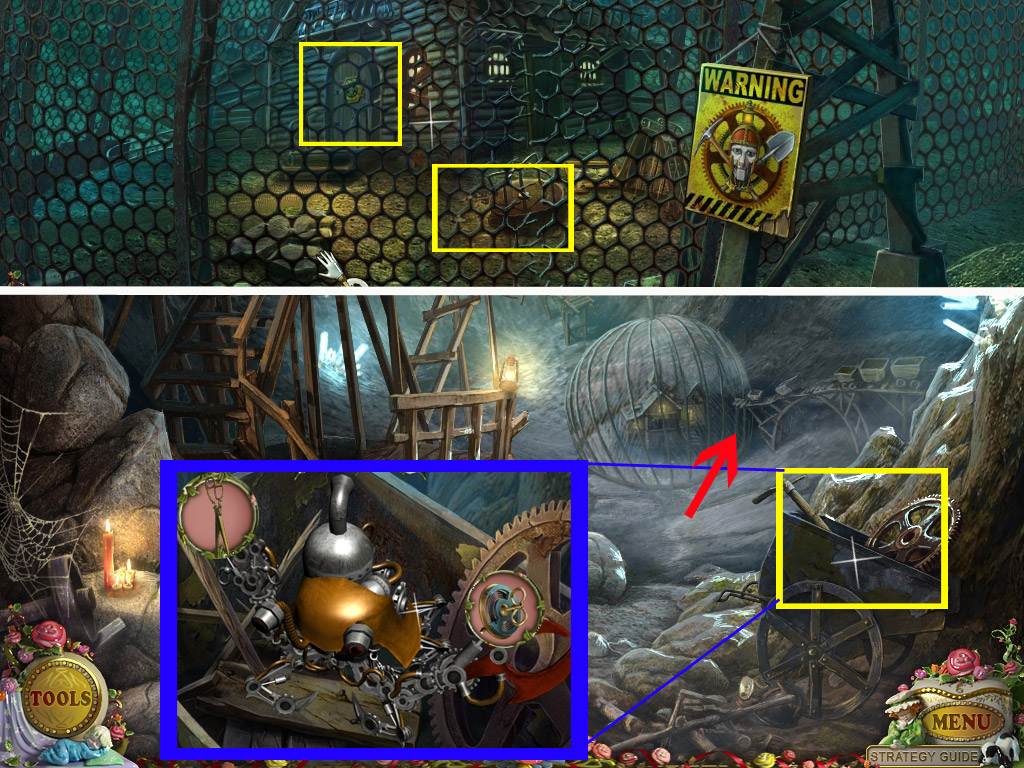
Zoom in on the broken cart on the far left and take the sleep gas.
Go 1x forward.
Play the search scene on the top; the cuckoo bird can be found by clicking on the cuckoo clock.
Find all objects to obtain a grasshopper tile.
Zoom in on the box in the lower right and take the barber button.
Screenshot
Go back until you stand on the place with the light beams.
Zoom in on the the door of the Barber Shop on the right side.
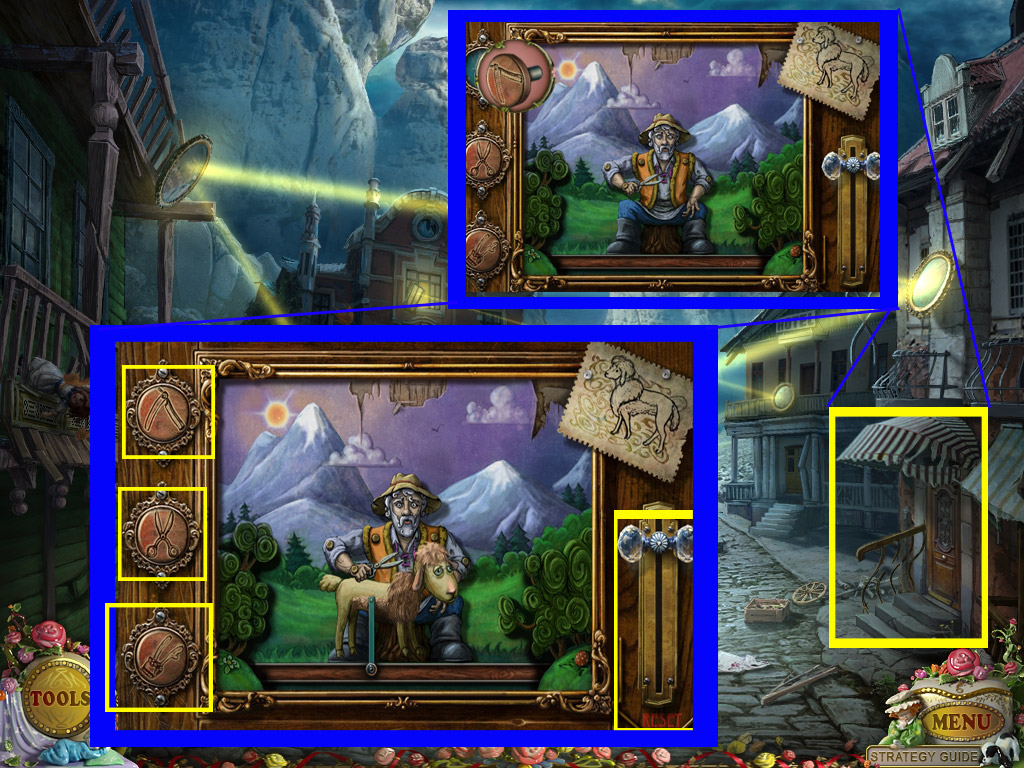
Place the barber button on the empty position on top.
A sheep appears. Your goal is to press the three buttons in the right order to make your sheep look like the one on the drawing top right. When you have a incorrect sheep, push the reset button on the right side and you will get a new sheep.
You want to push the buttons in the following order:
Top, middle, bottom, top.
Screenshot
Enter the Barber Shop.
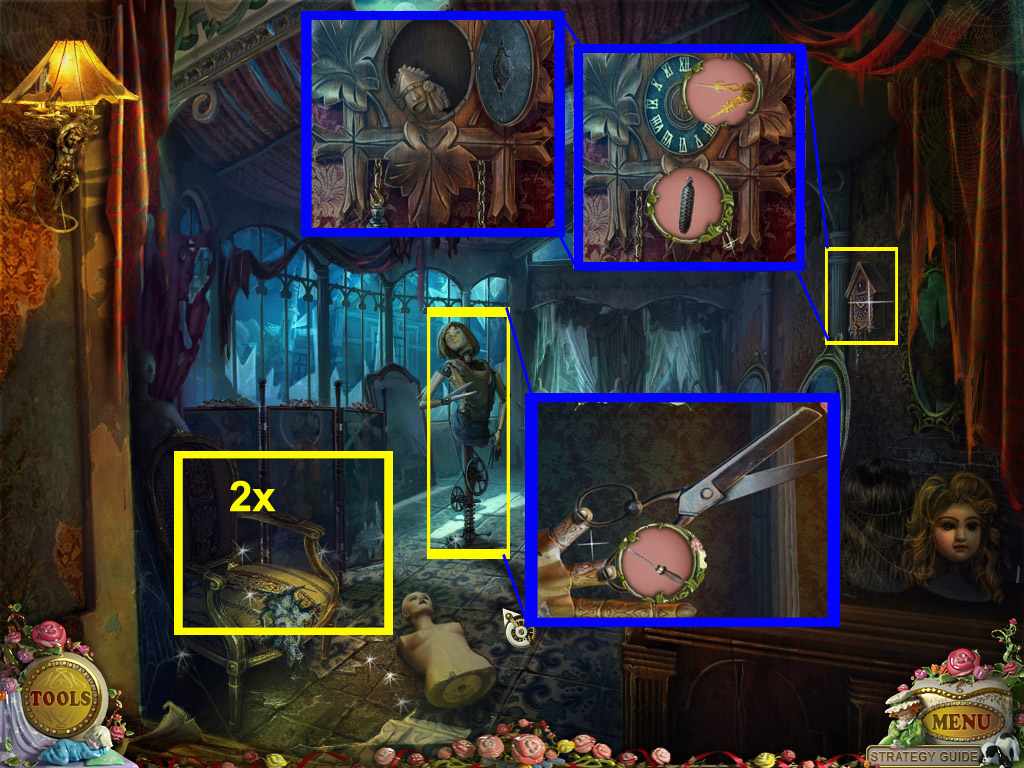
24. Barber Shop
Play the search scene on the right side to obtain a screwdriver.
Click the revolver on the right to make a bullet hole on the left.
As soon as you finished the search scene, another one will be activated.
Play the search scene to obtain clock hands.
Click the beads and the string at the low left side to get beads.
Zoom in on the mannequin in the middle of the room and use the screwdriver to remove the screws.
Take the scissors.
Zoom in on the cuckoo clock on the far right wall.
Place the clock weight (Spoiler 21) and the clock hands.
The door on top of the clock will open - take the ivory statue.
Screenshot
Exit the Barber Shop and enter the Residence.
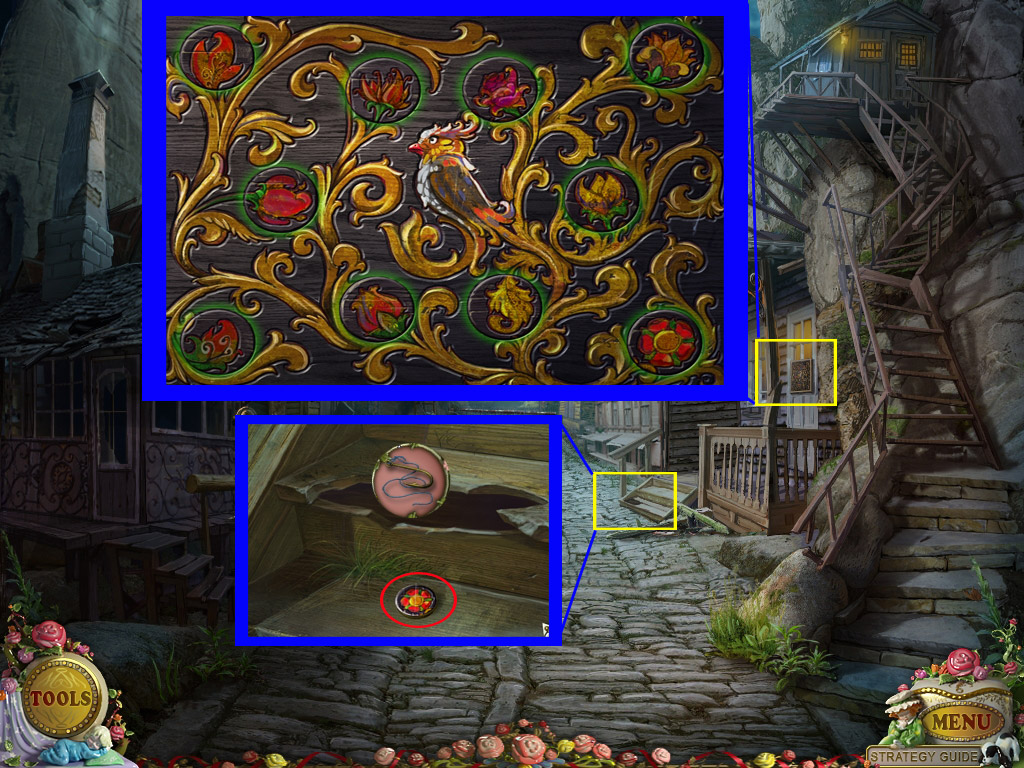
25. Residence
Play the search scene at the stairs.
The plane can be found inside the chest on the right side.
To find the dragon, click the cloth on the monkey's lap on the right side.
The cloth will clean the window behind the monkey, and you can click the dragon.
Find all objects to obtain a triangle (1/2).
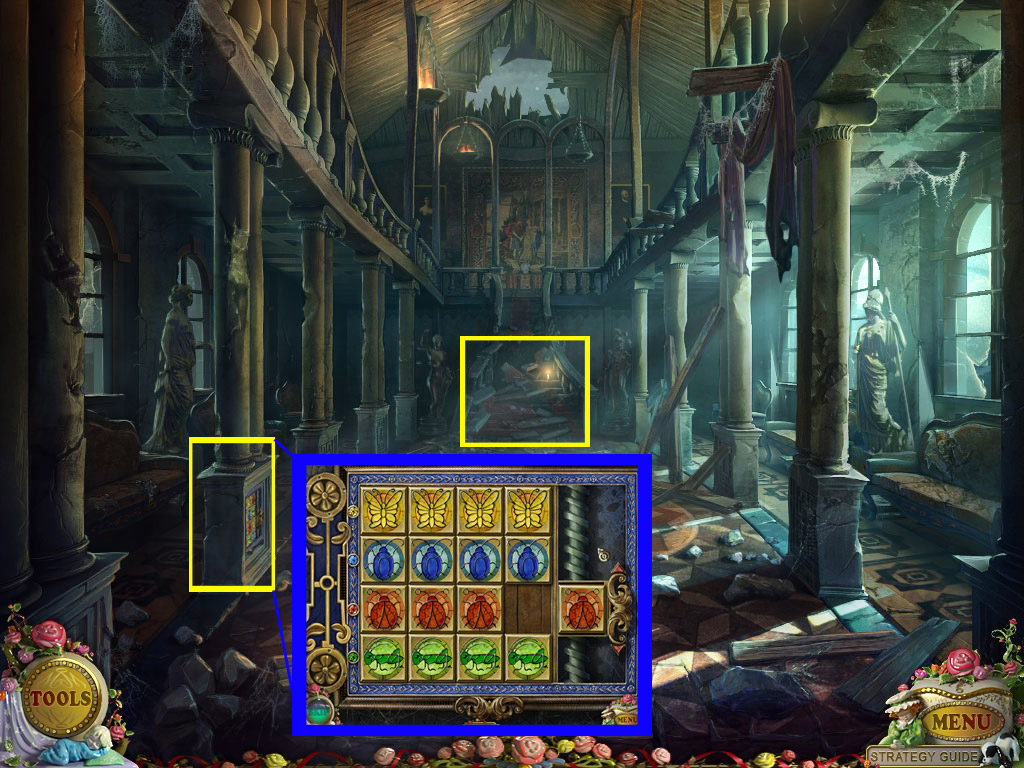
Zoom in on the bottom part of the first column left side and place the grasshopper tile (Spoiler 23).
Your goal is to slide all tiles so that the color of the animals match the color of the gem on the left side.
Use the spot on the right side as a "parking lot"; you may use the arrows to move this "parking lot" up and down if needed.
Screenshot
Take the wooden statue out of the compartment afterwards.
Exit the Residence and go 5x forward.
26. Mine
You are now at the mine part where you see the train top left.
Zoom in on the cart on the right side and place the scissors (Spoiler 24) at the puppet's left arm (seen from your side) and the winding gear (Spoiler 21) on its right arm.
The crab puppet will run away. Follow it with the arrow to the right side.
The crab cut the fence. Click the fence to activate a search scene.
Play the search scene to obtain a triangle (2/2).
Zoom in on the door behind the fence.
Screenshot
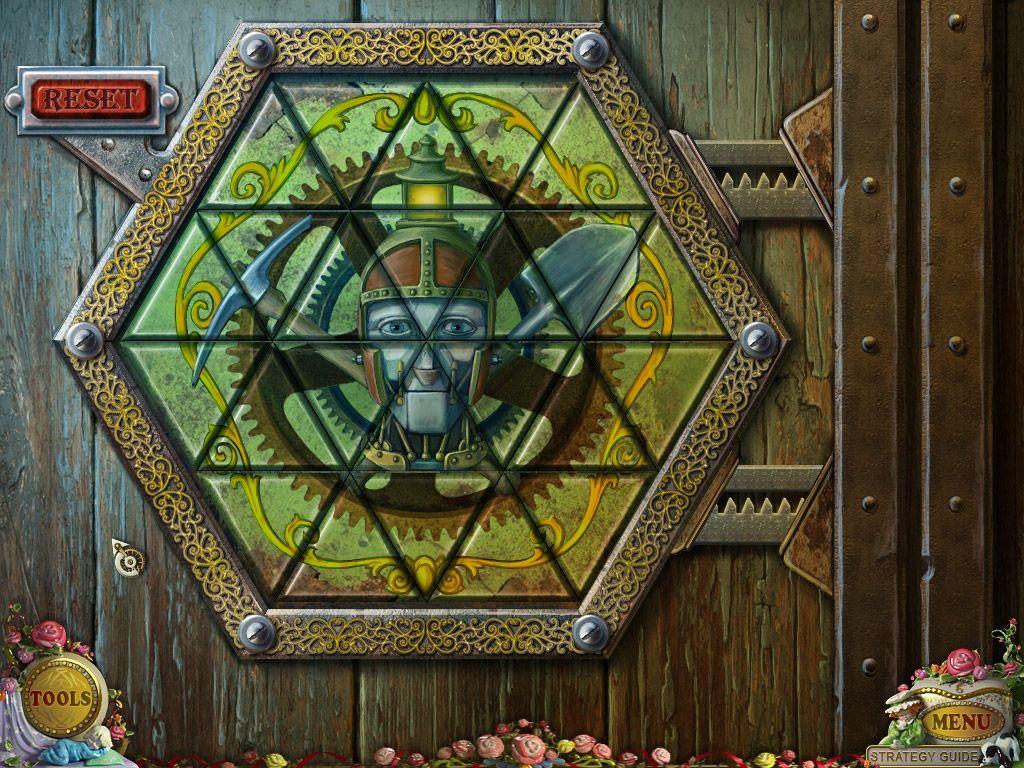
Place the 2 triangles (Spoiler 25 and here) on the board. Your goal is to assemble an image.
Clicking the center of a triangle will make it rotate. Clicking the border between neighboring triangles will make them swap places.
Screenshot
Enter Felicia's house and leave at once, because this activates another search scene outside.
Play the search scene to obtain a key.
To find the key, click the car on top of the slide; take the key when the car is at the bottom of the slide.
To find the envelope, click the little bag next to the crate on the left side.
Enter the house.
27. Felicia's House
Zoom in on the box on the right side and place open the lock with the key.
Click again to activate a puzzle. Your goal is to bring all four shapes from column 1 to column 3.
The shapes in column 3 have to be in the same order as in column 1.
You can only move one shape at time.
Each shape can only go on a spot with its marking.
To move a shape click first the shape and then the spot you want it to move to.
Move the shapes in the following order:
Move square to column 2.
Move triangle to column 3.
Move square to column 3.
Move diamond to column 2.
Move square to column 1.
Move triangle to column 2.
Move square to column 2.
Move circle to column 3.
Move square to column 3.
Move triangle to column 1.
Move square to column 1.
Move diamond to column 3.
Move square to column 2.
Move triangle to column 3.
Move square to column 4.
Screenshot
The box will open; grab the key.
This will also open the door to the left.
It seems that Suzy was kept there but is gone now.
Go back 3x and use the key on the door on the left.
Enter and you will have found Suzy.
Chapter 8: Rescue Suzy
28. Felicia's Lab
Place the sleep gas (Spoiler 23) on the ground.
Wait until the green steam is gone and zoom in on Suzy and Felicia.
Grab the brooch from Felicia.
Screenshot
Go back 9x to come back to the bridge.
29. Finale
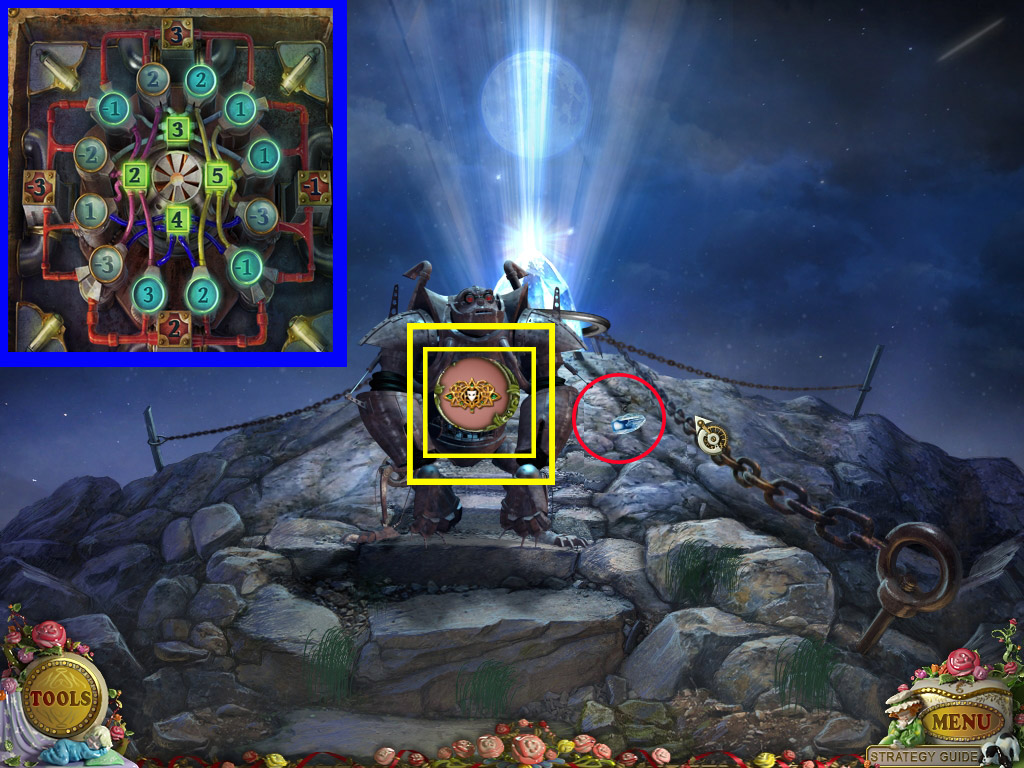
Zoom in on the puzzle on the wall on the right side.
Place the three statues on the empty spots. Your goal is to bring the red ball into the golden hole at the bottom
To do this, you will have to move the circle.
To do so, swap the statues - this will work as a scale.
When you want the circle to move to the right place, move the more heavy statues on the right side and other way around.
When the ball falls into the hole, stones will appear at the wall. Use them.
Screenshot
Click Felicia's brooch at the large puppet and zoom in on it after to activate a puzzle.
Your goal is to trace the wires leading to the green numbers. Click the blue numbers that add up to the connected green number. The red numbers may not light up.
When done, the large puppet will start to destroy the huge crystal behind it.
Pick up the shard of the crystal from the ground.
Screenshot
Return to Felicia's Lab.
Zoom in on the device and place the crystal between the two holders in the middle to activate a mini game.
Your goal is to untangle the strings.
Move the circles around and place circles in your way into the slides.
Screenshot
Watch THE END
Posted by: Kayleigh |
March 24, 2011 3:56 PM
|
March 24, 2011 3:56 PM