
Women's Murder Club 4:
Little Black Lies
Platform: Windows
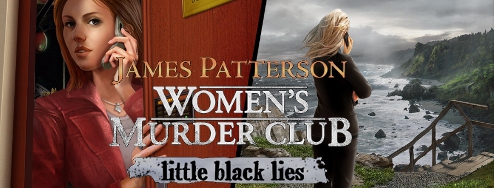
![]() When best-selling true crime author Regina Blacklock turns up dead, the police think it's suicide or an accident. Her friend Claire Washburn, chief medical examiner for San Francisco, knows better, and not just because Regina apparently scrawled Claire's name at the scene of the crime before she died. Women's Murder Club 4: Little Black Lies is a hidden-object mystery adventure about a little town and a very big secret. Based on the best-selling books by James Patterson, the Women's Murder Club series is about four women who are frequently drawn together to use their varying skills to solve mysteries. Which is entirely different from the murder club I have with my friends... uh... forget I said that.
When best-selling true crime author Regina Blacklock turns up dead, the police think it's suicide or an accident. Her friend Claire Washburn, chief medical examiner for San Francisco, knows better, and not just because Regina apparently scrawled Claire's name at the scene of the crime before she died. Women's Murder Club 4: Little Black Lies is a hidden-object mystery adventure about a little town and a very big secret. Based on the best-selling books by James Patterson, the Women's Murder Club series is about four women who are frequently drawn together to use their varying skills to solve mysteries. Which is entirely different from the murder club I have with my friends... uh... forget I said that.
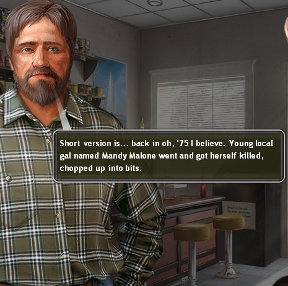 Swapping perspectives between the women, you'll solve puzzles and search for clues in a remote town that would like to pull in the tourists, but resents you prying around old wounds. See, Regina, it turns out, had intended to use a 35-year-old unsolved murder as the basis for her next book; a young girl who was rumoured to be involved with a cult, and was discovered dismembered decades ago. Although the police had their suspects, they couldn't prove anything... but Regina might have gotten a little too close to the truth in her investigations. Sounds like a good time for you to go sticking your nose in, too, eh?
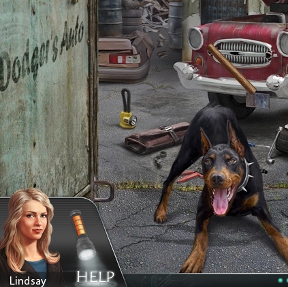
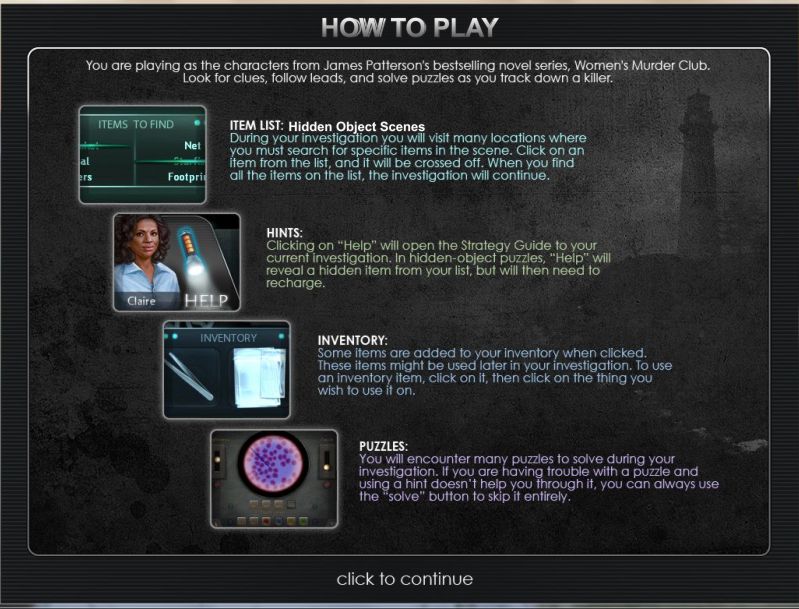
Most of the game is played like a standard point-and-click, searching locales for items or points of interest and gathering inventory objects to be used later. Hidden-object scenes are marked with shimmering sparkles (ooooh) and playing one will net you a few items you'll need to use. Most of the puzzling is split equally between figuring out what item you need to use where, and good ol' fashioned brain twisters. If you get stuck, clicking on the recharging flashlight next to your character's portrait will give you a clue. The game also comes with a built-in strategy guide that can be accessed at any time by clicking on the folder icon in the bottom right corner.
 Analysis: I've never read any of James Patterson's books, but Little Black Lies reminds me of what I call "afternoon snacks"; short, pulpy novels you devour in a sitting. All the characters and plot points are about what you'd expect in your typical contemporary mystery story, up to and including the usual small town stereotypes. If you've read a suspense story written within the last twenty years, you've probably seen variations on all these characters before. And yet, it works. It's entertaining, has a few good twists, and most importantly, is told well. Things unfold at a natural pace, and the game is good at giving out just enough clues to keep you interested. The story isn't going to break any new ground, but it's got a likable cast, and is at least as interesting as most of your standard lineup of cop dramas. If you enjoy NCIS, CSI, L&O, or any other random grouping of letters, you'll probably enjoy this too. (Speaking of, isn't it about time Crossing Jordan got its own hidden-object game?)
The grim and gritty atmosphere the story calls for doesn't quite make it into the gameplay, which isn't that challenging, and is occasionally downright goofy. Characters tend to make large leaps of logic and do things that seem absolutely pointless just because the plot requires them to, or because it makes the game longer. It's also a little disappointing that the game involves so much backtracking and in such a limited range; you'll explore the same places repeatedly with different characters, usually with only minor changes, and solve the same hidden object scenes multiple times before you see any new locations. Even then, the game still sends you back to places you've been before, over and over, until you're ready to set that freaking library on fire just to change the scenery and... uh... sorry... went to a place there that was kinda... hm. Where was I?
But despite this, Little Black Lies is a solid title. It's incredibly well presented, with great artwork, sleek interfaces, and a nicely done soundtrack. It's great to see such a professional piece of work come out on the market, and while fans will be happy to see their favourite characters return true to form, newcomers (such as myself) will also find the game fun and accessible. It's not incredibly original, but it will provide a satisfying chunk of creepy mystery solving to keep you sniffing for clues for a good long while.
![]() Windows:
Windows:
Download the demo
Get the full version
![]() Mac OS X:
Mac OS X:
Not available.
Try Boot Camp or Parallels or CrossOver Games.


Walkthrough Guide
(Please allow page to fully load for spoiler tags to be functional.)
James Patterson's Women's Murder Club: Little Black Lies Walkthrough
General Tips and Information
Your Welcome Screen choices including the usual play and quit and you can view credits, select your profile and options.
Options include full screen with a widescreen adjustment, viewing tips, and VSNC which you are told that turning off may improve performance on some computers.
As you play the game characters will be added to the Dossiers.
Other extras such as wallpaper, soundtracks, epilogue, and find-all mode will not be added until you have completed the game.
Screenshot
A Help screen is available from the game play menu as is Options and don't forget to exit and save otherwise you will have to begin the current Investigation all over again.
Hidden Object Scenes are random but will be marked because you will come back to the scene more than one time.
If you are having trouble finding an item check all screenshots for that location or choose the Help button at the bottom of the screen.
Hints are unlimited from the Help button but it will need time to recharge once you have used it.
At least one key object from the Hidden Object Scenes will go into your Inventory as will some other items you collect along the way.
Puzzles will need to be solved during the investigations so if you are having trouble, you can use the Solve button to skip.
Screenshot
When you have completed the game you will be able to access Find-all mode which will give you the opportunity of replaying Hidden Object Scenes.
Screenshot
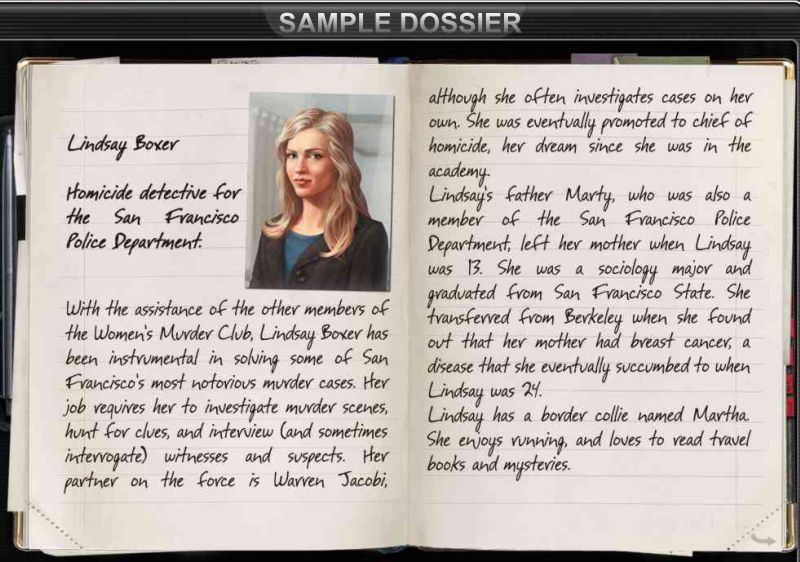
You will be playing as different characters from the Women's Murder Club during the game.
The Dossiers will tell you about them as well as the other people you encounter on your journey.
Screenshot
The book in the lower right corner of the scenes will follow your investigations.
There is also a tab for a strategy guide in case you need a quick fix.
Screenshot
You will receive a Map of the area during one of your investigations.
You can then click on the map to transport to other locations that aren't in the immediate vicinity of your current location.
Screenshot
Golden arrows will show you other locations to go to.
A blue hand will indicate something to move or pick up.
A magnifying glass shows that you need to take a closer look at that area.
Don't forget to exit out of close ups.
Investigation 1: Claire Washburn
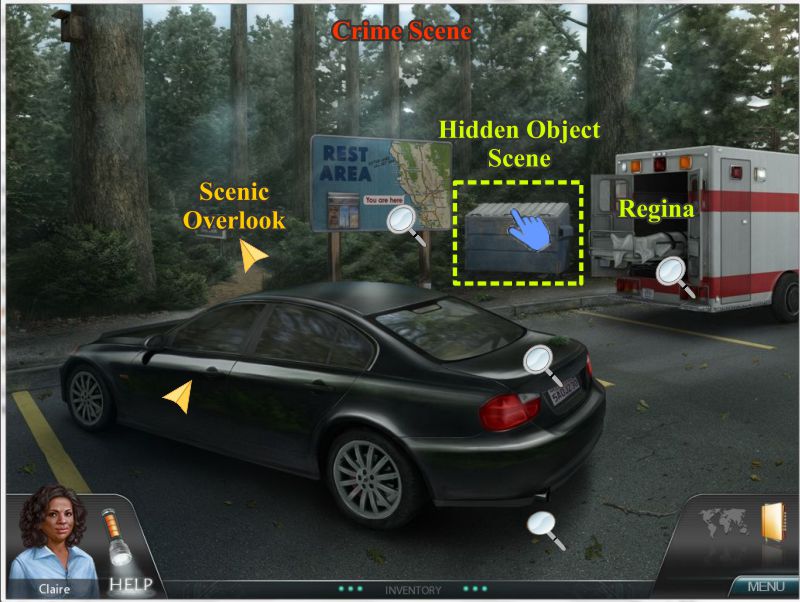
Crime Scene
Claire's friend Regina has been found dead and a message on the windshield called out to her so she goes to the crime scene.
Take a look at everything with a magnifying glass.
You will have to wait to play the Hidden Object Scene until you have something to prop open the dumpster.
Screenshot
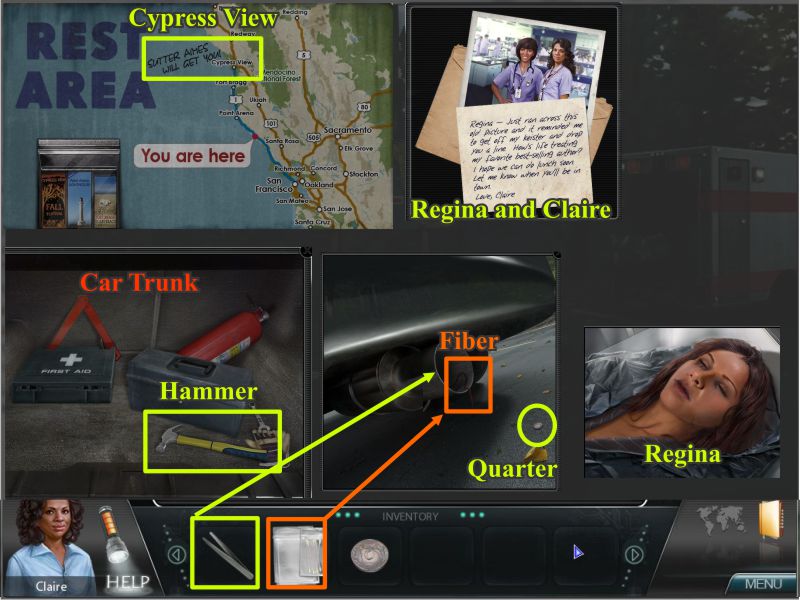
The Rest Area map shows Regina may have been in Cypress View.
Check Regina in the ambulance.
Open the car trunk and take the hammer.
Go to a close up of the tail pipe and pick up the quarter on the ground.
Use your tweezers to retrieve the fiber from the tail pipe and bag it as evidence.
When you look at the picture of Claire and Regina that is inside the car it will disappear.
Screenshot
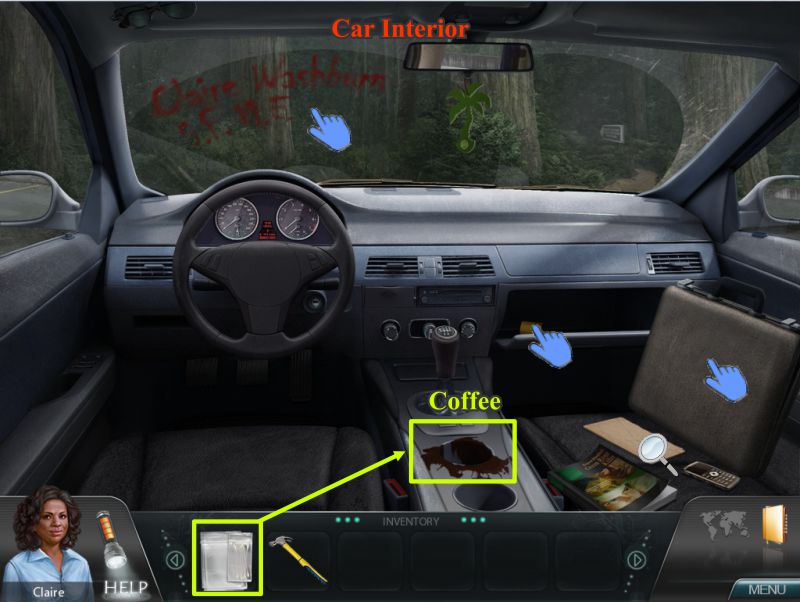
Go into the car and note the windshield lipstick message and the lipstick cap in the glove compartment.
Also note that Regina's laptop is missing and collect a sample of the spilled coffee as evidence.
Screenshot
Scenic Outlook
Go to the Scenic Outlook and use the hammer to take the nail out of the board.
Note the seagull with something red in his mouth.
Place the quarter in the telescope for a Hidden Object Scene.
Screenshot
Shoreline
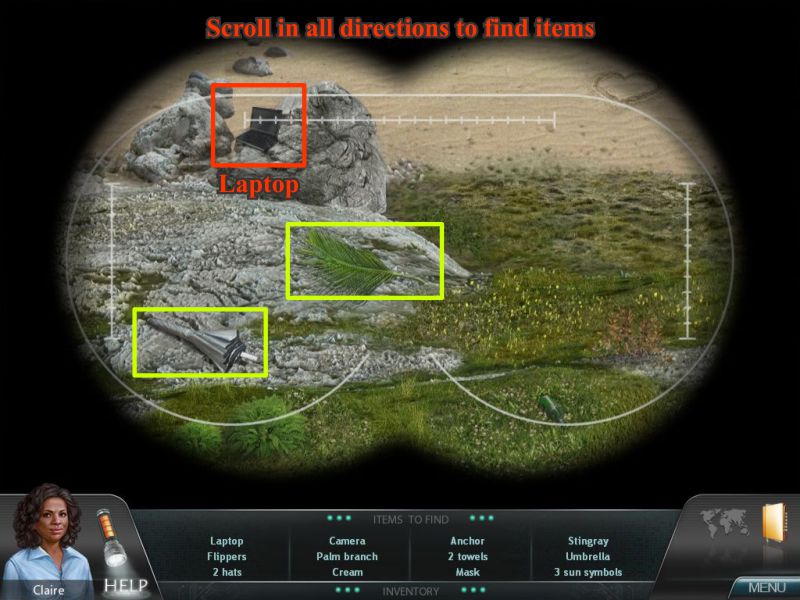
The Hidden Object Scene is a view of the Shoreline where you will need to pan around to find the objects on your list which will include Regina's laptop.
Screenshot
Go down the stairs to the Shoreline for a close up of Regina's laptop.
Some of the keys are scattered all over so find them and place them on the keyboard.
The red power button is missing and may be what the seagull had in its beak so go back up to the Crime Scene.
Screenshot
Crime Scene
Use the board from your inventory to prop open the dumpster for a Hidden Object Scene.
Pick up the quarter and nuts as well as everything else on your list.
Screenshot
Go back to the Scenic Outlook.
Scenic Outlook and Shoreline
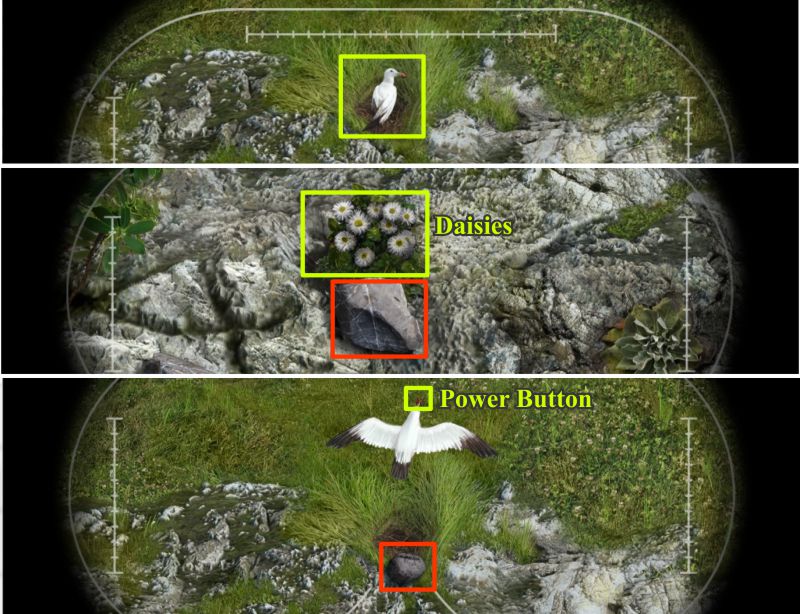
Pop the quarter in the telescope and spot the seagull in its nest.
Start collecting the items on your list and when you pick up the daisies, the rock below it will roll toward the seagull causing it to fly away.
Screenshot
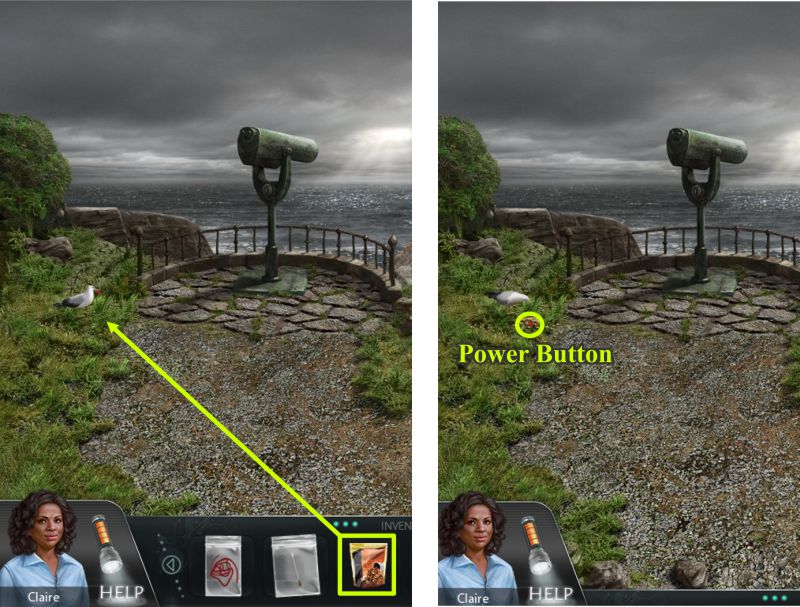
When you are finished collecting your list the seagull will be at the Scenic Outlook so trade him the bag of nuts for the power button.
Screenshot
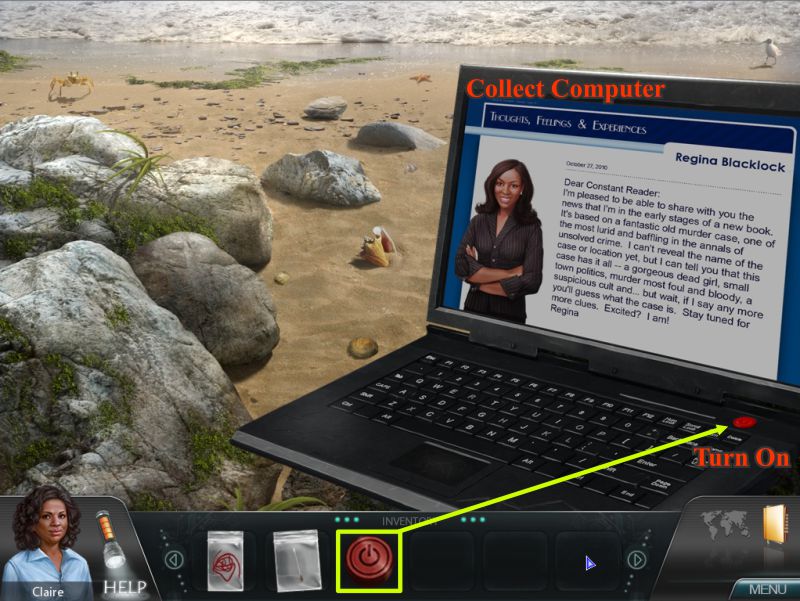
Go down to the Shoreline and place the power button on the computer.
Boot up the computer and read Regina's message before collecting the computer and going to the Crime Lab.
Screenshot
Crime Lab
You will have a sample of Regina's blood in a Petri dish so pick up the eyedropper and place a drop of blood on the closest slide.
Place the slide in back on top of it and put the slide in the microscope.
Once you examine the slide you will be playing a mini game to identify 20 blood cells that might have carbon monoxide in them.
All of the blood cells aren't available on the immediate screen so you will have to pan around to find 20.
Screenshot
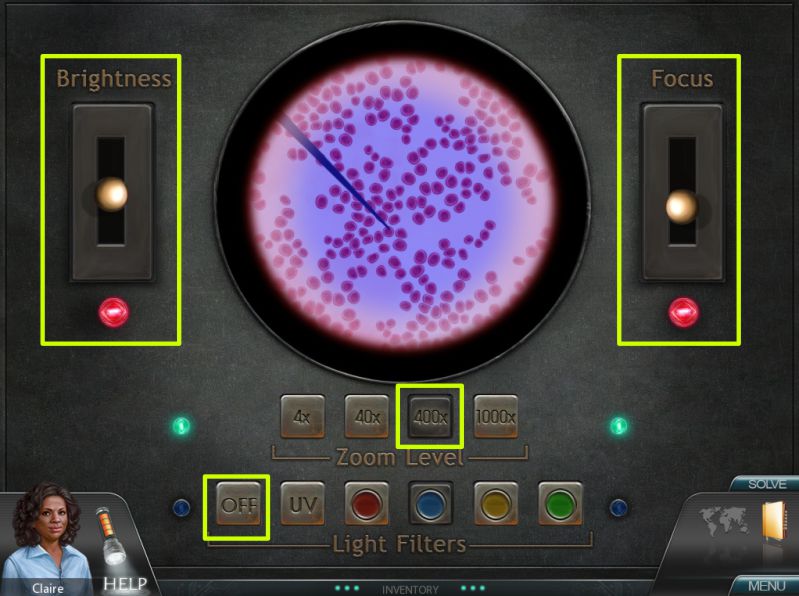
Before you can upload the blood sample to the computer you will need to make some adjustments so turn on the microscope.
Choose 400 zoom and slide the brightness and focus levers until the red lights come on.
Once you have made the adjustments press the OFF button to upload it.
Turn on the monitor and identify the cells shown in the last screenshot.
Screenshot
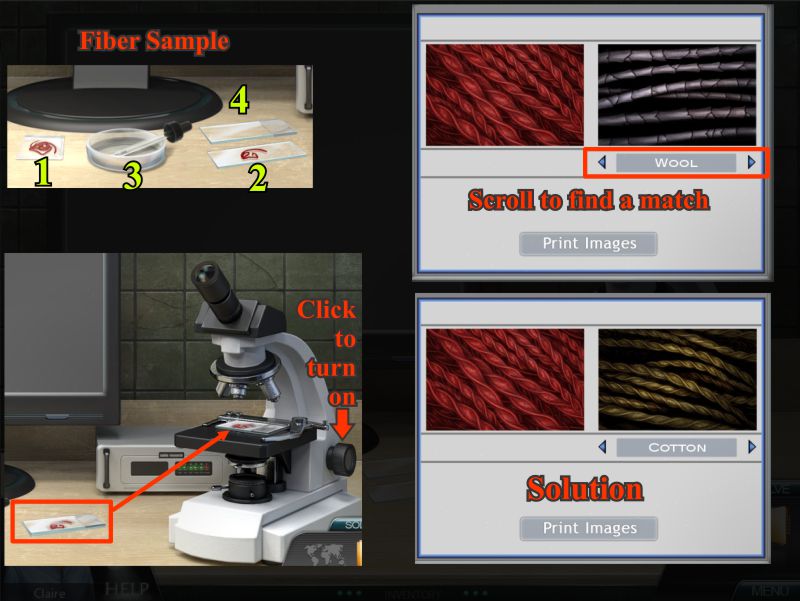
Take a piece of the fabric sample and place it on the front slide.
Use the eyedropper to place a drop of water on the slide and then place the back slide on top of the sample and put it on the microscope.
Turn on the microscope to make adjustments before uploading the sample to the computer.
Once you have uploaded it, you will get a mini game to match the fabrics.
The solution will show they are both cotton.
Screenshot
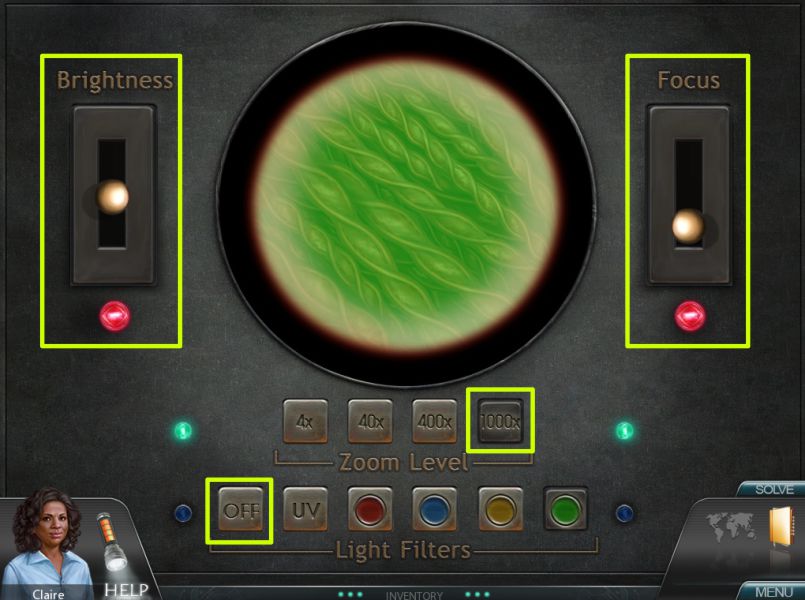
Time to adjust the fabric visuals and choose 1000 zoom, slide the brightness and focus levers till the red lights come on and press the OFF button to upload it to the computer.
Turn the computer screen on and check the last screenshot for the solution.
Screenshot
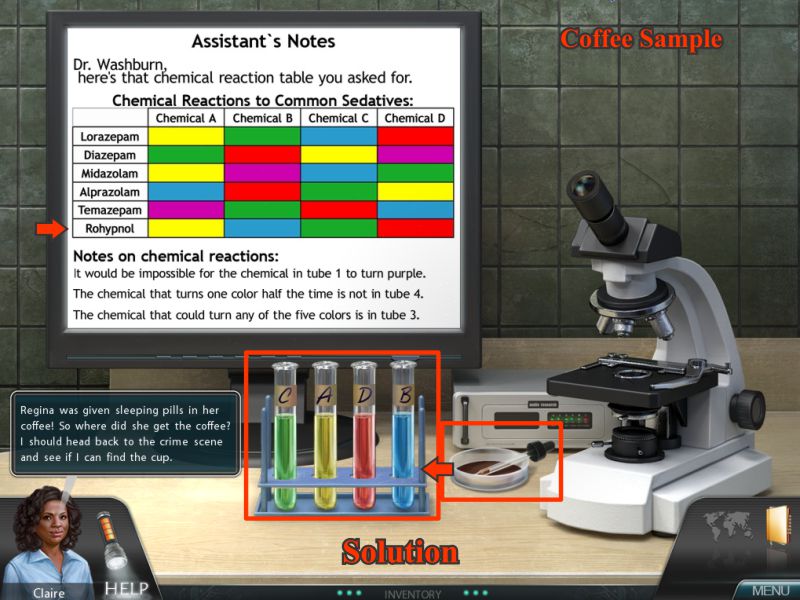
The coffee sample will need to be transferred by the eyedropper to each of the 4 test tubes.
They will each turn a different color in their solutions but the marking were somehow missing so you will need to decide which test tube has the correct marking.
There is a chart to help you decipher which is which or you can check the screenshot for the solution.
Screenshot
Back at the Crime Scene
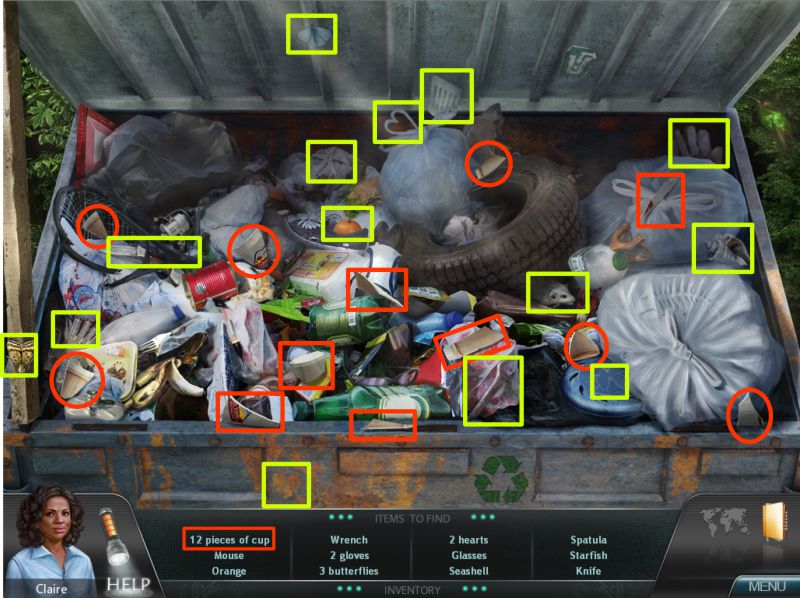
Since the coffee was drugged, Claire needs to find the coffee cup pieces so you are back at the Crime Scene dumpster.
Collect all the pieces of the coffee cup as well as the rest of your list in this Hidden Object Scene.
Screenshot
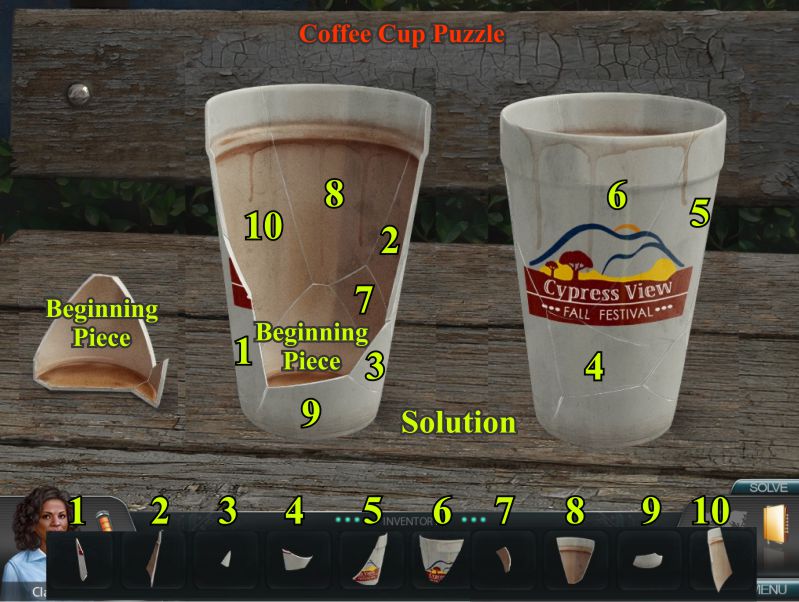
Coffee Cup Puzzle
You now have all the pieces of the coffee cup so you need to assemble them and find out where Regina got the cup.
Screenshot
Investigation 2: Lindsay Boxer
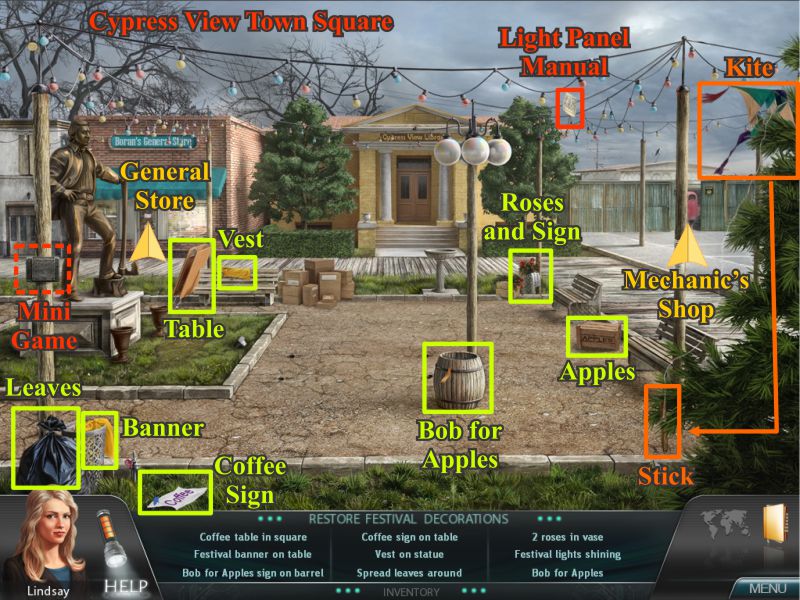
Cypress View Town Square
Claire called Lindsay to go to Cypress View and investigate why Regina was there.
The town Festival is over but there are leftovers that Lindsay can use to recreate the scene.
Place all the items where they originally were during the Festival and pick up the kite which will knock down the stick that you need to collect.
Some items you need will be found in other places and will need to be completed later.
Screenshot
Cypress View General Store
Go to the General Store and move the coat to get the key.
Check the Donation Box.
Screenshot
Use the key you found to open the Donation Box.
Lindsay wants the hose but can't get it out of the box without being able to cut the wire.
Screenshot
Click on the Hidden Object Scene and collect your list including the hammer.
Screenshot
Go to Dodger's Auto Repair to see what you can find out.
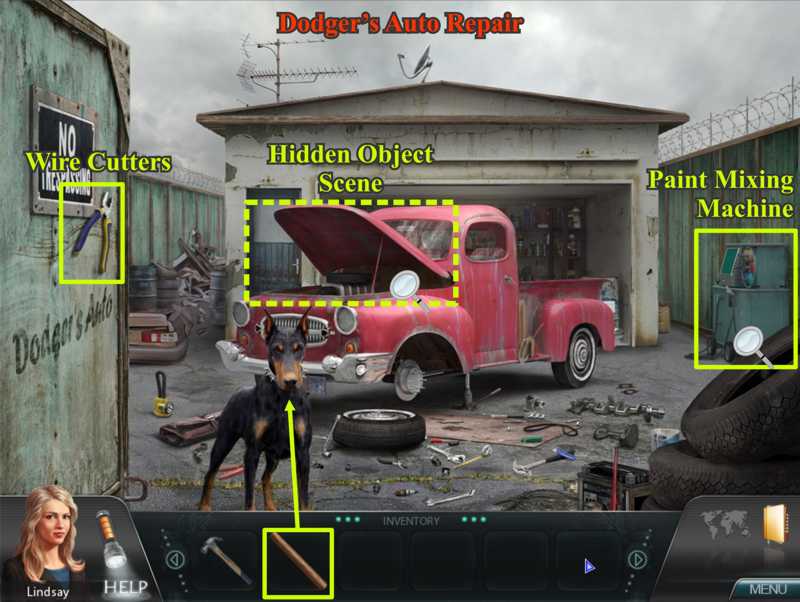
Dodgers Auto Repair
There is a nasty dog protecting the yard so give him the stick you picked up and he will be friendly and go play with it.
Talk with the owner and then play the Hidden Object Scene before tackling the Paint Mixing Machine puzzle.
Be sure to collect the Wire Cutters on the left.
Screenshot
Collect everything on your list including the screwdriver.
Screenshot
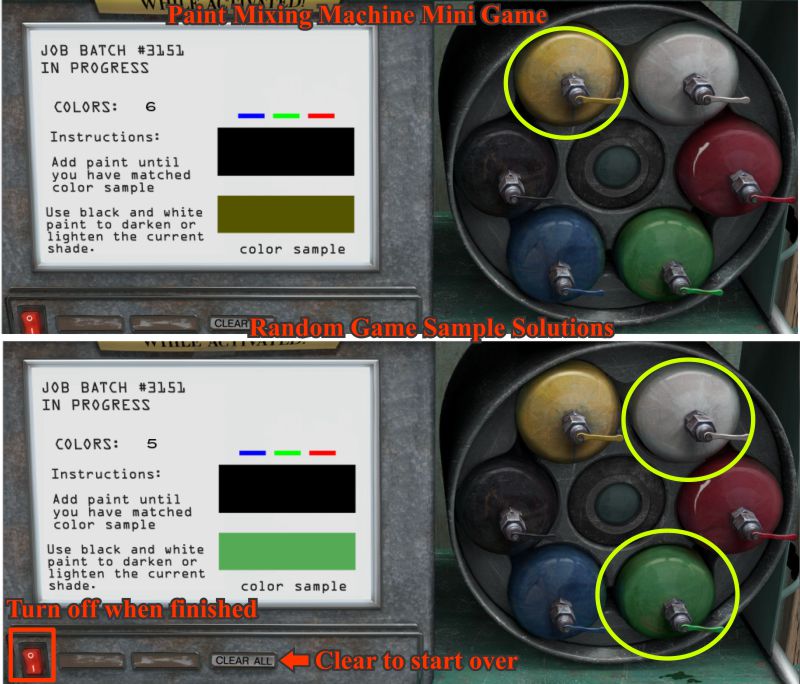
In order to move the Paint Mixing Machine you will need to solve the color mixing puzzle.
This is a random game so I can only give you samples.
You need to match the bottom color by pressing the paint tubes to match the bottom color.
Screenshot
Once you have completed the color matching you will be able to turn off the machine and move it to get to the place in the fence that was broken into.
Use your screwdriver on each of the 9 screw and click with a counterclockwise motion to remove each of them.
Once the screws are removed, click on the board to remove it and discover the fiber.
Use your lab kit to claim the fiber sample.
Screenshot
Town Square and General Store
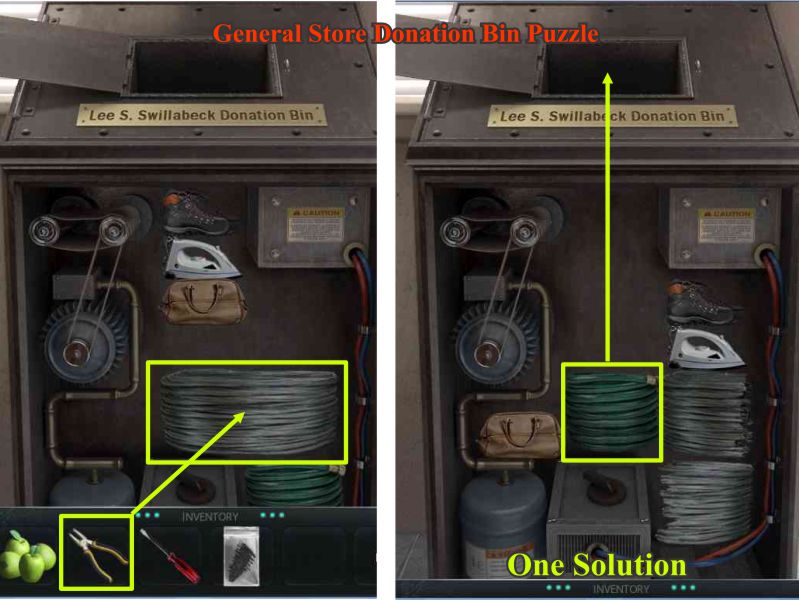
Go back to the General Store and the Donation Bin.
Use your wire cutters to snip the wire in half.
You can now move all the objects in the bin around so you can release the hose.
There is no exact solution but one solution is shown in the screenshot.
Screenshot
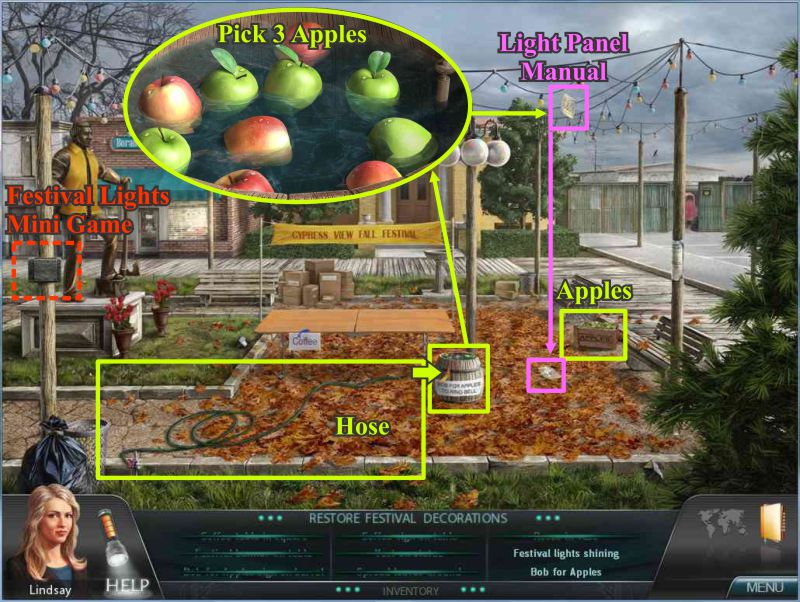
Back out in the Town Square you can connect the hose to the spigot and see the results of your setup.
Once you have filled the Apple Barrel with water place the apples in the barrel.
Click on it for a close up and pick any 3 apples to remove.
Removing the apples will cause the Light Panel Manual to fall to the ground for you to collect.
Screenshot
Go to the Light Panel and use your screwdriver to individually remove all the screws counterclockwise.
Screenshot
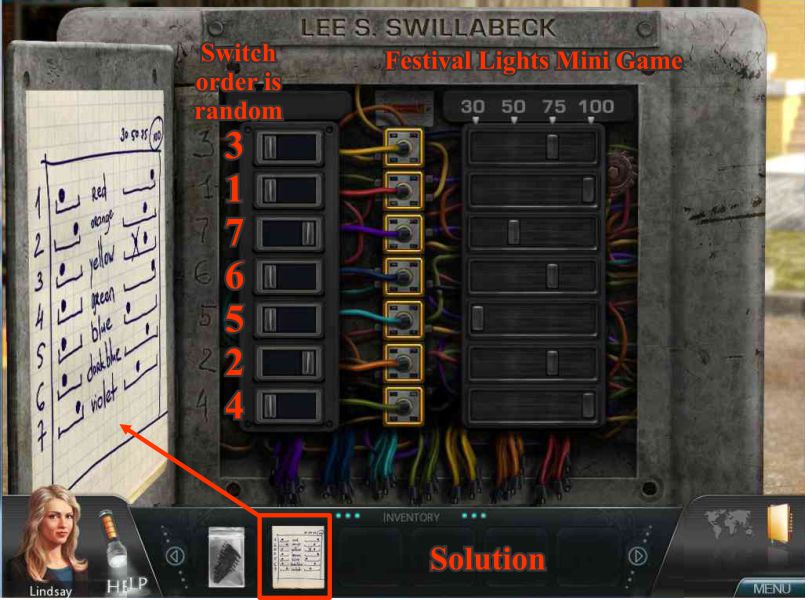
Festival Lights Puzzle
Once the panel is open place the manual page on the door.
The numbers that appear on the left panel for the mini game are random but the manual and right panel will always be the same.
Match the manual to your panel to complete the game.
Screenshot
Investigation 3: Cindy Thomas
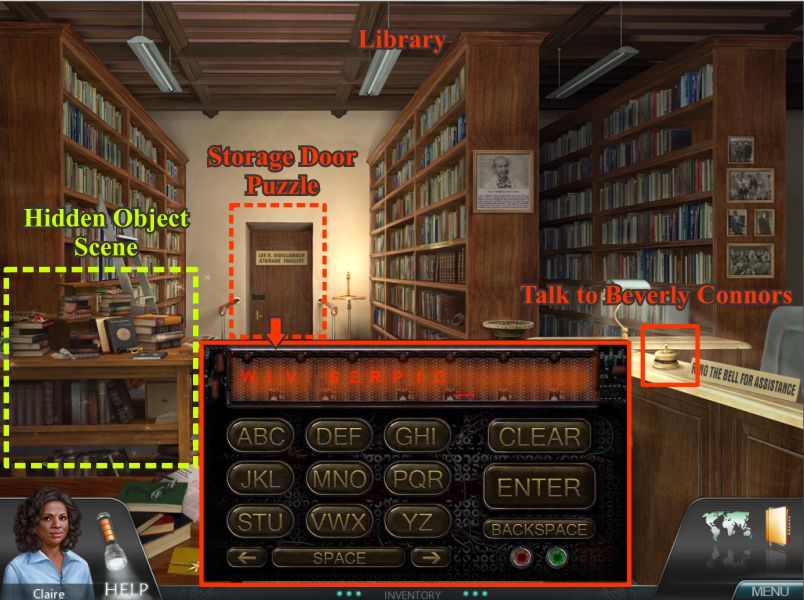
Cypress View Library
Cindy has been called upon for help so choose to enter the Library.
Check out all the magnifying glasses and play the Hidden Object Scene.
Talk to the Librarian when she appears.
Screenshot
Note the missing book on the shelf and pick up the winding key.
Screenshot
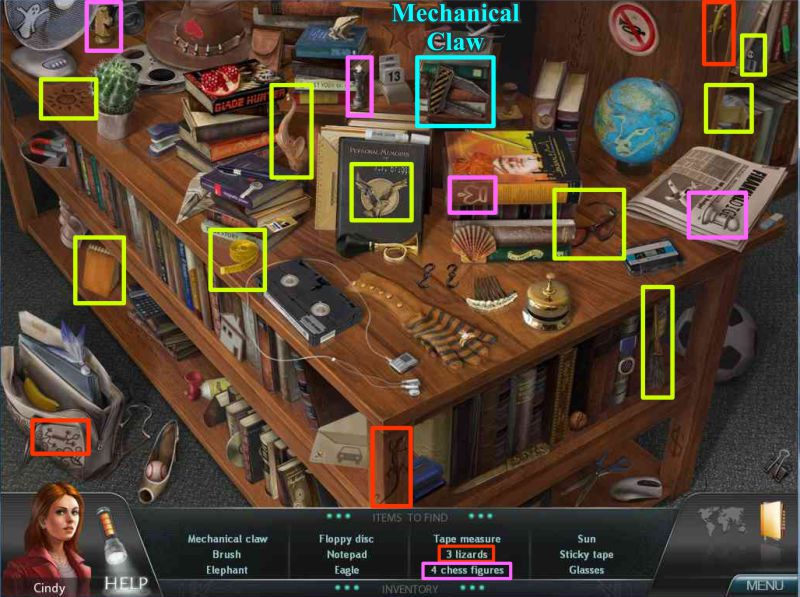
Play the Hidden Object Scene and collect you list as well as the Mechanical Claw.
Screenshot
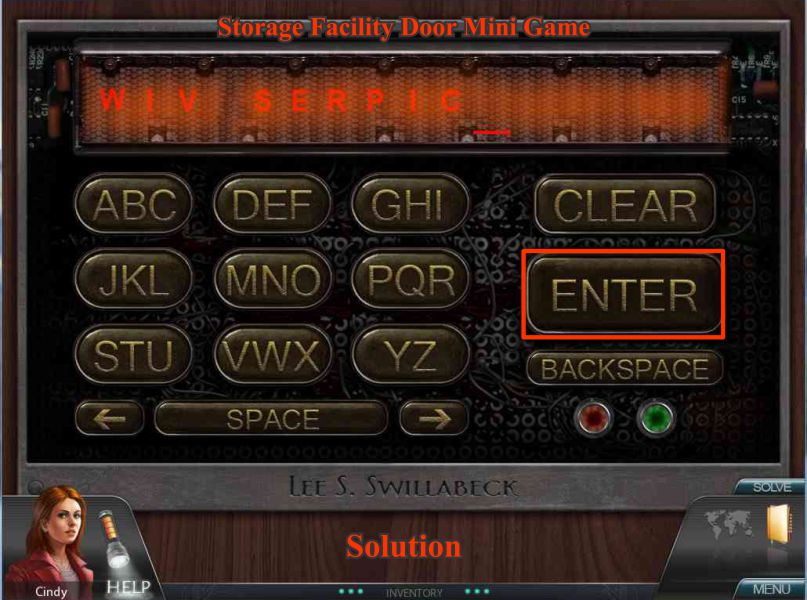
Library Storage Facility
Go to the Storage door and play the mini game by pressing the keys to spell WIV SERPIC and then Enter.
Since Lee Swillabeck liked to spell things backwards, the phrase actually says Cipres Viw in reverse.
Screenshot
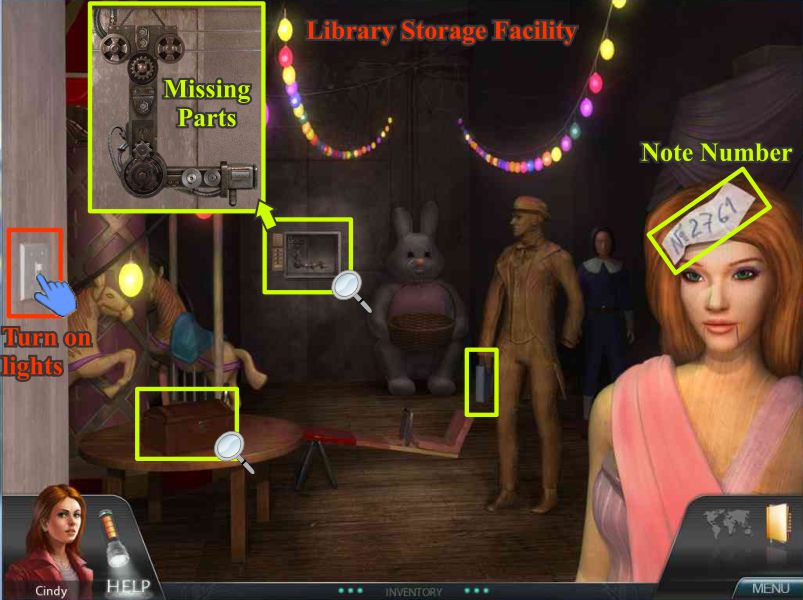
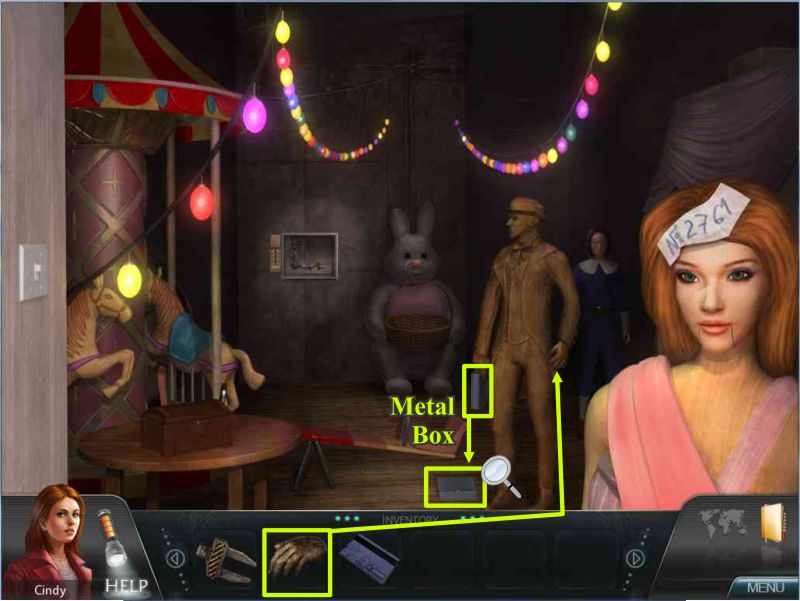
Turn on the light and note the magnified objects as well as the number on the manikin's head as well as the box in the wooden statues' hand.
Screenshot
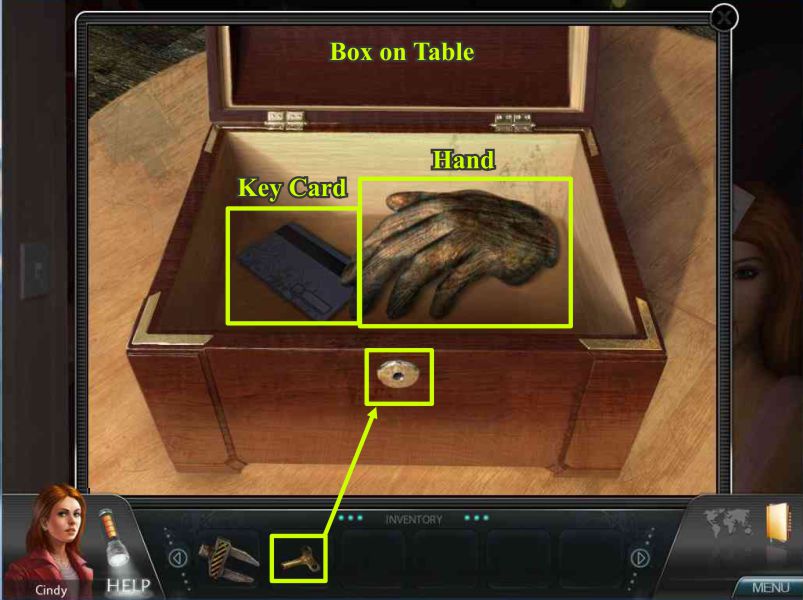
Use your winding key on the wooden box on the table and collect the key card and wooden hand.
Screenshot
Place the wooden hand on the statue and it will drop the metal box.
Screenshot
Dodger's Auto Repair
Go back to Dodger's Auto Repair and move the rag to collect the oil can.
Click to play the Hidden Object Scene under the truck hood.
Screenshot
Collect everything on your list including the chain and screwdriver.
Screenshot
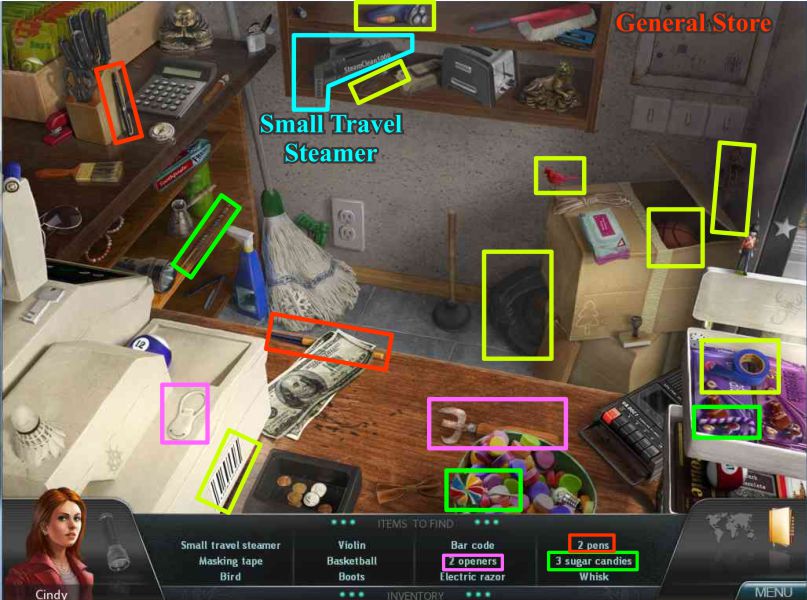
General Store
Go back to the General Store and click on the counter for a Hidden Object Scene to get the small travel steamer.
Screenshot
Click on the gumball machine and use your screwdriver to remove the 4 screws counterclockwise so you can take the rubber band.
Screenshot
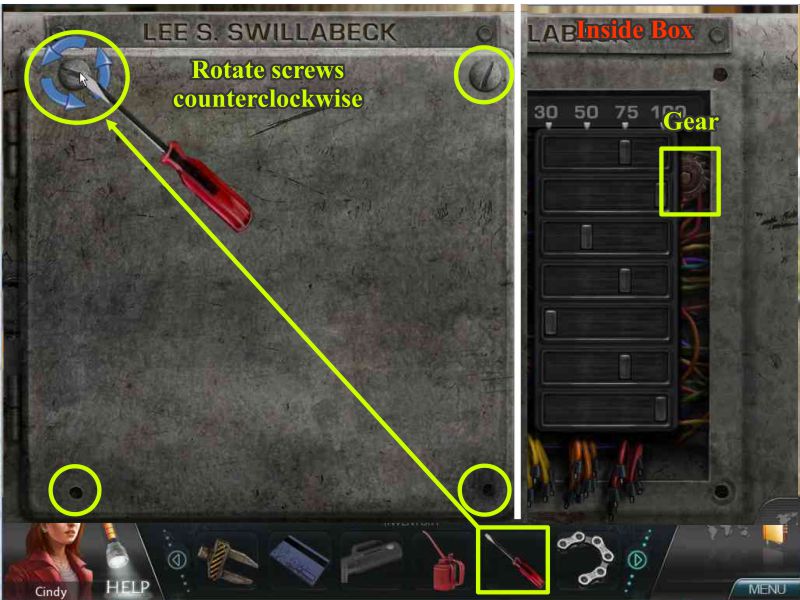
Town Square Light Panel
Go to the Town Square Light Panel and use your screwdriver to remove all 4 screws counterclockwise.
Once the panel is open pick up the gear at the far right.
Screenshot
Library
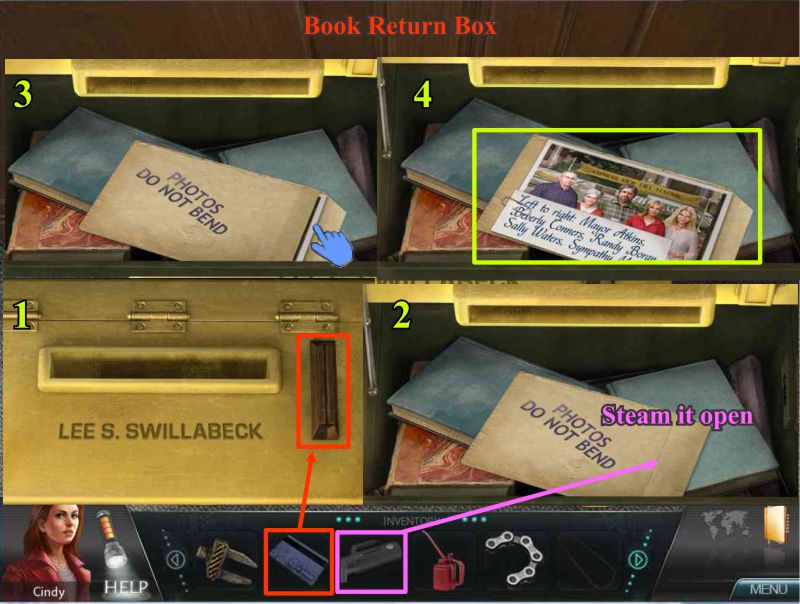
Go back to the Library and click on the book return box.
Use the key card from your inventory on the box and discover the envelope inside.
Use your steamer to open the envelope and take out the contents of which turns out to be a picture of the Council members who were at the Festival so take the picture.
Screenshot
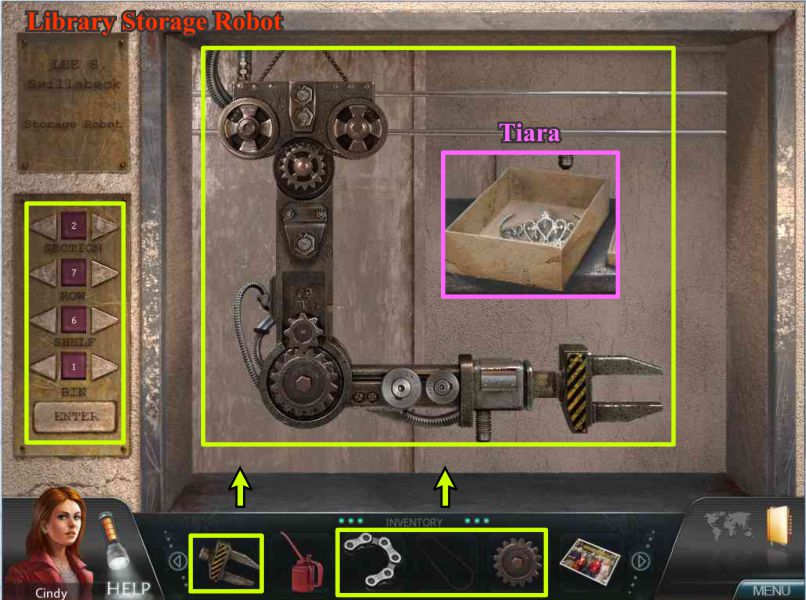
Go to the Library retrieval system and repair the Storage Robot.
Plug in the number from the manikins head (2761) on the keypad and press Enter.
You will get a box with a tiara in it so collect it.
Screenshot
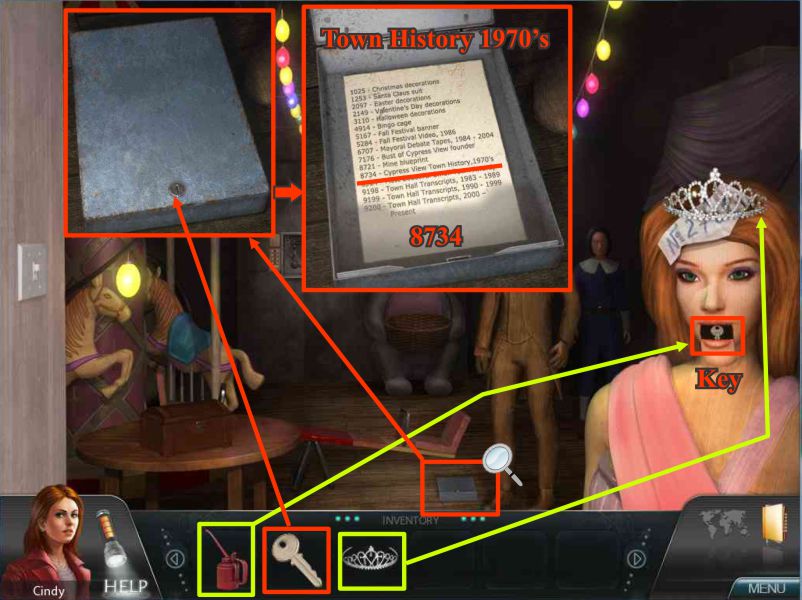
Back away from the robot and place the tiara on the manikin's head and her mouth will partially open.
Oil her mouth with the oil can and take the key that appears.
Use the key on the metal box which produces a list inside of the stored archives in the Library.
Note the Town History Book from the 70s is 8734.
Screenshot
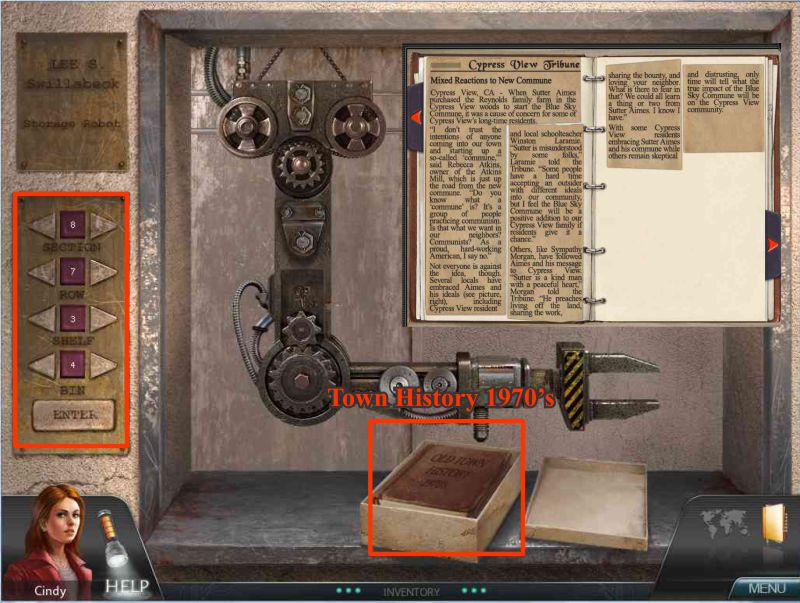
Go to the robot and key in 8734, press enter and retrieve the book.
Screenshot
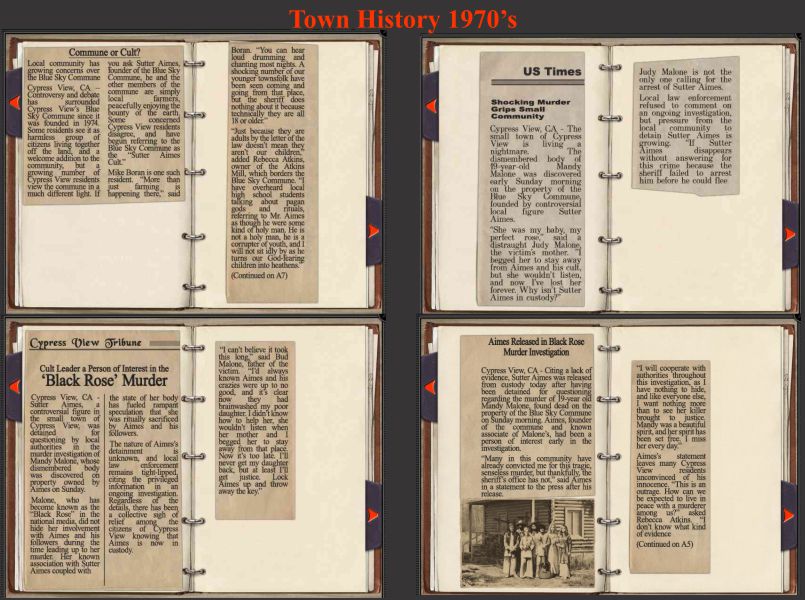
Read the Town History from 1975.
Screenshot
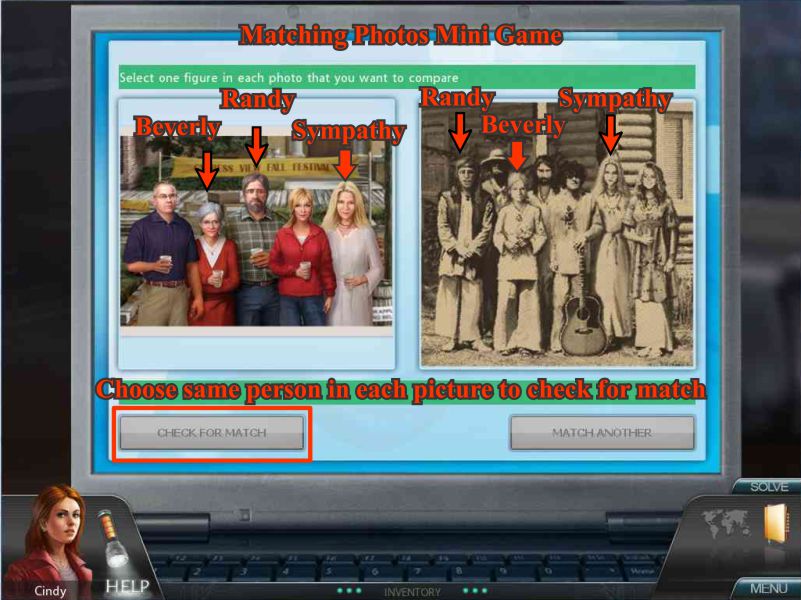
Compare the new picture you have from the Festival with the old picture from the history book.
You will be able to match 3 of the Town Council members with Sutter's group.
Screenshot
Investigation 4: Lindsay
Library
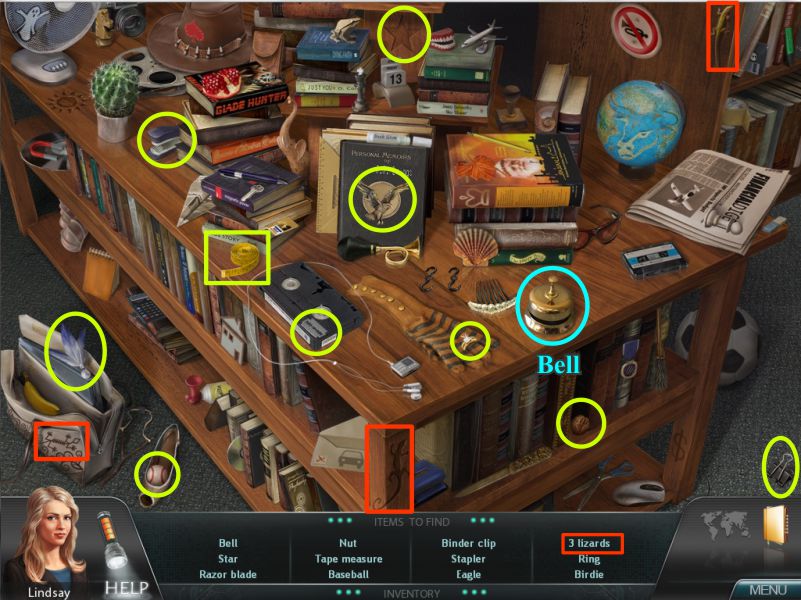
Go into the Library and play the Hidden Object Scene on the table to the left to get the Bell.
Screenshot
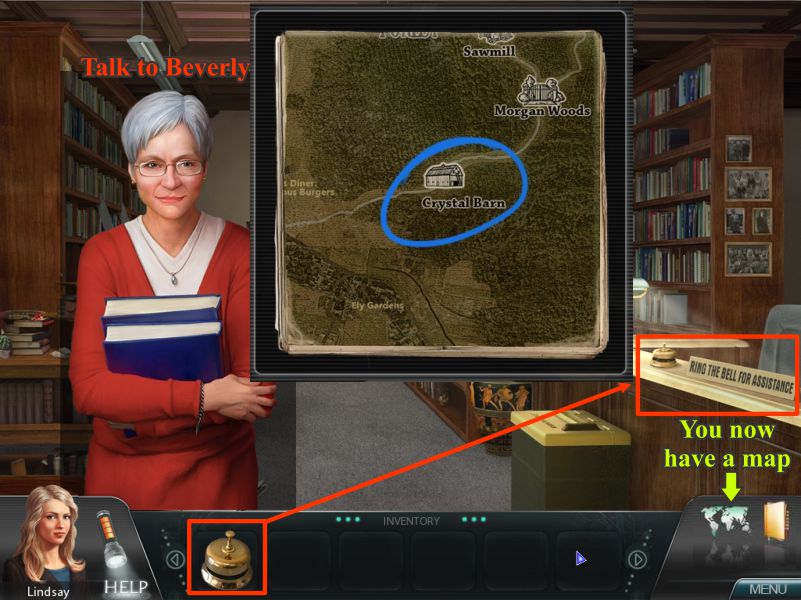
Place the Bell on the counter and ring it to summon the Librarian.
Talk to Beverly Connors and she will give you the Map.
Use the Map to transport yourself to the Crystal Barn.
Screenshot
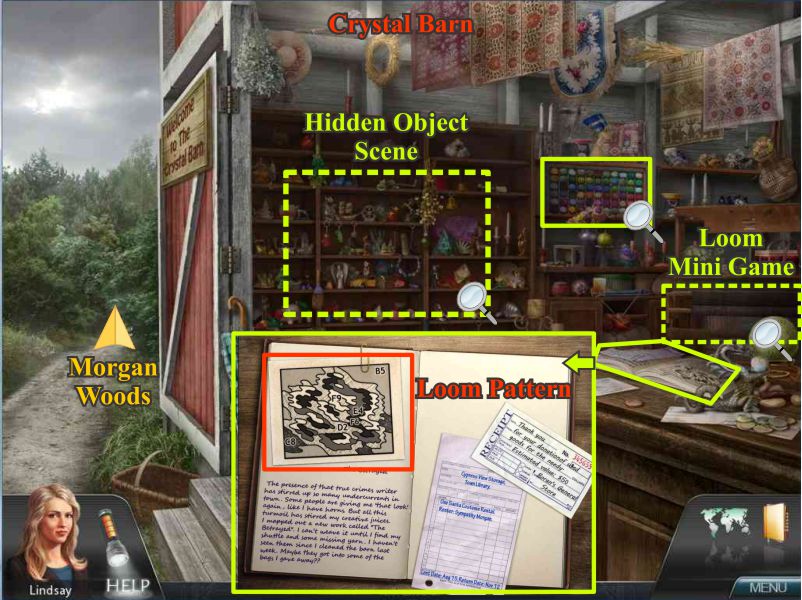
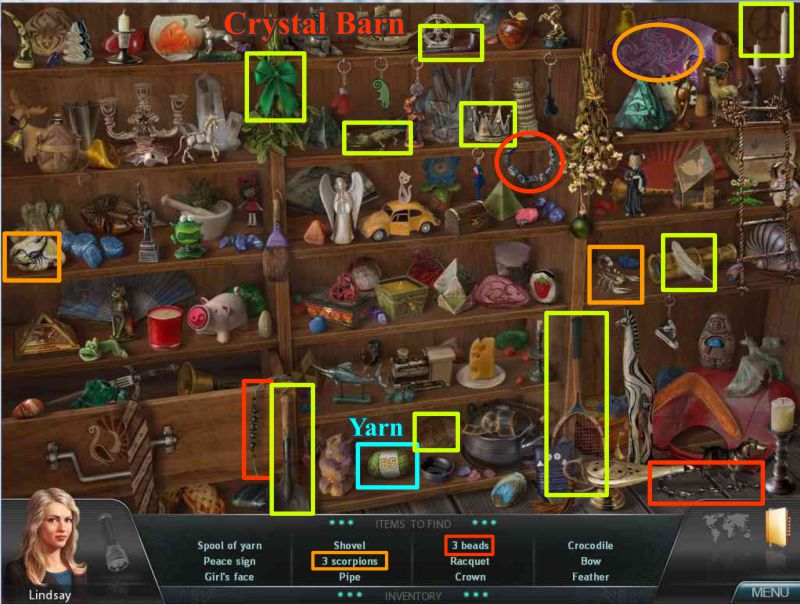
Crystal Barn
Sympathy Morgan isn't there so have a look around at all of the magnifying glasses.
Pick up the Loom Pattern and play the Hidden Object Scene.
Screenshot
Collect your list which will include one of the missing balls of yarn.
Screenshot
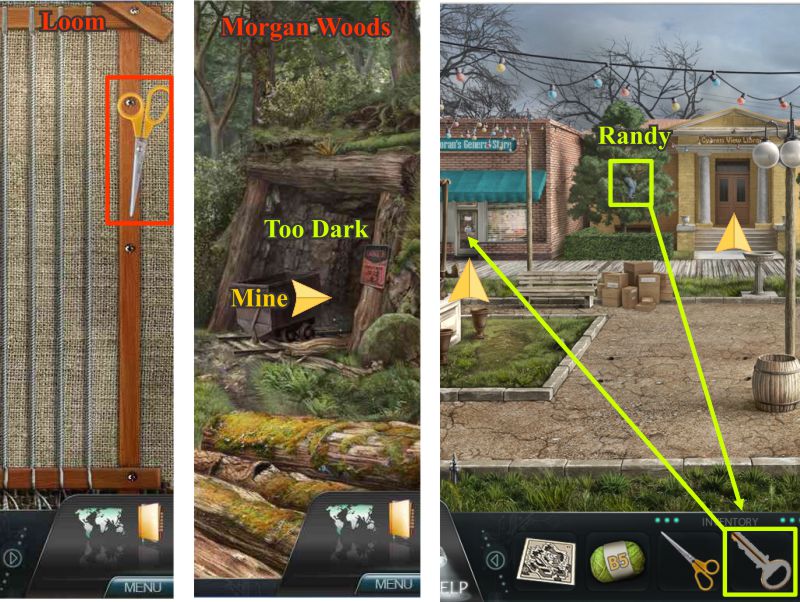
Pick up the scissors on the loom.
Go towards Morgan Woods and note the mine is too dark to enter so you need something to illuminate it.
Use the Map to go back to town and talk to Randy in the tree by the Library about needing to get into his store.
He will give you the key to the door so use it to go in.
Screenshot
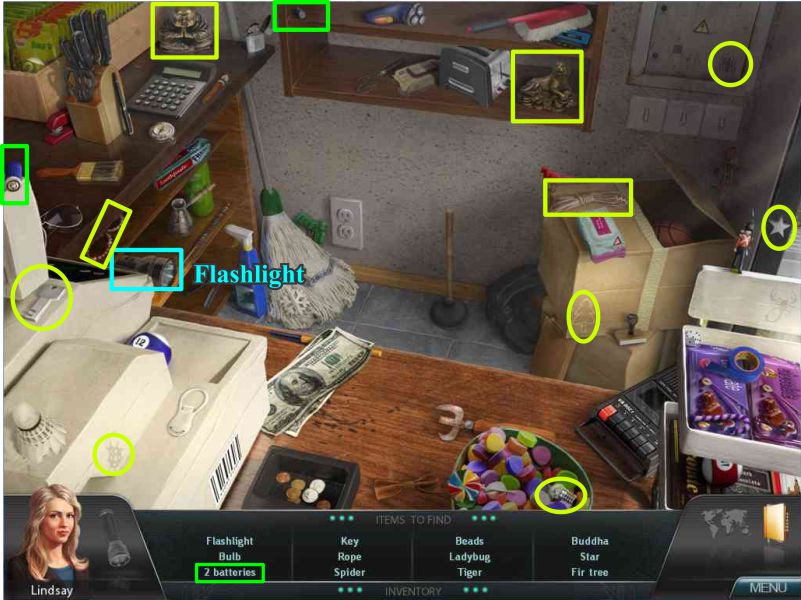
General Store
Play the Hidden Object at the counter to get the Flashlight.
Screenshot
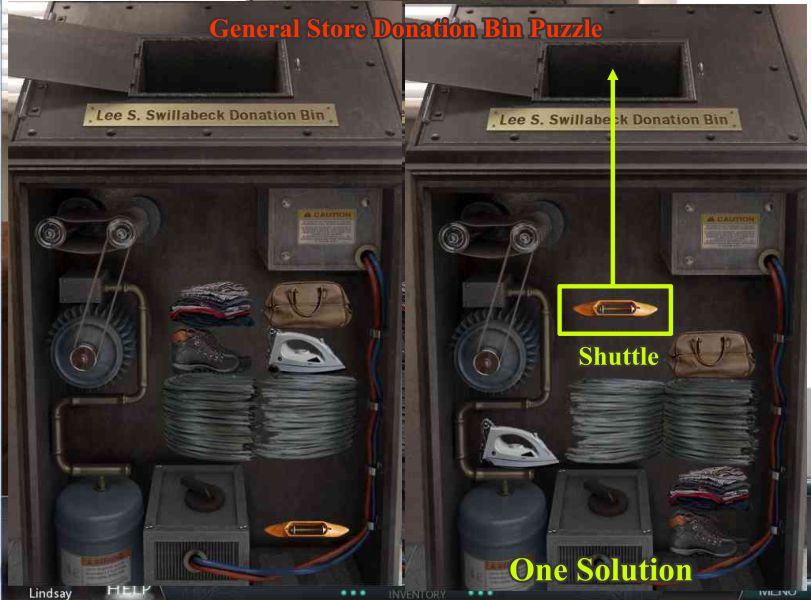
Donation Bin Puzzle
Click on the Donation Bin and note there is a shuttle on the bottom so move everything around to bring it to the top so you can collect.
There is more than one way to move everything but one solution is shown in the screenshot.
Screenshot
Library Storage Facility
Go to the Library and open the door by entering WIV SERPIC and pressing Enter.
Screenshot
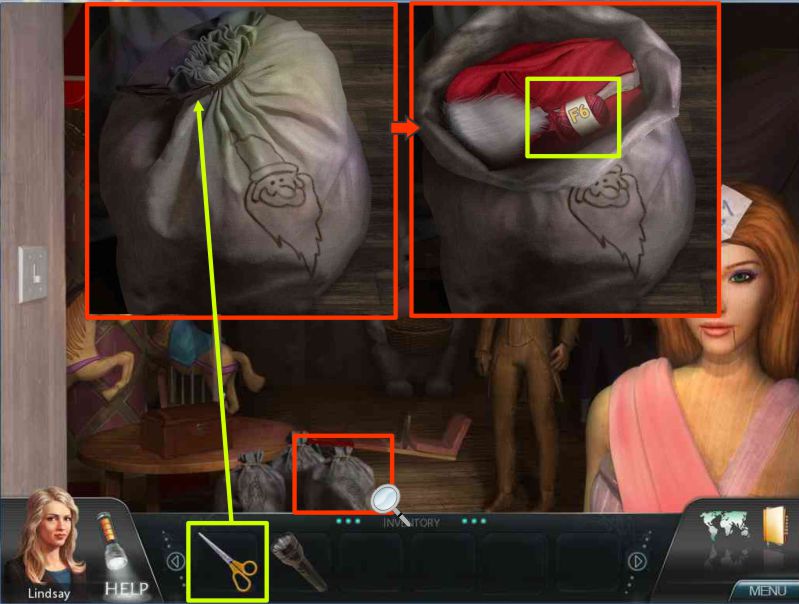
Click on the first donation bag for a close up, use your scissors on it and collect the yarn.
Screenshot
Crystal Barn
Click on the yarn display and collect what you need for the Loom Puzzle.
You already have B5 and F6 in your Inventory so pick up: D2, E4, C8 and F9.
Screenshot
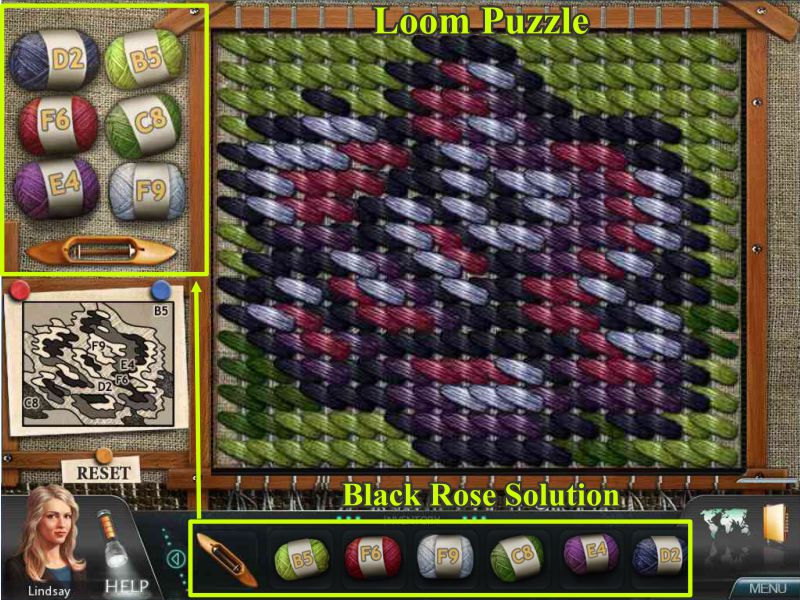
Loom Puzzle
Place the pattern, shuttle and yarn on the loom.
Pick up a yarn color and place it where it goes on the loom to weave the Black Rose.
If you get a color in the wrong place, you can Reset the puzzle with the button below the pattern but you will have to start from the beginning.
Screenshot
Talk to Sympathy when she appears.
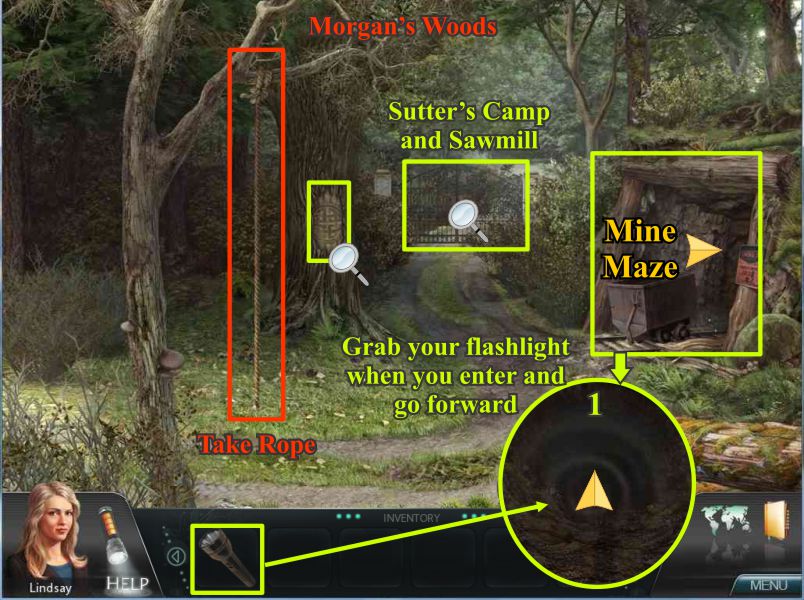
Morgan Woods
Go to Morgan Woods and take the rope from the tree.
Note the locked gate and the carving on the tree before entering the mine.
Since it is dark, you need to pick up the flashlight from your Inventory and go straight ahead.
Turn left at the footprints and go forward.
You come to a puddle chasm and since you don't know how deep it is, use your rope on the beam at the right to swing across and go forward.
Go forward again and then turn right twice.
Pick up the Chain Saw and use the Map to return to town.
Screenshot
Give the Chain Saw to Randy who is still in the tree and talk to Sympathy when she appears.
Investigation 5: Claire
Playing as Claire
You are now playing as Claire because Lindsay called her for her forensic expertise.
Enter the Library, play the Hidden Object Scene, and ring the bell on the counter to talk to the Librarian.
Go to the Storage Facility and open the door using the WIV SERPIC code and press Enter.
Screenshot
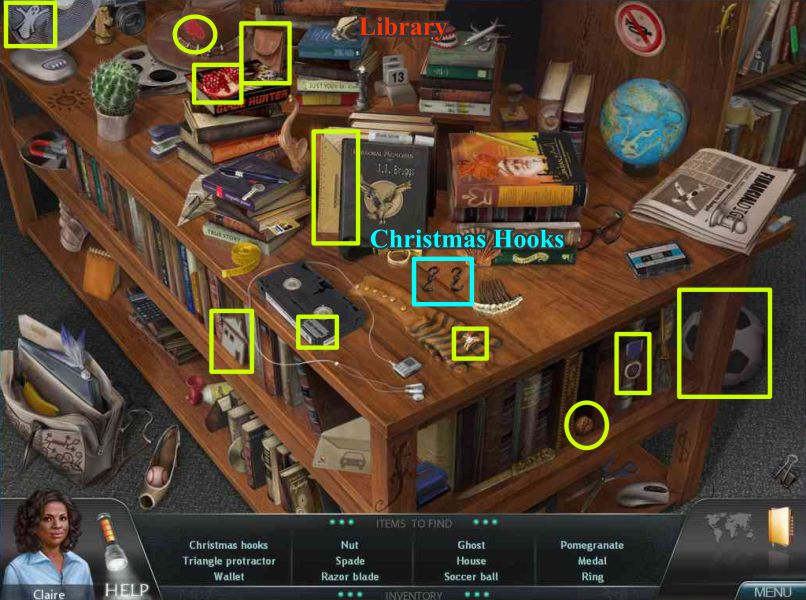
Collect your Hidden Object list which will include the Christmas Hooks.
Screenshot
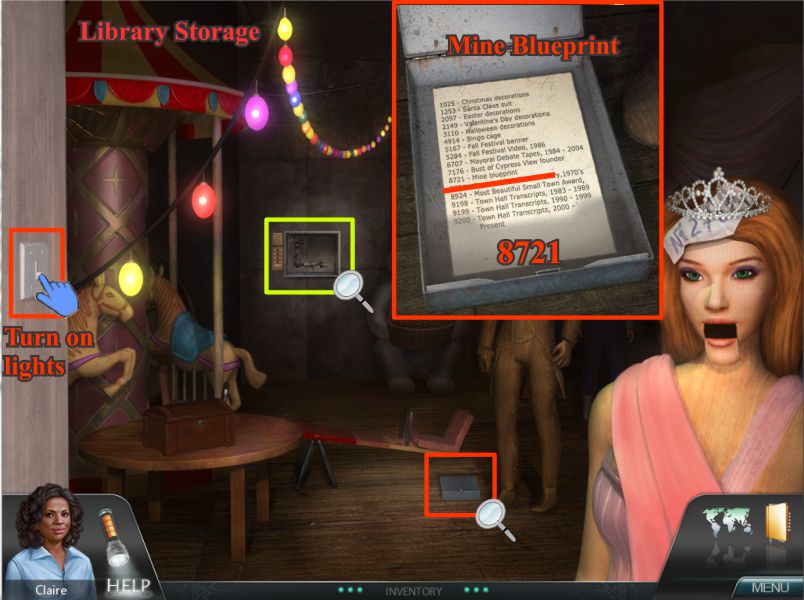
Turn on the light in the Storage Room and check the metal box for the number of the mine blueprint.
Screenshot
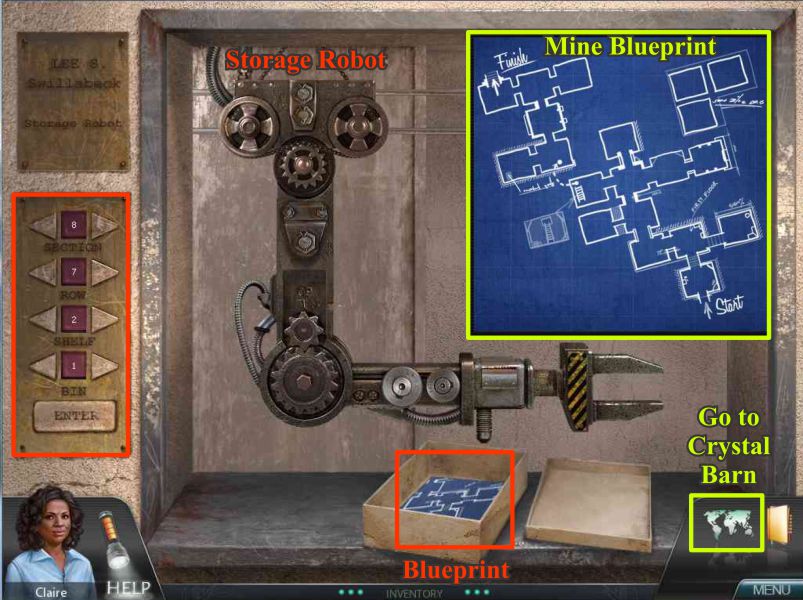
Go to the robot and enter 8721, press enter and collect the blueprint when it arrives.
Click on the Map and go to the Crystal Barn.
Screenshot
Crystal Barn
Play the Hidden Object Scene to get the Ladder.
Check out the book on the counter and note Sutter's birth date: 12-4-1948.
Screenshot
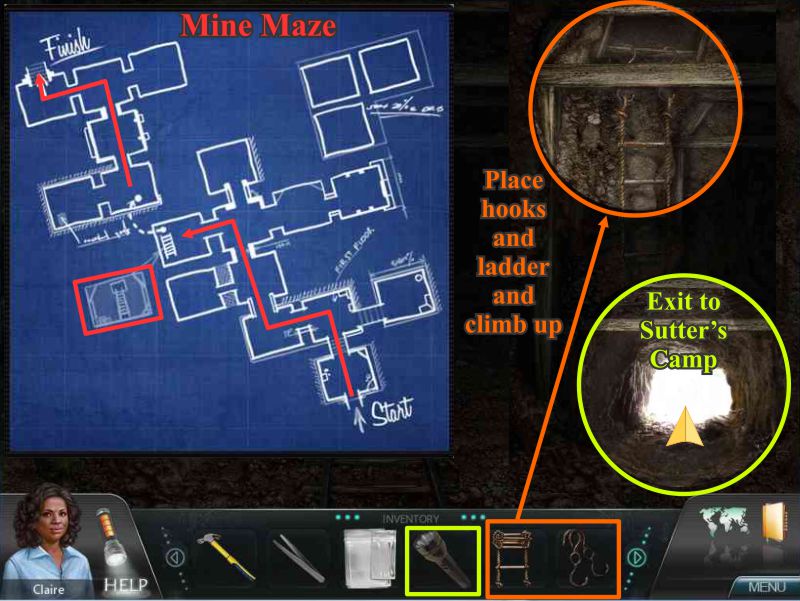
Mine Maze Mini Game
Use your flashlight to navigate the maze following the blueprint: Forward, Left, Forward, Forward, Left.
You will find an opening in the ceiling so place the Christmas Hooks and Ladder on the hatch so you can climb up.
Go Forward twice and then left where you will see an opening to exit to Sutter's Camp.
Screenshot
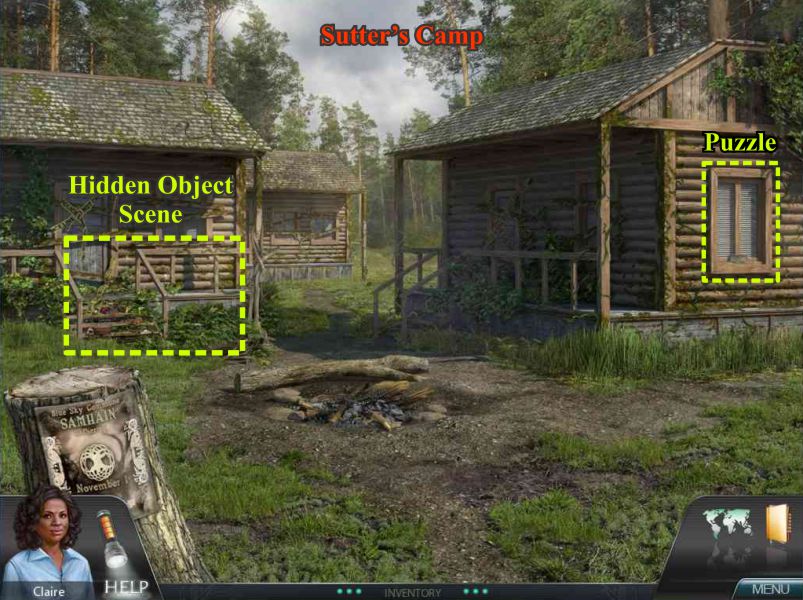
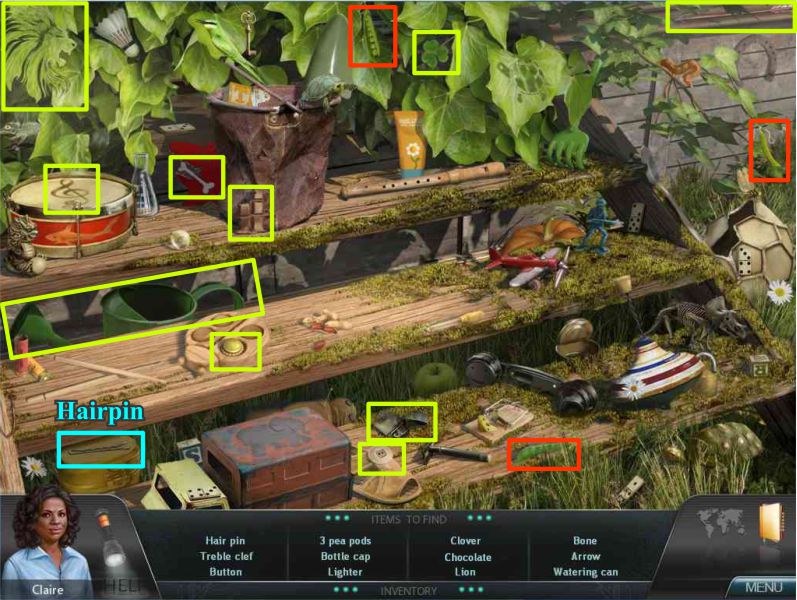
Sutter's Camp
Play the Hidden Object Scene and note the window on the right where you will play a puzzle.
Screenshot
Collect everything on your list including the Hairpin.
Screenshot
Use your Hairpin on the window lock to trigger the puzzle.
Screenshot
Cabin Window Lock Puzzle
Your goal is to move the blocks around so that the pins fit in them.
The puzzle is random but the screenshot shows a sample solution and if necessary, you can choose to skip the puzzle.
Screenshot
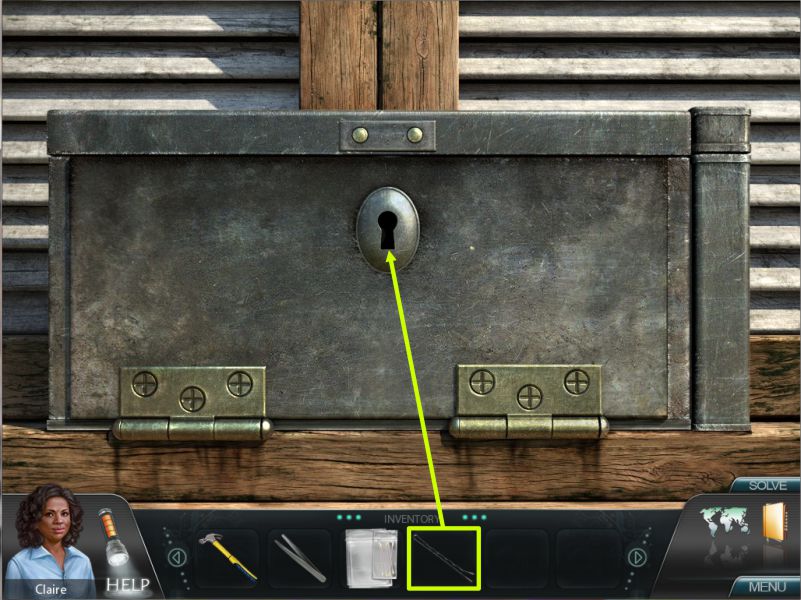
Once inside Sutter's cabin open the shutters and move the rug to access the board underneath.
Pick up the shovel and click on the box label for a close up.
Use your tweezers to lift each corner and then bag it with the test kit.
Click on the loose board under the rug and use your hammer to remove the nail.
Screenshot
Enter Sutter's birth date (12448) and click on the handle to open the strong box.
Click on his journal and read the page.
Screenshot
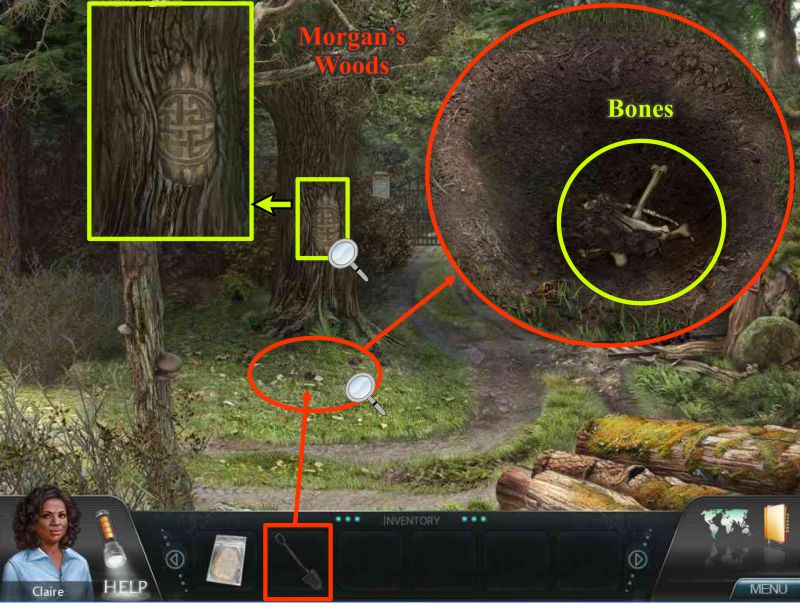
Morgan Woods
Exit and use the Map to go to Crystal Barn and forward to Morgan Woods.
Look at the carving on the tree and determine it must be the tree Sutter wrote about.
Click under the tree for a close up and use your shovel to dig.
Collect the bones you find.
Screenshot
Crime Lab
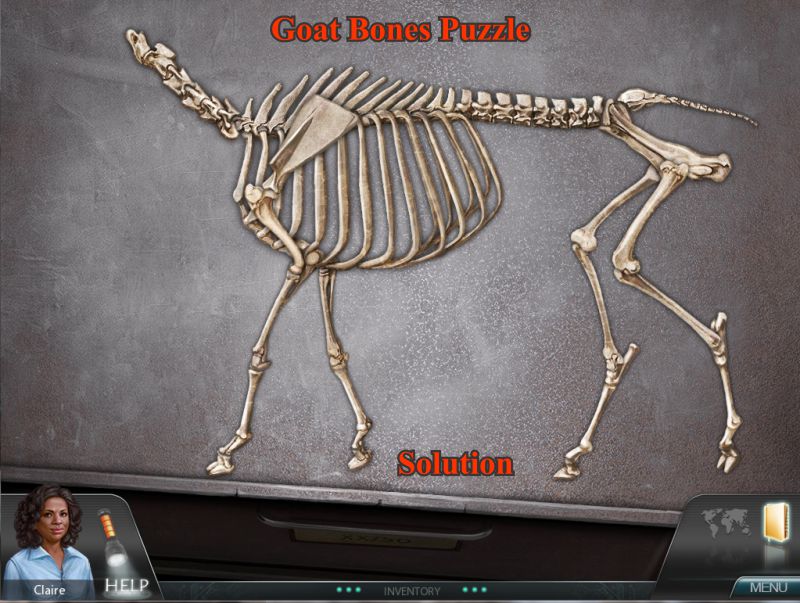
Goat Bones Puzzle
Back at the Lab Claire needs your help to assemble the bones she collected.
Attach the various piece and when you are correct it will glow gold.
It turns out to be a goat and the solution is in the screenshot.
Screenshot
Label Mini Game
Your next task is to see what is written on the label from Sutter's Cabin.
First you need to exactly measure 5 oz. of water before you place the tablet in it.
Transfer the water between the beakers as follows:
10 into 7
7 into 3
3 into 10
7 into 3
3 into 10
7 into 3
10 into 7
7 into 3
You should now have 5 oz. in the 7 oz. beaker so place the tablet in the water and pour the solution indo the tray with the label.
The label now reveals an address at Chateau D'Ortagne in Marbeau France.
Screenshot
Claire calls upon Lindsay who now has access to Cindy's software program.
Type in the needed information and press Enter.
Screenshot
No information shows up for Sutter so click on the Chateau button to see a list of owners.
You are given two choices of owners so click on Renfru Mortimer.
You have found the masked man from Sutter's group so have a conversation with Renfru.
Screenshot
Investigation 6: Lindsay
Journey to Pacific Point Lighthouse
Talk to Randy at the General Store and Beverly at the Library.
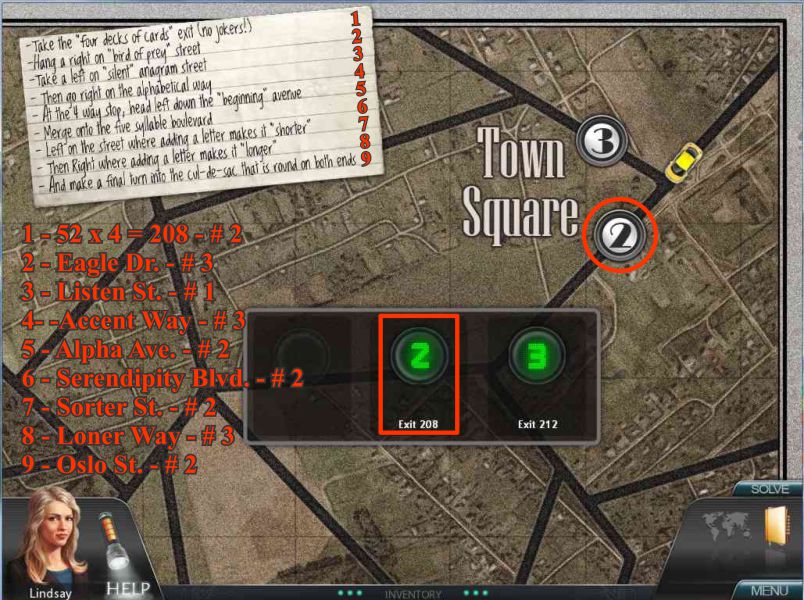
Beverly gives you a map and strange directions how to get to the lighthouse.
It may not be the most direct route but you will need to follow the directions you've been given so your first crossroad gives you a choice of Exit 208 or 212.
Beverly's instructions say to take the "4 deck of cards" exit so since 52 times 4 is 208, take choice 2 which is Exit 208.
Next turn says to hang a right on "bird of prey" street so choose #3 which is Eagle Drive.
To take a left on silent anagram street you will need to choose #1 Listen Street.
Next is a right on the alphabetical way so your choice must be #3 which is Accent Way.
When you come to the 4-way stop you need to head left down the "beginning" avenue so your choice has to be #2 Alpha Avenue.
Your 6th direction is to merge onto the 5 syllable blvd. so choose Serendipity Blvd. which is #2.
Now you need to go left on a street where adding a letter makes it shorter so choose #2 Sorter Street.
You need to make the next street "longer" by adding a letter so turn right on Loner Way which is #3.
Finally you are about to reach your destination so it needs to be round at both ends which is Oslo Street choice 2.
Screenshot
If all of that is way too confusing, here is a composite map of how to find your way to Pacific Point Lighthouse.
Screenshot
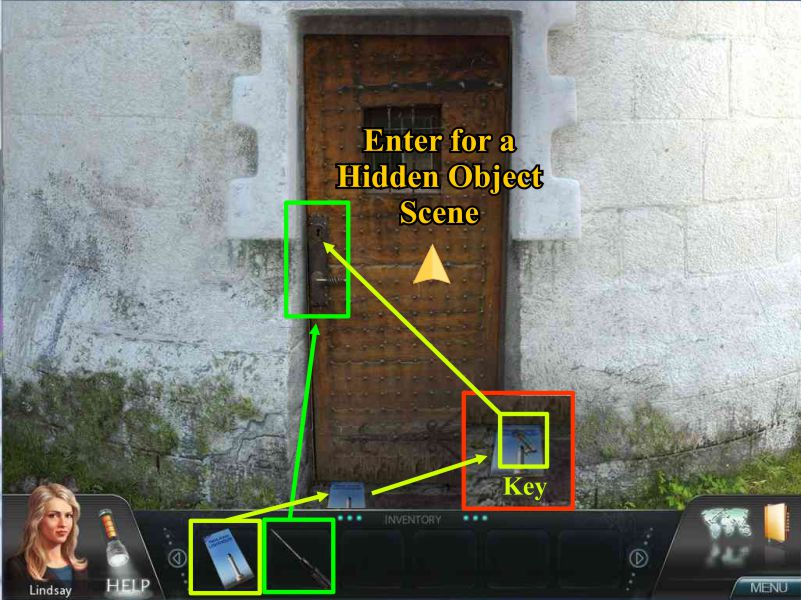
Pacific Point Lighthouse
Check out the rocks and the locked toolbox and door.
Grab a flyer from the display.
Move the mat by the door and take the key.
The key doesn't fit the door so use it to open the toolbox and take the screwdriver.
Screenshot
Click on the door for a close up and slide the flyer under the door.
Use the screwdriver to push the key out of the keyhole and pull it back out on the flyer.
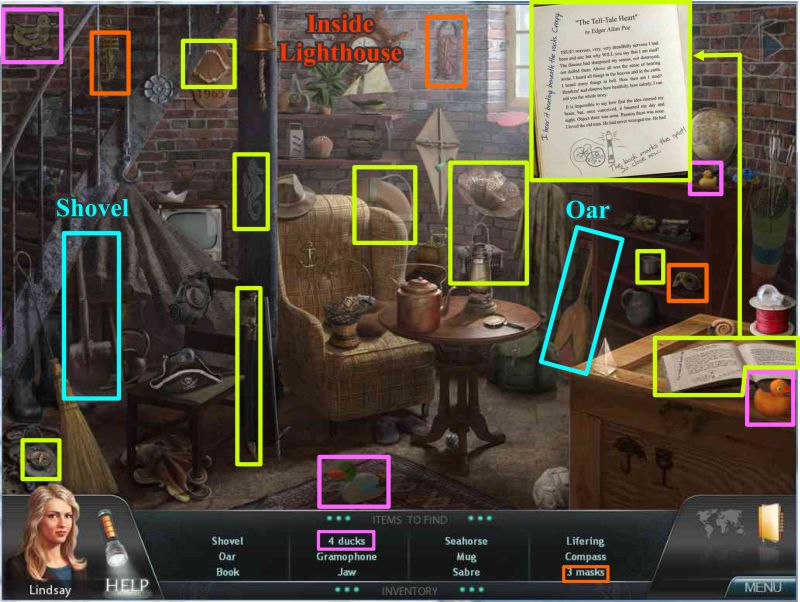
Open the door with the key and go inside to play a Hidden Object Scene.
Screenshot
Collect your list which will include the Shovel and Oar.
Screenshot
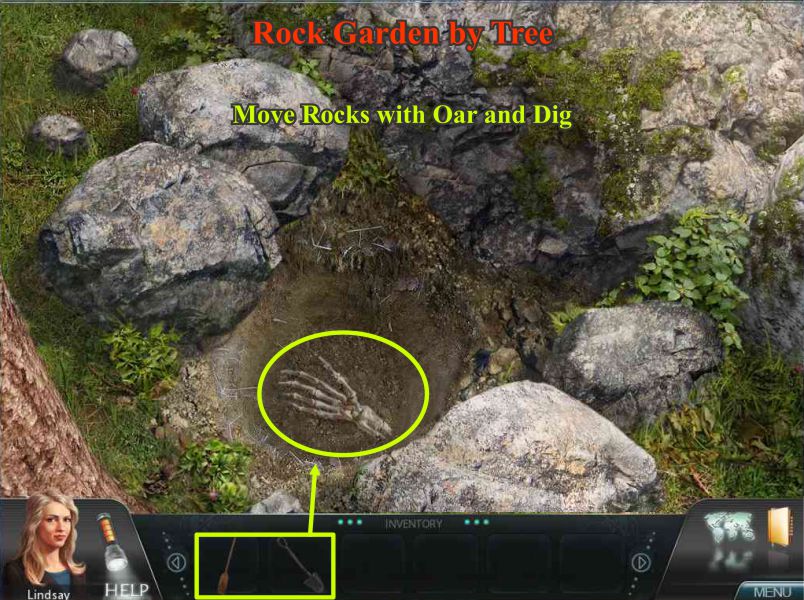
Go outside and click for a close up of the rock formation.
Use your oar to move the rocks and the shovel to dig in the loose dirt until you discover a hand.
Screenshot
Crime Lab: Claire
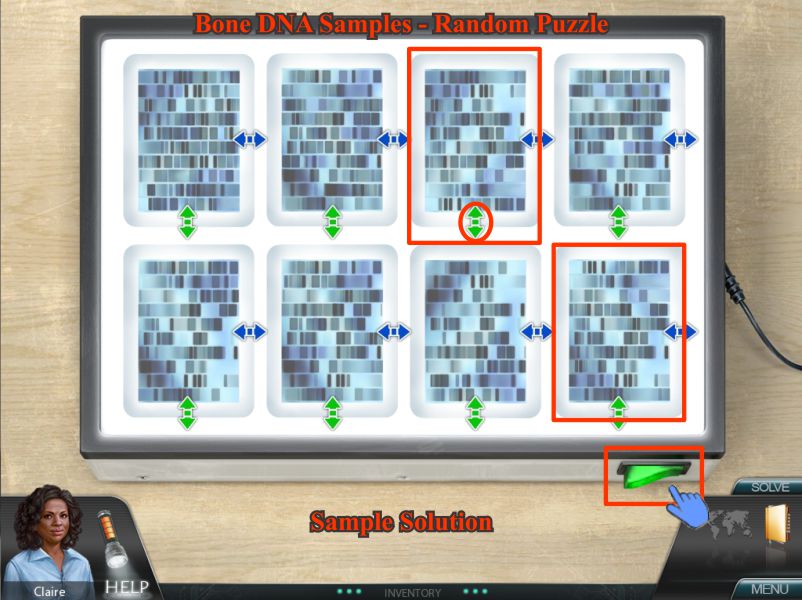
DNA Samples Mini Game
Lindsay had the remains transported to the Crime Lab for Claire to analyze.
The DNA samples are random but your goal is to find 2 that match as in the sample solution.
Turn on the monitor and then you may need to flip the samples horizontally or vertically in order to find a match.
Screenshot
Investigation 7: Lindsay
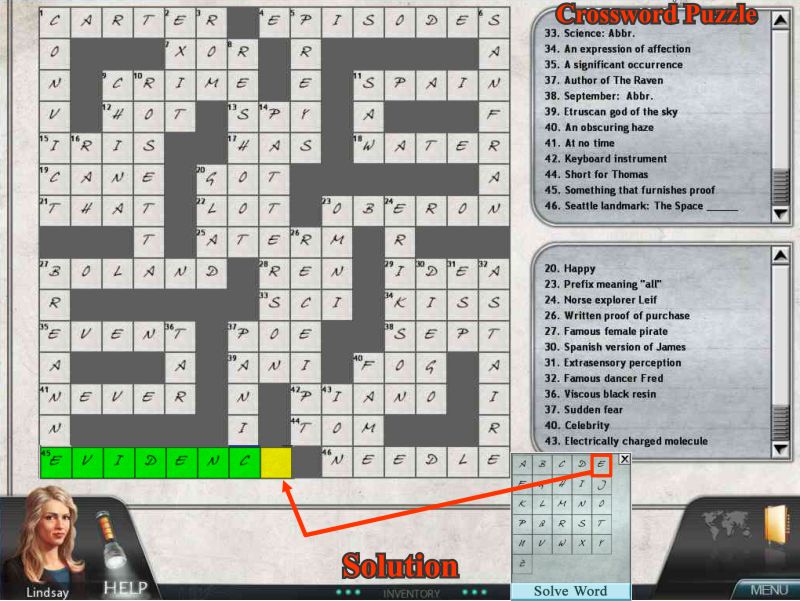
Crossword Puzzle
Beverly is sitting on a bench in the Cypress View Town Square but doesn't have time to talk until she finishes her crossword puzzle so you will help her.
Click on a missing word and Solve Word box will pop up for you to use to enter the letters you want.
The solution is shown in the screenshot.
Screenshot
Beverly tells Lindsay about the sheriff who now lives outside of town so use your Map to go to the Hillcrest Apartments.
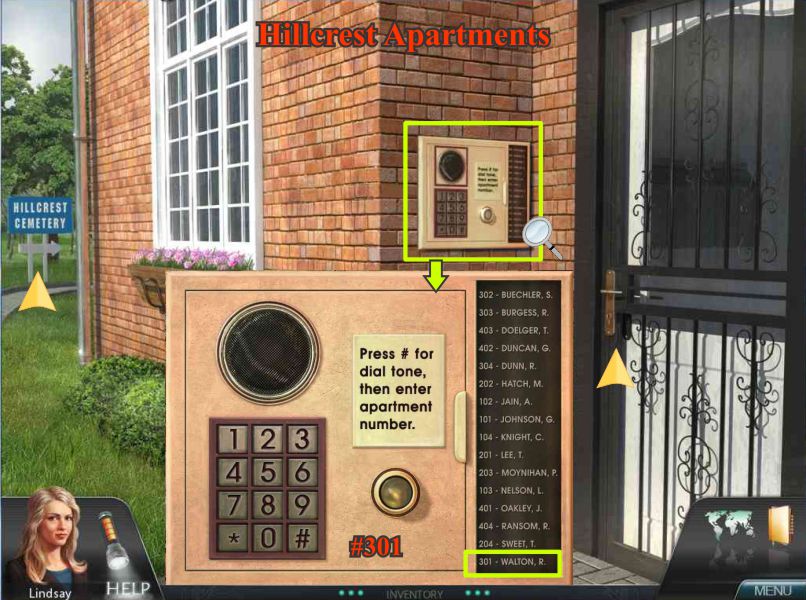
Hillcrest Apartments
The door is locked and the intercom is broken so you will need to fix it before you can contact the ex-sheriff.
Once you have repaired the intercom enter #301 and talk to R. Walton.
Screenshot
Intercom Mini Game
Open the panel and note that for a building of 4 stories the connection needs to start at B on the left and go to both A and C on the right.
There are two switches at the bottom to change the power source so flip the right one down.
Connect the wires as shown in the screenshot and shut the panel.
When you've called Sheriff Walton and talked to him he will finally buzz you in.
Screenshot
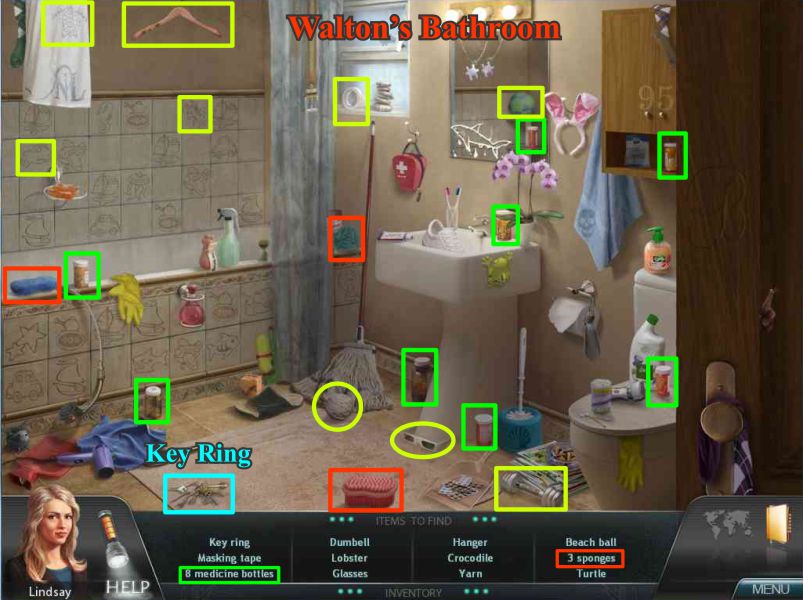
Talk to Walton who says he's misplaced his pills so go to the bathroom for a Hidden Object Scene.
Collect the 8 bottles of pills, the Key Ring, Masking Tape, and the rest of your list.
Screenshot
Leave Walton's apartment and go to the cemetery.
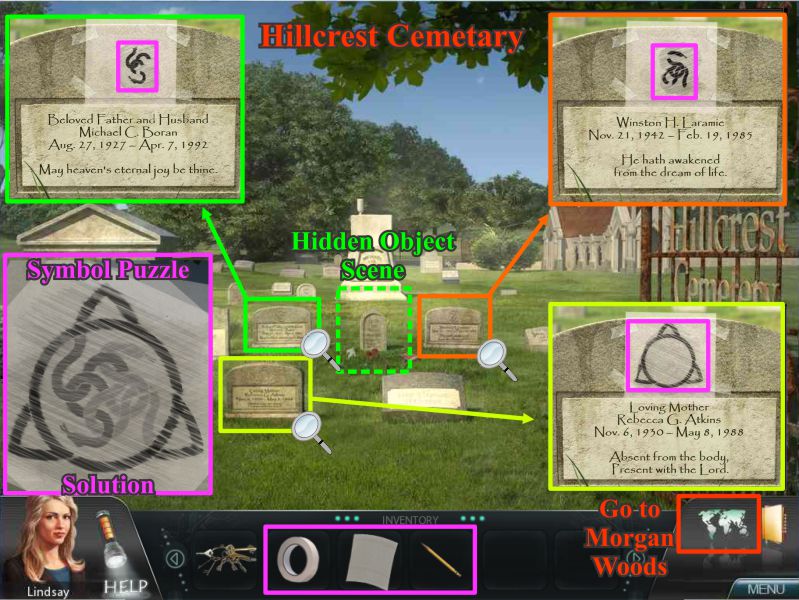
Hillcrest Cemetery
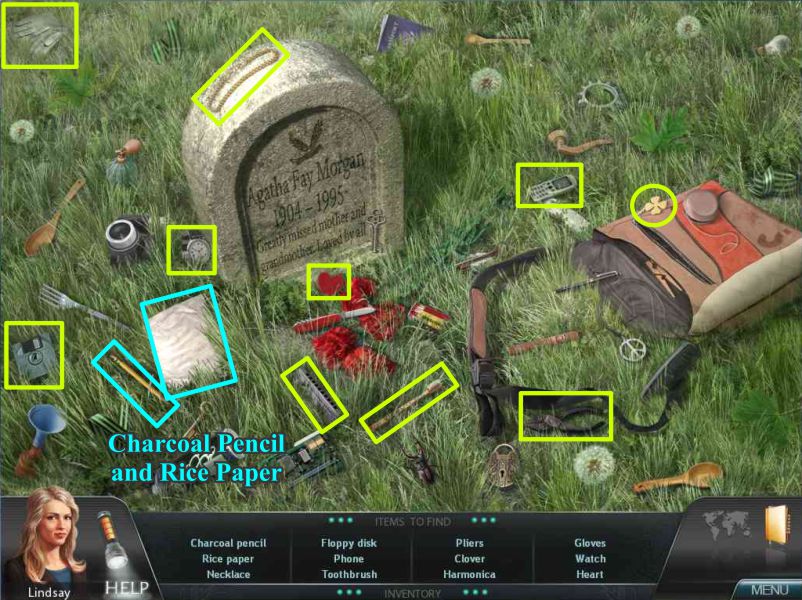
Play the Hidden Object Scene to get the Charcoal Pencil and Rice Paper to use to copy the symbols on the 3 tombstone close ups.
Place a piece of rice paper over the symbol, tape it, and use the pencil to rub over it.
Once you have all 3 you will get a puzzle to connect them into one symbol as shown in the screenshot.
Screenshot
Collect everything on your list including the Charcoal Pencil and Rice Paper.
Screenshot
Use you Map to go to the Sawmill.
Atkins Saw Mill
Go to the Saw Mill gate by the Mine and use the keys you got from Walton of unlock the gate and go through.
Go inside the mill and converse with Adam Atkins.
He needs to repair the saw and asks your help in replacing the fuses.
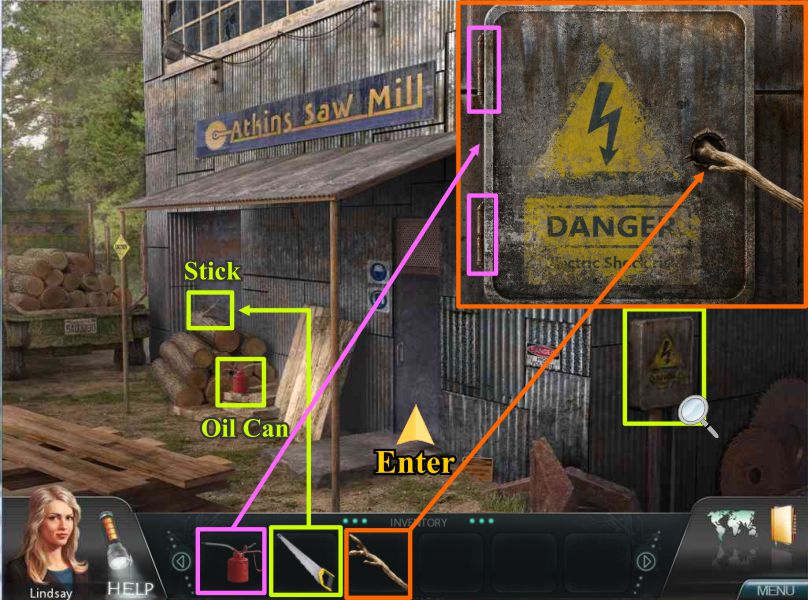
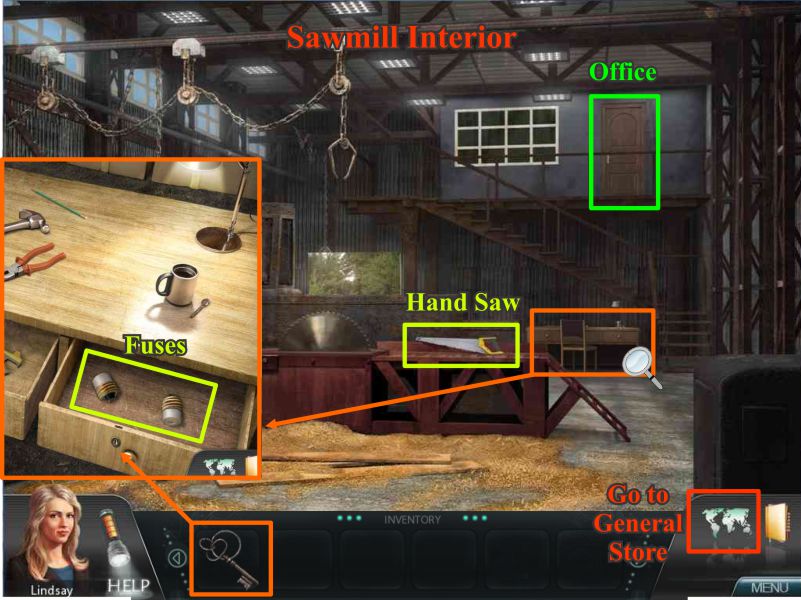
Grab the Handsaw and go outside.
Pick up the oil can and go to the fuse box.
You need something to open it so use your handsaw to cut the branch off the log pile out front.
Oil the hinges on the fuse box and put the stick in the hole to open the box.
Screenshot
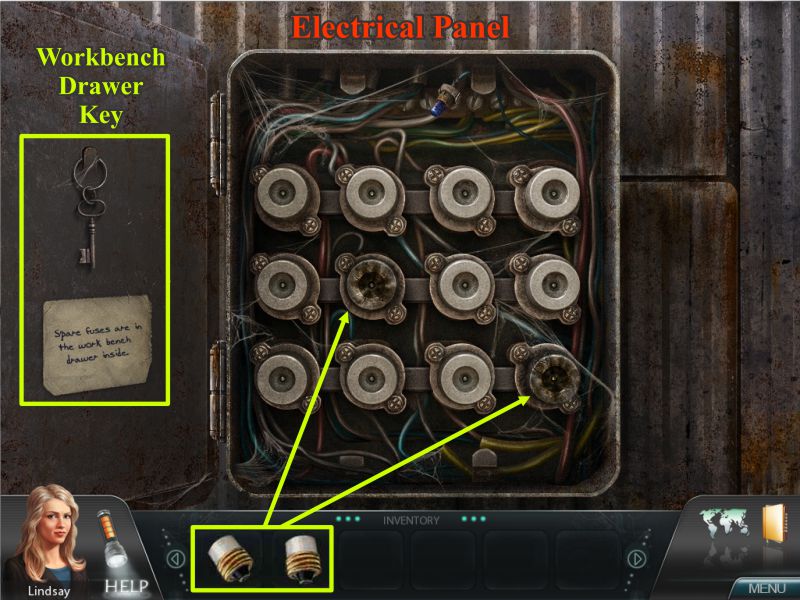
Fuse Box
There are 2 burnt out fuses and the key is hanging on the door so take it and go back inside to get the 2 fuses to replace the burnt out ones.
Screenshot
Go to the desk in back and use the key to open the right drawer and get the fuses.
Screenshot
After you've replaced the fuses and talked to Adam again, use the Map to go to town and enter the General Store.
General Store
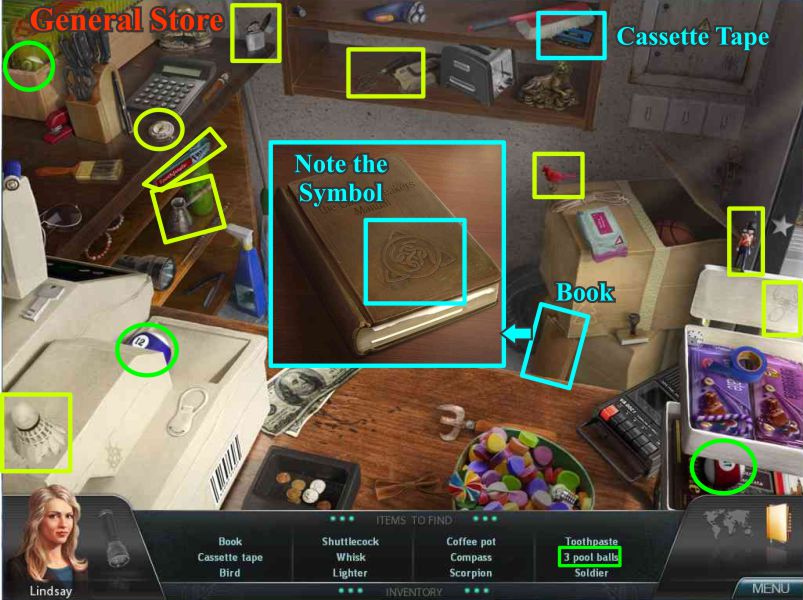
Play the Hidden Object Scene to get the Book with the symbol on it and the Cassette Tape.
Screenshot
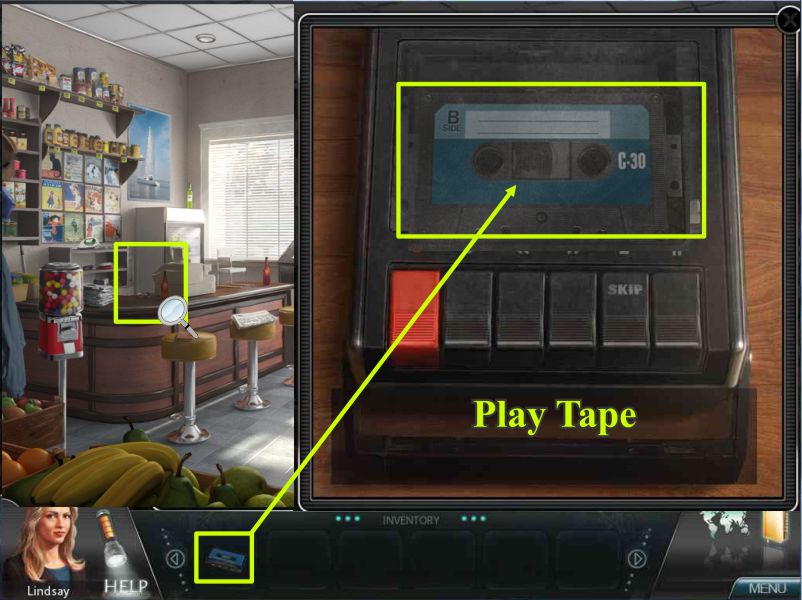
Click near the cash register to bring up the tape recorder.
Insert the tape and play it.
Have a conversation with Randy and find out what really happened.
Screenshot
Lindsay has a conversation with Claire and gets a search warrant for the mill.
Investigation 8: Lindsay
Atkins Saw Mill
Outside the mill pick up the Awl and go inside mill.
Go to the back desk where you got the fuses and read the note.
Use the awl inside the drawer to find the secret drawer and take the office key.
Screenshot
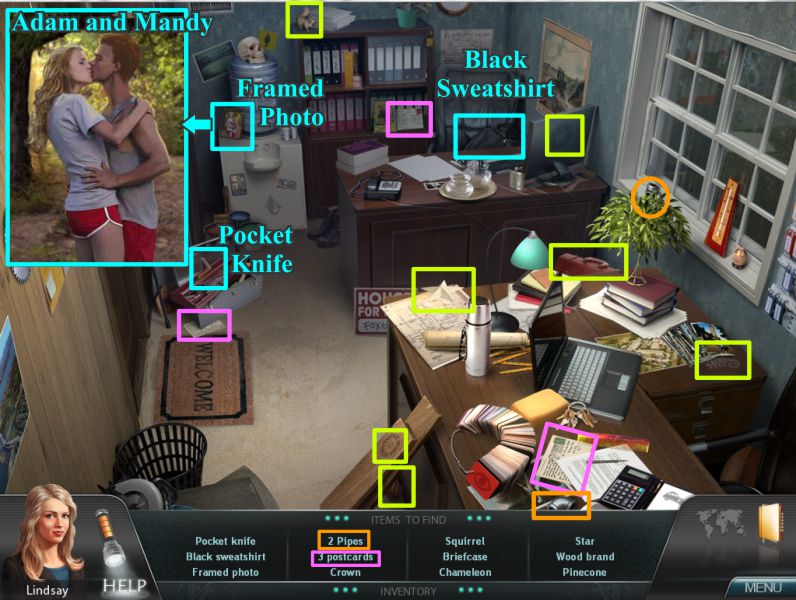
Saw Mill Office
Open the office door and click to play the Hidden Object Scene.
Collect your list which will include a Pocket Knife, Black Sweatshirt and a Framed Photo which shows Mandy and Adam were a little more than acquaintances.
Screenshot
Go back downstairs and click on the circular saw.
Use the pocket knife to pick the lock and play the puzzle to open it.
Once it is open spray Luminol on the edge of the table and bag a sample of the blood.
Screenshot
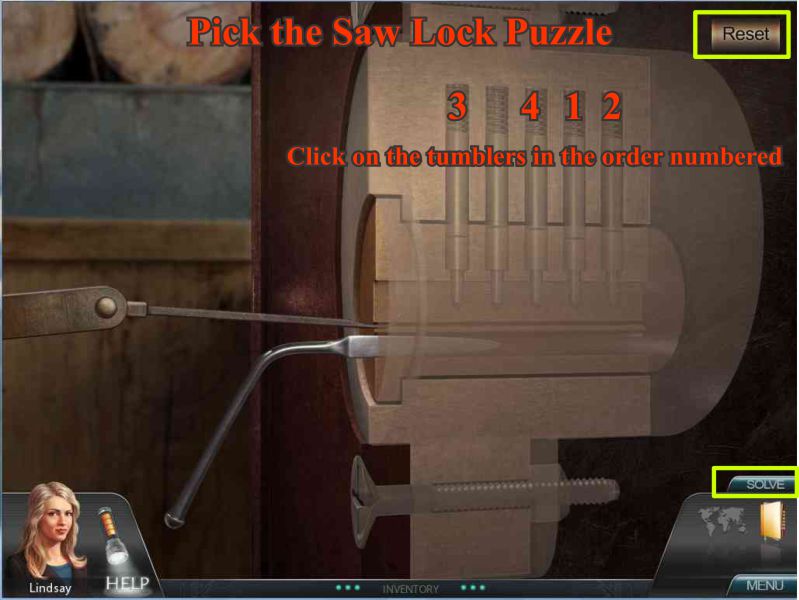
Saw Lock Puzzle
Click the tumblers in the order shown in the screenshot.
Screenshot
Crime Lab
Random DNA Test Puzzle
Lindsay sent the sweatshirt and blood sample to the crime lab for Claire to analyze.
Turn on the monitor and match two blood samples by flipping them until you find a match as shown in the sample solution.
Screenshot
Test the fiber sample by adjusting the brightness and focus until the red light shows at 1000 magnification.
Press OFF to upload it and print a sample of each.
Screenshot
Claire gives the results to Lindsay who confronts Adam at the Saw Mill.
Congratulations! You have completed the game and solved the case so can now play the Epilogue.
Epilogue: Adam Atkins
Atkins Saw Mill 35 Years Ago
Adam is attempting to cover up the evidence of what happened.
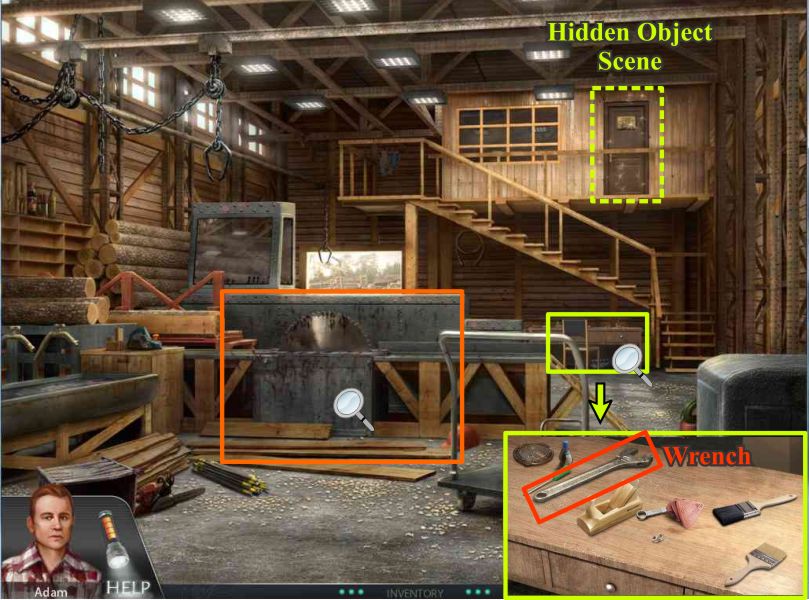
Go to the desk in the back and pick up the wrench.
Click on the office door for a Hidden Object Scene.
Screenshot
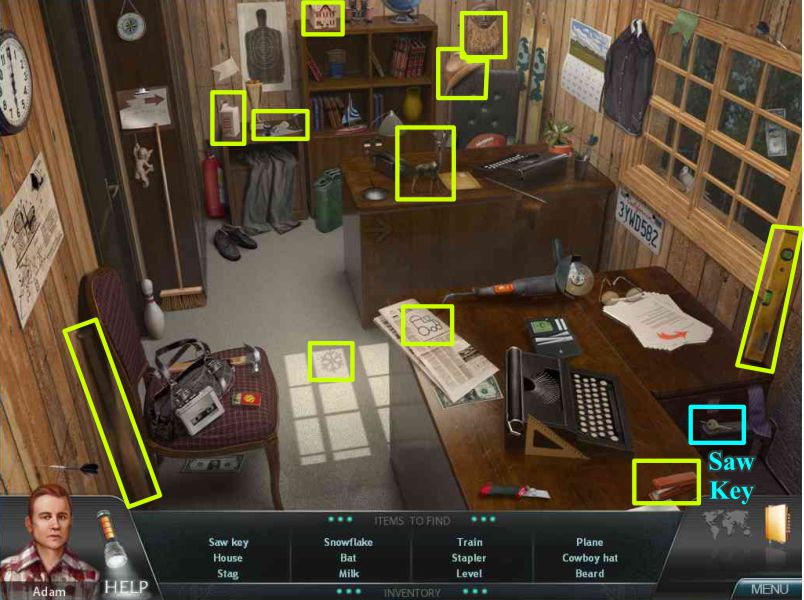
Collect everything on your list including the Saw Key.
Screenshot
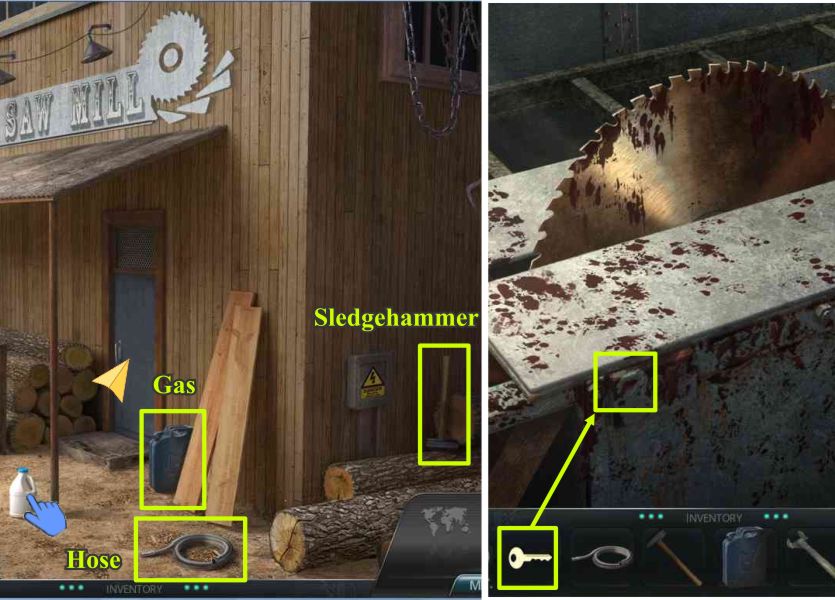
Go outside and check the bleach bottle to find out it's empty.
Pick up the hose, gas can and sledgehammer and go back inside.
Use the key to open the saw.
Screenshot
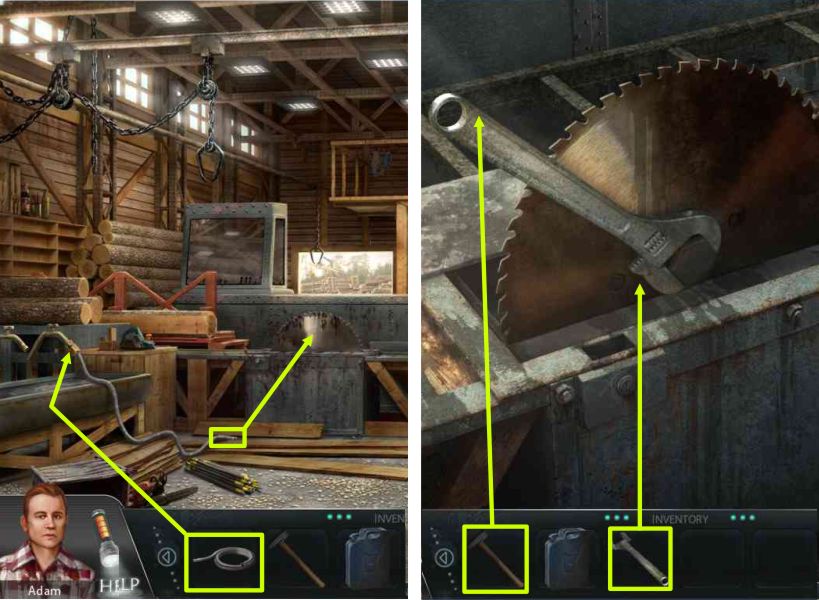
Attach the hose to the faucet, pick up the nozzle and wash down the blade.
Click for a close up of the saw and use the wrench to remove it.
It won't budge so use the sledgehammer to help it along.
Screenshot
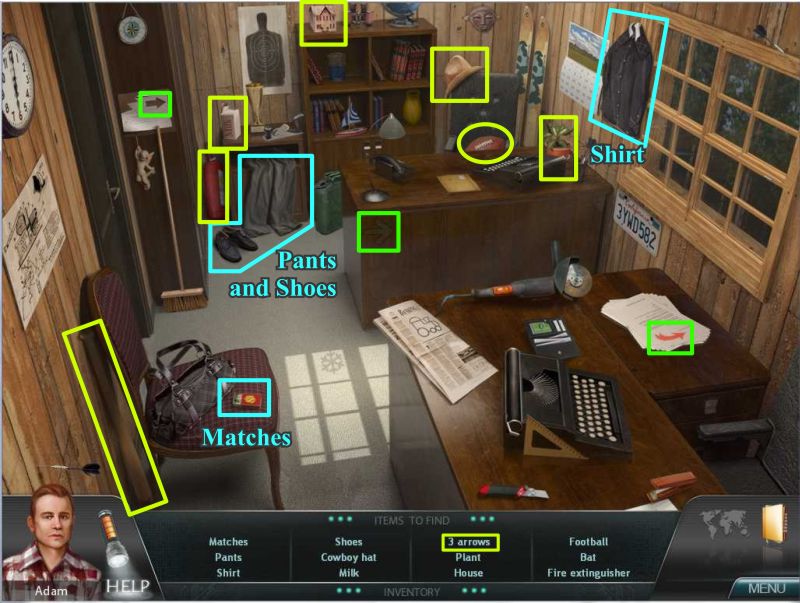
Click on the office door for another Hidden Object Scene.
Collect your list which will include the Shirt, Matches, Pants and Shoes.
Screenshot
Adam has changed out of his bloody clothes and goes outside.
Place the clothes and shoes in the bucket.
Pour the gas in the bucket and light it with the matches.
Screenshot
You have completed the Epilog and now know how it all started 35 years before the Women's Murder Club investigated and found all the Little Black Lies of Cypress View.
Posted by: Jazz |
October 17, 2010 12:40 PM
|
October 17, 2010 12:40 PM