
Treasure Seekers:
The Time Has Come
Platform: Mac, Windows
![]() More Treasure Seekers! The latest installment in the hidden object series, Treasure Seekers: The Time Has Come, preserves the story and layout of previous games and features a slightly older Nelly and Tom. Not only have the characters grown up, but Artogon seems to have matured bits of the gameplay as well, featuring a better-crafted series of puzzles and more interesting locations to search through.
More Treasure Seekers! The latest installment in the hidden object series, Treasure Seekers: The Time Has Come, preserves the story and layout of previous games and features a slightly older Nelly and Tom. Not only have the characters grown up, but Artogon seems to have matured bits of the gameplay as well, featuring a better-crafted series of puzzles and more interesting locations to search through.
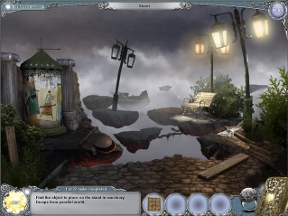 Avoiding some of the plot traps many hidden object games fall victim to, Treasure Seekers 4 stays away from haunted mansion/mental institution territory and instead opts for a time-traveling adventure. The ancient Mayans predicted the end of the world would happen in 2012, and in this game, you can help prevent that from happening. Switch between two time periods so you can investigate events and affect things in the future from the past, all by using a magical ring.
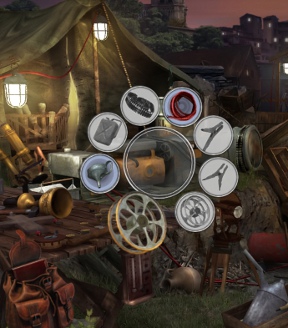
Gameplay is traditional Treasure Seekers fare, with Artogon's lovely "container items" filling out a good portion of the puzzles. One of the first you'll encounter is a simple generator needed to power some lights. In order to get it to work, you must find half a dozen parts scattered throughout the scene. Click on the generator and a round menu opens up with each item displayed as a slightly blurry icon. Find the item, drag it to the generator, and you've filled in a slot! It's simple, it's intuitive, and it looks great in the game.
Apart from servicing container items, the rest of the puzzles in Treasure Seekers focus on solving basic tasks using a few items from nearby areas. You'll need to travel a bit in order to find what you need (especially later in the game), but a refilling hint meter ensures you never get stuck, and small white "sparkles" appear on objects that are important for your search.
 Analysis: The Treasure Seekers series has become a staple hidden object game since its introduction a few years ago. Not only are the container items interesting, but the games focus on a pair of siblings and their adventures, telling a good story that shows surprising continuity between sequels. The villain and some of the plot points come across as a bit contrived (gotta appreciate Totenkraft's sense of style, though!), but the whole thing is put together so well, you never really mind.
As is becoming the practice of many modern hidden object games, Treasure Seekers: The Time Has Come features both casual and standard modes of play. The former features a faster hint timer and the above mentioned white sparkles, while the latter is a bit more difficult. Casual mode offers very little challenge, but it's great if you're only interested in kicking back and having a good time.
A great follow-up to the first Treasure Seekers games, with Artogon's seasoned hidden object/adventure hands creating an experience worthy of any casual gamer!
A Collector's Edition is also available and it includes a battery of extras, including wallpapers, a strategy guide, and concept art. Best of all, a bonus adventure is available to play, and it's actually a great addition to the game! Remember that Big Fish Game Club Members pay only $13.99 for Collector's Editions (or 2 club credits), and collector's editions count 3 card punches of 6 total needed for a free game.
![]() Windows:
Windows:
Download the demo
Get the full version
Also available: Collector's Edition
![]() Mac OS X:
Mac OS X:
Download the demo
Get the full version
Also available: Collector's Edition


Walkthrough Guide
(Please allow page to fully load for spoiler tags to be functional.)
Treasure Seekers: The Time Has Come Walkthrough
General Information and Tips
On the Main Menu you can choose another profile, start the adventure, select your options, link to prior Treasure Seek games, or quit the game.
Options include Music and Sound volume, full screen or windowed, correction for widescreen when appropriate, and difficulty level. You may read the credits.
If you start a new profile, you will have to choose your options again for that profile.
If you purchased the Collector's Edition, "Extras" include the Strategy Guide, which is also accessible from each scene, Concept Art, and Wallpaper.
In the Collector's Edition, you will see a screen giving you your choice of play and can check a box if you don't wish to see it each time you start the game. Extra Play will become available once you have completed Normal Play.
In Casual Mode, the Hint and Skip buttons charge faster and less time is required for illuminating the next collectable item.
Advanced Mode is suggested for experienced game players. The Hint and Skip buttons take long to recharge and most other hints are unavailable.
When you first begin the game, you will have a choice of using Interactive Help.
Each time you start the game, you will see the beginning cutscene unless you choose to skip it.
At the beginning of each chapter, you will also see the cutscene while the game is loading.
If you need further instructions for Puzzles or Mini Games, click on the "?" in the upper left corner of that screen.
When you Exit the game, your progress is automatically saved.
Be sure to check the screenshots for additional information.
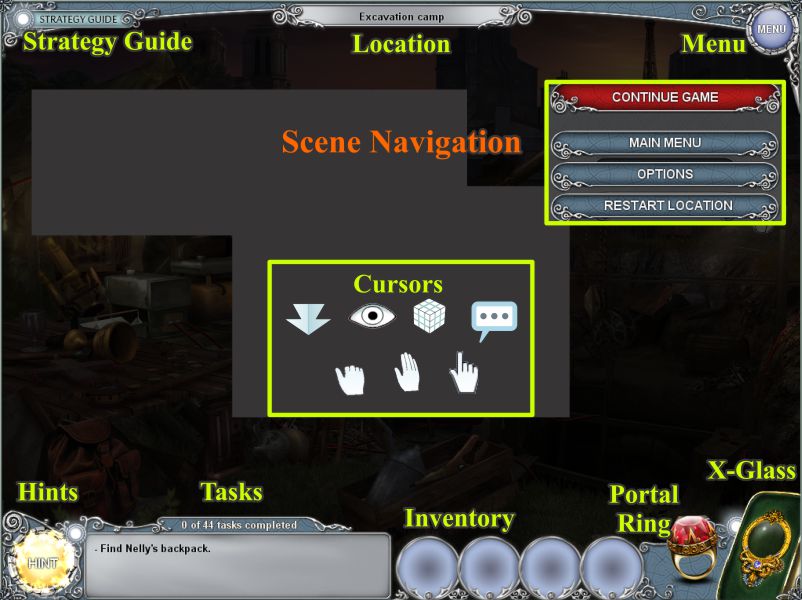
Scene Navigation
There is no timer or click penalty in the main scenes, but don't click too much in the Hidden Object Scene or your cursor will go nuts for a while.
If you purchased the Collector's Edition, you can access the Strategy Guide in the upper left corner.
The top center area of the screen shows your location.
The upper right corner lets you access the Menu that gives you a choice of continuing the game, returning to the Main Menu, changing your Options, or restarting your current location.
If you choose to restart a location, you will need to replay the entire chapter.
Hints are located in the lower left corner.
Next to Hints are your Tasks to complete. The upper portion of the box shows how many tasks you have already completed and the total number that needs to be located for that chapter.
To the right of Tasks is your Inventory.
Once you find The Ring, it will be available next to your Inventory. The Ring is a Portal between Tom's present time in 1932 and the year 2012.
When it is available for use, the X-Glass will show up in the lower right corner.
Cursors
Your cursor will get different attachments as a clue to help you with your tasks.
An Eye cursor attachment means you should take a closer look at an area.
A cube means there is a Puzzle or Mini Game to play.
There are 3 types of hands shown in the screenshots: a fist means you can pick something up or pull something open; an open hand means you need to move something; a pointing hand helps you move levers, handles or knobs on items that need opening.
A blue arrow means you can follow it to another location.
A bubble with 3 dots in it means you need to talk to a person to find out important information.
Key Objects
Sometimes when you click on an item, you cannot immediately pick it up or use it because a circle appears that has other circles attached to it with several objects you need to find.
When you find one of the objects, it will not automatically go into the key object circle.
You need to place the objects in the circle and the small circle with that item will change color to tell you that you found it.
Once you find all the items in the small circles, the key object will be available to you.
Hidden Object Scenes
Hidden Object Scenes are marked in the screenshots because we will all have the same items to find but not in the same order.
As you pick up an item, another item will appear in your list until the list is complete.
Multiple items will be color coded.
All items to collect in the Hidden Object Scenes are marked and listed in the screenshots.
Items listed in blue require an additional task to collect them, such as opening another object, combining it with another object not on the list, or moving another object to see it.
You will come away with an Inventory item at the completion of the Hidden Object Scenes.
Screenshot
Chapter 1: Paris, France
Navigation
Once Tom has the Ring, he will travel between 2012 and 1932.
The Excavation Camp is only in 1932.
In 2012 Molay's Room becomes the Secret Room and Castle Hall becomes Museum Hall.
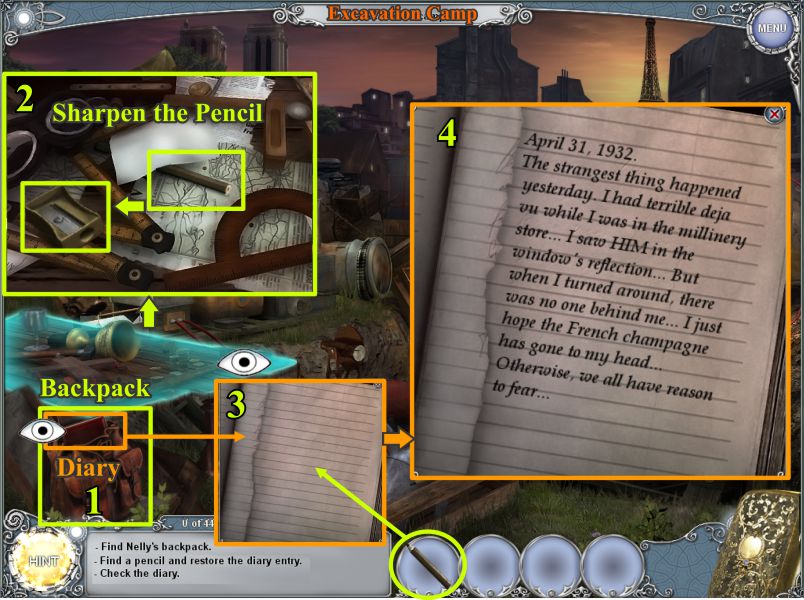
Excavation Site
Open Nelly's backpack and look at her Diary.
The page is blank, but Tom knows a trick to read it. Click on the table at the left and pick up the Pencil.
Sharpen the pencil and use it on the diary page to read Nelly's comments.
Screenshot
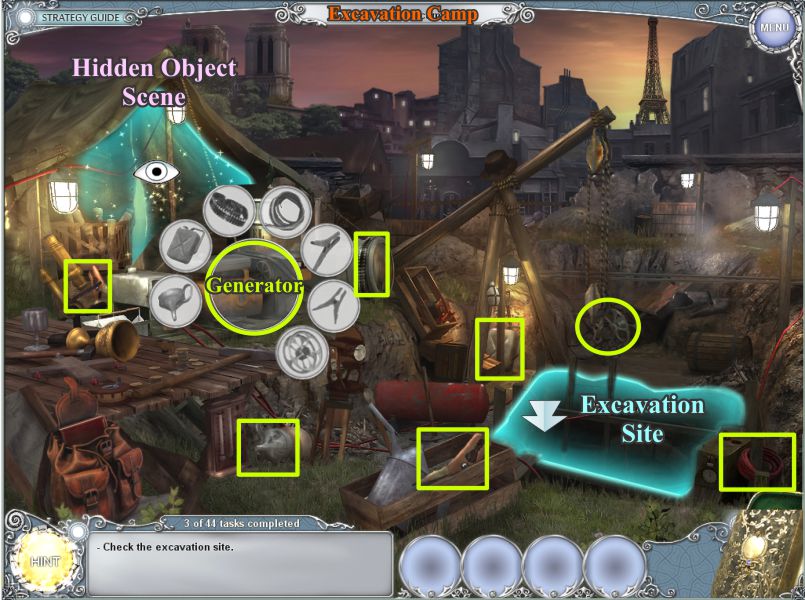
Go down the ladder to the Excavation site and back to Camp to trigger a Key Object.
Click on the Generator and find 7 marked objects necessary to start it.
Go back down to the Excavation site to find out it is still too dark. Once back up at the Camp, click on the tent for a Hidden Object Scene.
Screenshot
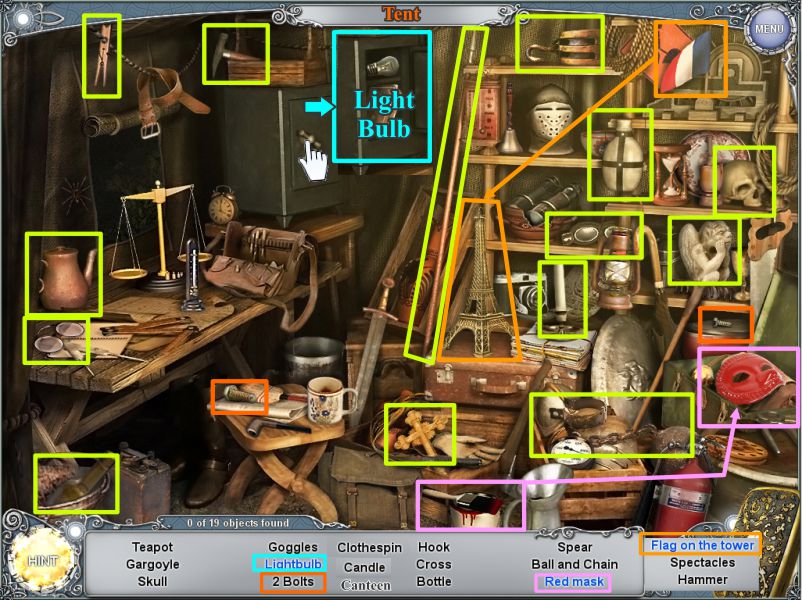
Tent Hidden Object Scene
Open the safe to get the Light Bulb.
Paint the mask red to pick up the Red Mask.
Place the French flag on the Eiffel Tower for Flag on the Tower.
Screenshot
Excavation
Go back down to the Excavation site and place the Light Bulb in the lamp.
Click on the Broken Plate on the back wall for a Key Object circle.
Pick up the 7 Plates marked in the screenshot and use the X-Glass to find the last plate buried in the dirt.
Screenshot
Tent Hidden Object Scene
Go back to the tent for another Hidden Object Scene.
Open the safe to get the book and place the spider in the jar to collect Spider in a Jar.
Open the suitcase to find the bomb inside.
Once you've collected everything, you will have a Shovel, so go back down to the Excavation.
Screenshot
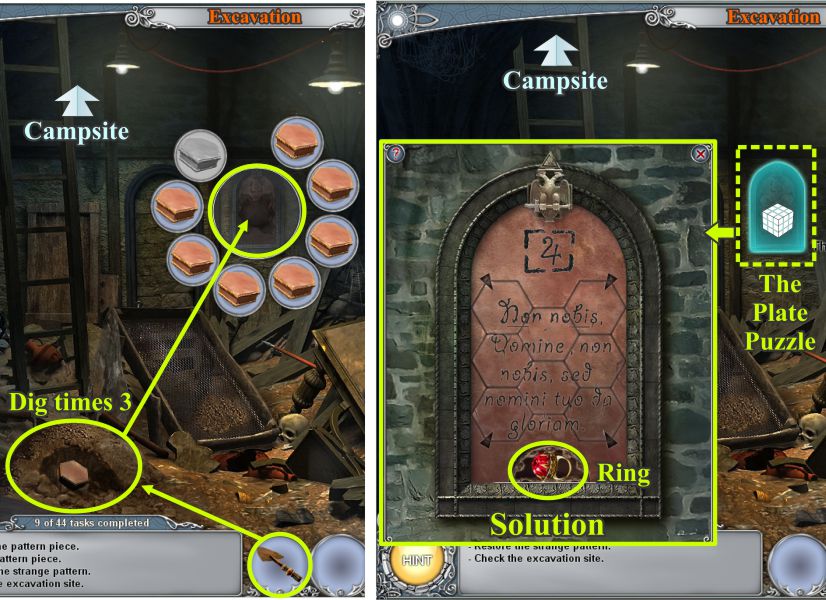
Excavation and Plate Puzzle
Dig up the last Plate by digging in the dirt 3 times.
Click on the plate for a puzzle and swap the plates to get the solution shown in the screenshot.
Pick up the Ring.
Screenshot
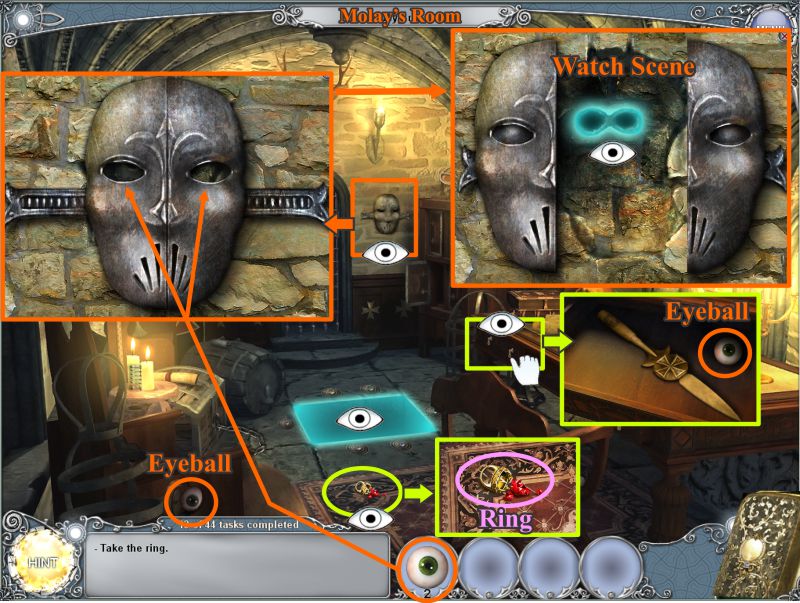
Molay's Room
Tom is transported by the Ring to a room in a castle.
The gem in the ring is broken, so pick up the setting.
Tom hears voices through the mask on the wall, so examine it.
It is missing eyeballs. Pick up the one on the ground and open the desk drawer to get the other one.
Place the Eyeballs in the mask and it will open for you to peer though the viewer shown in the screenshot.
Screenshot
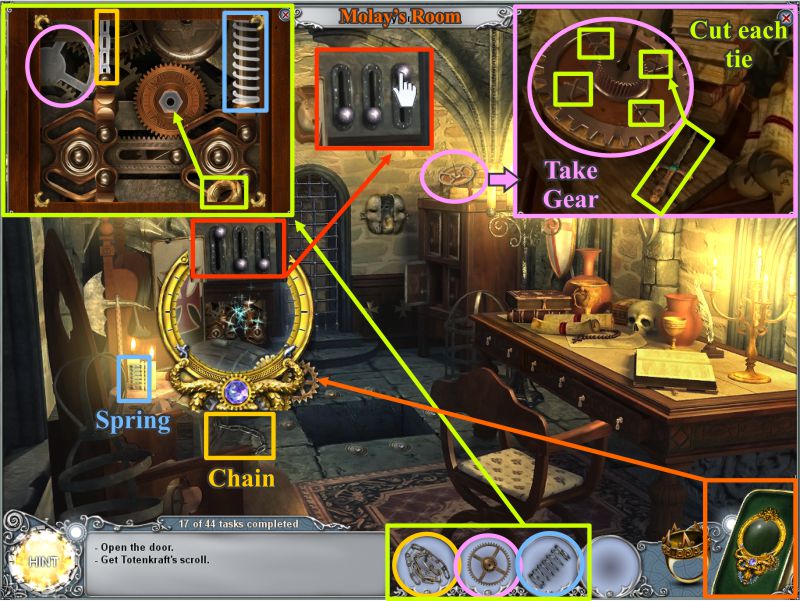
Tom has to get through the door, but the mechanism is broken. Use the X-Glass to find it.
Zoom in on the mechanism and pick up the nut to place it where it belongs.
Collect the Spring and Chain and click on the area on top of the cabinet to get the Gear.
Use the knife to cut the 4 ties holding the gear and take it.
Place the missing parts in the mechanism and arrange the levers as shown in the screenshot to open the gate and door.
Screenshot
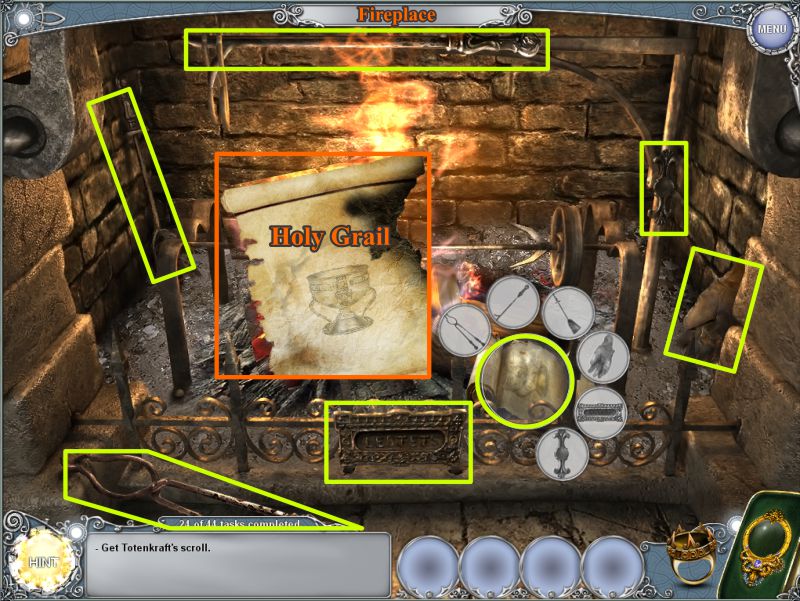
Castle Hall Fireplace
Go to the Fireplace in the Castle Hall to get the scroll.
Click on the scroll for a Key Object. Place the items marked in the screenshot to set the scroll that shows Totenkraft is after the Holy Grail.
Pick up the red gem on the carpet, and you will be transported to the future.
Screenshot
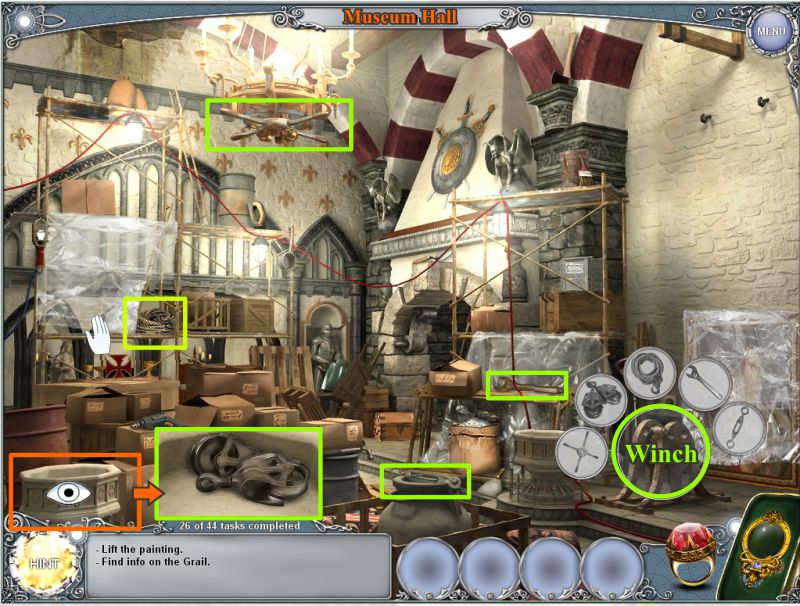
Museum Hall
The Castle Hall is now a museum, and the painting is in Tom's way. Click on the Winch for a Key Object and find the items marked in the screenshot.
One of the parts is in the fountain at the left, and you will need to move the tarp to get the rope.
Click on the Winch lever to raise the picture, and use the X-Glass to find the Secret Door.
Screenshot
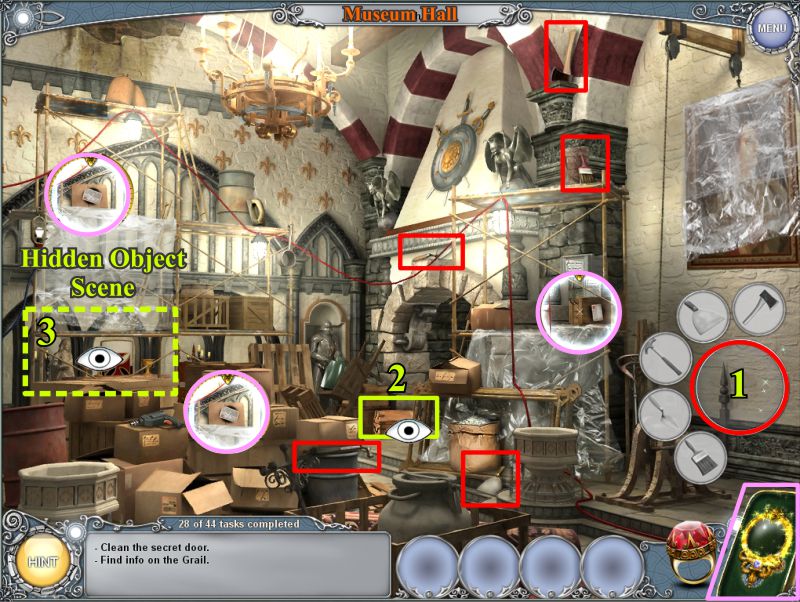
Click on the wall for a Key Object and find the items marked in the screenshot.
Zoom in on the strange symbol on the wall.
Check the small chest and lock to trigger the Hidden Object Scene.
Use the X-Glass to find the torn pages on the boxes marked in the screenshot.
Screenshot
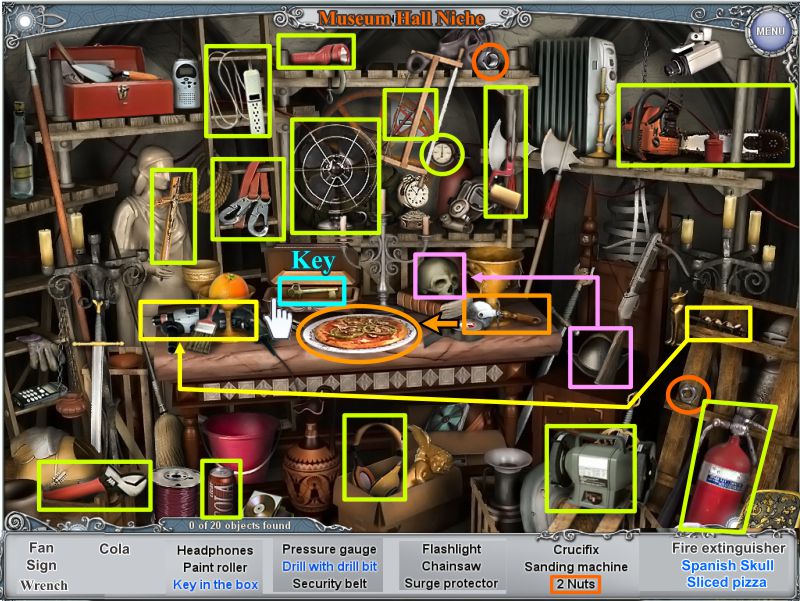
Museum Hall Niche Hidden Object Scene
Use the pizza cutter on the pizza to get the Sliced Pizza.
Place the Conquistador Helmet on the skull to get a Spanish Skull.
Open the box to pick up the Key.
Place the drill bit in the drill so you can collect Drill with Drill Bit.
Screenshot
Museum Hall
Use the Key to open the small chest and see where to find the seal to insert on the plaque to open the door.
Go back in time to Castle Hall.
Castle Hall
Click on the box for a Mini Game and swap the shields to look like the solution in the screenshot.
Zoom in on the open box to discover the seal is gone.
Use the ring to go to Museum Hall to find something to copy the seal.
Screenshot
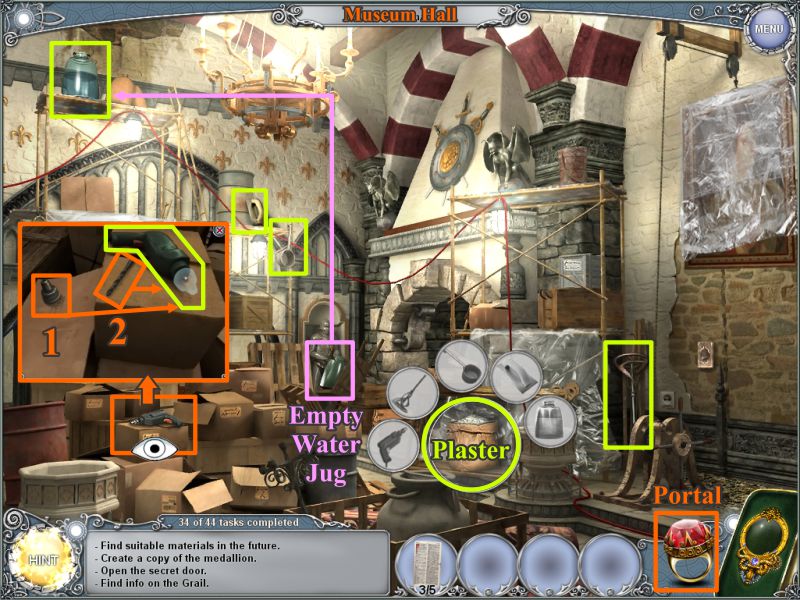
Museum Hall
Click on the bag of plaster for a Key Object.
Place the Empty Water Jug on the scaffolding to collect water from the drip so you can place the jug in the Key Object.
Click on the drill to assemble the missing parts and place the competed drill in the circle.
Collect the rest of the items marked in the screenshot and you will end up with a pot of plaster.
Screenshot
Castle Hall
Go back to Castle Hall and zoom in on the box to place the plaster on the design.
Pick up the hardened plaster and return to Museum Hall.
Museum Hall
Place the plaster amulet on the door plaque.
Enter the Secret Room to find out it has no light, then go back to Museum Hall.
Pick up the Portable Light.
Go back to the secret room and hang the light on the hook in the top center of the scene.
The light isn't plugged in, so go back to Museum Hall and plug in the light.
Return to the Secret Room and examine all the dust, then come back to Museum Hall.
Play the Hidden Object Scene to get a broom.
Go back into the Secret Room.
Screenshot
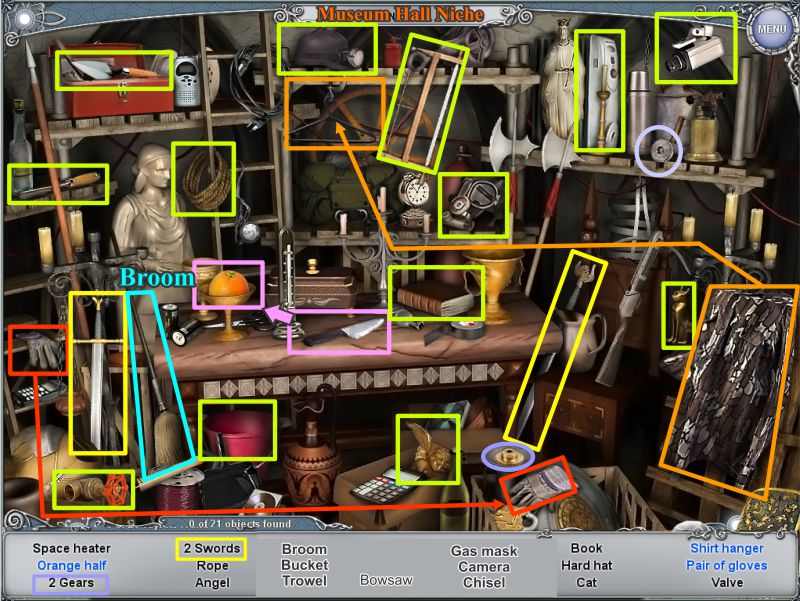
Museum Hall Niche Hidden Object Scene
Open doors to find hidden items.
Collect all the items to get the broom.
Put the shirt on the hanger to get Shirt Hanger.
Place the left glove as marked in the screenshot on the right glove to collect a Pair of Gloves.
Use the knife to cut the orange and pick up the Orange Half.
Screenshot
Secret Room
Use the broom to sweep away all the dust, then click on the secret compartment on the floor.
Note the 3 missing buttons that Tom remembers seeing in the past. Call upon the Ring to go the Molay's Room.
Molay's Room and Secret Room
Open the desk drawer and take the Letter Opener.
Click on the compartment and use the Letter Opener to remove the 3 buttons shown in the screenshot.
Return to the Secret Room via the ring.
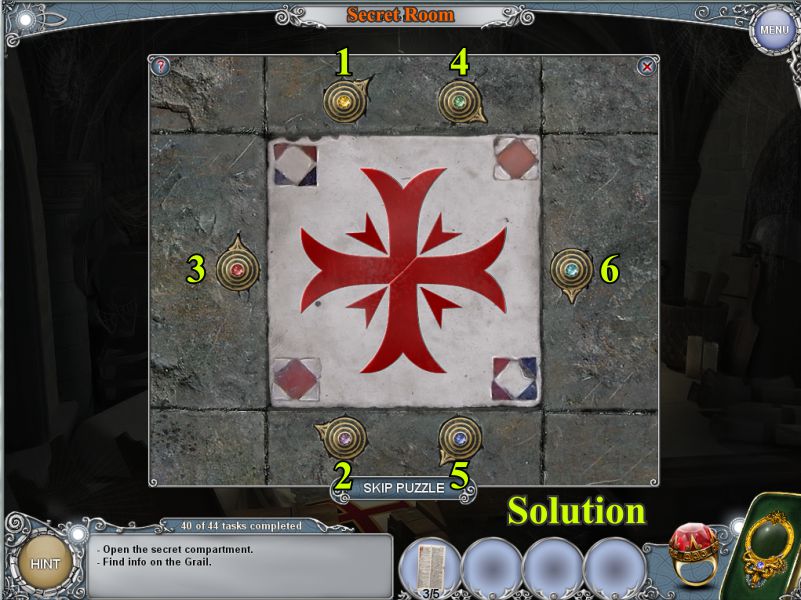
Place the 3 buttons as shown in the screenshot to trigger a Mini Game.
Screenshot
Secret Room Mini Game
In order to open the secret compartment, you need to press the buttons in the order shown in the screenshot.
Screenshot
Secret Room
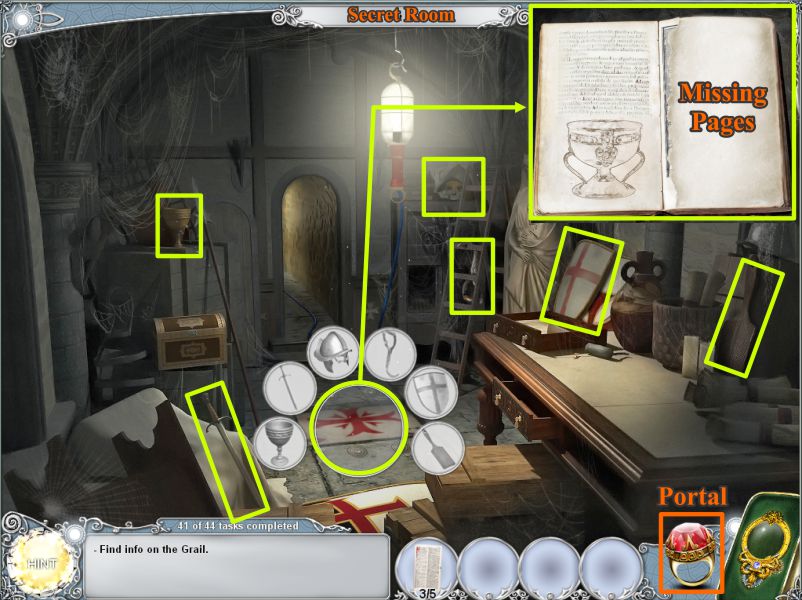
The compartment is stuck, so click on it for a Key Object and place the marked items in the circle.
A book with missing pages is inside the compartment.
You have 3 pages of the book and need to find the last 2 pages.
Use the ring to go back to Molay's Room.
Screenshot
Molay's Room and Secret Room
Use the X-Glass to find the 2 pages marked in the screenshot.
Use the portal to return to the Secret Room and click on the compartment.
Place the pages on the book and see what Tom has to say about the Holy Grail.
Screenshot
Everything Tom read in the book points to a Temple in Jerusalem, so he flies to the City of David in 2012.
Chapter 2: Jerusalem
Navigation
You will be doing a lot of traveling back and forth from the years 2012 and 1932 in this chapter.
Those locations only in 2012 include the Chapel and Storage Room.
The locations only in 1932 include the Tent, Temple Cell, and the Secret Room downstairs in the Temple.
The only way in and out of the Temple is the Secret Passage in the Wall in 1932.
Temple Gate 2012
Pick up the Rake and Broom, then click on the sign by the Chapel.
Remove the dirt with the Broom and take note of the date, which is 1306.
Click on the Storage Room door for a Mini Game.
Press the number 1306 to open the lock.
Enter the Storage Room for a Hidden Object Scene.
When you have to glue, head off to the Wall.
Screenshot
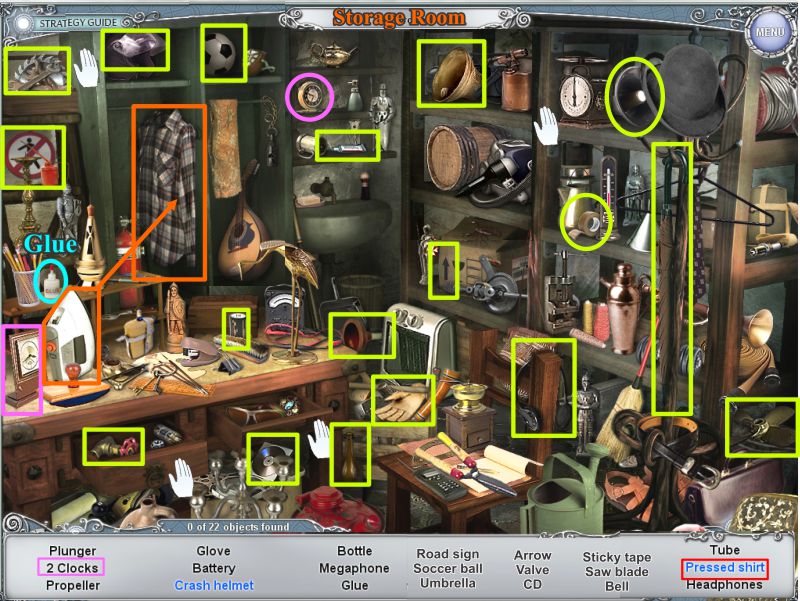
Storage Room Hidden Object Scene
Open and close the doors and drawers and slide the curtain to find all the objects on the list and get the Glue.
Use the iron on the shirt for a Pressed shirt.
Screenshot
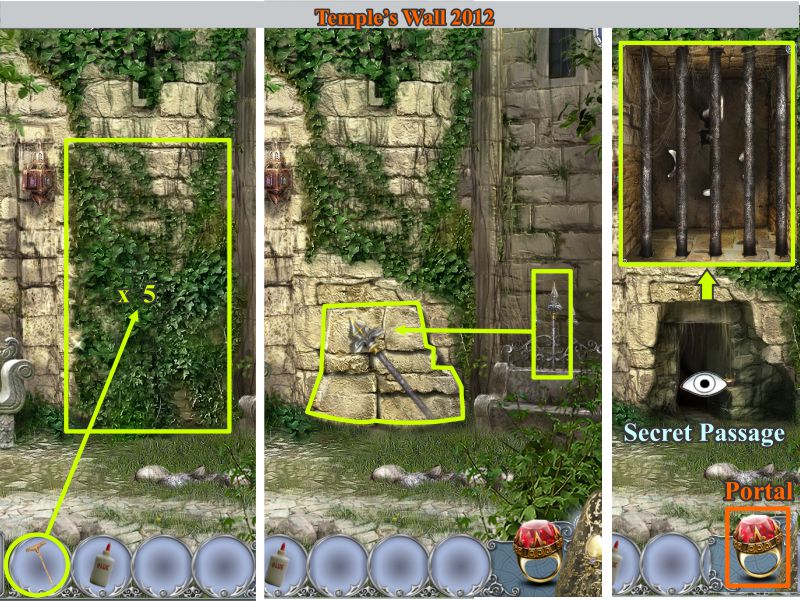
Temple's Wall 2012
Use your rake 5 times on the wall to remove the foliage.
Pick up the center fence post and use it 5 times to loosen the stones shown in the screenshot.
Use the sharp point 5 more times to remove the stones.
Check the Secret Passage to discovered it has bars.
Screenshot
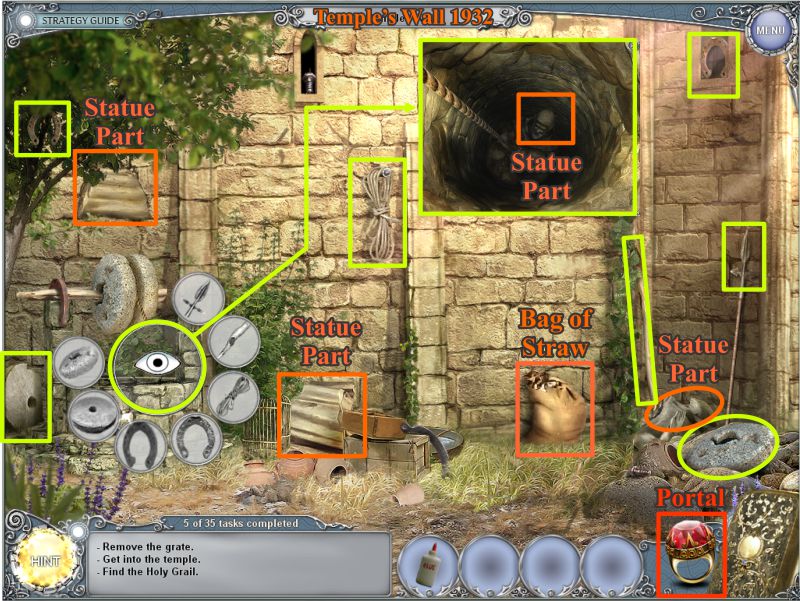
Temple's Wall 1932
Travel back to 1932 and pick up the Bag of Straw and the Statue Parts marked in the screenshot.
Click on the well and discover that the last Statue Part is at the bottom.
Click on the well again for a Key Object to fix the well.
Collect all the parts and then zoom in to get the Statue Part.
Screenshot
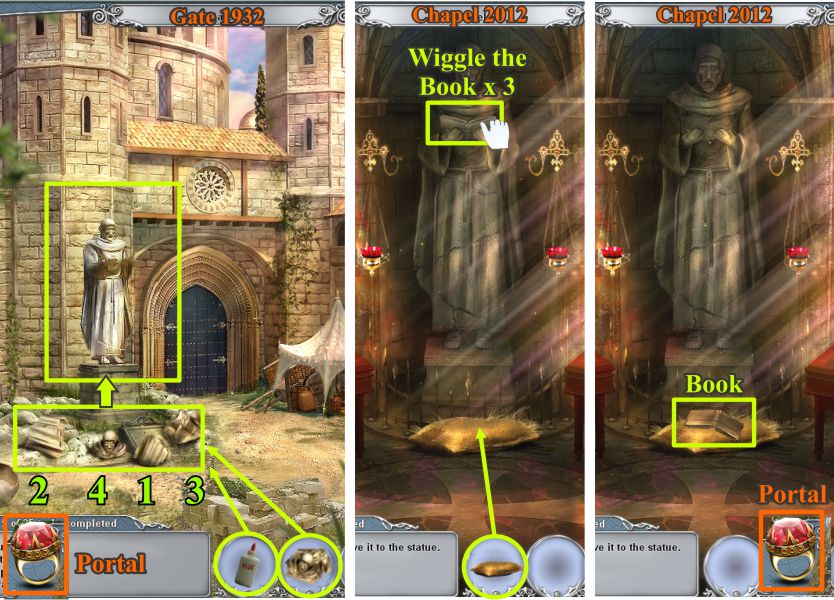
Gate 1932 and Chapel 2012
Exit down to the Gate and place the Statue Parts on the statue.
The parts will fall on the ground. Place your Glue on the statue parts and assemble the statue as shown in the screenshot.
The book is missing, so travel to 2012 and enter the Chapel that was built around the statue.
Wiggle the book a couple times to loosen it and Tom will decide it is going to fall. Place the Bag of Straw under the statue and wiggle the book again.
Pick up the Book from the bag of straw and travel back to 1932.
Screenshot
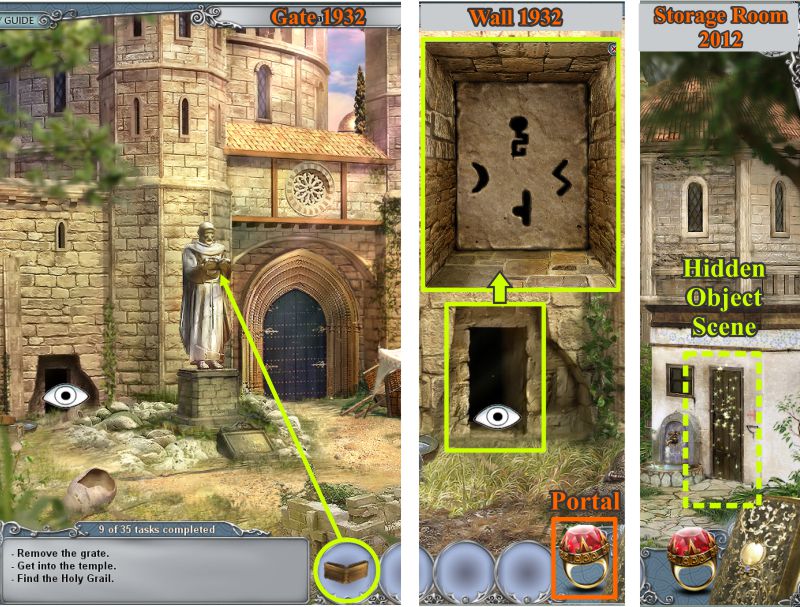
Gate 1932, Wall 1932, and Storage Room 2012
Place the book on the statue and the secret passage will open.
Zoom in on the passage and discover the 4 keys are missing.
The keys you need are behind bars in 2012, so go to the Storage Room for a Hidden Object Scene to find a saw.
Screenshot
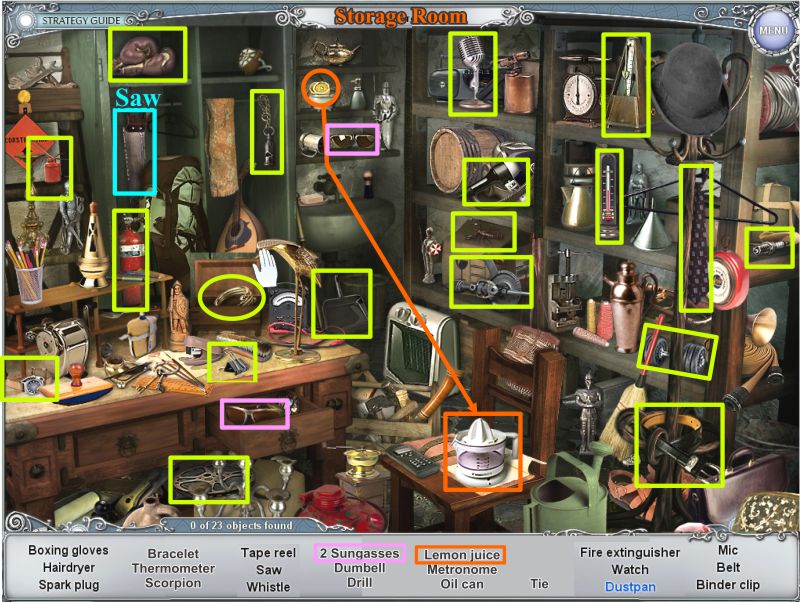
Storage Room Hidden Object Scene
Remember to open and close all doors, drawers, and the curtain to find all the objects.
Take the lemon off the shelf and juice it in the juicer to collect the Lemon juice.
Open the box on the table to find the Bracelet.
Screenshot
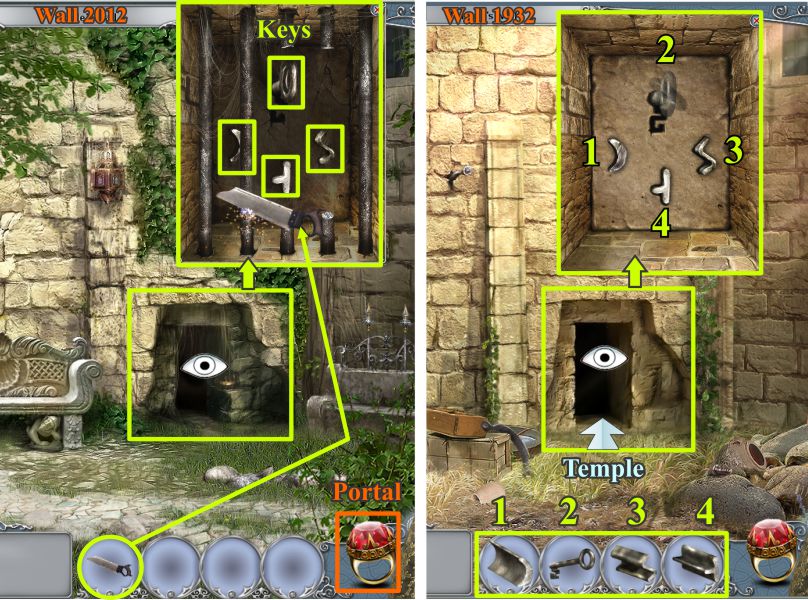
Temple's Wall 2012 and 1932
Go to the Wall and saw the 3 bars so you can collect the 4 keys.
Travel to 1932 and place the 4 keys as shown in the screenshot.
The passage will open, so enter the Temple.
Screenshot
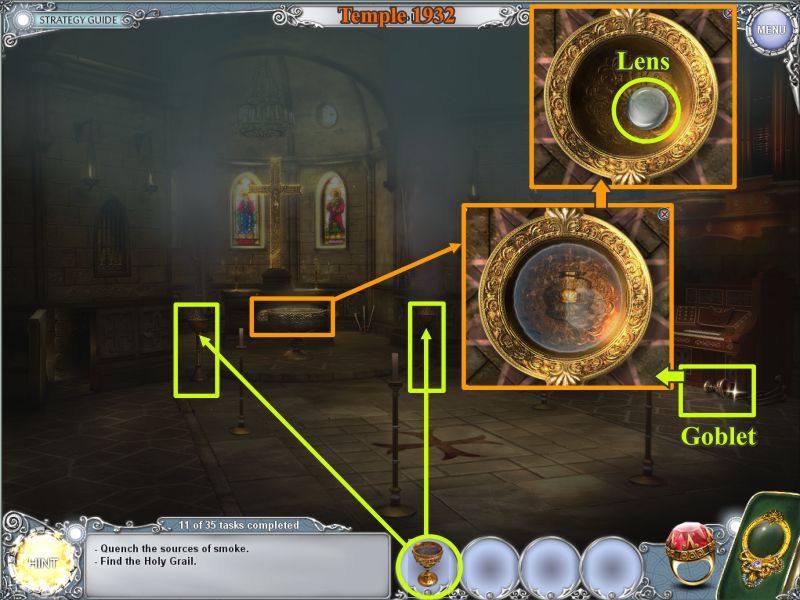
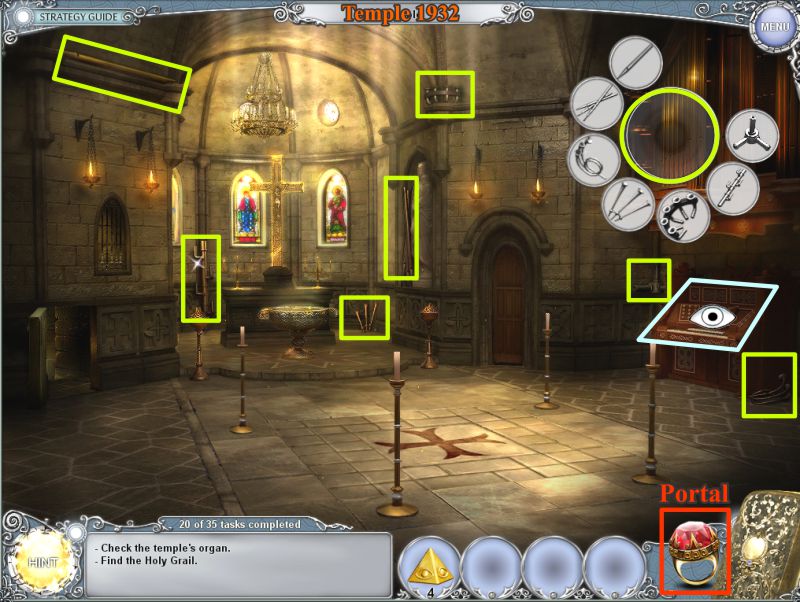
Temple 1932
It's dark and smoky inside, so you need to put out the censers.
Grab the Goblet at the right and click on the bowl marked in orange to fill the goblet with water.
Once the water is gone, grab the Lens that remains.
Put out the 2 censers marked in the screenshot.
Screenshot
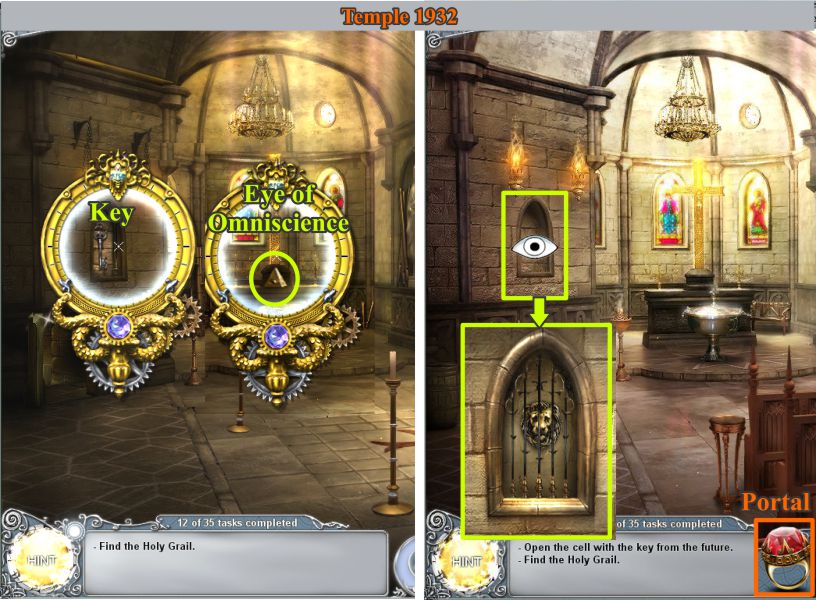
Temple 1932 and 2012
Click on the Cell Door on the right to find out its locked.
Use the X-Glass to pick up the Eye of Omniscience. Note that the key you need can't be reached in the niche.
Zoom in on the niche only to discover there is a Lion's Head behind bars.
Screenshot
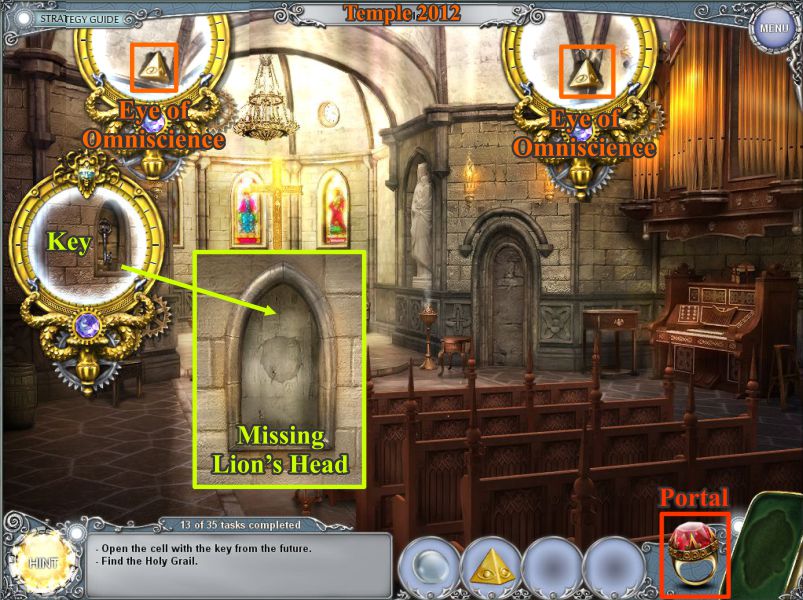
Temple 2012
Travel to 2012 and use the X-Glass to pick up the 2 Eye of Omniscience and view the Key.
Zoom in on the niche to see the bars are gone but the lion's head is missing.
Screenshot
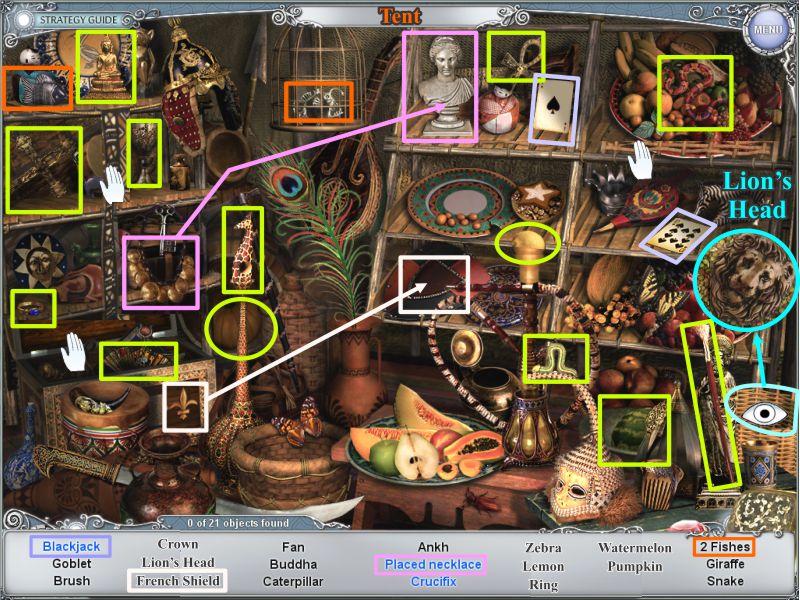
Tent Hidden Object Scene
Travel back to 1932 and go to the Gate for a Hidden Object Scene in the Tent.
Open and close all the baskets, shelves, and chest to collect everything, and get the Lion's Head that is inside the basket at the far right.
For the French Shield, place the fleur de lis on the shield.
Place the necklace on the bust to collect the Placed Necklace.
Blackjack will be collected when you combine the ace of spades with the 10 of spades.
See the screenshot for the combinations and location of all the items.
Return to the Temple and travel to 2010.
Screenshot
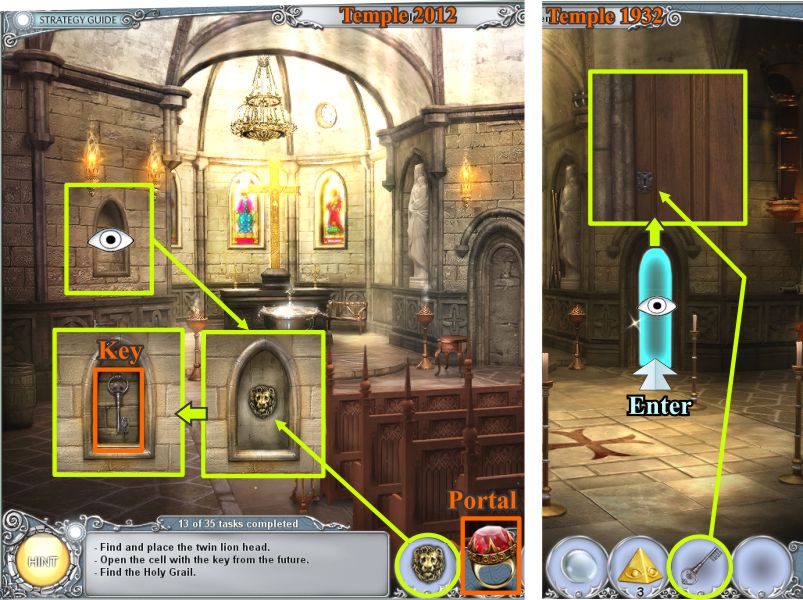
Temple 2012 and 1932
Go back to the Temple and travel to 2012.
Zoom in on the niche and place the Lion's Head. The niche will open so you can grab the key.
Travel back to 1932, zoom in on the Cell door, open it with your key, and go inside.
Screenshot
Temple Cell 1932
Use the X-Glass to collect another Eye of Omniscience.
Pick up the Censer and click on the left drawer for a Key Object.
Collect everything marked in the screenshot and open the right drawer to get the seal.
Open the drawer after the Key Object and click on the open book.
The book will transfer to the table so you can zoom in and note that the pages are blank.
Screenshot
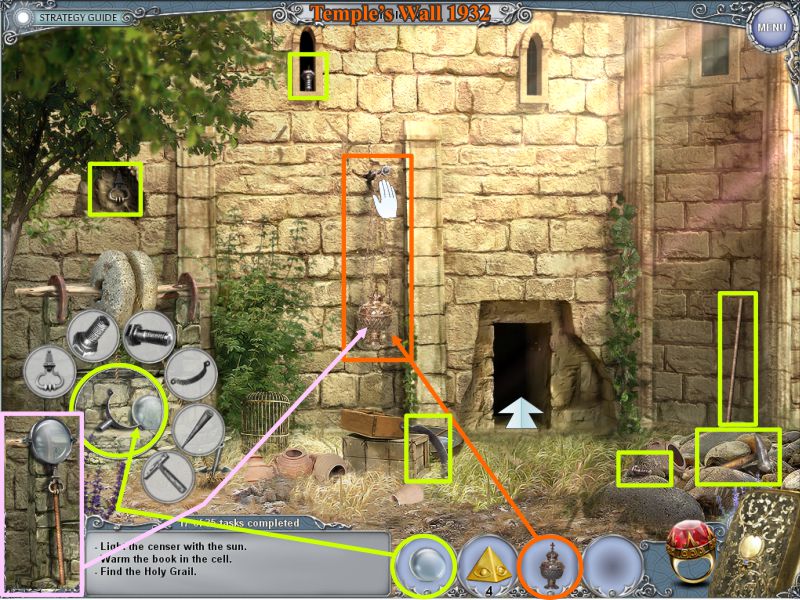
Temple Cell 1932
Go outside to the Wall and hang the censer on the nail.
Place the lens on the well next to the holder and click for a Key Object.
Collect all the items market in the screenshot, and you will get a magnifying glass on a long stick.
Hold it over the censer and the sun will light the censer.
Pick up the censer and go back to the Cell.
Screenshot
Temple Cell 1932
Zoom in on the book and hold the censer over it until writing appears.
Tom says he needs a mirror to read it so go to the Tent at the gate for a Hidden Object Scene.
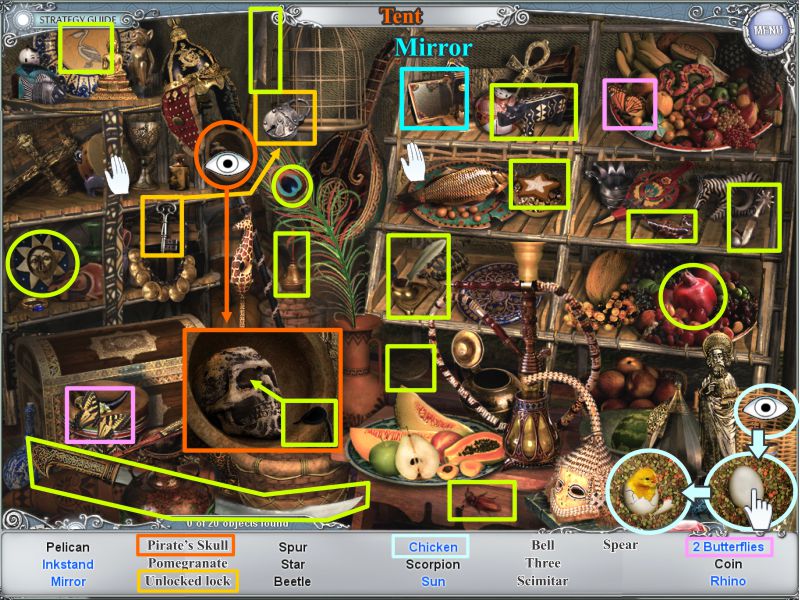
Tent Hidden Object Scene
Collecting everything will get you a Mirror.
Remember to open and close the baskets and curtain.
Zoom in on the container marked in red in the screenshot, put the eye patch on the skull, and you will have a Pirate Skull.
Check inside the basket at the far right and tap on the egg until it becomes a Chicken.
Use the key on the lock for an Unlocked lock.
Screenshot
Temple Cell
Go back to the Cell in the Temple and zoom in on the book.
Place the mirror. Tom will say it says something about the organ, so go out into the Temple.
Temple 1932
Click on the organ for a Key Object and collect the parts to repair it.
Zoom in on the console and decide you need to go to 2012 to get some organ pipes.
Screenshot
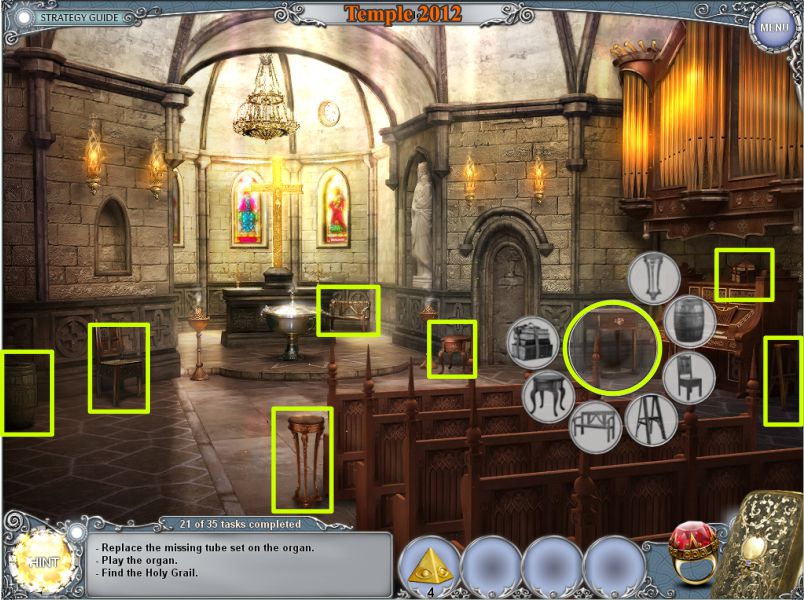
Temple 2012
You can't reach the organ pipes, so you need to pile up some furniture.
Click on the small table near the organ for a Key Object and collect all the marked pieces of furniture.
Screenshot
Temple 2012 and 1932
Climb up and take the pipes.
Travel back to 1932 and place the pipes in the organ.
Click on the console for a Mini Game, but you can't play the organ without music.
There was some music in the Chapel display case, so exit to the gate and travel to 2012.
Screenshot
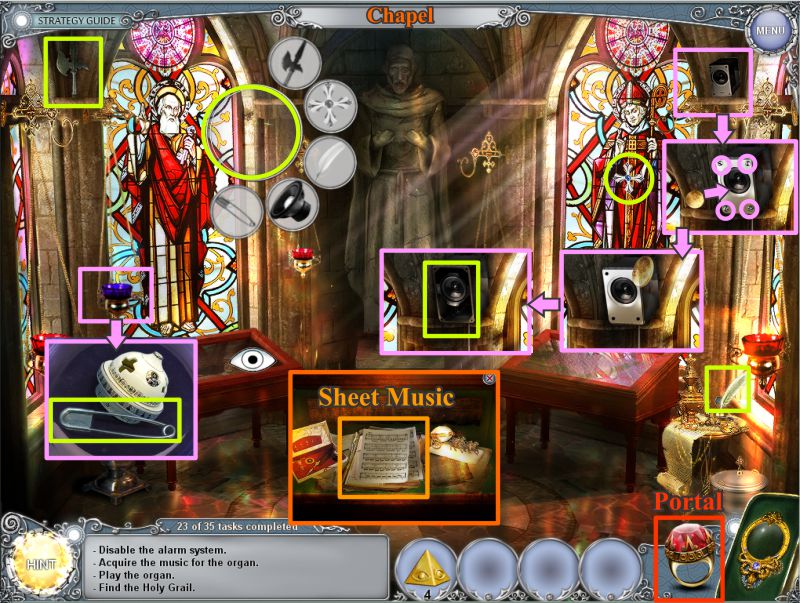
Chapel
Go in the Chapel and discover there is an alarm on the displace case.
Use the X-Glass to trace the alarm wire to a brick as shown by the path in the screenshot.
Screenshot
Click on the brick for a Key Object and collect the items for it.
Look in the blue hanging bowl at the left to find the safety pin.
Zoom in on the speaker at the right and use the coin to undo the 4 screws, as shown in the screenshot.
Remove the cover and take the speaker.
Take the sheet music from the opened display case.
Screenshot
Temple 1932 Organ Mini Game
Travel back to 1932 and go to the Temple.
Zoom in on the organ console and place the sheet music to start the Mini Game.
There are 4 lines of music to be played, so press "dV" and play the 2 notes shown in the screenshot.
If you are correct, the notes in the sheet music will light up.
If you make a mistake, you will have to start the line over again.
Screenshot
The screenshot shows lines 2, 3, and 4.
At the end of the music, the cross in the floor will sink and the entry to the Secret Room will appear so go down the stairs.
Screenshot
Secret Room
The Grail box is all chained up, so you need to open it.
Two stands are missing, so put them where they belong on either base.
Place the 4 Eyes of Omniscience on top of the stands as shown in the screenshot and remove the chains from the box.
The box will rise out of the floor.
Pick up the bottle and click on the skull to remove the Gem.
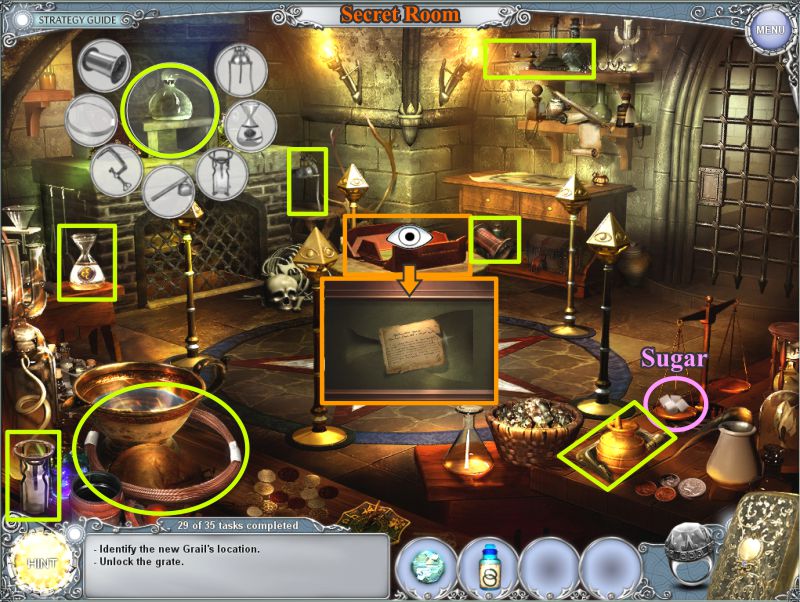
Screenshot
Click on the box to find out the Grail has been moved elsewhere.
Pick up the Sugar and click on the beaker on the Workbench for a Key Object.
Collect all the items to get the beaker.
Screenshot
Place the beaker on the map on the table, and click for a closer look.
It will cover the larger stain, so move the oil lamp to the other stain.
Place the Gem in the beaker and lights will radiate.
Screenshot
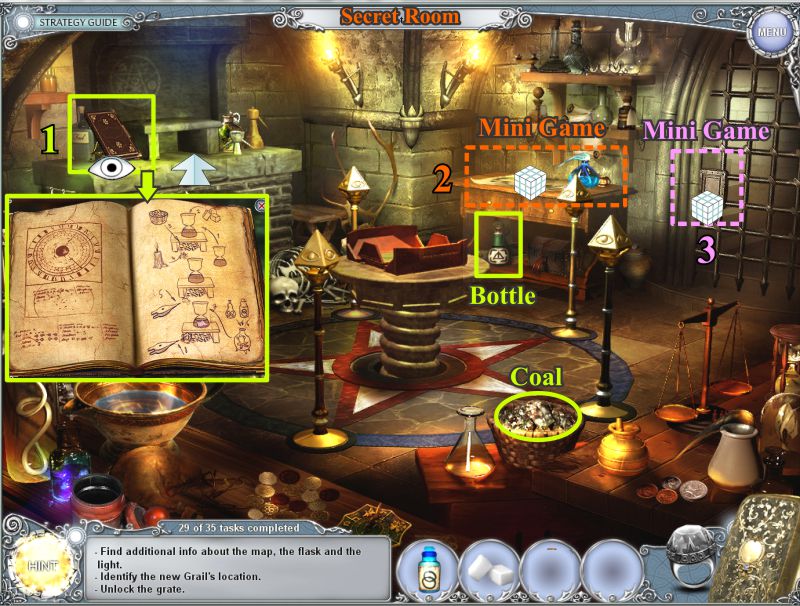
Pick up the Bottle and Coal.
There are 3 Mini Games to be played so check the screen shot for their location and order of play.
Click on the book on the Workbench to trigger the first Mini Game.
Screenshot
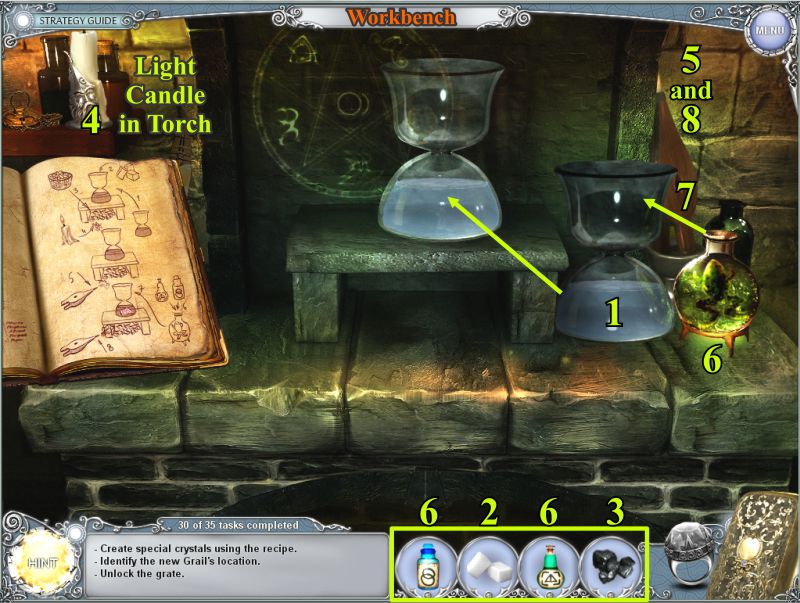
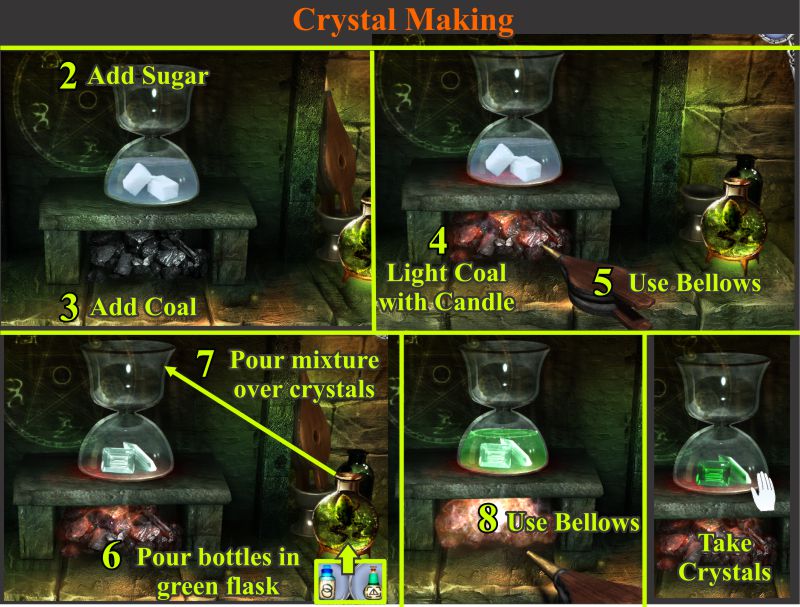
Secret Room Workbench Crystal Making Mini Game
There are 8 steps in the Crystal Making process.
Check the screen shot to see the order of what you need to do.
First task is to place the beaker on the warmer.
Screenshot
Add the sugar to the beaker.
Place the coal under the warmer.
Back away from the Workbench to light the candle on one of the torches, then use the lit candle to light the coal.
Use the bellows on the fire to melt the sugar into crystals.
Pour the two bottles into the green flask.
Pour the green flask into the beaker.
Use the bellows on the fire so the liquid evaporates.
Take the finished crystals.
Screenshot
Secret Room Map Mini Game
Zoom in on the map and place the crystals there.
Situate the crystals as shown in the screenshot to see the location of the Grail.
Note the eye in the triangle that appears at the coordinates.
Screenshot
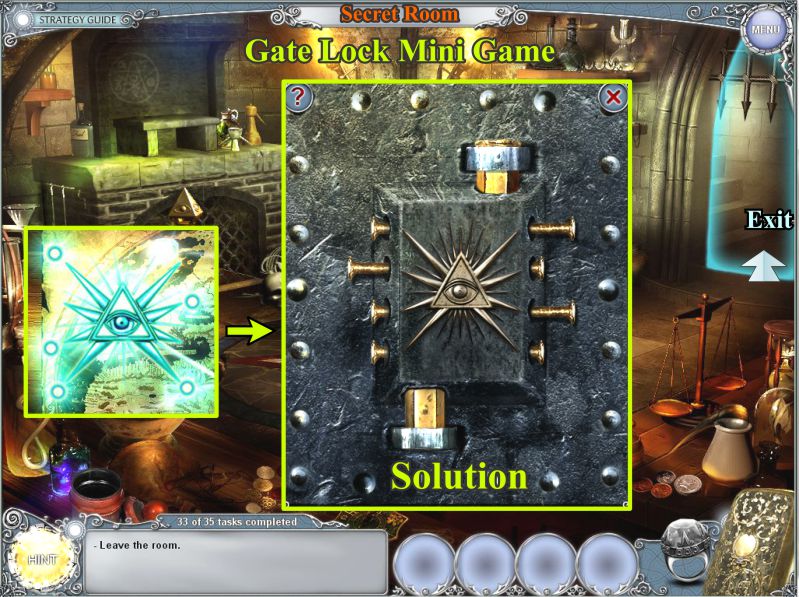
Gate Lock Mini Game
Click on the Gate and examine the lock for the next Mini Game.
Push in the pins in the configuration shown in the screenshot to match the picture on the map.
The gate opens, so exit to end the chapter and go on to your next location.
Screenshot
Chapter 3: Scotland
Navigation
Tom arrives in Scotland in 2012, but the stone once again breaks on the way to 1932, so you will be playing this chapter solely in 1932.
Rather than going between the different years, you will eventually find yourself going between the same scenes during daylight and nighttime.
The nighttime scenes are lightened in the screenshots to help you see what is happening.
Square and Graveyard
Tom finds himself in the Square by the Abby, so talk to the Monk standing there.
The Monk tells a story about the Guardian of the Grail and directs Tom to the Graveyard.
Other locations you will be visiting later are the Dungeon, the Blacksmith and the Gypsy Wagon for Hidden Object Scenes.
Go to the Graveyard and pick up the Sickle to remove all the foliage on the statue.
Screenshot
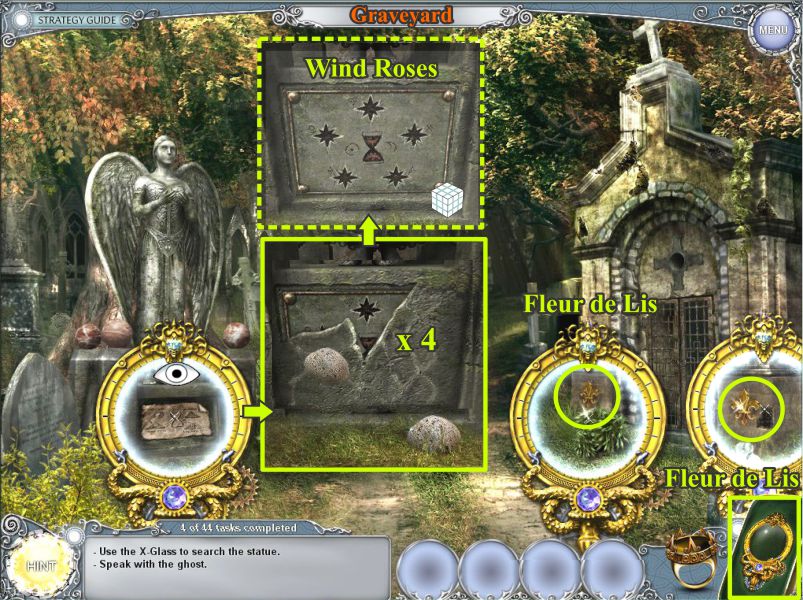
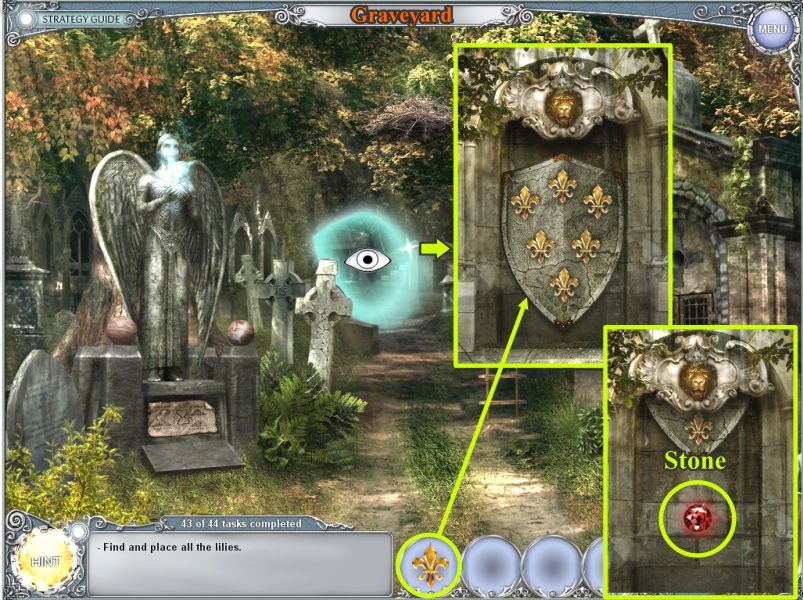
Graveyard
Use the X-Glass to find two Fleur de Lis (lilies) and examine the base of the statue.
Use the stone at the base of the plaque 4 times to break the outer portion and review the plaque.
You need to find at least one Wind Rose to open the plaque, so go back to the Square and talk to the Monk.
Screenshot
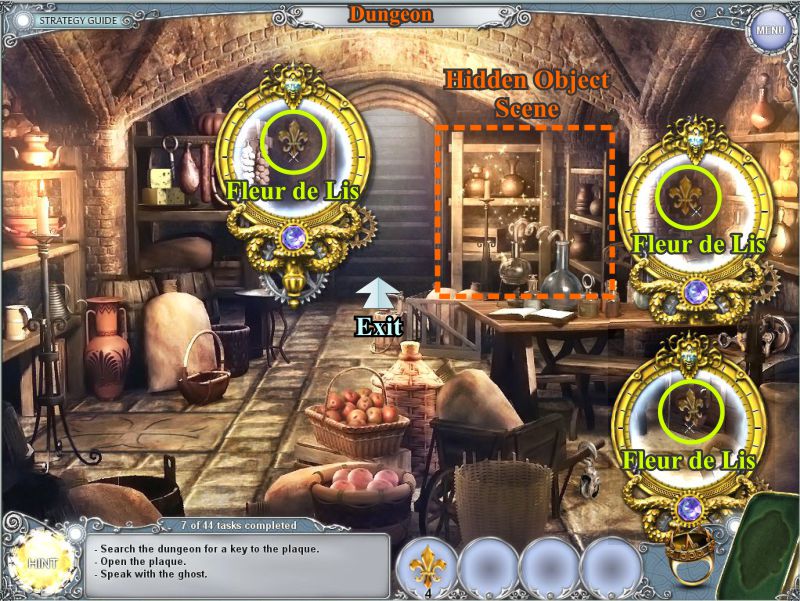
Dungeon
The Monk suggests looking in the Dungeon, so take the door on the left.
Use the X-Glass to locate the 3 Fleur de Lis (lilies) and click on the corner for a Hidden Object Scene.
Screenshot
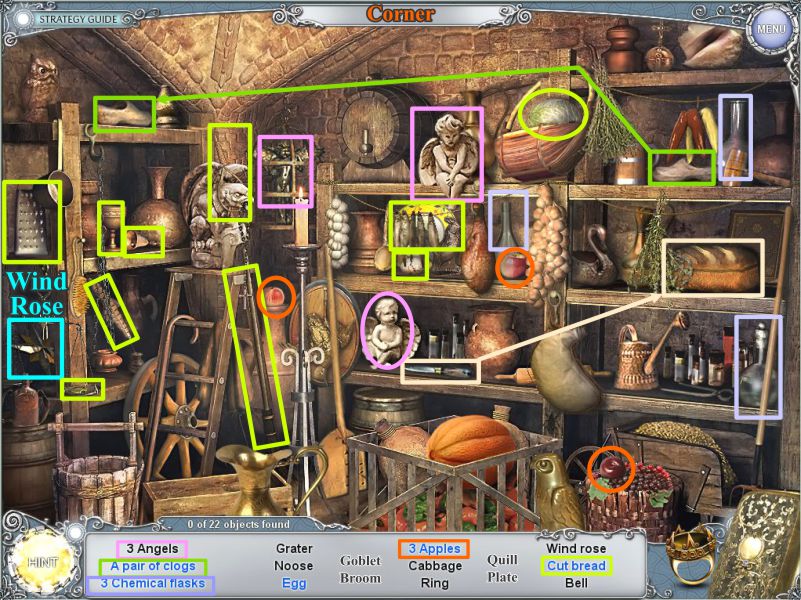
Corner Hidden Object Scene
Slide open the closed shelves.
Collect everything to get a Wind Rose.
Place the clog on the right with the one on the left to get A Pair of Clogs.
Use the knife to cut the bread.
Refer to the screenshot for the marked items.
Screenshot
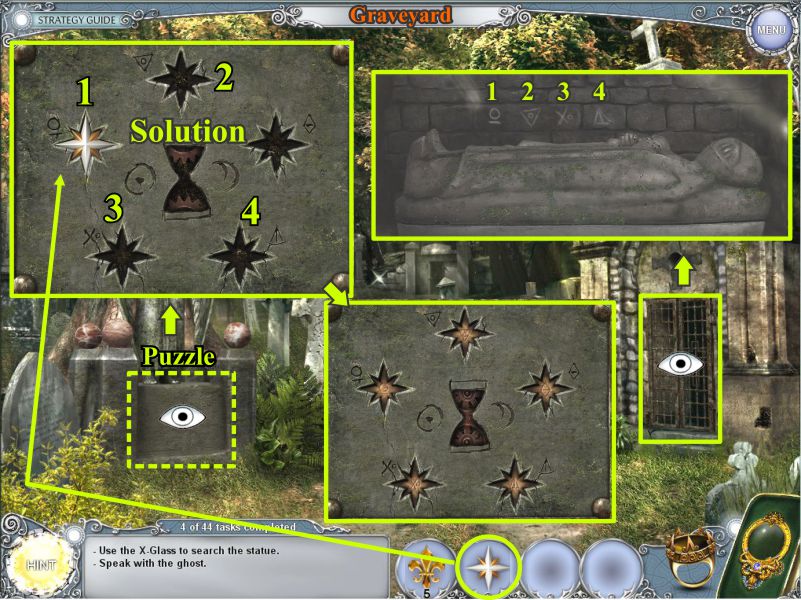
Graveyard
Go back to the Graveyard and check the crypt to see the symbols.
Zoom in on the plaque under the statue and place your Wind Rose as shown in the screenshot.
Pick up the Wind Rose and move it to the second location.
Repeat the same procedure for positions 3 and 4.
All 5 Wind Roses will create their symbols.
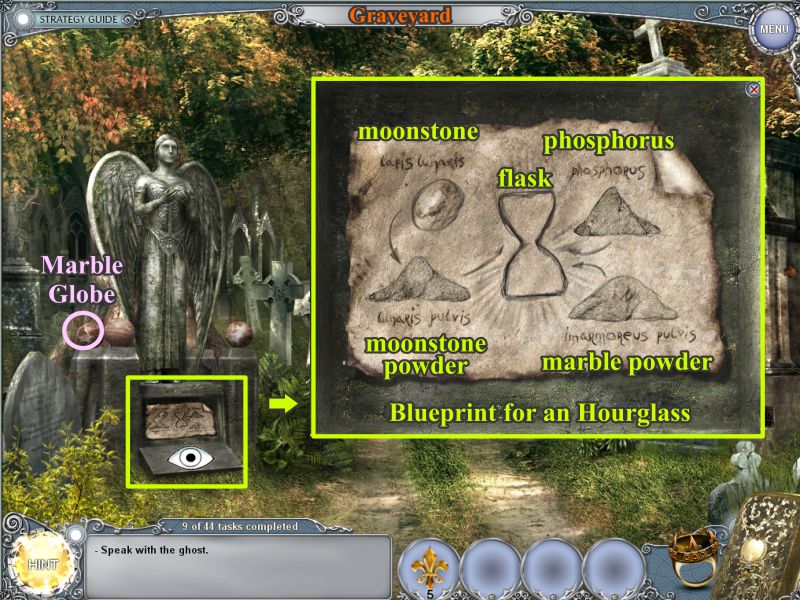
Screenshot
The plaque opens. Zoom in to read the blueprint to create an hourglass.
You will need to find a moonstone, phosphorus, marble, and hourglass flask.
The moonstone and marble will need to be ground to powder.
Pick up the Marble Globe and head back to the Square.
Screenshot
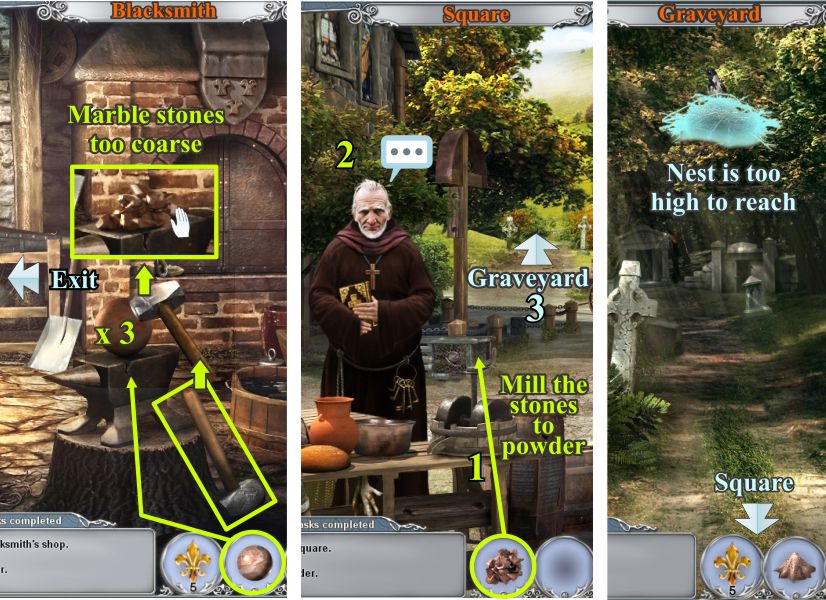
Blacksmith, Square and Graveyard
Go to the Blacksmith and place the marble on the anvil.
Smash it 3 times with the hammer and pick up the coarse marble stones.
Place the stones to the mill to grind them to powder.
Speak to the Monk about where to find a moonstone.
He recalls a raven having carried one off. Go back to the Graveyard and click on the nest to trigger your next task.
Screenshot
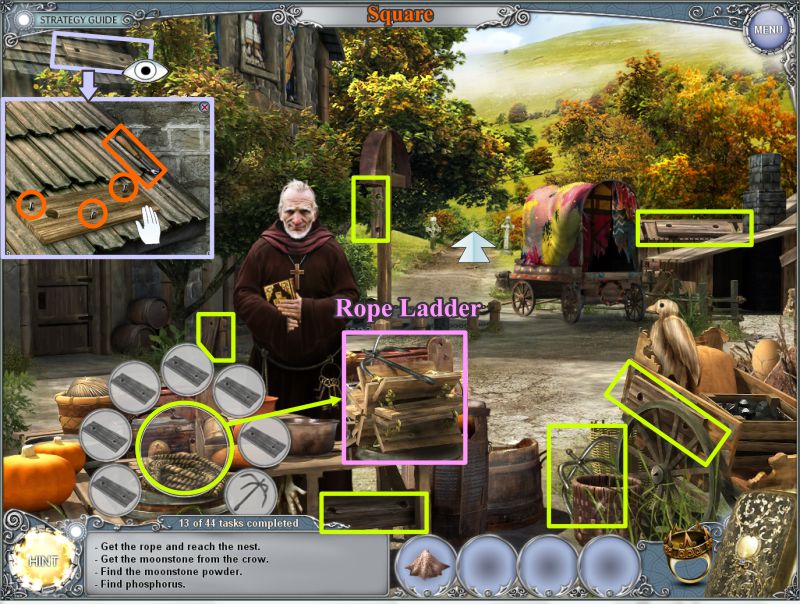
Square
Return to the Square and click on the table for a Key Object to get a Rope Ladder.
Collect the items marked in the screenshot.
Zoom in on the roof and use the tool there to remove the 3 nails from the rung.
Head back to the Graveyard.
Screenshot
Graveyard
Place the ladder on the nest, only to find out the raven isn't about to leave. Tom decides he needs a bird of prey to scare it off.
Square
Return to the Square and click on the wooden bird for a Key Object.
Collect the items marked in the screenshot.
Zoom in on the tree, place the feathers as shown, and collect the 3 feathers.
Click on the Gypsy Wagon for a Hidden Object Scene to get a Hunter's Whistle.
Place the Hunter's Whistle on the hawk and it will go into your Inventory.
Screenshot
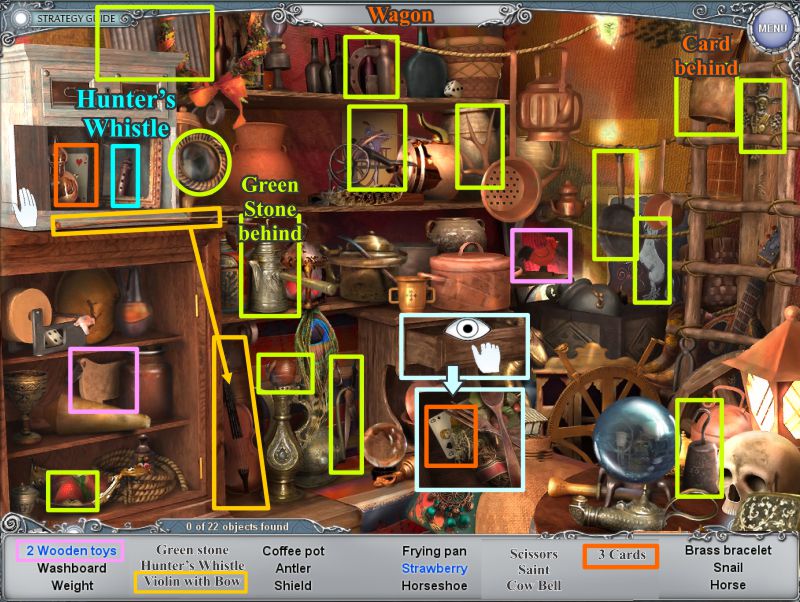
Wagon Hidden Object Scene
Open the cabinet doors and drawer in the table.
Collect all the items marked in the screenshot.
The green stone is behind the coffee pot and one of the cards is behind the cowbell.
Zoom in on the open drawer and take the card.
Place the bow on the violin and collect the Violin with Bow.
Screenshot
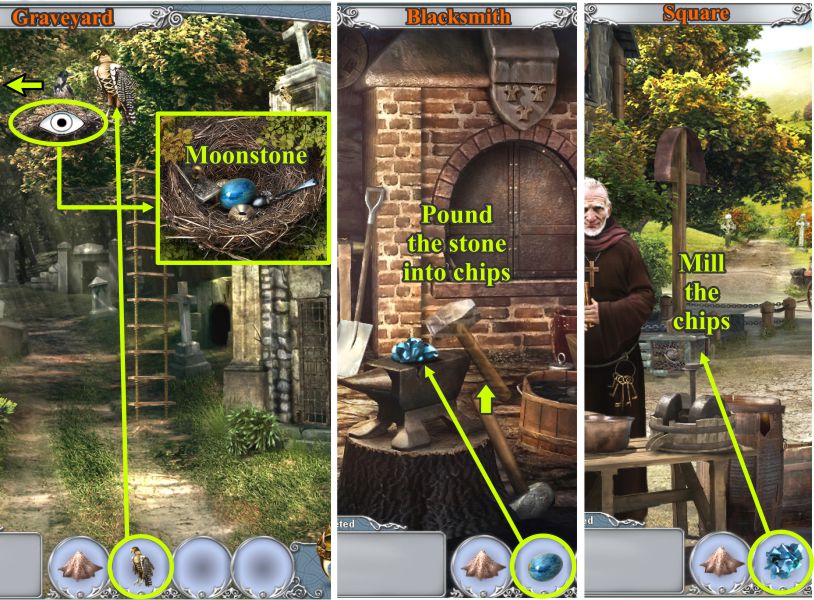
Graveyard, Blacksmith, and Square
Go to the Graveyard, put the hawk in the nest, and the raven will fly away.
Take the Moonstone to head off to the Blacksmith.
Place the Moonstone on the anvil and pound it into chips.
Take the chips out to the mill in the Square and turn them into powder.
Screenshot
Graveyard
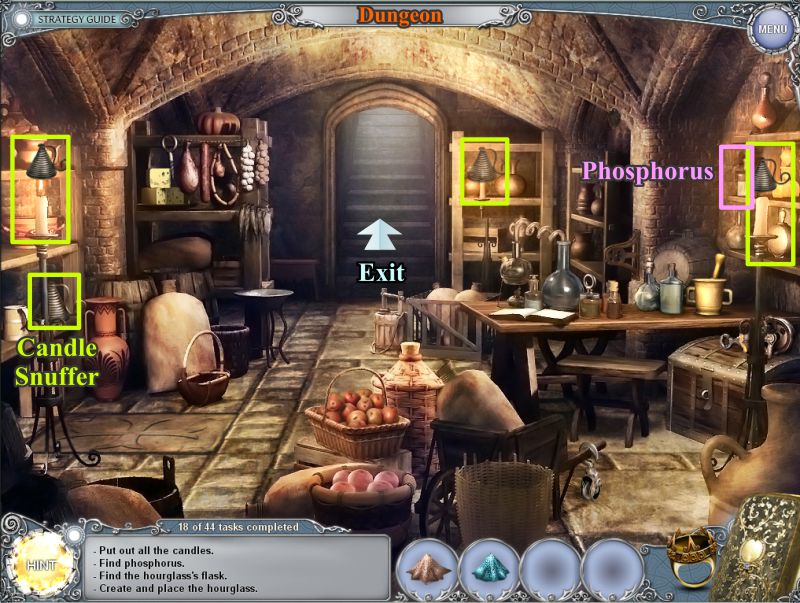
Go to the Dungeon to look for some Phosphorus.
Tom figures he can find it in the dark, so take the Candle Snuffer and put out the 3 candles shown in the screenshot.
Take the glowing Phosphorus; it will combine with your other 2 powders.
Screenshot
Square
Talk to the Monk to find out where you can find the flask for the hourglass.
He says it is probably in the same place you found the Wind Rose, but you just put out all the candles in the Dungeon. You need to find some way to light them again.
Tom thinks he remembers a light in at the Blacksmith's, so go there.
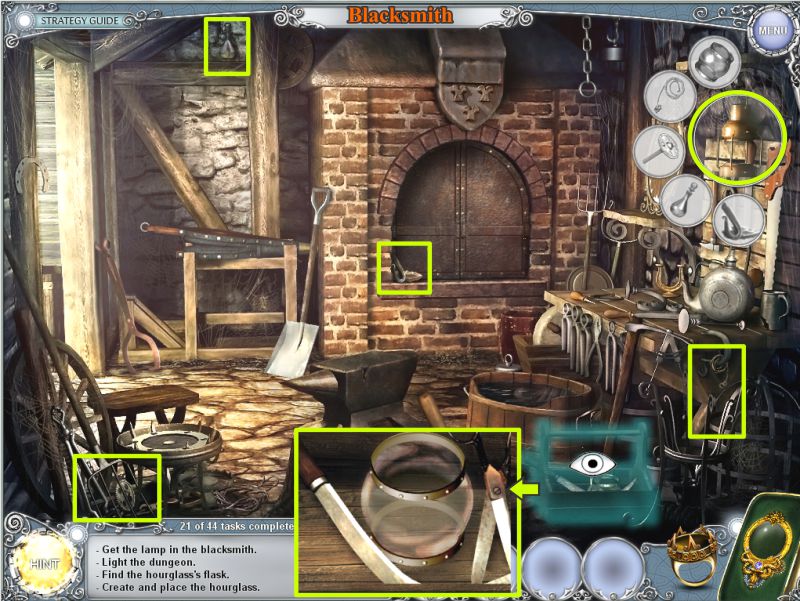
Blacksmith
Click on the light for a Key Object and add all the items marked in the screenshot.
Zoom in on the toolbox for one of the items.
Collect the light and go to the Dungeon.
Screenshot
Dungeon
Use the light to re-light the 3 candles you previously snuffed out to find the Phosphorus.
Click on the corner for a Hidden Object Scene.
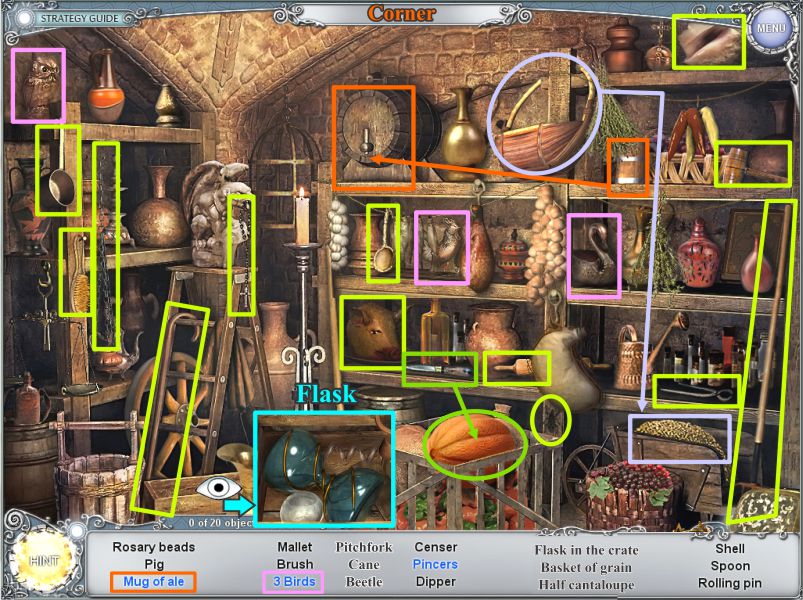
Corner Hidden Object Scene
Slide open the closed shelves to find all the hidden items.
Use the knife to cut the cantaloupe in half.
Look in the crate at the left to find the Flask.
Fill the basket with grain and the mug with ale.
Check the screenshot for all the markings.
Screenshot
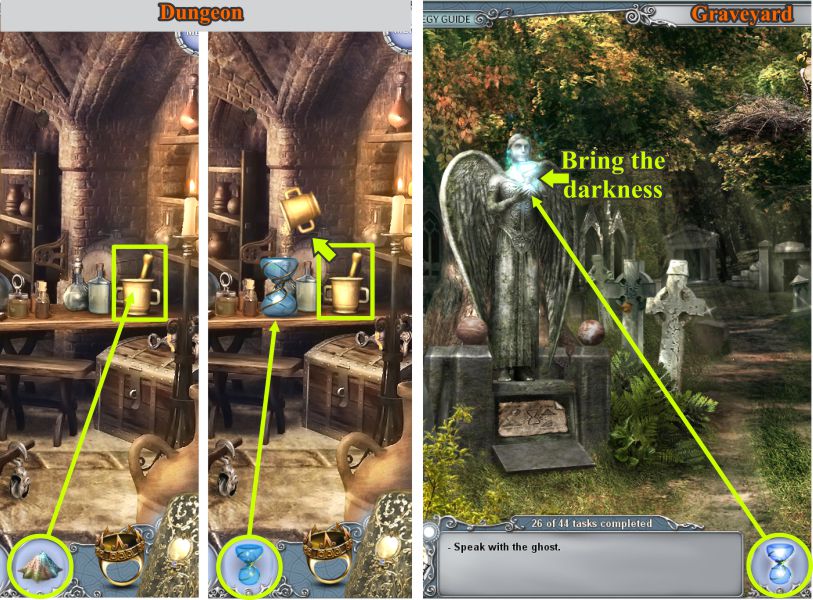
Dungeon and Graveyard
Place your powder combination in the mortar and pestle to grind it.
Place the flask on the table and pour the powder into it.
Go to the Graveyard and hand the hourglass to the statue.
Click on the hourglass to bring the darkness.
Zoom in on the crypt and note the light beams to trigger your next task.
Screenshot
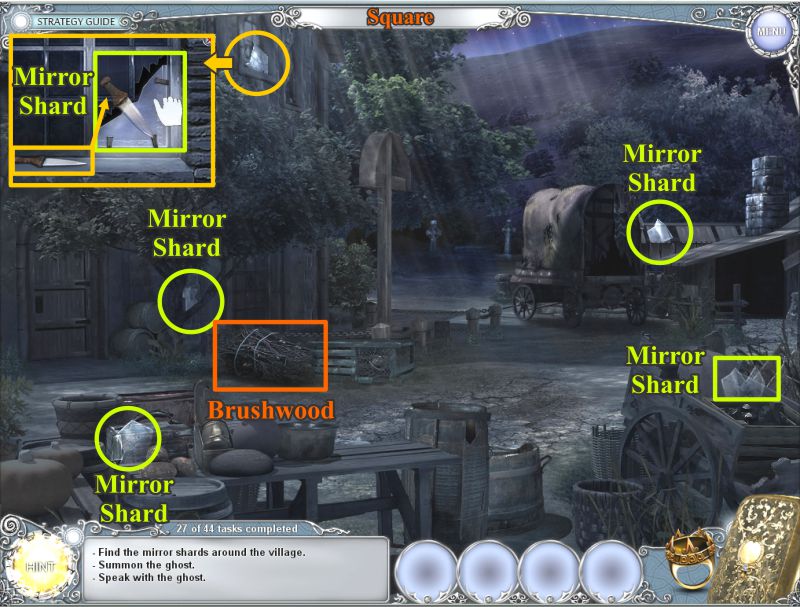
Square
Go to the Square in search of Mirror Shards.
Pick up the Brushwood and the 4 visible shard pieces.
Click on the window shown in the screenshot. Use the knife that is there to undo the clips holding the piece so you can take it.
Return to the Graveyard.
Screenshot
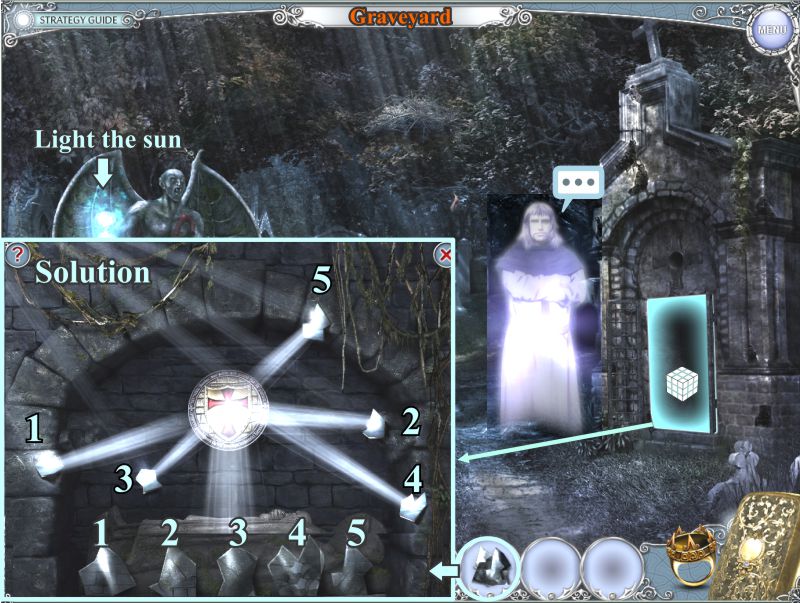
Graveyard
Click on the crypt for a Mini Game to place the mirrors.
Place the numbered pieces as shown in the screenshot, and the ghost will appear.
Talk to the ghost, then click on the hourglass to light the sun and make it daylight.
Screenshot
Square, Blacksmith, and Square
Go to the Square and ask the Monk for some Holy Water.
After your conversation, go to the Blacksmith.
Pick up the canteen on the workbench at the right and dip it in the barrel of water.
Return to the Square and give the canteen of water to the Monk to sanctify it.
Go back to the Graveyard.
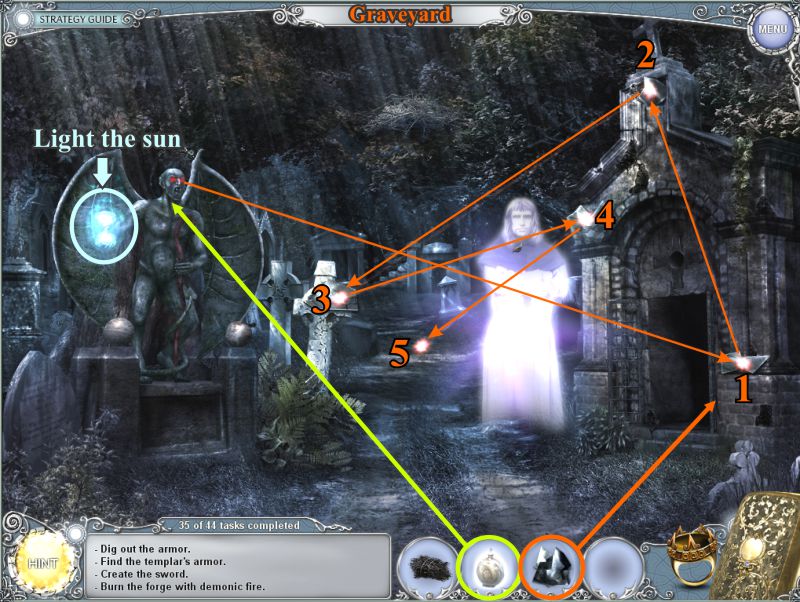
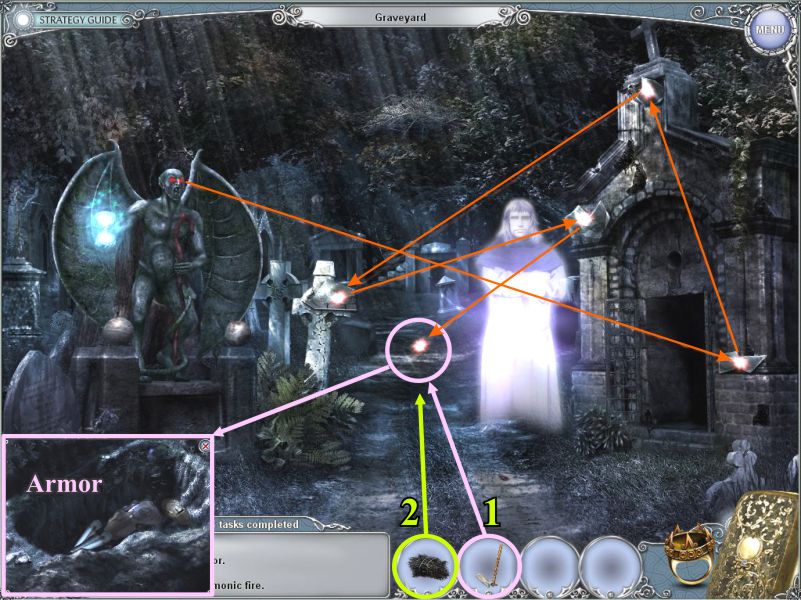
Graveyard
Click on the hourglass to bring the darkness.
Pour the canteen of Holy Water over the demon statue and his eyes will glow red and stare at a spot on the mausoleum.
Tom realizes he needs to reflect from that point, so collect the 5 mirror pieces from the crypt.
Place a shard on each of the reflective places shown in the screenshot.
Click on the hourglass to return to daylight and go to the Square in search of a shovel.
Play the Hidden Object Scene in the Wagon.
Screenshot
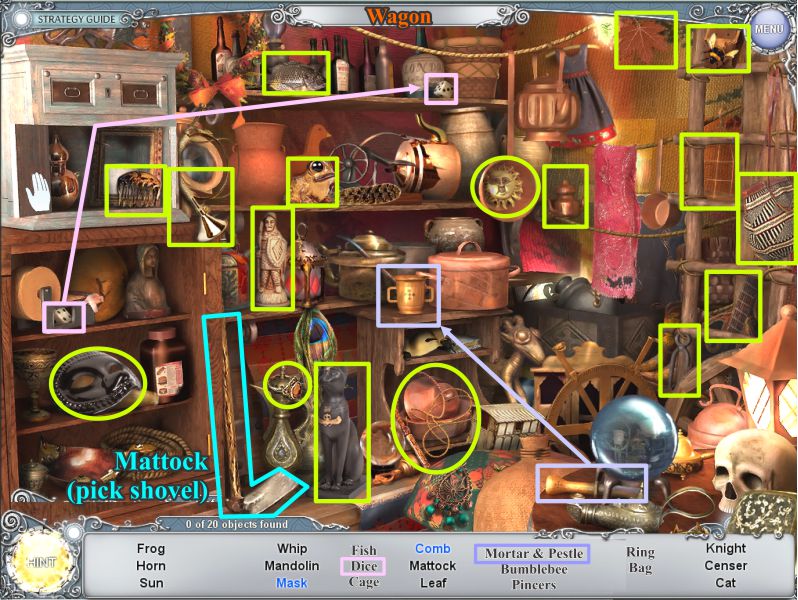
Wagon Hidden Object Scene
Open and close the 2 cabinet doors to find all the objects so you can get a Mattock, which is a pick shovel.
Put the pestle in the mortar and the left die with the right die to get the dice.
See the screenshot for the marked objects.
Screenshot
Graveyard
Go back to the Graveyard, dig up the armor and collect it.
Place the brushwood from your Inventory in the hole, and you will get a burning branch for your Inventory.
Screenshot
Blacksmith and Square
Go to the Blacksmith and pick up the coal bucket.
Go out into the Square and fill the bucket with coal from the cart.
Blacksmith
Return to the Blacksmith and place the bucket of coal near the furnace.
Use the shovel 3 times to load coal into the furnace.
Light the coal with the burning branch, only to find out there is too much smoke and not enough fire.
Use the X-Glass to inspect the chimney.
It is clogged, so you need to go outside to fix the problem.
Screenshot
Square
Click on the chimney. Tom determines you need a brush, so go back inside the Blacksmith and grab the brush by the door.
Use the brush to clean out the chimney and return to the Blacksmith.
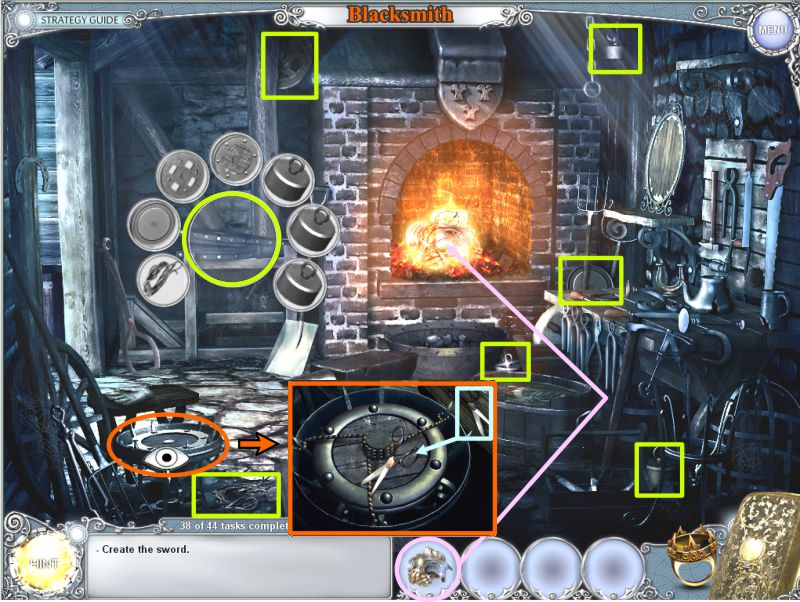
Blacksmith
The fire still isn't hot enough, so click on the bellows for a Key Object and collect the items shown in the screenshot.
Click for a close up of the wheel in the lower left corner. Use the scissors that are there to snip the 3 ties that are holding it, so you can collect it.
Once you have completed the Key Object, the bellows will start pumping to make the fire hotter.
Screenshot
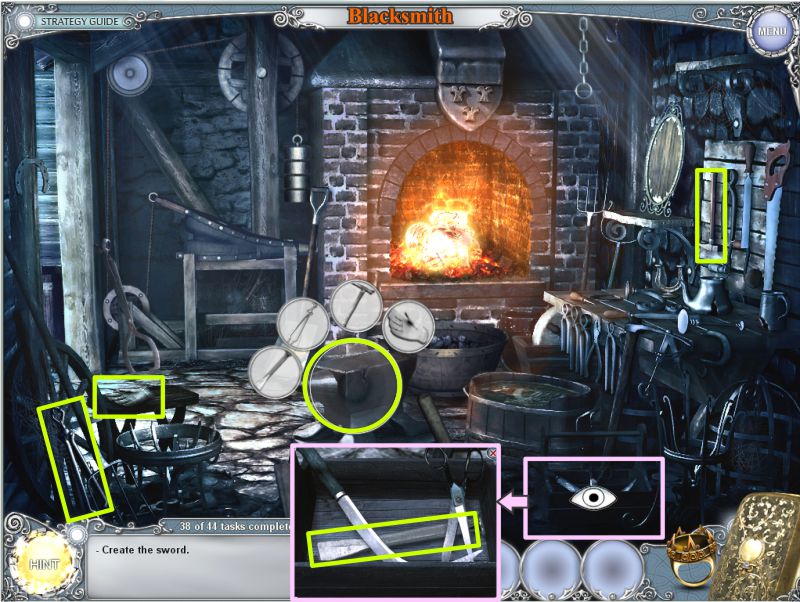
You will need the anvil to finish your task, so click on it for a Key Object.
In order to collect everything, you will need to look in the toolbox marked in the screenshot.
Pick up the chisel for your Key Object and your anvil should be ready.
Screenshot
Graveyard
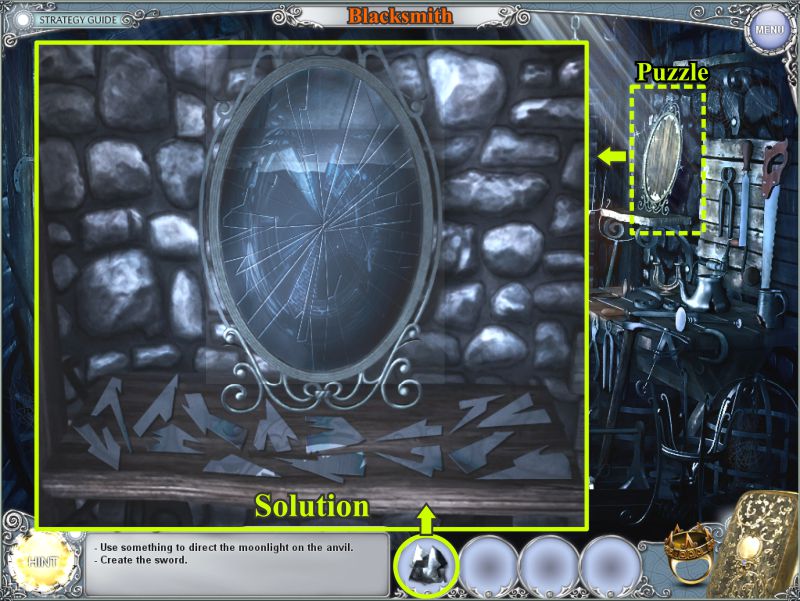
Since you are creating a moon sword, you need some moonlight. Go back to the Graveyard and collect the 4 mirror shards outside of the demon fire, then return to the Blacksmith.
Click on the broken mirror to trigger a puzzle and place the shards.
The screenshot has been lightened a lot to help you see the shard pieces and where to place them.
The screenshot also shows the solution.
Screenshot
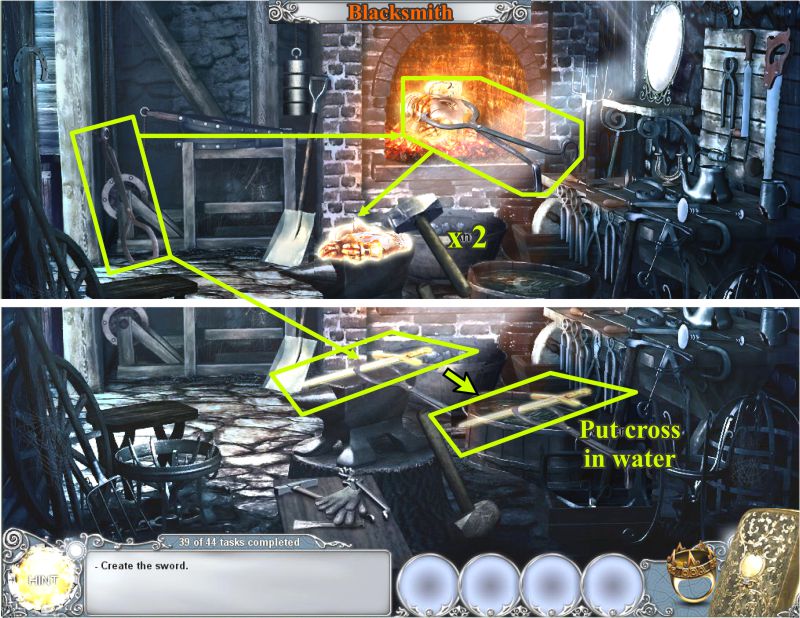
The mirror will shed light on the anvil so pick up the tongs and use them to transfer the molten armor to the anvil.
Pick up the hammer and use it twice on the molten metal to create the sword.
Again use the tongs to pick up the super hot sword and place it in the water to cool it.
Once cooled, the moon sword will go into your Inventory.
Screenshot
Graveyard
Take the sword to the Graveyard and give it to the ghost.
In your conversation, he will tell you who took the Grail and where you can now find it.
He is very upset about it being gone, so now that he once again has his sword, he is off to find the Grail.
Click the hourglass to bring on daylight to be able to talk to the Monk.
Square
Since you are in 1932, you ask the Monk about finding another stone for the ring, because you need to be in 2012 in order to get to Yucatan, Mexico as soon as possible.
As usual, he tells you to check the Dungeon, so go there.
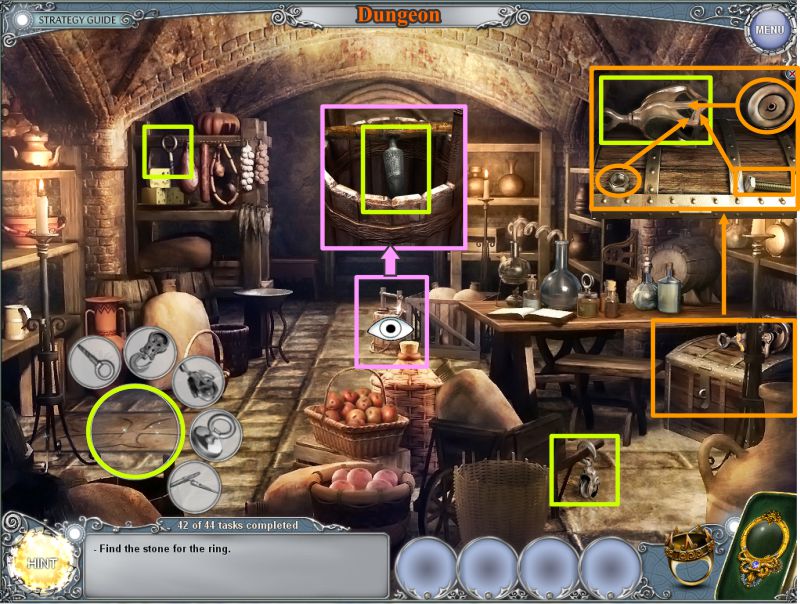
Dungeon
Use the X-Glass to find a chest at the left under the cross.
Click on the cross to trigger a Key Object.
Check the chest at the right and put the pulley together.
Zoom in on the bucket in front of the exit to grab another part.
When you have collected everything, the trap door will open, so click for a Hidden Object Scene.
Screenshot
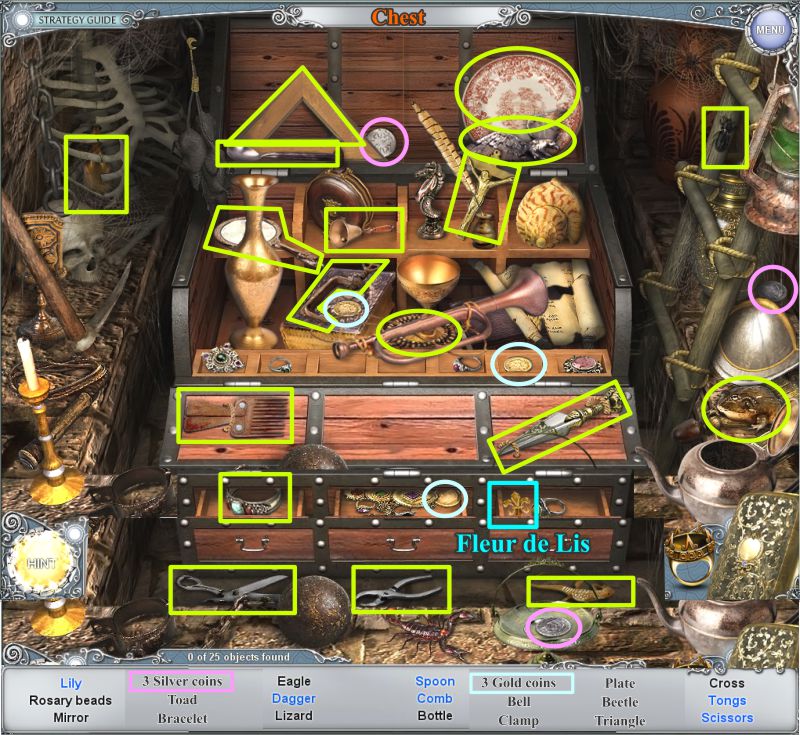
Chest Hidden Object Scene
Open and close the front of the chest and drawers, and slide the top separation to view all the objects.
You will find the last Fleur de Lis (lily).
Screenshot
Graveyard
Go to the Graveyard and click on the area shown in the screenshot.
Place the 6 Fleur de Lis on the shield.
The niche will open for you to collect a new stone for the ring.
Screenshot
Chapter 4: Mayapan, Mexico
Tom uses the ring to travel to 2012 on the Yucatan peninsula in Mexico.
He sees Totenkraft and Nelly talking, so his objective is to distract Totenkraft so he can talk to Nelly.
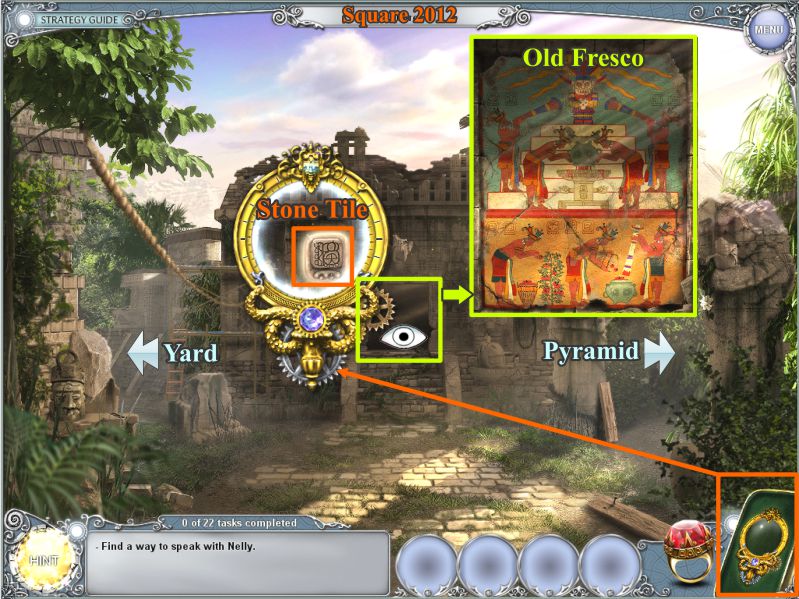
Square 2012
Use the X-Glass to find a Stone Tile.
Examine the Old Fresco to see the natives gathering tomatoes, making juice, and offering it to an idol.
Take the left exit to the Yard.
Screenshot
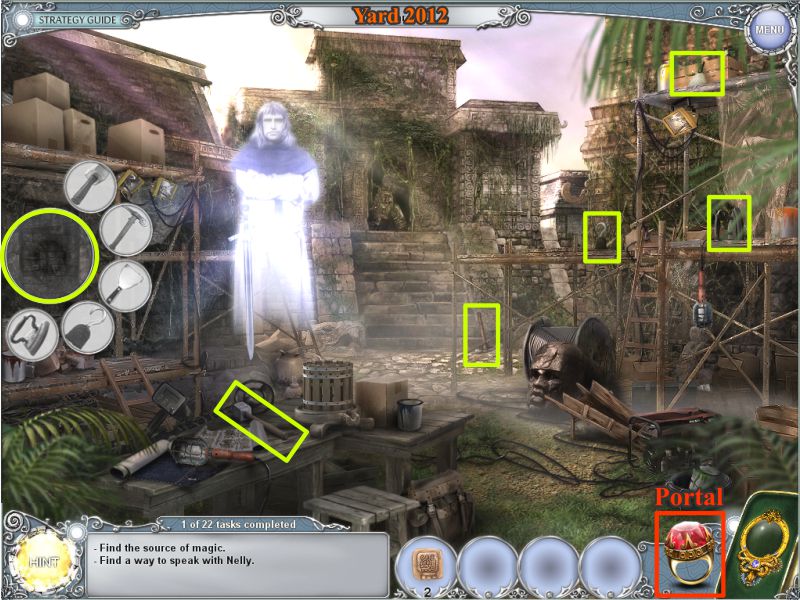
Yard 2012
Tom meets up with the ghost, so talk to him.
He is being held by a force field, so use the X-glass to check the field around him that is coming from the idol.
Use the X-Glass to find the Stone Tile shown in the screenshot.
Screenshot
Click on the idol for a Key Object and collect the items shown in the screenshot.
Use the Ring to travel to 1932.
Screenshot
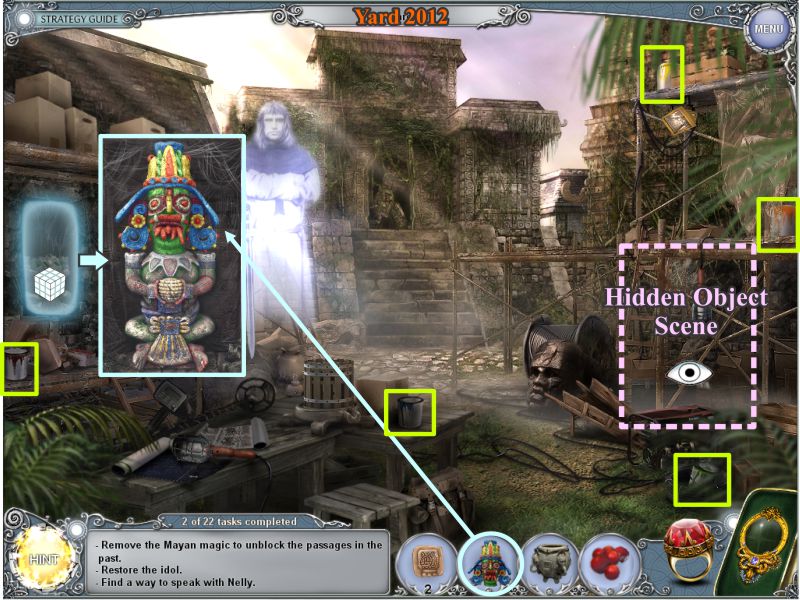
Yard 1932
Click on the idol for a Key Object.
Zoom in on the area shown in pink on the screenshot.
Use the knife that is there to cut the rope 4 times and collect the wheel.
Collect the rest of the items that are marked in the screenshot.
Screenshot
Pick up the idol head and click on the area shown in the screenshot for a Mini Game.
Your goal is to move the disks so the light reflects to the crystal at the bottom.
Screenshot
Square 1932
Go to the Square and pick up the tomatoes on the bush to the right.
Travel back to 2012 and go to the Yard.
Yard 2012
Place the head on the idol to trigger your next task, which is to pick up the cans of paint marked in the screenshot.
Click on the scaffolding for a Hidden Object Scene.
Screenshot
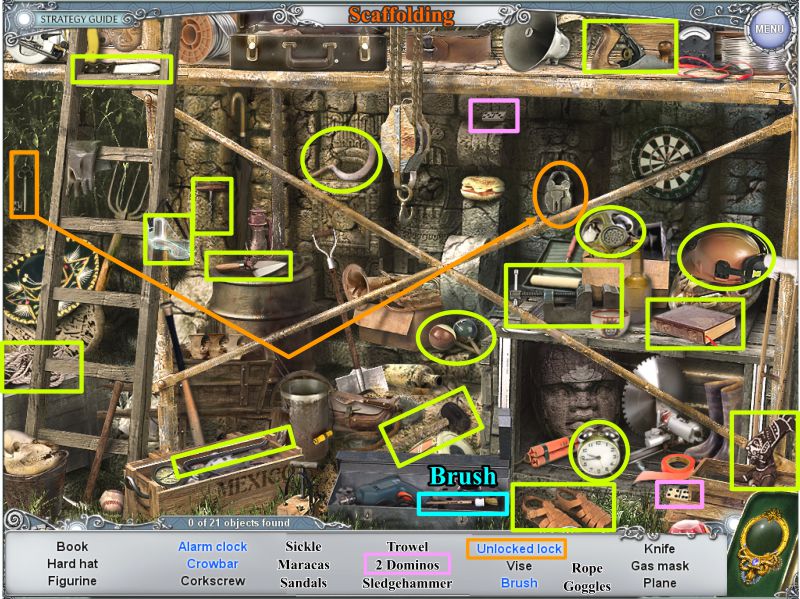
Scaffolding Hidden Object Scene
Open the Mexico box to find the crowbar.
The brush is in the toolbox.
Flip open the crate to find the alarm clock.
Use the key to open the lock for an unlocked lock.
Screenshot
Paint the Idol Mini Game
Click on the idol and place the paint to start the Mini Game.
Paint the idol using the side pictures for help.
The solution is in the screenshot.
Screenshot
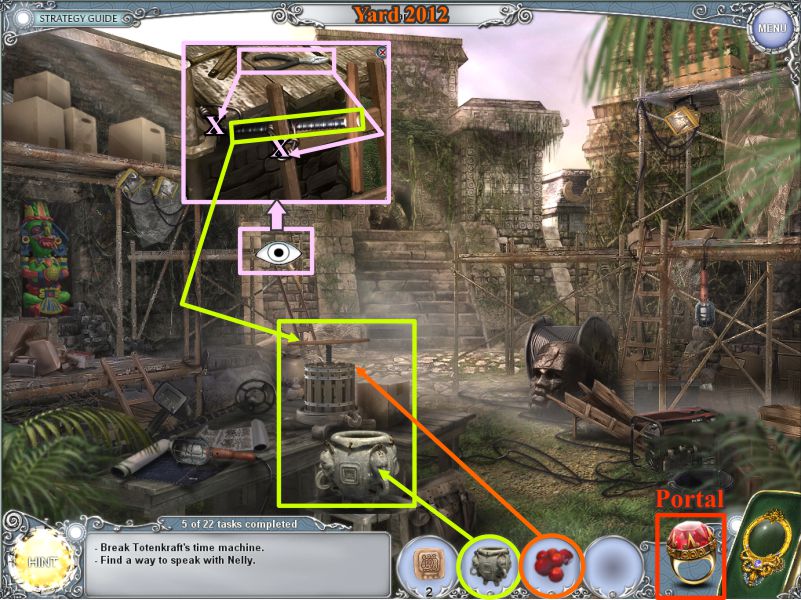
Yard 2012
The force field is gone, so have a conversation with the ghost, who then disappears until you need him.
Click on the area marked in pink in the screenshot to find the handle for the juicer.
Use the wire cutters to free it and place it on the juicer.
Put the pot as shown and place the tomatoes in the juicer.
Once they are juiced, the pot will go to your Inventory.
Use the Ring to travel to 1932 and go to the Square.
Screenshot
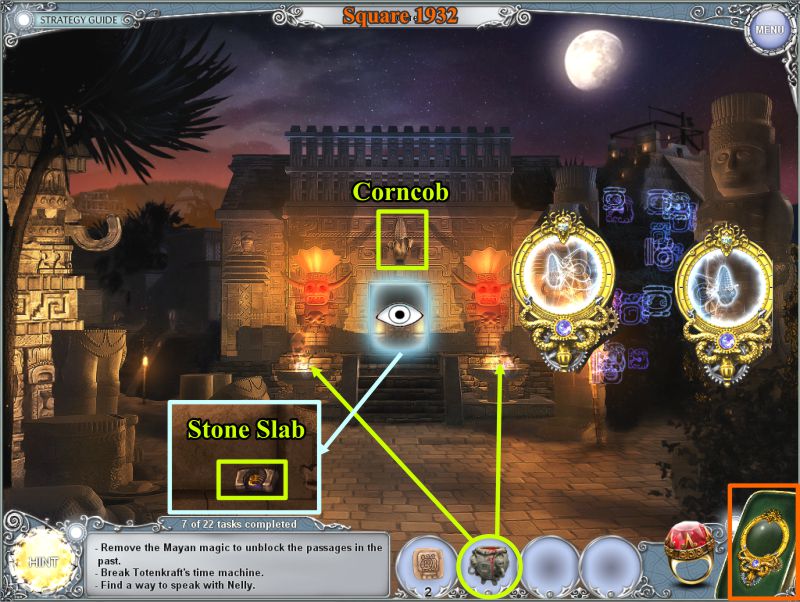
Square 1932
Place your pot with the tomato juice in front of each idol.
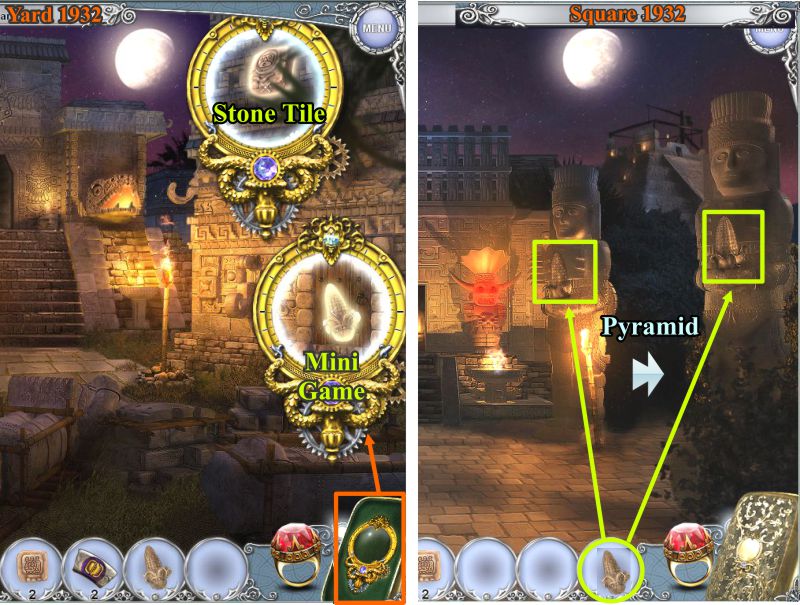
Click on the niche between the idols and pick up the Stone Slab.
Grab the Corncob above the niche.
Use the X-Glass to see that you need 2 corncobs to remove the Mayan block to the pyramid.
Travel to 2012, go to the Yard and click on the Scaffolding for a Hidden Object Scene.
Screenshot
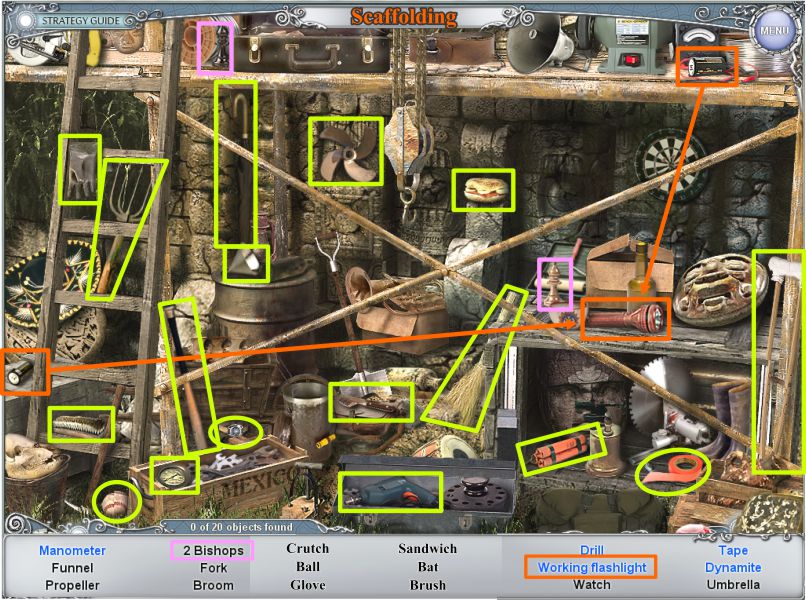
Scaffolding Hidden Object Scene
Open the crate, wooden box, and toolbox to find some of the objects.
Place the 2 batteries in the flashlight to get a working flashlight.
Although it is not on your list, you will come away with a Stone Slab once you have collected everything.
Screenshot
Yard and Square in 1932
Travel back to the Yard in 1932 and use the X-Glass to locate the Corncob and the Stone Tile shown in the screenshot.
Click on the Corncob area for a Mini Game to collect the corncob.
When you have finished the Mini Game, go to the Square and place the 2 corncobs.
You have broken the force field and can now go to the Pyramid.
Screenshot
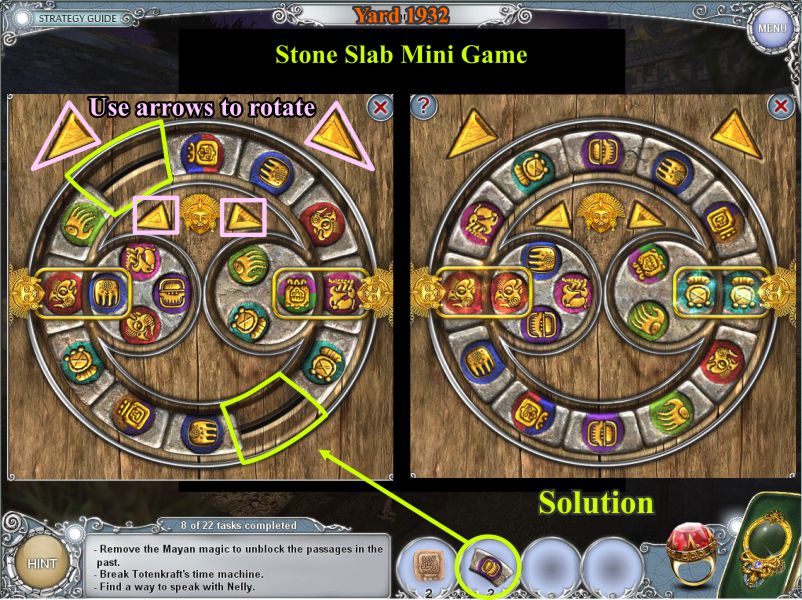
Stone Slab Mini Game
Place the 2 stone slabs from your Inventory to start the game.
Your goal is to rotate the circles, using the arrows marked in the screenshot, until you have 2 matching symbols in the gold outlines as shown in the screenshot solution.
Screenshot
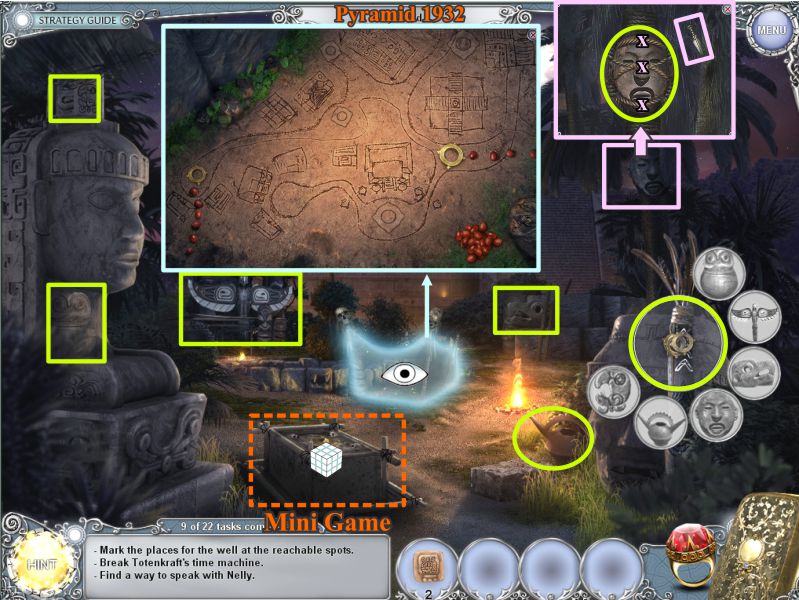
Pyramid 1932
You've placed the corncobs and are now free to enter the Pyramid area.
Zoom in on the blue area in the screenshot and view the map to see you will need some rings and berries to mark the remaining wells and passages.
Click on the branch at the right for a Key Object to get 3 rings for your Inventory.
Screenshot
Ring Mini Game
Your goal is to rotate the rings until the lines are connected between the skulls and the center hub in order to get another well ring.
Work from the inside out and see the screenshot for the solution.
Screenshot
Map Puzzle
Place the well rings on the map, and the berry passages will automatically be marked.
Exit to the Square and travel to 2012.
Screenshot
Square 2012
Plotting the wells on the old map worked because a well has appeared in the Square in 2012.
Click on the hook next to the well for a Key Object to get a grappling hook.
Attach the grappling hook to the Well and climb down the rope ladder.
Screenshot
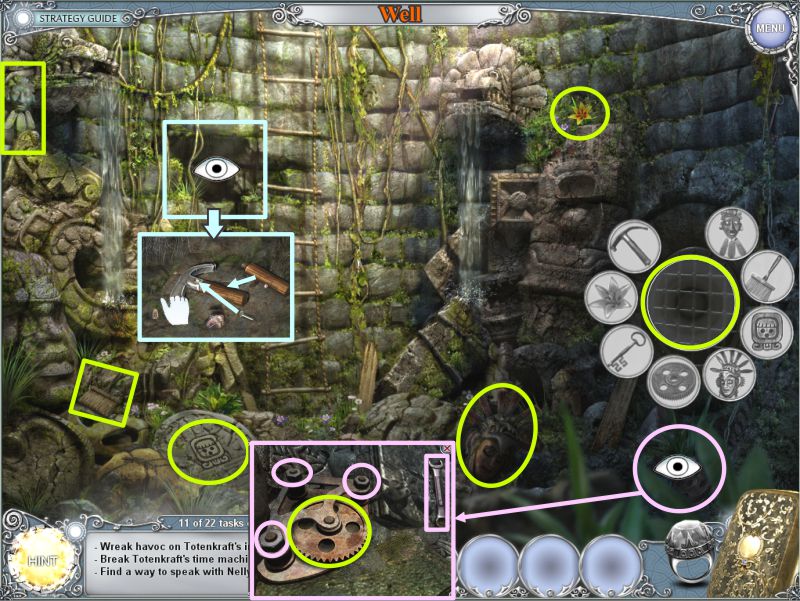
Well
Click on the grate at the right for a Key Object to open it.
Zoom in on the pink and blue markings in the screenshot to get a couple of the items.
Use the wrench to loosen the nuts to get the gear.
Screw the handle to the hammer and collect it.
Screenshot
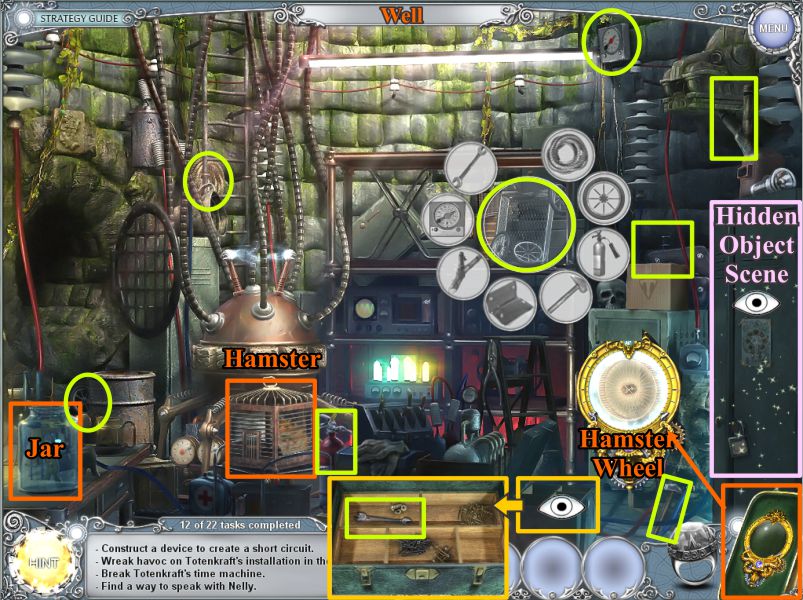
Well
Go through the open grate to the Well by the Pyramid.
Pick up the Jar and the Hamster.
Use the X-Glass to find the Hamster Wheel locked in the safe.
Click on the Key Object marked in the screenshot and collect the objects.
Zoom in on the box near the safe to collect one of the items.
You have triggered a Hidden Object Scene in the Tool Room.
Screenshot
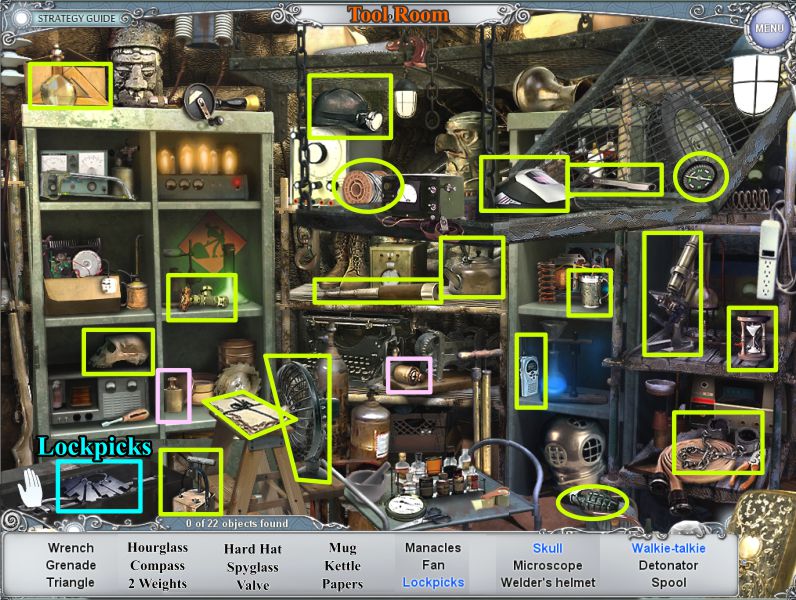
Tool Room Hidden Object Scene
Open and close the cabinet doors and check the toolbox for items.
Screenshot
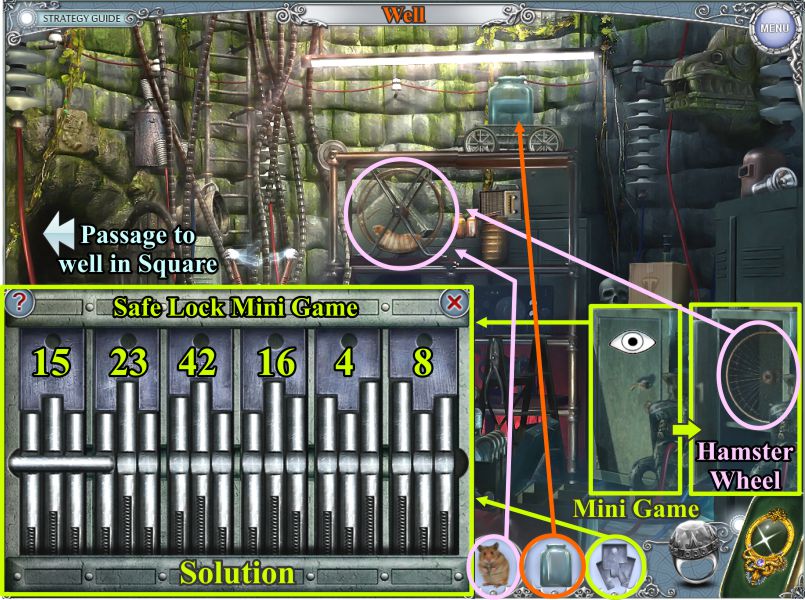
Well
You found a set of lockpicks, so zoom in on the safe and place them on the lock to trigger a Mini Game.
Swap the numbered parts of the lock to arrive at the solution shown in the screenshot.
Take the Hamster Wheel from the safe and place it as shown.
Go through the passage to the well in the Square, fill your jar with water from one of the 2 streams, and return to the Pyramid Well.
Place the jar with the water as shown, and put the hamster in the wheel.
You will be transported back to the other well while the hamster explodes the water out of the well.
Screenshot
Pyramid 2012
Go up the rope ladder to the Square and go to the Pyramid.
Take the Holy Grail and zoom in on the machine mechanism.
Pick up the wrench and smash the fuses to disable the time machine.
Go to the top of the pyramid to find Nelly.
Screenshot
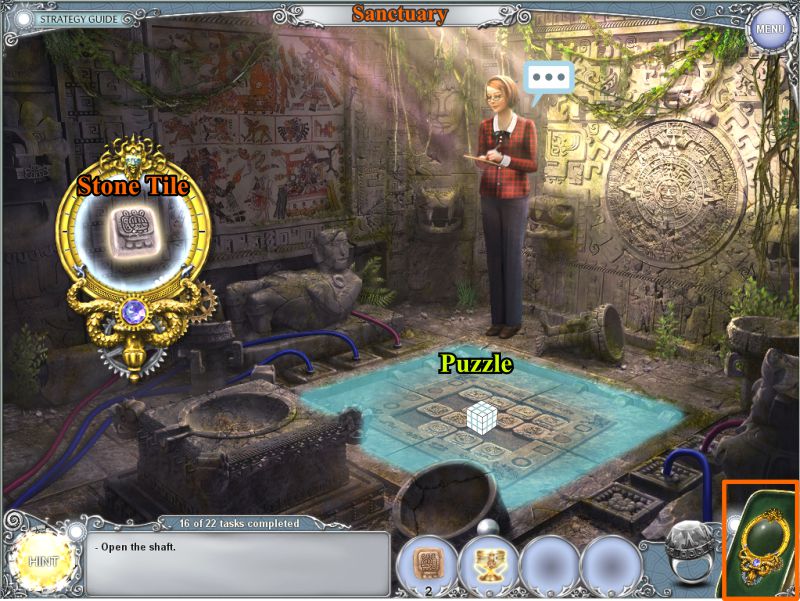
Sanctuary
Talk to Nelly, who tells you to open the trap door in the floor.
When she leaves, use the X-Glass to find the last Stone Tile.
Click on the floor for a puzzle.
Screenshot
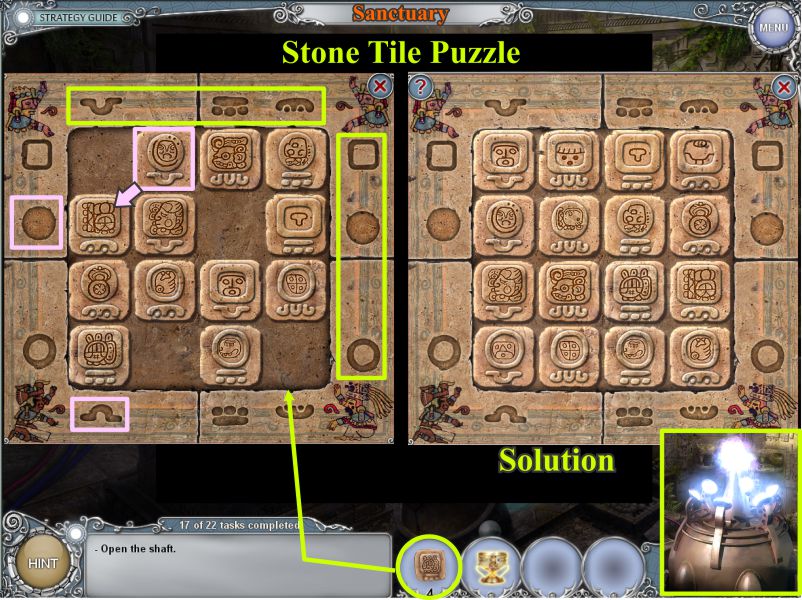
Stone Tile Puzzle
Place the 4 stone tiles on the puzzle to activate it.
The markings at the sides, top, and bottom are your clue as to which shapes and symbols go in the rows and columns.
The screen show shows a sample marked in pink and the final solution.
The floor will open and a machine will rise.
Screenshot
Pyramid
Go tell Nelly the job is done, and she will send you to the Well to get the toolbox.
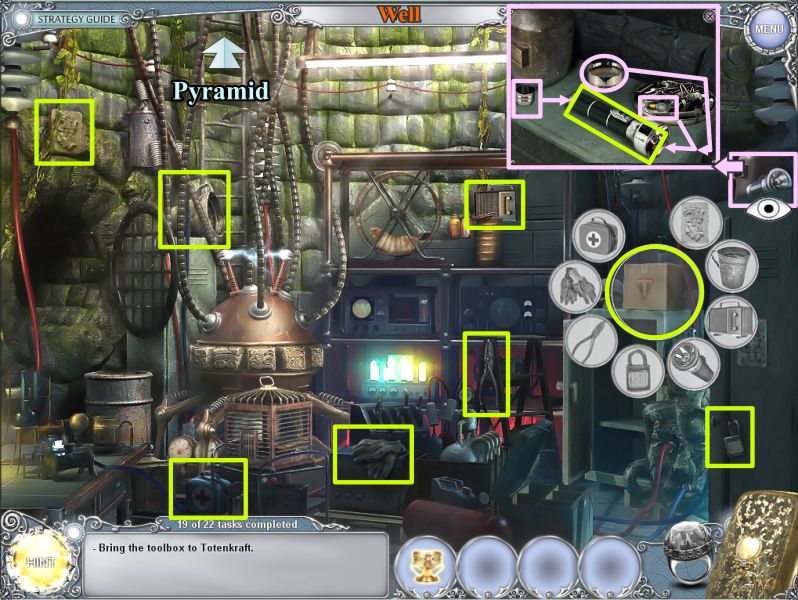
Well
Click on the toolbox for a Key Object.
Click on the flashlight and assemble it, as shown in the screenshot.
When you have collected everything, go up the ladder to the Pyramid.
Screenshot
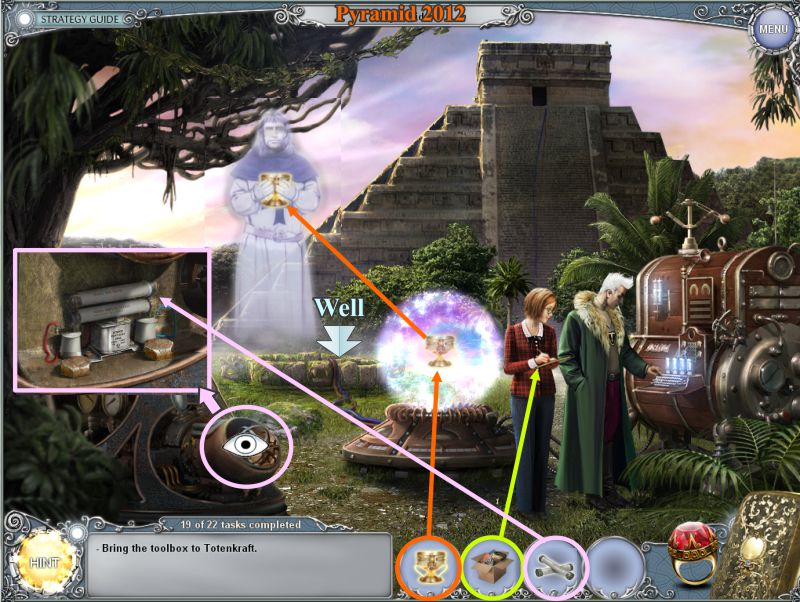
Pyramid
Give the toolbox to Nelly.
They can't find the Grail; Tom admits he has it and is ordered to place it in the sphere.
The ghost appears and grabs it from the sphere.
They try to explain to him that they need it to save the world and he doesn't believe them, so needs to be transported to see for himself.
Since the machine is broken, you need to go to the Tool Room and find some fuses to fix it.
When you have the fuses, zoom in on the mechanism and place the fuses.
Screenshot
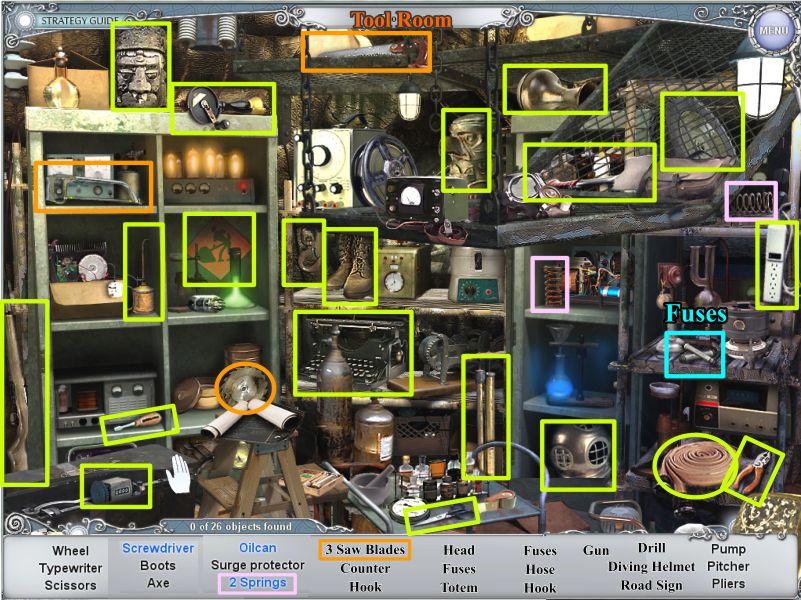
Tool Room Hidden Object Scene
Open and close the cabinet doors and toolbox to find everything and get the fuses.
Go back to the Pyramid and fix the machine.
Screenshot
Pyramid
The ghost is transported to the future to view what happens.
When he returns, he gives the Grail to you to place in the sphere.
You have done your part in saving the world, so watch the cutscenes.
Posted by: Jazz |
February 8, 2011 8:19 PM
|
February 8, 2011 8:19 PM
Treasure Seekers: The Time Has Come - Extra Play Walkthrough
General Information
If you purchased the Collector's Edition of the game, you are ready for Extra Play, so click on Start Adventure.
The next screen will give you your choice of Normal Play or Extra Play. If you choose Normal Play, you will lose all your progress, so be sure to choose Extra Play.
For the bonus portion of the game, you will alternate playing as each of the 3 characters: Nelly, Tom, and Stephen Totenkraft.
You can alternate between characters by clicking on them.
The Ring works for Nelly and Tom but not for Totenkraft.
Mayapan, Mexico
Once the destruction of the world has been stopped, everything turns to chaos in Mexico and Nelly, Tom, Totenkraft, and the time machine are pulled into a parallel world at the top of the Pyramid called the Sanctuary.
Your ultimate goal now is to escape from the parallel world.
The parallel world is tailored to each of our characters passions, so the door you enter will become their particular surroundings.
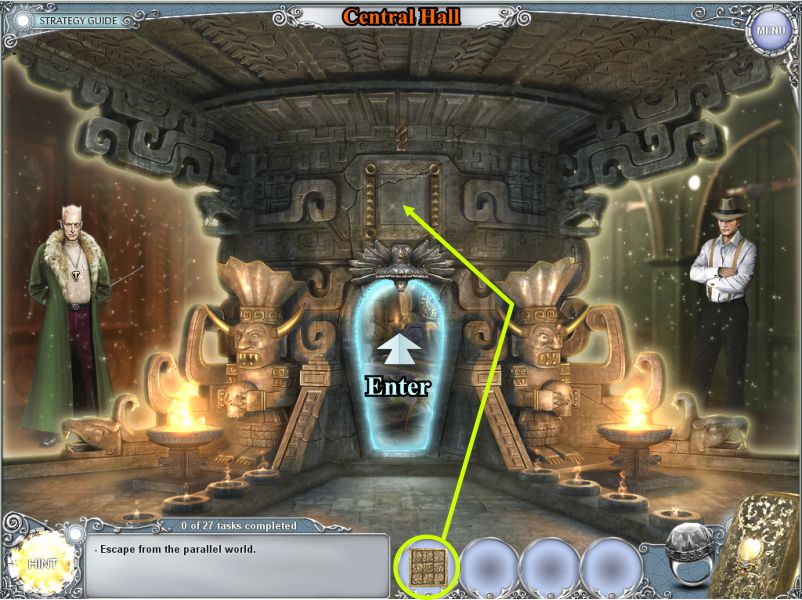
The Central Hall surroundings also change depending upon which character you are playing.
All 3 characters have access to the X-Glass, and the Inventory is shared by everyone, no matter who finds the object.
Parallel World
Tom is the main character as you enter the world. Grab the Seal above the door and Nelly and Totenkraft will appear.
Totenkraft explains he has spent the last few centuries in this place because of Tom and Nelly.
Nelly's room is the Pyramid Sanctuary, and she is able to use the Ring to travel between 2012 and 1932.
Tom's room is a Shop, and he is able to use the Ring to travel between 2012 and 1932.
Totenkraft's room is a Laboratory; the Ring is not available for him to travel in time.
Click on Nelly and place the Seal from your Inventory above her door to find your next task.
Screenshot
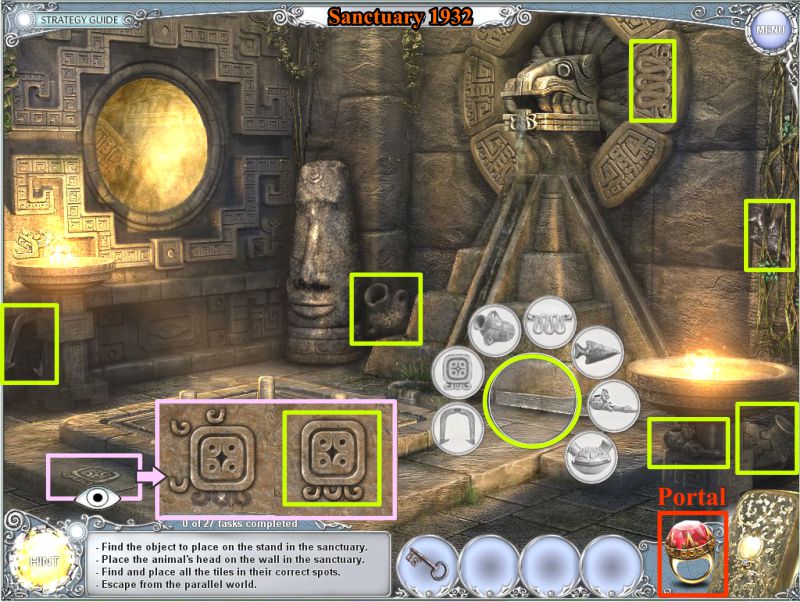
Sanctuary 1932
Enter the door and click on the key for a Key Object to obtain it for your Inventory.
Use the Ring for Nelly to travel to the Sanctuary in 1932.
Screenshot
Sanctuary 2012
Click on the machete for a Key Object.
Zoom in on the glyph and rearrange as shown in the screenshot.
Travel back to 2012 and go to the Central Hall.
Screenshot
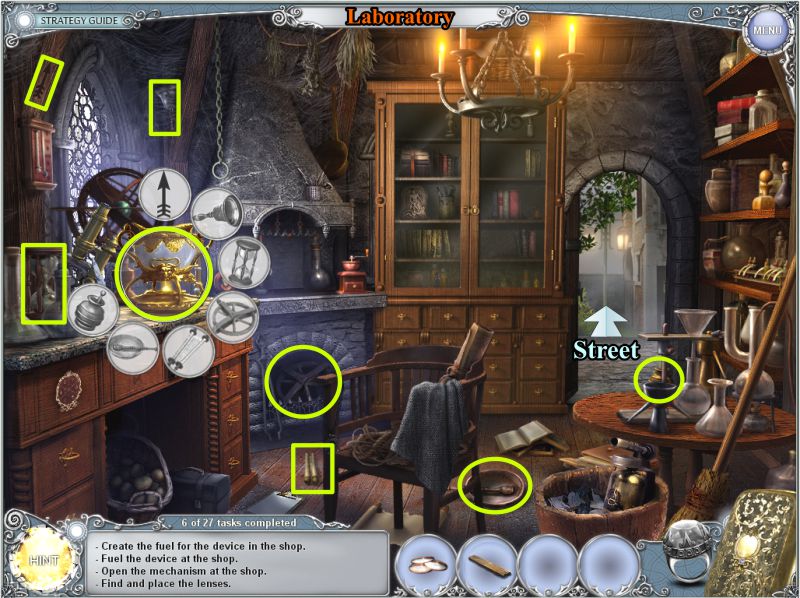
Laboratory
Choose Totenkraft and enter the Laboratory.
Use the X-Glass on the cabinet to see the hidden door and trigger a Key Object.
Zoom in on the plate over the fireplace and assemble it.
Collect the rest of the items and the cabinet will move to reveal a door.
Use the key from your Inventory to open the door and exit to the Street.
Screenshot
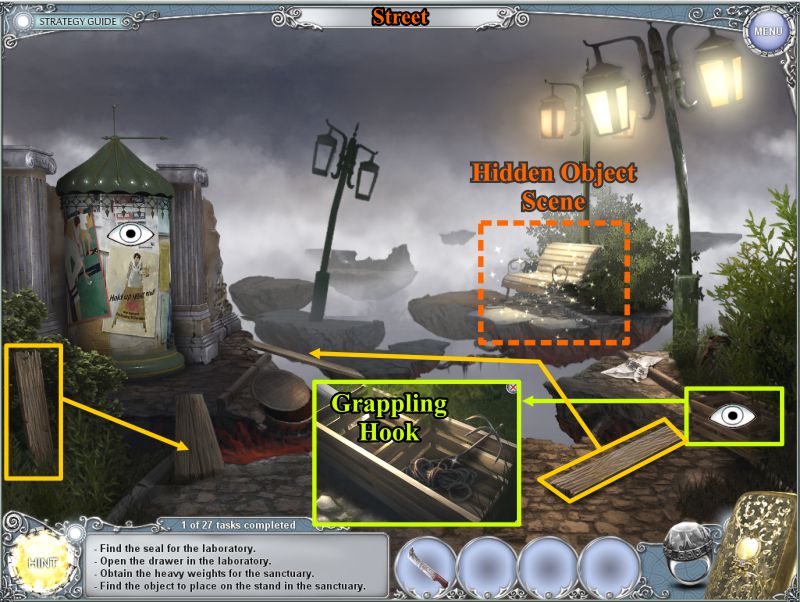
Street
Check out the advertising pillar.
Zoom in on the box at the right and take the grappling hook.
There is a Hidden Object Scene at the bench, but you can't get to it without connecting the islands or you might fall through.
Pick up the 2 planks and place them as shown in the screenshots.
You don't have sufficient planks, so go back to the Central Hall and turn things over to Tom.
Screenshot
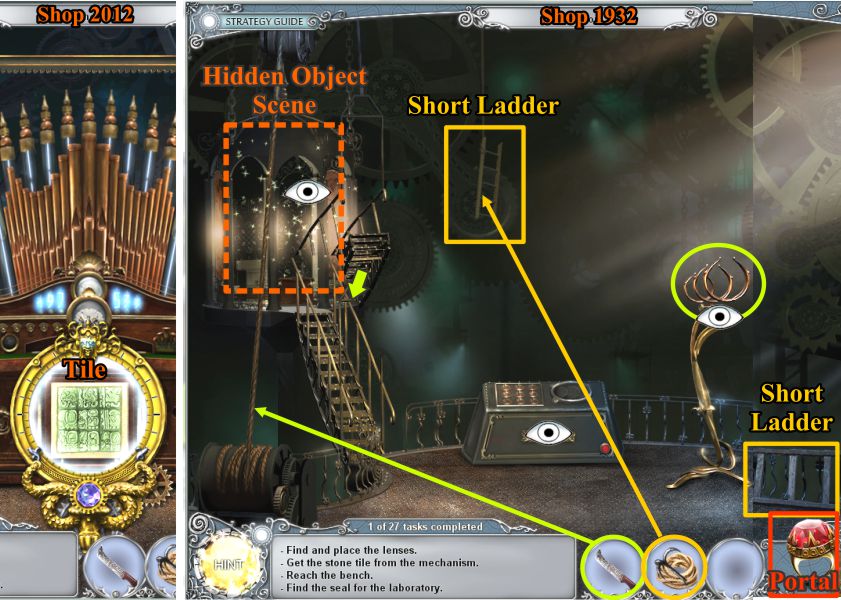
Shop 2012 and 1932
Enter the Shop and use the X-Glass to locate a tile in the cabinet.
Travel to 1932 and check out the items marked in the screenshot.
Use the grappling hook to pick up the one short ladder.
Grab the other one and they will combine in your Inventory.
Cut the rope with your machete. The stairs will lower so you can go to the Pavilion for a Hidden Object Scene.
Screenshot
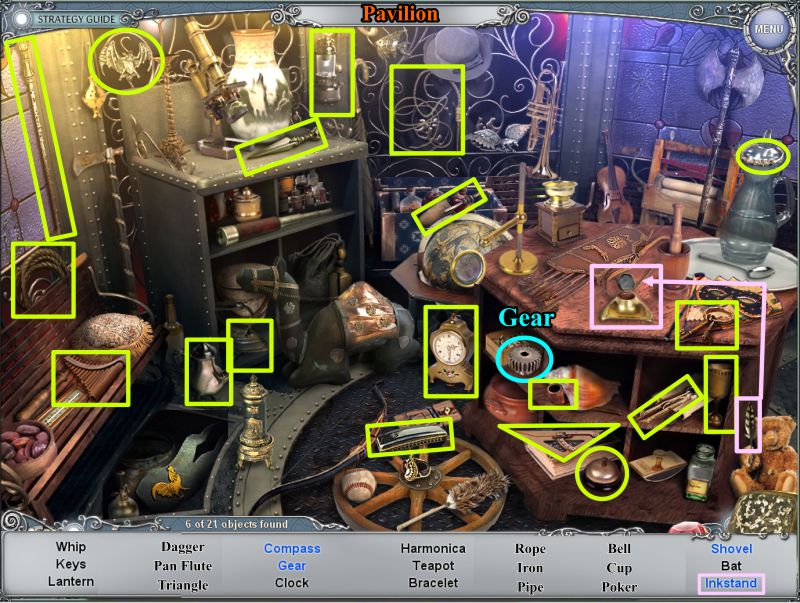
Pavilion Hidden Object Scene
Collect everything and you will get a Gear.
Place the feather with the ink to get an Inkstand.
Screenshot
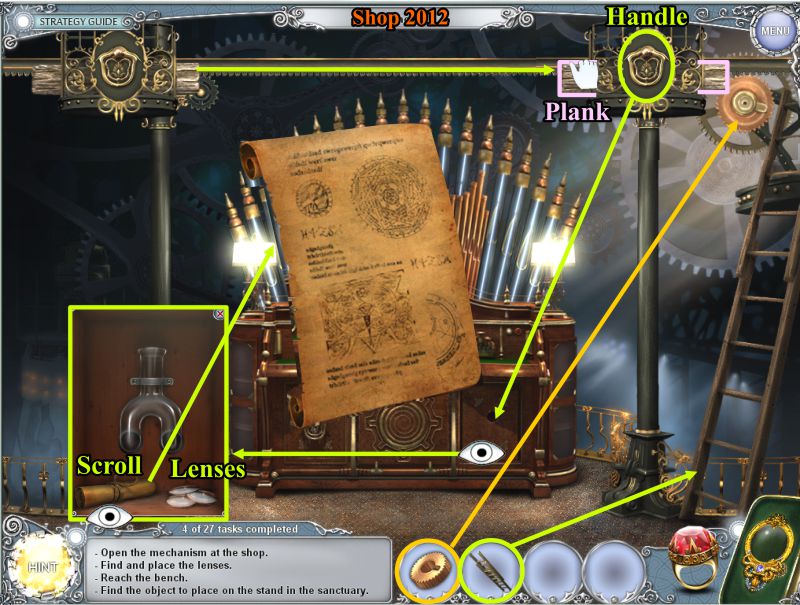
Shop 2012
Use the Ring to travel back to 2012.
Place the ladder at the right so you can add the missing gear.
The mechanism will travel across the scene as shown in the screenshot.
Take the Handle and use it to open the right cabinet door.
Zoom in for a close up and take the Lenses, read the Scroll and check out the tube.
Tom decides he needs to consult with Totenkraft about the scroll, so go back to the Central Hall and click on Totenkraft.
Screenshot
Laboratory
Totenkraft says the scroll is a recipe for fuel. Go to the Laboratory and click on the container on the desk for a Key Object.
When you have collected everything, go out to the street.
Screenshot
Street
Place the last plank from your Inventory to be able cross the islands to the Bench for a Hidden Object Scene.
Bench Hidden Object Scene
Open and close all lids on the boxes to be able to collect everything.
Zoom in on the trash can to find the Lion Head.
Screenshot
Return to the Central Hall and click on Nelly.
Sanctuary 2012
Go to the Sanctuary and place the lion head over the altar.
The lion will spill water in the fountain, causing it to lower.
The wall disc will turn around and a key will fall out for you to pick up.
Go back to the Central Hall and click on Tom.
Shop 2012
Go to the Shop and use the key on the left cabinet door.
Zoom in and take the blade.
Use the Ring to transport you to 1932.
Shop 1932
Place the lenses from your inventory in the holder as shown in the screenshot.
Turn on the red button on the box.
Look through the lenses at the light formation.
Click on the box for a puzzle. Match the light formation by pressing the buttons on the box so you can collect the Medal.
Screenshot
Use the Ring to return to 2012 and go to the Central Hall.
Turn the scene over to Totenkraft to return to the Lab with the Medal.
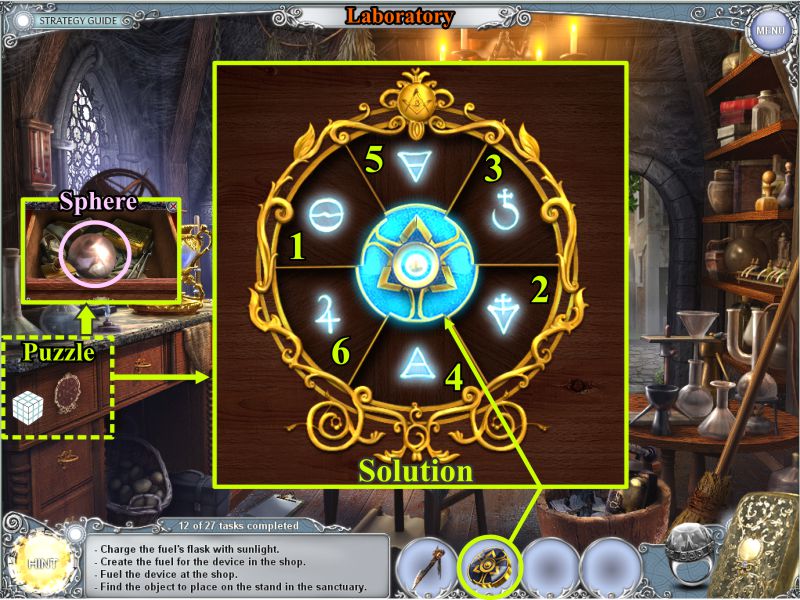
Laboratory
Enter the Laboratory and click on the left drawer of the desk for a puzzle.
Place the Medal in its place to activate the puzzle.
Your objective is to press the symbols in the correct order to open the drawer.
If you miss the correct order, you will have to start from the beginning.
The solution is shown in the screenshot. When the drawer will opens, take the Sphere.
Screenshot
Sanctuary 2012
Return to the Central Hall and click on Nelly to enter the Sanctuary and place the Sphere on the pedestal.
Travel to 1932 via the Ring.
Sanctuary 2012
Use the Blade from your Inventory on the gold disk to scrape off some gold.
After examining the gold flakes, Nelly decides she needs a magnet to purify it.
Transport back to 2012 and go to the Central Hall.
Pavilion Hidden Object Scene
Click on Tom, enter the Shop, and transport back to 1932 to play the Hidden Object Scene at the Pavilion.
Collect everything to get the Weather Vane.
To get the Mortar and Pestle, place the 2 objects together as shown in the screenshot.
Screenshot
Return to the Central Hall and click on Totenkraft.
Street
Enter the Lab and go to the Street.
Place the Weather Vane on the advertising pillar and it will whirl around for you to grab a magnet.
Return to the Central Hall and click on Nelly.
Sanctuary 1932
When Nelly goes to the Sanctuary, use the Ring to travel to 1932.
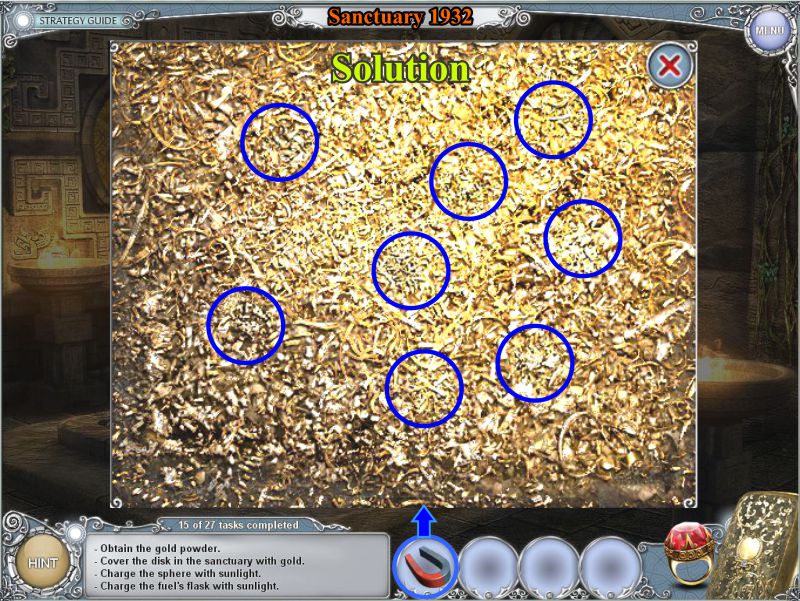
You need to purify the gold dust, so click on it for a Mini Game.
Gold Purification Mini Game
In order to purify the gold, you need to remove all the unnecessary elements, of which there are 8.
Place the magnet on the close up of the gold and move it around.
The elements you need to remove will wiggle when you get close to them.
When you have completed your task, the gold dust will go into your Inventory.
Return to 2012.
Screenshot
Sanctuary 2012
You need to direct sunlight on the sphere for Totenkraft to use it, so replenish the wall plaque with its missing gold dust.
The disk will radiate sun to the sphere, which will automatically go into your Inventory when charged.
Return to the Central Hall and click on Totenkraft.
Laboratory
Go to the Lab and use the sphere to charge up the fuel you previously made.
Once the fuel is charged, it will automatically go into your Inventory.
Return to the Central Hall and click on Tom.
Shop 2012
Go to the Shop and click on the right open cabinet compartment for a close up.
Pour the fuel in the tube and the front of the cabinet will open for you to take the Tile.
Central Hall
Return to the Central Hall and place the Tile above the door.
You have now found the tiles for Nelly and Tom, so turn the reins over to Totenkraft by clicking on him.
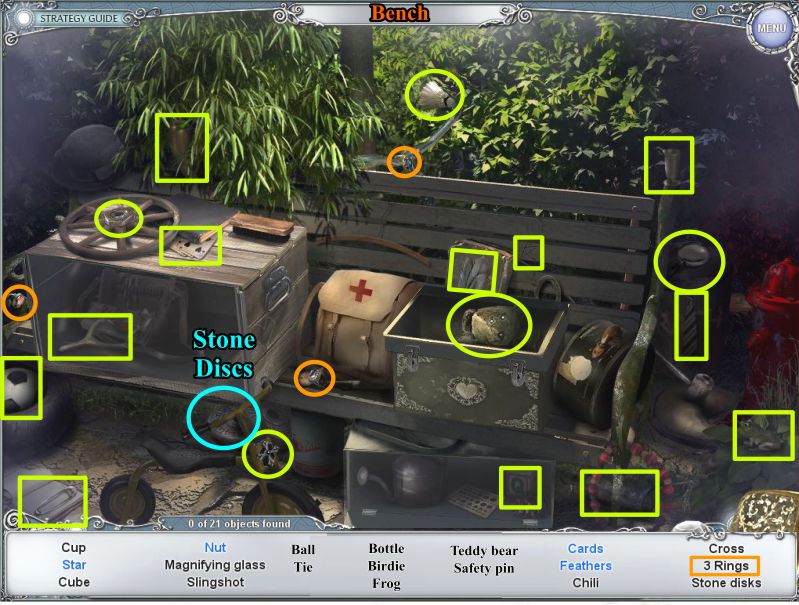
Go through the Lab to the Street and click on the Bench for a Hidden Object Scene.
Bench Hidden Object Scene
Open and close all lids to find everything and you will get 2 Stone Discs.
Screenshot
Go back to Central Hall and click on Nelly.
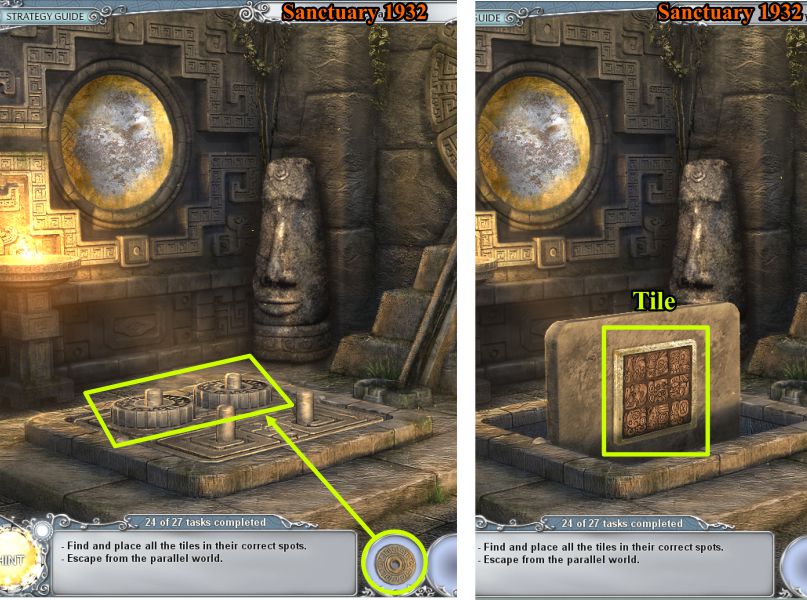
Sanctuary 1932
Go to the Sanctuary and use the Ring to travel to 1932.
Place the 2 stone discs as shown in the screenshot. The floor will rotate, producing a Tile for you to grab.
Screenshot
Return to 2012 and go to the Central Hall.
Central Hall
Click on Totenkraft so he can place his tile above the door.
All tiles have been placed, and Nelly, Tom, and Totenkraft are freed from the parallel world.
Posted by: Jazz |
February 11, 2011 5:51 PM
|
February 11, 2011 5:51 PM