
Treasure Seekers: Follow the Ghosts
Platform: Mac, Windows

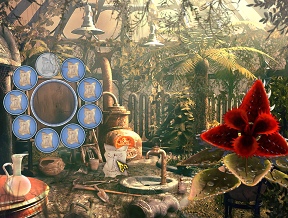
![]() Folks who like hidden object/adventure hybrids fall into one of two camps: those who like the "traditional" hidden object scenes with lists of things to find, and those who like more context-sensitive actions, finding only the things (or pieces of the things) that are needed to propel the action. Well, Artogon has raised the stakes with Treasure Seekers: Follow the Ghosts and their point seems to be... why not enjoy both?
Folks who like hidden object/adventure hybrids fall into one of two camps: those who like the "traditional" hidden object scenes with lists of things to find, and those who like more context-sensitive actions, finding only the things (or pieces of the things) that are needed to propel the action. Well, Artogon has raised the stakes with Treasure Seekers: Follow the Ghosts and their point seems to be... why not enjoy both?
 Treasure Seekers: Follow the Ghosts is the third in the Treasure Seekers series. Yes, Nelly and Tom, those investigating siblings, are back to solve yet another mystery, this one involving a priceless stolen gem and a lot of supernatural activity. Together and at home (for once), the two notice that simultaneously with the aforesaid jewel being grabbed in a daring robbery, a ghost appears at the home of the family who owned the gem. Are they linked? Well, Tom thinks so, so why not investigate?
Their initial investigation gives our intrepid heroes the reputation as investigators of the paranormal, and before you know it they are off, separately and together, traveling around the globe to discover what is causing such havoc with the supernatural. Nelly is still calm and methodical, Tom is still a mechanical genius and a bit of a doofus, and between them they soon realize that an old enemy has resurfaced and is behind it all. Can they stop the evil mastermind before his plans come to fruition? Play to find out.
 For the most part the interface is the one that has made Artogon's games so unique: click on an area that needs solving and a circle pops up showing what items need to be gathered to complete that particular task. A changing cursor alerts the player to things that can be picked up, examined, manipulated, or spoken to, as well as a cursor that indicates areas that can be traveled to. Tasks can be performed simultaneously or concurrently depending upon the area. However, in addition to the basic dynamic that is so familiar with Artogon's other games, a new dynamic has been added: classic, list-driven hidden object scenes. As you play through a location you will find not only the classic circle dynamic but also mini-games, puzzles, and the aforementioned hidden object scenes, all of which must be solved to discover what is causing the local problem.
Hints are on a refilling timer that refills either very quickly (in casual mode) or just fairly quickly (in advanced mode). The mini-games and puzzles are also on a skip timer; wait long enough and you can bypass them if they become too difficult. A handy running tally of the necessary tasks that helps the player keep track of everything that needs to be done is welcome, especially in the later chapters where the tasks can number in the dozens.
 Analysis: The Treasure Seekers series are some of the loveliest, most entertaining hybrids out there and Treasure Seekers: Follow the Ghosts seeks to expand and enhance the formula. With a choice of modes (casual and advanced), and such a variety of problem solving, hidden objects, and mini-games, Artogon has created casual gameplay that will satisfy folks on all areas of the spectrum, with fun and challenging puzzles that will appeal to a wide variety of gamers. Better yet, Artogon seems to be going against the tide of the ever shrinking sequel. Treasure Seekers: Follow the Ghosts is not longer than Treasure Seekers II but it is no shorter either, which, these days, is a minor miracle.
The artwork is, as always, gorgeous to look at. Hyper real and luminous, the backgrounds perfectly mirror the time and location of each of the chapters. Music and sound effects that are by turn lively and spooky round out the experience. But the best part is the characters, especially the dead, undead, and nearly dead folks whose rest has been disturbed, which has made most of them both depressed and a little cranky. Half of the fun is meeting these nearly or dearly departed who just want to be left alone and have no idea why some lunatic keeps insisting on messing with their places of rest.
Although some might not like the addition of the classic hidden object scenes, they are not numerous enough or obtrusive enough to slow down the momentum of the story, and in fact add enough to the gameplay to create an environment that will appeal to everyone who likes the adventure/hidden object hybrids, and perhaps even those who don't. So will Nelly and Tom save the day? Will the evil mastermind's plan succeed? What do you think? Play and find out!
![]() Windows:
Windows:
Download the demo
Get the full version
![]() Mac OS X:
Mac OS X:
Download the demo
Get the full version


Walkthrough Guide
(Please allow page to fully load for spoiler tags to be functional.)
TREASURE SEEKERS: FOLLOW THE GHOSTS WALKTHROUGH
General Tips And Hints:
From the Main Menu you can select your Profile, Options, Quit the game, see the credits, or "Start Adventure".
Options include your choice of music and sound volume, a custom cursor, full screen or windowed mode, and if you want to have a widescreen correction in full screen mode.
If you click too many times, your cursor will become unusable for a while.
Sometimes there are what they call "key objects". This means that when you click on something a circle appears that has other circles attached to it with the objects you need to find.
When you find one of the objects it will not automatically go into the key object circle.
You need to place the objects in the circle which will change color to tell you that you found it.
Some scenes will have hidden object lists and the items in these scenes will be automatically collected.
For lists some items will be in yellow. Before you can get these items you will need to complete something else such as combining an item with another item which might not be on the list.
As you find objects you will see that your list of items left to find will increase so the screen shots will show all items at one time.
Lists of items to find will be shown randomly but the complete list will always be the same.
Sometimes you will need to roam around to different locations to complete all the tasks that are expected.
The Tasks you need to complete are show in the lower right part of the screen and must be completed in order.
The number of tasks to complete is shown above the taskbar and shows how many tasks you have completed, such as 12 out of 29.
The circles to the left of the taskbar are for your Inventory items.
There is no timer and the "Hint" button which is located to the left of your Inventory refills itself.
At the top of each scene there is a bar to tell you your location.
The Menu is in the upper right corner and you can access options or the Main Menu from there.
If you are playing window mode and touch your desktop, there is an automatic pause feature so you will need to click Continue Game when you are ready to resume play.
Your game is always saved when you exit but the intro scenes will replay while that chapter of the game is loading.
Screenshot
Cursor Attachments:
Sometimes your cursor will get an attachment.
Gears mean you need to check something because it could end up being a key object.
A hand means you should pick up the object.
A face wants you to talk to the person for more information.
If there is a magnifying glass, you should take a closer look at an area or item.
Footprints show you the way to exit the location.
Options:
On the Options Menu you can adjust the volume of the music and sound; choose to have a custom cursor or not; select full screen or window mode, and decide if you need a widescreen correction in full screen mode.
There are 5 chapters in the normal play of the game plus a bonus in the Collector's Edition once you have completed the Normal game play.
Each time you start the game you will see this screen unless you check the box not to show it again.
When you first start your adventure you will be asked to make a choice between Casual or Advanced Mode.
In Casual Mode the "Hint" and "Skip Puzzle" buttons charge faster and less time is required for illuminating the next collectable item.
Advanced Mode is suggested only for experienced players. The "Hint" and "Skip Puzzle" buttons take longer to activate and most other hints are not available.
Mini Games:
Mini games can be skipped once the "Skip" button is full.
If you need further instructions, click on the "?" in the upper left corner of the game screen.
Chapter 1: England
The adventure begins in 1931 England with the mysterious disappearance of the Ruby Heart diamond from the Bristol Museum.
Tom is fascinated by the theft because it coincided with the appearance of a ghost at the Caldwold Manor so he and Nelly are off to investigate.
Caldwold Manor
When you arrive at the Manor you will be given your choice as to whether you would like to have interactive help or not.
Once you say "yes" the only way you can get rid of it was to start over.
The first thing you need to do is enter the office so click on the door and follow the footprints.
Talk to the owner to find out about the decoder plates.
Click on the bookshelves and collect all the items for the key object.
Once the key object is complete you will see the plates behind the panel so take them and exit to the library.
Screenshot
You need to search the shelves for genealogy which is marked.
Once chosen it will be bring up an insert to select the green book with the crest which when chosen flies to the desk and opens up.
Place the decoder plates from your Inventory on the Encrypted Book to bring up a mini game.
Screenshot
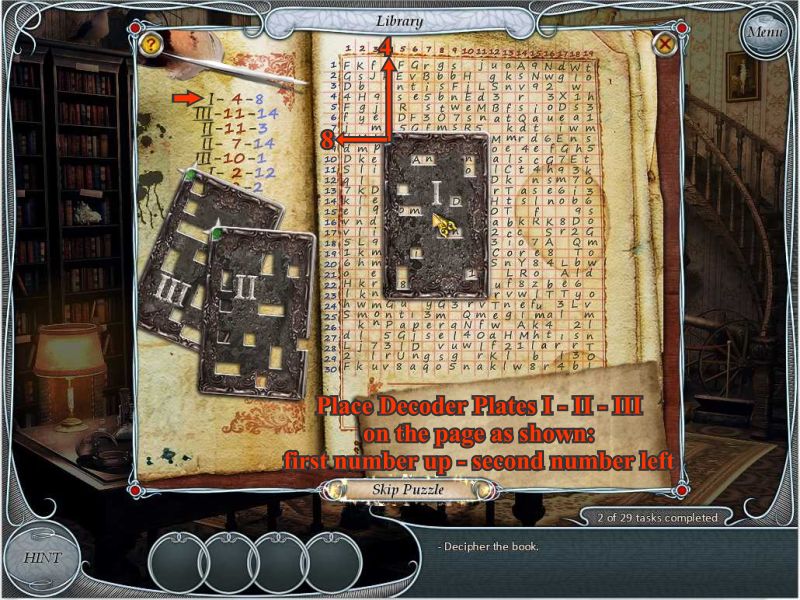
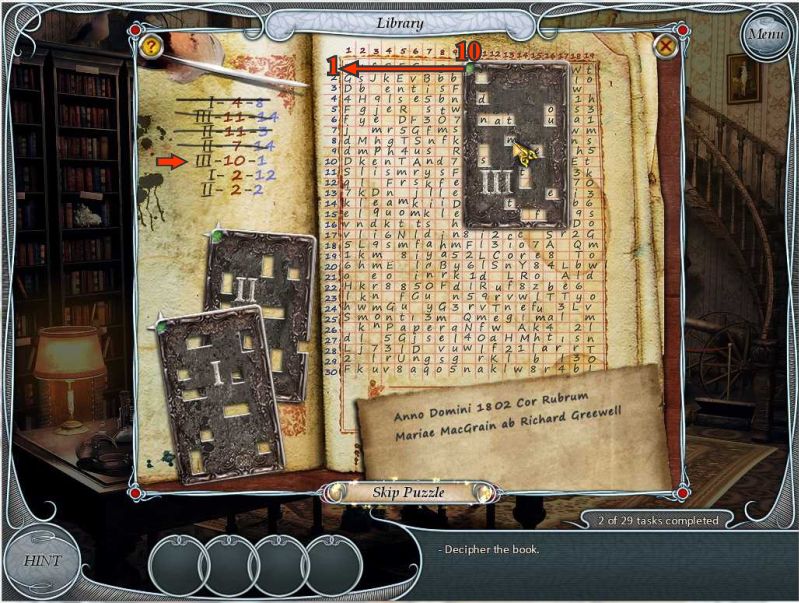
Mini Game To Decode Book
You have 3 decoder plates plus instructions on the left side of the book to show you in what order to use the plates and where.
Once the "Skip Puzzle" button is full you also have the option to not play the game.
Notice the two arrows at the upper left corner of the plates and place each plate on the book so they point to the proper row.
Pick up Plate I and place it as shown.
The instructions say 4 - 8, but the 4 is on the top row and the 8 is on the side column as shown by the arrows.
You will notice the plate starts to flash slightly when it is correct so let go of the plate and it will burn itself in blue light and produce the letters at the bottom of the scene.
Screenshot
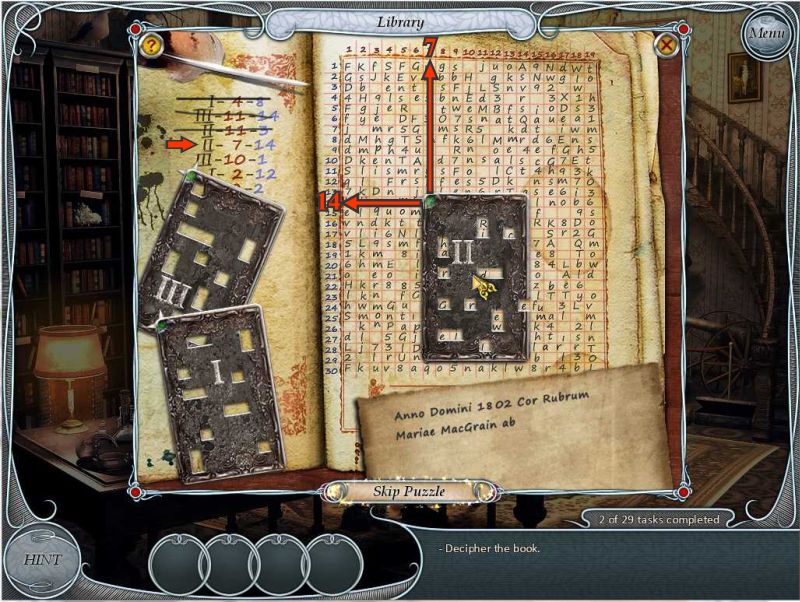
The second round is Plate III: 11 - 14 so put the side column arrow at 14 and the top row at 11 and let go when it starts to flash.
Screenshot
The third selection is Plate II at column 3 and row 11.
Screenshot
Back to Plate II which is column 14 and row 7.
Screenshot
Plate III is at column 1 and row 10.
Screenshot
Plate I needs to be placed at column 12 and row 2.
Screenshot
The last plate is II which is 2 and 2 and will give you the Latin solution which Nelly translates for you.
Screenshot
Give the decoded Genealogy Book to the owner and go back to the library to take the stairs to the attic for further investigation.
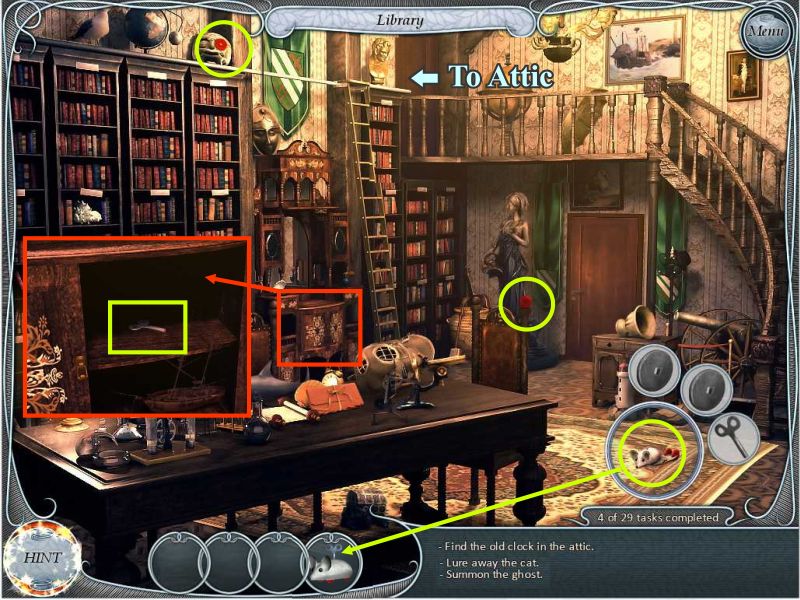
When you get to the attic you encounter a nasty cat that blocks your efforts to look at the antique clock.
You remember seeing a toy mouse in the library so go back downstairs.
Click on the mouse to bring up the key object.
One item you need is in the cabinet marked in red and can be seen in the insert.
Take the completed mouse back to the attic.
Screenshot
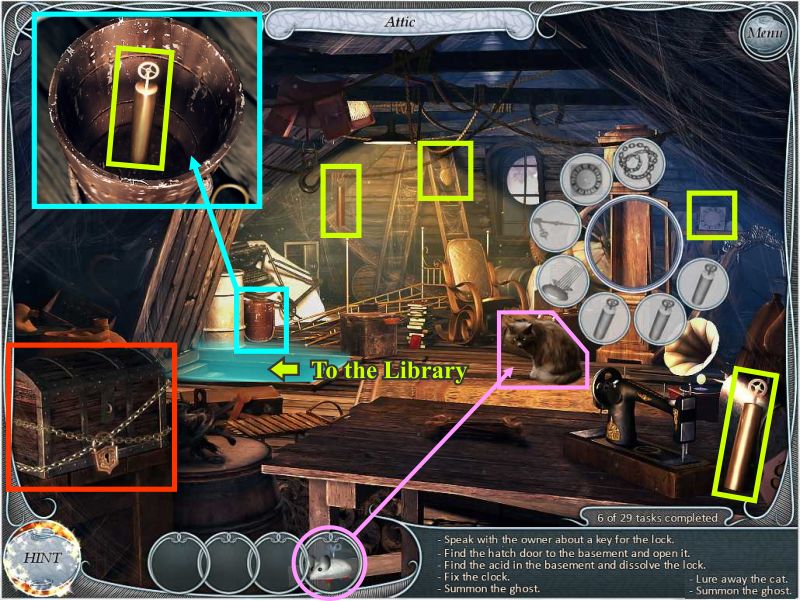
Put the toy mouse in front of the cat and it will run back and forth and then down the stairs with the cat following it.
Click on the clock to bring up a key object and collect all the items available.
Click the bucket to get the item shown in the insert.
Click on the trunk lock and go back to the office to talk to the owner about a key for it.
Screenshot
The owner doesn't have a key for the lock but he does have a key for the basement where he says you can get some acid to dissolve the lock and chain.
The basement access is in the Library so go there and lift the edge of the carpet and use the key on the hatch which will flip open so you can go to the basement.
Screenshot
When you get to the basement electrical sparks are flying and the place is filled with water.
The acid is the bottle marked in pink so you will need to drain the water to get to it.
The valve to drain the water is just under the acid so you need something to lasso it.
Go back through the Library and upstairs to the attic where you saw a hook.
No, you could not have taken the hook with you the last time you were in the attic because it wasn't shown on the taskbar as yet.
Get the hook which is shown in the insert and return to the basement.
Collect the rope and it will combine with the hook.
Use the rope and hook to get the valve — put the valve in its place and click it to pump out the water.
Once the water is gone grab the acid and exit to the library and back to the attic.
Screenshot
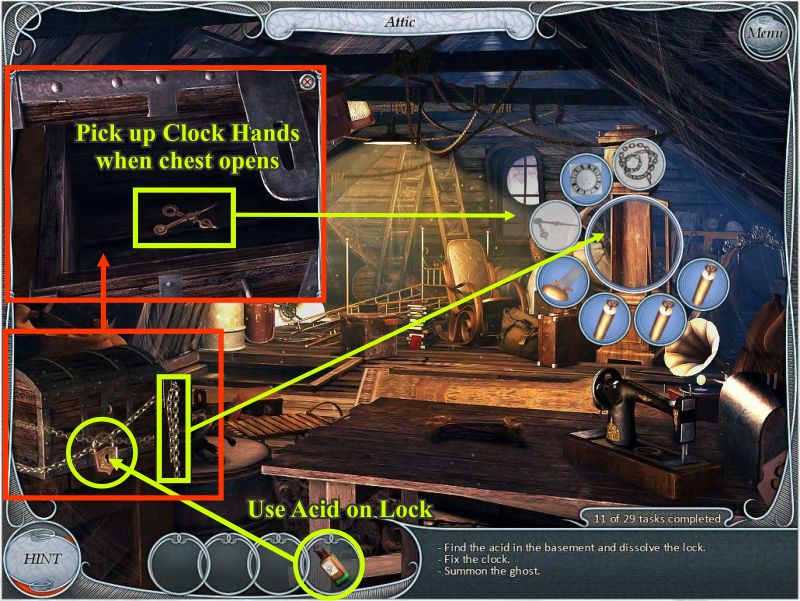
Use the acid on the lock and the chains will give way for the chest to open.
Grab the clock hands in the chest as shown in the insert and collect the loose chains to complete the key object.
Click on the clock to bring up a mini game.
Screenshot
Clock Mini Game
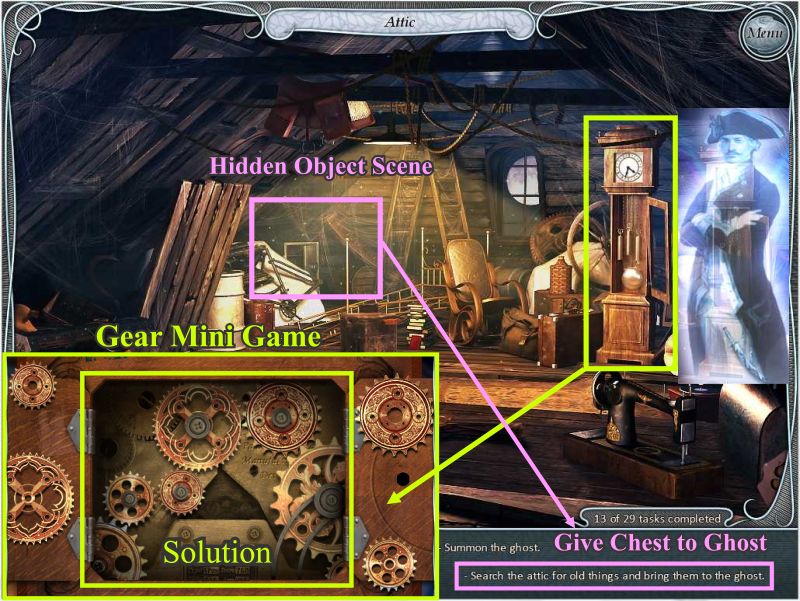
Your goal is to set the clock to midnight and summon the ghost.
Place the 4 gears as shown in the insert in order to summon the ghost.
Talk to the ghost and then look for his things in the "Old Stuff" a hidden object scene.
Screenshot
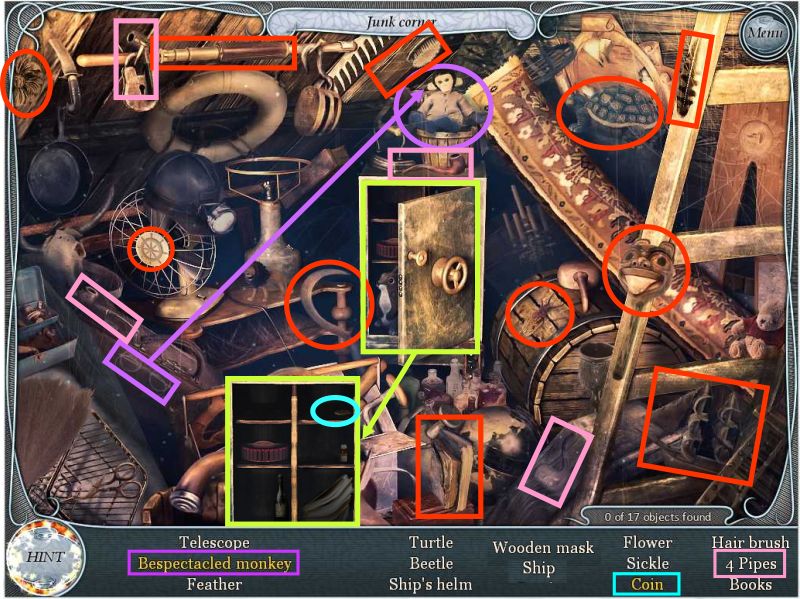
Put the glasses on the monkey and collect the bespectacled monkey.
The coin is in the safe so follow the lime sequence.
All 17 items to find are shown on the taskbar.
When you have finished collecting the items you will get chest to give to the ghost.
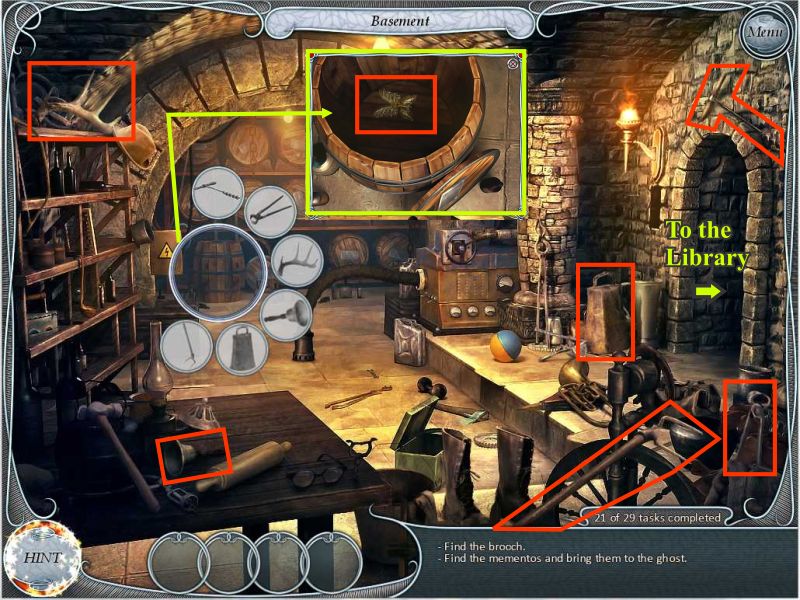
After receiving the chest the ghost requests you bring him the pieces of his heart from behind the torch in the basement.
Exit to the library and go to the basement.
Screenshot
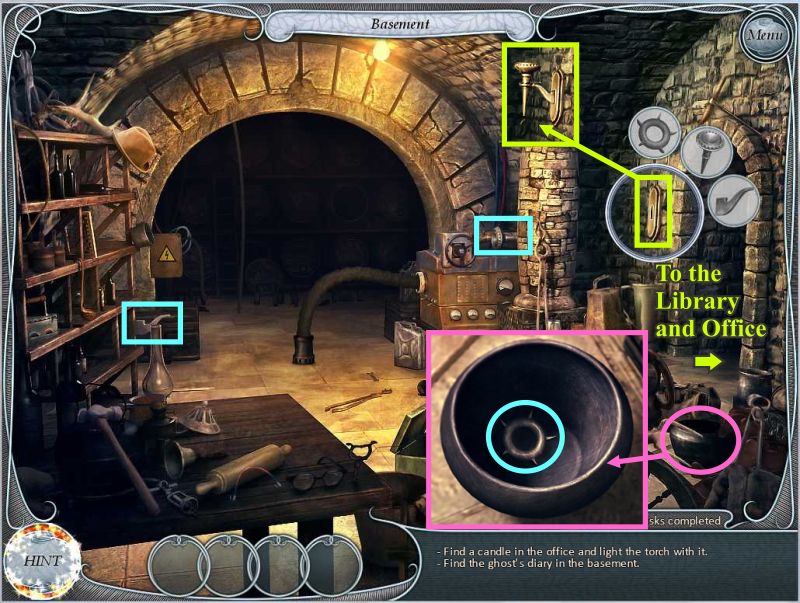
Click on the green marker to the left of the entrance for a key object.
One item is in the bowl shown in the pink insert.
You will get a torch shown in the green insert but you will need to go to the office to get something to light it.
Exit to the library and then enter the office.
Screenshot
Take the candle off the desk and go back to the basement.
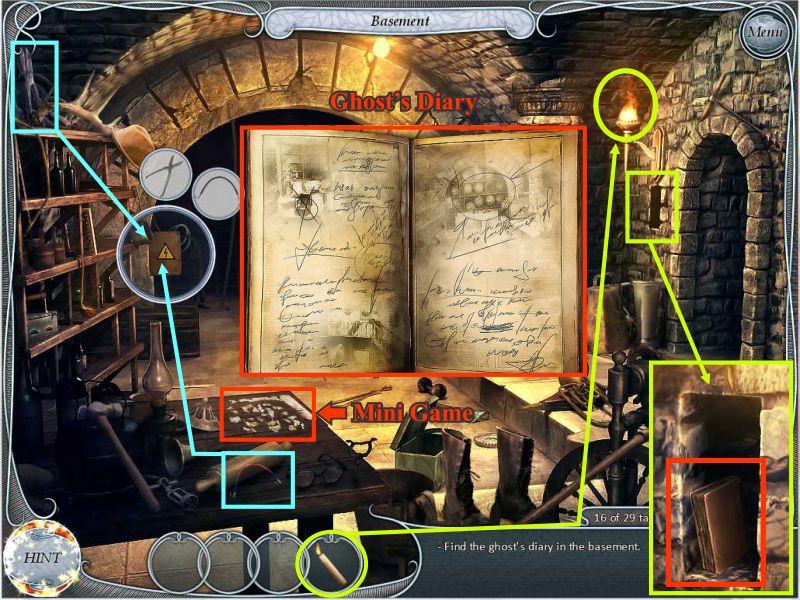
Use the candle to light the torch and the sconce will move revealing a secret hiding place.
Click on it to bring up the insert with the diary and take the diary.
The diary contains a list of the wine barrels in the cellar but it is so fragile that it falls apart so needs to be put back together.
Click on the pieces on the table to bring up a mini game.
After you have completed the wine barrel list you will need to repair the wiring so click on the electric box to bring up a key object and pick up the cutters and wire for the circle.
Screenshot
Wine Barrel List Mini Game
This is a jigsaw puzzle and the solution is shown on the left.
It reveals that 1864 was the magic year for the barrel you need to find to retrieve the brooch.
Screenshot
Once the wiring is repaired you need to identify which barrel you want because there are only partial dates when you click on them.
The correct barrel is at the far left in the bottom row so click on it to bring up a key object.
When you are finished collecting the items click on the barrel to retrieve the broach shown in the insert.
Take the broach and exit to the library to examine the stairway on the way to the attic.
Screenshot
Click on the painting on the stairway wall to bring up a key object.
One of the items you need is in the small cabinet by the bookcase as shown in the insert.
When you have collected everything the painting will fall off the wall revealing a safe.
Click on the safe only to find out it is empty so go into the office to talk to the owner who says he doesn't use it because the lock is broken and that everything is stored in the "Old Stuff" part of the attic.
Screenshot
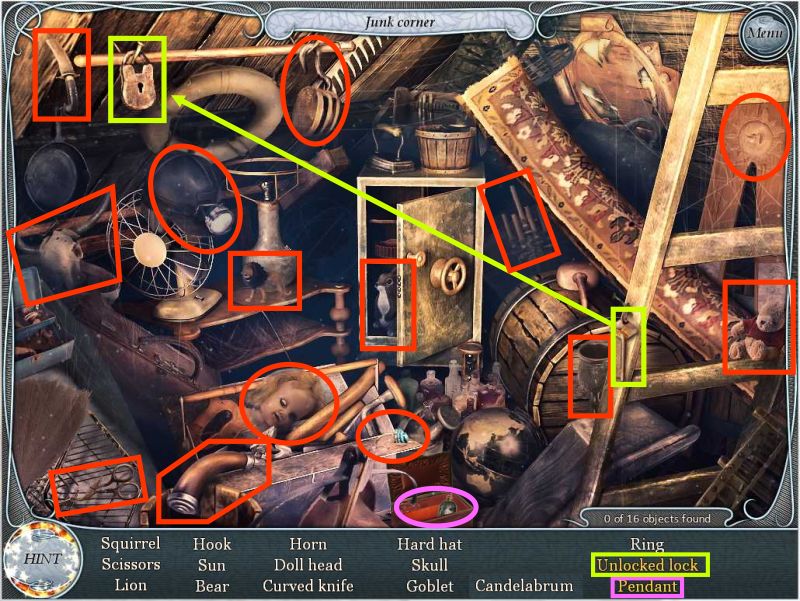
Go back to the attic and click on the "Old Stuff" pile again to see what is still there.
All the items are shown on the taskbar and marked in red except for those that need further action.
Click on the box circled in pink to find the pendant.
Follow the lime sequence to unlock the lock and then collect it.
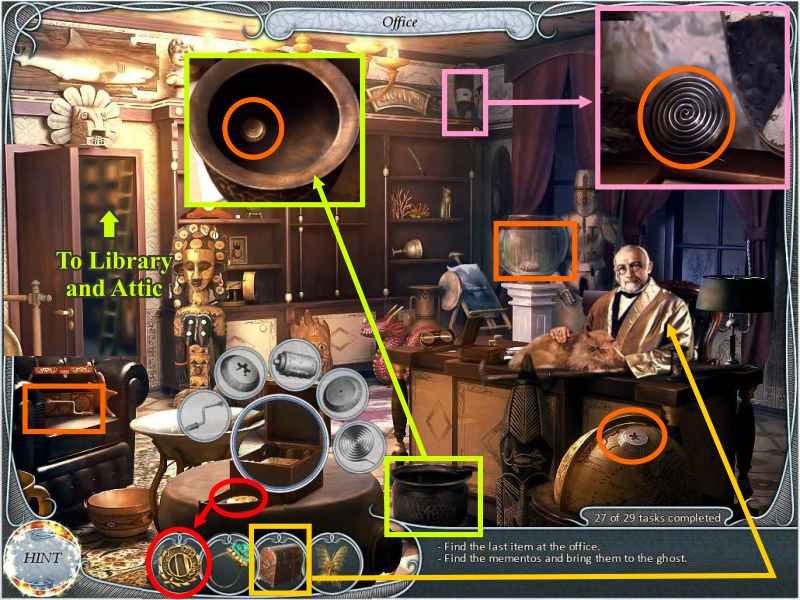
Go to the office to find out what to do with the items you've found which are now in a chest.
Screenshot
Give the chest to the owner who remembers the ring being in the safe so gives it back to you.
Click on the music box on the table to bring up a key object.
2 of the items are in other objects as shown in the inserts.
After you have placed all the objects in the music box it will produce the last memento for the ghost so take the medallion and go to the attic.
Screenshot
Give the brooch, ring and medallion to the ghost and learn what they mean to him.
Chapter 2: Germany
Since Nelly and Tommy didn't find the Ruby Heart in England, they decide to split up and investigate reports of paranormal activity in Germany and France.
Nelly arrives in Germany where Yeti sightings have been reported by local farmers so she follows a lead which takes her to a Mill.
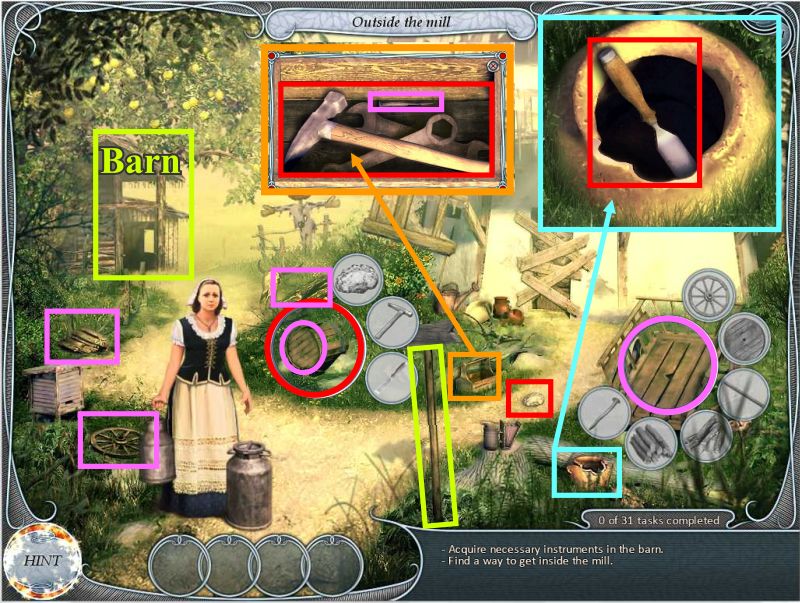
Outside The Mill
The woman at the Mill tells Nelly the Mill has been boarded up so she decides to get into the Mill to look around
Click on the cart and barrel to bring up two key objects.
The barrel items need to be collected first so the end of the barrel can be used for the cart.
Click on the toolbox marked to get the hammer for the barrel as shown in the orange insert.
The toolbox will disappear so click on it again and grab the nail for the cart.
Click on the pot to get the chisel shown in the blue insert.
Screenshot
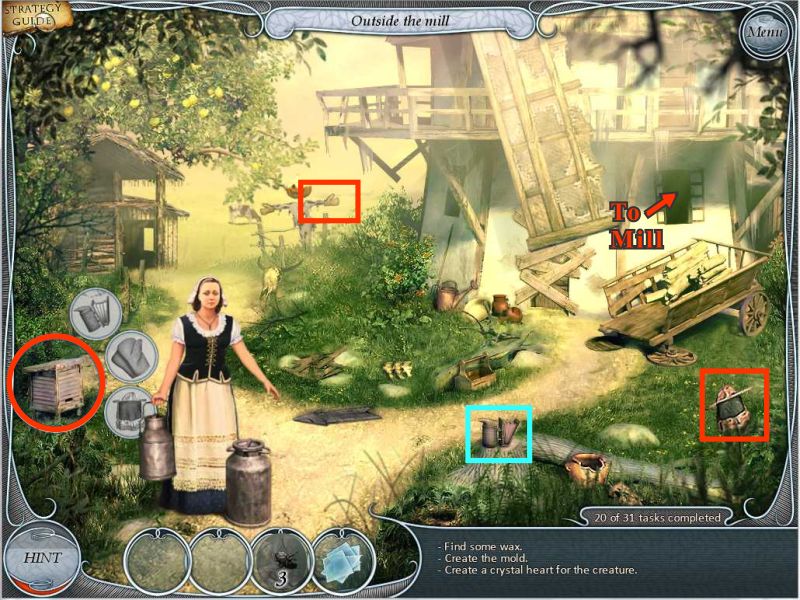
The woman won't go into the barn so Nelly goes for tools to dig up the arrow sign to use for the cart.
When you need to combine items they only count as one object to pick up after they are combined because it isn't automatic.
The pig needs to be painted before you can collect an orange pig.
Click the hat to get "hat wearing skull".
Use the candle on the lantern to get "lit lantern".
Put the weights on the other part of the scale to get equilibrium.
Screenshot
You now have a shovel and saw to get the pole for the cart.
First use the shovel to dig up the sign and then saw the arrow off and put the pole in the cart key object to complete it.
You have everything you need for the cart so give it a shove over to the window and climb into the Mill.
Once inside the Mill Nelly finds that the tracks she was told about end at a mirror which seems to be a portal so she decides to activate it but something is missing that looks like an apple so she goes back outside to get a real apple to use in its place.
Take the stick you created from the arrow sign which is now attached to the front of the cart and hit the apple tree with it.
An apple falls to the ground so pick it up and go back through the window into the Mill.
Screenshot
Mini Game to Activate the Portal
Place the apple where marked on the mirror.
Click on the mirror to bring up a mini game and put the jigsaw puzzle together.
The solution is shown to the right of the puzzle.
Click on the mirror and go through the portal.
Screenshot
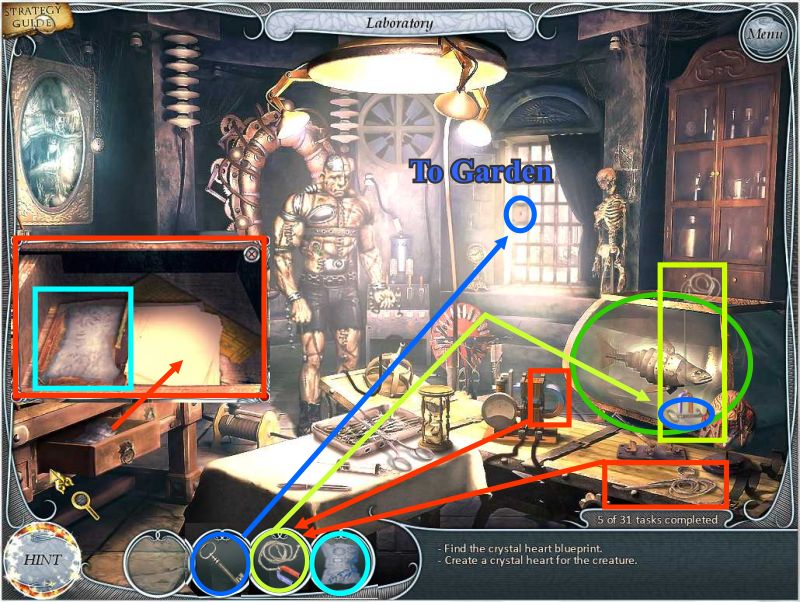
Through the portal is a Laboratory with a creature who had a crystal heart that was stolen.
Click on the first drawer at the left to collect part of the blueprint to help Nelly make him a new one.
Pick up the rope and magnet which will combine in your Inventory.
Use the magnet retrieve the key from the fish tank and will go into your Inventory.
Use the key on the door and push it open to exit to the secret garden.
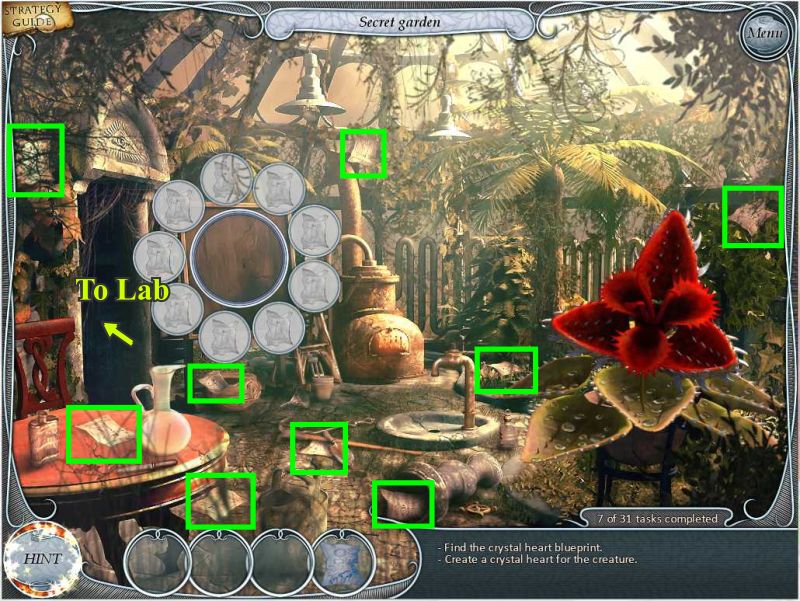
Screenshot
Click on the easel and collect all the pieces of paper to bring up a mini game.
Screenshot
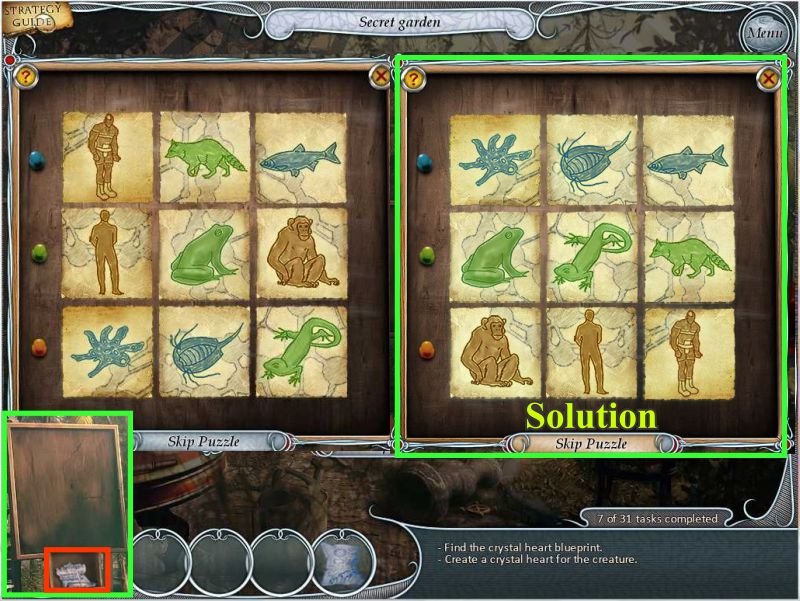
Evolution Mini Game
Your task is to arrange each species according to its correct evolution order.
Swap a picture with the one next to it until you get the solution shown on the right.
When you have completed the game it will flash on the picture of the creature.
You will then be in the secret garden and a drawer drops down under the easel as shown in the insert.
Take the piece of the blueprint that appears and go back into the laboratory through the door on the left.
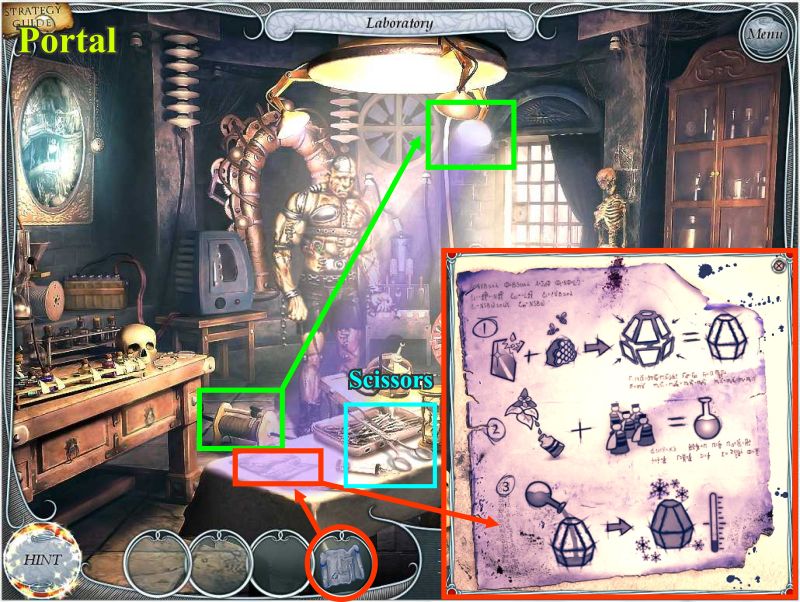
Screenshot
Place the blueprint on the table.
Click on the rheostat which changes the light to UV.
Click on the blueprint to get a closer look.
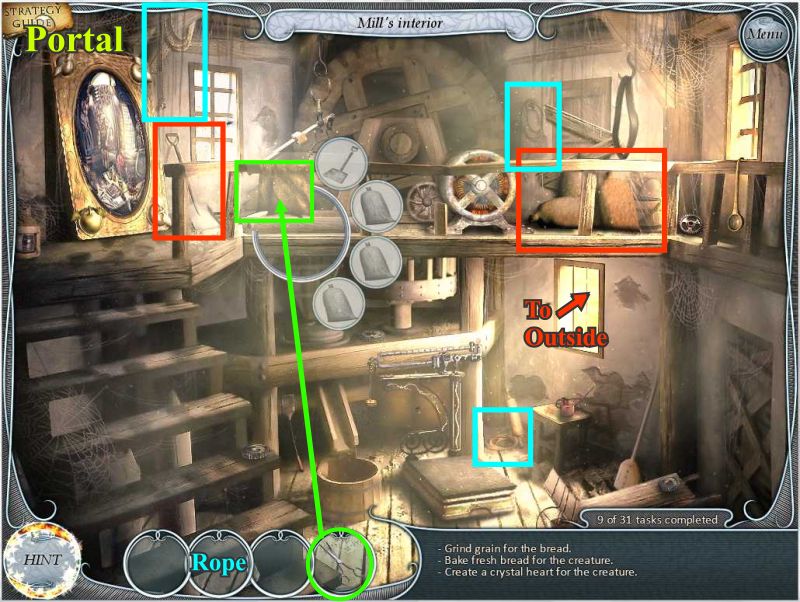
The creature needs bread to stay alive so go back through the portal into the mill.
Screenshot
Pick up the 3 sacks of grain in the right red rectangle and collect the shovel for the key object.
You will get some cloth to repair the windmill blades but you need something to cut it up so go back through the portal to the lab.
Grab the huge pair of scissors off the table and go back through the portal to the mill.
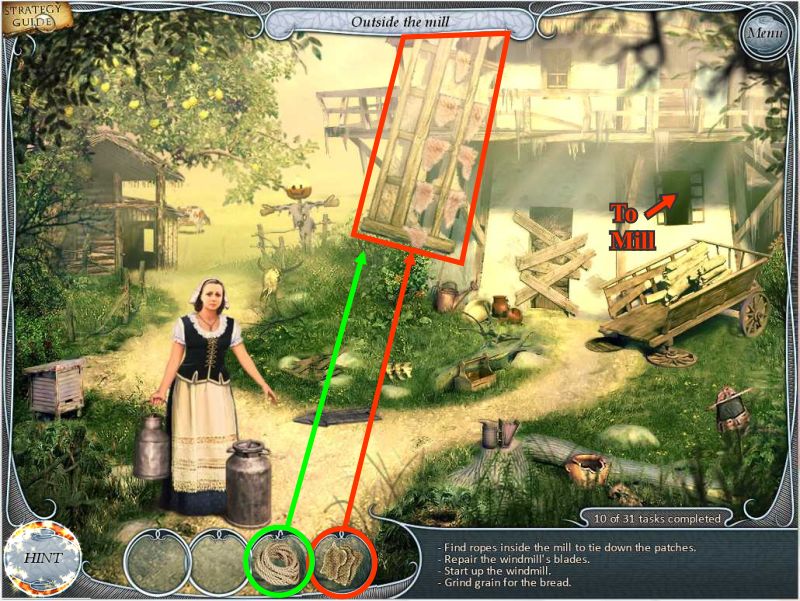
Use the scissors to make patches for the windmill and go outside.
Screenshot
Place the patches on the windmill blade and you realize you have to tie them down so go back inside the mill.
Collect the 3 pieces of rope and go outside.
Place the rope on the blade and go back into the mill.
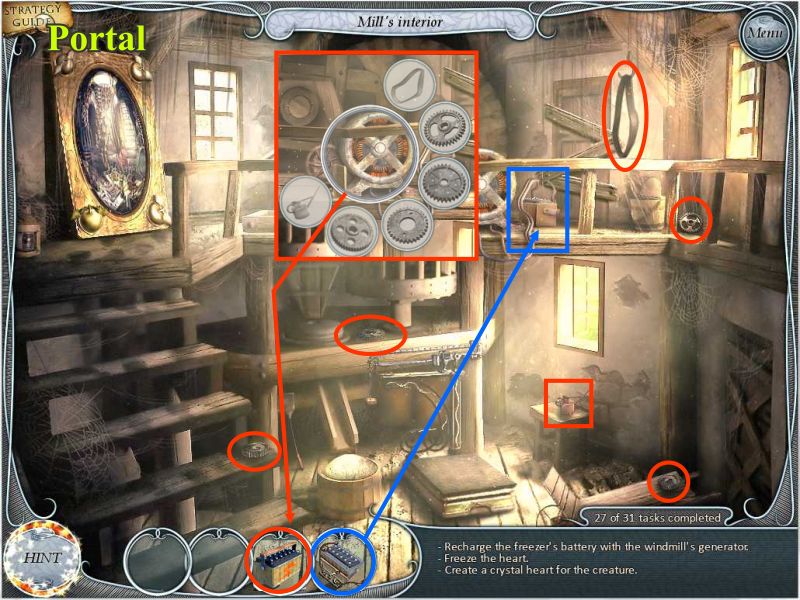
Screenshot
The grain you placed in the grinder earlier comes down the chute all ground so click on the container to bring up a key object.
Collect all the items including the one in the green insert and go back outside to ask for some milk.
The woman is afraid to go into the barn because of the Yeti so you need to go to the barn to find a pitcher for the milk.
Screenshot
The items you need to collect will be the same as those shown but will appear randomly — all of the items to find are shown on the task bar but will be added as you find some of the previous items.
To get the halved apple you will need to pick up the knife and use it on the whole apple — follow the light blue sequence.
The trumpeting bird is found inside the trumpet on the top shelf in the middle — follow the yellow sequence.
The forgotten photo marked in orange is behind the kettle.
The milk can is sort of hidden behind the knife.
The bottles are marked in red and the clay pots in pink.
Click on the duck and she will produce the duck egg marked in cyan.
Once you have found everything you will automatically be transported back outside.
Screenshot
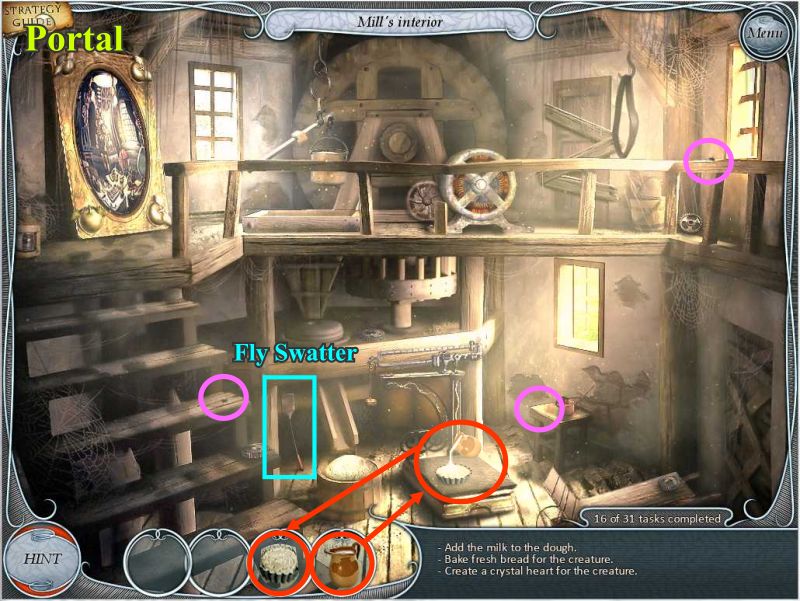
Give the pitcher to the woman and she will give you a full pitcher back — go back into the mill.
Pour the pitcher of milk on the grain and you will get a pan of dough.
Pick up the fly swatter and kill at least one fly.
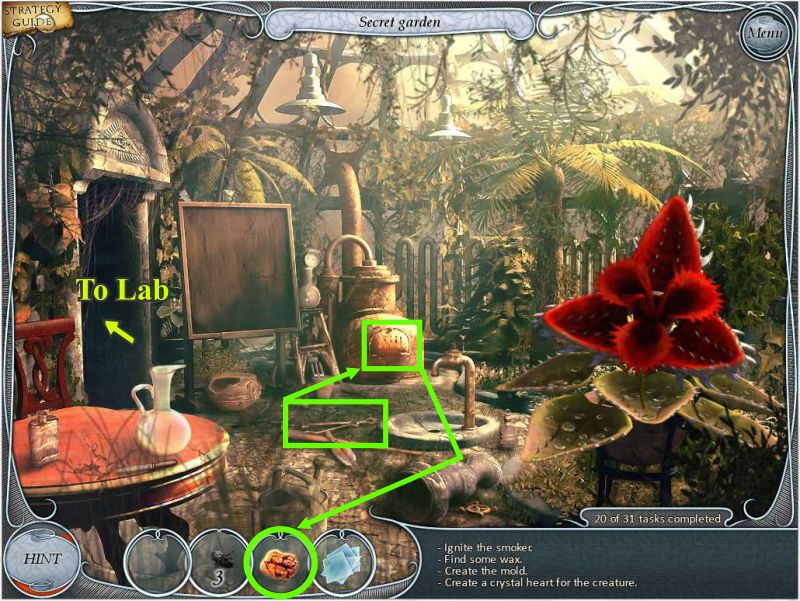
Go though the portal into the lab and then through the gate door into the garden.
Screenshot
Put the dough into the oven and it will return you a cooked loaf of bread — go back into the lab.
Screenshot
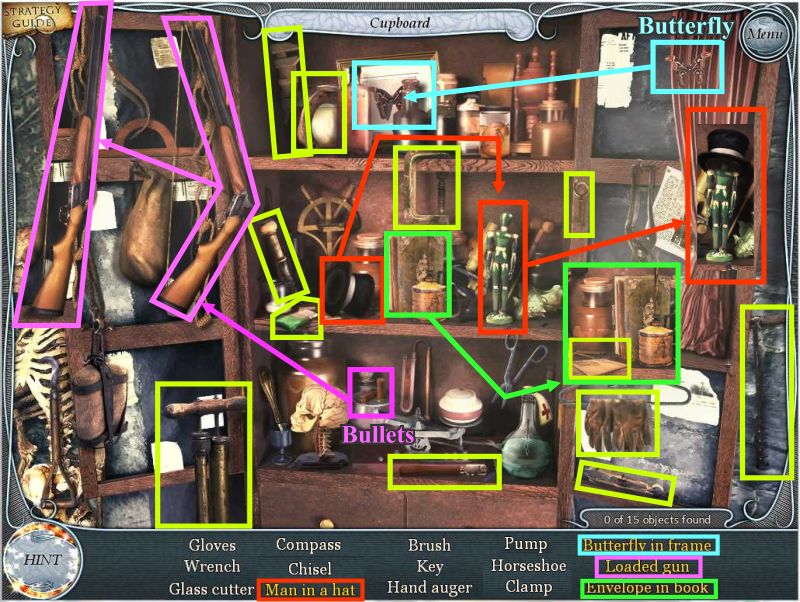
Give the loaf of bread to the creature and click on the cupboard in search of a glass cutter to start creating the crystal for his heart.
The open cupboard gives you a close up of items to find including the glass cutter.
To load the gun place the bullets in the gun and then collect the gun shown in the insert to the left of it.
The light blue sequence is the butterfly in the frame — pick up the butterfly and place him in the empty frame and then collect the whole thing.
The red sequence tells you to place the top hat on the man statue and then check out the insert and collect what you see.
Click on the book in the yellow sequence and it will produce the envelope for you to pick up.
You are now back in the lab and have the glass cutter which you need to use on the cupboard to get some glass for the heart but then you need to find something sticky to hold the glass together so go back through the portal and to the outside of the mill.
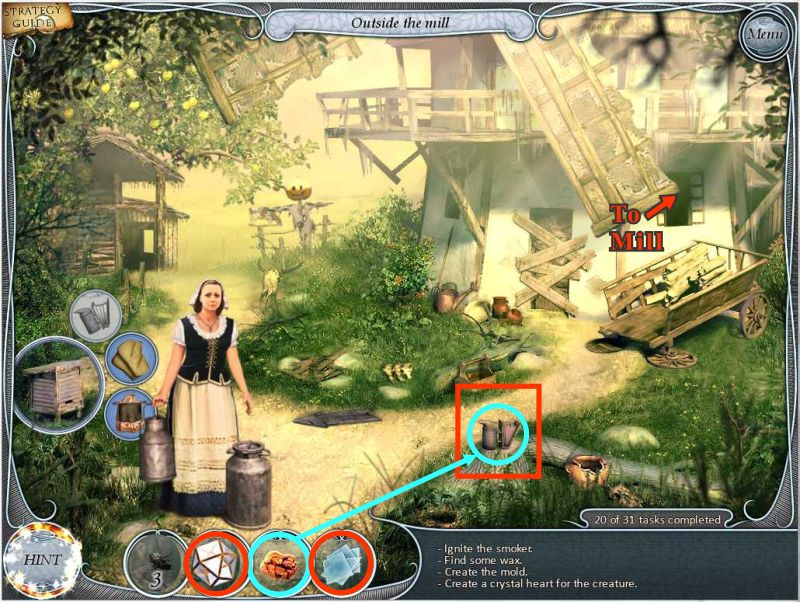
Screenshot
Click on the beehive and then the smoker to realize you need coal for it before you can use it so go into the mill, through the portal to the lab and then into the garden.
Screenshot
Pick up the tongs and get some hot coals from the oven — go back into the lab, through the portal to the mill and then to the outside of the mill.
Screenshot
Place the coals in the smoker and then put it into the beehive.
The wax from the hive will combine with the glass and make a crystal but the blueprints call for plant dew so go into the mill and through the portal to the lab.
Screenshot
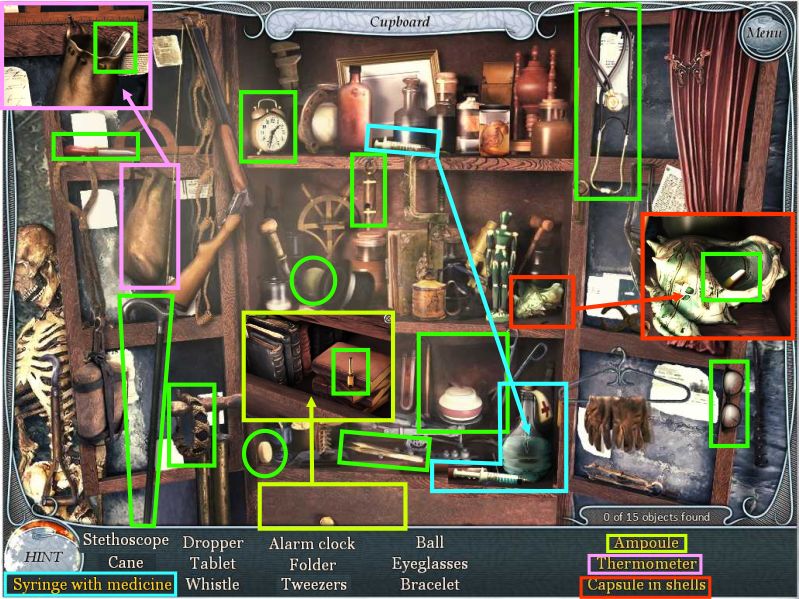
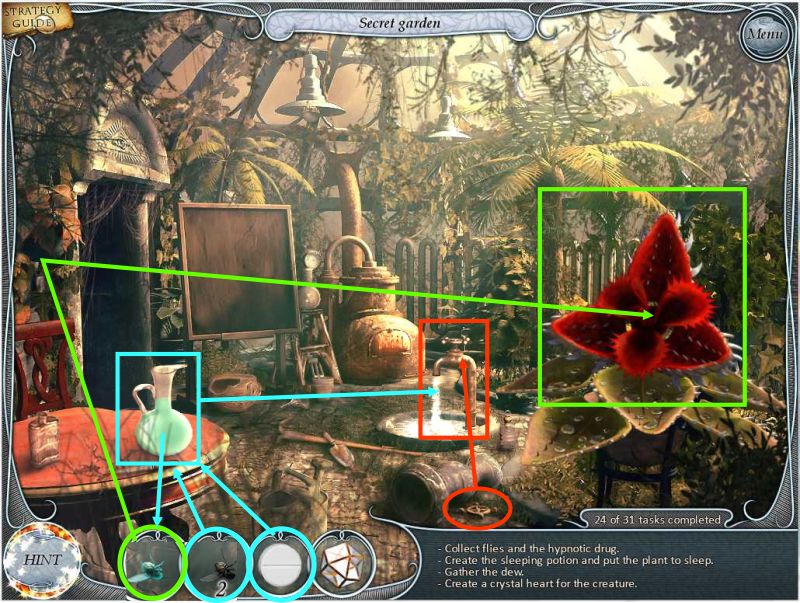
Speak to the creature about the carnivorous plant and needing dew from it. He tells you to create a potion to make it sleep so click on the cupboard to the right to get a closer look.
Collect all the items as they appear on the list.
Follow the blue sequence to put the syringe in the medicine and then pick up the full syringe which will be next to the medicine flask.
Open the drawer below to find the ampoule.
Click on the bag and pick up the thermometer as shown in the insert.
Click on the shell to get the capsule inside.
Screenshot
Once you have collected everything the drug will go into your Inventory.
The water spigot is missing the valve so pick it up from the red circle and place it where it belongs.
Click to turn on the water and place the pitcher from the table under the water and it will return to the table full.
Place the drug tablet in the pitcher and add a fly so you now have a drugged fly to feed to the plant.
Screenshot
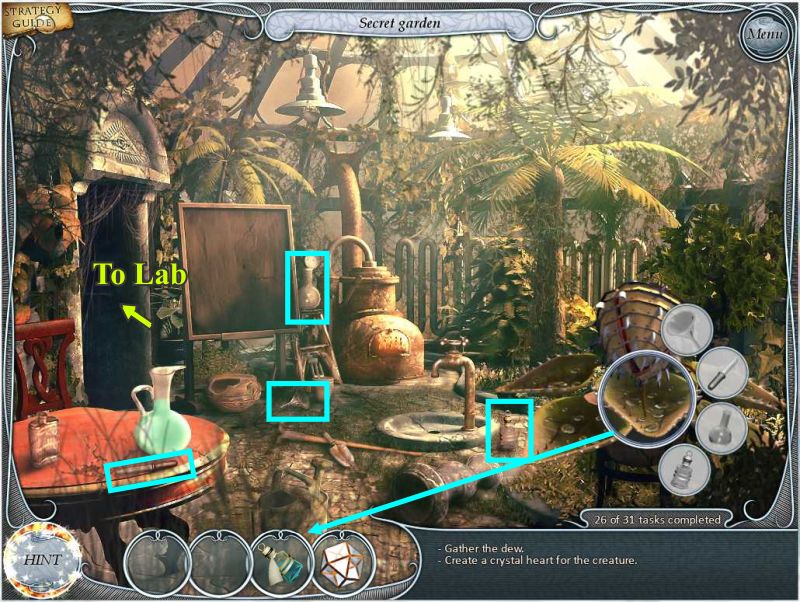
When the plant falls asleep click on it to bring up the key object.
Place all the items in the key object and you will get the dew vial so go back into the lab to finish processing it.
Screenshot
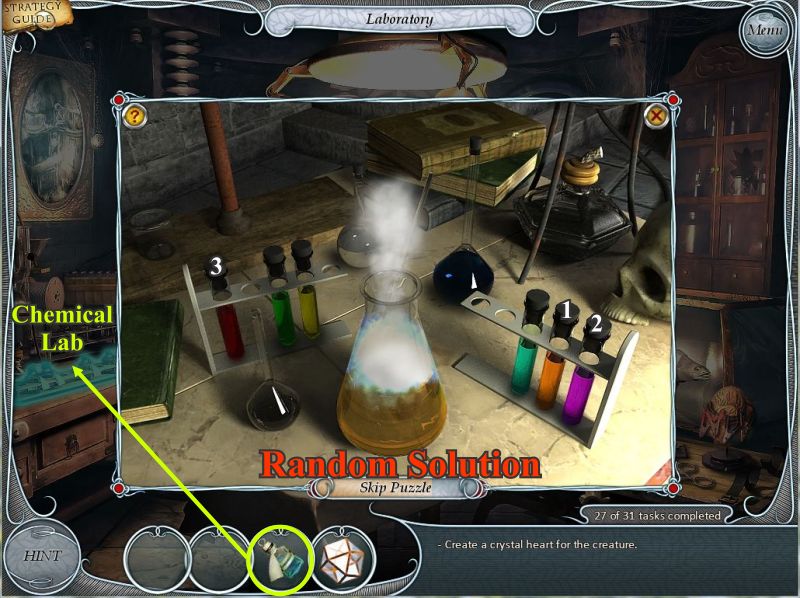
Chemical Lab Mini Game
Place the vial on the Chemical Lab on the table to the left to bring up a mini game.
Your job is to add the ingredients from the test tubes in the correct order so the solution doesn't blacken and you don't have to start over.
The solution is random but one possibility is shown in the screen shot.
Screenshot
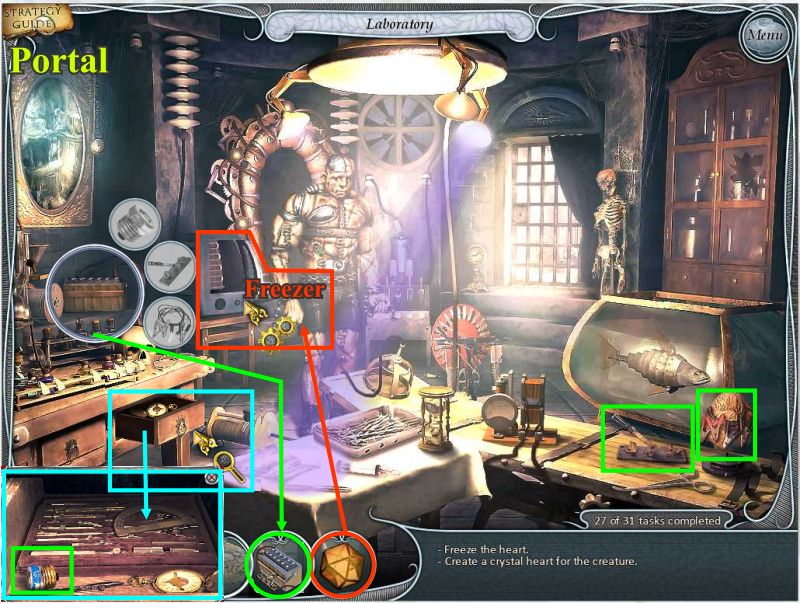
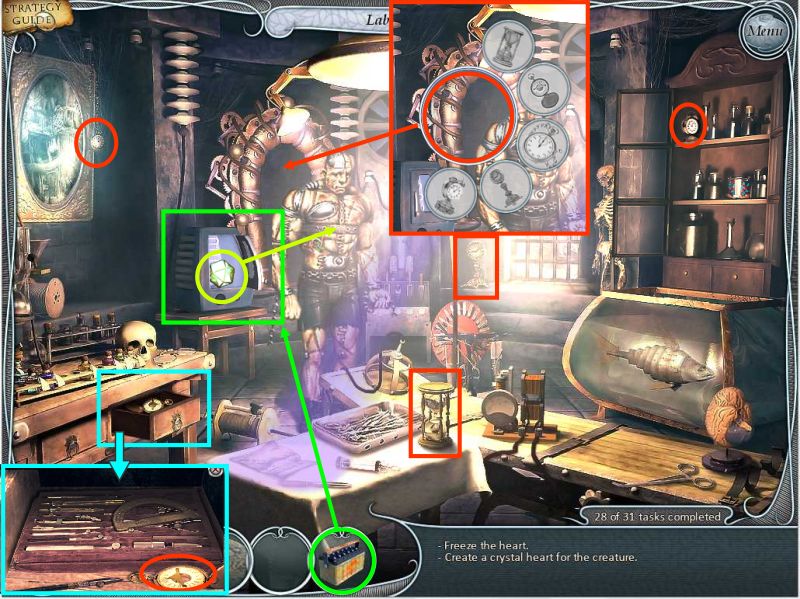
The crystal is now partially complete so put it in the freezer next to the creature.
The freezer's battery needs charging so click on it for a key object.
Collect the items needed including the one in the desk drawer.
Take the battery you receive to the mill to charge it so go through the portal.
Screenshot
Hook up the battery by placing it on the generator.
Click on the generator for a key object which is moved over so you can see the battery.
When you have collected all the items to charge the battery it will go into your Inventory so go back through the portal to the lab.
Screenshot
Place the charged battery on the freezer and it will give you the finished crystal.
Give the crystal to the creature who tell you he wants to go back to his own time so Nelly thinks she knows how to reset the portal.
Click on the area just to the left of the creature to get the key object which I moved over so you can see everything all at one time.
Pick up the items for the key object including the one in the drawer of the table and the creature will be transported back through the hole.
Screenshot
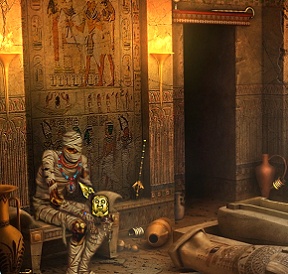
Chapter 3: Egypt
Nelly arrives in Egypt and is wondering about Tom because she hasn't heard from him in a while.
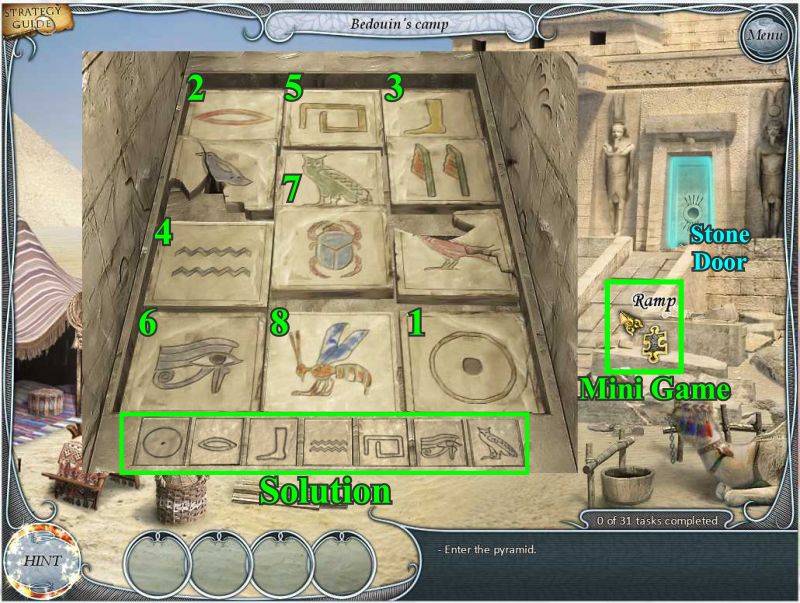
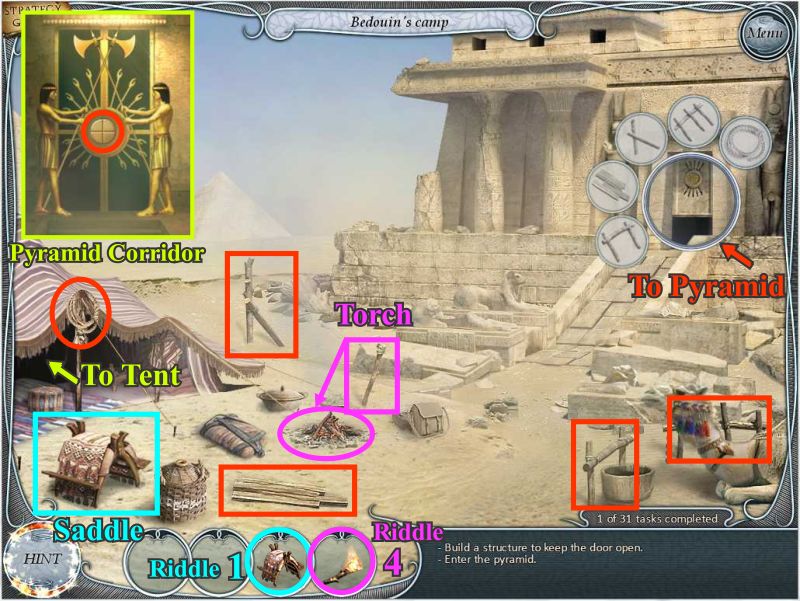
Your are at the Bedouin's Camp and your first task is to get into the pyramid through the stone door.
Nelly doesn't like the looks of the ramp so click on it to bring up a mini game.
Your task is to press the tiles in the correct sequence so that they will show up on the bottom row.
There are 8 tiles to press but only 7 in the solution and if you miss one in the sequence, you have to start over.
The solution tiles appear after you press the next tile in the order and are shown in the screen shot.
Screenshot
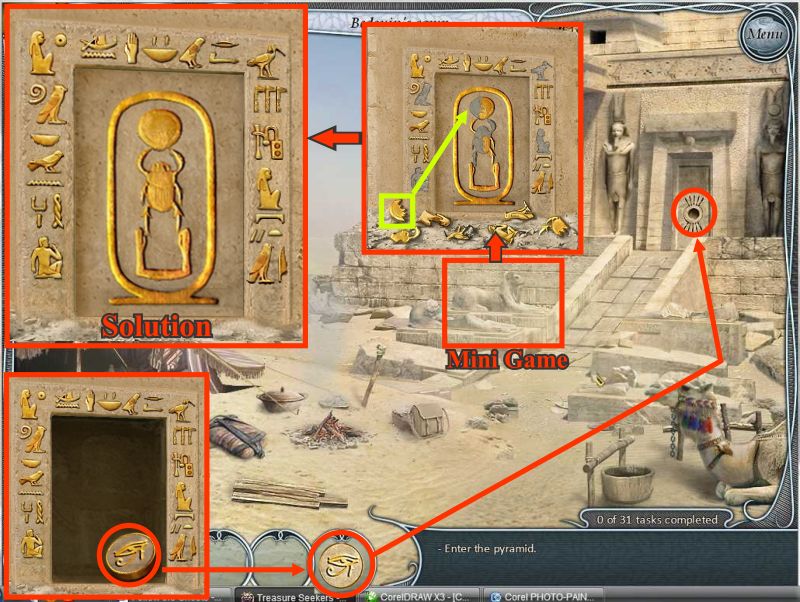
Click on the statue to the left of the ramp and a puzzle will appear.
Place the pieces of the puzzle where they belong as shown in the insert to the right.
When you have completed the puzzle it will open so pick up the symbol for your Inventory and place it in the stone door.
Screenshot
The door mechanism is broken so you need to construct something to hold it open.
Click on the door and collect all the items in the key object including the one behind the camel.
Click on the finished door to enter the pyramid.
Click on the door to talk to the guards who provide you with a riddle to get for them.
Notice that there are 4 sections on the lock on the door so you will be sent outside for 4 different riddle solutions to bring back to the guards.
When you go back to the guards to get the next riddle click on the door after presenting your object.
The objects for the first and fourth riddles are at the campsite.
The first riddle is "It rides on another's back but carries a load on its own" and the answer is "saddle" so pick it up and take it back to the guards.
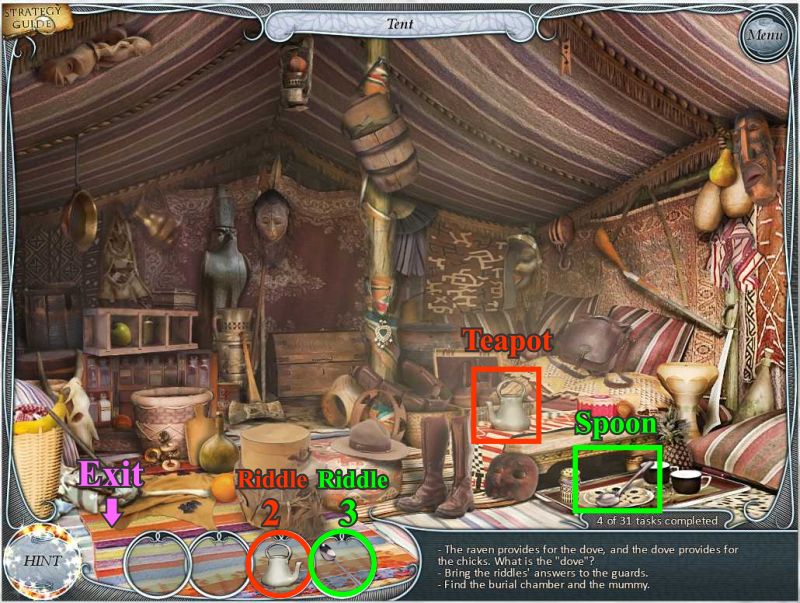
For the 2nd and 3rd riddles you will need to go into the tent.
The fourth riddle is "Feed it and it will live; water it and it will die" and the answer is torch so pick it up and light it with the fire.
Screenshot
The second riddle is "The raven provides for the dove and the dove provides for the chicks. What is the "dove?" and the answer is teapot so take to the guards and come back to the tent.
The third riddle is "What can feed everyone by himself?" and the answer is spoon.
When you come back outside, remember the fourth item is in the campsite.
Screenshot
Each time you give one of the objects to the guards a piece of the lock will disappear until the door will finally open and you can enter the burial chamber.
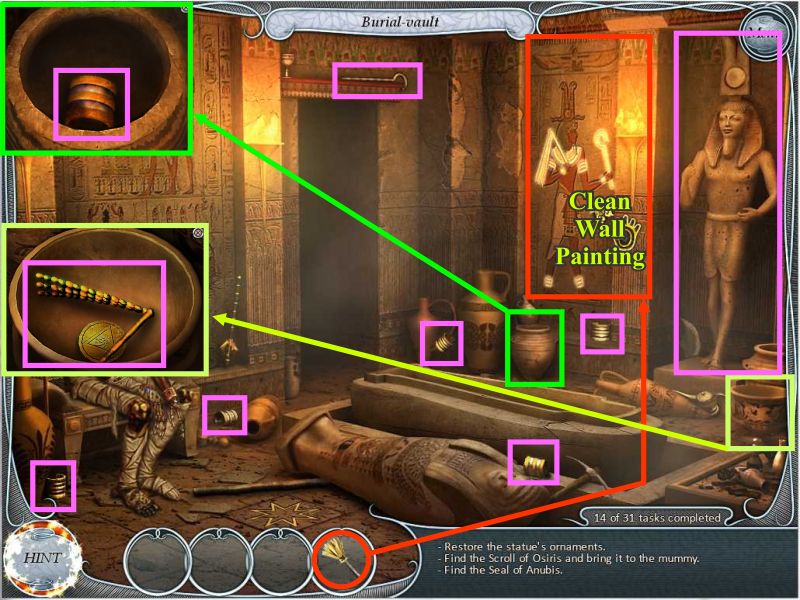
You encounter a mummy in the burial vault who tells you that thieves stole the Seal of Anubis and the Scroll of Osiris so you need to find the objects and bring them to the mummy.
Screenshot
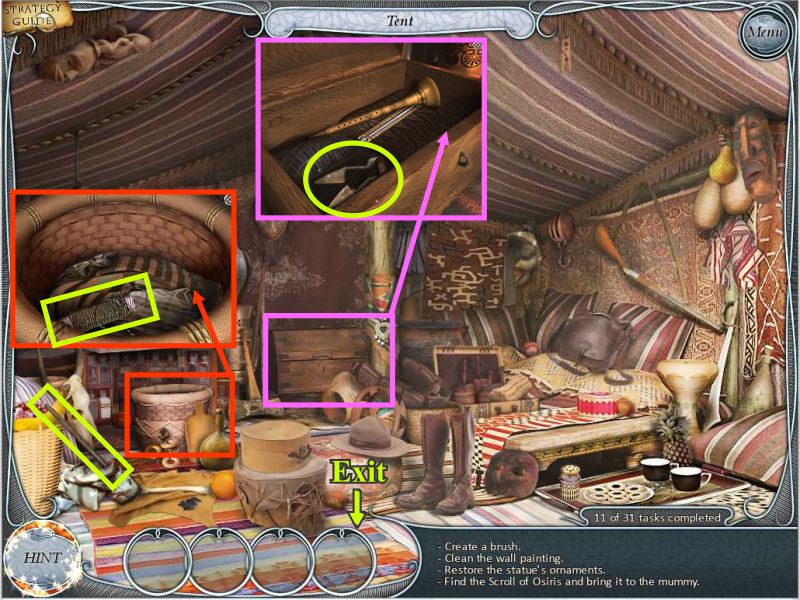
The wall painting is a clue to restoring the statue but it is too dirty to see so you need to go to the tent to see if you can find something to clean it so go back to the corridor and exit to the campsite so you can get to the tent.
Screenshot
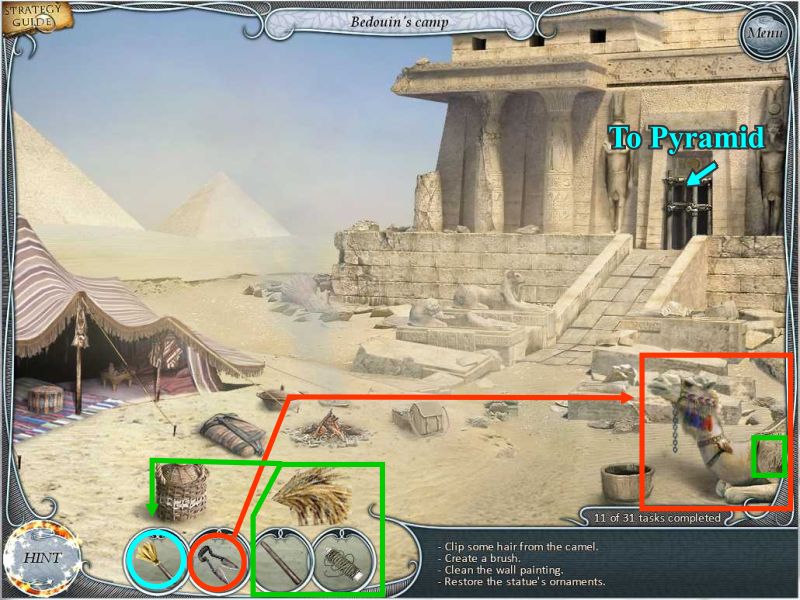
You need to make a brush so pick up the cane plus the thread and clippers in the two inserts and go back to the campsite.
Use the clippers to snip a little camel's hair for your brush which will combine with the cane so go back to the pyramid and keep going until you get into the vault.
Screenshot
Use your camel's hair duster to clean the wall picture which will show highlighted areas of what you need to find to restore the statue.
Check the two insert sequences for items and then click on the far left wall.
Screenshot
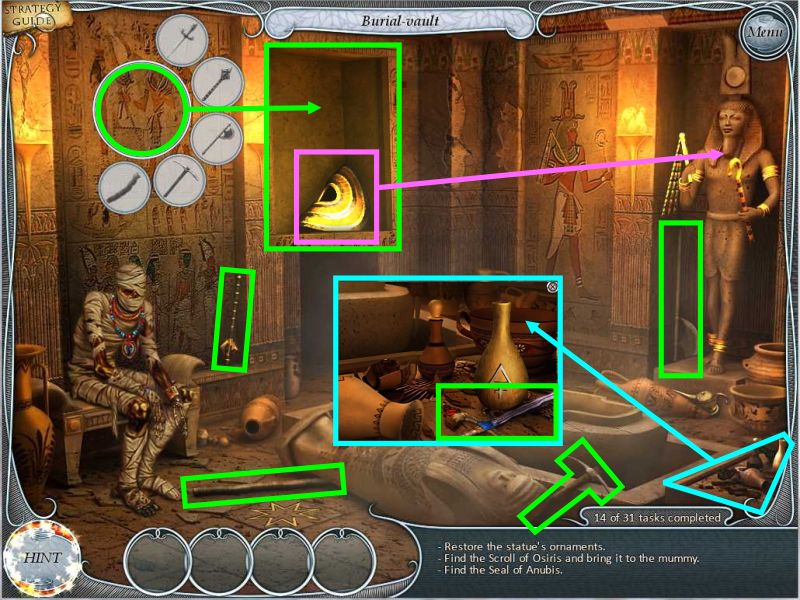
The far left wall brings up a key object with items to find
Once you have collected all of the items it will open revealing the neck piece.
Place the neck piece on the statue and the wall will close but the statue will now have a scroll in her hand.
Screenshot
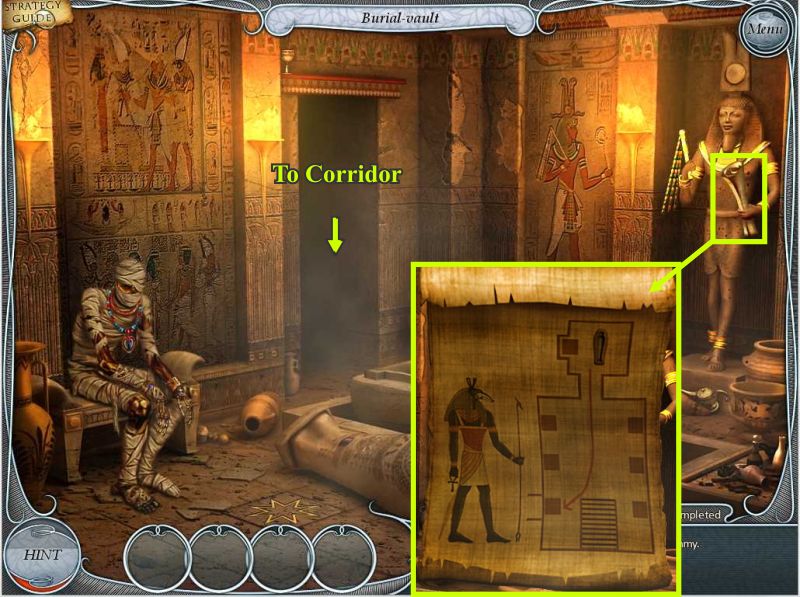
Click on the scroll for a closer look which reveals directions to the treasury to get the items for the mummy so exit to the corridor.
Screenshot
Click on the statue of Anubis to bring up a key object — collect the 4 items.
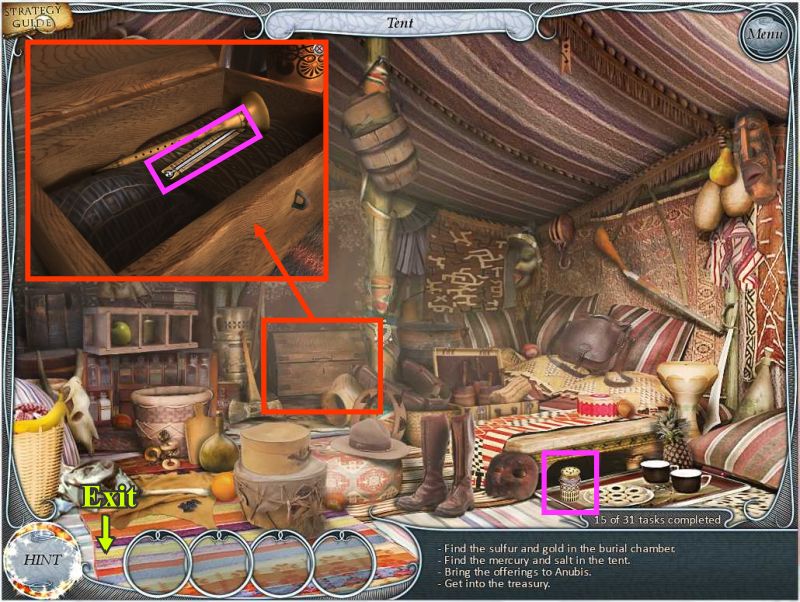
You don't have the necessary items for the offering to Anubis so you need to collect 2 of the items, mercury and salt, from the tent so exit to the campsite and go to the tent.
Screenshot
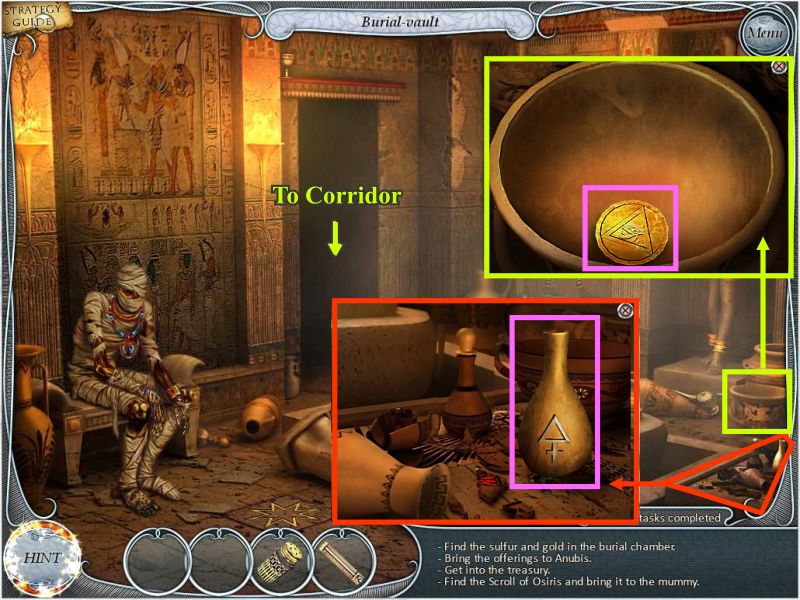
There is a thermometer in the chest in the back so collect it for the mercury and pick up the salt shaker on the right before exiting and going to the burial vault.
Screenshot
The next 2 items are sulfur and gold so click on the jar and pick up the gold coin.
The sulfur is shown in the red insert.
Screenshot
Take the sulfur and go to the corridor.
Anubis Mini Game
Click on the statue of Anubis to bring up the insert — place all the offerings you have collected in there proper placed as color coded above.
Anubis will move revealing the entrance to the treasury.
You enter the treasury and are greeted by a snake shown in the insert.
Screenshot
Nelly remembers seeing a flute in the tent so exit to the corridor, go to the campsite and enter the tent.
Collect the 5 masks marked in blue and the 3 keys marked in lime.
Combine the feather with the inkwell to get "inkwell with pen".
The globe needs to be put back together so place the half on the bed with the half at the far left and collect it.
The bracelet is in the small box at the back and shown in the green insert.
The flute that you need is in the chest and is shown in the pink insert.
Pick up all the other items and you will end up in the campsite so go into the pyramid and back into the treasury room on the left.
Screenshot
Place the flute on the snake and it will coil up and go to sleep.
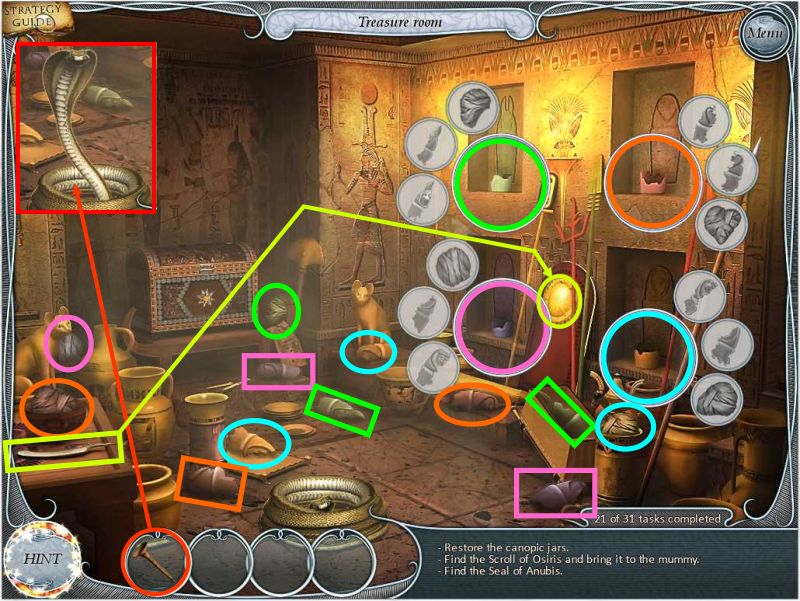
Somebody broke all of the canopic jars so the mummy can't go to the otherworld unless you can restore them.
Click on the 4 niches to bring up 4 key objects — collect the color coded pieces of the jars and place them in the key objects.
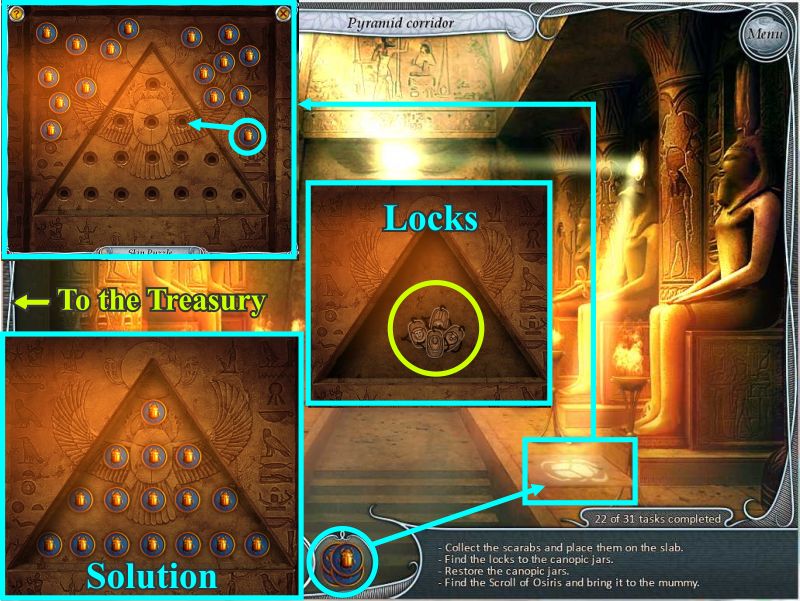
Now that the jars are restored they need locks — there are some hieroglyphics that say they will be shown by the sun disk.
Take the knife off the table to the left and scrape the sun off where shown and exit to the corridor.
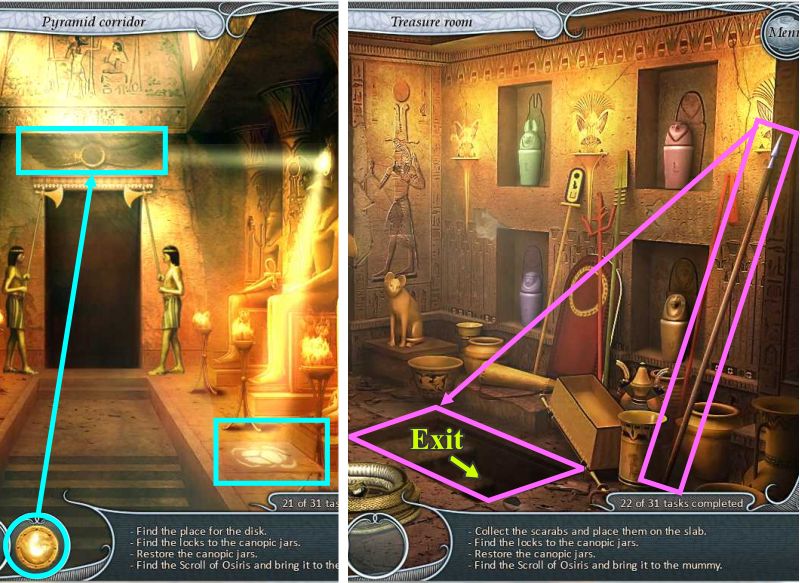
Screenshot
Place the sun where shown and it will reflect to the marking on the floor so to back to the treasury.
Pick up the spear at the right and use it on the loose area of the floor.
The tile lifts up to reveal a secret vault so go down the steps.
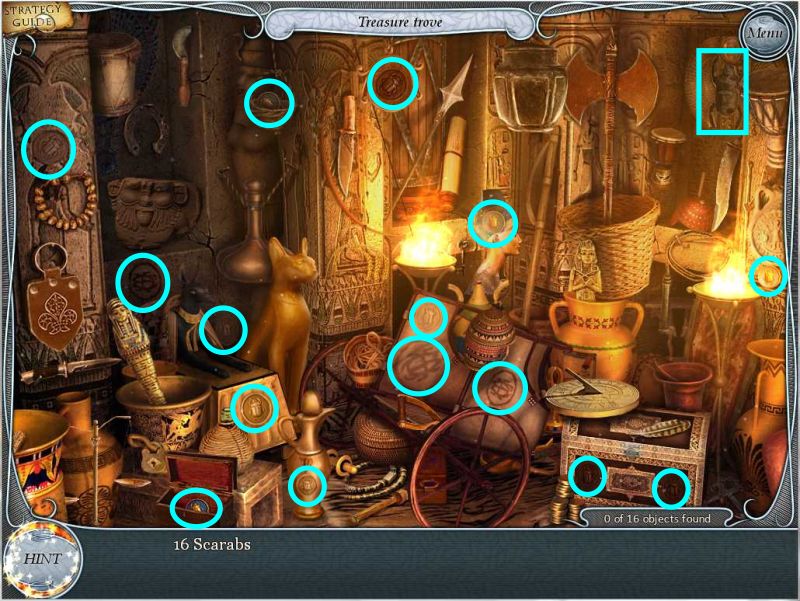
Screenshot
Collect the 16 scarabs and you will be transported back to the treasury so exit to the corridor.
Screenshot
Scarab Mini Game
Place the scarabs on the area on the floor to get the mini game shown in the top left insert.
The solution is shown in the lower left insert but the process is random so I can't show you how to arrive at it.
Pick up a scarab and place it somewhere in the triangle and some of the holes will close.
Place another scarab in one of the open holes and some holes will open and some will close.
Keep placing them in open holes until you eventually get the triangle filled.
It may be necessary to take one out of a hole and place it somewhere else in order to reach your goal.
When it is completely filled the triangle will open and reveal the locks for the jars.
Take the locks for your Inventory and go back to the treasury.
Screenshot
The locks match the heads on their jar and are color coded to show where they belong.
Click on the trunk on the back wall to find out it is locked so exit to the corridor and go to the burial vault.
Screenshot
Click on the loose tile in the floor to open it as shown in the insert.
Take the key and exit to the corridor and enter the treasury.
Place the key on the chest which will open as shown in the insert.
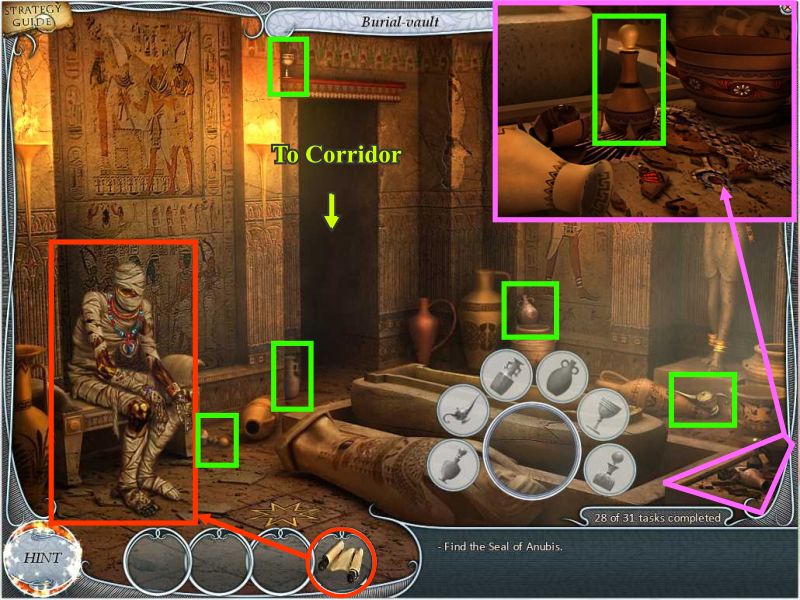
Take the scroll and exit to the corridor and back to the vault.
Screenshot
Give the scroll to the mummy and click on the sarcophagus for a key object to find all the burial items.
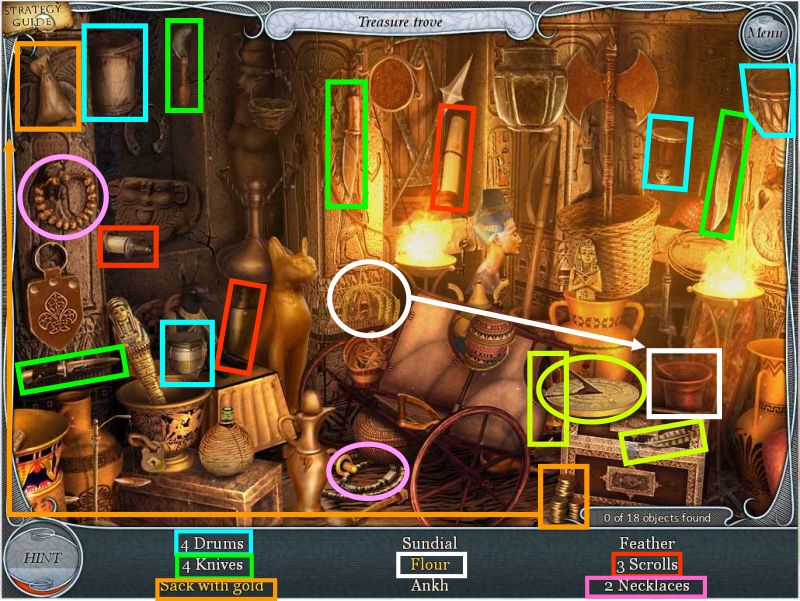
You still need the seal of Anubis so go back through the corridor to the treasury and then downstairs to the trove.
Screenshot
Collect 4 drums marked in blue; 4 knives marked in green; 3 scrolls marked in red; 2 necklaces marked in pink.
Collect the yellow marked feather and sundial — the ankh is partially hidden behind the sundial.
Follow the orange sequence and place the gold in the bag and collect it.
The white sequence will get you flour — place the wheat in the mortar and pestle and then take the flour.
The doors to the treasury and burial vault will close as you are transported back to the corridor.
Screenshot
The ankh is what you need to seal the tomb so place it on the lock on the burial vault door and exit to the campsite and see what happens to the pyramid door after you leave as shown in the insert.
Screenshot
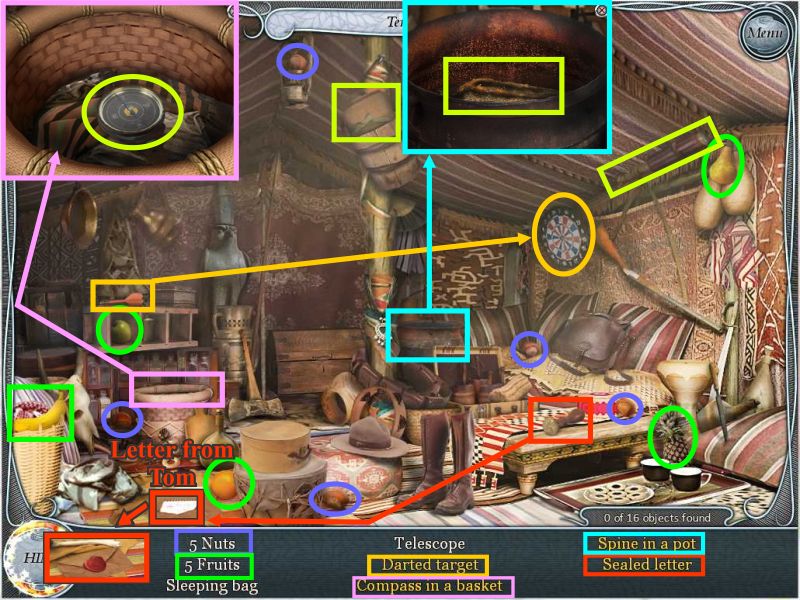
Go into the tent to collect some things before you leave Egypt.
Collect 5 nuts and 5 fruits.
Click on the basket to get the compass shown in the pink insert.
Pick up the dart and place it on the dart board and take the board.
Click on the turquoise pot which will open an insert for you to get the spine.
Collect the sleeping bag and telescope.
Pick up the red seal and place it on the letter which will create a sealed envelope and exit the tent.
The sealed envelope turns out to be a letter from Tom who has just arrived in France.
Screenshot
Chapter 4: France
Tom arrives in France and is called to the cemetery.
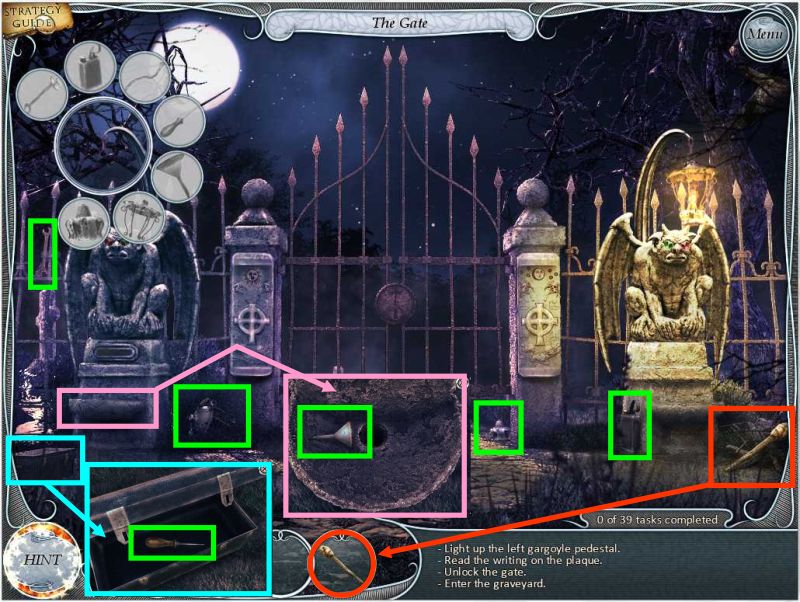
Click on the cemetery gate on the right side of the screen for a close up.
The gargoyle on the left doesn't have a lamp so you need to light it to read the inscription underneath.
Click on the torch marked in red and it will go into your Inventory.
Click on the left gargoyle to bring up a key object and find all the items for it.
Some of the items are not in plain sight so check out the connections.
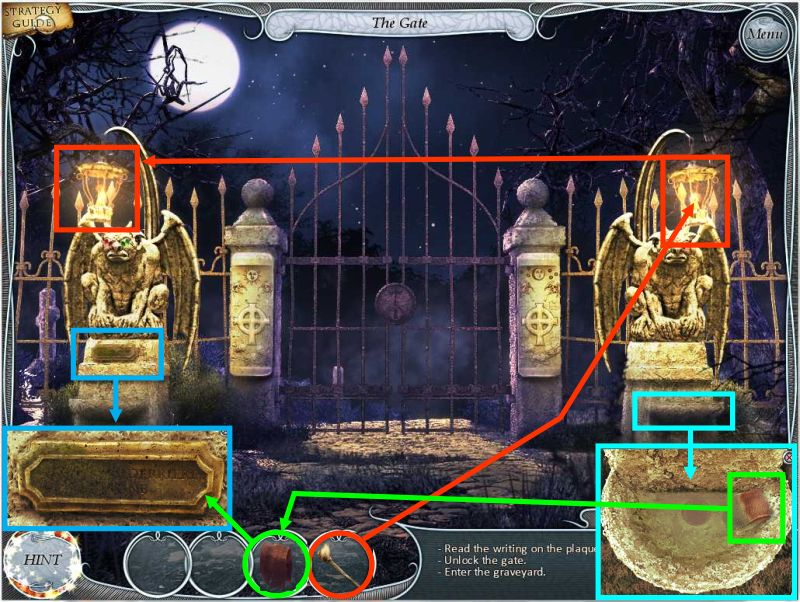
Once you have the lamp light the torch on the right lamp and then take it from your Inventory to light the left lamp.
Screenshot
Click on the plaque on the left gargoyle to find out it is too dirty to read.
Click on the bowl under the right gargoyle and pick up the wet rag to use on the left plaque.
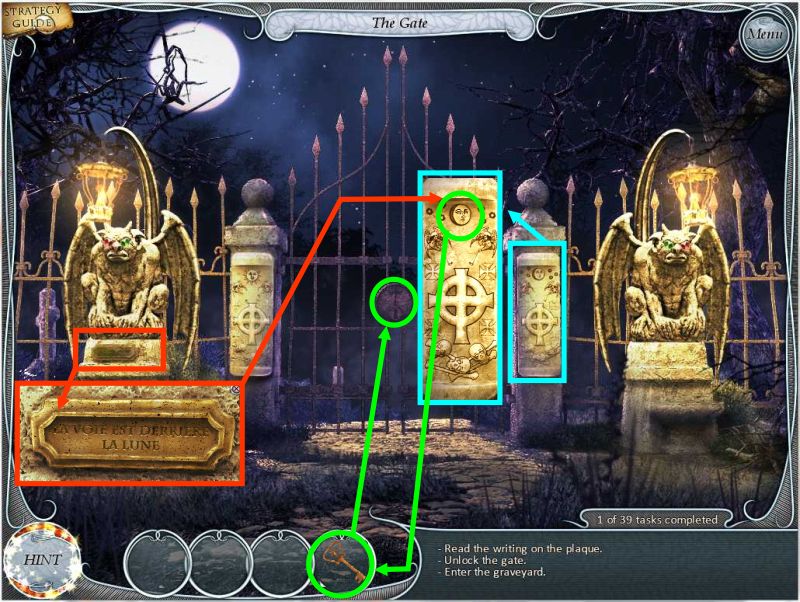
The cleaned plaque says in French that "the way is behind the moon".
Screenshot
Click on the right post to get a closer look.
Click on the top symbol which is a moon and it opens.
Take the key for your Inventory and use the key on the gate to go into the graveyard.
Screenshot
Tom encounters one of the living dead who tells Tom he came out of his coffin to defend the crypt from looters and now a tree has fallen in from of the door so he can't return.
Click on the tree and collect the key object items.
Click on the bucket and find the rocks for the key object.
The branch only breaks off and the tree doesn't move so you need to go through the gate and find the Sexton's house in the square in hopes of getting a saw.
Screenshot
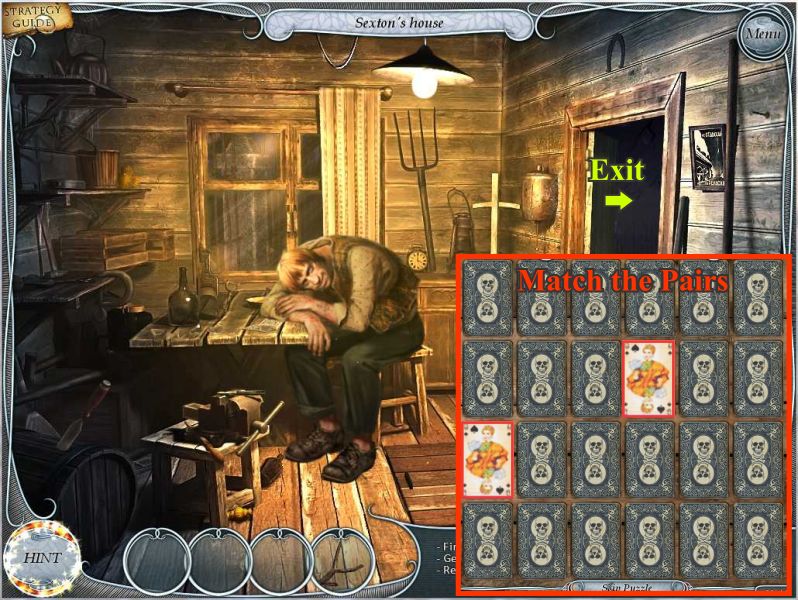
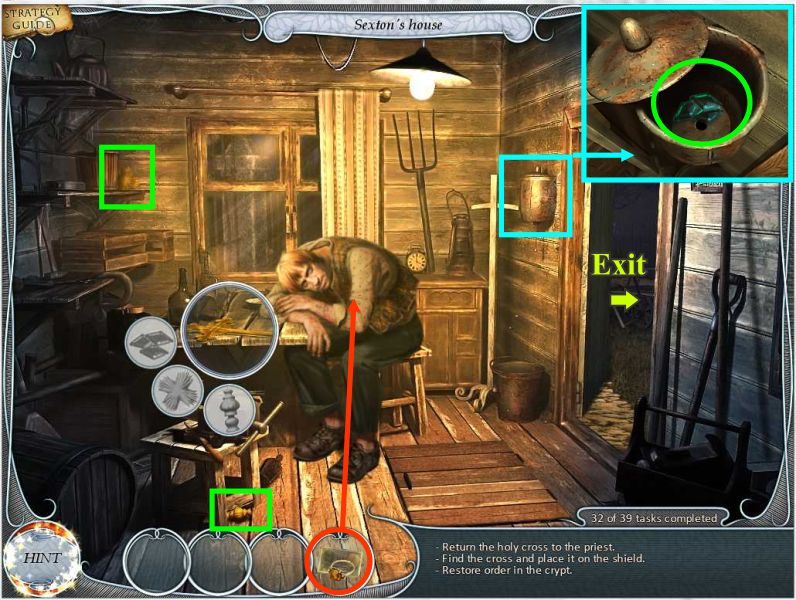
When you enter the sexton's house he is asleep at the table.
Reach for the saw in the upper left corner of the screen and a bottle falls on the table waking the sexton.
Tom tells him he needs to borrow the saw and asks what he knows about a mysterious robber. The sexton says he saw him in the newspaper so find 7 pieces of newspaper lying around.
Place the completed newspaper pile on the table to bring up a mini game.
Mini Game To Discover The Robber
Click on the scissors to get the image and then click on the face parts to make it look like the solution who Tom says looks like his old nemesis Totenkraft.
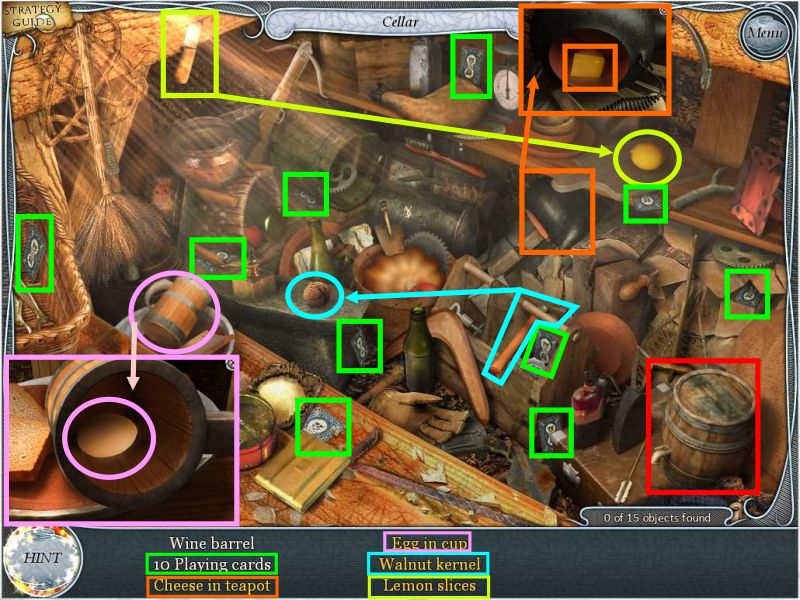
The sexton says he will think about the saw if Tom gets some hors oeuvres and wine from the cellar so go to the cellar.
Screenshot
Collect 10 playing cards and the wine barrel.
Click on the pink mug and collect the egg shown in the insert.
Click on the orange pot and collect the cheese shown in the insert.
Pick up the knife and use it on the lemon to make lemon slices.
Use the hammer on the walnut and collect the pieces.
Screenshot
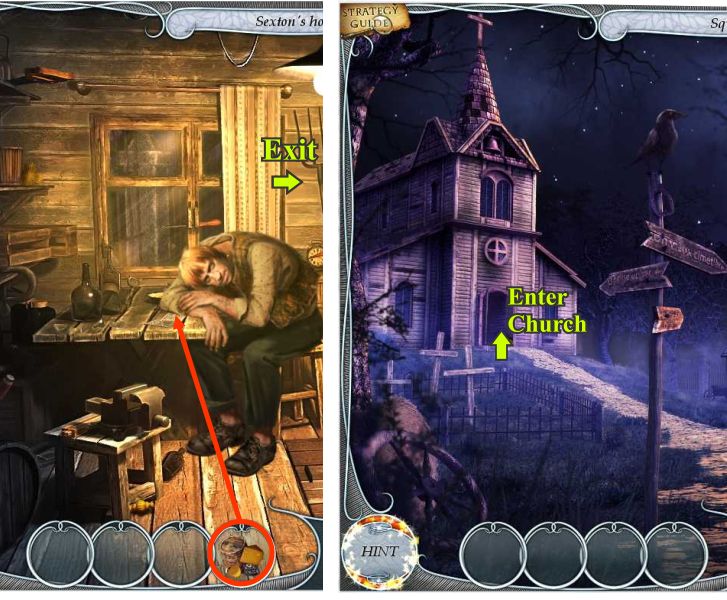
Give the food and wine to the sexton who says the barrel is empty so no wine then no saw.
Exit his house and go to the church in search of a bottle of wine.
Enter the church and look for the priest.
Screenshot
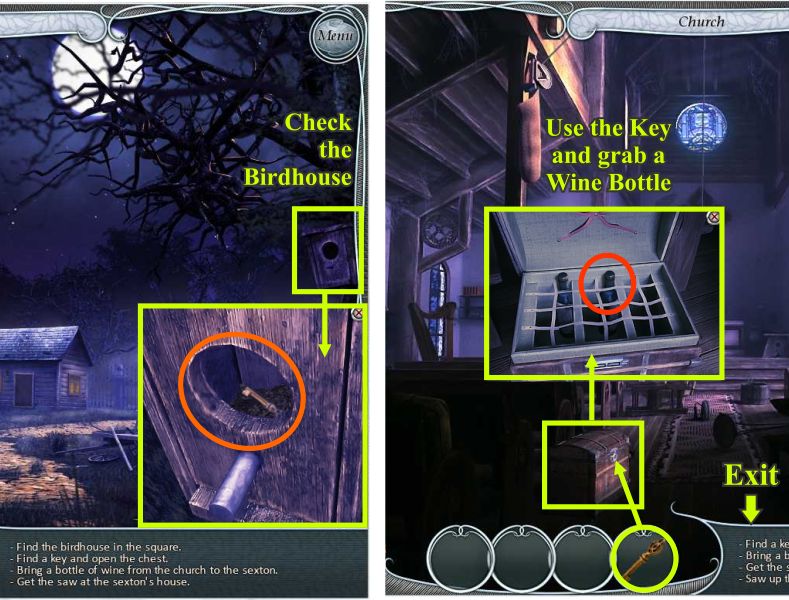
Check out the chest marked in yellow to find out it is locked.
Click on the confessional and ask the priest for the key.
He tells you a bird stole it and to go find him so exit to the square.
Screenshot
Click on the birdhouse to the far right and get the key shown in the insert and go back into the church.
Open the chest with the key, take a bottle of wine and exit to the square and go to the sextant's house.
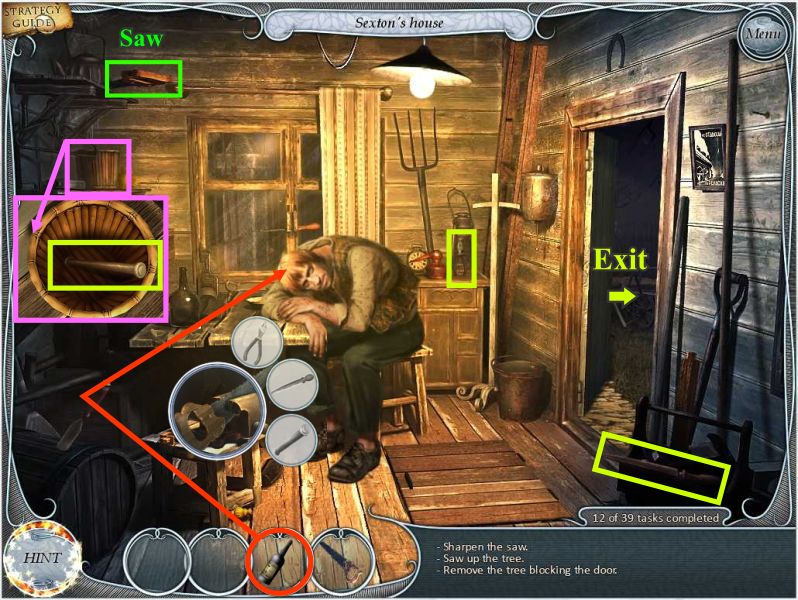
Screenshot
Give the sextant the bottle of wine and take the saw which is too dull to cut anything.
Put the saw on the vise and gather the key object tools to sharpen the saw.
One of the tools is in the pink basket.
Once the saw is sharpened it will go back into your Inventory so exit to the square, go to the cemetery gate and back into the graveyard.
Screenshot
Use the saw on the tree and once the tree is clear of the door you are asked to open it but the hinges are too rusty.
Exit to the cemetery and go to the sextant's house to look for an oil can.
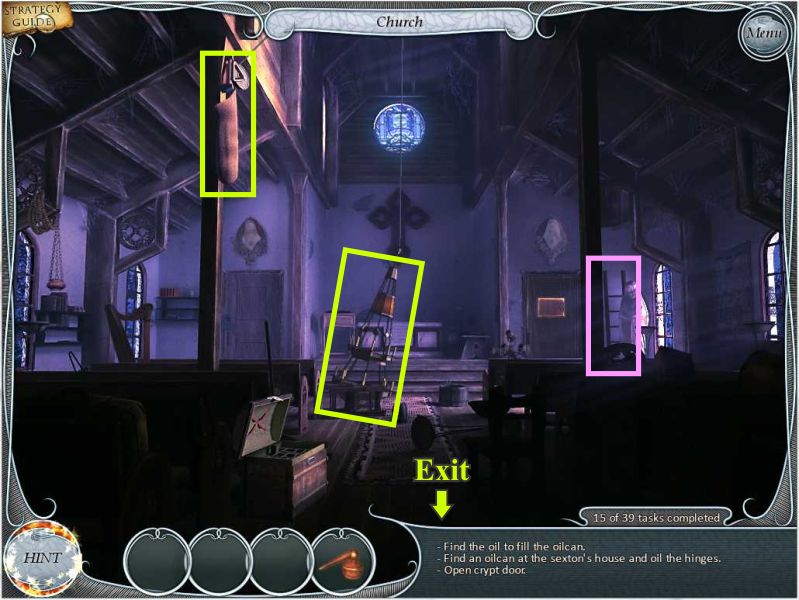
Screenshot
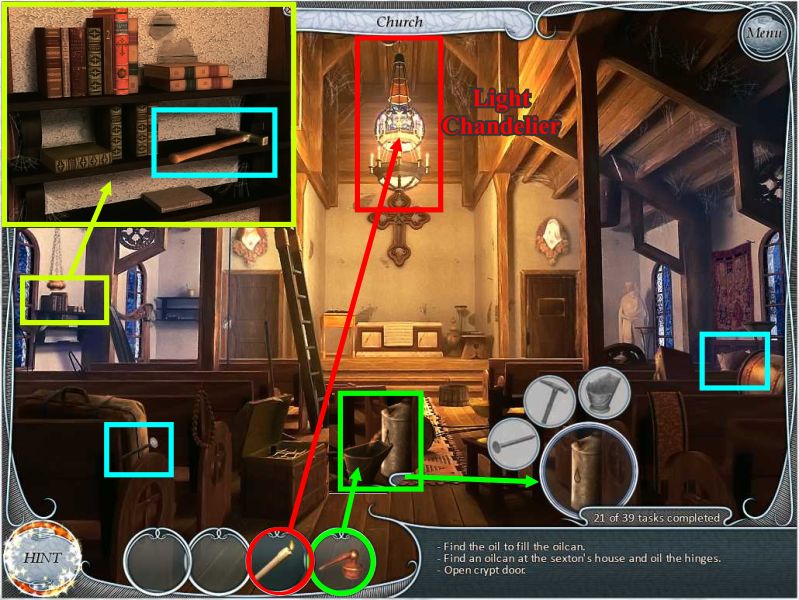
The oil is empty so exit to the square and go to the church to see if you can find some oil.
You can't see anything in the church so decide to try to light the chandelier but you can't reach the weight to raise it.
There is a small ladder so take it and exit to the square to go back to the sexton's house.
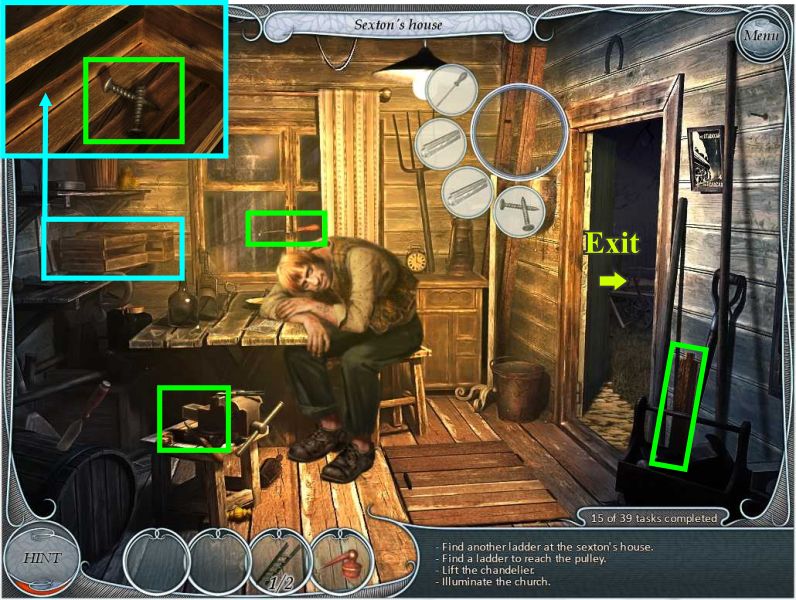
Screenshot
You need to find another ladder so click on the space with the key object and collect the items including the one in the box on the left and go back to the church.
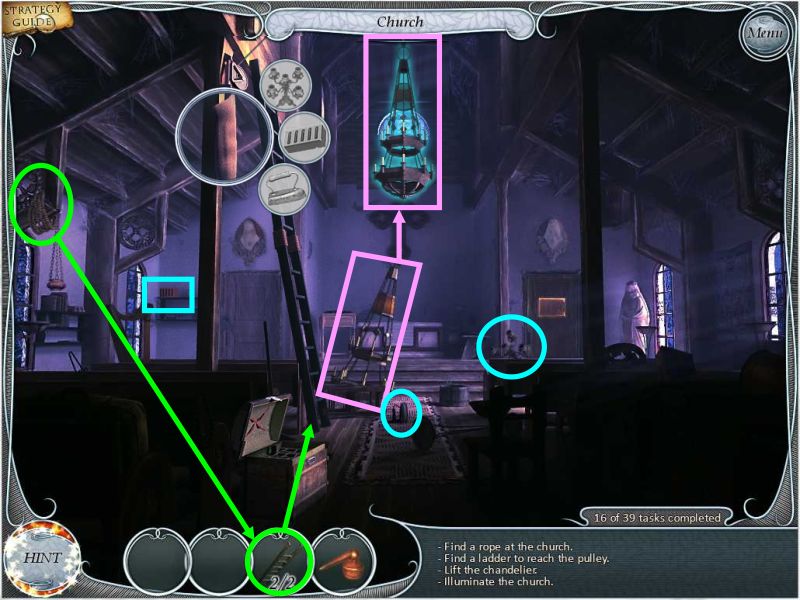
Screenshot
Click on the rope at the left and it will combine with your two ladder pieces.
Place the ladder so that you can click on the bag and bring up a key object to find items to weight it down.
Once it is heavy it will raise the chandelier but Tom forgot to light it first so click on it and you will get a candle for your Inventory.
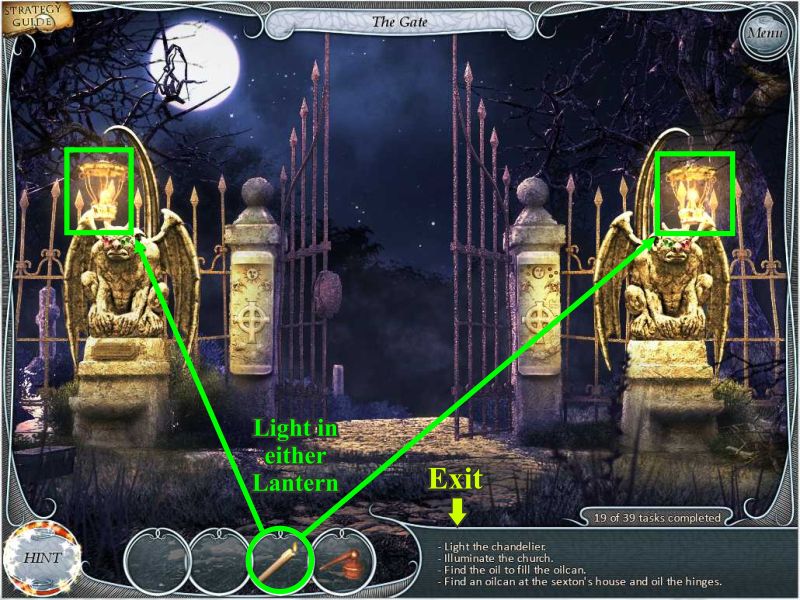
Exit the church and go to the cemetery gate.
Screenshot
Place the candle on either lamp and it will return lit into your Inventory.
Exit back to the square and into the church.
Screenshot
Use your lit candle to light the chandelier.
You can see the oil can on the right so click on it to get a key object and collect the items including the hammer on the bookshelf.
The hammer and nail will make a hole in the can for the oil to pour out into the container as shown in the insert so place the oil can there to fill it.
The filled can will go back into your Inventory — exit to the square, go to the gate and enter the graveyard.
Screenshot
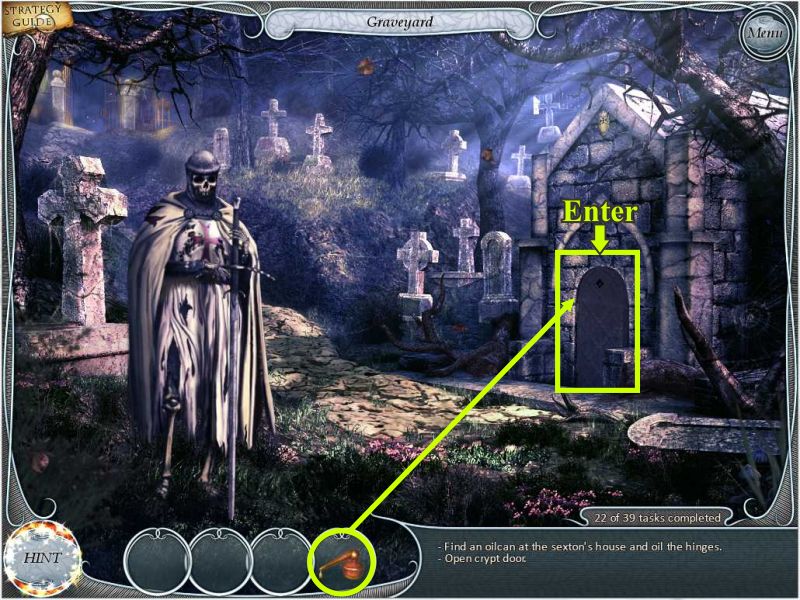
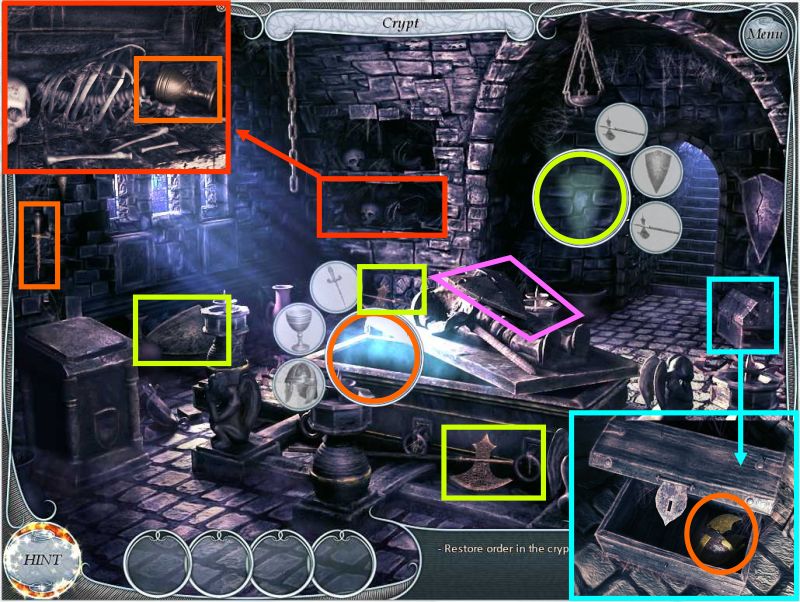
Oil the hinges of the crypt and open the door and go inside.
Screenshot
The place is a mess so the occupant asks Tom to help tidy up.
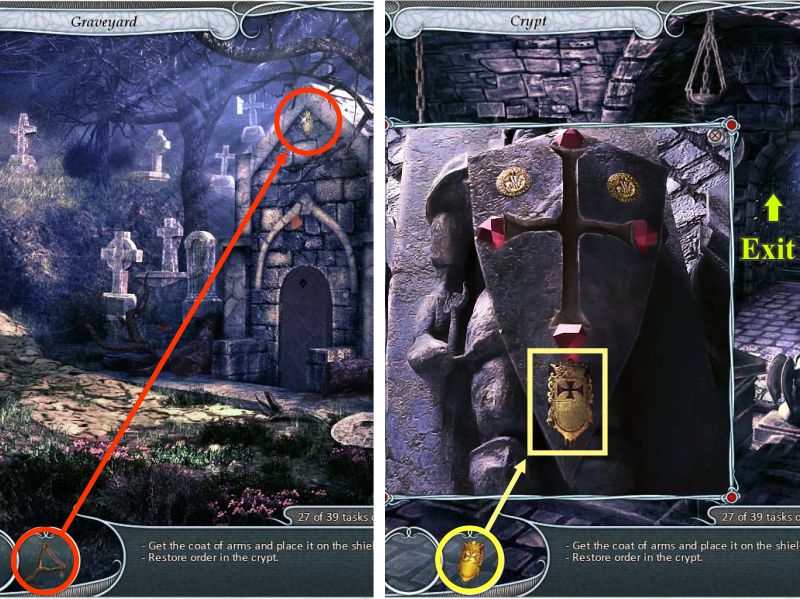
Click on the coffin first and find the key items including the one item in the blue chest and the other on the shelf at the back.
You then get access to the green key object on the shield so collect those items.
Screenshot
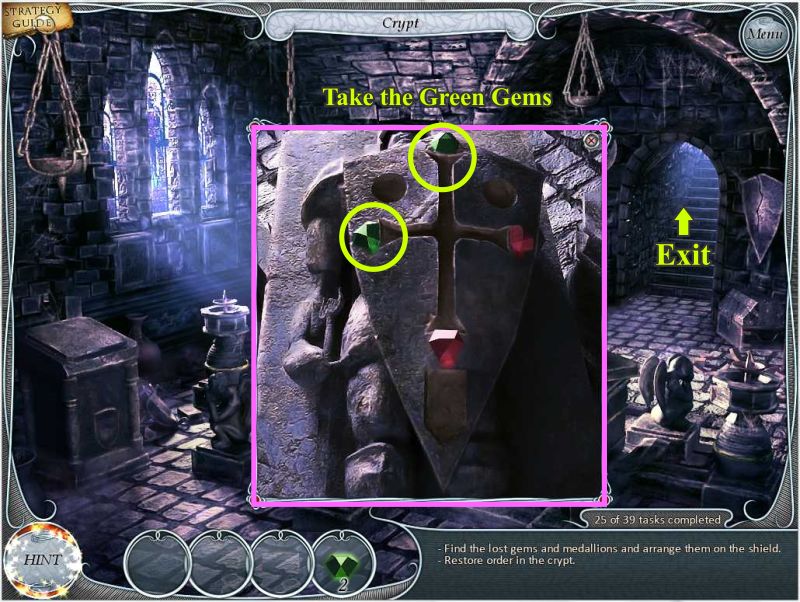
Click on the coffin to view the shield.
Tom remembers seeing gems like the ones on the shield so collect the 2 green gems for your Inventory and exit the crypt to the gate.
Screenshot
The gargoyles each have one green and one red gem for eyes as shown in the inserts.
Remove both red gems and replace them with the green gems from your Inventory.
Once they have two green eyes the gargoyles will open their mouths so take the 2 medallions and go back to the graveyard and enter the crypt.
Screenshot
Click on the coffin to get a closer look and place the 2 medallions and the 2 red gems into the shield.
Tom notices it is missing a cross and a crest so exit the crypt.
Screenshot
All of the crosses on the graves are too big but there is a crest above the door that is too high to reach so you need something to knock it down.
Exit to the cemetery gate, go to the square, enter the sexton's house and go down to his cellar.
Collect all the items on the list including the ones that need special attention.
The chess piece in the basket is the basketed castle.
The white sequence is the pressed leaf.
The red sequence puts the handle on the cauldron with a handle.
The lime sequence becomes a loaded crossbow and the 5 gears are marked in blue.
Screenshot
The tool you found turns out to be a slingshot without a rubber band so you ask the sexton if he has one and he says he will give it to you if you play a card game with him.
The card game is shown in the insert and it is a match the pairs so keep clicking and matching the cards until have them all and get the rubber band.
Take your complete slingshot and exit to the square, go to the gate and enter the graveyard.
Screenshot
Use the slingshot to get the crest and enter the crypt.
Click on the coffin to bring up the close up view and place the crest in its proper place.
Screenshot
You still need a cross so exit to the graveyard, go through the gate to the square and to the church to talk to the priest.
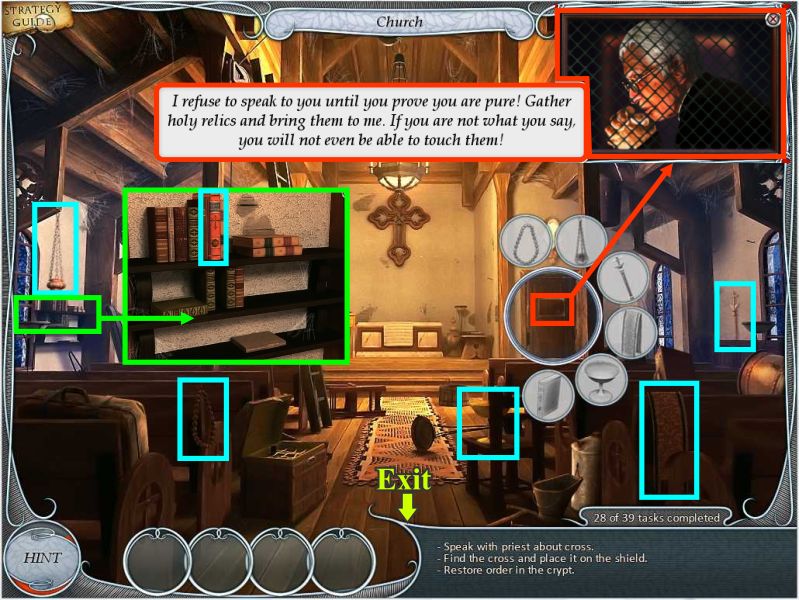
Click on the door to speak to the priest who won't talk to Tom until he can prove he is pure by collecting holy relics.
Close the insert of the priest and click on the door to bring up a key object of relics.
Collect the blue items including the book on the shelves.
The priest comes out and confesses that he took the cross to protect himself from the evil in the cemetery but someone has stolen his cross and he suspects the sexton.
If you find the cross, he will give you the cross from the crypt so exit the church and go to the sextant's house.
Screenshot
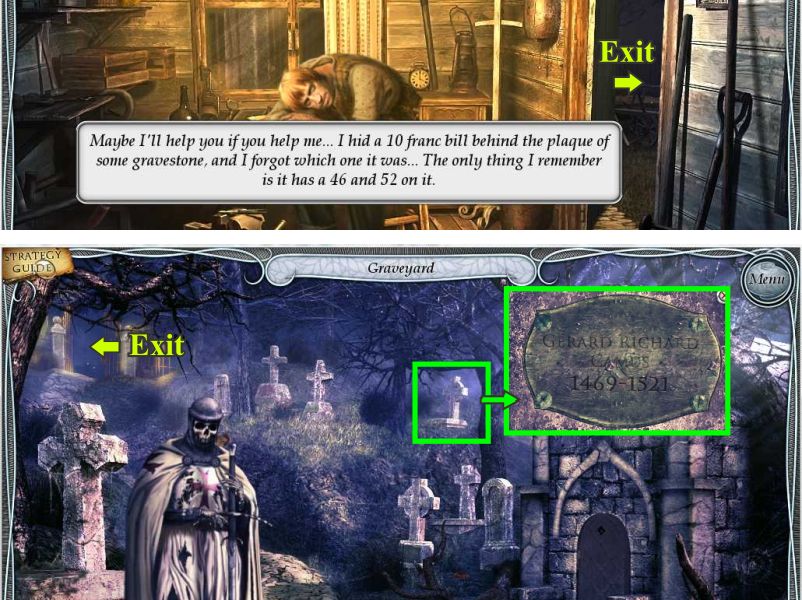
Click on the sexton who says he may help you if you get him the 10 franc bill he hid behind the plaques of a gravestone so exit to the square, go to the gate and enter the graveyard.
You need to find a plaque that says both 46 and 52 on it.
The one marked and shown in the insert seems to have both numbers with the 46 in the middle of the first date and 52 in the middle of the second.
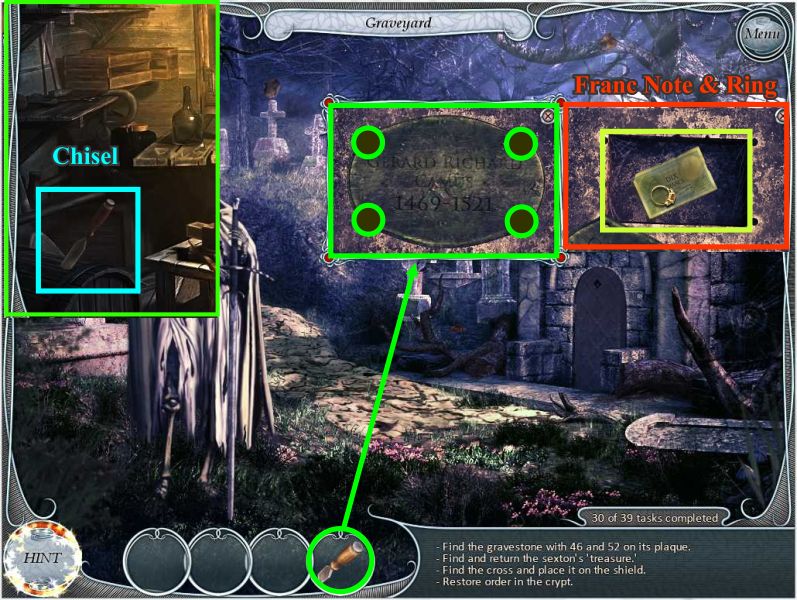
Click on the screws to find out that you need something to remove them.
There is a chisel in the sextant's house so go to the gate and into the square and back to the sextant's house.
Screenshot
Pick up the chisel at the left and go back to the graveyard.
Screenshot
Click on the gravestone and use the chisel on each of the screws.
Pick up the sexton's treasure from inside the plaque and take it back to his house.
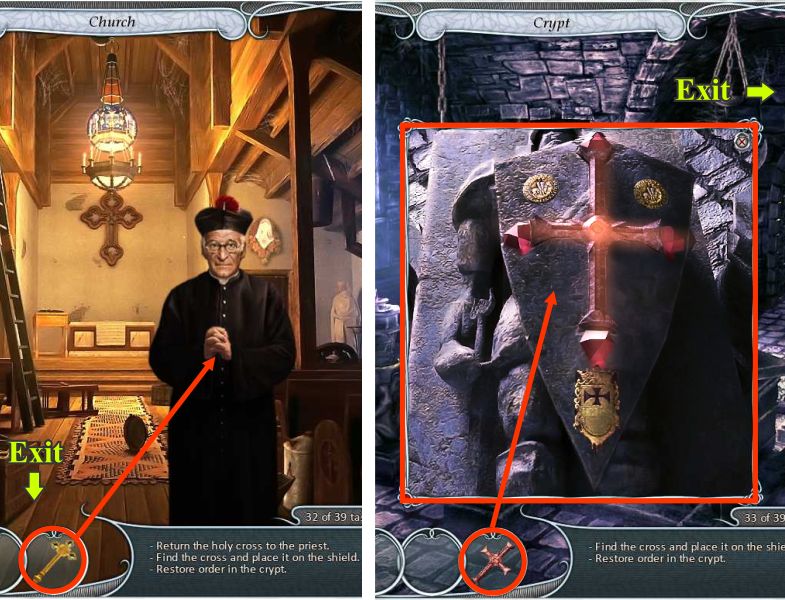
Give the money and ring to the sextant and he will give you the cross.
Click on the cross and collect the 3 items for the key object including the one in the container on the right wall as shown in the insert.
Take the cross from the table and go to the church.
Screenshot
Give the cross to the priest who will give you the cross for the crypt so exit to the square, go to the gate to enter the graveyard and go into the crypt.
Click on the coffin and place the cross on the shield and go talk to the skeleton to tell him his crypt is ready.
He asks to have the priest to say a burial prayer so he can truly be dead so exit the graveyard to the church.
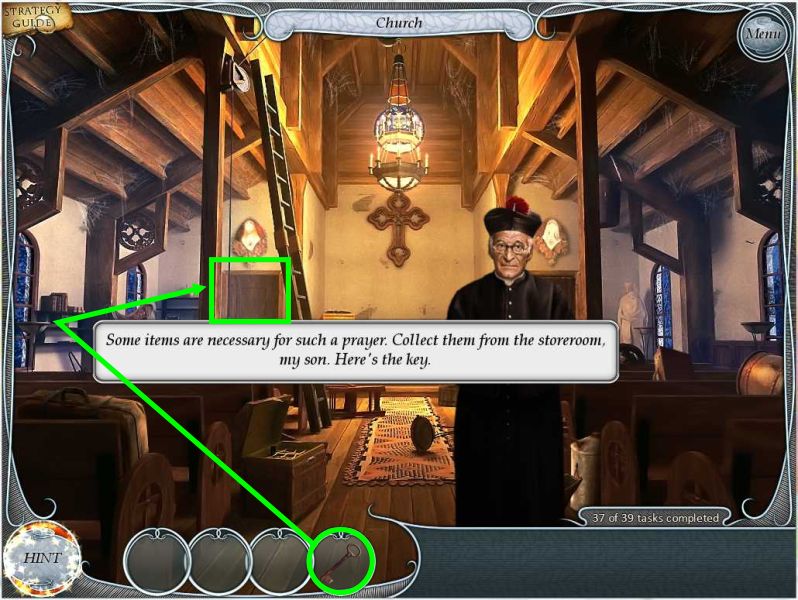
Screenshot
Tom asks the priest about the prayer and he says some items are need from the storeroom so gives you the key to go the storeroom at the back left of the church.
The priest is forbidden to go to the graveyard at night so Tom will have to perform the ceremony.
Screenshot
Collect all the items as well as the combined items.
The red sequence will give you the flowers in the vase.
Use the brush on the shoes to make them shiny.
The violet sequence will get you the comb the towels.
The insert shows the can opener in the pot.
Pick up 2 angels, 2 bells, and 4 candles.
Exit the church to the square, go to the gate and through the graveyard to the crypt.
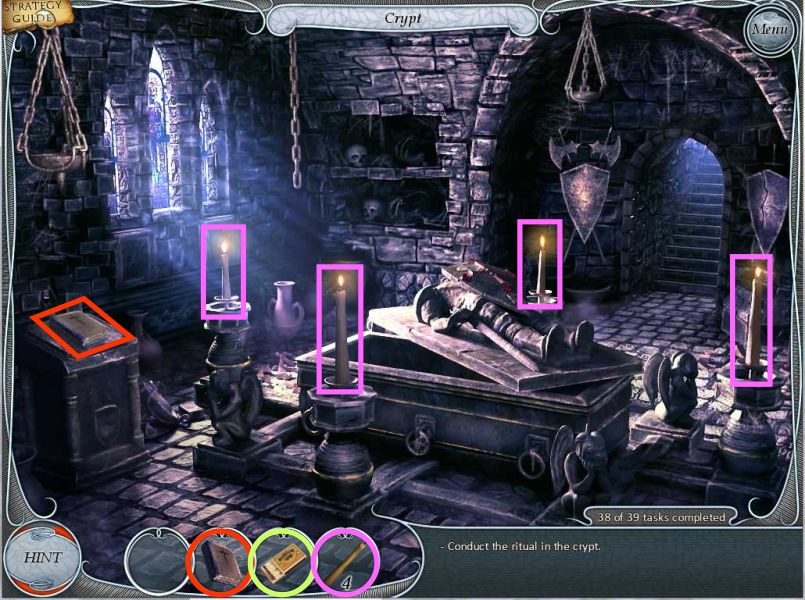
Screenshot
The skeleton is in the coffin so place the funeral candles as shown and then light each of them with the matches.
Place the book on the stand to the left and click on it.
Tom will tell him to rest in peace and the coffin closes.
Screenshot
Posted by: grinnyp |
July 5, 2010 4:52 AM
|
July 5, 2010 4:52 AM
TREASURE SEEKERS: FOLLOW THE GHOSTS WALKTHROUGH CONTINUED
Chapter 5: Siberia
You will see Nelly and Tom are on a train to Siberia each time you begin this chapter.
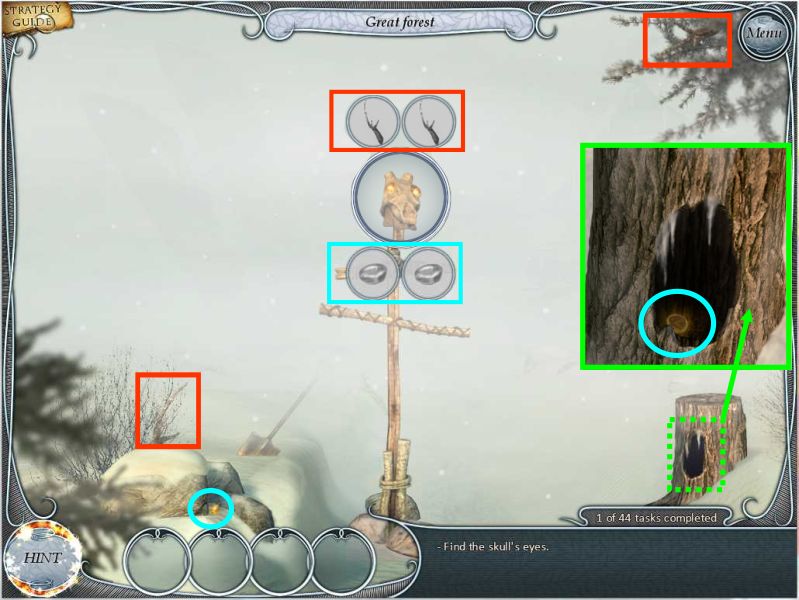
Their first encounter in Siberia is a talking skull that needs his eyes to see them so click on him to bring up the lower key objects.
When you find his eyes he says if you find his horns that he can clear the fog so click on him again to bring up the upper key objects and give him his horns.
Screenshot
The skull now says he is free.
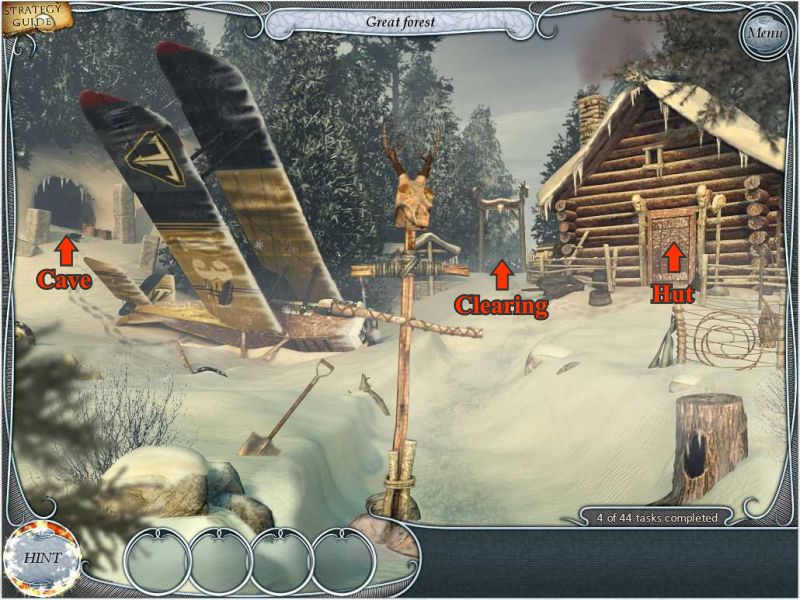
There are 3 paths in the Great Forest: the cave is to the left; the forest clearing is through the gate at the back; and the door goes into the Shaman's hut so there first.
Screenshot
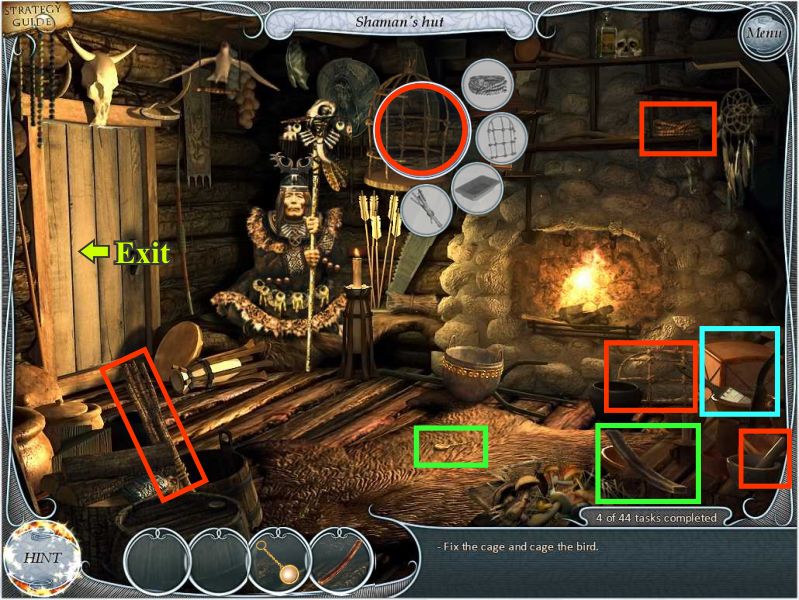
There is a bird flying around that lands on Tom so they decide to repair the cage and get the bird in it.
Click on the cage for the key object and find the items.
There is a stick and a mirror to collect that will go into your Inventory.
When you have finished collecting everything lure the bird into the cage by placing the mirror in the cage.
Click on the door to close the cage and lock it with the stick.
The Shaman thanks you for caging the bird and explains how he became blind.
He asks for your help so open the chest to look for the ritual chalice.
The chest is empty so the chalice must have been stolen by the visitor who took the Shaman's magic potion to restore his sight.
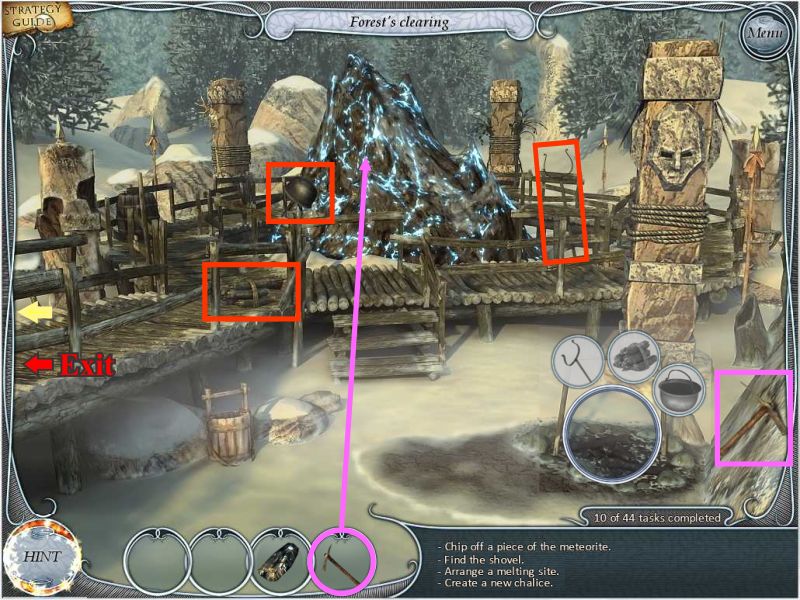
He asks you to construct a new chalice at the big stone in the forest clearing so exit the hut and go through the gate to the clearing.
Screenshot
Check out the 3 idols protecting the meteorite with a force field.
Click on them to bring up 3 key objects which I would suggest doing one at a time as numbered so that some items to find will be easier to see.
The green horns are a bit behind and mushroom and the red berries are partially hidden by the yellow key object and you need to click on the blue bucket to see the insert.
Screenshot
Pick up the pickaxe in the lower right corner and it will go into your Inventory for you to use to chip some metal off the meteorite.
Click on the fire area and collect the items for the key object.
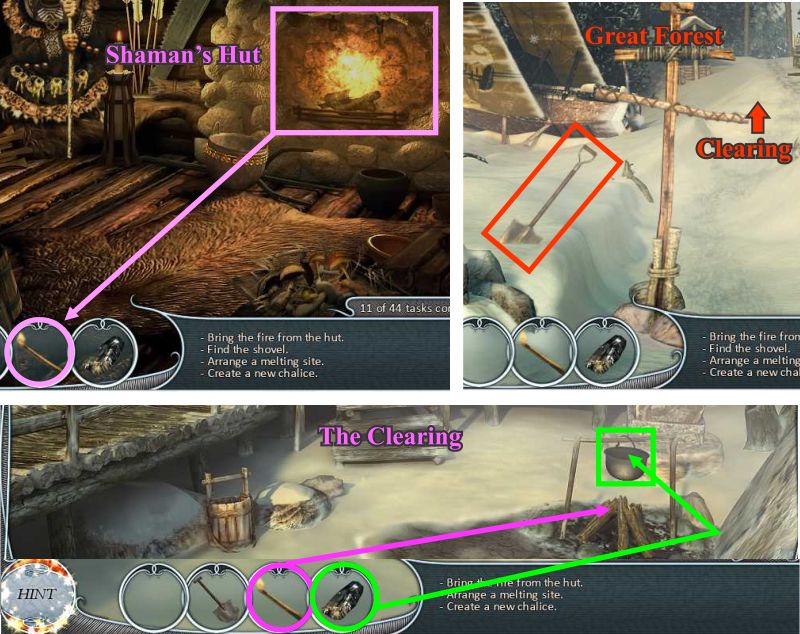
You need something to light the fire so go to the hut.
Screenshot
Click on the fire and you will get a lighted stick for your inventory so go back to the forest.
On your way to the clearing grab the shovel marked in red.
Put the metal in the pot and light the fire with the stick but the fire on the stick goes out so go back to the hut.
Screenshot
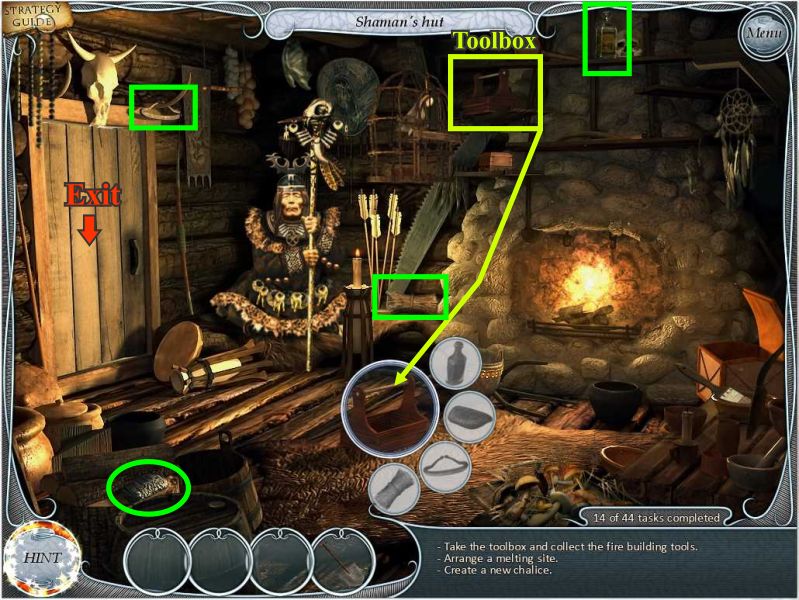
Tom asks the Shaman for matches or a lighter but the Shaman says he must use flint and stone.
Click on the tool box marked in lime and it will land on the floor so click on it again to get a key object.
Collect all the items needed for flint and stone and go back outside and return to the clearing.
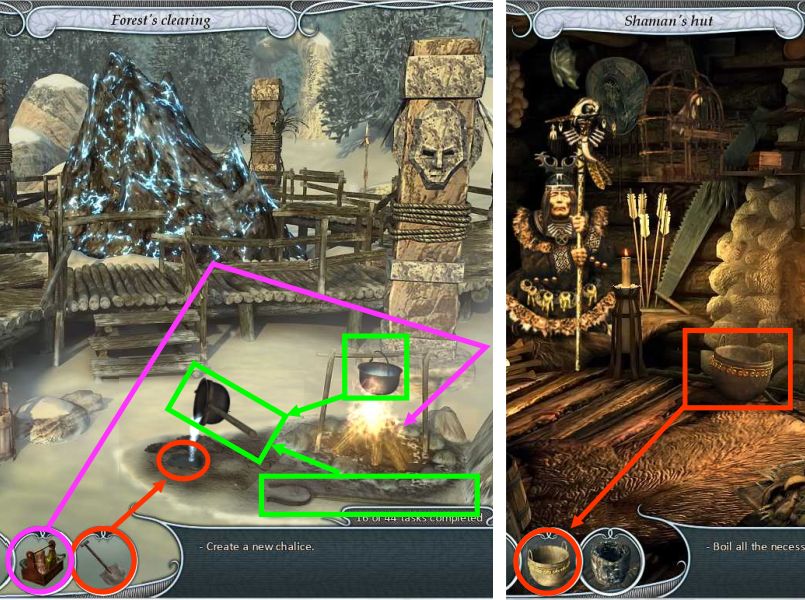
Screenshot
Place the flint and stone on the logs and watch the fire light.
Dig a hole with the shovel so you have a mold for the chalice.
Click on the pot on the fire and it will combine with the handle and pour the melted metal into the hole.
The chalice mold goes into your Inventory so go back to the hut to ask the Shaman what to do next.
Screenshot
The Shaman says to gather the ingredients for the recipe and cook them in the pot so click on the pot which will go into your Inventory.
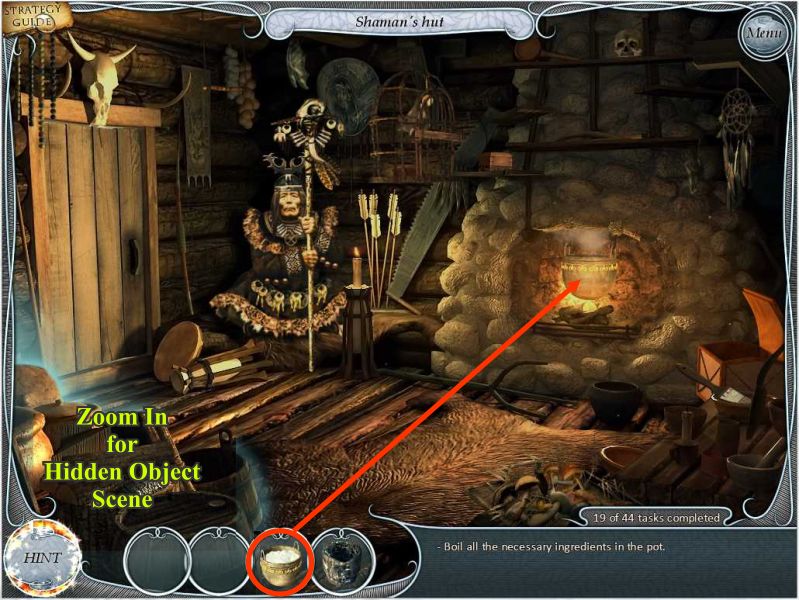
Tom wants to know where the faucet is to fill the pot so the Shaman tells him there is water everywhere outside.
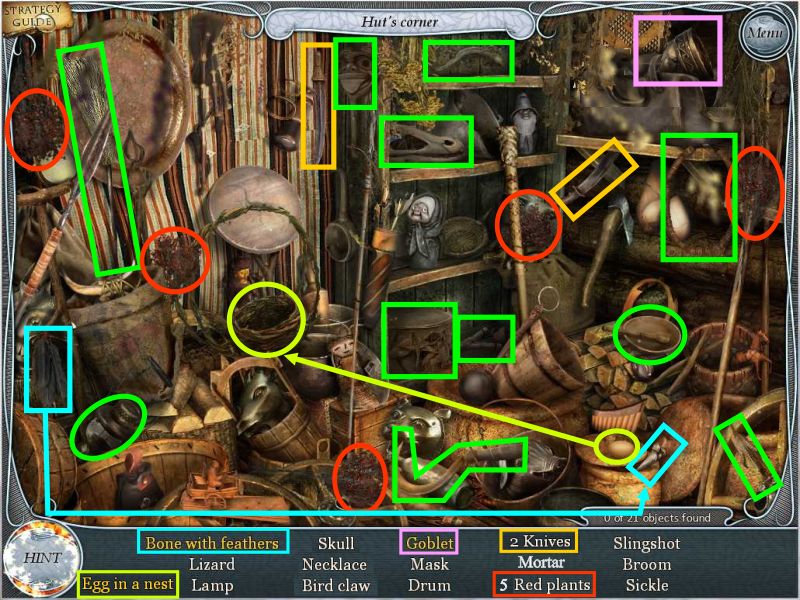
Go outside and put the pot anywhere and it will fill up with snow so go back into the hut and place the pot with the snow on the fire while you go to the hut's corner to search for ingredients.
Screenshot
All items are listed on the taskbar so collect them as they become available.
The 5 red plants are marked in red and the 2 knives are gold.
Click on the top shelf on the right and the goblet will appear.
Place the egg in the nest and collect it.
Place the blue feather on the bone and they will combine for you to collect the bone with feathers.
Screenshot
You will be transported out of the corner to the main part of the hut.
Click on the mortar in the lower right corner to get close up #1.
Place ingredients from your Inventory into the mortar as shown for close up #2.
Pick up the pestle and put it in the mortar and it will grind the ingredients as shown in close up #3.
Click on the ground ingredients in close up #4 and they will go into your Inventory for you to put in the pot on the fire.
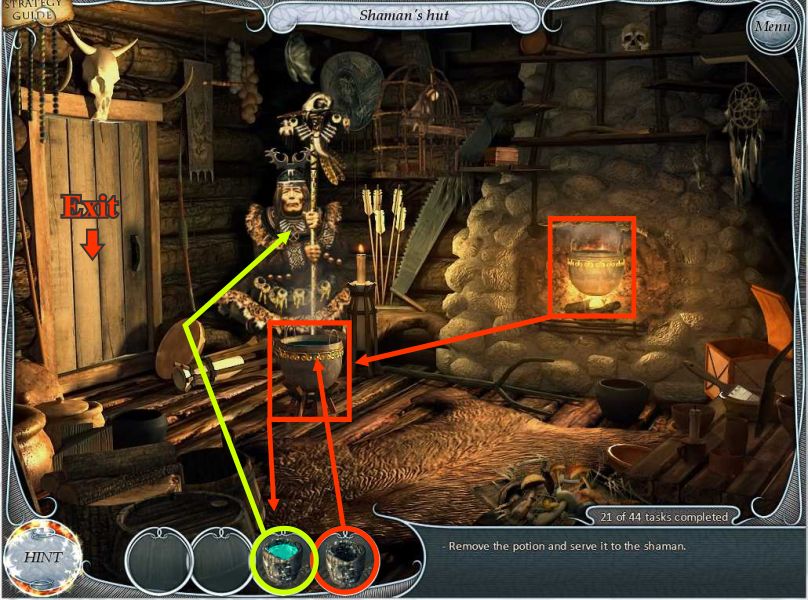
Screenshot
To remove the cooked potion from the fire, click on the pot and it will go onto the footstool in front of the Shaman.
Dip the empty chalice in the pot and it will return full to your Inventory so give it to the Shaman.
He says it will take time to work and that in the meantime you should bring him some things from the iron bird (the airplane that crashed) and the cave so go outside to investigate and click on the airplane to get a closer look.
Screenshot
Collect all the items and combine those items needed.
Pick up the left glove and put it on the right glove to collect it.
Pick up the goggles and place them on the helmet and collect.
Pick up the rag and place it on the blood and collect it.
Open the suitcase and pick up the travel journal.
Pick up the rope and hook and place it on the wheel to collect it.
Go to the Shaman's hut.
Screenshot
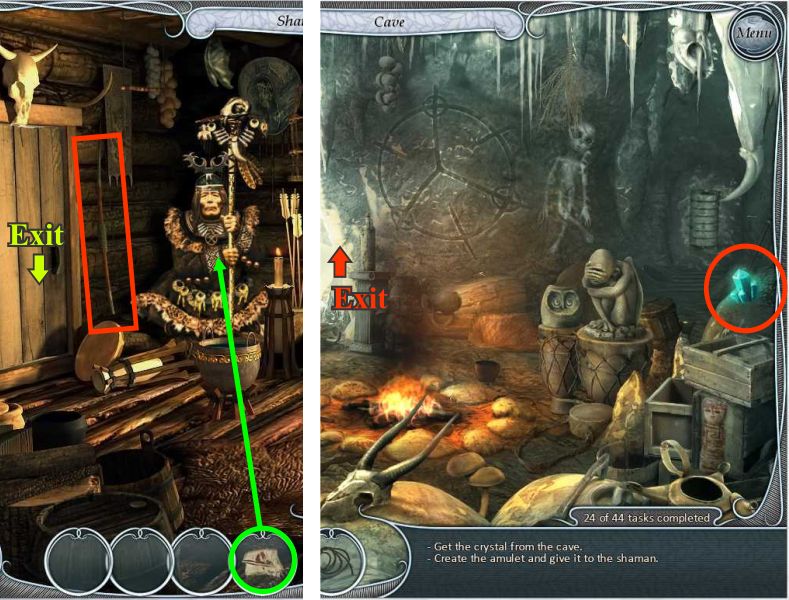
Give the bloody rag to the Shaman and he will tell you that in order to create the amulet you will need string and the crystal from the cave.
Pick up the bow string from the right side of the door and to go to the forest and enter the cave.
Pick up the crystal and it will combine with the string so take them back to the hut.
Screenshot
Give the amulet to the Shaman and he will return a protected amulet marked to you.
The Shaman says you need to collect some other things so click on him to bring up the key object.
Collect the items needed including the one in the pink box shown in the insert.
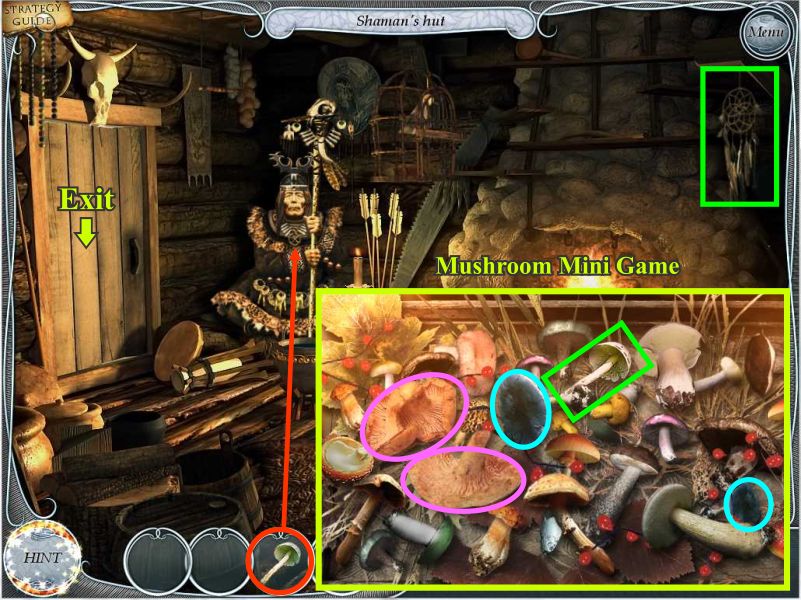
The Shaman now says that you need a powerful mushroom and there will be no mistaking it because there is only one.
Click on the mushrooms at the bottom of the scene to bring up a mini game.
Screenshot
Match the mushroom pairs until there is only one mushroom left which is marked in green so take it for your Inventory.
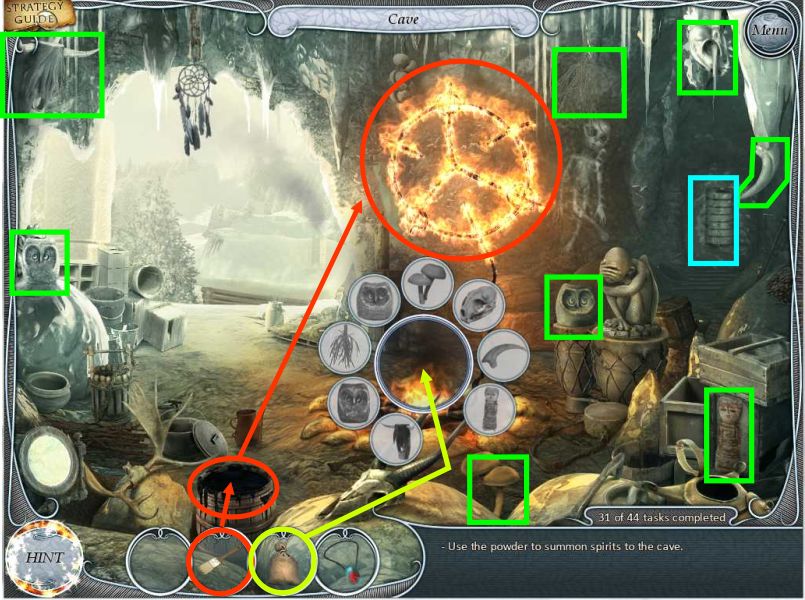
Give the deadly mushroom to the Shaman and he will give you a bag of powder.
You are instructed to take the dream catcher off the wall and go to the cave where you are to place the trap at the exit, set fire to the wall and summon the spirits so exit and go to the cave.
Screenshot
Place the dream catcher at the exit and examine the wall drawing.
You need something to ignite it so check out the tar bucket at the lower edge of the scene but you need a paint brush to put the tar on the wall so go back to the hut.
Grab the paint brush at the right of the scene and return to the cave.
Screenshot
Place the brush in the tar and it will return to your Inventory ready to paint on the wall.
Paint the wall with the tar and the wall will catch on fire so click the fire to bring up a key object.
Collect all the items and when you are done place the powder bag in the fire.
The dream catcher is now charged and returns to your Inventory so return to the hut to see what to do next.
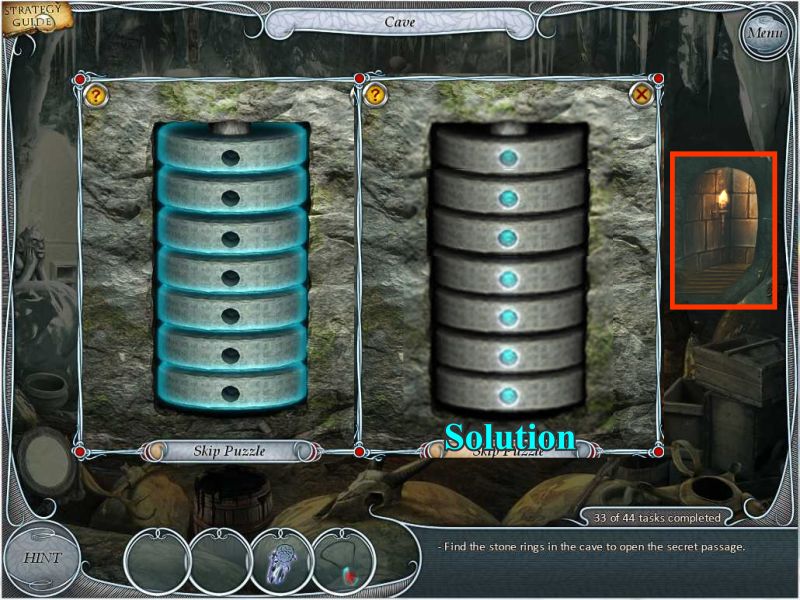
The Shaman says you aren't done yet because all of the spirits will not fit in the dream catcher. He says there are stone rings in the cave and that if you turn them a secret passage to another world will appear.
Go back to the cave and click on the stones that were marked in blue to bring up a mini game.
Screenshot
Stones Mini Game
Turn the rings until all the dots line up.
The puzzle is random so I can't show you how to do it but the solution is shown on the right in the screen shot.
Each time you turn a ring it will have an effect on another ring, sort of like the scarab puzzle that you did earlier, so just keep trying trial and error to light them all up so the secret passageway opens as shown in the insert.
Go through the opening and into the lab.
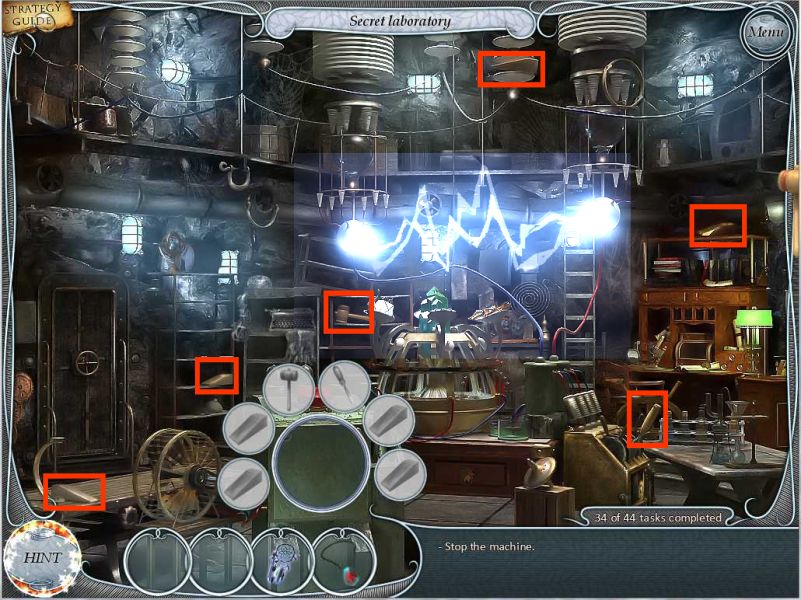
Screenshot
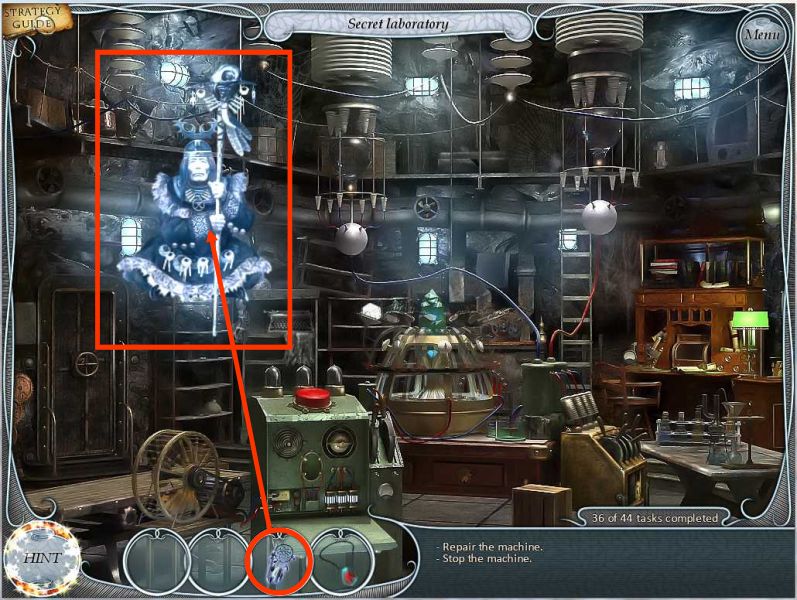
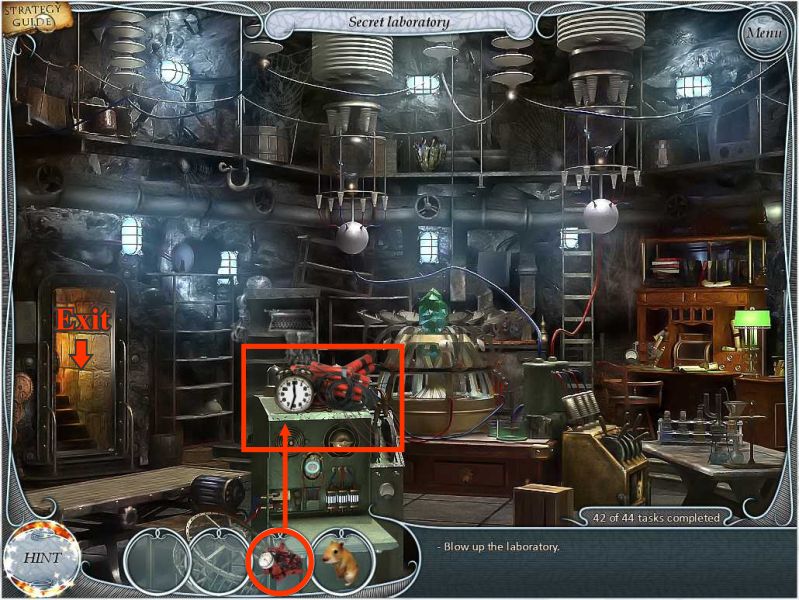
You encounter Totenkraft but he disappears and leaves you with his machine that he says will blow up in a few minutes.
You need to stop the machine so click on the green box with the red button on top to bring up a key object and collect all the items.
Screenshot
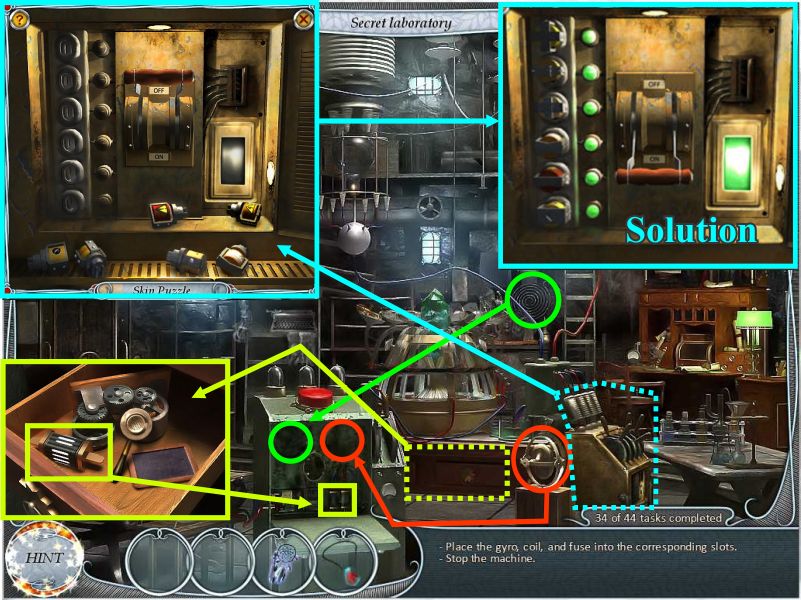
Tom says it is still missing a gyro, the coil, a fuse and something strange of click the key object and collect the parts for the gyro.
Screenshot
Place the gyro where it belongs and click on the drawer marked in green to get the fuses and place them where they belong.
Grab the coil and place it
Click on the blue regulator to bring up the fuse mini game shown in the upper left insert.
Place the fuses into the plugs at the left and then pull the switch down to check if they are correctly placed.
If the light is red, it's wrong but if the light is green, it's in the right place.
Keep placing the fuses until all the lights are green as shown in the upper right insert because there is no one right answer.
Screenshot
Nelly can't find whatever the "something strange" part is that Tom was talking about so a ghost-like image of
When you give him the dream catcher you are transported to the spirit world and are back in his hut.
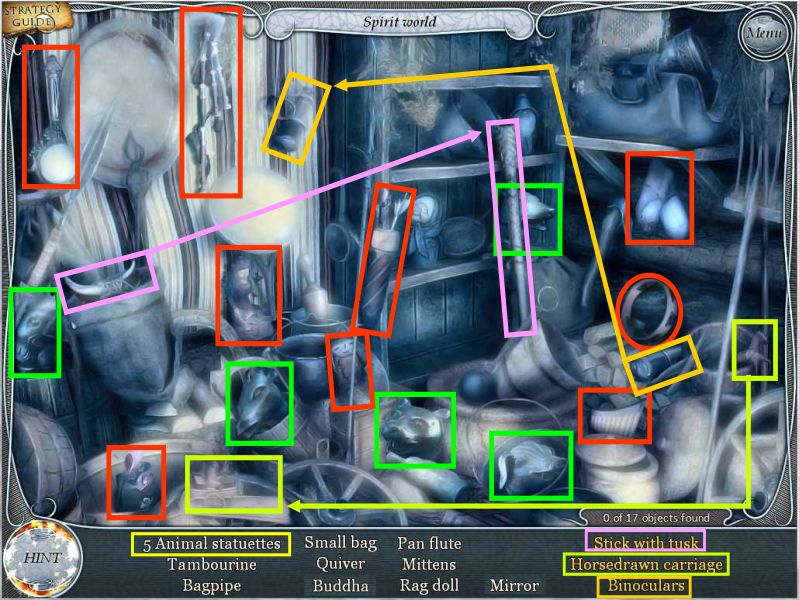
The spirits told the Shaman that the item you need is hidden in the spirit world and that first you need to find the keys and open the trove so you are transported to a ghostly image of the trove.
Screenshot
Collect all the items and the 5 animal heads, one of which is sort of hidden behind the stick.
Place the tusk on the stick and collect the stick with a tusk.
Create a horse drawn carriage to collect by combining the horse with the carriage.
Put the binoculars together and collect them.
Screenshot
Animal Head Mini Game
The animal heads you collected turn into a Mini Game.
The heads are numbered so match the heads to the same numbers on the columns.
When all the columns have been lowered there will be a crack in the rock so take what is inside and it will go into your Inventory as you will be transported back to the lab.
Screenshot
Place the find that from your Inventory where it belongs in the panel to stop the machine so now click on the red button.
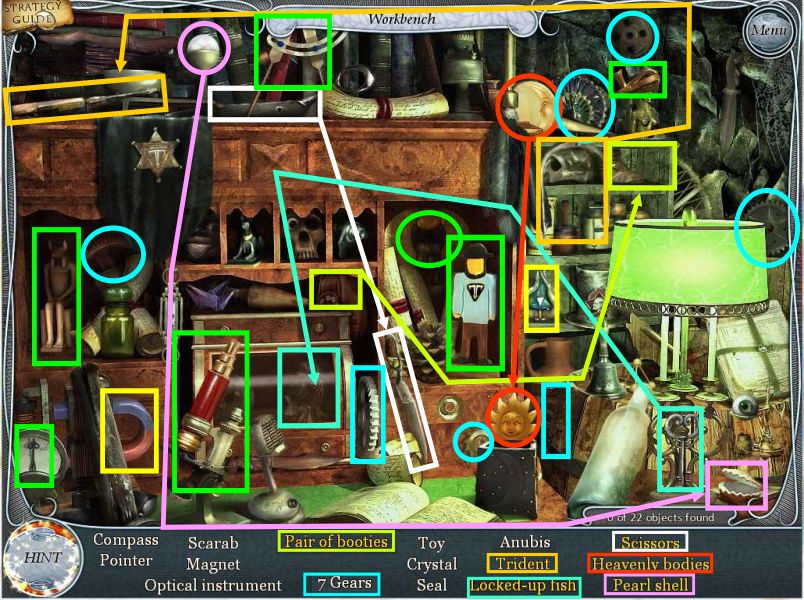
A portal appears and Nelly says it is all the places they have been and that they should return everything so click on the workbench marked in blue and you will get a close up view.
Screenshot
All the items you need to find have been placed on the taskbar but this one is getting just a little bit complicated so follow the color sequences carefully.
Place the trident parts together and collect it.
Put the pearl in the shell and collect it.
In order to get the fish you will need to use the key on the secretary and then grab him when the door opens.
The booties need to be combined to collect them.
The heavenly bodies are the sun and moon so combine them and collect them.
You need combine both parts of the scissors to collect them.
When you have found everything you will be transported back to the lab.
Screenshot
Place the numbered items in the portal in the order indicated.
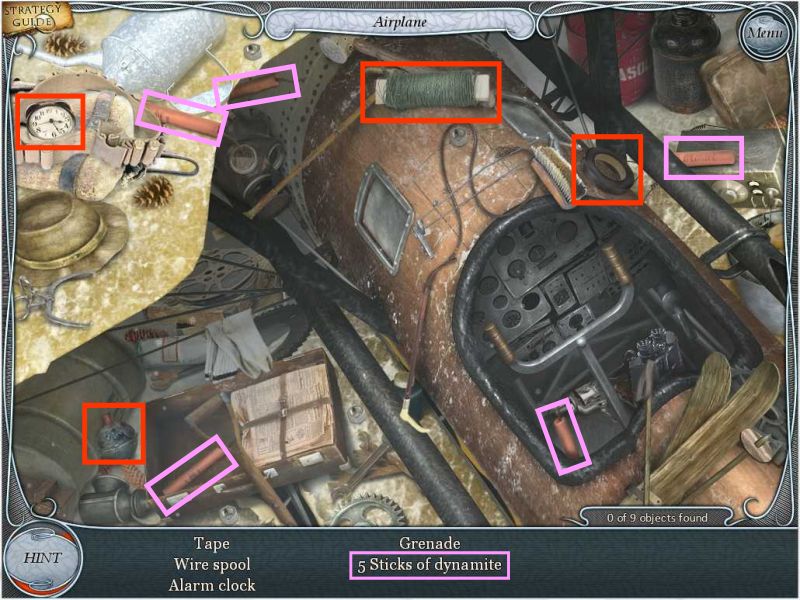
Tom suggests blowing the place up so exit to the cave and go to the airplane but before you go Nelly remembers a hamster being in the lab so rescue him and he will go into your Inventory.
Screenshot
Click on the airplane for a close up.
Collect the 5 sticks of dynamite and the rest of the items marked in red and go back to the lab.
Screenshot
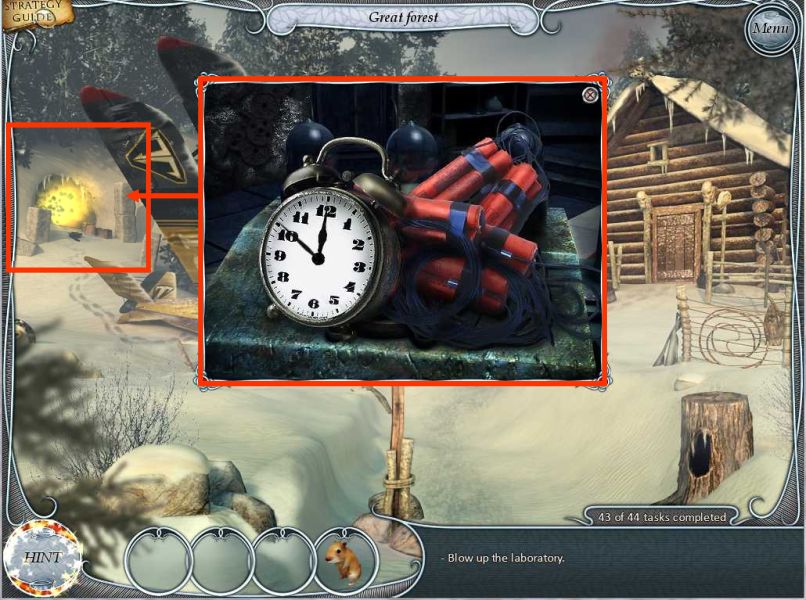
Place the explosives on top of the red button and run for it to the Great Forest.
Screenshot
Mission accomplished so now watch the ending scenes!
Screenshot
You Have Completed All Your Assignments And Removed All The Anomalies.
Special thanks to Jazz for this wonderful walkthrough!
Posted by: grinnyp |
July 5, 2010 5:00 AM
|
July 5, 2010 5:00 AM
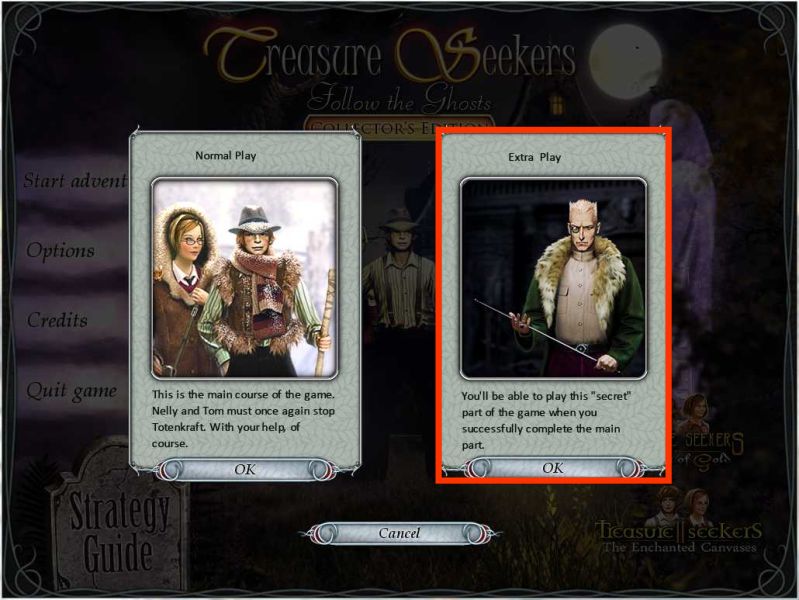
Collector's Edition Bonus
If you have purchased the Collector's Edition and have completed "Normal Play", when you click on start adventure you will be taken to a scene where you can now play the bonus part of the game.
To play the bonus, choose "Extra Play" to start on an adventure as Totenkraft.
There is no "Skip" button so you will have to choose what you want to play each time you start the game.
Screenshot
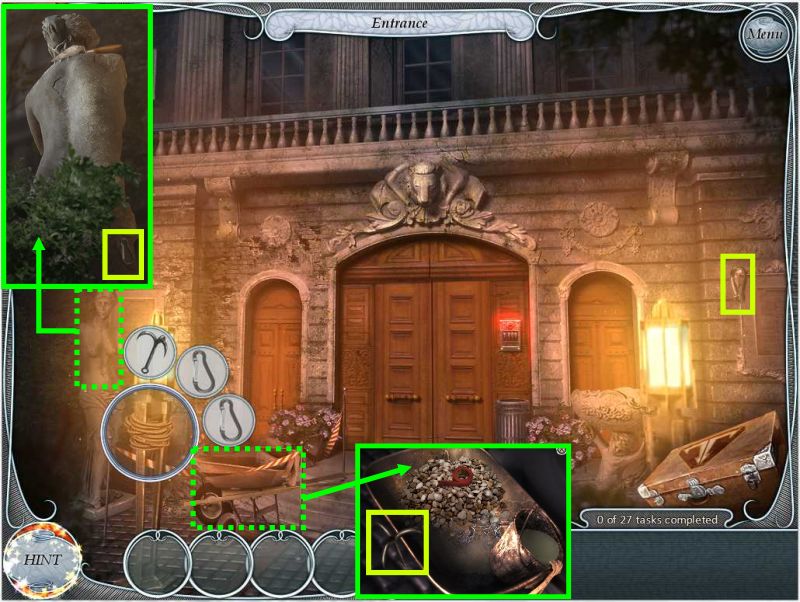
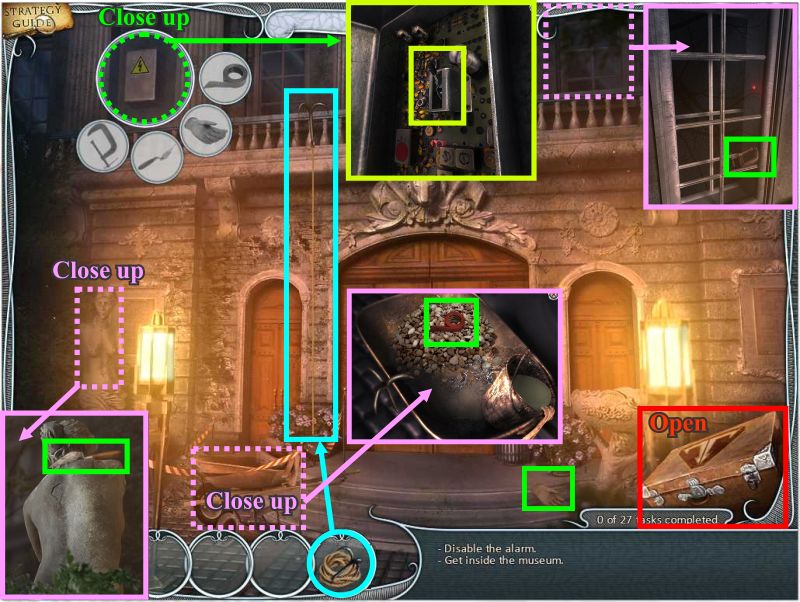
Totenkraft is in search of ingredients to make a new Philosopher's Stone so he begins at the museum but it is night and the alarm is on so he needs another way in.
Click on the left lamp post to bring up a key object and collect the items.
Click on the statue and the wheel barrow for a close ups.
Screenshot
You now have a grappling hook and rope to throw it up on the balcony by clicking there.
Click on the left window to find out there is a very extensive alarm system so click on the power supply box to bring up a key object.
Click for close ups of the statue and wheel barrow to find items and click on the right window for a close up to get the clamp.
When you have collected the key object items click on the power box to open it and throw the switch to find out there is still power.
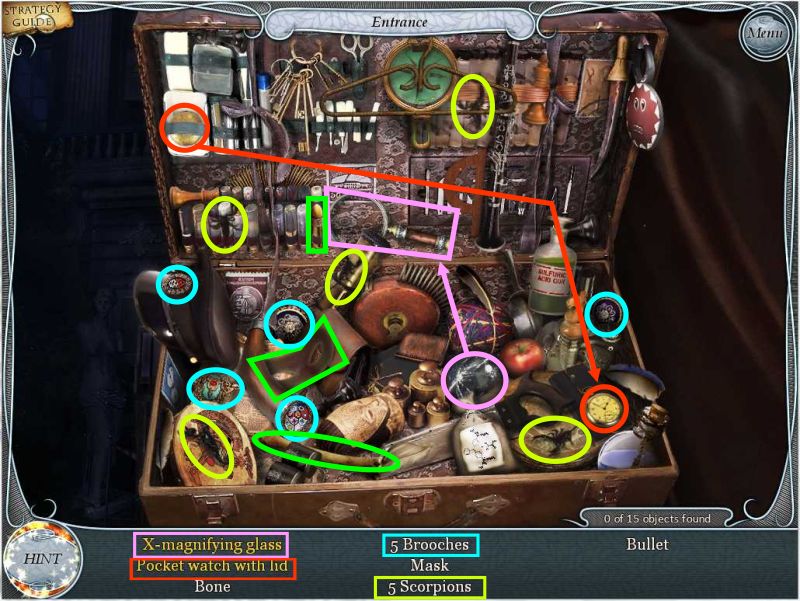
More drastic measures are required so click on Totenkraft's suitcase in the lower right corner.
Screenshot
Find 5 scorpions and 5 broaches as well as the rest of the items on the list.
Place the lens on the rest of the magnifying glass and collect it.
Put the lid on the pocket watch and collect it.
Screenshot
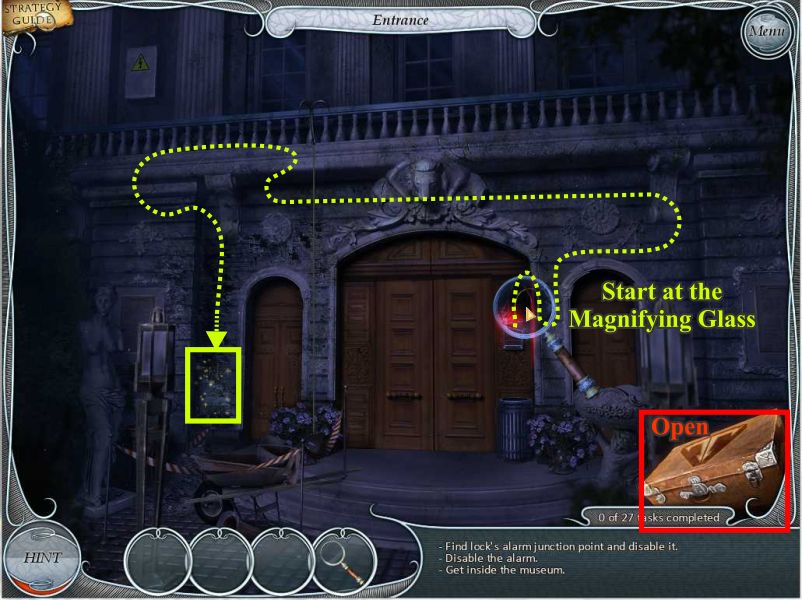
Pick up the magnifying glass from your Inventory and click on the alarm box and it will attach itself to your cursor.
Use the magnifying glass to trace the wiring to the junction box.
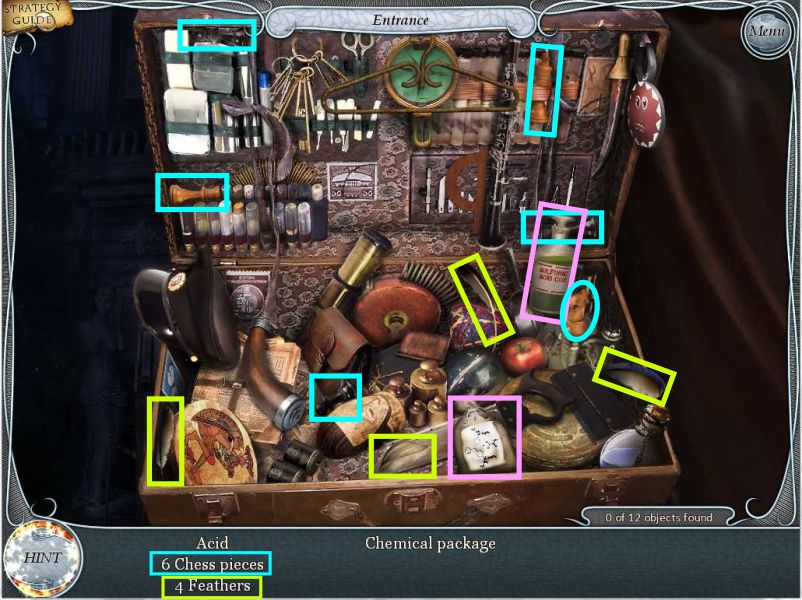
When you click on the sparkling junction box you find out it is behind the wall so you need something to get through the stone so back to the inside of the suitcase.
Screenshot
Pick up the acid bottle, chemical package, and 4 feathers.
Collect 6 chess pieces in blue including the one behind the acid bottle that won't be fully visible until you get the bottle.
Screenshot
Use the acid on the junction box.
Click on the trash container and pick up the cup.
Click on the wheel barrow and fill the cup from the bucket of water.
Put the cup of water on the junction box to short circuit the wires
Screenshot
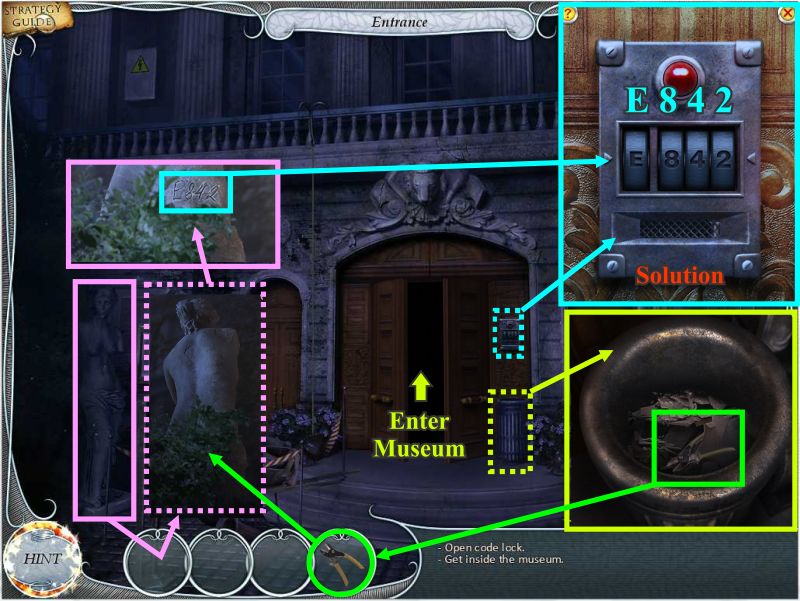
Click on the trash can and pick up the clippers.
Click on the statue and use the clippers from your Inventory on the ivy until you can see E842.
Click on the alarm panel for a close up and enter E842 so the museum doors will open and you can enter.
Screenshot
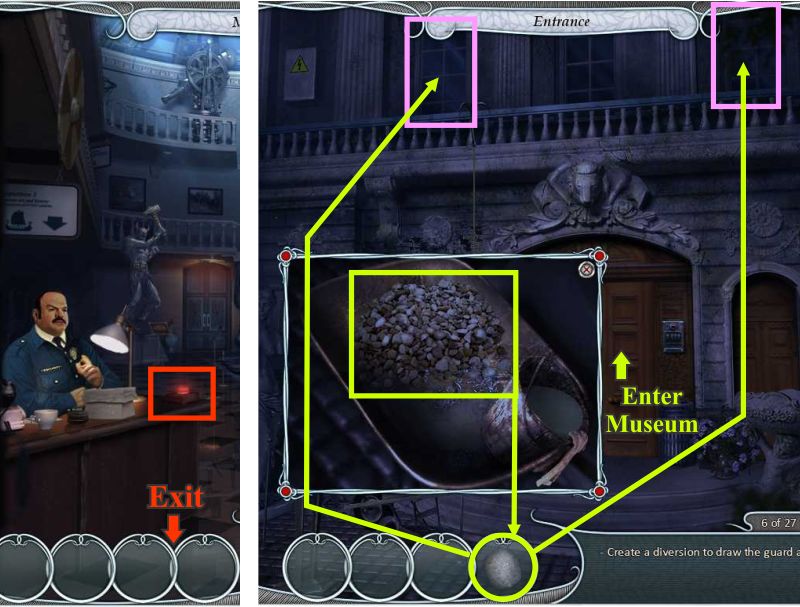
There is a guard at the desk inside the main hall of the museum.
You need to create a diversion because you don't want him to hit the alarm button so go back outside.
Click on the wheel barrow and pick up a pebble.
Put the pebble on either balcony window and go back inside the museum.
Screenshot
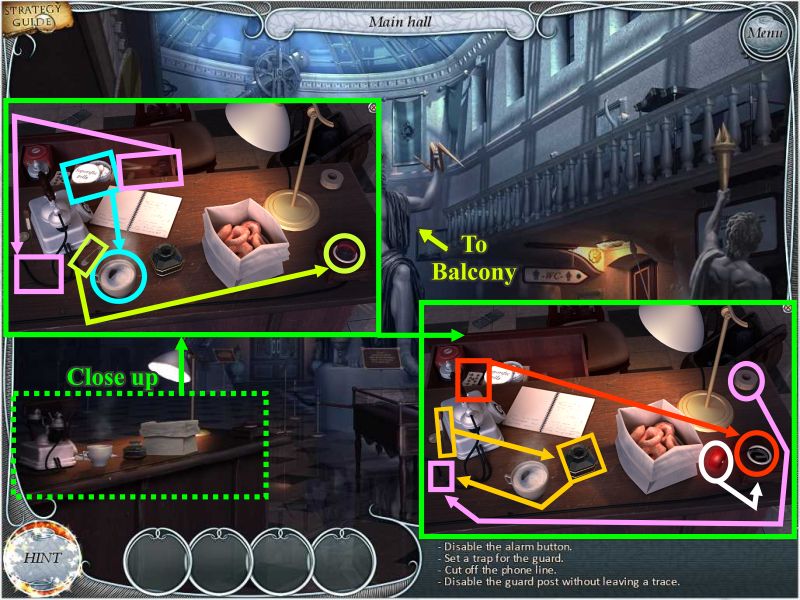
The guard is gone so Totenkraft wants to disable his post.
Click anywhere in the scene that says to the main hall in order to get a wider view of the room.
Click on the guard's desk for a close up.
In the left insert pick up a couple of sleeping pills and place them in his coffee.
Take the scissors from the drawer and cut the phone line.
Pick up the safety pin and flip the cap off the alarm button.
Go to the right insert and take a piece of the tape at the upper right of the desk and tape the phone line back together.
Pick up the paint brush, dip it in the ink and paint the piece of tape on the phone line.
Pick up the playing card, stuff it in the alarm and put the cap back on the alarm button.
Go back outside and wait for the guard to come back and take the bait.
Screenshot
Go back inside to find that the guard is sleeping like a baby so go to the balcony.
Click on the right door to the Exposition to bring up a mini game.
Your goal is to click on the 4 buttons to make the light beams go away so you can enter the room.
The solution is random so click once or twice on the buttons to see what happens.
Each move you make will affect one or more of the beams so keep experimenting till you get them all off.
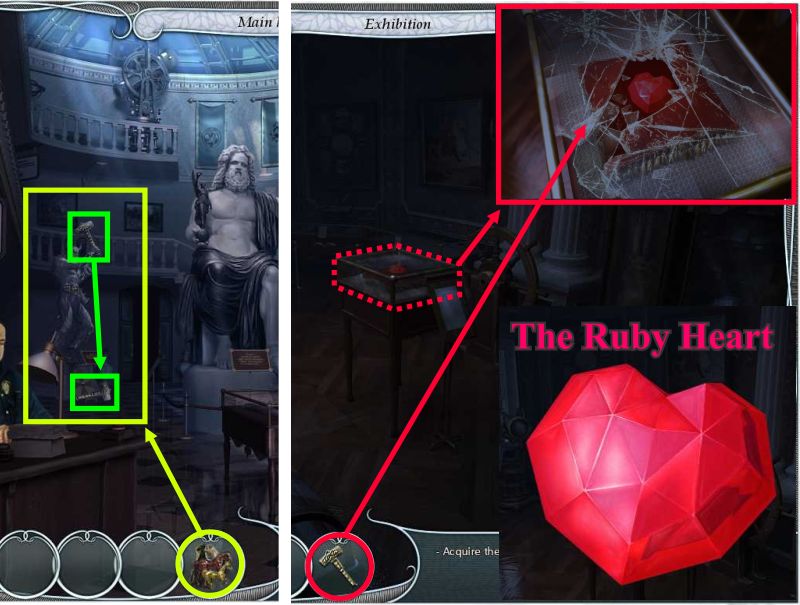
Screenshot
The Ruby Heart is in the glass case in the middle of the room so click on it for a close up and then exit it.
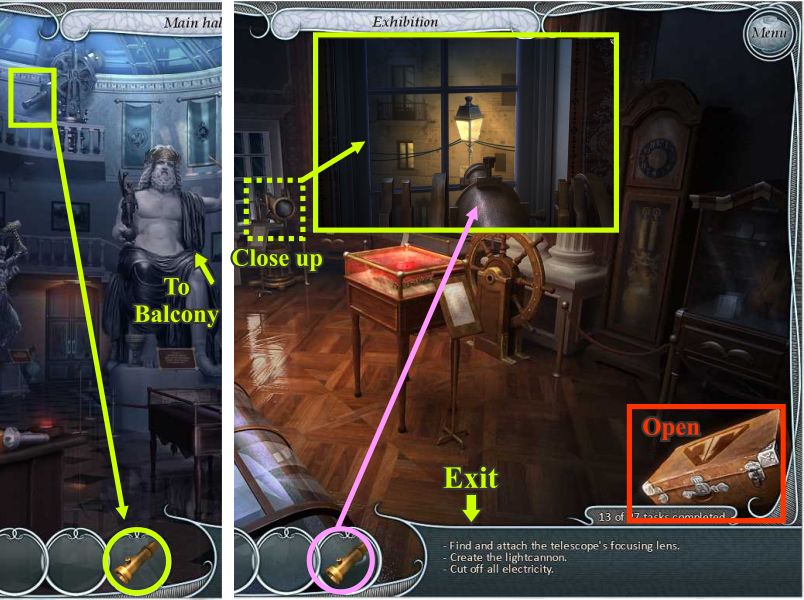
Click on the back right window to view the street light.
Click on the object under the right window to bring up a key object to create Totenkraft's new invention the light cannon.
Collect the parts and click on it to find out it is missing a vital focus part so go to the main hall in search of something that will work.
Screenshot
Take the lens off the telescope and take it back to the exposition/exhibition room.
Click the light cannon for a close up and place the lens on it.
There is still something missing so exit out of the close up and click on the suitcase in the lower right corner.
Screenshot
Collect the 5 stamps and click on the cigarette case to open it up and collect the lighter.
Collect the rest of the items and a lightening accumulator will go into your inventory.
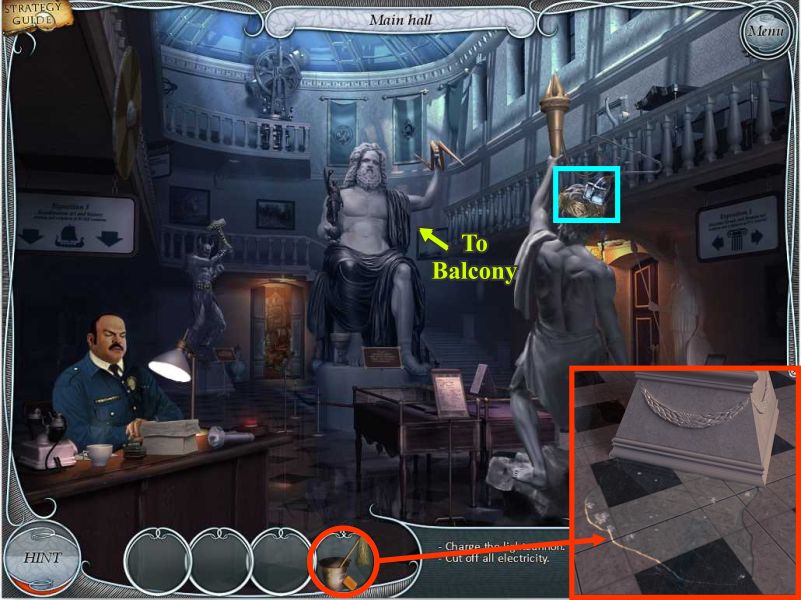
Go to the main hall.
Screenshot
Take a closer look at the plaque on the statue of Zeus and you will find out that he is the god of the sky and thunder so take his crown and it will mix with the lightening accumulator in your Inventory to form an "angering device".
Take a closer look at the plaque on the statue of Prometheus to find out how he angered Zeus so give the angering device from your Inventory to Prometheus and it will go to his head.
You need to move the statue of Prometheus in front of Zeus but when you click on Prometheus you find out that you need help to move such a heavy statue so go to the storeroom.
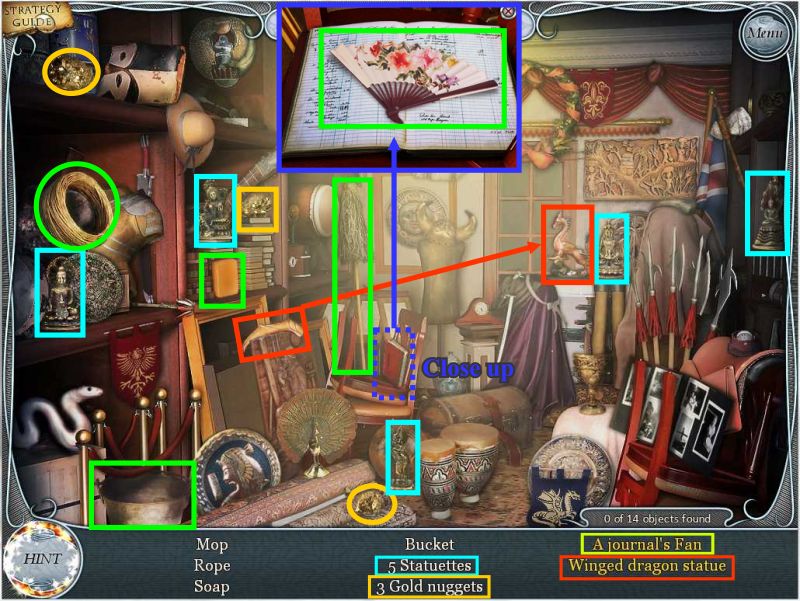
Screenshot
Click on the journal to collect the fan.
Place the wing on the dragon to collect the winged dragon statue.
Collect the 5 statuettes and 3 gold nuggets.
Pick up the rest of the items and the janitor's tools will go into your Inventory.
Screenshot
Click on Prometheus to get a close up of the floor and place the janitor's tools there.
Click on the statue again and it will move in front of Zeus and the accumulator will charge so collect it off Prometheus' head and it will go into your Inventory.
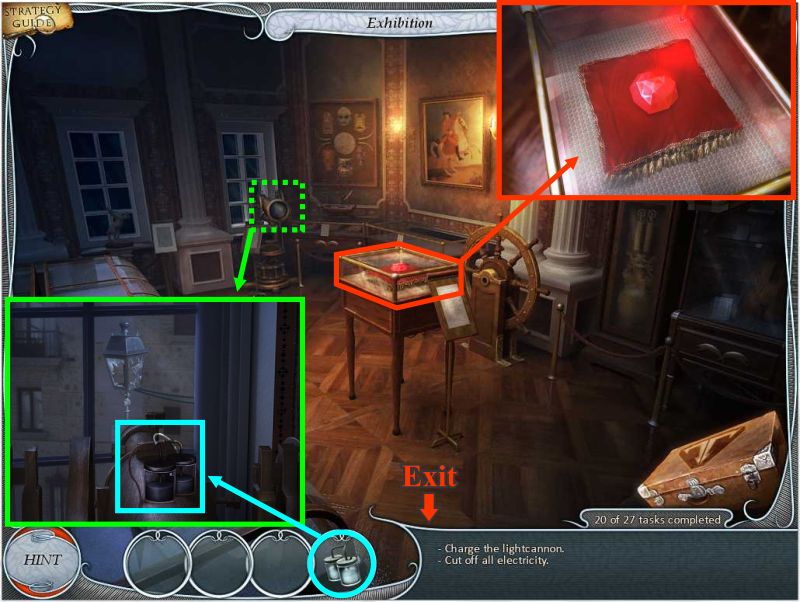
Go back upstairs to the Exhibition room.
Screenshot
Click on the cannon to get a close up view, place the charged accumulator from your Inventory on top of it, and watch the sparks fly.
The electricity has been cut off so exit the close up.
Examine the Ruby Heart case to find out you now need to disable the alarm.
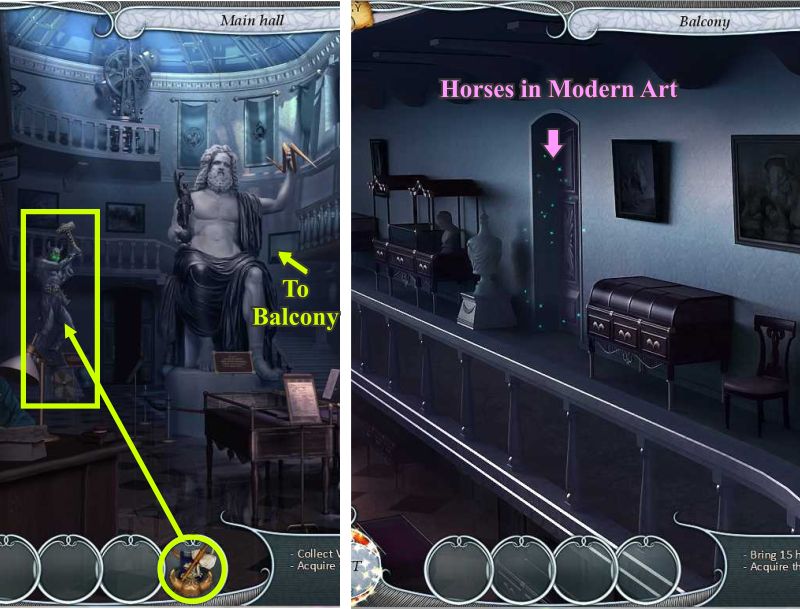
Totenkraft says a hammer fit for the gods should work to break the glass so exit out of the close up and go back to the main hall.
Screenshot
Click on the statue of Thor to bring up a key object.
Collect the items including the axe in the case.
Pick up the flashlight on the desk for your Inventory and go to the storeroom.
The storeroom is dark so use your flashlight to enter.
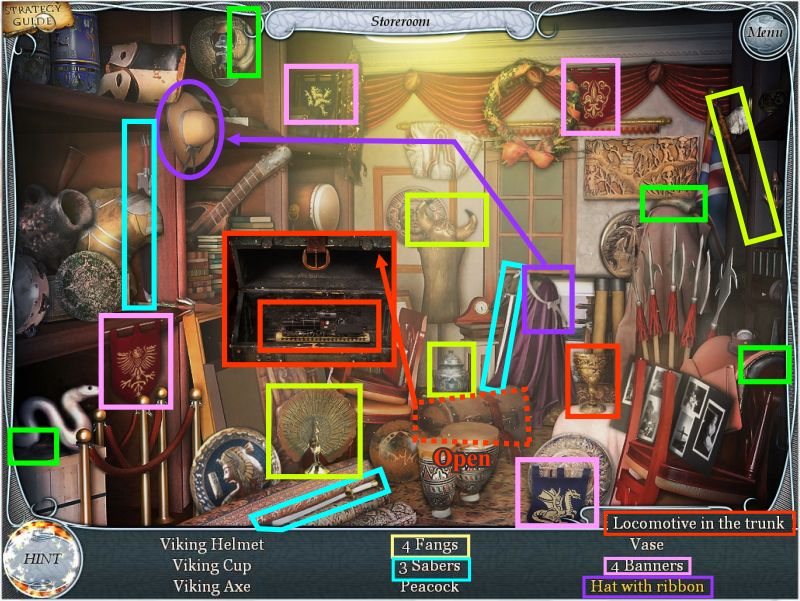
Screenshot
The scene is totally dark except for your flashlight but I gave you a lighted scene to see what you need to collect.
Pick up the 4 banners, 4 fangs and the 3 sabers.
Put the ribbon on the hat to collect it and click on the trunk to get a close up and take the locomotive.
Screenshot
You will be transported back to the main hall to give the Viking equipment to Thor who will only trade his hammer for 15 horses so go to the balcony.
Screenshot
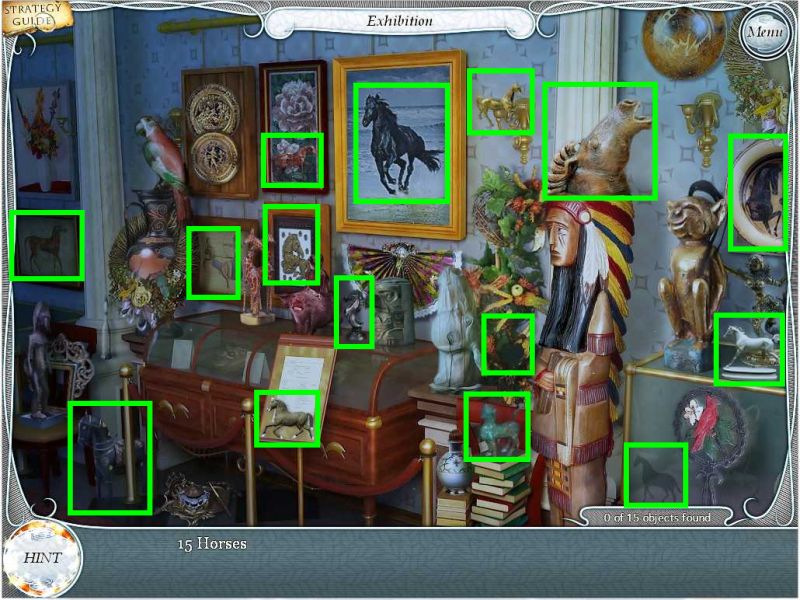
Click on the left door to enter the "Horses in Modern Art" exhibit.
Collect the 15 horses in this exhibit as shown on the screen shot that I lightened for you.
You are back on the balcony with your horse collection in your Inventory so take it downstairs to Thor.
Screenshot
Give the herd of horses to Thor and he will drop his hammer so pick it up and go back upstairs into the right door to the Exhibition room.
Click on the case for the close up, pick up the hammer of gods and smash the glass.
Take the Ruby Heart and watch the next scenes.
Screenshot
Extra special thanks to Jazz for the walkthrough of the bonus chapter from the Collector's Edition!
Posted by: grinnyp |
July 5, 2010 5:05 AM
|
July 5, 2010 5:05 AM