
The Scruffs: Return of the Duke
Platform: Mac, Windows
![]() Most of us don't get cool birthrights; we get things like old hand-me-downs, untameable curly hair, or a collection of decorative spoons from our families and call it a day. But not Grandpa Scruff; he's destined to be the next Duke of Scrufford! Or, at least, he would be if he hadn't been gone for thirty years, allowing an impostor to take advantage of an ancient contract and step into his shoes. Unless Grandpa Scruff finds the lost Regalia before night, Scrufford will be forever plunged into an era of darkness the likes of which the world will have never seen!... possibly. The Scruffs: Return of the Duke is a silly, gorgeous little hidden-object adventure that packs on the charm for a light-hearted cartoon romp anyone can enjoy.
Most of us don't get cool birthrights; we get things like old hand-me-downs, untameable curly hair, or a collection of decorative spoons from our families and call it a day. But not Grandpa Scruff; he's destined to be the next Duke of Scrufford! Or, at least, he would be if he hadn't been gone for thirty years, allowing an impostor to take advantage of an ancient contract and step into his shoes. Unless Grandpa Scruff finds the lost Regalia before night, Scrufford will be forever plunged into an era of darkness the likes of which the world will have never seen!... possibly. The Scruffs: Return of the Duke is a silly, gorgeous little hidden-object adventure that packs on the charm for a light-hearted cartoon romp anyone can enjoy.
 To restore Grandpa Scruff to his rightful place, you'll need to track down the pieces of the Regalia by seeking out the Knights of Scrufford, a secret order loyal only to the true duke. Naturally, there's a catch; each knight only knows where the next one is, so you'll have to find them all individually and then prove Grandpa really is who he claims to be. (Because really, who wouldn't be clamouring to name themselves leader of a kingdom that sounds like it should be populated solely by wire-haired terriers?) This is done, usually, by tracking down a bunch of items for each person and solving some puzzles in the process. If you need some help, just click on Scruffy, the family's intrepid mutt, and he'll bark in a hot-or-cold fashion to let you know when you're close to the item you're seeking. There's also a fully integrated strategy guide under the menu if you need a little more direct help, but surely the Duke of Scrufford needs no such contrivances, right? Onward, noble disheveled ruler!
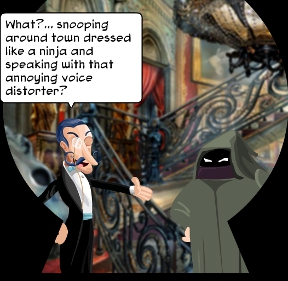
Analysis: There are times when a game like The Scruffs: Return of the Duke is exactly what you need. Colourful, vibrant, and energetic story and characters, it's the perfect way to unwind and just let yourself smile. The artwork and animation is fantastic, with an unusually solid and robust set of voice actors only adding to the experience. It definitely doesn't take itself seriously, and that light-heartedness is more than welcome if you want something that feels casual and relaxing. If you haven't played the original game, you're probably not going to understand who anyone is, but it's not really a perquisite. The plot, focused on the hammy Saturday morning cartoon-esque drama and villain, is corny but funny despite its cast of cardboard cutout characters. Just don't take it too seriously, enjoy the twists and turns, and you'll have a great time.
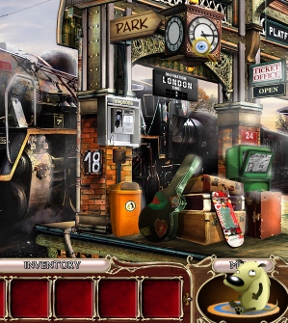 Despite its goofball presentation, however, Return of the Duke isn't necessarily easy. It's just a shame the cartoonish character design wasn't married to the environmental artwork, since the mishmash of actual photography not only looks a little weird, but can also make it difficult to tell what you're looking at when some items are small. Puzzles also don't really give any instructions or help, so if you're particularly stymied as to the rules of something or even just don't know what you're looking at, you're out of luck and might be forced to use the skip button. Luckily, the cast and story more than provide enough incentive to keep playing, and as your eyes adjust to the odd style choice you'll have an easier time picking out objects as you go.
When it comes to goofy, feel-good cartoon adventures, The Scruffs: Return of the Duke is right up there with the best of them. While the characters and dialogue will probably enthrall you more than the standard gameplay does, it's a great choice for players who want something casual, charming, and light-hearted to relax for an evening or so with, especially if they've got some kids who are fans of gaming too. Most players will probably spend around four hours on it, more or less depending on how difficult they find it, but if you like humour and silliness you'll love every second. Give the demo a try and see if you don't enjoy getting acquainted with the Scruffs.
(Note: Make sure you properly close this game by selecting "save and exit" under the menu or you may lose progress back to the beginning of the chapter!)
![]() Windows:
Windows:
Download the demo
Get the full version
![]() Mac OS X:
Mac OS X:
Download the demo
Get the full version


Walkthrough Guide
(Please allow page to fully load for spoiler tags to be functional.)
The Scruffs: Return of the Duke Walkthrough
General Information
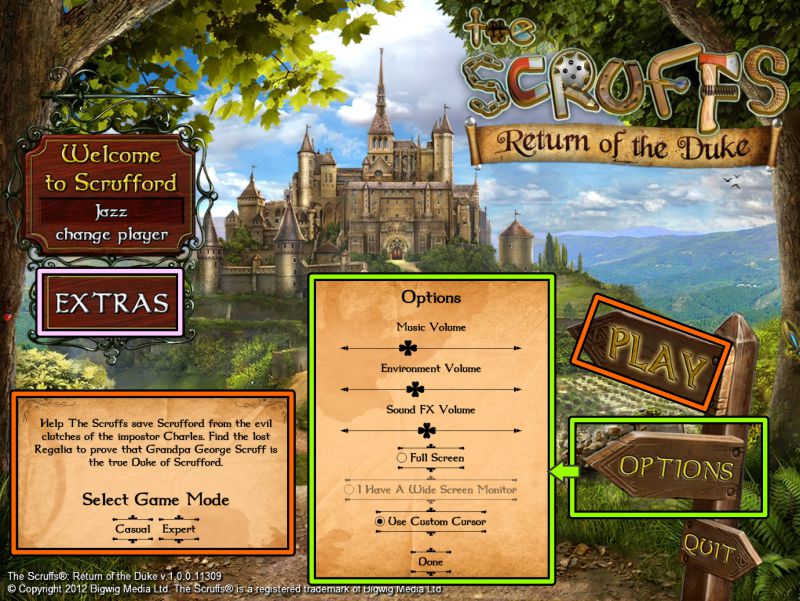
Main Menu
From the Main Menu, you can Play or Quit the game, choose your Options and Profile, and view the Extras.
Be sure to exit to the Main Menu if you want to Quit the game; otherwise your progress will not be saved.
Options include Music, Environment, and Sound FX volume; Full or Windowed screen, use of a custom cursor, and widescreen.
There is a Strategy Guide and Extras included with the game.
Game Modes are Casual and Expert.
Casual Mode gives you more help and Scruffy recharges quicker.
As an Expert, you get to put your skills to the test because you will get less help.
As you begin play, you will get a choice of having Interactive Help .
Screenshot
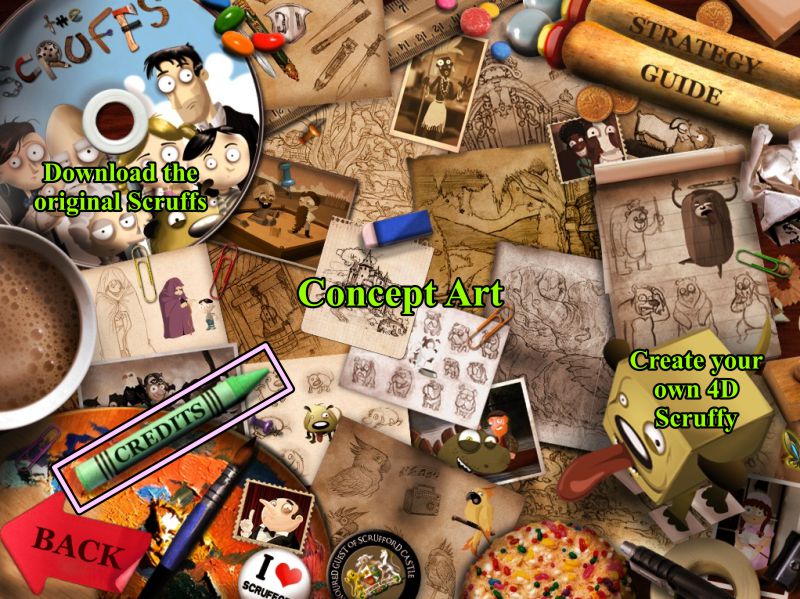
Extras
In Extras, you can download the original Scruffs game, check out the concept art, create your own 4D Scruffy, and view the credits.
Screenshot
Scene Navigation
Hints are unlimited once Scruffy, in the lower right corner, gets his rest.
When you call upon him for help, he will get increasingly more excited as you get closer to the object you need to find.
When there is nothing more for you to do in a particular scene, if asked, Scruffy until tell you to look somewhere else.
Above Scruffy, you can access the same Menu you will also encounter when the game is paused.
The Menu gives you your choice of continuing the game, accessing the Options, Help and Strategy Guide, or Saving and Exiting to the Main Menu.
In the lower left corner is your Notebook with your list of tasks that will be crossed off once you have completed them.
Whenever you receive a new task, the bell will ring, and the Notepad will raise up to show you the new task.
In the center is your Inventory and your Scroll with your Hidden Object Lists.
You can open or close the scroll as you wish.
If you need to identify an item in your Inventory, mouse over it for its name.
The items to locate are mainly the same for everyone so are marked in the screenshots, plus all items that go into your Inventory are marked in bright blue.
Mini Games have a Skip option when the button at the top of the game becomes full.
All Mini Games also have an Info question mark Button in the upper left corner that will tell you what is expected for you to complete the game.
Objects and locations with a Magnifying Glass should be checked out for more information.
Rotating gears mean there is an interactive task to complete.
Moving feet show you how to get to another location, as does a gold arrow when you can exit at the bottom of the scene.
You will need to back out of close-up scenes via the "X" in the upper right corner, or by clicking somewhere in the main scene.
Each chapter has a goal for you to achieve in order to obtain an item of the Scrufford Regalia.
At the beginning of each chapter, you will be asked to collect some objects and return them to the person who requested them. In exchange you will a Scroll that will provide you with your Hidden Object lists for that chapter.
The character in control of the Scroll is called a Knight, and you need all of them to sit at the Scrufford table.
There are 12 items to locate in the Scroll Scenes that are the same for everyone with a few exceptions.
Make certain you carefully select the objects you wish: If you are a little bit off, you may see a red "X", which means you just need to get a little closer.
Although you may see object in a scene that you will later need, you cannot pick them up until you learn that you need them.
Chapter 1: Wisdom
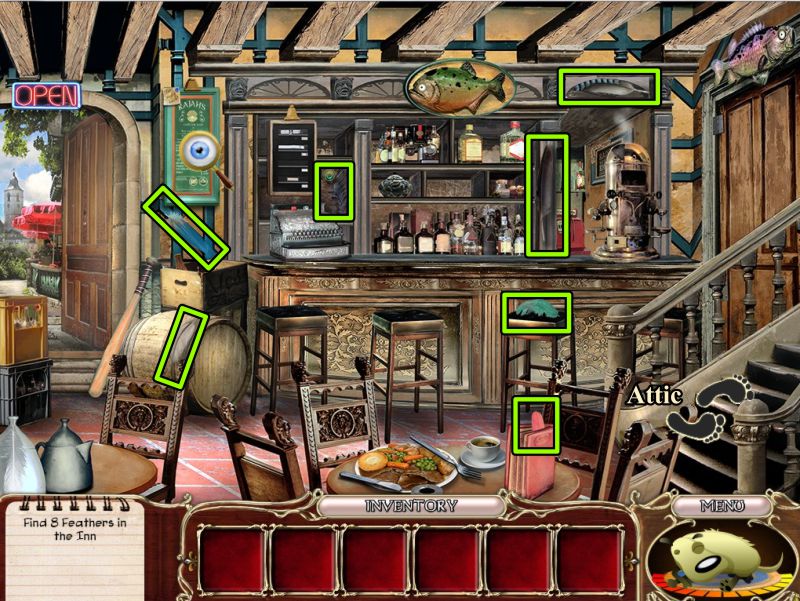
Inn
You meet up with Grandpa's childhood friend Rajah, who can't find his thingies, so you have your first collection task to locate 8 feathers for Rajah.
Once you find them, go upstairs to the Attic.
Screenshot
Attic
Give Rajah his collection of Feathers, and he will give you a Scroll that you will use for a Hidden Object Scene.
Rajah will tell you that you need to find everything on the Scroll and then call him.
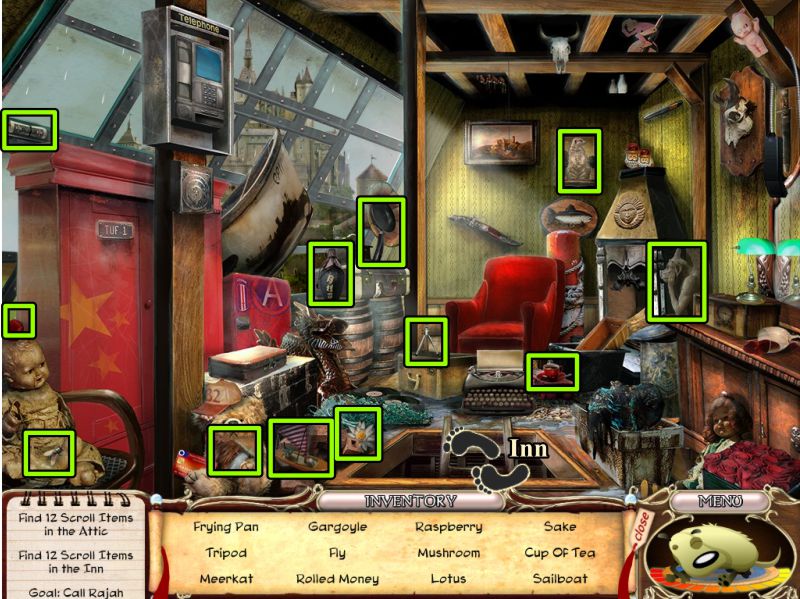
Attic Scroll Scene
Collect everything on your list, then go downstairs to the Inn.
Screenshot
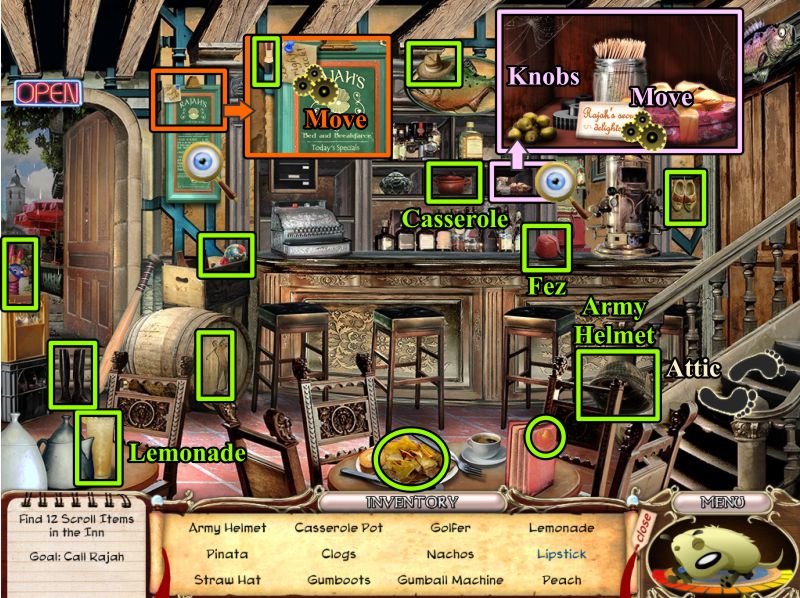
Inn Scroll Scene
Collect the items on your scroll, then zoom in on the menu near the door and move the note to find the Lipstick.
I labeled some of the items in the screenshot that may be variables on your list of objects to find.
Zoom in on the area marked in pink in the screenshot, move the card and take the Knobs.
Return to the Attic.
Screenshot
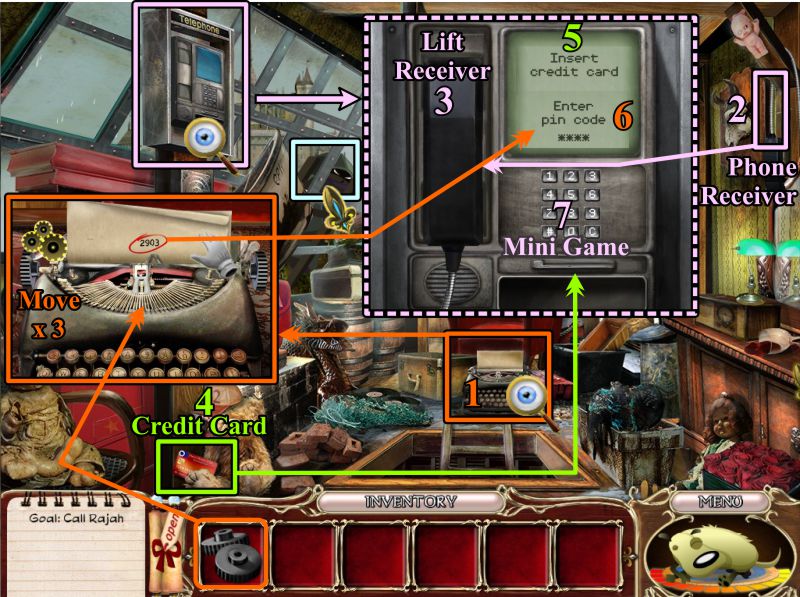
Attic
Click on the spooky character at the window.
Zoom in on the typewriter, place the Knobs, and move them 3 times to see the code.
Pick up the Phone Receiver at the right, zoom in and place it on the phone.
Lift the receiver, and you will get a message that you need a credit card.
Grab the Credit Card from the bear and insert it in the phone.
Enter the 2903 code from the typewriter to trigger a Mini Game.
Screenshot
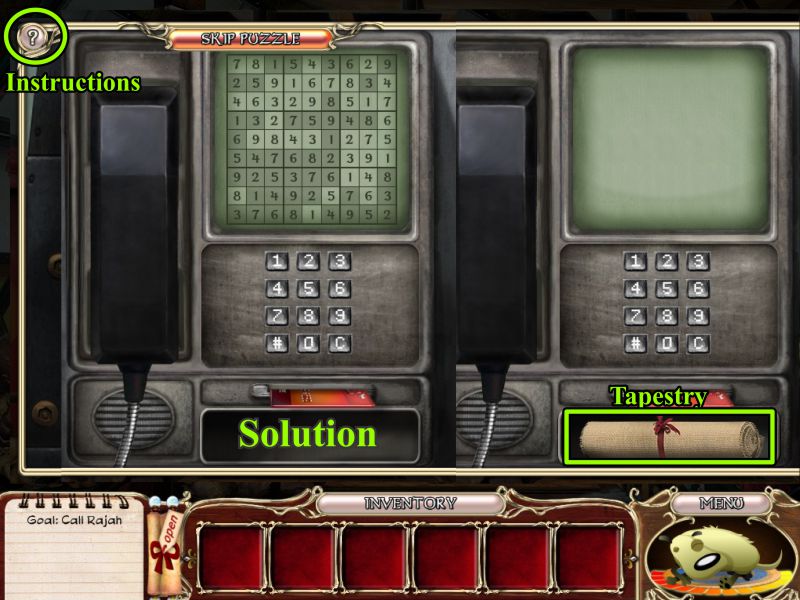
Telephone Sudoku Mini Game
See the screenshot for the solution.
Once you have completed the game, you will receive your first Regalia item: The Tapestry of the Order of the Knights of Scrufford.
Screenshot
Chapter 2: Honesty
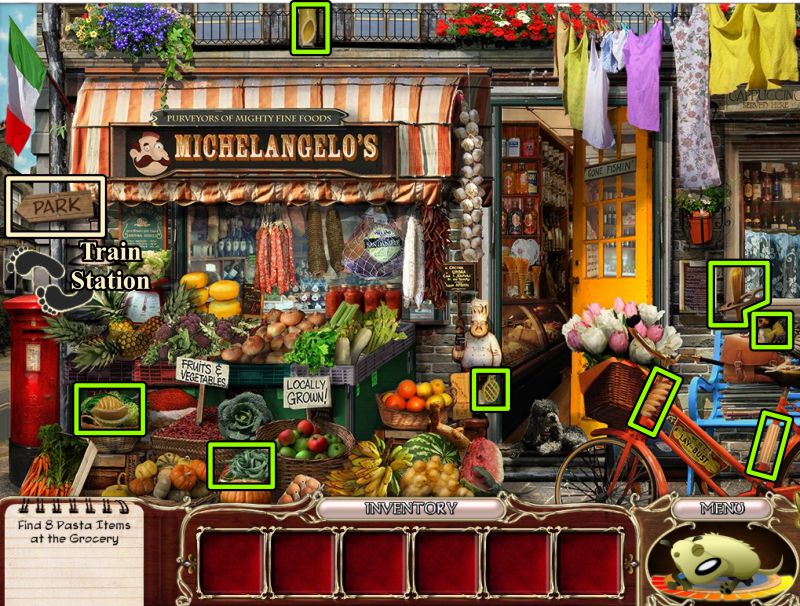
Grocery
Michelangelo needs you to collect some pasta items for him.
Once you have found all of them, go to the Train Station via the Park sign on the left.
When you get to the Park, follow the sign to the Train Station.
Screenshot
Train Station Scroll Scene
Give Michelangelo his collection of Pasta in exchange for a Scroll.
He will tell you that you need to fix the train schedule to find what you are looking for.
Collect everything on your list, and you will get a Clamp for your Inventory.
Return to the Grocery.
Screenshot
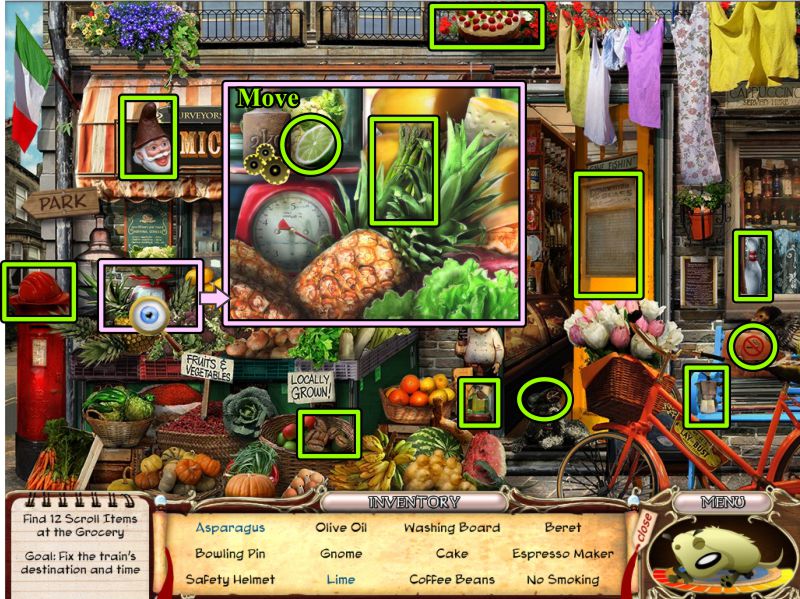
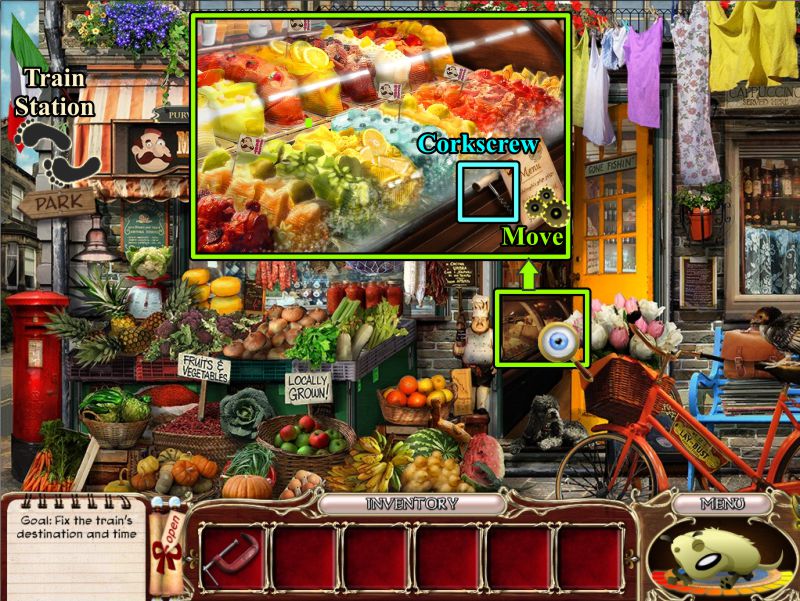
Grocery Scroll Scene
Collect everything visible on your list, then zoom in on the fruit stand.
Pick up the Asparagus and move the weight to find the Lime.
Screenshot
Grocery
Zoom in on the case inside the door.
Move the menu card to find a Corkscrew.
Go to the Train Station.
Screenshot
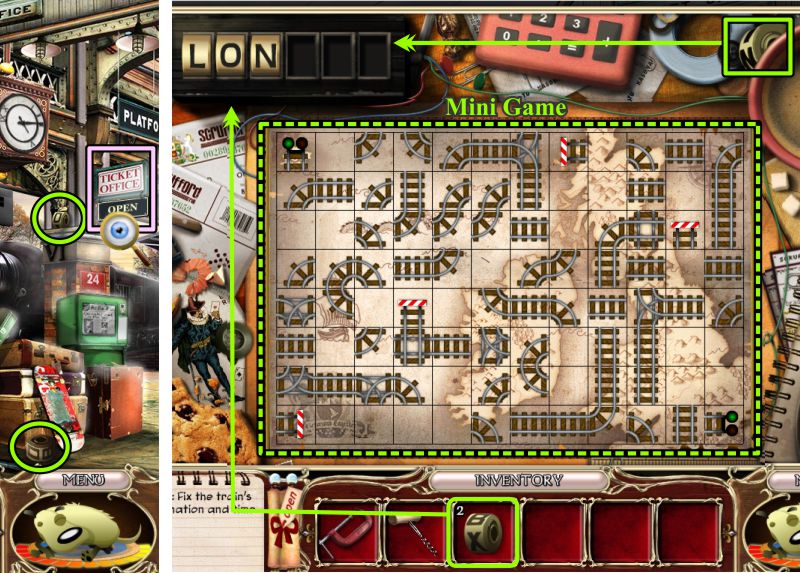
Train Station
Pick up the two Rollers, then zoom in on the now open Ticket Office.
Grab the third Roller and place all 3 of them in the tray to trigger a Mini Game.
Screenshot
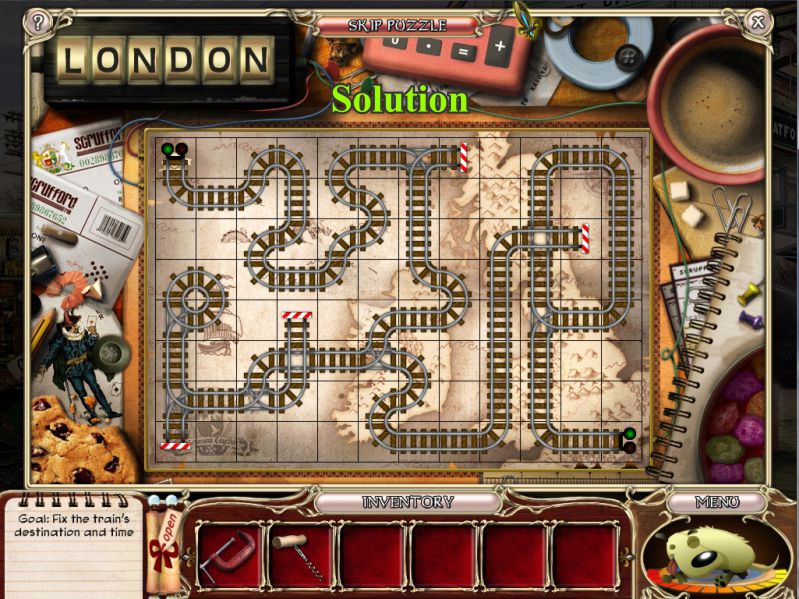
Train Track Mini Game
See the screenshot for the solution.
Once you have completed the game, the location rollers will change to London.
Screenshot
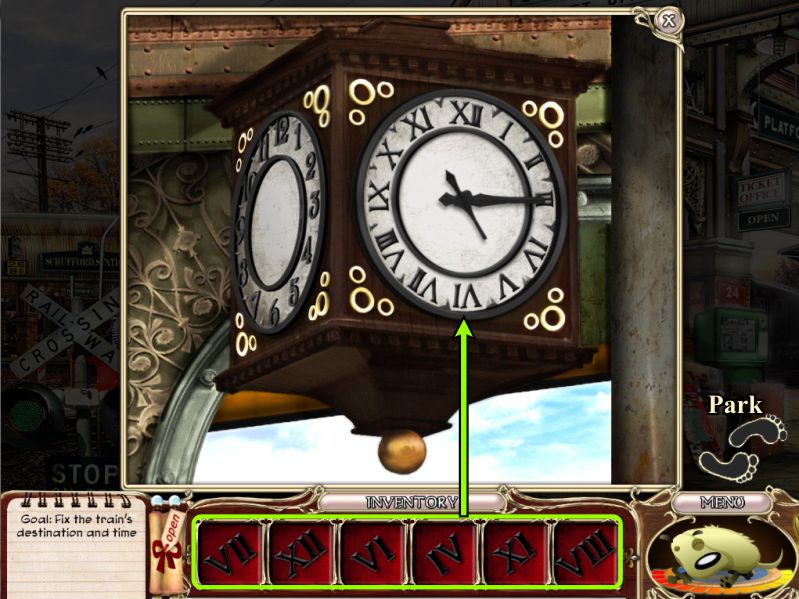
Train Station Clock
Zoom in on the clock to find out some of the Roman Numerals are missing.
Pick up the 2 numbers there, and go to the main scene to find the other 4 numbers.
Zoom in again on the clock.
Screenshot
Place all the numbers as shown in the screenshot, exit the close up, and go to the Park.
Screenshot
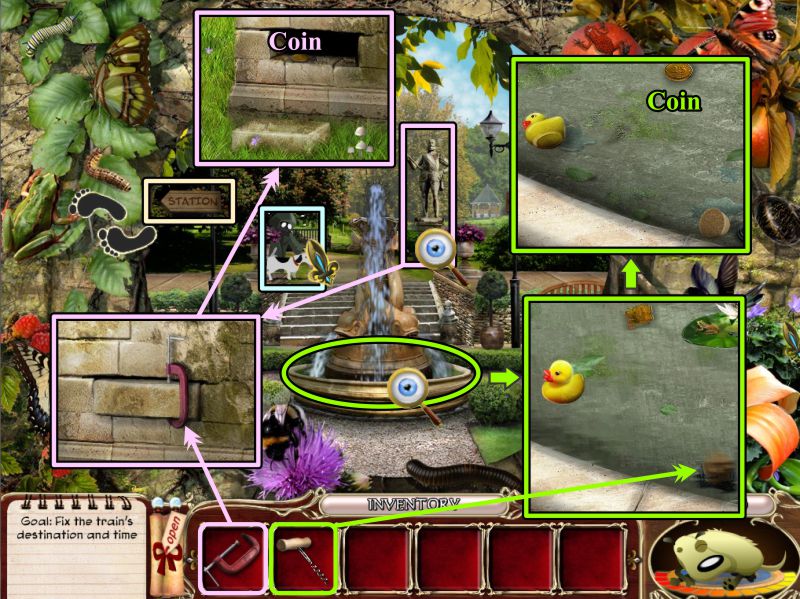
Park
Click on the weird character to get rid of it.
Zoom in on the statue, place your Clamp to remove the brick, and take the Coin.
Zoom in on the fountain and use the Corkscrew to remove the plug and drain the water.
Take the Coin and return to the Train Station.
Screenshot
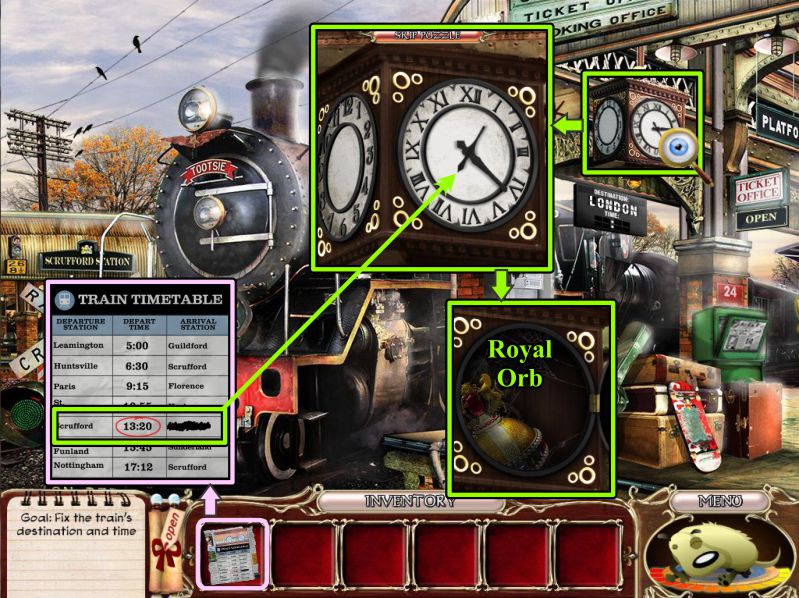
Train Station
Zoom in on the newspaper stand, place your 2 Coins, turn the knob twice, and take the train timetable.
Screenshot
Zoom in on the clock and set the time to 1:20, as shown on the timetable.
Collect the Royal Orb.
Screenshot
Chapter 3: Justice
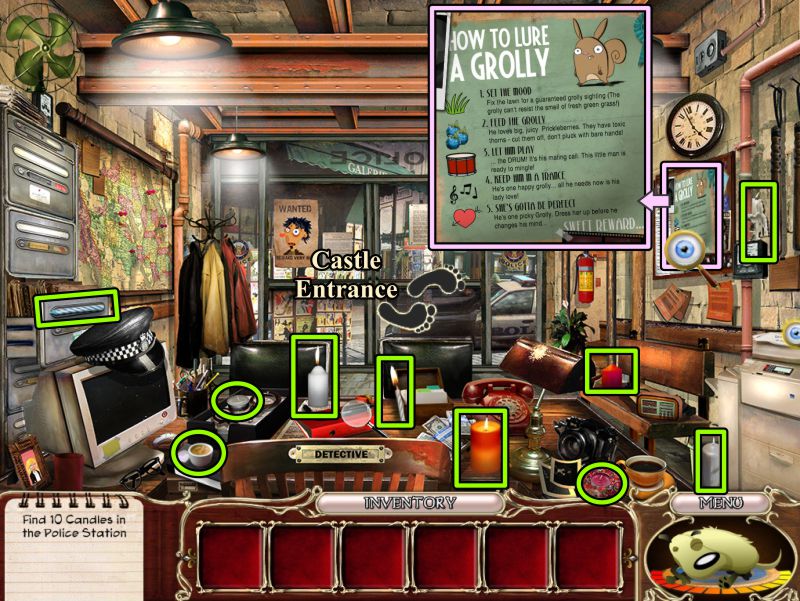
Police Station
Max needs you to find 10 Candles.
Zoom in on the sign to find out "How to Lure a Grolly".
Go out the door to the Castle Entrance.
Screenshot
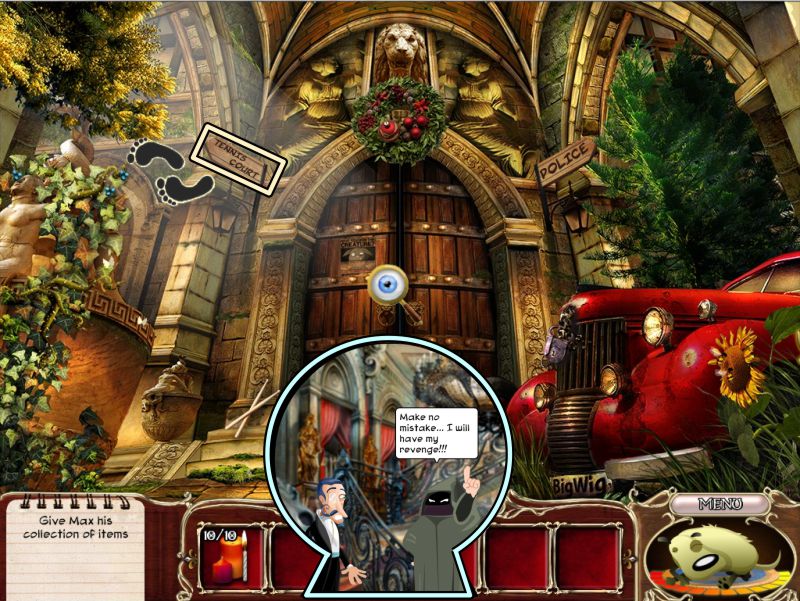
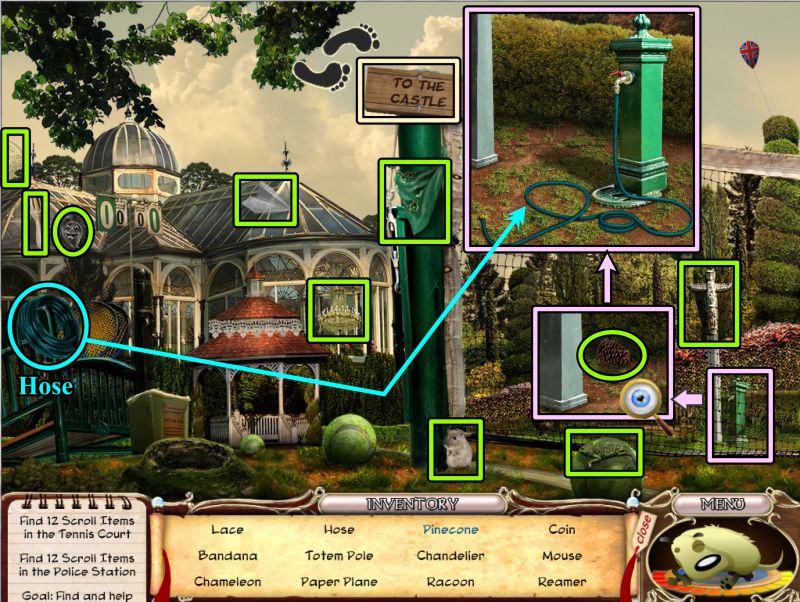
Castle Entrance
Zoom in on the door and watch the scene through the keyhole.
Continue on to the Tennis Court.
Screenshot
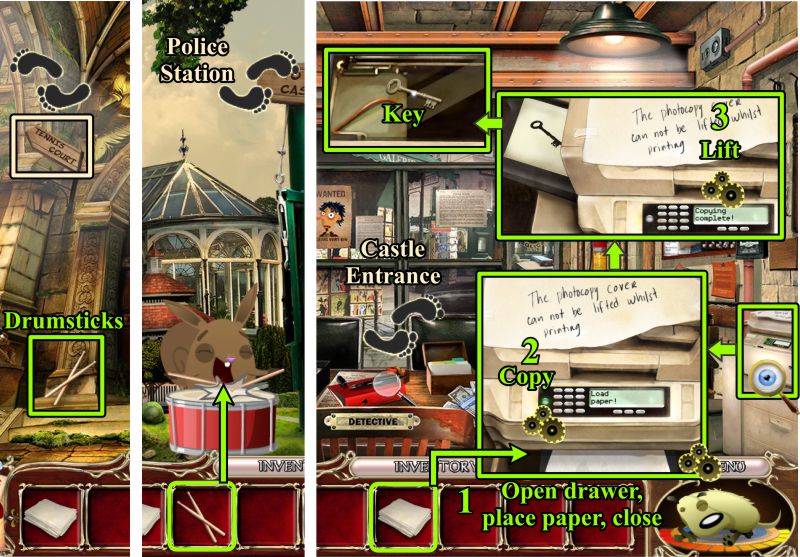
Tennis Court
Give Max his collection of Candles in exchange for a Scroll. He will tell you that you need to get the Grolly for him to give you what you want.
Collect everything, and you will get a Hose for your Inventory.
Zoom in on the water faucet at the right, pick up the Pinecone, and connect the Hose.
Go to the Castle Entrance.
Screenshot
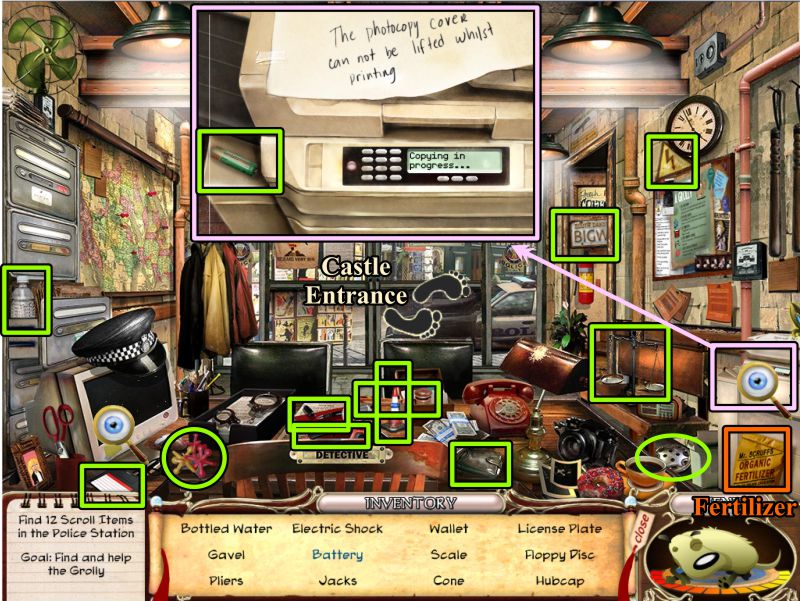
Police Station Scroll Scene
Zoom in on the copy machine to find the Battery.
Collect the Fertilizer in the lower right corner above Scruffy, then head to the Castle Entrance.
Screenshot
Castle Entrance
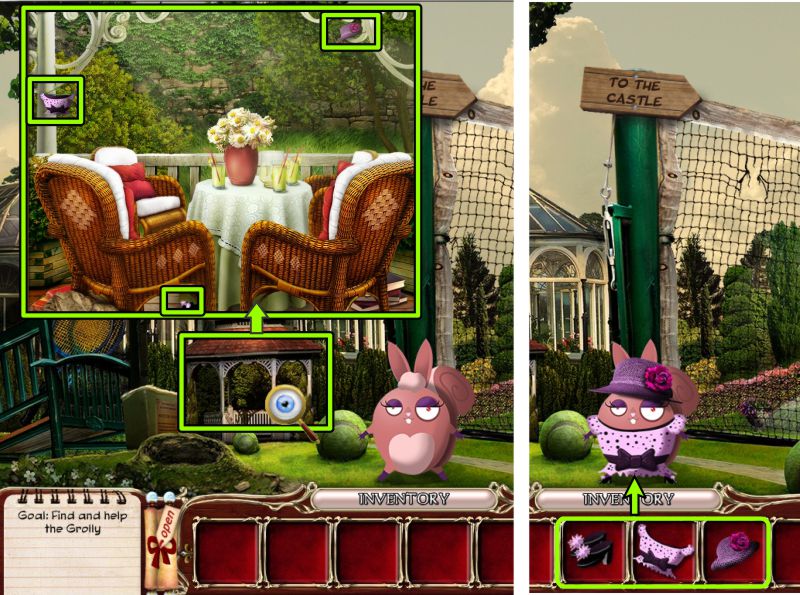
Pick up the Sprinkler, check out the magnifying glasses, and go to the Tennis Court.
Screenshot
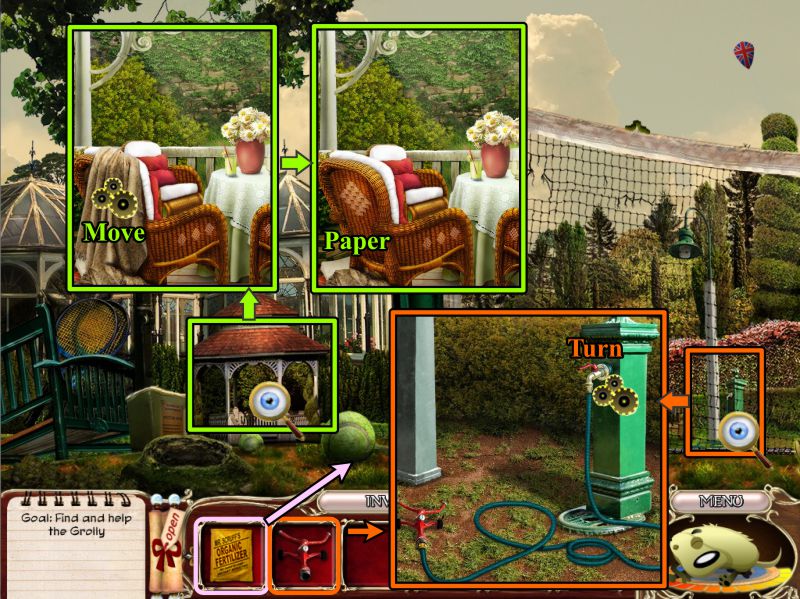
Tennis Court
Zoom in on the gazebo, move the shawl, and pick up the Paper.
Place the Fertilizer on the Tennis Court, zoom in on the faucet, place the Sprinkler on the Hose, and turn the faucet.
Screenshot
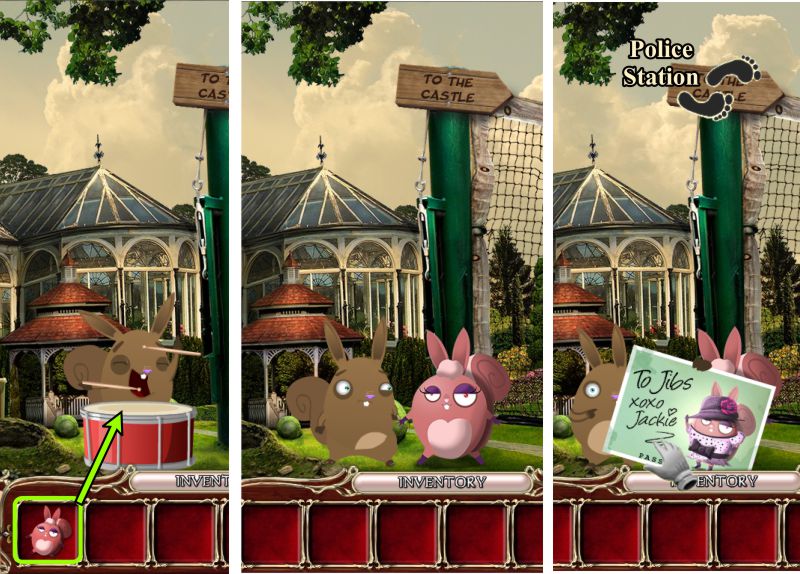
The Grolly and Police Station
The Grolly comes out of his hole and paints a sign for you to feed him.
Go to the Police Station to collect the Scissors, and head to the Castle Entrance.
Screenshot
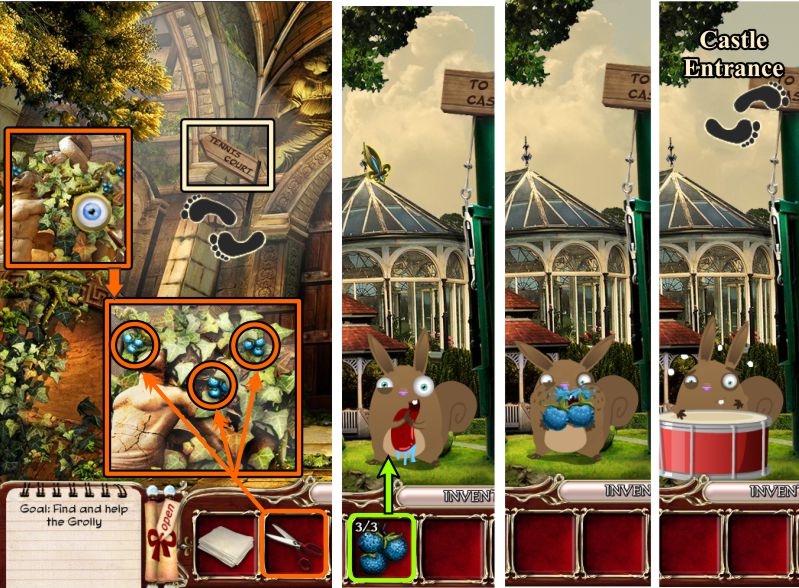
Castle Entrance and Tennis Court
Zoom in on the pot at the left, and clip the 3 sets of Berries with the Scissors.
Go to the Tennis Court and give the Berries to the Grolly.
He brings out a Drum, but he can't play it without Drumsticks.
Go to the Castle Entrance.
Screenshot
Castle Entrance
Grab the Drumsticks and take them back to the Grolly.
He's happily playing, so head to the Police Station.
Zoom in on the copy machine.
Open the drawer, place the Paper, and close the drawer.
Press the button to copy whatever was there before it ran out of paper.
The copy is of a key, so lift the top and take the Key.
Go to the Castle Entrance.
Screenshot
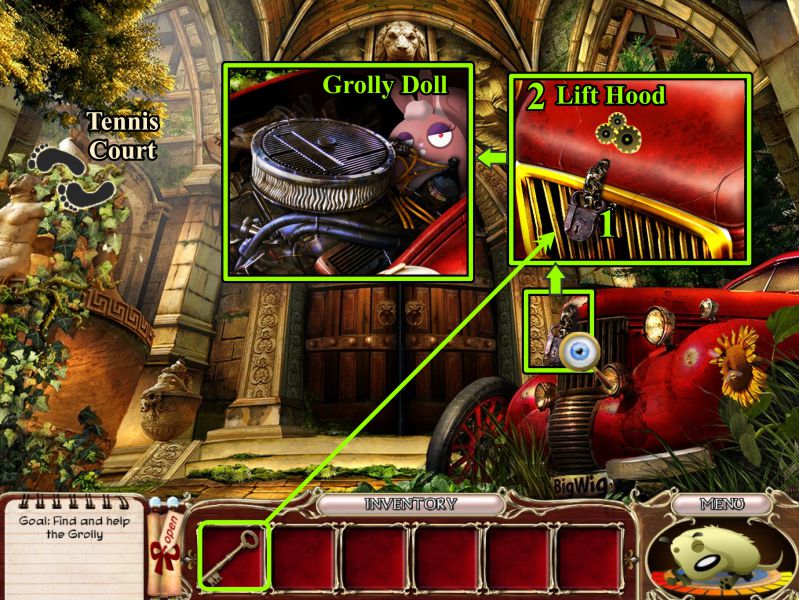
Attic
Zoom in on the lock on the hood of the car and open it with the Key you just found.
Lift the hood and take the Grolly Doll.
Go to the Tennis Court.
Screenshot
Tennis Court
Give the Grolly Doll to the Grolly.
He give you a picture of how he wants her dressed.
Head to the Police Station.
Screenshot
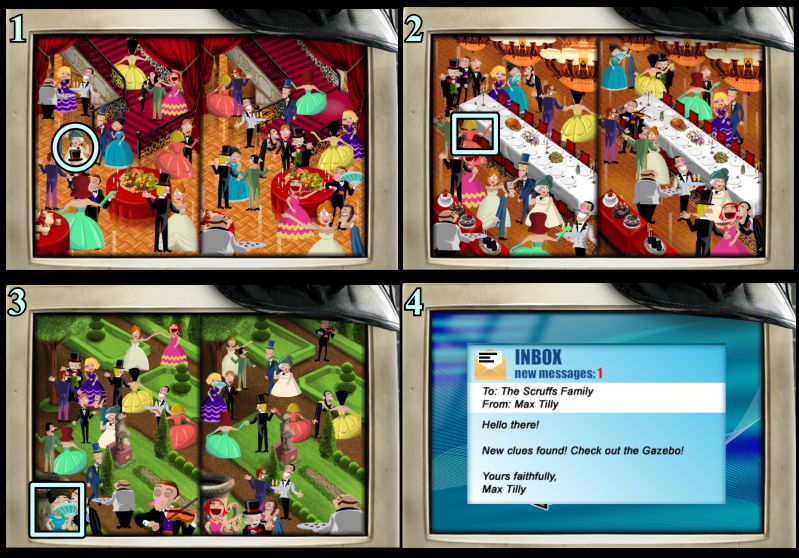
Police Station
Zoom in on the computer, note the password on the card the Grolly gave you, and type in BADDIE.
Click on the arrow for a Mini Game.
Screenshot
Computer Mini Game
Your goal is to compare both sets of pictures and mark the character on the left who does not appear in the right picture. See the screenshot for the solutions.
Read the message from Max. Return to the Tennis Court.
Screenshot
Tennis Court
Zoom in on the gazebo and pick up the Grolly clothes.
Dress your Grolly Doll in the clothes.
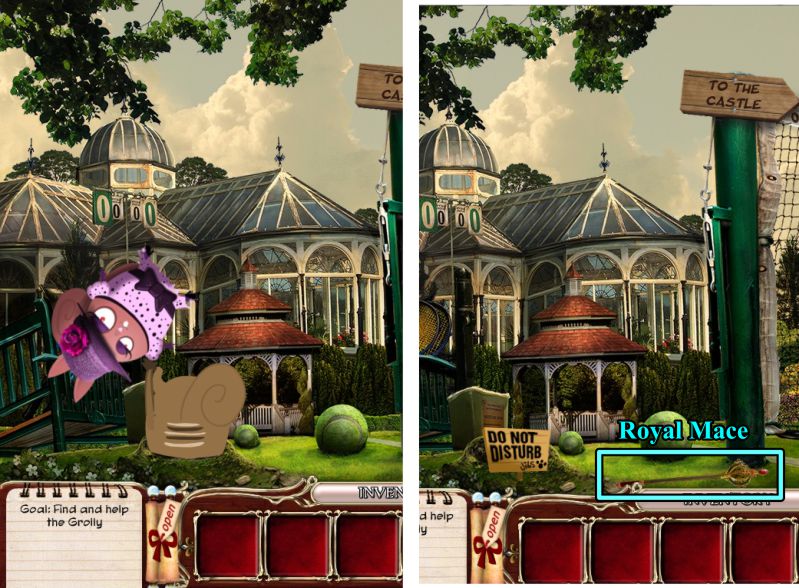
Screenshot
The Grolly grabs the doll and heads down his hole.
He comes back with a "Do Not Disturb" sign and the Royal Mace.
Screenshot
Chapter 4: Prudence
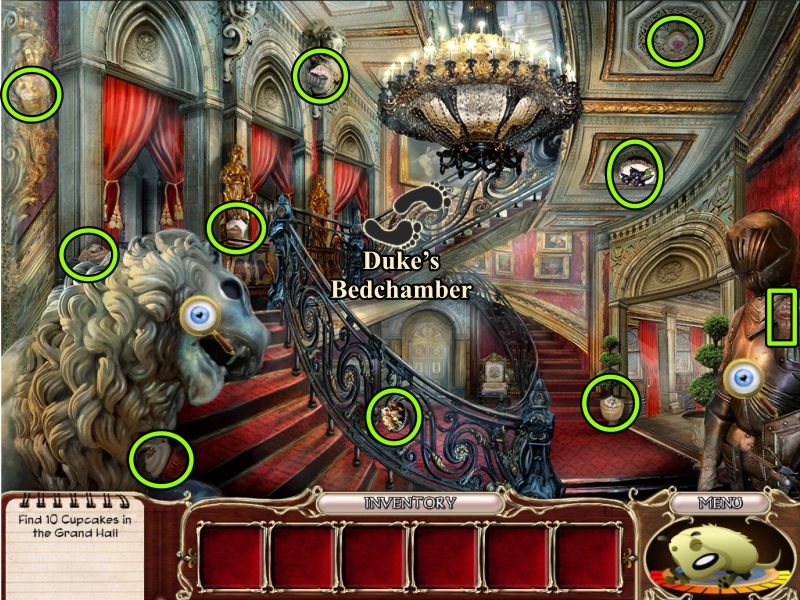
Grand Hall
Find 10 Cupcakes for Pixie, then take them to the Duke's Bedchamber.
Screenshot
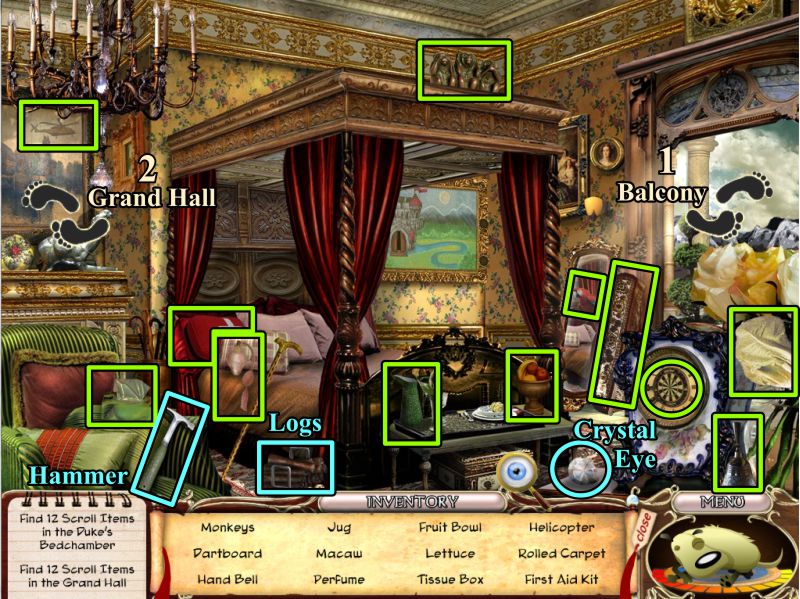
Duke's Bedchamber
Give Pixie her Cupcake collection to get your Scroll.
She will tell you that you need to send out a smoke signal from the Castle to get what you are looking for.
Collect everything on your list, then pick up the Hammer, Logs, and Crystal Eye.
Go to the Balcony, then head back to the Grand Hall.
Screenshot
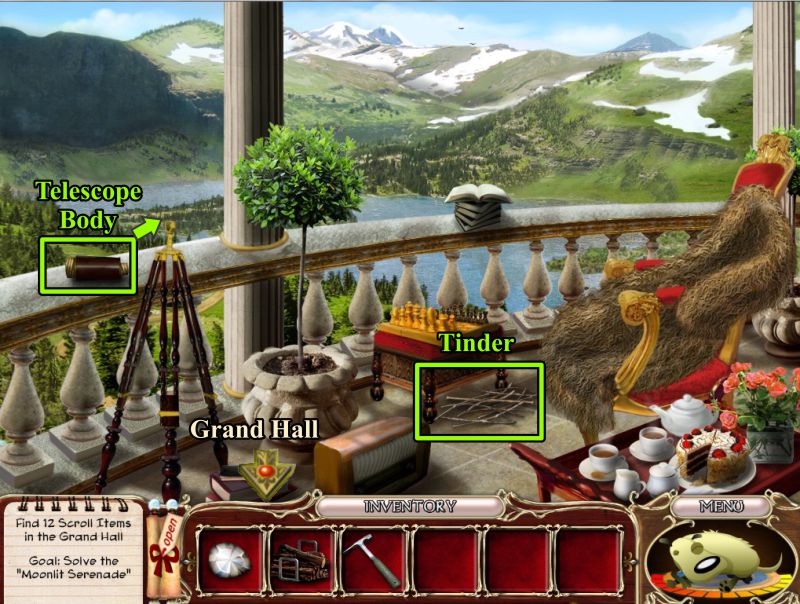
Balcony
Pick up the Tinder and Telescope Body.
Put the Telescope Body on the Telescope, then go to the Grand Hall.
Screenshot
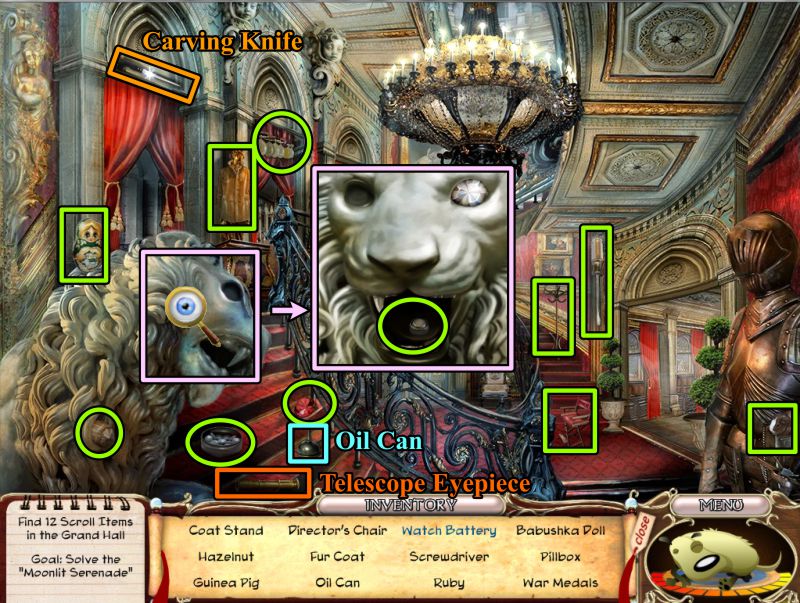
Grand Hall Scroll Scene
Collect everything on your list, plus the Telescope Eyepiece and the Carving Knife.
Zoom in on the lion to find the Watch Battery.
Screenshot
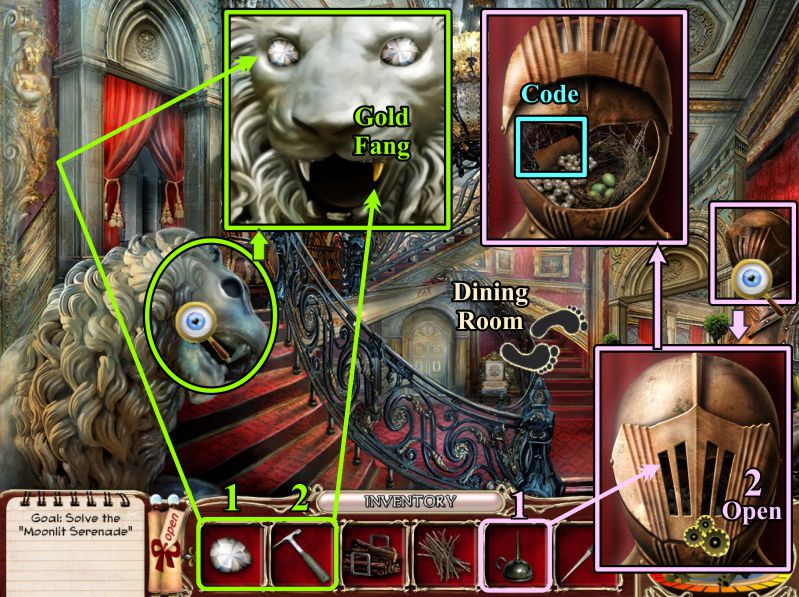
Grand Hall
Zoom in and place the Crystal Eye on the Lion.
Knock off the Gold Fang with your Hammer.
Zoom in on the suit of armor, oil it so you can open it, and take the Code.
Go to the Dining Room.
Screenshot
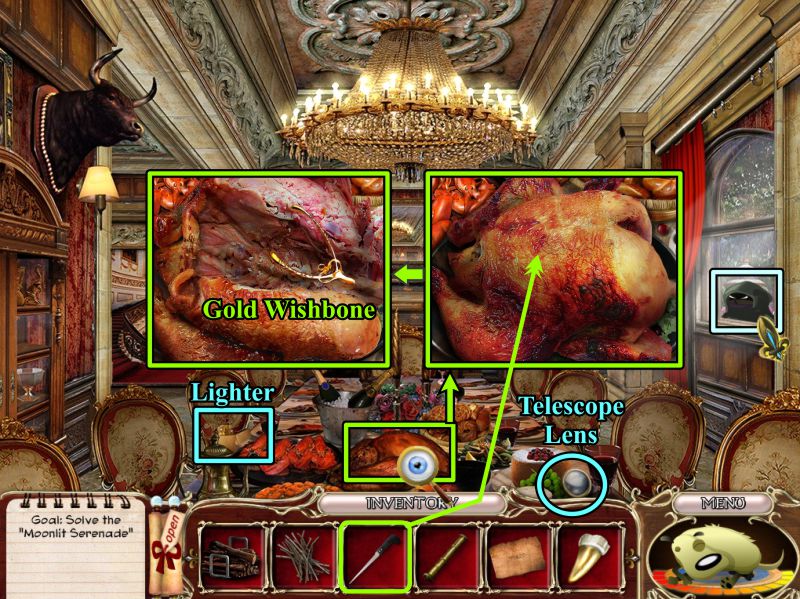
Dining Room
Click on our pesky Peeping Tom, then pick up the Lighter and Telescope Lens.
Zoom in on the turkey and cut it open with your Carving Knife to collect the Gold Wishbone.
Screenshot
Zoom in on the Fireplace.
Place your Logs and Tinder, then light it with your Lighter to send out a smoke signal.
Go to the Duke's Bedchamber.
Screenshot
Duke's Bedchamber
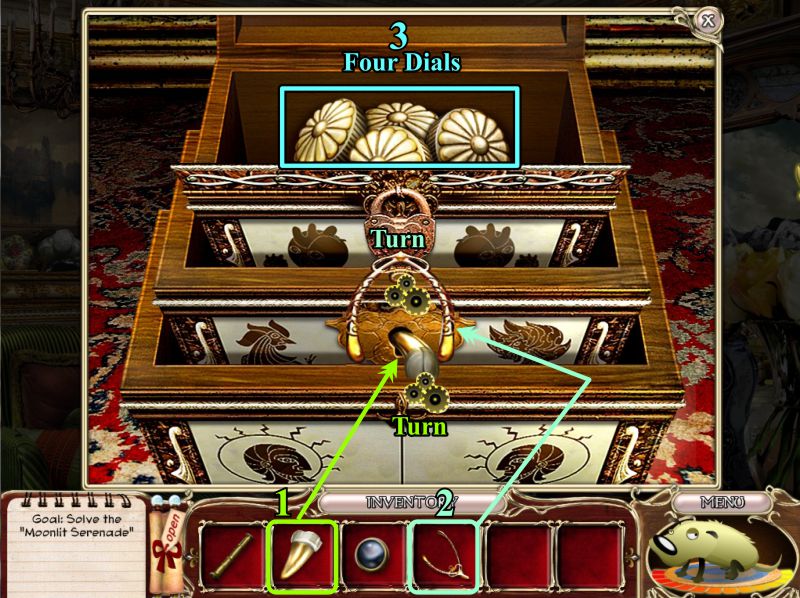
Zoom in on the chest in front of the bed.
Use your 736 code to open the combination lock.
Screenshot
Place the Gold Fang in the first lock and turn it.
Place the Gold Wishbone in the next lock and turn it.
Take the Four Dials, then go to the Balcony.
Screenshot
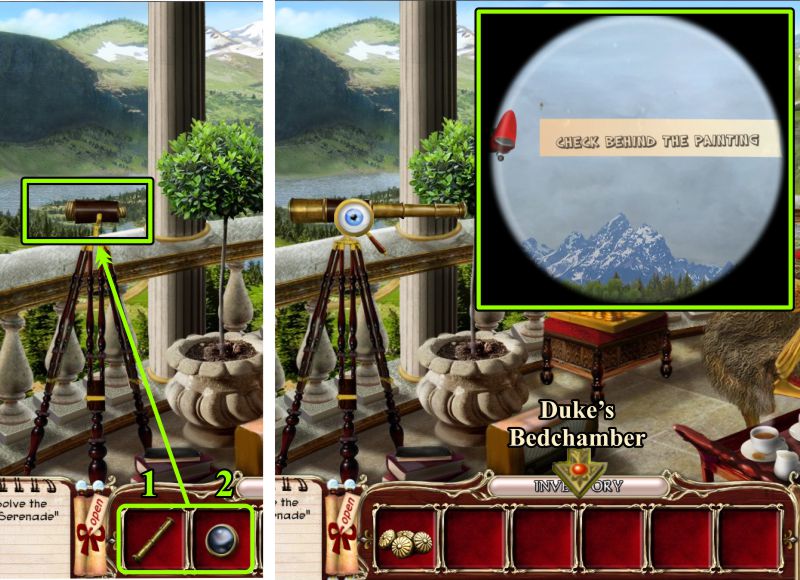
Balcony
Assemble the Telescope with the Eyepiece and Lens.
Look through the Telescope to see an airplane with a message that tell you to check behind the painting.
Return to the Duke's Bedchamber.
Screenshot
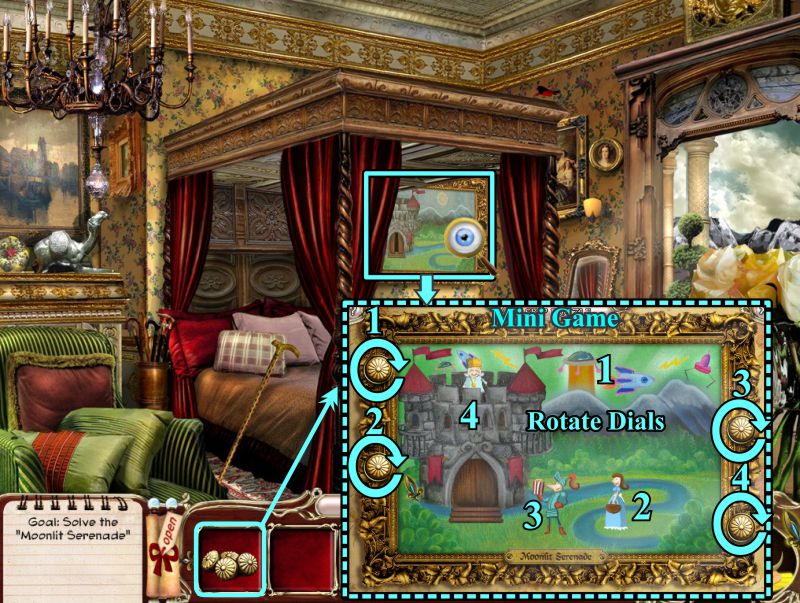
Duke's Bedchamber Painting
Zoom in on the painting and place the 4 Dials to trigger a Mini Game.
Your goal is to rotate the dials to change the different elements of the painting.
See the screenshot to learn which dial connect to the 4 parts of the painting.
Screenshot
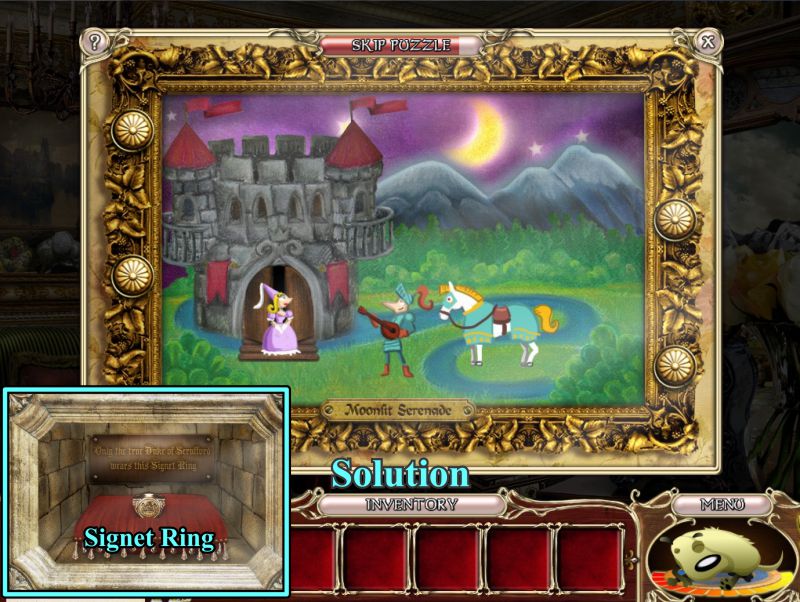
See the screenshot for the painting solution.
Collect the Signet Ring from the niche behind the painting.
Screenshot
Chapter 5: Hope
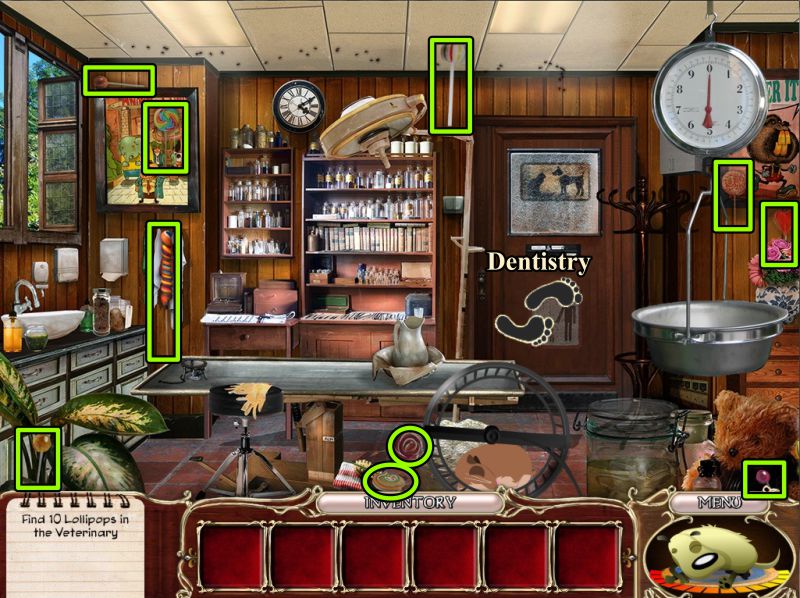
Veterinary
Collect 10 Lollipops for Bernard.
Go through the door to the clinic reception area and enter the door with the tooth on it.
Screenshot
Dentistry Scroll
Give Bernard his Lollipops to get your Scroll. He says you need to get the hamster running up to speed in order to power up the X-ray machine.
The Beaker and Dropper will go into your Inventory.
Zoom in on the machine to find the Peppermint Candy.
Go to Reception.
Screenshot
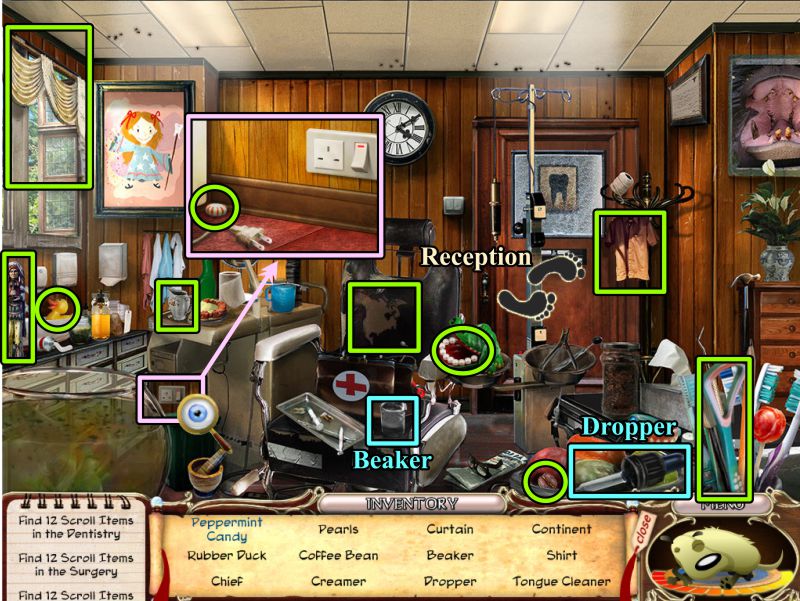
Reception
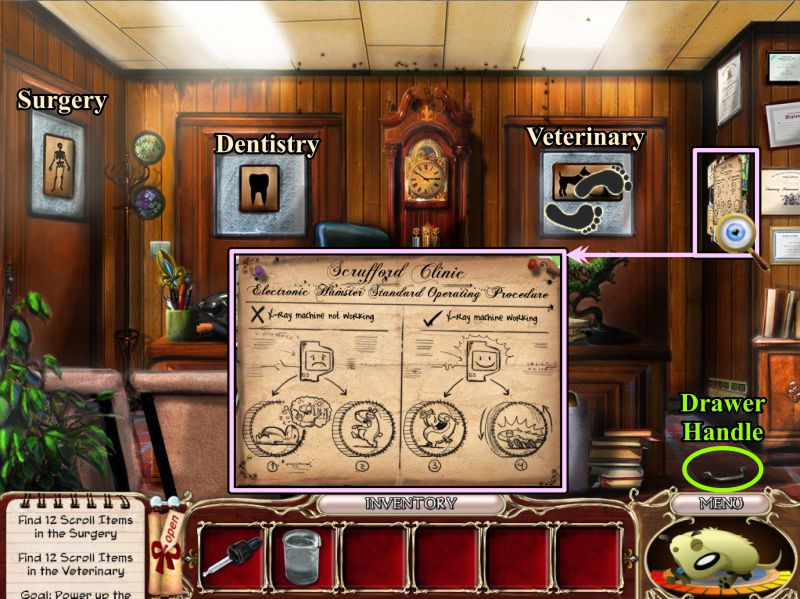
Pick up the Drawer Handle, then zoom in to the instructions on the wall above the Hamster.
When you try to enter Surgery, Bernard appears and says you cannot go in there with Scruffy. He suggests you try to distract him with a Frisbee.
Return to Veterinary.
Screenshot
Veterinary Scroll
Check out the weirdo at the window and click on him.
Collect everything to get a Glass Stick and Frisbee for your Inventory.
Also, pick up the Meteor Rock.
Give the Frisbee to Scruffy, and he will leave to play with it so you can go to Surgery.
Screenshot
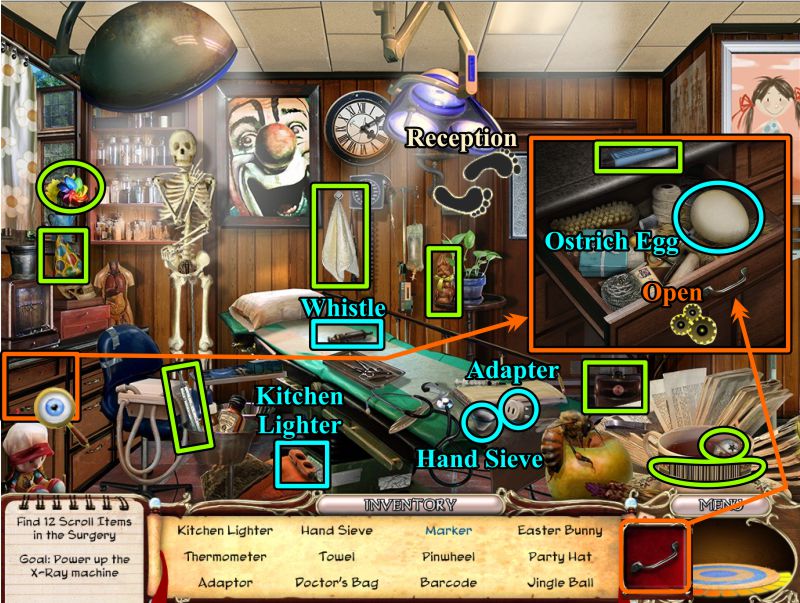
Surgery Scroll
Collect everything on your list, and a Kitchen Lighter, Hand Sieve, and Adapter will go into your Inventory.
Pick up the Whistle and zoom in on the drawer of the cabinet at the left.
Place your Drawer Handle and open the drawer.
Pick up the Marker and collect the Ostrich Egg for your Inventory.
Go to Reception.
Screenshot
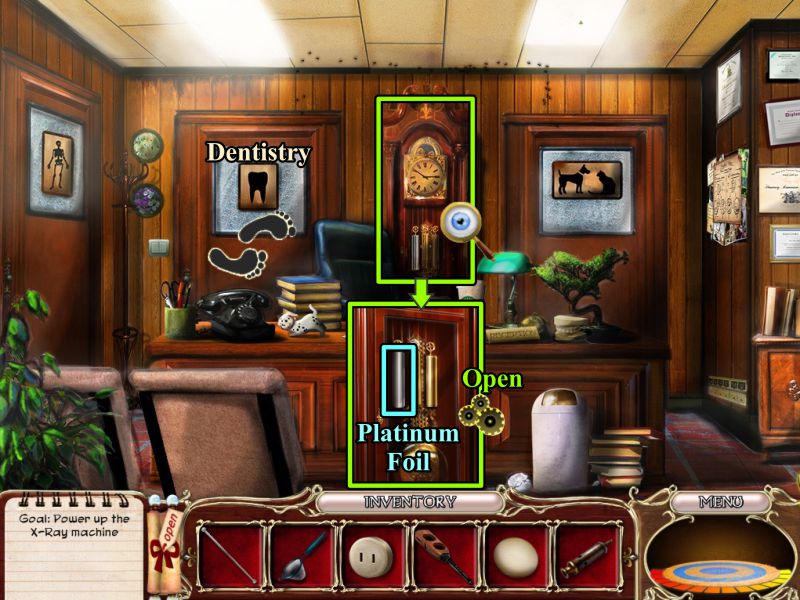
Attic
Zoom in on the Grandfather Clock, open it and take the Platinum Foil.
Go to Dentistry.
Screenshot
Dentistry
Scruffy has had enough fun, so place the Whistle on his pad to call him.
Zoom in and use the Hand Sieve twice to clear the fish tank so you can get the Aloe Vera.
Zoom in on the area with the plug, place the Adapter, and plug in the cord.
Go to Veterinary.
Screenshot
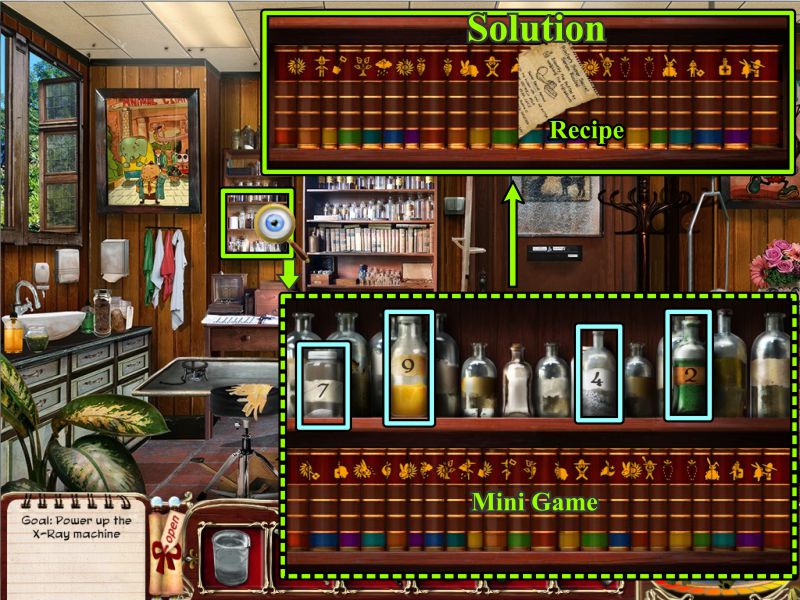
Veterinary
Zoom in on the bookshelf and collect the bottles shown in the screenshot.
Play the Book Mini Game by rearranging them as shown in the screenshot so you can get the Recipe.
Screenshot
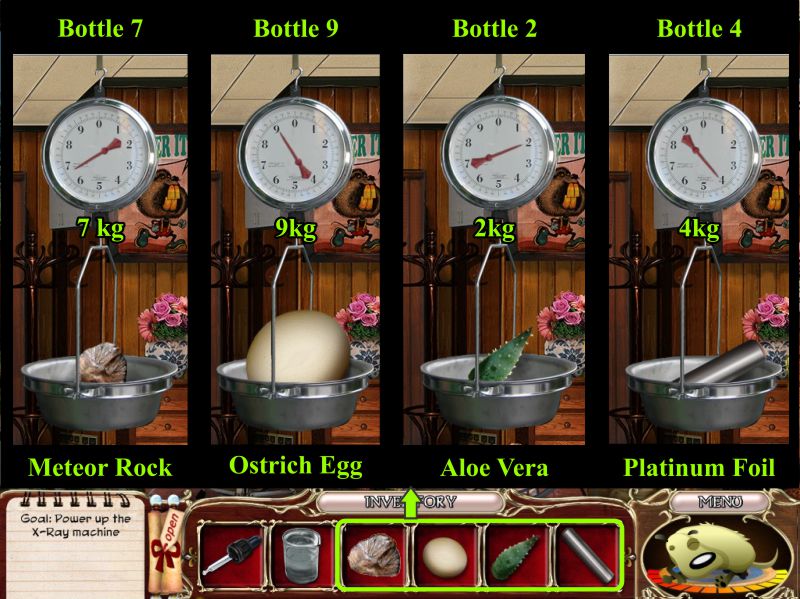
You have all the Ingredients, but you need to weigh them to determine how they relate to the bottles you collected.
See the screenshot for the solution as to which ingredients match up with which bottles.
Screenshot
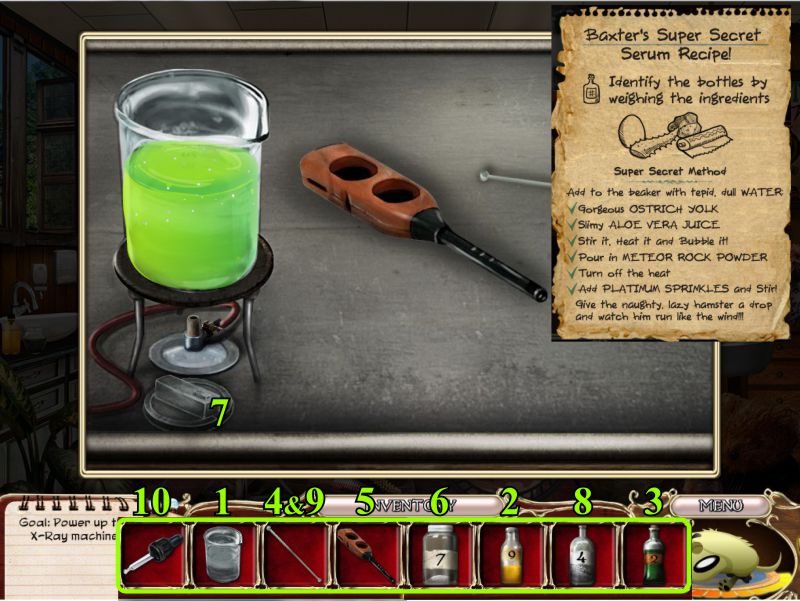
Zoom in on the table and place all the items from the recipe according to the numbered ingredients in the screenshot.
Screenshot
Give the Dropper of serum to the Hamster and watch him go.
Go to Dentistry.
Screenshot
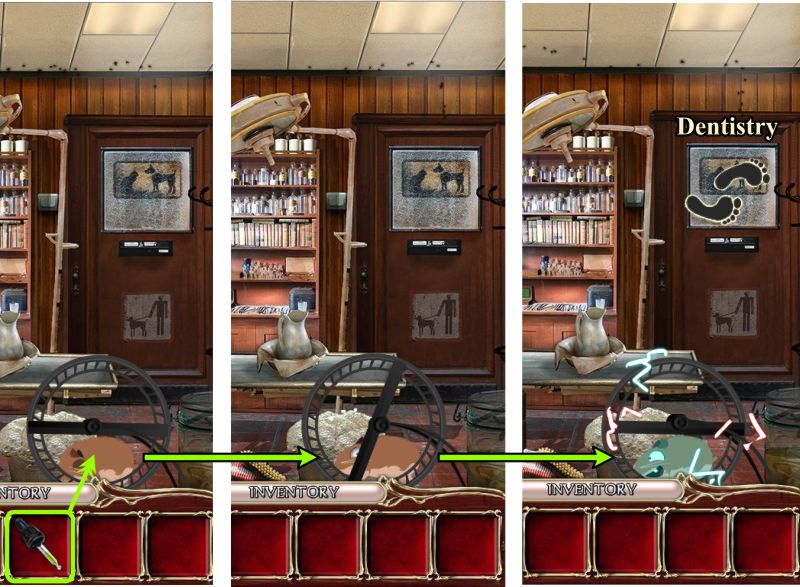
Dentistry
Zoom in on the X-ray machine for a Mini Game.
You are X-raying Scruffy and what's in his belly.
Your goal is to watch the items added and select the last one in order to go on to the next screen.
A sample of all the items is shown in the screenshot.
When you finish the game, you will be rewarded with the Scrufford Shield.
Screenshot
Chapter 6: Patience
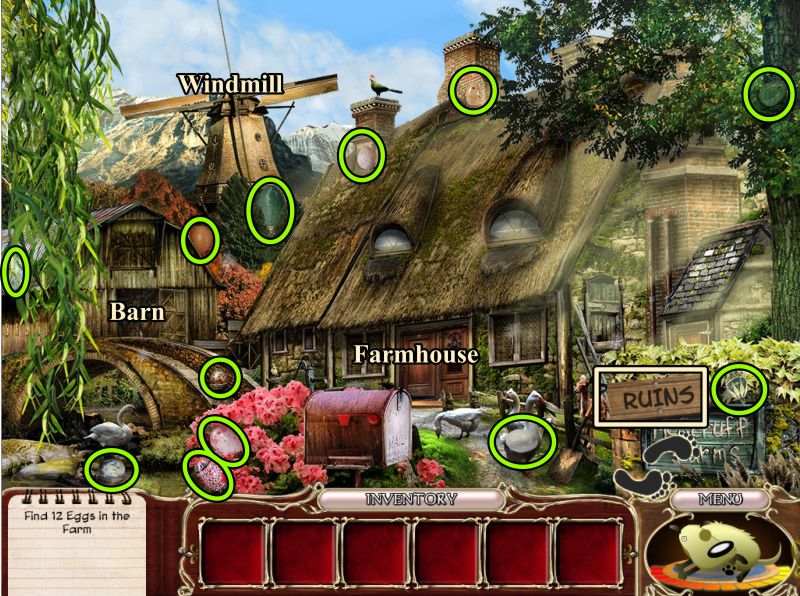
Farm
Collect 12 Eggs at the Farm for Scott.
Go to the Ruins to give him his collection.
Screenshot
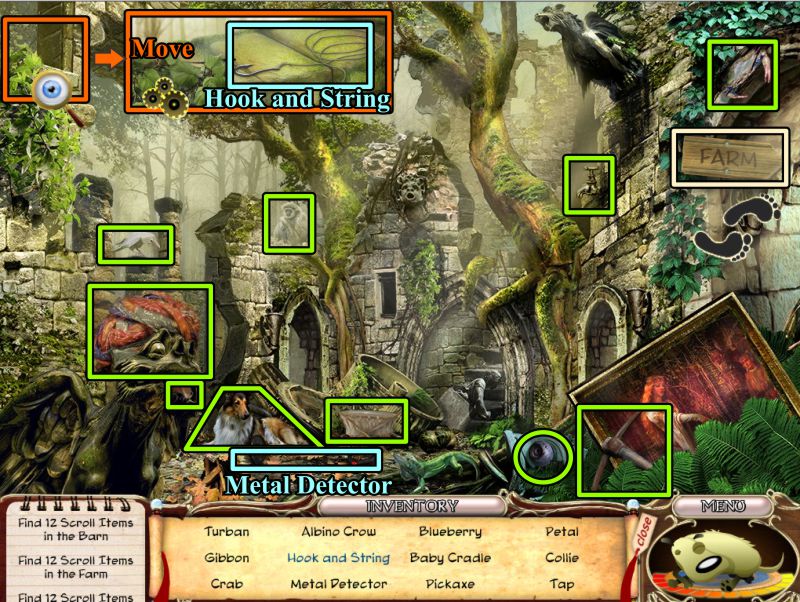
Ruins Scroll
Give Scott his Eggs. He will tell you to fix the Mural and give you a Scroll.
Collect all the items you need, zoom in on the upper left corner to find the Hook and String, and the Metal Detector you collected will go into your Inventory.
Return to the Farm.
Screenshot
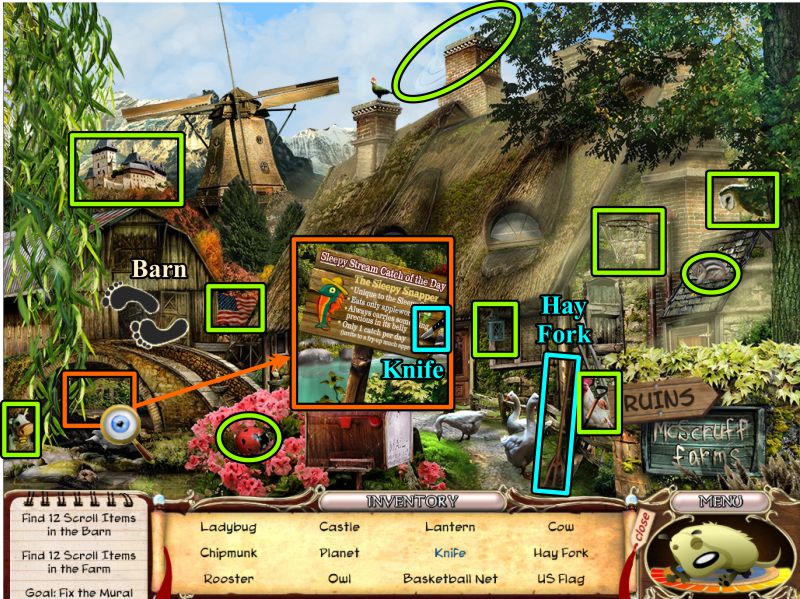
Farm Scroll
Collect everything and zoom in under the bridge to find the Knife.
Pick up the Hay Fork and go to the Barn.
Screenshot
Barn Scroll
Collect everything, then zoom in on the basket at the left.
Move the leaf to find the Apple Worm.
Pick up Cappy's Collar, then go to the Windmill.
Screenshot
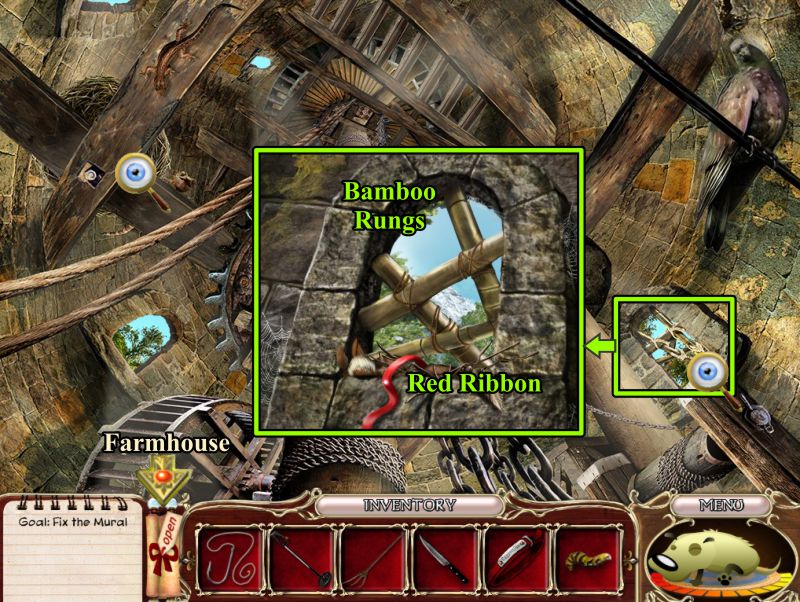
Windmill
Zoom in on the right window, collect the Bamboo Rings, and pick up the Red Ribbon.
Go to the Farm and enter the Farmhouse.
Screenshot
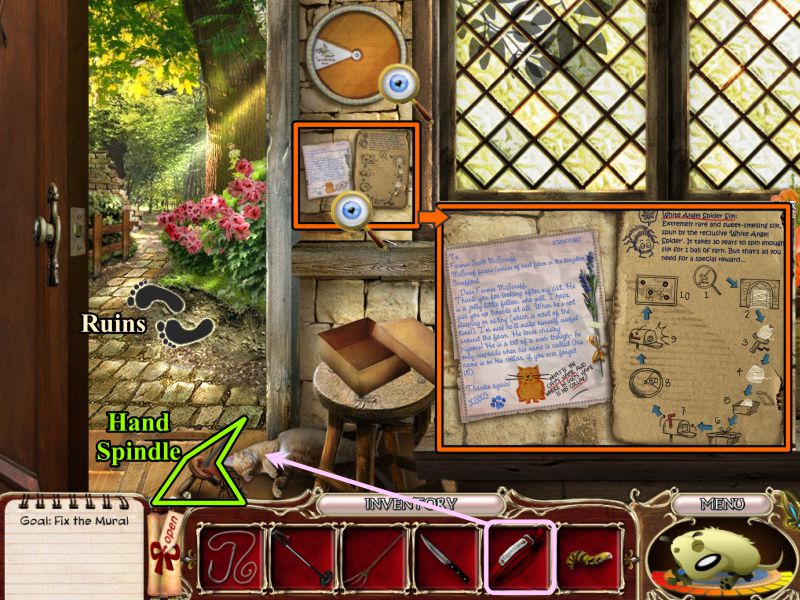
Farmhouse
Grab the Hand Spindle, then check out the clock and bulletin board before going to the Ruins.
Screenshot
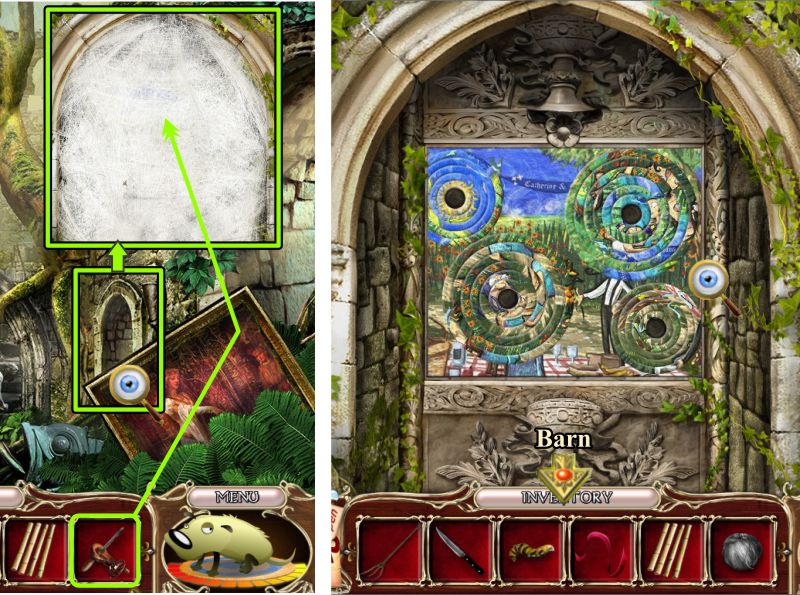
Ruins
Zoom in on the alcove and use the Hand Spindle to collect the spider web.
Check out what you find behind it, then go to the Barn.
Screenshot
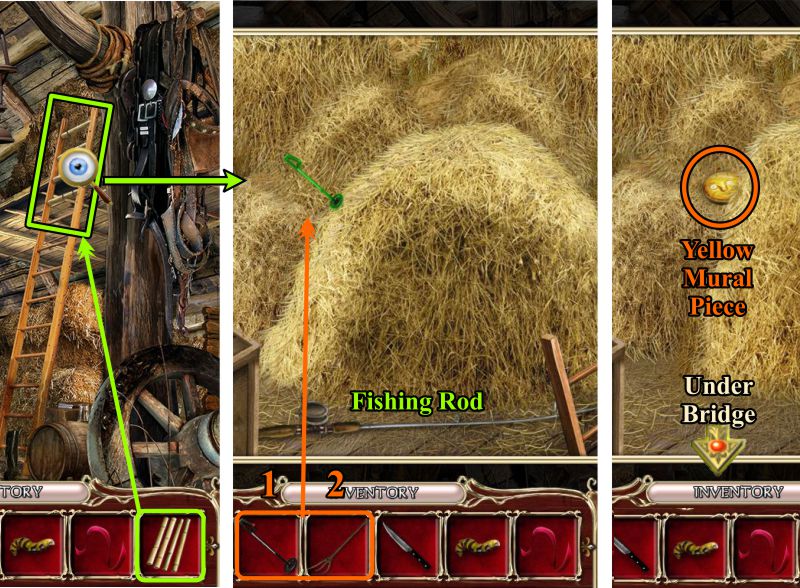
Barn
Place the Bamboo Rungs in the ladder and zoom in on the hay loft.
Collect the Fishing Rod, then use the Metal detector on the hay.
It will turn green when you find your goal; use the Hay Fork to find the Yellow Mural Piece.
Go to the Farm and zoom in under the bridge.
Screenshot
Under the Bridge and Windmill
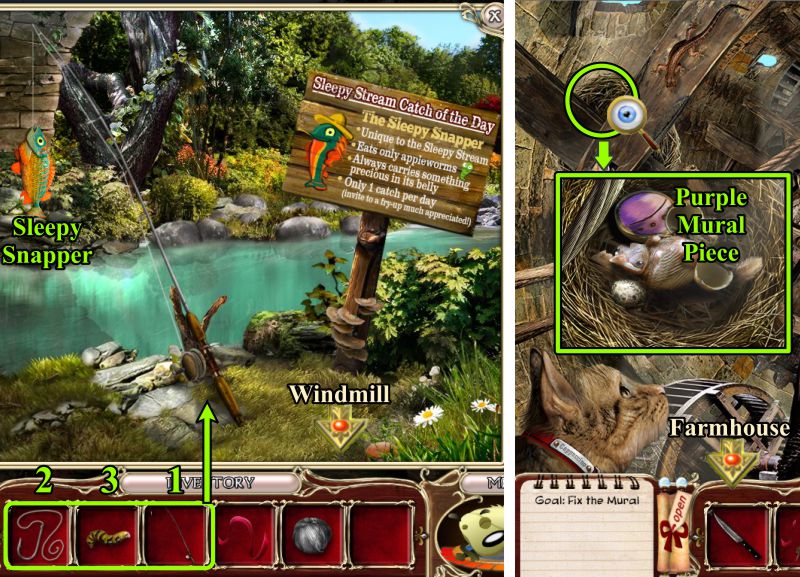
Time to go fishing for a Sleepy Snapper, so place your Fishing Rod.
Attach your Hook and Line, plus your Apple Worm.
When you catch the Sleepy Snappy, grab him for your Inventory.
Once at the Windmill, you will see that Cappy beat you there and scared off the Mamma Pigeon.
Zoom in on the nest and take the Purple Mural Piece.
Go to the Farmhouse.
Screenshot
Farmhouse
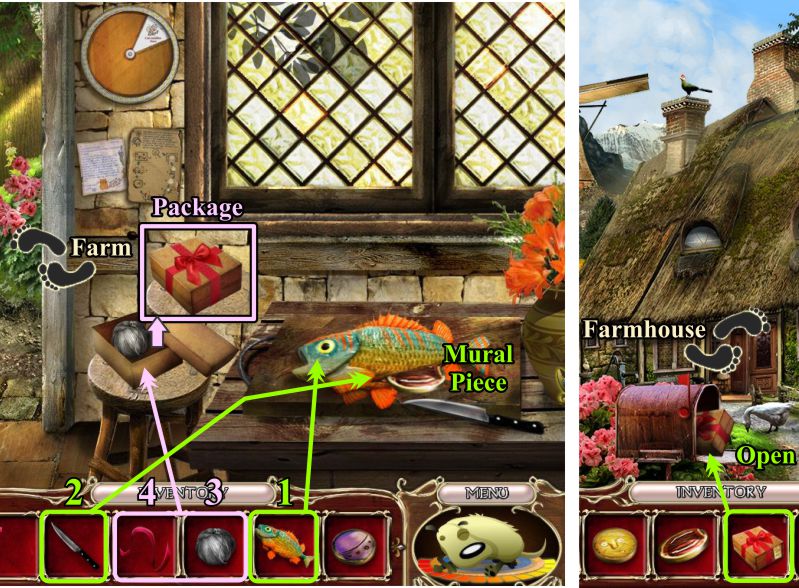
Place the fish on the plank and cut him open with the knife to get the Mural piece.
Place the silk yarn in the box, then tie it up with the Red Ribbon.
Go to the Farm and open the mailbox.
Place the package in the mailbox and return inside the Farmhouse.
Screenshot
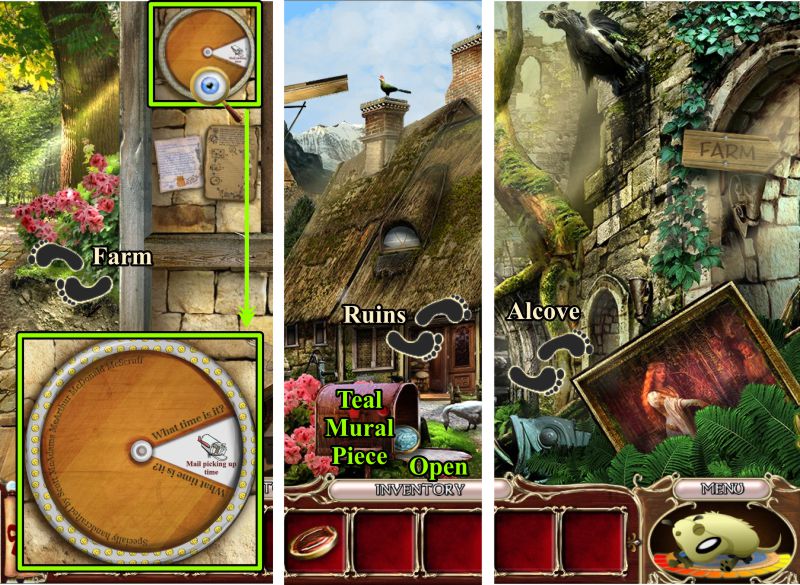
Farmhouse, Farm, and Ruins
Check the clock to find out the mail has been delivered.
Go back outside, open the mailbox, and take the Teal Mural Piece.
Go to the Ruins and then to the Alcove.
Screenshot
Alcove
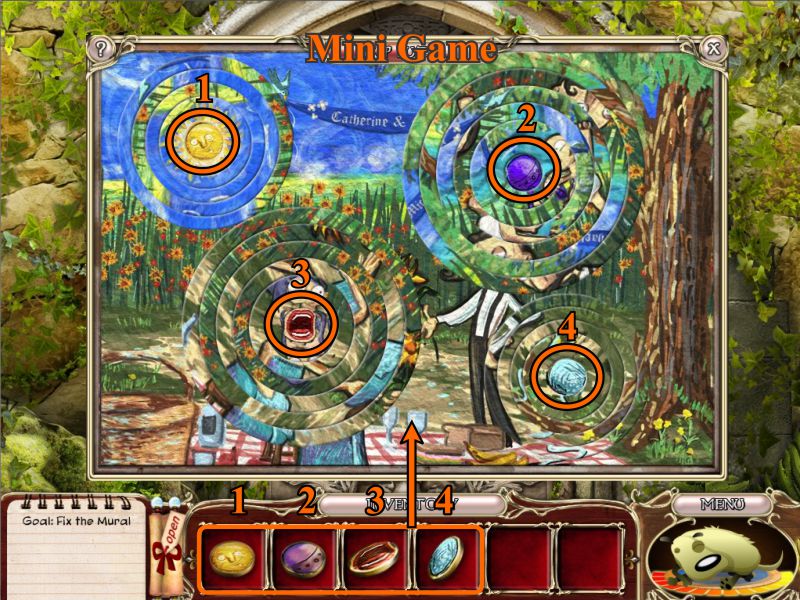
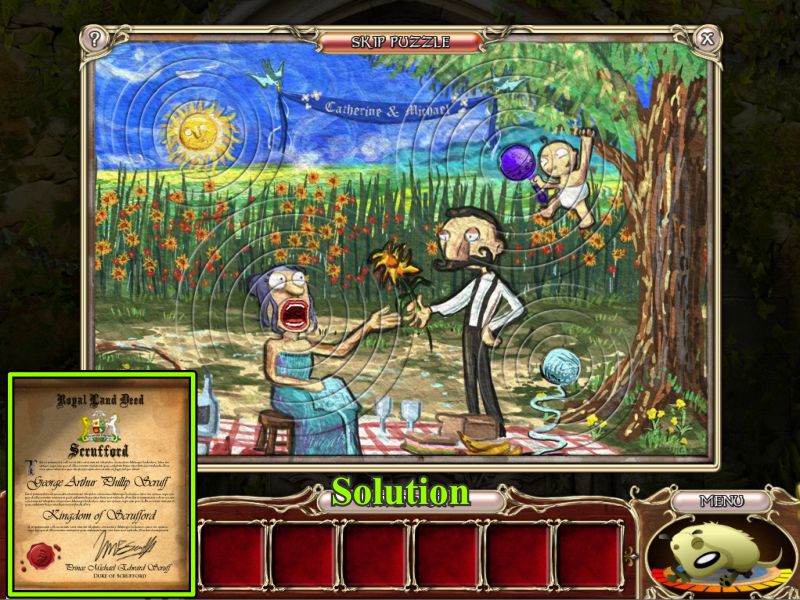
Place all the Mural Pieces as shown in the screenshot in order to trigger a Mini Game.
Screenshot
Mural Mini Game
Rotate all the circles to create the solution shown in the screenshot.
You will now receive the Scrufford Land Deed when you have completed the mural.
Screenshot
Chapter 7: Benevolence
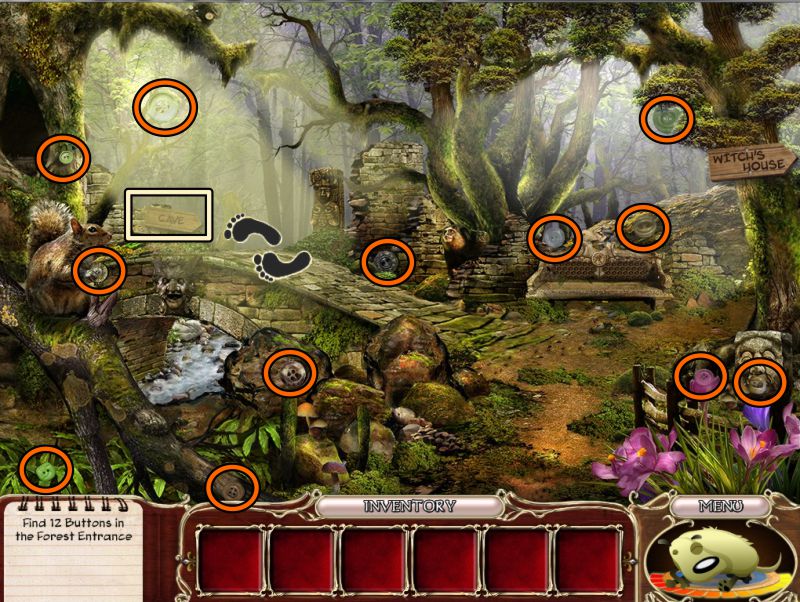
Forest Entrance
Collect 12 Buttons for the Witch, then go toward the Cave.
Screenshot
Outside Bear Cave
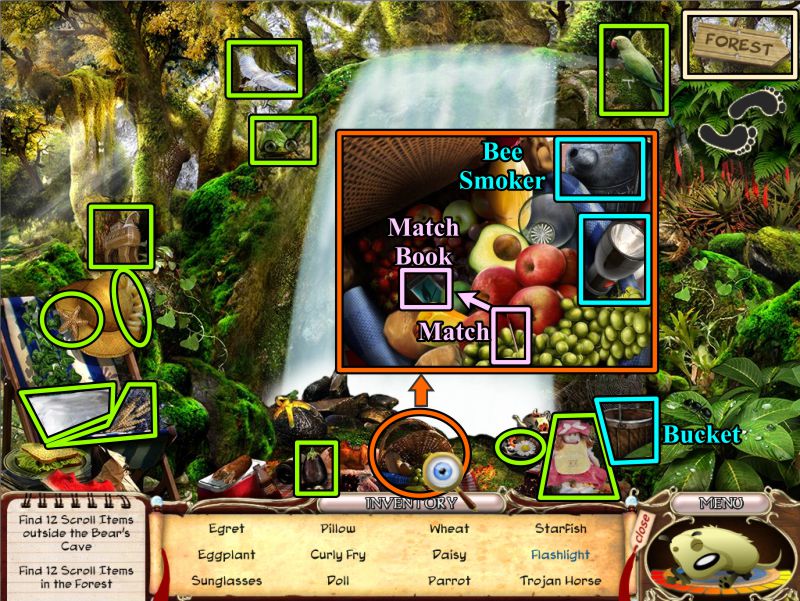
Give the Witch her Buttons in exchange for your Scroll.
She will tell you that what you are looking for is guarded by a bear.
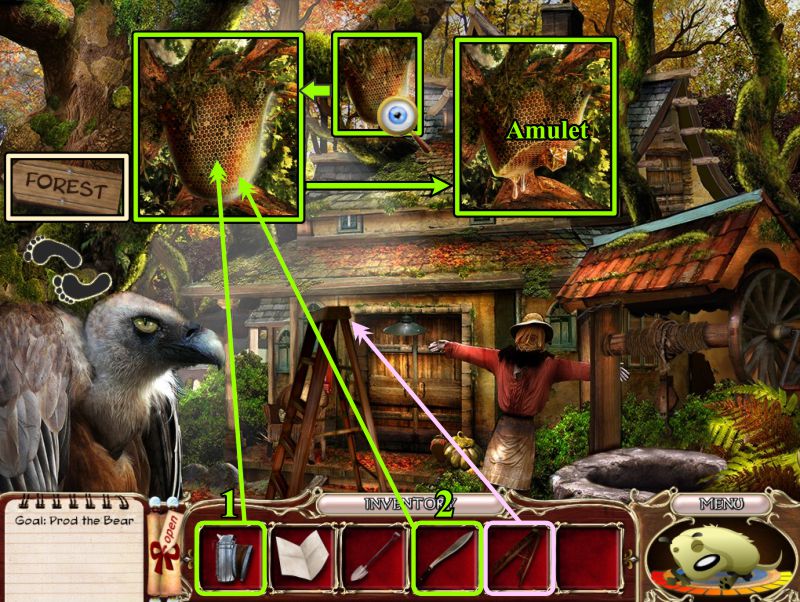
Collect everything you can see, then zoom in on the area marked in red in the screenshot to find the Flashlight.
Also, pick up the Match and light it on the Match Book so you can light the Bee Smoker and collect it.
Pick up the Bucket and go to the Forest Entrance.
Screenshot
Forest Entrance Scroll Scene
Click on our cloaked friend to see what happens.
Collect everything to get an Axe and Key for your Inventory.
To find the Key, zoom in on the bench.
Screenshot
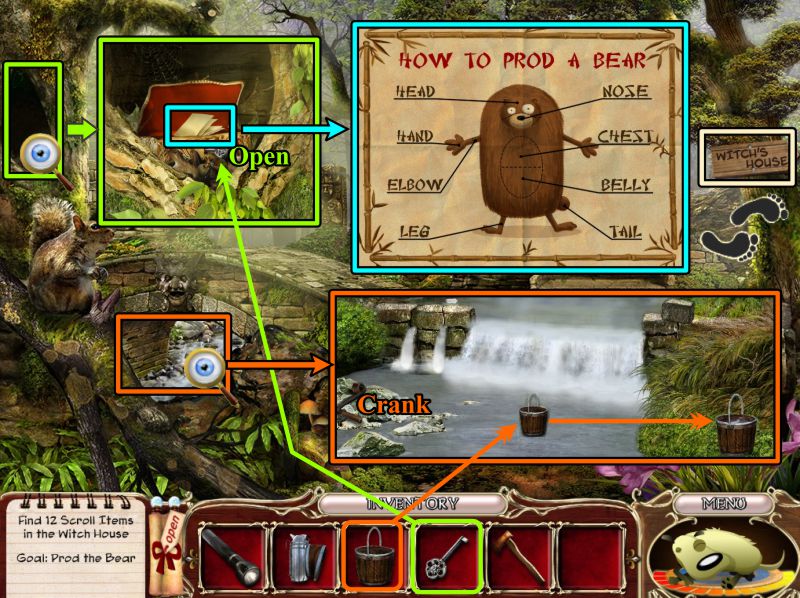
Forest Entrance
Zoom in under the bridge, pick up the Crank, and fill your Bucket with water.
Zoom in on the tree at the left, use your Key to open the box, and take the "How to Prod a Bear" instructions.
Go to the Witch's House.
Screenshot
Witch's House
Collect everything on your list.
Look in the well to find the Nut.
Screenshot
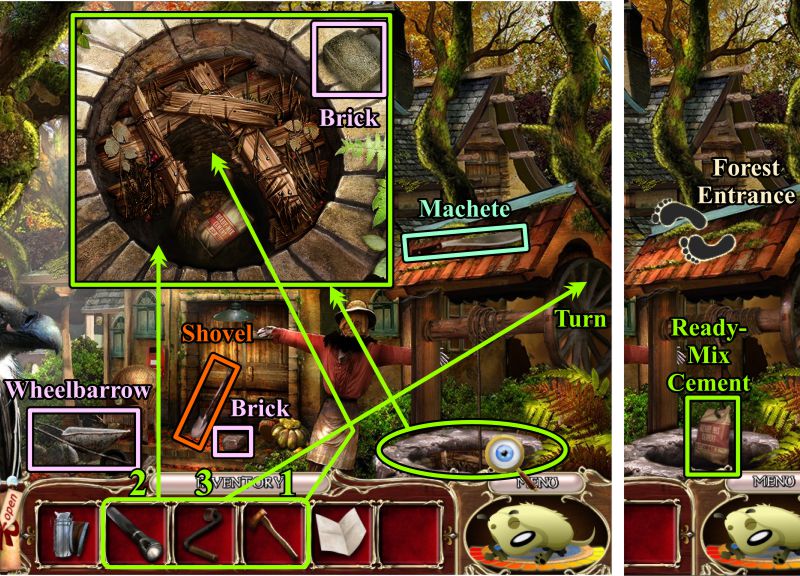
Collect the Wheelbarrow, Shovel, Brick, and Machete.
Zoom in on the well, pick up the Brick, and use the Axe to break the wood cover.
Use your Flashlight to see what's down the well.
Place the Crank on the well, turn it, and collect the Ready-Mix Cement.
Return to the Forest Entrance.
Screenshot
Forest Entrance
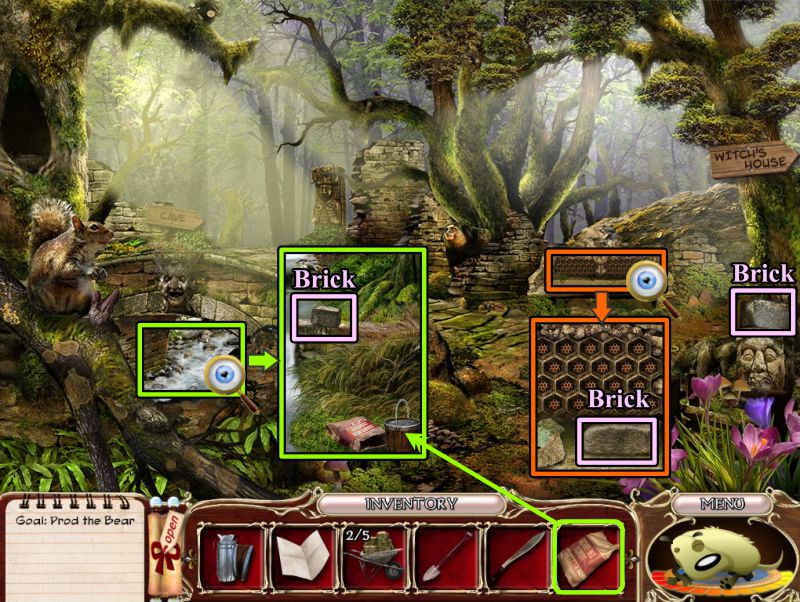
Pick up the Brick by the tree at the right, zoom in on the bench, and collect the Brick that is there.
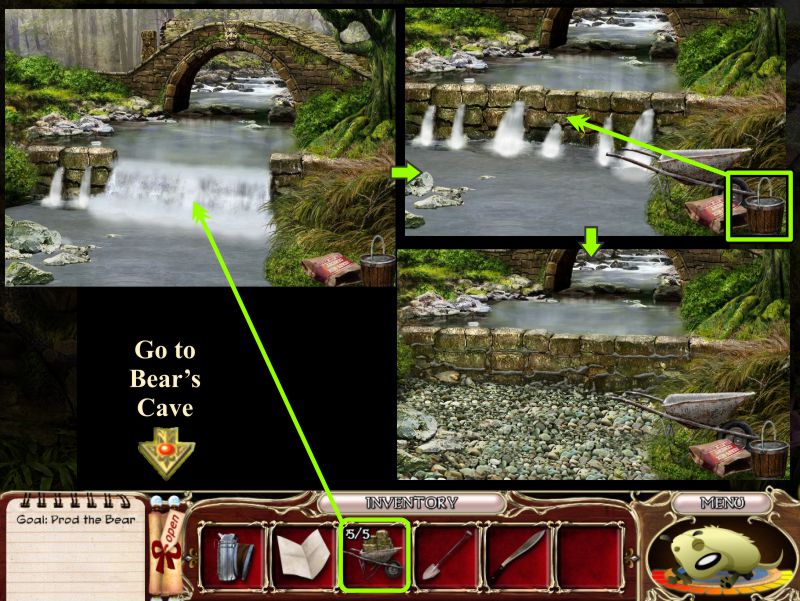
Zoom in under the bridge, pick up the Brick, and pour the Ready-Mix Cement in the bucket of water.
Screenshot
Place the Bricks to dam the water and the cement to seal off the leaks.
Go to the Bear's Cave.
Screenshot
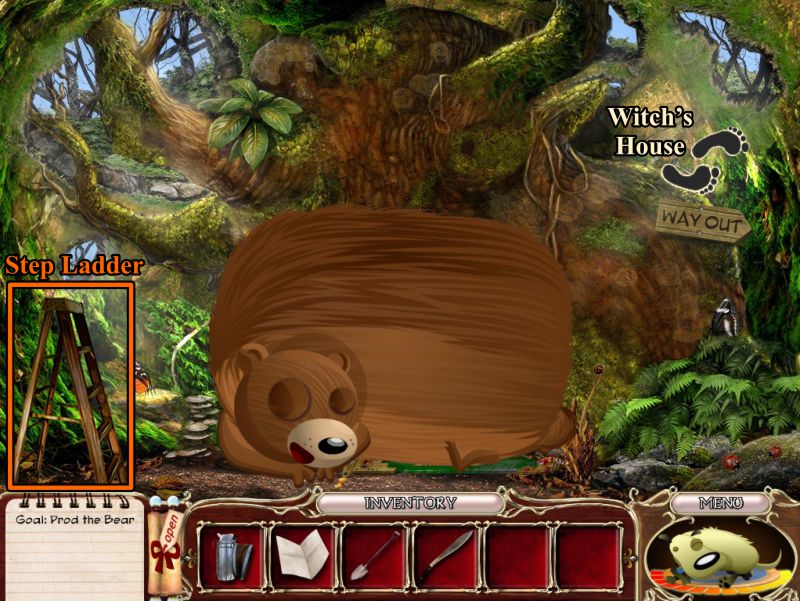
Bear's Cave
A big ol' bear is happily sleeping, so grab the Step Ladder and head to the Witch's House.
Screenshot
Witch's House
Place the Step Ladder and zoom in on the bee hive.
Use the Bee Smoker on the hive and give it a whack with the Machete.
Take the Amulet, then go to the Forest Entrance.
Screenshot
Forest Entrance
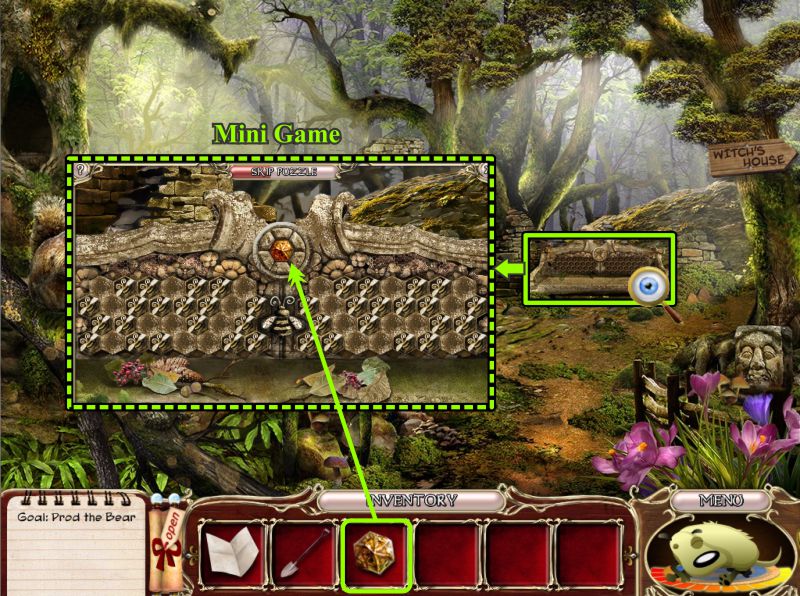
Zoom in on the Bench and place the Amulet to trigger a Mini Game.
Screenshot
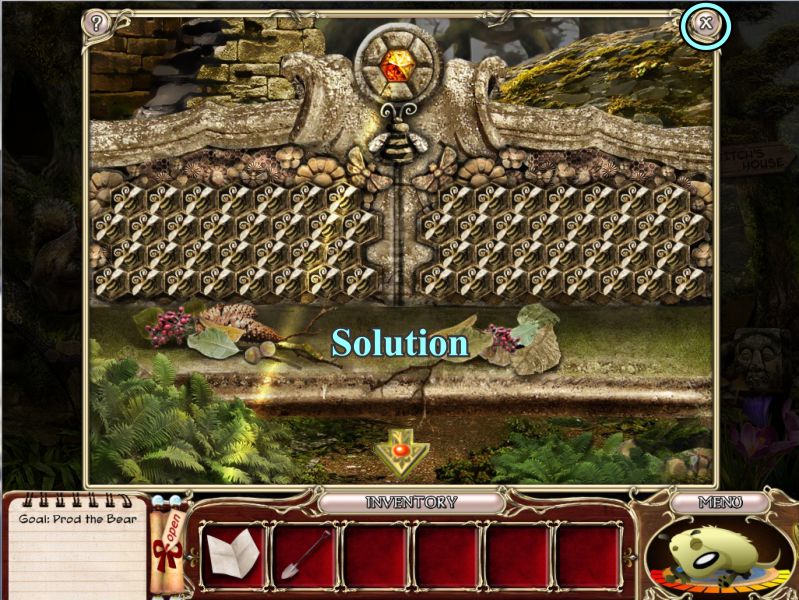
Bench Mini Game
Your goal is to turn around all the honeycomb so the queen bee is surrounded by bees on both sides.
Each bee you turn will also turn the surrounding bees.
The queen bee and Amulet will move up so that the Amulet produces a glow on the ground. See the screenshot.
Exit out of the close up.
Screenshot
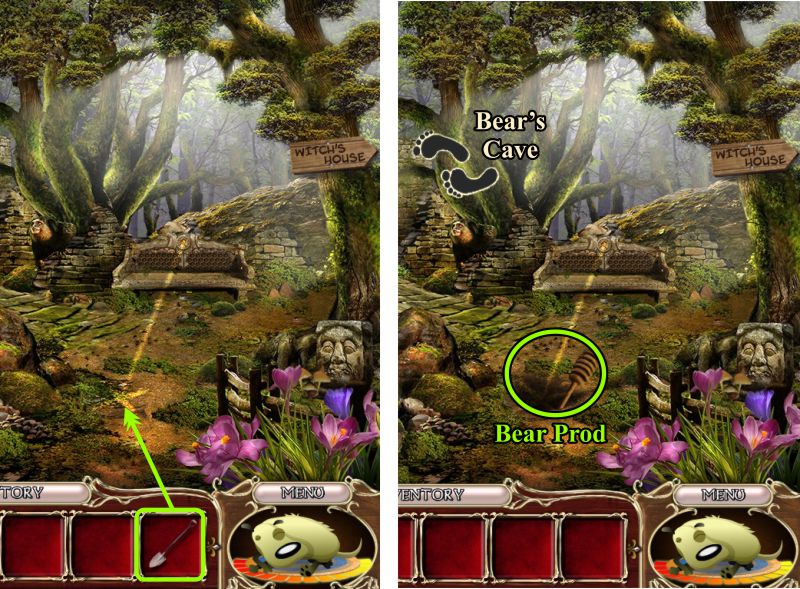
Forest Entrance
Use your Shovel to dig where the "X" is located.
Pick up the Bear Prod and head to the Bear's Cave.
Screenshot
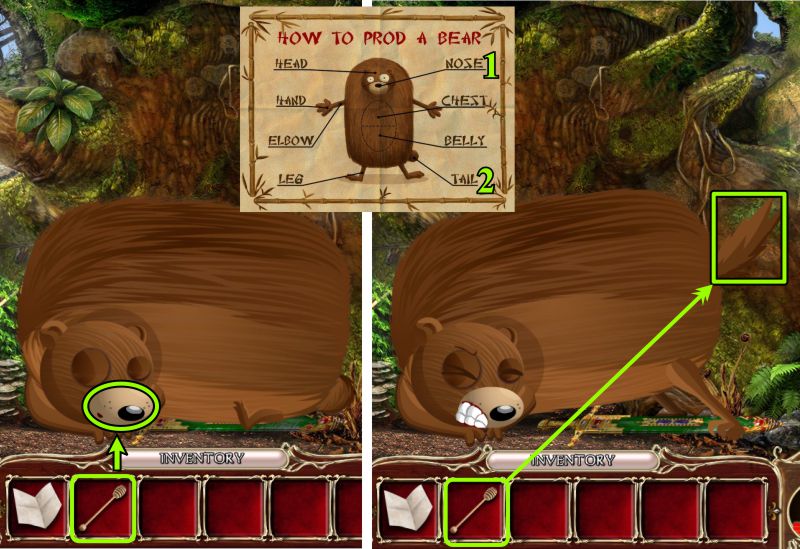
Prodding the Bear
There is a sword under the Bear, so you need him to give it up.
See the screenshots for all his expressions and antics.
Poke him in the nose with the prod.
His tail will stand up, so poke his tail.
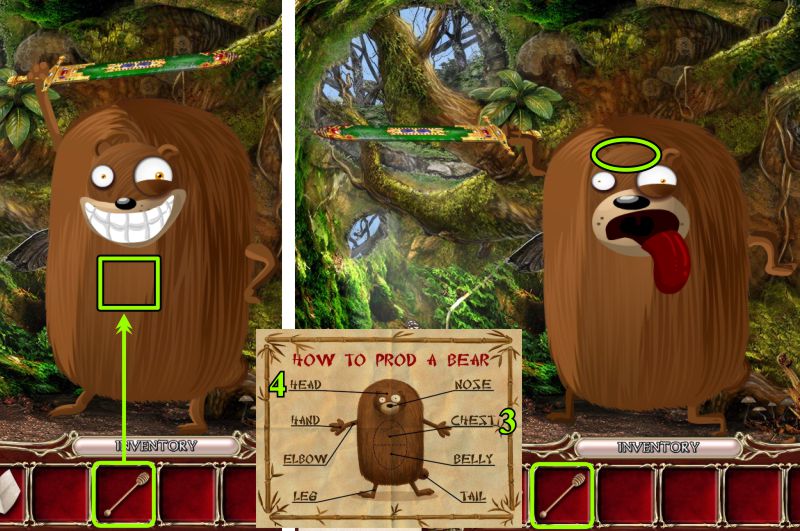
Screenshot
He's standing up, so poke him in the chest.
Time to poke him in the head.
Screenshot
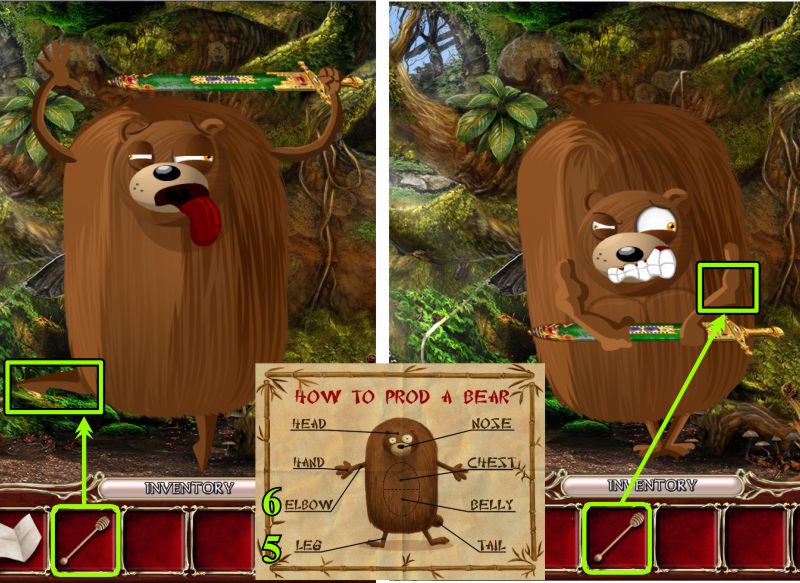
One leg is raised, so poke him there.
He's got a good grip on the sword, so poke his elbow.
Screenshot
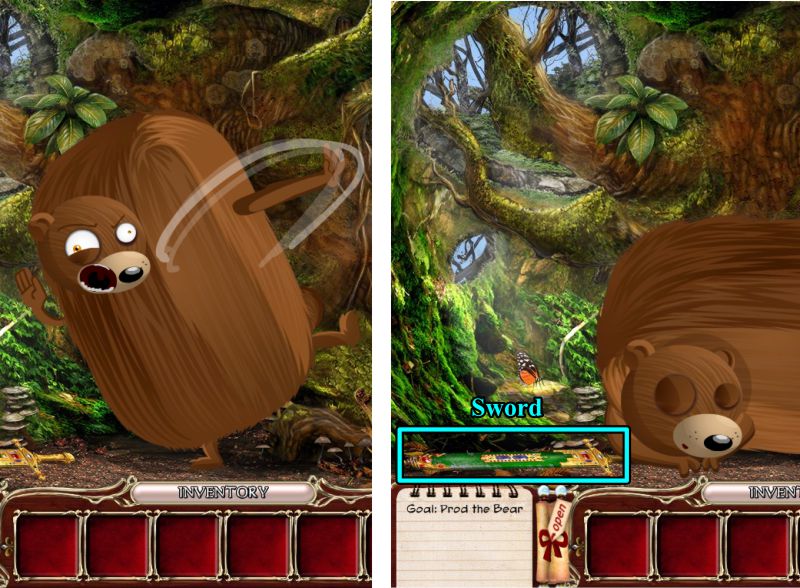
He dropped the sword but you can't pick it up, so poke him in the hand.
A one-hand handstand is pretty talented, so let's poke that hand.
Screenshot
Now he's tired of the game, so finally goes back to sleep.
Grab the Scrufford Sword.
Screenshot
Chapter 8: Integrity
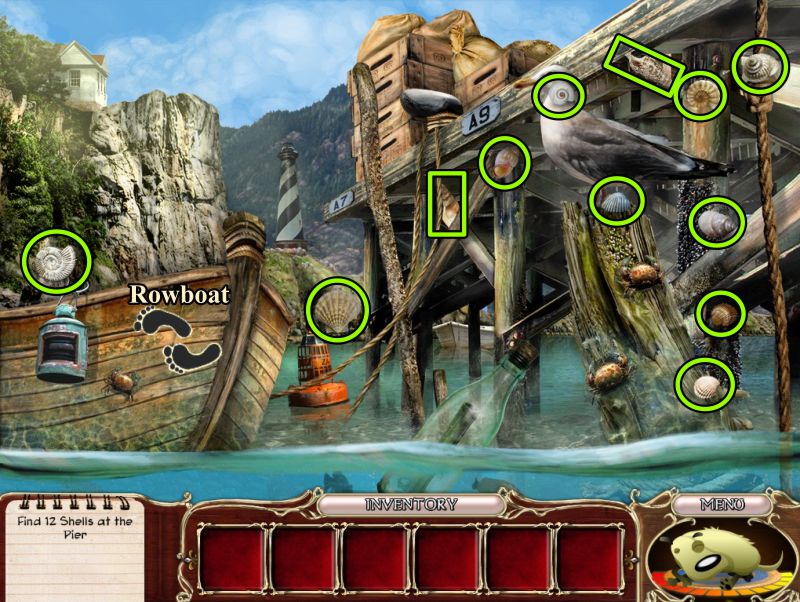
Pier
Find the 12 Shells and go to the Rowboat.
Screenshot
Rowboat and Beach
Click on the Beach at the left to go there.
Go up the stairs at the left to the Cottage.
Cottage
Give Captain Wickham his Shells.
He will give you your Scroll and tell you to find 4 pearls to open the Nautical Safe.
Zoom in on the chair, pick up the Net, and move to bow to find a Crowbar.
The Crowbar, Tongs, and Net will go into your Inventory.
Go back down to the Beach, notice one of your oars is missing, and up the right stairs to the Lighthouse.
Screenshot
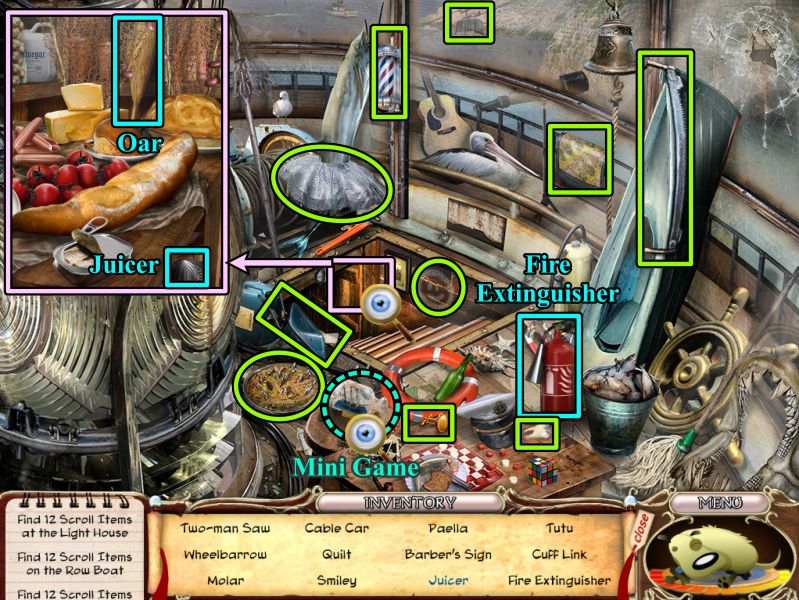
Lighthouse Scroll Scene
Zoom in on the pink area in the screenshot to find the Juicer and an Oar.
The Oar, Juicer, and Fire Extinguisher will go into your Inventory.
Zoom in on the ship in a bottle for a Mini Game.
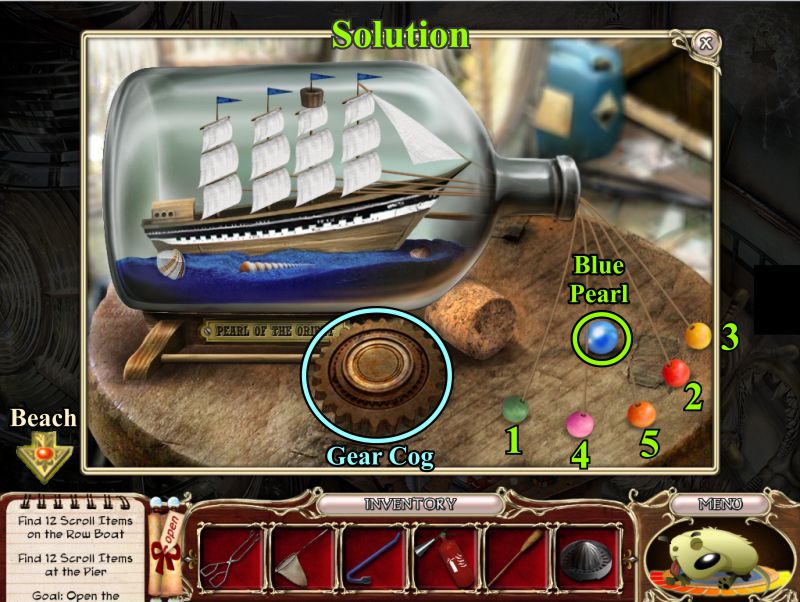
Screenshot
Ship in the Bottle Mini Game
Grab the Gear Cog, then click on the balls in the order shown in the screenshot to inflate the sails of the ship.
Pick up the Blue Pearl and return to the Beach.
Screenshot
Beach
Zoom in on the box at the right and take the Gear Cog.
Place the Oar on the Rowboat, and zoom in on the sandcastle.
Use your Tongs to remove the Special Sand.
Go back into the Rowboat.
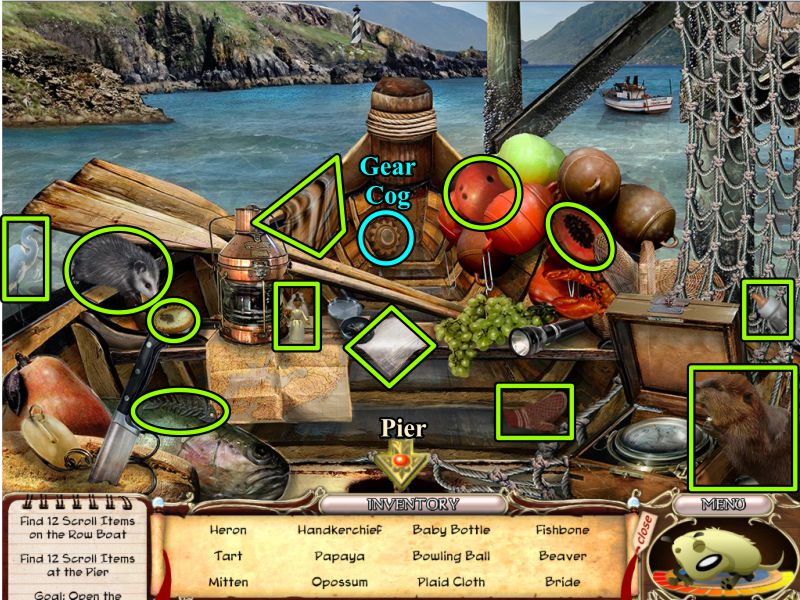
Screenshot
Rowboat Scroll Scene
Collect all the items on your list, pick up the Gear Cog, and go to the Pier.
Screenshot
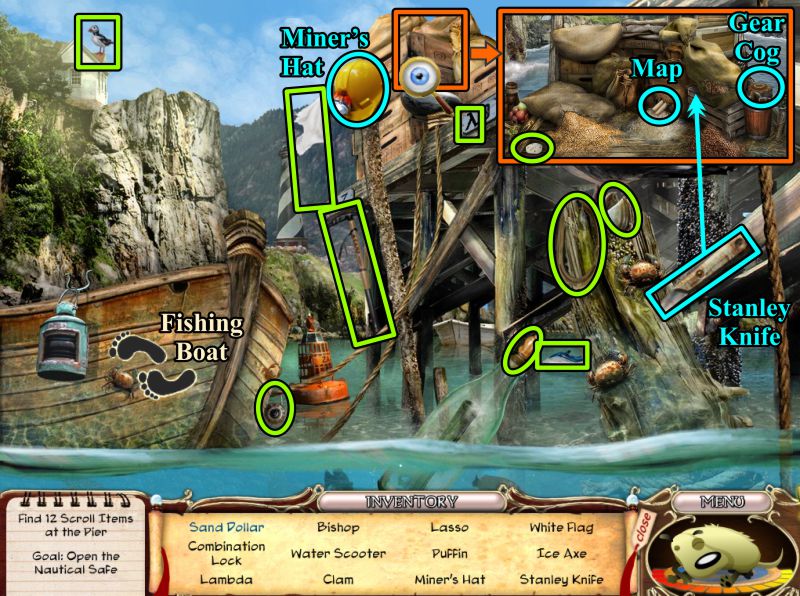
Pier Scroll Scene
Collect everything, and the Miner's Hat and Stanley Knife will go into your Inventory.
Zoom in on the boxes and bags on top of the Pier.
Take the Gear Cog, and use your Stanley Knife to cut open the bags until you find a Map.
Go to the Rowboat and then to the Fishing Boat.
Screenshot
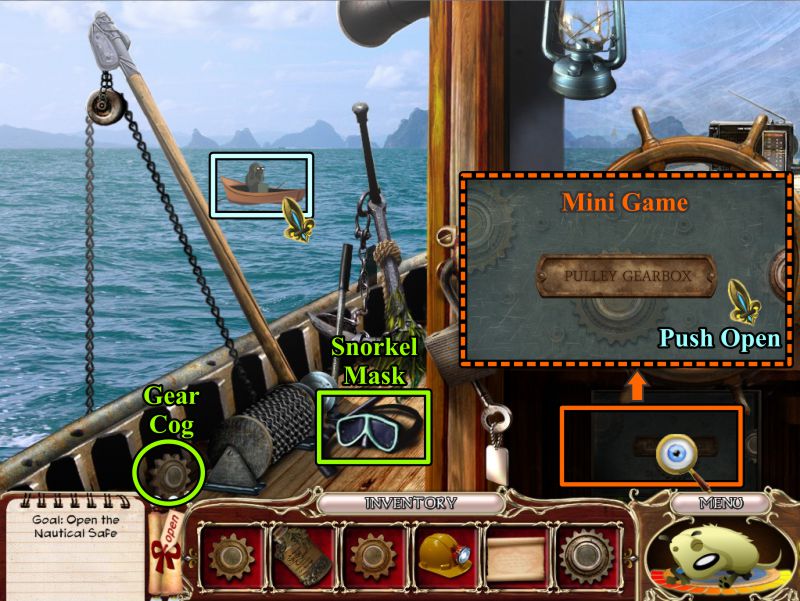
Fishing Boat
Click on the rowboat with your cloaked shadow in it.
Take the Gear Cog and Snorkel Mask.
Zoom in on the Pulley Gearbox and push the cover open.
Screenshot
Gearbox Mini Game
There are 2 small Gear Cogs and 3 large Gear Cogs to be placed in the box.
See the screenshot for the solution.
Close the cover and push the green button to raise the pulley.
Take the Yellow Pearl and go to the Pier.
Screenshot
Pier
Zoom in on the water to find a clam shell.
Place your Snorkel on the water so you can get to the shell.
Pick up the Squid, then use your Crowbar to open the shell.
Put the Special Sand on the bottom part of the shell.
Close the shell.
Open it again to find a White Pearl.
Collect the White Pearl and go to the Beach.
Screenshot
Beach
Zoom in on the box and place your Map.
Place the Juicer on the box and the Squid in it.
Pour the Squid Ink on the Map to make it visible.
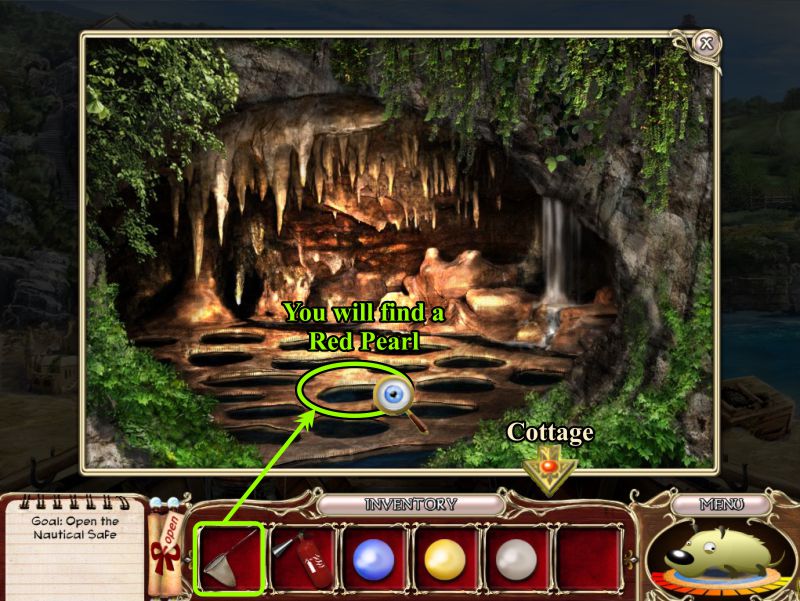
Zoom in on the Cave and use your Miner's Hat to look inside.
Screenshot
Cave
Use your Net on the spot marked on the Map to find a Red Pearl.
Back out and go to the Cottage.
Screenshot
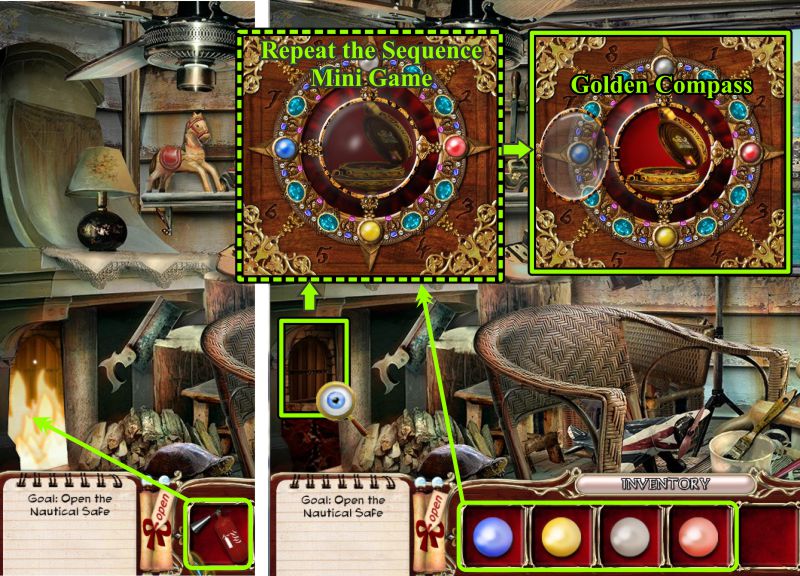
Nautical Safe Mini Game
Use your Fire Extinguisher to put out the fire.
Zoom in on the Nautical Safe and place your 4 Pearls in the vacant slots to trigger a Mini Game.
It doesn't matter what color pearl goes in which slot.
This is a repeat-the-sequence game and is random.
Watch the blue lights and press them in the order they are lit.
When you have completed all the sequences, the safe will open for you to collect the Golden Compass.
Screenshot
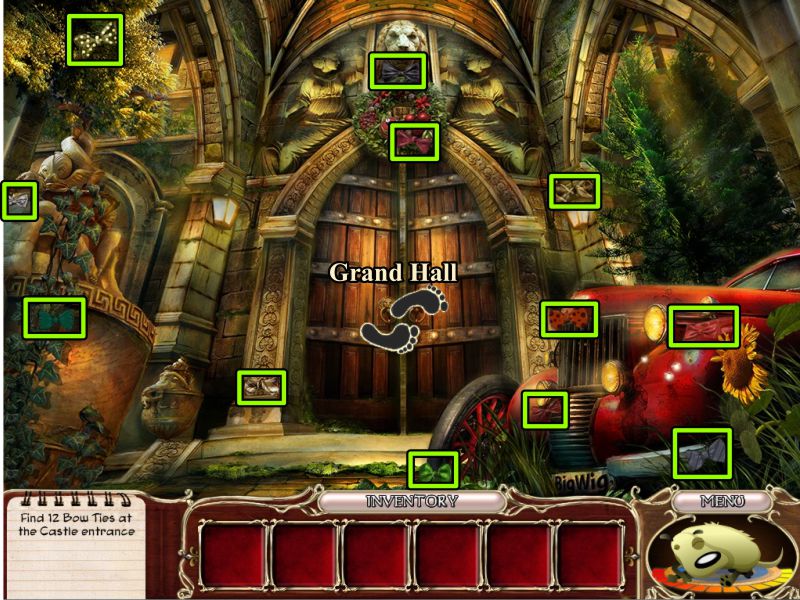
Chapter 9: Loyalty
Castle Entrance
Find 12 Bow Ties, then enter the Grand Hall.
Screenshot
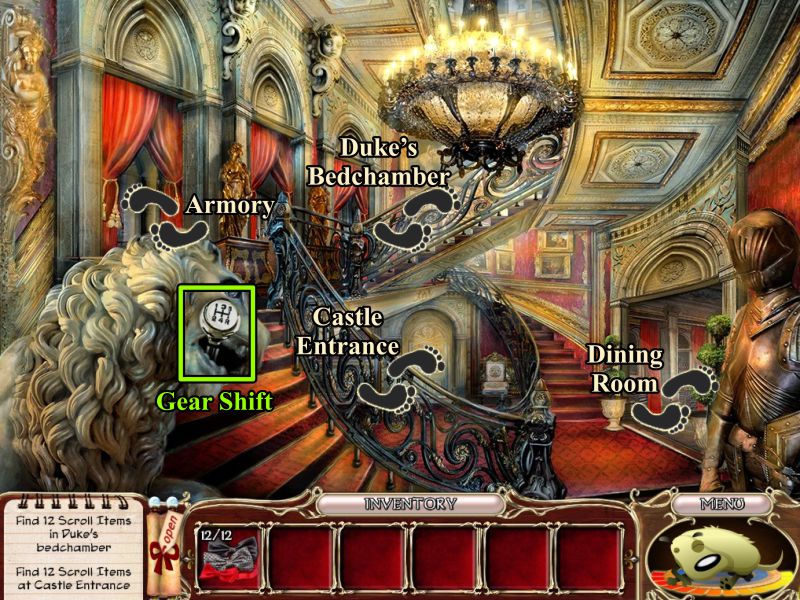
Grand Hall
Take the Gear Shift out of the Lion's mouth, not the various exits, and go to the Dining Room.
Screenshot
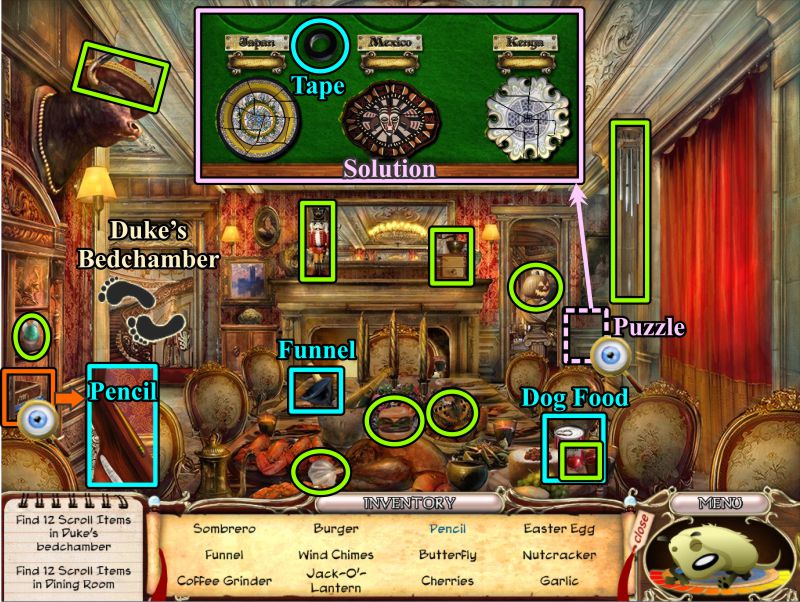
Dining Room
Give Fritz his Bow Ties, take the Scroll, and learn you need to find 4 Cannonballs to get the Regalia.
Pick up all the items on your Scroll, and the Pencil and Funnel will go into your Inventory.
Zoom in on the alcove at the left to find the Pencil.
Grab the can of Dog Food, then zoom in on the right of the scene to the right of the fireplace for a Puzzle.
Take the Tape, then put the puzzle pieces together as shown in the screenshot.
You aren't finish with it yet, because you need to find some glue to put the China pieces together.
Go to the Duke's Bedchamber.
Screenshot
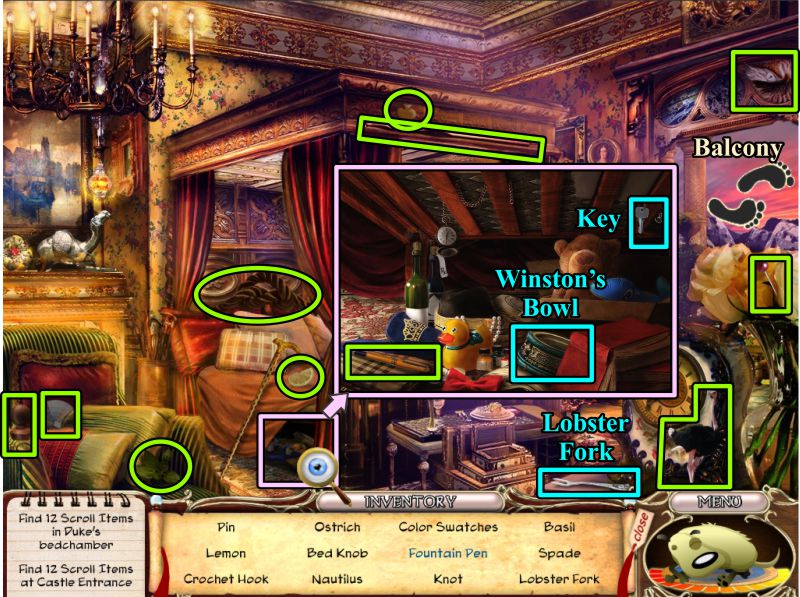
Duke's Bedchamber Scroll Scene
Collect everything on your list, and the Lobster Fork will go into your Inventory.
Zoom in under the bed to find the Fountain Pen.
While you are there, collect Winston's Bowl and a Key for your Inventory.
Go to the Balcony.
Screenshot
Balcony
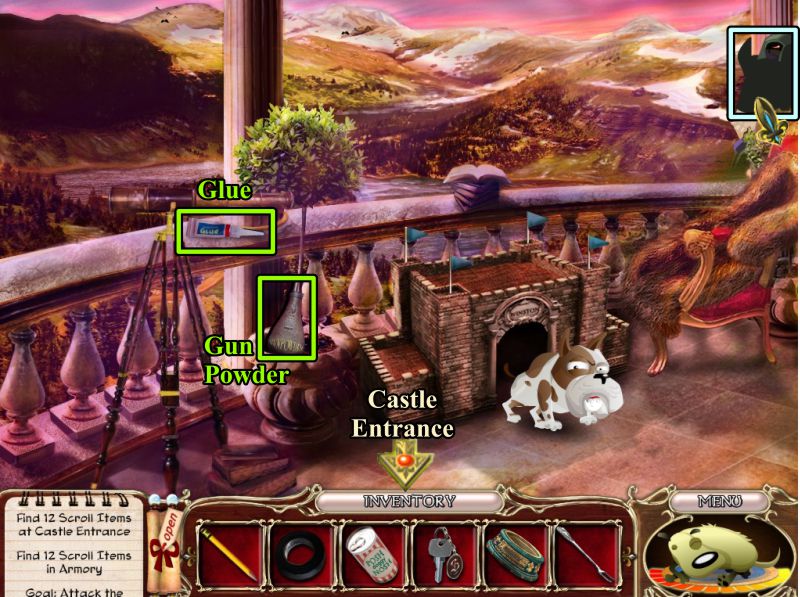
Winston is there guarding his doghouse, and our creepy friend is spying out a window, so click on him.
Take the Glue and Gun Powder, then go to the Castle Entrance.
Screenshot
Castle Entrance Scroll Scene
Collect everything on your list to get Wire Cutters for your Inventory.
Pick up the Doggie Laxative at the left, then zoom in on the car.
Pick up the Wick to finish off the Scroll.
Screenshot
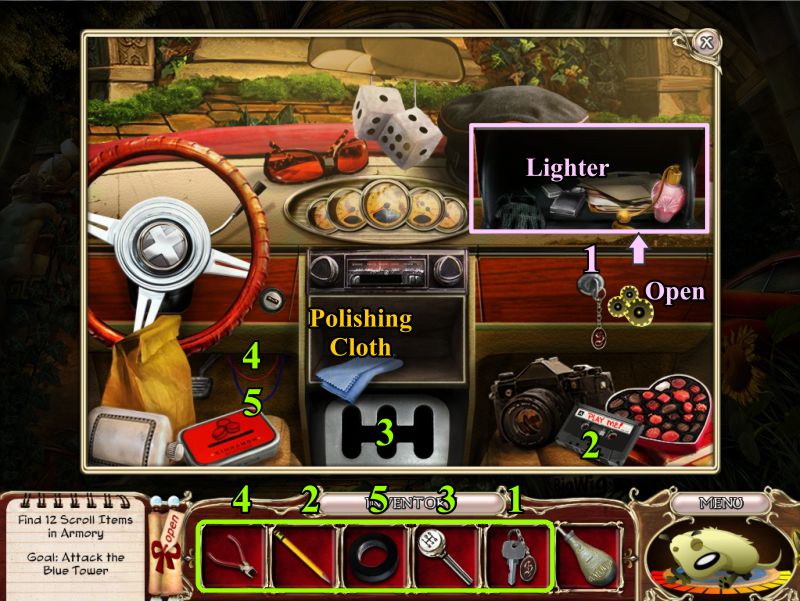
Car
Pick up the Polishing Cloth, open the glove compartment with the Key, and take the Lighter.
Use the Pencil to wind up the tape and take the Cassette.
Place the Gear Shift where it belongs.
Now you need to start the car so you can play the Cassette.
Since you don't have a key, you need to use your Wire Cutters to snip the two wires under the ignition.
Use your tape to make the proper connections.
Screenshot
Cassette Tape Mini Game
Place the Cassette in the player for a Mini Game.
Using the Gear Shift, follow the instructions at the top of the scene.
The numbers are random, but when the game is finished, the steering wheel will open to give you a Cannonball.
Go to the Armory.
Screenshot
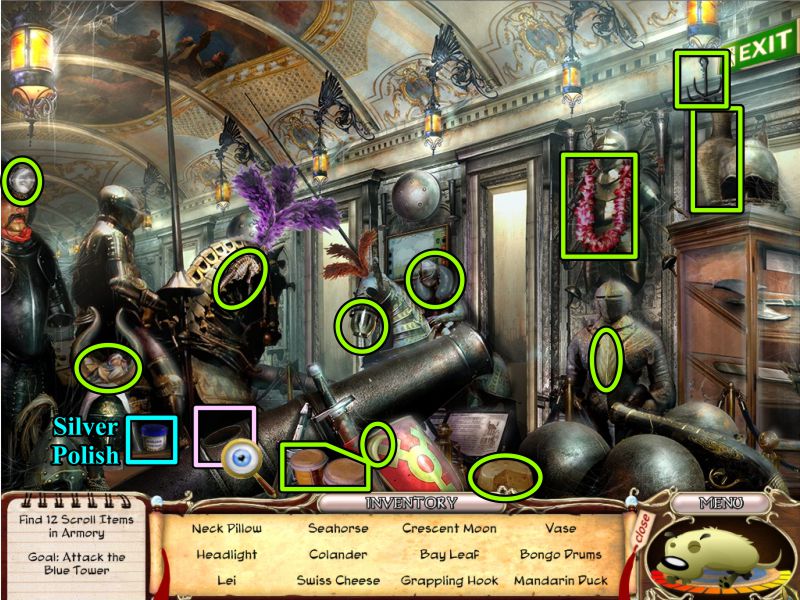
Armory Scroll Scene
Collect everything on your list, grab the Silver Polish, and zoom in on the cannon.
Screenshot
Armory
Place the Funnel, Gun Powder, and Wick in the cannon.
Light it with your Lighter, and collect the Cannonball from the display cabinet.
Go to the Dining Room.
Screenshot
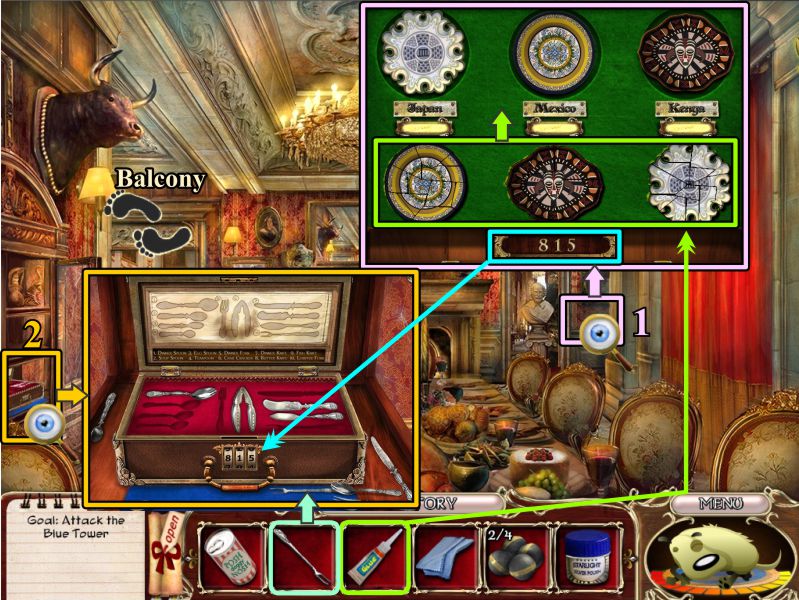
Dining Room
Zoom in on the China plates it the right corner.
Use your Glue to hold the pieces together.
Arrange the plates above according to their proper country, as shown in the screenshot.
Note the number 815 when the shelf opens, and zoom in on the alcove at the left.
Enter the number 815 to open the combination lock.
Place your Lobster Fork on the blue cloth.
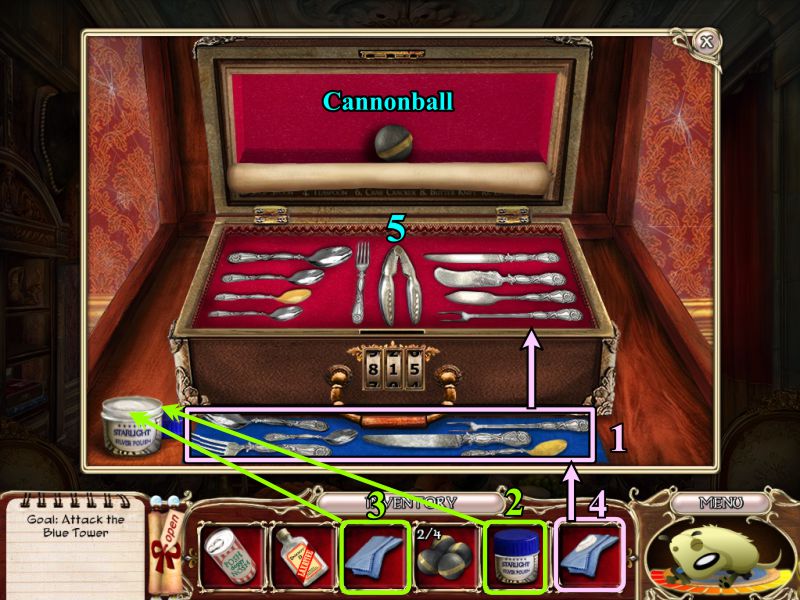
Screenshot
Silver Chest
Arrange all the dirty silverware on the blue cloth.
Place the Silver Polish on the tray.
Dip the Polishing Cloth in the Silver Polish.
Polish each individual piece of silverware.
Place the silverware in the chest as shown in the screenshot.
Take the Cannonball, and go to the Balcony.
Screenshot
Balcony
Place Winston's bowl in front of him and fill it with the Dog Food.
Pour the Doggie Laxative on the food.
You may have to feed him a couple of times because he will happily eat the food with or without the laxative.
When the laxative takes effect, Winston will leave, and you can examine the doghouse.
Take the Cannonball and go to the Armory.
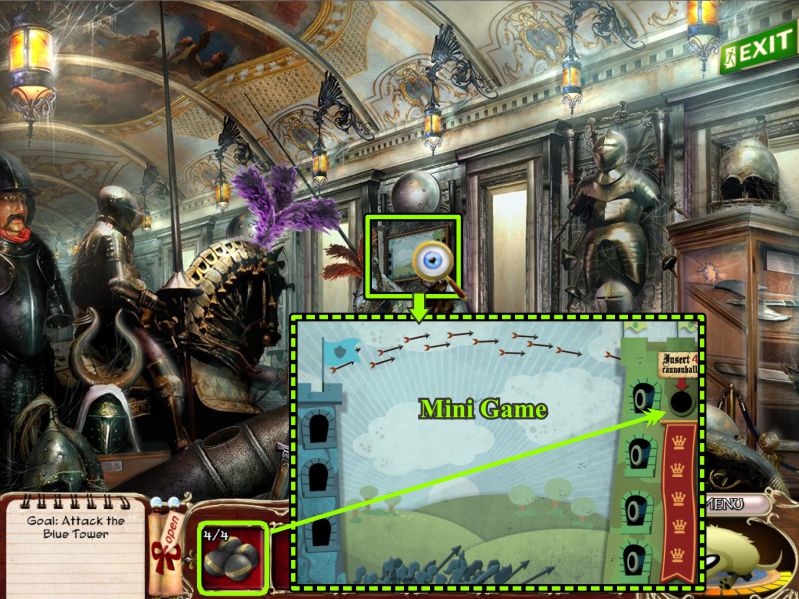
Screenshot
Armory
Zoom in on the painting and place your Cannonballs as indicated to trigger a Mini Game.
Screenshot
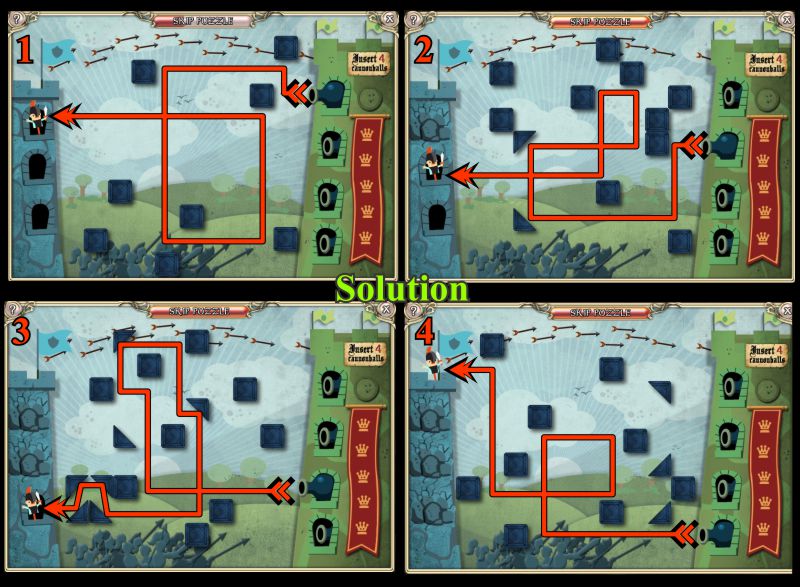
Cannonball Mini Game
There are 4 rounds to this game.
Your goal is to move the Cannonballs from each of the cannons in the tower on the right so as to hit the knight in the blue tower on the left.
Click on the arrows attached to the Cannonballs to move them around and direct them to the knight.
See the screenshot for the solutions.
Screenshot
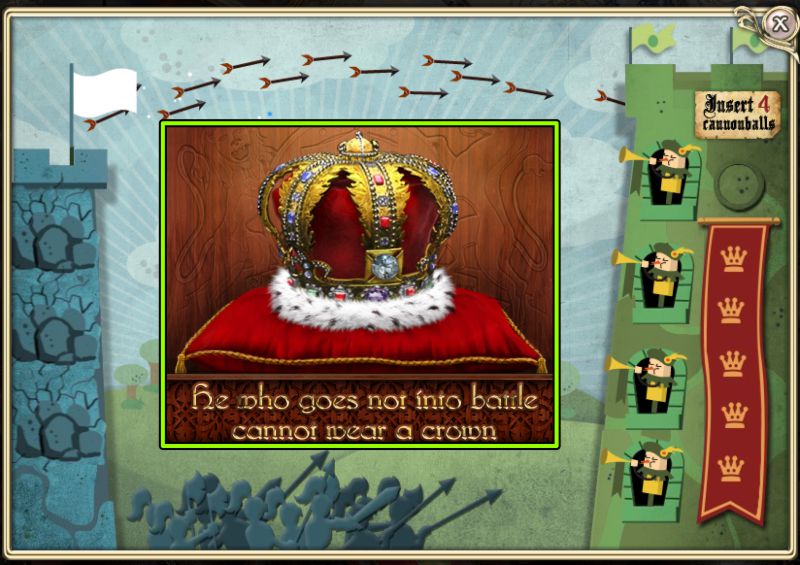
When you have completed the game, you will be rewarded with a Crown.
Screenshot
Chapter 10: Love
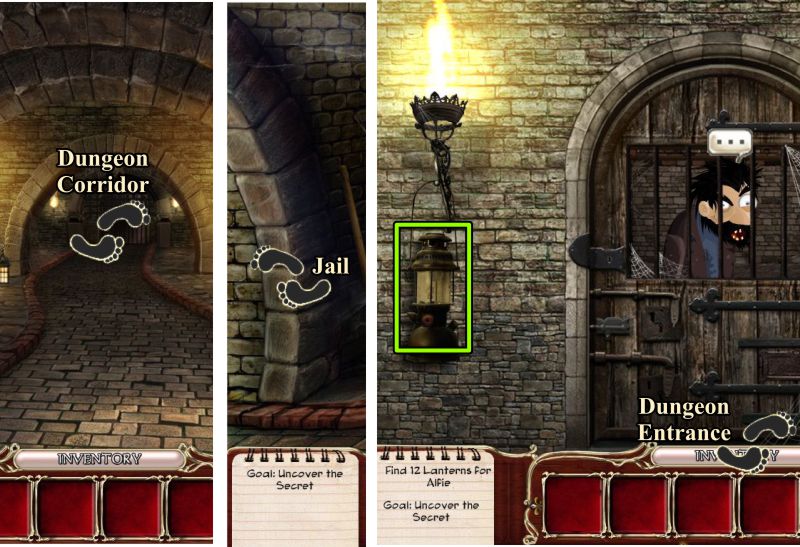
Jail
Go to the Dungeon Corridor and left to the Jail.
Talk to Alfie who wants 12 Lanterns.
Grab the one on the wall and go to the Dungeon Entrance.
Screenshot
Dungeon Entrance
Collect the 3 Lanterns and go forward to the Dungeon Corridor.
Screenshot
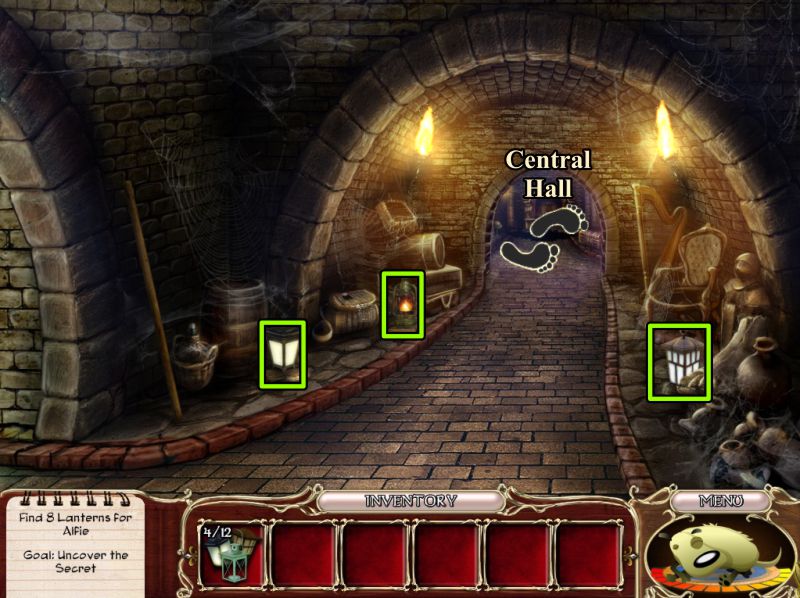
Dungeon Corridor
Collect the 3 Lanterns and go forward to the Central Hall.
Screenshot
Central Hall
Check out the magnifying glass and back wall.
The Dark Room is to the right but you can't go there as yet.
Pick up the 2 Lanterns and go to the Gallery.
Screenshot
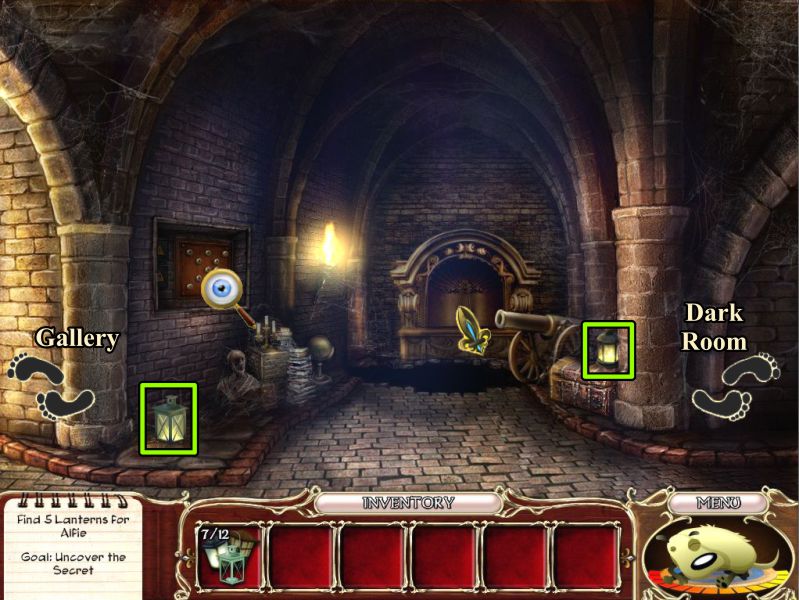
Gallery
Check out the magnifying glass and Dungeon Door.
Collect the 3 Lanterns, and go see Alfie in Jail.
Screenshot
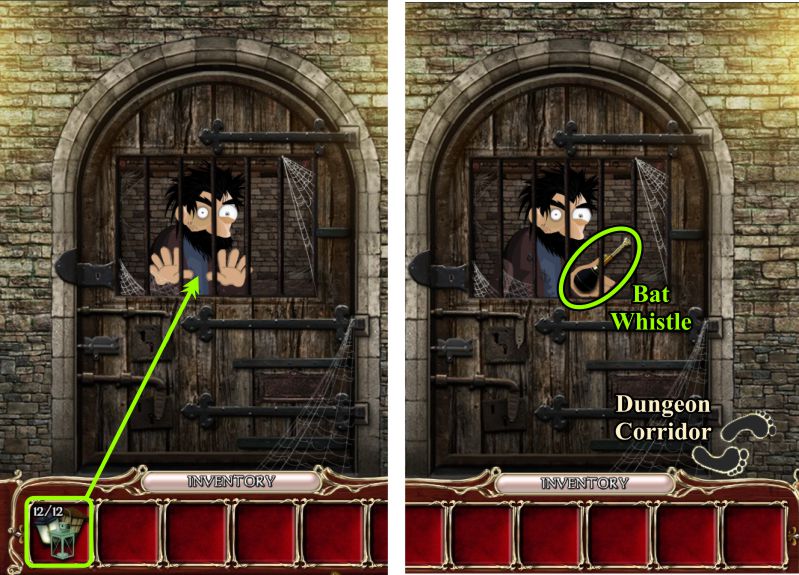
Jail
Give Alfie his Lanterns and he will give you a Bat Whistle.
Go to the Dungeon Corridor.
Screenshot
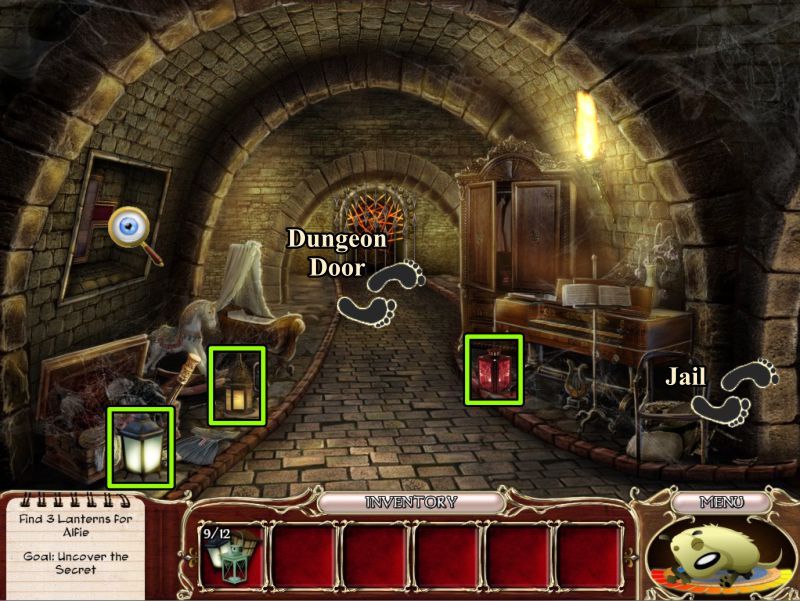
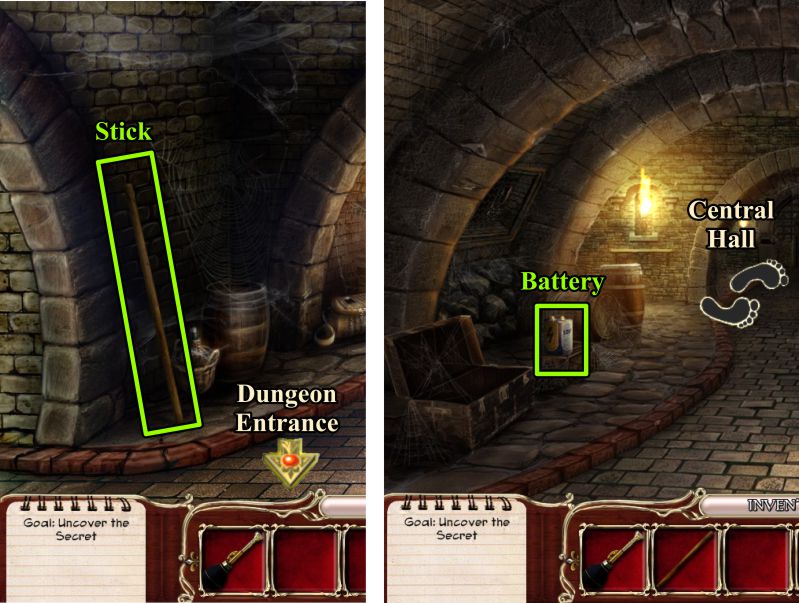
Dungeon Corridor and Entrance
Pick up the Stick and go to the Dungeon Entrance.
Take the Battery and go to Central Hall.
Screenshot
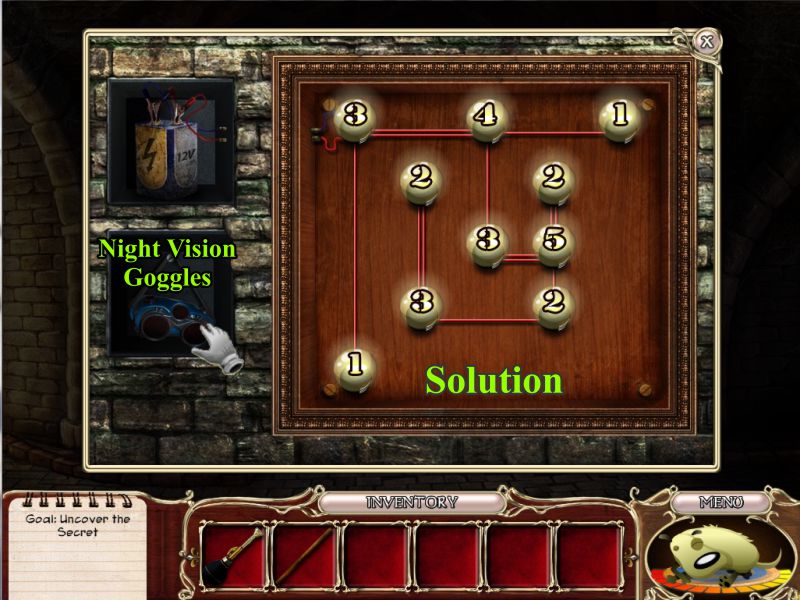
Central Hall
Zoom in at the left and open the electric compartment.
Place your Battery to trigger a Mini Game.
Screenshot
Bulb Mini Game
Each bulb has a number on it showing how many connections need to be made to it in order to light it.
Click on a bulb and then find another bulb it will connect to.
Keep connecting the bulbs, as shown in the screenshot, until they are all lit and you can collect the Night Vision Goggles.
Go to the Dark Room.
Screenshot
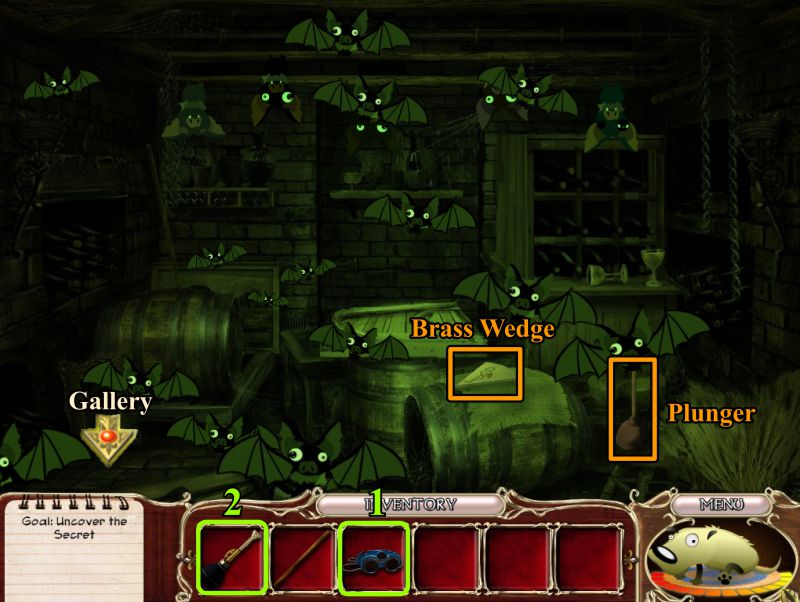
Dark Room
Place your Dark Vision Goggles in the scene, and use your Bat Whistle to get rid of all the flying bats.
Pick up the Brass Wedge and Plunger, and return to the Central Hall.
Screenshot
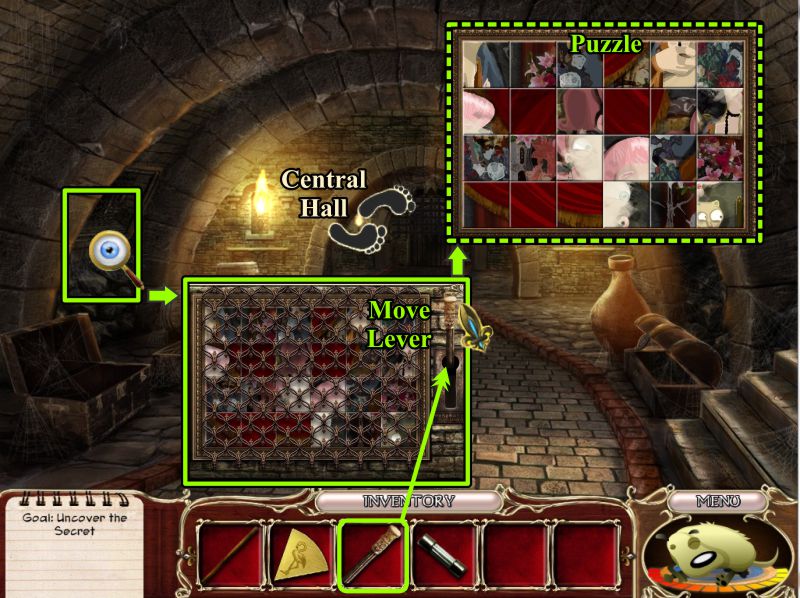
Gallery
Pick up the Lever and zoom in on the left wall.
Use the Plunger to remove the cover and trigger a Mini Game.
Screenshot
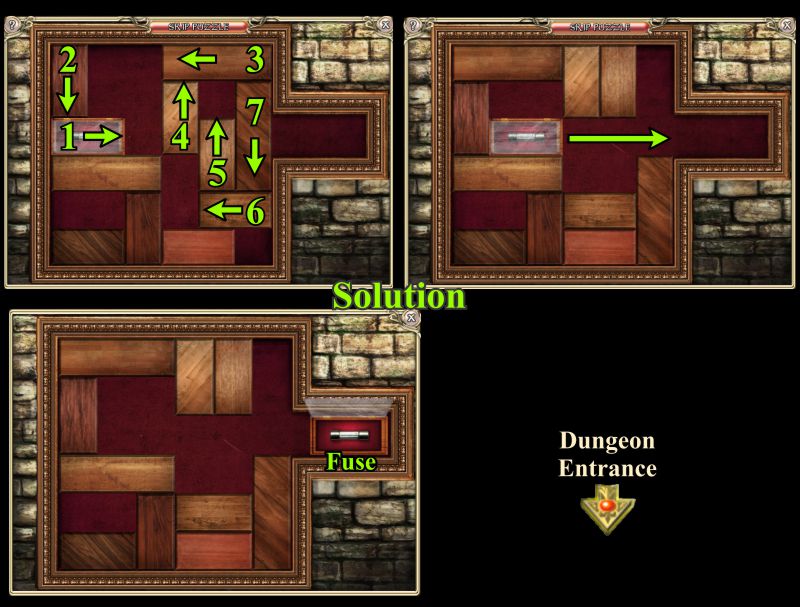
Slider Mini Game
Your goal is to get the box with the Fuse to the right side.
See the screenshot for the solution.
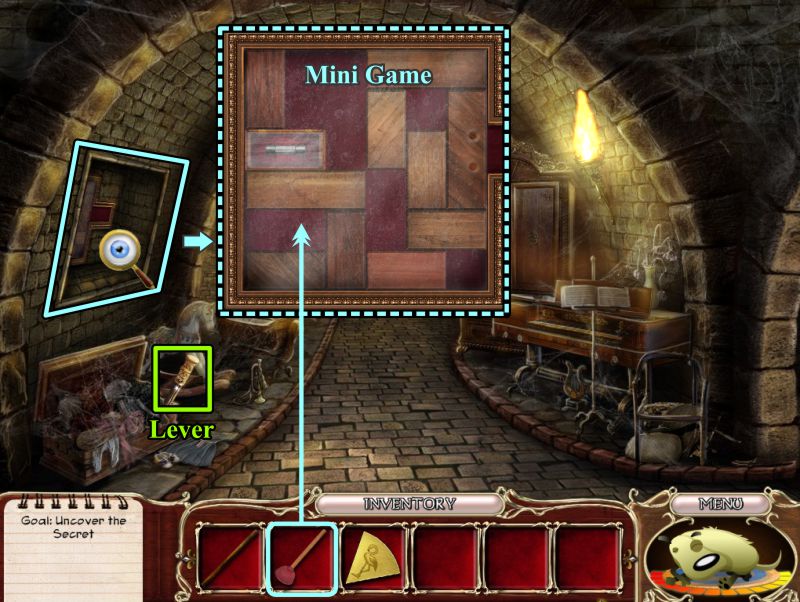
Take the Fuse and go to the Dungeon Entrance.
Screenshot
Dungeon Entrance
Zoom in at the left, place the Lever, move it to open the cover and reveal a Puzzle.
Screenshot
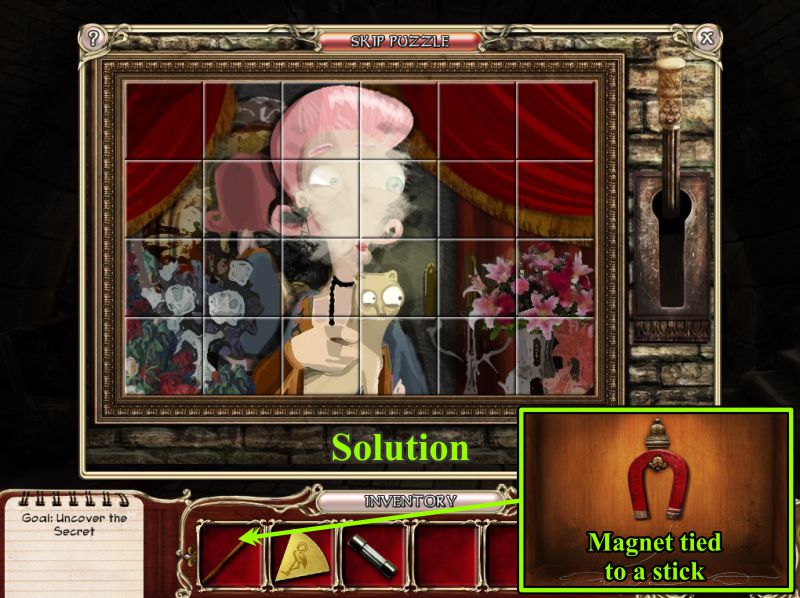
Puzzle
Swap the tiles to assemble the picture as shown in the screenshot.
Take the Magnet and it will attach itself to the Stick in your Inventory.
Go to the Central Hall.
Screenshot
Central Hall and Dungeon Door
Use the Stick tied to the Magnet on the far wall to get the Ancient Medallion.
Go to the Dungeon Door.
Zoom in and place the Ancient Medallion.
Click on it to remove it and start a Mini Game.
Screenshot
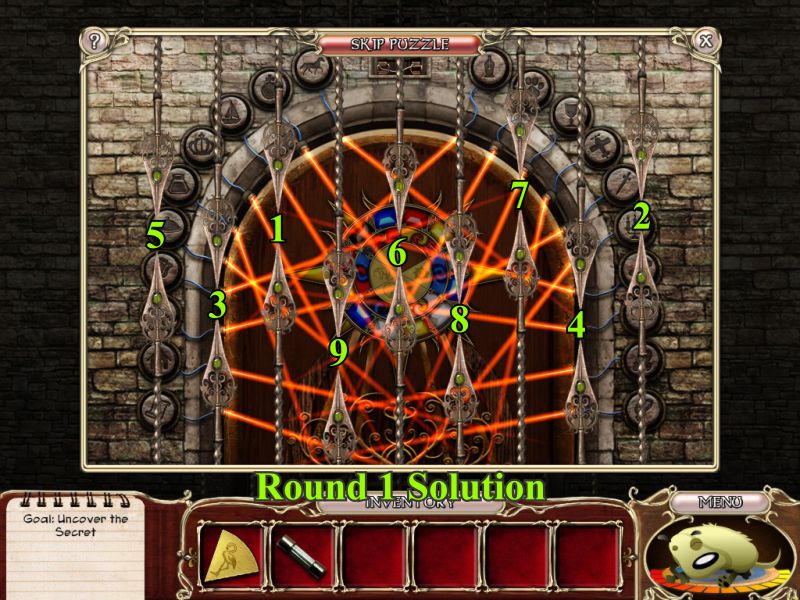
Dungeon Door Mini Game
Your goal is to remove the spears for Round 1.
See the screenshot and remove them in the order numbered.
Screenshot
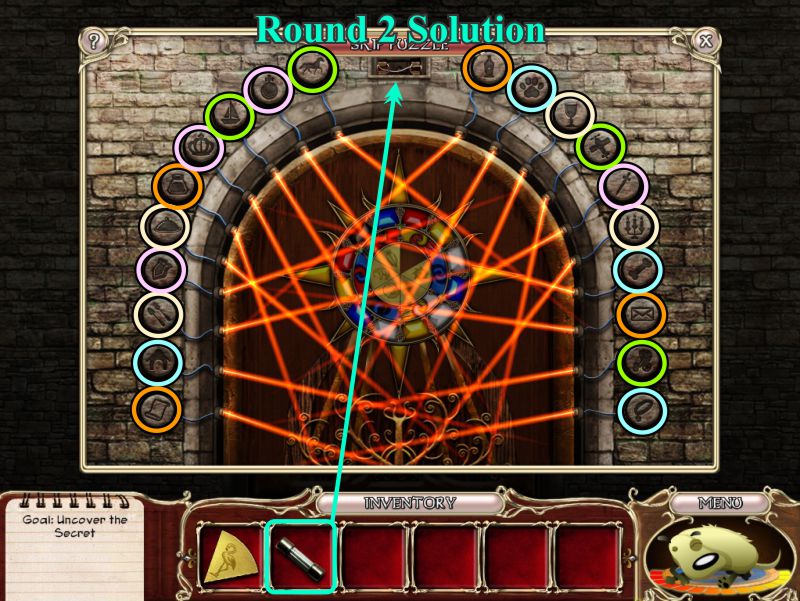
For Round 2, place the Fuse in the fusebox.
Your goal is to remove the lasers by pushing the surrounding buttons in a certain way.
Select groups of 4 related objects as shown in the screenshot.
Screenshot
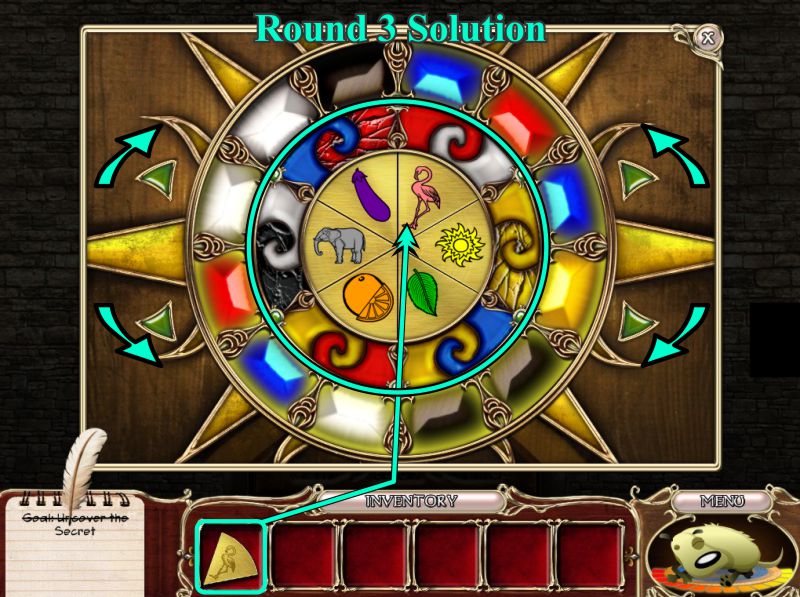
For the final round, place your Metal Wedge in the vacant place in the inner circle.
Use the arrows to rotate the middle ring to change its colors to match the screenshot.
To change colors, align the portions of the middle ring with the outer ring color you wish it to have, and press the outer color.
The 2 cracked background colors cannot be changed.
For instance, the section above the flamingo is correctly shown as white and red to make pink.
The outer colors must touch what you wish to change, so you could press the adjacent blue to change the background, and the red for the foreground and make it purple.
The wedges will light up when you have the correct colors.
When you have successfully completed all rounds of the game, the Dungeon Door will open.
Watch the cut scene.
Screenshot
You have completed the game and successfully restored Grandpa as the rightful Duke of Scrufford, with the promise of more adventures to come.
Posted by: Jazz |
March 4, 2012 10:30 AM
|
March 4, 2012 10:30 AM