

![]() The Robbery is a stylish mobile room escape game from Caluliber that isn't about escaping from rooms, towers, or even offices. Instead, you're a burglar out for some cash, cracking safes one by one using your puzzle solving skills. Use clues and a few inventory items in each level to get to the gold, then race against the clock (and the security lasers) to grab it all for yourself. Tasty, tasty loot!
The Robbery is a stylish mobile room escape game from Caluliber that isn't about escaping from rooms, towers, or even offices. Instead, you're a burglar out for some cash, cracking safes one by one using your puzzle solving skills. Use clues and a few inventory items in each level to get to the gold, then race against the clock (and the security lasers) to grab it all for yourself. Tasty, tasty loot!
 The biggest selling points for The Robbery are its high-quality visuals and creative presentation. This isn't a game that was slapped together with clip art and a couple lines of code. The artwork is dynamic and original, filled with little bonuses like wiggling trees or smiling fridge magnets. Interacting with this world is also surprisingly fluid, as you'll twist safe doors and zoom in on objects with ease. Cracking safes is fun, not a hassle.
The Robbery is an ad-supported free download that comes with ten levels. There are three in-app purchases available at the moment, one for removing ads, one for unlocking unlimited hints, and one with 15 new levels. Even with everything unlocked, The Robbery feels a little light on content, especially when there are mobile escape games out there that boast 100 or so stages. The quality is much higher here, though, so some trade-offs are expected. Here's hoping for more levels in the future, as the ones currently in the game are great!
![]() The Robbery (iPhone, iPod Touch, iPad)
The Robbery (iPhone, iPod Touch, iPad)


Walkthrough Guide
(Please allow page to fully load for spoiler tags to be functional.)
The Robbery Walkthrough
Note: Many clues and puzzles in this game are randomized each playthrough. Please refer to a solution listed in this guide as an example rather than the single definitive answer to a puzzle.
Stage 1 - Smells Like Gold
Level 1-1: First Strike
Spin the vault wheel clcokwise to open it.
Collect all the loot inside the safe.
Level 1-2: Classic Safe
Note the message taped onto the orange box on the bottom right shelf of the bookcase with the numbers "3-1".
Turn the top dial on the safe to the number 3.
Turn the bottom dial on the safe to the number 1.
When the correct numbers are set on the two dials, the bar attached to the vault wheel changes from red to green.
Turn the vault wheel clockwise to open the safe.
Take all the gold in the safe, but be careful not to touch the red laser in the middle of the treasure.
Level 1-3: Post Office
Tilt your device to move the ball to the red button at the end of the path.
Start by holding your device flat, and then tilt the top of your device down to roll the ball back.
Tilt right to move the ball right.
Now tilt the bottom of your device downward (so you're holding the device vertically) to roll the ball down.
Tilt right again to roll the ball right.
Finally, tilt the top of your device down again to move the ball to the red button and open the safe.
Collect all the treasure inside the safe without touching the moving laser.
Start from the right side and take as much as you can while tapping in a vertical motion to get as much gold as possible before the laser reaches you, then quickly move to the left side and do the same.
Level 1-4: The Painting
Tap the small white dot near the right side of the screen to turn on the light.
Shake your device to drop the painting from the wall.
Push the now uncovered red button on the wall after the painting drops to the floor.
Turn the vault wheel clockwise to open the safe.
Loot all the gold inside the safe, and make sure to take The Thief Duck too!
Level 1-5: Kids Room
Pick up the CROWBAR on the floor to add it to your inventory.
Click the music box on the shelf to zoom in.
Press the music note button to hear a tune, then press the buttons in the correct order to mimic the tune you just heard.
Push the buttons on the music box in this order to solve the puzzle: Green - Yellow - Orange - Green - Orange - Green - Purple.
Take the KEY from the opened music box, then use the KEY to open the padlock on the safe.
Collect all of the mooney inside the safe, starting at the lower right corner to avoid the moving laser. Also make sure to take the X-RAY SCANNER inside the safe too!
Stage 2 - Rob & Run
Level 2-1: Egyptian Room
Pick up the MAGNIFIER from the floor at the lower left corner of the scene.
Drag and drop the MAGNIFIER over the face of the seated figure in the picture on the wall to zoom in.
While looking at the zoomed-in picture, use the MAGNIFIER again on the eye to take an even closer look.
Note the six numbers in the center of the eye: 025439.
Tap the safe to zoom in, then tap the buttons on the safe to enter the combination you saw with the magnifier.
Turn the dial to open the safe.
First take the Ancient Skull in the middle, then grab all the gold bars inside the safe. Try tapping around the corners of the safe, starting at the lower right corner, to avoid the moving lasers.
Level 2-2: Living Room
Take the FRIDGE MAGNET stuck to the fridge door.
Use the X-RAY SCANNER on the vault door on the area beside the handle.
Through the scanner you'll see an object on the other side of the safe door that matches the magnet in your inventory.
Place the FRIDGE MAGNET on the door in the same spot where you saw the object in the scanner. Slide the magnet to the right to open the safe.
Loot all of the coins and treasure, starting at the upper right side, but be careful of the vertical laser that appears suddenly and moves very quickly through the safe.
Level 2-3: Phone Call
Pick up the MOBILE PHONE from the table.
Tap the phone on the receiver at the right side of the table to zoom in.
Note the number listed at the bottom right corner of the machine.
Attach the MOBILE PHONE to the docking station on the wall beside the round vault door, then tap the phone to take a closer look.
Press the buttons to dial the phone number you saw on the machine: 086008000, then hit the green button.
Zoom out from the phone docked on the wall, then tap the ringing telephone on the table to zoom in.
Note the number under "Missed Call" and dial it on this phone: 086009000.
This will call back the phone on the wall and unlock the vault.
Rotate the vault door to open it.
Take the gold bars, being careful to avoid the disappearing and reappearing lasers. If you carefully tap the edges of the gold bars, you can collect them without touching the laser when it's active.
Level 2-4: The Basement
Use the CROWBAR from your inventory on the bent piece of metal sticking out from the middle of the pipe.
Tap the valve on the pipe to turn on the water, which will come pouring out of the hole you made with the crowbar.
The steam from the hot water will make three numbers appear on the vault door: 384
Enter this combination into the vault lock, then turn the wheel to open the safe.
Take all the cash inside the vault. It's safest if you start at the lower right corner to avoid the two upper lasers.
Level 2-5: High Security
Tilt your device to the right to slide the safe away from the center of the room.
Use the CROWBAR from your inventory to lift the loose floor tile below the locked grey hatch.
Take the uncovered KEY from the hole in the floor.
Unlock the hatch door with the KEY and tap the door to open it.
Take the SAFE MAGNET from the opened hatch.
Drag the alarm into the hatch and close the door to hide it away.
Quickly flip your device upside down (meaning that the top of the device is now pointing down, not flipped over facing away from you) to swing the lightbulb hard enough to break it. After it smashes, return your device to its normal position
Tilt your device left to return the safe to the center of the room.
Slide cord beside the window upwards to lower the blinds.
Now that all the lights are out, you should see three glowing circles on the safe door.
Move the two magnets on the safe over two of the green circles.
Place the SAFE MAGNET you found in the hatch on top of the third green circle.
Collect all the diamonds inside the open safe now. No lasers here to worry about, so just grab them as fast as you can!
Stage 3 - The Great Robbery
Level 3-1: Cat Room
Use the CROWBAR from your inventory on the television twice to break the screen away.
Tap the puzzle revealed behind the broken screen to zoom in.
Arrange the tiles so that the numbers are arranged from lowest to highest like the numbers on a phone numpad, starting with 1 at the top left corner.
The starting positions of the tiles are randomized each game, but the solution is always the same. Make sure to end with the empty space at the bottom right corner!
Solution.
After you solve the first puzzle, a second one will appear after it.
The goal of this puzzle is to create a blue highlighted line around each edge of the two blue squares.
Tilt your device forward, back, left, or right to move the ball along the track.
When the ball moves past one path section, it will highlight it blue. If it moves over the same path again, the path will go back to being unlit.
Move the ball in the following directions to solve the puzzle:
Tilt the device left to move the ball to the bottom left corner.
Tilt the top of the device down to move the ball to the middle of the left side.
Tilt the device right to move the ball to the middle of the right side.
Tilt the top of the device down to move the ball to the top right corner.
Tilt the device left to move the ball to the middle of the top side.
Tilt the bottom of the device down to move the ball to the middle of the bottom side and complete the puzzle.
Solution.
The safe will open once the second puzzle is complete.
You can safely tap the bottom of the coins just under the lowest laser to collect most of the items in the safe. Wait for the lasers to disappear, then take the Big Diamond and any coins still left in the middle.
Level 3-2: Computer Safe
Tap the digital safe to enter the "password".
Type anything you want three times. After entering the third wrong password, the system will ask you if you want to "recover your password," so type Yes.
Answer the security questions to reset the password:
Q1: What's your favorite pet?
Hint: It's the creature inside this room.
A: spider
Q2: What's inside the safe?
Use the X-RAY scanner to take a peek inside the digital safe
A: Socks
Phone
Money
Once you've successfully solved the security questions, enter the password shown on the digital safe.
The password is thieves
Loot all of the treasure inside the safe, including the phone and socks, by tapping inside the area of the moving squares.
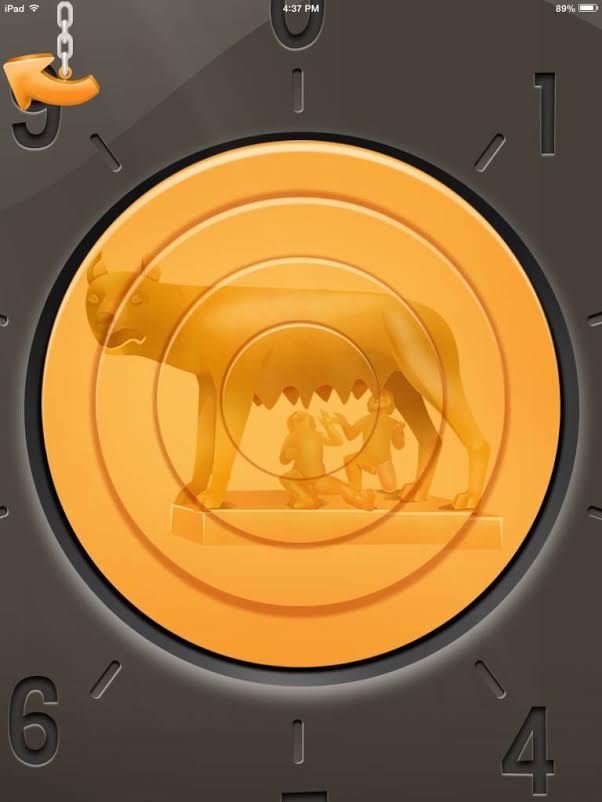
Level 3-3: The Penthouse
Turn the hands of the clock to match with whatever the actual current time is on your device to unlock the drawers under the clock.
Drag the two small doors open to see the books on the shelf.
Note the shape of the books: II, VI, and III.
The books represent Roman numerals 2, 6, and 3.
Turn the dial on the safe to enter the combination 263.
Tap the gold dial in the center of the safe to zoom in.
Rotate the rings to arrange the picture on the gold dial.
Solution.
Loot all the cash inside the safe. Start at the right side to avoid the two lasers, then do the left side as the vertical laser moves away, and finally the center while avoiding the rotating laser.
Level 3-4: Party Room
Take the NEEDLE on the table.
Use the NEEDLE to pop one of the floating balloons, then collect the deflated blue or yellow BALLOON as it moves down the conveyor belt.
Attach the BALLOON to the silver tube above the end of the blue pipe.
You'll notice a stream of air coming out of the blue pipe which partially inflates the balloon, but it's not enough.
Blow onto your device for a few seconds to blow up the balloon, which turns the valve and opens the safe.
Collect all of the coins in the safe and the Golden Spool. The two vertical lasers here move very slowly, so it should be easy to collect the coins on the side when the lasers move close together and the coins in the middle when the lasers move apart.
Level 3-5: Digital Safe
Pick up the TOILET PLUNGER from the lower left corner of the floor.
Drag the curtain covering the wall to the left to reveal a glass case.
Lift the piece of glass upwards and then take the SAFE CAM from the wall cache.
Attach the SAFE CAM to the socket at the top of the safe.
At this point, the SAFE CAM will activate the camera in your device, which will automatically start taking pictures.
Note the three unlit circles at the bottom of the safe.
Point your device's camera at a red, blue, and green object to take a picture of it, which will light up one of the safe circles.
After the camera has taken a picture of something red, blue, and green, the safe will open.
Tap the gold bars inside the safe as quickly as you can. There are no lasers to begin with, but the longer you take, the more lasers will appear.
Level 3-6: Mechanical Safe
Tap the safe to zoom in. Turn the three dials on the safe until the bars on the meter are exactly in the middle.
The goal is to have all the green bars to be filled and none of the red bars filled.
Turn the large dial to 1, the medium dial to 1, and the small dial to 2.
Collect all the bags of gold by tapping rapidly in a clockwise motion to stay ahead of the lasers.
Level 3-7: North Pole Security
If you use the X-RAY SCANNER on the back wall, you'll notice a gear mechanism attached to the clock and lamps.
Also note how the two lamps are red and green, and the minute and hour hands of the clock are also red and green.
Turn the red lamp on the wall to the 3 o'clock position and the green lamp to the 7 o'clock position.
Take the COMPASS from the revealed wall cache.
Insert the compass into the space at the center of the safe.
Take a look at the name of the security company on the safe - the solution is right there!
Turn your device until the compass points towards N, for North.
Hold it in place until all of the lights at the bottom of the safe are lit to unlock the door.
Take all of the money and diamonds while avoiding the swinging lasers.
Start with the outer treasure, then collect the treasure at the middle; you've got a lot more time than usual here, so it's better to be careful than fast.
Level 3-8: Underwater Safe
Pick up the OXYGEN TANK behind the bloated puffer fish.
Use the TOILET PLUNGER from your inventory on the fish's mouth to open it.
Take the KEY from its extended tongue.
Put the OXYGEN TANK in the open clam shell to keep it from closing shut.
Now you can safely take the SAFE WHEEL from the clam.
Use the KEY to open the padlock and remove the chain.
Attach the SAFE WHEEL to the socket at the center of the safe, then turn the wheel to open it.
Collect all of the gold bars, but be careful of the two fast moving diagonal lasers.
Start with the treasure near the middle. They'll pause every other time they reach the corners of the safe, that's your chance to get the outer treasure.
Level 3-9: Hot Wheel
Open locker 180 to find a bottle of OIL.
Use the OIL to repair the rusted locker at the top right corner, locker 168, then take the piece of FOLDED PAPER inside.
Drop the FOLDED PAPER on top of the smoking cigarette at the edge of the trash bin to light the paper on fire.
Drag the burning paper over to the smoke detector to turn on the sprinklers, which will cool the safe wheel.
Open locker 173 to find a KEY.
Use the KEY on locker 175 to open it, where you'll find an ACCESS CARD within.
Insert the ACCESS CARD into the slot at the top left corner of the safe.
The password to the safe is the number of the locker where you found the ACCESS CARD: 175
Take all of the cash inside of the safe. Try to tap closer to the slower moving diagonal lasers on the left and right side, rather than the fast moving one in the center.
Level 3-10: The Attic
Lift the front left corner of the rug to a find KEY 1.
Shake your device to drop the vase off the dark shelf and onto the top of the safe.
Pick up KEY 2 from the shards of the broken vase.
Tap the locked drawer to zoom in.
Use four fingers to simultaneously pull the four latches down to open the drawer, then take KEY 3.
Use the KEYS to open the three padlocks on the safe:
The KEY (1) from the rug opens the top lock.
The KEY (2) from the vase opens the bottom lock.
The KEY (3) from the drawer opens the middle lock.
Tap as quickly as you can in a clockwise motion to take as many gold nuggets while the lasers in the safe are still spinning.
Once they stop moving, carefully collect the remaining gold nuggets and the Safe Bat, aiming for the easier ones to reach first. As time passes, more lasers will disappear.
Stage 4 - Mission Impossible
Level 4-1: Time Machine
Make a pinching motion on your screen to zoom out from the time capsule and calendar.
Pick up the SCREWDRIVER on the floor beside the capsule. Use it remove the four screws on the sides of drawer.
If you're having trouble getting the screws removes, try dropping the SCREWDRIVER so that the tip of the end is on top of the screw, not the handle.
Take the BROKEN REMOTE from the shelf.
Tap the time machine to open it, then put the BROKEN REMOTE inside. Tap the machine again to zoom in.
Push the plus or minus buttons to set the year at the top of the machine, then tap the machine to travel to that year.
In the current year, 2225, the remote is broken. If you go too far in the past, the remote will only be a blueprint.
You have to find the right year before 2225 where the the remote has already been constructed, but not too far ahead so that it's already old and broken.
The correct year is randomized each game, but it will never contain a number higher than 4.
Once you find the right date, take the FUNCTIONAL REMOTE from the machine.
Use the FUNCTIONAL REMOTE on the time capsule.
Press the buttons on the remote to enter whatever date you found to repair the remote, then push the power button at the top to open the capsule.
Loot all of the gold bars inside the capsule.
Rapidly tap the gold bars at the right side of the capsule to collect them as fast as you can before the first laser appears.
From there, keep looting from right to left. The longer you take, the more lasers will appear.
Level 4-2: Office
Tap the papers on the desk to move them away, then take the revealed tube of GLUE.
Turn left to view the side of the room full of light switches.
Use the GLUE on the bottom left button to fix it. The switch will now be stuck in the "ON" position.
Turn right twice to face the lightbulbs and the floor hatch.
One of the bulbs in the center of the front row is now lit (the one you turned on by gluing the button on).
Note how the lit bulb is on a light ceiling tile. Memorize which remaining bulbs are on the light ceiling tiles and which are on the dark ones.
Go back to the view of the light switches.
Flip the switches so that lightbulbs on light tiles at the other side of the room are ON, while bulbs on dark tiles are OFF.
Since the glued switch is already done, the only two switches left to hit are the top left switch and top middle switch.
Turn back around to the lightbulbs. If the three correct bulbs and none of the wrong bulbs are lit, the hatch in the floor will open.
Take the VAULT WHEEL from the pedestal that comes out of the hatch.
Move right to face the vault. Attach the VAULT WHEEL to the center, then tap the vault to zoom in.
Lift the correct levers so that the green bar at the top of the vault is completely filled.
Some levers raise the bar while in the lower position (red) while others raise the bar while in the upper position (green). The solution to this puzzle is randomized each game.
Once you've completed the puzzle, turn the wheel to open the safe.
Loot the diamonds in the safe. When the grid of lasers move apart, take the ones in the center. When they move together, take the ones at the outer edges.
Level 4-3: Bank Basement
Pick up the PAPER AIRPLANE from the lower left corner of the floor.
Drag the empty ingot case in the left shelf onto the scale.
Note the weight of the case - this number is randomized each game.
Now place the ingot from the right shelf on the scale.
Take note of the ingot weight, this also a random number each game.
Finally, place the full case of ingots on the scale.
Take note of this third weight (which is a randomized number just like the other two weights) on the scale.
Tap the full ingot case to zoom in.
Use the three weights you found using the scale to determine the number of ingots in the case.
For the following example, let's say the empty case weighs 10 kg, an ingot weighs 5 kg, and the full case weighs 50 kg:
First subtract the weight of the empty case from the total weight of the full ingot case.
50kg - 10kg = 40kg.
Now divide the remaining number by the weight of an ingot.
40kg/5kg = 8.
The final number is the amount of ingots in the case. So, for this example, the solution is 8. Remember that your number, however, could be totally different!
Enter the total number of ingots you found into the space at the top of the full case using the plus and minus buttons.
Now place the full ingot case into the elevator and press the elevator button to send it to Floor 3, the Authorization Office.
If the number you put on the ingot case was correct, the office will send back the case with the UNLOCKING CARD.
Insert the UNLOCKING CARD into the card slot at the top left corner of the safe, then tap the safe door to open it.
There are no lasers here, so just take all the gold bars as quickly as you can in both the case in the safe and the back of the safe.
Level 4-4: The Newspaper
Take the box of CAT FOOD on the table.
Pour the CAT FOOD into the dish on the floor.
Pick up the NEWSPAPER SCRAP 1/6 from the ground after the cat moves.
The paper scrap will appear on the table. If you tap it, you'll see how many more pieces you still need to collect.
Tap the corner of the wallpaper to the right of the door to find NEWSPAPER SCRAP 2/6.
Drag the paper out of the hole in the trash bin to collect NEWSPAPER SCRAP 3/6.
Quickly tilt your device left and right to swing the pillow off the seat of the rocking chair. Take the uncovered NEWSPAPER SCRAP 4/6 from the seat of the chair.
Tap the safe on the wall to zoom in.
Pull out the NEWSPAPER 5/6 from the top right corner of the safe.
Drag the door open, then tap the doorway to go into the closet.
Take NEWSPAPER SCRAP 6/6 from the lower left side of the back wall.
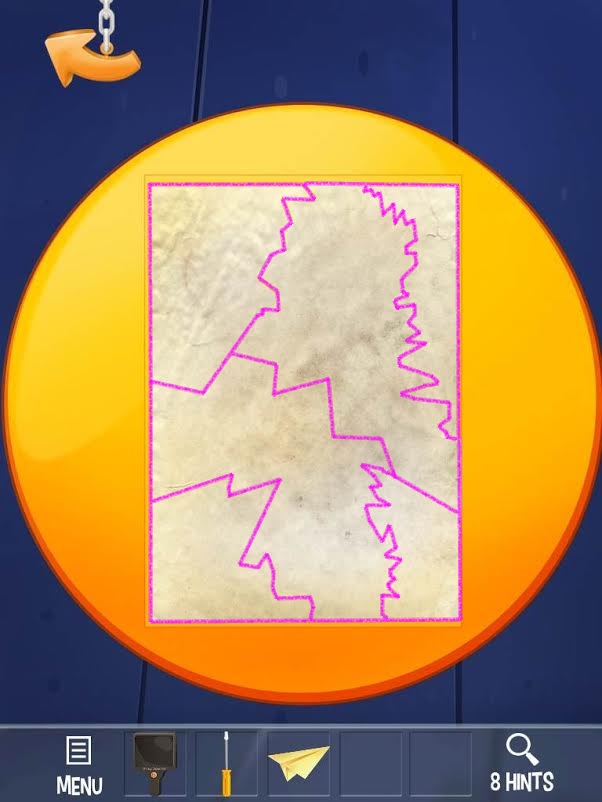
Go back to the apartment, then tap the coffee table to zoom in.
Now that you have all of the NEWSPAPER SCRAPS, you can assemble the pieces into a complete page.
Drag a scrap to move it around the table or tap a piece to rotate it.
Pay attention to the flat edges of the paper scraps, which indicate that section touches the outer border of the page.
Solution.
Take the assembled NEWSPAPER from the table.
Zoom out and then tap the door to go back to the closet.
Shake your device vertically to open the floor hatch, which will also take out the light table.
Put the NEWSPAPER on top of the table and then tap it to zoom in.
Press the "ON" button to turn on the backlight.
Move the paper over the light so that the blue square sections are all aligned on top of the letters in the newspaper article.
Find the right position of the paper where the letters highlighted with a blue square make a complete word when they are read from left to right and top to bottom.
The positions of the blue squares on the table are randomized, so the complete word in your game might be a different solution than the one in this guide. Some example solutions are "thief" "dealer" "bandit" or "winner".
Zoom out and return to the apartment, then tap the safe to zoom in.
Press the letter keys to enter the solution you found on the newspaper. Push enter to submit your solution. The handle will turn slightly and unlock when the correct password is entered
Rotate the handle clockwise to open the safe, then loot all the diamonds and the Golden Paper inside.
You have 20 seconds to collect the items, so the key here is to be careful rather than hasty. Try tapping the edges of the diamonds to take them safely without touching the disappearing and reappearing lasers.
Level 4-5: Automatic Safe
Put the PAPER AIRPLANE from your inventory on top of the ironing board.
Drag the iron back and forth on top of the paper to flatten it. Take the FLAT PAPER from the board.
Insert the FLAT PAPER into the printer, then press the green "PRINT" button. Collect the printed ENCODING MAP from the printer.
Memorize the cypher on the paper. Take a look at the moving message underneath the window and use the ENCODING MAP to translate it.
The translated message says: "Safe opens at 14:10." The time itself is randomized each game, 14:10 is just an example.
Go to the settings on your device and manually change the time to 14:10 (aka 2:10 pm).
Return to the game once you have the right time and the safe will open automatically.
Loot the gold inside the safe and avoid the swinging cross pattern of lasers. Start with the outer corners of the safe where you have more room to quickly grab the gold, then carefully take the remaining treasure in the center.
Posted by: Trinn |
May 5, 2014 8:15 PM
|
May 5, 2014 8:15 PM