

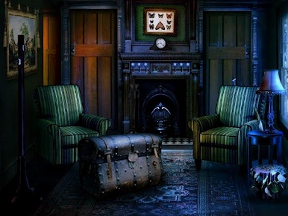
![]() A house, in a field, looking about as haunted as haunted can get. Why not step up and take a closer look? The Haunt is a mobile point and click puzzle game from Furious Apps that plays (and looks) like a casual adventure/hidden object game you might download to your desktop computer. Instead of a mouse and keyboard, though, you get to investigate a haunted house with your own two hands, finding items, managing your inventory, and solving mini-games while a paranormal presence follows you from room to room.
A house, in a field, looking about as haunted as haunted can get. Why not step up and take a closer look? The Haunt is a mobile point and click puzzle game from Furious Apps that plays (and looks) like a casual adventure/hidden object game you might download to your desktop computer. Instead of a mouse and keyboard, though, you get to investigate a haunted house with your own two hands, finding items, managing your inventory, and solving mini-games while a paranormal presence follows you from room to room.
 Soon after beginning the adventure, you find a note from Mayor Riddendorf thanking you for accepting the town's request to rid the area of strange spirits. Apparently many have tried to dispel the dark forces, but none have succeeded. And you're next on the list! No reason to think you'll fail as well, right? Positive thinking and all that? Either way, this is your goal, and you'll accomplish everything by using the touch screen. Inspect objects, collect items, move throughout the map and open your inventory with a simple tap.
Inside the house you'll run across plenty of strange things, and we're not just talking about the decor (which really is odd, once you look at it). Puzzles are all over the place, taking the form of mini-games, inventory riddles, and so on. Inspect everything and explore every room to find the items you'll need to proceed. You'll also find a healthy share of clues you'll need to remember for later use. Also a part of the game are finding bonus items like puzzle pieces, coins and moths, the latter of which serves as hints for those inevitable moments when you get stuck.
 Analysis: The mobile market has so far been home to mostly puzzle games and quick reflex-based time wasters. To see a game as attractive and content-rich as The Haunt is a rare thing! It has all the qualities of a beefy PC/Mac download squeezed into a portable package, and since it was built from the ground up for the touch screen, you won't find any awkward control conversions or objects too tiny for your finger to point out.
The Haunt ditches a lot of more modern control methods in favor of the straightforward, infallible tap. There's no need to wonder about rotating inventory items to look at the reverse, no cause to shake your device around, swipe weird parts of the screen, or try barking into the microphone (don't judge me!). While a part of you will be disappointed The Haunt doesn't utilize the cutting edge of point and click interaction, another, much larger part (possibly the liver, since it's so big) reminds you none of that matters. The Haunt plays perfectly and never turns the interface into a puzzle, leaving you alone in the haunted house with riddles to solve.
Can't get enough of The Haunt? Try The Haunt 2!
Big adventure in a small package, The Haunt is worth several hours of solid puzzle solving entertainment. There's also plenty of secret items to find, which should satisfy the hidden object fan we sometimes don't like to admit we're harboring. You might even get a good spook or two while you're at it!
NOTE: This game was played and reviewed on an iPad. Game was available in the North American market at the time of publication, but may not be available in other territories. Please see individual app market pages for purchasing info.


Walkthrough Guide
(Please allow page to fully load for spoiler tags to be functional.)
The Haunt Walkthrough
Collectibles: Puzzle Pieces, Moths, & Coins
Living Room - 4 Puzzle Pieces, 1 Coin, 1 Moth.
Screenshot.
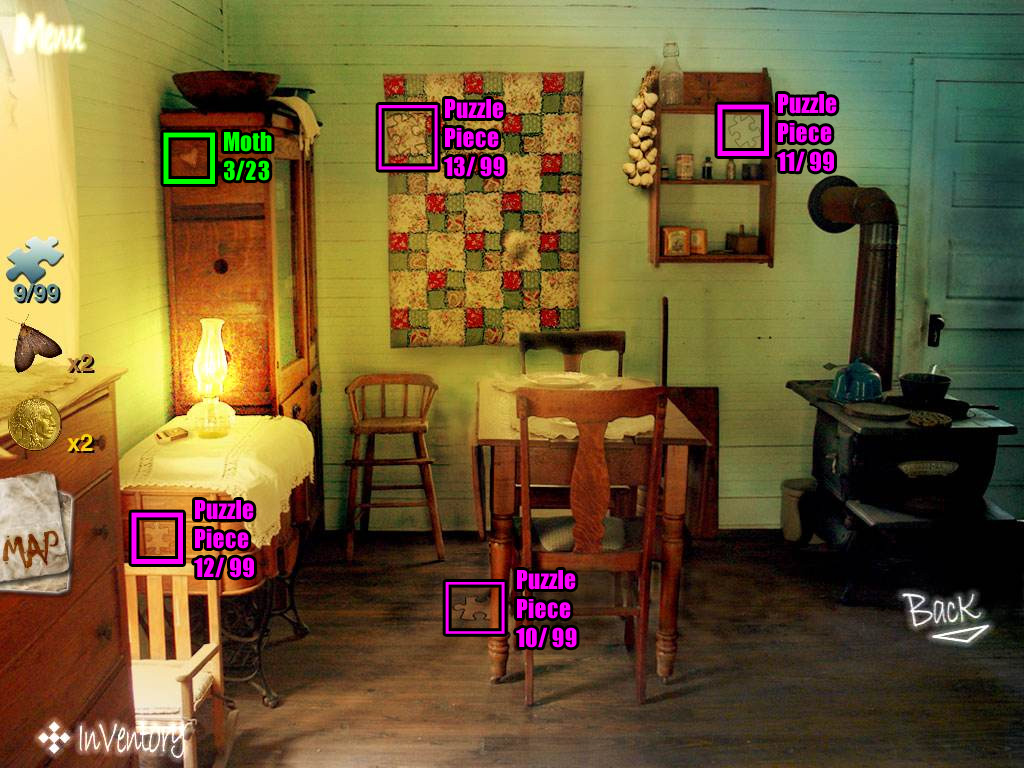
Dining Room - 5 Puzzle Pieces, 1 Coin, 1 Moth.
Screenshot.
Kitchen - 4 Puzzle Pieces, 1 Moth.
Screenshot.
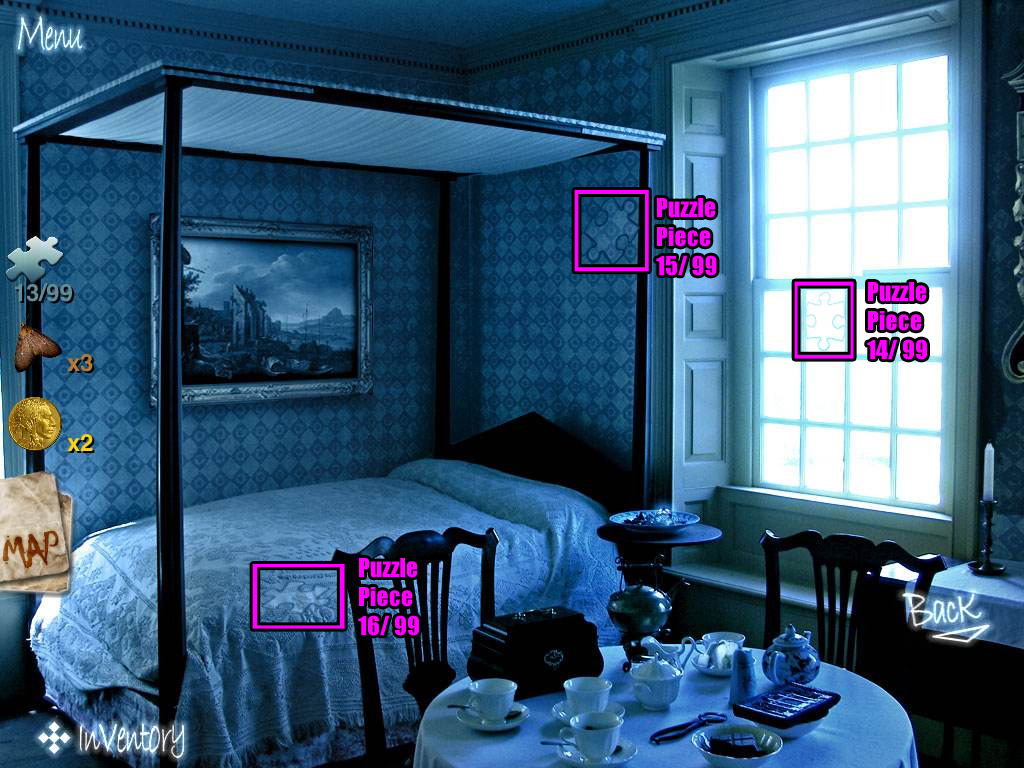
Blue Bedroom - 3 Puzzle Pieces.
Screenshot.
Utility Room - 3 Puzzle Pieces, 1 Moth.
Screenshot.
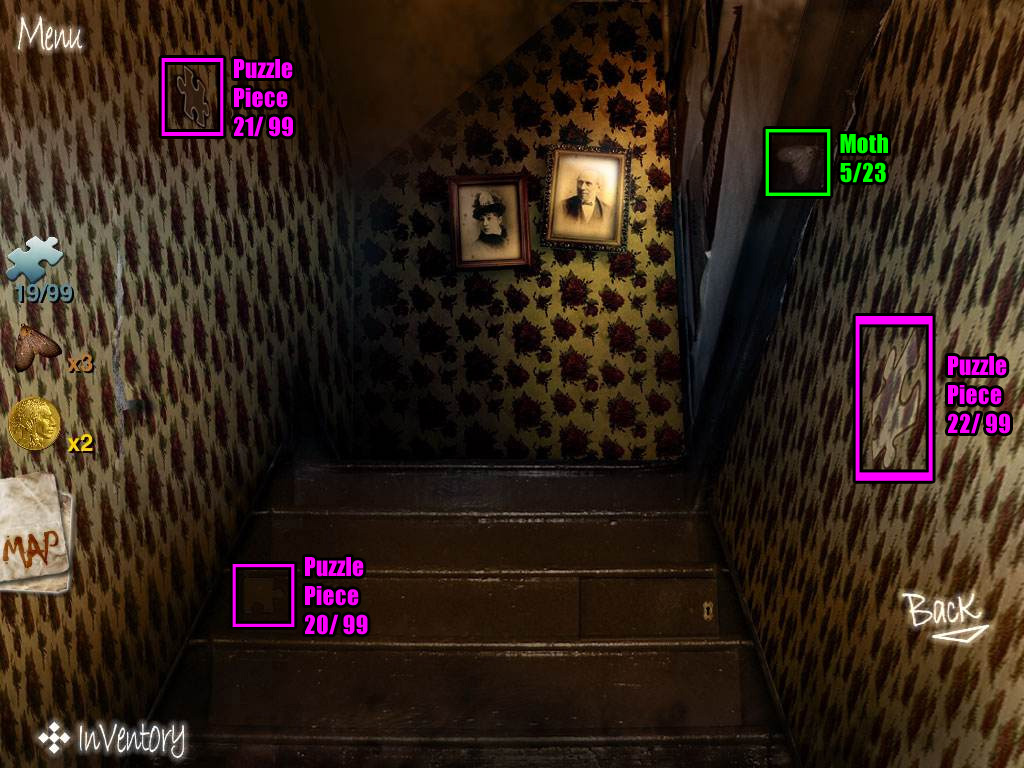
Stairway - 3 Puzzle Pieces, 1 Moth.
Screenshot.
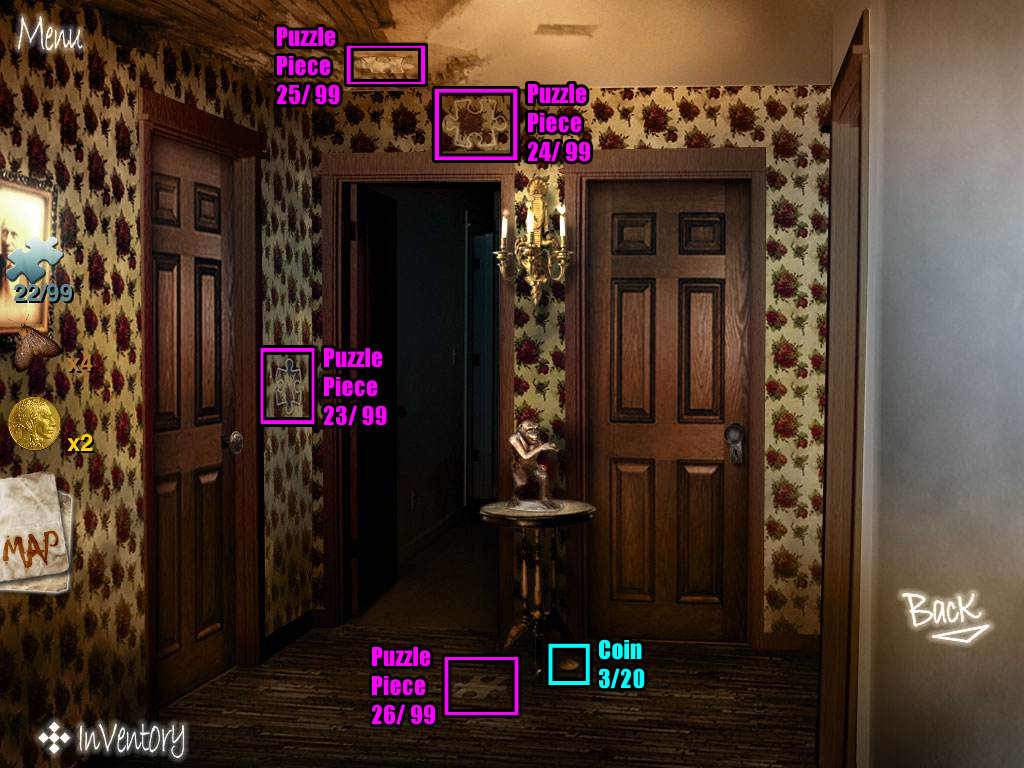
Upstairs Landing - 4 Puzzle Pieces, 1 Coin.
Screenshot.
Children's Bedroom - 1 Moth, 1 Coin.
Screenshot.
Bathroom - 3 Puzzle Pieces, 1 Moth.
Screenshot.
Hall - 2 Puzzle Pieces.
Screenshot.
Guest Bedroom - 4 Puzzle Pieces, 1 Coin.
Screenshot.
Study - 4 Puzzle Pieces, 1 Moth, 1 Coin.
Screenshot.
Basement Stairway - 2 Puzzle Pieces.
Screenshot.
Basement - 3 Puzzle Pieces.
Screenshot.
Basement: Left - 5 Puzzle Pieces, 1 Moth, 1 Coin.
Screenshot.
Porch - 4 Puzzle Pieces.
Screenshot.
Yard - 6 Puzzle Pieces.
Screenshot.
Stable Entrance - 5 Puzzle Pieces.
Screenshot.
Stable - 3 Puzzle Pieces, 1 Moth, 1 Coin.
Screenshot.
Stable Stalls - 3 Puzzle Pieces, 1 Coin.
Screenshot.
Garden Shed Entrance - 4 Puzzle Pieces.
Screenshot.
Garden Shed - 3 Puzzle Pieces, 1 Moth, 1 Coin.
Screenshot.
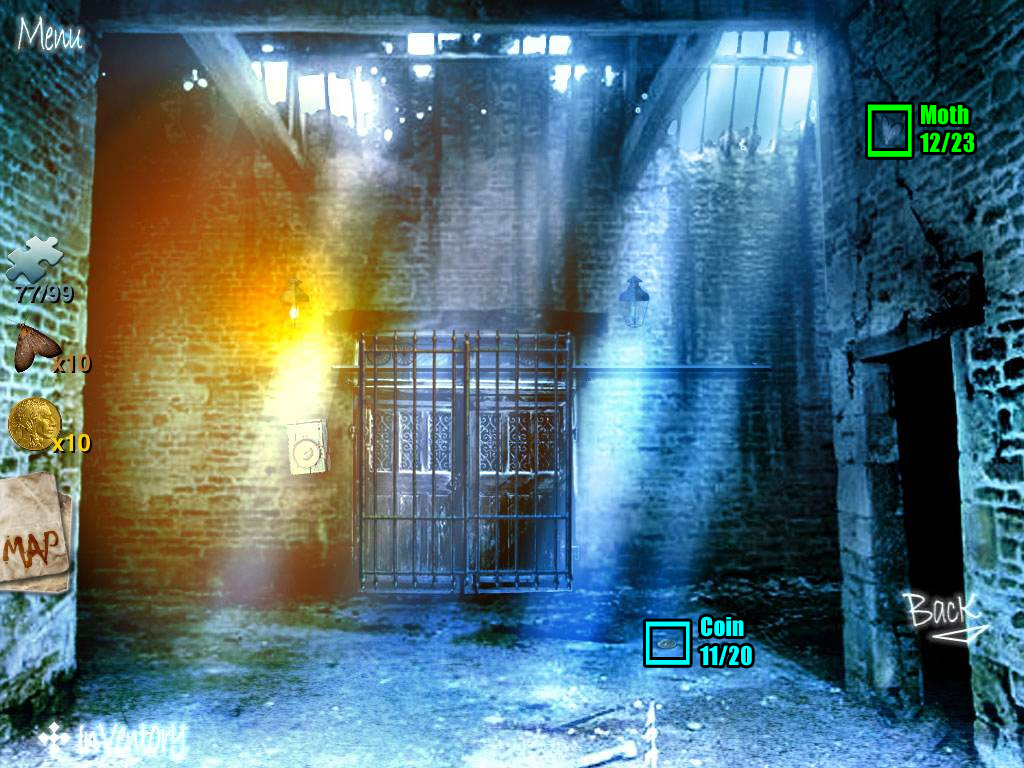
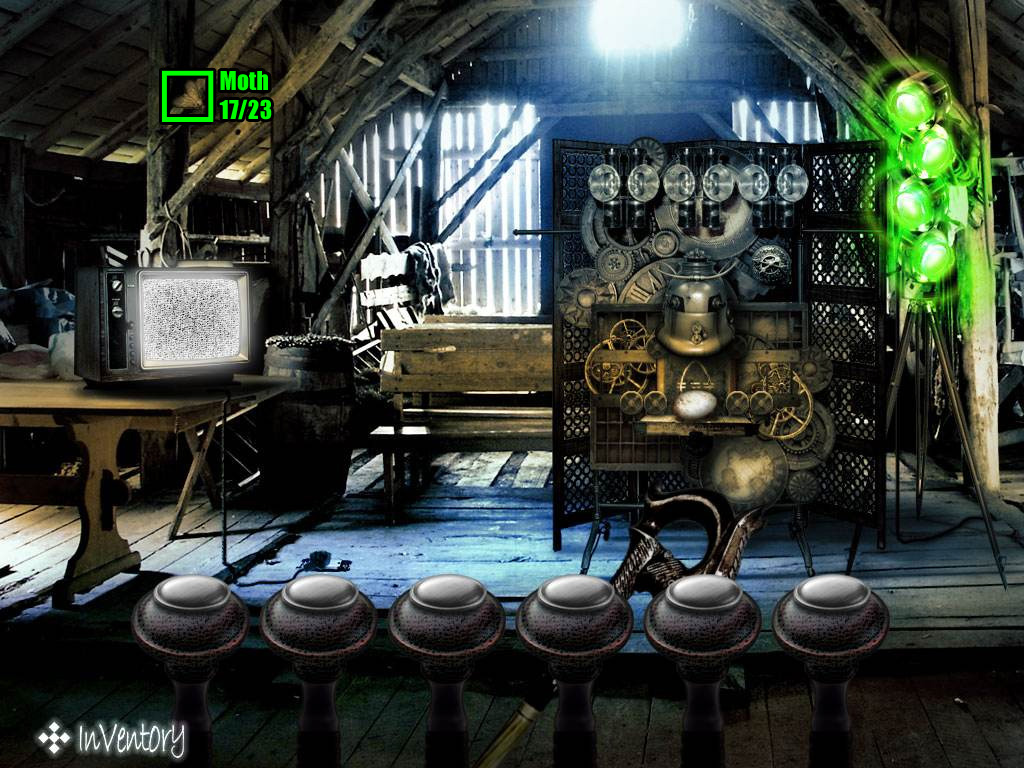
Barn - 1 Moth, 1 Coin.
Screenshot.
Small Barn Yard - 1 Moth
Screenshot.
Fortune Teller's Room - 2 Puzzle Pieces, 1 Moth, 1 Coin.
Screenshot.
Right Side Room - 3 Puzzle Pieces, 1 Moth.
Screenshot.
Barn Upstairs Landing - 2 Puzzle Pices, 1 Moth, 1 Coin.
Screenshot.
Loft - 1 Moth.
Screenshot.
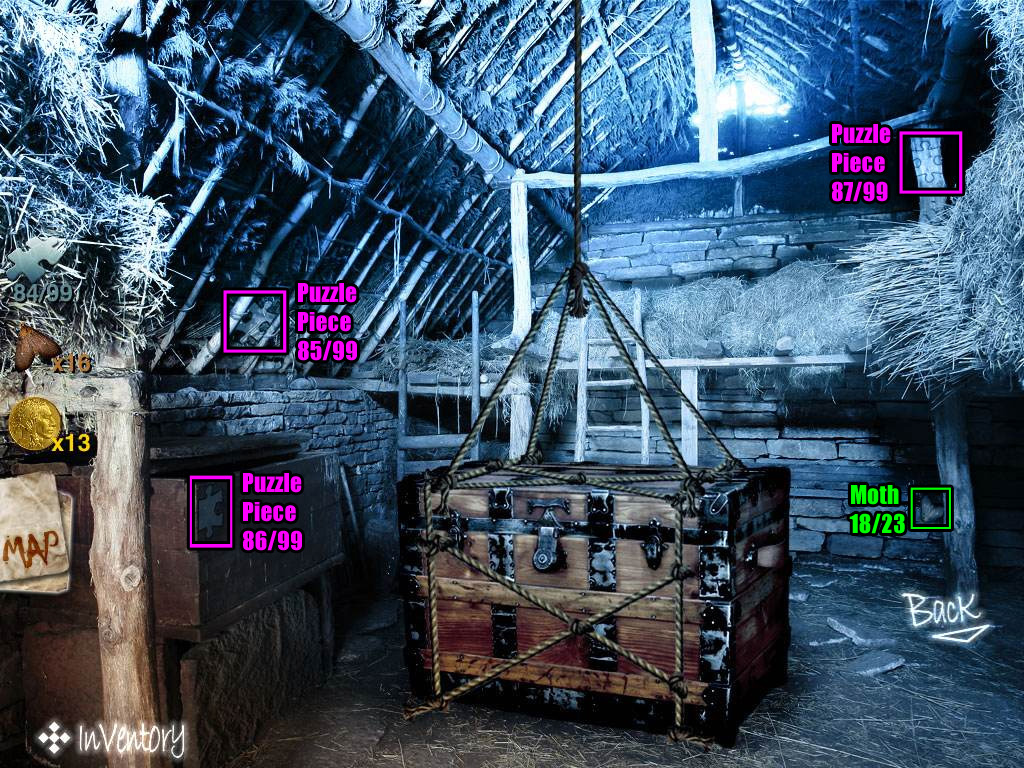
Barn Attic - 3 Puzzle Pieces, 1 Moth.
Screenshot.
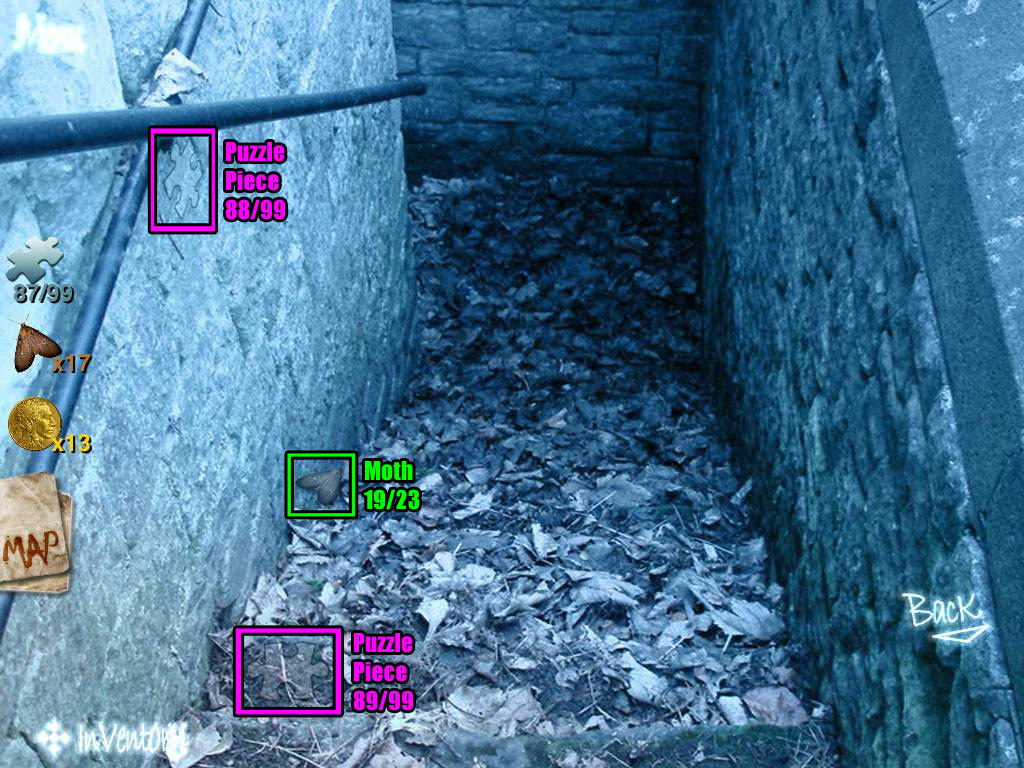
Cellar Stairs - 2 Puzzle Pieces, 1 Moth.
Screenshot.
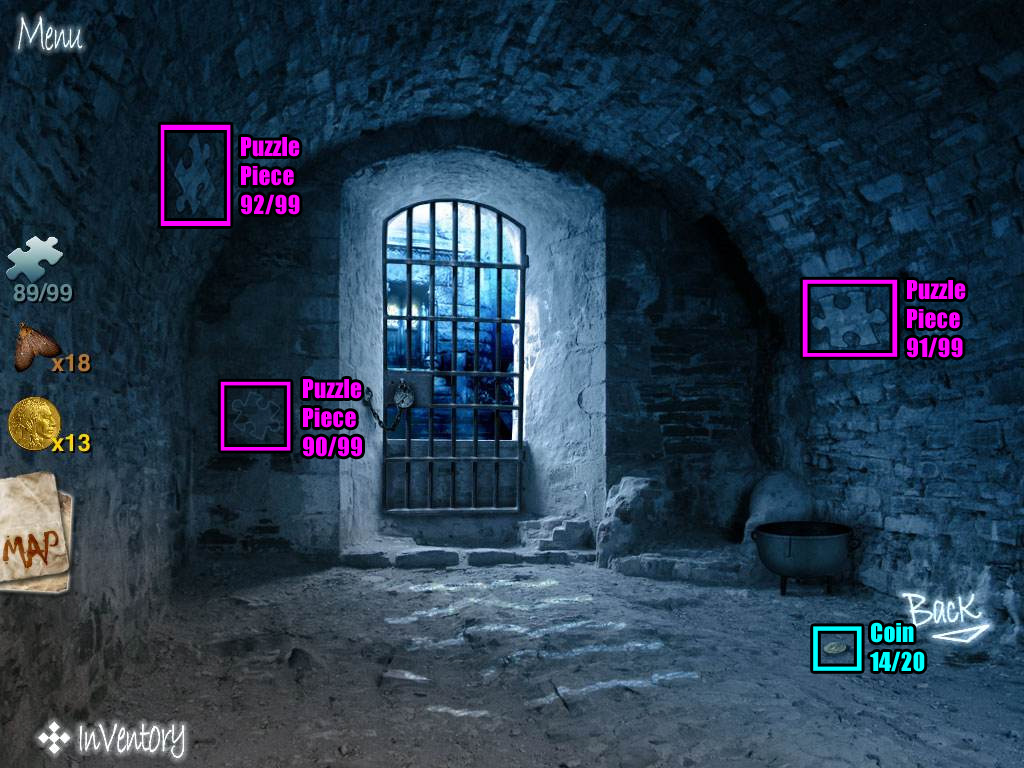
Barn Cellar - 3 Puzzle Pieces, 1 Coin.
Screenshot.
Mausoleum Foyer - 1 Moth, 1 Coin.
Screenshot.
Alcove - 1 Coin.
Screenshot.
Attic - 3 Puzzle Pieces, 1 Moth.
Screenshot.
Striped Bedroom - 1 Moth, 1 Coin.
Screenshot.
Left Side Room - 1 Coin.
Screenshot.
Ruins - 4 Puzzle Pieces, 1 Coin.
Screenshot.
Tomb Pathway - 1 Moth.
Screenshot.
Tomb - 1 Coin.
Screenshot.
Chapter 1
Front Porch
Tap the front door of the house to approach it.
Open the mailbox and take the letter inside.
Tap the letter to break the seal and read the note.
Look inside the envelope to find a MAP and PADLOCK KEY.
You can refer to the Map to view a floorplan of the building and find your current location.
Tap the door for a closer look.
Use the PADLOCK KEY to open the lock.
Quickly tap the doorknob several times until it flies off.
Back up to view the porch again.
Pick up the DOORKNOB on the ground.
Inspect the door again.
Add the DOORKNOB to the space in the door, then tap the door to open it.
Continue forward into the Living Room.
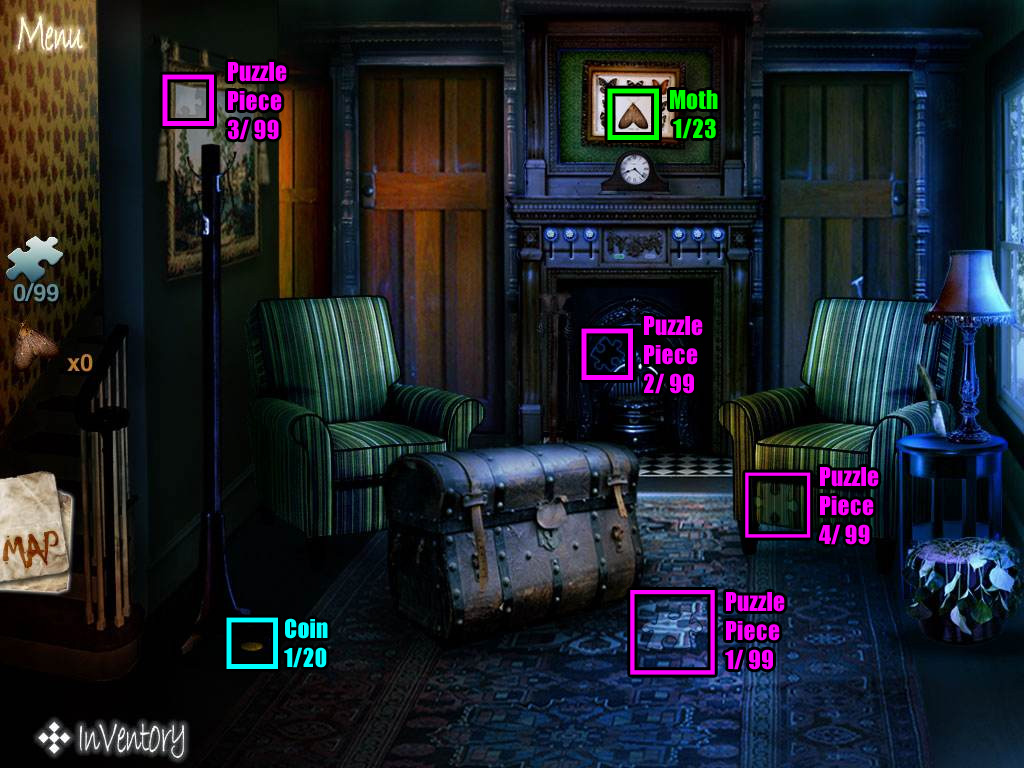
Living Room
Puzzle Piece 1/99 is on the carpet in front of the large trunk.
Puzzle Piece 2/99 is inside the fireplace.
Puzzle Piece 3/99 is at the upper left corner of the painting hanging on the left wall.
Puzzle Piece 4/99 is below the seat of the right sofa chair.
Moth 1/25 is inside the picture frame above the fireplace mantle.
Coin 1/20 is on the floor beside the coat rack.
Take the HUNTING KNIFE sticking out of the small, round table.
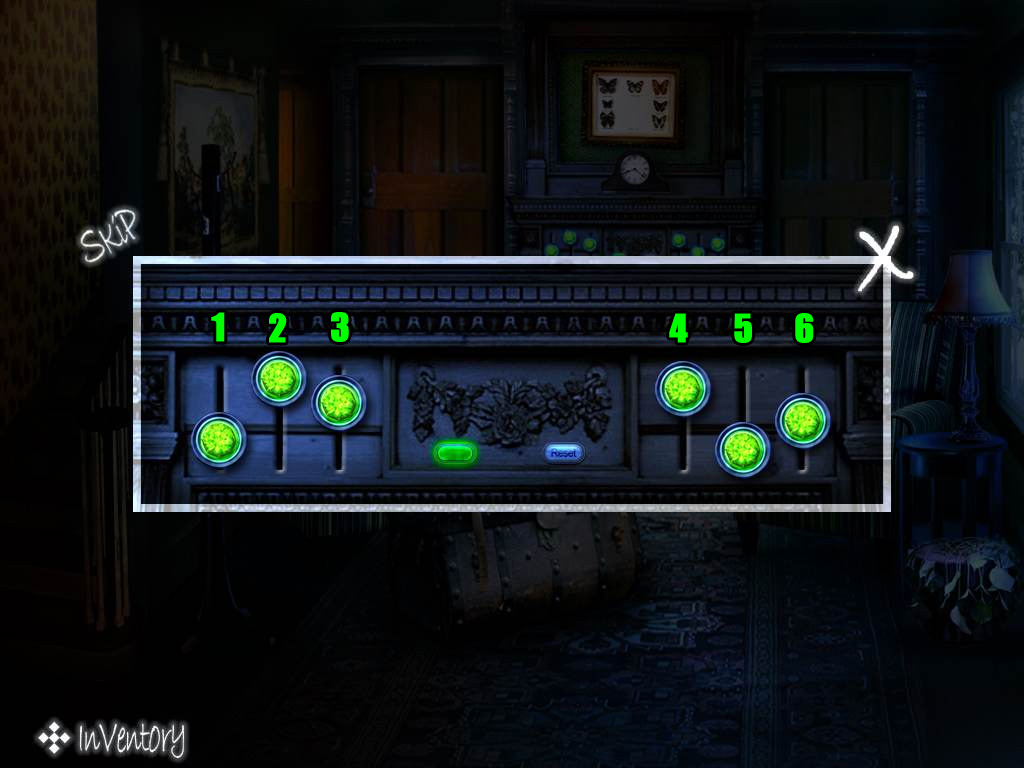
Tap the fireplace mantle to start the puzzle.
Arrange the sliders to light all of them green.
Tap and drag a slider to move it up or down.
When a slider is correctly positioned, it will glow green.
Moving one slider will also simultaneously move one or more other sliders.
Changing the position of Slider 1 will also move Slider 2 and Slider 5.
Changing the position of Slider 2 will also move Slider 1 and Slider 4.
Changing the position of Slider 3 will also move Slider 1 and Slider 2.
Changing the position of Slider 4 will also move Slider 5 and Slider 6.
Changing the position of Slider 5 will also move Slider 3 and Slider 6.
Changing the position of Slider 6 will also move Slider 2 and Slider 5.
Solve from right to left; first find the point at which the slider lights up.
Next, try to get all the sliders as close as possible to that point.
Lastly, make slight adjustments to arrange each slider in its correct position.
Press the small, blue button if you need to reset the sliders.
Screenshot.
After the puzzle is solved, push the green button between the sliders and take the SKELETON KEY 1 from the revealed cache.
Go through the right door into the Dining Room.
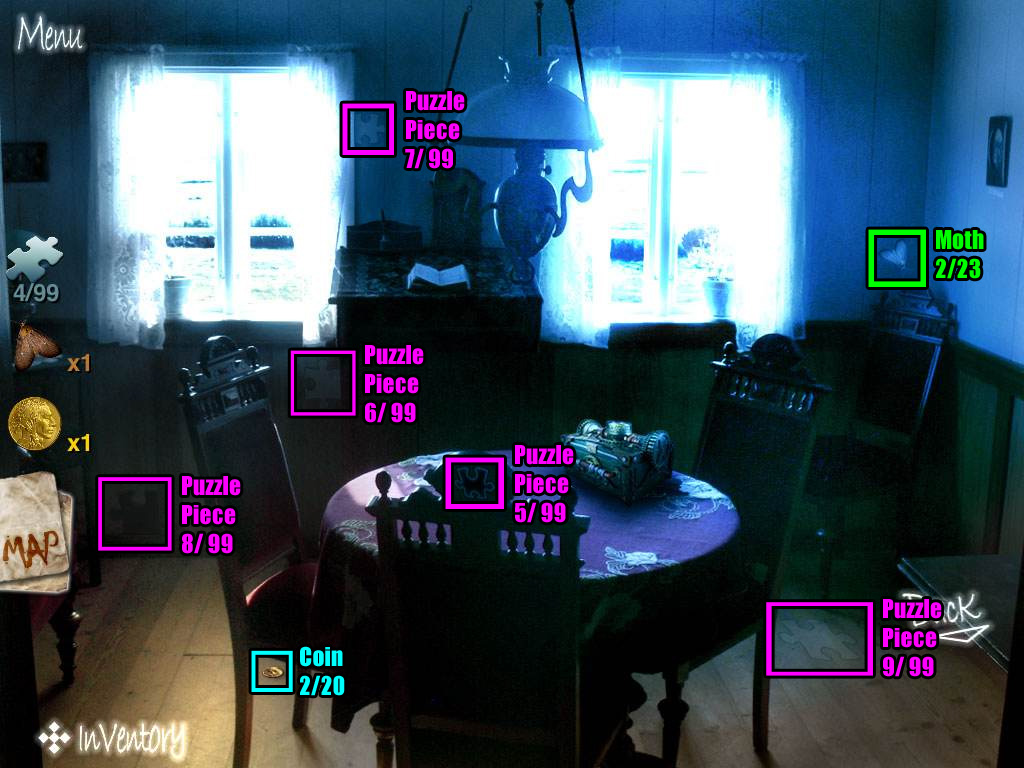
Dining Room
Puzzle Piece 5/99 is on the back of the nearest chair at the table.
Puzzle Piece 6/99 is under the lower right corner of the left window.
Puzzle Piece 7/99 is by the upper right side of the left window.
Puzzle Piece 8/99 is at the base of the wall directly below the left window.
Puzzle Piece 9/99 is on the floor beside the chair in the corner.
Moth 2/25 is on the wall above the top of the chair in the corner.
Coin 2/20 is on the floor underneath the left chair at the table.
Take the DIARY on top of the writing desk between the windows.
You can read through the pages of the Diary to find useful clues related to future puzzles.
Go back to the Living Room, then continue through the left door to enter the Kitchen.
Kitchen
Take a MATCH from the matchbox beside the lantern on the left table.
Use the MATCH on the same matchbox to make it a LIT MATCH.
Light the lantern with the LIT MATCH to illuminate the room.
Puzzle Piece 10/99 is on the floor underneath the table in the middle of the room.
Puzzle Piece 11/99 is on the wall above the middle shelf of the spice rack.
Puzzle Piece 12/99 is at the side of the left table, directly below the matchbox.
Puzzle Piece 13/99 is near the upper left corner of the quilt.
Moth 3/25 is near the upper left corner of the cupboard against the left wall.
Inspect the dark spot in the middle of the quilt hanging on the wall.
Lift the bulging patch of the quilt to find a SKELETON KEY 2.
Use the SKELETON KEY 2 (from the quilt patch) to unlock the right door.
Take a bulb of GARLIC from the bunch hanging from the left side of the shelves.
Go back to the Living Room.
Tap the lit area behind the left sofa chair and to the left of the Kitchen door to travel to the Hall Alcove.
From there, go through the left door to enter the Blue Bedroom.
Blue Bedroom
Puzzle Piece 14/99 is on the window pane.
Puzzle Piece 15/99 is on the wall above the bed's headboard.
Puzzle Piece 16/99 is on the blanket on the bed, just beside the left chair.
Take the BLUE RARE GEMSTONE from the dish on the end table beside the window.
Open the small wooden box on the table and take the DECORATIVE EGG found inside.
Go back to the Hall Alcove and continue through the right door to the Utility Room.
Utility Room
Puzzle Piece 17/99 is on the right side of the trough.
Puzzle Piece 18/99 is on the floor to the left of the open doorway.
Puzzle Piece 19/99 is on the wall above the cupboard.
Moth 4/25 is on the back of the right chair.
Take the STEEL PRY BAR leaning against the wall between the radiator and the cupboard.
Go back to the Living Room, then continue left to go up the Stairway (you can see the banister to the stairs just left of the coatrack).
Chapter 2
Stairway
Puzzle Piece 20/99 is at the far left side of the middle stair.
Puzzle Piece 21/99 is in the middle of the left wall.
Puzzle Piece 22/99 is in the middle of the right wall.
Moth 5/25 is near the top of the beam that splits the right wall.
Tap the ripped section of the wallpaper on the left wall to reveal a hidden code.
Note the pattern of the X's and O's in the grid, as well as the adjacent letters and numbers.
Continue up the stairs to reach the Upstairs Landing.
Upstairs Landing
Puzzle Piece 23/99 is on the wall between the left door and middle door.
Puzzle Piece 24/99 is on the wall above the middle doorframe.
Puzzle Piece 25/99 is in the middle of the stained section of the ceiling.
Puzzle Piece 26/99 is on the floor beside the base of the small table.
Coin 3/20 is on the floor underneath the small table.
Tap the monkey statuette to reveal the RED RARE GEMSTONE in its hand.
Go through the open middle door that's left of the monkey statue to enter the Children's Bedroom.
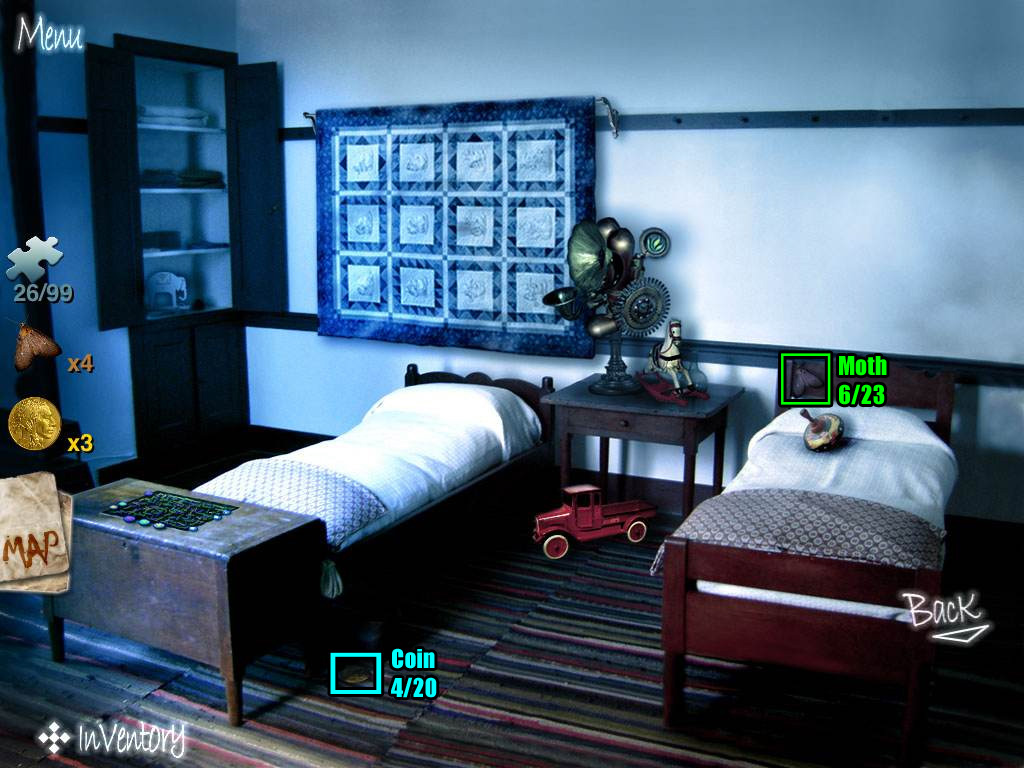
Children's Bedroom
Moth 6/25 is on the left side of the headboard on the right bed.
Coin 4/20 is on the floor at the foot of the left bed.
Take the MECHANICAL DEVICE 1/4 on top of the table.
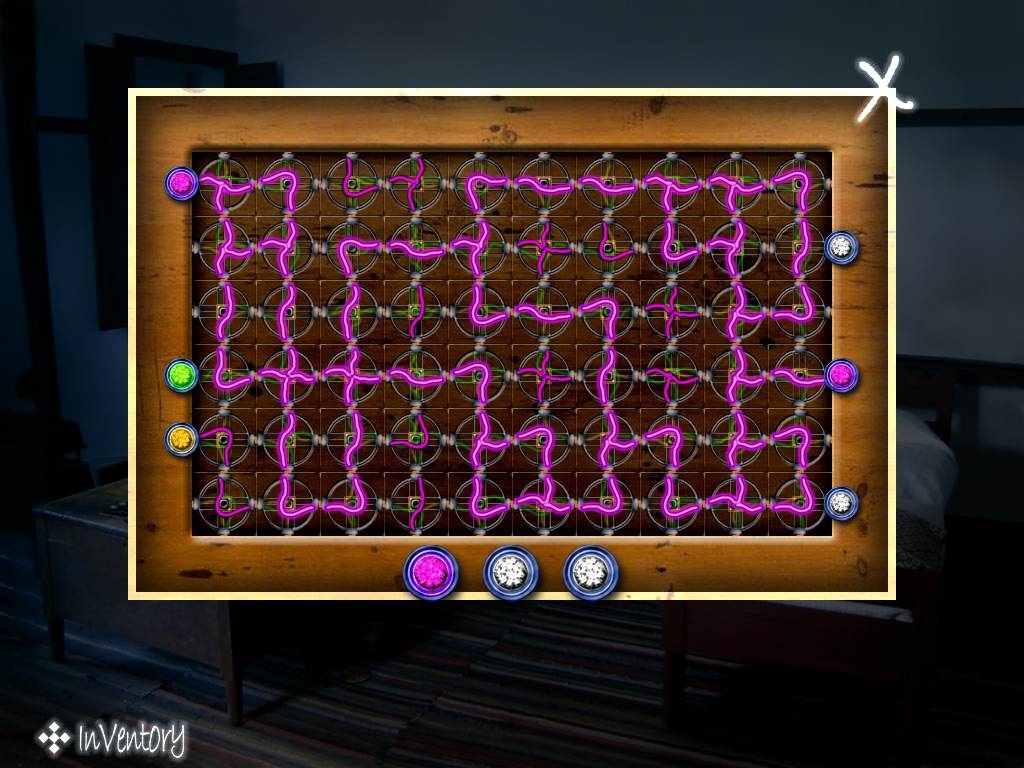
Tap the toy chest in front of the left bed to start the puzzle.
Create an interrupted path of wires from each colored gemstone on the left side to the correct gemstone on the right side.
Tap one of the three gemstones buttons at the bottom of the board to select the color of the wires.
The left button selects the purple wires, the middle button selects the green wires, and the right button selects the yellow wires.
Tap each wire to rotate it in place.
Solution Part 1 - Yellow.
Solution Part 2 - Purple.
Solution Part 3 - Green.
You can look inside the unlocked toy chest, but none of its contents are usable just yet.
Go back out to the Upstairs Landing, then go through the middle door that's right of the monkey statue to enter the Bathroom.
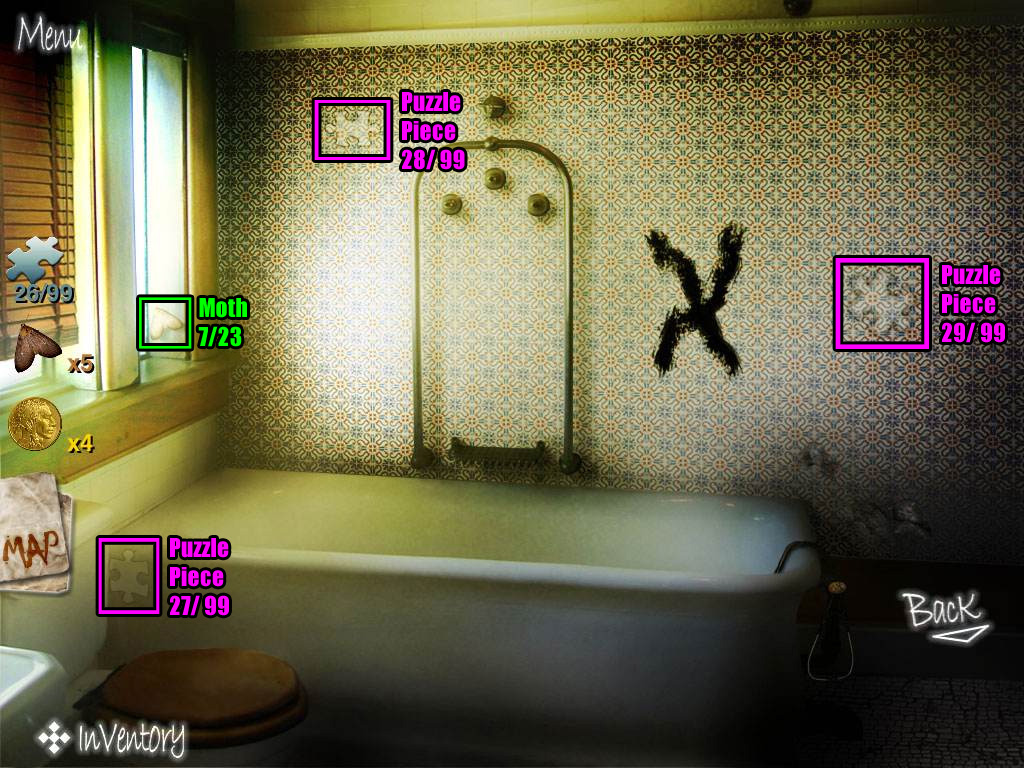
Bathroom
Puzzle Piece 27/99 is on the front left corner of the tub.
Puzzle Piece 28/99 is at the upper left side of the wall.
Puzzle Piece 29/99 is to the right of the black X on the wall.
Moth 7/25 is on the right side of the window.
Take the STETHOSCOPE on the bench beside the bathtub.
Go back out to the Upstairs Landing, then continue through the far right doorway into the Hall.
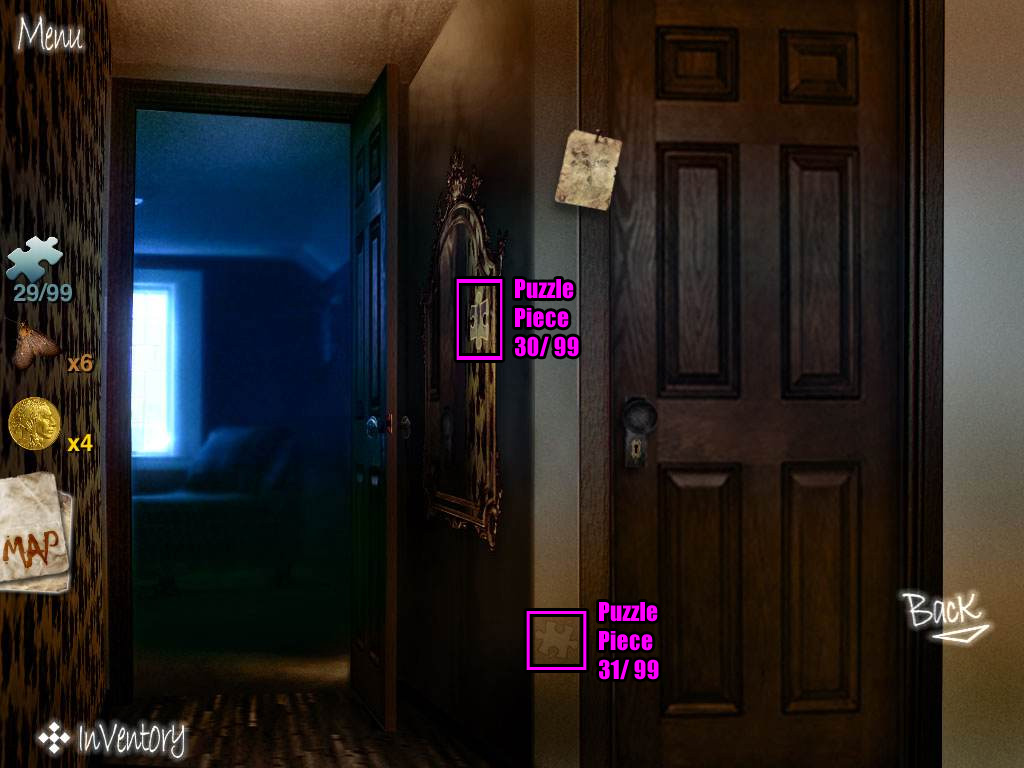
Hall
Puzzle Piece 30/99 is on the right side of the picture frame.
Puzzle Piece 31/99 is near the bottom of the wall to the left of the closed right door.
Read the "Moonflower" note nailed to the right door.
Go through the left door to enter the Guest Bedroom.
Guest Bedroom
Puzzle Piece 32/99 is at the top of the left wall.
Puzzle Piece 33/99 is at the lower right corner of the left window.
Puzzle Piece 34/99 is inside the small mirror on the dresser.
Puzzle Piece 35/99 is over one of the blue squares near the bottom of the blanket.
Coin 5/20 is on the endtable to the right of the bed.
Inspect the dream catcher barely visible in front of the left window.
Note the patterns stitched onto the middle of the dream catcher.
Place the RED RARE GEMSTONE in the octagonal shape at the top.
Place the RARE BLUE GEMSTONE in the circular shape at the bottom.
Go back to the Kitchen, then continue through the right doorway to the Study.
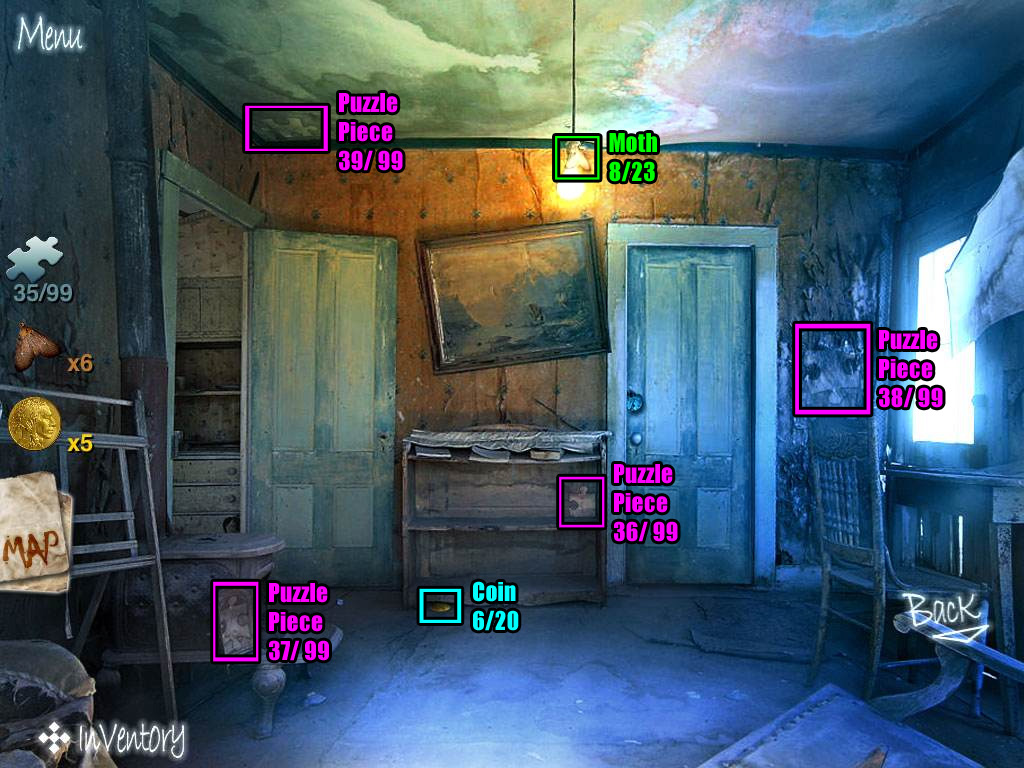
Study
Puzzle Piece 36/99 is on the right side of the top shelf in the empty bookcase.
Puzzle Piece 37/99 is inside the door of the stove.
Puzzle Piece 38/99 is on the wall beside the right door.
Puzzle Piece 39/99 is at the rear left corner of the ceiling.
Moth 8/25 is above the lightbulb hanging from the ceiling.
Coin 6/20 is on the floor beside the lower left corner of the bookcase.
Remove the crooked painting from the wall to uncover a wall safe.
Tap the wall safe for a closer look.
Place the STETHOSCOPE against the safe to start the puzzle.
Turn the dial and listen for the loud clicks to crack the safe.
Tap and drag to rotate the dial.
As the arrow on the dial passes each point, it will make a small ticking sound.
When the arrow passes by the correct point, it will sound like a loud click instead.
First rotate the safe clockwise and listen for the loud click.
Stop immediately and then turn the dial counter-clockwise.
When you hear the second loud click, stop and turn clockwise again.
After the third loud click, tap the handle to open the safe.
Once the puzzle is solved, take the PINK RARE GEMSTONE and the SAPPHIRE MONOCLE inside the opened safe.
Go through the left doorway to the Basement Stairway.
Chapter 3
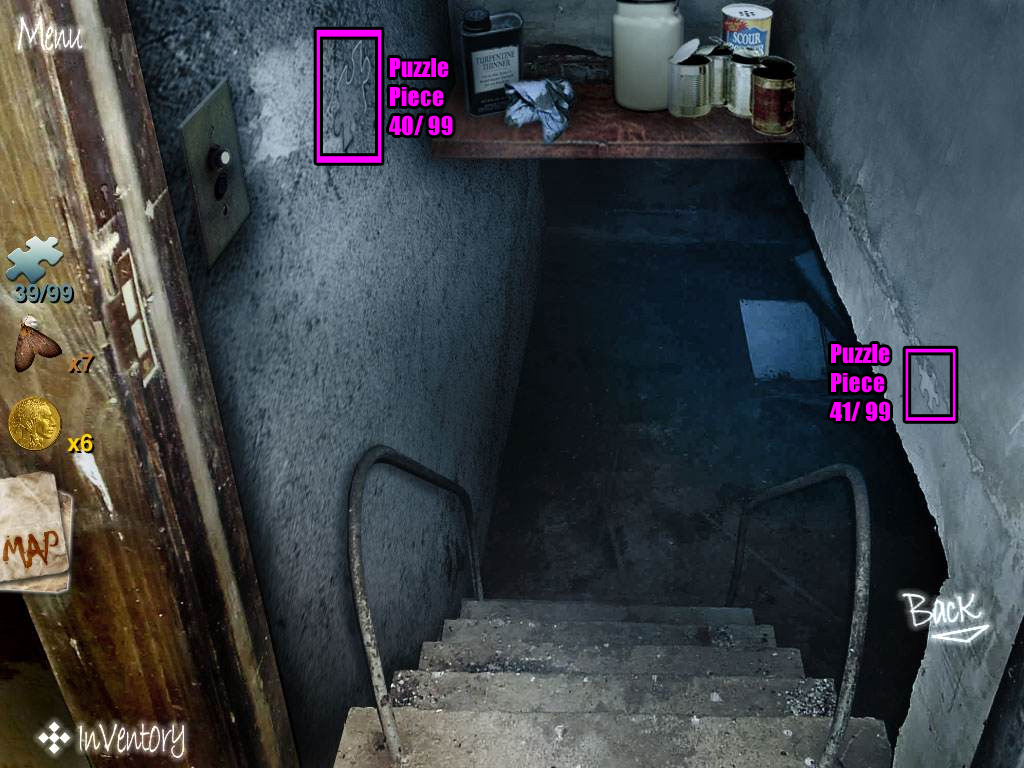
Basement Stairway
Puzzle Piece 40/99 is on the wall to the left of the shelf.
Puzzle Piece 41/99 is on the wall just above the right railing.
Take the DIRTY RAG and TURPENTINE on the shelf.
Go down the stairs into the Basement.
Basement
Pick up the ELECTRICAL FUSE on the ground between the pillars.
Inspect the fuse box at the upper left corner of the right wall.
Insert the ELECTRICAL FUSE into the left socket.
Flip the switch to turn on the power.
Go back up to the Basement Stairway.
Basement Stairway
Press the button on the wall above the left railing to turn on the lights.
Move down the stairs again into the Basement.
Basement
Puzzle Piece 42/99 is on the ceiling beside the left lightbulb.
Puzzle Piece 43/99 is on the wall next to the right window.
Puzzle Piece 44/99 is at the lower left corner of the right wall.
Take the FLOWER PLOT on the floor beside the table.
Put the FLOWER PLOT on the section of the floor illuminated by the right window, just beside the rear support beam.
Tap the area to the left to face the left side of the Basement.
Basement: Left
Puzzle Piece 45/99 is at the top of the box behind the teddy bear.
Puzzle Piece 46/99 is on the barrel against the right wall.
Puzzle Piece 47/99 is on the left wall above the dart target.
Puzzle Piece 48/99 is on the right side of the safe.
Puzzle Piece 49/99 is on the wall above the ladder.
Moth 9/25 is on the back wall directly below the light bulb.
Tap the large safe to start the puzzle.
Use the clue from the wall at the Stairway to solve the puzzle.
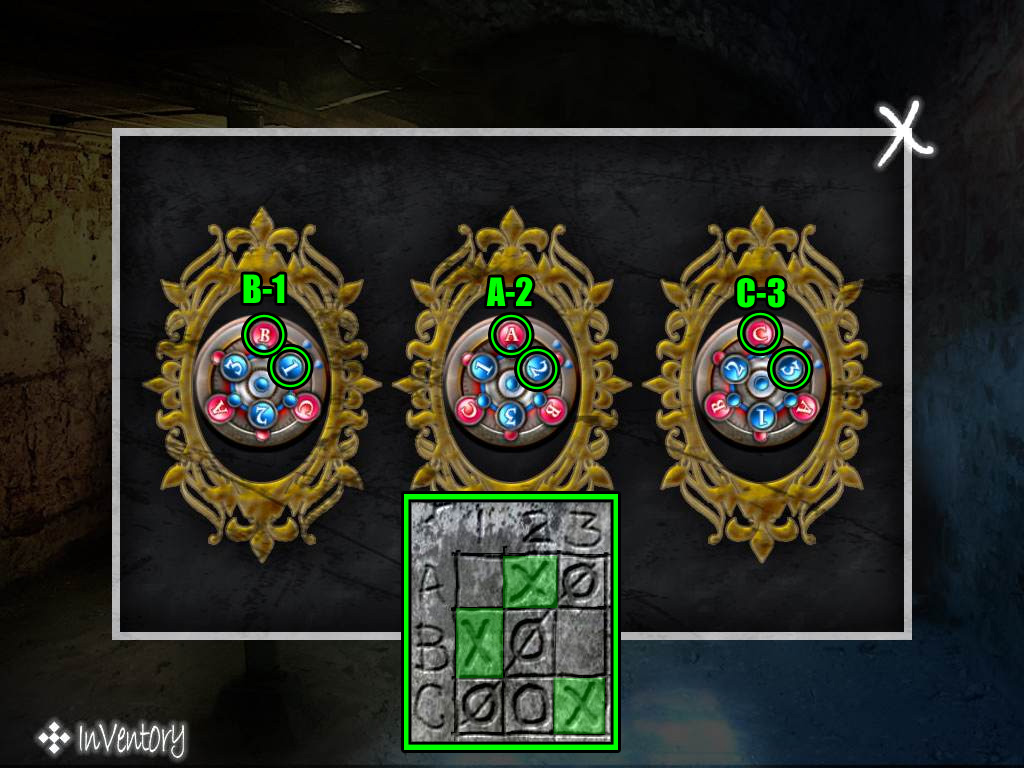
Find the coordinate of each X on the grid, then turn the dials to enter them into the safe.
Tap the outer ring to set the letter between the two red dots at the top.
Tap the inner ring to set the number between the two blue dots at the upper right.
From left to right, the order is: B-1, A-2, C-3.
Solution.
After the puzzle is solved, take the SKELETON KEY 3, the GREEN RARE GEMSTONE and the Coin 7/20 from the opened safe.
Return to the Guest Bedroom upstairs.
Guest Bedroom
Click the dream catcher hanging above the left window to zoom in.
Put the PINK RARE GEMSTONE to the heart-shaped in the outline stitched into the dreamcatcher.
Place the GREEN RARE GEMSTONE in the square outline.
Now that the dream catcher is complete, note the shape, color, and position of each stone in the center.
Go back downstairs and move to the Study.
Study
Use SKELETON KEY 1 (from the fireplace mantle puzzle in the Living Room) to open the right door.
Continue forward to the Porch.
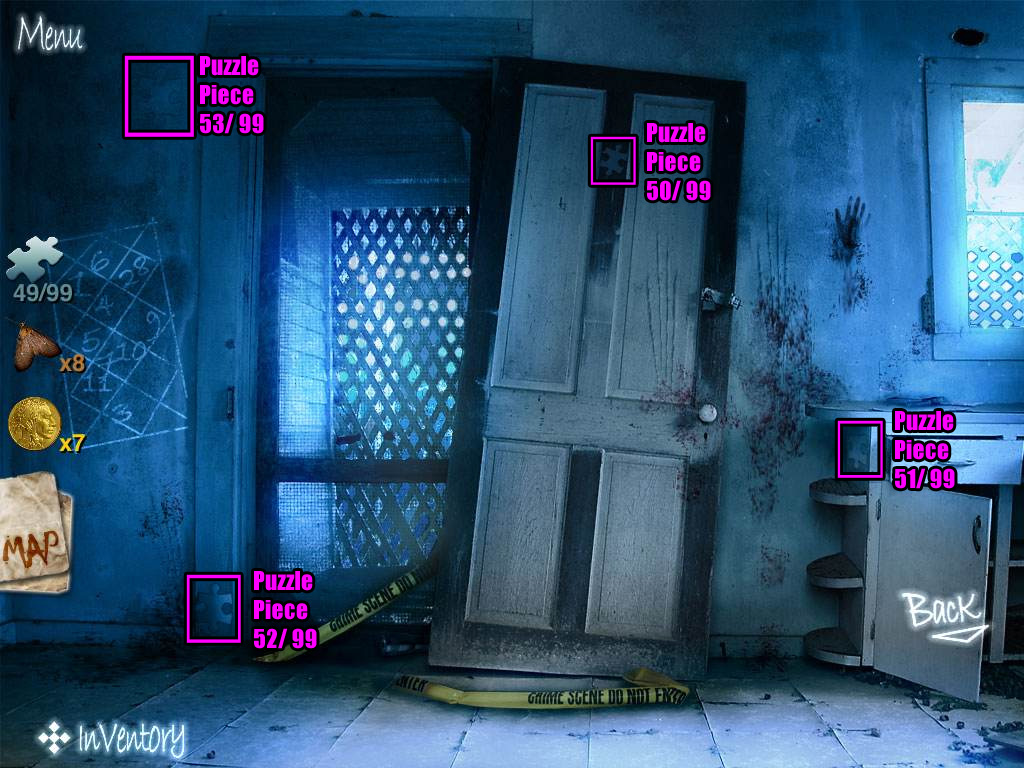
Porch
Puzzle Piece 50/99 is near the top of the door.
Puzzle Piece 51/99 is above the shelves on the left side of the cupboard.
Puzzle Piece 52/99 is at the lower left corner of the door frame.
Puzzle Piece 53/99 is beside the upper left side of the door frame.
Note the pattern and numbers written on the wall to the left of the doorway.
Take the ADJUSTABLE WRENCH on the counter under the window.
Go out the door to the Yard.
Chapter 4
Yard
Puzzle Piece 54/99 is in the branches of the far left tree.
Puzzle Piece 55/99 is in the middle of the field.
Puzzle Piece 56/99 is on the ground near the start of the road.
Puzzle Piece 57/99 is on the left side of the bridge at the end of the road.
Puzzle Piece 58/99 is in the branches of the large tree beside the right house.
Puzzle Piece 59/99 is in the moon.
Tap the right building to go to the Stable Entrance.
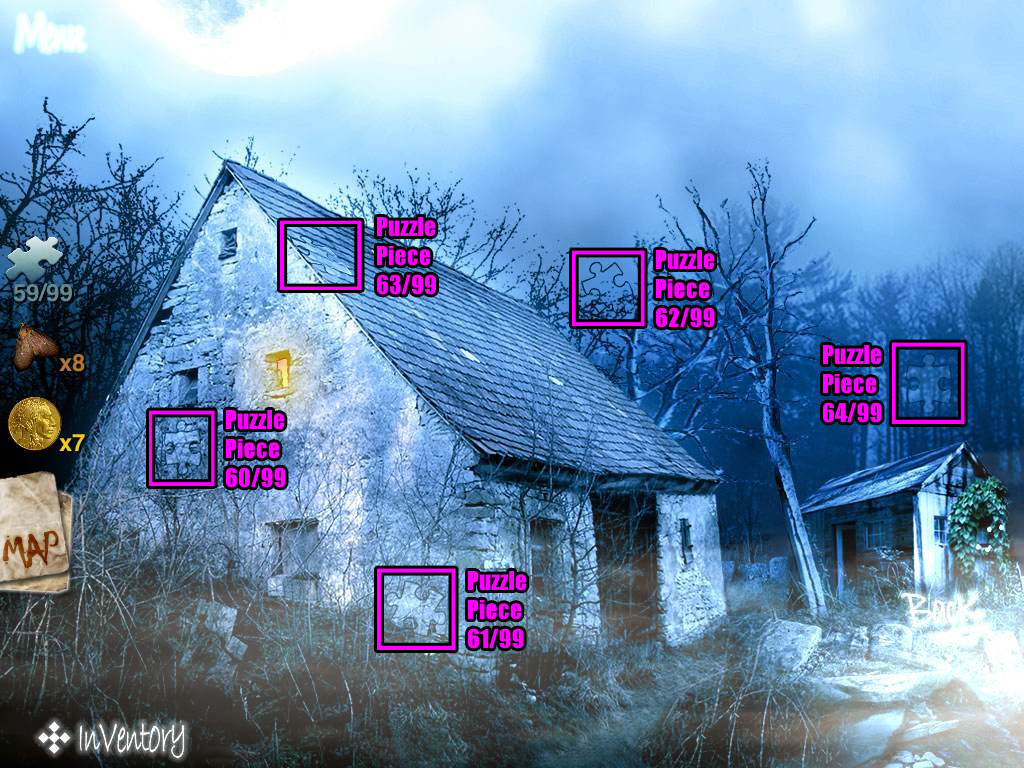
Stable Entrance
Puzzle Piece 60/99 is under the middle window on the left side of the cottage.
Puzzle Piece 61/99 is near the lower right corner of the left side of the building.
Puzzle Piece 62/99 is in the tree branches above the upper right corner of the roof.
Puzzle Piece 63/99 is near the upper left corner of the roof.
Puzzle Piece 64/99 is in the middle of the trees above the garden shed.
Tap the door to enter the Stable.
Stable
Puzzle Piece 65/99 is at the right side of the back wall, beside the far right rope.
Puzzle Piece 66/99 is at the top of the beam between the two middle ropes.
Puzzle Piece 67/99 is on the ground above the chalk numbers 3 and 4.
Moth 10/25 is at the left side of the back wall, beside the far left rope.
Coin 8/20 is on the ground above the chalk number 1.
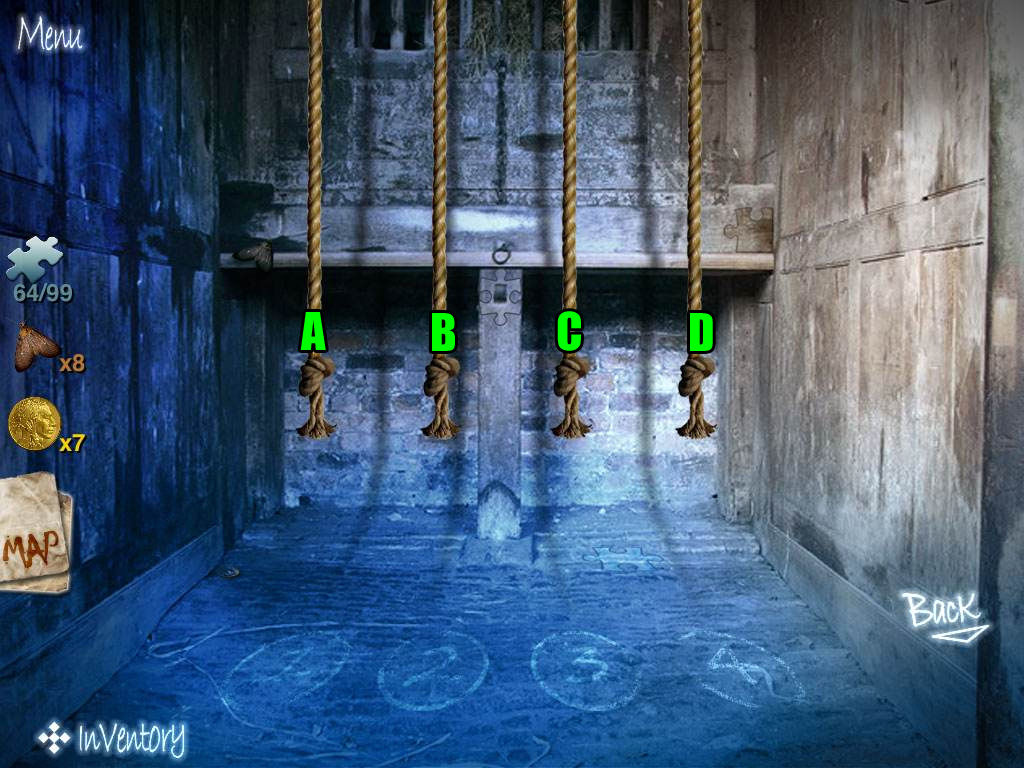
Tap one of the ropes to start the puzzle.
Use trial-and-error by pulling the ropes to find the correct sequence.
When you pull each rope, it will make one of three different noises:
The sound of a rope tugging up and down and then silence means that you've pulled the wrong rope to begin with.
If you pull the correct rope, you'll hear the rope tugging and then a noise like metal spinning.
The sound of the rope tugging and then a loud clank indicates that you've pulled the wrong rope and the puzzle has reset from the beginning.
Pull the ropes in the following order to solve the puzzle:
A - D - C - D - B - A
Solution.
After the puzzle is solved, go through the revealed doorway to the Stable Stalls.
Stable Stalls
Puzzle Piece 68/99 is on the wall to the right of the deer head.
Puzzle Piece 69/99 is at the end of the wooden strip that goes through the middle of the floor.
Puzzle Piece 70/99 is at the top of the nearest triangular-shaped stall.
Coin 9/20 is underneath the plow on the platform.
Take the LADDER at the side of the platform.
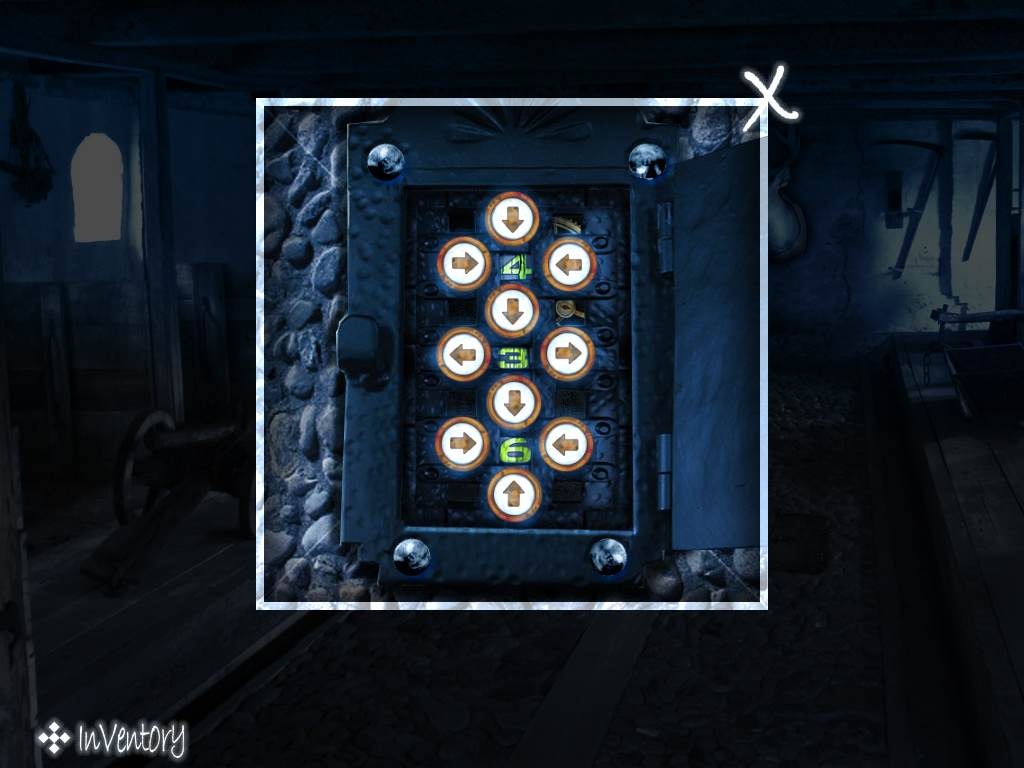
Tap the small door on the right side of the ground for a closer look.
Lift the panel to start the puzzle.
Arrange the buttons on the board so that the amount of arrows pointing to each number is equal to the value of that number.
Only four arrows must point at the number four, only three arrows must point at the number 3, and only 6 arrows must point at the number 6.
Tap the buttons to rotate the arrows.
Solution.
After the puzzle is solved, take the GEAR WHEEL 1/3 from the revealed cache.
Go back outside to the Stable Entrance, then continue right to the Garden Shed Entrance.
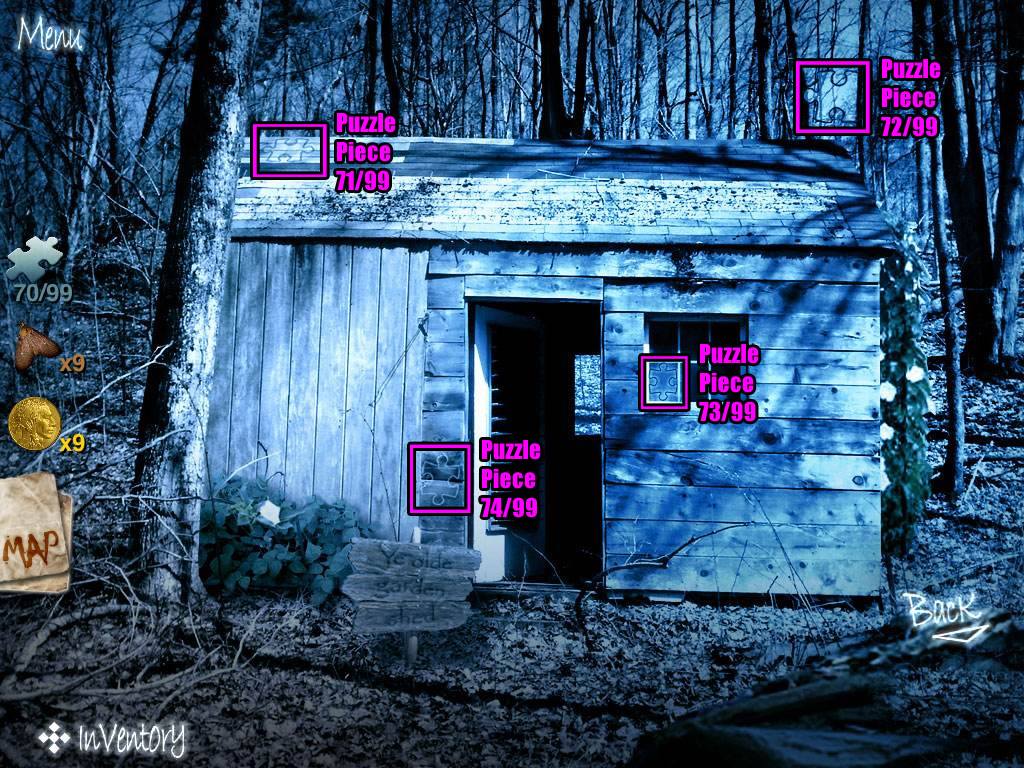
Garden Shed Entrance
Puzzle Piece 71/99 is at the upper left side of the roof.
Puzzle Piece 72/99 is in the trees above the upper right side of the roof.
Puzzle Piece 73/99 is on the lower left windowpane in the window.
Puzzle Piece 74/99 is just left of the front door.
Note the bush with the moonflower plant next to the sign.
Tap the doorway to enter the Garden Shed.
Garden Shed
Puzzle Piece 75/99 is on the seat of the chair.
Puzzle Piece 76/99 is on the ground to the right of the cactus plant.
Puzzle Piece 77/99 is on the wall next to the far right window.
Moth 11/25 is on the wall beside the window above the left bench.
Coin 10/20 is on the floor underneath the table and the chair.
Take the PRUNING SHEARS on the floor under the right bench.
Go back outside to the Garden Shed Entrance.
Garden Shed Entrance
Use the PRUNING SHEARS on the bush to the left of the doorway to cut off the MOONFLOWER SEEDLING.
Go back twice to the Yard, then tap the left building to enter the Barn.
Chapter 5
Barn
Moth 12/25 is on the wall above the right door.
Coin 11/20 is on the ground between the two doors.
Tap the box on the wall beside the blocked door to start the puzzle.
Position the colored lenses over their matching colored rings on the dial.
Tap a lens to rotate it in the direction that the arrow under the lens is pointing.
Press the star button at the lower left side to reset the puzzle.
Solution.
After the puzzle is solved, open the door and move forward to the Small Barn Yard.
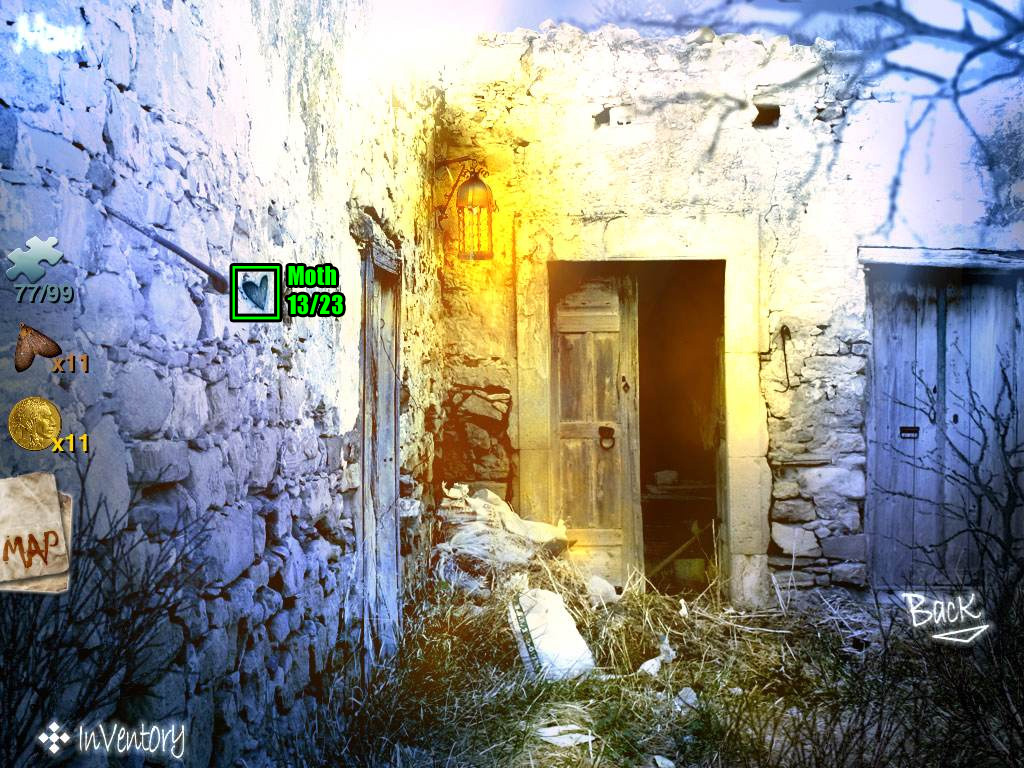
Small Barn Yard
Moth 13/25 is on the left wall beside the closed doorway.
Take the POTTING SOIL from the pile of dirt in the corner.
Go through the open doorway into the Fortune Teller's Room.
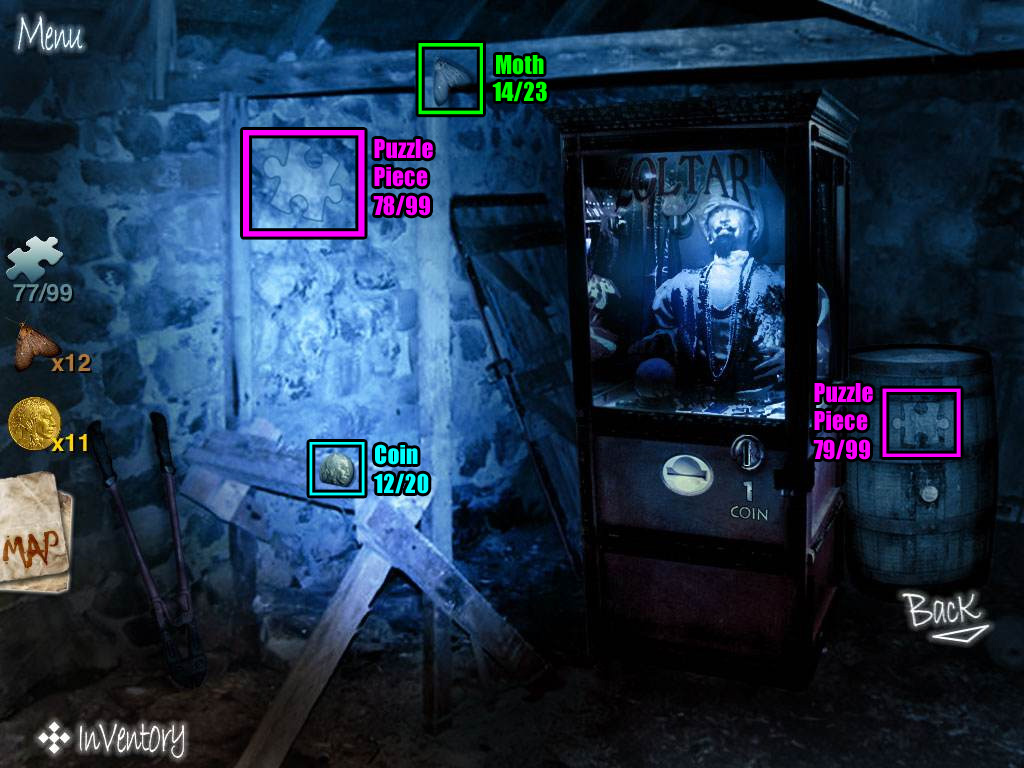
Fortune Teller's Room
Puzzle Piece 78/99 is in the middle of the left wall.
Puzzle Piece 79/99 is at the top of the barrel.
Moth 14/25 is up near the rafters.
Coin 12/20 is on the sawhorse.
Take the HEAVY BOLT CUTTERS leaning against the mide wall.
You can use the Coins on the fortune telling machine to get a novelty fortune.
Move back twice to the front room of the Barn, then go around the corner to the Right Side Room.
Right Side Room
Puzzle Piece 80/99 is on the wall to the left of the boarded up section.
Puzzle Piece 81/99 is near the upper left corner of the left wall.
Puzzle Piece 82/99 is at the top of the wall between the rafters.
Moth 15/25 is on the tractor poster on the right wall.
Use the STEEL PRY BAR to remove all the boards covering the left wall.
Tap the revealed weight hanging from the chain to start the puzzle.
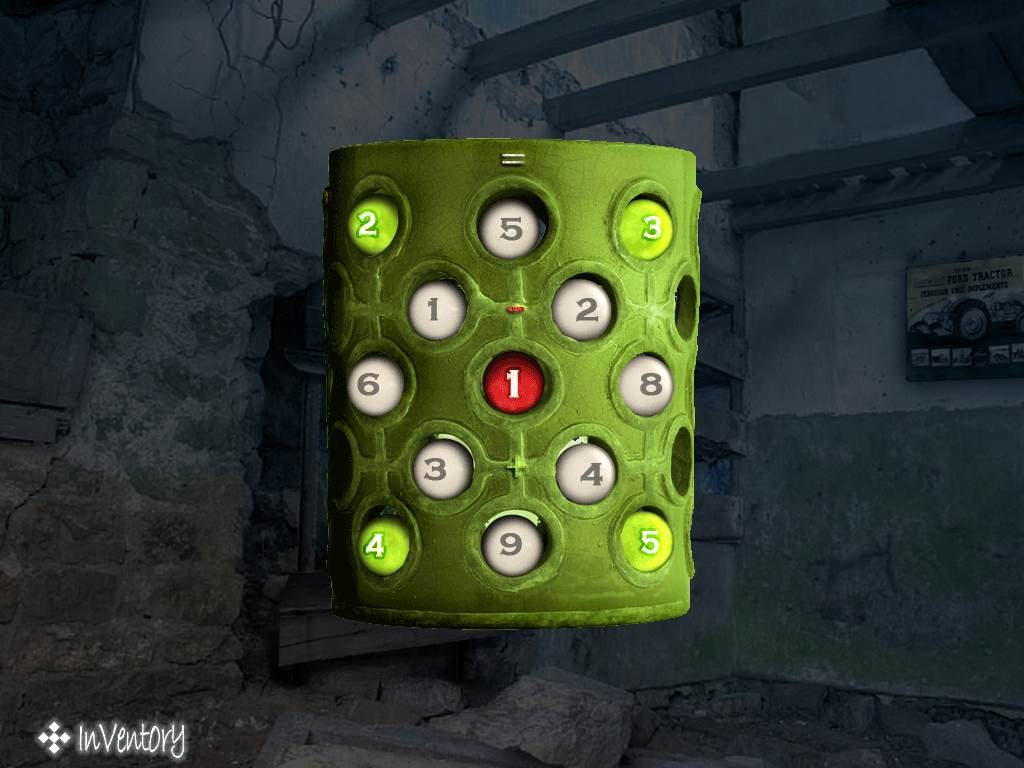
Although the puzzle looks a bit confusing at first, it's actually quite simple - change the numbers on the white buttons to complete the equations on each line.
If you look at the middle of the weight, you'll see three symbols.
The white = symbol indicates that the numbers on the white buttons need to equal the correct solutions for the equations.
The red - symbol indicates that the value of the red button is subtracted.
The green + symbol indicates that the green buttons are added.
First, solve the addition problems. Add green number 2 at the upper left and green number 3 at the upper right together.
2 + 3 = 5
Change the white number between 2 and 3 to 5.
Add green number 2 at the upper left and green number 4 at the lower left.
2 + 4 = 6
Change the white number between 2 and 4 to 6.
Add green number 3 at the upper right and green number 5 at the lower right.
3 + 5 = 8
Change the white number between 3 and 5 to 8.
Add green number 4 at the lower left and green number 5 at the lower right.
4 + 5 = 9.
Change the white number between 4 and 5 to 9.
Next, solve the subtraction problems. Subtract the red number 1 in the center from the green number 2 at the upper left.
2 - 1 = 1
Change white the number between 2 and 1 to 1.
Subtract the red number 1 in the center from the green number 3 at the upper right.
3 - 1 = 2
Change the white number between 3 and 1 to 2.
Subtract the red number 1 in the center from the green number 4 at the lower left.
4 - 1 = 3
Change the white number between 4 and 1 to 3.
Subtract the red number 1 in the center from the green number 5 at the lower right.
5 - 1 = 4
Change the white number between 5 and 1 to 4.
Solution.
Place the LADDER against the left wall under the rafters.
Go up the ladder to the Barn Upstairs Landing.
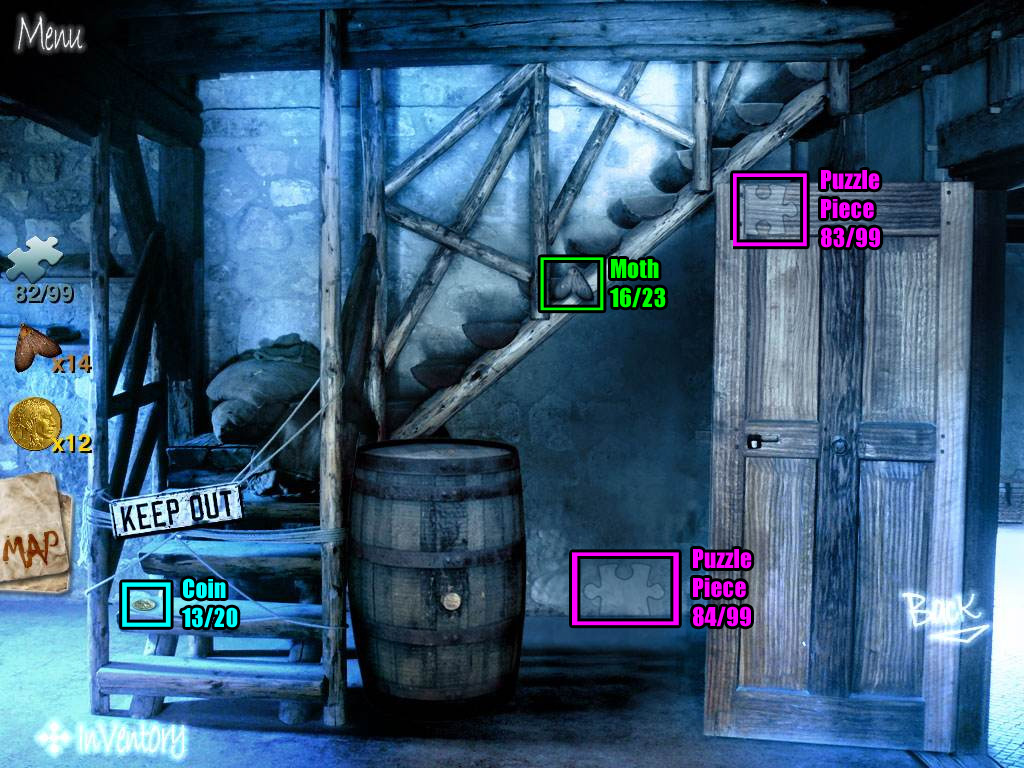
Barn Upstairs Landing
Puzzle Piece 83/99 is at the top of the door.
Puzzle Piece 84/99 is on the wall to the right of the barrel.
Moth 16/25 is on the bottom of the railing at the middle of the stairs.
Coin 13/20 is on the second step of the stairs.
Move through the right doorway into the Loft.
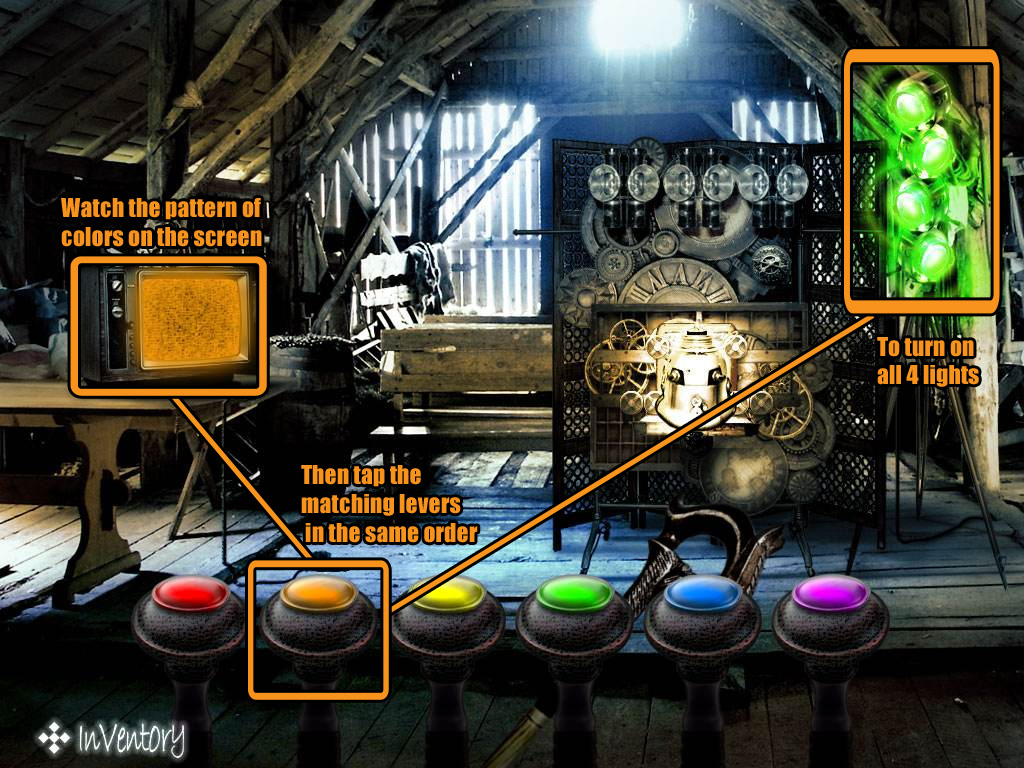
Loft
Moth 17/25 is on the front left support beam.
Tap the plug on the floor to put it in the outlet and turn on the television.
Place the DECORATIVE EGG in the outline at the middle of the large mechanism.
Pull the large lever to start the puzzle.
Both the television and the bulbs at the top of the mechanism will flash a sequence of five random colors and then stop.
Hit the colored switches in front of the large lever in the same order as the color pattern shown on the television.
If you make a mistake, the lever will reset and you will have to replay a new sequence.
After you successfully enter the first correct solution, one of the spotlights to the right of the mechanism will glow green.
Repeat the puzzle three more times to turn on the remaining spotlights.
Solution.
After the puzzle is solved, take the FOSSILIZED BIRD EGG from the mechanism.
Go back to the Loft, then continue up the latter to the Barn Attic.
Barn Attic
Puzzle Piece 85/99 is on the left side of the thatch roof, just above the stone section of the wall.
Puzzle Piece 86/99 is on the right side of the large crate against the left wall.
Puzzle Piece 87/99 is at the top of the right support beam.
Moth 18/25 is on the wall near the bottom of the far right support beam.
Use the HUNTING KNIFE to cut through the ropes tied around the trunk.
Tap the trunk to zoom in.
Open the lid and take the CELESTIAL PLACARD MOON, GEAR WHEEL 2/3, and the MACHETE inside the trunk.
Move back three times to the front room of the Barn, then continue through the right door to the Cellar Stairs.
Cellar Stairs
Puzzle Piece 88/99 is on the left wall, just underneath the hand rail.
Puzzle Piece 89/99 is on the left side of the second step from the top.
Moth 19/25 is on the left side of the fifth step.
Go down the stairs into the Barn Cellar.
Barn Cellar
Puzzle Piece 90/99 is on the wall to the left of the gate.
Puzzle Piece 91/99 is on the right wall above the cauldron.
Puzzle Piece 92/99 is near the top of the left wall.
Coin 14/20 is on the ground beside the right wall.
Take the WITCHES CAULDRON next to the right wall.
Use the HEAVY BOLT CUTTERS to break the chain attached to the gate.
Tap the gate and continue forward to the Mausoleum Entrance.
Chapter 6
Mausoleum Entrance
Inspect the front doors for a closer look.
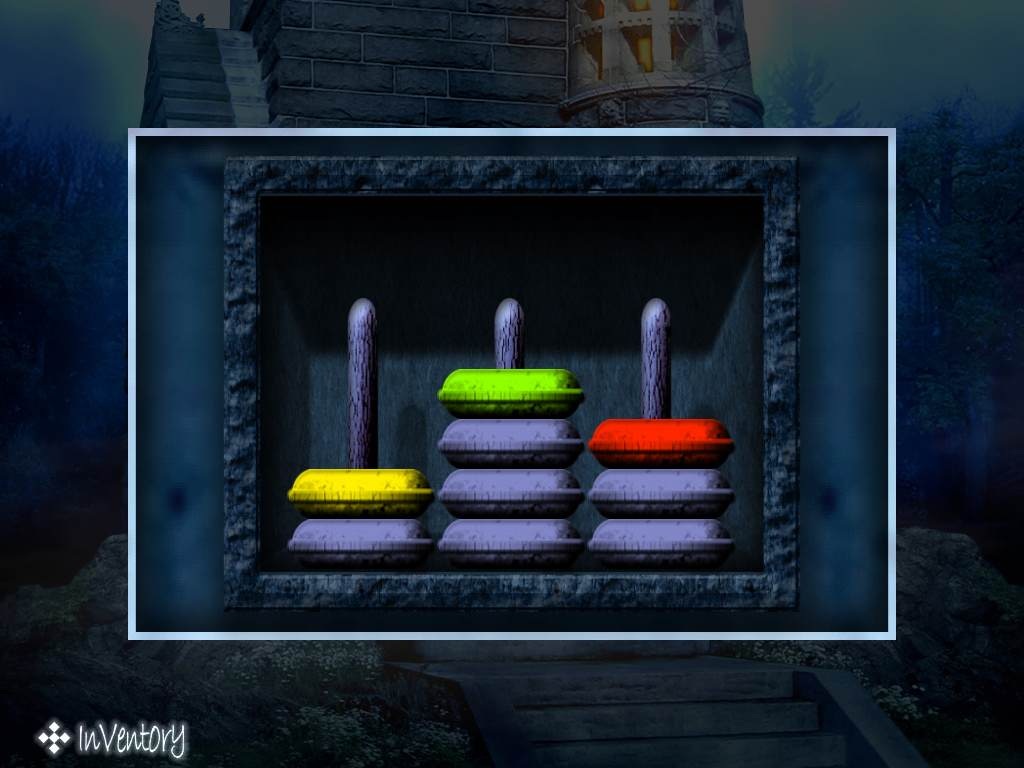
Tap the pegs in the square betwen the doors to start the puzzle.
Move the colored rings over their matching colored spaces on the pegs.
The yellow ring goes at the bottom of the left peg, the green ring goes at the top of the middle peg, and the red ring goes in the middle of the right peg.
Tap and drag the top ring to lift it, then release it over a different peg to place it.
Each peg can hold a maximum of 5 rings.
Solution.
After the puzzle is solved, go through the open door to the Mausoleum Foyer.
Mausoleum Foyer
Moth 20/25 is at the top of the back wall, just below the middle of the archway.
Coin 15/20 is on the ground beside the base of the rear left column.
Take the MECHANICAL DEVICE 2/4 on the floor behind the rear right column.
Tap the flickering area to the left of the front left column to move to the Candlelit Grave.
Candlelit Grave
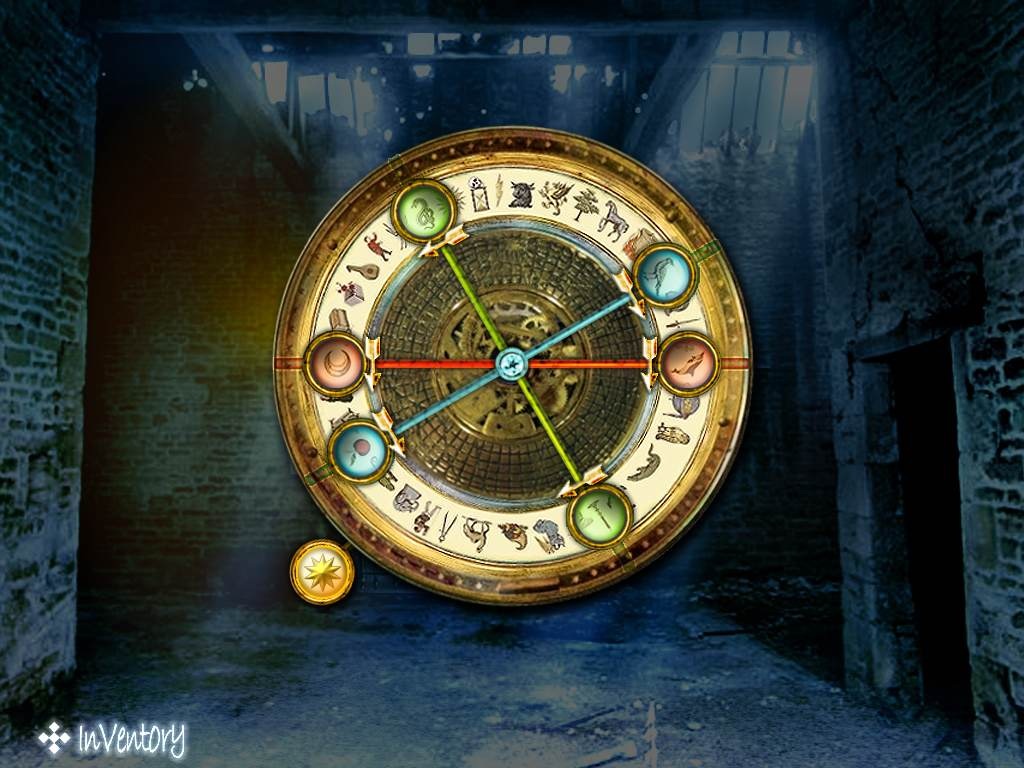
In this room is a large wheel with four colored gems and a large gold coin. Position the wheel so that the coin is at the top of the wheel (at the 12 o' clock position).
Tap any of the gems to rotate the wheel clockwise.
Each gem turns the wheel a differnet amount.
Use the lines painted across the walls in a cross shape pattern to gauge the distance that each gem turns the wheel.
Screenshot.
After the puzzle is solved, take the SCALLOP SHELL from the revealed cache at the top of the wheel.
Go back to the Mausoleum Foyer, then continue through the left door to enter the Alcoves.
Alcoves
Take the Coin 16/20 on the ground beside the pillar in the center of the room.
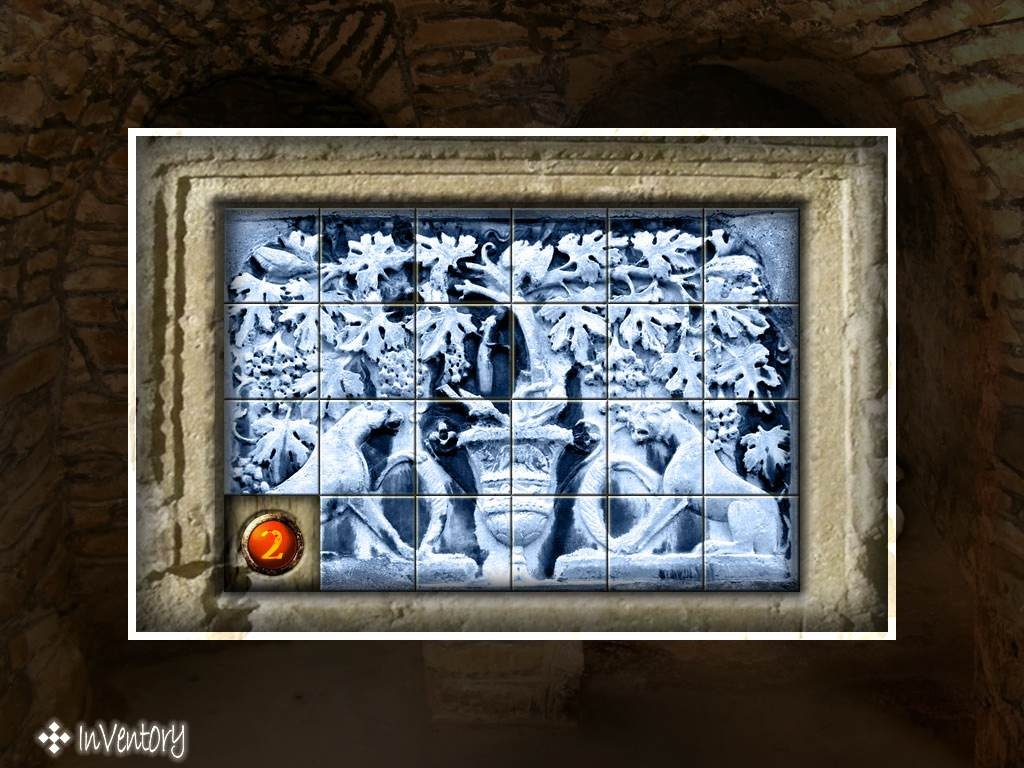
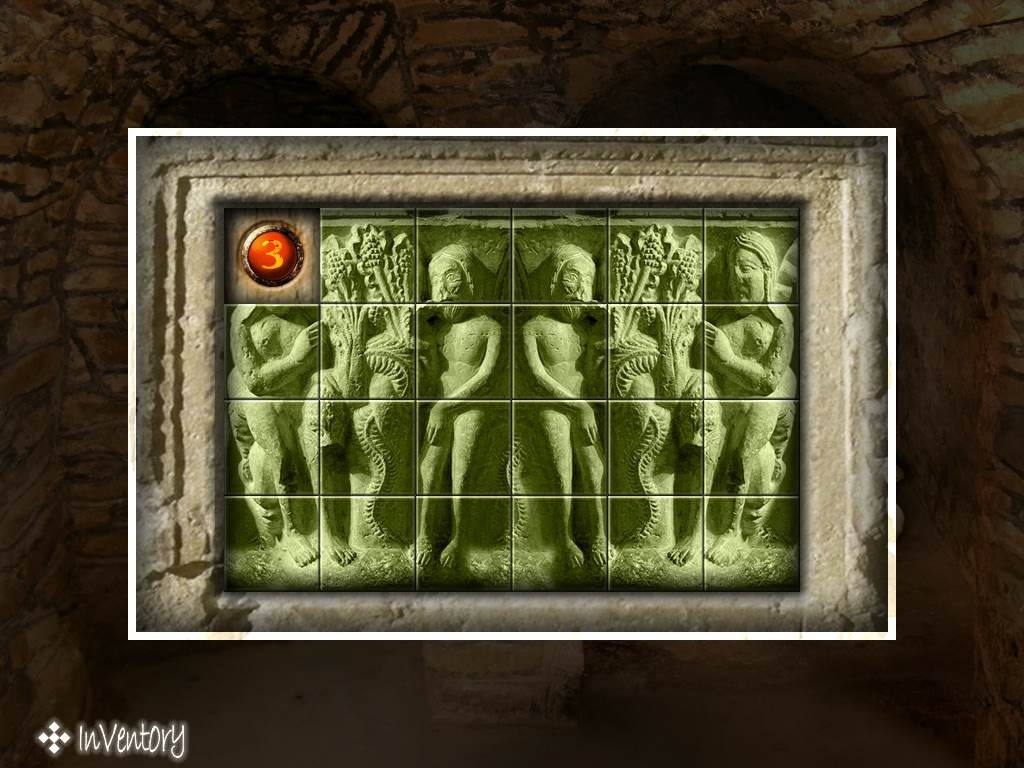
Tap the carved pattern at the front of the stone block to start the puzzle.
Slide the tiles around the board to complete the image.
Tap a tile to automatically move it into an adjacent empty space.
Picture 1
Start by solving the border pieces around the upper left corner.
Press the button at the lower right corner to start the next part of the puzzle.
Solution 1.
Press the button at the lower left corner to start the third part of the puzzle.
Solution 2.
Press the button at the upper right corner to complete the puzzle.
Solution 3.
Take the SLEDGE HAMMER from the top of the stone block.
Continue forward to the Crypt.
Crypt
Place the FOSSILIZED BIRD EGG on the middle pedestal.
Move back twice to return to the Mausoleum Foyer, then continue through the right door to the Red Altar.
Red Altar
Take the GOLD CRUCIFIX at the top of the stand on the left side of the room.
Leave the mausoleum and go all the way back to the Basement in the house.
Chapter 7
Basement
Put the POTTING SOIL in the ceramic pot on the floor.
Add the MOONFLOWER SEEDLING to the flower pot.
Exit the Basement and go upstairs to the Hall.
Hall
Use SKELETON KEY 3 (from the safe puzzle in the Basement: Left) to unlock the right door.
Go up the stairs to the Attic.
Attic
Tap the ghost repeatedly until she attacks you.
Return to the Basement downstairs.
Basement
The potted moonflower plant should be fully bloomed.
Use the PRUNING SHEARS to snip off the MOONFLOWER BLOOM from the plant.
Go back to the Attic.
Attic
Use the MOONFLOWER BLOOM from your inventory on the ghost.
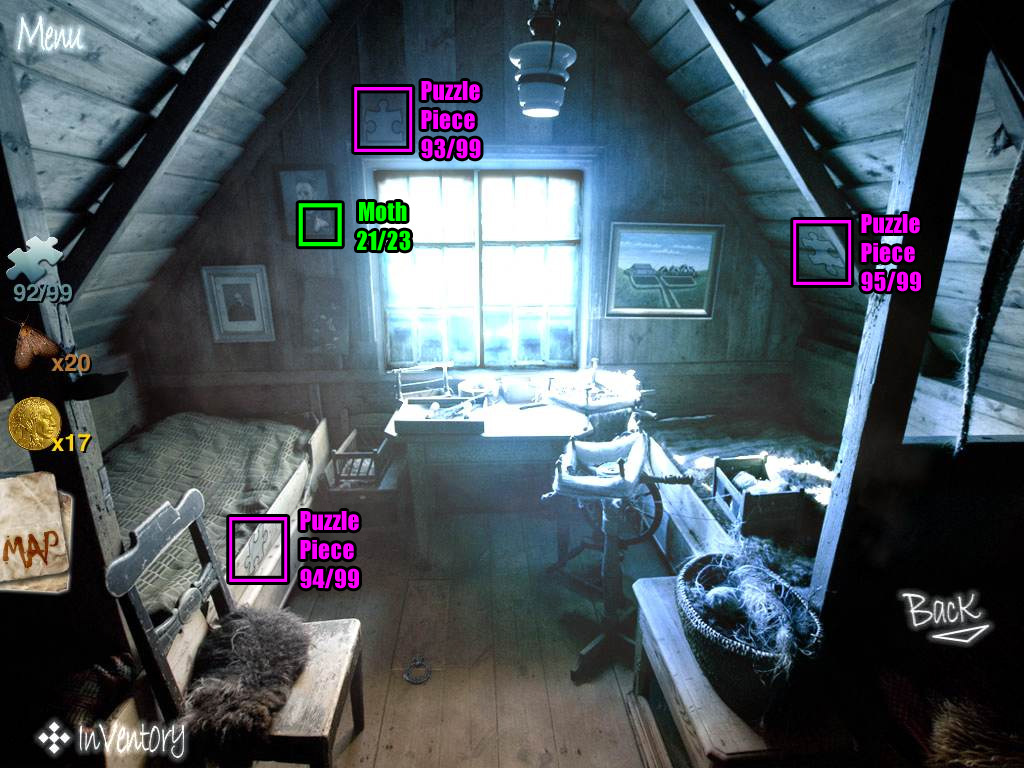
Puzzle Piece 93/99 is on the back wall above the upper left corner of the window.
Puzzle Piece 94/99 is on the right side of the left bed.
Puzzle Piece 95/99 is beside the support beam on the right wall.
Moth 21/25 is on the top picture frame to the left of the window.
Tap the handle on the floor to lift the floorboard.
Take the box from the revealed cache in the floor, then tap the box to zoom in.
Tap the small button panel on the box to start the puzzle.
Press the large buttons so that they match in color to the small button that is in the same position.
Each button is made of different two parts: the center and the border.
Both the center and the border can be one of three colors: white, light grey, or dark grey.
Simply look at the image of one of the small buttons, then tap the bigger button at the same place until they look the same.
Solution 3.
After the puzzle is solved, open the box and take the SKULL MEDALLION and the BEETLE MEDALLION inside.
Move back twice to reach the Upstairs Landing, then continue through the left door to the Striped Bedroom.
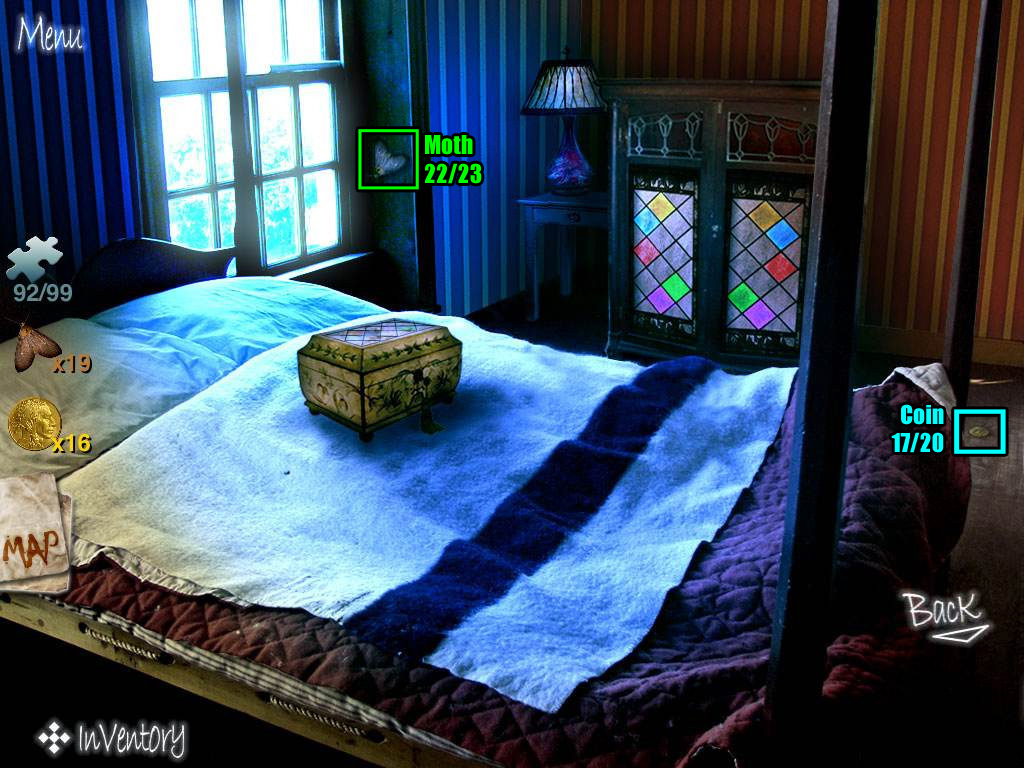
Striped Bedroom
Moth 22/25 is on the wall to the right of the window.
Coin 17/20 is on the ground near the corner of the bed.
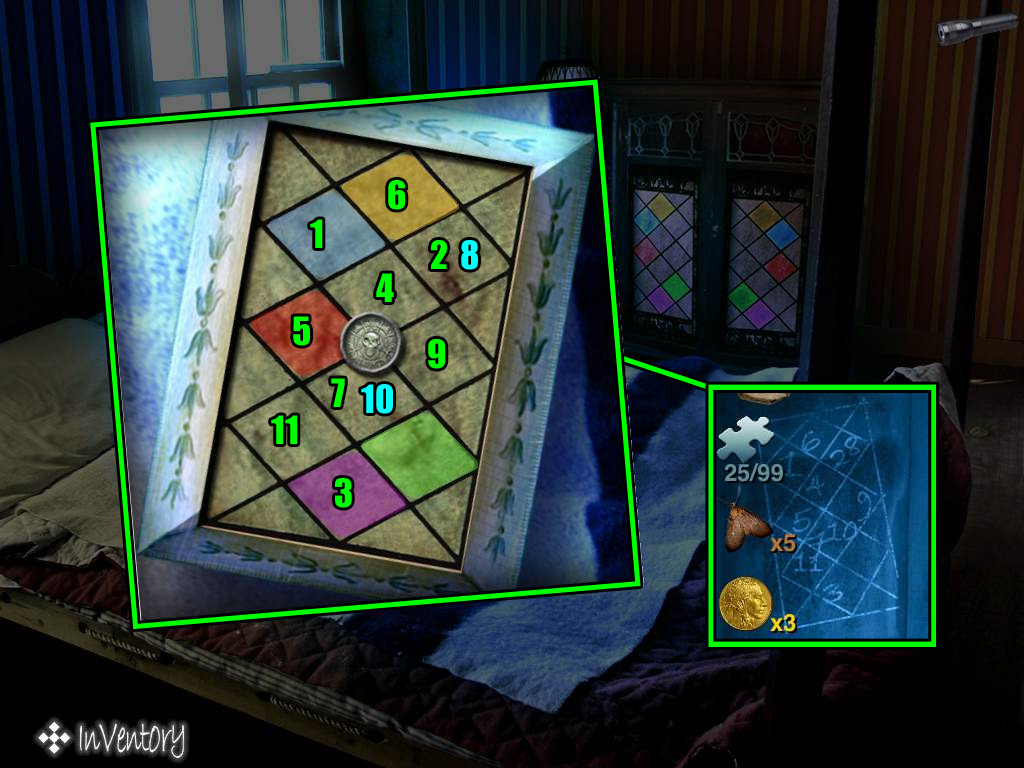
Tap the jewelry box on the bed to start the puzzle.
Tap the colored diamonds on the puzzle box in the same order as the chalk outline found on the wall of the Porch.
Screenshot.
Place the SKULL MEDALLION inside the indentation on the jewelry box.
Tap the glowing medallion, then take the uncovered CELESTIAL PLACARD STAR inside the box.
Go back once, then continue through the door on the right side of the monkey statue to enter the Bathroom.
Bathroom
Use the SLEDGE HAMMER on the section of the wall marked with a black X mark.
Keep tapping the wall while the SLEDGE HAMMER is equipped to smash a large hole through the plaster.
Take the MECHANICAL DEVICE 3/4 from the hole in the wall.
Go back downstairs to the Living Room.
Living Room
Tap the trunk in the middle of the room to zoom in.
Place the CELESTIAL PLACARD STAR in the star-shaped outline.
Put the CELESTIAL PLACARD moon in the moon-shaped indentation.
Open the lid of the trunk and take the METEORITE and GEAR WHEEL 3/3 inside.
Go through the right door to the Dining Room.
Dining Room
Tap the box on top of the table for a closer look.
Place the BEETLE MEDALLION into the round niche at the center of the box.
Tap the medallion once it's on the box to open it, then take the EXOTIC BEETLE inside.
Back out once, then go around the left corner and continue through the left door into the Blue Bedroom.
Blue Bedroom
Tap the framed painting that is hanging over the bed to zoom in.
Pour the can of TURPENTINE onto the painting.
Wipe off the smeared paint with the DIRTY RAG.
Use the SAPPHIRE MONOCLE on the painting to find four unqiue symbols; note the symbols for later.
Go back once and then through the right door into the Utility Room.
Utility Room
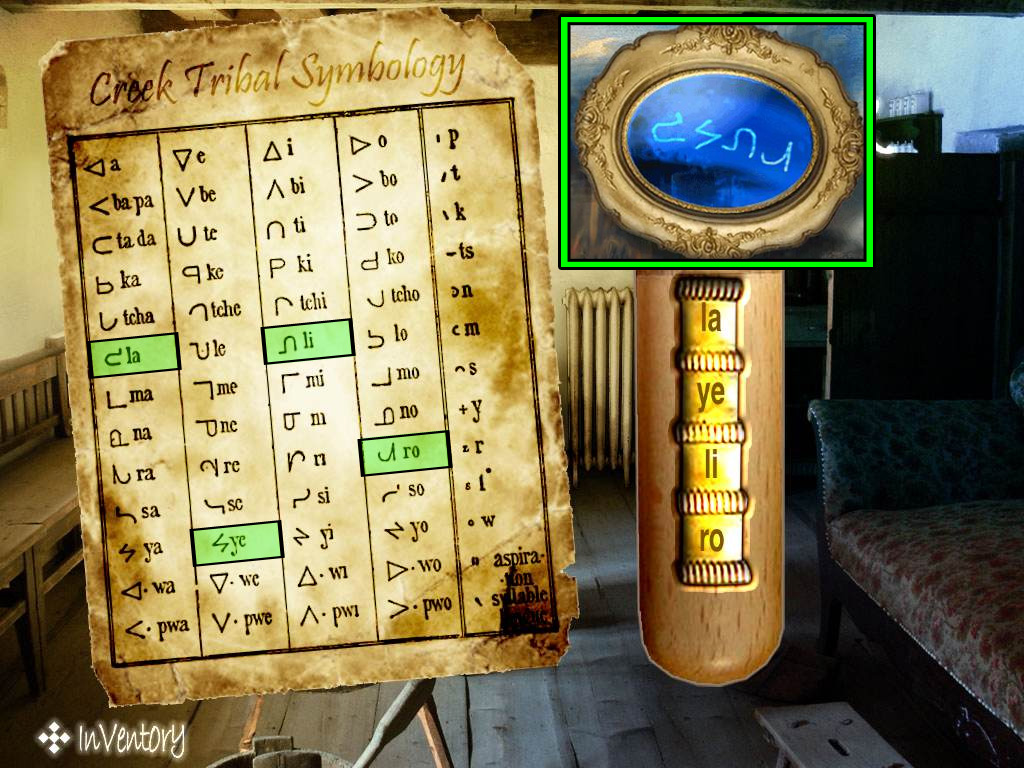
Inspect the Creek Tribal Symbology chart in the frame of the left picture on the wall.
Find the four matching symbols as the ones seen on the painting in the Blue Bedroom, then note their English spelling translations.
Tap the right jar on the table to start the puzzle.
Tap the buttons to enter the four correct words translated from the symbols on the chart.
Set the buttons in order from top to bottom in the same order that the symbols were read from left to right.
The first translated symbol is "la", the second is "ye", the third is "li" and the last is "ro".
Screenshot.
After the puzzle is solved, tap the top of the capsule to remove the cap and take the SKELETON KEY 4 inside.
Return to the bottom of the Stairway.
Stairway
Use the SKELETON KEY 4 (from the capsule puzzle in the Utility Room) to open the small lock at the right side of the second step.
Use the STEEL PRY BAR to move the jammed panel on the stair out of the way.
Take the EARTH STONE from the opened compartment.
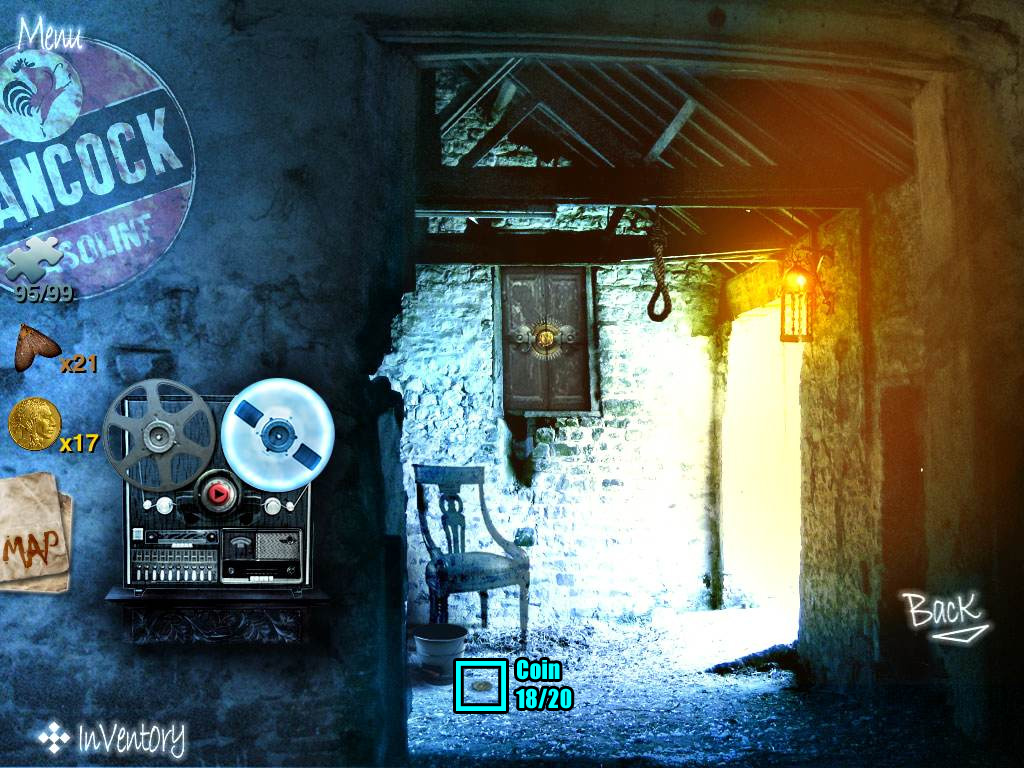
Leave the house through the porch and return to the Barn. From there, go around the left corner to reach the Left Side Room.
Chapter 8
Left Side Room
Coin 18/20 is on the floor beside the bucket.
Use the ADJUSTABLE WRENCH on the gold bolt in the middle of the small doors on the wall.
Take the MECHANICAL DEVICE 4/4 from the compartment behind the opened doors.
Press the red play button in the middle of the recording mechanism.
Memorize the pattern of high and low pitched notes played by the device.
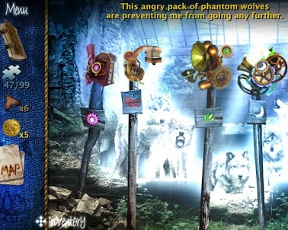
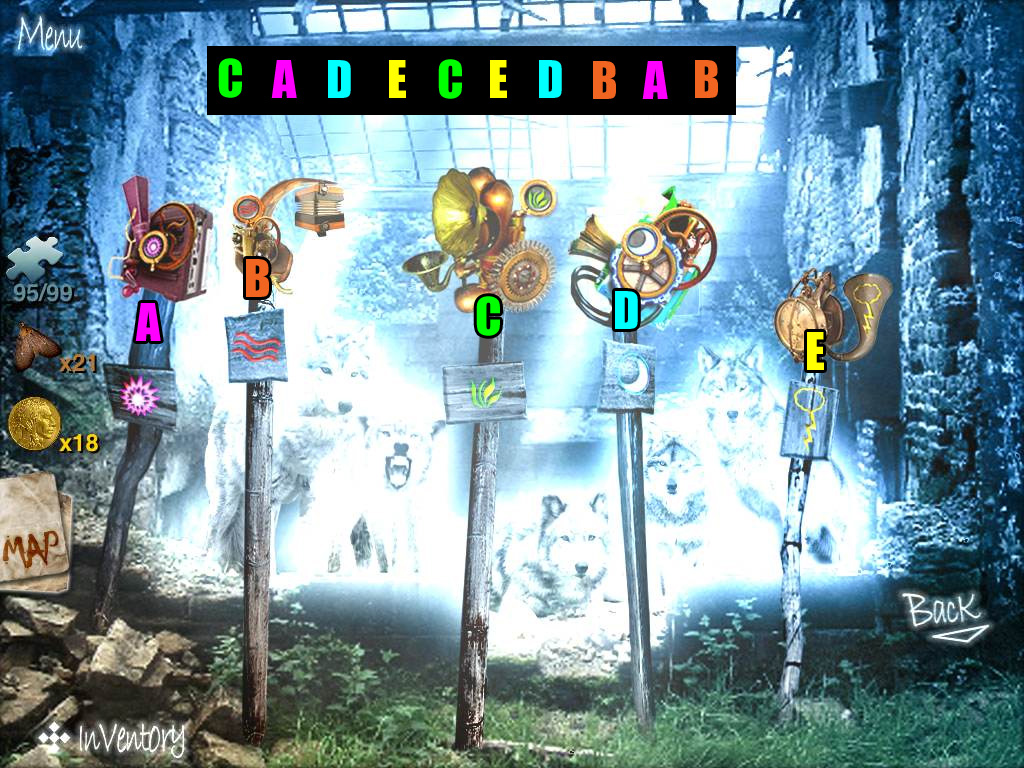
Move around the right corner to the Wolf Room.
Wolf Room
Place each of the four MECHANICAL DEVICES from your inventory on the four posts.
Check each device for its unique symbol, then put it at the top of the post with a matching symbol.
The first is a purple star, the second is a green leaf, the third is a blue and white moon, and the fourth is a yellow lightning bolt.
When all of the posts are in place, tap the devices to find that they each play a unique note.
The notes go lower to higher from left to right, with the far left device playing the lowest note and the far right device playing the highest note.
Tap the devices in the correct order to play the same notes you heard in the song from the recorder in the Left Side Room.
Refer to the screenshot below and tap the devices in the following order to solve the puzzle:
C, A, D, E, C, E, D, B, A, B
Screenshot.
The wolves will disappear after the puzzle is solved, allowing you to move forward to the Ruins.
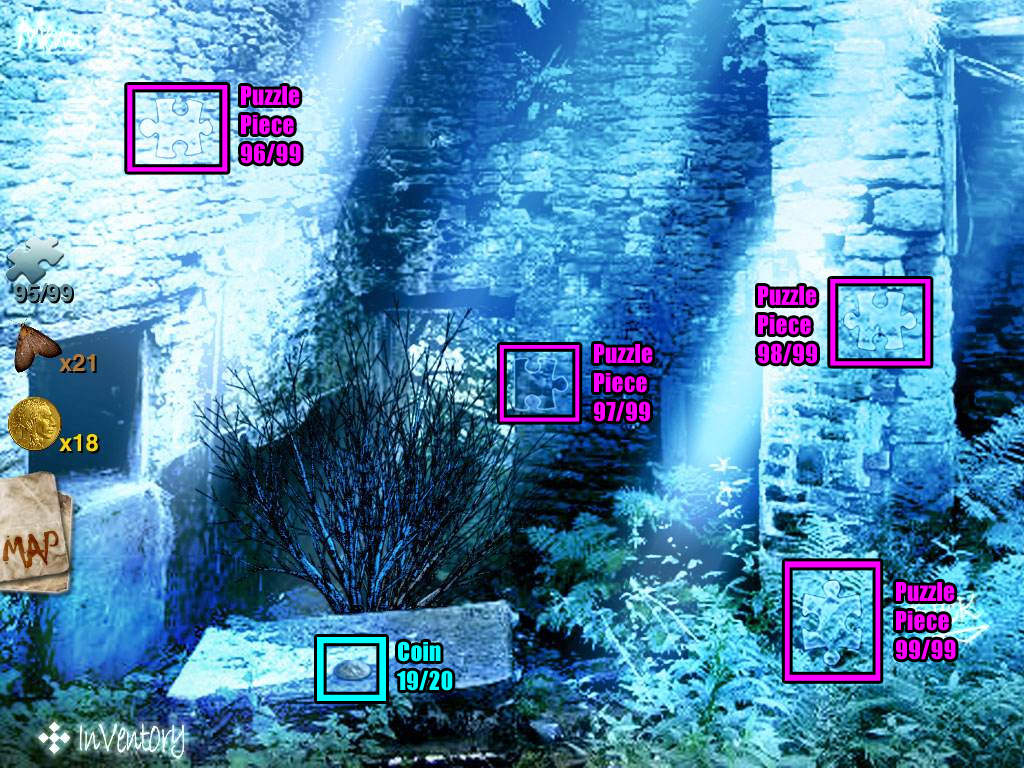
Ruins
Puzzle Piece 96/99 is near the top of the left wall.
Puzzle Piece 97/99 is on the wall to the right of the blocked doorway.
Puzzle Piece 98/99 is at the middle of the large stone column.
Puzzle Piece 99/99 is on the fern at the lower right corner.
Coin 19/20 is on top of the large stone slab.
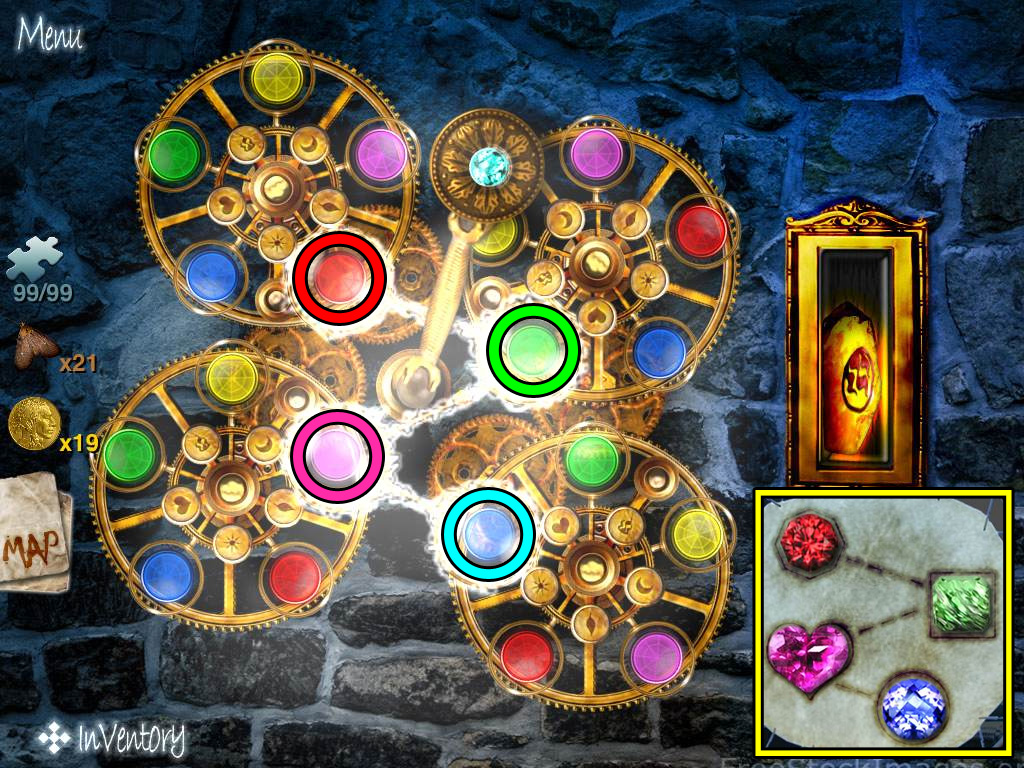
Tap the square hole in the left wall to look inside.
Add the three GEAR WHEELS from your inventory to the gold mechanism to start the puzzle.
To solve the puzzle, you will need to rotate the wheels to position the colored gems under the four lenses.
The clue to the solution can be found by inspecting the dream catcher in the Guest Bedroom of the house.
The upper left gem in the dream catcher is red, the upper right gem is green, the lower left gem is pink, and the lower right gem is blue.
The colored gems in the wheel must be in the same position as the gems in the dream catcher.
You can tap the gear wheels to take them off the pegs and then replace them on a different peg.
Tap the large lever between the wheels to rotate all four wheels simulaneously.
Screenshot.
Once the puzzle is solved, take the FIRE AMBER from the revealed cache.
Use the MACHETE to cut down the large bush blocking the doorway.
Continue forward to the Tomb Pathway.
Tomb Pathway
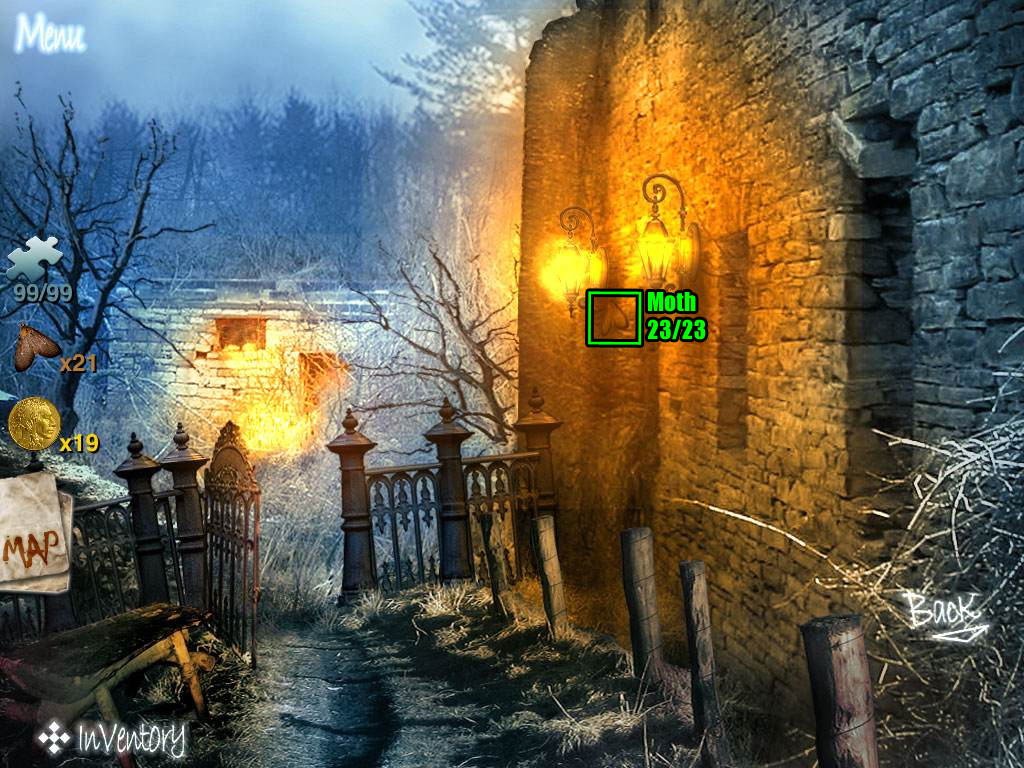
Moth 23/25 is on the wall between the two flickering lanterns.
Take the CRANK WHEEL leaning against the bottom of the post on the right side of the path.
Go back to the Mausoleum Foyer and continue through the right door to the Red Tomb.
Red Tomb
Place the CRANK WHEEL on the socket at the middle of the altar.
Tap the wheel once to rotate it and reveal a small door beside the crank.
Open the door and take the WOODEN CRUCIFIX inside.
Return to the Porch in the house.
Porch
Pick up the FLASHLIGHT on the foor at the bottom of the door, just under the yellow tape.
The FLASHLIGHT will stay at the upper right corner of your screen for later use.
Go to the left side of the basement, then continue through door at the back to reach the Pit.
Pit
Tap the FLASHLIGHT to turn it on, then tap and drag around the screen to move the light.
Move the light around the room until a demon appears sitting on the chair in the corner.
Before the demon has a chance to attack, quickly use the WOODEN CRUCIFIX to banish him.
Click the small recess behind the chair to zoom in.
Take the SUN CRYSTAL beside the pile of bones.
Return to the Mausoleum Foyer again, then go left twice to the Crypt.
Crypt
Put the 5 element stones on top of their matching pedestals.
Place the EARTH STONE (from the unlocked compartment in the Stairway) on the first pedestal at the far left side.
Place the SUN CRYSTAL (from the cache in the wall at the Pit) on the second pedestal.
Place the FOSSILIZED BIRD EGG (from on the color lever puzzle in the Loft) on the middle pedestal.
Place the METEORITE (from the celestial trunk in the Living Room) on the fourth pedestal.
Place the FIRE AMBER (from the gear wheel puzzle at the Ruins) on the last pedestal.
Tap the lock in the gate blocking the small alcove to start the puzzle.
Press the gems buttons in the correct order so that they are all simultaneously lit.
Simply tap a button to light it and count how long it stays lit.
Quickly press the gems that glow for the longest amount of time first and the shortest amount of time last.
Screenshot.
Once the puzzle is complete, take the uncovered CERAMIC FLASK inside the alcove.
Go all the way back to the Tomb Pathway (past the Wolf Room in the Barn). From there, tap the gate to open it and continue forward into the Tomb.
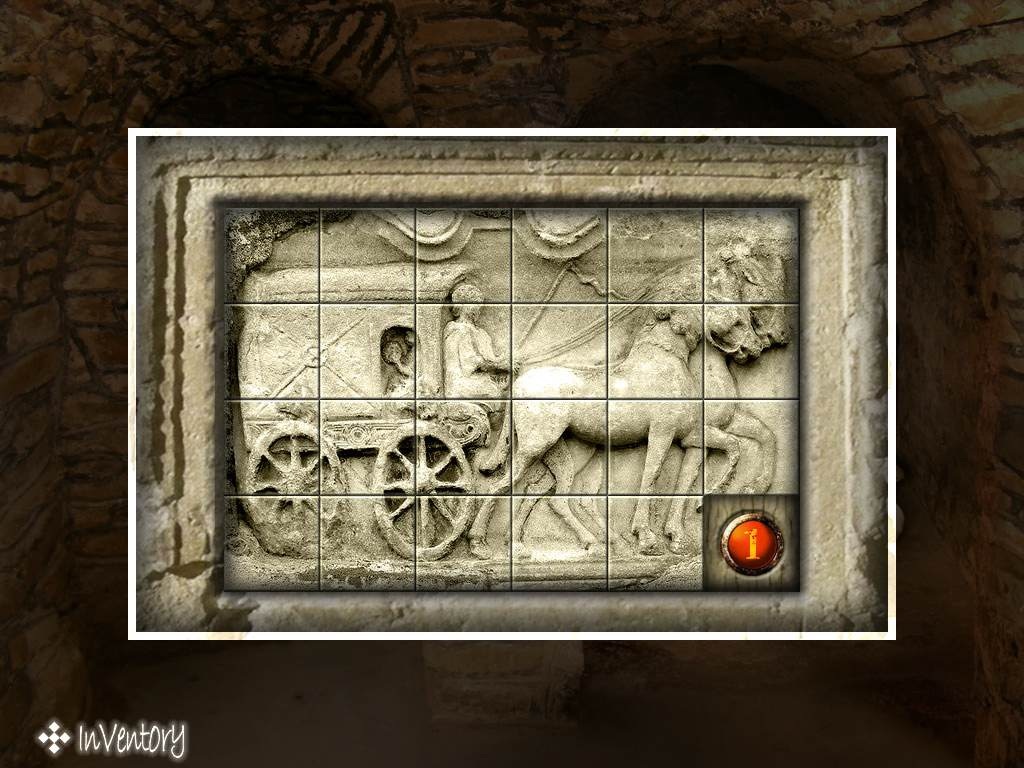
Tomb
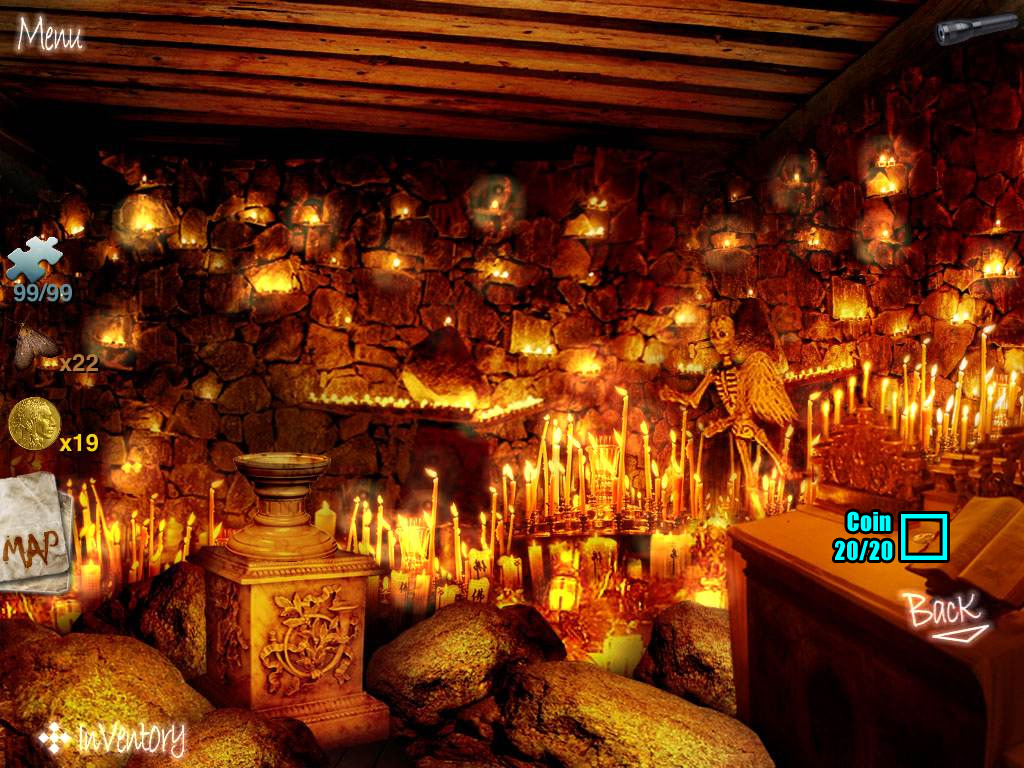
Coin 20/20 is beside the book on the surface of the table.
By this point, you should have all 99 Puzzle Pieces collected (If not, check the Collectibles section of the walkthrough and go back and find them all now).
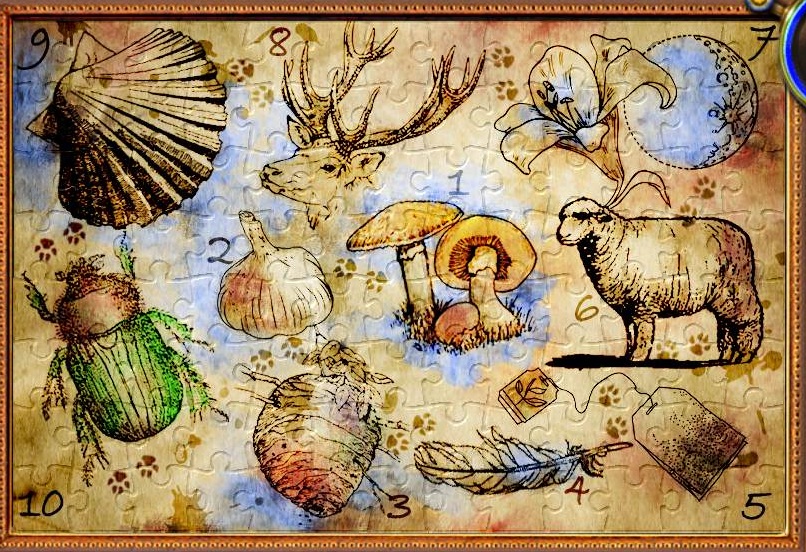
Tap the jigsaw puzzle piece icon at the upper left side of the screen to start the jigsaw puzzle.
Place all of the jigsaw puzzle pieces over their matching outline inside the frame to complete the picture.
Start with the four corner pieces, then solve the the left/right/top/bottom border pieces, and lastly solve the inner pieces.
Tap and drag a puzzle piece to move it, then release it to set it down.
If a piece is released at the correct location, it will lock in place.
Screenshot.
After you've assembled the jigsaw puzzles, take note of the 10 numbered items in the picture.
You must find and collect each of these 10 items hidden in different locations throughout the game.
MUSHROOM - Go to the Yard. Tap the cluster of mushrooms growing on the right side of the path to add them to your inventory.
GARLIC - Go to the Kitchen. Tap the bunch of garlic hanging from the left side of the wall shelf.
HORNET'S NEST - Go to the Porch. Open the door of the cabinet under the counter, then take the nest inside.
FEATHER - Go to the Children's Bedroom. Solve the puzzle on the toy chest to unlock it, then look inside the chest. The feather is partially concealed behind the blue box and toy car.
TEA BAG - Go to the Blue Bedroom. Take the tea bag from the tea cup on the table.
WOOL - Go to the Attic. Tap the basket on top of the bench at the foot of the right bed to take the wool.
MOONFLOWER BLOOM - Go to the Basement. Use the PRUNING SHEARS to clip the flower from the potted plant on the floor.
DEER ANTLER - Go to the Stable Stalls. Tap the deer head hanging from the back wall to collect the antler.
SCALLOP SHELL - Go to the Candlelit Grave. Solve the wheel puzzle and take the shell from the compartment where the coin is at the top of the wheel.
EXOTIC BEETLE - Go to the Dining Room. Open the box on the table with the BEETLE MEDALLION to find the beetle inside.
Place the WITCHES CAULDRON on top of the bowl-shaped stand on the stone pedestal.
Put all 10 of the ingredients into the cauldron.
Use the CERAMIC FLASK on the glowing cauldron once all the ingredients are prepared to collect the MAGIC POTION.
Go all the way back to the Pit in the basement of the house.
Pit
Pour the MAGIC POTION into the glowing pit to purify it.
Thanks to Trinn for the walkthrough!
Posted by: Mike |
October 2, 2012 2:23 PM
|
October 2, 2012 2:23 PM