
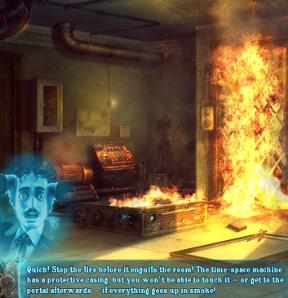
Tesla's Tower:
The Wardenclyffe Mystery
Platform: Mac, Windows

![]() Being related to a famous scientist is only a good thing if he isn't credited with robbing the world of colour and the ability to enjoy music. It was decades ago that Nikola Tesla's ill-fated experiment flooded the world with "Ether Radiation" before he vanished, and people still can't decide if it was an accident or an act of malicious genius from a budding supervillain. Marie Tesla has spent her life trying to unlock and reverse her great-great-grandfather's mistakes, but she's not having much luck... until the day Tesla starts talking to her through a temporal rift and coaxes her back in time, that is. Tesla's Tower: The Wardenclffe Mystery is a high-adventure hidden-object game from Persha Studio that combines excellent cinematic camp with a great light-hearted mystery for a time-travelling adventure you should definitely check out. Plus, it gave me an excuse to make a banner image with ghost/bubble Tesla talking on the phone. Win! What are you waiting for? Allons-y!
Being related to a famous scientist is only a good thing if he isn't credited with robbing the world of colour and the ability to enjoy music. It was decades ago that Nikola Tesla's ill-fated experiment flooded the world with "Ether Radiation" before he vanished, and people still can't decide if it was an accident or an act of malicious genius from a budding supervillain. Marie Tesla has spent her life trying to unlock and reverse her great-great-grandfather's mistakes, but she's not having much luck... until the day Tesla starts talking to her through a temporal rift and coaxes her back in time, that is. Tesla's Tower: The Wardenclffe Mystery is a high-adventure hidden-object game from Persha Studio that combines excellent cinematic camp with a great light-hearted mystery for a time-travelling adventure you should definitely check out. Plus, it gave me an excuse to make a banner image with ghost/bubble Tesla talking on the phone. Win! What are you waiting for? Allons-y!
 In order for Marie to uncover the truth about what really happened all those years ago, she'll have to team up with her wayward ancestor to unlock the secrets of his inventions and go back in time. It turns out not everyone appreciated what Tesla was trying to achieve, and treachery might be afoot! As Marie with, eventually, your trusty sidekick holo-Tesla (yeeesssss), click around to look for clues, solve puzzles, and gather items. If anything in your inventory can be combined, it'll happen automatically, and you can click the glowing orb on the bottom-left when it's fully charged to point the way to your next objective, or find a random item in a hidden-object scene. Marie's journal will keep track of objectives as well as offer up a handy map should you get lost.
 Analysis: With its heavy emphasis on light-hearted adventure and goofy time-travelling story, Tesla's Tower stands out from the usual sea of darker themed games and shouldn't be overlooked. It's not particularly challenging, both because of a generous hint function and clean area/puzzle designs, but it engages and entertains at a pace not usually seen in hidden-object adventures. Tesla's constant chatter and animation makes him a likable companion, and the mystery you'll solve constantly evolves with characters, plot twists, near-death experiences, and more. It's just a shame it doesn't offer anything as substantial in regards to the gameplay, which is by itself fine and dandy, but never really does anything to surprise you or differentiate itself from any other title in the genre. But, man, come on. Mystery solving with Nikola Tesla? Beautiful visuals? Murderous scientific conspiracies? This is just the ticket if you're sick of grim, dark games and want something fun and energetic instead.
The large amount of dialogue and straight-forward gameplay might put some players off, but Tesla's Tower: The Wardenclffe Mystery is still worth checking out. At around four hours or so for a playthrough, it's a satisfying length, and the focus on plot and characters is refreshing. Most importantly, however, it's something different, and if you prefer games with a greater emphasis on more traditional adventure gameplay with a sprinkling of hidden-object scenes, you should probably check out the demo here. It's just plain fun, and though it might lose points with history buffs for its science-fiction treatment of Tesla or not mentioning the source of his genius, it's a rich, engaging experience of the type I'd like to see more of in the future.
![]() Windows:
Windows:
Download the demo
Get the full version
![]() Mac OS X:
Mac OS X:
Download the demo
Get the full version


Walkthrough Guide
(Please allow page to fully load for spoiler tags to be functional.)
Tesla's Tower: The Wardenclyffe Mystery
Chapters 1-2
Chapter 1
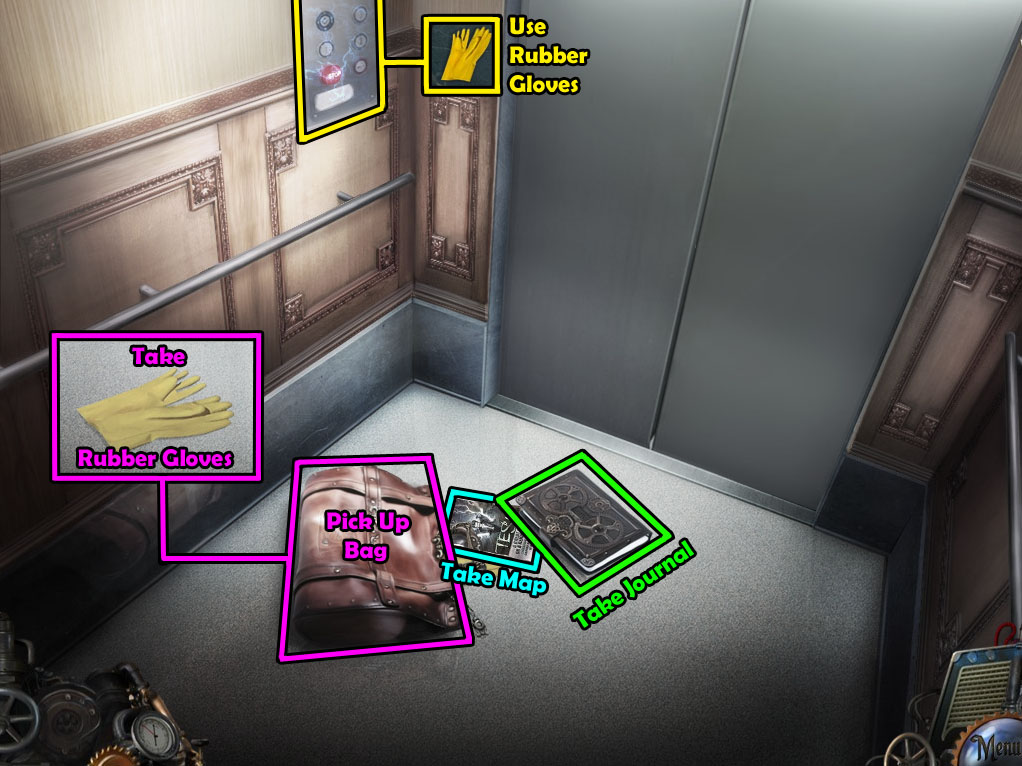
Elevator
Elevator Screenshot.
Pick up your glasses from the floor.
Take the Journal to add it to the toolbar at the bottom of the screen.
Inspect the flier on the ground, then click it turn it over to find a map.
Pick up the bag to add the inventory bar at the bottom, then take the RUBBER GLOVES to place them to your inventory.
Use the RUBBER GLOVES on the electrified button panel to stop the door.
Exit through the door to the Abandoned Basement.
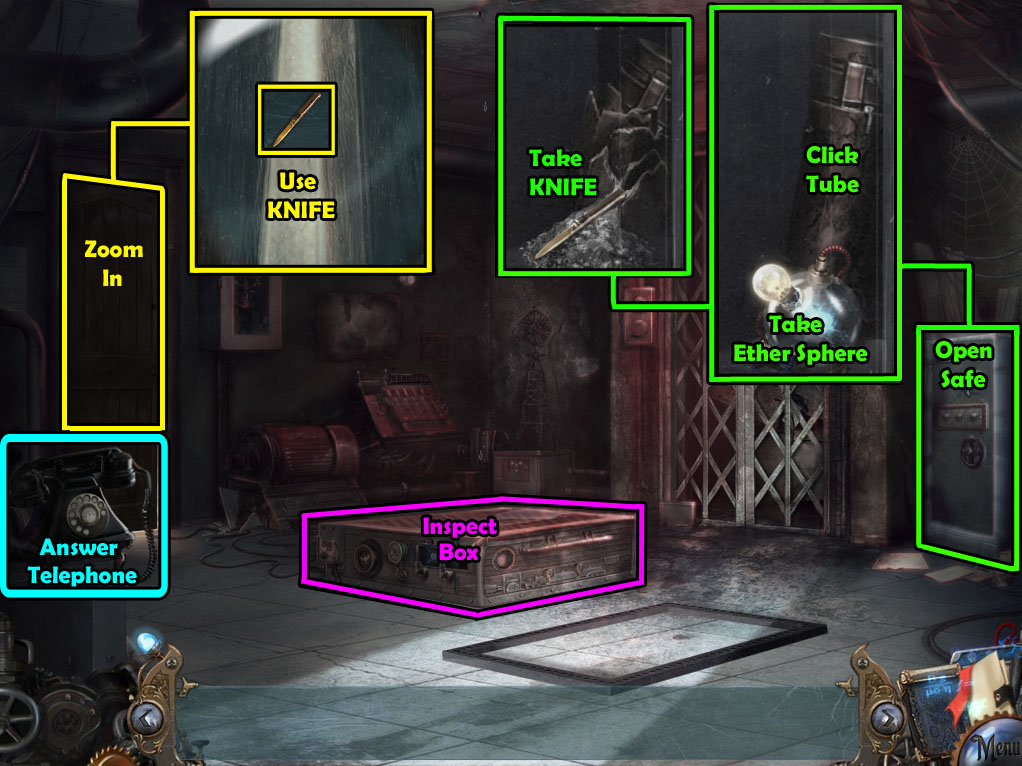
Abandoned Basement
Abandoned Basement Screenshot.
Answer the telephone ringing on the table.
Open the door to the safe in the corner of the room, then click the safe to look inside.
Pick the ether sphere to add it to the toolbar.
Click the blueprints container, then take the KNIFE from inside the safe.
Answer the telephone again to speak with Tesla.
Inspect the metal box in the middle of the floor.
Click the door to the left to zoom in.
Use the KNIFE to cut through the wallpaper in the crack of the door.
Go out to the Basement Laundry Room.
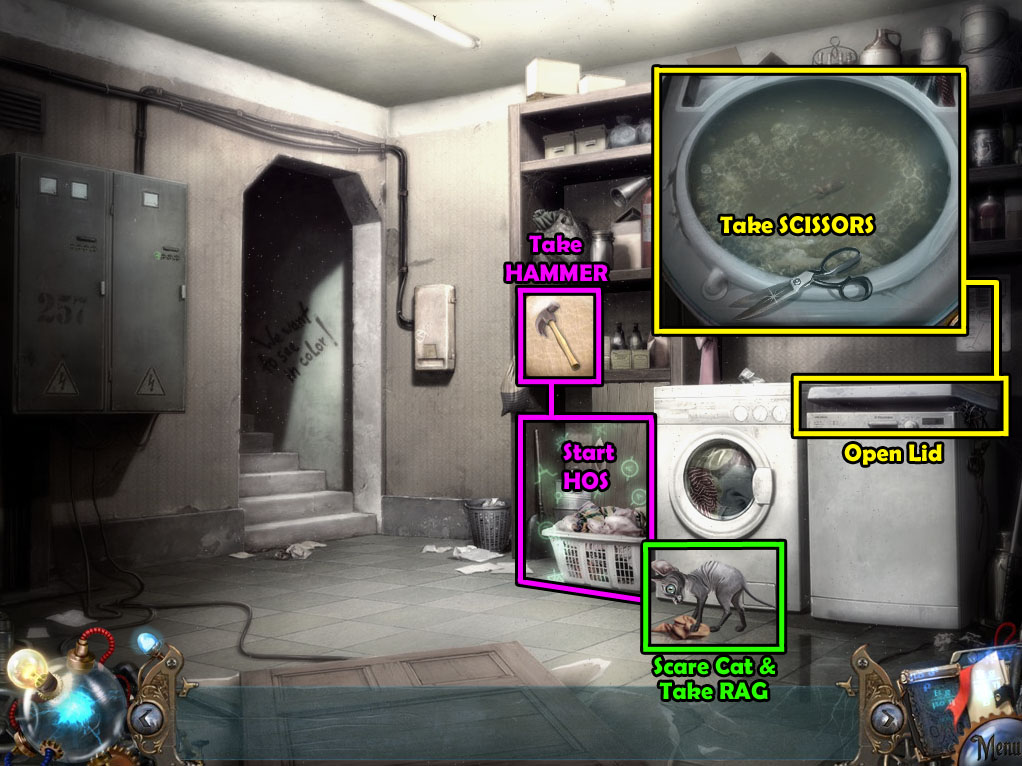
Basement Laundry Room
Basement Laundry Room Screenshot.
Click the cat to chase it away.
Pick up the RAG on the floor.
Lift the lid of the washing machine, then click it to zoom in.
Pick up the SCISSORS at the front of the machine.
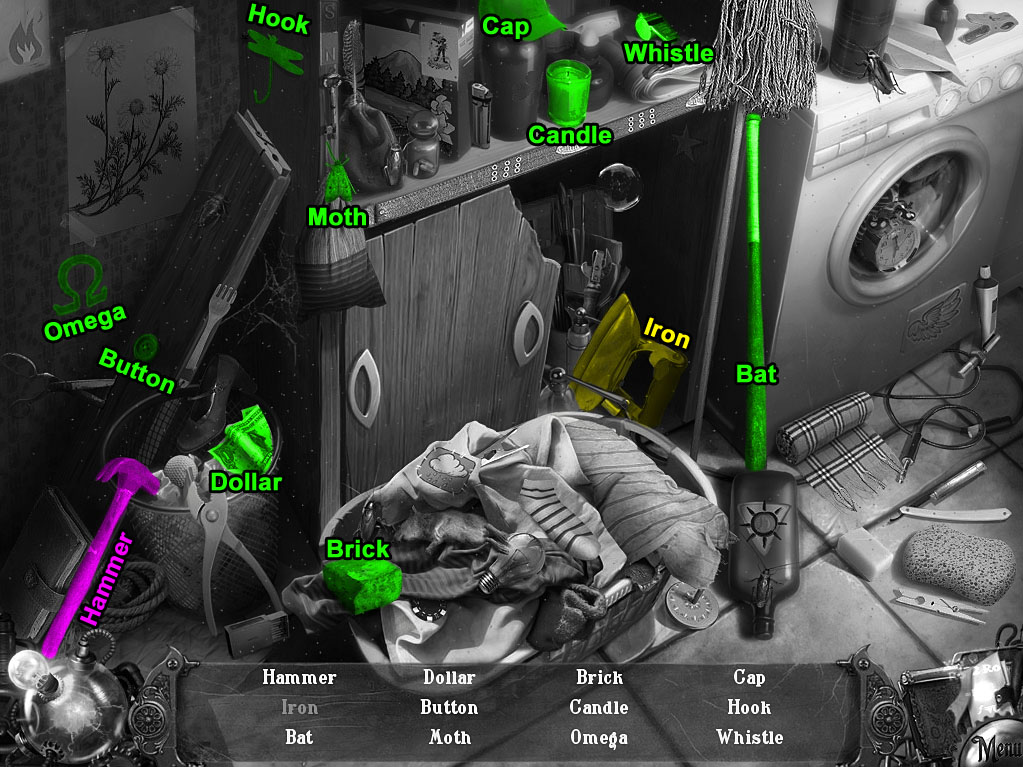
Click the laundry basket to start the hidden object scene.
Move the drawer to the right to find the Iron.
Screenshot.
Once the hidden object scene is complete, you will receive the HAMMER.
Go up the stairs to the Apartment Lobby.
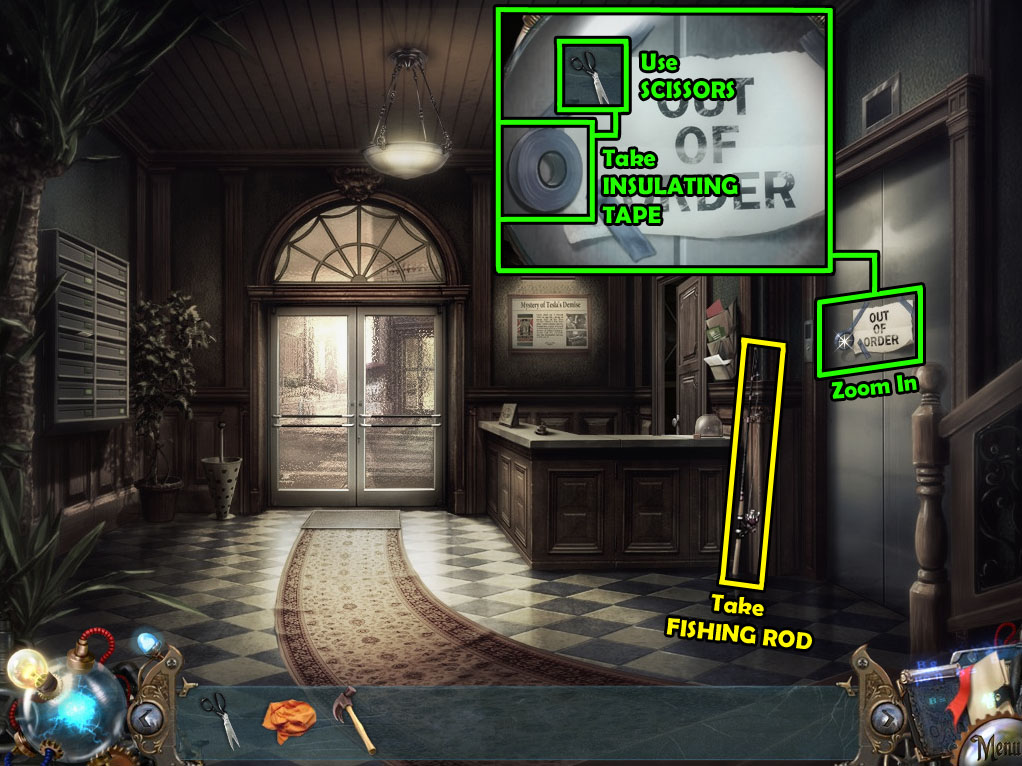
Apartment Lobby
Apartment Lobby Screenshot.
Take the FISHING ROD leaning against the wall beside the elevator.
Click the taped note in the middle of the elevator doors to zoom in.
Use the SCISSORS (from the washing machine in the Basement Laundry Room) to cut off the roll of INSULATING TAPE.
Go out the doors to the Street.
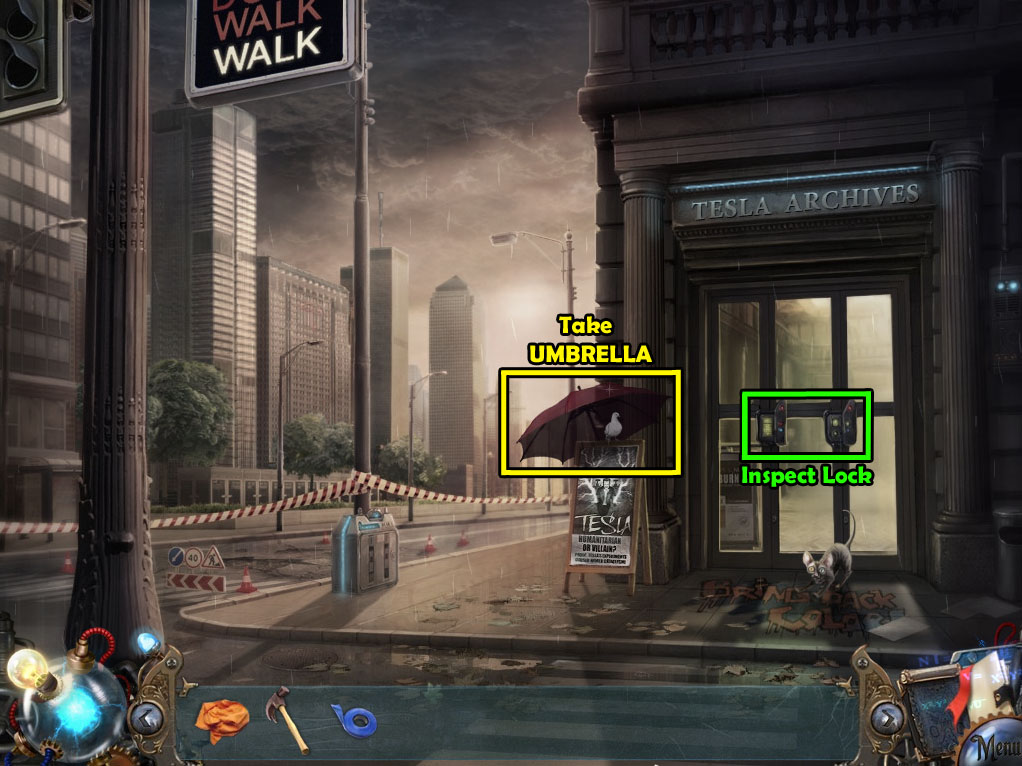
Street
Street Screenshot.
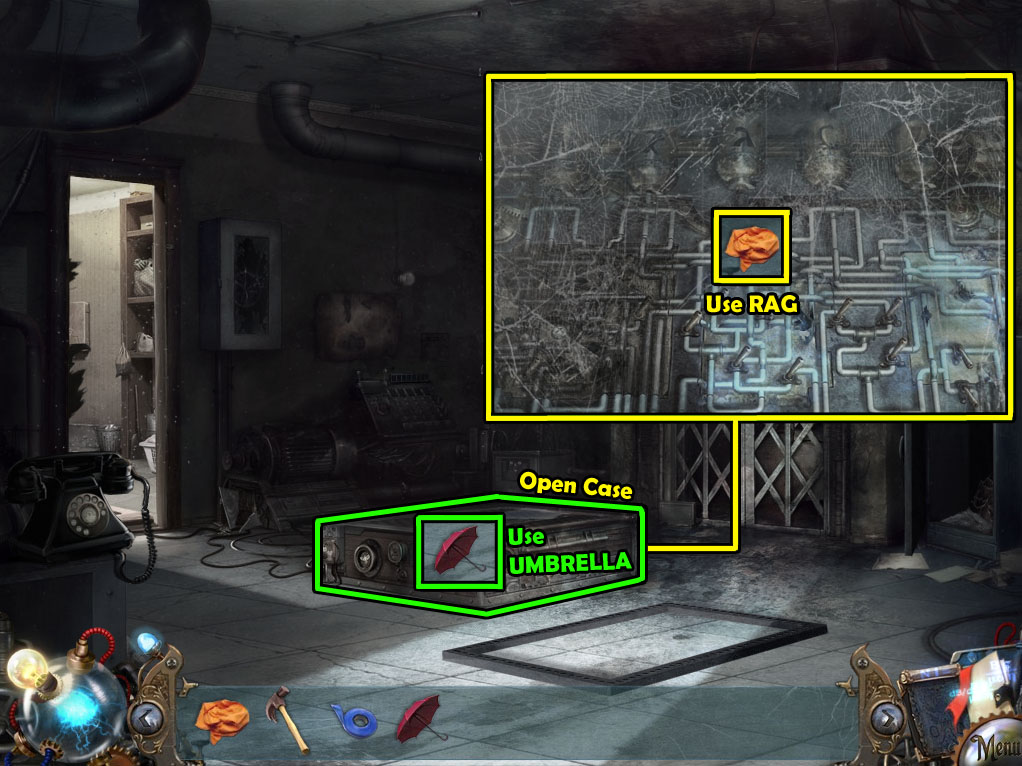
Take the UMBRELLA at the top of the sign board.
Inspect the lock in the middle of the door.
Go back to the Abandoned Basement.
Abandoned Basement
Abandoned Basement Screenshot.
Use the UMBRELLA (from the sign board on the Street) to cover the metal case.
Open the lid of the case to look inside.
Use the RAG (from the floor of the Basement Laundry Room) to clean off the dust.
Move left to the Basement Laundry Room.
Basement Laundry Room
Basement Laundry Room Screenshot.
Take the MAILBOX KEY from the man in the doorway.
Inspect the fuse panel on the left wall.
Use the INSULATING TAPE (from the elevator door in the Apartment Lobby) to repair the broken wire.
Continue up the steps to the Apartment Lobby.
Apartment Lobby
Apartment Lobby Screenshot.
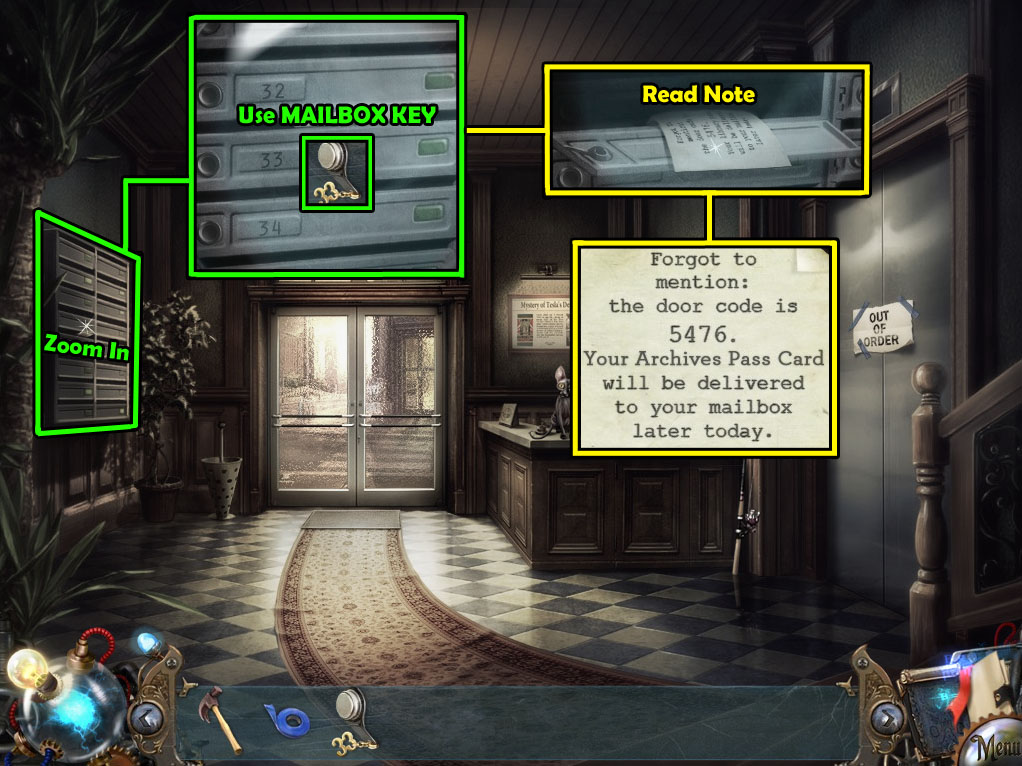
Click the mailboxes against the left wall to zoom in.
Use the MAILBOX KEY (from the man in the Basement Laundry Room) to open box 33.
Take the note from the opened mailbox, then read the note in your inventory to find the door code: 5476.
Go out to the Street.
Street
Street Screenshot.
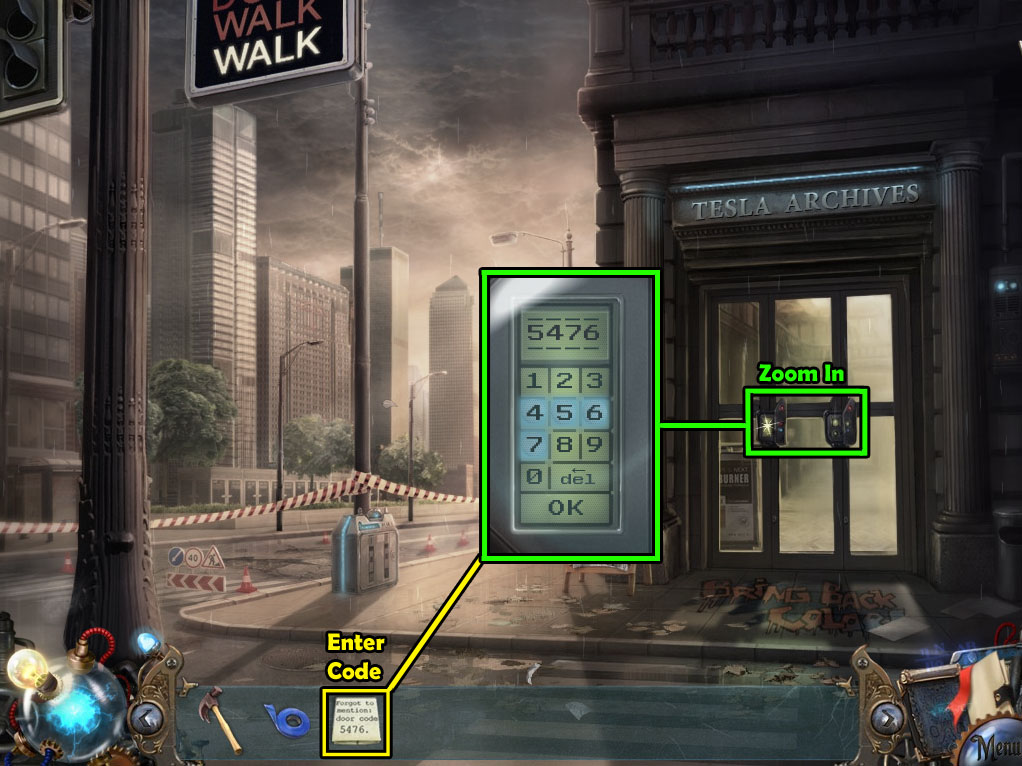
Click the lock in the middle of the doors to the Tesla archives building for a closer look.
Enter the code number from your mailbox note into the electronic lock.
Go through the open door into the Archive Hall.
Archive Hall
Archive Hall Screenshot.
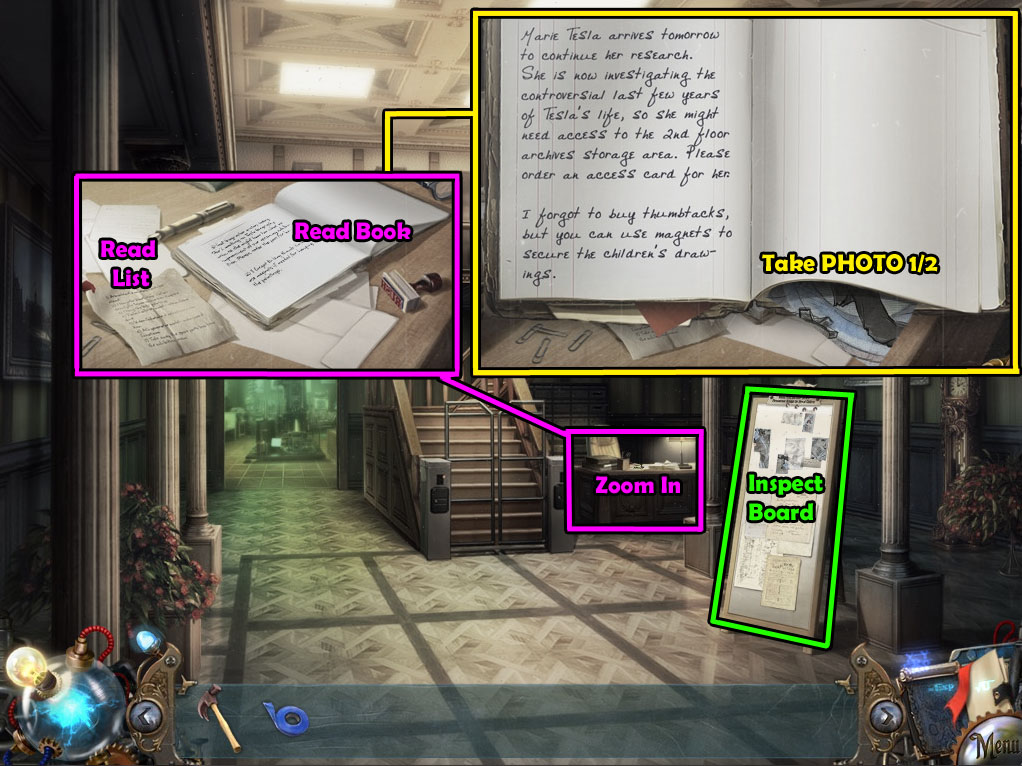
View the bulletin board to find that it's missing two pages.
Inspect the open book on top of the desk.
Take the PICTURE (1/2) under the bottom of the right page.
Close the book and read the check list on the table.
Continue forward to the Tesla Exhibition.
Tesla Exhibition
Tesla Exhibition Screenshot.
Click the lower left framed picture on the left wall to zoom in.
Take the PICTURE (2/2) from the side of the frame.
Watch the video at the bottom of the machine in the center of the room.
Click the screen in the rear right corner of the room for a closer look.
Take the CLAMPS hanging over the monitor.
Press the right arrow button at the side of the screen to go through the slides.
Inspect the crate at the ride side of the room for a close-up view.
Take the Tesla Labs map on top of the crate.
Use the HAMMER (from the Basement Laundry Room hidden object scene) to remove the four nails at the sides of the lid to start the puzzle.
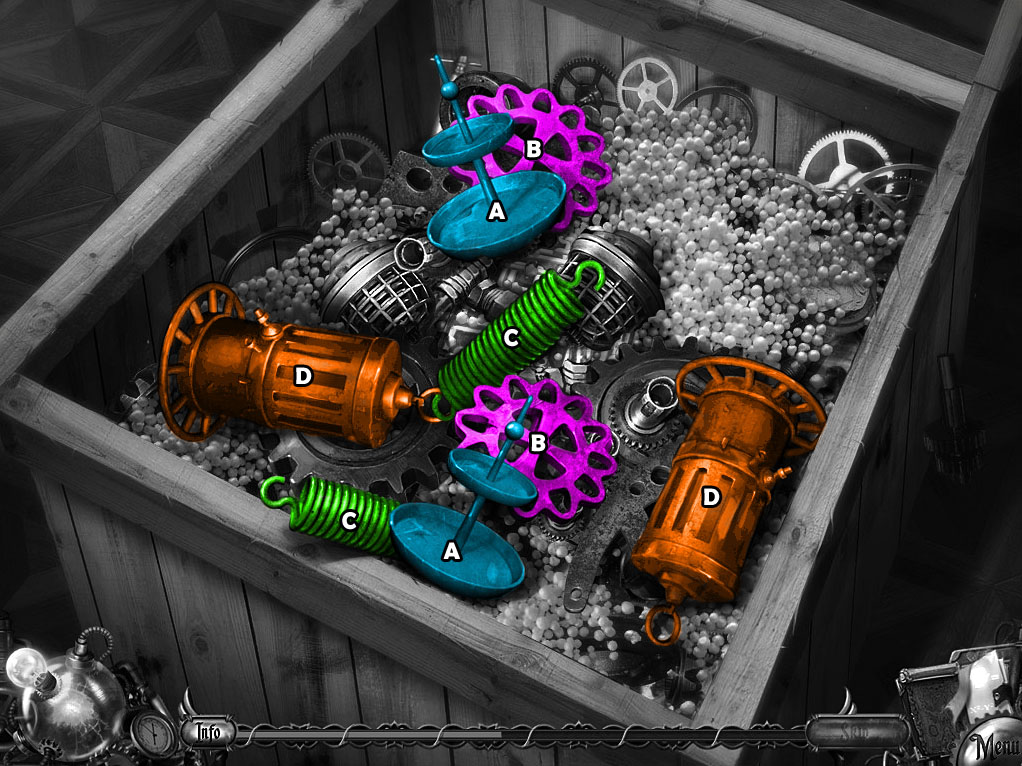
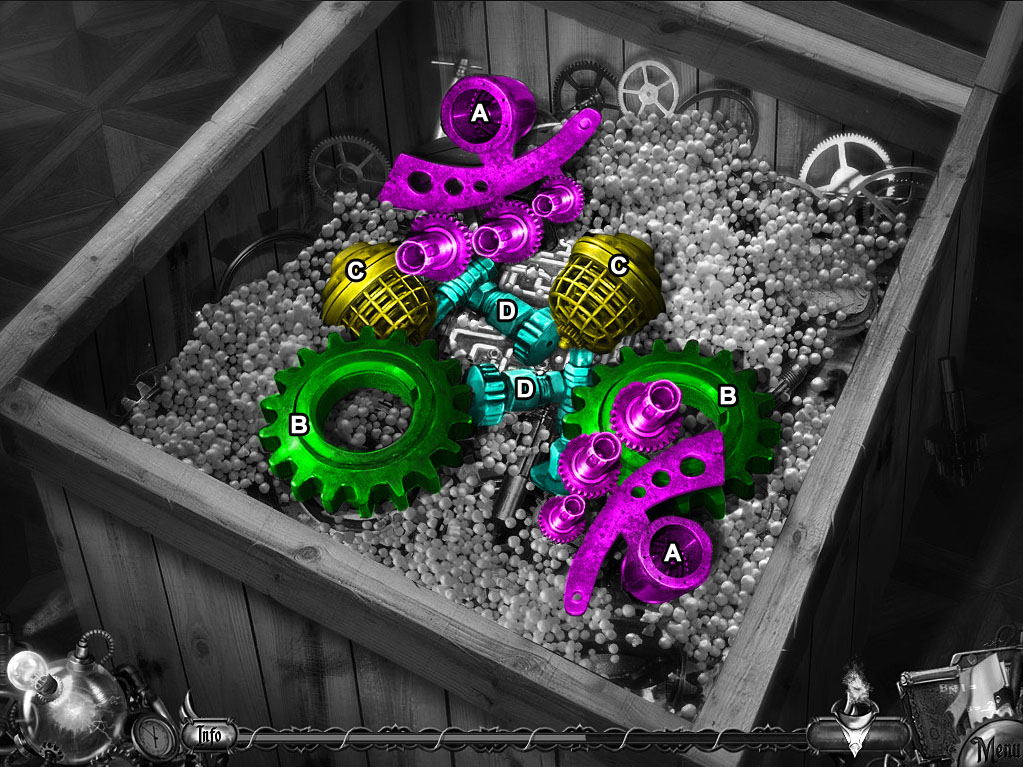
Match the pairs of parts to remove them from the crate.
Click one part to select it, then click the identical part in the box to remove both items.
You must remove the parts from the top of the pile first before you can take out the objects underneath.
Solution Part 1.
Solution Part 2.
Solution Part 3.
After the puzzle is solved, remove the styrofoam to reveal the ETHER CHARGED CIRCUIT BOARD inside the crate.
Go back to the Archive Hall.
Archive Hall
Archive Hall Screenshot.
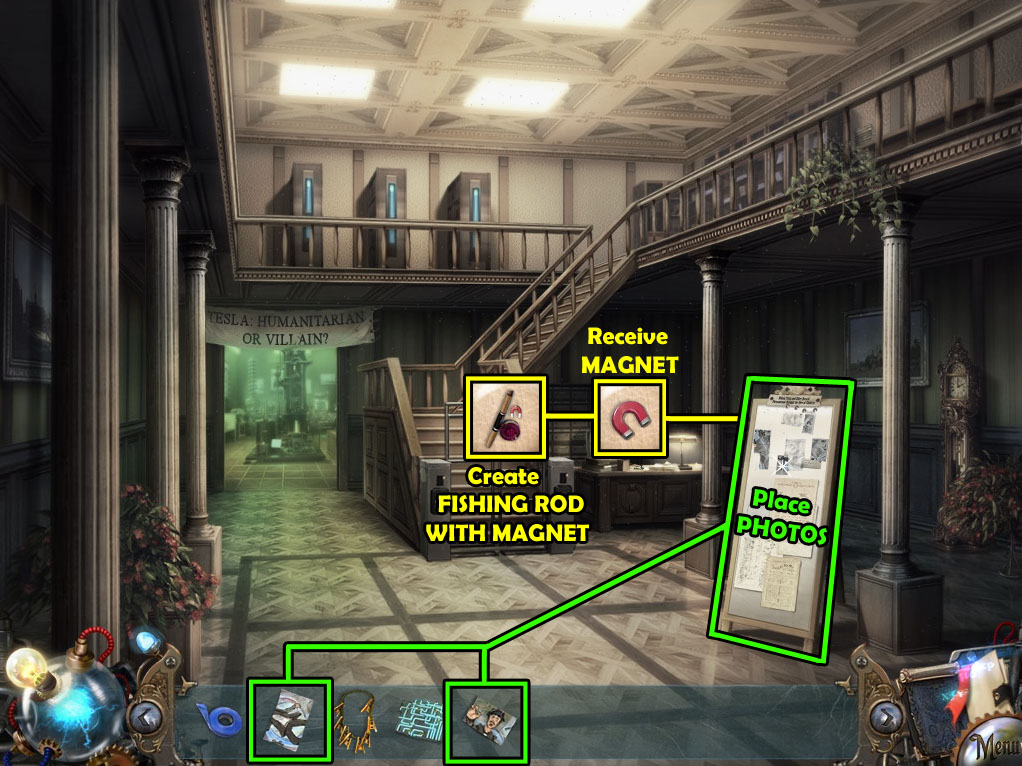
Click the bulletin board on the right side of the room to zoom in.
Add the two PICTURES (one from the book on the table at the Archive Hall and one from the frame ont he wall in the Tesla Exhibition) to start the puzzle.
Arrange the pictures on the board to complete the image.
Click and drag an image to rotate it in a circle around its pin.
Find where the images align, then place all but one of the magnets there to hold the pictures in place.
Solution.
After the puzzle is solved, you will receive the MAGNET.
The MAGNET will automatically combine with the FISHING ROD in your inventory to create the FISHING ROD WITH MAGNET.
Go back to the Basement Laundry Room
Basement Laundry Room
Basement Laundry Room Screenshot.
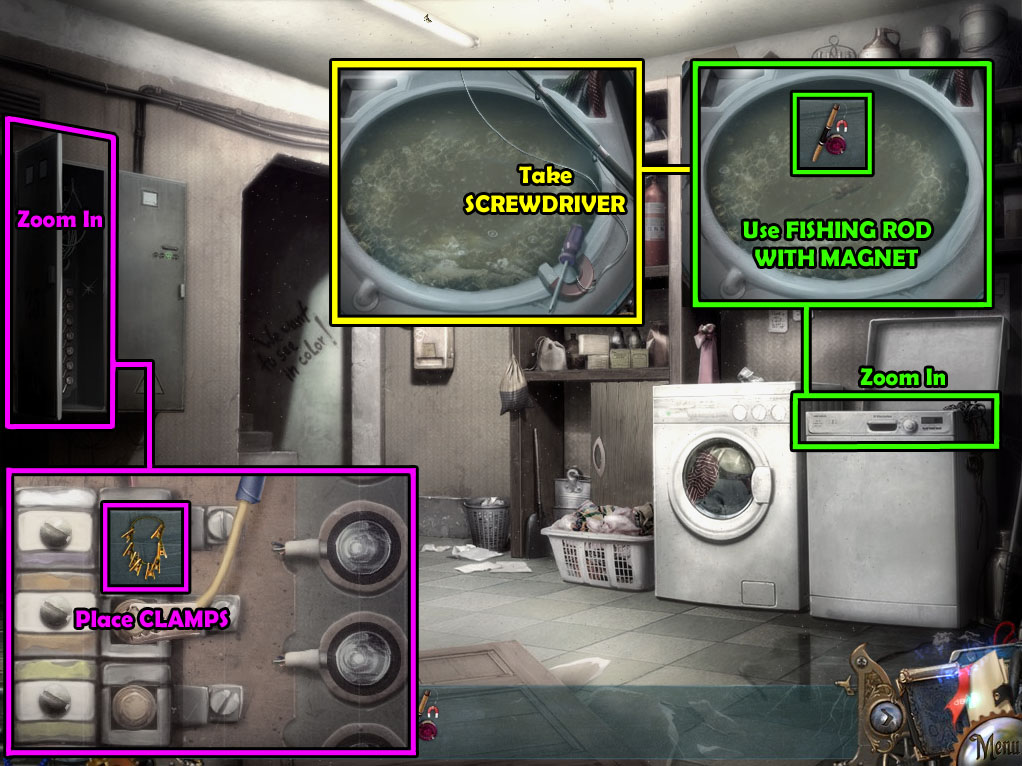
Click the top of the washing machine to look inside.
Use the FISHING ROD WITH MAGNET (from the magnet puzzle at the Archive Hall) on the water.
Take the SCREWDRIVER pulled out of the water.
Click the fuse panel for a closer look.
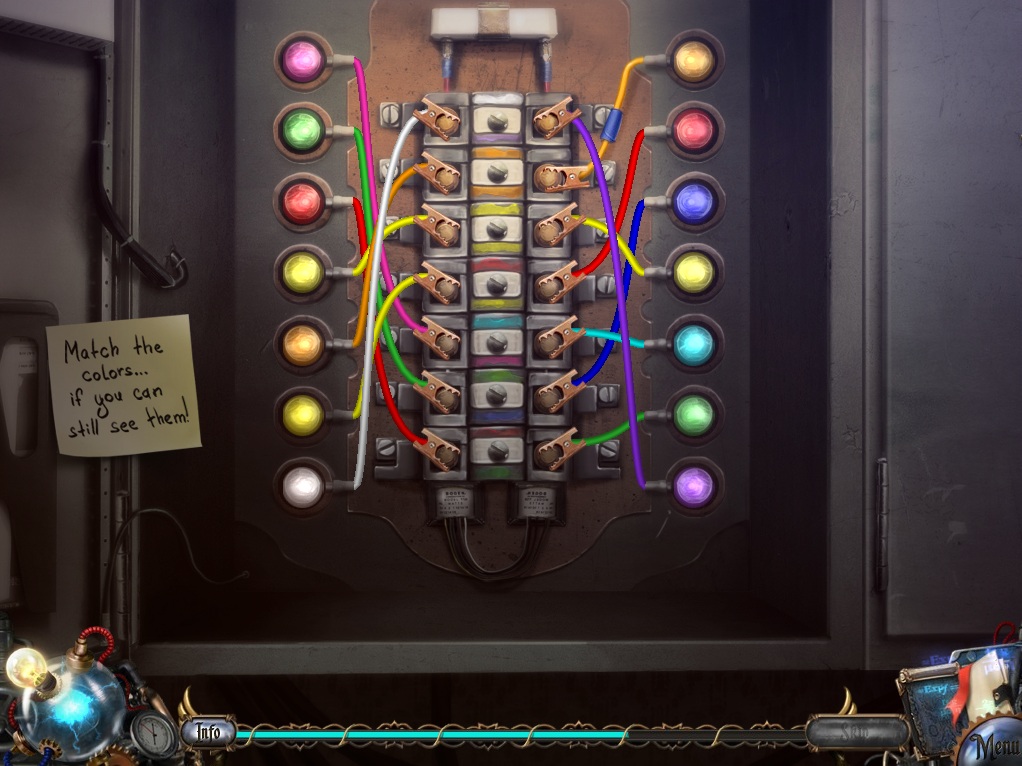
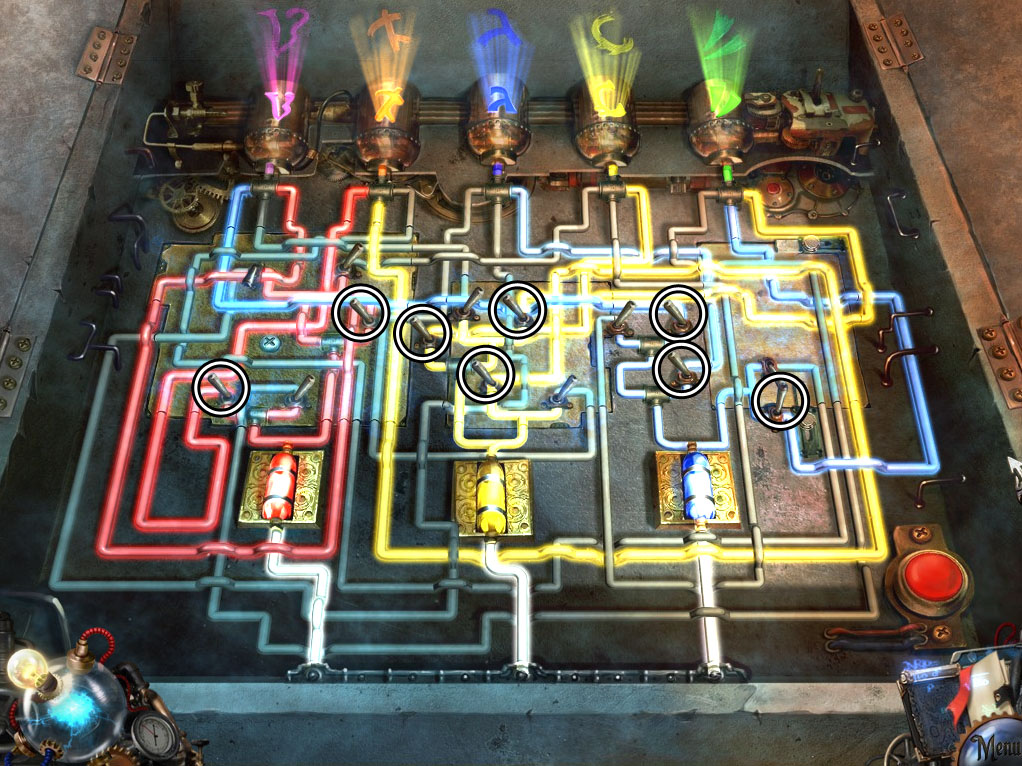
Add the CLAMPS (from the monitor at the Tesla Exhibition) to the bolts to start the puzzle.
Connect the clamps to the matching colored bolts to light up all of the bulbs.
Click and drag a clamp to move it, then release it over one of the bolts to set it in place.
Each clamp is attached to a wire of a certain color, and next to each bolt is a small square with a colored strip at the top and bottom.
When a clamp is attached to a bolt that matches in color, the bulb at the end of the wire will light up.
Some colors are repeated more than once, so you simply need to place the clamp at one bolt to test it and if it doesn't light up, try the other bolt.
Solution.
Go back to the Abandoned Basement.
Abandoned Basement
Abandoned Basement Screenshot.
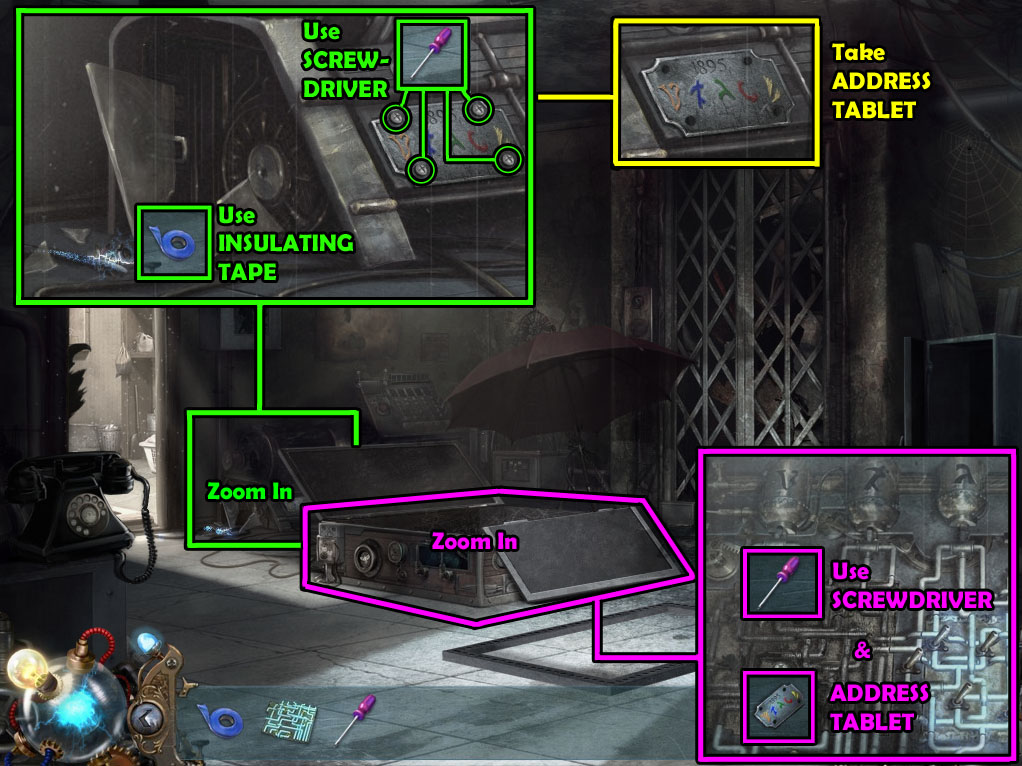
Click the generator on the floor beside the doorway to zoom in.
Use the INSULATING TAPE (from the elevator door in the Apartment Lobby) to repair the broken wire.
Use the SCREWDRIVER (from the washing machine in the Basement Laundry Room) to remove the four screws from the metal plate, then click the ADDRESS TABLET to add it to your inventory.
Inspect the open metal box in the middle of the floor.
Use the SCREWDRIVER on the screw to remove the fried section of the circuit board.
Place the ETHER CHARGED CIRCUIT BOARD (from the mechanical parts puzzle at the Tesla Exhibition) in the empty space.
Use the SCREWDRIVER on the screw again to set the circuit board in place.
Place the ADDRESS TABLET on the empty panel at the top.
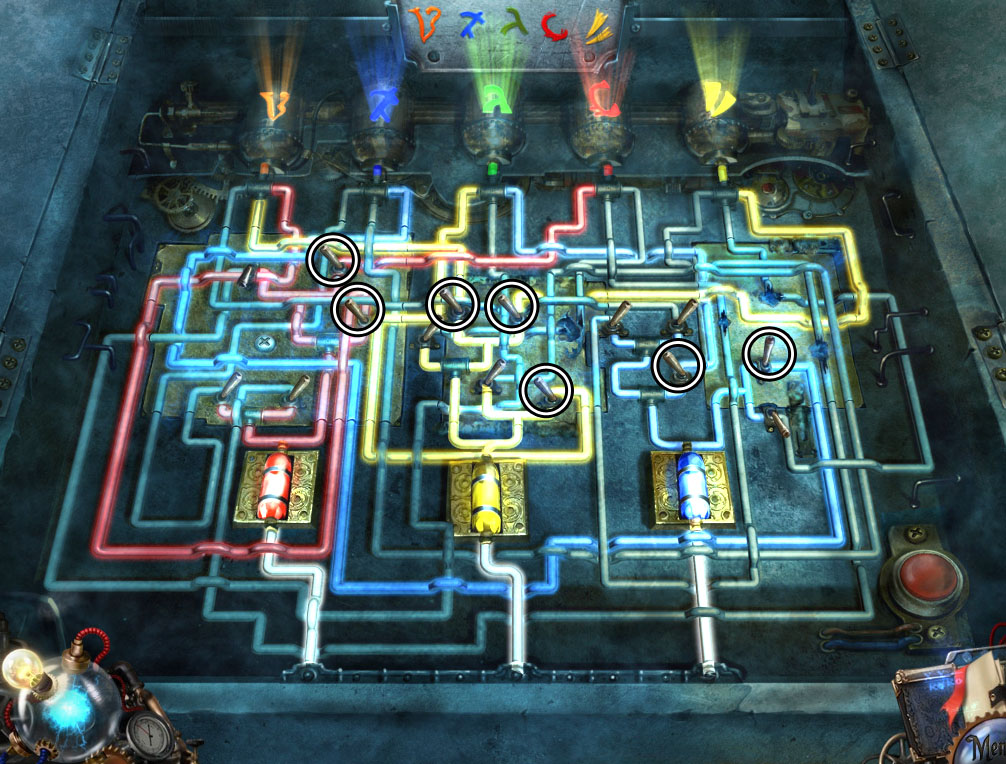
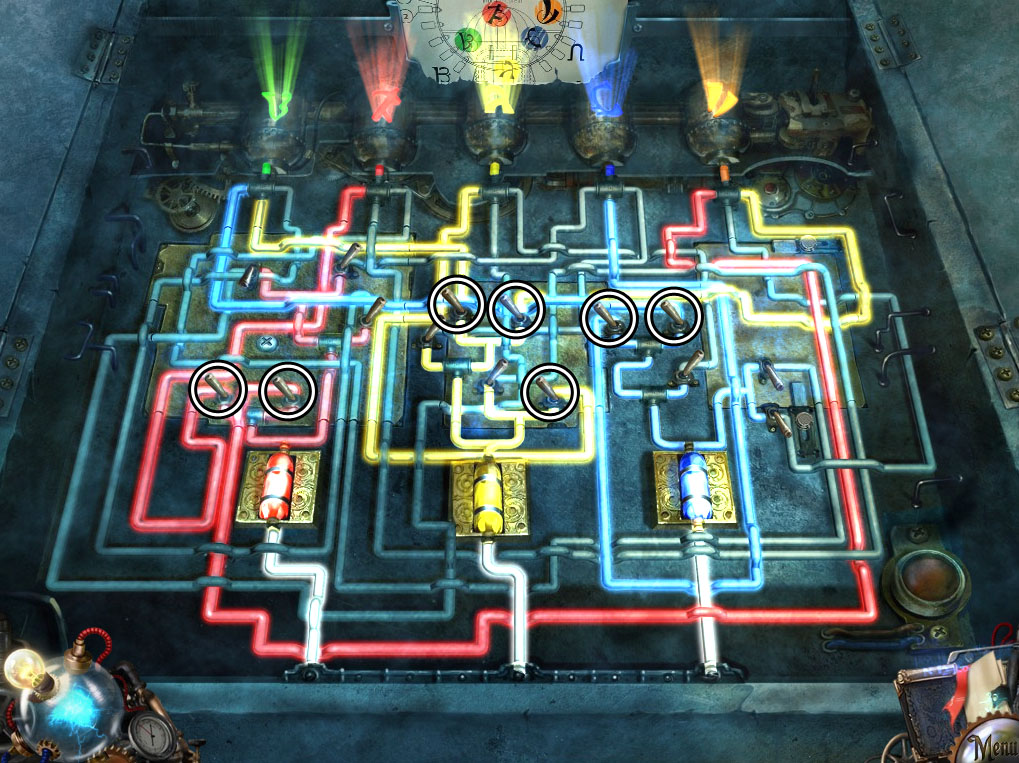
Push the red button at the lower left corner to turn on the machine and start the puzzle.
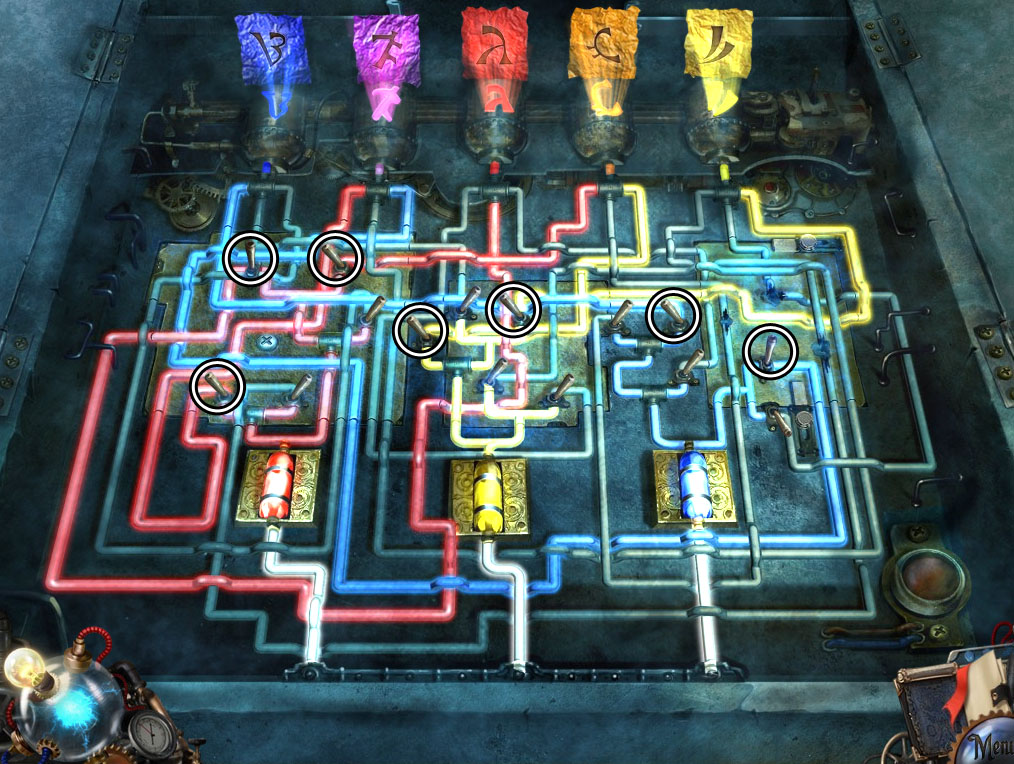
Flip the levers to control the paths of light into the correct tanks.
The panel at the top shows the proper color of each tank from left to right: orange, blue, green, red, and yellow.
The bulbs at the bottom project a light of a primary color: red, blue, or yellow.
Flip the switches to release to turn a connect light on or off and move it down the pipes; when two pipes cross, their colors will combine to create a secondary color.
Combine the red and yellow to make the orange symbol at the first tank, direct blue to the second tank, combine blue and yellow to make the green symbol at the third tank, direct red to the fourth tank, and direct yellow to the fifth tank.
Solution.
After the puzzle is solved, go through the open portal in to the door to the Main Room of Tesla's Avenue Lab.
Chapter 2
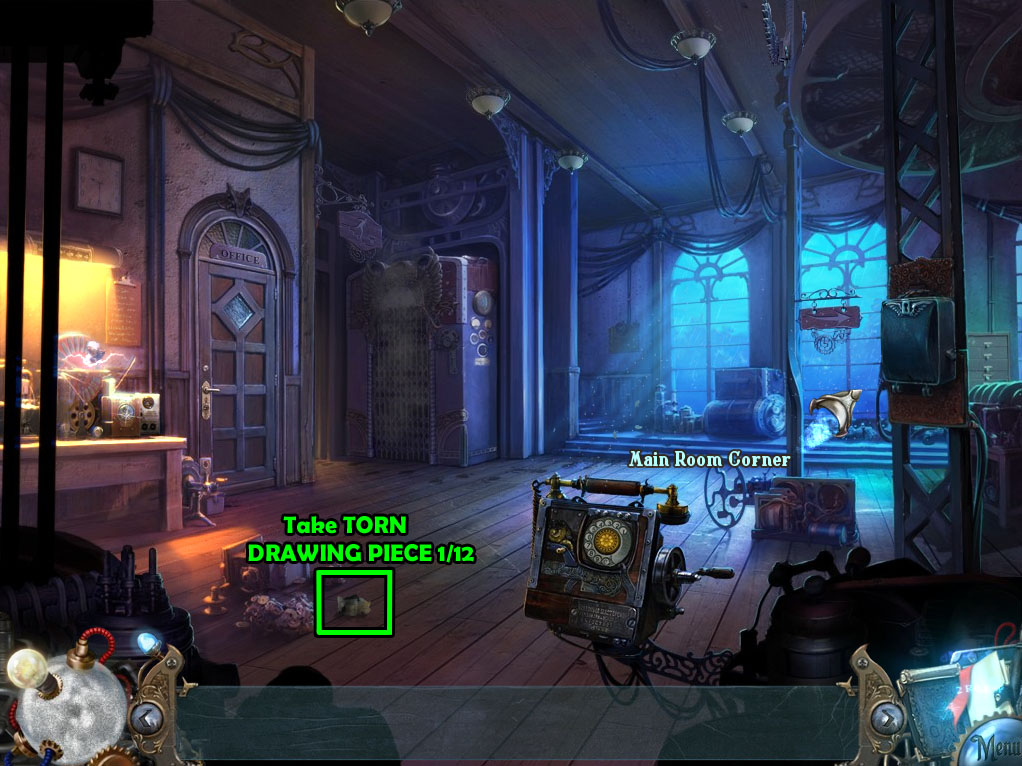
Main Room
Main Room Screenshot.
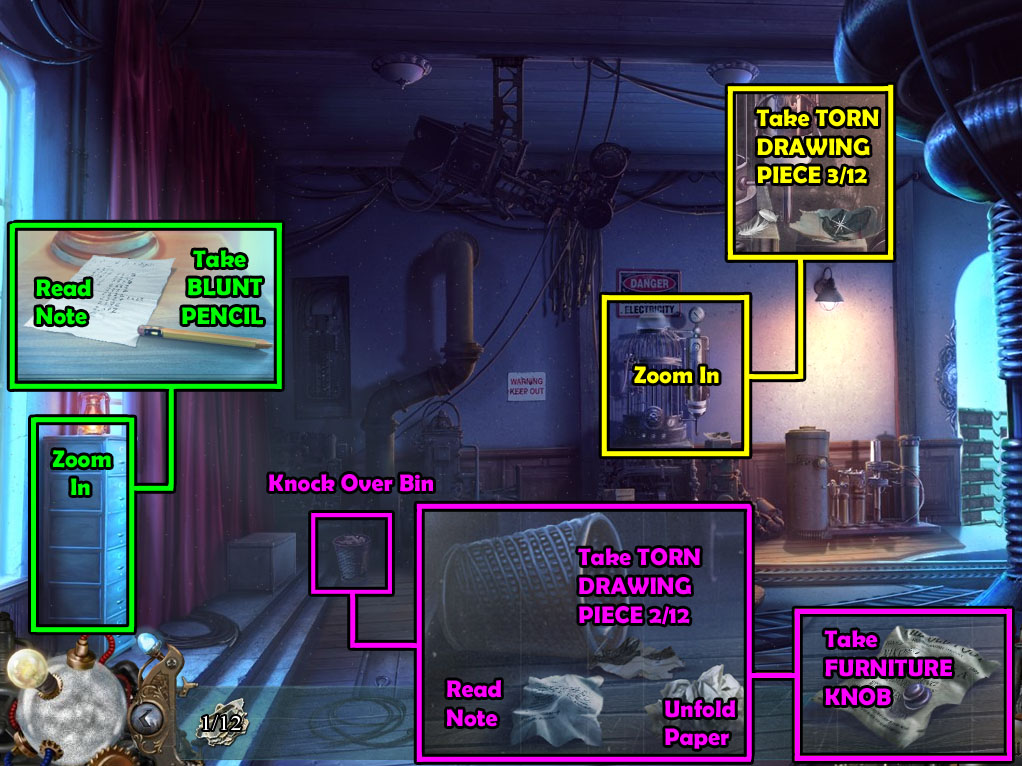
Take the crumpled TORN DRAWING PIECE 1/12 next to the small pile of parts on the floor.
Continue right to the Main Room Corner.
Main Room Corner
Main Room Corner Screenshot.
Click the top of the cabinet by the left wall to zoom in.
Take the BLUNT PENCIL and read the note beside the bottom of the lantern.
Knock over the small waste basket in the corner of the room, then inspect the fallen pile of papers.
Unfold the lower right paper to find the FURNITURE KNOB.
Take the TORN DRAWING PIECE 2/12, then read the lower left paper.
Click the cage at the back of the room for a closer look.
Take the TORN DRAWING PIECE 3/12 beside the bottom of the cage.
Go right to the Laboratory Hall.
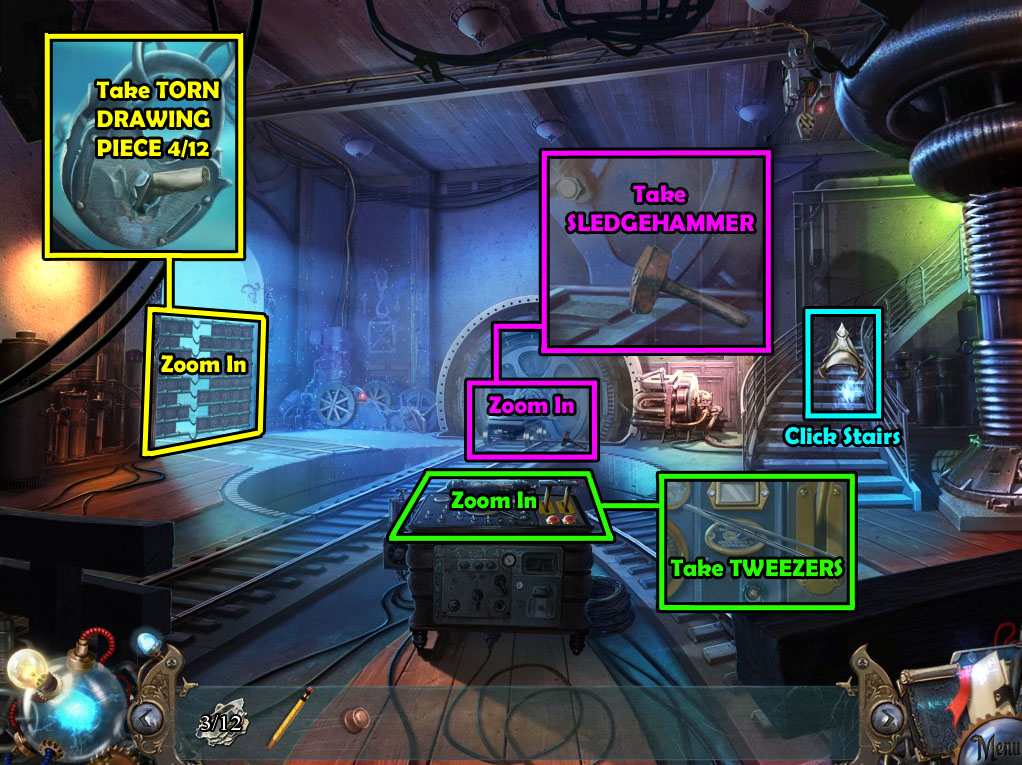
Laboratory Hall
Laboratory Hall Screenshot.
Inspect the top of the control panel to find the TWEEZERS.
Click the left gate for a closer look.
Take the TORN DRAWING PIECE 4/12 in the keyhole of the padlock.
Click the cart at the end of the track to zoom in.
Pick up the SLEDGEHAMMER on the ground beside the track.
Attempt to walk up the stairs to start the cutscene.
Go back to the Main Room, then continue left to the Back Door.
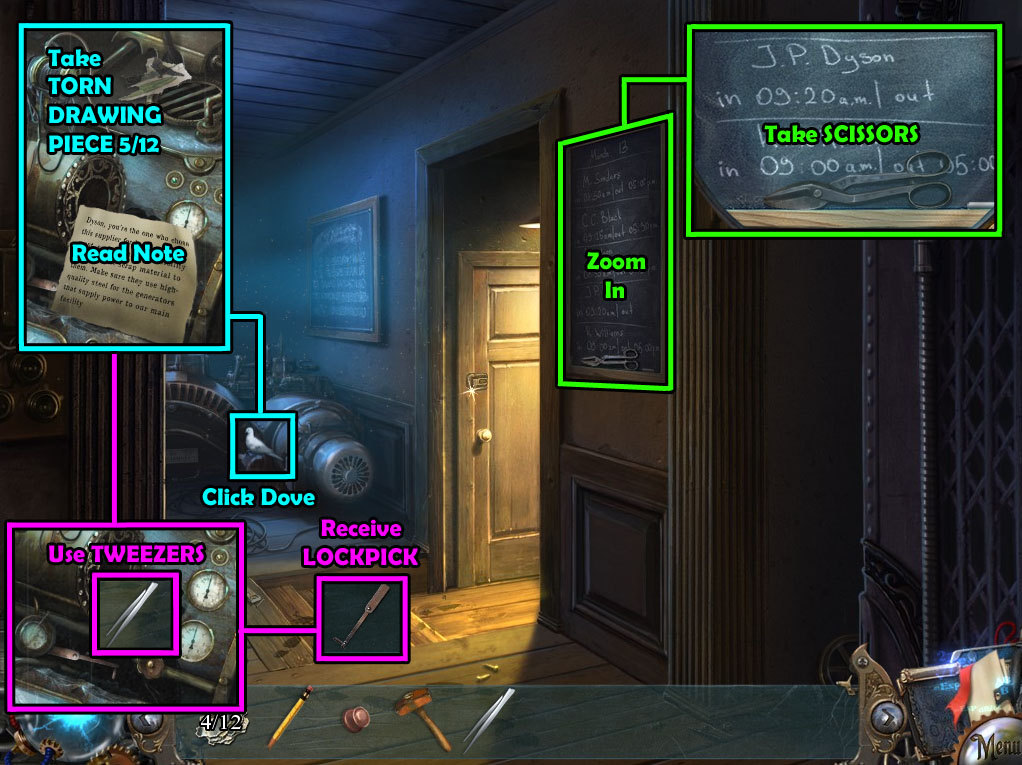
Back Door
Back Door Screenshot.
Click the dove sitting on the machinery at the back of the hall to start the cutscene.
Inspect the machinery after the dove leaves to find a note and the TORN DRAWING PIECE 5/12.
Use the TWEEZERS (from the control panel at the Laboratory Hall) on the hole in the machinery to pull out the LOCKPICK.
Click the chalk board for a closer look.
Take the SCISSORS at the bottom of the frame.
Go back to the Main Room.
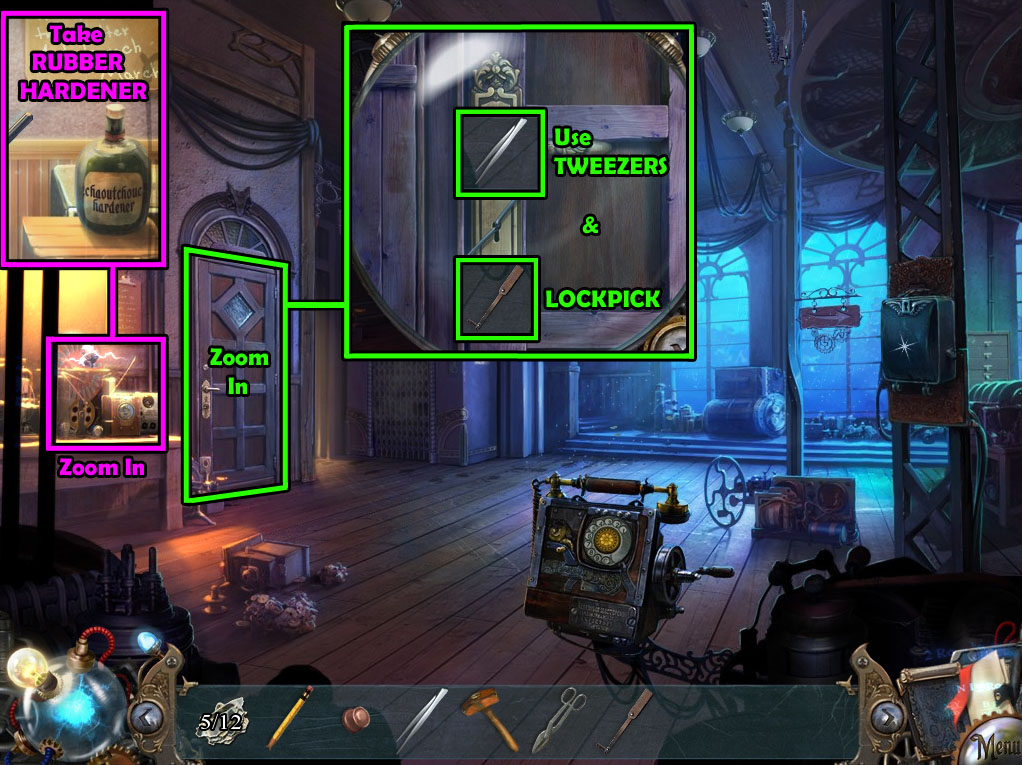
Main Room
Main Room Screenshot.
Click the device on the table to zoom in.
Take the bottle of RUBBER HARDENER on top of the right box.
Click the office door for a closer look.
Use the TWEEZERS (from the control panel at the Laboratory Hall) to pull the wire out of the lock.
Put the LOCKPICK (from the machinery at the Back Door) into the lock to start the puzzle.
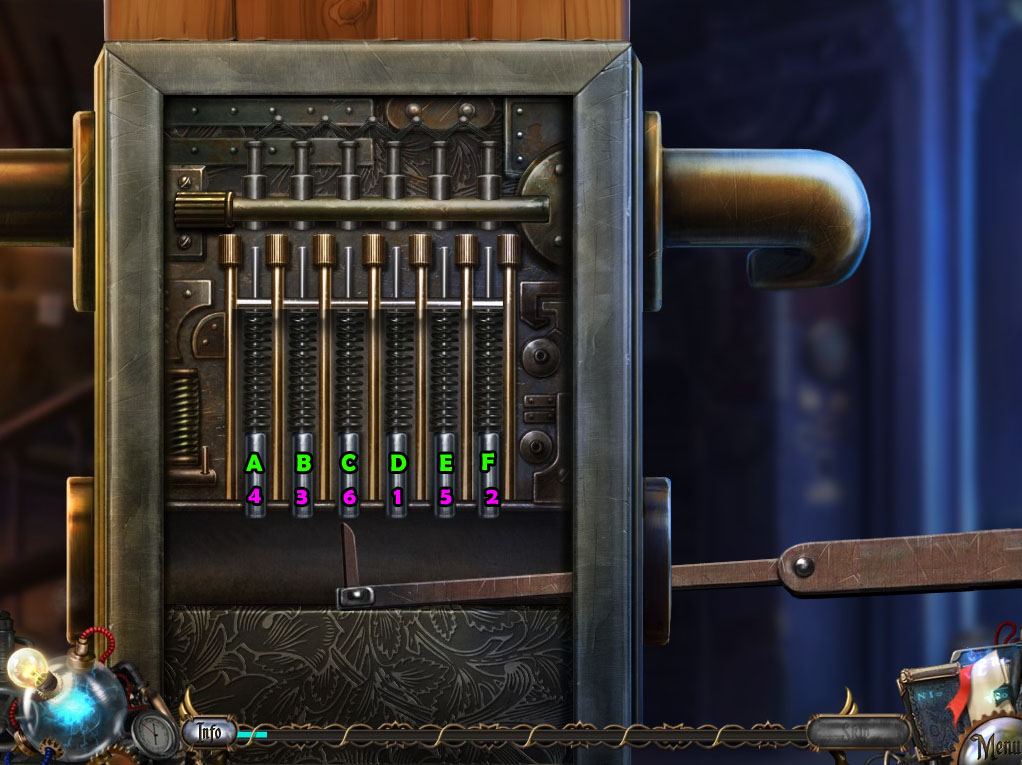
Lift the tumblers in the correct order to open the lock.
Move the cursor left or right to select a tumbler, then move it up to lift it.
If a tumbler is lifted in the right order, it will stay in place; otherwise the puzzle will reset from the beginning.
Hit the tumblers in the following order:
D-F-B-A-E-C
Solution.
After the puzzle is solved, go through the open door to Tesla's Office.
Tesla's Office
Tesla's Office Screenshot.
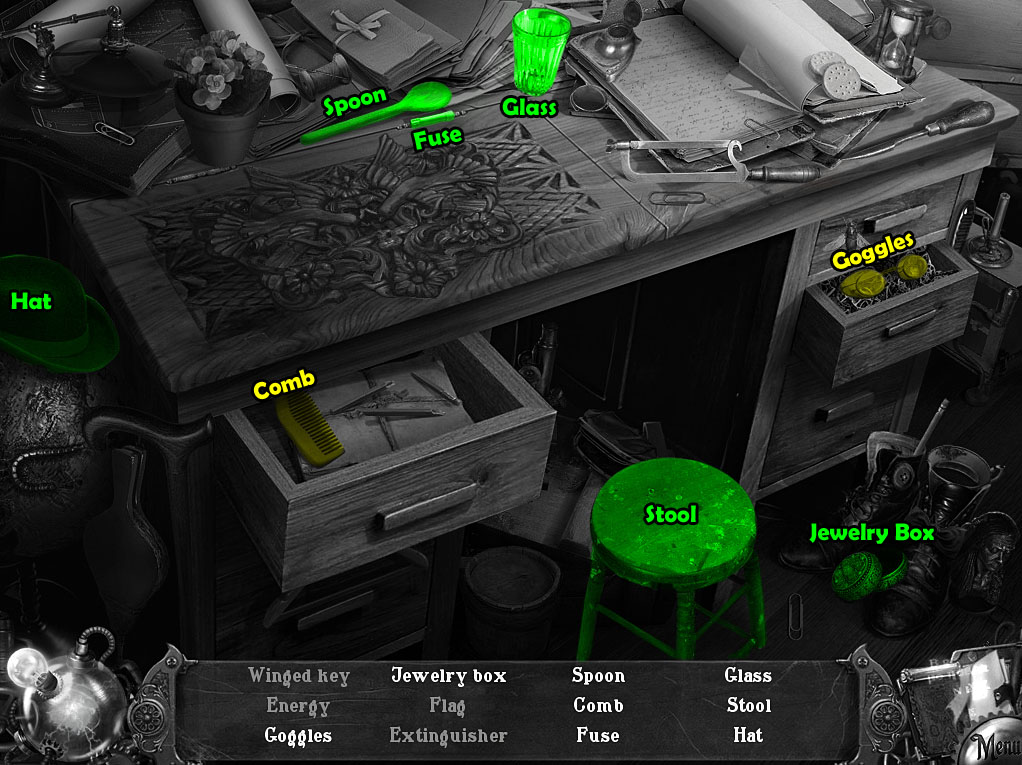
Click the left desk to start the hidden object scene.
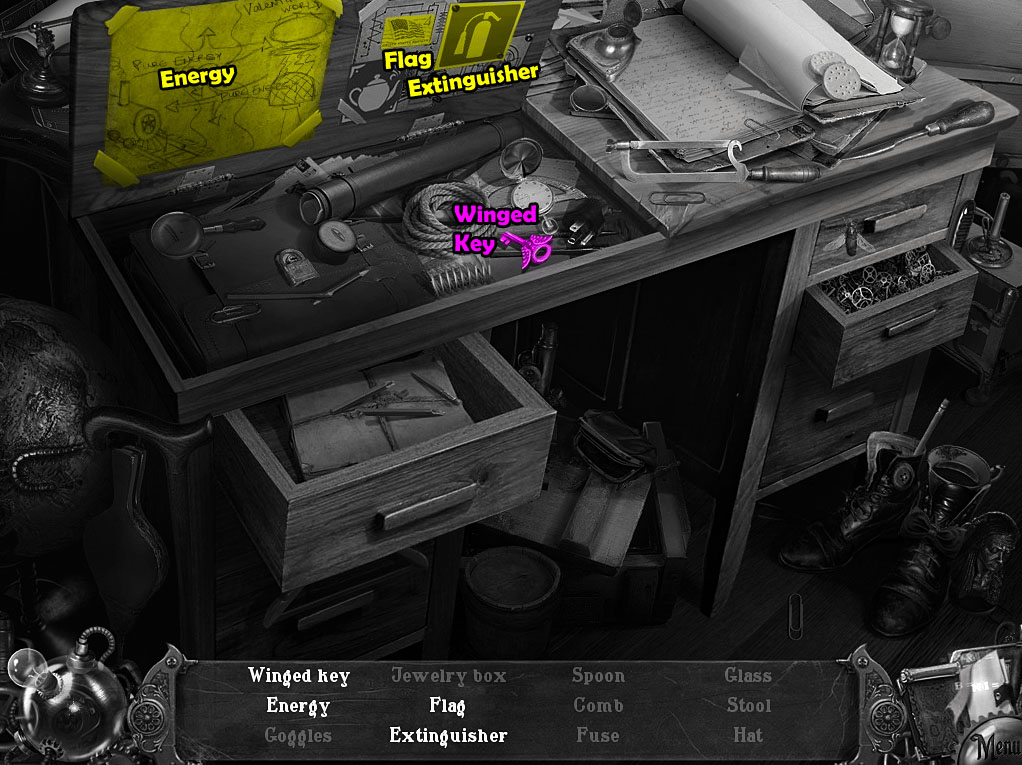
Lift the panel on the top of the desk to reveal the Winged Key, Flag, Energy, and Fire Extinguisher.
Open the left drawer to find the Comb.
Open the right drawer to find the Goggles.
Screenshot Part 1
Screenshot Part 2
Once the hidden object scene is complete, you will receive the WINGED KEY.
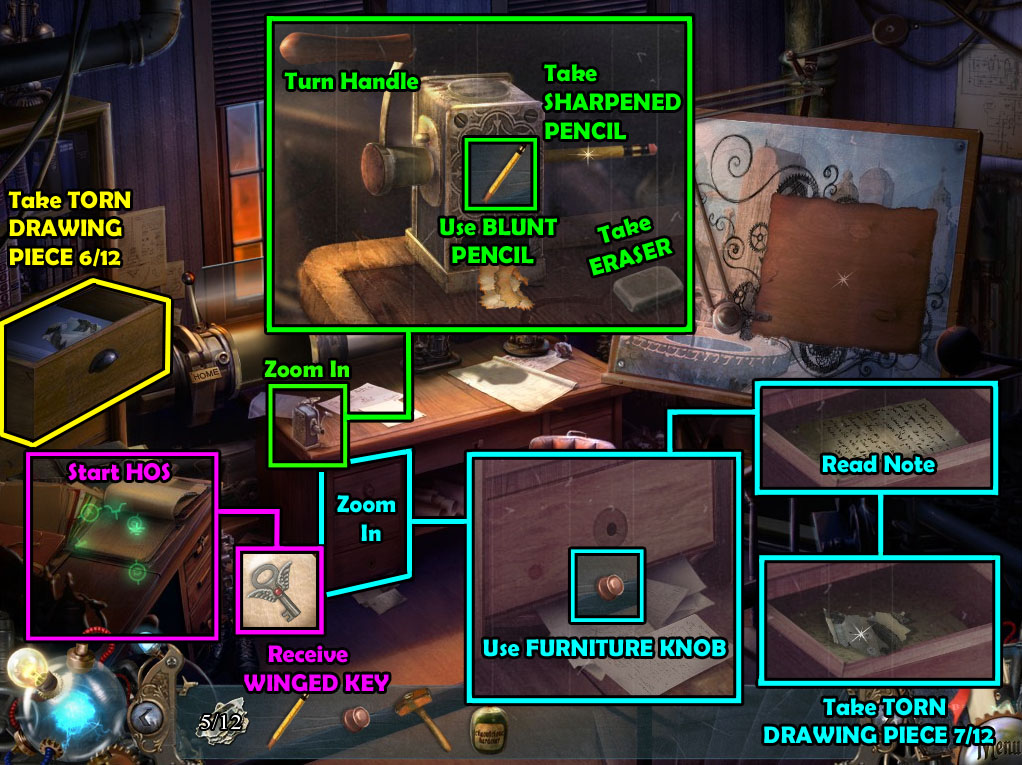
Open the drawer above the left desk to find the TORN DRAWING PIECE 6/12.
Inspect the pencil sharpener at the top of the right desk.
Take the ERASER on top of the carved heart.
Use the BLUNT PENCIL (from the cabinet at the Main Room Corner) on the pencil sharpener, then turn the handle and take the SHARPENED PENCIL.
Click the bottom drawer of the right desk to zoom in.
Place the FURNITURE KNOB (from the waste basket at the Main Room Corner) into the hole in the center of the drawer.
Open the drawer and read the note inside, then take the TORN DRAWING PIECE 7/12.
Go back out to the Main Room.
Main Room
Main Room Screenshot.
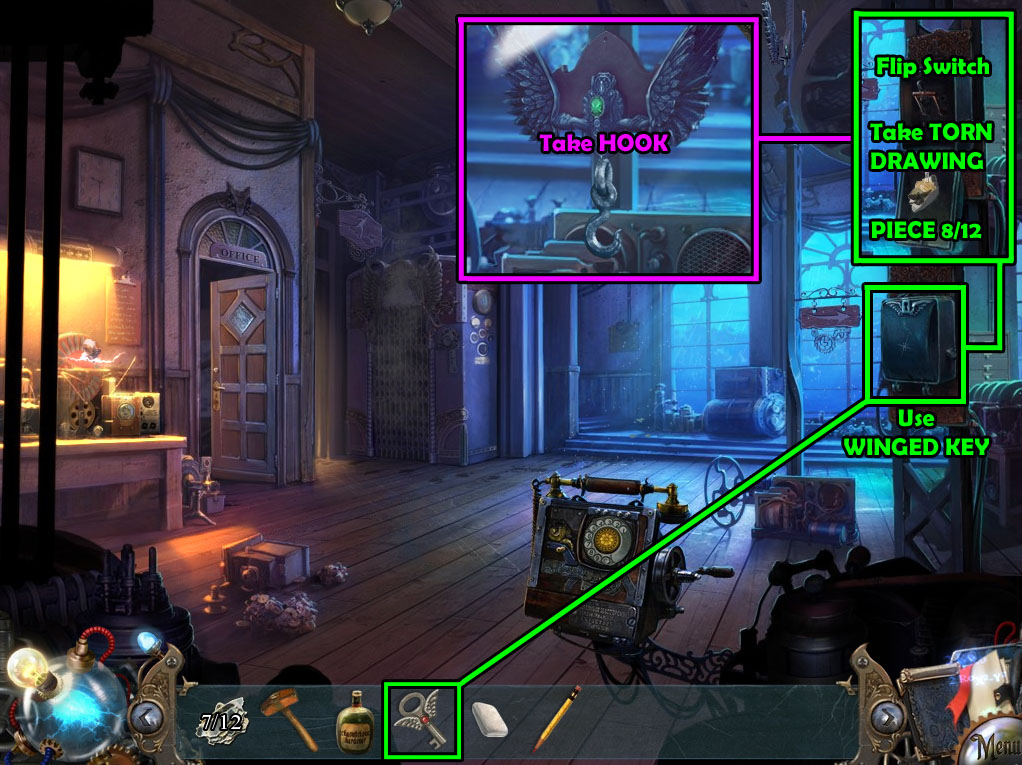
Use the WINGED KEY (from Tesla's Office hidden object scene) to open the metal box on the support beam.
Take the TORN DRAWING PIECE 8/12 from the bottom of the opened panel door.
Hit the switch to lower the wire, then click the angel at the bottom of the wire to zoom in.
Take the HOOK hanging off the angel.
Flip the switch again to lift the angel back up.
Return to the Laboratory Hall.
Laboratory Hall
Laboratory Hall Screenshot.
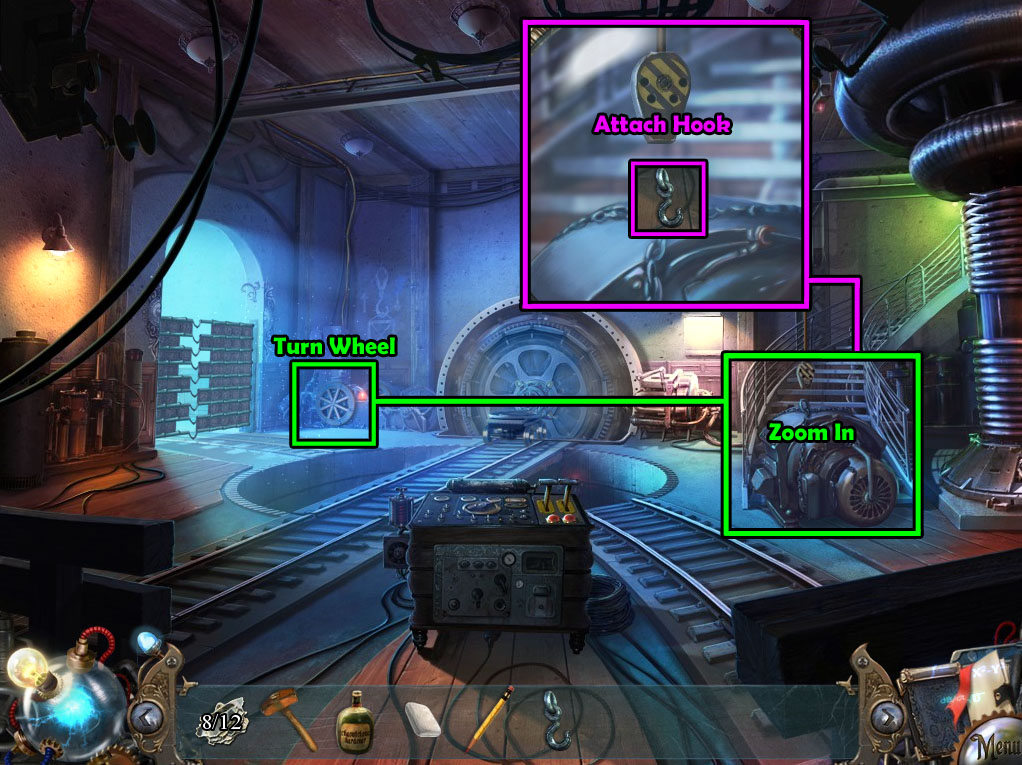
Turn the wheel in the rear left corner of the room to lower the cable over the machinery blocking the stairs.
Click the bottom of the cable to zoom in.
Attach the HOOK (from the angel wire in the Main Room) to the cable.
Turn the wheel again to lift the cable back up and remove the machinery from the stairs.
Go up the stairs to the Control Room.
Control Room
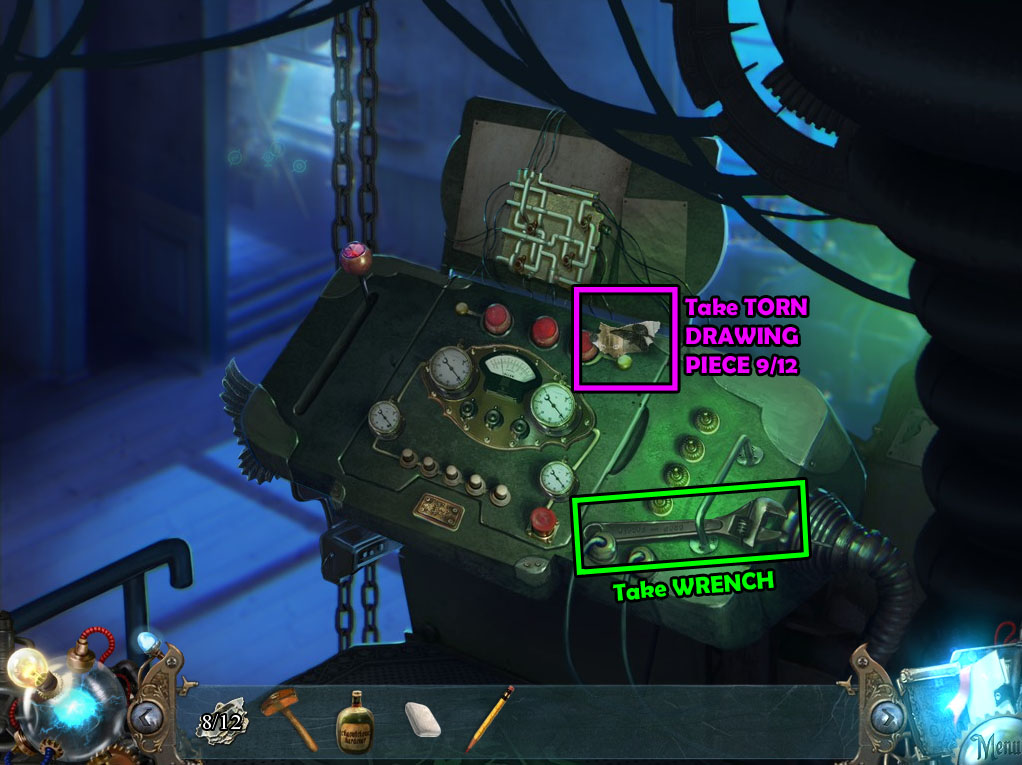
Control Room Screenshot.
Take the WRENCH under the handle on the right side of the control panel.
Take the TORN DRAWING PIECE 9/12 to the right of the three red buttons at the top of the control panel.
Go back to the Laboratory Hall.
Laboratory Hall
Laboratory Hall Screenshot.
Click the large generator on the back wall to zoom in.
Use the WRENCH to remove the four bolts and lift the broken case from the generator.
The GENERATOR BOLTS will be added to your inventory.
Go back to the Main Room.
Main Room
Main Room Screenshot.
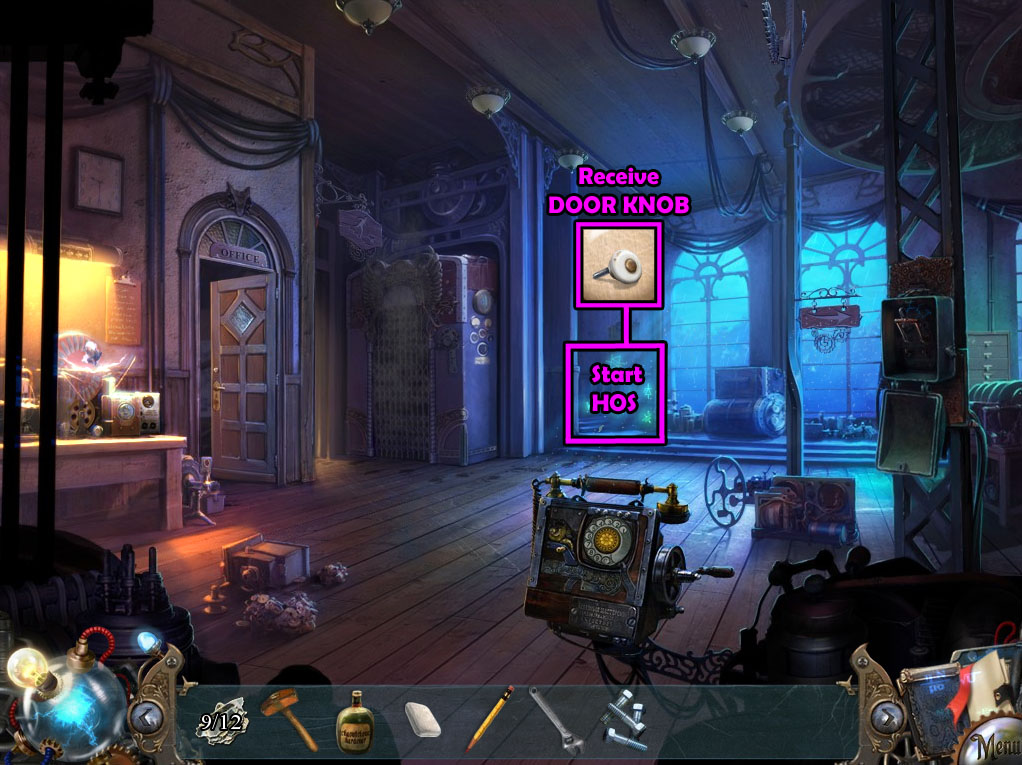
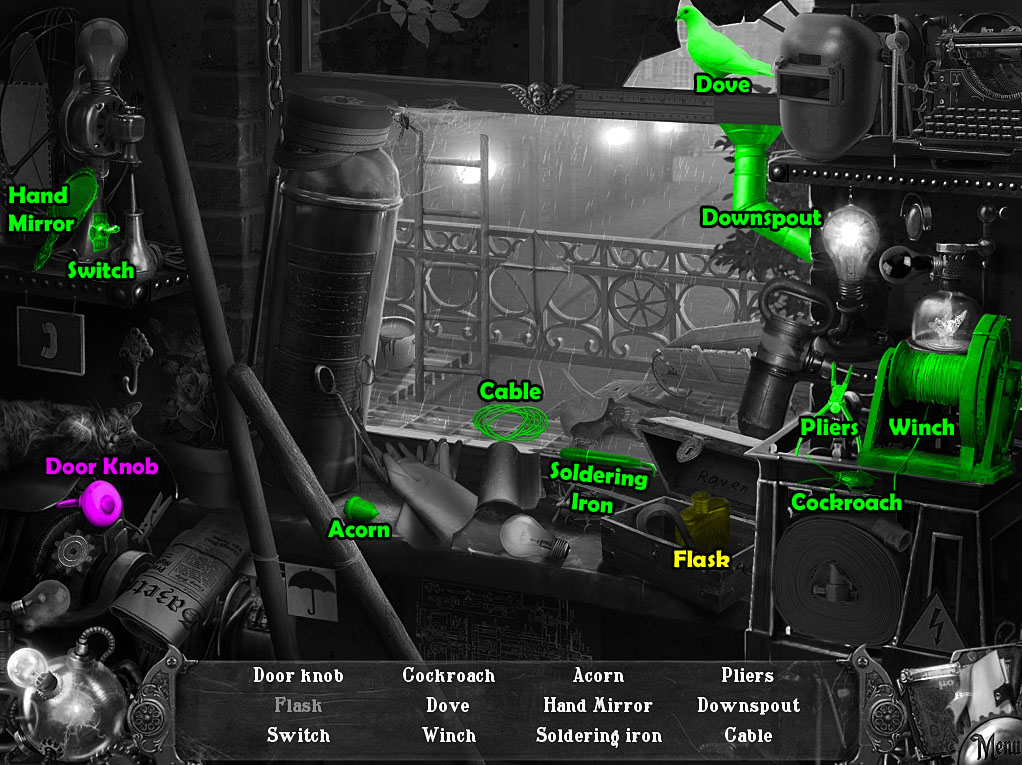
Click the area beside the left window at the back wall to start the hidden object scene.
Open the small chest to find the Flask.
Screenshot.
Once the hidden object scene is complete, you will receive the DOOR KNOB.
Walk left to the Back Door.
Back Door
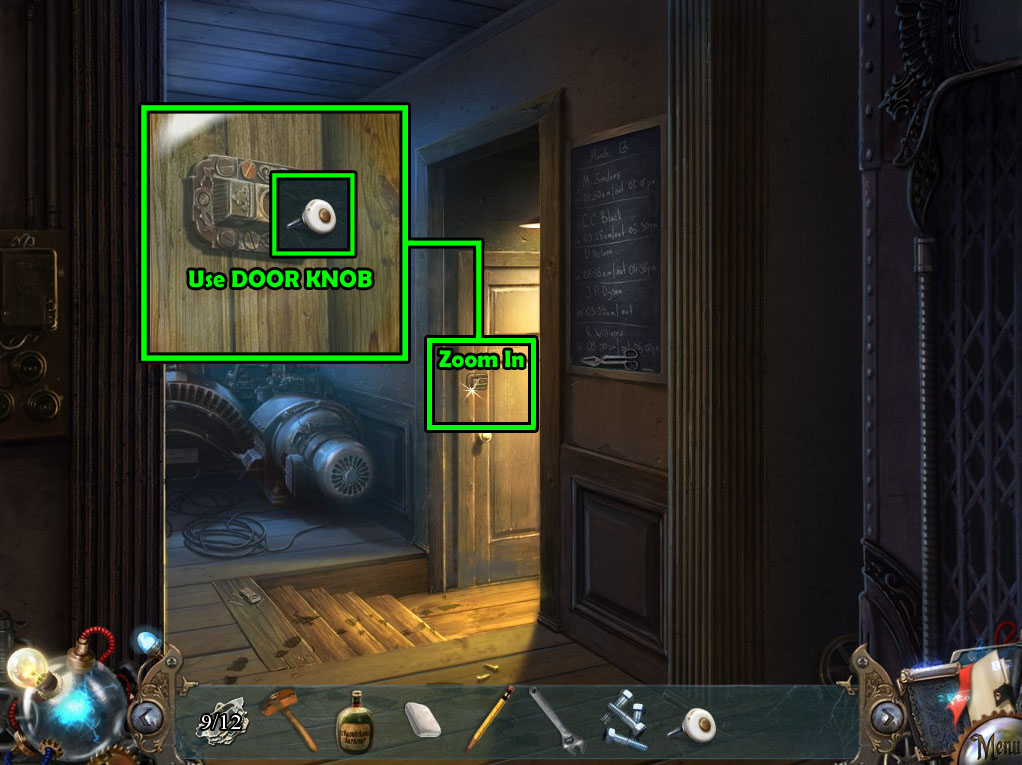
Back Door Screenshot.
Click the latch on the door for a closer look.
Add the DOOR KNOB (from the Main Room hidden object scene) to the latch.
Slide the knob to open the door.
Go forward through the door to the Basement.
Basement
Basement Screenshot.
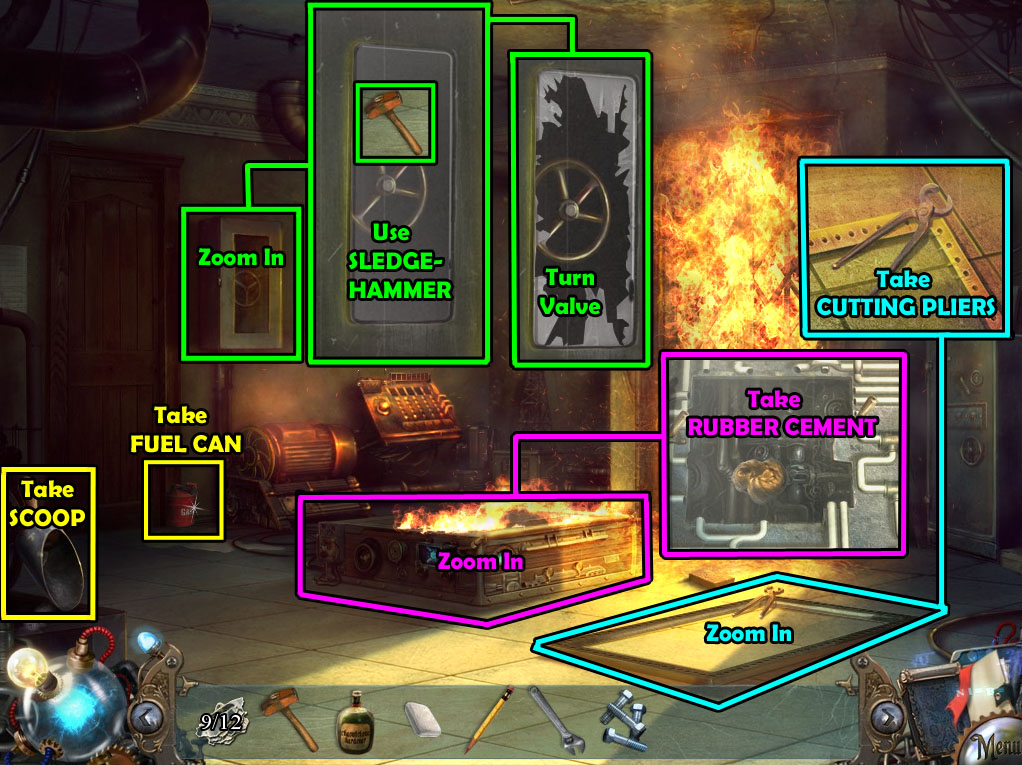
Take the SCOOP on top of the counter at the lower left corner of the room.
Pick up the CAN OF FUEL on the floor at the bottom of the door.
Click the emergency case on the wall for a close-up view.
Use the SLEDGEHAMMER (from the floor at the Laboratory Wall) to smash the glass.
Turn the valve to start the water sprinklers.
Open the hatch in the floor to look inside.
Take the RUBBER CEMENT in the space at the upper left side of the circuit board.
Click the metal frame on the ground to zoom in and take the CUTTING PLIERS.
Return to the Laboratory Hall.
Laboratory Hall
Laboratory Hall Screenshot.
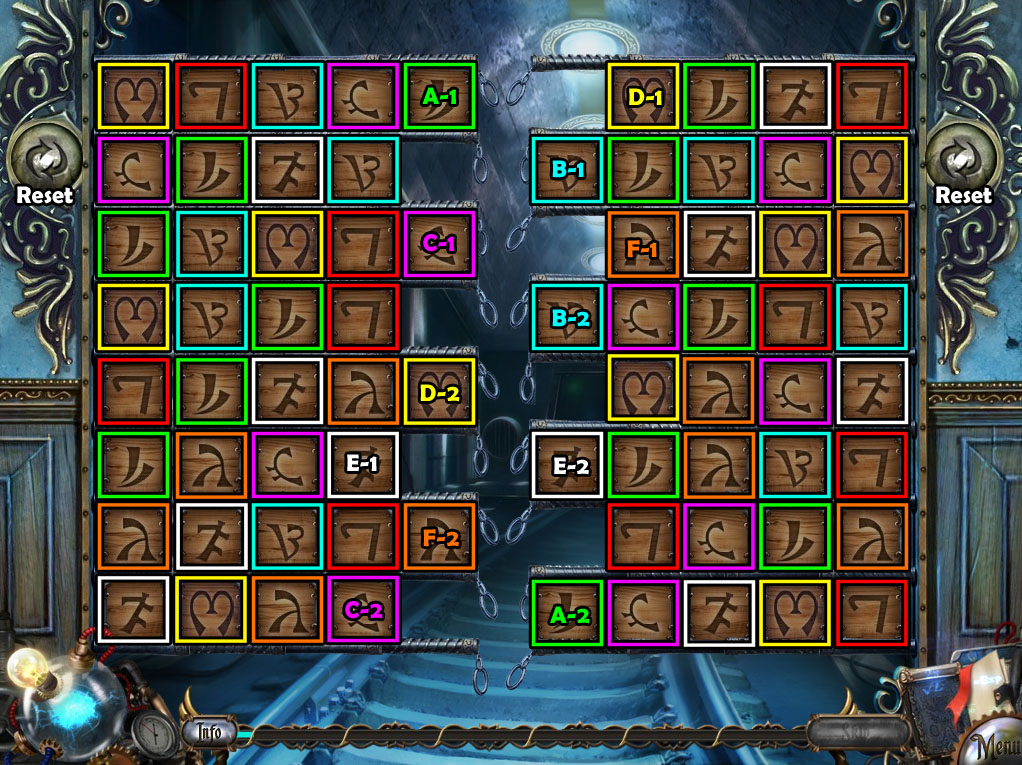
Click the left gate for a closer look.
Use the CUTTING PLIERS (from the metal frame on the floor of the Bsaement) to cut through the chain and start the puzzle.
Pair the matching symbols on the blocks at the end of each row.
Remove all of the blocks to complete the puzzle.
Click an open block to select it, then click another open block to pair the two, which will cause the next block in the row to move to the end.
If you get stuck, press the reset button at the upper left or upper right to start the puzzle from the beginning.
Example.
After the puzzle is solved, continue down the stairs to the Assembly Room.
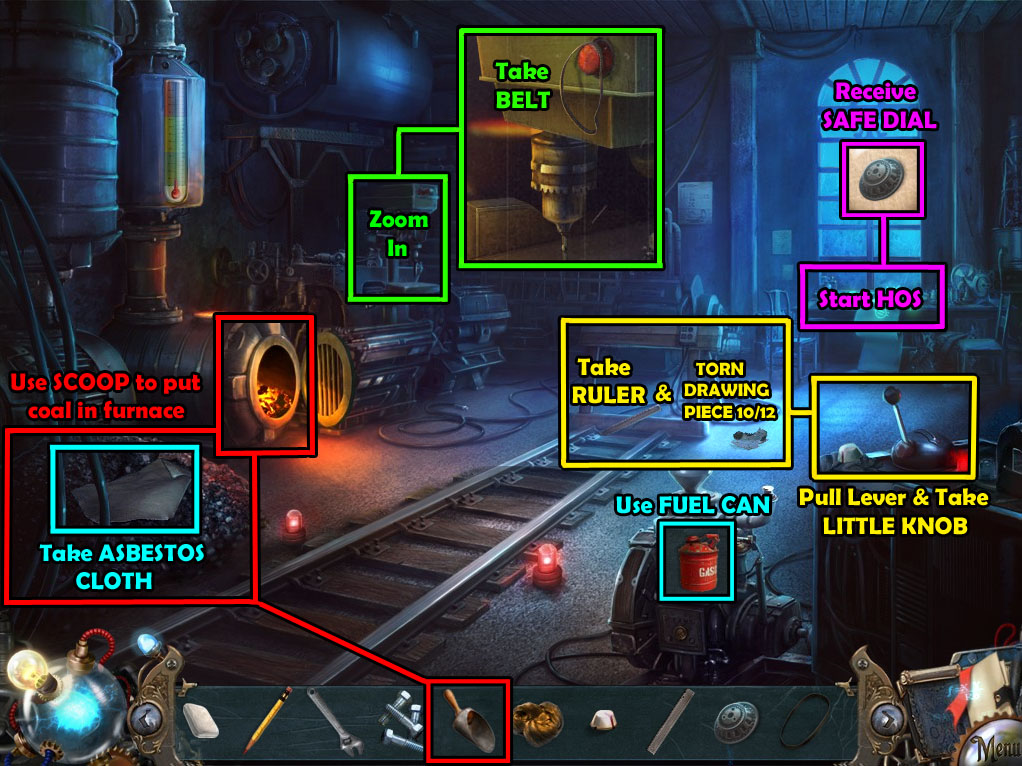
Assembly Room
Assembly Room Screenshot.
Use the FUEL CAN (from the floor of the Basement) on the small generator at the lower right side of the room.
Pull the lever at the corner of the machinery on the lower right to send the cart down the track.
Take the LITTLE KNOB beside the lever.
Pick up the RULER left behind at the end of the track and the TORN DRAWING PIECE 10/12 on the floor to the right of the ruler.
Click the work table at the back of the room to start the hidden object scene.
Screenshot.
Once the hidden object scene is complete, you will receive the SAFE DIAL.
Click the drilling machine for a closer look.
Take the BELT wrapped around the red button at the top of the machine.
Take the ASBESTOS CLOTH on top of the pile of coal.
Open the door to the furnace.
Use the SCOOP (from the counter at the Basement) to shovel in three scoops of coal into the furnace.
Click the pile of coal for a close-up view.
Use the SCOOP a fourth time on the coal to make it a SCOOP WITH COAL and uncover the WOODEN BLOCK.
Put the final SCOOP WITH COAL into the furnace.
Go back to the Laboratory Hall.
Laboratory Hall
Click the control panel for a closer look.
Pull down the lever under Cart 1.
Push the left red button to move Cart 1 to the roadblock at the end of the track.
Pull down the lever under Cart 2.
Turn the dial to rotate the track to Cart 2.
Push the right red button once to move Cart 2 onto the middle of the track.
Turn the dial again to rotate the track back towards the generator.
Lift the lever under Cart 2 back up.
Push the right red button again to move it to the generator.
Click the cart in front of the generator to zoom in.
Attach the case on the cart to the generator.
Place the GENERATOR BOLTS (removed from the old generator case at the Laboratory Hall) in the sockets at the corners of the case.
Use the WRENCH to tighten the four bolts.
Go back twice to the Main Room.
Main Room
Inspect the electrified box on top of the table at the left side of the room.
Place the LITTLE KNOB (beside the machinery lever at the Assembly Room) on the On/Off switch.
Hit the switch to turn off the power.
Take the TORN DRAWING PIECE that falls to the bottom of the device.
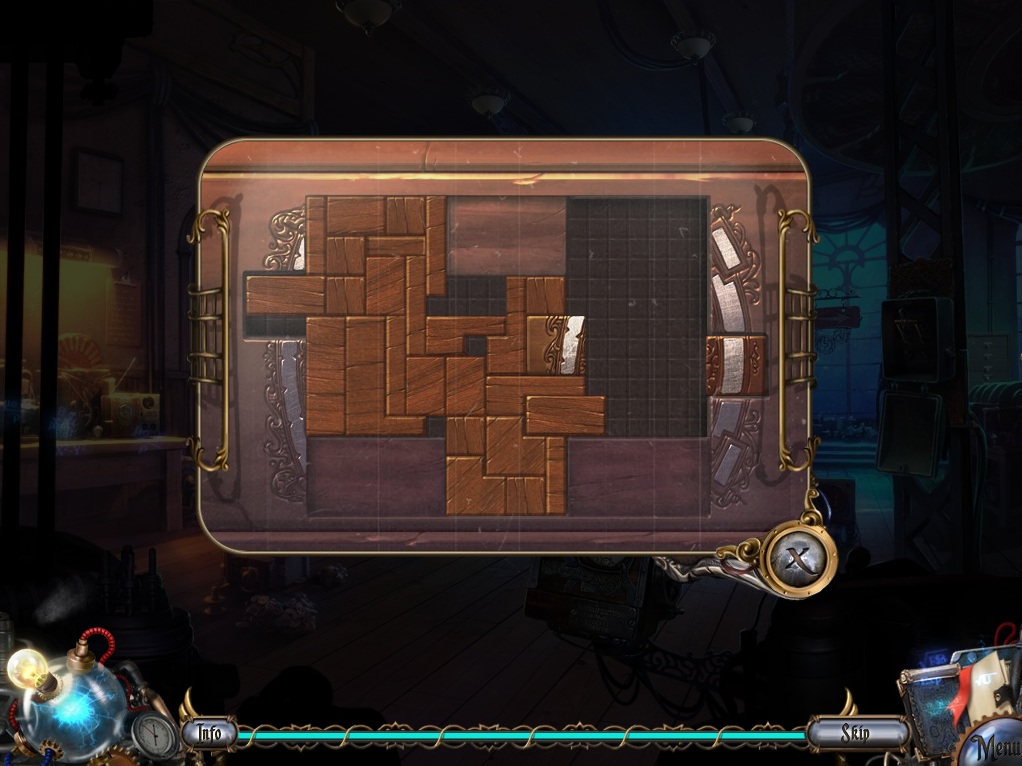
Add the WOODEN BLOCK (from the pile of coal at the Assembly Room) to the wood panel at the front of the device to start the puzzle.
Move the two patterned blocks into the spaces at the opposite sides of the board.
Arrange the smaller wooden pieces to allow the blocks to move from one side to the other.
Click and drag a wooden block to move it across the board, then release it to set it in place.
A block can only be places where there is empty space.
One method to solving this puzzle is to completely clear out each side of the board one at a time.
Solution Part 1.
Solution Part 2.
After the puzzle is solved, take the CODE NOTE from the opened compartment at the bottom of the wood box.
Read the numbers written on the note: 3-3-2-7.
Click the window at the back of the room to repeat the hidden object scene.
Screenshot.
Once the hidden object scene is complete, you will receive the GEAR 1/3.
Return to the Basement.
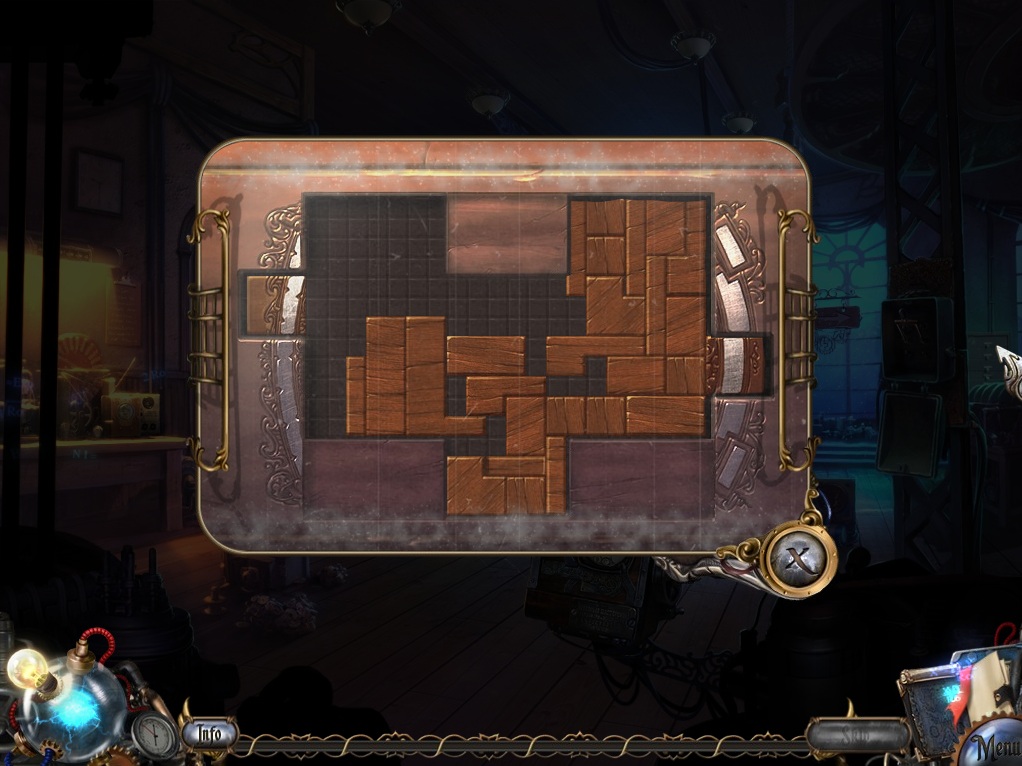
Basement
Click the safe in the rear right corner of the room for a close-up view.
Place the CODE NOTE (from the wood blocks puzzle at the Main Room) above the lock on the safe.
Add the SAFE DIAL (from the Assembly Room hidden object scene) to the middle of the left disc to start the puzzle.
Arrange the numbers on the three dials to enter in the combination shown on the CODE NOTE: 3 3 2 7.
Click and drag the dials to rotate them clockwise or counter clockwise.
Solution.
Take the TORN DRAWING PIECE 12/12 from the opened safe, as well as the CAPSULE WITH DOCUMENTS and the GEAR WITHOUT A HOLE.
Travel to Tesla's Office.
Tesla's Office
Use the RUBBER CEMENT (from the circuit board in the Basement) on the crack in the glass mail tube.
Add the RUBBER HARDENER (from the table in the Main Room) to the patch of rubber to seal the tube.
Put the CAPSULE WITH DOCUMENTS (from the opened safe in the Basement) into the pipe compartment.
Close the lid and pull the lever under the "Home" sign to deliver the capsule.
Place the 12 TORN DRAWING PIECES to the empty space on the drawing board to start the puzzle.
Arrange the fragments of the paper to complete the drawing.
Click and drag a piece of paper to move it across the board, then release the piece to set it down.
Right click a piece to rotate it 90 degrees clockwise.
If a fragment is correctly positioned, it will lock in place.
Solution.
After the puzzle is solved, add the RULER (from the floor behind the cart at the Assembly Room) to the drawing board.
Reopen the compartment in the mail tube to find a GEAR 2/3.
Return to the Assembly Room.
Assembly Room
Click the drill mechanism for a closer look.
Place the GEAR WITHOUT A HOLE onto the plate under the drill.
Press the red button to start the drill spinning.
Pull the lever at the side of the machine to drill a hole in the center of the gear.
Retrieve the GEAR 3/3 from the plate.
Click the table under the window at the back of the room to repeat the hidden object scene.
Screenshot.
Once the hidden object scene is complete, you will receive the PAPER GLUE.
Go back to Tesla's Office.
Tesla's Office
Use the PAPER GLUE (from the Assembly Room) on the drawing board.
Click the drawing board to start the hidden object scene.
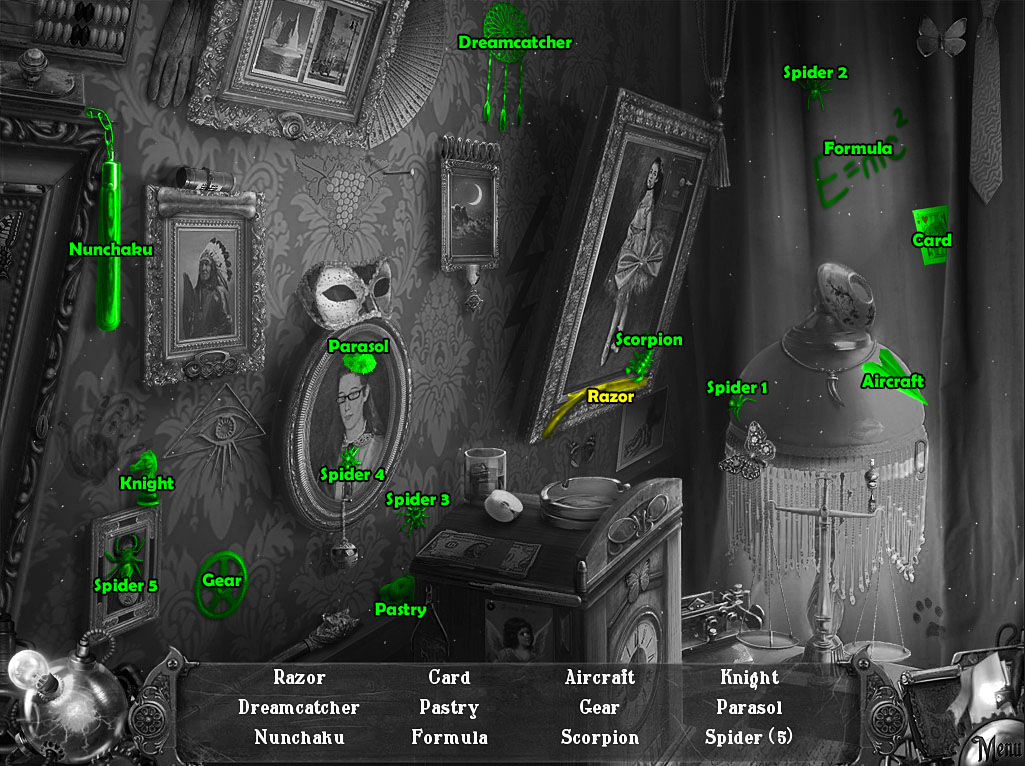
Find and erase the 12 doves in the drawing.
Screenshot.
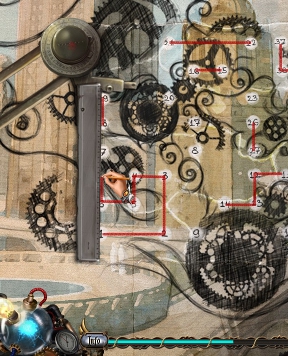
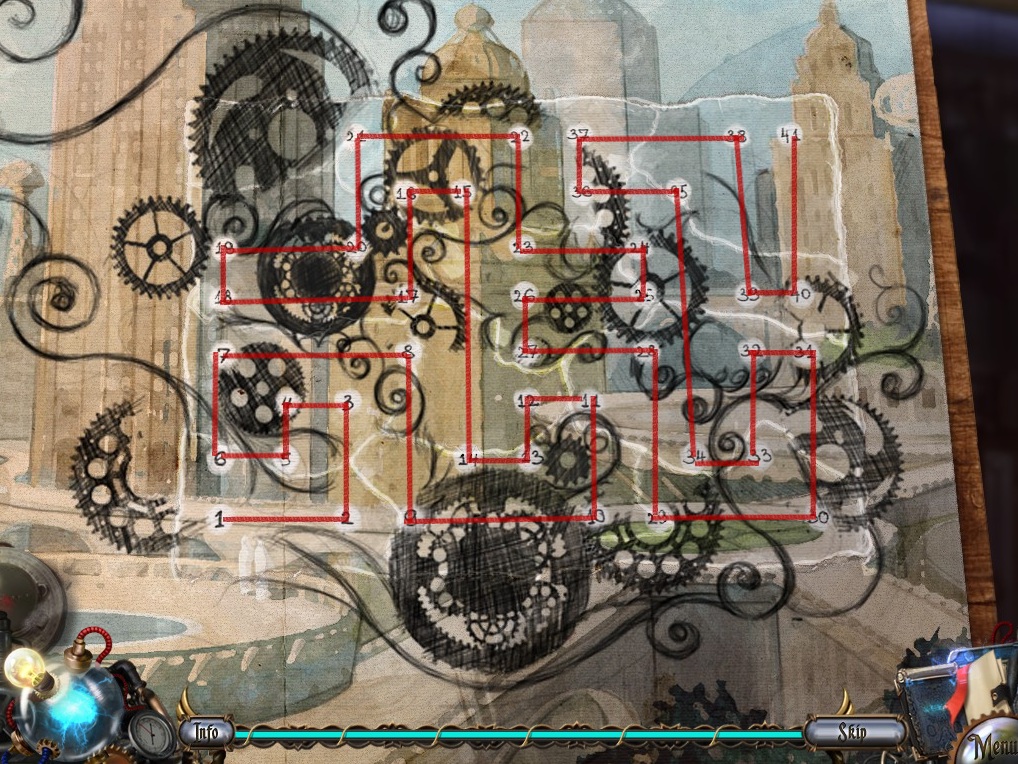
Use the SHARPENED PENCIL (from the desk in the office) on the drawing board to start the puzzle.
Draw a horizontal or vertical line to connect all of the points in numbered order.
Click and drag the device to move the ruler or rotate it up and down.
Some of the red lines are already drawn for you; start at point number 3 and draw a horizontal line to point number 4.
Align the cursor at the top of the ruler when it's positioned horizontally, then click and drag along the ruler to draw a straight red line between the two points.
Continue to follow the numbers and draw lines to connect every consecutive point.
Solution.
After the puzzle is solved, you'll receive the DRAWING.
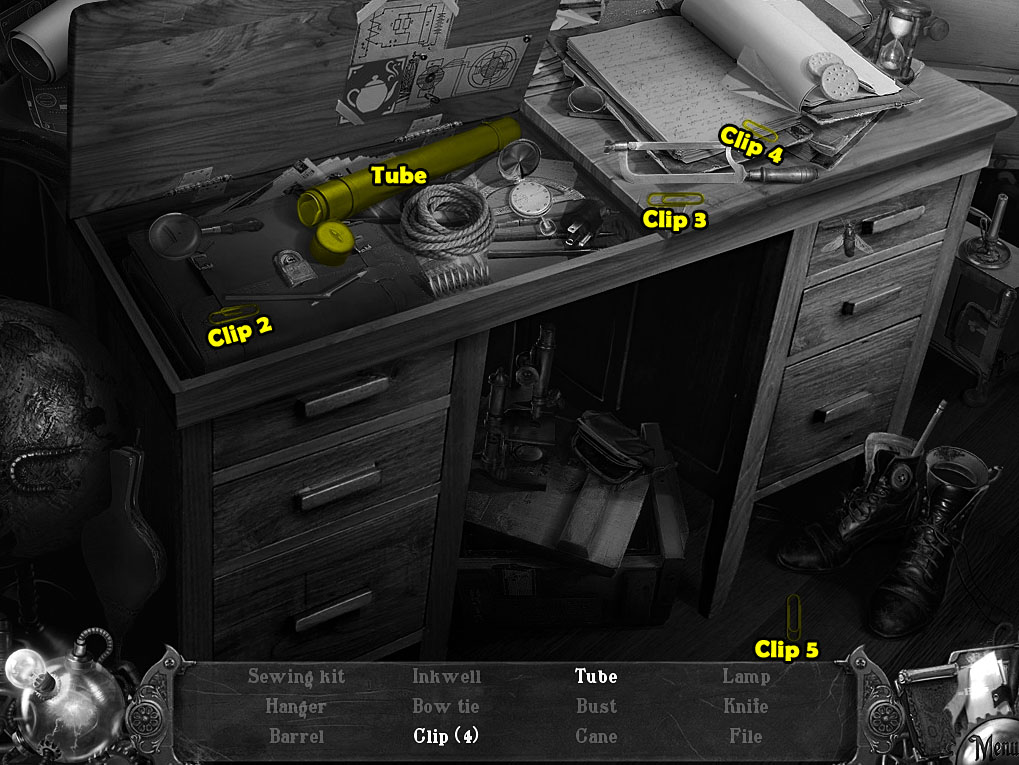
Click the desk on the left side of the room to repeat the hidden object scene.
Lift the panel on the desk to find the TUBE and the CLIP.
Screenshot Part 1.
Screenshot Part 2.
Once the hidden object scene is complete, you will receive the SEWING KIT.
Go to the Basement.
Basement
Click the metal frame on the floor to zoom in.
Place the ASBESTOS CLOTH (from the pile of coal in the Assembly Room) on top of the frame.
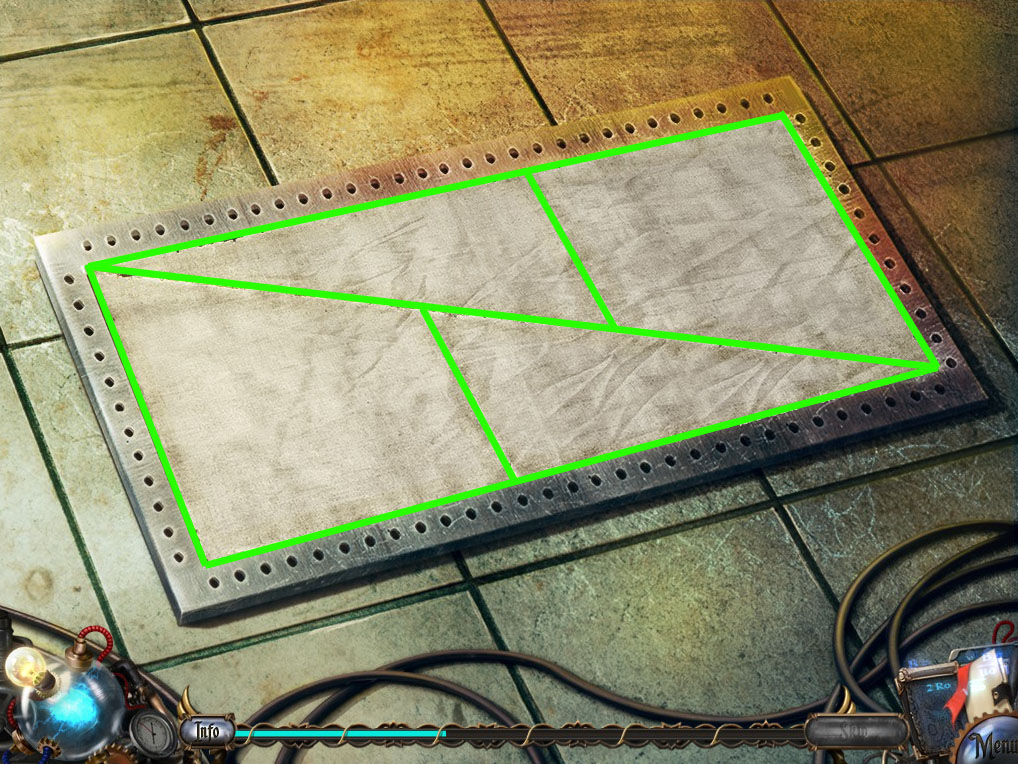
Use the SCISSORS (from the blackboard at the Back Door) to cut the cloth and start the puzzle.
Arrange the strips of cloth so that they all fit inside the frame.
Click and drag the fragments to move them around, or right click the pieces to rotate them.
When a piece is correctly positioned, it will lock in place.
Solution.
After the puzzle is solved, use the SEWING KIT (from the hidden object scene at Tesla's Office) to stitch all of the gaps in the cloth and then the edge of the cloth around the frame.
Click the sewn frame to place it as a barrier between the equipment and the flames.
Go back out to the Main Room and answer the ringing telephone, then continue to the Control Room.
Control Room
Click the left side of the control panel to look over edge.
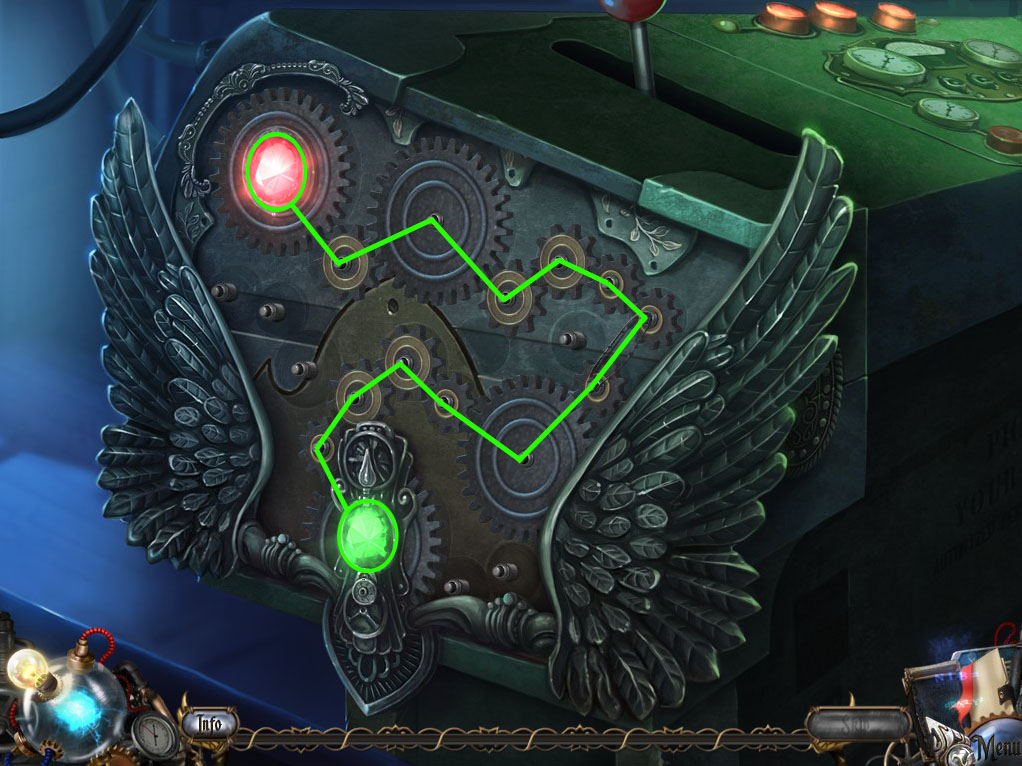
Add the three GEARS and the BELT (from the drill machine at the Assembly Room) to the mechanism to start the puzzle.
Arrange the gears so that they rotate the mechanism with the green gem at the bottom.
Click a gear to select it, then click one of the empty sockets to place it.
Start at the large rotating gear with the red gem at the upper left.
From that point, if adjacent gears fit together, they will both begin to rotate.
Solution.
After the puzzle is solved, pull the lever on the control panel to open the circuit board.
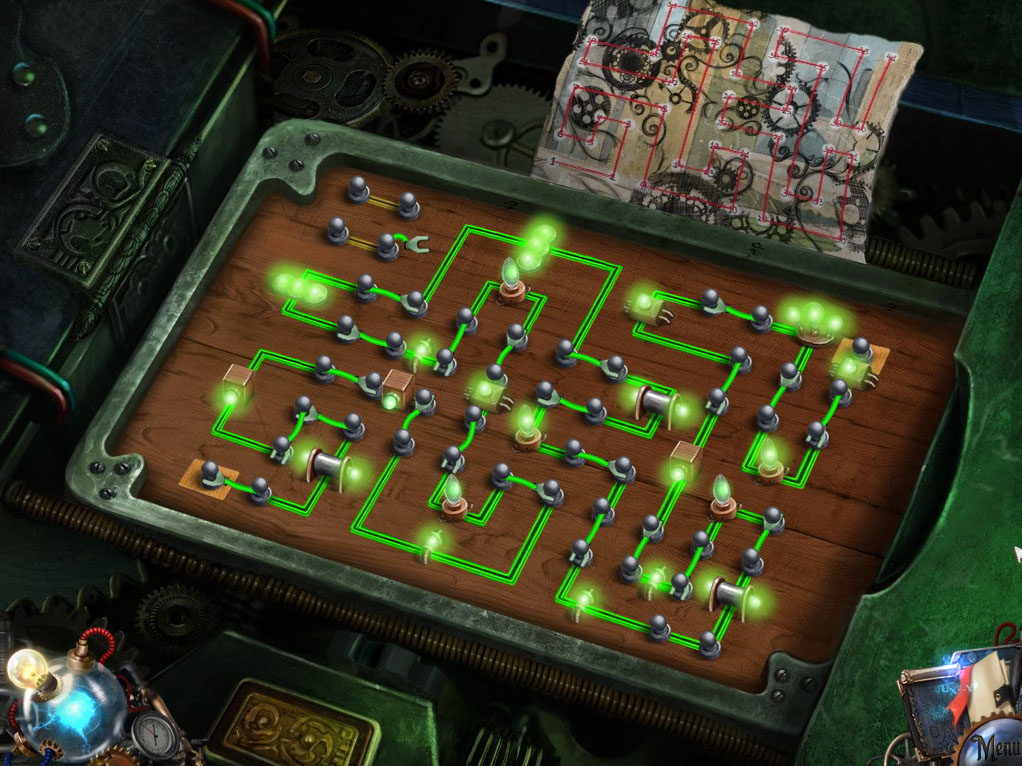
Add the DRAWING (from the drawing board puzzle in Tesla's Office) to the circuit board to start the next puzzle.
Connect the wires to the bolts to create a path that matches the red lines on the blue prints.
Click and drag a wire to move it, then release it over a bolt to attach it.
If a circuit is completed, the light bulb will change from red to green.
Just because the light is green does not mean the path has been made correctly: refer to the drawing at the top of the circuit board to see a diagram of the correct pattern.
Solution.
Once the puzzle is solved, take the charged 2ND CIRCUIT BOARD above the panel.
Return to the Basement.
Basement
Inspect the inside of the equipment in the metal case on the floor.
Add the 2ND CIRCUIT BOARD (from the circuit board puzzle at the Control Room) to the empty space at the upper left.
Press the red button to start the next puzzle.
Just like the previous similar puzzle, you must flip the switches to direct the color through the pipes from the tubes at the bottom to the tanks at the top to light the symbols with the correct colors.
When pipes with two different primary colors cross, their colors will combine to create a new secondary color.
Remember that red and blue make purple, yellow and red make orange, and blue and yellow make green.
Solution.
Go through the blue portal door to travel to the Abandoned Basement.
Posted by: Trinn |
June 15, 2012 7:14 PM
|
June 15, 2012 7:14 PM
Tesla's Tower: The Wardenclyffe Mystery
Chapters 3-4
Chapter 3
Abandoned Basement
Read the paper on the left wall.
Inspect the time machine under the paper, then press the red button to test it.
Now you must search for five foils and an item associated with the correct date.
Continue through the left door to the Basement Laundry Room.
Basement Laundry Room
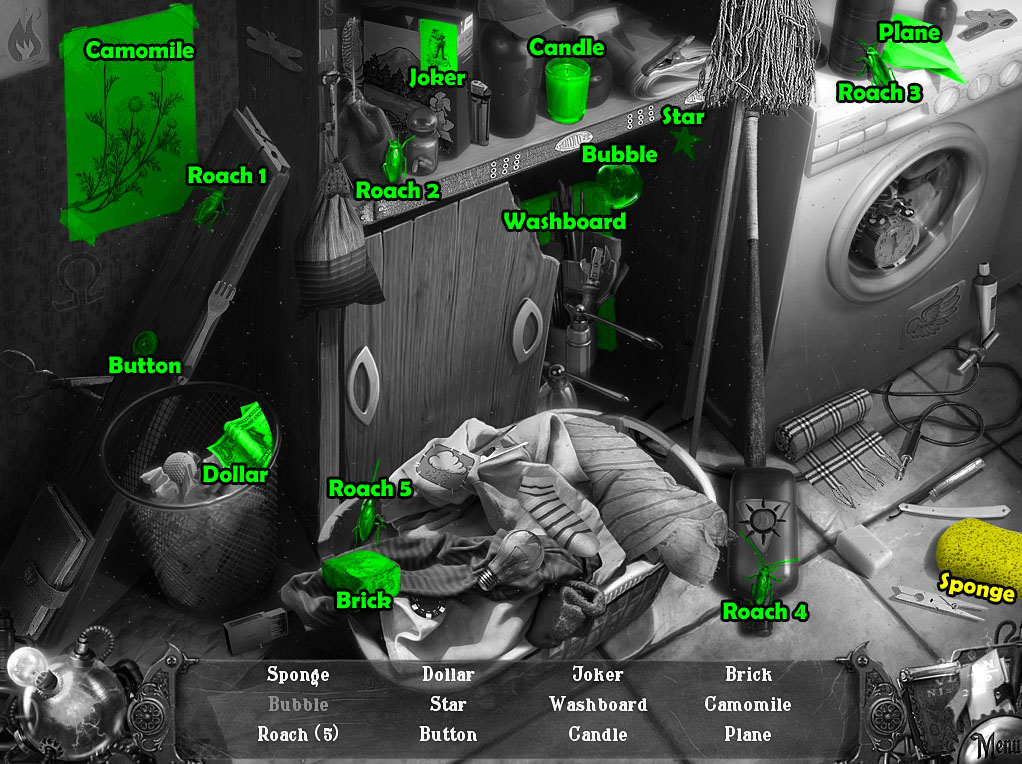
Click the laundry basket to start the hidden object scene.
Slide the door to the left to reveal the Bubble in the cabinet.
Screenshot.
Once the hidden object scene is complete, you will receive the SPONGE.
Inspect the top of the washing machine.
Take the DRAWER KEY at the lower right corner of the cover.
Go up the stairs to the Apartment Lobby.
Apartment Lobby
Place the overturned bucket on the floor upright to the right of the door.
Use the SPONGE (from the Basement Laundry Room hidden object scene) to soak up the five puddles of water.
Click each puddle twice while equipping the sponge to remove the puddle completely, then empty the sponge in the bucket.
Pick up the BUCKET WITH WATER after the floor is cleared.
Look inside the umbrella stand to the left of the door.
Remove the newspaper to find the ORANGE FOIL PACK.
Inspect the newspaper framed on the wall above the reception desk.
Note the date of Tesla's death: March 3, 1943.
Read the New Yorker brochure to add the map to your journal.
Take the YELLOW FOIL PACK behind the broken glass.
Watch the broadcast on the television, then pick up the BLUE FOIL PACK on the counter in front of the T.V.
Lift the counter at the side of the reception desk, then open the small door and inspect the tie rack.
Use the DRAWER KEY (from the washing machine at the Basement Laundry Room) to open the small locked drawer under the left shelf.
Turn the key and take the PURPLE FOIL PACK from the opened drawer.
Click the glass dome on top of the counter for a closer look.
Lift the dome and pick up the SIGNET RING from the display.
Go back to the Basement Laundry Room.
Basement Laundry Room
Click the washing machine to zoom in.
Pour the BUCKET WITH WATER (from the wet floor of the Apartment Lobby) into the machine.
Once the water level is increased, take the floating RED FOIL PACK.
Go back again to the Abandoned Basement.
Abandoned Basement
Click the time machine for a close-up view.
Place the SIGNET RING (from the glass display case in the Apartment Lobby) in the upper left slot under the arrow.
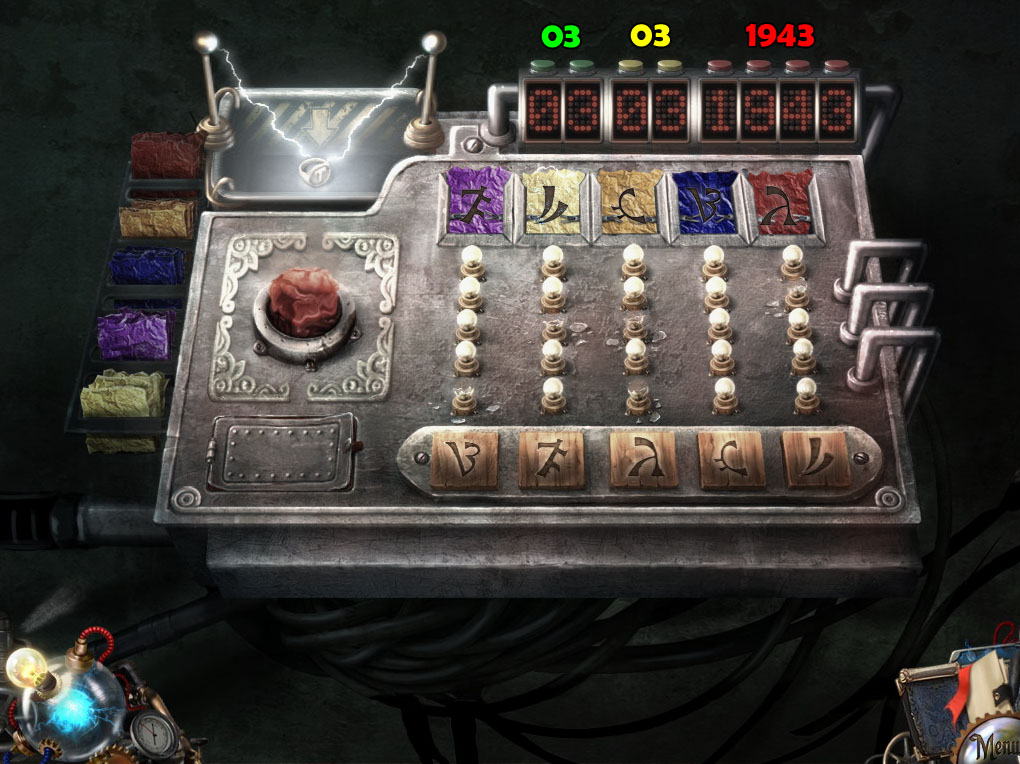
Put the ORANGE, YELLOW, BLUE, PURPLE, and RED FOIL PACKS in the holder at the left side of the machine to start the puzzle.
Press the buttons at the top to set the date, then arrange the colored foil pieces in the correct order.
Press the buttons to enter the date from the newspaper in the Apartment Lobby March 3, 1943 numerically: 03-03-1943.
Place the foils and press the red button five times to test each foil piece: incorrectly placed pieces will be burned and destroyed one at a time.
Solution.
After the puzzle is solved, you will receive the HOTEL ADDRESS PLATE.
Inspect the machinery inside the metal case on the floor.
Place the HOTEL ADDRESS PLATE in the space at the top.
Press the red button to start the next puzzle.
Just like the two previous similar puzzles, you must flip the switches to direct the color through the pipes from the tubes at the bottom to the tanks at the top to light the symbols with the correct colors.
When pipes with two different primary colors cross, their colors will combine to create a new secondary color.
Remember that red and blue make purple, yellow and red make orange, and blue and yellow make green.
Solution.
Go through the portal in the elevator door to travel to the Hotel Suite Parlor.
Hotel Suite Parlor
Take the TOWEL on top of the coffee table.
Inspect the end table under the telephone.
Take the DOOR KEY between the lamp and the paper.
Use the DOOR KEY to unlock the left door.
Click the telephone for a closer look.
Take the PEN on top of the receiver.
Open the middle door, then click the door for a close-up view.
After the cut scene, take the LIGHT BULB on the table blocking the doorway.
Click the desk for a closer look.
Take the EMPTY CUP to the left of the lamp.
Remove the lamp shade from the top of the lamp.
Replace the broken bulb with the LIGHT BULB from your inventory.
Put the lamp shade back over the bulb, then flip the light switch to turn on the light.
Click the portraits above the desk to start the hidden object scene.
Screenshot.
Once the hidden object scene is complete, you will receive the RAZOR.
Pick up the overturned STOOL on the floor.
Place the STOOL at the bottom of the red curtains, then click the curtains to zoom in.
Use the RAZOR to cut through the rings.
Pull back the cut drapes, then click the revealed window for a closer look.
Open the latch and continue out to the Suite Balcony.
Suite Balcony
Use the EMPTY CUP (from the desk in the Hotel Suite Parlor) on the flower pot to receive the CUP FILLED WITH WATER.
Click the dove to start the cut scene.
Pick up the PARAPET STONE that falls to the ground.
Inspect the doors at the end of the balcony.
Use the PARAPET STONE to break the glass.
Click the latch to open the window and continue forward to the Suite Bedroom.
Suite Bedroom
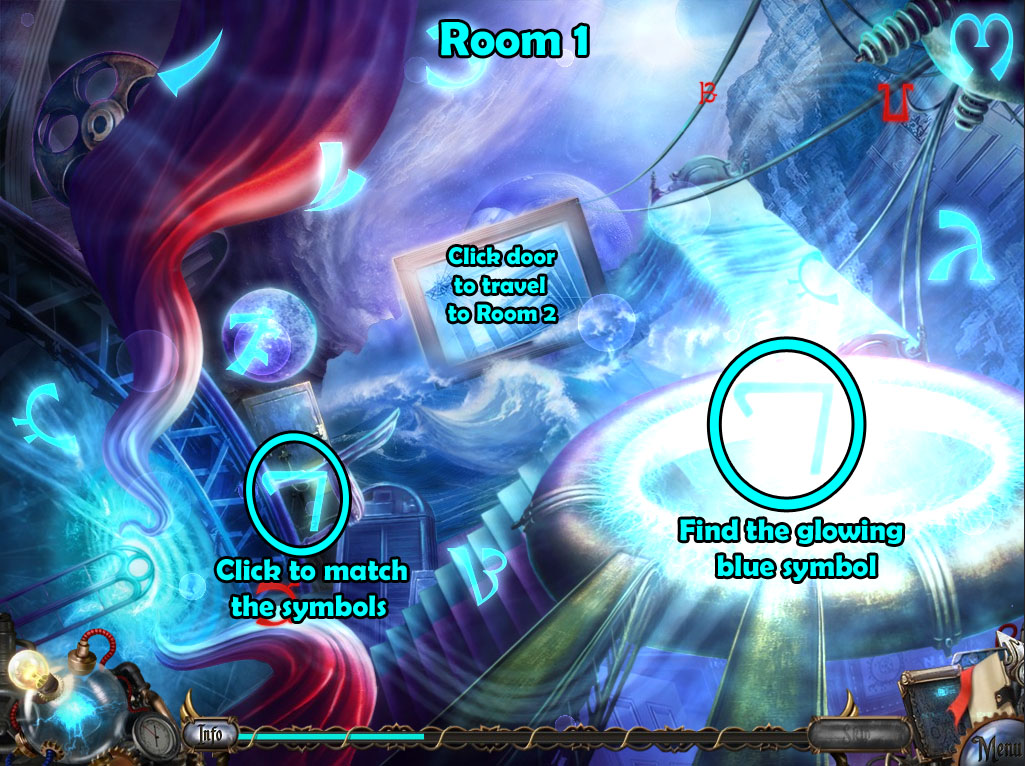
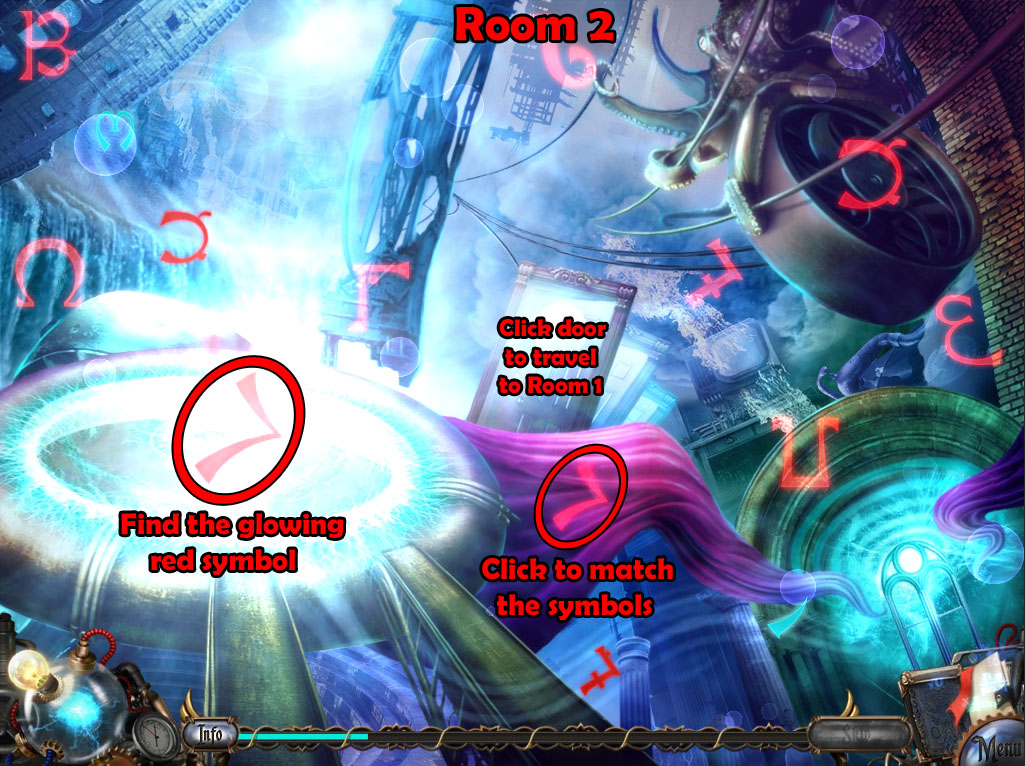
After the initial cinematic, you will be transported to a puzzle in the Ether.
To escape this area, you need to find the magic symbol that is highlighted over the vortex.
The symbols will constantly move until one stops above the vortex and begins to pulsate.
Click the matching symbol floating around the area to remove the pair until all of the symbols are eventually removed.
Only blue symbols are found in the first room where you begin; go through the door to enter the second room to find the red symbols.
Example 1.
Example 2.
After the puzzle is solved, you will be returned to the Suite Balcony room.
Click the red chair to move it to the left.
Now you can inspect the hat box at the top of the closet.
Use the RAZOR (from the Hotel Suite Parlor hidden object scene) to cut through the string around the box.
Take the CRUMBLED COOKIE and the X-RAY BULB inside the opened box.
Open the closet doors, then click it to look inside.
Take the two TOWELS on the shelf; they will combine with the first TOWEL (from the coffee table in the Hotel Suite Parlor) to make a rope of THREE TIED TOWELS.
Inspect the open window leading to the Hotel Neighboring Room.
Attach the THREE TIED TOWELS from your inventory to the broken rope at the lower left side of the window.
Click the towels to connect it with the hook beside the lamp.
Go across the repaired bridge to the Hotel Neighboring Room.
Hotel Neighboring Room
While at the view near the bottom of the bed, pick up the base of the STATUETTE on the carpet.
Pull out the suitcase from under the bed and lift the two latches at the side to unlock and open it.
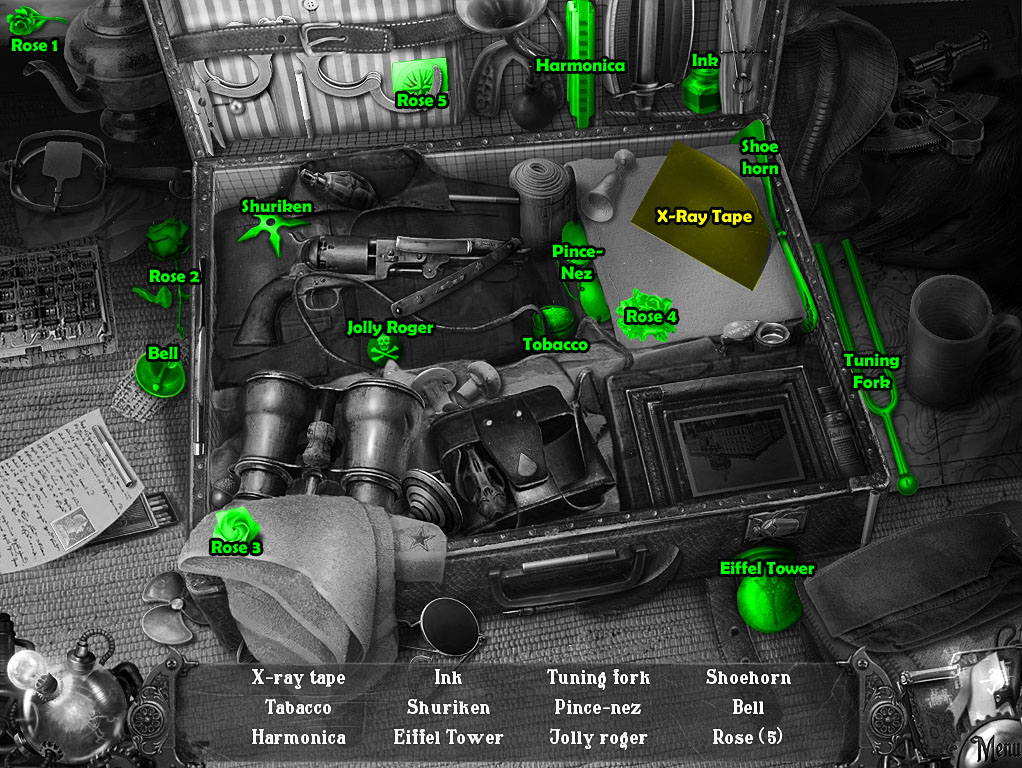
Click the opened suitcase to start the hidden object scene.
Screenshot.
Once the hidden object scene is complete, you will receive the X-RAY TAPE.
Go up to view the whole bedroom.
Move the left pillow on the bed to find the journal.
Open the journal, turn to the last page, and take the FAKE SAFE CODE.
Click the capsule on the bed to look inside.
Take the POSTAL STAMP in the tube.
Click the writing desk for a closer look.
Pick up the BURNING OIL LAMP on top of the music box.
Take the SEALING WAX just under the light.
Return to the Suite Balcony.
Suite Balcony
Click the bird house at the side of the building for a closer look.
Give the CRUMBLED COOKIE (from the hat box in the Suite Bedroom) to the bird.
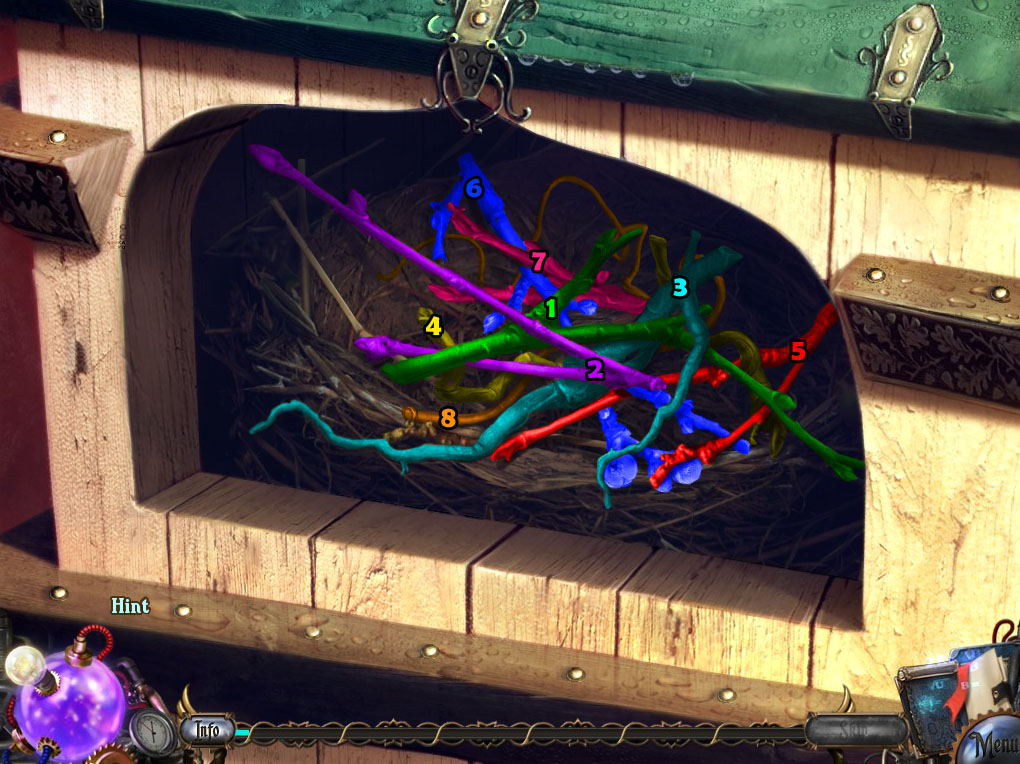
After the bird leaves, click the bird house again to start the puzzle.
Click the branches to remove them one at a time from the nest.
Only a free branch can be taken out; if the branch is obstructed it will only shake.
After all the branches are removed, take the STRING from the bottom of the nest.
Solution.
Go back to the Hotel Suite Parlor.
Hotel Suite Parlor
Inspect the loose floorboard above the folded corner of the carpet.
Place the STATUETTE (from the floor of the Hotel Neighboring Room) on the carved circle in the floor.
Take the LOCKER KEY between the springs under the board.
Click the brazier to look inside.
Pour the BURNING OIL LAMP (from the desk at the Hotel Neighboring Room) on the coals to heat up the fire.
Return to the Suite Bedroom.
Suite Bedroom
Click the open closet for a closer look.
Use the LOCKER KEY (from under the floor board in the Hotel Suite Parlor) on the intricate lock at the top of the case.
Turn the lock to open the case and reveal the x-ray machine.
Take the COIN on the surface of the machine.
Insert the X-RAY TAPE (from Hotel Neighboring Room hidden object scene) into the slot at the bottom of the machine.
Put the X-RAY BULB (from the hat box in the closet of the Suite Bedroom) into the lamp at the top.
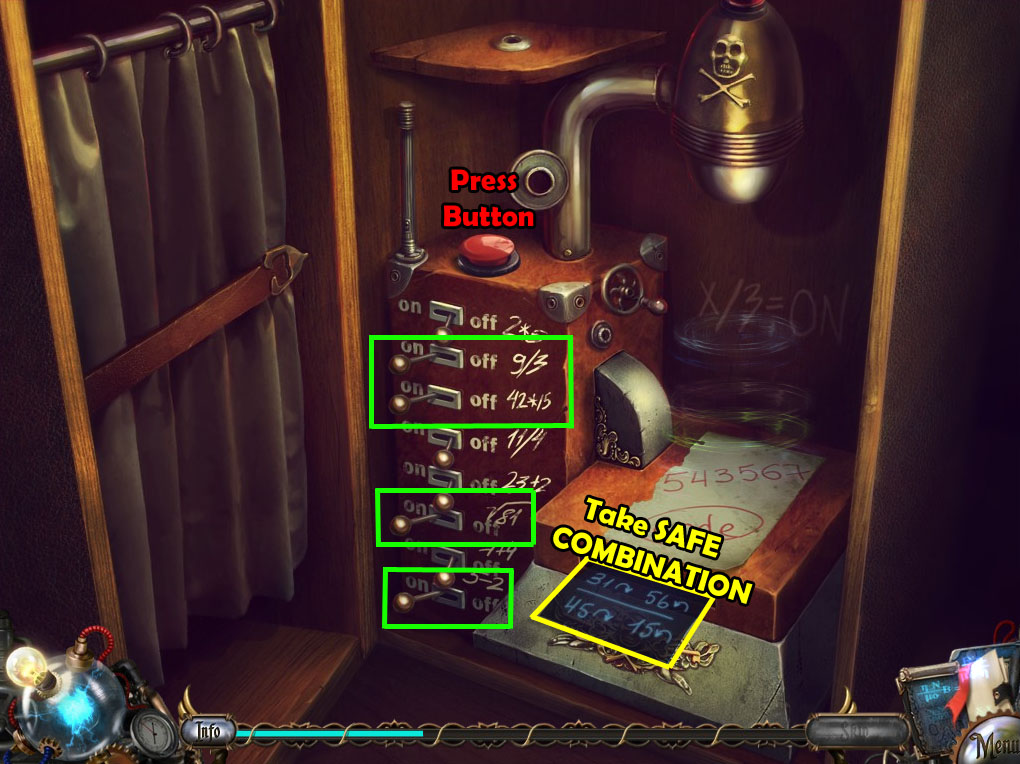
Place the FAKE SAFE CODE (from the journal on the bed in the Hotel Neighboring Room) onto the surface under the lamp to start the puzzle.
Turn all of the correct switches that are multiples of 3 ON, and switch the others OFF.
Solve the equations next to each lever to determine whether or not the number is a multiple of 3; if it is, turn the switch ON.
2*5 = 10, OFF.
9/3 = 3, ON.
42*15 = 630, ON.
11/4 = 2.75, OFF.
23+2 = 25, OFF.
√81 = 9, ON.
7+4 = 11, OFF.
5-2 = 3, ON.
Press the red button to enter your solution, then take the SAFE COMBINATION that is ejected from the slot.
Solution.
Click the large safe for a closer look.
Place the SAFE COMBINATION above the lock to start the minigame.
Enter the combination by turning the dial on the lock to open the safe.
Click and drag the dial to rotate it, then release it to stop it at a number.
First turn the dial clockwise to 31 (A), then counter-clockwise to 56 (B); next turn it clockwise to 45 (C), and finally counter-clockwise to 15 (D).
Solution.
After the puzzle is solved, take the THIRD ETHER CHARGED CIRCUIT from the opened safe.
Inspect the telephone power box on the floor by the foot of the bed.
Attach the loose wires to the two right bolts.
Go through the window to travel to the Hotel Neighboring Room.
Hotel Neighboring Room
Click the open suitcase on the floor to repeat the hidden object scene.
Screenshot.
Once the hidden object scene is complete, you will receive the BOX OF MATCHES.
Click the desk at the back of the room for a close-up view.
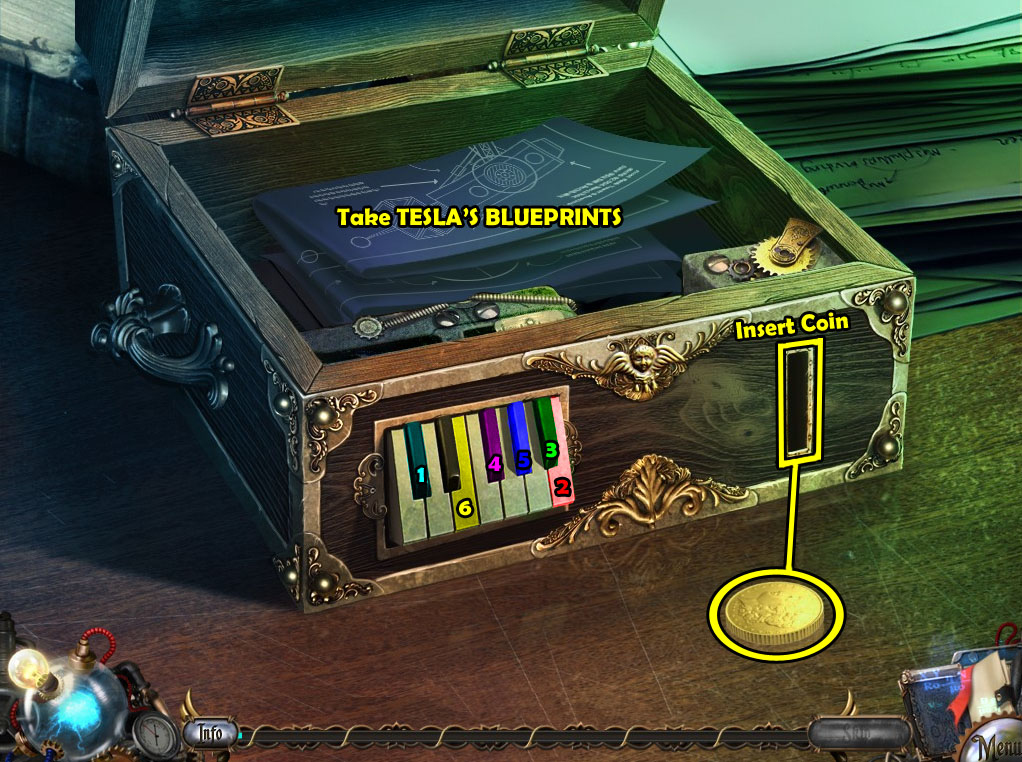
Insert the COIN (from the x-ray machine at the Suite Bedroom) into the slot in the music box to start the puzzle.
Listen and watch the six notes that are played on the keyboard, then press the keys to repeat them in the same order.
The correct order of the notes is: C♯(1) - B(2) - B♭(3) - F♯(4) - A♭(5) - E(6).
Solution.
After the puzzle is solved, take TESLA'S BLUEPRINTS from the opened compartment at the top of the music box.
Go back to the Hotel Suite Parlor.
Hotel Suite Parlor
Click the burning brazier to look inside.
Put TESLA'S BLUEPRINTS (from the music box puzzle at the Hotel Neighboring Room) into the fire.
Pour the CUP FILLED WITH WATER (from the flower pot at Suite Balcony) on the fire to douse the flames.
Take the SIGNET RING on top of the pile of ashes.
Inspect the end table under the telephone.
Use the BOX OF MATCHES (from the Hotel Neighboring Room hidden object scene) to light the lamp.
Place the THIRD ETHER CHARGED CIRCUIT (from the safe puzzle at the Suite Bedroom) on the paper and click the paper to fold the package.
Tie the STRING (from the nest puzzle at the Suite Balcony) around the wrapped package.
Use the SEALING WAX (from the desk at the Hotel Neighboring Room) on the lamp's flame to melt the end, then use the HOT SEALING WAX where the strings cross on the package.
Press the SIGNET RING into the wax to make a seal.
Add the POSTAL STAMP (from the capsule tube at the Hotel Neighboring Room) to the corner of the package.
Use the PEN (from the telephone at the Hotel Suite Parlor) to write the address on the package.
Pick up the MAIL PACKAGE to add it to your inventory.
Click the opened left door to look in the side room.
Place the MAIL PACKAGE into the mailbox.
Inspect the telephone and attempt to use it to find the line is dead.
Click the framed pictures on the wall above the table to repeat the hidden object scene.
Screenshot.
Once the hidden object scene is complete, you will receive the TRANSFORMER.
Return to the Suite Bedroom.
Suite Bedroom
Click the power box on the floor for a closer look.
Place the TRANSFORMER in the socket at the center of the box.
Double check that the two right wires are connected to the bolts.
Go back to the Hotel Suite Parlor.
Hotel Suite Parlor
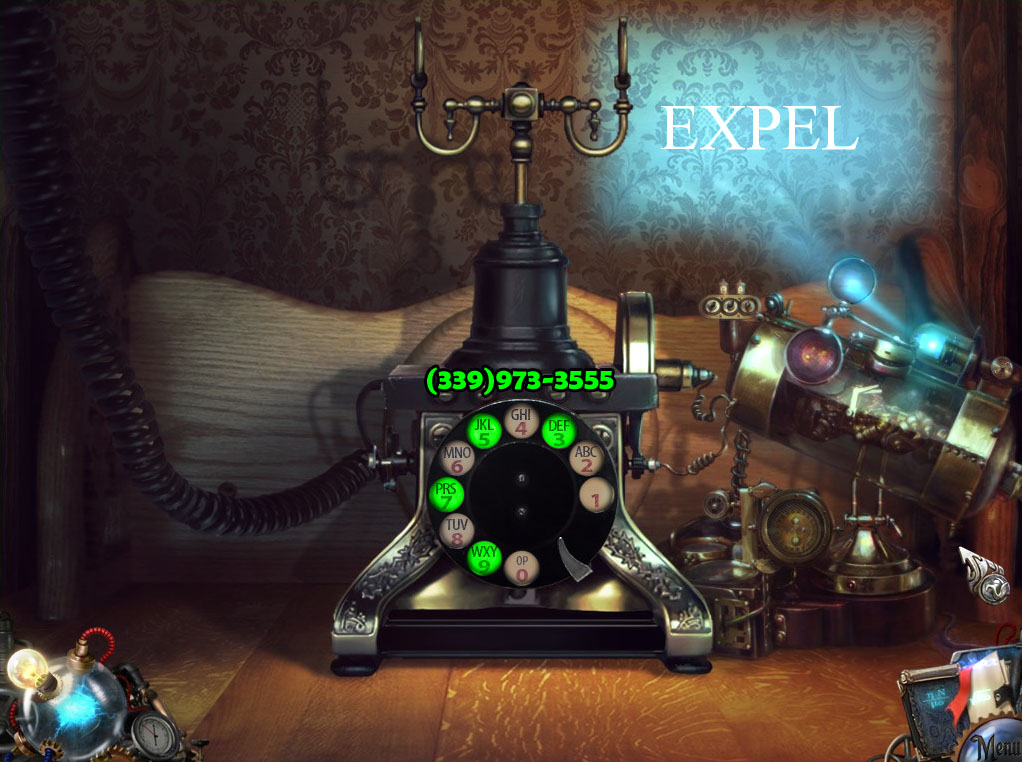
Click the telephone for a close-up view.
Lift the receiver to start the puzzle.
Dial the numbers on the telephone to write out the word "EXPEL" from the projector.
Click at the space on the dial for the number you want to select, then drag it to the stop past number 1 and release the dial to enter in a number.
Tap the switch at the top of the phone if you want to reset the number.
Above each number on the dial are a few letters; to dial the second or third letter, simply enter that number two or three times.
The final order is: 3-3-9-9-7-3-3-5-5-5, or as a 10 digit telephone number (339)973-3555.
Solution.
After the puzzle is solved, go through the portal in the left doorway to travel to the Abandoned Basement.
Chapter 4
Abandoned Basement
Click the metal case on the floor for a closer look.
Lift the two metal switches at the top and bottom of the old circuit board to remove it.
Move forward twice to enter the Apartment Lobby.
Apartment Lobby
Click the open mailbox to look inside.
Take the ARCHIVE PASS on top of the package.
Open the package to find the THIRD ETHER CHARGED CIRCUIT.
Go out the door to the Street, then continue forward twice to Tesla's Exhibition.
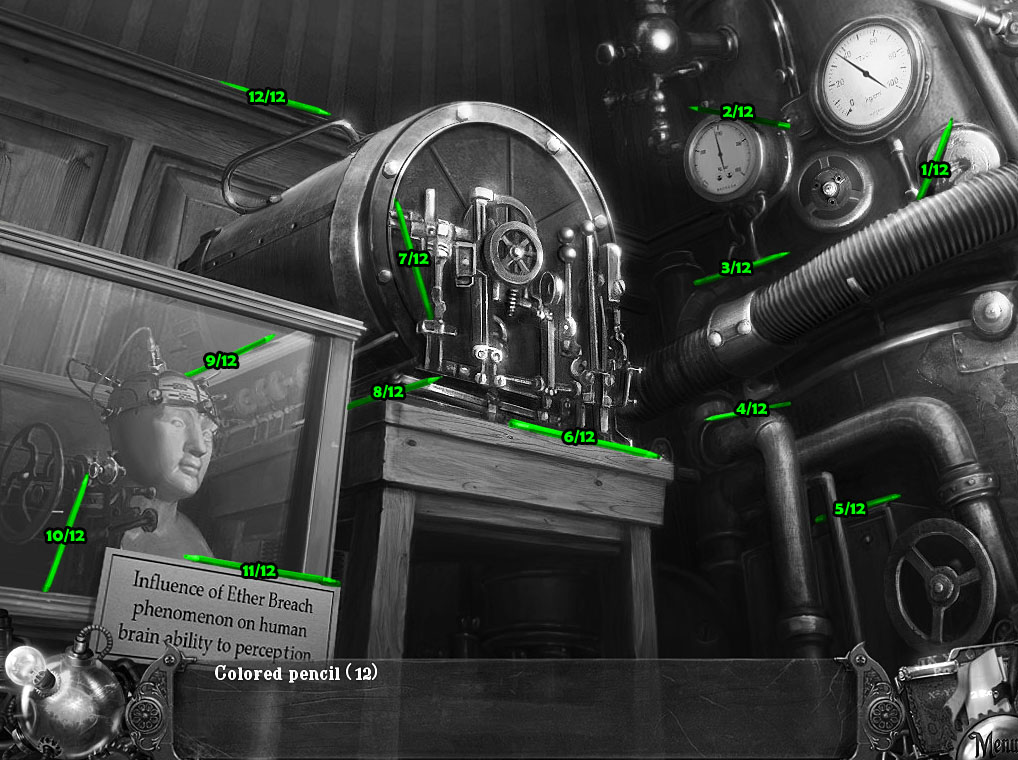
Tesla Exhibition
Click the generator at the back of the room to start the hidden object scene.
Find the 12 colored pencils hidden around the area.
Screenshot.
Once the hidden object scene is complete, the COLORED PENCILS will be added to your inventory.
Back out to the Archive Hall.
Archive Hall
Use the ARCHIVE PASS (from the mailbox in the Apartment Lobby) to unlock the gate at the bottom of the stairs.
Go up the stairs to the archives.
Click the shelves in the middle of the left bookcase for a closer look.
Open the green book on the far right side of the lower shelf to read it.
Tear off the corner of the left page to find the STENCIL, then close the book.
Next, open the red book on the left side of the upper shelf.
Use the STENCIL on the symbols drawn on the pages to start the puzzle.
Find the five symbols on the page that align perfectly with the holes in the stencil.
Click the stencil to lift it and use your cursor to move it around the pages, then click again to release the stencil.
Solution.
After the puzzle is solved, use the COLORED PENCILS (from the Tesla Exhbition Hidden Object Scene) to color the page under the stencil.
Remove the stencil and tear off the top of the page to receive the WARDENCLYFFE ADDRESS.
Return to the Abandoned Basement.
Abandoned Basement
Click the metal case on the floor for a closer look.
Place the THIRD ETHER CHARGED CIRCUIT (from the mailbox package in the Apartment Lobby) into the space on the panel.
Turn the latches at the top and bottom of the circuit to lock it in place.
Add the WARDENCLYFFE ADDRESS to the top of the panel.
Push the red button at the lower right to start the puzzle.
Again, you must flip the switches to direct the color through the pipes from the tubes at the bottom to the tanks at the top to light the symbols with the correct colors.
Each symbols respective color is shown in the torn drawing at the top of the puzzle, so the tanks in order of left to right are: Green, Red, Yellow, Blue, Orange.
When pipes with two different primary colors cross, their colors will combine to create a new secondary color.
Remember that red and blue make purple, yellow and red make orange, and blue and yellow make green.
Solution.
After the puzzle is solved, go through the portal in the elevator to the Road.
Road
Take the ROPE tied around the sheet metal between the two pipes on the right.
Pick up the VALVE 1/5 on the ground in front of the dog.
Take the CROWBAR leaning against the door to the telephone booth.
Click the telephone booth to look inside.
Take the SMALL COIN 1/5 from the dispenser at the bottom of the telephone.
Pick up the Wardenclyffe map on the shelf under the telephone.
Take the FLAP on the directory, then exit the booth.
Use the FLAP to scare away the dog.
Inspect the dove on the ground to find that it's wounded.
Continue forward to the Wardenclyffe Tower Gates.
Wardenclyffe Tower Gates
Use the CROWBAR (from the telephone booth at the Road) to break the window above the left car door.
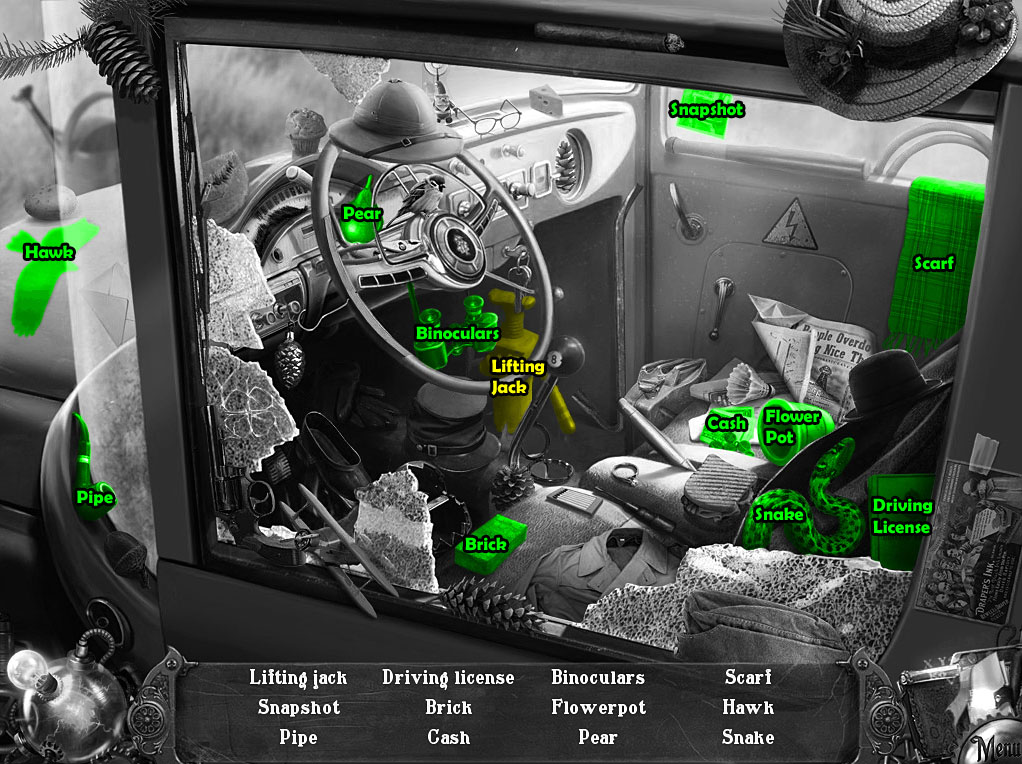
Click the open window to start the hidden object scene.
Screenshot.
Once the hidden object scene is complete, you will receive the LIFTING JACK.
Place the LIFTING JACK under the car, then click it three times to raise the car and take the LADDER.
Click the puddle in the ground to zoom in.
Remove the large board on the right to reveal the HATCH PART 1/7.
Click the junk floating in the water to take it out, revealing the VALVE 2/5 at the bottom of the water.
Take the RAKE between the handles of the gate.
Open the gate and continue forward to the Tower Front Yard.
Tower Front Yard
Take the NUMBER PLATE 1 hanging from the string on the utility pole.
Click the large gear stuck in the ground on the left to zoom in.
Use the CROWBAR (from the telephone booth at the Road) to pull the gear out of the ground and reveal the VALVE 3/5.
Continue right to the Tower Backyard.
Tower Backyard
Take the SPADE leaning against the tree.
Pull out the VALVE 4/5 from the hollow at the top of the tree.
Click the hatch under the pile of leaves on the right for a closer look.
Use the RAKE (from the gate at the Wardenclyffe Tower Gates) three times to remove all the leaves.
Open the hatch and take the HAMMER at the top of the stairs.
Inspect the pile of dirt in front of the left bush.
Use the SPADE to dig up the dirt and reveal the HATCH PART 2/7.
Place the LADDER (from under the car at the Wardenclyffe Tower Gates) against the wall under the top window.
Use the HAMMER to break the glass, then go through the window to the Wardenclyffe Laboratory.
Wardenclyffe Laboratory
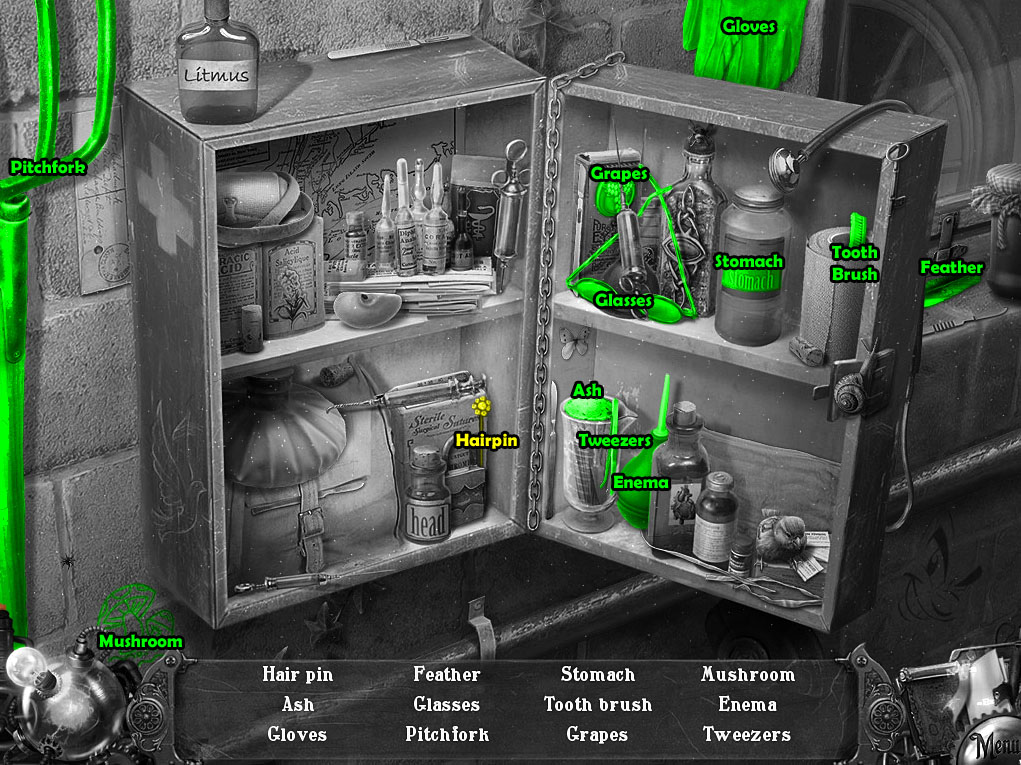
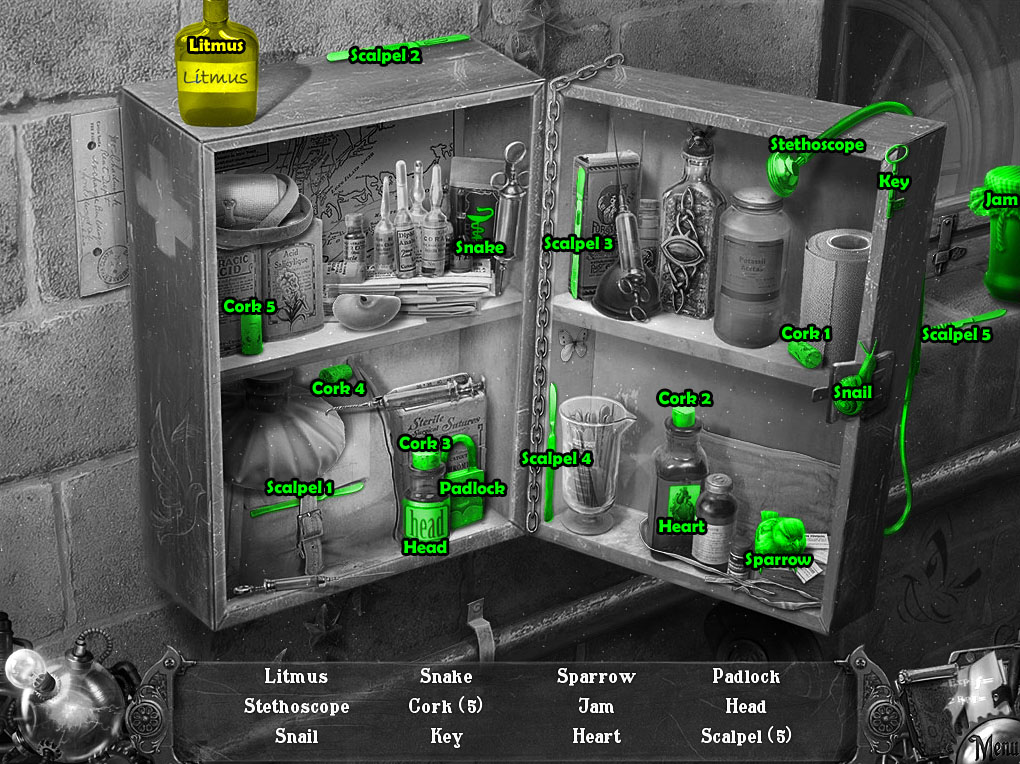
Open the first aid box on the right wall, then click the open box to start the hidden object scene.
Screenshot.
After the hidden object scene is complete, you will receive the HAIRPIN.
Click the machinery beside the barred door on the left to zoom in.
Take the VALVE 5/5 and the HATCH PART 3/7 on the machine.
Take the POSTER on the wall to the left of the barred door.
Click the right door for a closer look.
Pick up the SMALL COIN 2/5 on the floor in front of the door.
Place the POSTER on the floor, then click it to slide it under the door.
Use the HAIRPIN to push the key out of the keyhole under the door handle.
Click the poster again to pull it back and take the LABORATORY KEY on top if it.
Use the LABORATORY KEY to unlock the door.
Continue right to the Tower Front Square.
Tower Front Square
Inspect the grate in the ground to the right of the electrified puddle.
Use the CROWBAR (from the telephone booth at the Road) to lift the hatch.
Take the NUMBER PLATE 2 from the underside of the removed hatch.
Tie the ROPE (from the scrap metal at the Road) to the gear stuck in the grate, then pull the rope and take the HATCH PART 4/7.
Move right to the Tower Back Square.
Tower Back Square
Click the bird bath to zoom in.
Take the SMALL COIN 3/5 at the left side of the bird bath.
Take the DOVE CAGE and the HATCH PART 5/7 that was underneath the cage.
Pick up the RUBBER TARPAULIN over the pile of rusted equipment.
Click the rear right transmitter for a close-up view.
Take the NUT to the right of the number plate space.
Take the bottle of RUST REMOVER behind the transmitter.
Go back to the Tower Front Square.
Tower Front Square
Place the RUBBER TARPAULIN (from the top of the junk pile at the Tower Back Square) over the electrified puddle.
Add the five VALVES from your inventory to the leaking pipes at the left side of the fence to start the puzzle.
Turn the valves in the correct order to close the leaking pipes.
Click the valve to turn it, which will also rotate the valve that matches in color.
Refer to the screenshot below for the following solution:
Click the green valve (A), the purple valve (B), the yellow valve (C) and then the red valve (D).
Solution.
After the puzzle is solved, go forward to the Shaft Entrance.
Shaft Entrance
Click the transmitter for a closer look.
Pick up the NUT 2/4 on the ground in front of the transmitter.
Take the WRENCH sticking out of the top of the transmitter.
Click the shaft to look down.
Take the SMALL COIN 4/5 at the corner of the top step.
Pick up the HACKSAW on top of the second to last step.
Go back to the Wardenclyffe Laboratory.
Wardenclyffe Laboratory
Inspect the rusted metal box on the wall to the left of the barred door.
Use the RUST REMOVER (from the transmitter at the Tower Back Square).
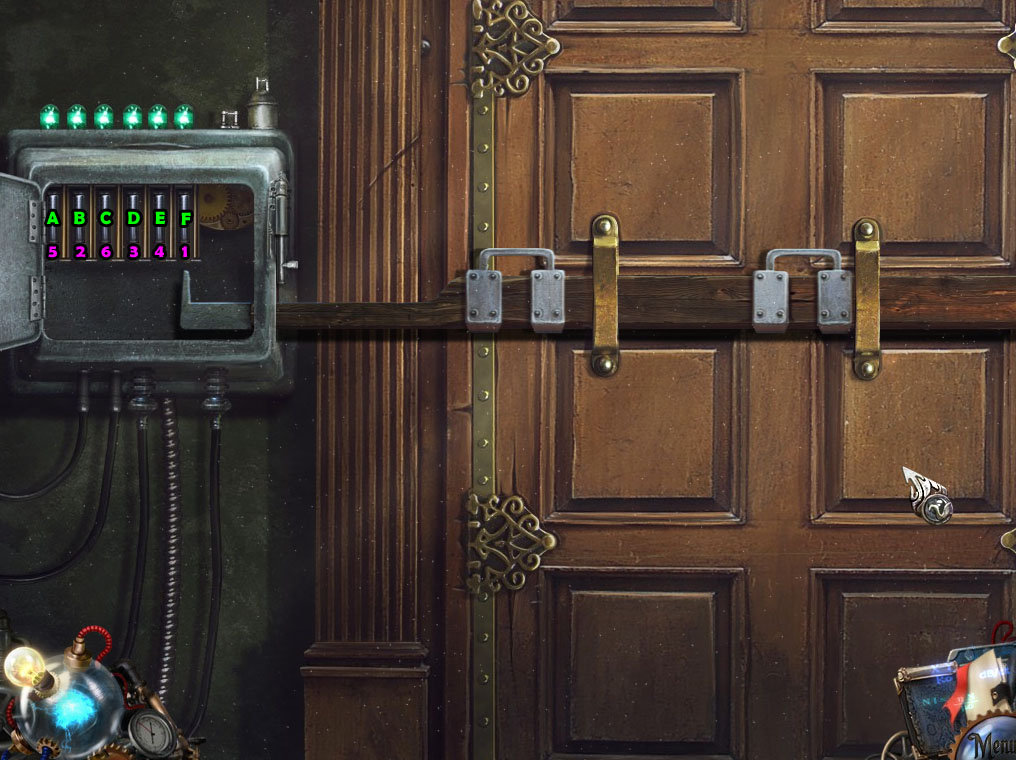
Open the door to the box to start the puzzle.
Lift the tumblers in the correct order to open the lock.
Click the bar with the pointed end to select it, then move the cursor left and right to shift the bar.
Move the cursor up to lift a pin; if it's lifed in the right order, it will lock in place.
If the incorrect pin is raised, all of the tumblers will reset.
Hit the pins in the following order:
F-B-D-E-A-C.
Solution.
After the puzzle is solved, go through the open door to the Tower Front Yard.
Tower Front Yard
Click the right dirt pile in front of the building to zoom in.
Use the SPADE (from the tree at the Tower Back Yard) to dig up the dirt and reveal the NUT 3/4.
Click the left right dirt pile next to the fence for a closer look.
Use the SPADE again to remove the dirt pile and find the SMALL COIN 5/5.
Go back to the Wardenclyffe Tower Gates.
Wardenclyffe Tower Gates
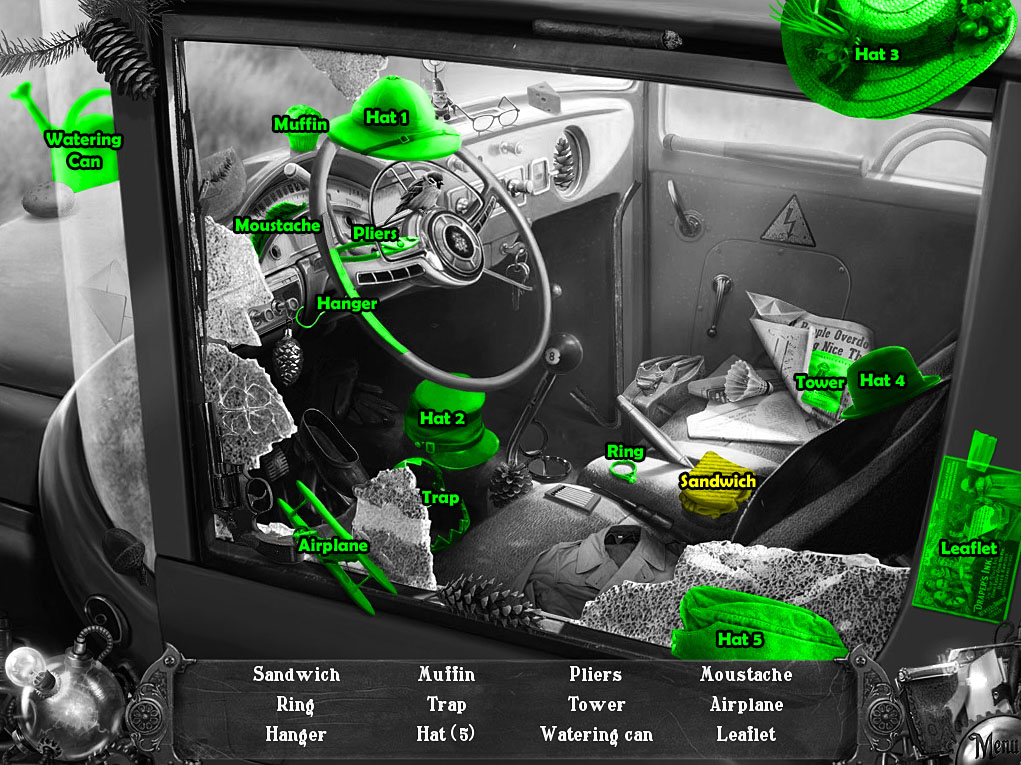
Click the broken car window to repeat the hidden object scene.
Screenshot.
Once the hidden object scene is complete, you will receive the SANDWICH.
Go back to the Road.
Road
Click the wounded dove in the middle of the road for a closer look.
Use the DOVE CAGE (from the bird fountain at the Tower Back Square) to start the puzzle.
Chase the dove into the cage by clapping around it to direct its movement.
Click one of the hexagonal spaces around the dove to clap there; the dove will move away from the direction of the clap.
Solution.
After the puzzle is solved, you will receive the CAGED DOVE.
Click the telephone booth to look inside.
Insert the five SMALL COINS from your inventory into the coin slot in the telephone to make a phone call.
Note Tesla's number in the directory and click the piece of paper to tear off the GENERATOR AREA CODE: 7539.
Use the WRENCH (from the transmitter at the Shaft Entrance) to remove the four BOLTS around the NUMBER PLATE on the wall of the telephone booth and add both items to your inventory.
Return to the Tower Backyard.
Tower Backyard
Click the LADDER leaning against the wall under the window to place it back in your inventory.
Go back once to the Tower Front Yard.
Tower Front Yard
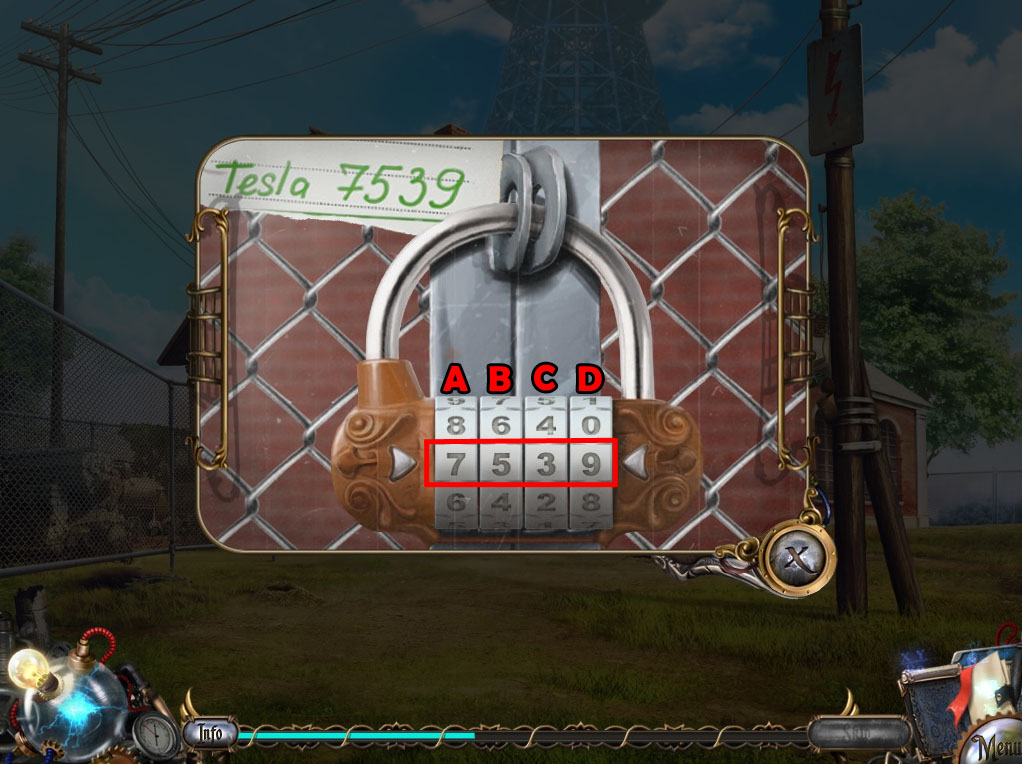
Click the locked section of the gate to start the minigame.
Turn the pieces of the lock to enter the GENERATOR AREA CODE from the telephone booth at the Road: 7539.
The easiest way to solve this puzzle is to simply set it from right to left:
Start by first setting piece D to 9, which rotates all the pieces A, B, C, and D.
Next, set the number at piece B to 5, which rotates pieces A, B, and C.
Then, set the number at piece C 3, which rotates pieces A and C.
Lastly, set the number at piece A to 7, which only rotates itself.
Solution.
After the puzzle is solved, go through the open gate to the Generator Area.
Generator Area
Give the SANDWICH (from the Wardenclyffe Tower Gates hidden object scene) to the starving dog.
Take the PART OF SCHEME taped to the brick wall.
Use the HAMMER (from the hatch at the Tower Backyard) to smash the loose bricks, revealing the HATCH PART 6/7.
Pick up the last HATCH PART 7/7 from the hole in the ground beside the right generator.
Place the LADDER (from the wall at the Tower Back Yard) up against the side of the utility pole.
Click the power box at the top of the pole for a closer look.
Take the last NUT 4/4 from the shelf inside the box.
Add the four NUTS and the four BOLTS from your inventory to the power box, then use the WRENCH (from the transmitter at the Shaft Entrance) to tighten them and start the puzzle.
Created a connected path with the wires from the top to the bottom without crossing over any of the other bolts.
Click a wire to select it, then click a bolt to attach it; if the path of the wire is over a bolt that it isn't connected to, the bolt will spark and you will not be able to place the wire.
An easy method to solve this puzzle is to start by attaching four lines to the bolts at the top, then create a path from there to the second beam from the bottom.
From there, just attach the four wires from the bottom up to the beam to connect at the same bolts with the wires from the top.
Solution.
Click the pile of dirt on the ground to zoom in.
Use the SPADE (from the tree at the Tower Back Yard) to dig up the dirt and uncover the COPPER WIRE REEL.
Go back to the Wardenclyffe Laboratory.
Wardenclyffe Laboratory
Click the first aid box on the wall to repeat the hidden object scene.
Screenshot.
Once the hidden object scene is complete, you will receive the LITMUS.
Move right twice to the Tower Back Square.
Tower Back Square
Click the nailed boards covering the hole in the fence to zoom in.
Use the HACKSAW (from the steps at the Shaft Entrance) to cut through the boards.
Remove the sawed boards and take the DEVICE PART lying in the grass.
Click the bird bath for a closer look.
Place the CAGED DOVE (from the puzzle at the Road) at the top of the bird bath.
Open the cage door and take the EMPTY SCHEME note that the dove drops into the left bowl.
Put the EMPTY SCHEME into the water, then add the LITMUS (from the Wardenclyffe Laboratory hidden object scene) to the wet paper.
Take the TRANSMITTER DIAGRAM note from the water.
Click the left transmitter to zoom in.
Place the NUMBER PLATE 2 (from the grate at the Tower Front Square) in the space at the bottom of the transmitter.
Refer to the TRANSMITTER DIAGRAM and turn the dial to set the mode to "3".
Use the COPPER WIRE WHEEL (from the dirt pile at the Generator Area) to repair the broken wire at the upper left side of the transmitter.
Click the right transmitter to zoom in.
Place the NUMBER PLATE 3 (from the telephone booth at the Road) in the space at the bottom of the transmitter.
Refer to the TRANSMITTER DIAGRAM and turn the dial to set the mode to "Tower".
Go back to the Shaft Entrance.
Shaft Entrance
Click the transmitter for a closer look.
Place the NUMBER PLATE 1 (from the utility pole at the Tower Front Yard) in the space at the middle of the transmitter.
Refer to the TRANSMITTER DIAGRAM and turn the dial to set the mode to "2".
Pull the lever at the bottom of the transmitter.
Click the shaft to look down into it.
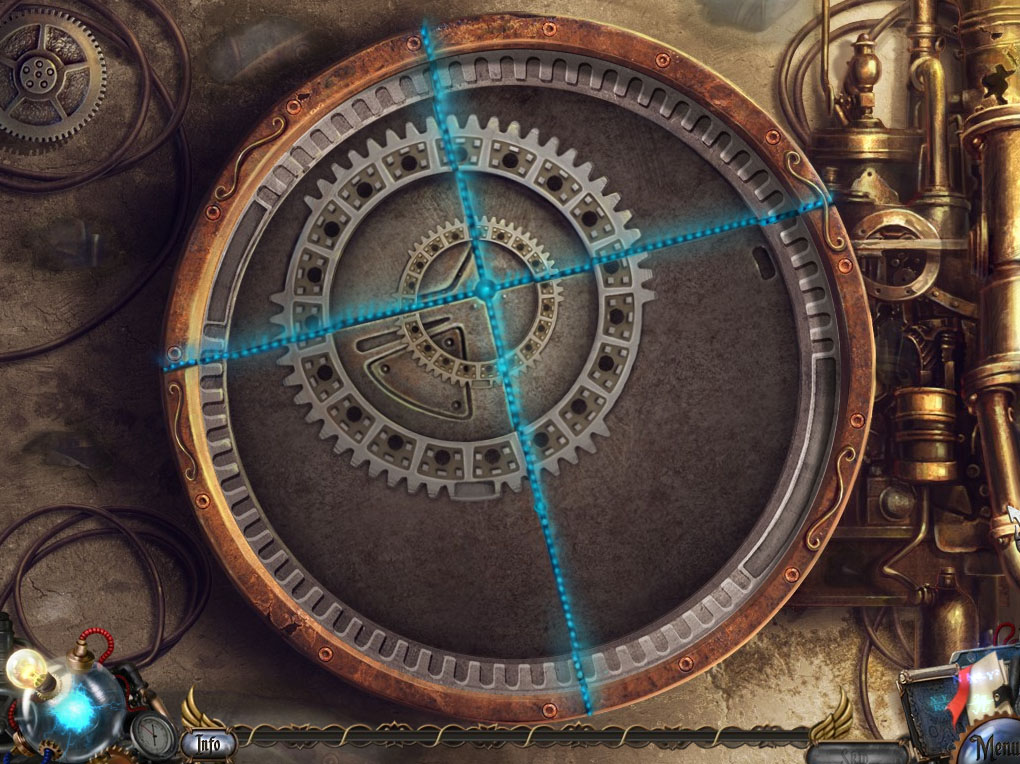
Add the seven HATCH PARTS from your inventory to the hatch at the bottom of the shaft to start the puzzle.
Rotate the discs to align all of the intersecting lines.
Click and drag a disc to rotate it clockwise or counter clockwise.
Start by aligning the outermost disc with the glowing blue lines in the outer metal frame.
When the lines are connected correctly, they will also start to glow blue.
Next, rotate the smallest, inner most disc to align both it and the middle disc.
Lastly, align the second smallest disc to complete the cross.
Solution.
After the puzzle is solved, go down into the Underground Shaft.
Underground Shaft
Add the PART OF SCHEME (from the brick wall at the Generator Area) to the torn half on the wall.
Click the scheme to view the instructions for operating the Ether reactor.
Screenshot.
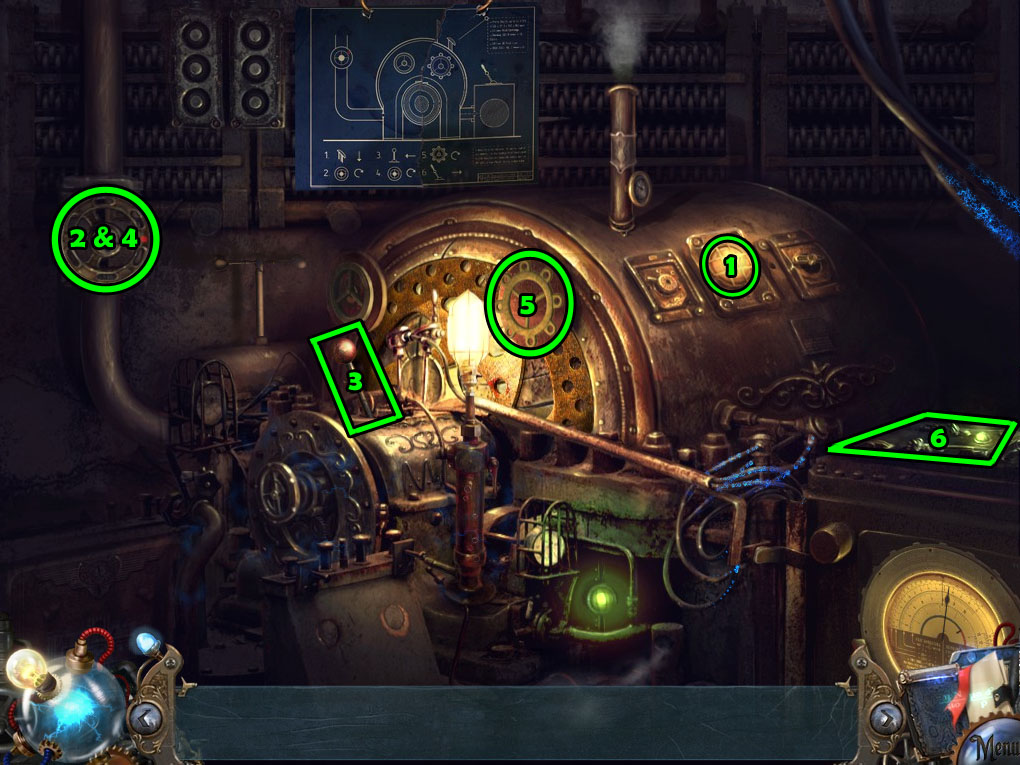
Add the DEVICE PART (from behind the boarded fence at the Tower Back Yard) to the Ether reactor to start the puzzle.
Operate the machine by following the directions numbered 1 to 6 from the scheme on the wall.
Make sure the DEVICE PART is fully inserted into the machine, then push the button at the top of the part to complete the first step.
Rotate the wheel in the middle of the pipe at the far left to complete step 2.
Pull the lever in the middle of the machine to complete step 3.
Rotate the wheel in the middle of the pipe at the far left a second time to complete step 4.
Rotate the right wheel at the front of the machine to complete step 5.
Pull the lever at the far right side of the machine to complete step 6.
Solution.
After the puzzle is solved, go back out to the Tower Front Square.
Tower Front Square
After the cut scene, you will be transported to the Ether world.
At the bottom of the screen there are five stationary red and blue symbols.
Find and click the matching symbols that are floating by in the air.
Example.
After the puzzle is solved, you will be returned to the Apartment Lobby; go out the doors to the Street to complete the game.
Posted by: Trinn |
June 28, 2012 10:46 PM
|
June 28, 2012 10:46 PM