
![]() Snark Busters: Welcome to the Club is a new hidden object game from Alawar. If you're tired of dime novel-quality storylines, cheesy settings that go from haunted mansion to haunted castle and back, and protagonists whose missing family members you couldn't care less about, this game is your savior. Snark Busters doesn't pretend to be anything new and original, but by doing that, it succeeds at both. It's a hidden object game with wide appeal, enticing fans of the genre and encouraging everyone else to hop in and give the genre a try!
Snark Busters: Welcome to the Club is a new hidden object game from Alawar. If you're tired of dime novel-quality storylines, cheesy settings that go from haunted mansion to haunted castle and back, and protagonists whose missing family members you couldn't care less about, this game is your savior. Snark Busters doesn't pretend to be anything new and original, but by doing that, it succeeds at both. It's a hidden object game with wide appeal, enticing fans of the genre and encouraging everyone else to hop in and give the genre a try!
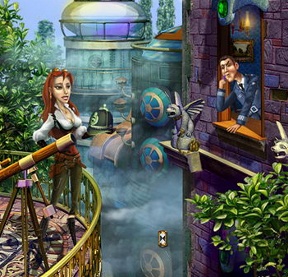
 Kira, a young woman with a mischievous streak of curiosity, stole the inspector's hat on a dare from one of her friends. As a result, her father locked her in her room. Kira isn't one to take a locked window at face value, and soon she discovers not only a way out, but an entire universe hiding in her mirror. This gives way to a new quest of grand proportions: the hunt for the elusive Snark.
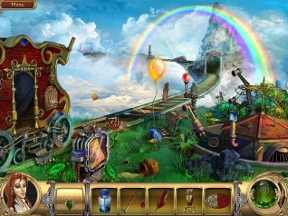
Instead of dumping lists of items in front of your face to find, Snark Busters is built around pieces of items. At the bottom of your screen is an inventory bar with a few slots. In some of the slots are silhouettes of items that have been sliced into sections. Your job is to find these pieces stashed amongst the scenery. As you would expect, the shards are rotated and scaled about and placed in devious locations, so you won't always be able to find them with ease. But it wouldn't be much of a game if it was all piled up and neatly labeled from the get-go, would it?
Once you assemble an item, it's time to use it! Certain objects in the level can be opened, moved, or otherwise interacted with. A vase, for example, would be a great thing to use with that hammer you just put together. Performing these little tasks reveal more item shards you need, open up new places to explore, or progress the story bit by bit.
 Analysis: Hooray for something different! Snark Busters: Welcome to the Club takes little pieces from other hidden object games and puts them together in a fine new way. We're all familiar with finding pieces of items, using items to finish puzzles, and completing mini-games from time to time. The difference is Snark Busters never makes any of this a chore. It's one of those games that makes you want to put an exclamation mark after its title. It's pure whimsy, unapologetically light-hearted, and nothing but an extended spell of time-wasting relaxation. It doesn't try to wow you with a grand story, fantastic new gimmicks, or even ground-breaking visuals. It just tries to entertain you, and that it accomplishes very, very well.
One part adventure, one part hidden object game, Snark Busters tends to feel a little lopsided at the beginning of each area. A good 80% of the items you'll need to find are strangely obvious, almost as if they were put there so you could get that rush of clicking a dozen things in a row. After that, it's time to scour the scene for the remaining pieces, something that often feels a little too difficult.
The hint system, while generous in its use and quick to recharge, has the uncanny ability to always point out the object you need the least. Got one more slice of that lantern to find? Too bad, the hint system wants you to grab that rake handle. You'll never really get stuck, though, as it's always just a matter of time before a new hint is at your disposal.
Snark Busters: Welcome to the Club is pure entertainment. From its mild steampunk setting to the childlike tasks you complete, you'll be driven to keep playing the game from beginning to end.
![]() Windows:
Windows:
Download the demo
Get the full version
![]() Mac OS X:
Mac OS X:
Download the demo
Get the full version


Walkthrough Guide
(Please allow page to fully load for spoiler tags to be functional.)
Snark Busters: Welcome to the Club Walkthrough
Part 1: Tips and Tutorial
Tips:
You need to find all the pieces of the objects pictured on the bottom of the screen. You are looking for the colored parts. Once you find a part it will be "grayed" out. Well, tan actually.
Some pieces will not be available until you achieve other steps. Those will be shown in red. So, don't stress out, you'll get them eventually.
You will occasionally be traveling through parallel versions of the same scene. Sometimes changing an object in one version will change the similar object on the other side.
If you're having trouble finding any of the pieces click on the spoiler image at the end of each scene description. They're all mapped out just in case! They are color coded by the object.
Tutorial:
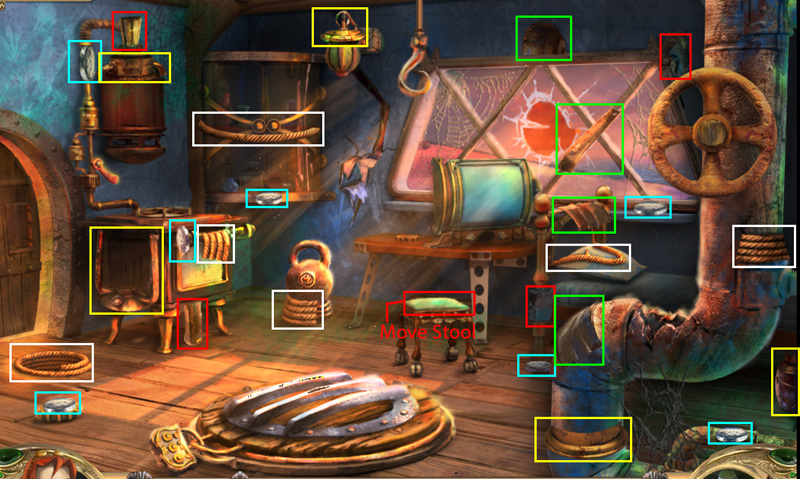
Find the Hammer parts. Use the Hammer to hit the mail tube and pick up the letter.
Assemble the Screwdriver and use it to screw in the door handle. Pull the handle and step outside.
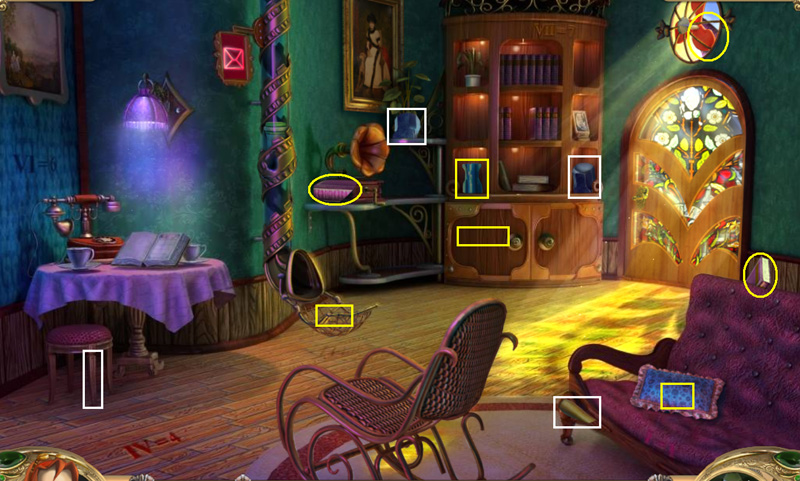
Screenshot
Pick up Wrench pieces and use it to open the fuse box. Pull the fuses.
Pick up the Spyglass pieces and put it on the tripod. Remember the number you see on the helmet. Use the switch to the right of the door to turn off the power to the fan. Go back inside.
Go to the phone and dial the number next to the police badge number you saw on the helmet.
Find the Book pieces. You have to move the rocking chair to find the last piece. Put the books on the shelf and click them to put them in numerical order.
Screenshot
Pick up the Crossbow from behind the painting. Return to the balcony and shoot the helmet with the Crossbow.
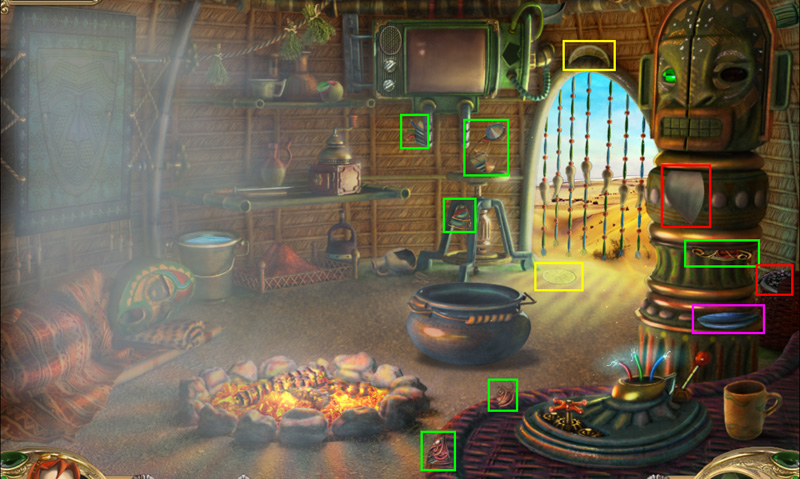
Part 2: Kira's House
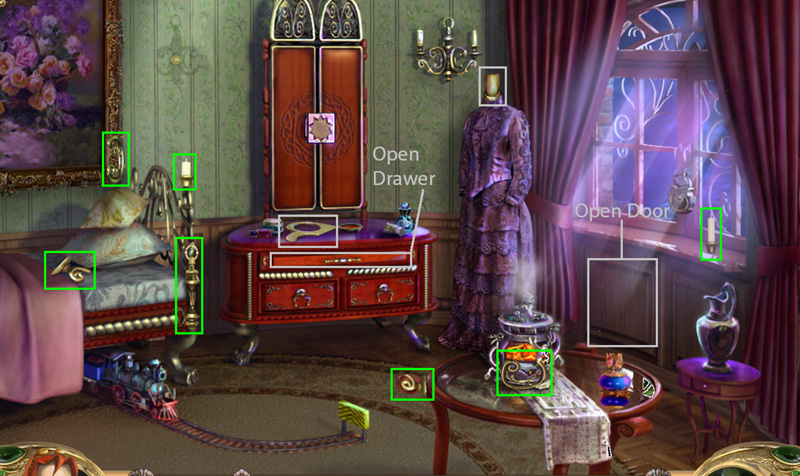
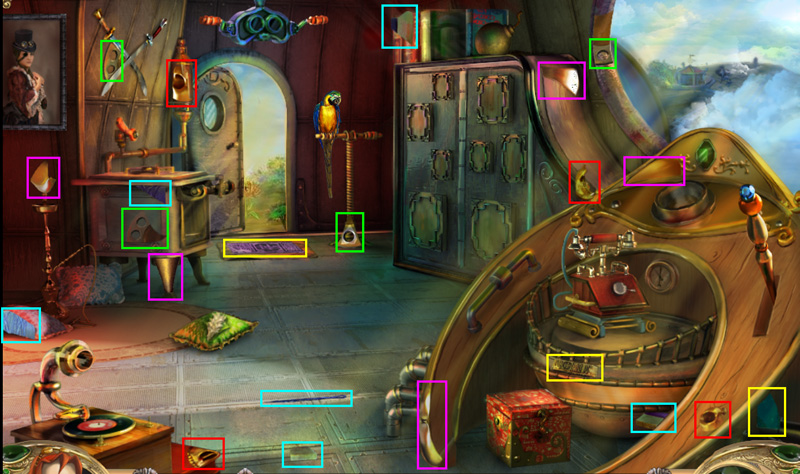
Bedroom
Find the seven pieces of the Candelabra then place it on the wall to the left of the mirror. Click the Candelabra and move the helmet on the bottom shelf to find a piece of the Key.
Open the top drawer of the dresser and move all the objects off the false bottom. Pick up the Key piece.
Open door beneath the window and pick up last Key piece. Use the Key to wind up the train and pick up Keys. Use them on the window lock.
Screenshot
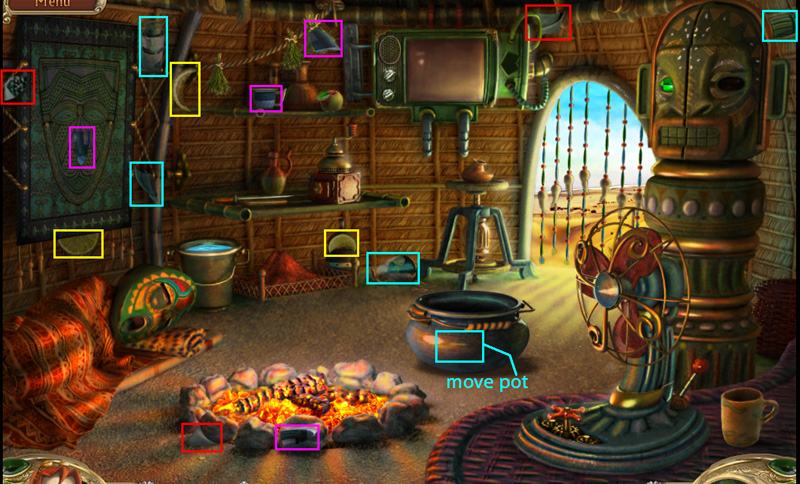
Pick up the paper airplane on the table and find all the objects: Star (yellow), Rope (pink), Hammer (blue), Note (green), Tongs (white)
Screenshot
Put Star in slot above dresser then pick up the pieces of the letter. To read the note, place it on the mirror, then afterward click on the mirror.
Pick up the Hat (yellow), Scissors (red), Key (white), Handle (gray), Curtain Clip (green)
Screenshot
Place the Hat on the mannequin to get last piece of the Curtain Clip.
Use the Handle on the drawer beneath the mirror to pick up last Key piece.
Use the Key on door beneath the TV and use the Curtain Clip to pull back curtain and pick up last Scissor piece. Use Scissor to cut carpet.
Travel back through the mirror. Use hammer on the vase on the table. Get last Rope piece.
Pick up Rope piece and Tong on the floor. Use Tongs to pick up cinder from burner on table and use it to light both candelabras.
Use Rope on window and go out the window.
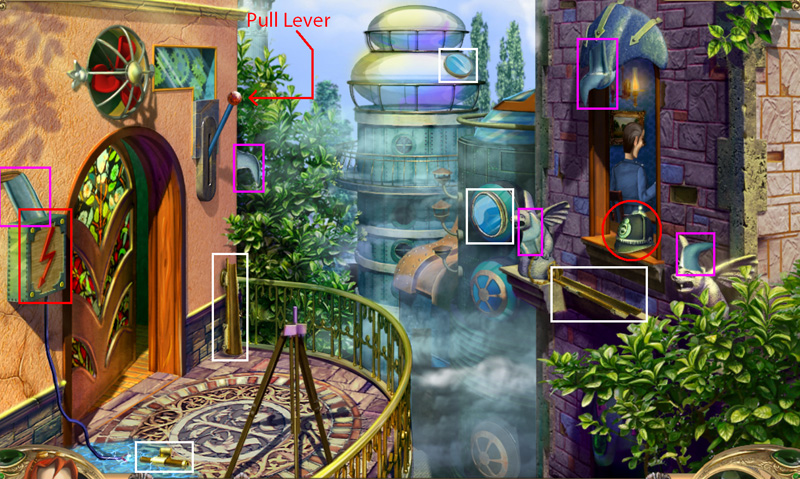
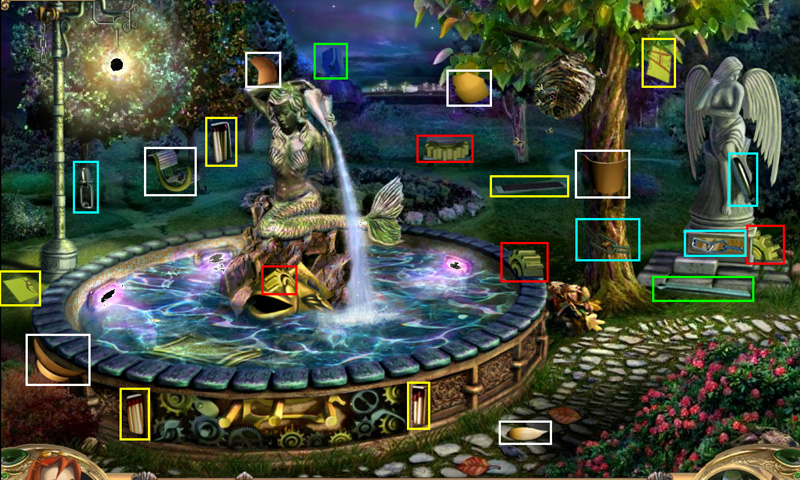
Garden
Pick up Gloves (pink), Net (blue), Rake (yellow), Watering Can (white), Oil Can (red)
Screenshot
Dip Watering Can in water to fill it. Water the flowers on left and pick up Net piece.
Place wheel from back of car on to the axle then go over the bridge.
Pick up Puzzle Pieces (white), Broom (blue), Sickle (red), Lantern (pink), Lion (yellow)
Screenshot
Use Broom on spider in gazebo and pick up Sickle piece. Use Sickle on reeds on left. Return across the bridge to the window.
Pick up Net piece in water on the left. Use the Net to pick up the Hairpin. Use Hairpin to open the car trunk and pick up Rake and Wrench piece.
Use Wrench to tighten wheel and pick up Rake and Glove pieces. Use Rake on pile of leaves and pick up Oil Can piece.
Use Gloves to remove poison ivy on the wall. Switch the light to the gazebo then use the Oil Can on the hoist in the center. Return over the bridge.
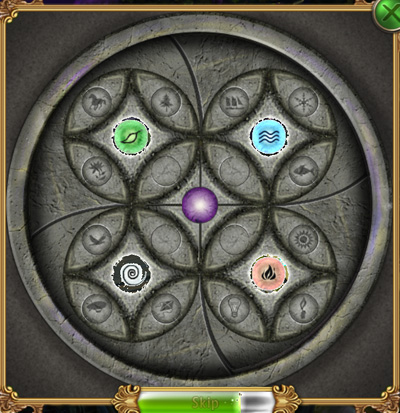
Get Puzzle and Lantern pieces under the bridge. Click on floor of gazebo, place the Puzzle Pieces on the floor and do puzzle.
Move each piece to its appropriate area of the dial (water, fire, wind, earth)
Screenshot
Pick up Lamp piece then place the lamp under the bridge. Return to light switch on wall over the bridge. Switch it to the bridge. Go back over the bridge.
Pick up last Lion piece and put the Head on the sculpture. Turn both Lions to face each other then cross bridge.
Get Jug (white), Chain (blue), Gears (red), Matches (yellow), Screwdriver (green)
Screenshot
Use Matches to light leaves under tree and pick up Gear piece. Dip the Jug in the water and place it on the stone in front of the angel sculpture. Pick up the Chain piece.
Use Chain on lamp on the left and pick up Screwdriver piece.
Use Light Cover in fountain and pick up Gear piece then place them in front of the fountain and pick up Screwdriver piece.
Click on bottom of fountain and use Screwdriver on plate then pick up Dragon.
Return to bedroom and go through the mirror. Place Dragon on the lock and enter the mirror.
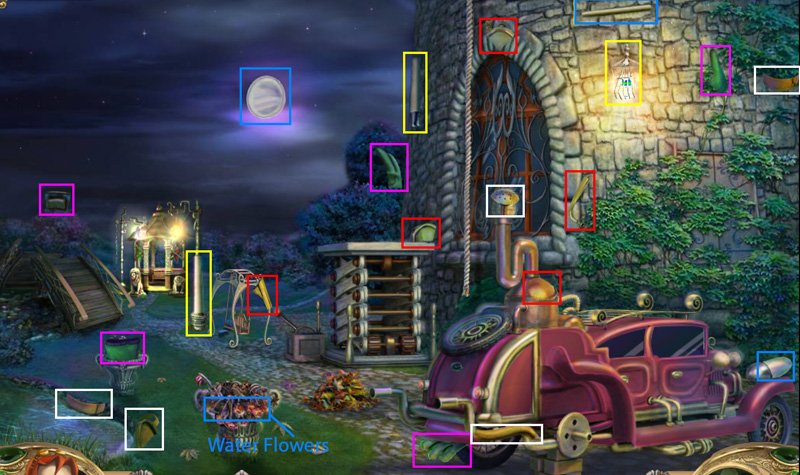
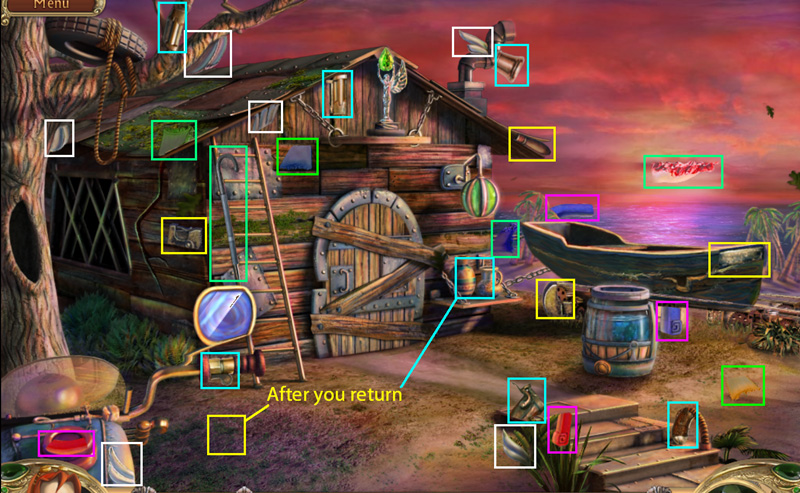
Part 3: Pirate Beach
Pick up Fishing Rod (white), Crayons (blue), Crowbar (pink), Face (yellow), Wheel (green)
Screenshot
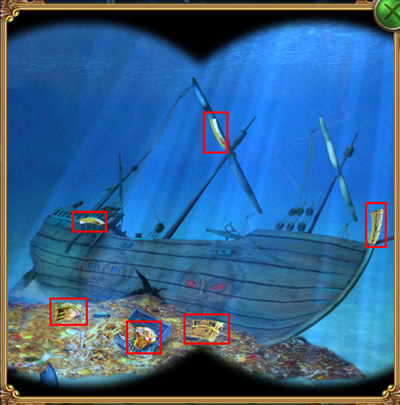
Use Fishing Rod to get suitcase out of the water. Open it and pick up Crowbar piece and piece of Paper.
Place Paper on left of sculpture then go up the stairs.
Pick up Wings (white), Pistol (blue), Magnet (pink), Wrench (yellow), Umbrella (green)
Screenshot
Place Wings on angel and enter the mirror.
Pick up Oil Lamp (white), Shovel (red), Cuckoo (yellow), Scissors (green), Pickax (black)
Screenshot
Use Scissors to cut balloon string pick up Pickax piece.
Place Cuckoo in clock and pick up Shovel piece. Use Shovel on glowing area on ground. Return through mirror.
Pick up Pistol and Wrench piece. Use Wrench on the barrel. Click barrel and pick up Magnet piece. Use the Magnet in hole on tree and pick up Bullet.
Use Pistol on chest and pick up Umbrella piece inside. Use Umbrella to pull down tire from tree branch. Return through mirror.
Click on chest and pick up Pickax handle and anchor lever. Attach anchor lever to boat and pick up Lamp and Pickax pieces. Use the Pickax on the door and enter.
Pick up Rope (white), Pot (green), Silver (blue), Hammer (red), Oil Lamp (yellow)
Screenshot
Return outside and go to beach. Pick up Crowbar piece on boat and use it to open the hull of the boat. Pick up Torch and Wheel piece on the boat.
Place the Wheel on the cannon. Pick up the Crayon piece next to the cannon and rub the Crayons on the paper on the statue, then return to the hut.
Tie the rope to the hook and click on the lock on the floor. Notice the ">" signs. Put your numbers in the correct order [note: individual numbers may vary]
Connect the rope to the heavy object on the left. Pick up the Silver and Lamp pieces and the Copper Plate. Click the Oil Lamp to go downstairs.
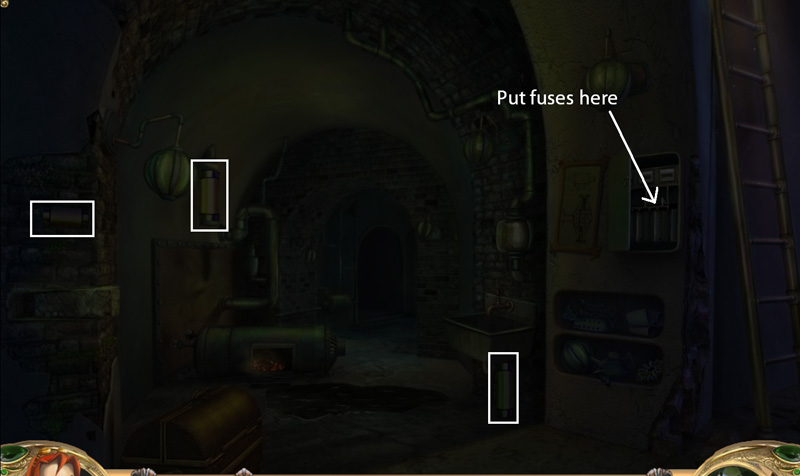
Find the 3 Fuses and put them in the fuse box.
Screenshot
Pick up Oiler (white), Pincers (blue), Bucket (green), Chisel (red)
Screenshot
Use Chisel on stone on left wall. Pick up Oiler piece and use Oiler on case hinges. Inside pick up Valve and Pincer piece.
Place Valve on sink faucet. Use Pincer to pick up hot Bucket piece from fire. Put it in the sink. Return upstairs.
Pick up Hammer, Pot and Silver pieces
Screenshot
Turn on the gas lever above stove and place the Pot on the stove. Put the Silver in the Pot and place the Copper Plate over the hole in the pipe. Use Hammer to pound it down then pick up the Pot and pour the silver on it. Turn the valve and go downstairs.
Turn on the faucet. Fill the Bucket under the faucet and pour it on the fire. Go forward through the doorway.
Find the Figurine (white), Chemicals (pink), Lighter (green), Repair Kit (yellow), Ring (red)
Screenshot
Pull power switch on right. Pick up Figurine and Lighter pieces from X-ray viewer. Click on table below viewer and place Figurines in drawer to get Lighter and Chemical pieces. Click on paper in drawer.
Use Lighter on burner on table. Place the Chemicals on the burner and pick up Compound. Pour them on the paper and pick up the Razor.
Use Razor to cut tape off of pipe on left. Use Repair Kit on wires and look through the binoculars to use tongs to capture mechanical fish. Return to the beach.
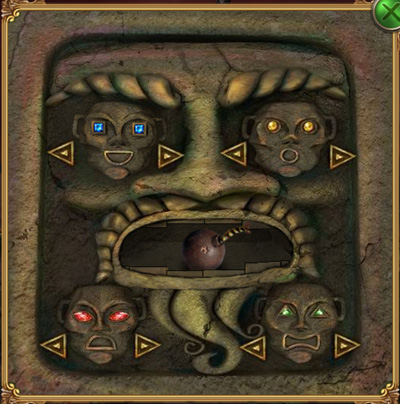
Get Mask piece from fish and place it on the sculpture. Match the eyes with the mouths on each face. There are clues in each of the treasure chests you opened.
Screenshot
Get Cannon Ball then place the Torch on the mechanical fish. Put the Cannon Ball in the cannon and light it with the Torch. Return downstairs lab.
Look through the binoculars again and pick up the Ring pieces.
Screenshot
Use Ring to cut glass on the table. Pick up the Octopus and return to the hut. Go through the mirror and use the Octopus on the lock.
Part 4: The Lab
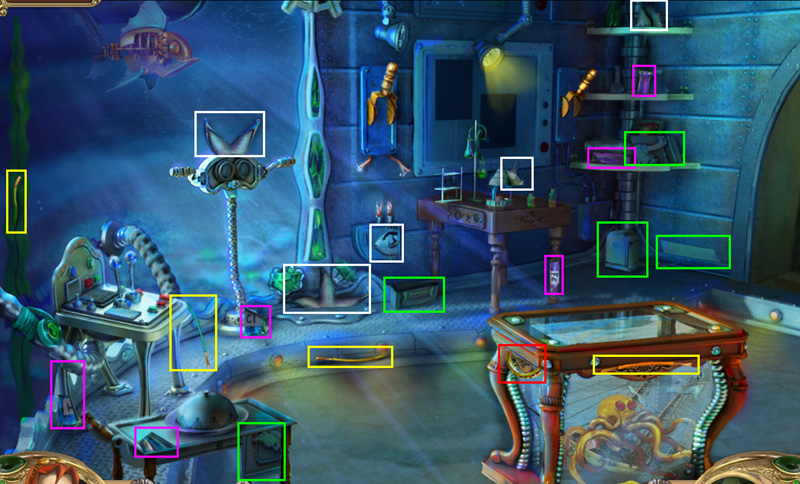
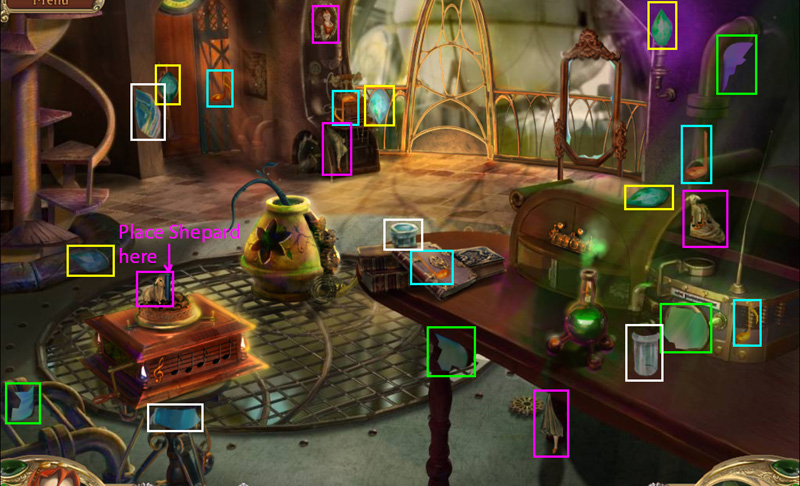
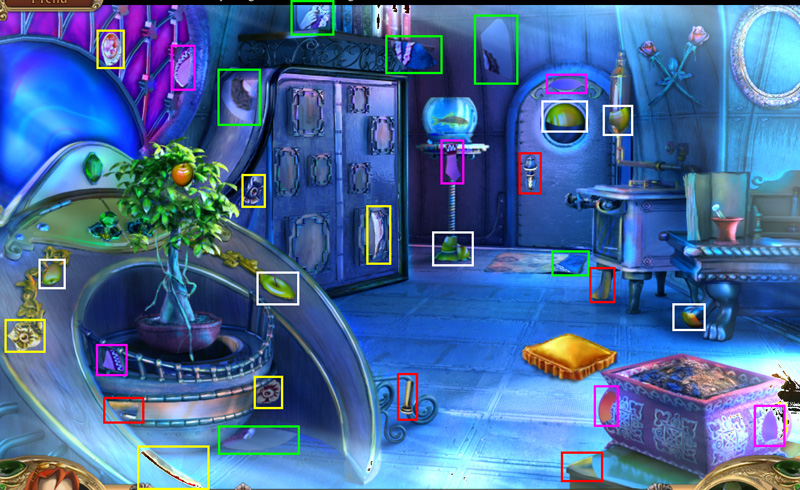
Find Neutralizing Agent (white), Sheppard (pink), Notes (blue), Mirror (green), Flower (yellow)
Screenshot
Place the Notes and Sheppard on the music box. Pick up the Flower piece and go downstairs to the left.
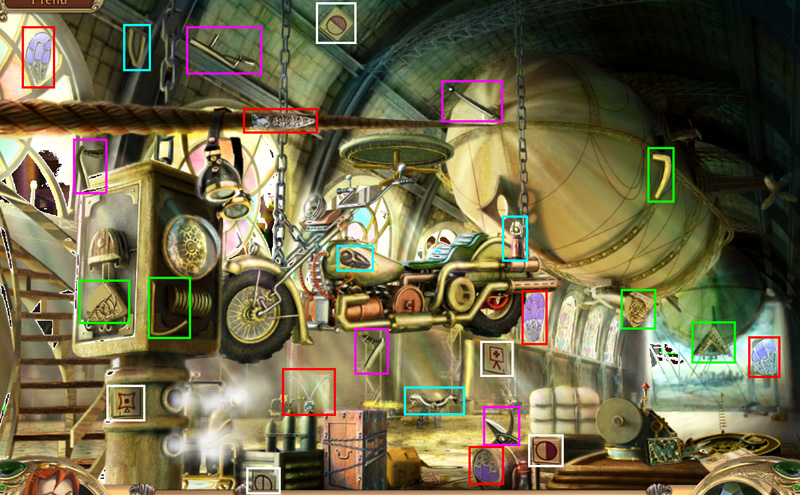
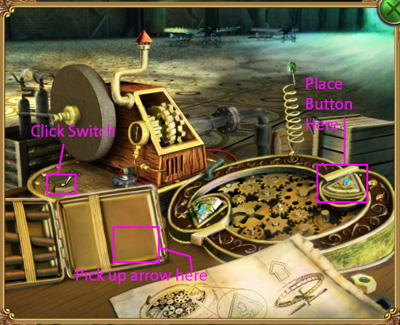
Get Puzzle Pieces (white), Knife (blue), Butterfly (red), Wire Cutters (pink), Remote Button (green)
Screenshot
Click on table to right and place Butterfly on case. Pick up arrow. Place the Remote Button on right. Flick switch to left.
Screenshot
Click crate in center and use the Wire Cutters on the wires. Return upstairs.
Pick up Mirror piece and place it in the frame in back. Enter the mirror.
Pick up the Colored Glass, fix the gate by fitting the glass in the right places. Return through the mirror.
Screenshot
Pick up Neutralizing Agent piece and pour it into green beaker on table. Go upstairs.
Find Light Bulb (red), Chain (blue), Record (green), Key (pink), Valve (white)
Screenshot
Place Light Bulb in lamp on left, pick up parchment and Record piece. Place the parchment under the microscope and pick up Chain.
Place Chain on gears in back and pick up Valve piece behind fan. Return downstairs.
Click lock on dresser and put symbols in correct order: simply follow the picture. Get Flower piece place it on the flower pot and return upstairs.
Get Key piece in center flower. Use Key on lock on right and pick up Record piece. Place Record on gramophone, get Valve piece and place Valve on pipe. Close the Valve and go downstairs.
Pick up Knife piece click on table, switch on grinder and sharpen Knife. Use knife on white package in center and pick up Lever. Place Lever on machine on left and return upstairs.
Turn steam back on and return downstairs. Pull lever to lower motorcycle and pick up Puzzle piece.
Click the crate and put puzzle pieces on it. Finish the puzzle. Hint: Each row and column has one of each symbol (filled, angled, pointed, etc.) simply find which one is missing from each.
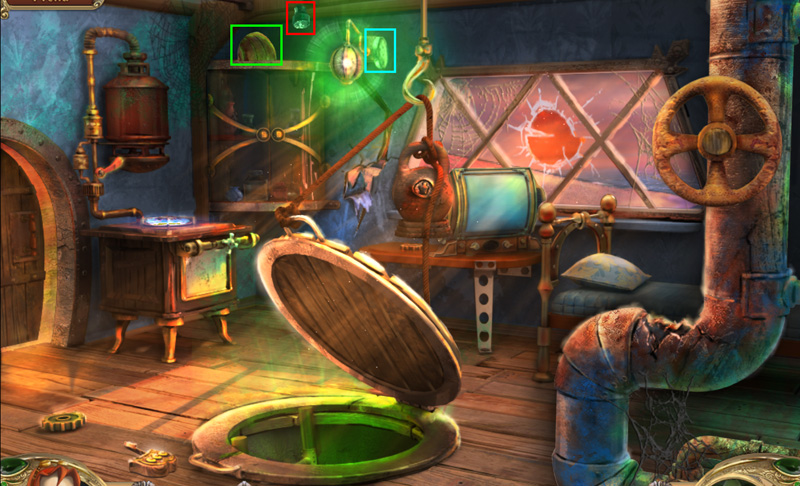
Pick up the snake, return upstairs, go through the mirror and place snake in the lock. Go through the mirror.
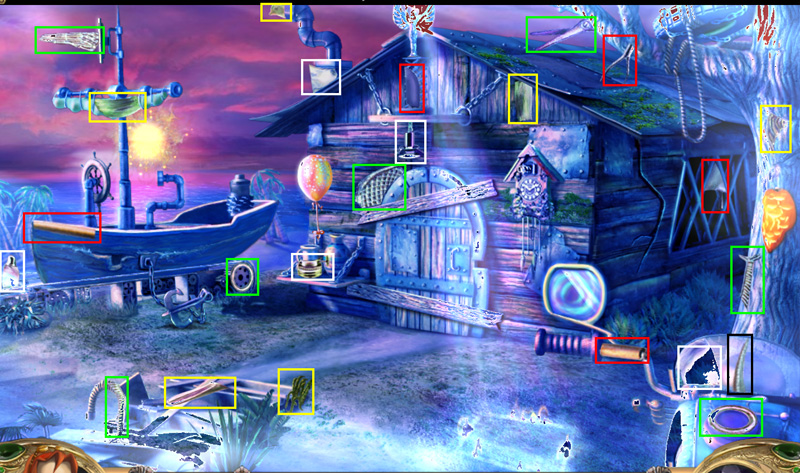
Part 5: The Train and Plane
Find the Jar (pink), Flail (blue), Bellows (yellow), Owl (red), Coin (gray)
Screenshot
Click the Jar and place it on the bee. Place the Jar on the balloon and pick up the Flail piece. Use the Flail on the coal to right.
Open the small door on right of train. Pick up coal and place it inside. Enter the train.
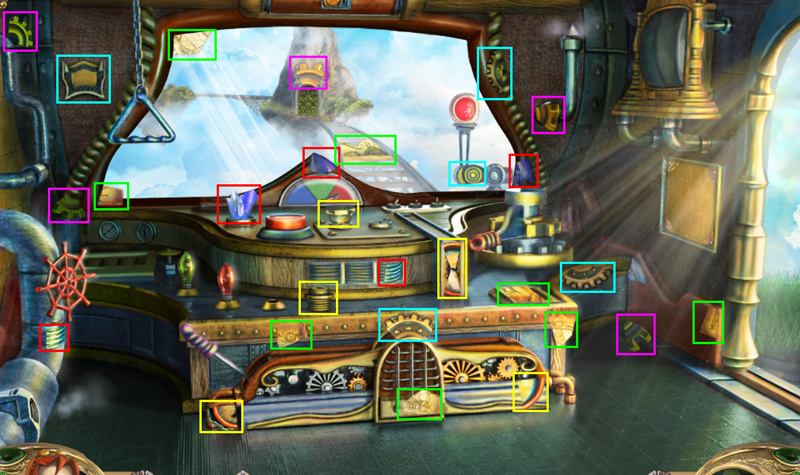
Find the Bulb (red), Disk (blue), Gear (pink), Layout (green), Gauge (yellow)
Screenshot
Place Layout on frame on the right. Arrange the pieces.
Screenshot
Place the Bulb next to the others on the panel. Place the Gear in front on the left. Place Disk above the window and do the puzzle.
Screenshot
Pick up the Gauge piece and place it on the pipe on the left. Hit the controls in the proper order as shown on the Layout. Exit the train.
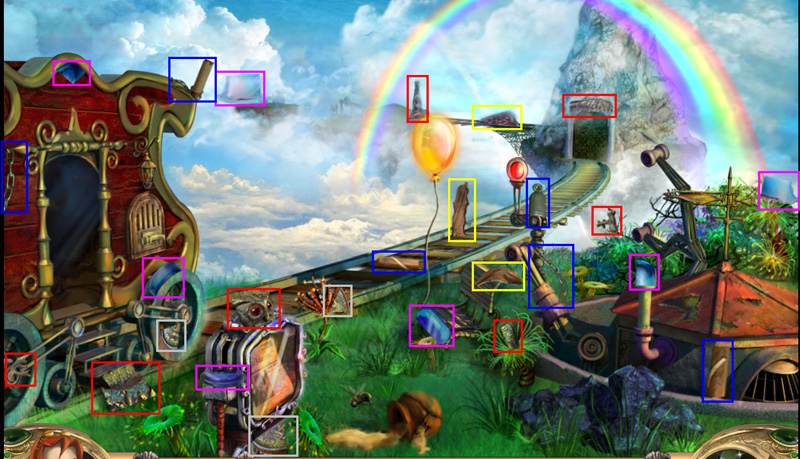
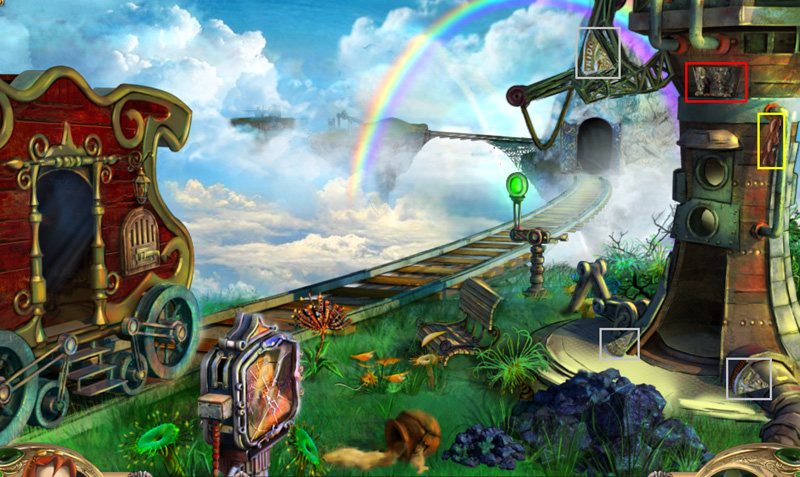
Find the Slingshot (red), Dynamite (green), Magnifying Glass (yellow), Clock Hand (white), and Machete (blue)
Screenshot
Shoot kite with the Slingshot, pick up Machete piece. Use Machete to cut grass in front of gate. Pick up Dynamite, Magnifying Glass and Clock Hand pieces.
Place Hand on clock and set to time on the sign. Pick up Magnifying Glass piece and remember position of stick figure. (In fact, write it down!)
Place Dynamite in front of gate and position Magnifying Glass above it to start fuse. Cross bridge to plane.
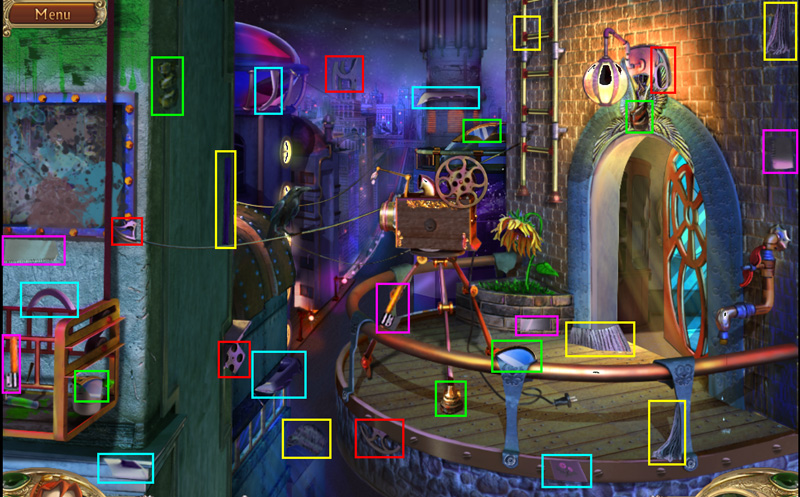
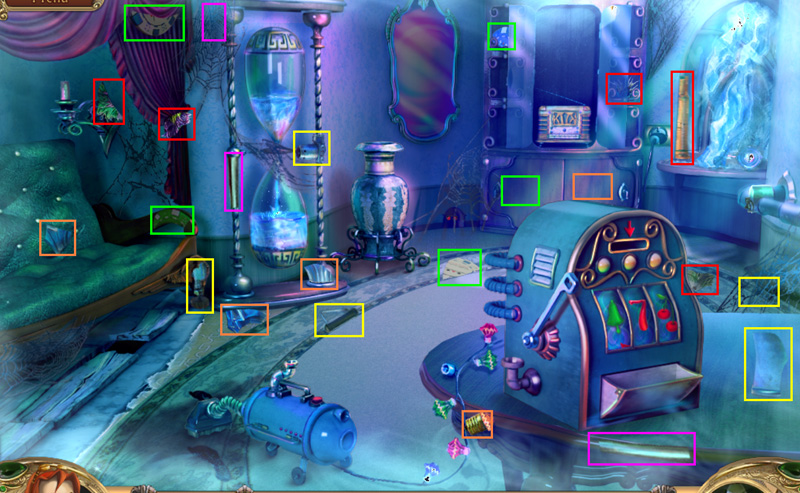
Find Speaker (pink), Thread (blue), Books (yellow), Skull (red), Dial (green)
Screenshot
Look through binoculars to pick up Speaker and Book pieces. Pull jeweled handle on far right and go through the mirror.
Pick up a Shovel (red), Ring (yellow), Portrait (green), Heart (pink), Apples (green)
Screenshot
Place the Apples on the tree and pick up the Portrait and Heart pieces. Place Portrait in the frame on right.
Use the Shovel in square pot in front right. Return through the mirror.
Pick up Thread piece and push big red button. Notice the tower has risen. Return to the train, pull handle on left.
Pick up Owl, Coin and Bellow pieces.
Screenshot
Use coin in newspaper stand and pick up Newspaper. Enter the tower.
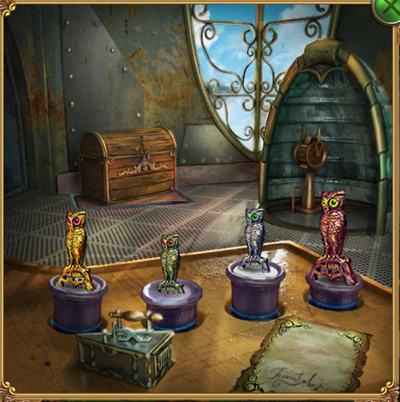
Place the Owls on the stands according to how far down the blue lines are on each stand.
Screenshot
Click the chest and pick up the Unicorn. Click on the paper. Click on the iron to open it. Put the Newspaper inside and use the Bellows to heat it up. Remember the number you see.
Return to the train and travel back to the plane. Look through the binoculars and use the arrows on the sides to turn to the right. Pick up Thread and Dial pieces.
Use Thread on the pillow on the ground then move the pillow and pick up Dial piece. Place the Dial on the phone and dial the number you saw.
Pick up the Handle and place it in the music box. Pick up Book piece. Pull the handle on the right and go through the mirror.
Pick up Heart piece and place it in the planter on the right. Use the fish bowl in back to water it. Pick the flowers.
Click on the table on the right. Follow the picture instructions in the book. Example, place pearls on the cutting board and combine with knife...
Pick up "dough" and place it in the oven. Return through mirror, turn lever above stove then return through mirror. Pick up cookies and go back through mirror
Give cookie to the bird. When he moves, pick up Book piece. Place Books on top of cabinet and pick up Speaker piece.
Place Speaker on gramophone and get Skull piece from bird perch. Place skull on skeleton and turn his arms and legs until it matches the stick figure you saw earlier.
Screenshot
Return through mirror and place unicorn in lock. Enter the mirror.
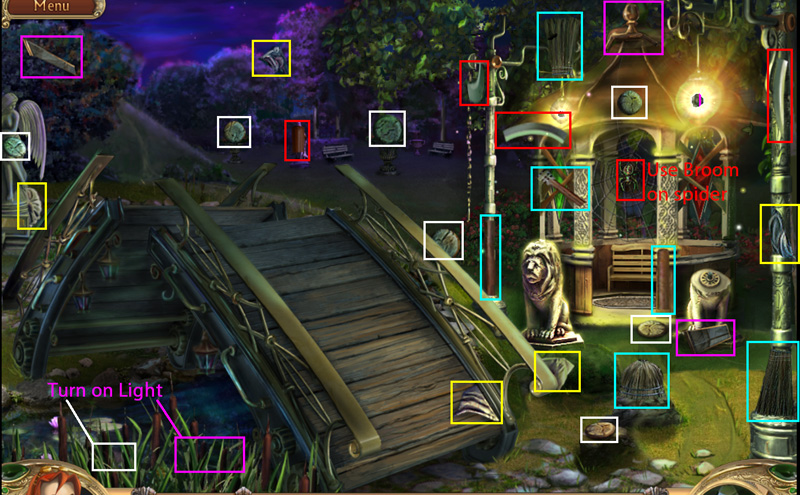
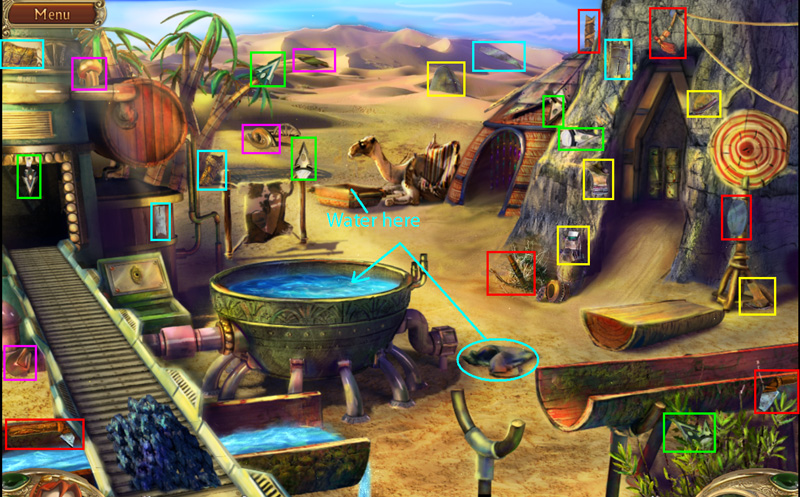
Part 6: In the Desert
Pick up the Wine Bottle (blue), Fan (green), Pepper (red), Bowl (pink), Lemons (yellow)
Screenshot
Place the Fan on the wires then continue finding pieces.
Screenshot
Leave the hut and find a Knife (blue), Shurikan (green), Tomahawk (red), Handle (pink), Water skin (yellow)
Screenshot
Pick up rag from the ground and place it in the water basin. Use Knife to cut hide and pick up Water skin piece.
Fill Water skin in flowing water and fill the camel's trough to pick up Shurikan piece. Throw it at the bull's-eye and pick up detergent.
Place detergent in basin and hang up the rag. Remember the snake patterns. Enter the cave and match the snakes like you saw.
Find Brush (pink), Glue (blue), Hammer (yellow), Key (green), Ladder (red)
Screenshot
Ring the bell on the left to get last Key piece. Go through the mirror.
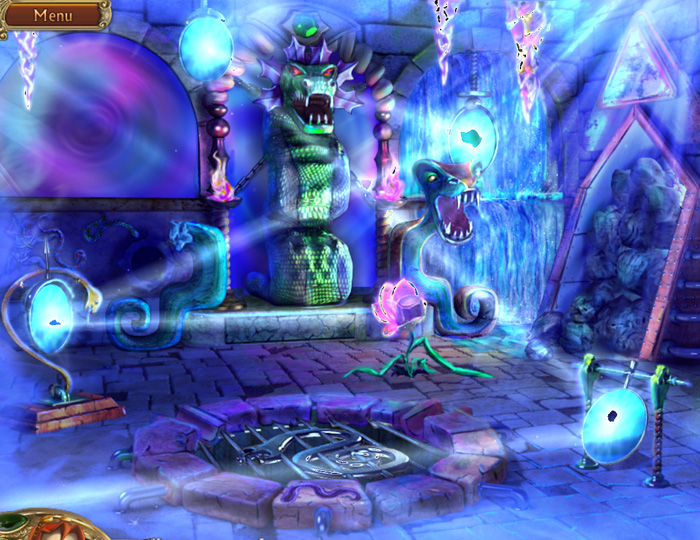
Find Sun (pink), Snake Head (red), Hammer (yellow), Claw (green), Mug (orange)
Screenshot
Place the mug under the waterfall and tilt the mirrors until the light hits the flower.
Screenshot
Pick up the Hammer piece in the flower and use it on the base of the snake idol. Pick up the snake.
Click on the well on the floor. Place snake in the stone. Pour water in the center and pick up Water Bell. Return through the mirror.
Pick up Hammer piece at base of idol. Push the stone ball away. Pick up the Brush piece and use it on the idol.
Exit the cave and pick up the Tomahawk and Handle piece. Use the Tomahawk on the log and place log on supports. Go back into the cave.
Pick up Ladder piece in pool and use the Hammer to hit the gongs in the order shown on the column. [note: you have to do it quick enough so they stay lit.] Pick up Glue piece and part of gold lock.
Click idol and put the Glue in the empty spot. Place the part of the lock on the glue. Use the Key in the lock, click the eyes until they are all open then go through mirror.
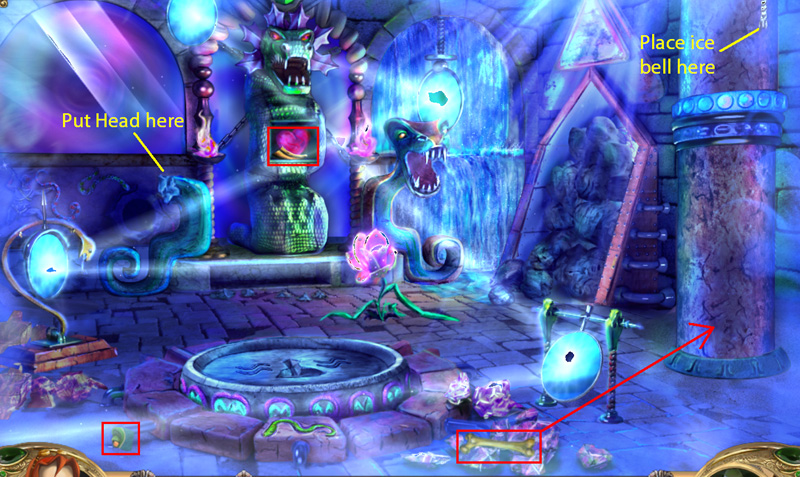
Pick up the Claw and Snake Head pieces. Also, the Bone. Place the Snake Head on snake to left of idol.
Screenshot
Place the Water Bell in his breath and hang it from the rope on the right. Ring the Ice Bell then pick up the Sun piece. Return through the mirror.
Pick up the Ladder piece and place it in front of the door. Use the Brush on sign above the door. Remember the numbers. Return through the mirror. Climb the rope ladder and remember the numbers. Pick up the final sun piece.
Place the Sun into the column with the Bone and Claw. Pick up the Sword and stab the snake heart with it. Return outside.
Pick up the Handle part and use it on the box. Pull the handle and enter the correct numbers.
2,4,3,1,1 but: +1,-1,-1,+3,+3 = 3,3,2,4,4
Enter the tent and pick up Bowl piece from the TV. Pick up red clay from under table with the bowl. Take water out of the pail with the bowl. Use clay to fix hole in the TV. Get Wine, Pepper and Lemon pieces from TV.
Click the table and put Pepper in the grinder. Put large pot on fire. Pour in Wine then add Lemons and Pepper. Pick up Apple from the shelf, click on table, place Apples on cutting board, cut them with the knife and add them to the pot.
Pick up mug on far right. Fill it in the pot and give it to the sick man. Place emerald in the idol's eye. Pick up scorpion. Return to cave, go through the mirror and use scorpion in the lock.
Part 7: Back at Home?
Pick up Pliers (red), Cord (yellow), Knife (blue), Weight (green), Wrench (pink)
Screenshot
Use Wrench to open bomb to left of clock. Pick up Knife piece. Open cabinet on left, pick up Weight piece.
Click cards on table. Remember how many of each suit there are. Turn on yellow handle on left and go out the door.
Find a Saw (pink), Mop (yellow), Magnifying Glass (green), Reel (red), watering Can (blue)
Screenshot
Use Saw on the ladder on the wall and pick up Mop piece. Pick up ladder and turn on the spigot. Use mop under spigot, cross ladder and clean frame on left. Remember radio station number. Pick up Magnifying Glass and Watering Can pieces.
Fill Watering Can with water, water the flower. When the bird moves pick up Reel piece then place it and the Magnifying Glass on the projector. Return to the room.
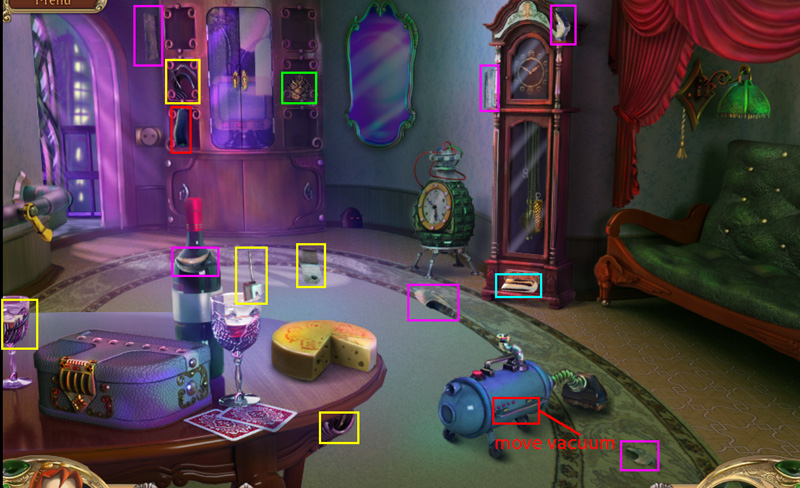
Go through the mirror and find the Duster (red), Torch (yellow), Tokens (green), Crowbar (pink), Light (orange)
Screenshot
Use Duster to clear all cobwebs and pick up Torch and Crowbar pieces. Return through mirror.
Pick up Knife and Weight pieces from cabinet. Pull cord above couch. Pick up 5 pieces from the couch and return through the mirror.
Light Blowtorch on the candle. Use the Blowtorch on the ice in back. Pick up Bulb and Radio Dial. Put Dial into radio in cabinet and tune to the number you saw outside. Pick up Crowbar piece.
Put Bulb in string of lights and turn on vacuum. Pick up Chip piece, put them in the slot machine and pull handle. Look at the cards and remember the number of each suit. Pick up Crowbar piece.
Use Crowbar on board under couch. Pick up the paper. Return through the mirror.
Pick up Weight piece. Use knife to cut a piece of cheese. Put the cheese by the cabinet. Pick up Pliers piece. Pick up Cord piece off red curtain.
Click on box on the table. Enter the number for each suit.
5 Spades, 9 Hearts, 4 Clubs, 7 Diamonds
Read the paper and remember the weights. Pick up Cord and Weight pieces. Put the Weight in the clock and pick up Pliers piece.
Plug Cord into wall on back left. Take end outside. Plug in projector. Return inside. Use Pliers to cut any wires on the bomb! Go through the hole.
Find Gloves (red), Hammer (blue), Key (yellow), Stethoscope (green), Weights (pink)
Screenshot
Use Hammer to break glass on alarm on left. Pick up Glove piece and deactivate alarm by turning circuits until only the green lights are lit.
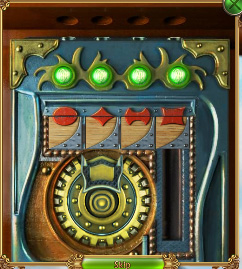
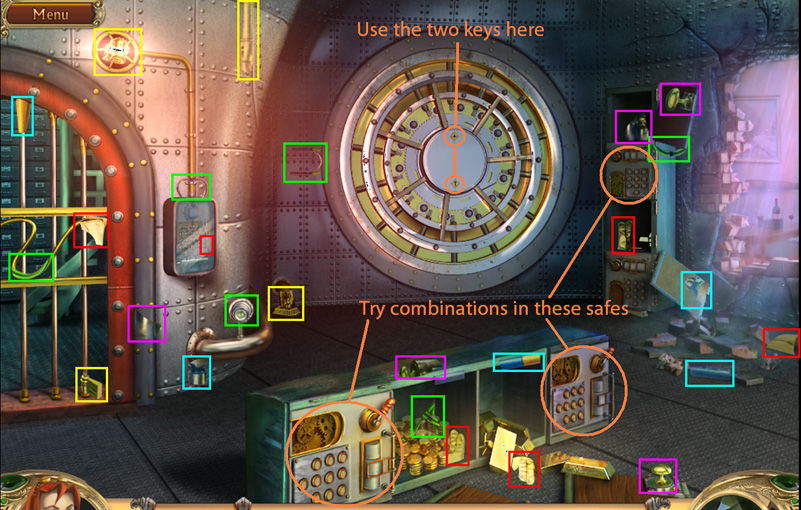
Click the top right safe. You have three possible combinations. To enter a combination the glass has to be over the number. Turn the number then pull the handle. Move the glass to the next column, put in the number and pull the lever, etc. You may have to try all three numbers but once you find a correct one, you won't need that number again so it gets easier. Do this for the top right safe then the two in the front.
Pick up Key piece and another Key. Use them in the big safe in the back. Pick up the Stethoscope piece then us it on the safe. Turn the dial until you hear/see it change. Wait until the light comes on then find the next number. Continue until all the lights are lit.
Pick up the last Weight piece. Go to the top right safe. Match the weight with the weights you saw earlier by placing the weights on the scale.
Fairy = 190. Use the largest weight first then add from the smallest up.
Put the Weight on the pedestal. Pick up the Fairy. Go back to the main room then go through the mirror. Place the Fairy in the lock and enter! Congratulations.
Special thanks to Walzar for this fabulous walkthrough!
Posted by: grinnyp |
August 22, 2010 4:54 AM
|
August 22, 2010 4:54 AM