
Snark Busters 3: High Society
Platform: Mac, Windows

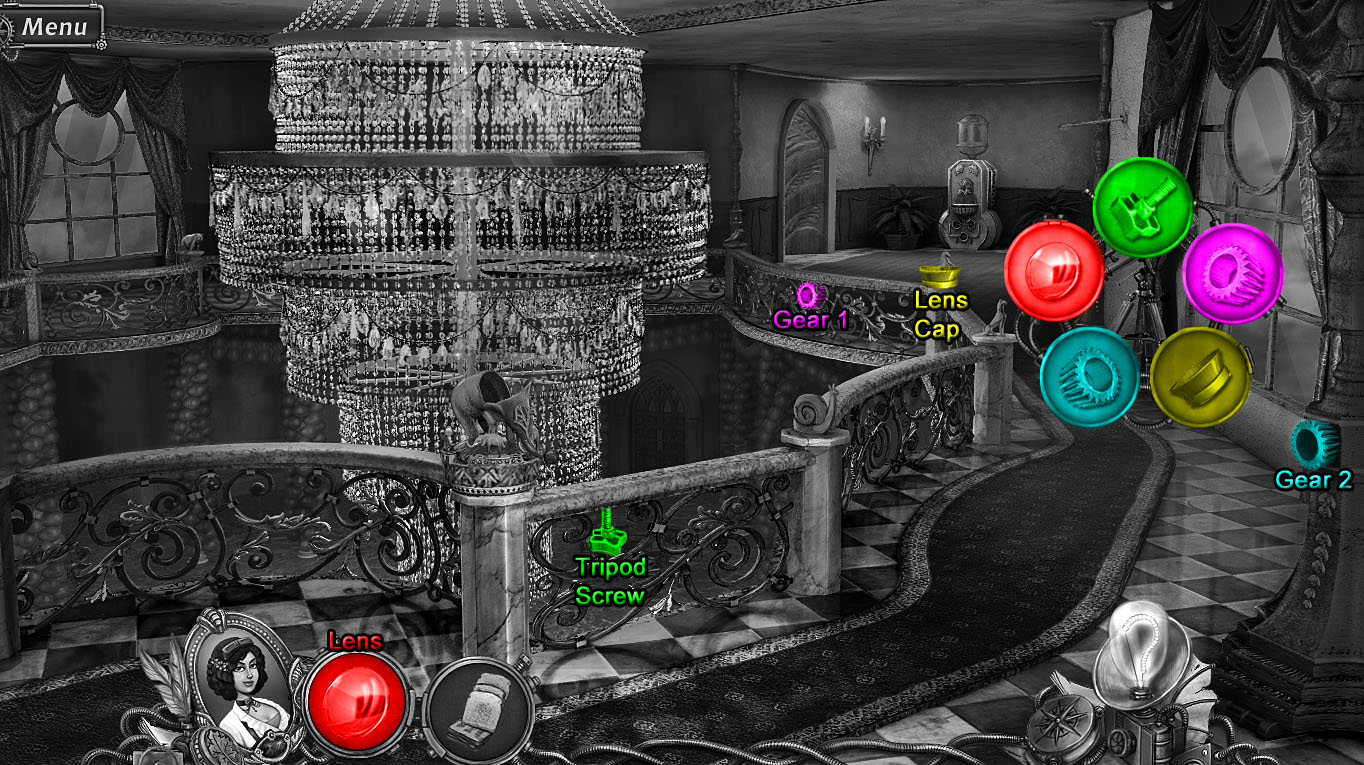
![]() Elizabeth Hughes is a photographer, and she's good at it, too. There's something else she's good at, as she discovers the day Duchess Daffington accuses her fiancé of stealing. Naturally, Elizabeth sets right out to clear her beloved Nicolas of the crime—by climbing through second story windows, rifling through wardrobes and other, um, means of obtaining evidence of his law-abiding nature. She's very skilled at it such things you see. As it turns out, these are just the skills to earn the savvy female protagonist a very prestigious invitation—the offer to join Snark Busters: High Society.
Elizabeth Hughes is a photographer, and she's good at it, too. There's something else she's good at, as she discovers the day Duchess Daffington accuses her fiancé of stealing. Naturally, Elizabeth sets right out to clear her beloved Nicolas of the crime—by climbing through second story windows, rifling through wardrobes and other, um, means of obtaining evidence of his law-abiding nature. She's very skilled at it such things you see. As it turns out, these are just the skills to earn the savvy female protagonist a very prestigious invitation—the offer to join Snark Busters: High Society.
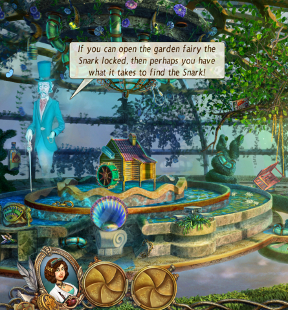 Lucky for you, you get to tag along for the soaring third installment in Alawar's unconventional hidden object puzzle adventure series. Catching the Snark is nice but catching Olivia Daffington in her lie is even nicer. To do so, travel through backwards worlds and interesting locales to get the picture that proves Nicolas did not steal that vile vixen's silly locket.
Navigation is a snap: follow the arrows to exit one scene and enter the next. It's not all about searching, though. There's the fun of adventuring, discovering and a balanced mix of mini-games—sometimes easy, sometimes tricky—to keep gameplay dynamic. Interactive areas will glimmer only after you discover them the first time. Or, select the "expert" level to forgo sparkles and to slow down the hint/skip timer significantly. Outside of the photo focusing puzzle, all mini-games have a skip function. A user friendly hint button will nudge you where you need to go if you get stuck and the true widescreen—both in full screen and windowed modes—lets you better delight in all the sights.
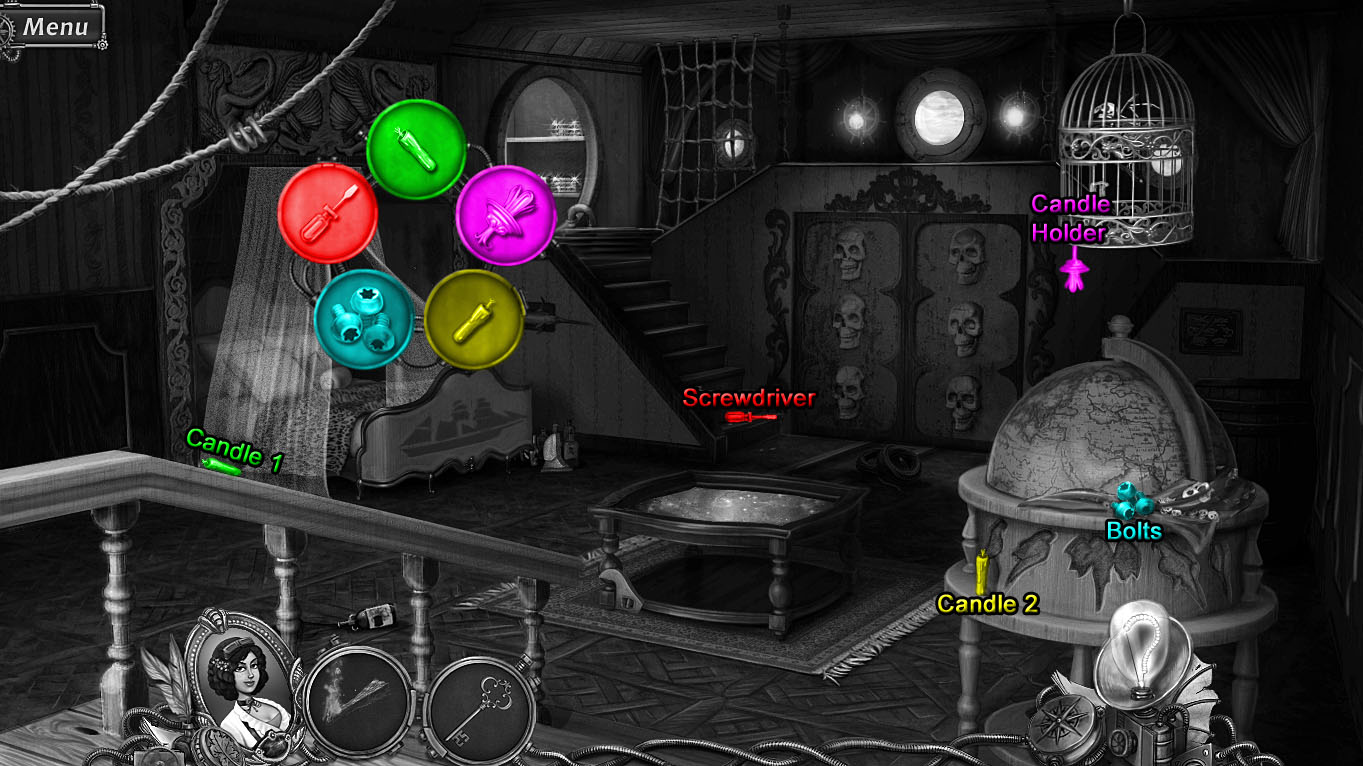
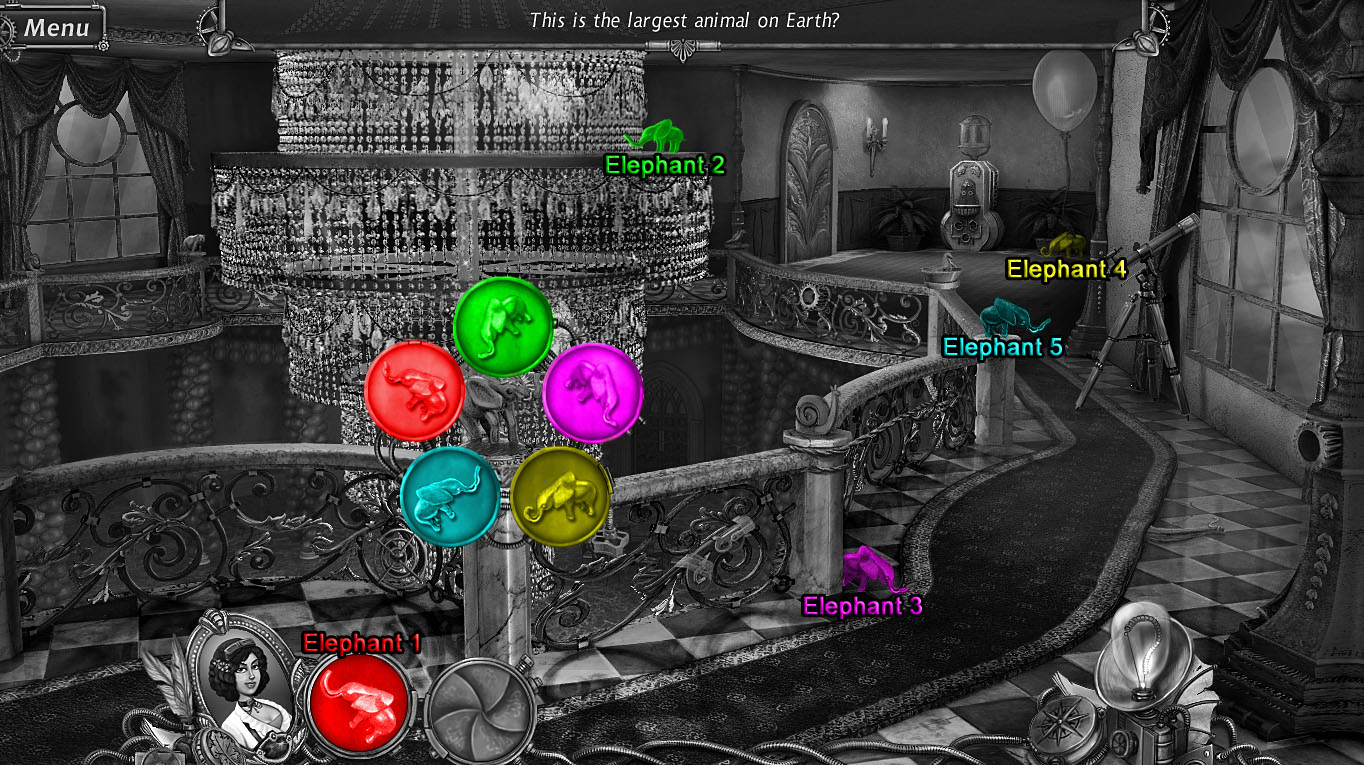
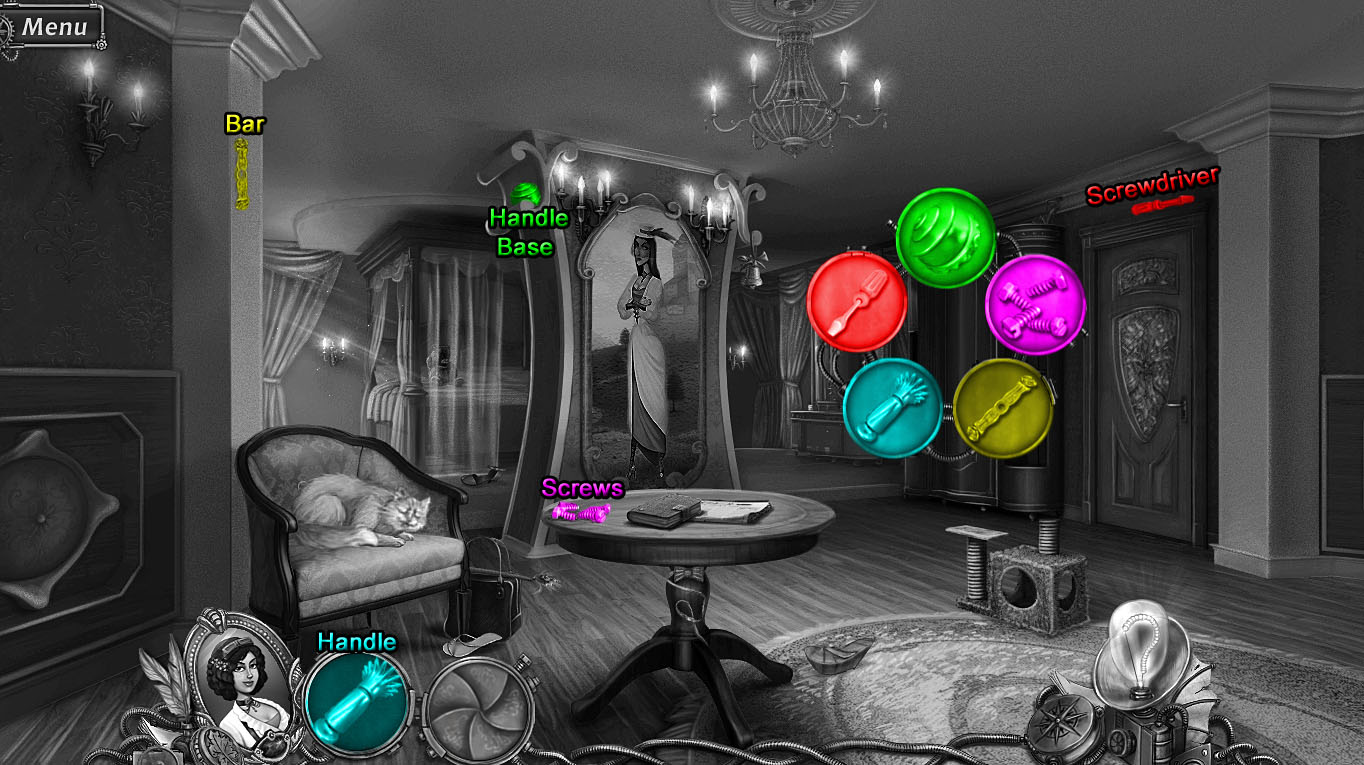
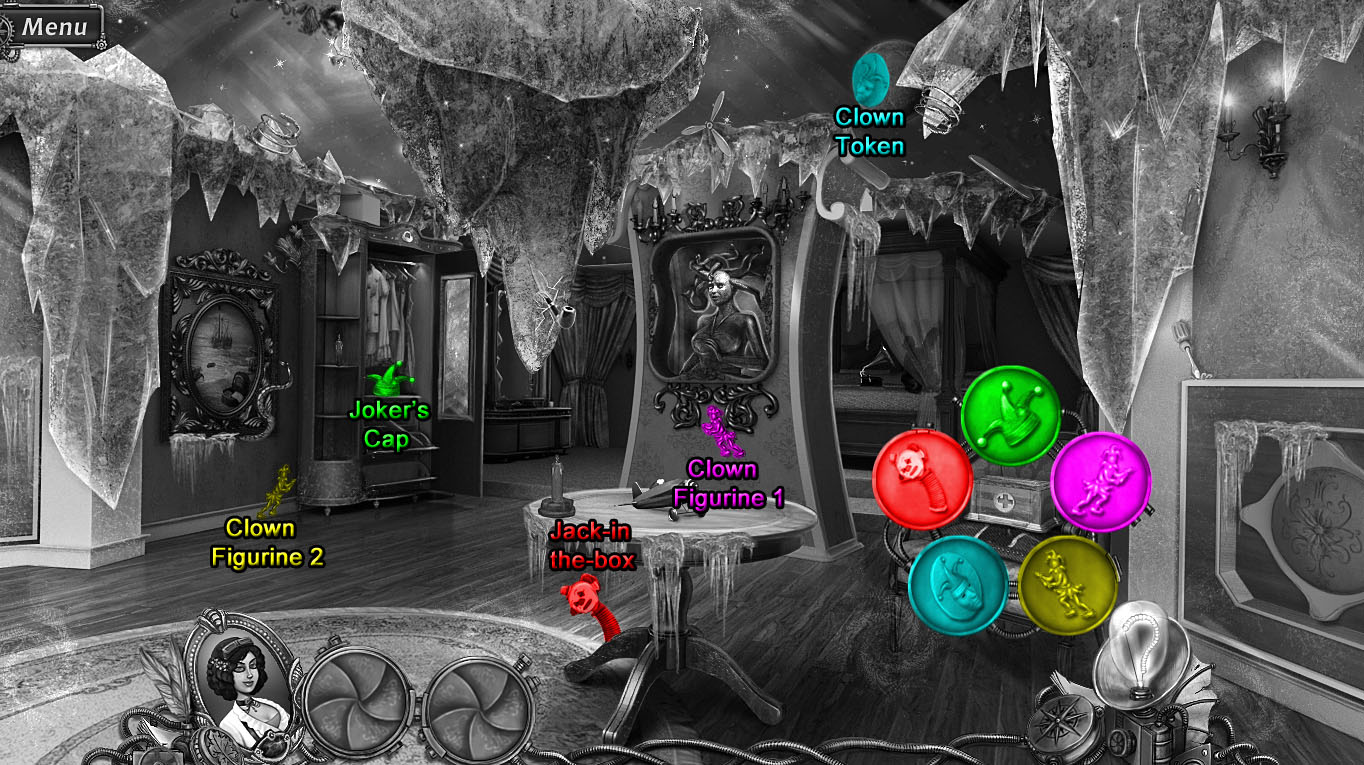
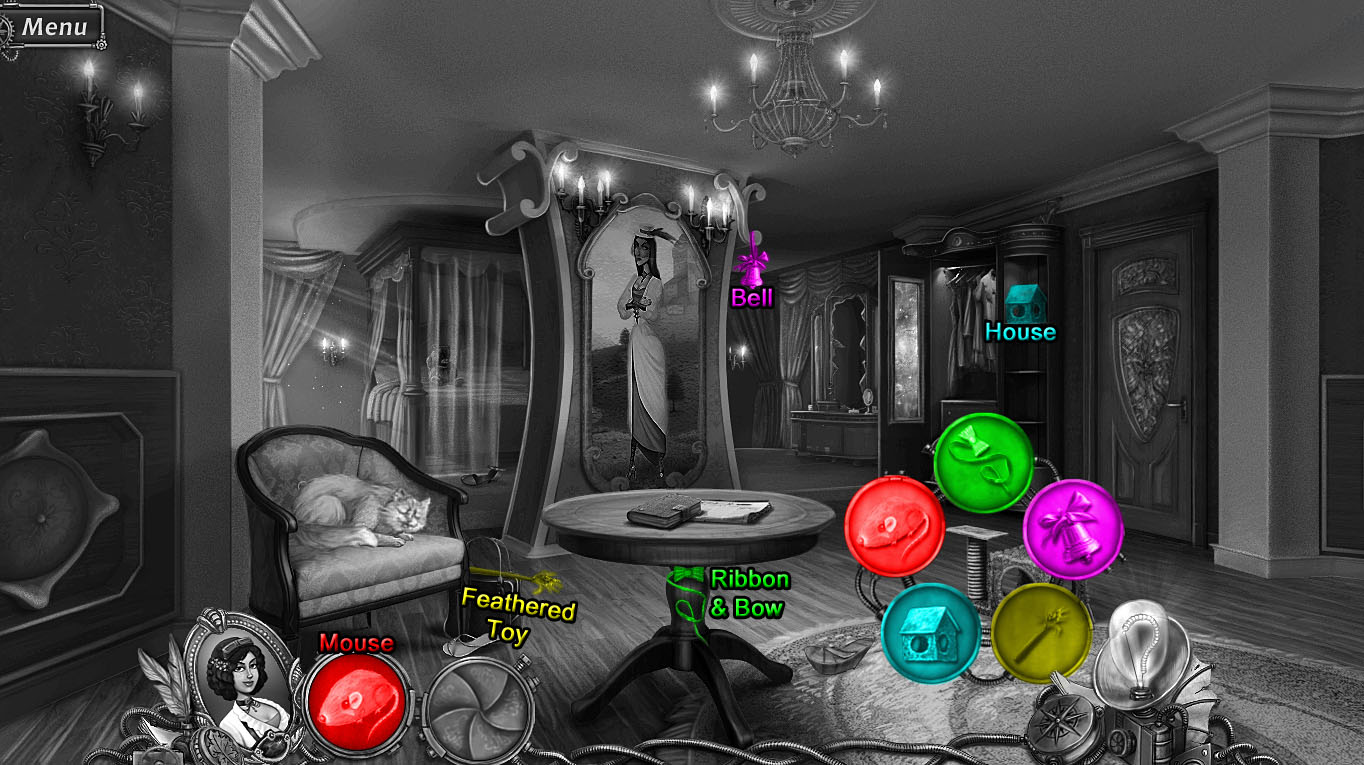
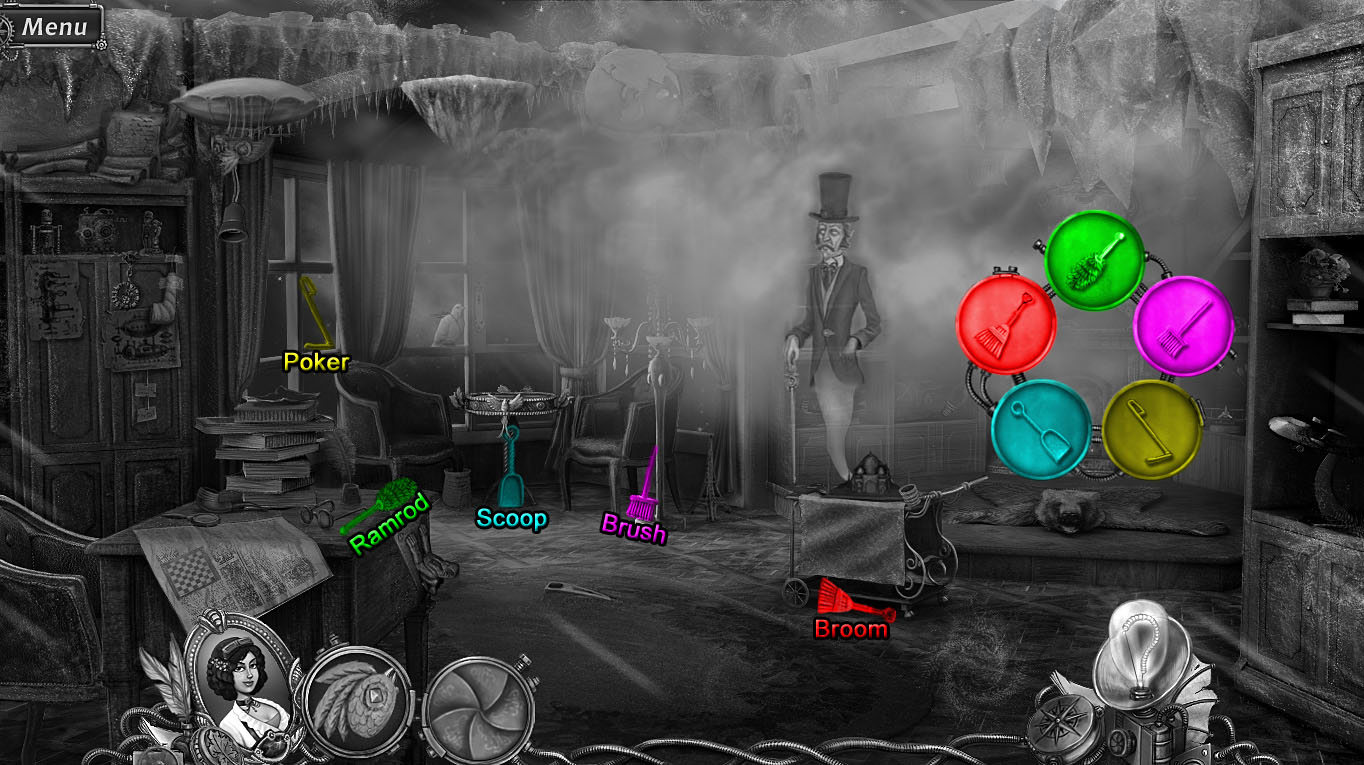
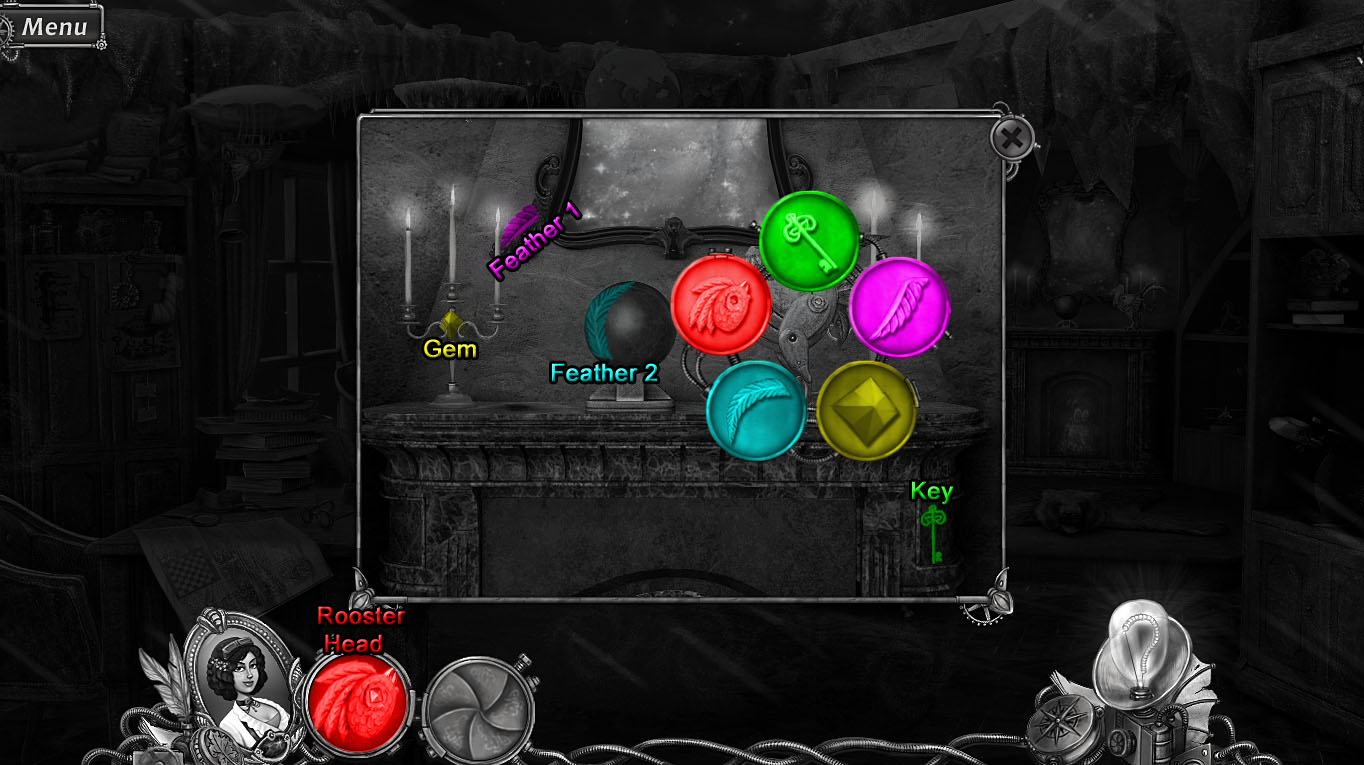
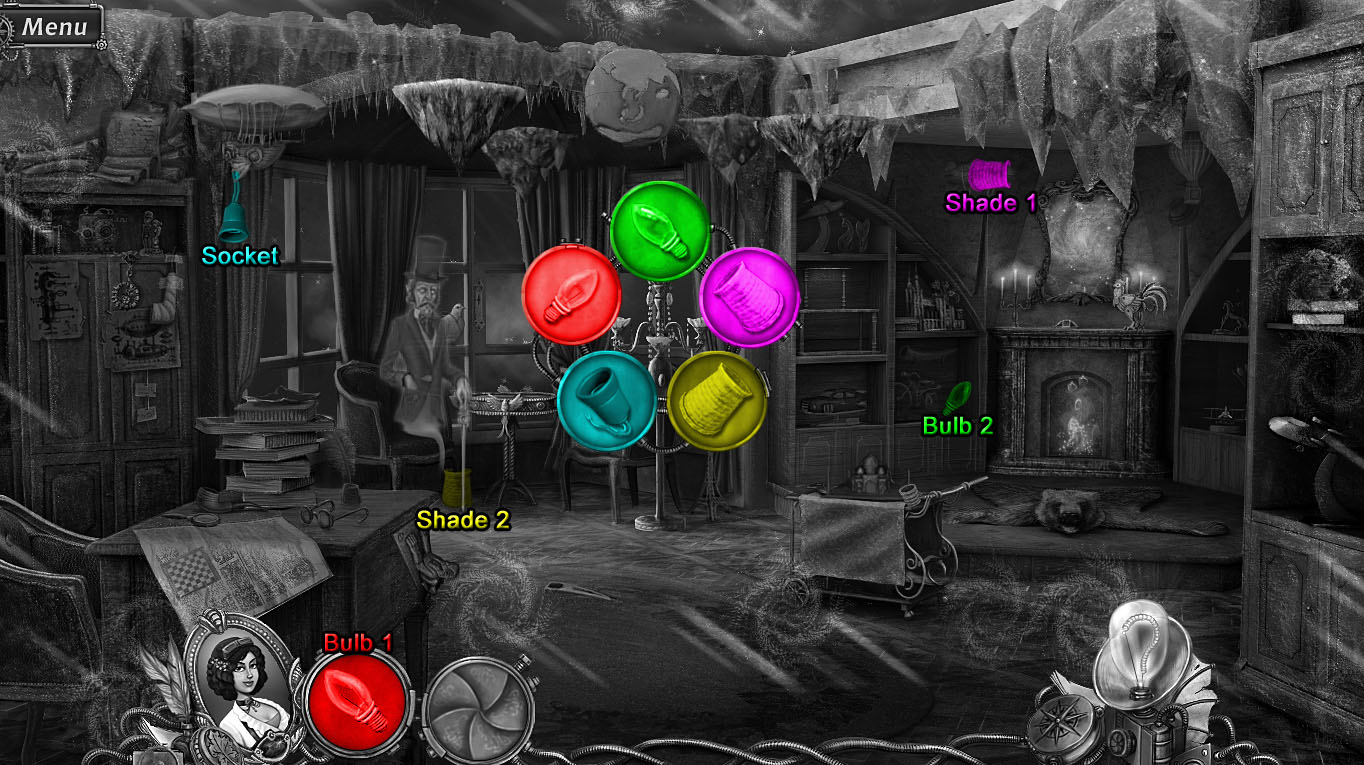
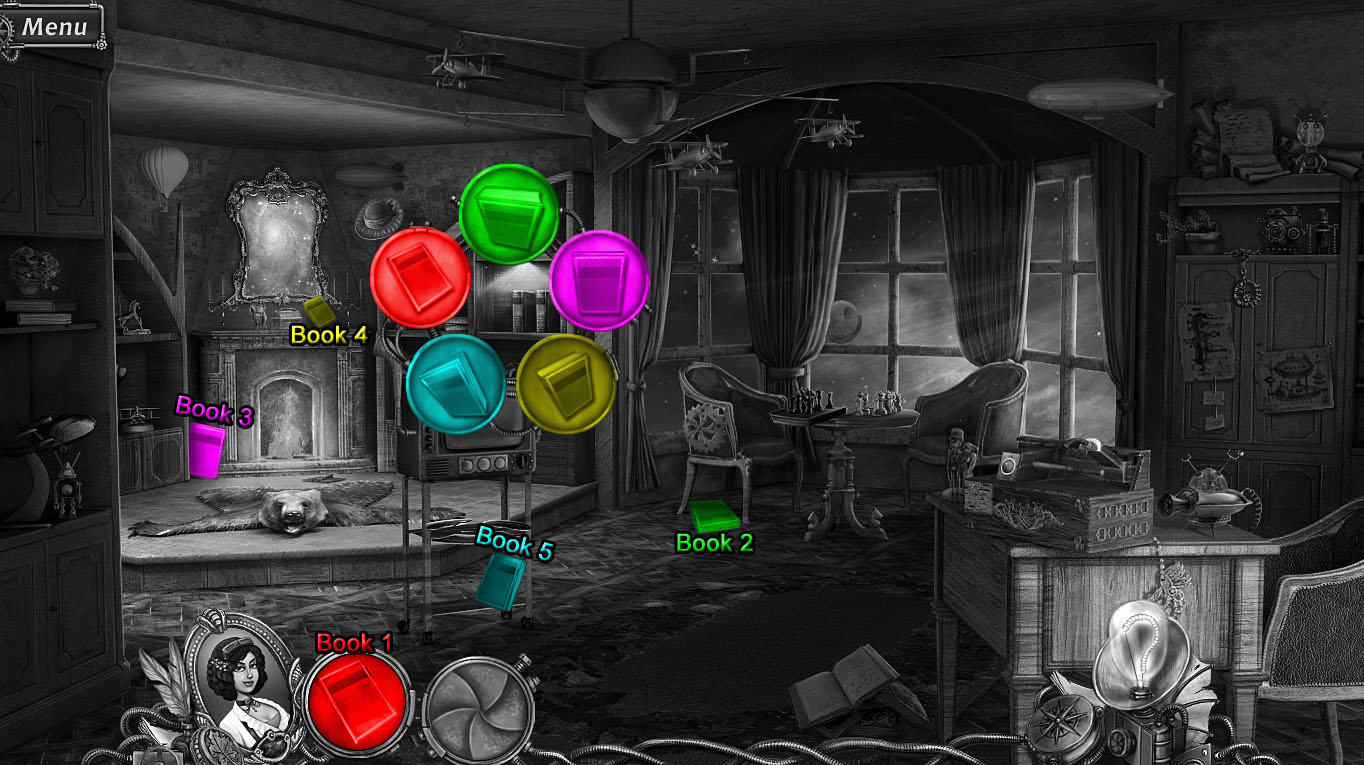
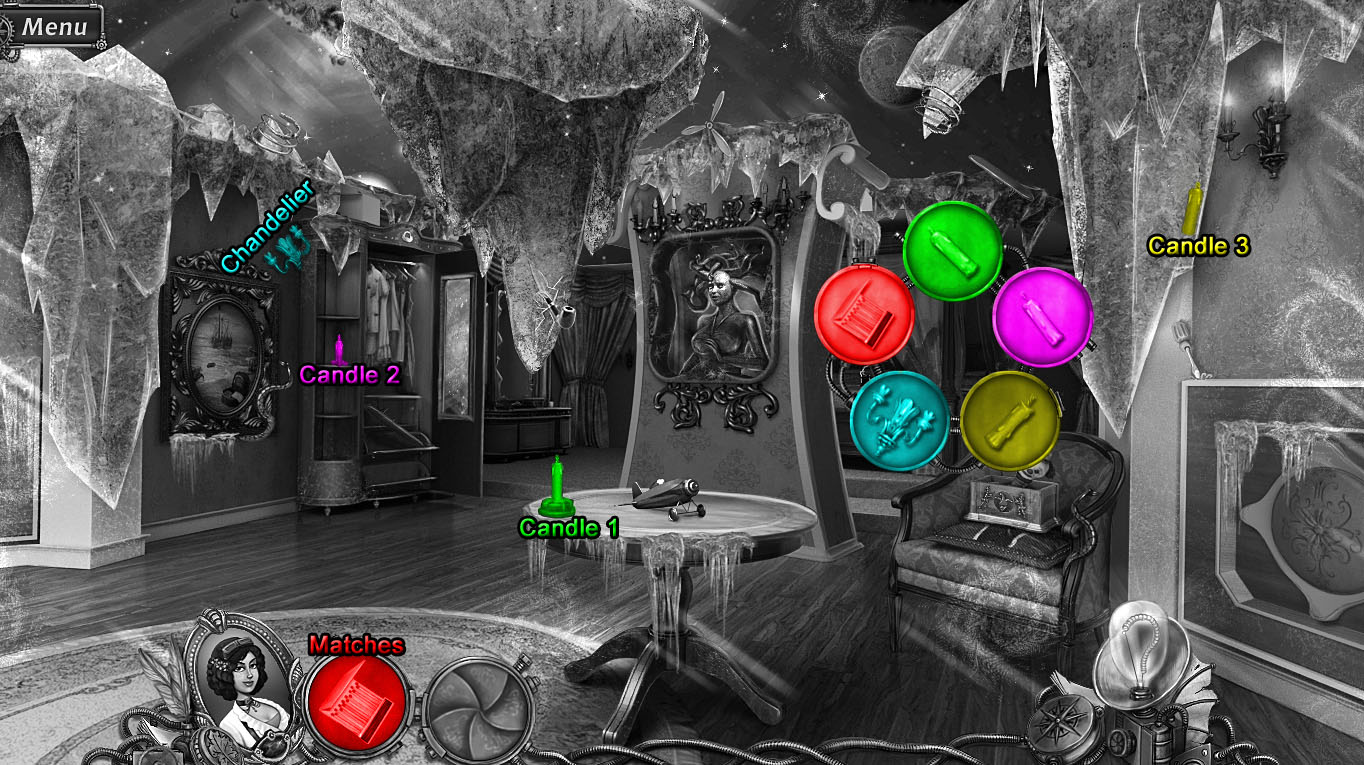
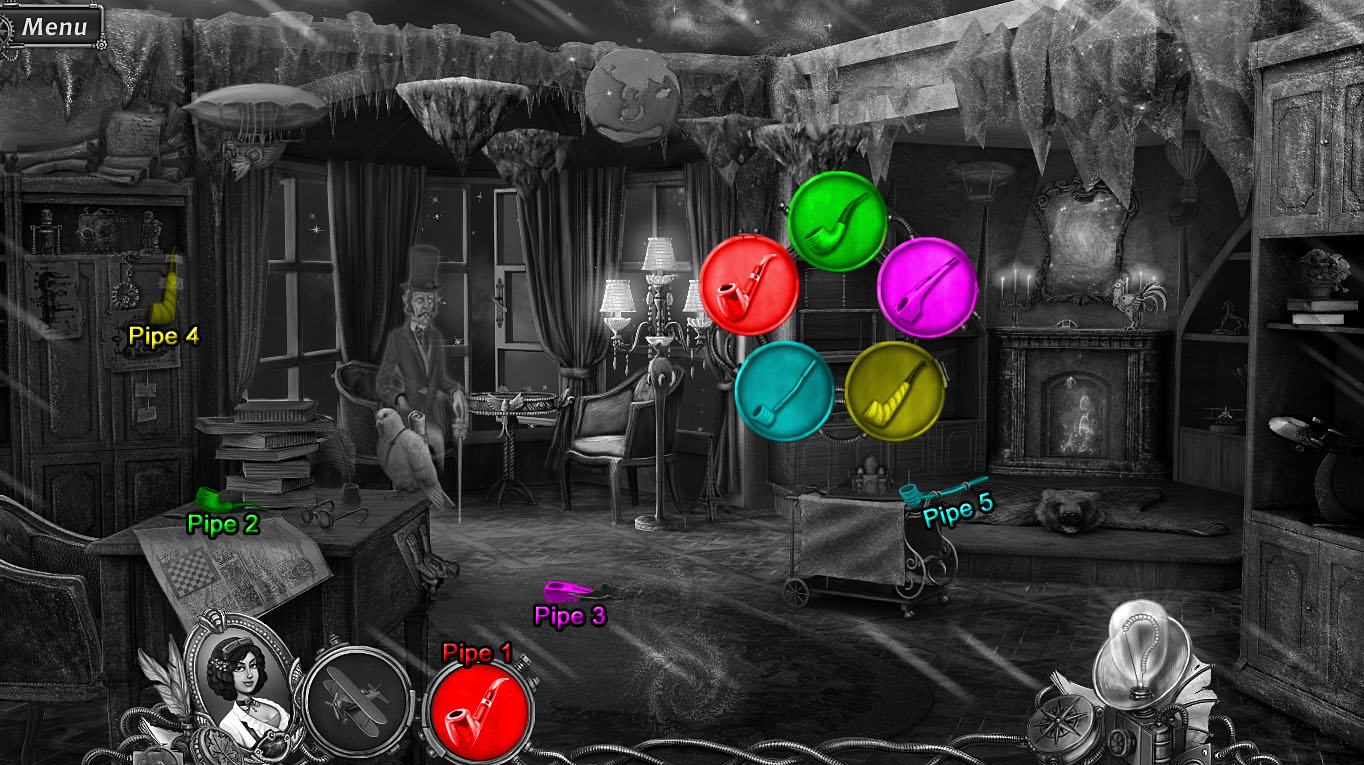
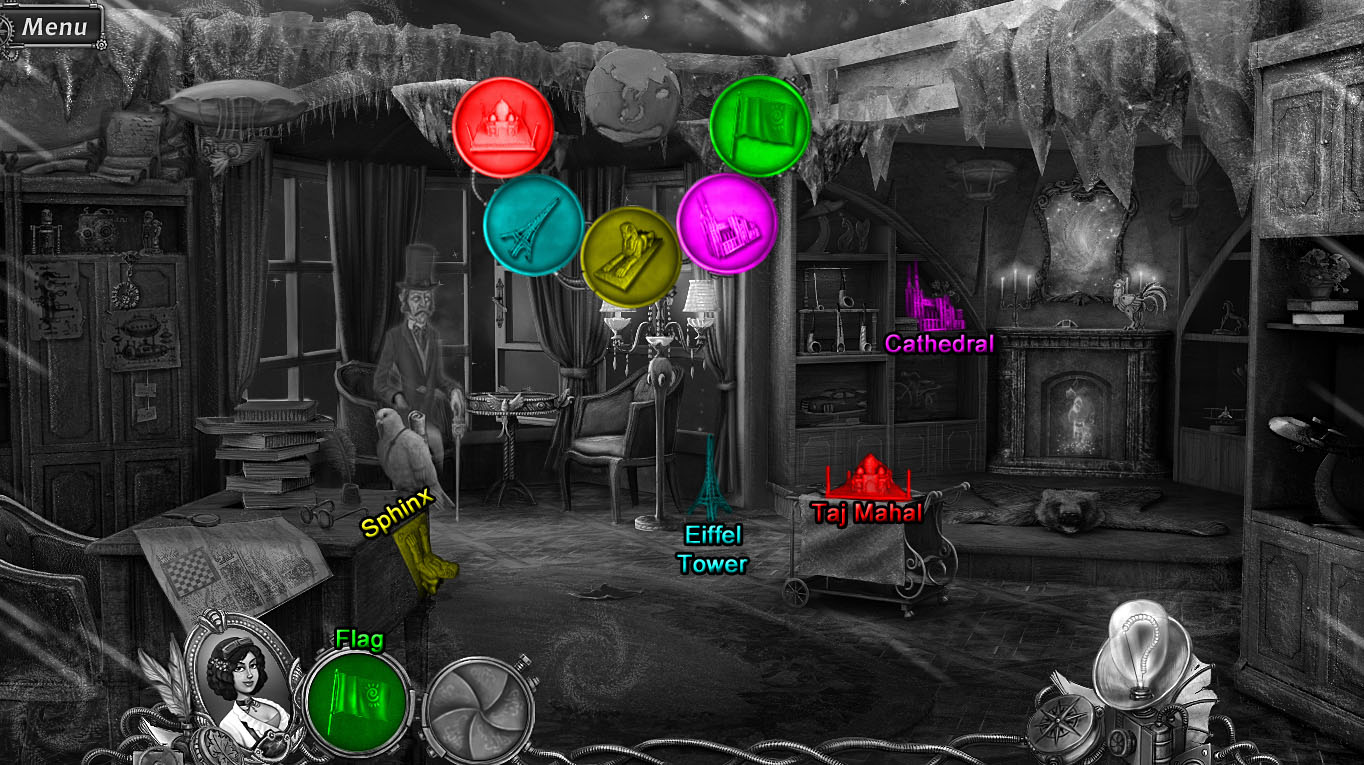
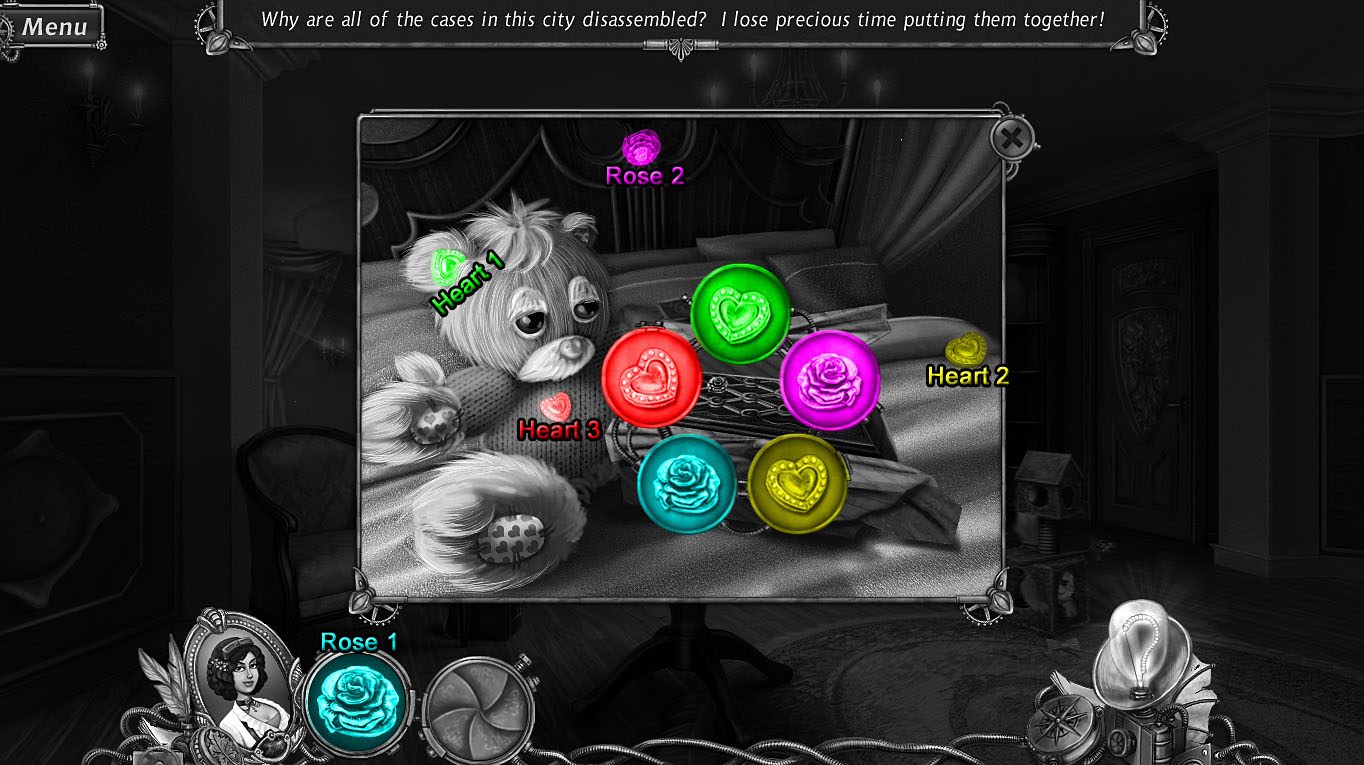
Because the Snark is such a mischievous little bugger, dashing around disassembling all that he touches, there's plenty to search for here just as in the first and second Snark Busters games. Yet this time, except for an occasional broken mirror or frayed rope, the sought after objects are whole and in good condition. When you pick one up—or when you click on an interactive area—a circlet will open up displaying the objects needed before such somethings as a doorway or useful tool is completed. Most of the five chapters involve separate subplots about various spirits of Snark Busters past; do a ghost a favor and he'll help you out, too. These side stories make each chapter more purposeful and lengthy, to result in about 5½ hours of game time.
 Analysis: If you're looking for a game that's bright, cheerful and a heck of a lot of fun, you're in for a special treat! In an industry that is glutted with the same ol' same ol' time and time again, Snark Busters: High Society happily brings unique to the table. I know, loved ones in trouble is an oft-used plot device, hidden object games are fertile breeding grounds for ghosts, and the "circlet" form of search, while not common, has appeared already in games such as The Mystery of the Crystal Portal series and Depths of Betrayal.
What is unique is the way Snark Busters: High Society keeps the story upbeat, engaging and smart without dropping into inanity or triteness. It doesn't second guess its players' intelligence by pretending we don't already know the secret to this mystery or by offering up artificially contrived plot twists. Instead, characters are well-rounded and likeable (you'll even like disliking the villainess), and the story is kept fresh by a new subplot in each of the five chapters. The task of finding objects never feels arduous or strained because it fits naturally into the adventuring element of the game.
Fresh does mean change, though. While I was glad to forgo the eyestrain of seeking barely recognizable fragments, I'll admit some might be disappointed in the change from little pieces to whole objects. The crisp, clear details of every scene made the switch necessary: odd-shaped fragments would stand out too much against the lovely backgrounds. Then, because no fragments means a bottom-of-the-screen display of pieced objects is impractical, the circlets allow for a wide array of items to seek without fumbling through a cumbersome side-scrolling inventory bar.
 All this fabulousity is tinged by two tiny flaws. One is Elizabeth's disconcerting yet chuckle inducing Milli Vanilli moments. It's a good thing, then, that all of the voice-overs are marvelous listens, paced perfectly and sprinkled with snarky witticisms (Newscaster Jessica Marrey, for example, is spot on hilarious!) A pricklier thorn is a photo development puzzle that begins the first chapter; the red lines are misleading and the controls are not explained well enough. Confusing at first, once you figure out the trick (or take a peek at our walkthrough), this puzzle is enjoyable and much easier the next go around.
Snark Busters: High Society emanates high quality and superb design down to the smallest detail. Love gorgeous aesthetics in your games? You'll love the visual artistry of the steampunk-esque fantasy environments. It starts off with a couple blemishes but soon develops into an entertaining, casually challenging and smirk-filled experience. The colorful worlds and humorous story provide a much needed departure from the standard fare's woeful tales of gruesomeness. So give it the chance to win you over. It's easier to catch a Snark by its tail than to be not beguiled by this fanciful seek-and-find romp.
![]() Windows:
Windows:
Download the demo
Get the full version
![]() Mac OS X:
Mac OS X:
Download the demo
Get the full version


Walkthrough Guide
(Please allow page to fully load for spoiler tags to be functional.)
Snark Busters: High Society Walkthrough
(Part 1, Chapters 1 & 2)
Chapter 1
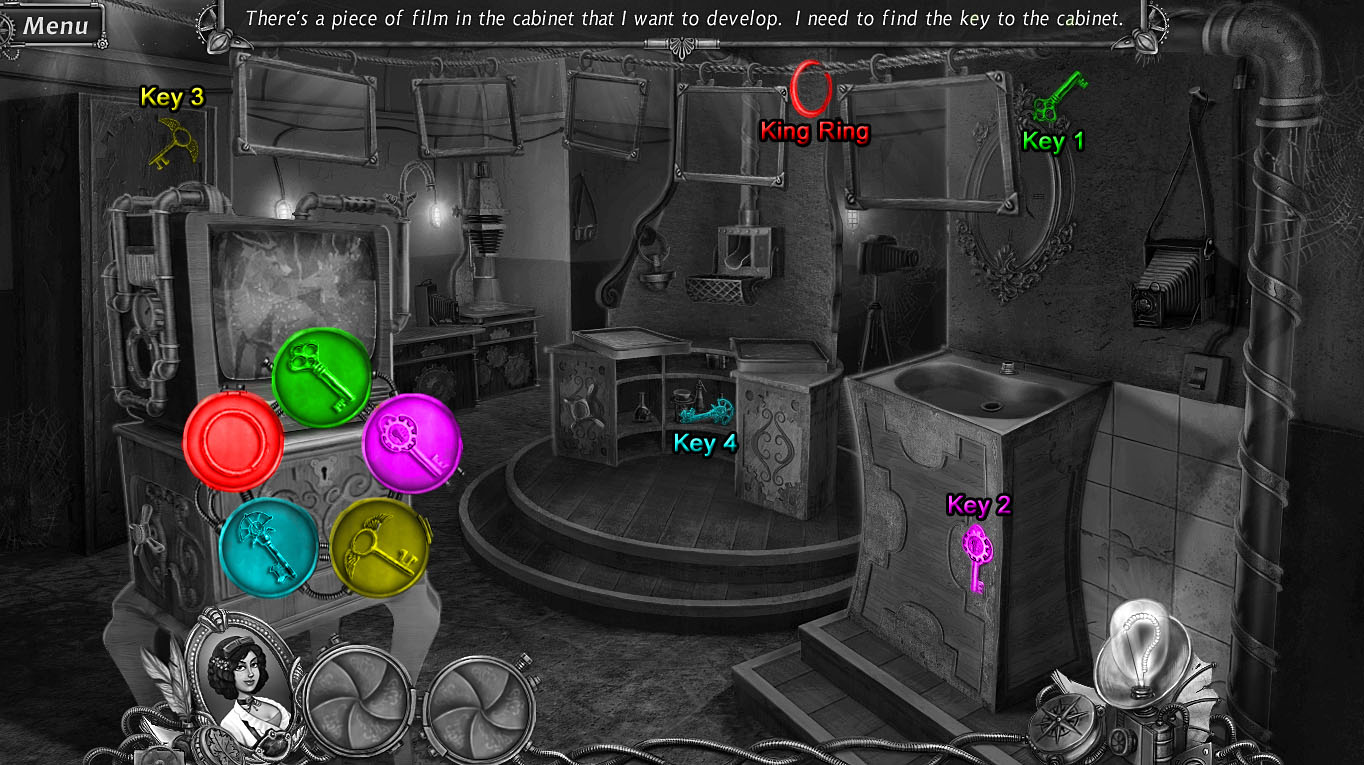
Photo Lab
Click the cabinet under the television to view the missing pieces of the Keyring.
The first Key is at the top of the mirror frame hanging on the wall above the sink.
The second Key is on the right side at the front of the sink base.
The third Key is at the top of the screen behind the television.
The fourth Key is on the middle shelf under the purple and green developer fluids.
The Key Ring is hanging from the rope between the two glass plates on the right.
Cabinet Screenshot.
After all of the pieces are collected, click the open cabinet to look inside.
Take the Film Negative on top of the photo album cover.
Open the photo album, then take the Washer on the right page.
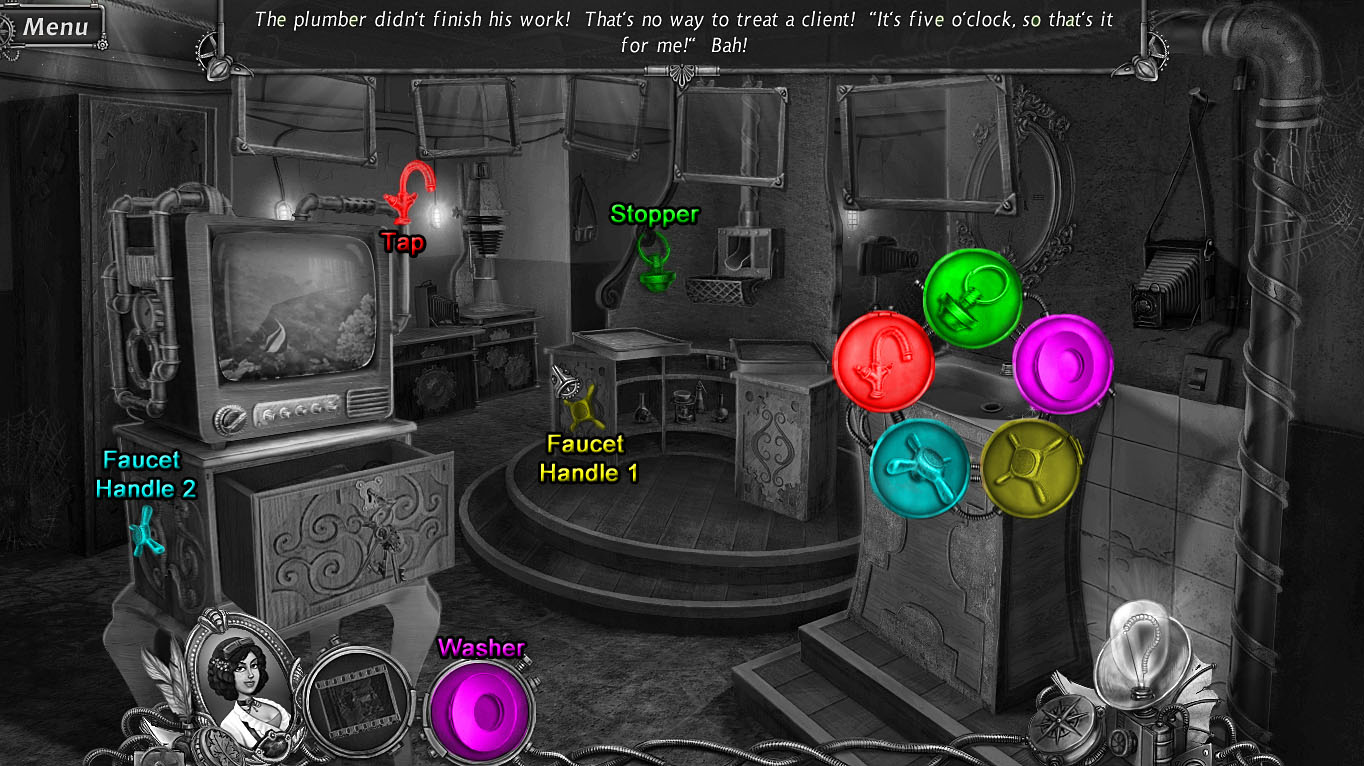
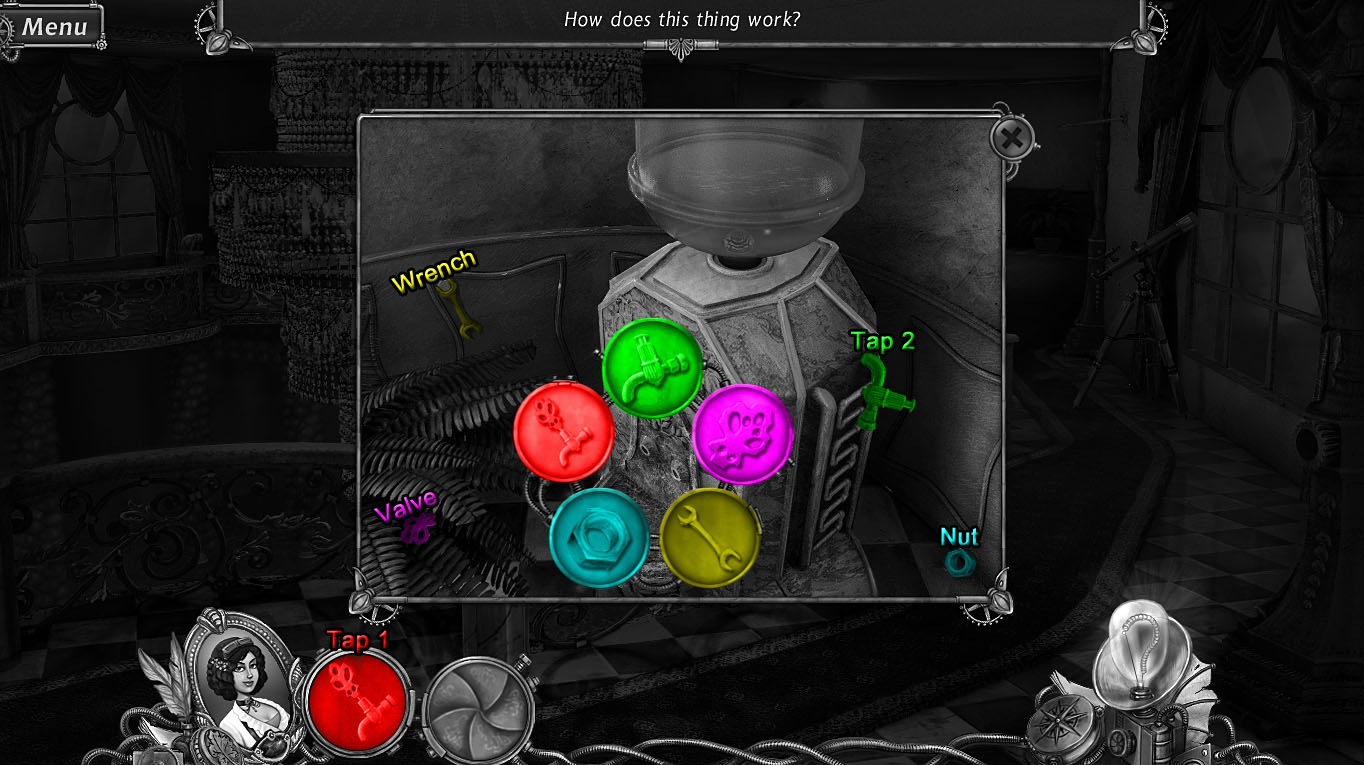
Click the sink to view the missing pieces of the Faucet.
Add the Washer from your inventory to the sink.
The first Faucet Handle is at the left side of the drawers directly below the purple developer fluid tray.
The second Faucet Handle is on the left side of the cabinet under the television.
The Tap is on the tubes at the upper right corner of the television.
The Stopper is hanging from the railing on the wall above the purple developer fluid.
Sink Screenshot.
When all the pieces are collected, the sink will fill with water.
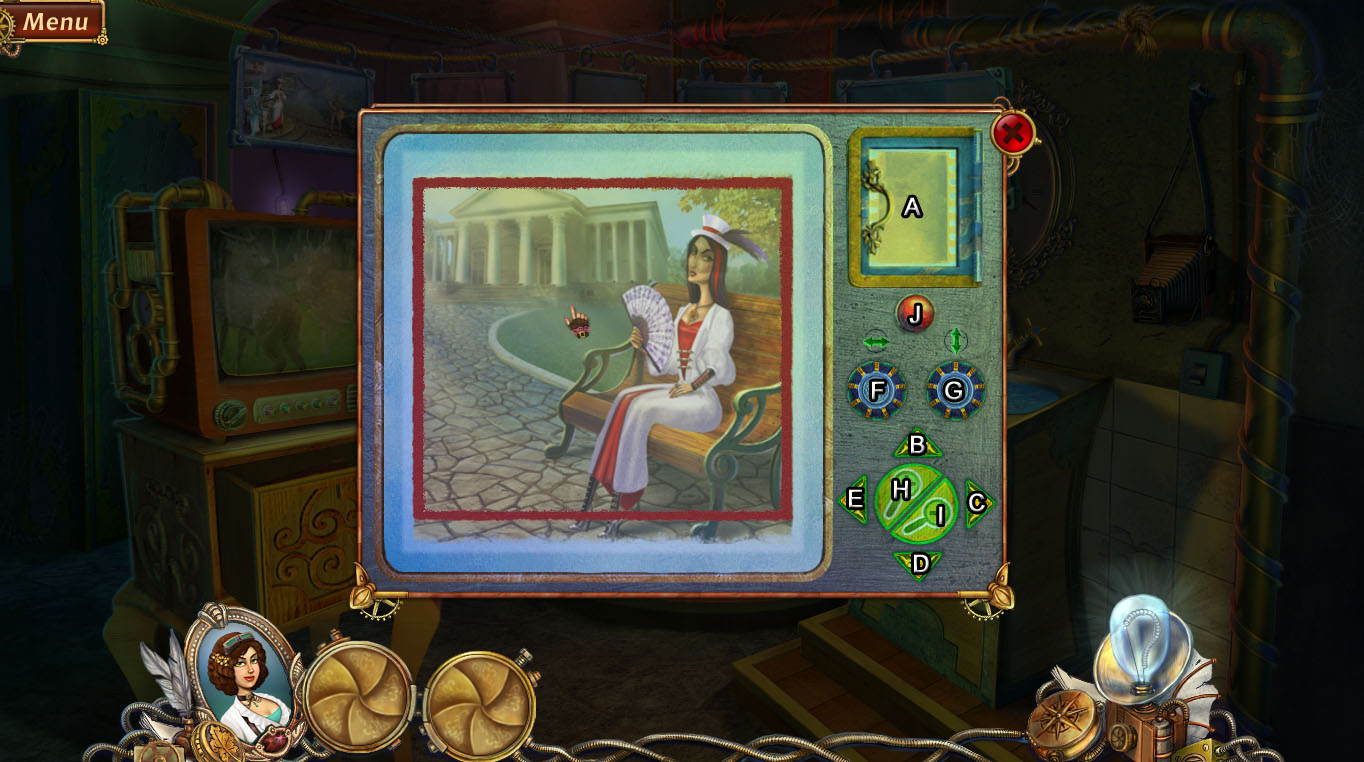
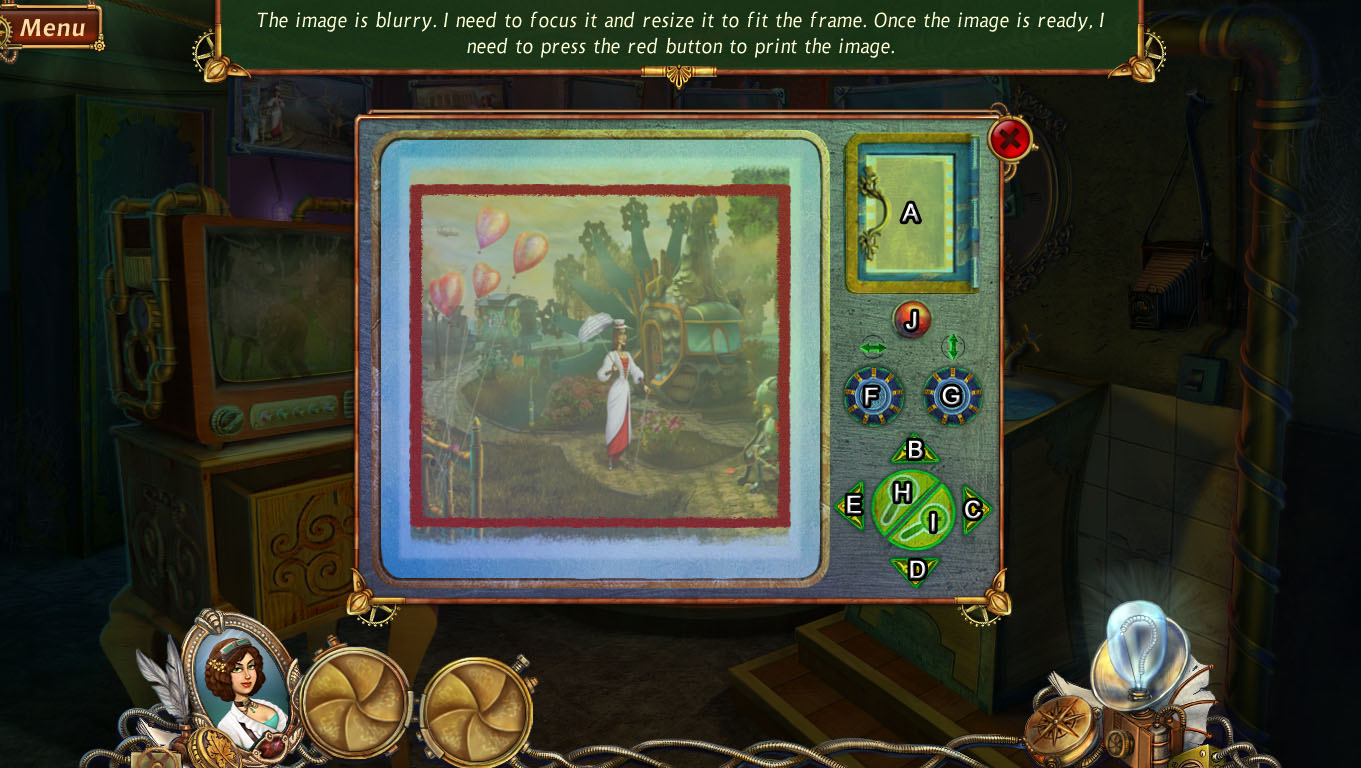
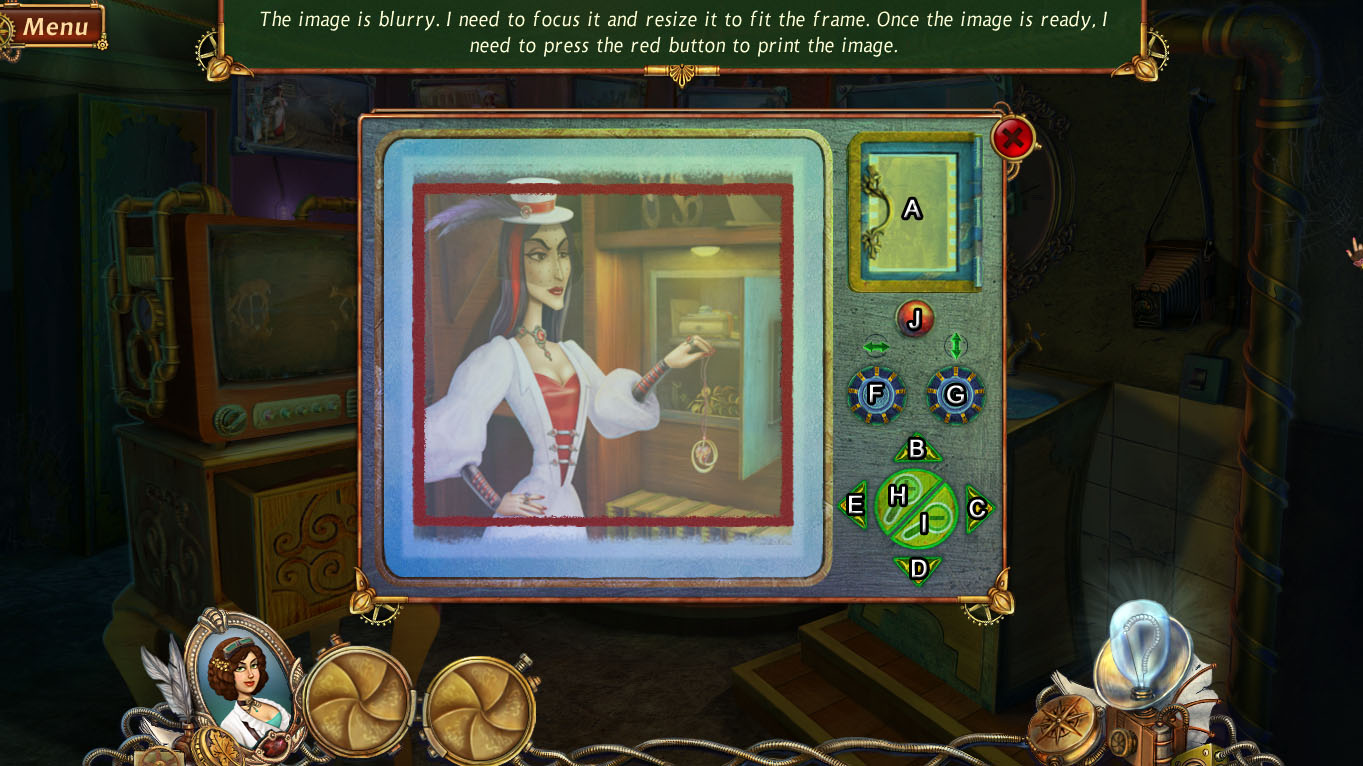
Click the mechanism beside the camera on the table at the back of the room for a closer look.
Place the Film Negative in the small compartment in the upper right corner of the camera (A).
Use the directional arrows (B, C, D, & E) at the lower right corner of the camera to focus the image.
Click the left blue dial under the horizontal arrow (F) and the blue dial under the vertical arrows (G) to stretch the image into the shape of a square.
Click the + magnifier button (H) to zoom in or the - magnifier button (I) to zoom out.
Press the red button (J) to print the complete image.
Camera Screenshot.
Click the Undeveloped Photo in the center of the red square to add it to your inventory.
Place the Undeveloped Photo in the green and purple trays of developer fluid on the counter to receive the Developed Photo.
Put the Developed Photo inside the water-filled sink to make the Washed Photo.
Finally, place the Washed photo in the left glass frame hanging from the rope.
Mansion Gates
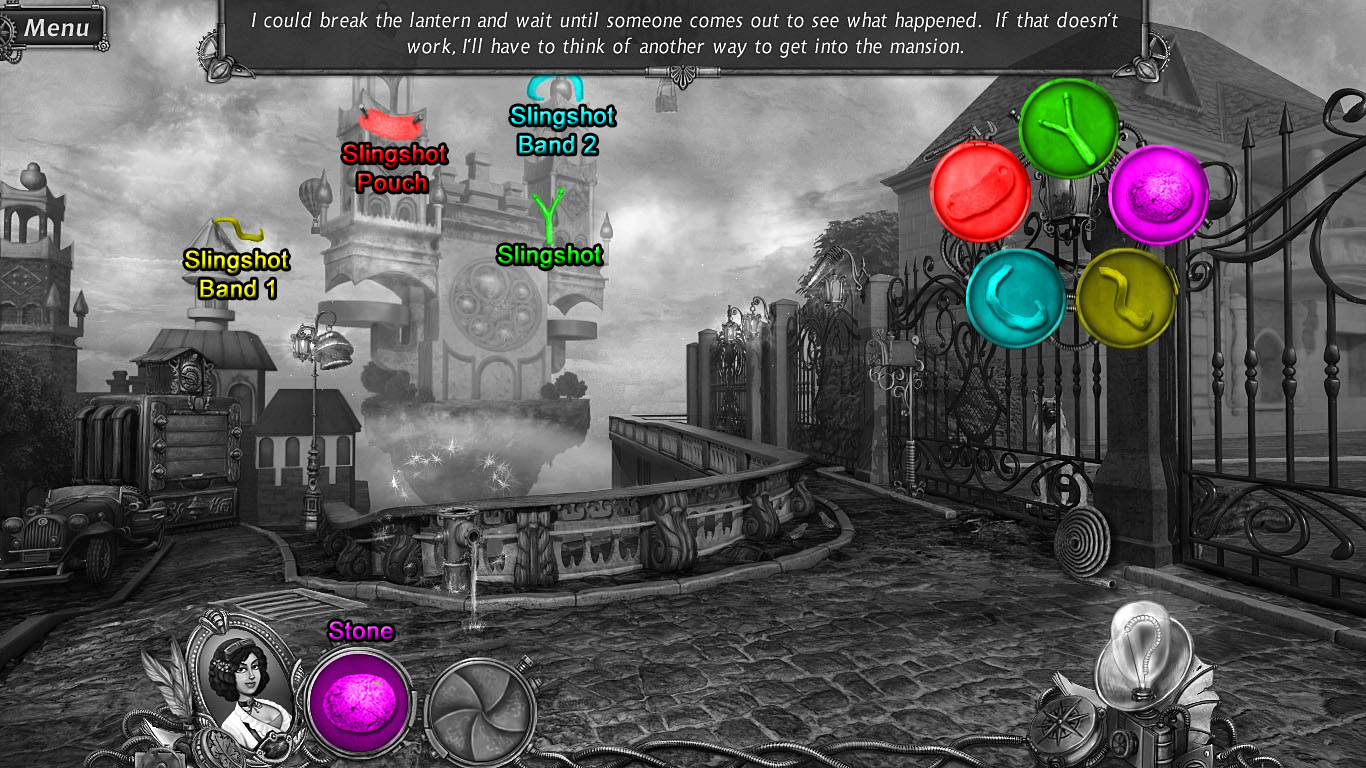
Click the drain in the road to the left of the fire hydrant to zoom in.
Take the Stone on the curb beside the drain.
Click the lantern at the top of the gate to view the missing pieces of the Slingshot.
Add the Stone from your inventory to the incomplete slingshot.
The first Slingshot Band is at the top of the spire behind the cuckoo clock.
The second Slingshot Band is at the top of the right tower of the floating castle.
The Slingshot Pouch is in the middle of the left tower of the floating castle.
The Slingshot frame is at the bottom of the right tower of the floating castle.
Slingshot Screenshot.
Once all the pieces are collected, the Slingshot will smash the lantern.
Pick up the gargoyle shaped Mailbox Handle that falls to the ground from the lantern.
Click the mailbox in front of the entrance gate for a closer look.
Place the Mailbox Handle on the peg at the front of the mailbox door.
Take the Fire Hydrant Cap inside the open mailbox.
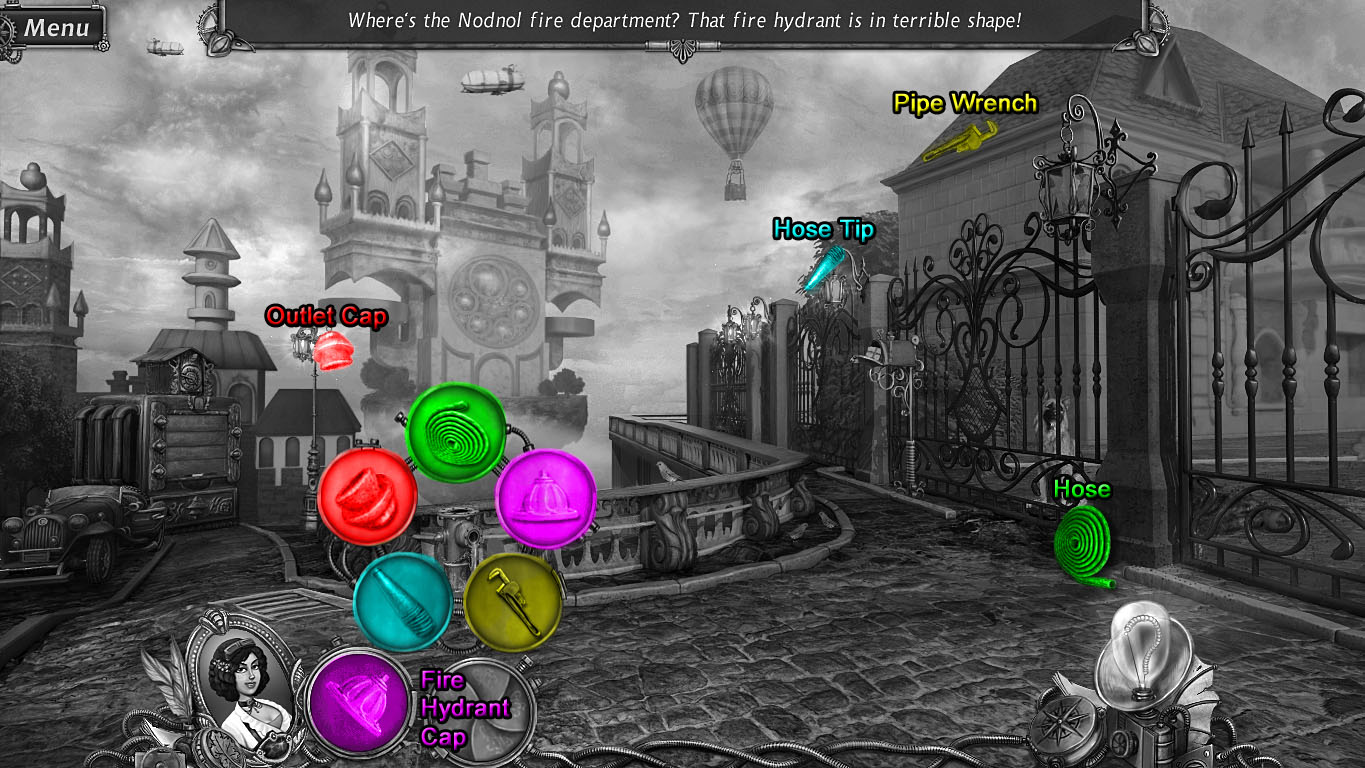
Click the fire hydrant in the middle of the sidewalk to view the missing fire hydrant pieces.
Add the Fire Hydrant Cap from your inventory to the incomplete hydrant.
The Pipe Wrench is on top of the roof of the right building.
The Hose Tip is above the lantern in the middle of the gate.
The Outlet Cap is on the top of the lamppost at the end of the sidewalk.
The Hose is at the bottom of the pillar beside the dog.
Fire Hydrant Screenshot.
After all the pieces are collected, the hose attached to the hydrant will fill the drain in the road with water.
Take the Hour Hand that floats to the surface of the water in the paper boat.
Click the green machine to zoom in, then click the cuckoo clock at the top of the machine for a close-up.
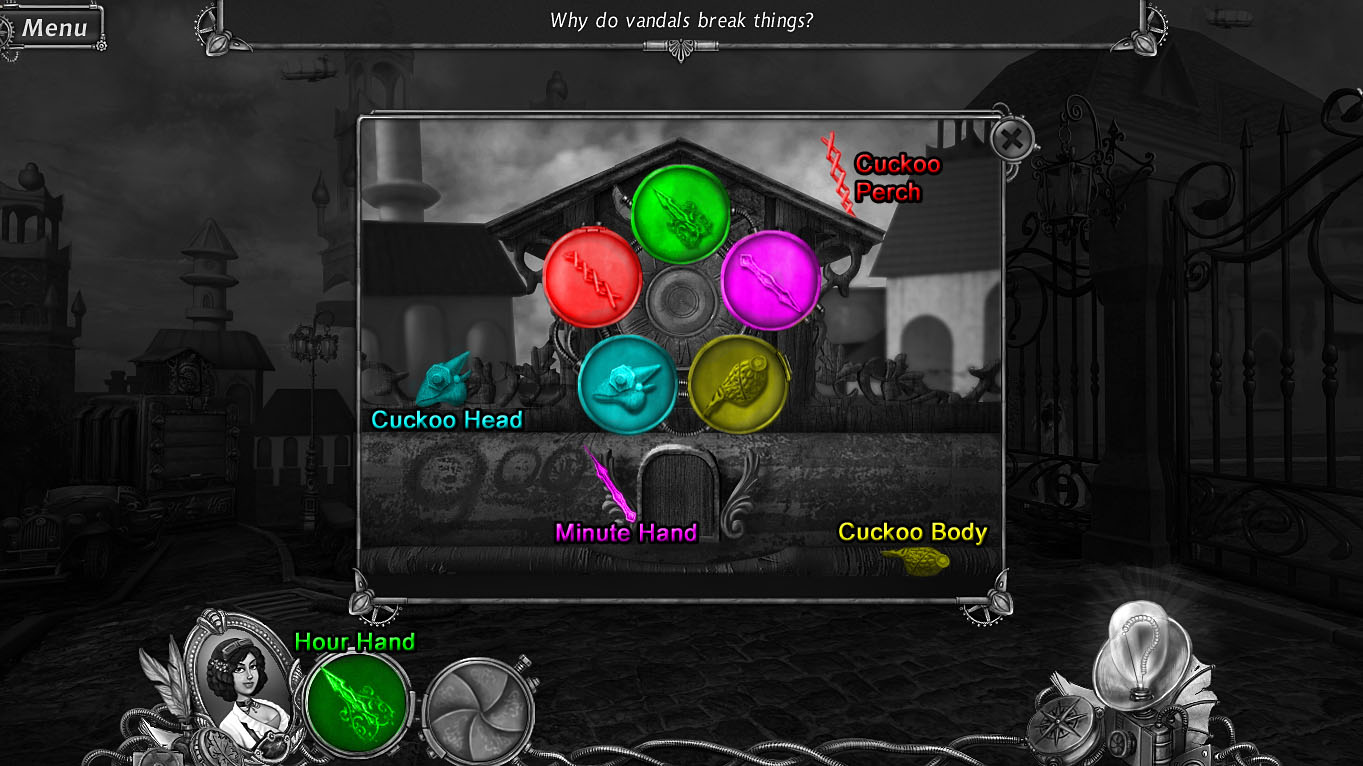
Click the face of the clock to view the missing pieces of the clock.
Add the Hour Hand from your inventory to the incomplete clock.
The Minute Hand is in the middle of the gold filigree on the left side of the door.
The Cuckoo Body is near the base at the lower right corner of the window.
The Cuckoo Head is in front of the carved wooden leaves to the left of the clock.
The Cuckoo Perch is at the right edge of the roof on top of the cuckoo clock.
Cuckoo Clock Screenshot.
The minigame will start after all of the clock pieces are collected.
Move the hour and minute hands on the cuckoo clock to set it to the time shown at the lower left side of the clock's base.
Click a clock hand to select it, then rotate it clockwise or counterclockwise and click again to release the hand.
The hour hand should be set to IX, the Roman numeral for 9.
The minute hand should be set to XII, the Roman numeral for 12.
Solution.
When the correct time is set, the vending machine puzzle will begin.
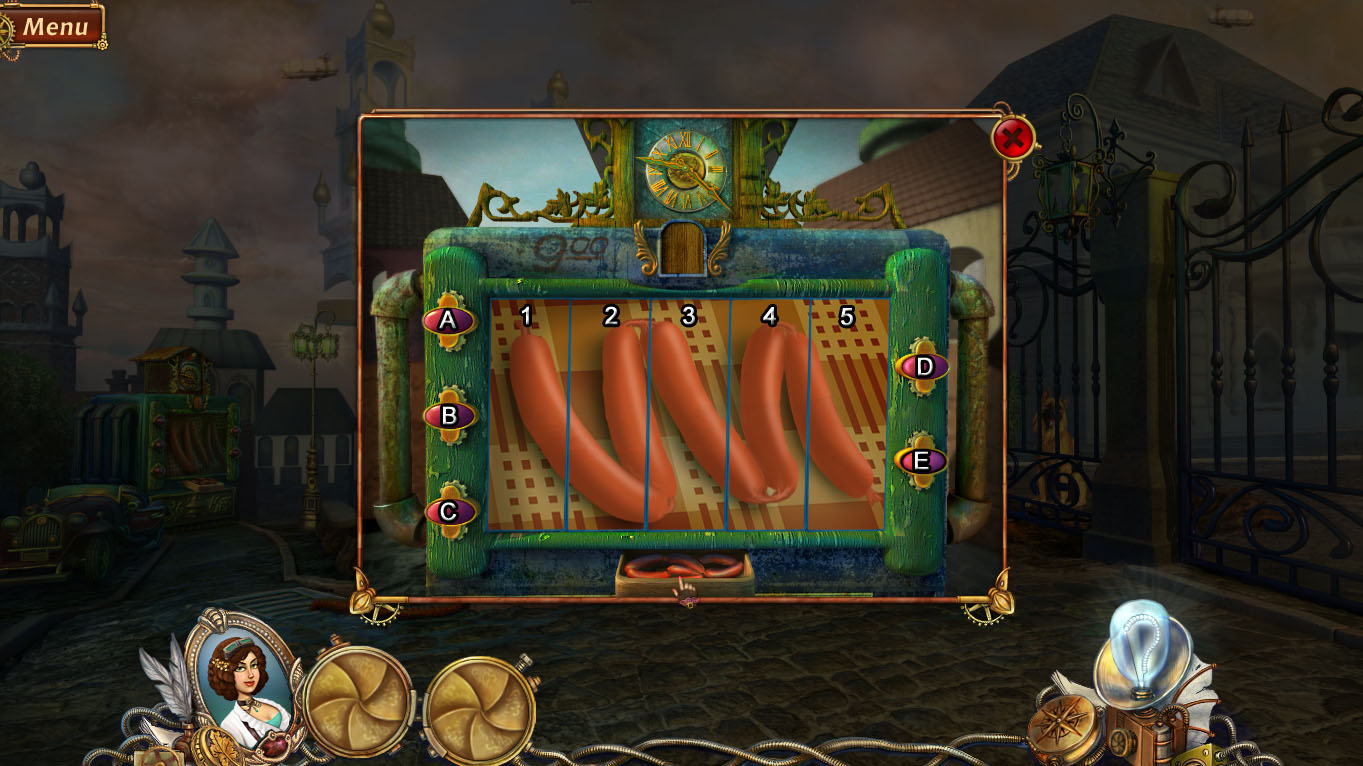
Click the buttons to cycle through the images inside each panel in the frame to complete the picture of a sausage link.
The top button on the left side (A) flips panels 1 and 4.
The middle button on the left side (B) flips panels 2 and 5.
The bottom button the left side (C) flips panels 2 and 3.
The upper button on the right side (D) flips panels 1 and 3.
The lower button on the right side (E) flips panel 5.
Start by pressing button A to set the image of the sausage in Panel 4.
Next, press button D to set the image of the sausage in Panel 1.
Then, press button C to set the image of the sausage in Panel 3.
Next, press button B to set the image of the sausage in Panel 2.
Finally, press button E to set the image of the sausage in Panel 5.
Solution.
Once the puzzle is solved, take the Sausages from the compartment at the bottom of the puzzle frame.
Place the Sausages from your inventory on the ground in front of the dog.
Go through the hole under the gate to travel to the Courtyard.
Courtyard
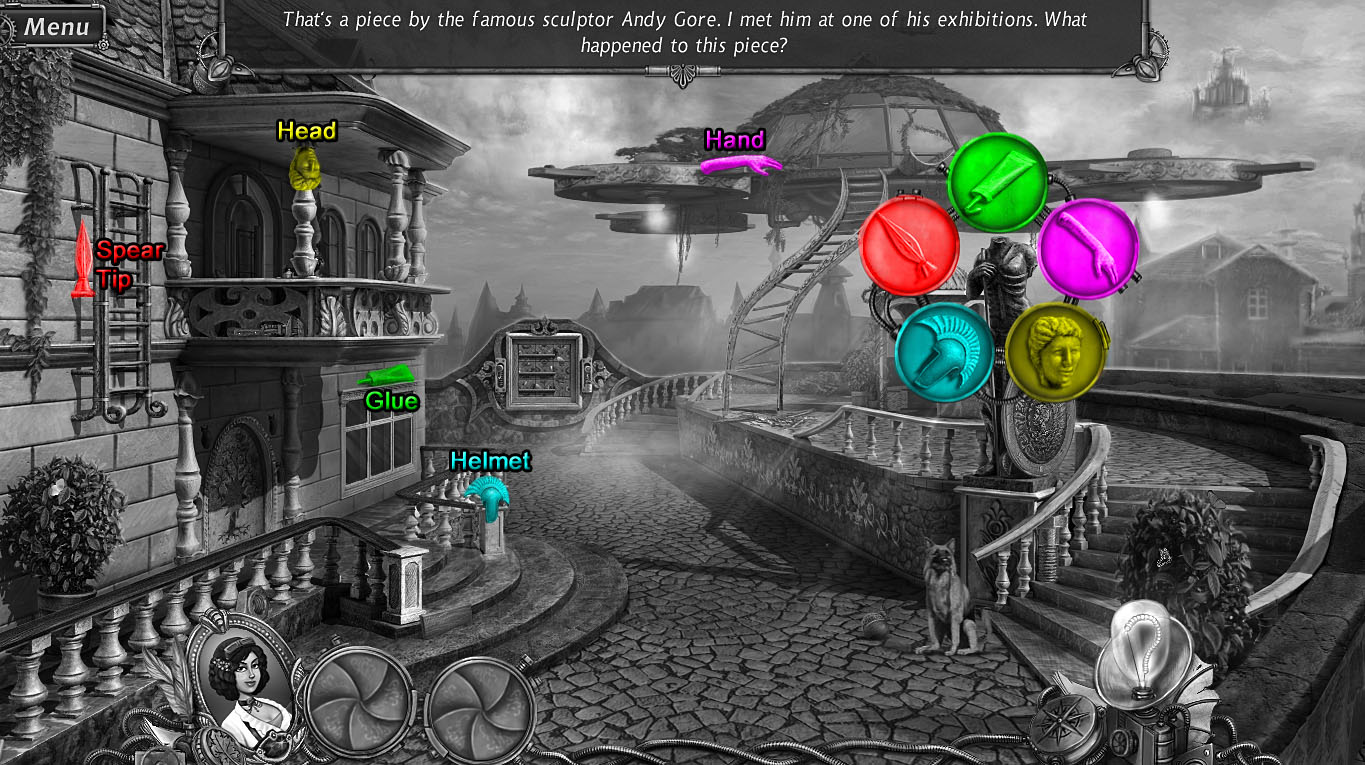
Click the broken statue on the pedestal by the right stairs to view the missing statue pieces.
The Glue is above the rectangular window on the first floor of the house.
The Hand is at the lower left side of the dome on the floating island.
The Head is at the top of the column on the balcony.
The Helmet is at the end of the back railing on the steps to the house.
The Spear Tip is on the left side of the ladder on the wall of the house.
Statue Screenshot.
When all the statue pieces are collected, the statue will turn her shield and reveal one of the jeweled Apples.
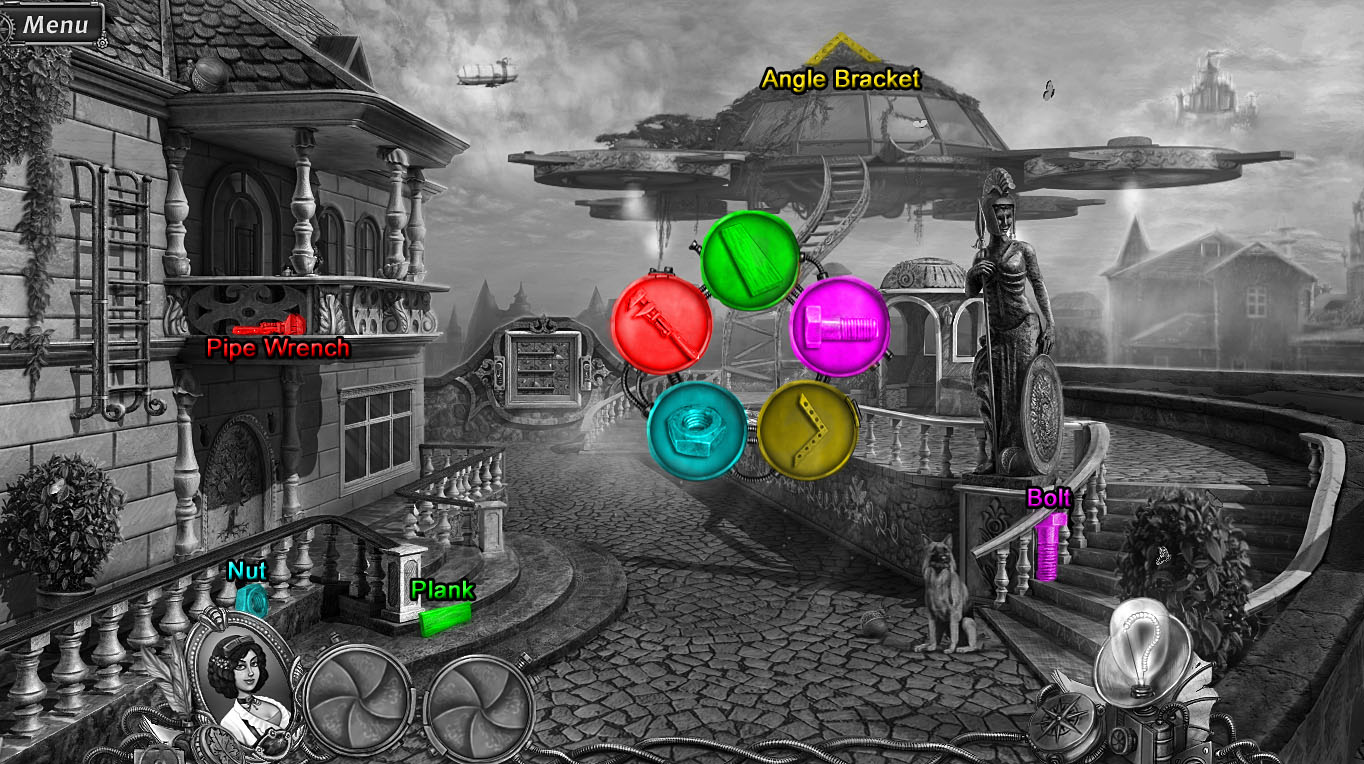
Leave the Apple in place for now and click the broken stairway to the flying island to view the missing pieces of the stairs.
The Plank is in the middle of the steps leading to the house.
The Bolt is in the middle of the railing directly below the statue.
The Angle Bracket is at the top of the dome on the floating island.
The Nut is at the bottom of the left railing in front of the house.
The Pipe Wrench is at the bottom of the left side of the balcony.
Stairway Screenshot.
Once all the pieces are collected, go up the repaired stairs to the Garden.
Garden
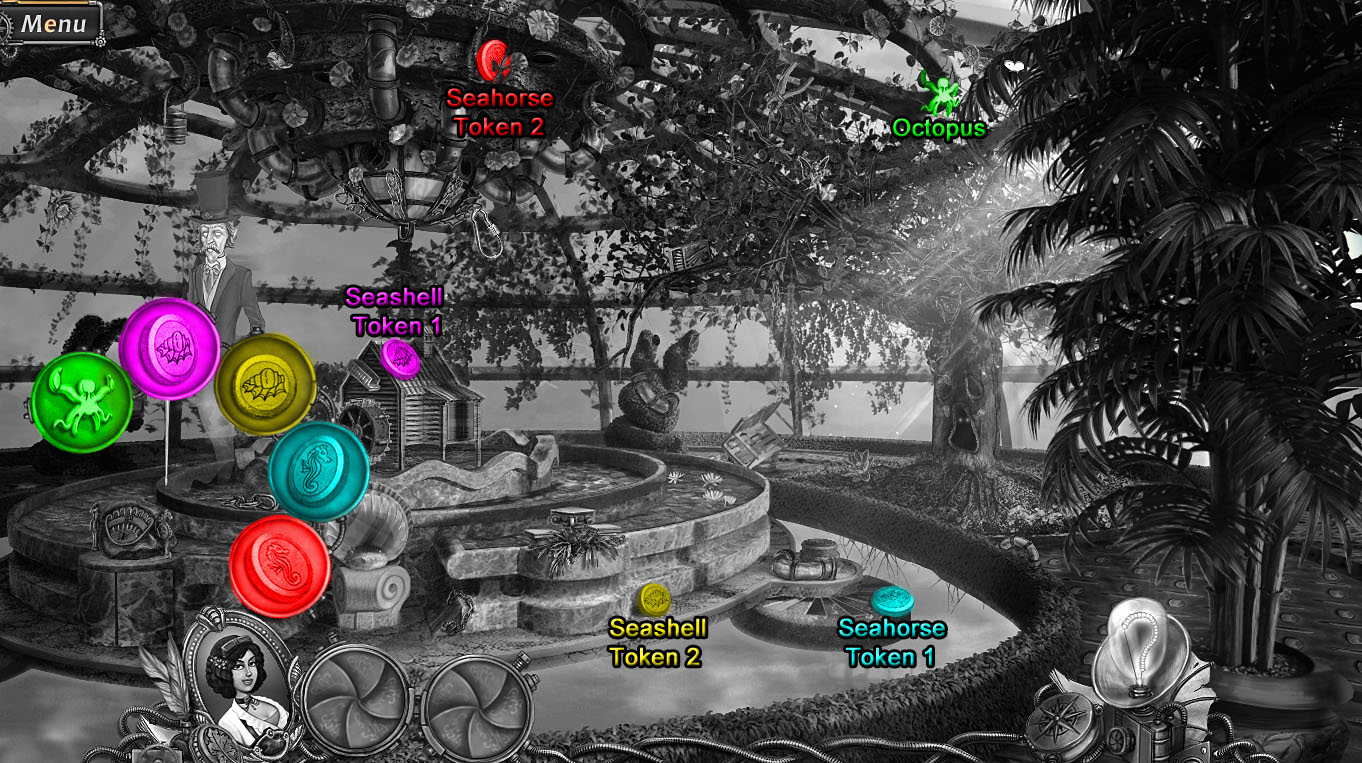
Speak with the ghost floating over the fountain.
Click the locked box under the ghost to look for the missing pieces of the sea chest.
The Octopus is on the upper right side of the dome's frame.
The first Seashell Token is on the roof of the small building in the middle of the fountain.
The second Seashell Token is on the lower right side of the ring around the base of the fountain.
The first Seahorse Token is on the edge of the circular propeller cover.
The second Seahorse Token is in the middle of the tube mechanism in the middle of the dome ceiling.
Sea Chest Screenshot.
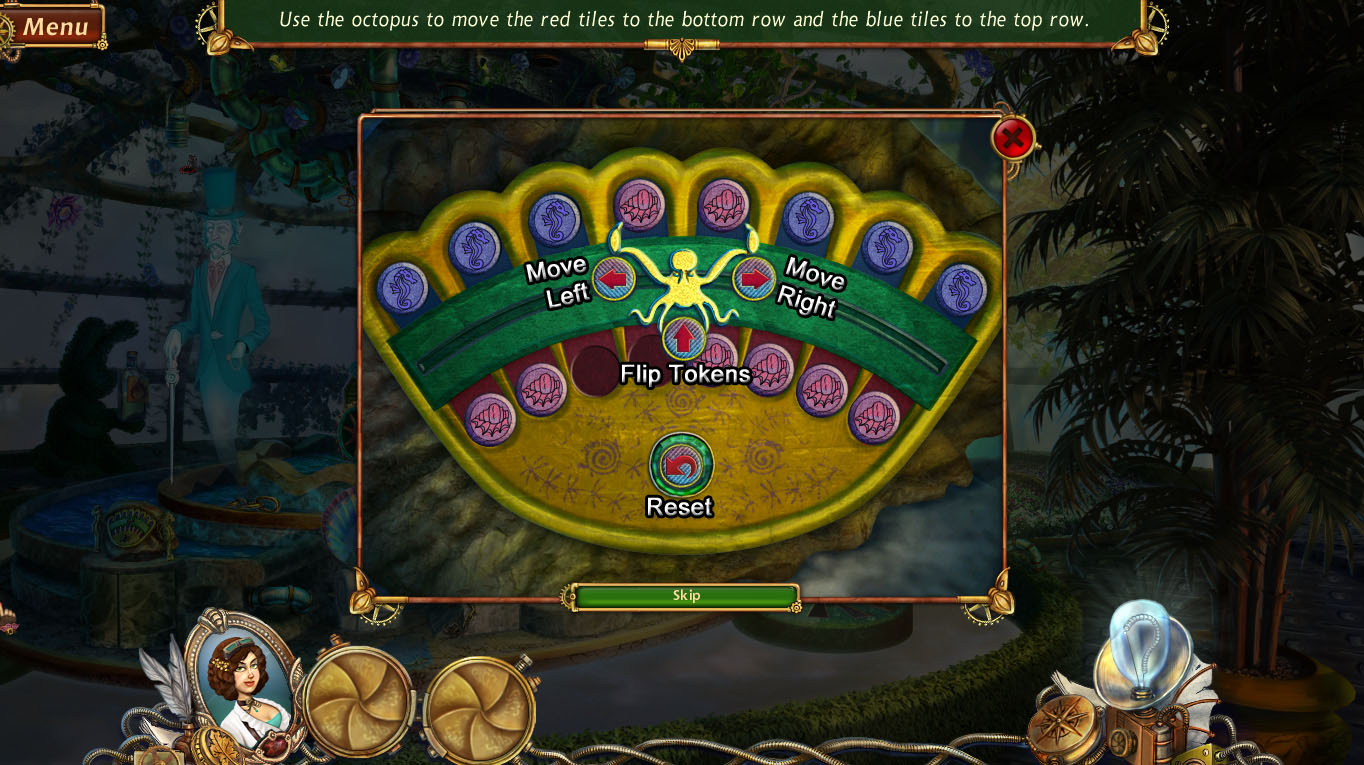
The puzzle will begin after all the sea chest pieces have been collected.
Use the octopus to arrange all the blue seahorse tokens at the top and all the red seashell tokens at the bottom.
Click the left and right arrows to move the octopus from side to side.
Click the down arrow to pick up two adjacent tokens and move them into the empty spaces on the opposite side.
Push the button at the board to reset the puzzle.
Solution.
Once the puzzle is solved, the sea chest will open and reveal a Fairy.
Leave the Fairy in place for now and click the mirror to travel to the Frozen Garden.
Frozen Garden (Backward World)
Click the cannon to the right of the Christmas tree to view the missing fireworks pieces.
The first Fireworks is on the nose of the middle dolphin in the ice sculpture.
The second Fireworks is just to the lower right of the mirror that transports you back to the Garden.
The third Fireworks is near the bottom of the chunk of ice in the middle of the dome ceiling.
The fourth Fireworks is slightly above the third, between the two tubes in the center of the ice chunk.
The fifth Fireworks is on the left side of the ring that goes in a circle around the floor.
Fireworks Screenshot.
After all the pieces are collected, the rockets will fire from the cannons and break the icicle hanging from the ceiling.
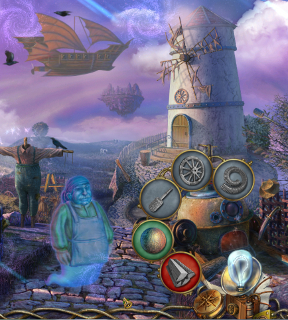
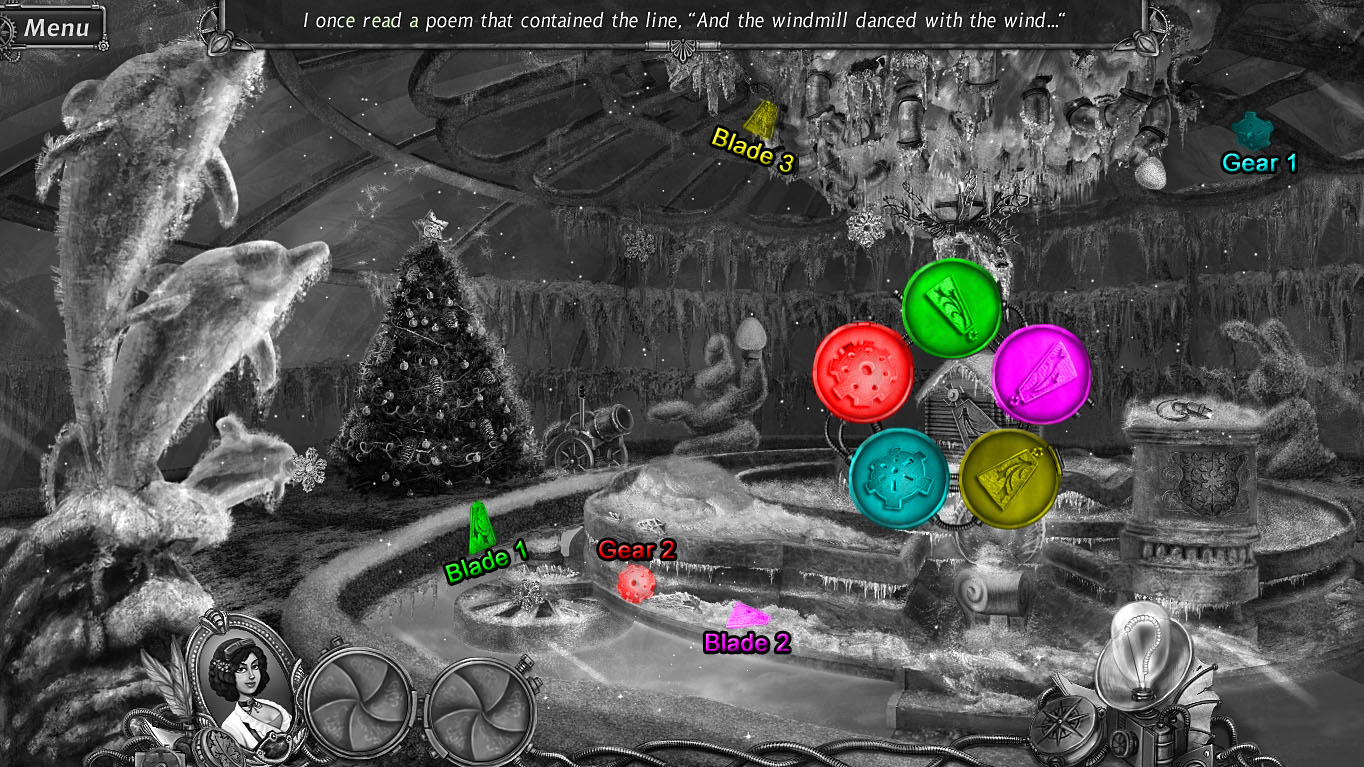
Click the miniature house in the middle of the frozen fountain to view the missing windmill pieces.
The first Blade is on the inside of the ring in the floor, just above the round propeller.
Pick up the second Blade that fell to the floor after the icicle shattered and add it to the windmill.
The third Blade is in the chunk of ice at the ceiling, just to the right of the broken icicle.
The first Gear is on the frame at the upper right corner of the dome.
The second Gear is on the ground just to the left of the second Blade.
Windmill Screenshot.
When all the pieces are collected, the repaired windmill will blow the snow away from the fountain, revealing the Light Bulb and the Garden Fairy.
Pick up the Garden Fairy on the ice in the fountain to add it to your inventory.
Travel through the mirror to return to the Garden.
Garden
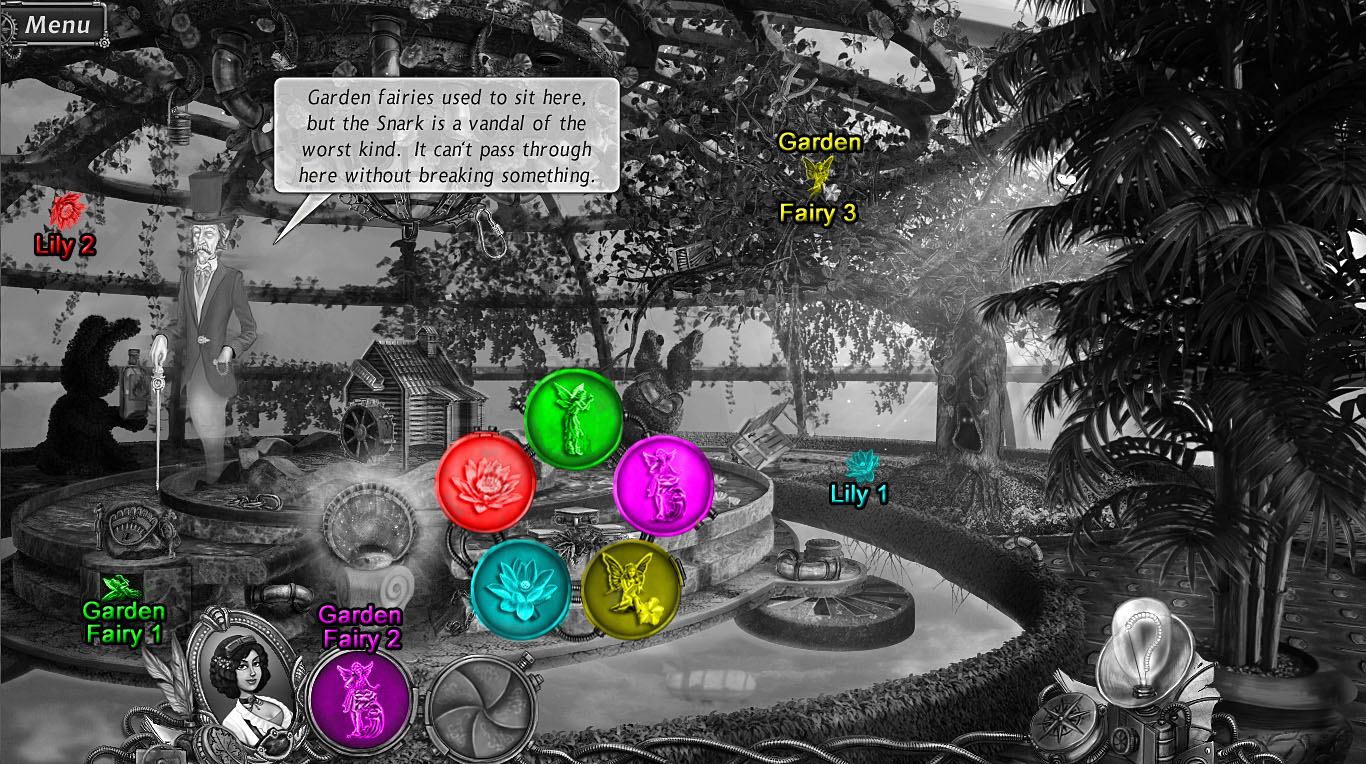
Click the miniature pedestal at the front of the fountain to view the missing fairy pieces.
The first Garden Fairy is in the compartment directly below the sea chest.
Add the second Garden Fairy from your inventory to the pedestal.
The third Garden Fairy is on the upper branch of the large tree.
The first Lily is on the ground to the right of the broken swing.
The second Lily is on the left side of the dome, to the left of the floating ghost's head.
Fairies Screenshot.
Once all the pieces are collected, the pedestal will rise, revealing a compartment with the Fish inside.
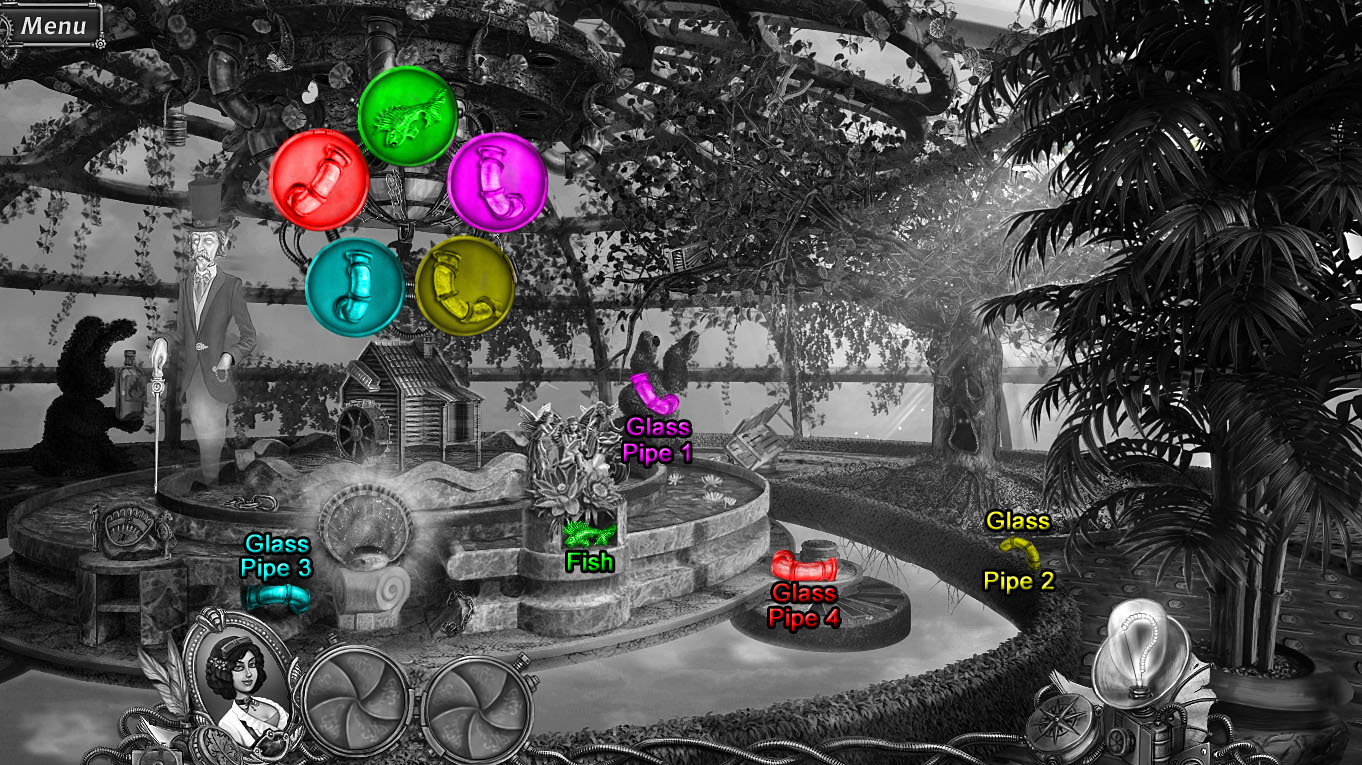
Click the fountain mechanism at the top of the dome to view the missing glass pipe pieces.
Pick up the Fish from the compartment and add it to the fountain mechanism.
The first Glass Pipe is in the middle of the right shrub.
The second Glass Pipe is on the right side of the hedge ring that circles around the floor.
The third Glass Pipe is at the base of the fountain, to the lower left of the mirror that transports you to the backwards world.
The fourth Glass Pipe is on the floor directly above the round propeller.
Glass Pipes Screenshot.
After all the pieces are collected, the small door at the side of the small building in the fountain will open, revealing the Ring inside.
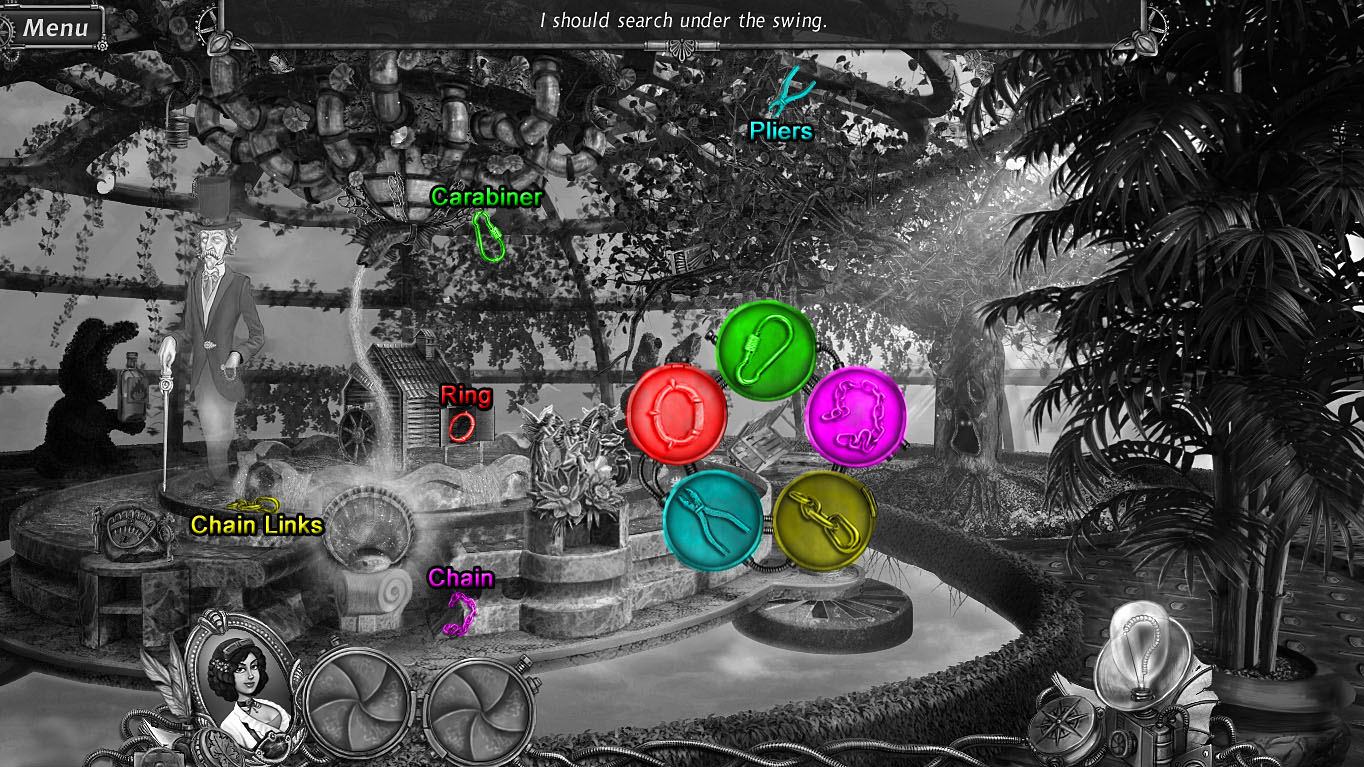
Click the broken swing hanging from the tree to view the missing swing pieces.
Take the Ring from the small building and add it to the broken swing.
The Carabiner is hanging from the bottom of the fountain at the top of the dome.
The Chain is at the base of the fountain, to the lower right of the mirror that transports you to the backwards world.
The Chain Links are at the lower left edge of the ring around the middle fountain tier.
The Pliers are in the middle of the leaves at the top of the tree branch.
Swing Screenshot.
When all the pieces are collected, the repaired swing will be lifted off the ground.
Pick up the Christmas Lights and the Bucket on the ground under the swing to add them to your inventory.
Use the Bucket on the water in the left side of the fountain to make it a Bucket Of Water.
Go through the mirror to travel to the Frozen Garden.
Frozen Garden (Backward World)
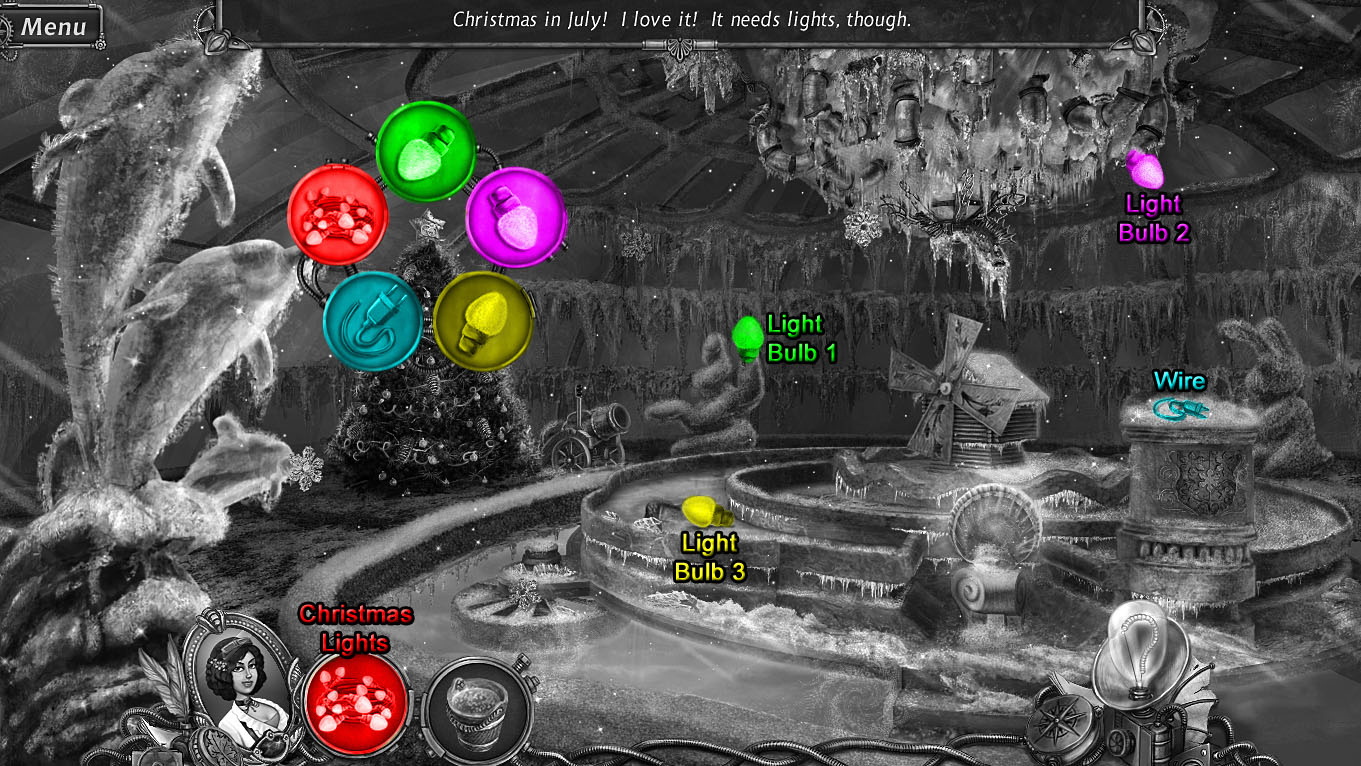
Click the Christmas tree to view the missing lights pieces.
Add the Christmas Lights from your inventory to the tree.
The first Light Bulb is on top of the shrub to the right of the Christmas tree.
The second Light Bulb is beside the right tubes on the chunk of ice in the ceiling.
The third Light Bulb is on the left side of the bottom fountain tier.
The Wire is on top of the snowflake pedestal on the right side of the fountain.
Christmas Lights Screenshot.
Once all the pieces are collected, the Christmas tree will light up, revealing the Snowflake at the bottom of the tree.
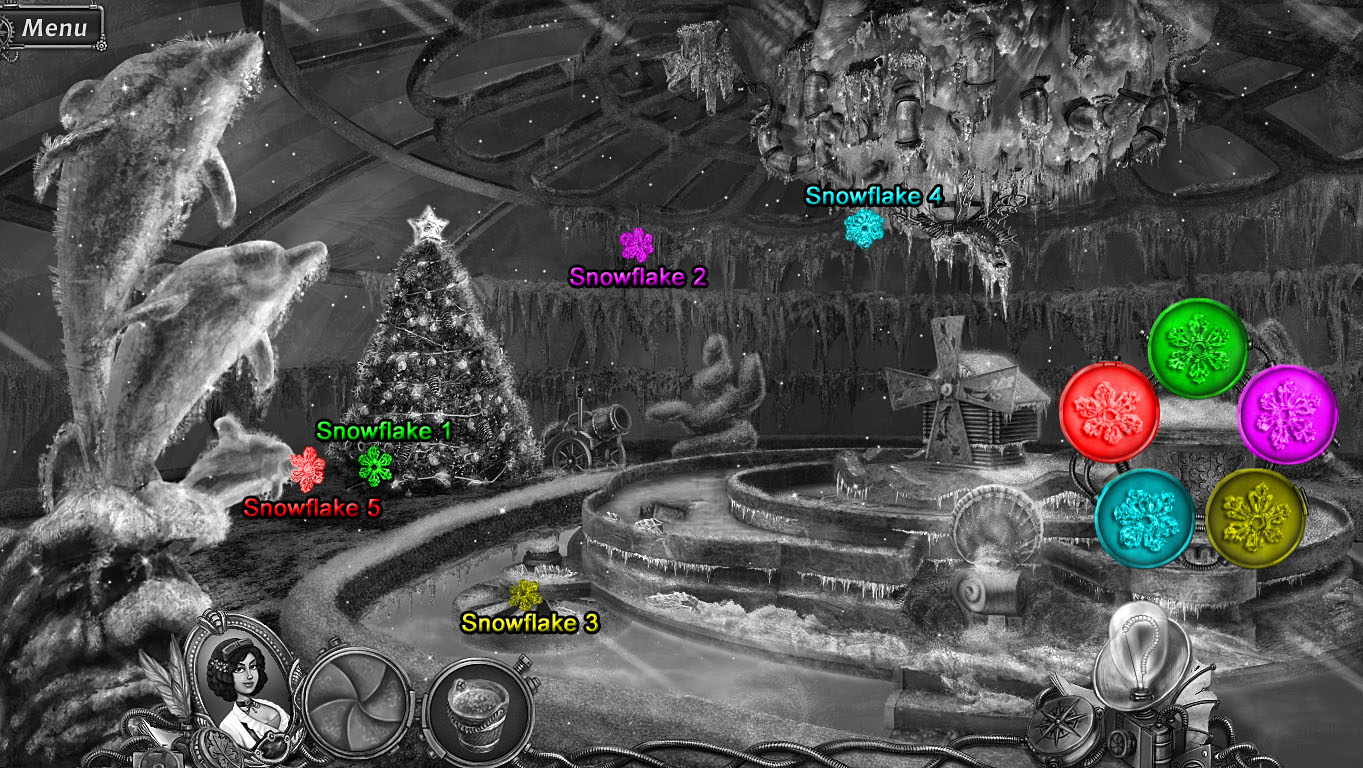
Click the snowflake pedestal to view all the missing snowflakes.
Pick up the first Snowflake at the bottom of the Christmas tree and add it to the pedestal.
The second Snowflake is on the left side of the frame of the dome ceiling.
The third Snowflake is on top of the round propeller cover.
The fourth Snowflake is under the lower left tubes in the chunk of ice in the ceiling.
The fifth Snowflake is on the bottom dolphin's nose in the ice sculpture.
Snowflakes Screenshot.
After all the snowflakes are collected, the front of the pedestal will open.
Look inside the revealed compartment to view the hamster wheel.
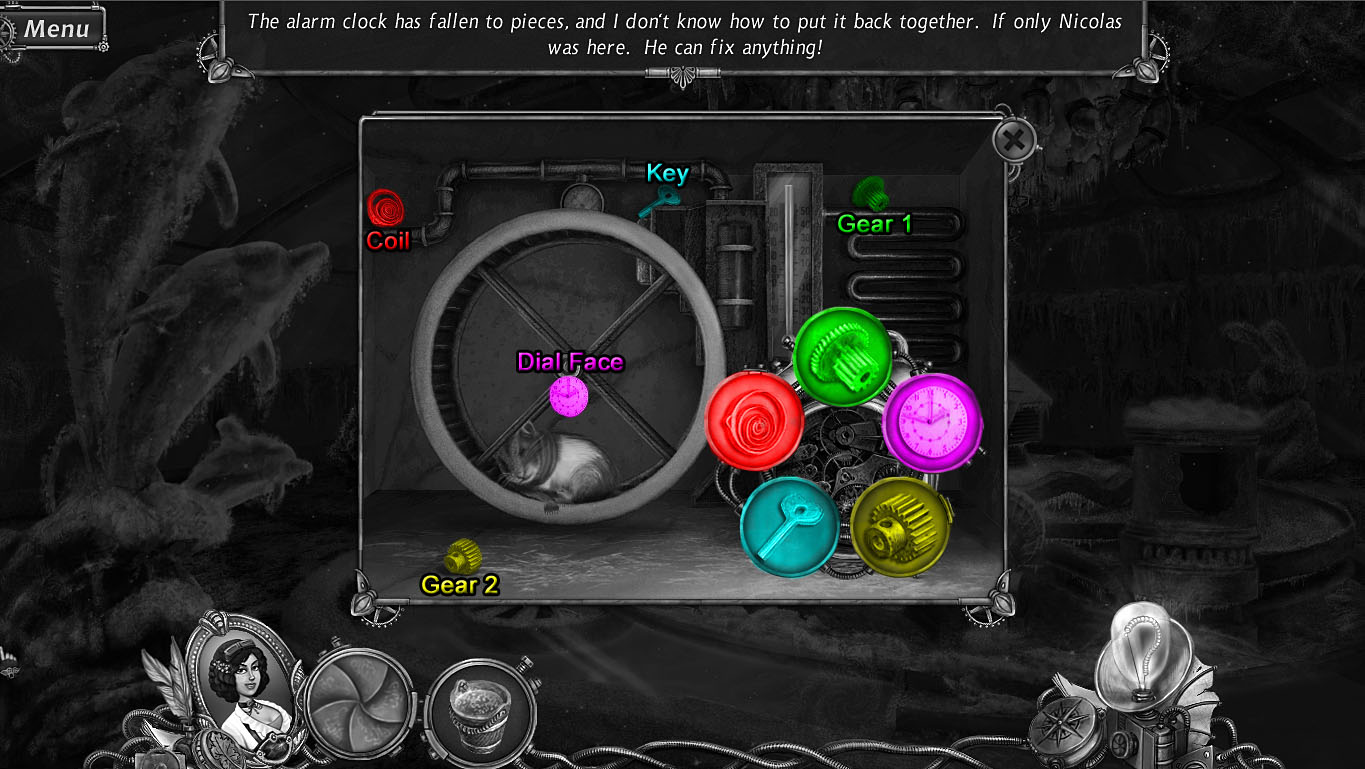
Click the alarm clock beside the hamster to view the missing clock pieces.
The first Gear is at the top of the tube attached to the thermometer.
The Dial Face is in the center of the hamster wheel.
The second Gear is near the lower left corner of the compartment.
The Key is between the top pipe and the hamster wheel.
The Coil is at the left end of the top pipe.
Alarm Clock Screenshot.
When all the pieces are collected, the repaired alarm clock will wake up the hamster, who will melt the ice in the fountain.
Take the heart puzzle box out of the water to place it at the side of the fountain: some pieces are still missing, so you will have to return later.
Click the Oil Lamp Base floating in the fountain water to add it to your inventory.
Go through the portal in the mirror to return to the Garden, then go back to reach the Courtyard.
Courtyard
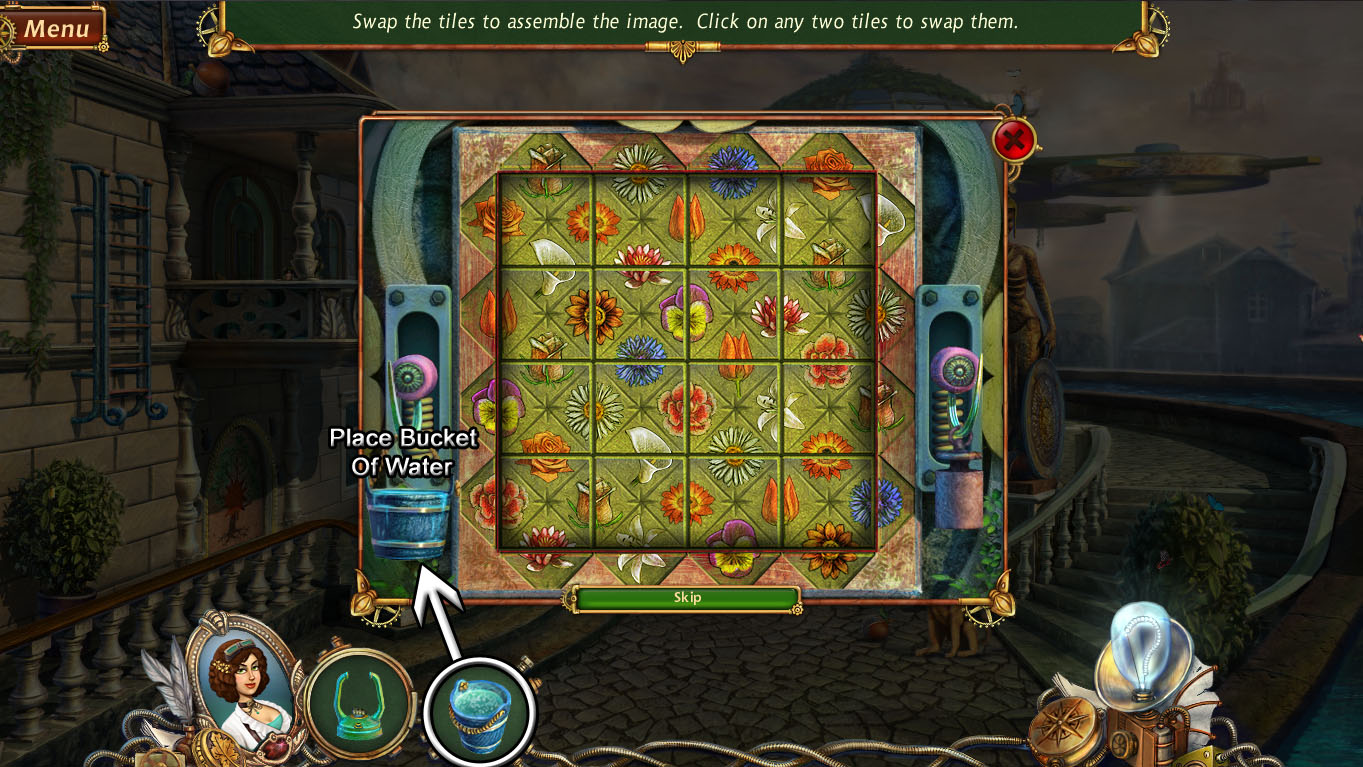
Click the flower board on the wall beside the rear stairs for a closer look.
Place the Bucket Of Water from your inventory on the left hook to start the puzzle.
Arrange the square tiles so that the images of all the flowers in each row and column are connected.
Click one flower tile to select it, then click a different flower tile to swap their positions.
Each section of the tile must match the flower at its top, bottom, left, and right sides.
The easiest way to solve this puzzle is to start at the corners, then arrange the tiles at the borders of the square, and then finally do the center tiles.
Solution.
Once the puzzle is solved, take the revealed Sun inside the flower board.
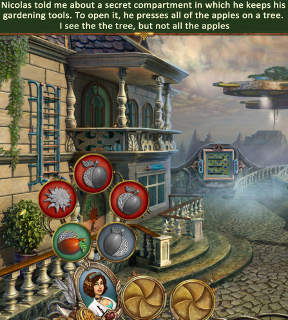
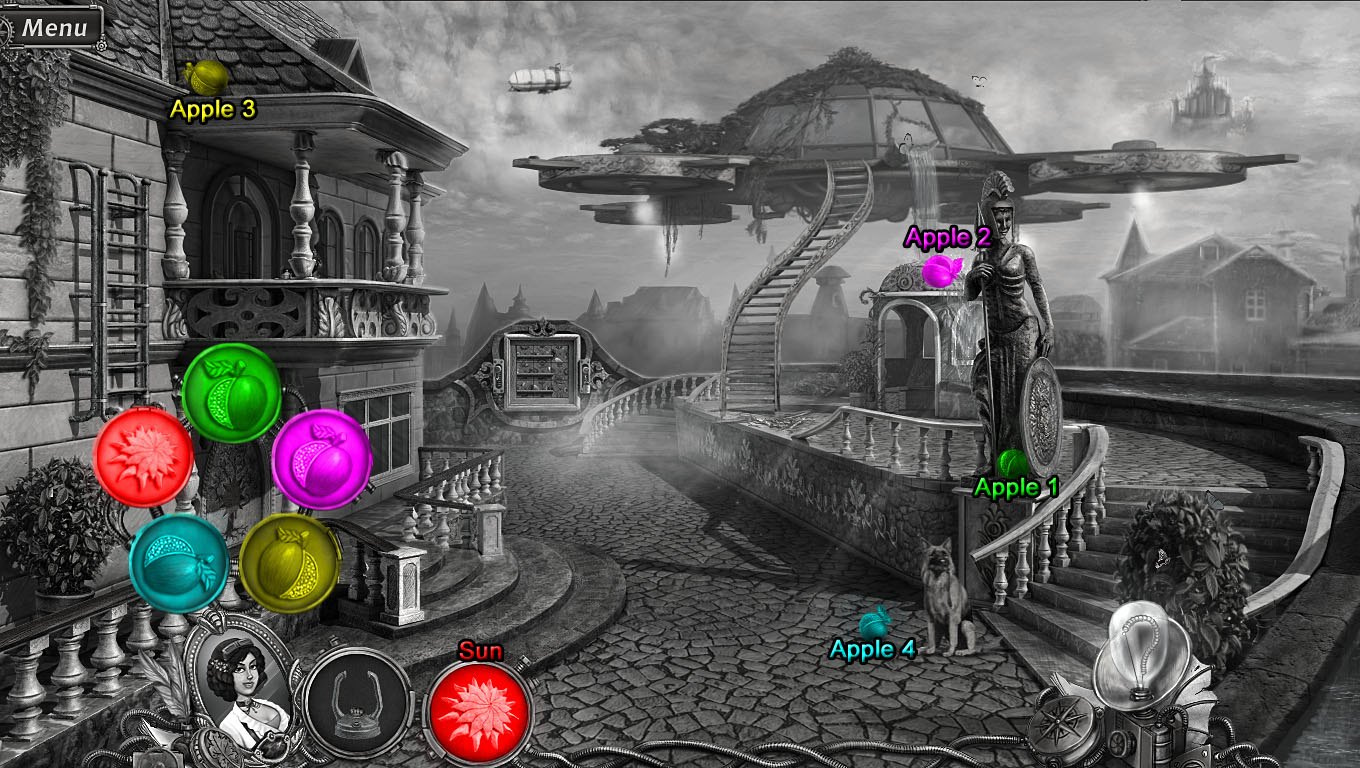
Click the tree mosaic on the mansion wall to view the missing tree pieces.
Add the Sun from your inventory to the tree.
The first Apple is just to the left of the shield at the foot of the statue.
The second Apple is on the roof of the gazebo, by the bottom of the waterfall from the floating island.
The third Apple is above the left side of the balcony on the roof of the mansion.
The fourth Apple is on the ground to the left of the dog.
Apples Screenshot.
When all the pieces are collected, click the revealed wall cache to look inside and take the Lamp Cover.
Go up the stairs leading to the floating island to travel to the Garden.
Garden
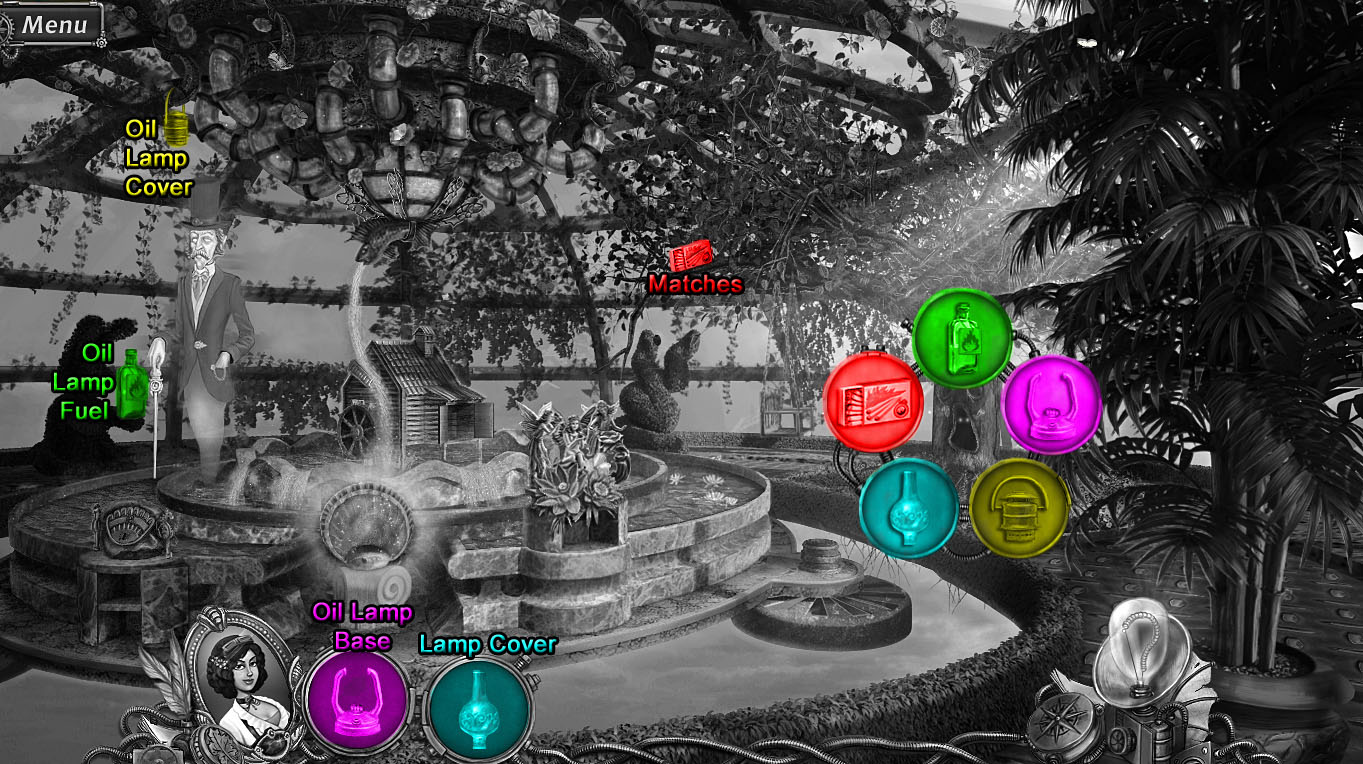
Click the hollow in the tree to view the missing pieces of the lantern.
Add the Oil Lamp Base and Lamp Cover from your inventory to the lantern.
The Oil Lamp Fuel is on the hand of the rabbit-shaped hedge.
The Oil Lamp Cover is hanging from the left pipes at the top of the dome.
The Matches are on top of the far left tree branch.
Lantern Screenshot.
After all the pieces are collected, look inside the tree hollow to find the Cane.
Go back out to the Courtyard.
Courtyard
Use the Cane from your inventory to pull down the ladder at the side of the house.
Click the ladder to look inside the second floor room.
Pick up the Razor on the table.
Open the purse and take the Zipper Slider inside.
Go back to the Mansion Gates.
Mansion Gates
Click the mailbox to look inside.
Pull out the package in the mailbox, then use the Razor from your inventory to cut it open.
Take the Puzzle Piece (1/2) from the opened package.
Return to the Garden on the floating island.
Garden
Click the hollow in the tree for a closer look.
Use the Zipper Slider from your inventory on the teddy bear to open its pouch.
Take the Puzzle Piece 2/2 inside the bear.
Go through the mirror portal to the Frozen Garden.
Frozen Garden (Backward World)
Inspect the puzzle box on the side of the fountain to view a close-up.
Add the two Puzzle Pieces from your inventory to the box to start the puzzle.
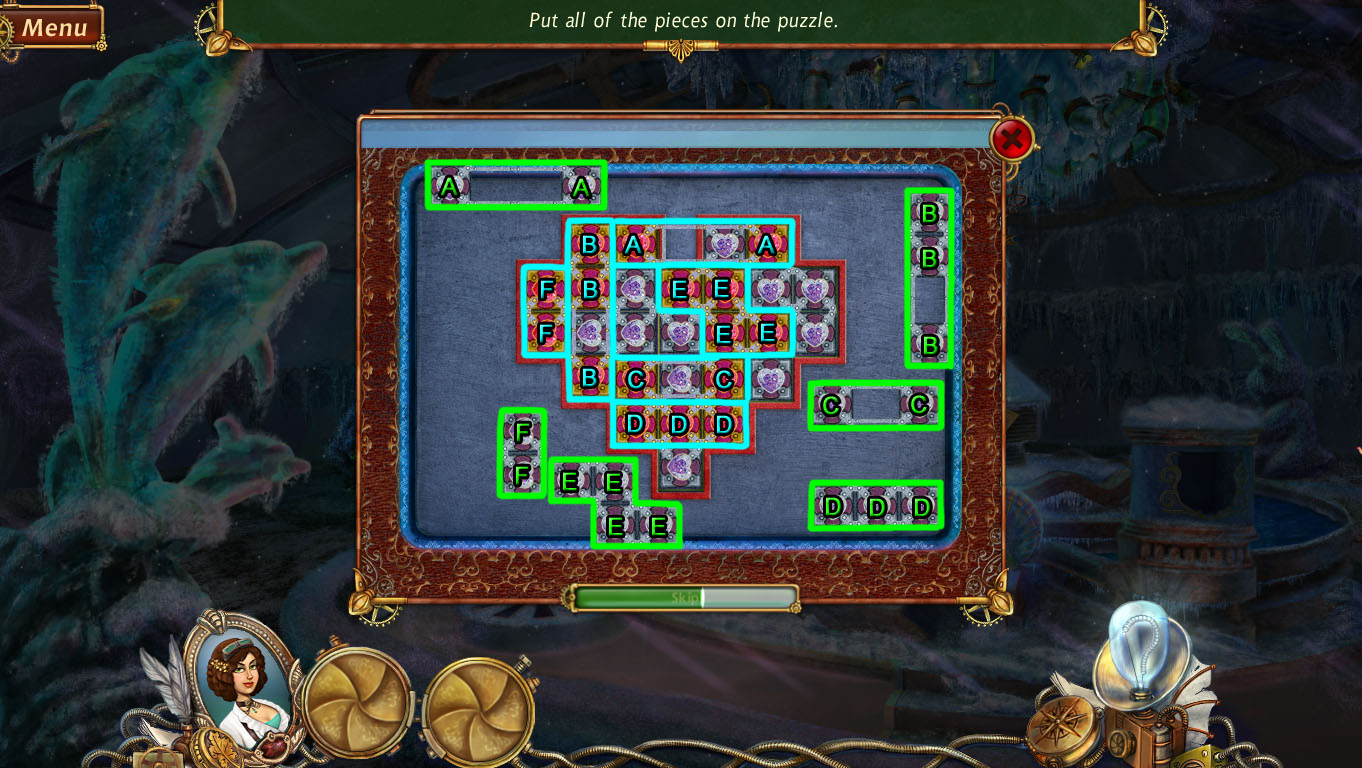
Place the tile sections inside the heart so that they all fit.
Click a tile section to select it, then move it over an empty section on the board.
If the section flashes green, you can set it in place.
Solution.
The box will open after the puzzle is solved, revealing the Film Negative inside.
Pick up the Film Negative to add it to your inventory, then travel back to the Photo Lab.
Chapter 2
Photo Lab
Click the mechanism beside the camera on the table at the back of the room for a closer look.
Place the Film Negative from your inventory in the small compartment in the upper right corner of the camera (A).
Use the directional arrows (B, C, D, & E) at the lower right corner of the camera to focus the image.
Click the left blue dial under the horizontal arrow (F) and the blue dial under the vertical arrows (G) to stretch the image into the shape of a square.
Click the + magnifier button (H) to zoom in or the - magnifier button (I) to zoom out.
Press the red button (J) to print the complete image.
Camera Screenshot.
Click the Undeveloped Photo in the center of the red square to add it to your inventory.
Place the Undeveloped Photo in the green and purple trays of developer fluid on the counter to receive the Developed Photo.
Put the Developed Photo inside the water-filled sink to make the Washed Photo.
Finally, place the Washed photo glass frame hanging from the rope next to the first framed photo you completed earlier.
Theater Stage
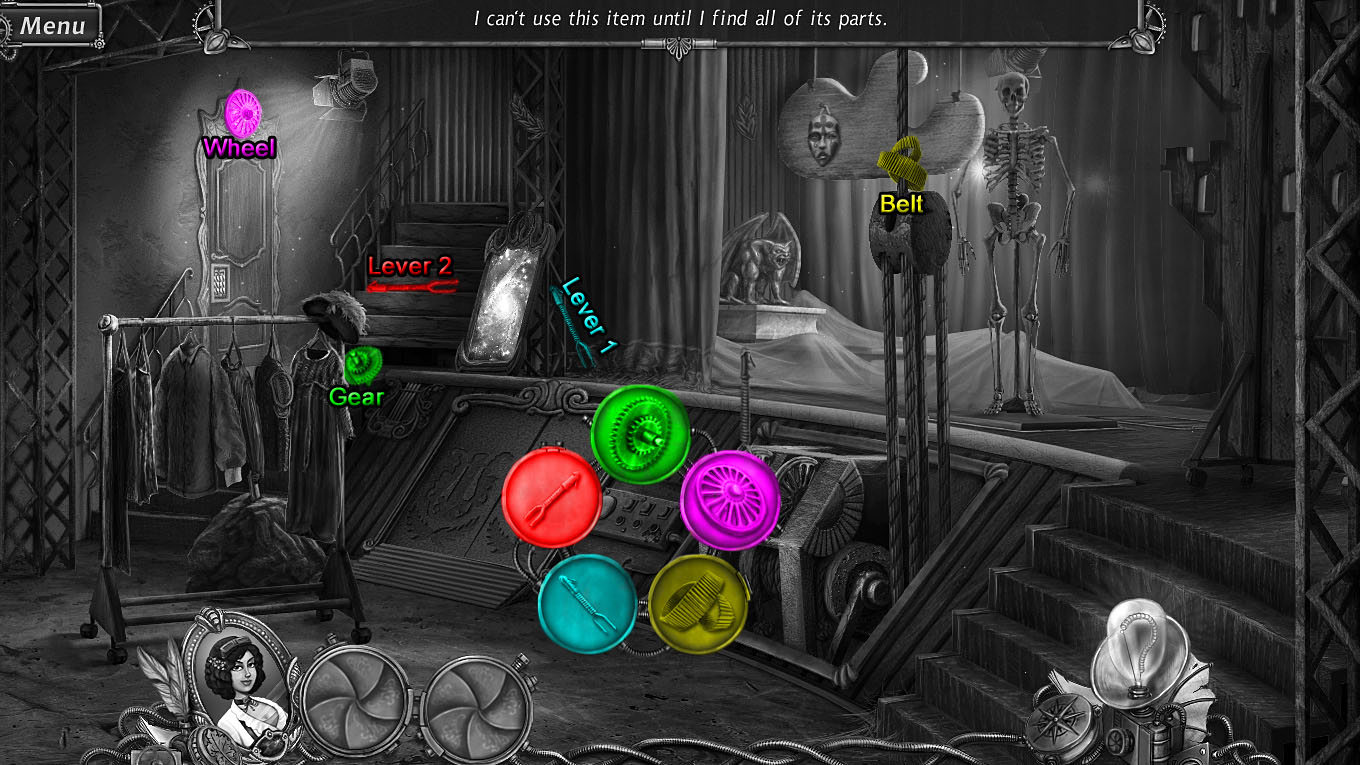
Move the clothing rack aside to reveal the Gear at the top of the lower left stairs.
Click the lever control mechanism to the right of the bas-relief doors to view the missing pieces.
Add the Gear from the stairs to the mechanism.
The Wheel is at the top of the left door.
The Belt is on the top rope of the pulley.
The first Lever is on the ground beside the mirror portal.
The second Lever is on the middle step of the left stairway.
Lever Mechanism Screenshot.
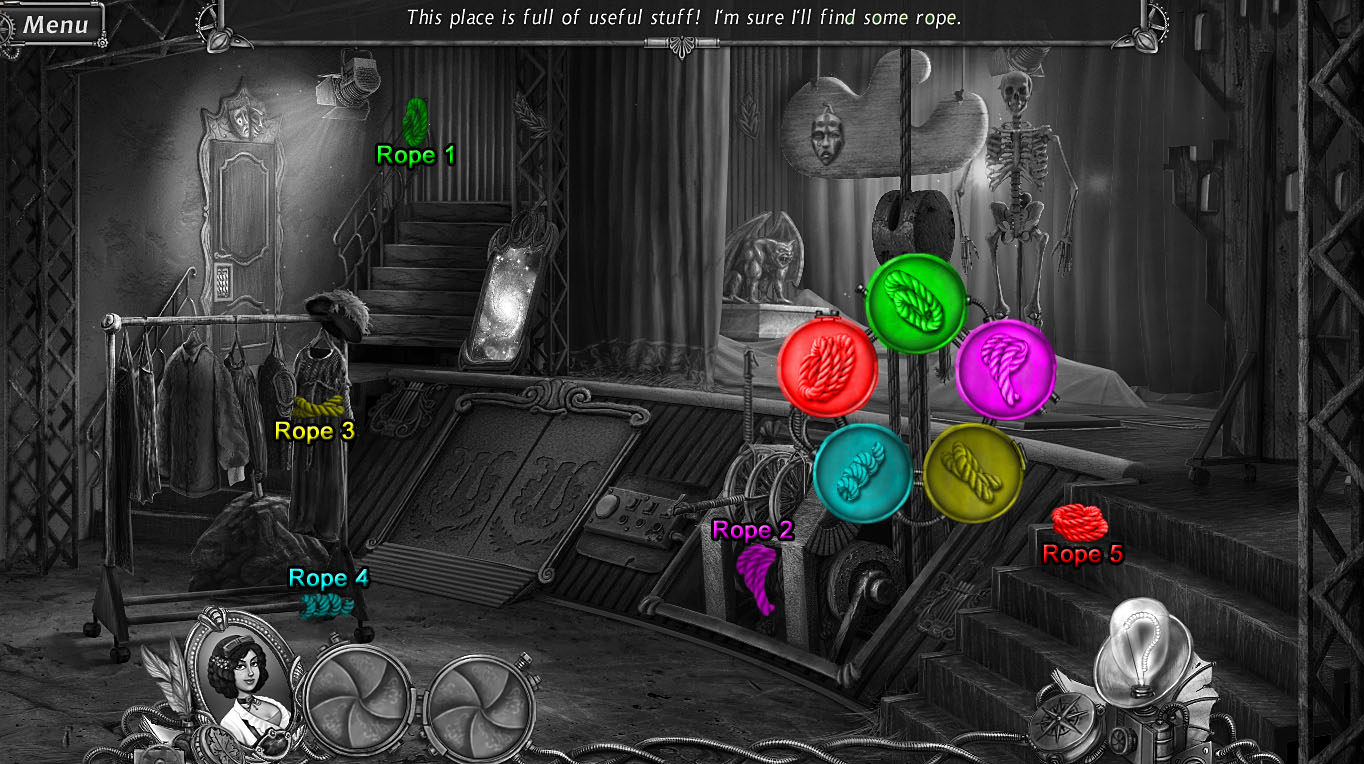
After the level mechanism is repaired, the rope at the right side of the pulley will break.
Click the broken pulley to view the missing rope pieces.
The first Piece of Rope is at the top of the railing beside the left stairs.
The second Piece of Rope is wrapped around the bottom of the lever mechanism.
The third Piece of Rope is tied around the middle of the red dress on the clothing rack.
The fourth Piece of Rope is on the bottom bar of the clothing rack.
Ropes Screenshot.
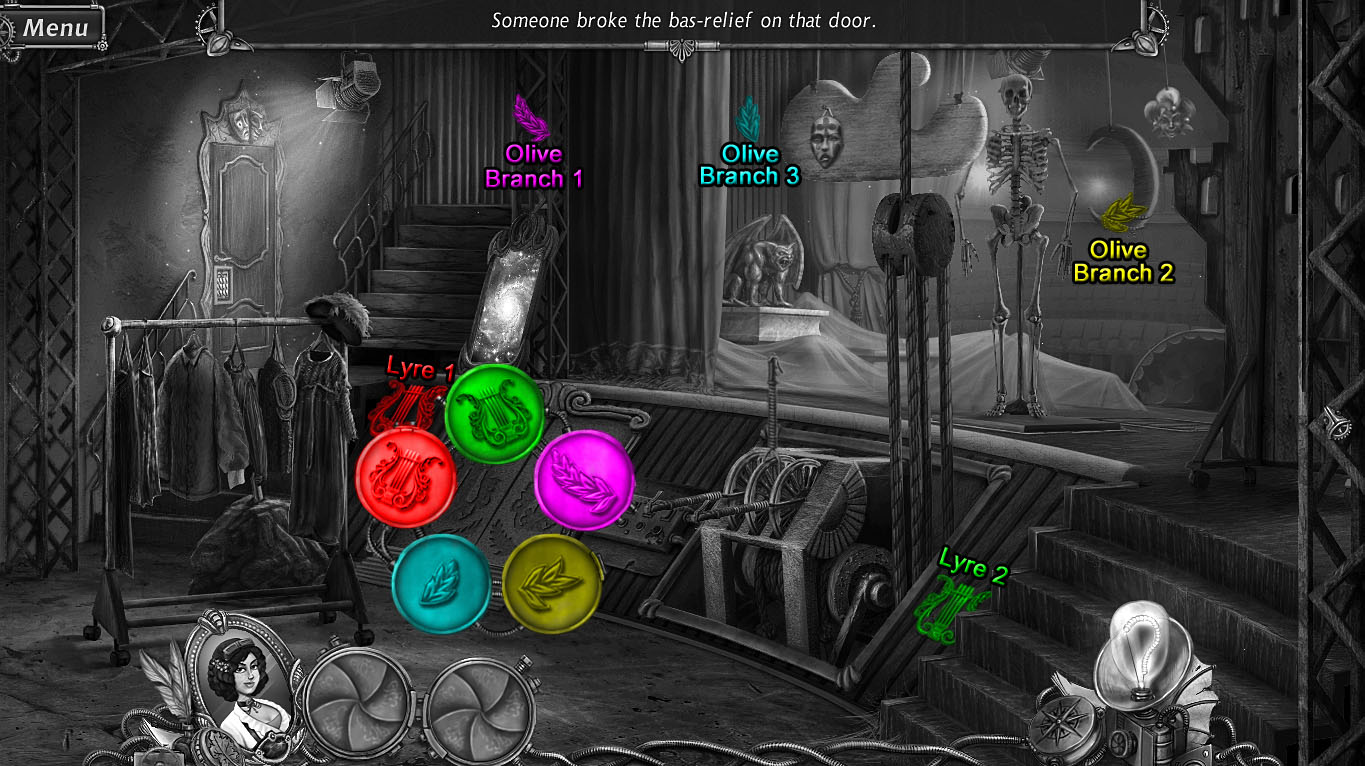
Once all the rope pieces are collected, click the lever mechanism twice to lower the mask and the moon over the stage.
Click the bas-relief on the door at the bottom of the stage to view the missing relief pieces.
The first Olive Branch is in the middle of the support beam to the left of the stage curtain.
The second Olive Branch is tied to the bottom of the moon hanging over the stage.
The third Olive branch is on the striped section of the wall on the left side of the stage.
The first Lyre is on the left side of the base of the stage, just beside the bas-relief door.
The second Lyre is on the right side of the base of the stage, beside the right steps.
Bas-Relief Screenshot.
When all the pieces are collected, the doors at the base of the stage will open.
Go through the open doors to the Music Room.
Music Room
Click the skeleton to view the missing bone pieces.
The Skull is on the right leg under the table.
The Nuts & Bolts are on the middle of the floor between the maracas.
The Hand is on the floor over the sheet of music.
The first Bone is tied to the stand holding up the lid of the piano.
The second Bone is on the floor under the green drum.
Skeleton Screenshot.
After all the pieces are collected, the lift will raise the skeleton up to the Theater Stage, revealing the Dove token at the base of the lift.
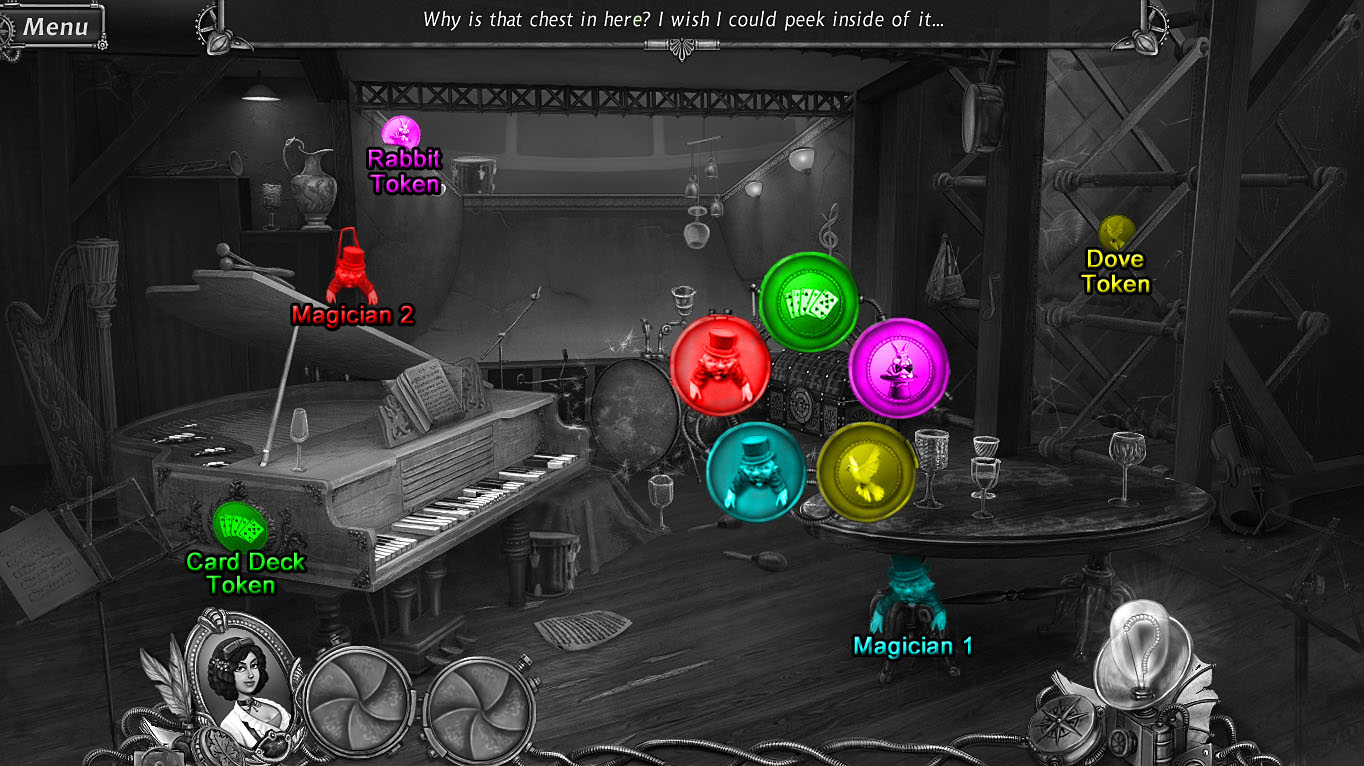
Click the magician's chest to view the missing magic trick pieces.
The Card Deck Token is on the left side of the piano.
The Rabbit Token is on top of the upper left lantern in the pit leading to the theater.
The Dove token is between the metal bars in the middle of the lift.
The first Magician is on the left leg under the table.
The second Magician is hanging from the corner of the ledge under the large vase.
Magician's Chest Screenshot.
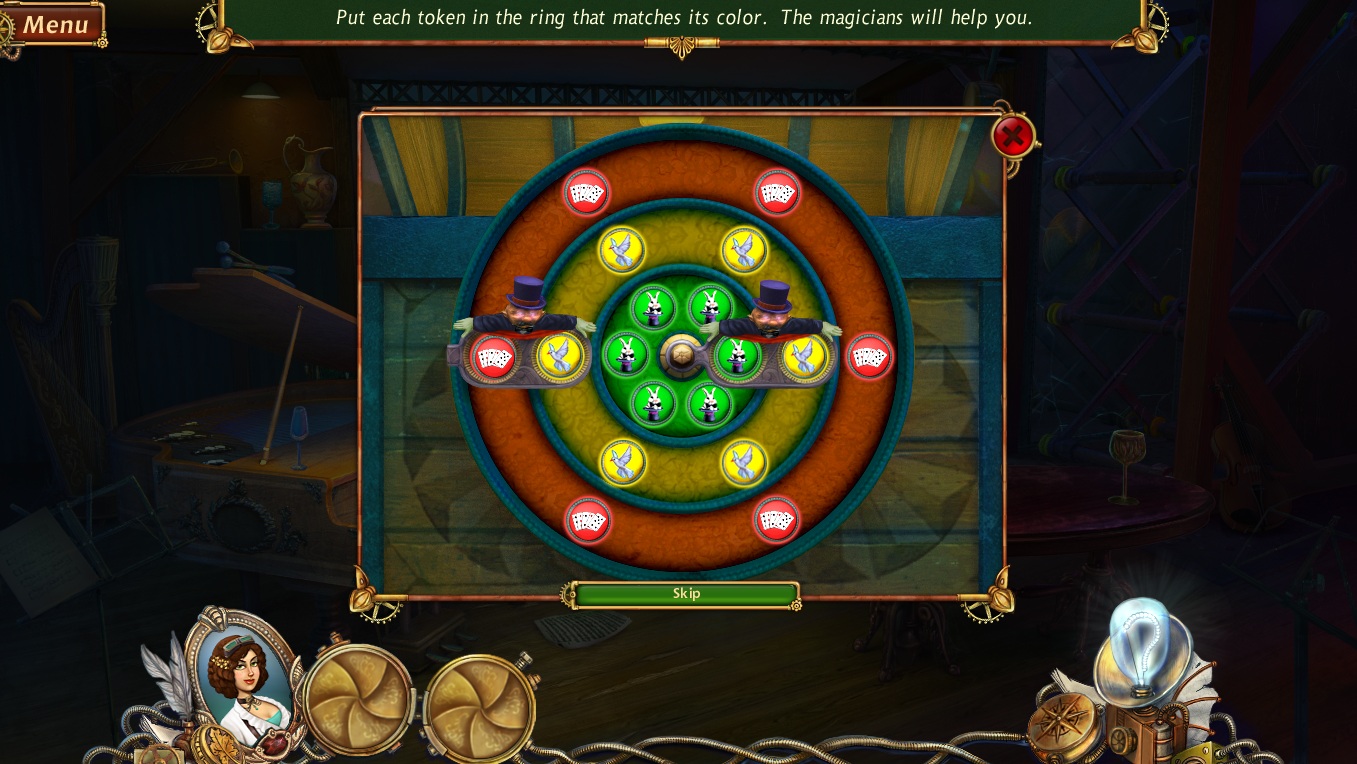
The magician chest puzzle will start after all the magic trick pieces have been collected.
Arrange the tokens so that they are placed in a ring that matches its color.
The red card tokens go in the red outer ring, the yellow dove tokens go in the yellow middle ring, and the green rabbit tokens go in the green inner ring.
Click each of the rings to rotate them clockwise.
Click the left magician to swap the two adjacent tokens under his hands in the outer and middle rings.
Click the right magician to swap the two adjacent tokens under his hands in the middle and inner ring.
Solution.
Once the puzzle is solved, look inside the opened chest to find a locked diary inside that is missing a dragonfly and butterfly token.
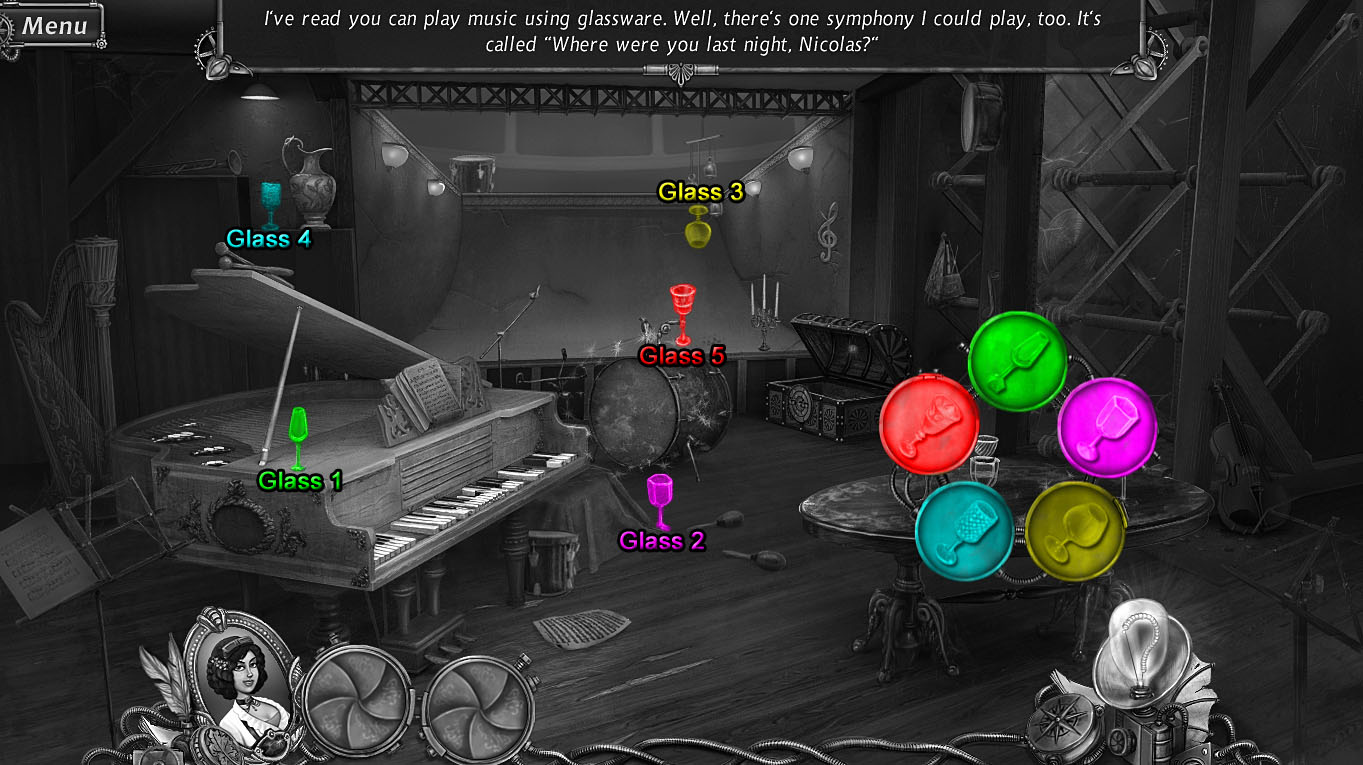
Click the round table to view the missing glassware pieces.
The first Glass is on top of the left side of the piano.
The second Glass is on the floor in front of the green drum.
The third Glass is tied to the bells hanging from the beam in the ceiling.
The fourth Glass is on the ledge beside the face.
The fifth Glass is just above the green drum.
Glasses Screenshot.
When all the glasses are collected, the vibrations from the music will shatter the glass, revealing the Cymbal in the lift.
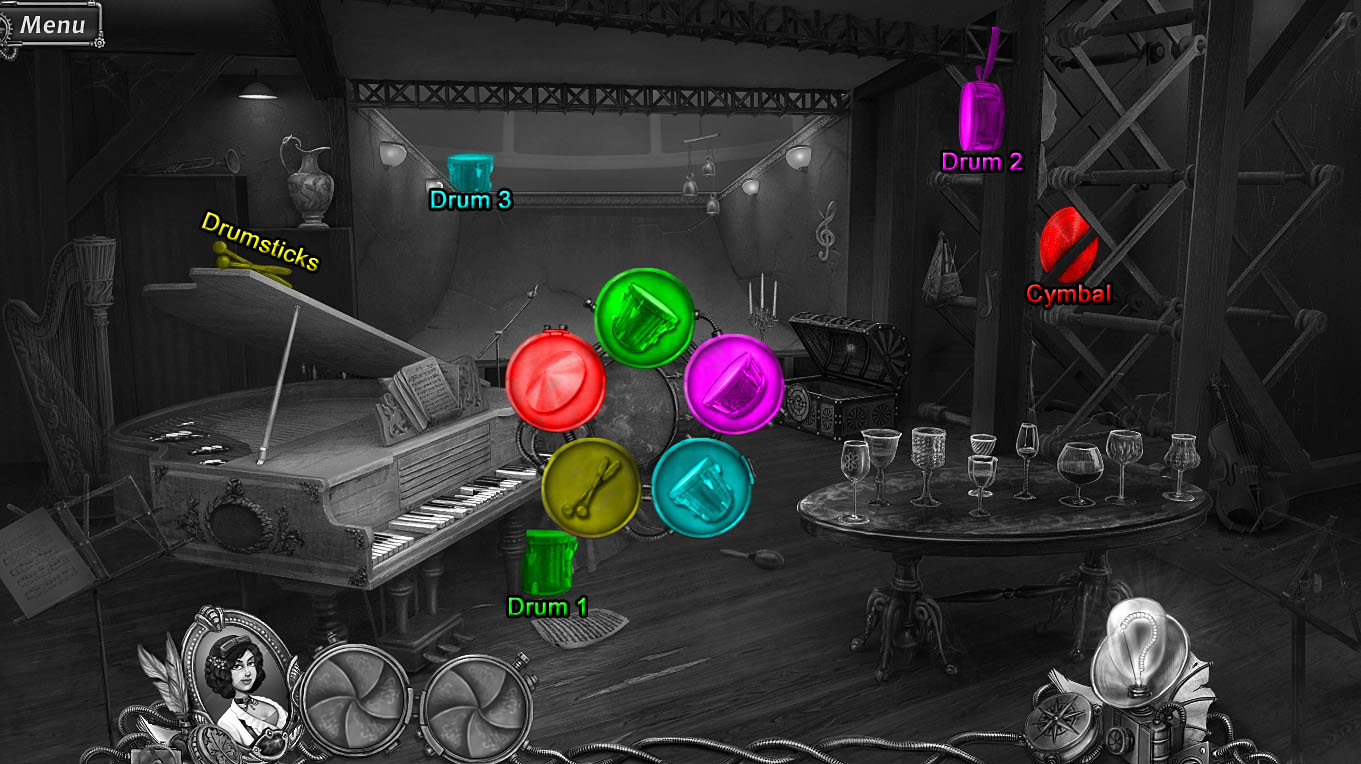
Click the green drum set to view the missing drum pieces.
The first Drum is beside the right leg of the piano.
The second Drum is hanging from the end of the beam beside the lift.
The third Drum is above the upper left corner of the orchestra pit.
The Drumsticks are on top of the piano lid.
The Cymbals are between the medal bars in the lift.
Drum Set Screenshot.
After all the pieces are collected, the noise from the drums will drop the vase onto the ground.
Pick up the Angel Token on the floor on top of the broken vase shards to add it to your inventory.
Go back to the Theater Stage, then go through the mirror portal to travel to the Romeo & Juliet Set.
Romeo & Juliet Set (Backward World)
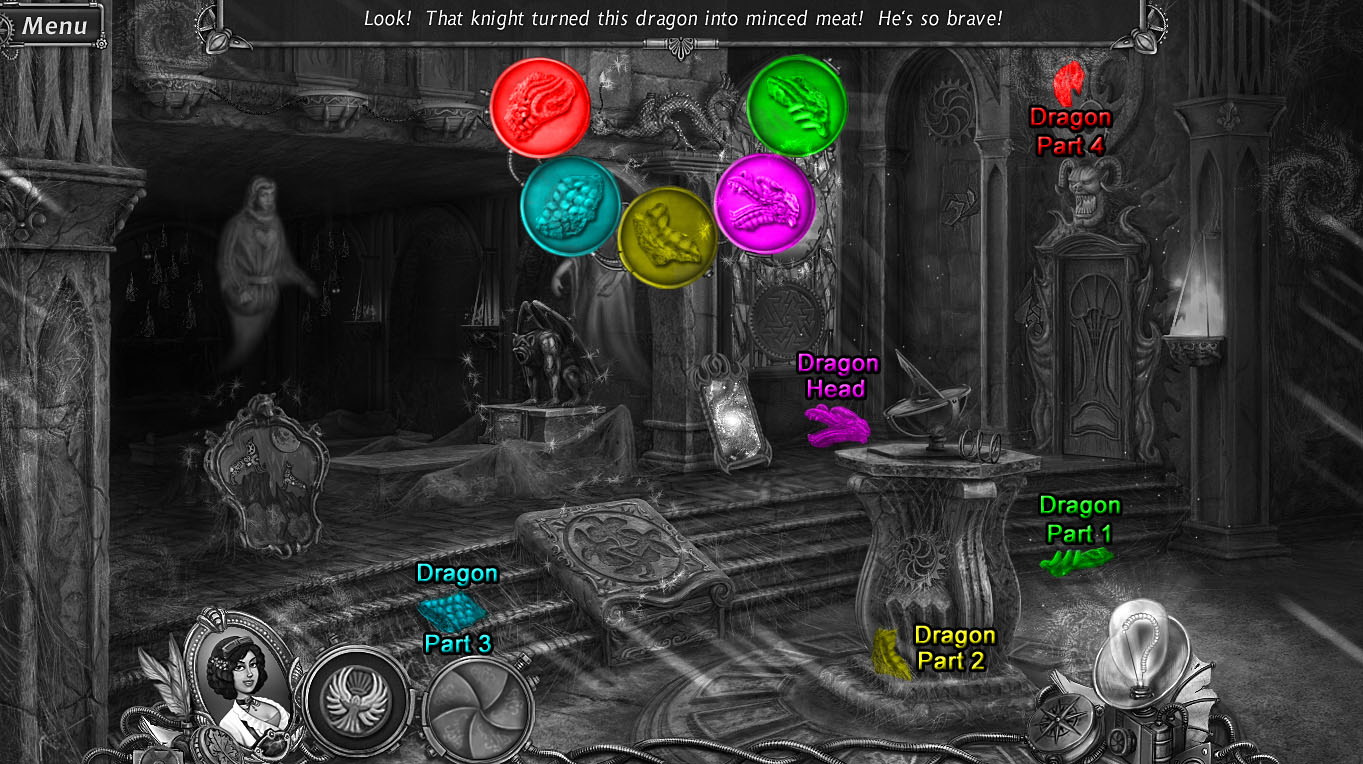
Click the broken dragon statue on top of the column to view the missing dragon pieces.
The first Dragon Part is on the floor beside the right section of the steps.
The Dragon Head is on the ground under the stained glass window.
The second Dragon Part is at the bottom of the sundial platform.
The third Dragon Part is on the step to the left of the bird altar.
The fourth Dragon Part is in the middle of the stone carving above the demon mask on the wall.
Dragon Screenshot.
Once all the pieces are collected, the completed dragon will light all the torches to illuminate the top of the room.
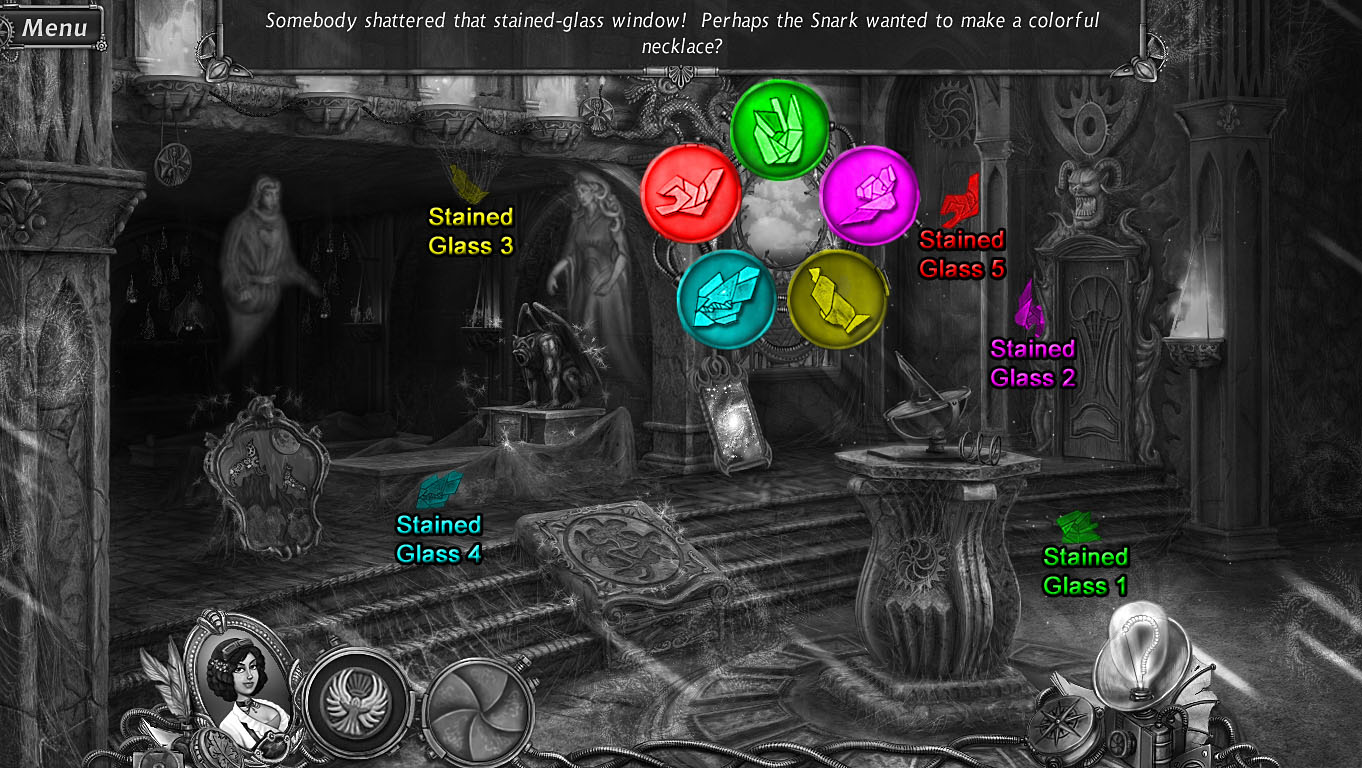
Click the broken stained glass window to view the missing glass shards.
The first Stained Glass Window Piece is on the floor beside the right section of the steps.
The second is on the left side of the door under the demon mask.
The third Stained Glass Window Piece is hanging in the spiderweb under the second torch from the right.
The fourth Stained Glass Window Piece is on the side of the front stone coffin.
The fifth Stained Glass Window Piece Stained Glass Window Piece is on the wall inside the archway, just to the right of the window.
Stained Glass Window Screenshot.
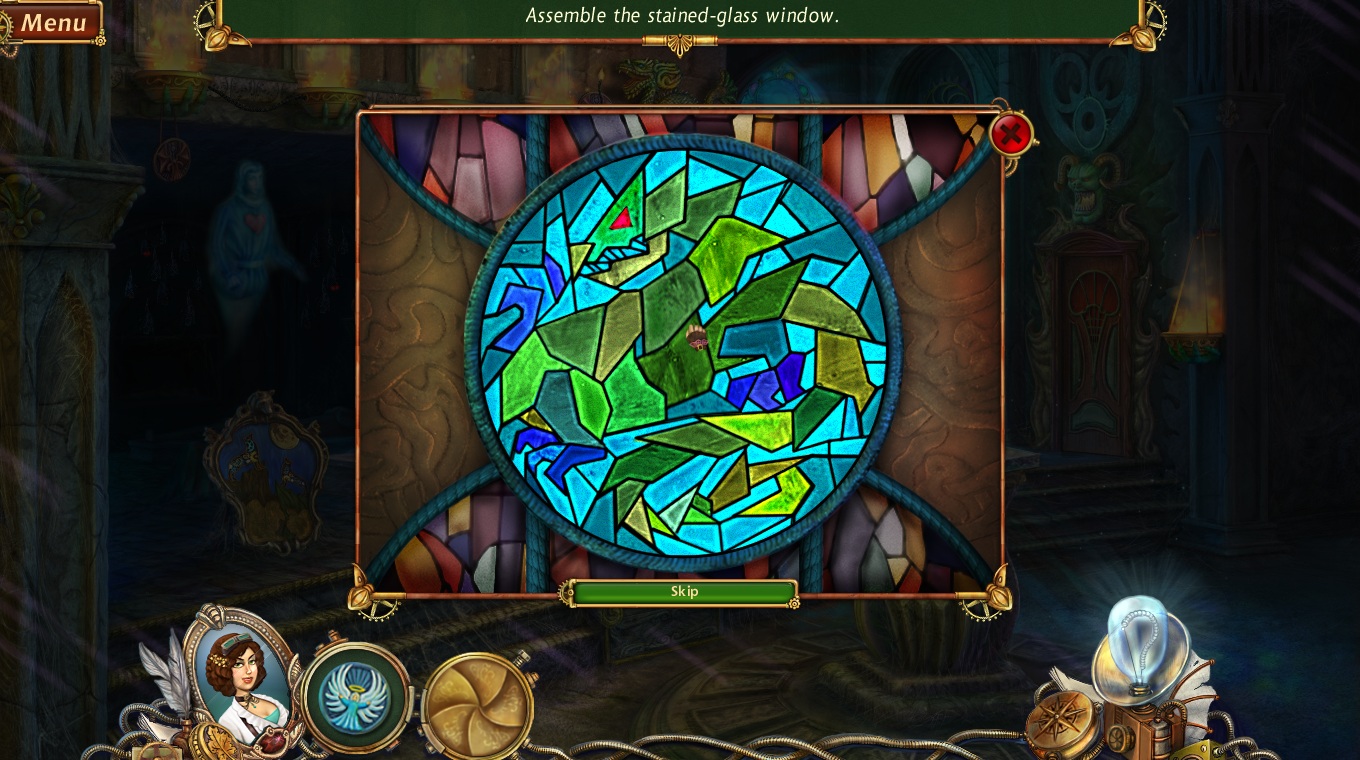
The window puzzle will start as soon as all the glass pieces are collected.
Arrange the glass shards inside the window to complete the image.
Click a piece on the left or right sides of the window pane to select it, then click an area inside the circle to place it.
If correctly positioned, the glass piece will lock in place and become highlighted.
An easy method to solve this puzzle is to first locate the light blue colored outer pieces around the border of the circle, then to fill in the middle pieces.
Solution.
After the puzzle is solved, the light from the window will reflect off the sundial and illuminate the area inside the tomb.
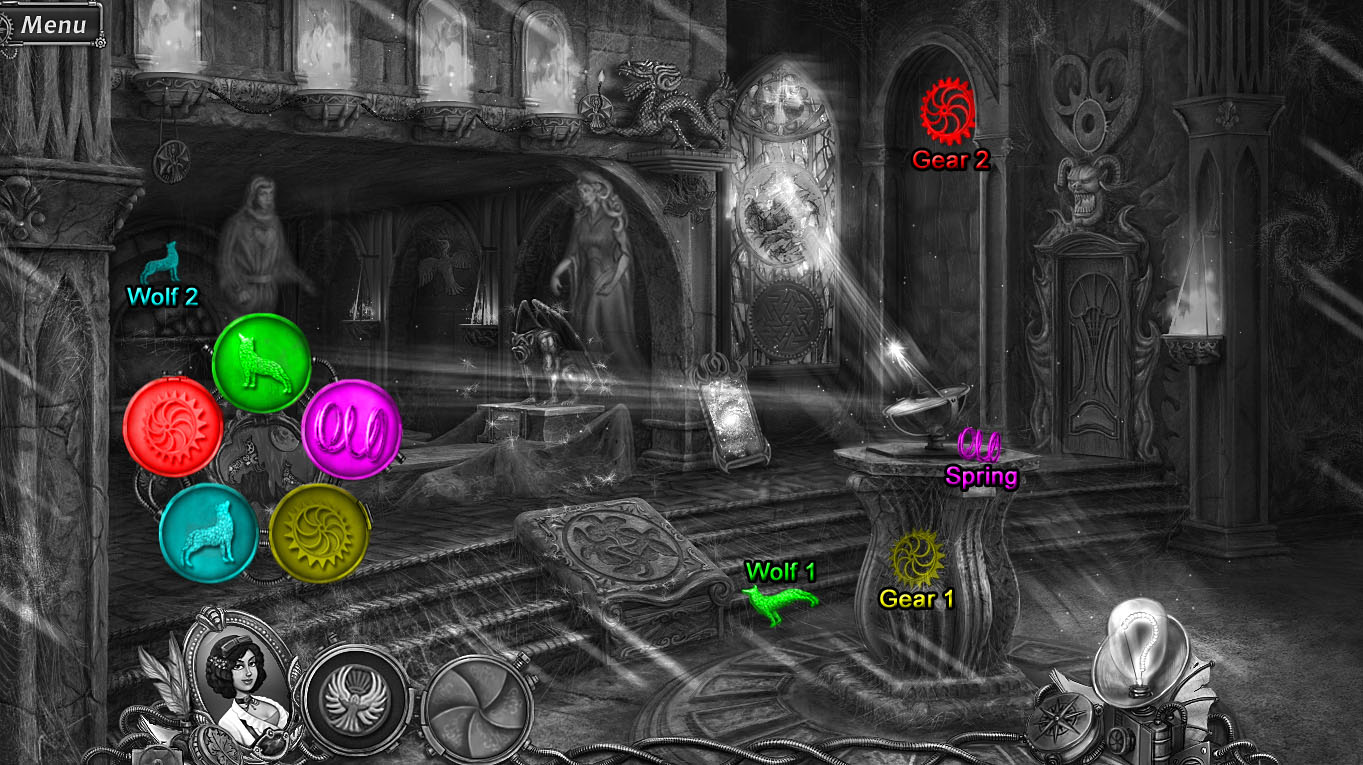
Click the framed wolf painting to view the missing mechanism pieces.
The first wolf is at the bottom of the steps beside the bird altar.
The Spring is on top of the sundial pedestal.
The first Gear is in the middle of the sundial pedestal.
The second Wolf is at the top of the arch in the back of the tomb.
The second Gear is inside the archway in the wall to the right of the stained glass window.
Wolf Mechanism Screenshot.
When all the pieces are collected, the moon will drop from the wolf painting, revealing one of the Birds.
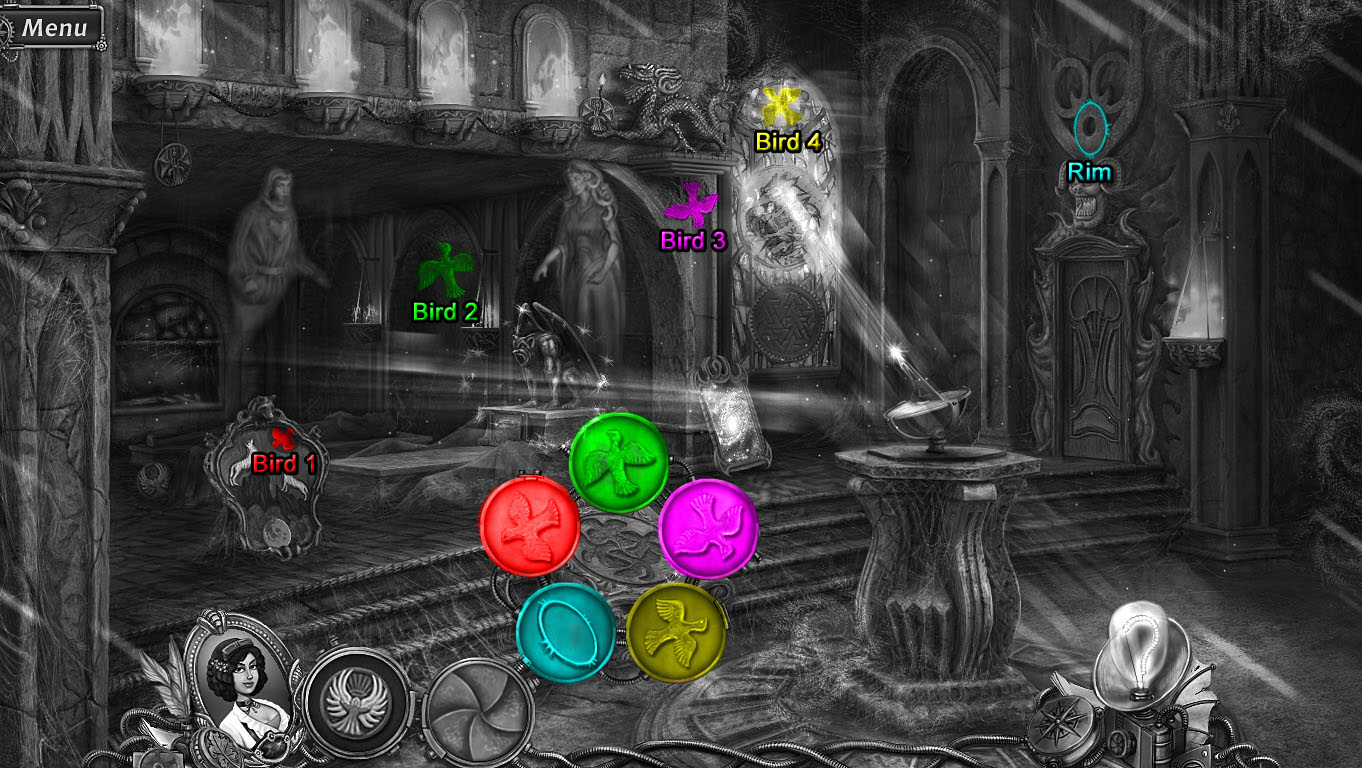
Click the bird altar in the middle of the steps to view the missing bird pieces.
The first Bird is inside the space for the moon in the wolf mechanism.
The second Bird is at the top of the middle archway in the tomb.
The third Bird is in the spiderweb under the platform for the dragon statue.
The fourth Bird is in the small circle at the top of the stained glass window.
The Rim is around the circular shaped stone carving directly above the demon mask door.
Bird Altar Screenshot.
Once all the pieces are collected, the cache at the bottom of the bird altar will open, revealing the Human Token.
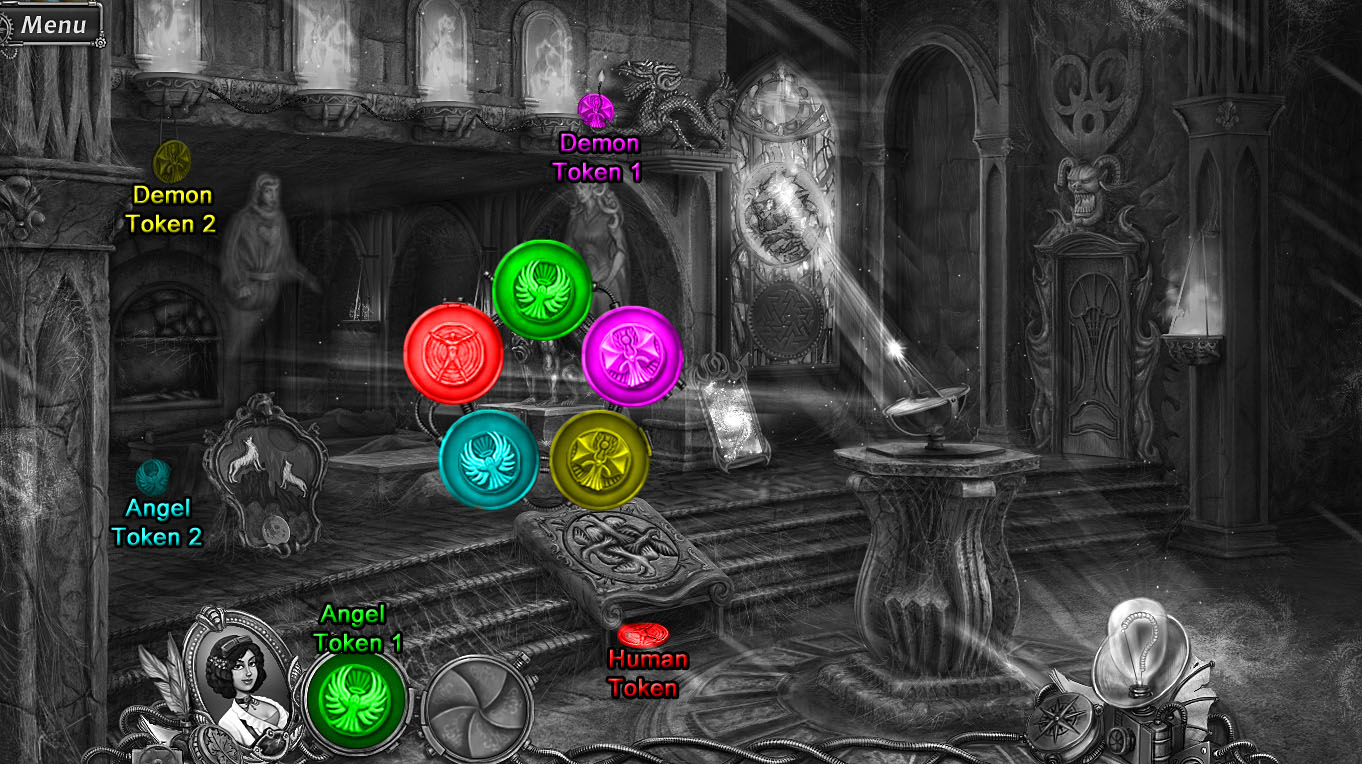
Click the gargoyle inside the tomb to view the missing tokens.
Add the first Angel Token from your inventory to the gargoyle.
The first Demon Token is in the hand of the dragon statue.
The second Demon Token is hanging from the far left torch.
The second Angel Token is on the floor near the back of the tomb.
The Human Token is in the cache at the bottom of the bird altar.
Gargoyle Screenshot.
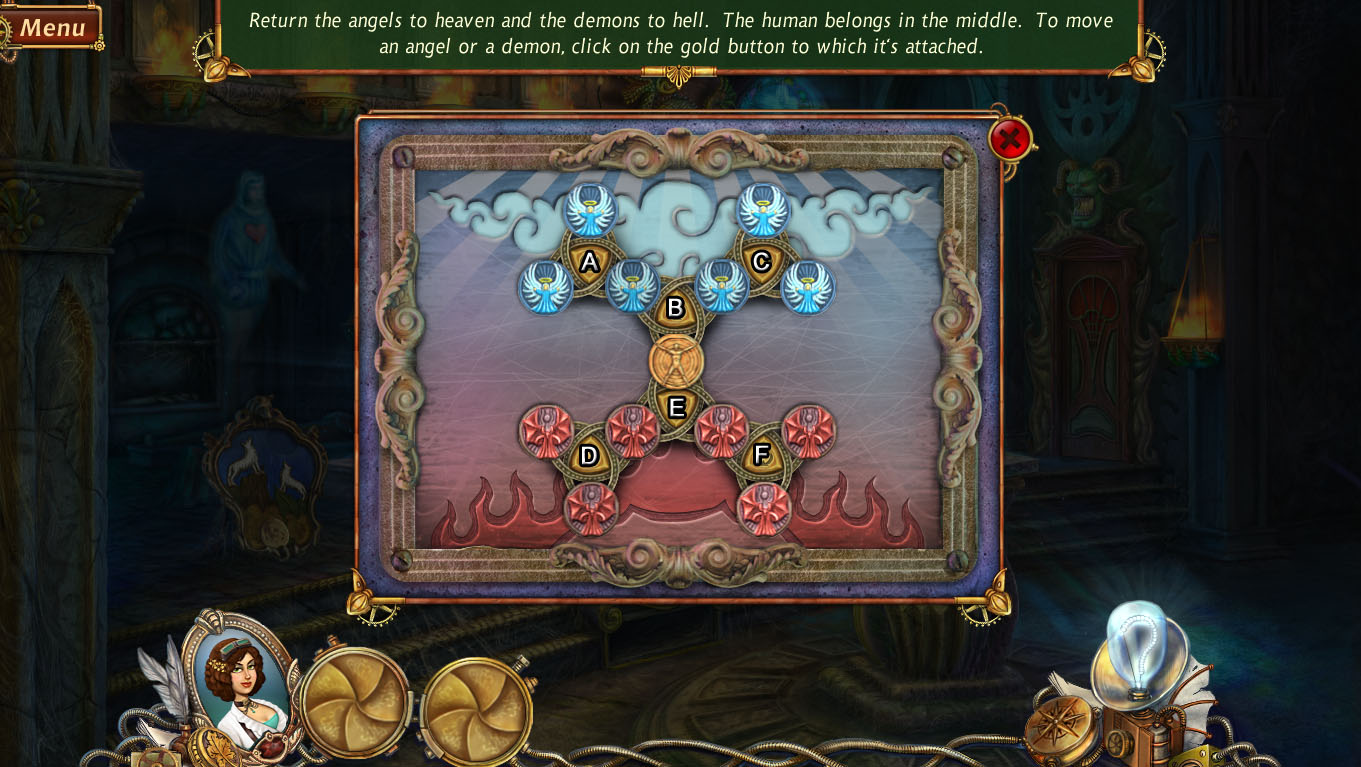
After you've found all of the tokens, click the gargoyle to start the puzzle.
Arrange the tokens so that all of the angel tokens are at the top, all of the demon tokens are at the bottom, and the human token is in the middle.
Click the arrow buttons in the middle of a group of three tokens to rotate all of the adjacent tokens one position clockwise.
To solve this puzzle, click the tokens in the following order:
Press button E.
Press button B.
Press button A.
Press button E.
Press button B.
Press button A.
Press button F.
Press button E.
Press button B.
Press button F.
Press button E.
Press button B.
Press button E.
Press button D.
Press button C.
Press button B.
Press button E.
Press button D.
Press button C.
Press button B.
Press button E.
Press button C.
Press button B.
Solution.
Once the puzzle is solved, take the Curtain Tassel and read the note inside the revealed compartment to find the combination number.
Go through the mirror to travel to the Theater Stage.
Theater Stage
When you enter the theater, the gargoyle statue will raise onto the stage with a mask at the bottom of the platform.
Use the Curtain Tassel from your inventory to tie the red curtain at the side of the stage and uncover another mask.
Click the two skeletons to make them dance and reveal the last mask.
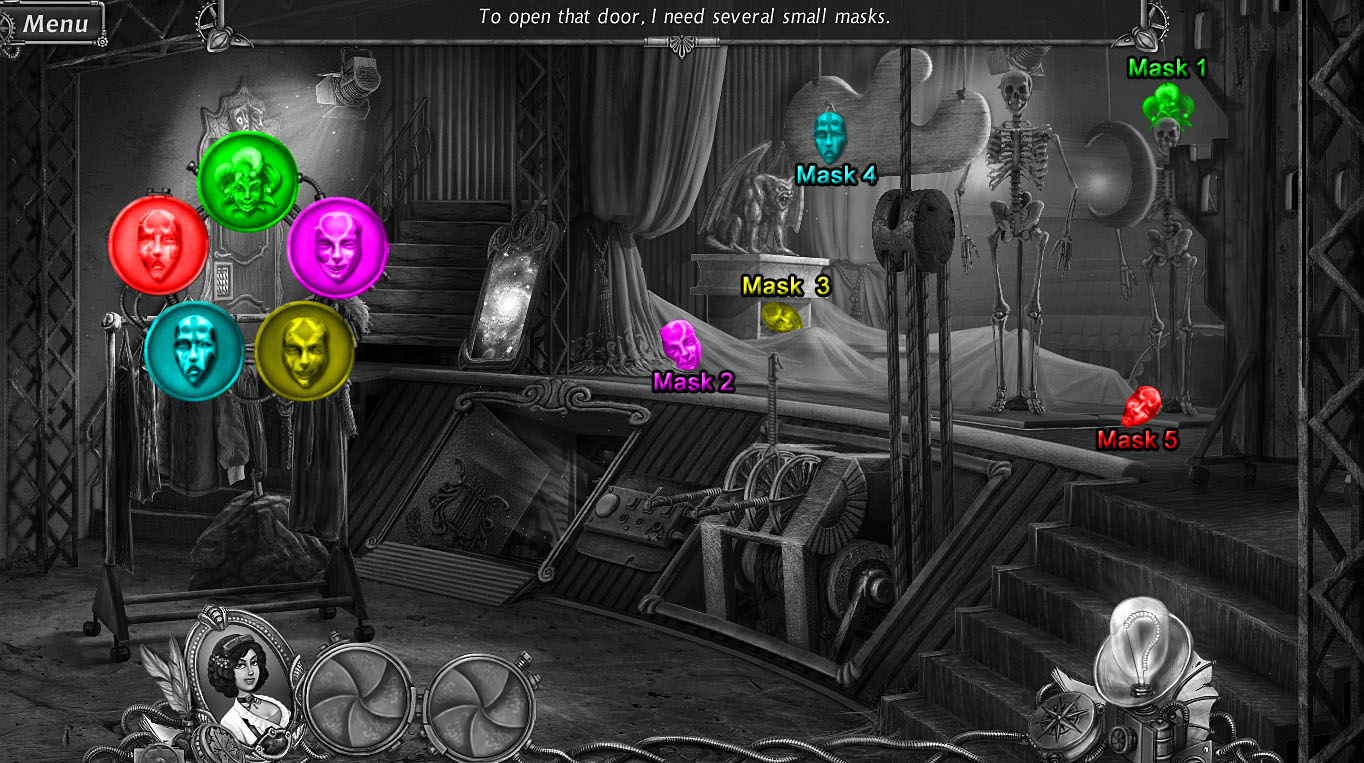
Click the left door to view the missing masks.
The first Mask is hanging behind the right skeleton's skull.
The second Mask is on the stage floor at the bottom of the red curtain.
The third Mask is in the space at the bottom of the gargoyle platform.
The fourth Mask is nailed to the cloud prop hanging over the stage.
The fifth Mask is at the floor of the right skeleton.
Masks Screenshot.
The door will unlock after all the masks have been collected.
Go through the open door to enter the Boudoir.
Boudoir
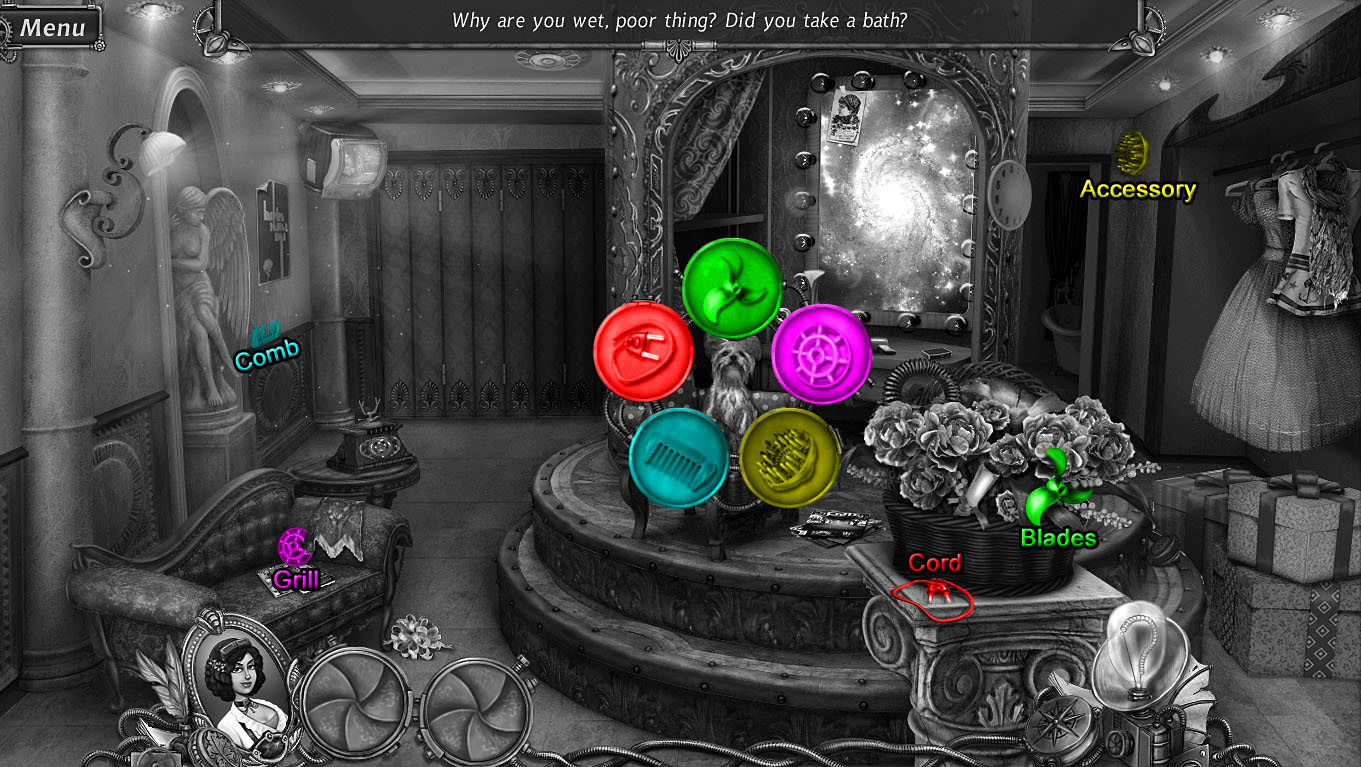
Click the dog that's sitting on the armchair to view the missing grooming pieces.
The Blades are in front of the right flowers in the basket.
The Grill is on the seat leaning against the arm of the green sofa.
The Accessory is against the right wall in the upper rear corner of the room.
The Comb is on the left wall underneath the poster.
The Cord is on the pedestal in front of the flower basket.
Dog Grooming Screenshot.
Once all the pieces are collected, click the Necklace beside the groomed dog to add it to your inventory.
Go through the portal in the vanity mirror to travel to the Dark Dressing Room.
Dark Dressing Room (Backward World)
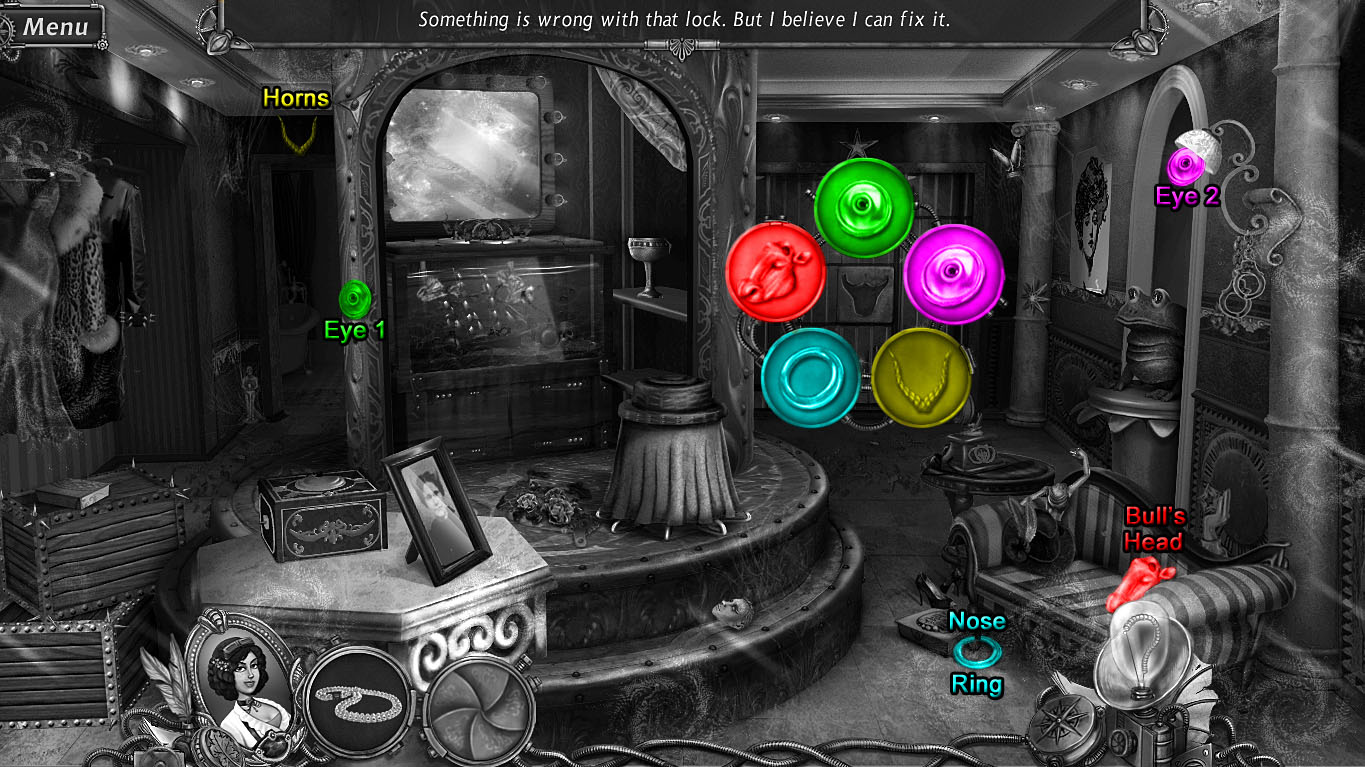
Click the lock in the middle of the iron bars to view the missing bull pieces.
The first Eye is on the left side of the arch, just beside the fish tank.
The second Eye is in the middle of the lamp shade in the middle of the column on the right wall.
The Horns are at the top of the doorway leading to the bathroom.
The Nose Ring is on the floor at the bottom of the striped sofa leg.
The Bull's head is on the seat of the striped sofa.
Bull Lock Screenshot.
Open the cage to reveal a piece of the ballerina jewelry box.
Go through the portal in the mirror to return to the Boudoir.
Boudoir
When you enter the room, the dressing screen will move back and reveal the costumed mannequins.
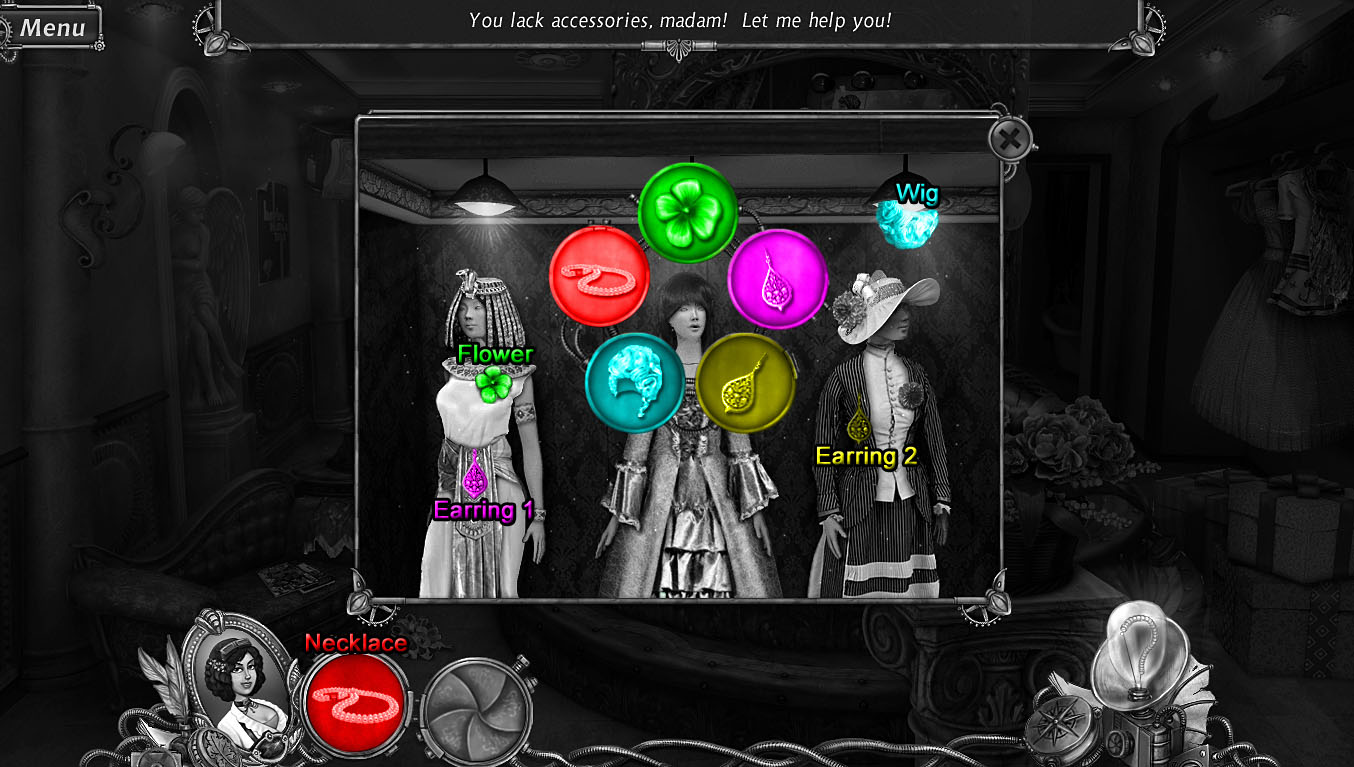
Click the mannequins for a closer look, then click the middle figure to view the missing accessories.
Add the Necklace from your inventory to the mannequin.
The Flower is at the top of the left mannequin's white dress.
The first Earring is in the middle of the left mannequin's sash.
The second Earring is on the side of the right mannequin's coat.
The Wig is at the bottom of the right hanging lamp.
Mannequin Screenshot.
Open the front panel of the center mannequin's chest to find the Mouthpiece and Tutu Skirt.
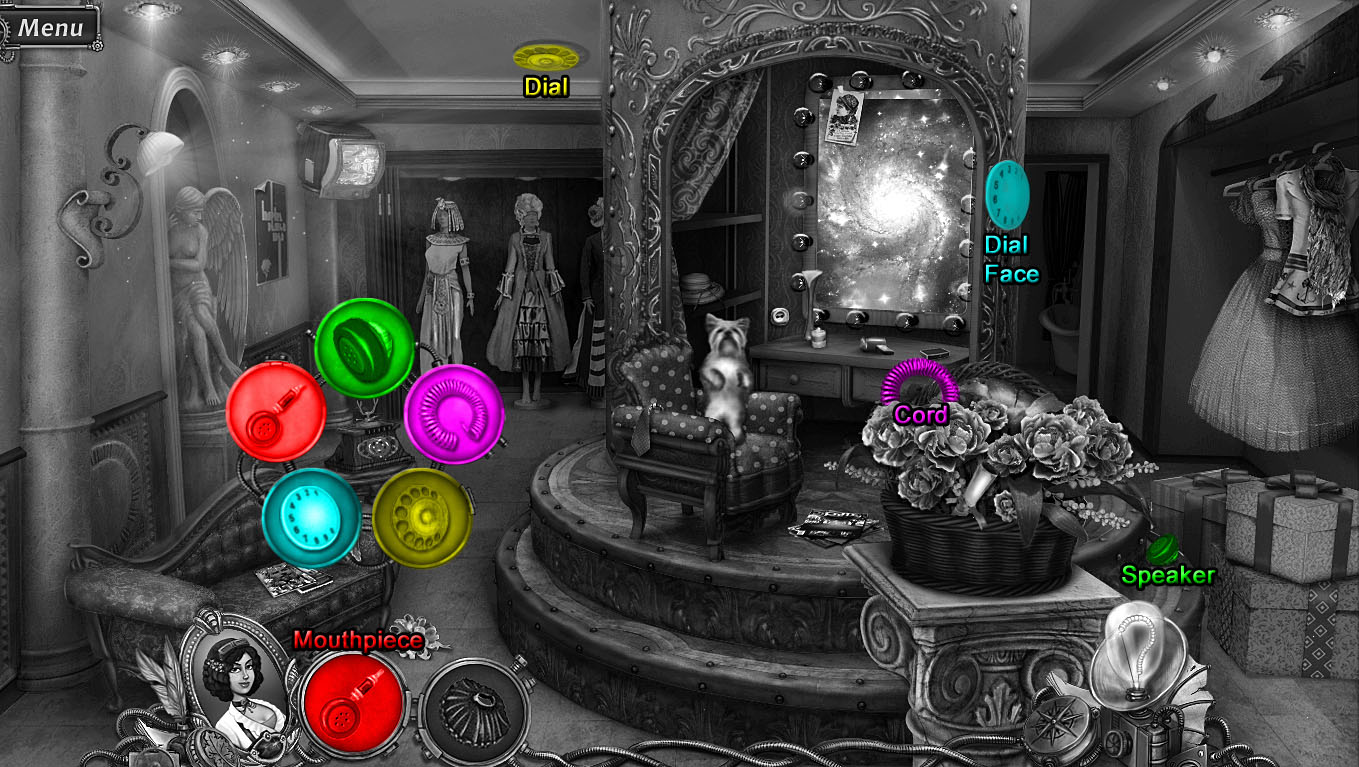
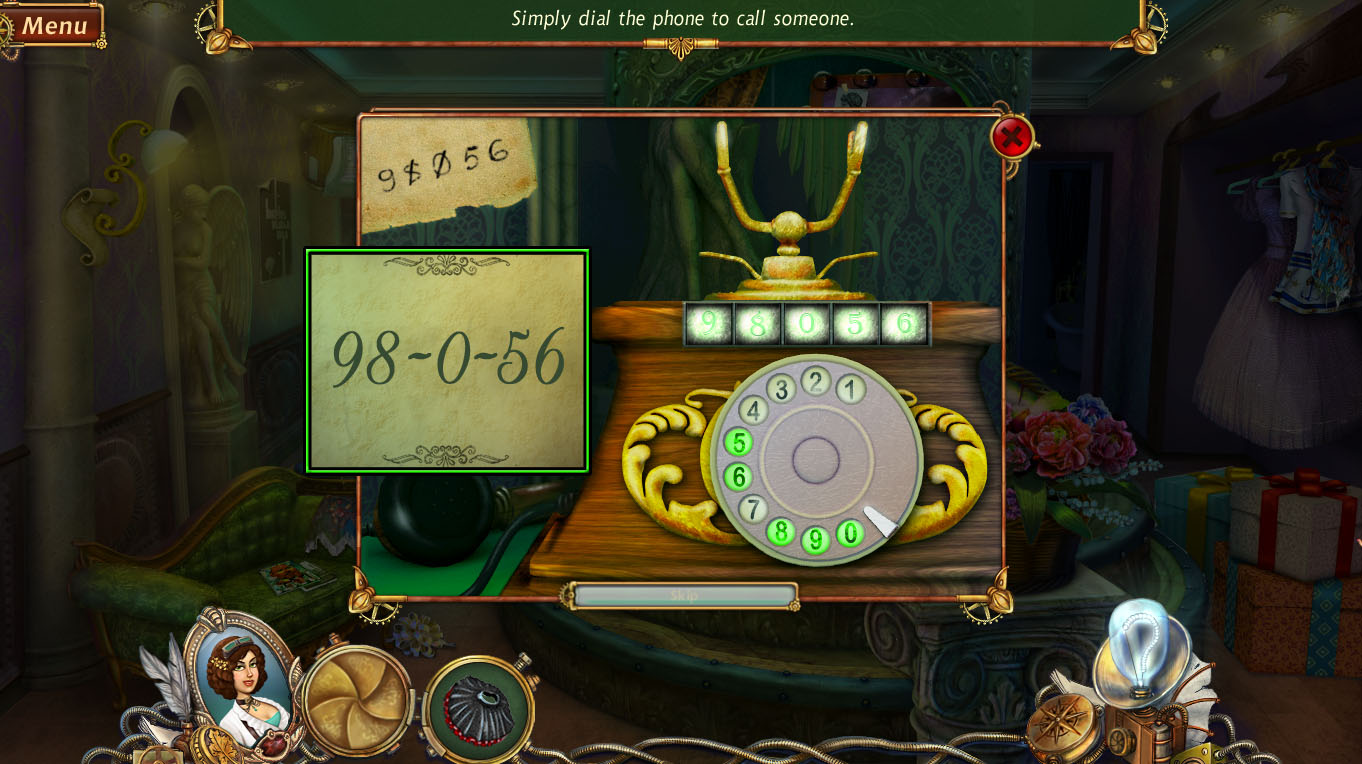
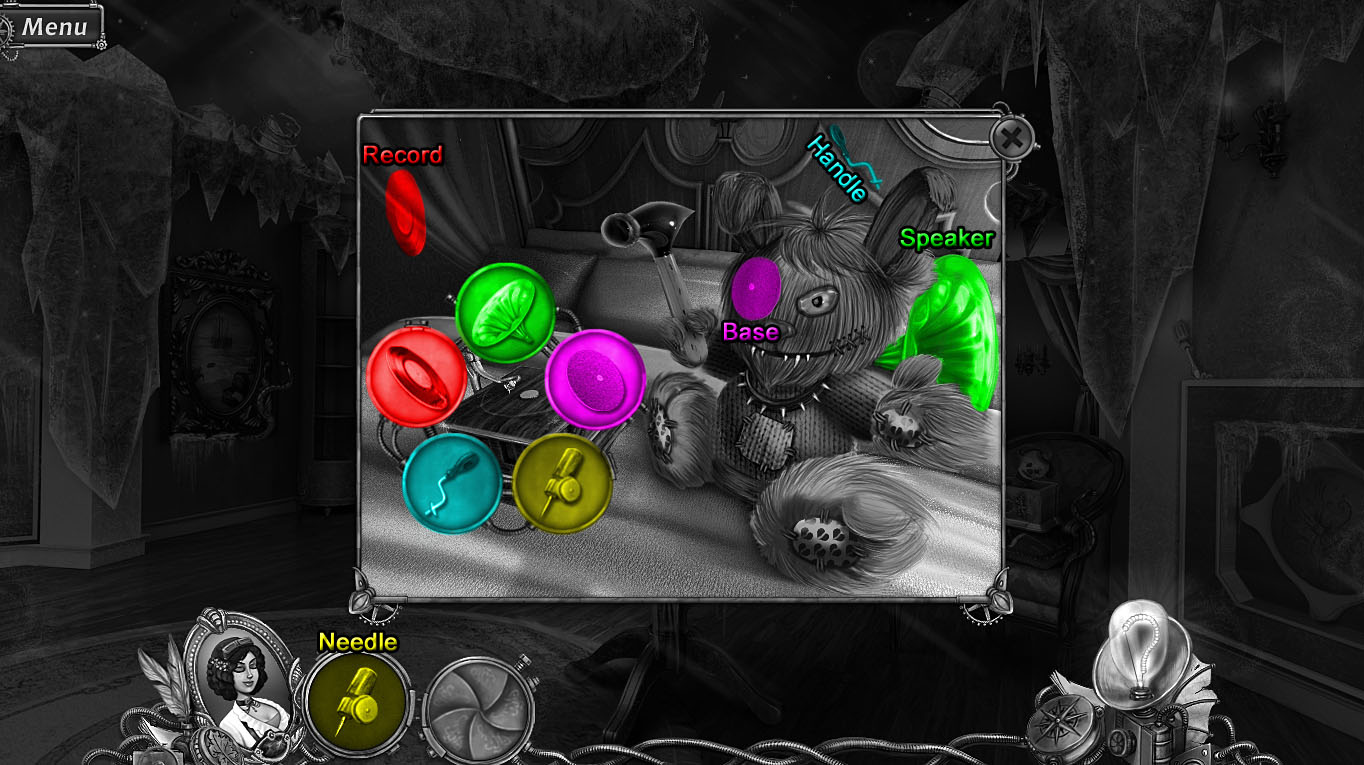
Click the telephone on the small table to view the missing receiver pieces.
Add the Mouthpiece from your inventory to the phone.
The Speaker is on the right side of the bottom step.
The Cord is above the left flowers in the basket.
The Dial is on the left side of the ceiling.
The Dial Face is on the right side of the archway, just to the right of the mirror.
Telephone Screenshot.
Once all the pieces are collected, click the telephone for a close-up view.
Click the buttons on the dial face to enter the correct numbers into the telephone.
This randomized combination is the same set of numbers found in the gargoyle cache after solving the angels and demons tokens puzzle at the Romeo & Juliet Set.
Screenshot.
Travel through the mirror portal to return to the Dark Dressing Room.
Dark Dressing Room
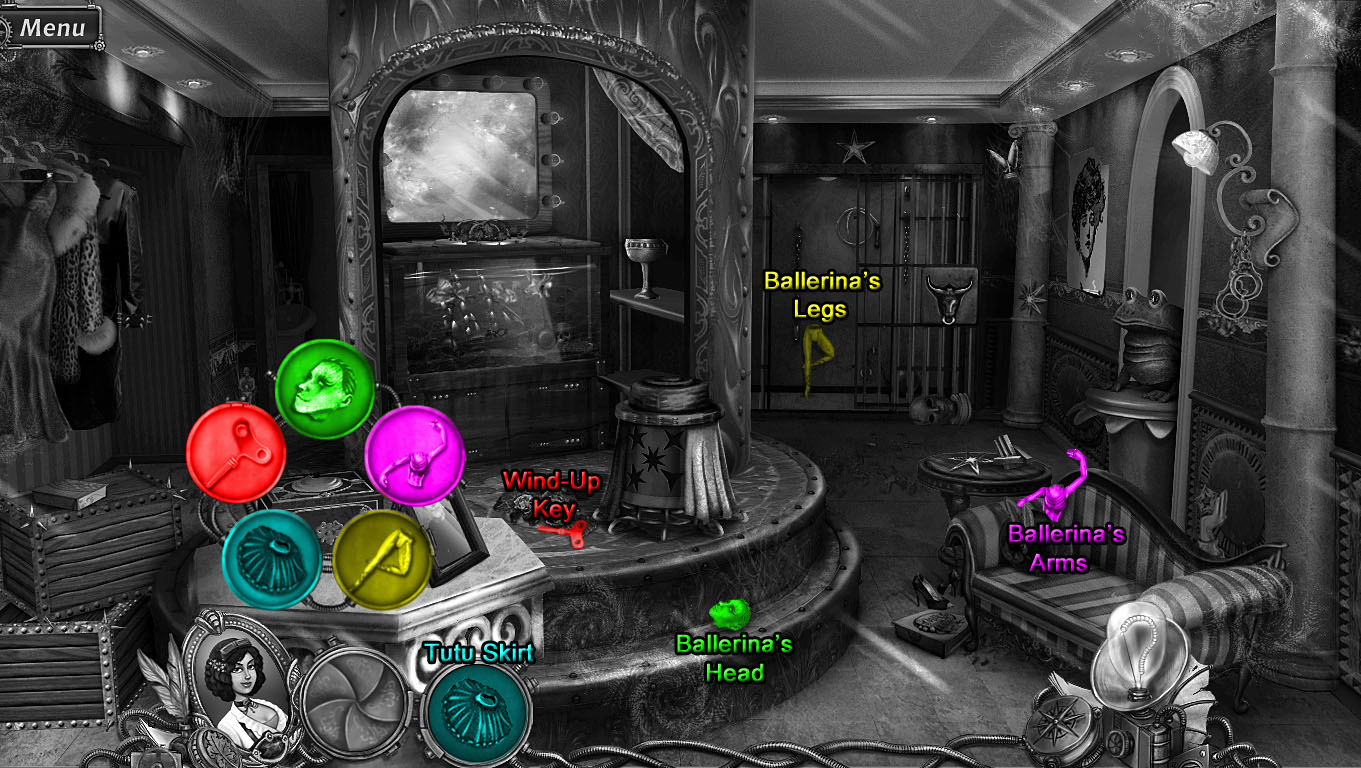
Click the music box on top of the marble table to view the missing ballerina pieces.
Add the Tutu Skirt from your inventory to the music box.
The Ballerina's Head is on top of the lower step.
The Ballerina's Arms are behind the hat on the striped sofa.
The Ballerina's Legs are inside the cell with the bull lock.
The Wind-Up Key is on the floor of the top step, beside the flowers.
Ballerina Screenshot.
After all the pieces are collected, take the Crab out of the opened music box.
Click the aquarium tank to zoom in.
Place the Crab at the bottom of the thorny leaves.
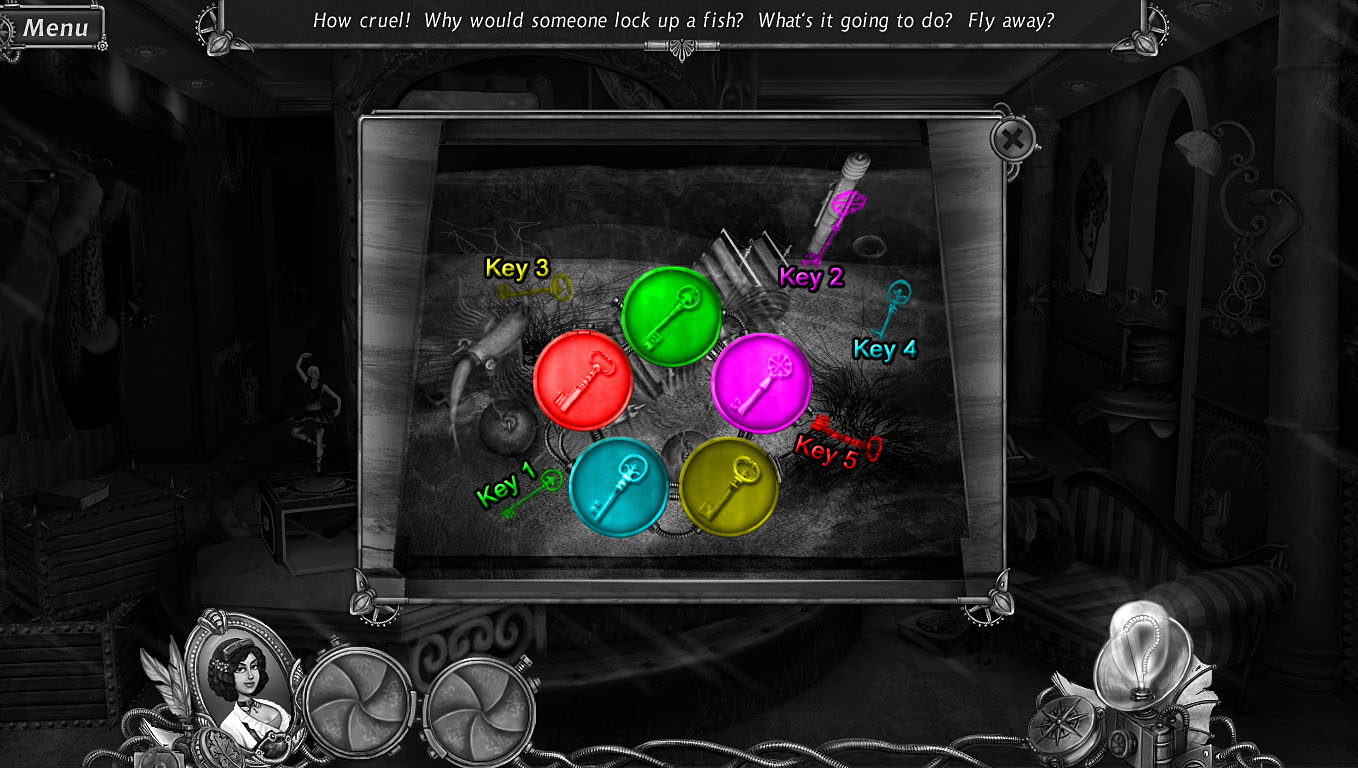
Click the chained fish in the water to view the missing keys.
The first Key is on the sand directly below the left fish's ball and chain.
The second Key is in front of the water filter.
The third Key is on the sand above the left clump of seaweed.
The fourth Key is in the sand at the upper right corner of the tank.
The fifth Key is in the right clump of seaweed.
Fish Tank Screenshot.
Once the flying fish are freed from the tank, take the Pegasus Figurine in the water.
Click the trophy on the shelf to view the missing awards.
Add the Pegasus Figurine from your inventory to the shelf.
The Oscar is in the corner of the room by the doorway to the bathroom.
The Nike Figurine is in the spiderweb at the top of the back right column.
The Star Figurine is behind the top of the striped couch.
The Golden Mask Figurine is on the floor in front of the iron bars.
Trophies Screenshot.
When all the trophies are collected, click the bottle of champagne on the top shelf to break the glass in the picture frame and reveal a Star.
Move the blue curtain at the front of the small stand to uncover the star cache.
Click the star cache to view the missing stars.
The first Star is in front of the broken picture frame on the pedestal.
The second Star is in the middle of the column in the rear right corner of the room.
The third Star is on the upper left side of the archway, just to the left of the mirror portal.
The fourth Star is on the wall above the prison cell.
The fifth Star is on top of the small round table beside the striped sofa.
Stars Screenshot.
After all the stars are collected, take the Butterfly from the box at the top of the cache.
Pick up the Piano Keys on the round table beside the striped sofa.
Return to the Music Room.
Music Room
Click the keyboard on the piano to view the missing musical pieces.
Add the Piano Keys from your inventory to the piano.
The Treble Clef is on the right wall of the orchestra pit.
The Note is on the middle support beam of the lift.
The Candelabra is at the lower right corner of the orchestra pit, just above the magician's chest.
The Metronome is on the metal bar at the left side of the lift.
Piano Screenshot.
Once all the pieces are collected, take the Dragonfly inside the piano.
Click the magician's chest to zoom in.
Add the Butterfly and Dragonfly from your inventory to the matching sockets in the book cover.
Turn to the last page in the diary to find the arsenic formula receipt.
Close the book and pick up the Diary to add it to your inventory.
Go back to the Romeo & Juliet Set.
Romeo & Juliet Set (Backward World)
Give the Diary from your inventory to the ghosts.
Speak with the ghosts to receive the Film Negative.
Posted by: Trinn |
May 24, 2012 8:45 PM
|
May 24, 2012 8:45 PM
Snark Busters: High Society Walkthrough
(Part 2, Chapters 3 & 4)
Chapter 3
Photo Lab
Click the mechanism beside the camera on the table at the back of the room for a closer look.
Place the Film Negative from your inventory in the small compartment in the upper right corner of the camera (A).
Use the directional arrows (B, C, D, & E) at the lower right corner of the camera to focus the image.
Click the left blue dial under the horizontal arrow (F) and the blue dial under the vertical arrows (G) to stretch the image into the shape of a square.
Click the + magnifier button (H) to zoom in or the - magnifier button (I) to zoom out.
Press the red button (J) to print the complete image.
Camera Screenshot.
Click the Undeveloped Photo in the center of the red square to add it to your inventory.
Place the Undeveloped Photo in the green and purple trays of developer fluid on the counter to receive the Developed Photo.
Put the Developed Photo inside the water-filled sink to make the Washed Photo.
Finally, place the Washed Photo in the middle glass frame hanging from the rope.
Robo Park
Click the musical coach blocking the path to zoom in.
Click the middle robotic musician to view the missing instrument pieces.
The first Drum Skin is at the end of the left robot's trumpet.
The second Drum Skin is on the music note-shaped design at the lower left side of the coach.
The Drumsticks are over the right music note design at the lower right side of window in the coach.
The Drum Base is on top of the right robot's head.
The Strap is at the upper left corner of the window in the coach.
Robot Musicians Screenshot.
After all the pieces are collected, the musical coach will move away from the sidewalk.
Follow the cleared path forward to the Dock.
Dock
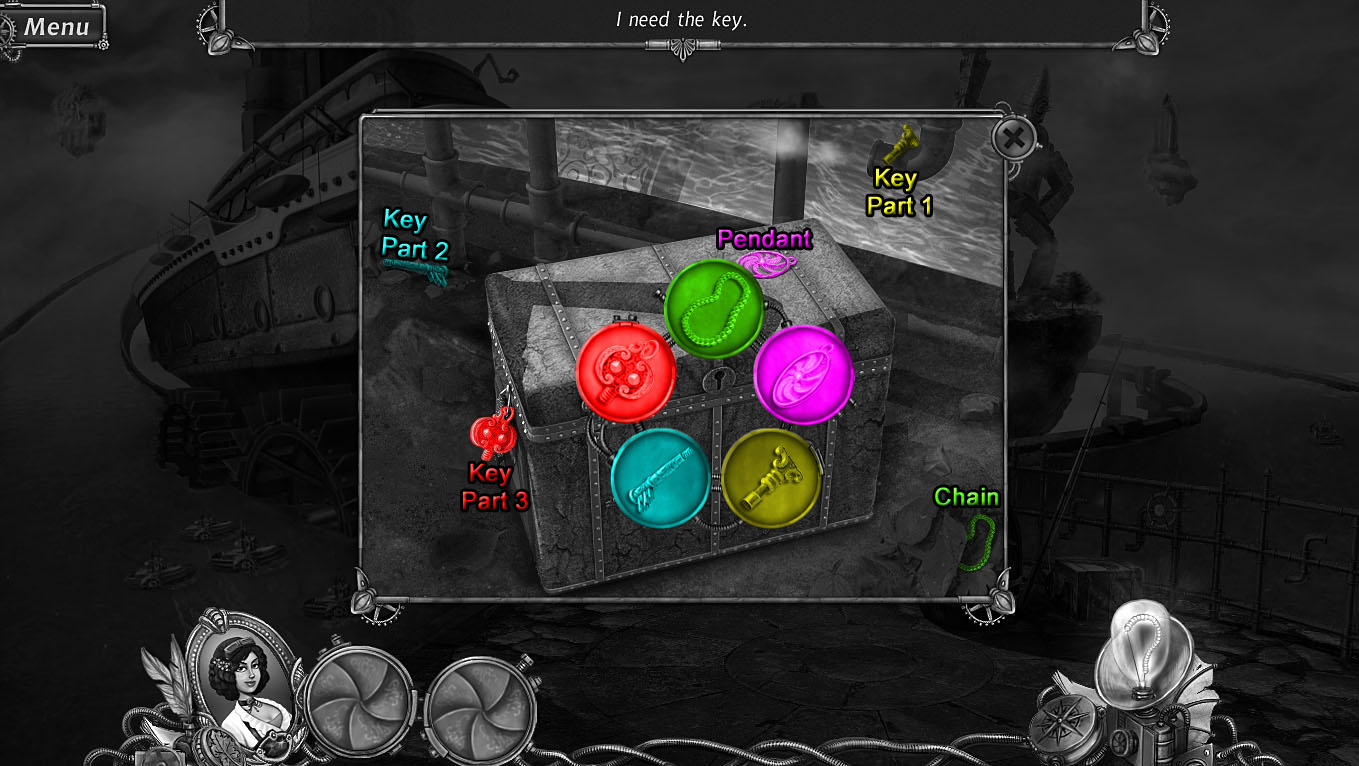
Click the chest on the ground to the right of the barrel to zoom in.
Click the lock in the center of the chest to view the missing key pieces.
The Chain is in the pile of leaves at the bottom right corner.
The Pendant is on top of the upper right side of the chest.
The first Key Part is on top of the steaming pipe at the top right corner.
The second Key Part is on the ground near the bottom of the pipe in the top left corner.
The third Key Part is hanging from the left side of the chest.
Locked Chest Screenshot.
Take the Sugar cubes and the Ship from the inside of the chest.
Note that there is an empty bottle in the right compartment in the chest that will come in handy later.
Click the model ships floating in the water to view the other missing ships and parts.
Add the Ship from your inventory to the water.
The Water Wheel is at the bottom of the mechanical flamingo pedestal.
The Ship's wheel is in the middle of the pipe fence, just above the opened chest.
The Pipe is on top of the island floating in the sky to the right of the giant robot.
The Anchor is at the top of the cruise ship's bow.
Model Ships Screenshot.
After the model ships sail away, take the Hook floating in the water.
Add the Hook to the Fishing Rod leaning against the fence beside the barrel to add the rod to your inventory.
Use the Fishing Rod on the water to the left of the ocean liner to catch a Fish.
Give the Fish from your inventory to the cat sitting on the barrel.
Click the empty right pedestal at the front of the bridge to view the missing mechanical flamingo pieces.
The Flamingo's Body is covering the head of the giant robot.
The Flamingo's head is on top of the barrel.
The first Flamingo's Leg is on the ground beside the steps at the water's edge.
The second Flamingo's Leg is sticking out of the upper right side of the cruise ship.
The Flamingo's Neck is at the side of the structure on the left floating island.
Mechanical Flamingo Screenshot.
Once all the flamingo pieces are collected, pick up the Eye on the ground that rolls to the front of the bridge.
Go back to the Robo Park.
Robo Park
Click the cupid robot sitting on the park bench to view the missing pieces.
Add the first Eye from your inventory to the robot.
The Bow is at the bottom of the springing arrow sign.
The Spring is around the top of the fence post near the lower left corner.
The Wing is above the door to the peacock machine.
The second Eye is in the flower bed to the left of the large peacock machine.
Cupid Robot Screenshot.
After all the robot pieces are collected, take the Axe that's left behind on the park bench.
Return to the Dock.
Dock
Use the Axe from your inventory to chop up the barrel.
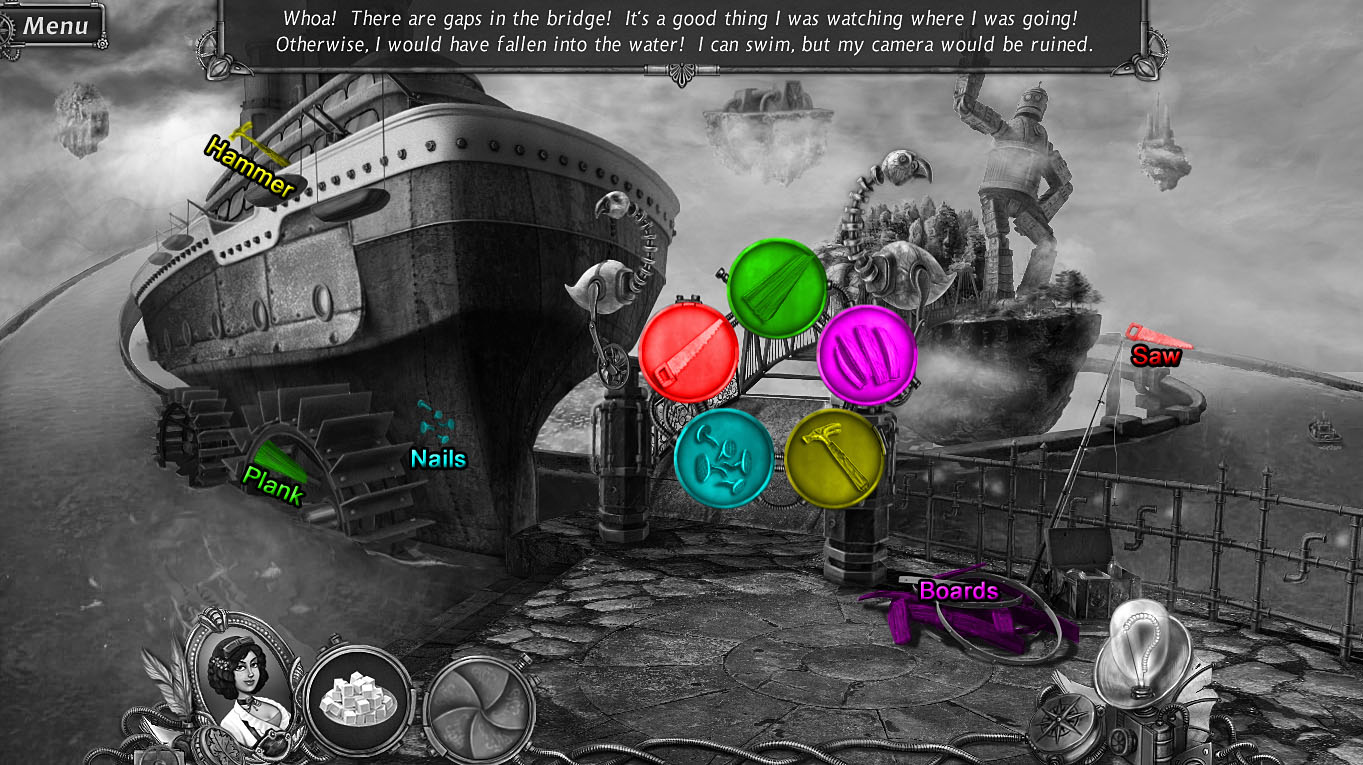
Click the broken bridge to view the missing pieces.
Take the Boards from the destroyed barrel and add them to the bridge.
The plank is in the middle of the front water wheel at the bottom of the cruise ship.
The hammer is above the lifeboat hanging over the side of the cruise ship.
The Nails are stuck in the bow of the ship just above the front water wheel.
The saw is on the rail at the side of the water path, to the right of the giant robot's floating island.
Bridge Screenshot.
Go across the repaired bridge to reach the Robot Lake.
Robot Lake
Click the broken floating sign to view the missing pieces.
The Motor is at the middle of the right robot foot.
The Chain is in the water under the bottom of the right lamppost.
The first Blade is in the far right branch of the tree.
The left Blade is near the top of the left lamppost.
The Cap is at the front of the left robot foot.
Floating Sign Screenshot.
Once all the pieces are collected, the repaired signpost will uncover the thermometer.
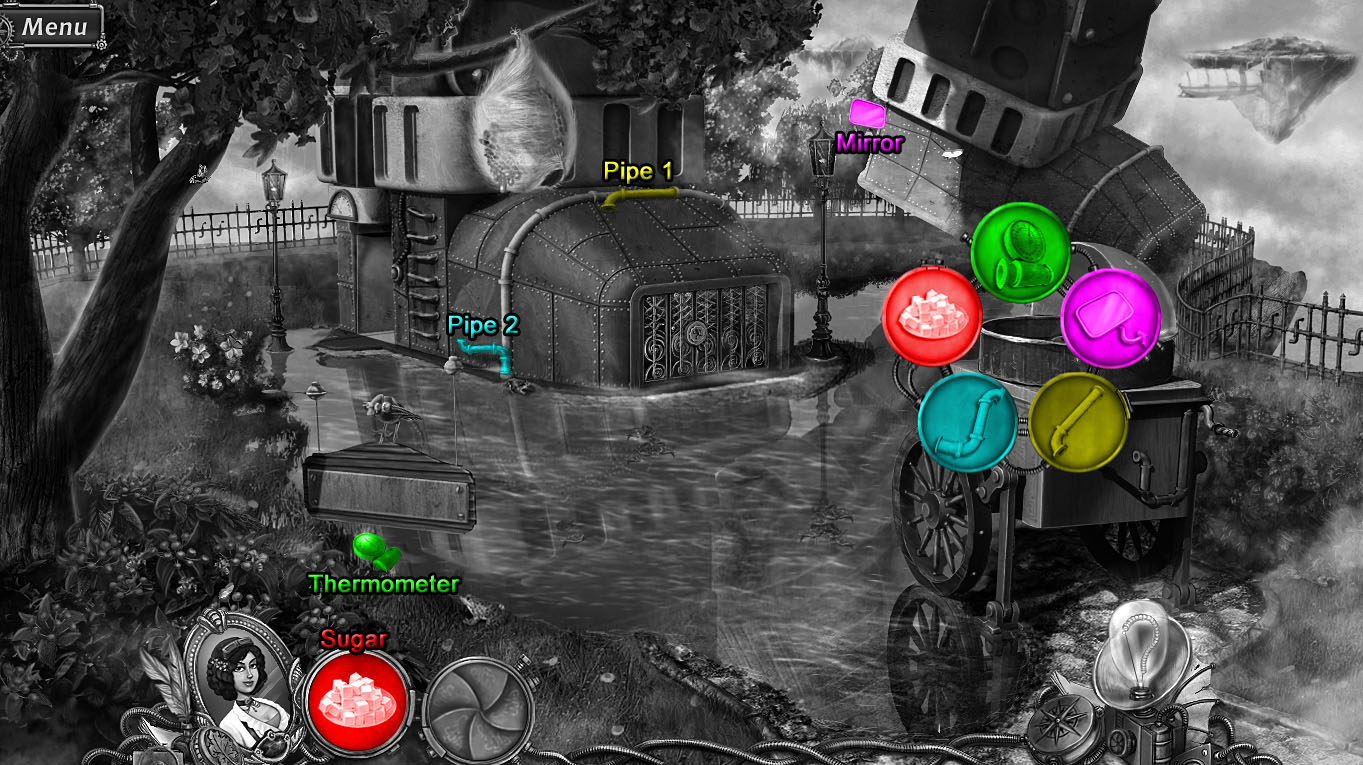
Click the cotton candy machine to view the missing pieces.
Add the Sugar cubes from your inventory to the machine.
Pick up the Thermometer on the ground under the signpost and add it to the machine.
The Mirror is on the left side of the right robot foot.
The first Pipe is at the top of the left robot foot.
The second Pipe is on the left side of the left robot foot.
Cotton Candy Machine Screenshot.
When all the pieces are collected, the bees will leave the bush and travel to the ball of cotton candy.
Take the Berries from the bush at the bottom of the tree.
Go through the mirror to travel to the Lake at Night.
Lake at Night (Backward World)
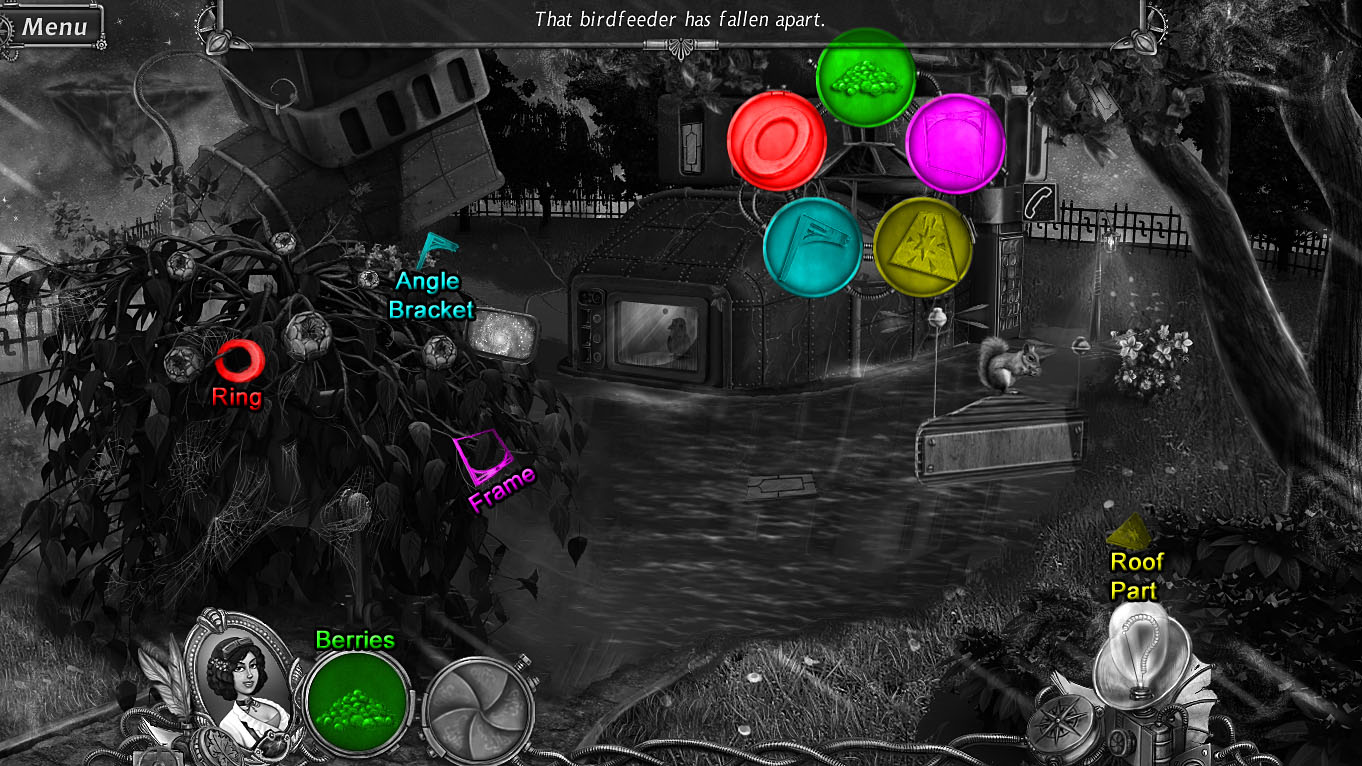
Click the bird feeder hanging from the tree to view the missing pieces.
Add the Berries from your inventory to the feeder.
The Frame is hanging from the left bush under the mirror portal.
The Roof Part is sticking out of the top of the right bush.
The Angle Bracket is at the top of the left bush.
The Ring is hanging on the left bush beside the lower left flower.
Bird Feeder Screenshot.
After all the pieces are collected, take the Speaker from the repaired bird feeder.
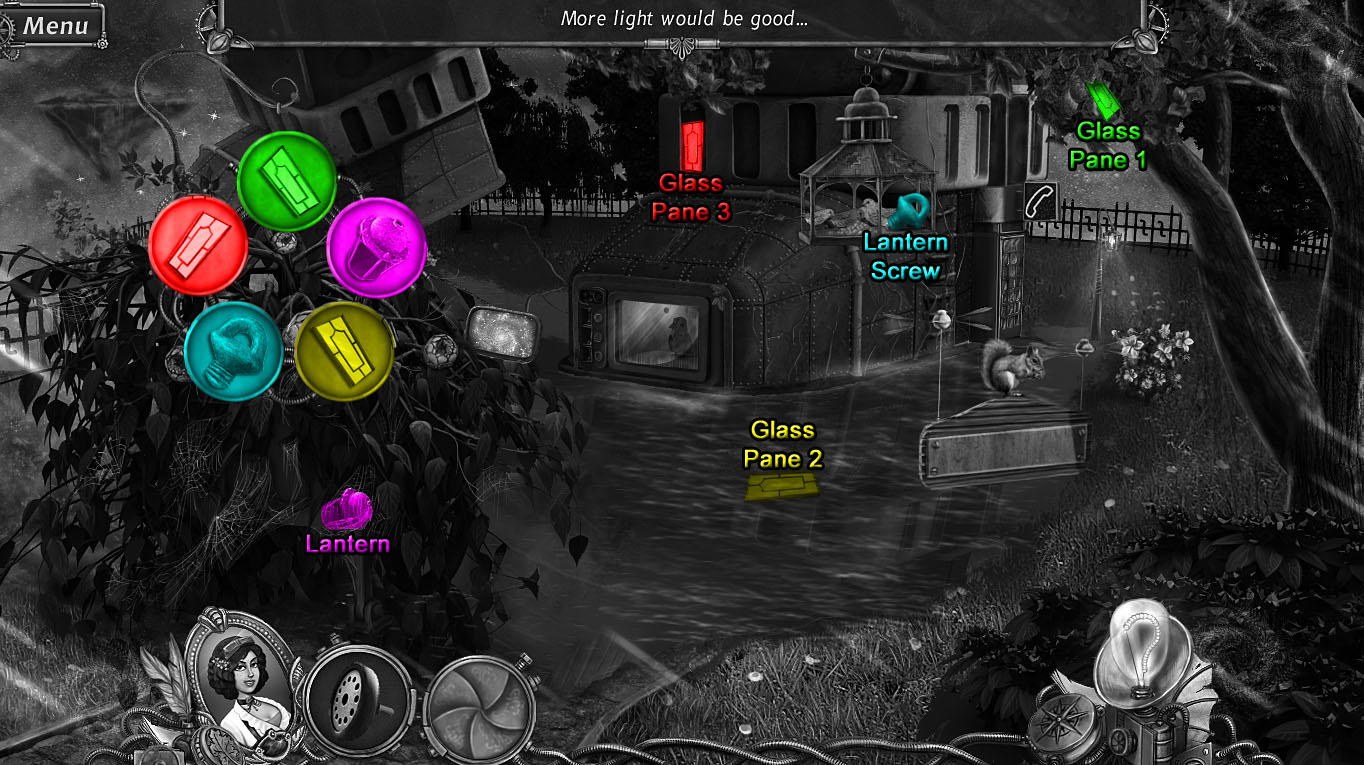
Click the lantern hanging above the left bush to view the missing light pieces.
The first Glass Pane is in the leaves at the top of the tree.
The Lantern is in the spiderweb at the bottom of the left bush.
The second Glass Pane is floating in the middle of the water.
The Lantern Screw is in the bird feeder.
The third Glass Pane is in the rectangular gap at the upper left side of the right robot foot.
Lantern Screenshot.
Once all of the pieces are collected, take the Disc from the middle flower.
Open the door to the red telephone booth, then click the booth to look inside.
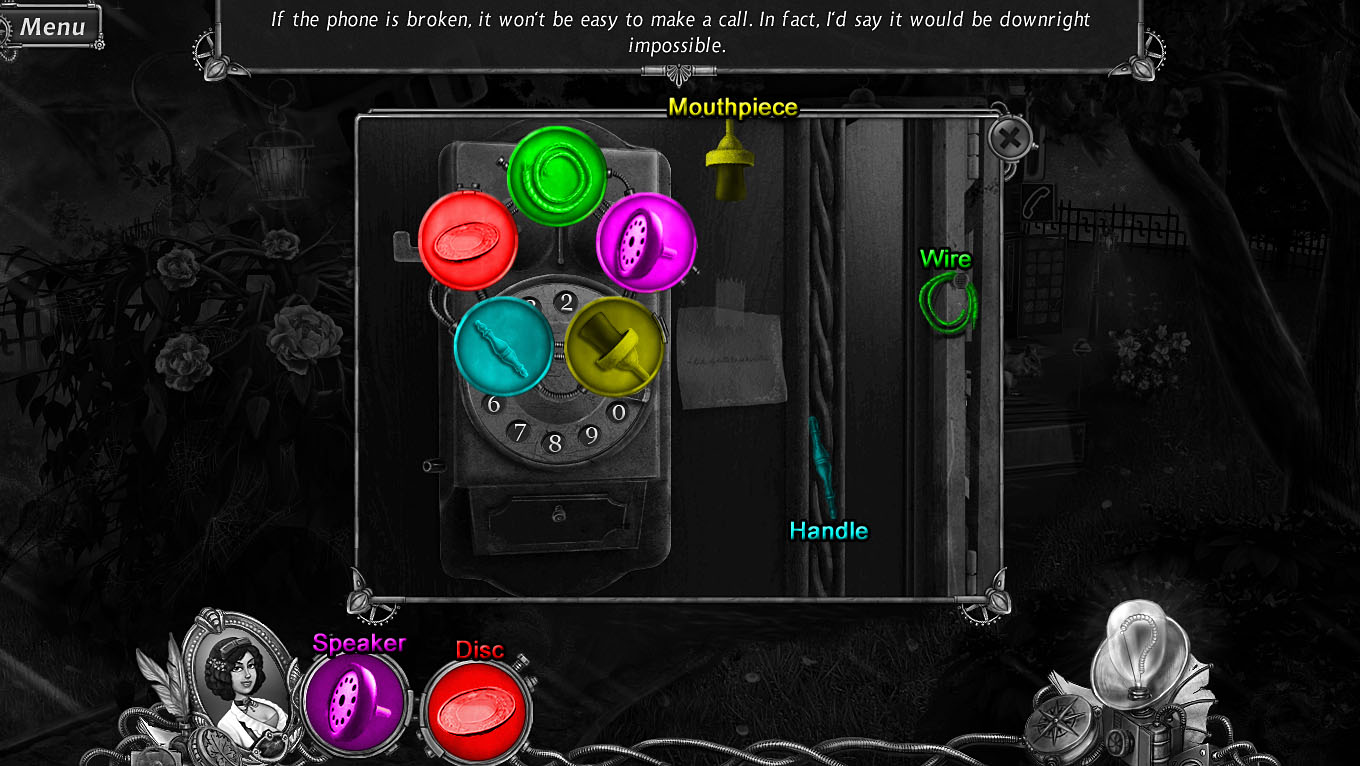
Click the broken telephone to view the missing pieces.
Add the Speaker and the Disc from your inventory to the phone.
The Wire is wrapped around the nail on the right side of the phone booth.
The Mouthpiece is hanging to the right of the telephone from the top of the phone booth.
The Handle is at the bottom of the swirl design going through the middle of the metal bar.
Telephone Screenshot.
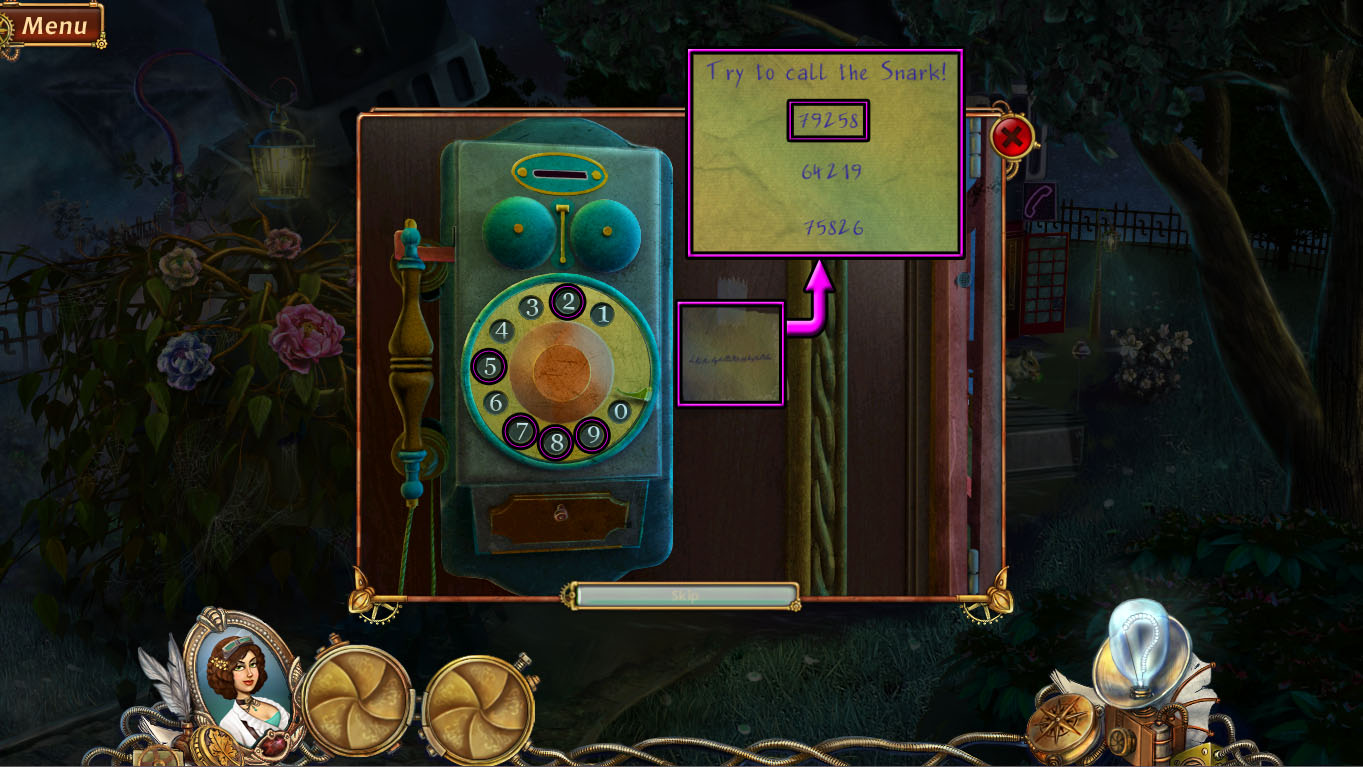
The minigame will begin when all of the telephone pieces are collected.
Use the telephone to dial the three numbers written on the paper at the side of the booth.
All three numbers and the order of the correct number are random each game; in this example the number is 79258.
Memorize each number, then click the buttons on the telephone to dial the number.
If the number is incorrect, the coin will be returned at the bottom of the dispenser and you must try a different number.
Solution.
Take the Key-bot that falls to the bottom of the telephone dispenser.
Read the rolled piece of paper and note the image of the telephone and the 2 digit number.
Go through the mirror portal to return to the Robot Lake.
Robot Lake
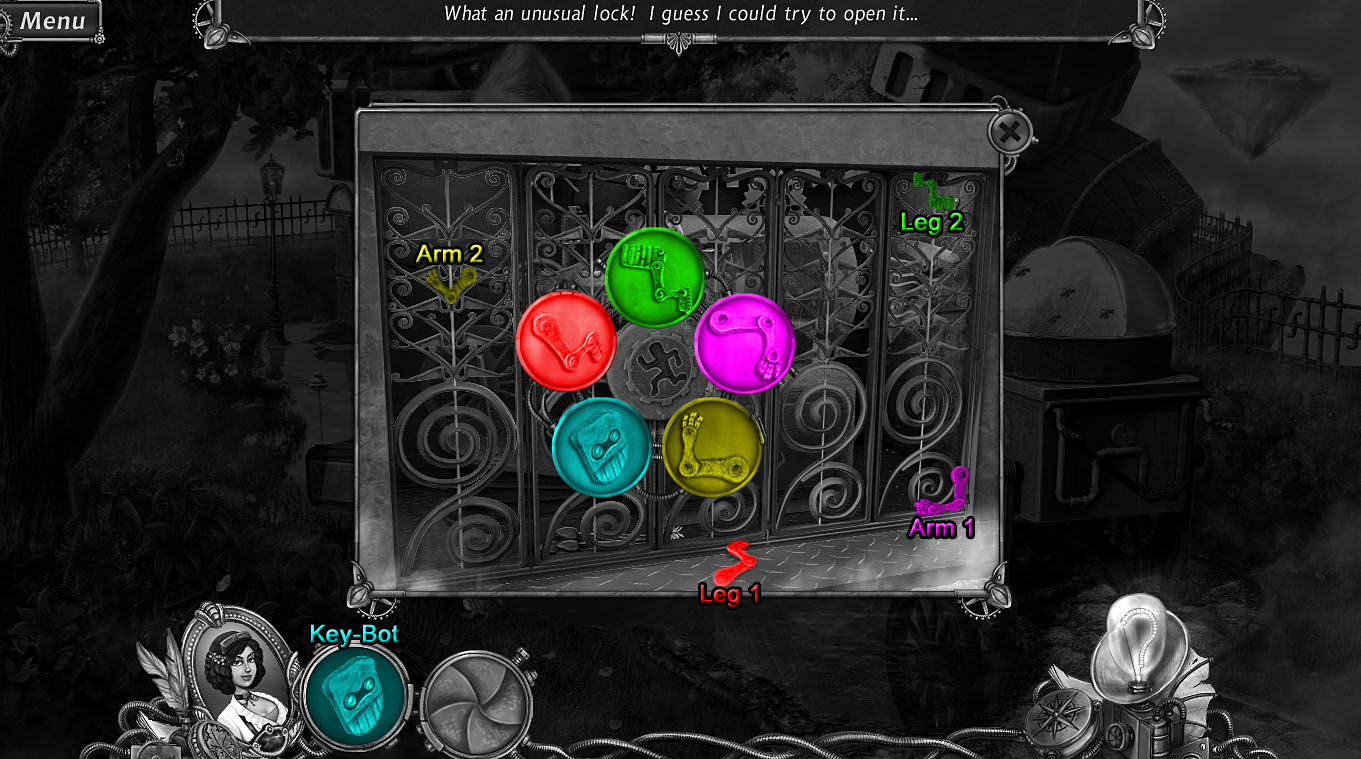
Click the grille at the front of the left robot foot to zoom in.
Click the lock at the middle of the grille to view the missing pieces.
Add the Key-bot head from your inventory to the lock.
The first Arm is at the lower right corner of the grille.
The second Arm is near the top of the filigree in the far left section of the grille.
The first Leg is on the metal base at the bottom of the grille.
The second Leg is at the top right corner of the grille.
Grille Lock Screenshot.
Pick up the Arrows by the bottom of the bellows.
Take the Bucket hanging at the upper right side of the steam engine.
Use the Bucket from your inventory on the lake water to receive a Bucket of Water.
Go back to the Robo Park.
Robo Park
Give the Arrows from your inventory to the cupid robot.
Read the piece of paper that falls to the ground from the popped balloons, and note the 2 digit number written on the paper.
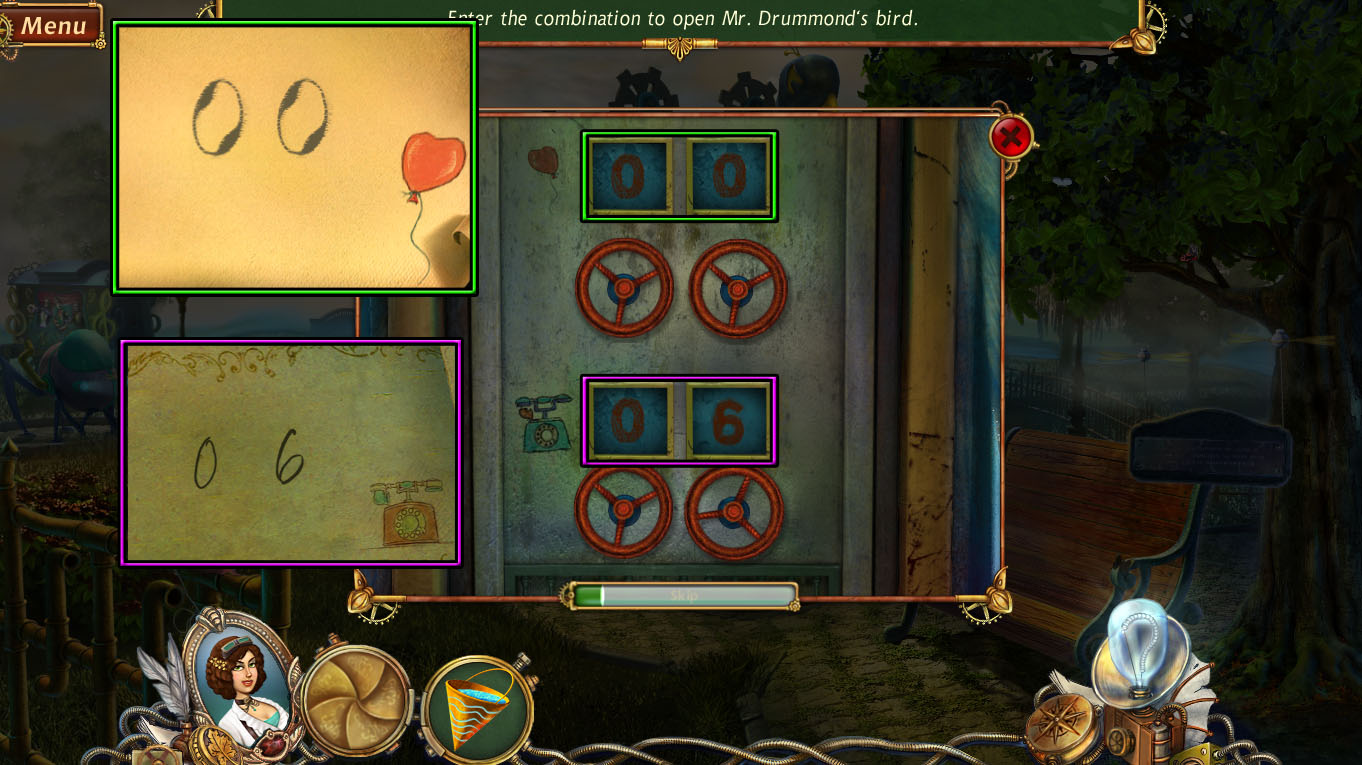
Click the side of the peacock machine to start the minigame.
Use the valves to enter in the correct combination.
Turn the valves under each square to cycle through the numbers 0-9.
The first two numbers are found in the note from the popped balloons at the Robo Park.
The second two numbers are from the rolled paper in the telephone booth.
The solution is a random selection of numbers each game, so for the following example the balloon combination is 0,0 and the telephone combination is 0,6.
Solution.
Once the minigame is complete, click the open door to look inside.
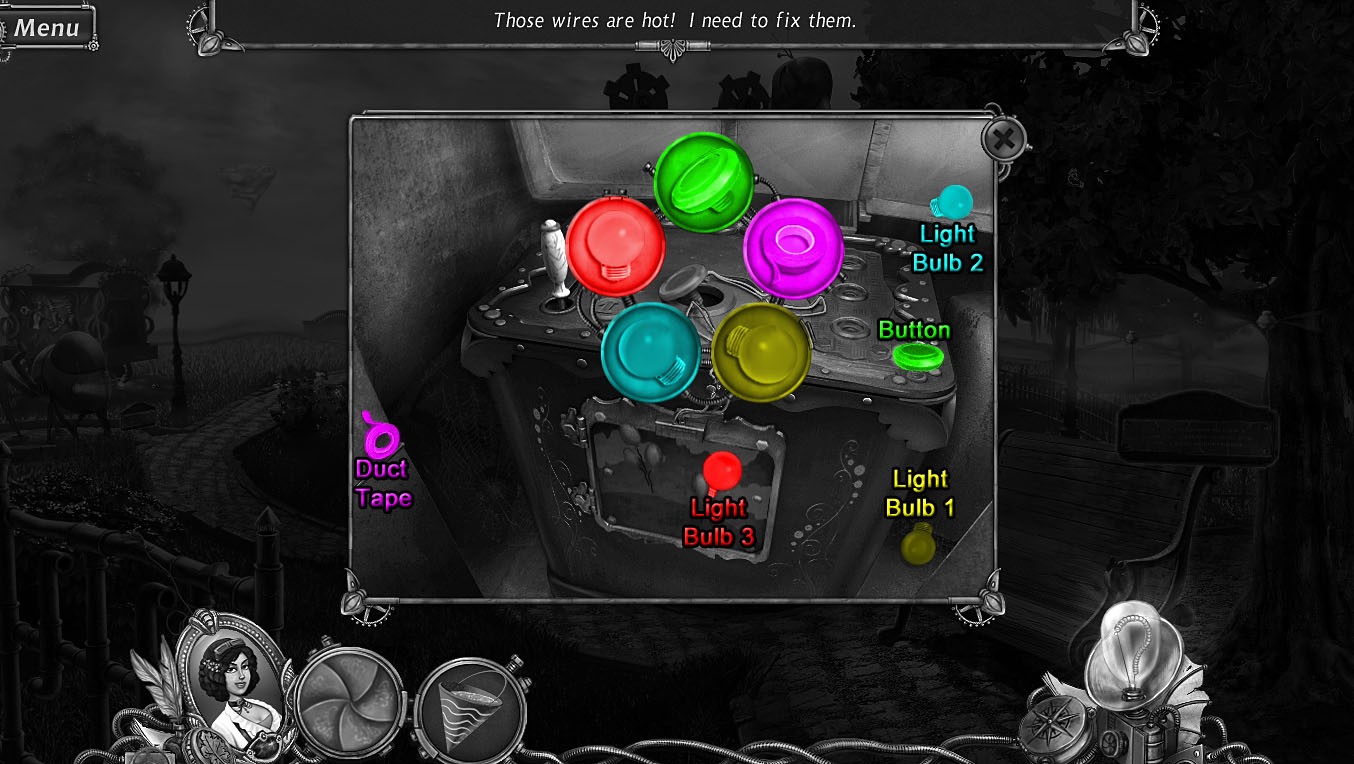
Click the broken button at the center of the control panel to view the missing pieces.
The Button is at the lower right corner of the control panel.
The Duct Tape is in the middle of the wall near the lower left side of the room.
The first Light Bulb is on the floor to the right of the control panel base.
The second Light Bulb is at the bottom of the right window.
The third Light Bulb is in the middle of the right group of balloons in the picture on the control panel base.
Control Panel Screenshot.
After all the pieces are collected, click the red button in the middle of the control panel.
Take the revealed Knife from the cache below the panel.
Move forward to travel to the Dock.
Dock
Click the chest beside the fishing rod for a closer look.
Use the Knife from your inventory to cut the plastic bottle into a Makeshift Funnel.
Return to the Robot Lake.
Robot Lake
Inspect the steam engine inside the left robot foot.
Remove the star-shaped cap from the water tank.
Open the oven door to reveal the burning coals.
Add the Makeshift Funnel from your inventory to the hole in the water tank.
Pour the Bucket of Water from your inventory into the funnel.
Pick up the Inductor Coil that falls to the ground.
Use the mirror portal to travel to the Lake at Night.
Lake at Night (Backward World)
Click the penguin behind the glass at the bottom of the right robot foot to zoom in.
Add the Inductor Coil from your inventory to the empty socket on the left side of the foot.
This will repair the steam engine and automatically transport you to the Robot Lake.
Robot Lake
Click the elevator at the side of the left robot foot for a close-up view.
Press the red button to open the elevator doors.
Move inside the elevator to travel to the Robot Laboratory.
Robot Laboratory
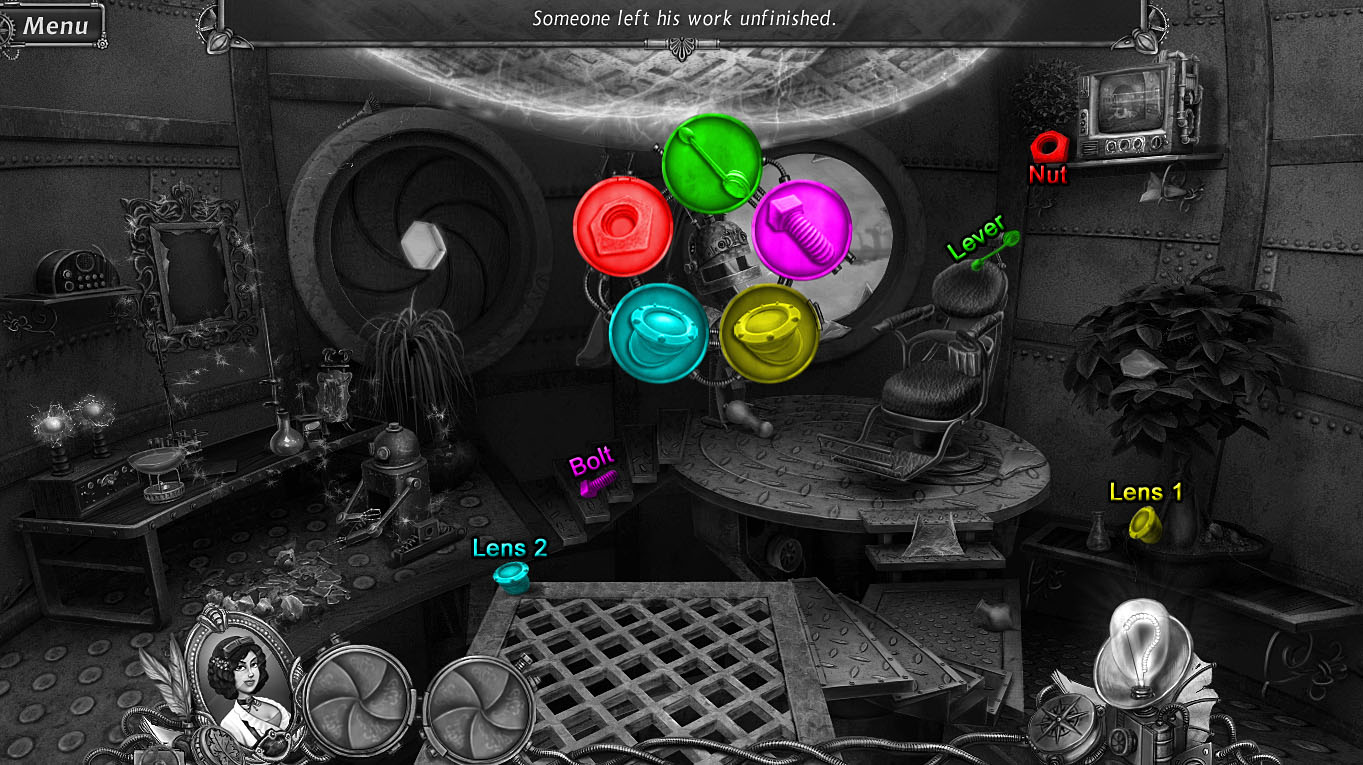
Click the golden robot head to view the missing pieces.
The Lever is at the side of the headrest on the dentist chair.
The Bolt is in the middle of the rear steps.
The first Lens is in the dirt of the right planter.
The second Lens is at the upper left corner of the orange platform.
The Nut is on the shelf beside the television.
Robot Head Screenshot.
After all the pieces are collected, the Robot's Head will be added to your inventory.
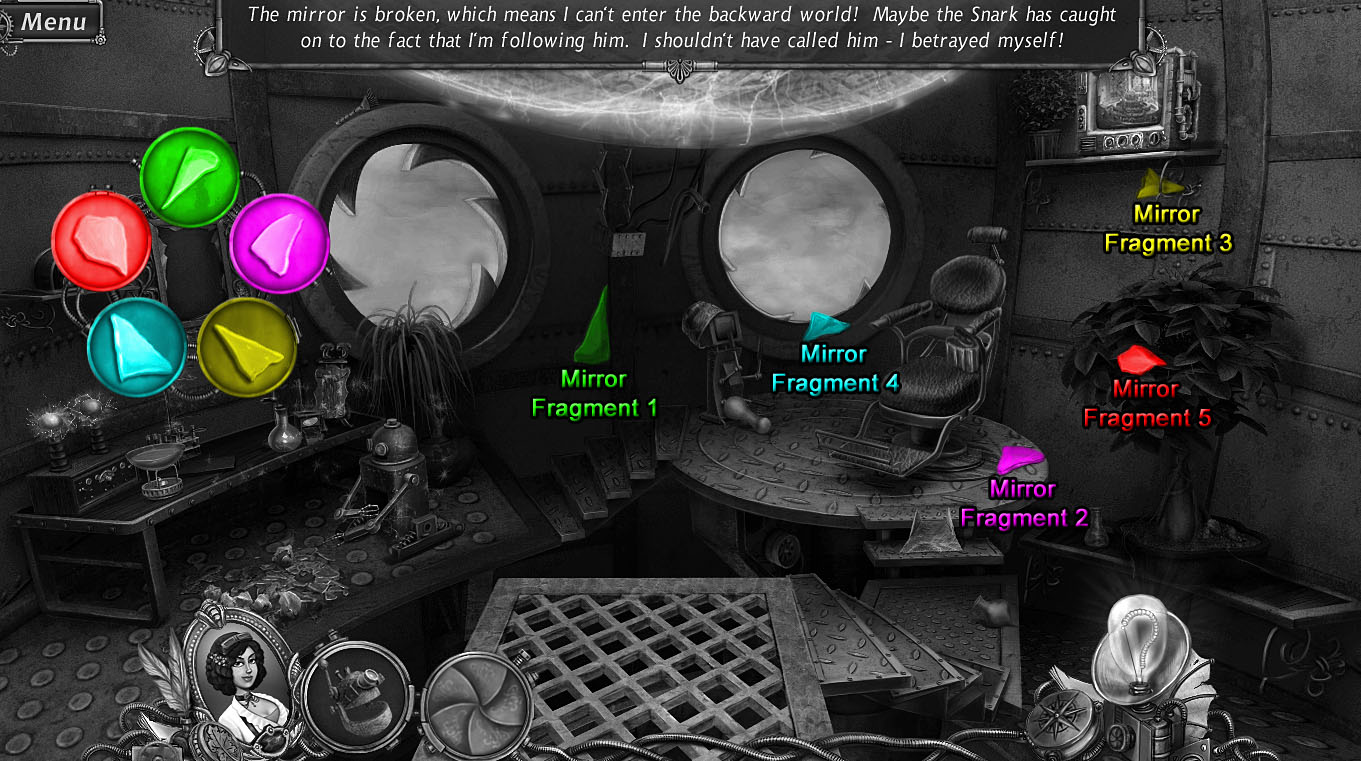
Click the broken mirror on the left wall to view the missing pieces.
The first Mirror Fragment is beside the support beam between the two eye holes.
The second Mirror Fragment is on the floor to the right of the dentist chair.
The third Mirror Fragment is underneath the television shelf.
The fourth Mirror Fragment is at the bottom of the right eye hole.
The fifth Mirror Fragment is in the leaves of the right potted plant.
Mirror Screenshot.
Once all of the pieces are collected, go through the portal in the mirror to travel to the Mutant Plant Room.
Mutant Plant Room (Backward World)
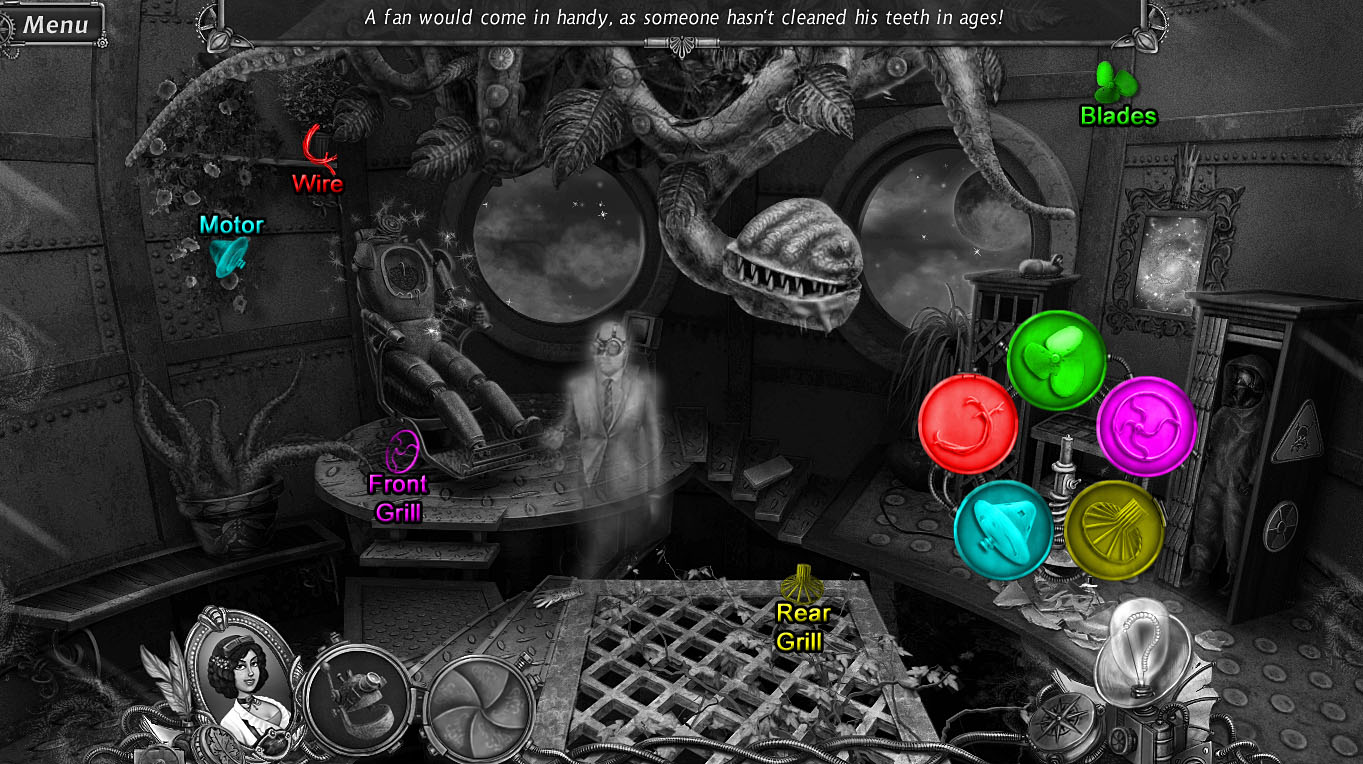
Click the broken fan to the left of the hazmat suit to view the missing pieces.
The Blades are on the wall above the mirror.
The Front Grill is under the headless robot on the dentist chair.
The Rear Grill is near the upper right corner of the grated platform.
The Motor is at the bottom of the vines on the shelf on the left wall.
The Wire is in front of the potted plant atop the shelf on the left wall.
Fan Screenshot.
When all the pieces are collected, pick up the Glass Coil at the bottom of the repaired fan.
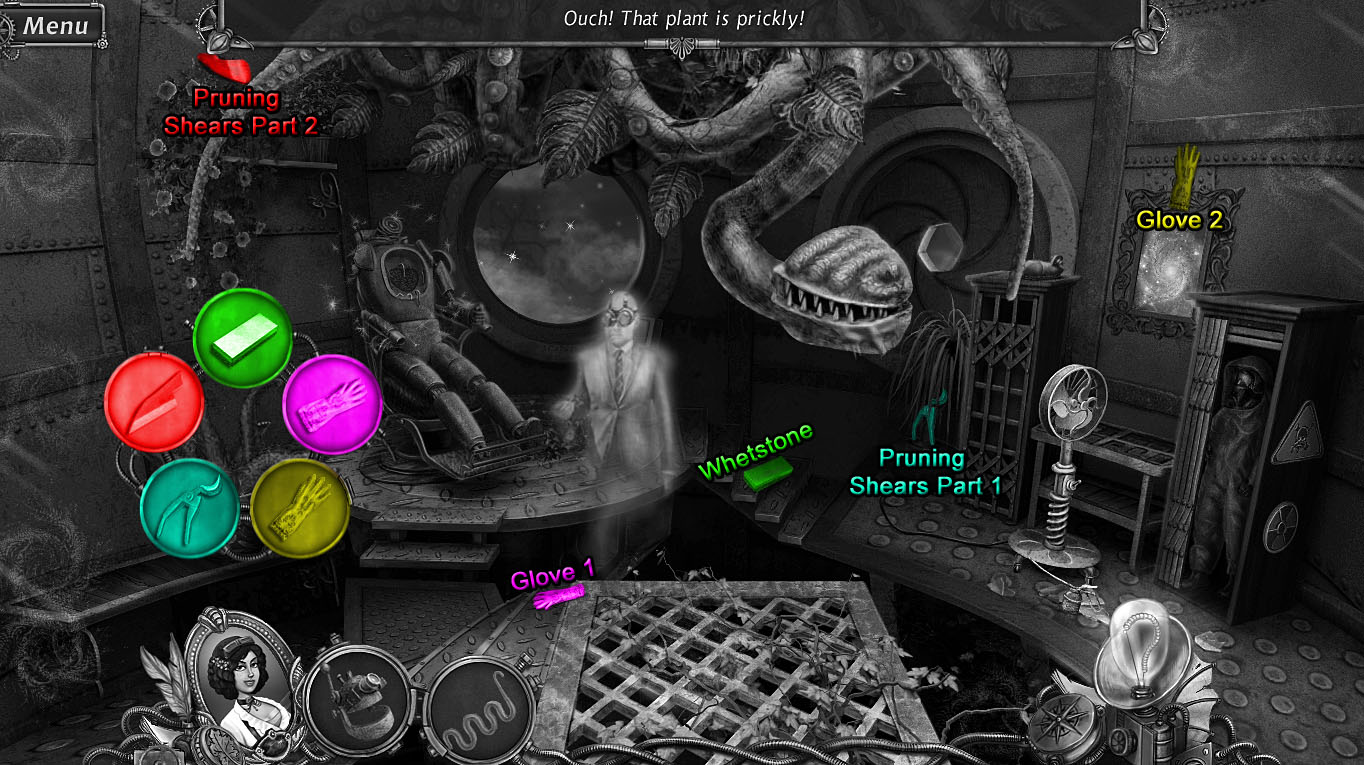
Click the prickly potted plant to view the missing gardening tool pieces.
The Whetstone is on the middle step of the stairs.
The first Glove is near the upper left corner of the grated platform.
The second Glove is at the top of the mirror portal.
The first Pruning Shears Part is at the middle of the right potted plant.
The second Pruning Shears Part is above the vines on the wall shelf.
Gardening Tools Screenshot.
After all the pieces are collected, the gold robot's Hand will be revealed in the potted plant; leave it there for the time being.
Go through the mirror portal to return to the Robot Laboratory.
Robot Laboratory
Click the chemistry set on the table to view the missing pieces.
Add the Glass Coil from your inventory to the chemistry set.
The Test Tube is on the shelf beside the lower right potted plant.
The Flask is on the platform at the bottom of the right stairs.
The Mortar is on top of the small television to the left of the dentist chair.
The Pestle is at the bottom of the stand under the small television.
Chemistry Set Screenshot.
Once all the pieces are collected, click the completed chemistry set to zoom in.
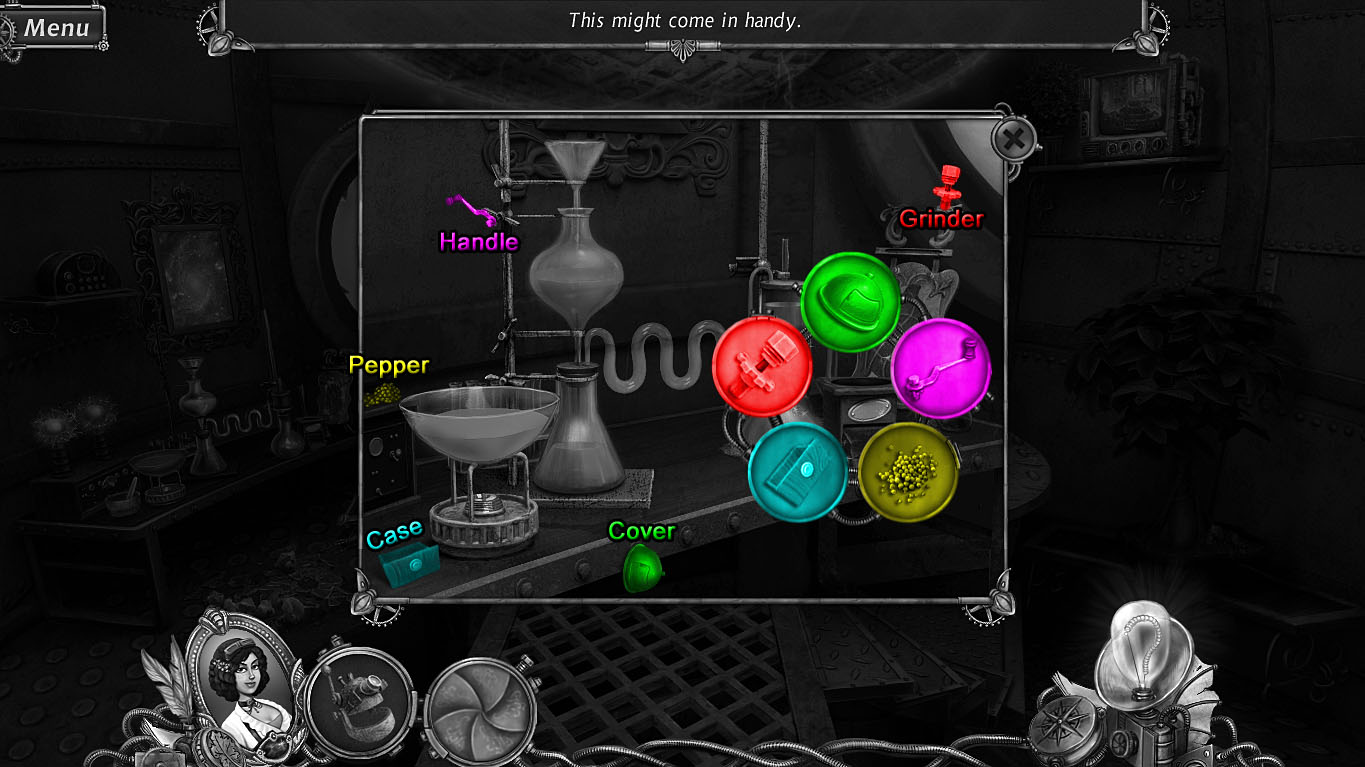
Click the broken pepper grinder to view the missing pieces.
The Cover is hanging from the bolt at the side of the table.
The Handle is at the side of the metal stand holding the beakers.
The Pepper is on top of the switch box on the left side of the table.
The Case is on the table beside the burner.
The Grinder is above the broken mirror frame.
Pepper Grinder Screenshot.
Once all the pieces are collected, take the Ground Pepper from the repaired grinder.
Use the mirror portal to travel to the Mutant Plant Room.
Mutant Plant Room (Backward World)
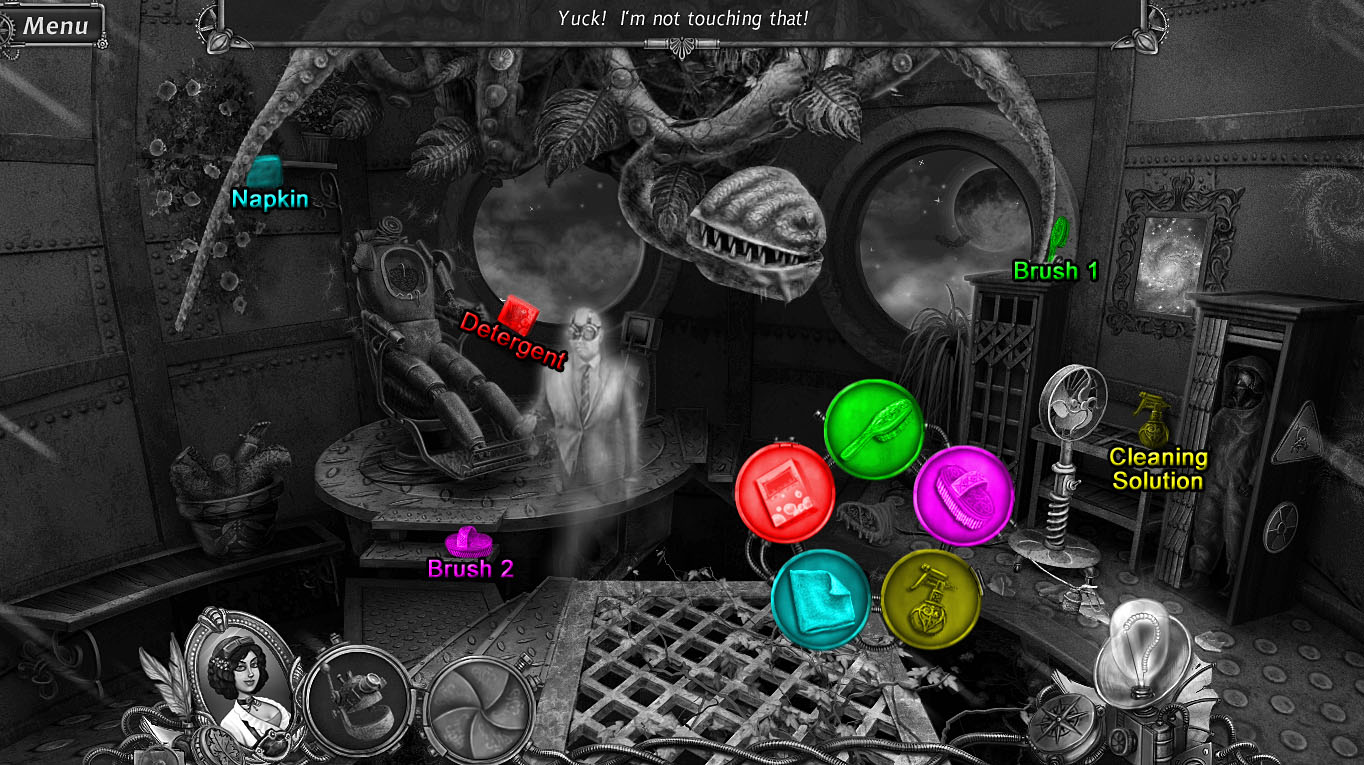
Use the Ground Pepper from your inventory on the fan to spray it at giant carnivorous plant.
Click the snot-covered object the plant sneezes onto the floor to view the missing cleaning tools.
The first Brush is on top of the left locker.
The second Brush is on the step below the dentist chair.
The Cleaning Solution is on the table to the left of the hazmat suit.
The Napkin is hanging off the side of the wall shelf.
The Detergent is at the bottom of the left eye hole window.
Cleaning Tools Screenshot.
After all the pieces are collected, the cleaning tools will remove the grime from the robot heart on the floor.
Click the robot sitting in the dentist chair to view the missing pieces.
Add the Robot's Head from your inventory to the robot.
Pick up the Heart on the floor and add it to the robot.
The Foot is on top of the left locker.
The Hand is in the middle of the clipped potted plant.
The Oiler is on the ground below the fan.
Robot Screenshot.
When all the pieces are collected, click the completed robot to zoom in.
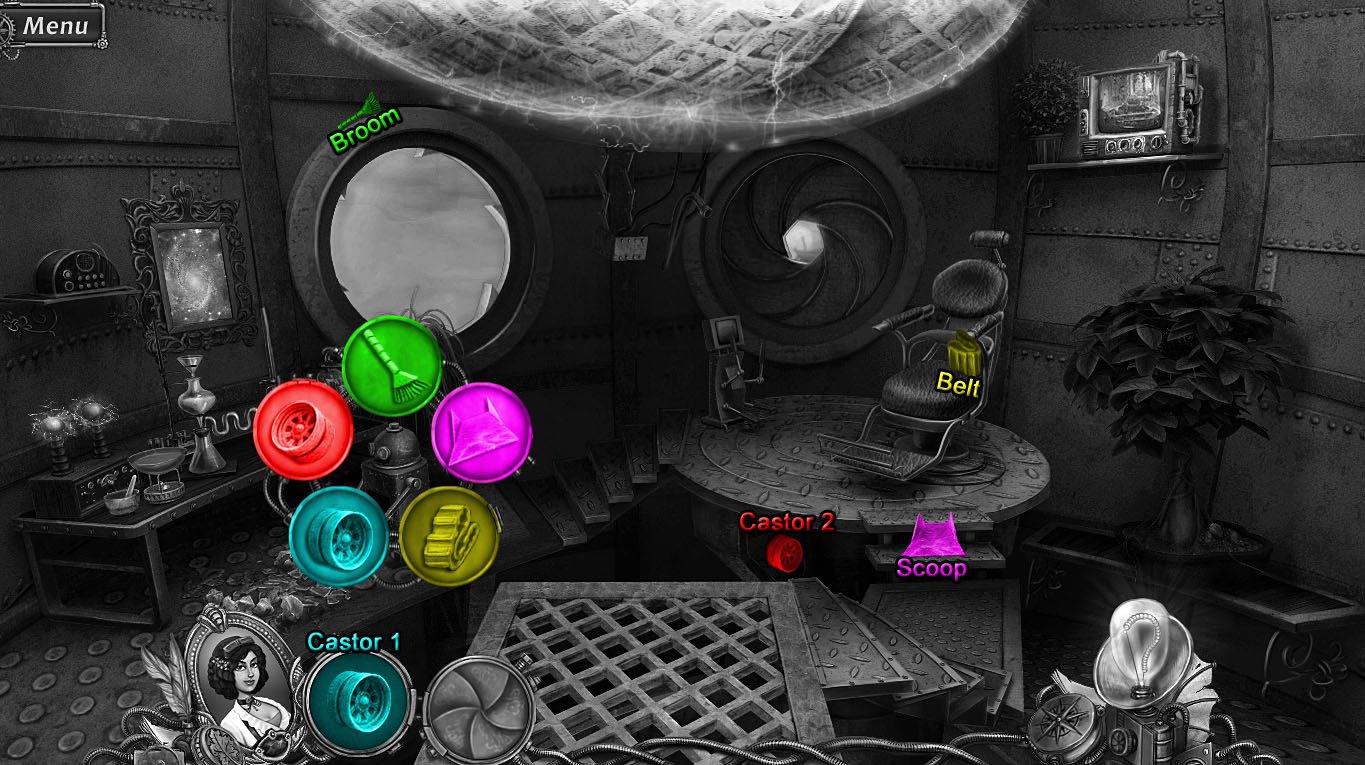
Take the Castor and the Schematic from the robot's hand.
Go through the mirror portal to return to the Robot Laboratory.
Robot Laboratory
Click the cleaning robot to view the missing pieces.
Add the first Castor from your inventory to the robot.
The Broom is at the top of the left eye hole window.
The Scoop is on the steps below the dentist chair.
The Belt is on the seat of the dentist chair.
The second Castor is underneath the circular platform.
Cleaning Bot Screenshot.
Once all the pieces are collected, pick up the Matches the cleaning robot uncovers on the floor.
Click the chemistry set on the table to zoom in.
Place the Schematic from your inventory on to the stand at the right side of the table.
You can click the schematic at any time to view the recipe to prepare the neutralizer solution.
Use the Matches from your inventory to light the burner.
Remove the Powder from the burner, then pour it into the funnel at the top of the beakers.
Take the completed flask of Neutralizer from the table.
Use the mirror portal to travel to the Mutant Plant Room.
Mutant Plant Room
Use the Neutralizer from your inventory on the giant carnivorous plant.
Speak with the ghost professor to receive the Film Negative.
Chapter 4
Photo Lab
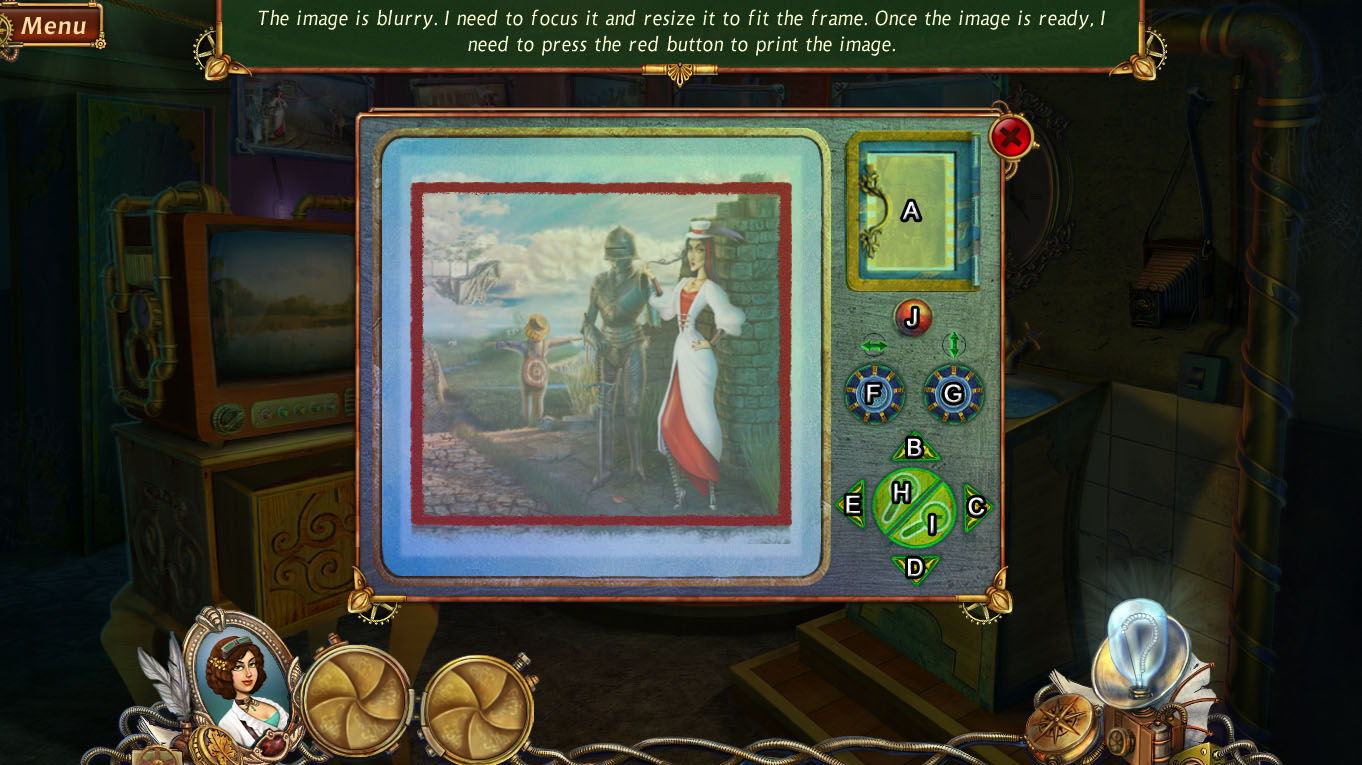
Click the mechanism beside the camera on the table at the back of the room for a closer look.
Place the Film Negative from your inventory in the small compartment in the upper right corner of the camera (A).
Use the directional arrows (B, C, D, & E) at the lower right corner of the camera to focus the image; the arrows will turn green when the image is properly aligned.
Click the left blue dial under the horizontal arrow (F) and the blue dial under the vertical arrows (G) to stretch the image into the shape of a square.
Click the + magnifier button (H) to zoom in or the - magnifier button (I) to zoom out; the magnifier buttons will also turn green when the picture is properly zoomed.
Press the red button (J) to print the complete image.
Camera Screenshot.
Click the Undeveloped Photo in the center of the red square to add it to your inventory.
Place the Undeveloped Photo in the green and purple trays of developer fluid on the counter to receive the Developed Photo.
Put the Developed Photo inside the water-filled sink to make the Washed Photo.
Finally, place the Washed Photo in the glass frame hanging from the rope above the mail tube.
Flying Islands
Click the broken vacuum cleaner in the middle of the road to view the missing parts.
The Hose is in the center of the windmill blades.
The Button is leaning against the left fence at the bottom of the windmill.
The Power Cord is on top of the knight's helmet.
The Dust Bag is on the bottom brick of the broken wall.
The Vacuum Cleaner Brush is on the ground of the island floating in the sky.
Vacuum Cleaner Screenshot.
After all the pieces are collected, the repaired vacuum will blow away the pile of leaves to reveal a Key on the ground.
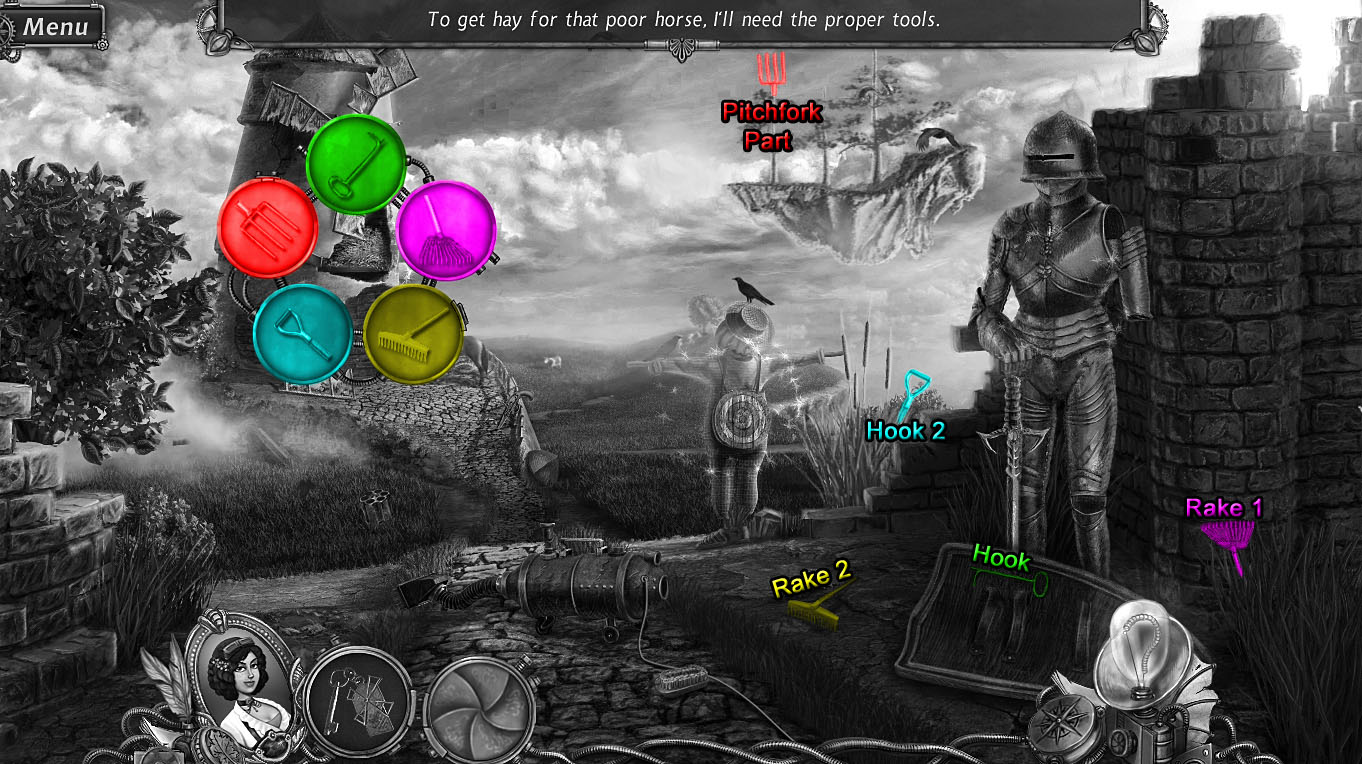
Click the pile of hay in the windmill to view the missing farm equipment tool.
The first Hook is above the two bands on the knight's shield.
The first Rake is in the grass at the bottom of the wall to the right of the knight.
The second Rake is on the ground to the left of the shield.
The second Hook is in the cattails plant beside the scarecrow.
The Pitchfork Part is at the top of the left tree on the floating island.
Horse's Hay Screenshot.
Once all the pieces are collected, the horse will move towards the haystack to uncover the knight's Glove.
Click the knight's suit of armor to view the missing pieces.
Add the Glove on the ground beside the horse to the knight.
The Umbrel is at the top of the brick wall in front of the windmill.
The Shoe is at the bottom of the scarecrow.
The Knee Brace is above the top windmill blade.
The Pauldron is at the bottom of the small wall along the side of the road.
Suit of Armor Screenshot.
When all of the pieces are collected, the knight will hold up the shield.
Pick up the Brush on the ground to add it to your inventory.
Use the Brush to clean the dirt off the shield and reveal a mirror portal.
Go through the portal to travel to the Pirate's Mill.
Pirate's Mill (Backward World)
Take the Knife leaning against the side of the right fence beside the cannon.
Use the Knife to carve the pumpkin at the top of the wooden post.
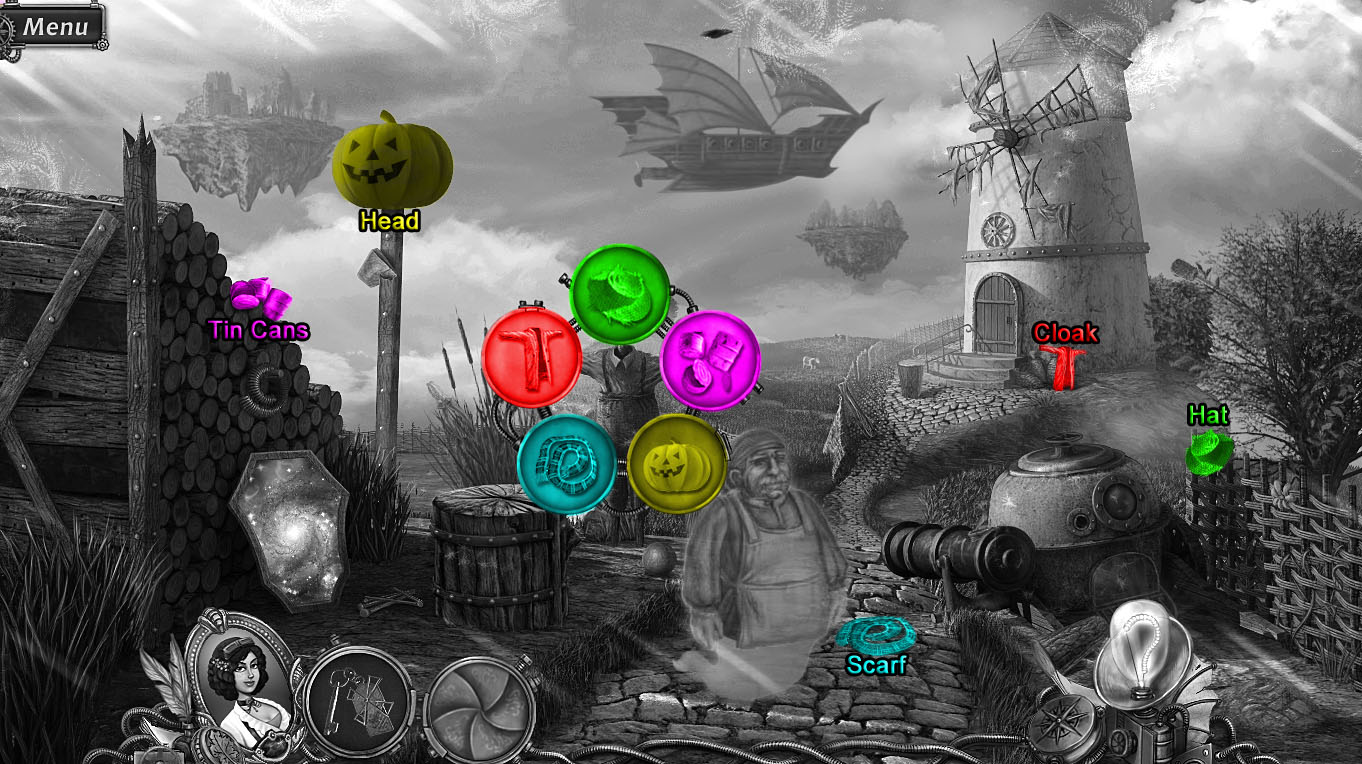
Click the scarecrow to view the missing parts.
Take the carved pumpkin Head from the post and add it to the scarecrow.
The Hat is at the top of the right fence.
The Tin Cans are on the upper right side of the stack of logs.
The Scarf is on the ground between the ghost and the cannon.
The Cloak is at the bottom of the windmill to the right of the steps.
Scarecrow Screenshot.
After all the pieces are collected, take the Bullet that falls to the ground in front of the completed Scarecrow.
Use the Key from your inventory on the front door to the windmill, then go through the open door to enter the building.
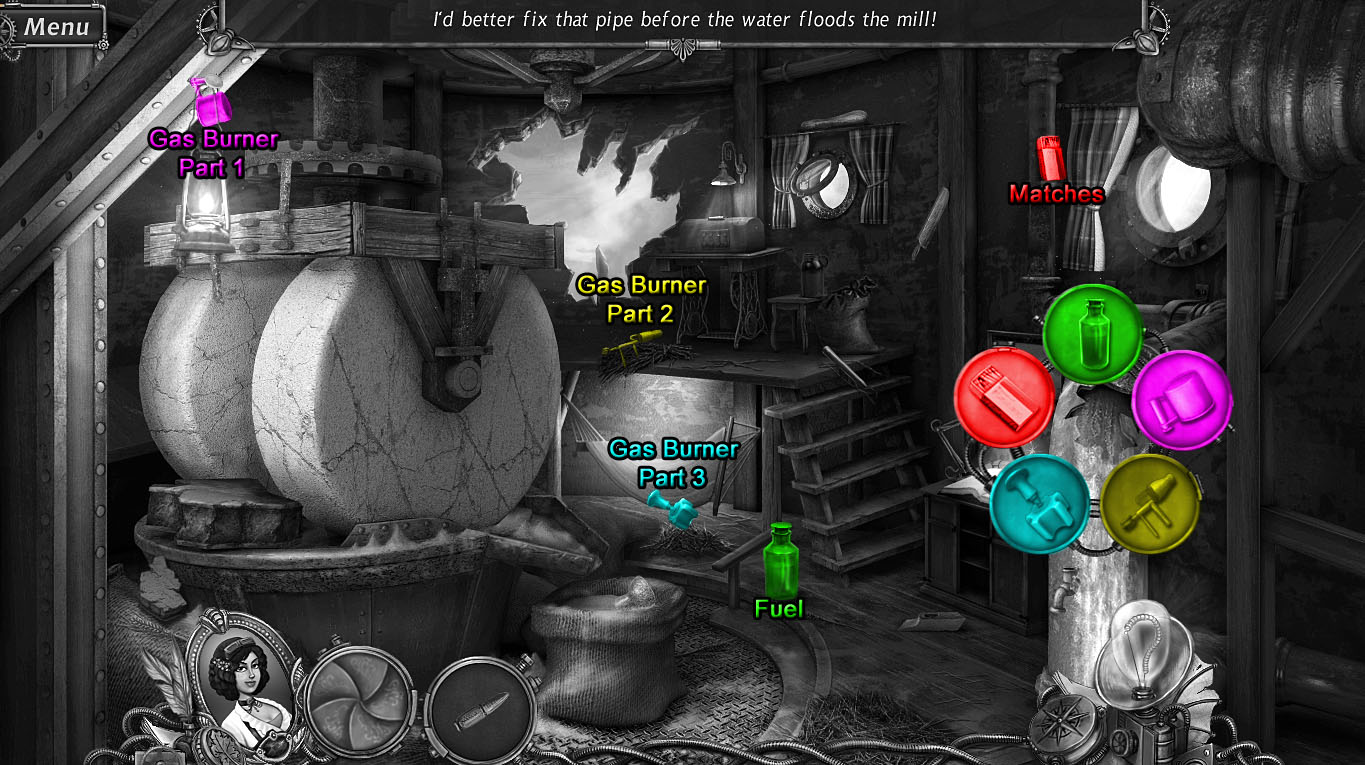
Inside the Mill (Backward World)
Unravel the hammock hanging under the platform to reveal the Gas Burner Part.
Click the broken water pipe to view the missing pieces.
The Fuel is on the floor to the left of the steps.
The first Gas Burner Part is hanging from the support beam above the lantern.
The second Gas Burner Part is on top of the bundle of straw on the platform.
The third Gas Burner Part is on the floor under the hammock.
The Matches are at the side of the pipe next to the right window.
Water Pipe Screenshot.
Click the toolbox on top of the table on the platform to start the minigame.
Arrange the tokens around the green, yellow, and red buttons so that each material is with its matching article of clothing.
Click a button to rotate the four adjacent tokens around it in a clockwise direction.
When a token is positioned around the correct button, it will start to flash.
Note the color of the material or type of tool shown in the image on the token to find which button it belongs to.
The green button requires the hook, the green and yellow striped knitting, the yellow thread, and the green thread.
The yellow button is simply the middle piece that can have any combination of the green button's tokens on the left and the red button's tokens on the right.
The red button requires the needle, the yellow roll of cloth, the four buttons, and the thimble.
Solution.
Once the puzzle is solved, click the revealed sewing machine to view the missing pieces.
The Wheel is hanging from the nail on the wall.
The Needle is on the edge at the side of the table.
The Switch is on the table just under the oven mitt.
The Cord is hanging off the side of the table, to the left of the Needle.
The Spool is at the upper right corner of the table.
Sewing Machine Screenshot.
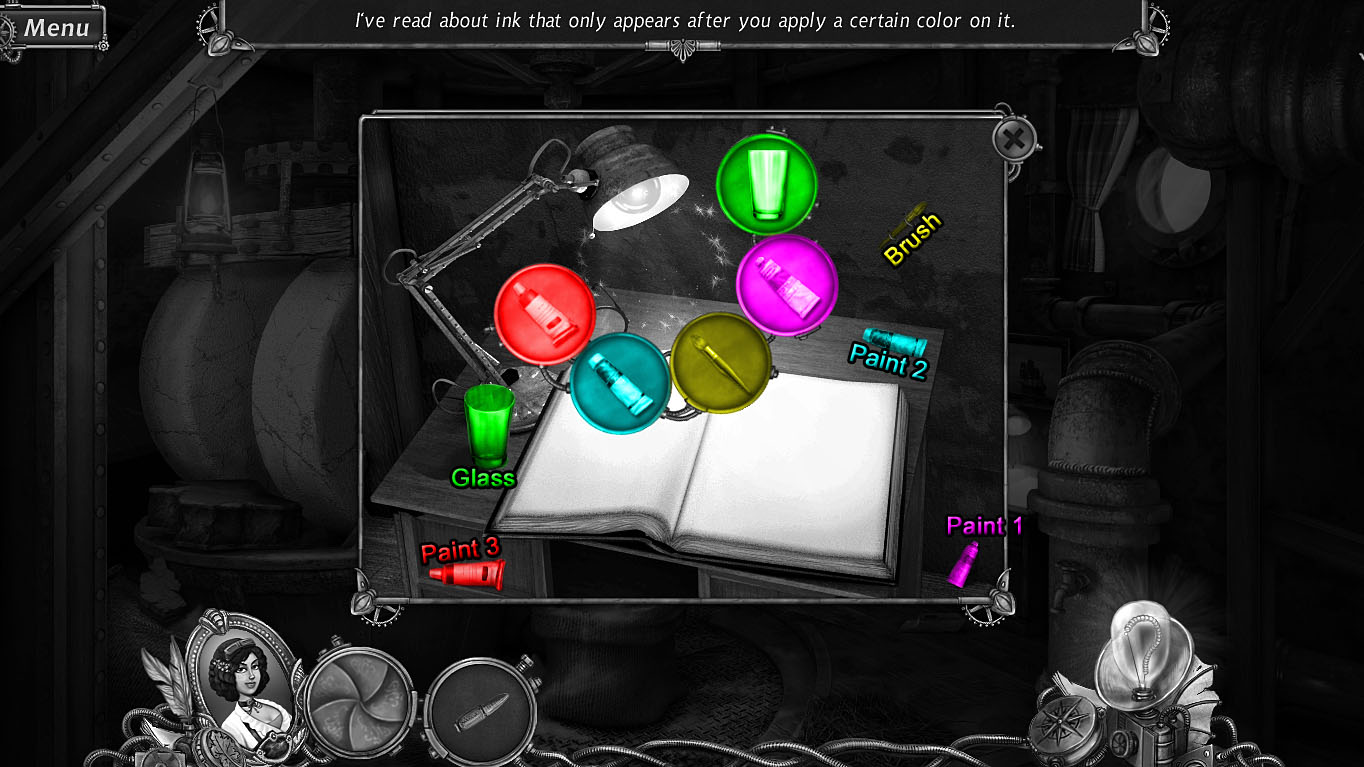
Click the book on top of the small desk to zoom in.
Click the light bulb in the lamp to view the missing paint set parts.
The Glass is on the table below the lamp.
The first tube of Paint is on the floor at the lower right corner of the area.
The Brush is hanging between the two nails on the wall.
The second tube of Paint is at the upper right corner of the table.
The third tube of Paint is in front of the drawer at the lower left side of the table.
Paint Set Screenshot.
After all the pieces are collected, click the highlighted section of the book to view the hidden message.
The message shows two elemental symbols, one fire and one leaf, as well as two random clues that refer to a number for that element.
Note the two numbers for later, then go back to the Flying Islands.
Flying Islands
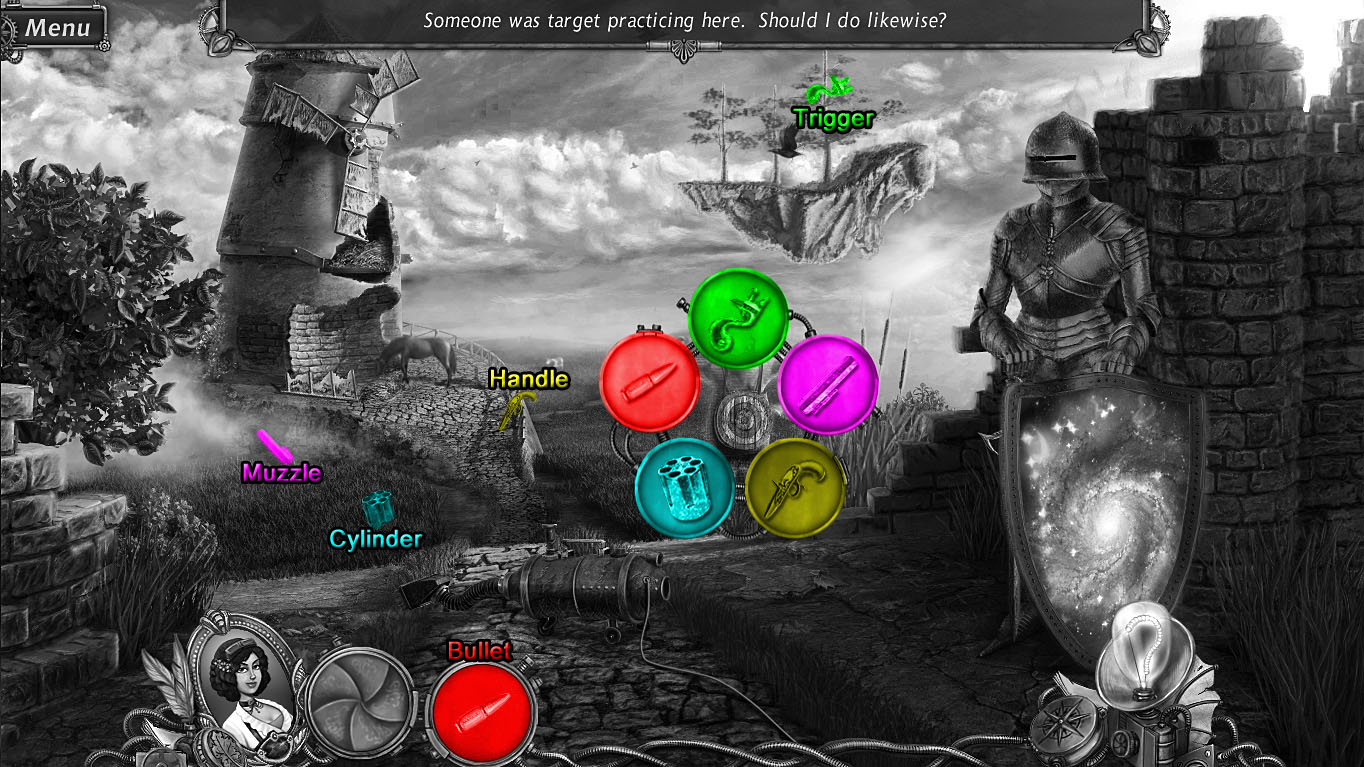
Click the target on the scarecrow to view the missing gun pieces.
Add the Bullet from your inventory to the target.
The Trigger is at the top of the right tree on the island floating in the sky.
The Muzzle is on the ground below the mill.
The Handle is on the road leaning against the side of the fence.
The Cylinder is in the grass to the left of the road.
Target Gun Screenshot.
When all of the pieces are collected, take the revealed Mallet on the ground at the foot of the scarecrow.
Travel through the mirror portal to return to the Pirate's Mill.
Pirate's Mill (Backward World)
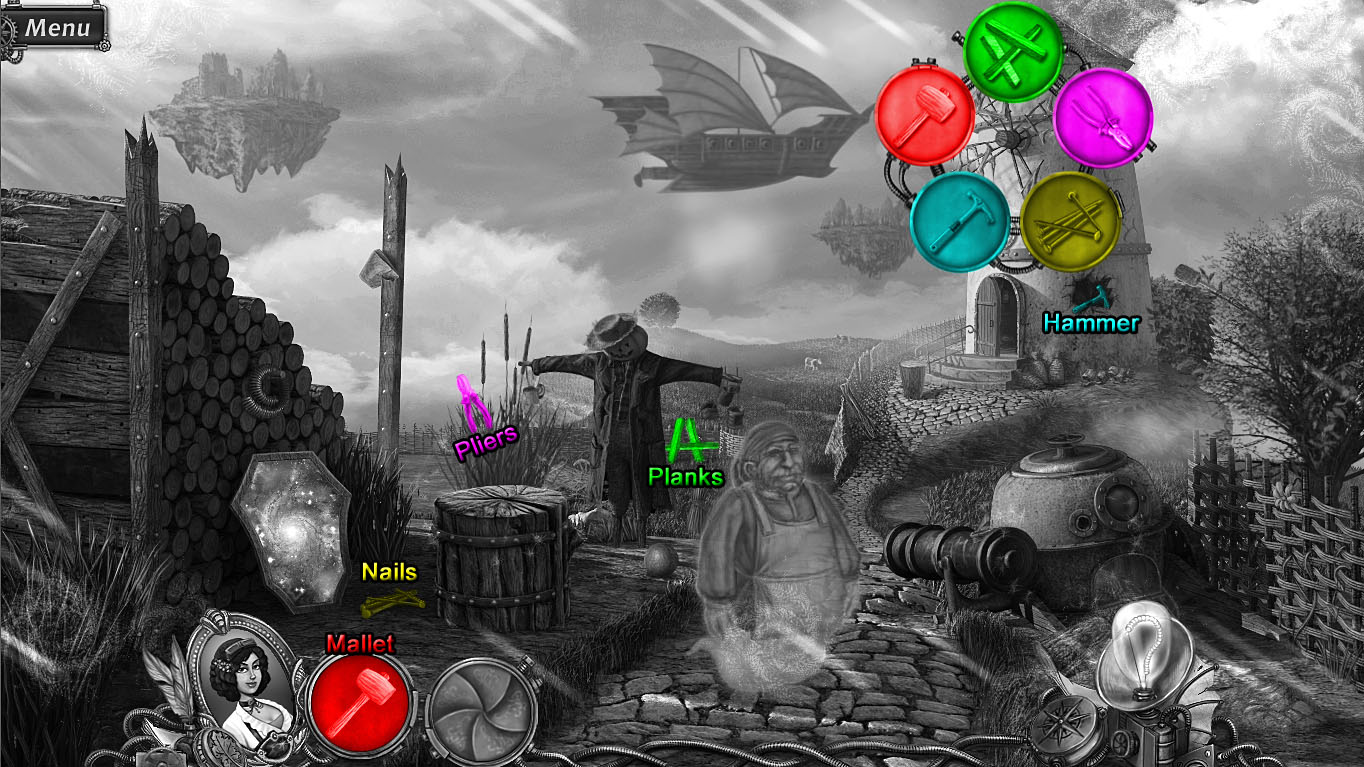
Click the broken blades of the windmill to view the missing tools.
Add the Mallet from your inventory to the mill.
The Planks are in front of the fence behind the scarecrow.
The Pliers are at the top of the cattail plant to the left of the scarecrow.
The Nails are on the ground between the mirror portal and the stump.
The Hammer is in the hole in the outer wall of the windmill.
Windmill Blades Screenshot.
Once all of the pieces are collected, continue forward Inside the Mill.
Inside the Mill (Backward World)
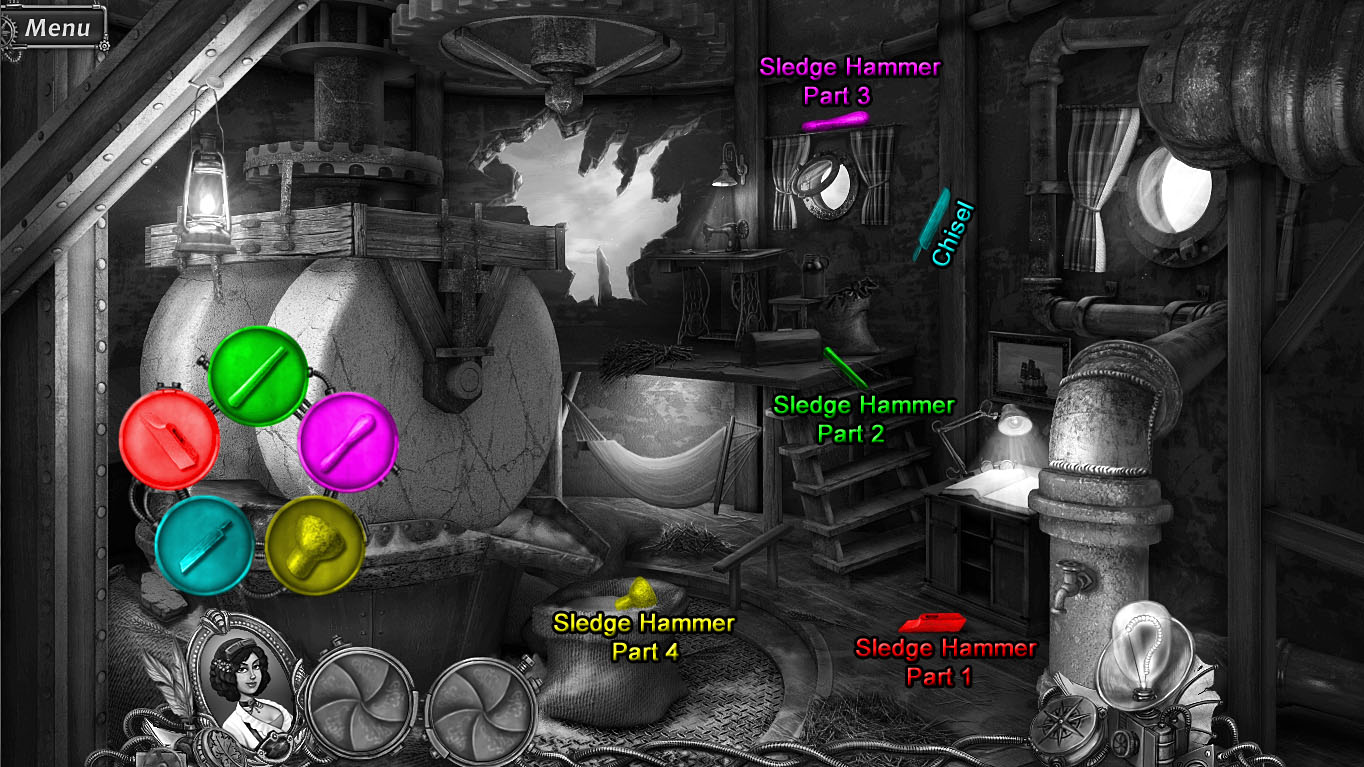
Click the chunk of wall stuck between the millstones to view the missing sledge hammer pieces.
The first Sledge Hammer Part is on the floor beside the small writing desk.
The second Sledge Hammer Part is on the edge of the platform at the top of the steps.
The third Sledge Hammer Part is on top of the curtain rod over the left window.
The fourth Sledge Hammer Part is in the sack of flour.
The Chisel is sticking out of the wooden beam on the wall between the two windows.
Sledge Hammer Screenshot.
Go back outside to the Pirate's Mill.
Pirate's Mill (Backward World)
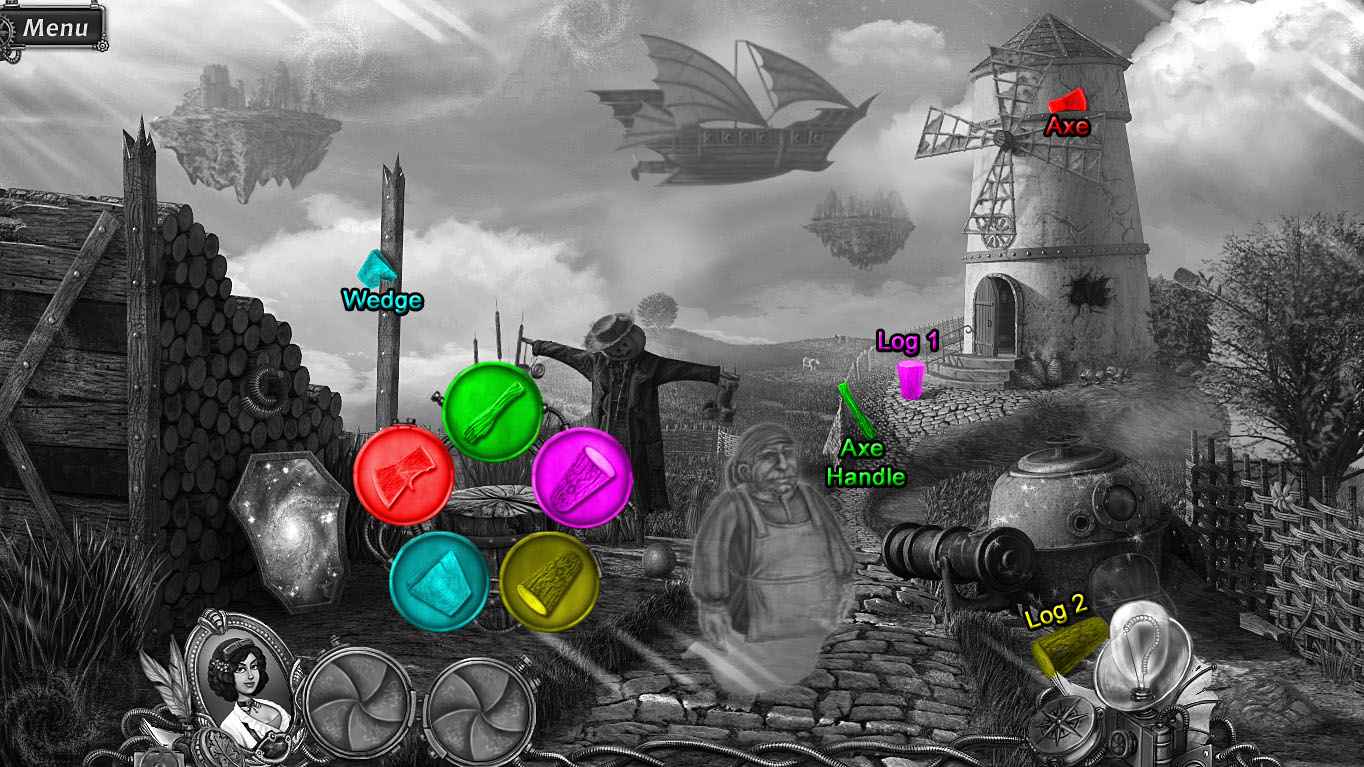
Click the chopping block in front of the scarecrow to view the missing pieces.
The Axe Handle is leaning against the fence to the left of the road.
The first Log is in the middle of the road behind the Axe Handle.
The second Log is on the ground in front of the cannon.
The Wedge is stuck in the middle of the post to the right of the lumber pile.
The Axe blade is above the upper metal band on the mill, between the two windmill blades.
Chopping Block Screenshot.
When all of the pieces are collected, the completed axe will chop the logs into Firewood.
Take the Splinter on the ground in front of the chopping block.
Click the cannon to view the missing pieces.
Add the Firewood from the chopping block to the cannon.
The cannon Ball is on the ground in front of the scarecrow.
The Ramrod is in the upper left branches of the tree behind the right fence.
The Wheel is behind the bottom windmill blade.
The Hose is hanging from a nail in the middle of the lumber pile.
Cannon Screenshot.
Once all the pieces are collected, put the Splinter from your inventory into the oven beside the cannon to make it a Burning Splinter.
Go up the stairway to the Pirate Ship.
Pirate Ship (Backward World)
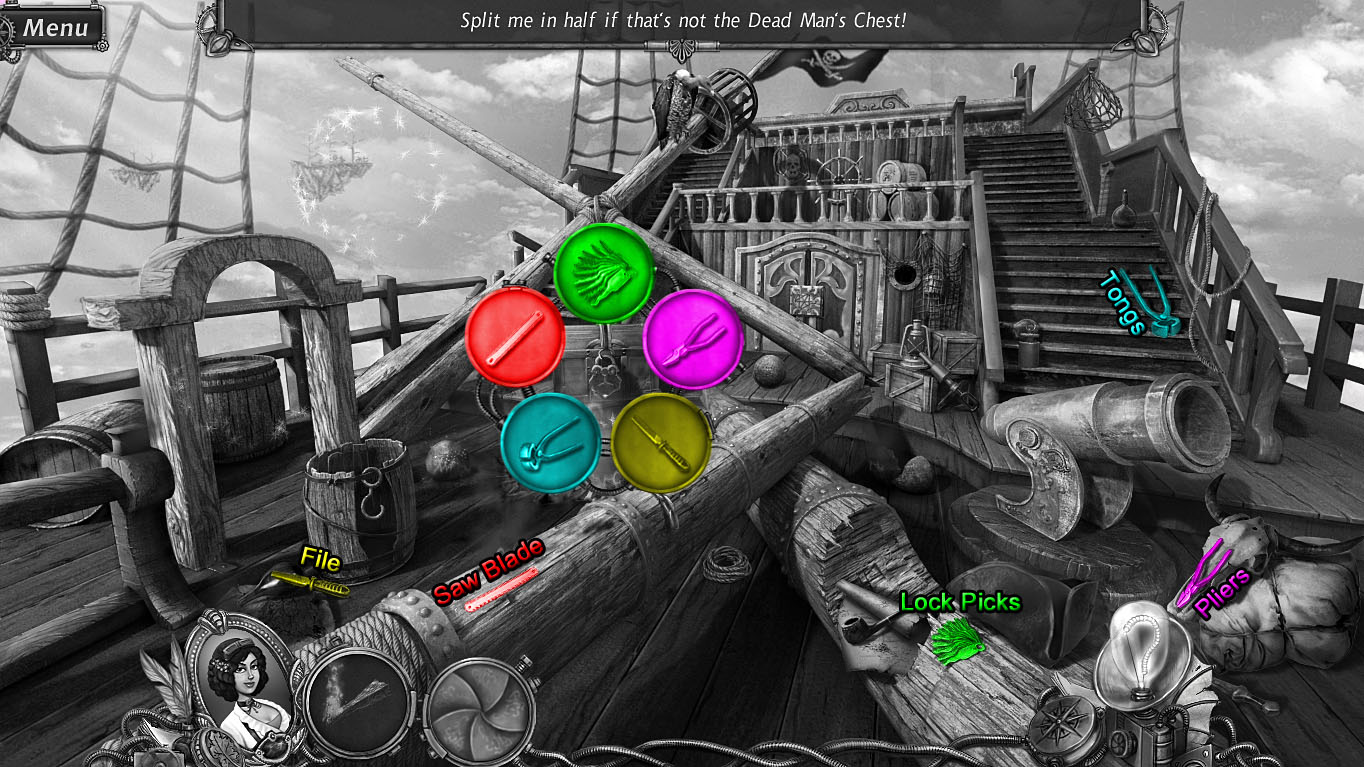
Click the padlocked treasure chest to view the missing lock picking tools.
The Lock Picks are beside the hat at the bottom of the lower right fallen mast.
The Pliers are in the middle of the bull skull under the cannon.
The File is leaning against the bottle on the deck beside the barrel with the hook.
The Tongs are in the middle of the right stairs.
The Saw Blade is next to the burning section of the lower left fallen mast.
Treasure Chest Screenshot.
After all the pieces are collected, the treasure chest will open to reveal the Bell.
Take the empty Bucket hanging in the net between the window and the right stairway.
Go back down, then continue forward through the door to travel Inside the Mill.
Inside the Mill (Backward World)
Use the Bucket from your inventory on the tap in the water pipe to make it a Bucket of Water.
Return to the Pirate Ship.
Pirate Ship (Backward World)
Use the Bucket of Water from your inventory to douse the burning red Cannonball and drop the Clasp on the deck.
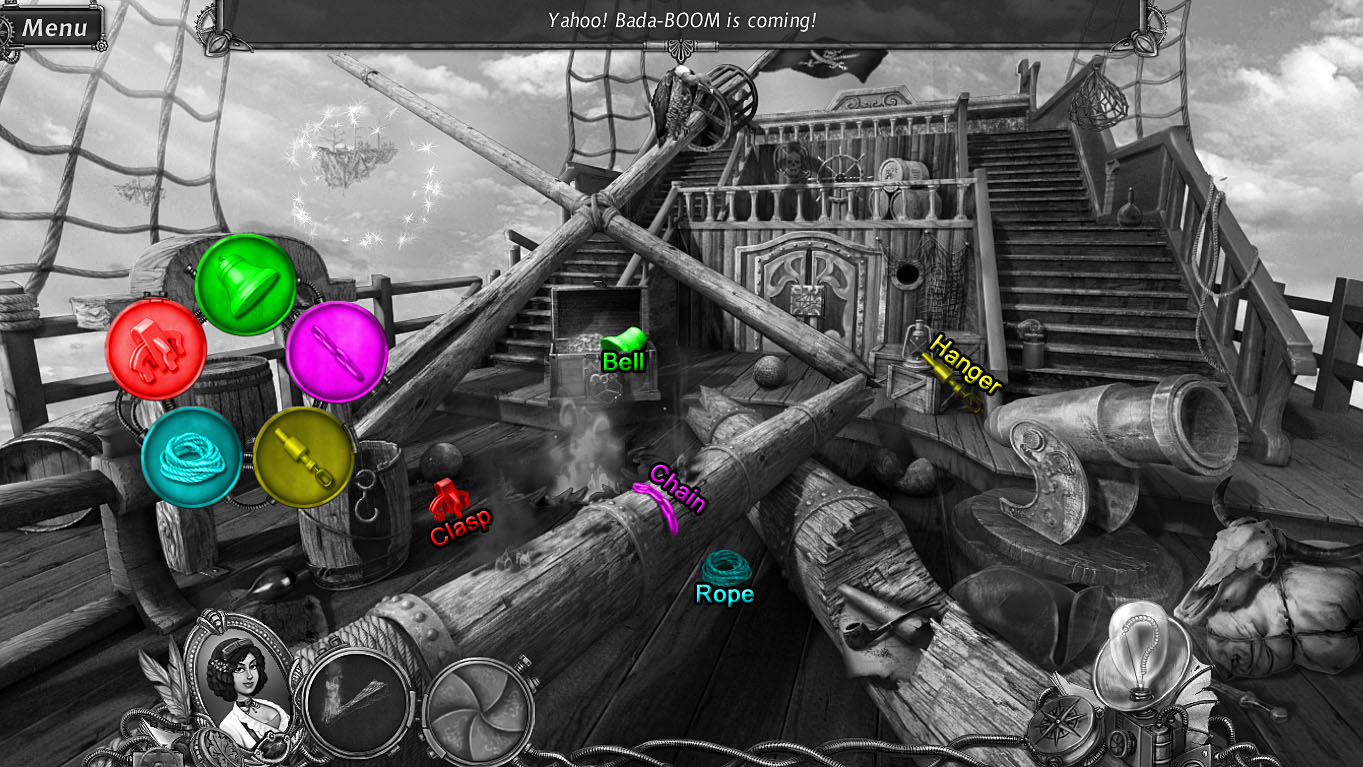
Click the bell arch on the lower left side of the deck to view the missing pieces.
Pick up the Clasp that fell from the bucket and add it to the arch.
Take the Bell from the opened treasure chest and add it to the arch.
The Chain is between the two small flames on the lower left fallen mast.
The Hanger is leaning against the side of the crates next to the door.
The Rope is on the floor between the two lower fallen masts.
Bell Screenshot.
Once all of the pieces are collected, the ringing bell will scare the vulture away from the crow's nest at the top of the fallen mast.
Click the crow's nest to zoom in.
Click the skeleton pirate to view the missing photo pieces.
The Duct Tape is at the upper left side of the steps.
The first Piece of Photo is taped to the top of the beam on the right side of the steps.
The second Piece of Photo is at the top of the wooden post in the upper left corner of the area.
The third Piece of Photo is on the floor between the skeleton's legs.
The fourth Piece of Photo is at the bottom of the lower right wooden post.
Skeleton Screenshot.
Take the complete photo in the skeleton's hand to view an image revealing the secret cache in the wall at the Flying Islands.
Go back to the Pirate's Mill, then click the mirror portal to travel to the Flying Islands.
Flying Islands
Click the missing brick in the wall to the right of the knight to view the missing explosive pieces.
The first stick of Dynamite is at the top of the cattail plant to the right of the scarecrow.
The second stick of Dynamite is on the ground in front of the knight suit of armor.
The third stick of Dynamite is at the left side of the short stone wall directly under the windmill.
The Fuse is on the lower metal band to the left of the hole in the mill building.
The Detonator is on the ground in front of the broken wall beside the knight.
Explosives Screenshot.
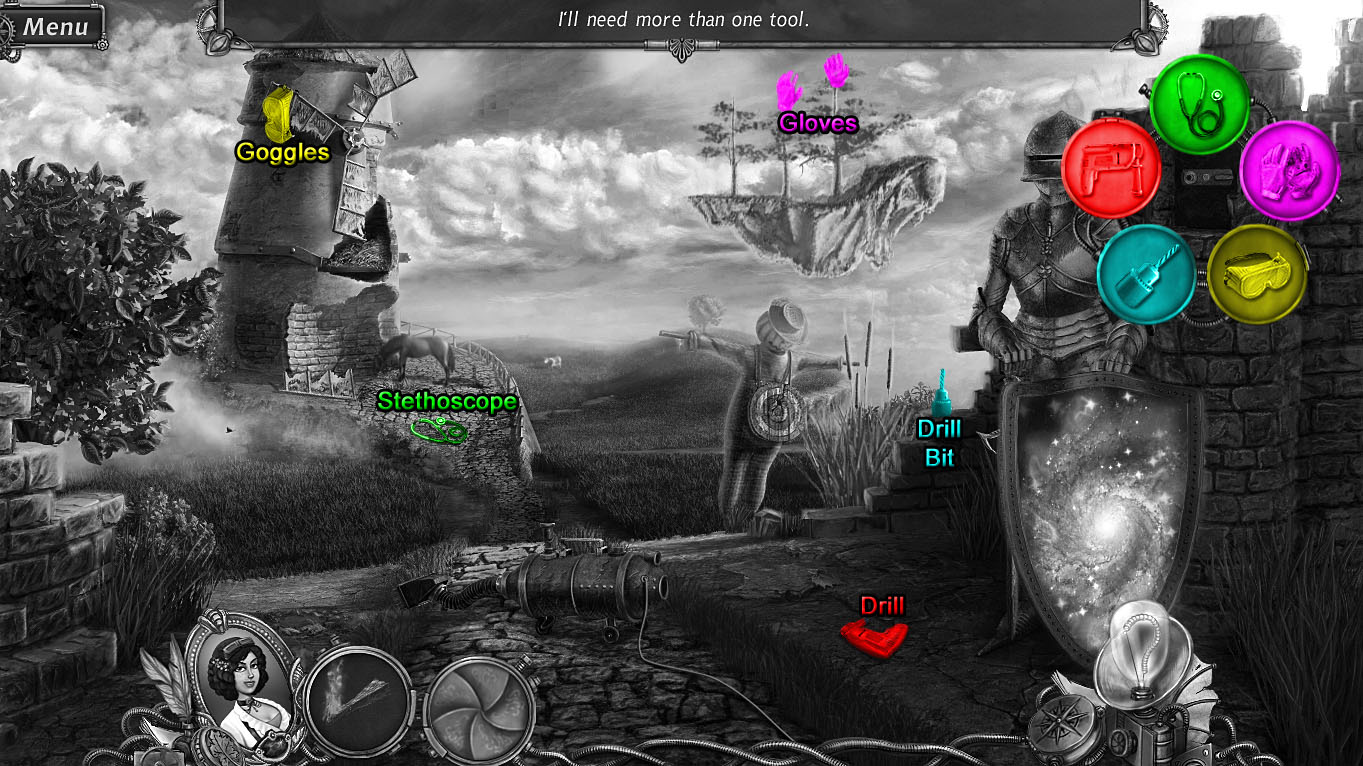
After all the pieces are collected, click the safe in the detonated cache to view the missing safe cracking tools.
The Stethoscope is in the middle of the road just below the horse.
The Gloves are on top of the middle and right trees on the floating island.
The Goggles are hanging off the side of the upper left windmill blade.
The Drill Bit is on the top brick of the broken wall beside the knight.
The Drill is on the ground to the left of the knight's feet.
Safe Cache Screenshot.
When all the pieces are collected, take the Locket's Skull from the opened safe.
Travel through the mirror portal and go up the stairs to return to the Pirate Ship.
Pirate Ship (Backward World)
Inspect the skeleton in the crows nest at the top of the fallen mast for a closer look.
Insert the Locket's Skull from your inventory into the medallion around the skeleton's neck.
Click the folded paper inside the opened locket to reveal a note with another image of two elemental symbols and a numbers clue.
Although the numbers clue is random each game, the first element is a droplet to symbolize water and the second element is a swirl to indicate air.
Click the end of the upper left beam of the fallen mast to view the missing weight pieces.
The first Cannonball is on the floor in front of the blocked doorway.
The second Cannonball is on the floor next to the flaming hole in the deck.
The Net is at the top of the railing on the right stairway.
The Hook is in the middle of the barrel in front of the bell.
The Weight is on the steps at the bottom of the right stairs.
Weighted Net Screenshot.
When all of the pieces are collected, the net will tip the side of the mast and unblock the door to the cabin.
Click the uncovered doors to start the puzzle.
Arrange each individual gear with its matching group of gears by shape and color.
Click a gear to move it along the track into an empty space.
A gear can only move to a space connected by the path.
When a gear is correctly positioned with its matching group, it will begin to flash.
Solution.
After the puzzle is solved, go through the open doors to the Cabin.
Cabin (Backward World)
Click the stand under the globe to view the missing parrots.
The first Parrot Figurine is inside the picture frame on the wall in the alcove.
The second Parrot Figurine is at the bottom of the filigree on the right side of the skull doors.
The third Parrot Figurine is on the rope tied around the middle of the curtain beside the porthole window.
The fourth Parrot Figurine is on the wall to the left of the television.
The fifth Parrot Figurine is standing on the lower right corner of the table with the mirror portal.
Parrot Figurines Screenshot.
Once all the pieces are collected, the globe will open to reveal the Ring.
Click the blue and white striped hammock lying on the floor in the alcove to view the missing pieces.
Add the Ring from the globe to the hammock.
The Spreader Bar is on the floor under the table with the mirror portal.
The first Rope Fragment is at the end of the banister on the steps at the entrance to the room.
The second Rope Fragment is hanging over the railing above the left skull door.
The third Rope Fragment is at the top of the stairs leading to the round vault door.
Hammock Screenshot.
After all the pieces are collected, the hammock will lift to reveal a Sword.
Go through the mirror portal to travel to the Bedroom.
Bedroom
Click the vault door at the top of the steps to start the puzzle.
Using the four number clues you've discovered so far (the first two from the hidden message Inside the Mill and the second two from the folded note in the pirate skeleton's locket) to enter the code into the safe.
Click the piece of paper at the right side of the safe if you need to look at your clues again.
The symbols remain the same each game, but the numbers and their clues are random.
In the upper left corner of the safe is a sword icon with a swirling symbol on a dark blue button.
The paper in this example gives the following clue: The number of captains on a ship.
Click the dark blue button to cycle through the numbers and set it to 1, because there is only 1 captain on a ship.
In the upper right corner of the safe is a parrot icon with a leaf symbol on a green button.
The paper in this example gives the following clue: Half a dozen.
Click the green button to cycle through the numbers and set it to 6, which is half a dozen.
In the lower left corner of the safe is a skull and crossbones icon with a fire symbol on a red button.
The paper in this example gives the following clue: The number of people in a duet.
Click the red button to cycle through the numbers and set it to 2, the number of a duet.
In the lower right corner of the safe is the pistol icon and a water droplet symbol on a light blue button.
The paper in this example gives the following clue: The number of fingers on one hand.
Click the light blue button to cycle through the numbers and set it to 5, for the five fingers on each hand.
Other clues not included in the example are: The number of sides on the world - 4 hemispheres, Rotate the number six to get this number - 9 is 6 upside down, and The number of angles in a triangle - 3 angles.
Solution.
Once the puzzle is solved, click the opened vault to look inside.
Click the golden peacock statue to view the missing statue parts.
The Bird Crest is on the shelf at the upper right corner of the area.
The first Bird Feather is on the left side of the round table.
The second Bird Feather is on the shelf at the upper left corner.
The third Bird Feather is on top of the far right gold bars in the middle shelf.
The Bird Head is on the right side of the round table.
Gold Peacock Screenshot.
When all of the pieces are collected, take the Cage Key from the opened cache at the bottom of the peacock.
Click the space on the wall beside the bed to view the missing candelabrum pieces.
The first Candle is on top of the railing at the entrance of the room.
The Candleholder is hanging from the bottom of the bird cage.
The second Candle is in front of the left parrot design on the globe stand.
The Bolts are on the purple cloth on the globe.
The Screwdriver is at the bottom of the steps leading to the vault.
Candelabrum Screenshot.
After all the items have been collected, use the Burning Splinter from your inventory to light the completed candelabrum.
Move away the left curtain over the bed and take the Sabre sticking out of the pillows.
Go through the mirror portal in the table to travel to the Cabin.
Cabin (Backward World)
Click the parrot inside the bird cage to zoom in.
Use the Cage Key from your inventory to open the lock.
Take the Eye Patch behind the parrot inside the unlocked cage.
Click the skull doors to view the missing sabres.
Add the first Sabre from your inventory to the door.
The Second Sabre is at the top of the map on the wall between the two glowing lanterns.
The Third Sabre is on the carpet underneath the table with the mirror portal.
The fourth Sabre is at the side of the right stairway and under the swordfish.
The fifth Sabre is stuck in the ground underneath the hammock.
Skull Sabres Screenshot.
When all of the sabres are collected, pick up the Wrench Part on the floor of the opened closet.
Click the pirate mannequin that moves down the track out the closet to view the missing costume pieces.
Add the Eye Patch from your inventory to the mannequin.
The Belt is hanging on the swordfish at the side of the stairs.
The Hat is on the hammock hanging in the alcove.
The Feather is next to the glass bottles inside the globe.
The Hook is hanging off the side of the railing on the steps at the entrance to the room.
Pirate Costume Screenshot.
Once all the pieces are collected, the parrot will fly from the cage to the mannequin.
Click the empty cage to look inside and take the Ruby.
Travel through the mirror portal in the table to return to the Bedroom.
Bedroom
Click the porthole window between the two lanterns to view the missing wrench parts.
Add the first Wrench Part from your inventory to the window.
The second Wrench Part is at the top of the stairs leading to the vault.
The third Wrench Part is in front of the bottles at the foot of the bed.
The fourth Wrench Part is at the bottom of the coffee table with the mirror portal.
The Spring is around the lower rope hanging in the upper left corner of the room.
Porthole Screenshot.
After all of the parts are collected, take the Emerald from the opened window.
Go back to the Cabin through the mirror portal.
Cabin (Backward World)
Click the vault at the top of the right steps to zoom in.
Place the Emerald and the Ruby from your inventory into the empty sockets in the middle of the snakes.
Take the roll of Silk cloth from the opened vault.
Move back twice to exit the ship, then go Inside the Mill.
Inside the Mill (Backward World)
Inspect the sewing machine on the table for a closer look.
Use the Silk from your inventory on the sewing machine to sew the Sail.
Go back out to the Pirate's Mill.
Pirate's Mill (Backward World)
Place the Sail from your inventory on the torn blades of the windmill.
Speak with the ghostly pirate to receive the Film Negative.
Posted by: Trinn |
May 24, 2012 9:15 PM
|
May 24, 2012 9:15 PM
Snark Busters: High Society Walkthrough
(Part 3, Chapter 5)
Chapter 5
Photo Lab
Click the mechanism beside the camera on the table at the back of the room for a closer look.
Place the Film Negative from your inventory in the small compartment in the upper right corner of the camera (A).
Use the directional arrows (B, C, D, & E) at the lower right corner of the camera to focus the image.
Click the left blue dial under the horizontal arrow (F) and the blue dial under the vertical arrows (G) to stretch the image into the shape of a square.
Click the + magnifier button (H) to zoom in or the - magnifier button (I) to zoom out.
Press the red button (J) to print the complete image.
Camera Screenshot.
Click the Undeveloped Photo in the center of the red square to add it to your inventory.
Place the Undeveloped Photo in the green and purple trays of developer fluid on the counter to receive the Developed Photo.
Put the Developed Photo inside the water-filled sink to make the Washed Photo.
Finally, place the Washed Photo in the last glass frame on the right.
Bedroom
Take the gold Elephant on top of the round table.
Open the door and exit to the Upstairs Hallway.
Upstairs Hallway
Click the gold elephant figurine on top of the pedestal on the railing to view the other missing elephants.
Add the first Elephant from your inventory to the pedestal.
The second Elephant is on the right side of the middle chandelier tier.
The third Elephant is at the bottom of the pedestal under the snail figurine.
The fourth Elephant is front of the planter to the right of the water cooler.
The fifth Elephant at the top of the pedestal on the railing, to the right of the snail pedestal.
Elephants Screenshot.
Once all the elephants are collected, take the Handle from the split elephant figurine.
Go back to reenter the Bedroom.
Bedroom
Click the wardrobe between the door and the cracked mirror to view the missing parts.
Add the Handle from your inventory to the wardrobe.
The Handle Base is at the side of the left wall decoration above the duchess's portrait.
The Screws are beside the locked journal on the round table.
The Bar is at the top of the column on the left wall.
The Screwdriver is at the top of the door frame.
Wardrobe Screenshot.
When all of the pieces are collected, go through the mirror portal inside the wardrobe to travel to the Frozen Bedroom.
Frozen Bedroom (Backward World)
Click the jack-in-the-box on the seat of the chair to view the missing pieces.
The Joker's Cap is on the top shelf inside the wardrobe.
The first Clown Figurine is at the bottom of the filigree under the Gorgon statue.
The second Clown Figurine is against the wall beside the lower left corner of the wardrobe.
The Clown Token is at the front of the floating orb in the sky.
The Jack-In-The-Box is behind the left leg under the round table.
Jack-In-The-Box Screenshot.
After all the pieces are collected, take the toy Mouse from the opened jack-in-the-box.
Return to the Bedroom through the mirror portal.
Bedroom
Click the cat house on the floor to view the missing parts.
Add the Mouse from your inventory to the cat house.
The Ribbon & Bow is underneath the round table.
The Bell is hanging off the wall decoration on the right side of the duchess's portrait.
The Feathered Toy is on top of the purse next to the sofa chair.
The House is on the upper right shelf in the wardrobe.
Cat House Screenshot.
Once all the pieces are collected, take the uncovered Scissors from the seat of the sofa chair.
Click the shelves at the bottom of the wardrobe to view the missing shoes.
The first Shoe is on top of the sofa chair.
The second Shoe is in front of the purse on the floor beside the chair.
The third Shoe is on the rug between the table and the cat house.
The fourth Shoe is on the ground in front of the bed.
The fifth Shoe is on top of the upper right corner of the wardrobe.
Shoes Screenshot.
When all the pieces are collected, take the Ring on top of the shoe shelves in the wardrobe.
Click the teddy bear on the bed to zoom in.
Use the Scissors from your inventory to cut through the wrapping around the package on the bed.
Pick up the Locket on top of the opened case.
Click the table under the broken vanity mirror for a closer look.
Click the locked cache under the blue cat figurine to view the missing pieces.
Add the Locket and the first Ring from your inventory to the cache.
The Cat Figurine is the purple cat statuette beside the right scale spring.
The second Ring is at the lower left corner of the left scale spring.
The Earring is hanging from the filigree between the blue and green cat figurines on the scale.
Cat Figurines Screenshot.
After all the pieces are collected, take the Office Key from the opened cache under the middle cat figurine.
Exit through the door to reach the Upstairs Hallway.
Upstairs Hallway
Click the door at the end of the hall for a closer look.
Use the Office Key from your inventory to open the lock above the handle.
Go through the open door to enter the Office.
Office
Pick up the Quiver with Arrows on the floor in front of the bear rug.
Go back once to return to the Upstairs Hallway.
Upstairs Hallway
Click the balloon floating above the telescope to view the missing crossbow parts.
Add the Quiver with Arrows from your inventory to the balloon.
The Rope is tied across the railing between the snail pedestal and dog pedestal.
The Reticule is at the right side of the far left railing.
The Shoulder Stock is taped to the railing between the elephant pedestal and the snail pedestal.
The Crossbow Limb is on the tile floor between the right wall and the middle of the green carpet.
Crossbow Screenshot.
When all of the pieces are collected, take the Chess Piece that falls to the floor from the popped balloon.
Continue forward into the Office.
Office
Click the chess table in front of the window to view the missing chess pieces.
Add the first Chess Piece, the king, from your inventory to the chess board.
The second Chess Piece is a pawn on the top book shelf to the right of the fireplace.
The third Chess Piece is a knight in the mouth of the bear rug.
The fourth Chess Piece is a rook on the desk between the Dictaphone and the toy spaceship.
The fifth Chess Piece is a queen on top of the television set.
Chess Board Screenshot.
Once all the pieces are collected, take the Rooster Head from the revealed compartment in the middle of the chess board.
Go through the portal in the mirror above the fireplace to travel to the Frozen Office.
Frozen Office (Backward World)
Click the smoking fireplace to view the missing chimney cleaning tools.
The Ramrod is on top of the writing desk.
The Brush is at the side of the right chair.
The Poker is in the middle windowpane of the left window.
The Scoop is in front of the stand of the round table.
The Broom is between the wheels of the serving cart.
Fireplace Screenshot.
The smoke from the fireplace will be cleared out of the room when all of the pieces are collected.
Click the mantle over the fireplace to zoom in.
Click the toy rooster on the right side of the mantle to view the missing parts.
Add the Rooster Head from your inventory to the body.
The Key is at the lower right side of the fireplace mantle.
The first Feather is at the bottom left corner of the frame to the mirror portal.
The Gem is in the center of the left candelabrum.
The second Feather is on the left side of the black sphere.
Toy Rooster Screenshot.
After all the pieces are collected, the rooster will knock over the black sphere to reveal the Bulb.
Click the lamp in front of the right chair to view the missing pieces.
Add the first Bulb from your inventory to the lamp.
The second Bulb is on the lower right shelf to the left of the fireplace.
The first Shade is around the toy blimp floating left of the mirror portal.
The second Shade is around the leg of the left chair in front of the window.
The Socket is at the top of the curtain beside the far left window.
Lamp Screenshot.
Once all the pieces are collected, take the Book from the seat of the right chair.
Return to the Office through the mirror portal.
Office
Click the green books on the shelf to the right of the fireplace to view the missing books.
Add the first Book from your inventory to the shelf.
The second Book is on the floor under the chair to the left of the chess board.
The third Book is between the bottom of the fireplace and the left bookcase.
The fourth Book is under the mirror portal on the fireplace mantle.
The fifth Book is at the bottom of the stand under the television.
Books Screenshot.
When all of the pieces are collected, click the revealed safe behind the bookshelf to zoom in.
Take the Small Key at the upper right corner of the safe.
Go back to the Bedroom.
Bedroom
Click the diary on top of the round table to zoom in.
Use the Small Key from your inventory to open the lock on the cover.
On the first page of the diary is a note with five clues to find each number of the safe code.
The first number is the month of the duchess's birth.
The second number is the amount of green planes the duchess's father owns.
The third number is the number of spires seen from the hall window.
The fourth number is the amount of peacocks in the aviary.
The fifth number is a secret number found in the Dictaphone.
Turn the page once to find the Matches.
Travel through the mirror portal in the wardrobe to the Frozen Bedroom.
Frozen Bedroom (Backward World)
Click the bed in the back of the room to view the missing candelabrum pieces.
Add the Matches from your inventory to the bed.
The first Candle is next to the toy plane on the round table.
The second Candle is on the shelf at the left side of the wardrobe.
The third Candle is at the side of the chunk of ice covering the right wall.
The Chandelier is partially behind the upper left corner of the wardrobe.
Candelabrum Screenshot.
Once all of the pieces are collected, click the bed to zoom in.
Take the Handle on the bed in front of the toy rabbit.
Return to the Frozen Office.
Frozen Office (Backward World)
Click the middle window for a closer look.
Add the Handle from your inventory to the frame in the center of the window.
Read the note the carrier pigeon drops onto the floor.
Click the window again to zoom in.
Take the Needle on top of the round table.
Go back to the Frozen Bedroom.
Frozen Bedroom (Backward World)
Inspect the bed for a close-up view.
Click the record player on top of the bed to view the missing parts.
Add the Needle from your inventory to the record player.
The Speaker is on the bed behind the toy rabbit.
The Base is over the left eye on the toy rabbit.
The Handle is at the upper right side of the headboard.
The Record is against the left wall, partially covered by the curtain.
Record Player Screenshot.
After all the pieces are collected, the rabbit will smash the record with the hammer.
Take the Glue on the bed and remove the broken record pieces.
Exit through the mirror portal then return to the Office.
Office
Click the broken record on the stand under the television to view the missing pieces.
Add the Glue from your inventory to the record.
The Brush is at the left side of the fireplace mantle.
The Napkin is in the middle of the floor, just below the round table.
The first Piece of a Record is at the bottom of the right floating blimp.
The second Piece of a Record is in the middle of the green drape on the left side of the window.
Broken Record Screenshot.
When all the pieces are collected, the completed Record will be added to your inventory.
Go back to the Frozen Bedroom.
Frozen Bedroom (Backward World)
Click the record player on top of the bed to zoom in.
Place the Record from your inventory on the record player.
Take the Wind-Up Key and read the note in the toy rabbit's stomach.
Note the date on the right page, May 17.
This is the first clue for the safe code; the number for the month of the the duchess's birth is 5.
Click the toy plane on the round table to view the missing parts.
Add the Wind-Up Key from your inventory to the plane.
The Propeller is on the chunk of ice above the Gorgon statue.
The first Wing is on the ice above the bed.
The second Wing is on the shelf in the wardrobe.
The Screwdriver is leaning against the ice-covered column in the right wall.
Toy Plane Screenshot.
Pick up the Toy Plane after it lands on the round table to add it to your inventory.
Click the Gorgon statue to view the missing pieces.
The first Bracelet is around the end of the icicle sticking out of the right wall.
The second Bracelet is at the middle of the ice on top of the left wall.
The first Snake is on the floor by the open cardboard box.
The second Snake is over the lower right corner of the picture frame on the left wall.
The third Snake is around the right arm of the green sofa chair.
Medusa Statue Screenshot.
When all the pieces are collected, take the Pipe that falls to the floor.
Return to the Frozen Office.
Frozen Office (Backward World)
Click the empty stand on the shelf to view the missing pipe collection.
Add the first Pipe from your inventory to the stand.
The second Pipe is next to the stack of books on the desk.
The third Pipe is beside the piece of paper on the floor.
The fourth Pipe is taped to the upper right corner of the cupboard.
The fifth Pipe is at he right side of the serving tray.
Pipe Collection Screenshot.
After all the pipes are collected, the ghost of the duke will give you a second Plane.
Travel through the mirror portal to enter the Office.
Office
Add the two Planes from your inventory to the mobile in the ceiling.
This is the second clue for the safe code; the number of green planes on the mobile is 3.
Pick up the blue Flag that falls to the floor.
Return through the portal to the Frozen Office.
Frozen Office (Backward World)
Click the floating islands around the globe in the ceiling to view the missing monuments.
Add the Flag from your inventory to the globe.
The Cathedral is on the shelf to the left of the fireplace.
The Sphinx is on the right side of the desk.
The Eiffel Tower is standing on the floor under the right window.
The Taj Mahal is on top of the serving tray.
Globe Screenshot.
Once all the pieces are collected, take the Tap from the split globe.
Exit through the mirror portal and go back once to the Upstairs Hallway.
Upstairs Hallway
Click the water cooler at the end of the hall to zoom in.
Click the front of the water cooler to view the missing tap pieces.
Add the first Tap from your inventory to the water cooler.
The second Tap is on pipe at the right side of the water cooler.
The Valve is on the leaf of the plant in the lower left corner.
The Wrench is in the middle of the wall just above the plant.
The Nut is on the floor in the bottom right corner.
Water Cooler Screenshot.
After all the pieces are collected, take the Rose that drops out of the water tap.
Go back to enter the Bedroom.
Bedroom
Inspect the bed for a closer look.
Click the case next to the teddy bear to view the missing pieces.
Add the first Rose from your inventory to the case.
The first Heart is in the teddy bear's left ear.
The second Rose is in the middle of the headboard.
The second Heart is at the upper right side of the bed cover.
The third Heart is in the middle of the teddy bear's red sweater.
Rose and Heart Case Screenshot.
The puzzle will begin after all of the pieces are collected.
Move all of the tokens to the matching spaces on the opposite side of the case.
Every red heart token needs to be placed on a red space on the right side of the board and every gold flower token needs to be on the yellow space on the left side of the board.
Click a token to select it, then click an empty connected space to move it to that position.
Tokens cannot move to a space occupied by another token, nor can they move to a place on the board not connected by a path.
Solution.
Once the puzzle is solved, take the Heart from the opened case.
Travel through the mirror portal to the Frozen Bedroom.
Frozen Bedroom (Backward World)
Place the Heart from your inventory in the Gorgon statue's hands.
Take the Vase from the hole in the floor.
Go through the mirror portal and continue forward to the Upstairs Hallway.
Upstairs Hallway
Click the water cooler at the end of the hall to zoom in.
Use the Vase from your inventory on the tap to fill the Vase with Water.
Go back to the Frozen Bedroom.
Frozen Bedroom (Backward World)
Use the Vase with Water from your inventory to douse the flames inside the frame on the wall.
Take the Lens and the Bread inside the revealed compartment inside the frame.
Return to the Upstairs Hallway.
Upstairs Hallway
Click the telescope beside the right window to view the missing parts.
Add the Lens from your inventory to the telescope.
The Tripod Screw is under the top of the railing between the elephant and snail pedestals.
The first Gear is in the middle of the far right railing.
The Lens Cap is around the horse statuette at the top of the pedestal.
The second Gear is in the middle of the column on the right side of the room.
Telescope Screenshot.
After all the pieces are collected, click the telescope to look through it out the window.
Remove the piece of Sticky Tape covering the lens to add it to your inventory.
This is the third clue for the safe code; the number of spires visible through the telescope is 4.
Go to the Frozen Office.
Frozen Office (Backward World)
Click the small round table in front of the window to zoom in.
Place the Bread from your inventory on top of the table to lure over the carrier pigeon.
Use the Sticky Tape from your inventory to repair the torn paper the pigeon drops on the table.
Click the taped note to read it.
This is the fourth clue for the safe code; the number of peacocks in the aviary is random, but in this example it was 4.
Speak with the ghostly duke to receive the Cylinder.
Travel through the mirror portal to return to the Office.
Office
Click the Dictaphone on top of the desk to view the missing parts.
Add the Cylinder from your inventory to the Dictaphone.
The Speaker is on the tube at the side of the television.
The Hose is wrapped around the hat to the right of the mirror portal.
The Gear is at the side of the left chair in front of the window.
The Bobbin is in the window pane in the middle window.
Dictaphone Screenshot.
When all of the pieces are collected, click the repaired Dictaphone to listen to the recording.
This is the fifth clue for the safe code; the number stated in the recording is random, but in this example it was 9.
Click the wall safe in the book shelf to zoom in.
If you've found all of the clues, enter in the 5 numbers of the safe code written on the piece of paper at the lower left side of the safe.
These numbers are random each game, but their locations are always the same.
Safe Code Screenshot.
Take the Necklace from the opened safe.
Posted by: Trinn |
May 25, 2012 2:52 PM
|
May 25, 2012 2:52 PM