
Secrets of the Dark:
Eclipse Mountain
Platform: Mac, Windows

![]() Much like the protagonists of today's game, Orneon has just sauntered into town with a thrilling sequel to Secrets of the Dark: Temple of Night, unleashing a stunning new adventure/hidden object hybrid with Secrets of the Dark: Eclipse Mountain. Once again light and dark clash in a suspiciously empty small town denuded by yet more demons. Are you sensing a theme here?
Much like the protagonists of today's game, Orneon has just sauntered into town with a thrilling sequel to Secrets of the Dark: Temple of Night, unleashing a stunning new adventure/hidden object hybrid with Secrets of the Dark: Eclipse Mountain. Once again light and dark clash in a suspiciously empty small town denuded by yet more demons. Are you sensing a theme here?
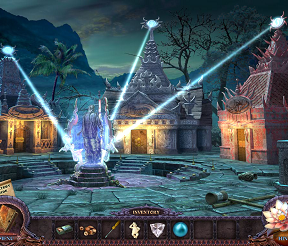 The adventure begins as you and your intrepid friend and reporter Peter leisurely wander towards a picturesque little Thai village. However, due to the fact that Peter seems to be the demon equivalent of catnip, the journey is interrupted by ravenous demonic servants who — you guessed it — kidnap Peter as part of a nefarious plan to unleash evil upon the world. Yes, again. Seriously, this is the second time you will spend an entire game attempting to rescue poor, put upon Peter and, quite frankly, dude needs to get a talisman or something so this doesn't happen a third time. It will be up to you to explore this dark region of Southeast Asia aided only by four monks who have unfortunately gotten themselves stoned. No, not high on dope, or executed biblical style, but turned into actual stone. Fortunately they are still helpful even in their statueified states.
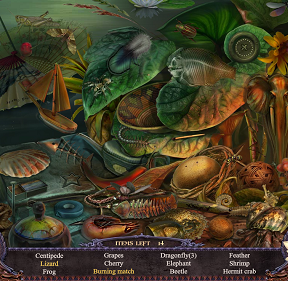
As you explore deeper and deeper into this obscure village you will encounter a plethora of challenges that include a nicely balanced mix of traditional hidden object scenes, "reverse" hidden object scenes, and mini-games and puzzles. Collect useful items as you explore, including some that may not seem useful at all but are actually blessings in disguise. Find a particular animal skull, for instance, and if you can offer it to the correct stoned monk it will transform into something helpful, like a hammer. Other useful items can be found hanging around each scene, in both types of hidden object scenes, and lurking beneath dirt or debris. A changing cursor is helpful in distinguishing areas of interest along with a variety of sparkles, at least in the "Regular" mode of play. Many areas also incorporate the wonderful "light/dark" mechanism from the first game, where a scene is actually two different scenes depending upon whether it is light or dark when you walk into the room. Explore, solve, sneak, and sometimes brute force your way towards saving your friend and the rest of the world from the all-encompassing evil. And then dump the guy because, seriously, two demon kidnappings are enough for anyone to live through.
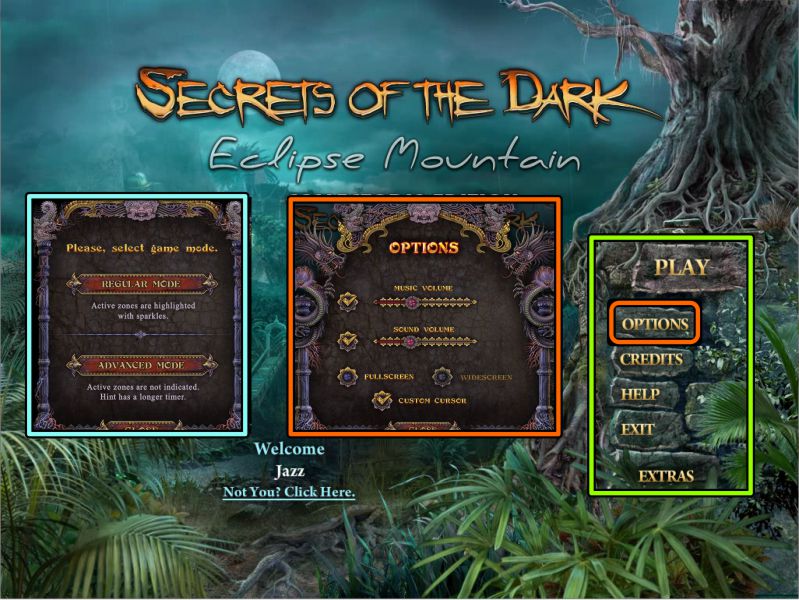
 Secrets of the Dark: Eclipse Mountain offers three modes of play, Regular, Advanced, and Hardcore, each with its own difficulty level. A bottom-loading inventory helps you keep track of the multitude of items you will encounter and your journalist notebook keeps track of the story as well as the clues scattered about the place. The refilling hint timer doubles as a skip function for the mini-games and puzzles and is useful inside the hidden object scenes as well as within the larger adventure itself. All the bells and whistles of a classic adventure game are here to be discovered, along with some nice twists thanks to the fact that many rooms and locations harbor a second, secret side that expands the gameplay exponentially.
Analysis: There are now thousands of these hybrid adventure games out on the market now, and it is becoming harder and harder for one game to distinguish itself from the rest. Fortunately Orneon is one of the best designers around and they have once again brought us an adventure that is both gorgeous and fun to play with a delicate balance of exploration and gameplay that is difficult to achieve. Pacing is what makes the gameplay in Secrets of the Dark: Eclipse Mountain sing, with each hidden object scene and mini-game coming at just the right time to feel organic and move the story along, rather than feeling like roadblocks to slow down and frustrate the player. This juggling act is one of the most difficult to achieve in a hybrid and Orneon once again nails it.
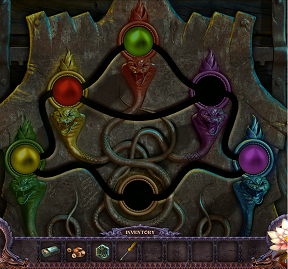 The mini-games, puzzles, and hidden object scenes are top-notch, a nice mix of familiar and challenging. The "reverse" hidden object scenes are especially nice, featuring the challenge of placing items back into the scene rather than pulling them out. The mini-games and puzzles are based on many familiar tropes such as gear puzzles, pipe puzzles, hidden match-2s, and multiple variations on sliders. Don't let the familiarity of the mini-games and puzzles put you off, for they highlight some interesting new twists that certainly change up the gameplay and make what is old seem fresh again. Nicest of all is the fact that many items needed to continue the adventure are not just strewn across the landscape like so much random junk. Instead items can be hiding under a fall of leaves, or lurking in pools of water, or just be magically transformed into something else that disguises its potential, adding another layer to the adventure aspect.
Orneon certainly knows how to set the stage for its adventures, from the lush, tropical scenery in its predominant greens and blues denoting both the place (Thailand) and the time (mostly in the dark), to the incidental sounds, haunting music, and variety of small animations that make the world of Secrets of the Dark: Eclipse Mountain come alive. Practically every game these days has bugs or other vermin scuttling across the screen, but how many also feature the rustling of leaves blowing in the wind, the haunting chirps of cicadas and other insect fauna, and the sound of water dripping, gurgling, and rushing around with accompanying animations, making for an amazingly immersive experience.
Some might complain that the "Regular" mode is too easy with its quickly refilling hint timer and cascade of sparkles and glints to point out areas of interest, but for those who like tougher adventures there is always the Advanced mode (with no sparkles and slowly refilling timers) or the Hardcore mode which, as advertised, is pretty hardcore with every hint and tip feature turned off, including the opening tutorial. There's not much else to complain about here as Orneon has produced a fantastic, fun, immersive trip that should delight adventure fans everywhere. Well, you could complain about "demon-bait" Peter, but then, hey, you're the one hanging out with him.
A Collector's Edition is also available. It includes wallpapers, a built-in strategy guide, the ability to replay certain mini-games, and a bonus adventure. Remember that Big Fish Game Club Members pay only $13.99 for Collector's Editions, and collector's editions count 3 card punches of 6 total needed for a free game.
![]() Windows:
Windows:
Download the demo
Get the full version
Also available: Collector's Edition
![]() Mac OS X:
Mac OS X:
Download the demo
Get the full version
Also available: Collector's Edition


Walkthrough Guide
(Please allow page to fully load for spoiler tags to be functional.)
Secrets of the Dark: Eclipse Mountain Walkthrough
Chapters 1 - 8
General Information
Main Menu
From the Main Menu, you can Play or Quit the game and choose your Options and Profile.
Options include Music, Voice and Sound FX volume, Full or Windowed screen, use of a custom or system cursor, and an adjustment for a wide screen in full-screen mode.
There is an additional choice for Automatic arrow cursors. If it is "Off", there will be no arrows to show you other locations, but you can still use the Compass for navigation.
You are given your choice of two Difficulties in the beginning: Casual or Advanced.
In Casual Mode, the Tutorial is turned on, and areas of interest have visible sparkles.
Advanced has no sparkles and the Tutorial is off.
Screenshot
Navigation Help
There is a Help screen you can refer to for help with Scene Navigation. It is available from the Main Menu or from the scene menu.
The lotus in the lower right corner is for Hints.
A pointing finger means you can touch an object to get more information or to perform a task.
A grabbing hand means you should pick up the object.
A magnifying glass is for close-ups.
A round highlighted area is for you to click in order to change the illumination of the scene from light to dark or vice versa.
A cursor with a glow around it means you need to change the illumination to find out more information about an object.
Directional arrows show you where you can exit a scene.
There are two types of Hidden Object Scenes: lists of objects to find, and objects to be returned to the scene in their proper places.
Hidden object scenes are the same for all players; the final item for each scene will is marked in bright blue in all the screenshots.
Screenshot
Chapter 1: Arrival in Thailand
Crossroads
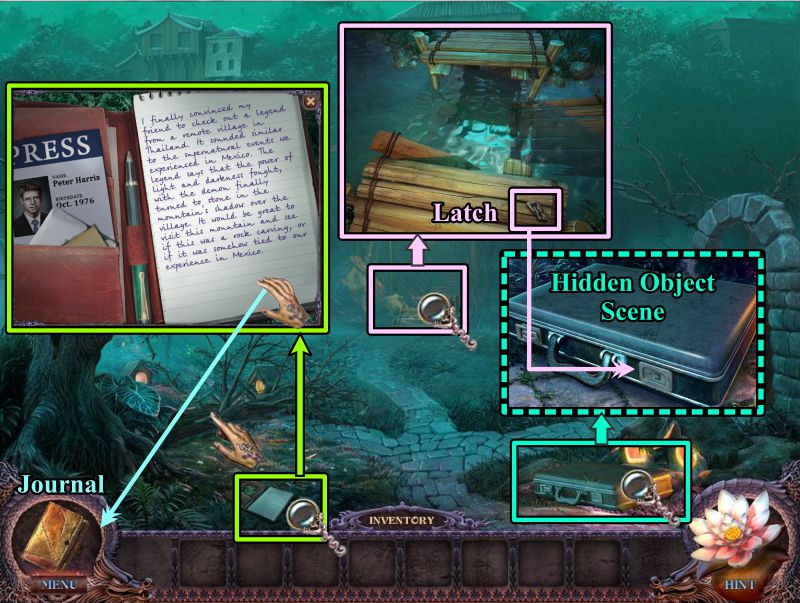
Pick up the Peter's notebook on the ground and take the page for your Journal.
Zoom in on the bridge and take the Latch.
Examine the suitcase and place the Latch to trigger a Hidden Object Scene.
Screenshot
Journal
In the lower left corner is your Journal that will be updated as you progress through the game, so check it for important information.
You can replay cut scenes, and even zoom in to get a closer look at a note you've collected.
Screenshot
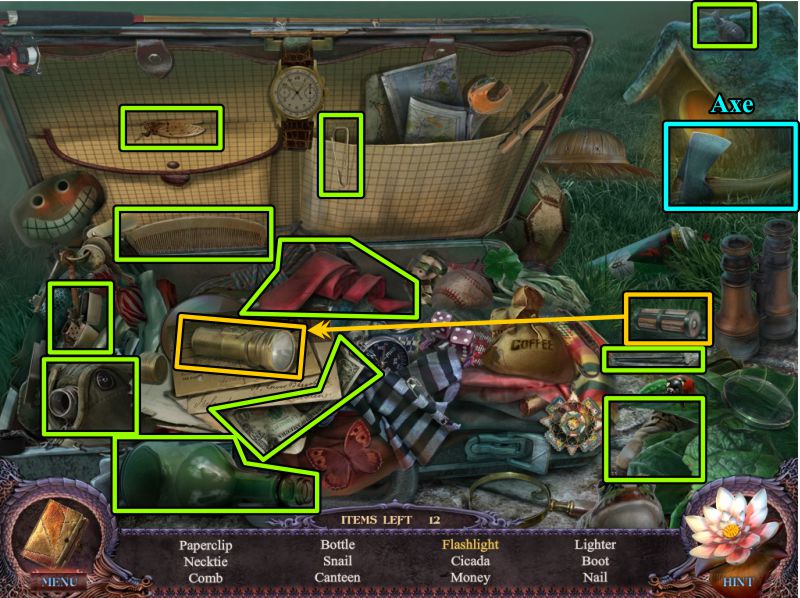
Suitcase Hidden Object Scene
Place the batteries in the flashlight to collect it.
Your Inventory item will be an Axe.
Screenshot
Monk Statue
Use the Axe on the tree limb to clear a path for yourself.
Zoom in on the well, open the doors, and take the Drawer Handle.
Zoom in on the Monk Statue, take the Fence Key, and head back to the Crossroads.
Screenshot
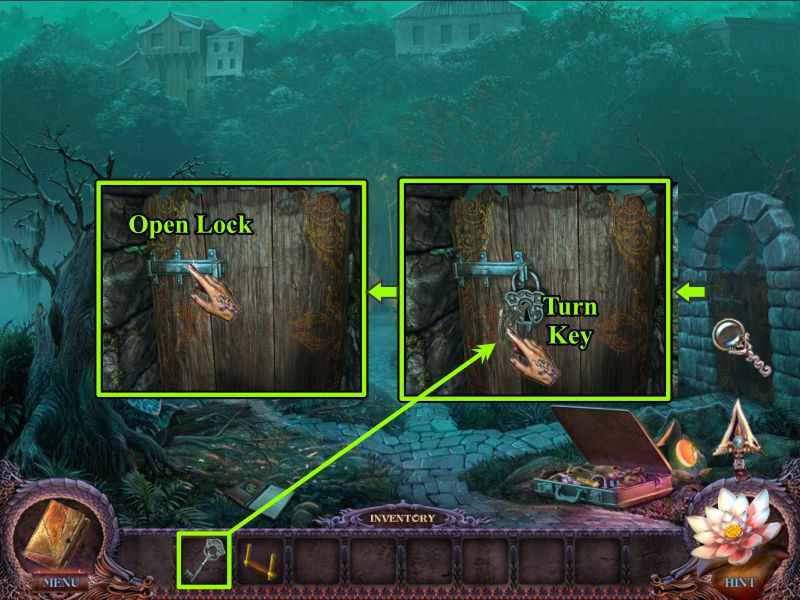
Crossroads Gate
Zoom in on the gate, place the key, and turn it.
Open the lock and go through the gate.
Screenshot
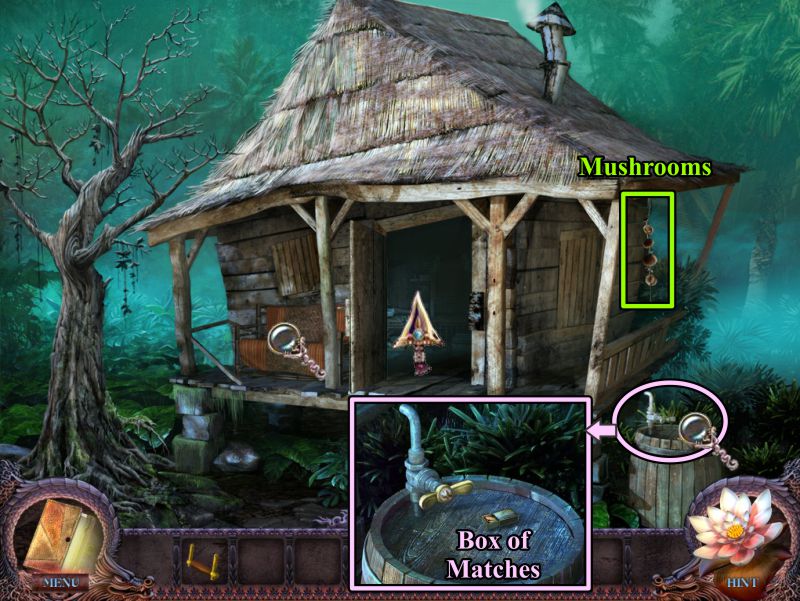
Outside Monk's Hut
Zoom in on the barrel and take the Box of Matches.
Collect the Mushrooms, then enter the Hut.
Screenshot
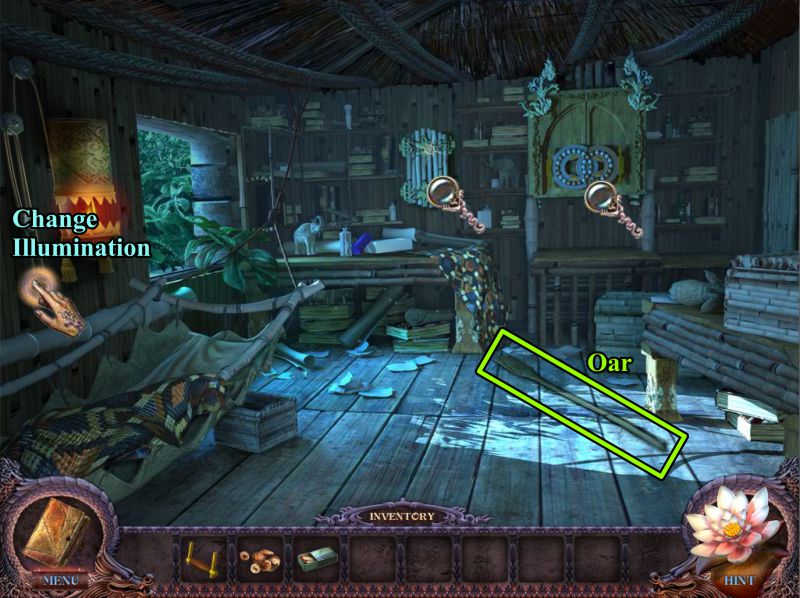
Monk's Hut Dark
Check out the magnifying glasses, grab the Oar, and change the illumination.
Screenshot
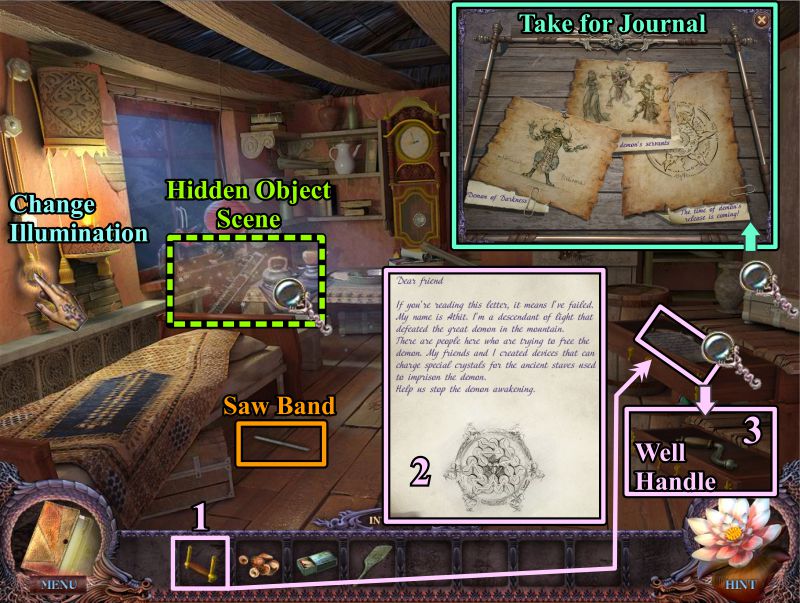
Monk's Hut Light
Pick up the Saw Band.
Place the Drawer Handle, then take the note and the Well Handle beneath it.
Zoom in on the right wall and take the pictures for your Journal.
Play the Hidden Object Scene.
Screenshot
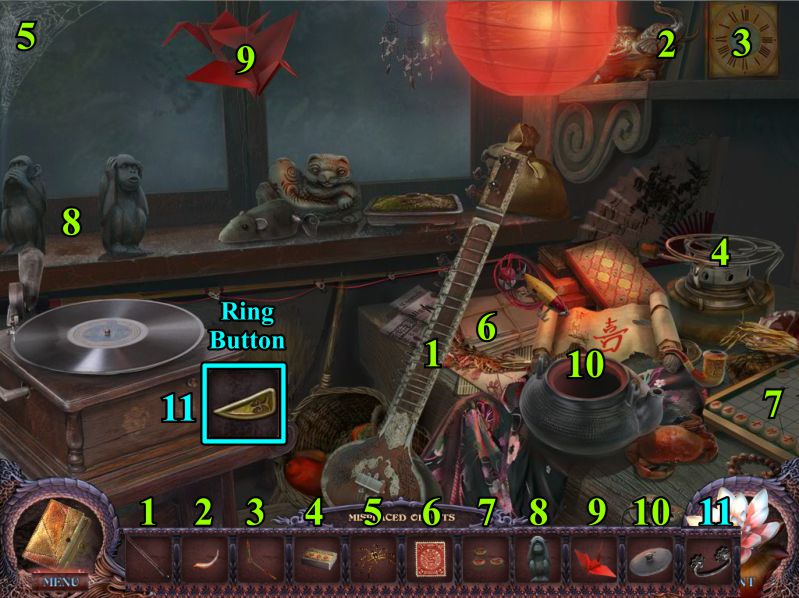
Monk's Hut Hidden Object Scene
This is a replacement scene for you to return the objects to their proper places. See the screenshot for a numbered solution.
Your final object is a drawer handle that when placed will get you a Ring Button for your Inventory.
Screenshot
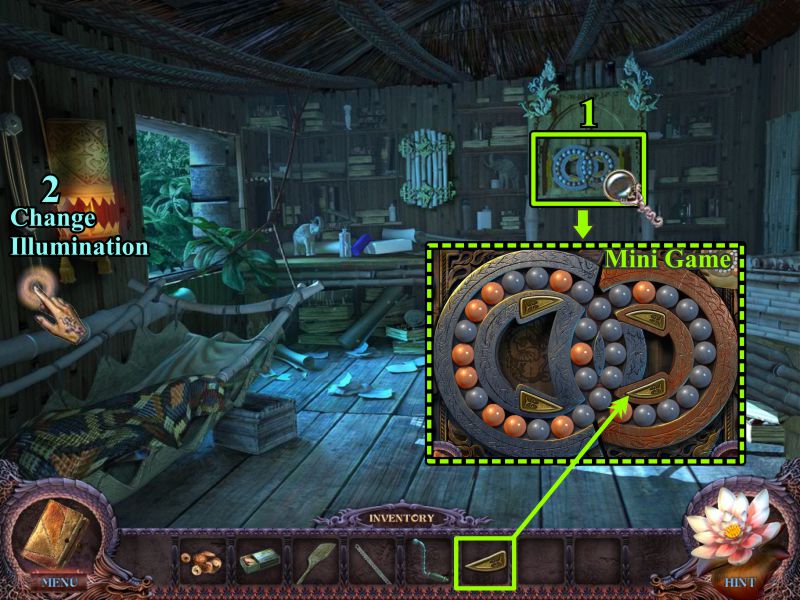
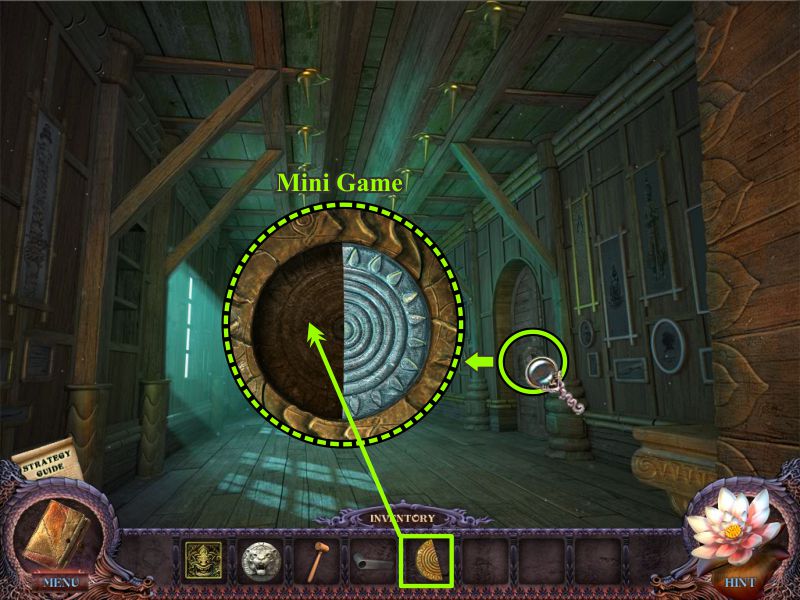
Monk's Hut Dark
Zoom in on the cabinet at the back and place the Ring Button to trigger a Mini Game.
When you have completed the game, change the illumination to daylight.
Screenshot
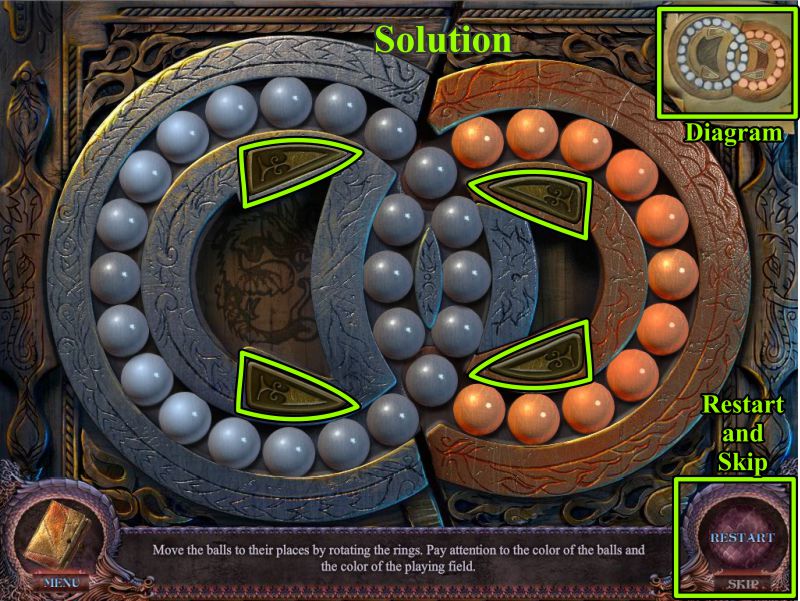
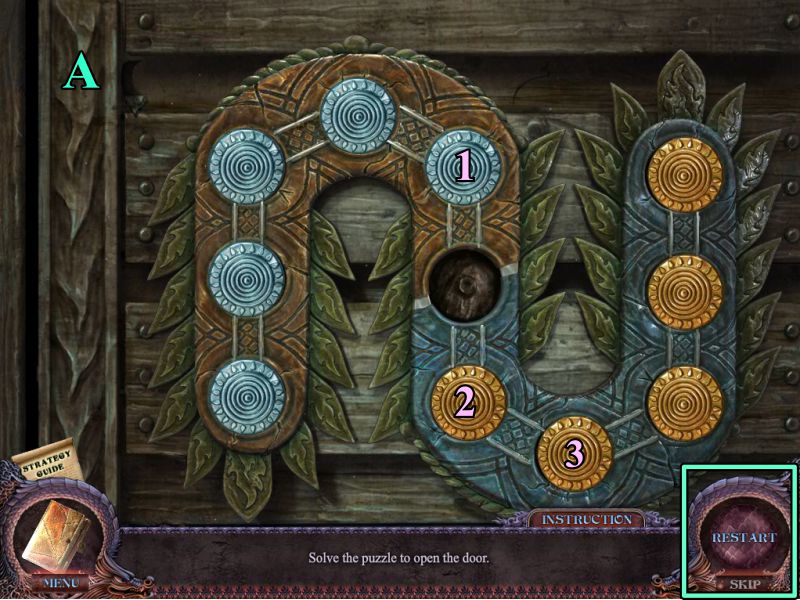
Cabinet Lock Mini Game
Your goal is to move the balls around so they match the diagram and screenshot solution.
Use the ring buttons to move the balls.
There is a Restart button if you need to use it.
Screenshot
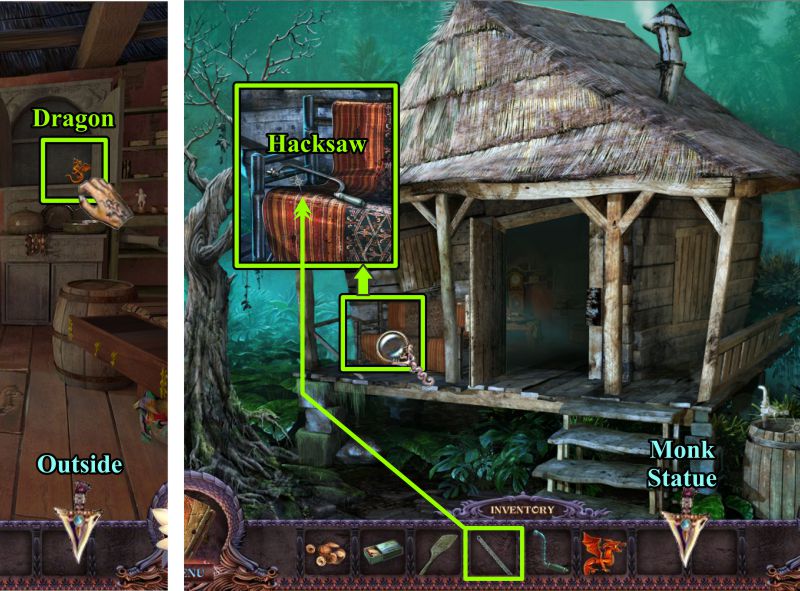
Outside Monk's Hut
Take the Dragon from the cabinet when it's light.
Go outside, zoom in on the sofa, and put the Saw Blade on the saw to get a Hacksaw.
Return to the Monk Statue.
Screenshot
Monk Statue
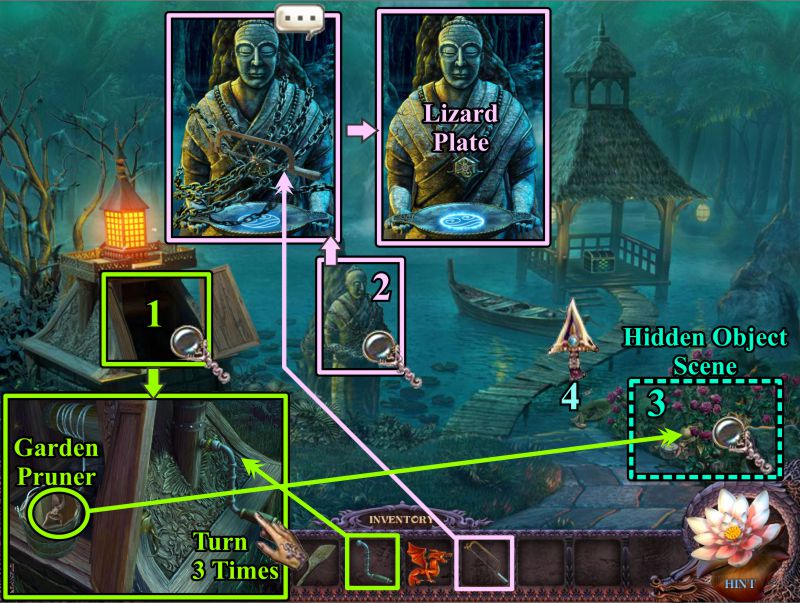
Zoom in on the well and place the Well Handle.
Turn it 3 times to bring the bucket up and collect the Garden Pruner.
Zoom in on the Monk Statue and use the Hacksaw to remove the chains.
Talk to the Monk and remove the Lizard Plate from around his neck.
Use the Garden Pruner on the bushes to the right to trigger a Hidden Object Scene.
Then, go to the dock.
Screenshot
Chapter 2: Athit the Monk
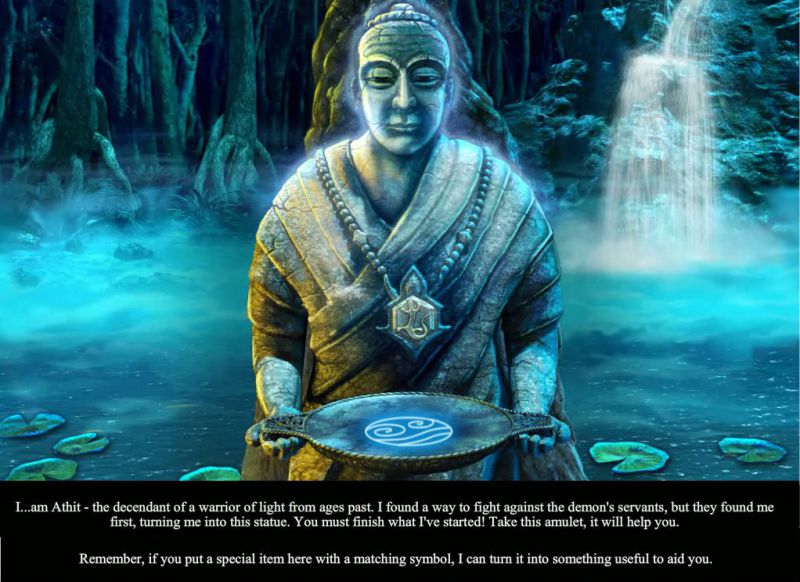
The Monk's Statue
Find out what the Monk has to say. You can either check the screenshot or replay the scene in your Journal.
Screenshot
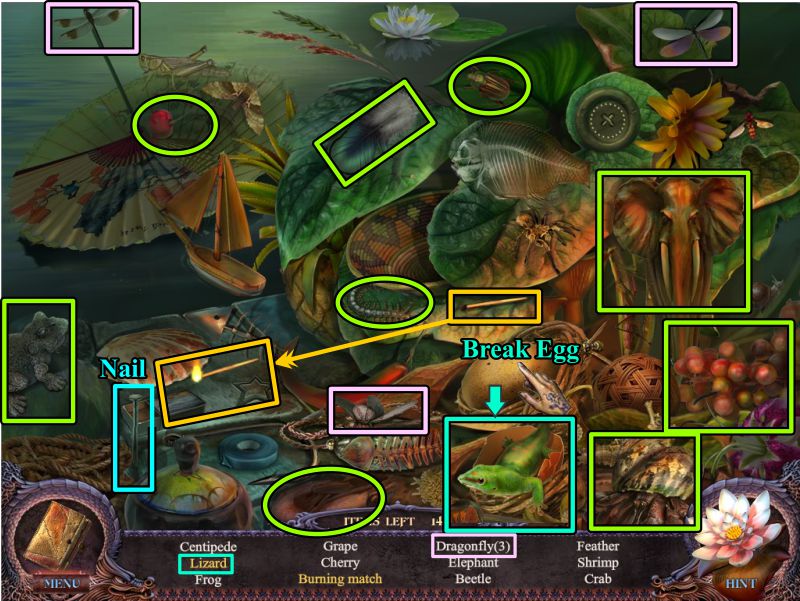
Bush Hidden Object Scene
Take the match and light it on the match box to get a Burning Match.
Break the egg with your finger in order to find the Frog.
You will get a Nail for your Inventory.
Screenshot
Dock and Monk Statue
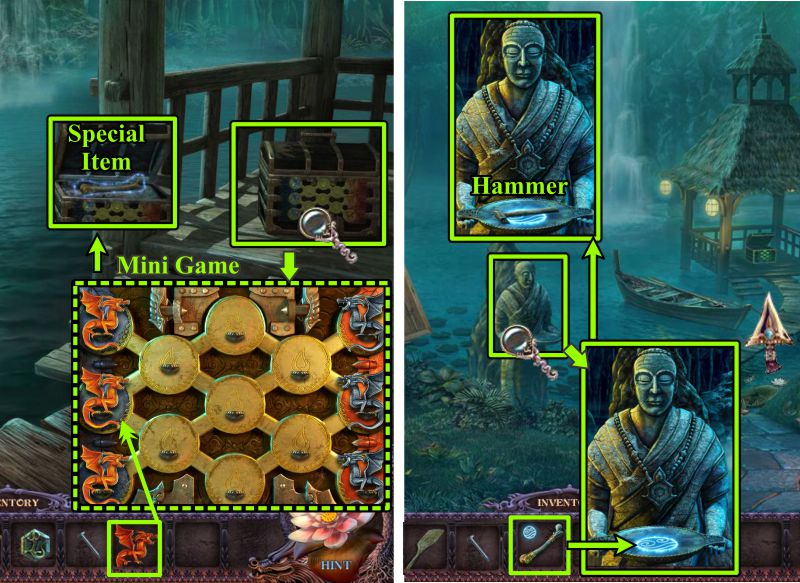
Zoom in on the chest and place the orange Dragon to trigger a Mini Game.
When the chest opens, take the Special Item back to the Monk.
Place it on his tray, and it will turn into a Hammer.
Return to the Dock.
Screenshot
Dragon Chest Mini Game
Your goal is to move all the orange dragons to the right and the gray ones to the left.
If they meet each other in adjoining circles, one will be returned to its starting position.
See the screenshot for the solution.
Screenshot
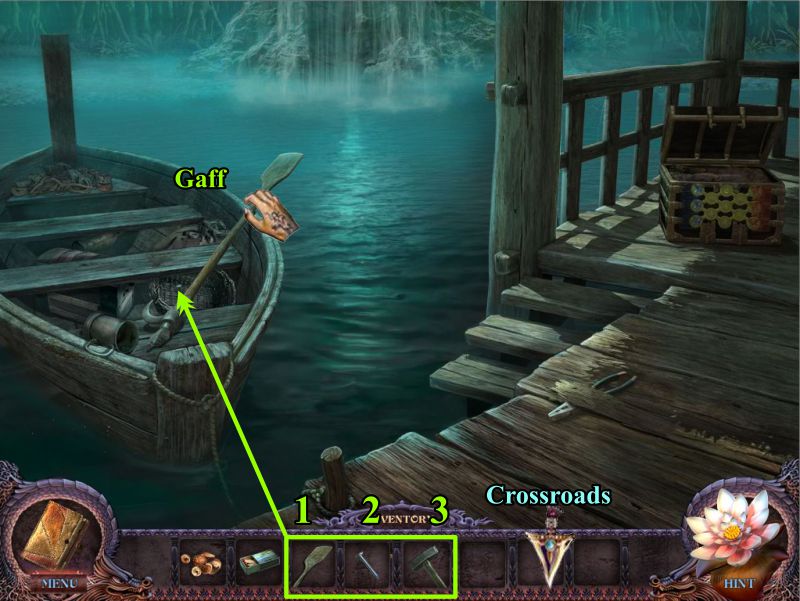
Dock
Back on the Dock, place the Oar on the hook in the boat.
Secure it with the Nail and Hammer it in.
Take the Gaff, then go to the Crossroads.
Screenshot
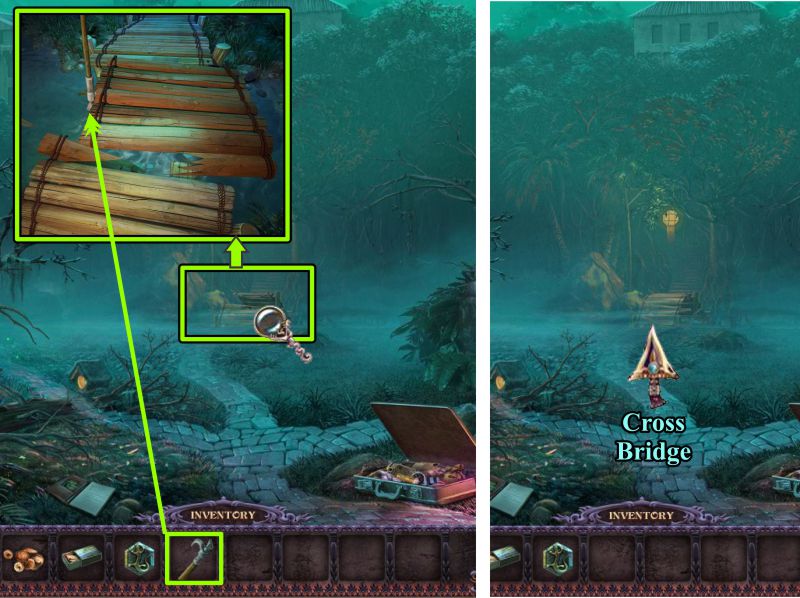
Crossroads
Zoom in on the bridge, use the Gaff to restore the section from the water, and cross the bridge.
Screenshot
Hotel Street
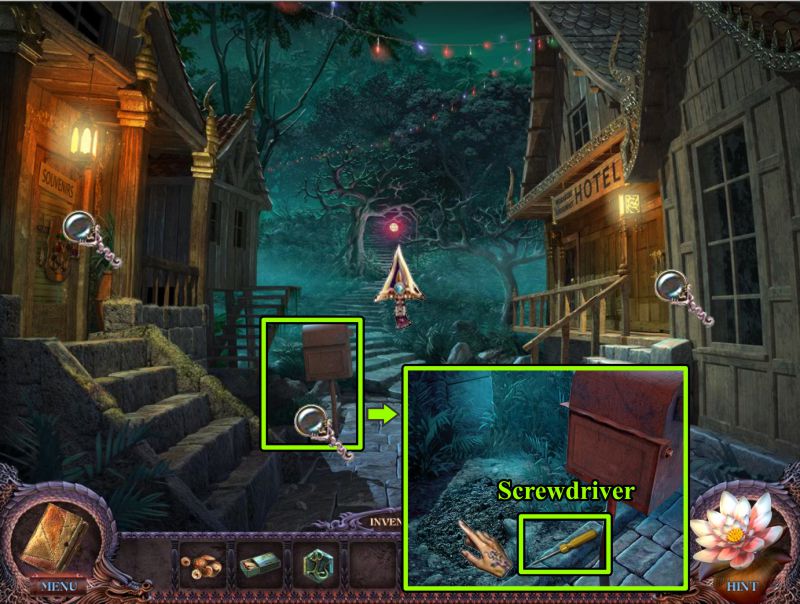
Zoom in on the mailbox and pick up the Screwdriver.
All the doors are locked, so head forward to see what's there.
Screenshot
Fountain Square
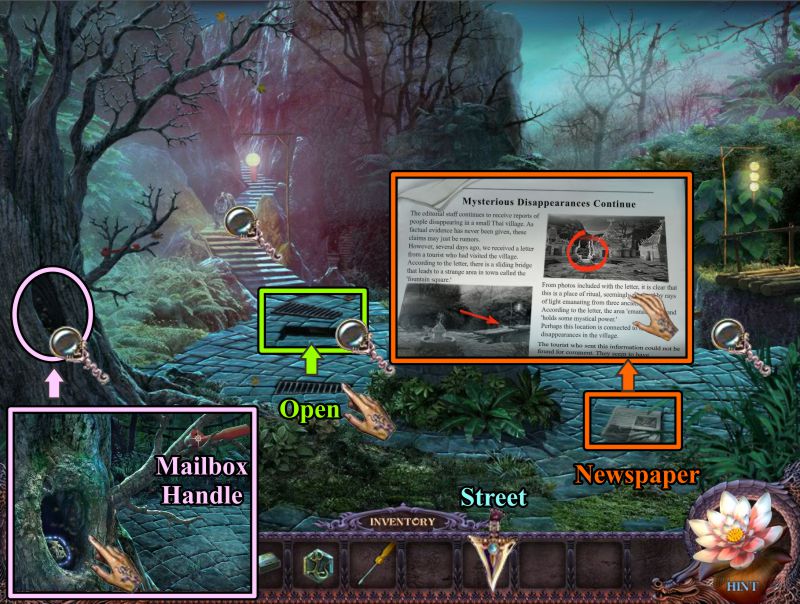
Zoom in on the tree, take the Mailbox Handle, and note the bees.
Open the grate, zoom in, and find the valve missing.
Pick up the Newspaper, read the information, and take it for your Journal.
The sliding bridge has been disabled, and there's a vicious dog on the stairs, so you can't go anywhere else but back to Hotel Street.
Screenshot
Hotel Street
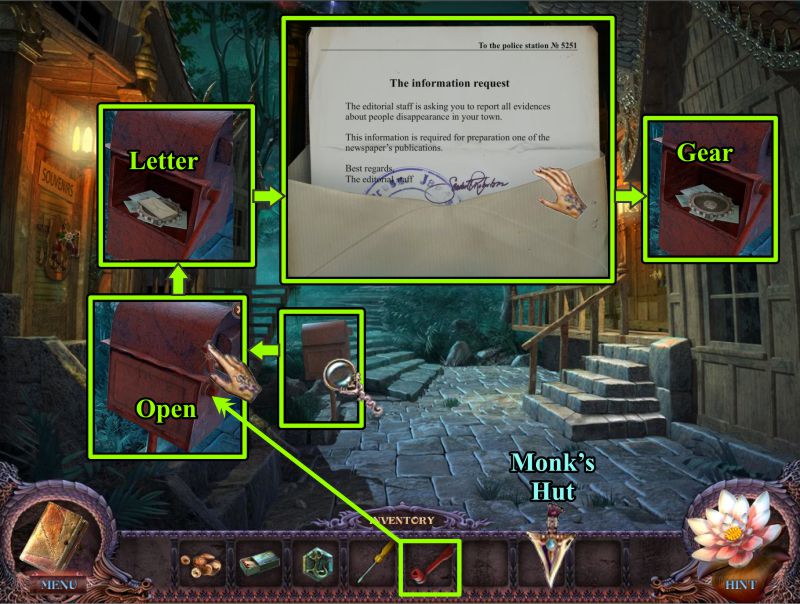
Zoom in on the mailbox and place the Mailbox Handle.
Read the report and take it for your Journal.
Collect the Gear, then go to the Monk's Hut.
Screenshot
Outside Monk's Hut and Fountain Square
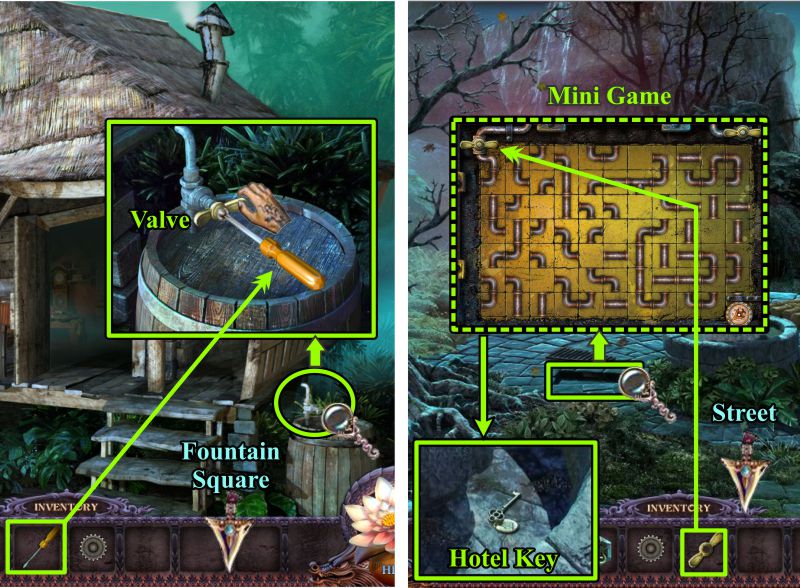
Zoom in on the barrel and use your Screwdriver to remove the Valve.
Return to Fountain Square.
Zoom in on the fountain mechanism and place the Valve to trigger a Mini Game.
When you have drained the water from the fountain, you can reach the Hotel Key, so go to Hotel Street.
Screenshot
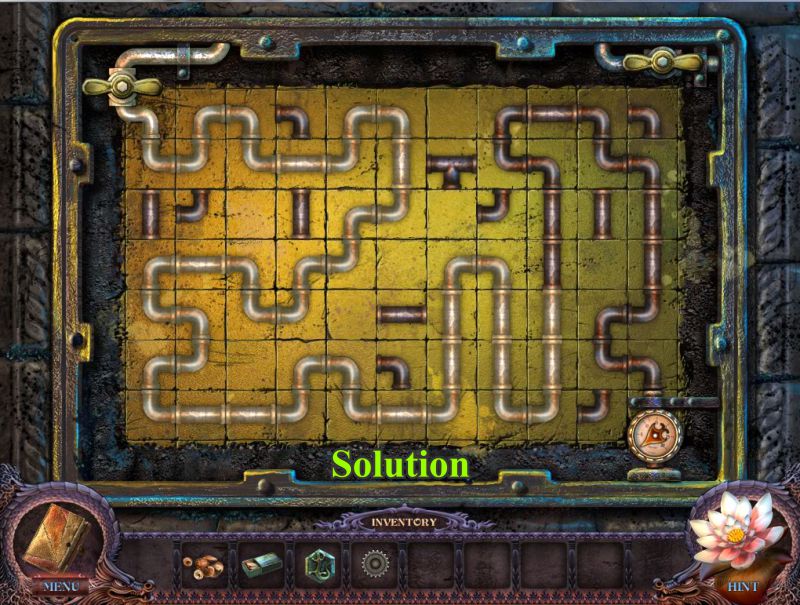
Fountain Mini Game
Your goal is to turn the pipes to connect the valve and drain. See the screenshot for the solution.
Screenshot
Chapter 3: The Hotel
Hotel Door
Zoom in on the Hotel door and place your Hotel Key.
Once the door opens, enter the Hotel.
Screenshot
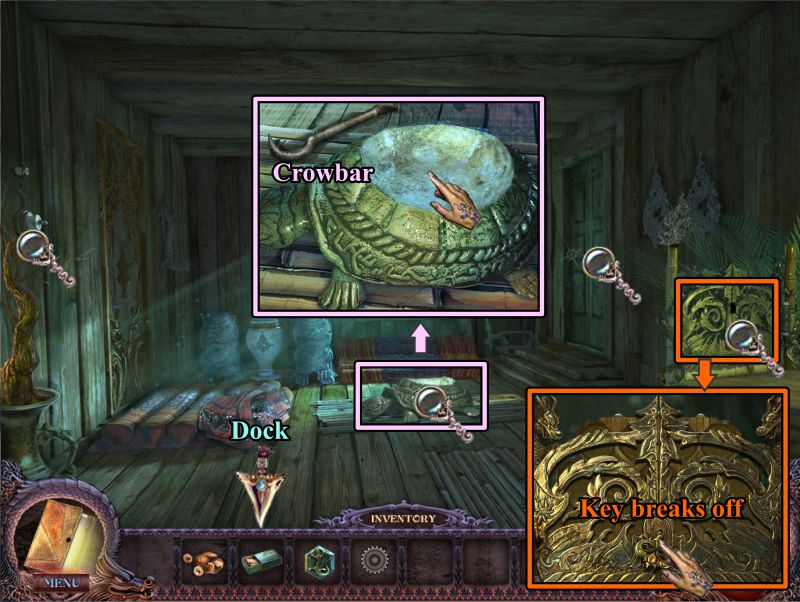
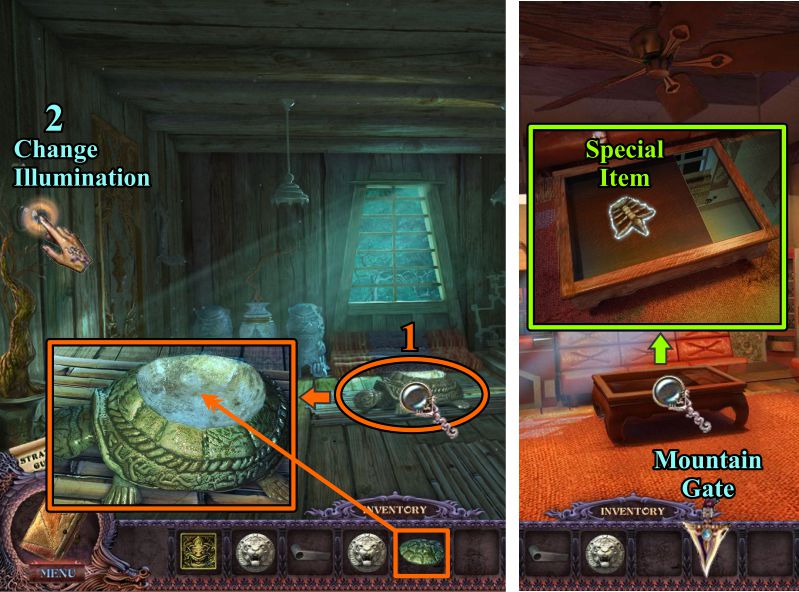
Hotel Lobby Dark
Zoom in on the turtle, note the missing part, and pick up the Crowbar.
Examine the bed board at the right. Try to turn the key, and it breaks off.
Go to the Dock.
Screenshot
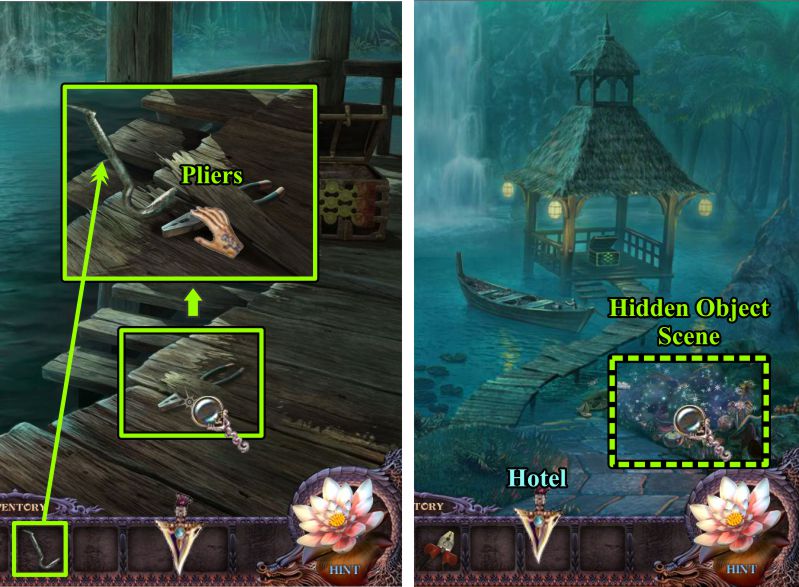
Dock
Zoom in and use the Crowbar on the board to get the Pliers.
Back out to the bush and play the Hidden Object Scene.
Go to the Hotel.
Screenshot
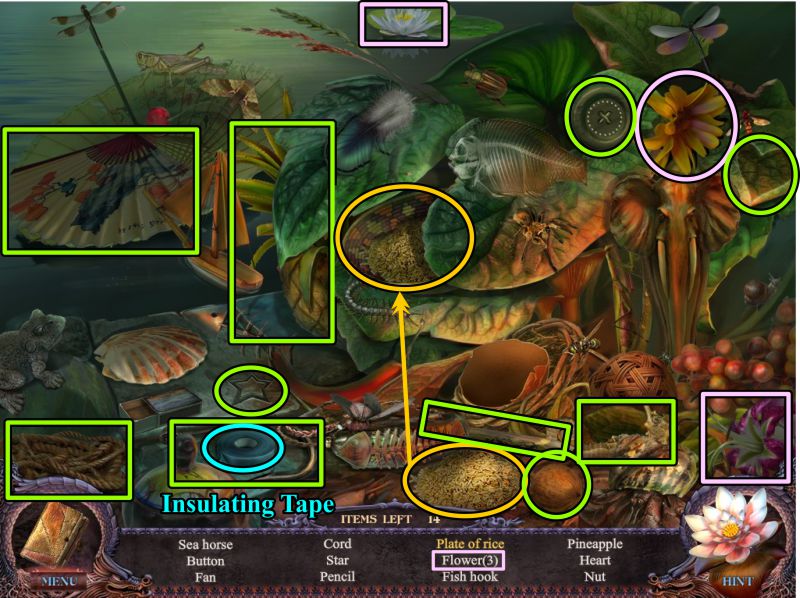
Bush Hidden Object Scene
Place the rice in the plate to get a Plate of Rice.
Your Inventory item will be some Insulating Tape.
Screenshot
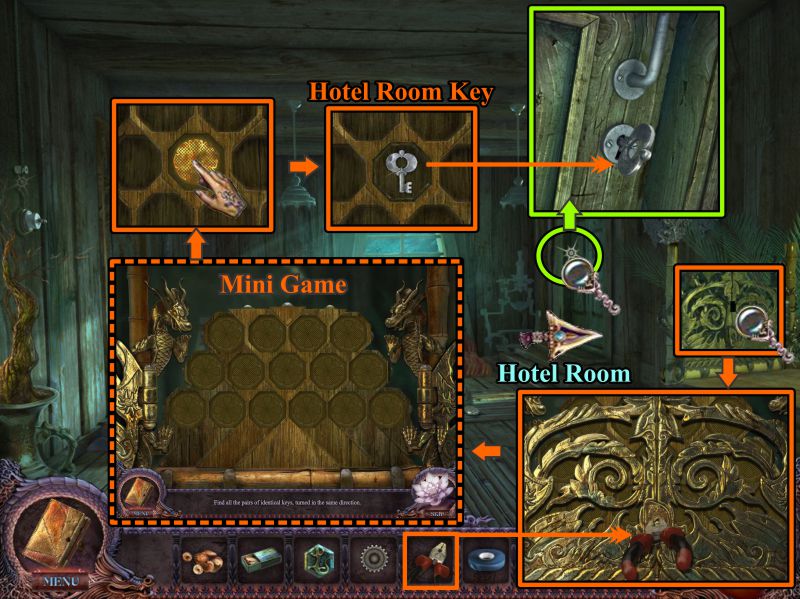
Hotel Lobby Dark
Zoom in on the bed board and use the Pliers to remove the key part to trigger a Mini Game.
To solve the Mini Game, turn over the tiles until you have matched all the keys.
The trick in solving the game is to keep turning the tiles until the keys are facing the same direction when you choose them.
The final key you choose will be the Hotel Room Key, so collect it, open the Hotel Room, and enter.
Screenshot
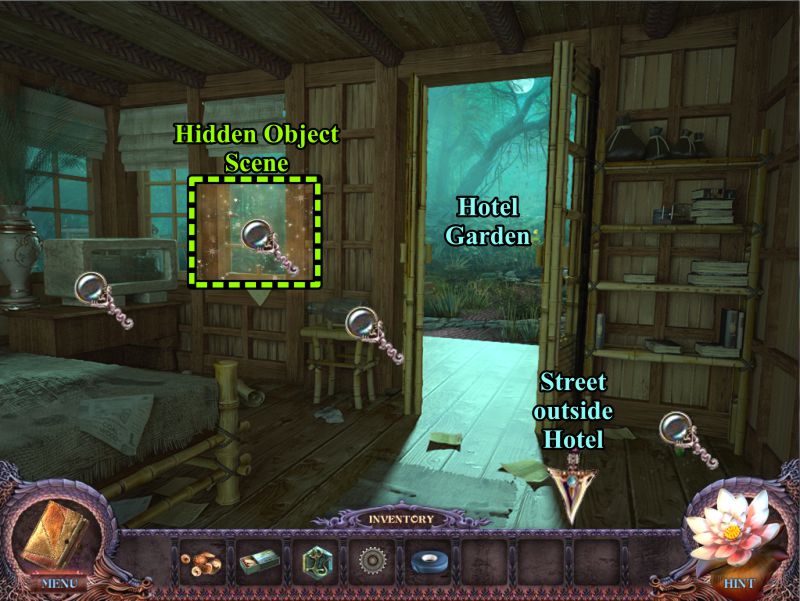
Hotel Room Dark
Check out all of the magnifying glassed, note the Garden exit, and play the Hidden Object Scene.
Screenshot
Veranda Hidden Object Scene
This is a replace the object game.
See the screenshot for the numbered solution. Your final object will be a Digging Tool.
Screenshot
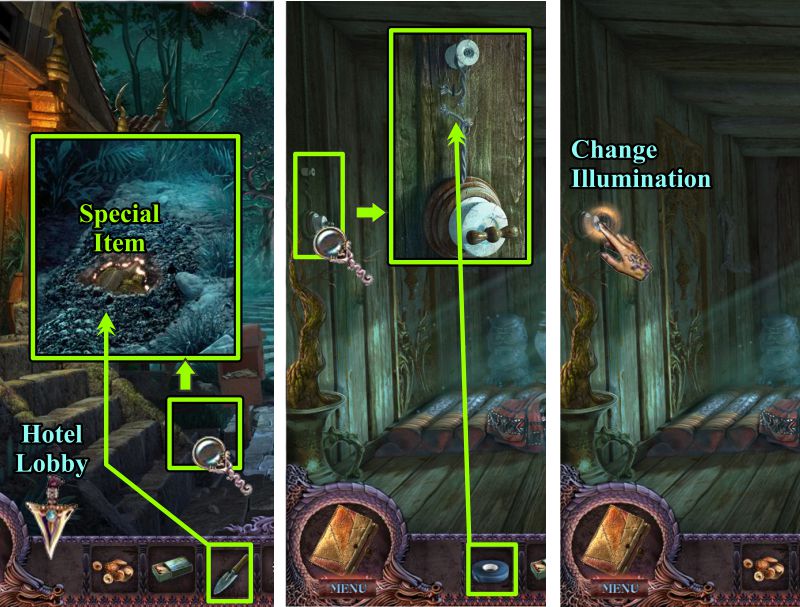
Hotel Street and Dark Lobby
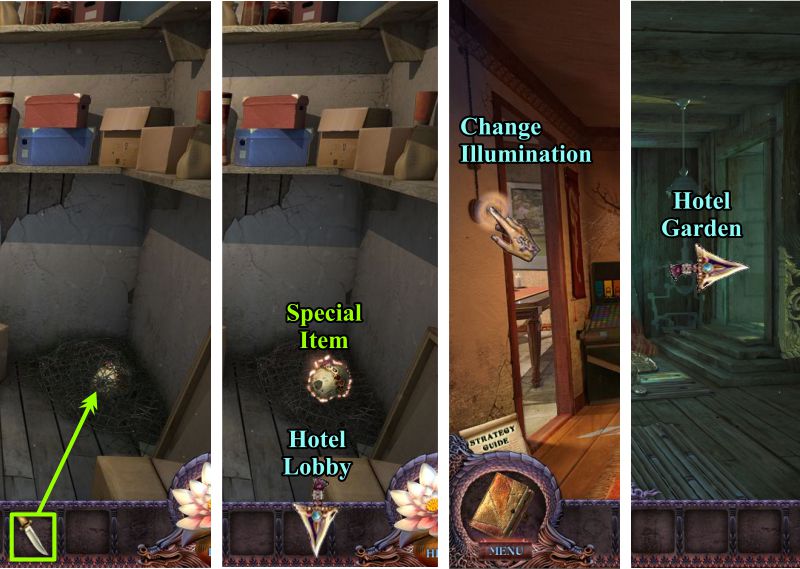
Use your Digging Tool on the dirt next to the mailbox in order to find the Special Item.
Go to the Hotel Lobby. Use the Insultating Tape to repair the light so you can change the illumination.
Once it is repaired, change the illumination.
Screenshot
Hotel Lobby Light
Zoom in and check out the Registration Book. Take the page for your Journal.
Examine the window to find a Smoker.
Light it with your Lighter and take the Smoker.
Examine the table and take the Code you find there.
Go to the Kitchen.
Screenshot
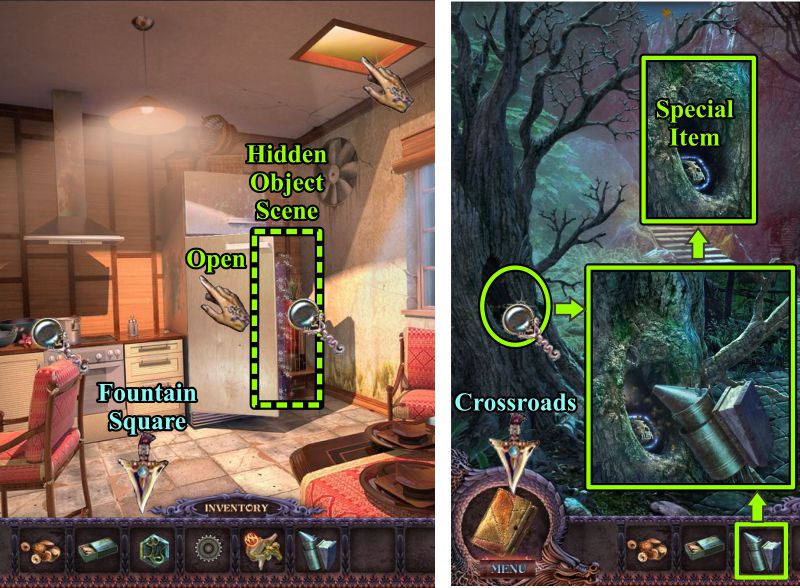
Hotel Kitchen and Fountain Square
Open the refrigerator door and play the Hidden Object Scene.
Go to Fountain Square and zoom in on the tree hollow.
Use the Smoker on the bees so you can collect the Special Item.
Head back to the Crossroads.
Screenshot
Refrigerator Hidden Object Scene
Place the caviar on the pancake so you can collect Pancake with Caviar.
Your Inventory item is a Corkscrew.
Screenshot
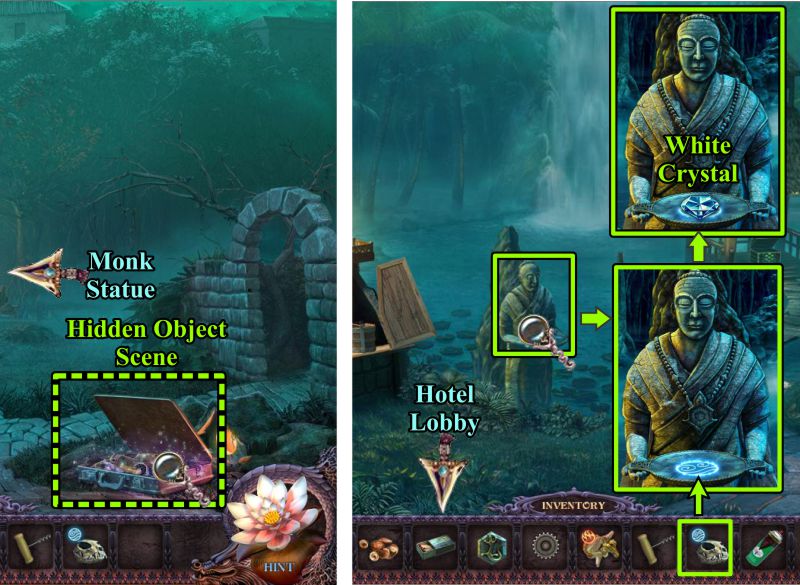
Crossroads and Monk Statue
Play the suitcase Hidden Object Scene, then go to the Monk Statue.
Place your Special Object to receive a White Crystal.
Go to the Hotel Lobby.
Screenshot
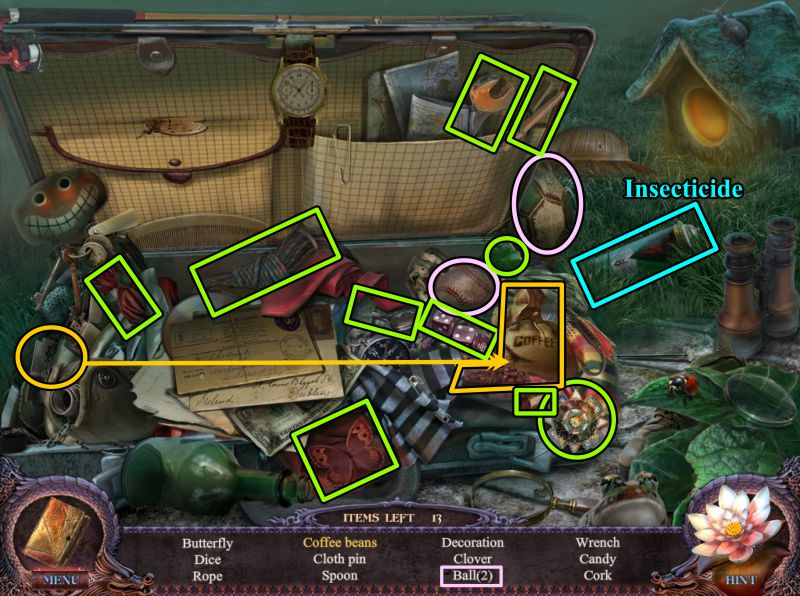
Suitcase Hidden Object Scene
Use the razor blade to cut the bag of coffee and collect the Coffee Beans.
You will get Insecticide for your Inventory.
Screenshot
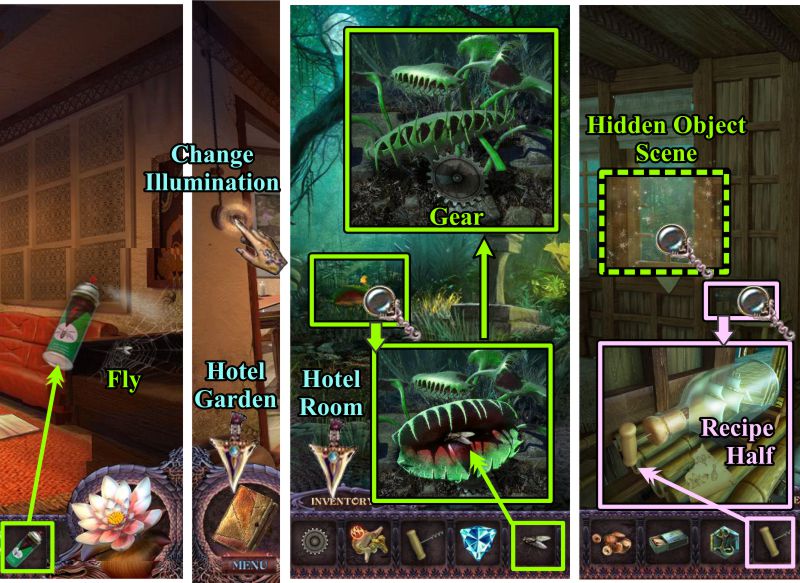
Hotel Lobby Light, Hotel Garden and Hotel Room
Use the Insecticide on the spider and collect the Fly.
Change the illumination and go to the Hotel Garden.
Give the Fly to the plant and take the Gear.
Back out to the Hotel Room and zoom in on the bottle.
Use the Corkscrew to remove the cork and take the Recipe Half.
Play the Hidden Object Scene.
Screenshot
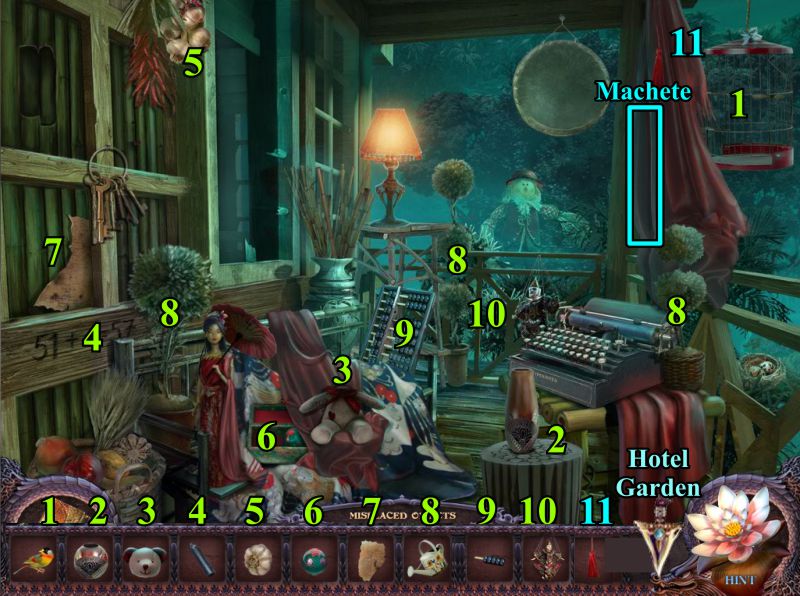
Veranda Hidden Object Scene
Return all of the objects to the scene. See the screenshot for the numbered solution.
Your Inventory item will be a Machete.
Return to the Hotel Garden.
Screenshot
Chapter 4: Buffalo Monk Assistant
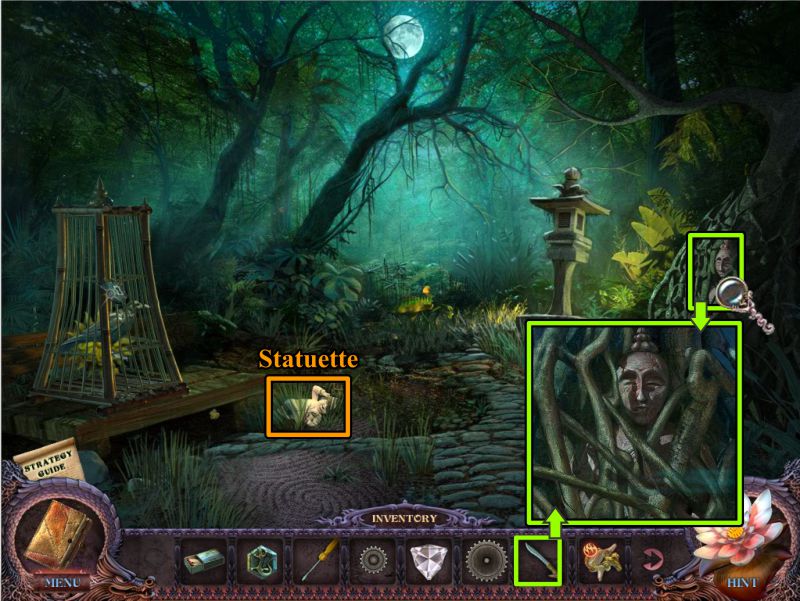
Hotel Garden
Pick up the Statuette, then zoom in on the stone statue at the right.
Remove the vines with the Machette.
Screenshot
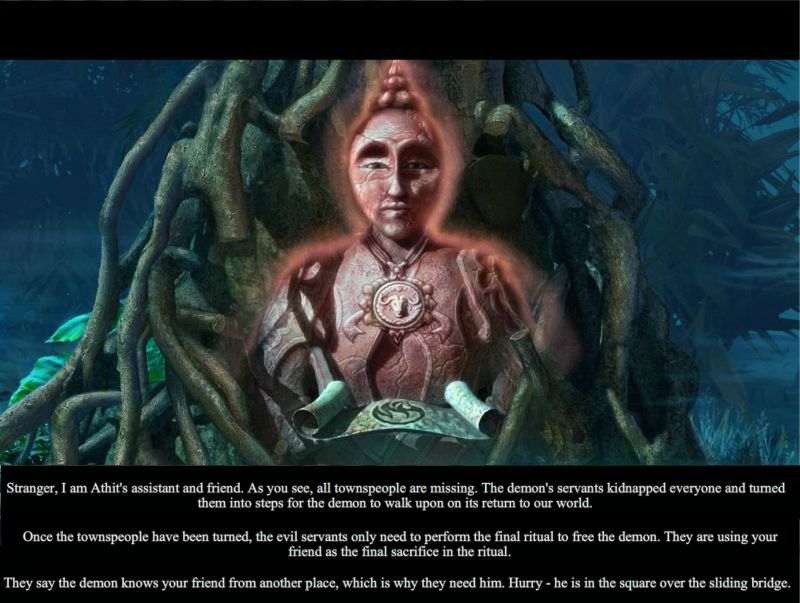
Athit's Assistant
Hear what Athit's assistant has to say. The conversation is shown in the screenshot.
Screenshot
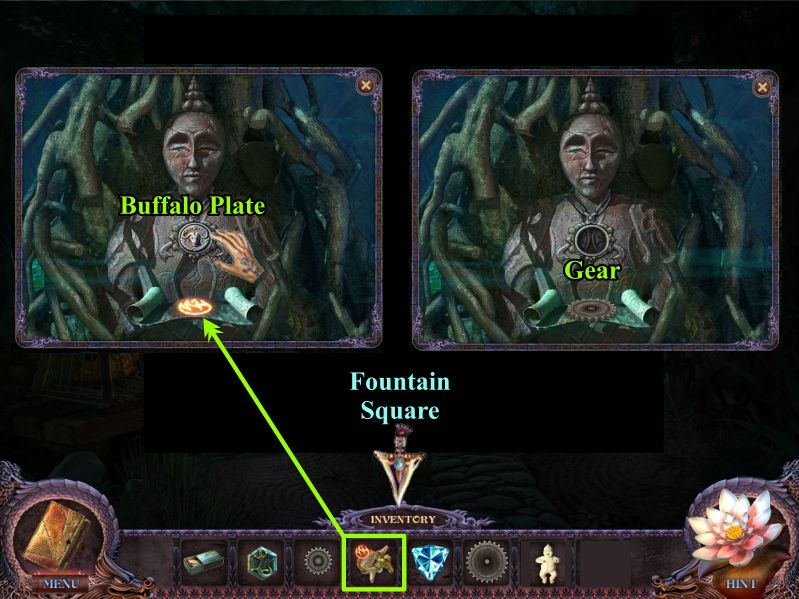
Take the Buffalo Plate amulet.
Place your Special Item on the scroll to get a Gear.
Go to Fountain Square.
Screenshot
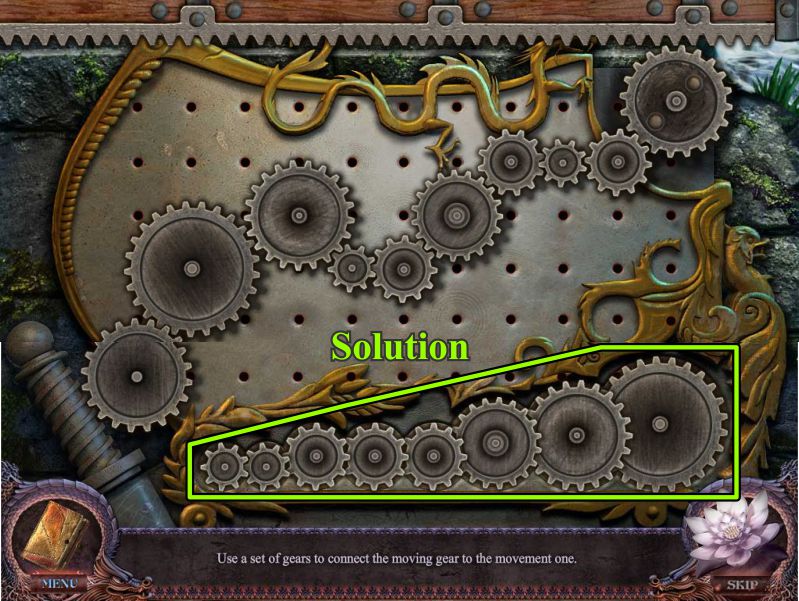
Fountain Square
Zoom in on the bridge mechanism and place your Gears to trigger a Mini Game.
Once the bridge is repaired, cross it.
Screenshot
Sliding Bridge Gear Mini Game
See the screenshot for the solution.
Screenshot
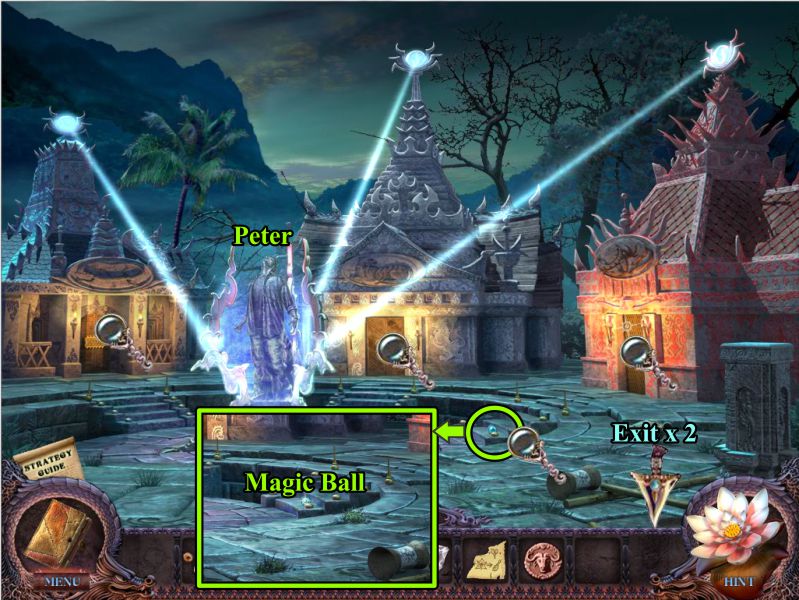
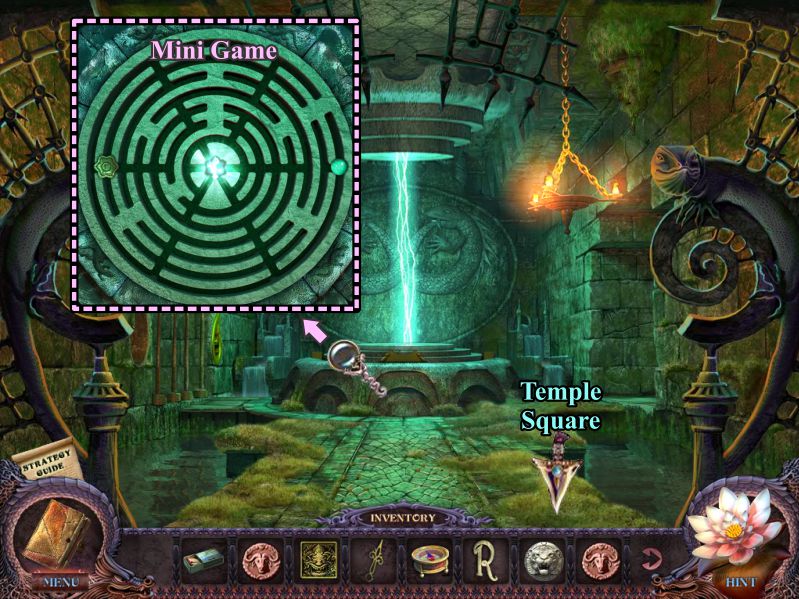
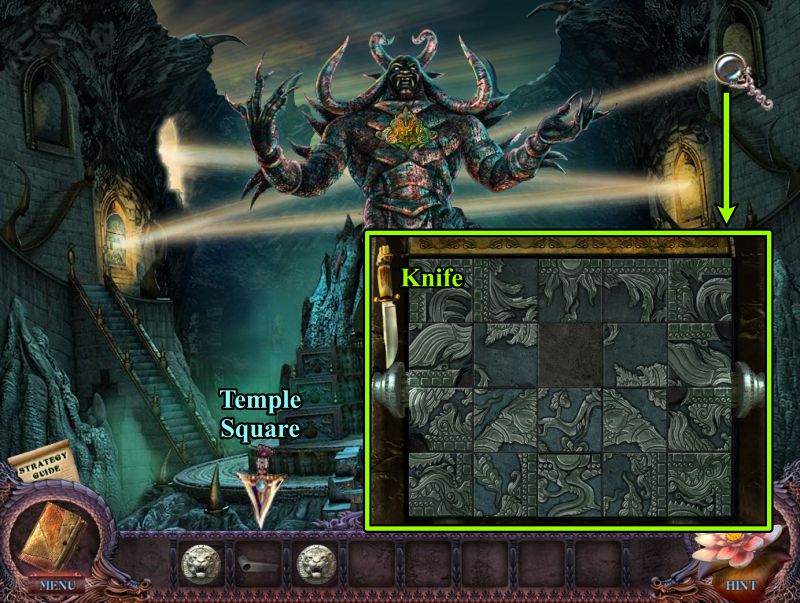
Temple Square
Peter is being held captive by 3 rays of light.
Zoom in on the Magic Ball and pick it up.
Examine each temple before exiting down twice.
Screenshot
Chapter 5: Souvenir Shop
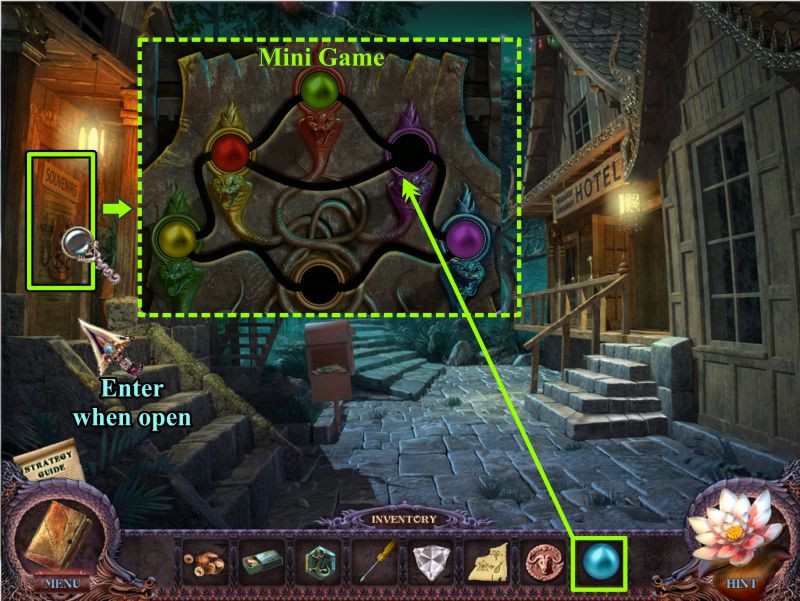
Souvenir Shop Door
Zoom in on the Souvenir Shop door and place your Magic Ball to start a Mini Game.
Once the door is open, enter the shop.
Screenshot
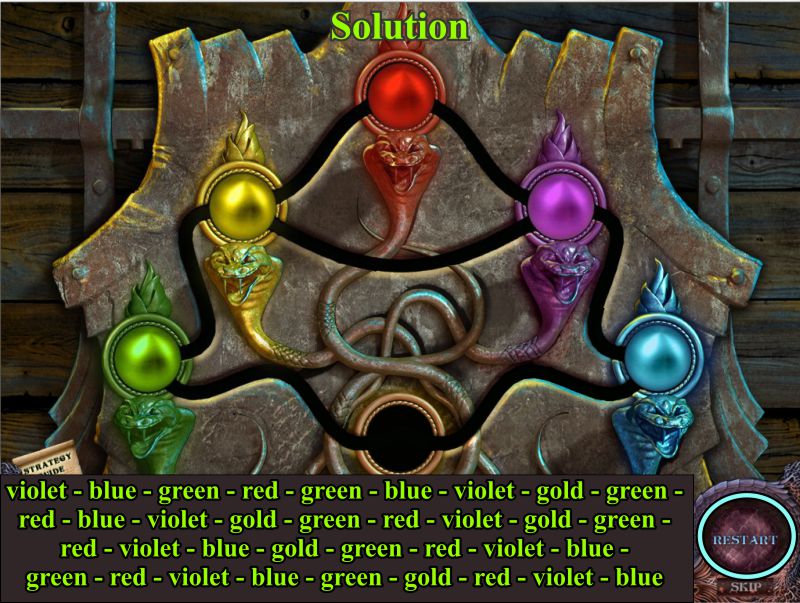
Souvenir Shop Door Mini Game
Your goal is to place the balls to match the same color snake.
Slide the balls using the vacant spaces.
See the screenshot for a step-by-step solution.
Screenshot
Souvenir Shop Dark
Grab the Bank Note and check out the magnifying glasses.
Zoom in at the back and take the Statuette.
Go to the Hotel Lobby.
Screenshot
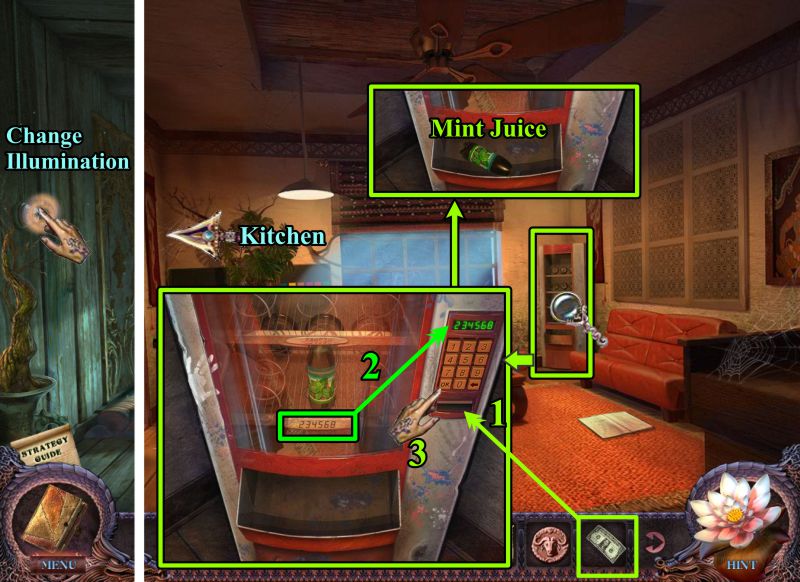
Hotel Lobby Dark and Light
Change the illumination and zoom in on the vending maching.
Feed it your Bank Note, then enter the number shown under the bottle.
Press "OK" and take your Mint Juice.
Enter the Kitchen.
Screenshot
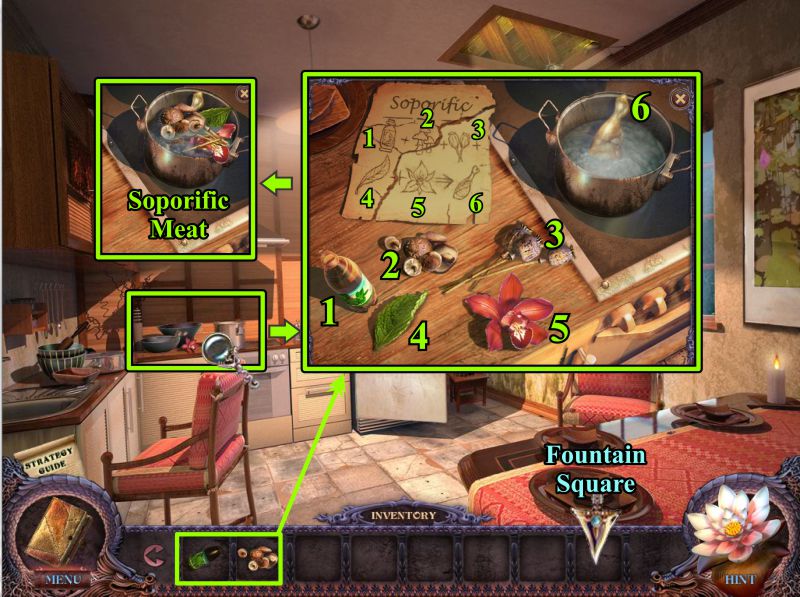
Kitchen
Zoom in on the stove and place the Mint Juice and Mushrooms.
Follow the instructions as shown in the screenshot.
Take the Soporific Meat, then go to Fountain Square.
Screenshot
Chapter 6: Path to Eclipse Mountain
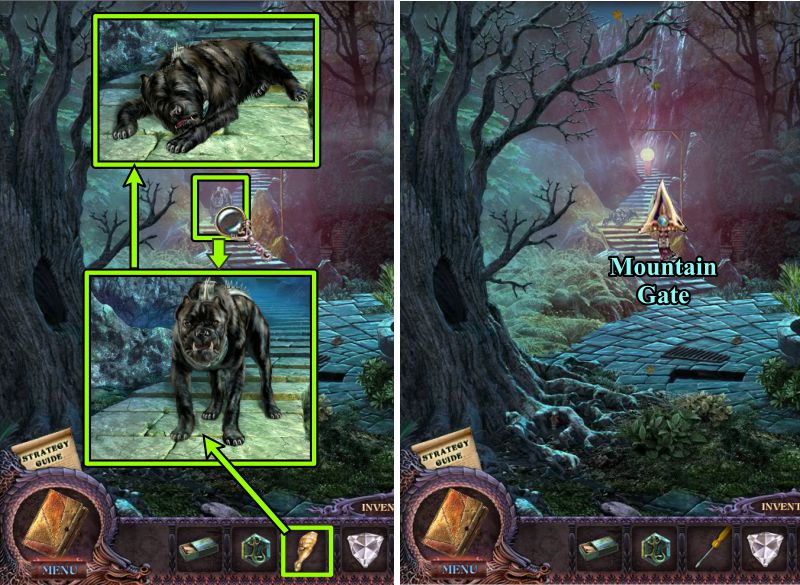
Fountain Square
Zoom in on the dog and give him the Soporific Meat.
Once he falls asleep, go up the steps to the Mountain Gate.
Screenshot
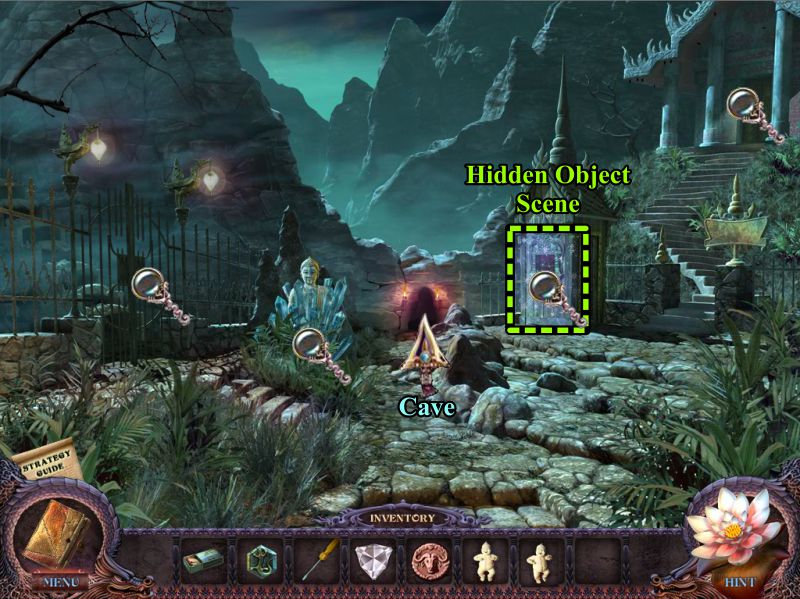
Mountain Gate
Examine all the magnifying glasses, play the Hidden Object Scene, and enter the Cave.
Screenshot
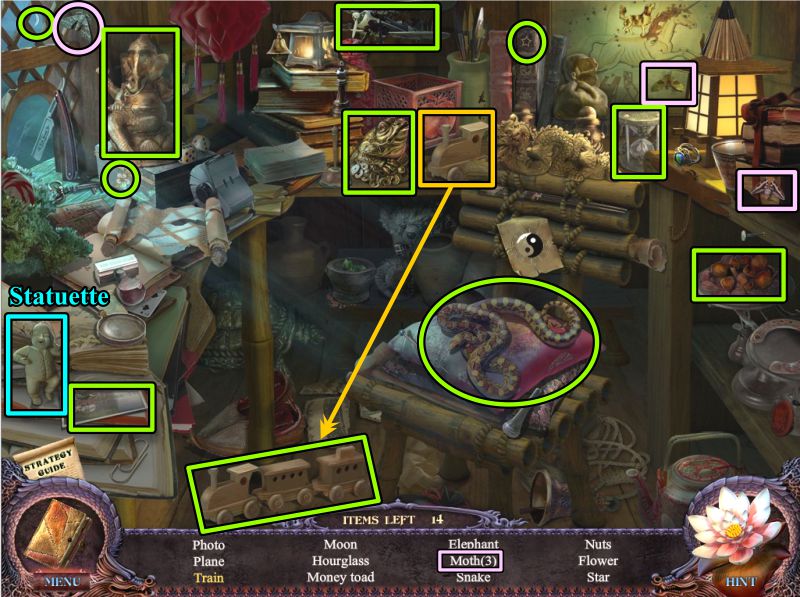
Pavilion Hidden Object Scene
Place the locomotive on the cars to collect the Train.
Your Inventory item will be another Statuette.
Screenshot
Cave
Check out the various items the hand points to, grab the Special Item, and head to the Monk's Hut.
Screenshot
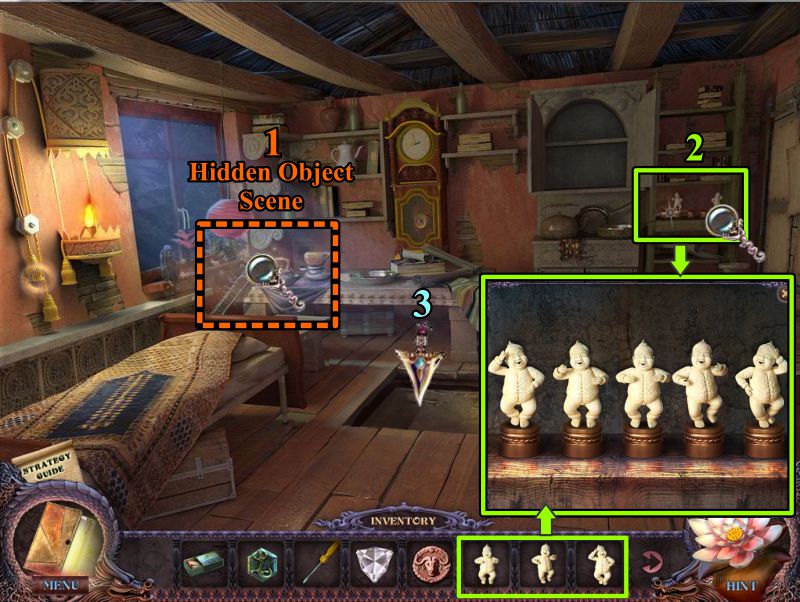
Monk's Hut Light
Play the Hidden Object Scene.
Zoom in on the shelf and place the Statuettes.
Go down to the Basement.
Screenshot
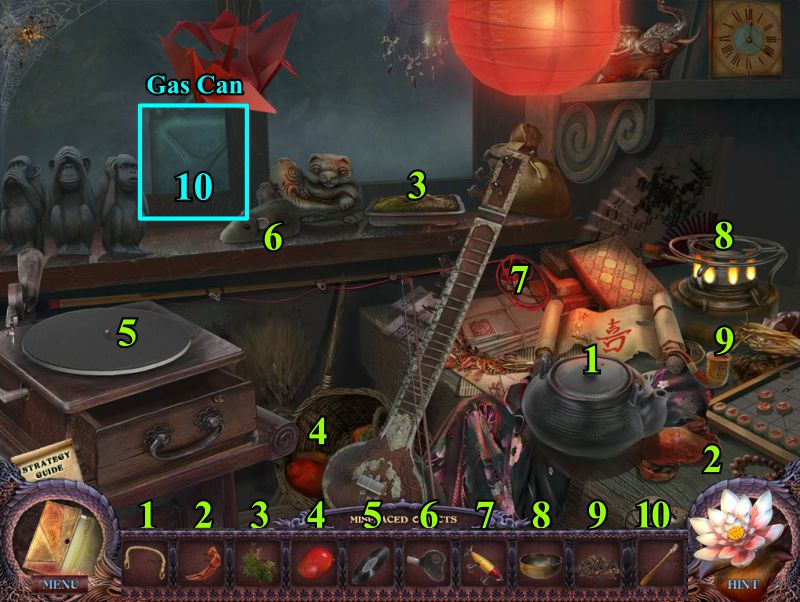
Hut Hidden Object Scene
Return all the objects to their proper places in the scene.
See the screenshot for a numbered solution.
A Gas Can will go into your Inventory.
Screenshot
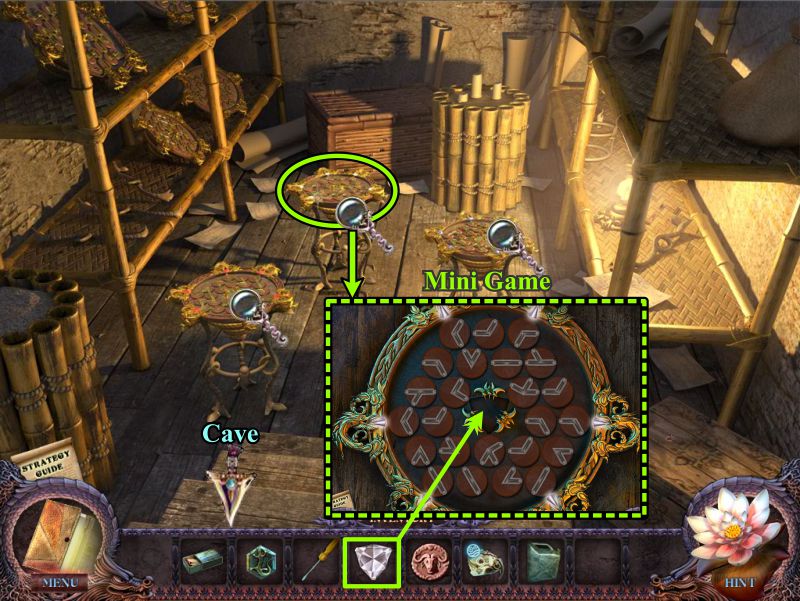
Hut Basement
Examine the three tables.
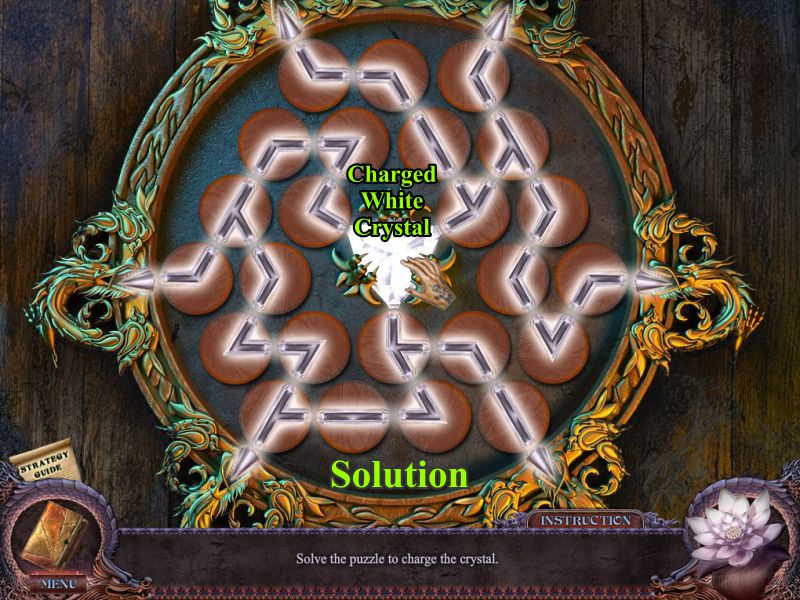
Select the middle one and place your White Crystal to trigger a Mini Game.
Screenshot
White Crystal Mini Game
See the screenshot for the solution.
Take the Charged White Crystal and go to the Cave.
Screenshot
Cave
Zoom in on the staff at the left, place the Charged White Crystal, and collect a White Staff.
Place your Gas Can by the barrel, turn the valve, and take the Full Gas Can.
Go see the Monk Statue.
Screenshot
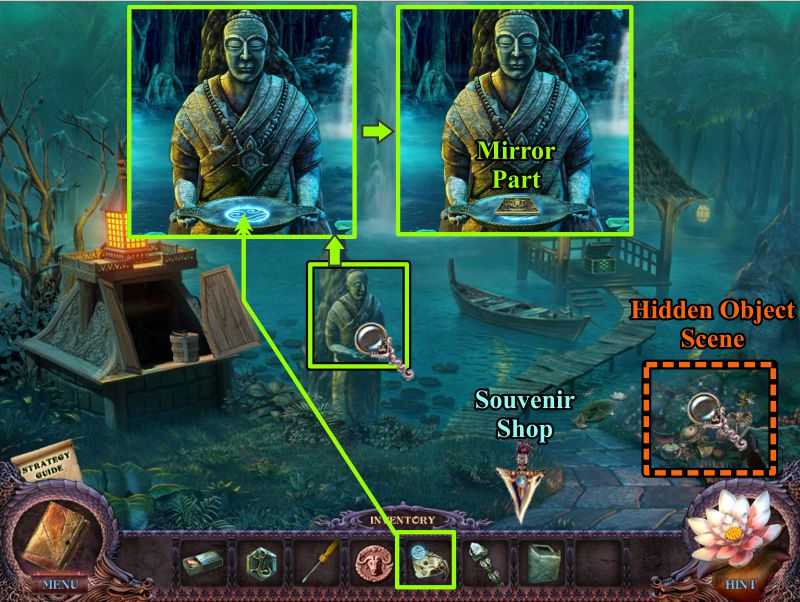
Monk Statue
Place your Special Item on the tray to get a Mirror Part.
Play the Hidden Object Scene, and then go to the Souvenir Shop.
Screenshot
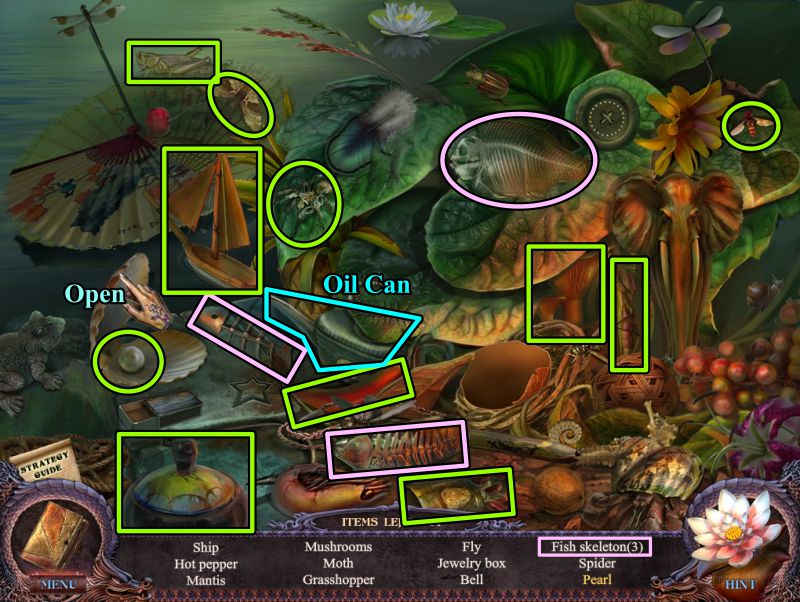
Bush Hidden Object Game
Open the shell to find the Pearl.
An Oil Can will go into your Inventory as the final item.
Screenshot
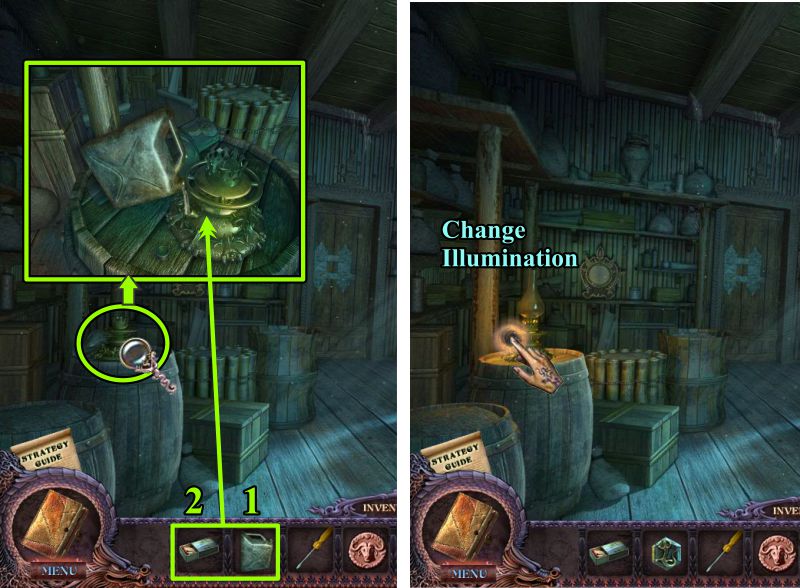
Souvenir Shop Dark
Zoom in on the lamp, fill it with gas from your Gas Can, and use the Matches to light it.
Change the illumination.
Screenshot
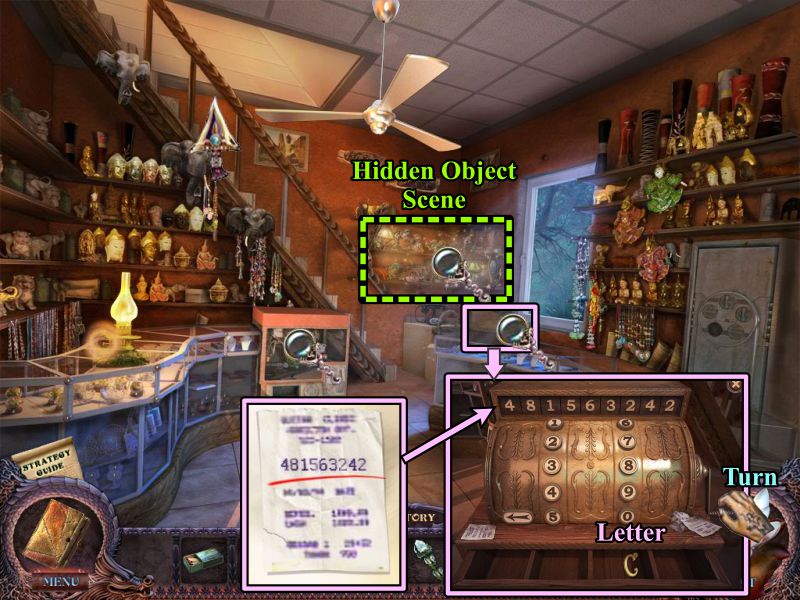
Souvenir Shop Light
Zoom in on the cash register and enter the numbers on the receipt you found that is recorded in your Journal...see the screenshot.
Take the Letter "C".
Play the Hidden Object Scene.
Screenshot
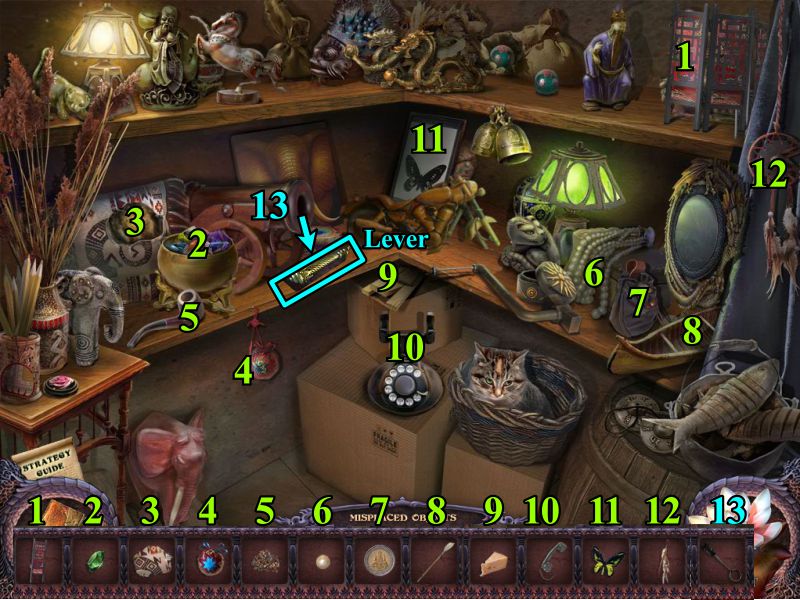
Souvenir Hidden Object Scene
Replace the objects in the scene. See the screenshot for the numbered solution.
When you've cleaned out the cannon, you will get a Lever for your Inventory.
Screenshot
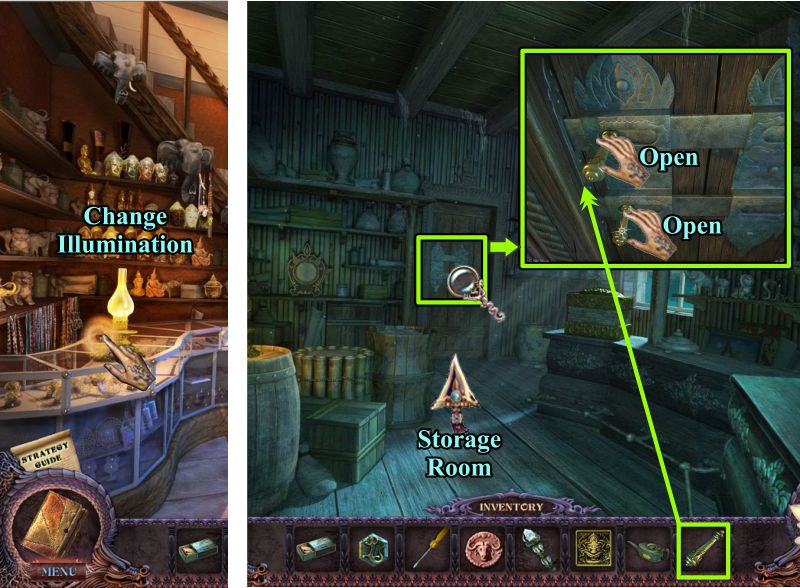
Souvenir Shop Light and Dark
Change the illumination, then zoom in on the door.
Place the Lever, open both levers, and enter the Storage Room.
Screenshot
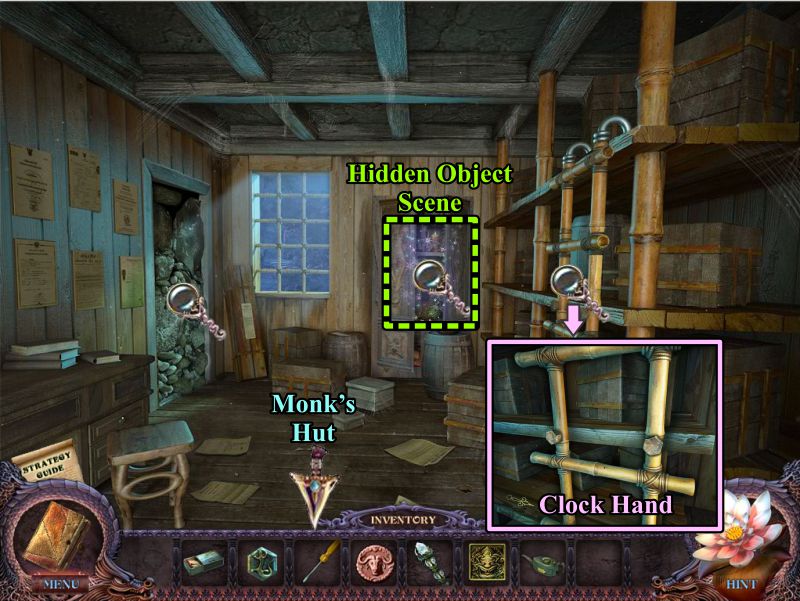
Souvenir Shop Storage Room
Zoom in on the ladder and take the Clock Hand.
Note the blocked door, play the Hidden Object Scene, and go to the Monk's Hut.
Screenshot
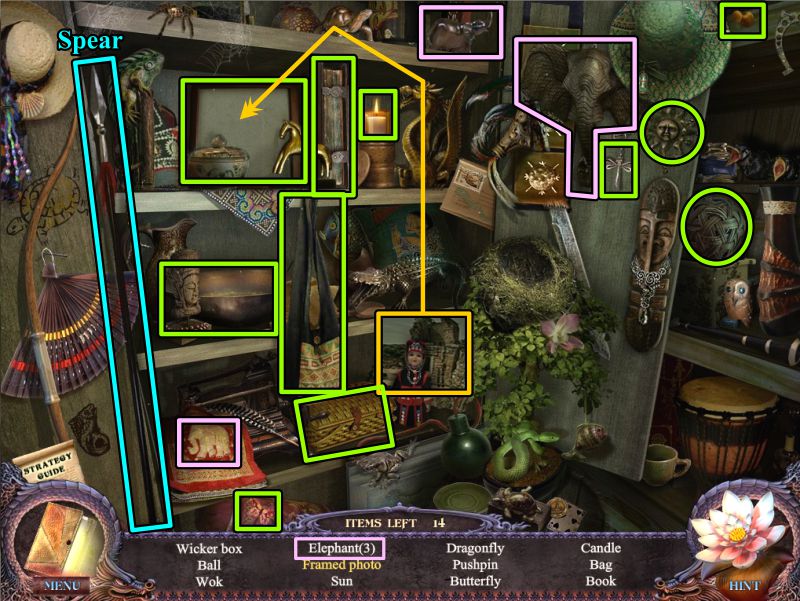
Storage Hidden Object Scene
Place the photo in the frame to get the Framed Photo.
Collect a Spear as your final object.
Screenshot
Monk's Hut Light and Dark
Change the illumination, then zoom in on the left cabinet.
Use your Oil Can to remove the rust from the bottom pin.
Remove the pins to open the cabinet; you need to change the illumination to see what is inside.
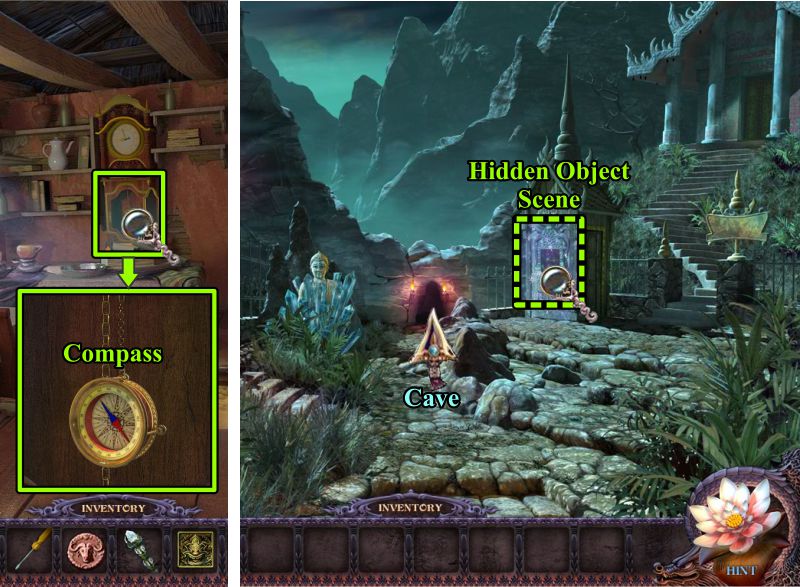
Screenshot
Monk's Hut Light and Mountain Gate
Zoom in under the clock and take the Compass.
Go to the Mountain Gate, play the Hidden Object Scene, and enter the Cave.
Screenshot
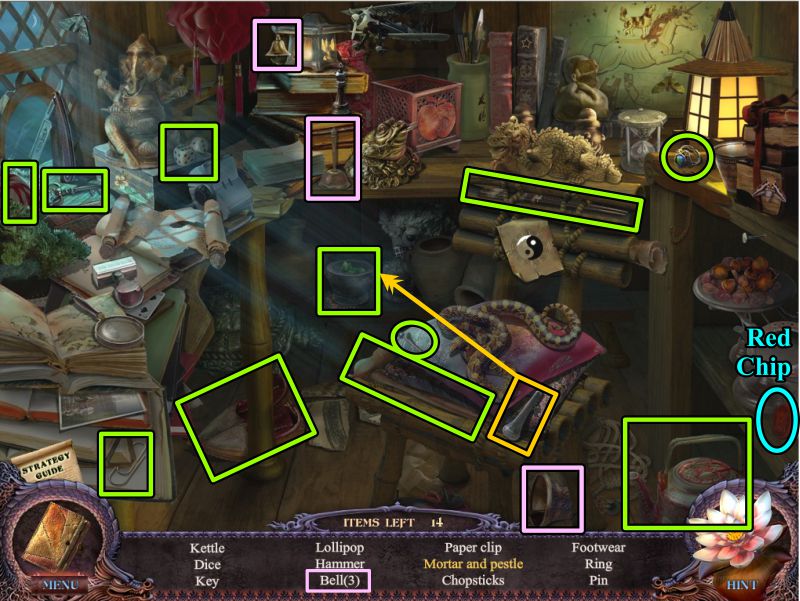
Pavilion Hidden Object Scene
Place the pestle in the mortar so you can collect both of them as one.
Your final item will be a Red Chip.
Screenshot
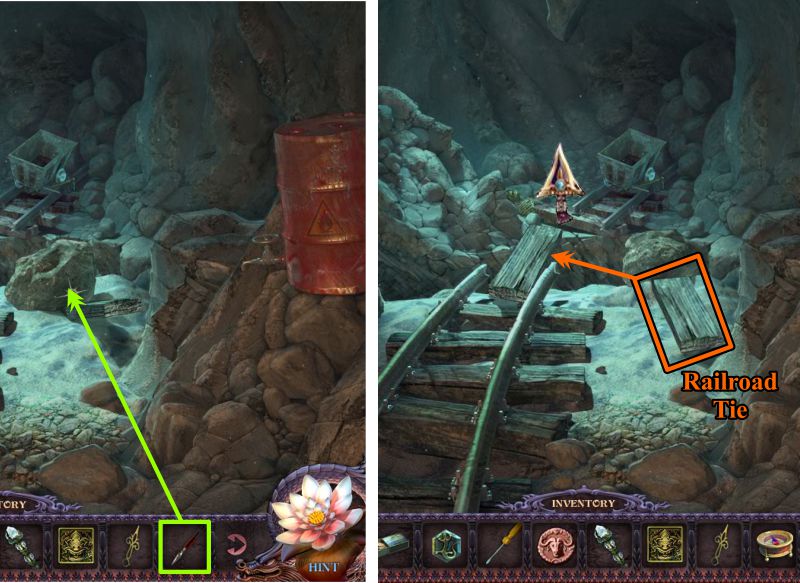
Cave
Use the Spear as leverage to move the rock.
Place the Railroad Tie over the chasm and go forward.
Screenshot
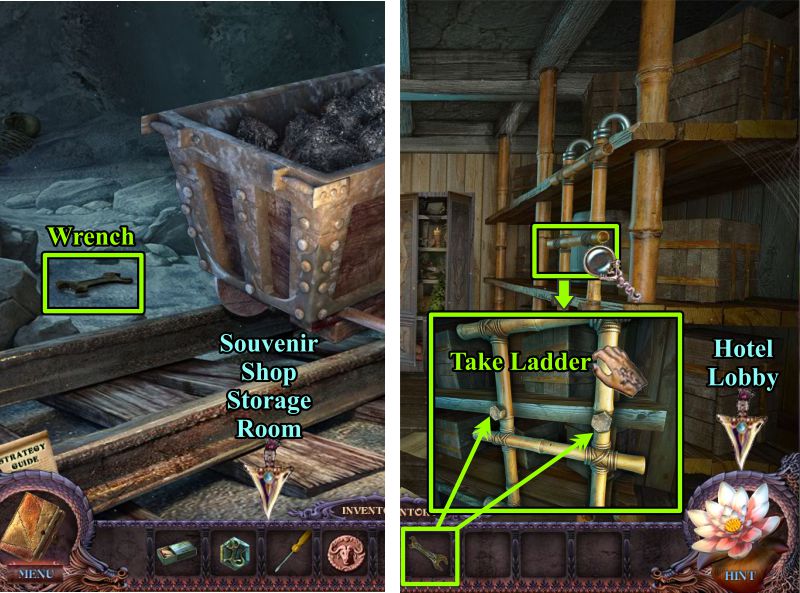
Cave and Souvenir Storage Room
Collect the Wrench, then go to the Souvenir Shop Storage Room.
Zoom in and use your Wrench to free the Ladder.
Go to the Hotel Lobby.
Screenshot
Chapter 7: Return to the Hotel
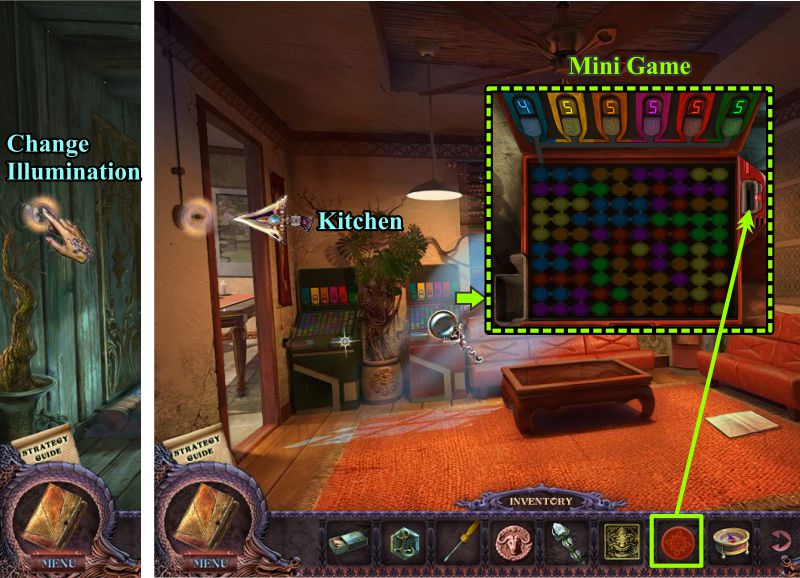
Hotel Lobby Dark and Light
Change the illumination and zoom in on the right gaming machine.
Insert your Red Chip to trigger a Mini Game.
Once you have completed the game, go to the Kitchen.
Screenshot
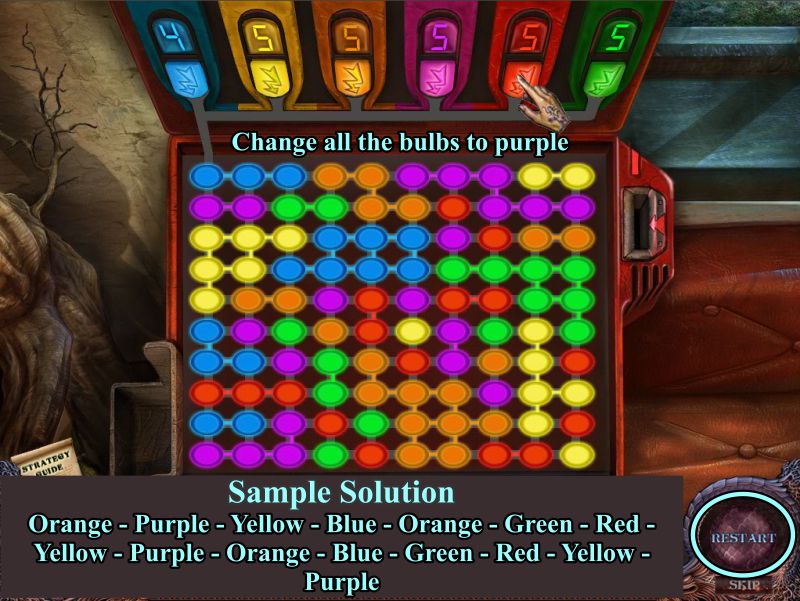
Red Gaming Machine Mini Game
Your goal is to change all the bulbs to purple using the buttons above the play surface.
There is a Restart button if you need to make a correction.
See the screenshot for a sample solution.
Screenshot
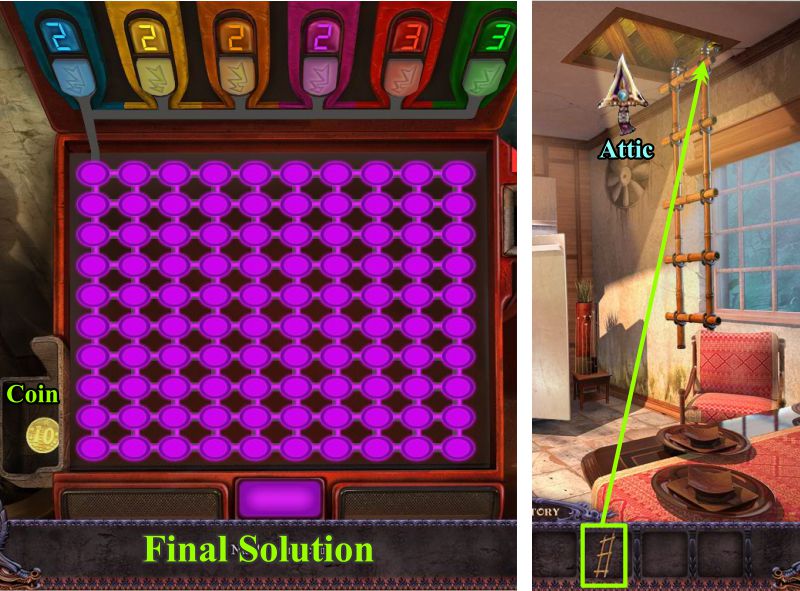
Gaming Machine and Kitchen
The screenshot shows the final solution.
Take the coin.
Place the Ladder on the hatch and enter the Attic.
Screenshot
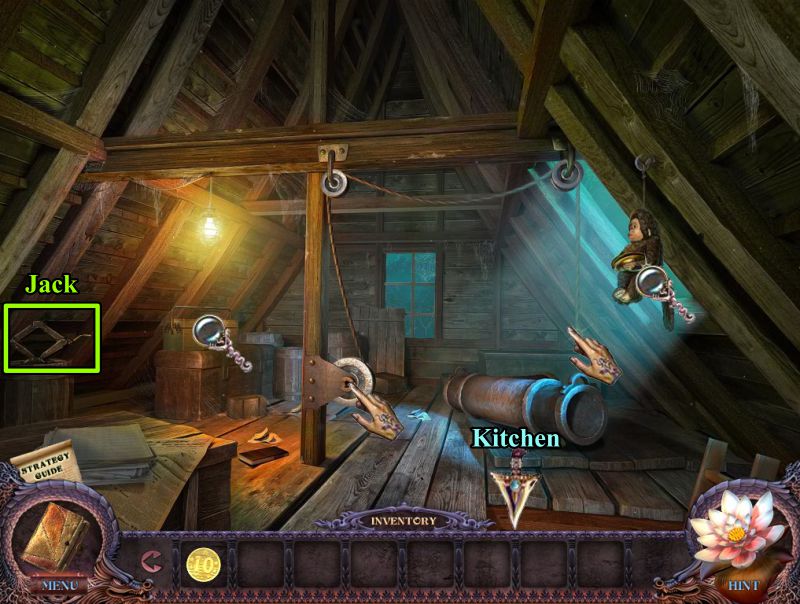
Attic
Note the areas you cannot deal with at the moment. Grab the Jack, then return to the Kitchen.
Screenshot
Kitchen
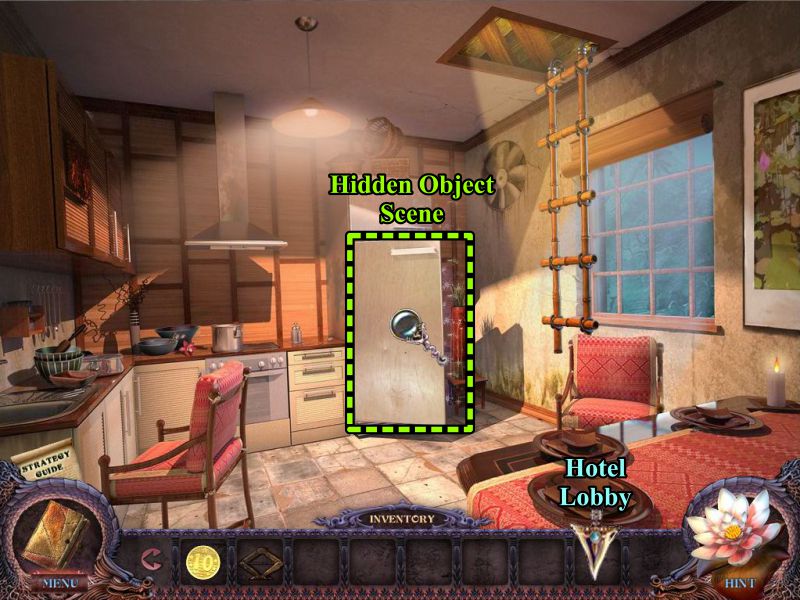
Play the Hidden Object Scene, and then go to the Hotel Lobby.
Screenshot
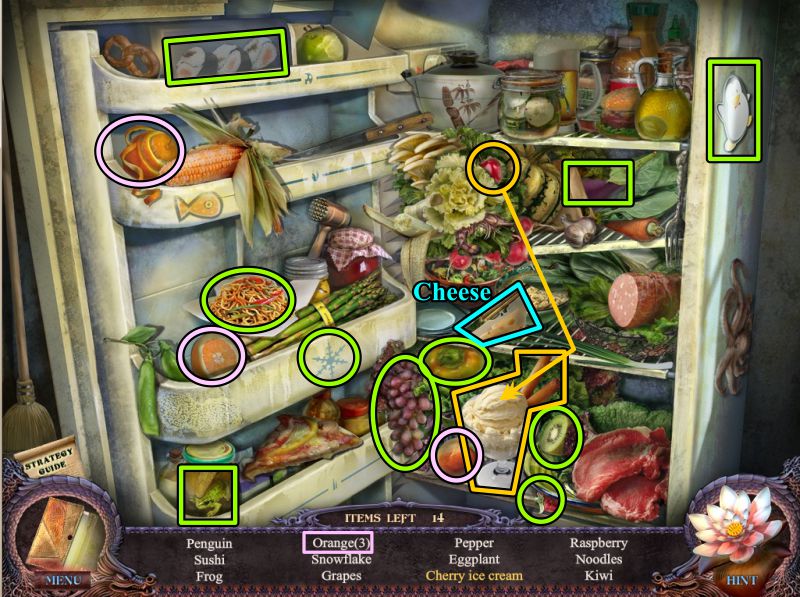
Refrigerator Hidden Object Scene
Place the cherry on the ice cream to get Cherry Ice Cream.
Collect some Cheese for your Inventory.
Screenshot
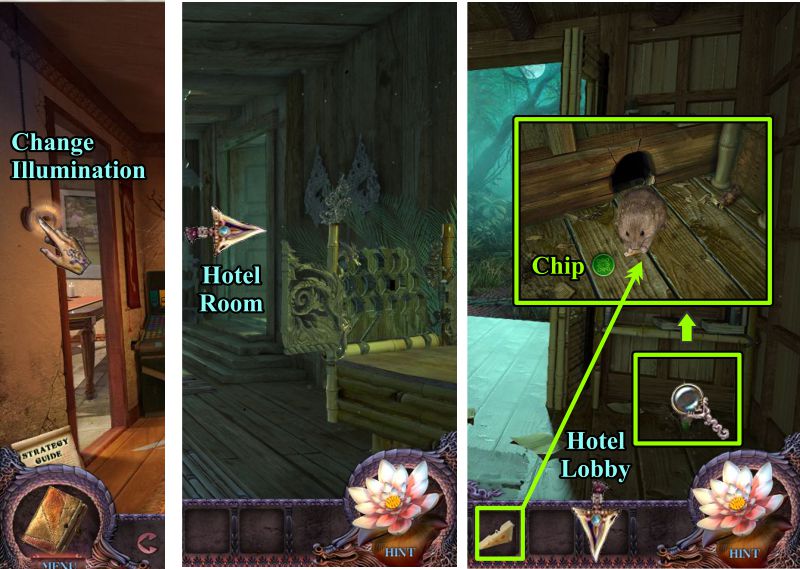
Hotel Lobby and Hotel Room
Change the illumination and enter the Hotel Room.
Zoom in and give the Cheese to the mouse in exchange for the Chip.
Return to the Lobby.
Screenshot
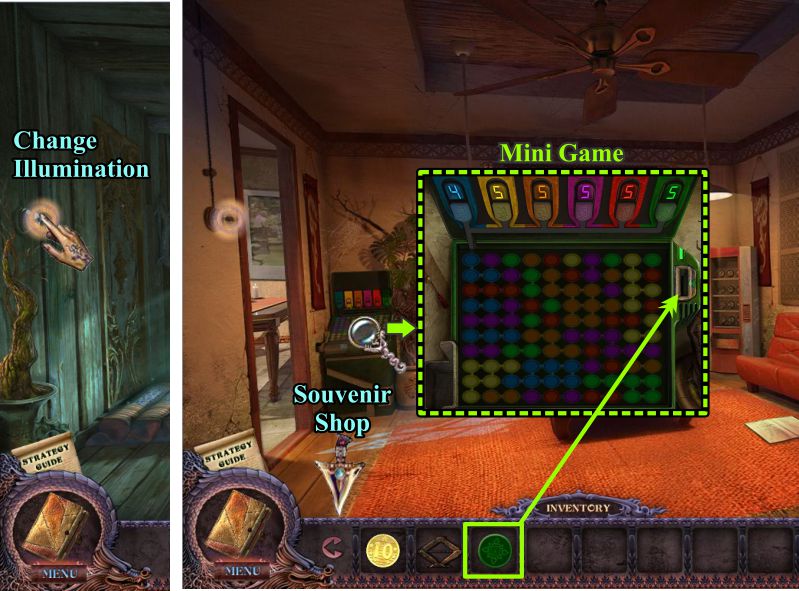
Hotel Lobby Dark and Light
Change the illumination and zoom in on the left gaming machine.
Place the Green Chip to trigger a Mini Game.
When you are finished, go to the Souvenir Shop.
Screenshot
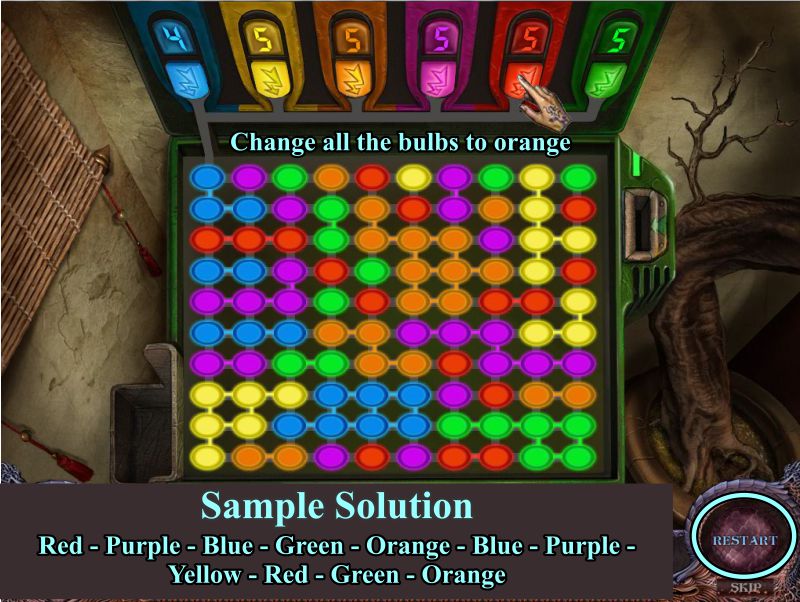
Green Gaming Machine Mini Game
Your goal is to change all the bulbs to orange by using the buttons above. See the screenshot for a sample solution.
Once again, there is a Restart button if needed.
Screenshot
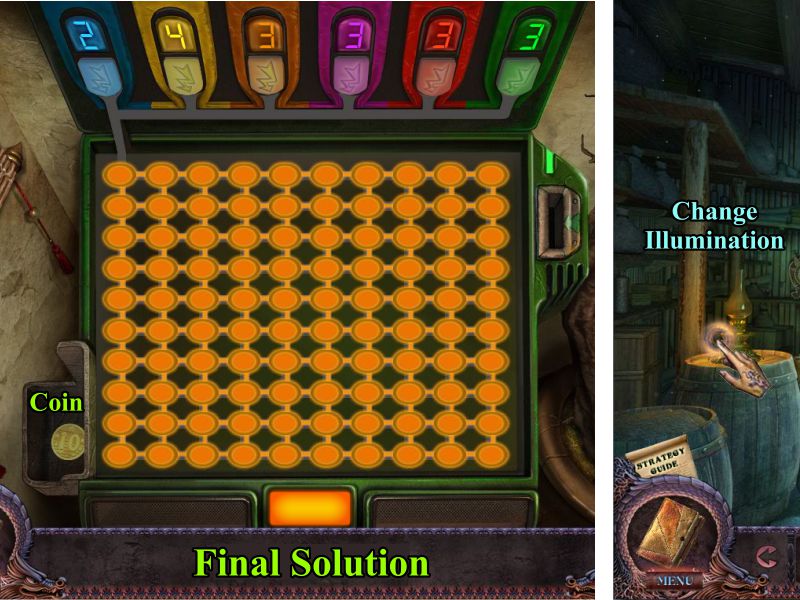
Gaming Machine and Souvenir Shop
The screenshot shows the final solution. Take the coin.
Once you get to the Souvenir Shop, change the illumination.
Screenshot
Souvenir Shop Light
Zoom in on the vending machine and place your two coins.
Press the red button, and the claw will fetch you a Button.
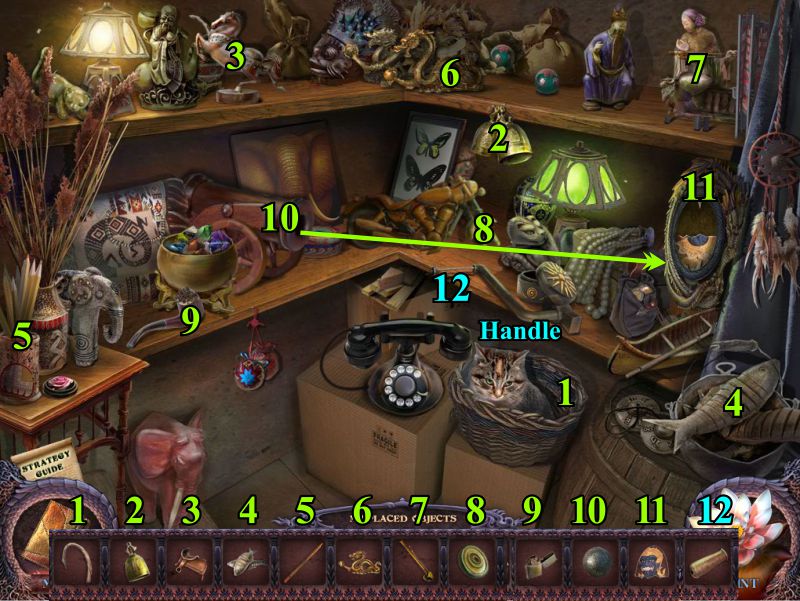
Play the Hidden Object Scene, then go to the Attic above the Hotel Kitchen.
Screenshot
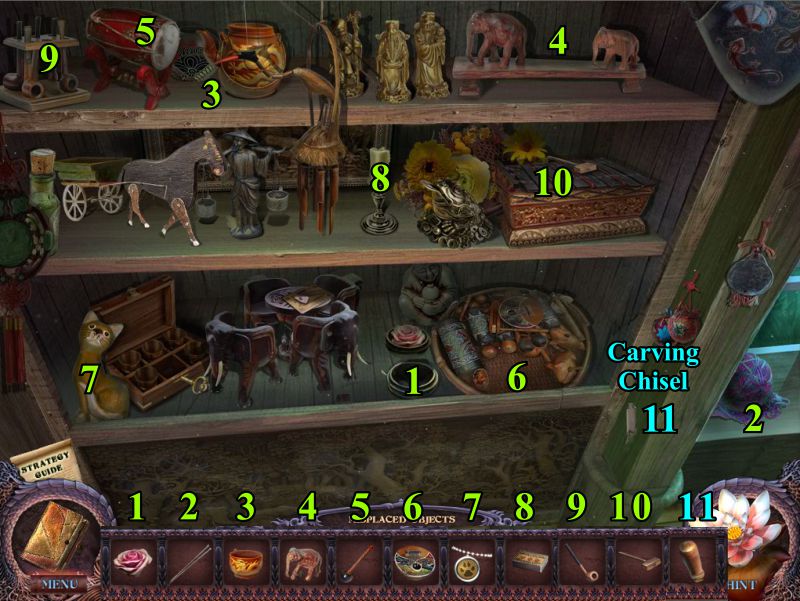
Souvenir Hidden Object Scene
Return the objects to their proper places. See the screenshot for a numbered solution.
When you place the cannonball in the cannon, it will shoot out and break the mirror, so place item 11 to complete the picture.
Your final object is a Handle for your Inventory.
Screenshot
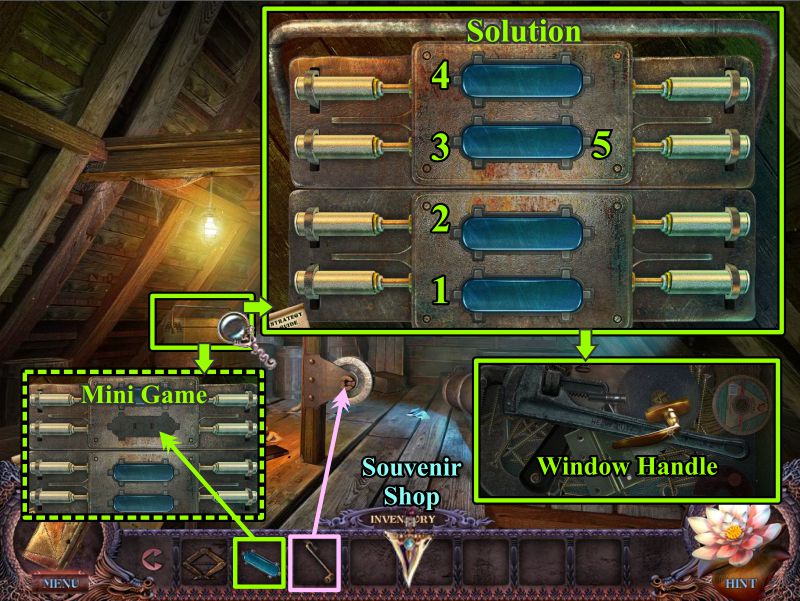
Attic
Place your Handle on the wheel.
Zoom in on the chest and place the Button to trigger a Mini Game.
Press the buttons as shown in the screenshot in order to open the lid.
Take the Window Handle, then return to the Souvenir Shop.
Screenshot
Souvenir Shop Light
Go upstairs to the Sitting Room and zoom in on the window.
Place the Window Handle and take the Grabhook.
Go to the Hotel Attic.
Screenshot
Attic
Place the Grabhook on the rope, turn the handle, and take the Special Item.
Go to the Cave.
Screenshot
Chapter 8: Tiger Monk Assistant
Cave and Mountain Gate
Go forward across the chasm, and place the Jack to lift the cart.
Push on the Jack until you can take the Pickaxe.
Leave the cave and zoom in on the stone statue.
Use the Pickaxe to break the crystals and free the statue.
Screenshot
Monk Assistant
Converse with the monk's assistant.
What he has to say is shown in the screenshot.
Screenshot
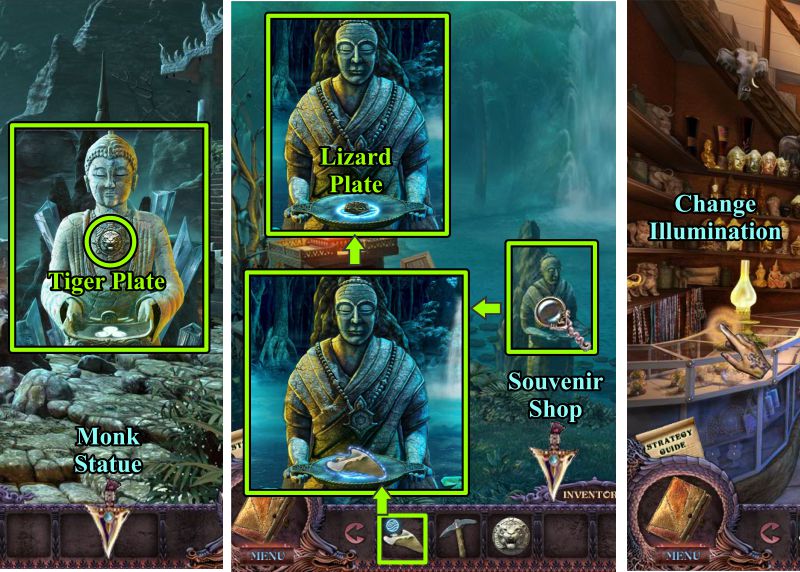
Monk Statue and Souvenir Shop
Take the Tiger Plate and go to the Monk Statue.
Place your special item in return for another Lizard Plate.
Go to the Souvenir Shop and change the illumination.
Screenshot
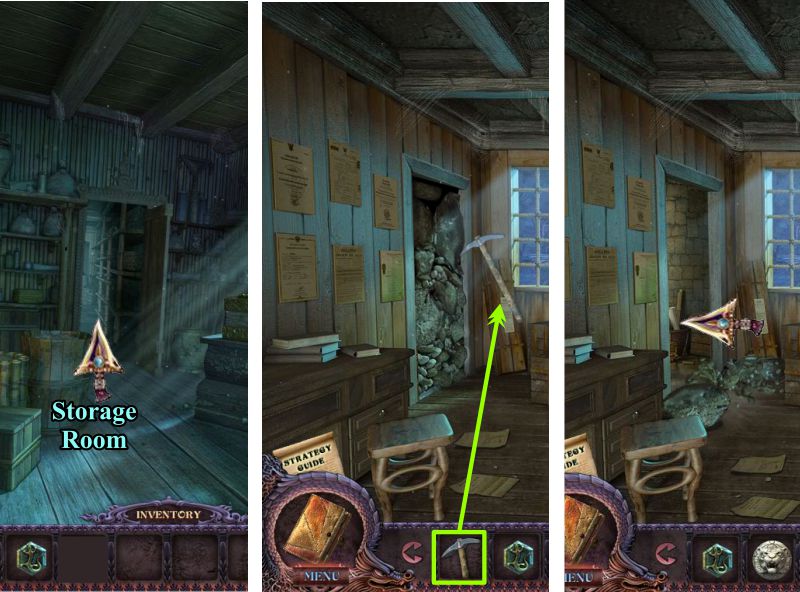
Souvenir Storage Room
Enter the Storage Room and use your Pickaxe to remove the blockage from the door.
See what's on the other side.
Screenshot
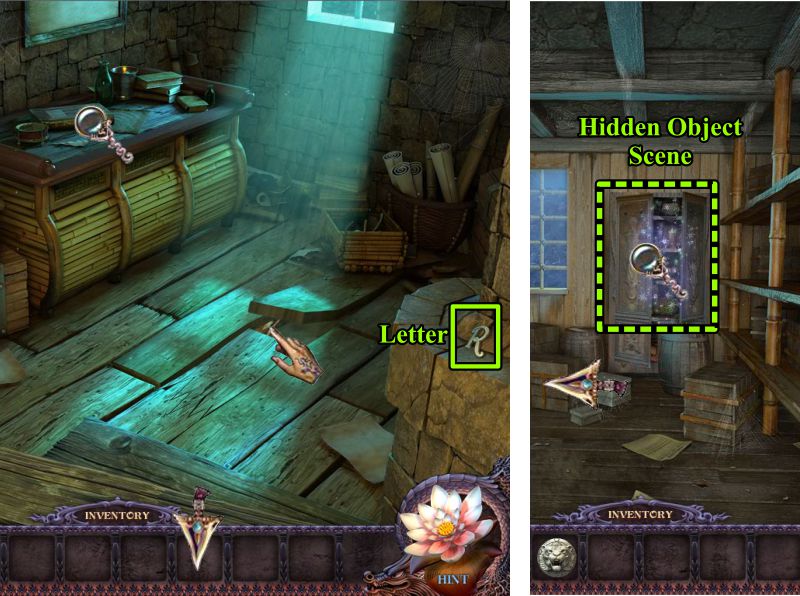
Souvenir Shop Office and Storage
Examine the desk and take the Letter "R".
Return to the Storage Room and play the Hidden Object scene.
Go back to the Office.
Screenshot
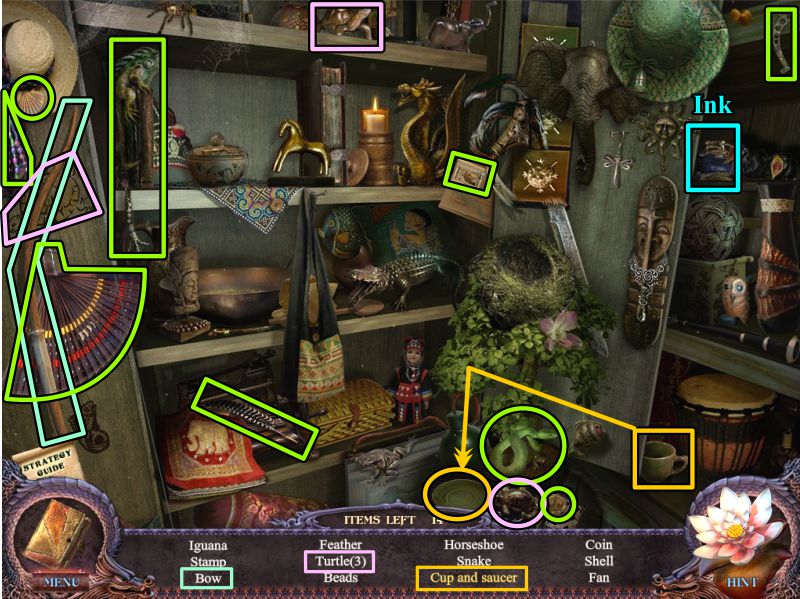
Storage Cabinet Hidden Object Scene
Place the cup on the saucer to get a Cup and Saucer.
Collect some Ink as your final item.
Screenshot
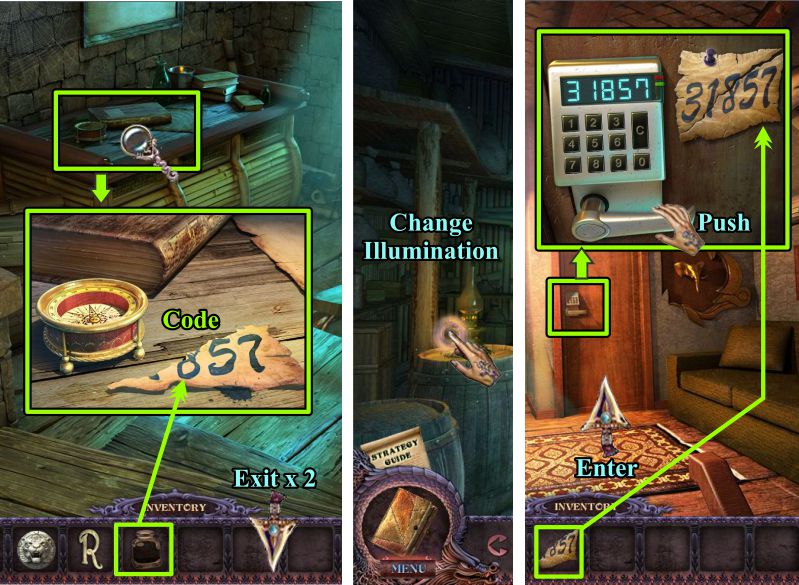
Souvenir Shop Office and Upstairs
Zoom in on the desk, place the ink on the paper, and take the Code that appears.
Go to the front room, change the illumination, and go upstairs.
Zoom in on the door and place the Code with the paper already there.
Enter 31857 on the lock, push the handle, and enter the room.
Screenshot
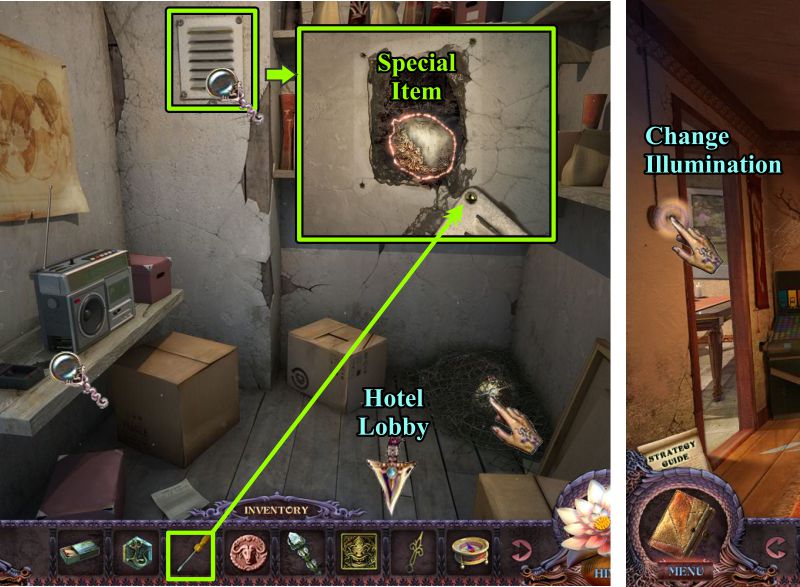
Upstairs Storage and Hotel Lobby
Note the items of interest, then zoom in on the vent.
Use your Screwdriver to remove the screws to get the Special Item.
Go to the Hotel Lobby and change the illumination.
Screenshot
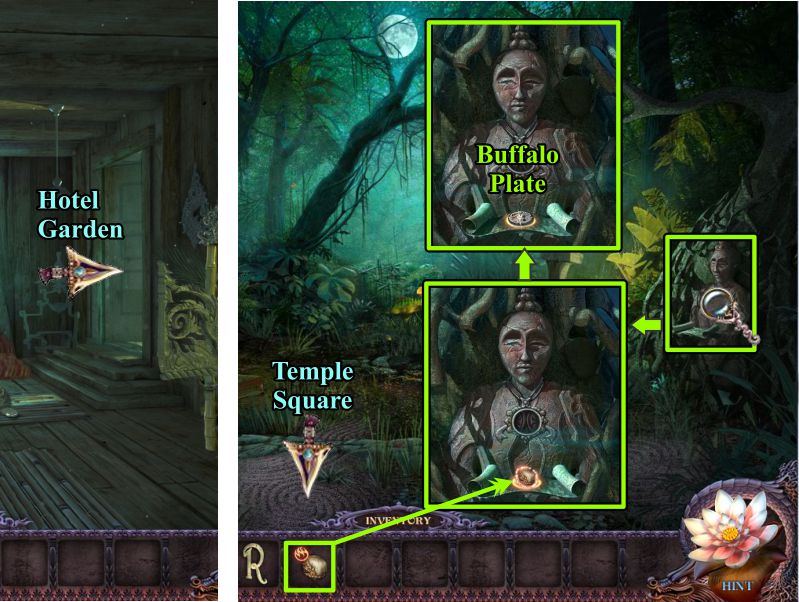
Dark Hotel Lobby and Hotel Garden
Go out to the Garden and zoom in on the statue.
Place your Special Item on the scroll and collect another Buffalo Plate.
Go to Temple Square across the sliding bridge.
Screenshot
Posted by: Jazz |
May 9, 2012 4:08 PM
|
May 9, 2012 4:08 PM
Secrets of the Dark: Eclipse Mountain Walkthrough
Chapters 9 - 15
Chapter 9: Lizard Temple
Temple Square
Zoom in on the temple door to the left.
Place your 2 Lizard Plates to start a Mini Game.
When you have unlocked the door, enter Lizard Temple.
Screenshot
Lizard Temple Door Mini Game
Click on the plates as shown in the screenshot.
Screenshot
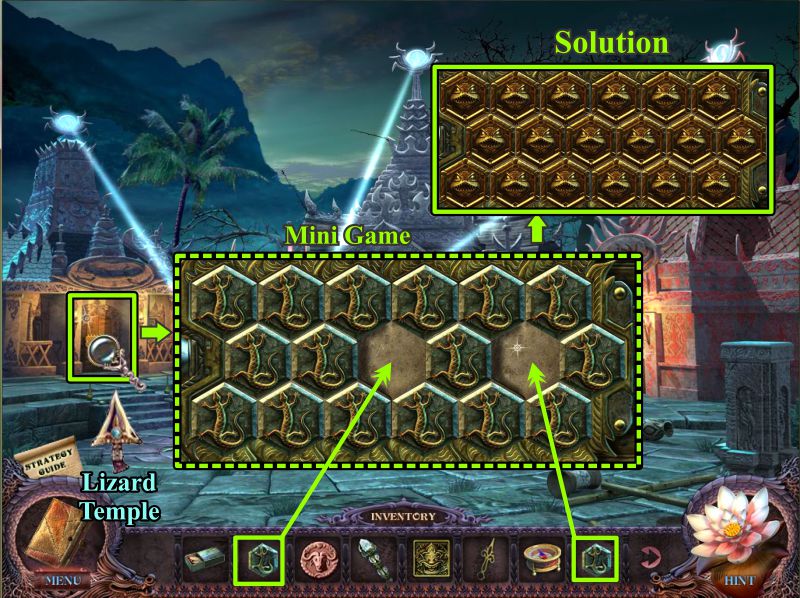
Lizard Temple
Use your White Staff on the werecreature.
Once she disappears, zoom in on the dome and press the button into place to open the it.
Screenshot
Zoom in on the opening to trigger a Mini Game.
Once you have completed it, go out to Temple Square.
Screenshot
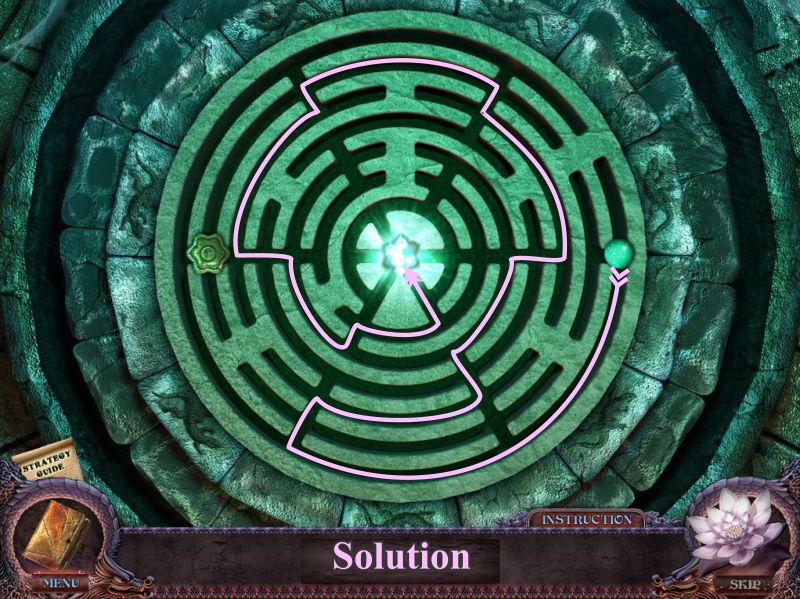
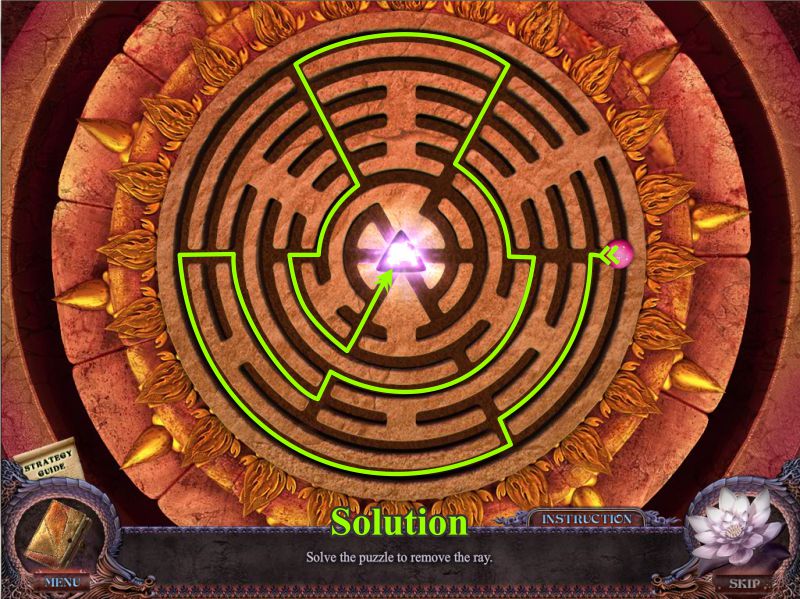
Lizard Temple Mini Game
Your goal is to use the ball to guide the lid to the center in order to block the beam of light.
See the screenshot for the path to use.
Screenshot
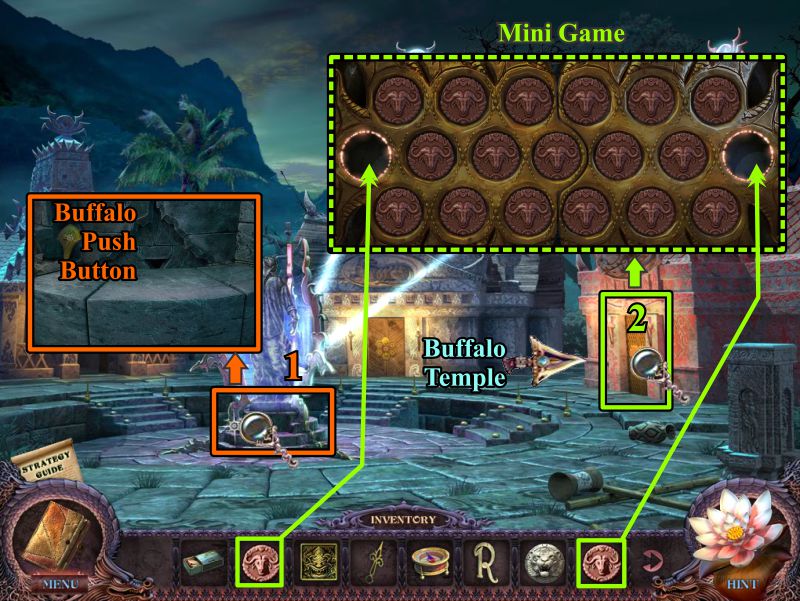
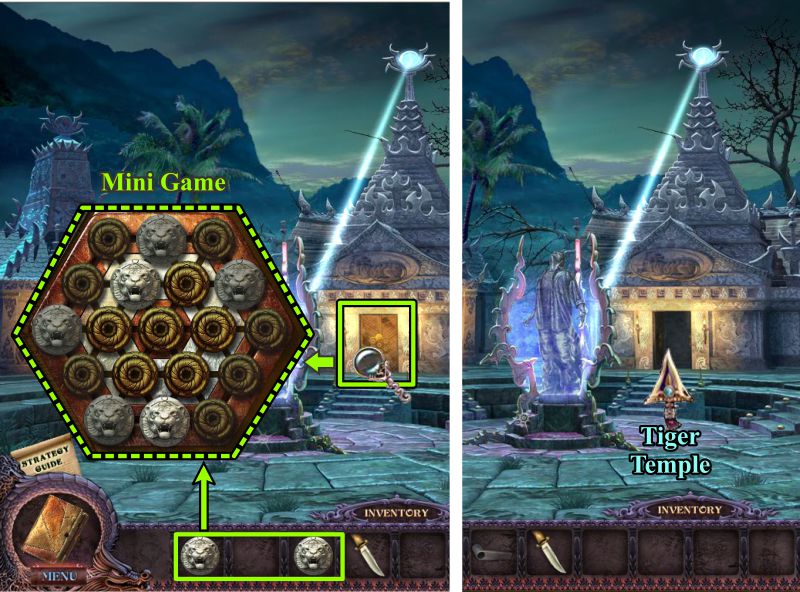
Temple Square
Zoom in on the base of Peter's pedestal and take the Buffalo Push Button.
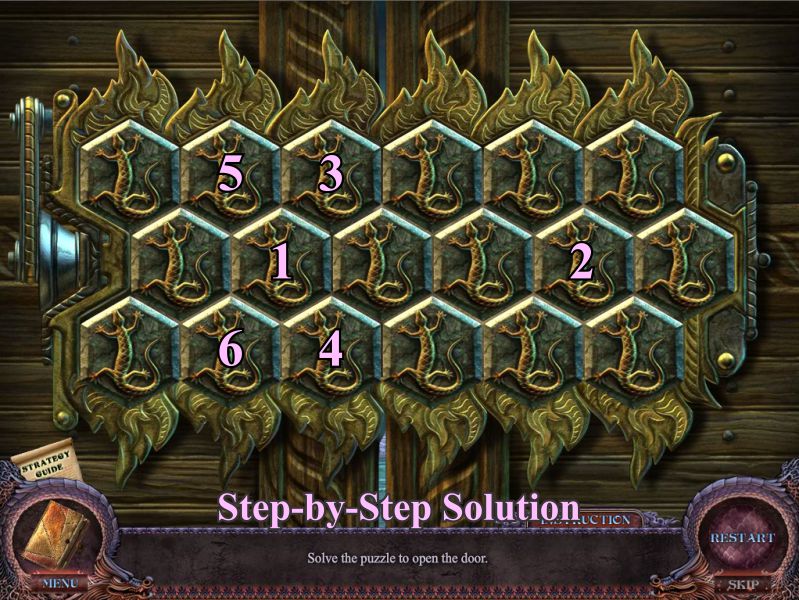
Examine the door of the temple to the right and place your 2 Buffalo Plates to trigger a Mini Game.
When the door opens, enter the Buffalo Temple.
Screenshot
Buffalo Temple Door Mini Game
Your goal is to match the pairs, but the trick is that they must be facing the same direction.
See the screenshot for a numbered solution of the same symbols.
The circled symbol will be the last unmatched symbol.
Screenshot
Lizard Temple and Hotel Lobby
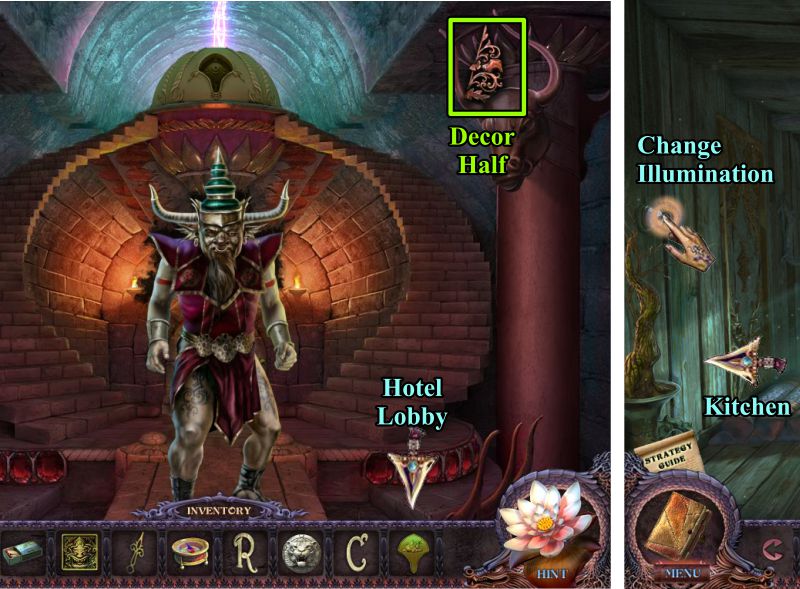
Your way is blocked by another werecreature, so take the Dècor Half and go to the Hotel Lobby.
Change the illumination and enter the Kitchen.
Screenshot
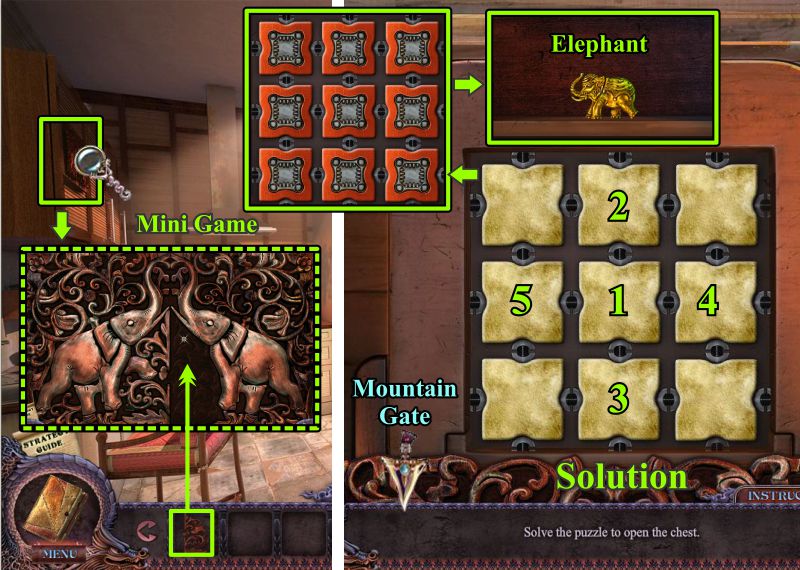
Hotel Kitchen
Zoom in on the cabinet to the left and place your Dècor Half to trigger a Mini Game.
Turn over the tiles as shown in the screenshot until they are all orange.
Take the Elephant, then go to the Mountain Gate.
Screenshot
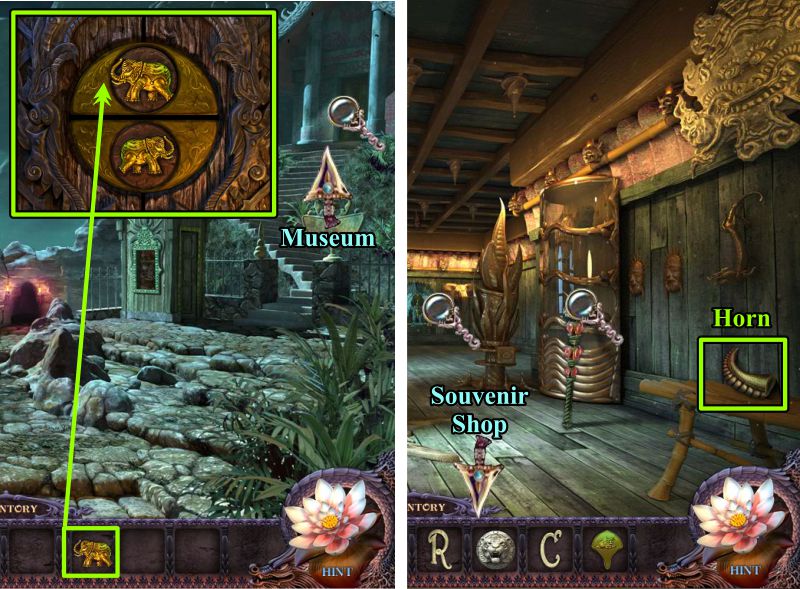
Museum Door
Zoom in on the Museum Door and place your Elephant to open the door.
Enter the Museum, examine the magnifying glasses, grab the Horn, and head to the Souvenir Shop.
Screenshot
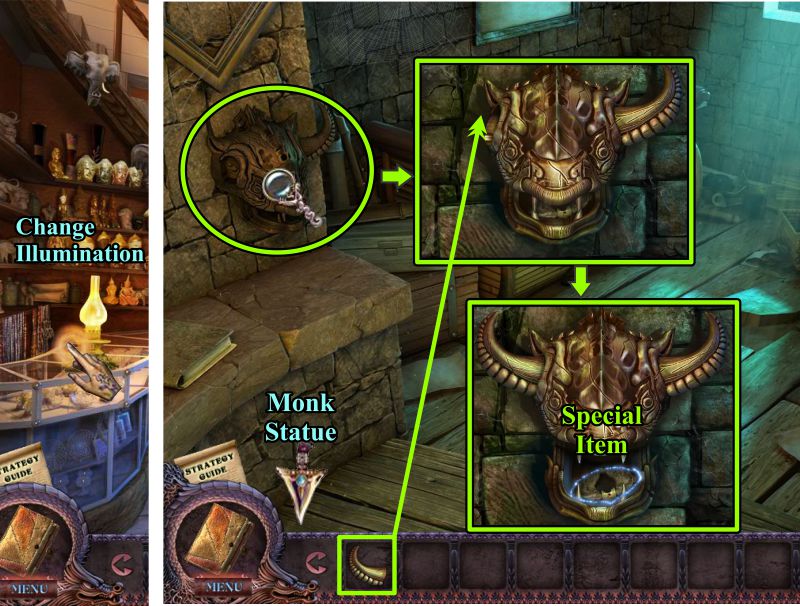
Souvenir Shop
Change the illumination, and go through the Storage Room to the Office.
Zoom in on the animal head and place the Horn.
Take the Special Item, then go to the Monk Statue.
Screenshot
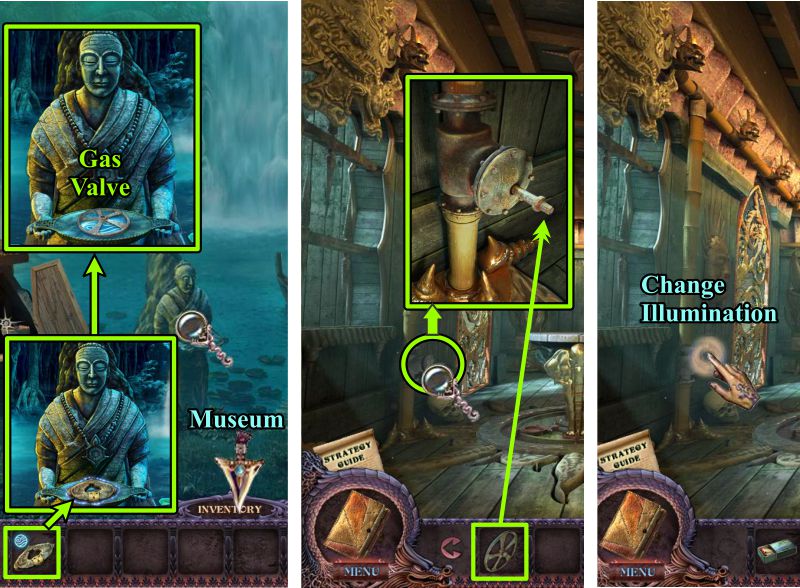
Chapter 10: Museum
Monk Statue
Put your Special Item on the statue's plate and collect a Gas Valve.
Go to the Museum, zoom in on the gas line, and place your Gas Valve.
You now have the ability to change the illumination, so do so.
Screenshot
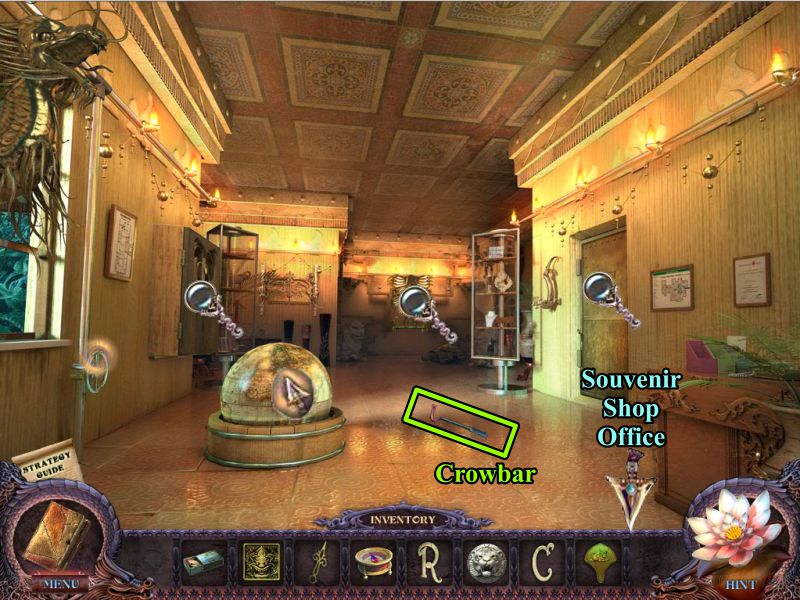
Museum Light
Examine the magnifying glasses, grab the Crowbar, and go to the Souvenir Shop Office.
Screenshot
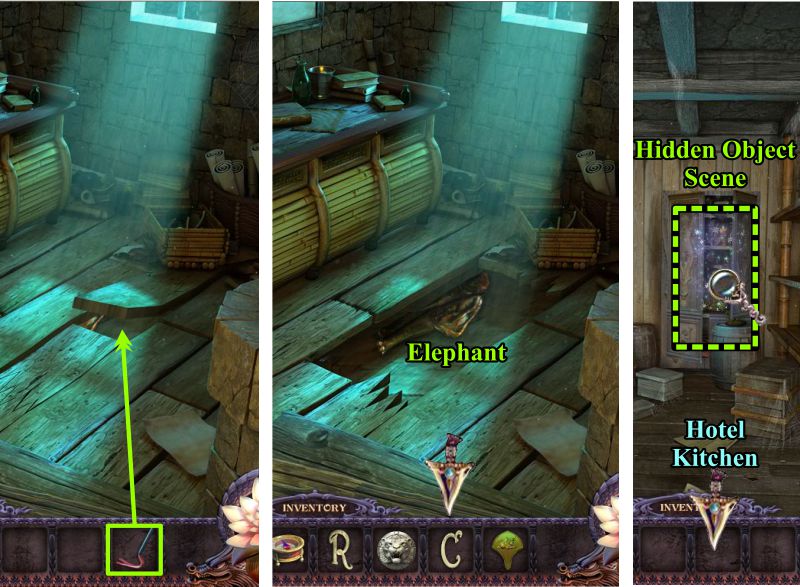
Souvenir Shop
Use the Crowbar to lift the boards, then take the Elephant.
Back out to the Storage Room, and play the Hidden Object Scene.
Go to the Hotel Kitchen.
Screenshot
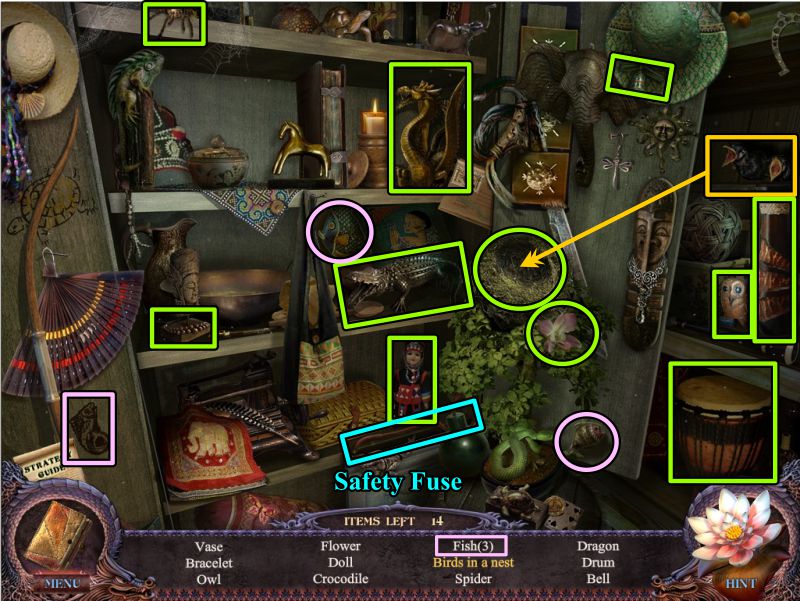
Storage Cabinet Hidden Object Scene
Place the Birds in the Nest to collect it.
A Safety Fuse is your final object.
Screenshot
Hotel Kitchen Hidden Object Scene
Zoom in on the Refrigerator for a Hidden Object Scene.
Use the knife to slice the sausage for a Sausage Slice.
You will get a Mallet for your Inventory.
Go to the Museum.
Screenshot
Museum
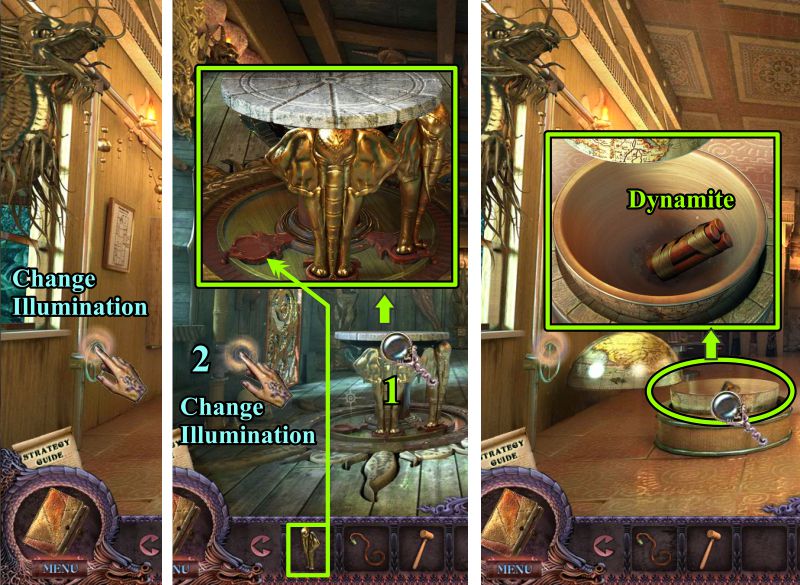
Change the illumination to dark.
Zoom in on the table and place the Elephant.
Change the illumination back to light.
Zoom in on the globe and take the Dynamite.
Screenshot
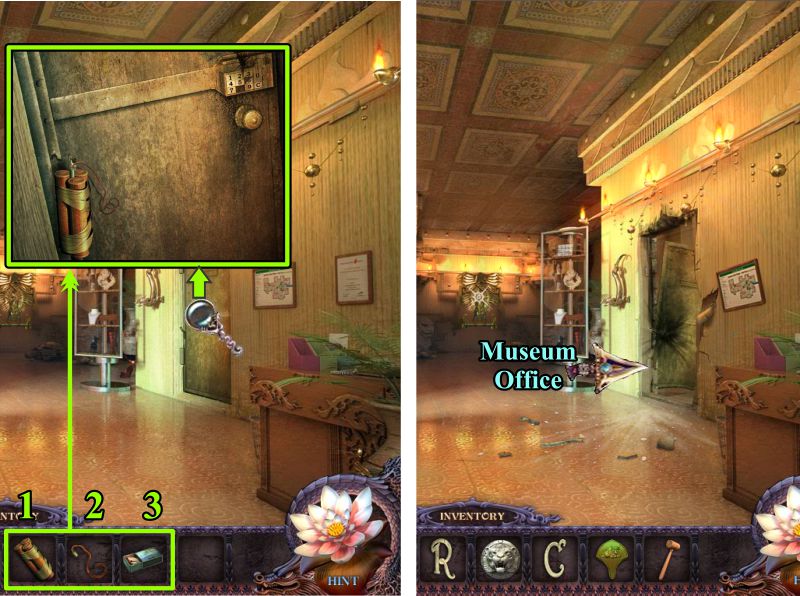
Go to the door on the right, zoom in and place your Dynamite.
Place the Safety Fuse, light it with your Matches, and stand back.
Go through the door you just blew open to find the Museum Office.
Screenshot
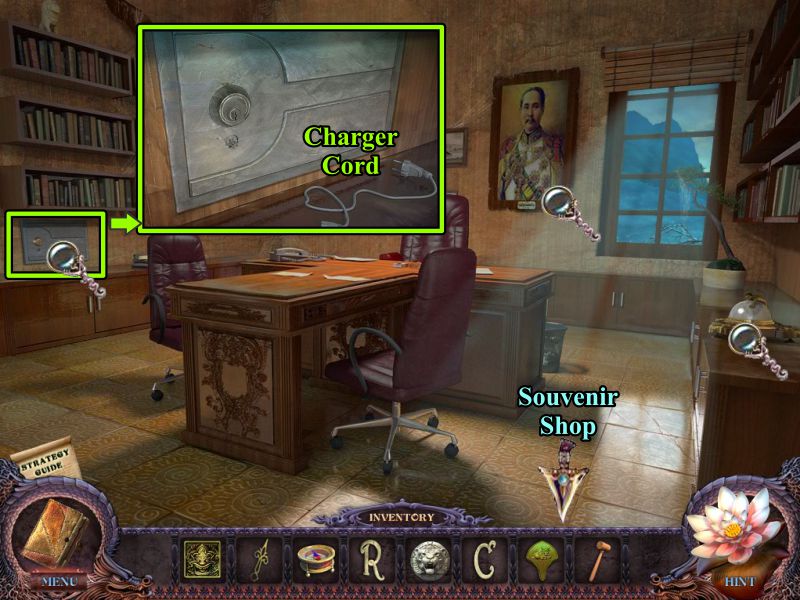
Museum Office
Examine the magnifying glasses, then take the Charger Cord from the top of the cabinet by the safe.
Go to the Souvenir Shop.
Screenshot
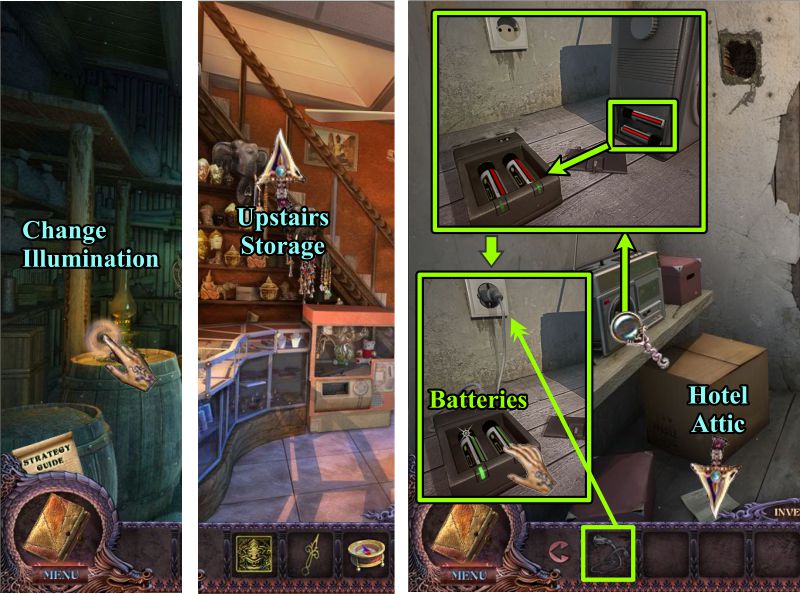
Souvenir Shop
Change the illumination to light and go upstairs to the Storage.
Zoom in on the radio, take the batteries, and place them in the charger.
Plug in your Charger Cord, and take the charged Batteries.
Go to the Hotel Attic.
Screenshot
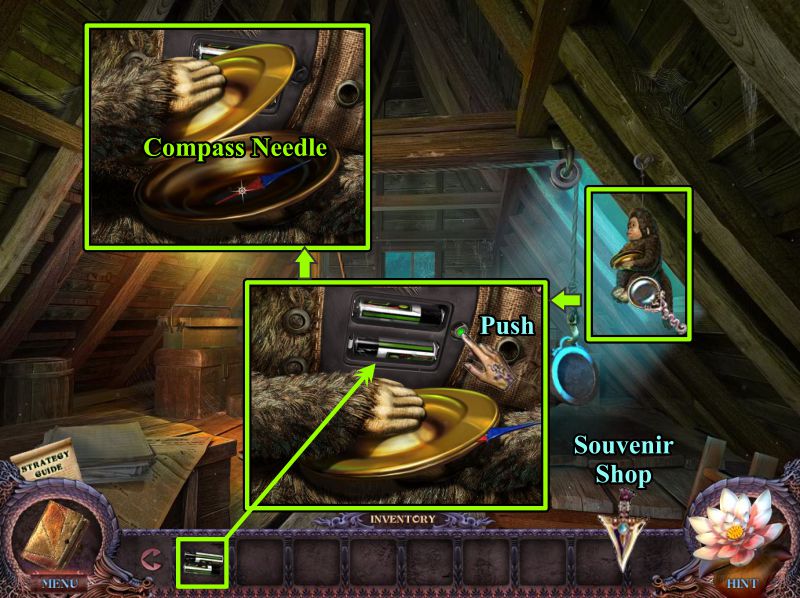
Hotel Attic
Zoom in on the toy monkey and place your Batteries.
Push the green button, and take with Compass Needle when the cymbals stop.
Go to the Souvenir Shop.
Screenshot
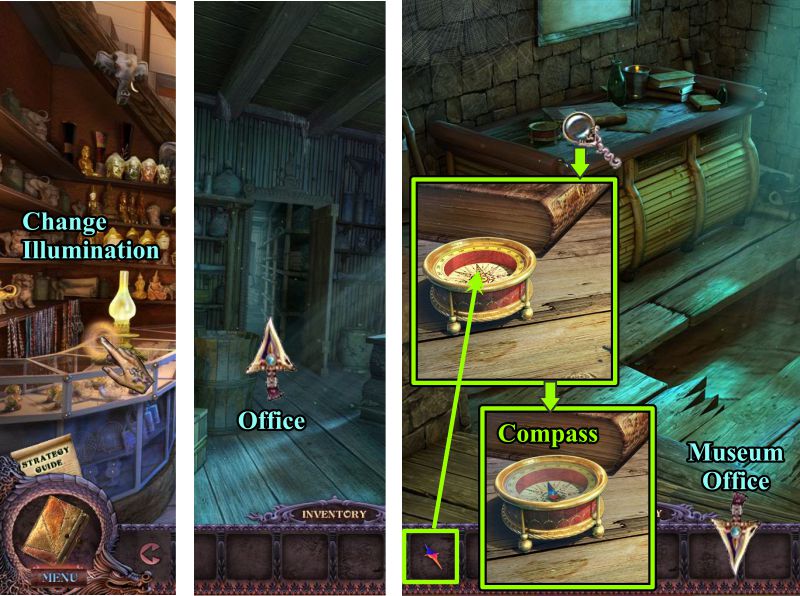
Souvenir Shop
Change the illumination, go to the Office, and zoom in on the desk.
Place the Compass Needle in the compass, and it will cover itself with glass.
Collect the Compass and go to the Museum Office.
Screenshot
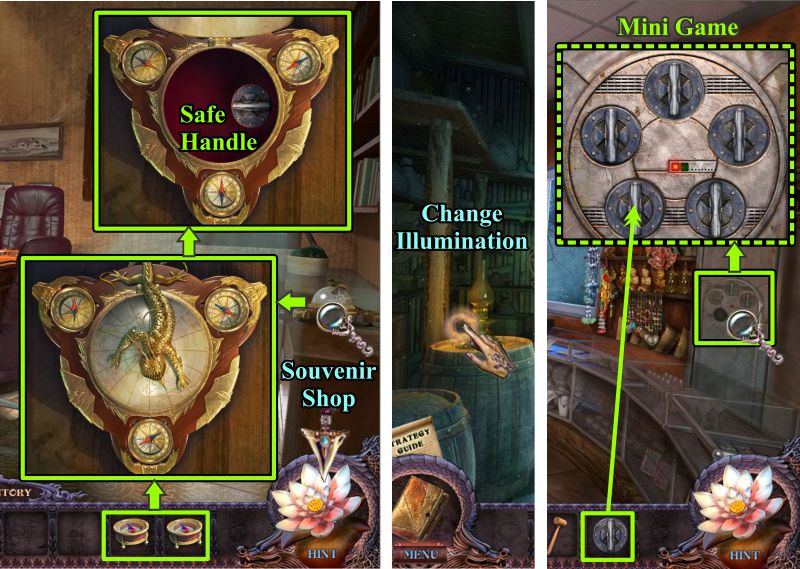
Museum Office and Souvenir Shop
Zoom in on the cabinet at the right and place your 2 Compasses.
When the cover opens, take the Safe Handle and return to the Souvenir Shop.
Change the illumination and zoom in on the safe.
Place your Safe Handle to trigger a Mini Game.
Screenshot
Safe Mini Game
See the screenshot for the handles to turn in order to open the safe.
Screenshot
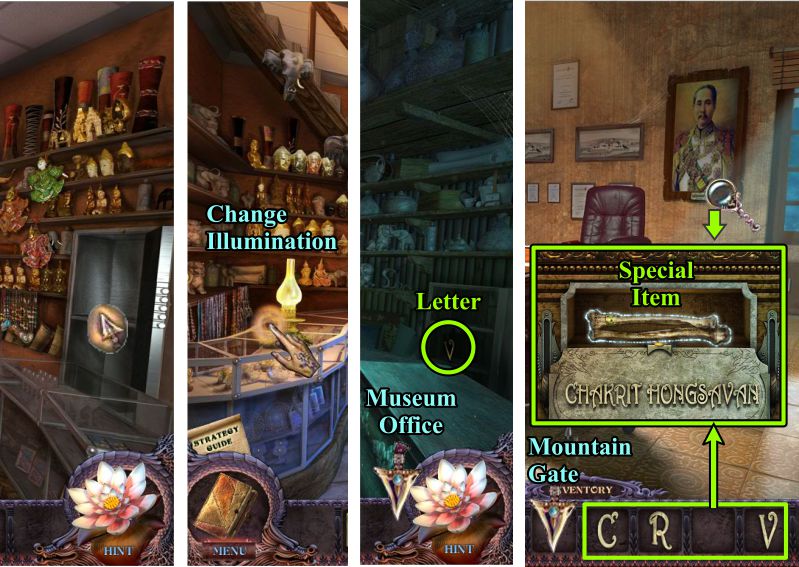
Souvenir Shop and Museum Office
There is nothing for you to take inside the safe because you need to first change the illumination.
Take the Letter and go to the Museum Office.
Zoom in on the portrait and place the 3 letters to spell the name shown in the screenshot.
Take the Special Item, then go to the Mountain Gate.
Screenshot
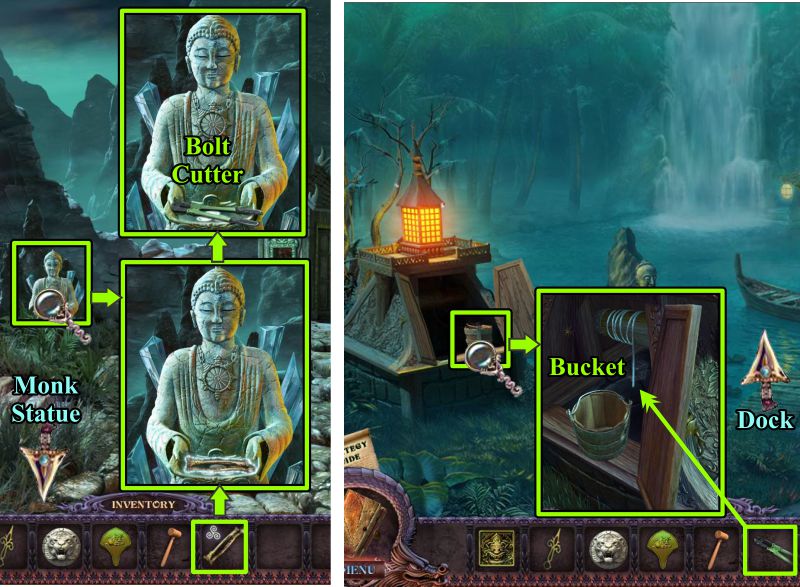
Mountain Gate and Monk Statue
Zoom in on the statue and place your Special Item.
Collect the Bolt Cutter, then go to the Monk Statue.
Zoom in on the well and use your Bolt Cutters to detach the Bucket.
Collect the Bucket and head to the Dock.
Screenshot
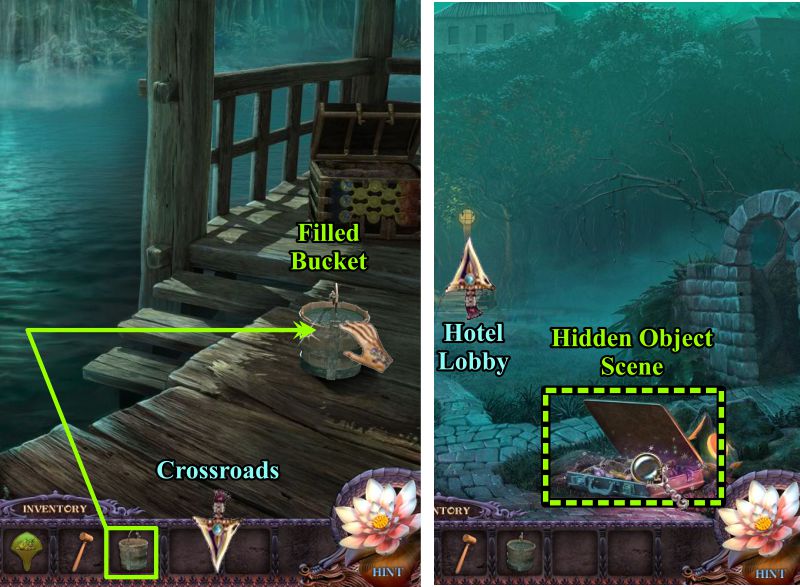
Dock and Crossroads
Dip your Bucket in the water and collect a Filled Bucket.
Go to the Crossroads, play the Hidden Object Scene, and head to the Hotel Lobby.
Screenshot
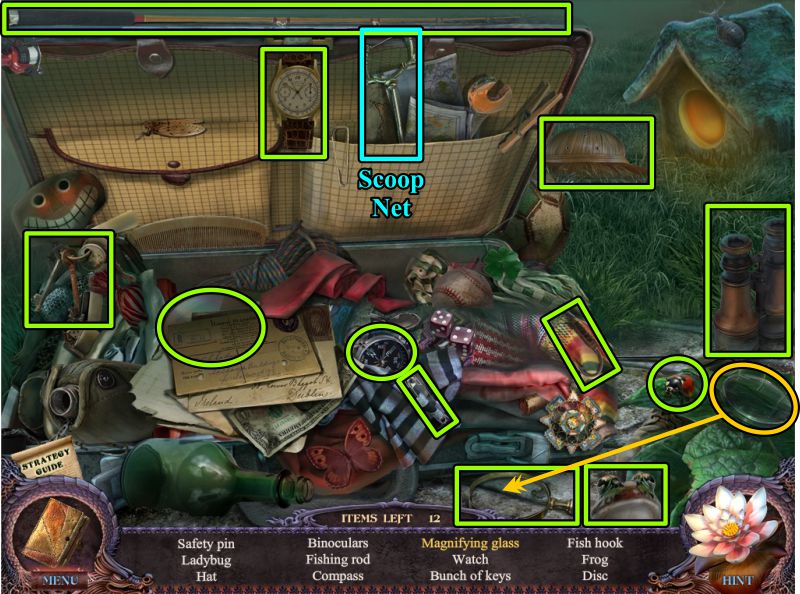
Suitcase Hidden Object Scene
Place the lens in the frame to get a Magnifying Glass.
Your final Object is a Scoop Net.
Screenshot
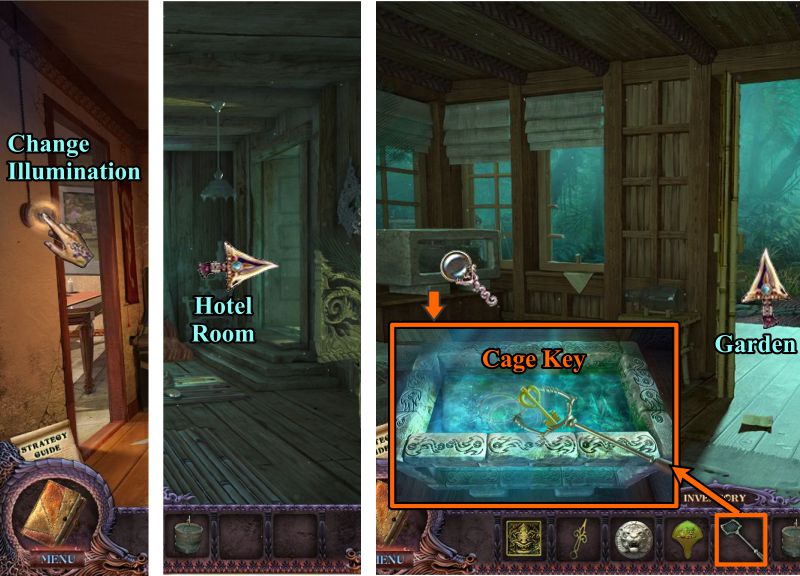
Hotel
Change the illumination to dark and go to the Hotel Room.
Zoom in on the aquarium and use the Scoop Net to get the Cage Key.
Go out to the Garden.
Screenshot
Hotel Garden
Unlock the cage, take the Sun once the bird leaves, and go off to the Museum.
Screenshot
Museum
Change the illumination, zoom in on the gate to the left, and use your Filled Bucket to cool the iron.
Go through the open gate to the Corridor.
Screenshot
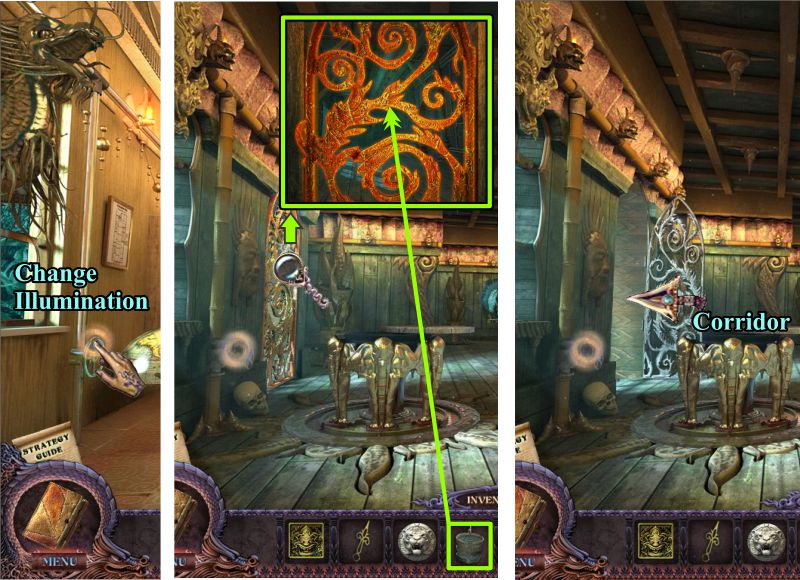
Museum Corridor
Zoom in on the back wall and place the Sun.
Take the Metal Element and Clock Hand.
Play the Hidden Object Scene.
Return to the front room.
Screenshot
Shelf Hidden Object Scene
Return the numbered objects to their correct places as shown in the screenshot.
An Eagle Head will go into your Inventory.
Screenshot
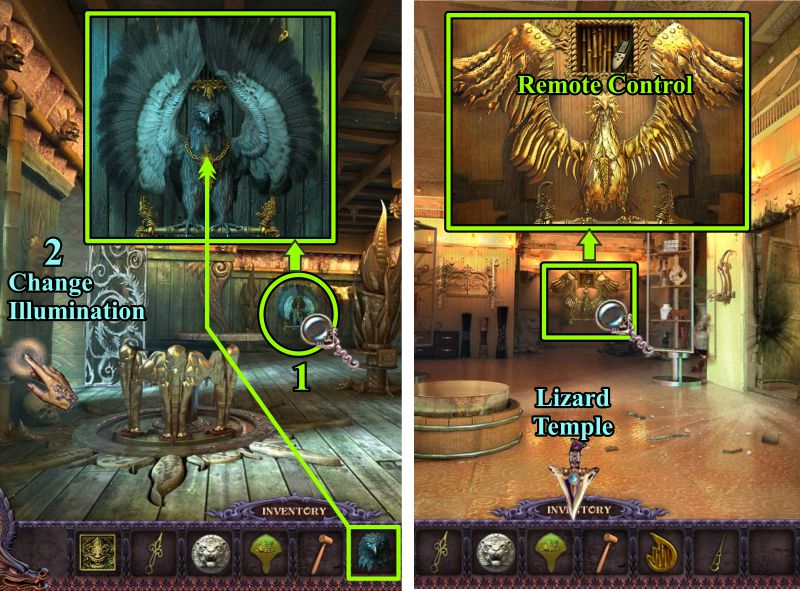
Museum
Zoom in on the back wall and place the Eagle Head.
Change the illumination to light.
Zoom in on the back wall to take the Remote Control.
Go to the Lizard Temple.
Screenshot
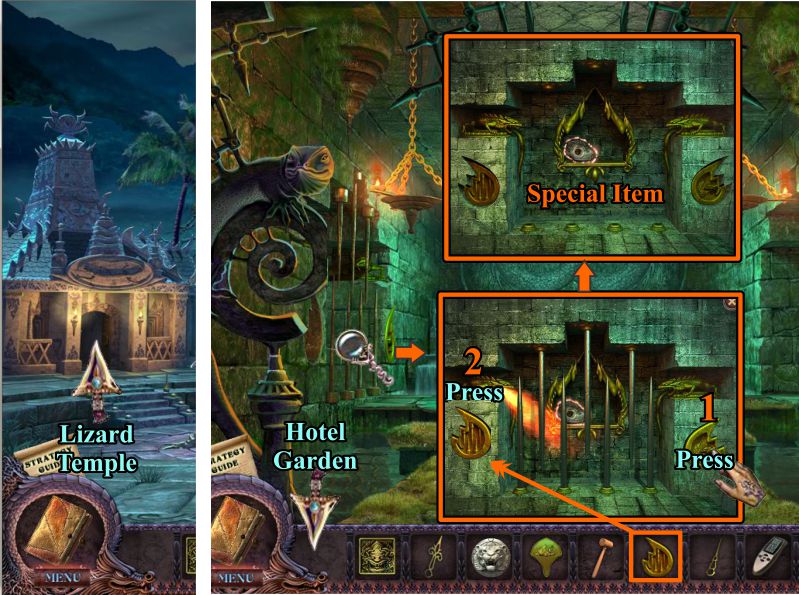
Lizard Temple
Zoom in on the bars to the left.
Press the Metal Element that is already in place.
Put the other Metal Element in its place and press it.
Take the Special Item, and go to the Hotel Garden.
Screenshot
Chapter 11: Buffalo Temple
Hotel Garden and Monk's Hut Basement
Zoom in on the statue and place your Special Item.
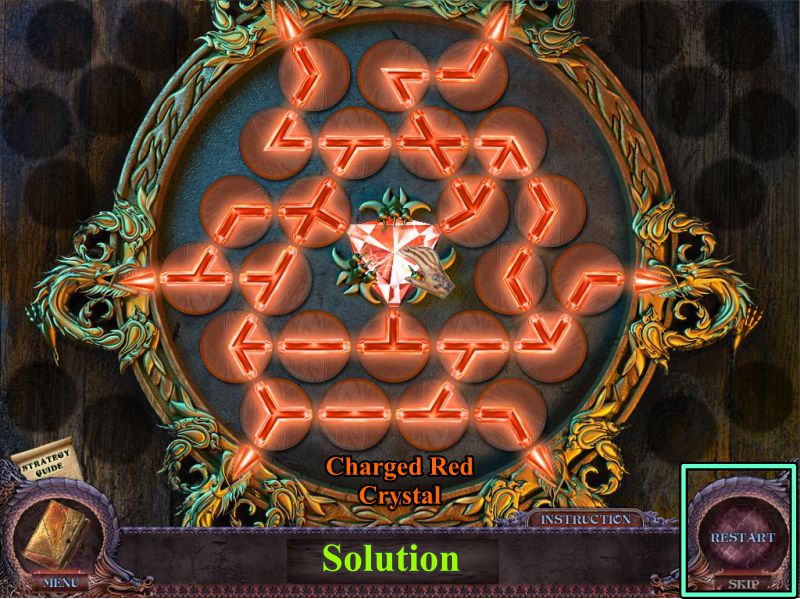
Collect the Red Crystal, then go to the Basement of the Monk's Hut.
Zoom in on the table to the left and place your Red Crystal to trigger a Mini Game.
Screenshot
Place the connections as shown in the screenshot to charge the crystal.
Take the Charged Red Crystal, then go to the Museum.
Screenshot
Museum and Buffalo Temple
Change the illumination, place the Charged Red Crystal, and take the Red Staff.
Go to the Buffalo Temple and use the Red Staff to get rid of the werecreature.
Screenshot
Buffalo Temple
Zoom in on the dome, place the Buffalo Push Button, and press it to open the dome.
Zoom in on the beam for a Mini Game.
Screenshot
Buffalo Temple Mini Game
See the screenshot for the path to get the lid to the center and cap the beam of light.
Screenshot
Temple Square and Souvenir Shop
Zoom in on Peter's pedestal and take the Handle.
Go to the Souvenir Shop, change the illumination, and go upstairs.
Screenshot
Souvenir Shop
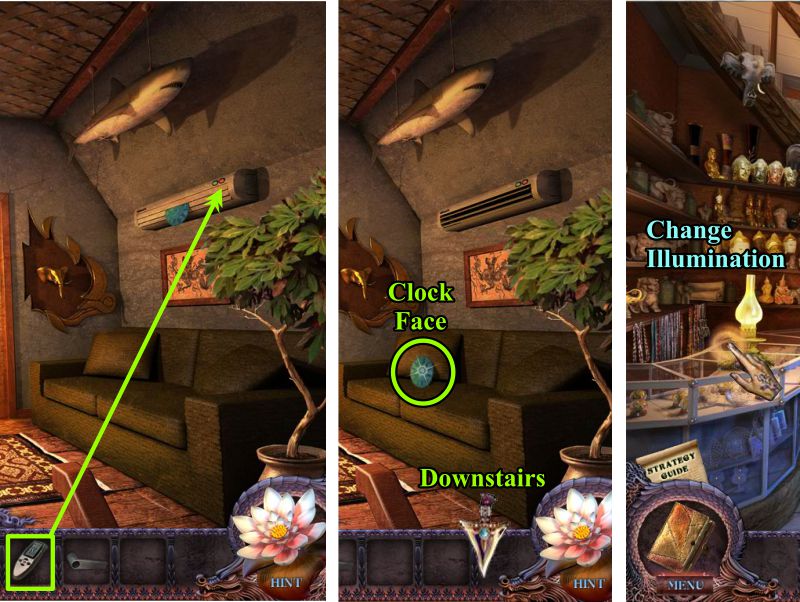
Use the remote control to open the vent, then collect the Clock Face.
Return downstairs and change the illumination to dark.
Screenshot
Zoom in on the clock and place the Clock Face and 2 Clock Hands.
Set the time as shown in the screenshot. Although it says 7PM in the clock stand, the clock is mirrored.
Take the Golden Dragon.
Change the illumination and return upstairs.
Zoom in on the back wall and place your Golden Dragon.
Take the Moon Half and go to the Museum.
Screenshot
Chapter 12: Return to the Museum
Museum Corridor
Zoom in on the door and place your Moon Half to trigger a Mini Game.
Screenshot
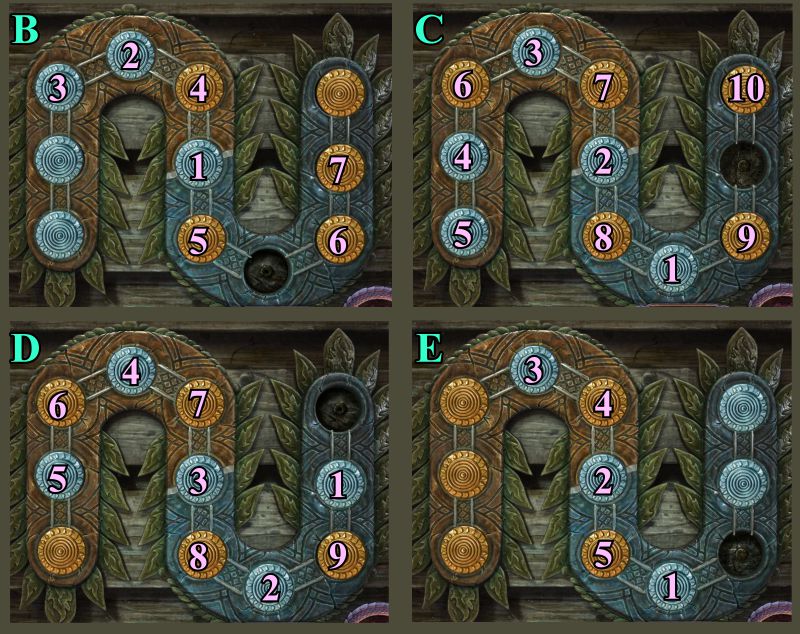
Workroom Door Mini Game
Your goal is to exchange the discs so that they match their background colors.
See the screenshot for the first moves.
There is a Restart button in case you make a wrong move.
Screenshot
See the screenshot for the next series of moves.
Screenshot
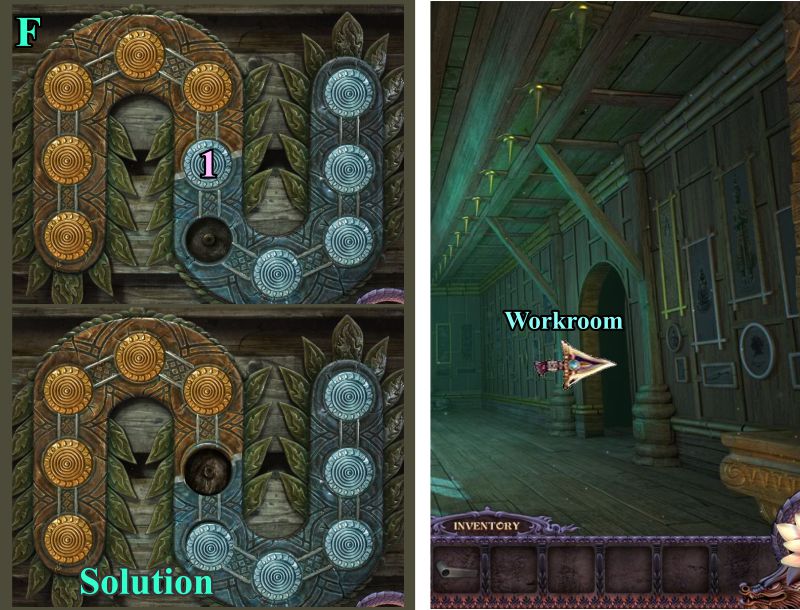
See the screenshot for the final move and solution.
Enter the Workroom.
Screenshot
Museum
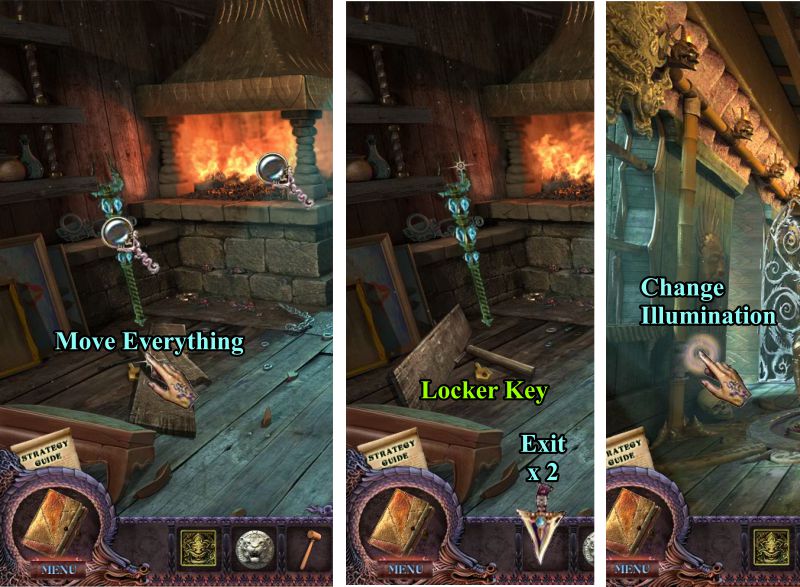
Move everything on the floor to find a Locker Key.
Exit down twice and change the illumination.
Screenshot
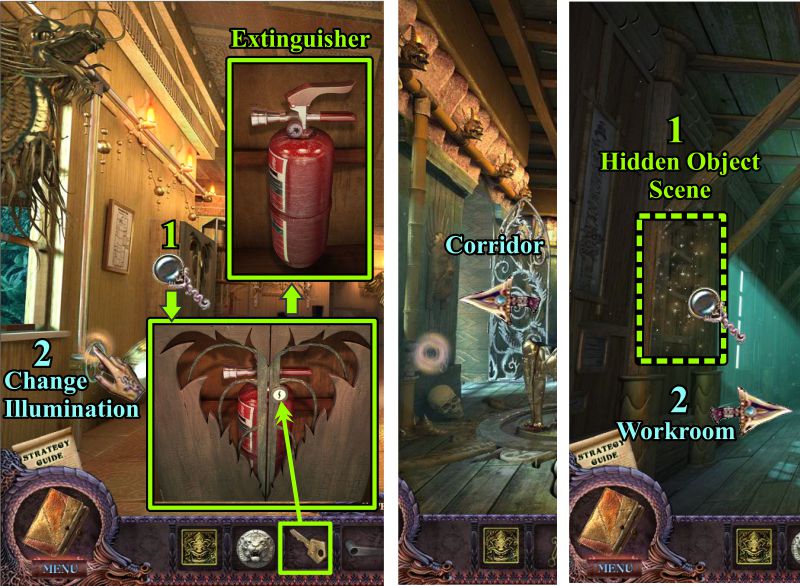
Zoom in on the cabinet at the left and use the Key to unlock it.
Take the Extinguisher.
Change the illumination and go to the Corridor.
Play the Hidden Object Scene.
Return to the Workroom.
Screenshot
Shelf Hidden Object Scene
Return the objects to their proper places as numbered in the screenshot.
Place the handle on the blade to get a Carving Chisel.
Screenshot
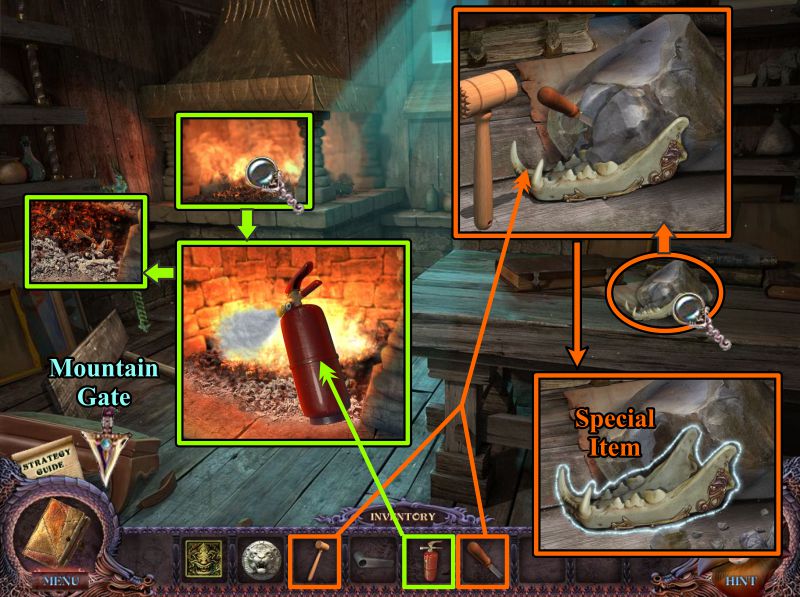
Museum Workroom
Zoom in on the table, place the Carving Chisel, and use the Mallet to dislodge the Special Item.
Zoom in on the forge and use the Extinguisher to put out the fire.
There is a key you can't get because it's still too hot, so head off to the Mountain Gate.
Screenshot
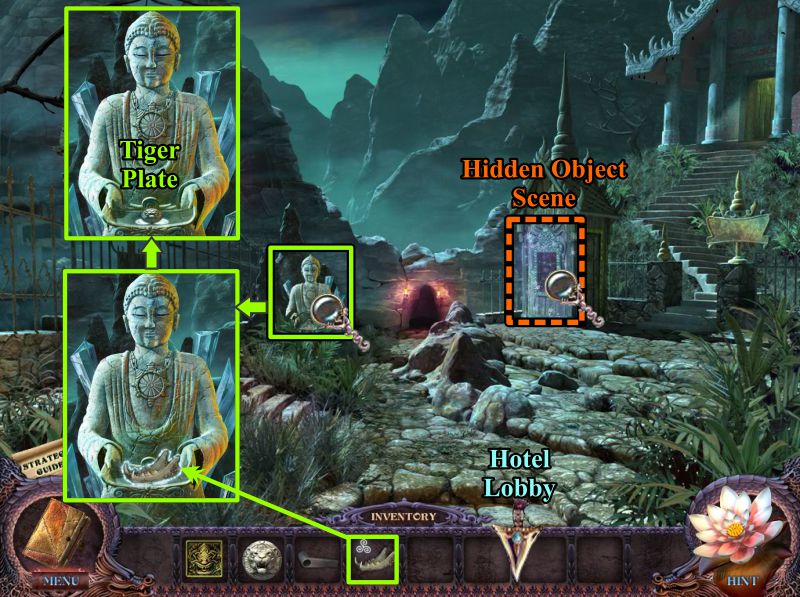
Lizard Temple
Zoom in and place your Special Item to get another Tiger Plate.
Play the Hidden Object Scene and go to the Hotel Lobby.
Screenshot
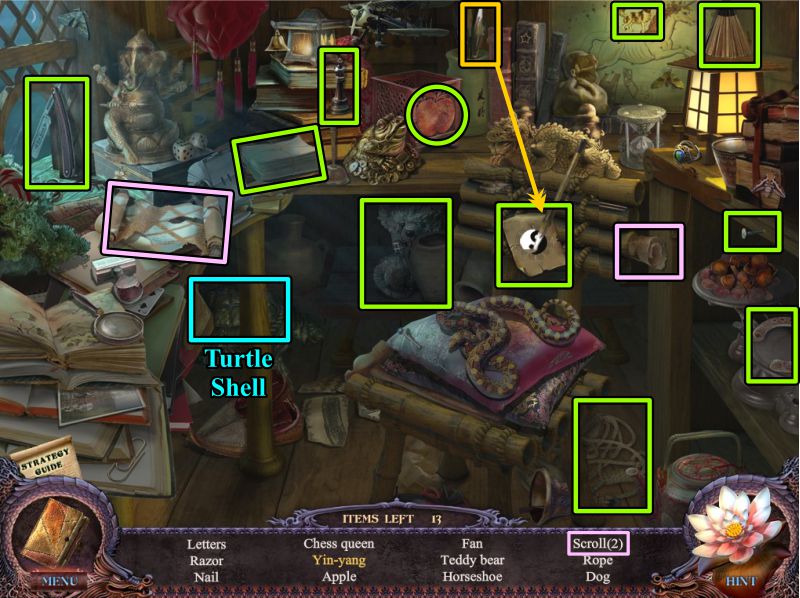
Pavilion Hidden Object Scene
Use the brush with white paint to finish the Yin-yang.
Your final object is a Turtle Shell.
Screenshot
Hotel Lobby
Zoom in and place the Turtle Shell on the turtle table.
Change the illumination to light.
Zoom in on the table and take the Special Item.
Screenshot
Chapter 13: Eclipse Mountain
Mountain Gate
Zoom in on the statue, place your Special Item, and take the Gate Key.
Examine the gate, insert the Gate Key to open the gate, and go to Eclipse Mountain.
Screenshot
Mirror Mini Game
Zoom in on the lower left niche and place your Mirror Part to trigger a Mini Game.
Your goal is to turn over the mirror pieces and place the images in their proper positions.
When a piece is properly placed, it will remain turned over.
See the screenshot for the solution.
Screenshot
You have created a new reflection, so zoom in and take the Knife.
Go to Temple Square.
Screenshot
Temple Square
Zoom in on the middle temple door.
Place your 2 Tiger Plates to trigger a Mini Game.
When the door opens, enter Tiger Temple.
Screenshot
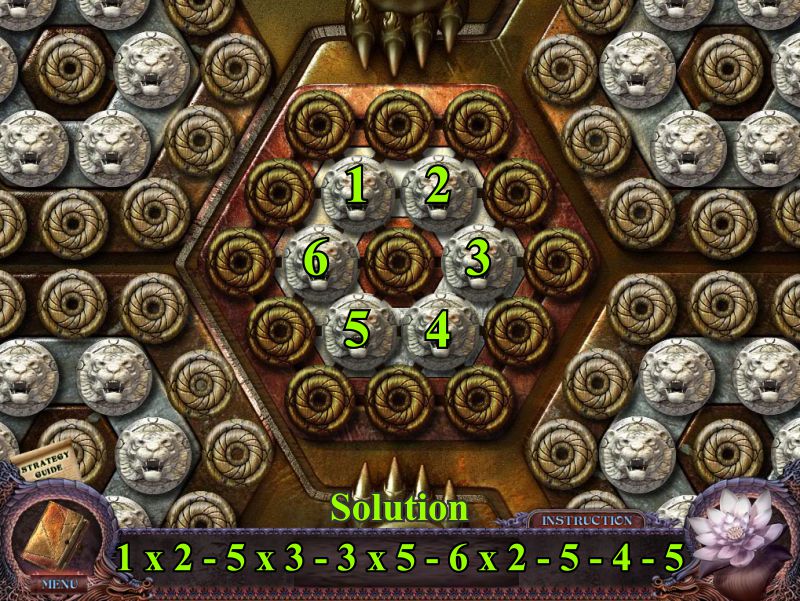
Tiger Temple Door Mini Game
Your goal is to place the 6 Tiger Plates in the inner circle.
Rotating one tile will make the others surrounding it move as well.
See the screenshot for the numbered solution.
Screenshot
Tiger Temple
Grab the Tongs and go to the Museum Workroom.
Screenshot
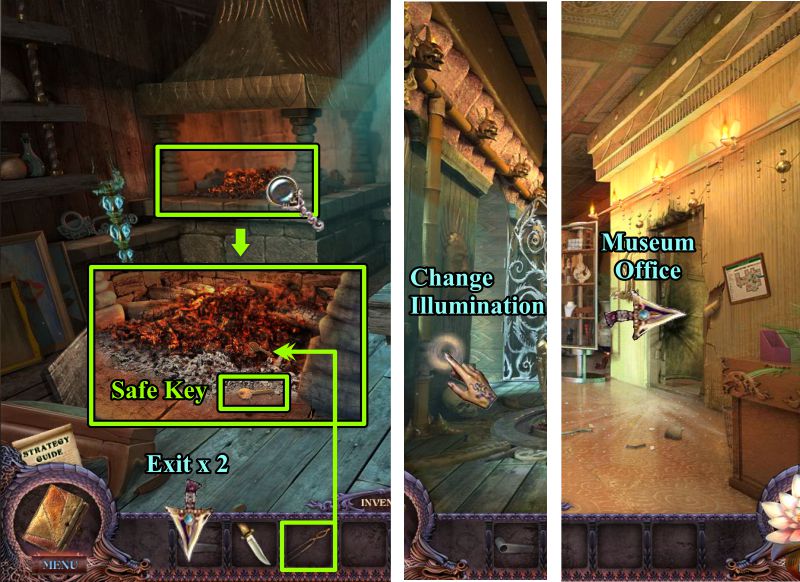
Museum
Zoom in on the forge and use your Tongs to get the Safe Key.
Exit down twice and change the illumination.
Enter the Office.
Screenshot
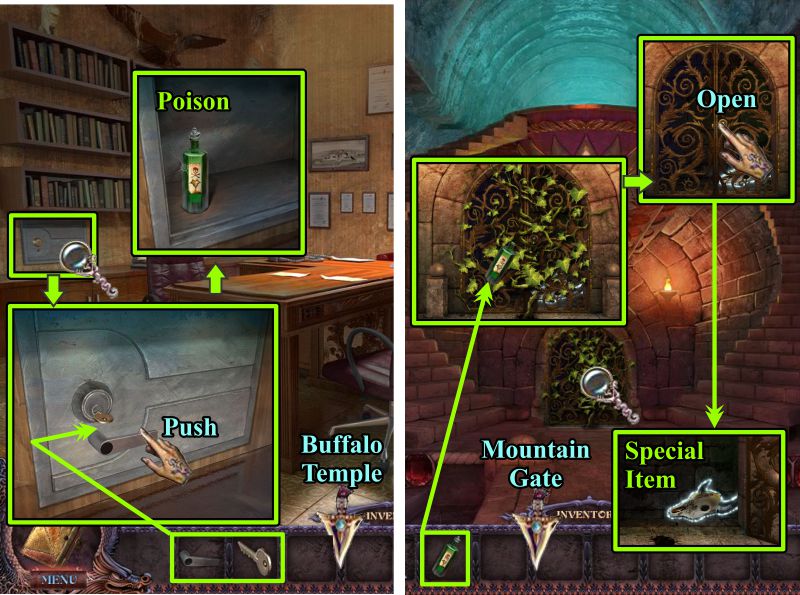
Museum Office and Buffalo Temple
Zoom in on the safe, place the Handle and Safe Key, and push the handle.
Take the Poison and head to the Buffalo Temple.
Use the Poison on the poisonous plant, open the grate, and take the Special Item.
Go to the Mountain Gate.
Screenshot
Chapter 14: Tiger Temple
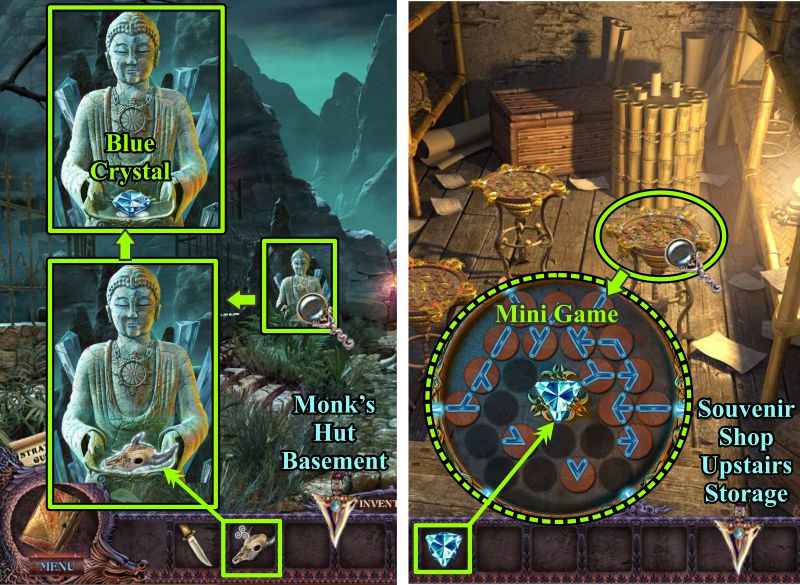
Mountain Gate and Monk's Hut Basement
Zoom in on the statue, place the Special Item, and take the Blue Crystal.
Go to the Monk's Hut Basement.
Zoom in on the right table and place the Blue Crystal to trigger a Mini Game.
When you are finished there, go to the upstairs storage at the Souvenir Shop.
Screenshot
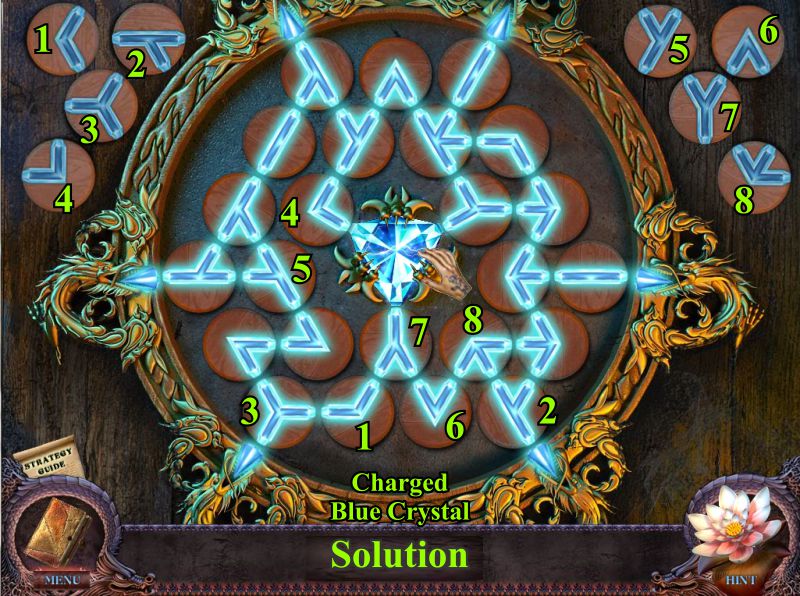
Blue Crystal Mini Game
Rotate and place the connectors as shown in the screenshot numbered solution.
Collect the Charged Blue Crystal.
Screenshot
Souvenir Shop and Hotel
Zoom in on the net bag and use your Knife to get the Special Item.
Go to the Hotel Lobby, change the illumination, and head to the Garden.
Screenshot
Hotel Garden and Museum
Zoom in on the statue and place your Special Item to get a Mirror Part.
Go to the Museum and change the illumination so you can get to the Workroom.
Screenshot
Workroom and Eclipse Mountain
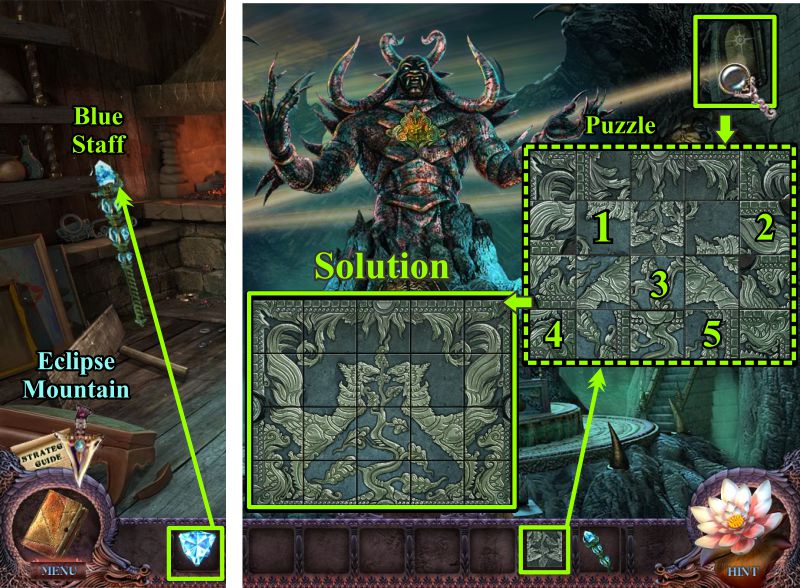
Placed the Charged Blue Crystal and collect the Blue Staff.
Go to Eclipse Mountain.
Zoom in on the upper right niche and place your Mirror Part to trigger a Puzzle.
Rotate the pieces as numbered in the screenshot to create the solution picture.
Screenshot
Eclipse Mountain and Tiger Temple
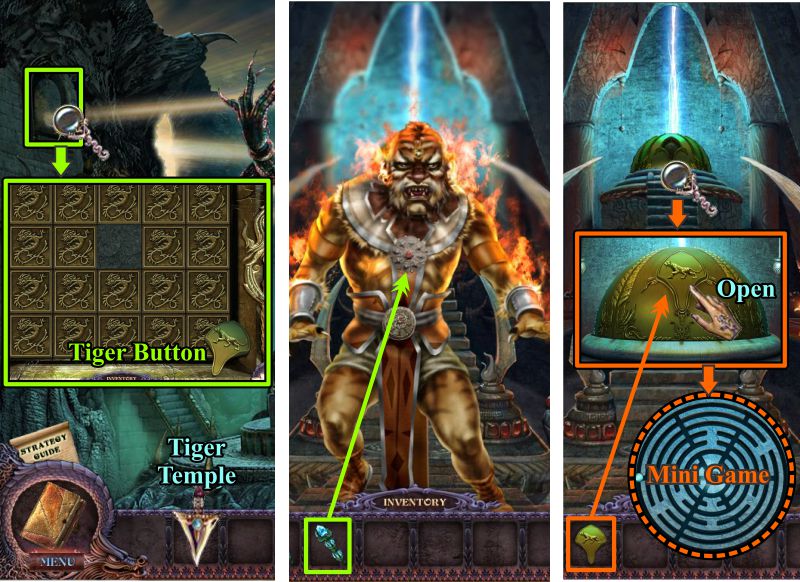
Zoom in on the niche at the upper left and take the Tiger Button.
Go to the Tiger Temple and use the Blue Staff on the werecreature.
Zoom in on the dome, place the Tiger Button, and push to open the dome.
Zoom in again for a Mini Game.
Screenshot
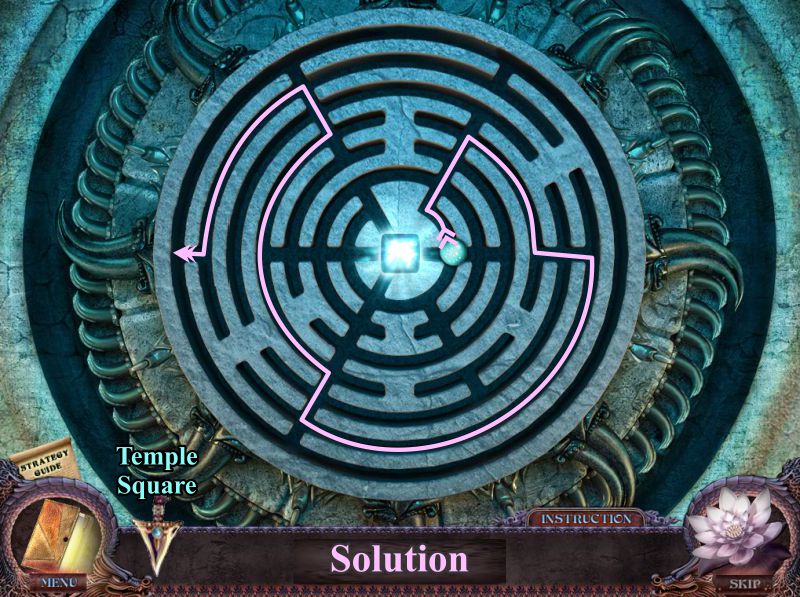
Tiger Temple Mini Game
See the screenshot for the path to use to get the lid to the center of the maze.
Screenshot
Chapter 15: Demonic Destruction
Temple Square and Mountain Gate
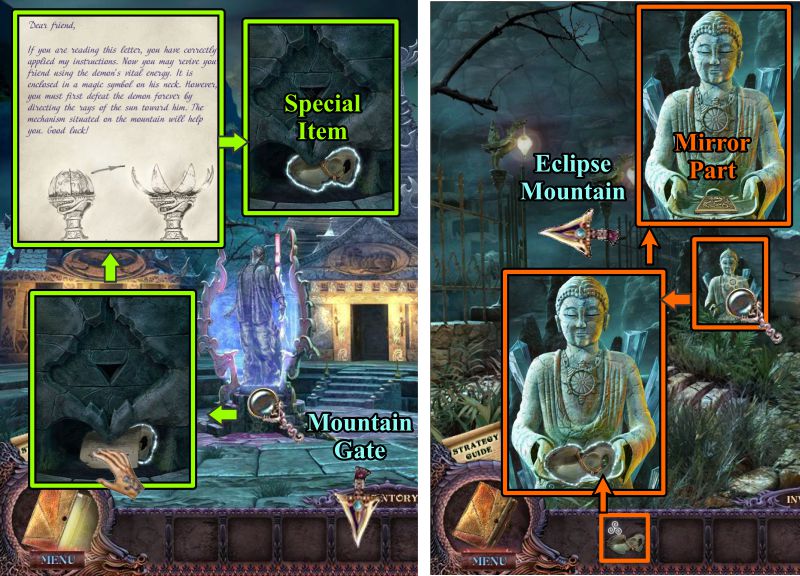
You have removed all of the beams, but Peter still isn't free.
Zoom in on the pedestal, take the note and read it.
Collect the Special Item, then go to Mountain Gate.
Zoom in and place your Special Item on the statue's tray.
Take the Mirror Part, then go through the gate to Eclipse Mountain.
Screenshot
Eclipse Mountain
Zoom in on the upper left niche and place the Mirror Part to trigger the Mini Game.
See the screenshot for the resulting image.
Screenshot
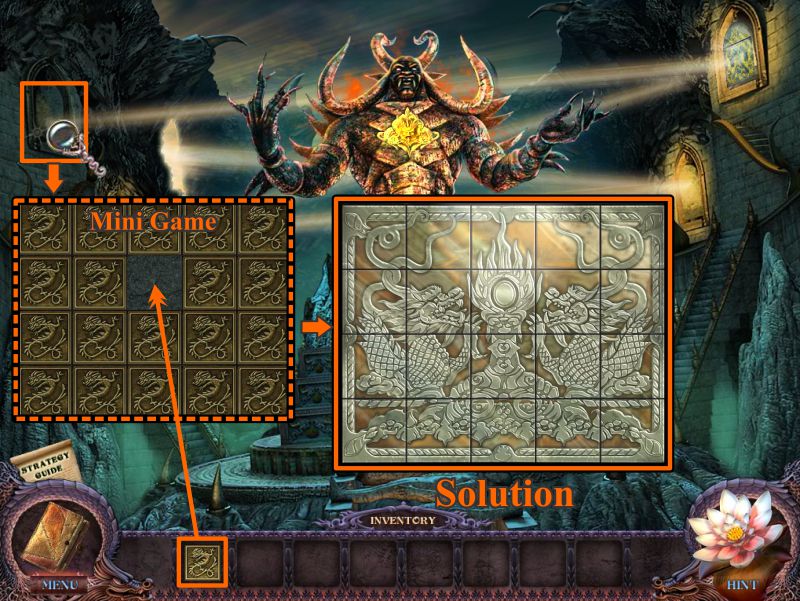
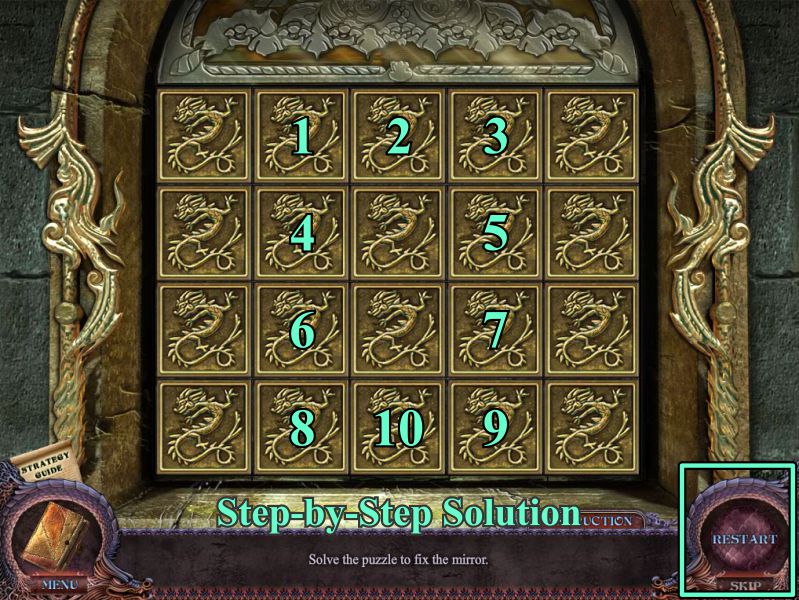
Mirror Mini Game
Clicking on a mirror piece will cause that piece and surrounding pieces to turn.
You have a Restart button available if you need it.
See the screenshot for a step-by-step numbered means to the solution.
Screenshot
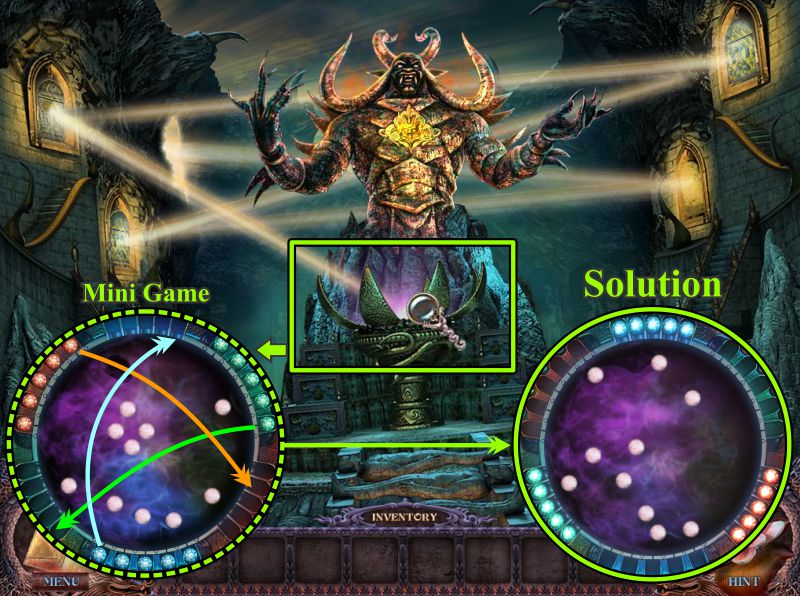
Finale
The beams of light are all deflected by the mirrors to shine on the pedestal in front of the demon. Zoom in on it for a Mini Game.
Your ultimate goal is to direct the sun's rays toward the magic symbol on the Demon's neck.
In order to accomplish this task, you will need to move all of the outer balls from their current cells to those of the same color on the opposite side of the sphere.
To do this, you will have to drag each one through the inner portions of the sphere without coming in contact with any of the energy orbs swimming around the inner sphere.
See the screenshot for a few sample paths and the final solution.
Screenshot
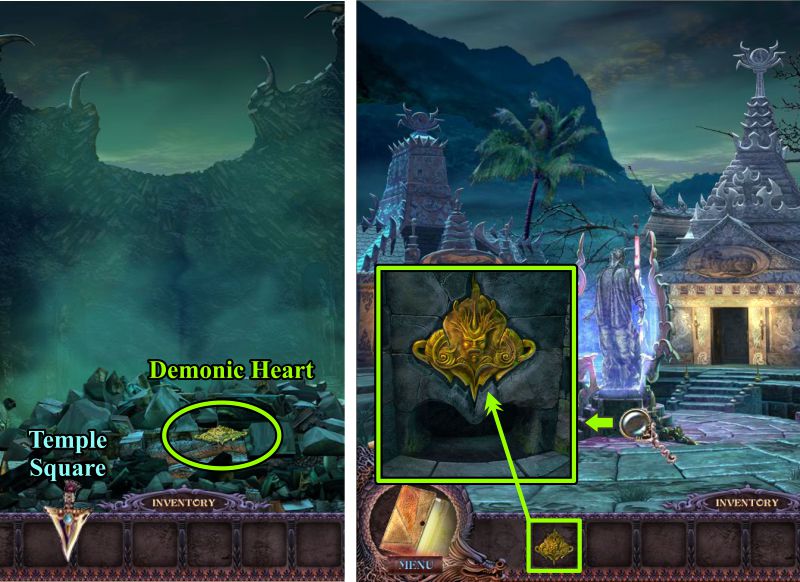
Eclipse Mountain and Temple Square
Watch the cut scene as the demon is destroyed, take the Demonic Heart, and go to Temple Square.
Zoom in on the pedestal and place the Demonic Heart.
Watch the cut scene.
Screenshot
Congratulations! You have completed the basic adventure of Secrets of the Dark: Eclipse Mountain, and once again saved Peter Harris. Well, at least until the next time he finds himself in a jam.
Posted by: Jazz |
May 15, 2012 6:10 PM
|
May 15, 2012 6:10 PM