

![]() Marking the fourth game in the series, Samantha Swift and the Fountains of Fate starts off with our tenacious heroine out-surfing the bad guys over some serious waves. This girl never rests, not even between sequels! Still on the trail of Cortez, Samantha embarks upon a quest to recover the Emerald of Judgement, an artifact that may unlock the secrets of the Fountain of Youth!
Marking the fourth game in the series, Samantha Swift and the Fountains of Fate starts off with our tenacious heroine out-surfing the bad guys over some serious waves. This girl never rests, not even between sequels! Still on the trail of Cortez, Samantha embarks upon a quest to recover the Emerald of Judgement, an artifact that may unlock the secrets of the Fountain of Youth!
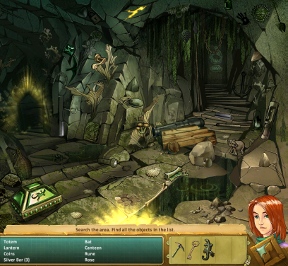 In another small step away from the series' original adventure/hidden object roots, Fountains of Fate focuses more on object finding than puzzle solving. Each scene is filled with items stashed in clever (and not-so-clever) locations, from camouflage knives attached to huts to coins hidden amongst other round things. Check the list at the bottom of the screen, find the items, and give them a click. Once you complete one set of items another one appears, continuing the hunt for another round on the same screen.
Samantha Swift and the Fountains of Fate introduces blue and green items that are a little more involved that just "find and click". Green items in your list can be found on the screen, but you have to interact with the environment first. Slide a stone to the side or tip the cannon over, your item is there, it just can't be seen. The cursor will change when you're over an area that can be interacted with. Once you nab a green item it stays in your inventory, ready to help you find the even more hidden blue objects.
When an item is marked in blue on your list, you'll have to solve a puzzle to find it. Some of these are pretty abstract, while others make complete logical sense. Either way, areas you can interact with will trigger a cursor change when you hover over them, so finding them is a matter of sweeping the mouse back and forth a bit.
You'll also be happy to know that hints are generous and useful, recharging at a fast rate and finding only the items you want it to find. Samantha's item scanner is also back, allowing you to view a silhouette of any item simply by clicking on it in the list. Frequent mis-clicks result in this scanner falling inactive for a few moments, so use your eyes to find, not your cursor!
 Analysis: Whenever a new Samantha Swift game is released, hidden object/adventure fans rightfully get excited. The series made its debut back in 2008 with a grand art style and a tasty combination of genres with an almost perfect balance. Since then, the series has slowly shifted away from the adventure side of things, focusing more on hidden objects while keeping the same high level of detail and production values intact.
Mini-games are less frequent in Fountains of Fate, which isn't really a good or a bad thing. But replay value is better, as now there are special Swift birds to find in each level to unlock the unlimited play mode. They're generally easy to find, you'll probably nab them all your first time through, but it's worth it! You'll also uncover a few trophies while you play, little achievement-like bonuses for doing interesting and challenging things during the game.
Fans of the Samantha Swift series are in for both a good time and a bit of disappointment. You'll feel like one of the elite few when you can follow the story and recognize the characters right off the bat, as Fountains of Fate doesn't bother with introductions or lengthy explanations for series foals.
On the other hand, Fountains of Fate continues the sad tradition of moving away from what originally made the series so great. You won't find as many puzzles or as much adventure in this installment, which is why many of us fell in love with Samantha in the first place. There's still a great game to be had, one that's well-made and entertaining on many levels, so don't dismiss it until you've tried it.
![]() Windows:
Windows:
Download the demo
Get the full version
![]() Mac OS X:
Mac OS X:
Download the demo
Get the full version


Walkthrough Guide
(Please allow page to fully load for spoiler tags to be functional.)
Samantha Swift and the Fountains of Fate Walkthrough
General Information
The Main Menu gives you access to Help and Options, the Museum and Trophies, Play and Quit.
You can change your profile which starts off as Samantha and Options include Sound and Music volume, Full Screen versus Window Mode, Custom Cursor size, plus you can view the Credits.
There is no timer in the Adventure part of the game and the game automatically saves when you exit.
There are 6 chapters with a total of 30 locations in the game as well as various puzzles throughout.
You will be searching for the following life extension waters: Waters of Eden, Shangri-La Immortality Water, Solomon's Water of Life, Kachina Rain Water, Water of Asgard's Immortals, Fountain of Youth.
Screenshot
Unlimited HO
Once you have collected 60 swift birds you can play Unlimited Hidden Object Mode.
Unlimited HO has a reverse timer which records how long it takes you to complete the list.
You have your choice of 8 scenes you will have already played once by the end of the game.
Screenshot
The PDA and Hints
The PDA is used to get special information and to find items using the scanner.
You can access the PDA from "Menu" located under the scanner.
You can customize its background, check your log and contacts, go to the Museum to check the items you have collected, exit to the Main Menu, or resume the game.
By clicking on the name of an item on the list you can see its shape in the scanner.
Hints are no unlimited. You begin with 1 Hint and the lightning bolts you collect provide additional hints.
If you cannot find a particular item, you can click on it and then choose a hint to find that one item.
The lightning bolts will be marked in red and the swift bird symbols in pink.
There is one lightning bolt and 2 birds in every location.
Hidden Objects
Some of the items to find on the Hidden Object lists have crossword clues such as a "Mimic Expert" is a Parrot.
Hidden Object lists are random so will not be marked except for the tools you need to use in that scene or later plus the Secret Items.
Hidden Object scenes have 16 items to collect in two sets of 8 plus any special items that follow.
General instruction for all Hidden Object scenes is to collect the 2 Swift Birds, the Lightning Bolt Hint and everything on your lists.
White items are readily available.
Green items require an action such a moving another object.
Blue items are hidden and require a tool to uncover them.
The "Secret Item" is the last one in order to continue the adventure and will be marked in turquoise.
Special Cursors
Your cursor will turn into a hand when you need to open or move something to get a Green item.
When you get a magnifying glass attachment with your cursor, be sure to take a closer look because there is a puzzle to be solved.
When your cursor gets a set of gears that means you need to use a tool to uncover a Blue item.
A yellow arrow with a man walking shows where you can exit from that location.
Trophies
You can access and view the trophies you have collected from the main menu.
Some of the trophies are easy to get and others are more difficult to achieve so they are something to look forward to when the play the game again.
The following list of Trophies is for your ultimate challenge.
Diamond Adventurer: Complete the Story Mode of the game without using any hints.
Swift Catcher: Collect all the swift bird symbols.
Perfect Visionary: Collect all the hidden objects without using the scanner.
Conquistador Treasurer: Find the Emerald of Judgment.
Not So Puzzling: Solve all of the puzzles without using the "Skip" button.
Crystal Mirror: Complete all of the "Spot the Difference" scenes.
Museum Curator: Find the first museum object.
Super Sleuth: Find all the crossword clue objects without a hint or scanner.
Master Adventurer: Complete the Story Mode of the game.
Search and Destroy: Complete the Unlimited Hidden Object Mode.
Zeus: Collect all of the lightning bolt hints.
True Blue: Collect all the blue objects without using a hint or the scanner.
A-MAZE-ing: Complete the labyrinth.
All-in: Win the card game.
Careful Collector: Complete the game with an unbroken scanner.
She Sells Sea Shells: Solve the witch's shell puzzle.
Chapter 1: Florida
Somewhere in the Florida Keys three generations of archeologists have searched for the Cortez Emerald of Judgment. Now it is Samantha Swift's turn to chase a promising lead but others are also interested in the Emerald's legendary healing powers.
Stilt House
Move the cart and the curtain so you can pick up the Amber Fossil and the Gold Scepter.
Collect the Crank and place it in the hole on the well so it will bring up the Hook.
Place the Scepter in the hole by the stairs and the Hook on it.
The Hook will attach itself to the well so turn the crank and the stairs will rearrange revealing the Coral Necklace.
Take the necklace and place it on the statue which will move revealing an opening so enter it.
Screenshot
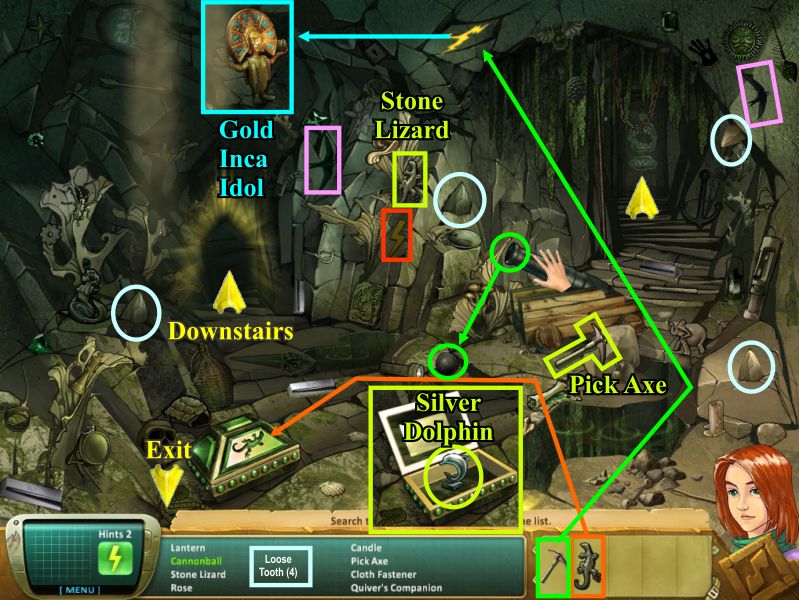
Coral Tunnel
Tip the cannon down and the Cannon Ball will roll out.
To get the Silver Dolphin you will need to place the Stone Lizard on the box.
Use the Pick Axe on the crack in the ceiling to get the Gold Inca Idol.
After you go downstairs you will be returning to pick up the 4 loose teeth.
Screenshot
Coral Tunnel Megalodon
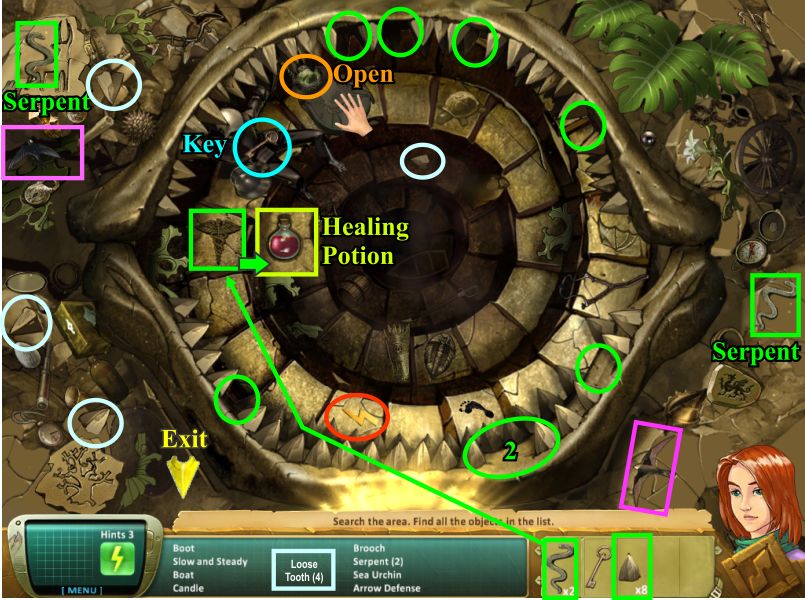
A Megalodon is a megatoothed prehistoric shark and you are looking at its open jaws.
Open the pouch to collect the Brooch.
Pick up the 2 Serpents and place them on the medical symbol and the step will move so you can get the Healing Potion.
The Megalodon is missing 8 teeth so collect the 4 loose ones here and then go back upstairs to collect the 4 there.
When all of the teeth are placed the jaw snaps shut and opens a door upstairs that leads to the Swamp Entrance.
Screenshot
Swamp Entrance
Pick up the Bottle of Acid and use it on the lock on the chest to get the Inca Mask.
Move the tree branch to get the Gold Egg.
Collect the Grappling Hook and Crowbar to retrieve the crate from the swamp pond.
Pull the crate out with the Grappling Hook and use the Crowbar to open it.
Take the Dino Femur and collect the Painted Board.
Go back to the Stilt House in search of more boards and when you return, click on the fence for a puzzle.
Screenshot
Return to Stilt House
Pick up the 3 Painted Boards and return to the Swamp Entrance.
Screenshot
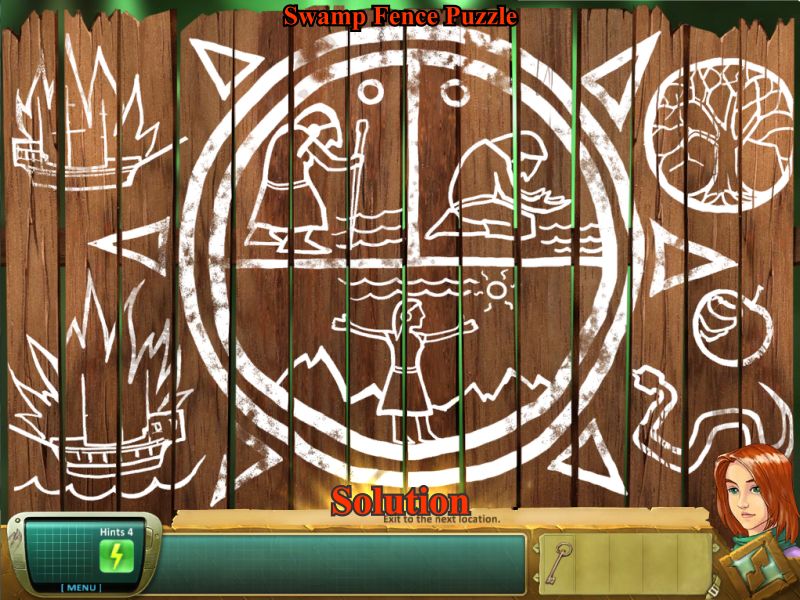
Swamp Fence Puzzle
Once you click on the fence at the back of the scene arrange the boards to show a pictogram of a Calusa Indian woman transforming from an old to a young woman.
I suggest first arranging the boards that are there and then inserting the other 4 Painted Boards into the empty slots.
The boards do not swap but rather float sideways and can double up but will become stationary once they are in the correct place.
Screenshot
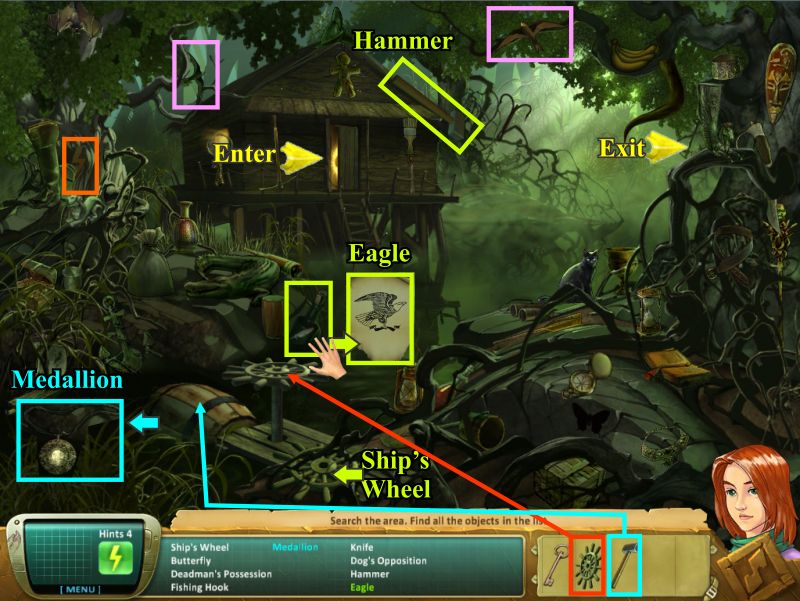
Witch Swamp
Collect the Ship's Wheel and Hammer.
Move the bottle with the feather to get the Eagle inside.
Place the Ship's Wheel on top of the post and a barrel will rise up from the swamp.
Use the Hammer to break up the barrel and collect the Medallion.
Zombies will rise up out of the swamp so use your key to unlock the hut and go inside.
Screenshot
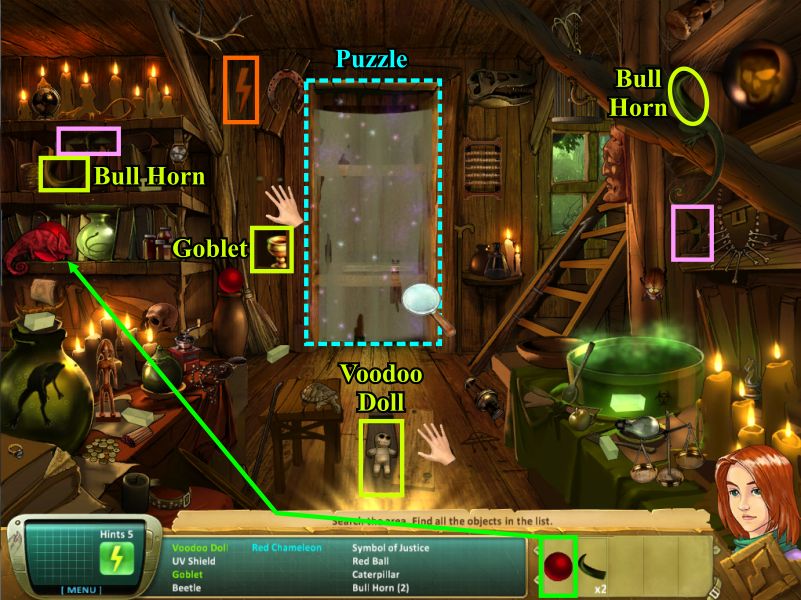
Witch Hut
Open the back panel to get the Goblet and move the floor board to collect the Voodoo Doll.
Pick up the 2 Bull Horns when they are available and click on the curtain for a puzzle.
Screenshot
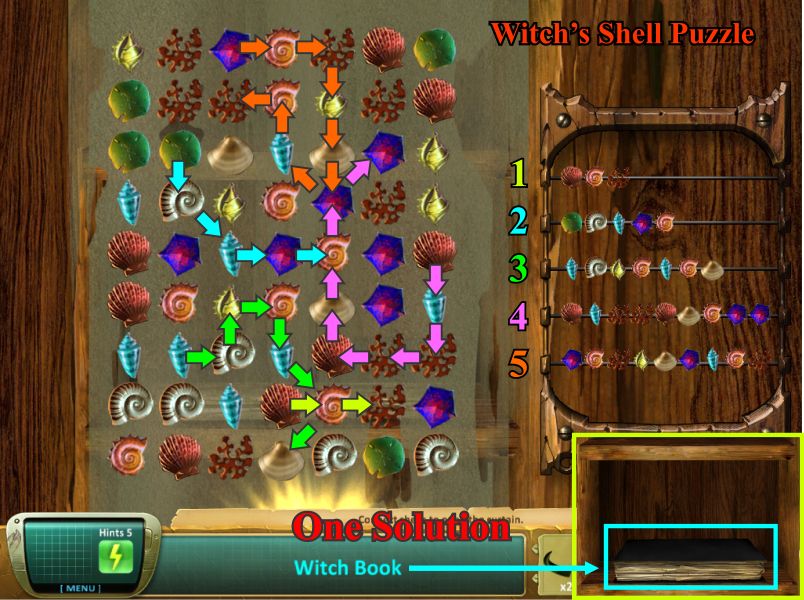
Witch Shell Puzzle
There are 5 rounds in the puzzle and your goal is to connect the shells on the left to match the rows on the right.
There is more than one solution but in case of need check the screen shot for one of them.
Your reward for successfully completing the puzzle is the Witch Book.
Click on it and it will open for you to read.
Screenshot
Witch Hut and Swamp
You have learned from the Witch Book how to eliminate a zombie so collect the 6 blocks of salt.
Screenshot
Go outside and place a block of salt on each zombie one at a time.
The Crystal Skull will rise out of the swamp so click on it to collect it and exit at the right back of the scene.
Galleon Graveyard
Cortez had a habit of burning ships so you are still on the right path.
Collect the Pirate Sword and Globe.
Pick up the bottle and the Navy Medal will fall out.
Place the Globe on the book to get the Old Map.
Slash the sail with the sword and collect the Emerald Cross.
Move the grate near Samantha and exit to the next location.
Screenshot
Conquistadors
Open the chest to collect the Cobra and move the shield to collect the Cat.
Pick up the Cupid and the 2 Fangs.
Place the Fangs on the snake statue and the Matador will appear.
Go to the close up of the bull.
Screenshot
Golden Bull
Place the golden horns and nose ring on the bull.
Stand the matador with his cape on the pedestal and it will lower to open the door with the bull for a puzzle.
Screenshot
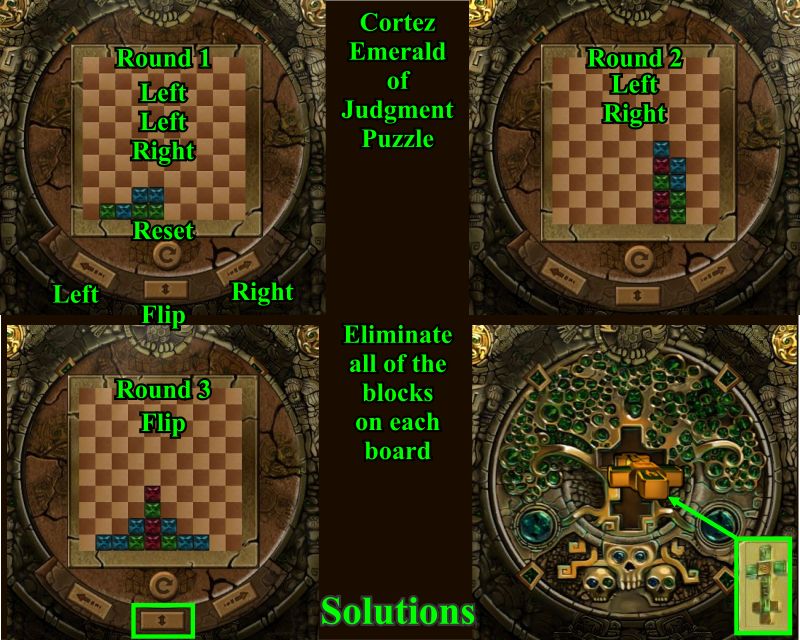
Cortez Emerald of Judgment Puzzle
Your goal is to eliminate all the blocks in each of the three rounds.
The levers at the bottom move the board left and right or flip it upside down.
The reset button is just under the board.
Round 1: Press left, left and right.
Round 2: Press left and right.
Round 3: Flip it upside down.
Place the emerald cross in the middle and click to open the door.
Screenshot
Chapter 2: Basra, Iraq
Markus Payne's birthplace is mysteriously stricken from public record. His specialties are intimidation, world economics, tactics, command and control. Payne wants it all, and will go to any extreme to get it. Successful in shady business dealings and covert international operations, he thinks he can get away with anything, and usually does. He and his henchmen are at the top of the food chain because he can bring any resource to bear by fear, power, and seemingly endless funds. Payne is driven by his insatiable lust for power. His comfort zone is to intimidate and manipulate from the shadows like a puppet-master. We can only speculate at his ultimate plan and who he intends to string up to his controller next. The only loves of Payne's life are his private vaults of precious artifacts that rival some of the greatest museums in the world. Each piece has an evil, depressing story to tell, as dozens have died and lost for Payne's self indulgences. He doesn't care what he destroys to get what he wants.
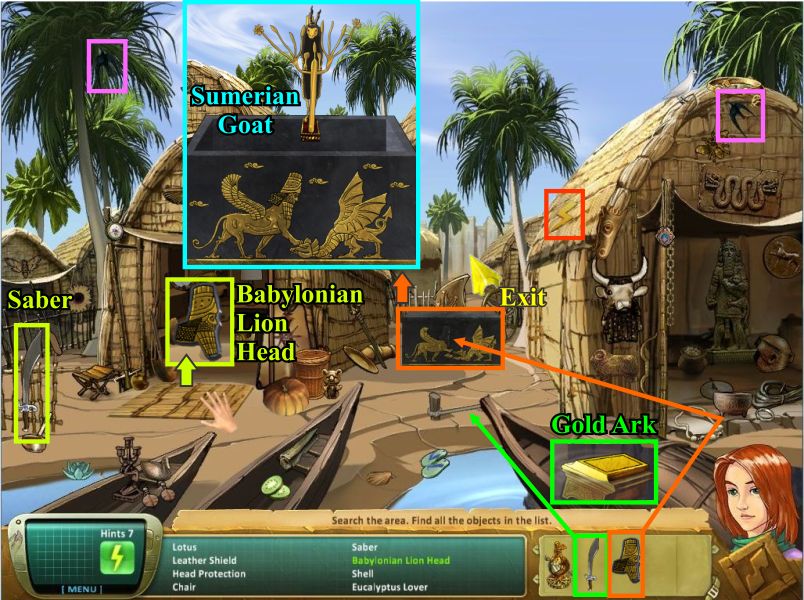
Mesopotamian Marshland Farm
Pick up the Saber and move the rug to get the Babylonian Lion Head.
Cut the rope tying up the boat on the right and it will move for you to collect the Gold Ark.
Place the Babylonian Lion Head on the chest and it will open for you to take the Sumerian Goat.
Exit to toward the structure in the background.
Screenshot
Ancient Dam
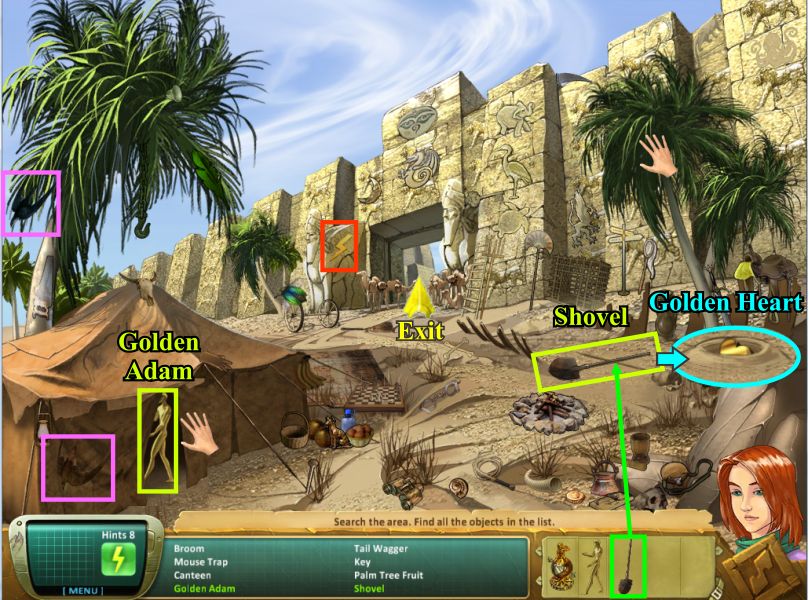
Move the tent flap to get the Golden Adam.
Shake the taller of the 2 trees on the right and the Shovel will fall out for you to pick up.
Use the Shovel to dig the cross mark in the sand where you picked it up and collect the Golden Heart.
Go through the opening in the wall.
Screenshot
Ziggurat
A ziggurat is a temple tower having the form of a terraced pyramid built in receding tiers and many have been found in the ancient Mesopotamian valley.
Move the curtain and it will blow away revealing the Potted Plant for you to collect.
Open the saddlebag on the left camel and take the Gems.
Give the Potted Plant to the camel on the left and he will bend down to eat it so you can collect the Golden Eve.
Exit toward the smokestacks in the background.
Screenshot
Outside Payne's Factory
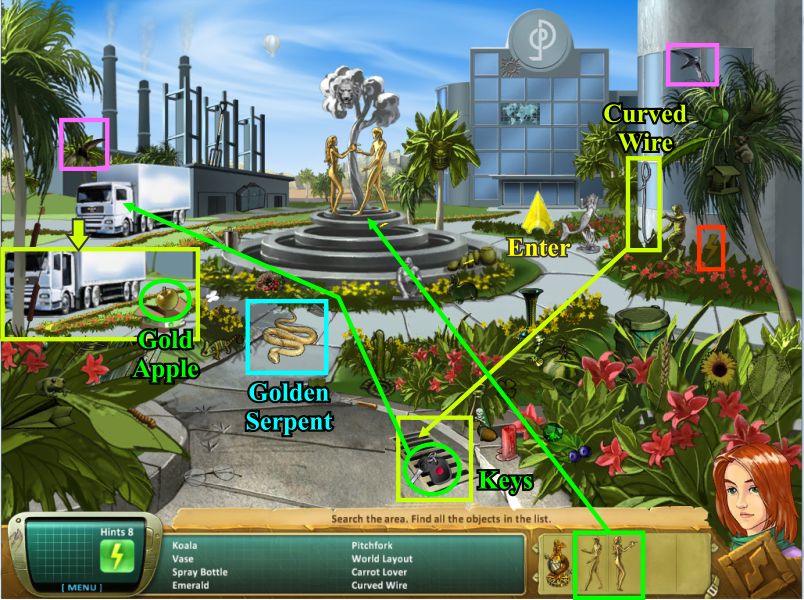
Pick up the Curved Wire and later use it to fish the Keys out of the drain.
Use the Keys to start the truck and it will move forward tossing out a box with the Gold Apple.
Place the Golden Adam and Eve on the fountain which will start up and throw the Golden Serpent on the ground.
Enter Payne's Factory.
Screenshot
Inside Payne's Factory
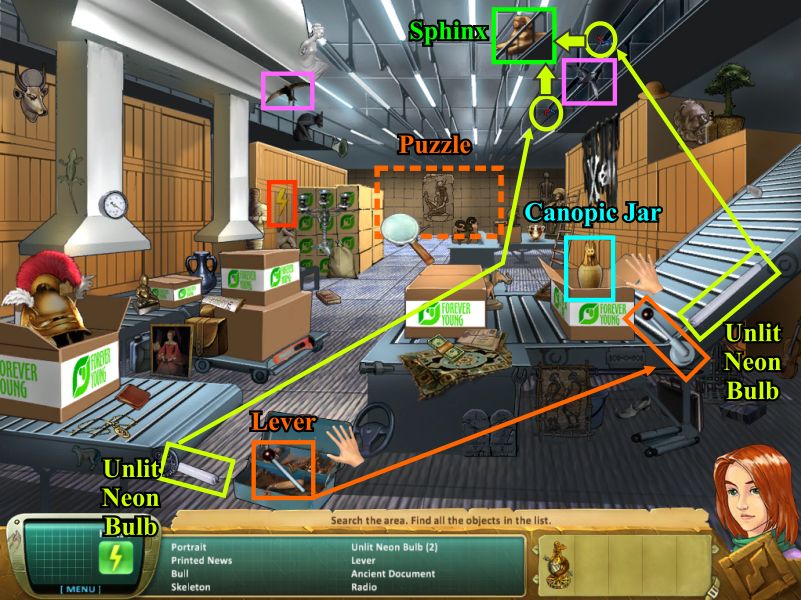
Open the toolbox to get the Lever.
Collect the 2 Unlit Neon Bulbs and during the second list of objects, place them on the 2 red markings on the side of ceiling lights to see the Sphinx.
Place the Lever where it belongs and a box with come down the conveyor belt.
Open the box and collect the Canopic Jar.
Click on the back wall for a close up view of a puzzle.
Screenshot
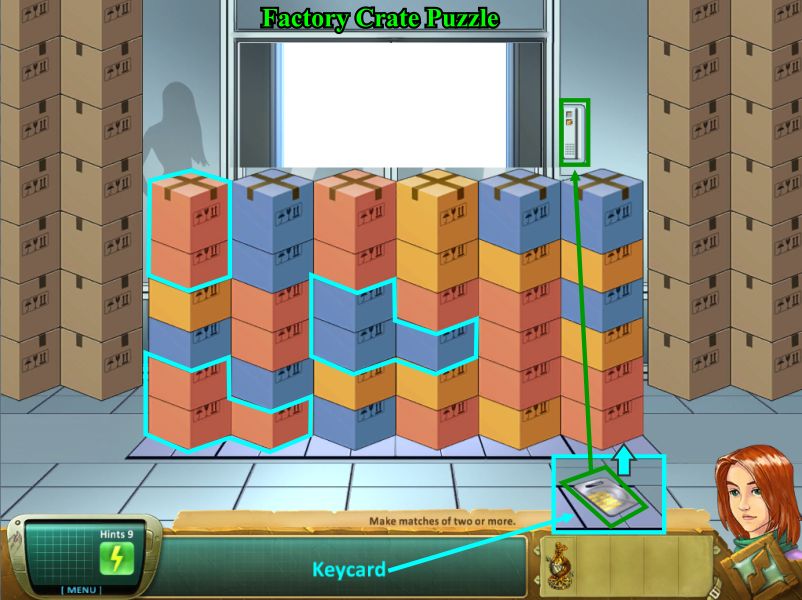
Factory Crate Puzzle
Your goal is to remove all the boxes 2 or more at a time like the sample markings in the screen shot.
The stacking is random and if you have any leftover boxes, a new configuration will drop down for you to try again.
When you have successfully removed everything you will find a keycard underneath.
Use the keycard on the door and go to the next location.
Screenshot
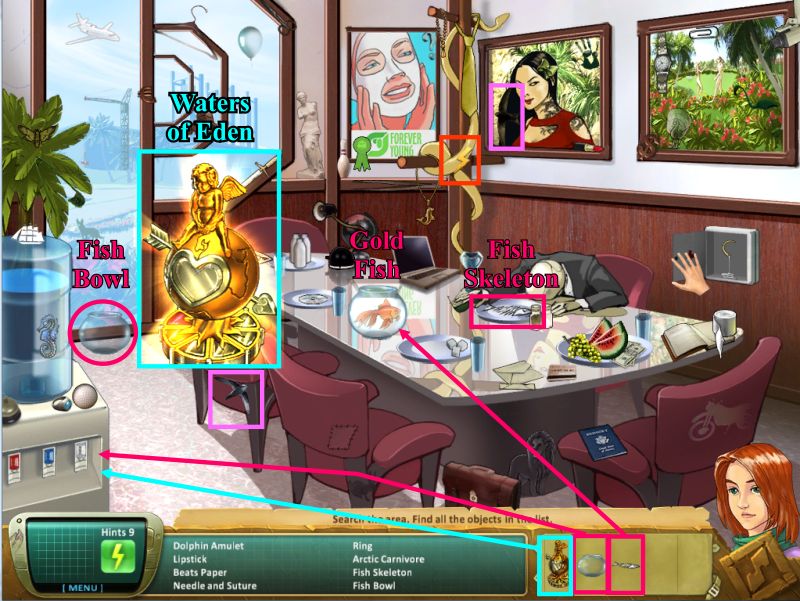
Board Room
Open the first aid kit to get the Needle and Suture.
Collect the Fish Bowl and Fish Skeleton.
Fill the Fish Bowl with water from the cooler and it will go to the table.
Place the Fish Skeleton in the water and it will turn into a Gold Fish.
Fill the Cupid with the Waters of Eden.
Screenshot
Chapter 3: Lijiang, China
Adam and Sam discuss that there has been a big media blitz on Forever Young skin care products and that M'Alice ne Pei is the new spokeswoman. It can't be a coincidence that Payne's company is stepping up sales just as Fountain of Youth water is being discovered. since she has now become a spokeswoman for his product.
Great Wall of China
Move the stone to pick up the Coin.
Pick up the Yin and the Matches.
To get the star you need to light the rocket with the Matches.
Place the Yin with the Yang and a door will open in the column for you to collect the Golden Mantis.
Exit through the door at the top of the stairs.
Screenshot
Monk Pagoda
Match up 16 related pairs:
2 Masks
Boy and Girl
Bamboo and Panda
Piggy Bank and Coin
Fish and Bait
Knife and Board
Cage and Sparrow
Anchor and Ship
Flower and Butterfly
Warrior and Rapier
Gong and Stick
Rat and Trap
Doll and Umbrella
Scabbard and Sword
2 Handballs
Stallion and Horseshoe
When you find all the pairs the Buddha will move revealing your next location so go there.
Screenshot
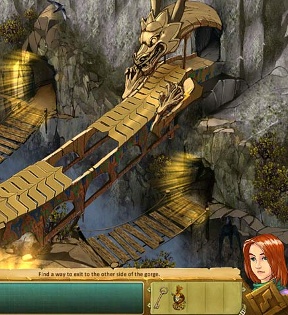
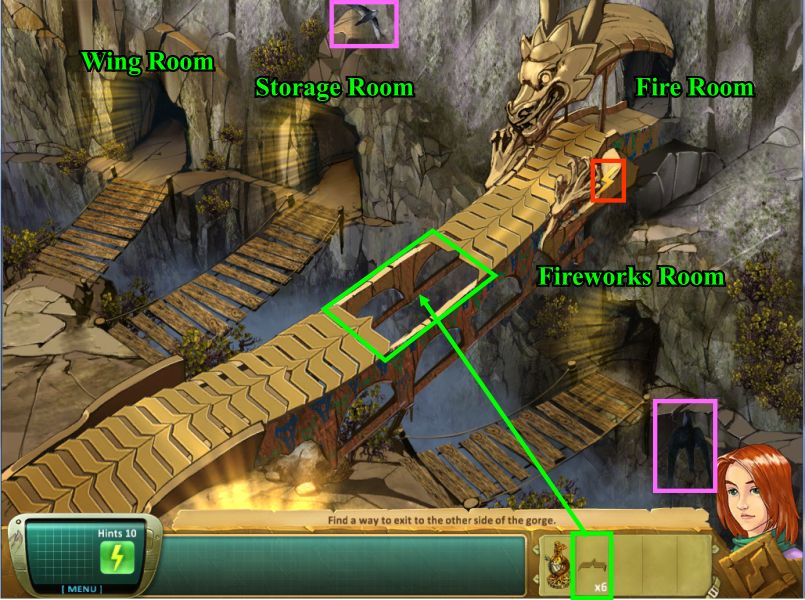
Tiger Leaping Gorge and Serpent Bridge
You are now at Tiger Leaping Gorge and need to find a way to repair the Serpent Bridge so go into each of the rooms to search for the missing planks.
When you find all 6 planks place them one at a time on the bridge and cross it to the Fire Room.
Screenshot
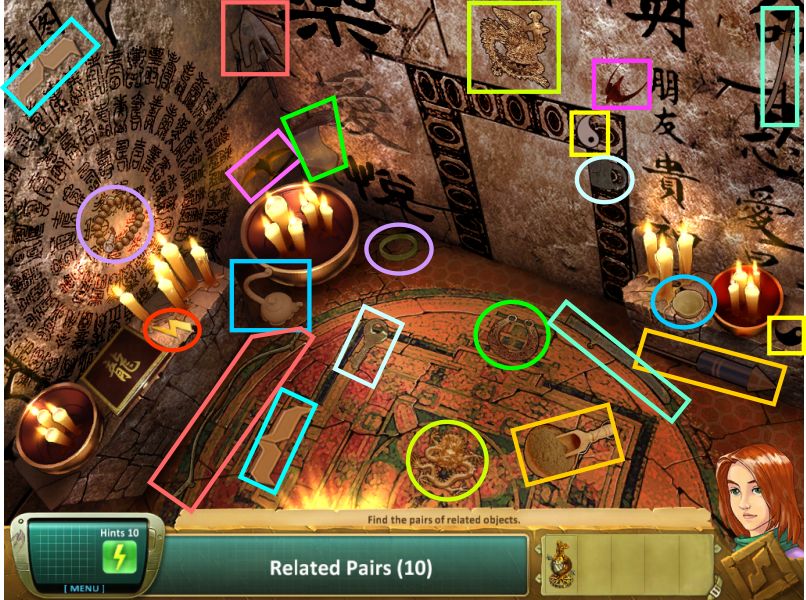
Wing Room
Collect 10 related pairs:
Bow and Dart
Key and Lock
Dragon and Phoenix
Teapot and Cup
Powder and Firework
Scabbard and Sword
Yin and Yang
Saddle and Horseshoe
Bracelet and Rosary Beads
2 Bridge Planks
Screenshot
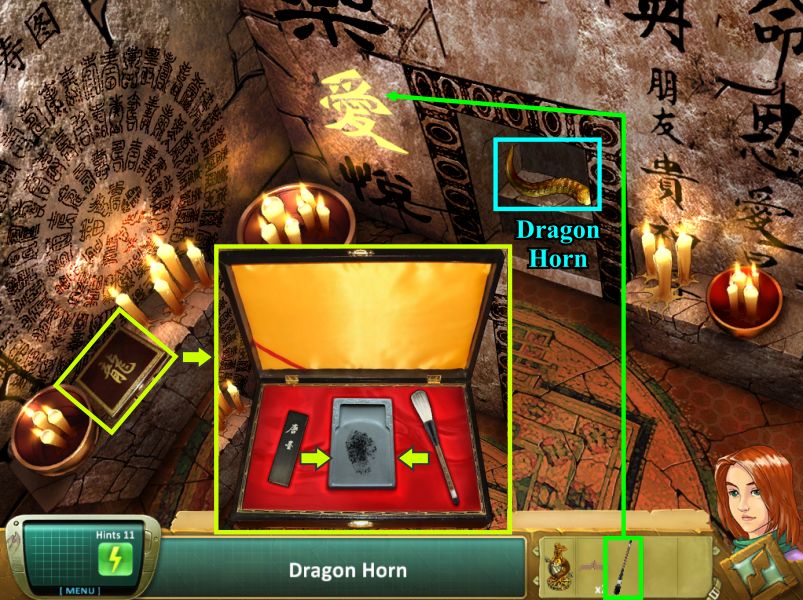
When you have matched up all the pairs click on the box on the bench at the left and pick up the Ink Stick and Calligraphy Brush.
Rub the Ink Stick on the plate in the box and place the brush on the plate to get an Inked Brush.
Use the brush to darken the faded character to the left of the small door and the door will open to reveal a Dragon Horn for you to collect.
Go back out to the Gorge and enter another room.
Screenshot
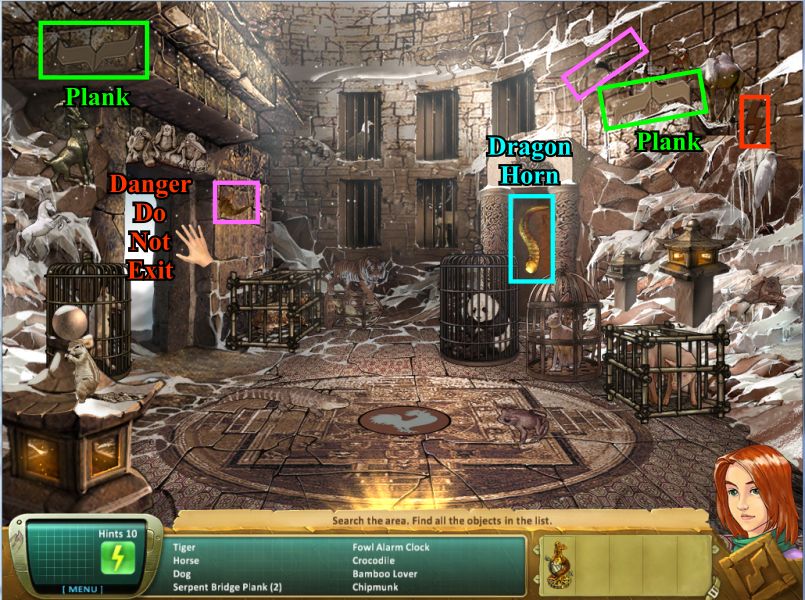
Storage Room
The door on the left is a cliff hanger so if you open it and go through it, Sam will be hanging there.
To pull her back up just click anywhere.
Once back in the room collect the 2 Planks and at the end click on the door at the back right to open it and get the other Dragon Horn.
Exit back to the Gorge and enter the third room
Screenshot
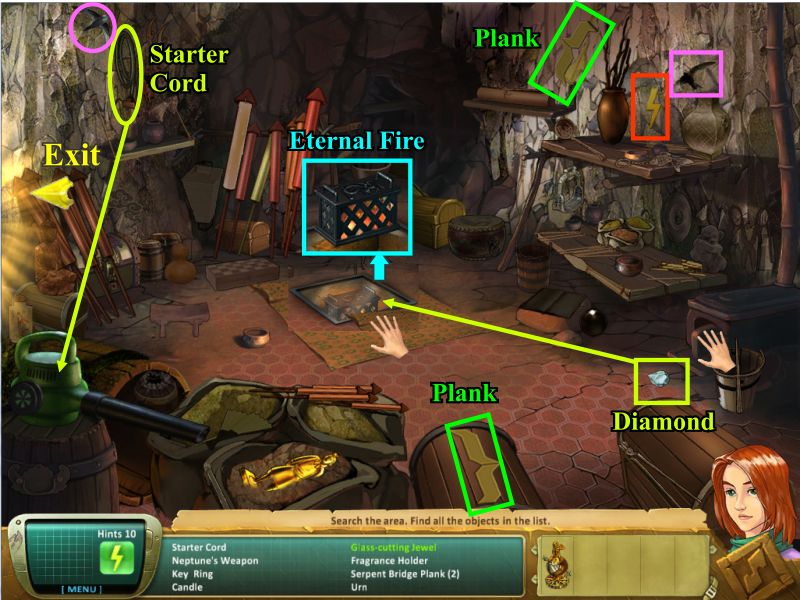
Fireworks Room
Pull back the rug to see the Eternal Fire under glass.
Open the oven and the Diamond will fall out.
Pick up the 2 Planks and the Starter Cord.
Use the starter cord on the leaf blower to get the Gold Statue.
Use the Diamond to cut the glass so you can collect the Eternal Fire.
Screenshot
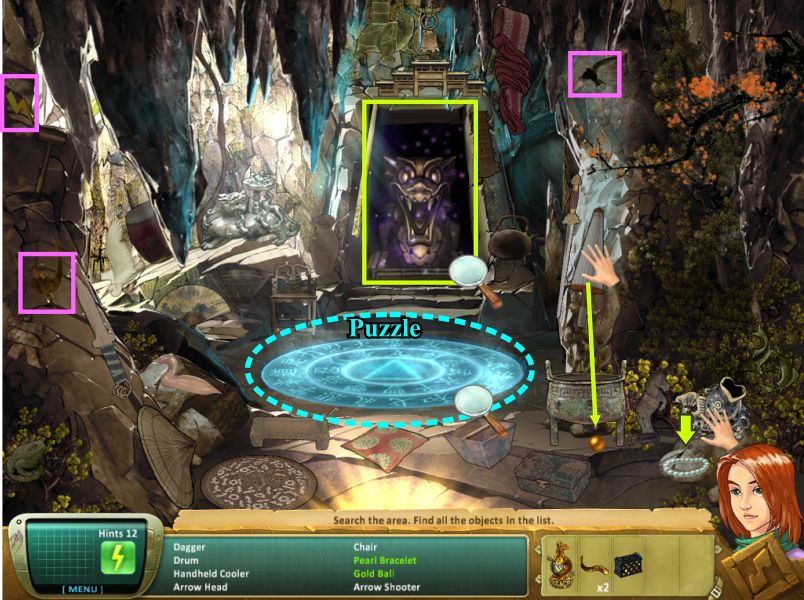
Fire Room
Open the parasol and the Gold Ball will fall out.
Pick up the fish and the Pearl Bracelet will fall on the rock.
Click on the blue circle for a puzzle.
Screenshot
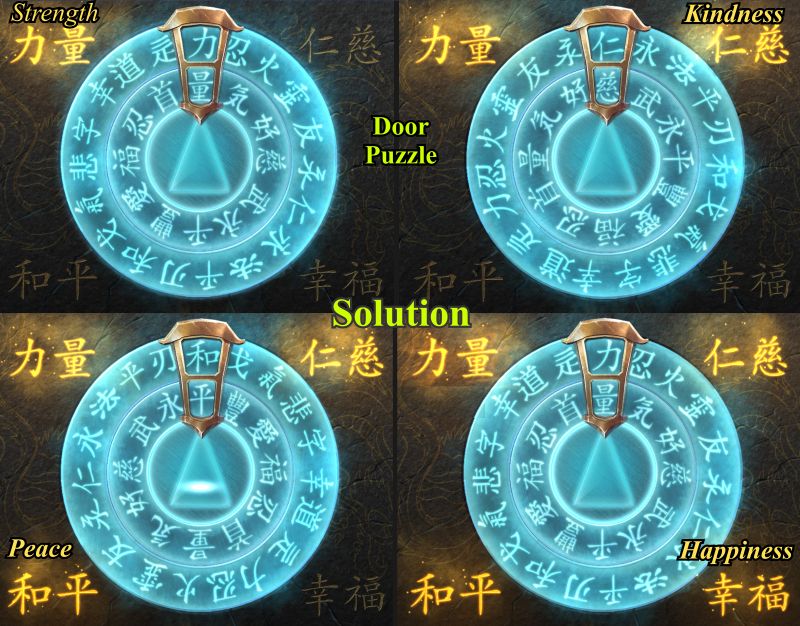
Dragon Door Puzzle
There are 4 Chinese words surrounding the wheel and your goal is to move the 2 circles on the wheel so the words show up in the marker.
The four words are Strength, Kindness, Peace and Happiness.
You can do them in any order you wish and when you have completed at 4 the door in the back will open.
Screenshot
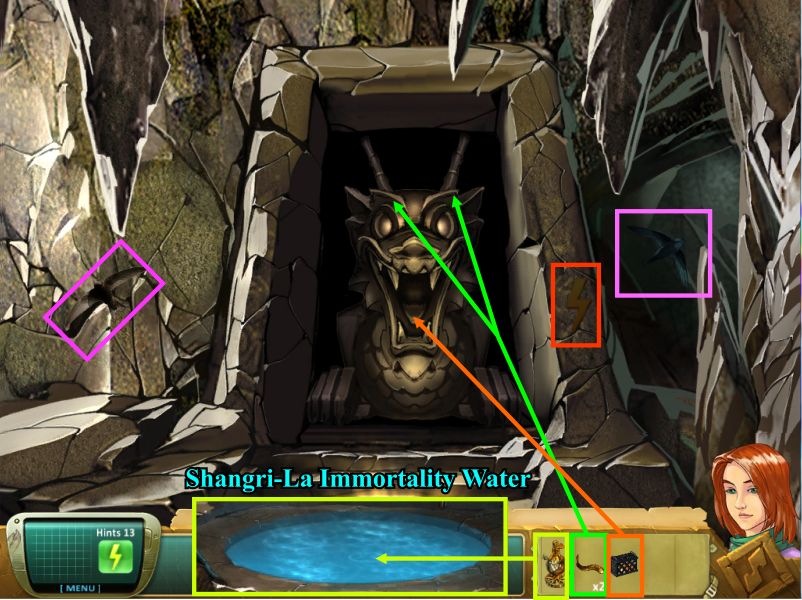
Dragon
Click on the Dragon for a close up view.
Place the 2 Dragon Horns where they belong and place the Eternal Fire in his mouth.
The Dragon will breathe fire that will melt the ice in the center of the Fire Room.
Fill the Cupid with the Shangri-La Immortality Water.
Screenshot
Chapter 4: Yasshayuk-Gordion, Turkey
Zoe is the daughter of legendary King Midas. She was turned to gold when she hugged him at the height of his curse. During one of Samantha's prior adventures she brought Zoe and her dog Asil back to life. The affects of her transmutation to gold and back have taken its toll and Zoe has begun aging at a rapid rate so only a miracle discovery by Sam can lead to a cure.
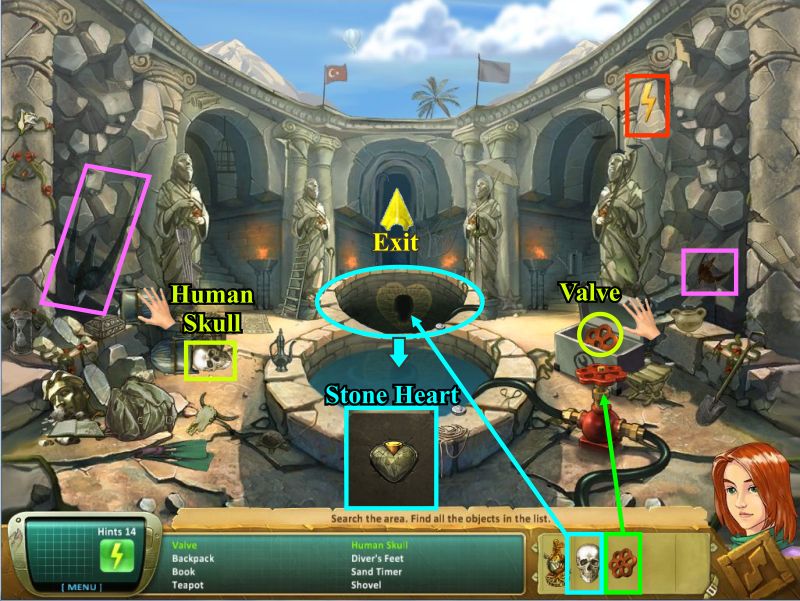
Midas Palace Entrance
Open the box and take the Valve.
Move the helmet and the Human Skull will fall out.
Place the Valve on the Water Pump to get rid of the well water.
Place the Skull in the opening in the heart and collect the Stone Heart when it rises.
The door to the Palace opens for you to enter.
Screenshot
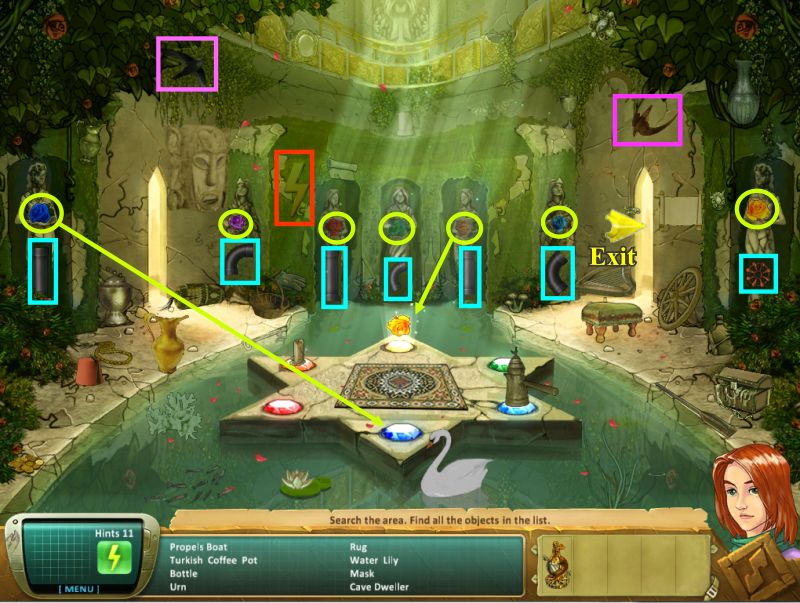
Midas Palace
Collect the 6 colored Roses from the statues.
Place the Roses on top of their corresponding colored stones in the middle of the room and collect the Valve and 6 Pipes that appear when the statues lower.
Exit through the door on the right.
Screenshot
Midas Treasure
After you've collected everything open the box next to Midas the place the Ring you collect on his finger and he will point the way out.
Screenshot
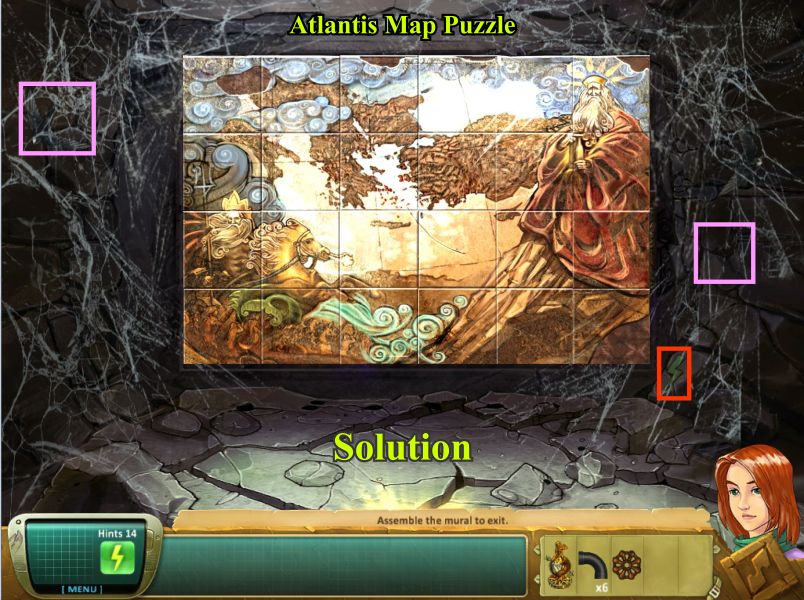
Atlantis Map Puzzle
In order to solve the puzzle you will need to slide the pieces around to assemble a complete mural.
When they are in the correct position they will become permanent.
When are finished exit through the tunnel but don't forget to collect the birds and hint.
Screenshot
Saladin Castle
Open the crate to get the Pick Axe and collect the Scanner next to it.
Use the Scanner from your inventory to find where the Gold Dancer is hidden.
Use the Pick Axe to break the rock and collect the Gold Dancer.
Click the statue hand to reveal a secret compartment.
Place the Gold Dancer on the music box and the drawer will open for you to take to Gold Star.
Place the Gold Star on the indentation in the statue and it will move forward for you to collect the Genie Bottle.
After you get the Genie Bottle the exit will appear behind the stone statue so exit left.
Screenshot
This part of her quest is taking Sam on the mural's path so next stop is Jerusalem looking for Solomon's mines.
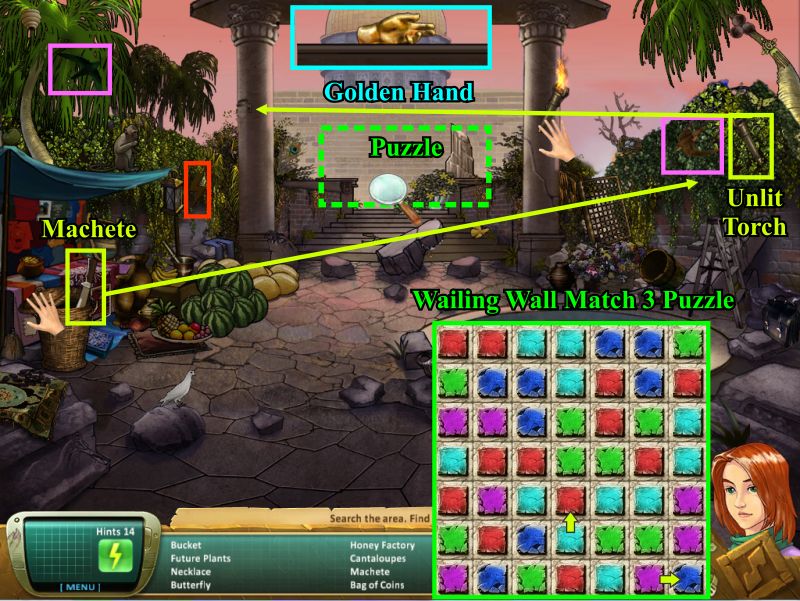
Wailing Wall and Puzzle
Open the basket on the left to get the Machete which you will eventually use on the vines where you pick up one of the birds so you can find the Unlit Torch.
Place the Torch on the left column and it will light.
Touch either of the Torches and they will turn upside down and the piece between the columns will lower with the Golden Hand on top of it.
Go for a close up of the Wailing Wall and click on it for a Match 3 Puzzle.
When you have completed the puzzle the wall will open so enter.
Screenshot
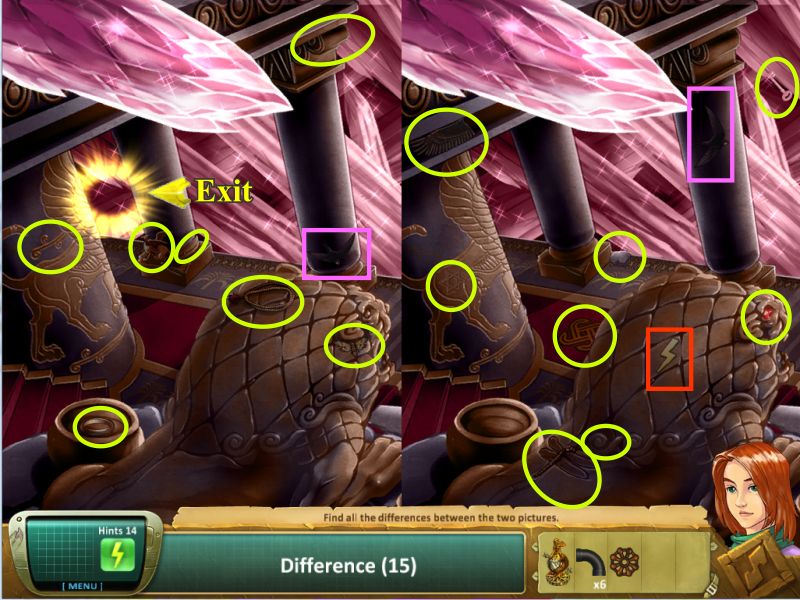
Crystal Room
Find 15 differences between the 2 pictures and the exit at the left will appear.
Screenshot
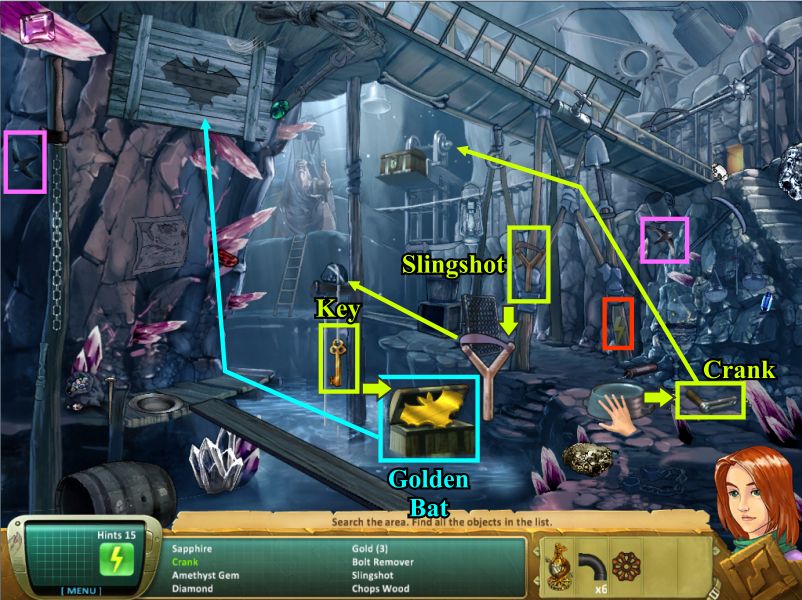
Solomon Mine
Move the upside down pan to find the Crank.
Pick up the Slingshot which you will later use to get the key by placing it on the rock on the pole.
To get the Golden Bat you will have to use the Crank on the winch so it will lower the chest.
The chest will float toward you so you can reach it with the key and open it to collect the bat.
Place the Golden Bat on the wooden indentation in the upper left of the scene.
Screenshot
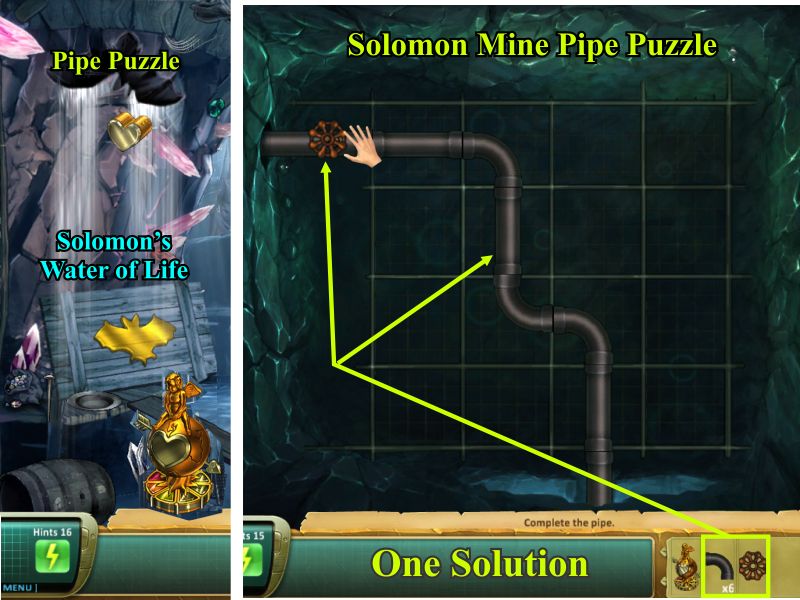
Solomon Mine Pipe Puzzle
The box with the bat will fall down so click on the sparkles for a puzzle.
Place your 6 pipes on the board.
When you connect one to another a rotating circle will appear for you to turn the pipe.
When you have finished placing the pipes put the Valve in place and click to turn it.
Solomon's Water of Life will flow down the wall so place the Cupid in it to fill it up.
Screenshot
Chapter 5: Arizona
Water immortality in this area of the country refers to the Hopi Kachina myth. Angela Weaver introduced Samantha to a shaman who may be able to give some insight about Zoe's condition.
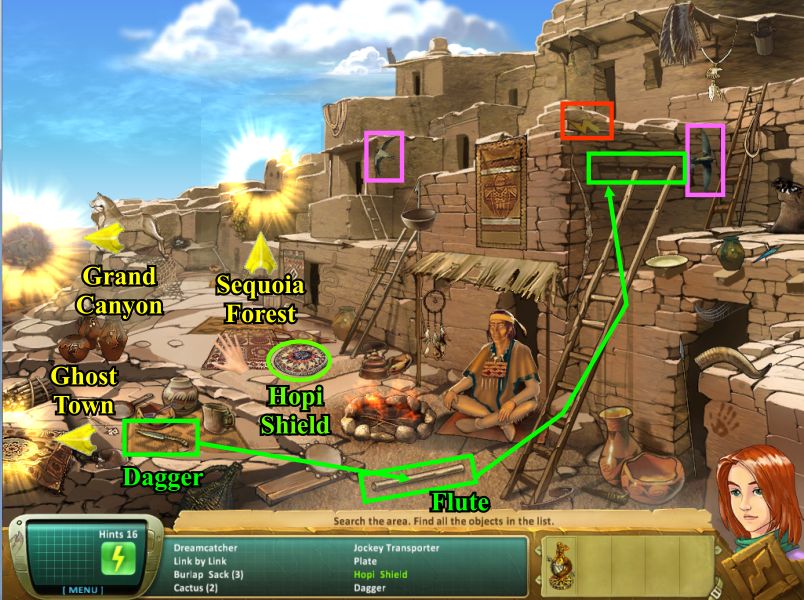
Walpi Valley
Move the rug to get the Hopi Shield.
Collect the dagger which you will later use to poke holes in the piece of pipe to create a Flute.
Place the Flute in the indentation at the top of the ladder next to the right Swift Bird and the wall will open to reveal a vessel with a Kokopelli painted on it.
Screenshot
Samantha encounters the Shaman who tells her the spirits are sending her on a quest for the Hopi people. There are four sacred tablets. He has one but she must find the other three so the Kachina will reward everyone with the special rain of eternal life.
Grand Canyon
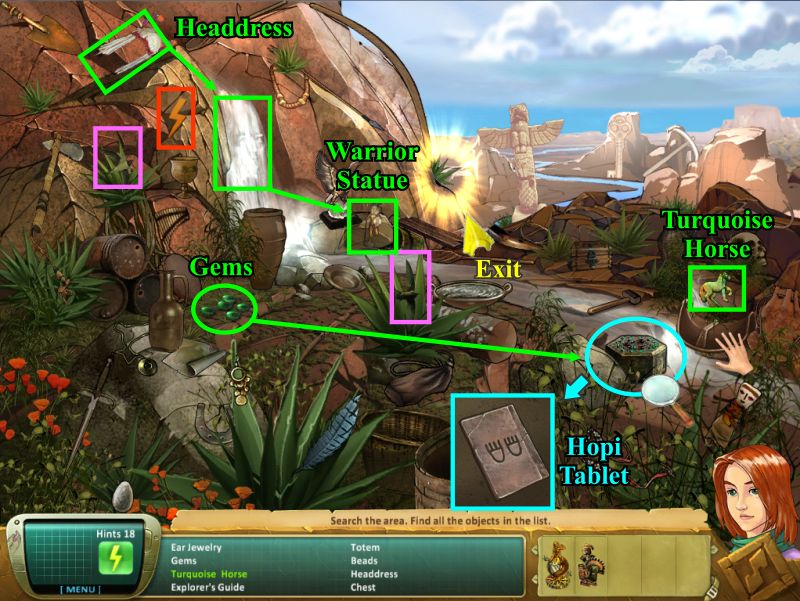
Move the saddle to find the Turquoise Horse.
Collect the Gems and the Indian Headdress.
Place the Headdress on the head figure in the waterfall to collect the Warrior Statue.
Place the Gems on the Jewel Box to open it and collect one of the Hopi Tablets.
Screenshot
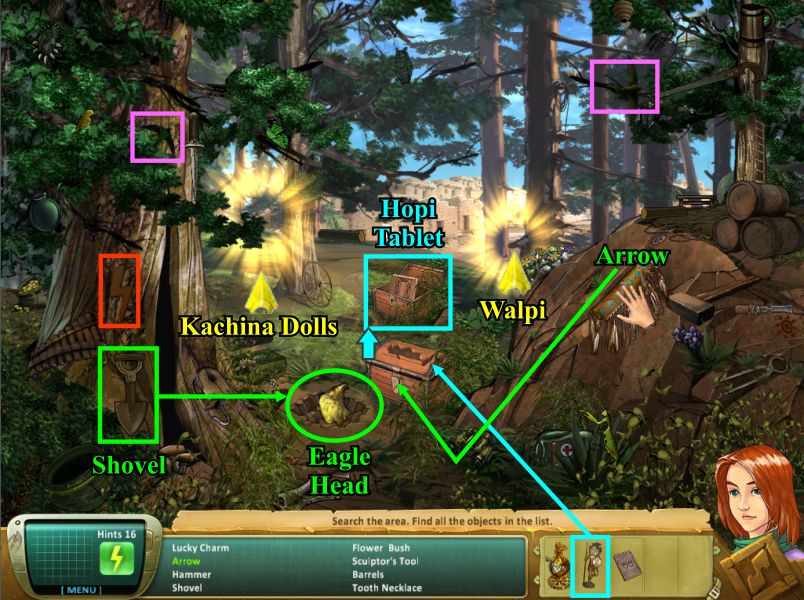
Sequoia Forest
Move the quiver to get the arrow.
Use the shovel to get the Eagle Head.
Exit on the left the other Sequoia Forest area to find the Kachina Spirit Dolls.
Screenshot
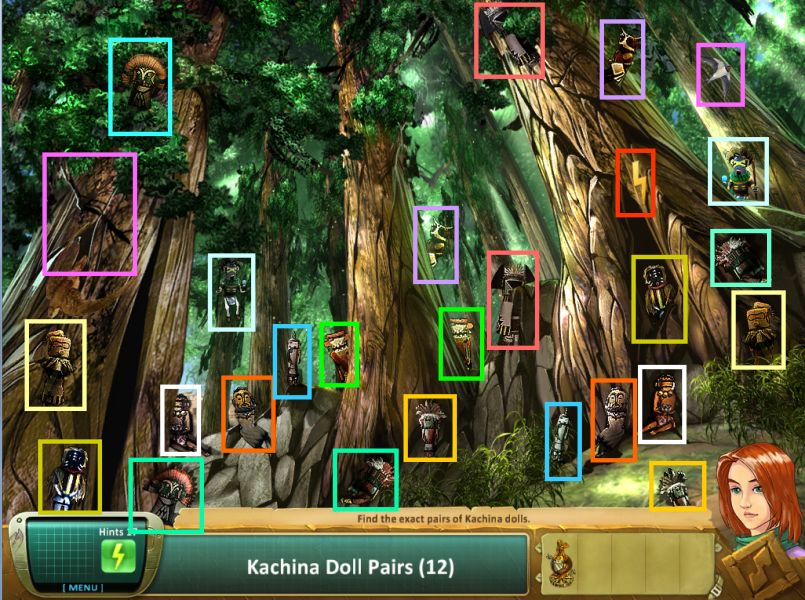
Sequoia Forest Kachina Spirit Dolls
It is said that the Kachina spirit dolls in Hopi Legend bring life-giving rain.
Find 15 Kachina Doll Pairs
Screenshot
Exit back to Walpi and enter the Ghost Town.
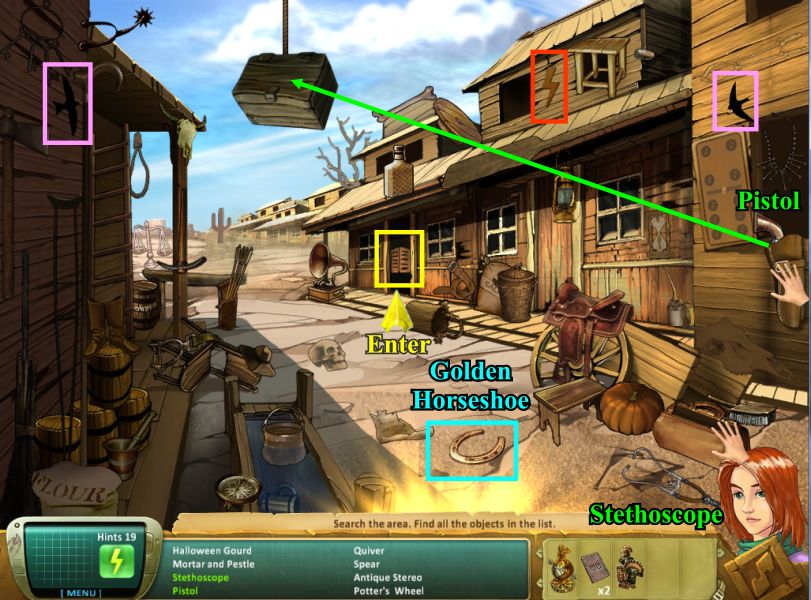
Ghost Town
Open the Medical Bag at the right to get the Stethoscope.
Move the Pistol Holder and the Pistol will fall out on the ground for you to collect.
Use the Pistol to shoot the crate so the Golden Horseshoe will fall out for you to collect.
Enter the Card Room.
Screenshot
Ghost Town Card Room
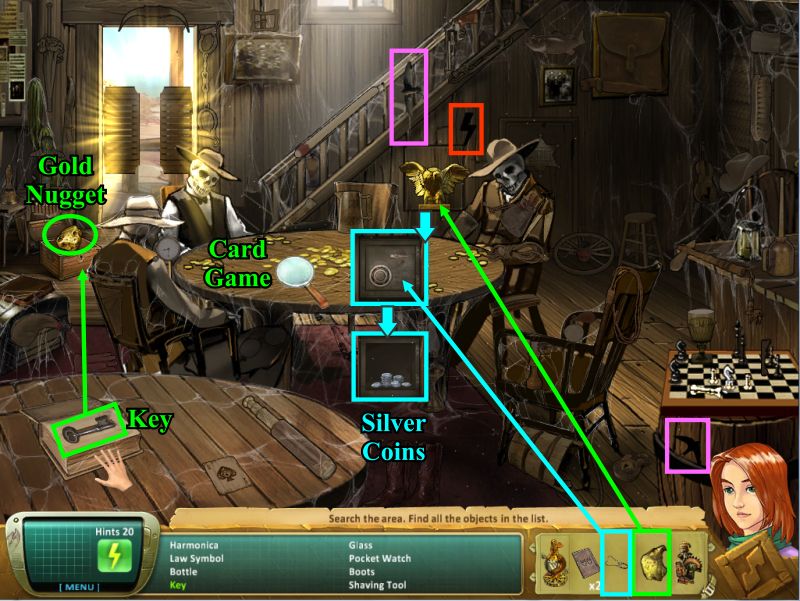
Open the book on the table to get the Key.
Use the Key to open the chest and get the Gold Nugget.
Place the Eagle Head from your Inventory on the Eagle and it will move to reveal the safe.
Place the Stethoscope on the sage and it will open for you to get the Silver Coins.
Screenshot
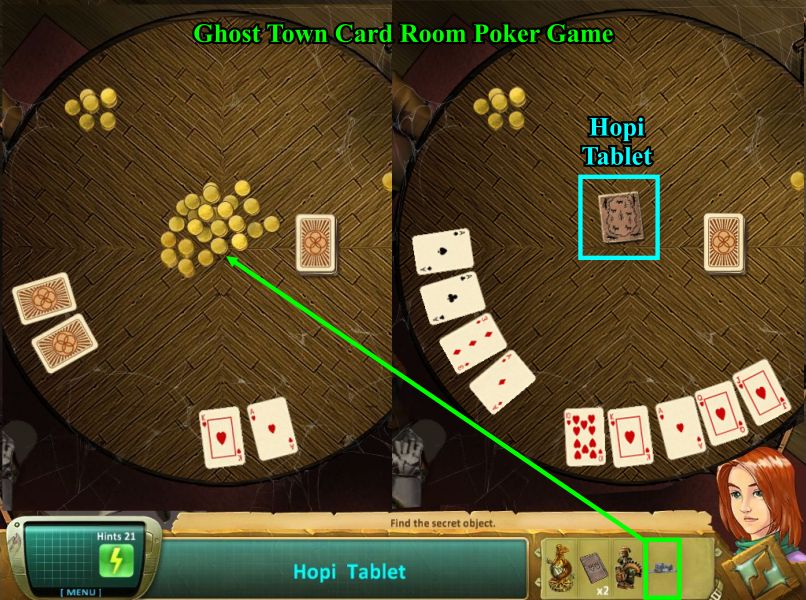
Ghost Town Card Room Poker
Click on the table for the Poker Game.
Your hand will be automatic and two of the players will fold.
Place your silver coins on the pile and more cards will be dealt.
You will win and be able to collect the remaining Hopi Tablet.
Screenshot
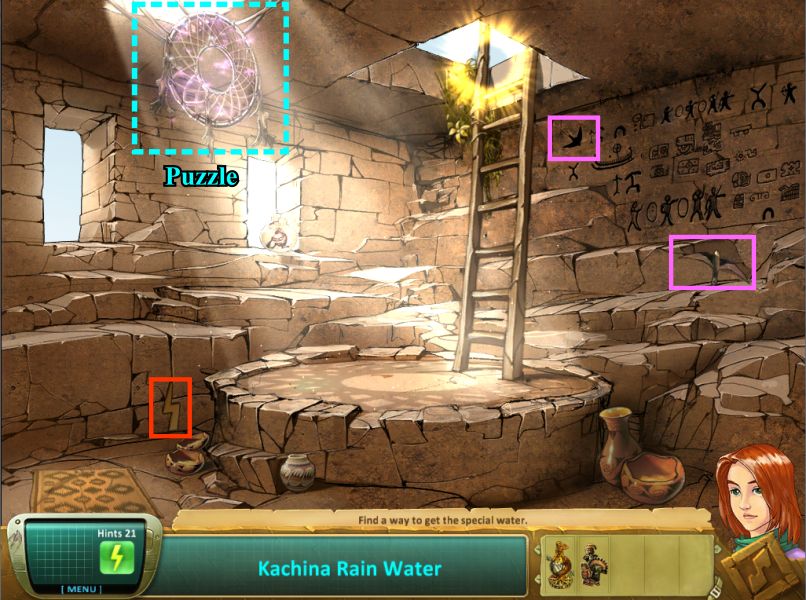
Walpi Quest
Give the shaman all of the Hopi Tablets one by one and an entrance to the secret chamber will appear. Enter the chamber and click for a close up of the Dream Catcher for a puzzle.
Screenshot
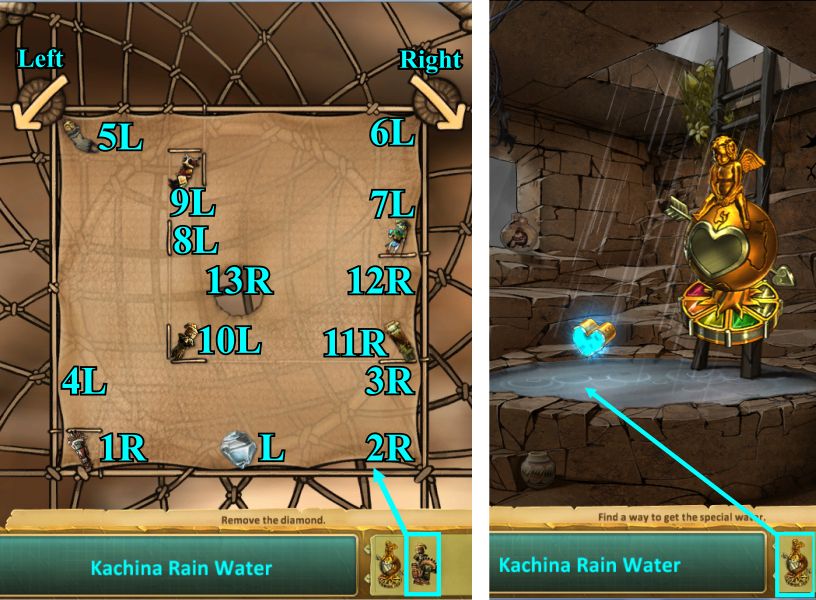
Walpi Quest Puzzle
Your goal is to get the Diamond to the place in the middle of the scene so follow the directions and screenshot.
Left, Right, Right, Right, Left, Left, Left, Left, Left, Left, Left, Right, Right, Right.
When you have finished the puzzle, the rain will fall and fill the well so place the Cupid in the water and it will fill itself with the Kachina Rain Water.
Screenshot
Chapter 6: Exuma Island the Bahamas
M'Alice ne Pei is a renowned magician and collector of magic tricks, espionage, thief, and smuggler. She is one of the world's best magicians and sleight of hand artists and is motivated by the thrill of tricking the best minds in the world. Her wisdom somehow exceeds her age and the criminal underworld so it is thought that she is decades older than she appears. Another carefully guarded mystery is the bond between M'Alice and Payne.
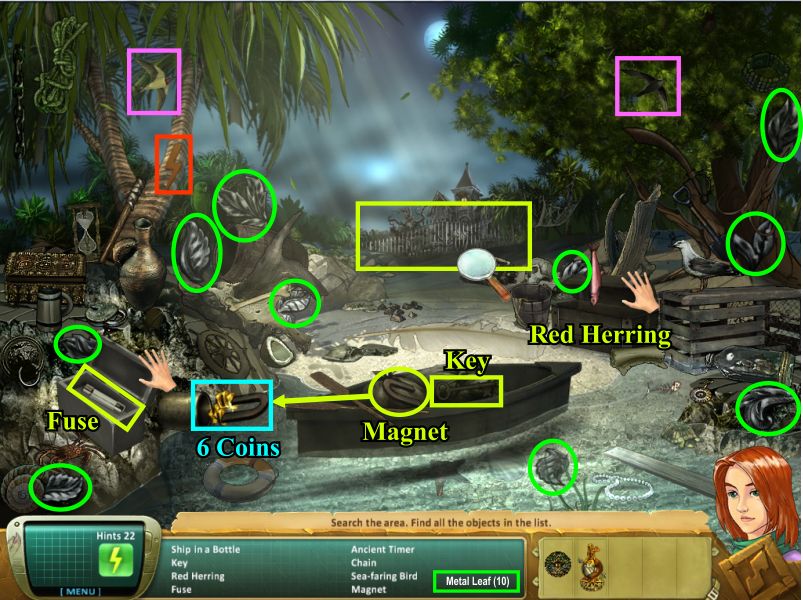
Exuma Beach
Open the box at the right as well as the tool box on the left and you can collect the Red Herring and the Fuse.
Also pick up the Fuse, Key, and Magnet.
Your next task will be to collect 10 metal leaves which are marked in green in the screenshot.
Use your Magnet on the pipe at the left and you will pull out 6 gold coins which you will need to collect off the magnet one coin at a time.
When you have completed everything, the gate in the background will glow for you to go there.
Screenshot
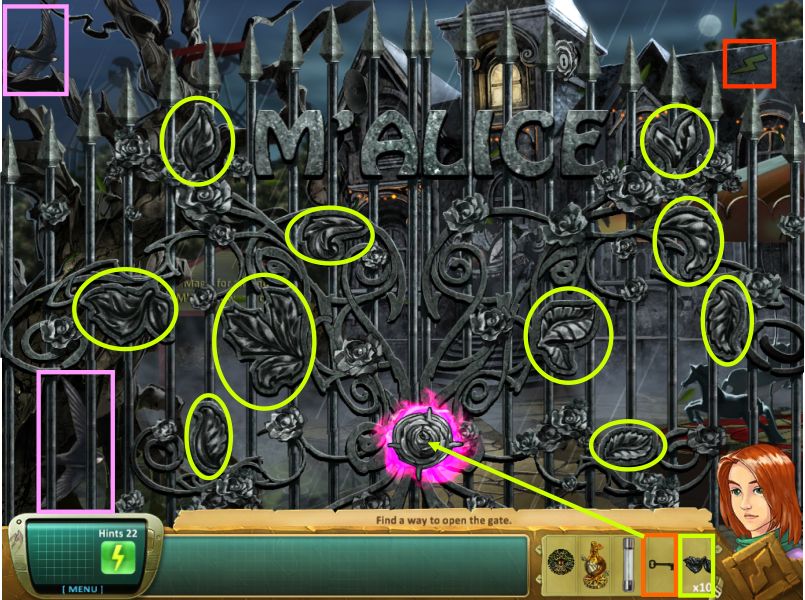
M'Alice Gate
Place all the Fig Leaves in their correct indentation and a keyhole will appear in the lock for you to use the key from your Inventory.
Screenshot
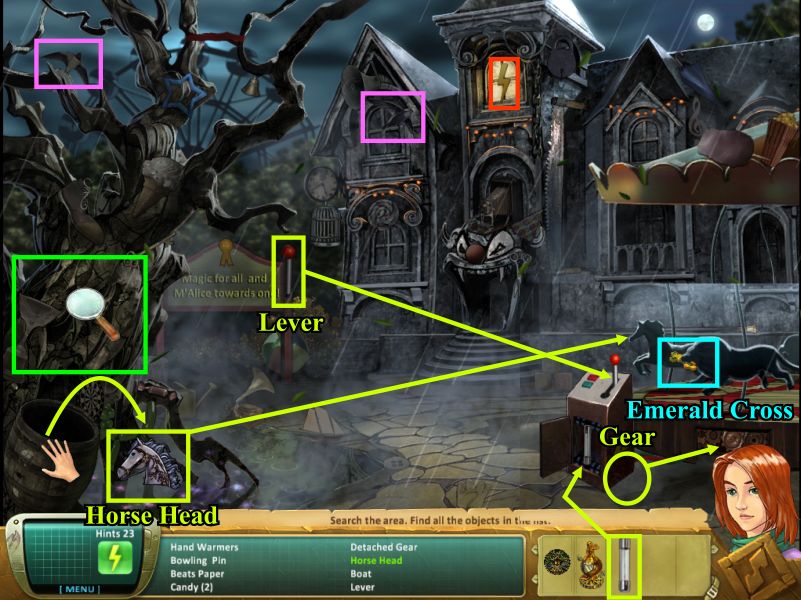
Exterior of M'Alice House
Move the barrel to get the Horse Head and pick up the lever and gear.
In order to get the Emerald Cross, put the Fuse from your into the carousel mechanism, the Horse Head on the horse, and the Lever in place.
Collect the cross and click on the tree for a close up.
Screenshot
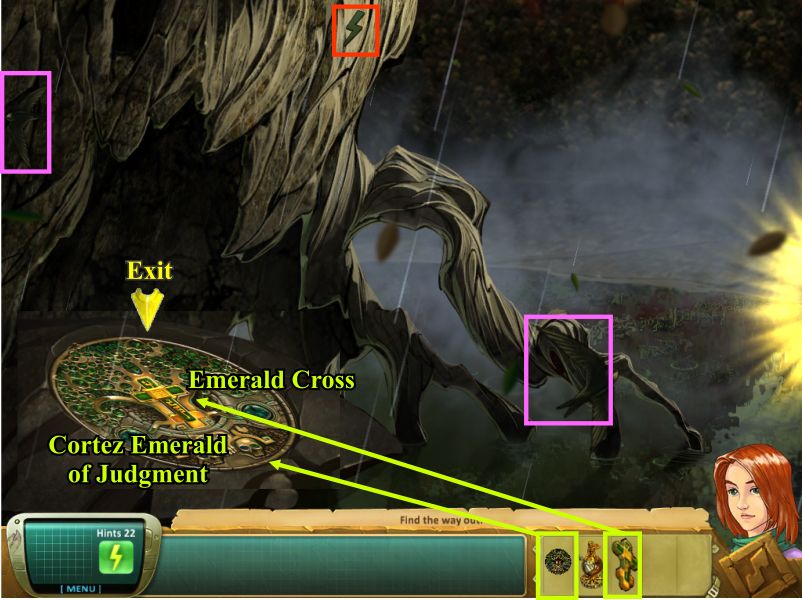
Tree Exit
Place the Cortez Emerald of Judgment on the indentation and the Emerald Cross in the middle.
It will rotate and create an opening for you to exit.
Screenshot
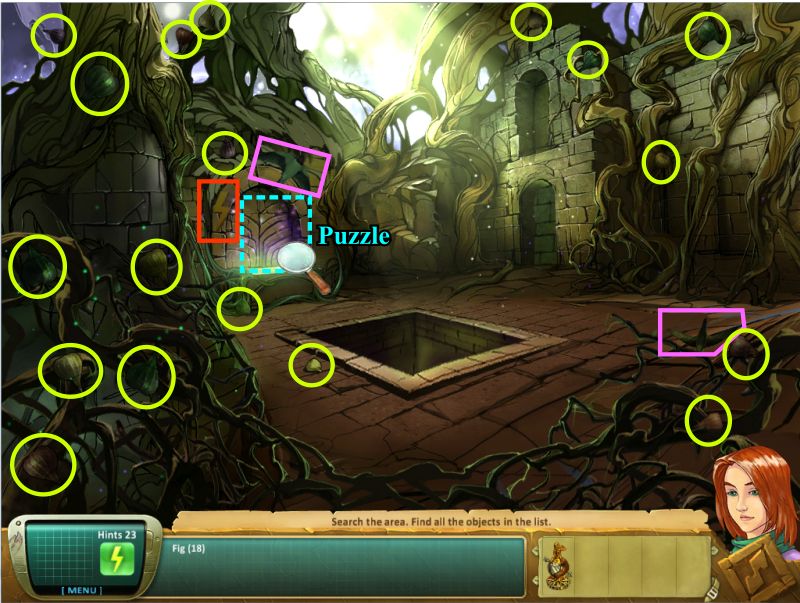
Fig Roots
Collect the 18 Figs and click on the sparkling area for a close up and puzzle.
Screenshot
Fig Roots Puzzle
Place the Figs on the puzzle board and they will arrange themselves on the tiles.
There are 3 tiles already permanently in place so your goal is to complete the pattern with the remaining 6 tiles as shown in the screenshot.
When you have finished the puzzle place the Cupid in the water to fill it and exit through the door at the right which has opened.
Screenshot
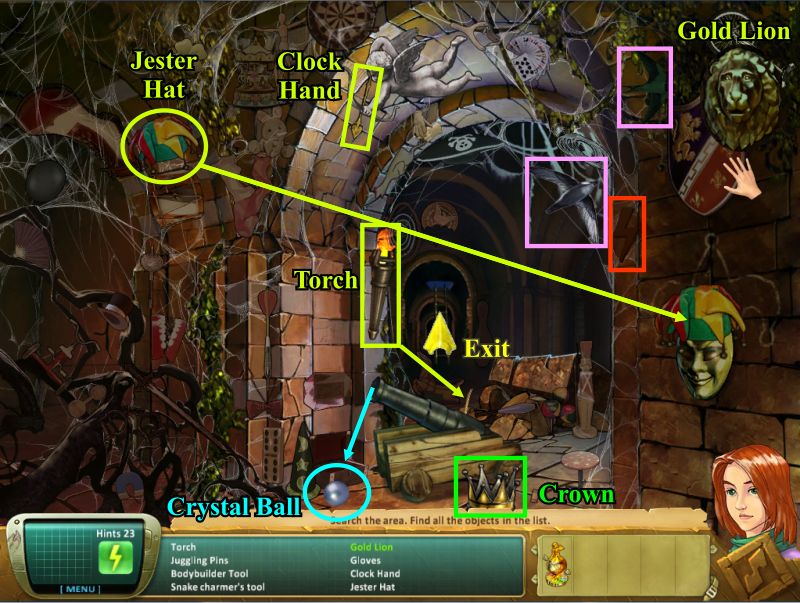
Tunnel
Move the shield to get the Golf Lion.
Collect the Jester Hat, Clock Hand and Torch.
Place the Jester Hat on the Jester and the Crown will fall from above to the ground.
Light the cannon fuse with the Torch and it will give you the Crystal Ball.
Exit through the door at the back when it opens.
Screenshot
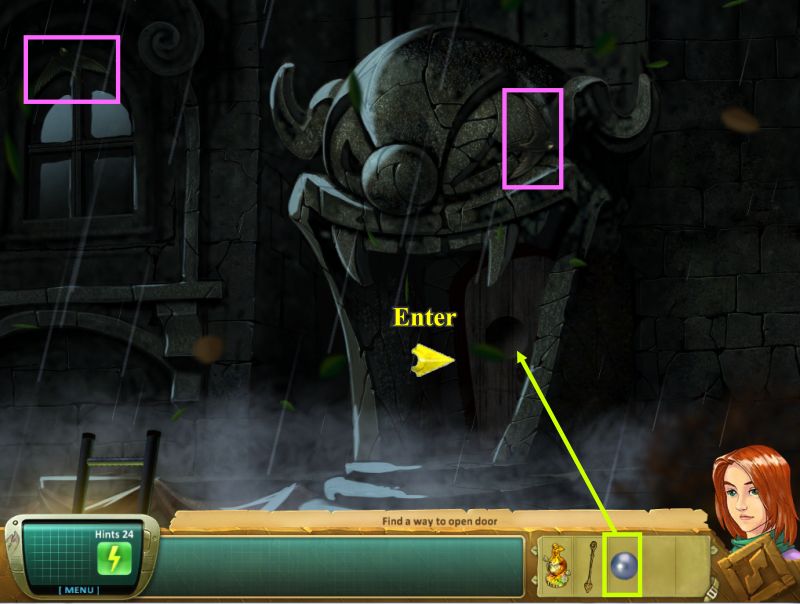
Labyrinth Entrance
There is no Lightning Bolt in this scene so place the Crystal Ball and enter the Labyrinth.
Screenshot
Labyrinth Puzzle
Go forward 3 times.
Turn left and go forward 4 times to the 10 of Clubs.
Turn right and go forward once.
Turn left and go forward 4 times to the Jack of Hearts.
Turn left and go forward once.
Turn right and go forward once.
Turn left and go forward twice.
Turn left and go forward 3 times to Queen of Spades.
Turn right and go forward once.
Turn left and go forward twice.
Turn left and go forward once.
Turn right and go forward twice.
Turn right and go forward 6 times to the King of Diamonds and the lamp will go into your Inventory.
Turn right and go forward 4 times to the spider web and use the lamp to get rid of it.
Forward once to the door and open it to go inside.
The screenshot is a directional diagram in case of need.
Screenshot
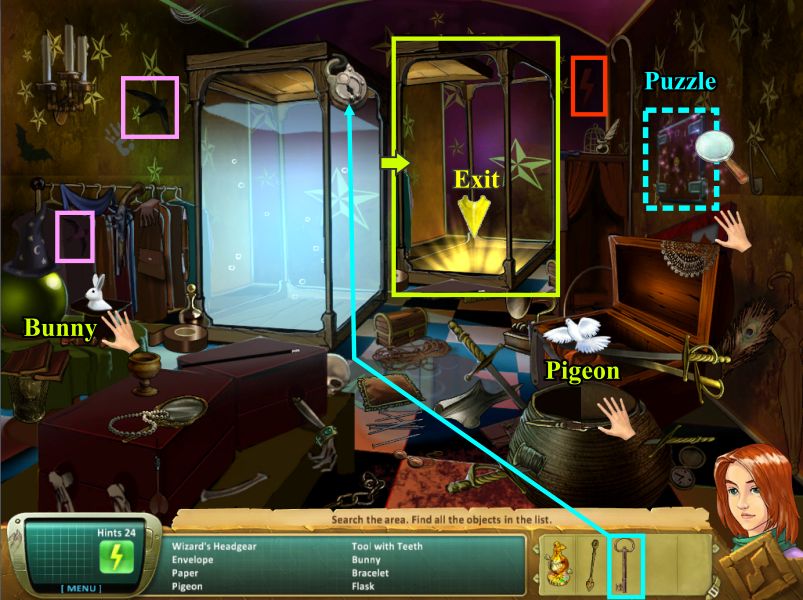
M'Alice Magic Room
Move the lid off the container to get the Pigeon and disturb the hat to get the Bunny.
Move the wall hanging to find the safe and click on it for a close up.
Once you have the Key use it on the padlock and the water will drain from the tank revealing an exit for you to take.
Screenshot
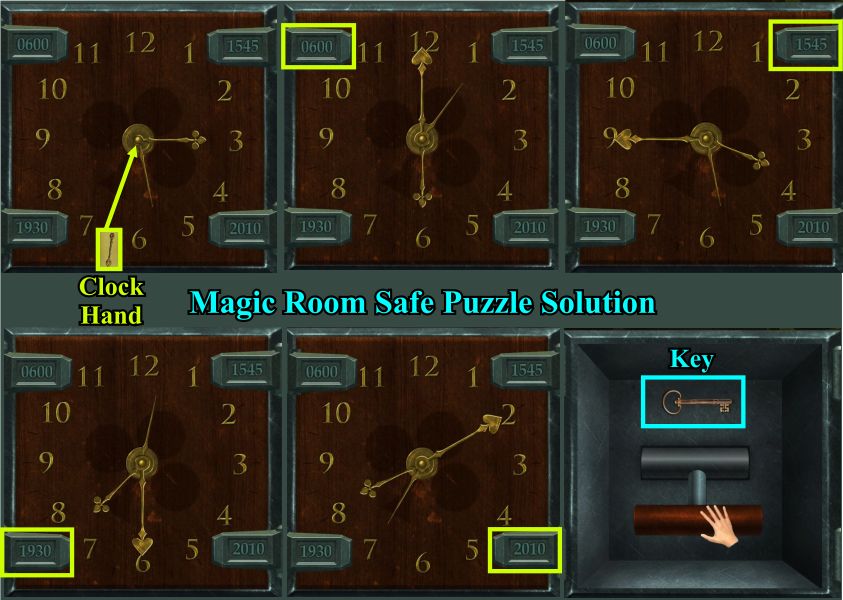
Magic Room Safe Puzzle
There are 4 times that must be set on the clock in any order you wish but first you need to place the Clock Hand.
Use the minute hand to set the times which are: 6:00 (600), 3:45 (1545), 7:30 (1930), and 8:10 (2010).
Once you have set all 4 times the safe will open so pull the lever down to get the Key.
Screenshot
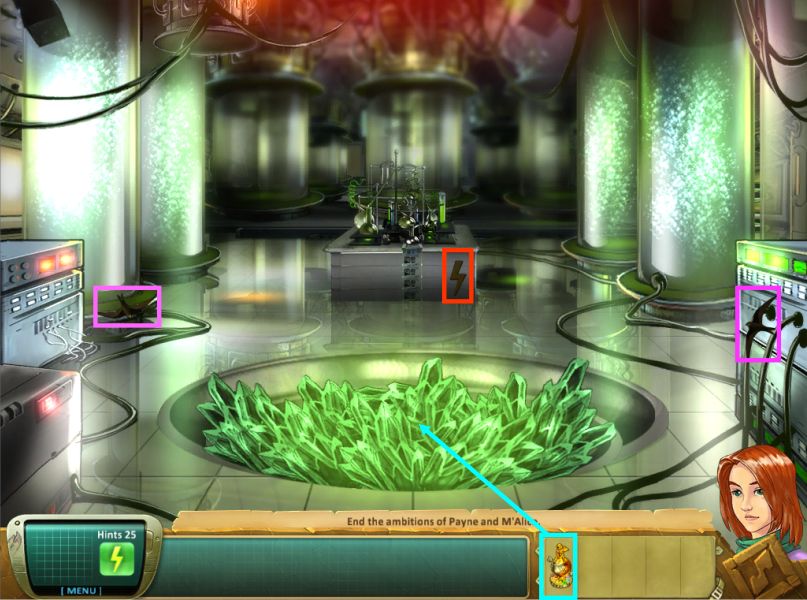
Incubation Room
You encounter Payne and M'Alice so place your Cupid on the green crystals and watch what happens.
Screenshot
You have completed your quest to find all of the waters of eternal life so watch the ending movie.
Be sure to check out all the items you have picked up for the Museum, the Trophies you have collected, and try your hand at the Unlimited HO.
Special thanks to Jazz for this fabulous walkthrough!
Posted by: grinnyp |
August 22, 2010 6:40 PM
|
August 22, 2010 6:40 PM