
Nightmare Realm
Platform: Mac, Windows
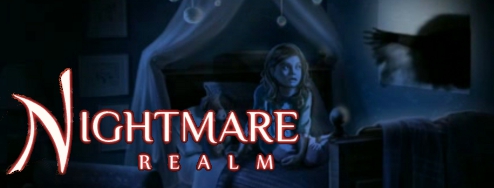
![]() Ask any child of the 1980s and we'll tell you; fantasy isn't always happy. We learned that from Sarah, and even from Fantasia. Four years after a freak car accident that killed her husband and left her daughter Emily without a father, Kathleen knows better than anyone that life isn't always a fairytale. But what she doesn't know is that doesn't mean there isn't any magic left in her life. Nightmare Realm is a stunning and engrossing hidden-object dark fantasy adventure from Lesta Games and Films that's full of surprises and blows almost all competition out of the water.
Ask any child of the 1980s and we'll tell you; fantasy isn't always happy. We learned that from Sarah, and even from Fantasia. Four years after a freak car accident that killed her husband and left her daughter Emily without a father, Kathleen knows better than anyone that life isn't always a fairytale. But what she doesn't know is that doesn't mean there isn't any magic left in her life. Nightmare Realm is a stunning and engrossing hidden-object dark fantasy adventure from Lesta Games and Films that's full of surprises and blows almost all competition out of the water.
 A moment before midnight the day before Emily's seventh birthday, something strange and terrifying happens. Kathleen is woken by Emily's visiting uncle Peter, who brings her downstairs just in time to witness Emily's abduction. The police aren't going to be much help with this one, however, since "big black cloud of noxious evil with eyes made of glowing hate" generally doesn't translate well to a suspect sketch. Kathleen has no choice but to pursue, and she and Peter unknowingly step into a massive conspiracy from another realm that endangers all the bright young minds of the future. What is the "bridge of seven"? Who are the "Extractors", and what do they want with Emily?
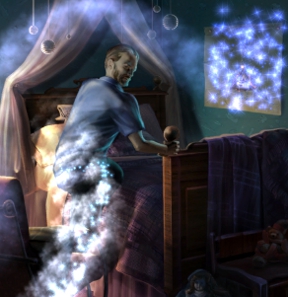
Gameplay is simple and done simply by clicking with the mouse. In casual difficulty, objects you can interact with will sparkle or cause the cursor to change as you mouse over them. Make sure you investigate everything; there are clues everywhere, and Kathleen's journal will keep track of objects or places of note that could come in handy. Most puzzles don't come with instructions, but if you're stuck, the hint button will tell you what you should be doing. It will also provide you with a nudge in the right direction if you're at a loss as to what to do or where to go during normal gameplay. Just make sure to keep your eyes peeled for origami figurines; collect all 33, and you'll unlock something special.
 Analysis: Nightmare Realm is a fairly unusual hidden-object adventure in that it places such a large emphasis on story, and also in that the story itself is actually really good. While it starts out somewhat predictable (seen one adorable moppet kidnapped by supernatural forces, seen 'em all), Nightmare Realm has more than enough twists and turns to keep feeling fresh and original, and players who dismiss it based on the first fifteen minutes of play are going to be sorely missing out. The world design here is also top notch, creating a realm that feels strange and otherworldly without relying on typical fantasy tropes to do so. Nightmare Realm really felt like it could have been a top-notch dark fantasy film in the form of Labyrinth (only without David Bowie's painted on pants), but as a game it still delivers better than most other casual titles out there.
If there's a downside to the story, however, it's that it's a little anticlimactic, has a few plot holes, and leaves you wanting a lot more. If you buy the Collector's Edition you'll gain access to a bonus chapter that provides some more story and an entirely new set of areas to explore, clocking in at over an hour of extra playtime. The standard gameplay will probably take most players around four hours to complete, which may seem a little light to some for a Collector's Edition purchase price, but the quality of the whole package is simply outstanding and I personally would happily pay for it again. Some of the animations applied to otherwise static figures look odd, but the artwork and area designs are gorgeous and made the whole thing a joy to experience.
 Nightmare Realm is no slouch where the gameplay is concerned either. Hidden-object scenes are full of fantastic detail and mini-puzzles, object solutions are logical but inventive, and the environments you explore are packed with great detail and while the puzzles are mostly variations on types you've seen before, they're still presented in a creative fashion. The only real downside is that the game does force you to do a fair amount of back-tracking from time to time, and there are only a handful of hidden-object scenes that repeat throughout the course of the game.
In a nutshell, Nightmare Realm is everything I want every game in the genre to be; creative, captivating, beautiful, creepy, and fun. I played it all in one sitting although I only meant to try the demo, and wished it have been even longer when I was done with it. It's sorely in need of a sequel to flesh out the backstory to the premise, but even taken on its own, Nightmare Realm is a fantastic adventure that comes highly recommended. Try the demo and then keep your eyes on the developer for future releases. Nightmare Realm is just plain good, period.
A Collector's Edition is also available. It contains a bonus chapter to play, wallpapers, strategy guide, and more. Remember that Big Fish Game Club Members pay only $13.99 for Collector's Editions (or 2 club credits), and collector's editions count 3 card punches of 6 total needed for a free game.
![]() Windows:
Windows:
Download the demo
Get the full version
Also available: Collector's Edition
![]() Mac OS X:
Mac OS X:
Download the demo
Get the full version
Also available: Collector's Edition


Walkthrough Guide
(Please allow page to fully load for spoiler tags to be functional.)
Nightmare Realm Walkthrough Part 1: General Knowledge & Chapters 1-3
General Knowledge
At the start of a new game, there are two choices of difficulty: Casual mode and Expert mode.
Casual Mode includes a beginning tutorial, faster hint and skip recharge timers, and glittering sparks around interactable areas.
Expert Mode has no tutorial, a slower recharge timer on Hints and Skips, and no sparks around areas of interest.
Both modes include a changing cursor.
When the cursor is over an area you can inspect, it will change to the shape of an eye.
When the cursor is over someone you can speak to, it will change to a mouth.
When the cursor is over an interactable object, it will change to a hand.
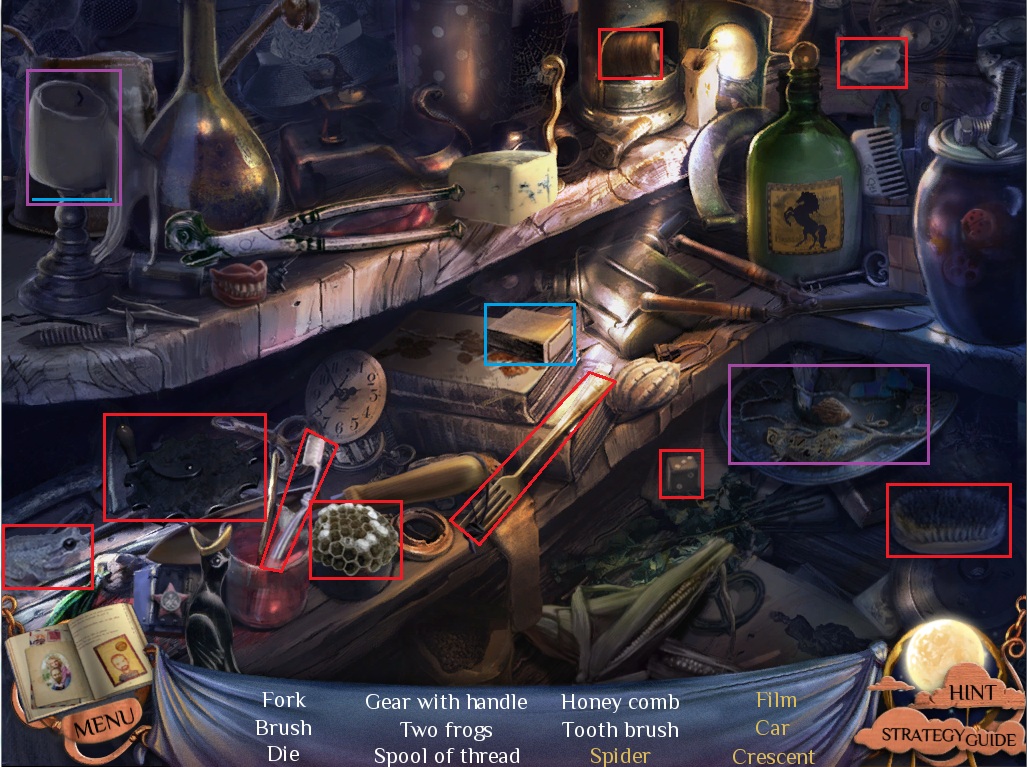
In screenshots, these interactable objects will be highlighted with a purple box.
Objects in hidden object scenes are surrounded by a red box.
An interactable area in a hidden object scene is surrounded by a purple box and underlined with a colored line. Items used on that interactable area will be surrounded by a box matching that colored line.
While in game, the book in the lower left corner of the screen is the Diary, which contains important information and clues noted throughout your journey.
Below the Diary is the Menu button, which takes you to the in-game menu.
From the in-game menu, you can change the volume, the custom cursor, the aspect ratio, the windowed/fullscreen mode, or access the main menu.
The spaces along the bottom of the screen is the inventory, which is the place for all the items collected throughout the game.
Push the left and right arrows at the sides of the inventory bar to cycle through items.
The Hint button on the right can be used to find an item in a hidden object scene, explain the guidelines to a puzzle, or help you find the next step in your adventure.
Chapter 1
The Cliff
Go up the hill to the car on the cliff.
Take the Rock behind the rear wheel of the car to add it to the inventory.
Click the rear window of the car to zoom in.
Use the Rock to smash through the window.
Take the twisted Sharp Metal Piece from the roof of the car.
Step back once to the hill.
Click Emily's seat belt to zoom in.
Use the Sharp metal Piece to tear through the seat belt.
Return to the car at the edge of the cliff.
Click the glowing stump to zoom in.
Take the Mysterious Ring.
Click the rear window of the car to zoom in.
Use the Safety Belt on David in the passenger seat.
The House
Click the flower pot under the stairs to zoom in.
Take the red heart Origami(1/33)
Talk to Peter and Emily.
Click the door to step outside to the porch.
Take all four of Emily's drawings off the ground.
Step back inside the house.
Go through the open door to Emily's bedroom.
Click the bedside table to zoom in.
Click the drawer to open it.
Take the damaged photograph and the Push Pins.
Return to the entrance of the house.
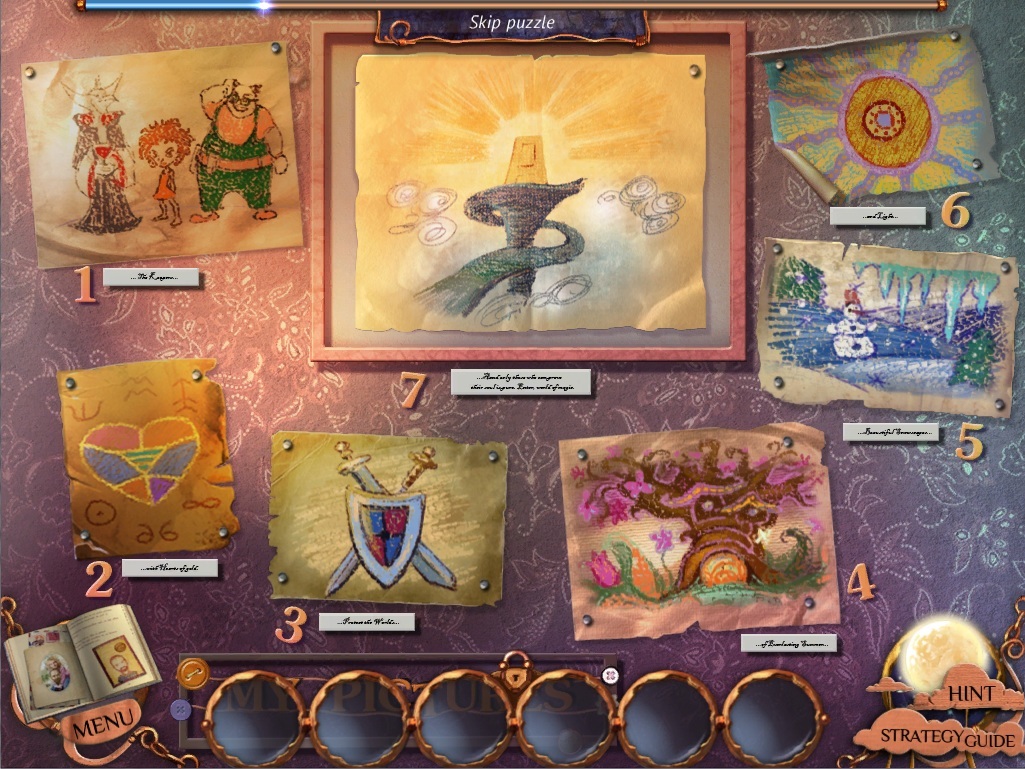
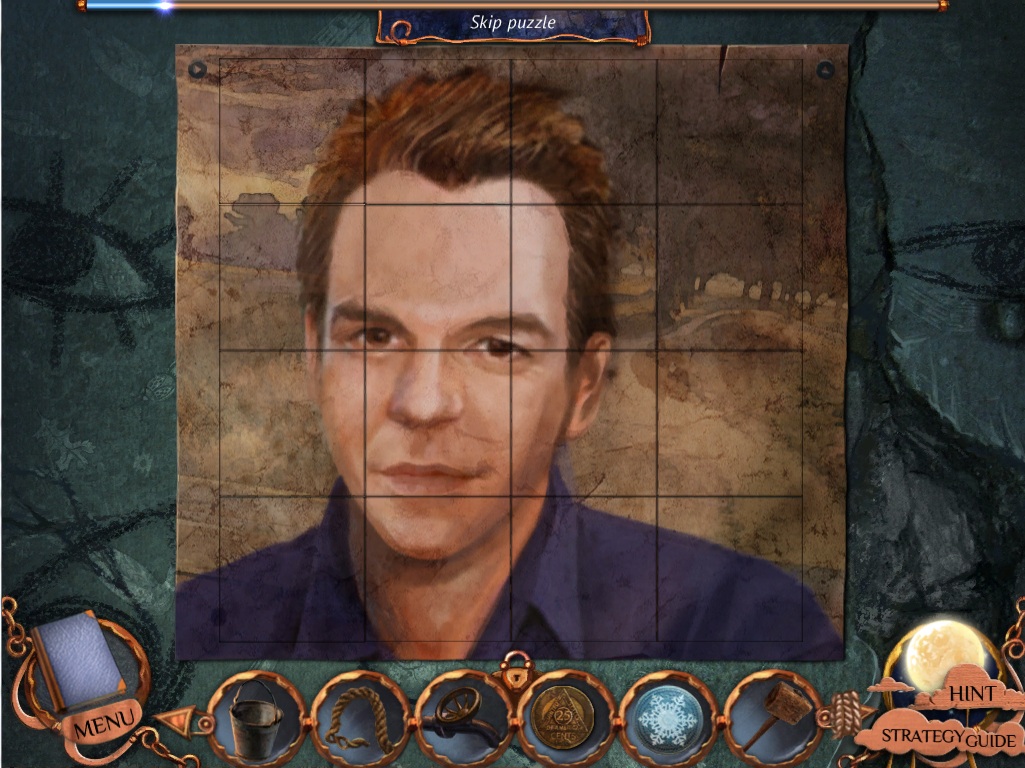
Click the whiteboard on the wall to zoom in to the drawings puzzle.
To solve this puzzle, place the drawings in the spaces of their corresponding labels.
Click the label to read the description of the drawing that belongs there.
Hover the cursor over the drawing to read what it is a picture of.
Put the Drawing of Some Magical Creatures on the space labelled "The Keepers"
Put the Drawing of Sword and Shield in the space labelled "Protect the Worlds"
Put the Drawing of Sun in the space labelled "and Light"
Put the Drawing of a Strange Looking Place in the space labelled "The Sanctuary Door"
Solution.
Follow Emily back into her bedroom.
Click Emily to speak to her.
Take the Teddy Bear at the foot of the bed.
Give the Teddy Bear to Emily.
Return to the entrance of the house.
Go upstairs.
Click the bedside lamp to turn on the light.
Click the bedroom door and talk to Peter
Go downstairs.
Click the keyhole of Emily's door to look inside.
Go halfway up the stairs.
Click Emily's drawings on the wall.
Return to the master bedroom.
Click Emily's portrait on the wall to the left of the door.
Take the Origami(2/33) on the red curtain by the doorway.
Take the Origami(3/33) on the bedsheets.
Click the bedside table to zoom in.
Move away the slippers under the bed to reveal the Drawer Handle.
Use the handle on the drawer, then click the drawer to open it.
Open the jewelry box and take the Mysterious Ring.
Take Emily's room key.
Return to Emily's Room.
Use the Room Key on the glowing keyhole.
Go inside Emily's bedroom.
Take the Picture Piece(1/7) on the seat of the small chair to the far left.
Take the Picture Piece(2/7) on top of the rocking chair.
Click the rocking chair to zoom in.
Take Emily's Present and the Picture Piece(3/7)
Take the Picture Piece(4/7) on the arm of the rocking chair.
Take Picture Piece(5/7) and Picture Piece(6/7) on top of the bed.
Take the Picture Piece(7/7) on the blanket hanging over the foot of the bed.
Click the torn drawing on the wall to zoom in.
Add the seven Picture Pieces from your inventory to to the space on the wall to start the picture puzzle.
To solve this puzzle, assemble all of the pieces to complete the picture of a castle.
Left click a piece to select it.
Right click while holding a piece to rotate it once clockwise.
Left click a place in the wall while holding a piece to set it down.
If a piece is correctly positioned, it will lock in place.
Solution.
Insert the Mysterious Ring from your inventory into the glowing emblem on the wall.
Click Peter to talk to him.
Click the drawing on the wall to go through the portal.
Chapter 2
The Extractor Realm
Click the caged door to zoom in.
Take the Origami(4/33) underneath the hammer.
Take the Hammer hanging from the nail beside the cage.
Move right once towards the stairway.
Click the chair to zoom in.
Take the Valve and the Origami(5/33)
Read the note behind the teddy bear.
Go up the stairs.
Go through the open doorway at the end of the hall.
Click Emily and take the origami crane she blows towards you.
Click the Extractor by the door.
Go back downstairs and then head right through the archway.
Take the Origami(6/33) on the top of the left pillar.
Take the coil of Rope at the bottom of the vine-covered door.
Click the splintered wood of the right pillar to zoom in.
Use the Hammer from your inventory on the crack to reveal the Goblet.
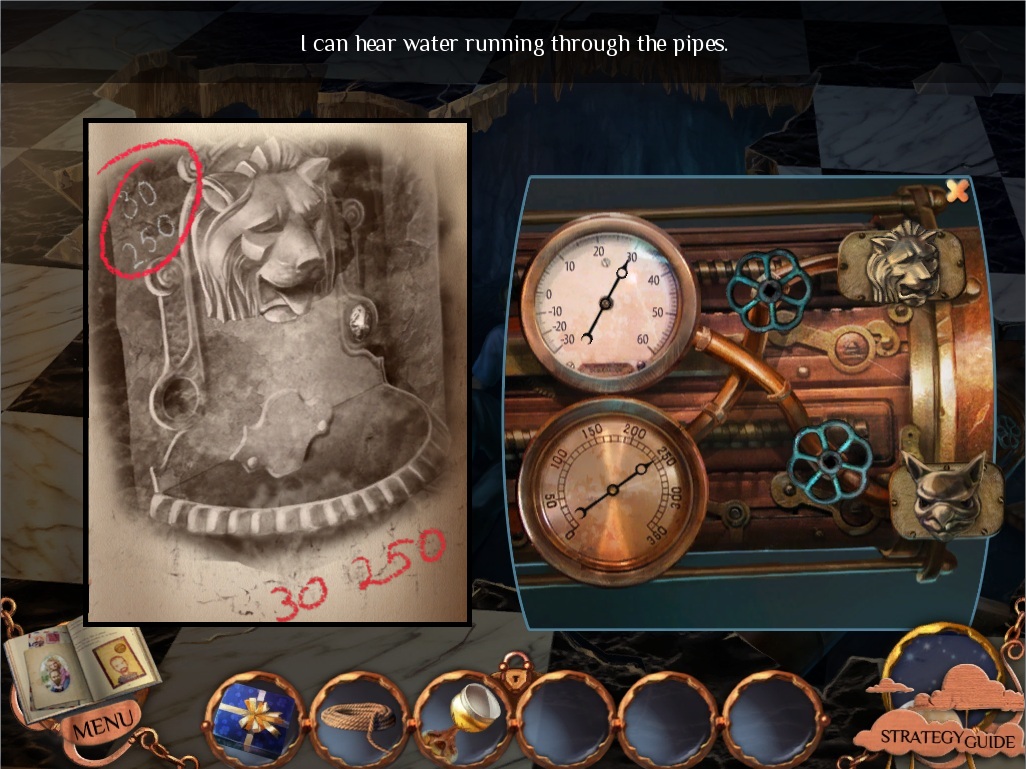
Click the fountain to zoom in.
Note the numbers etched above the lion's head.
Return to the portal entrance area, in the room with the caged divers suit.
Click the covered painting hanging from the wall.
Take the Origami(7/33) to the right of the frame.
Click the hole in the ground where Peter was standing.
Click Peter to speak with him.
Click the pipe the cracked floor to zoom in.
Take the Origami(8/33) on the black and white tiles in the upper right corner.
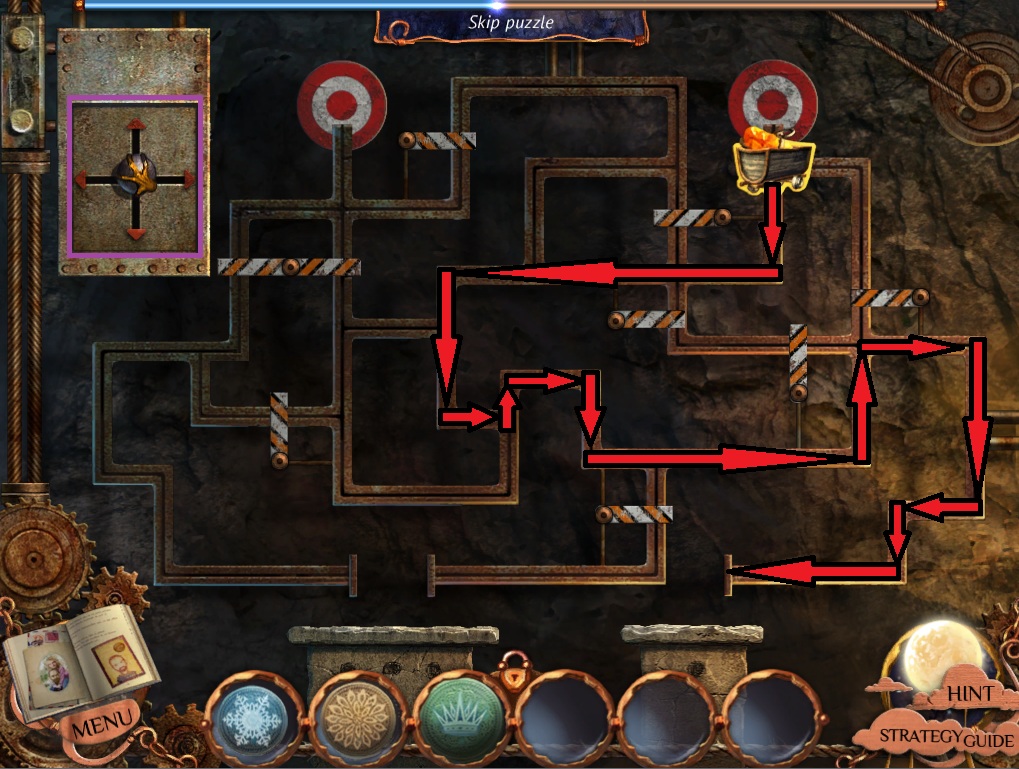
Add the Valve from your inventory to the hole in the tube next to the gargoyle head to start the valve puzzle.
To solve this puzzle, set the pressure gauges by turning the valve handles.
The Lion's head valve raises the bottom meters pressure, and the Gargoyle's valve raises pressure the top meter.
Use the reference in the Diary to find the correct numbers each meter should be set to.
Solution.
Move two rooms to the right, to the room with the lion head fountain.
Click the fountain to zoom in.
Use the Goblet from your inventory on the water inside the fountain, then click the Goblet with Water to pick it up.
Go left and then upstairs to the collapsed room full of rubble.
Take the Origami(9/33) hanging above the right lantern.
Click the lantern to zoom in.
Use the Goblet with Water from your inventory on the glowing lantern.
Take the doused Ornament Half behind the broken glass.
Go back downstairs and return to the room with the lion fountain.
Click the vine-covered door to zoom in.
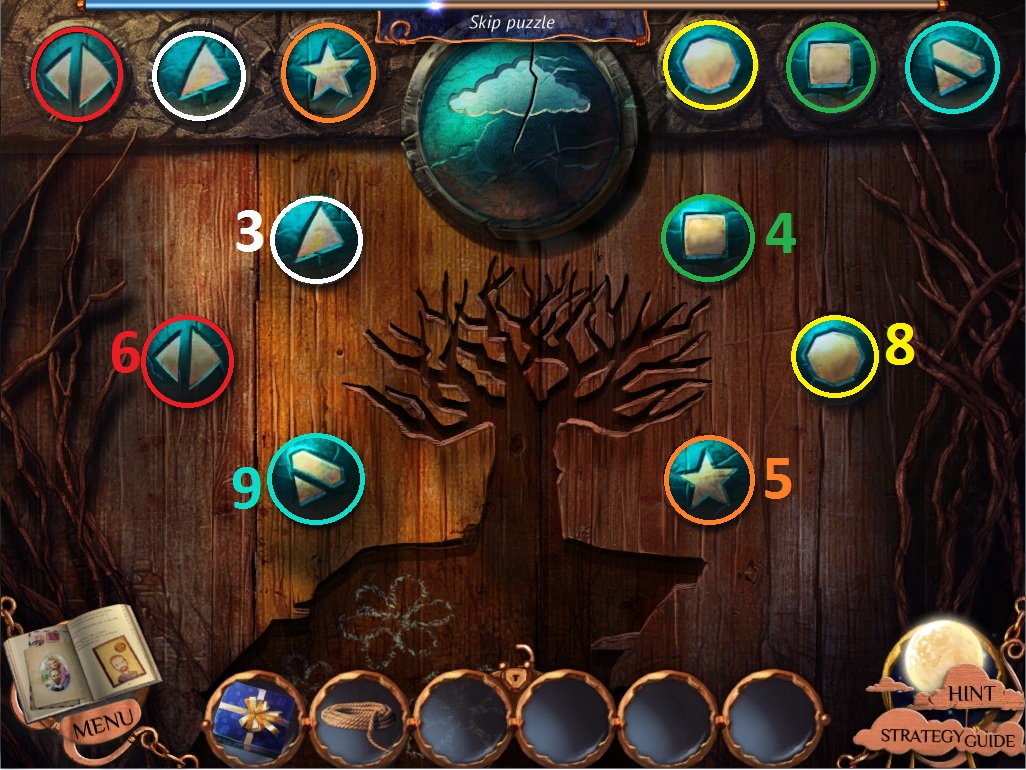
Add the Ornament Half from your inventory to begin the puzzle.
To solve this puzzle, place the symbols on the space with their matching numbers.
Click a tile to pick it up, then click a numbered space to set it down.
The roman numeral in each space corresponds to the shape of each symbol.
A triangle has three points, so the triangle tile goes in the space with the roman numeral III for 3.
A square has four points, so the square tile goes in the space with the roman numeral IV for 4.
A star has five points, so the star tile goes in the space with the roman numeral V for 5.
Together, the two triangles have six points, so the double triangle tile goes in the space with the roman numeral VI for 6.
An octagon has eight points, so the octagon tile goes in the space with the roman numeral VIII for 8.
Together, the hexagon and triangle have nine points, so the hexagon and triangle tile goes in the space with the roman numeral IX for nine.
Solution.
Go through the open door into the desert realm.
Desert Realm
Click the bottom of the mushroom steps to zoom in.
Click the broken Stone Tablet Half to add it to your inventory.
Take the Origami(10/33) in the branches at the top left corner of the screen.
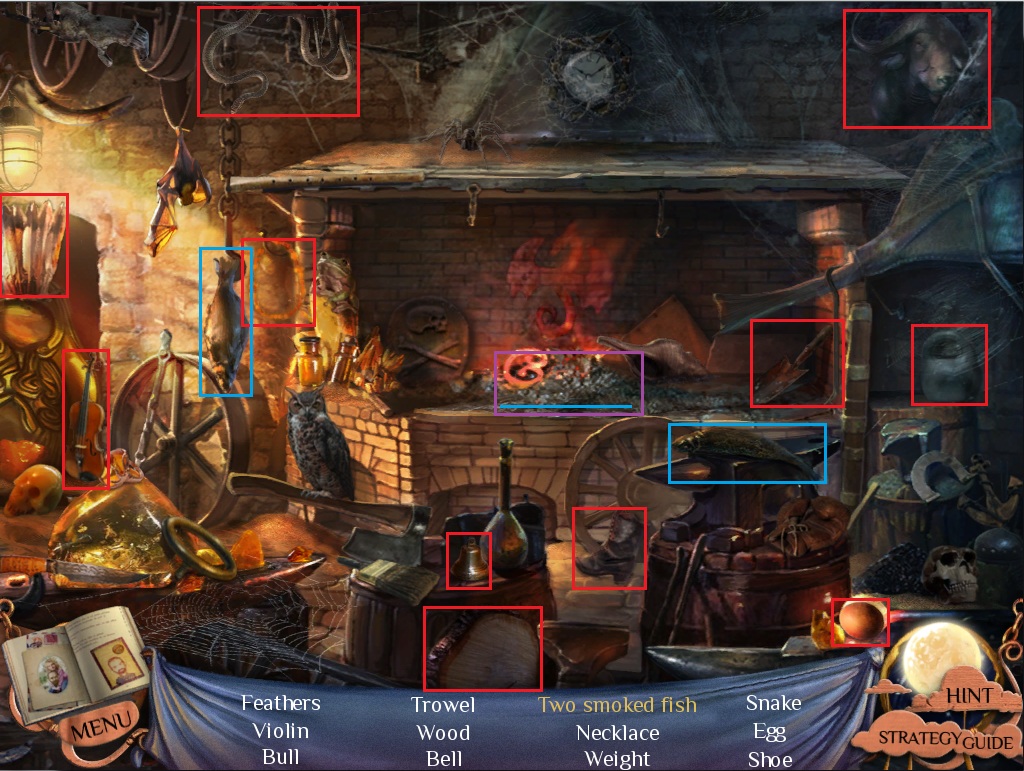
Click the pile of junk on the ground by the left tree to start the hidden object scene.
Click the net on top of the pot to push it aside.
Use the Axe on the Tangled Pick.
Use the freed Pick on the Buried Log.
Collect all available items.
Screenshot.
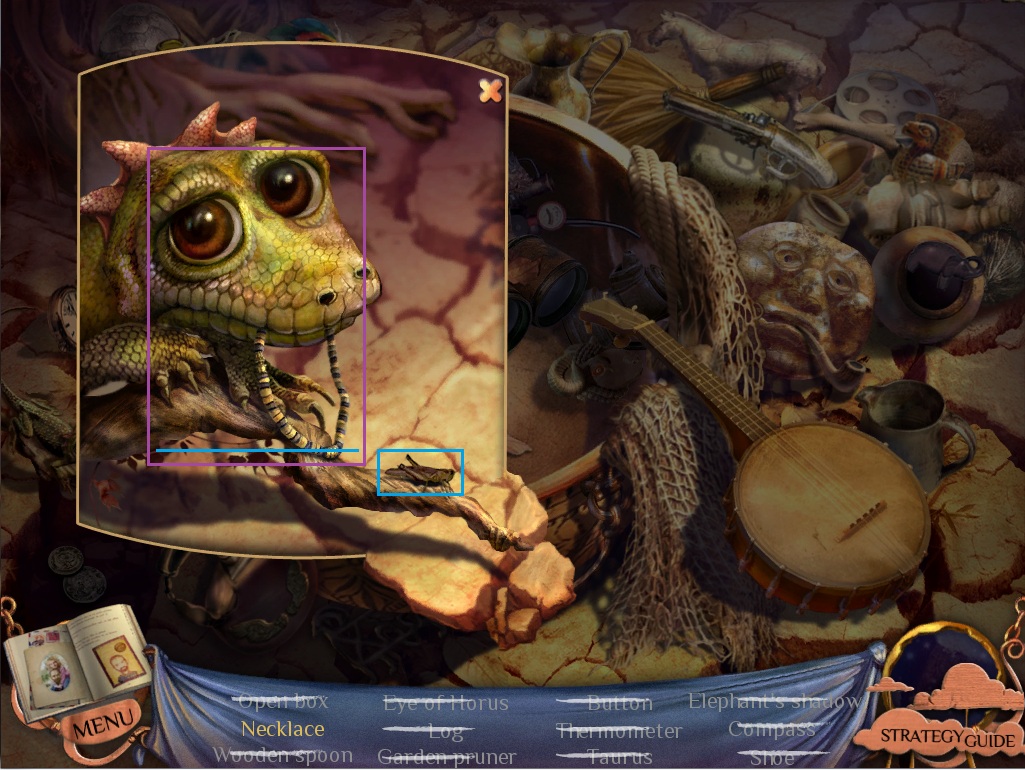
Click the lizard to the left of the basket to zoom in.
Give the Cricket to the Lizard and take the Necklace from its mouth.
Screenshot.
Once the hidden object scene is complete, you will receive a Log.
Click the debris at the bottom of the middle tree.
Click the saw blade behind the trunk and attach it to the saw handle.
Add the screws to the three holes in the handle.
Use the screwdriver to tighten the screws.
Click the saw to add it to your inventory.
Go through the dark trees into the dimly lit room.
Take the second Log behind the unlit brazier.
Go back one screen and then up the mushroom stairs.
Take the Origami(11/33) at the end of the rope ladder.
Place the first Log from your inventory over the ravine between the ground and the first island.
Click the log sticking out of the ground to zoom in.
Use the Saw from your inventory on the log.
Click the Log to add it to your inventory.
Place the two Logs over the canyon spaces between the platforms, then click forward to move across.
Take the Origami (12/33) by the front of the bridge.
Cross the bridge to reach the witchdoctor's tree house.
The Witchdoctor's Tree House
Take the Origami(13/33) by the window of the house.
Click the frozen witchdoctor's hand to zoom in.
Add the Stone Tablet Half from your inventory to the broken tablet in her hand.
Take the Acorns out of her hand to add them to your inventory.
Note the order of ingredients on the tablet recipe.
Click the table to zoom in.
Take the pot of Honey.
Go inside the tree house.
Take the Origami(14/33) next to the window above the rafters.
Click the small glass pane in the left wall to zoom in.
Note the pattern of the colors inside the heart.
Take the Rag and the Crayons in front of the glass.
Click the box on the bed to zoom in.
Move the paper cutouts away to reveal the Origami(15/33) tulip.
Click the space under the bed to zoom in.
Use the Honey from your inventory in the middle space between all the junk.
Click the wrench sticking out of the sack of grain to scare out Beetle #1.
Click the rolled up paper beneath the spider to scare out Beetle #2.
Click the envelope between the bed boards to scare out Beetle #3.
Click all three beetles stuck in the honey to add them to your inventory.
Click the boarded up door to start the hidden object scene.
Collect all available items.
Screenshot.
Click the brown pouch to zoom in.
Take all five pins out of the voodoo doll and place them in the pin cushion.
Take the leaf curio behind the cloth.
Use the green thread on the cloth to embroider a lizard.
Place the three gemstones inside their matching rings.
Screenshot.
Once the hidden object scene is complete, you will receive a Knife.
Click the rug on the floor to move it aside.
Take the Root on top of the secret door.
Leave the tree house and return to the entrance of the desert realm, in front of the mushroom stairway.
Desert Realm
Click the mushrooms sticking out of the left tree to zoom in.
Use the Knife from your inventory on the stems of the mushrooms.
Click the stalks to add the mushrooms to your inventory.
Click the pile of debris under the left tree to repeat the hidden object scene.
Use the Straw Brush on the unhappy mask.
Put the Feather at the top of the unhappy mask.
Use the Hammer to smash the Bottle.
Take the Chords out of the broken bottle and use them on the Banjo
Use the Razor on the Net to reveal the Bullet.
Add the Bullet to the Pistol and fire it to scare off the bird.
Use the two dropped feathers on the unhappy mask.
Collect all available items.
Screenshot.
Once the hidden object scene is complete, you will receive a Gear.
Return to the outside of the witchdoctor's tree house.
The Witchdoctor's Tree House
Click the table beside the petrified witchdoctor to zoom in.
Use the noted recipe in the Diary as a reference and follow the list of the ingredients.
First put the mushrooms into the cauldron.
Next add the three Beetles.
Then put the Root in the cauldron.
Lastly throw in the Acorns.
Stir it all together with the pestle beside the cauldron, then dip the glass bottle on the left into the concoction.
Click the Magic Potion to add it to your inventory.
Screenshot.
Use the Magic Potion on the petrified witchdoctor.
Click the witchdoctor to speak with her and she will give you a Flint.
Back up twice to return to the ravine in the desert realm.
Desert Realm
Use the Knife from your inventory on the rope ladder.
Click the ladder to add it to your inventory.
Go back once to return to the desert realm entrance, then go forward through the dark archway into the cave.
Use the Flint from your inventory on the unlit brazier to reveal the runed stone puzzle.
Arrange the glowing stone tablets to match the pattern noted in your Diary.
Click a runed stone to select it, then click another tablet to swap their positions.
Screenshot.
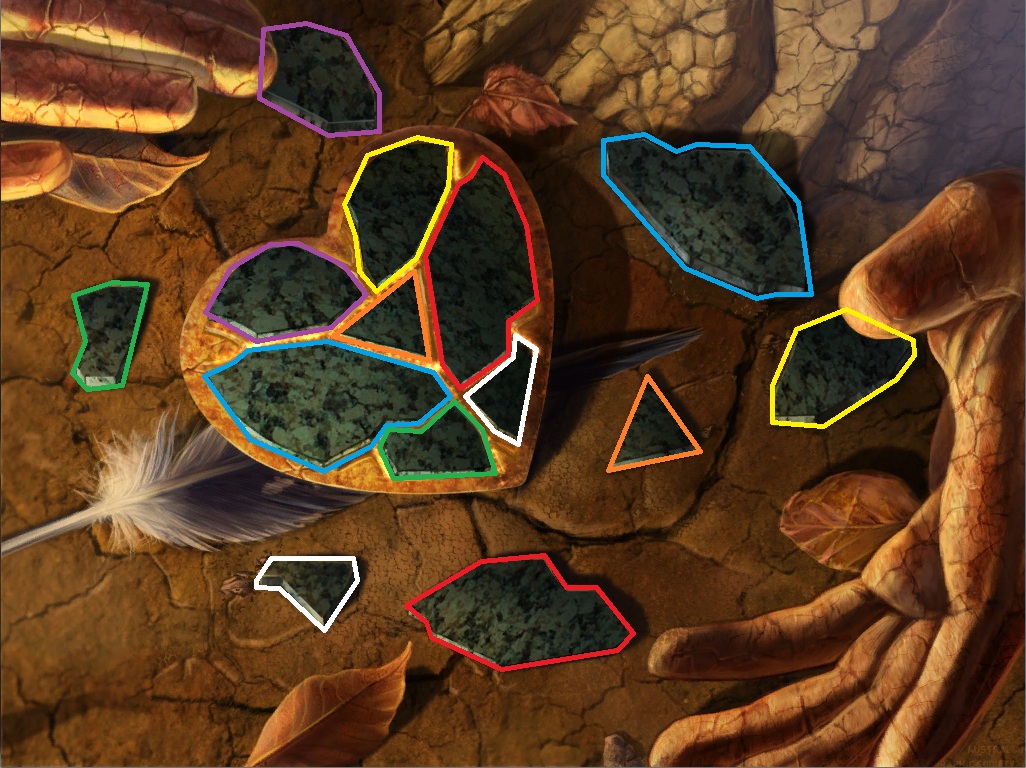
Once the puzzle is solved, click the shattered heart in the spirit's hands to start another puzzle.
To solve this puzzle, place the stone fragments into their corresponding spaces on the heart-shaped frame.
Click a fragment to select it, then click a space on the heart to set it down.
Right click while a fragment is selected to rotate it clockwise.
If a fragment is set in the correct space, it will lock in place.
Screenshot.
Add the Crayons and the Rag from your inventory to start the third and final puzzle.
To solve this puzzle, color the heart to match the image noted in the Diary.
Click a crayon to select a color, then click a heart piece to color it with the crayon.
If you make a mistake, use the rag to wipe the crayon off the piece.
Screenshot.
Place the Spirit's Heart from your inventory into the space in the spirit's chest.
Click the spirit to speak with him.
Take the Origami(16/33) on the cave wall above the glowing blue brazier.
Go back to leave the cave, then head up the mushroom stairs.
Click the lily pad floating in the water to the left of the first log.
Take the Handle on top of the flower.
Return to the outside of the witchdoctor's house.
The Witchdoctor's Tree House.
Click the witchdoctor to speak with her.
Go inside the tree house.
Use the handle from your inventory on the round groove in the cellar door.
Click the door to open it, then drop the ladder from your inventory down the hole.
Click the cellar to zoom in.
Take the Origami(17/33) next to the broken pumpkin.
Take Pearl #1 beside the two pumpkins on the left.
Take Pearl #2 inside the broken pumpkin.
Take Pearl #3 next to the wheel of the rope mechanism.
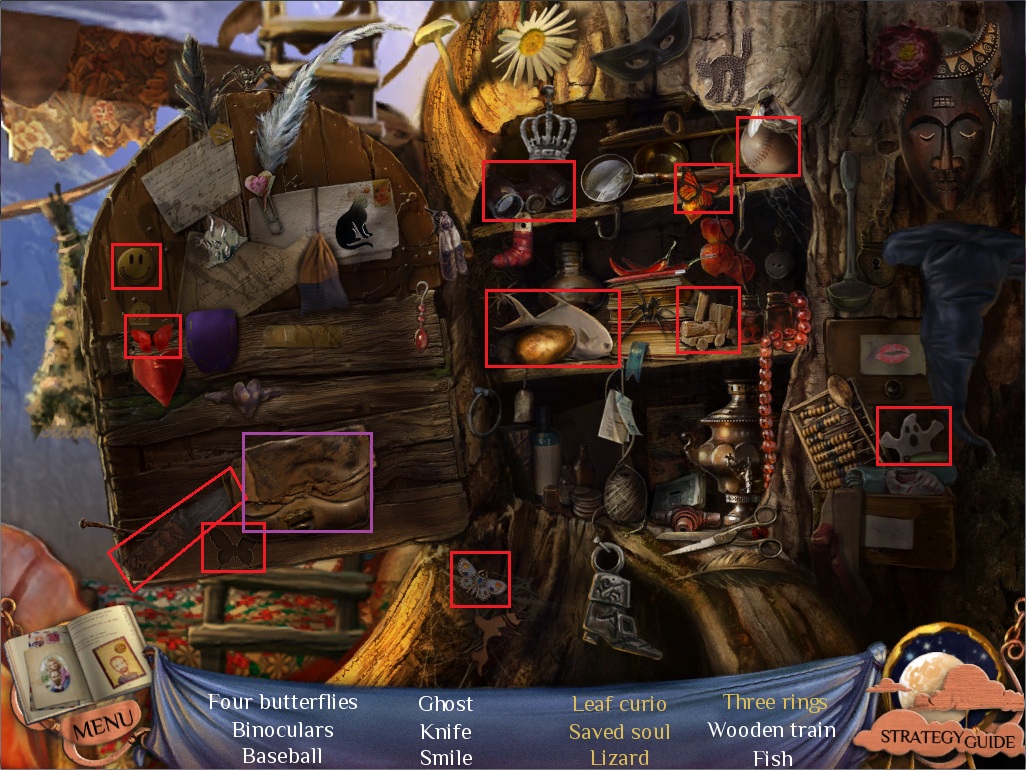
Click the shelves in the top left corner to begin the hidden object scene.
Collect all available items.
Click the matchbox to open it, then take a match.
Strike the match on the side of the box to light it, then use the lit match on the candle to reveal the Crescent moon on the side of the beaker.
Screenshot.
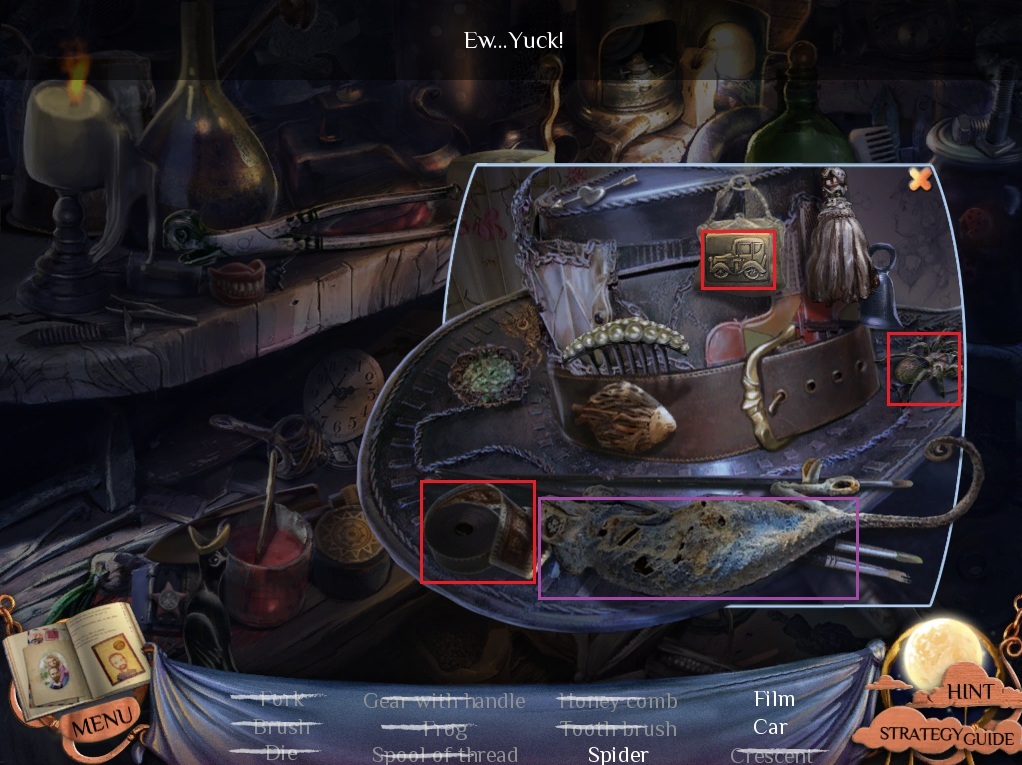
Click the junk on the clock face below the corner of the bottom shelf to zoom in.
Click the dead chameleon to move it aside, revealing the Film.
Screenshot.
Once the hidden object scene is complete, you will receive A Gear with a Handle.
Add the two gears from your inventory to the rope mechanism.
Click the mechanism to pull the rope.
When the rope breaks, attach the Rope from your inventory to the mechanism, then click it again.
Take the uncovered Mechanical Arm.
Leave the tree house and go back once to reach the bridge in the Desert Realm.
Desert Realm
Click the robot to zoom in.
Take the goggles off the top of the robot.
Add the Mechanical Arm from your inventory to the robot's left side.
Place the three Pearls into the open compartments at the left, top, and bottom of the robot's chest, then click all four pearls to activate them.
Click the witchdoctor to speak with her.
Give the witchdoctor the goggles from your inventory.
Speak with the witchdoctor again to receive a Diamond.
Return to the witchdoctor's tree house and go inside.
Click the boarded up door to repeat the hidden object scene.
Collect all available items.
Screenshot.
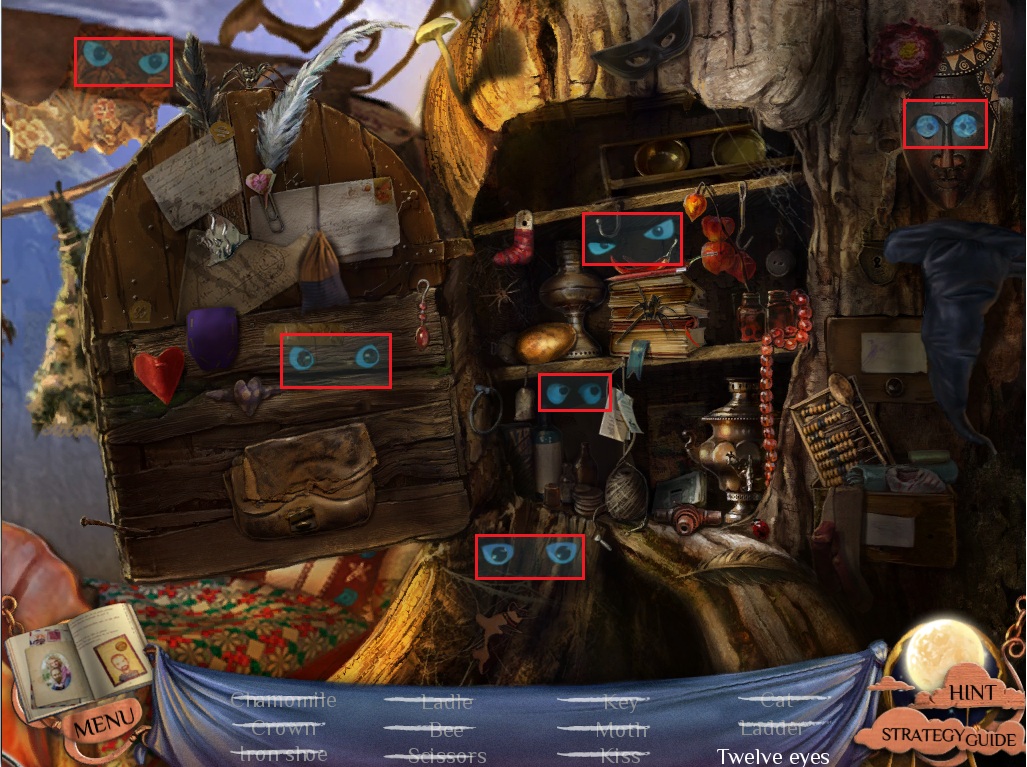
Click the Enchanted Magnifying Glass to pick it up.
Move the magnifying glass across the screen to reveal the Twelve Eyes.
Screenshot.
Once the hidden object scene is complete, you will receive a Ladder.
Click the glass case on the left wall.
Use the Diamond from your inventory to cut through the glass, uncovering the Drawing of a Heart.
Go back out the portal to the hallway of the house in the real world.
The House
Click the wall of Emily's pictures across from the staircase to zoom in.
Add the Drawing of a Heart from your inventory to space #2 on the wall.
Go upstairs to the master bedroom.
Click Emily's portrait to zoom in.
Take the Eye-shaped Key hanging on the wall to the right of the portrait.
Click the medical bag by the window to the right to zoom in.
Take the First Aid Kit and the Origami(18/33)
Go back through the portal to the entrance of the Extractor Realm
Chapter 3
The Extractor Realm
Click the hole in the ground to zoom in.
Add the Ladder from your inventory to the hole and climb down.
Give Peter the First Aid Kit from your inventory.
Click Peter to talk to him, then click the drawing in his hand.
Go up the ladder.
Take the Boards that float to the surface of the water.
Click the wrapped up frame on the wall to zoom in.
Use the Knife from your inventory on the paper to start the witch puzzle.
To solve this puzzle, rotate the tiles to make the image of a witch.
Click a tile to rotate it clockwise.
Click each of the four tiles two times.
Click the loose stone to the left of the portrait to shake it free.
Press the revealed button to submit your solution.
Screenshot.
Once the puzzle is solved, take the revealed Warm Clothes.
Go up the stairs to the destroyed room.
Click the right door to zoom in.
Use the Eye-shaped Key from your inventory on the keyhole.
Go through the opened door.
Add the Boards from your inventory to the broken stairs.
Take the Origami(19/33) on the wall beside the coil of black wire.
Click the bag at the top of the stairs to zoom in.
Click the last page to read Emily's file.
Take the Origami(20/33) next to the red and yellow ball.
Go up the stairs.
Take the Origami(21/33) on the wall in the top left corner of the screen.
Click the blackboard to zoom in.
Take the Switcher and the Electric Tape.
Go down the stairs.
Use the Electric Tape on the broken wire.
Return upstairs.
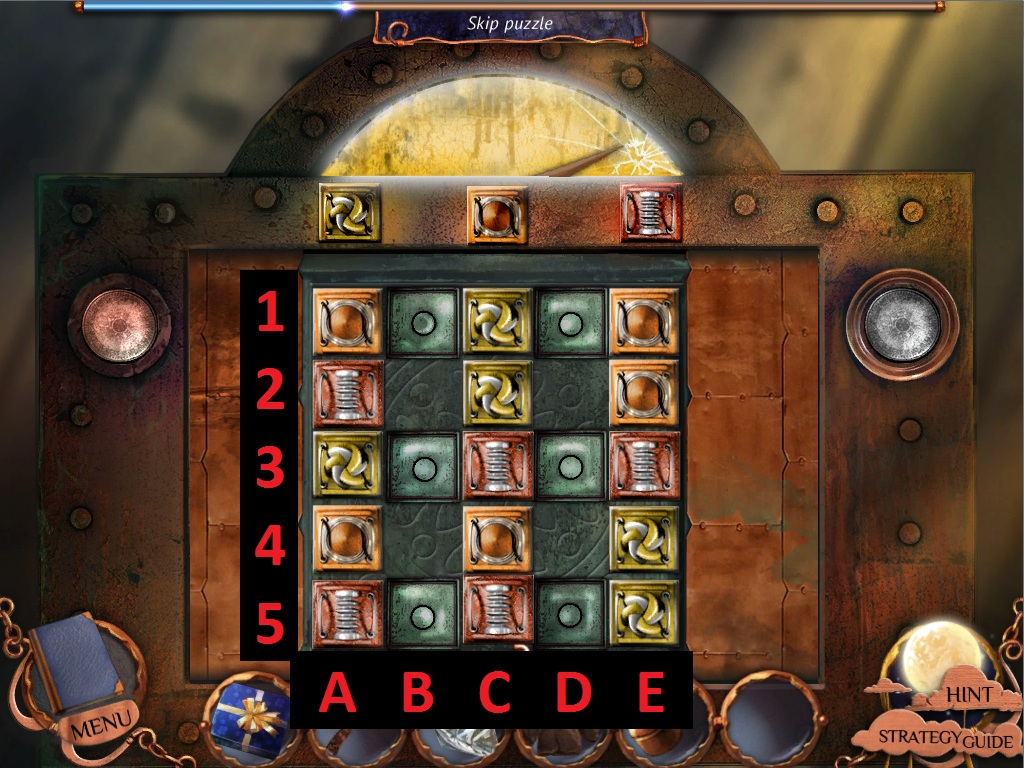
Click the panel of the large Tesla coil.
Click the left button to start the puzzle.
To solve this puzzle, move the tiles into the row under their corresponding symbols.
Click and drag a tile up, down, left, or right to move it into an empty space.
Tiles cannot move over obstacles such as a wall or other tiles.
Screenshot.
Move the tile at C4 to D4
Move the tile at A4 to C4
Move the tile at A5 to B4
Move the tile at A3 to A5
Move the tile at A2 to A4
Move the tile at A1 to A3
Move the tile at C2 to A1
Move the tile at C1 to A2
Move the tile at E2 to B2
Move the tile at E1 to C1
Move the tile at E3 to E1
Move the tile at C3 to E2
Move the tile at C4 to D2
Move the tile at D4 to C2
Move the tile at E4 to C3
Move the tile at C5 to E3
Move the tile at E5 to C5
Move the tile at B4 to E5
Move the tile at A4 to E4
Move the tile at A3 to D4
Move the tile at C3 to A3
Move the tile at C5 to A4
Move the tile at D4 to C5
Move the tile at C2 to C4
Move the tile at B2 to C3
Move the tile at D2 to C2
Screenshot.
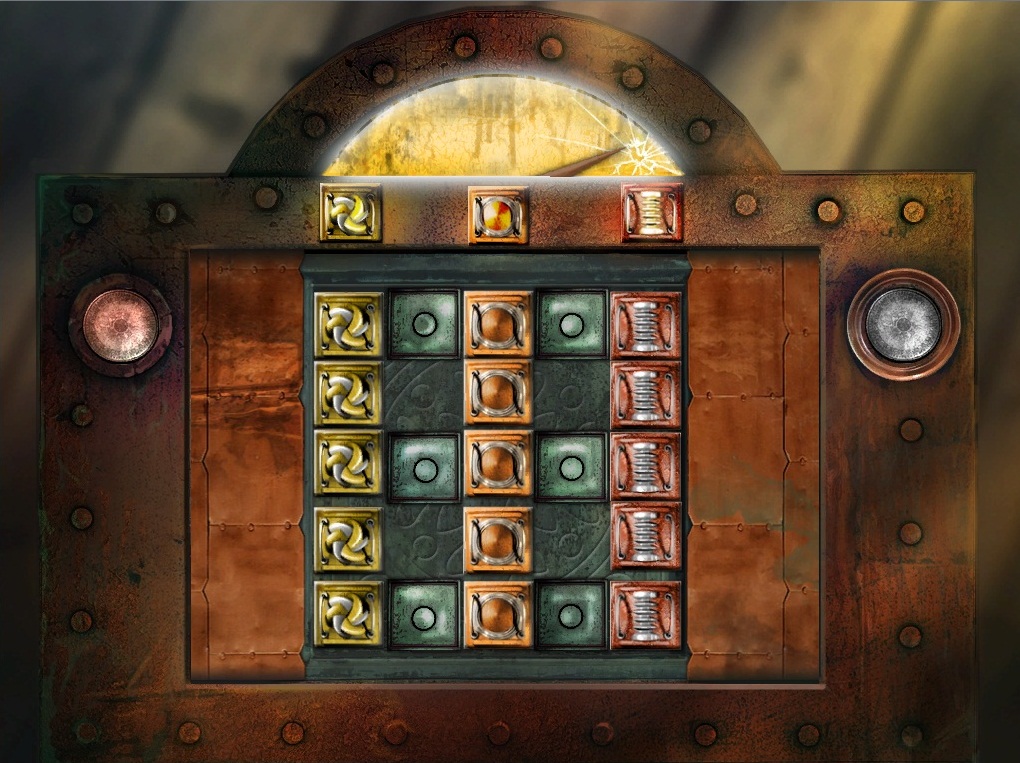
Once the puzzle is solved, the panel will slide revealing a second puzzle.
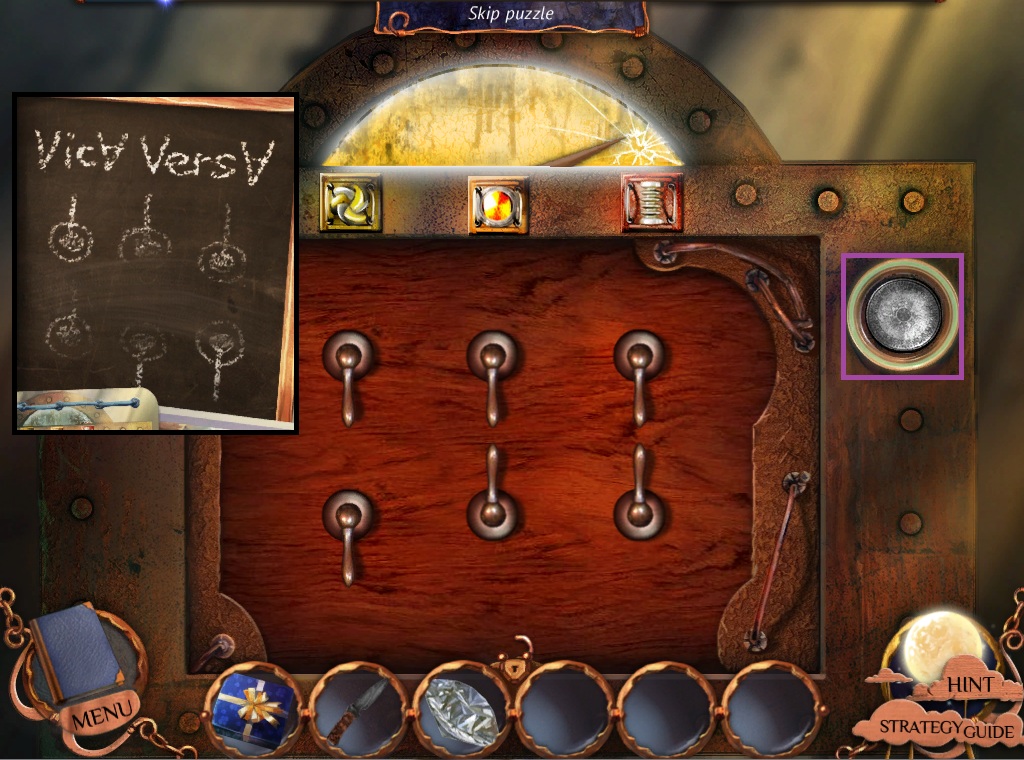
To solve this puzzle, flip the switches to a pattern opposite the diagram noted in the Diary.
Add the Switcher from your inventory to the hole in the switchboard.
Click a switch to turn it up or down.
Remember: Vice Versa
Screenshot.
Click the right button to submit your solution.
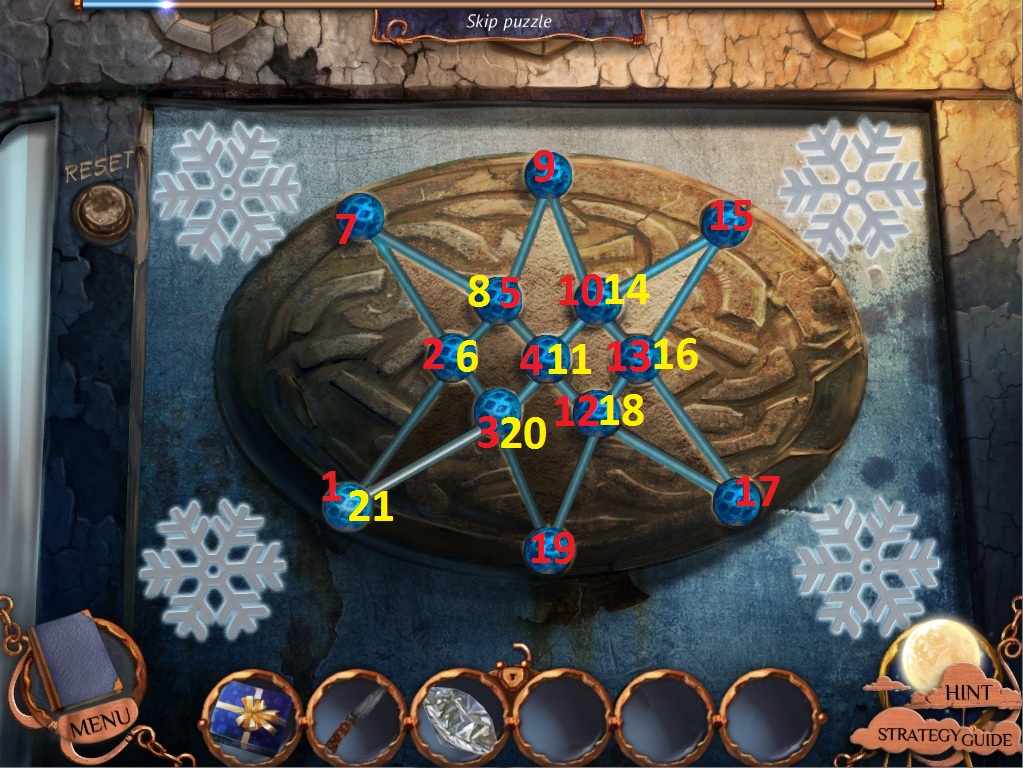
Click the metal doorway to the left to zoom in to the third and final puzzle.
To solve this puzzle, draw a path crossing each line of the star.
Click a blue gem to select it, then click another blue gem to trace a path connecting the two.
Each path can be drawn only once.
Screenshot.
Go through the open portal into the frost realm.
Frost Realm
Click the note stuck to the log to zoom in.
Take the Origami(22/33) and the Green Bottle.
Take the Origami(23/33) on the ground beneath the birdhouse.
Follow the path forward to the campsite.
Take the Origami(24/33) in the tree below the squirrel.
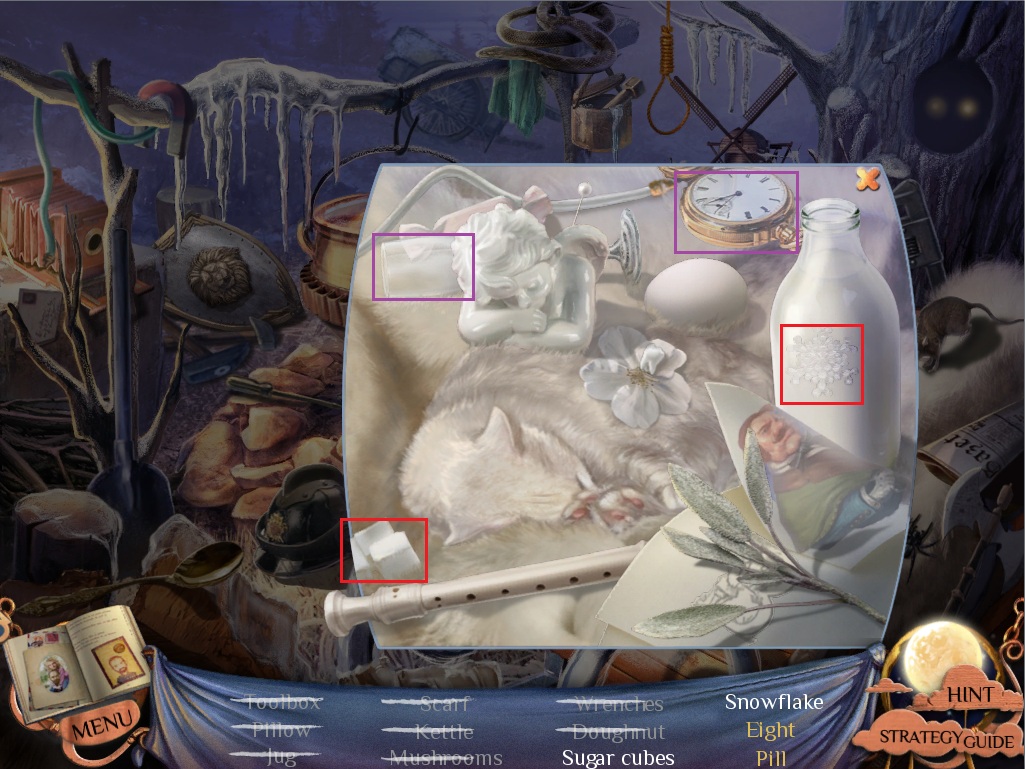
Click the fireplace next to the lantern to start the hidden object scene.
Collect all available items.
Screenshot.
Click the white fur coat to zoom in.
Rattle the champagne glass twice to shake out the Pill.
Push the pocket watch aside to reveal the Eight.
Screenshot.
Once the hidden object scene is complete, you will receive a Toolbox.
Click the can to the right of the frozen cauldron to zoom in.
Click the lid of the dog food can, then click the Wieners to add two to your inventory.
Follow the path forward to the gate.
Take the Origami(25/33) between the frozen bars on the right side of the gate.
Click the right guard's chest to zoom in.
Take the Uncharged Battery from the guards chest cavity.
Return to the room with the Tesla coil, in the Extractor realm.
Extractor Realm
Use the Uncharged Battery from your inventory on the Tesla machine.
Return to the gate in the frost realm.
Frost Realm
Place the Charged Battery from your inventory in the right guard's chest.
Take the Axe dropped to the ground.
Move right for a better view of the factory sign.
Take the Rope hanging over the sign.
Take the Origami(26/33) above the instructions to build a guard's head.
Go back to the entrance of the frost realm, in the forest.
Use the Axe from your inventory on the branches covering the birdhouse.
Click the birdhouse to zoom in.
Take the Nuts.
Return to the campsite.
Click the glass feeding post next to the workbench.
Place the Nuts from your inventory next to the leaf, then back away from the case to lure in the squirrel.
Click the post again to zoom in.
Take the Toolbox Key left behind.
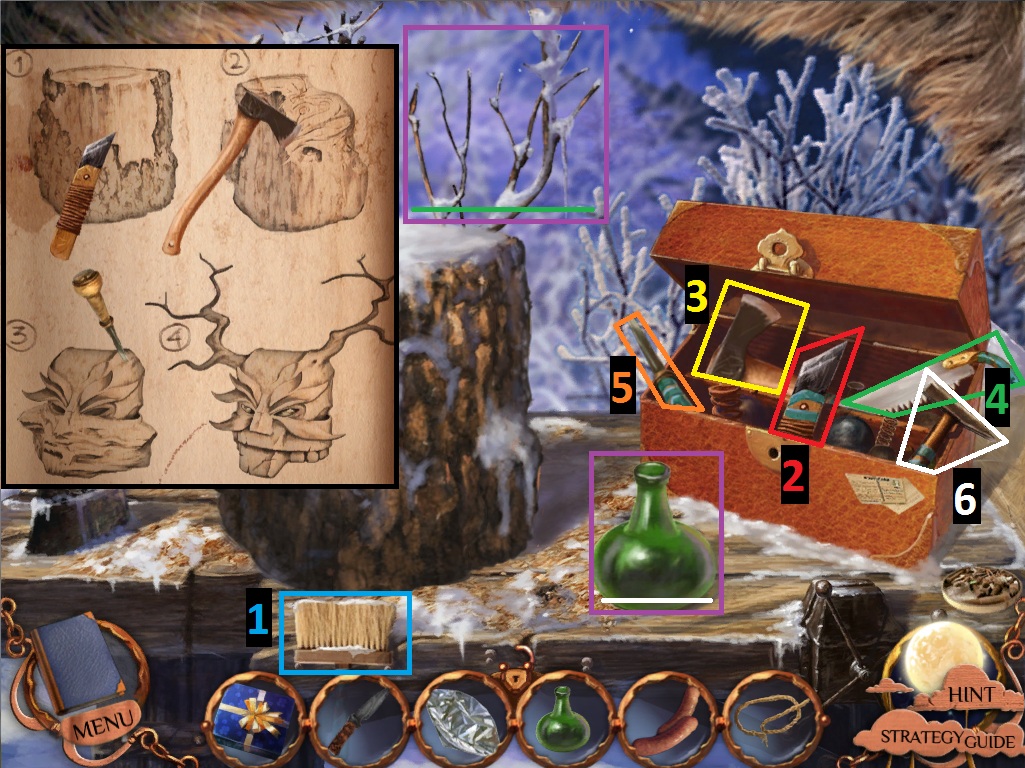
Click the workbench to zoom in.
Place the Toolbox from your inventory on the table.
Use the Toolbox Key to unlock the toolbox.
Follow the instructions noted in the Diary to carve the guard's head using the appropriate tools.
First dust the snow off the stump with the Brush.
Next shave all the pieces of bark off the log with the Razor.
Then chop the wood with the Axe.
Use the Handsaw on the branches behind the stump.
Use the Pick to fine tune the rough carving.
Place the Green Bottle from your inventory onto the table.
Smash the bottle with the Hammer.
Add the two large shards of glass to the eye holes of the head.
Place the chopped tree branches at the sides to make horns.
Screenshot.
Click the completed head to add it to your inventory.
Return to the gates.
Place the Wooden Head from your inventory on top of the left guard's neck.
Click the wooden guard to speak with him.
Go through the open gates to the factory.
The guard dog will not let you pass, so return to the campsite.
Click the cauldron to repeat the hidden object scene.
Collect all available items.
Screenshot.
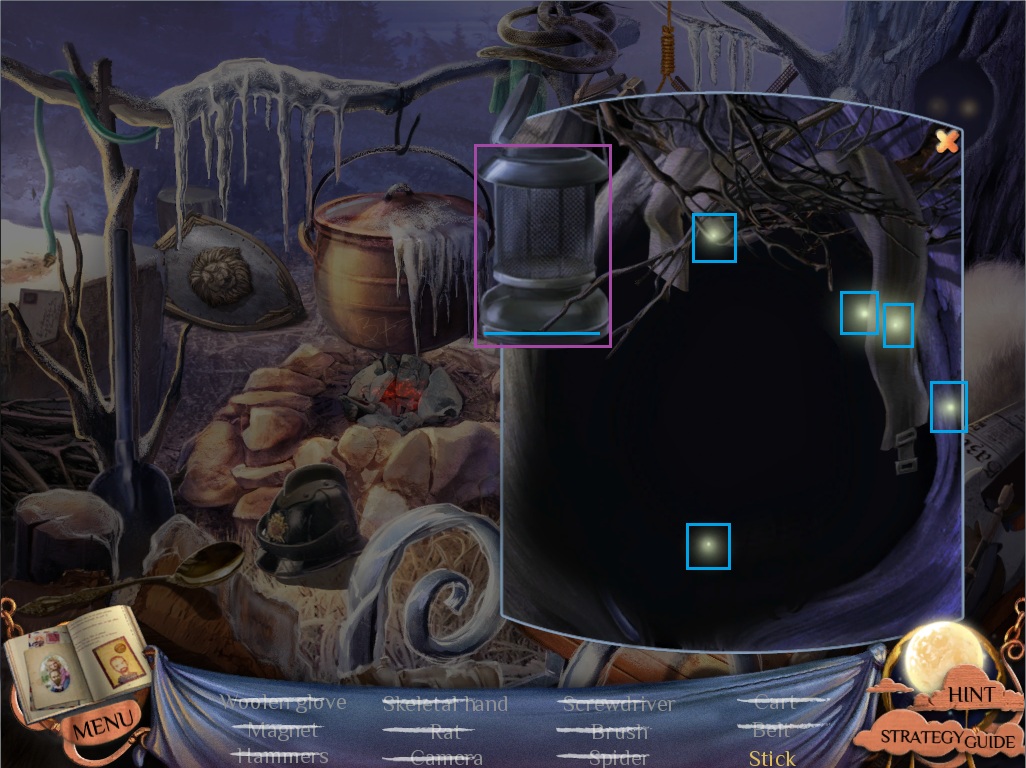
Click the hollow of the tree to zoom in.
Drag all the fireflies into the lantern to reveal the wounded owl.
Screenshot.
Push aside the branches to uncover the bandage.
Wrap the bandage around the wounded owl to reveal the Stick.
Once the hidden object scene is complete, you will receive a Stick.
Return to the entrance of the factory.
Toss one of the Wieners from your inventory to the guard dog.
Click the doghouse to zoom in.
Click the door of the dog house to lift it.
Use the Stick on the door of the dog house.
Attach the Rope to the stick.
Place the Wiener into the makeshift trap as bait.
Take the Origami(27/33) between the cage bars.
Wait for the dog to go for the food inside the trap, then tug the end of the rope.
Go back once to the open gate.
Talk to the Wooden Guard to borrow his hand.
Return to the factory entrance.
Use the wooden Left Hand on the left button.
Press the right button.
Click the large double doors between the alarms.
The Jail Cell
Take the Origami(27/33) and the coil of Rope beside the broken ladder.
Click the skeleton's hands.
Take the Blowtorch and the Bone that drop to the ground.
Click the writing on the wall to note the poem.
Attach the Rope to the hook hanging from the ceiling.
Click the rope to tie it to the stone on the wall.
Pry the stone loose from the wall with the Bone.
Click the stone three times to smash through the cracked wall.
Click the open chest in the other room to zoom in.
Pick up the brick behind the chest and use it three times to smash the loaf of bread.
Take the revealed Small Handsaw and the red Lead Ball.
Use the Handsaw on the metal rod at the bottom of the the ladder, then click the Rod to add it to your inventory.
Click the loose brick jutting out of the wall to zoom in.
Remove the brick using the Metal Rod.
Put the Small Lead Ball into the crack in the pipe.
Click the exit of the pipe in the wall to the left of the ladder.
Take the Lighter.
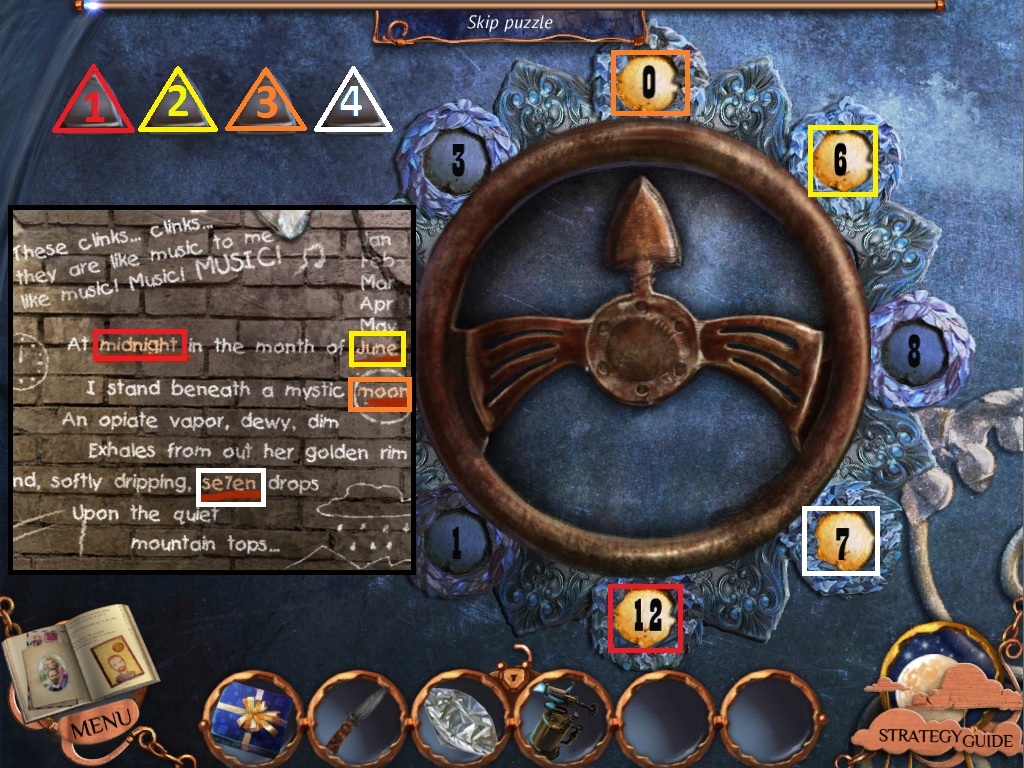
Click the vault door to zoom in.
Attach the Blowtorch from your inventory to the hook on the wall.
Use the Lighter on the blowtorch.
Pick the blowtorch up and move it around to melt all the ice off the wheel to begin the puzzle.
To solve this puzzle, enter in the correct combination according to the poem written on the cell wall.
The first line reads "At midnight in the month of June".
Midnight is 12 o' clock and June is the sixth month of the year; the first two numbers are 12 and 6.
The next line reads "I stand beneath a mystic moon".
The word moon is surrounded by a circle, representing the number 0.
The last highlighted line reads "And, softly dripping, se7en drops"
The word and number are the same, 7.
The complete combination is 12,6,0,7.
Click the numbers around the wheel to enter the combination.
When entered correctly, each of the four triangular lights will glow green.
Screenshot.
Go through the open doors into the elevator.
Push the up button to ride the elevator to the factory.
The Factory
Take the Origami(28/33) on the left wall, next to the bell.
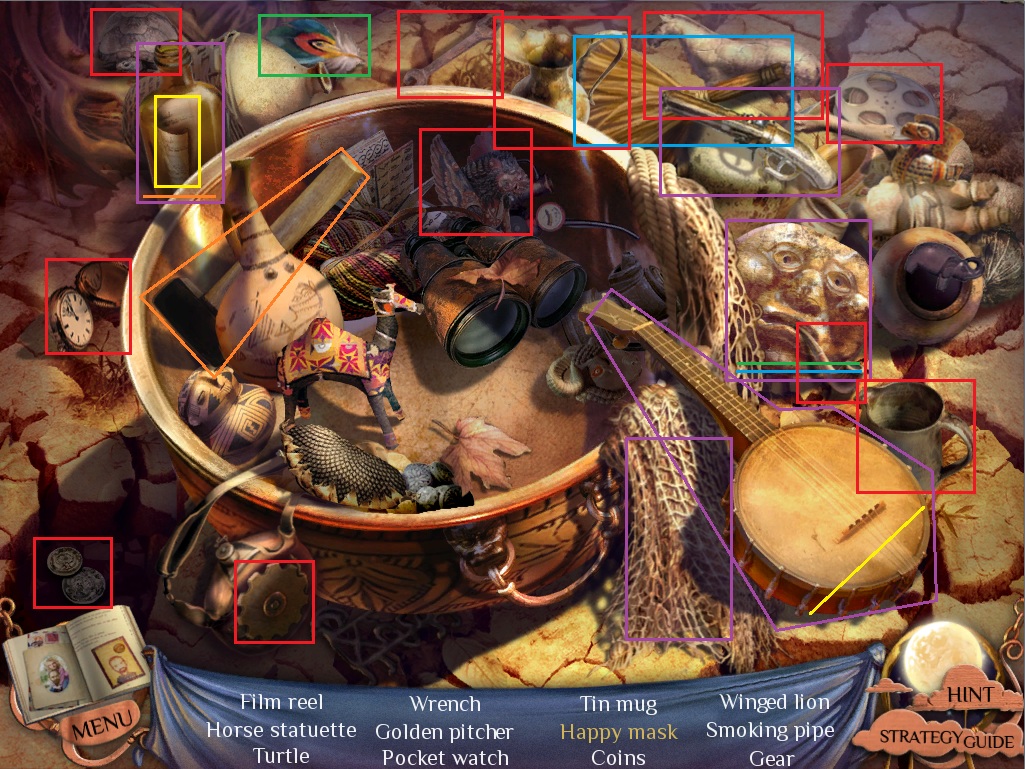
Click the pod in the middle of the room to start the hidden object scene.
Collect all available items.
Several of the hidden items are hidden behind the doors in the wall.
Click the door to lift it, revealing the Weights, Iron, Rocket, and Big Golden Ring.
Push the chair aside to reveal the Cannonball.
Click the round mechanism with the blue and yellow lights to reveal the Nose.
Screenshot.
Put the Record and the Handle on the gramophone, then click the handle to open the compartment.
Click the compartment to zoom in to the puzzle.
To solve this puzzle, arrange all the pieces of paper to complete the image.
Two of the pieces are already set.
Click a paper to pick it up, then click a space on the board to place it.
When a fragment is properly positioned, it will lock in place.
Screenshot.
Click the matchbox to open it.
Pick up a match, strike it, and use it to light the candle.
Use the paper over the flame of the candle to reveal the secret message.
Take the pink envelope on the side of the gramophone compartment.
Open it and click the Old Photo inside.
Once the hidden object scene is complete, the Factory Master will kick you out back to the frost realm.
Frost Realm
Return to the factory sign to the right of the gate.
Use the Blowtorch on the the frost covering Emily's drawing.
Click the Drawing of a Frozen Landscape to add it to your inventory.
Go all the way back through the portal to the house in the real world.
The House
Return to the wall of pictures across the stairway.
Add the Drawing of a Frozen Landscape to the fifth space.
Go upstairs to the master bedroom.
Click Emily's portrait to zoom in.
Take the Diving Helmet Emblem hanging to the right of the portrait.
Go back through the portal to the extractor's realm.
Posted by: Trinn |
July 8, 2011 10:01 PM
|
July 8, 2011 10:01 PM
Nightmare Realm Walkthrough Part 2: Chapters 4-5 & Collector's Edition Bonus Chapter
Chapter 4
Extractor Realm
Click the cage in front of the diving suit to zoom in.
Use the Diving Helm Emblem on the lock to the gate.
Use the Diamond from your inventory on the glass case.
Take the Diving Suit.
Go down the water-filled hole in ground.
Click the cracked pipe to zoom in.
Use the Blowtorch to meld the hole in the pipe.
Resurface and go back to the storage compartment where you found the diving suit.
Use the Blowtorch on the gas can to refill it with fuel.
Dive back underwater and repair the three remaining cracks in the pipe with the Blowtorch.
Move forward through the underwater tunnel.
Use the Diamond from your inventory on the statue's missing eye socket.
Note the two revealed digits carved into the statue.
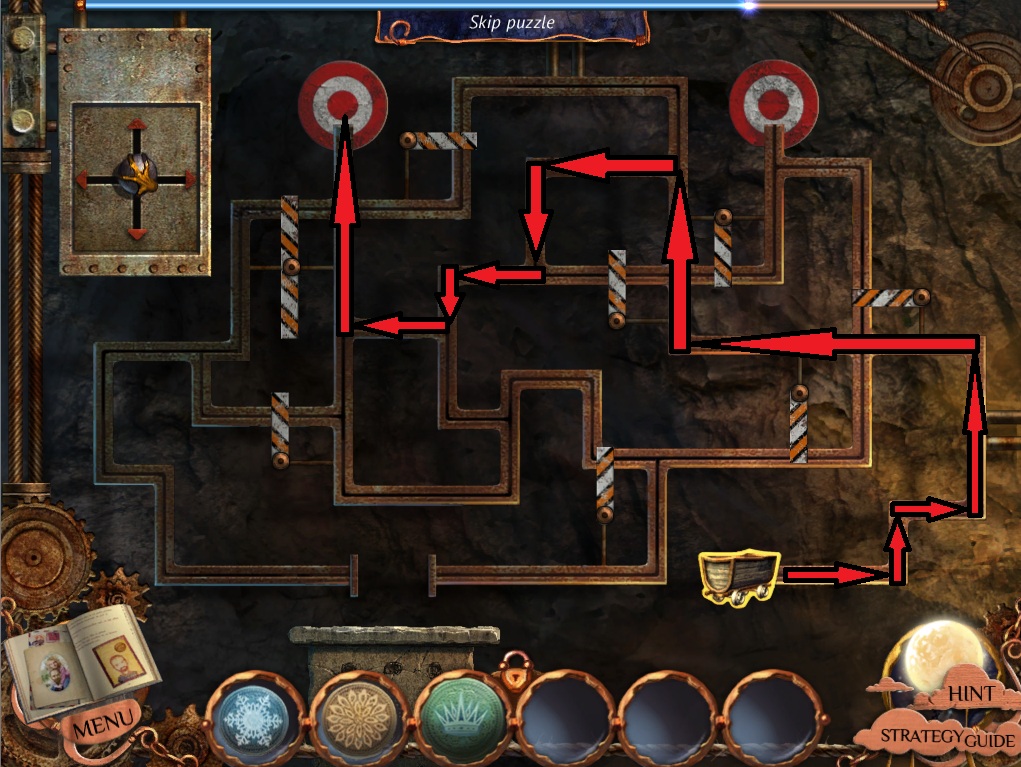
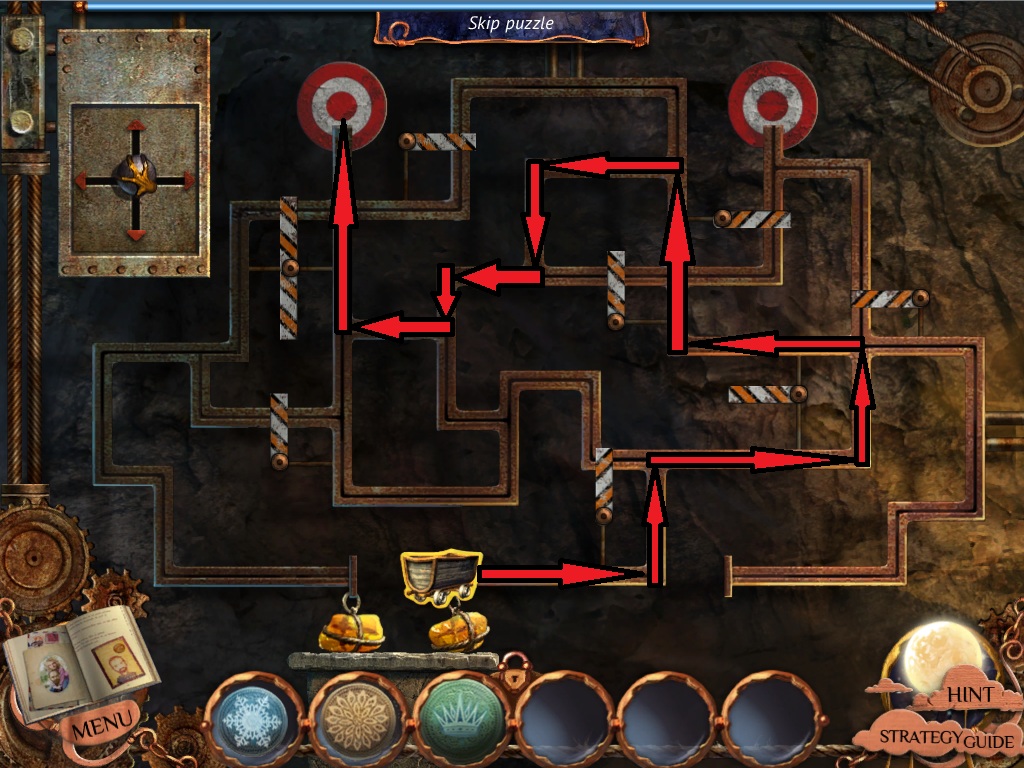
Return to the surface of the water and click the pipe between the cracked floor to repeat the water pressure puzzle.
Like the first time, click the valve handles to match the pressure noted in the Diary.
The first pressure meter should be set to -10
The second should be set to 360.
Screenshot.
Go down the ladder into the drained tunnels.
Take the Origami(29/33) in the lower left corner.
Go forward through the tunnel.
Take the Origami(30/33) on the rubble blocking the archway.
Click the bottle next to the shaft to zoom in.
Click the cork to pop it off.
Take the Drawing of Swords and a Shield.
Return to the house in the real world.
The House
Go back to the hall across the stairs, and click the wall of Emily's drawings to zoom in.
Place the Drawing of Swords and a Shield on the 3rd numbered space.
Return to the master bedroom upstairs.
Click Emily's portrait on the left wall to zoom in.
Click the origami butterfly to open the note.
Take the Witchdoctor Token on the wall next to the portrait.
Return to the witchdoctor's tree House in the desert realm.
The Witchdoctor's Tree House
Take the Unlit Torch underneath the table.
Click the witchdoctor's hand to zoom in.
Click the strange black mass over the corpse.
Take the Sanityzak Recipe rolled up in the witchdoctor's hand.
Click the cellar to zoom in.
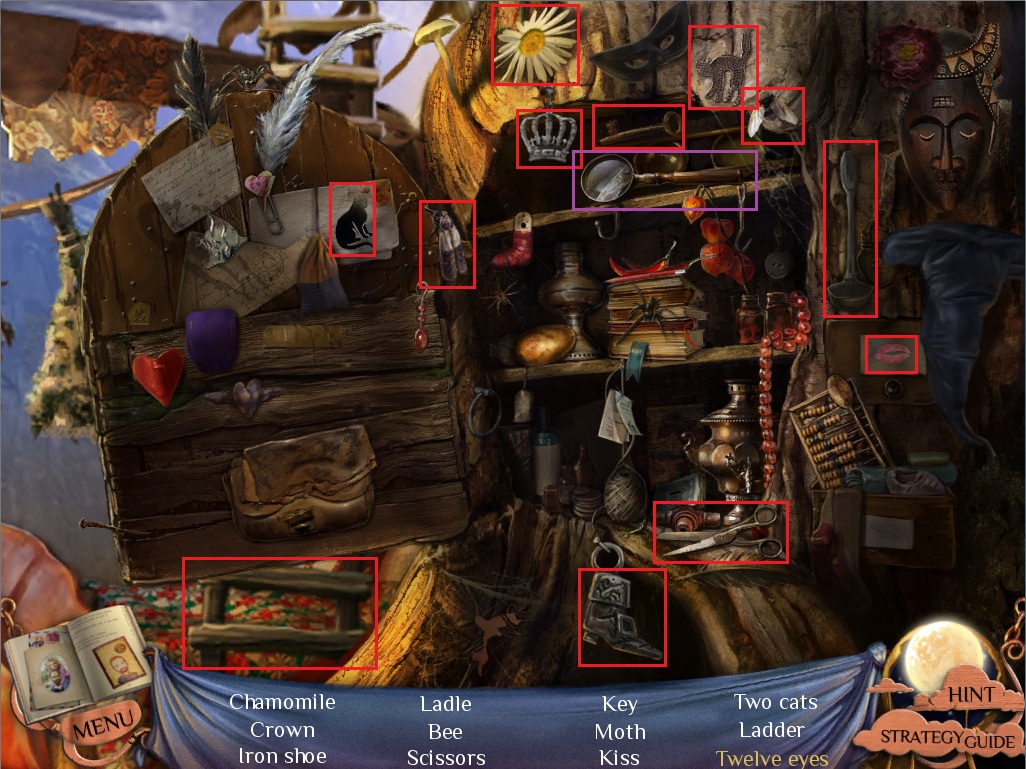
Click the shelves to repeat the hidden object scene.
Collect all available items.
Screenshot.
Click the plate at the bottom shelf to zoom in.
Take the Bell, Purse, and Heart.
Screenshot.
Once the hidden object scene is complete, you will receive a Trowel.
Use the Knife from your inventory on the large pumpkin in the top right corner.
Take the Pumpkin Seed from the carved slice.
Take the Fishing Rod in the lower left corner.
Go back once to exit the tree House.
Take the Blackcurrant berries from the pink blossoms in the branches of the house.
Take the red Poppy Flower left of the alchemy table.
Go back once to the bridge with the robot.
Take the Strawberry and the Dandelion growing on the large rock.
Click the mound of dirt beside the water to zoom in.
Use the Trowel from your inventory to dig a hole, revealing the Worms.
Go back one screen to the large river surrounded by shrubbery.
Take the Blueberry branch hanging from the right shrub.
Take the Chamomile below the left shrub.
Click the area of the river where the fish are jumping to zoom in.
Use the Fishing Rod from your inventory on the water.
When a fish stops at the lure, click the Fish to add it to your inventory.
Go back one screen to reach the desert realm entrance.
Take the Bell Flower on the ground to the left of the mushroom stairway.
Take the Raspberry beside the far left tree.
Go forward into the spirit's cave.
Click the spirit's tears on the ground to zoom in.
Click the Amber Tear to add it to your inventory.
Use the Unlit Torch from your inventory on the glowing blue brazier.
Return to the inside of the witchdoctor's tree house.
Click the closet door to zoom in to the emotions puzzle.
To solve this puzzle, arrange the tokens labelled with emotions across the board according to the order given in Emily's note.
Add the Witchdoctor Token from your inventory to the empty space on the board.
The first line of the poem says "My fear...blows down from the North"
Place the Fear Token at the north side of the compass rose, labelled "N"
The next line reads "Opposite my Fear stands my Hope"
Place the Hope Token at the south side of the compass.
The next line describes the "right and left pillars of your love: Solicitude and Pride"
Place the Solicitude Token on the right side, to the east and place the Pride Token on the left side, to the west.
The third verse says "Between your Pride... and my Hope...sits Mercy"
Put the Mercy Token in the space between the Pride and Hope Tokens, in the southwest.
The fourth verse reads "My Pity...neighbors Fear's eastern edge and is inclined to my Mercy"
Place the Pity Token to the right of the Fear Token, on the opposite side of the compass as Mercy, in the northeast side.
The next verse says "Between...Solicitude and the Hope...lies my Remorse"
Put the Remorse Token between the Solicitude and Hope Tokens in the southeast side.
Screenshot.
Once the puzzle is solved the door will slide open, revealing the witchdoctor's alchemy table.
Click the table to begin making the Sanityzak recipe.
To make the Sanityzak, follow the recipe and ingredients listed in the note left by the witchdoctor.
Screenshot.
Put the shovel of coals into the fireplace beneath the bowl.
Use the Lit Torch on the coals.
Place the Poppy, Dandelion, Pumpkin Seed, Camomile, and Bell Flower into the spaces with the matching picture on the dish.
Use the spoon hanging in the top left corner to scoop up the flower pieces.
Put the flower pieces into the grinding machine to the left of the bowl.
Click the lever to the right of the fire to drop down the cooking device.
Put the red powder into the cooking device.
Take the empty vial attached to the tube with the red ribbon from the machine on the right side.
Use the vial on the red steam pouring out of the left pipe.
Replace the red vial to the machine with the tube with the red ribbon.
Put the Fish on the platter with an engraved fish.
Use the Knife from your inventory on the fish.
Click the fish three times to chop it, then put the chopped pieces into the blender to the left of the bowl.
Place the fish powder into the device.
Take the blue vial from the machine on the right, and use the vial on the blue steam coming out of the left pipe.
Replace the blue vile to its original spot on the right machine, attached to the tube with the blue ribbon.
Put the Amber Tear underneath the crushing mechanism.
Place the crushed amber in the center of the dish.
Add the Black Currant, Blueberry, Raspberry, and Strawberry to the appropriately matching pictures on the dish.
Use the Spoon hanging above the grinder to scoop up the berries.
Pour the berries into the grinding machine.
Take the green powder and pour it into the cooking machine.
Take the last empty vial attached to the tube with the green ribbon.
Use the vial on the pipe blowing out the green steam.
Put the vial back onto the right mechanism.
Take the completed Sanityzak pill and the Drawing of a Blooming Tree from the opened drawer.
Return to the house in the real world.
The House
Go back from Emily's bedroom to the hall across the stairs.
Click the wall of drawings to zoom in.
Add the Drawing of a Blooming Tree to the space on the wall numbered 4.
Go upstairs to the master bedroom.
Click Emily's portrait on the left wall to zoom in.
Take the Factory Key hanging to the right of the portrait.
Return to the campsite in the frost realm.
Chapter 5
Frost Realm
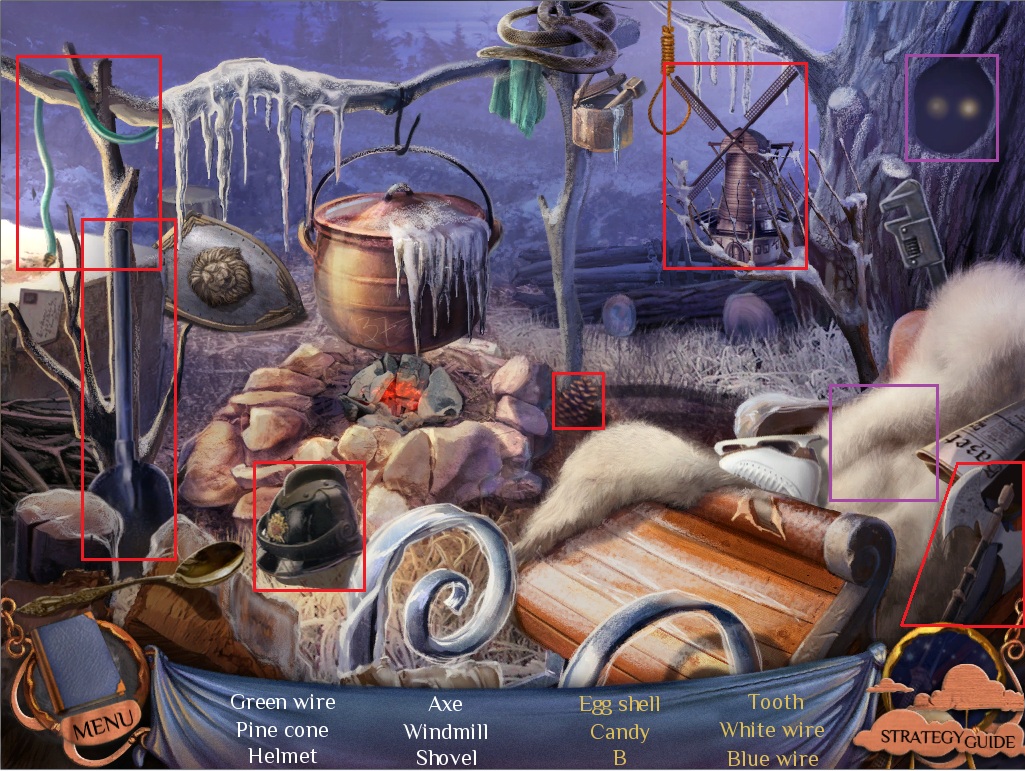
Click the cauldron to repeat the hidden object scene.
Collect all available items.
Screenshot.
Click the white fur coat to zoom in.
Take the B, Candy, Tooth, and White Wire.
Click the egg twice to break off a piece of the Egg Shell.
Screenshot.
Click the hollow of the tree to zoom in.
Take the Blue Wire to the left of the owl's feet.
Once the hidden object scene is complete, you will receive Colored Wires.
Return to the doors of the factory.
Click the double doors to zoom in.
Use the Factory Key from your inventory on the keyhole.
Go through the open door into the factory.
The Factory
Take the Origami(31/33) on the top right corner of the factory doors.
Use the Sanityzak from your inventory on the factory master.
Click the sane factory master to speak with him.
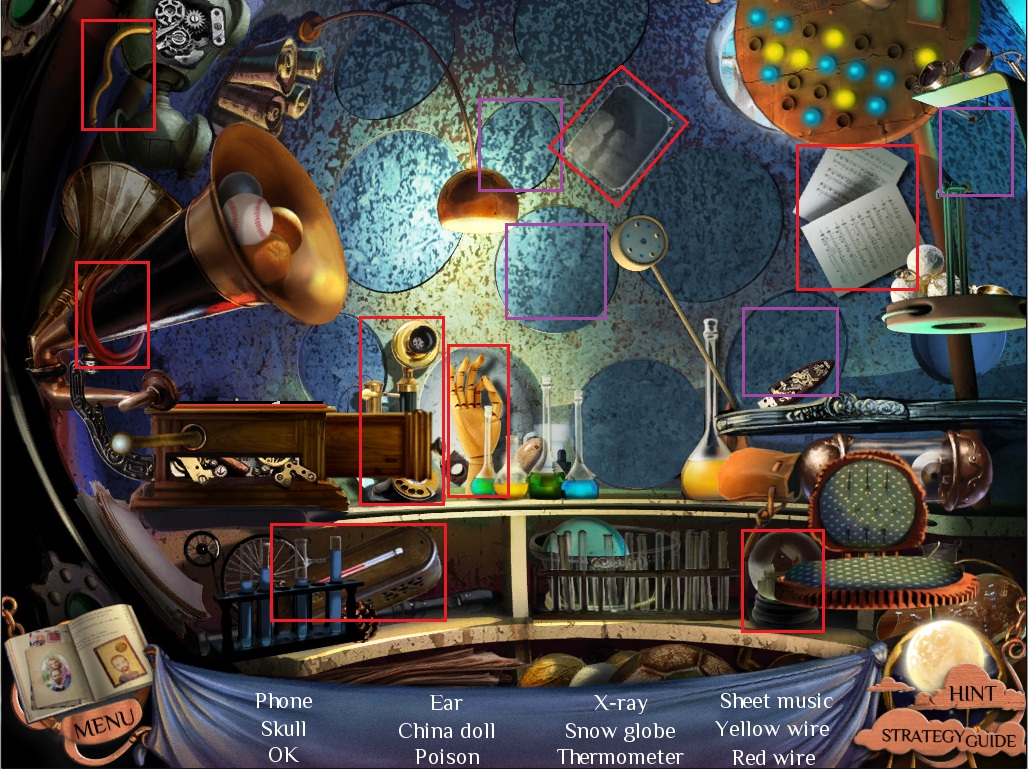
Click the round device in the middle of the room to start the hidden object scene.
Collect all available items.
Click the round doors on the wall to reveal the Ear, Skull, Poison, and the China Doll.
Screenshot.
Once the hidden object scene is complete, you will receive red and yellow Colored Wires.
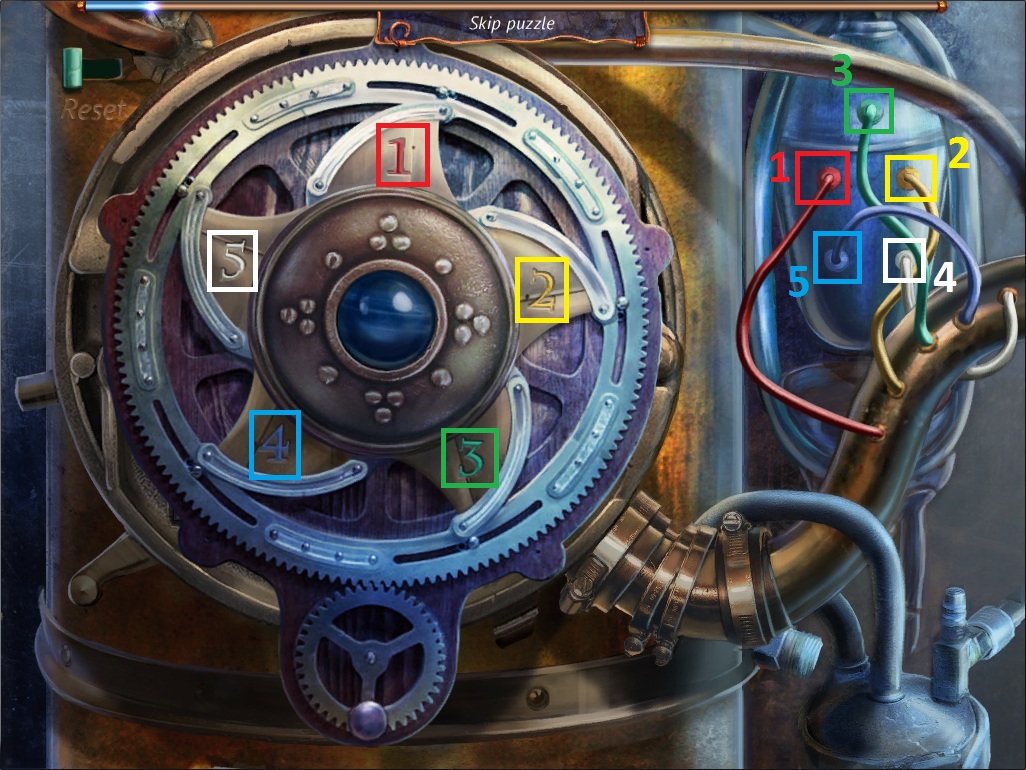
Click the engine on the right wall to zoom in.
Attach the colored wiles to the wire panel on the right side of the machine to begin the puzzle.
To solve this puzzle, attach the colored wires following the order colored numbers on the machine.
The correct order is: Red, Yellow, Green, Blue, White.
Screenshot.
Once the puzzle is solved, the door will slide over, revealing another puzzle.
To solve this puzzle, place the tiles over the spaces with the matching symbol
Click and hold a tile to select it, then drag it up, down, left, or right to drag it in that direction.
When a tile is over the space with the matching symbol, it will glow yellow.
Click the Reset button in the top left corner of the machine to reset the entire engine puzzle.
Screenshot.
Speak to the factory master.
Go back through the double doors to the outside of the factory.
Take the Origami(32/33) in the snow in front of the doghouse.
Go back one screen to the campsite.
Click the factory master to speak with him.
Click the present under the tree.
Click the tree branch to push it aside.
Click the top present to push it out of the way.
Click the top of the red box.
Take the Drawing of a Sun inside the gift box.
Speak to the factory master again.
Take the Mystic Orb on the snow near the factory master's corpse.
Click the factory master's coat to zoom in.
Click his pocket to open it, and take the note crumpled inside.
Return to the house in the real world.
The House
Go to the hallway across the stairs.
Click the wall of drawings to zoom in.
Add the Drawing of a Sun in the space numbered 6.
Go upstairs to the master bedroom.
Click Emily's portrait on the wall to the left of the door.
Returned to the collapsed room upstairs in the extractor realm.
Extractor Realm
Go forward through the open doorway.
Click the door at the top of the winding platform.
Click the ropes ties around the bottom of Emily's cage to zoom in.
Use the Knife from your inventory on each of the four ropes tied to the ground.
Once all the ropes are cut, click the case to push it off.
Click Emily to zoom in.
Put the Mystic Orb from your inventory into the sphere space.
Click Peter to speak with him.
Return through the portal to the house in the real world.
The House
Take the envelope from Emily.
Open the envelope and take the drawing inside.
Click the wall of Emily's Drawings across the stairs.
Put the Drawing of Some Magic Creatures from your inventory on the space numbered 1.
Click Emily to speak with her.
Give Emily her Present from your inventory.
Speak to Emily again.
Click the present to zoom in.
Click the Palette to move it aside.
Take the Origami(33/33) and the box of Matches.
Use the Matches on the candles of the cake.
Click the birthday cake.
Bonus Chapter(Collector's Edition)
Click the "Extras" button in the main menu to access the Extras tab, then click the "Extra Chapter" button in large letters at the top.
The Sewers
Take the Board leaning on the left wall.
Take the Iron Step on the ground at the left side of the water.
Click the glowing tunnel to zoom in.
Take the second Iron Step.
Place the board from your inventory on the water.
Click the pile of junk at the bottom of the ladder to zoom in.
Take the third Iron Step.
Move away the branch to reveal the Wrench.
Click the grate in the wall to zoom in.
Use the Wrench on all four bolts around the grate.
Take the Flask with Alcohol from the skeleton's hands.
Click the roll on the skeleton's back to reveal the scroll of paper.
Unfurl the scroll and take the Golden Scarab.
Click the ladder to zoom in.
Use the three Iron Steps from your inventory on the holes in the wall between the ladder rungs.
Click the manhole at the top to try to climb out.
Take the Heavy Rock on the ground next to the ladder.
Click the grate on the ground beneath the skeleton.
Use the Heavy Rock on the loose bar of the grate.
Take the Large Iron Rod.
Click the glowing blue tunnel to zoom in.
Use the Large Iron Rod on the bag in the back of the tunnel.
Take the Matches from the bag.
Click the pile of branches at the bottom of the ladder to zoom in.
Use the Alcohol on the branches.
Use the Matches on the alcohol-soaked branches.
Go up the ladder again and click the manhole.
Climb up the ladder to the surface of the desert.
The Desert
Click the burning house to zoom in.
Take the Saber sticking out of the sand on the right.
Click the water wheel beside the house to zoom in.
Use the Saber on the briars to reveal the Shovel.
Take the Boat Hook leaning against the rocks.
Click the note on top of the mechanical device.
Take the Brass Token on the pipe above the small metal door.
Take the second Brass Token on the beam of the water wheel.
Go back once then click the burning house to step inside.
Talk to the old hag Mary then step back outside and go back one more time to the full view of the desert.
Click the left structure to zoom in.
Use the Golden Scarab from your inventory on the ring of the statue's hand.
Use the Shovel on the highlighted spot in the sand.
Click the dug hole to zoom in.
Take the Bar of Gold from the treasure chest.
Return to the sewers.
The Sewers
Click on the bubbly area in the water to zoom in.
Use the Boat Hook from your inventory on the crate.
Use the Saber on the crate to reveal the Switch
Return to the view of the burning house and water wheel in the desert.
The Desert
Click the large amber crystal to zoom in.
Take the third Brass Token by the bottom left chain link.
Return to the view of the water wheel.
Place the Bar of Gold into the water mechanism on the right.
Take the fourth and final Brass Token.
Place the four Brass Tokens from your inventory into their matching spaces on the small metal door.
Click the panel behind the door to zoom in.
Add the Switch from your inventory to start the puzzle.
To solve this puzzle, connect each of the buttons with the number of lines indicated next to each button.
Click the space between two buttons to draw a connecting line between them.
Click the switch to test your solution.
Screenshot.
Go back inside the house.
Take the Oil Can in the sand beside the overturned table.
Click the locked box on the chair to zoom in.
Click the letter next to the box to note it in the Diary.
Take the bucket by the bottom of the stairs.
Click the photographs on the left wall to zoom in.
Take the note tucked behind the left frame.
Go up the stairs to the attic.
Click the desk to begin the hidden object scene.
Collect all available items.
Put the four bingo buttons on the bingo card to make Bingo!
Screenshot.
Once the hidden object scene is complete, you will receive the Drumsticks.
Click the teddy bear on the bookshelf to zoom in.
Put the Drumsticks in the teddy bear's hands.
Take the Wind Rose inside the broken drum.
Take the Pincers on the ground in front of the toy car.
Take the Rope around the toy plane.
Click the bed to zoom in.
Take the Wooden Block under the bed.
Click the globe in the corner of the room to zoom in.
Put the Wind Rose in the hole at the top of the globe.
Take the revealed second Wooden Block at the bottom of the globe.
Click the overturned bucket next to the toy car.
Click the paper in the back of the bucket.
Take the third Wooden Block.
Go back outside the house.
Click the large amber crystal to zoom in.
Use the Wooden Pincers on the fourth Wooden Block to add it to your inventory.
Return to the attic inside the house.
Click the large trunk under the bookshelf to zoom in.
Place the four Wooden Blocks from your inventory to the empty spaces on the lid of the trunk to begin the puzzle.
Click one of the Wooden Blocks to move it into the space next to the red button.
Push the red button to rotate the block, alternating through the letters.
Change the first letter to O.
Change the second letter to M.
Change the third letter to Y.
Change the last letter to T.
Arrange the blocks to spell the name "Tommy"
Screenshot.
Take the Photo Piece and the Cask Tap from the trunk.
Go back downstairs.
Click the framed photographs on the wall to zoom in.
Add the Photo Piece from your inventory to the upper left frame.
The House
Take the Quarter on the steps.
Click the small table in the bottom right corner to zoom in.
Take the Button next to the glued key.
Go outside through the left door.
Click Emily to speak with her.
Go inside Emily's bedroom.
Click the bedside table and open the small door.
Click the box in the cabinet to zoom in.
Add the Button from your inventory to the box to begin the puzzle.
To solve this puzzle, find the symbols that match the five shown at the top of the board.
Click a symbol to select it. If chosen correctly, its matching symbol at the top will burn away, revealing a letter.
The puzzle will repeat until the hidden message is completely decoded.
Screenshot.
Once the puzzle is complete, take the revealed Crayon.
Go back outside to the porch.
Give Emily the Red Crayon from your inventory.
The Desert
Click the wall of photographs to zoom in.
Click the photograph of Mary and her son.
Follow the golden trail outside to the amber crystal.
Take the unlocked Snowflake Token.
Return to the attic inside the house.
Click the desk to repeat the hidden object scene.
Collect all available items.
Add the two frog puzzle pieces to the frog square picture.
Screenshot.
Once the hidden object scene is complete, you will receive a Mallet.
Return to the ladder inside the sewers.
The Sewers
Click the cracked right wall to zoom in.
Use the Mallet from your inventory on the hourglass drawing on the wall.
Click the rag to push it over, revealing the Hourglass and the Dagger.
Return to the attic inside the house.
The Desert
Click the area under the bed to zoom in.
Use the Knife from your inventory on the loose floorboard.
Take the Eyeball.
Go downstairs.
Click the small box on the sofa to zoom in.
Place the Eyeball inside the round hole carved in the box.
Take the second Hourglass.
Return to the buried statue in the desert.
Click the statue's eyes to zoom in.
Place the two Hourglasses from your inventory into the carvings in the statue's eye sockets.
Take the revealed Photo Piece in the bridge of the statue's nose.
Go back inside Mary's house.
Click the photographs on the left wall to zoom in.
Add the Photo Piece from your inventory to the lower left frame.
The House
Click the teddy bear hanging by the window.
Take the Needle next to the bear.
Go out the left doorway to the porch.
Take the bottle of Solvent behind Emily.
Take the second Quarter on the railing of the steps.
Step back inside the house.
Click the small table under the stairs to zoom in.
Use the Solvent on the glued down Key.
Go inside Emily's room.
Click the bedside table to zoom in.
Click the small box in the drawer.
Use the Key from your inventory on the keyhole at the top of the box to start the puzzle.
To solve this puzzle, press the correct button before its matching symbol disappears.
On the left or right sides a chain will immediately start pulling, revealing a tile with a symbol on it.
Press the matching button on the board before the tile on the chain reaches the top.
If you find the correct button in time, one of the ten bulbs at the bottom of the board will illuminate.
Screenshot.
Once the puzzle is complete, you will receive a message from Tommy instructing you to take the Yellow Crayon.
Step back outside to the porch.
Give the Yellow Crayon to Emily and you will receive a Picture Fragment.
Return to Emily's room.
Click the puzzle on the wall to zoom in.
Add the puzzle fragment from your inventory to the board to start the puzzle.
To solve this puzzle, rotate the tiles to complete the picture of David.
Click a tile to rotate clockwise.
Screenshot.
Take the third and fourth Quarters over David's eyes and click the date at the bottom of the picture.
Return to the porch outside the house.
Click the machine by the door to the wall.
Put all four coins from your inventory into the coin slot of the device.
Take the Mystic Key that slides into the hand.
Use the Mystic Key on the door to the left of the coin device.
Go through the open doorway.
Take the Scissors sticking out of the wall.
Click David to speak with him.
The Desert
Click the photographs on the wall to zoom in.
Click the lower left framed photo.
Follow the golden trail to the amber crystal outside the house.
Take the Flower Token from the middle lock.
Click the small hole in the sand to zoom in.
Take the Reflector inside the hole.
Go to the buried stone statue in the desert.
Go through the statue's open mouth into the cave.
The Cave
Use the Mallet on the shards in the left head's mouth.
Place the Reflector from your inventory inside the empty mouth.
Take the Bell behind the right head.
Go forward through the tunnel.
Click the cask beside the glass dome.
Use the Cask Tap from your inventory on the barrel.
Put the Empty Bucket under the tap.
Click the red light to zoom in.
Take the Sack in front of the railroad sign.
Use the Oil Can on the rusty lever.
Click the lever to switch the light.
Take the second Bell out of the mine cart.
Put the Rope from your inventory to the left gate lever.
Attach the Sack to the rope.
Use the Full Bucket on the right gate lever.
Click the open gate to start the hidden object scene.
Collect all available items.
Place the two fish on the hooks above the coals.
Screenshot.
Once the hidden object scene is complete, you will receive the third Bell.
Put the empty barrel underneath the hanging bells.
Click the bells to zoom in.
Attach the three Bells from your inventory to the empty spaces on the hooks to start the puzzle.
To solve this puzzle, ring the bells in the correct order.
Each of the seven bells produces a different color and sound when rung.
Note that "Rainbow Music" is carved into the wood backwards.
Also note the color of the moon drawings, and the degree to which the moons are waxing or waning.
Play the bells in reverse order, starting with the purple full moon and ending with the thin red crescent moon.
Screenshot.
Take the Photo Piece attached to the balloon.
Return to Mary's house in the desert.
The Desert
Click the photographs on the left wall to zoom in.
Use the Photo Piece from your inventory on the upper right frame.
The House
Click the photo on the ground to read Tommy's note.
Go inside Emily's bedroom.
Click the clothes on top of the rocking chair to zoom in.
Use the Scissors from your inventory on the green coat button.
Return to the hallway.
Click the teddy bear hanging in front of the window to zoom in.
Put the Button on the space of the bear's eye.
Use the Needle to tighten the string of the other eye.
Click the left wall to zoom in.
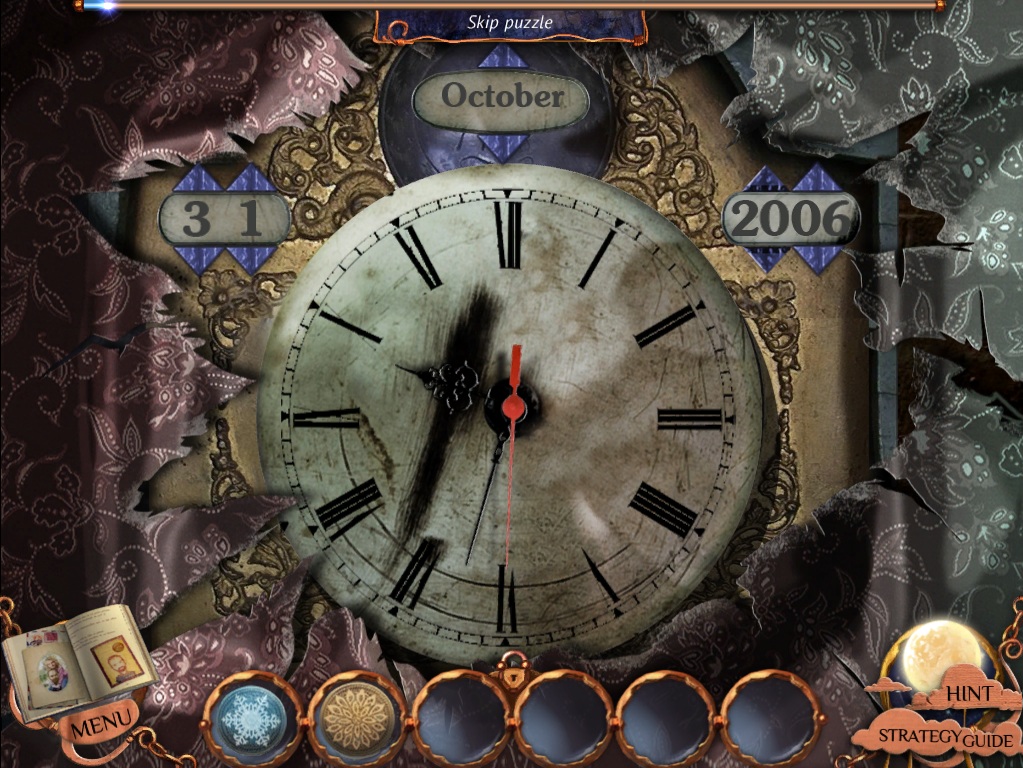
Remove all the wallpaper shreds around the clock to start the puzzle.
To solve this puzzle, enter the date that David died.
The date is noted in the Diary from the tiles puzzle: 10/31/2006
Change the month to October by hitting the bottom arrow under January.
Change the left number to 31.
Change the right number to 2006.
Screenshot.
Take the repaired Teddy Bear sitting on the windowsill.
Step outside to the porch.
Give the Teddy Bear to Emily to receive the Note.
Go through the white doorway into David's room.
Give the Note from Emily to David.
The Desert
Click the photographs on the wall to zoom in.
Click the upper right framed photograph.
Follow the golden trail outside to the amber crystal.
Take the unlocked Crown Token.
Follow the golden trail back inside Mary's house.
Click Mary to speak with her.
Return to the caves through the buried statue head.
The Cave
Go down through the tunnel into the room with the mining shaft.
Click the panel on the wall above the table where the sarcophagus was.
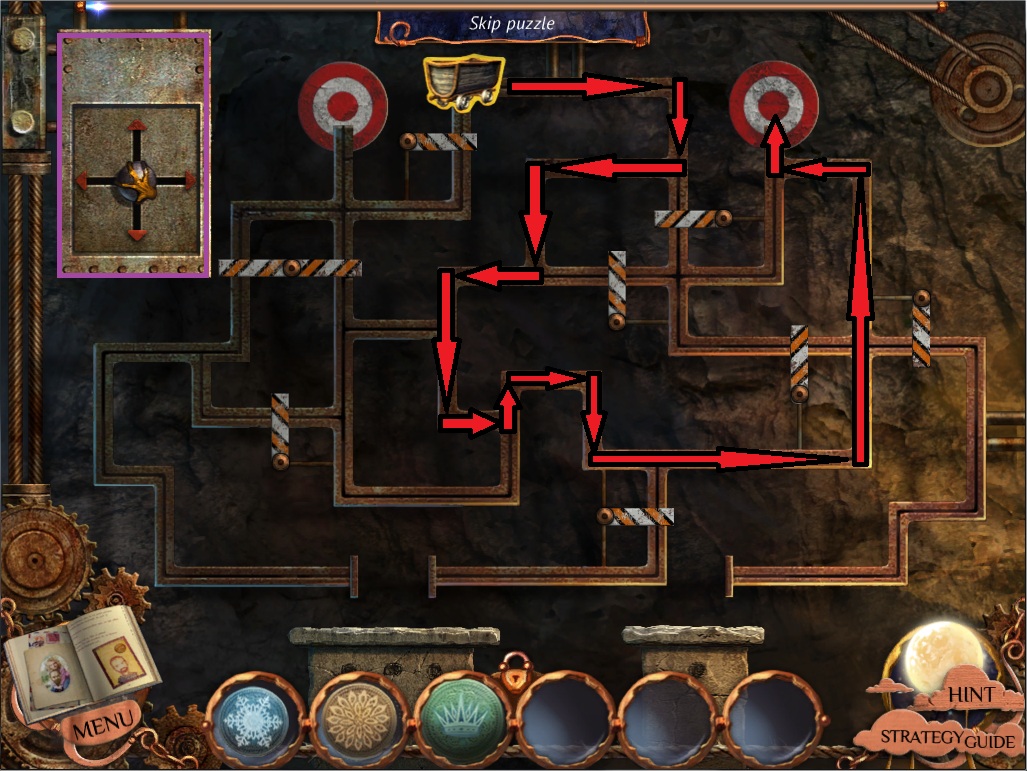
Use the Handle from your inventory on the mechanism in the upper left corner to start the puzzle.
To solve this puzzle, move the mining cart to the targets and platforms.
Click and drag the handle up, down, left, or right to move the mining cart in that direction.
The cart cannot move anywhere that is not along the track or through any barriers.
To get to the right target go:
Right, Down, Left, Down, Left, Down x2, Right, Up, Right, Down, Right x2, Up x2, Left, Up.
Screenshot.
To drop the ore off at the right platform go:
Down, Left x3, Down x2, Right, Up, Right, Down, Right x2, Up, Right, Down, Left, Down, Left.
Screenshot.
To reach the left target go:
Right, Up, Right, Up, Left x2, Up x2, Left, Down, Left, Down, Left, Up x2
Screenshot.
To get to the left platform go:
Down, Right, Up, Right, Down, Left, Down, Left, Down, Left, Down, Left, Up, Left, Down, Right, Down, Right
Screenshot.
Return to the right target by moving:
Left, Up, Left, Up, Right, Down, Right, Up, Right, Up, Right, Up, Right, Down x2, Right, Up, Left, Up.
Screenshot.
Return to the left platform by moving:
Down, Right, Down, Left, Up x2, Left, Down, Left, Down x2, Right, Up, Right, Down, Right, Down, Left.
Screenshot.
Go back to the left target by moving:
Right, Up, Right, Up, Left, Up x2, Left, Down, Left, Down, Left, Up x2
Screenshot.
Go to the left platform for the last time by moving:
Down x2, Right, Up, Right x3, Up, Right, Down x2, Left, Down, Left.
Screenshot.
Click the pedestal to zoom in.
Read the note behind the pressing device.
Click the opened gate to repeat the hidden object scene.
Collect all available items.
Screenshot.
Once the hidden object scene is complete, you will receive a Valve.
Click the book on the pedestal to zoom in.
Add the Valve to the pressing mechanism on top of the book.
Click the book and open it to reveal the Metal Base.
Return to Mary's house in the desert.
The Desert
Click the bird statue hanging in front of the middle window.
Use the Metal Base from your inventory on the bottom of the statue.
Take the Skull out of the bird's mouth.
Return to the cave through the buried statue head.
The Cave
Click the mouth of the right head to zoom in.
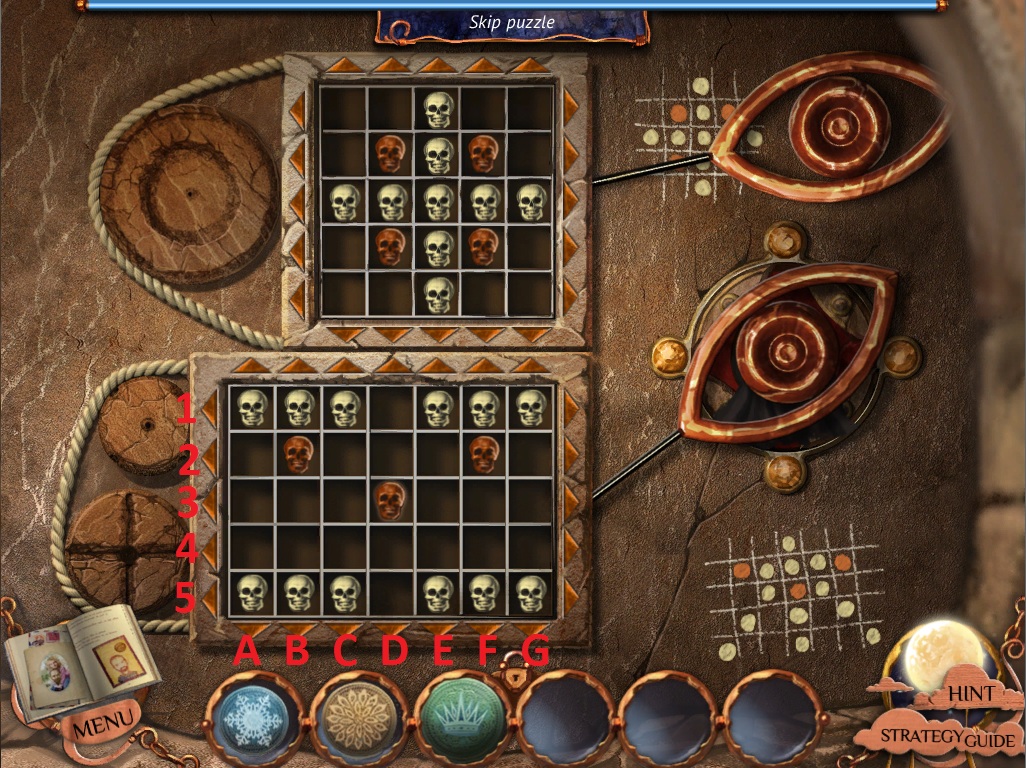
Add the Skull to the lower board to start the puzzle.
To solve this puzzle, place the skulls to match the images drawn to the right.
Click the up, down, left, and right arrows to move the rows and columns of skulls in the respective directions.
Starting with the top grid:
Screenshot.
Click the Right arrow at Row 1
Click the Up arrow at Column A
Click the Left arrow at Row 5
Click the Up arrow at Column C 3 times.
Click the Left arrow at Row 5
Click the Up arrow at Column C two times.
Click the Right arrow at Row 5 two times.
Click the Up arrow at Column C
Click the Down arrow at Column A
Click the Right arrow at Row 5 two times.
Click the Down arrow at Column A
Click the Down arrow at Column E two times.
Click the Left arrow at Row 3.
Click the Down arrow at Column C
Click the Right arrow at Row 1.
Click the Down arrow at Column E two times.
Once the small grid is complete, move on to the large grid at the bottom:
Screenshot.
Click the Up arrow at Column B
Click the Up arrow at Column C three times.
Click the Down arrow at Column C
Click the Up arrow at Column E three times.
Click the Down arrow at Column E
Click the Up arrow at Column F
Click the Right arrow at Row 1 two times.
Click the Left arrow at Row 5 three times.
Click the Down arrow at Column G four times.
Click the Up arrow at Column D
Click the Left arrow at Row 5 three times.
Click the Down arrow at Column D
Click the Right arrow at Row 1
Click the Down arrow at Column G four times.
Screenshot.
Once the puzzle is complete, take the revealed Piece of Black Robe.
Go down the tunnel to the room with the elevated iron door.
Use the Piece of Black Robe on the door.
Go through the open doorway into the destroyed hallway.
Click the door at the end of the hall to zoom in.
Use the three Tokens from your inventory on the spaces in the door.
Go through the doorway at the top of the winding path.
Click Emily's sarcophagus.
The End
Posted by: Trinn |
July 8, 2011 10:04 PM
|
July 8, 2011 10:04 PM