
Nightmare on the Pacific
Platform: Mac, Windows

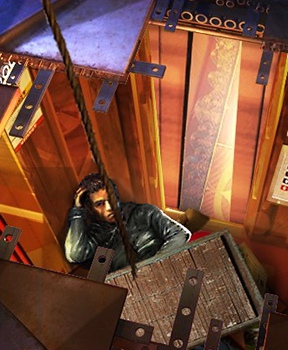
![]() It's the kind of choice you never want to have to make, yet you have to make it in an instant. You're at the scene of a disaster, and your loved ones are missing. The rescuers are saying it's too dangerous and they have to leave the area. Do you go with them? Or do you put yourself at risk looking for the ones you love? The heroine of Nightmare on the Pacific, a hidden object from Little Games, makes the latter choice. Join her in a modern day Titanic disaster as she searches a sinking cruise ship for her family.
It's the kind of choice you never want to have to make, yet you have to make it in an instant. You're at the scene of a disaster, and your loved ones are missing. The rescuers are saying it's too dangerous and they have to leave the area. Do you go with them? Or do you put yourself at risk looking for the ones you love? The heroine of Nightmare on the Pacific, a hidden object from Little Games, makes the latter choice. Join her in a modern day Titanic disaster as she searches a sinking cruise ship for her family.
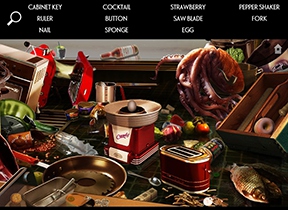 Being trapped inside not only a cruise ship but also a hidden object game, in order to find her family, the heroine first has to find a lot of random objects, like plungers, billiard balls, and apples. There are also some parts of the scenery in some areas she can manipulate, such as piling up objects to form a make-shift ladder. She also needs to solve some inventory puzzles (such as using a key on a lock) as well as some straight-up puzzles, because what cruise ship doesn't use light-up puzzles as a form of security? All you'll need to do these things is your trusty cursor and some sharp eyes to look out for little blue sparklies. If you want to get the happy ending of the game, you'll also want to keep an eye out for some more subtly sparkling objects. Gotta collect 'em all!
Analysis: Despite its flaws, Nightmare on the Pacific offers a pretty compelling storyline and a few truly clever puzzles (my favorite was one involving a curious fish). Without looking at walkthroughs, the game took me about three hours total. This is a game where the demo really reflects the rest of the game, so if the demo captures your fancy, the full game will keep it caged for quite a while.
And now for one of Nightmare on the Pacific's most serious flaw: scenes where multiple objects fitting the same description appear, yet only one of them counts. For example, a scene might have two cameras. You can click on the "wrong" camera until the cows come home, and you'll only be rewarded with that temporary loss of cursor control by which the game punishes you for what it thinks is random clicking. This doesn't occur in every hidden object scene, but it feels sloppy and lazy of the gamemakers when it does. There also appear to be two minor, non-game-breaking bugs which popped up in the transition from Collector's Edition to standard: first, the chapter icon in the upper left hand corner never changes, and secondly, you frequently have to manually click through dialogue.
 On the other hand, the game avoids two serious potential pitfalls completely: scenes that are too dark, and objects that are too tiny. If you're tired of games where you have to plant your face a centimeter from your monitor in order to spot a cigarette, or games whose idea of atmosphere is to pour a bucket of gray all over everything, your eye doctor will approve your choice to play Nightmare on the Pacific instead. The game does atmosphere really well in general, actually. You begin the game in a certain area, and when you have to return to that area at the end of the game, conditions are noticeably getting worse. This really helps in increasing the sense of urgency and danger. And let's not forget that unlike most HOGs, Nightmare on the Pacific has a legitimate reason for its hidden object scenes to look like a huge mess: you're inside a ship that has been rolling around (and in some cases, inverting).
Nightmare on the Pacific also has a truly excellent in-game map, available anytime by clicking in the upper right corner, and a useful feature for determining exits: simply hover the cursor at the bottom of the screen, and red exit icons will appear over all exits. Since you'll be doing a lot of traveling in the game, these features really help you to keep your bearings.
With only a few flaws to contend with, Nightmare on the Pacific is still an engaging game with an interesting storyline and some puzzles that really draw you in.
![]() Windows:
Windows:
Download the demo
Get the full version
![]() Mac OS X:
Mac OS X:
Download the demo
Get the full version


Walkthrough Guide
(Please allow page to fully load for spoiler tags to be functional.)
Nightmare on the Pacific - Walkthrough
General
Puzzles can be skipped.
Click on the note icon in the upper right to access the diary.
The diary will give show you a map of the ship; the name of the location you are right now will blend in and out.
Locations with outstanding tasks are marked with a pushpin.
On the achievement page of the diary you can see a see a suitcase on the right side. During the game, find the 13 obscured objects it shows to get a reward for it.
Sparkling items or areas will allow you to interact or zoom in for a closer look.
The search scenes are not random. You will always get the same items, just maybe in a different order.
Finding a few items will let a few more appear on your list.
The hint will recharge in around a few seconds.
The walkthrough provides you with an inventory list in the order the items are found. This list will give you the location (names as on the game map) and the specific area where to find this item.
All inventory items are marked in black inside the spoiler in this walkthrough. When an inventory item is used, you will find the name of the location in which the object can be found behind the spoiler.
The walkthrough also provides you with the list of all family items and their locations.
Numbers behind locations show the number of times you already visited this location.
Inventory List
Tweezers - Heliport, suitcase
Card - Heliport, suitcase
Control light- Heliport, suitcase
Door handle - Stairs, locker
Pipe - Stairs, locker
Key for suitcase - Ventilation shaft, use tweezers
Screwdriver - Stairs, suitcase
Hacksaw - Stairs, suitcase, search scene
Switch - Stairs, suitcase, search scene
Flare gun - Stairs, suitcase, search scene
Cog wheel - Pool, arched bridge, search scene
Fire extinguisher - Pool, arched bridge, search scene
Stepladder - Hallway, debris, search scene
Glass cutter - Corridor below bathroom, trash bin, search scene
Fluorescent tube - Museum, right side, search scene
Chip - Museum, game machine
Golden anchor with chain - Casino, game machine
Crowbar - Heliport, far right, search scene
Wire cutting pliers - Heliport, far right, search scene
Rope - Our Cabin, balcony, search scene
Harpoon - At the pool, in the water, after rescuing Jimmy.
Long Hook - Safe-boat crane, safe boat, search scene
Key card - Maintenance Walk-Way
Lever - Cabin No. 2
Fire axe - Elevator, search scene
Scissors - Elevator, search scene
Rope (needed in Chapter 4) - Ship's Keel, life buoy
Cabinet key - Kitchen
Propane tank - Corridor (Level 1), search scene
Paddle - Corridor (Level 1), search scene
Little key - Bar, search scene
Disk grinder - Bar, search scene
Light bulb - Elevator Level 4, search scene
Service key - Elevator Level 4, talk to Thomas
Cog wheels (5) - Ship's Stack, search scene
Valve - Elevator II, search scene
Diving tank - Elevator II, search scene
Flippers - Aquarium, ground after draining
Diving Mask - Engine Room, mouth of dead shark
Banner - Casino, hanging in the middle of the room
List of Family Belongings
Book - Pool
Stuffed panda - Hallway
Wooden Car - Our Cabin
Toiletry Bag - Bathroom
Camera - Casino
Jacket - Heliport
Foil wrapped package - Cabin No.2
Watch - Elevator
Keys - Corridor (Level 1)
Pocket knife - Elevator IV
Wallet - Kitchen
Glasses - Engine Room
Passports - Bar
Ice Cube - Kitchen
Swim mask - Restaurant
Chapter 1: Jimmy
Find Jimmy
Zoom into the red toolbox on the right side and click the latch to open it.
Grab the control light, pincer, the card and the tweezers.
Click the door and enter the Stairs.
Zoom into the yellow box, left on the railing.
Use the control light from your inventory to change the broken bulb, then push the green button to turn on the light.
Zoom into the locker on the left and use the card from your inventory on the left side to open it.
Grab the door handle and the pipe.
Zoom into the door straight ahead and use the door handle on the right side.
Click the door and enter the Corridor.
Zoom into the grate on the left to learn that you need a tool.
Zoom into the iron gate on the far left and use the pipe on the bars.
Move forward to the Ventilation shaft.
Zoom into the vent on the far left and use the tweezers to remove the key from the vent on the right.
Go back twice and zoom into the suitcase.
Use the key on both locks to open it.
Click again to get a search scene.
Find all the listed items.
The screwdriver, hacksaw, switch and the flare gun will go in your inventory once you finished the search scene.
Return to the corridor and zoom into the vent on the left.
Use the screwdriver to remove the screw.
Assemble the wheel by clicking and dragging. The water turns off automatically when you finished.
Head through the bars on the far left and zoom into the vent where you saw Jimmy earlier.
Click two times to fall through the shaft and find Jimmy in the Pool.
Chapter 2: Save Jimmy
At the pool (1)
Click the book (1/13) on the left side; it goes into the suitcase with your family belongings (diary).
Zoom into the broken window on the far left to learn that you need a tool to break the glass completely.
Click the arched bridge on the right to trigger a search scene.
Find all the listed items.
The cog wheel and the fire extinguisher will go in your inventory, once you finished the search scene.
Click the passageway on the right to the broken window (with the word GREAT HOTEL above) to enter the Hallway.
Hallway (1)
Click the stuffed panda (2/13) on the right side on the ground; it goes into the suitcase with your family belongings (diary)
Zoom into cabin 2 on the right to learn that you need a key card.
Use the fire extinguisher (Spoiler: Chapter 2, At the pool) multiple times on the fire in front of cabin 1.
Click on the door to cabin 1 and then click on the window above to learn that you need something to climb up.
Go 1x forward to enter the Dining Hall.
Dining Hall
There is a little red box on the left side - click it to turn on the sprinkler.
There is a little green box on the right side - click it to activate the fans and clear the air.
Talk to the steward on the ground to learn that he is stuck and needs help as well. You will have to click several times before the task appears on the top.
Go down 1x to the Hallway.
Hallway (2)
After the short cut scene, zoom into the debris to trigger a search scene.
Find all the listed items.
The stepladder will go in your inventory, once you finished the search scene.
Click the stepladder on the door of cabin 2 and zoom into the window above.
Use the hacksaw (Spoiler: Chapter 1, Find Jimmy) to get rid of the bars (you will need to click four times).
Click the window again to enter "Our Cabin".
Our Cabin
Click the wooden car (3/13) in front of the bed; it goes into the suitcase with your family belongings (diary).
Click the balcony door to learn that it is stuck.
Click the door to the left and enter the bathroom.
Bathroom
Click the toiletry bag (4/13) on the ground under the window on the back; it goes into the suitcase with your family belongings (diary).
Click the bathtub several times until all the stuff falls down.
Click on the bottom of the shower on the left side to trigger a "find the differences" mini game.
Find the ten differences between the images.
There is no hint. If you cannot find all differences, you will have to skip this mini game.
Screenshot
Click the hole on the ground to learn the the blue girders are sharp.
Use the hacksaw (Spoiler: Chapter 1, Find Jimmy) to remove them and click the hole again to go down to the Corridor.
Corridor (below bathroom)(1)
Click the blue trash bin on the right side to trigger a search scene.
Find all items to obtain a glass cutter for your inventory.
Zoom into the charger on the left wall. You can't do anything with it; you just need to note it.
Click the door to the Museum to learn that it is locked.
Click on the right to enter the Casino.
Casino (1)
Click the camera (5/13) on the low right side; it goes into the suitcase with your family belongings (diary).
Click the roulette table on the right to trigger a search scene.
The cordless screwdriver will go into your inventory.
Zoom into the slot machine on the left to learn that there are three parts missing. You only have two of them so far, so exit the zoom scene and go back 1x in the Corridor (below bathroom).
Corridor (below bathroom) (2)
Click the charger on the right and use the cordless screwdriver (Spoiler: Chapter 2, Casino) with it.
Wait until the power window on the screw driver shows green.
Zoom into the Museum door and remove the four screws of the lock panel with the charged screwdriver.
Enter the Museum.
Museum
Zoom into the game machine in the low right corner.
You will have to sort the animals by size starting with the biggest on top.
To change the position of two animals, click both of them and they will swap places.
The correct order is:
Whale, Orcas, Shark, Dolphin, Tuna, Turtle, Lobster, Crab, Mussel and Prawn.
Get the chip out of the slot in the low left.
Zoom into the niche on the right side behind the game machine to trigger a search scene to obtain a fluorescent tube.
Leave the Museum and go right to the Casino.
Casino (2)
Zoom into the slot machine on the left.
Place the fluorescent tube (Spoiler: Chapter 2, Museum) on the top of the slot machine, the cog wheel (Spoiler: Chapter 2, At the pool) on the low left and the switch (Spoiler: Chapter 1, Find Jimmy) on the right side. Use the chip (Spoiler: Chapter 2, Museum) on the coin slot in the low right.
Take the golden anchor with chain from the prize slot on the bottom.
Return to the corridor (below bathroom)
Corridor (below bathroom) (3)
Use the golden anchor with chain (Spoiler: Chapter 2, Museum (2)) on the hole above the Museum entrance.
Climb up to reach the bathroom again.
Go back three times to the pool (where Jimmy is)
At the Pool (2)
Zoom into the broken window on the far left and use the glass cutter (Spoiler: Chapter 2, Corridor (below bathroom)(1)) to break it completely.
You will need to click five times to do so.
Go outside on the Maintenance Side-Walk.
Maintenance Side-Walk (1)/Ladder
Click the key card on the right and the lifeboat to learn that you cannot reach them yet.
Go forward to the Ladder.
Click the golden control device under the ladder.
Your goal is to move the red striped block to the entrance on the right side.
Please see spoiler for a step by step solution.
Move the vertical block on the left side up.
Move the red striped block to the left.
Move both vertical blocks in the middle down.
Move the top right horizontal block to the left.
Move the upper vertical block in the middle up.
Move the horizontal block on the top right to the left.
Move the upper vertical block in the middle up.
Move the horizontal block from the right to the left.
Move both vertical blocks on the right up.
Move the lower vertical block in the middle up.
Move the red striped block to the right.
When finished, click the top of the ladder to reach the Heliport.
Heliport (1)
Click the jacket (6/13) on the far right side; it goes into the suitcase with your family belongings (diary).
Click on the far right to trigger a search scene.
Find all items to obtain a crowbar and wire cutting pliers.
Go to the right Heliport-Edge and note the lifeboat, crane, lifeboat and caved in ceiling.
Go back 4x times and at the pool 1x forward to reach the Hallway and enter "Our Cabin"
Our Cabin (2)
Use the crowbar at the balcony door.
Click the balcony door again to trigger a search scene.
Find all listed items to obtain a rope.
Return to the heliport.
Heliport (2)/ Dining Hall (2)/ At the Pool (3)
Use the rope (Spoiler: Chapter 3, Our Cabin (2)) on the hole on the ground and climb down.
Click the hanging rope again to free the steward.
Return to the pool and click Jimmy to help him out of the pool.
After the steward and Jimmy have gone to the heliport, take the harpoon from the pool.
Return to the Heliport (through broken glass window)
Chapter 3: The Lifeboat
Heliport-Edge
Go to the right to the Heliport-Edge and click the harpoon (Spoiler: Chapter 2: Heliport (2)/Dining Hall (2)/At the Pool (3)) at the life buoy straight ahead.
Use the rope to go down.
Life-Boat Crane
Click the life-boat to trigger a search scene.
Find all listed items to obtain a long hook.
Click the crane panel to learn that you need a lever, then click the control box to learn that it is locked.
Go back 4x to the Maintenance Side-Walk.
Maintenance Side-Walk (2)/ Cabin No. 2
Use the long hook (Spoiler: Chapter 3, Safe-Boat Crane) on the key card.
Return to the pool and through the right door.
Zoom into Cabin No. 2 and use the key card to open it.
Take the lever from the crane on the right side.
Click the foil wrapped package (7/13) on the ground to the left; it goes into the suitcase with your family belongings (diary).
Return to the Heliport and from there to the Life-Boat Crane.
Life-Boat Crane/
Maintenance Side-Walk(3)
Use the lever (Spoiler: Maintenance Side-Walk (2)/Cabin No. 2) on the crane panel and watch the boat moving down.
Return to the Maintenance Side-Walk and click to boat to trigger a cut scene.
Chapter 4: Thomas
Ship's Keel
Click on the life buoy floating in the water. There is something underneath, but it is too deep to reach.
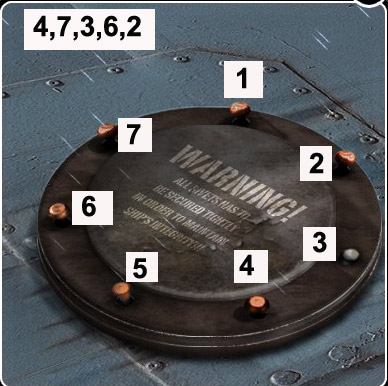
Click the grate at the bottom middle.
Your goal is to click on the rivets to get them all in the up position at one time. Clicking one rivet will affect the one itself and the two rivets right and left next to it.
There are several solutions possible; the screenshot shows one.
Screenshot
Go down.
Elevator I(1)
Click the watch (8/13) on the left; it goes into the suitcase with your family belongings (diary).
Click the open compartment on the left to trigger a search scene.
Find all listed items to obtain a fire axe and scissors.
Click down to learn that you first need to find a way to do this safely.
Click straight forward to enter the corridor.
Corridor (Level 1)
Click the suitcase on the left to open it and take the keys (9/13); it goes into the suitcase with your family belongings (diary).
Click the cabinet on the right to learn that it is locked.
Use the fire axe (Spoiler: Chapter 4, Elevator I) on the door (click 3x) and enter the Aquarium.
Aquarium/Ship's Keel
Click the red button on the lower right to get light.
Zoom into the drain on the far right to learn that something is missing.
Click on the water to learn that there is something under the surface you cannot reach yet.
Click the round window to learn that you need something to cut the rope that is holding the life buoy.
Tap at the back window where you see the fish, and note that the fish reacts to the tap.
Go on clicking on the window and lead the fish to the rope.
The fish will bite through. The life buoy will be above the surface.
Go back four times to the Ship's Keel.
Click onto the life buoy on the water
The rope it was hanging on will go into your inventory.
Return to the Elevator.
Elevator I, II, II, IV (1)
Click the rope (Spoiler: Chapter 5, Aquarium/Ship's Keel) on the beam leading to the corridor.
Go down to Level 2
Click the door to level 2 to learn that it is stuck.
Click the red lever on the right side to learn that it is stuck.
Climb down the rope to level 3.
Zoom on the power box on the left side.
Your goal is to click on the lights to turn them all red.
Clicking a light will affect all other lights in the same row and column.
The easiest way to do so is:
Click the four corner lights first (doesn't matter in which order) and at last the light in the middle.
Use the wire cutting pliers (Spoiler: Heliport (1)) to cut the wire.
Go down the shaft to level 4 to find Thomas.
Click the pocket knife (10/13) at the cover on the left; it goes into the suitcase with your family belongings (diary).
Talk with Thomas.
Click on the doorway next to Thomas and enter the green door on the left.
Kitchen (1)
Click the wallet (11/13) at the edge of the left table; it goes into the suitcase with your family belongings (diary).
Click the sparkle on the low right side to play the search scene.
Find all listed items to obtain the cabinet key.
Zoom into the red fridge and press the button to learn that nothing will work until the main generator isn't working.
Click the wall on the left to learn that it seems breakable.
Go back twice and climb up the rope to Level 1
Corridor (Level 1)
Zoom into the cabinet and use the cabinet key (Spoiler: Chapter 4, Kitchen) to open it.
Click the key again. When the close up window closes, click the cabinet again to trigger a search scene.
Find all listed items to obtain a propane tank and a paddle.
Head back to Level IV and enter the red door on the right side.
Engine Room (1)
Click the glasses (12/13) on the red beam, bottom of the scene; it goes into the suitcase with your family belongings (diary).
Zoom into the generator box on the far right to learn that the cog wheels are missing.
Go back to the Kitchen.
Kitchen (2)
Place the propane tank (Spoiler: Chapter 4, Corridor (Level 1)) at the left wall.
Use the flare gun (Spoiler: Chapter 1, Find Jimmy) to let it explode.
Go through the hole in the wall.
Restaurant (1)
Click the power strip on the left and the water to note the shark.
Use the paddle (Spoiler: Chapter 4, Corridor (Level 1)) to remove the furniture from the hole on the far right.
Go through the hole into the Bar.
Bar
Pick up the passports (13/13) from the chair on the low right; your collection of family belongings is now complete.
Click the panel in the lower middle three times to learn that you need a light bulb.
Click the debris in the far left and play the search scene.
Find all items to obtain a little key and a disk grinder.
Go back four times to Elevator Level IV to free Thomas.
Elevator IV(2)
Click the disk grinder (Spoiler: Chapter 4, Bar) on the disk laying on Thomas to trigger a mini game.
Follow the way between the two lines with your mouse.
Then click next to Thomas to trigger a search scene.
Find all listed items to obtain a light bulb.
Talk with Thomas; he will give you a service key.
Go back to the bar and use the light bulb on the hatch.
Click down twice to reach the Ship's Stack.
Chapter 5: Find a Way Out
Ship's Stack
Click the sparkle in the middle bottom and play the search scene.
Find all listed items to obtain 5 cog wheels.
Zoom into the panel on the far right and turn all screws horizontal with the service key (Spoiler: Chapter 4, Elevator IV (2)).
The panel opens. Click on the shaft to learn that you need diving equipment.
Exit here and head back to Engine Room (red door).
Engine Room (2)
Zoom into the generator on the far right.
Place all cog wheels (Spoiler: Chapter 5: Ship's Stack) so that the all rotate.
For the solution please see screenshot.
Screenshot
Now the second circuit works again.
Go into the kitchen (green door).
Kitchen (3)
Zoom into the right refrigerator and push the green button.
Take an ice cube from the slot.
Go back and climb up the rope to Level 2.
Elevator II (2)
Click the ice cube (Spoiler: Chapter 5, Kitchen (3)) on the hot lever to cool it down.
Click the lever and then the door to trigger a search scene.
Find all listed items to obtain a valve and a diving tank.
Climb up the rope and go straight ahead to the Aquarium.
Aquarium (2)
Zoom into the drain panel on the far right and place the valve (Spoiler: Chapter 5, Elevator II).
When the water is gone, pick up the flippers from the ground.
Return to the Restaurant through the hole in the kitchen.
Restaurant (2)
Click the toaster near the power strip.
When the shark is dead, zoom into it and take the diving mask out of its mouth.
Go the right into the Bar and go down the hatch twice.
Click on the hole far right and watch the cut scene.
Chapter 6: Find Dennise
Museum/Casino
Click the red chain to climb up, then click the crack to enter the ship.
Enter the Museum.
Zoom into the water hole on the right to see Dennise.
Go back to Casino and use the scissors to cut down the banner.
Head back to the Museum and click the banner onto Dennise.
Leave the Museum, then climb up the rope. Go back twice (you are at the pool now)
Use the way through the broken window and go straight ahead to the Heliport.
Chapter 7: Call Help
Heliport/Life-boat crane
Zoom into the red emergency box on the far left and click the receiver to learn that you need power.
Go to the right and use the rope to come to the crane.
Click the little key (Spoiler: Chapter 4, Bar) on the box to the left of the controls.
Take the weather balloon out of the Box and return to the Heliport.
Use the weather balloon on the emergency box.
Accept the call.
Watch the cut scene.
CONGRATULATIONS, YOU FINISHED THE GAME!
Thanks to Kayleigh for the walkthrough!
Posted by: Mike |
January 22, 2011 6:58 PM
|
January 22, 2011 6:58 PM