
Mystery Trackers: Four Aces
Platform: Mac, Windows

![]() Animal attacks bad enough to cause evacuation? Well, turns out invisible man-beasts, aggressive hybrid squirrels, and angry pterodactyls are a tad bit more alarming than raccoons in your garbage. It's happening in the town of Brightfield, along with unusually low temperatures and snowfall that complicates the evacuation efforts. As a Mystery Tracker Detective, you smell adventure and a more interesting evening than being yapped at by your tiny dog, so you set out to the snowbound town by private plane to discover the truth. Mystery Trackers: Four Aces is a hidden-object hybrid that's a fantastic stew of action, campy drama, and spider chipmunks that spit venom at you. So, you know. Good luck ever feeling safe in the forest ever, ever again. (Eh, there are worse things.)
Animal attacks bad enough to cause evacuation? Well, turns out invisible man-beasts, aggressive hybrid squirrels, and angry pterodactyls are a tad bit more alarming than raccoons in your garbage. It's happening in the town of Brightfield, along with unusually low temperatures and snowfall that complicates the evacuation efforts. As a Mystery Tracker Detective, you smell adventure and a more interesting evening than being yapped at by your tiny dog, so you set out to the snowbound town by private plane to discover the truth. Mystery Trackers: Four Aces is a hidden-object hybrid that's a fantastic stew of action, campy drama, and spider chipmunks that spit venom at you. So, you know. Good luck ever feeling safe in the forest ever, ever again. (Eh, there are worse things.)
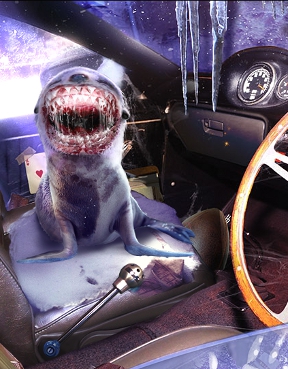 This time around, you've got both frog and pup to help you in your investigations, which probably means Batman won't take you seriously. Elf can be used to dig or fetch certain objects, while your amphibious companion acts as your hints when charged. The streets of Brightfield are full of freakish hybridized creatures, some of which can be nabbed to add to your bestiary, but others will need items to scare them away or placate them, and you know what that means. You get to rifle through piles of junk and creep around scary deserted streets looking for useful objects! It also seems like there's someone in Brightfield with a serious grudge against puzzles, since most of the ones you encounter are broken and missing pieces that need to be tracked down as well. As a bonus of sorts, you can even find special chips you can use to spend on not-actually-useful-whatsoever toys for Elf's house, which I might be more inclined to make fun of, but considering this is a dog who can open doors for you, merrily retrieve keys across rooftops, and more, I guess maybe he's entitled to a squeaky ball even if he is one of those obnoxious little yap-yap dogs. On top of all this, it looks like one young girl named Kelly missed the evacuation and is being pursued by a massive angry beast, and a secret society of thieves known as the Four Aces appear to have a hand in the events. Which means Umbrella Corporation is probably going to serve them a cease-and-desist for infringing on the whole "unspeakable acts against nature for personal gain" thing.
 Analysis: I always enjoy and thus recommend the games I review, but Mystery Trackers is one of the few hidden-object adventure I genuinely love and look forward to. Cross my heart, hope to fly, stick a cupcake in my eye. Their combination of cinematics, highly creative camp, and flair for puzzles and adventures make them some of the best games around, and Four Aces is no different. Though one of the big plot twists is probably fairly easy to see coming, the story is packed full of intense moments, attempts on your life, drama, and big hair beasts menacing screamy girls. Something about the combination monster movie/mad scientist/secret society thing just works, and makes for grand entertainment... sort of like if Sherlock Holmes, Indiana Jones, and Frankenstein were forced to coexist in the same glorious novel. The frequent noir-style narrated scenes might be a bit cheesy but keep the plot moving along at a brisk pace, and the whole design is gorgeous.
The downside? Even if you're playing on one of the harder levels of difficulty, the game isn't much of a challenge. Objects needed to get past obstacles are frequently found in the immediate vicinity when you need them, and most of the puzzles are less about brain power and deduction, and more about simply matching things or swapping things or putting things on or in other things. Most of it is actually very logical, which is nice, but players looking for a game that will truly make them feel like a detective with a big, fat brain might be a bit put off. You'll also end up doing quite a lot of backtracking, though the interactive map that lets you hop around takes some of the sting away. But with over five hours of play, not including the bonus Collector's Edition chapter that actually feels like a bonus rather than something cut off from the core game to justify the extra cost, Mystery Trackers: Four Aces is one of the most easily recommended hidden-object adventures around. Elephant Games should already be synonymous with quality for you if you've played any of their other games, and this latest is another resplendent feather in their cap. If you like action, campy adventure, strange sights and drama that doesn't take itself too seriously, do yourself a favour and check out the demo today. You're in for a treat, and one wild ride.
A Collector's Edition is also available. It contains a bonus chapter, art gallery, strategy guide, and more. Remember that Big Fish Game Club Members pay only $13.99 for Collector's Editions (or 2 club credits), and collector's editions count 3 card punches of 6 total needed for a free game.
![]() Windows:
Windows:
Download the demo
Get the full version
Also available: Collector's Edition
![]() Mac OS X:
Mac OS X:
Download the demo
Get the full version
Also available: Collector's Edition


Walkthrough Guide
(Please allow page to fully load for spoiler tags to be functional.)
Mystery Trackers: Four Aces Walkthrough
General Information
Main Menu
From the Main Menu, you can Play or Quit the game, choose your Options and your Profile, or choose a little Help.
If you purchased the Collector's Edition, you can access Bonus Content and the Strategy Guide.
You can also go to the Doghouse to shop for Elf, and you can view the Morphing Creatures you have captured.
After you begin to play the game, if you go to the Main Menu and then wish to resume gameplay, choose carefully because you will be given your choice to continue the game or reset it to the beginning.
Screenshot
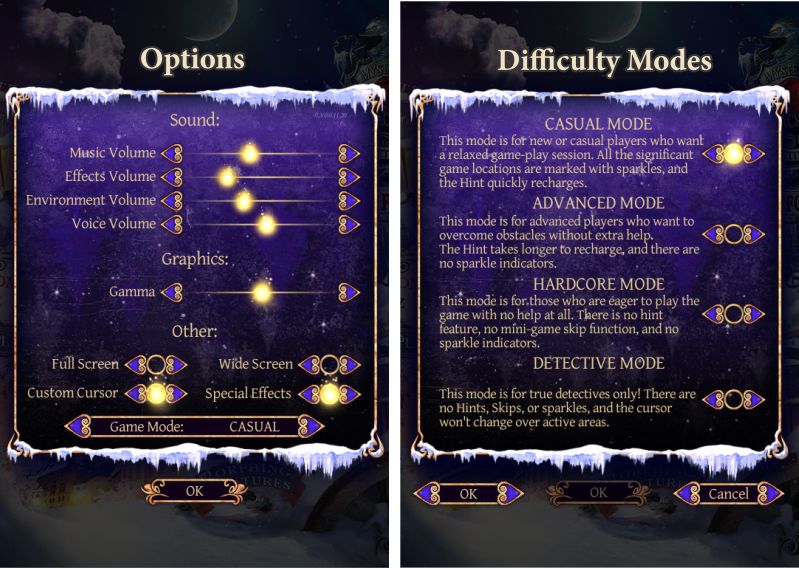
Options and Modes of Play
Options include Music, Sound Effects, Environment and Voice volume; Full or Windowed screen; use of a Custom Cursor; an adjustment for wide screen in full-screen mode; and your choice of Special Effects or not.
There are 4 Difficulty Modes: Casual, Advanced, Hardcore, and Detective.
Casual Mode is for new players or those who want a more relaxed game play. All areas of interest have visible sparkles, and hints quickly recharge.
In Advanced Mode, hints take longer to recharge, and there are no sparkles.
Hardcore Mode is for those players who do not want any help, because there are no hints or skip features, nor are there any sparkles.
If you are a true detective, choose Detective Mode because you are on your own with no hints, skips, or sparkles, and the cursor doesn't change shape over active areas to show you what is required.
Screenshot
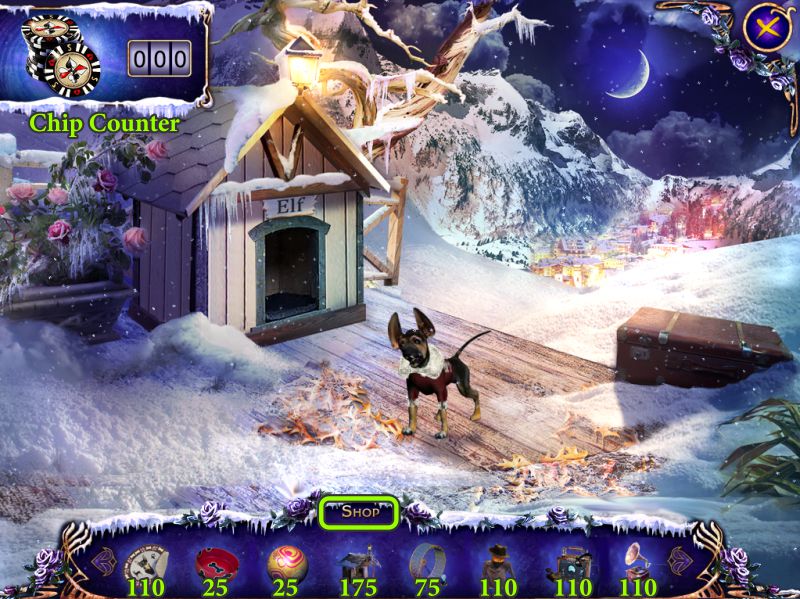
Doghouse
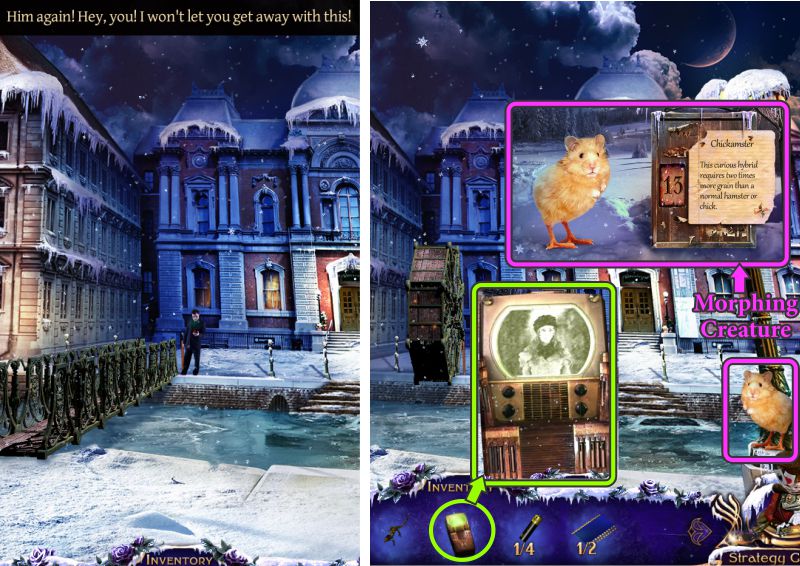
Elf is your companion on this journey and will help you dig in snow, fit into tight places, and even turn into a tracking Chihuahua on occasion.
You will collect Chips along the way that you can use to buy items for Elf.
The screenshot shows how many Chips are needed for the various items.
Screenshot
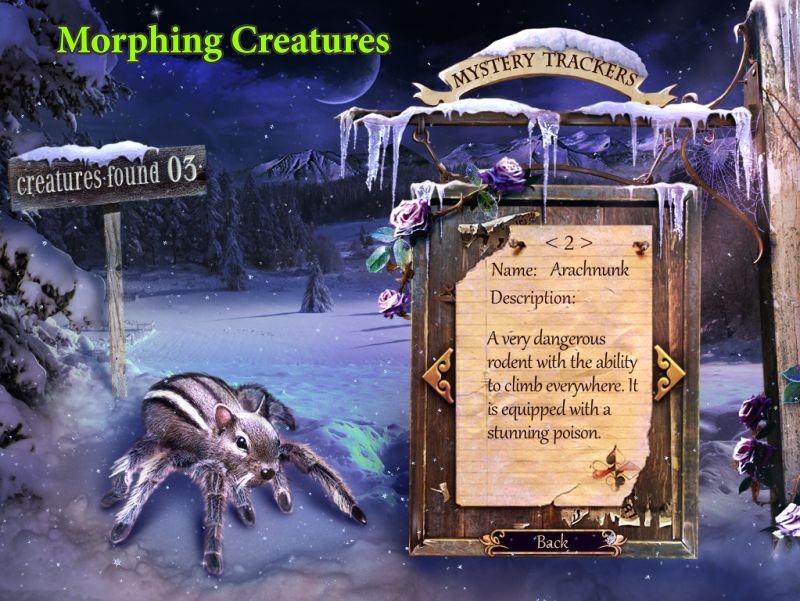
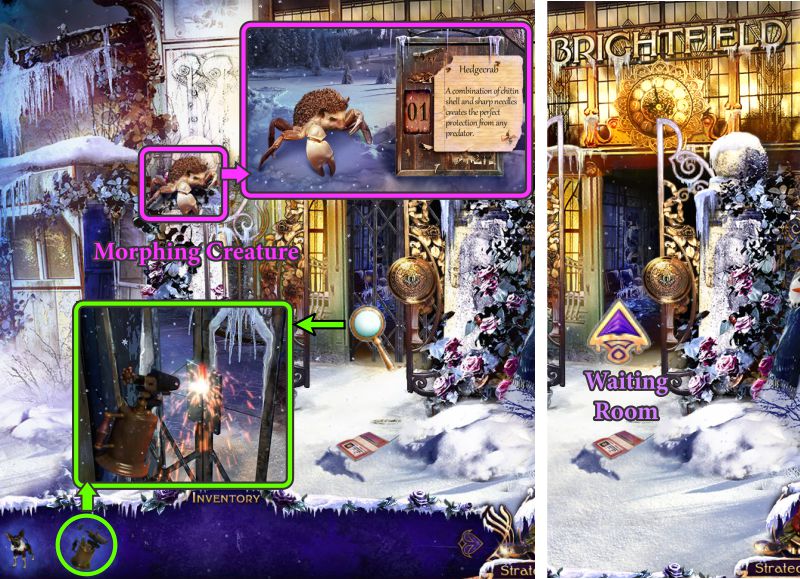
Morphing Creatures
You will encounter Morphing Creatures throughout the game, such as the sample shown in the screenshot of a combination chipmunk and spider.
Screenshot
Compass Map
In the lower left corner of your scenes you will have access to a Map of Brightfield that you can use to travel from one location to another after your initial visit.
The screenshot is a sample of your Map as it will expand when you visit other areas, so follow the arrow to get back to a previous view of the map if you need to visit a location found there.
You can also replay any of the cut scenes.
Screenshot
Chapter 1: Brightfield Airport
Landing Strip
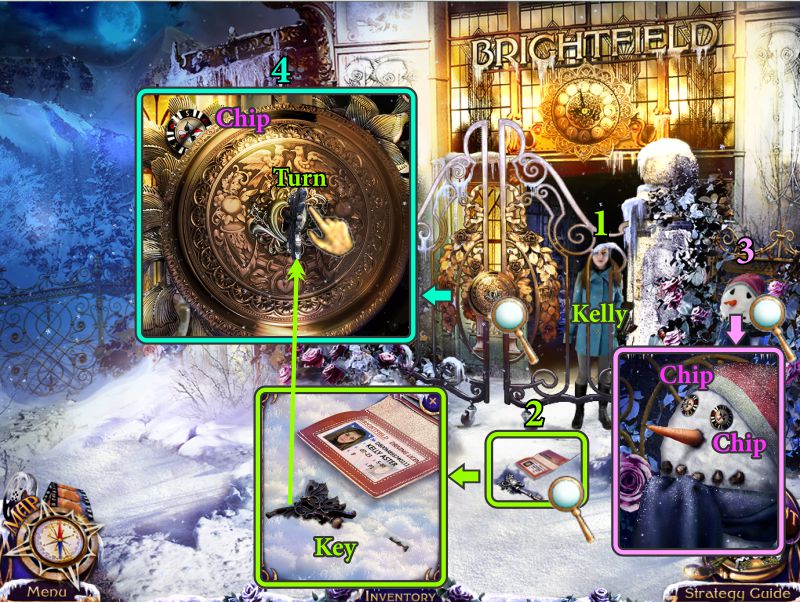
Talk to the girl behind the gate who missed the evacuation.
Kelly will throw you a Key, so pick it up, zoom in on the gate, take the Chip, and open the gate.
After the beast chases Kelly into the waiting room, the gate there will close.
Zoom in on the snowman and take the Chips.
Screenshot
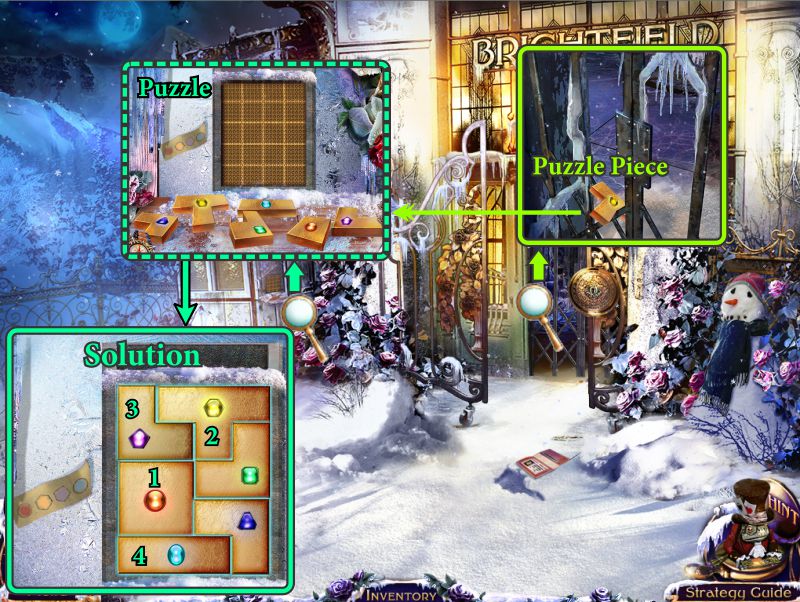
Examine the gate to the Waiting Room and take the Puzzle Piece.
Zoom in on the guard booth and place the Puzzle Piece to trigger a puzzle.
Arrange the puzzle as shown in the screenshot solution, then click on the puzzle pieces as numbered.
Screenshot
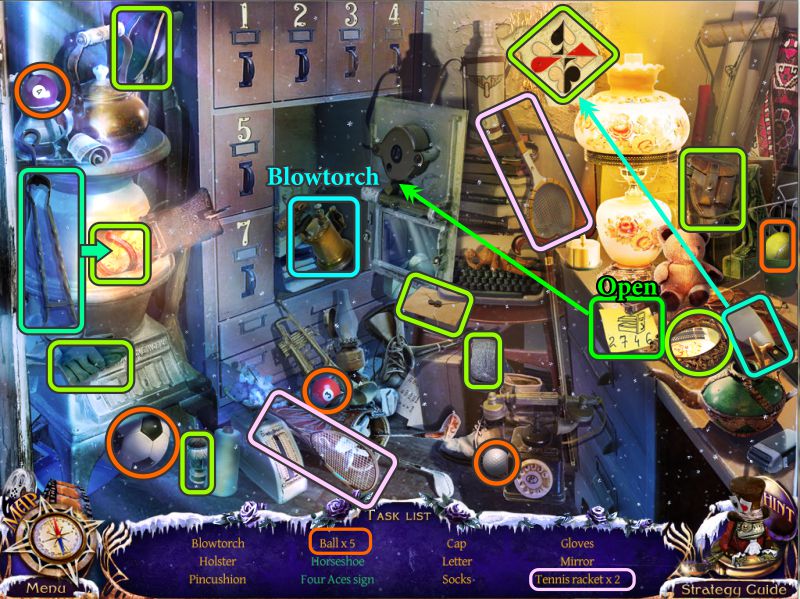
Guard Booth Hidden Object Scene
Use the tongs to get the Horseshoe.
In order to open the safe to collect the Blowtorch for your Inventory, open drawers 2, 7, 4, and 6.
Use the scraper on the wall to reveal the Four Aces Sign.
Screenshot
Screenshot
Waiting Room
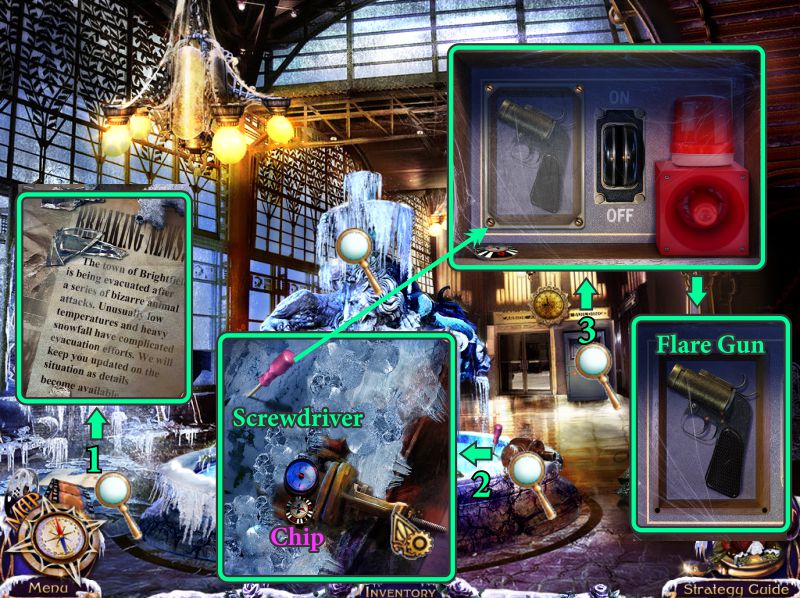
Read the note on the floor.
Examine the fountain to find out you need a handle for the valve, and take the Screwdriver.
Zoom in on the alarm by the door, unscrew the panel holding the Flare Gun and take it.
Screenshot
Use the Flare Gun to scare away the creature.
Open the bag.
Take the Valve Handle, Post Office Trinket, and Chip.
Play the recording.
Screenshot
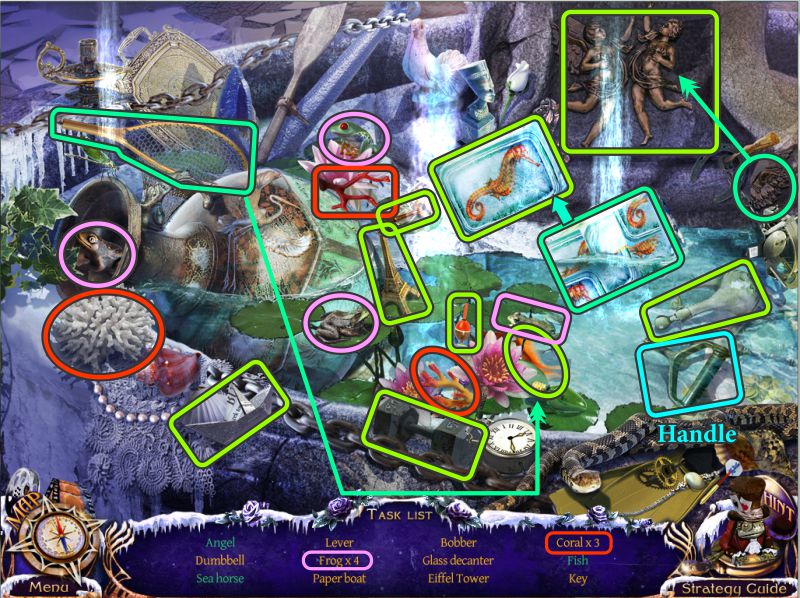
Zoom in on the fountain and place the Valve to trigger a Hidden Object Scene.
Fountain Hidden Object Scene
Use the net to catch the Fish, and place the wing on the Angel.
Complete the puzzle to collect the Seahorse.
Screenshot
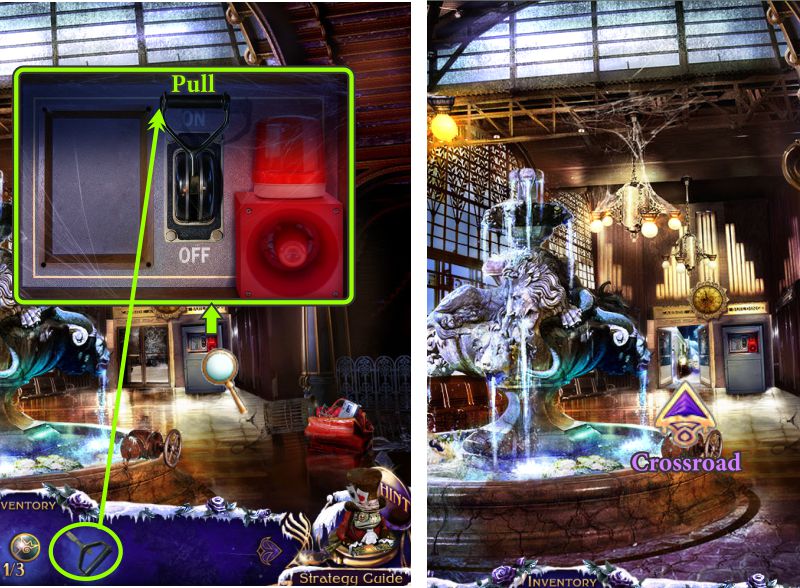
Waiting Room
Zoom in and place the Handle on the fire alarm.
Pull the handle to turn off the alarm and exit to the Crossroad.
Screenshot
Chapter 2: Town of Brightfield
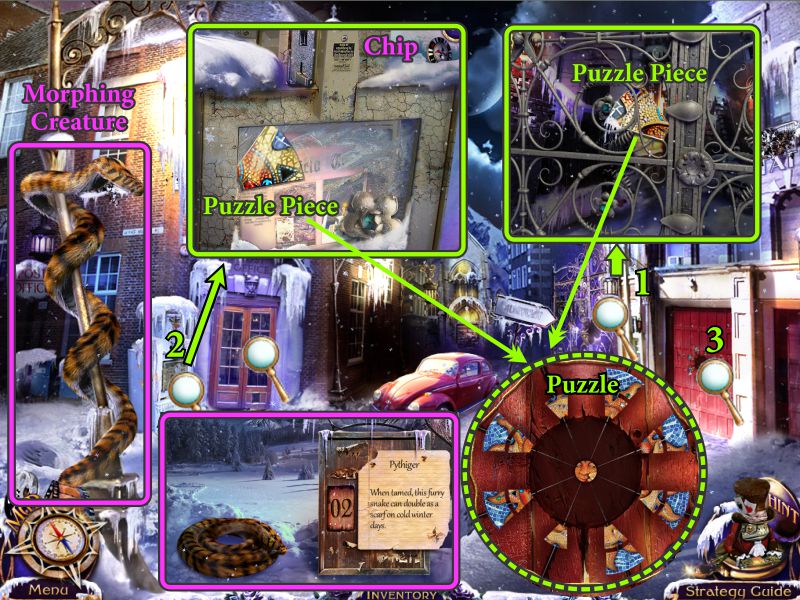
Crossroad
Collect the Morphing Creature.
Zoom in on the gate where Elf followed the beast and take the Puzzle Piece.
Examine the newspaper stand by the Post Office and take the Puzzle Piece and Chip.
Zoom in on the Fire Station door and place your Puzzle Pieces to trigger a puzzle.
Screenshot
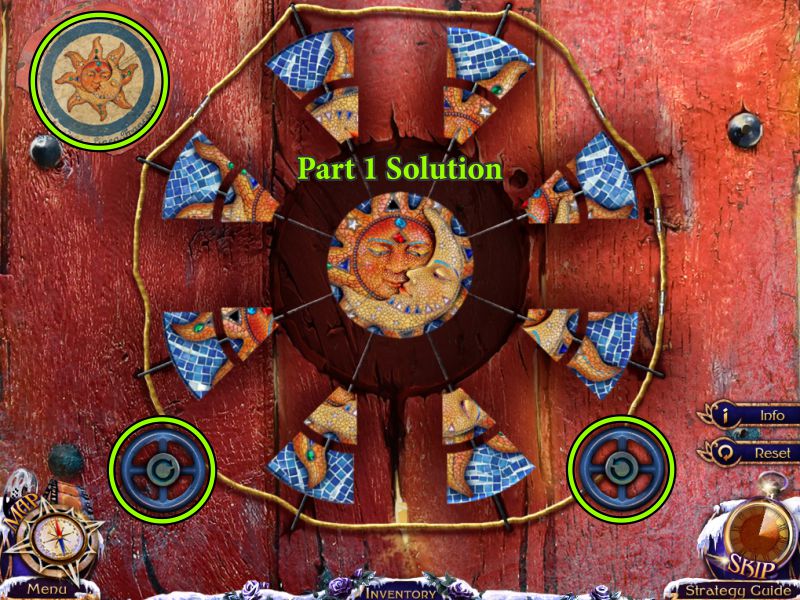
Fire Station Door Puzzle
Your goal is to assemble the puzzle pieces to resemble the image in the upper left corner.
Use the wheels at the bottom to turn the puzzle so you can drop the pieces where they belong.
Complete the inner circle first as shown in the screenshot.
Screenshot
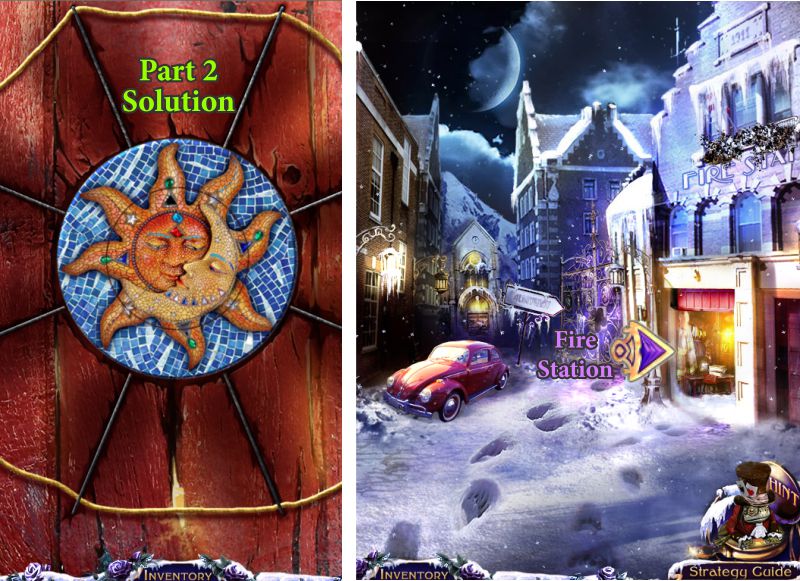
Complete the outer ring as shown in the screenshot, and enter the Fire Station.
Screenshot
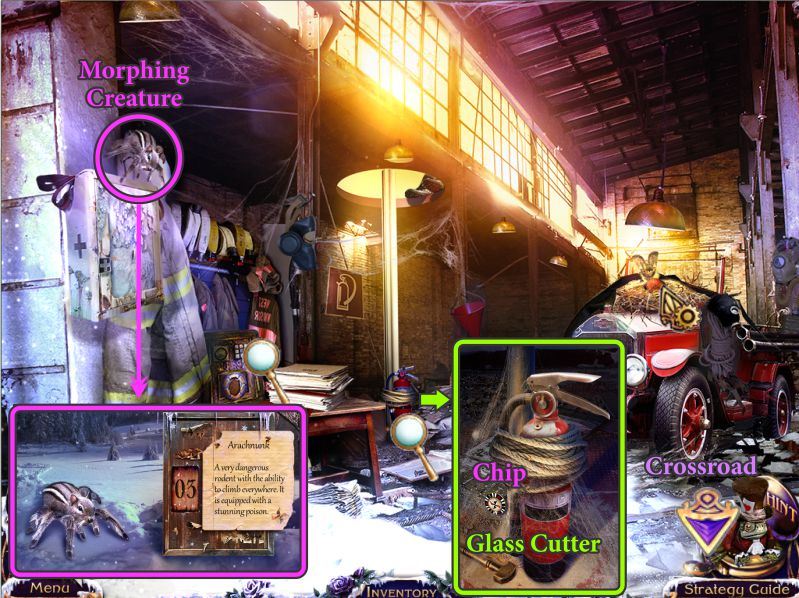
Fire Station
Pick up the Morphing Creature, and zoom in on the fire extinguisher.
Collect the Chip and Glass Cutter.
Return to the Crossroads.
Screenshot
Crossroad
Zoom in and use the Glass Cutter on the newspaper stand to get the Flower Medallion.
Examine the gate, place the Flower Medallion, and go to the Side Street.
Screenshot
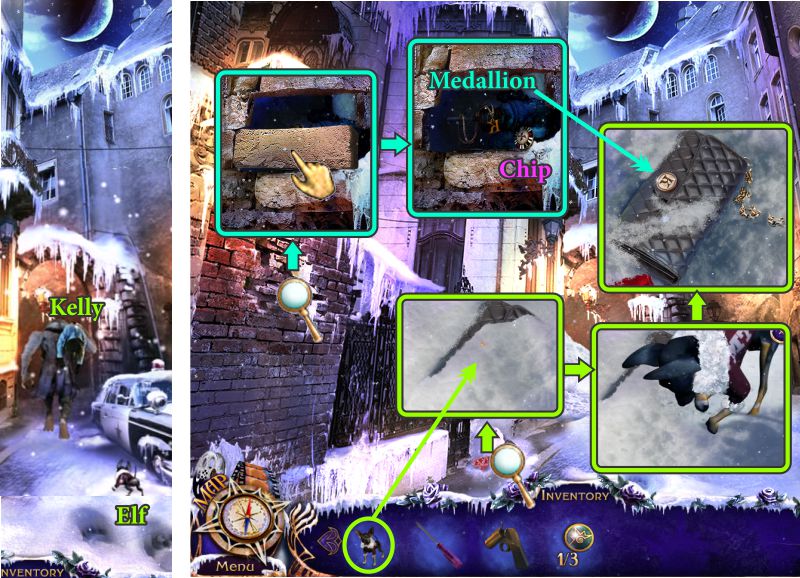
Side Street
You get there in time to see the beast carrying Kelly down the street, but you can't follow because someone dumps snow from the roof to block your path.
Something is buried in the snow, so have Elf dig it out. It appears to be Kelly's purse, but the clasp is missing
Zoom in on the brick wall, remove the brick and take the Chip and Letter K Medallion.
Place the Medallion on Kelly's purse.
Screenshot
Side Street and Crossroad
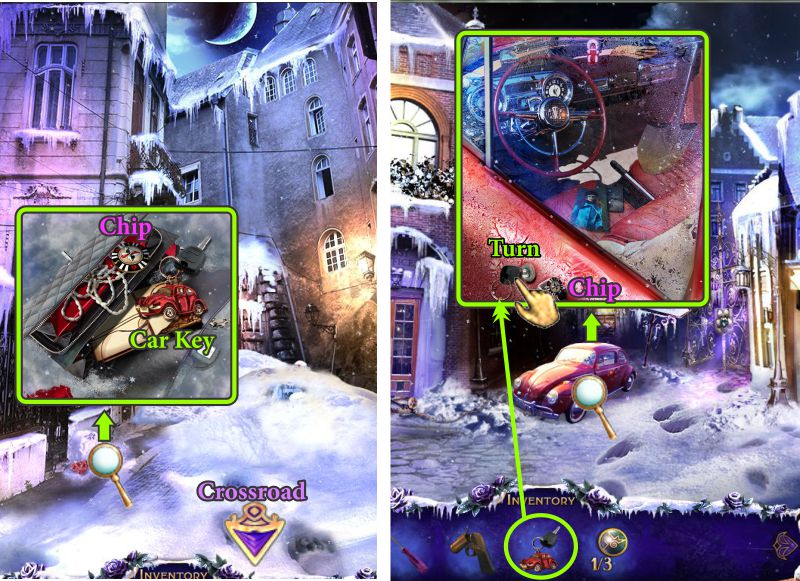
Take the Chip and Car Key from Kelly's purse, and go to the Crossroad.
Zoom in on the car, take the Chip, place the Car Key in car door, turn to open it, and stand back.
Screenshot
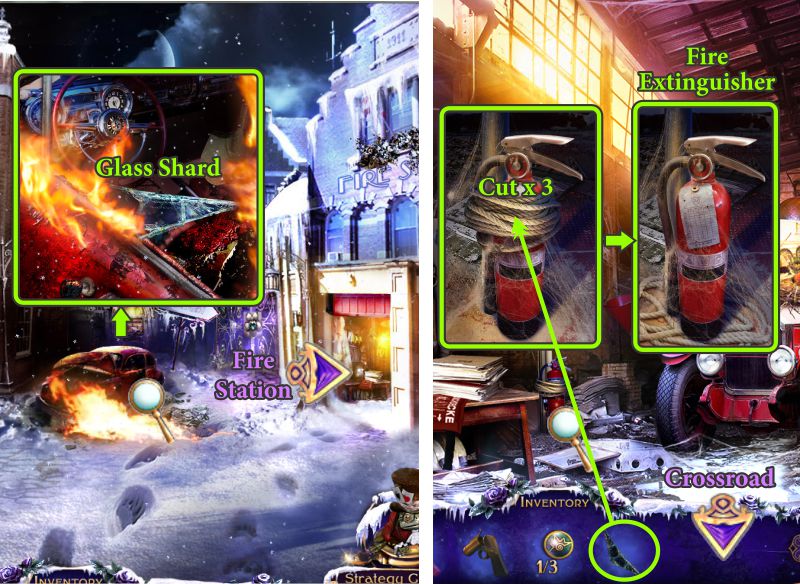
Crossroad and Fire Station
One of the Aces sets the car on fire.
Zoom in on the burning car and grab the Glass Shard.
Head into the Fire Station and zoom in on the Fire Extinguisher.
Use the Glass Shard 3 times to cut the rope, and take the Fire Extinguisher.
Return to the Crossroad.
Screenshot
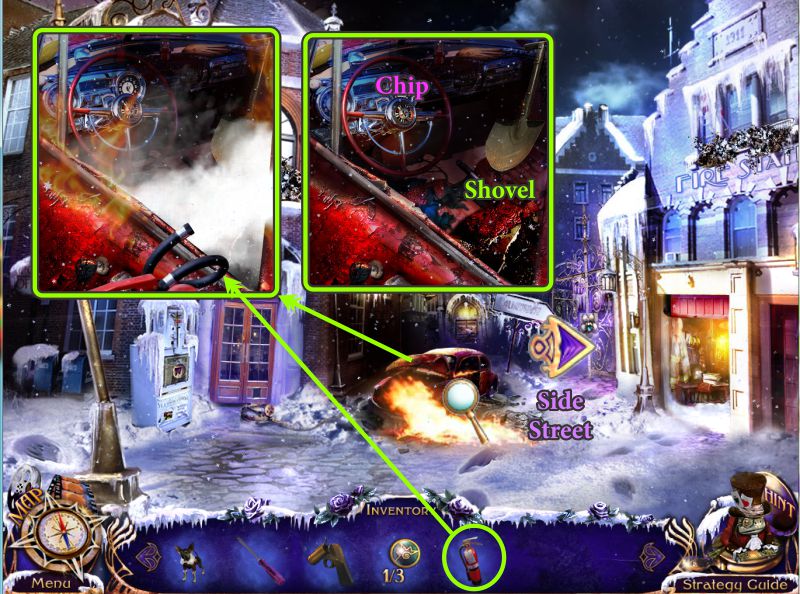
Crossroad
Put out the fire with the extinguisher.
Take the Chip and Shovel.
Go to the Side Street.
Screenshot
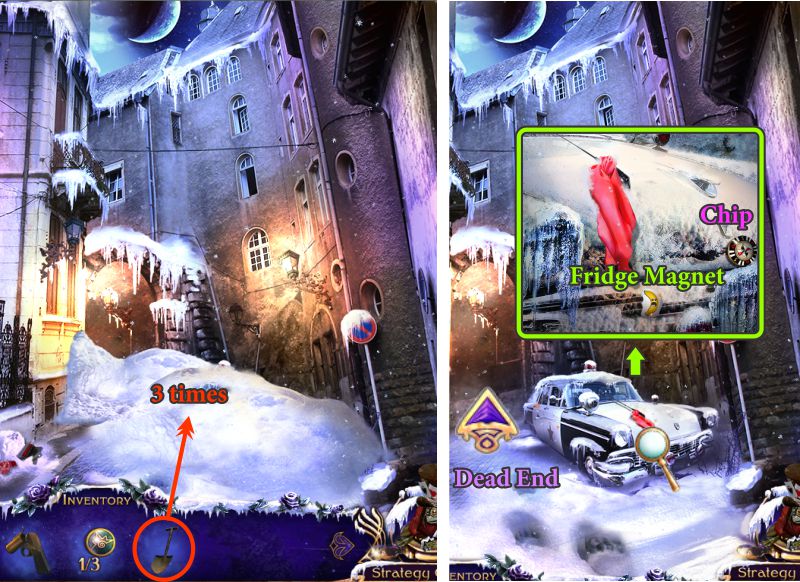
Side Street
Use the Shovel 3 times on the snow.
Zoom in on the Police Car, take the Chip and Fridge Magnet.
Head down the street to the Dead End.
Screenshot
Chapter 3: Dead End
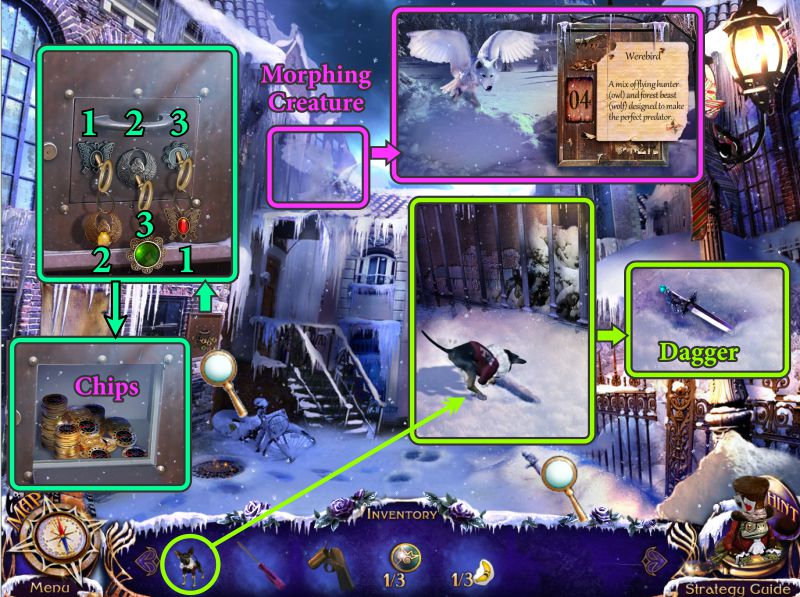
Dead End
Send Elf to dig up the Dagger Kelly dropped.
Capture the Morphing Creature, then zoom in on the locked box on the wall.
Exchange the keys as shown in the screenshot and take the Chips from the open box.
Screenshot
Use the Dagger to cut open the covering on the wall.
Zoom in and pull down the ladder.
Try to climb the ladder.
Screenshot
One of the Aces appears and destroys the ladder.
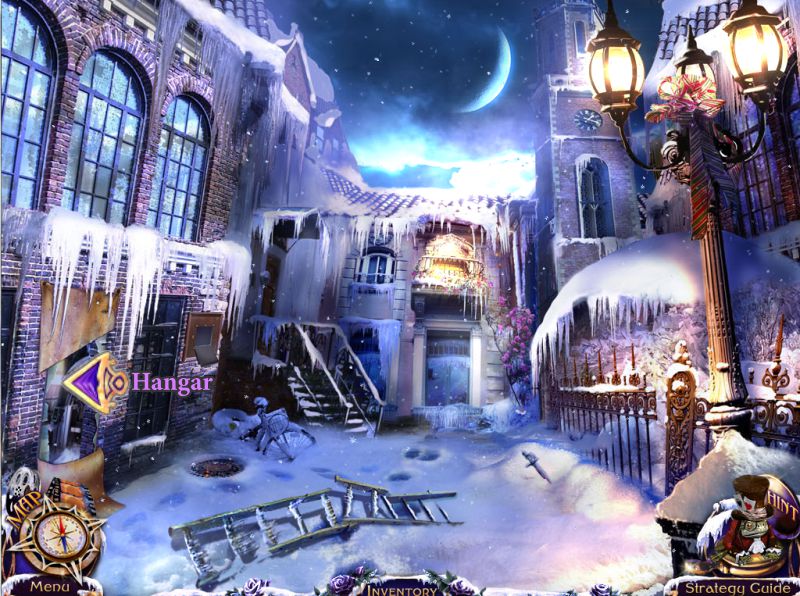
You need to find another way to get to the balcony, so go to the Hangar through the opening you uncovered.
Screenshot
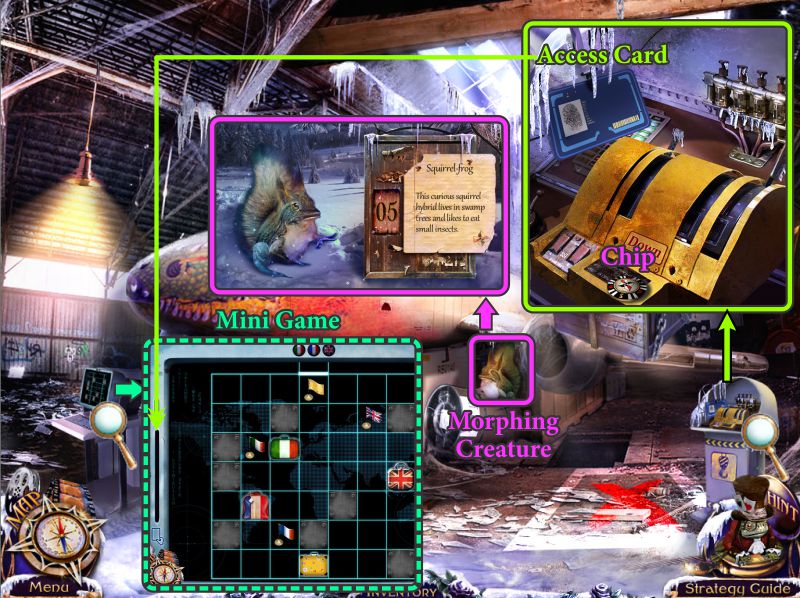
Hangar
Zoom in on the control panel and take the Chip and the Access Card.
Capture the Morphing Creature, then zoom in on the baggage scanner.
Place the Access Card to trigger a Mini Game.
Screenshot
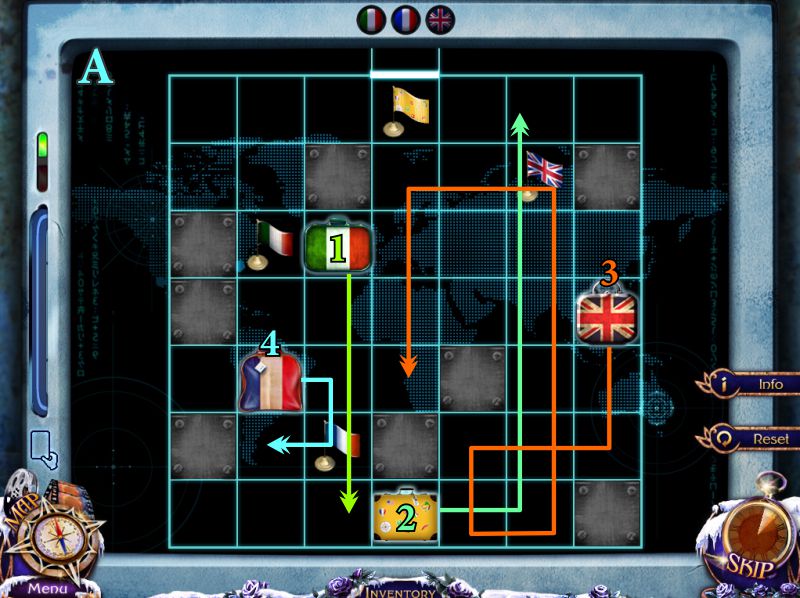
Baggage Scanner Mini Game
Your goal is to get all the suitcases to their matching flags.
When you click on a suitcase, arrows will show you in which direction the suitcase can travel.
See the screenshot for the first moves to your ultimate goal, which is to get the yellow suitcase through the gate at the top.
Screenshot
See the screenshot for the next steps.
Screenshot
See the screenshot for the conclusion.
Screenshot
Hangar
Zoom in on the open suitcase for a Hidden Object Scene.
Suitcase Hidden Object Scene
Place the cap on the bear to get a Graduate Bear.
Flip the switches, as shown in the screenshot, to turn on the flashlight.
You will get the Control Panel Lever for your Inventory.
Screenshot
Hangar
Zoom in on the control panel, place the Handle, and pull it.
Use the Dagger to open the box.
Take the Chip, Post Office Trinket, and Loaded Spear Gun.
Go to the Dead End.
Screenshot
Chapter 4: The Lair
Dead End
Place the Spear Gun on the balcony to shoot it.
Climb the rope up to the Lair.
Lair
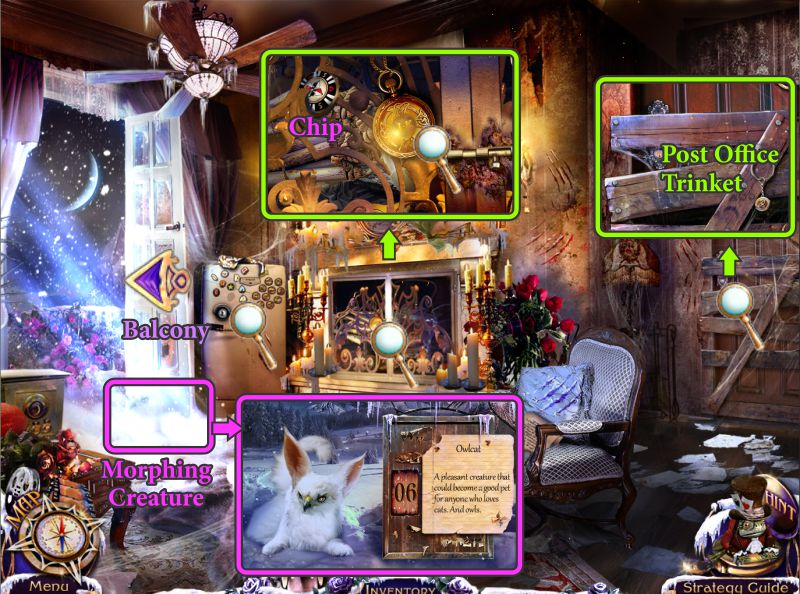
Zoom in on the boarded up door and take the Post Office Trinket.
Capture the Morphing Creature.
Examine the fireplace, take the Chip, and check out James' Medallion for a cutscene.
Go to the Balcony.
Screenshot
Balcony and Side Street
Send Elf to bring back the Key so you can grab it.
Go to the Side Street and zoom in on the Police Car.
Put the Key in the lock and turn it.
Enter the Police Car.
Screenshot
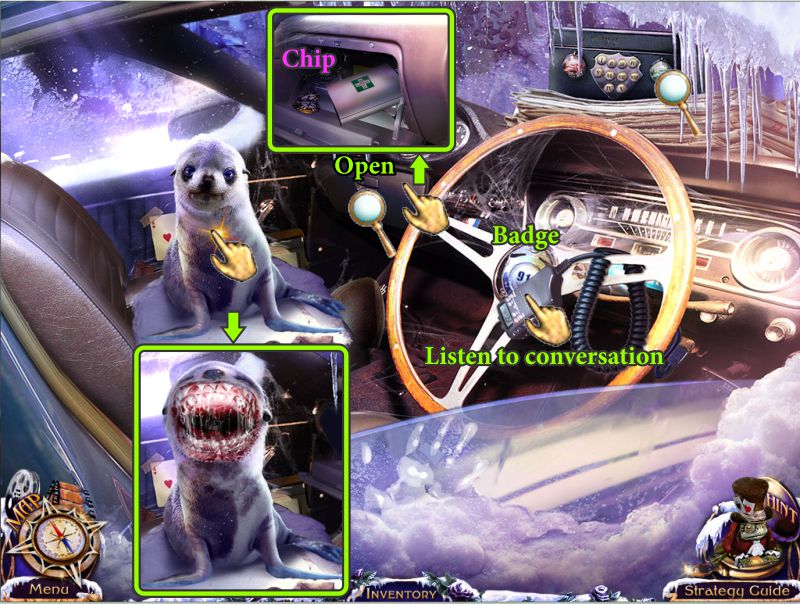
Police Car
There is a seemingly adorable seal pup in the car, but be careful when you touch it.
Open the glove compartment and take the Chip.
Play the radio recording and take the Police Badge.
Screenshot
Zoom in on the safe, enter the numbers etched on it, and take the Chips.
Go to the Fire Station.
Screenshot
Fire Station
Zoom in on the mailbox, place the Badge, enter 911 on the key pad, and turn the knob.
Take the Oxygen Mask, Chips, and Wolf Paw Medallion.
Go to the Crossroad.
Screenshot
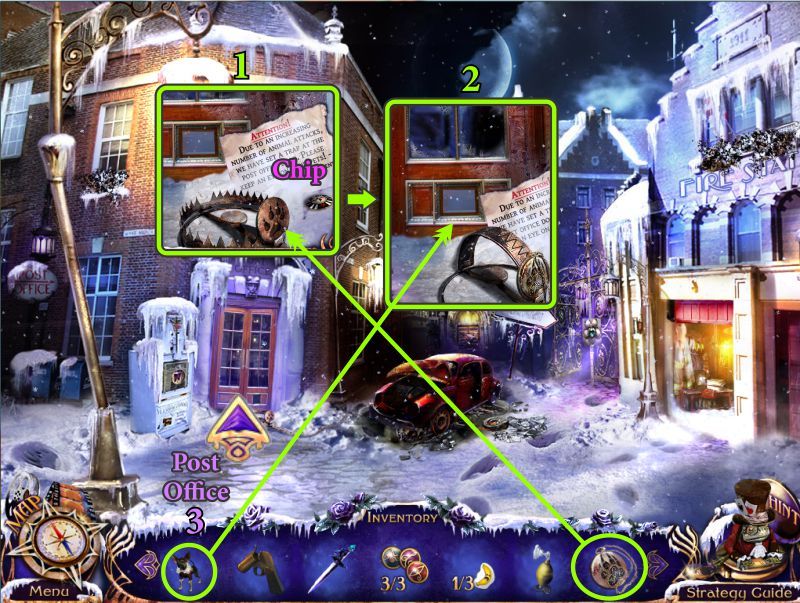
Crossroad
Zoom in on the Post Office Door, place the Wolf Paw Medallion on the trap, and collect the Chip.
Send Elf through the doggie door.
Enter the Post Office.
Screenshot
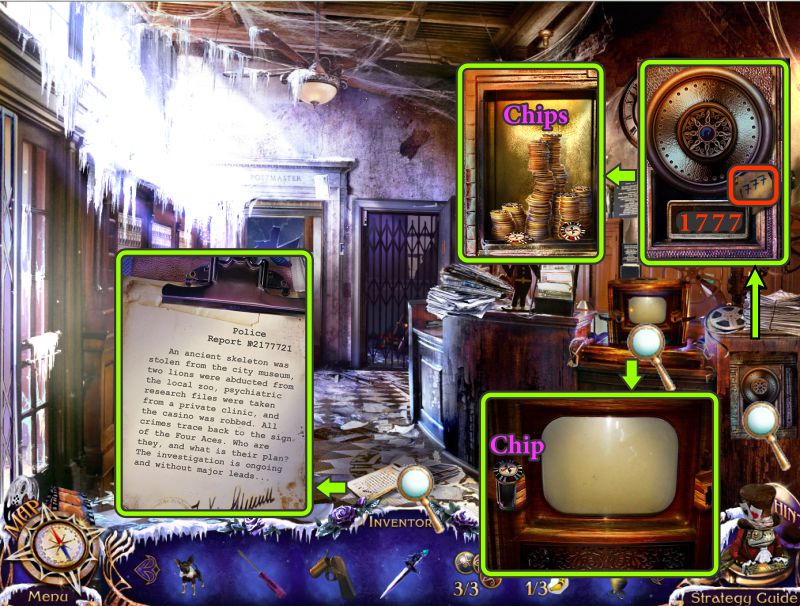
Post Office
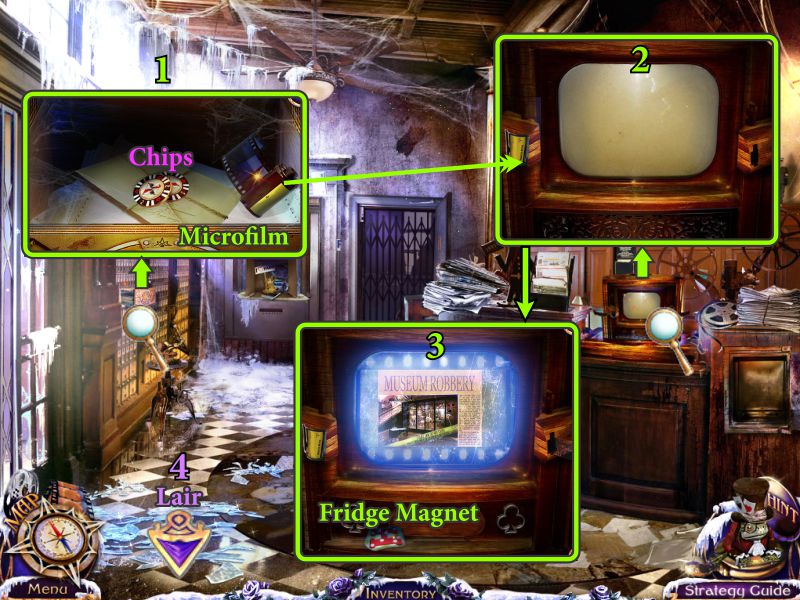
Read the clipboard on the floor, zoom in on the microfilm reader, and take the Chip.
Open the safe using 1777, as shown on the note, and take the Chips.
Screenshot
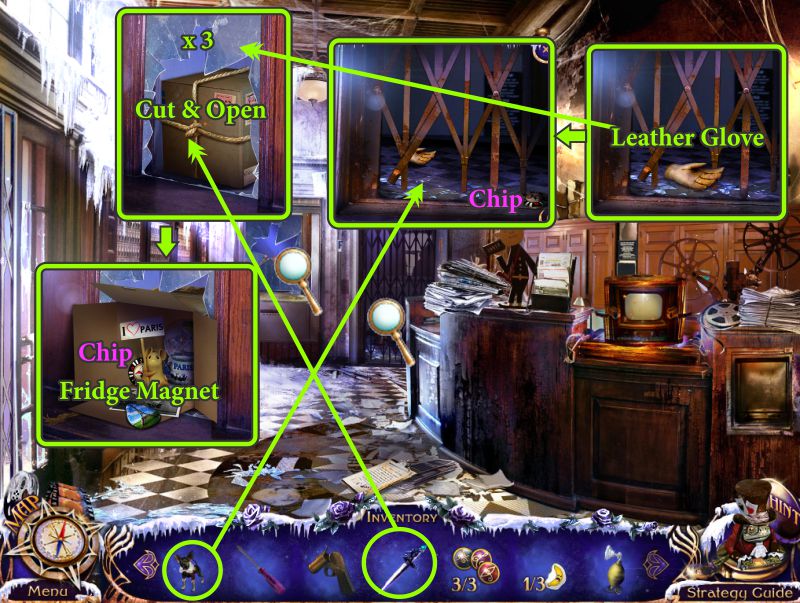
Send Elf through the gate to get the Leather Glove, and don't forget to pick up the Chip.
Use the Leather Glove to remove the glass shards 3 times from the window.
Cut the cord on the box with the Dagger and open the box.
Collect the Chip and the Fridge Magnet found inside.
Screenshot
Zoom in on the post boxes and place your Post Office Trinkets to start a Mini Game.
Screenshot
Post Office Box Mini Game
Your goal is to swap the round pieces by using the various shapes to make them move where then need to go.
See the screenshots for a step-by-step solution as to how to swap the pieces.
Screenshot
Screenshot
Post Office
Your reward for the opening the box is a couple Chips and a Microfilm.
Zoom in and place the Microfilm on the reader and watch the cutscene.
Take the Fridge Magnet and go to the Lair.
Screenshot
Lair
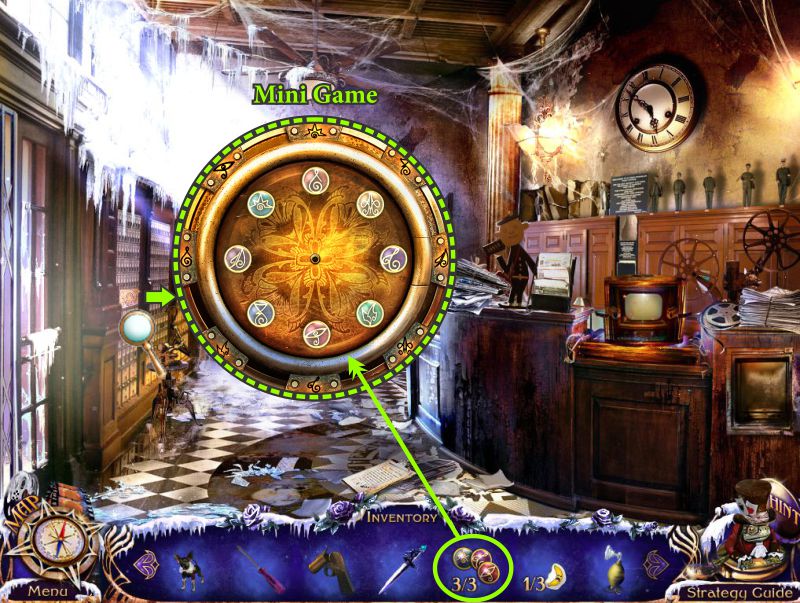
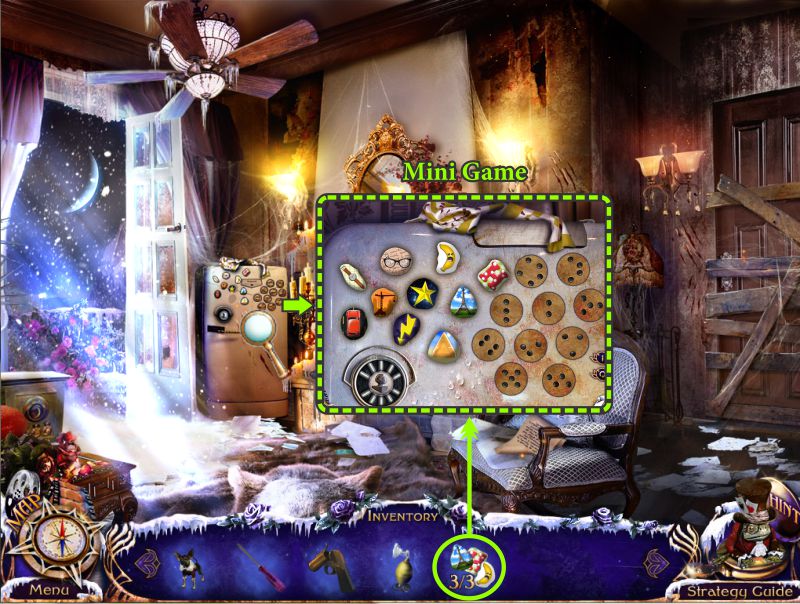
Zoom in on the refrigerator and place your Fridge Magnets to trigger a Mini Game.
Screenshot
Lair
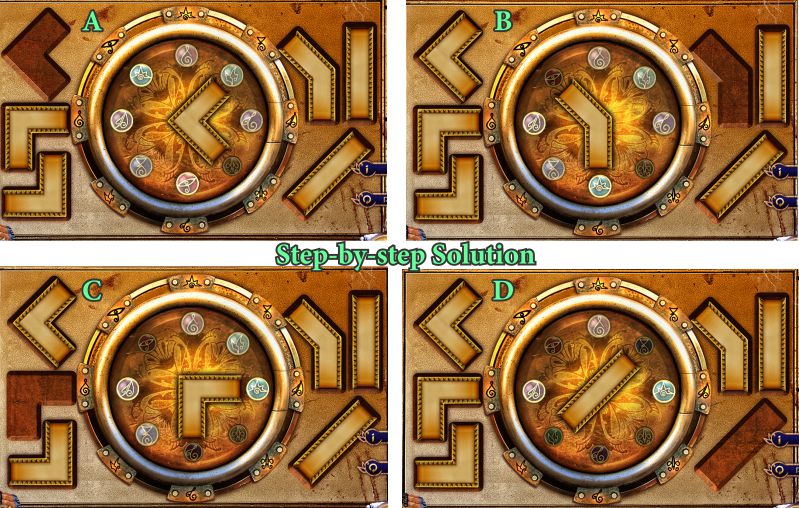
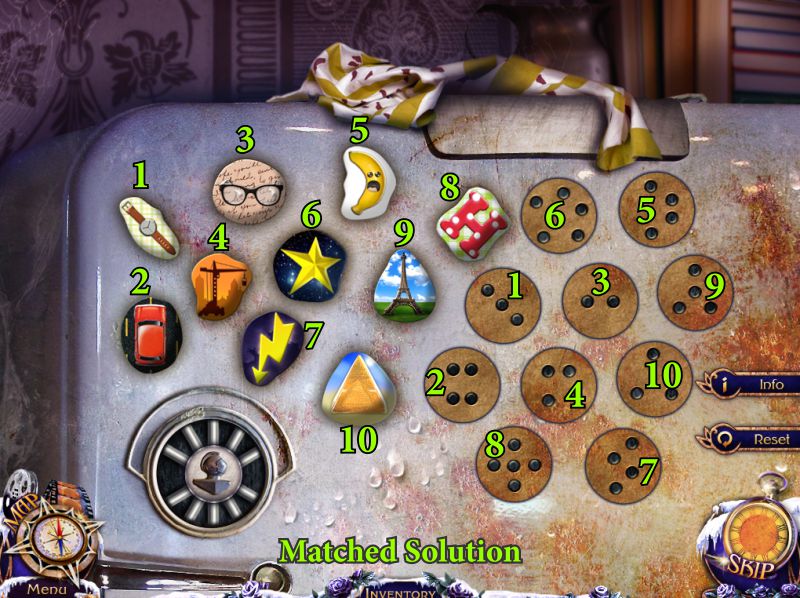
There are two parts to the game: first you need to turn the holders on the right side to the correct position so you can match up magnets with the holders.
See the screenshot for a numbered solution.
Screenshot
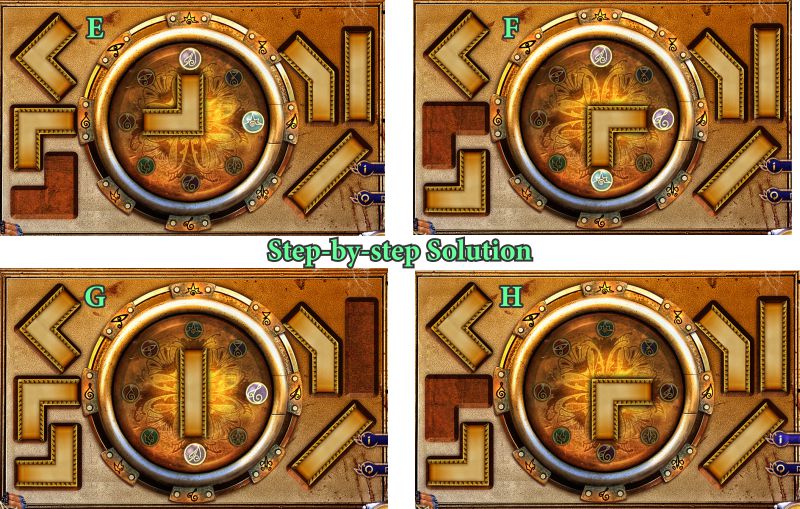
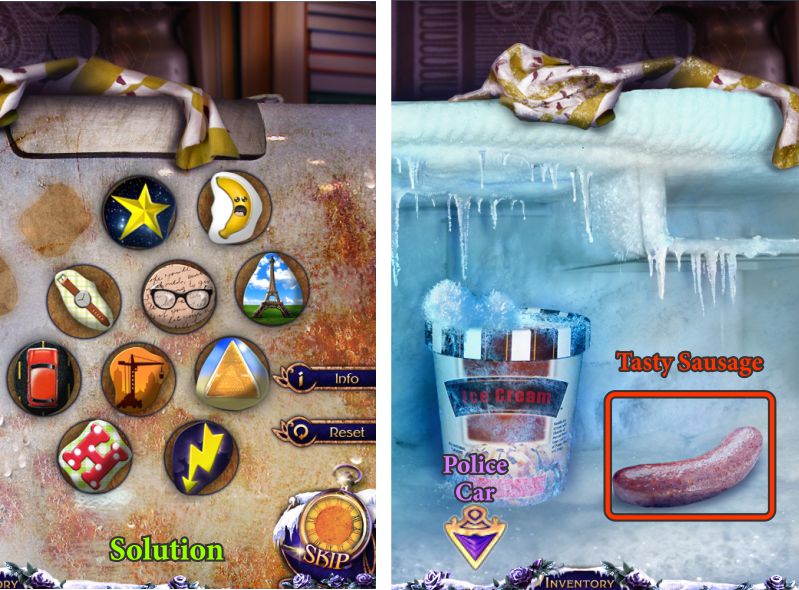
The final solution is shown in the screenshot.
Take the Tasty Sausage and go to the Police Car.
Screenshot
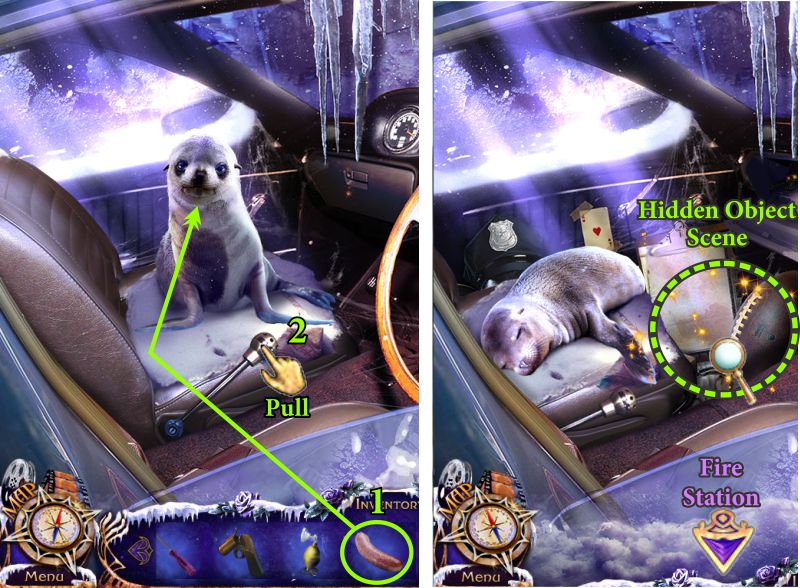
Police Car
Give the Tasty Sausage to the seal pup.
Pull the lever.
Play the Hidden Object Scene.
Go to the Fire Station.
Screenshot
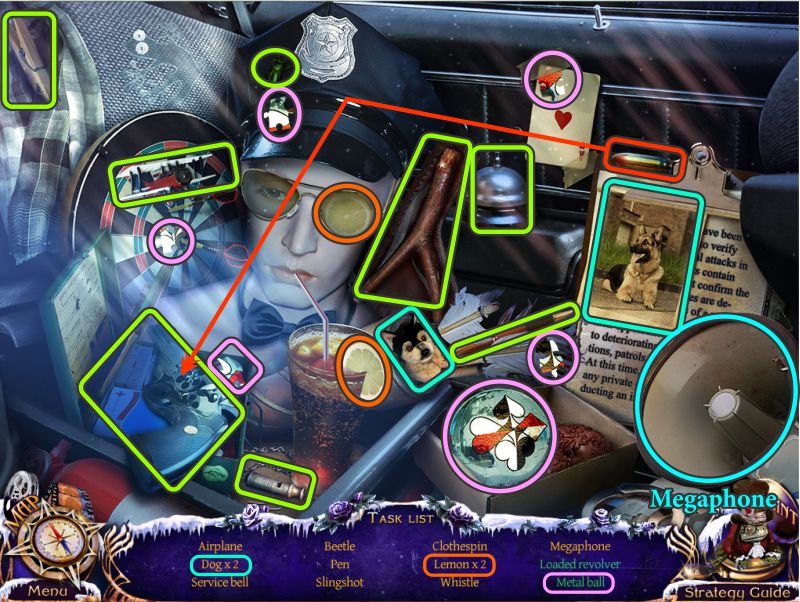
Police Car Hidden Object Scene
Place the bullet in the revolver to get a Loaded Revolver.
Complete the puzzle to get the Metal Ball.
You will get a Megaphone for your Inventory.
Screenshot
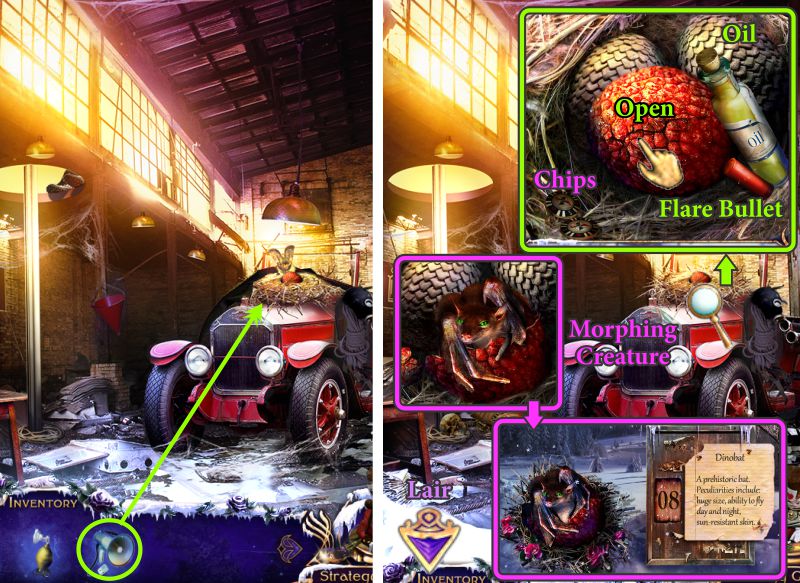
Fire Station
Use the Megaphone to scare away the bat creature.
Zoom in on the nest and take the Oil and Flare Bullet, and the bullet will load your Flare Gun.
Collect the Chips and open the cracked egg.
Take the Morphing Creature, and go to the Lair.
Screenshot
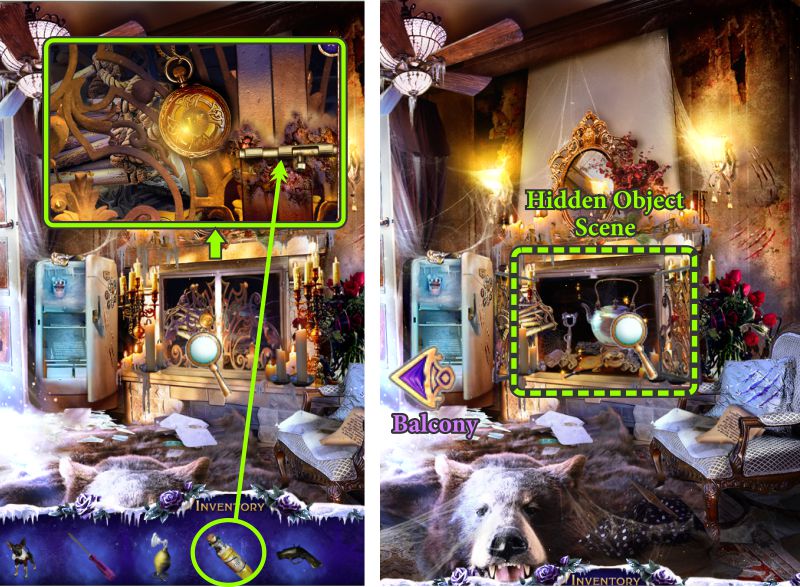
Lair
Zoom in on the fireplace and use the Oil on the lock.
Play the Hidden Object Scene.
Exit to the Balcony.
Screenshot
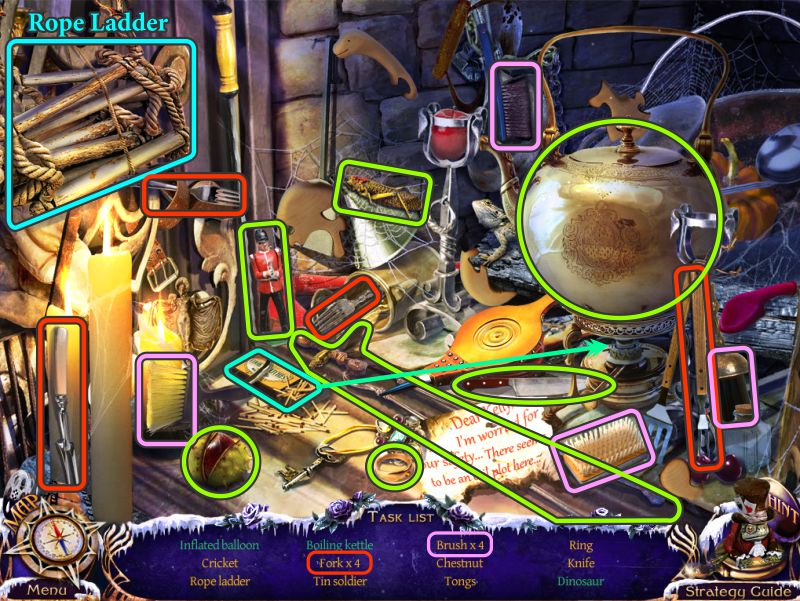
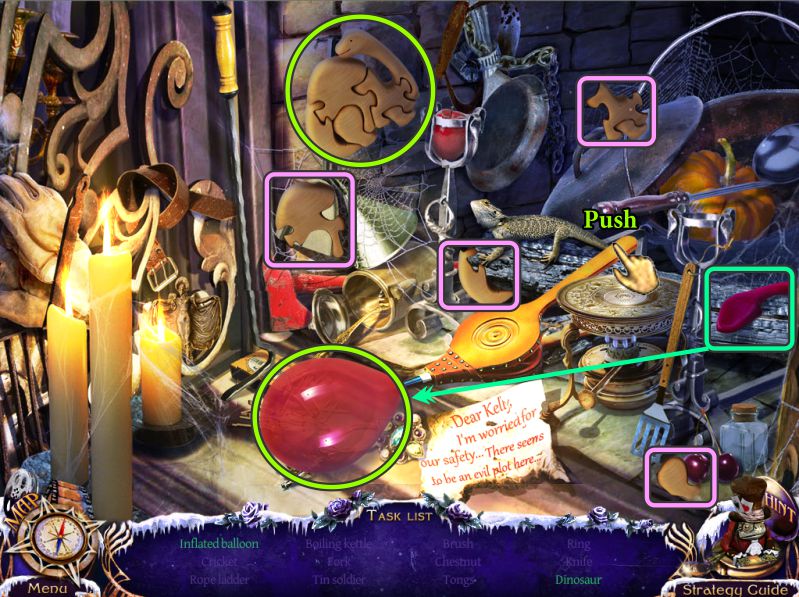
Fireplace Hidden Object Scene
Use the matches to light the burner to get the Boiling Kettle.
The Rope Ladder will go into your Inventory.
Screenshot
Place the balloon on the bellows and push to get an Inflated Balloon.
Complete the dinosaur puzzle and collect the dinosaur.
Screenshot
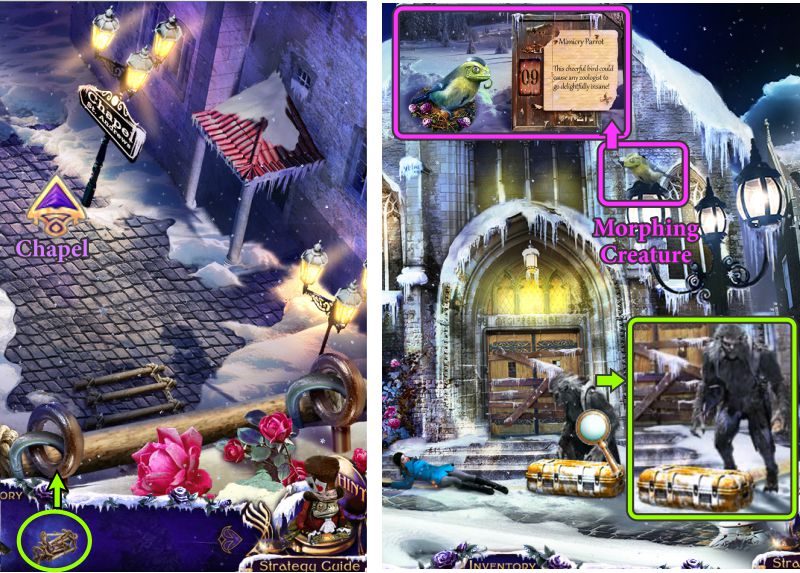
Balcony and Chapel Exterior
Place the Rope Ladder in the rings and head off toward the Chapel.
Collect the Morphing Creature, and zoom in on the beast for a cut scene.
Screenshot
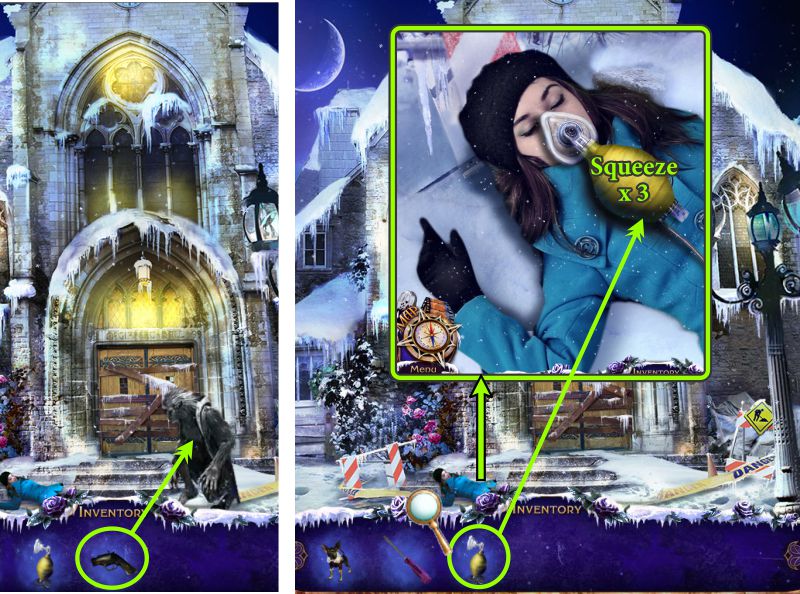
Chapel Exterior
Use the Flare Gun to scare off the beast.
Zoom in on Kelly and place the Oxygen Mask on her mouth.
Squeeze it 3 times to revive her, and watch the cut scene.
Screenshot
Chapter 5: The Chapel
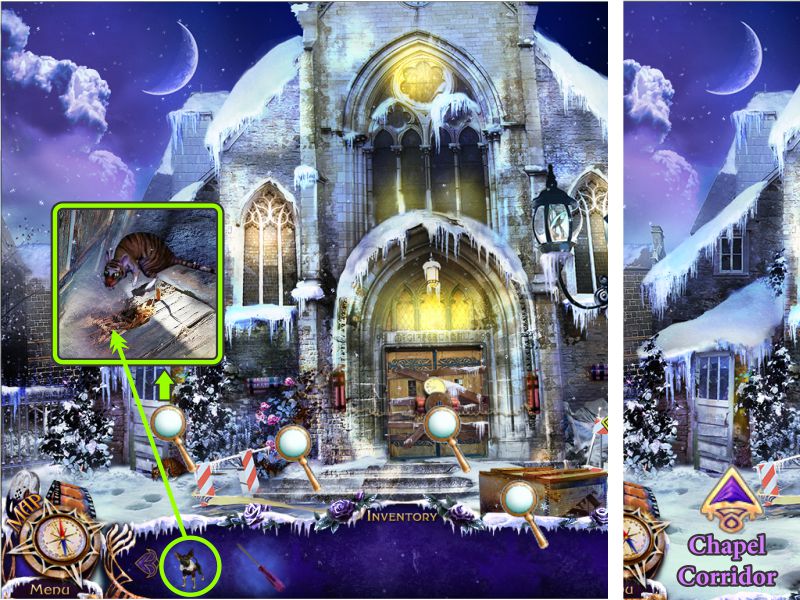
Chapel Exterior
Examine all the magnifying glasses, and zoom in on the side door.
Send Elf to scare off the rat-like creature.
Enter the Chapel Corridor.
Screenshot
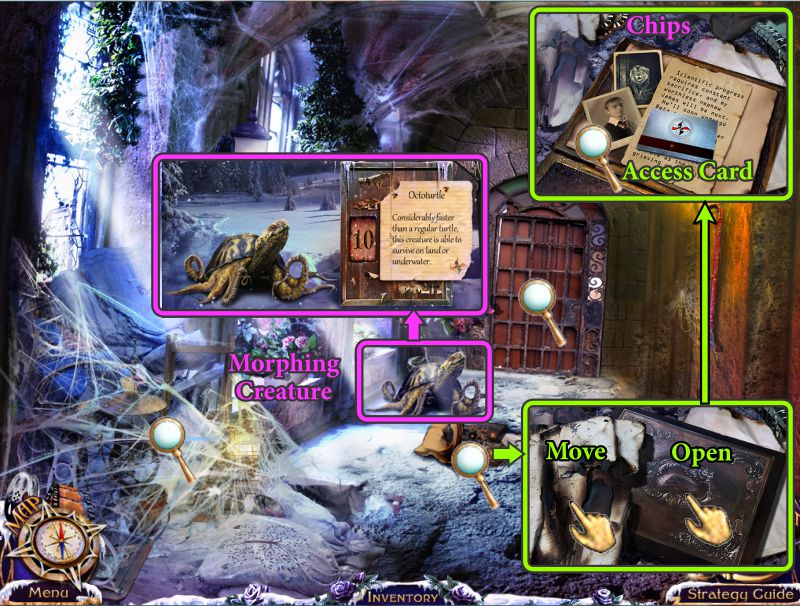
Chapel Corridor
Capture the Morphing Creature, and zoom in on the case on the floor.
Move the papers and open the case.
Take the Access Card and Chips.
Screenshot
Examine the lantern on the wall, and take the Crowbar and Chips.
Zoom in on the plant by the door and take the Fire Apple.
Return outside.
Screenshot
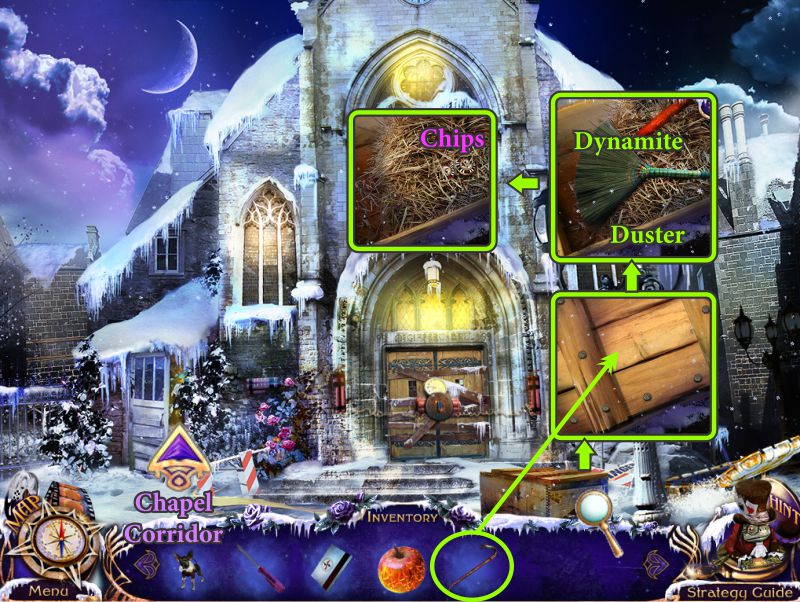
Chapel Exterior
Use the Crowbar to open the crate.
Take the Dynamite, Duster and Chips.
Return to the Chapel Corridor.
Screenshot
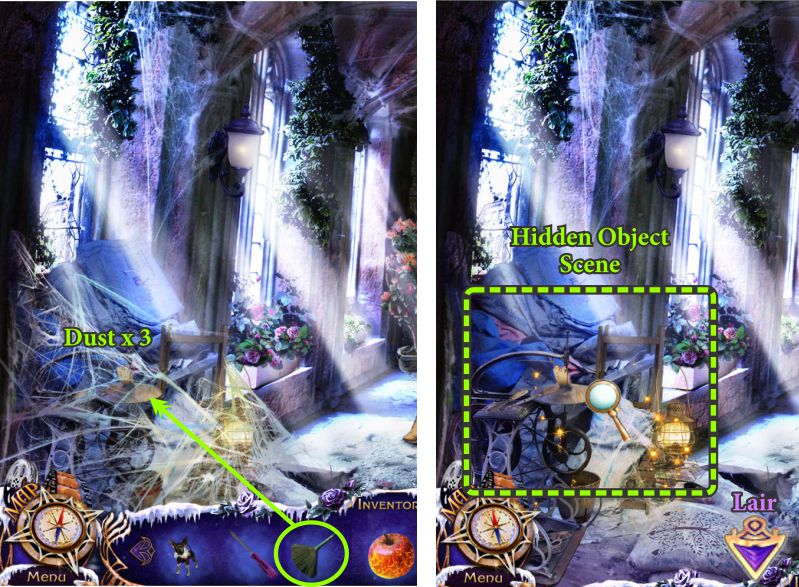
Chapel Corridor
Dust off the cobwebs at the left 3 times.
Play the Hidden Object Scene.
Go to the Lair.
Screenshot
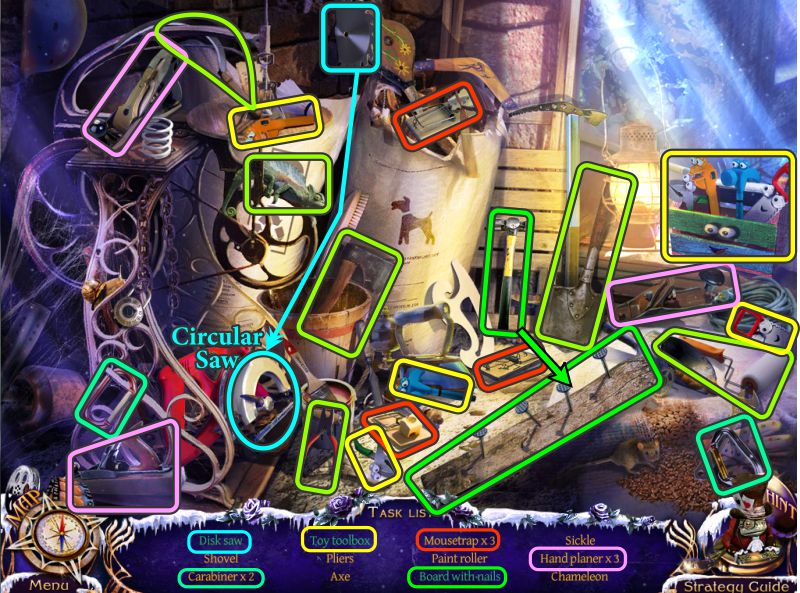
Chapel Corridor Hidden Object Scene
Place the blade on what is called a Disk Saw to get a Circular Saw for your Inventory.
Use the hammer to pound the nails into the board.
Place all the toy tools in the Toy Toolbox.
See the screenshot for the color-coded multiple objects.
Screenshot
Lair
Zoom in on the boarded up door and use the Circular Saw to remove the boards.
Enter the Bedroom.
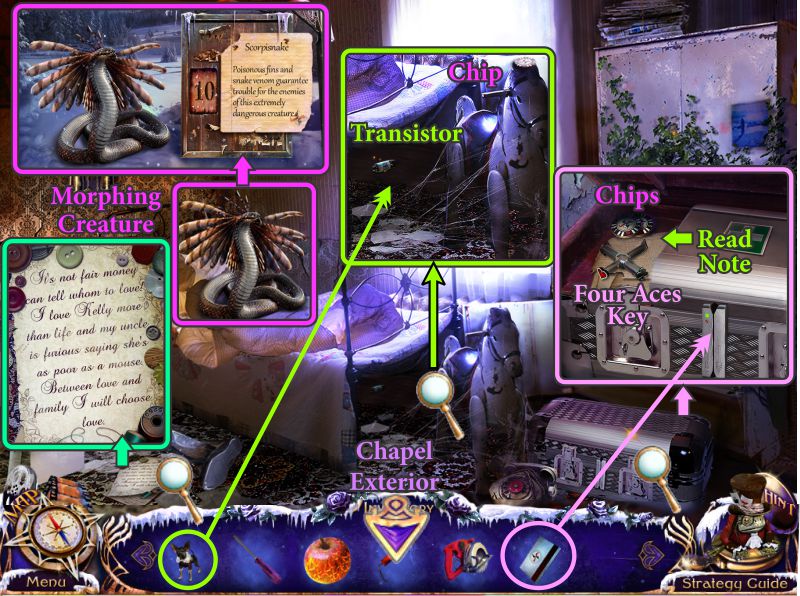
Bedroom
Collect the Morphing Creature.
Read the note on the floor.
Send Elf under the bed to get the Transistor, then collect it and the Chip.
Zoom in on the chest and use the Access Card to open it.
Take the Chips and For Aces Key.
Go to the Chapel Exterior.
Screenshot
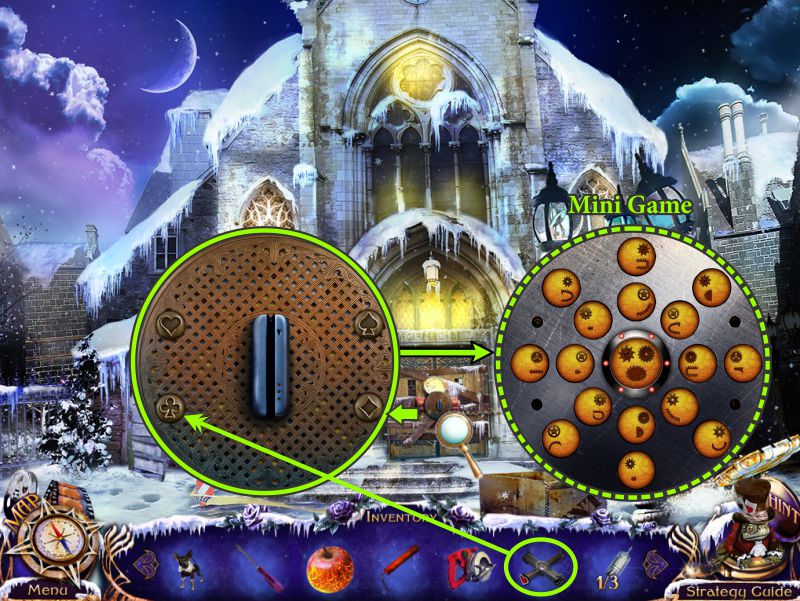
Chapel Exterior
Zoom in on the front door and use the Four Aces Key to remove the bolts for a Mini Game.
Screenshot
Chapel Door Mini Game
Your goal is to match the half faces images to the larger complete faces that appear in the center of the lock.
See the screenshot for a color-coded solution.
When the doors open, enter the Chapel.
Screenshot
Chapel
Talk to Kelly, and examine the many magnifying glasses.
Use Elf to get the Transistor from the rat hole, and collect it and the Chip.
Zoom in on the safe and enter the number indicated (mine was 1372) to get a bunch of Chips.
Go to the Post Office.
Screenshot
Post Office
Zoom in on the microfilm reader and use the Four Aces Key to open the compartment.
Take the Transistor and return to the Chapel.
Screenshot
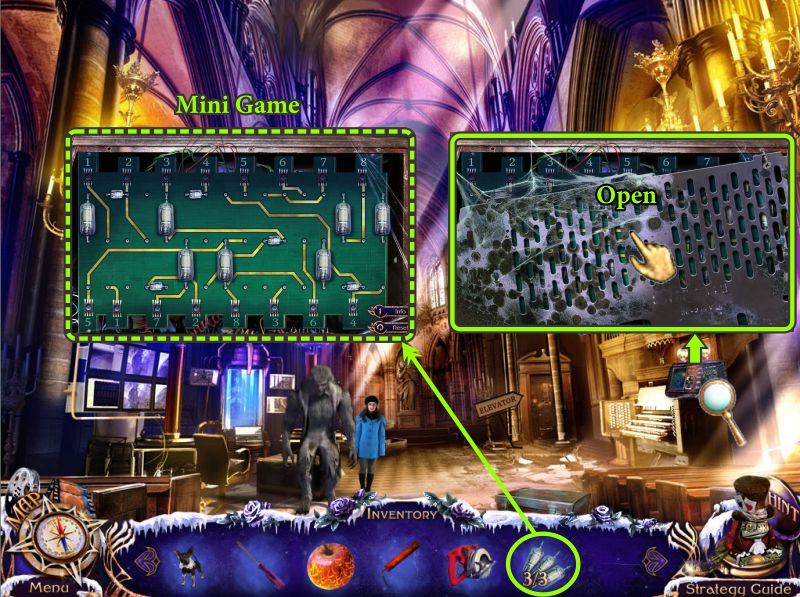
Chapel
Zoom in on the radio, open the panel and place your Transistors for a Mini Game.
Screenshot
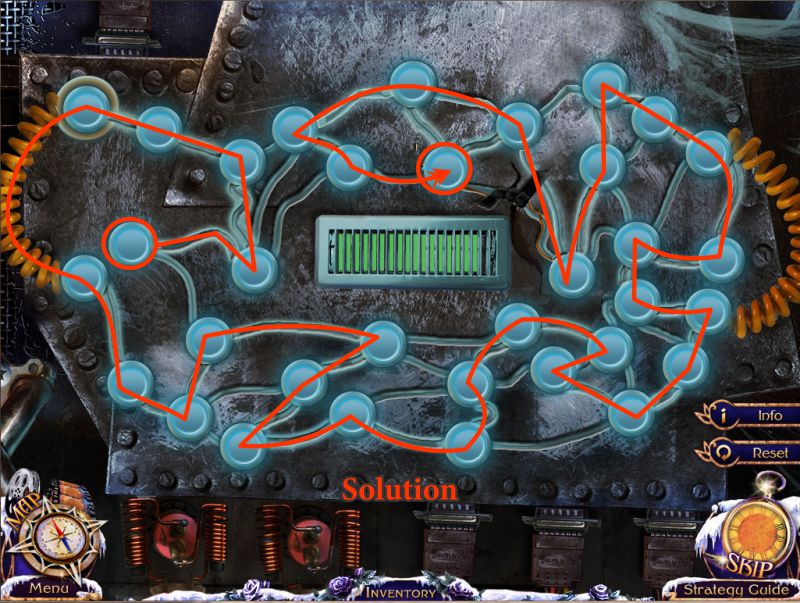
Radio Mini Game
You goal is to connect the numbered circuits with the large and small transistors so everything lights up.
See the screenshot for the solution.
Screenshot
Once the circuits are connected, you need to use the black dials with the arrows to connect to the hidden signal on the indicated radio tower.
Screenshot
Chapel and Bedroom
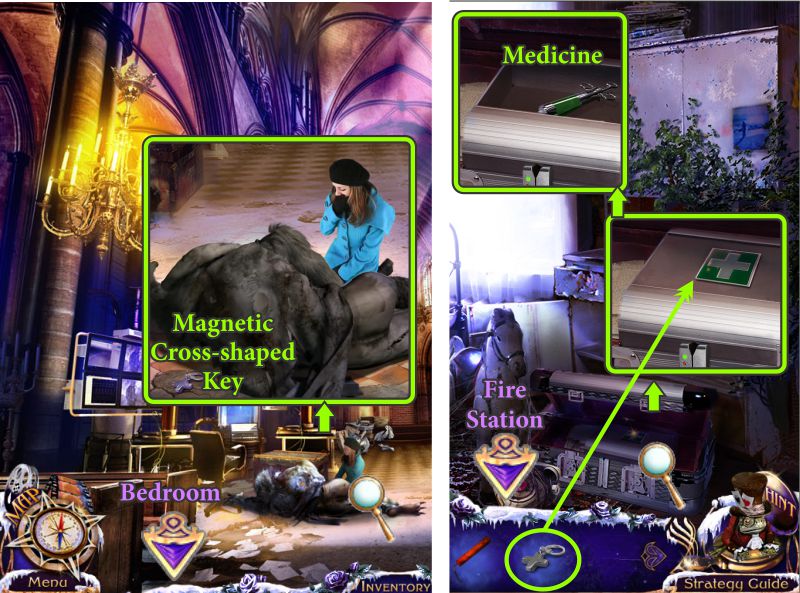
Watch the cut scene, then zoom in on wounded James and take the Magnetic Cross-Shaped Key.
Go to the Bedroom.
Zoom in on the chest and open the first-aid kit with the Magnetic Cross-Shaped Key.
Take the Medicine, and head to the Fire Station.
Screenshot
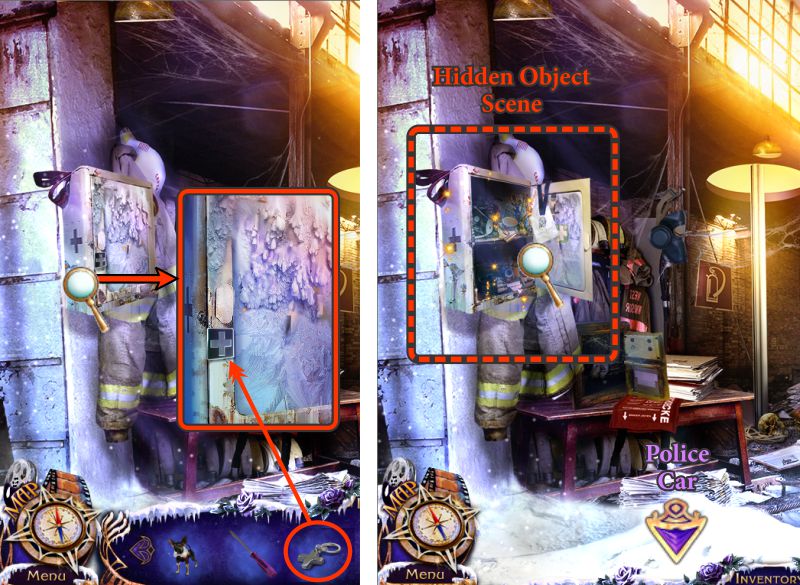
Fire Station
Zoom in on the first-aid kit and open it with the Magnetic Cross-Shaped Key.
Play the Hidden Object Scene before going to the Police Car.
Screenshot
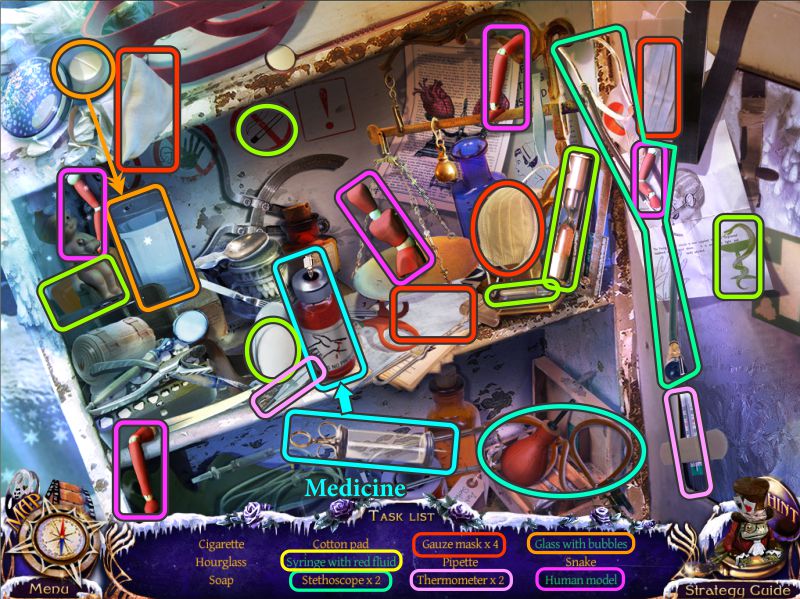
Fire Station Hidden Object Scene
Place the tablet in the water glass to get a Glass with Bubbles.
Place the arms and legs on the Human Model.
Use the syringe on the bottle of red liquid to get more Medicine for your Inventory.
Screenshot
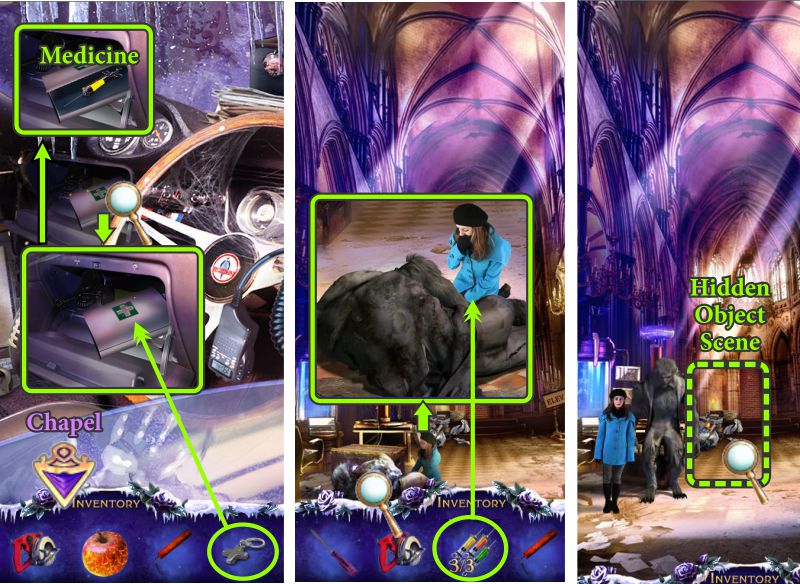
Police Car and Chapel
Zoom in on the glove compartment and open the first-aid kit with the Magnetic Cross-Shaped Key.
Take the Medicine and go to the Chapel.
Since Kelly is a nurse, zoom in and give the Medicine to her to administer to James.
Play the Hidden Object Scene.
Screenshot
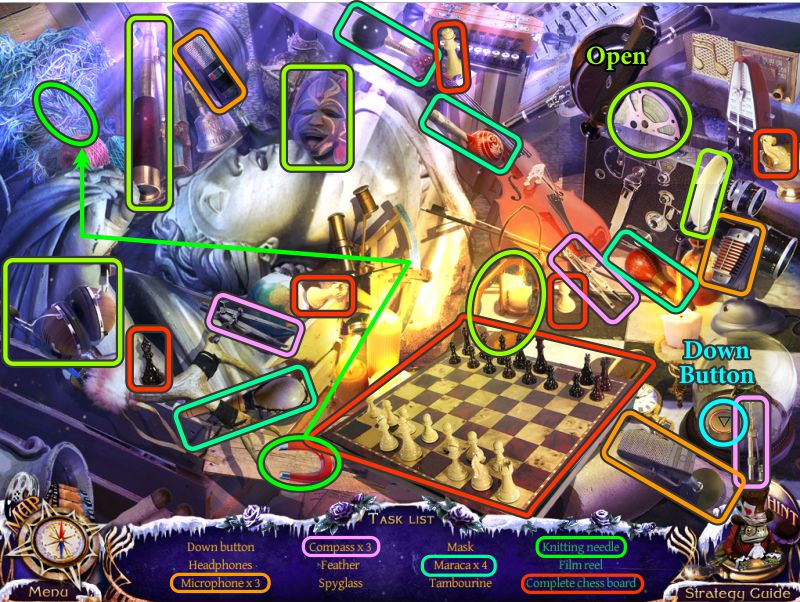
Chapel Hidden Object Scene
Collect the chess pieces to complete the board.
Open the film can to get the reel.
Use the magnet just above the yarn to find the Knitting Needle.
The Down Button will go into your Inventory.
Screenshot
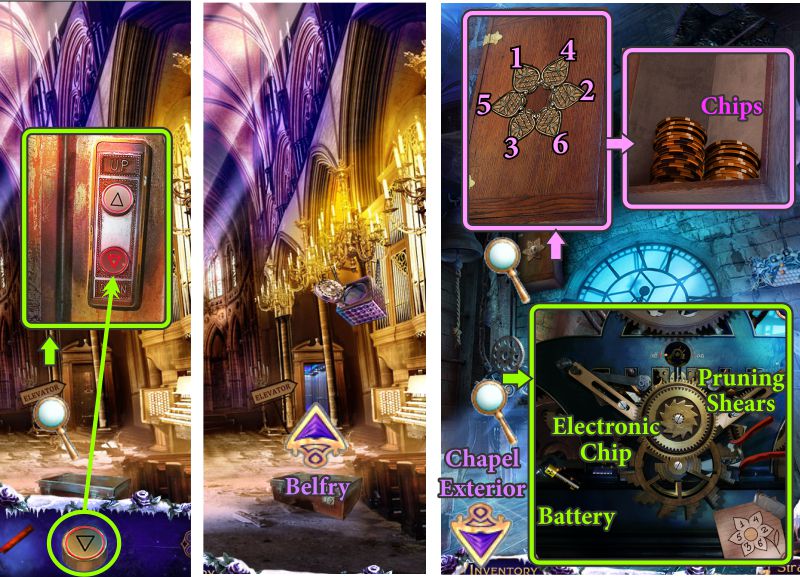
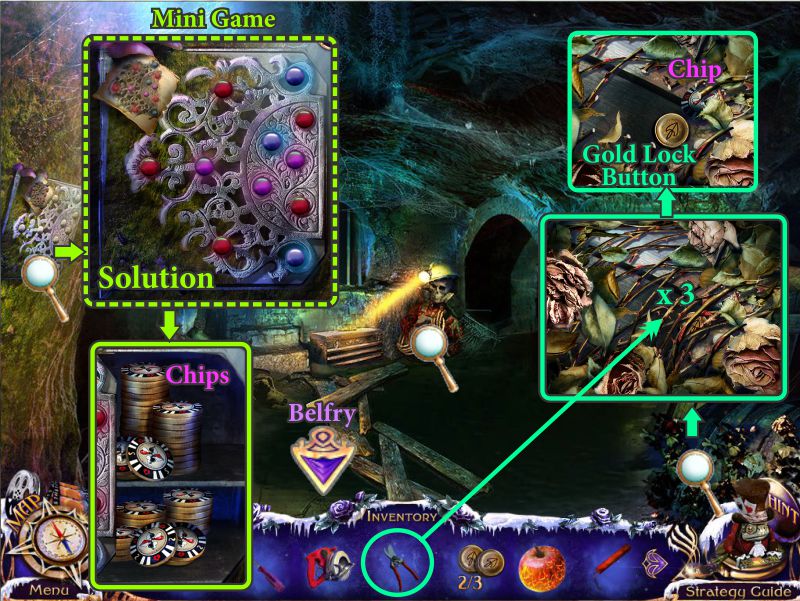
Chapel and Belfry
Zoom in on the elevator and place the Down Button.
Enter the elevator to go to the Belfry.
Zoom in on the mechanism to find an Electronic Chip, Pruning Shears, and Battery.
Take note of the numbered pattern in the lower left.
Examine the safe and press the pedals as numbered in the screenshot.
Take the Chips, and go to the Chapel Exterior.
Screenshot
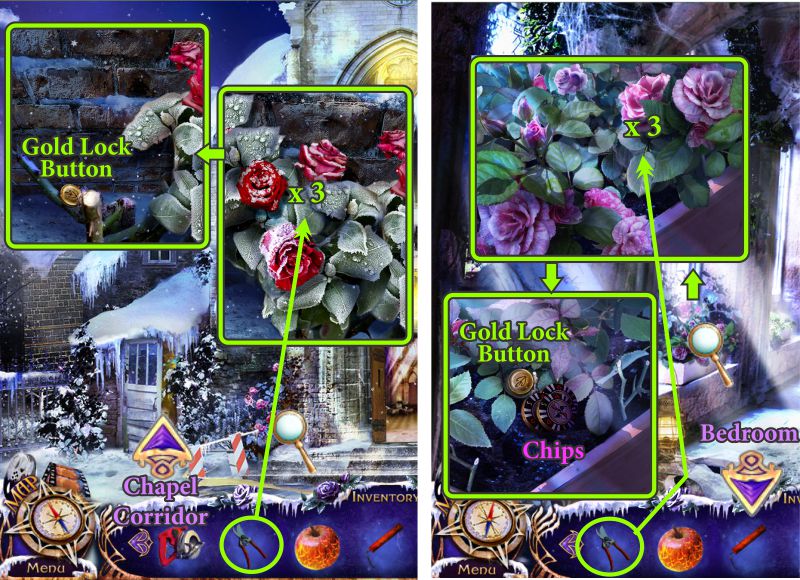
Chapel Exterior and Corridor
Zoom in on the rose bush and use the Pruning Shears on it 3 times.
Take the Gold Lock Button and go to the Chapel Corridor.
Prune the roses in the window box 3 times with the Pruning Shears.
Take the Gold Lock Button and Chips.
Go to the Bedroom.
Screenshot
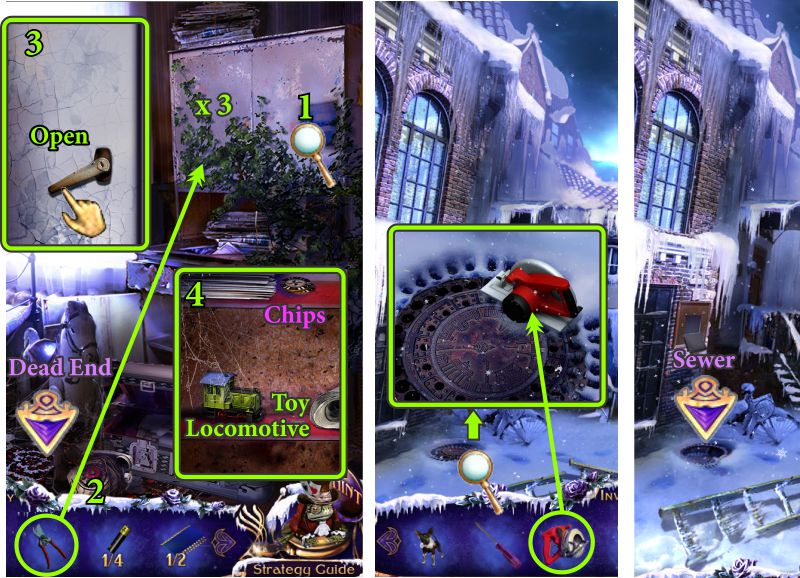
Bedroom and Dead End
Zoom in on the vine-covered cabinet and use the Pruning Shears 3 times.
Open the cabinet and take the Chips and Toy Locomotive.
Go out to the Dead End, and examine the manhole cover.
Use the Circular Saw to remove the cover, and enter the Sewer.
Screenshot
Chapter 6: The Sewer
Sewer
Zoom in on the left wall and play the Mini Game.
Your goal is to push the buttons until the colors match the diagram and the screenshot.
Take the Chips.
Examine the thorny bush on the right and use your Pruning Shears 3 times.
Collect the Gold Lock Button and Chip.
Go to the Chapel Belfry.
Screenshot
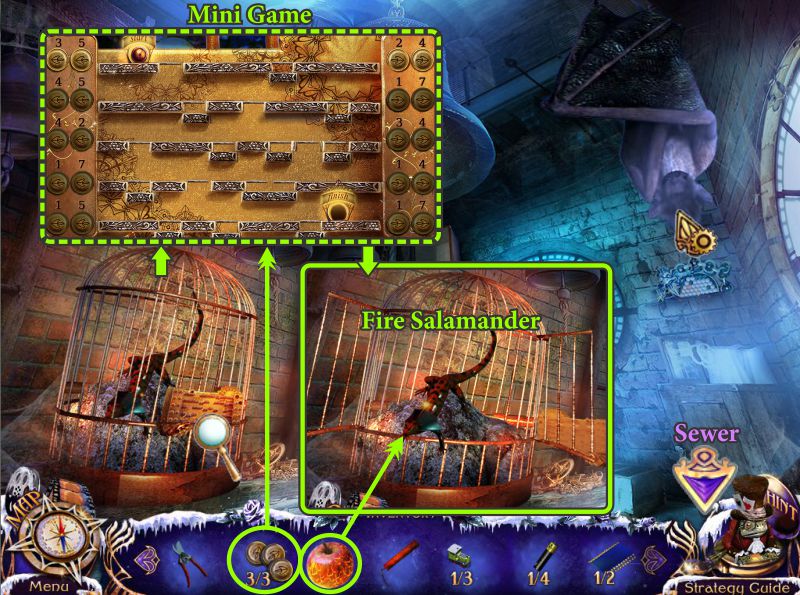
Belfry
Place the 3 Gold Lock Buttons on the cage for a Mini Game.
Once the cage is open, give the Fire Apple to the Fire Salamander to calm him down so you can collect him.
Return to the Sewer.
Screenshot
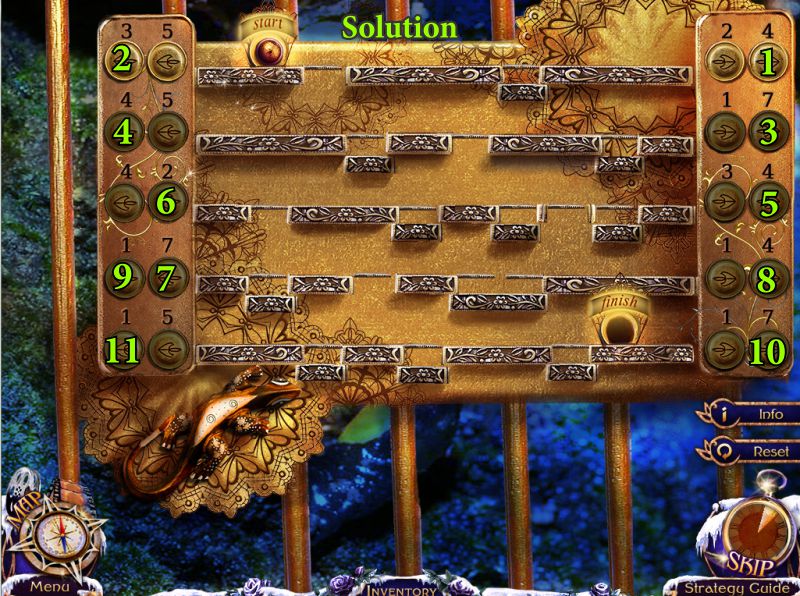
Cage Mini Game
Your goal is to get the ball from start to finish.
Press the buttons as numbered in the screenshot.
Screenshot
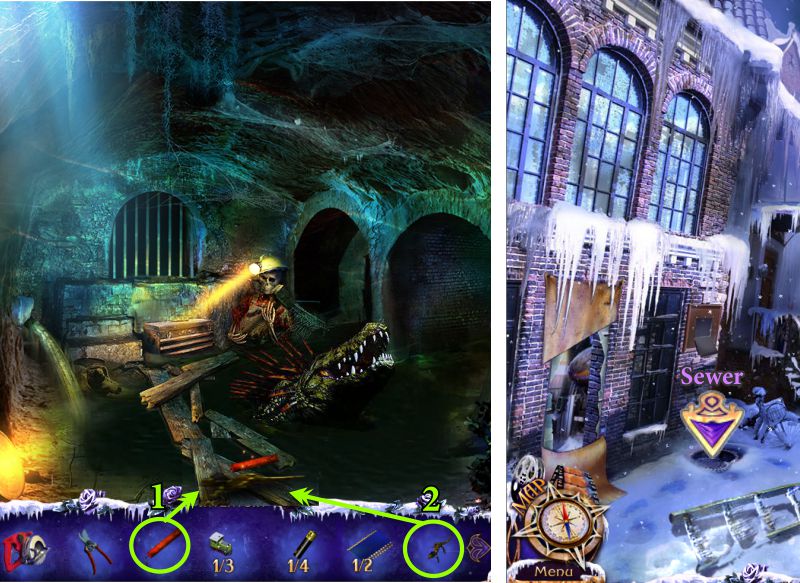
Sewer
Place the dynamite on the boards and use the Fire Salamander to light it so you can get rid of the creature.
Return to the Sewer after the blast.
Screenshot
Sewer
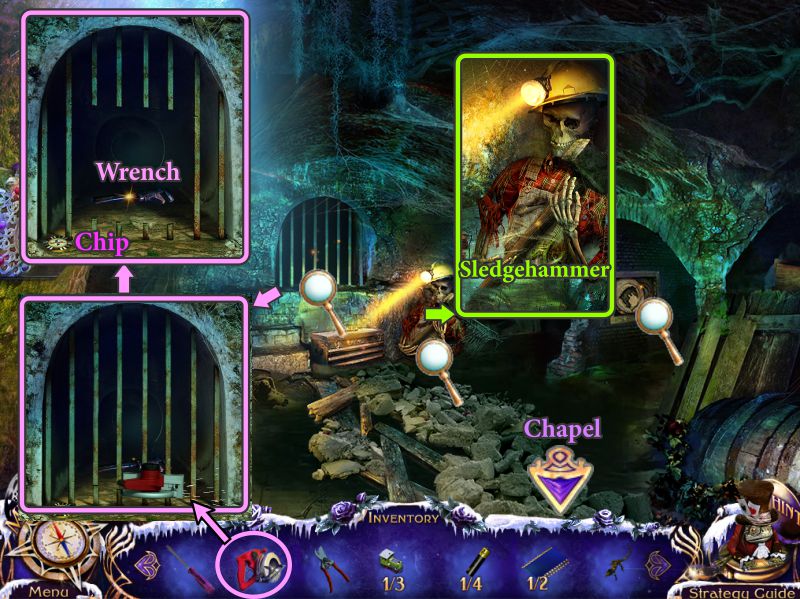
Examine the skeleton and take the Sledgehammer.
Zoom in on the bars and use your Circular Saw to cut them.
Take the Chip and Wrench.
Go to the Chapel.
Screenshot
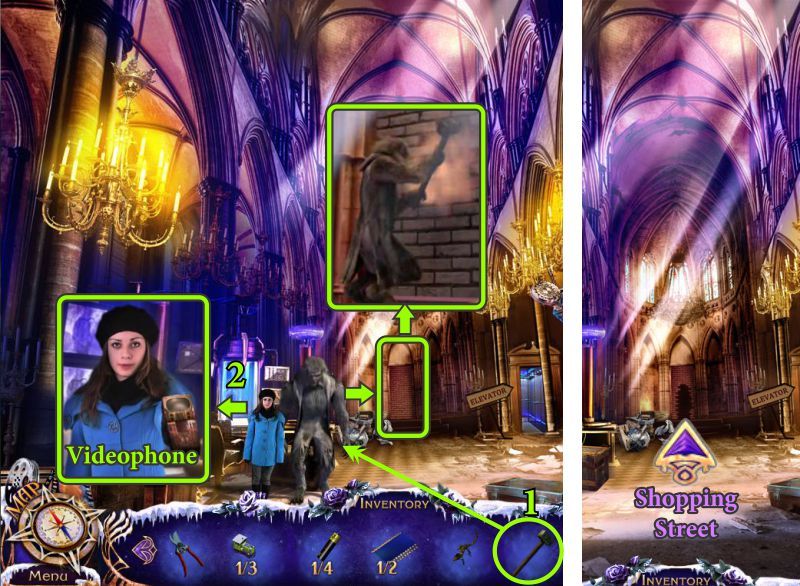
Chapel
Give the Sledgehammer to James, and he will destroy the brick entry in back.
Kelly gives you a Videophone to call her if you need help because she and James are going somewhere safe.
Go through the opening to Shopping Street.
Screenshot
Shopping Street
Karr is there and blocks the end of the street with a truck.
Zoom in on it and use the Wrench to remove the gas cap to see if there is any fuel.
Capture the Morphing Creature.
Zoom in on the awing at the left, send Elf to get the Toy Locomotive, and take the Chips.
Place your Pruning Shears on the pole to get a pair of Long Pruning Shears.
Screenshot
Shopping Street and Sewer
Use the Long Pruning Shears to cut down the Leaf Key from the wire.
Go to the Sewer.
Zoom in and use the Leaf Key to open the box.
Take the Toy Locomotive, and go to the Bedroom.
Screenshot
Bedroom and Shopping Street
Zoom in on the train table and place the Toy Locomotives for a Mini Game.
After the Mini Game you will receive a Lock Pick, so go to Shopping Street and zoom in on the fireworks kiosk.
Use the Lock Pick on the Lock and play the Hidden Object Scene.
Screenshot
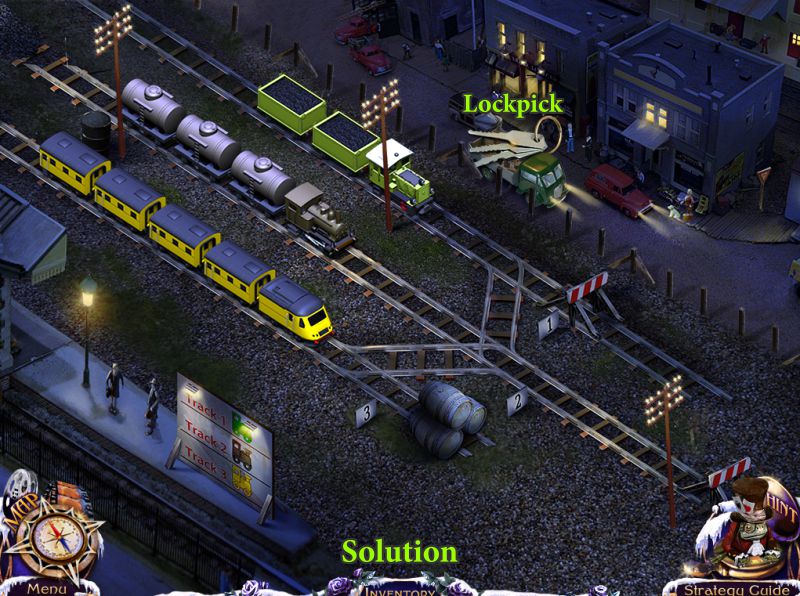
Toy Train Mini Game
Your goal is to arrange the trains as shown in the screenshot.
Touch a car, and the track will light up the areas where you can move the car.
Use the forward position of the center track to move the cars to the side tracks.
You will be rewarded with a Lockpick.
Screenshot
Kiosk Hidden Object Scene
Use the scissors to cut the Long Fuse that you will get for your Inventory.
Assemble the Poster as shown in the screenshot.
Open the cash register by entering the symbols shown on the wall: see the screenshot.
Screenshot
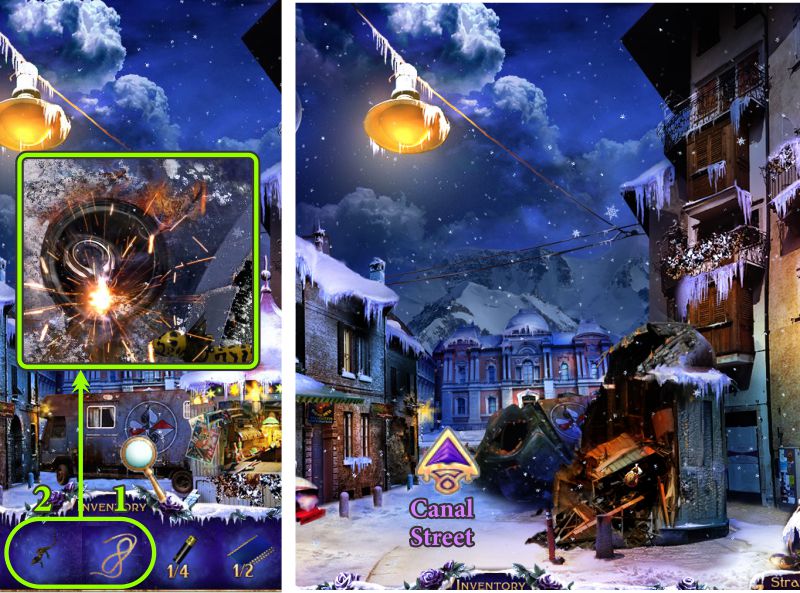
Shopping Street
Zoom in on the truck, place the Long Fuse in the gas tank, and use the Fire Salamander to light the fuse.
Stand back and watch your path being cleared.
Go forward to Canal Street.
Screenshot
Canal Street
Karr is there and rolls up the bridge so you cannot cross the canal.
Collect the Morphing Creature and call Kelly for help.
Screenshot
James restores the bridge so you can cross to the Museum Entrance.
Note the two places in the canal, as well as the lamp post.
Screenshot
Museum Entrance
Use Elf to see what's under the snow pile.
It turns out to be a block of ice, so use your Fire Salamander to melt it.
Take the Museum Key, zoom in on the door, place the key, and turn it.
Screenshot
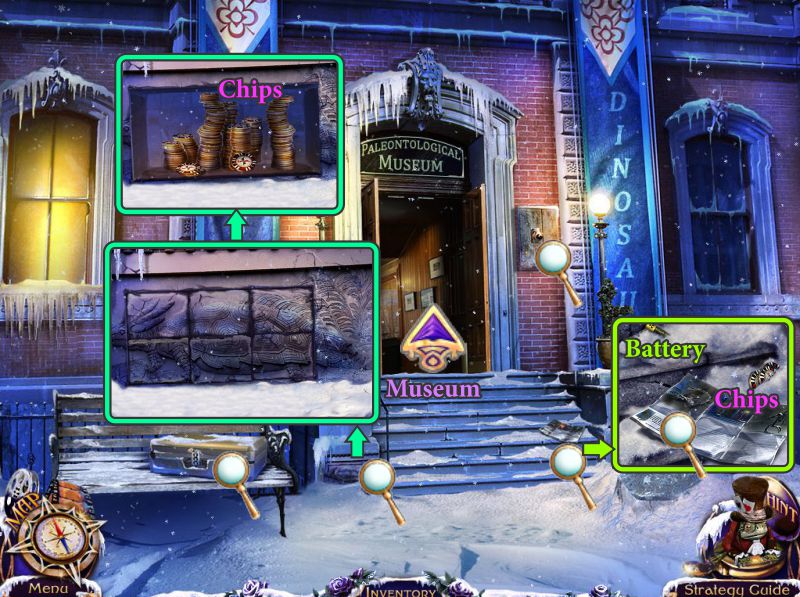
Before entering the Museum, zoom in on the steps to find a Battery and some Chips.
Read the paper.
Examine the niche to the left of the stairs and arrange the stones as shown in the screenshot.
Take the Chips you find inside, and enter the Museum.
Screenshot
Chapter 7: The Museum
Museum
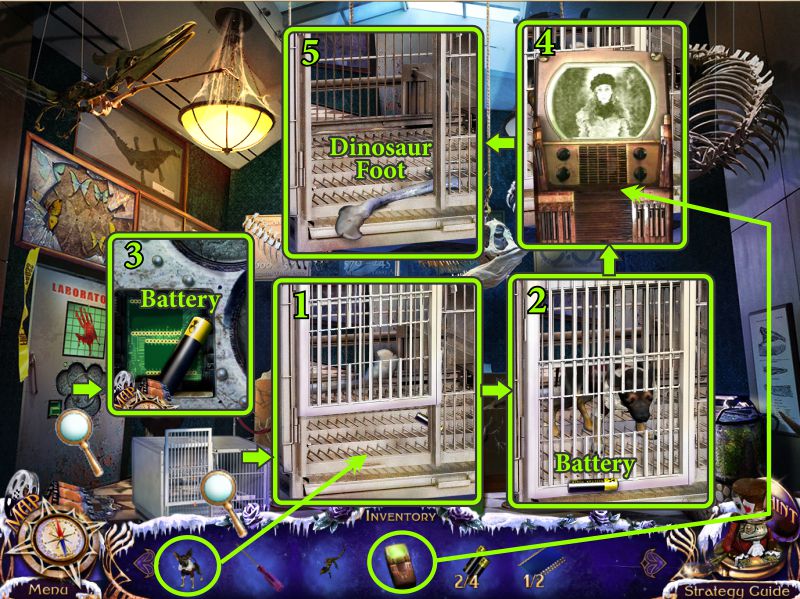
You send Elf into the cage for its contents, and the door falls down, locking him inside.
You can't call Kelly because the phone is dead, but Elf sends out a Battery for you to collect.
Zoom in on the Laboratory door to find another Battery.
Call Kelly for help.
James comes and frees Elf, so collect the Dinosaur Foot.
Screenshot
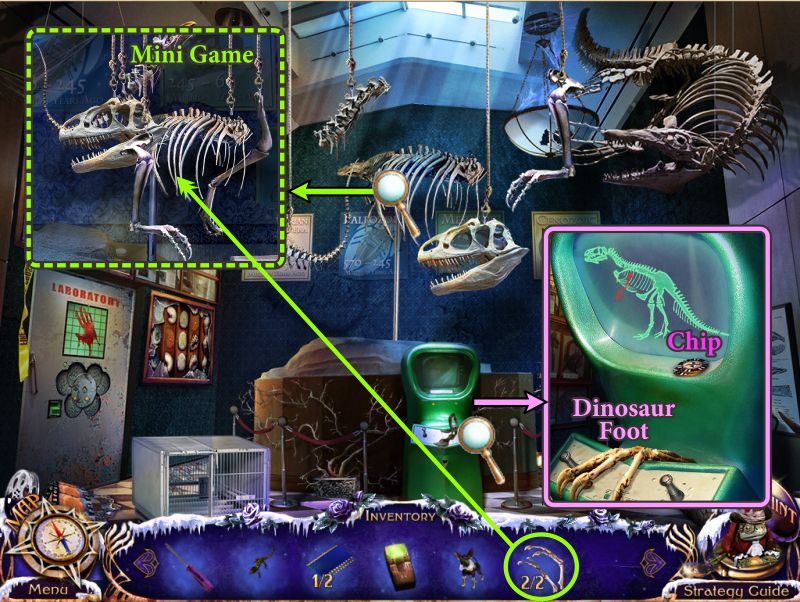
Examine the green viewer, and take the Chip and Dinosaur Foot.
Zoom in on the hanging dinosaur parts and place your 2 Dinosaur Feet for a Mini Game.
Screenshot
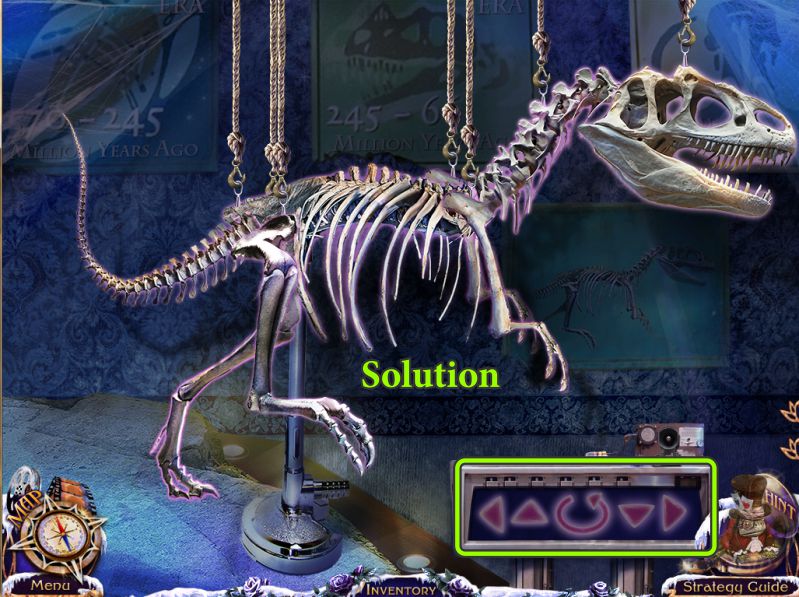
Dinosaur Mini Game
Using the arrows and reverse buttons, rearrange the dinosaur bones to look like the screenshot solution.
Screenshot
Museum
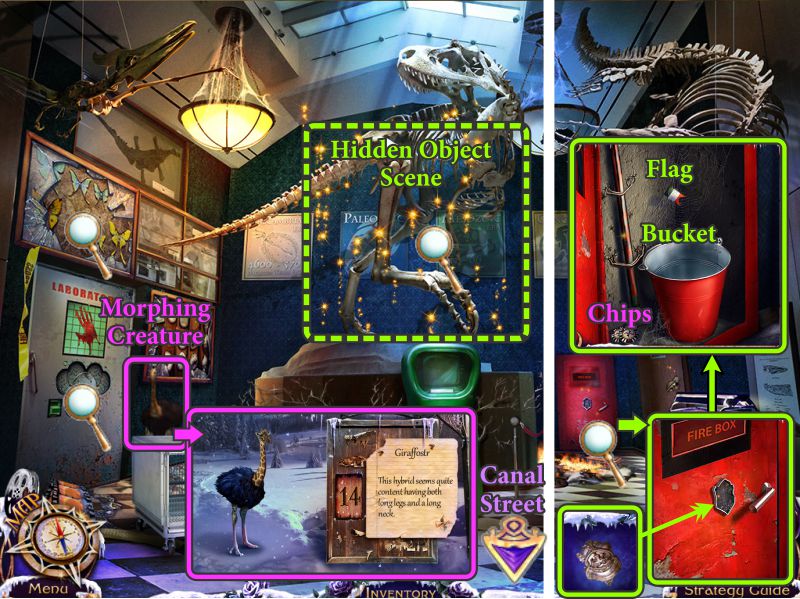
Capture the Morphing Creature and play the Hidden Object Scene.
Use the Badge to open the fire box.
Take the Chips, Flag, and Bucket.
Go to Canal Street.
Screenshot
Dinosaur Hidden Object Scene
Use the wind-up key on the bird to get a Singing Mechanical Bird.
Break the egg with the mallet to find the Baby Dinosaur.
Press each of the rungs on the ladder to match the screenshot, and collect your Rainbow Ladder.
The Firefighter Badge will go into your Inventory.
Screenshot
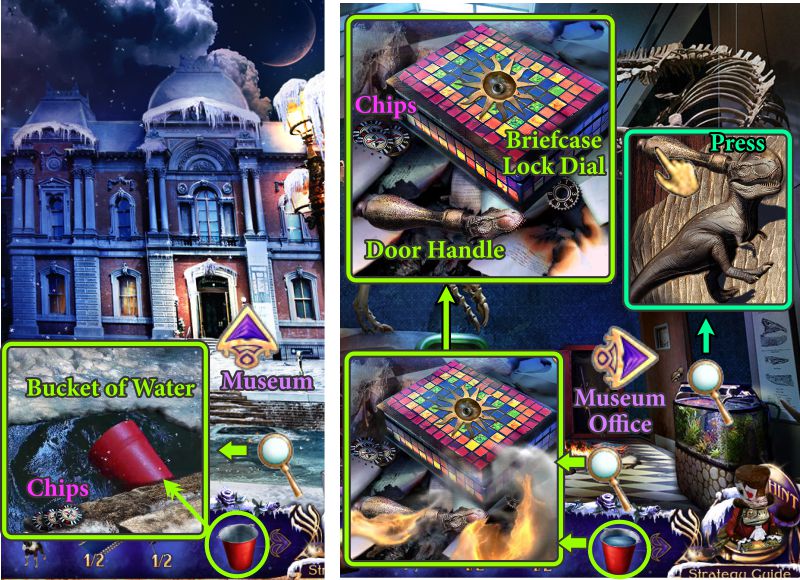
Canal Street and Museum
Zoom in on the canal, dip your Bucket in the canal to get a Bucket of Water.
Take the Chips and return to the Museum.
Zoom in on the fire and use the Bucket of Water to put it out.
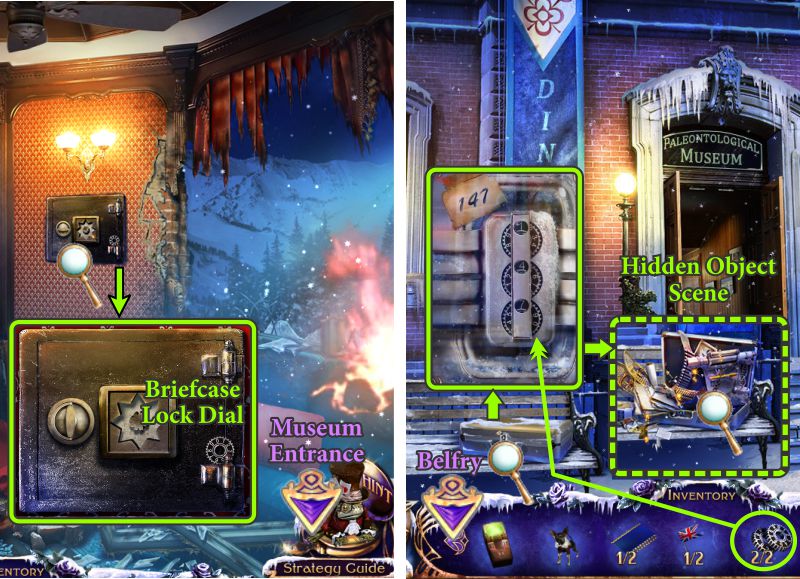
Take the Chips, Door Handle, and Briefcase Lock Dial.
Zoom in on the door at the right, place the Door Handle, press it, and enter the Museum Office.
Screenshot
Museum Office
Capture the Morphing Creature, then move the pillows on the sofa to collect some Chips and a Piece of Picture.
Examine the drawer and take the Toolbox Handle from the desk.
Check out the magnifying glasses, and turn the chair around.
Screenshot
Museum Office and Shopping Street
Examine the skeleton and take the Floppy Disk.
Zoom in on the corner of the desk, note the missing switch, and take the Chips.
Go to Shopping Street, and zoom in on the toolbox.
Take the Chips and Wire Cutter, and return to the Museum.
Screenshot
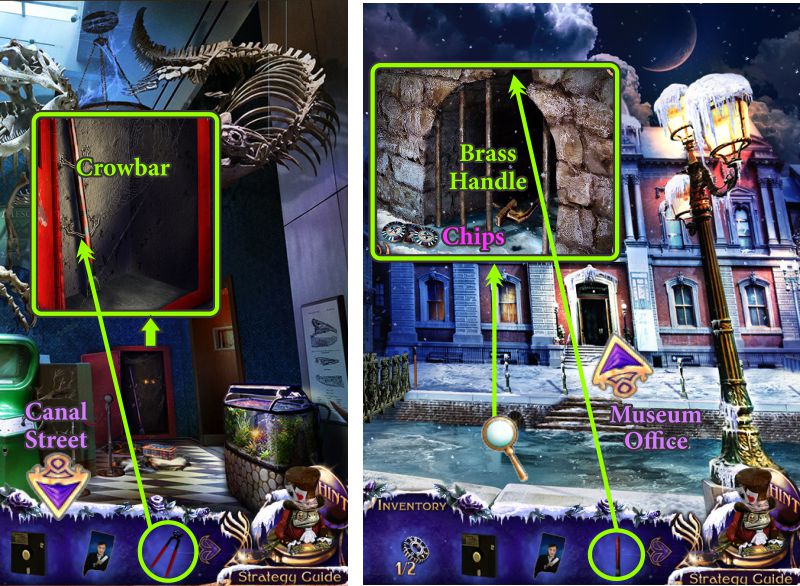
Museum and Canal Street
Zoom in on the fire box, and use the Wire Cutter to remove the Crowbar.
Go to Canal Street and zoom in on the drain.
Use the Crowbar to remove one of the bars so you can take the Brass Handle.
Collect the Chips and go to the Museum Office.
Screenshot
Museum Office
Zoom in and place the Brass Handle on the window.
Open it just in time to see Karr in a helicopter getting ready to throw a fire bomb at you.
Screenshot
Museum Office and Entrance
That was a close call, but continue your investigation by zooming in on the safe to get the Briefcase Lock Dial.
Go outside to the entrance and zoom in on the briefcase.
Place your Briefcase Lock Dials, and turn the dials to 147.
Play the Hidden Object Scene, and go to the Belfry.
Screenshot
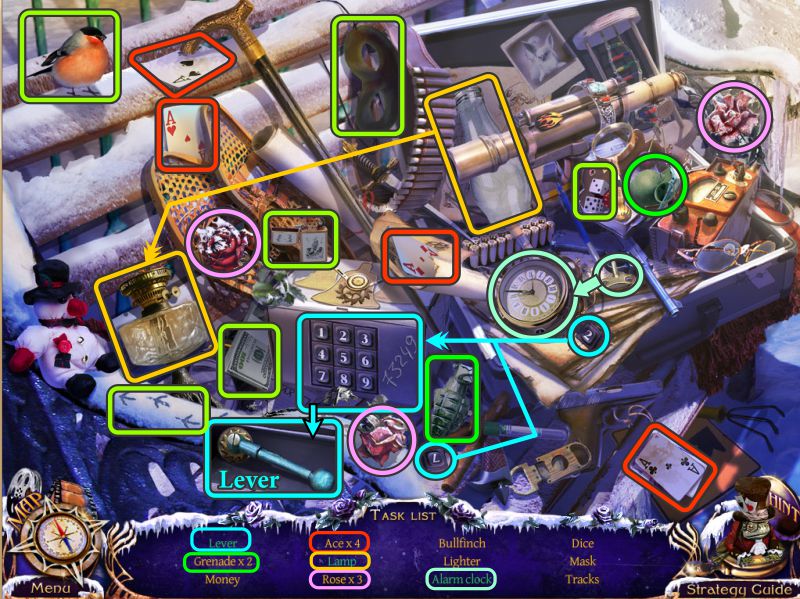
Briefcase Hidden Object Scene
Place the 2 missing keys in the keypad and enter 73249 to open the safe.
Take the Lever that will end up in your Inventory.
Place the glass shade on the bottom of the Lamp.
Add the wind-up key to the Alarm Clock.
Screenshot
Belfry and Sewer
Zoom in and place the Lever on the mechanism, turn it to lower a skeleton.
Read the note in the skeleton's pocket, and take the Crocodile Amulet.
Go to the Sewer.
Zoom in on the niche, and place the Crocodile Amulet to open it.
Take the Chip, Clock Hands, and Star Half.
Go to the Bedroom.
Screenshot
Bedroom and Museum Office
Zoom in on the clock and place the Clock Hands.
Take the Butterfly and Star Half.
Go to the Museum Office and zoom in on the safe.
Place the Star Halves to open the safe.
Take the Chips, Golden Crown, and Electronic Chip.
Go to the Museum.
Screenshot
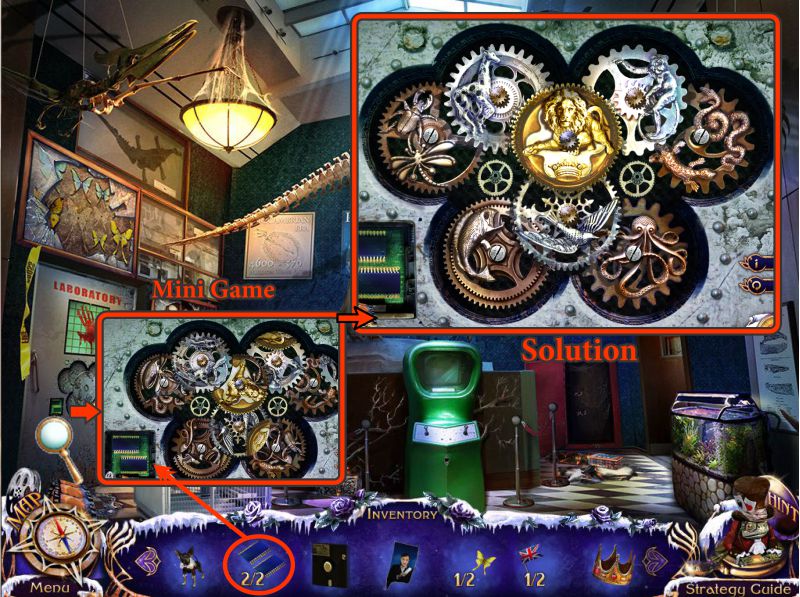
Museum
Zoom in on the Laboratory door and place your 2 Electronic Chips to trigger a Mini Game.
Move the various wheels to complete the pictures of each wheel as shown in the screenshot solution.
Enter the Laboratory.
Screenshot
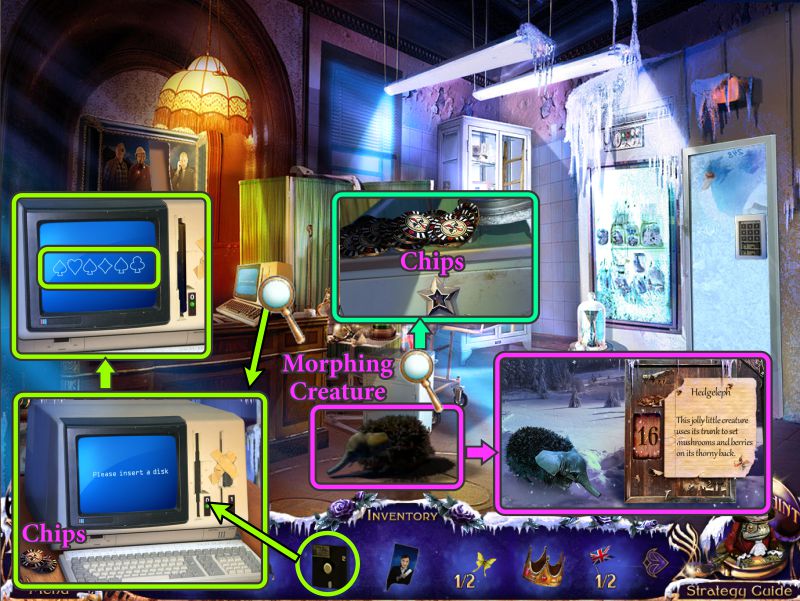
Laboratory
Capture the Morphing Creature.
Zoom in and take the Chips from the top of the small cabinet.
Examine the computer, take the Chips, and insert the Floppy Disk.
Watch the scene and take note of the final image.
Screenshot
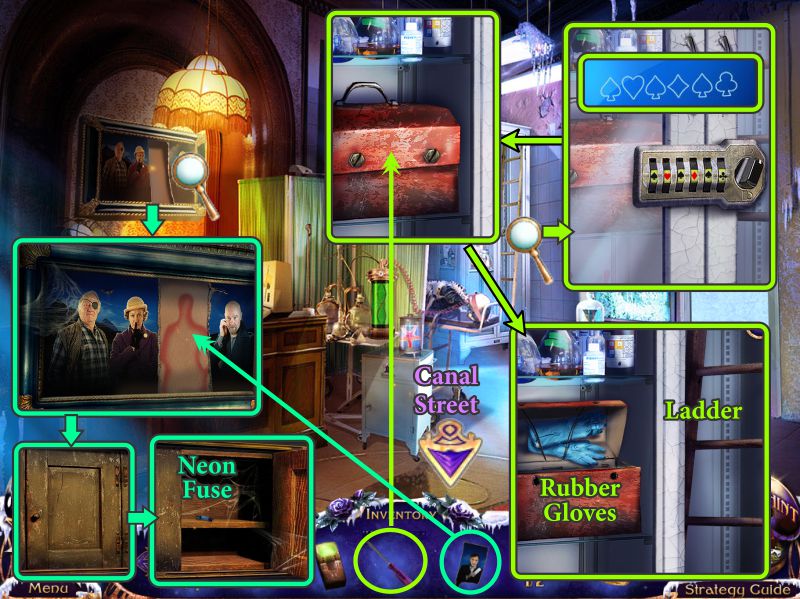
Examine the picture above the computer, and place your Picture Piece.
Collect the Neon Fuse.
Examine the lock on the tall cabinet and enter the images from the computer.
Use your Screwdriver of open the case, take the Rubber Gloves, and the Ladder on the door.
Go to Canal Street.
Screenshot
Canal Street and Laboratory
Zoom in on the light, place the Ladder and take the Neon Fuse and Mermaid Figurine.
Return to the Laboratory.
Zoom in on the frozen door, place the Neon Fuses, and enter 248 on the keypad.
Take the Butterfly, and use the Fire Salamander to thaw out the Drawer Key.
Go to the Museum.
Screenshot
Museum
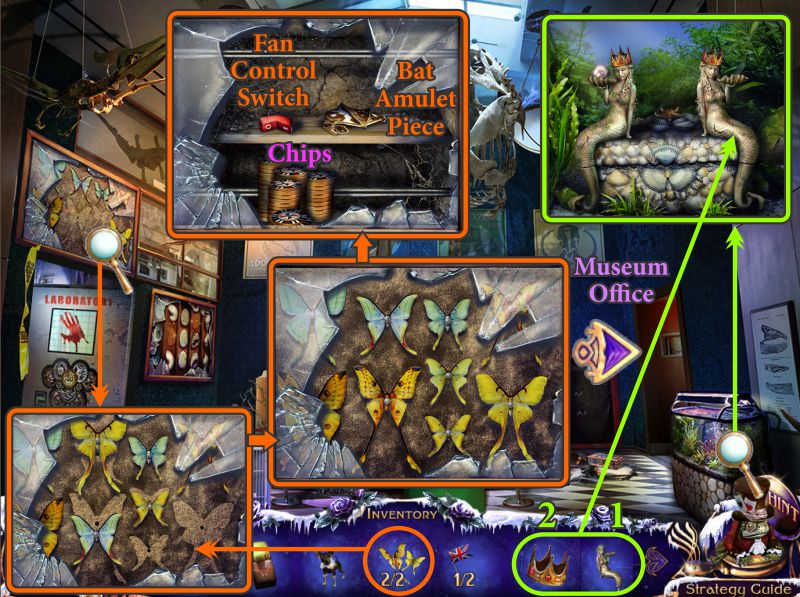
Examine the frame above the Laboratory door and place your Butterflies.
Rearrange the Butterflies as shown in the screenshot.
Take the Chips, Fan Control Switch, and Bat Amulet Piece.
Zoom in on the Aquarium, place your Mermaid Figurine, and the Golden Crown on her head.
To complete the pair, you still need to find a pearl.
Go to the Museum Office.
Screenshot
Museum Office
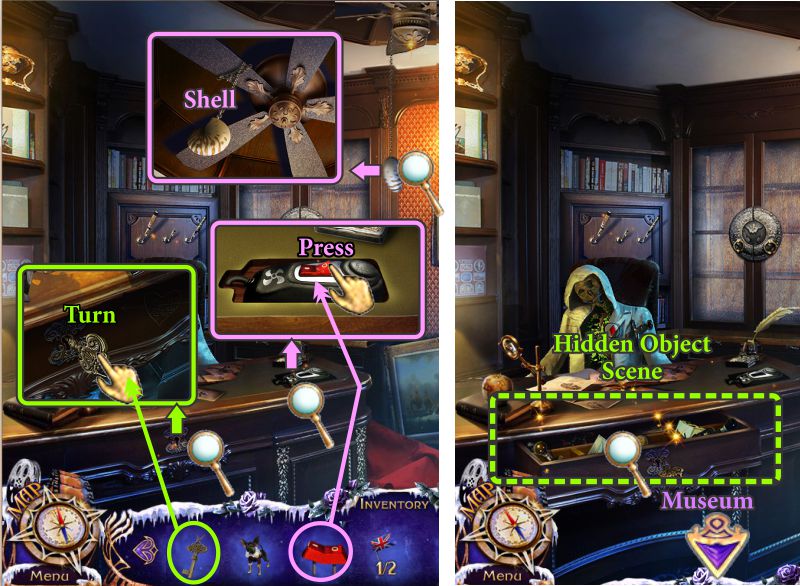
Examine the fan control and place the Fan Control Switch.
Press it to turn off the fan so you can collect the Shell.
Zoom in and place your Drawer Key, turn to open the drawer for a Hidden Object Scene, then return to the Museum.
Screenshot
Drawer Hidden Object Scene
Use the pen to draw a sailboat on the pad.
Place the number square in the calendar box.
Turn the numbers and date to read December 25.
Use the screwdriver to free the Shell that goes into your Inventory.
Screenshot
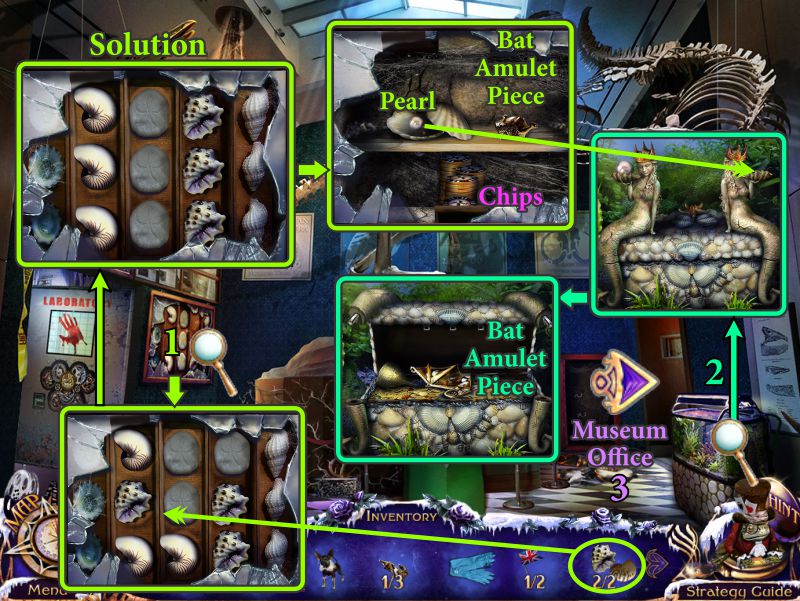
Museum
Zoom in on the frame next to the Laboratory door and place your Shells.
Rearrange them as shown in the screenshot.
Take the Bat Amulet Piece and Pearl.
Zoom in on the Aquarium and place the Pearl.
Take the Bat Amulet Piece, and return to the Office.
Screenshot
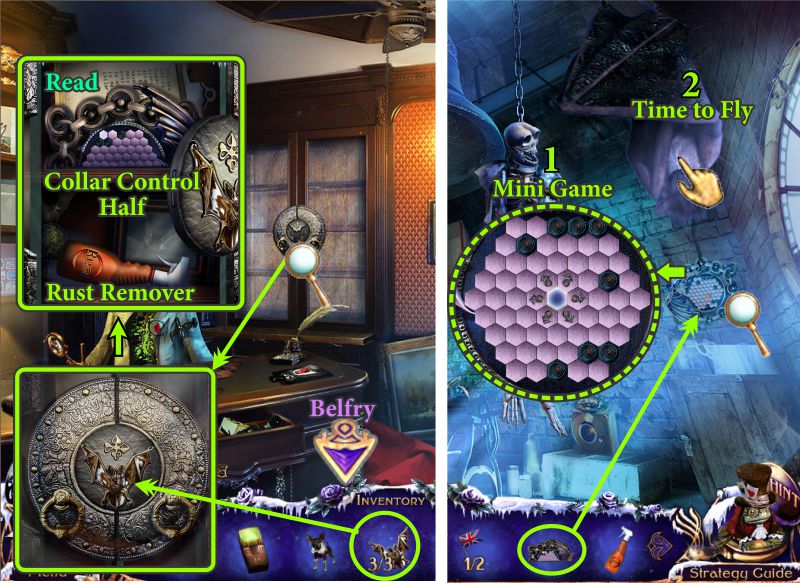
Museum Office and Belfry
Zoom in on the cabinet and place the Bat Amulet Pieces to open the lock.
Take the Collar Control Half and Rust Remover, and read the note.
Go to the Belfry and place your Collar Control Half to trigger a Mini Game.
Once you have the bat under control, climb aboard for a flight.
Screenshot
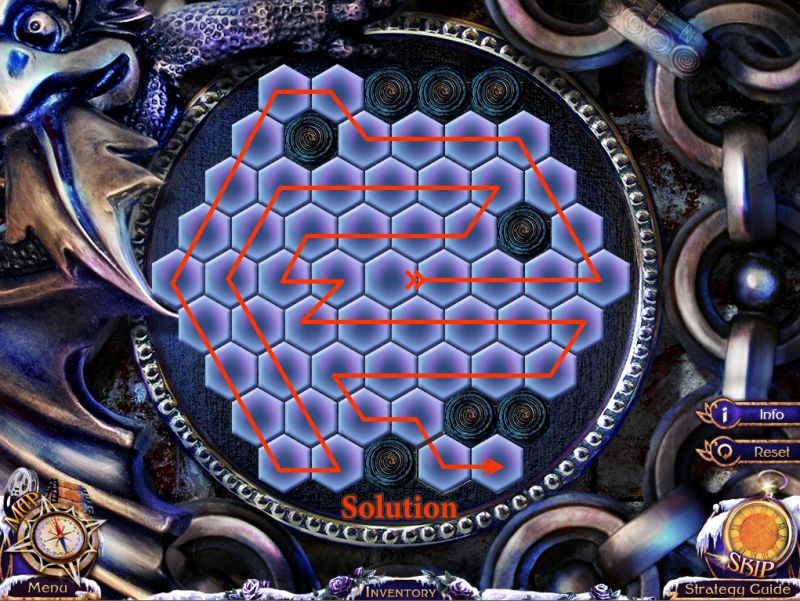
Collar Control Mini Game
Your goal is to turn all the cells blue.
See the screenshot for the path to take.
Screenshot
Chapter 8: Hunting Cabin
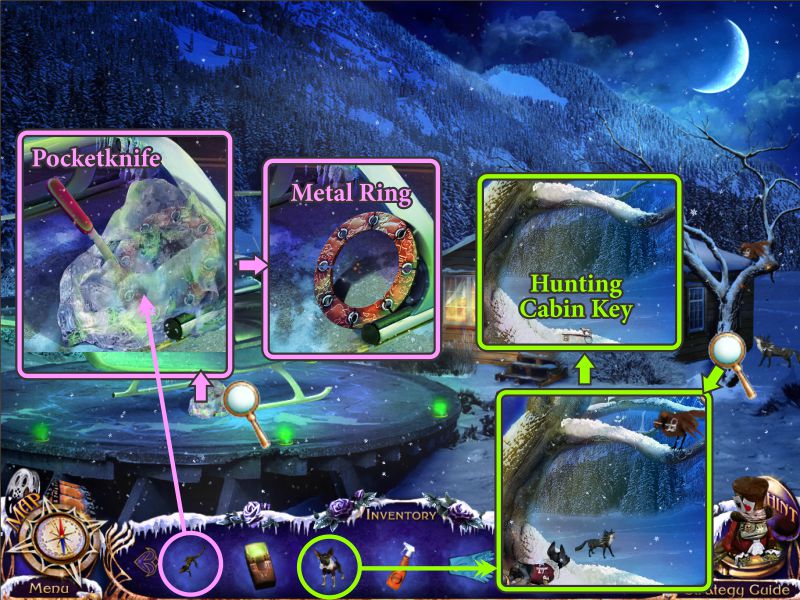
Heliport
Zoom in on the helicopter, take the Pocketknife, and have your Fire Salamander melt the ice.
Take the Metal Ring, and zoom in on the tree.
The bird is holding a key you want, so send Elf to scare off the fox and get the Hunting Cabin Key.
Screenshot
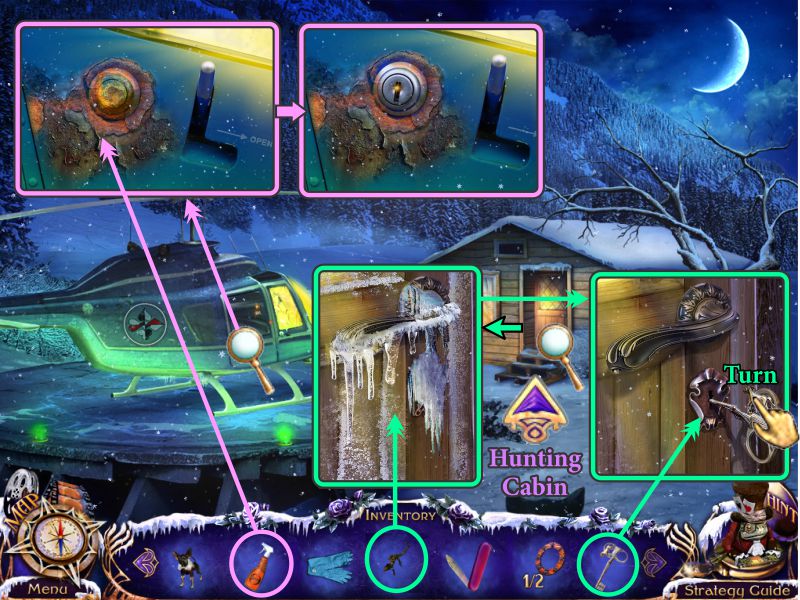
Examine the lock on the helicopter and use the Rust Remover on the lock.
Zoom in on the cabin door and send the Fire Salamander to remove the ice.
Place the key in the lock, turn it, and enter the Hunting Cabin.
Screenshot
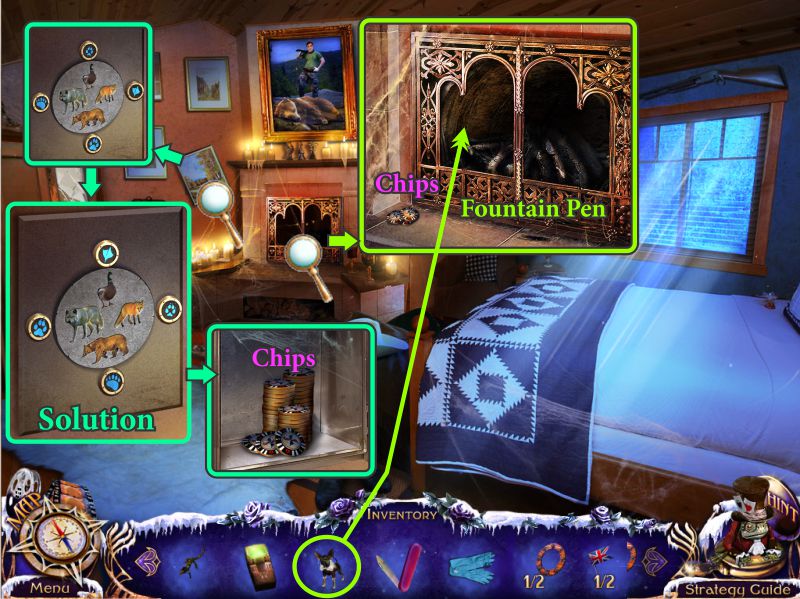
Hunting Cabin
Zoom in on the fireplace, collect the Chips, and send Elf in to retrieve the Fountain Pen.
Examine the crooked picture on the wall to find a safe behind it.
Swap the paw prints to open the safe and find a stash of Chips.
Screenshot
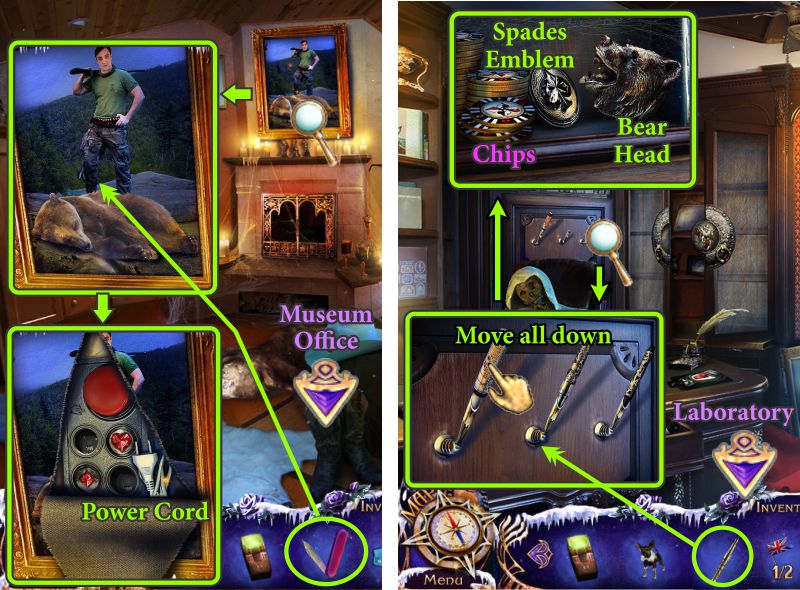
Hunting Cabin and Museum Office
Examine the picture of Karr over the fireplace and use your Pocketknife to remove a portion of it.
Take the Power Cord and go to the Museum Office.
Zoom in on the pens on the wall, place your Fountain Pen, and move all the pens to the down position.
Take the Chips, Spades Emblem, and Bear Head.
Go to the Museum Laboratory.
Screenshot
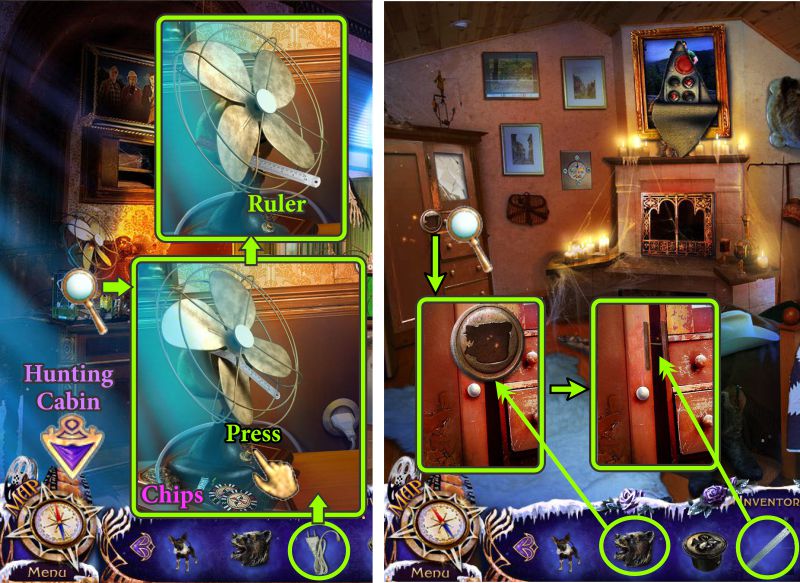
Laboratory and Hunting Cabin
Plug in the fan with the Power Cord, press the on button, and take the Ruler.
Collect the Chips, and go to the Hunting Cabin.
Zoom in on the cabinet, and place the Bear Head.
The cabinet is still latched, so use the ruler to open it.
Screenshot
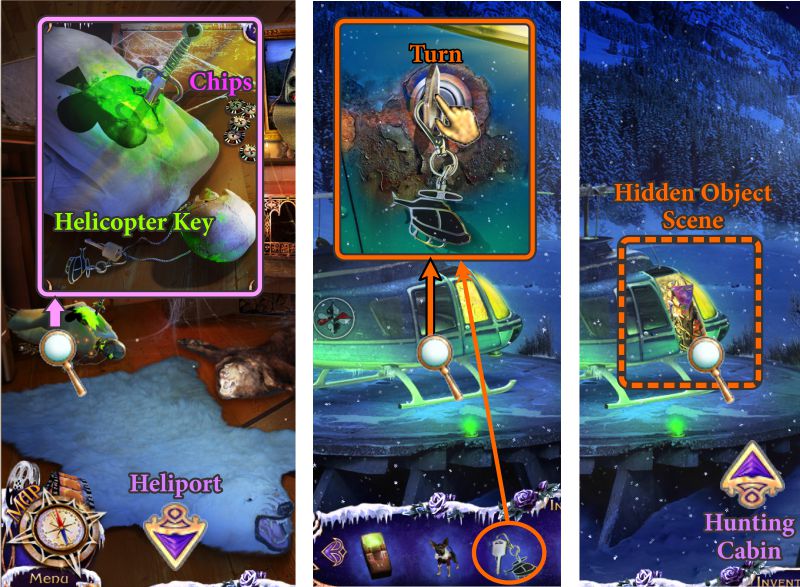
Hunting Cabin and Heliport
The Ace of Clubs falls out of the cabinet, so zoom in on him.
Take the Chips and Helicopter Key.
Go outside to the Heliport, zoom in on the helicopter, place the Helicopter Key, and turn it to reveal a Hidden Object Scene.
Return to the Hunting Cabin.
Screenshot
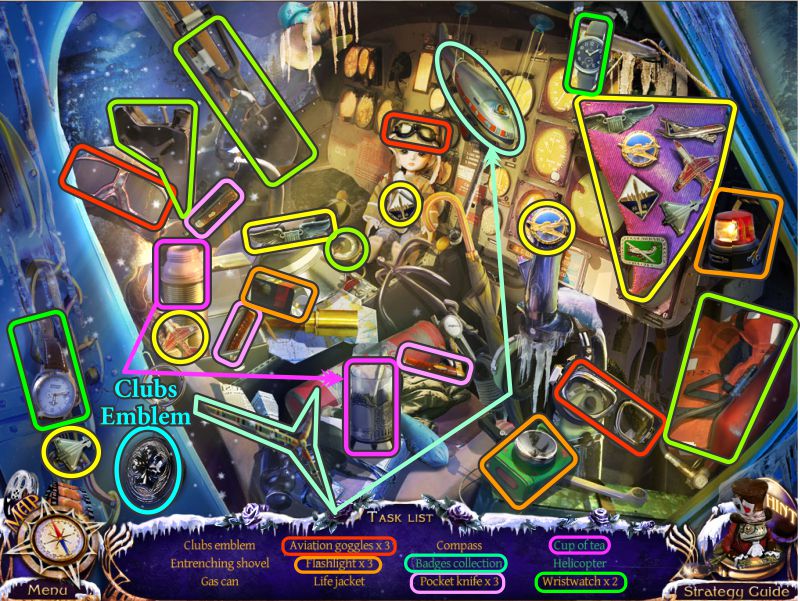
Helicopter
Place the blades on the helicopter body.
Complete the Badges collection market in yellow.
You will receive the Clubs Emblem for your Inventory.
Screenshot
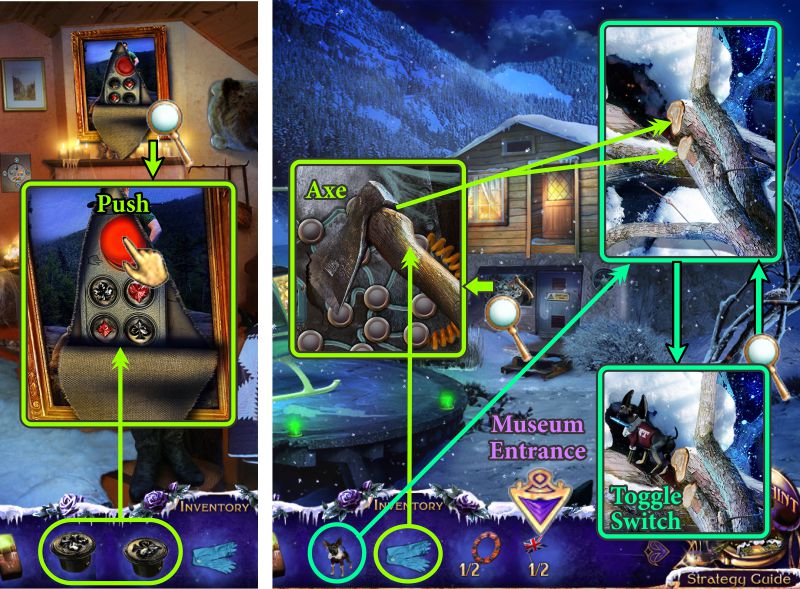
Hunting Cabin and Heliport
Zoom in on Karr's picture, place the Spade and Club Emblems, and push the red button. Somehow you end up outside as the cabin rises to reveal a bunker underneath it.
Zoom in on the door and take the Axe next to it, using your Rubber Gloves.
Examine the tree and cut a couple branches with the Axe.
Send Elf to investigate, and he returns with a Toggle Switch.
Go to the Museum Entrance.
Screenshot
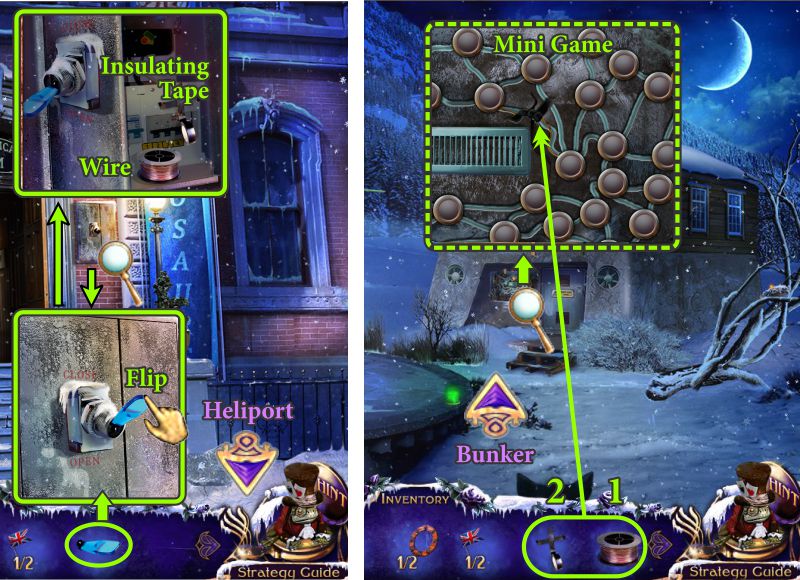
Museum Entrance and Heliport
Zoom in on the compartment next to the door, place the Toggle Switch and flip it.
Take the Wire and Insulating Tape.
Go to the Heliport and zoom in on the Bunker door.
Place the Wire and Insulating Tape to trigger a Mini Game.
Screenshot
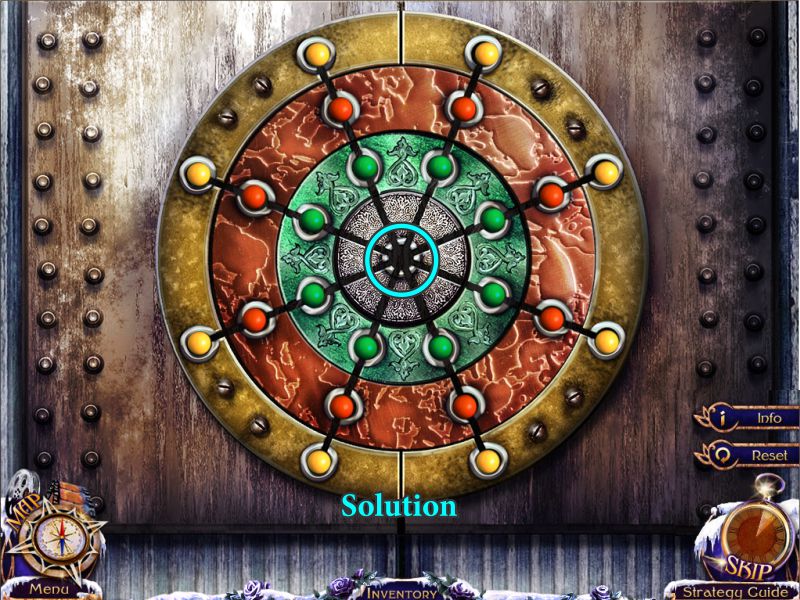
Bunker Door Mini Game
You goal is to light up all the buttons to open the door.
See the screenshot for a solution.
Screenshot
Chapter 9: The Bunker
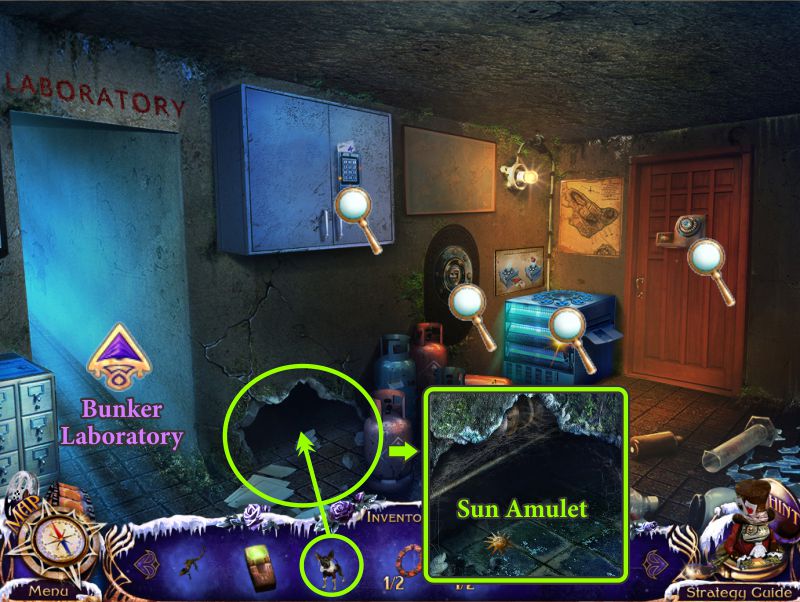
Main Room of Bunker
Examine all the magnifying glasses, and zoom in on the hole.
Send Elf to retrieve the Sun Amulet.
Go left to the Bunker Laboratory.
Screenshot
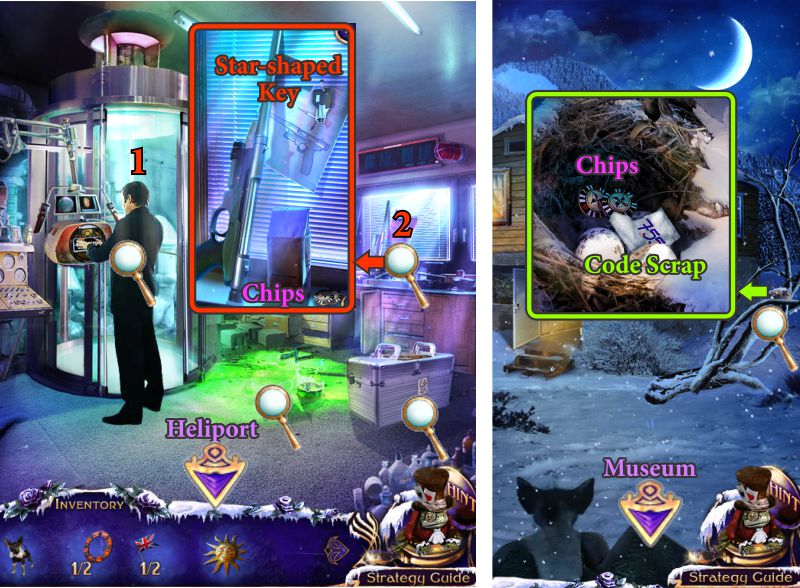
Bunker Laboratory and Heliport
Check out Karr and a cut scene.
Examine the magnifying glasses, and zoom in on the counter.
Take the Chips and Star-shaped Key.
Go outside to the Heliport and zoom in on the bird nest.
Collect the Chips and Code Scrap, and head to the Museum.
Screenshot
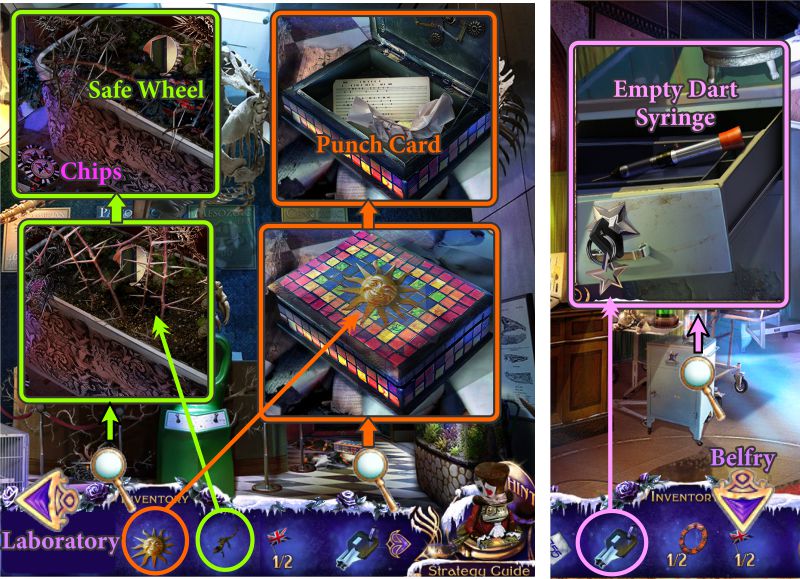
Museum and Museum Laboratory
Examine the thorny plant and have the Fire Salamander burn it.
Take the Chips and Safe Wheel.
Zoom in on the colorful box on the floor, place the Sun Amulet, and take the Punch Card.
Go into the Laboratory, zoom in on the small white cabinet, and place the Star-shaped Key.
Take the Empty Dart Syringe, and go to the Belfry.
Screenshot
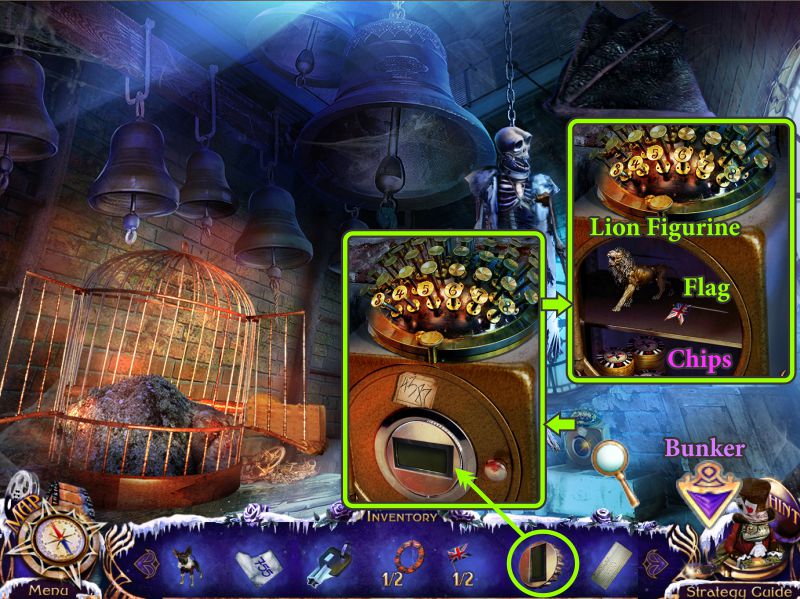
Belfry
Zoom in on the safe and place your Safe Wheel.
Enter the code 4387 on the keys above.
Take the Chips, Flag, and Lion Figurine.
Go to the Bunker.
Screenshot
Bunker
Zoom in on the cabinet, place your Code Scrap, and enter 4755 on the keypad.
Fill your Dart Syringe with the liquid, and go to the Bunker Laboratory.
Zoom in on the Tranquilizer Gun, install the Dart Syringe, and take the Tranquilizer Gun.
Screenshot
Bunker Laboratory
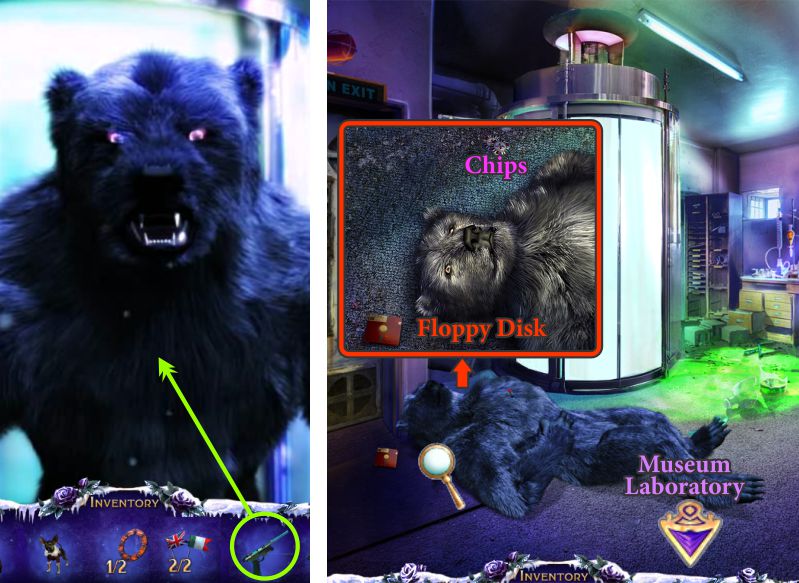
You're just in time because Karr, transformed into a bear, has come out of the transformation device, so shoot him with the Tranquilizer Gun.
He is sleeping peacefully, so zoom in to collect the Floppy Disk and Chips.
Go to the Museum Laboratory.
Screenshot
Museum Laboratory and Bunker Laboratory
Zoom in on the computer and place the Floppy Disk.
Take the Metal Ring and return to the Bunker Laboratory.
Examine the metal chest and place the 2 Metal Rings for a Mini Game.
Once you have opened the chest, play the Hidden Object Scene.
Screenshot
Metal Chest Mini Game
Your goal is to arrange the balls to match the color of the rings.
The balls can be moved along the lines, using the center as a place of transfer as you rotate the rings.
See the screenshot for the solution.
Screenshot
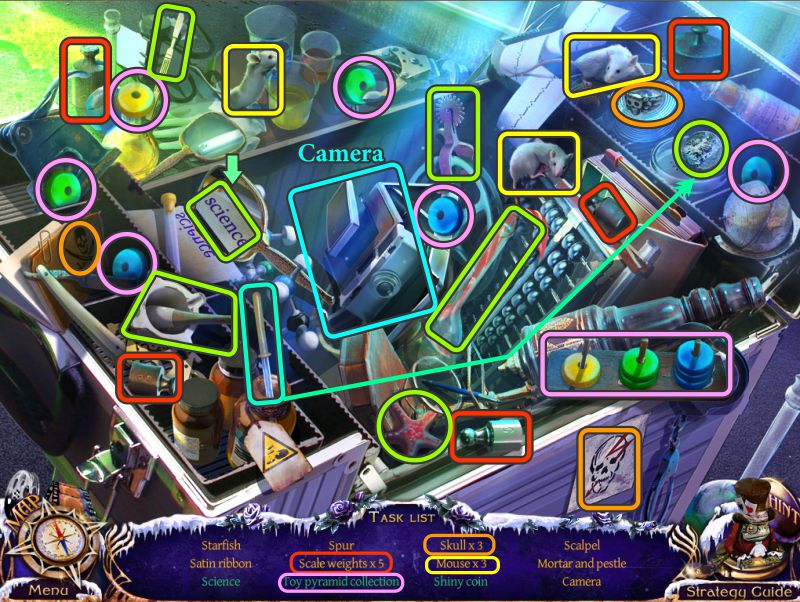
Metal Chest Hidden Object Scene
Use the eyedropper liquid to make the coin shiny.
Assemble the toy pyramid with the rings marked in pink so there are 1, 2, and 3 color-coordinated rings on the holder.
Use the mirror to reflect the word "Science".
The Camera will go into your Inventory.
Screenshot
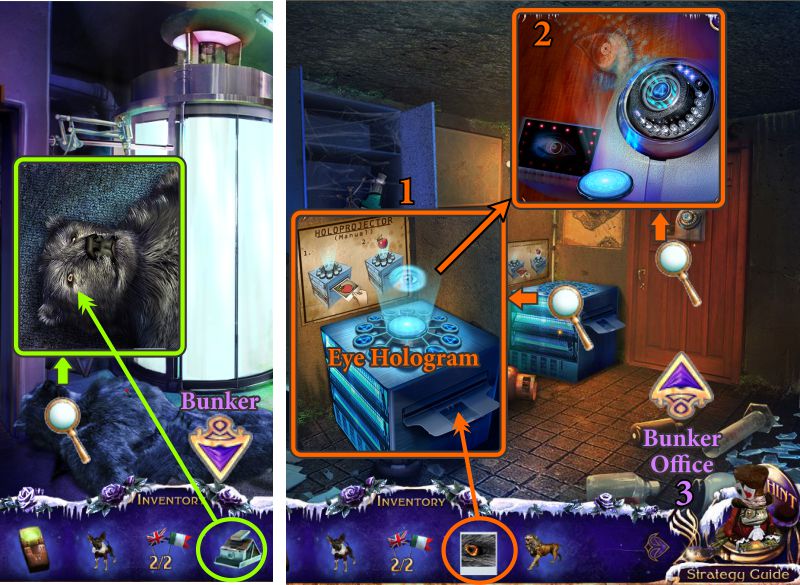
Bunker
Use the Camera to take a picture of Karr's eye, and go to the main part of the Bunker.
Zoom in on the machine, note the instructions, and feed the picture of Karr's eye into the tray.
Take the Eye Hologram and place it on the door for recognition.
Enter the Bunker Office.
Screenshot
Bunker Office
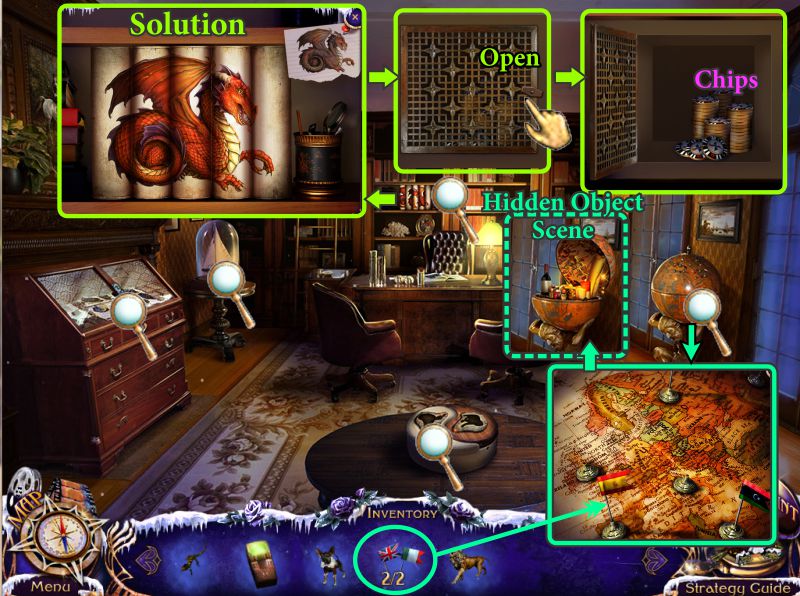
Zoom in on the book shelves and arrange the book bindings according to the diagram.
Open the niche, and take the Chips.
Examine the globe to find 2 flags missing. Place your Flags to trigger a Hidden Object Scene.
Screenshot
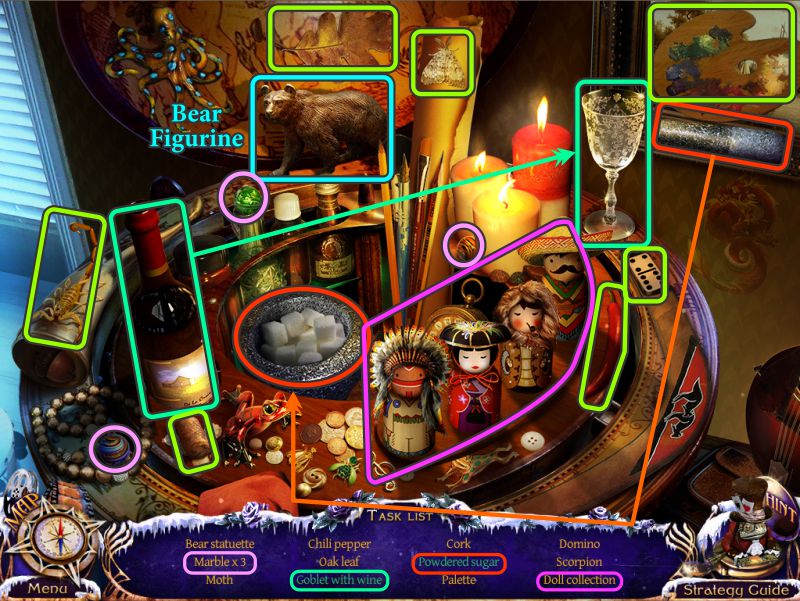
Globe Hidden Object Scene
Pour the wine in the goblet to get a Goblet with Wine.
Take the pestle and use it on the sugar cubes in the mortar to get Powdered Sugar.
Rearrange the heads on the dolls as shown in the screenshot to complete your Doll Collection.
The Bear Figurine will go into your Inventory.
Screenshot
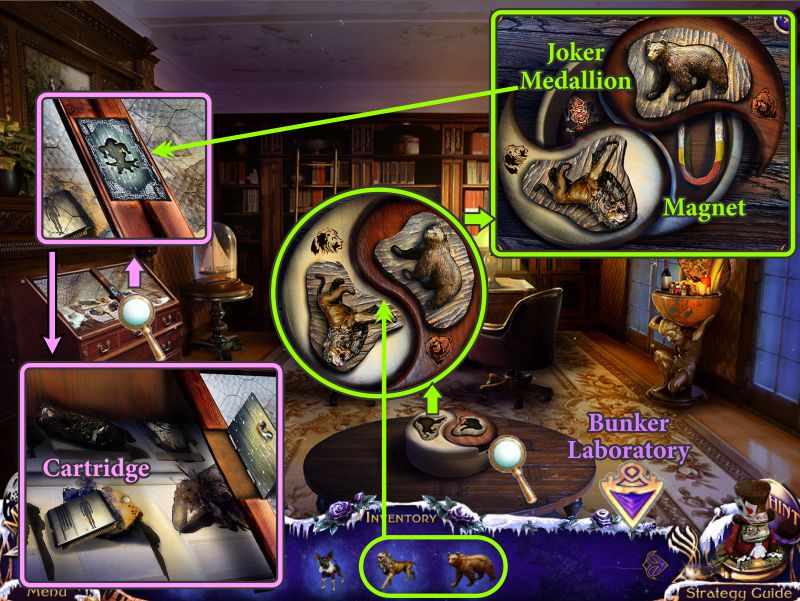
Bunker Office
Zoom in on the table and place your Bear and Lion Figurines.
Take the Magnet and Joker Medallion.
Examine the display case and use the Joker Medallion to open it.
Take the Cartridge, and go to the Bunker Laboratory.
Screenshot
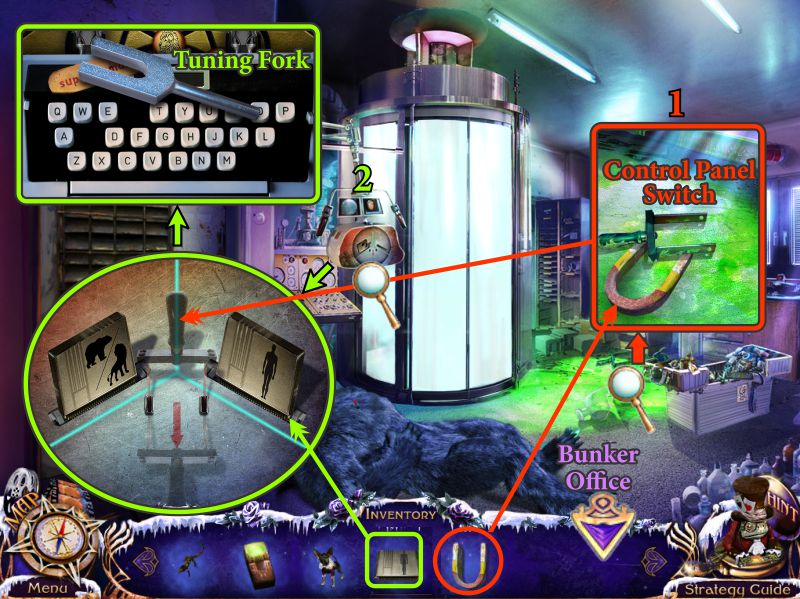
Bunker Laboratory
Zoom in on the green ooze and use the Magnet to get the Control Panel Switch.
Examine the control panel and place the Cartridge and Control Panel Switch.
Take the Tuning Fork. Now you need to find the 2 missing keys, so go to the Bunker Office.
Screenshot
Bunker Office and Bunker
Zoom in on the ship in the glass dome and use the Tuning Fork to break the glass.
Take the Button and go to the main part of the Bunker.
Zoom in on the safe, place the Tuning Fork, and take the Chips and Button.
Go to the Bunker Laboratory.
Screenshot
Bunker Laboratory
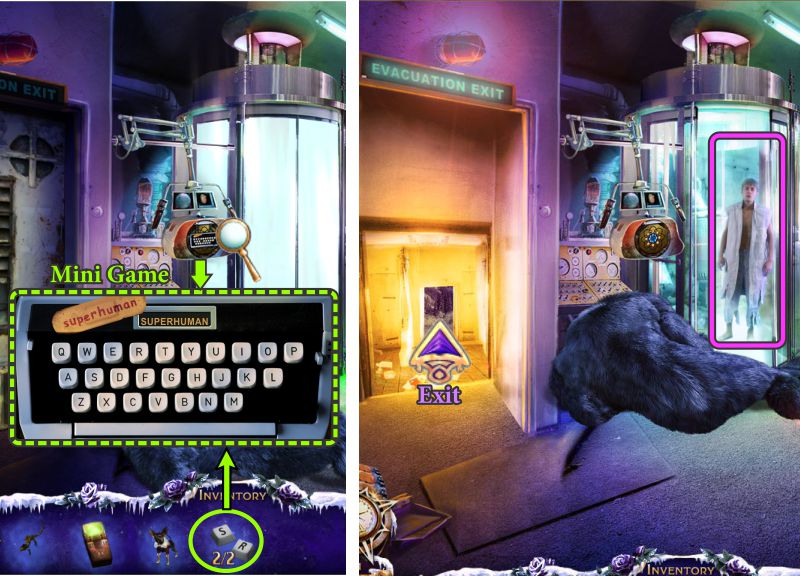
Zoom in on the control panel, place your 2 Buttons, and type in "superhuman" as the password to trigger a Mini Game.
After the Mini Game, James has been restored to human form.
Watch the cut scene and follow James out the Evacuation Exit.
Screenshot
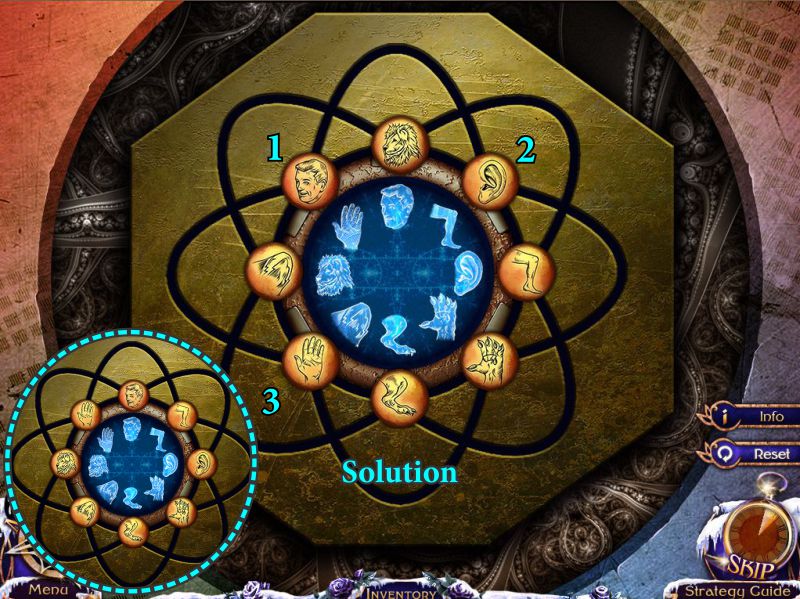
Bunker Laboratory
Your goal is to align the buttons with their matching symbols.
When you move a button, it will travel along the arched path clockwise, but the 2 buttons next to it will move counterclockwise.
See the screenshot for the solution.
Screenshot
Congratulations, you have earned your badge as a Mystery Tracker Detective by solving the mystery of the Four Aces.
Watch the final cut scene.
Posted by: Jazz |
October 15, 2012 6:52 PM
|
October 15, 2012 6:52 PM