
Love Chronicles:
The Sword and the Rose
Platform: Mac, Windows
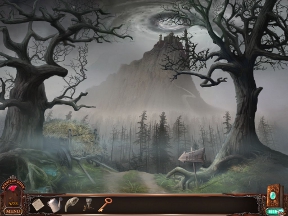
![]() Love Chronicles: The Sword and the Rose, a new casual adventure game from Vendel Games, creator of the Magic Encyclopedia series, flings you into a gloomy world of alchemy, spells, sleeping trees, frozen puddles and glowing rose petals. As a prince who is on his way home from an adventure, you encounter a strange island filled with mystery. And ice. Lots and lots of ice. Your boat becomes trapped on the shore, so you set foot to sand and investigate the island's strange sights.
Love Chronicles: The Sword and the Rose, a new casual adventure game from Vendel Games, creator of the Magic Encyclopedia series, flings you into a gloomy world of alchemy, spells, sleeping trees, frozen puddles and glowing rose petals. As a prince who is on his way home from an adventure, you encounter a strange island filled with mystery. And ice. Lots and lots of ice. Your boat becomes trapped on the shore, so you set foot to sand and investigate the island's strange sights.
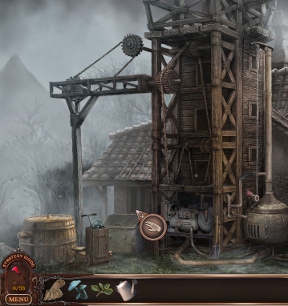
 Love Chronicles plays very organically, allowing you the freedom to roam around, explore, gather items and solve puzzles that aren't slammed in your face. The game is focused more on inventory items than hidden object scenes and mini-games, though there are plenty of the latter to be found. You begin wandering through the woods, watching your cursor as it highlights different parts of the screen you can interact with. It seems like everything is a puzzle waiting to be solved, but you need to do some more walking before you can start solving the riddles at hand!
Story plays a big part in Love Chronicles, and it's told through a series of short cutscenes at key points during the gameplay. The style in which the plot unfolds is very much like a fantasy movie, with poignant facts dropping in your lap when you least expect them.
An interesting inclusion in Love Chronicles' gameplay is the red rose by your inventory. Your overall goal is to reclaim the enchanted petals so you can return the rose to its owner and break the curse of the witch. The petals are frozen in ice, however, and you must thaw them out before you can collect them. Click the rose, then click the ice and you'll melt just about anything frozen that's on the screen. It's a bit of immersion that makes you feel strangely powerful as well as giving you an effective role in this strange world.
 Analysis: Love Chronicles inflates the sense of mystery by refusing to hide puzzles from your view, preferring instead to sit everything in plain sight while you fumble to solve the riddles at hand. This is a bit overwhelming at first, as you'll come across half a dozen pieces of scenery that need your attention and you'll be powerless to investigate further, but the more you play the more you discover, and when that magical inventory item comes along that solves an earlier puzzle, you'll recognize it immediately!
Even though the game seems open, Love Chronicles is just as linear as any other hidden object hybrid. You must have certain items to gain access to certain areas that will give up other items you'll need to progress. So, naturally, things play out exactly as the developer planned them to. But because you can hop back and forth, moving around a dozen or more screens at once, you feel like the world keeps growing larger and more intricate, even though the game never gets too complicated for you to handle. It's a careful illusion, but it was pulled off quite well.
The only real down side to Love Chronicles is its habit of holding your hand, then letting go at the strangest times. The hint system works well, until it fails you when you need it most. If you miss an item, something random you just neglected to pick up, but can somehow continue, the game often fails to recognize this, leaving you backtracking as far as possible, scouring the landscape for signs of a missed object. You're never stuck for more than a few minutes, of course, but since you begin to rely on the game telling you what's needed next, you're suddenly left out in the cold when it just... doesn't.
Love Chronicles: The Sword and the Rose is a great-looking, magic-filled casual adventure game with great puzzles and an imaginative setting. It isn't as filled with doom and gloom as most hidden object hybrids tend to be, it's more of a fairy tale adventure on the darker side of things. Good length, satisfying inventory riddles, and plenty of bonuses to keep you coming back for more!
A Collector's Edition is also available. It contains a strategy guide, concept art, wallpapers, and bonus gameplay content. Remember that Big Fish Game Club Members pay only $13.99 for Collector's Editions (or 2 club credits), and collector's editions count 3 card punches of 6 total needed for a free game.
![]() Windows:
Windows:
Download the demo
Get the full version
Also available: Collector's Edition
![]() Mac OS X:
Mac OS X:
Download the demo
Get the full version
Also available: Collector's Edition


Walkthrough Guide
(Please allow page to fully load for spoiler tags to be functional.)
Love Chronicles: The Sword and the Rose - Walkthrough
General
There is no time limit.
You may choose "Normal"- and "Expert" - mode. The difference are in the recharging time of the hint and skip buttons, and if areas of interest are shown with sparkles.
During the game you will have to find the 33 rose petals, as there is no way to end the game without them.
The rose petals are shown in the low left corner of your screen. They do have a job to fulfill as well: Use them to melt ice.
The petals will go into their box automatically (except the first one); you do not have to pick them up.
Your mouse curser will change at different places.
A hand indicates that you can pick up things.
An eye informs you to click and get further information, or to open or activate something.
A gear shows that inventory objects are needed for any kind of interaction.
An arrow shows the direction you can go to.
In the early stage of the game you will find an assembling device. This device will pop up automatically whenever you have collected all parts of an object that needs to be reassembled.
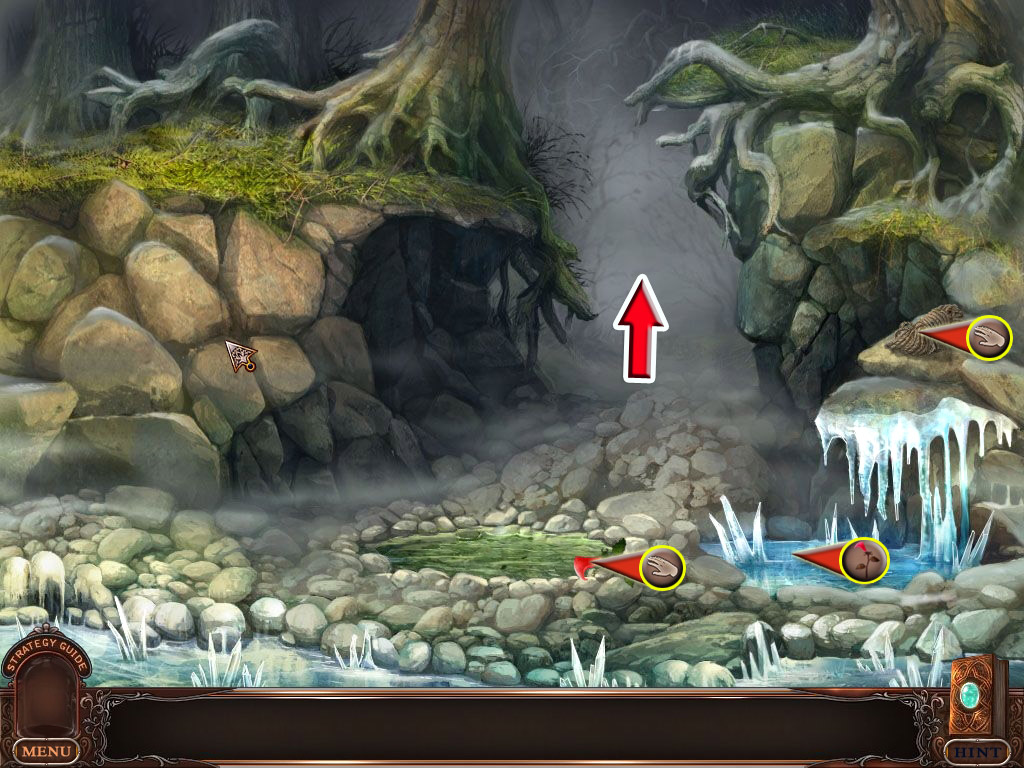
The screenshots also use symbols to help you:
A hand: Item to take.
An eye: Click for further information, open or activate some.
Red arrow: Direction to go to.
Rose petal: Melt ice.
Search Scene Button: Click to access search scene.
Zoom in button: Click to get a closer view.
Inventory Objects in white square: use this object here.
Inventory List
This list tells you the scene number for where the item can be found, and where it can be used. Scenes are numbered above each spoiler tag in this walkthrough.
Bark 12/12
Bark Beetle 12/12
Book (1/2) - 23/28
Book (2/2) - 27/28
Book (of 13 Invocations) - 28/29
Box Knob - 20/21
Branch 12/12
Branch, burning 12/12
Bucket - 1/2
Card (1/15) - 25/27
Card (2-13/15) 27/27
Card (14/15) - 27/27
Card 15/25) - 27/27
Chalk - 15/16
Chemistry Set - 23/26
Chess Figures (2) - 23/23
Chess Pieces - 23/24
Chips 14/14
Claw - 3/6
Clock Hand (2) - 23/23
Cloth - 15/16
Corkscrew's Root - 2/6
Crank - 2/3
Crescent Moon - 36/37
Crowbar - 10/10
Cup - 20/29
Door Ring - 34/35
Drill - 16/16
Element Stones - 37/38
Elevator Parts - 4/5
Embroidery - 36/36
Faucet - 15/16/
Fast growing Flowers - 8/8
Fertilizer - 26/26
Film - 33/33
Film Developer - 33/33
Fire Extinguisher - 19/20
Flint - 12/12
Flask with lightning - 4/6
Flower (from Fire Tree) - 26/29
Fly - 1/1
Garden Shears - 1/1 - 12/12, 14
Gem (green, for Chess Room) - 21/21
Gem (purple, for Music Room) - 23/24
Gem (orange, for Theater Room) - 25/27
Glove (without and with glass shard) - 20/20
Ground Triller - 8/8
Glowing Mushroom for tree potion - 1/6
Glowing Mushroom for light in cave - 7/8
Green Bitter Petal - 1/6
Grinder - 5/6
Hair Pin - 30/30
Hammer - 36/
Handle - 32/33
Ink Blot Sheet - 32/33
Iron Rings 10/10
Key (for basement drawer) - 4/4
Key (for Castle Hall (over Balcony)) - 16/17
Key (for Armory Room) - 30/31
Key (for Bedroom) - 35/36
Key with Ribbon - 36/36
Knife - 15/15
Ladder - 16/17
Lettered Chips - 32/34
Lever - 12/13
Lion Coin - 31/34
Magnet - 30/30
Matches - 15/16,
Meteorite - 4/6
Mirror - 27/28
Music Sheet - 23/25
Notes - 25/25
Old Tree Bark - 14/29
Pangoline's Eye - 4/6
Phonograph - 25/28
Pick Axe - 16/16
Piece of a Picture - 20/21
Pitch Fork - 8/8
Planks 1, 2, 3, 4/5 - 9/11
Plank 5/5 - 10/11
Potion (for tree) - 6/7
Red Eye - 30/30
Ring - 34/34
Rope - 1/3
Rope - 30/34
Rose Key - 20/20
Royal Coin - 31/32
Shovel 15/15
Skull Key - 18/19
Sphere - 34/34
Spring - 4/4
Star, eight pointed - 14/29
Staff - 23/29
Star Key - 10/10
Star Map Slide - 4/6
Stars - 30/36
Stone - (for Courtyard Fountain) 14/14
Stones - 8/8
Stone Symbol - 8/8
Sun Medallion - 36/38
Swab - 18/29
Sword (Corporal) - 38/38
Sword (Spirit) - 10/38
Sword (Toy) - 27/27
Symbol Keys - 10/10
Thread - 36/36
Tile - 20/20
Tiles (2) - 23/23
Tongs - 19/22
Treble Clef - 25/25
Twig - 12/12
Venus Fly Trap Flower - 1/1
Watering Can (empty) - 3/6
Watering Can (filled) - 7/8
Wire Cutter - 4/5
Chapter 1
1. First Steps - Remove the Thorns
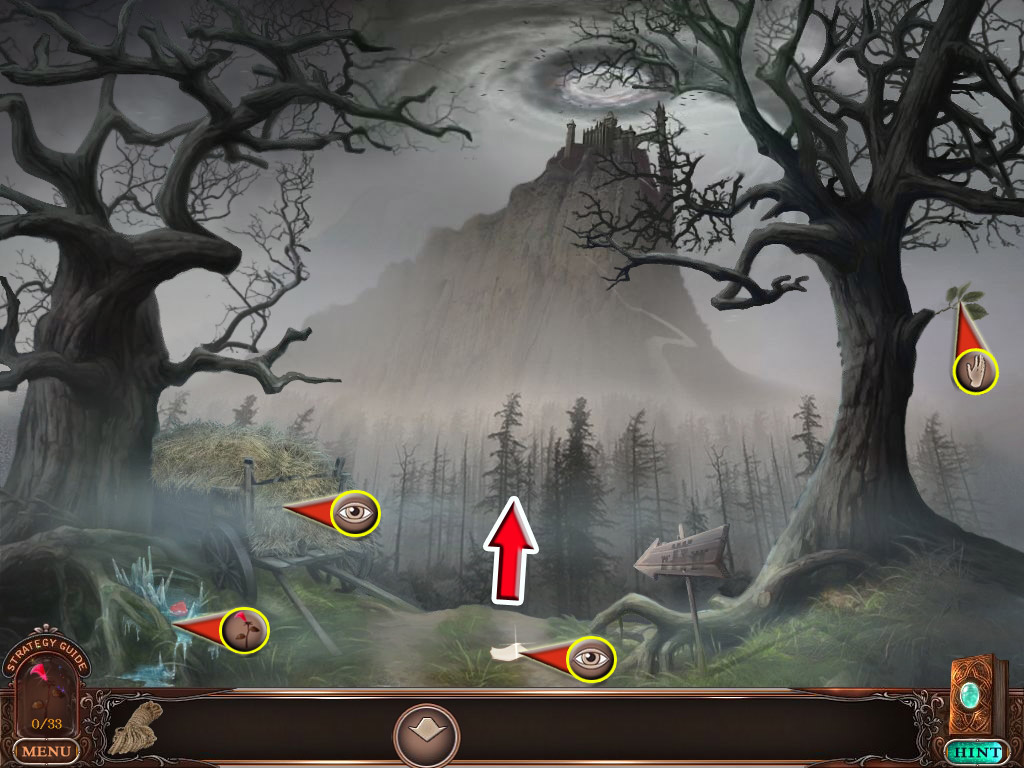
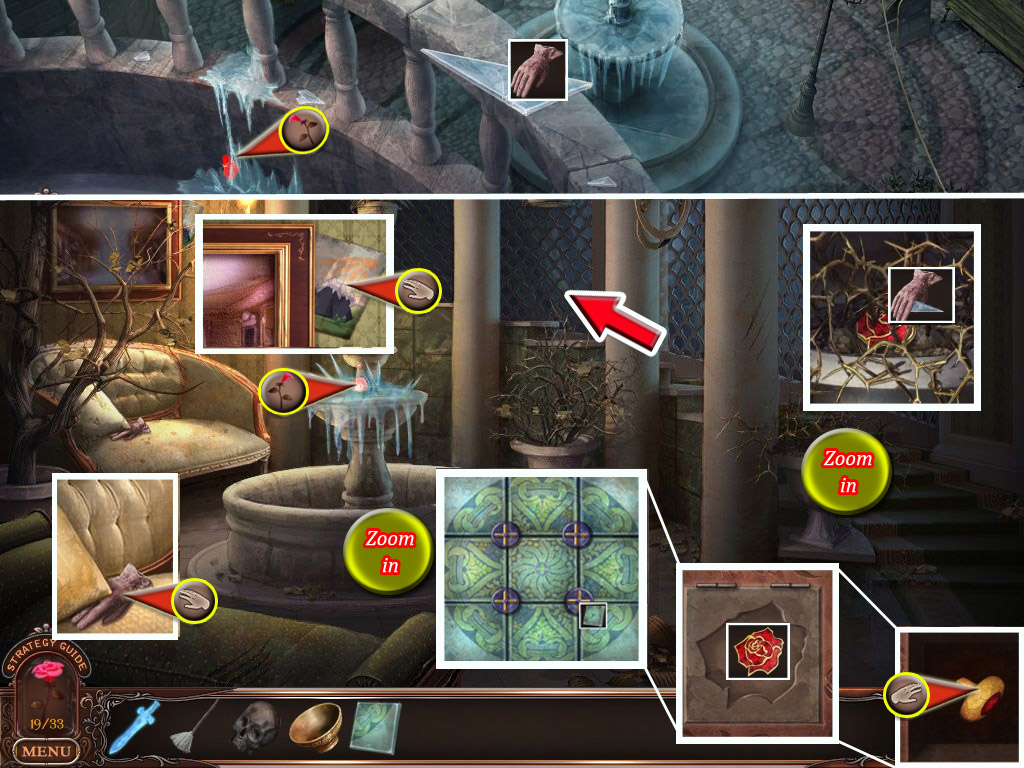
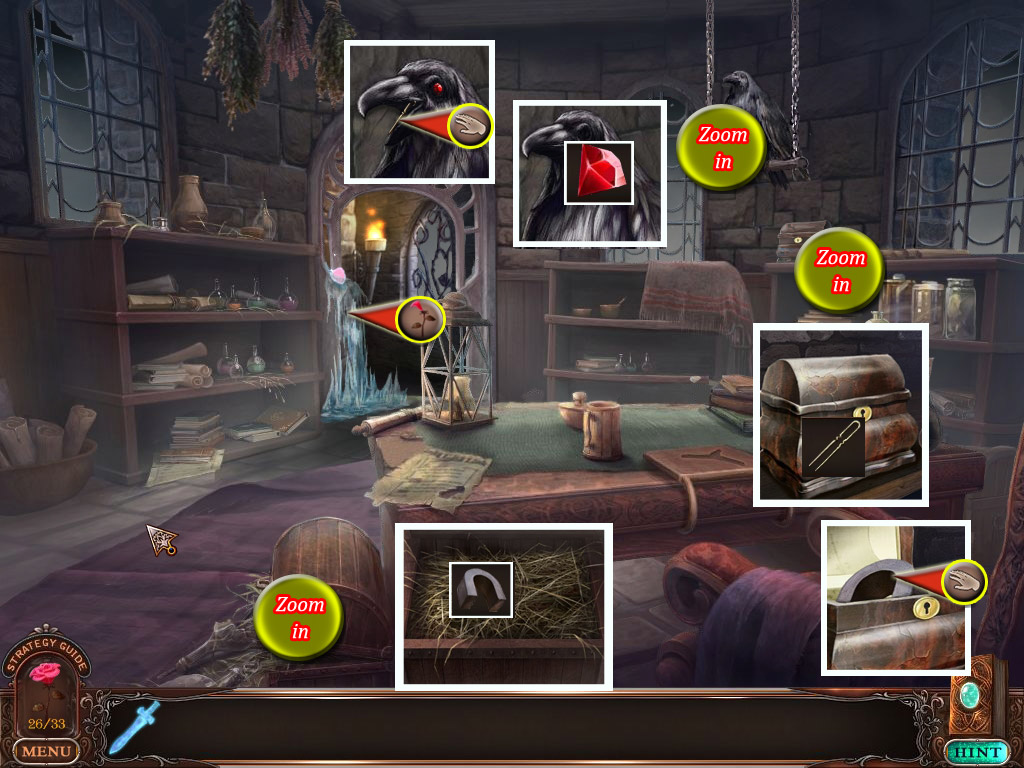
Pick up the rose, and use it to melt the ice on the low right side to obtain the other rose petal (1/33).
Take the rope on the right side and go forward.
Screenshot
Click the ghost and read the note she left behind.
Click the hay wagon to learn that something is hidden inside the hay.
Take the green bitter petals from the tree on the top right side.
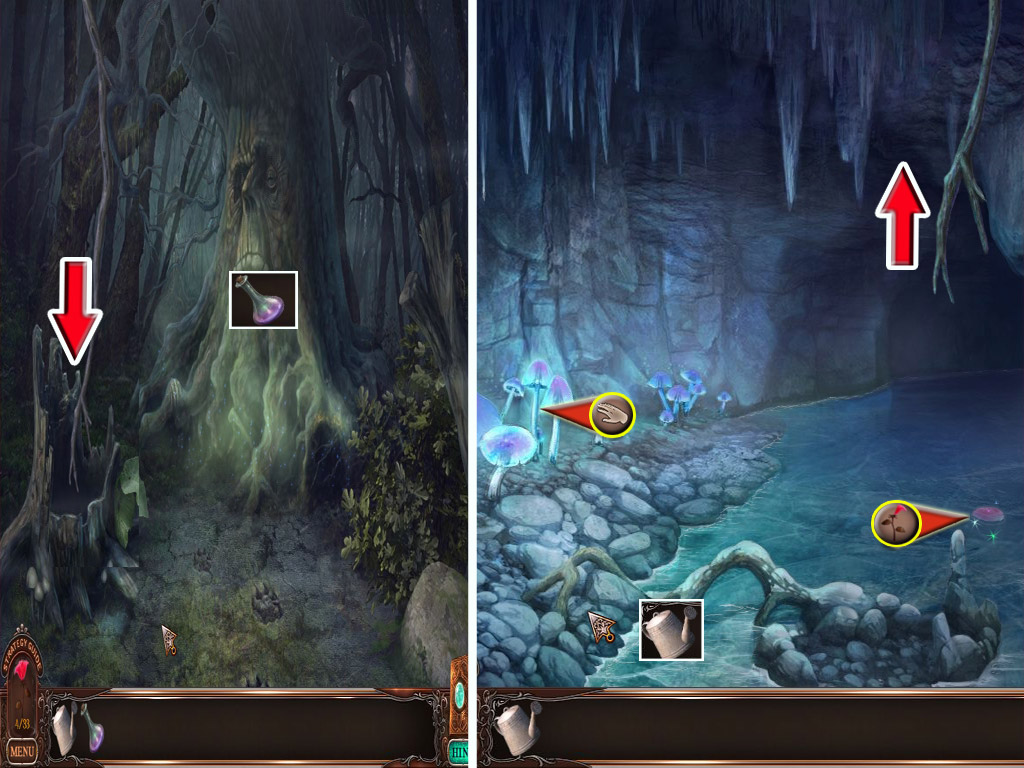
Melt the ice on the low left side to obtain a rose petal (2/33).
Screenshot
Go forwards twice.
Collect the venus fly trap flower and the glowing mushrooms on the low left side.
Go back once.
Use the venus fly trap flower at the skull on the rock, right side.
A fly will go into your inventory.
Go back to the tree.
Place the fly in the spider net to make the spider vanish and click to remove the web.
Take the garden shear that is now free to grab.
Return to the crossing.
Melt the ice on the low right side to obtain the a rose petal (3/33).
Take the bucket and use the garden shears at the left side to remove the thorns (click 3x).
Screenshot
Go left.
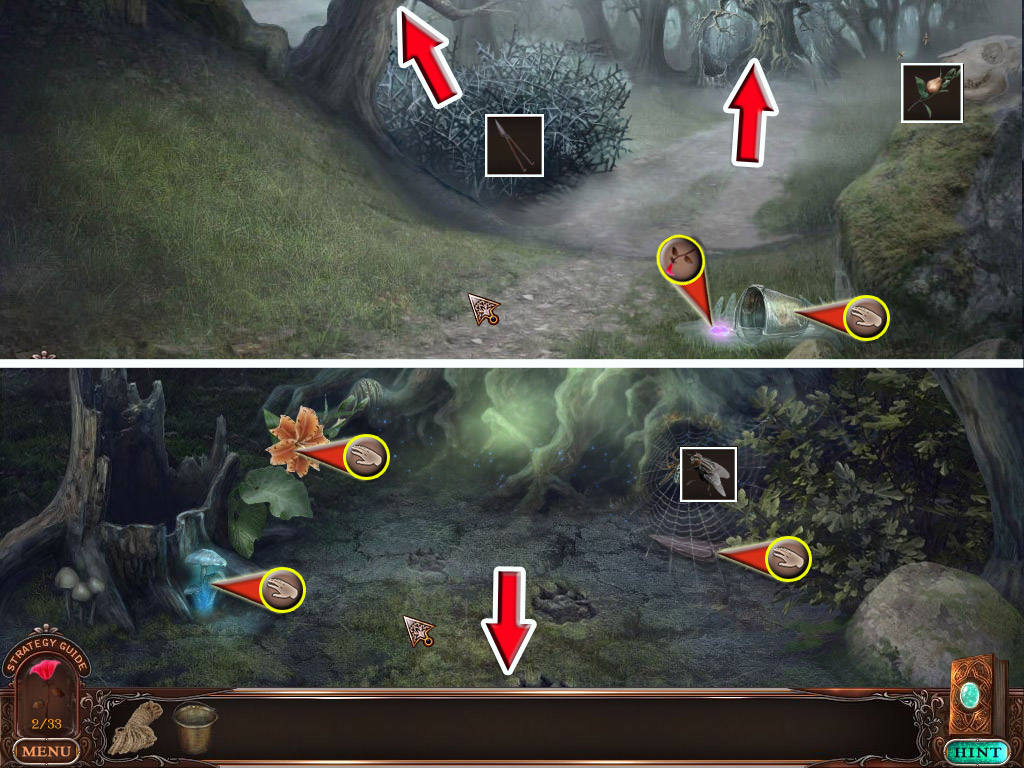
2. Way to the Mill/Backside of the Mill
Zoom in on the board on the left and read the notes.
Melt the ice on the low right side to obtain a rose petal (4/33).
Zoom in on the the lower part of the tree where you just melted the ice and take the corkscrew's root.
Screenshot
Go forward and then to the left.
Grab the shovel from the ground on the right side of the wooden tower.
Click the oven on the right to open its door.
Click the metal box on the far left to open it and take the crank.
Place the bucket (Spoiler 1) next to the metal box and the shovel into the coal in the box; the shovel will go back into the inventory.
The bucket will be filled with coal, take it.
Place the bucket with coal next to the oven on the right and use the shovel on it.
The oven will be filled with coal; click the red lever above.
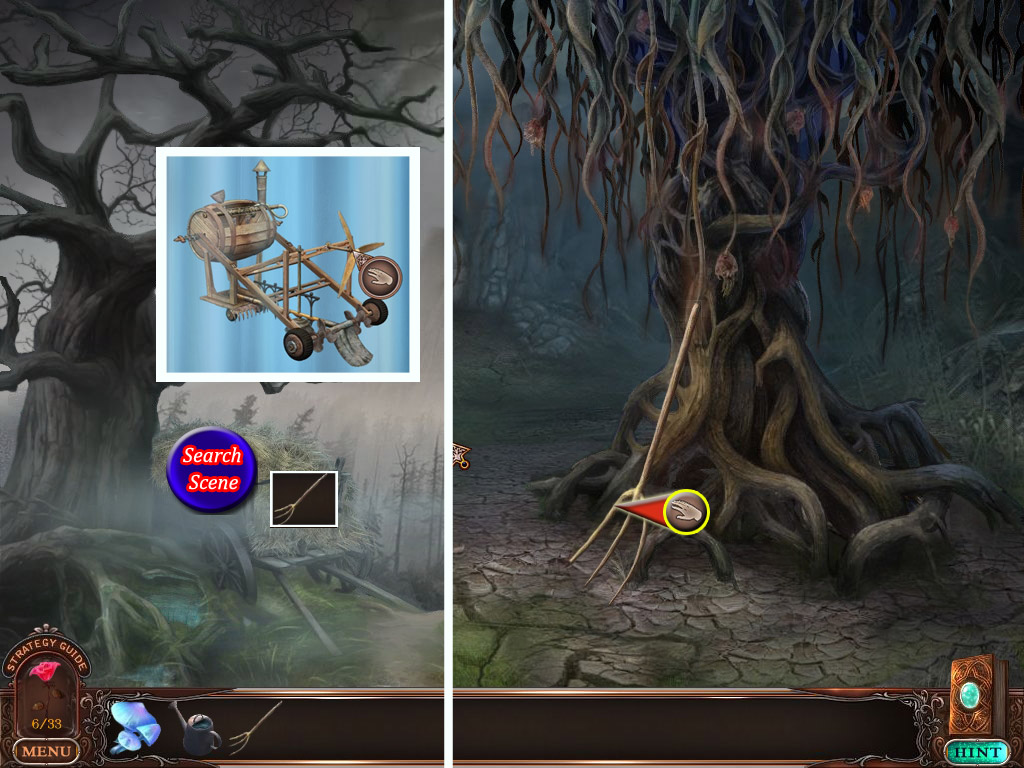
Zoom in on the generator on the left, next to the oven, to learn that you need instructions.
Take the device in front of the barrel on the low left side. Whenever you will have to assemble things, this device will pop up automatically.
Screenshot
Use the arrow at the bottom to head to the front side of the mill.
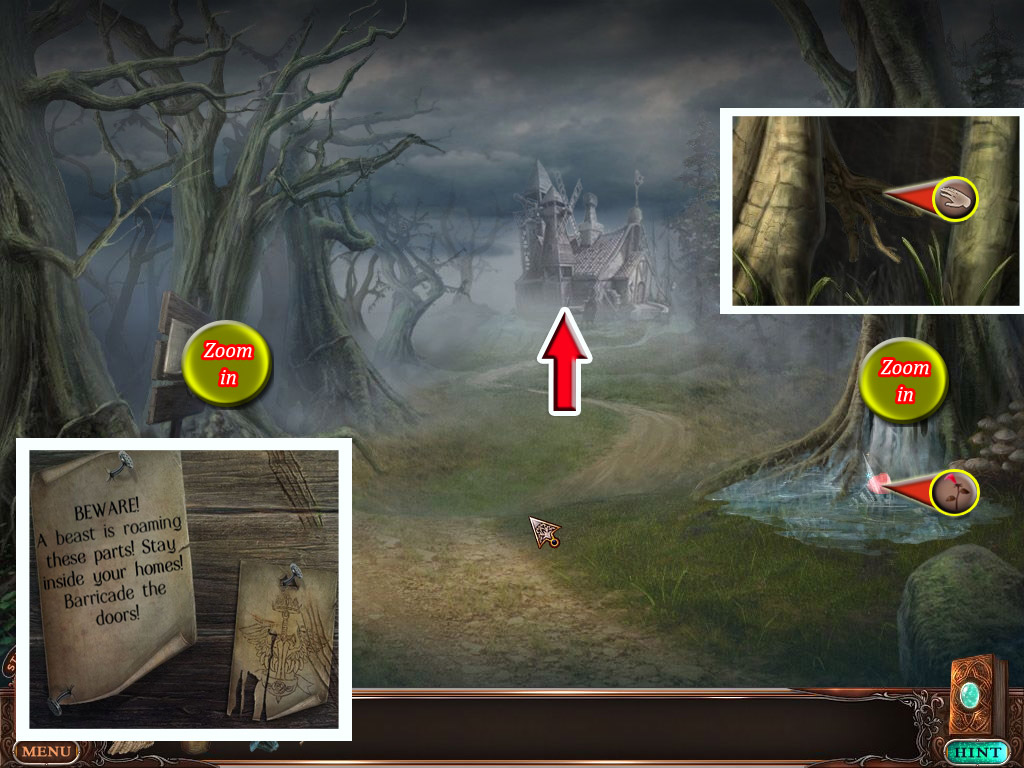
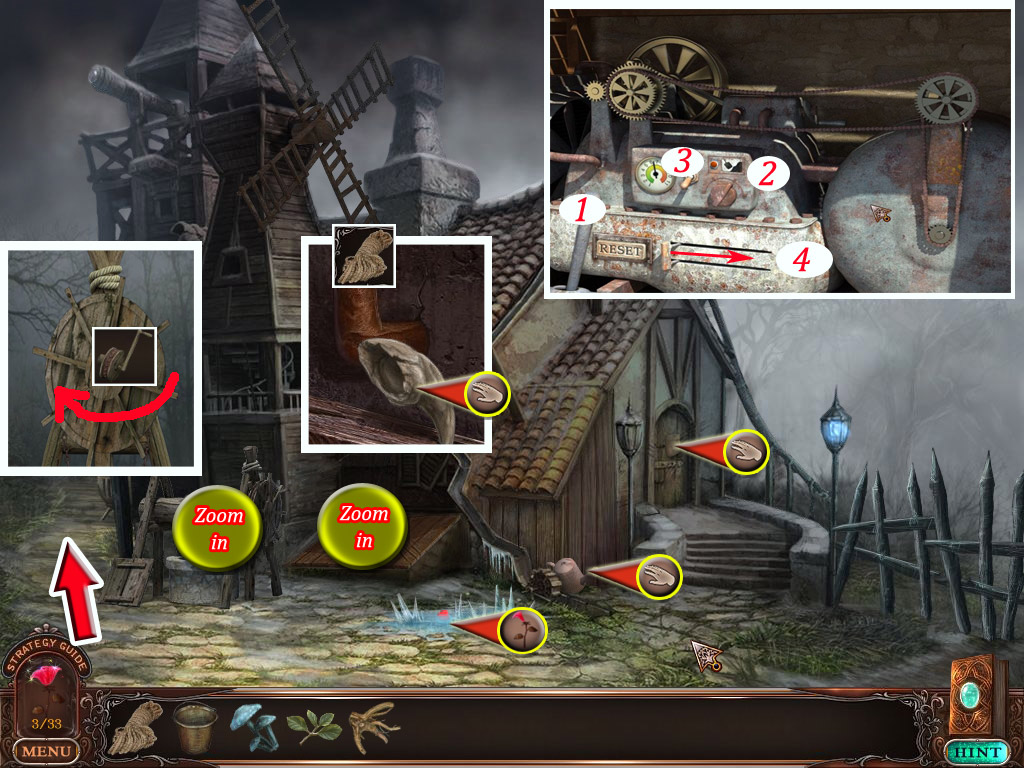
3. Front side of the Mill/Start the Generator
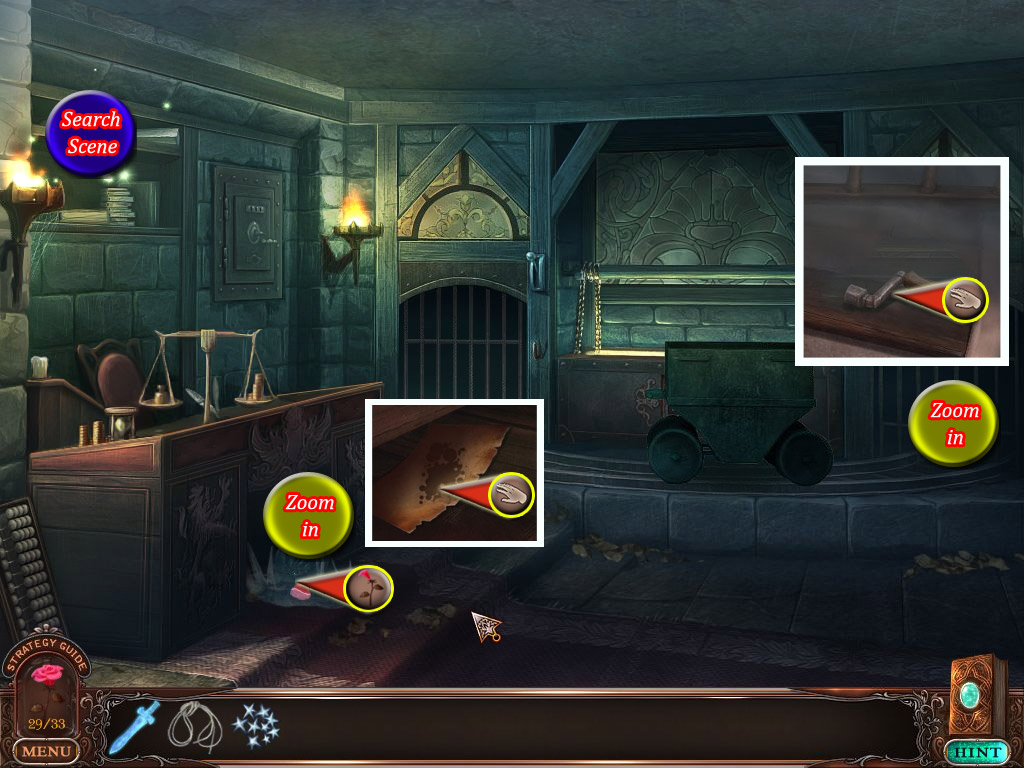
Take the note on the door and read it.
Take the empty watering can on the right, next to the basement entrance.
Zoom in on the basement entrance behind the well and take the claw.
Place the rope at the hook and exit the close up.
Zoom in on the well and place the crank (Spoiler 2).
Click, hold and turn the crank counter clockwise to open the basement door.
Enter the basement and grab the instructions on the left wall; it will go into your journal.
Return to the backside of the mill and zoom in on the generator.
Follow the instructions to make it start by clicking the long lever in the lower left, turning the dial on the second line, using the switch next to it on the left, and pulling the lever below to the right.
Screenshot
If you can't do any because it says the generator is not working, exit the close up and press the red lever above the oven.
The generator is running now and there is light in the house; return to the basement.
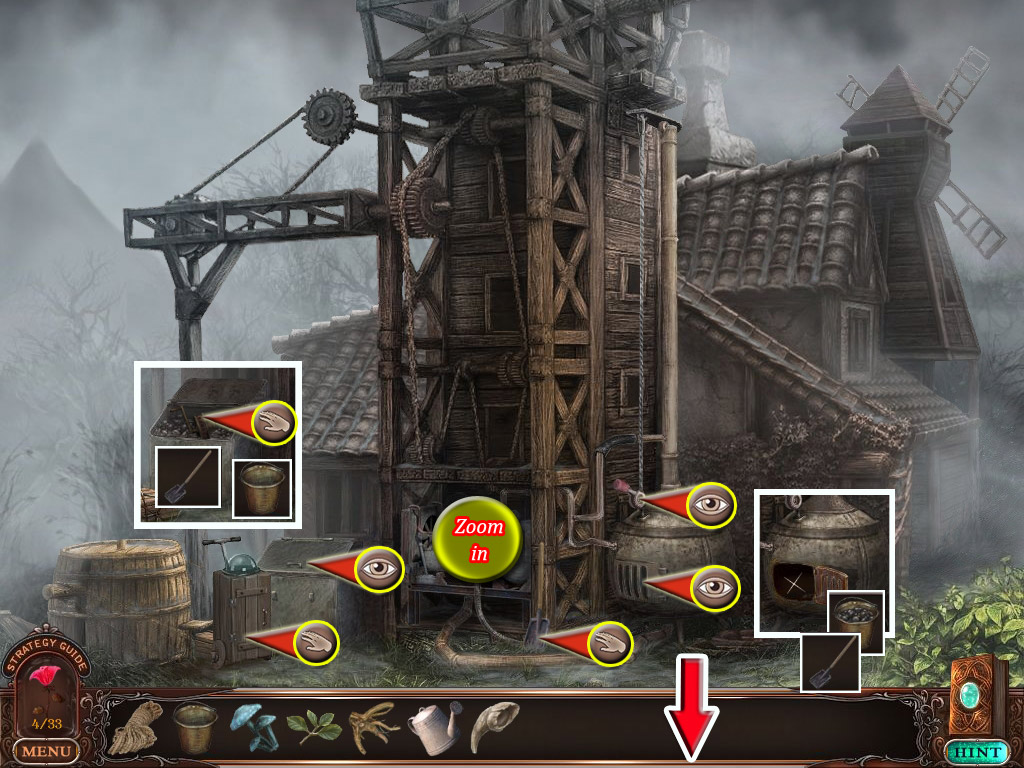
4. Basement/Lab
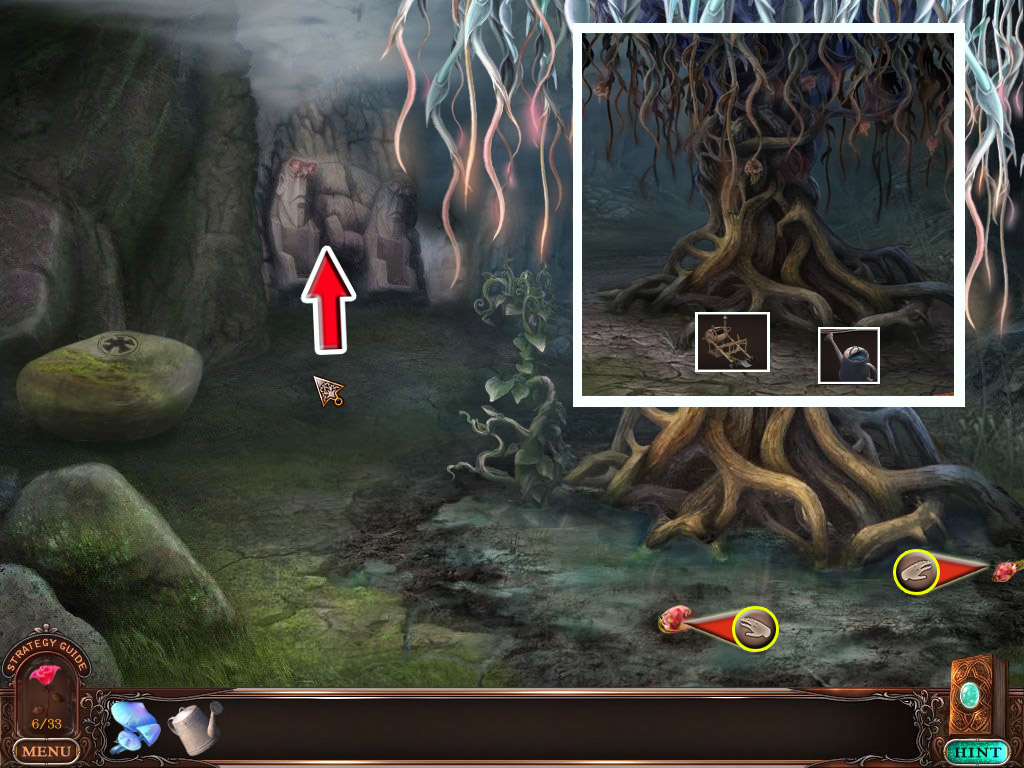
Zoom in on the upper shelf and take the meteorite.
The drawer below is locked and you need a key, so use the stairs to enter the lab.
Take the star map slide above the window on the far right.
Zoom in on the shelf above the counter on the left and take Pangoline's eye and the spring.
Zoom in on the the shelf in back next to the window and place the spring at the glass tube.
A flask with lightning will go into your inventory.
Zoom in on the top of the cabinet and grab the ingredient list from the wall; it will go into your journal.
Take the wire cutter which was hidden behind the paper.
Click the lever on the right, next to the elevator; the panel above will open and key falls out.
Take the key.
Screenshot
Go back to the Basement, zoom in on the drawer on the far left and use the key to open it.
Play the search scene to obtain elevator parts.
Exit the house and go to the left.
5. Behind Mill/Elevator
Zoom in on the suitcase on the far left, next to the barrel, and use the wire cutter to open it.
Play the search scene to obtain various parts of a grinder.
After finishing the scene, you will use your assembling device.
Drag and drop the parts to reassemble the grinder; use the picture on the left as example.
Return to the lab and click the elevator parts (Spoiler 4) at the elevator panel to activate a mini game.
Restore the fuses and the gears to their proper slots.
The gears have to move.
While fuses in the right spot can't be moved, the gears will only lock into place when all are in correct order.
Screenshot
Click to enter the elevator; you will be brought up to the observatory.
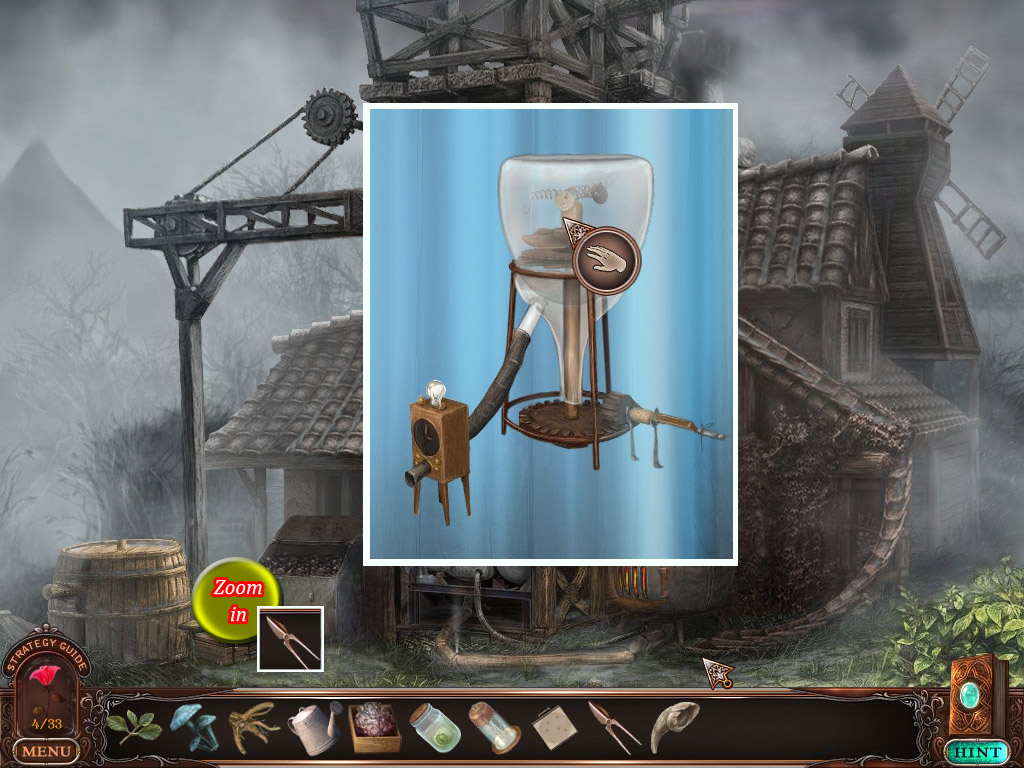
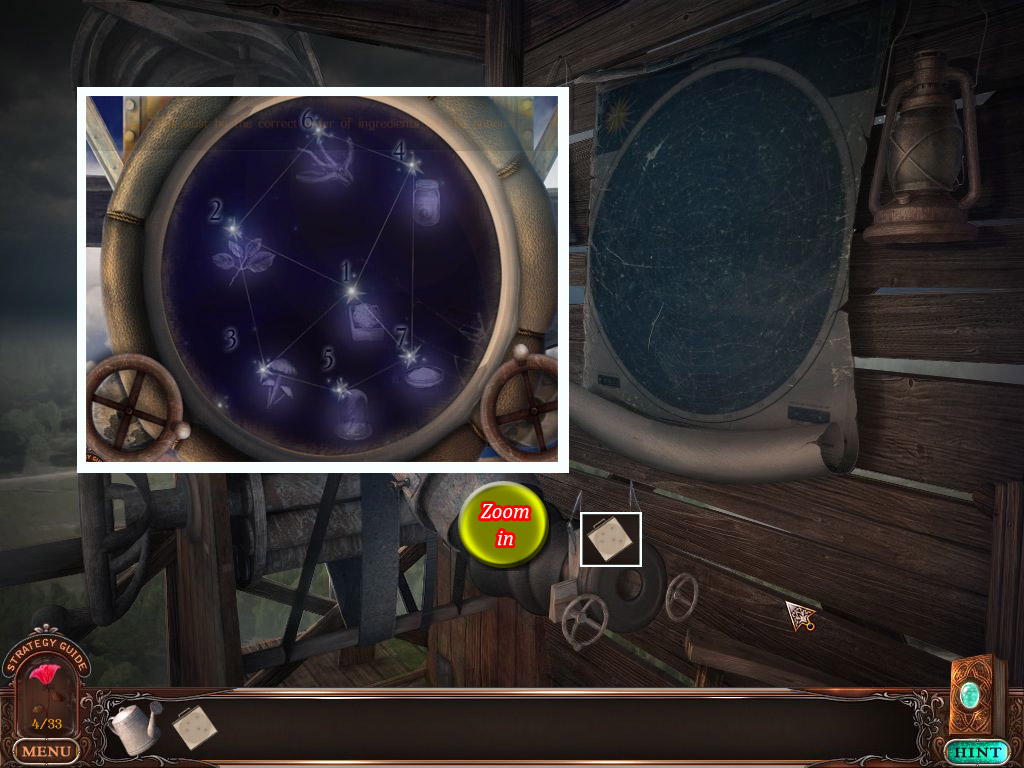
6. Observatory/Lab
Place the star map slide into the eye piece and zoom in to start a mini game.
Your goal is to align the ingredient on the slide with the stars.
There are two wheels at the bottom.
Turning the right one will make the slide move up and down.
Turning the left one will make the slide move right and left.
When the pattern of ingredients and stars make a map, numbers will appear on the recipe. Click to take it into your inventory.
To find the right constellation, turn the wheels to the bottom right and do some fine tuning.
Screenshot
Return to the lab.
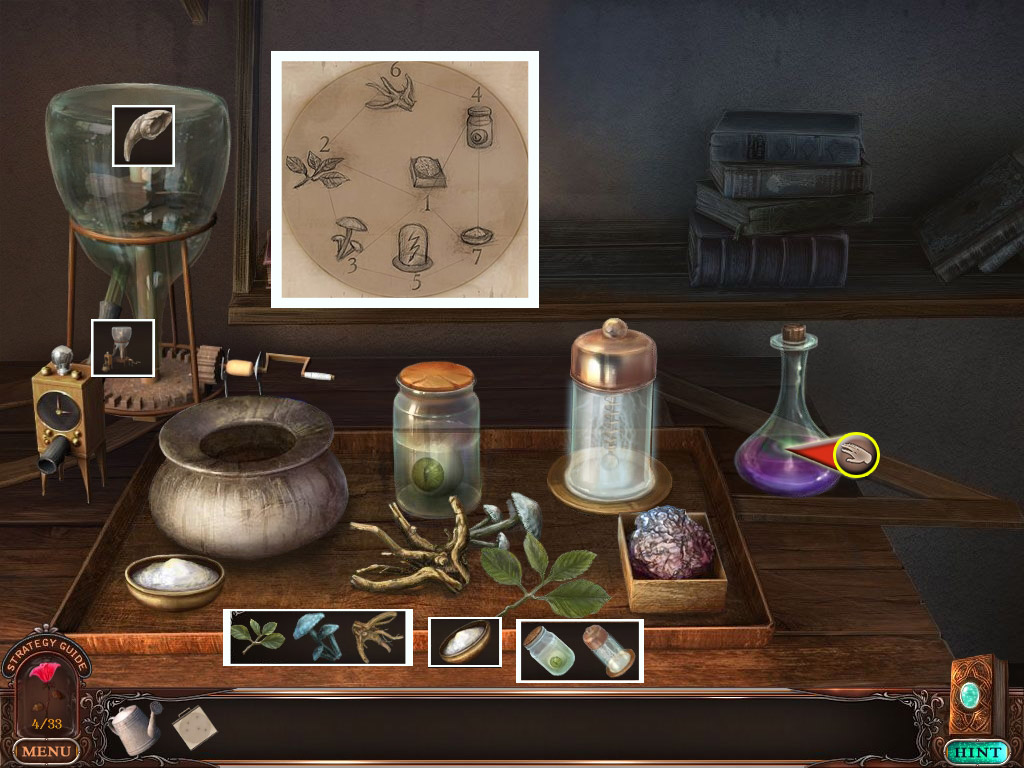
Zoom in on the counter on the left.
Place the grinder on the table.
Put the claw (Spoiler 3) into the grinder; claw dust will go into your inventory.
Now place green bitter petals, glowing mushrooms (both Spoiler 1), corkscrew's root (Spoiler 2), meteorite, Pangoline's eye, the flask with lightning (all Spoiler 4) and the claw dust on the tablet.
Click the ingredient in the order shown on the star map (see journal): Meteorite, bitter petals, glowing mushrooms, Pangoline's eye, flask with lightning, corkscrew's root and claw dust.
Correct ingredients will move a bit and show a violet sparkle; making a mistake in the order will make you start all over.
When you activate all the ingredients, they will go into the bowl.
The flask on the right side will be filled with potion. Take the flask.
Screenshot
Exit the house, return to the crossing and go forward to the tree.
Chapter 2
7. The Tree/Underground
Use the potion (Spoiler 6) at the Tree.
Talk to the tree and go down the stump.
Melt the ice on the low right side to obtain a rose petal (5/33).
Use the empty watering can (Spoiler 3) at the fresh water to get a filled watering can.
Get some glowing mushrooms from the left side.
Screenshot
Go up again and talk again to the tree; he will clear the way.
Go 1x forward.
8. Fast growing Tree/Hay Wagon
Take the pitch fork from the tree left.
Go back 3x and click three times with the pitch fork at the hay wagon on the left.
This will activate a search scene. Find all items on your list to make the assembling device pop up.
Reassemble the ground triller.
Screenshot
Return to the fast growing tree and use the ground triller on the hard ground.
Use the filled watering can (Spoiler 7) to water the tree.
Take the two fast growing flowers.
Go back once and down the stump and fill your watering can again.
Screenshot
Go up and go forward 2x.
9. Stone Wall/Fast growing Tree
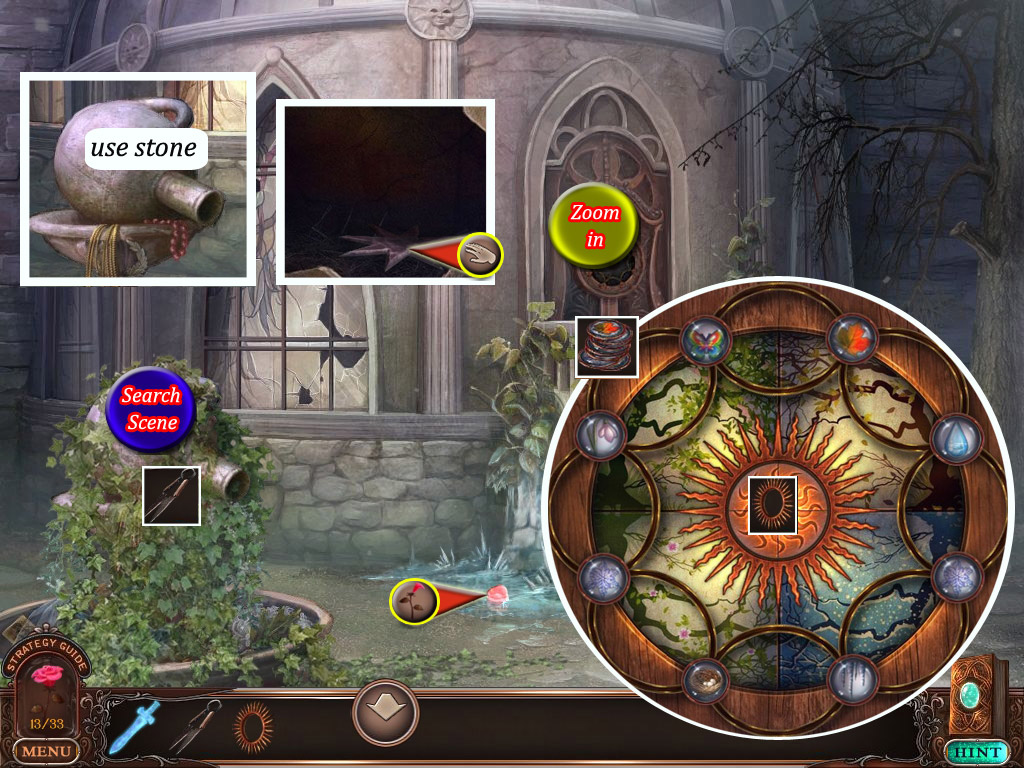
Melt the ice on the low left side to obtain a rose petal (6/33).
Collect the planks (4/5) and use the filled watering can (Spoiler 8) at the two soil patches to the right and left of the stone wall.
Plant one fast growing flower (Spoiler 8) in each patch.
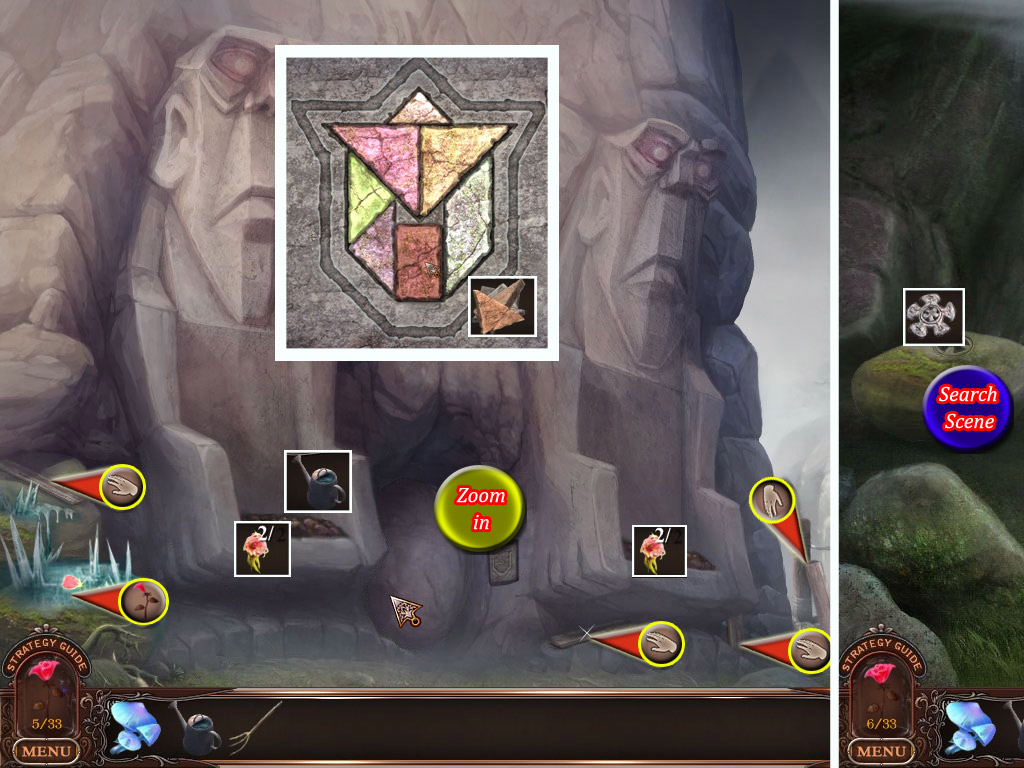
Press the little panel at the low middle of the stone wall and take the stone symbol.
Return to the fast growing tree and place the stone symbol on the stone at the left side.
The stone moves; play the search scene to obtain stones.
Return to the stone wall and zoom in on the panel again.
Place the stones on the tablet.
Your goal is it to place the stones in a way that all stones are used, with no free space left and no overlapping.
Click, drag and let go of the stones, or click to rotate.
Screenshot
The entrance opens, enter the cave.
10. Cave
Place the glowing mushrooms (Spoiler 8) in the bowl top left side.
Melt the ice on the low right side to obtain a rose petal (7/33).
Take the crowbar out of the water and zoom in on the chest.
Use the crowbar to pry open the chest and collect the five symbol keys.
Zoom in on the door on the far left.
Your goal is to first line up the symbols in the middle gap in the door by using the arrows left and right.
Some movements will affect other rows as well.
Click
Top row: right arrow 1x
Second row seen from top: left arrow 2x
Second row seen from bottom: right arrow 1x
Bottom row: left arrow 2x
Now that the symbols are line up, place the symbol keys in the appropriate slot.
Screenshot
The door opens; enter the room with the sword.
Pick up the star key.
Return to cave and place the star key at the stone in lower middle of the scene.
Play the search scene to obtain 5 iron rings.
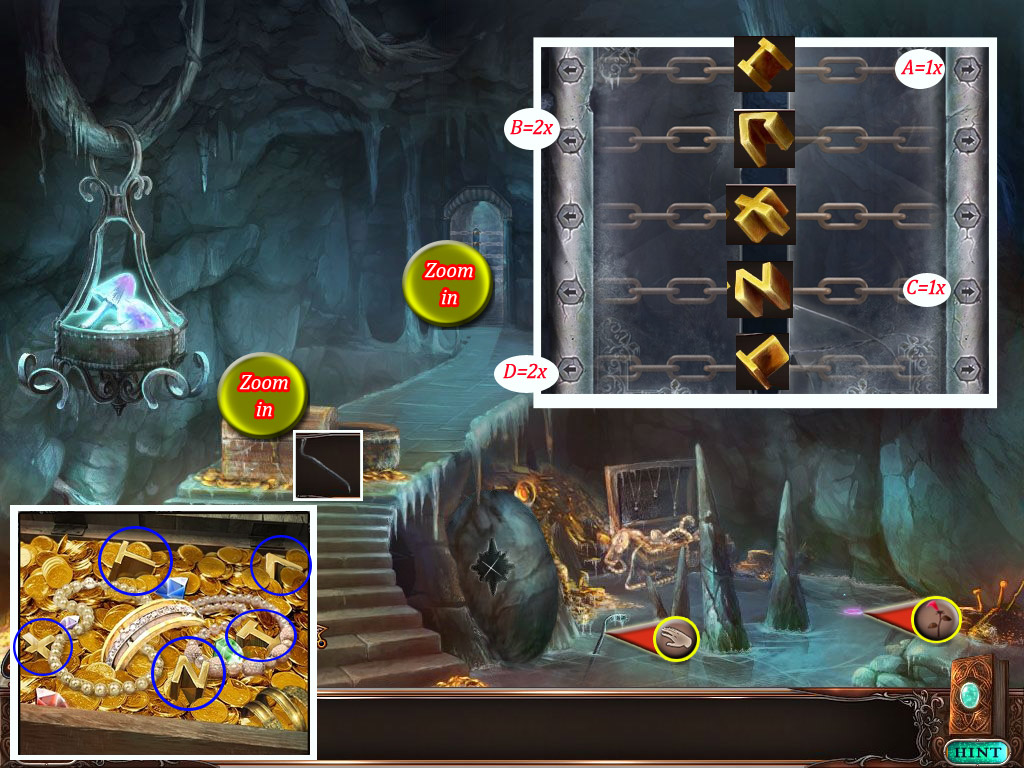
Go to the room with the sword and click the rings at the end of each chain.
Your goal now is to pull the chains in the right order so that the tiles behind will light up.
If you pull the wrong chain you will have to start over.
Seen from left to right 1-6, pull: 3, 1, 6, 4, 2, 5
Take the sword.
A plank (5/5) falls through the hole; pick it up.
Screenshot
Exit the cave.
11. Bridge
Zoom in on the bridge and place the planks on the hole.
Move over the bridge and go ahead.
Chapter 3
12. Way to the Castle
Melt the ice on the low right side to obtain a rose petal (8/33).
Zoom in on the bottom of the tree on the left and take the flint.
Take the branch from the tree on the right.
Go forward 1x.
Melt the ice on the low right side to obtain a rose petal (9/33).
Pick up the garden shears from the ground.
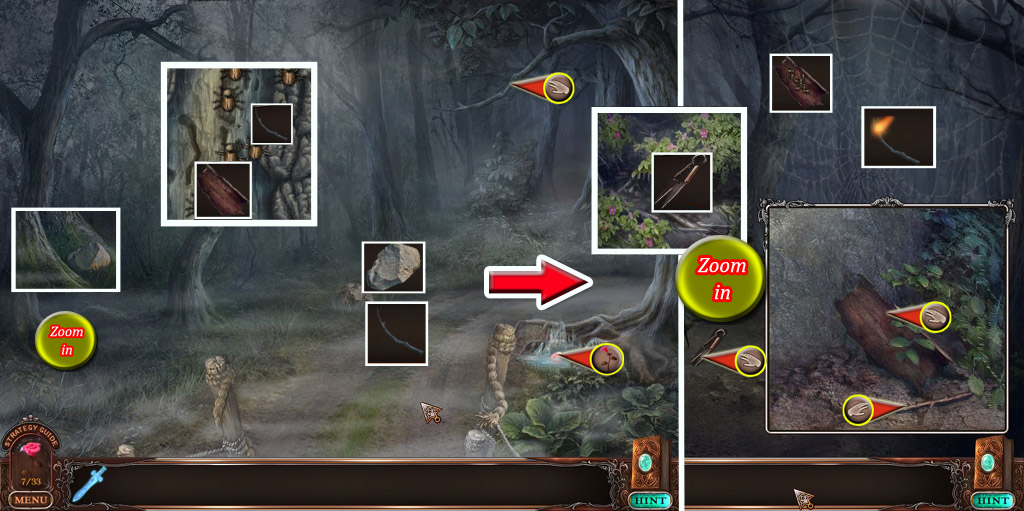
Zoom in on the bush in the low right corner and take the bark and the twig.
Zoom in on the bush on the left, next to the web.
Use the garden shears to remove the thorns and take the lever.
Go back 1x.
Use the flint to start a fire at the stone on the left side.
Light the branch and get a burning branch.
Zoom in on the tree stump with bugs on the left side.
Place the bark and push down 5 beetles with the twig to obtain bark beetles.
Go 1x forwards.
Place the bark beetles at the left side of the web.
Use the burning branch on the web.
Screenshot
Go forward.
13. Castle Entrance
Melt the ice on the low right side to obtain a rose petal (10/33).
Behind the ice, you can now zoom in on a hatch to access a mini game.
Place the lever (Spoiler 12) in the empty slot.
Your goal is to reassemble a rose picture. To do so, use the levers at the bottom.
The levers on the left will bring the tile in the specific column up or down (up lever up, down lever down).
The levers on the right will move the tile in the specific row to the left or right (left lever up, right lever down).
Screenshot
The completed rose will be colored and the gate opens. Go forward.
14. Castle - Courtyard
Note that this is a scrolling scene. Move your cursor completely to the left or right to scroll.
Melt the ice on the left column to obtain a rose petal (11/33).
Go to the left.
Zoom in on the water basin and melt the ice to obtain a rose petal (12/33).
Take the name plate piece.
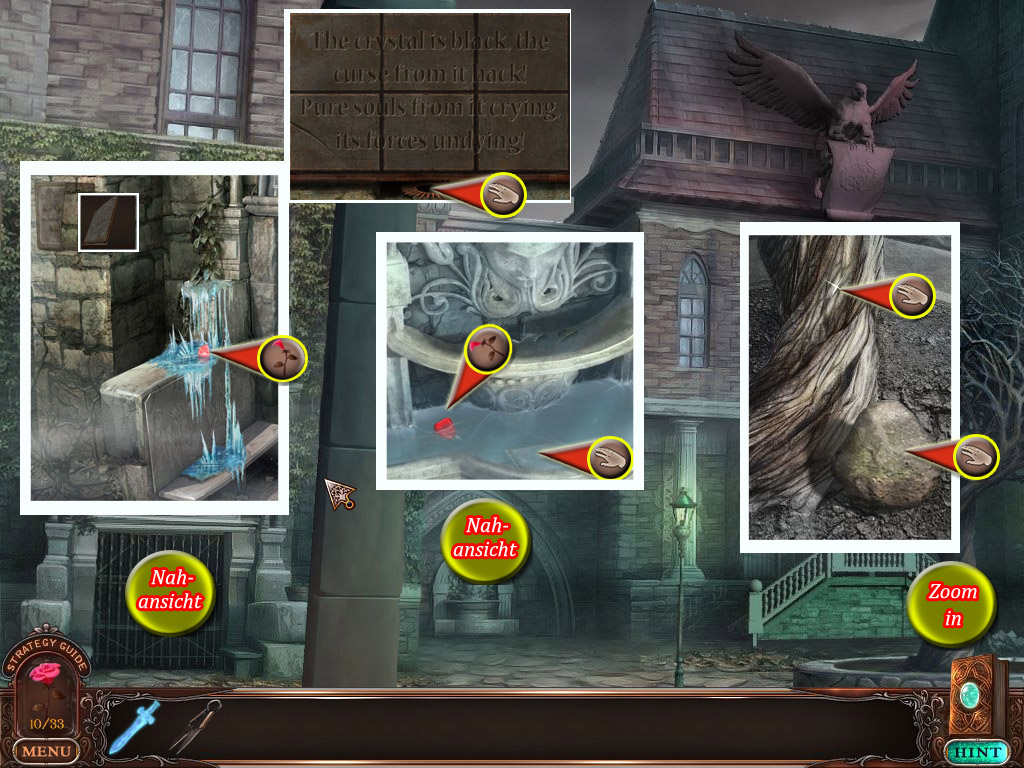
Exit the close up and zoom in on the tree on the right.
Take the old tree bark and the stone.
Zoom in on the gate on the left.
Melt the ice on the low left to obtain a rose petal (13/33).
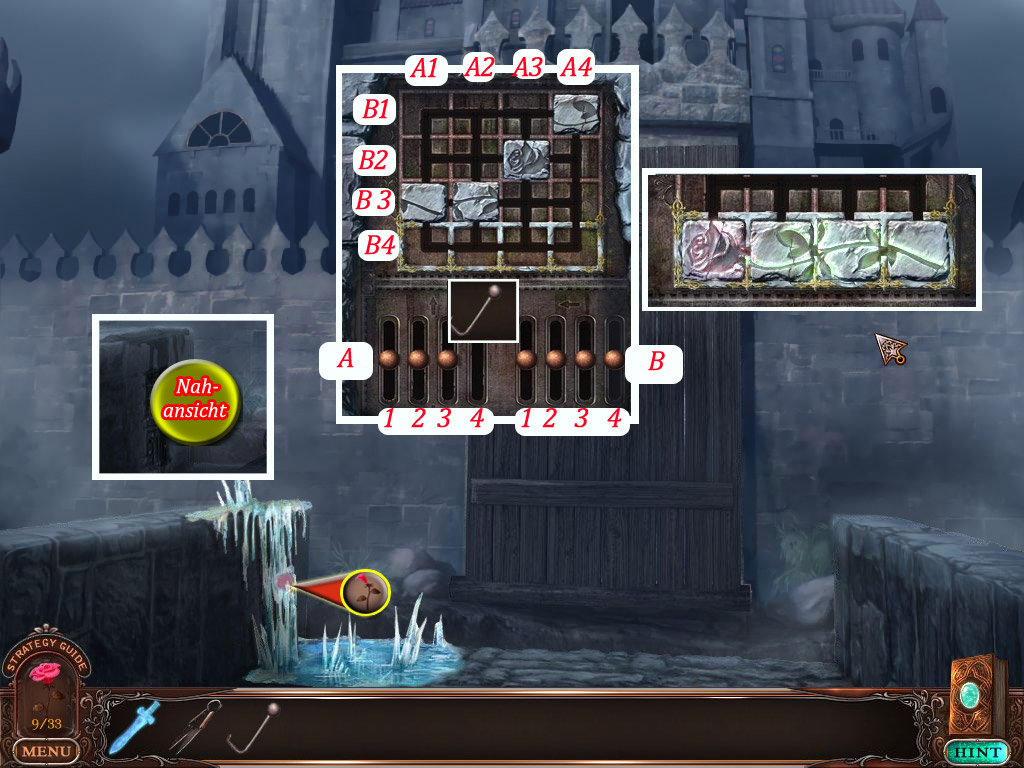
Place the metal place piece at the other part of the wall on the left side to activate a mini game.
Swap the tiles to get a message.
You can only swap tiles laying next to each other or below/above.
The text has to spell:
The crystal is black, the
curse from it hack!
Pure souls from it crying
its forces undying
A compartment below the text will open; take the sunbeam disk.
Screenshot
Scroll to the right and from there into the fountain on the left.
Remove the vines with the garden shears (Spoiler 12) to activate the search scene.
Find 10 chips.
Use the stone to destroy the jar on the fountain. Zoom in on the broken jar and take the eight pointed star.
Melt the ice on the left next to the stairs to obtain a rose petal (14/33).
Zoom in on the door on the right and place the sunbeam disk in the middle. Click the 10 chips somewhere on the screen to activate a mini game.
Your goal is to bring the chips into the right order according to their symbols and the time of year the inside circle shows.
Swap the symbols by clicking two of them sharing the same ellipse.
The right side contains at the top autumn, at the bottom winter.
The left side needs to show spring at the bottom and summer on the top.
When the symbols are in the right order the door will open.
Screenshot
Enter the Green House.
15. Green House
Melt the ice on the left next to the tree to obtain a rose petal (15/33).
Take the knife from the table in the low right corner.
Zoom in on the book on the same table.
Wait until the water drop from the leaf falls onto the pages; they will color up and you will learn that the tree will bloom with fertilizer.
Zoom in on the cabinet on the far right and melt the ice inside to obtain a rose petal (16/33).
Take the recipe for fertilizer; it will go into your journal.
Zoom in on the cabinet on the far left and cut the rope with the knife.
Zoom in on the cloth at the tree and cut off a piece with the knife.
Open the cabinet and take the matches, chalk, shovel and the faucet.
Zoom in on the colored plant pots on the far right and use the shovel to dig out the five keys.
Note the colors and shapes on the pots and the shapes on the keys.
Zoom in on the hatch in the low left corner.
Now place all keys in their appropriate slot.
Circle: yellow
Triangle: green
Wide Pentagon: yellow
Long Pentagon: purple
Square: red
Now click the keys in the order left to right as the pots have been standing:
Blue, purple, yellow, red, green
The hatch opens.
Screenshot
Enter the Basement.
16. Basement
Melt the ice on the ground to obtain a rose petal (17/33).
Take the unlit torch from the wall on the right.
Go forward.
Place the torch at the right side and light it with the matches (Spoiler 15).
Melt the ice at the right wall to obtain a rose petal (18/33).
Take the pick axe in front of the barrel and the ladder at the far right.
Zoom in on the barrel, place the faucet (Spoiler 15) and click once; this will activate a search scene right next to the barrel.
Find all objects from your list, then reassemble the drill.
Use the drill at the barrel and melt the ice in the drill hole to obtain a rose petal (19/33).
Zoom in on the barrel again, click the faucet and use the cloth (Spoiler 15) at the running water to get a wet cloth.
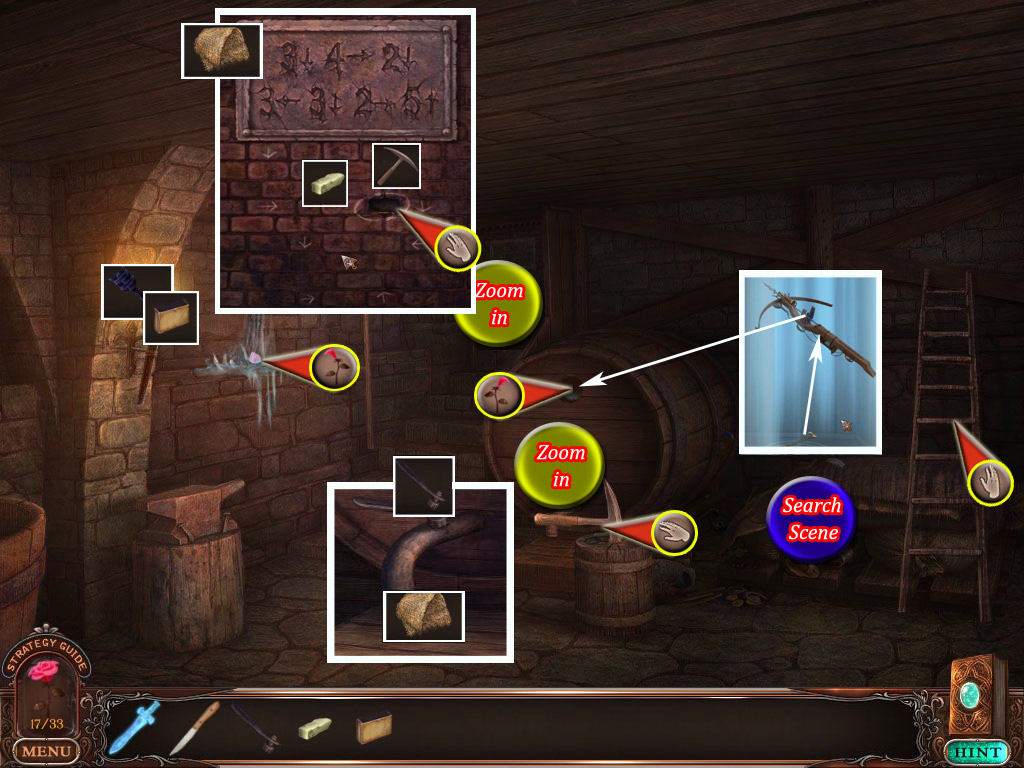
Zoom in on the wall above the stairs in the far left.
Use the wet cloth to clean the upper plate. There is one arrow drawn on the stones below.
Use your chalk to mark the bricks along the way; which brick to mark is shown on the plate.
For example, if you see 3->, you will need to count the next three bricks to the right of the marked one. Mark the last brick with the chalk. Go on until the last hint - this time the chalk will make a circle around one brick.
Use the pick axe to remove the brick and take the key.
Screenshot
Go back twice to the Green House.
17. Green House (Balcony)
Use the ladder (Spoiler 16) on the balcony and zoom in on the door.
Use the key (Spoiler 16) to open it.
Enter the castle.
Chapter 4
18. Hall
Click the door in the far middle.
After the cut scene, go back once and take the swab on the far right side.
Zoom in on the lion statue on the low left side and take the skull key.
Screenshot
Exit to the Courtyard.
19. Courtyard
Zoom to the left side and from there on the bird statue on the roof.
It will fall down; the debris will activated as search scene. Zoom in on it and find all listed items.
Assemble the fire extinguisher with some of these items.
Zoom in on the Crypt door on the left and place the skull key (Spoiler 18).
Enter the crypt and take the tongs in the far right corner.
Screenshot
Return to the Hall.
20. Ballroom/Fountain Room/Balcony
Zoom in on the fire and use the fire extinguisher (Spoiler 19) anywhere on the screen.
Pick up the cup from the ground.
Zoom in on the chair on the right and take the note; it will go into your inventory.
Zoom in on the chair again and take the tile.
Go through the arch on the low left side.
Screenshot
Melt the ice at the fountain to obtain a rose petal (20/33).
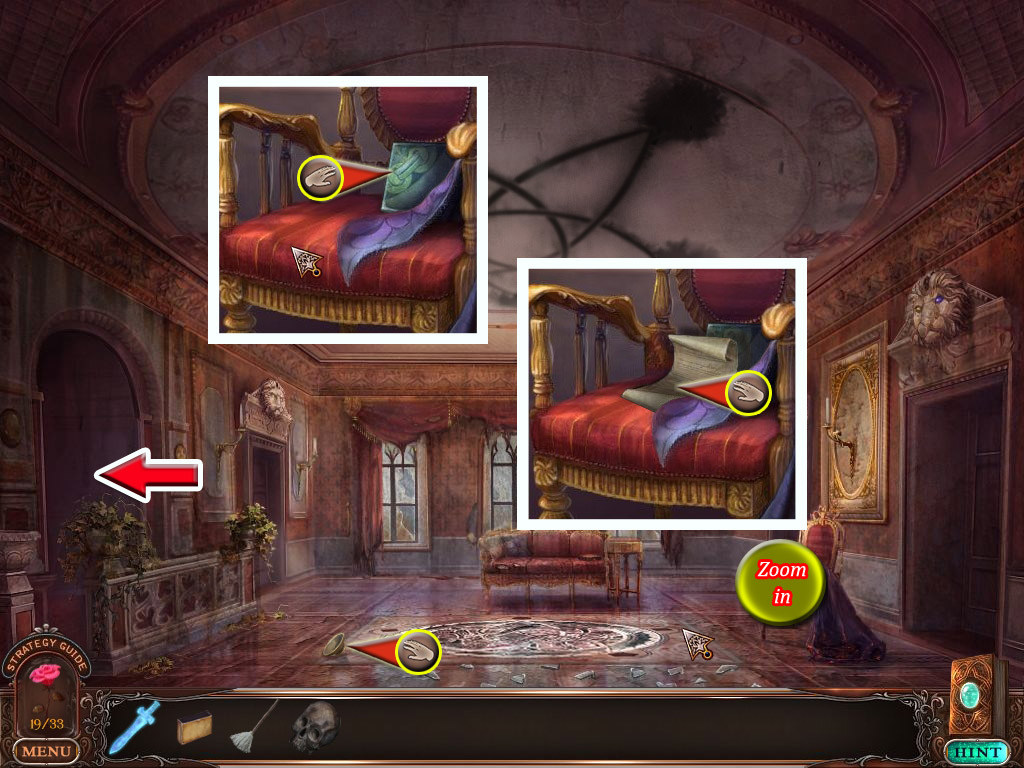
Zoom in on the couch in the back and take the glove.
Zoom in on the painting above the couch and grab the piece of a picture.
Use the arrow at the top of the scene to go on the Balcony.
Melt the ice on the ground to obtain a rose petal (21/33).
Grab the big glass shard on the banister with the glove.
Return to the Fountain Room and zoom in on the flower pot next to the stairs.
Click the glove with the glass shard 3 times onto the thorns and take the rose key.
Zoom in on lower part of the fountain to play a mini game.
Pace the tile at the empty spot.
Reassemble the picture.
Each button turns the four connected tiles one step per click; top and low left clockwise, top and low right counter clockwise.
There is a step by step solution possible, but it only works if the puzzle is still in starting position. There is no reset button.
Seen the buttons top left and right as A and B, the buttons low left and right as C and D, click:
C = 1x
B = 1x
D = 1x
C = 1x
A = 2x
B = 2x
A = 1x
B = 1x
C = 1x
B = 1x
D = 1x
The tiles will vanish; place the rose key in the middle of the board.
It will open, take the box knob.
Screenshot
Return to the Ballroom.
21. Ballroom
Zoom in on the couch in the far middle of the room.
Use the box knob (Spoiler 20) to open the box.
Take the note; it will go into your journal.
Place the piece of a picture (Spoiler 20) on the right side to reveal shapes.
Place these shapes on the left side of the board, so that all the space is used and no shapes are overlapping.
An overlapping shape will be dark; a correctly laying one will be highlighted (which does NOT mean it is in the right spot).
For a solution please have a look at the screenshot below.
After completing the puzzle, take the green gem.
Zoom in on the lion head above the door on the low right side.
The head has a yellow and a blue eye. A combination of blue and yellow will give green. So place the green gem at the empty spot between the eyes.
Screenshot
Now the door is open. Enter the Chess Room.
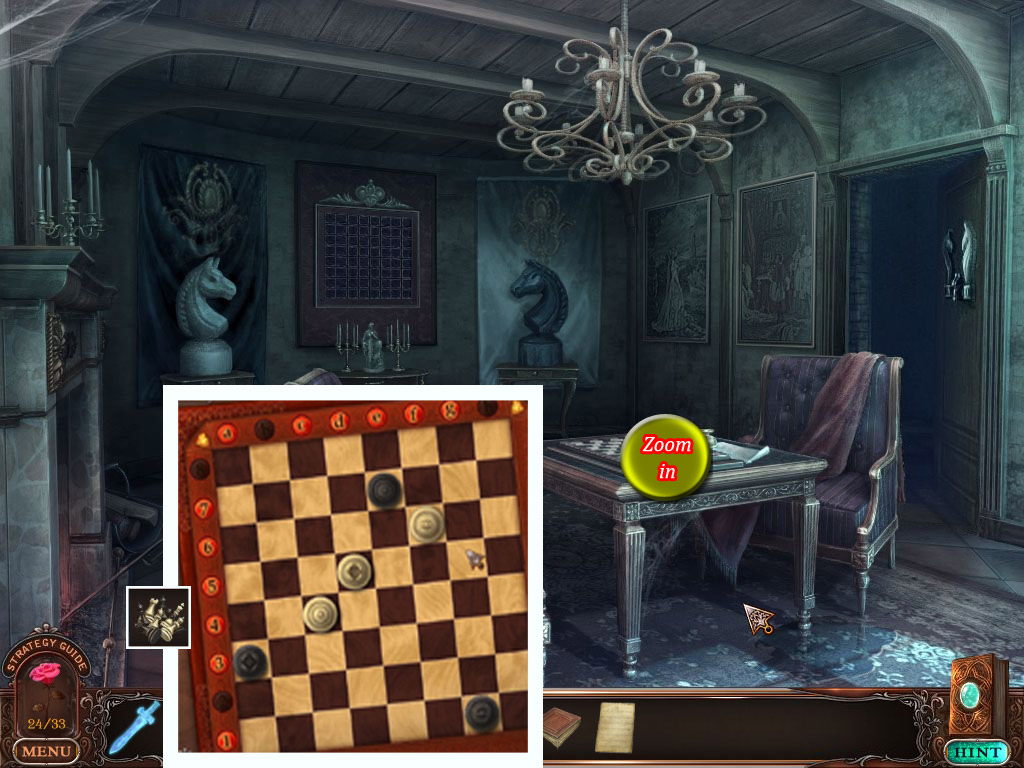
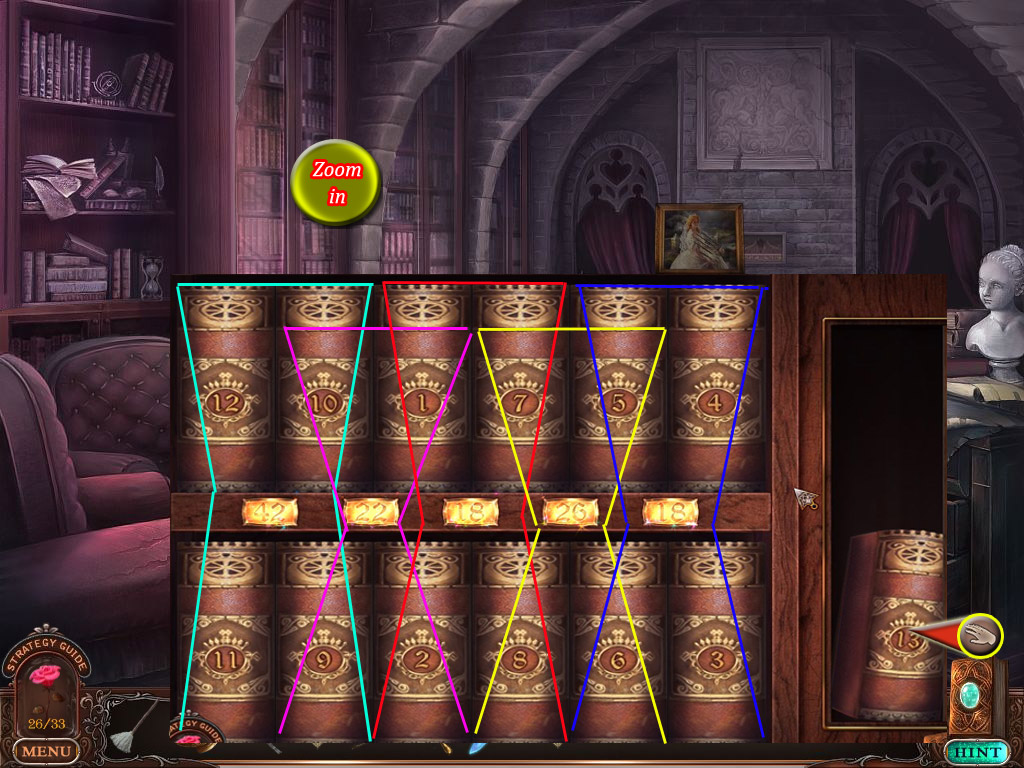
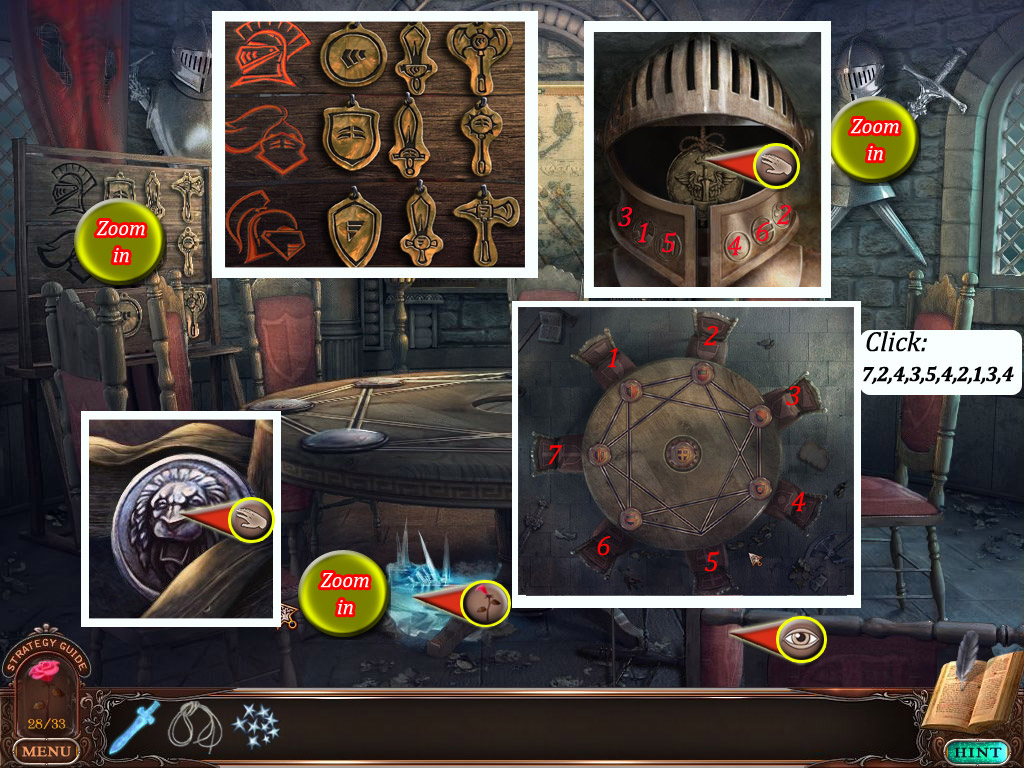
22. Chess Room
Melt the ice on the ground to obtain a rose petal (22/33).
Zoom in on the fire place and use the tongs (Spoiler 19) to remove the note.
Zoom in on the back wall.
The note you just found is on the right side. Note that each symbol in the two rows has a number.
You find the same symbols on the left side and at the bottom of the chess board.
Look for the two symbols with the number 1 and click the square where they would meet on an imaginary line.
When you are right, a crown will appear on the square.
Now do the same with the other symbols.
When you make a mistake, you will have to start all over.
Finishing the puzzle will open the door to the right.
Screenshot
Enter the Study.
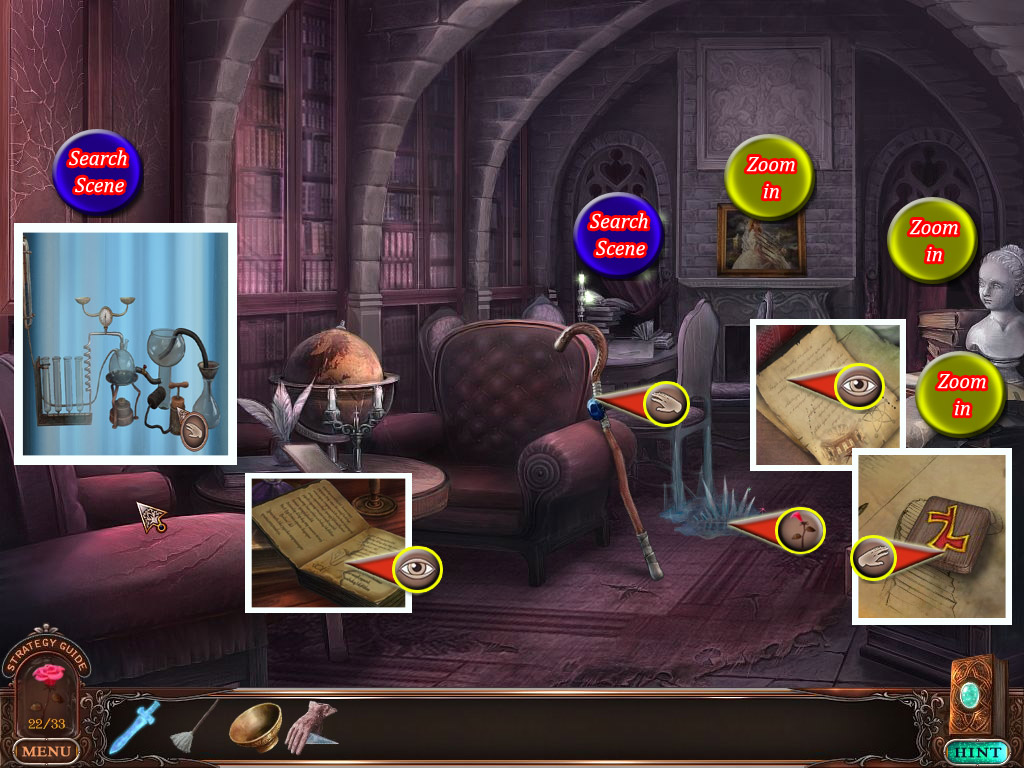
23. Study
Melt the ice on the floor to obtain a rose petal (23/33).
Take the staff leaning against the chair.
Zoom in on the book on the table on the low left side and note that there is a ripped page.
Click the cabinet with the padlock behind this table; the doors will open.
Play the search scene and reassemble the chemistry set afterwards.
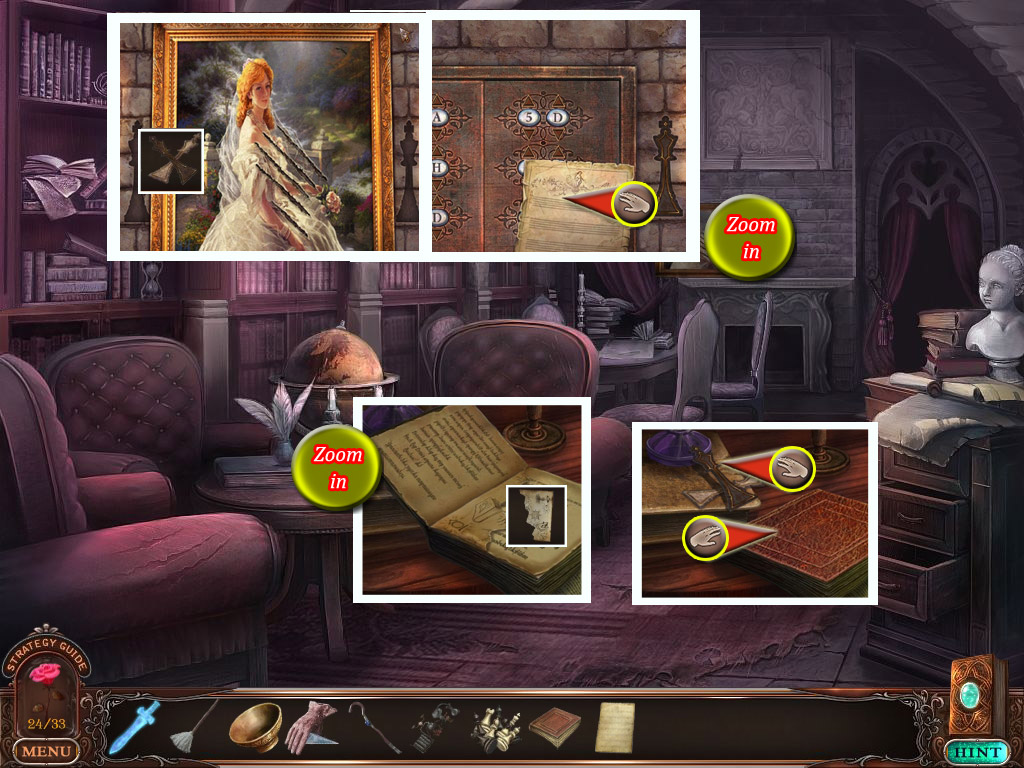
Zoom in on the cabinet on the low right side and take the note (it will go into your journal).
Zoom in again and take the tile (1/2).
Zoom in on the alcove on the far left side and play the search scene to obtain chess pieces.
Zoom in on the painting above the fire place to note that two chess pieces are missing (but not the ones you obtained in the search scene).
Click the curtain in the far back and enter the laboratory corner.
Screenshot
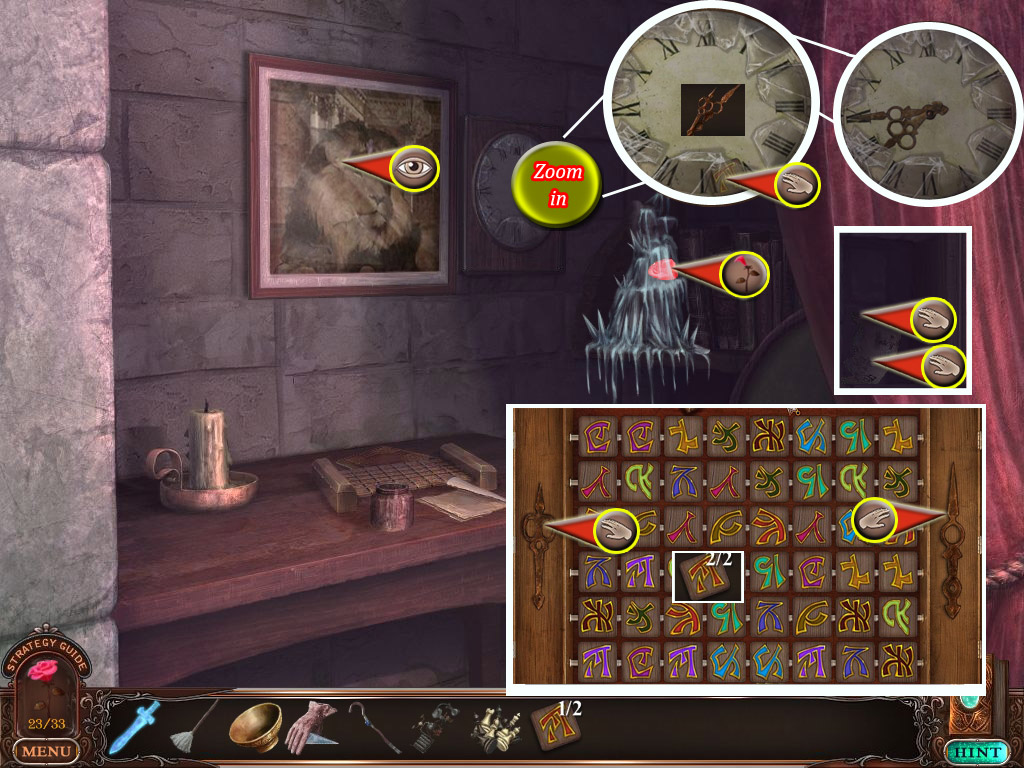
Melt the ice on the right side to obtain a rose petal (24/33).
Zoom in on the clock and take the tile (2/2).
Zoom in on the table and place the two tiles on the empty spots.
Now find matching pairs by clicking two tiles.
After finding all matching pairs, take the two clock hands, one on the left and one the right side of the board.
Zoom in on the clock again and place the clock hands.
Move the hour hand to show the time you saw on the note in the Ballroom (box on the couch); you will find the note in your journal (7:40).
The close up will close; click the painting left next to the clock and it will open.
Take the half of a page out.
Exit the alcove.
Screenshot
Zoom in on the table on the low left side.
Place the half of a page on the book and click to get the information into your journal.
The book (1/2) closes; take it and take the two chess figures you will now see.
Zoom in on the portrait above the fire place and place the two chess figures into the slots; the portrait will move.
Take the empty music sheet.
Screenshot
The puzzle you can't solve yet. Exit to the Chess Room.
24. Chess Room/Study
Zoom in on the chess board on the table and place the chess pieces (Spoiler 23).
Your goal is to place the chess pieces on the right square.
Each correct combination will be written down on the paper on the right side.
To find the right position, place a chess piece on an empty square in the upper row.
Move it to the side until you see a letter on top light up.
Now go down in this column with the chess piece until a number on the right side lights up.
A piece at the right place can't be moved anymore.
Take the paper; it will go into your journal.
Screenshot
Return to the Study and zoom in on the puzzle above the fireplace.
Use the arrows to change the numbers and letters according to the combinations on the paper from the Chess Room.
The two panels will open; take the purple gem.
Screenshot
Return to the Ballroom.
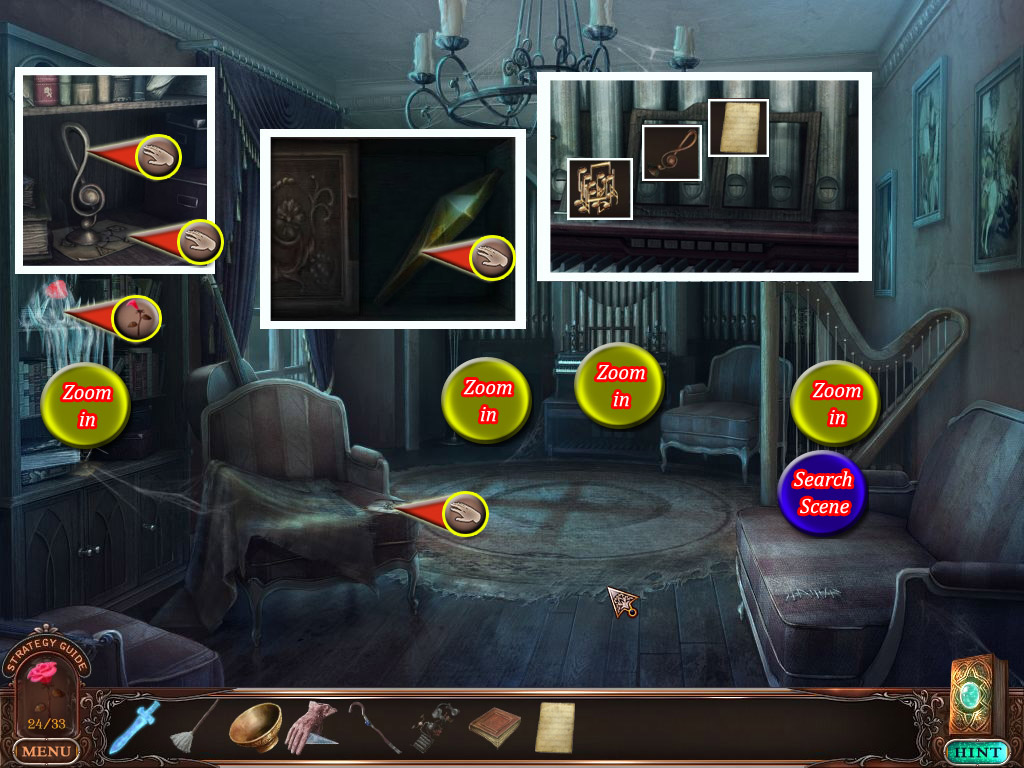
25. Ballroom/Music Room
Zoom in on the lion head on the far right.
The eyes of the lion are red and blue - a combination would yield purple. Place the purple gem (Spoiler 24).
Melt the ice at the shelf on the right side to obtain a rose petal (25/33).
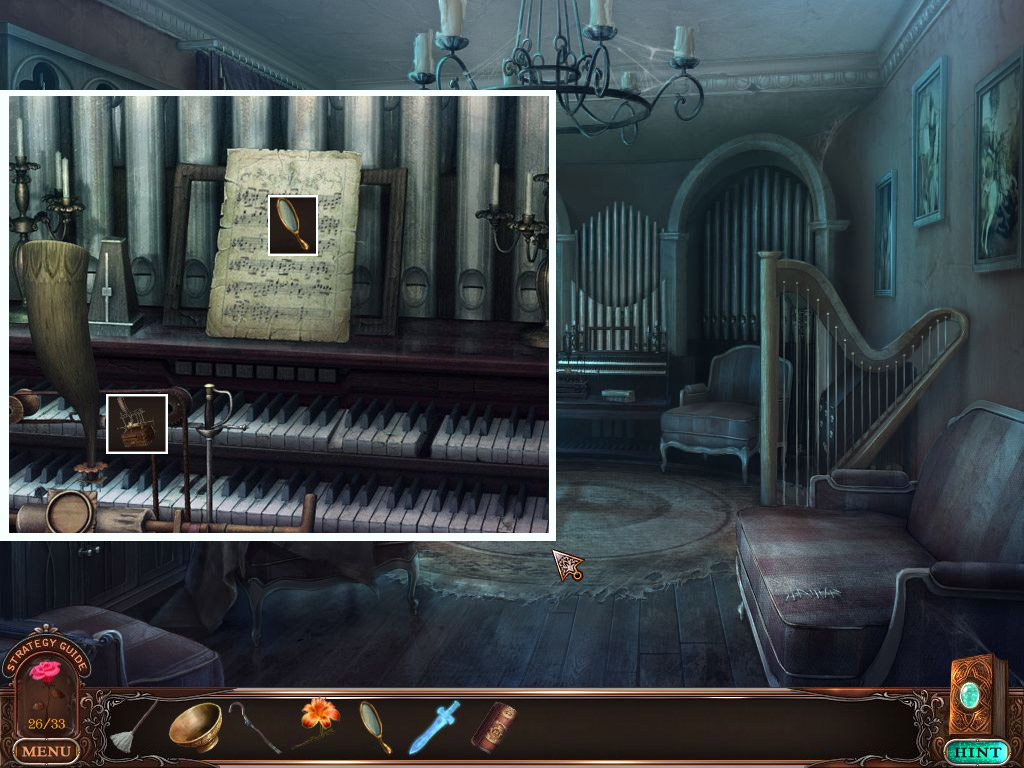
Zoom in on that shelf, take the treble clef and the note.
Take the card (1/15) from the chair in front of the shelf
Zoom in on the harp.
You will have to replay the notes of the harp. Repeat three sequels to obtain notes.
Zoom in on the piano at the far back wall.
Place the music sheet (Spoiler 24) on the stand and add the notes and the treble clef.
The piano plays; exit the close up.
The melody has opened a compartment on the far left side. Take the orange gem.
Play the now active search scene at the harp.
Find all listed items and reassemble the phonograph afterwards.
Screenshot
Exit to the Ballroom and go back 3x to the Green House.
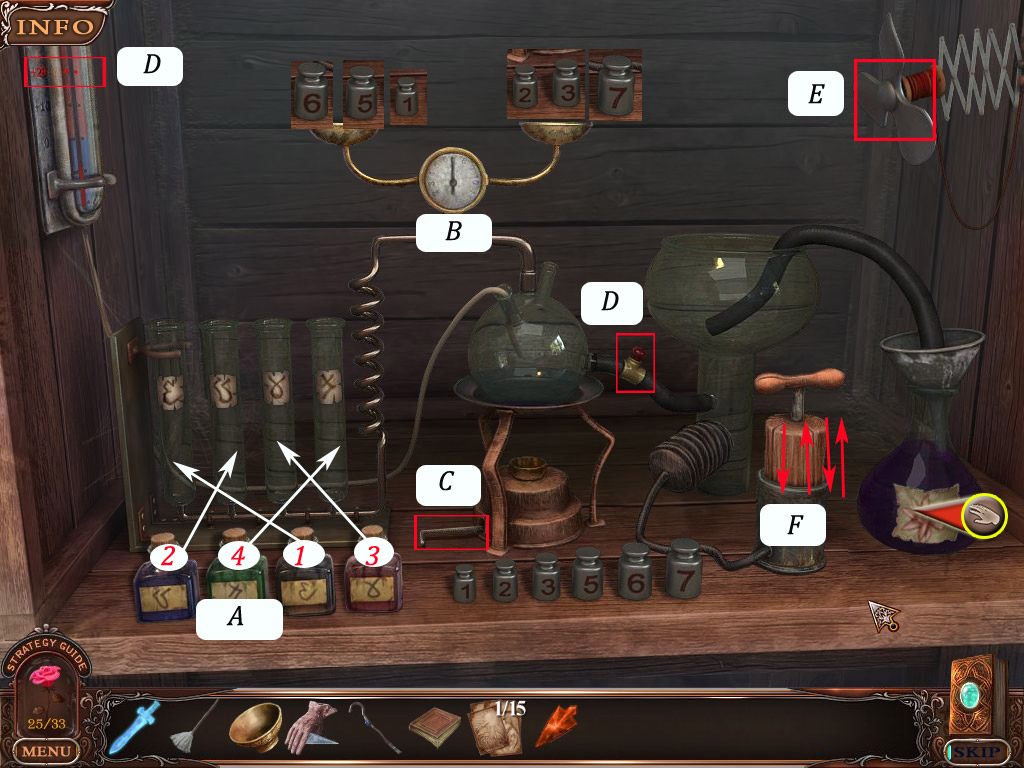
26. Green House
Zoom in on the cabinet on the lower right side.
Place the chemistry set (Spoiler 23).
Your journal has the recipe on page 20. First, the ingredients have to go into the test tube.
You will need to use the right order according to the symbols on the test tube.
Click the bottle, then the test tube.
From left to right, 2-4-3-1
Now balance the weights - right side: 6, 5, 1 (=12), left side: 2, 3, 7 (=12).
Turn on the burner on the low right side.
Take a look at the thermometer; when it reaches 20 degrees, click the red switch at hose on the right side of the burner.
Turn on the fan with a click.
Push the wooden plunger up and down until the flask on the right side is filled.
Take the flask with the fertilizer.
Screenshot
Place it at the left side bottom of the fire tree.
Wait until it is blooming, then zoom in on the right side of the tree and pick up one flower.
Screenshot
Return to the Ballroom.
27. Ballroom/Theater Room
Zoom in on the lion head above the far left door and place the orange gem (Spoiler 25).
Enter the Theater Room
Melt the ice on the left side to obtain a rose petal (26/33).
Take the toy sword at the table leg on the low left side.
Play the search scene and find all cards to obtain cards (13/15).
Take the mirror from the shelf on the right side.
Zoom in on the chair on the right side and use the glove with the shard to cut open the pillow.
Take the dragon horn.
Zoom in on the dragon above the chair and place the horn at its head; this will open the stage.
Zoom in on the stage and give the toy sword to the prince; he will kill the dragon with it.
As a reward he will get a card (14/15); take it.
Zoom in on the picture on the right wall and reassemble the pictures. Pieces in the right place will lock.
Take the card (15/15) afterwards.
Zoom in on the table on the left and place the cards somewhere.
Each card has a positive or a negative picture. Sort all cards with positive picture in the left slot, cards with negative pictures in the right slot.
Take the book (2/2).
Screenshot
Exit to the Ballroom and enter the Study.
28. Study/Music Room
Zoom in on the far left book shelf and place the two books (Spoiler 23 and 27).
Swap the books to rearrange them so that the four books surrounding one of the numbers in the middle will add up to that number.
Take the Book of 13 Invocations from the now-open compartment on the right side.
Screenshot
Exit to the Ballroom and enter the Music Room.
Zoom in on the piano and place the phonograph (Spoiler 25) in the low left corner and the mirror on the music sheet. The phonograph will go back into your inventory.
Screenshot
Exit to the Ballroom.
29. Ballroom
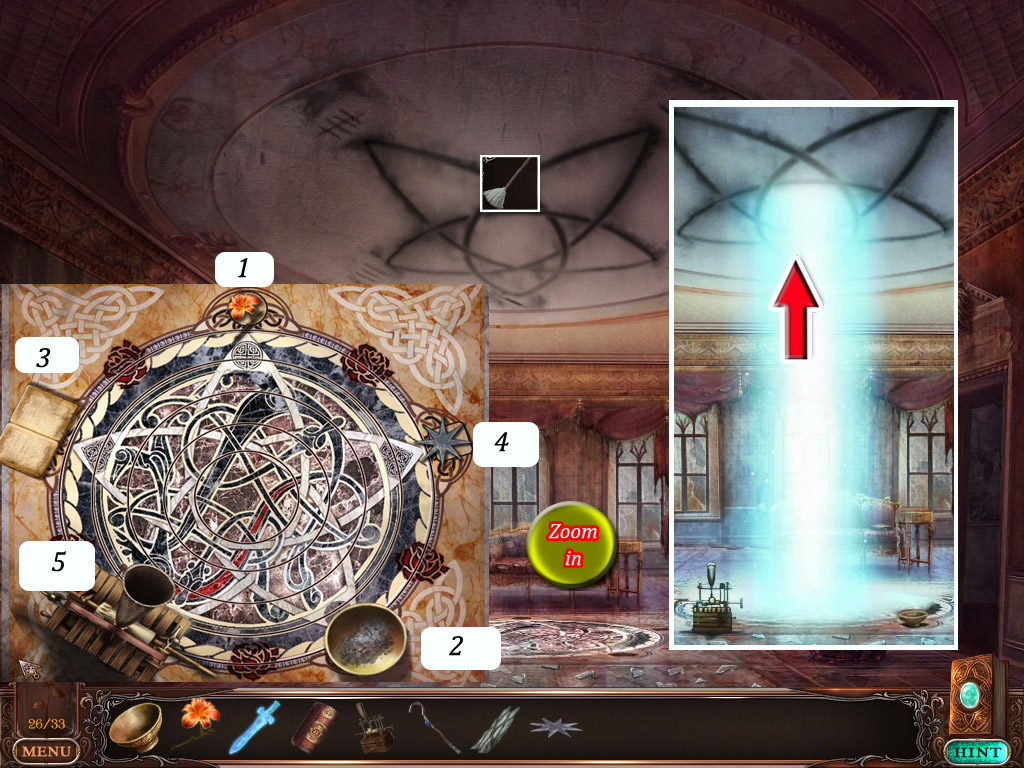
Use the swab (Spoiler 18) to clean the dirt on the drawing at the ceiling.
Zoom in on the circle in the ceiling and turn the rings to get a complete image. A ring in the right position will lock.
Now place the ingredients; you can find information about this in your journal, page 27.
At the top place the flower (Spoiler 26); now clockwise:
Eight pointed Star (Spoiler 14)
Cup (Spoiler 20): place the old tree bark (Spoiler 14) into it.
Phonograph (Spoiler 25 and 28)
Book of 13 Invocations (Spoiler 28)
Use the staff (Spoiler 23) to click the items in the order you have seen on the ceiling (you may also refer to your journal).
Click flower, cup, book, star, phonograph.
There seems to be a little bug, that you may see the sentence "I should click the items in another order". Don't let this irritate you; you are doing fine. A few seconds after clicking the book, the window will close and a light beam appears.
Click the beam and go upwards to the tower.
Screenshot
Chapter 5
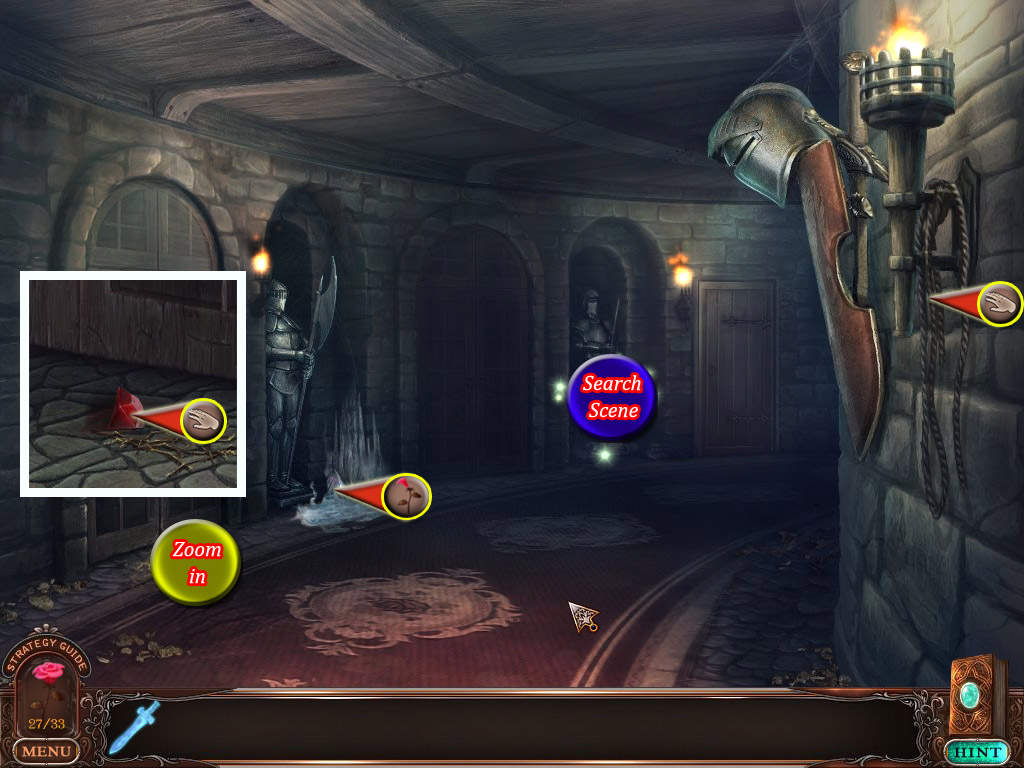
30. Tower - Workshop/Hall
Melt the ice to the left, next to the door on the far back, to obtain a rose petal (27/33).
Go through the door.
Melt the ice on the left side in front of the first door to obtain a rose petal (28/33).
Zoom in on the floor in front of the first door and take the red eye.
Take the rope hanging from the torch on the top right side.
Play the search scene at the far right knight statue to obtain stars.
Screenshot
Return to the Workshop.
Zoom in on the raven on the right side and place the red eye.
It will open its beak; take the hair pin.
Zoom in on the box on the shelf on the right side and use the hair pin to pick the lock.
Take the magnet and open the chest on the left next to the desk with a click.
Zoom in and use the magnet on the hay to obtain a key.
Screenshot
Go to the Hall.
31. Hall/Armory Room
Melt the ice under the table to obtain a rose petal (29/33).
Use the key (Spoiler 30) at the first door on the left side and enter.
Click the chair to stand it up.
Zoom in on the wooden panel on the far let to trigger a mini game.
Your goal is to match shields and weapons with the helmet by their specific markings.
To swap, click to shields or swords; they will change places.
When a row is complete, the helmet will light up in orange.
When everything is in right order, the board will turn around.
Click to get this information into your diary.
Open the diary and take a look. The symbols on the board are in a specific order and numbered.
Exit the journal and zoom in on the helmet on the far right side. The symbols you saw in your journal are engraved on the helmet.
Click them in the right order. After each correct click, you will see a colored highlight.
When done, take the royal coin out of the helmet.
Zoom in on the table to trigger another mini game.
Your goal is to match the shield with the engraved shields on the chairs.
Clicking a shield will make them move along the line to an empty space.
At the end, the chair in bottom middle will be without a shield.
For a solution please see screenshot; there is no reset-button, so this solution will only work if you did not already clicked somewhere.
When you are done, a light beam will raise from the middle of the table.
Zoom in on the food of the table and take the lion coin.
Screenshot
Exit the room.
32. Hall/Miner Room
Melt the ice under the desk to obtain a rose petal (30/33).
Play the search scene in the top left corner to obtain lettered chips.
Zoom under the desk and take the ink blot sheet.
Zoom in on the far right gate and take the handle.
Screenshot
Exit the Room and return to the workshop.
33. Workshop
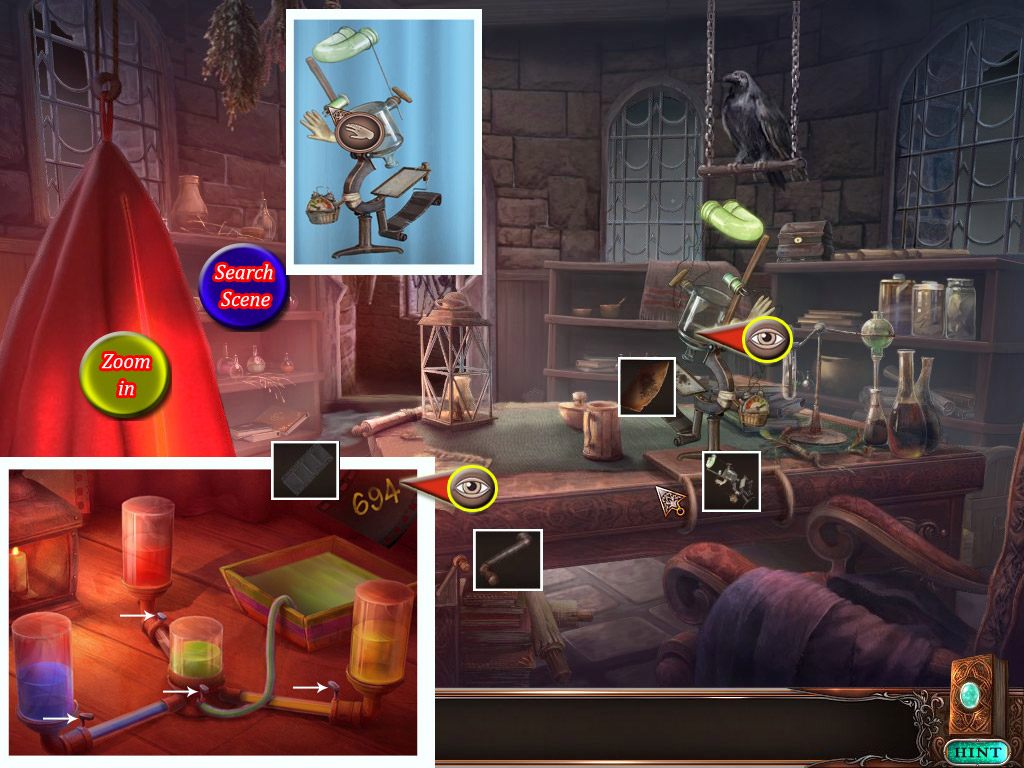
Play the search scene at the shelf on the left side and reassemble the XR film developer afterwards.
Place the film developer on the desk and the ink blot sheet (Spoiler 32).
Click to make it work and take the film.
Place the handle at the right side of the table and click it once; a red tent will appear - zoom in for a mini game.
Place the film the clip above the bowl.
Your goal is to fill the bowl with three colored layers to create a development solvent.
Click the switch at the colored glasses to fill the empty glass in the middle.
When you have the right mixture, click the switch at the empty glass to fill it into the bowl. Click it again to empty the hose from the glass to the bowl.
When thinking which color combination yields the color you need, you want to consider that the color inside the middle glass cannot be emptied.
If you make a mistake you have to start over.
Use:
Red and yellow = orange (click the switch at the middle glass twice)
Yellow and blue = purple (click the switch at the middle glass twice)
Red and yellow = green (click the switch at the middle glass twice)
When you have all three layers, the film will be dunked, and a number appears. Click to get it into your journal.
Screenshot
Exit the tent and return to the Miner Room.
34. Miner Room
Use the rope (Spoiler 30) at the lever right next to the left gate; this will open the gate.
Click the trolley; it will roll through the gate.
Zoom in on the lower part behind where the trolley was standing.
Place the lion coin (Spoiler 31) in the middle.
Your goal is to arrange the green balls along the perimeter of the central square.
To do so use the arrows.
I have to apologize; I was not able to make a solution for this. I had to click so often and got slightly confused.
Your best goal is to get four lines of green balls in a row in the far left, right, top and bottom row/column and then work with the arrows to get them into the perimeter on by one.
When done, this will activate a mechanism. A box now rests on top of this stand. Zoom in on it, click to open the box and take the ring.
Now zoom in on the safe on the far left side.
Screenshot
Place the ring into the slot and use the dial to change the numbers on the top - you may refer to you journal page 37. You need the numbers from the developed film: 694.
Hover over the number you want to change to make the dial-arrow move to this slot.
Click the inner part of the dial to change the numbers.
Click the lever on the right side to open the safe and take the sphere.
Exit the room and enter the Armory Room.
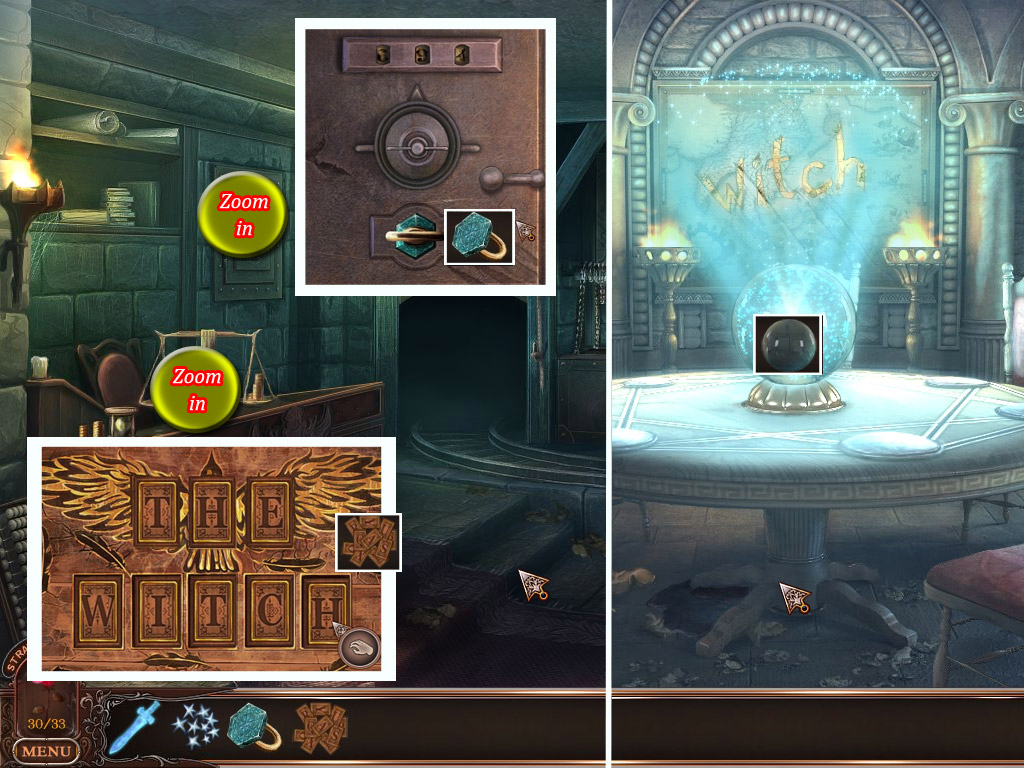
Place the sphere into the beam to see the word "WITCH".
Return to the Miner Room.
Zoom in on the desk on the right side and place the lettered chips (Spoiler 32).
Use the letters to spell the word WITCH in the empty spots.
Screenshot
The box will open; take the door ring.
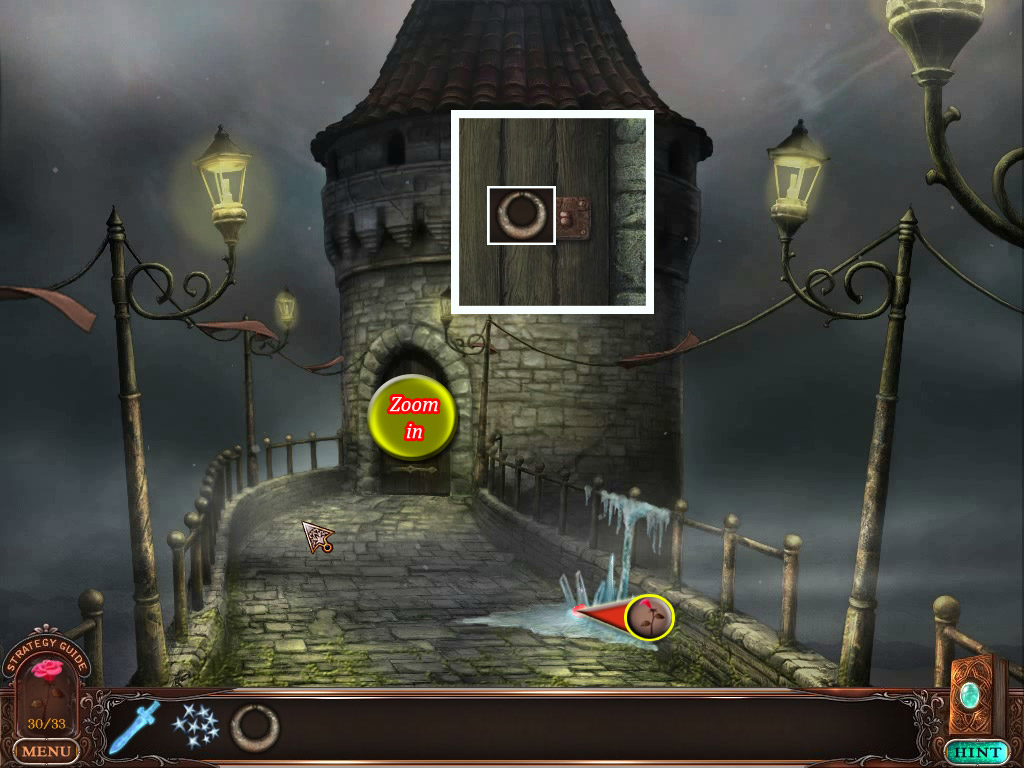
Exit the room and go through the last door on the far right.
35. Staircase upper Part/Beast's Room
Melt the ice on the right side to obtain a rose petal (31/33).
Zoom in on the door and place the door ring (Spoiler 34).
Screenshot
The door opens; enter.
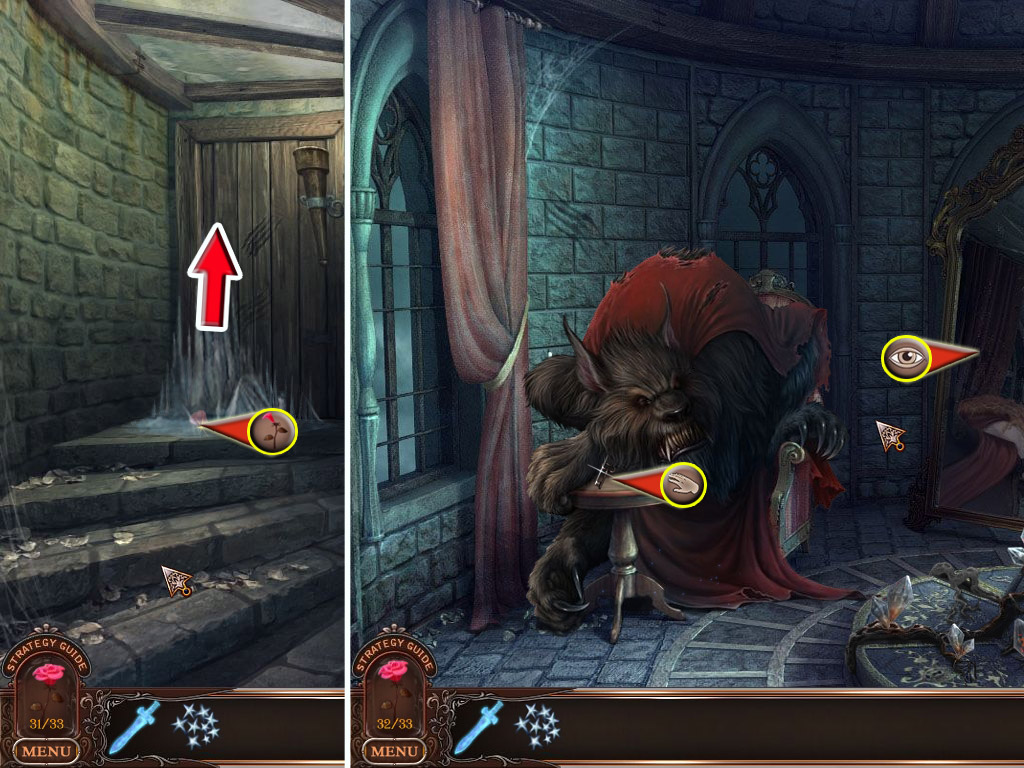
Melt the ice in front of the door to obtain a rose petal (32/33).
Enter and take the key between the beast's paws.
Click the mirror to learn that in reality the beast is the princess.
Screenshot
Exit the room and go down the stairs.
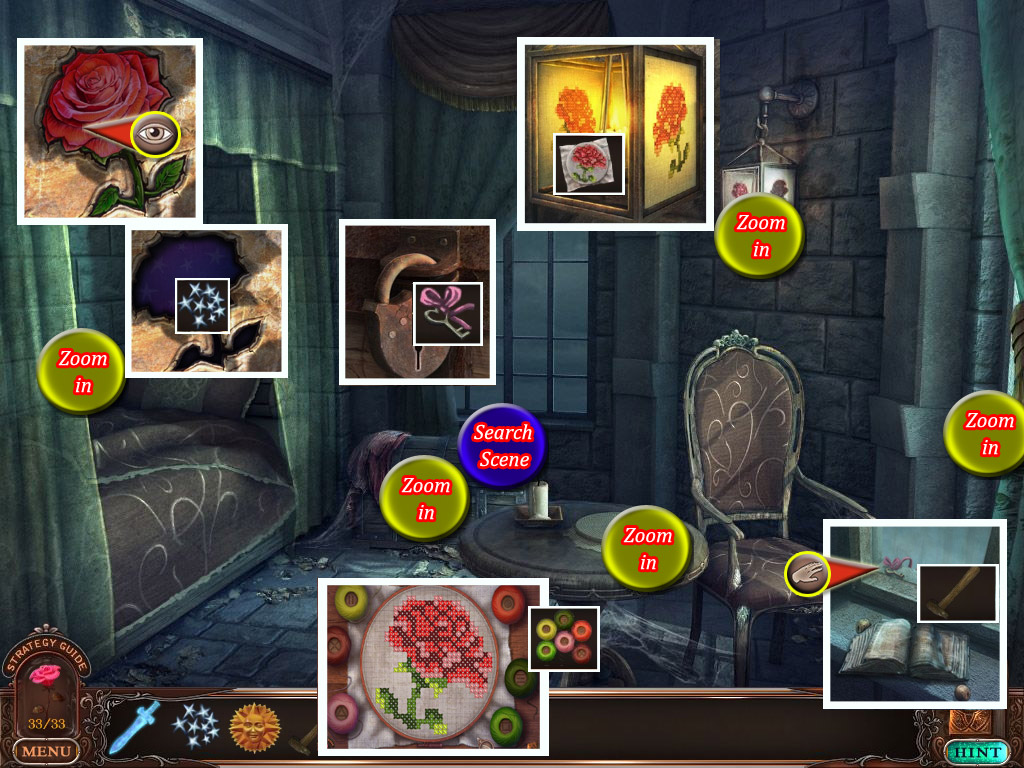
36. Staircase lower Part/Bedroom
Melt the ice on the right side to obtain a rose petal (33/33).
Take the hammer that was hidden behind.
Take the sun medallion on the left side.
Zoom in on the padlock and use the key (Spoiler 35) to open the it.
Screenshot
Enter the bedroom.
Zoom in on the window on the right side and use the hammer; click three times to break the glass.
Take the key with ribbon.
Zoom in on the chest next to the bed and use the key to open it.
Play the search scene to obtain thread.
Zoom in on the table and place the thread; a needle will be attached at your cursor automatically.
Click one thread and drag with the needle over the pattern. The thread will be placed at each place where it belongs to. There is no need to click the matching symbols.
When it is done, take the embroidery.
Zoom in on the lantern and place the embroidery.
Zoom in on the spot of the bed where the lantern beam points on.
Take the rose; it goes into your journal.
Place the stars (Spoiler 30) into the appropriate spots.
Take the crescent moon.
Screenshot
Return to the Beast's Room.
37. Beast's Room
Zoom in on the stand on the bottom and take the note; it will go into your journal.
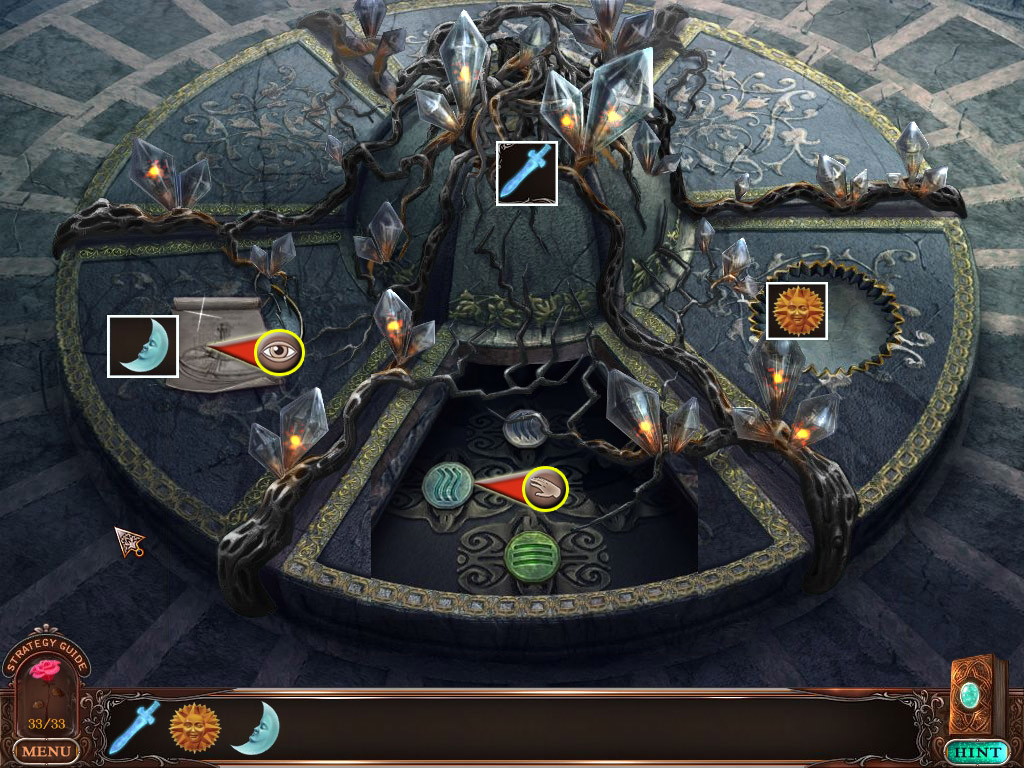
Place the crescent moon on the left slot and the sun medallion on the right spot.
The slot between the two symbols opens. Take the element stones.
Screenshot
A secret passage opens; go down.
38. Finale
Place the element stones (Spoiler 38) at the wall to trigger a mini game.
Your goal is to bring the symbols in the right order according to the elements.
To move the symbols, click and drag them to an empty slot.
The element
on top: air - butterfly and eagle.
on the left: water - fish and water drops.
on the right: fire - sun and fire symbol.
on the bottom: earth - paw and flower
Enter the stairs in the floor and use the spirit sword on the black crystal.
Take the corporal sword.
Go down twice to the Beast's Room.
Click the remains of the crystal.
Use the corporal sword at the slot.
After the witch broke the mirror, use the rose petals to wake up the princess.
Congratulation, you finished the game.
Posted by: Kayleigh |
June 14, 2011 4:55 PM
|
June 14, 2011 4:55 PM