
Lost Souls: Enchanted Paintings
Platform: Mac, Windows

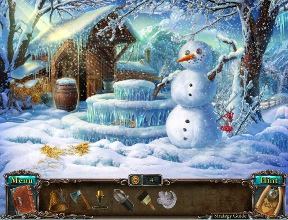
![]() A friendly reminder from your internet pals: if a mysterious painting of a spooky old castle appears on your doorstep late one night, do not let your child hang it in his or her room. Mischievous things are bound to happen, and not the sort of madcap adventures one would find in an episode of Scooby Doo. Lost Souls: Enchanted Paintings, from Fenomen Games, tells the story of a missing boy who suffers the unfortunate fate of getting sucked into a painting. His mother, Bella, will do anything to get him back, including enlisting the help of some otherwordly friends.
A friendly reminder from your internet pals: if a mysterious painting of a spooky old castle appears on your doorstep late one night, do not let your child hang it in his or her room. Mischievous things are bound to happen, and not the sort of madcap adventures one would find in an episode of Scooby Doo. Lost Souls: Enchanted Paintings, from Fenomen Games, tells the story of a missing boy who suffers the unfortunate fate of getting sucked into a painting. His mother, Bella, will do anything to get him back, including enlisting the help of some otherwordly friends.
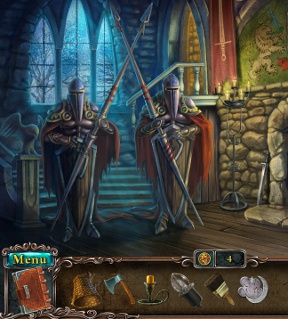
 Lost Souls: Enchanted Paintings is a "mostly adventure but sometimes there are hidden object scenes" game. You play the role of Bella who must enter a series of paintings to rescue her son. Within each painting you'll find a world, complete with a map that has a number of places you can visit. The game allows you to travel from zone to zone, picking up items you might need and using them in different locations. It's quite a bit of fun to scoot around these lushly-drawn scenes and scrutinize the environment for things you can use!
Hidden object scenes are fairly common and feature a short laundry list of items to find. Apart from those, you'll also do quite a bit of investigating to find items scattered around the main part of the game. Using objects from your inventory is key to solving most puzzles, and with a bit of logic any clever casual gamer can determine how to use a shovel to clear off some snow hiding a neat little shining item below!
Analysis: Lost Souls: Enchanted Paintings goes well beyond the norm to create a lush world that resembles a painted fairytale. The music is sort of stilted in areas and doesn't quite fit the mood, but the images on your screen are so vivid, you honestly won't pay the soundtrack much attention. It's all about pretty colors and bright pictures.
 One aspect of Lost Souls that can't be ignored is how user-friendly this game is. Every aspect of the interface was sculpted to make it easier to play, from solid click mechanics to well-grounded puzzles and hidden object scenes that never toss logic out the door. Click detection is unusually precise, something that can be a nuisance in some hidden object games. Here, though, it works surprisingly well, encouraging you to take your time and be thorough in your investigations instead of just wildly flogging the mouse button until you reach the end.
Lost Souls falls on the short side of the hidden object game length scale, clocking in at just over three hours for an average player. The diminished size is largely due to the game's low level of difficulty. Puzzles and quests are interesting, but they don't really go the extra step required to make them challenging. It's fun pecking around to find out what goes where, but you won't feel it necessary to hit the hint button very often.
Simple and effortless to play, Lost Souls: Enchanted Paintings delivers exactly what a casual hidden object game should deliver: satisfying gameplay and lush visuals. No gimmicks to get in the way, just a good (if short) casual adventure game to help pass the evening.
A Collector's Edition is also available. It contains exclusive wallpapers, concept art, a bonus free roam mode, and an in-game strategy guide. Remember that Big Fish Game Club Members pay only $13.99 for Collector's Editions (or 2 club credits), and collector's editions count 3 card punches of 6 total needed for a free game.
![]() Windows:
Windows:
Download the demo
Get the full version
Also available: Collector's Edition
![]() Mac OS X:
Mac OS X:
Download the demo
Get the full version
Also available: Collector's Edition


Walkthrough Guide
(Please allow page to fully load for spoiler tags to be functional.)
Lost Souls: Enchanted Paintings (Collectors Edition) Walkthrough
Part 1: General Info, Ch 1-2
General Information
At the start of each new game, you have a choice between two difficulty options: Easy Mode and Expert Mode.
In Easy Mode the Hint and Skip buttons reload more quickly and active zones are highlighted with glittering areas.
In Expert Mode the Hint and Skip buttons will reload much more slowly and active areas will not be highlighted.
Throughout your aventure, Coins can be collected, which are used to purchase Trophies at the Main Menu screen.
Once the game has been completed, you may return to any of the areas to pick up extra Coins.
When the cursor is over a Coin or any other object that can be picked up, it will change to a hand.
Items that are collected will be added to the Inventory bar at the bottom of the screen. Use these Inventory items to interact with the environment, solve puzzles, or progress through the story.
Interactable areas where you can use Inventory items are indicated by the cursor changing to a Gear shape.
The cursor will change to a magnifying glass around areas in a scene where you can zoom in for a closer look.
When the cursor changes to an arrow, you can click the area to travel to a new location or to a hidden object scene.
There are two types of hidden object scenes: in the first, you must collect items around the scene that are found in the list at the bottom of the screen; in the second type of hidden object scene the list is replaced by a small picture that looks identical to the item, but may differ in scale or rotation.
After each hidden object scene, one of the items found will be added to your Inventory.
To the left of the Inventory is the Map. Use the Map to travel to the different locations around the world.
Above the Map is the Hint Button. Press the Hint button to reveal an item in a hidden object scene or to reveal the next step in your journey.
On the opposite side of the Inventory bar is the Notebook. The Notebook contains important information such as relevant plot points and puzzle information.
Above the Notebook is the Menu button. Press the Menu button to pause the game, access the in-game options menu, or exit to the title screen.
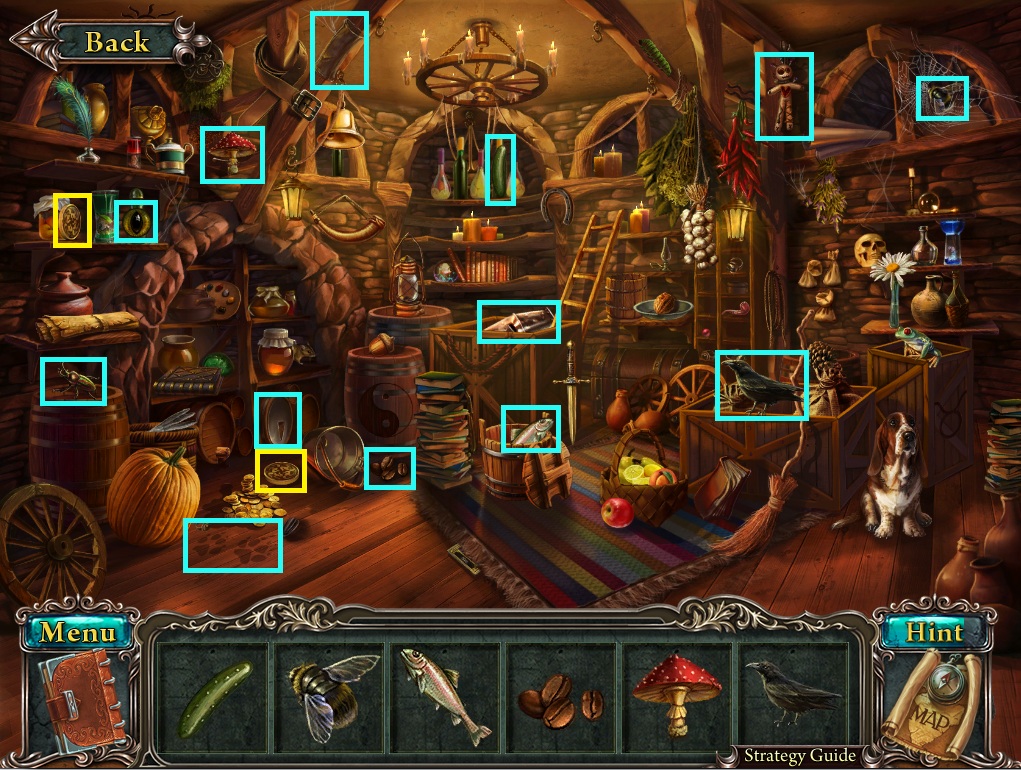
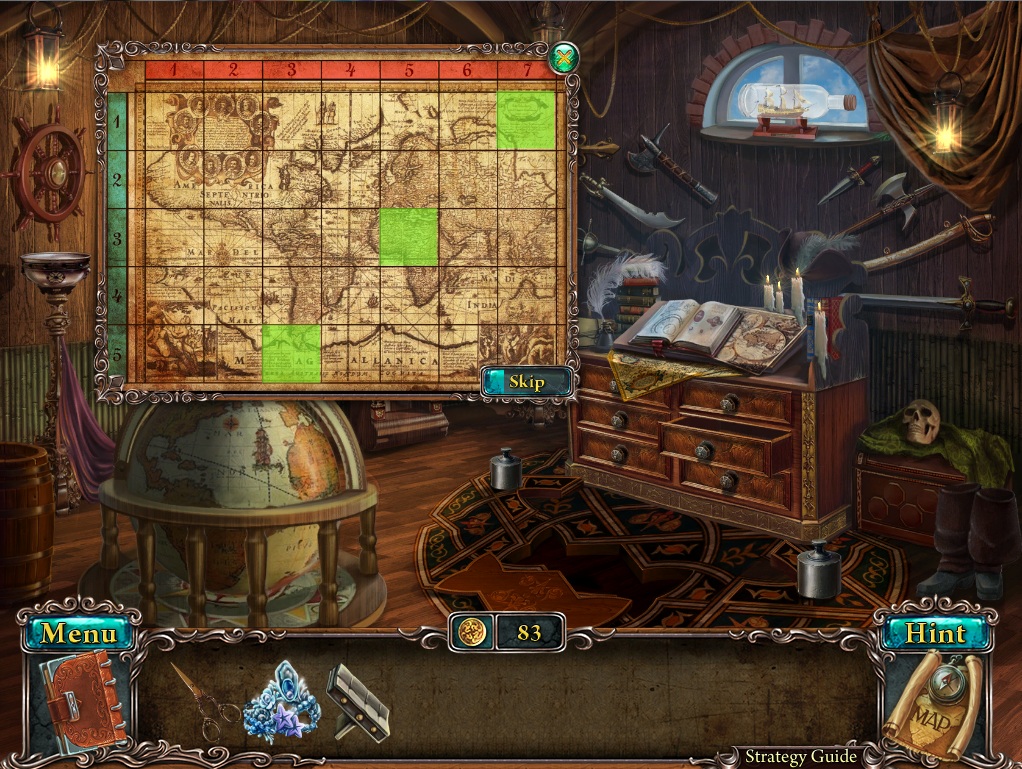
Chapter 1 - Frozen World
Painting Gallery
Click the portrait of the boy.
Click the painting of the frozen landscape on the upper right.
Remove the dust from the painting by clicking and dragging the brush tool along the faded areas.
The percentage at the bottom will track the amount of dust removed.
Click the painting again to travel to the frozen world.
Magic Altar
Click the baby Robin in the snowbank under the tree to add it to your inventory.
Place the Robin in the nest on the branch to receive Coin #1.
Take the Shovel leaning against the trunk of the left tree.
Click the object sticking out of the snow directly in front of the frozen altar to zoom in.
Use the shovel three times on the snow to reveal the Key to the Stables.
Click the Map and travel to the Stables.
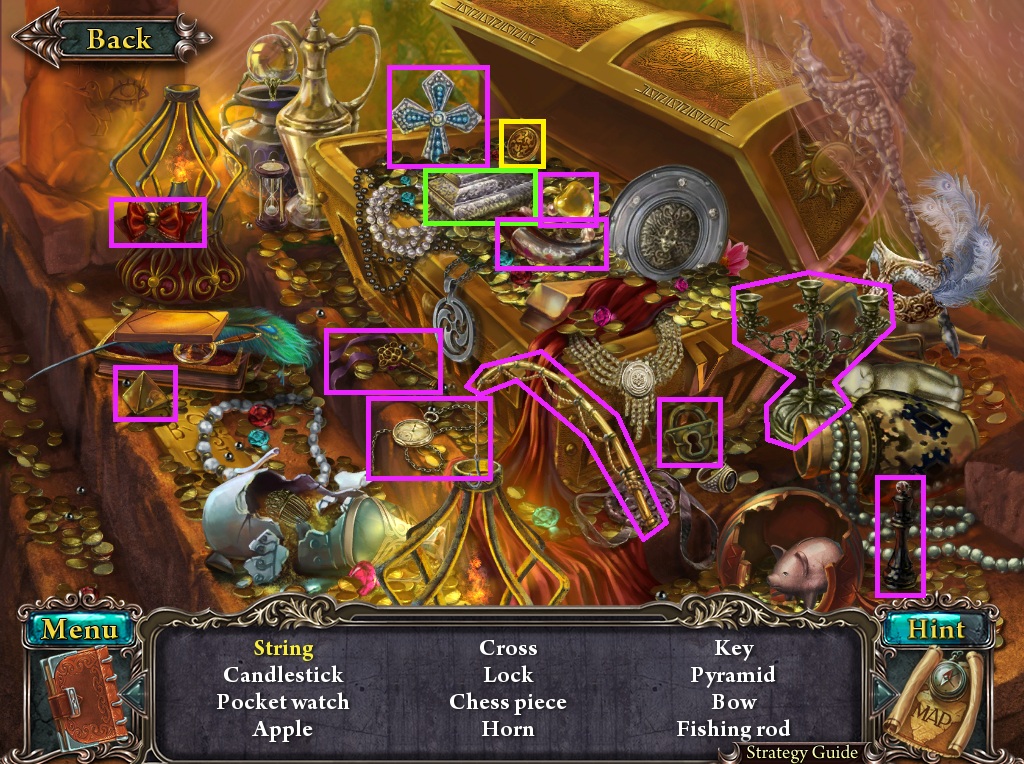
Stables
Take the Snowman's Hat on the ground to the left of the frozen fountain.
Take Coin #2 on the roof of the stables, partially obscured by the tree branch.
Take the Snowman Part (1/2) on top of the right side of the roof.
Click the pile of hay on the ground to reveal the Carrot.
Take the Snowman Part (2/2) behind the base of the right tree.
Add both Snowman Parts from your inventory to the unfinished snowman to the right of the fountain.
Put the Carrot in the snowman's nose and the Hat on top of his head.
Take the Axe sticking out of the trunk of the tree.
Use the Axe to break the barrel in front of the stables, revealing the Colorless Symbol (1/4).
Click the stable door for a closer look.
Use the Key to the Stables from your inventory on the padlock, then click the key to turn it.
Go through the open door to start the hidden object scene.
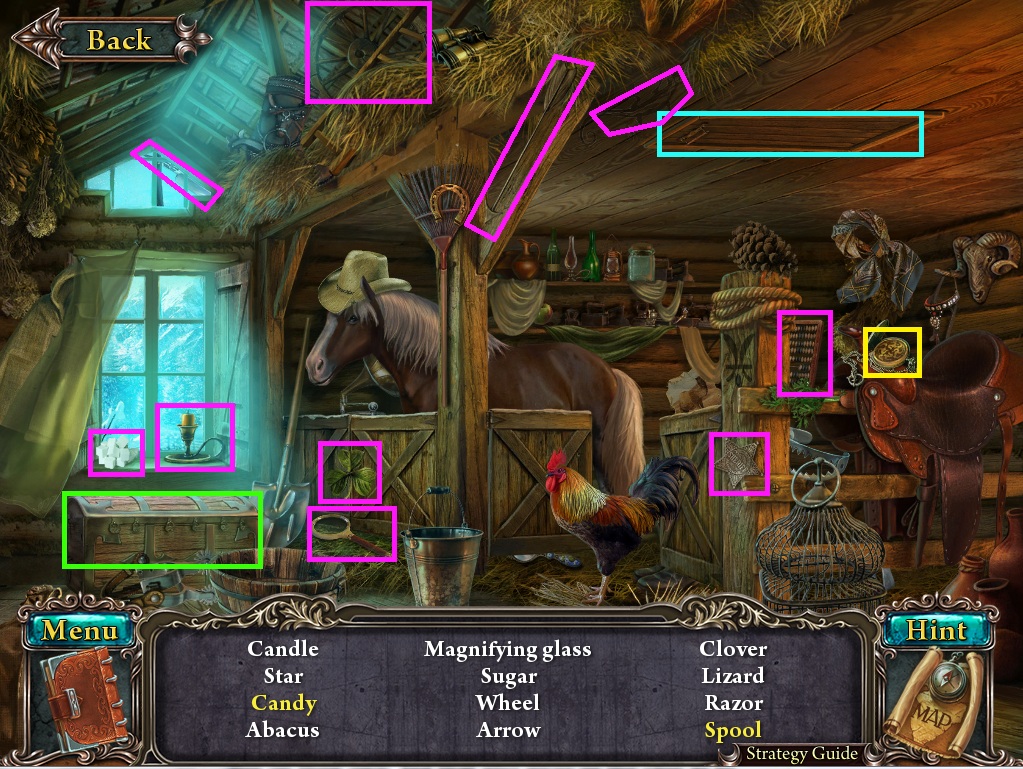
Take Coin #3 on top of the saddle.
Open the chest to reveal the Candy.
Open the hatch to reveal the Spool.
Screenshot.
Once the hidden object scene is complete, you will receive a Candle.
Click the Map and travel to the Small Hall.
Small Hall
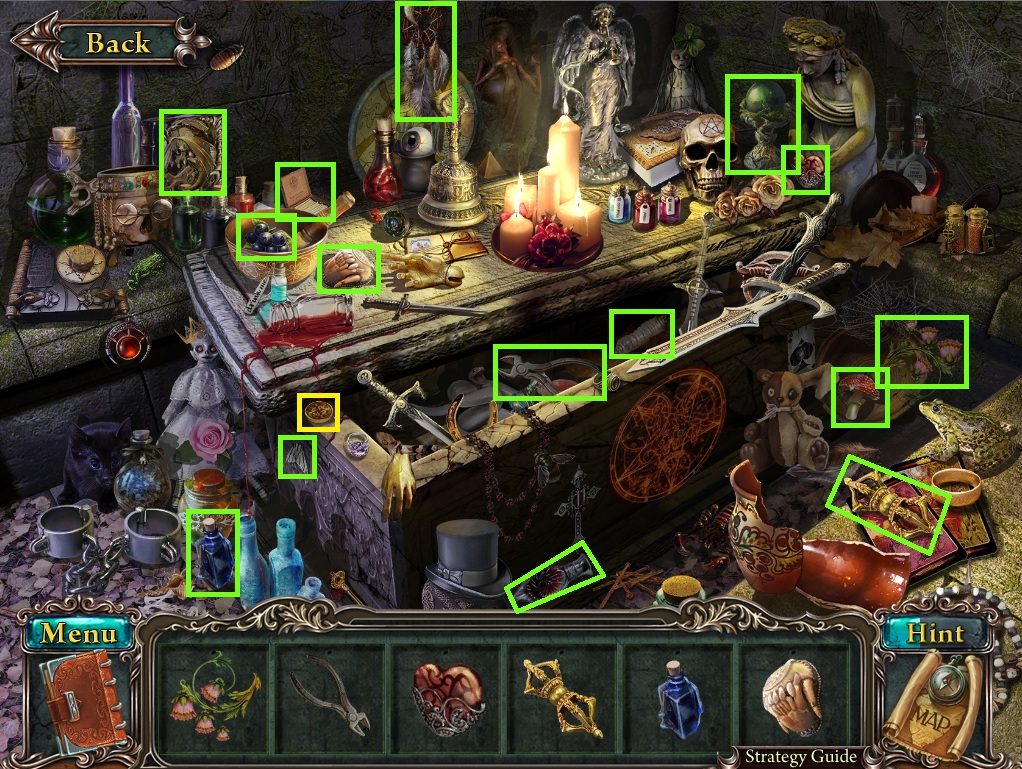
Take Coin #4 on the right wall beside the left sword banner and Coin #5 in front of the base of the eagle pedestal at the bottom of the stairs.
Take the Brush on the ground in front of the door.
Take the Colorless Symbol (2/4) between the lion and the left sword banner on the right wall.
Take the Light Bulb on the floor beside the right knight's foot.
Take the Colorless Symbol (3/4) at the bottom of the right sword banner.
Click the wooden door to prompt the cut scene.
Use the Candle from your inventory on the candle holder beside the right knight.
Use the Map to go back to the stables.
Stables
Click the pile of hay to the left of the stables to zoom in.
Click the base of the frozen fountain to zoom in.
Use the Candle from your inventory to melt the icycles blocking the pile of Coins.
Return to the small hall.
Small Hall
Give the Coins from your inventory to the two guards.
Go up the stairs to the observatory.
Observatory
Take Coin #6 in front of the scrolls on the ground between the two bookcases.
Take Coin #7 on top of the pile of books in front of the desk.
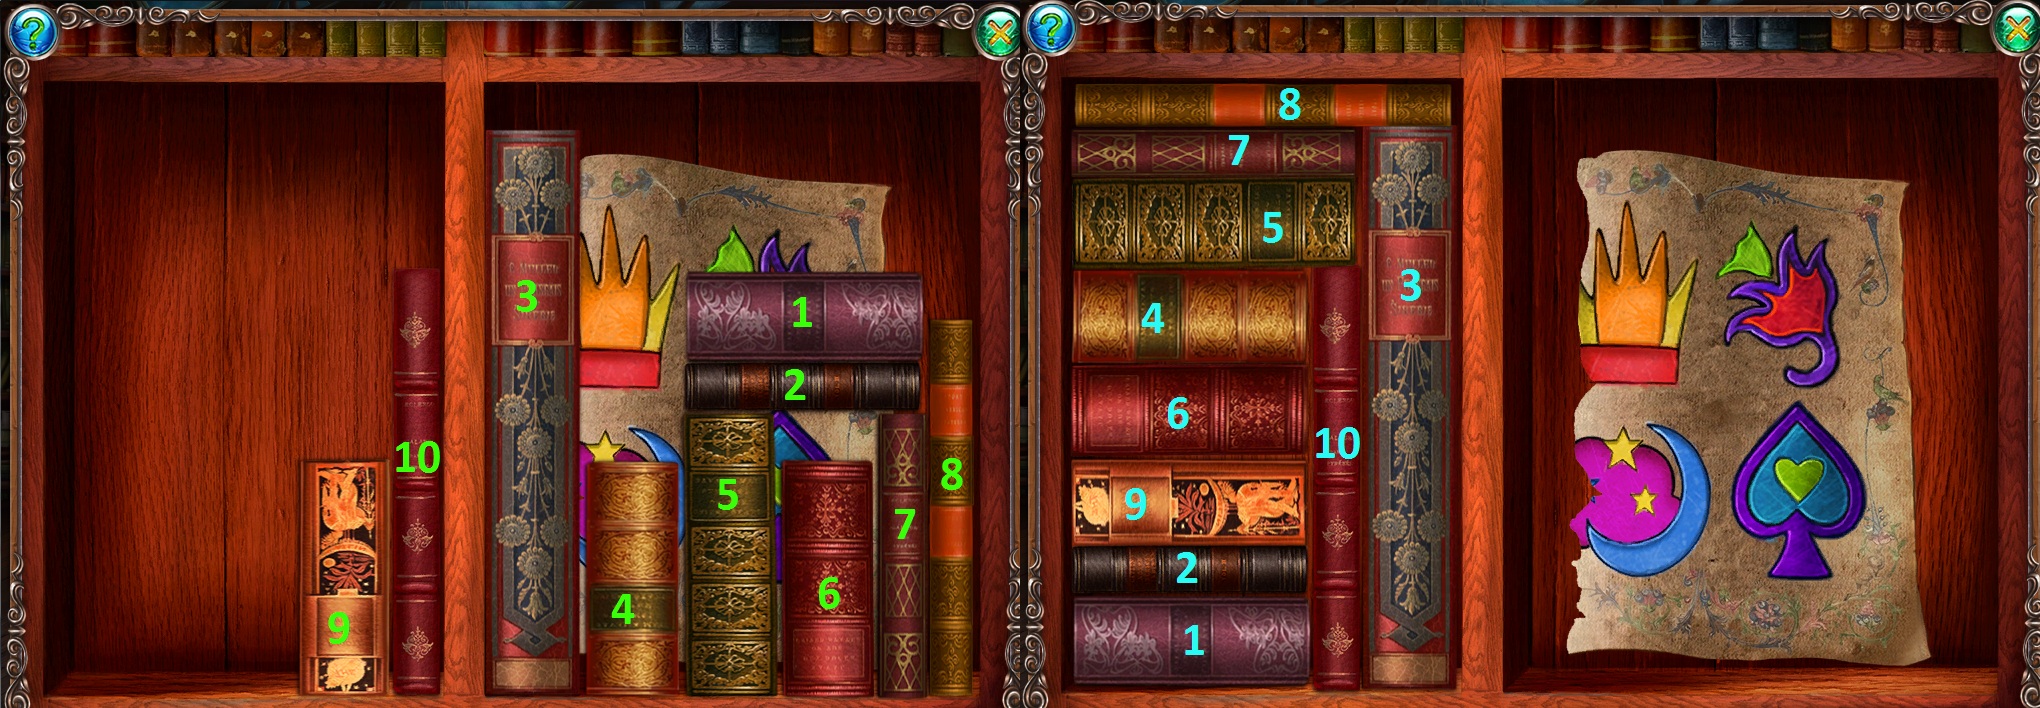
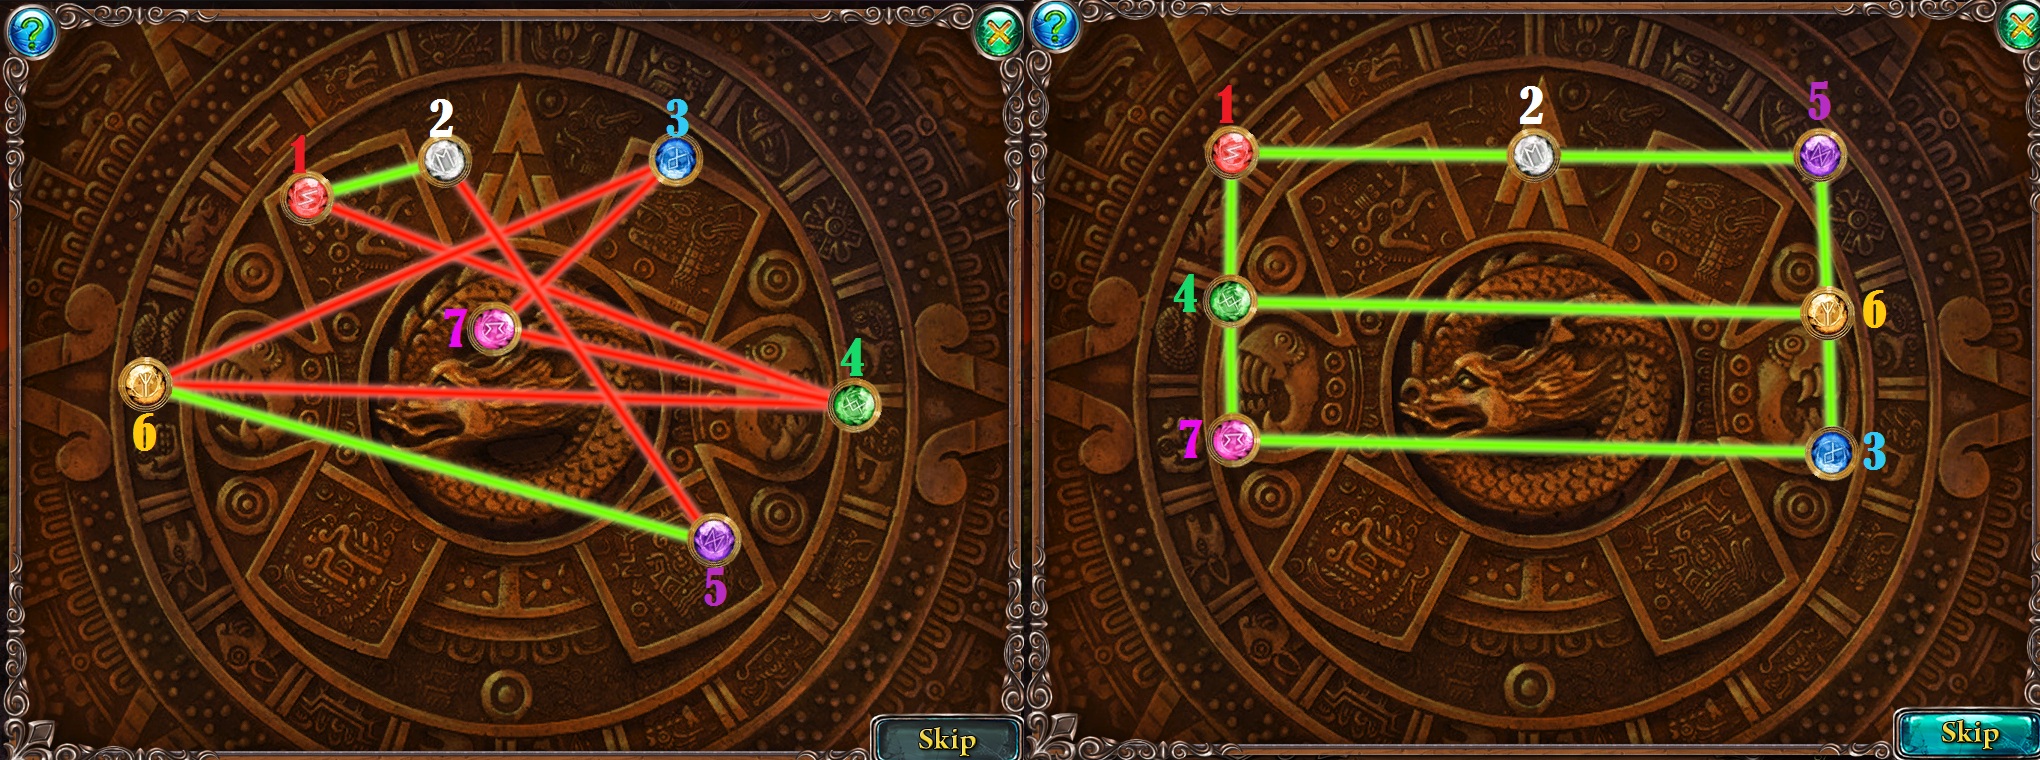
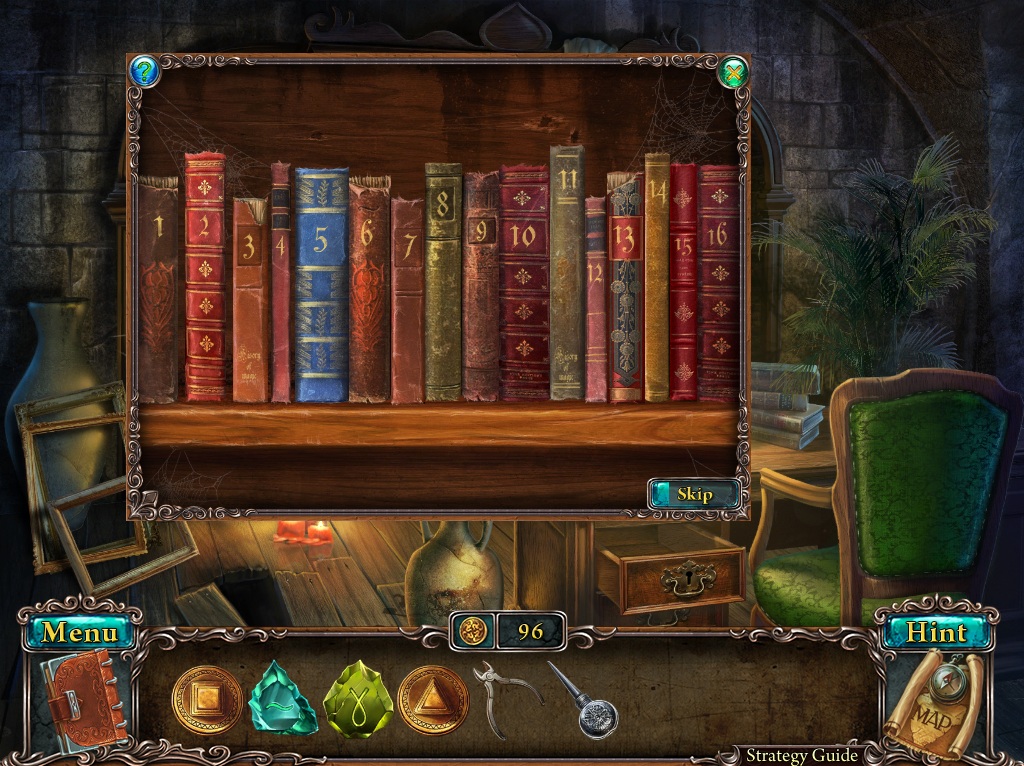
Click the bookcase to start the puzzle.
To solve this puzzle, move the books from the right shelf to the left shelf to reveal the whole paper.
Click a book to select it, then click a position on the shelf to place it.
While selected, right click to rotate a book 90 degrees.
Books cannot be placed through obstacles such as walls or other books.
Solution.
Once the puzzle is solved, click the Paper to add it to your inventory.
Take the Ice Pick on the floor beside the green desk chair.
Click the large telescope to look through it.
Use the Brush from your inventory to clear away all the dust from the lens. The percentage in the lower left corner tracks the progress of your dusting.
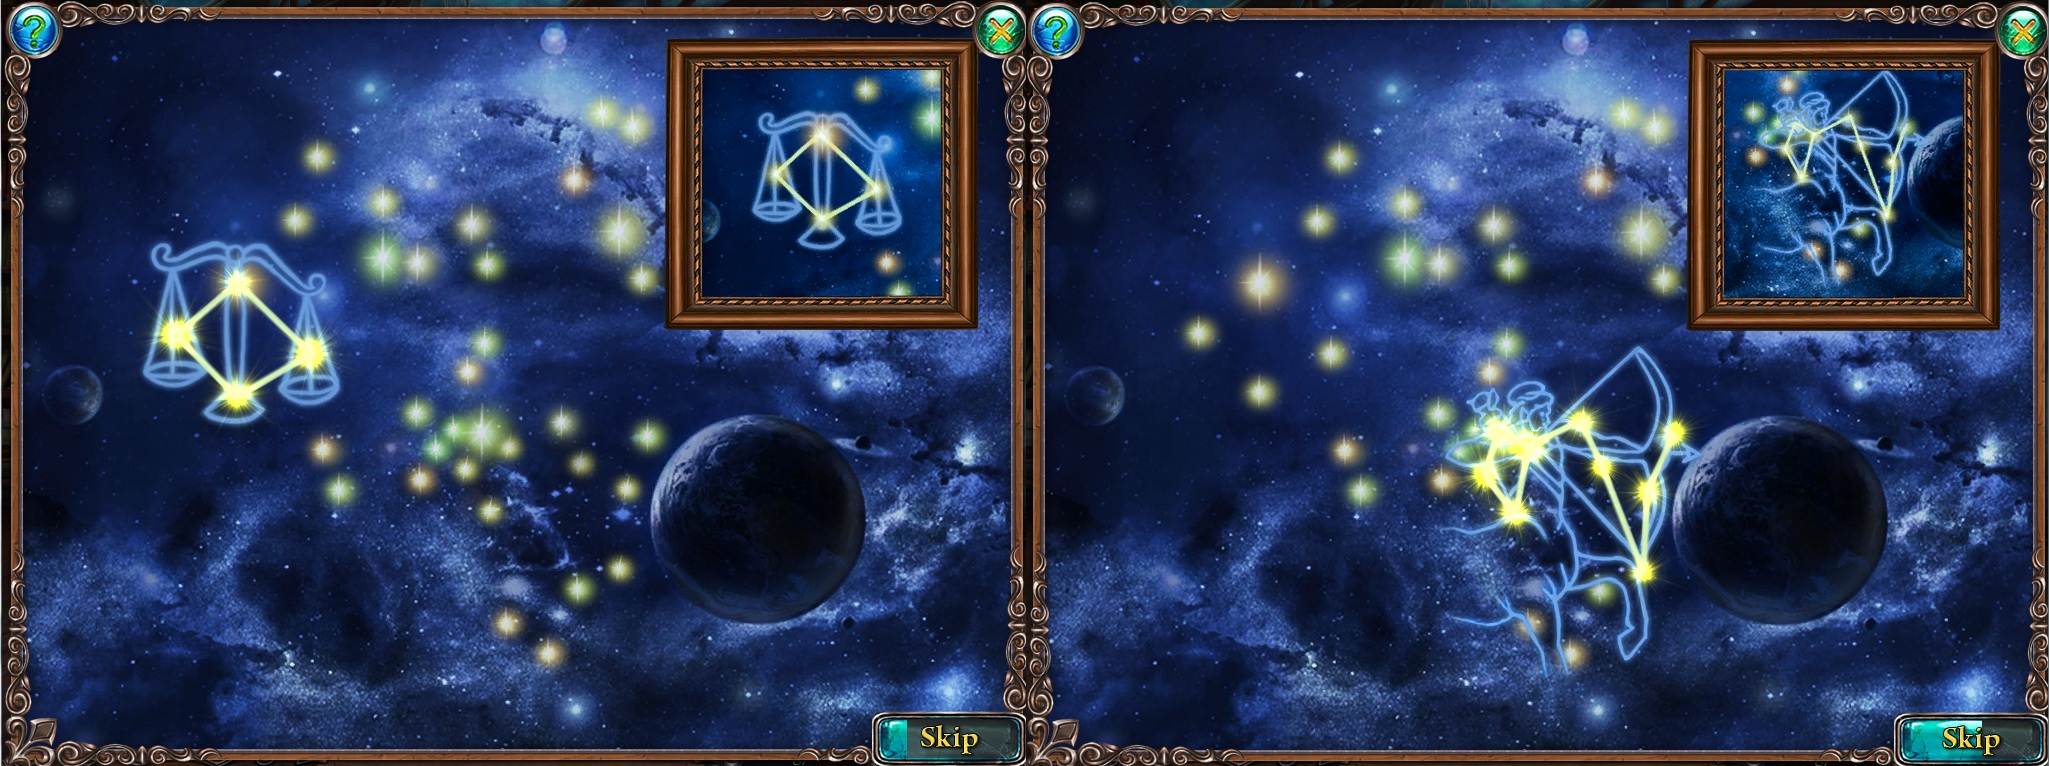
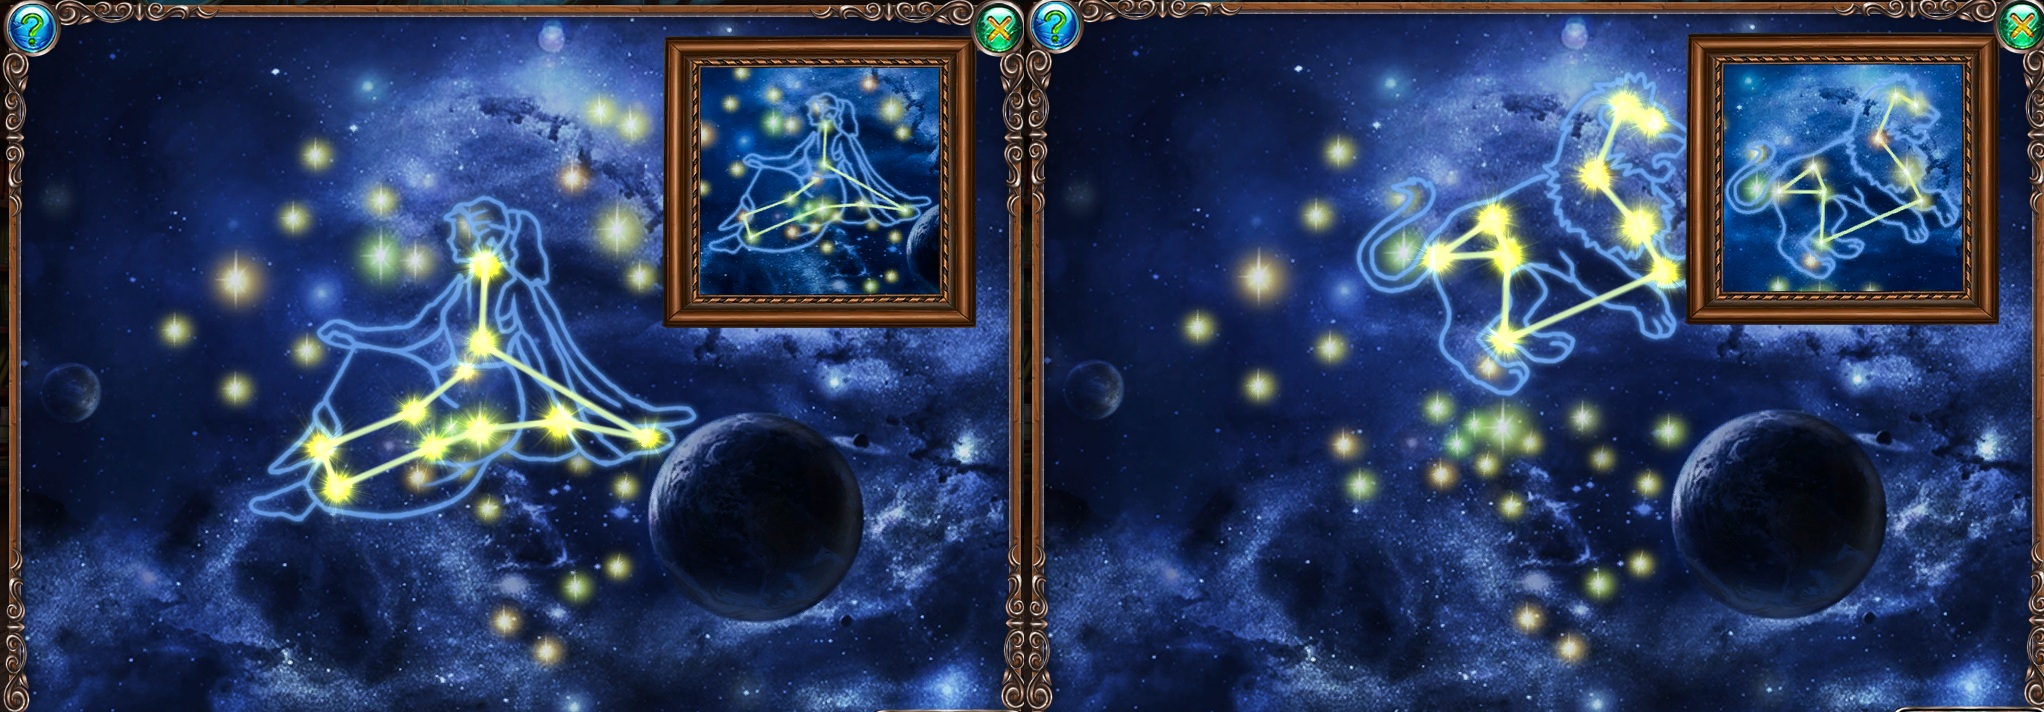
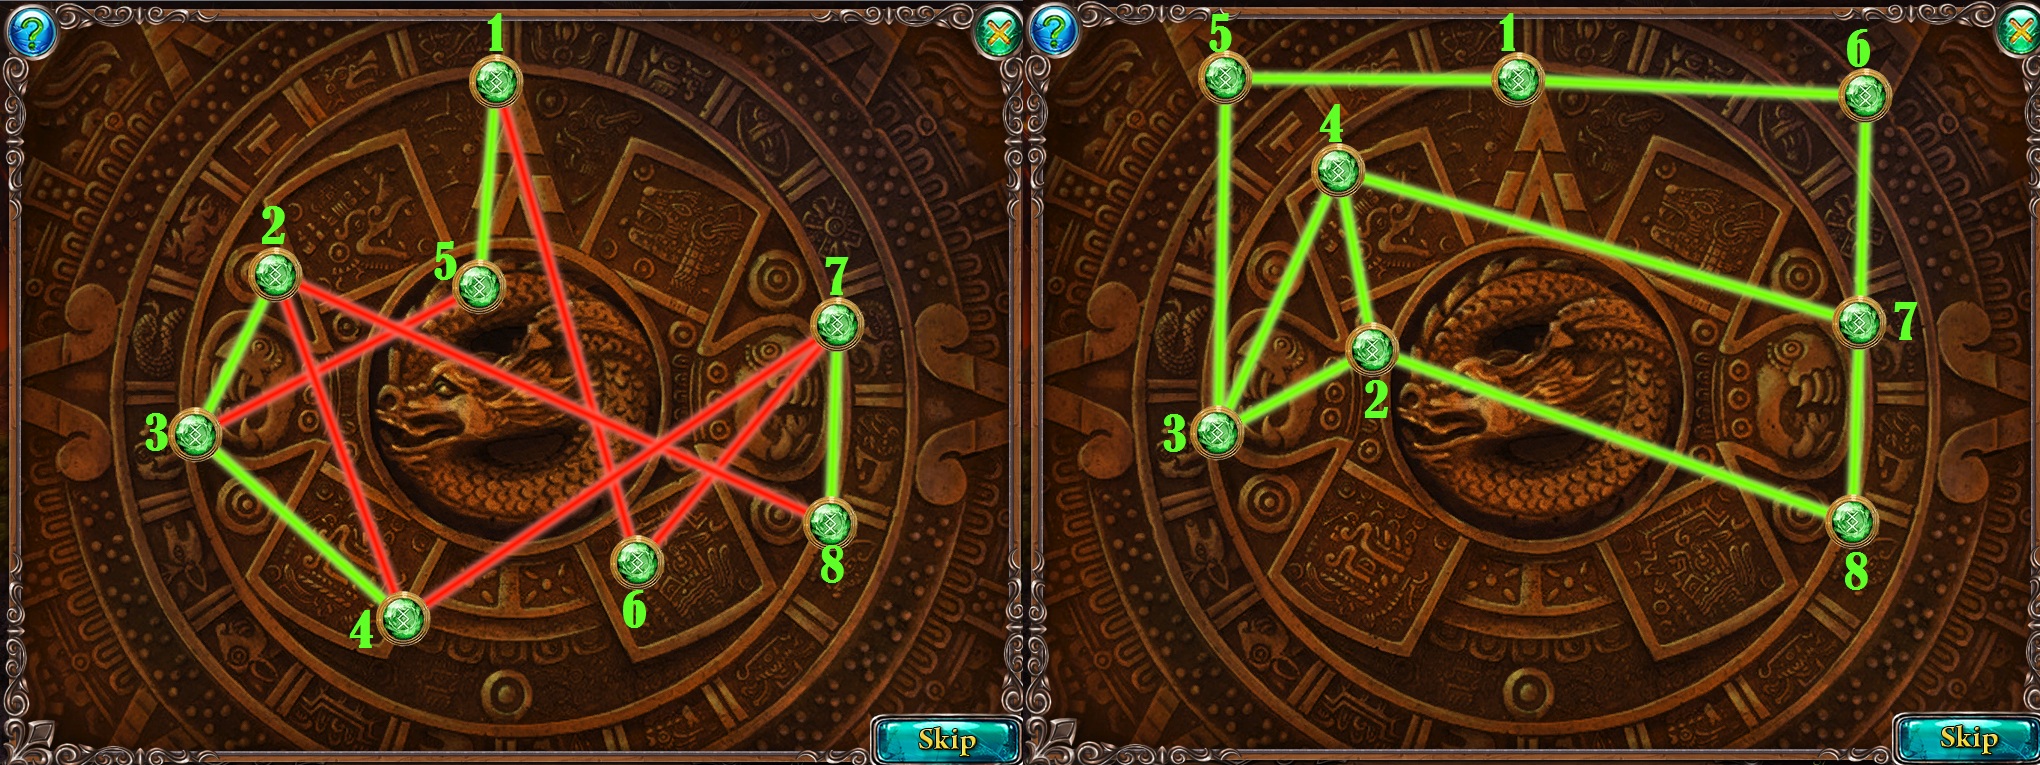
Click the cleaned telescope to start the puzzle.
To solve this puzzle, make the constellations by connecting the stars following the pattern shown in the image at the upper right corner.
Click a star to create a path of light between it and the previous star.
If correct, the path will lock in place and the star will glow brightly.
If incorrect, the cursor will briefly flash an X.
Solution Part 1.
Solution Part 2.
Once the puzzle is solved, a note with a code will be added to the Notebook.
Click the dome in the left window for a closer look.
Add the Lightbulb from your inventory to the stand under the dome.
Collect the 5 Stars revealed in the windows.
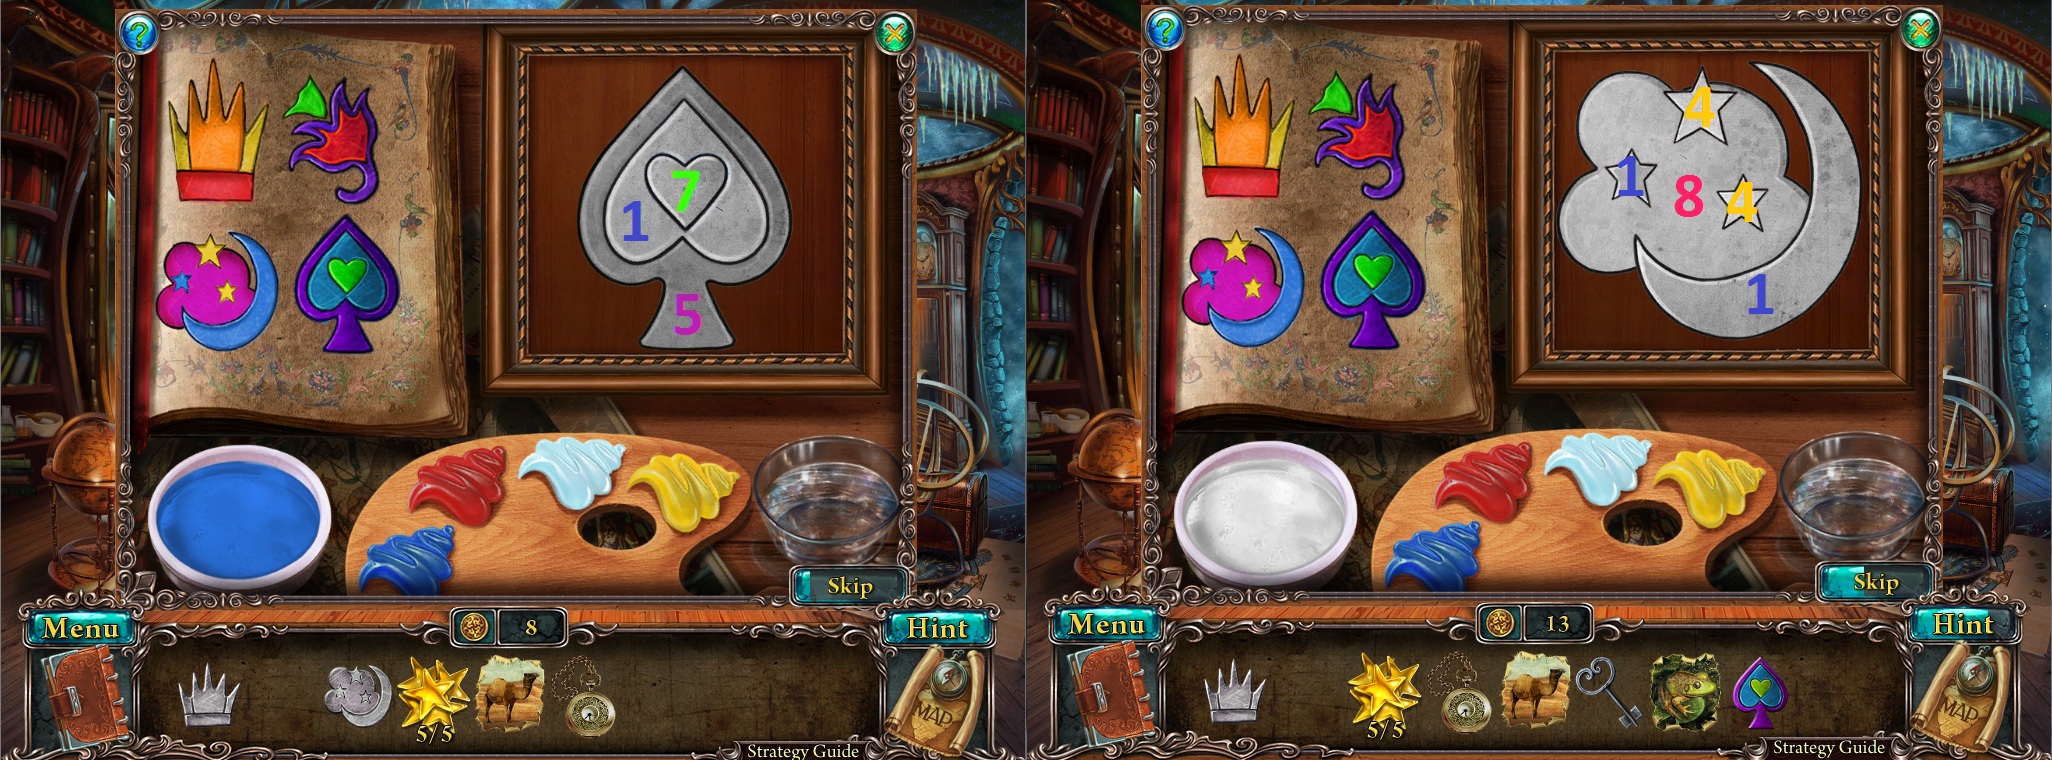
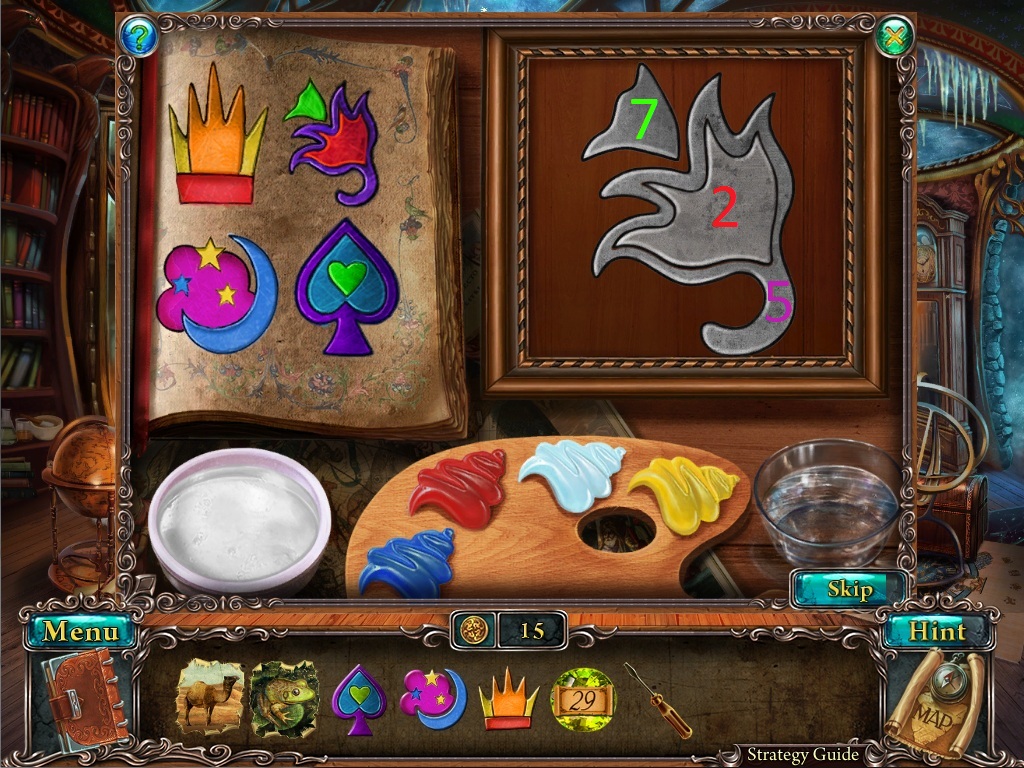
Click the book on the desk to zoom in.
Add the Page from your inventory to the ripped page on the book to star the puzzle.
To solve this puzzle, paint the Colorless Symbols from your inventory to match the colors images from the book.
Place a colorless symbol from your inventory on to the square.
Dip the brush in the paint and then use the brush on the symbol to paint it that color.
For the colorblind, the following screenshot will indicate colors by number.
Starting from the left of the palette, Blue is #1, Red, is #2, White, is #3, and Yellow is #4.
Combine the primary colors on the symbol to make secondary colors by first dipping the brush in the paint of one color, then putting the brush into the white bowl. Repeat the process to add a second different color.
Blue + Red = Purple #5. Red + Yellow = Orange #6. Blue + Yellow = Green #7. Red + White = Pink #8.
Click the glass of water to remove paint from the brush or to empty the white bowl.
Solution Part 1.
Solution Part 2.
For now, only 3 of the symbols can be completed, so the puzzle must be left unfinished.
Go back downstairs to the small hall.
Small Hall
Use the Ice Pick from your inventory to break through the ice wall blocking the door.
Click the door to zoom in to the puzzle.
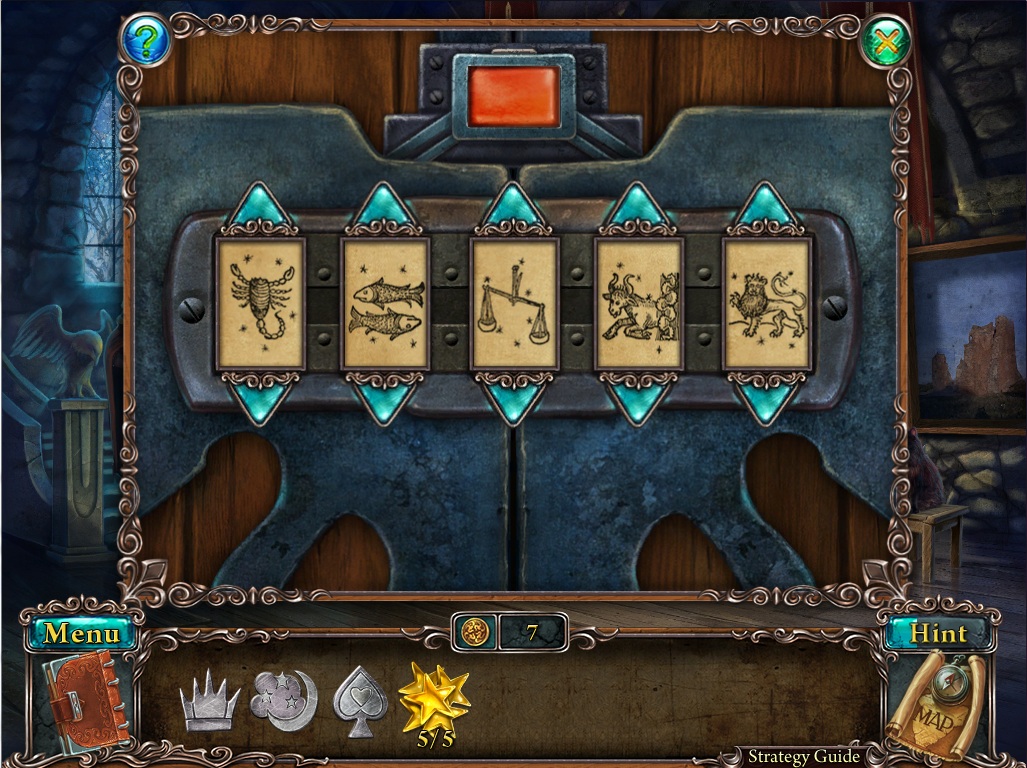
Enter in the combination of astrological signs found from the telescope puzzle.
You have already been given Scorpio, Pisces, Aries, and Libra, but the middle sign is unknown.
Click the up and down arrows at the ends of the dials to cycle through the signs.
Solution.
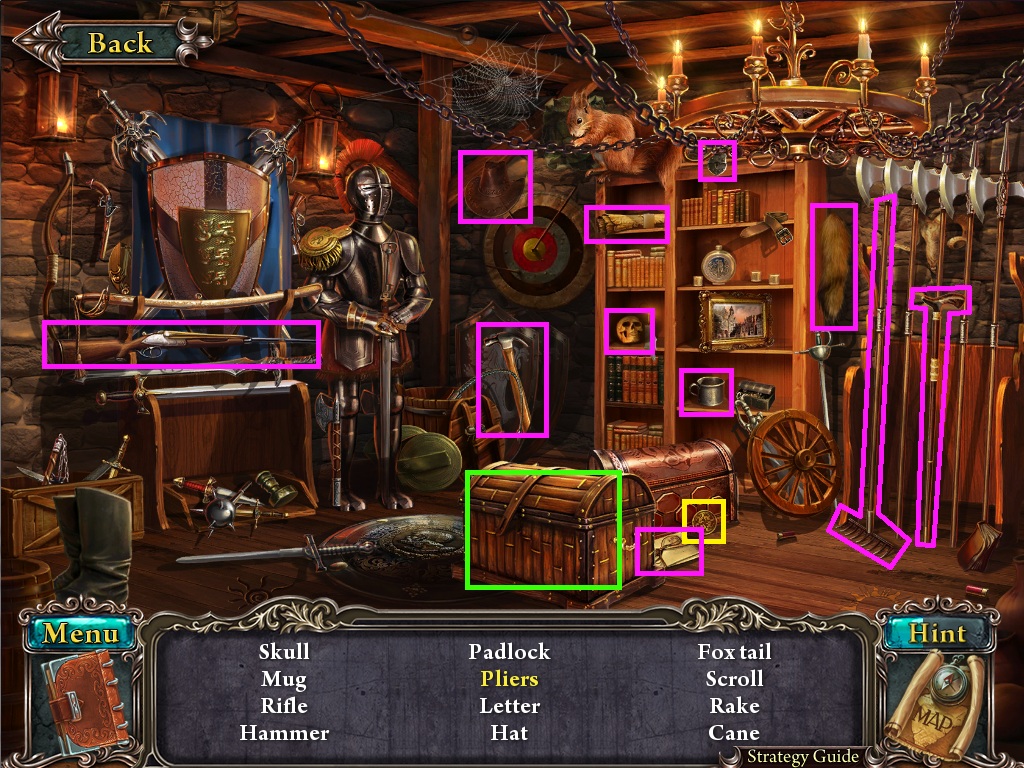
Once the puzzle is solved, click the opened door to start the hidden object scene.
Take Coin #8 on the floor in front of the iron chest.
Open the wooden chest to reveal the Pliers.
Screenshot.
Once the hidden object scene is complete, you will receive a Rake.
Use the Map to return to the stables.
Stables
Click the pile of hay beside the stables to zoom in.
Use the Rake from your inventory on the hay to reveal the Scarf.
Add the Scarf to the snowman, then take the Pocketwatch from its arm.
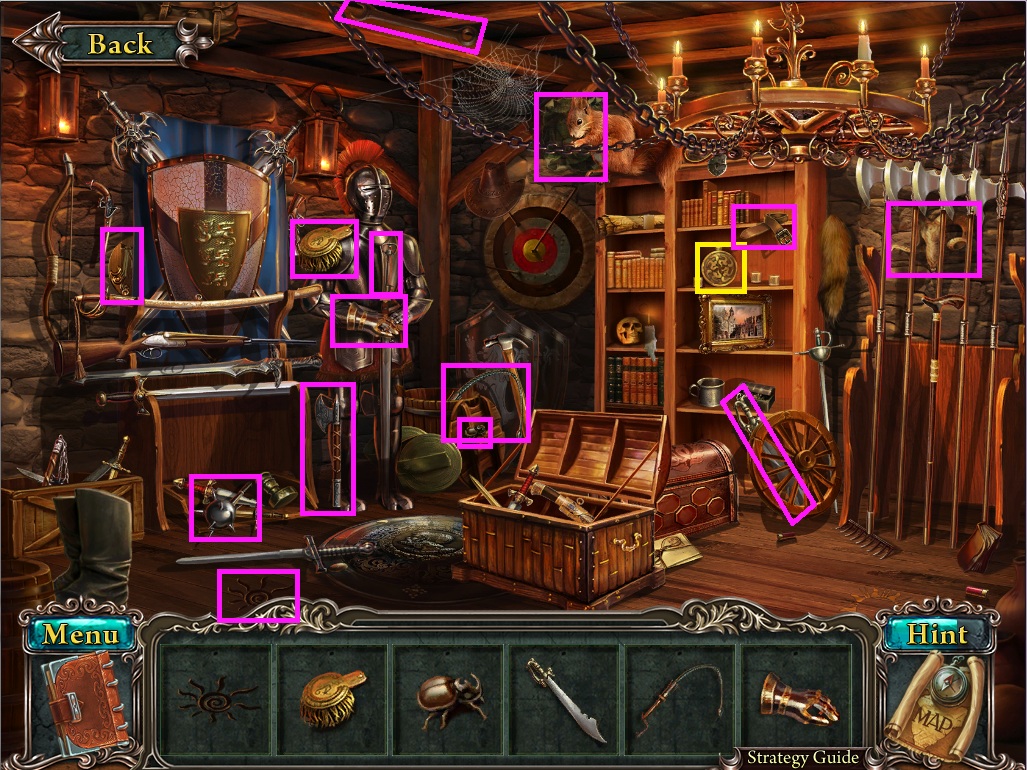
Click the doors to the stable to repeat the hidden object scene.
Take Coin #9 at the top of the rake.
Screenshot.
Once the hidden object scene is complete, you will receive a Piece of Canvas (1/3).
Use the Map to return to the small hall.
Small Hall
Click the door to repeat the hidden object scene.
Take Coin #10 on the bookshelf.
Screenshot.
Once the hidden object scene is complete, you will receive a Piece of Canvas (2/3).
Use the Map to travel to the cabinet.
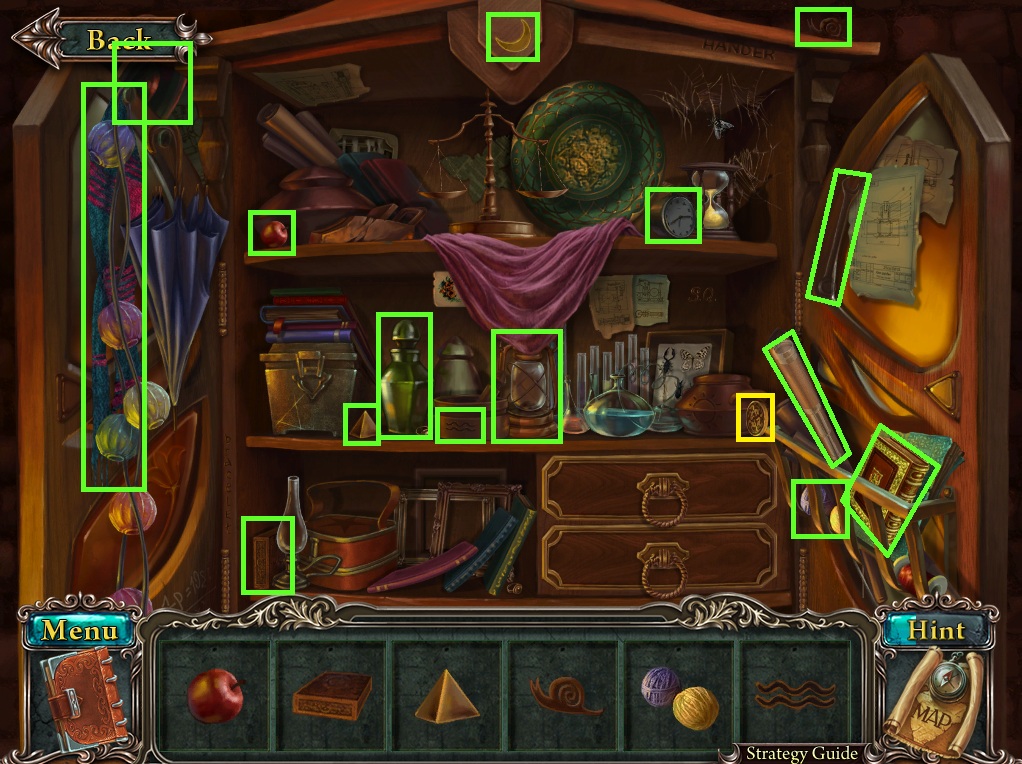
Cabinet
Take Coin #11 in the face of the grandfather clock.
Take Coin #12 on the windowsill.
Click the mirrors around the room to aim the beam of light at the hole in the floor boards.
Click the hole to zoom in and take the Key to the Library.
Screenshot.
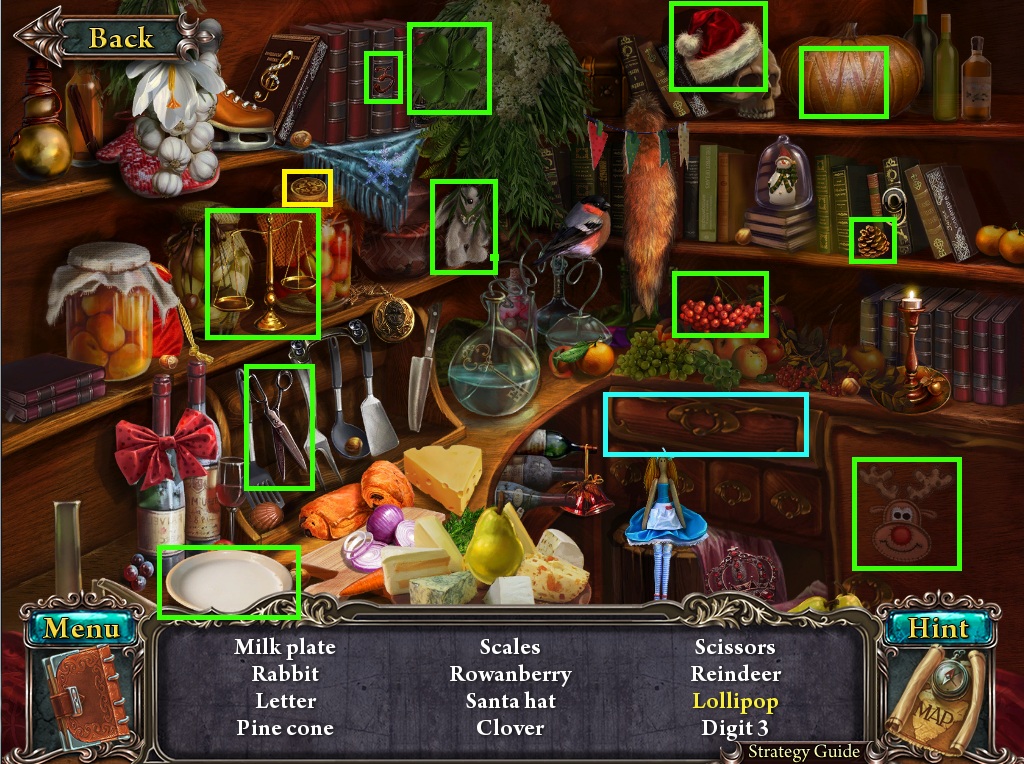
Click the shelves to start the hidden object scene.
Take Coin #13 on top of the jar of apples.
Open the cabinet to reveal the Lollipop.
Screenshot.
Once the puzzle is solved, you will receive a Plate of Milk.
Click the large treasure chest to zoom in.
Add the 5 Stars from your inventory to the golden eagle to open the chest, then take the Gem (1/3) inside.
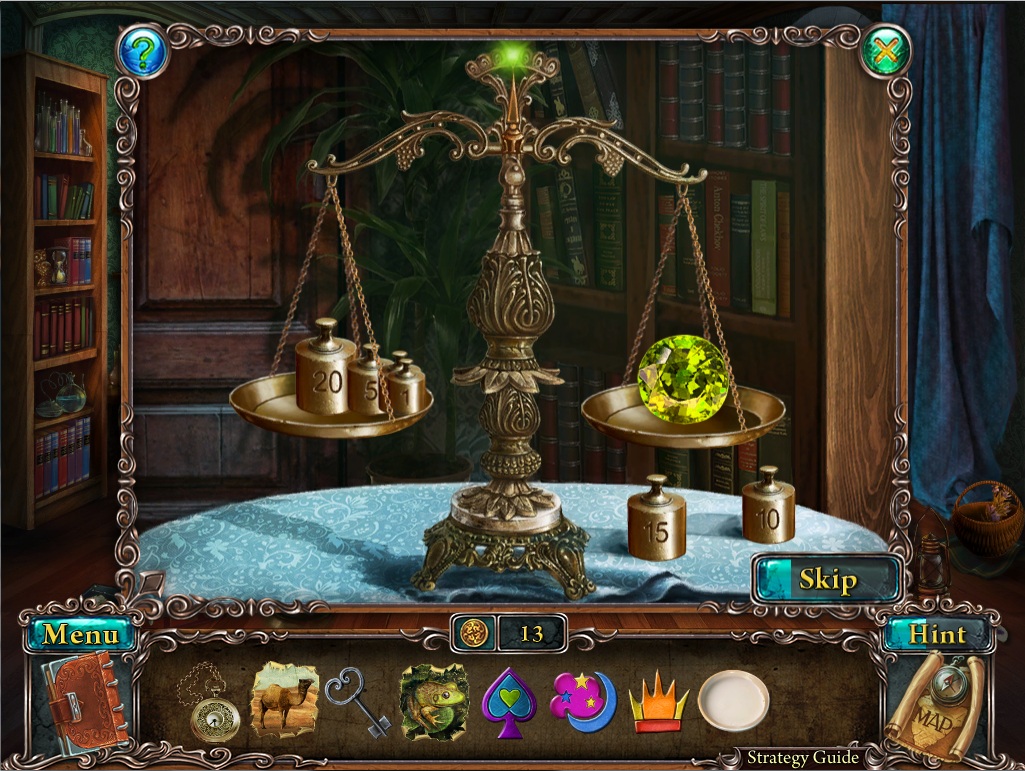
Click the scale on the table to zoom in.
Add the Gem from your inventory to one of the plates of the scale to start the puzzle.
To solve the puzzle, use the weights to balance with the gem on the scale.
Click a weight to select it, then click either the scale or the table to place it.
Add weights 20, 5, 3, and 1 to the scale.
Solution.
Click the door in the back of the room for a closer look.
Use the Key to the Library from your inventory on the keyhole.
Click the key to turn the lock, then click the handle to open the door.
Go through the open door into the library.
Library
Give the Pocket Watch from your inventory to the librarian to receive the Screwdriver.
Take Coin #14 between the legs of the overturned chair.
Take Coin #15 leaning against the book on the floor to the left of the hourglass.
Use the Map to go back to the Small Hall.
Small Hall
Give the Plate of Milk from your inventory to the cat on the stool.
Take the Colorless Symbol (4/4) left behind on top of the stool.
Go up the stairs into the observatory.
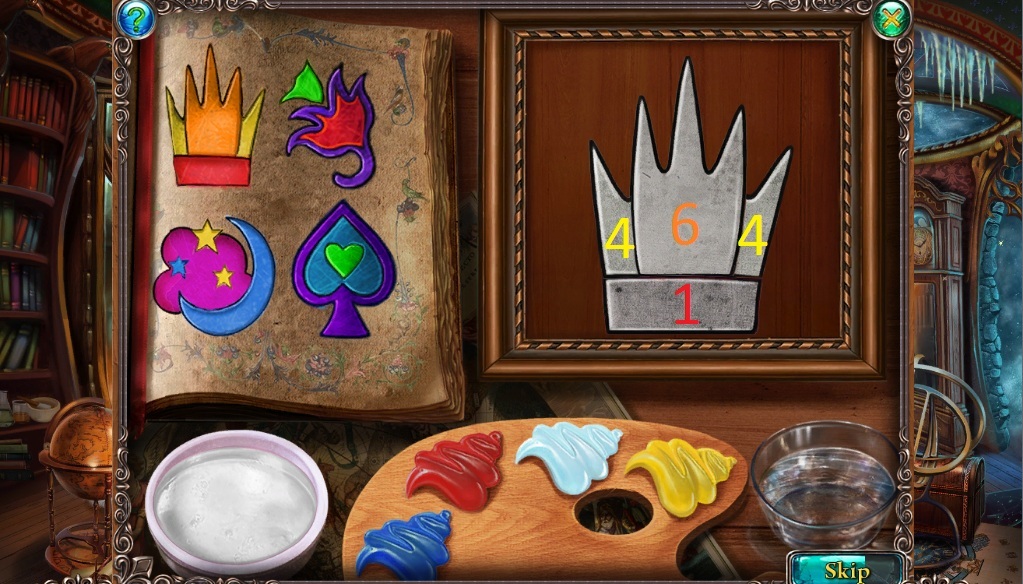
Observatory
Click the table to zoom in.
Add the Colorless Symbol from your inventory to the square to complete the puzzle.
As before, use the paint brush to paint the symbol to match the image in the book.
Solution.
Go back downstairs to the small hall.
Small Hall
Click the coat of arms above the door to zoom in.
Add the four colored symbols from your inventory onto their matching spaces carved into the shield.
Take the Gem (2/3) from the revealed secret compartment behind the shield.
Use the Map to return to the cabinet.
Cabinet
Click the bookcase to repeat the hidden object scene.
Take Coin #16 on the top right shelf next to the pumpkin.
Screenshot.
Once the hidden object scene is complete, you will receive a Door Handle.
Click the scale to zoom in.
Add the 2nd Gem from your inventory to the scale plate to repeat the puzzle.
As before, find the weight of the gem by balancing it with the weights on the scale.
Add the 20, 10, 3, and 1 weight to the scale.
Solution.
Return to the library.
Library
Click the cabinet of the desk to zoom in.
Add the Door Handle from your inventory to the cabinet door.
Use the Screwdriver on the handle to tighten the screws.
Open the cabinet and take the Gem (3/3) inside.
Go back to the cabinet.
Cabinet
Click the scale on the table to zoom in.
Add the third Gem from your inventory to the scale plate to repeat the puzzle.
As before, find the weight of the gem by balancing it with the weights on the scale.
Add the 15, 3, and 1 weight to the scale.
Solution.
Return to the library.
Library
Click the safe in the middle of the bookcase to zoom in.
Add the three Weighted Gems from your inventory to the scale to start the puzzle.
To solve this puzzle, enter the combination by setting the dials to the weight equal to each gem.
Click a dial to cycle through the numbers 0-9.
Solution.
Once the puzzle is solved, take the Piece of Canvas (3/3) inside the open safe.
Click the paintings on the wall to zoom in.
Place the Piece of Canvas with the camel into the desert painting on the upper right.
Place the Piece of Canvas with the toad into the lily pad painting on the lower right.
Place the Piece of Canvas with the penguin into the iceberg painting on the lower left.
Take the Magic Bowl from the revealed cache behind the paintings.
Use the Map to travel to the magic altar.
Magic Altar
Use the Magic Bowl from your inventory on the altar to receive a Piece of Canvas.
Chapter 2 - Forest Kingdom
Painting Gallery
Click the painting to the left of the son's portrait to zoom in.
Use the brush to remove all of the dust from the painting. The percentage in the lower left corner will track your progress.
Click the painting to travel to the forest kingdom.
The Magic Well
Take Coin #17 on the ground to the left of the tree.
Take the Carrot on the ground in front of the well.
Take the Medallion Part (1/2) on the ground to the left of the fountain.
Give the Carrot to the white rabbit in front of the tree.
Take the revealed Medallion Part (2/2) in the hole at the base of the tree.
Use the two Medallion Parts from your inventory on the carved star in the front of the stone structure.
Take the Forest Hut Key from the revealed cache.
Use the Map to travel to the forest hut.
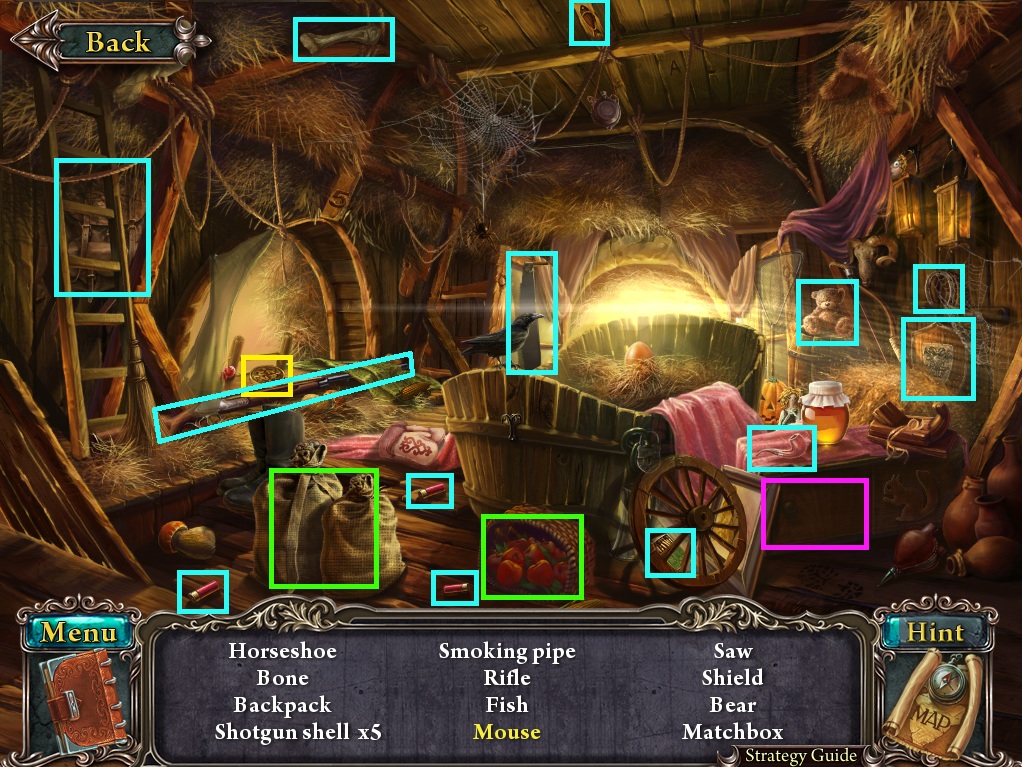
Forest Hut
Take Coin #18 on the first floor windowsill of the hut.
Take Hazelnut (1/5) above the watering can next to the fence.
Take the Mushroom (1/3) in the grass on the right side of the path.
Take the Hazelnuts (2/5) and (3/5) on the ground of the path.
Take the Dove perched on the fence post.
Take the Hazelnut (4/5) on the far left fence post.
Take the Mushroom (2/3) in the grass above the left fence post.
Take the Mushroom (3/3) in the grass between the pink and purple flowers.
Click the ferns in the bottom left corner of the screen to reveal the Hazelnut (5/5).
Click the birdhouse to zoom in.
Use the Dove from your inventory on the platform in front of the birdhouse to receive Coin #19.
Click the door of the hut to zoom in.
Use the Forest Hut Key from your inventory on the keyhole.
Click the key to turn it, then click the handle to open the door.
Click the open door to go inside.
Inside the Hut
Take Coin #20 in front of the flower vase on the right windowsill.
Click the forester to speak with him.
Click the chalkboard above the fireplace for a closer look.
Note the order of ingredients in the recipe for making forester's soup.
Take the Wooden Spoon hanging above the fireplace.
Click the stairs to the cellar to start the hidden object scene.
Take Coin #21 in front of the jar on the middle shelf to the far left.
Take Coin #22 on the floor to the left of the bucket.
Solution.
Once the hidden object scene is complete, you will receive a Pipe Segment.
Use the Pipe Segment on the missing pipe space at the top of the stove.
Put the Hazelnuts from your inventory inside the bowl above the grinder.
Click the handle of the grinder 3 times, then take the bowl of Ground Nuts from the dish below the grinder.
Take the Bucket underneath the grinder.
Take the Ladder leaning against the wall to the left of the window.
Go back outside the hut.
Forest Hut
Click the well to zoom in.
Use the Bucket from your inventory on the well.
Click the handle to pull the rope back up, then take the Bucket of Water.
Use the Ladder on the open window at the second floor of the hut.
Click the window to start the hidden object scene.
Take Coin #23 on the left windowsill.
Click the sacks to reveal the Shotgun Shell (4/5).
Move the basket of apples to reveal the Shotgun Shell (5/5).
Open the drawer to reveal the Mouse.
Solution.
Go back inside the hut.
Inside the Hut
Use the Bucket of Water from your inventory on the cauldron above the fire.
Light the cauldron fire with the Matches.
Add the Mushrooms and Ground Nuts to the cauldron.
Stir the mixture with the Wooden Spoon to receive the Wooden Spoon with Soup.
Give the Wooden Spoon with Soup to the forester to receive the Harp.
Use the Map to travel to the Flower Temple.
Flower Temple
Take Coin #24 and the Oil Can at the foot of the right statue.
Use the Harp from your inventory on the left statue to receive Coin #25.
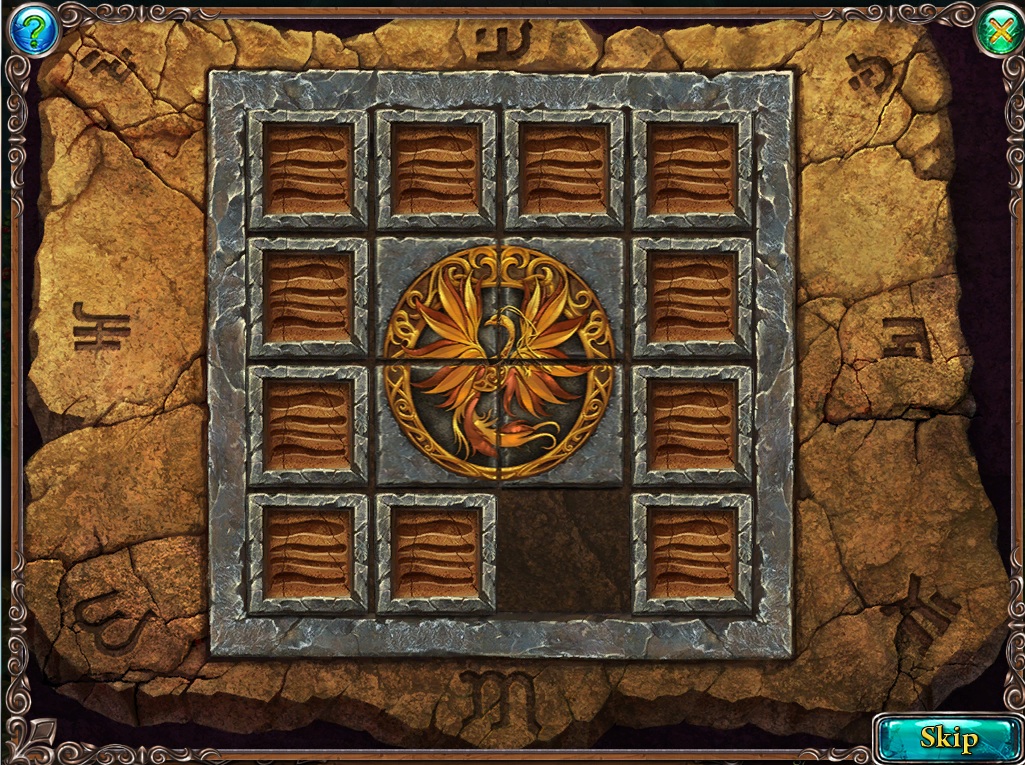
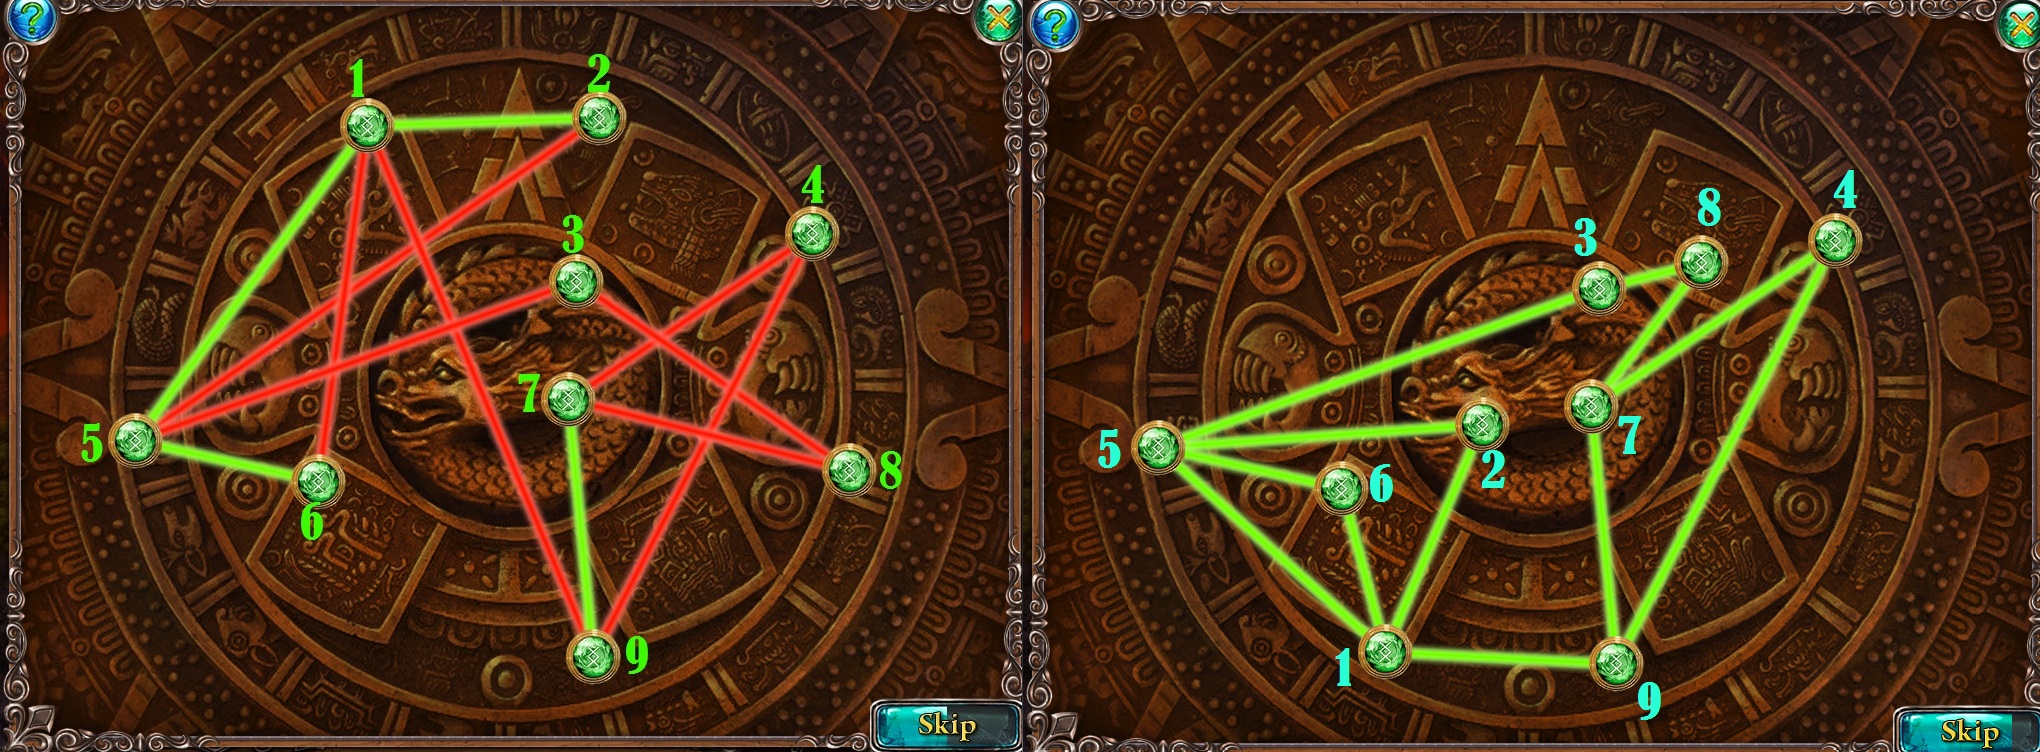
Click the board on the stone slab to start the puzzle.
To solve the first part of the puzzle, arrange the tiles so that the round tiles complete the circular image in the center of the board.
Click a tile to select it then drag it into an empty space to place it.
Tiles cannot be moved diagonally or through other tiles.
The position of the outer square tiles is not significant; only the circular tiles need to be correctly placed.
Solution.
To solve the second part of the puzzle, rotate the dials to complete the circular image of the phoenix.
Click and hold a dial to select it, then rotate it clockwise or counterclockwise.
Solution.
Once the puzzle is solved, you will receive a Piece of Stone
Add the Piece of Stone from your inventory to the top of the column on the left side of the center slab.
Click both of the stones on the pillars to drain the water from the fountains.
Take the revealed Chest Key from the right side of the fountain and use it on the chest at the left side of the fountain.
Take the Mosaic Part from the opened chest.
Use the Map to travel to the fairy meadow.
Fairy Meadow
Take the Coin #26 in the grass on the right side of the tree.
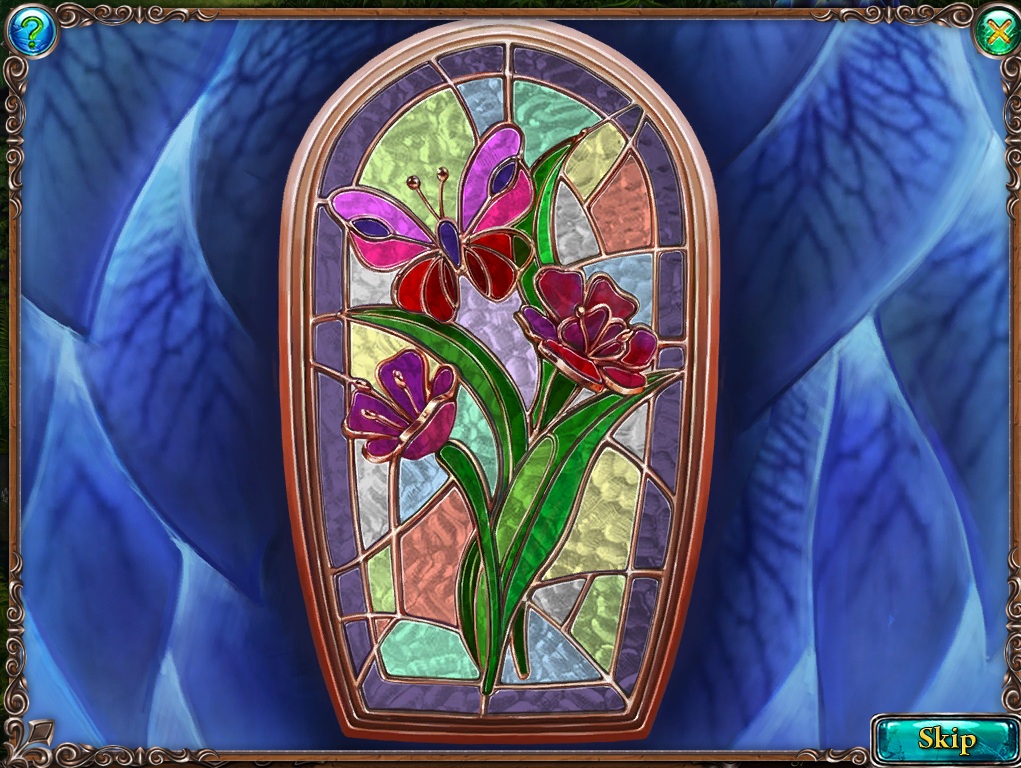
Click the glass pain in the center of the large, glowing flower hanging from the tree to zoom in.
Use the Mosaic Part from your inventory on the unfinished mosaic to start the puzzle.
Arrange all the glass pieces to complete the mosaic.
Click a shard to select it, then click a position on the pane to set it. If correct, the piece will lock in place.
Solution.
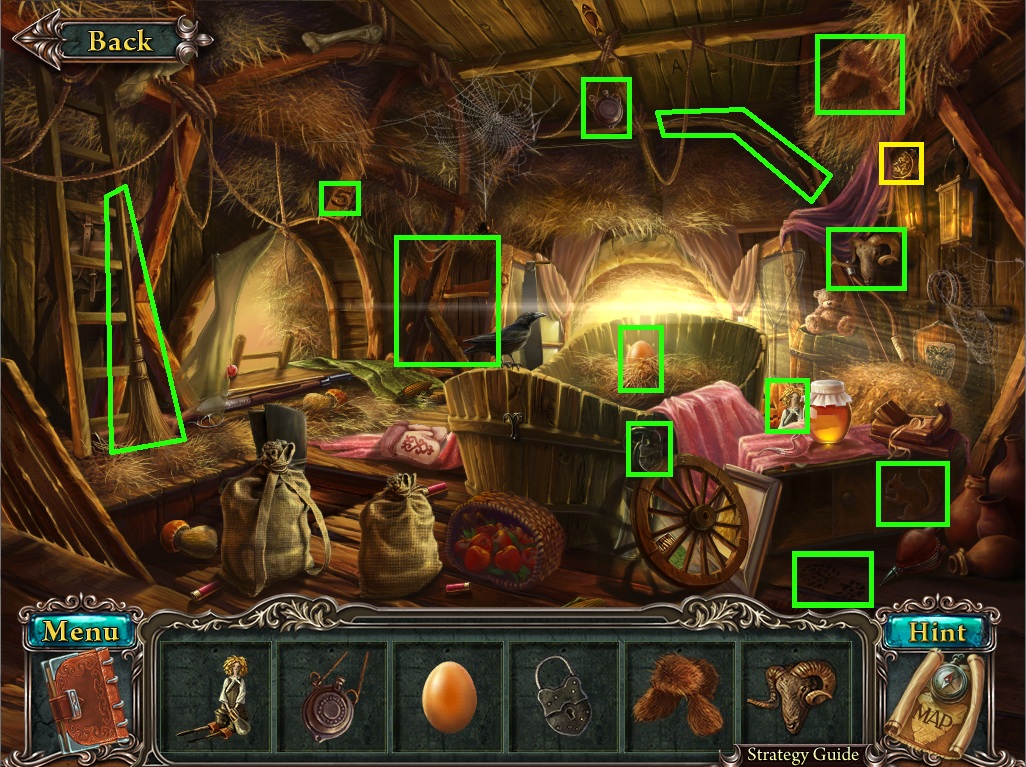
Once the puzzle is solved, click the open window in the flower to start the hidden objct scene.
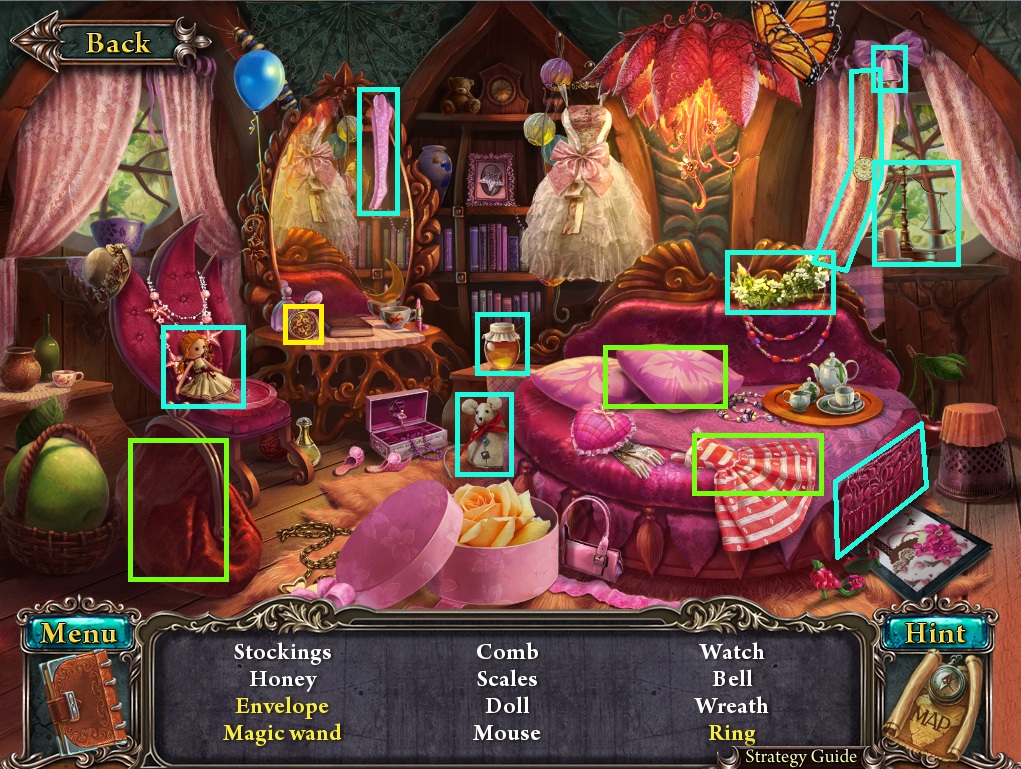
Take Coin #27 on the table in front of the large mirror.
Open the large coinpurse to reveal the Ring.
Move the dress aside to reveal the Magic Wand.
Move the pillow to reveal the Envelope.
Solution.
Once the hidden object scene is complete, you will receive a Magic Wand.
Use the Magic Wand on all of the lilly pads in the lake, then take the Diadem from the large flower in the center.
Give the Diadem to the fairy woman to receive the Portal Key.
Click the large stone door to zoom in.
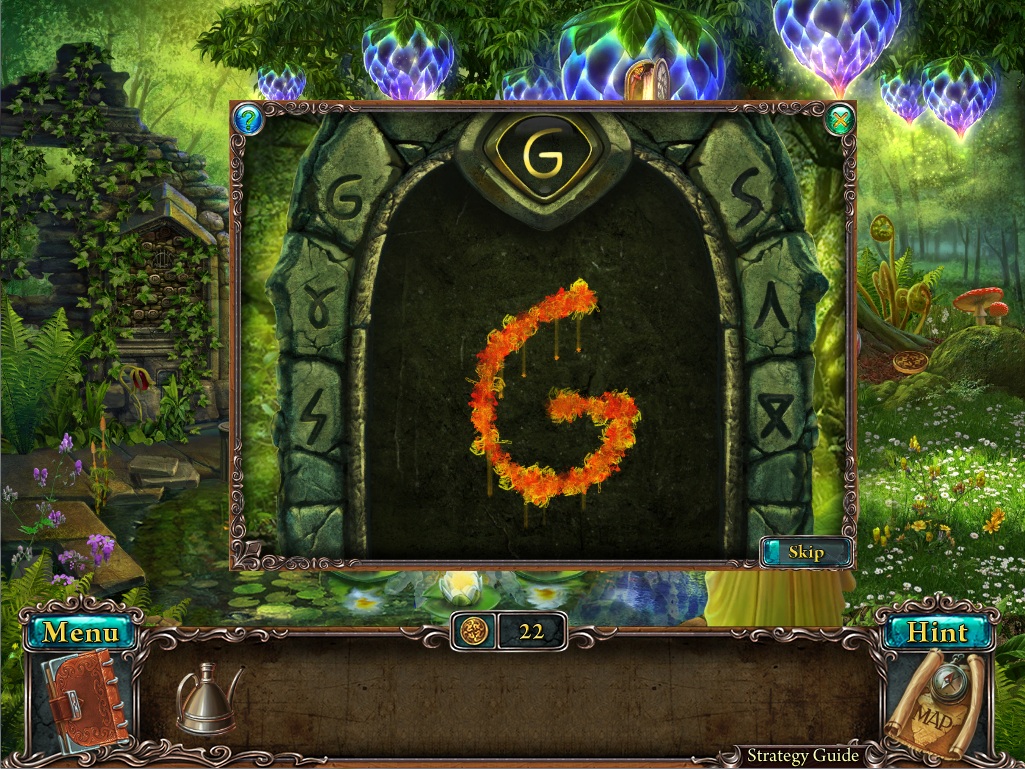
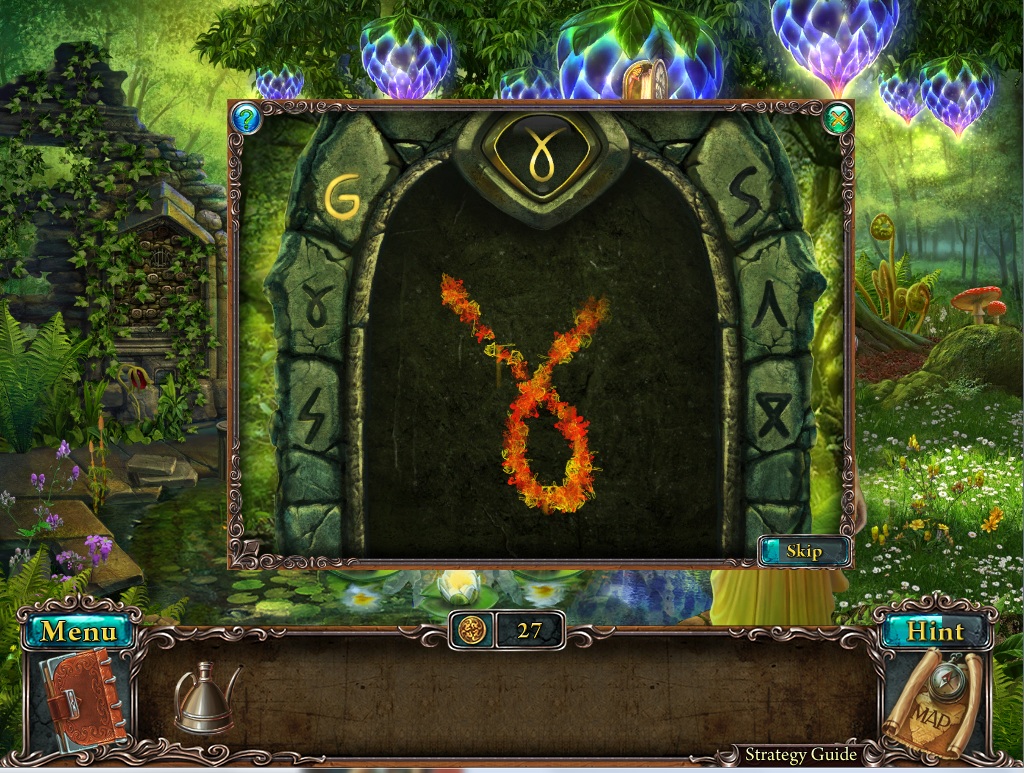
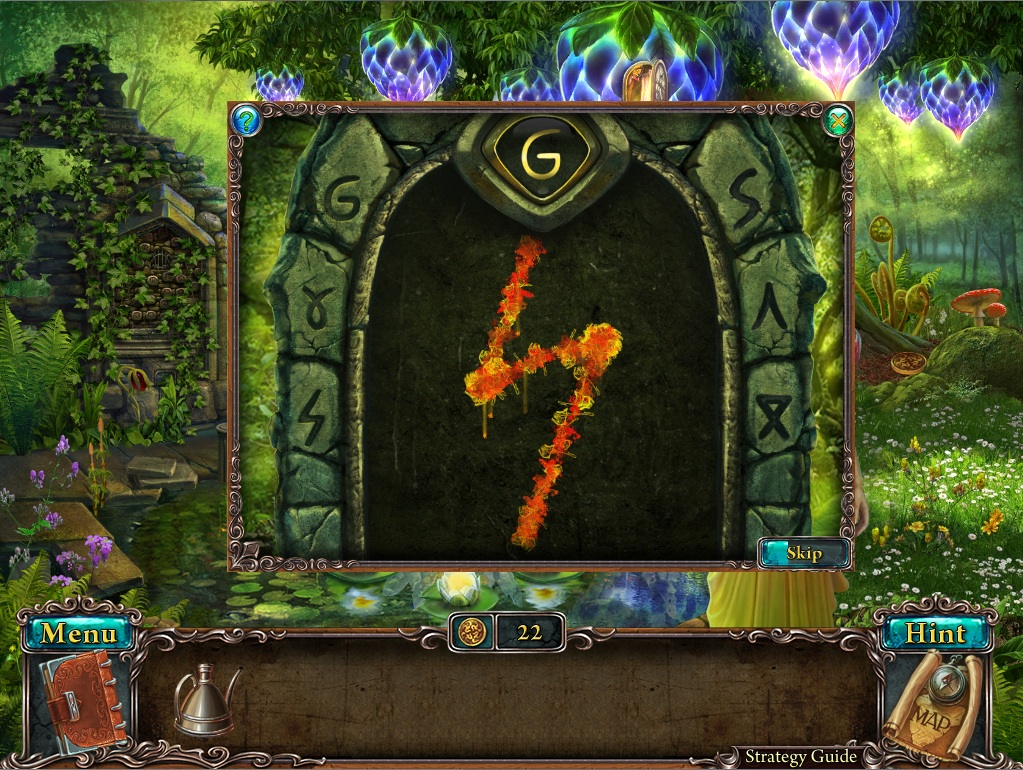
Use the Portal Key on the recess in the center of the bricks to start the puzzle.
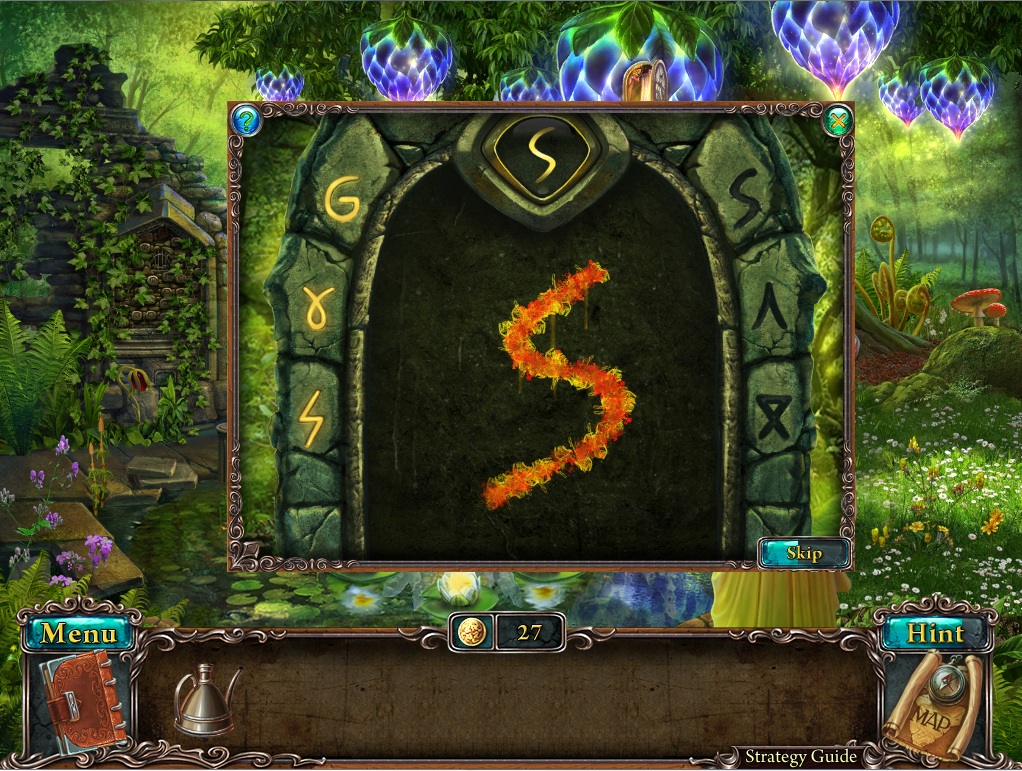
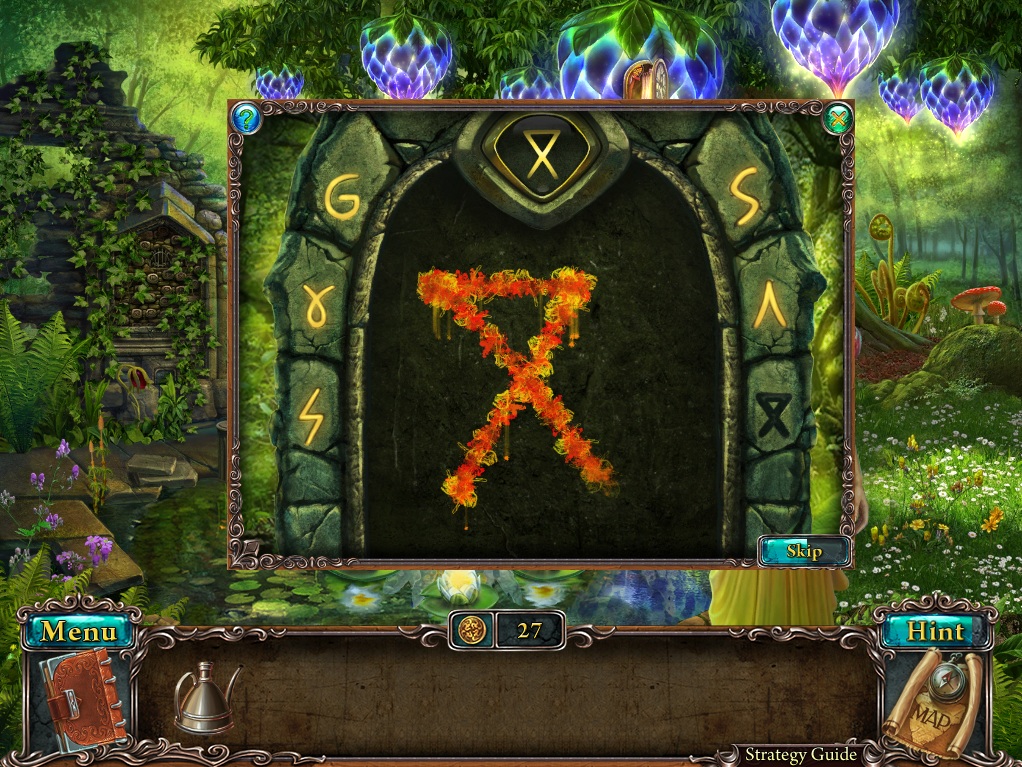
To solve this puzzle, draw the symbols.
Click and drag the cursor in the space at the center of the door to trace the image shown in the diamond at the top of the door.
If correct, the matching symbol will glow gold at the left or right side of the door.
Solution #1.
Solution #2.
Solution #3.
Solution #4.
Solution #5.
Solution #6.
Take the Pruner on the ground in front of the open portal.
Click the vine-covered wall to the left of the portal to zoom in.
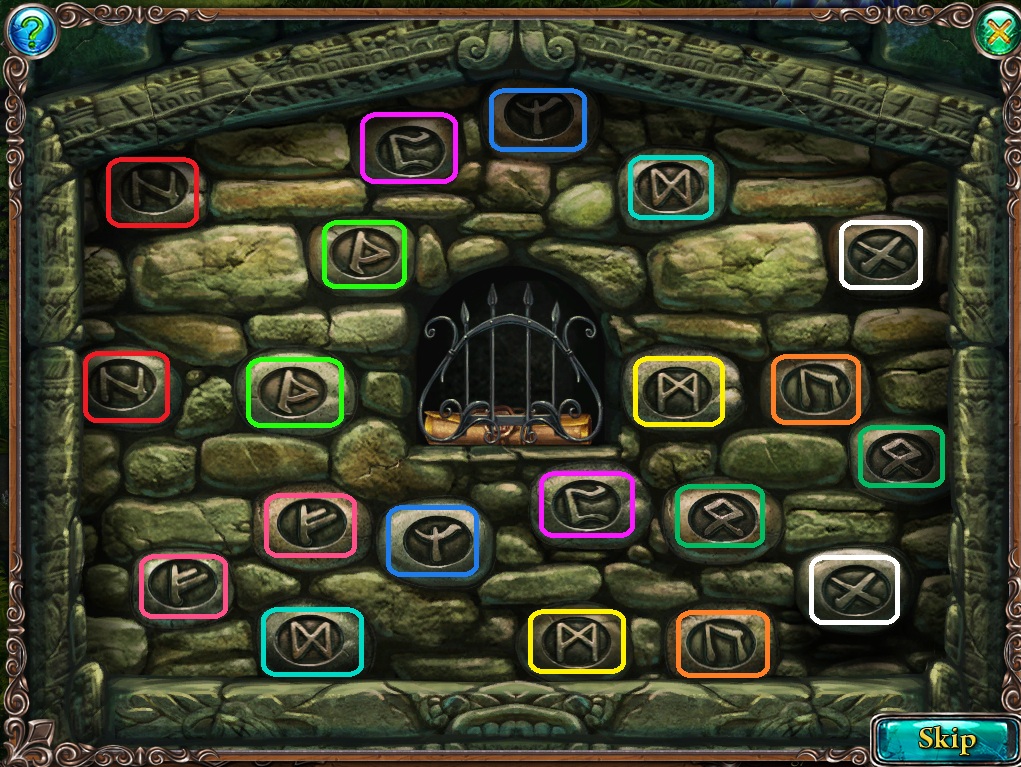
Use the Pruner to clear away the ivy frmo the wall to start the puzzle.
To solve this puzzle, match all of the pairs of runes.
Click a blank square to reveal its rune carving, then click a different square to reveal it as well.
If the runes do not match, they will both revert back to blank squares.
If the two runes are a matching pair, they will lock in place.
Solution.
Once the puzzle is solved, you will receive the Safe Code in your Notebook.
Go through the portal doorway.
Portal World
Take Coin #28 underneath the large flower at the dwarf's feet.
Click the area across the bridge to start the cutscene.
Take the Plank (1/5) on the ground in front of the large tree on the right.
Take the Plank (2/5) at the end of the broken bridge.
Take the Plank (3/5) on the ground directly underneath the dwarf.
Take the Plank (4/5) on top of the mushroom above the dwarf's head.
Take the Plank (5/5) leaning against the tree between the squirrel door and the red mushrooms.
Click the broken bridge to zoom in.
Add the five planks from your inventory to the empty spaces on the bridge.
Go back to the fairy meadow.
Fairy Meadow
Click the window in the flower to repeat the hidden object scene.
Take Coin #29 on the top shelf of the bookcase.
Screenshot.
Once the hidden object scene is complete, you will receive an Empty Flask.
Go through the door to the portal world.
Portal World
Use the Empty Flask from your inventory on the leaf filled with the Water of Bravery.
Give the Water of Bravery to the dwarf to receive the Acorn.
Use the Map to travel to the forest hut.
Forest Hut
Click the window at the second story of the hut to repeat the hidden object scene.
Take Coin #30 between the rafters and the lanterns on the right wall.
Screenshot.
Once the hidden object scene is complete, you will receive a Wooden Squirrel.
Click the birdhouse to zoom in.
Use the Oil Can from your inventory on the rusted hinges to the door of the birdhouse.
Click the door to open it and take the Part of a Safe inside.
Use the Map to travel to the flower temple.
Flower Temple
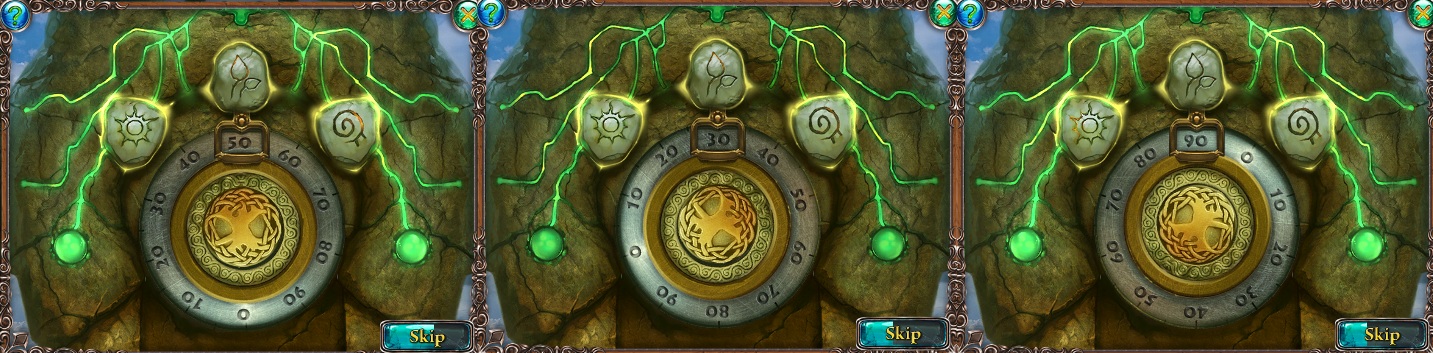
Click the safe on the round stone in the center of the room to zoom in.
Add the Part of a Safe from your inventory to the engraved recess in the middle to start the puzzle.
To solve this puzzle, enter in the safe code found in your notebook.
Click the disc and drag it clockwise or counterclockwise to rotate it in that direction.
Enter in the combination according to the order of the runed stones above the safe.
Sun stone - 50; Leaf Stone - 30; Swirl stone - 90
Solution.
Once the puzzle is solved the safe will open, revealing the Eye Gem.
Use the Map to travel to the fairy meadow, then go through the door into the portal world.
Portal World
Click the small carving at the base of the right tree to zoom in.
Add the Wooden Squirrel and the Acorn from your inventory to the engravings in the wood.
Take the Hammer from the revealed cache.
Click the broken bridge to zoom in.
Use the Hammer on the nails sticking out of the three planks of wood.
Click the chest on the cart across the bridge for a closer look.
Add the Eye Gem to the demon face lock on the chest, then take the Part of an Altar inside.
Use the Map to return to the Magic Well.
Magic Well
Add the Part of an Altar from your inventory to the incomplete altar on the left side of the pool.
Speak with the tree to receive the Piece of Canvas.
Posted by: Trinn |
September 3, 2011 1:00 PM
|
September 3, 2011 1:00 PM
Lost Souls: Enchanted Paintings (Collectors Edition) Walkthrough
Part 2: Ch 3-5
Chapter 3 - Dragon Realm
Painting Gallery
Click the painting on the lower right side of the wall to zoom in.
Use the brush to clean all of the dust off of the painting. The percentage in the bottom left corner will track your progress.
Click the painting to travel to the dragon realm.
Altar
Take Coin #31 on the lower right side of the altar.
Take the Dragon Part (1/4) on the ground to the right of the altar.
Take the Dragon Part (2/4) on the ground directly above the altar.
Take the Dragon Part (3/4) on the right edge of the altar.
Take the tank on the step of the right stairs.
Click the city in the distance to start the hidden object scene.
Take Coin #32 on the steps beside the row of candles.
Screenshot.
Once the hidden object scene is complete, you will receive the Dragon Part (4/4).
Place the Dragon Parts from your inventory into the engraving at the front of the altar.
Take the revealed Crowbar inside the opened compartment.
Use the Map to travel to the Balcony.
Balcony
Take Coin #33 in the corner of the left archway.
Take Coin #34 on the ground to the right of the woman.
Take the Dagger sticking out of the far left dragon flag.
Take the Beetle (1/6) at the bottom of the far left pillar.
Take the Cogwheel on the ground between the two left pillars.
Take the Beetle (2/6) on the left side and the Fishing Rod on the right side of the center archway.
Take the Beetle (3/6) at the top of the distant building.
Click the loose floorboard directly below the far left to zoom in.
Use the Crowbar from your inventory to remove the board, revealing the Ear.
Use the Map to travel to the living room.
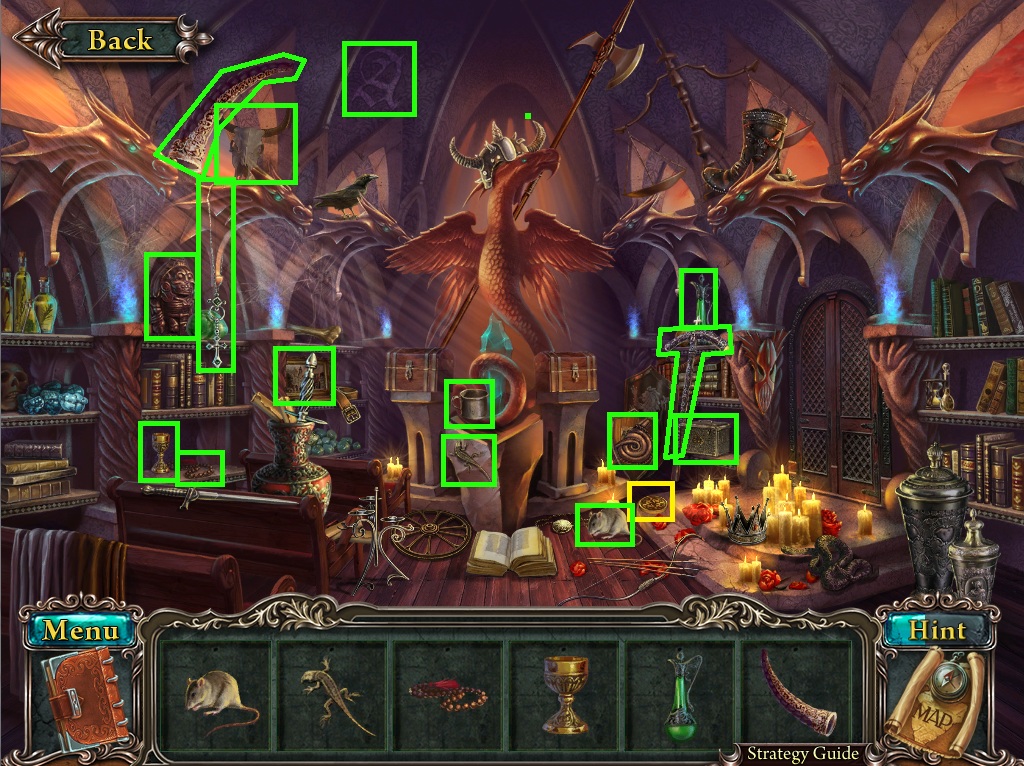
Living Room
Take the Coin #35 on the ground underneath the table.
Take the Card (1/6) on the ground to the right of the small chest.
Take the Card (2/6) on the wall above the doorway.
Take the Card (3/6) on the seat of the green chair at the right side of the table.
Take the Card (4/6) on the ground directly below the same chair.
Take the Card (5/6) on the ground below the rack of horns.
Click the hanging canvas above the table to zoom in.
Use the Knife from your inventory to cut through the canvas, revealing the Card (6/6).
Take the Dragon Statue Shard from the left dragon figure under the table.
Take the Piece of Cloth on the seat of the front left green chair.
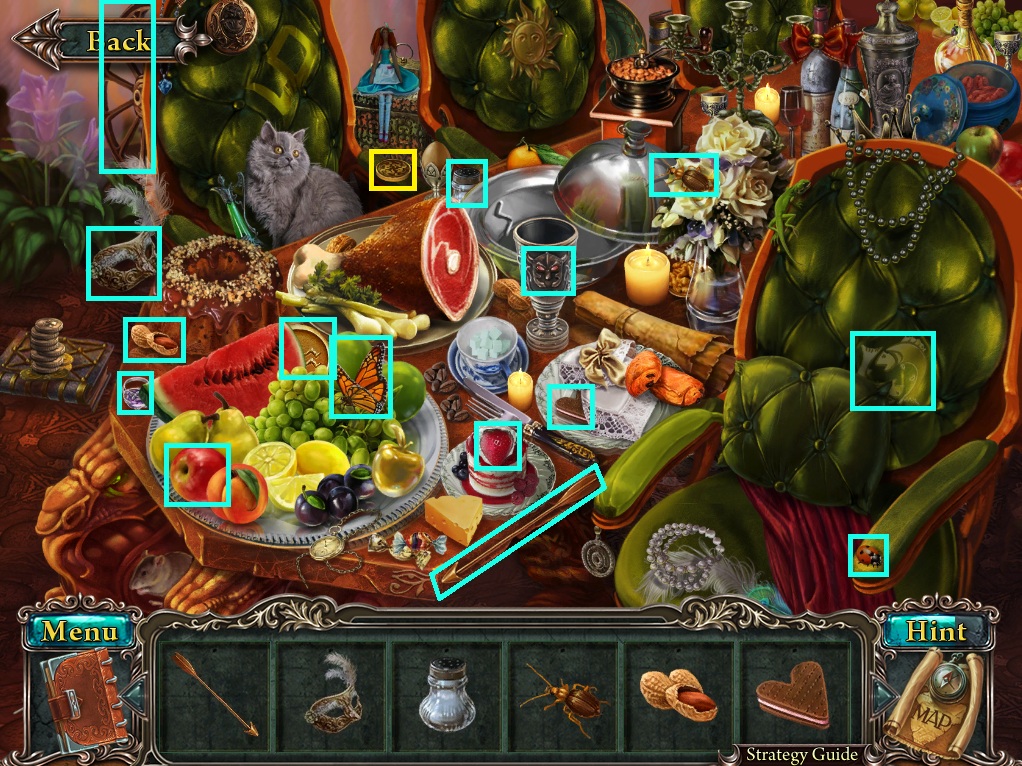
Click the table to start the hidden object scene.
Take Coin #36 on the table between the goblet and the scroll.
Click the silver tray to reveal the Cheese.
Move the red cloth to reveal the Pince-nez.
Screenshot.
Once the hidden object scene is complete, you will receive Ham.
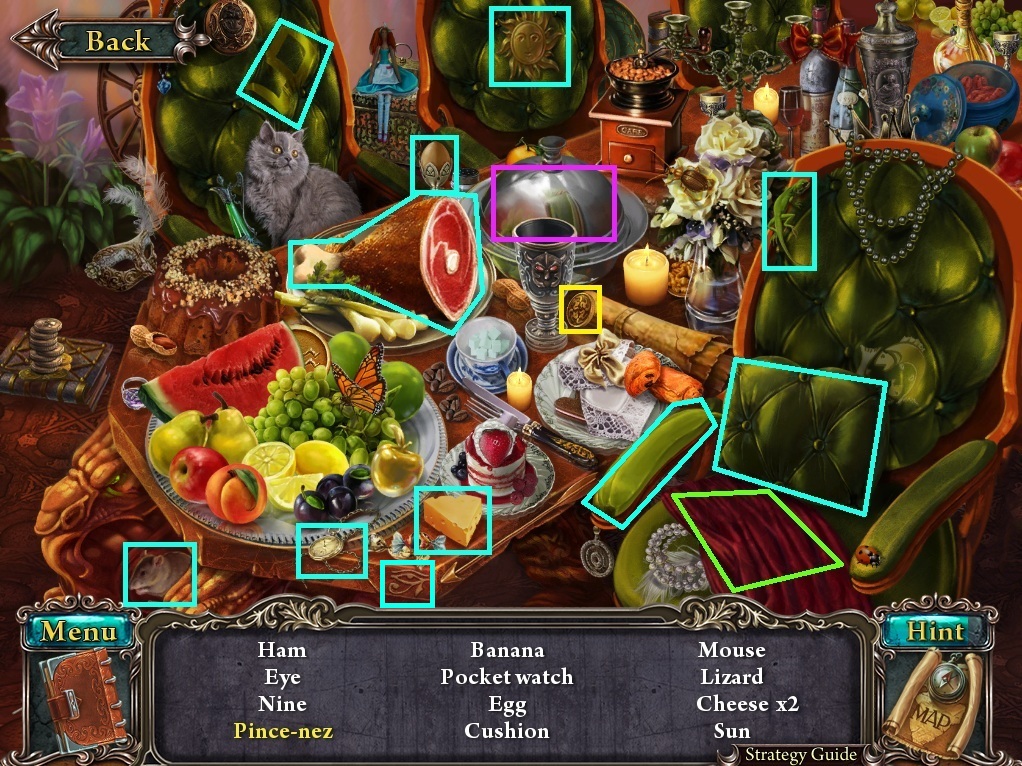
Click the door to zoom in.
Use the Tank on the space in the upper left and the Cogwheel from your inventory on the lock mechanism, then click the door to start the puzzle.
To solve this puzzle, create a path of pipes from the red tank to the lock mechanism.
Click a pipe to pivot it 90 degrees.
A pipe that is connected to the tank will be filled with red liquid and an unconnected pipe will stay blank and empty.
Solution.
Go through the open door into the mage's room.
Mage's Room
Take Coin #37 on the pile of books underneath the large crystal.
Use the Cards from your inventory on the card display atop the left shelf to receive Coin #38.
Click the framed painting on the right wall to zoom in.
Use the Piece of Cloth to clean the dust off the image. The percentage at the lower left corner will track your progress.
Once the painting is clean, you will receive the correct order to unlock the beetle chest.
Use the Map to travel to the treasury.
Treasury
Give the dog the Ham from your inventory.
Take the Coin #39 on the stones in the middle of the river.
Take the Broom on the right side of the riverbank.
Take the Beetle (4/6) in the leaves of the right tree.
Take the Beetle (5/6) in the tulip by the water.
Take the Pitcher to the left of the tulips.
Take the Beetle (6/6) at the top of the treasury building.
Place the Dragon Statue Shard from your inventory onto the broken dragon statue at the right side of the road.
Click the opened cache at the bottom of the statue platform to zoom in and take the Key (1/2) inside.
Use the Fishing Rod from your inventory on the river to receive the Fish.
Take the Flag in the branches of the tree.
Click the treasure chest to start the hidden object scene.
Take Coin #40 inside the chest.
Open the jewelry box to reveal the String.
Screenshot.
Once the hidden object scene is complete, you will receive a String.
Use the Map to travel to the living room.
Living Room
Give the Fish from your inventory to the hungry cat to receive Coin #41.
Click the table to repeat the hidden object scene.
Take Coin #42 on the arm of the chair next to the cat.
Screenshot.
Once the hidden object scene is complete, you will receive a Water Amulet.
Go through the door into the mage's room.
Mage's Room
Use the Broom from your inventory on the large spiderweb in the corner of the ceiling to reveal the Horn.
Click the large chest to zoom in.
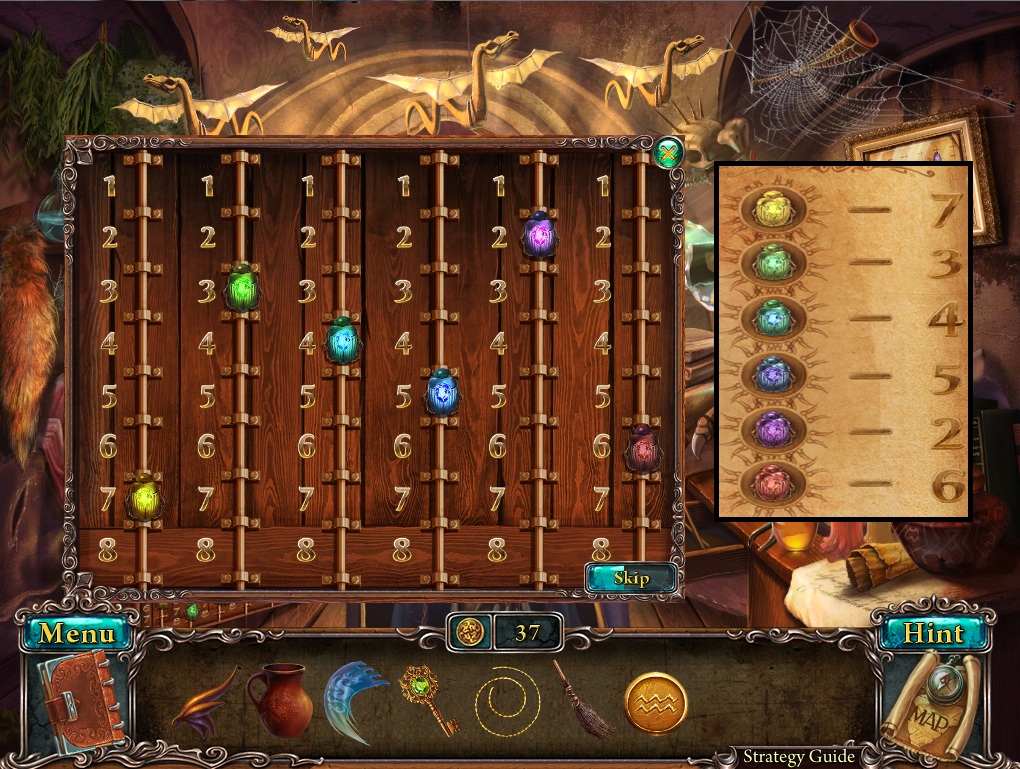
Add the six Beetles from your inventory to the top of the slides on the board to start the puzzle.
Arrange the Beetles to match the image from the framed painting on the wall.
Click and drag a Beetle up and down to move it along the slide.
Position the beetles next to the appropriate numbers according to the combination in the Notebook.
If correctly placed, the gem in the Beetle's back will glow brightly and it will lock in place.
Starting from the left, Yellow Beetle - 7; Green Beetle - 3; Teal Beetle - 4; Blue Beetle - 5; Violet Beetle - 2; Red Beetle - 6.
Solution.
Take the Earth Amulet from the open chest.
Go back out to the living room.
Living Room
Place the Horn from your inventory onto the horn rack.
Take the Key (2/2) from the revealed secret compartment.
Use the Map to travel to the altar.
Altar
Click the distance city to repeat the hidden object scene.
Take Coin #43 on the bottom shelf of the far left archway.
Screenshot.
Once the hidden object scene is complete, you will receive a Mask.
Use the Map to travel to the Dragon Cave.
Dragon Cave
Take Coin #44 on the ground by the tip of the dragon's tail.
Take Coin #45 on top of the stone fountain.
Click the fountain to zoom in.
Add the Ear from your inventory to the stone dragon head.
Click both of the ears on the sides of the head to start the flow of water.
Fill up the Pitcher with the water in the fountain.
Use the Pitcher of Water to douse the fiery brazier.
Click the brazier to zoom in and take the Key (3/3).
Use the Mask from your inventory on the large rock pillar.
Click the disc in the center of the floor to start the puzzle.
To solve this puzzle, arrange the stones so that none of their lines are intersecting.
Click and hold a stone to select it, then drag it across the board to move it.
If the paths between stones are intersecting, the line will glow red.
If the path between two stones is uninterrupted, it will glow green.
Solution #1.
Solution #2.
Solution #3.
Solution #4.
Solution #5.
Once the puzzle is solved the center platform will raise with the Cell Key on top of it.
Use the Map to travel to the balcony.
Balcony
Click the bird cage to zoom in.
Use the Flag from your inventory on the empty flag pole at the top of the middle column to receive Coin #46.
Give the String to the woman with the harp.
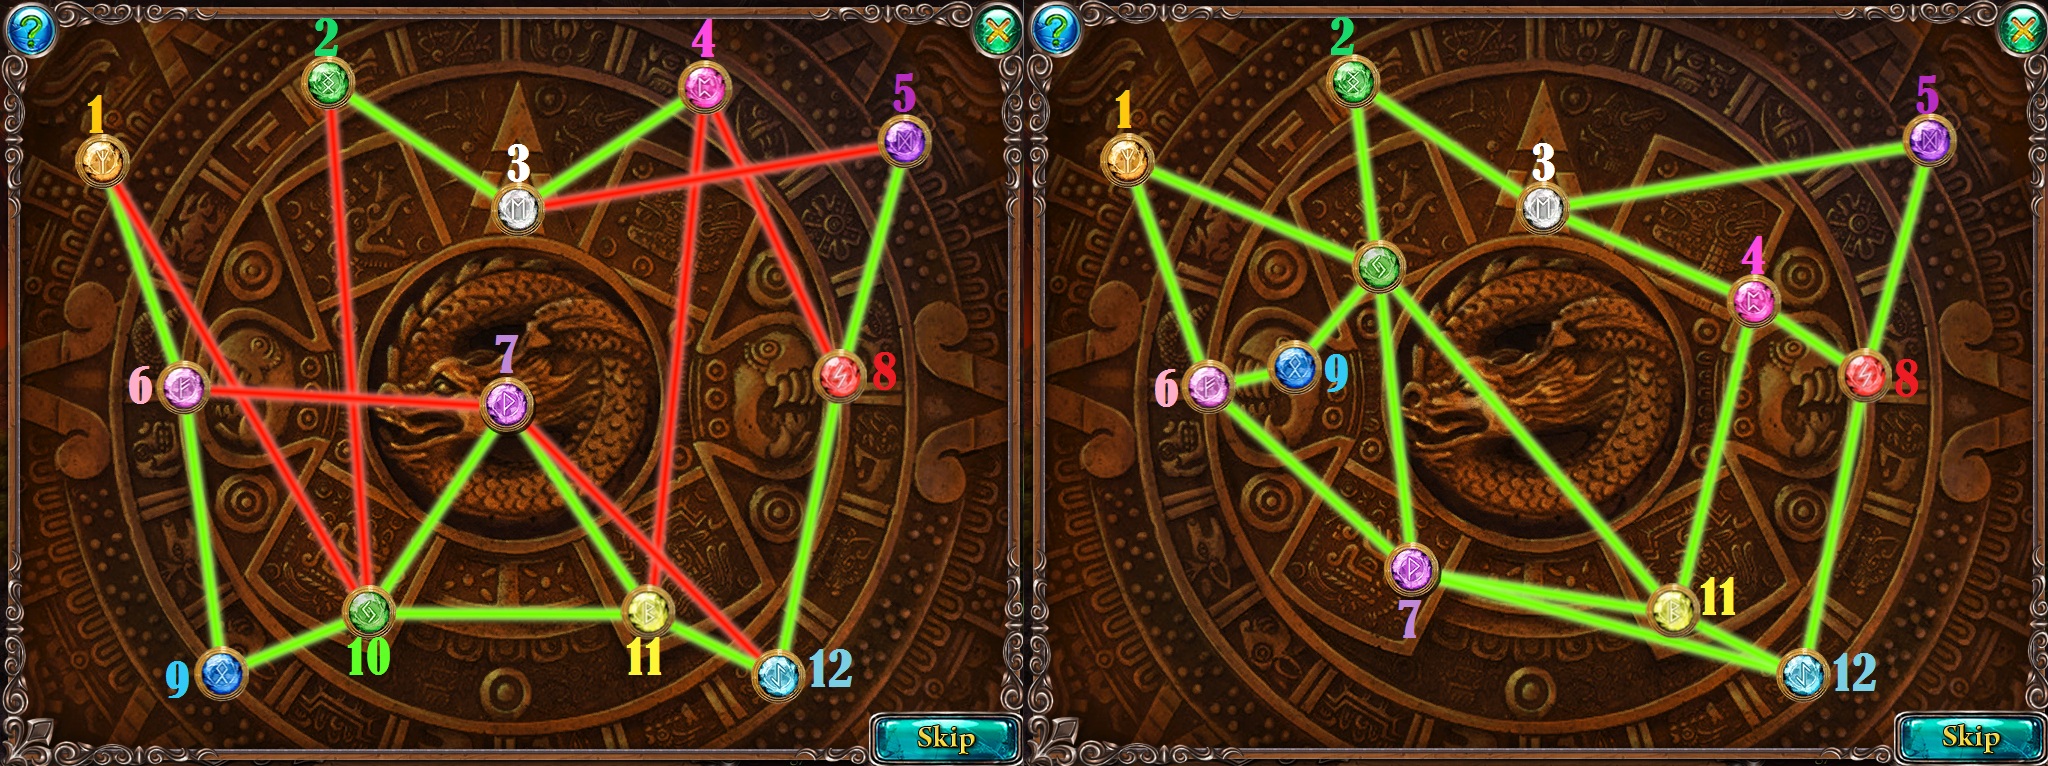
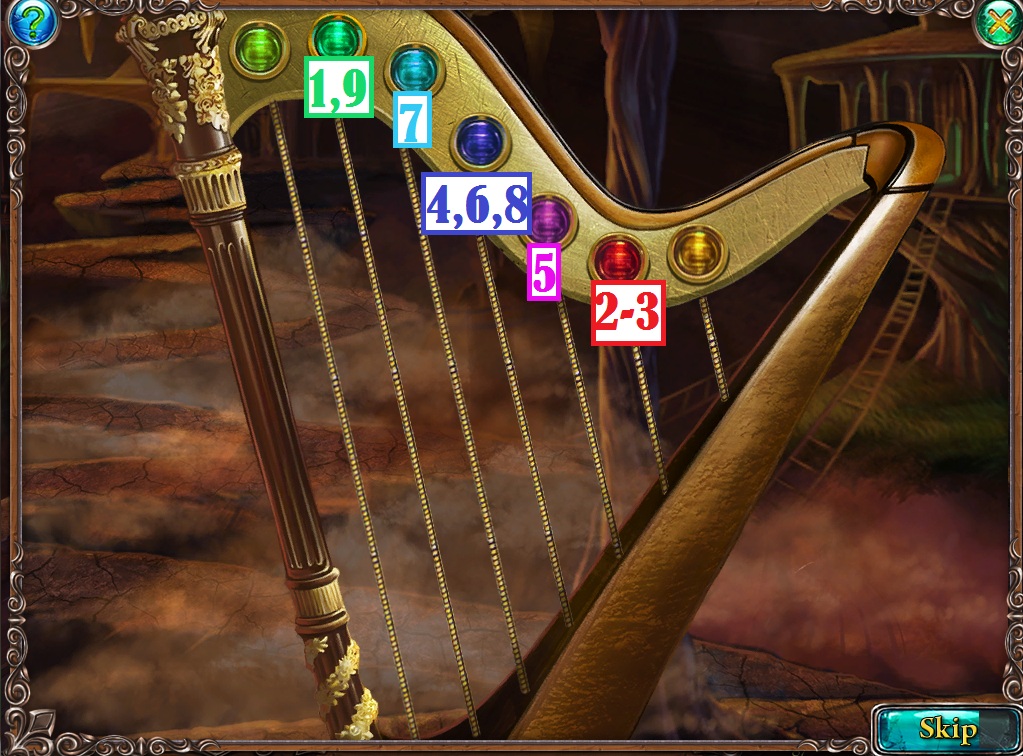
Click the harp to start the puzzle.
This puzzle is played like a game of Simon Says.
Watch the order in which the colored gems at the top of the harp light up, then click the corresponding strings in the same order.
If played correctly, the string will glow brightly green.
If played incorrectly, the string will glow red and the order will be replayed.
Solution.
Once the puzzle is solved, the music will lift the veil of fog concealing a glowing green building in the distance.
Click the building to zoom in, then place the three Keys from your inventory into the keyholes.
Turn the keys to open the safe and take the Dragon Eye inside.
Click the bird cage for a closer look.
Use the Cell Key from your inventory on the padlock to open the cage and take the Air Amulet inside.
Use the Map to travel to the Treasury.
Treasury
Click the treasury building to repeat the hidden object scene.
Take Coin #47 inside the pearl necklace on the middle step.
Screenshot.
Once the hidden object scene is complete, you will receive a Plate.
Use the Map to travel to the dragon cave.
Dragon Cave
Use the Dragon Eye from your inventory on the head sleeping dragon.
Take the Fire Amulet from its mouth.
Return to the mage's room.
Mage's Room
Place the Plate from your inventory into the frame behind the large crystal.
Take the carved Dragon Plate from the frame.
Use the Map to travel to the treasury.
Treasury
Use the Dragon Plate from your inventory on the engraved stone next to the tree.
Take the Mage's Bracelet from the revealed secret cache.
Go back to the mage's room.
Mage's Room
Give the Mage's Bracelet from your inventory to the mage.
The mage's crystal ball will reveal the order of the amulets, which will be written in your Notebook.
Use the Map to return to the altar.
Place the Water Amulet on the I pedestal.
Place the Earth Amulet on the II pedestal.
Place the Air Amulet on the III pedestal.
Place the Fire Amulet on the IV pedestal.
Speak with the warrior to receive the Piece of Canvas.
Chapter 4 - Dwarven Realm
Painting Gallery
Click the painting directly underneath the son's portrait to zoom in.
Use the brush to remove all the dust from the painting. The percentage in the lower left corner will track your progress.
Click the painting to travel to the Dwarven Realm.
Throne Room
Take Cion #48 at the top of the bookcase.
Take the Bead (1/7) on the ground between the potted plant and the bookcase.
Click the pillows on the ground to move them aside, revealing Bead (2/7), Bead (3/7), and Bead (4/7).
Take Bead (5/7) on the tray of food.
Take Bead (6/7) on the floor at the end of the large green fabric.
Take Bead (7/7) in the lion statue's eye.
Take the Cheese on the tray of food.
Use the Map to travel to the house on the hill.
House on the Hill
Take Coin #49 in the large flowerpot.
Give the Cheese from your inventory to the mouse poking its head out of the wall.
Click the mouse hole to zoom in.
Remove the pile of items on the ground in this order:
The red bow
The wrapped piece of candy
The cat doll
The pink flower
The dragonfly earring
The feather
The white flower
The comb
The heart-shaped box
The star medallion
Take the revealed Closet Key.
Take the Feather on the rug in front of the rocking chair.
Place the Beads from your inventory onto the beaded pillow to receive Coin #50.
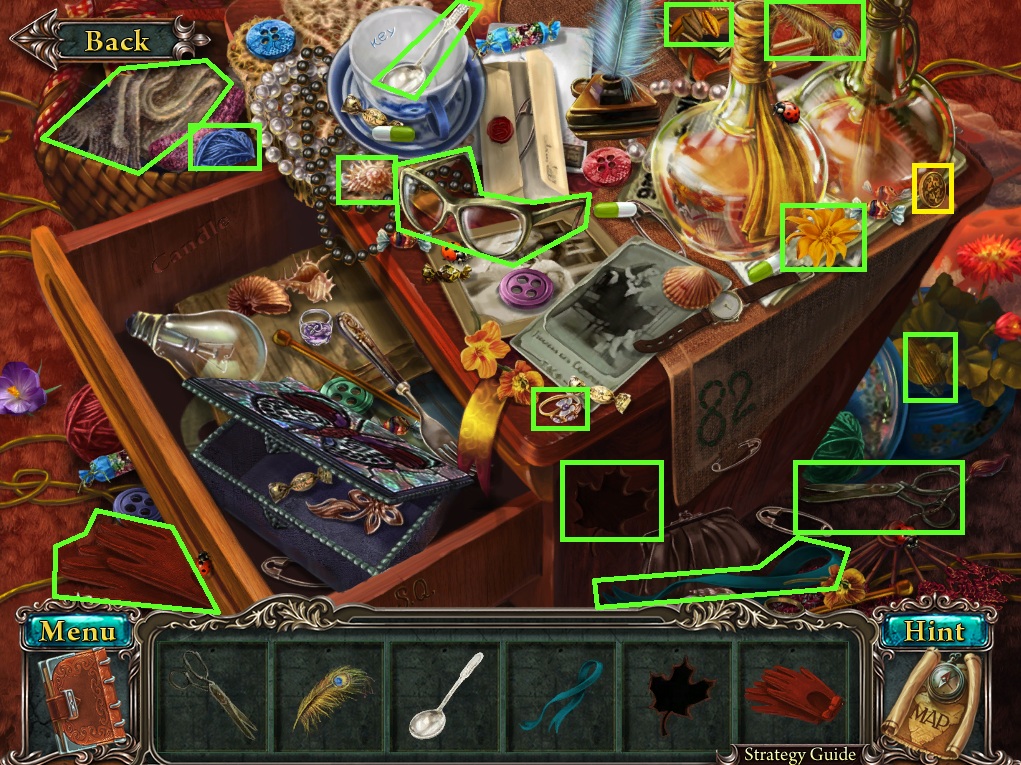
Click the drawers to start the hidden object scene.
Take Coin #51 at the top of the flask with the yellow ribbon.
Click the fan to reveal the Pin (1/2).
Open the jewelry box to reveal the Brooch.
Move the photograph to reveal the Button.
Open the envelope to reveal the Pin (2/2).
Screenshot.
Once the hidden object scene is complete, you will receive a Light Bulb.
Take the Empty Bottle on top of the drawers.
Use the Map to return to the throne room.
Throne Room
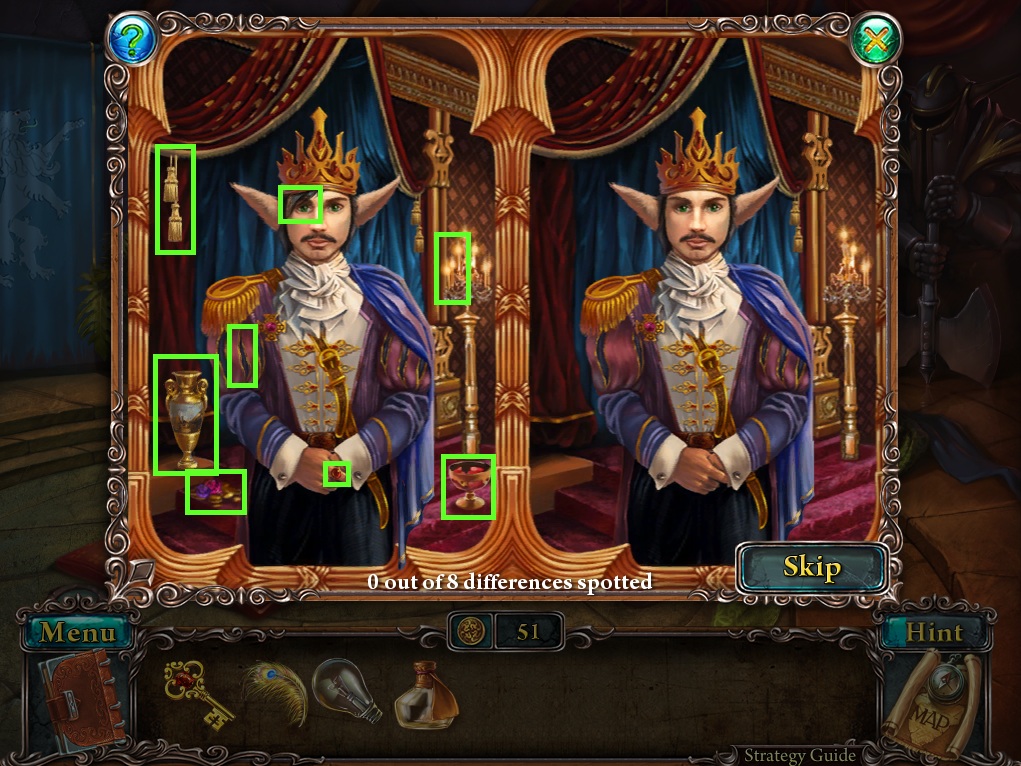
Click the portrait of the king on the wall to start the puzzle.
To solve this puzzle, find all the differences between the left and right portrait.
Click a discrepency on the left side of the two paintings to identify it. If correct, it will be removed from the painting.
The number at the bottom tracks your progress out of 8 differences.
Solution.
Once the puzzle is solved, the portrait will lift, revealing the Throne Decoration.
Click the top of the throne to zoom in.
Place the Throne Decoration from your inventory into the recess at the top of the throne to receive Coin #52.
Use the Map to travel to the workshop.
Workshop
Take Coin #53 on top of the worktable.
Take the Empty Watering Can on the ground above the bellows.
Take the Powder Keg on top of the right table.
Take the Firewood on the rug under the center table.
Click the closet door to zoom in.
Use the Closet Key from your inventory on the keyhole, then click the key to turn it.
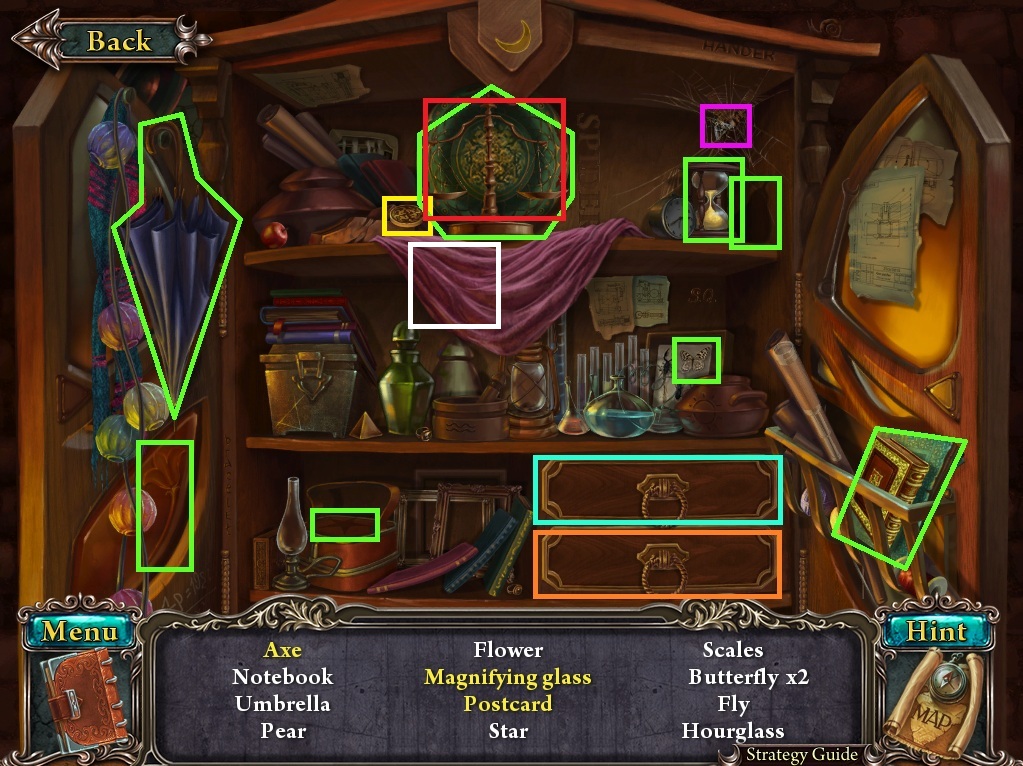
Click the closet to start the hidden object scene.
Take Coin #54 on the top shelf to the left of the scales.
Click the spiderweb to reveal the Fly.
Move the cloth to reveal the Postcard.
Open the top shelf to reveal the Magnifying Glass.
Open the bottom shelf to reveal the Hammer.
Move the plate to reveal the Butterfly.
Screenshot.
Once the hidden object scene is complete, you will receive an Axe.
Use the Map to travel to the magic garden.
Magic Garden
Take Coin #55 on the leaf of the foutain statue.
Take Key Piece (1/7) on the ground between the yellow flowers and the vase.
Take the Key Piece (2/7) in the gardener's basket.
Take the Key Piece (3/7) in the grass to the left of the gardener.
Take the Key Piece (4/7) on the ground to the left of the plot of dirt.
Take the Key Piece (5/7) on the ground between the plot of dirt and the toolbox.
Move the leaf under the toolbox to reveal the Key Piece (6/7).
Take the Key Piece (7/7) on top of the wing in front of the vase.
Take the Pincers from the toolbox.
Take the Pickaxe behind the far left flower pot.
Use the Empty Watering Can from your inventory on the water pouring out of the fountain.
Click the large stone door to zoom in.
Use the Key Pieces from your inventory on the keyhole, then turn the key to open the door.
Click the open door to start the puzzle.
To solve this puzzle, arrange all the pieces to fit the carvings in the stone tablet.
Click a piece to select it, then click a space to set it.
If correct, the piece will briefly glow then lock in place.
Solution.
Once the puzzle is solved, the door will open, revealing a broken mirror.
Use the Map to travel to the Mine.
Mine
Take Coin #56 at the ceiling above the center lantern.
Take the Shovel leaning against the barrels.
Use the Pickaxe from your inventory on the chunk of rock to the right of the barrels to reveal the Mirror Ore.
Use the Axe on the crate to the right of the mine cart to reveal the Cup.
Use the Lightbulb on the left lantern.
Take the Torch on the left side of the tunnel.
Click the tunnel to start the cutscene.
Use the Powder Keg from your inventory on the pile of rubble.
Return to the workshop.
Workshop
Click the closet to repeat the hiden object scene.
Take Coin #57 on the shelves above the two drawers.
Screenshot.
Once the hidden object scene is complete, you will receive a Wheel (1/2).
Place the Cup from your inventory onto the shelf above the jeweler's head to receive Coin #58.
Put the Mirror Ore on to the plate on the work table.
Use the Pincers to pick up the melted ore inside the plate to receive the Mirror Shard.
Return to the house on the hill.
House on the Hill
Place the Firewood from your inventory into the fireplace.
Light the Torch with the fire in the fireplace.
Click the drawers to repeat the hidden object scene.
Take Coin #60 leaning against the right empty flask.
Screenshot.
Once the hidden object scene is complete, you will receive Sky Lily Seeds.
Use the Map to return to the mine.
Mine
Use the Torch from your inventory on the powder keg.
Go through the cleared tunnel to the tomb.
Tomb
Take Coin #61 and Coin #62 on the pile of gold around the platform.
Take the Piece of Crystal floating in the water.
Take the Wheel (2/2) in the water to the left of the shield.
Take the Garden Shears leaning against the vase in the water.
Take the Gem (1/8) inside the broken vase in the water.
Take the Gem (2/8) in the pot of gold on the left side of the platform.
Take the Gem (3/8) on the pot of gold on the right side of the platform.
Take the Gem (4/8) under the port of gold on the right side of the platform.
Take the Gem (5/8) next to the vase in the center of the platform.
Take the Gem (6/8) in the eye of the statue on the right side of the ceiling.
Take the Gem (7/8) in the eye of the statue on the left side of the ceiling.
Click the torn piece of cloth to reveal the Gem (8/8).
Place the Feather from your inventory next to the one inside the large red vase to receive Coin #63.
Go back to the mine.
Mine
Add the Wheels from your inventory to the cart to receive Coin #64.
Use the Map to travel to the magic garden.
Magic Garden
Place the Mirror Shard from your inventory into the space on the broken mirror to receive Coin #59.
Use the Shovel on the plot of dirt.
Add the Sky Lily Seeds to the soil.
Water the small plant with the Full Watering Can.
Cut the flower with the Garden Shears to receive the Sky Lily.
Give the Sky Lily to the gardener to receive the medicinal Herbs.
Add the Piece of Crystal to the large chunk of crystal to the right of the mirror to receive Coin #65.
Use the Map to return to the workshop.
Workshop
Give the Gems from your inventory to the jeweler to receive the Pendant.
Click the mortar and pestle on the work table to zoom in.
Place the Herbs into the mortar to receive the Crushed Herbs.
Put the Crushed Herbs into the brewer underneath the jeweler's desk.
Use the Empty Flask on the purple liquid to receive the Bottle of Mixture.
Use the Map to travel to the house on the hill.
House on the Hill
Give the Bottle of Mixture from your inventory to the old lady to receive the Magic Book.
Click the frame on the left shelf above the fireplace to zoom in.
Place the Pendant into the tear-shaped carving in the frame to receive Coin #66.
Use the Map to return to the throne room.
Throne Room
Click the bookshelf to zoom in.
Place the Magic Book from your inventory in the space on the shelf.
Click the box from the revealed box to start the puzzle.
To solve this puzzle, arrange the pieces of paper to complete the image of the clock.
Click and drag a piece to move it around the board.
Adjacent pieces when placed together will briefly glow then become attached.
Solution.
Once the puzzle is solved, the picture with the time 4:40 will be added to your notebook.
Go back to the house on the hill.
House on the Hill
Click the clock above the fireplace to zoom in.
Click and drag the hands of the clock to set the time on the clock to 4:40.
Take the Sarcophagus Key from the compartment behind the clock face.
Return to the Tomb.
Tomb
Click the mouth of the sarcophagus to zoom in.
Place the Sarcophagus Key from your inventory inside the mouth.
Take the Magic Sphere from the mummy's hands.
Use the Map to travel to the throne room.
Throne Room
Give the Magic Sphere to the king.
Speak with the king to receive the Piece of Canvas.
Chapter 5 - Sea Realm
Painting Room
Click the painting on the upper left side of the wall to zoom in.
Use the brush to remove the dust from the painting. The percentage in the lower left corner will track your progress.
Click the painting to travel to the sea realm.
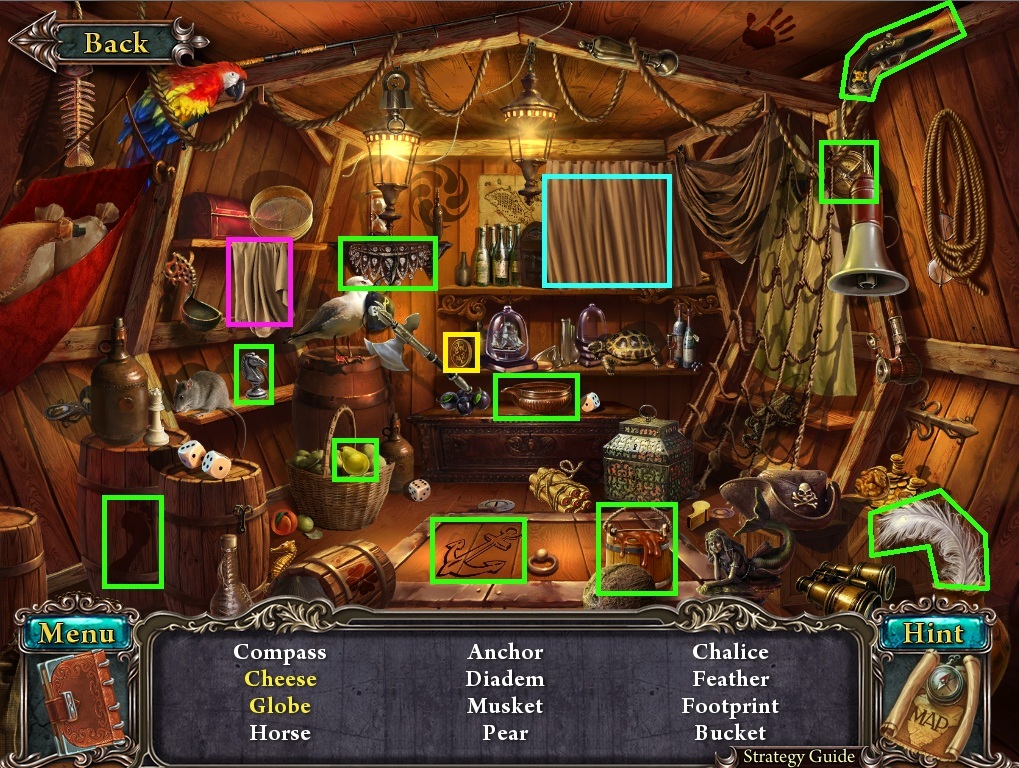
Ship
Take the Coin #67 on the floor between the door and the stairs.
Take the Coin #68 by the feet of the bird.
Take the Brush under the crane mechanism.
Take the Pincers leaning against the wooden door.
Click the hatch in front of the wheel to lift it, then click it again to go down into the hull.
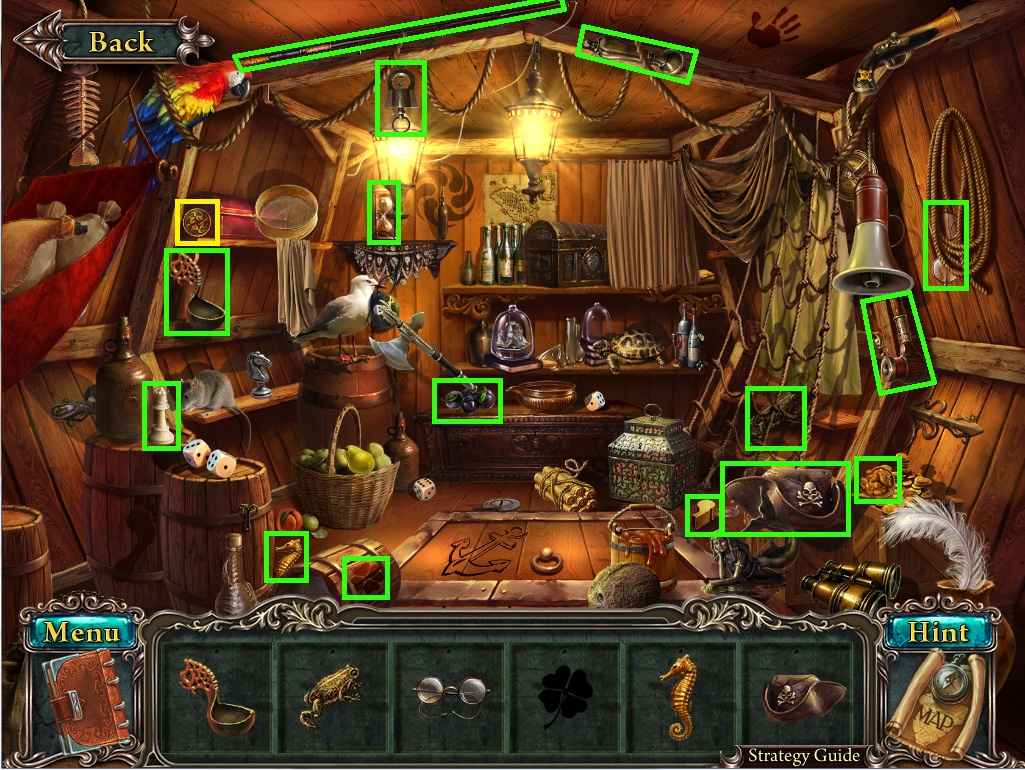
Hull
Take Coin #69 on the right wall shelf.
Take the Plank (1/5) behind the lantern.
Take the Plank (2/5) at the left side of the design on the floor.
Take the Plank (3/5) on top of the right barrel.
Take the Plank (4/5) on the left support beam.
Take the Plank (5/5) at the top of the door frame.
Click the windows on the left wall to zoom in.
Use the Brush from your inventory to clean both of the windows.
Take the Mug of Rum on the bench between the windows.
Click the middle cask to zoom in.
Place the Mug of Rum from your inventory into the space under the wine barrel crane.
Click the large door for a closer look.
Use the Pincers to cut through the chains.
Click the open door to start the hidden object scene.
Take Coin #70 on the left side of the middle shelf.
Move the curtain to reveal the Globe.
Lift the cloth from the left shelf to reveal the Cheese.
Screenshot.
Once the hidden object scene is complete, you will receive a Bucket of Resin.
Go back up to the deck of the ship.
Ship
Click the hole in the rowboat to zoom in.
Place the Planks from your inventory over the hole, then cover them in the Resin.
Return to the hull.
Hull
Click the door to repeat the hidden object scene.
Take Coin #71 on the left shelf by the red box.
Screenshot.
Once the hidden object scene is complete, you will receive a Valve.
Click the wine cask to zoom in.
Use the Valve from your inventory on the barrel crane, then click the valve to fill the Mug of Rum.
Go back to the top deck of the ship.
Ship
Give the Mug of Rum from your inventory to the captain.
Click the board the captain is holding to start the puzzle.
To solve this puzzle, remove all the white stones from the board before the captain removes the black stones.
Click an empty square to place a stone.
The stone you place and any stones of similar color attached at either a vertical, horizontal, or diagonal line will be removed from the board.
The +number after a stone is placed indicates how many stnoes you removed in your turn.
Solution.
Once the puzzle is solved, you will receive Oxygen Tanks.
Add the Oxygen Tanks to the diving gear in the row boat.
Use the Map to travel to the sea floor.
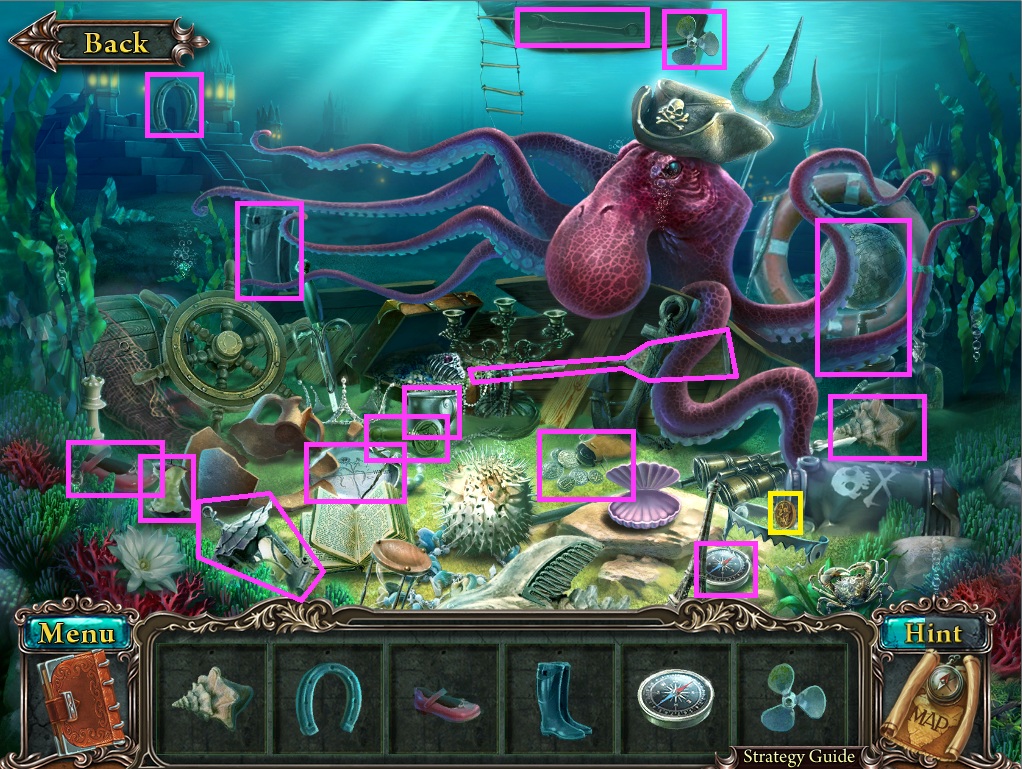
Sea Floor
Take Coin #72 between the rock and the seaweed.
Take the Weight (1/2) to the left of the rock.
Take the Crowbar at the base of the mechanism.
Use the Map to travel to the underwater temple.
Underwater Temple
Take Coin #73 at the foot of the small stairs.
Take Coin #74 to the left of the broken triton statue.
Take the Statue Arm to the left of the steps.
Take the Statue Trident above the two columns.
Take the Statue Torso underneath the base of the statue.
Take the Statue Tail on the pile of rocks in the lower left corner.
Add all the Statue parts, except the missing head, from your inventory to the broken statue on the pedestal.
Click the lock mechanism on the gate to start the puzzle.
To solve this puzzle, arrange all of the slides in the correct order to complete the image.
Click a slide to select it, then click another slide to swap positions.
Solution.
Click the open gate to start the hidden object scene.
Take Coin #75 inside the treasure chest.
Break the vase to reveal the Medallion.
Open the clam to reveal the Pearl.
Screenshot.
Once the hidden object scene is complete, you will receive a Pearl.
Use the Map to travel to the Sunken Ship.
Sunken Ship
Take Coin #76 under the piece of coral attached to the rock.
Take Coin #77 underneath the large chest.
Put the Pearl from your inventory inside the clam to receive Coin #78.
Take the small Ship on the ground behind the chest.
Take the Weight (2/2) to the left of the chest.
Click the boarded up side of the sunken ship to zoom in.
Use the Crowbar to pry off the boards, then click the hull to begin the hidden object scene.
Take Coin #79 by the chest on the shelf.
Remove the lid of the crate to reveal the Crown.
Open the chest to reveal the fish Skeleton.
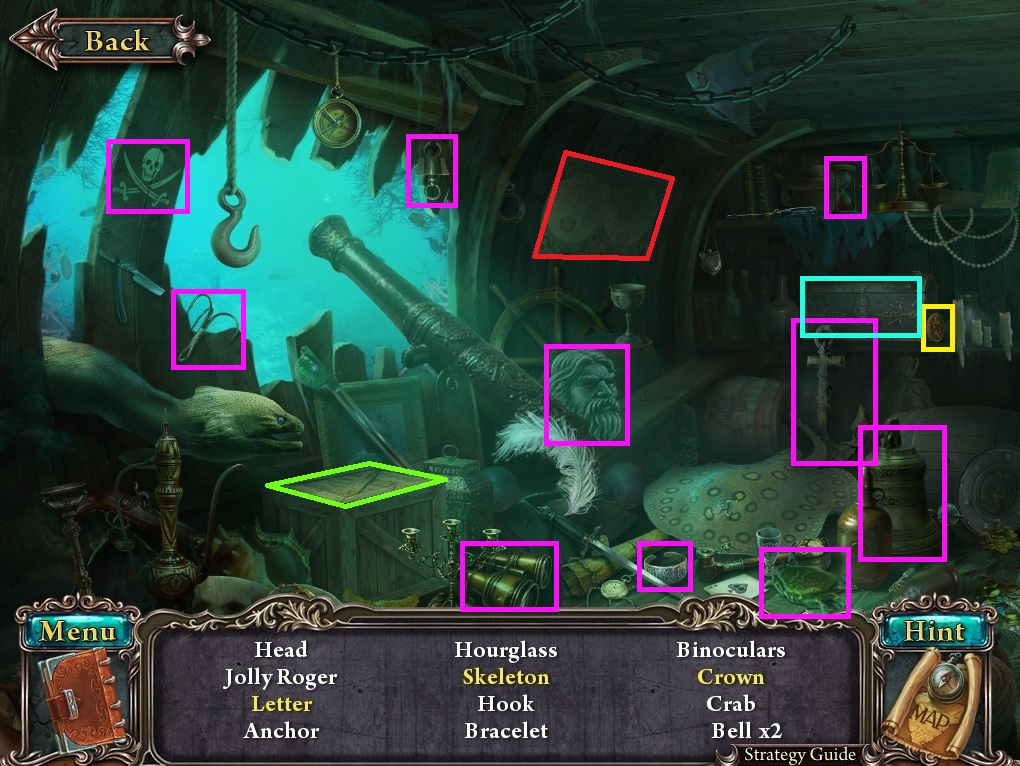
Peel away the map to reveal the Letter.
Screenshot.
Once the hidden object scene is complete, you will receive the Statue Head.
Click the crab to push it away from the Cabin Key.
Use the Map to return to the underwater temple.
Underwater Temple
Place the Statue Head from your inventory at the top of the broken statue.
Click the revealed cache to zoom in and take the Drawer Handle.
Click the gate to repeat the hidden object scene.
Take Coin #80 on the floor between the binoculars and the trap.
Screenshot.
Once the hidden object scene is complete, you will receive a Compass.
Use the Map to travel to the ship.
Ship
Click the wheel for a closer look.
Place the Compass into the round space at the back of the wheel to receive the combination of coordinates on the map in your Notebook.
Click the door to the cabin to zoom in.
Use the Cabin Key from your inventory on the keyhole.
Click the key to turn it, then go through the open door into the cabin.
Cabin
Take Coin #81 on the chest by the skull.
Take Coin #82 below the book on the drawers.
Use the Ship from your inventory on the bottle in the window to receive Coin #83.
Take the Scissors on the wall under the window.
Click the middle drawer on the right to zoom in.
Use the Drawer Handle on the empty space on the drawer to open it, then take the Jewelry inside.
Click the book to start the puzzle.
Arrange all of the pieces of paper to complete the picture.
Click a piece to select it, then drag it around the board to place it.
When adjacent pieces are placed together,they will automatically attach.
Solution.
Once the puzzle is solved, you will receive the instructions to trigger the underwater mechanism circuit in your Notebook.
Place the two Weights from your inventory on the raised arrows on the left and right side of the circular design on the floor.
Take the Lever from the revealed compartment in the floor.
Click the map for a closer look.
Enter in the coordinates from the ship's wheel found in your Notebook: 1,7 - 3,5 - 5,3
Screenshot.
Take the Medallion Piece (2/2) from the space behind the map.
Use the Map to return to the sunken ship.
Sunken Ship
Give the Jewelry from your inventory to the mermaid to receive the Chest Key.
Click the chest to zoom in.
Use the Chest Key from your inventory on the keyhole to open the chest, then take the Medallion Piece (1/2) inside.
Click the hole in the ship to repeat the hidden object scene.
Screenshot.
Once the hidden object scene is complete, you will receive a Screwdriver.
Use the Scissors on the netted fish to receive Coin #84.
Use the Map to return to the underwater temple.
Underwater Temple
Click the circular recess in the stone bulding to zoom in.
Place the two Medallion Pieces into the circle to reveal the cache, then take the Blue Crystal inside.
Return to the cabin of the ship.
Cabin
Click the grate in the left wall to zoom in.
Use the Screwdriver from your inventory to remove the screws at the four corners of the grate, then take the Manometer inside.
Use the Map to travel to the sea floor.
Sea Floor
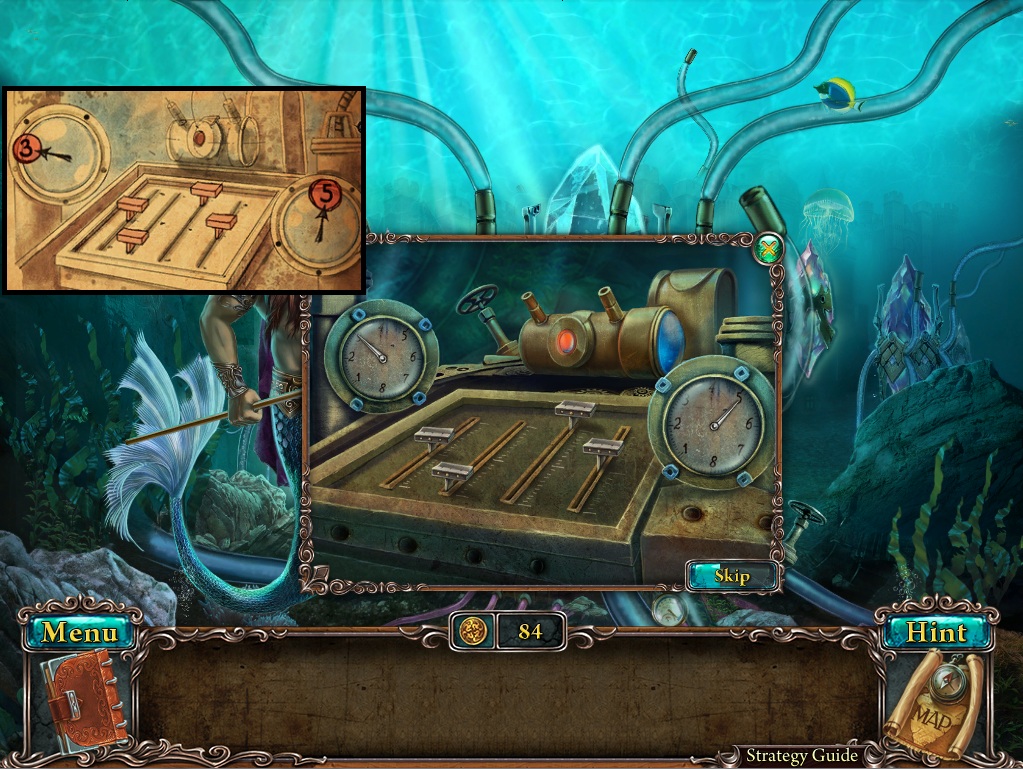
Use the Blue Crystal from your inventory on the space in the center of the mechanism.
Click the control panel at the bottom of the mechanism to zoom in.
Add the Manometer to the round space at the left side of the control panel and the lever to the empty slide on the board.
Arrange the controls to match the image in your Notebook.
Screenshot.
Speak with the triton to receive the Piece of Canvas.
The End
Posted by: Trinn |
September 3, 2011 1:01 PM
|
September 3, 2011 1:01 PM
Lost Souls: Enchanted Paintings (Collectors Edition) Walkthrough
Bonus Chapter - Dark World
Painting Gallery
Click the painting on the upper right side of the wall to zoom in.
Use the brush to clean all the dust off the painting. The percentage in the bottom left corner will track your progress.
Click the cleaned painting to travel to the Dark World.
Castle
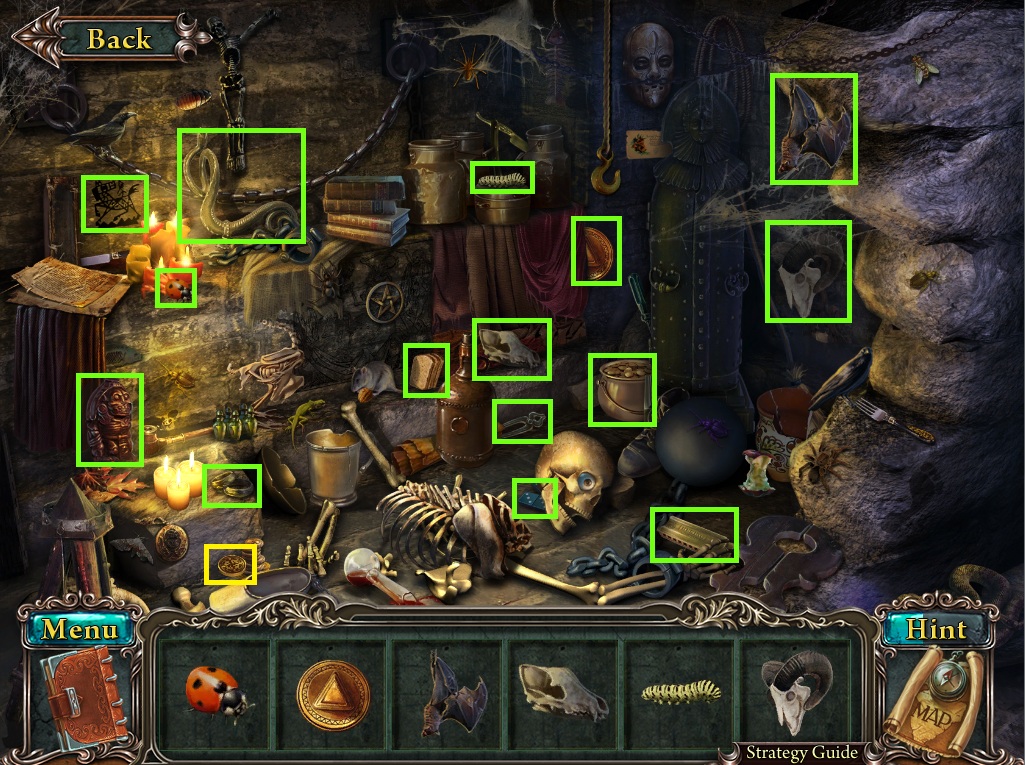
Take Coin #85 at the base of the tree trunk.
Take the Shovel leaning against the left side of the doorway.
Take the Matches on the stones in front of the door.
Take the Plank (1/2) on top of the pile of leaves.
Take the Plank (2/2) above George Young's grave.
Add both of the planks to the tree trunk to comlpete the ladder.
Click the nest above the ladder to zoom in and take the Lever.
Use the Matches on the unlit torches on both sides of the door.
Place the Lever from your inventory into the space under the right torch.
Click both the levers at the sides of the door to open it.
Go through the open doors into the entrance.
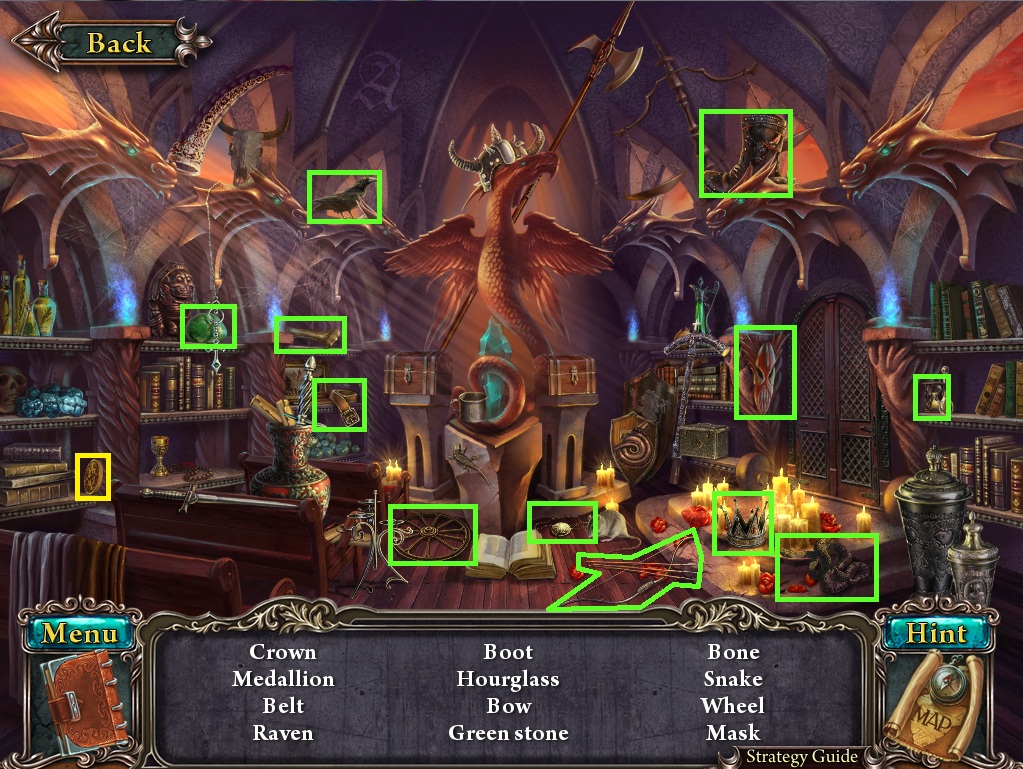
Entrance
Take Coin #86 on the left windowsill.
Take Coin #87 at the base of the right statue.
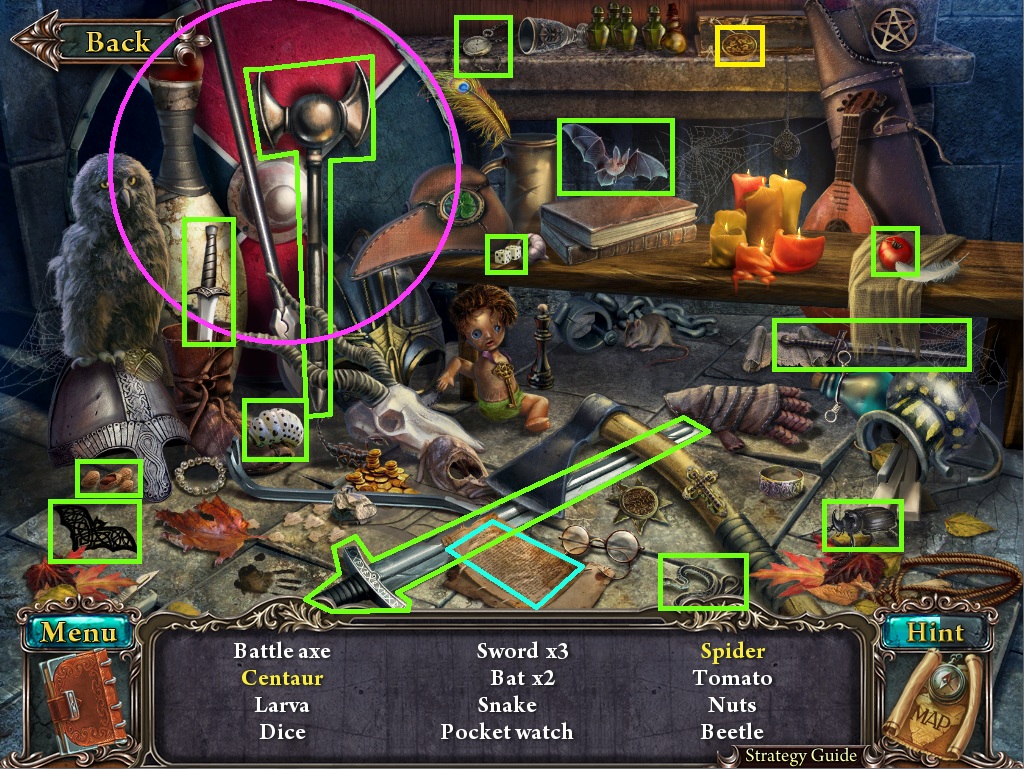
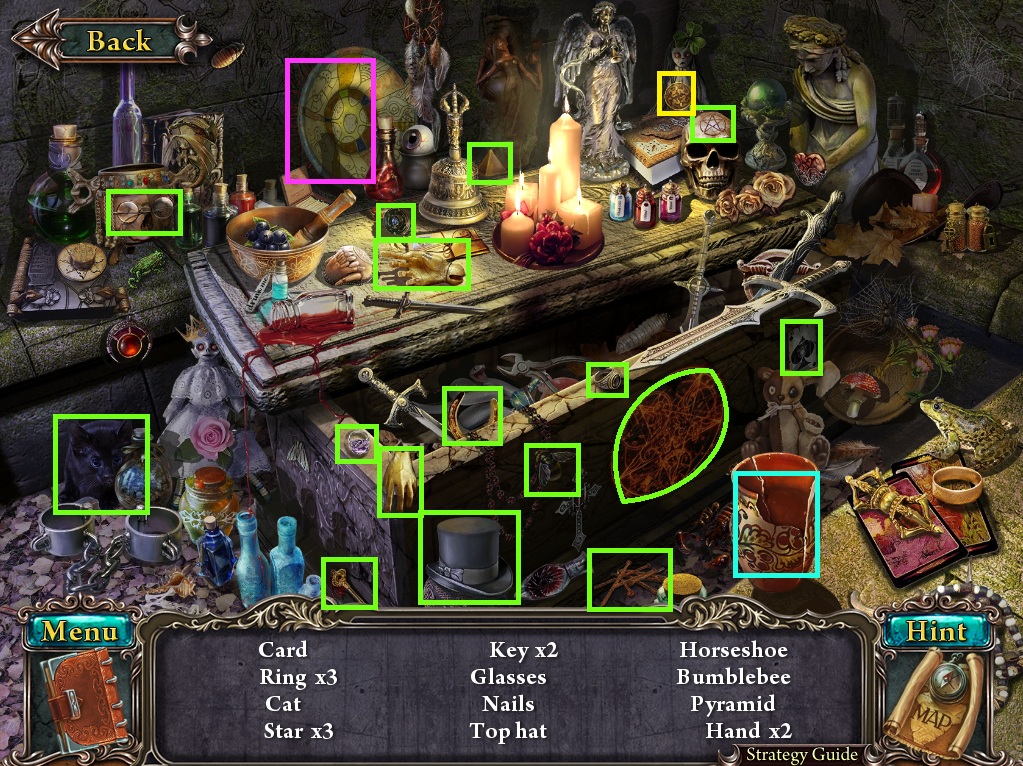
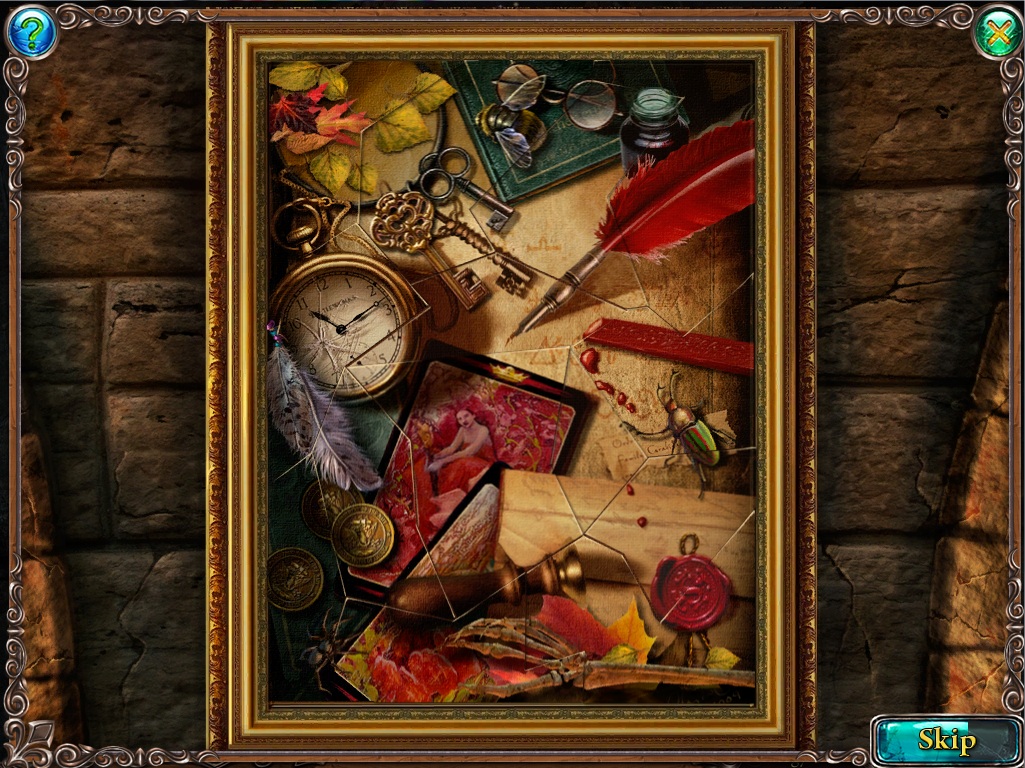
Click the table by the window to start the hidden object scene.
Take Coin #88 on the windowsill.
Roll the shield away to reveal the Spider.
Move the sheet of paper to reveal the Centaur.
Screenshot.
Once the hidden object scene is complete, you will receive a Battle Axe.
Give the Battle Axe to the left statue.
Click the opened compartment at the base of the statue to zoom in and take the Chest Key (1/3).
Take the Painting Piece (1/6) to the left of the circular gate on the floor.
Take the Painting Piece (2/6) in the upper left corner of the ceiling.
Take the Paitning Piece (3/6) on the right window pane.
Use the Map to travel to the graveyard.
Graveyard
Take Coin #89 on the cross of the fresh grave.
Use the Shovel from your inventory on the dirt of the grave.
Take the Lion Head Part leaning against the broken wooden fence.
Use the Map to travel to the prison.
Prison
Take the Coin #90 on the wooden board leaning against the wall.
Take Coin #91 at the base of the sarcophagus.
Take the Pipe to the left of the wooden board.
Take the Skull (1/3) to the left of the iron maiden.
Take the Book (1/3) on the bed next to the old man.
Use the Map to return to the castle.
Castle
Click the stone lion head to the left of the door to zoom in.
Attach the Lion Head Part from your inventory to the broken lion head.
Take the Skull (2/3) inside the revealed cache.
Go back inside the entrance.
Entrance
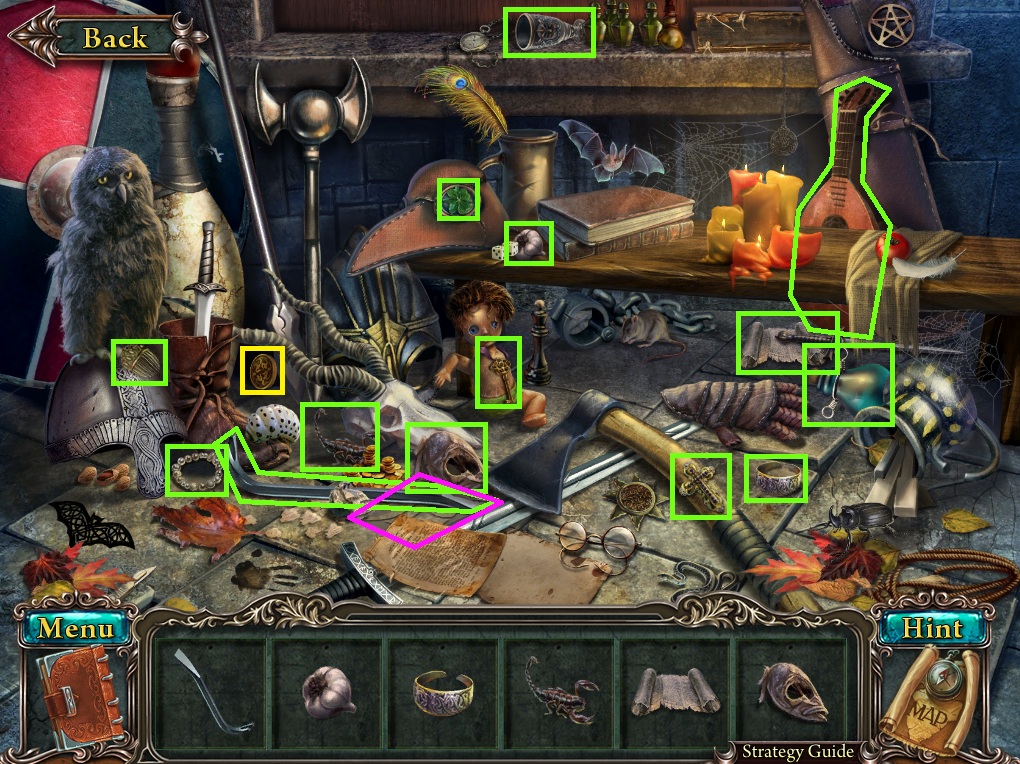
Click the bench under the window to repeat the hidden object scene.
Take Coin #92 under the horns of the gazelle skull.
Screenshot.
Once the hidden object scene is complete, you will receive a Crowbar.
Use the Map to return to the graveyard.
Graveyard
Use the Pipe from your inventory on the snake in the basket.
Click the basket to zoom in and take the Skull (3/3).
Click the coffin in the uncovered grave for a closer look.
Use the Crowbar to remove the coffin lid and take the Crystal (1/5) inside.
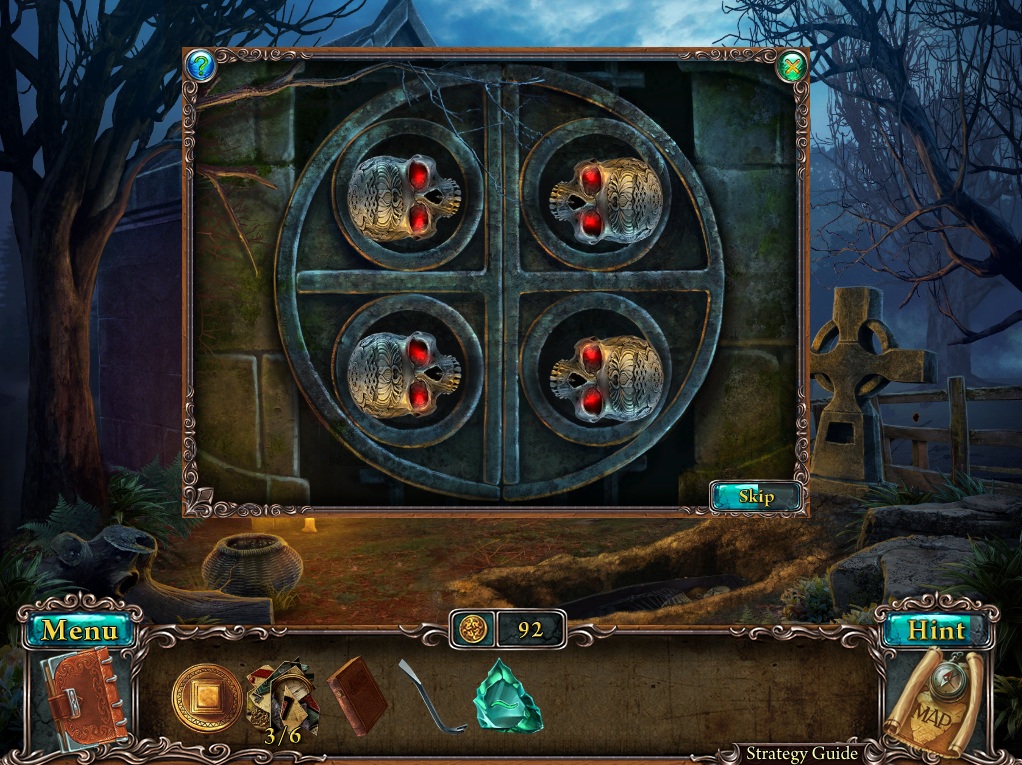
Place the three Skulls from your inventory into the round spaces in the gate to start the puzzle.
To solve this puzzle, rotate each of the four skulls into the correct positions to open the gate.
Click a skull to rotate it clockwise.
Moving the upper left skull also moves the lower left skull.
Moving the upper right skull also rotates the upper left and lower left skulls.
Moving the lower right skull also moves the lower left skull.
When a skull is in the correct position, its eyes will glow brightly red.
Start by correctly positioning the upper right skull, then the lower right skull, next the upper left skull, and lastly the lower left skull.
Solution.
Click the open tomb to start the hidden object scene.
Take Coin #93 in front of the doll.
Click the shield to reveal the Star.
Break the vase to reveal the Key.
Screenshot.
Go back to the castle entrance.
Entrance
Click the wooden door to zoom in.
Use the Chamber Key from your inventory on the keyhole, then turn the key to open the lock.
Go through the open door into the chamber.
Chamber
Take Coin #94 on the top right bookshelf.
Use the Crowbar from your inventory to remove the boards at the bottom left shelf, then take the revealed numbers Nine and Three.
Take the Painting Piece (4/6) from the middle right shelf.
Take the Painting Piece (5/6) beside the skeleton's foot.
Click the loose floorboard to the left of the vase to reveal the Book (2/3)
Take the Painting Piece (6/6) on the back of the green desk chair.
Take the Dagger sticking out of the desk.
Go back to the entrance.
Entrance
Place the Painting Pieces from your inventory into the frame above the doorway.
Click the painting to start the puzzle.
Arrange all the painting pieces to complete the image.
Click a piece a select it, then drag it to a position inside the frame to place it.
Adjacent pieces when placed together will connect.
Solution.
Once the puzzle is solved, the painting will lift, reveailng another Crystal (2/5).
Return to theoutside of the castle.
Castle
Click George Young's grave to zoom in.
Add the 9 and 3 from your inventory to the dates on the headstone.
Take the Shackles Key from the opened grave.
Use the Map to return to the Prison.
Prison
Use the Shackles Key from your inventory on the old prisoner to free him.
Speak with the old man to receive the Drawer Key.
Use the Dagger on the strong rope holding up the spiked ball.
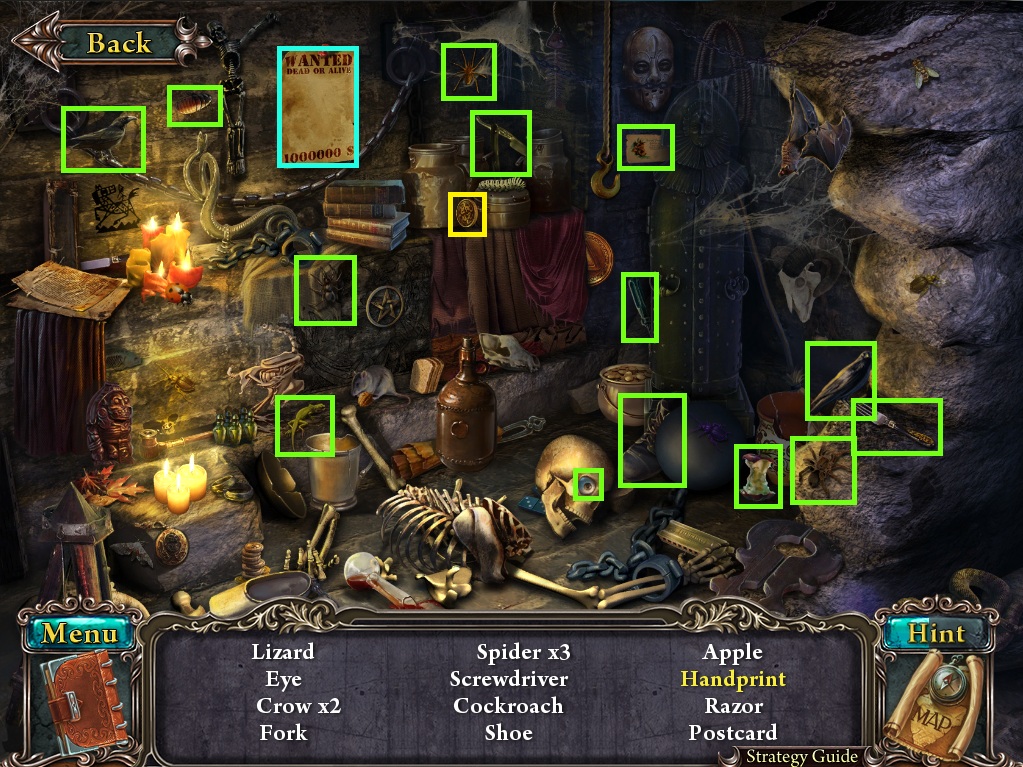
Click the broken wall to start the hidden object scene.
Take Coin #95 on the ledge above the red cloth.
Click the wanted poster to reveal the Handprint.
Screenshot.
Once the hidden object scene is complete, you will receive a Chest Key (2/3).
Use the Map to return to the graveyard.
Graveyard
Click the tomb to repeat the hidden object scene.
Take Coin #96 at the bottom of the coffin frame.
Screenshot.
Once the hidden object scene is complete, you will receive Clippers.
Return to the chamber.
Chamber
Click the desk drawer to zoom in.
Use the Drawer Key from your inventory on the keyhole, turn the key to open the lock, and take the Oil Can and Book (3/3) inside.
Click the middle left bookshelf for a closer look.
Add the three Books from your inventory to the shelf to start the puzzle.
To solve this puzzle, arrange all of the books in numerical order from 1 to 16.
Click a book to select it, then click another book to swap positions.
Solution.
Once the puzzle is solved, take the revealed Crystal (3/5) from the shelf.
Click the vase to zoom in.
Use the Oil Can on the mouth of the vase, then take the Cheese inside.
Use the Map to travel to the prison.
Prison
Use the Cheese from your inventory on the cage trap on the floor.
Click the mousehole to zoom in and take the Key Part.
Click the sarcophagus for a closer look.
Use the Clippers from your inventory on the metal wire wrapped around the door.
Take the revealed Crystal (4/5) inside the Sarcophagus.
Return to the castle entrance.
Entrance
Click the large chest for a closer look.
Place the two Chest Keys from your inventory into their respective places on the lock mechanism, but one is still missing.
Click the bottom of the grate to zoom in.
Add the Key Part from your inventory to the space between the two tiles to open the gate.
Go down the stairs to the magic altar.
Magic Altar
Take Coin #97 at the base of the left column.
Take the Vial of Blood (1/6) at the foot of the stairs.
Take the Vial of Blood (2/6) by the animal skull on the ground.
Take the Vial of Blood (3/6) at the base of the right column.
Take the Vial of Blood (4/6) on top of the rocks outside the colonnade.
Take the Vial of Blood (5/6) at the base of the far left column.
Take the Vial of Blood (6/6) on the red cloth in near the bottom of the far left column.
Give the Vials of Blood to the large bat hanging on the lever to the left of the stairs.
Place the 4 crystals from your inventory into their respective places around the sphere, but one is still missing.
Use the Map to return to the prison.
Prison
Click the broken wall to repeat the hidden object scene.
Take Coin #98 below the candles on the stone.
Screenshot.
Once the hidden object scene is complete, you will receive an Eye.
Return to the chamber.
Chamber
Click the skull on the desk for a closer look.
Place the Eye from your inventory into the eye socket of the skull, then take the Chest Key (3/3) inside.
Go back to the entrance.
Entrance
Click the large chest on the floor to zoom in.
Place the final Chest Key from your inventory into the last empty space on the lock mechanism to start the puzzle.
To solve this puzzle, find the correct combination of colors to each shape.
Click the left dial once, the middle dial twice, and the right dial three times.
The colors should be left - green; middle - red; right - purple.
Once the puzzle is solved, take the Crystal (5/5) inside the open chest.
Go down the stairs to return to the magic altar.
Magic Altar
Place the Crystal from your inventory into the last pedestal around the sphere.
Pull the lever to the left of the stairs to activate the crystals and receive the Piece of Canvas.
The End
Posted by: Trinn |
September 3, 2011 6:22 PM
|
September 3, 2011 6:22 PM