
Lost In Time:
The Clockwork Tower
Platform: Windows

![]() When a teenage girl wanders into a local clock tower and surprises the clocksmith, she ends up causing an accident that upsets the very balance of time itself. Can she find out what went wrong and fix it before time itself ceases to exist? Only time will tell in Lost In Time: The Clockwork Tower.
When a teenage girl wanders into a local clock tower and surprises the clocksmith, she ends up causing an accident that upsets the very balance of time itself. Can she find out what went wrong and fix it before time itself ceases to exist? Only time will tell in Lost In Time: The Clockwork Tower.
 Lost In Time is a pretty standard adventure/hidden object game served up for the less experienced of players. As the nosy Eliza, you end up disrupting time when a special watch lands in the gears of the local clock tower. As a result everyone is stuck in time. Fortunately, you uncover a sentient pocket watch that helps guide you towards repairing said tower. But to get there you will be doing quite a lot of puzzle solving and hidden object finding.
Lost In Time mixes a bit of adventure with some hidden object elements and a good wedge of puzzles. Most of the time you'll walk around exploring small areas with a battery of puzzles in the queue and a list objectives to complete. You're always on the lookout for things to pick up in these parts of the game, and from time to time you'll stumble across a hidden object scene. These aren't overly challenging, with small lists to find and no exotic items stashed in the cupboards. You can even exit and resume hidden object scenes as you see fit!
The puzzles make up the most demanding part of the game, but they cover familiar types, mostly sliding puzzles, and an interesting card game. The exception is the rather tough puzzle at the end. You'll also need to stay on the lookout for bits of diamond and coal, which the local villagers seem to have left scattered all over the place. Why? Haven't a clue. But you can use them as currency at the general store, buying things like a slab of meat for ten diamonds. Looks like leaving precious gems laying around has decreased their value, hasn't it?
 Analysis: Before delving into the game, it should be noted that Lost In Time is really for newcomers to the genre and young kids. It contains a guilt-free hint system that only requires a recharge period and you can even click on individual goals to get a specific clue (not to mention the very useful ability of clicking on a hidden object list item to see a silhouette of it). Every puzzle, with the exception of the final one, can be skipped and the whole experience, for me at least, clocked in at less than three hours. It is not meant for serious players, but is incredibly kid-safe, and very casually-oriented, too.
With that in mind, it is a pretty good experience that never gets too frustrating and covers the fundamental bases of this genre mash-up. With nice art and a funny(ish) script, Lost In Time is about as polished and presentable as most peers in the genre (likewise, the voice work is as less-than-impressive as you'd expect too). Where it does fall short from other novice games in this genre is in it's lack of epicness. Usually such an adventure will take you to exotic locales and meet truly strange people, but Lost In Time keeps it simple and hangs around a town that counts a park amongst its more exciting attractions.
Lost In Time is a good addition to this family of games and a solid starting point if you have a young kid or old relative you want to surprise with a relatively unchallenging game.
![]() Windows:
Windows:
Download the demo
Get the full version
![]() Mac OS X:
Mac OS X:
Not available.
Try Boot Camp or Parallels or CrossOver Games.


Walkthrough Guide
(Please allow page to fully load for spoiler tags to be functional.)
Lost In Time: The Clockwork Tower
Tips:
Lost In Time has an ever-present hints system - if you are stuck, click on a specific item in the to do list for a hint on what to do
There are diamonds and coal scattered everywhere. Pick these up. Diamonds are used to buy stuff from the General Store, while coal can be converted with the machine in the Clock Tower workshop.
You can use the map, after installing the golden gears, to warp to locations you have been before.
Gear Locations
The Copper Gears
Main Floor: in front of the left staircase.
At the Workshop door: in front of the stairs.
Drawing Table (in the Staircase room): Complete the HOG game. Completing this game also gains you the town map.
Silver Gears locations
Outside the tower: next to the park gate.
The Signpost: on top of the light.
The bridge: on the other side of the bridge, to the right.
Sundial: next to the outer ring of stones, to the right.
Gold Gear locations
Back Room: Hidden object - use the watch.
Toy store front, table: In front of the puzzle table, a hidden object that activates once you complete the picture puzzle.
Genie's lamp: Back of the back room. It's a hidden object, so use the watch and focus on the top left of the screen.
Otto: Beat Otto at his card game.
Diamond gear locations
In the exhibit hall: finish the HOG to unveil it as a hidden object (right of screen).
Museum: Free Mr. Pendergast
Courtyard: Head to the general store and buy the pickaxe (top, 20 diamonds). Go to the clock tower courtyard and use the pickaxe on the rubble blocking the door. It will also unearth a diamond gear.
Machine Room: Finish the Tools and Parts HOG.
Clocktower Workshop: Use the termites on the chest with the gear symbol. Then use the watch's time forward ability. The termites will eat the box, leaving the gear exposed. The termites can be found on the fireplace mantle in the Clockmaster's Quarters.
Walkthrough
The Ruined Tower
Eliza has broken the tower and is left standing in the tower foyer. Pick up the pocket watch lying on the floor.
The pocket watch speaks! It needs to be repaired and Eliza has to find the three gears required. Then click on the wrench symbol next to the watch (on the HUD). You have to place the gears. The trick to these puzzles is to note the size of the holes in the gears and match them with similar holes in the watch. After a few switched you'll find the combination.
Solution:Screenshot
The watch can now detect hidden objects. If an object is hidden in the room, the watch pulses blue. Click on the watch then move the cursor near the elevator. A key will appear. Take it.
Time to leave. Head to the front door and click on it. You will read the note. Use the key on the front door.
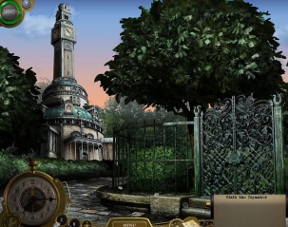
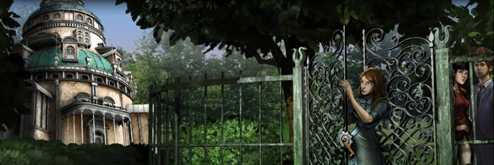
Outside the Clock Tower/Memorial Park
Wow, the sky has gone screwey! Click on the iron gate. It won't open! This triggers a time quake and the watch pules blue (hidden object). Click on the watch and wave the cursor around the left side of the tower. A hand crank will appear.
Use the hand crank on the gate, then click on it to open the gate. Enter Memorial Park.
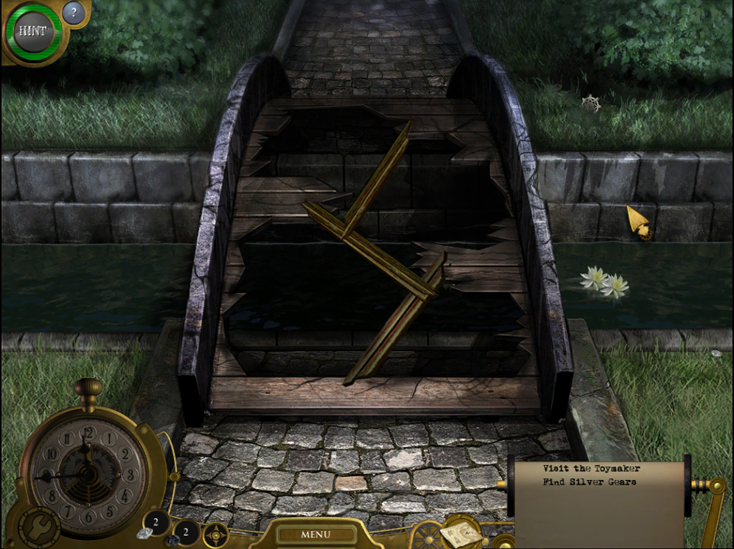
Fixing the bridge
Kaitlynn is trapped in some time warp (please, no singing). We can't help her just yet. Instead, click on the sundial.
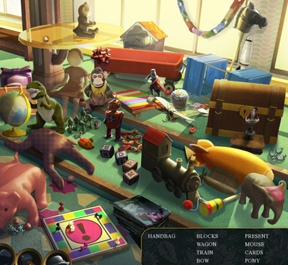
It's a HOG game. Complete the game to get the axe.
Head to the bridge. A timequake shakes it up and destroys it. You'll need wood. Go back to the main park scene and click on the park bench. Use the axe on it. Pick up the pieces.
Go back to the bridge and drop the appropriate wooden pieces on the ghost versions.
Solution:Screenshot
Restoring the Toy Store
The toy store has burned down! Time to reverse time... To do that you will need all four Silver gears. Rebuild the silver gears into the watch.
Solution:Screenshot
The watch can now reverse time. Go back to the toy store. The watch will pulse purple. Click on it and then click on the shop. A slider will pop up. Drag it backwards to restore the shop.
The shop is still on fire! Pick up the flaming stick and head over to the General Store. Use the stick on the snow to make a path.
Enter the general store and buy the hose (5 diamonds) on the far right. If you don't have enough diamonds, just look around some of the scenes.
Head back to the toy store and use the hose on the fire hydrant. Spray the fires until they are all extinguished. Head into the toy store.
The Toy Store
The Toymaker is trapped. Your watch is pulsing purple. Click on it and then click on the shelf trapping the toymaker. Drag the slider that appears on the HUD.
The toymaker is also stuck in a time bubble. Head to the back room. The watch is pulsing blue (hidden object). Click on it and then wave the cursor in the top left corner. It's a gold gear. Take it.
Click on the workbench and then click on the unfinished toy. He needs to be put together.
Otto's Parts locations
Note: There are ten parts, but the game won't notify you that you had all of them until you rebuild Otto
Otto's upper arm:
Next to Otto's head.
Otto's hat:
On the coil, far left of the workbench.
Otto's waist:
In the back room, on the top shelf, far left.
Otto's spine:
In the back room, on the carousel. Press the green button and have the purple zeppelin ride move forward. Its on top of the ride.
Otto's eye:
Complete the genie lamp puzzle (back of the back room). Click the colors in sequence to spell Your Wish Is My Command:
Purple, Green, Red, Blue, Yellow
Otto's lower arm:
Toy store front, it is a hidden object (use the watch) in front of the large clock.
Otto's Elbow:
Complete the picture puzzle on the desk in the front room. Rotate the pieces and use the feint image on the board as a guide.
Otto's left leg:
In the toy store front, just below the table - it only appears after completing the picture puzzle.
Otto's right leg:
Complete the peg puzzle. To beat this puzzle you need to remove all but three pegs.
Otto's Heart:
Complete the maze game. First you need the missing mouse: find it by completing the Toys HOG game (in the Toy store front, to the far right). Click on the maze game (toy store front, far left) and use the mouse to start it. The trick to beating this game is getting the blue mouse on its spot first.
Red mouse: Up, right.
Purple mouse: up,left.
Green mouse: up, left.
Blue mouse up, right, up.
Purple mouse: up, right.
Green mouse: left, down.
Yellow mouse: right, up, left.
You can now fix Otto. Put the parts in their reasonable sequence (spine before waist, etc.) Otto now wants to play a card game.
Otto's card game
In this game, you have to flip all your positions to stars. You do this with the blue Time Traveler card. The other cards you move back and forth with, while the sabotage card removes an opponent star. Ultimately the trick to winning is to strike first. If the game lands a star first, it tends to win the round. Don't worry about losing - you still win some diamonds. This should get you the final gold gear.
You can now rebuild the gold gears. Once done you can access people stuck in the time bubbles as well as warp around the map to locations you have visited before.
Solution:Screenshot
The Toy Maker's tea
Once you have rebuilt the gold gears, head to the front of the toy shop. The watch will pulse gold. Click on it and then click on the toymaker. He needs dandelion tea.
Freeing Eliza's Mom
Go to the general store and head to the kitchen in the back. Eliza's mom is also in a time bubble. Click on the watch (pulsing gold) and click on Mom.
In order to free her, Eliza needs to bake muffins. Click on the Food prep station in the kitchen. You need to make both kinds of muffins: follow the instructions taped to the wall to make each type.
Freeing Kaitlynn/Herbert
Eliza's mom is free and she has the recipe for the tea, but no dandelions. Head back to the park and talk to Kaitlynn. Seems like she has her own problem. Head to the train station (left from the general store).
Click on the watch and click on time-trapped Herbert. He wants to give Kaitlynn flowers. Go back to the sundial in the park and click on the flowers. You need clippers.
Head to the general store and buy the clippers (on the back wall, 20 diamonds).
Go back to the sundial and use the clippers on all the white flowers. Also pick up the tickets, lying amongst the flowers.
Give the tickets to Kaitlynn. Eliza can now ride the train. Head to the train station and give Herbert the flowers.
Click on the train at the train station and go to the museum. Then click on the train again to go to the clock tower's back entrance. Pick all the dandelions.
Now that you have the dandelions, head to the kitchen in the general store and click on the food prep station. Mix the tea according the the instructions on the wall. Take the tea to the Toymaker. In exchange he will give you a key to the museum.
The Museum
Go to the museum and use the key you got from the Toymaker. It starts a puzzle. You have to align all of the circles to complete the picture. To do this, get the flames of the sun next to the right, while aligning the lower half of the star int he larger brown circle to an 11-o-clock position. Then just keep clicking on the blue circles - the puzzle will slot into place.
Distract the T-rex
Go to the courtyard and click on the goat. A timequake will happen. Take the unconscious goat back to the museum.
Use the goat on the T-rex. While the dino is distracted, click on the watch and then on the T-Rex. Pull the slider that appears back to return it to a skeleton.
After the T-Rex is taken care of, the watch will pulse gold. Click on it and then click on Mr. Pendergast.
Saving Mr. Pendergast
Head to the exhibit hall. To free Pendergast you need to complete all three puzzles. But first you need the tools to do so.
Click on the Workspace in the exhibit hall. It's a HOG - beat it to get the relief pieces and paint brush. When you finish the HOG and return to the exhibit hall, the watch will indicate a hidden object. It's a diamond gear (around the right of the screen).
The paint puzzle:
Use the brush on the painting and click-and-drag the motions indicated.
Solution:Screenshot
The Carving:
Place the missing three pieces then slide the pieces until you have the complete picture.
Solution:Screenshot
The Charter:
Go to the general store and buy the shovel (30 diamonds). Then go to the sundial and use the shovel on the ground around it. The time capsule is on the left of the sundial. It's rusted, so use the watches ability to reverse time. Get the charter piece. Return to the museum and use the piece with the charter display. Click on each piece until they all line up.
Getting around the Clock Tower
Go to the Workshop door in the clock tower. Use the watch's hidden object power to unveil a puzzle on the door. Now use the clock's time reversal power on the puzzle.
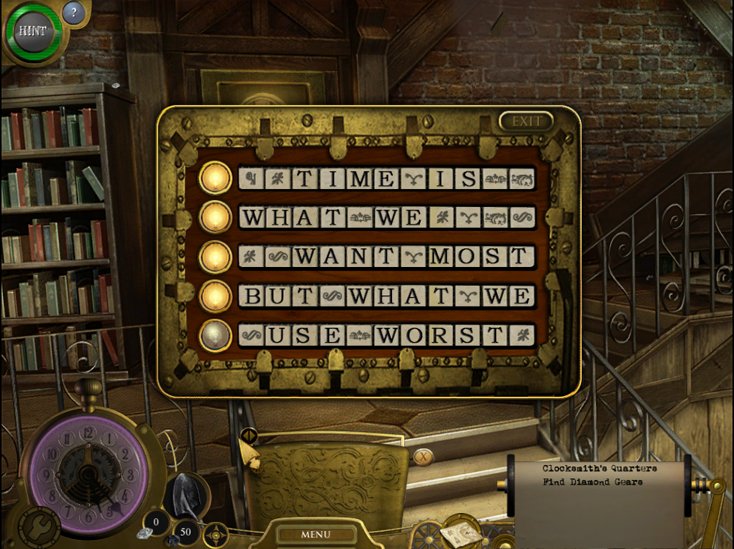
Workshop Door puzzle:
After using the watch's time reverse power, use the slider to change through the different rows of letters. When the letters form a sentence, click on the light to its left to lock it in place. Keep doing this until you lock all five sentences.
Solution:Screenshot
Enter the workshop and use the coal converter to get more diamonds. Then head over to the general store and buy the apple seeds (back shelf, left, 20 diamonds).
Head back to the workshop and use the apple seeds on the pot next to the table. Then use the watch's time feature to make the plant grow and access the Clockmaker's Quarters.
The Clockmaker's Quarters
Click on the table. It starts a HOG, which gives you three stones when completed.
Use the stones on the lock box in front of the bed and press the red button. You will get the elevator key.
Head to the Clock Tower's staircase. Use the watch's time-reverse ability on the elevator. Use the key and then select the third floor.
The Machine Room
Click on the tools and parts, which will activate a HOG. Complete this to get three levers.
Use the levers on the control box, then flip the levers to line up the staircase and head to the gear platform.
Use the watch to talk to the Clockmaker. You need to find the three gears and restore the clock.
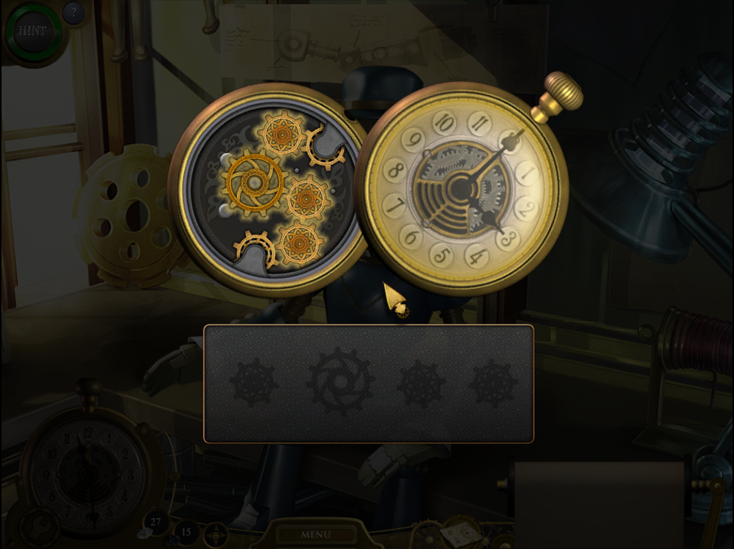
Restoring the clock
To restore the clocks you will need to build the diamond gears.
Solution:Screenshot
Click on the map. Once the diamond gears are restored, the three gear locations are shown on the map. Once a gear is ready to be moved, the watch will pulse with a feint green. Click on the pulse, then the gear.
Museum: Behind the T-Rex. Use the watch's time-reverse ability on it.
Courtyard: The circular pattern in the grass. Use the shovel to dig it up.
Gear Platform: Lying on the platform. Give it to the Toymaker to be repaired.
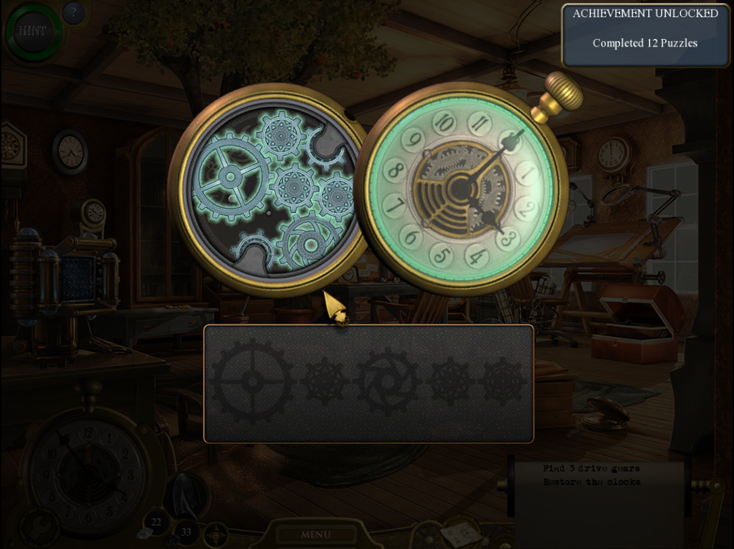
The Clock Room
To finish the game, you need to put all the clocks on 12:00. That means both arms, the XII (outer ring) and the 0 (inner ring) all need to be at the top position. Each circle has two gears that rotate it in different directions and different iterations.
The best strategy is to isolate which gears cause the half rotations of the large numbers and short hand. Lets take the internal ring as an example. Flip the short hand with the half-rotation gear until it rests on the top position. Then switch gears and crank it down to the bottom (6) position. Switch gears again and rotate the dial back to 12 in one move.
The outer ring works the same, with the Roman Numerals being the ones that revolves halfway.
Keep doing this and you will soon move all the dials into the right spot.
For every one click on the halfway gear of the outer ring, the other gear gets two clicks. On the inner ring the ratio is 1 to 4.
Congrats! You are done!
Thanks, James, for the walkthrough!
Posted by: Mike |
January 11, 2011 5:11 PM
|
January 11, 2011 5:11 PM