
Living Legends: Ice Rose
Platform: Mac, Windows

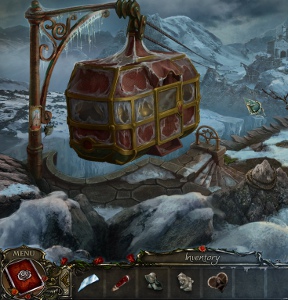
![]() People, there are just some things you don't let loved ones do. Drink Red Bull, watch The Real Housewives of Terrible People, and run off to snow-covered, desolate magic mountains alone while offering up the vaguest possible explanation for doing so. In 4 Friends Games' hidden-object adventure Living Legends: Ice Rose, your beloved Edward has been missing for some time after traipsing off to Rosemont, a town that was buried in a blizzard that left what townsfolk who didn't flee in a "sleep state", and now that the police have given up looking for him, it's up to you to track him down. Of course, the chances are slim that Edward has either stumbled upon Liam Neeson and is helping him defeat some wolves in hand-to-hand combat, or kicking back in a ski lodge with some hot chocolate. Guess who gets to thwart an ancient evil homewrecker and save the world?
People, there are just some things you don't let loved ones do. Drink Red Bull, watch The Real Housewives of Terrible People, and run off to snow-covered, desolate magic mountains alone while offering up the vaguest possible explanation for doing so. In 4 Friends Games' hidden-object adventure Living Legends: Ice Rose, your beloved Edward has been missing for some time after traipsing off to Rosemont, a town that was buried in a blizzard that left what townsfolk who didn't flee in a "sleep state", and now that the police have given up looking for him, it's up to you to track him down. Of course, the chances are slim that Edward has either stumbled upon Liam Neeson and is helping him defeat some wolves in hand-to-hand combat, or kicking back in a ski lodge with some hot chocolate. Guess who gets to thwart an ancient evil homewrecker and save the world?
 The game offers three flavours of difficulty that change how much hand-holding (hints, sparklies) you'll encounter. It turns out that the evil force who has spirited away dearest Edward at least want you to have a sporting chance of thwarting their schemes, so rather than, say, surround the entire village of Rosemont in a wall of impenetrable ice they've decided to leave a trail of easily assembled clues and puzzle mechanisms for you to solve. The few townspeople remaining in Rosemont are all frozen solid, but that doesn't necessarily mean that they can't help you if you're willing to give them help in return. But, hey, as long as you have the hint and skip functions for when you get stuck, what's a little "combat a malicious evil ice witchery" between friends?
Analysis: If you get a vague Dire Grove vibe from playing this, you're not the only one, and that's not necessarily a bad thing. It's sort of like a more Disney-esque interpretation of the concept. Ice Rose is a beautiful game, and does a great job of infusing that magical atmosphere that makes these types of titles such excellent evening kick-back fare. The environments are gorgeous, character design is pretty solid (albeit silent, which makes the mouth movements odd), and the soundtrack knows when to kick in and when to fade away. It's not the most original concept in the world, but it doesn't have to be. If you like your games magical and entertaining over scary and suspenseful, then Living Legends: Ice Rose might be right up your proverbial alley if you're willing to look past the occasionally goofy writing.
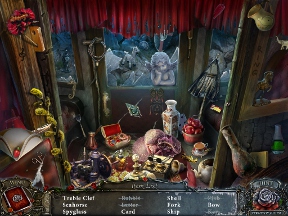 Gameplay is about what you'd expect, solving puzzles and tracking down items, though thankfully the latter doesn't really stray into the illogical. Some of the obstacles are, however, a little dumb. Do you really need to track down a key to get past a waist-high gate? Do I need to play a little matching game to get said key when it's the only key with a big ornate top on it? You need to hunt down something to tie back those shabby, frayed cloth curtains before you can pass through them? Really? It's not what I would call a deal-breaker, but it did wring a derisive snort out of me a few times. If you don't like an overabundance of hidden-object scenes, the amount in Ice Rose and how often they're repeated might put you off. They are, fortunately, clean and well designed, and the same can be said for most of the puzzles you'll encounter.
While the game starts off fairly easy, it does possess a bit of a difficulty curve the farther you go, although chances are you still won't find it much of a challenge. It's not that the game is deliberately easy, more it doesn't really offer anything you won't have seen before in other games and seems to focus on being lovely and approachable. I spent around four hours on the game, which may mean that players who value a lot of bang for their buck should try the demo first. Living Legends: Ice Rose is a familiar but comely game with enough style and intrigue to make it worth spending some time with. Fans of fairytale adventure will like the premise and stunning presentation, and if you want a genuinely casual and relaxing game, Living Legends: Ice Rose is well worth checking out.
A Collector's Edition is also available. It contains a bonus chapter, art gallery, strategy guide, and more. Remember that Big Fish Game Club Members pay only $13.99 for Collector's Editions (or 2 club credits), and collector's editions count 3 card punches of 6 total needed for a free game.
![]() Windows:
Windows:
Download the demo
Get the full version
Also available: Collector's Edition
![]() Mac OS X:
Mac OS X:
Also available: Collector's Edition


Walkthrough Guide
(Please allow page to fully load for spoiler tags to be functional.)
Living Legends: Ice Rose
Basic Gameplay
Information
You can change the music and sound levels from the options tab.
You can change the cursor in the options tab.
You have the option between fullscreen and widescreen.
All extras will be unlocked upon completion of the game.
If playing the collector's edition, extras include: Wallpapers, extra gameplay, hidden object scene play, puzzles, screensaves, music, and concept art.
There are three levels of difficulty:
Casual: The hint and skip options recharge rapidly and active zones will sparkle.
Advanced: The hint and skip options recharge much slower, and there will be no indiciation of active zones.
Expert: The hint option is only available for use in hidden object scenes, and both hint and skip options recharge at a snail's pace. There is no indication of active zones.
You will be given an opportunity for a tutorial at the start of the game which you have the option to decline.
Hovering over an area that can be zoomed in on changes your cursor to a magnifying glass; this is also what will appear when hovering over a hidden object scene.
If you hover over an object that can be picked up or affected, then the cursor changes to a grasping hand.
The hidden object scenes are randomized.
On your screen to the bottom left is your menu button and journal.
On the bottom right is the hint button as well as strategy guide.
The bottom middle of your screen is your inventory.
Chapter One: Rosemount
Opening the Gondola
Click on the envelope in your hands.
Click once more and receive the shard of glass.
Investigate the heart on the tree to your left.
Pick up the knife.
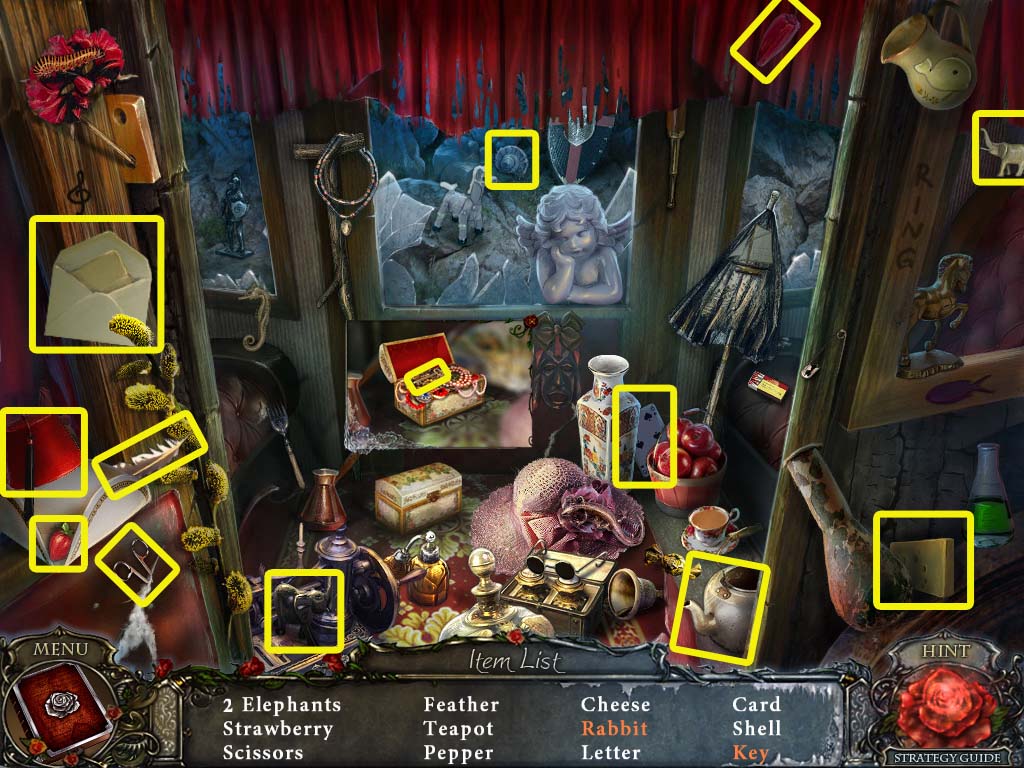
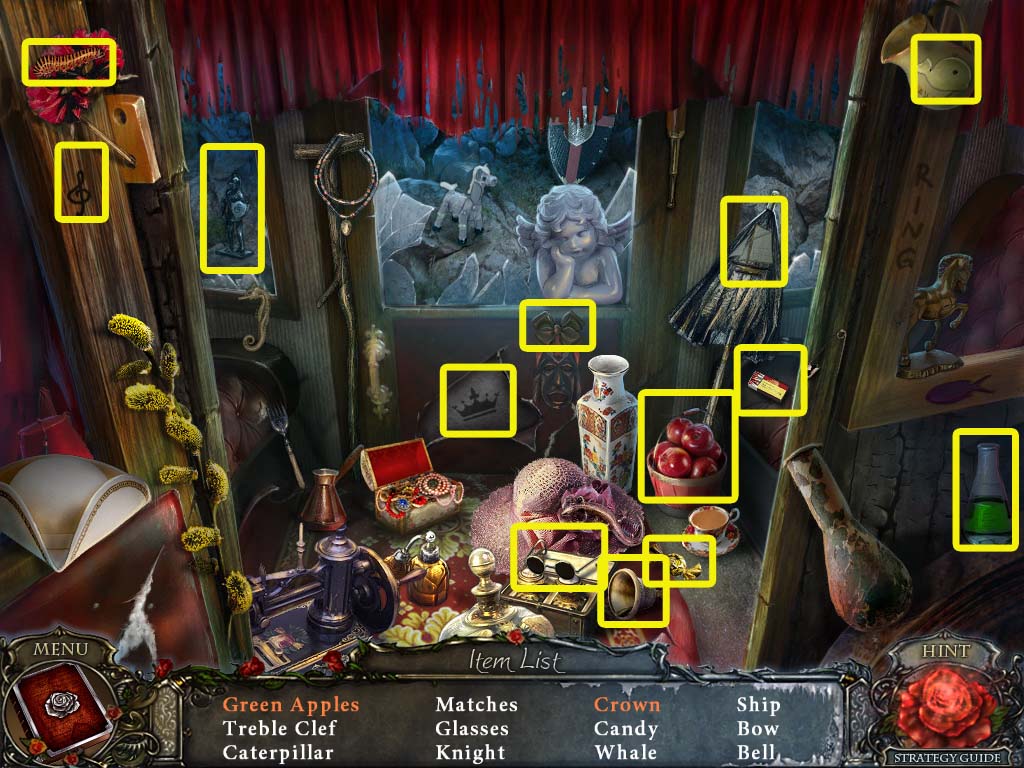
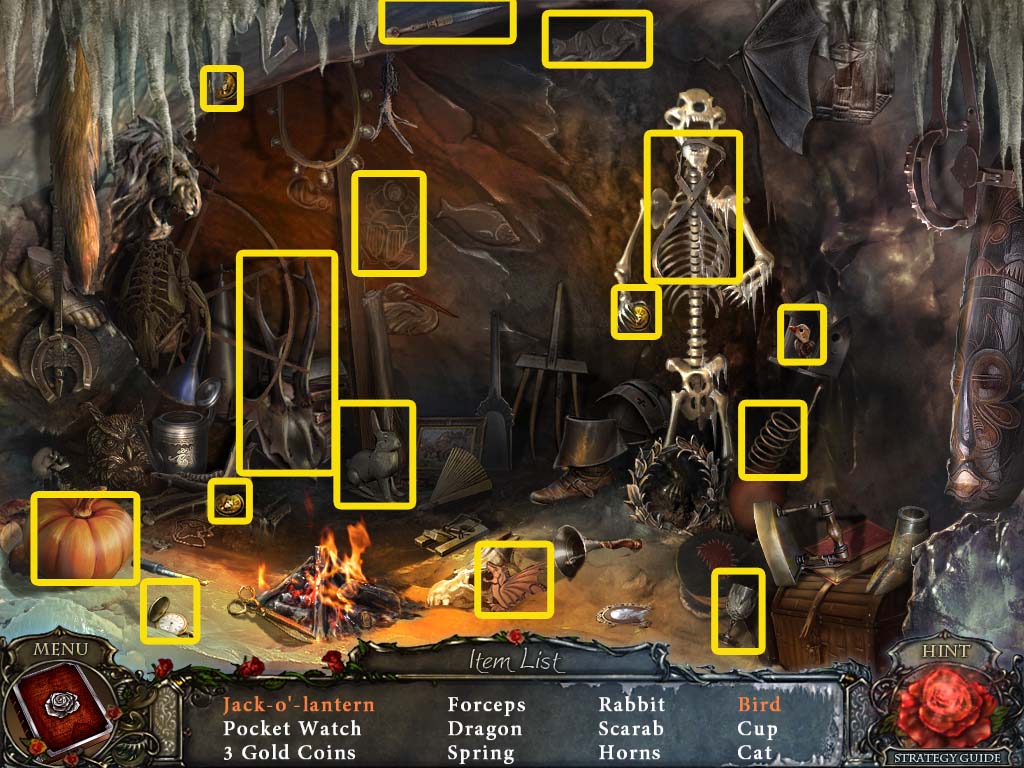
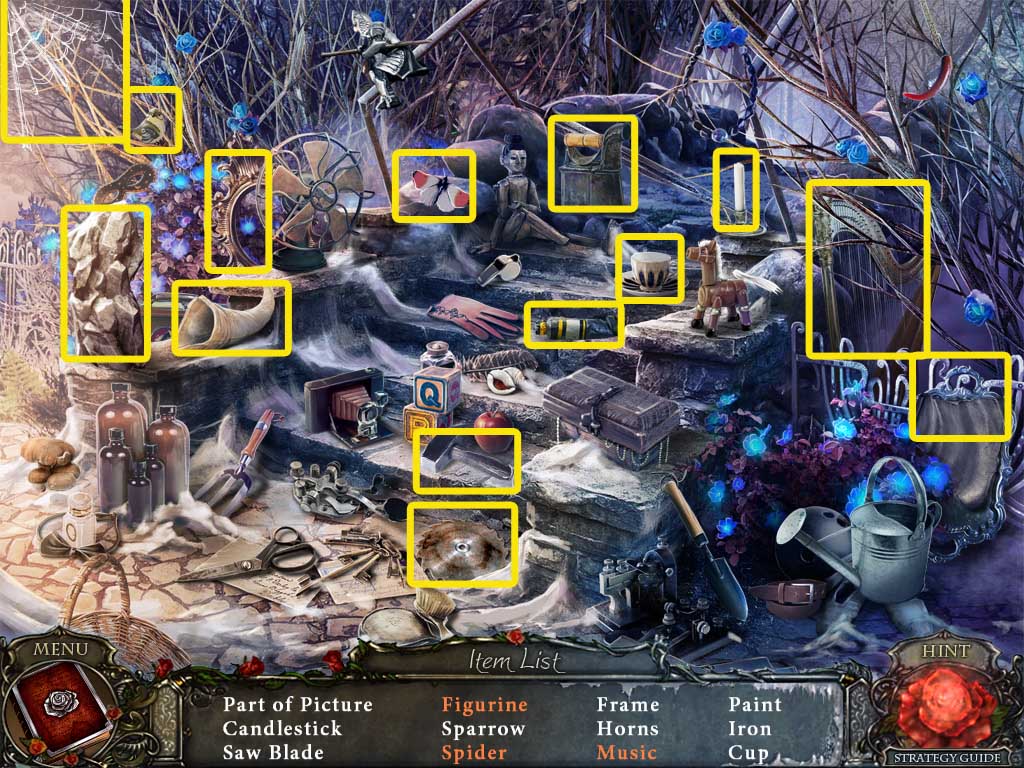
Start the hidden object scene on the right.
Click on the fez hat to reveal the rabbit.
Click on the jewelry box to reveal the key.
Screenshot
You receive a chest key.
Investigate the chest at the back of the wagon.
Use the chest key to open it up.
Pick up the rose emblem piece.
Move forward.
Head to the right towards Rosemount first.
Click on the Rosemount path once more to move towards it.
Investigate the bird nest.
Pick up the photo.
Investigate the rock face to your left and pick up the red gem.
Go back and investigate the satchel laying on the ground.
Use your knife to cut the straps open.
Pick up the rose emblem piece as well as the letter.
Go forward to the left, towards the gondolier.
Pick up the rope that's on the rock.
Investigate the pole to the left of the gondola and pick up the empty oil can.
Click on the gondola. Place the two rose emblem pieces on the empty spot.
This will start a series of puzzles where you must move the colored flower circles to their matching color slots.
Puzzle One:
Slide the green flower down into the open middle spot.
Slide the red flower up so it's in the correct slot.
Slide the blue flower right into the correct slot.
Slide the green flower down left into the correct slot.
After completing the first puzzle, another will appear.
Puzzle Two:
Slide the blue flower down into the middle spot.
Move the green flower up into the top slot.
Move the red flower up right into the purple slot.
Move the purple flower down into the bottom slot.
Move the green flower down left into the left slot.
Move the red flower up to the top slot.
Move the purple flower up right to the right slot.
Move the blue flower down.
The third and final puzzle will start.
Puzzle Three:
Move the green flower left.
Move the purple flower right.
Move the blue flower left.
Move the red flower up.
Move the purple flower up.
Move the blue flower across.
Move the yellow flower up.
Move the green flower left.
After the gondola opens, go inside.
Getting the Hammer Handle
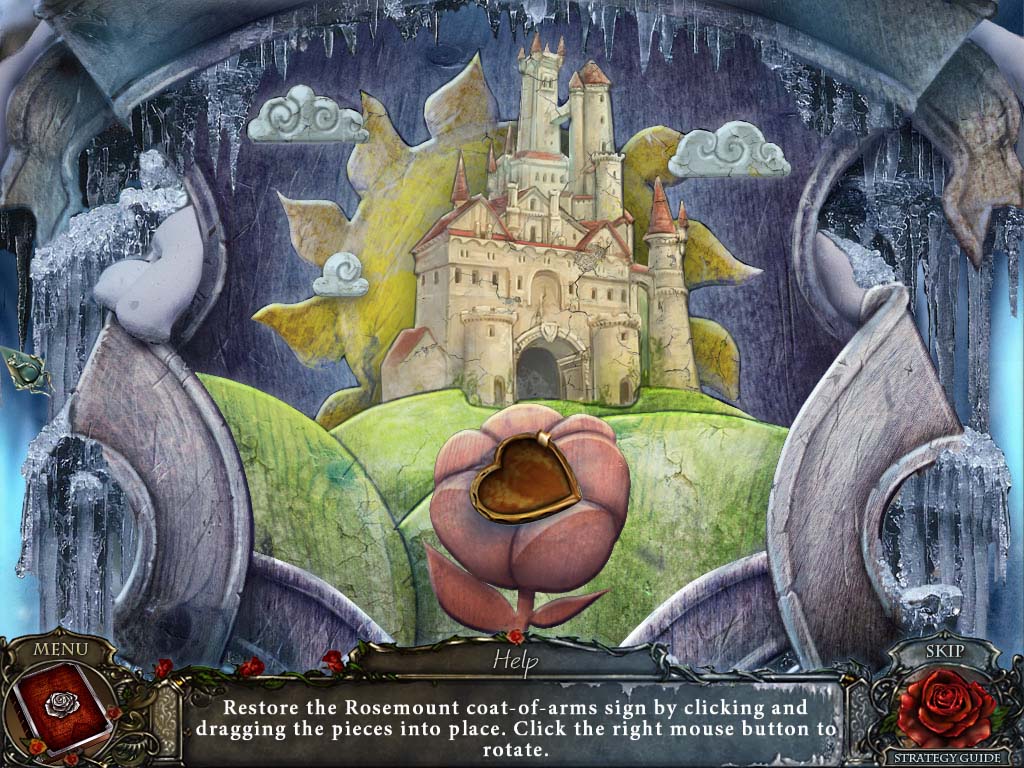
Investigate the table and pick up the Rosemount sign pieces.
Leave the gondola and go back once more.
Investigate the Rosemount sign and place the Rosemount sign pieces on it.
Place the pieces in the proper spots to fix the sign.
It's easiest to start on the border and work towards the inside.
Right clicking will rotate the piece you have.
Screenshot
You receive a locket part.
Investigate the tree stump and click on the leaves to clear them away.
Place the photo and the locket part on the locket.
Pick up the locket, then go forward to the gondola once more.
Go inside the gondola and give the locket to the woman.
Investigate the table and click on the purse to open it.
Pick up the nail file.
Click on the Castle Le Roy paper to add it to your journal.
Leave the gondola and investigate the turret in the distance.
Use the nail file to get the lion sign.
Go into the gondola once more and investigate the desk to the right.
Place the lion sign on the missing lock spot.
To open the desk you must click on the creatures in the correct order.
Lion.
Eagle.
Snake.
Pick up the ticket fragment and the hammer handle.
Getting the Crowbar
Leave the gondola and return to where you did the first hidden object scene.
Click on the ground to the left and attach the hammer handle to the hammer and receive a hammer.
Start the hidden object scene.
To reveal the crown, you must click on the rip in the carriage wall.
To make the apples green, you have to click on the green potion and pour it over the apples.
Screenshot
You receive matches.
Go forward and go to the right towards Rosemount.
Use your hammer on the ice wall three times, then go forward.
Pick up the bucket.
Investigate the snow where the newspaper is and pick up the gold tile.
Go forward into the town square.
Investigate the keg and pick up the code plate.
Go forward between the buildings on the right to reach the alley.
Investigate the figurine on the window sill and pick up the gold tile and the figurine.
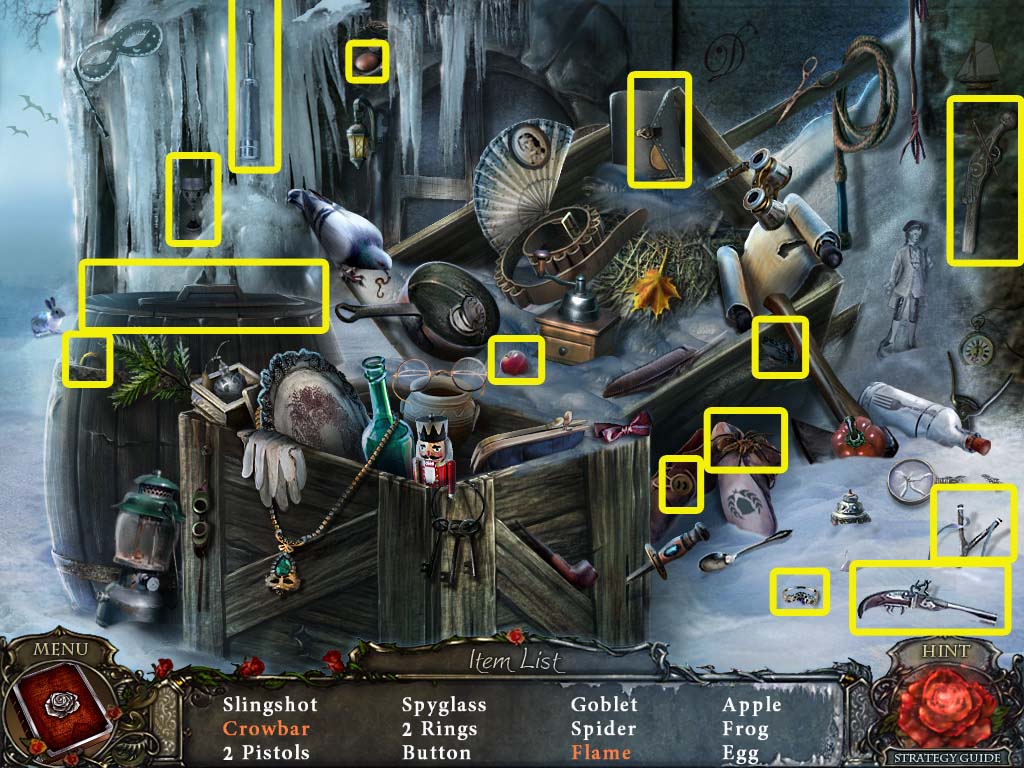
Start the hidden object scene.
Click open the satchel to retrieve the flame.
Click on the barrel top and investigate inside to get the crowbar.
Screenshot
You receive a crowbar.
Getting into the Hotel
Go back to the town square and investigate the well.
Use the crowbar on the planks twice.
Put the bucket down, then the rope, and then click on the bucket to send it down the well.
Pick up the gold tile.
Investigate the door to the left and place all three gold tiles on it to start the puzzle.
When you have to move from left to right, that will be referred to as a row.
When you have to go up or down, that will be referred to as a column.
There are three rows and three columns.
Move row 1 to the right once.
Move row 2 to the right twice.
Move row 3 to the right once.
Move column 2 down once.
Move row 3 to the left once.
Move column 2 up once.
Move column 3 up once.
Move row 3 to the left once.
Move column 3 down once.
Move row 3 to the right once.
Screenshot
Enter the hotel.
Chapter Two: The Hotel
Getting Upstairs
Go through the door on the right.
Investigate the broken chandelier and pick up the green gem.
Investigate the piano and pick up the book and the code plate.
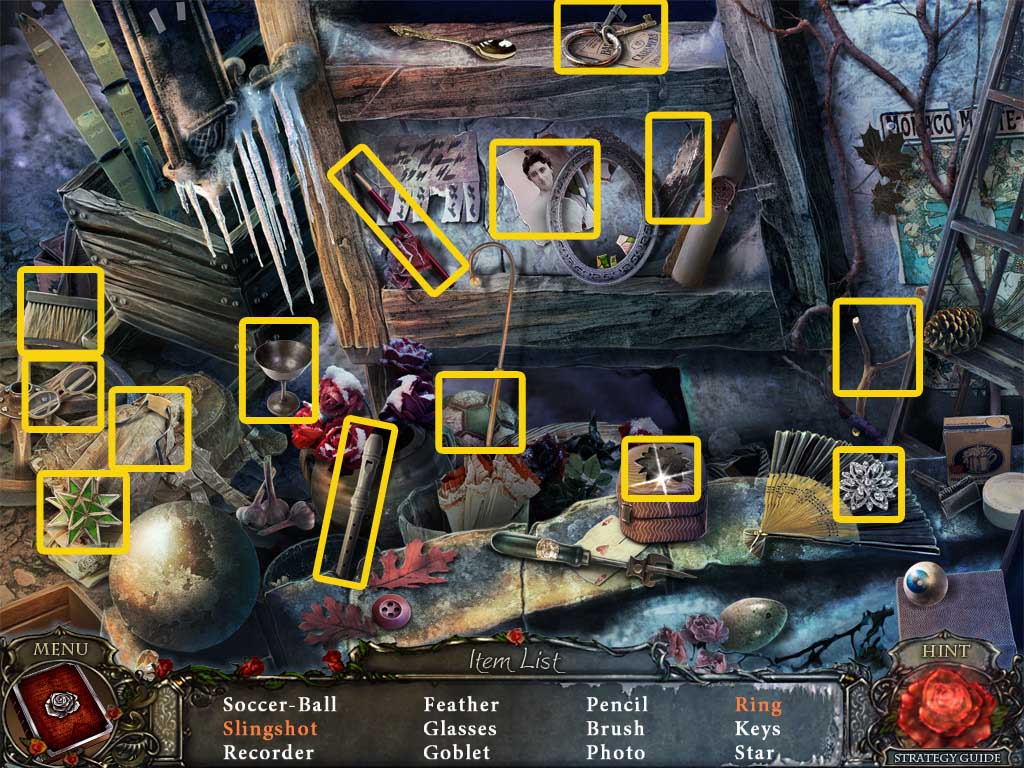
Start the hidden object scene.
Click the eye patch on the skeleton to reveal the eye.
Click on the hand to show three fingers.
Use the pencil on the chalkboard to write 7.
Screenshot
You receive a corkscrew.
Go back twice out to the town square.
Click on the barrel and use the corkscrew on the cork.
Place the empty oil can beneath the cork to receive full oil can.
Go back once to where the wagon and farm land is and investigate the wagon.
Click on the curtains to pull them away.
Place the full oil can on the lantern, then use the matches.
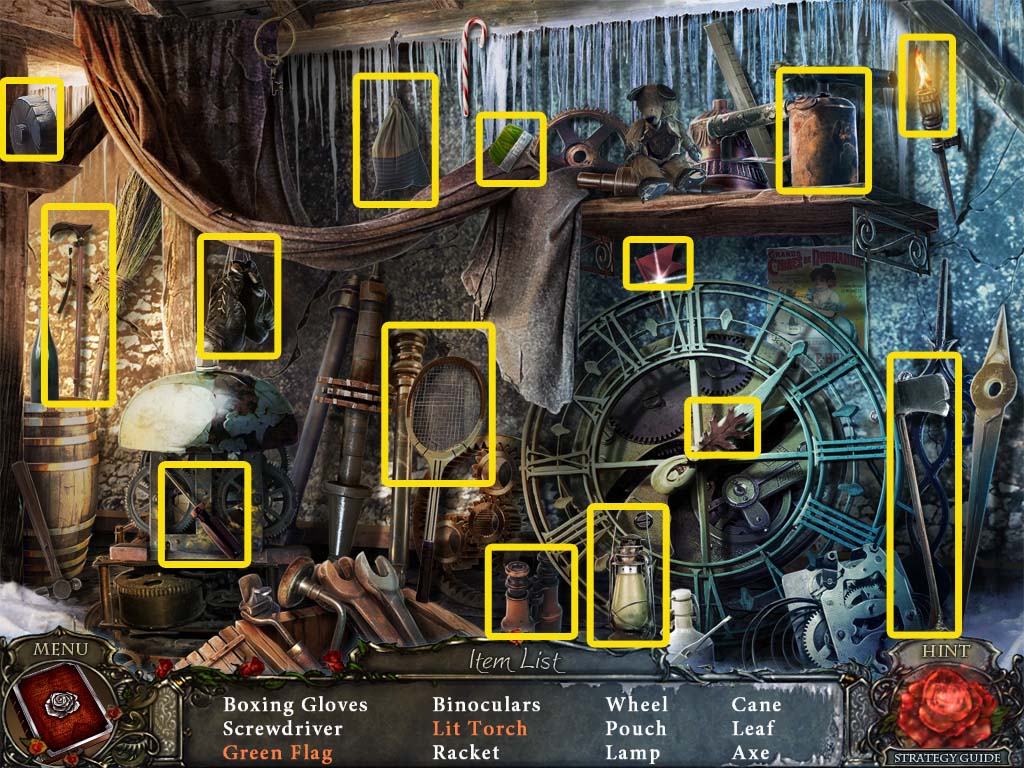
Start the hidden object scene.
Open the cabinet to reveal the comb and the mask.
Screenshot
You receive lace.
Go back to the hotel and use the lace on the curtains blocking the staircase, then go upstairs.
Getting the Code Plate
Pick up the hat from the table.
Investigate the blue spot on the floor next to the man's chair and pick up the paper and the stone.
Investigate the fireplace mantel and pick up the brush.
You can place the figurine on the mantel now, or do it when you get the second figurine.
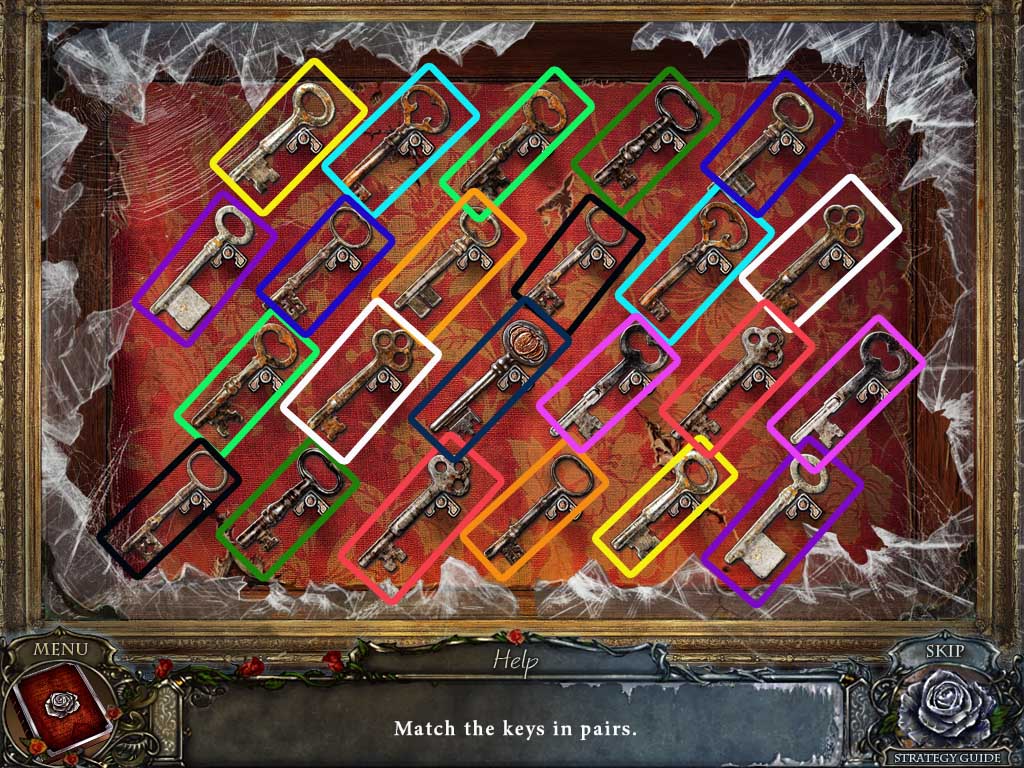
Go down to the hotel lobby and investigate the case behind the desk.
Use the stone three times on the glass protecting the keys to start the puzzle.
You must match the key pairs to one another.
You receive a key with pumpkin.
Screenshot
Leave the hotel and go back to the pumpkin patch.
Investigate the gate and use the key with pumpkin on the lock, then go in.
Investigate the scarecrow and pick up the paper and the candle.
Pick up the shovel part from the hay stack on the right.
Go back to the hotel and go into the dining room.
Start the hidden object scene.
Click on the bottle to reveal the code plate.
Use the dish rag to clean the mirror and reveal the A.
Screenshot
You receive a code plate.
Getting the Third Figurine
Investigate the table with the pumpkin and use the brush to clear away the snow.
Place the hat, knife, and candle on the table.
Use the knife to carve the pumpkin.
Light the candle with the matches, then place it in the pumpkin.
Place the hat on the pumpkin.
Pick up the Jack O' Lantern.
Leave the hotel and go forward to the alley.
Investigate the crate and attach the shovel part to the shovel handle to receive a shovel.
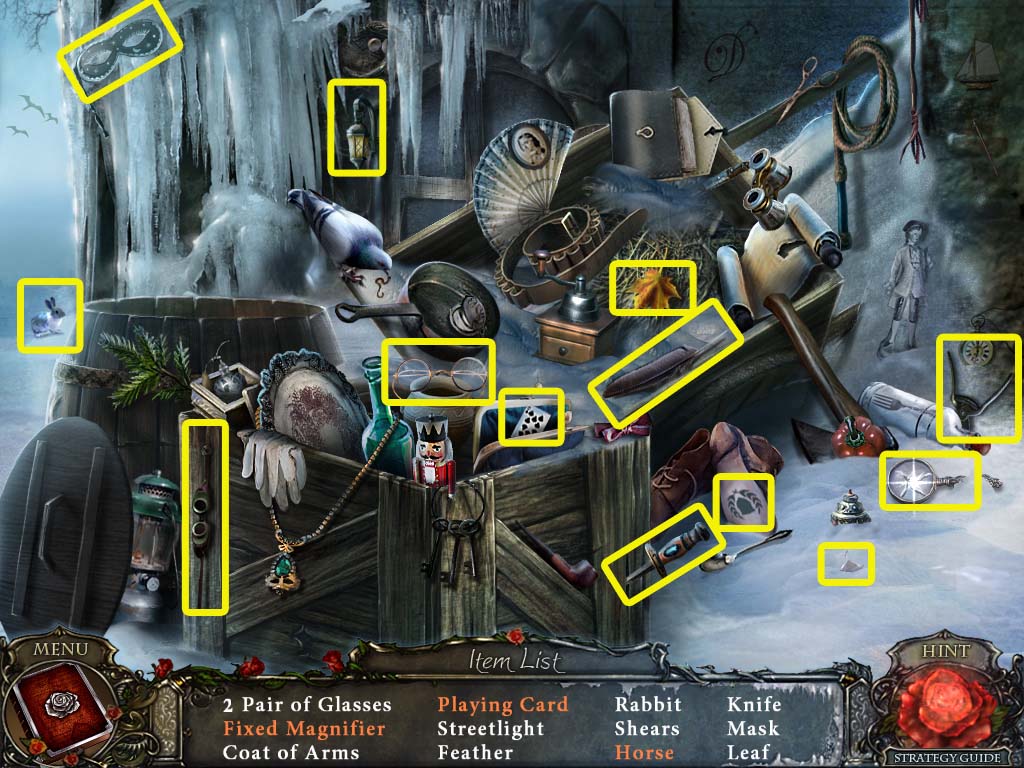
Start the hidden object scene.
Look into the barrel to get the horse.
Open the purse to reveal the card.
Pick up the pieces of the magnifying glass to fix it.
Screenshot
You receive shears.
Go back twice and go into the pumpkin patch.
Place the Jack O' Lantern on the top of the scarecrow stick.
Use the shovel to dig where the x is shown on the ground.
Investigate the thorny bush on the left and use the shears three times in order to grab the figurine.
Getting the Bundled Heart
Return to the hotel and go upstairs.
Investigate the fireplace mantel and place the figurine on it. There should be three figurines in total on the mantel.
Investigate the picture above the mantel.
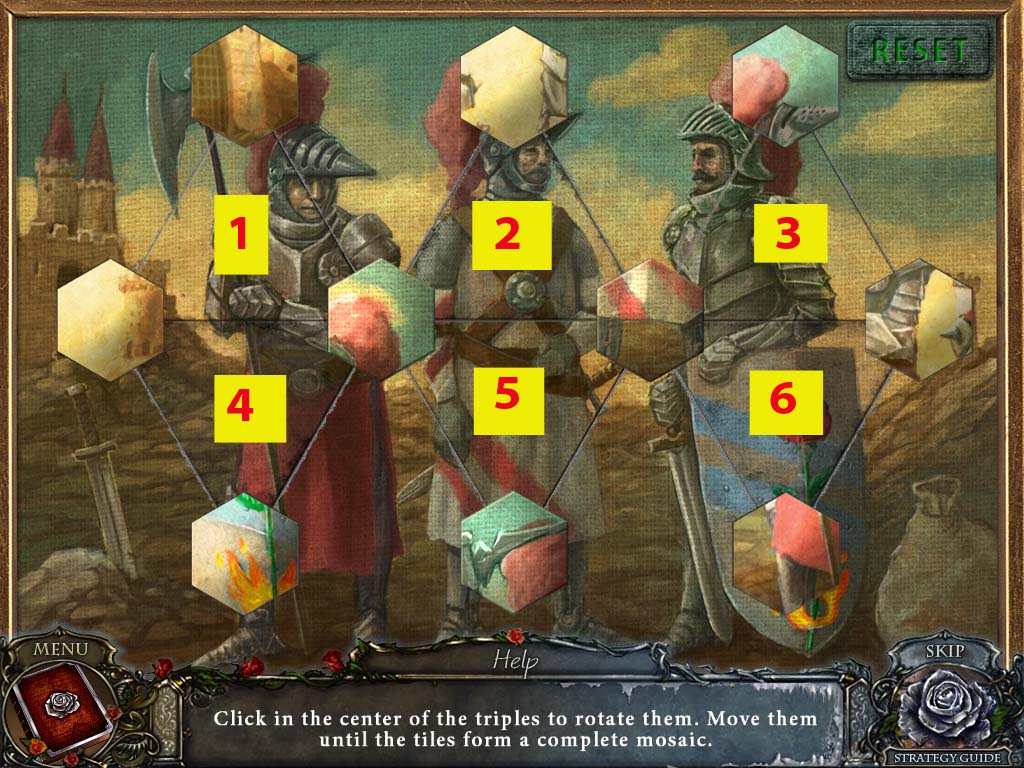
Place all three code plates on the canvas to start the puzzle.
You must place each code plate on the appropriate spot, and you can rotate by right clicking on them.
Exit the puzzle after finishing and go downstairs to the hotel lobby.
Click on the bag that's on the floor, then click on the clasp and turn the dials to the correct code.
Snowflake, heart, butterfly.
Screenshot
Pick up the blue gem and the paper.
Go outside to the town square.
Click on the bottom of the statue and use the brush to wipe off the snow.
Place all three gems on the puzzle to start it.
Click the right arrow on circle 2 one time.
Click the left arrow on circle 3 four times in a row.
Click the right arrow on circle 2 three times.
Click on the left arrow on circle 1 one time.
Click on the left arrow on circle 2 three times.
Screenshot
Investigate the statue once more and pick up the box key.
Go back once and right into the pumpkin patch.
Investigate the hole you dug and place the box key on the box.
Pick up the bundled heart.
Getting the Blue Rose
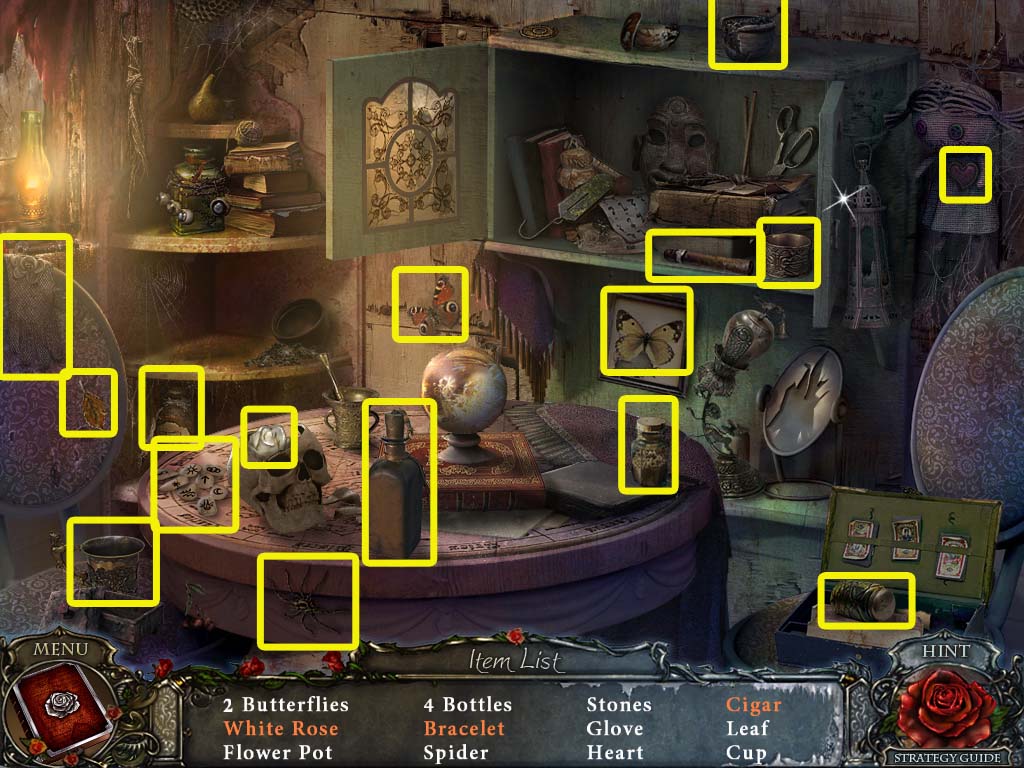
Go back once and start the hidden object scene.
Click on the cabinet to open it and reveal the bracelet and the cigar.
Click the top of the skull to reveal the white rose.
Screenshot
You receive a white rose.
Go to the hotel and go upstairs and give the bundled heart to Kai.
You will be given the icy heart, and the hotel will be unfrozen.
Click on the book case to open it, then investigate the inside.
Place the book on the shelf to start the puzzle.
Click on the books as they fall out.
You receive a stained glass piece.
Go through the door to your left to go out onto the balcony.
Click on the blanket on the rocking chair to reveal a key, then pick it up.
Investigate the birdcage and use the key to open it.
Pick up the coin from the birds mouth.
Investigate the rose bush to the left and use the shears to cut and receive the red rose.
Go down to the hotel lobby and investigate the chair to the left.
Click on the pillow, then pick up the newly revealed train key piece.
Investigate the front of the reception desk to your right where the paneling is bent.
Click on the paneling to reveal a compartment and pick up a pair of tongs.
Go into the dining room and investigate the broken window.
Pick up the blue rose.
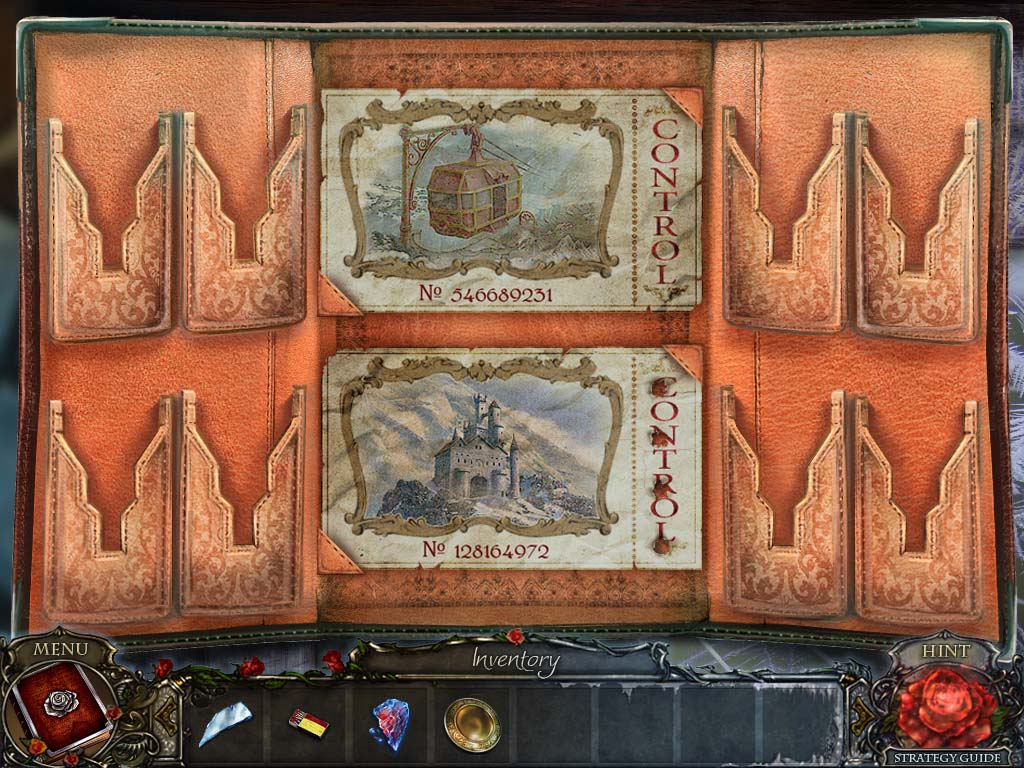
Getting the Train Ticket
Go back upstairs and out onto the balcony.
Investigate the table and place all three roses in their respective color coded spots.
Click the pages on the book until you're at the end and take note of the 11.1.4.7 code and the four-handed watch.
Go back once and investigate the fireplace.
Place the coin in the fire and use the pair of tongs to grab it back out to receive heated coin.
Go to the alley and investigate the door that's straight ahead of you.
Place the heated coin in the center slot.
You will need to move the bird limbs to the correct numbers.
Left clicking a limb will move it one direction while right clicking will move it in the opposite direction.
Screenshot
Go through the door into the store.
Investigate the crack on the bottom of the middle case and pick up the stained glass piece.
Investigate the glass top of the first case on the far left.
Place the two stained glass pieces on either side of the butterfly body.
Pick up the plate.
Investigate the portrait on the wall to the right.
Pick up the train key piece.
Investigate the journal on the desk to your right.
Place the two train key pieces in the open slot.
Start the puzzle: you'll need to complete both top and bottom.
Put your ticket fragment down onto the page, then solve.
You can rotate pieces by right clicking on them.
Screenshot
Click on the top ticket once you're finished.
Getting the Gondola to Start
Go back to the hotel and go into the dining room.
Investigate the cabinet with the plates and add your plate to open a hidden compartment and pick up the mechanism part.
Return to the gondola.
Investigate the panel control and place the mechanism part and ticket on it.
Pick up the lightning sign and investigate the electric box on the left wall.
Place the lightning sign on the panel to reveal a wiring puzzle.
In the puzzle, each fuse has a different color on each end. The colors on the end must match the slot you put the fuse in. You turn the fuse by right-clicking on it.
Once you've placed all the fuses in the correct spot, click on the power lever to the left to turn it on.
Screenshot
Go back to the control panel and press the start button.
Chapter Three: The Cave
Getting a Flower Token
Investigate the gondola door that's on the ground and pick up the rag.
Investigate the inside of the gondola and use the rag three times to remove the glass.
Pick up the gloves and both boards.
Click once more on the gondola door where the rag was and put down both boards.
Go across the river.
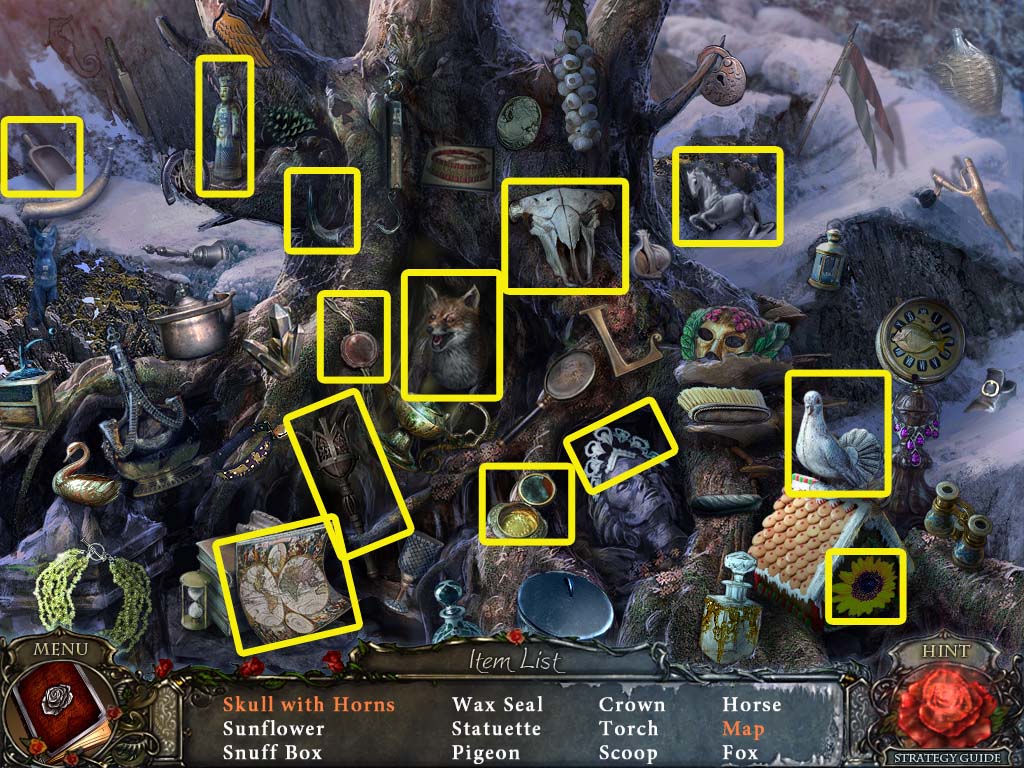
Start the hidden object scene.
Unfurl the map to reveal the atlas.
Find the horns and place it on the cattle skull.
Screenshot
You receive a torch.
Place the torch on the statue, then use the matches to light it.
Investigate the statue and pick up the snowflake.
Click on the door and place the snowflake in the empty space where it belongs.
Go forward.
Investigate the skeleton on the floor to the right and pick up the knife.
Pick up the note that had fallen.
Investigate the hand of the statue with light glowing on it.
Use the knife to cut the ropes.
Pick up the shackle.
Go back once and investigate the goblet on the left.
Pick up the note and use the knife on the cracked part of the goblet three times.
Pick up the flower token.
Getting the Brick
Go forward into the ice cavern, then go right.
Investigate the mouth of the wall face to the right and pick up the triangle.
Investigate the pipe to the right of the second stone face on the left wall.
Use the gloves and pick up the wrench.
Go back out to the gondola and investigate the side of the gondola.
Use the wrench to get the bolt off, then click on the cover.
Click on the valve and spin it around to retrieve it.
Go back to the stone face cavern and zoom back into the piping.
Place the valve on the pipe and click on it to stop the steam.
Go forward.
Start the hidden object scene.
Drag the photo to the frame on the desk.
Click on the dominoes twice to create an eight.
Turn the page of the book to reveal the kettle.
Screenshot
You receive a red eye piece.
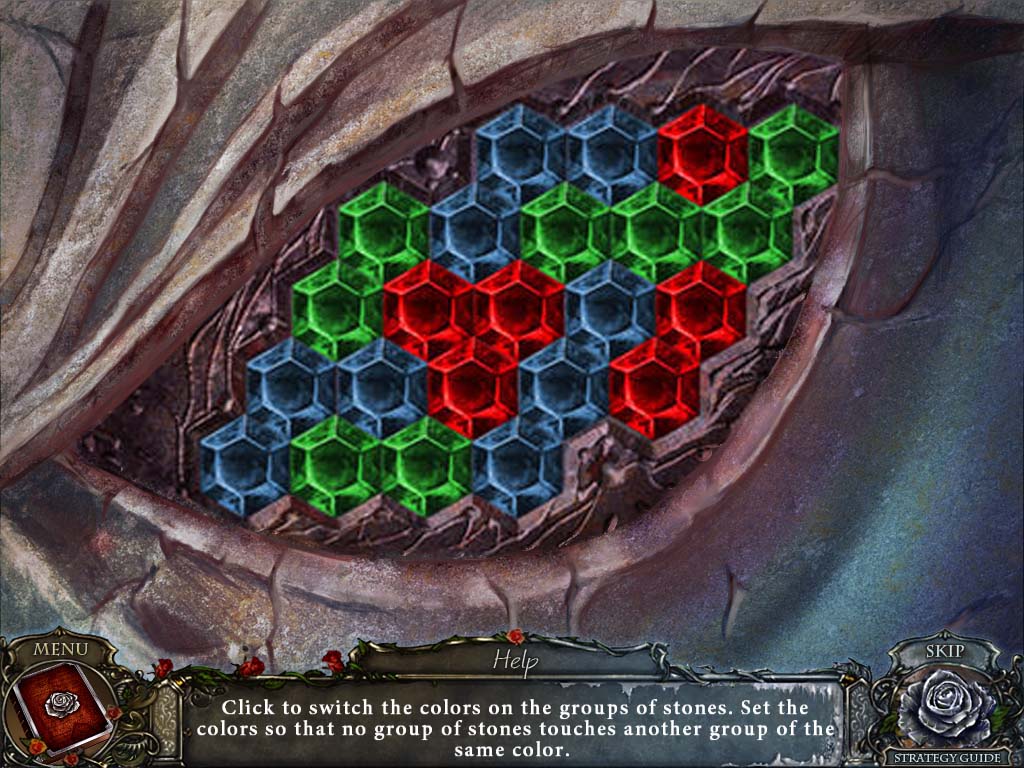
Go back once and investigate the stone face with the red eye.
Place the red eye piece in the open spot to start a puzzle.
No color should be touching a tile of the same color.
Screenshot
Investigate the mouths of both stone faces on the left side.
Pick up the prism and the brick.
Getting the Triangle
Go forward.
Investigate the back of the wall and pick up the note.
Place the brick in the empty space.
Pick up the flower token.
Investigate the burlap sack on the right of the screen and use the knife to cut it open.
Pick up the flower token.
Go back twice to the entrance of the cave.
Investigate the hand where you received the shackle and place the prism on the top.
Click on the puzzle on the wall that the light is pointing to.
Place all flower tokens to trigger the puzzle.
Place all the leaf tokens on the left column.
Place all the purple flower tokens on the middle column.
Place all the rose bud tokens on the right column.
Screenshot
Go up the newly-formed stairs to the left.
Investigate the candles on the left and pick up the button.
Go back once, then up the stairs to the right twice until you're in the room where you placed the brick in the wall.
Investigate the panel to the right of the open doorway and place the button in the bottom circle, then press it.
Go into the elevator.
Pick up the paper and the figurine.
Investigate the chest of the skeleton and pick up the triangle.
Getting the Cane
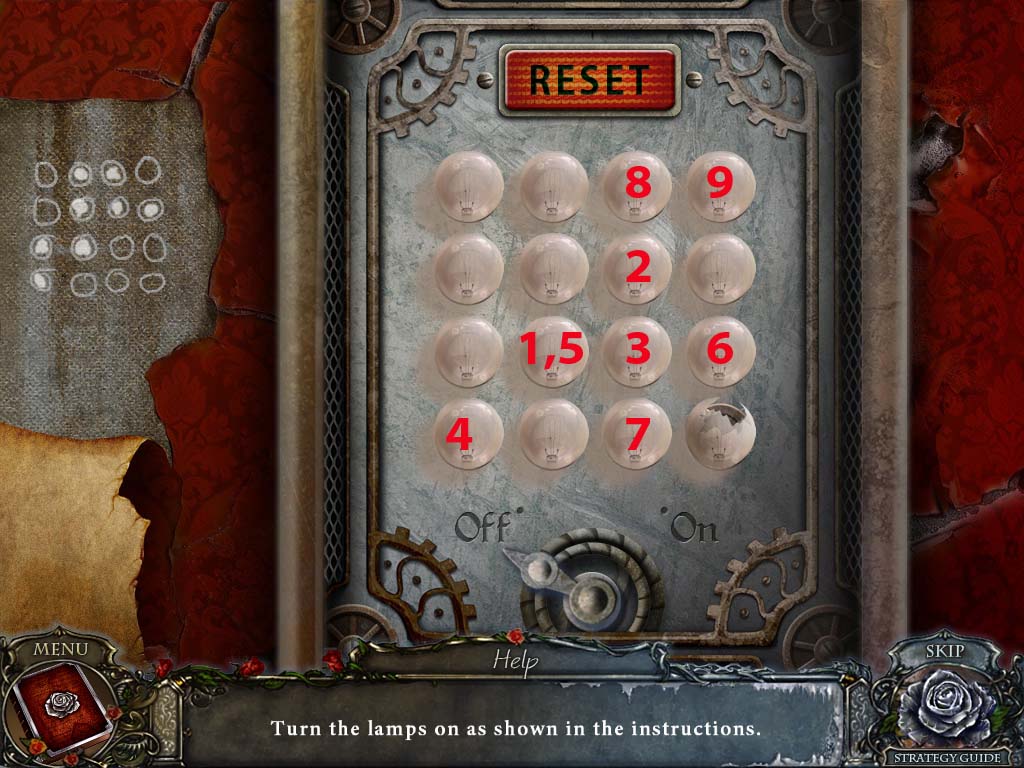
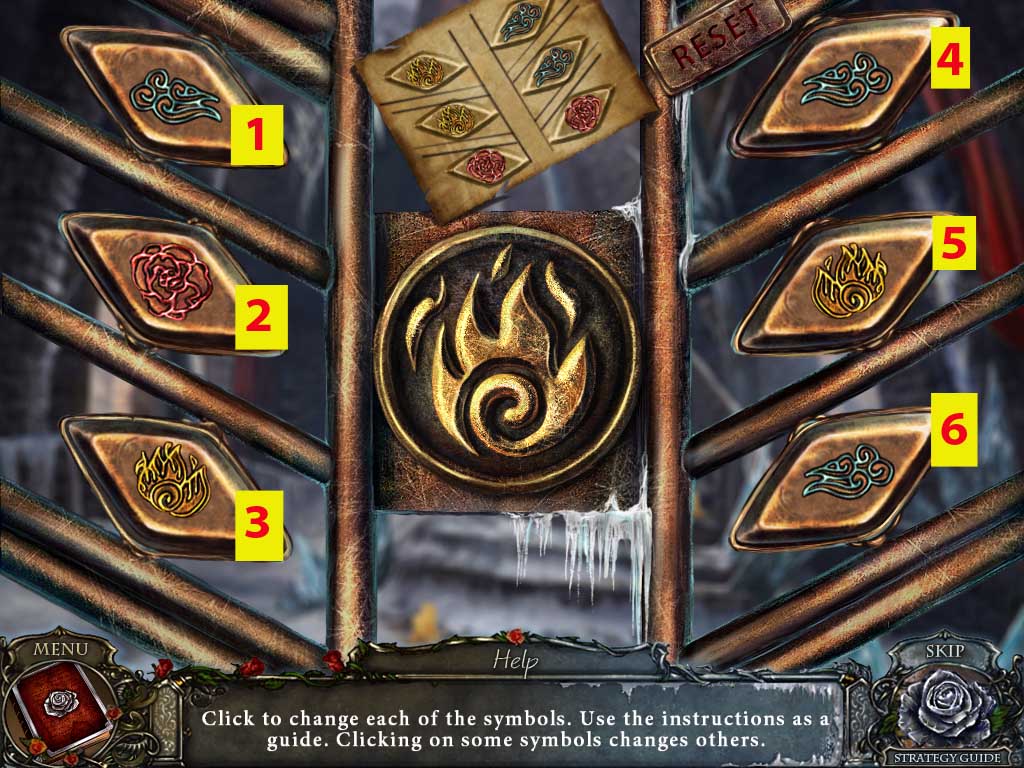
Investigate the elevator panel and click on wallpaper to tear it and reveal a code.
Press the buttons on the panel in the correct order.
Screenshot
Once you've completed the puzzle, click on the panel to make the elevator go and get out once it reaches its destination.
Grab the axe.
Investigate the notebook and click on it to receive it.
Go right and investigate the tree. Use the axe to cut the branch.
Click on the rail and pick up the nails.
Move forward.
Investigate the tree and use the axe to cut the branch.
Click on the shield held by the statue and grab the paper.
Investigate the stone and grab the hammer.
Go back once and investigate the cave.
Put down the branches, paper, and then use the matches to light it.
Start the hidden object scene.
Attach the missing paper piece to the map.
Click on the cloth to reveal the wheel.
Screenshot
You receive a cane.
Getting the Ladder
Investigate the blue spot on the rock.
Use the hammer on the rock three times and pick up the blue eye.
Go forward.
Investigate the gate and use the cane on the handle and click on it to pick it up.
Go back twice.
Use the cane on the lamp.
Investigate the lamp, then open the cover and pick up the key.
Go back into the elevator.
Click on the skull to reveal a panel, then click on it.
Place the handle on the panel.
Grab the sun and the key.
Investigate the lamp in the elevator and use the hammer twice to break it open, then grab the blue candle.
Press the elevator button to go down, then go out.
Click on the ladder and click on the broken rung.
Place the nails on the rung and hit them with the hammer.
Pick up the fixed ladder.
Getting a Figurine
Go back once and investigate the stone face the requires the blue eye and put it in the socket.
Investigate the mouth and pick up the figurine.
Go back once.
Place the ladder against the rock wall near the figurine, then pick it up.
Go back once.
Investigate the tree roots on the stairs and use the axe to cut away the roots and pick up the moon.
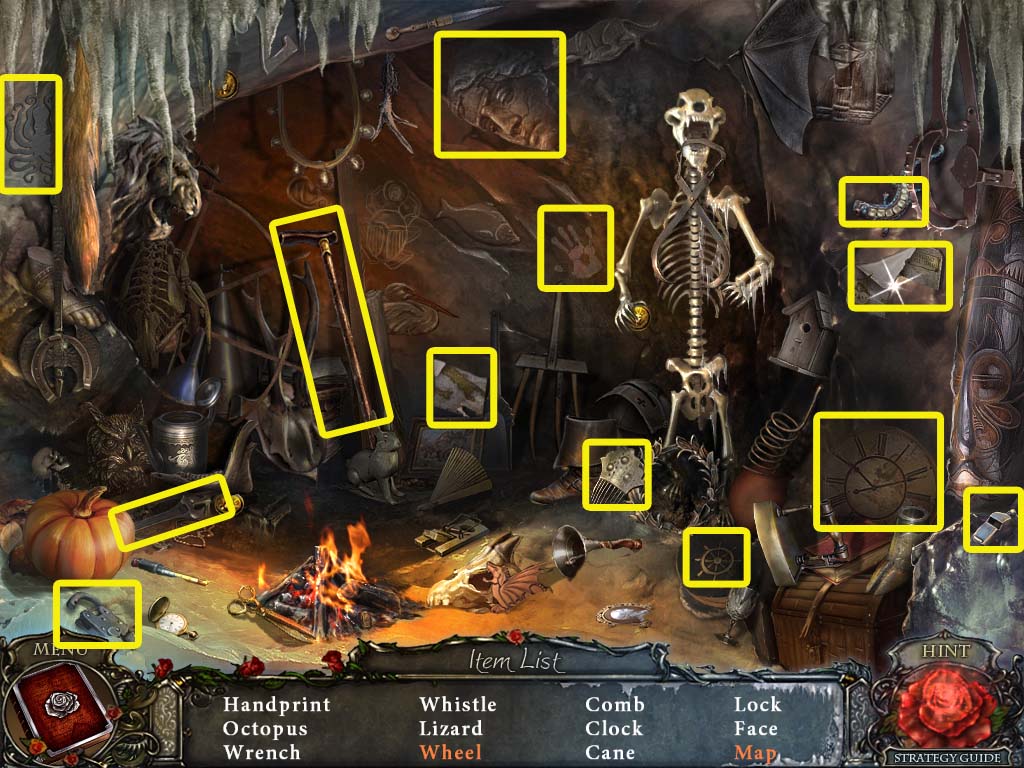
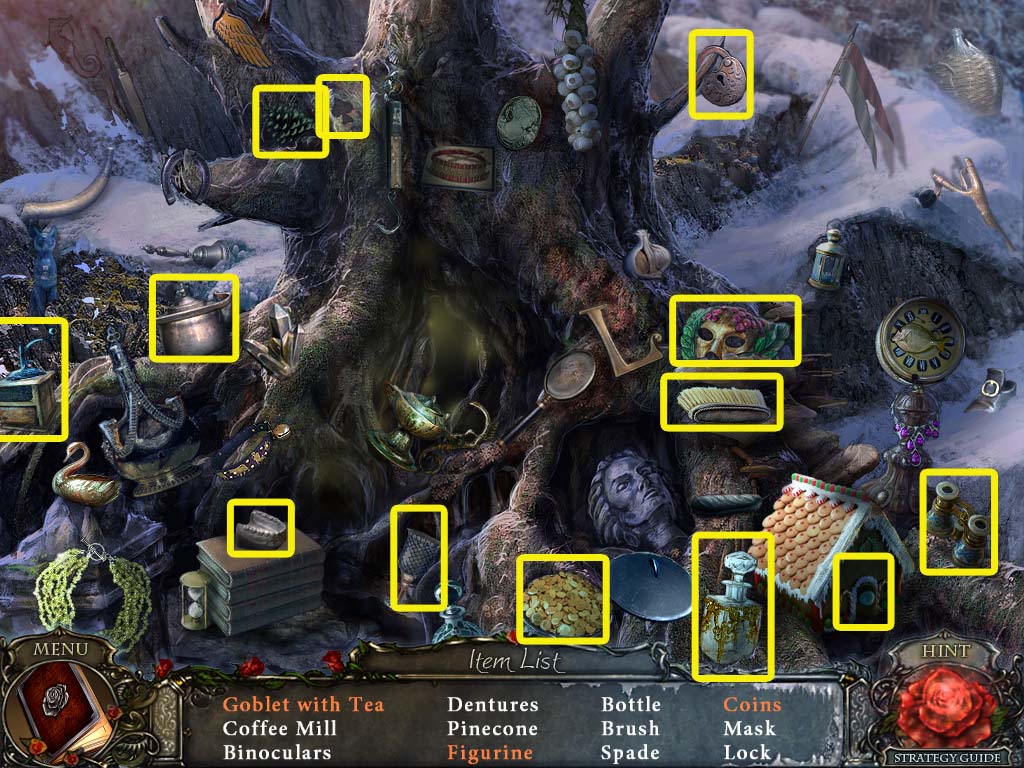
Start the hidden object scene.
Click on the pot to reveal the gold coins.
Take the teapot and pour tea into the goblet, then pick it up.
Click on the gingerbread house, open the door, and grab the figurine.
Screenshot
You receive a figurine.
Go forward until you've reached the castle gates.
Chapter Four: The Castle Gates
Getting One Green Eye
Investigate the rock and use both keys to unlock the figurine, then pick it up.
Go back to the elevator and go down, then exit.
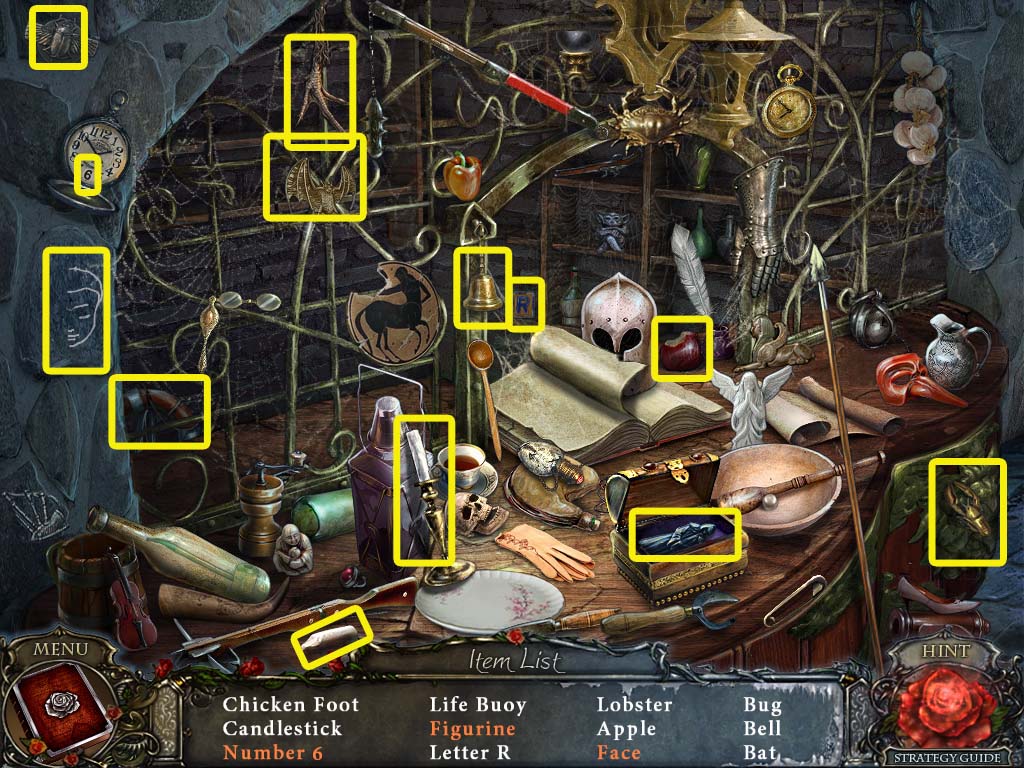
Start the hidden object scene.
Pick up the chalk and use it to finish the drawing of the face.
Click open the pocket watch to reveal the six.
Click on the jewelry box to reveal the figurine.
Screenshot
You receive a figurine.
Go up the elevator once more and exit.
Click on the box and place all six figurines inside it to start a puzzle.
Place each figurine and the items in the puzzle screen in the correct room that best matches the outfit and scene.
Once the scene is correct, the figurine will disappear.
Screenshot
Pick up the fire key, then go back once.
Investigate the chest the skeleton is holding and place the fire key in the slot.
Click the box open and pick up the rose.
Go down the elevator, down twice, then up the stairs to the left.
Investigate the altar and place the moon, sun, and blue candle in the proper spots.
Use the matches to light the candle and start a puzzle.
Click on the pictures to match them to the words.
Brain=Life.
Unicorn=True.
Heart=Love.
Mask=Lie.
Skull=Death.
Investigate the statue and place the rose on it.
Investigate the bouquet and press on it. Pick up the Queen's face.
Click on the skull, open its mouth, and pick up the triangle.
Pick up the green eye that's next to the skull.
Getting the Gold Key
Go back once.
Investigate the water and pick up the hacksaw.
Click the bottom of the statue and grab the spindle.
Go right and then forward.
Investigate the wall on the right and place the shackles on the chain.
Use the hacksaw to receive shackles with a chain.
Investigate the left wall and place the spindle on it.
Attach the shackles with a chain to the spindle.
Turn the handle and pick up the green eye.
Go back once and investigate the eyeless stone face.
Place both green eyes in the sockets.
Click on the fiery mouth of the right statue and pick up the heart emblem.
Go up the elevator and go right.
Investigate the chest and put the heart emblem in the empty spot.
Pick up the blue rose token.
Go forward and investigate the small tower.
Place the Queen's face on the lock to start the puzzle.
The flower is the green triangle.
The sun is the yellow triangle.
The leaves are the red triangle.
The snowflakes are the blue triangle.
Pick up the gold key.
Opening the Castle Gates
Go back three times and investigate the door on the left.
Place all three triangles on the three locks.
Use the gold key on the center lock, turn it, then go through the door.
Investigate the cabinet in the back and pick up the paper on the desk, then click the cabinet and grab the mural piece.
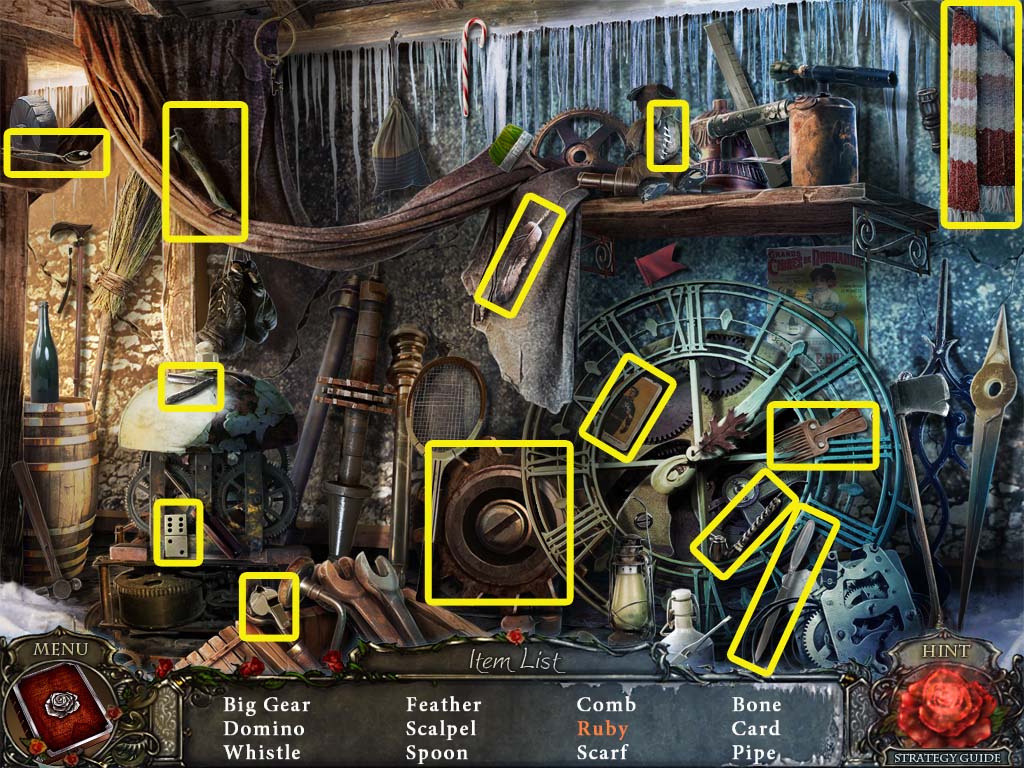
Star the hidden object scene.
Use the knife to cut open the teddy bear and reveal the ruby.
Screenshot
You receive a gear.
Return to the castle gates and investigate the small tower.
Place the gear on the mechanism and turn the handle to open the castle gates.
Go through into the castle courtyard.
Chapter Five: The Courtyard
Getting the Red Feather
Investigate the dome and pick up the second mural piece.
Go forward and investigate the cart.
Click on the flowers to remove them and pick up the hook.
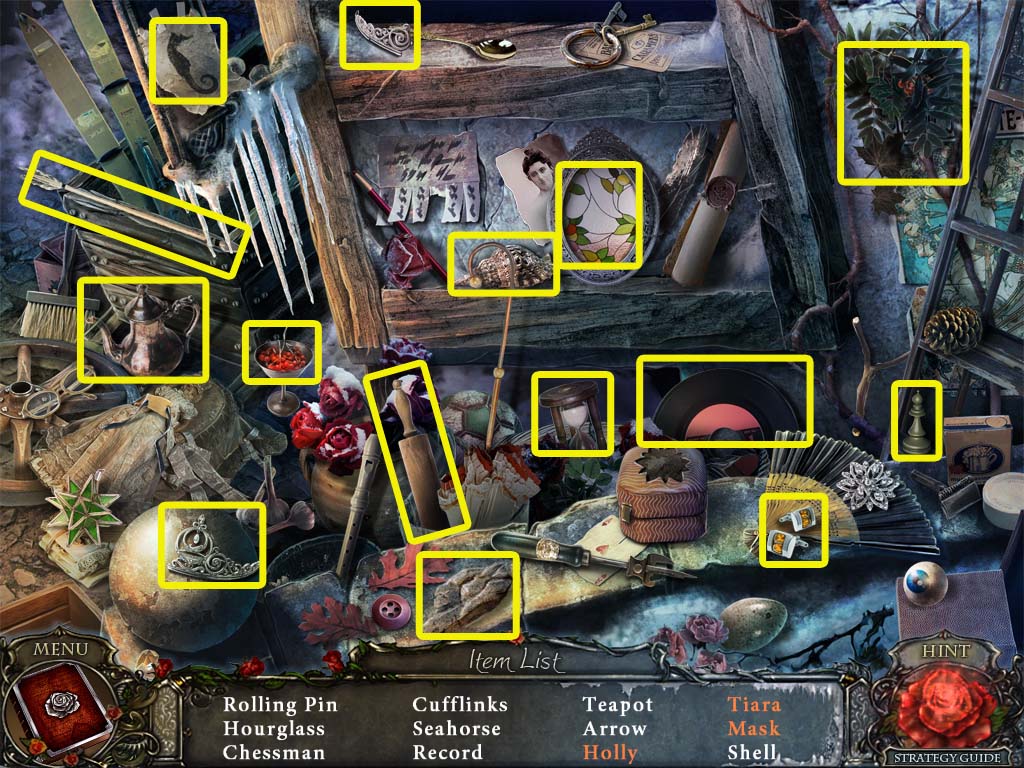
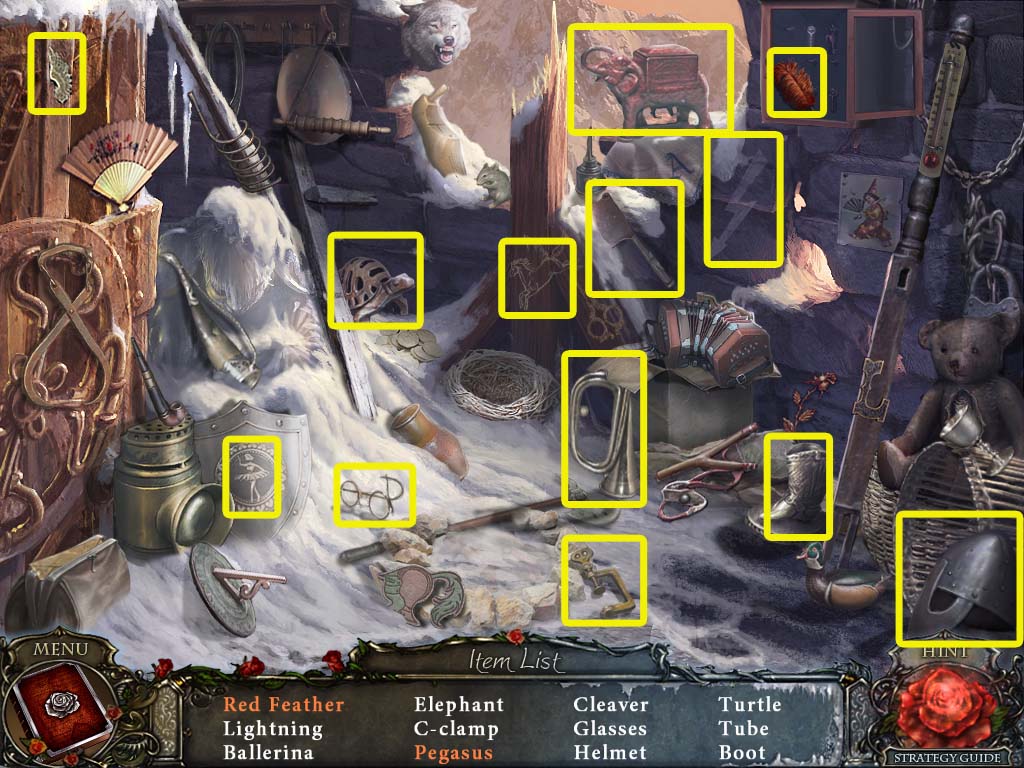
Start the hidden object scene.
Put the berries on the wreath to make it holly.
Pick up the tiara piece and add it to the broken tiara to fix it and grab the tiara.
Use the rock to break the mirror and pick up the mask.
Screenshot
You receive a mask.
Investigate the left staircase and pick up the ring.
Investigate the snow person and grab the golden pendant.
Go back once, then go right.
Investigate the post and place the hook with the rope then pick up the newly-made rope and hook.
Click on the statue on the right and put the mask on its face.
Pick up the third mural piece.
Go back once and investigate the damaged tower.
Put your rope and hook on the open space and use it to climb up.
Pick up the shovel.
Investigate the barrel and pick up the first picture part.
Go up the steps and pick up the wire cutters.
Head left and start the hidden object scene.
Put the wing on the horse to create the pegasus and pick it up.
Open the door to grab the red feather.
Screenshot
You receive a red feather.
Getting the Cannonball
Pick up the bucket.
Investigate the table on the right and pick up the red rose token.
Click on the circular spot at the top of the stairs and pick up the fourth mural piece.
Go back twice and investigate the barrel once more.
Place the bucket next to the barrel and click on the bucket to receive a bucket with water.
Go down and then move forward through the gates.
Investigate the wall on the right and place all four mural pieces on it to start the puzzle.
Start with the inside boxes because every time you mouse over, the tile will change.
Keep your mouse on the outside of the mural so you can easily flip the outlying boxes without accidentally flipping them.
Screenshot
Pick up the crystal ball.
Go back once and then go right.
Click on the left gate to knock it down, then investigate it.
Use the wire cutters and pick up the crowbar.
Head to the front of the castle and click on the crates.
Use the crowbar to open the crate and pick up the prism.
Go back to the very top of the tower and investigate the floor where you picked up the mural piece.
Use the bucket of water on it and pick up the ice rose.
Return to the castle gates and click on the small tower.
Click on the helmet and place the red feather in it.
Pick up the empty bag.
Click on the helmet once more to drop the halberd, then pick the halberd up.
Go back once and then place the halberd in the bucket dangling from the right side of the castle.
Investigate the bucket and pick up the cannonball.
Getting the Wheel
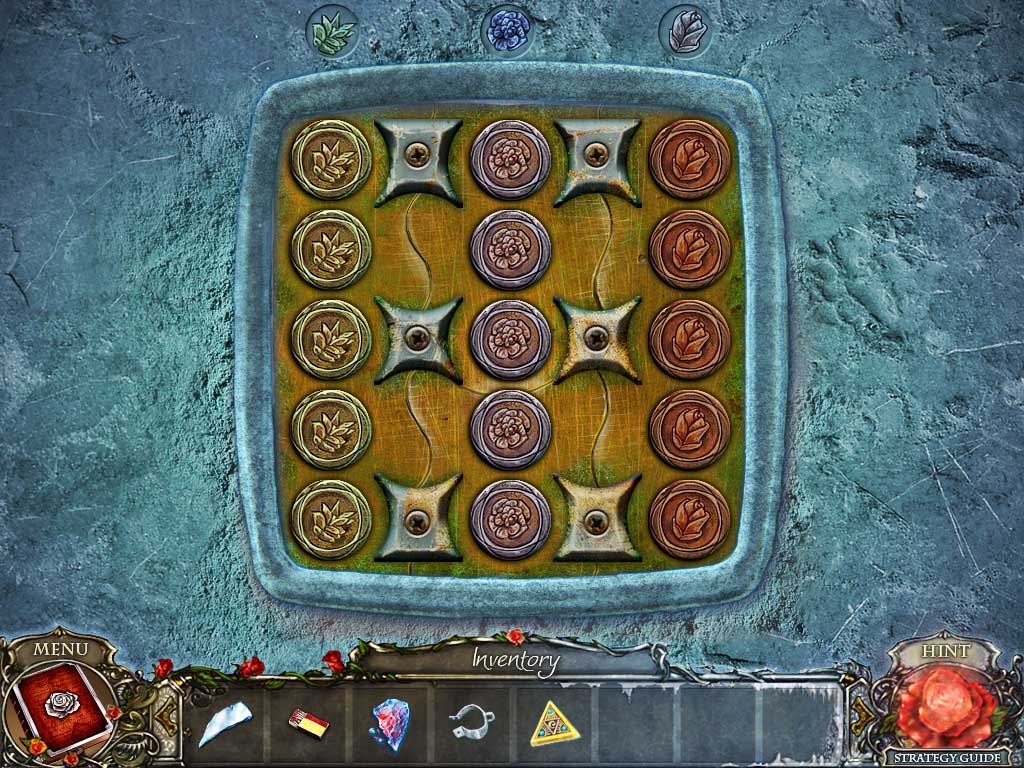
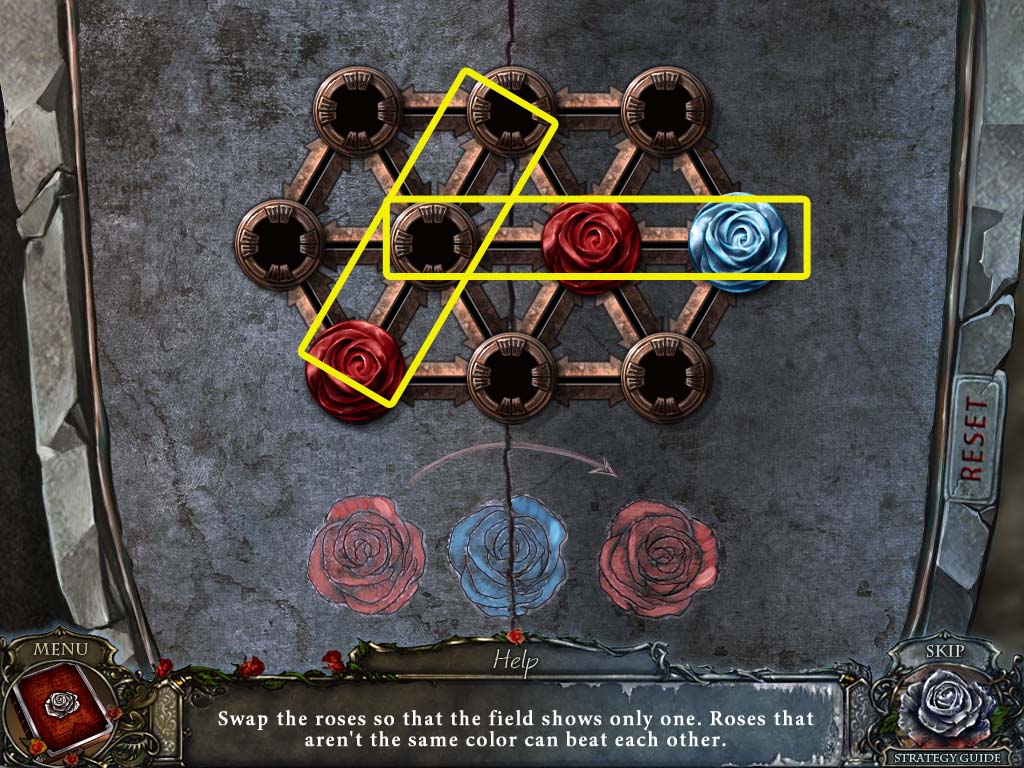
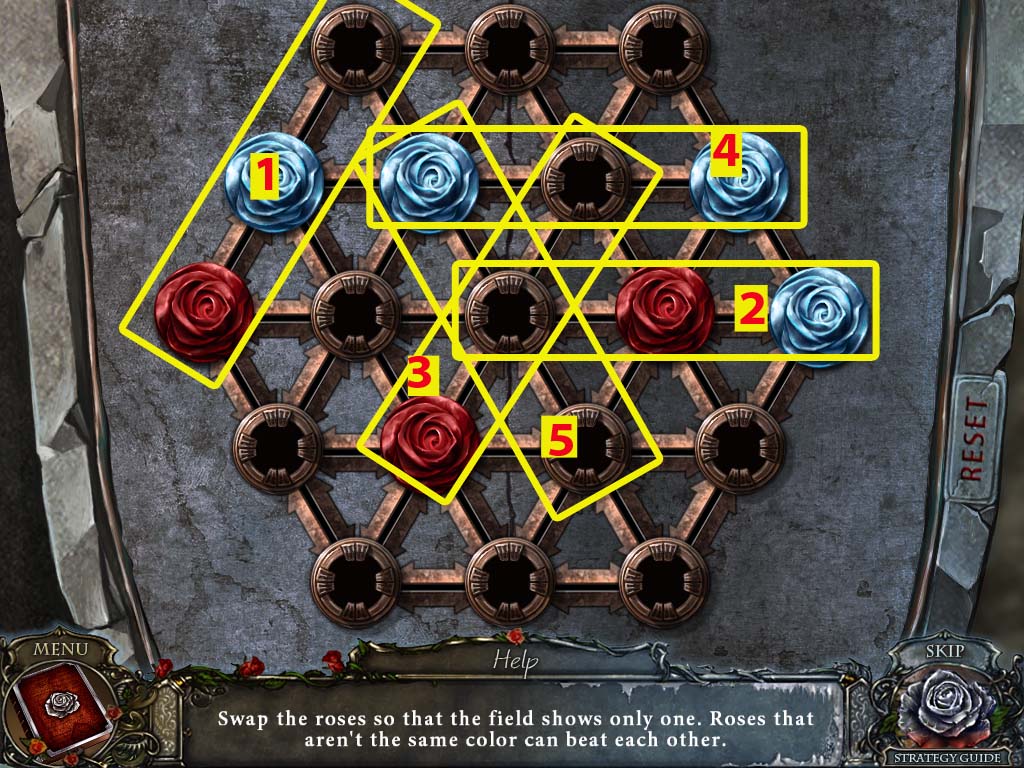
Click on the shield and place the red rose token and the blue rose token in their respective spots to start a puzzle.
The puzzle is much like checkers, where you must jump over a rose of the opposite color to get it out. At the end only one rose must remain on the board.
Screenshot
Screenshot
Screenshot
Pick up the smelting form.
Go down once and start the hidden object scene.
Touch the birdhouse to get the bird.
Use the knife on the pumpkin to make the jack o' lantern.
Screenshot
You receive gold coins.
Go down once and go through the door.
Start the hidden object scene.
Click on the blow torch to light the torch.
Use the paint brush to paint the red flag green.
Screenshot
You receive a wheel.
Getting the Wax Rose
Investigate the pile of coal and use the shovel on it to retrieve coal.
Pick up the picture part.
Click on the stove and put the coal inside, then place the smelting form on the top of the stove.
Place the gold coins and golden pendant on the smelting form.
Pick up the newly crafted gold rose.
Return to the castle gates and click on the small tower.
Investigate the picture and place the two picture parts on it to start a puzzle.
Press on the triangles in the middle to flip the pieces around until the picture is formed properly.
Click triangle 1 once, then triangle 5 once, then triangle 1 once.
Click triangle 2 once, triangle 1 once, triangle 6 once.
Click triangle 4 twice, triangle 5 once, triangle 6 once.
Click triangle 2 once, triangle six once, triangle 3 twice.
Click triangle 4 once, triangle 5 once, triangle 3 once.
Click triangle 2 twice, triangle 5 once, triangle 2 once.
Click triangle 4 once, triangle 5 once, triangle 4 twice.
Click triangle 5 twice, triangle 4 twice.
Screenshot
You receive a wax rose.
Chapter Six: The Finale
Getting the Crystal
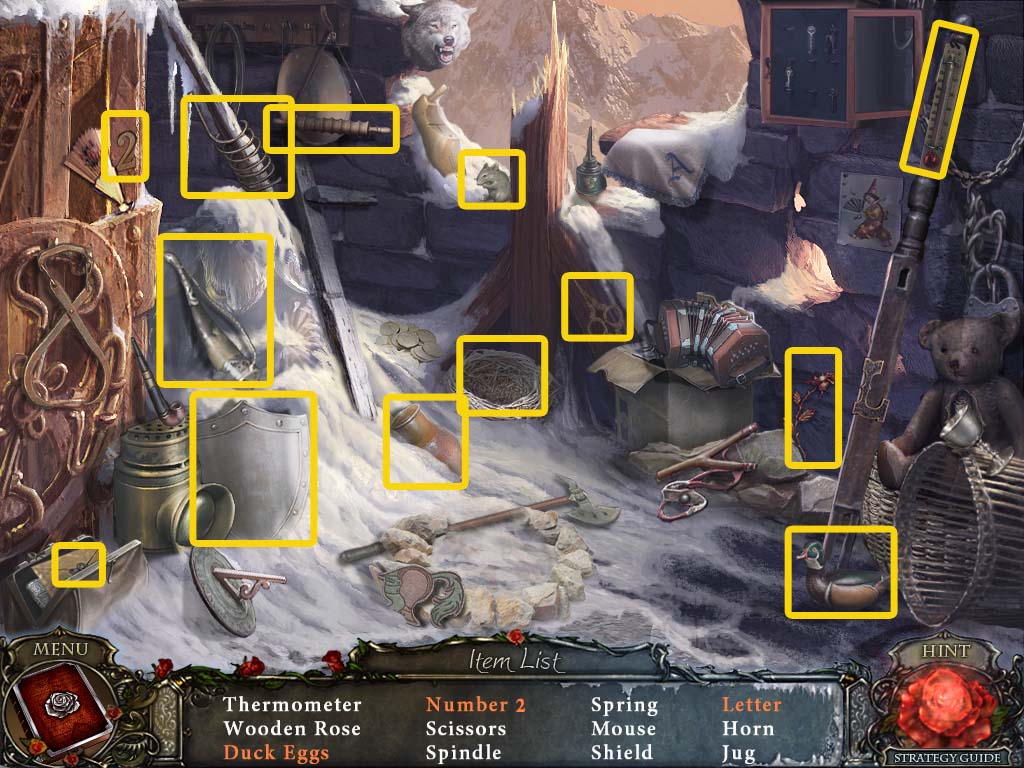
Go to the very top of the tower once more and start the hidden object scene.
Open the purse to reveal the letter.
Click on the fan to reveal the number 2.
Place the duck in the nest to get duck eggs.
Screenshot
You receive a wooden rose.
Click on the cart and place the wheel on it, then use the crowbar to push it.
Investigate the table and pick up the gunpowder with the empty bag.
Go down and push on the cart again.
Click on the cannon and inspect the end where the cannon shoots out.
Place the gunpowder followed by the cannonball into the barrel, then push the ball.
Click on the fuse and light it with the matches.
After the cannonball breaks through the ice, investigate the back door and pick up the prism.
Go out of the tower and then head right.
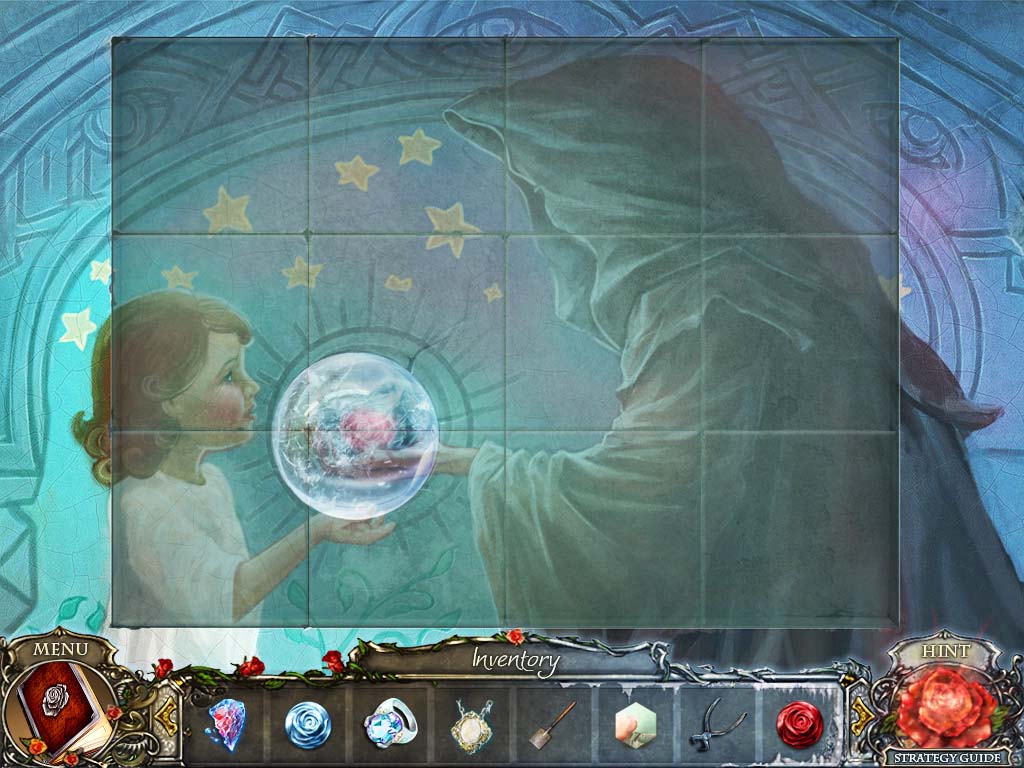
Investigate the lock above the door, then place the crystal ball, ice rose, golden rose, wax rose, and wooden rose into the empty slots.
Click on the left statue and place the prism on the plate, then click on the right statue and place the other prism on the plate.
Head forward and start the hidden object scene.
Use the chisel on the stone to reveal the figure.
Click on the harp to get music.
Place the butterfly on the spider web to lure out the spider.
Screenshot
You receive a picture part.
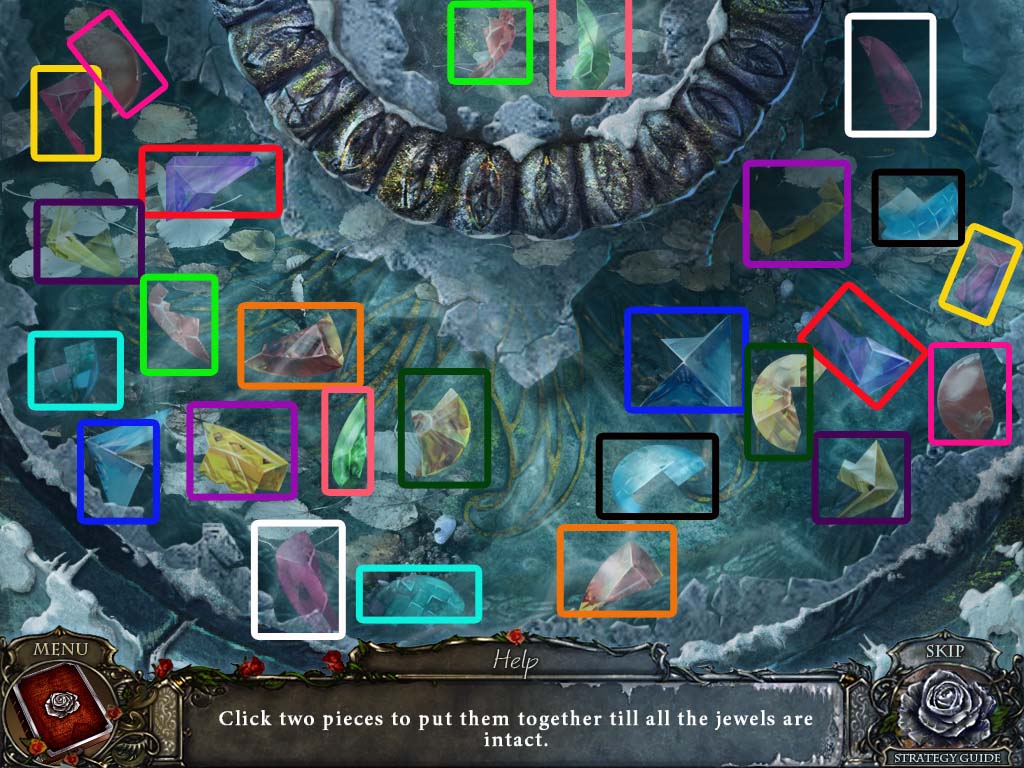
Investigate the fountain to start a puzzle.
Click on the matching jewel fragments.
Screenshot
You receive a crystal.
Getting the Door Sign
Go up the tree and investigate the two gravestones that are both missing numbers.
Investigate the doll and take the code lock piece.
Go down three times and investigate the top of the dome, then put the crystal in it.
Click on the crystal twice to move the light onto the door.
Go forward once, open the door, then go inside.
Investigate the red curtain and grab the grave stone number, then move forward.
Click on the brick to remove it, then investigate the open space.
Pick up the needle and thread.
Click on Edward and give him the mirror shard.
Investigate Edward and pick up the book key, then walk down twice.
Start the hidden object scene.
Place the rubber sling on the woodstick to create a slingshot.
Put the flower on the top of the box and take the ring.
Screenshot
You will receive a ring.
Go back to the tree and investigate the lock. Click on the vines three times to get rid of them.
Use the book key on the lock and open the book.
Pick up the ring you find after flipping the page.
Flip the page again and pick up the door sign.
Getting the Trowel
Return to the tower and go to the first level.
Investigate the picture frame and put the picture part and the needle and thread on the cloth.
Go up and investigate the back door.
Place the door sign in the middle to start the puzzle.
Click the images until they resemble the clues given at the top.
Click the spots in this order: 5, 5, 6, 6, 3, 5, 5.
Screenshot
Go forward and investigate the cannonball. Click on it and pick up the revealed gravestone number.
Click on the window and pick up the gravestone number.
Click on the puzzle that's on the column.
For the first puzzle, move the snowflake up to the empty circle.
For the second puzzle, move the snowflake up eight spots, the raindrops down three, and the heart up six.
For the third puzzle, move the ice heart down eight times, the rose up two, the snowflake down three, the crown three. Move the rose up two times, the crown up six, the snowflake down three times, and the heart up twice.
You receive a doll's heart.
Go up and investigate the crowns, then take the crown.
Return to the tree and start the hidden object scene.
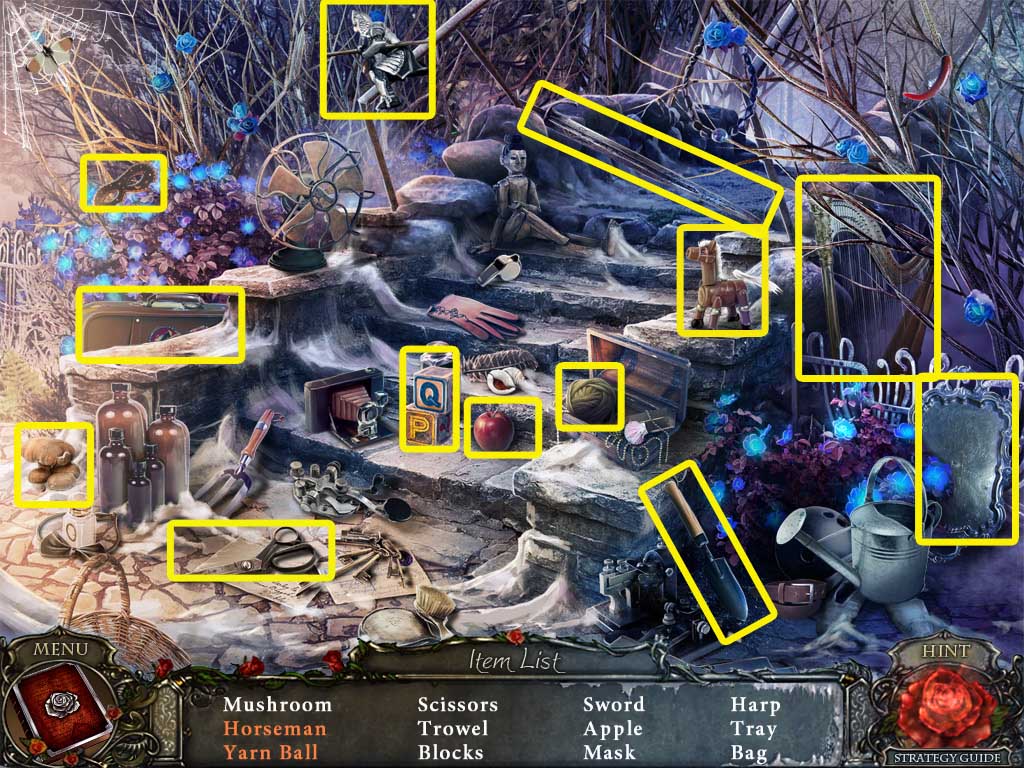
Put the soldier on the horse and click on the horseman.
Open the box to reveal the yarn.
Screenshot
You receive a trowel.
Getting the Mirrors
Investigate the tree, inspect the doll and return the doll's heart.
Take the ring.
Investigate the gravestone on the left and place the gravestone number 4 and gravestone number 3.
Investigate the right gravestone, click on the moss to move it, and add the gravestone number 5 to it.
Go down and inspect the flower bed, then use the trowel three times on the snow and pick up the ring.
Return to the tower and go to the second level and through the door at the end of the walkway.
Inspect the chest and place the crown and the part of code lock on it to activate a puzzle. You must have solved the tree puzzle first before you can solve this puzzle.
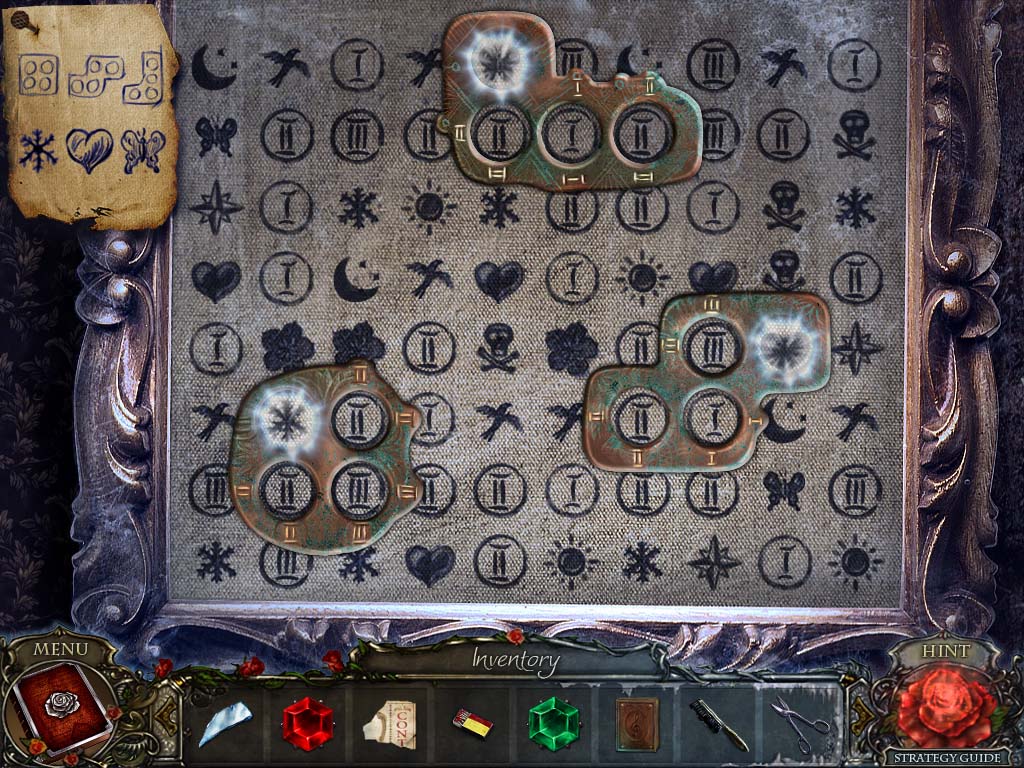
Use the code that's on the crowns to enter in the proper lock sequence. Press on the buttons to change the sequence. Red should be on the left and yellow should be on the right.
The top row on the left side should be a flower, star, heart, butterfly.
The bottom row on the left side should be a flower, star, bird, fish bones.
The top row on the right side should be a flower, star, snowflake, sun.
The bottom row on the right side should be a flower, star, snowflake, fish bones.
Pick up all three mirrors.
Defeating the Ice Queen
Return to the courtyard and investigate the dome's mechanism.
Flick the switch, then turn the crystal beam to rest on the bridge, then turn it once more so it is focused on the Queen's tower.
Go to the tower bridge and investigate the railing.
Place a mirror on it, then go through the door.
Inspect the steps and place a mirror in the hole.
Go up the stairs and place the remaining mirror in the upper left corner.
Investigate the globe, then add all five rings to it.
Place the icy heart on the pillow.
Screenshot
Posted by: Meaghan |
March 29, 2012 5:56 PM
|
March 29, 2012 5:56 PM